

Page 1

41
Page 2

Tabel of Contents
1 IMPORTANT SAFETY INSTRUCTIONS.................................................................................................
2 INSTALL YOUR PHONE ..............................................................................................
2.1 Connect the BaseStation
2.2 Install and Charge the Batteries
...................................................................................................................................
...........................................................................................................................
............................
3 GET TO KNOW YOUR PHONE .
3.1 H
3.2 H
andset Overview .......................................................................................................................................
andset LCD Display
.......................................................................................................................................
3.3 Base Oerview..............................................................................................................................................
3.4 M
4 ..........................................................................................................
4.1 Make an
4.1.1
4.1.2 Direct dialing ................................................................................................................
4.1.3 Call from the phonebook ...................................................................................................................
4.1.4 Call from the call list ....................................................................................................................
4.1.5 Call from the redial list ......................................................................................................................
4.1.6 Call timer ...........................................................................................................................
4.2 Answer a Call ..............................................................................................................
4.3 Turn on or off the audio boost
4.4 End a Call ..................................................................................................................
4.5 Adjust Earpiece and Handsfree Volume
4.6 Mute a Call ............................................................................................................
4.7 Set the Silent Mode ................................................................................................................
4.8 Redial ..............................................................................................................
4.8.1 Redial a number from the redial list
4.8.2 Save a redial number into the phonebook
4.8.3 Delete a redial number ...................................................................................................................
4.8.4 Delete the entire redial list
4.9 Keypad Lock ............................................................................................................
4.10 Find Handset .............................................................................................................
4.11 Make an Internal Call .....................................................................................................................
4.11.1 Intercom another handset
4.11.2 Transfer an external call to another handset
4.11.3 Make a 3- way conference call
enu Structure ..................................................................................................................................
USE YOUR PHONE
External Call
Preparatory dialing
................................................................ . ...........................................................................
..............................................................................................................................
.......................
................................
.........................
................................
............................................................................................................................
..................................
..............................................................................................................
...................................
......................10
............................................10
....................................................................................................................10
............................................................................................................ 10
................................................................................................................................. .10
...................................10
.................................10
..................................................................................................................................11
....................................................................................................
............................................................................................................................11
............
................
............
...............10
..............11
......
1
2
2
2
3
4
6
7
8
9
9
9
9
9
9
9
9
9
9
9
9
..10
11
5 PHONEBOOK ...................................................................................................
5.1 Add a New Entry ..................................................................................................................
5.2 Edit an Entry ............................................................................................................
5.3 View an Entry ...............................................................................................................................
5.4 Copy an Entry .............................................................................................................
5.5 Copy all Entries ...............................................................................................................
5.6 D na etele Entry ...............................................................................................................
5.7 Delete the Entire Phonebook
5.8 View Phonebook Capacity..................................................................................................................
....................................... 12
............................12
..................................12
....................12
.................................12
............................12
.............................13
............................................................................................................................13
...........13
Page 3

Tabel of Contents
5.9 Edit Call Group ...........................................................................................................................................13
5.9.1 E
5.9.2 C
5.10 S
5.10.1 E
5.10.2 D
6 CALL LIST ..................................................................................................................... ............................15
dit call group name ................................................................................................................................. ..... 13
hange call group ringtone .............................................................................................................................13
peed Dial ........................................................................................................................................................13
dit a speed dial ......................................................................................................................................... .13
elete a speed dial ............................................................................................................................... .........14
6.1 V
6.2 S
6.3 D
6.4 D
6.5 D
6.6 S
6.7 T
7
7.1 H
7.2 T
iew the Call L ist ................................................................................................................................. ......15
tore a Call List Numberinto the Phonebook .................................................................................................. 1 5
ial a Call List Numbr ................................................................................................................................15
elete an Entry in the Call List .....................................................................................................
elete the Entire Call L ist ........................................................................................................................... .15
tore All Calls or Only Unanswered Calls in the Call List
urn On or Off the New Call Alert ......................................................................
SOUND
......................................................................................................................... ....................................17
andset Ringer ............................................................................................................................................17
ones .............................................................................................................................. ................................... ..17
...................................................................................
............................................
..................
15
15
16
8 SETTINGS..................................................................................................................................................18
8.1 H
8.1.1 E
8.1.2 D
8.1.3 S
8.1.4 A
8.1.5 R
8.1.6 S
8.1.7 T
8.1.8 R
8.1.9 D
8.1.10 R
8.2 B
8.2.1 S
8.2.2 S
8.2.3 S
8.2.4 S
8.2.5 C
8.2.6 S
8.2.7 A
8.2.8 R
8.3 S
8.3.1 S
8.3.2
andset Settings.................................................................................................................. ........................18
nable the Direct Call ....................................................................................................................................18
isable the Direct Call ...................................................................................................................................18
elect base station ........................................................................................
djust the display contrast ........................................................................................................................ ....18
ename the handset .............................................................................................................................. ..........18
et language .............................................................................................................................. .....................18
urn on or off the auto answer
egister an additional handset ........................................................................................................................19
e-Register a handset .....................................................................................................
estore the handset to default settings .............................................................................
ase Settings ..............................................................................................................................................19
et the base ringer ....................................................................................................................................... .19
et the handset priority ...................................................................................................
et the dial mode ..........................................................................................................................................20
et the recall time .........................................................................................................................................20
hange the system
et an exchange code ............................................................................................................
ctivate the ECO mode ................................................................................................................
eset the base settings to default settings
et the Date ,Time and Alarm ..........................................................................................................
et date and time ...................................................................................................................
S
et an alarm
PIN
.....................................................................................................
......................................................................................................................
..................................................................................................................
........................................................................................................ 2
...................
.............................
...............................
................................
.............................
...............
.......................
.................
..............
.......................
............................................
18
..18
19
19
. 20
20
20
20
21
21
21
1
9 DEFAULT SETTINGS ................................................................................................... .
10 TROUBLESHOOTING
.............................................................................................................................
...........................
22
.23
Page 4

Tabel of Contents
CONFORMITY ........................................................................................................................................................24
Page 5

When using your telephone equipment, basic safety precautions should always be followed
to reduce the risk of fire, electric shock and injury, including the following:
1) Read and understand all the instructions.
2) Follow all warnings and instructions marked on the product.
3) Unplug this product from the wall outlet before cleaning. Do not use liquid cleaners or
aerosol cleaners. Use a damp cloth for cleaning.
4) Do not use this product near water (for example, near a bath tub, kitchen sink, swimming
pool).
5) Do not overload wall outlets and extension cords as this can result in the risk of fire or
electric shock.
6) Unplug this product from the wall outlet and refer servicing to VTech under the following
conditions:
When the power supply cord or plug is damaged or frayed.
If the product does not operate normally by following the operating instructions.
If the product has been dropped and the cabinet has been damaged.
If the product exhibits a distinct change in performance.
7) Avoid using a telephone (other than a cordless type) during an electrical storm. There
may be a remote risk of electric shock from lightning.
8) Do not use the telephone to report a gas leak in the vicinity of the leak.
9) Use only the supplied NiMH (Nickel Metal Hydride) batteries! The operation per
iods for
the handsets are only applicable with the default battery capacities
10) The use of other battery types or non-rechargeable batteries/primary cells can be
dangerous. These may cause interference and/or unit damages. The manufacturer will
not be held liable for damage arising from such non-compliance.
11) Do not use third party charging bays. The batteries may be damaged.
12) Please note the correct polarity while inserting the batteries.
13) Do not immerse batteries in water, do not place in fire.
Package contents
The package contains the following items:
• 1 Handset
• 1 Base station
• 1 AC power adapter
• 1 Telephone line cord
• 2 rechargeable batteries
• 1 English user manual and
1 Chinese user manual
The maximum range between the base station and the handset is approximately 300 meters.
Depending on the surrounding conditions as well as spatial and structural factors, the range
may be reduced. The range indoors is normally less than outdoors.
1
Page 6

1
2
INSTALL YOUR PHONE
2.1
11
Connect the Base Station
1) Plug the power supply & line cord into the base station.
2) Plug the power supply & line cord into the wall socket.
3) The base indicator lights up.
4) Always use the cables provided in the box.
12
2.2
Install and Charge the Batteries
1) Slide out the battery compartment cover.
2) Place the 2 batteries as indicated. Respect polarity.
3) Slide the battery compartment cover back.
4) Put the handset on the base and charge the battery for 14 hours first time. A beep
indicates that the handset is properly placed on the base or charger.
Use only NiMH rechargeable batteries.
2
Page 7

1
3
3.1
GET TO KNOW YOUR PHONE
13
Handset Overview
13
12
11
10
9
14
14
1
2
3
4
2
3
5
8
6
7
3
Page 8

1
1 RIGHT SOFT KEY
mb-
us nI
.unem niam eht ssecca ot sserP :edom eldi nI
.noitceles eht mrifnoc ot sserP :edom une
2 )tesdnah
fo edis no( LAIDER/PU
.tsil laider eht ssecca ot sserP :edom eldi nI
P :edom unem nI
saercni ot sserP :llac a gniruD
.smeti unem eht pu llorcs ot sser
.emulov eht e
.sdrawpu enil eno og ot sserP :edom gnitide nI
3 )tesdnah fo edis no( TS
IL LLAC / NWOD
.tsil llac eht ssecca ot sserP :edom eldi nI
unem nI
d ot sserP :llac a gniruD
.emulov eht esaerce
.smeti unem eht nwod llorcs ot sserP :edom
.sdrawnwod enil eno og ot sserP :edom gnitide nI
4 TALK OFF
During a call: Press to end a call and go back to idle screen .
t sserP :edom gnitide / unem nI
.tsil eht pu llorcs ot sserP :tsiL llaC / tsil laideR / tsil koobenohP nI
.tsil eht nwod llorcs ot sserP :tsiL llaC / tsil laideR / tsil koobenohP nI
.neercs eldi ot kcab og o
.tesdnah eht ffo rewop ot esoohc ot dloh dna sserP :eldI nI
t no rewop ot sserP :ffo rewop si tesdnah eht nehW
.tesdnah eh
5 ALPHANUMERIC KEYPAD, * (STAR), # (HASH)
# /* / retcarahc / tigid a tresni ot sserP
.regnir
eht ffo / no nrut ot sserp gnoL :edom eldi ni yek *
p gnoL :edom klat ni yek *
.edom eslup a ni nehw
# key in editing mode:
Press to toggle between uppercase or lowercase
.tupni retcarahc
.kcol dapyek eht ffo / no nrut ot sserp gnoL :edom eldI ni yek #
# key
0 ke .esuap a tresni ot sserp gnoL :edom gnitide rebmun / gnilaiderp / eldi
in .llac eht etum
ni y
nu /
etum ot sserp gnoL :edom klat
In Idle: Press and hold any digit key (except 1, *, #) to access the number
stored in the respective digit key (applicable if user has stored numbers in the
.)snoitacol laid deeps
yliraropmet enot ot edom laid eht egnahc ot sser
4
Page 9

6 SPEAKERPHONE
During a call: Press to turn on / off the speakerphone.
Call List / Phonebook entry: Press to make a call with speakerphone.
During ringing: Press to answer a call with speakerphone.
7 Microphone
8 RECALL / FLASH
In idle / predialing mode: Press to insert a flash.
During a call: Press to dial a flash.
9 TALK ON
In idle / predialing mode : Press to make a call.
In Redial list / Call List / Phonebook entry: Press to make a call to the
selected entry in the list.
During ringing: Press to answer a call.
10 PHONEBOOK
In idle mode: Press to access phonebook.
11 LEFT SOFT KEY
In sub-menu mode: Press to go back to previous level.
In contextual menu during a call: Press to go back previous level.
12 Earpiece
13 Call Indicator
Flashes when there is an incoming call.
Steadily on when audio boost is turned on in talk mode.
14 Amplify
In idle mode: Press to select a handset to make an internal call.
In editing / predialing mode: Press to clear a characters / digit
In editing / predialing mode: Long press to delete all the characters / digit
In talk mode: Press to turn on or off audio boost.
5
Page 10
1
14
3.2
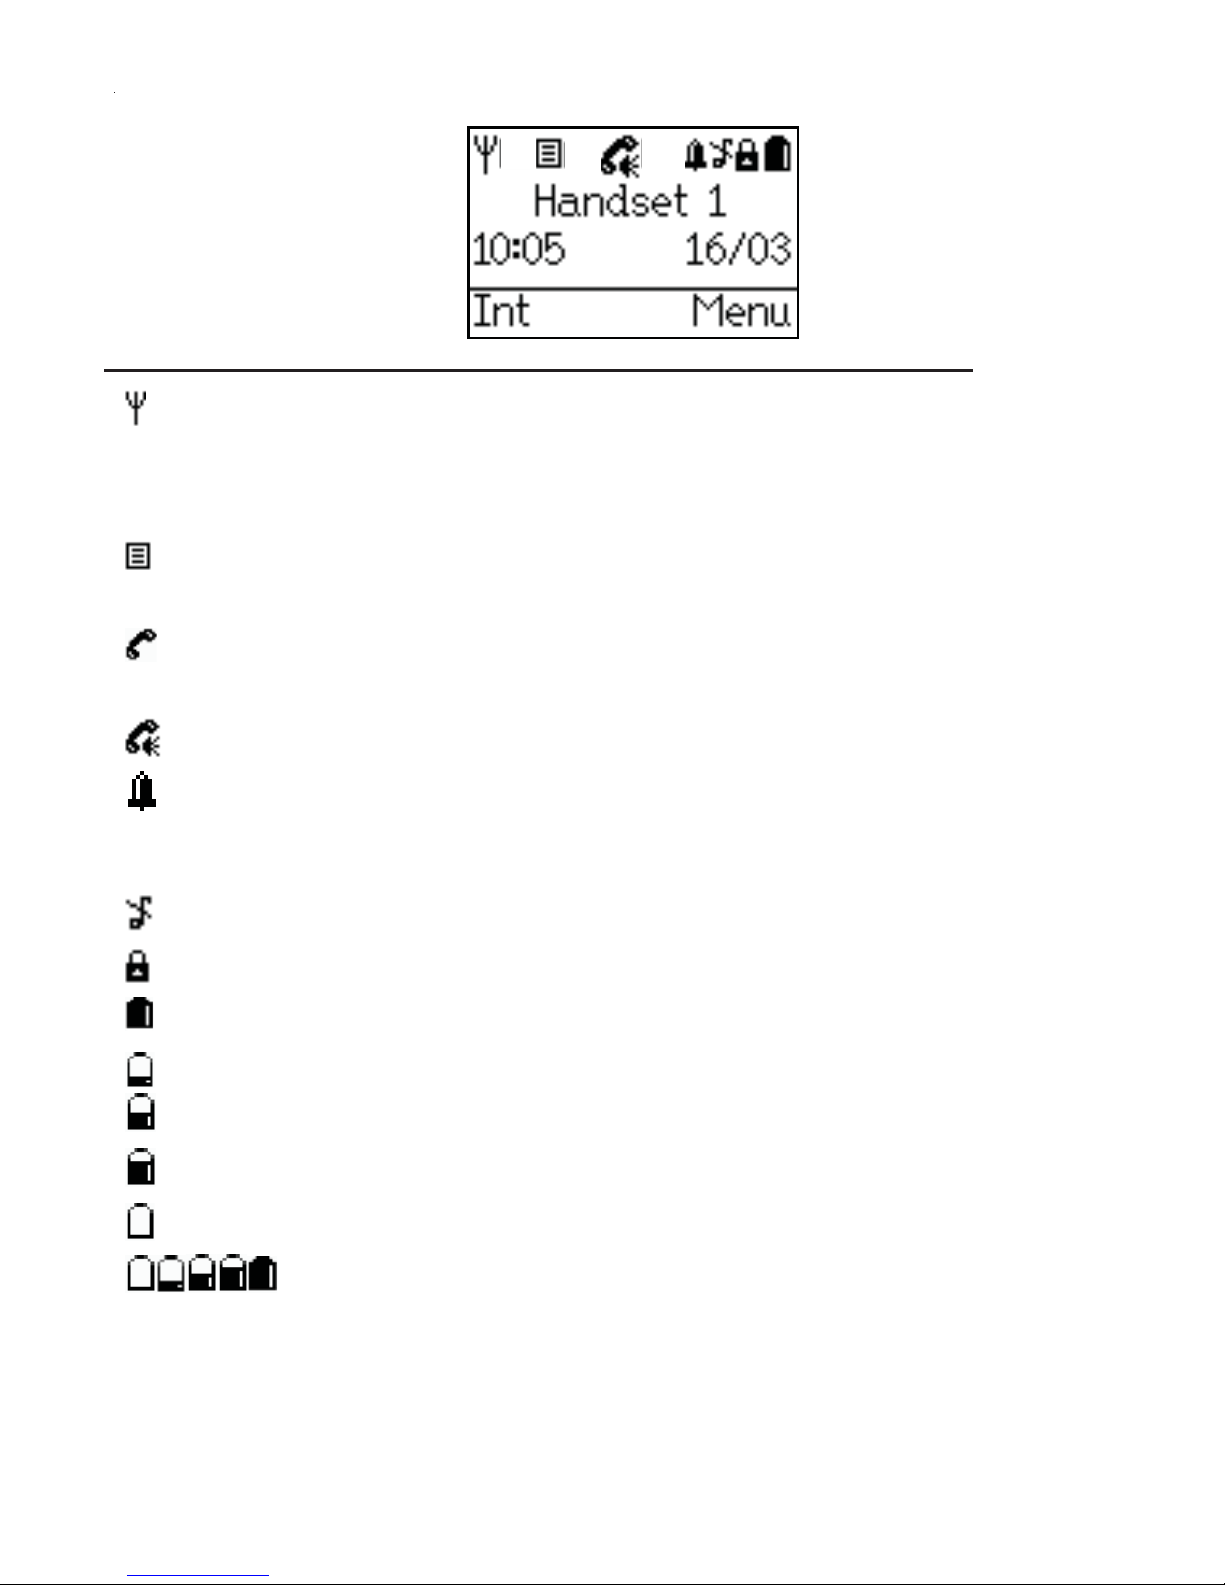
Handset LCD Display
Icons Description
Steadily on when the handset is in range of the base.
Flashes when the handset is in marginal range of the base.
Off when the handset is not registered to the base or out of range
Indicates when missed call is received (Network Subscription is required).
Turns off when at least one missed call has been read.
Indicates a call is in progress.
Flashes when ringing.
Indicates that handsfree is being used.
Indicates that the alarm is set.
Flashes when the alarm time is reached.
Turns off when the alarm is off.
Indicates that the ringer is switched off.
Indicates that the keypad is locked.
Indicates when the battery is fully charged.
Indicates when the battery is 1/4 charged.
Indicates when the battery is 1/2 charged.
Indicates when the battery is ¾ charged.
Flashes when low battery is detected and indicates that it needs charging.
Animates during charging
6
Page 11
1
3.3
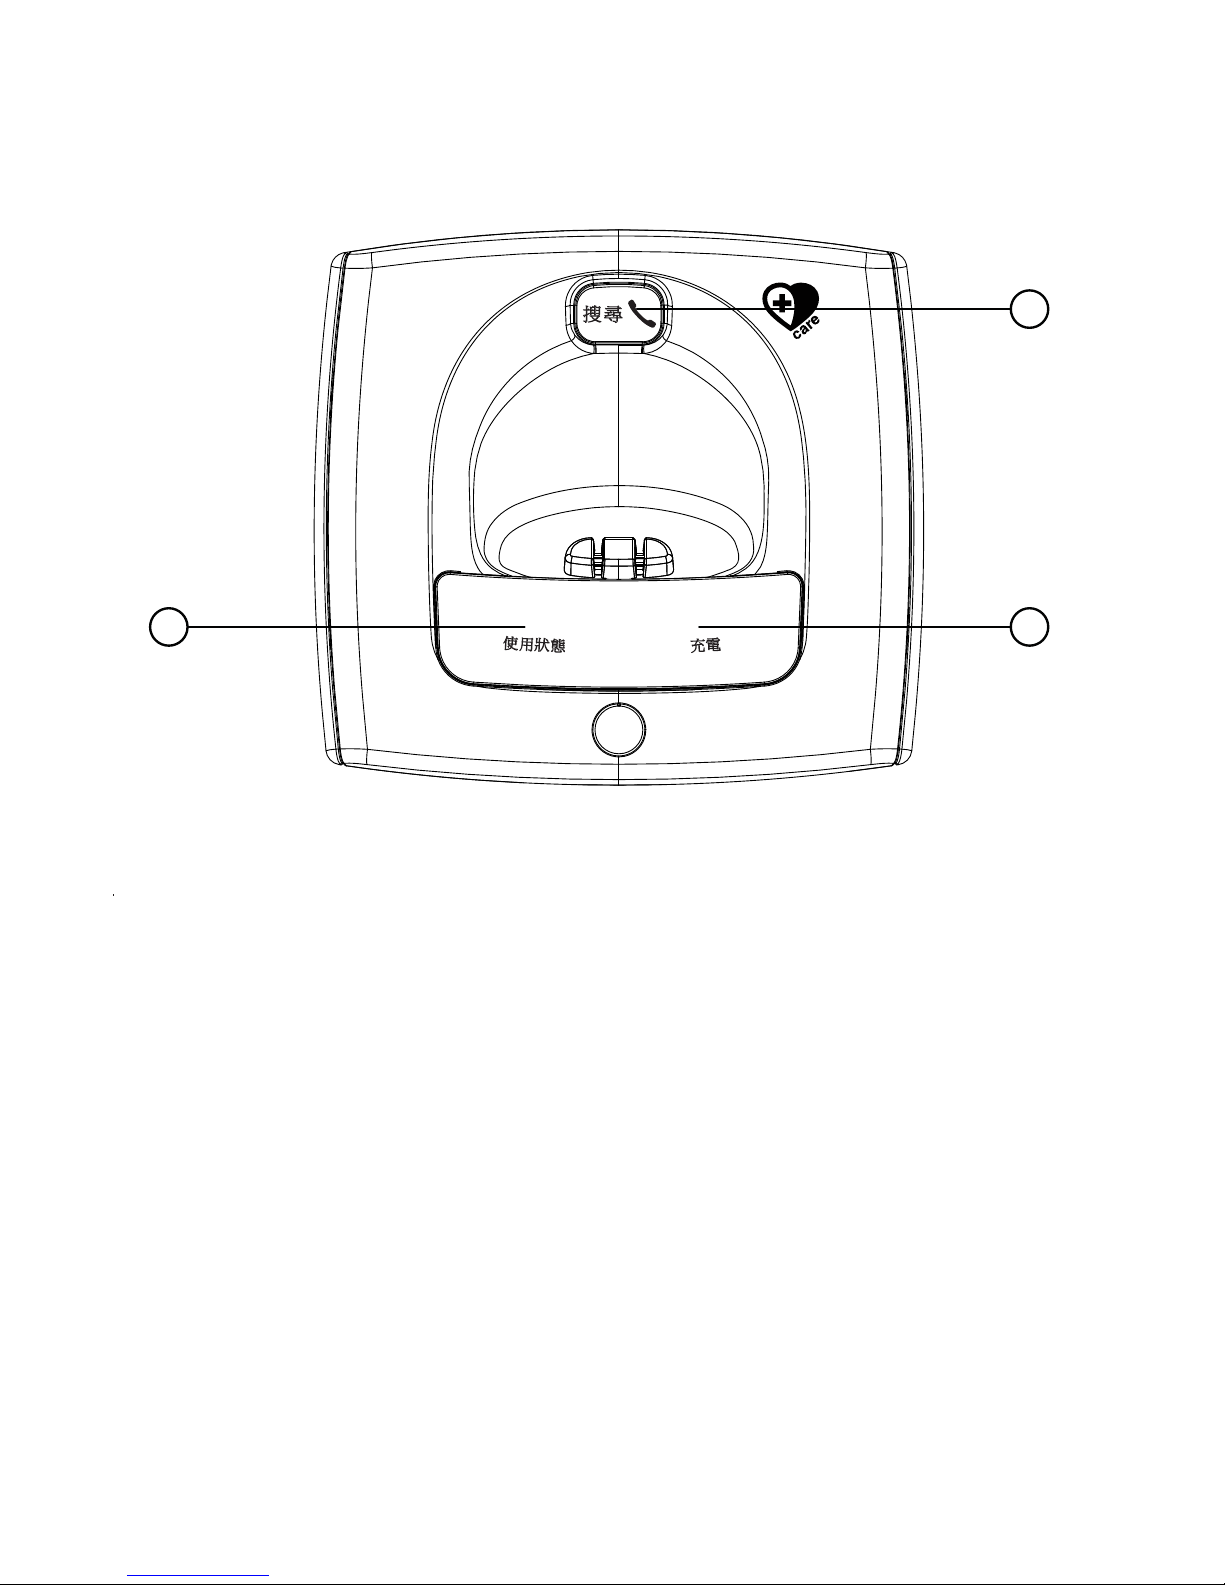
Base Oerview
᧰ ᇟ
3 2
Փ
⫼
⢔
ᜟ
䳏
ܙ
1
1. Find
Press to ring all registered handsets, helpful for finding a missing handset.
Also used during the registration process.
2.
Red Charging light
On: when the handset is on the base.
3. Green Power/In Use light
On: power on.
Flashes: when the phone rings, during a call, during handset registration.
7
Page 12

3.4
16
Menu Structure
In idle mode, press <MENU> will firstly access the Sound menu. Press <Up> will access the
Redial List. Press <Down> will access the Call List. Refer to the following for the menu
structure.
<UP/DOWN>
Key Press
<MENU>
<UP/DOWN>
Main Menu Sound Settings
Sub menu
Ringer
Tones
H/set Settings
Base Settings
Date/Time/Alarm
The following menus can be accessed by pressing relevant keys in idle mode:
Keys Down / Call List Up / Redial Phonebook or Phonebook
Sub menu
List Empty or
Display Call List
Details
Delete
Delete All
Call Number
Store Number
Settings
List Empty or
Display Redial List
Delete
Delete All
Call Number
Store Number
List Empty Display Phonebook
entries
New Entry
Capacity
New Entry
Edit Entry
View
Copy
Copy All
Delete Entry
Delete All
Capacity
Edit Call Grp
Speed Dial
8
Page 13

3
USE YOUR PHONE
4
4.1 Make an External Call
4.1.1 Preparatory dialing
Enter the phone number and press <TALK ON> or <SPEAKERPHONE> to dial the number.
Press <Clear> to clear the entry.
4.1.2 Direct dialing
Press <TALK ON> or <SPEAKERPHONE> to take the line and enter the phone number.
4.1.3
Call from the phonebook
Press <Phonebook> to access the phonebook and press <UP/DOWN> to select the desired
phonebook entry. Press <TALK ON> or <SPEAKERPHONE> to dial out to the selected
phonebook entry.
4.1.4 Call from the call list
Press <Down> to access the call list and press <UP/DOWN> to select the desired call list entry.
Press <TALK ON> or <SPEAKERPHONE> to dial out to the selected call list entry.
4.1.5 Call from the redial list
Press <Up> to access the redial list and press <UP/DOWN> to select the desired redial
number. Press <TALK ON> or <SPEAKERPHONE> to dial out to the selected redial number.
4.1.6 Call timer
Your handset automatically times the duration of every call. The call timer will display a few
seconds after the call has made. It is shown in hours, minutes and seconds format
(HH:MM:SS).
4.2
Answer a Call
If handset is not on the charging cradle:
When the phone rings, press <TALK ON> / <SPEAKERPHONE> to answer a call.
If the handset is on the charging cradle or the base station:
When the phone rings, pick up the handset to answer a call.
Note: You need to turn on the Auto Answer before you can answer a call by this method.
Please refer to section “8.1.7 Turn on or off the auto answer” for details.
4.3
Turn on or off the audio boost
In talk mode, press <Amplify> key to turn on the audio bo
displayed on screen. Voice volume from the earpiece will be increased, and the call indicator
will be steadily on.
Press <Amplify> again to turn off audio boost, “Boost Off” will be displayed and the call
indicator will be off.
Note: Audio boost will be turned off automatically when end the call.
4.4
End a Call
During a call connection, press <TALK OFF> to end the call.
OR
Put the handset on the base station to end the call.
4.5
Adjust Earpiece and Handsfree Volume
5 volume levels (Level 1 to Level 5) to choose from for each of earpiece and handsfree
volume.
During a call:
9
ost feature. “Boost On” will be
Page 14

Press <UP> or <DOWN> to increase or decreae the volume level respectively. The current
setting is shown. When you end the call, the settings will remain at the last selected level.
4.6
Mute a Call
You can talk to someone nearby without letting the caller hear you during a call.
During a call:
Press and hold <#> to mute the microphone and“Mute On ” is displayed on the LCD. Your
caller cannot hear you. Press and hold<#> again to unmute the microphone.
4.7
In idle, press and hold <STAR> to turn off the
Set the Silent Mode
on the LCD.
4.8
Redial
You can redial up to 15 of the last numbers called. If you have stored a name in the
phonebook to go with the number, the name will be displayed instead.
Note: After making a
call, further key input after
call timer is displayed will not be stored in the
redial list.
55
4.8.1
Redial a number from the redial list
1. Press <Up> to access the redial list.
2. Press <UP/DOWN> to browse the redial list.
3. Press <TALK ON> to dial to the selected redial number.
Note: If there are no numbers in the redial list, the display shows
56
4.8.2
Save a redial number into the phonebook
“List Empty”.
deyalpsid si noci ”FFO REGNIR“ ehT .regnir
1. Follow steps 1 and 2 in section
2.
Press <Option> and <UP/DOWN> to select Store Number.
3. Press <OK> to enter the name, edit the
X
4.8.1X.
number and select the group if necessary.
4. Press <OK> to save the redial number into the phonebook.
57
4.8.3
1. Follow steps 1 and 2 in section
Delete a redial number
X
4.8.1X.
2. Press <Option> and <UP/DOWN> to select Delete.
3. Press <OK> to confirm.
58
4.8.4
1. Follow steps 1 and 2 in section
Delete the entire redial list
X
4.8.1X.
2. Press <Option> and <UP/DOWN> to select Delete all .
3. Press <OK> to confirm.
4.9
Keypad Lock
You can lock the keypad so that it cannot be used accidentally while carrying it around.
1. To lock the keypad: In idle mode, press and hold <#> key, the <Keypad lock icon>will
display and “Keypad Locked” will display.
2. To unlock the keypad: In idle mode, press and hold <#> key, the <keypad lock icon> will
disappear and “ Keypad Unlocked” will display for 2 seconds before returning to standby.
4.10
Find Handset
You can locate the handset by pressing <FIND> on the base station. All the handsets
registered to the base will ring up for 30 seconds and “Paging” is displayed on the LCD. You
can stop the paging by pressing <TALK OFF> or <Back> on the handset or <FIND> on the
base again.
27
10
Page 15

4.11
Make an Internal Call
This feature is only applicable when there are at least two registered handsets. It allows you
to make internal calls, transfer external calls from one handset to another handset and make
conference calls.
1.
4.11.1
Press <Int> and <UP/DOWN> to select the handset that you want to make an internal
2.
59
Intercom another handset
call with.
Press <OK>.
3.
The called handset rings and press <TALK ON> on the called handset to establish the
internal call.
60
4.11.2
Transfer an external call to another handset
During a call:
X
Follow steps 1 and 2 in section
1.
The external call is put on hold automatically and the called handset rings.
2.
Press <TALK ON> on the called handset to establish an internal call.
3.
Press <TALK OFF> on the calling handset to end the current call with the external party.
4.
The external call is transferred to the called handset.
5.
61
4.11.3
Make a 3-way conference call
4.11.1X.
The conference call feature allows one external call to be shared with two handsets (in
intercom). The three parties can share the conversation and no network subscription is
required.
During an external call:
X
Follow Steps 1 to 3 in section
1.
Press <Conf> to establish the 3-way conference.
2.
4.11.2X.
Any handset hangs up during a conference call will leave the other handset still in connection
with the external call.
During the conference call:
Press <Single> on the calling handset to select Single call.
1.
The calling handset talks to the internal party and the external party is put on hold
2.
automatically.
During an external call:
X
Follow steps 1 to 3 in section
1.
Press <Intern> on the calling handset to switch calls.
2.
The calling handset talks to the called handset and the external call is put on hold
3.
4.11.2
automatically.
Press <Intern> again on the calling handset to switch calls.
4.
The calling handset is switched to talk to the external party and the internal call is put on
5.
hold automatically.
11
Page 16

3
4
PHONEBOOK
5
Your phone can store up to 200 private phonebook entries with names and numbers. Each
phonebook entry can have a maximum of 24 digits for the phone number and 15 characters
for the name. You can categorize your phonebook entry into one of the seven call groups.
28
5.1
Add a New Entry
In idle:
1. Press <Phonebook> to access the phonebook.
Note: If no entry is found in the phonebook, “List Empty” will display.
2. Press <UP/DOWN> to select the desired phonebook entry.
3. Press <Option> and <UP/DOWN> to select New Entry.
4. Press <OK> and <UP/DOWN> to enter the name, number and call group.
Note: You can press <#> to toggle between the uppercase and lowercase letters. Phone
number is mandatory to enter in order to save it as a phonebook entry.
5. Press <OK> to save the phonebook entry.
Note: Once a new entry is added, the phonebook entry will be displayed in alphabetical order.
29
5.2
Edit an Entry
In idle:
1. Press <Phonebook> to access the phonebook.
2. Press <UP/DOWN> to select the desired phonebook entry.
3. Press <Option> and <UP/DOWN> to select Edit Entry.
4. Enter the revised name, phone number and call group and press <OK>.
5. Press <OK> to confirm.
30
5.3
View an Entry
In idle:
1. Press <Phonebook> to access the phonebook.
2. Enter the first character of the name by multi-tap.
OR
2. Press <UP/DOWN> to select the desired phonebook entry.
3. Press <Option> and <UP/DOWN> to select View.
4. Press <OK> to confirm.
31
5.4
Copy an Entry
In idle:
1. Press <Phonebook> to access the phonebook and press <UP/DOWN> to select the
desired entry.
2. Press <Option> and <UP/DOWN> to select Copy.
3. Press <OK> and <UP/DOWN> to select the handset you want to copy.
Note: if no base or other handsets are registered, "No handset" will display on the screen.
At the receiving handset:
4. Display shows “Receive dir. entries?” Press <Yes> to confirm or <No> to cancel.
5. Upon successful copying, the display will show “Copied”.
Note: The PB entries in the initiating handset are copied and appended to existing PB entries
in the receiving handset and are sorted in alphabetical order.
5.5
Copy all Entries
In idle:
1. Press <Phonebook> to access the phonebook. The first entry is displayed.
2. Press <Option> and <UP/DOWN> to select Copy All.
3. Press <OK> and <UP/DOWN> to select the handset you want to copy.
12
Page 17

Note: if no base or other handsets are registered, "No handset" will display on the screen.
At the receiving handset:
4. Display shows “Receive dir. entries?” Press <Yes> to confirm or <No> to cancel.
5. Upon successful copying, the display will show “Copied”.
Note: The PB entries in the initiating handset are copied and appended to existing PB entries
in the receiving handset and are sorted in alphabetical order.
33
5.6
Delete an Entry
In idle:
1. Press <Phonebook> to access the phonebook.
2. Press <UP/DOWN> to select the desired phonebook entry.
3. Press <Option> and <UP/DOWN> to select Delete.
4. Press <Yes> to confirm or <No> to cancel.
34
5.7
Delete the Entire Phonebook
In idle:
1. Press <Phonebook> to access the phonebook.
2. Press <UP/DOWN> to select the desired phonebook entry.
3. Press <Option> and <UP/DOWN> to select Delete All.
4. Press <Yes> to confirm or <No> to cancel.
35
5.8
View Phonebook Capacity
In idle:
1. Press <Phonebook> to access the phonebook.
2. Press <Option> and <UP/DOWN> to select Capacity.
3. Press <OK> to display the number of entries remaining in the phonebook memory.
36
5.9
5.9.1
Edit Call Group
62
Edit call group name
In idle:
1. Press <Phonebook> to access the phonebook.
2. Press <Option> and <UP/DOWN> to select Edit Call Grp.
3. Press <OK> and <UP/DOWN> to the desired call group
4. Press <OK> to select Rename Group.
5. Press <OK> and <Clear> to delete the current name and enter a new name.
6. Press <OK> to save.
63
5.9.2
Change call group ringtone
In idle:
1. Press <Phonebook> to access the phonebook.
2. Press <Option> and <UP/DOWN> to select Edit Call Grp.
3. Press <OK> and <UP/DOWN> to the desired call group.
4. Press <OK> to select Ringtone .
4. Press <OK> and <UP/DOWN> or to choose the desired melody. Corresponding melody is
played while browsing the melody list. A total of 15 melodies are provided for your selection.
5. Press OK to confirm.
37
5.10
5.10.1
Speed Dial
64
Edit a speed dial
In idle:
1. Press <Phonebook> to access the phonebook.
2. Press <Option> and <UP/DOWN> to select Speed Dial.
3. Press <OK> and <UP/DOWN> to select the speed dial location.
13
Page 18

4. Press <OK> to display the details of the speed dial location.
Note: If no number is stored in the selected speed dial location, “No Number” will display in
the screen.
5. Press <Option> and <UP/DOWN> to select Edit.
6. Press <OK> to display the phonebook entries.
7. Press <UP/DOWN> to select your desired phonebook entry that you want to store in the
selected speed dial location.
8. Press <OK> to confirm.
5.10.2
65
Delete a speed dial
In idle:
X
1. Repeat steps 1 to 4 in Section
5.10.1
2. Press <Option> and <UP/DOWN> to select Delete.
3. Press <OK> to confirm.
14
Page 19

CALL LIST
6
5
This feature is available if you have subscribed the Caller Line Identification service with your
network service provider. Your phone can store up to 20 calls with date/time information in
the call list. The number will be shown on the LCD when the phone is ringing. If the number
matches with one of the entries in your private phonebook, the caller’s name stored in the
private phonebook will be displayed alternatively with the number.
If the caller number is withheld, “Withheld” will display.
If the caller number is unavailable, “Unavailable” will display.
38
6.1
View the Call List
All unanswered calls are saved in calls log with the latest call putting at the top of the list.
When the call list is full, the oldest call will be replaced by a new call. The unanswered call
which has not been read is marked with “New” at the bottom of the unanswered call entry.
1. Press <Down> to access the call list.
2. Press <UP/DOWN> to select the desired entry.
3. Press <Option> and <UP/DOWN> to select Details.
4. Press <OK> to view the date and time information of the selected call list entry.
39
6.2
1. Follow steps 1 and 2 in Section
Store a Call List Number into the Phonebook
X
6.1X.
2. Press <Option> and <UP/DOWN> to select Store Number.
3. Press <OK> and <UP/DOWN> to enter the name, number and call group if necessary.
4. Press <OK> to confirm.
40
6.3
Dial a Call List Number
1. Follow steps 1 and 2 in Section 6.1.
2. Press <Option> and <UP/DOWN> to select Call Number.
3. Press <OK> and you can edit the selected call lis
t number.
4. Press <TALK ON> or <SPEAKER> to dial out to the call list number.
41
6.4
1. Follow steps 1 and 2 in Section
Delete an Entry in the Call List
X
6.1X.
2. Press <Option> and <UP/DOWN> to select Delete.
3. Press <OK> to confirm.
42
6.5
1. Follow steps 1 and 2 in Section
Delete the Entire Call List
X
6.1X.
2. Press <Option> and <UP/DOWN> to select Delete All.
3. Press <OK> to confirm.
4. Press <OK> to reconfirm.
43
6.6
Store All Calls or Only Unanswered Calls in the Call List
If All Calls is selected, answered and unanswered calls are stored in the call list. If Missed
Calls is selected, only unanswered calls are stored in the call list.
X
1. Follow steps 1 and 2 in Section
6.1X.
2. Press <Option> and <UP/DOWN> to select Settings.
3. Press <OK> and <UP/DOWN> to go to Category.
3. Press <OK> and <Up/Down> to choose All Calls or Missed Calls.
4. Press <OK> to confirm.
15
XX
Page 20

44
6.7
Turn On or Off the New Call Alert
If New Call Alert is turned on, you will hear a beep when there is a missed call and <Missed
Call icon> will display.
1. Follow steps 1 and 2 in Section
6.1.
2. Press <Option> and <UP/DOWN> to select Settings.
3. Press <OK> and <UP/DOWN> to go to New Call Alert.
4. Press <UP/DOWN> to turn on or off the new call alert.
5. Press <OK> to confirm.
16
Page 21

6
SOUND
7
You can set different melodies to personalize your external and internal ringer. A total of 15
melodies are provided for your selection.
7.1 Handset Ringer
In Idle:
1. Press <Menu> and <UP/DOWN> to select Sound.
2. Press <OK> and <UP/DOWN> to select Ringer.
3. Press <OK> to select External.
4. Press <OK> and <UP/DOWN> to select your desired melody for your external ringer.
5. Press <OK> and <UP/DOWN> to select Internal .
6. Press <OK> and <UP/DOWN> to select your desired melody for your internal ringer.
7. Press <OK> and <UP/DOWN> to select Ring Volume.
8. Press <OK> and <UP/DOWN> to select your desired ringer volume from level1
.
to level 5 or off
Note: If the ringer volume is set to Off, <Ringer off icon> will display in idle.
9. Press <OK> and <UP/DOWN> to select Silence and select Beep or Off.
Note: When you set the ringer to Off, you can still hear a beep when there is an
incoming call by setting the Silent to Beep. If you set the Silent to Off, you cannot hear
any tone
when there is an incoming and the ringer is set to Off.
10. Press <OK> to confirm.
7.2
Tones
Your handset can give a beep to you when an action is confirmed to be successful, out of
range is detected, a key is pressed or low battery is detected.
In Idle:
1. Press <Menu> and <UP/DOWN> to select Sound.
2. Press <OK> and <UP/DOWN> to select Tones.
3. Press <OK> and <UP/DOWN> to turn on or off the Key Beeps.
4. Press <DOWN> and <UP/DOWN> to turn on or off the Confirmation tone.
5. Press <DOWN> and <UP/DOWN> to turn on or off the Battery Low alert tone.
6. Press <DOWN> and <UP/DOWN> to turn on or off the Out of range alert tone.
7. Press <OK> to confirm.
17
Page 22

3
7
SETTINGS
8
Your phone comes with a selection of settings that you can change to personalize your
phone the way you like it to work.
8.1
Handset Settings
8.1.1 Enable the Direct Call
When activated, the direct call feature enables you to dial the selected number by pressing
any key on your handset. This feature is very useful for direct access to emergency service.
1. Press <MENU> and <UP/DOWN> to select Settings.
2. Press <OK> and <UP/DOWN> to select H/set Settings.
3. Press <OK> and <UP/DOWN> to select CallMe .
4. Press <OK> to enter the 4-digit system PIN. (Default 4-digit system PIN is 0000)
5. Press <OK> and <UP/DOWN> to select On to enable the direct call.
6. Press <OK> to enter the number for direct call.
7. Press <OK> to return to Idle displaying with “CallMe” .
67
8.1.2
1. Repeat steps 1 to 3 mentioned in section
Disable the Direct Call
X
8.1.1X.
2. Press <OK> and <UP/DOWN> to select Off to disable the direct call.
3. Press <OK> and return to previous menu level.
OR
X
1. Repeat steps 1 to 6mentioned in section
8.1.1X.
2. Press <Option> and <UP/DOWN> to select Off to disable the direct call.
3. Press <OK> to confirm.
68
8.1.3
Select base station
If your handset is registered to more than one base stations, you can select which base
station to use.
1. Repeat steps 1 to 2 mentioned in section 8.1.1.
3. Press <OK> and < UP/DOWN> to choose Select Base.
4. Press <OK> and <UP/DOWN> to select your desired base station.
5. Press <OK> to confirm.
69
8.1.4
1. Repeat steps 1 to 2 in section
Adjust the display contrast
X
8.1.1X1.
2. Press <OK> and <UP/DOWN> to select Contrast.
3. Press <OK> and <UP/DOWN> to select the contrast level from 1 to 5.
4. Press <OK> to confirm.
70
8.1.5
1. Repeat steps 1 to 2 in section
Rename the handset
X
8.1.4X.
2. Press <OK> and <UP/DOWN> to select Handset name.
3. Press <Clear> to delete one character.
4. Press <OK> to confirm.
Note: Not support editing handset name in Traditional Chinese.
71
8.1.6
1. Repeat steps 1 to 2 in section
Set language
X
8.1.1X.
2. Press <OK> and <UP/DOWN> to select Language.
3. Press <OK> and <UP/DOWN> to select the desired language.
4. Press <OK> to confirm.
72
8.1.7
1. Repeat steps 1 to 2 in section
Turn on or off the auto answer
X
8.1.1X.
18
Page 23

2. Press <OK> and <UP/DOWN> to select Auto Answer.
3. Press <OK> and <UP/DOWN> to turn on or off the Auto Answer feature.
4. Press <OK> to confirm.
73
8.1.8
Register an additional handset
You can register up to 5 handsets per base station.
X
1. Repeat steps 1 to 2 in section
8.1.1X.
2. Press <OK> and <UP/DOWN> to select Register.
3. Press <OK> and <UP/DOWN> to select the desired base station that you want your
handset to register to.
4. Press <OK> to enter the 4-digit system PIN.
Note: 4-digit PIN is entered in ****. Once 4 digits are entered, the right soft key will become
OK.
5. Press and hold <FIND> on the base station.
6. Press <OK> on the handset to confirm.
Note: “Registering…” will display. A beep tone is emitted from the handset to indicate
successful registration and the screen returns to idle mode.
If the base is found and the PIN is correct, an unused handset number will be assigned
automatically.
If the PIN is incorrect, “Incorrect PIN” will display with an error tone and the handset returns
to idle.
If no base is found within a certain period, “No Base Found” will display with an error tone,
and the handset returns to idle..
74
8.1.9
1. Repeat steps 1 to 2 in section
De-Register a handset
X
8.1.1X.
2. Press <OK> and <UP/DOWN> to select De-register.
3. Press <OK> to enter the 4-digit System PIN.
Note: 4-digit PIN is entered in ****. Once 4 digits are entered, the right soft key will become
OK.
4. Press <OK> and <UP/DOWN> to select the handset that you want to de-register.
Note: Only subscribed handsets are listed. The handset currently used cannot be deregistered.
5. Press <OK> to de-register the handset.
6. Press <YES> to confirm handset de-registration.
7. “De-registered” will display and go back to idle.
75
8.1.10
1. Repeat steps 1 to 2 in section
Restore the handset to default settings
X
8.1.1X.
2. Press <OK> and <UP/DOWN> to select Handset Reset.
3. Press <OK> and <YES> to confirm resetting the handset to default settings.
Note: Phonebook and speed dial entries will not be deleted after handset reset.
47
8.2
8.2.1
Base Settings
76
Set the base ringer
In Idle:
1. Press <Menu> and <UP/DOWN> to select Settings.
2. Press <OK> and <UP/DOWN> to select Base Settings.
3. Press <OK> and <UP/DOWN> to select Ringer.
4. Press <OK> and <UP/DOWN> to select your desired melody for your base ringer. (A total
of five melodies for base ringer are provided.)
5. Press < OK> and <UP/DOWN> to select Ring volume
6. Press < OK> and <UP/DOWN> to select your desired ringer volume from
Level 1
to
Level 5 or Off.
7. Press <OK> to confirm.
19
Page 24

8.2.277Set the handset priority
When you have more than one handset registered to the base station, you can set which
handset to ring first before the others.
In Idle:
X
1. Repeat steps 1 and 2 in section
8.2.1X.
2. Press <OK> and <UP/DOWN> to select H/set Priority .
3. Press <OK> and <UP/DOWN> to choose Select Handset.
4. Press <OK> and <UP/DOWN> to select which handset to get the priority to ring first.
Note: If All Handsets is chosen, all the registered handsets will ring at the same time and
press <OK> to confirm.
5. Press <OK> and <UP/DOWN> to select the number of ring delay (2 Rings / 4 Rings / 6
Rings / 8 Rings).
6. Press <OK> to confirm.
78
8.2.3
Set the dial mode
In Idle:
X
1. Repeat steps 1 and 2 in section
8.2.1X.
2. Press <OK> and <UP/DOWN> to select Dial Mode .
3. Press <OK> and <UP/DOWN> to select Tone or Pulse.
4. Press <OK> to confirm.
79
8.2.4
Set the recall time
In Idle:
X
1. Repeat steps 1 and 2 in section
8.2.1X.
2. Press <OK> and <UP/DOWN> to select Recall Time.
3. Press <OK> and <UP/DOWN> to select the desired flash time.
4. Press <OK> to confirm.
80
8.2.5
Change the system PIN
In Idle:
X
1. Repeat steps 1 and 2 in section
8.2.1X.
2. Press <OK> and <UP/DOWN> to select System PIN.
3. Press <OK> to enter the old 4-digit system PIN.
4. Press <OK> to enter the new 4-digit system PIN.
5. Press <OK> to enter the new 4-digit system PIN.
6. Press <OK> to reconfirm and save the new 4-digit PIN.
Note: If the PIN is incorrect,
81
8.2.6
Set an exchange code
“INCORRECT PIN” will display with an error tone in the screen.
You can set an exchange code for your handset such that a pause will be inserted after the
first digit if it matches with the exchange code. This feature is especially useful for PBX
systems.
In Idle:
X
1. Repeat steps 1 and 2 in section
8.2.1X.
2. Press <OK> and <UP/DOWN> to select PBX access.
3. Press <OK> to enter the exchange code.
4. Press <OK> to confirm.
Note:
Only one digit is allowed to enter for the exchange code.
82
8.2.7
Activate the ECO mode
Your telephone is provided with a low-emission mode. If ECO mode is activated, as soon as
you place the handset in the base station, the transmission power between handset and base
station is reduced to them minimum.
In Idle:
X
1. Repeat steps 1 and 2 in section
8.2.1X.
2. Press <OK> and <UP/DOWN> to select ECO Mode.
20
Page 25

3. Press <OK> to select On to activate ECO mode.
4. Press <OK> to confirm.
8.2.8
83
Reset the base settings to default settings
After system reset, the phone will return to its original settings.
In Idle:
X
1. Repeat steps 1 and 2 in section
8.2.1X.
2. Press <OK> and <UP/DOWN> to select System Reset.
3. Press <OK> to enter the 4-digit System PIN.
Note: 4-digit PIN is entered in ****. Once 4 digits are entered, the right soft key will become
OK.
4. Press <OK> and <YES> to confirm resetting the base settings to default settings.
The base will restore to default settings and return to standby.
48
8.3
8.3.1
Set the Date, Time and Alarm
84
Set date and time
In Idle:
1. Press <Menu> and <UP/DOWN> to select Settings.
2. Press <OK> and <UP/DOWN> to select Date/Time/Alarm.
3. Press <OK> and <UP/DOWN> to select Date/Time
.
.
4. Press <OK> and <UP/DOWN> to select Time format.
5. Press <OK> and <UP/DOWN> to select 12 Hour or 24 Hour format.
6. Press <OK> and <UP/DOWN> to select Date format.
7. Press <OK> and <UP/DOWN> to select dd/mm or mm/dd date format.
8. Press <OK> and <UP/DOWN> to select Enter time.
9. Press <OK> to enter the time. During time input, press <#> to toggle between AM or
PM if 12 hour time format is selected.
10. Press <OK> and <DOWN> to enter Enter date.
11. Press <OK>, And input the date.
12. Press <OK> to confirm.
85
8.3.2
Set an alarm
In Idle:
1. Press <Menu> and <UP/DOWN> to select Settings.
2. Press <OK> and <UP/DOWN> to select Date/Time/Alarm.
3. Press <OK> and <UP/DOWN> to select Alarm
.
4. Press <OK> and <UP/DOWN> to select Enter time.
5. Press <OK> to enter th
e alarm time using the 24 hour format.
6. Press <OK> and <UP/DOWN> to select Alarm on/off
7. Press <DOWN> and <UP/DOWN> to turn on or off the alarm.
8. Press <OK> and <UP/DOWN> to select Ringtone
9. Press <DOWN> and <UP/DOWN> to select the alarm melody.
10. Press
<OK> to confirm.
21
Page 26

DEFAULT SETTINGS
9
Item Default setting
Basic settings
Available languages Chinese (Language Menu Enable)
Handset name Handset
Display contrast Level 5
Handset Earpiece Volume Level 3
Hand free SPK Volume Level 3
Direct Call menu Off (Direct Call Menu Enable)
Msg Wait Off menu Disable
Auto Answer Mode menu On (Auto Answer Menu Enable)
System PIN 0000
ECO Mode on (ECO Menu Enable)
Clock/Alarm
Time format 24 hour
Date format dd/mm
Alarm on/off off
Alarm tone Melody 6
Dialing settings
Dial Mode Tone (Dial Mode Menu Enable)
Default Pulse M/B ratio
- +/-3%
Flash (Recall) time
Dialing Pause time 3s
Emergency Number 999
PBX Access Code
- Max. 1 digit
Redial memory 15 entries
600ms (Flash Time Menu Enable)
Ringer settings
Handset Ring Volume Level 3
Handset Ring Melody (external) Melody 2
Handset Ring Melody (internal) Melody 1
Beeptone Silence while ringer off
Base Ring Volume Level 3
Base Ring Melody Melody 1
Alert tone settings
Key beeps tone on
Confirmation tone on
Batt. Low alert on
Out of range alert off
Phonebook settings
Phonebook Memory
- name max. 15 chars
- number max. 24 digits
Group Name
Group 1
Group 2
Group 3
Group 4
Group 5
Group 6
Group 7
CID settings
Call list memory
- max. 20 digits for each number
Category All calls
New call alert Off
33/67
empty
200 entries
General
Family
Business
Friends
Utilities
VIP
Others
20 entries
22
Page 27

3
9
TROUBLESHOOTING
10
If you have difficulty with your phone, please try the suggestions listed below.
Problem Cause Solutions
a. Check the connections.
Unplug and plug back in the
a. The connection cord of the
base station is not plugged
in.
No dialing tone when pressing
<TALK ON> key
b. The adapter cord is not
plugged in correctly in the
base station.
c. The line is busy, as another
handset is used.
d. Wrong connection cord (no
Euro AS)
When connect to a PBX, no
and/or wrong connection after
Dialing prefix is needed. Insert the dialing prefix
dialing.
Base station out of range.
"Searching" is displayed.
Base station not connected to
mains.
The call does not work.
Service not activated or wrong
operator or wrong setting
No display. Empty battery Recharge battery
mains. Check that the
telephone line cord has
been plugged into the base
station and the phone
socket.
b. Check the base station plug
and the 220V plug (remove
and plug-in).
c. Wait until t
he line is
unoccupied.
d. Use the original connection
cord.
Reduce the range.
Connect base station to mains.
Check your Subscription with
network or change the dial
mode.
Please contact the technical support of the network provider for further information.
This telephone is not equipped with a grounding function! Therefore some of the functions
may be limited when used in PBX systems.
Technical Support
Please read out the serial number of this telephone to Technical Center.
The serial number can be found in the battery compartment after having the batteries
removed.
For technical support, call VTech Customer Service at (852)2667-7433.
10
CONFORMITY
This unit conforms to the following rules and regulations:
1995/5/EC Radio frequency and telecommunication equipment and the mutual acceptance of
conformity.
The CE mark proves the above.
23
Page 28
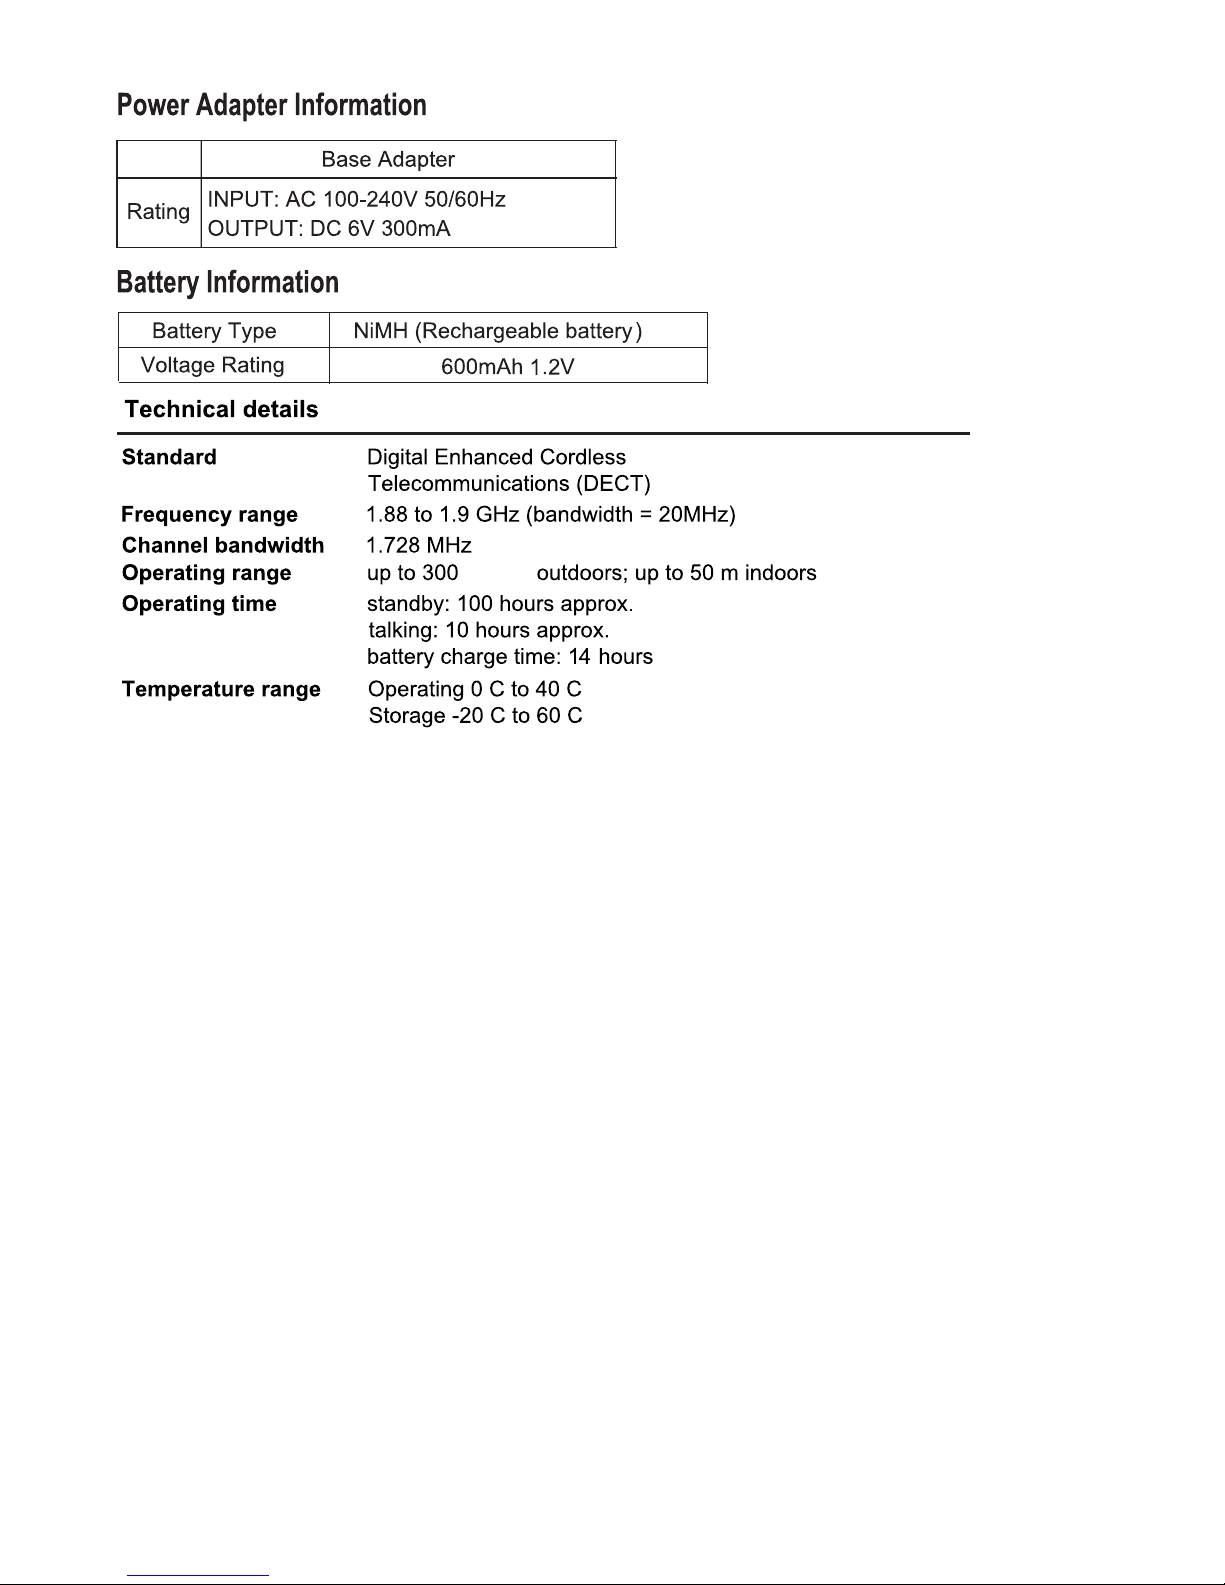
meters
24
Page 29

Customer Service Centre
Suite 1601, Lever Tech Centre, 69-71 King Yip Street,
Kwun Tong, Kowloon, Hong Kong.
Customer Service Hotline: (852) 2666 5558
Technical Inquiry Hotline: (852) 2667 7433
 Loading...