

Page 1

VT9013 /
VT9014
Page 2
Table of Contents
Connect the Base Station
Install and Charge the Batteries
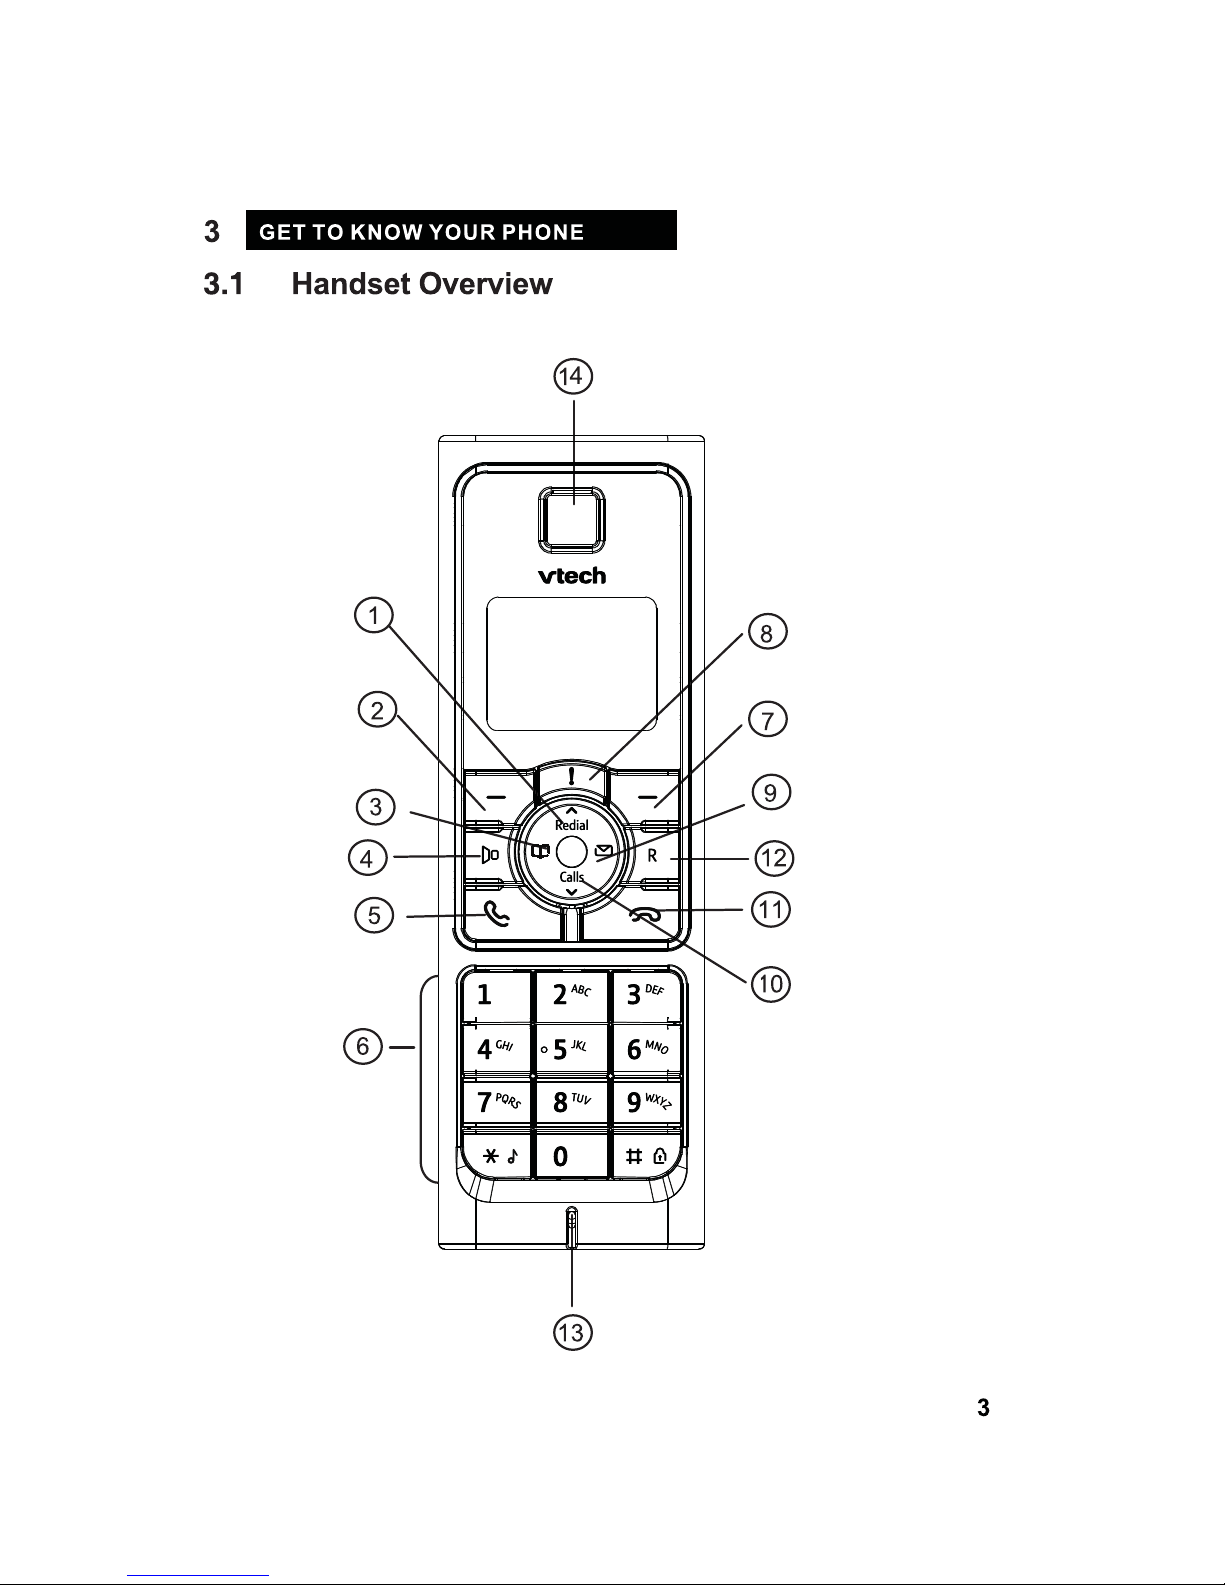
Handset Overview
Base Station Overview
Handset LCD Display
Make an External Call
Preparatory dialing
Direct dialing
Call from the phonebook
Call from the call list
Call from the redial list
Call timer
Answer a Call
End a Call
Adjust Earpiece and Handsfree Volume
Mute a Call
Set the Silent Mode
Redial
Redial a number from the redial list
Save a redial number into the phonebook
Delete a redial number
Delete the entire redial list
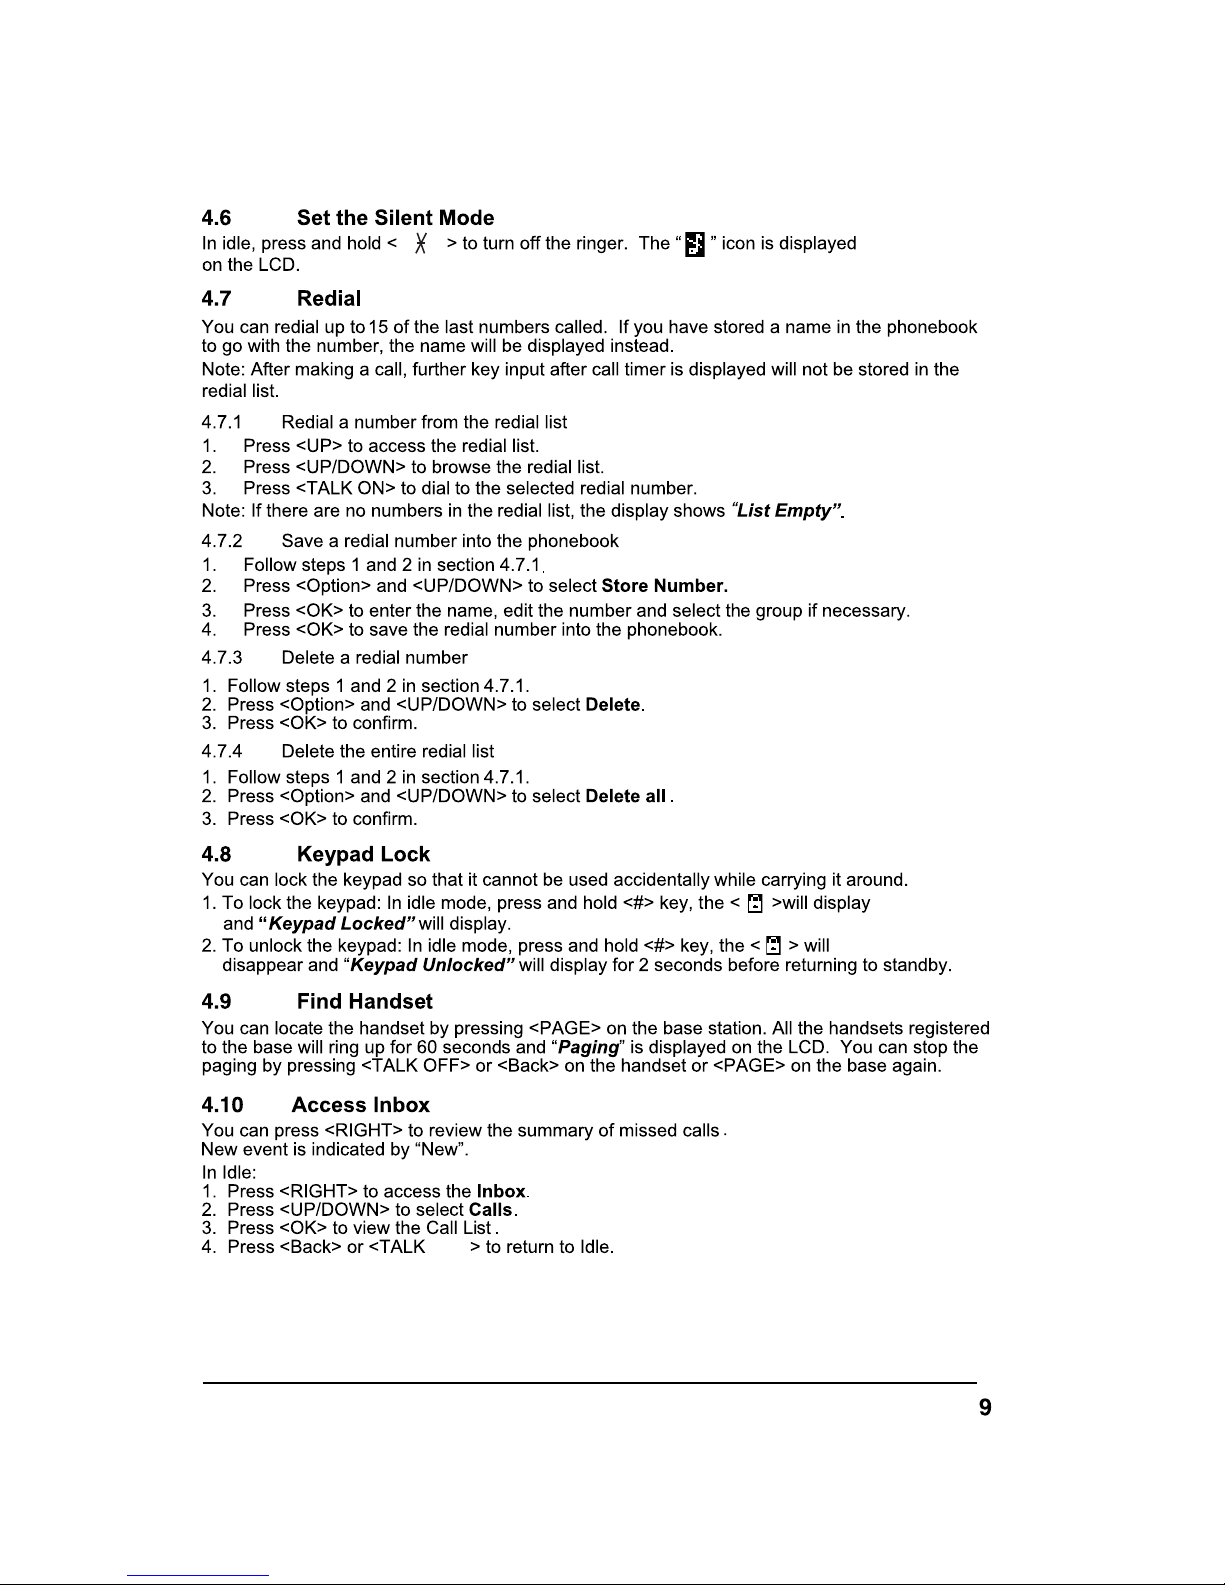
Keypad Lock
Find Handset
Access Inbox
Make an Internal Call
Intercom another handset
Transfer an external call to another handset
Make a 3-way conference call
6
7
8
8
8
8
8
8
8
8
8
8
8
8
9
9
10
10
10
Add a New Entry
Edit an Entry
View an Entry
Copy an Entry
Copy an Entries
Delete an Entry
Delete the Entire Phonebook
View Phonebook Capacity
Edit Call Group
Edit call group name
Change call group ringtone
Speed Dial
Edit a speed dial
Delete a speed dial
2
2
2
2
2
2
2
2
2
Page 3
View the Call List
Store a Call List Number into the Phonebook
Dial a Call List Number
Delete an Entry in the Call List
Delete the Entire Call List
Store All Calls or Only Unanswered Calls in the Call List
Turn On or Off the New Call Alert
Handset Ringer
Tones
Handset Settings
Enable the Direct call
Disable the Direct call
Select base station
Adjust the display contrast
Rename the handset
Set Language
Turn on or off the auto answer
Register an additional handset
De-register a handset
0
Restore the handset to default settings
Base Settings
Set the base ringer
Set the handset priority
Set the dial mode
Set the flash time
Change the system PIN
Set an exchange code
Activate the ECO mode
Reset the base settings to default settings
Set the Date, Time and Alarm
Set date and time
Set an alarm
DEFAULT SETTINGS
9
10
8
8
8
8
8
9
20
Page 4
VTech
If you have questions about this product, or having difficulty with setup or operation, call our VTech
Electronics (HK) Ltd.
Customer Service Centre : 852-2776 3223
Technical Inquiry Hotline : 852-2667 7433
VT9013/VT9014
1 AC power adapter
1 English user manual and
1 Chinese user manual
Page 5
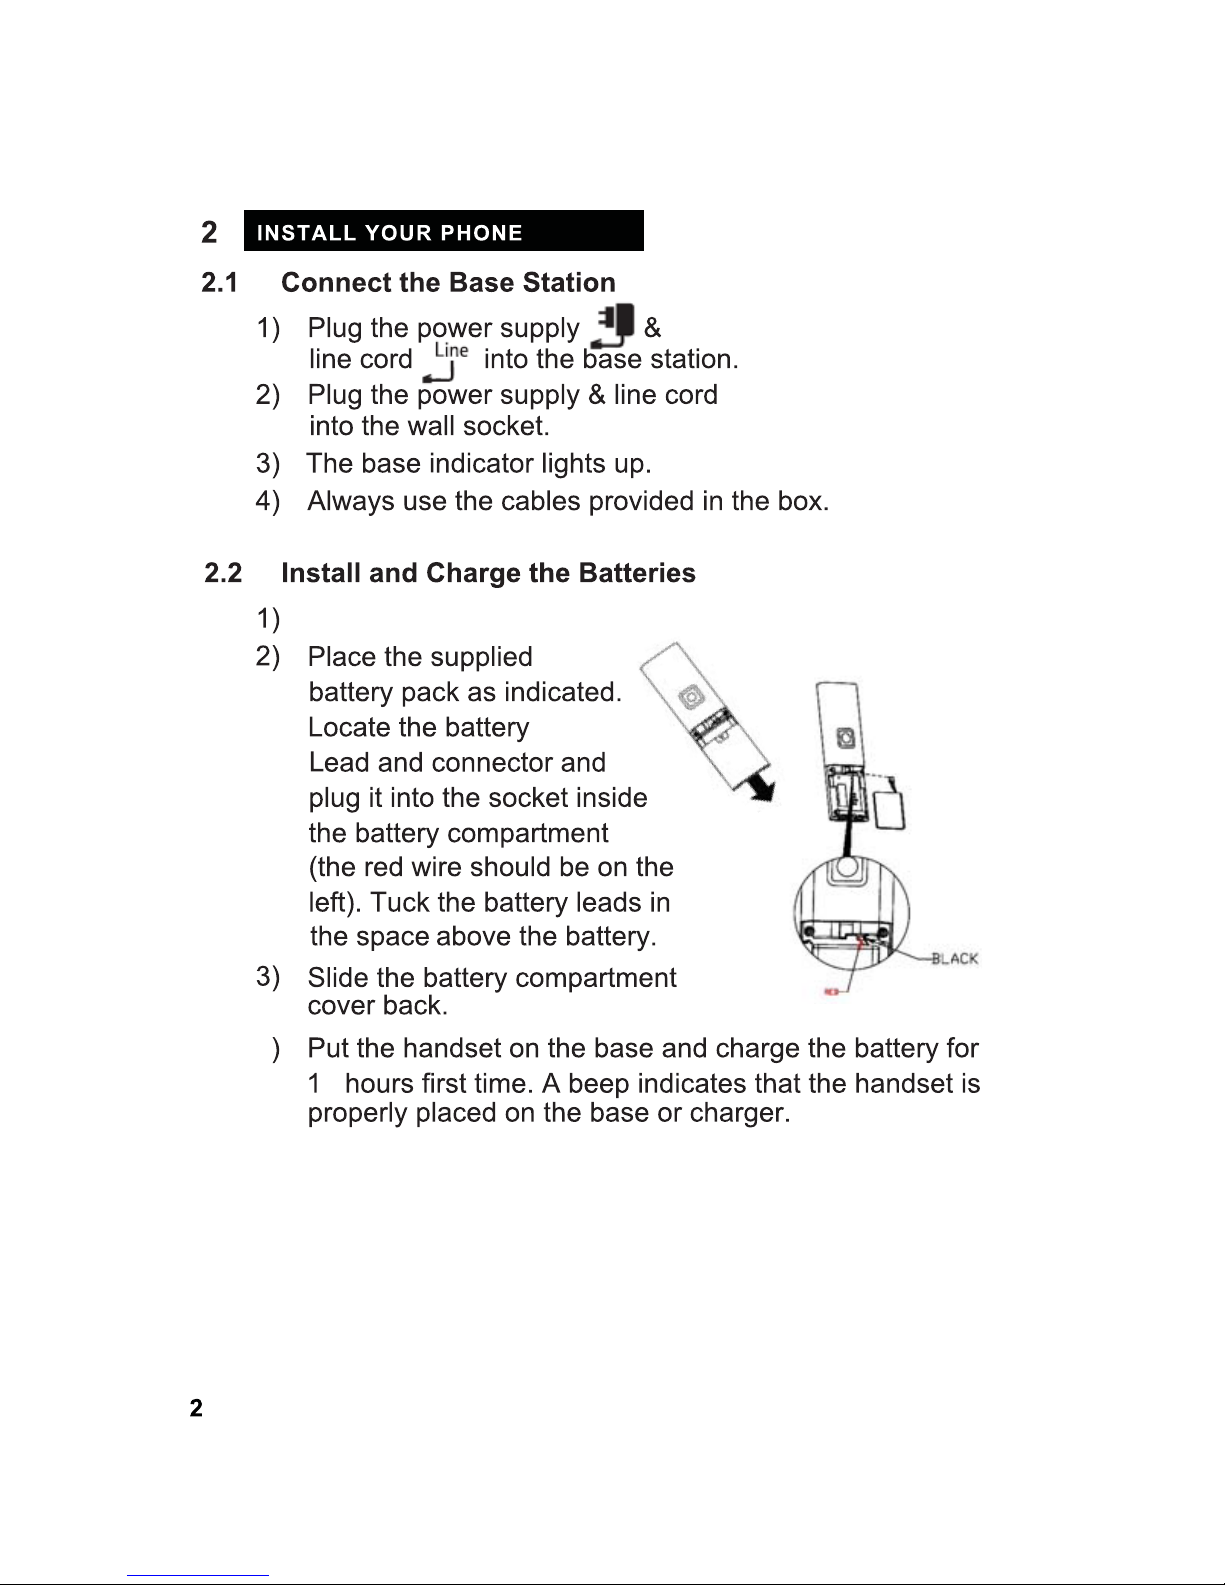
Slide out the battery compartment cover.
4
6
Use only the NiMH battery pack provided.
Page 6
Page 7

1 UP/REDIAL
In idle mode: Press to access the redial list
In menu mode: Press to scroll up the menu items
In Phonebook list / Redial list / Call List: Press to scroll
During a call: Press to increase the volume
In editing mode: Press to go one line upwards
2 LEFT SOFT KEY
In idle mode: Press to select a handset to make
In sub-menu mode: Press to go back to previous level
In contextual menu during a call: Press to go
In editing / predialing mode: Press to clear a
In editing / predialing mode: Long press to delete all
3 LEFT/ PHONEBOOK
In idle mode: Press to access phonebook
In main menu mode: Press to go back to idle
In sub-menu mode: Press to go back to previous level
During a call: Press to mute / unmute the microphone
In predialling mode: Press to move the cursor one
4 SPEAKERPHONE
During a call: Press to turn on / off the speakerphone. Call
List / Phonebook entry: Press to make a call with
During ringing: Press to answer a call with speakerphone
up the list
an internal call
back previous level
character / digit
the characters / digit
character to the left
speakerphone
5 TALK ON
In idle / predialing mode : Press to make a call
In Redial list / Call List/ Phonebook entry:
Press to make
During ringing: Press to answer a call
6 ALPHANUMERIC KEYPAD, * (STAR), # (HASH)
Press to insert a digit / character / * / #
* key in idle mode: Long press to turn off the ringer
# key in editing mode: Press to toggle between uppercase
# key in Idle mode: Long press to turn on / off
0 key in idle / predialing / number editing mode: Long
7
RIGHT SOFT KEY
In idle mode: Press to access the main menu
In sub-menu mode: Press to confirm the selection
a call to the selected entry in the list
the keypad
4
or lowercase character input
lock
press to insert a pause
Page 8

8
IMPORTANT PHONE NUMBER
Press to open a list of important phone number
9
RIGHT
In Idle: Press to access the status
In sub-menu mode: Press to go to
In Call list: Press to view the details of
In predialling / editing mode: Press to
10
DOWN / CALL LIST
In idle mode: Press to access the call list
In menu mode: Press to scroll down the
In Phonebook list / Redial list / Call List:
Press to scroll down the list
During a call: Press to decrease the volume
In editing mode: Press to go one line
11
TALK OFF
During a call: Press to end a call and go
In menu / editing mode: Press to go back to
In Idle: Press and hold to choose to power
When the handset is power off: Press to
12
RECALL / FLASH
In Idle / predialing mode: Press to insert a flash
During a call: Press to dial a flash
summary of call list,
next menu level
the selected call list entry
move the cursor one character to the right
menu items
downwards
back to idle screen
idle screen
off the handset
power on the handset
13
MICROPHONE
14
EARPIECE
5
Page 9
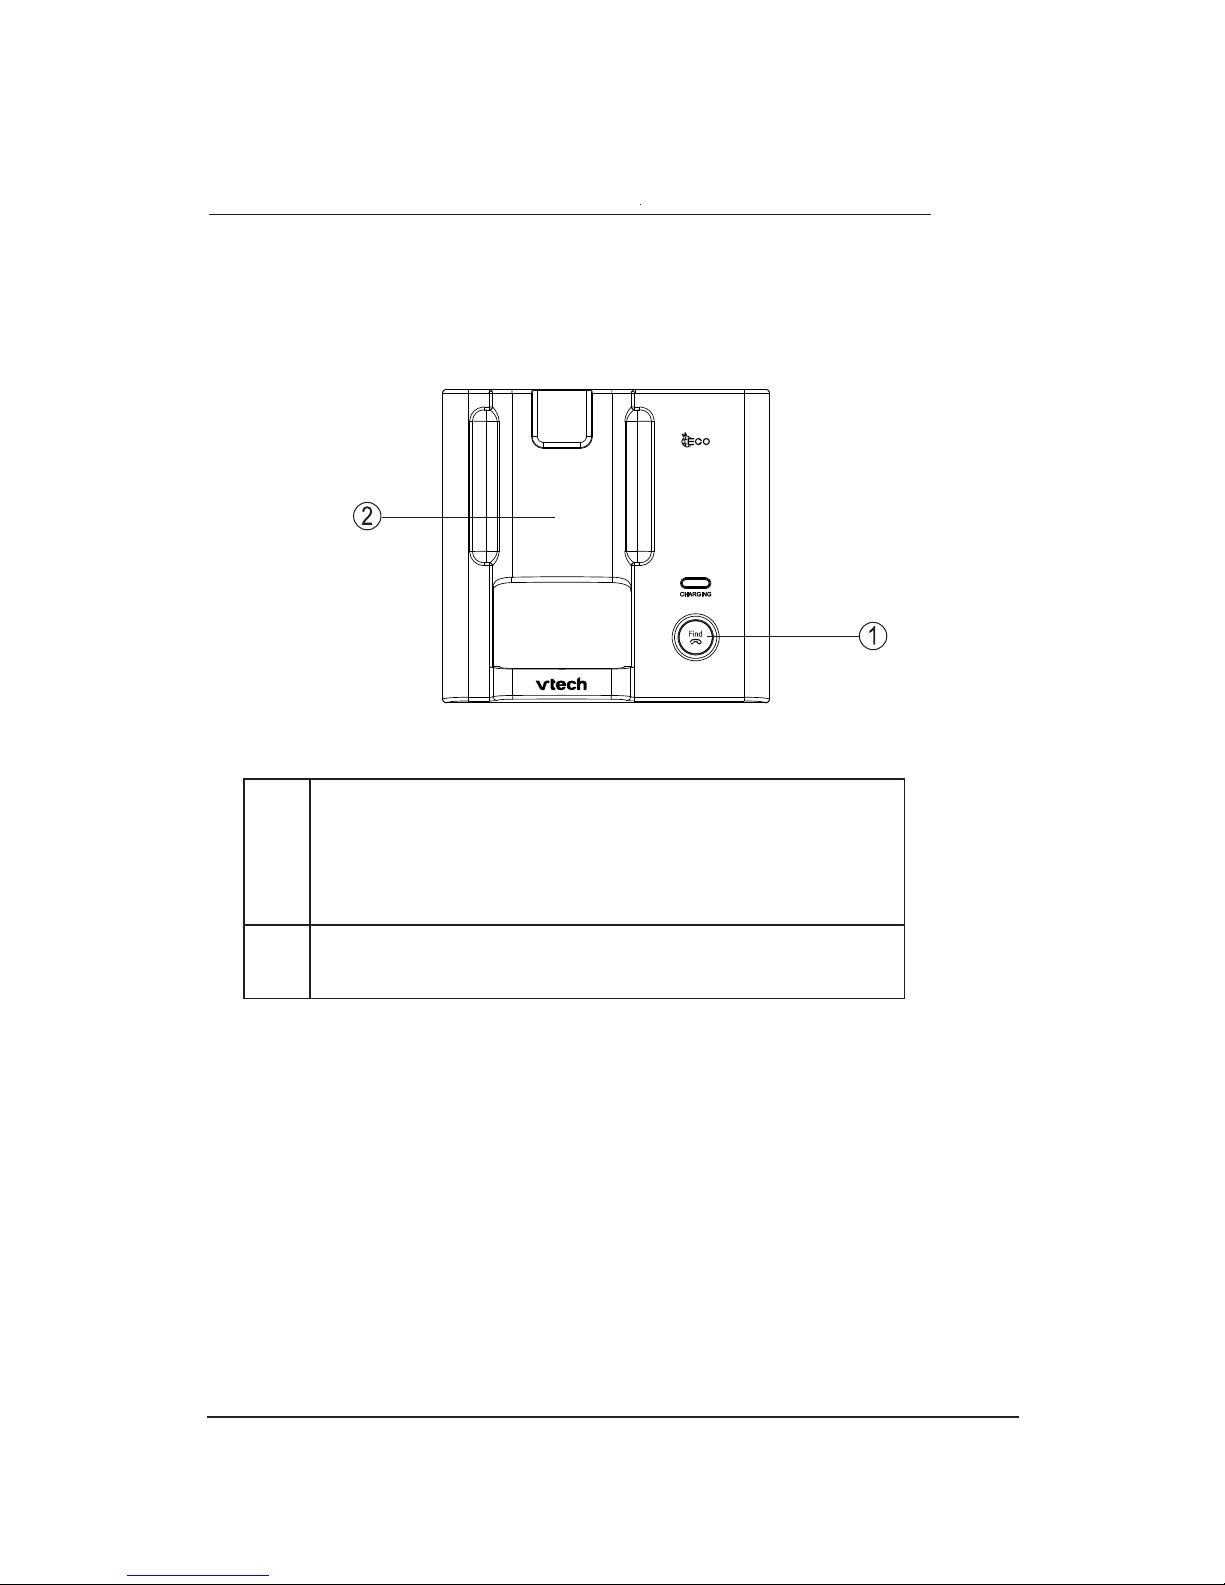
3.2 Base Station Overview
1.
PAGE
Press to ring all registered handsets.
You can make use of this to find the missing handset.
Long press to enter into registration mode.
CHARGING CRADLE
2.
Place the handset on the charging cradle for charging.
6
Page 10
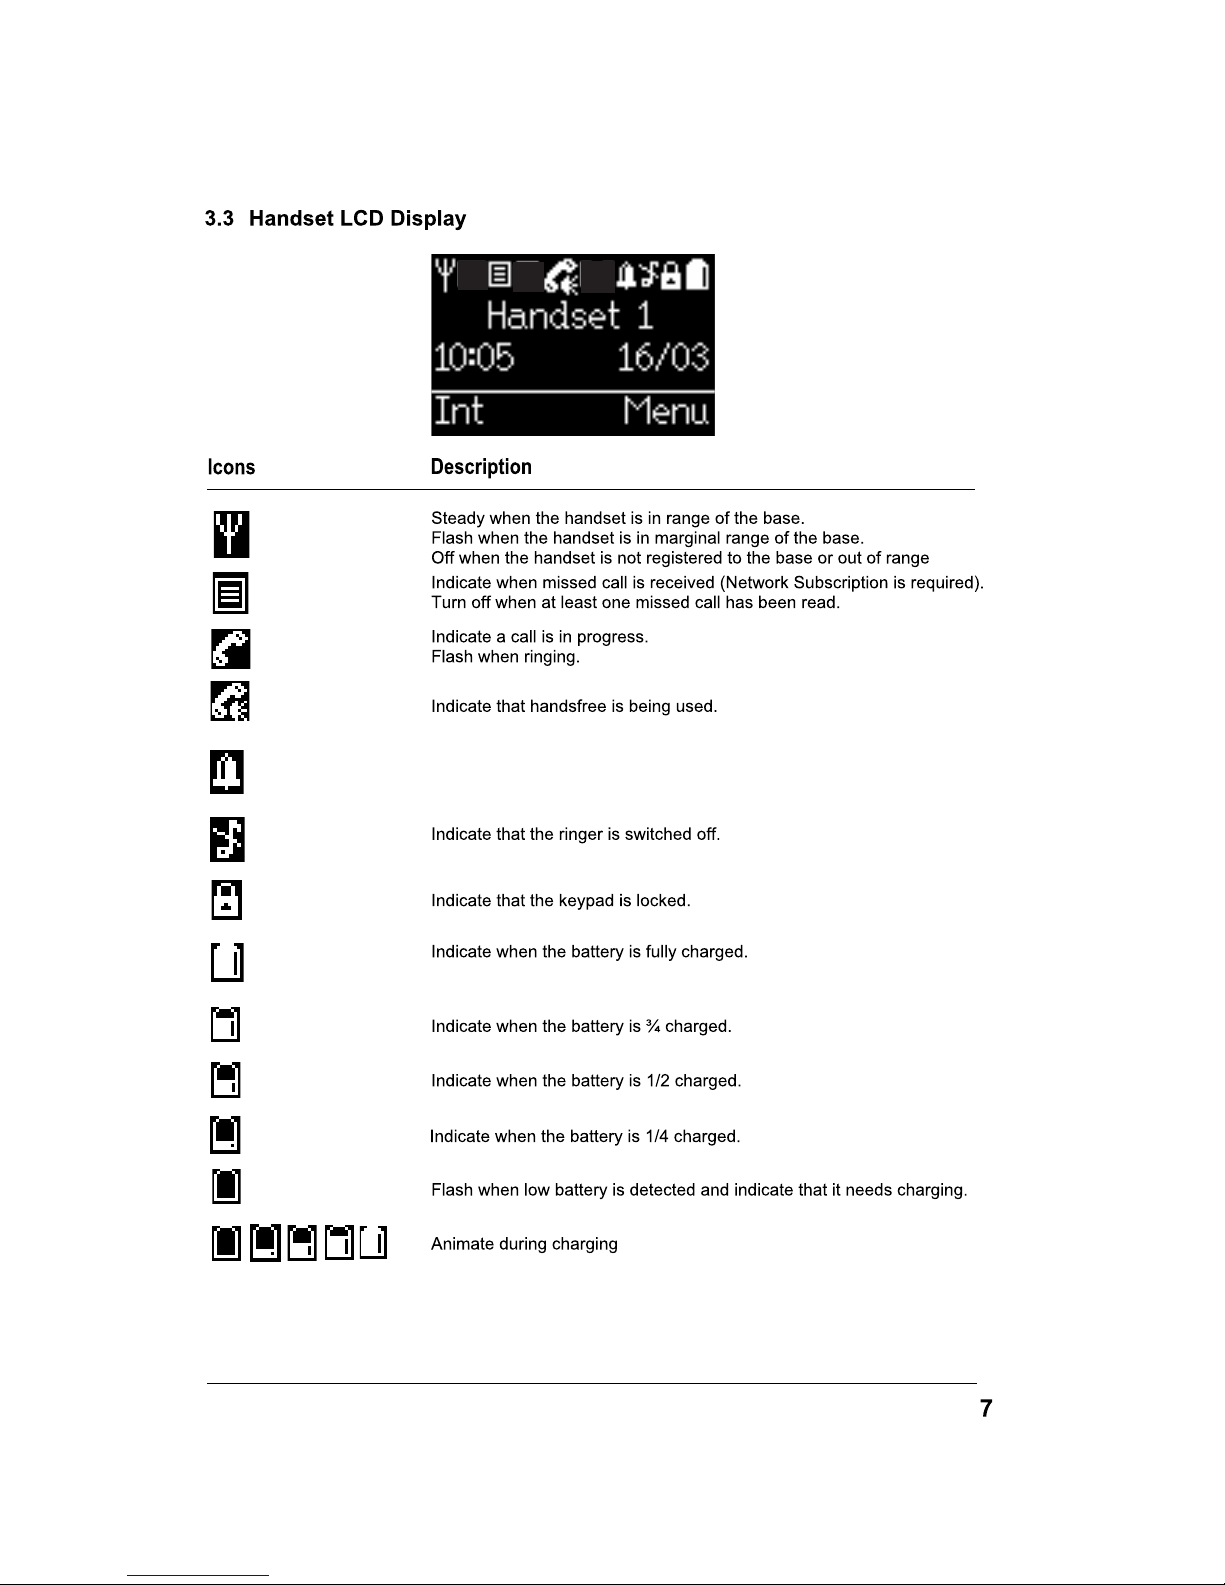
Indicate that the alarm is set.
Flash when the alarm time is reached.
Turn off when the alarm is off.
Page 11

USE YOUR PHONE
4
4.1 Make an External Call
4.1.1 Preparatory dialing
Enter the phone number and press <TALK ON> or <SPEAKERPHONE> to dial the number.
Press <Clear> to clear the entry.
4.1.2 Direct dialing
Press <TALK ON> or <SPEAKERPHONE> to take the line and enter the phone number.
4.1.3 Call from the phonebook
Press <LEFT> to access the phonebook and press <UP/DOWN> to select The Desired Phonebook
entry. Press <TALK ON> or <SPEAKERPHONE> to dial out to the selected phonebook entry.
4.1.4 Call from the call list
Press <DOWN> to access the call list and press <UP/DOWN> to select The Desired Call List Entry.
Press <TALK ON> or <SPEAKERPHONE> to dial out to the selected call list entry.
4.1.5 Call from the redial list
Press <UP> to access the redial list and press <UP/DOWN
Press <TALK ON> or <SPEAKERPHONE> to dial out to the selected redial number.
4.1.6 Call timer
Your handset automatically times the duration of every call. The call timer will display a few
seconds after the call has made. It is shown in hours, minutes and seconds format (HH:MM:SS).
> to select The Desired
Redial Number.
4.2 Answer a Call
When the phone rings, press <TALK ON> / <SPEAKERPHONE> to answer a call.
If auto answer is turned on and
When the phone rings, pick up the handset to answer a call.
4.3 End a Call
During a call connection, press <TALK OFF> to end the call.
OR
Put the handset on the base station to end the call.
4.4 Adjust Earpiece and Handsfree Volume
5 volume levels (Level 1 to Level 5) to choose from for each of earpiece and handsfree volume.
During a call:
or <DOWN> to increase or decrease the volume level respectively. The current
Press <U
setting is shown.
When you end the call, the settings will remain at the last selected level.
P>
4.5 Mute a Call
You can talk to someone nearby without letting the caller hear you during a call.
During a call:
Press <LEFT> to mute the microphone and “Mute On ” is displayed on the LCD. Your caller
cannot hear you.
Press <LEFT> again to unmute the microphone.
Page 12
OFF
Page 13

4.11 Make an Internal Call
This feature is only applicable when there are at least two registered handsets. It allows you to
make internal calls, transfer external calls from one handset to another handset and make
conference calls.
4.11.1 Intercom another handset
1. Press <Int> and <RIGHT/LEFT> to select the handset that you want to make an internal
call with.
2. Press <OK>.
3. The called handset rings and press <TALK ON> on the called handset to establish the
internal call.
4.11.2 Transfer an external call to another handset
During a call:
1. Follow steps 1 and 2 in section 4.11.1.
2. The external call is put on hold automatically and the called handset rings.
3. Press <TALK ON> on the called handset to establish an internal call.
4. Press <TALK OFF> on the calling handset to end the current call with the external party.
5. The external call is transferred to the called handset.
4.11.3 Make a 3-way conference call
The conference call feature allows one external call to be shared with two handsets (in intercom).
three parties can share the conversation and no network subscription is required.
The
During an external call:
1. Follow Steps 1 to 3 in section 4.11.2.
2. Press <Conf> to establish the 3-way conference.
Any handset hangs up during a conference call will leave the other handset still in connection
with the external call.
During the conference call:
1. Press <Single> on the calling handset to select Single call .
2. The calling handset talks to the internal party and the external party is put on hold
automatically.
During an external call:
1. Follow steps 1 to 3 in section 4.11.2
2. Press <Intern> on the calling handset to switch calls.
3. The calling handset talks to the called handset and the external call is put on hold
automatically.
4. Press <Intern> again on the calling handset to switch
5. The calling handset is switched to talk to the external party and the internal call is put on
hold automatically.
calls.
10
Page 14

PHONEBOOK
5
Your phone can store up to 200 private phonebook entries with names and numbers. Each
phonebook entry can have a maximum of 24 digits for the phone number and 15 characters for
the name. You can categorize your phonebook entry into one of the seven call groups.
5.1 Add a New Entry
In idle:
1. Press <LEFT> to access the phonebook.
Note: If no entry is found in the phonebook, “List Empty” will display.
2. Press <UP/DOWN> to select the desired phonebook entry.
3. Press <Option> and <UP/DOWN> to select New Entry .
4. Press <OK> and <UP/DOWN> to enter the name, number and call group.
Note: You can press <#> to toggle between the uppercase and lowercase letters.
Phone number is mandatory to
5. Press <OK> to save the phonebook entry.
Note: One a new entry is added, the phonebook entry will be displayed in alphabetical order.
enter in order to save it as a phonebook entry.
5.2 Edit an Entry
In idle:
1. Press <LEFT> to access the phonebook.
2. Press <UP/DOWN> to select the desired phonebook entry.
3. Press <Option> and <UP/DOWN> to select Edit Entry.
4. Press <OK> and <UP/DOWN> to enter the revised name, phone number and call group .
5. Press <OK> to confirm.
5.3 View an Entry
In idle:
1. Press <LEFT> to access the phonebook.
2. Enter the first character of the name by multi-tap.
OR
2. Press <UP/DOWN> to select the desired phonebook entry.
3. Press <Option> and <UP/DOWN> to select View .
4. Press <OK> and <UP/
DOWN> to view details.
5.4 Copy an Entry
In idle:
1. Press <LEFT> to access the phonebook and press <UP/DOWN> to select the desired entry.
2. Press <Option> and <UP/DOWN> to select Copy
3. Press <OK> and <LEFT/RIGHT> to select the handset you want to copy.
Note: if no base
"Not Handset ! "
4. Display shows “Receive dir. entries? ” Press <Yes> to confirm or <No> to cancel.
5. Upon successful copying, the display will show “Copied” .
Note: The PB entries in the initiating handset are copied and appended to existing PB entries in
the receiving handset and are sorted in alphabetical order.
5.5 Copy all Entries
In idle:
1. Press <LEFT> to access the phonebook. The first entry is displayed.
2. Press <Option> and <UP/DOWN> t
3. Press <OK> and <LEFT/RIGHT> to select the handset you want to copy.
Note: if no base "Not Possible" will display on the screen,
"Not Handset ! "
4. Display shows Receive dir. entries Press <Yes> to confirm or <No> to cancel.
5. Upon successful copying, the display will show “Copied” .
Note: The PB entries in the initiating handset are copied and appended to existing PB entries in
the receiving handset and are sorted in alphabetical order.
"Not Possible" will display on the screen, If no other handsets are registered,
will display on the screen. At the receiving handset:
o select Copy All .
will display on the screen. At the receiving handset:
?
.
If no other handsets are registered,
11
Page 15

5.6 Delete an Entry
In idle:
1. Press <LEFT> to access the phonebook.
2. Press <UP/DOWN> to select the desired phonebook entry.
3. Press <Option> and <UP/DOWN> to select Delete
4. Press<OK> and <Yes> to confirm or <No> to cancel.
entry .
5.7 Delete the Entire Phonebook
In idle:
1. Press <LEFT> to access the phonebook.
2. Press <UP/DOWN> to select the desired phonebook entry.
3. Press <Option> and <UP/DOWN> to select Delete All
4. Press <OK> and <Yes> to confirm or <No> to cancel.
5.8 View Phonebook Capacity
In idle:
1. Press <LEFT> to access the phonebook.
2. Press <Option> and <UP/DOWN> to select Capacity .
3. Press <OK> to display the number of entries remaining in the phonebook memory.
5.9 Edit Call Group
5.9.1 Edit call group name
In idle:
1.
Press <LEFT> to access the phonebook.
2. Press <Option> and <UP/DOWN> to select Edit Call Grp.
3. Press <OK> and <UP/DOWN> to the desired call group
4. Press <OK> to select Rename Group .
5. Press <OK> and <Clear> to delete the current name and enter a new name.
6. Press <OK> to save.
5.9.2 Change call group ringtone
In idle:
1. Press <LEFT> to access the phonebook.
2. Press <Option> and <UP/DOWN> to select Edit Call Grp .
3. Press <OK> and <UP/DOWN> to the desired call group.
4. Press <OK> and <UP/DOWN> to select Ringtone .
5. Press <OK> and <LEFT/RIGHT> to choose the de
played while browsing the melody list. A total of 1 ies are provided for your selection.
6. Press
5.10 Speed Dial
5.10.1 Edit a speed dial
In idle:
1. Press <LEFT> to
2. Press <Option> and <UP/DOWN> to select Speed Dial .
3. Press <OK> and <UP/DOWN> to select the speed dial location(Number 2 to 9).
4. Press <OK> to display the details of the speed dial location.
5. Press <Option> and <UP/DOWN> to select Edit .
6. Press <OK> to display the phonebook entries.
7. Press <UP/DOWN> to select your desired phonebook entry that you want to store in the
8. Press <OK> to confirm.
Note: If no number is stored in the selected speed dial location, “No Number” will display 2s in
the screen and show phonebook entry.
5.10.2 Delete a speed dial
In idle:
1. Repeat steps 1 to 4 in Section 5.10.1
2. Press <Option> and <UP/DOWN> to select
3. Press <OK> to confirm.
OK to confirm.
access the phonebook.
selected speed dial ocation.
Delete
.
sired melody. Corresponding melody is
5 melod
1
2
Page 16

CALL LIST
6
This feature is available if you have subscribed the Caller Line Identification service with your
network service provider. Your phone can store up to 20 calls with date/time information in the
call list. The number will be shown on the LCD when the phone is ringing. If the number
matches with one of the entries in your private phonebook, the caller’s name stored in the private
phonebook will be displayed alternatively with the number.
If the caller number is withheld, “Withheld” will display.
If the caller number is unavailable, “Unavailable” will display.
6.1 View the Call List
All unanswered calls are saved in calls log with the latest call putting at the top of the list. When
the call list is full, the oldest call will be replaced by a new call. The unanswered call which has
not been read is marked with “N
1. Press <DOWN> to access the call list.
2. Press <UP/DOWN> to select the desired entry.
3. Press <Option> and <UP/DOWN> to select Details
4. Press <OK> to view the date and time information of the selected call list entry.
ew” at the bottom of the unanswered call entry.
.
6.2 Store a Call List Number into the Phonebook
1. Follow steps 1 and 2 in Section 6.1.
2. Press <Option> and <UP/DOWN> to select Store Number.
3. Press <OK> and <UP/DOWN> to enter the name, number and call group if necessary.
4. Press <OK> to confirm.
6.3 Dial a Call List Number
1. Follow steps 1 and 2 in Section 6.1.
2. Press <Option> and <UP/DOWN> to select Call Number
3. Press <OK> and you can edit the selected call list number.
4. Press <TALK ON> to dial out to the call list number.
.
6.4 Delete an Entry in the Call List
1. Follow steps 1 and 2 in Section 6.1.
2. Press <Option> and <UP/DOWN> to select Delete.
3. Press <OK> to confirm.
6.5 Delete the Entire Call List
1. Follow steps 1 and 2 in Section
2. Press <Option> and <UP/DOWN> to select Delete All
3. Press <OK> to confirm.
4. Press <Yes> to reconfirm.
6.1.
.
6.6 Store All Calls or Only Unanswered Calls in the Call List
If All Calls is selected, answered and unanswered calls are stored in the call list. If Missed
Calls is selected, only unanswered calls are stored in the call list.
1. Follow steps 1 and 2 in Section 6.1.
2. Press <Option> and <UP/DOWN> to select Settings.
3. Press <OK> and <LEFT/RIGHT> to choose All Calls or Missed Calls
4. Press <OK> to confirm.
.
6.7 Turn On or Off the New Call Alert
If New Call Alert is turned on, you will hear a beep when there is
will display .
1. Follow steps 1 and 2 in Section 6.1.
2. Press <Option> and <UP/DOWN> to select Settings.
3. Press <OK> and <UP/DOWN> to go to New Call Alert.
4. Press <LEFT/RIGHT> to turn on or off the new call alert.
5. Press <OK> to confirm.
a missed call and < >
Page 17

SOUND
7
You can set different melodies to personalize your external and internal ringer. A total of
1 melodies are provided for your selection.
5
7.1 Handset Ringer
In Idle:
1. Press <Menu> and <UP/DOWN> to select
2. Press <OK> and <UP/DOWN> to select
3. Press <OK> and <LEFT/RIGHT> to select your desired melody for your external ringer.
4. Press <DOWN> and <LEFT/RIGHT> to select your desired melody for your internal ringer.
5. Press <DOWN> and <LEFT/RIGHT> to select your desired ringer volume from
Level 5
Note: If the ringer volume is set to
6. Press <DOWN> and <LEFT/RIGHT> to set
Note: When you set the ringer to Off, you can still hear a beep when there is an incoming call
by setting the Silent to Beep. If you set the Silent to Off, you cannot hear any tone when there
is an incoming and the ringer is set to Off.
7. Press <OK> to confirm.
or
Off
.
Off
, < > will display in idle.
Sound
Ringer
Silent
.
.
to
Beep
Level 1
.
to
7.2 Tones
Your handset can give a beep to you when an action is confirmed to be successful, out of range
is detected, a key is pressed or low battery is detected.
In Idle:
1. Press <Menu> and <UP/DOWN> to select
2. Press <OK> and <UP/DOWN> to select
3. Press <OK> and <LEFT/RIGHT> to turn on or off the
4. Press <DOWN> and <LEFT/RIGHT> to turn on or off the
5. Press <DOWN> and <LEFT/RIGHT> to turn on or off the
6. Press <DOWN> and <LEFT/RIGHT> to turn on or off the
7. Press <OK> to confirm.
Sound
Tones
.
.
Key Beeps
Confirmation
Battery Low
Out of Range
.
tone.
alert tone.
alert tone.
Page 18

8
SETTINGS
Your phone comes with a selection of settings that you can change to personalize your phone
the way you like it to work.
8.1 Handset Settings
8.1.1 Enable the Direct Call
When activated, the direct call feature enables you to dial the selected number by pressing any
key on your handset. This feature is very useful for direct access to emergency service.
1. Press <MENU> and <UP/DOWN> to select Settings .
2. Press <OK> and <
3. Press <OK> and <UP/DOWN> to select
4. Press <OK> to enter the 4-digit system
5. Press <OK> and <LEFT/RIGHT> to select On to enable the direct
6. Press <OK> to enter the number for direct call.
7. Press <OK> to return
8.1.2 Disable the Direct Call
1. Press <Option> to enter the 4-digit system PIN(Default 4-digit system PIN is 0000 )
2. Press <OK> and <LEFT/RIGHT> to select Off to disable the direct call.
3. Press <OK> to confirm.
8.1.3 Select base station
If your handset is registered to more than one base stations, you can select which base station
to use.
1. Press <M
2. Press <OK> and <UP/DOWN> to select H/Set Settings.
3. Press <OK> and < UP/DOWN> to choose Select Base
4. Press <OK> and <LEFT/RIGHT> to select your desired base station.
5. Press <OK> to confirm.
ENU> and <UP/DOWN> to select Settings.
UP/DOWN> to select
to Idle displaying with “Direct Call”
H/Set settings .
Direct Call
PIN. (Default 4-digit system PIN is 0000)
.
call.
.
.
8.1.4 Adjust the display contrast
1. Repeat steps 1 to 2 in section 8.1.1
2. Press <OK> and <UP/DOWN> to choose Display.
3. Press <OK> and <LEFT/RIGHT> to select the contrast level from 1 to 8.
4. Press <OK> to confirm.
8.1.5 Rename the handset
1. Repeat steps 1 to 2 in section 8.1.4 .
2. Press <OK> and <UP/DOWN> to enter your desired name for your handset.
3. Press <Clear> to delete one character.
4. Press <OK> to confirm.
.
15
Page 19

8.1.6 Set Language
1. Repeat steps 1 to 2 in section 8.1.1.
2. Press <OK> and <UP/DOWN> to select Language.
3. Press <OK> and <LEFT/RIGHT> to select the desired language.
4. Press <OK> to confirm.
8.1.7 Turn on or off the auto answer
1. Repeat steps 1 to 2 in section 8.1.1
2. Press <OK> and <UP/DOWN> to select Auto Answer.
3. Press <OK> and <LEFT/RIGHT> to turn on or off the Auto Answer feature.
4. Press <OK> to confirm.
8.1.8 Register an additional handset
You can register up to 5 handsets per base station.
1. Repeat steps 1 to 2 in section 8.1.1
2. Press <OK> and <UP/DOWN> to select Register.
3. Press <OK> and <LEFT/RIGHT> to select the desired base station that you want your handset
to register to.
4. Press <OK> to enter the 4-digit system PIN.
Note: 4-digit PIN is entered in
5. Press and hold <PAGE> on the base station until the Base emit a beep and IN-USE LED flash.
6. Press <OK> on the handset to confirm.
Note: “Registering…” will display. A beep tone is emitted from the handset to indicate successful
registration and the screen returns to idle mode.
If the base is found and the PIN is correct, an unused handset number will be assigned
automatically.
If the PIN is incorrect, “Incorrect PIN” will display with an error tone, and the handset return
to idle.
If no base is found within a certain period, “No Base Found” will display with an error tone, and
the handset returns to idle..
****
.
.
. Once 4 digits are entered, the right soft key will become OK.
s
8.1.9 De-Register a handset
1. Repeat steps 1 to 2 in section 8.1.1
2. Press <OK> and <UP/DOWN> to select De-register.
3. Press <OK> to enter the 4-digit Syst em PIN.
Note: 4-digit PIN is entered in . Once 4 digits are entered, the right soft key will become OK.
4. Press <OK> and <LEFT/RIGHT> to select the
5. Press <OK> to de-register the handset.
6.
“De-registered” will display and go back to idle.
Restore the handset to default settings
8.1.10
1. Repeat steps 1 to 2 in section 8.1.1
2. Press <OK> and <UP/DOWN> to select Handset Reset.
3. Press < OK> and <YES> to confirm resetting the handset to default settings.
Note: Phonebook and speed dial entries will not be deleted after handset reset.
8.2
8.2.1 Set the base ringer
In Idle:
1. Press <Menu> and <UP/DOWN> to select Settings.
2. Press <OK> and <UP/DOWN> to select Base Settings.
3. Press <OK> and <UP/DOWN> to select Ringer.
4. Press <OK> and <LEFT/RIGHT> to select your desired melody for your base ringer. (A total of
five melodies for base ringer are provided.)
1
6
Base Settings
****
.
et that you want to de-register.
hands
.
Page 20

5. Press < DOWN> and <LEFT/RIGHT> to select your desired ringer volume from Level 1 to
Level 5
or Off
.
6. Press <OK> to confirm.
8.2.2 Set the handset priority
When you have more than one handset registered to the base station, you can set which
handset to ring first before the others.
In Idle:
1. Repeat steps 1 and 2 in section 8.2.1.
2. Press <OK> and <UP/DOWN> to select H/Set Priority.
3. Press <OK> and <UP/DOWN> to choose Select Handset.
4. Press <OK> and <LEFT/RIGHT> to select which handset to get the priority to ring first.
Note: If All Handsets is chosen, all the registered handsets will ring at the same time and press
<OK> to confirm.
5. Press <OK> and <LEFT/RIGHT> to select the number of ring delay (2 Rings / 4 Rings /
6 Rings / 8 Rings).
6. Press <OK> to confirm.
8.2.3 Set the dial mode
In Idle:
1. Repeat steps 1 and 2 in section 8.2.1.
2. Press <OK> and <UP/DOWN> to select Dial Mode.
3.
Press <OK> and <LEFT/RIGHT> to select Tone or Pulse
.
4. Press <OK> to confirm.
8.2.4 Set the flash time
In Idle:
1. Repeat steps 1 and 2 in section 8.2.1.
2. Press <OK> and <UP/DOWN> to select Flash Time.
3. Press <OK> and <UP/DOWN> to select the desired flash time.
Note:Flash time options are country dependent. Possible options are
80/100/120/180/250/300/600/800ms. Defaulted Flash time is 600ms.
4. Press <OK> to confirm.
8.2.5 Change the system PIN
In Idle:
1. Repeat steps 1 and 2 in section 8.2.1.
2. Press <OK> and <UP/DOWN> to select System PIN.
3. Press <OK> to enter the old 4-digit system PIN.
4. Press <OK> to enter the new 4-digit system PIN.
5. Press <OK> to enter the new 4-digit system PIN.
6. Press <OK> to reconfirm and save the new 4-digit PIN.
Note: If the PIN is incorrect, “INCORRECT PIN” will display with an error tone in the screen.
8.2.6 Set an exchange code
You can set a
n exchange code for your handset such that a pause will be inserted after the first
digit if it matches with the exchange code. This feature is especially useful for PBX systems.
In Idle:
1. Repeat steps 1 and 2 in section 8.2.1.
2. Press <OK> and <UP/DOWN> to select
PBX access.
3. Press <OK> to enter the exchange code.
4. Press <OK> to confirm.
Note:
Only one digit is allowed to enter for the exchange code.
Page 21

8.2.7 Activate the ECO mode
Your telephone is provided with a low-emission mode. If ECO mode is activated,
as soon as you place the handset in the base station, the transmission power between
handset and base station is reduced to them minimum.
In Idle:
1. Repeat steps 1 and 2 in section 8.2.1.
2. Press <OK> and <UP/DOWN> to select ECO Mode.
3. Press <OK> to select On to activate ECO mode.
4. Press <OK> to confirm.
8.2.8 Reset the base settings to default settings
After system reset, the phone will return to its original settings.
In Idle:
1. Repeat steps 1 and 2 in section 8.2.1.
2. Press <OK> and <UP/DOWN> to select System Reset.
3. Press <OK> to enter the 4-digit System PIN.
Note: 4-digit PIN is entered in . Once 4 digits are entered, the right soft key will become OK.
4. Press <OK> and <YES> to confirm resetting the base settings to default settings.
The base will restore to default settings and return to standby.
****
8.3 Set the Date, Time and Alarm
8.3.1 Set date and time
In Idle:
1. Press <Menu> and <UP/DOWN> to select Settings
2. Press <OK> and <UP/DOWN> to select
3. Press <OK>
4. Press <OK> and <LEFT/RIGHT> to select 12 hour or 24 hour format.
5. Press <DOWN> and <LEFT/RIGHT> to
6. Press <DOWN> to enter the time.
7. Press <DOWN> to enter the date.
8. Press <OK> to confirm.
8.3.2 Set an alarm
In Idle:
1. Press <Menu> and <UP/DOWN> to select Settings.
2. Press <OK> and
3. Press <OK> and <UP/DOWN> to select
4. Press <OK> to enter the alarm time using the 24 hour format.
5. Press <DOWN> and <LEFT/RIGHT> to select Once /Daily/Off.
6. Press <DOWN> and <LEFT/RIGHT> to select the alarm melody.
7. Press <OK> to confirm.
and <UP/DOWN> to select Date/Time.
<UP/DOWN> to select
Date /Time/Alarm.
select dd/mm or mm/dd date format.
Date/Time/Alarm.
Alarm.
.
18
Page 22

9 Default Settings
g
g
g
Item Default settin
Basic settings
Available languages
Handset name
Display contrast Level 5
Handset Earpiece Volume Level 3
Hand free SPK Volume Level 5
Direct Call menu
Msg Wait Off menu
Auto Answer Mode menu
System PIN 0000
ECO Mode
Clock/Alarm
Time format 24 hour
Date format dd/mm
Alarm on/off off
Alarm tone Melody 6
Dialing settings
Dial Mode
Default Pulse M/B ratio
- +/-3%
Flash (Recall) time
Dialing Pause time 3s
Emergency Number
PBX Access Code
- Max. 1 di
Redial memory 15 entries
it
Ringer settings
Handset Ring Volume Level 5
Handset Ring Melody (external) Melody 1
Handset Ring Melody (internal) Melody 2
Beeptone Silence while ringer off
Base Ring Volume Level 2
Base Ring Melody Melody 1
Alert tone settings
Key beeps tone on
Confirmation tone on
Batt. Low alert on
Out of range alert
Phonebook settings
Phonebook Memory
- name max. 15 chars
- number max. 24 digits
Group Name
Group 1 General
Group 2 Family
Group 3 Business
Group 4 Friends
Group 5 Utilities
Group 6 VIP
Group 7 Others
CID settings
Call list memory
- max. 20 di
Category All calls
New call alert Off
its for each number
Chinese (Language Menu Enable)
Handset
Off (Direct Call Menu Enable)
Disable
On (Auto Answer Menu Disable)
on (ECO Menu Enable)
Tone (Dial Mode Menu Enable)
33/67
600ms (Flash Time Menu Enable)
999
empty
off
200 entries
20 entries
19
Page 23
10
100-240
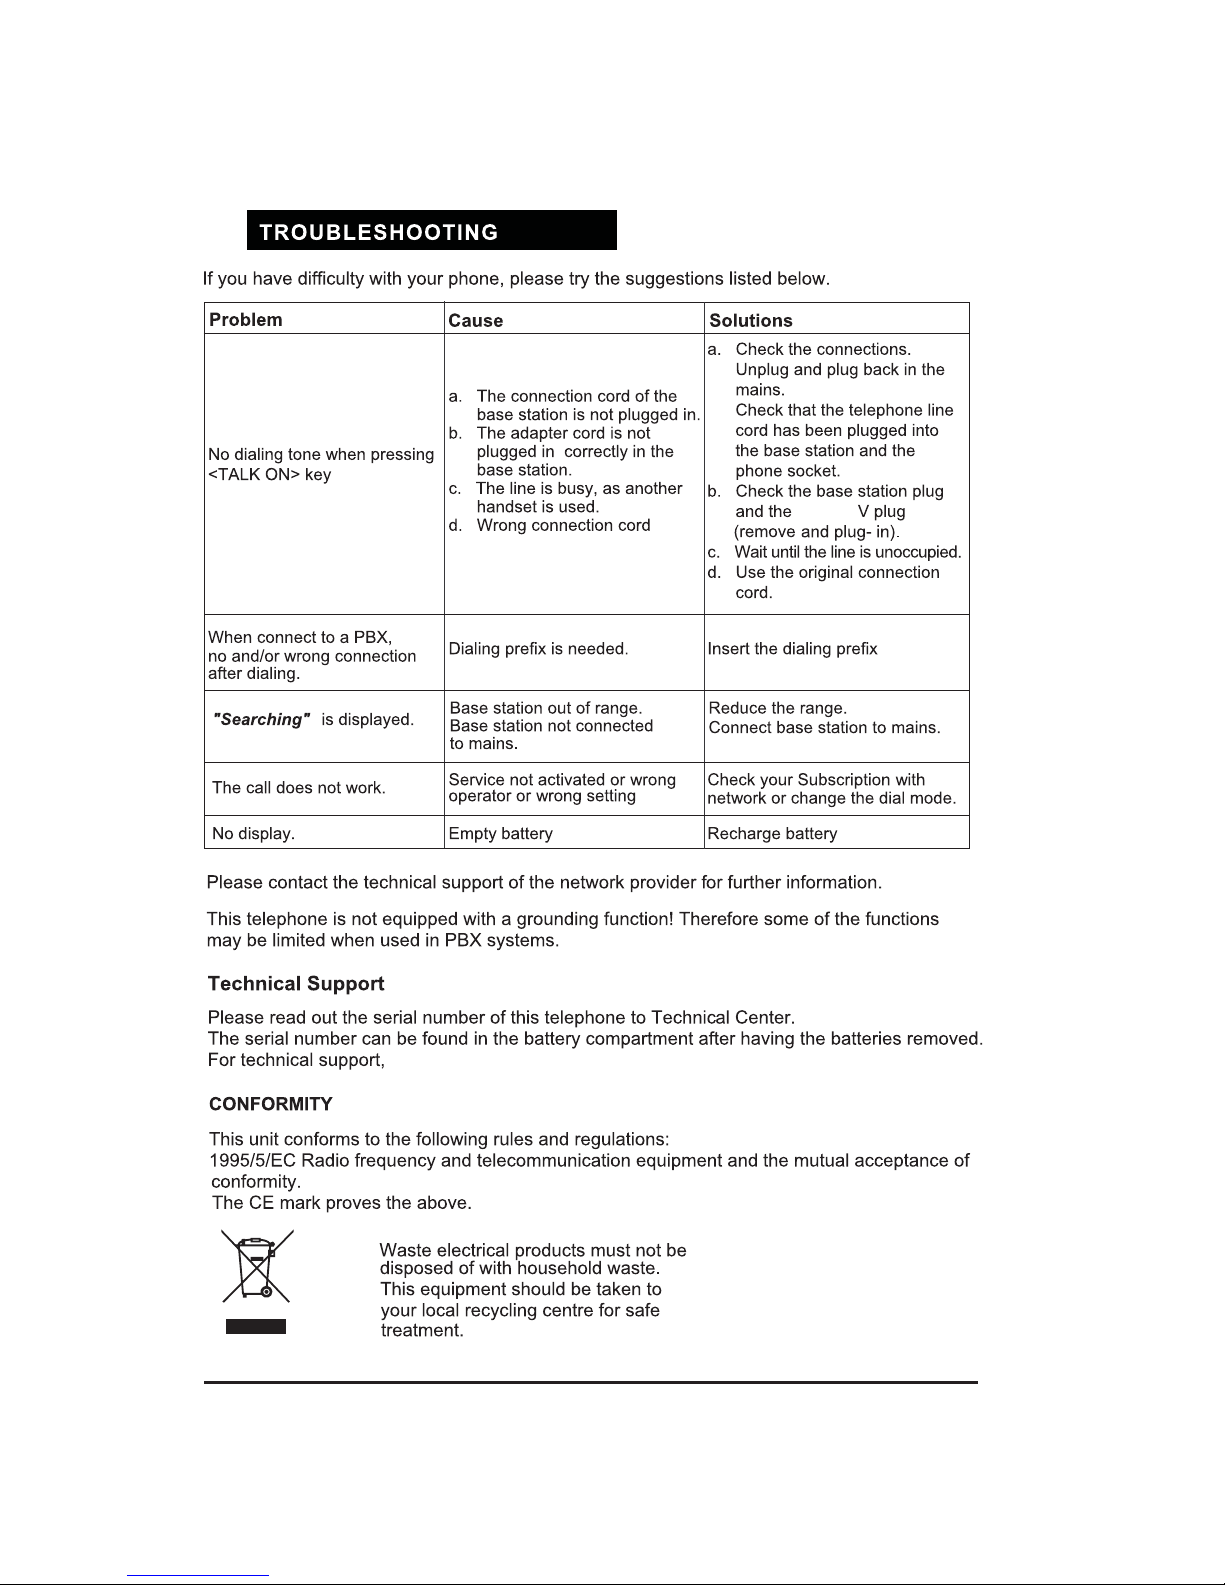
please call VTech Technical Inquiry Hotline Tel: 852-2667 7433.
20
Page 24
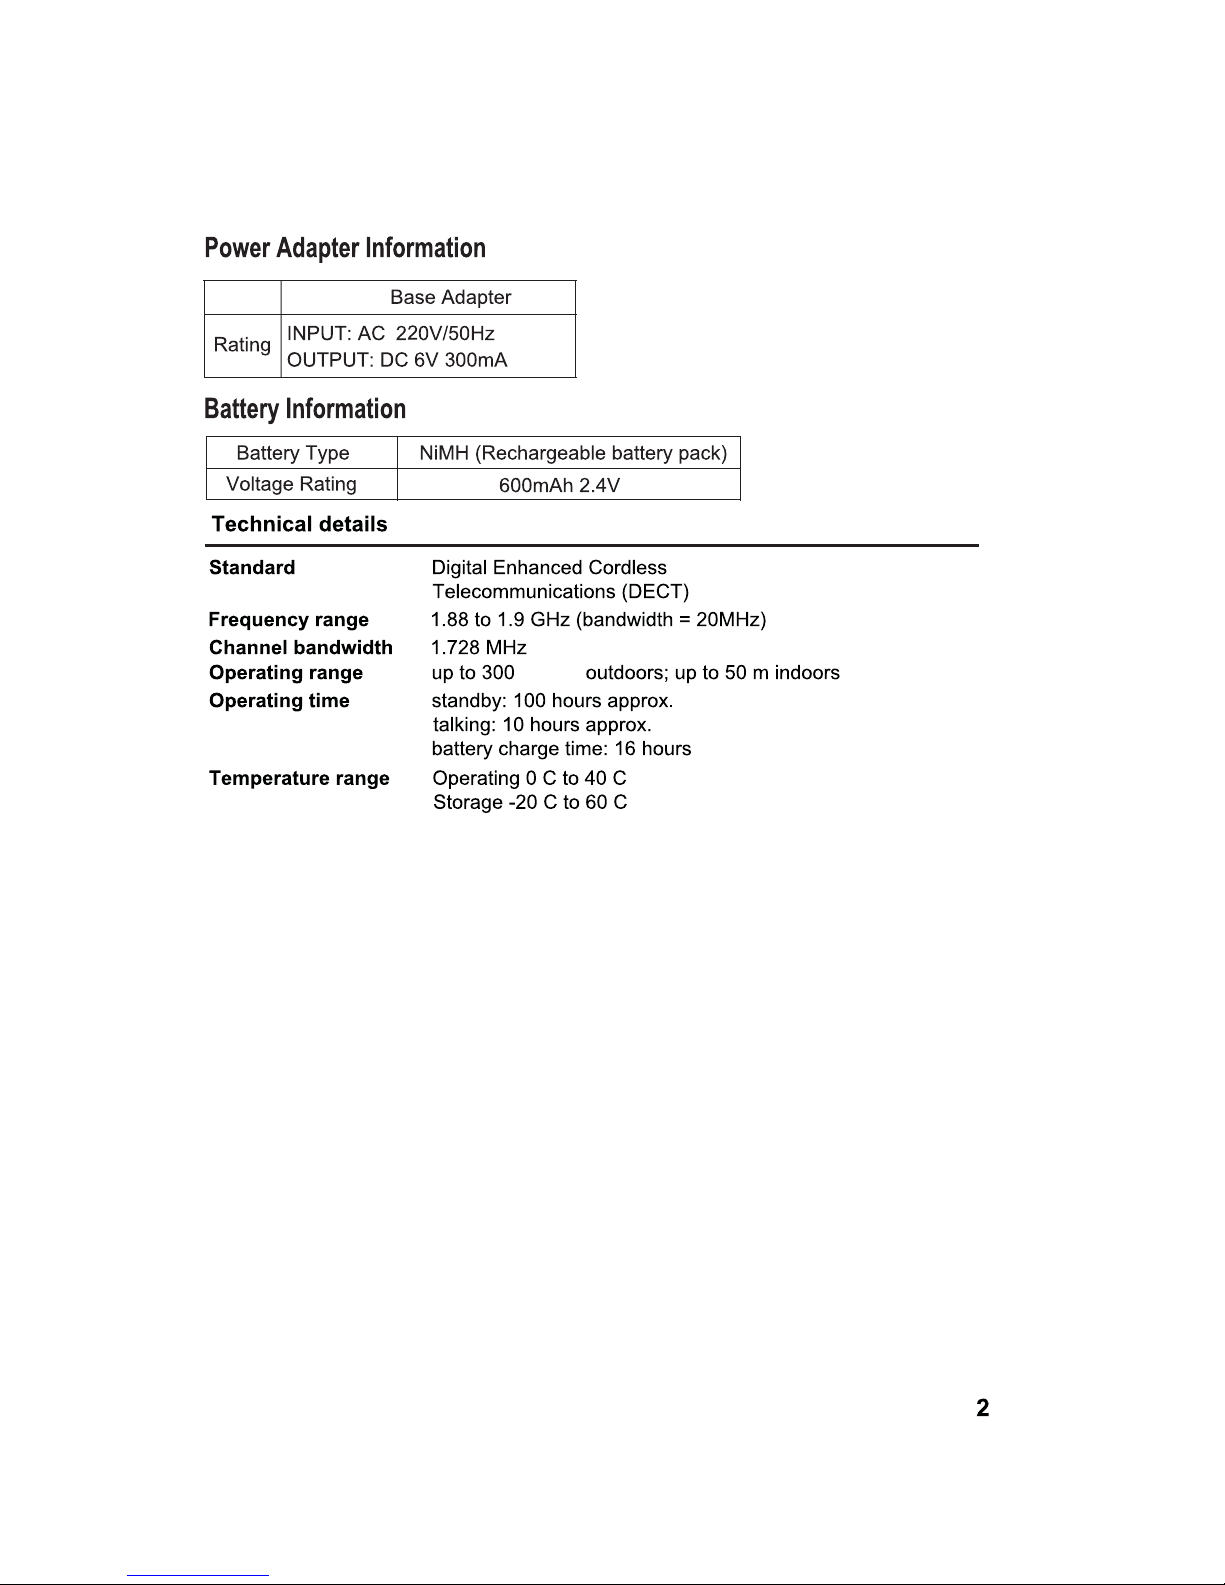
meters
1
Page 25
91-002452-010-100
 Loading...