


Dear Parent,
At VTech® we know how important the first day of school is for
your child. To help prepare preschoolers for this important event,
VTech® has developed the Preschool Learning series of interactive
toys.
Preschool Learning features fun characters and inviting school
themes that use technology to capture a child’s attention and teach
important preschool skills like spelling, counting and the alphabet.
These vital skills are taught in a way that’s both fun and highly
engaging to maintain a child’s interest. Children will also be
introduced to fun school subjects such as art class, music class and
even recess! With Preschool Learning, learning is fun from day
one!
At VTech® we know that a child has the ability to do great things.
That’s why all of our electronic learning products are uniquely
designed to develop a child’s mind and allow them to learn to the
best of their ability. We thank you for trusting VTech® with the
important job of helping your child learn and grow!
Sincerely,
Your Friends at VTech
®
To learn more about Preschool Learning and other VTech® toys,
visit
www.vtechkids.com

INTRODUCTION
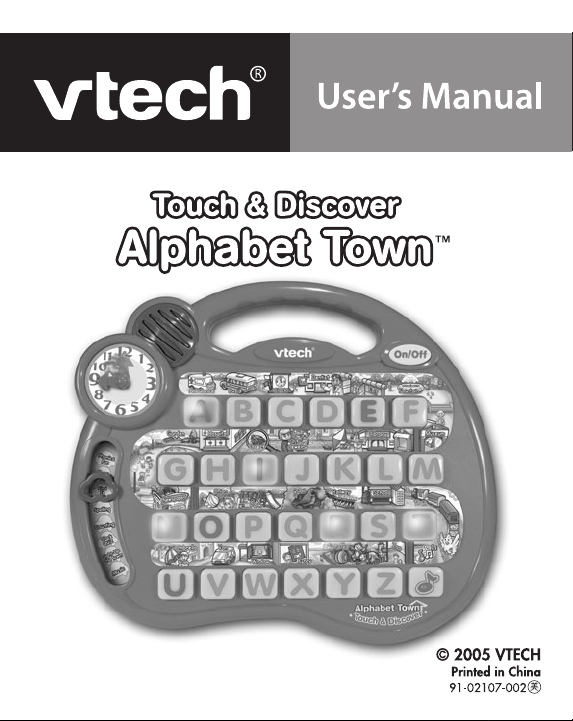
Thank you for purchasing the VTech® Touch & Discover Alphabet
Town™!
This fun-filled Touch & Discover Alphabet Town™ will keep your
child entertained as they learn and discover around the town. The lightup letter buttons and moveable clock hand will encourage exploration
as your child learns letters, phonics, numbers, telling time, basic
vocabulary and much more! With realistic sound effects, fun phrases
and cheerful melodies, touring the town has never been so much fun!
VOLUME CONTROL
SWITCH AT THE
BOTTOM OF THE UNIT
ON/OFF
MOVEABLE
CLOCK HAND
ACTIVITY
SELECTOR
BUTTON
LIGHT-UP
LETTER BUTTONS
OBJECT LABELS
LIGHT-UP
MUSIC BUTTON
INCLUDED IN THIS PACKAGE
• One VTech® Touch & Discover Alphabet Town™
• One User's Manual
WARNING:All packing materials such as tape, plastic sheets, wire
ties and tags are not part of this toy, and should be
discarded for your child’s safety.
Introduction
2

GETTING STARTED
BATTERY INSTALLATION
1. Make sure the unit is turned OFF.
2. Locate the battery cover on the
bottom of the unit. Use a coin or
screwdriver to open the battery
cover.
3. Install 3 new “AA” (UM3/LR6)
batteries following the diagram
inside the battery box. (The use of
new alkaline batteries is recommended for maximum performance.)
4. Replace the battery cover and tighten the screw to secure.
BATTERY NOTICE
• Non-rechargeable batteries are not to be recharged.
• Rechargeable batteries are to be removed from the toy before being
charged (if removable).
• Rechargeable batteries are only to be charged under adult
supervision (if removable).
• Different types of batteries or new and used batteries are not to be
mixed.
• Only batteries of the same or equivalent type as recommended
are to be used.
• Batteries are to be inserted with the correct polarity.
• Exhausted batteries are to be removed from the toy.
• The supply terminals are not to be short-circuited.
• The toy is not to be connected to more than the recommended
number of power supplies.
• Do not dispose of batteries in fire.
Getting Started
3

WE DO NOT RECOMMEND THE USE OF RECHARGEABLE
BATTERIES.
PRODUCT FEATURES
1. ON/OFF BUTTON
To turn the unit ON, press the ON/OFF
BUTTON.
Press the ON/OFF BUTTON again to
turn the unit OFF.
2. ACTIVITY SELECTOR
Slide the ACTIVITY SELECTOR to
select an activity to play.
3. LIGHT-UP LETTER BUTTONS
Press the 26 LIGHT-UP LETTER
BUTTONS to learn letters and their
sounds or to give a response/answer
in the related activity.
Product Features
4

4. LIGHT-UP MUSIC BUTTON
Press the LIGHT-UP MUSIC BUTTON
to hear the song “The Wheels on the
Bus”.
5. MOVEABLE CLOCK HAND
Move the clock hand to hear the
corresponding time and a related
phrase. In Clock Quiz, move the clock
hand to answer the questions.
6. AUTOMATIC SHUT-OFF
To preserve battery life, the VTech® Touch & Discover Alphabet
Town™ will automatically turn off after several minutes without
input. The unit can be turned on again by pressing the ON/OFF
BUTTON.
ACTIVITIES
1. Phonics Fun
Slide the ACTIVITY SELECTOR to the first position to enter this
activity.
Press the LETTER BUTTONS to hear the letter and its sound,
followed by a related word, fun phrase and sound effect.
Product Features
5

2. Town Visit
Slide the ACTIVITY SELECTOR to the second position to enter
this activity.
Complete the tour and see where you end up! At the beginning of
the tour, a light will flash to indicate the starting position. Wait and
see where the next stop is and press the flashing button to carry
on the tour. Listen and watch carefully!
3. Find It
Slide the ACTIVITY SELECTOR to the third position to enter this
activity.
You will be given hints to find a certain object or place. Press the
LETTER BUTTONS to answer.
4. Spelling
Slide the ACTIVITY SELECTOR to the fourth position to enter this
activity.
You will hear a word and its spelling. Watch carefully as the lights
light up in sequence. Press the LETTER BUTTONS in the correct
order to spell the word. The lights will flash to indicate which letter
should be pressed next.
Activities
6

5. Counting
Slide the ACTIVITY SELECTOR to the fifth position to enter this
activity.
A number of buttons will light up. Press the lights to count them
one by one. Keep pressing and counting until all the lights have
gone out!
6. Clock Quiz
Slide the ACTIVITY SELECTOR to the sixth position to enter this
activity.
You will be asked to set the clock to a specific time. Move the
clock hand to the correct time to answer.
7. Light-Up The Town
Slide the ACTIVITY SELECTOR to the seventh position to enter
this activity.
Press the lights as fast as you can to light up the town! Press each
light as it flashes and keep going until your time is up. Watch
carefully!
8. Music
Slide the ACTIVITY SELECTOR to the eighth position to enter this
activity.
Press the LETTER BUTTONS to hear a melody. Watch as the
lights dance with the music!
Activities
7

MELODY LIST
A Animal Fair
B Chopsticks
C Clementine
D Where Has My Little Dog Gone
E Goodnight Ladies
F Hey Diddle Diddle
G I’ve Been Working On The Railroad
H Hickory Dickory Dock
I Three Blind Mice
J In The Hall Of The Mountain King
K London Bridge
L Here We Go Round The Mulberry Bush
M The Entertainer
N Ring-A-Ring-O’ Roses
O Old MacDonald
P Polly Put The Kettle On
QTake Me Out To The Ball Game
R Alouette
S The Farmer In The Dell
T This Old Man
U The Can Can
V Shoo Fly Don’t Bother Me
W When The Saints Go Marching
XTwinkle, Twinkle Little Star
Y On Top Of Old Smokey
Z Oh Susanna
Melody List
8

CARE & MAINTENANCE
1. Keep the unit clean by wiping it with a slightly damp cloth.
2. Keep the unit out of direct sunlight and away from any direct heat
source.
3. Remove the batteries when the unit is not in use for an extended
period of time.
4. Do not drop the unit on hard surfaces and do not expose the unit
to moisture or water.
TROUBLESHOOTING
If for some reason the program/activity stops working or malfunctions,
please follow these steps:
1. Please turn the unit OFF.
2. Interrupt the power supply by removing the batteries.
3. Let the unit stand for a few minutes, then replace the batteries.
4. Turn the unit ON. The unit should now be ready to play again.
5. If the product still does not work, replace with a new set of batteries.
Note: The demo tag should be removed automatically when the product
is taken out of the packaging. If the demo tag is still in position
when you begin play, please remove it from the bottom of the
unit to activate normal play mode.
If the problem persists, please call our Consumer Services Department
at 1-800-521-2010 in the U.S. or 1-877-352-8697 in Canada and a
service representative will be happy to help you.
Care & Maintenance / Troubleshooting
9

IMPORTANT NOTE
Creating and developing Preschool Learning products is
accompanied by a responsibility that we at VTech® take very
seriously. We make every effort to ensure the accuracy of the
information, which forms the value of our products. However, errors
sometimes can occur. It is important for you to know that we stand
behind our products and encourage you to call our Consumer
Services Department at 1-800-521-2010 in the U.S. or 1-877-3528697 in Canada with any problems and/or suggestions that you
might have. A service representative will be happy to help you.
Note:
This equipment has been tested and found to comply with the limits for
a Class B digital device, pursuant to Part 15 of the FCC Rules. These
limits are designed to provide reasonable protection against harmful
interference in a residential installation. This equipment generates, uses
and can radiate radio frequency energy and, if not installed and used
in accordance with the instructions, may cause harmful interference to
radio communications. However, there is no guarantee that interference
will not occur in a particular installation. If this equipment does cause
harmful interference to radio or television reception, which can be
determined by turning the equipment off and on, the user is encouraged
to try to correct the interference by one or more of the following
measures:
• Reorient or relocate the receiving antenna
• Increase the separation between the equipment and receiver
• Connect the equipment into an outlet on a circuit different from
that to which the receiver is connected
• Consult the dealer or an experienced radio/TV technician for help
Tr oubleshooting
10
 Loading...