

Page 1

User’s Manual
Enchanted Princess Palace
UK
91-003236-015
Page 2

Page 3

2
2
2
INTRODUCTION
Thank you for purchasing the VTech® Toot-Toot FriendsTM Enchanted
Princess Palace.
This amazing palace expands to more than 1.2m/4ft wide and has a
variety of luxurious rooms, including a ballroom, music room, kitchen,
parlour and observation tower. While exploring the palace with Princess
Darla, place her on the ve MagicPoint locations to experience her
bright and friendly personality! When Princess Darla sits at her
MagicPoint Tea Set table with a friend (additional characters sold
separately), they will chat and sing with each other.
THREE ACCESSORIES
CLOCK
TOWER
OBSERVATION
TOWER
LIFT
BALLROOM
SPINNING
WHEEL
MAGICCHAT
TEA SET
SWING
STAIRCASE
MAGICPOINT CHARACTER
PRINCESS DARLA
Page 4

3
3
3
INCLUDED IN THIS PACKAGE
• One MagicPoint character - Princess Darla
• Two pillars
• One observation tower railing
• One ground oor main wall
• One 1st oor main wall
• One ground oor base and dance oor with one MagicPoint
location
• One 1st oor base with one MagicPoint location
• One bed
NOTE: This toy is not intended for teething.
• One harp • One mirror
Page 5

4
4
4
• One clock tower
• Four ags
• One twin tower roof with toy engravings inside
• One twin tower roof with a smooth surface for label application
• One single tower roof
• Two piers
• One staircase
• One tower bridge
• One MagicPoint tea set
• One tea set base
• One tower base
• One lift platform
• One lift tower support cover
• One tower with lift support
Page 6

5
5
5
• Two swing ropes
• Two doors
• One MagicPoint support cover
• One chandelier support cover
• Two label sheets
• One label instruction sheet
• User’s manual
• One small bridge
• One swing seat
Page 7

6
6
6
Unlock the packaging lock:
There is one packaging lock located on the character.
Use a coin or screwdriver to loosen
the screw.
Pull out the screw with the packaging
lock and discard them.
1
2
WARNING:
All packing materials, such as tape, plastic sheets, screws,
packaging locks and tags are not part of this toy and should be
discarded for your child’s safety.
NOTE: Please keep this user’s manual as it contains important
information.
GETTING STARTED
BATTERY INSTALLATION CHARACTER
1. Make sure the unit is OFF.
2. Locate the battery cover on the bottom of the
unit. Use a screwdriver to loosen the screws.
3. Install 2 new “AAA” (LR03/AM-4) batteries
following the diagram inside the battery
box. (The use of new alkaline batteries is
recommended for maximum performance.)
4 Replace the battery cover and tighten the
screws to secure.
Page 8

7
7
7
BATTERY NOTICE
• Alkaline Batteries are recommended. Rechargeable batteries are
not guaranteed to work with this product.
• Use only batteries of the same or equivalent type as recommended.
• Do not mix different types of batteries: alkaline, standard (carbon-
zinc) or rechargeable (Ni-Cd, Ni-MH), or new and used batteries.
• Do not use damaged batteries.
• Insert batteries with the correct polarity.
• Do not short-circuit the battery terminals.
• Remove exhausted batteries from the toy.
• Remove batteries during long periods of non-use.
• Do not dispose of batteries in re.
• Do not charge non-rechargeable batteries.
• Remove rechargeable batteries from the toy before charging (if
removable).
• Rechargeable batteries are only to be charged under adult
supervision.
Disposal of batteries and product
The crossed-out wheelie bin symbols on products and
batteries, or on their respective packaging, indicates they
must not be disposed of in domestic waste as they contain
substances that can be damaging to the environment and
human health.
The chemical symbols Hg, Cd or Pb, where marked, indicate
that the battery contains more than the specied value of
mercury (Hg), cadmium (Cd) or lead (Pb) set out in Battery
Directive (2006/66/EC).
The solid bar indicates that the product was placed on the
market after 13th August, 2005.
Help protect the environment by disposing of your product
or batteries responsibly.
For more information, please visit:
www.recycle-more.co.uk
www.recyclenow.com
Page 9
8
8
8
ASSEMBLY INSTRUCTIONS
With the VTech® Toot-Toot Friends™ Enchanted Princess Palace,
safety comes rst. To ensure your child’s safety, adult assembly is
required.
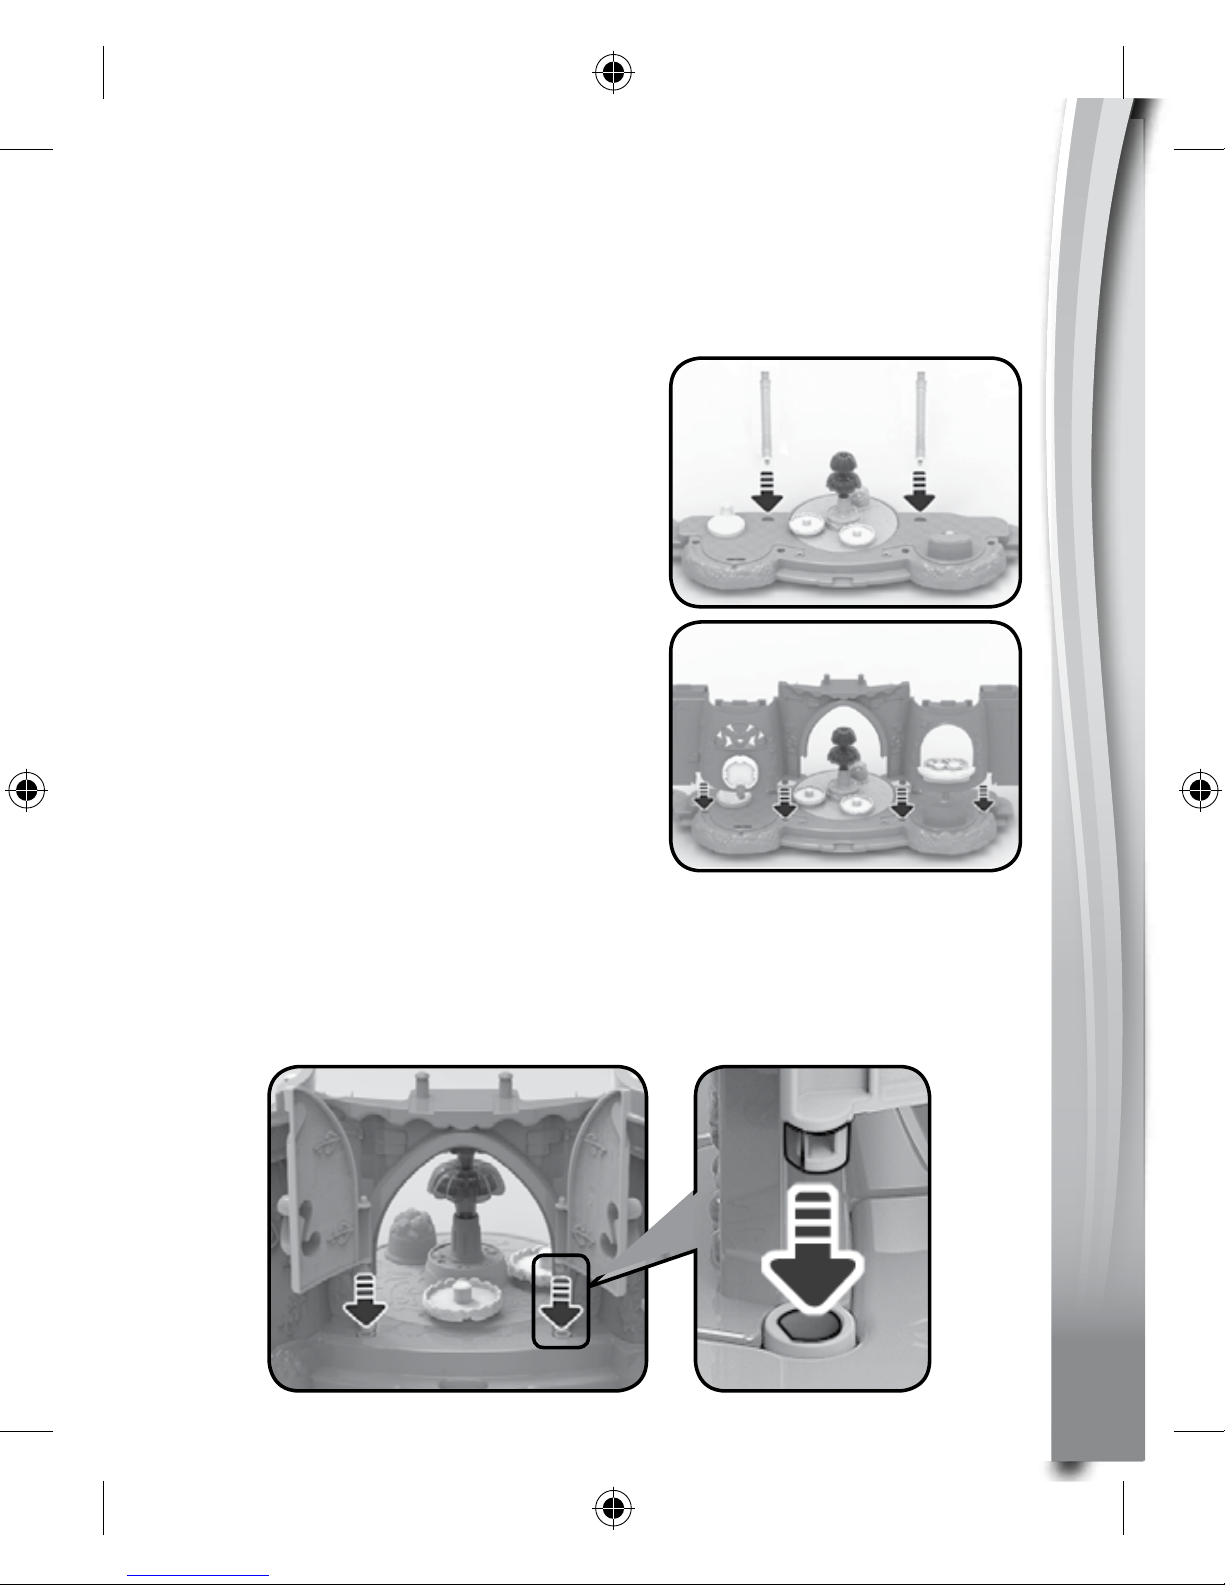
1 Insert the two PILLARS into the
GROUND FLOOR BASE as shown
in the picture. You will hear a “click”
sound when the pieces are secure.
2. Insert the GROUND FLOOR MAIN
WALL into the GROUND FLOOR
BASE as shown in the picture. You
will hear a “click” sound when the
pieces are secure.
3 Attach the two DOORS to the GROUND FLOOR MAIN WALL and
GROUND FLOOR BASE as shown in the picture.
Note: The door prongs are each a distinct shape. Carefully check
the shape of each door prong and ensure you are inserting it into
the correct hole.
Page 10

9
9
9
4. Insert the OBSERVATION TOWER RAILING into the 1ST FLOOR
BASE. Then, insert the 1ST FLOOR BASE into the GROUND
FLOOR MAIN WALL as shown in the picture.
5. Insert the 1ST FLOOR MAIN
WALL into the 1ST FLOOR BASE
as shown in the picture.
6. Insert the CLOCK TOWER, a TWIN TOWER ROOF and the SINGLE
TOWER ROOF into the 1ST FLOOR MAIN WALL as shown in the
picture. You will hear a “click” sound when the pieces are secure.
Twin Tower with
Toy Engravings
Page 11

10
10
10
7. Attach three FLAGS to the
TOWERS as shown in the picture.
8. Insert the MAGICPOINT
SUPPORT COVER and
CHANDELIER SUPPORT
COVER into the 1ST FLOOR
MAIN WALL as shown in the
picture.
9. Now, assemble the left side of the palace following the below steps:
A. Insert the two PIERS into the TEA SET BASE. You will hear a
“click” sound when the pieces are secure.
B. Then, attach the TOWER BRIDGE to the PIERS as shown in
the picture.
C. Then, attach the MAGICPOINT TEA SET to the TEA SET BASE.
D. Finally, connect the STAIRCASE to the left side of the TOWER
BRIDGE as shown in the picture.
Page 12

11
11
11
10. Follow the below steps to assemble the swing:
A. Insert the two SWING ROPES into each side of the SWING SEAT.
B. Then, attach the SWING ROPES to the bottom of the SMALL
BRIDGE as shown in the picture.
11. Now, assemble the right side of the palace:
A. Insert the LIFT TOWER SUPPORT COVER into
the tower.
Then, insert the tower into the TOWER BASE. You will hear a
“click” sound when the pieces are secure.
B. Attach the LIFT PLATFORM and SWING to the TOWER
WITH LIFT SUPPORT.
C. Then, insert a TWIN TOWER ROOF into the tower. You will hear
a “click” sound when the pieces are secure.
D. Finally, attach a FLAG to the top of the roof.
C
Page 13

12
12
12
12. After the above steps, you can attach the left and right sections to
the main palace.
Page 14
13
13
13
LABEL APPLICATION
Please stick the labels to the playset securely as indicated on the
LABEL INSTRUCTION SHEET.
PRODUCT FEATURES - CHARACTER
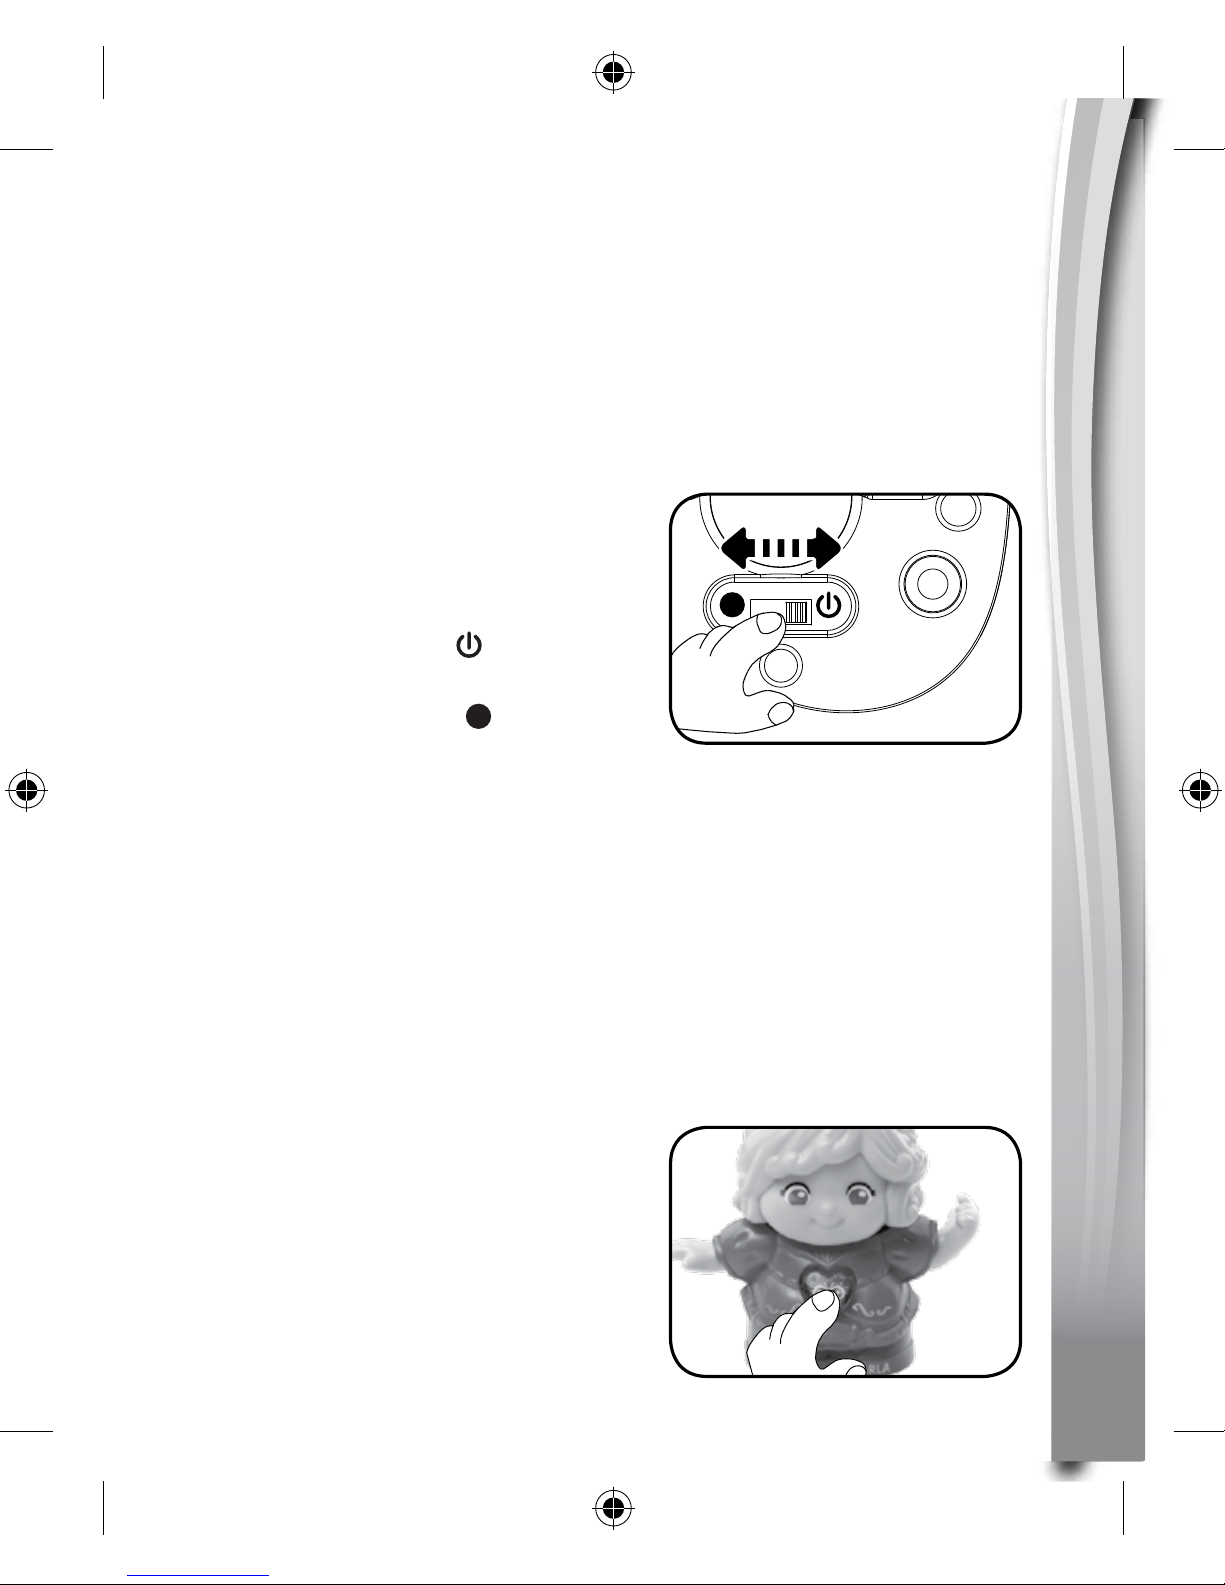
1. ON/OFF SWITCH
The ON/OFF SWITCH is located on
the bottom of the character.
To turn the unit ON, slide the ON/OFF
SWITCH to the ON (
) position. To
turn the unit OFF, slide the ON/OFF
SWITCH to the OFF (
) position.
2. AUTOMATIC SHUT-OFF
To preserve battery life, the VTech
®
Toot-Toot Friends™ character
will automatically power down after a short period of time without
input. The unit can only be turned on again by pressing the LIGHT-
UP BUTTON or by placing it on a MagicPoint location.
The LIGHT-UP BUTTON will ash several times when the unit’s
battery level is low. When this happens, please install new batteries.
ACTIVITIES – CHARACTER
1. Slide the ON/OFF SWITCH to
turn the unit ON. Then, press
the LIGHT-UP BUTTON to hear
phrases, songs, melodies and fun
sounds.
13
C
H
I
N
A
E
N
C
I
N
E
Page 15

14
14
14
2. Place the character on one of the
playset’s ve MagicPoint locations
to hear phrases, fun sounds, short
tunes and sing-along songs. The
character can also interact with
other VTech® Toot-Toot Friends™
playsets (each sold separately).
ACTIVITIES – ENCHANTED PRINCESS
PALACE
TM
1. Place Princess Darla on the
DRESSING ROOM MagicPoint
location to pretend she is looking
into the mirror.
2. Place Princess Darla on the
OBSERVATION TOWER
MagicPoint located in the centre
of palace so she can enjoy the
view.
Page 16

15
15
15
3. Place Princess Darla on the
KITCHEN MagicPoint location to
pretend she is preparing a meal for
her friends!
4. There are two MagicPoint
locations on the TEA SET:
a. Place Princess Darla on the
MagicPoint located on the chair
as shown in the picture to let her
rest as she has some tea!
b. Place Princess Darla on the
MagicPoint located on the other
chair as shown in the picture to
hear fun responses.
MagicPoint Locations
Place additional Toot-Toot FriendsTM MagicPoint characters on the
TEA SET MagicPoint location to hear them chat and sing together.
(Additional Toot-Toot FriendsTM MagicPoint characters are not
included and are each sold separately).
Page 17

16
16
16
MOTOR SKILL DEVELOPMENT
There are lots of fun things in the Enchanted Princess Palace that
you can explore to help develop ne motor skills.
1. Turn the SPINNING WHEEL to
open and close the palace gates.
2. Spin the CHANDELIER.
3. Turn the handle in the parlour to
spin the DANCE FLOOR. The
water in the fountain will also move
up and down!
Page 18

17
17
17
4. Place Princess Darla on the SWING
and push it to help her swing!
5. Place Princess Darla on the LIFT
and turn the handle on the top to
move the lift up and down.
6. Three ACCESSORIES are
included for role play fun.
7. Place the MAGICPOINT TEA SET
accessory around the palace for
role play fun.
Page 19

18
18
18
8. The palace can be folded for easy storage. Fold in the left and right
sides as shown below. When folding in the sides, be sure to insert
the prongs on each side of the palace into their respective slots
located on the edge of the second oor.
Note: You need to remove or fold back the staircase to be able to
completely close the palace.
CARE & MAINTENANCE
1. Keep the unit and its metal parts clean by wiping them with a slightly
damp cloth.
2. Keep the unit out of direct sunlight and away from any direct heat
sources.
3. Remove the batteries when the unit is not in use for an extended
period of time.
4. Do not drop the unit on a hard surface and do not expose the unit
to excess moisture or water.
Page 20

19
19
19
TROUBLESHOOTING
If for some reason the unit stops working or malfunctions while playing
with a MagicPoint accessory, please remove the character from the
accessory and place the character back onto the MagicPoint.
If the unit still does not function, or if for some reason the unit stops
working or malfunctions on its own, please follow these steps:
1. Please turn the unit OFF.
2. Interrupt the power supply by removing the batteries.
3. Let the unit stand for a few minutes, then replace the batteries.
4. Turn the unit ON. The unit should now be ready to play again.
5. If the product still does not work, replace with a new set of batteries.
If the problem persists, please contact our Consumer Services
Department and a service representative will be happy to help you.
Page 21

20
20
20
CONSUMER SERVICES
Creating and developing VTech products is accompanied by a
responsibility that we at VTech® take very seriously. We make
every effort to ensure the accuracy of the information, which forms
the value of our products. However, errors sometimes can occur.
It is important for you to know that we stand behind our products
and encourage you to call our Consumer Services Department with
any problems and/or suggestions that you might have. A service
representative will be happy to help you.
UK Customers:
Phone: 0330 678 0149 (from UK) or +44 330 678 0149 (outside UK)
Website: www.vtech.co.uk/support
Australian Customers:
Phone: 1800 862 155
Website: support.vtech.com.au
NZ Customers:
Phone: 0800 400 785
Website: support.vtech.com.au
PRODUCT WARRANTY/
CONSUMER GUARANTEES
UK Customers:
Read our complete warranty policy online at vtech.co.uk/warranty.
Australian Customers:
VTECH ELECTRONICS (AUSTRALIA) PTY LIMITED –
CONSUMER GUARANTEES
Under the Australian Consumer Law, a number of consumer
guarantees apply to goods and services supplied by VTech
Electronics (Australia) Pty Limited. Please refer to vtech.com.au/
consumerguarantees for further information.
Page 22

TM & © 2016 VTech Holdings Limited.
All rights reserved.
Printed in China.
91-003236-015
UK
Visit our website for more
information about our products,
downloads, resources and more.
www.vtech.co.uk
www.vtech.com.au
 Loading...