

Page 1

ErisStation® Conference Phone with Bluetooth
VCS752
Administrator and Provisioning Manual
Rev. 1 12/16
Page 2

VCS752 Administrator and Provisioning Ma nua l
C
ONTENT S
Preface ...................................................................................................... 6
Text Conventions....................................... ... .... ... ... ... .......................................... ... .... ... ... ..7
Audience.............................................................................................................................7
Related Documents............................................................................................................7
Introducing the VCS752........................................................................... 8
About the VCS752 conference phone................................................................................9
Quick Reference Guide ....................................................................................................10
Network Requirements.....................................................................................................12
VCS752 Configuration Methods.......................................................................................13
Adding a Custom Logo..................................................... ... ... ... .... ... ................................14
Idle screen logo behavior.....................................................................................14
Logo specifications................................. ... ... .... ... ... ... ..........................................14
Uploading a custom logo.....................................................................................15
Custom logo user interactions.............................................................................15
Customizing Soft Keys...................................... ... ... ... .... ... .......................................... ... ...16
Custom soft key configuration file settings ..........................................................16
Configuration Using the Phone Menus................................................ 19
Viewing the Main Menu ....................................................................................................20
Using the Status menu.........................................................................................20
Viewing Line status..............................................................................................22
Using the Admin Settings Menu .......................................................................................23
Using the Network Setting menu.........................................................................24
Using the Line menu............................................................................................27
Using the Provisioning menu...............................................................................28
Using the WebUI..................................................................................... 29
Using the Web User Interface (WebUI)............................................ ... ... .... ... ... ... ... .... ... ...30
Status Page......................................................................................................................32
System Status..................... .... ... ... .......................................... .............................32
System Pages ................................. .......................................... .... ... ... ... .... ......................33
SIP Account Management............ ... .... ... ... ... .... ... ... ... ... .......................................33
General Account Settings ...................................... .... ... ... ... .... ... ... ... ... .... ... ...33
2
Page 3

VCS752 Administrator and Provisioning Ma nua l
Dial Plan........................................................................................................35
SIP Server Settings................... .... ... ... .......................................... ... ... .... ... ...36
Registration Settings.....................................................................................36
Outbound Proxy Settings ..............................................................................36
Backup Outbound Proxy Settings .................................................................37
Audio Settings...............................................................................................37
Quality of Service..........................................................................................38
Signaling Settings .........................................................................................38
Feature Access Codes Settings....................................................................39
Voicemail Settings.........................................................................................41
NAT Traversal ...............................................................................................42
Music on Hold Settings .................................................................................42
Network Conference Settings .......................................................................42
Session Timer..................... ... ... .... ... ... ... .... ... ... .......................................... ...43
Call Settings.........................................................................................................44
General Call Settings....................... ... ... .... ... ... ... ... .......................................44
Do Not Disturb...............................................................................................44
Call Forward..................................................................................................45
Preferences .........................................................................................................46
General User Settings................... ... ... ... .......................................... ... .... ... ...46
Call Hold Reminder.......................................................................................47
Call Waiting...................................................................................................47
Program Dial Keys...............................................................................................48
Speed Dial.................................... .......................................... ... .... ......................49
Speed Dial Keys..................................................... .... ... ... ... .... ......................50
Signaling Settings................................................................................................51
Voice .............................................................................................................51
NAT Traversal ...............................................................................................51
Ringer Settings.................................... ... ... ... .......................................... ... .... ......52
Paging Zones................................ ... .......................................... .... ... ...................53
Network Pages .................................................................................................................54
Basic Network Settings........................................................................................54
Basic Network Settings .................................................................................54
Advanced Network Settings.................................................................................55
VLAN.............................................................................................................55
LLDP-MED....................................................................................................56
802.1x ...........................................................................................................56
Contacts Pages ................................................................................................................57
Local Directory.....................................................................................................57
Create Local Directory Entry.........................................................................59
Directory Import/Export ............. .... ... ... ... .......................................... ... .... ... ...59
Blacklist.........................................................................................................60
Create Blacklist Entry....................................................................................61
Blacklist Import/Export ..................................................................................62
LDAP ...................................................................................................................63
LDAP Settings...............................................................................................63
Broadsoft .............................................................................................................66
Broadsoft Phonebook Settings......................................................................66
Call History ..........................................................................................................67
3
Page 4

VCS752 Administrator and Provisioning Ma nua l
Servicing Pages................................................................................................................68
Reboot.................................................................................................................68
Time and Date.....................................................................................................68
Time and Date Format ..................................................................................69
Network Time Settings..................................................................................69
Time Zone and Daylight Savings Settings ....................................................69
Manual Time Settings....................................................................................70
Firmware Upgrade...............................................................................................71
Firmware Server Settings..............................................................................71
Manual Firmware Update and Upload ..........................................................72
Provisioning......................................................................................................................73
Provisioning Server.......................................................................................74
Plug-and-Play Settings..................................................................................74
DHCP Settings..............................................................................................75
Resynchronization.........................................................................................75
Import Configuration......................................................................................77
Export Configuration ........................................ ... ... .... ... ... ... .... ... ... ... .............77
Reset Configuration ......................................................................................78
Security................................................................................................................79
Passwords.....................................................................................................79
Web Server .................. .... ... ... .......................................... ... .... ......................80
Certificates...........................................................................................................80
Device Certificate..........................................................................................81
Server Certificate ................................... .... ... ... ... ... .......................................81
System Logs.............................................. ... .... ......................................... .... ... ...82
Syslog Settings .............................................................................................82
Network Trace...............................................................................................83
Download Log...............................................................................................83
Provisioning Using Configuration Files............................................... 84
The Provisioning Process.................................................................................................85
Resynchronization: configuration file checking.................................... ... ... .... ... ...86
VCS752 restart....................................... ... ... .... ... ... ... ... .......................................86
Configuration File Types...................................................................................................87
Data Files...................................... ... .... ... .......................................... ... ... ..........................88
Configuration File Tips and Security.................................................................................89
Guidelines for the MAC-Specific configuration file...............................................89
Securing configuration files with AES encryption ................................................90
Configuration File Parameter Guide..................................................... 92
"sip_account" Module: SIP Account Settings ...................................................................93
General configuration file settings .......... ... ... .... ... ... ... ... .... ... ... ... .... ... ... ... .............93
MAC-specific configuration file settings.............................................................104
"network" Module: Network Settings.................... ... ... .... ... .......................................... ... .106
General configuration file settings .......... ... ... .... ... ... ... ... .... ... ... ... .... ... ... ... ...........106
MAC-specific configuration file settings.............................................................108
"provisioning" Module: Provisioning Settings.................... ... ... ........................................ 110
4
Page 5

VCS752 Administrator and Provisioning Ma nua l
"time_date" Module: Time and Date Settings.................................................................115
"log" Module: Log Settings................................ ... ... ... .... ... ... ... ... ..................................... 119
"remoteDir" Module: Remote Directory Settings.............................................................120
"web" Module: Web Settings ......................................................................................... .125
"user_pref" Module: User Preference Settings...............................................................126
General configuration file settings .......... ... ... .... ... ... ... ... .... ... ... ... .... ... ... ... ...........126
MAC-specific configuration file settings.............................................................127
"call_settings" Module: Call Settings ..............................................................................129
"speed_dial" Module: Speed Dial Settings......................................................................131
"ringersetting" Module: Distinctive Ringer Settings.........................................................132
"file" Module: Imported File Settings...............................................................................133
General configuration file settings .......... ... ... .... ... ... ... ... .... ... ... ... .... ... ... ... ...........133
MAC-specific configuration file settings.............................................................134
"tone" Module: Tone Definition Settings..........................................................................136
"profile" Module: Password Settings...............................................................................139
General configuration file settings .......... ... ... .... ... ... ... ... .... ... ... ... .... ... ... ... ...........139
MAC-specific configuration file settings.............................................................139
"page_zone" Module: Paging Zone Settings..................................................................140
"softkey" Module: Custom Soft Key Settings..................................................................142
"bt_settings" Module: Bluetooth Settings........................................................................144
Troubleshooting................................................................................... 145
Common Troubleshooting Procedures...........................................................................145
Appendixes........................................................................................... 147
Appendix A: Maintenance....... ... ... ... .... ... ... ... .... ... .......................................... ... ... ... .... ... .147
Appendix B: GPL License Information............................................................................148
5
Page 6

P
REFACE
Congratulations on your purchase of this VTech product. Please thoroughly read this
manual for all the feature operations and troubleshooting information necessary to install
and operate your new VTech product. You can also visit our website at
businessphones.vtech.com or call 1 (888) 370-2006.
VCS752 Administrator and Provisioning Ma nua l
This administrator and provisioning manual contains detailed instructions for installing and
configuring your VCS752 SIP Conference Phone with Bluetooth and DECT Accessories
with software version 1.1.5.x or newer. See “Using the Status menu” on page 20 for
instructions on checking the software version on the VCS752. Please read this manual
before installing the product.
Please print this page and record the following information regarding your product:
Model number: VCS752
Type: Small to medium business SIP-endpoint conference phone
Serial number: _______________________________
Purchase date: _______________________________
Place of purchase: ____________________________
Both the model and serial numbers of your VTech product can be found on the bottom of
the console.
Save your sales receipt and original packaging in case it is necessary to return your
telephone for warranty service.
Preface 6 Back to Contents
Page 7

VCS752 Administrator and Provisioning Ma nua l
CallFwd
Notes provide important information
about a feature or procedure.
A caution means that loss of data or
unintended circumstances may result.
Text Conventions
Table 1 lists text formats and describes how they are used in this guide.
Table 1. Description of Text Conventions
T ext Format Description
Screen Identifies text that appears on a device screen or a
WebUI page in a title, menu, or prompt.
HARD KEY or DIAL-PAD KEY Identifies a hard key, including the dial-pad keys.
Identifies a soft key.
Example of a Note.
Example of a Caution.
Audience
This guide is written for installers and system administrators. It assumes that you are
familiar with networks and VoIP, both in theory and in practice. This guide also assumes
that you have ordered your IP PBX equipment or service and selected which PBX features
you want to implement. This guide references specific IP PBX equipment or services only
for features or settings that have been designed for a specific service. Please consult your
equipment supplier or service provider for recommended switches, routers, and firewall
and NAT traversal settings, and so on.
As the VCS752 SIP Conference Phone with Bluetooth and DECT Accessories becomes
certified for IP PBX equipment or services, VTech may publish interop guides for those
specific services. The interop guides will recommend second-party devices and settings,
along with VCS752-specific configurations for optimal performance with those services. For
the latest updates, visit our website at businessphones.vtech.com.
Related Documents
The VCS752 Quick Start Guide cont ains a quick reference guide to th e VCS752 external
features and brief instructions on connecting the VCS752 to a working IP PBX system.
The VCS752 contains a quick reference guide, full installation instructions, instructions for
making and receiving calls, and a guide to all user-configurable settings.
The documents are available from our website at businessphones.vtech.com.
Preface 7 Back to Contents
Page 8

I
NTRODUCING
THE
VCS752 Administrator and Provisioning Ma nua l
C HAPTER 1
VCS752
This administrator and provisioning guide cont ains detaile d instructions for configuring the
VCS752 SIP Conference Phone with Bluetooth and DECT Accessories. Please read this
guide before attempting to configure the VCS752.
Some of the configuration tasks described in this chapter are duplicated in the Web User
Interface (WebUI) described in the next chapter, but if you need to assign static IP
addresses, they must be set at each device.
This chapter covers:
“About the VCS752 conference phone” on page 9
“Quick Reference Guide” on page 10
“Network Requirements” on page 12
“VCS752 Configuration Methods” on page 13
“Adding a Custom Logo” on page 14
“Customizing Soft Keys” on page 16.
Introducing the VCS752 8 Back to Contents
Page 9

VCS752 Administrator and Provisioning Ma nua l
About the VCS752 conference phone
The VTech VCS752 SIP Conference Phone with Bluetooth and DECT Accessories is a
conference phone designed to work with popular SIP telephone (IP PBX) equipment and
services. Once you have ordered and configured your SIP equipment or service, the
VCS752 enables you to make and receive calls as you would with any other business
phone. In addition to its speakerphone and conferencing features, the VCS752 provides
calling features like hold, transfer and speed-dial numbers.
The VCS752 conference phone features include:
2.5-inch backlit Liquid Crystal Display
Bluetooth and DECT connectivity for cell phones and headsets
Up to 3 SIP account registrations
Up to 6 active SIP sessions
3-way conferencing
200-entry Call Log
You can configure the VCS752 using the menus on the phone , a br owse r-ba se d in te rface
called the WebUI, or an automatic provisioning process (see “Provisioning Using
Configuration Files” on page 84). The WebUI enables you to configure the VCS752 using
a computer that is connected to the same Local Area Network. The We bUI resid es on the
VCS752, and may get updated with firmware updates.
Introducing the VCS752 9 Back to Contents
Page 10

Quick Reference Guide
taErisS tion
1 2
4 5 6
7
8
1112
1314
9
10
3
The external features of the VCS752 conference phone are described below.
VCS752 Administrator and Provisioning Ma nua l
1. Status indicator 2. Speaker
3. Cell 2/Headset status indicator 4. LCD screen
5. MENU/SELECT 6. Navigation keys
7. TALK/OFF key 8. Dial pad keys
9. Front microphone 10. MUTE ALL
11. VOL key (ringer volume and listening volume) 12. Soft keys
13. HOLD/CANCEL key 14. Cell 1 Bluetooth Status indicator
Introducing the VCS752 10 Back to Contents
Page 11

1. USB port (power and network)
a
VCS752 Administrator and Provisioning Ma nua l
Introducing the VCS752 11 Back to Contents
Page 12

Network Requirements
A simple VCS752 SIP Conference Phone with Bluetooth and DECT Accessories
installation example is shown in Figure 1. A switched network topology is recommended for
your LAN (using standard 10/100 Ethernet switches that carry traffic at a nominal rate of
100 Mbit/s).
The office LAN infrastructure should use Cat.-5/Cat.-5e cable.
The VCS752 requires a wired connection to the LAN. However, wireless connections from
your LAN to other devices (such as laptops) in your office will not impede performance.
A Dynamic Host Configuration Protocol (DHCP) server is recommended and must be on
the same subnet as the VCS752 conference phones so that IP addresses can be
auto-assigned. In most cases, your network router will have a DHCP server. By default, the
VCS752 has DHCP enabled for automatic IP address assignment.
Some DHCP servers have default settings that limit the number of network IP
addresses assigned to devices on the network. You should log in to your server
to confirm that the IP range is sufficient.
VCS752 Administrator and Provisioning Ma nua l
If no DHCP server is present, you can assign a static IP to the VCS7 52. You can assign a
static IP address using the VCS752 menu. To assign a static IP, go to Admin settings >
Network setting > Set static IP. If you do not have a DHCP server or do not manually
assign static IPs, you will not be able to access the WebUI and/or enable automatic time
updates from an NTP server.
A DNS server is recommended to resolve the path to the Internet and to a server for
firmware and configuration updates. If necessary, the system administrator can also
download upgrade files and use the WebUI to update the VCS752 firmware and/or
configuration settings manually.
Figure 1. VCS752 Installation Example
Introducing the VCS752 12 Back to Contents
Page 13

VCS752 Configuration Methods
You can configure the VCS752 using one of the following methods:
From the VCS752 itself, using the menus. The VCS752 menus are best suited to
configuring a few settings, perhaps after the initial setup has been done. For
administrators, the settings available on the VCS752 menus include network
settings, account settings, and provisioning settings. See “Using the Admin
Settings Menu” on page 23. Many of the settings accessible on the VCS752 are
most useful for end users. Through the menu, they can customize the screen
appearance, sounds, and manage calls. For more information, see the VCS752
User Guide.
The Web User Interface, or WebUI, which you access using your Internet browser .
See “Using the WebUI” on page 29. The browser-based interface is easy to
navigate and best suited to configuring a large number of VCS752 settings at once.
The WebUI gives you access to every setting required for configuring a single
device. You can enter service provider account settings on the WebUI, and set up
provisioning, which will allow you to automatically and remotely update the
VCS752 after initial configuration.
VCS752 Administrator and Provisioning Ma nua l
Provisioning using configuration files. Working with configuration files allows you to
configure the device at regular intervals. There are several methods available to
enable the VCS752 to locate and upload the configuration file. For example, you
can enable the VCS752, when it starts up or reboot s, to check for the presence of
a configuration file on a provisioning server. If the configuration file is new or has
been modified in any way, the VCS752 automatically downloads the file and
applies the new settings. For more information, see “Provisioning Using
Configuration Files” on page 84.
Introducing the VCS752 13 Back to Contents
Page 14

Adding a Custom Logo
Y ou can upload a custom logo to be displayed on the pho ne idle screen and during bootup.
Uploading a logo is done using the configuration file. The parameters for uploading a
custom logo are described in “Uploading a custom logo” on page 15. The default logo for
bootup and idle mode is the vtech logo.
Idle screen logo behavior
The behavior described below is disabled by default.
You can enable the logo to appear instead of the idle screen after a specified period of
inactivity. The parameter for setting the delay before the logo appears is in the General
configuration file. See “user_pref.idle_to_logo_timeout” on page 126.
You can enable the phone screen to cycle between the logo and th e idle scre en whe n the
phone is in idle mode by setting both the
user_pref.logo_to_idle_timeout
on page 126.
VCS752 Administrator and Provisioning Ma nua l
user_pref.idle_to_logo_timeout
parameters. See “user_pref.logo_to_idle_timeout”
and the
Logo specifications
The file type and dimensions for the logo are listed below.
File type: Monochrome bitmap (.bmp)
Dimensions (w × h): Idle screenand bootup logo: 158 × 57 pixels
Positioning a custom logo on the screen is a matter of creating a logo with the maximum
dimensions listed above, including any surrounding white space. Note that the width of the
logo specified in the table above is the same as the width of the VCS752 screen (158
pixels). There are no configuration file settings to specify the x-axis or y-axis position of the
logo on the screen.
Introducing the VCS752 14 Back to Contents
Page 15

VCS752 Administrator and Provisioning Ma nua l
Uploading a custom logo
The file.bootup_logo and file.idle_logo parameters in the configuration file allow you to
upload a custom bootup logo and custom idle logo. Place the logos on your server and
enter the URL for each logo for the file.idle_logo and file.bootup_logo parameters.
If the downloaded logo is found to be invalid, the syslog will record one of the following
errors:
file not found
invalid file format
incorrect image size
image is not in black and white
Custom logo user interactions
For VCS752 users, pressing any hard key will exit the idle logo and perform the key's
function. For example, pressing MENU will show the Main Menu.
Pressing a soft key when the idle logo is showing will switch to the idle screen.
Introducing the VCS752 15 Back to Contents
Page 16

Customizing Soft Keys
The configuration file allows you to select which soft keys can appear on the Idle screen,
the Active Call screen, the Held Call screen and the Live Dial screen. You can also specify
the position of each soft key.
Some soft keys appear only under certain conditions. For example , the Line soft key on the
Idle screen appears only if there is more than one registered SIP account. When a
"conditional" soft key is not visible, the soft key's position is left empty.
Soft key levels with no soft keys will not be shown if there are multiple soft key levels (as
indicated by the and icons). Any soft key level where all soft keys are invisible will be
dynamically skipped when the user navigates through the available levels. On the VCS752,
a soft key level consists of three soft keys (populated or blank) in a row.
Table 2 shows the soft key options available for each screen. Each screen can have a
maximum of nine soft keys.
For the custom soft key configuration file parameter s, see “"softkey" Module: Custom Soft
Key Settings” on page 142.
VCS752 Administrator and Provisioning Ma nua l
Custom soft key configuration file settings
You cannot edit soft key text. The configuration file parameters allow you to only
select and position the soft keys for each screen.
Table 2. Custom Soft Keys
Screen Available Soft Keys Soft Key Text
Idle Blank
Directory
Call Log
Redial
Messages
Do Not Disturb
Call Forward
Call Forward All
Call Forward No Answer
Call Forward Busy
Directory
Call Log
Redial
Message
DND
CallFwd
FwdAll
CFNA
FwdBusy
Intercom
Retrieve Parked Call
Call Return
Group Call Pickup
Intercom
Retrieve
CallBack
GrpPickup
Introducing the VCS752 16 Back to Contents
Page 17

VCS752 Administrator and Provisioning Ma nua l
Table 2. Custom Soft Keys
Screen Available Soft Keys Soft Key Text
Direct Call Pickup
Line (visible with more than one account assigned)
Settings
Bluetooth connect
Bluetooth device 1
Bluetooth device 2
Program Dial (up to three Program Dial keys)
Call Active Blank
New
Park Call
End
Hold
Transfer
Conference
XferLine (visible with more than one call)
DirPickup
Line
Settings
Connect
Device 1
Device 2
[Custom]
New
Park
End
Hold
Transfer
Conf
XferCall
ConfLine (visible with more than one call)
Private hold
Bluetooth connect
Bluetooth device 1
Bluetooth device 2
Program Dial (up to three Program Dial keys)
Call Held Blank
End
New
Park Call
Retrieve Parked Call
Group Call Pickup
Direct Call Pickup
Resume
ConfCall
Priv hold
Connect
Device 1
Device 2
[Custom]
End
New
Park
Retrieve
GrpPickup
DirPickup
Resume
Introducing the VCS752 17 Back to Contents
Page 18

VCS752 Administrator and Provisioning Ma nua l
Table 2. Custom Soft Keys
Screen Available Soft Keys Soft Key Text
Transfer
Conference
XferLine (visible with more than one call)
ConfLine (visible with more than one call)
Program Dial (up to three Program Dial keys)
Live Dial Blank
Directory
Call Log
Redial
Messages
End
Dial
Input (letter/number selection)
Cancel
Backspc
Transfer
Conf
XferCall
ConfCall
[Custom]
Directory
Call Log
Redial
Message
End
Dial
123
Cancel
Backspc
Bluetooth connect
Bluetooth device 1
Bluetooth device 2
Program Dial (up to three Program Dial keys)
Connect
Device 1
Device 2
[Custom]
The custom soft keys parameters are included in the "softkey" module. For more
information, see “"softkey" Module: Custom Soft Key Setting s” on page 142. To modify a
soft key parameter, enter values separated by commas. Soft keys appear on the phone
screen in the same order as the soft key values you enter. For example, the
parameter/value combination of
softkey.idle = line,dir,settings
will result in the
Idle screen shown below:
Introducing the VCS752 18 Back to Contents
Page 19

C
ONFIGURATION
M
ENUS
VCS752 Administrator and Provisioning Ma nua l
U
SING THE
C HAPTER 2
P
HONE
The VCS752 Main Menu has the following sub-menus:
Features—manage calls and Bluetooth devices, view and add directory entries,
view call history, access messages, and use the speed dial menu.
Status—vie w the VCS752 network status, account registration status, and product
information.
User Settings—allows the user to set the language for the display, configure the
appearance of the display , edit progra mmable keys, register wireless microphones
and DECT speakers, register a DECT headset and customize the audio settings.
Admin settings—configure network settings (enter static IP addresses, for
example), account settings and prov isio nin g settin gs .
This chapter contains instructions for using the Admin Settings menu and for accessing the
Statu s menu. See the VCS752 User Guide for more information about the Features me nu
and User Settings menu.
Configuration Using the Phone Menus 19 Back to Contents
Page 20

Viewing the Main Menu
To use the VCS752 menu:
1. When the VCS752 is idle, press MENU.
The Main Menu appears.
VCS752 Administrator and Provisioning Ma nua l
2. Press
or to highlight the desired sub-menu, and then press SELECT.
Y ou can a lso press a correspo nding dial pad key to select a numbered menu item.
Press 2 to view the Status menu, for example.
Press SELECT or an appropriate soft key to save changes.
Press CANCEL to cancel an operation, exit the menu display or return to the idle
screen.
Using the Status menu
Use the Status menu to verify network settings and begin troubleshooting if network
problems or account registration issues affect operation.
You can also find the software version of the VCS752 on the Product Info screen,
available from the Status menu.
To view the Status menu:
1. When the VCS752 is idle, press MENU.
2. On the Main Menu, press
The Status menu appears.
or to highlight Status, and then press SELECT.
3. On the Status menu, press
SELECT.
The available status menus are listed in Table 3.
Configuration Using the Phone Menus 20 Back to Contents
or to highlight the desired menu, and then press
Page 21

VCS752 Administrator and Provisioning Ma nua l
T able 3. St atus menu summary
Menu Information listed
1. Network IP address
DHCP status (Enabled/Disabled)
Subnet Mask
Gateway IP address
DNS server 1 IP address
DNS server 2 IP address
SNTP server URL
MAC address
2. Line Lines and registration status. On the Line menu, highlight
and select the desired line to view detailed line status
information:
Line status (Registered/Not registered)
3. Product Info
Account display name
Account User ID
Registrar Server IP address
Registrar Server port number
Proxy server IP address
Proxy server port number
Model number
Serial number
MAC address
Boot version
Firmware version
V-Series
Hardware version
EMC version
Configuration Using the Phone Menus 21 Back to Contents
Page 22

VCS752 Administrator and Provisioning Ma nua l
Viewing Line status
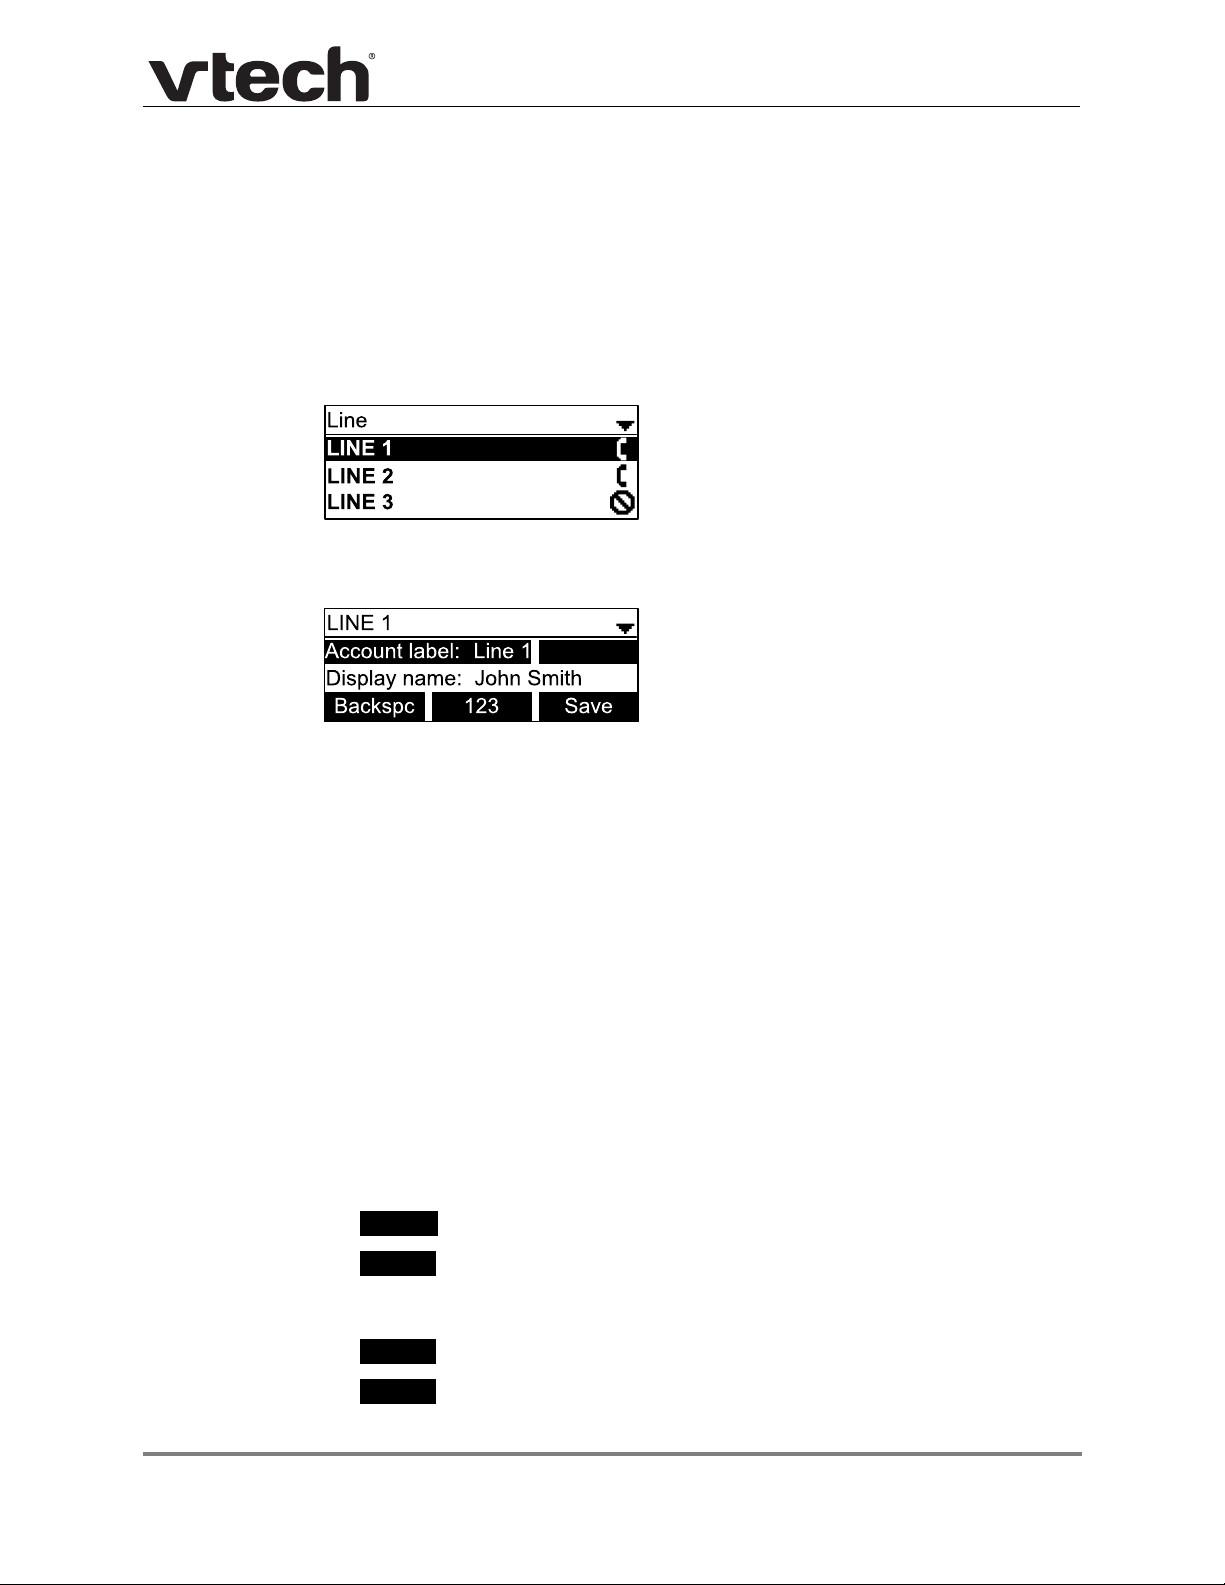
To view line status, from the Status menu, select Line. The Line menu lists the available
lines, along with icons indicating each line's current registration status.
Table 4. Line status icons
Icon Description
Line registered
Line unregistered
Line disabled
To view complete status information for a line:
On the Line menu, press or to highlight the desired line, and then press
SELECT. The full line status screen appears.
Configuration Using the Phone Menus 22 Back to Contents
Page 23

Using the Admin Settings Menu
Enter
123
To access the Admin Settings menu:
1. When the VCS752 is idle, press MENU.
The Main Menu appears.
VCS752 Administrator and Provisioning Ma nua l
2. Press
3. Use the dial pad to enter the admin password, and then pres s . The default
The Admin settings are listed in Table 5.
Table 5. Admin setting summary
Setting Options
1. Network setting 1. DHCP (Enabled, Disabled)
2. Line 1. LINE 1
or to highlight Admin settings, and then press SELECT.
-orPress 4 (Admin settings) on the dial pad.
password is admin (press the soft key to switch between text input
options—lowercase letters, uppercase letters, and numbers).
2. Set static IP
3. VLAN ID
4. Others
2. LINE 2
3. LINE 3
3. Provisioning 1. Server
2. Login
3. Password
4. Reset to default Press SELECT to display a screen that allows you to reset
the phone to factory default settings.
5. Restart phone Press SELECT to display a screen that allows you to restart
the phone.
Configuration Using the Phone Menus 23 Back to Contents
Page 24

VCS752 Administrator and Provisioning Ma nua l
Save
Using the Network Setting menu
Use the Network setting menu to configure network-related settings for the VCS752. For
more information about these settings, see “Basic Network Settings” on page 54 and
“Advanced Network Settings” on page 55.
To use the Network setting menu:
1. From the Admin Settings menu, press
then press SELECT.
The Network setting menu appears.
2. Press
To enable or disable DHCP:
1. From the Network setting menu, press
or to highlight the desired option, and then press SELECT:
DHCP
Set static IP
VLAN ID
Others (DNS and NTP servers).
SELECT.
The DHCP screen appears.
or to highlight Network setting, and
or to highlight DHCP, and then press
2. Press
DHCP is enabled by default, which means the VCS752 will get its IP address from the
network. When DHCP is disabled, you must enter a static IP address for the VCS752.
Configuration Using the Phone Menus 24 Back to Contents
or to select Enabled or Disabled, and then press .
You must be familiar with TCP/IP principles and protocols to configure static IP
settings.
Page 25

To set static IP for the VCS752:
Add dot
Add dot
Save
Backspc
Save
VCS752 Administrator and Provisioning Ma nua l
1. From the Network setting menu, press
press SELECT.
If DHCP is disabled, the Set static IP menu appears. If DHCP is enabled, an error
message appears briefly before returning you to the Network setting menu.
2. On the Set static IP menu, enter the static IP address. Use the dial pad and the
soft key to enter characters. Press
3. Press
4. Press
5. Press .
To set the VLAN ID for the VCS752:
1. From the Network setting menu, press
and enter the Subnet Mask. Use the dial pad and the soft key to
enter characters. Press
or to advance to the next character.
and enter the Gateway. Use the dial pad and the Add dot soft key to enter
characters. Press
press SELECT.
or to advance to the next character.
or to highlight Set static IP, and then
or to advance to the next character.
or to highlight VLAN ID, and then
2. On the VLAN ID menu, press
3. Press
4. Press .
and enter the WAN VID. Use the dial pad and the soft key to enter
characters. The valid range is 0 to 4095.
or to enable or disable the WAN VLan.
Configuration Using the Phone Menus 25 Back to Contents
Page 26

To set other settings (DNS and NTP):
Add dot
Save
VCS752 Administrator and Provisioning Ma nua l
1. From the Network setting menu, press
SELECT.
If DHCP is disabled, the Others menu appears. If DHCP is enabled, an error message
appears briefly before returning you to the Network setting menu.
2. Enter the IP address for the primary DNS server . Use the dial pad and the soft
key to enter characters. Press
3. Press
4. Press
5. Press .
and enter the IP address for the secondary DNS server. The VCS752 uses
this server if the primary server does not respond.
and enter the IP address for the NTP server. If the VCS752 does not use an
NTP server, you must manually enter the time and date settings.
or to advance to the next character.
or to highlight Others, and then press
Configuration Using the Phone Menus 26 Back to Contents
Page 27
VCS752 Administrator and Provisioning Ma nua l
Backspc
123
Save
Edit
Using the Line menu
Use the Line menu to configure line-specific settings for the phone.
To use the Line setting menu:
1. From the Admin Settings menu, press
to highlight Line, and then press SELECT.
The Line menu appears.
2. Highlight the desired line, if necessary, by pressing
full configuration menu for that line appears.
You can configure:
Account label
Display name
User ID
Authorization ID
Authorization Password
SIP Registrar Server IP
Registrar Server port
Proxy server IP
Proxy server port
Register (Yes or No)
Answer page (Manual or Auto)
, and then press SELECT. The
For more information about these settings, see “SIP Account Management” on page 33.
3. Edit the Line settings using the dial pad and the soft keys available for each setting:
—deletes a character
—enables you to e nter numbers, lower ca se letters, or upper case le tters
using the dial pad. The soft key does not appear whe n the setting accepts numbers
only .
—saves and applies the new settings
—enables you to edit the setting (appears for the Password setting)
4. Press
or to advance to the next character.
Configuration Using the Phone Menus 27 Back to Contents
Page 28

VCS752 Administrator and Provisioning Ma nua l
Backspc
ABC
Save
Edit
Save
Using the Provisioning menu
Use the Provisioning menu to configure auto-provisioning settings. For more info rmation
about auto-provisioning, see “Provisioning” on page 73 and “Provisioning Using
Configuration Files” on page 84.
On the Provisioning menu you can configure:
Server string—the URL of the provisioning server . The URL can include a complete
path to the configuration file.
Login ID—the username the VCS752 will use to access the provisioning server.
Login PW—the password the VCS752 will use to access the provisioning server.
To use the Provisioning menu:
1. From the Admin Settings menu, press
to highlight Provisioning, and then press
SELECT.
The Provisioning menu appears.
2. Enter the server URL using the dial pad keys:
—deletes a character
—enables you to e nter numbers, lower ca se letters, or upper case le tters
with the dial pad. Does not appear when the setting accepts numbers only.
—prompts you to reboot the phone and apply the new settings
—enables you to edit the setting (appears for the Password setting)
The format of the URL must be RFC 1738 compliant, as follows:
"<schema>://<user>:<password>@<host>:<port>/<url-path>"
"<user>:<password>@" may be empty.
"<port>" can be omitted if you do not need to specify the port number.
3. Press
to move to the next line and enter the Login ID for access to the pro visioning
server if it is not part of the server string.
4. Press
to move to the next line and enter the Login password.
5. Press .
Configuration Using the Phone Menus 28 Back to Contents
Page 29

U
SING THE
W
EB
VCS752 Administrator and Provisioning Ma nua l
C HAPTER 3
UI
The WebUI allows you to configure all aspects of VCS752 conference phone operation,
including account settings, network settings, contact lists, and provisioning settings. The
WebUI is embedded in the VCS752 operating system. When you access the WebUI, you
are accessing it on the device, not on the Internet.
This chapter describes how to access the WebUI and configure VCS752 settings. This
chapter covers:
“Using the Web User Interface (WebUI)” on page 30
“Status Page” on page 32
“System Pages” on page 33
“Network Pages” on page 54
“Contacts Pages” on page 57
“Servicing Pages” on page 68.
Using the WebUI 29 Back to Contents
Page 30

VCS752 Administrator and Provisioning Ma nua l
Using the Web User Interface (WebUI)
The Web User Interface (WebUI) resides on the VCS752 conference phone. You can
access it using an Internet browser. After you log in to the WebUI, you can configure the
VCS752 on the following pages:
System Contacts
SIP Account Management (see page 33)
Call Settings (see page 44)
User Preferences (see page 46)
Speed Dial (see page 49)
Signaling Settings (see page 51)
Ringer Settings (see page 52)
Network
Basic Network Settings (see page 54)
Advanced Network Settings (see page 55)
Local Directory (see page 57)
Blacklist
LDAP (see page 63)
Broadsoft (see page 66)
Call History (see page 67)
Servicing
Reboot (see page 68)
Time and Date (see page 68)
Firmware Upgrade (see page 71)
Provisioning (see page 73)
Security (see page 79)
Certificates (see page 80)
System Logs (see page 82)
The WebUI also has a System Status page, where you can view network status and
general information about the VCS752. The information on the Status page matches the
Status menu available on the VCS752.
Using the WebUI 30 Back to Contents
Page 31

VCS752 Administrator and Provisioning Ma nua l
To access the WebUI:
1. Ensure that your computer is connected to the same network as the VCS752.
2. Find the IP address of the VCS752:
a. When the VCS752 is idle, press MENU.
b. Press to highlight Status, and then press SELECT.
c. With Network highlighted, press SELECT.
The Network status screen appears.
d. On the Network status screen, note the IP Address.
3. On your computer , open an Internet browser . (Depending on your browser , some of the
pages presented here may look different and have different controls. Ensure that you
are running the latest update of your preferred browser.)
4. Type the VCS752 IP address in the browser address bar and press ENTER on your
computer keyboard.
The browser displays a window asking for your user name and password.
5. For the user name, enter admin. For the password, enter the default password,
admin. You can change the password later on the WebUI Security page, available
under Servicing.
6. Click OK.
The WebUI appears.
Click topics from the navigation bar along the top of the WebUI, and then click the links
along the left to view individual pages. For your security, the WebUI times out after 10
minutes, so if it is idle for that time, you must log in again.
Most WebUI configuration pages have a button. Click to save changes
you have made on the page. During a configuration session, click before you
move on to the next WebUI page.
The remaining procedures in this section assume that yo u are already logged into the WebUI.
The settings tables in this section contain settings that appear in the WebUI and
their equivalent settings in the configuration file template. You can use the
configuration file template to create custom configuration files. Configuration files
can be hosted on a provisioning server and us ed for aut om a tica lly con fig ur ing
phones. For more information, see “Provisioning Using Configuration Files” on
page 84.
Using the WebUI 31 Back to Contents
Page 32

Status Page
The WebUI System Status page is equivalent to the Status menu on the VCS752.
System Status
The System Status page shows:
VCS752 Administrator and Provisioning Ma nua l
General information about your device, including model, MAC address, and
firmware version
Account Status information about your SIP account registration
Network information regarding your device’s network address and network
connection
Using the WebUI 32 Back to Contents
Page 33

System Pages
SIP Account Management
On the SIP Account Management pages, you can configure each account you have
ordered from your service provider.
The SIP Account settings are also available as parameters in the configuration file. See
“"sip_account" Module: SIP Account Settings” on page 93.
General Account Settings
VCS752 Administrator and Provisioning Ma nua l
Click the link for each setting to see the matching configuration file parameter in
“Configuration File Parameter Guide” on page 92. Default values and ranges are listed
there.
Setting Description
Enable Account Enable or disable the SIP account. Select to enable.
Account Label Enter the name that will appear on the VCS752 display
when account x is selected.
Display Name
User identifier Enter the User identifier supplied by your service provider.
Enter the Display Name. The Display Name is the text
portion of the caller ID that is displayed for outgoing calls
using account x.
The User ID, also known as the Account ID, is a SIP URI
field used for SIP registration.
Note
: Do not enter the host name (e.g. "@sipservice.com").
The WebUI automatically adds the default host name.
Using the WebUI 33 Back to Contents
Page 34

VCS752 Administrator and Provisioning Ma nua l
Setting Description
Authentication name If authentication is enabled on the server, enter the
authentication name (or authentication ID) for
authentication with the server.
Authentication password If authentication is enabled on the server, enter the
authentication password for authentication with the server.
Dial Plan Enter the dial plan, with dialing strings separated by a |
symbol. See “Dial Plan” on page 35.
Inter Digit Timeout (secs) Sets how long the VCS752 waits after any "P" (pause) in
the dial string or in the dial plan.
Maximum Number of
Calls
Select the maximum number of concurrent active calls
allowed for that account.
Page Auto Answer When set to Auto, enables the VCS752 to automatically
answer when a page is received. This is usually the desired
behavior for paging.
Feature Synchronization Enables the VCS752 to synchronize with Broadworks
Application Server. Changes to features such as DND, Call
Forward All, Call Forward No Answer, and Call Forward
Busy on the server side will also update the settings on the
VCS752 menu and WebUI. Similarly, changes made using
the VCS752 or WebUI will update the settings on the
server.
DTMF method Select the default DTMF transmission method. You may
need to adjust this if call quality problems are triggering
unwanted DTMF tones or you have problems sending
DTMF tones in general.
Unregister after reboot Enables the phone to unregister the account(s) after
rebooting-before the account(s) register again as the
phone starts up. If other phones that share the same
account(s) unregister unexpectedly in tandem with the
rebooting VCS752, disable this setting.
Using the WebUI 34 Back to Contents
Page 35

VCS752 Administrator and Provisioning Ma nua l
Dial Plan
The dial plan consists of a series of dialing rules, or strings, that determine whether what
the user has dialed is valid and when the VCS752 should dial the number.
Numbers that are dialed when forwarding a call—when the user manually fowards
a call, or a pre-configured number is dialed for Call Forward All, Call Forward–No
Answer, or Call Forward Busy—always bypass the dial plan.
Dialing rules must consist of the elements defined in the table below.
Element Description
x Any dial pad key from 0 to 9, includin g # an d *.
[0-9]
x+ An unlimited series of digits.
, This represents the playing of a se condary dial ton e after the user ente rs the
PX This represents a pause of a defined time; X is the pause duration in
(0:9) This is a substitution rule where the first number is replaced by the second.
| This separator is used to indicate the start of a new pattern. Can be used to
A sample dial plan appears below.
Any two numbers separated by a hyphen, where the second number is
greater than the first. All numbers within the range or valid, excluding # and *.
digit(s) specified or dials an external call prefix before the comma. For
instance, "9,xxxxxxx" means the secondary dial tone is played after the user
dials 9 until any new digit is entered. "9,3xxxxxx" means only when the digit
3 is hit would the secondary dial tone stop playing.
seconds. For instance, "P3" would represent pause duration of 3 seconds.
When "P" only is used, the pause time is the same as the Inter Digit Timeout
(see “SIP Account Management” on page 33).
For example, "(4:723)xxxx" would replace "46789" with "723-6789". If the
substituted number (the first number) is empty, the second number is added
to the number dialed. For example, in "(:1)xxxxxxxxxx", the digit 1 is
appended to any 10-digit number dialed.
add multiple dialing rules to one pattern edit box.
Using the WebUI 35 Back to Contents
Page 36

VCS752 Administrator and Provisioning Ma nua l
SIP Server Settings
Setting Description
Server address Enter the IP address or domain name for the SIP server.
Server port Enter the port number that the SIP server will use.
Registration Settings
Setting Description
Server address Enter the IP address or domain name for the registrar
server.
Server port Enter the port number that the registrar server will use.
Expiration Enter the desired registration expiry time in seconds.
Registration Freq (secs) Enter the desired registration retry frequency in seconds. If
registration using the Primary Outbound Proxy fails, the
Registration Freq setting determine s th e nu m ber of
seconds before a registration attempt is made using the
Backup Outbound Proxy.
Outbound Proxy Settings
Setting Description
Server address Enter the IP address or domain name for the proxy server.
Server port Enter the port number that the proxy server will use.
Using the WebUI 36 Back to Contents
Page 37

VCS752 Administrator and Provisioning Ma nua l
Backup Outbound Proxy Settings
Setting Description
Server address Enter the IP address or domain name for the backup proxy server.
Server port Enter the port number that the backup proxy server will use.
Audio Settings
Setting Description
Ringer Tone Sets the ringer tone for incoming calls on the account.
Codec priority 1 Select the codec to be used first du rin g a call.
Codec priority 2 Select the codec to be used second during a call if the
previous codec fails.
Codec priority 3 Select the codec to be used third during a call if the
previous codec fails.
Codec priority 4 Select the codec to be used fourth during a call if the
previous codec fails.
Codec priority 5 Select the codec to be used fifth during a call if the previous
codec fails.
Enable voice encryption
(SRTP)
Enable G.729 Annex B When G.729a/b is enabled, se lect to enable G.729
Preferred Packetization
Time (ms)
Select to enable secure RTP for voice packets.
Annex B, with voice activity detection (VAD) and
bandwidth-conserving silence suppression.
Select the packetization interval time.
Using the WebUI 37 Back to Contents
Page 38

VCS752 Administrator and Provisioning Ma nua l
Quality of Service
Setting Description
DSCP (voice) Enter the Differentiated Services Code Point (DSCP) value
from the Quality of Service setting on your router or switch.
DSCP (signalling) Enter the Differentiated Services Code Point (DSCP) value
from the Quality of Service setting on your router or switch.
Signaling Settings
Setting Description
Local SIP port Enter the local SIP port.
Transport Select the SIP transport protocol:
TCP (Transmission Control Protocol) is the most
reliable protocol and includes error checking and
delivery validation.
UDP (User Datagram Protocol) is generally less prone
to latency, but SIP data may be subject to network
congestion.
TLS (Transport Layer Security)—the VCS752 supports
secured SIP signalling via TLS. Optional server
authentication is supported via user-uploaded
certificates. TLS certificates are uploaded using the
configuration file. See
Settings” on page 133
“"file" Module: Imported File
and consult your service
provider.
Using the WebUI 38 Back to Contents
Page 39

VCS752 Administrator and Provisioning Ma nua l
Feature Access Codes Settings
If your IP PBX service provider uses feature access codes, then enter the applicable codes
here.
Setting Description
Paging Enter the paging access code.
Call Park Enter the call park access code. Broadsoft provides a
feature access code for the park feature.
Asterisk/Metaswitch provides a parking lot extension
number for the park fe ature. Enter the p arking lot extension
number here.
Parked Call Retrieval Enter the call park retrieval access code. Broadsoft and
Asterisk/Metaswitch provide a feature access code for park
retrieval.
Voicemail Enter the voicemail acce ss code. The code is dialed when
the user selects a line from the phone's Message menu.
DND ON Enter the Do Not Disturb ON access code.
DND OFF Enter the Do Not Disturb OFF access code.
Call Forward All ON Enter the Call Forward All ON access code.
Call Forward All OFF Enter the Call Forward All OFF access code.
Call Forward No Answer ONEnter the Call Forward No Answer ON access code.
Call Forward No Answer
OFF
Using the WebUI 39 Back to Contents
Enter the Call Forward No Answer OFF access code.
Page 40

Setting Description
VCS752 Administrator and Provisioning Ma nua l
Call Forward Busy ON
Enter the Call Forward Busy ON access code.
Call Forward Busy OFF Enter the Call Forward Busy OFF access code.
Anonymous Call Reject ONEnter the Anonymous Call Reject ON access code.
Anonymous Call Reject
Enter the Anonymous Call Reject OFF access code.
OFF
Anonymous Call ON Enter the Anonymous Call ON access code.
Anonymous Call OFF Enter the Anonymous Call OFF access code.
Call Waiting ON Enter the Call Waiting ON access code.
Call Waiting OFF Enter the Call Waiting OFF access code.
Group Call Pickup Enter the Group Call Pickup code. Dialing the code enables
the user to answer a call ringing at another VCS752 that is
part of the same group.
Direct Call Pickup Enter the Direct Call Pickup code. Dialing the code enables
the user to answer a call ringing at another VCS752.
Using the WebUI 40 Back to Contents
Page 41

Voicemail Settings
Setting Description
VCS752 Administrator and Provisioning Ma nua l
Enable MWI
Subscription
When enabled, the account subscribes to the "message
summary" event package. The account may use the User
ID or the service provider's "Mailbox ID".
Mailbox ID Enter the URI for the mailbox ID. The phone uses this URI
for the MWI subscription. If left blank, the User ID is used
for the MWI subscription.
MWI subscription
expiration
Enter the MWI subscription expiry time (in seconds) for
account x.
Ignore unsolicited MWI When selected, unsolicited MWI notifications—notifications
in addition to, or instead of SUBSCRIBE and NOTIFY
methods—are ignored for account x. If the VCS752
receives unsolicited MWI notifications, the Message
Waiting LED will not light to indicate new messages.
Disable this setting if:
MWI service does not involve a subscription to a
voicemail server. That is, the server supports
unsolicited MWI notifications.
you want the Message Waiting LED to indicate new
messages when the VCS752 receives unsolicited MWI
notifications.
Enable Stutter Dial Tone Enables or disa ble s the stutter dial tone for that account
(indicating message(s) waiting) when the phon e goes off
hook.
Using the WebUI 41 Back to Contents
Page 42

NAT Traversal
Setting Description
VCS752 Administrator and Provisioning Ma nua l
Enable STUN
Server address Enter the STUN server IP address or domain name.
Server port Enter the STUN server port.
Enable UDP Keep-Alive Enables or disables UDP keep-alives. Keep-alive packets
Keep-alive interval (secs) Enter the interval (in seconds) for sending UDP keep-alives.
Enables or disables STUN (Simple Traver sal of UDP through
NATs) for account x. The Enable STUN setting allows the
VCS752 to identify its publicly addressable information
behind a NAT via communicating with a STUN server.
are used to maintain connections established through NAT.
Music on Hold Settings
Setting Description
Enable Local MoH Enables or disables a hold-reminder tone that the user
hears when a far-end caller puts the call on hold.
Network Conference Settings
Setting Description
Enable Network
Conference
Conference URI Enter the URI for the network bridge for conference
Using the WebUI 42 Back to Contents
Enables or disables network conferencing for account x.
handling on account x.
Page 43

VCS752 Administrator and Provisioning Ma nua l
Session Timer
Setting Description
Enable Session Timer Enables or disables the SIP session timer. The session
timer allows a periodic refreshing of a SIP session using
the RE-INVITE message.
Minimum value (secs) Sets the session timer minimum value (in seconds) for
account x.
Maximum value (secs) Sets the session timer maximum value (in seconds) for
account x.
Using the WebUI 43 Back to Contents
Page 44

VCS752 Administrator and Provisioning Ma nua l
Call Settings
You can configure call settings for each account. Call Settings include Do Not Disturb and
Call Forward settings.
The call settings are also available as parameters in the configuration file. See
“"call_settings" Module: Call Settings” on page 129.
General Call Settings
Setting Description
Anonymous Call Reject Enables or disables rejecting calls indicated as
"Anonymous."
Enable Anonymous Call Enables or disables outgoing anonymous calls. When
enabled, the caller name and number are indicated as
"Anonymous."
Do Not Disturb
Setting Description
Enable DND Turns Do Not Disturb on or off.
Incoming calls When set to Show, the phone displays incoming call
information while Do Not Disturb is on. When set to Reject,
the phone rejects incoming calls without alerting the user.
Using the WebUI 44 Back to Contents
Page 45

Call Forward
Setting Description
VCS752 Administrator and Provisioning Ma nua l
Enable Call Forward
Always
Enables or disables call forwarding for all calls on that line.
Select to enable.
Target Number Enter a number to which all calls will be forwarded.
Enable Call Forward
Busy
Enables or disables forwarding incoming calls to the target
number if:
the number of active calls has reached the maximum
number of calls configured for account x
Call Waiting Off is se lected.
Target Number Enter a number to which calls will be forwarded when Call
Forward Busy is enabled.
Enable Call Forward No
Answer
Enables or disables call forwarding for unanswered calls
on that line.
Target Number Enter a number to which unanswered calls will be
forwarded.
Delay Select the number of rings before unanswered calls are
forwarded.
Using the WebUI 45 Back to Contents
Page 46

VCS752 Administrator and Provisioning Ma nua l
Preferences
On the Preferences page, you can configure some basic settings for th e phone and set hold
reminder and call waiting settings. The Preferences page is a lso availa ble to p hone u sers
when they log on to the WebUI.
The preference settings are also available as parameters in the configuration file. See
“"user_pref" Module: User Preference Settings” on page 126.
General User Settings
Click the link for each setting to see the matching configuration file parameter in
“Configuration File Parameter Guide” on page 92. Default values and ranges are listed
there.
Setting Description
WebUI Language Sets the language that appears on the WebUI.
Phone Language Sets the language that appears on the phone. Other
languages may be added in a future release.
Backlight Timer (secs) Sets how long (in seconds) the screen backlight stays on
after the last button press.
Ringer Volume Sets the ringer volume for incoming calls. Y ou can also use
the VOLUME or keys on the VCS752.
Using the WebUI 46 Back to Contents
Page 47

Call Hold Reminder
Setting Description
VCS752 Administrator and Provisioning Ma nua l
Enable Call Hold
Reminder Tone
Tone Interval (secs) Sets the interval for the call hold r eminder tone, in se conds.
Enables or disables the call hold reminder tone. Select to
enable.
Call Waiting
Setting Description
Call Waiting Off
Call Waiting On When selected, enables incoming call notifications when
Enable Call Waiting Tone Enables or disables the call waiting tone. Select to enable.
Tone Interval (secs) Sets the interval for the call waiting tone, in seconds.
When selected, disables incoming call notifications when
the user is already on a call. Incoming calls are rejected.
Incoming callers hear a busy signal. When Call Waiting Off
is selected, and Call Forward Busy is enabled, incoming
calls are handled according to the Call Foward Busy setting .
the user is already on a call.
Using the WebUI 47 Back to Contents
Page 48

VCS752 Administrator and Provisioning Ma nua l
Program Dial Keys
The Program Dial feature allows phone users to dial numbe rs with a single pr ess of a soft
key. On the Program Dial pages, you can configure up to three Program Dial keys. Each
key requires a label (short enough to fit in the sof t key’s area), an account and number that
the key will dial, a location where the key will fit between the other soft keys, and the call
modes during which the key will appear.
To enter program dial soft keys:
1. Enter the Program Dial key label. Labels that exceed the width of the soft key will end
with ... when they appear on the phone.
2. Enter a value that the Program Dial key will dial.
3. Select an account that the Program Dial key will use.
4. Select the call modes for which you want the Program Dial key to appear.
5. Select the location for the Program Dial key for the selected call modes. You can place
the key before another key, or place it last in the order.
6. Click .
7. Configure any additional Program Dial keys.
Using the WebUI 48 Back to Contents
Page 49

VCS752 Administrator and Provisioning Ma nua l
Speed Dial
On the Speed Dial page, you can enter up to 10 speed dial numbers. For each speed dial
number you enter, you must assign the account on which the number will be dialed out.
To dial a speed dial number, press and hold the dial pad key that matches the speed dial
entry number.
This menu duplicates the speed dial menu on the phone (Main Menu >
Features > Speed dial) . Entries that are entered and saved on the WebUI replace
entries that were entered using the phone. Similarly, entries that are configured
using the phone menu will update entries on the WebUI.
The speed dial key settings are also available as par amete rs in the configur ation file. See
“"speed_dial" Module: Speed Dial Settings” on page 131.
After entering information on this page, click to save it.
To enter speed dial numbers:
1. In the Name column, enter the name associated with this speed-dial entry.
2. In the Value column, enter a phone number for the desired key.
3. In the Account column, select the account that this speed dial number will use.
4. Click .
Using the WebUI 49 Back to Contents
Page 50

VCS752 Administrator and Provisioning Ma nua l
Speed Dial Keys
Click the link for each setting to see the matching configuration file parameter in
“"speed_dial" Module: Speed Dial Settings” on page 131.
Setting Description
Name The name associated with the speed dial entry.
Value The phone number that the speed dial key dials when
pressed and held.
Account The SIP account that the phone will use to dial the number.
Using the WebUI 50 Back to Contents
Page 51

VCS752 Administrator and Provisioning Ma nua l
Signaling Settings
The signaling settings are also available as parameters in the configuration file. See
“"network" Module: Network Settings” on page 106.
After entering information on this page, click to save it.
Voice
Click the link for each setting to see the matching configuration file parameter in “"network"
Module: Network Settings” on page 106. Default values and ranges are listed there.
Setting Description
Min Local RTP port
Max Local RTP port Enter the upper limit of the RTP port range.
Enter the lower limit of the Real-time Transport Protocol (R TP)
port range. RTP ports specify the minimum and maximum port
values that the phone will use for RTP packets.
NAT Traversal
The NAT Traversal settings are communicated to the VoIP server so that the VCS752 is
reachable when connected to the Internet behind NAT.
Setting Description
Enable IP Masquerading Select to enable NAT traversal and IP ma sq ue r ad ing .
Public IP address Enter the external IP address of your router. This setting
identifies the router's public address to the VoIP server.
Public SIP port Enter the router port number being used for SIP. This
setting identifies the router's port to the VoIP server.
Min Public RTP port Enter the lower limit of the public RTP port range.
Max Public RTP port Enter the upper limit of the RTP port range.
Using the WebUI 51 Back to Contents
Page 52

VCS752 Administrator and Provisioning Ma nua l
Ringer Settings
The Ringer Settings enable you to provide a distinctive ringing feature via the custom
Alert-Info header associated with an inc oming call. This setting overrides the ringer tone you
have set for the account. For example, you can set a unique ringer tone to alert the VCS752
user upon receiving any incoming calls tagged as "important" in the Alert-Info header.
The SIP Invite message contains an Alert-Info header that the phone checks in order to
determine which ringer tone to play. The Alert-Info header format is as follows:
Alert-Info: info=info_text
If the header contains the "info" p arameter , the phone attempts to match it to the Distinctive
Ringing Text. If there is a match, the associated tone will play. If there is no match, the
default tone for the account will play.
The matching is done on a "first match" basis. In the case of duplicate text strings, the ringer
tone associated with the first matched entry in the Distinctive Ringing Text list will play.
The server-side configuration must be done with your service provider. The SIP Invite text
("Distinctive Ringing Text" on the Ringer WebUI p age) must be entered in the forma t
where x is the ringer number from 1 to 10. For example, to match Ringer 1 enter
ringerx
ringer1
.
,
The ringer settings are also available as parameters in the configuration file. See
“"ringersetting" Module: Distinctive Ringer Settings” on page 132.
After entering information on this page, click to save it.
Setting Description
Distinctive Ringing Text Enter the text that will match the "info" parameter and play
the ringer tone. The Distinctive Ringing Text must be in the
format ringerx where x is the ringer tone 1 to 10.
Tone Select the desired ringer from the list.
Using the WebUI 52 Back to Contents
Page 53

VCS752 Administrator and Provisioning Ma nua l
Paging Zones
On the Paging Zones page, you can enter the multicast IP addresses that the phone will
monitor. When a page is sent out using this multicast IP address, all phones that are
programmed to monitor that IP address will receive the paging RTP stream and play the
page on their speakerphone. You can also enable the phone to send out multicast pages
using a particular multicast IP address.
Y ou must first set up paging group s (each group consisting of a multicast paging IP address
and assigned User IDs) on your SIP PBX. The VCS752 can monitor a maximum of 10
multicast IP addresses.
Setting Description
Name Enter the name of the paging zone. Names can be a
maximum of 15 characters. The paging zone name is
displayed on the LCD during incoming and outgoing
multicast pages.
Multicast IP Enter the paging zone multicast IP address. The IP
address range for multicast addresses is
224.0.0.0–239.255.255.255.
Multicast Port Ente r the multicast port used by the multicast IP address.
The valid port range is 1 to 65535.
Priority Select the paging zone priority from 1 to 10. Zones with a
priority higher than another zone can interrupt the
lower-priority zone's active page.
In addition, a call priority setting is available in the
configuration file (page_zone.call_priority_t hr es ho ld ). Th is
priority setting also ranges from 1 to 10 (2 is the default). If
the paging zone priority is higher or equal to the call
priority, then a multicast page can interrupt an active,
dialing, or incoming call.
Enable Incoming Page
Select to enable the VCS752 to receive incoming pages for
that paging zone. If the "Enable Incoming Page" checkbo x is
not selected, the phone will not listen for the multicast, but
will still be able to broadcast an outgoing page.
Using the WebUI 53 Back to Contents
Page 54

Network Pages
You can set up the VCS752 for your network configuration on the Network pages. Your
service provider may require you to configure your network to be compatible with its
service, and the VCS752 settings must match the network settings.
The network settings are also available as parameters in the configuration file. See
“"network" Module: Network Settings” on page 106.
After entering information on this page, click to save it.
Basic Network Settings
VCS752 Administrator and Provisioning Ma nua l
If you disable DHCP on this page, you must configure static IP settings for the
VCS752. You must be familiar with TCP/IP principles and protocols to configure
static IP settings.
Basic Network Settings
Click the link for each setting to see the matching configuration file parameter in “"network"
Module: Network Settings” on page 106. Default values and ranges are listed there.
Setting Description
DHCP DHCP is selected (enabled) by default, which means the
VCS752 will get its IP address, Subnet Mask, Gateway , and
DNS Server(s) from the network. When DHCP is disabled,
you must enter a static IP address for the VCS752, as well
as addresses for the Subnet Mask, Gateway, and DNS
Server(s).
Static IP When Static IP is selected, you must enter a static IP
address for the VCS752, as well as addresses for the
Subnet Mask, Gateway, and DNS Server(s).
IP Address
Subnet Mask Enter the subnet mask.
If DHCP is disabled, enter a static IP address for the VCS7 52.
Gateway Enter the address of the default gateway (in this case, your
router).
Using the WebUI 54 Back to Contents
Page 55

VCS752 Administrator and Provisioning Ma nua l
Setting Description
Primary DNS If DHCP is disabled, enter addresses for the primary and
Secondary DNS
secondary DNS servers.
Advanced Network Settings
VLAN
You can organize your network and optimize VoIP performance by creating a virtual LAN
for phones and related devices.
Click the link for each setting to see the matching configuration file parameter in “"network"
Module: Network Settings” on page 106. Default values and ranges are listed there.
Setting Description
Enable LAN Port VLAN Enable if the phone is part of a VLAN on your network.
Select to enable.
VID Enter the VLAN ID (vlan 5, for example).
Priority Select the VLAN priority that matches the Quality of
Service (QOS) settings that you have set for that VLAN ID.
Outbound SIP packets will be marked and sent according
to their priority. 7 is the highest priority.
Note: Configuring QOS settings for your router or switch is
a subject outside the scope of this document.
Using the WebUI 55 Back to Contents
Page 56

VCS752 Administrator and Provisioning Ma nua l
LLDP-MED
Setting Description
Enable LLDP-MED Enables or disables Link Layer Discovery Protocol for
Media Endpoint Devices (LLDP-MED). LLDP-MED is a
standards-based discovery protocol supported on some
network switches. It is required for auto-configuration with
VLAN settings.
Packet Interval (secs) Sets the LLDP-MED packet interval (in seconds).
802.1x
Setting Description
Enable 802.1x Enables or disables the 802.1x authentication protocol.
This protocol allows the phone to attach itself to network
equipment that requires device authentication via 802.1x.
Identity Enter the 802.1x EAPOL identity.
MD5 Password Enter the 802.1x EAPOL MD5 password.
Using the WebUI 56 Back to Contents
Page 57

Contacts Pages
Local Directory
On the Local Directory page, you can manage your local directory entries. You can sort,
edit, delete, and add contact information for up to 200 entries. In order to back up your
contacts or import another local directory file, the page also enables you to export and
import your phone's local directory.
The Local Directory lists entries on up to 10 pages, with 20 entries per p age. Click ,
, , or a page number to view the desired page of entries.
VCS752 Administrator and Provisioning Ma nua l
You can also use the phone menu to manage local directory entries. For more
information, see the VCS752 User Guide.
Table 6 describes the buttons available on the Local Directory page.
Using the WebUI 57 Back to Contents
Page 58

Table 6. Local Directory commands
Click To...
Sort the list by last name.
Edit information for an entry
View the next page of entries.
View the last page of entries.
View the first page of entries.
Delete selected entries from the directory. Click Select All to
select every entry on the page you are viewing.
Add a new directory entry.
Delete all Directory entries.
VCS752 Administrator and Provisioning Ma nua l
Import a directory file.
Export the directory.
To add a new directory entr y:
1. Click .
The Create Local Directory Entry page appears.
2. Enter the required information as described in the following table.
Using the WebUI 58 Back to Contents
Page 59

VCS752 Administrator and Provisioning Ma nua l
Create Local Directory Entry
Setting Description Range Default
First Name Enter the appropriate names in
Last Name
these fields. The maximum length
of the first name and last name
fields is 15 characters.
n/a Blank
Ringer Tone Sets a unique ringer tone for calls
from this directory entry.
Account Sets the account used when you
dial this directory entry.
Work Number
Enter the appropriate names and
numbers in these fields.
Other Number
Auto, Tone 1–10 Tone 1
Default Account,
Account 1–3
n/a BlankMobile Number
Default
Account
Directory Import/Export
The best way to create a directory file for import is to first export the directory from the
phone. After exporting the file, open it in an .xml editor and add or modify entries.
Importing a directory file adds the imported directory entries to existing entries. Therefore,
it is possible to have duplicate entries after importing a directory file. If you are importing a
"complete" directory file with the aim of replacing the entire current directory, use Select All
and to clear the directory before importing the file.
Using the configuration file, you can set whether an imported directory file adds to
existing entries or replaces existing entries. See “"file" Module: Imported File
Settings” on page 133.
Directory files are .xml files that have the following tags:
Local Directory WebUI field Directory file XML tag
First Name <DIR_ENTRY_NAME_FIRST>
Last Name <DIR_ENTRY_NAME_LAST>
Work Number <DIR_ENTRY_NUMBER_WORK>
Mobile Number <DIR_ENTRY_NUMBER_MOBILE>
Other Number <DIR_ENTRY_NUMBER_OTHER>
Account <DIR_ENTRY_LINE_NUMBER>
Call Block (not on WebUI) <DIR_ENTRY_BLOCK>
Ringer Tone <DIR_ENTRY_RINGER>
Using the WebUI 59 Back to Contents
Page 60

VCS752 Administrator and Provisioning Ma nua l
Blacklist
On the Blacklist page, you can manage local blacklist entries. The VCS752 rejects calls
from numbers that match blacklist entries. You can sort, edit, delete, and add up to 200
blacklist entries. In order to back up your blacklist entries or import another local blacklist
file, the page also enables you to export and import the blacklist.
The blacklist lists entries on up to 10 pages, with 20 entries per page. Click ,
, , or a page number to view the desired page of entries.
You can also use the VCS752 menu to manage blacklist entries. For more
information, see the VCS752 User Guide.
Table 7 describes the buttons available on the Blacklist page.
Table 7. Blacklist commands
Click To...
Sort the list by last name.
Edit information for an entry
View the next page of entries.
View the last page of entries.
View the first page of entries.
Delete selected entries. Click Select All to select every entry on
the page you are viewing.
Using the WebUI 60 Back to Contents
Page 61

Table 7. Blacklist commands
Click To...
Add a new entry.
Delete all entries.
Import a blacklist file.
Export the blacklist.
To add a new blacklist entry:
1. Click .
The Create Blacklist Entry page appears.
VCS752 Administrator and Provisioning Ma nua l
2. Enter the required information as described in the following table.
Create Blacklist Entry
Setting Description Range Default
First Name Enter the appropriate names in
Last Name
these fields. The maximum length
of the first name and last name
fields is 15 characters.
Account Sets the account used when you
dial this directory entry.
Work Number
Enter the appropriate names and
numbers in these fields.
Other Number
n/a Blank
Default Account,
Account 1
Account 1–3
n/a BlankMobile Number
Using the WebUI 61 Back to Contents
Page 62

VCS752 Administrator and Provisioning Ma nua l
Blacklist Import/Export
The best way to create a blacklist file for import is to first export the blacklist from the
VCS752. After exporting the file, open it in an .xml editor and add or modify entries.
Importing a blacklist file adds the imported blacklist entries to existing entr ies. Therefore, it
is possible to have duplicate entries after importing a blacklist file. If you are importing a
"complete" blacklist file with the aim of replacing the entire current blacklist, use Select All
and to clear the blacklist before importing the file.
Using the configuration file, you can set whether an imported blacklist file adds to
or replaces existing entries. See “"file" Module: Imported File Settings” on
page 133.
Blacklist files are .xml files that have the following tags:
Blacklist WebUI field Blacklist file XML tag
First Name <BLACKLIST_ENTRY_NAME_FIRST>
Last Name <BLACKLIST_ENTRY_NAME_LAST>
Work Number <BLACKLIST_ENTRY_NUMBER_WOR K>
Mobile Number <BLACKLIST_ENTRY_NUMBER_MOBILE>
Other Number <BLACKLIST_ENTRY_NUMBER_OTHER>
Account <BLACKLIST_ENTRY_LINE_NUMBER>
Using the WebUI 62 Back to Contents
Page 63

VCS752 Administrator and Provisioning Ma nua l
LDAP
The phone supports remote Lightweight Dire ctory Access Protocol (LDAP) directories. An
LDAP directory is hosted on a remote server and may be the central directory for a large
organization spread across several cities, of fices, and dep artment s. You can configure the
phone to access the directory and allow users to search the directory for names and
telephone numbers.
The LDAP settings are also available as parameters in the configuration file. See
“"remoteDir" Module: Remote Directory Settings” on page 120.
After entering information on this page, click to save it.
LDAP Settings
Click the link for each setting to see the matching configuration file parameter in
“"remoteDir" Module: Remote Directory Settings” on pag e 120. Default values and ranges
are listed there.
Setting Description
Enable LDAP Enables or disables the phone's access to the LD AP
directory.
Directory name Enter the LDAP directory name.
Server address Enter the LDAP server domain name or IP address.
Port Enter the LDAP server port.
Using the WebUI 63 Back to Contents
Page 64

VCS752 Administrator and Provisioning Ma nua l
Setting Description
Version Select the LDAP protocol version supported on the phone.
Ensure the protocol value matches the vers io n as sign e d
on the LDAP server.
Authentication scheme Select the LDAP server authentication scheme.
Authentication name Enter the user name or authentication name for LDAP
server access.
Authentication password Enter the authentication password for LDAP server access.
Base Enter the LDAP search base. This sets where the search
begins in the directory tree structure. Enter one of more
attribute definitions, separated by commas (no spaces).
Your directory may include attributes like "cn" (common
name) or "ou" (organizational unit) or "dc" (domain
component).
For example: ou=accounting,dc=vtech,dc=com
Maximum number of
entries
Sets the maximum number of entrie s returned for an LDAP
search. Limiting the number of hits can conserve network
bandwidth.
Maximum search delay Enter the delay (in seconds) before the phone starts
returning search results.
First name filter Enter the first name attributes for LDAP searching. The
format of the search filter is compliant to the standard string
representations of LDAP search filters (RFC 2254).
Last name filter Enter the last name attributes for LDAP searching. The
format of the search filter is compliant to the standard string
representations of LDAP search filters (RFC 2254).
Phone number filter Enter the number attributes for LDAP searching. The
format of the search filter is compliant to the standard string
representations of LDAP search filters (RFC 2254).
First name attribute Sets the attribute for first name. What you enter here
should match the first name attribute for entries on the
LDAP server (gn for givenName, for example). This helps
ensure that the phone displays LDAP entries in the same
format as the Local Directory.
Last name attribute Sets the attribute for last name. What you enter here
should match the last name attribute for entries on the
LDAP server (sn for surname, for example). This helps
ensure that the phone displays LDAP entries in the same
format as the Local Directory.
Using the WebUI 64 Back to Contents
Page 65

VCS752 Administrator and Provisioning Ma nua l
Setting Description
Work number attribute Sets the attribute for the work number. Wha t you enter here
should match the work number attribute for entries on the
LDAP server (telephoneNumber, for example). This helps
ensure that the phone displays LDAP entries in the same
format as the Local Directory.
Mobile number attribute Sets the attribute for the mobile number. What you enter
here should match the mobile number attribute for entries
on the LDAP server (mobile, for example). This helps
ensure that the phone displays LDAP entries in the same
format as the Local Directory.
Other number attribute Sets the attribute for the other numb e r. What you enter
here should match the other number attribute for e ntries on
the LDAP server (otherPhone, for example). This helps
ensure that the phone displays LDAP entries in the same
format as the Local Directory.
Lookup for incoming
calls
Enables or disables LDAP incoming call lookup. If enabled,
the phone searches the LDAP directory for the incoming
call number. If the number is found, the phone uses the
LDAP entry for CID info.
Lookup in dialing mode Enables or disables LDAP outgoing call lookup. If enabled,
numbers entered in pre-dial or live dial are matched
against LDAP entries. If a match is found, the LDAP entry
is displayed for dialing.
Using the WebUI 65 Back to Contents
Page 66

VCS752 Administrator and Provisioning Ma nua l
Broadsoft
The phone supports access to the Broadsoft Phonebook. Users can search for and call
contacts that are hosted on the Broadsoft Phonebook. On the Broadsoft Phonebook
Settings page, you must enter the path a nd cr ed ential s to en able the ph one to a ccess the
Broadsoft Phonebook.
Broadsoft Phonebook Settings
Setting Description
Enable Broadsoft
Phonebook
Display name Enter the display name fo r the Broadsoft Phonebook. This
Server base address Enter the Broadsoft Phonebook server domain or IP
Port Enter the Broadsoft Phonebook server po rt.
Authentication name Enter the user name or authentication name for Broadsoft
Authentication password Enter the authentication password for Broadsoft
Directory type Select the directory type: Group, Group Common,
Enables or disables the phone's access to the Broadsoft
phonebook.
name appears on the Directory list on the VCS752 menu.
address.
Phonebook access.
Phonebook access.
Enterprise, Enterprise Common, Personal
Using the WebUI 66 Back to Contents
Page 67

VCS752 Administrator and Provisioning Ma nua l
Call History
The Call History page has no configurable settings. It displays Missed Calls, Received
Calls, and Dialed Calls. Users can view their call history and "click to dial" numbers if click
to dial is enabled.
Using the WebUI 67 Back to Contents
Page 68

Servicing Pages
Reboot
To manually reboot the VCS752 and apply settings that you have updated, click .
Time and Date
On the Time and Date page, yo u can manually set the time and date, and the time and date
formats. You can also set the system time to follow a Network Time Protocol (NTP) Server
(recommended) or you can set the time and date manually.
VCS752 Administrator and Provisioning Ma nua l
The time and date settings are also available as parameters in the configuration file. See
“"time_date" Module: Time and Date Settings” on page 115.
Using the WebUI 68 Back to Contents
Page 69

VCS752 Administrator and Provisioning Ma nua l
Time and Date Format
Click the link for each setting to see the matching configuration file parameter in
“"time_date" Module: Time and Date Settings” on p age 115. Default values and ranges are
listed there.
Setting Description
Date Format Sets the date format.
Time Format Sets the clock to a 24-hour or 12-hour format.
Network Time Settings
Setting Description
Enable Network Time Enables or disables getting time and date information for
your phone from the Internet.
NTP Server If Enable Network Time is selected, enter the URL of your
preferred time server.
Use DHCP (Option 42) If Enable Network Time is selected, select to use DHCP to
locate the time server . Option 42 specifies the NTP server
available to the phone. When enabled, the phone obtains
the time in the following priority:
1. Option 42
2. NTP Server
3. Manual time.
Time Zone and Daylight Savings Settings
Setting Description
Time Zone Select your time zone from the list.
Automatically adjust
clock for Daylight
Savings
User-defined DST Select to set your own start and end dates and offset for
DST Start: Month
DST Start: Week
DST Start: Day
DST Start: Hour
Select to adjust the clock for daylight savings time
according to the NTP server and time zone setting. To
disable daylight savings adjustment, disable both this
setting and User-defined Daylight Savings Time.
Daylight Savings Time. To disable daylight savings
adjustment, disable both this setting and Automatically
adjust clock for Daylight Savings.
If User-defined DST is enabled, set the start date and time
for daylight savings: Month, week, day, and hour.
Using the WebUI 69 Back to Contents
Page 70

Setting Description
VCS752 Administrator and Provisioning Ma nua l
DST End: Month
DST End: Week
DST End: Day
DST End: Hour
Daylight Savings Offset If User-defined DST is enabled, this specifies the daylight
Use DHCP (Option
2/100/101)
If User-defined DST is enabled, set the end date and time
for daylight savings: Month, week, day, and hour.
savings adjustment (in minutes) to be applied when the
current time is between Daylight Savings Start and
Daylight Savings End.
If Enable Network Time is selected, select to use DHCP to
determine the time zone offset. Options 2, 100 and 101
determine time zone information.
Manual Time Settings
If Enable Network Time is disabled or if the time server is not available, use Manual Time
Settings to set the current time.
Setting Description
Date Select the current year, month, and day. Click the Date
field and select the date from the calendar that appears.
Time Sets the current hour, minute, and second. Click the Time
field, and enter the current time. You can also refresh the
page to update the manual time settings.
Click to start the VCS752 using the manual time settings.
Using the WebUI 70 Back to Contents
Page 71

VCS752 Administrator and Provisioning Ma nua l
Firmware Upgrade
You can update the VCS752 with new firmware using the following methods:
Retrieving a firmware update file from a remote host computer an d accessed via a
URL. This central location may be arranged by you, an autho rized dealer, or your
SIP service provider. Enter the URL under Firmware Server Settings.
Using a file located on your computer or local network. No connection to the Internet
is required. Consult your dealer for access to firmware update files. Click
Upgrade
to view the page where you can ma nua lly upg rade the VCS7 52 firmw are.
The firmware upgrade settings are also available as parameters in the configuration file.
See “"provisioning" Module: Provisioning Settings” on page 110.
Manual
Firmware Server Settings
Click the link for each setting to see the matching configuration file parameter in
“"provisioning" Module: Provisioning Settings” on page 110. Default valu es and ranges are
listed there.
Setting Description
Firmware URL
Server authentication
name
Server authentication
password
To update the firmware immediately:
Click .
You can also configure the VCS7 52 to check for firmware updates at regular
intervals. See “Provisioning” on page 73.
The URL where the firmware update file resides. This should
be a full path, including the filename of the firmware file.
Authentication username for the firmware server.
Authentication password for the firmware server.
Using the WebUI 71 Back to Contents
Page 72

VCS752 Administrator and Provisioning Ma nua l
Manual Firmware Update and Upload
On the Manual Firmware Update Settings page, you can upgrade the VCS752 firmware
using a file located on your computer or local network.
To update the firmware using a file on your computer or local network:
1. On the Manual Firmware Update page, click to locate and open the
firmware update file.
2. Click .
After clicking the VCS752 will update its firmware and restart.
Using the WebUI 72 Back to Contents
Page 73

VCS752 Administrator and Provisioning Ma nua l
Provisioning
Provisioning refers to the process of acquiring and applying new settings for the VCS752
using configuration files retrieved from a remote computer. After a VCS752 is deployed,
subsequent provisioning can update the VCS752 with new settings; for example, if your
service provider releases new features. See also “Provisioning Using Configuration Files”
on page 84.
With automatic provisioning, you enable the VCS752 to get it s settings automatically—the
process occurs in the background as part of routine system operation. Automatic
provisioning can apply to multiple devices simultaneously.
With manual provisioning on the WebUI, you update the VCS752 settings (configuration
and/or firmware) yourself via Provisioning > Import Configuration and/or Firmware
Upgrade > Manual Upgrade. Manual provisioning can only be performed on one
VCS752 at a time.
On the Provisioning page, you can enter settings that will enable the VCS752 to receive
automatic configuration and firmware updates. The Provisioning page also allows you to
manually update VCS752 configuration from a locally stored configuration file using an
Import function. You can also export the VCS752 configuration—either to back it up or
apply the configuration to another VCS752 in the future—to a file on your computer.
The provisioning process functions according to the Resynchronization settings and
Provisioning Server Settings. The VCS752 checks for the provisioning URL from the
following sources in the order listed below:
1. PnP—Plug and Play Subscribe and Notify protocol
2. DHCP Options
3. Preconfigured URL—Any VCS752 updated to the latest firmware release will have the
Redirection Server URL available as the default Prov ision in g Ser ve r URL (see
“provisioning.server_address” on page 110).
Using the Redirection Service requires contacting the VTech support team for an
account.
If one of these sources is disabled, not available, or has not been config ured, the VCS752
proceeds to the next source until reaching th e en d of the list.
The provisioning settings are also available as parameters in the configuration file. See
“"provisioning" Module: Provisioning Settings” on page 110.
Using the WebUI 73 Back to Contents
Page 74

Provisioning Server
Setting Description
VCS752 Administrator and Provisioning Ma nua l
Server URL URL of the provisioning file(s). The format of the URL must
be RFC 1738 compliant, as follows:
"<schema>://<user>:<password>@
<host>:<port>/<url-path>"
"<user>:<password>@" may be empty.
"<port>" can be omitted if you do not need to specify the
port number.
Server authentication
name
Server authentication
password
User name for access to the provisioning server
Password for access to the provisioning server
Plug-and-Play Settings
Setting Description
Enable PnP Subscribe Select to enable the VCS752 to search for the provisioning
URL via a SUBSCRIBE message to a multicast address
(224.0.1.75). The VCS752 expects the server to reply with
a NOTIFY that includes the provisioning URL. The process
times out after five attempts.
Using the WebUI 74 Back to Contents
Page 75

VCS752 Administrator and Provisioning Ma nua l
DHCP Settings
Setting Description
Use DHCP Options Enables the VCS752 to use DHCP options to locate and
retrieve the configuration file. When selected, the VCS752
automatically attempts to get a provisioning server
address, and then the configuration file. If DHCP options
do not locate a configuration file, then the server
provisioning string is checked.
Note: Ensure that DHCP is also enabled on the “Basic
Network Settings” page.
DHCP Option Priority 1 If DHCP is enabled, sets the DHCP Option priority. Select
the highest priority option.
DHCP Option Priority 2 If DHCP is enabled, sets the DHCP Option priority. Select
the second highest priority option.
DHCP Option Priority 3 If DHCP is enabled, sets the DHCP Option priority. Select
the third highest priority option.
Vendor Class ID (DHCP
60)
User Class Info (DHCP
77)
DHCP Option 60 is available to send vendor-specific
information to the DHCP Server.
DHCP Option 77 is available to send vendor-specific
information to the DHCP Server.
Resynchronization
On the Resynchronization page, you can select how and when the phone checks for
updated firmware and/or configuration files.
Using the WebUI 75 Back to Contents
Page 76

VCS752 Administrator and Provisioning Ma nua l
Setting Description
Mode Sets which files for which the VCS752 checks. It can check
for configuration files, firmware update files (from the URL
entered on the Firmware Server Settings page), or both.
Note: When checking for both configuration and firmware
files, the firmware URL can be within the config file. This
firmware URL takes take precedence ov er the URL on the
Firmware Server Settings page. It will also update the URL
on the Firmware Server Settings page. This allows you to
change the firmware URL automatically.
Bootup Check Sets the VCS752 to check the provisioning URL for new
configuration and/or firmware files upon bootup. The
update is applied as part of the reboot process.
Schedule Check: Disable
Schedule Check: Interval
When selected, disables regularly scheduled file checking.
Sets an interval for checking for updates. After selecting
Interval, enter the interval in minutes between update
checks.
Schedule Check:
Days of the Week
Select to enable weekly checking for updates on one or
more days. After selecting Days of the Week, select the
day(s) on which the VCS752 checks for updates.
Start Hour
Select the hour of the day on which the VCS752 checks for
updates.
End Hour
Select the hour of the day on which the VCS752 stops
checking for updates.
Use encryption Enables an AES-encrypted configuration file to be
decrypted before being applied to the VCS752. Select if
the configuration file has been secured using AES
encryption. See “Securing configuration files with AES
encryption” on page 90.
Passphrase If the configuration file has been secured using AES
encryption, enter the 16-bit key. See “Securing
configuration files with AES encryption” on page 90.
Using the WebUI 76 Back to Contents
Page 77

VCS752 Administrator and Provisioning Ma nua l
Import Configuration
Y ou can configure the VCS7 52 by importing a configuration file from your com puter or your
local network. For more information about configuration file types and configuration file
formatting, see “Provisioning Using Configuration Files” on page 84.
To import a configuration file:
1. Click to locate and open the configuration file.
2. Click .
The VCS752 will update its configuration.
Manually importing a configuration file differs from the auto-provisioning process in that:
The VCS752 does not check whether the file has been loaded before. The
configuration file is processed whether or not it is dif ferent from th e current version.
The VCS752 will restart immediately after importing the configuration file, without
waiting for one minute of inactivity.
Export Configuration
You can export all the settings you have configured on the WebUI and save them as a
configuration file on your computer . You can then use this configuration file as a backup, or
use it to update other phones.
Under Export Configuration, you can also reset the phone to its default configuration.
The exported configuration file will contain the following passwords in plain text:
SIP account authentication password
EAPOL password
Firmware server password
Provisioning server password
Encryption passphrase
LDAP server password
Broadsoft directory server password.
Please ensure that you save the exported configuration file in a secure location.
You can also disable passwords from being exported as plain text. See
“provisioning.pwd_export_enable” on page 114
Using the WebUI 77 Back to Contents
Page 78

VCS752 Administrator and Provisioning Ma nua l
To export the configuration file:
Click .
The format of the exported file is <model name>_<mac address>.cfg. For example,
VCS752_0011A0OCF489.cfg.
Exporting a configuration file generates two he ader lines in the configuration file. These
header lines provide the model number and software version in the following format:
#Model Number = xxxxxxx
#SW Version = xxxxxxx
You can use the exported file as a general configuration file, and duplicate the settings
across multiple units. However, ensure that you edit the file to remove any MAC-specific
SIP account settings before applying the general configuration file to other units.
Reset Configuration
You can reset the phone to its default settings.
To reset the VCS752 to its default configuration:
1. Under Reset Configuration, click .
2. When the confirmation box appears, click OK.
Using the WebUI 78 Back to Contents
Page 79

VCS752 Administrator and Provisioning Ma nua l
Security
On the Security page you can reset the admin password, reset the user password, and
enter web server settings.
The security settings are also available as parameters in the configuration file. See “"web"
Module: Web Settings” on page 125.
Passwords
You can set the administrator password and user password on the WebUI or by using
provisioning. For more information on using provisioning to set passwords, see “"profile"
Module: Password Settings” on page 139.
To change the admin password:
1. Enter the old password (for a new VCS752, the default password is admin).
2. Enter and re-enter a new password. Th e password is case sensitive and can consist of
both numbers and letters (to a maximum of 15 characters).
3. Click .
To change the User password:
1. Enter the old password (for a new VCS752, the default password is user).
2. Enter and re-enter a new password. Th e password is case sensitive and can consist of
both numbers and letters (to a maximum of 15 characters).
3. Click .
Using the WebUI 79 Back to Contents
Page 80

VCS752 Administrator and Provisioning Ma nua l
Web Server
Setting Description
HTTP Server port Port used by the HTTP server.
Enable Secure Browsing Sets the server to use the HTTPS protocol.
HTTPS Server port Port used by the HTTPS server.
To configure Web Server Settings:
1. Enter the HTTP Server port number. The default setting is 80.
2. Enable or Disable Secure Browsing. When enabled, the HTTPS protocol is used, and
you must select the HTTPS server port in the next step.
3. Enter the HTTPS server port number. The default setting is 443.
Changing the Web Server settings will reboot the VCS752.
Certificates
You can add two types of certificates using the WebUI or the provisioning file (see “"file"
Module: Imported File Settings” on page 133). The two types of certificates are:
Device—A single Device Certificate can be uploaded so that other parties can
authenticate the phone in the following case s:
When the phone acts as a web server for the user to manage configurations.
When the phone acts as a client for applications where HTTP is supported.
Server—A web server certificate can also be uploaded using provisioning. This
certificate (also called a trusted certificate) is for server authentication with secured
HTTP transaction in the following applications: SIP signaling, Provisioning,
Firmware, LDAP directory service, and Broadsoft directory service.
Using the WebUI 80 Back to Contents
Page 81

VCS752 Administrator and Provisioning Ma nua l
Device Certificate
To upload a Device certificate:
1. On the Device Certificate page, click .
2. Locate the certificate file and click Open.
3. On the Device Certificate page, click .
Server Certificate
To upload a web server certificate:
1. On the Server Certificate page, click .
2. Locate the certificate file and click Open.
3. On the Server Certificate page, click .
Using the WebUI 81 Back to Contents
Page 82

VCS752 Administrator and Provisioning Ma nua l
System Logs
On the Syslog Settings page, yo u can enter settings related to system logg ing a ctivities.
It supports the following logging modes:
Syslog server
Volatile file
Under Network Trace, you can capture network traffic related to the phone's activity and
save the capture as a .pcap file. The file can be used for diagnostic and troubleshooting
purposes.
Under Download Log, you can save the system log to a file.
The Syslog settings are also available as parameters in the configu ra tio n file. See “"log"
Module: Log Settings” on page 119.
Syslog Settings
Setting Description
Enable Syslog Enable log output to syslog server.
Server address Syslog server IP address.
Server port Syslog server port.
Log Level Sets the log level. The higher the level, the larger the
debug output.
5—ALL
4—DEBUG
3—INFO
2—WARNING
1—ERROR
0—CRITICAL
Using the WebUI 82 Back to Contents
Page 83

VCS752 Administrator and Provisioning Ma nua l
The logging levels are:
CRITICAL: Operating conditions to be reported or corrected immediately (for
example, an internal component failure or file system error).
ERROR: Non-urgent failures—unexpected conditions that won't cause the device
to malfunction.
WARNING: An indication that an error or critical condition can occur if action is not
taken.
INFO: Normal operational messages.
DEBUG: Developer messages for troubleshooting/debugging purposes.
Network Trace
To perform a network trace:
1. Start a network trace by clicking . The button changes to .
2. Stop the network trace by clicking .
3. Save the trace by clicking . Your browser should prompt you to save the
capture.pcap file.
Download Log
To download the system log:
1. Click .
2. After your browser prompt s you to save the system.log file, save the file in the desired
location.
Using the WebUI 83 Back to Contents
Page 84

P
ROVISIONING
F
ILES
U
SING
VCS752 Administrator and Provisioning Ma nua l
C HAPTER 4
C
ONFIGURATION
Provisioning using configuration files is the quickest way to configure multiple VCS752
conference phones. You can place configuration files on a provisioning server, where the
VCS752 conference phones retrieve the files and update their configuration auto matically.
Configuration files have the extension .cfg and contain settings that will apply to VCS752
conference phones. To edit a configuration file, open it with a text editor such as Notepad.
The settings within a configuration file are grouped into modules. Most of the modules
group their settings in the same way that settings are groupe d on the VCS752 W ebUI. For
example, the "time_date" module in the configuration file contains the same settings that
are on the Time and Date WebUI page. For a complete list of VCS752 configuration file
modules and their associated parameters, see
page 92.
Using the WebUI, you can also import a configuration file and apply the configuration file
settings to the VCS752. For more information, see
This chapter covers:
“The Provisioning Process” on page 85
“Configuration File Types” on page 87
“Data Files” on page 88
“Configuration File Tips and Security” on page 89.
“Configuration File Parameter Guide” on
“Import Configuration” on page 77.
Provisioning Using Configuration Files 84 Back to Contents
Page 85

The Provisioning Process
The automatic provisioning process is as follow s:
1. Check for new or updated configuration files. For file-checking options, see
“Provisioning” on page 73 and “Resynchronization: configuration file checking” on
page 86. The VCS752 maintains a list of the last loaded provisioning files. The VCS752
compares its current configuration against the files it finds on the provisioning server.
Checking for update… appears on the VCS752 screen.
If provisioning has been triggered by the resync timer expiring or by remote
check-sync, the VCS752 checks for updated files after one minute of inactivity.
2. Download the configuration files.
If any file on the provisioning server has changed, the VCS752 treats it as a new file
and downloads it.
If the provisioning URL specifies a path only with no filename, then by default the
VCS752 looks for and retrieves the following two files:
General file: <model>.cfg.
VCS752 Administrator and Provisioning Ma nua l
MAC-specific file: <model>_<MAC Address>.cfg.
The <model> variable is the VTech product model: VCS752, for example.
If the provisioning URL specifies both a path and filename, then the VCS752 retri eves
only the configuration file specified.
3. The VCS752 restarts af ter one minute of inactivity.
During provisioning, the VCS752 reads the configuration file and validates each module
and setting. The VCS752 considers a setting valid if it is:
a valid data type
formatted as a valid setting
within a valid data range
part of a module that passes an integrity check. That is, the module's settin gs ar e
consistent and logical. For example, in the "network" module, if DHCP is disabled,
but no static IP address is specified, the module will fail the integrity check and
none of the settings will apply.
Invalid modules or invalid settings are skipped and logged as ERROR messages in the
system log, but will not interrupt the provisioning process. The system log will include the
module parameters that have not been applied. A recognized module with unrecognized
settings will cause all other settings in that module to be skipped.
A successful configuration or firmware update is reported as an INFO message in the
system log.
See “Configuration File Parameter Guide” on page 92 for the options and value ranges
available for each configuration file setting.
Provisioning Using Configuration Files 85 Back to Contents
Page 86

VCS752 Administrator and Provisioning Ma nua l
Resynchronization: configuration file checking
You can select a number of options that determine when the VCS752 checks for new
configuration files. This process of checking for configuration files is called
Resynchronization. Resynchronization options are available on the WebUI Provisioning
page, but you can also include them in a configuration file.
The resynchronization options are:
Mode—sets the VCS752 to check for a configuration file only, a firmware update
file only, or both types of file.
Never—configuration file checking is disabled
Bootup—the VCS752 checks for new configuration files when it boots up. Any
updates are applied during the boot-up process.
Remote check-sync—enables you to start a resynchronization remotely using yo ur
hosted server's web portal. The Remote check-sync settings are available only in
the configuration file, not the WebUI.
Repeatedly, at a defined interval from 60 to 65535 minutes (45 days).
VCS752 restart
If the VCS752 needs to restart after an auto-update, the restart happens only after the
device has been idle for one minute.
To prevent users from delaying the update process (auto-updates cannot begin until the
VCS752 has been idle for one minute), or to av oid d evice rest ar t s that m ight inte rfere with
incoming calls:
set the resynchronization interval to a suitable period
upload any new configuration file(s) to your provisioning server after work hours so
that the VCS752 will download the file(s) when there is no call activity.
When you update the VCS752 by importing a configuration file using the WebUI, the device
restarts immediately after applying the new settings, regar dless of whether the VCS752 is
idle.
Provisioning Using Configuration Files 86 Back to Contents
Page 87

Configuration File Types
The VCS752 is able to retrieve and download two types of configuration file. Depending on
your requirements, you may want to make both types of configuration file available on your
provisioning server.
The two configuration file types are a general configuration file and a MAC-specific
configuration file. The types differ in name only. The formatting of the files' content is the
same.
The general configuration file contains settings that are required by every VCS752 in the
system.
The MAC-specific configuration file is a file that only a single VCS752 can retrieve. The
MAC-specific configuration file name contains a VCS752 MAC address and can only be
retrieved by the device with a matching MAC address.
The filename formats for both files are:
General file: <model>.cfg
MAC-specific file: <model>_<MAC Address>.cfg
VCS752 Administrator and Provisioning Ma nua l
The <model> variable is the VTech product model; for example, VCS752. For more
information about the MAC-specific configuration file, see
configuration file” on page 89.
If the provisioning URL specifies a path only with no filename, then by default the VCS752
will fetch both files.
However, if the provisioning URL specifies both a path and filename, then the VCS752 will
only fetch the single configuration file specified.
Both the general and MAC-specific files can contain any of the available configuration
settings. A setting can appear in the general configuration file or the MAC-specific
configuration file, or both files, or neither file. If a setting appears in both files, the setting
that is read last is the one that applies.
When the VCS752 fetches both a general and a MAC-specific configuration file, the general
file is processed first. You can configure a setting for most of your VCS752 conference
phones in the general file, and then overwrite that setting for just a few VCS752 conference
phones using the MAC-specific file.
“Guidelines for the MAC-Specific
Provisioning Using Configuration Files 87 Back to Contents
Page 88

Data Files
VCS752 Administrator and Provisioning Ma nua l
The configuration file can also include links to data files for product customization. Allowed
data types include the following:
Directory (contacts, blacklist) in .xml format
Certificates (server, provisioni ng, LDAP, Broadsoft) in pem format
Logos (a bootup logo and an idle screen logo) in .bmp format
Links to data files are in the configuration file's "file" module. This is where you enter any
URLs to the data files that the VCS752 conference phone may require.
None of the data files are exported when you export a configura tion file from the VCS75 2.
However, you can export a Directory or Blacklist .xml file using the WebUI. After modifying
the .xml file, you can use the configuration file "file" module to have the VCS752 import the
new file. For a complete list of data file parameters, see
Settings” on page 133.
“"file" Module: Imported File
Provisioning Using Configuration Files 88 Back to Contents
Page 89

VCS752 Administrator and Provisioning Ma nua l
Configuration File Tips and Security
All configuration settings are initially stored in a configuration template file. Copy, rename,
and edit the template file to create a general configuration file and the MAC-specific
configuration files you will need. You can store the general configuration file and the
MAC-specific files on your provisioning server.
Do not modify the configuration file header line that includes the model and firmware
version.
To save yourself time and effort, consider which settings will be common to all (or the
majority of) VCS752 conference phones. Such settings might include call settings,
language, and NA T settings. You can then edit those settings in the configuration template
and save it as the general configuration file. The remaining settings will make up the
MAC-specific configuration file, which you will have to copy and edit for each VCS752.
Guidelines for the MAC-Specific configuration file
The VCS752 downloads the MAC-specific configuration file after the general configuration
file. Y ou must create a MAC-specific configuration file for each VCS752 in your system. The
file name must contain the VCS752 MAC address, which is prin ted on a label on the of the
device, or available on the MENU > Status > Prod uct Info scr een. For example, a VTech
VCS752 conference phone with the MAC address of 00:11:A0:10:6F:2D would download
the VCS752_0011A0106F2D.cfg file.
When renaming a MAC-specific configuratio n file, ensure the filename is all upper
case.
The MAC-specific configuration file cont ains settings intend ed exclusively for that VCS752
conference phone. Such settings will include SIP account settings such as display name,
user ID, and authentication ID.
Provisioning Using Configuration Files 89 Back to Contents
Page 90

VCS752 Administrator and Provisioning Ma nua l
Securing configuration files with AES encryption
You can encrypt your configuration files to prevent unauthorized users modifying the
configuration files. The VCS752 firmware decrypts files using the AES 256 algorithm. Af ter
encrypting a file and placing it on your provisioning ser ver, you can enable the VCS752 to
decrypt the file after fetching it from the server.
The procedures in this section use OpenSSL for Windows for file encryption, as shown in
Figure 2.
To decrypt a configuration file, you will need a 16-character AES key that you specified
when you encrypted the file. The key (or passphrase) is limited to 16 characters in length
and supports special characters ~ ^ ` % ! & - _ + = | . @ * : ; , ? ( ) [ ] { } < > / \ # as well as
spaces.
The encryption of configuration files is suppor te d only fo r the aut o pr ov isio nin g
process. Encrypt files only if you intend to store them on a provisioning server. Do
not encrypt files that you intend to manually import to the VCS752. You cannot
enable decryption for manually imported configuration files.
To encrypt a configuration file:
1. (Optional) Place your configuration file in the same folder as the openssl executable
file. If the configuration file is not in the same folder as the openssl executable file, you
can enter a relative pathname for the [infile] in the next step.
2. Double-click the openssl.exe file.
3. On the openssl command line, type:
enc -aes-256-cbc -pass pass:[passphrase123456] -in [infile] -out [outfile]
-nosalt -p
Elements in brackets are examples—do not enter the brackets. Enter a 16-character
passphrase and the unencrypted configuration file filename (the "infile") and a name for the
encrypted file ("outfile") that will result.
Figure 2. OpenSSL command line
Provisioning Using Configuration Files 90 Back to Contents
Page 91

VCS752 Administrator and Provisioning Ma nua l
To enable configuration file decryption:
1. On the WebUI, click Servicing > Provisioning.
2. On the Provisioning page under Resynchronization, select Use Encryption for
configuration file.
3. Enter the 16-character passphrase that you created when you encrypted the
configuration file.
4. Click .
You must ensure that configuration files are encrypted when enabling AES
Encryption. Decrypting an unencrypted file will result in a garbage file that is not
processed. This will also be logged as an error in the system log.
Provisioning Using Configuration Files 91 Back to Contents
Page 92

C
ONFIGURATION
F
ILE
P
VCS752 Administrator and Provisioning Ma nua l
C HAPTER 5
ARAMETER
G
UIDE
This chapter lists the available options for all the settings within the VCS752 configuration
file. Most settings in the configuration file have an equivalent in the WebUI (see the settings
tables in “Using the WebUI” on p age 29). However , the options you must enter when editing
the configuration file have a different syntax and format.
The settings are divided into modules. Most modules cor respond to a page on the VCS7 52
WebUI. You may wish to reorganize the modules within the configuration file itself. The
configuration file settings can be listed in any order, and the configuration file will still be
valid.
The modules included in the configuration file are:
“"sip_account" Module: SIP Account Settings” on page 93
“"network" Module: Network Settings” on page 106
“"provisioning" Module: Provisioning Settings” on page 110
“"time_date" Module: Time and Date Settings” on page 115
“"log" Module: Log Settings” on page 119
“"remoteDir" Module: Remote Directory Settings” on page 120
“"web" Module: Web Settings” on page 125
“"user_pref" Module: User Preference Settings” on page 126
“"call_settings" Module: Call Settings” on page 129
“"speed_dial" Module: Speed Dial Settings” on p age 131
“"ringersetting" Module: Distinctive Ringer Settings” on page 132
“"file" Module: Imported File Settings” on page 133
Configuration File Parameter Guide 92 Back to Contents
Page 93

VCS752 Administrator and Provisioning Ma nua l
“"tone" Module: Tone Definition Settings” on page 136
“"profile" Module: Password Settings” on page 139
“"page_zone" Module: Paging Zone Settings” on page 140
“"softkey" Module: Custom Soft Key Settings” on page 142
“"bt_settings" Module: Bluetooth Settings” on pag e 144.
"sip_account" Module: SIP Account Settings
The SIP Account settings enable you to set up individual accounts for each user. You can
add up to three accounts for each VCS752. Each account requires you to configure the
same group of SIP account settings. The SIP account settings for each account are
identified by the account number, from 1 to 3 fo r the VCS752.
For example, for account 1 you would set:
sip_account.1.sip_account_enab le = 1
sip_account.1.label = Line 1
sip_account.1.display_name = 1 001
sip_account.1.user_id = 2325551001
and so on.
For account 2, you would set:
sip_account.2.sip_account_enab le = 1
sip_account.2.label = Line 2
sip_account.2.display_name = 1 002
sip_account.2.user_id = 2325551002
and so on, if you have additional accounts to configure.
The SIP account settings follow the format: sip_account.x.[element], where x is an account
number ranging from 1 to 3 for the VCS752.
All these settings are exported when you manually export the configuration from the
VCS752.
General configuration file settings
Setting:
Description: Sets the dial plan for account x. See “Dial Plan” on page 35.
Values: Text string Default: x+P
Configuration File Parameter Guide 93 Back to Contents
sip_account.x.dial_plan
Page 94

VCS752 Administrator and Provisioning Ma nua l
Setting:
Description: Sets the inter-digit timeout (in seconds) for account x. The inter-digit
Values: 1–10 Default: 3
Setting:
Description: Sets the maximum number of concurrent active calls allowed for that
Values: 1–6 Default: 6
Setting:
Description: Enables or disables automatic answering of pages for account x.
Values: 0 (disabled), 1 (enabled) Default: 0
Setting:
Description: Enables or disables automatic answering of pages for account x when
sip_account.x.inter_digit_timeout
timeout sets how long the VCS752 waits after the last digit is entered
before dialing the number.
sip_account.x.maximum_call_number
account.
sip_account.x.auto_answer_enable
sip_account.x.auto_answer_during_active_call
account x has an active call.
Values: 0 (disabled), 1 (enabled) Default: 0
Setting:
Description: Sets the transport method for DTMF signalling for account x.
Values: auto, rfc2833, inband, info Default: auto
Setting:
Description: Enables or disables the VCS752 to unregister account x after rebooting.
Values: 0 (disabled), 1 (enabled) Default: 0
Setting:
Description: Sets the SIP server IP address for account x.
Values: Text string Default: Blank
sip_account.x.dtmf_transport_method
sip_account.x.unregister_after_reboot_enable
sip_account.x.primary_sip_server_address
Configuration File Parameter Guide 94 Back to Contents
Page 95

VCS752 Administrator and Provisioning Ma nua l
Setting:
Description: Sets the SIP server port for account x.
Values: 1–65535 Default: 5060
Setting:
Description: Sets the registration server IP address for account x.
Values: Text string Default: Blank
Setting:
Description: Sets the registration server port for account x.
Values: 1–65535 Default: 5060
Setting:
Description: Sets the expiration time (in seconds) of the current registration for
sip_account.x.primary_sip_server_port
sip_account.x.primary_registration_server_address
sip_account.x.primary_registration_server_port
sip_account.x.primary_registration_expires
account x.
Values: 30–7200 Default: 3600
Setting:
Description: Sets the retry frequency of the current registration for account x.
Values: 1–1800 Default: 10
Setting:
Description: Sets the outbound proxy server IP address for account x.
Values: Text string Default: Blank
Setting:
Description: Sets the outbound proxy server port for account x.
Values: 1–65535 Default: 5060
Setting:
Description: Sets the backup outbound proxy server IP address for account x.
sip_account.x.registration_retry_time
sip_account.x.primary_outbound_proxy_server_address
sip_account.x.primary_outbound_proxy_server_port
sip_account.x.backup_outbound_proxy_server_address
Values: Text string Default: Blank
Configuration File Parameter Guide 95 Back to Contents
Page 96

VCS752 Administrator and Provisioning Ma nua l
Setting:
Description: Sets the backup outbound proxy server port for account x.
Values: 1–65535 Default: 5060
Setting:
Description: Sets the highest-priority codec for account x.
Values: g711u, g711a, g729, g726,
Setting:
Description: Sets the second highest-priority codec for account x.
Values: none, g711u, g711a, g729,
Setting:
Description: Sets the third highest-priority codec for account x.
sip_account.x.backup_outbound_proxy_server_port
sip_account.x.codec_priority.1
Default: g711u
g722
sip_account.x.codec_priority.2
Default: g711a
g726, g722
sip_account.x.codec_priority.3
Values: none, g711u, g711a, g729,
g726, g722
Setting:
Description: Sets the fourth highest-priority codec for account x.
Values: none, g711u, g711a, g729,
Setting:
Description: Sets the fifth highest-priority codec for account x.
Values: none, g711u, g711a, g729,
Setting:
Description: Enables or disables SRTP voice encryption for account x.
Values: 0 (disabled), 1 (enabled) Default: 0
sip_account.x.codec_priority.4
g726, g722
sip_account.x.codec_priority.5
g726, g722
sip_account.x.voice_encryption_enable
Default: g726
Default: g722
Default: g729
Configuration File Parameter Guide 96 Back to Contents
Page 97

VCS752 Administrator and Provisioning Ma nua l
Setting:
Description: Enables G.729 Annex B, with voice activity detection (VAD) and
Values: 0 (disabled), 1 (enabled) Default: 0
Setting:
Description: Sets the Voice Quality of Service Layer 3 - DSCP for account x.
Values: 0–63 Default: 46
Setting:
Description: Sets the Signalling Quality of Service Layer 3 - DSCP for account x.
Values: 0–63 Default: 26
Setting:
sip_account.x.g729_annexb_enable
bandwidth-conserving silence suppression. This setting applies only
when G.729a/b is selected in a
parameter.
sip_account.x.dscp
sip_account.x.sip_dscp
sip_account.x.normal_jitter
sip_account.x.codec_priority
Description: Sets the oRTP jitter buffer in milliseconds.
Values: 30–500 Default: 80
Setting:
Description: Sets the Local SIP port for account x.
Values: 1–65535 Default: Account 1: 5060
Setting:
Description: Sets the Signalling Transport Mode for account x.
Values: udp, tcp, tls Default: udp
Setting:
Description: Sets the paging feature access code for accou n t x.
sip_account.x.local_sip_port
Account 2: 5070
Account 3: 5080
sip_account.x.transport_mode
sip_account.x.access_code_page
Values: Text string Default: Blank
Configuration File Parameter Guide 97 Back to Contents
Page 98

VCS752 Administrator and Provisioning Ma nua l
Setting:
Description: Sets the Call Park feature access code for account x.
Values: Text string Default: Blank
Setting:
Description: Sets the retrieve parked call feature access code for account x.
Values: Text string Default: Blank
Setting:
Description: Sets the voicemail retrieval feature access code for account x.
Values: Text string Default: Blank
Setting:
Description: Sets the do not disturb (DND) ON feature access code for account x.
Values: Text string Default: Blank
sip_account.x.access_code_park_call
sip_account.x.access_code_retrieve_parked_call
sip_account.x.access_code_retrieve_voicemail
sip_account.x.access_code_dnd_on
Setting:
Description: Sets the do not disturb (DND) OFF feature access code for account x.
Values: Text string Default: Blank
Setting:
Description: Sets the Call Forward All ON feature access code for account x.
Values: Text string Default: Blank
Setting:
Description: Sets the Call Forward All OFF feature access code for account x.
Values: Text string Default: Blank
Setting:
Description: Sets the Call Forward No Answer ON feature access code for account x.
Values: Text string Default: Blank
sip_account.x.access_code_dnd_off
sip_account.x.access_code_cfa_on
sip_account.x.access_code_cfa_off
sip_account.x.access_code_cfna_on
Configuration File Parameter Guide 98 Back to Contents
Page 99

VCS752 Administrator and Provisioning Ma nua l
Setting:
Description:
Values: Text string Default: Blank
Setting:
Description: Sets the Call Forward Busy ON feature access code for account x.
Values: Text string Default: Blank
Setting:
Description: Sets the Call Forward Busy OFF feature access code for account x.
Values: Text string Default: Blank
Setting:
Description: Sets the Anonymous Call Block ON feature access code for account x.
Values: Text string Default: Blank
sip_account.x.access_code_cfna_off
Sets the Call Forward No Answer OFF feature ac ce ss code for account x.
sip_account.x.access_code_cfb_on
sip_account.x.access_code_cfb_off
sip_account.x.access_code_anonymous_call_block_on
Setting:
Description: Sets the Anonymous Call Block OFF feature access code for account x.
Values: Text string Default: Blank
Setting:
Description:
Values: Text string Default: Blank
Setting:
Description:
Values: Text string Default: Blank
Setting:
Description: Sets the Call Waiting ON feature access code for account x.
Values: Text string Default: Blank
sip_account.x.access_code_anonymous_call_block_off
sip_account.x.access_code_outgoing_call_anonymous_on
Sets the Anonymous Outgoing Call ON feature access code for account x.
sip_account.x.access_code_outgoing_call_anonymous_off
Sets the Anonymous Outgoing Call OFF feature a ccess co de for a ccount x.
sip_account.x.access_code_call_waiting_on
Configuration File Parameter Guide 99 Back to Contents
Page 100

VCS752 Administrator and Provisioning Ma nua l
Setting:
Description: Sets the Call Waiting OFF feature access code for account x.
Values: Text string Default: Blank
Setting:
Description: Sets the Group Call Pickup feature access code for account x.
Values: Text string Default: Blank
Setting:
Description: Sets the Direct Call Pickup feature access code for account x.
Values: Text string Default: Blank
Setting:
Description: Enables or disables message waiting indicator subscription for account x.
Values: 0 (disabled), 1 (enabled) Default: 0
sip_account.x.access_code_call_waiting_off
sip_account.x.access_code_group_call_pickup
sip_account.x.access_code_direct_call_pickup
sip_account.x.mwi_enable
Enable if SUBSCRIBE and NOTIFY methods are used for MWI.
Setting:
Description: Sets the MWI subscription expiry time (in seconds) for account x.
Values: 0–65535 Default: 3600
Setting:
Description: Enables or disables ignoring of unsolicited MWI notifications—
Values: 0 (disabled), 1 (enabled) Default:
Setting:
Description: Enables or disables MWI stutter dial tone for account x.
Values: 0 (disabled), 1 (enabled) Default: 1
sip_account.x.mwi_subscription_expires
sip_account.x.mwi_ignore_unsolicited
notifications in addition to, or instead of, SUBSCRIBE and NOTIFY
methods—for account x. Disable if MWI service is configured on the
voicemail server and does not involve a subscription to a voicemail
server.
sip_account.x.stutter_dial_tone_enable
Configuration File Parameter Guide 100 Back to Contents
 Loading...