

Page 1
User’s Manual
Build & Learn
Workbench
™
© 2005 VTECH
Printed in China
91-02130-002
Page 2

Dear Parent,
At VTech® we know how important the first day of school is for
your child. To help prepare preschoolers for this important event,
VTech® has developed the Preschool Learning™ series of
interactive toys.
Preschool Learning™ features fun characters and inviting school
themes that use technology to capture a child’s attention and teach
important preschool skills like spelling, counting and the alphabet.
These vital skills are taught in a way that’s both fun and highly
engaging to maintain a child’s interest. Children will also be
introduced to fun school subjects such as art class, music class and
even recess! With Preschool Learning™, learning is fun from
day one!
At VTech® we know that a child has the ability to do great things.
That’s why all of our electronic learning products are uniquely
designed to develop a child’s mind and allow them to learn to the
best of their ability. We thank you for trusting VTech® with the
important job of helping your child learn and grow!
Sincerely,
Your Friends at VTech
To learn more about Preschool Learning™ and other VTech® toys, visit
®
www.vtech.com
Page 3
INTRODUCTION
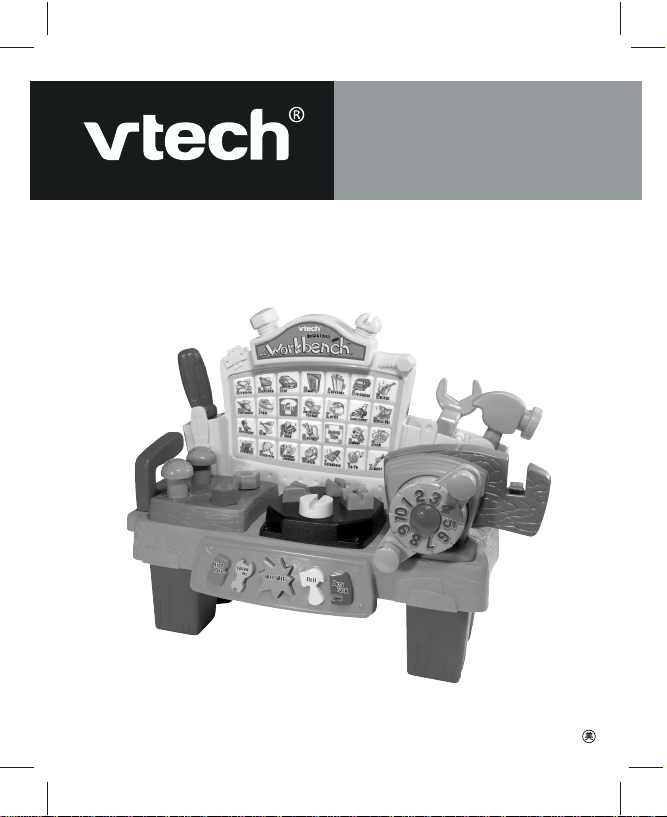
Thank you for purchasing the VTech® Build & Learn Workbench™.
The VTech® Build & Learn Workbench™ is an electronic workbench
for children to learn and have fun while engaging in constructive roleplaying activities. Children can have fun exploring the workbench in
self-guided play, or choose from the interactive activities and learn about
tools, colors, numbers, shapes, letters and vocabulary. Fun sounds
and responses provide added fun!
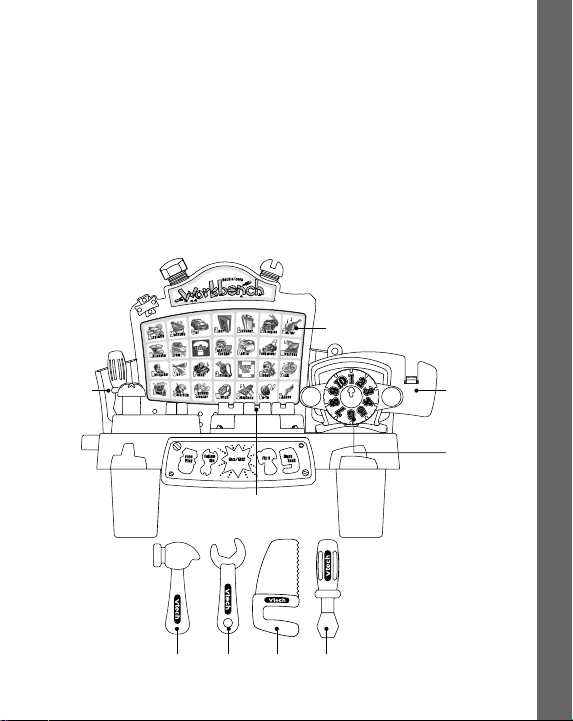
26 touch-sensitive
projects
Tool storage
Sawing station
Introduction
Number Dial
Workbench
SawWrenchHammer Screwdriver
2
Page 4
INCLUDED IN THIS PACKAGE
• One VTech® Build & Learn Workbench™ learning toy
• Four plastic workshop tools: screwdriver, wrench, hammer and saw
• One instruction manual
WARNING: All packing materials such as tape, plastic sheets,
wire ties and tags are not part of this toy, and should
be discarded for your child’s safety.
GETTING STARTED
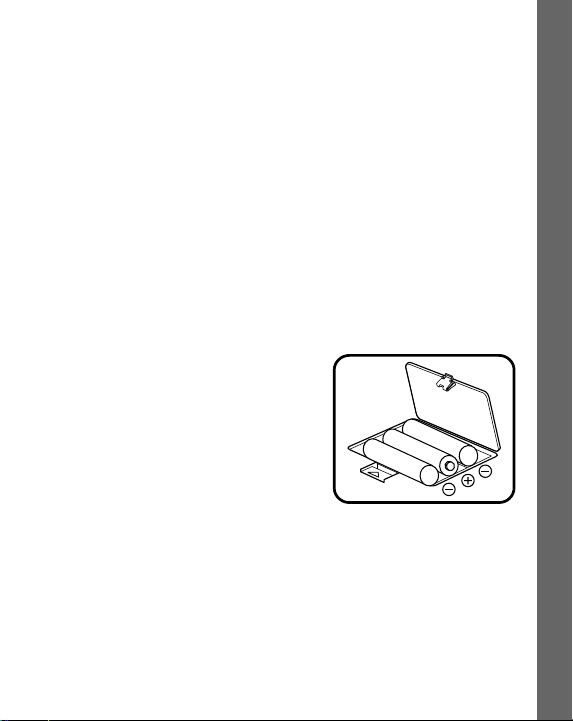
BATTERY INSTALLATION
1. Make sure the unit is OFF.
2. Locate the battery cover on the
bottom of the unit.
3. Open the battery cover.
4. Install 3 new “AA” (UM-3/LR6)
batteries into the compartment as
illustrated. (The use of new, alkaline
batteries is recommended for
maximum performance.)
5. Replace the battery cover.
Getting Started
3
Page 5

BATTERY NOTICE
• Install batteries correctly observing the polarity (+,-) signs to avoid
leakage.
• Do not mix old and new batteries.
• Do not use batteries of different types.
• Remove exhausted or new batteries from the unit when the unit
will not be used for an extended period of time.
• Do not dispose of batteries in fire.
• Do not attempt to recharge ordinary batteries.
• The supply terminals are not to be short-circuited.
• Only batteries of the same and equivalent type as recommended
are to be used.
WE DO NOT RECOMMEND THE USE OF RECHARGEABLE
BATTERIES.
TO BEGIN PLAY
1. ON/OFF BUTTON
To turn the unit on, press the ON/OFF
BUTTON.
Press the ON/OFF BUTTON again to turn
the unit off.
2. AUTOMATIC SHUT-OFF
T o preserve battery life, the VTech® Build & Learn Workbench™
will automatically turn off after a while without input. The unit can
be turned on again by pressing the ON/OFF BUTTON.
To Begin Play
4
Page 6
ACTIVITY FEATURES
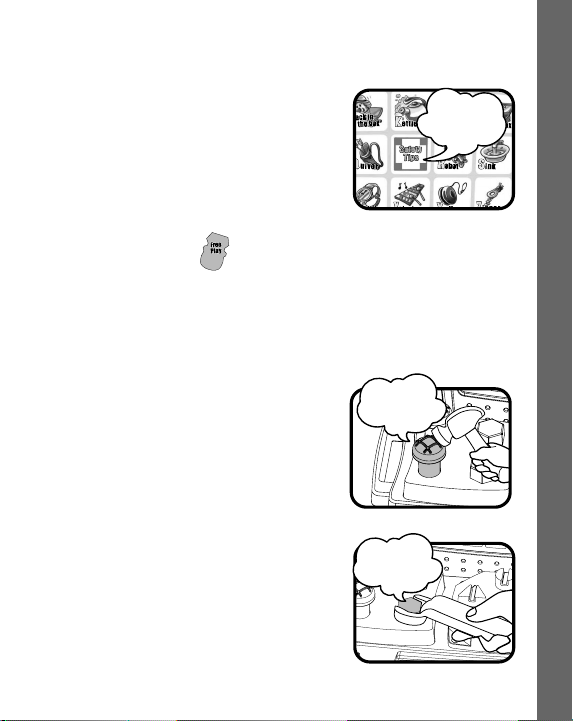
Safety Tips
Press the Safety Tips button anytime while
playing and a helpful safety tip will be played.
“Nails are
sharp, so
be careful!”
Free Play Activity
After the unit is turned on, it automatically enters the Free Play activity.
While playing in another activity, you can quickly enter Free Play by
pressing the Free Play button.
While in Free Play, the following responses are heard:
1) Use the Hammer to pound on the two
nails. You will hear a sound effect for
each one and some fun and educational
phrases.
2) Use the Wrench to turn the two bolts.
Y ou will hear a sound effect for each one
and some fun and educational phrases.
“Blue Nail!”
“Purple Bolt!”
Activities
5
Page 7

3) Use the Screwdriver to turn the four
screws. You will hear a sound effect for
each one and some fun and educational
phrases.
4) Use the Saw to saw the wood on the
sawing table. As you saw the wood, you
will hear a sawing sound and numbers
will be counted out loud each time you
saw.
“Big Circle
Screw!”
“One,Two,
Three!”
5) Turn the Vice dial to any number and it
will say the number.
6) Press the buttons on the Alphabet
Board, you will hear corresponding letter
name follow by the object's name.
“Two!”
“A is for
airplane!”
Activities
6
Page 8

Follow Me Activity
Press the Follow Me button to get into this activity.
“Could you turn
1. After you hear: “1, 2, 3 follow me,”
the grey bolt?”
you will be asked to complete task
using your tools.
“Let’s saw the
2. Follow the instructions and successfully
wood 10 times!”
finish the task. If you make a mistake
you’ll be able to try again. After three
incorrect responses, a new task will be
asked.
Fix It Activity
Press the Fix It button to get into this activity.
1. After you hear: “Ready for a building
project? Let’s go,” you will hear the sound
of an object, and then you’ll be told that
the object is broken… and you have to
fix it! Listen to the instructions, and
complete each task in order.
“First,turn
the dial to the
number 9!”
Activities
7
Page 9
2. After you have finished a project, you will
hear that the object is fixed and a
rewarding song will play. Then a new
project will be given.
“Wow! The
airplane is
working again!”
3. If you can’t finish the steps within the time
limit or any step is done incorrectly three
times, it will move on to the next project
and you can start again.
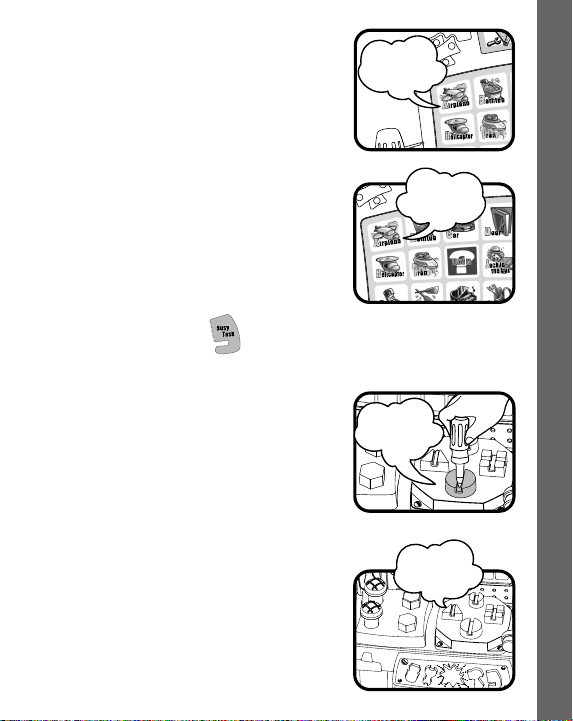
Busy Task Activity
Press the Busy Task button to get into this activity.
1. After you hear: “Let’s see how fast you
can work! Ready?” you’ll be given a
series of tasks to complete as fast as you
can.
2. Each time you complete a series, the
next series gets even faster. So prepare
to work quickly!
“Turn a screw!”
“Oops, you
can try that
again later!”
“Here's a real
challenge let's work faster!”
Activities
8
Page 10

3. If you can’t finish the steps within the time
limit or any step is done incorrectly three
times, you’ll start over from the previous
level.
“Uh oh, let’s
start again!”
Find It Activity
Press the Find It button to get into this
activity. This button is located on the
Alphabet Board.
1) You will be asked to find either:
• a letter (A-Z)
• the beginning letter of a certain object
• an object, based on listening to its sound
effect
2) You have to answer the question by
pressing one of the buttons on the
Alphabet Board. If you can’t answer
within the time limit, or you answer
incorrectly three times, a new question
will be asked.
“Can you
find the
Piano?”
“Look around
your bench.
Let’s play a
find it game.”
“M is for
Music box!”
Activities
9
Page 11

CARE & MAINTENANCE
1. Keep the unit clean by wiping it with a slightly damp cloth.
2. Keep the unit out of direct sunlight and away from any direct heat
sources.
3. Remove the batteries when the unit is not in use for an extended
period of time.
4. Do not drop the unit on a hard surface and do not expose the unit
to excess moisture.
TROUBLESHOOTING
If for some reason the program/activity stops working, then please follow
these steps:
1. Interrupt the power supply by removing the batteries.
2. Let the unit stand for a few minutes, then replace the batteries.
3. Turn the unit back ON. The unit will now be ready to play again.
4. If the unit still does not work, replace with an entire set of new
batteries.
If the problem persists, please call our Consumer Services Department
at 1-800-521-2010 in the U.S. or 1-877-352-8697 in Canada and a
service representative will be happy to help you.
Troubleshooting
10
Page 12

IMPORTANT NOTE:
Creating and developing Preschool Learning™products is
accompanied by a responsibility that we at VTech® take very
seriously. We make every effort to ensure the accuracy of the
information which forms the value of our products. However, errors
sometimes can occur. It is important for you to know that we stand
behind our products and encourage you to call our Consumer
Services Department at 1-800-521-2010 in the U.S. or 1-877-3528697 in Canada with any problems and/or suggestions that you
might have. A service representative will be happy to help you.
NOTE:
This equipment has been tested and found to comply with the limits for
a Class B digital device, pursuant to Part 15 of the FCC Rules. These
limits are designed to provide reasonable protection against harmful
interference in a residential installation. This equipment generates, uses
and can radiate radio frequency energy and, if not installed and used
in accordance with the instructions, may cause harmful interference to
radio communications. However, there is no guarantee that interference
will not occur in a particular installation. If this equipment does cause
harmful interference to radio or television reception, which can be
determined by turning the equipment off and on, the user is encouraged
to try to correct the interference by one or more of the following
measures:
• Reorient or relocate the receiving antenna
• Increase the separation between the equipment and receiver
• Connect the equipment into an outlet on a circuit different from
that to which the receiver is connected
• Consult the dealer or an experienced radio/TV technician for help
Important Note
11
 Loading...