

Page 1
User’s Manual
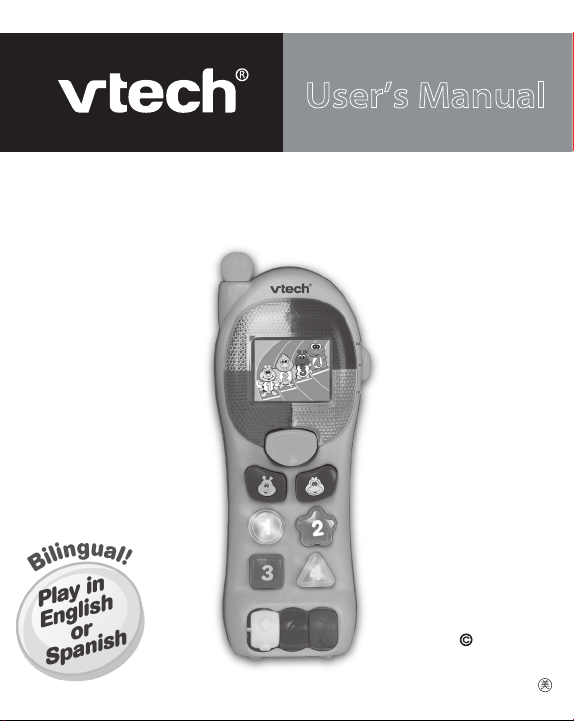
Bright Lights Phone
91-001552-010-000
™
2009 VTech
Printed in China
Page 2
Dear Parent,
Ever nice the look on your baby’s face when th learn something
new through their own discovery? ese self-accomplished
moments are a parent’s greatest reward. To help fulfill them,
VTech® created the Infant Learning® series ts.
ese unique interactive learning ts directly respond to what
children do naturally – play! Using innovative technology, these
ts react to baby’s interactions, making each play perience fun
and unique as th learn age-appropriate concepts like first words,
numbers, shapes, colors and music. More importantly, VTech®’s
Infant Learning® ts develop baby’s mental and physical abilities
by inspiring, engaging and teaching.
At VTech®, we know that a child has the ability to do great things.
at’s why all our electronic learning products are uniquely
designed to develop a child’s mind and allow them to learn to the
best their ability. We thank you for trusting VTech® with the
important job helping your child learn and grow!
Sincerely,
Julia Fitzgerald
Vice President, Marketing
VTech Electronics, NA
To learn more about the Infant Learning® series and her VTech® ts, visit www.vtechkids.com
Page 3
INTRODUCTION
2
3
4
1
ENG
ESP
Thank you for purcha sing the VTech® Bright Lights Phone™
learning toy!
With the VTech® Bright Lights Phone™, babies can take part in a
favorite role-play activity with their very own phone! With the press of a
button, the screen magically changes images and activities. Realistic
phone sounds and conversational phrases make baby talk even more
fun! What’s more, your child can play in English or Spanish for twice
the learning!
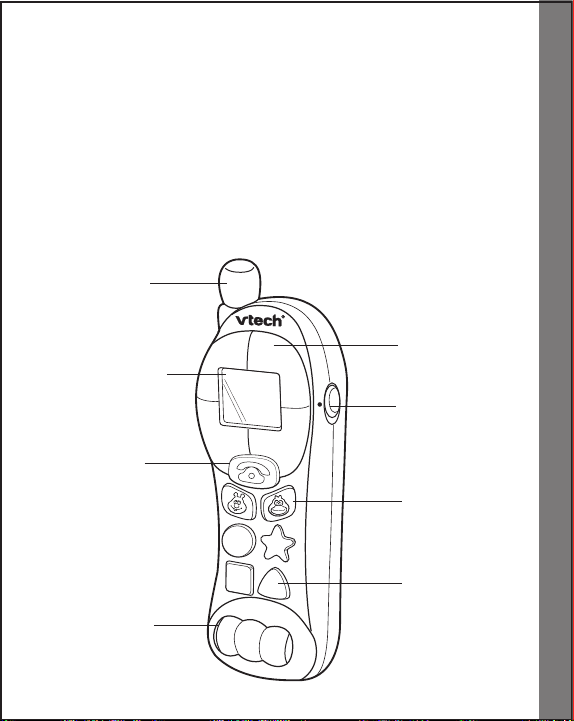
ANTENNA
LIGHT-UP
CHANGING
SCREEN
PHONE
BUTTON
FRAMES
ON/OFF/
LANGUAGE
V E R S I O N
SWITCH
CHARACTER
BUTTONS
Introduction
ROLLIN G
BEADS
LIGHT-UP
NUMBER
BUTTONS
2
Page 4
INCLUDED IN THIS PACKAGE
• One VTech® Bright Lights Phone™ learning toy
• One instruction manual
WARNING: All packing materials, such as tape, plastic sheets, wire
ties and tags are not part of this toy, and should be discarded for
your child’s safety.
GETTING STARTED
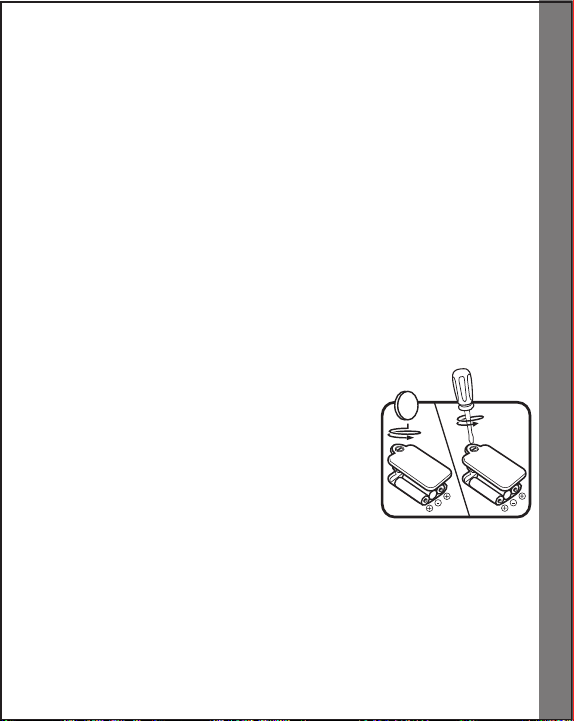
BATTERY INSTALLATION
1. Make sure the unit is turned OFF.
2. Locate the battery cover on the back of the
unit. Use a coin or screwdriver to loosen
the screw.
3. Install 3 new “AAA” (AM-4/LR03) batteries
following the diagram inside the battery
box. (The use of new alkaline batteries
is recommended for maximum performance.)
4. Replace the battery cover and tighten the
screw to secure the battery cover.
Getting Started
3
Page 5

BATTERY NOTICE
• The use of new alkaline batteries is recommended for maximum
performance.
• Install batteries correctly observing the polarity (+, -) signs to avoid
leakage.
• Do not mix old and new batteries.
• Do not mix batteries of different types: alkaline, standard (carbonzinc) or rechargeable (nickel-cadmium).
• Remove the batteries from the equipment when the unit will not be
used for an extended period of time.
• Always remove exhausted batteries from the equipment.
• Do not dispose of batteries in fire.
• Do not attempt to recharge ordinary batteries.
• The supply terminals are not to be short-circuited.
• Only batteries of the same and equivalent type as recommended
are to be used.
WE DO NOT RE COM MEN D THE USE OF RECH ARG EAB LE
BATTERIES.
Getting Started
4
Page 6
PRODUCT FEATURES
EN G
ES P
EN G
ES P
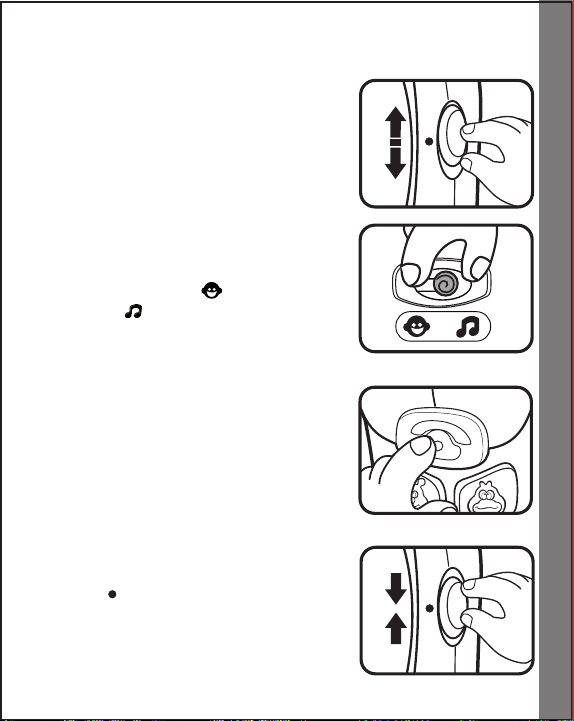
1. To turn the unit ON, slide the ON/OFF/
LANGUAGE VERSION SWITCH to the
ENGLISH (ENG) or SPANISH (ESP)
position.
To choose a mode, locate the MODE
2.
SELECTOR on the back of the unit.
Slide the MODE SELECTOR to the
TALKING MODE ( ) or the MUSIC
MODE ( ) position.
Once you hav e sele cte d between
3.
the TALKING MODE and the MU-
SIC MODE, press the phone button
to flip through the three screen images. Changing the screen images will
change the response of all the buttons
and beads.
Product Features
4. To turn the unit
LANGUAGE VERSION SWITCH to the
OFF ( ) position.
OFF, slide the ON/OFF/
5
Page 7
ACTIVITIES
2
3
4
1
“One”+ Do
Dialing and
ringing sound
+ "Hello!"
Dialing +
ringing sound
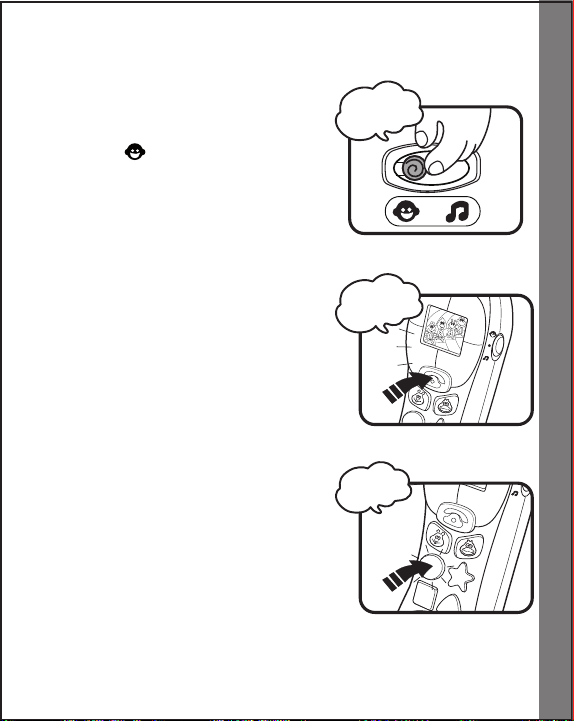
A. TALKING MODE
1. Slide the MODE SELECTOR on
the back of the unit to the TALKING
MODE ( ) position. You will hear
a dialing and ringing sound effect,
followed by “Hello!” The number
buttons and frames will flash with the
sound.
Number Screen
1. Press the PHONE BUTTON to flip
through the three screens, stopping
on the number screen. You will hear
a dialing and a ringing sound effect.
The number buttons and frames will
flash with the sound.
2. Press the LIGHT-UP NUMBER BUT-
TONS to hear the numbers identified
followed by the corresponding number
of piano notes. The number button will
light up when the number is identified
and the frames will flash with the
piano notes.
Activities
6
Page 8
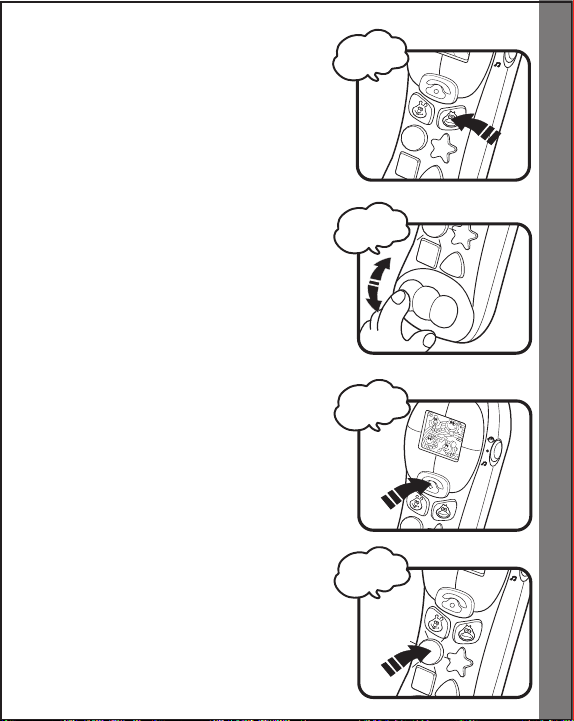
3. Press the CHARACTER BUTTONS
2
3
4
1
“Yellow”
2
3
1
“Duck”
2
3
4
1
“One”
“Hello!”
to hear the characters identified. The
number buttons will flash with the
sound.
4. Roll the
identified. The corresponding number
button will light up with the sound.
BEADS to hear numbers
Character Screen
1. Press the PHONE BUTTON to flip
through the three screens, stopping
on the character screen. You will hear
“Hello!” The number buttons will flash
with the sound.
2. Pr e s s the LIGHT-UP NUMBER
BUTTONS to hear the button colors
identified. The corresponding number
button and frame will light up with the
sound.
Activities
7
Page 9
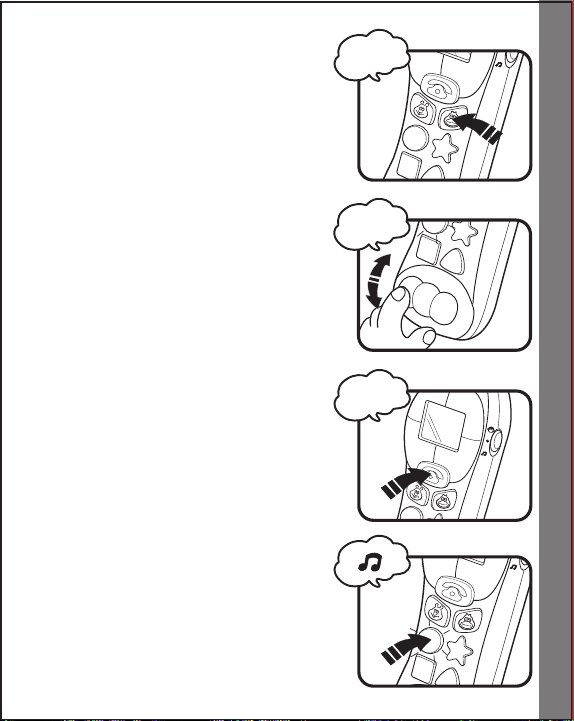
3. Press the CHARACTER BUTTONS to
2
3
4
1
2
3
4
1
“Yellow”
2
3
1
“Yellow
Duck”
“Peek-a-
boo!”
hear the colors and character names
identified. The corresponding frame
will light up with the sound.
4. Roll the BEADS to hear the bead
colors identified. The corresponding
number button and frame will light up
with the sound.
Mirror Screen
1. Press the PHONE BUTTON to flip
through the three screens, stopping
on the mirror screen. You will hear
“Peek-a-boo!” The number buttons
will flash with the sound.
Activities
2. Press the
TONS to hear short tunes. The number
buttons or the frames will flash with the
sound.
LIGHT-UP NUMBER BUT-
8
Page 10

3. Press the CHARACTER BUTTONS
2
3
1
"Quack
quack"
2
3
4
1
“Do”
to hear sound effects. The number
buttons will flash with the sound.
4. Roll the
piano notes. The frames will light up
with the sound.
5. If there is no input to the unit after ap
proximately 15 seconds, you will hear
a dialing and a ringing sound effect.
If there is no input after another 15
seconds, you will hear a ringing sound
effect followed by “Hello!” The unit will
automatically power-down. The unit
can be turned on again by pressing
any button.
BEADS to hear individual
-
Activities
9
Page 11

B. MUSIC MODE
Dialing
sound
2
3
4
1
Bee SFX
2
3
1
"Quack
quack"
1. Slide the MODE SELECTOR to the
MUSIC MODE ( ) position. You will
hear a short tune. The number buttons
and frames will flash with the sound.
Number Screen
1. Press the PHONE BUTTON to flip
through the three screens, stopping
on the number screen. You will hear
a dialing sound effect. The number
buttons will flash with the sound.
2. Press the LIGHT-UP NUMBER BUT-
TONS to hear sound effects played
the corresponding number of times.
The corresponding number button will
light up with the sound.
3. Press the CHARACTER BUTTONS to
hear sound effects. The frames on
the right side will flash with the duck
sound and the frames on the left side
will flash with the bug sound.
Activities
10
Page 12

4. Roll the BEADS to hear individual
Ringing
sound
2
3
4
1
Bee SFX+
2
3
1
2
3
4
1
“Do”
piano notes. The frames will light up
with the sound.
Character Screen
1. Press the PHONE BUTTON to flip
through the three screens, stopping
on the character screen. You will hear
a ringing sound effect. The frames will
flash with the sound.
2. Press the
TONS to hear sound effects followed
by short tunes. The corresponding
number button will flash with the sound
effect. The number buttons or frames
will flash with the short tunes.
3. Press the
to hear melodies. The number buttons
and frames will flash with the sound.
Press the character buttons while a
melody is playing to hear the character sound effect take over playing the
melody.
LIGHT-UP NUMBER BUT-
CHARACTER BUTTONS
Activities
11
Page 13

4. Roll the BEADS to hear melodies. The
“Peek-a-
boo!”
2
3
4
1
2
3
4
1
number buttons and frames will flash
with the sound. Roll the beads while
a melody is playing to hear random
sound effects play over top of the
melody.
Mirror Screen
1. Press the PHONE BUTTON to flip
through the three screens, stopping
on the mirror screen. You will hear
“Peek-a-boo!” The number buttons
will flash with the sound.
2. Press the NUMBER BUTTONS to
hear melodies. The number buttons and frames will flash with the
sound.
Activities
12
Page 14

3. Press the CHARACTER BUTTONS
2
3
4
1
2
3
1
"Quack
quack”
to hear sound effects. The frames on
the right side will flash with the duck
sound effect and the frames on the
left side will flash with the bug sound
effect. Press the character buttons
while a melody is playing to hear the
character sound effect take over playing the melody.
4. Roll the
short tunes. The number buttons and
frames will flash with the sound.
5. If there is no input to the unit after
approximately 15 seconds, you will
hear a random melody. If there is no
input after another 15 seconds, you
will hear a random short tune. The
unit will automatically power-down.
The unit can be turned on again by
pressing any button.
MELODIES:
1. A-Tisket, A-Tasket 2. London Bridge
3. Yankee Doodle 4. Hickory Dickory Dock
5. Pop! Goes the Weasel 6. Row, Row, Row Your Boat
7. Looby Loo 8. Good Night, Ladies
BEADS to hear random
Activities
13
Page 15

CARE & MAINTENANCE
1. Keep the unit clean by wiping it with a slightly damp cloth.
2. Keep the unit out of direct sunlight and away from any direct heat
source.
3. Remove the batteries when the unit will not be in use for an extended
period of time.
4. Do not drop the unit on hard surfaces and do not expose the unit to
moisture or water.
TROUBLESHOOTING
If for some reason the program/activity stops working, please follow
these steps:
1. Please turn the unit
2. Interrupt the power supply by removing the batteries.
3. Let the unit stand for a few minutes, then replace the batteries.
4. Turn the unit
5. If the product still does not work, replace with an entire set of new
batteries.
If the problem persists, please call our Consumer Services Department
at 1-800-521-2010 in the U.S. or 1-877-352-8697 in Canada, and a
service representative will be happy to help you.
For information on this product’s warranty, please call VTech® at 1-800521-2010 in the U.S. or 1-877-352-8697 in Canada.
OFF.
ON. The unit should now be ready to play again.
Care & Maintenance/Troubleshooting
14
Page 16

IMPORTANT NOTE:
Creatin g and dev eloping Infa nt Lear n ing produc ts is
accompanied by a responsibility that we at VTech® take very
seriously. We make every effort to ensure the accuracy of the
information, which forms the value of our products. However,
errors sometimes can occur. It is important for you to know that
we stand behind our products and encourage you to call our
Consumer Services Department on at 1-800-521-2010 in the
U.S. or 1-877-352-8697 in Canada, with any problems and/or
suggestions that you might have. A service representative will
be happy to help you.
NOTE:
This equipment has been tested and found to comply with the limits
for a Class B digital device, pursuant to Part 15 of the FCC Rules.
These limits are designed to provide reasonable protection against
harmful interference in a residential installation. This equipment
generates, uses and can radiate radio frequency energy and, if not
installed and used in accordance with the instructions, may cause
harmful interference to radio communications. However, there is no
guarantee that interference will not occur in a particular installation. If
this equipment does cause harmful interference to radio or television
reception, which can be determined by turning the equipment off and
on, the user is encouraged to try to correct the interference by one or
more of the following measures:
• Reorient or relocate the receiving antenna
• Increase the separation between the equipment and receiver
• Connect the equipment into an outlet on a circuit different from that
to which the receiver is connected
• Consult the dealer or an experienced radio/TV technician for help
Other Info
15
Page 17

THIS DEV ICE COM PLIES WITH PART 15 OF TH E FCC
RULES. OPERATION IS SUBJECT TO THE FOLLOWING TWO
CONDITIONS: (1) THIS DEVICE MAY NOT CAUSE HARMFUL
INTERFERENCE, AND (2) THIS DEVICE MUST ACCEPT ANY
INTERFERENCE RECEIVED, INCLUDING INTERFERENCE THAT
MAY CAUSE UNDESIRED OPERATION.
THIS CLASS B DIGITAL APPARATUS COMPLIES WITH
CANADIAN ICES-003.
CET APPAREIL NUMÉRIQUE DE LA CLASSE B EST CONFORME
À LA NORME NMB-003 DU CANADA.
Caution : Changes or modifications not expressly approved by the
party responsible for compliance could void the user’s authority to
operate the equipment.
Other Info
16
Page 18

Manual de
Instrucciones
Bright Lights Phone
91-001552-010-000
™
2009 VTech
Printed in China
Page 19

QUERIDOS PADRES
En VTech® sabemos que los niños tienen la capacidad
de hacer grandes cosas. Esta es la razón por la que
nuestros juguetes electrónicos educativos se diseñan
de tal modo que ayudan a desarrollar y estimular la
inteligencia de los niños y les permiten aprender y
ejercitar numerosas habilidades. Ya sea para aprender
letras o números, identificar colores y figuras, o
estimular los sentidos con música y luces, todos los
productos educativos de VTech® incorporan avanzadas
tecnologías y están adaptados al currículo escolar para
motivar a los niños de todas las edades a alcanzar su
máximo potencial.
Para más información sobre nuestros productos visite:
www.vtechkids.com
Page 20

INTRODUCCIÓN
2
3
4
1
ENG
ESP
Gracias por comprar Bright Lights Phone™ de VTech®. En VTech®
nos comprometemos a desarrollar los mejores juguetes posibles para
entretener y educar a su hijo.
Bright Lights Phone™ es un divertido teléfono móvil para niños
de 6 meses en adelante. Tiene luces, sonidos, música y llamativos
colores, todo lo que los críos de esta edad necesitan para potenciar
y desarrollar sus sentidos. Cada vez que jueguen con él, descubrirán
cosas nuevas y serán capaces de aprovechar todo su potencial.
Antena
Luces de colores
Cuadro
mágico
Botón de
teléfono
Ruedas de
colores
Sele ctor de
la lengua
Bo ton e s de
personajes
Bo t ones de
números
Introducción
2
Page 21

INCLUIDO EN ESTE EMBALAJE
- Un Bright Lights Phone™ de VTech®.
- Un manual de instrucciones.
ADVERTENCIA: Todos los materiales de este embalaje, tales como
cintas, hojas de plástico, alambres y etiquetas,
no son parte de este juguete y deberían ser
desechados para la seguridad de su hijo.
INSTALACIÓN DE LAS PILAS
1. As e gúre se de qu e el jug u ete es té
apagado.
2. Localice el compartimento de las pilas
en la parte trasera del mismo. Utilice una
moneda o un destornillador para abrir la
tapa.
3. Coloque 3 pilas “AAA” (AM-4/LR03) como
muestra el dibujo.
4. Coloque de nuevo la tapa y apriete el
tornillo para cerrar el compartimento.
ADVERTENCIA
• Se recomienda el uso de pilas alcalinas de alto rendimiento
específicas para productos tecnológicos.
• Instale las pilas correctamente respetando los signos de polaridad
(+, -) para evitar cualquier tipo de fuga.
Instalación de las pilas
3
Page 22

• Reemplace todas las pilas cada vez que se cambien.
• No mezcle pilas nuevas y viejas.
• No utilice pilas de diferentes tipos.
• Extraiga las pilas cuando no se vaya a utilizar el juguete durante
un largo periodo de tiempo.
• No intente recargar pilas normales.
• No acerque las pilas al fuego.
• No se debe provocar cortocircuitos en los bornes de una pila.
• La s pil as deben se r ins tala das por un adult o o baj o su
supervisión.
• Retire las pilas usadas del juguete.
• Retire las pilas recargables del juguete para su carga.
• Debe recargar las pilas siempre bajo la vigilancia de un adulto.
• Ayúdenos a cuidar nuestro entorno, es responsabilidad de todos.
Este símbolo indica que este producto y sus pilas no deben tirarse
a la basura al final de su vida útil, sino que deben ser depositados
en contenedores especiales, para poder reciclarlos
adecuadamente y así evitar daños en el medio
ambiente o efectos perjudiciales para la salud. Por
favor, respete la normativa vigente y recurra a un
Punto Limpio o a los servicios destinados para tal
fin en su localidad.
NO RECOMENDAMOS EL USO DE PILAS RECARGABLES CON
ESTA UNIDAD. SU UTILIZACIÓN PODRÍA ALTERAR EL FUNCIONAMIENTO NORMAL DEL JUGUETE.
Instalación de las pilas
4
Page 23

CARACTERÍSTICAS
EN G
ES P
EN G
ES P
1. Para girar la unidad, resbale el selector
de la lengua hacia la posición inglesa
(ENG) o española (ESP).
2. Para elegir un modo, sitúe el
de modo en la parte posterior de la
unidad. Resbale el selector de modo
hacia el modo voz ( ) o la posición
del modo música ( ).
3. Presione el
cambiar la pantalla y con ello el modo
de juego.
4. Para apagar la unidad, resbale el
selector de la lengua hacia la posición
de reposo ( ).
NOTA: Para ahorrar energía, el juguete se apagará automáticamente
después de unos minutos de inactividad. Para volver a jugar, sólo hará
falta presionar cualquier botón.
botón de teléfono para
selector
Características
5
Page 24

ACTIVIDADES
2
3
4
1
“Uno”
2
3
4
1
“Amarillo”
2
3
4
1
"Uno" +
"Dos"
2
3
1
“Pato”
MODO VOZ ( )
Pantalla de Números
1. Pulsando las
escuchará los números seguidos de
tantas notas como le correspondan.
teclas de números,
2. Pu lsa ndo los
se identifica rán a la vez que se
encienden las luces.
3. Al girar las
números con cada una de ellas.
Pantalla de Personajes
1. Pulsando las
escuchará los colores y se encenderán
sus luces correspondientes.
personajes, éstos
bolitas se identificarán los
teclas de números,
Actividades
6
Page 25

2. Pulsa n d o l o s p e rs onajes, s e
2
3
4
1
2
3
1
"¡Cuac,
cuac!"
2
3
1
“Pato
amarilllo”
2
3
4
1
“Amarillo”
identificarán por su nombre y color
correspondiente.
3. Al girar las
colores y se encenderán las luces
que le corresponden
Pantalla de Espejo
1. Pulsando las
escuchará cortas mel od ías y se
encenderán las luces alrededor de
la pantalla.
2. Pulsando los personajes, escuchará
sus sonidos característicos.
bolitas se escucharán los
teclas de números
Actividades
7
Page 26

3. Al girar las bolitas se escucharán
2
3
1
¡Cuac,
cuac!
2
3
4
1
“Uno”
2
3
4
1
“Do”
2
3
4
1
¡Bzz!
notas musicales y se encenderán las
luces que le corresponden.
MODO MÚSICA ( )
Pantalla de Números
1. Pulsando las
escuchará diferentes efectos de
sonido.
teclas de números,
2. Pulsando los
su sonido característico.
3. Al girar las
notas musicales y se encenderán las
luces que le corresponden.
personajes escuchará
bolitas se escucharán
Actividades
8
Page 27

Pantalla de Personajes
2
3
4
1
2
3
4
1
2
3
4
1
Bzzz !
2
3
1
1. Pulsando las
escuchará los efectos de sonido
seguido de melodías cortas.
teclas de números,
2. Pulsando los
divertidas melodías, si los pulsa una
segunda vez oirá cómo cantan.
3. Al girar las
melodías, si las pulsa por segunda
vez escuchará efectos de sonido.
Pantalla de Espejo
1. Pulsando las
escuchará melodías y se encenderán
todas las luces. Si a la vez pulsa los
animales, escuchará cómo cantan.
personajes escuchará
bolitas se escucharán
teclas de números
Actividades
9
Page 28

2. Pulsando los personajes, escuchará
2
3
1
“
¡Cuac,
cuac!
”
2
3
4
1
sus sonidos característicos.
3. Al girar las
melodías cortas.
bolitas se escucharán
Actividades
10
Page 29

CUIDADO Y MANTENIMIENTO
1. Limpie el juguete con un paño suave ligeramente húmedo. No
utilice disolventes ni abrasivos.
2. Manténgalo lejos de la luz directa del sol o de cualquier otra fuente
de calor.
3. Quite las pilas cuando el juguete no vaya a ser utilizado durante
un largo periodo de tiempo.
4. No deje caer la unidad sobre superficies duras, ni la exponga a la
humedad o al agua.
5. No trate de reparar la unidad ni desmontar el producto.
SOLUCIÓN DE PROBLEMAS
Si por alguna razón la unidad deja de funcionar o lo hace con
irregularidad, por favor, siga estos pasos:
1. Apague el juguete.
2. Quite las pilas.
3. Deje que la unidad repose durante unos minutos, después, vuelva
a poner las pilas.
4. Encienda el juguete, ahora debería funcionar.
5. Si el producto sigue sin funcionar, utilice pilas nuevas.
Si el problema continúa, por favor, póngase en contacto con nuestro
Servicio de Atención al Cliente a través del teléfono 1-800-521-2010
en los Estados Unidos, 1-877-352-8697 en Canadá o del correo
electrónico: www.vtechkids.com
Información Adicional
11
 Loading...