

Page 1

Contents
Welcome
Getting started and everyday use
Messages
Special features
Preventing and solving problems
Thank you 2
Important safety information 2
Emergency calls 3
Preparing your phone 4
Making and answering calls 10
Your Phonebook 14
Voice mail 18
Text messages 19
Utilities 28
Phone security features 32
Network features 33
Care and maintenance 39
Troubleshooting 42
A700 Approved Accessories 43
IndexIndex
Index
IndexIndex
4444
44
4444
Messages
Getting started and everyday use
Special features
Preventing and solving problems
Contents
1
Page 2

Welcome
Thank youThank you
Thank you
Thank youThank you
Congratulations on purchasing the VTECH A700 mobile
phone. Please read through this user guide, as it will be
helpful in providing useful tips in the operation of your
A700 mobile phone.
This guide is divided into four main chapters, each
marked by the tabs shown along the edge of each page for
quick location.
A full index is provided at the end of this guide.
© Copyright 2002 VTech. All rights reserved.
VTech is a trademark of VTech Holdings Ltd.
Welcome
2
ImporImpor
tant safety informationtant safety information
Impor
tant safety information
ImporImpor
tant safety informationtant safety information
Please read the following notes to enable safe and
efficient use of your mobile telephone
Do not use your phone if:
• you are driving. Always park the vehicle before making
or answering calls.
• you are in a hospital or near sensitive medical
equipment.
• you are in an aircraft.
• you are in a gas station or near any dangerous
chemicals; sparks may cause fire.
• you are close to explosives or near a blasting site.
• you are in an area where its operation is prohibited or
may cause interference or danger.
..
.
..
Page 3

Take care when using your phone if:
• you have a pacemaker fitted. Always check with the
manufacturer’s recommendations. In general, always
keep your phone at least 20cm (8in) away from the
pacemaker, never keep the phone in a breast pocket.
Always use the ear opposite to where the pacemaker
is fitted.
• you use a hearing aid, as interference may result.
Consult with the manufacturer for possible alternatives.
• you use other personal medical devices. Always be
safe and check with the manufacturer or your Doctor if
in doubt.
• you have an airbag fitted to your vehicle. Never
obstruct the airbag with any object, including your
mobile phone.
Emergency callsEmergency calls
Emergency calls
Emergency callsEmergency calls
This phone allows you to communicate using radio waves.
Because of this, connection cannot be guaranteed at all
times. Therefore you should not solely rely on your
phone for essential communications such as medical
emergencies.
If you use your phone infrequently it is important to
ensure that your phone is checked regularly, including
battery charge.
To make an emergency call
1 Turn the phone on using the red key,
2 Ensure you have suitable network coverage, some
networks require a smart (SIM) card to be fitted prior
to emergency calls,
3 Dial the appropriate emergency number,
4 Press the green key and wait for someone to answer.
Alternatively, use the Emergency option within the
Phonebook menu:
1 From standby, c to enter the menu, e to select
Phonebook, c to enter,
2 e to select Emergency call, c to display
Emergency call number, cto place call.
Remember to state your name, location and nature ofRemember to state your name, location and nature of
Remember to state your name, location and nature of
Remember to state your name, location and nature ofRemember to state your name, location and nature of
the emergency to the operator.the emergency to the operator.
the emergency to the operator.
the emergency to the operator.the emergency to the operator.
Welcome
3
Page 4
SI
M
SI
M
Getting started and everyday use
Preparing your phonePreparing your phone
Preparing your phone
Preparing your phonePreparing your phone
Before you can begin making and answering calls, please
take a moment to prepare your phone by completing the
basic steps outlined in this section.
Within this mini-section
Inserting your smart (SIM) card ............................................ 4
Fitting and charging the battery ............................................... 5
Turning on and off ........................................................................ 7
Entering a PIN code ..................................................................... 7
Setting the date and time.......................................................... 7
Customizing your phone ........................................................... 8
Change Language ..................................................................... 8
Display contrast ........................................................................ 8
Battery saving............................................................................. 8
Alert tones .................................................................................. 8
Vibration alert ............................................................................ 9
Auto key lock............................................................................. 9
Manual key lock ....................................................................... 9
Hot keys ....................................................................................... 9
Getting started and everyday use4
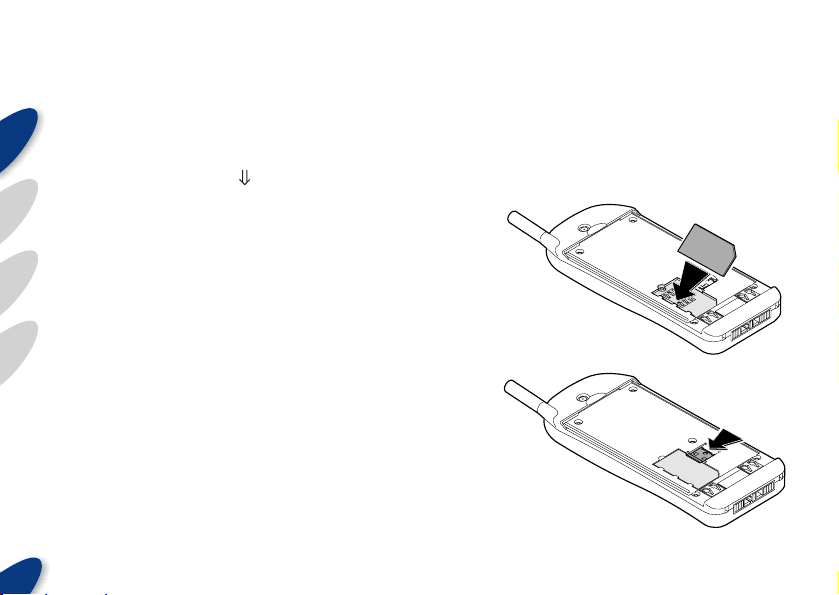
Inserting your smart (SIM) card
Your phone will have been supplied with a smart card
[SIM (Subscriber Identity Module) card] from your service
provider, if it has not already been inserted, do this now.
To insert the smart (SIM) card:
1 Remove the battery pack (see the next section).
2 Place
the
smart
(SIM)
card, with
the contact area
downward and
align the longest edge
underneath the three tabs.
3 Insert
the
smart
(SIM)
card down
into the socket
and slide across
the metal locking clip
so that the card is held
firmly in place.
4 Replace the battery pack.
Page 5
Installing and chargInstalling and charg
Installing and charg
Installing and chargInstalling and charg
batterybattery
battery
batterybattery
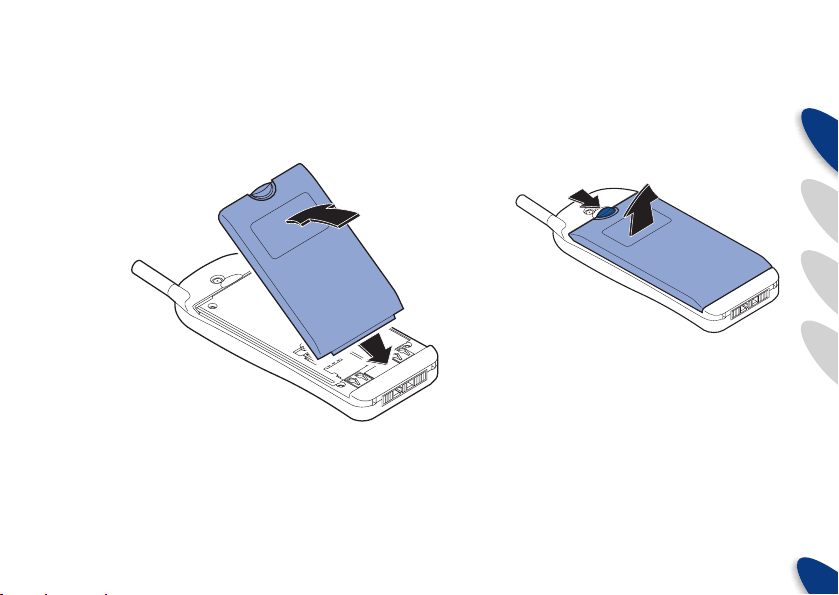
To install the battery:
1 Insert the base of the
battery pack into the
slot in the back of
the phone.
2 Press
the top
of the
battery to
the phone so
that it locks into
place.
ing theing the
ing the
ing theing the
To remove the battery:
• Press and hold the locking latch at the top of the
battery. While the latch is depressed, pull
the top of the battery away
from the
phone.
Getting started and everyday use
5
Page 6
2
5
1
3
6
4
8
7
#
9
0
abc
jkl
def
mno
ghi
tuv
pq
rs
w
x
y
z
+
2
5
1
3
6
4
8
7
#
9
0
abc
jkl
def
mno
ghi
tuv
+
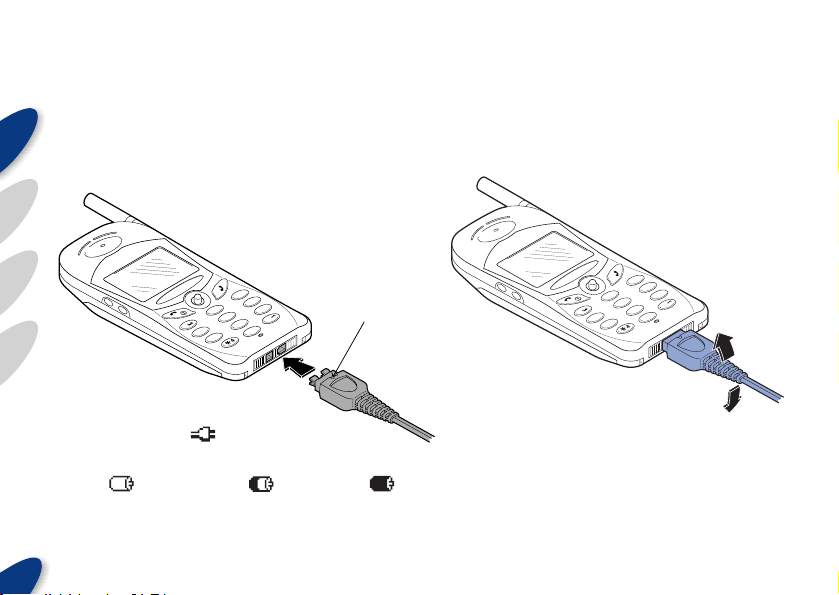
To charge the battery:
Note: Your phone can be switched on or off while
charging.
1 Plug the lead from the charger to the bottom of the
phone – the connector will fit only one way (align the
small notch on the connector with the front face of
the phone),
2 Plug the charger body into a suitable power outlet.
Charging should start within two minutes
unless the battery is fully discharged in
which case it may take up to 20
minutes to begin charging.
x
w
z
y
pq
rs
The battery
symbol in the top
left corner of the
display will alternate with
the charging symbol -
The battery symbol indicates the level of charge:
Empty:
Once the battery is fully charged, the battery symbol will
.
Half full: Full:
show full charge and the charging indicator will cease.
Getting started and everyday use
6
Notch
Note: The initial charge of the battery should be an
overnight charge or at least a minimum of six hours.
To disconnect the charger lead:
1 Remove the charger body from the power outlet,
2 Grip the charger plug and BEND IT UP OR DOWN so
that it snaps away from the base of the phone.
Important: Never pull directly on the
cable, hold only the connector.
Important: Never pull directly
on the charger lead to
remove
from the base
of the phone.
Important: Never expose your
phone or battery to high temperatures,
i.e. direct sunlight in a car.
Page 7

Switching on and off
To switch your phone on and off:
ON Press and release (.
OFF Press and hold ( for 3 seconds.
When your phone switches on for the very first time, you
may be prompted for a PIN code:
• To enter a valid PIN code – see Entering a PIN code
Entering a PIN code
Your smart (SIM) card may be protected by a PIN (Personal
Identification Number), if so you will be prompted to enter
it when you first switch on. The documentation from your
service provider should indicate the current PIN code.
To enter your PIN:
1 Enter the PIN code using the numeric keys – the
display will show ‘#’ symbols instead of the numbers
to avoid your code being seen by onlookers,
2 c or press ) to confirm the number. After a short
delay, your phone will join the network.
If you enter the wrong PIN code:
• a to clear any error. If you enter the wrong code
three times in succession, your smart (SIM) card
becomes disabled. Contact your service provider to
obtain a PUK (Personal Unblocking Key) which is a
separate, longer code - refer to the Phone security
features section.
Setting the time and date
If your phone has not previously been switched on (or
has been unused for a long period), you will need to set
the time and date.
To set the time and date:
1 From standby, c to enter the menu,
2 e to select Settings, c to enter,
3 e to select Time and Date, c to enter,
4 e to select Date, c to enter,
• The current setting is displayed - to alter the settings
within each option:
• enter the numbers using the keypad, or
• b to increment a value,
• d to decrement a value,
• c to accept the value and move to the next
setting,
• a to move back to the previous setting.
5 When you have completed the Date option, access
Time to set that in the same manner.
6 Press ( to return to standby mode.
Getting started and everyday use
7
Page 8

Customizing your phone
Configure these settings to customize the phone to your
needs.
Change Language
1 From standby, c to enter the menu,
2 e to select Settings, c to enter,
3 e to select the language, and c to enter,
4 e to select the required language, and c to apply.
Display contrast
Allows you to adjust the display to be readable in a variety
of lighting and temperature conditions.
1 From standby, c to enter the menu,
2 e to select Settings, then Contrast,
3 e to select required contrast setting and c to apply.
Battery saving*
Allows you to conserve battery power by disabling the display
and keypad backlight.
1 From standby, c to enter the menu,
2 e to select Settings, c to enter,
3 e to select Battery saving, c to enter,
4 e to select ON (or OFF) and c to apply.
* Version dependent
Getting started and everyday use
8
Alert tones
1 From standby, c to enter the menu,
2 e to select Settings, c to enter,
3 e to select Alert tones c to enter,
4 e to select the following:
You can set the following:
• Deep silent – disables all alert and keypad tones.
You can also switch to this mode from the standby
screen by pressing and holding * – the
displayed in Deep silent mode,
• Ringer volume – sets the volume of the main alert
for incoming calls,
• Melodies – sets the alerts to use for a variety of
conditions:
• All cases – sets the same alert for all conditions,
• Number stored – sets the alert for incoming calls
from phone numbers stored in your Phonebook,
• Number not stored – sets the alert for incoming
calls from unknown phone numbers,
• Messages – sets the alert for incoming text
messages,
• Alarm – sets the melody for calendar alarms,
• Message waiting – sets the alert used when an
incoming text message is received.
icon is
Page 9

• Key tones – sets the sound played when a key is
pressed.
Vibration alert
Use the vibration alert when you need to receive calls
without disturbing others, i.e. during meetings.
1 From standby, c to enter the menu,
2 e to select Settings, c to enter,
3 e to select Vibration, c to enter,
4 e to set vibration mode ON (or OFF), c to apply.
•
is displayed when vibration mode is selected.
Auto key lock
This feature automatically locks the keypad until you either
receive a call, or press and hold #. The keypad is
locked again after the incoming call ends, or after inactivity.
The symbol is displayed when the keypad is locked.
To set:
1 From standby, c to enter the menu,
2 e to select Settings, c to enter,
3 e to select Auto key lock, c to enter,
4 e to select ON (or OFF), c to apply.
Once set, press and hold # to unlock the keypad.
Manual key lock
You can manually lock and unlock the keypad at any time.
• Press and hold # to manually lock/unlock the keypad.
Hot keys
The hot key function allows you to quickly access a
regularly used feature by pressing and holding just one
key. Use the Hot Keys menu option to assign your chosen
phone functions to the keys 2 to
To set Hot keys:
Shortcut for keys that have not yet been assigned: Press
and hold the required key (2 to
shows ‘Not programmed’. When the display then shows
‘Program hot key?’ c or press ) to confirm. Now go
to step 4 below.
1 From standby, c to enter the menu,
2 e to select Settings, then Hot keys. The display will
show Key 2 and the current setting for that key,
3 e to select the required key (2 to 9) and c to
accept. A list of phone functions will be displayed,
4 e to select the required phone function and c to
apply that function to the key.
Getting started and everyday use
.
) until the display
9
Page 10

Making and answering callsMaking and answering calls
Making and answering calls
Making and answering callsMaking and answering calls
Within this mini-section
Making a call .................................................................................. 10
Dialed incorrectly? ................................................................. 10
Ending a call .................................................................................. 10
Answering a call ........................................................................... 10
To decline or forward a call .............................................10
To invoke silent mode to avoid disturbance ........... 10
To adjust the earpiece volume during a call ........... 10
To mute the microphone during a call ...................... 11
Any key answer ............................................................................ 11
Auto answer ................................................................................... 11
Redialing numbers ..................................................................... 11
Auto redial ...................................................................................... 11
Viewing the Call log ................................................................... 12
Shortcut to access dialed and missed calls .............12
Making a second call ................................................................. 12
Answering a second call.......................................................... 13
Making international calls ......................................................... 13
Forwarding calls ............................................................................ 13
Call times and Call timer ......................................................... 14
Getting started and everyday use
10
Your phone is ready to make and receive calls whenever a
network name is shown on the display.
Note: Calls cannot be made or received when there is no
network service, indicated by the lack of the
on the display and possibly the text -
Network search
symbol
.
Making a call
• Type the area code and number, then press ).
Dialed incorrectly?
• Click a to clear a single digit,
• Click and hold a to clear the whole number.
Ending a call
• Press (.
Answering a call
• When your phone rings, either press ) or c.
To decline or forward a call
(forward to your Voice mail, if set):
• Press (, or a.
To set silent mode to avoid disturbance:
• Press and hold *.
To adjust the earpiece volume during a call:
• Use the volume buttons to the left of the display.
Page 11

To mute the microphone during a call:
• Click c twice to switch mute on or off.
Any key answer
This feature allows you to answer incoming calls by
pressing any key, except (. This can be useful when
you want to take calls quickly without looking for the
appropriate key.
To enable (or disable) any key answer mode:
1 From standby, c to enter the menu,
2 e to select Settings, c to enter,
3 e to select then Any Key Answer, c to enter
4 e to select ON (or OFF), c to apply.
Auto answer
This feature is used in conjunction with the personal
handsfree kit for your phone and automatically answers
incoming calls after a set number of rings.
Redialing numbers
To redial the last number called:
• Press ) twice.
To redial one of the last ten numbers dialed:
1 Press ) or depress joystick to view the dialed calls
list,
2 e to select the number to be redialed, ) to call.
To recall previous missed calls:
1 Press and hold ) to view the missed calls list,
2 e to select the number to be redialed, ) to call.
Auto Redial
This feature is designed to help you when numbers that
you call are engaged. When enabled, Auto redial will
attempt, over a 15 minute period, to make connection
with an engaged number.
To switch Auto redial on (and off):
1 From standby, c to enter the menu,
2 e to select Network, c to enter,
3 e to select Auto redial, c to enter,
4 e to select ON (or OFF ), c to apply.
Getting started and everyday use
11
Page 12

To stop Auto redial attempts:
• Press (
Note: If you make any other use of the phone while Auto
redial is on, it will cancel Auto redial.
Viewing the Call Log
Records of all dialed calls plus all incoming calls can be
accessed using the Call log.
Note: The number of calls stored depends upon your
smart (SIM) card capacity. New calls replace records of
the oldest calls.
To view the Call log:
1 From standby, c to enter the menu,
2 e to select Call log, c to enter,
3 e to choose Missed calls, Received calls or Dialed
calls (select Delete to clear selected lists),
c to enter,
4 e to select the required number (or name), then
either:
• Press ) to dial, or
• c to view number, c for options:
• Save number – save number in your Phonebook,
Getting started and everyday use
12
• Send message to – send an SMS text message
to the number,
• Call number – dial the number,
• Forward calls to – forward your calls to the
number.
Shortcut to access dialed and missed calls:
• Dialed calls - press ) or depress joystick
• Missed incoming calls - press and hold )
• Received calls - set and use a Hot key (see Hot keys)
Making a second call
During a call, you can put the call on hold and dial another
number.
Note: your network must provide support for this feature.
To make a second call:
1 Press ) to put the current call on hold.
2 Enter new number, or e to select a Phonebook entry.
3 Press ) to call the new number.
To switch between calls:
• Press ) to switch between the two calls.
To end one call:
• Press ( to end the current call, and then ) to
retrieve the other call.
Page 13

Answering a second call
Your phone allows you to accept a second incoming call,
providing that you have a subscription to Call Waiting with
your network. For more details see Answering a call
earlier in this mini-section or Conference calls in the
Special features section.
When a second call occurs:
• Press ) to place the first call on hold and answer
the new call, or
• Press ( to end the first call, and then answer, reject
or forward the new call.
Making international calls
Note: Your network may restrict international calls for new
subscribers.
1 Press and hold 0 until Country is displayed,
2 e to select the required country name and c to
apply (or just enter the code if you know it),
• Expert tip: instead of scrolling through all the
country names, just press the key (repeatedly, if
necessary) that represents the first letter of the
required country, to show that part of the list.(eg.
Press 444 to find countries which start with “i”)
3 Enter the area code followed by the phone number,
and press ) to call.
Call Forwarding
This service* allows you to set multiple call forwarding
arrangements using the following factors:
• various phone conditions, e.g. when busy,
• different call types, e.g. voice, data, fax, all,
• separate, or combined forwarding destinations.
To activate Call Forwarding:
1 From standby, c to enter the menu,
2 e to select Call Forward, and c to enter,
3 e to choose one of the options, and c to enter.
• Unconditional – Forwards all calls of the type(s) to
be selected in step 5 below - a
displayed in the standby screen when this option is
set,
• All unanswered – Forwards all calls that fall into any
of the three categories below,
• If busy – Forwards when phone is in another call,
• If no reply – Forwards any calls that you do not
answer.
• If not reachable – Forwards when phone is out of
coverage or switched off.
* Call Forward functions are network and smart (SIM)
card dependant. You may or may not be offered this
service by your network provider.
symbol is
Getting started and everyday use
13
Page 14

• Status check – Discovers current setup logged with
your network.
4 e to select Activate, Deactivate (to cancel an
existing setup) or Status check (to discover current
setup), c to proceed.
5 e to choose call type(s): Voice, Fax, Data or All.
6 e to select either Forward to voice mail or Other
number. c to proceed.
7a If Forward to voice mail was selected, then the calls
will be forwarded to your voice mail.
7b If Other number was selected, then e to select the
Call Forward number - either from the Phonebook or
enter from keypad.
8 c to confirm a summary of settings and initiate a
connection to register them with your network.
Call timer
Your phone keeps a record of all incoming and outgoing
call durations.
To view call times:
1 From standby, c to enter the menu,
2 e to select Call Timer, c to enter,
3 e to select Time, c to enter,
4 e to select Last call, All calls out, All calls in, All
calls or Clear timers to reset all. c to apply.
Getting started and everyday use
14
Your PhonebookYour Phonebook
Your Phonebook
Your PhonebookYour Phonebook
Store regular contact numbers in your Phonebook, with
names, for quick dialing. When an incoming call is
received from a stored number, the name is displayed
before you answer the call.
Within this mini-section
Adding a number and name ................................................. 14
Making a Phonebook call ........................................................ 16
Options for Phonebook entries ..................................... 16
Other Phonebook features .................................................... 16
Using the Phonebook menu ........................................... 16
Storing tones for automated phone services .......... 17
Phonebook shortcut ............................................................. 17
Adding a number and name
1 Enter the required area code and number with its
long distance prefix,
Note: you are recommended to include the
international prefix for all entries, even in your own
country so that the correct number will be dialed
when you’re abroad - the prefix is ignored when you
Page 15

are in the same country - see ‘Making International
Call’ in the previous chapter for details on entering
the required prefix(es),
2 c twice - display shows Enter name,
3 Enter the name using the keypad as outlined below,
4 c to save the completed entry in your Phonebook.
To enter a name:
1 Press the keypad button that shows the required
letter - the first one of the letters printed on the
button will be displayed (other character choices
for that button are shown at the top of the display).
2 If the first letter is not the one required, press the
same button repeatedly until the required letter is
displayed – you may need to practice this
technique as the letter is selected one second after
the button was last pressed (a to delete a
mistake).
3 Repeat the above process for each letter to build a
name, with the aid of the following special features:
• Spaces - 1 to insert a space,
• Move cursor - Click e to move the cursor back/
forward through the text, hold e to go to the
start or end,
• Case shift - Press * before a required button
to shift between upper and lower case (the arrow
in the lower left corner of the display shows the
case setting - down for lower case, up for upper
case). The initial letter is automatically capitalized,
• Shift/number lock – Press and hold * to
change between normal case (outline arrow in
lower left corner of the display), upper case shift
lock (solid arrow) and number lock (1 in a box)
for entering a series of numbers,
• Delete - Click a to delete a character, hold a
to delete the whole name,
• International characters - Numbers and
International characters appear after the standard
characters shown on each button,
• Punctuation characters - Use 0 and # to
provide special characters:
• 0 provides . , 0 ? ! ” : ; @ £ $ ¥ ( ) < > _
• # provides . # * + / - = & %
• Max. characters - The maximum number of
characters is determined by your smart (SIM)
card and the counter in the lower left corner
shows the characters used.
Getting started and everyday use
15
Page 16

Making a phonebook call
1 From standby, e to enter your Phonebook,
2 Locate the required entry:
• e through the list to locate, or
• use the keypad to enter the first letter (press
repeatedly until required letter is displayed in the
lower right corner), then e to locate the entry,
3 ) to call.
Options for Phonebook entries
A number of options are available for each entry within
your Phonebook:
1 From standby, e to enter your Phonebook,
2 e to select the required entry, c to enter,
3 c to view the entry options:
• View entry – displays the number and then the
name of the entry,
• Delete entry – removes the entry from your
Phonebook,
• Edit number – allows the stored number to be
changed,
Getting started and everyday use
16
• Edit name – allows the entry name to be changed,
• Send a message – send a text message to the
number stored in the entry,
• Send by SMS – transmit the Phonebook entry
details as a text message to another contact in your
Phonebook, or a new number,
• Call forward – Call forward incoming calls to the
number stored in the entry,
• Dial – make a call to the number stored in the
entry.
Other Phonebook features
Using the Phonebook menu
• From standby, c twice to enter the Phonebook menu
item. The following items are available:
• Search – create, call or change an entry,
• Add number – create a new entry,
• Own number – enter your own mobile number, in
case you forget it,
Page 17

• Capacity – shows Phonebook space available for
new entries,
• Emergency call – provides the standard network
emergency call number.
Storing tones for automated phone services
If you regularly call automated phone systems, switchboards or answering machines, you can use your
Phonebook to store the tones that operate these services:
1 From standby, enter the standard area code and
phone number,
2 Press and hold 0 until
Wait for connection),
3 Type the digits that represent the tones,
• Optionally, press and hold 0 until
(meaning Pause), this gives the automated system
time to process the other numbers before sending
more.
4 c twice to save the sequence and then enter a
name as discussed earlier.
is displayed (meaning
w
p
is displayed
Phonebook shortcut
Each number saved in the phonebook can be quickly
accessed using the keypad to enter the location number
(up to 3 digits) followed by #.
The location number is shown whenever you use View
entry to review a Phonebook entry:
Number
233 1222
12
It is the number seen on the bottom right of the display.
In the display example above, the location number is 12.
To quickly access this phone number, press 12#.
After this you can press ) to dial the number.
Getting started and everyday use
17
Page 18

Messages
Voice mail Voice mail
Voice mail
Voice mail Voice mail
Most networks provide an answering service (subscription
charges may apply), which lets callers leave voice
messages when:
• your phone is switched off, or temporarily out of
coverage,
• you don’t answer,
or
• you’re engaged (unless you use a call waiting option).
Your provider may set up the Voice mail service
automatically, if not, you need to follow the steps given
next.
Within this mini-section
Setting up voice mail ................................................................ 18
Forwarding to voice mail .................................................18
Listening to voice mail ....................................................19
Forwarding to voice mail
To forward your phone to voice mail or to determine
under which circumstances your phone will be
answered by voice mail see section on Call
Forwarding (pg13-14).
Messages
18
Setting up voice mail
To set the voice mail number:
Shortcut when the voice mail number has not been set:
Press and hold 1 until the display shows ‘Voice mail
number not set’. Now go to step 4 below.
1 From standby, c to enter the menu,
2 e to select Voice mail, c to enter,
3 e to choose Setup voice mail, c to enter.
4 The
5 c to accept and c to confirm the Save changes?
Note: With some networks you may need to call a
different mailbox number when abroad.
icon will be displayed so that you can
choose how to set the Voice mail number advised by
your network:
• from your Phonebook - e to choose the voice
mail number,
or
• from the keypad - enter the voice mail number.
prompt.
Page 19

Listening to voice mail
Depending on your network and its configuration, you may
be notified about new voice mail messages by a text
message or by a call. You then need to instruct your
phone to listen to the message(s):
To hear your voicemail message(s):
• Press and hold 1.
If “Voice mail number not set” is displayed, then you have
to set the voice mail number. See Setting up voice mail.
Text messages
Within this mini-section
Text messages .............................................................................. 19
Creating text messages ............................................................. 20
To enter text............................................................................ 21
Using predictive text ..................................................................22
Personal dictionary manager ................................................. 23
My dictionary ........................................................................... 23
Reading text messages ............................................................. 24
To read a new incoming message ............................... 24
To read (and use) previous messages ..................... 24
Message options .......................................................................... 25
Inbox message options ..................................................... 25
Draft message options ........................................................ 25
Phone number in messages .......................................... 25
Message memory space ......................................................... 26
To check available space ................................................... 26
Text message settings ............................................................... 26
Cell broadcast ............................................................................... 26
[1] To define your channel list ...................................... 27
[2] To switch a channel on (or off) ............................. 27
[3] To enable (or disable) cell broadcast ................27
Saving and forwarding broadcast messages ............ 27
Text messages
Text messages (or Short Messaging Service, SMS) provide
a useful, and low cost, way to share information. The text
messages supported by your phone fall into two
categories:
• Information sent from one mobile phone user to
another,
or
Messages
19
Page 20

• Information sent by the network to mobile phone
users within a certain area. This is called cell broadcast
and can include local information with relevance to
your current vicinity. There may be network
subscription charges for some services.
When you create messages on your phone, they are sent
to a centralized service centre using a special phone
number supplied by your network. Once received at the
service centre, the message is then transmitted over the
network to your intended recipient.
Note: when creating or reading a text message you can
use the volume buttons to the left of the display to
increase or decrease the text size for easy reading.
Creating text messages
1 From standby, c to enter the menu,
2 e to select Messages, c to enter,
3 e to Write message, c to enter,
You have a choice:
• Start a completely fresh message - e to select
Create new, c to enter,or
• Use predefined text as the basis for your message e to Use predefined, c to enter,
• e to select the required message, c to
confirm,
Messages
20
4 Enter your message using the keypad (discussed in
‘Enter text’ on the next page), then c to confirm,
Note: your phone includes a word prediction feature
to help you to enter text more quickly - please refer
to the section ‘Using predictive text’ for details.
5 When your message is complete, either:
• Press ), or
• c to view the message menu and then c again
to select Validate.
The message menu will be displayed.
6 You now have a choice:
• Send the message immediately - c to select
Send, or
• Save the message to send (or re-edit) later - e to
select Save, c to enter,
• Parameters c to select
• e to choose either Service center (Message
centre number) or Validity period c to select
7 The
icon will be displayed so that you can
choose how to address the message:
• Send to an entry in your Phonebook - e to choose
the required recipient,
or
Page 21

• Send to a number entered on the keypad - enter
the full number (including area code) of your
recipient.
8 If you chose Save, the message will be stored ready
to be sent at another time - access Drafts to send the
message.
If you chose Send, the message will be sent to your
network, where attempts will be made to deliver it to
your recipient. The ‘Message Sent’ response means
that your network service centre has received it – it
does not guarantee that your message has been
successfully delivered to your recipient.
Note: If your message is not sent, you will be offered
Retry. If this fails, check that your Message Centre
Number is correct. See section “Text message setting”
and set correct message centre number using Service
centre sub menu.
To enter text:
1 Press the keypad button that shows the required
letter - the first of the letters, printed on the button,
will be displayed (other character choices for that
button are also shown on the display).
2 If the first letter is not the one required, press the
same button repeatedly until the required letter is
displayed – you may need to practice this technique
as the letter is selected one second after the button
was last pressed (e to delete a mistake).
3 Repeat the above process for each letter to build
each word, with the aid of the following special
features:
• Spaces - 1 to insert a space,
• Move cursor - Click e to move the cursor back/
forward through the text, hold e to go to the start
or end,
• Case shift - Press * before a required button to
shift between upper and lower case (the arrow in
the lower left corner of the display shows the case
setting - down for lower case, up for upper case).
The initial letter is automatically capitalized,
• Shift/number lock – Press and hold * to change
between normal case (outline arrow in lower left
corner of the display), upper case shift lock (solid
arrow) and number lock (1 in a box) for entering a
series of numbers,
• Delete - Click a to delete a character, hold a to
delete the whole message,
• International characters - Numbers and International characters appear after the standard characters
shown on each button,
21Messages
Page 22

• Punctuation characters - Use 0 and # to
provide special characters:
• 0 provides . , 0 ? ! ” : ; @ £ $ ¥ ( ) < > _
• # provides . # * + / - = & %
• Max. characters - Each message can have a
maximum of 160 characters (the counter x/160 in
the lower left corner shows the characters used).
• Phonebook entries - You can insert numbers stored
in your Phonebook:
1 c to view message options, e to select
Phonebook, c to enter,
2 e to select required Phonebook entry, c to
insert.
Using predictive text
Your phone includes an intelligent word predictor that
helps you to write messages more quickly. Using the
predictor means that you do not need to repeatedly press
keys to achieve the required characters of each word.
To switch the predictor ON or OFF:
Within the message editor, either:
• c to view the message menu, e to choose Change
edit mode, c to enter,
or
Messages
22
• Press and hold # until the
(predictor ON) or disappears (predictor OFF) at the
foot of the display.
Note: you can switch the predictor on or off at any
stage during the message editing process.
To enter words using the predictor:
Begin entering a word - for each character, press the key
containing that character only once.
As you enter each character, the predictor calculates all of
the words that might be formed using that combination of
key presses. The predictor’s current ‘best guess’ is
displayed in the top left corner of the display and the
number of possible words are shown at the bottom of the
screen.
• e to scroll through other guesses,
• c to accept the current guess,
• a to delete the last typed character.
If a match cannot be found:
If the predictor cannot find a match for the characters that
you have entered, it will display Unknown word. The
entered characters are then shown isolated from the
remaining message and you are prompted to Type new
word.
A icon appears
Page 23

• Type the word out in full using the normal method of
multiple key presses to achieve the exact characters.
• c to accept the entered word and return to the main
message editor. This word is then added to My
dictionary for future use. –
When the message is complete:
Send the message as normal. See step 5 of the section
Creating text messages for further details.
To change the predictor language:
The predictor uses the phone’s default language, however,
it can be set separately:
1 From within the message editor, c to view the
message options,
2 e to choose Language, c to enter.
3 e to select required language, c to enter.
Personal dictionary manager
Your phone may include a Personal dictionary manager
My dictionaryMy dictionary
titled
My dictionary. When using the text predictor (p.
My dictionaryMy dictionary
22) feature in your phone, you may find that there are
words or phrases that you would commonly use, but are
not in the predictors dictionary.
to enter, save and edit these words. Up to 26 words with
a minimum of 3 characters and a maximum of 24
characters per word can be saved.
My dictionaryMy dictionary
My dictionary allows you
My dictionaryMy dictionary
Adding a new word to
1 From standby, c to enter the menu,
2 e to select Messages, c to enter,
3 e to My dictionary, c to enter,
• When My dictionary is activated, it may display a list
of words saved in the personal dictionary and a
smart menu item called Add new word is shown at
the top of the list.
4 c to enter Add new word,
• ‘Type new word’ will appear at the top of the screen.
Type in the new word using the keypad (discussed
in ‘Enter text’ on page 21).
• Then c to confirm and save. The save animation
will be displayed and the user will return to the My
dictionary sub-menu.
Personal Dictionary is full:
If there is no space left in the dictionary when you try to
Add new word, the words ‘Personal Dictionary Full’ will be
displayed for a few seconds and you will have to delete a
word before adding a new one.
Editing a word in My dictionary:
1 In the My dictionary sub-menu e to the word you
wish to edit, c to select.
My dictionaryMy dictionary
My dictionary:
My dictionaryMy dictionary
Messages
23
Page 24

2 e to Edit c to select.
• ‘Edit word’ will appear at the top of the screen.
Type in the new word using the keypad (discussed
in ‘Enter text’ on page 21)
• Then c to confirm and save. The save animation
will be displayed and the user will return to the My
dictionary sub-menu..
Deleting a word in My dictionary:
1 In the My dictionary sub-menu e to the word you
wish to edit, c to select.
2 e to Delete c to select.
• ‘Delete (word) From dictionary’ will appear
3a a if you choose not to Delete, the words ‘Can-
celled by user’ will appear on the screen for a few
seconds and return you to the My dictionary sub-
menu.
3b To delete a word from My dictionary, c, and the
delete animation sequence will follow, deleting the
word and bringing you back to the My dictionary submenu.
Reading text messages
When a new text message is received, your phone will
alert you in the following ways:
Messages
24
• using the current messages melody or vibrator (see
Text message settings for more details).
• for a short while the display will show the beginning of
the message along with the number of the sender,
• if you do not acknowledge and read through the
message, then the display will change to show
and the icon on the top row.
Messages
To read a new incoming message:
1 From screen indicating the new message, c to open
the new message,
2 e to scroll through the message,
3 c to view message options (see Message options).
To read (and use) previous messages:
1 From standby, c to enter the menu,
2 e to select Messages, c to enter, then choose
either:
• previously received messages - e to select Inbox,
c to enter.
• previously sent or saved messages - e to select
Drafts, c to enter.
3 e to select required message, c to open,
4 e to scroll through the message,
5 c to view message options (see Message options).
Page 25

Message Options
Inbox message options
• Within a received message, c to view options,
• Delete – remove the message from memory,
• Reply – send a reply to the sender of the message,
• Forward – forward the message to a new recipient,
• Call sender – phone the person who sent the
message,
• Save sender – add the sender’s number to your
Phonebook,
• Active number – call, save, send a message to, or
forward calls to a phone number shown in the
message,
Draft message options
• Within a created message, c to view options,
• Delete – remove the message from memory,
• Send – send the message to a recipient from your
Phonebook or whose mobile number you know,
• Edit – edit the current message.
• Active number – call, save, send a message to, or
forward calls to a phone number shown in the
message.
• Commands (if supported by network provider):
• Status inquiry – view network status and delivery
information for the message,
• Del. if not delivered – prevents continual
message delivery retries by the service centre
when the recipient is unavailable.
• Activate auto report – requests confirmation that
the message has been delivered,
• Deactivate auto report – cancels the request for
delivery confirmation.
Phone numbers in messages
When reading text messages that contain one or more
phone numbers, you can easily call or save the number(s).
To use a number embedded in a text message:
1 Within a message, c to view options,
2 e to select Active number,
• If there are two or more numbers, e to choose,
3 c to enter. You now have a choice:
• To call the number: Press ),
• To save the number: c twice to select Save number,
• To send a message to the number, or forward your
incoming calls to it: c and then e to choose the
relevant option.
Messages
25
Page 26

Message memory space
Storage space for messages is limited (determined by
your smart (SIM) card), therefore you are advised to
delete as many messages as possible. The receipt of new
messages may be affected if the storage becomes full,
however, your phone will provide a warning.
If the message capacity becomes full when a new
message is received and you do not acknowledge and
delete the message, then the display will change to show
SMS full and the
To check available space:
1 From standby, c to enter the menu,
2 e to select Messages, then choose Capacity.
• If the Used figure is nearing the Capacity setting then
view the messages as discussed earlier and delete
any that are no longer required.
icon on the top row.
Text message settings
A selection of general settings are associated with text
messaging, the most important of which is the messaging
service centre number for your network. Generally this
number is pre-installed on your smart (SIM) card.
To access text message settings:
1 From standby, c to enter the menu,
2 e to select Messages, then Settings, the following
Messages
26
options are available:
• Service centre – the number to which your text
messages are sent for transmission,
• Validity period – the time period that your network
should continue to try delivering messages,
*• Message type – converts and sends messages as
email, fax, etc. subject to network support,
*• Delivery report – notifies you when each message
is received, or gives the reason why not – there
may be a charge for this service, subject to network
support,
*• Same centre reply – routes a reply to your
message via your own message centre, subject to
network support,
• Melody – sets the sound used to announce
incoming messages.
Cell broadcast
Your network may provide cell broadcast features where
news, travel information and special offers in your current
vicinity are sent to your phone using text messages. If you
subscribe to such a service, your network informs you of
the available channels, of which you can choose any five.
* Subject to network support.
Page 27

Activating cell broadcast involves three main steps:
• [1] Define your channel list,
• [2] Switch each channel on,
• [3] Enable the cell broadcast feature.
Note: Monitoring cell broadcasts reduces standby battery
time.
[1] To define your channel list:
Before you can receive cell broadcast information, you
need to select which channel(s) to monitor. To do this:
1 From standby, c to enter the menu,
2 e to select Messages, then Cell broadcast, then
Channel list,
• the display will show an Add entry option and also
list any current channels.
3 e to select Add entry, c to enter.
• If channel 50 (the most common channel) is not
already in the list, it will be proposed,
4 e to select the proposed channel, or a to reject it
and type a different channel number as advised by
your network, c to enter.
Note: You now need to switch on the chosen channel(s):
[2] To switch a cell broadcast channel on (or off):
1 From standby, c to enter the menu,
2 e to select Messages, then Cell broadcast, then
Channel list,
3 e to select the required channel, c to enter,
4 e to select On (or Off, or Delete to remove), c to
confirm.
•a
symbol is shown next to each enabled
channel.
Note: You now need to enable the cell broadcast feature:
[3] To enable (or disable) the cell broadcast feature
1 From standby, c to enter the menu,
2 e to select Messages, then Cell broadcast, then
Receive CB,
3 e to select On (or Off), c to confirm.
Saving and forwarding broadcast messages
Your phone retains the first page of the most recent
broadcast per channel, however, this data is erased when
you switch off. As with any other text message, you can
save broadcast messages or send (forward) them to
someone else.
Messages
27
Page 28

Special features
UtilitiesUtilities
Utilities
UtilitiesUtilities
Within this mini-section
Calculator ......................................................................................... 29
To use the calculator ...........................................................29
Currency Converter .................................................................... 29
To configure the currency converter ........................... 29
To use the currency converter ....................................... 30
Calendar ........................................................................................... 30
To open the calendar ......................................................... 30
To add an entry ...................................................................... 30
To edit an entry ...................................................................... 31
Games* ............................................................................................ 32
* Version dependent
Special features
28
Your phone provides the following useful applications:
• Calculator – provides basic calculation facilities -
including addition, subtraction, multiplication and
division.
• Currency Converter – as an integral part of the
calculator, this function allows you to quickly convert
amounts between currencies.
• Calendar – allows you to plan your activities and view
them on a day, week or month basis.
• Games* – a selection of games are provided for your
enjoyment. On-screen playing instructions are
included with each game.
Page 29

Calculator
To use the calculator:
1 From standby, c to enter the menu,
2 e to select Extra, c to enter,
3 e to select Calculator, c to enter,
4 Displays shows Enter number – enter your first
number, c to enter,
5 e to choose between suggested operators, c to
enter,
6 Display shows Enter number – enter your second
number, c to enter, to select Equals, c to enter,
7 Display shows the Result.
Note: On subsequent calculations, e to scroll up and
select the results or operands from previous calculations.
Note: Press # to enter a decimal point.
Currency Converter
Your phone includes a currency converter funtion within
the Calculator. To use the converter, you first need to
define a domestic currency (your home currency), a
foreign currency and the exchange rate between the two.
To configure the currency converter:
1 From standby, c to enter the menu,
2 e to select Extra, then Calculator,
3 Display shows Enter number, c to display the
operators list, i.e. +, -, x, etc.
4 e to select Exchange rate, c to enter. The display
shows Domestic - now select your home country.
5 e to enter the list of countries (if a country is
already set, first use a to delete the three digit
country code) You can now select the required
country. To do this, either:
Special features
29
Page 30

• e to scroll through the list of countries, c to
select the one that is highlighted, or
• Use the keypad to select the initial letter of your
country - press the appropriate number key
repeatedly until the required letter is displayed in
the lower right corner of the display. The list will
move to selected letter, then use e to scroll
further and c to select the highlighted country.
6 c to advance to the Foreign country setting. Use the
same procedure as for the Domestic setting - see
step 5.
7 c to advance to the Exchange rate setting. Use the
keypad to enter the exchange rate between your
chosen domestic and foreign currencies. Press # to
enter a decimal point.
Note: The entered exchange rate must represent
the value of the foreign currency relative to 1.00 of
your domestic currency.
8 c to set the entered exchange rate and c again to
confirm the setting. The exchange rate will be saved
and you can now use the currency converter.
To use the currency converter:
1 From standby, c to enter the menu,
2 e to select Extra, then Calculator,
Special features
30
3 Displays shows Enter number, use the keypad to
enter the amount to be converted, c to confirm.
4 e to select either: To domestic or To foreign as
required, c to confirm.
5 The display shows the amount in both the foreign and
domestic currencies.
Calendar
To open the calendar:
1 From standby, c to enter the menu,
2 e to select Extra, c to enter,
3 e to select Calendar, c to enter,
• The calendar provides day, week, month, capacity
and entry list, all of which allow you to create new
entries.
4 e to select a view (day, week or month), c to
enter.
To add an entry:
1 From within the day view (see above),
c to view options,
2 e to select Add entry, c to enter,
Page 31

3 e to choose an event type, c to enter,
4 e to choose the frequency, if applicable – Once,
Daily, Weekly, Working days c to enter,
5 e to configure, if applicable, one or more timing
details: Start time, Stop time, Date,
6 Use the keypad letters to type your comments,
c to enter.
Note: When an appointment or reminder entry is due, an
alert will be sounded accompanied by the icon and a
summary on the display. If the phone is switched off
when an alert becomes due, you will receive it when you
next switch on.
To edit an entry:
1 Locate the entry to be edited, either:
• From within the day view (see previous page),
c to view options, or
• If you have numerous entries, using the Entry list,
2 e to select the required entry, c to enter – the
following options are available:
• View item – displays a summary of the chosen
entry,
• Edit – allows you to change any aspect of the
chosen entry,
• Postpone – allows you to delay the timing of the
chosen entry,
• Delete – removes the chosen entry from the
calendar.
Special features
31
Page 32

Games*
To use the games:
1 From standby, c to enter the menu,
2 e to select Extra, c to enter,
3 e to select Games, c to enter,
4 A selection of games are listed, e to select the
required game.
• For instructions on how to play the selected game,
select the Help option.
* Version dependent
Phone security featuresPhone security features
Phone security features
Phone security featuresPhone security features
Your phone can optionally use the security codes, PIN and
PIN2, stored in your smart (SIM) card to control access to
certain features, such as the Restricted Phonebook and the
call charge limit. You can choose to change your PIN
codes and also to enable/disable their use.
Note: The use of PIN2 is dependant on your network
operator and the smart (SIM) card in use.
Special features
32
Changing your PIN or PIN2 codes
Note: your PIN code must be enabled before it can be
changed, you will be prompted to enable it if it is
currently disabled.
To change your PIN or PIN2 code(s):
1 From standby, c to enter the menu,
2 e to select Settings, then Security,
3 e to choose either Change PIN or Change PIN2,
4 Type the current code and c (or )), to enter,
5 Type the new code (# is displayed for each number)
and c to enter,
6 Re-type the new code as confirmation and c to
enter.
Page 33

Switching your PIN on (and off)
Note: Disabling your PIN code is not recommended.
To switch your PIN code on (or off):
1 From standby, c to enter the menu,
2 e to select Settings, c to enter,
3 e to select Security, c to enter,
4 e to select Enable PIN (or Disable PIN),
5 Type the PIN code and c to enter.
If your SIM becomes blocked
For security purposes, if the wrong PIN code is entered
three times in succession, your smart (SIM) card is
automatically blocked. You will need to contact your
service provider in order to obtain a PUK (Personal
Unblocking Key) which is a separate, longer security code.
Network featuresNetwork features
Network features
Network featuresNetwork features
Network features are services that are provided by your
network and fully supported by your phone.
Note: Some network features may require additional
subscription charges. Contact your network provider for
more details.
Within this mini-section
Call waiting ...................................................................................... 34
To switch call waiting on (and off)................................ 34
Call barring...................................................................................... 34
To set call barring.................................................................. 34
Conference calls .......................................................................... 35
To start a conference call ..................................................35
To manage a conference call.......................................... 35
SIM toolkit functions .................................................................. 36
Service dialing numbers ......................................................... 36
Withholding your number....................................................... 37
To set (or reset) number withholding ....................... 37
Special features
33
Page 34

Alternative networks .................................................................. 38
To change the network currently in use .................... 38
The preferred networks list ............................................. 38
To edit the preferred networks list............................... 38
Call waiting
Provides an alert, while you are in a call, when a second
incoming call is received so that you can decide to take,
call forward or decline it.
To switch call waiting on (and off):
1 From standby, c to enter the menu,
2 e to select Network, c to enter,
3 e to select Services, c to enter,
4 e to select Call waiting, c to enter,
5 e to select Activate (or Deactivate), then c to
confirm,
• Confirmation of the new setting will be received
from your network,
• Choose the Status check option if you are unsure of
the current setting.
Special features
34
Call barring
Allows you to prevent certain types of calls being made to
or from your phone. This service requires the use of a
special barring password that is provided by your network.
Note: Calls to recognized emergency numbers, are never
barred.
To set call barring:
1 From standby, c to enter the menu,
2 e to select Network, c to enter,
3 e to select Services, c to enter,
4 e to select Call barring, c to enter,
5 e to select Outgoing call or Incoming call, then c
to enter, you have the following options:
• Outgoing calls:
• All – prevents all outgoing calls, except emer-
gency calls,
• International – prevents any international calls
being made,
• Int. except home – prevents any international
*
calls being made except to your network’s home
country (while abroad),
• Status check – determines any current settings.
Network dependant (service may not be
*
available)
Page 35

• Incoming calls:*
• All – prevents all incoming calls,
• When roaming – prevents all incoming calls
when you are not registered with your home
network (i.e. when roaming),
• Status check – determines any current settings.
6 e to choose the required option, then c to
confirm and c to activate,
• Confirmation of the new setting will be received
from your network.
Conference calls
Conference calls allow more than two people to talk in a
common connection. You need two separate calls to begin
a conference, these can both be outgoing, incoming, or a
mixture of both.
To start a conference call:
1 Make, or answer your first call in the usual manner,
2 ) to place the call on hold,
3 Make, or answer an additional call in the usual
manner,
4 c to access the menu and choose Join.*
Repeat steps 3 and 4 for each person joining the
conference call, up to a maximum of five people in total.*
To manage a conference call:*
1 During the conference call, c to access the
conference call,
2 c to display conference call participants,
3 e to select one of the callers,
4 c to show conference options available for selected
caller:
• to hang up this call - e to select Disconnect,
• to separate a call away from the conference - e
to select Split,
• to switch between the separated call and the
conference - )or e to select Swap,*
• to end the separated call - ( (when connected
to the separated call),
• to end the conference - ( (when connected to
the conference),
• to return to held caller after ending the separated
call - e to select Retrieve. *
*Network dependant (service may not be available)
Special features
35
Page 36

SIM toolkit functions
Note: SIM toolkit functions are network and smart (SIM)
card dependant. You may or may not be offered this
service by your network provider.
SIM toolkit functions typically provide specialized contact
numbers as well as other custom options that are made
available as menu options.
To use a SIM toolkit function (when available):
1 From standby, c to enter the menu,
2 e to select SIM toolkit, c to enter,
3 e to highlight the required option, c to enter.
• The selected option will operate as determined by
your network provider, or an associate organization.
Special features
36
Service dialing numbers
Note: Service dialing numbers are network and smart
(SIM) card dependant. You may or may not be offered
this service by your network provider.
Service dialing numbers operate rather like a phonebook
list where the entries are pre-configured by your network
provider. When you choose one of the list entries, a call is
made and you can take advantage of the special on-line
service.
To use a service dialing number (when available):
1 From standby, c to enter the menu,
2 e to select Services, c to enter,
3 e to highlight the required entry, c to enter.
• A call will be made to a pre-configured number and
you will hear the available options and/or services.
Note: The service numbers can only be modified
by your network provider.
Page 37

Withholding your number
As standard, your phone number is transmitted as part of
every call that you make and can be read by other mobile
phone users and certain landline phones. If you don’t
want your network to do this, you can withhold your
number.
Note: When you withhold your number and call a phone
capable of displaying incoming numbers, the fact that
you have withheld your number will be indicated to the
called party.
To set (or reset) number withholding:
1 From standby, c to enter the menu,
2 e to select Network, c to enter,
3 e to select Services,c to enter,
4 e to select Identification,c to enter,
5 e to select the following:
• See caller ID – indicates the current caller ID setting.
• Call Private – when activated, it prevents sending
your number whenever you make your call.
*•See Called party ID – activates/deactivates showing
you the called party’s actual phone number. If this
network feature is supported, then you would be
able to see the phone number of the called party
even if the called party’s phone was forwarded.
*•Called Private – activates/deactivates passing on
your phone number to the calling party when you
forward calls. If this network feature is supported,
then it would allow you to prevent sending your
number to another party if your phone was
forwarded.
• Status check – determines any current settings,
6 e to choose the required option, then c to
confirm and c to activate,
• Confirmation of the new setting will be received
from your network.
*Version dependant (service may not be available)
Special features
37
Page 38

Alternative networks
When you are out of range of your normal (home)
network, you may still be able to obtain service by
connecting through an alternate network. This is most
common when you are abroad, and your home network
will have roaming agreements with many other networks,
which your phone will automatically select if given a free
choice. However, you may wish to guide your phone to
use a different network and this feature allows you to do
this.
To temporarily change the network currently in use:
1 From standby, c to enter the menu,
2 e to select Network, c to enter,
3 e to select Change network, c to enter,
• your phone will scan the airwaves for other network
signals and display the results,
• networks that you are barred from using will be
indicated by a
4 e to select the required network, c to confirm.
• attempts will be made to connect to the chosen
network and the results displayed.
The preferred networks list
Your networks’ list of preferred networks are stored on
your smart (SIM) card and these will be selected in order
Special features
38
symbol.
whenever your home network is unavailable. You can edit
the list by adding or deleting network entries.
To edit the preferred networks list:
1 From standby, c to enter the menu,
2 e to select Network, c to enter,
3 e to select Preferred networks, c to enter,
• the standard list is displayed and is usually full, so
entries need to be deleted before new ones can be
added.
• To delete an entry: e to select the required
entry, c twice to delete.
4 To add a new entry: e to select Add preferred item,
c to enter.
5 e to select the required country (or type the key
that represents the first letter of the country), c to
enter,
6 e to select a new network from the known networks
list for the selected country, c twice to confirm,
• The display will show Enter position,
7 (This step may differ with some smart (SIM) cards)
Type a number between 1 and 10 to rank the
position in the preferred network list that the new
entry will take, c to confirm.
Page 39

Preventing and solving problems
Care and maintenanceCare and maintenance
Care and maintenance
Care and maintenanceCare and maintenance
Your phone is designed and manufactured to exacting
standards and will provide reliable service provided it is
treated with care – please follow the guidelines below.
General care
• Keep your phone and its accessories in a safe place
away from small children.
• Keep your phone in a cool dry place away from
possible water damage or temperature extremes.
• Avoid dusty or dirty environments that could damage
the moving parts of your phone.
• Never attempt to open your phone, this product is not
designed with consumer interchangeable components
and you could invalidate any warranties provided.
• Always use an approved repair centre if your product
becomes faulty.
• Do not drop, knock or shake your phone, delicate
electronic components may be damaged.
• Never use abrasive cleaning products on your phone,
clean only with a lint-free cloth.
• Always use approved spares or accessories, unapproved components may effect performance of your
product.
• Take special care with your smart (SIM) card. Do not
damage any of the special contacts on the card or
inside the phone.
Battery information
• Use only approved accessories and replacement
batteries, never use an unapproved charger which
could be either unsafe or damage your phone.
• Do not try to charge your battery in extreme temperature conditions, its performance could be affected.
• Only use the battery for its intended purpose.
• Never use a battery or charger that have been
damaged in any way.
• Never place anything across the battery terminals that
may cause them to short, this will damage the battery.
• Temperature extremes will impact the performance of
your battery, always try to keep your battery close to
room temperature, never allow it to experience
temperatures below -15°C or above +50°C.
• Never dispose of a battery in a fire. Locate the battery
disposal and recycling program in your area.
Preventing and solving problems
39
Page 40

Radio Frequency Signals
This Product meets the government’s requirements for
exposure to radio waves.
In USA FCC requirements: Part: 2.989/1057
In Canada IC RSS-133
FCC RF EXPOSURE INFORMATION
Read this information before using your handset
In August 1996 the Federal Communications Commission
(FCC) of the United States with its action in Report and
Order FCC 96-326 adopted an updated safety standard for
human exposure to radio frequency (RF) electromagnetic
energy emitted by FCC regulated transmitters. Those
guidelines are consistent with the safety standard
previously set by both U.S., and international standards
bodies. The design of this phone complies with the FCC
guidelines and these international standards.
Use only the supplied or an approved antenna. Unauthorized antennas, modifications, or attachments could impair
call quality, damage the phone, or result in violation of FCC
regulations.
Do not use the phone with a damaged antenna. If a
damaged antenna comes into contact with the skin, a
minor burn may result. Please contact your local dealer for
replacement antenna.
Preventing and solving problems
40
Part 15. 107/109/207
Part 24. 232/235/238
SAR
Body-worn Operation
This device has been tested for FCC RF exposure
requirements with a VTech Leather case (model number
80-5237) providing a 1.5cm separation distance between
the back of the phone and the user’s body.
In order to comply with FCC RF exposure requirements a
minimum separation distance of 1.5 cm must be
maintained between the user’s body and the back of the
phone, including the antenna. Third-party cases or beltclips/holsters, and similar accessories should not contain
any metal components.
For more information about RF exposure, please visit the
FCC website at www.fcc.gov
Any changes or modifications not expressly approved by
the party responsible for compliance could void the user’s
authority to operate the equipment.
This equipment has been tested and found to comply with
the limits for a Class B digital device, pursuant to Part 15 of
the FCC Rules. These limits are designed to provide
reasonable protection against harmful interference in a
residential installation. This equipment generates, uses
and can radiate radio frequency energy and, if not installed
and used in accordance with the instructions, may cause
harmful interference to radio communications. However
there is no guarantee that interference will not occur in a
particular installation.
Page 41

If this equipment does cause harmful interference to radio
or television reception, which can be determined by
turning the equipment off and on, the user is encouraged
to try to correct the interference by one or more of the
following measures:
• Reorient or relocate the receiving antenna.
• Increase the separation between the equipment and
receiver.
• Connect the equipment into an outlet on a circuit
different from that to which the receiver is connected
• Consult the dealer or and experienced radio/TV
technician for help.
Technical specifications
• Weight: 70g, including the standard battery fitted.
• Size: Main body dimensions:
102mm (h) x 43mm (w) x 17mm (d)
• Volume: Less than 70cc.
• Standby time: up to 250 hours - dependent on your
current network,
• Talk time: up to 180 minutes - dependent on
your current network,
• Power (frequencies):
• GSM Class 1 (1 Watt) Freq. Range 1850-1990 MHz
Preventing and solving problems
41
Page 42

TT
roubleshootingroubleshooting
T
roubleshooting
TT
roubleshootingroubleshooting
If you experience a problem when using your phone, first
try to solve the problem using the information below:
Can’t switch the phone on
• Battery may be drained. Charge it and check the
charging indication in the display.
• Battery contacts may be dirty. Clean the contacts on
both the battery and the phone using a dry cloth.
Switch the phone on and off a few times.
• New replacement battery. Recharge the battery.
• The battery may have been incorrectly charged,
inducing its automatic safety circuit which remains in
force for six hours. Remove battery and wait for six
hours, then refit and try to switch on your phone.
No charging display
• Battery may be drained. Charge it for 2 hours, then
disconnect and charge normally.
• Battery may be defective. Battery performance reduces
over a period of time. Replace the battery. The battery
will last longer if you keep it out of extreme heat.
• Check the A/C power socket, and the connection to the
phone.
• Do not charge the battery in extreme temperature
conditions.
‘Check SIM’ is displayed after fitting it
Preventing and solving problems
42
• Smart (SIM) card may not be correctly located. Ensure
the SIM is correctly orientated and secured using the
metal slider.
• Damaged smart (SIM) card. Visually check it and
return, if necessary to your Service Provider.
• SIM contacts may be dirty. Clean the SIM contacts using
a dry cloth or a soft pencil eraser.
PIN error
• 3 incorrect entries. Type the Personal Unblocking Key
(PUK) code, provided by your network (see Phone
security features section). If your PUK or PIN codes are
lost, call your Service Provider.
No connection to network
• Weak signal. Move to higher ground, or to a window or
open space.
• Outside GSM coverage. Check the network coverage
map to see whether you should have coverage.
• SIM not valid. Contact your Service Provider.
• New network not authorized. Try selecting the network
manually, or try another network. If the problem
persists, contact your Service Provider.
Phone loses network
• Weak signal. Reconnection, or connection to another
network is automatic. Switching off and on may
accelerate this.
Page 43

Calls not possible
• Dialing error. Use the full national area code. Use the
appropriate international prefix, if required.
• New SIM fitted. Check for new restrictions.
• Charge limit reached. Call your Service Provider, or
use PIN 2 to reset.
Certain calls not possible
• Call restriction set. Your Service Provider may set
restrictions.
Cannot save in Phonebook
• Call restriction set. Check the Phonebook restrictions.
• Phonebook is full. Delete any entries you don’t need.
Cannot find phonebook
• SIM has been changed. Refit original smart (SIM) card.
Voice mail not working
• Call Forward not set. Set the Call Forwarding (see
Setting up Voice mail).
Cannot send a text message
• Operator does not support this service. Check with
your Service Provider.
• SMS Message Centre not set. Set Message Centre.
• Destination does not have compatible phone.
• Message type wrong.
• Enter full telephone number including area code when
sending message.
Cannot set a function
• Not supported by your Operator, or special registration
required. Check with your Service Provider.
Menu entries missing
• Possible SIM Restrictions. Check with your Service
Provider.
Severe shock
• Internal damage could result. Remove and refit battery
and smart (SIM) card.
• Do not dismantle the phone.
Immersion in water
• Internal damage could result. Rapidly dry with cloth,
but do not heat. Dry the contacts thoroughly. Remove
battery and smart (SIM) card and let them dry, then
install them. Stand the phone upright in moving air. Do
not dismantle the phone.
A700 Approved AccessoriesA700 Approved Accessories
A700 Approved Accessories
A700 Approved AccessoriesA700 Approved Accessories
• Leather Case 80-5237
• Portable Handsfree Headset 80-5238
• 540mAh Battery Pack (Standard) 80-5239
• 680mAh Battery Pack (High Capacity) 80-5240
Preventing and solving problems
43
Page 44

Index
A
Accessories 43
Alert tones 8
Any keys answer 11
Auto key lock 9
B
Battery
charging 6
saving / power conservation 8
installing / removing 5
safety information 39
Barred
unbarring 34
C
Calculator 29
Calendar 30
Call Barring 34
Call Forward 13
Call log
viewing 12
Call timer 14
Call Waiting 34
Calls
answering 10
ending 10
from Phonebook 16
Index
44
list of dialed 12
list of missed 12
making 10
Can’t switch phone on 42
Care
for your phone 39
Cell broadcast 26
Charging the battery 6
Conference calls
starting and managing 35
Contrast
setting 8
Counters 14
Currency Converter 29
Customizing your phone 8
D
Dialed calls
list of 12
E
Emergency calls 3
Entering names / numbers
in Phonebook 14
Entering text
in text messages 21
F
FCC 40
G
Games 32
H
Hot keys 9
I
International calls
dialing 13
Page 45

K
Key lock
auto 9
manual 9
L
Language
setting 8
M
Messages PIN code
predictive text input 22
Missed calls
list of 12
Mistake
incorrectly dialed / clearing 10
Mute microphone 11
My dictionary 23
N
Names
Entering in Phonebook 15
Networks
alternative 38
preferred list 38
No charging 42
O
Options
for Phonebook entries 16
for text messages 25
P
Phonebook
adding to 14, 15
entry options 16
making a call 16
PIN code
changing 32
entering 7
switching on and off 33
PIN error 42
PIN2 code
changing 32
Power saving 8
Predictive text 22
PUK (Personal Unblocking Key) 7, 33
R
Radio frequency signals 40
Reading
text messages 24
Redial 11
S
Safety 2
Safety Information 2
Second call
making and receiving 12
Security features 32
Settings
alert tones 8
for call barring 34
for call forward 13
for call timer 14
for cell broadcast 26
for text messages 26
for voice mail 18
hot keys 9
language 8
vibration alert 9
Smart (SIM) card
inserting 4
Specifications 41
Switching on 7
Index
45
Page 46

T
Text
predictive input 22
typing in text messages 21
Text messages
creating 20
reading 24
Time
setting 7
Tones
storing in Phonebook 17
Troubleshooting 42
Typing names
in Phonebook 14, 15
Typing text
in text messages 21
V
Vibration alert 9
Voice mail
listening to messages 19
setting up 18
Voice mail not working 43
W
Withhold
your number 37
Index
46
 Loading...