

Page 1

Contents
1
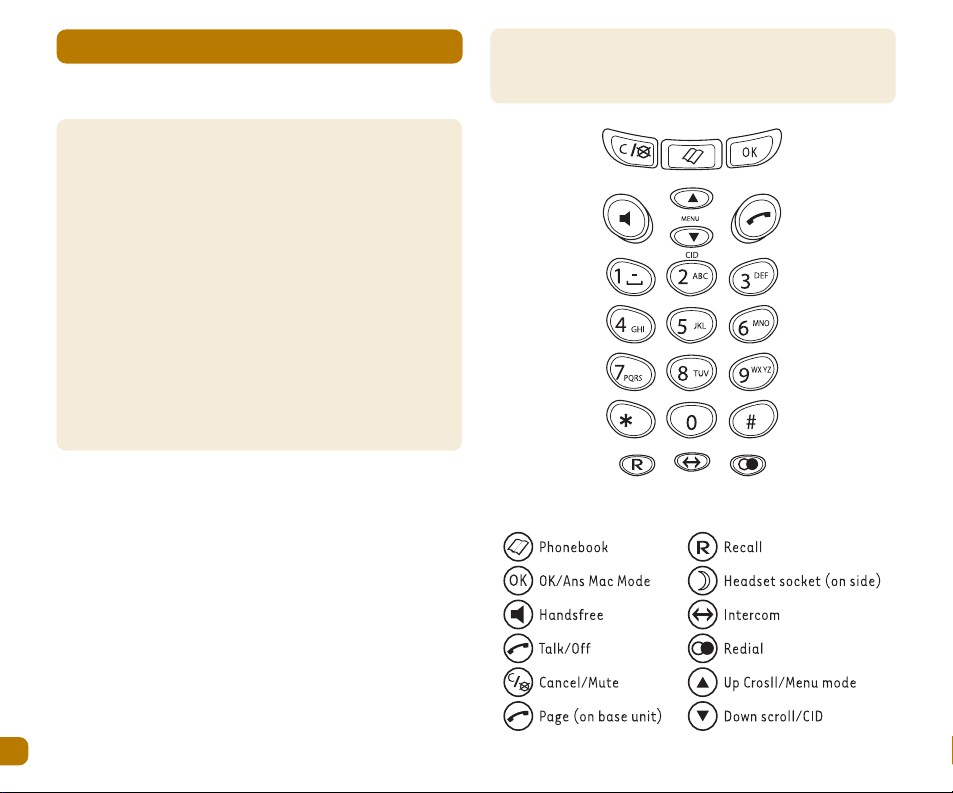
Getting to know your telephone keypad
Important safety information 3
Introduction 4
Getting to know your telephone keypad 4
Display indicators 5
Setting up your telephone 6-7
Making calls 8-9
Caller display 10
Answering system 11-13
Other handset features 14
Menu system 15
PhoneBook 16-17
Language 18
Customising your base unit 19-20
PIN code 21
Customising your handset(s) 22-23
Additional network services 24
Additional handsets 25
Removing a handset from a base 26
Intercom 27
Additional base units 28
Troubleshooting 29
Factory settings 30
Certificate of conformity 31
Page 2

Important safety information
2
Important safety information
This equipment is not designed for making emergency calls
in the event of a power failure. Alternative arrangements
should be made for access to emergency services.
This product is intended for connection to an analogue
PSTN. (Public switched telephone networks) and private
switchboards within the United Kingdom.
If you wear a Hearing aid you should note the A110/C110
works by transmitting radio waves between base and
Handset which may cause a humming noise.
People with a Heart pacemaker should consult their doctor
before using this telephone.
1. Use only Vtech approved battery cells for the handset.
Failure to observe this advice may void the guarantee.
The use of incorrect batteries may create a risk of
explosion.
2. There may be a slight risk that electrical storms could
damage the A110/C110. We recommend that the
telephone cord and mains plug be removed from your
A110/C110 during such weather conditions.
3. The A110/C110 will produce a certain of amount heat
during operation. For this reason it is recommended that
this equipment in NOT placed in direct contact with
Antique, veneered or delicate furniture surfaces
4. This equipment is not suitable for use in damp or humid
conditions such as bathrooms. Do not expose the
equipment or batteries to fire or water.
5. Batteries should NOT be disposed of with normal
household waste. Consult your local council or chemist
for disposal advice.
6. Do NOT use this equipment in places where volatile or
explosive materials may be present.
7. The A110/C110 DECT telephone emits radio signals which
could interfere with other electronic equipment,
computers, radio, TV, clock radio alarms etc. A distance
of at least 1 metre should be maintained between the
A110/C110 base station and other equipment. This will
minimise the risk of such interference.
8. Do not clean the A110/C110 with a dry cloth, which may
cause static shock. Use a damp (not wet) cloth. Never
spray cleaning fluids directly onto the case.
9. Take care to ensure the power cord is connected to the
correct input socket on the A110/C110 base.
Unpacking
Please check the box contents for completeness. If any
parts are missing return complete box to your supplier.
Page 3

Getting to know your telephone keypad
3
Getting to know your telephone keypad
A110/C110 Handset
Telephone line cord
A110/C110 Base unit
Handset Batteries (2)
User Guide
Power Adapter
2 Wall fixing screws & plugs
Note: Keep your proof of purchase to support any guarantee
claim.For your records:
Date of Purchase
Place of Purchase
Serial Number:
Page 4
Getting to know your telephone keypad
4
Getting to know your telephone keypad
Thank you for purchasing either the A110 or the C110 DECT
telephone.
The A110/C110 DECT telephone provides the convenience
of cordless operation with high quality digital sound. It
complies with the Digital enhanced Cordless
Telecommunications (DECT) Standard and offers superior
clarity and many technologically advanced features as
well as an answering system on the C110.
It is possible to use up to 5 Handsets with each A110/C110
Base station. Each handset may be linked with up to 4
different bases, to build up a comprehensive cordless DECT
telephone system.
Study the following illustrations to ensure you are familiar
with the function and position of the buttons and keys.
Page 5
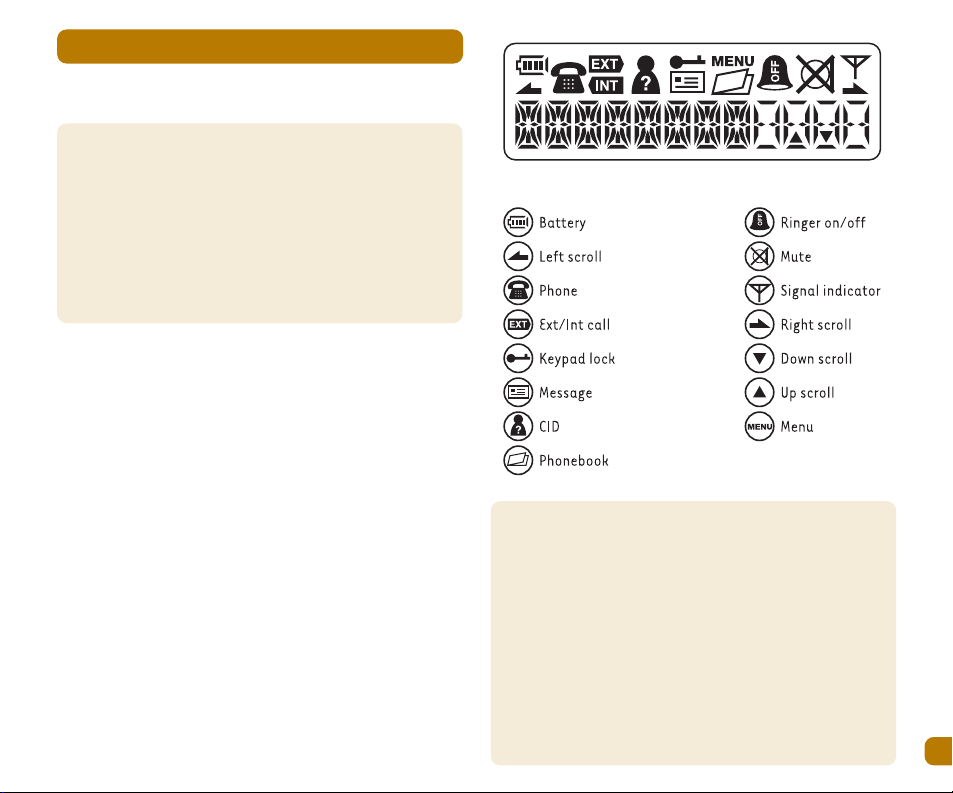
Display indicators
5
Display indicators
Display indicators show you about the current status of
operation of the handset.
When the telephone is ready for use, with no digits entered
by the user, the display will show; the range indicator, the
battery indicator, the handset identity number and the
handset name/model number. This is called the
'STANDBY MODE'
The handset number will change between 1 & 5 depending
on how many handsets are registered to the same base.
The handset name/model number on the display can be
changed to a name or location of your choice, however it is
limited to 8 characters.
Headset. Your headset is fitted with a socket (2.5mm) for a
Headset. Headsets can be obtained from your helpline by
mail.
Page 6

Setting up your telephone
6
Setting up your telephone
The Base Station is supplied with one handset preregistered. The base can accept up to 5 handset
registrations. When more than one handset is registered to
a base INTERCOM (handset to handset) communication is
possible. When 3 or more handsets are registered, two can
be one an intercom call with the third on an external call.
Locating the Base Station.
The position in which you place the base station can have a
significant effect upon the range and performance of your
A110/C110 DECT telephone.
Observe the following points:
•
The base must be near to both a telephone socket and a
mains electricity socket.
• Avoid placing base too close to large metal objects like
filing cabinets, radiators or electrical appliances. This
can impair the range.
• The power of the signal depends on the position of the
base. The higher the base, the better. An upstairs room
near to the centre of the house is preferred.
Buildings with thick internal and external walls of stone or
granite may impair the transmission of the signals to and
from the base.
Plug the lead from the adapter into the requisite socket on
the Base Unit. Plug the power adapter into a convenient 13
AMP power socket. Turn on the mains power. The Base is
now ready to receive the handset with batteries for
charging.
Charge for at least 16 hours BEFORE you attempt to
connect your telephone to the telephone line.
Page 7

Setting up your telephone
7
Setting up your telephone
Handset batteries
Before you can use your A110/C110 DECT Telephone, the
handset batteries have to be installed and fully charged.
To do this the base station must be connected to the mains
electricity supply using the power adapter supplied.
Installing the Handset batteries
The handset is powered by two AA size NiCad (Nickel
Cadmium) batteries. Install these into the handset
ensuring you observe correct polarity (the position of the
+ve and -ve poles is marked on the case) and fit the
battery compartment door. Use only Vtech approved
rechargeable batteries. Failure to do so could result in
batteries exploding whilst being charged.
New Image required
Charging the Handset
Place the handset on the base and leave until the handset
batteries are fully charged or for at least 16 hours. The LCD
display on the handset will show the progress of the
charging cycle via the battery icon on the display. The
battery symbol will feature a moving line whilst charging is
in progress.
When all the charging cells are visible the
battery is almost fully charged. When the
battery symbol stops flashing, the
battery is fully charged and may now be
used.
The telephone is now ready for connection to the telephone
network.
Warning: Your Base must be connected to the electricity
supply at ALL times except when the product is not to be
used for long period of time.
Battery low warning
When the charge remaining in the battery
is low and charging is required, the
battery icon will begin to flash (blink on
& off).
In addition a warning beep will be sounded by the handset,
even during a call. The beep indicates the handset is about
to close down. Place the handset onto the charger or base
and ensure the symbol continues to blink to confirm
charging is in progress. Refer to the paragraph above for
information concerning battery charge level.
Page 8

Making calls
8
Making calls
Pre-dial - allows you to check the dialling number is
correct.
1. Key in the required number
2. Press if you enter an incorrect number,
press
3.To end the call, press or replace the
handset on the base.
Post Dial – allows you to connect to the network before
dialling a number.
1. Press and wait for the dial tone
2. Dial the number required.
3. To end the call, pressor replace the handset on the base.
Call Timer
Approximately, ten seconds after commencing a call the
call timer will begin to count. After the call has ended the
time of the call will remain on the display for five seconds
approximately. This feature can be turned off if required,
see handset menu section.
Adjusting the earpiece volume during a call
Use the SCROLL UP/DOWN keys to select the desired
volume.
Receiving Calls
When an incoming call occurs, the Base and Handset will
ring. If Caller Line Identity (CLI) service is available the
Handset display will show the caller's number. If the
Caller's number is in your quick dial memory, the name is
displayed instead of number
Handset on Base
1. Pick up the handset and the call will be connected
automatically.
2. To end the call, press Handset
NOT on Base
As above but when picking up Handset, press to answer
call.
Page 9

Making calls
9
Making calls
Range
If you are on a call and walk out of range of the base unit;
the sound quality in the earpiece will degrade, warning
beeps will be heard, and the range indicator will flash.
Note: On the fringes of the handset range, the range icon
may be present on the display, but it is not possible to
make or receive calls.
Hands-free calls
Your telephone handset can also make and receive
speakerphone calls, allowing group conversations.
To make a speakerphone call
1. Press
2. Dial the required number
3. To end the call, press
To receive a call in speakerphone mode
1. Press
2. To end the call, press
To switch from a normal call to a speakerphone call
1. Press when the call is connected
2. Press SPEAKER again to return to a normal call
Muting your handset microphone during a call
If you wish to prevent the called party hearing you whilst
you have a conversation with
another person, press the CANCEL/MUTE button. Press the
CANCEL/MUTE button a second time to cancel the mute
setting.
Pause
For applications such as telephone banking, it may be
necessary to insert a PAUSE into a dialling sequence, press
and hold . P will be shown on the display for each pause.
Page 10

Caller display
10
Caller display
This feature is available only if you subscribe to the Caller
Display service provided by your network operator.
Caller display allows you to see who is calling before you
answer a call and to see who has called in your absence. Up
to 20 incoming numbers can be stored in the call list. When
the list is full, the oldest number will be deleted
automatically. If a name and number has been stored in
the phonebook memory, the name will be shown when the
number calls.
When a call is received this symbol will appear on the
display and the phone LED will flash on the base unit. When
the list is reviewed these prompts will disappear.
1. Press the first name/number on the list will be
displayed.
If a name is displayed, press OK to see the number
Press OK again to see the date and time of a call
If the display shows ' EMPTY no calls are stored.
2. Continue to view the list using the Scroll and OK buttons.
3. Press CANCEL/MUTE key to return to standby mode.
To dial a number from the call list
1. Ensure the required name/number is visible on the
display.
2. Press
To delete all numbers from the Call log
1. Enter handset menu and scroll to DEL CID.
2. Press OK twice.
To copy a number from the call list into the phonebook
1. Store the number in the phonebook memory (see
Phonebook section, page 17)
2. Use the number edit procedure to add a name.
Page 11

Answering sytem
11
Answering system
Setting Up
If you have purchased the C110, a digital answering system
is available. The system is controlled by the handset(s)
and offers up to twelve minutes of recording time.
To access the TAD (Answering System) menu:
Press twice
Press to enter the menu
Use the SCROLL keys to navigate
Use the OK button to confirm
Use the CANCEL/MUTE key to cancel/escape
The following functions are available within the TAD menu:
1. Pin Code: a 3-digits code (000 factory setting) is
provided to stop unauthorised access to the TAD menu.
It is recommended that this is changed to a number of
your choice as this number is also used to access your
answering system when dialling in remotely.
2. Ring Delay: Ring delay is used to set the number of rings
heard before the system answers calls. There are two
options:Economy mode (2 rings if new messages are
recorded, 4 rings if no new message) Ring setting ( 2
rings to 7 rings, user selectable)
3. Emergency Number: A 3-digits code (111 factory
setting) can be used to override any call filtering setting
in the event of an emergency. ( foe Fire, Police,
Ambulance, Coastguard)The base will ring for 8 seconds.
4. Filtering: a number of settings are available to filter
calls.
SPK FILT (Speaker filtering)
Speaker Filtering enables all calls to be listened to on the
first registered handset (handset #1). The handset speaker
will be turned on when the OGM is played. When speaker
filtering is activated on handset #1, all other handsets
cannot answer any call.
FUL FILT (Full filtering)
Full Filtering allows the answering system to receive calls
and take messages, but without ringing.
CID FLT1
CID Filtering 1 allows user to direct all calls to the
answering system which will record messages but not ring
EXCEPT one which can be the most important number in the
phonebook.
CID FLT2
CID Filtering 2 allows all the calls to ring EXCEPT one
number from the phonebook that is not allowed and will be
directed to the answering system.
Page 12

Answering system
12
Answering system
Using your answering system
The answering system can be controlled by the handset(s)
or by dialling in from a remote location.
Handset(s) mode
1. Press the display will show ANS MAC
2. Use the keypad digits as described below to tailor the
setting to your personal
preference.
( Suggestion to O’Neills tabulate this section??)
Note: Your C110 is supplied with one OGM ( Ans & Rec) only.
It is important to record an OGM (Outgoing message) to
your callers. OGM 1 is for normal call answering (Record
mode) while OGM 2 allows callers to hear a pre-recorded
message (Answer Only mode), but does not allow them to
leave a message.
• Switch ON/OFF: press 8
• Play OGM1: press 6 & 1, press 6 & 1 again to stop
recording (30 seconds max)
• Play OGM2: press 6 & 2, press 6 & 2 again to stop
recording (60 seconds max)
• Record OGM1: press 9 & 1, press 5 to stop recording
• Record OGM 2: press 9 & 2, press 5 to stop recording
• Answer Record mode: press 7 & 1
• Answer Only mode: press 7 & 2
• Go back to previous message: press 1
• Play messages/repeat current messages: press 2
• Play the next message: press 3
• Play Memos: 4 & 1
• Record Memos: 4 & 2
• Stop playing: press 5
• Delete the current message: press 0
• Delete all message: press 9 & 0
NOTE: When you record your own OGM1 you delete the
factory OGM1 which cannot be recovered.
Your AS will not time or date stamp ICMs unless you
subscribe to CID service.
There is no parallel phone detect system so the AS will
record calls if they are answered on another telephone on
the same line.
Remote control
The answering system can be accessed when you are away
from home.
1. Dial your number
2. When the system answers and you hear your OGM, key in [
followed by the 3-digit PIN code ( factory set 000), If the
code is correct, you will hear 2 beeps. If three incorrect
PIN codes are entered, the line will be dropped. There is
also an 8-second timeout to drop the line between key
inputs.
3. Use the table above to control the answering system
4. See page 14 for setting your personal REMOTE ACCESS PIN
Code
Note: There is a 3 second busy tone inserted at the end of each
incoming message.Messages can only be played back via the base
speaker.
Page 13

Answering sytem
13
Answering system
Messages cab only be played back via the base speaker
If the Answering System is switched OFF
• Let the phone ring 10 times
• After 10 rings, the AS seizes the line and gives 2 beeps
• Key in the 3-digit PIN code
• If the code is correct, the recorded OGM will be played.
• AS will be turned on automatically and you can use the
keypad to control the system.
Message Display
The handset display will provide information on the status
of the answering system.
( Request to O’Neills round corners of display
illkustration?)
AS has one new message
AS has one old message
AS has no message
AS is full
Memory Full
If the memory is full the system will switch to answer-only
mode automatically and not allow callers to leave a
message. If an OGM2 is not recorded the answering system
will not operate. If the memory becomes full in the middle
of a message, the AS will give 2 beeps before hanging-up.
Changing your PERSONAL REMOTE ACCESS PIN Code
Press two times
Press OK two times
Key in old PIN ( 000)
Display prompts for NEW PIN, key in new PIN Press OK
Display prompts REPEAT, key in new pin again.
Press OK Handset beeps to confirm.
Please remember to record this new number safely where
you can get to it away from home. You will not be able to
access your answerphone messages away from home
without this code.
Page 14

Other handset features
14
Other handset features
Redial list
Your A110/C110will store the last ten numbers dialled
automatically. One or all of the numbers can be re-dialled
as required.
( Request to O’Neills can you produce an icon representing
the key ?)
1. Press DOUBLE CIRCLE until the required number is visible
on the display
2. Press TALK the number will be dialled
automatically.(Request to O’Neills can you use icon for ‘
TALK’?)
To delete numbers from the redial memory, ensure the
number is on the display and press OK twice.
Switching the Handset ON & OFF
The handset can be switched off, if it is not required to
ring, however the base unit will ring.
To turn off: Press and Hold the OK key until the handset
beeps and the screen goes blank
To turn on: Press and hold the OK key until the handset
beeps, the display will show status once Handset has
latched on to the base.
Note: The handset will not respond to Paging when switched off.
Paging the Handset(s)
Your base station has a page button. This button is used to
send a signal to all registered handsets (provided they are
switched on) and also to initiate the registration process
for additional Handsets.
This feature is useful for locating mis-placed handsets.
To P age:Press and release the PAGE key. All active
handsets will sound for 30 seconds.
To cancel: Press and release the CANCEL key on any
handset.
It is recommended that you change the ring tone on the
handsets to enable users to distinguish internal paging
from external calls.
Belt Clip
A belt clip is mounted on the rear of the product. Using the
clip the handset can be attached to a belt, trouser waist
band, etc. This clip cannot be disconnected.
Headset Socket
Your telephone can be used with a suitable headset. A
headset socket is located on the right hand side of the
handset. When a headset is connected the microphone of
the handset is muted automatically.
Additional Network Services
The R (Recall) button can be used to access additional
network services. Contact your network operator for
further details.
Page 15

Other handset features
15
Other handset features
Menu System
Your telephone features a simple menu system with
informative display messages. Four keys are used to
navigate the menu.
SCROLL UP - Used to enter the menu mode and to scroll up
within menus
OK - Used to enter sub menus and to confirm selections
CANCEL - Used to exit or erase incorrect settings
SCROLL DOWN – Used to scroll down within menus and
access CID log
The main menu consists of the following sub menus:
PHONEBK
TAD MENU (only available with C110 models)
LANGUAGE
REGISTER
KEY LOCK
MONITOR
B SELECT
BASE
HANDSET
Note: When KEYLOCK is active no calls can be made . This includes
emergency calls
Page 16

PHONEBK = Phone book
16
PHONEBK = Phone book
PHONEBK = PHONE BOOK
Your A110/C110DECT telephone can store up to 40 of your
popular numbers. This will allow you to retrieve the
numbers and dial them with minimal key-strokes. Names
up to 8 characters and up to 18 digits for numbers.
Storing names/numbers into the PHONEBOOK memory
1. Press SCROLL UP
2. Press OK
3. Press OK
4. Enter name (see text below)
5. Press OK
6. Enter number
7. Press OK
8. Continue to enter names and numbers or press SCROLL UP
to access MELODY, DEL ALL, DELETE, EDIT menus or press
CANCEL to return to standby mode.
When the edit mode prompts for a NAME, the alpha
characters on the keys become active. A letter can be
entered by repeatedly pressing of the relevant key.
If you enter an incorrect letter, use the CANCEL/MUTE key to
delete.
Example: to enter letter R in edit mode press the key 7
three times, repeated presses of the key will show
succeeding letters and number.
If the key is not pressed for a few moments, the cursor
moves to the next position to the right, ready for the next
letter to be entered.
The maximum number of characters for a NAME is 8.
Attempts to enter more than 8 will overwrite the eighth
letter.
To view the names/numbers in the phonebook
1. Pressdisplay shows first name in memory
2. Pressorto scroll through the numbers
3. Press OK to view numbers if required
4. Press to escape or cancel
Dialling from your PHONEBOOK Memory
1. Press
2. Press or
3. Press
Editing or deleting a PHONEBOOK entry
To edit
1. Scroll to EDIT
2. Press OK
3. Press OK name/number
4. Press OK
To delete
1. Scroll to DELETE
2. Press OK
3. Press OK name/number
4. Press OK
 Loading...