

Page 1

Congratulations
on purchasing your new VTech product.
Before using this telephone, please read the
Important safety instructions
on page 30 of this manual.
This manual has all the feature operations and troubleshooting necessary to install
and operate your new VTech telephone. Please review this manual thoroughly to
ensure proper installation and operation of this innovative and feature rich VTech
product. For support, shopping, and everything new at VTech, visit our website at
www.vtechphones.com. In Canada, please visit www.vtechcanada.com.
www.vtechphones.com
i
Page 2

Table of contents
Installation . . . . . . . . . . . . . . . . . . . . . . . . 1
Parts checklist . . . . . . . . . . . . . . . . . . . . . . 1
Install handset battery . . . . . . . . . . . . . . . . . . 2
Telephone base installation . . . . . . . . . . . . . . . 3
Desk/table bracket installation . . . . . . . . . . . . . . 4
Dial type . . . . . . . . . . . . . . . . . . . . . . . . . 4
DSL lter . . . . . . . . . . . . . . . . . . . . . . . . . 5
Telephone settings . . . . . . . . . . . . . . . . . . . . 6
Handset layout . . . . . . . . . . . . . . . . . . . . . . 6
Telephone base layout . . . . . . . . . . . . . . . . . . 7
Date and time . . . . . . . . . . . . . . . . . . . . . . . 8
Ring melody . . . . . . . . . . . . . . . . . . . . . . . 8
Ring volume . . . . . . . . . . . . . . . . . . . . . . . 9
Battery low tone . . . . . . . . . . . . . . . . . . . . . 9
Out of range tone . . . . . . . . . . . . . . . . . . . . 10
Key tone . . . . . . . . . . . . . . . . . . . . . . . . 10
Edit handset name . . . . . . . . . . . . . . . . . . . 11
Language . . . . . . . . . . . . . . . . . . . . . . . . 11
Dial type . . . . . . . . . . . . . . . . . . . . . . . . 12
Clear voicemail . . . . . . . . . . . . . . . . . . . . . 12
Reset to default settings . . . . . . . . . . . . . . . . 13
Temporary tone dialing . . . . . . . . . . . . . . . . . 13
Basic operation . . . . . . . . . . . . . . . . . . . . . 14
Make, answer and end calls . . . . . . . . . . . . . . 14
Options while on calls . . . . . . . . . . . . . . . . . 14
Speakerphone . . . . . . . . . . . . . . . . . . . . . 14
Mute . . . . . . . . . . . . . . . . . . . . . . . . . . 14
Call waiting . . . . . . . . . . . . . . . . . . . . . . . 14
Find handset . . . . . . . . . . . . . . . . . . . . . . 15
Advanced operation . . . . . . . . . . . . . . . . . . 16
Director y . . . . . . . . . . . . . . . . . . . . . . . . 16
Review the directory . . . . . . . . . . . . . . . . . . 16
Search the director y . . . . . . . . . . . . . . . . . . 16
Character chart . . . . . . . . . . . . . . . . . . . . . 17
Store a directory entry . . . . . . . . . . . . . . . . . 18
Dial a directory entry . . . . . . . . . . . . . . . . . . 18
Edit a directory entr y . . . . . . . . . . . . . . . . . . 19
Delete from the directory . . . . . . . . . . . . . . . 19
Caller ID . . . . . . . . . . . . . . . . . . . . . . . . 20
Call log . . . . . . . . . . . . . . . . . . . . . . . . . 21
Review the call log . . . . . . . . . . . . . . . . . . . 21
Dial a call log number . . . . . . . . . . . . . . . . . 22
Store a call log number . . . . . . . . . . . . . . . . . 22
Delete from the call log . . . . . . . . . . . . . . . . . 23
Redial . . . . . . . . . . . . . . . . . . . . . . . . . 24
Review redial . . . . . . . . . . . . . . . . . . . . . . 24
Store a redial number to the director y . . . . . . . . . 24
Dial from redial . . . . . . . . . . . . . . . . . . . . . 25
Delete from redial. . . . . . . . . . . . . . . . . . . . 25
Handset and telephone base indicators . . . . . . . . 26
Handset light . . . . . . . . . . . . . . . . . . . . . . 26
Telephone base lights . . . . . . . . . . . . . . . . . 26
Handset icons . . . . . . . . . . . . . . . . . . . . . 26
Handset display screen messages. . . . . . . . . . . 27
www.vtechphones.com
ii
Page 3

Table of contents
Call log display screen messages . . . . . . . . . . . 28
Battery . . . . . . . . . . . . . . . . . . . . . . . . . 29
Important safety instructions . . . . . . . . . . . . . . 30
Troubleshooting . . . . . . . . . . . . . . . . . . . . 31
Operating range . . . . . . . . . . . . . . . . . . . . 39
Maintenance . . . . . . . . . . . . . . . . . . . . . . 39
About cordless telephones . . . . . . . . . . . . . . . 40
Warranty . . . . . . . . . . . . . . . . . . . . . . . . 40
FCC, ACTA and IC regulations . . . . . . . . . . . . . 42
The RBRC® seal . . . . . . . . . . . . . . . . . . . . 43
Technical specications . . . . . . . . . . . . . . . . 44
Index . . . . . . . . . . . . . . . . . . . . . . . . . . 45
www.vtechphones.com
iii
Page 4
Installation
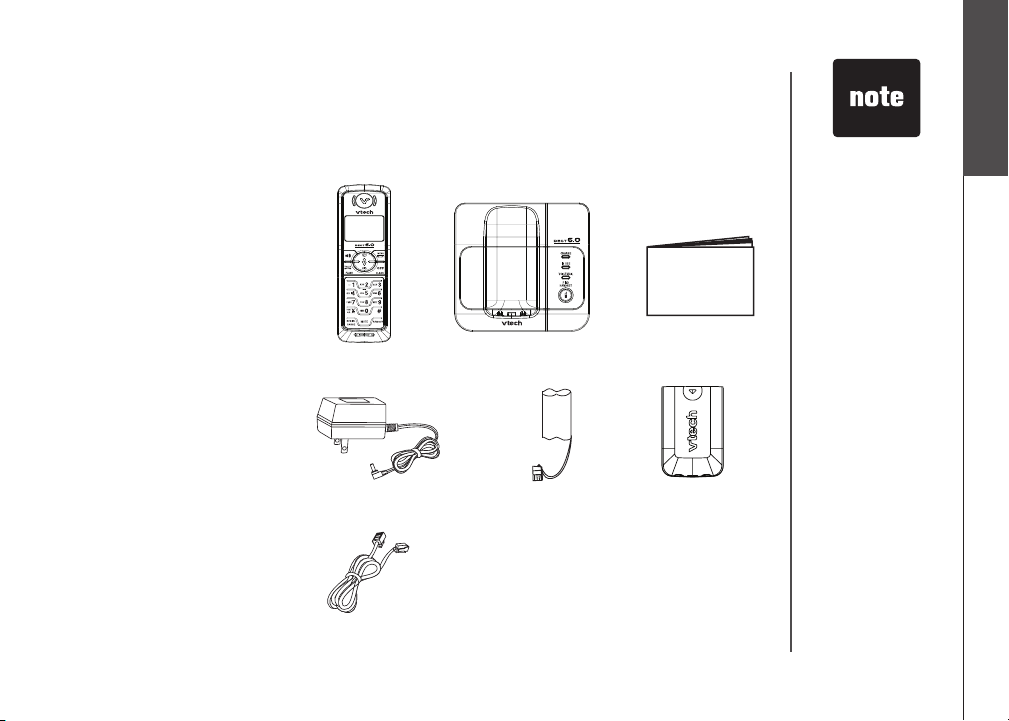
Parts checklist
Remember to save your sales receipt and original packaging in case it is necessary to ship your
telephone for warranty service. Check to make sure the telephone package includes the following:
1. Handset
2. Telephone base
3. User’s manual
4. Base power adapter
5. Batter y
6. Batter y compartment cover
7. Telephone line cord
1. Handset
2. Telephone base
3. User’s manual
For re pla cemen t
•
ba tt eri es or power
adapter, vi sit our
website a t www .
vt ec hph one s.
com or call 1 (800)
595-9511.
In Canada go to
www.vtechcanada.
com or dial 1 (800)
267-7377.
Installation
Basic operation
4. Base power adapter
7. Telephone line cord
www.vtechphones.com
5. Battery
6. Battery compartment cover
1
Page 5
If the handset will
•
not be used for a
long period of time,
remove the bat tery
to prevent possible
leakage.
To p urc has e
•
re pl ace men t
ba tt eri es, vi sit our
website at www .
vt ec hph one s.
co m or call 1
(800) 595-9511. In
Canada, go to www.
vtechcanada.com
or dial 1 (800) 267-
7377.
Installation
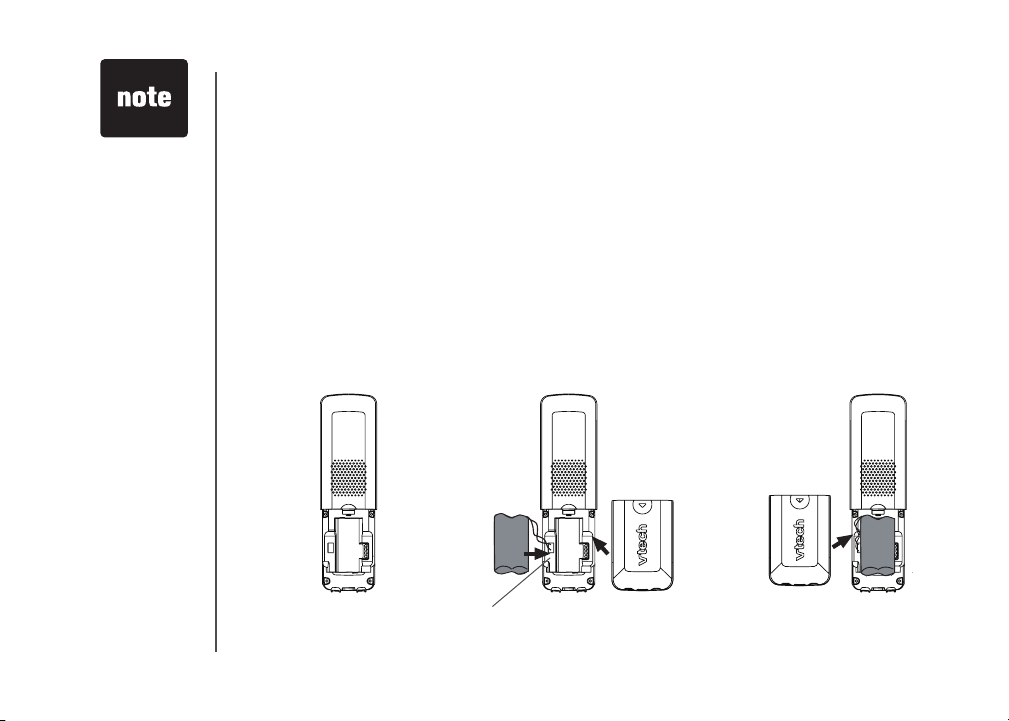
Install handset battery
• Align the two holes in the plug with the socket pins according to the color-coded label in the
battery compartment, then snap the plug into place.
• Place the battery into the compartment.
• Position the battery compartment cover and slide it upwards until it clicks into place.
• Put the handset in the telephone base to charge the new battery for at least 16 hours. The battery
may have enough charge for shor t calls. For best performance, charge it for at least 16 hours.
You can keep the battery charged by returning the handset to the telephone base after each use.
When the battery power is fully depleted, a full recharge takes about 16 hours.
For further information on batteries, please see the
color-coded label
Battery section on page 29.
2
www.vtechphones.com
Page 6
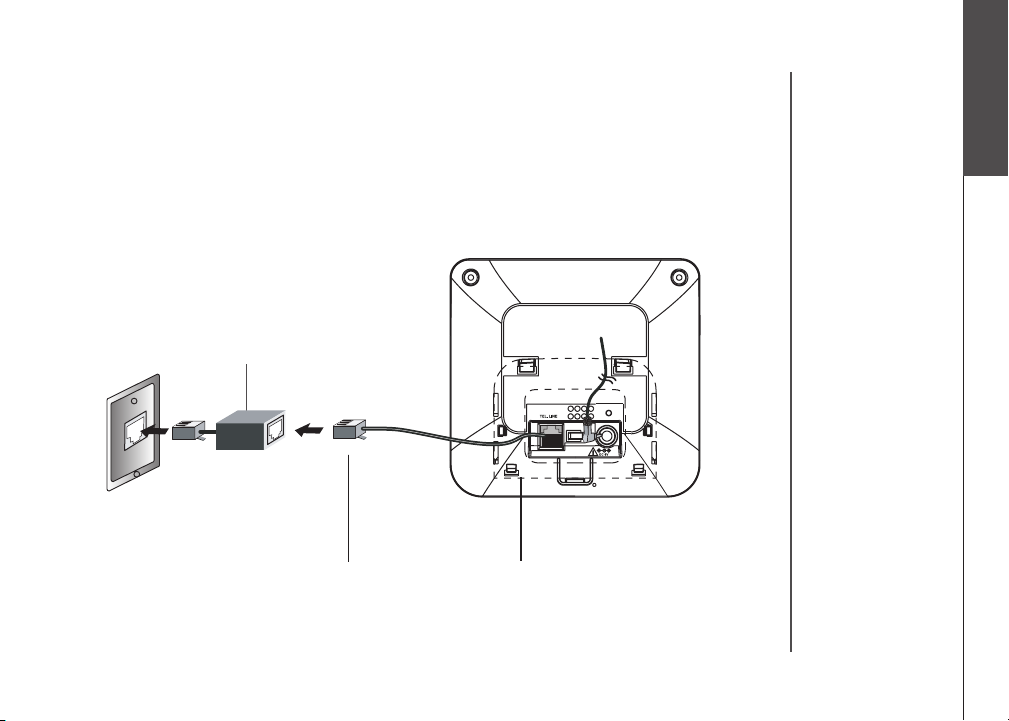
Installation
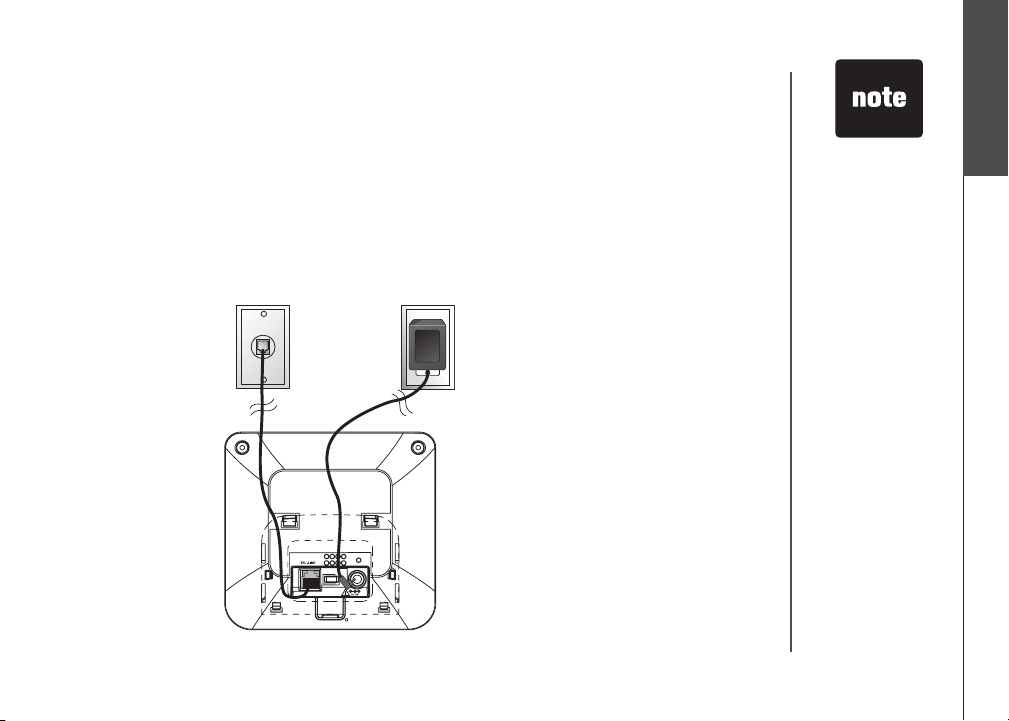
Telephone base installation
Install the telephone base and the charger as shown below. Choose a location away from any electronic
equipment and appliances such as personal computers, computer routers, television sets, microwave
ovens, and refrigerators. Avoid excessive heat, cold, dust or moisture.
1. Plug the telephone line cord
into a telephone wall jack.
2. Plug the power adapter into an electrical
outlet not controlled by a wall switch.
Use only the
•
VTech batteries
and power adapter
(or equivalent)
supplied with
this telephone.
To obtain a
replacement, visit
our website at
www.vtechphones.
com or call 1
(800) 595-9511.
In Canada go to
www.vtechcanada.
com or dial 1 (800)
267-7377.
•
This power unit
is intended to be
correctly oriented
in a vertical or oor
mount position.
The prongs are not
designed to hold
the plug in place if
it is plugged into a
ceiling, under-thetable or cabinet
outlet.
Installation
Basic operation
www.vtechphones.com
3
Page 7
Installation
Desk/table bracket installation
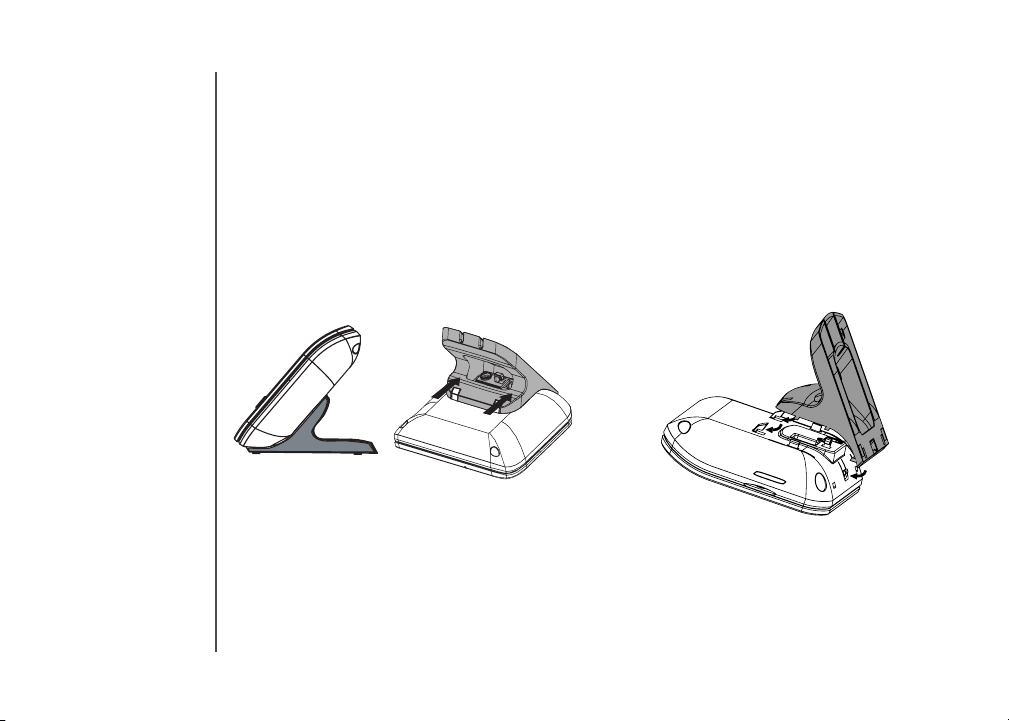
The telephone base comes with the desk/table bracket installed and ready for tabletop use.
To remove the bracket:
1. Push the bracket away from the telephone
base as shown below. Do not remove the
bracket by force to avoid breakage of
the tabs.
Dial type
If you have touch-tone service, your telephone is ready to use as soon as the battery is charged.
If you have pulse (rotary) service, the dial type must be changed. To change the dial type, see
Dial type section on page 12.
To install the bracket:
1. Align the tabs of the bracket with the slots
at the bottom of the telephone base as
shown in the diagram.
2. Slide the bracket towards the center
of the tele phone base until it click s
into place.
4
www.vtechphones.com
Page 8
Installation
If you subscribe to DSL service
If you receive high speed internet through your telephone line (commonly referred to as DSL), and
you are experiencing interference during telephone conversations and/or your caller ID features are
not functioning properly, install a DSL lter to the telephone line between the telephone base and
the telephone wall jack. Contact your DSL provider for a DSL lter.
DSL lter (for
DSL users)
To single telephone jack (RJ11C) Telephone line cord
Installation
Basic operation
www.vtechphones.com
5
Page 9
Telephone settings
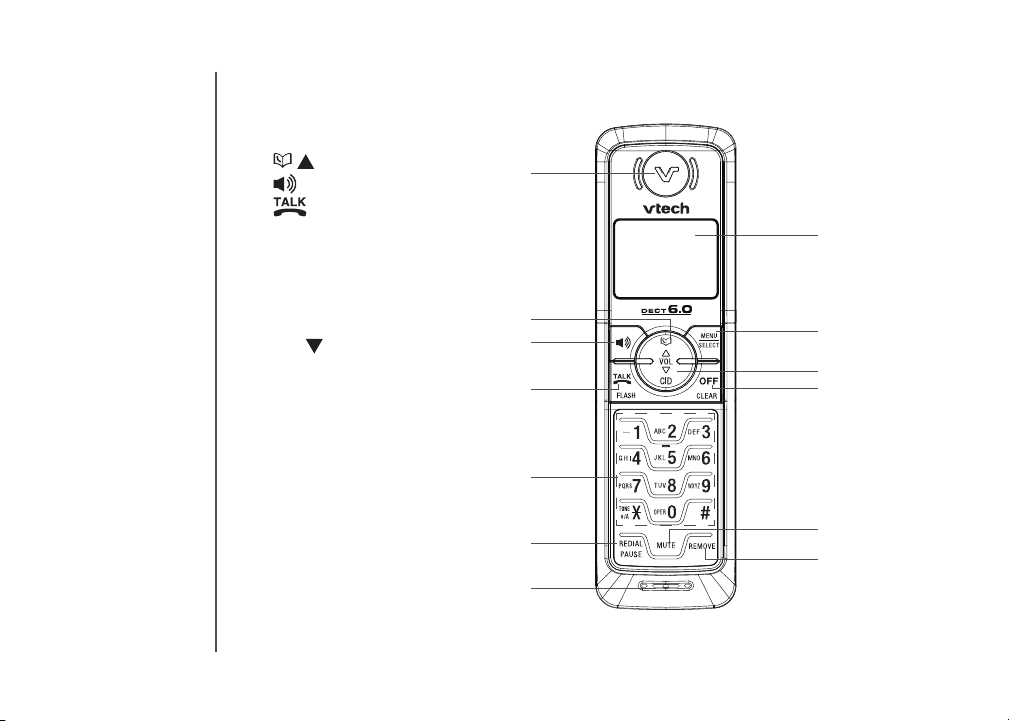
Handset layout
1. Earpiece
2.
/ (directory/volume)
3.
(speakerphone)
4.
5. Dialing keys (0-9,*,#)
6. REDIAL/PAUSE
7. Microphone
8. Handset display
9. MENU/SELECT
10. CID/
11. OFF/CLEAR
12. MUTE
13. REMOVE
/FLASH
(caller ID/volume)
1
2
3
4
5
8
9
10
11
6
12
13
7
6
www.vtechphones.com
Page 10

Telephone settings
Telephone base layout
1. CHARGE light
2. IN USE light
3. VOICEMAIL light
4. FIND HANDSET
Telephone settings
Basic operation
1
2
3
4
www.vtechphones.com
7
Page 11
Telephone settings
When entering
•
the date or time, if
the digit is single,
a zero must be
entered rst (i.e.
if the time is 6:08,
you must enter
0608).
8
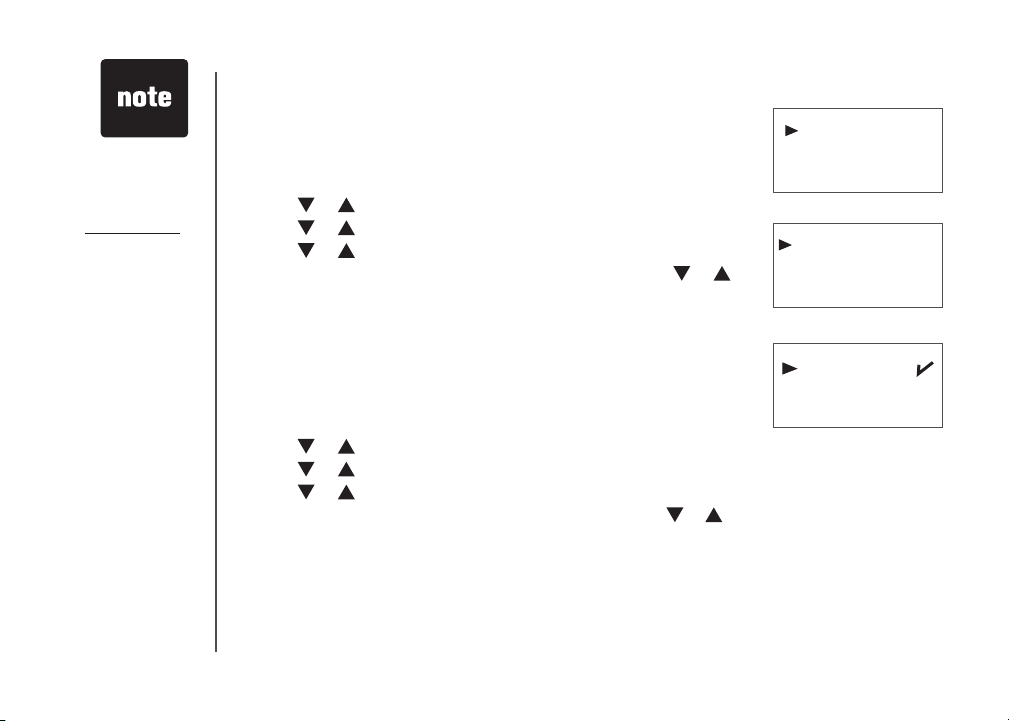
Date and time
• Press MENU/SELECT to display menu when in idle mode.
• Press
• Use the keypad to set the year. Press
• Use the keypad to set the date. Press
•
Use the keypad to set the time. Press or to select a.m. or p.m.
or to reach DATE/TIME. Press MENU/SELECT.
MENU/SELECT.
MENU/SELECT.
Press MENU/SELECT.
• The screen displays STORED
and you’ll hear a conrmation beep.
Ring melody
There are ten handset ringer melodies to choose from.
• Press
• Press
• Press
• Press
• The screen displays STORED
MENU/SELECT to display menu when in idle mode.
or to reach SETUP HS. Press MENU/SELECT.
or to reach RING MELODY. Press MENU/SELECT, a
checkmark is shown next to the current ring melody.
or to scroll through the choices and a sample of each
ring melody will be played. Press MENU/SELECT.
and you’ll hear a conrmation beep.
www.vtechphones.com
YeAr 200\
dAte \1/01
tIMe \2:12AM
rING MelodY
rING voluMe
MelodY 1
MelodY 2
Stored
Page 12
Telephone settings
Ring volume
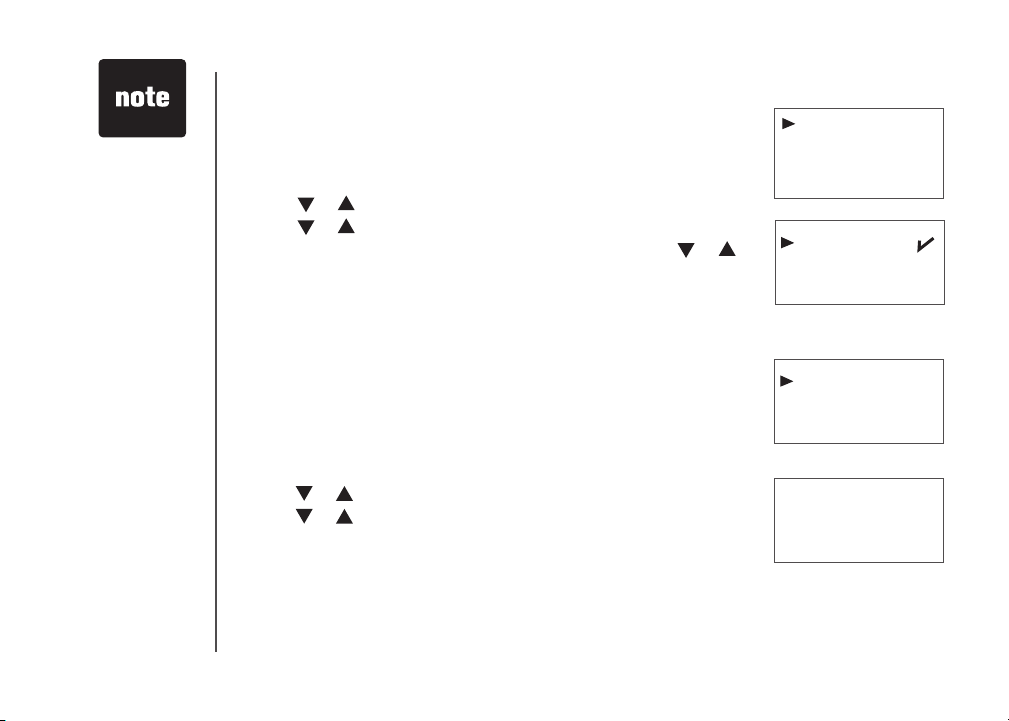
The handset ringer volume can be adjusted from ve available levels.
• Press
• Press
• Press
• Press
• Press
Battery low tone
The handset is preset to beep when the battery level is low.
• Press
• Press
• Press
• Press
• A checkmark is shown next to the current selection. Press
• The screen displays STORED
MENU/SELECT to display menu when in idle mode.
or to reach SETUP HS. Press MENU/SELECT.
or to reach RING VOLUME. Press MENU/SELECT.
or to scroll through the choices and a sample of each ring
volume will be played.
MENU/SELECT to conrm. The screen displays STORED and
you’ll hear a conrmation beep.
MENU/SELECT to display the menu when in idle mode.
or to reach SETUP HS. Press MENU/SELECT.
or to reach TONES. Press MENU/SELECT.
or to reach BATTERY LOW. Press MENU/SELECT.
or
to choose ON or OFF. Press MENU/SELECT.
and you’ll hear a conrmation beep.
toNeS
HANdSet NAMe
BAtterY low
out of rANGe
oN
off
The handset will
•
not ring when the
ringer volume is at
the lowest setting.
A ringer off icon
will be displayed.
While the
•
telephone is
ringing, you
can temporarily
silence the ringer
by pressing
OFF/CLEAR
MUTE. A ringer
off icon
be displayed. The
next call will ring
normally.
Telephone settings
Basic operation
or
will
www.vtechphones.com
9
Page 13
Telephone settings
Press OFF/CLEAR
•
at anytime to the
return to previous
screen.
Press and hold
•
OFF/CLEAR
anytime to exit the
menu.
10
Out of range tone
The handset will beep during a conversation when it is out of range from
the telephone base. This tone is preset to ON.
• Press
• Press
at
• Press
• Press
• A checkmark is shown next to the current selection. Press
• The screen displays STORED
MENU/SELECT to display the menu when in idle mode.
or to reach SETUP HS. Press MENU/SELECT.
or to reach TONES. Press MENU/SELECT.
or to reach OUT OF RANGE. Press MENU/SELECT.
or
to choose ON or OFF. Press MENU/SELECT.
and you’ll hear a conrmation beep.
Key tone
The handset is preset to beep whenever any button is pressed. To
change this setting:
• Press
• Press
• Press
• Press
• A checkmark is shown next to the current selection. Press
• The screen displays STORED
MENU/SELECT to display the menu when in idle mode.
or to reach SETUP HS. Press MENU/SELECT.
or to reach TONES. Press MENU/SELECT.
or to reach KEY BEEPS. Press MENU/SELECT.
or to
select ON or OFF. Press MENU/SELECT.
and you’ll hear a conrmation beep.
www.vtechphones.com
toNeS
HANdSet NAMe
out of rANGe
KeY BeePS
oN
off
Page 14

Telephone settings
Telephone settings
Edit handset name
• Press MENU/SELECT to display the menu when in idle mode.
• Press
• Press
Press REMOVE to backspace and erase characters. Press and hold
•
REMOVE to delete the entire entry. Press * to alternate between
uppercase and lowercase.
• Use the keypad to enter characters (see the chart on page 17). Press
MENU/SELECT.
• The screen displays STORED
or to reach SETUP HS. Press MENU/SELECT.
or to reach HANDSET NAME. Press MENU/SELECT.
and you’ll hear a conrmation beep.
Language
To change the language for all screen displays:
• Press
• Press
• Press
• A checkmark is shown next to the current selection. Press
• Press
• The screen displays STORED
MENU/SELECT to display menu when in idle mode.
or to reach SETUP HS. Press MENU/SELECT.
or to reach LANGUAGE. Press MENU/SELECT.
or
to choose the desired language.
MENU/SELECT.
and you’ll hear a conrmation beep.
www.vtechphones.com
HANdSet NAMe
lANGuAGe
eNter NAMe
HANdSet
a
\
lANGuAGe
reSet
A handset name
•
can be up to 14
characters only.
Only handset
•
display screens
are affected by
the language
setting.
Basic operation
11
Page 15
Telephone settings
The clear voicemail
•
feature only turns off
the displayed NEW
VOICEMAIL
and VOICEMAIL
light on the telephone
base. It does not
delete your voicemail
message(s). Use
this feature when the
telephone indicates
there is voicemail
when you have none
or you have accessed
your voicemail from a
remote location (while
away from home). If
there is actually a new
voicemail message,
your local telephone
company will continue
to send a signal which
will cause the NEW
VOICEMAIL
in the handset and
the telephone base
VOICEMAIL light to
ash.
message
message
12
Dial type
The dial type is preset to touch tone. If you have pulse (rotary) service,
the dial type must be changed.
• Press MENU/SELECT to display menu when in idle mode.
• Press
• Press
• A checkmark is shown next to the current selection. Press
or to reach SETUP BS. Press MENU/SELECT.
or to reach DIAL T YPE. Press MENU/SELECT.
or
to choose between TONE and PULSE. Press MENU/SELECT.
• The screen displays STORED
and you’ll hear a conrmation beep.
Clear voicemail
If you subscribe to voicemail services provided by your local telephone
company, NEW VOICEMAIL will appear on the handset display and
the VOICEMAIL light on the telephone base will ash when you have
a new voicemail message. This feature allows you to turn off these
indicators.
• Press
• Press
• Press
• The screen displays INDICATOR OFF?
• The screen displays STORED
MENU/SELECT to display the menu when in idle mode.
or to reach SETUP BS. Press MENU/SELECT.
or to reach CLR VOICEMAIL. Press MENU/SELECT.
Press MENU/SELECT.
and you’ll hear a conrmation beep.
www.vtechphones.com
dIAl tYPe
clr voIceMAIl
toNe
PulSe
clr voIceMAIl
reSet
INdIcAtor off?
Page 16
Telephone settings
Telephone settings
Reset to default settings
The handset and the telephone base can be individually reset to their
default settings by selecting RESET in the SETUP HS or SETUP BS menus
respectively.
• Press
•
• Press or to reach RESET. Press MENU/SELECT.
• The screen displays RESET?
• If selection is conrmed, the screen displays STORED
MENU/SELECT to display menu when in idle mode.
Press or to reach SETUP HS or SETUP BS. Press MENU/SELECT.
Press MENU/SELECT to conrm or
OFF/CLEAR to exit to previous menu.
and you’ll hear a
conrmation beep.
Temporary tone dialing
If you have pulse (rotary) service, you can change from pulse to touch tone
dialing during a call by pressing *TONE. This is useful if you need to send touch
tone signals for access to telephone banking or long distance ser vices.
Press /FLASH.
•
Press *TONE. Buttons pressed after this send touch tone signals.
•
Dial the number.
•
After hanging up, the telephone automatically returns to pulse dial service
•
www.vtechphones.com
reSet
rING MelodY
reSet?
.
When the handset
•
or telephone base
settings are reset
to default, all items
stored in memory
will be deleted.
This includes the
directory and call
log entries.
Basic operation
13
Page 17

Press or to
•
adjust the listening
volume during a
conversation.
14
Basic operation
Make, answer and end calls
• Press /FLASH or , then use the keypad to dial a number.
-OR-
•
Dial a number (press REMOVE to make corrections) and then press
/FLASH or .
• Press /FLASH, or any dialing keys (0 -9, * or #) to answer an
incoming call.
• Press OFF/CLEAR or put the handset back in the telephone base to
end a call.
• The call timer will be activated during a call to show call duration.
Options while on calls
Speakerphone
•
Press to alternate between speakerphone and normal handset use.
Mute
•
Press MUTE on the handset to sil enc e the mic rop hone dur ing a
conversation. You can still hear the caller but the caller cannot hear you.
• The screen displays MUTE.
• Press
Call waiting
If you subscribe to call waiting service and you are on a call when a new call
comes in, you will hear a beep. The caller ID information will be displayed
if you subscribe to caller ID service from your local telephone company.
• Press
• Press
MUTE again to resume conversation.
/FLASH on the handset to answer the incoming call and put
the current call on hold.
/FLASH at anytime to alternate between calls.
www.vtechphones.com
PHoNe 00:00:10
595-9511
MUTE
Page 18

Basic operation
Find handset
• Press FIND HANDSET on the telephone base to locate the handset when
in idle mode. The handset will ring and PAGING
•
Press FIND HANDSET again or put the handset back on the telephone
base to stop the paging tone.
will ash on its screen.
Basic operation
PAGING
www.vtechphones.com
15
Page 19

Advanced operation
Directory
The directory can store up to 50 entries. Each entry may consist of a
number up to 24 digits and a name up to 15 characters.
• The screen displays EMPTY if there is no record in the director y.
• The screen displays FULL
if the directory is full.
eMPtY
16
Review the directory
• Press / to enter the directory.
• Press
-OR-
• Press
• Press
• Press
• Press
or to browse and press OFF/CLEAR to exit.
MENU/SELECT to display menu when in idle mode.
or to reach DIRECTORY. Press MENU/SELECT.
or to reach REVIEW. Press MENU/SELECT.
or to browse and press OFF/CLEAR to exit.
Search the directory
Entries are sorted alphabetically and names beginning with numbers
are listed rst.
An alphabetical search can be done after entering the directory. Enter
the rst letter of the name using the chart on page 17. The rst name
beginning with that letter will be displayed.
For example, press 5 (JKL) once to nd Jenny, twice to nd Kristen, or
three times to nd Linda.
-OR-
You can search the directory by pressing
www.vtechphones.com
or on the handset.
dIrectorY
cAll loG
revIew
Store
vtecH
1-595-9511
Page 20

Advanced operation
Character chart
Use the keypad and the chart below to enter a name (up to 15 characters). Each press of a particular
key causes the characters to be displayed in the following order:
Number key
1 space 1 * ? ! / ( )
2 A B C 2
3 D E F 3
4 G H I 4
5 J K L 5
6 M N O 6
7 P Q R S 7
8 T U V 8
9 W X Y Z 9
0 0
* Uppercase/lowercas e
# #
• Press REMOVE to backspace and erase a single character.
•
Press and hold REMOVE to delete the entire entry.
•
Press and hold REDIAL/PAUSE to insert a dialing pause (P will be displayed) when entering a
telephone number.
1 2 3 4 5 6 7 8 9
Characters b y number of key presses
,
, - . &
www.vtechphones.com
Press
•
*
repeatedly to
alternate between
uppercase
and lowercase
when entering
characters.
Advanced operation
17
Page 21

Advanced operation
18
Store a directory entry
• Press MENU/SELECT twice to enter the DIRECTORY.
• Press
• The screen displays ENTER NUMBER
number and then press MENU/SELECT.
• The screen displays ENTER
characters and then press MENU/SELECT.
• The screen displays STORED
or to reach STORE and then press MENU/SELECT.
. Use the keypad to enter the
NAME. Use the keypad to enter the
and you’ll hear a conrmation beep.
Dial a directory entry
• Press / to enter the director y.
• Press
search to nd it.
• Press
-OR-
• Press
• Press
• Press
• Press
search to nd it.
• Press
or to scroll to the desired entry, or use the alphabetical
/FLASH or to dial.
MENU/SELECT to display menu when in idle mode.
or to reach DIRECTORY. Press MENU/SELECT.
or to reach REVIEW. Press MENU/SELECT.
or to scroll to the desired entry, or use the alphabetical
/FLASH or to dial.
www.vtechphones.com
Store
revIew
eNter NuMBer
eNter NAMe
a
Stored
Page 22

Advanced operation
Edit an entry in the directory
• Press / or MENU/SELECT three times to enter the directory.
• Press or to scroll to the desired entry or use the alphabetical
search to nd the number. Press MENU/SELECT.
•
The screen displays ENTER NUMBER. Use REMOVE and the keypad
to edit the number and press MENU/SELECT.
• The screen displays ENTER NAME
edit the name and then press MENU/SELECT.
• The screen displays STORED
. Use REMOVE and the keypad to
and you’ll hear a conrmation beep.
Delete from the directory
• Press / or MENU/SELECT three times to enter the directory.
• Press
To delete an entry
• Press REMOVE
• The screen displays DELETED
To delete all entries
•
Press and hold REMOVE.
• The screen displays DELETE ALL?
• The screen displays DELETED
or to scroll to the desired entry.
.
and you’ll hear a conrmation beep.
Press MENU/SELECT.
and you’ll hear a conrmation beep.
www.vtechphones.com
eNter NuMBer
eNter NAMe
a
Stored
deleted
delete All?
Press OFF/CLEAR
•
to return to the
previous screen.
Press and hold
OFF/CLEAR
exit the menu at
anytime.
to
Advanced operation
19
Page 23

Advanced operation
About caller ID
If you subscribe to caller ID service from your local telephone company, this feature displays the
name and telephone number of the caller before answering a call (even when you are on another
call). The caller ID features of this product will work only if you subscribe to caller ID service and
both you and the caller are in areas offering caller ID service, and if both telephone companies use
compatible equipment.
Contact your local telephone company if:
you have both caller ID and call waiting, but as separate services (you may need combined service),
•
• you have only caller ID service, or only call waiting ser vice,
• you do not subscribe to caller ID or call waiting services but wish to try them.
There may be fees for these services, and they may not be available in all areas.
This product can be used without subscribing to either caller ID or combined caller ID with call waiting
service, although the caller ID features of this product will not function.
20
www.vtechphones.com
Page 24

Advanced operation
Call log
The information of the caller will be displayed if you subscribe to caller ID
service from your local telephone company.
• The call log can store up to 50 entries.
Each entry may consist of a number up to 20 digits and a name up to
•
15 characters. If the number consists of more than 20 digits, the last 20
digits will be displayed and stored. If the name consists of more than 15
characters, the rst 15 characters will be displayed and stored.
• Entries are displayed in chronological order with the newest
entry rst.
• When the call log is full, the oldest entry will be deleted to make room
for the new incoming call information.
• The screen displays EMPTY if there is no record in the call log.
• The screen displays NEW if there are new call log entries (missed and
unread calls).
• Duplicate or anonymous calls (no caller ID information) will be stored
in the call log.
Review the call log
• Press CID/ to enter the call log.
-OR-
Press MENU/SELECT. Press or to select CALL LOG.
•
• Press
• The name (if available), number, date and time of the incoming call are
MENU/SELECT and then press or to browse through the
entries.
displayed on the screen.
www.vtechphones.com
JoHNNY fu
2-345-6789
New
05:27PM 11/23
eMPtY
Due to regional
•
service
differences,
the caller ID
information
may not be
available for
every incoming
call. In addition,
the callers may
intentionally
block their name
and/or telephone
number.
•
The time is
automatically set
and updated with
incoming caller ID
information if you
subscribe to this
service.
Advanced operation
21
Page 25

While reviewing
•
the call log, press
# repeatedly to
display the other
dialing options.
The available
options are: (1
+ area code +
number, area code
+ number, 1 +
number, number
only). The various
dialing options are:
595-9511
1-595-9511
800-595-9511
1-800-595-9511
Advanced operation
Dial a call log number
• Press CID/ to enter the call log.
-OR-
Press MENU/SELECT. Press or to select CALL LOG.
•
• Press
• Press
Store a call log number
• Press CID/ to enter the call log.
-OR-
•
• Press
• Press
• Use the keypad to enter the name and then press
• The screen displays STORED
MENU/SELECT and then press or to scroll to the desired
entry.
/FLASH or to dial.
Press MENU/SELECT. Press or to select CALL LOG.
MENU/SELECT and then press or to scroll to the desired
entry.
MENU/SELECT and the screen displays ENTER NAME.
MENU/SELECT.
and you’ll hear a conrmation beep.
eNter NAMe
a
Stored
22
www.vtechphones.com
Page 26

Advanced operation
Delete from the call log
• Press CID/ to enter the call log.
-OR-
Press MENU/SELECT. Press or to select CALL LOG, then
•
press MENU/SELECT.
To delete one entry
•
Press or to scroll to the desired entry and then press REMOVE
• The screen displays DELETED and you’ll hear a conrmation beep.
To delete all entries
•
Press and hold REMOVE when in the CALL LOG.
• The screen displays DELETE ALL?
• The screen displays DELETED
Press MENU/SELECT.
and you’ll hear a conrmation beep.
.
delete All?
deleted
Press OFF/CLEAR
•
to return to the
previous screen.
Press and hold
OFF/CLEAR
exit the menu at
anytime.
to
Advanced operation
www.vtechphones.com
23
Page 27

Advanced operation
Redial
The redial list can store up to 10 of the most recently dialed numbers.
• When there are already 10 entries in the redial list, the oldest entry
will be deleted to make room as you place additional calls.
• The screen displays EMPTY if there are no records in the list.
Review redial
• Press REDIAL/PAUSE to enter the redial list.
• Press
Store a redial number to the directory
• Press REDIAL/PAUSE to enter the redial list.
• Press
• The screen displays ENTER NAME
• Use the keypad to enter the name and then press
• The screen displays STORED
or to browse through the entries.
or to scroll to the desired entry. Press MENU/SELECT.
.
MENU/SELECT.
and you’ll hear a conrmation beep.
24
www.vtechphones.com
Page 28

Advanced operation
Dial from redial
• Press REDIAL/PAUSE to enter the redial list.
• Press
• Press
Delete from redial
• Press REDIAL/PAUSE to enter the redial list.
To delete one entry
•
Press or to scroll to the desired entry and then press REMOVE.
• The screen displays DELETED and you’ll hear a conrmation beep.
To delete all entries
•
Press and hold REMOVE.
• The screen displays DELETE ALL?
• The screen displays DELETED
or to scroll to the desired entry.
/FLASH or to dial.
Press MENU/SELECT.
and you’ll hear a conrmation beep.
deleted
delete All?
Press OFF/CLEAR
•
to return to the
previous screen.
Press and hold
OFF/CLEAR
exit the menu at
anytime.
to
Advanced operation
www.vtechphones.com
25
Page 29

Handset and telephone base indicators
Handset light
• On when the handset speakerphone is in use.
Telephone base lights
IN USE • Flashes when there is an incoming call.
• On when the handset is in use.
VOICEMAIL • Flashes when there is a new network message (A subscription service from your
CHARGE • On when the handset is in the telephone base.
local telephone company is required).
Handset icons
• Ringer off.
(Battery indicator)
26
• Cycles (low, medium, and full) when handset battery is charging.
Flashes when the battery power is low.
•
www.vtechphones.com
Page 30

Handset display screen messages
Display: When:
cAll
cHArGING
coNNectING...
eMPtY
eNded
full
lINe IN uSe
low BAtterY
Mute
New
New voIceMAIl
Not AvAIlABle
No lINe
PAGING
There is an incoming call.
A handset with low battery has been placed on the telephone base to recharge.
The cordless handset is searching for the telephone base.
There are no entries in the call log, directory, or redial list.
You have just ended a call.
The directory is full.
Another handset connected to the same line is in use.
The battery needs to be recharged.
The microphone is muted temporarily during a conversation.
There are un-reviewed calls in the call log.
There is new voicemail message.
There is no line or the handset is out of range from the telephone base.
-OR-
If one handset is already viewing the call log and another handset attempts to
review it.
There is no telephone line connected.
The handset locator has been activated or the handset is being paged.
Appendix
www.vtechphones.com
27
Page 31

Handset display screen messages
Display: When:
PHoNe
PlAce IN cHArGer
wArNING
cHecK BAtterY!
The handset is in use.
The battery is very low. The handset should be placed on the telephone base
to recharge.
The battery is not installed or not installed properly in the handset.
-OR -
The battery needs to be replaced.
-OR -
An incorrect battery has been installed by mistake. Use only the supplied
VTech battery, or equivalent.
Call log display screen messages
Display: When:
PrIvAte NAMe
PrIvAte NuMBer
PrIvAte cAller
uNKNowN NAMe
uNKNowN NuMBer
uNKNowN cAller
loNG dIStANce
l
(before caller’s number)
28
or
The caller is blocking name information.
The caller is blocking telephone number information.
The caller is blocking name and number information.
This caller’s name is unavailable.
This caller’s number is unavailable.
No call information is available about this caller.
This is a long distance call.
www.vtechphones.com
Page 32

Battery
After the battery is fully charged for 16 hours, you can expect the following performance:
Operation Operating time
While in use (talking)
While not in use (standby*)
*Hands et is off t he telep hone ba se but not i n use.
The battery needs charging when:
• A new battery is installed in the handset.
• Battery indicator on screen is ashing.
CAUTION:
1. Use only the supplied battery (part number 89-1326-00-00) or equivalent. To order a replacement, visit our website at
www.vtechphones.com or call 1 (800) 595-9511. In Canada, visit www.vtechcanada.com or call 1 (800) 267-7377.
2. Do not dispose of the battery in a re. Check with local waste management codes for special disposal instructions.
3. Do not open or mutilate the battery(ies). Released electrolyte is corrosive and may cause burns or injury to the eyes or
skin. The electrolyte may be toxic if swallowed.
4. Exercise care in handling batteries in order not to create a short circuit by letting them come into contact with conductive
materials such as rings, bracelets, and keys. The battery and/or conductor may overheat and cause burns.
5. Charge the batter y(ies) provided with or identied for use with this product only in accordance with the instructions and
limitations specied in this manual.
WARNING:
TO PREVENT FIRE OR SHOCK HAZARD, DO NOT EXPOSE THIS PRODUCT TO WATER OR ANY TYPE OF MOISTURE.
10 hours
100 hours
Appendix
www.vtechphones.com
29
Page 33

Important safety instructions
When usi ng your tele phone eq uipmen t, basic s afety pr ecauti ons shou ld always be f ollowed:
1. Rea d and under stand a ll instr uction s.
2. Foll ow all warn ings and i nstru ctions m arked on th e produc t.
3. Unp lug this p roduc t from the wa ll outle t before cl eaning. D o not use li quid or aer osol cl eaners . Use a damp c loth for c leaning .
4. Do no t use this p roduc t near water (fo r example, n ear a bathtu b, kitch en sink, or s wimmin g pool).
5. Do no t place th is produ ct on an un stable s urfac e such as a ta ble, she lf or stan d. This pro duct may f all, caus ing seri ous dama ge.
6. Slo ts an d ope nings in th e bac k or botto m of the te lephon e bas e and handset are provi ded fo r vent ilation . To prote ct t hem fr om over heatin g, th ese o pening s must not be
blocke d by placing the pr oduct on a sof t sur face such as a bed, sofa or rug. Thi s produc t should neve r be placed nea r or over a radiator or heat re gister. This pr oduct sh ould
not be plac ed in an are a where pro per venti lation i s not provi ded.
7. Thi s produc t should be oper ated only fro m the type of power sou rce indi cated on the mark ing label . If you are not sure of the type of powe r supply in your hom e, consult you r
dealer or l ocal po wer compa ny.
8. Do no t allow any thing to r est on the p ower cord . Do not ins tall thi s produc t where th e cord may b e walked on.
9. Neve r push objects of any kind into this pro duct throu gh slots in the telepho ne base or handset as they may touch dang erous volta ge points or create a short cir cuit that could
result in a r isk of re o r electr ic shoc k. Never sp ill liqu id of any kin d on the pro duct.
To reduce the risk of electr ic shock , do not disassem ble this prod uct, but take it to an authoriz ed servi ce facilit y. Opening or removi ng parts of the telep hone base or hand set other
10.
than spe cied a ccess d oors may ex pose you to d angero us voltag es or other r isks. In correc t reass emblin g can caus e elect ric shoc k when th e produc t is subs equentl y used.
11. D o not overl oad wall ou tlets an d extensi on cord s as this ca n result i n the risk o f re or elec tric sh ock.
12. U nplug th is produ ct from t he wall out let and ref er serv icing to a n authori zed ser vice fac ility u nder the f ollowin g condi tions:
A . When the p ower suppl y cord or p lug is dam aged or fraye d.
B. I f liquid h as been sp illed on to the pro duct.
C. If th e produc t has been ex posed t o rain or water.
D. If th e produc t does not o perate no rmally b y followi ng the ope rating in struc tions. Ad just onl y those c ontrol s that are cov ered by the o perati on instr uction s, as impr oper
adjustmen t of other c ontrol s may result i n damage a nd often r equires ex tensive work by an aut horized te chnic ian to rest ore the pr oduct to n ormal op eratio n.
E. I f the prod uct has b een drop ped and t he teleph one base a nd/or han dset has b een dama ged.
F. If the prod uct exhi bits a dis tinct c hange in p erform ance.
13. The power u nit is intende d to be corre ctly o riente d in a v ertic al or oor mo unt po sition. The pr ongs a re not design ed to h old th e plug in plac e if i t is pl ugged into a ceiling ,
under-th e-tab le or cabi net outl et.
14. Avo id using a t elepho ne (other th an cordl ess) durin g an elec trical s torm. Th ere is a remo te risk of el ectri c shock f rom ligh tning.
15. D o not use th e teleph one to rep ort a gas l eak in the v icinit y of the le ak.
16. O nly put th e hands et of your tele phone n ext to your ea r when it is i n normal t alk mode.
CAUTION: Use o nly the po wer adapte r provid ed with th is produ ct. To obtain a r eplace ment, vi sit our web site at ww w.vtechp hones.c om or call 1 (8 00) 595 -9511. In Canada go
to www.vte chcan ada.com o r dial 1 (80 0) 267-7377.
SAVE THESE INSTRUCTIONS
30
www.vtechphones.com
Page 34

Troubleshooting
If you have difculty with your telephone, please try the suggestions below. For Customer Service, visit our website at www.
vtechphones.com, or call 1 (800) 595-9511; in Canada, call 1 (800) 267-7377.
Problem Suggestion
My telephone does not
work at all.
LOW BATTERY is
displayed on screen.
• Make sure the batter y is installed and charged c orrectly (page 2). For optimum daily
performance, return the cordless handset to the telephone base after use.
• Make sure the power adapter is securely plugged into an outlet not controlled by a wall
switch.
•
Make sure the telephone line cord is plugged rmly into the telephone base and the wall jack.
• Unplug the unit’s electrical power. Wait for approximately 15 seconds, then plug it back in.
Allow up to one minute for the cordless handset and telephone base to synchronize.
• Charge the battery in the cordless handset for at least 16 hours.
• Remove and re-insert the battery. If that still does not work, it may be necessary to purchase
a new battery.
• Disconnect the telephone base from the jack and plug in a working telephone. If this telephone
does not work, the problem is probably in the wiring or the local service. Call the local telephone
company.
• Place the handset in the telephone base for recharging.
• Remove and re-install the battery and use it normally until fully discharged, then recharge the
handset on the telephone base for 16 hours.
• If the above measures do not correct the problem, the battery may need to be replaced.
Appendix
www.vtechphones.com
31
Page 35

Troubleshooting
Problem Suggestion
The battery does not
charge in the handset
or the handset battery
does not accept
charge.
The CHARGE light is
off.
• Make sure the handset is placed in the telephone base correctly. The CHARGE light on the
telephone base should be on.
• Remove the battery from the handset and then re-install it in the handset. Put the handset
back to the telephone base and charge for 16 hours.
• If the cordless handset is in the telephone base but the CHARGE light is not on, see
CHARGE light is off in this section.
• It may be necessary to purchase a new battery. Please see the Battery section of this user’s
manual (page 29).
• The telephone might be malfunctioning. Please see the Warranty section of this user’s manual
(page 40) for further instruction.
• Clean the charging contacts on the cordless handset(s) and telephone base each month using
a pencil eraser or a dry non-abrasive fabric.
•
Make sure the power adapter and telephone line cords are plugged in correctly and securely
• Unplug the power adapter. Wait for 15 seconds before plugging it back in. Allow up to one
minute for the cordless handset and telephone base to reset.
• The telephone might be malfunctioning. Please see the Warranty section of this user’s manual
(page 40) for further instruction.
The
.
32
www.vtechphones.com
Page 36

Troubleshooting
Problem Suggestion
There is no dial tone. • First, try all the above suggestions.
• Move the cordless handset closer to the telephone base. It might be out of range.
• The telephone line cord might be malfunctioning. Try installing a new telephone line cord.
• Disconnect the telephone base from the telephone jack and connect a different telephone. If
there is no dial tone on the other telephone either, the problem is in your wiring or local service.
Contact your local telephone company.
My handset dis play s
CONNECTING...
My handset dis play s
NOT AVAILABLE
•
Move the handset closer to the telephone base. You might have moved out of range.
Move the handset closer to the telephone base. You might have moved out of range.
•
.
Make sure no other handset is reviewing the call log when an attempt is denied.
•
Appendix
www.vtechphones.com
33
Page 37

Troubleshooting
Problem Suggestion
The telephone does
not ring when there is
an incoming call.
• Make sure the ringer is on (page 9).
• Make sure the telephone line cord and power adapter are plugged in properly (page 3).
• The cordless handset may be too far from the telephone base. Move it closer to the telephone
base.
• There may be too many extension telephones on the telephone line to allow all of them to ring
simultaneously. Try unplugging some of them.
• If the other telephones in your home are having the same problem, the problem is in the wiring
or local service. Contact the local telephone company (charges may apply).
• Other electronic products can cause interference to your cordless telephone. Try installing your
telephone as far away as possible from the following electronic devices: wireless routers, radios,
radio towers, pager towers, cellular telephones, digital telephones, intercoms, room monitors,
televisions, VCRs, personal computers, kitchen appliances, and other cordless telephones.
•
Test a working telephone at the telephone jack. If another telephone has the same problem, the
problem is in the telephone jack. Contact your local telephone company (charges may apply)
• The telephone line cord might be malfunctioning. Try installing a new telephone line cord.
• Remove and re-insert the battery and place the cordless handset in the telephone base.
• Wait for the cordless handset to synchronize with the telephone base. Allow up to one minute
for this to take place.
.
34
www.vtechphones.com
Page 38

Troubleshooting
Problem Suggestion
I cannot dial out. • First, try all the above suggestions.
• Make sure there is a dial tone before dialing. It is normal if the cordless handset takes a second
or two to synchronize with the telephone base before producing a dial tone. Wait an extra
second before dialing.
•
Make sure the telephone is set to the correct dial type (pulse dial or tone dial) for the service in
your area. See Dial type on page 12 to set the dial type.
• If the other telephones in your home are having the same problem, the problem is in the wiring
or local service. Contact your local telephone company (charges may apply).
• Eliminate any background noise. Noise from a television, radio, or other appliances may cause
the telephone not to dial out properly. If you cannot eliminate the background noise, rst try
muting the cordless handset before dialing, or dialing from another room in your home with
less background noise.
Appendix
www.vtechphones.com
35
Page 39

Troubleshooting
Problem Suggestion
There is noise
or interference
during a telephone
conversation.
My calls cut in and out
when I am using the
cordless handset.
• The handset may be out of range. Move it closer to the telephone base.
• Appliances or other cordless telephones plugged into the same circuit as the telephone base
can cause interference. Try moving the appliance or telephone base to another outlet.
• Other electronic products can cause interference to your cordless telephone. Try installing your
telephone as far away as possible from the following electronic devices: wireless routers, radios,
radio towers, pager towers, cellular telephones, digital telephones, intercoms, room monitors,
televisions, VCRs, personal computers, kitchen appliances, and other cordless telephones.
• If your telephone is plugged in with a modem or a surge protector, plug the telephone (or
modem/surge protector) into a different location. If this solves the problem, re-locate your
telephone or modem farther apart from each other, or use a different surge protector.
• The layout of your home or ofce might be limiting the operating range. Try moving the telephone
base to another location, preferably a higher location for better reception.
• Disconnect the telephone base from the modular jack and plug in a corded telephone. If calls
are still not clear, the problem is probably in the wiring or local service. Contact the local
telephone company (charges may apply).
• If the other telephones in your home are having the same problem, the problem is in the wiring
or local service. Contact the local telephone company (charges may apply).
• Do you have DSL service? If yes, you need to have a DSL lter installed at every telephone jack
that has a telephone connected to it. Contact your DSL service provider for lter information.
36
www.vtechphones.com
Page 40

Troubleshooting
Problem Suggestion
I hear other calls when
using the telephone.
• Disconnect the telephone base from the telephone jack. Plug in a different telephone. If there are
still other calls, the problem is probably in the wiring or local service. Call your local telephone
company.
I hear noise in the
cordless handset, and
none of the keys or
buttons work.
My caller ID features are
not working properly
The system does
not receive caller ID
or the system does
not display caller ID
during call waiting.
• Make sure the telephone line cord is plugged in securely.
Remove and re-insert the battery.
•
• Caller ID is a subscription service. You must subscribe to this service from your local telephone
company for this feature to work on your telephone.
• The caller may not be calling from an area which supports caller ID.
• Both you and the caller’s telephone companies must use equipment which are compatible with
caller ID ser vice.
• If you subscribe to DSL service, install a DSL lter to the telephone line between the telephone
base and the telephone line jack. Contact your DSL service provider for lter information.
• Make sure you subscribe to caller ID with call waiting features provided by the local telephone
company.
• The caller may not be calling from an area which supports caller ID.
• Both you and the caller’s telephone companies must use equipment which are compatible with
caller ID ser vice.
• If you subscribe to DSL service, install a DSL lter to the telephone line between the telephone
base and the telephone line jack. Contact your DSL service provider for lter information.
www.vtechphones.com
Appendix
37
Page 41

Troubleshooting
Problem Suggestion
My cordless handset
beeps and is not
performing normally.
Common cure for
electronic equipment
• Make sure the power cord is securely plugged into the telephone base. Plug the unit into a
different working electrical outlet not controlled by a wall switch.
• Move the cordless handset closer to the telephone base. It may be out of range.
• Reset the telephone base by unplugging the unit’s electrical power. Wait for 15 seconds and
plug it back in again. Allow up to one minute for the cordless handset and the telephone base
to synchronize.
• Other electronic products can cause interference to your cordless telephone. Try installing
your telephone as far away from these electronic devices as possible: wireless routers, radios,
radio towers, pager towers, cellular telephones, intercoms, room monitors, televisions, personal
computers, kitchen appliances and other cordless telephones.
• If the unit is not responding normally, try putting the cordless handset in the telephone base.
If it does not seem to respond, try the following (in the order listed):
• Disconnect the power to the telephone base.
• Disconnect the battery on the cordless handset.
• Wait a few minutes before connecting power to the telephone base.
• Re-install the battery and place the cordless handset into the telephone base.
• Wait for the cordless handset to synchronize its connection with the telephone base. Allow up
to one minute for this to take place.
38
www.vtechphones.com
Page 42

Operating range
This cordless telephone operates with the maximum power allowed by the Federal Communications Commission (FCC). Even so, this handset and telephone base can
communicate over only a certain distance ----which can vary with the locations of the telephone base and handset, the weather, and the layout of your home or ofce.
When the handset is out of range, the handset will display CONNECTING. The user can access the handset directory, and certain parts of the menu system, i.e.
handset setting, but not the time setting and telephone base setting. NOT AVAILABLE will be displayed if access is denied.
If there is a call while the handset is out of range, it might not ring, or if it does ring, the call might not connect well when you press
telephone base, then press /FLASH to answer the call.
If the handset moves out of range during a telephone conversation, there might be interference.
To improve reception, move closer to the telephone base.
/FLASH. Move closer to the
Maintenance
Taking car e of your te lepho ne
Your cordless telep hone co ntains s ophis ticate d elect ronic parts, s o it must be treated with care.
Avoid roug h treatment
Place the handse t down gently. Save the origina l packing materi als to protect your telepho ne if you ever need to ship it.
Avoid wate r
Your teleph one ca n be da maged if it g ets wet. Do not use th e hand set out doors in the rain, or hand le it w ith wet hands. Do not insta ll the teleph one base near a
sink, bat htub or shower.
Elect rical s torms
Electr ical storms can sometimes caus e power sur ges harmful to ele ctron ic equi pment. For your own safety, take caution w hen usin g elect ric app lianc es during storms.
Clean ing your te lephone
Your telephon e has a durab le plastic casin g that shou ld retain its luster for many years. Cl ean it only with a soft c loth slightly dampened with water or a mil d soap.
Do not use excess water or clean ing solvents of any k ind.
Remember that electrical appliances can cause serious injury if used when you are wet or standing in water. If the telephone base should fall into water, DO NOT
RETRIEVE IT UNTIL YOU UNPLUG THE POWER CORD AND TELEPHONE LINE CORDS FROM THE WALL. Then pull the unit out by the unplugged cords.
Appendix
www.vtechphones.com
39
Page 43

About cordless telephones
Privacy: The same feature s that make a cordless telephone convenient create some limi tations. Telephone calls are trans mitted between the telephone base and
•
the cordless handset by radio waves, so there is a pos sibili ty that the cordless telepho ne conversations could be intercepted by radio receiving equipment within
range of t he cord less han dset. Fo r this rea son, you should no t think of c ordless telep hone co nversat ions as being as pr ivate as th ose on corded tel ephones.
Elect rical Power : The telephone base of this cordless telephone must be connected to a worki ng electri cal outlet. The electrica l outlet should not be controlled
•
by a wall swit ch. Call s cannot be made from the cordless handset if the tel ephone base is un plugg ed or switched of f, or if the electr ical power is inter rupted .
•
Potent ial T V Inte rfer ence: Some c ordless telephones operate at freq uenci es that may caus e inter ferenc e to tel evisio ns and VCR s. To minimi ze or prevent
such inter ferenc e, do not place the telephon e base of the cordless tele phone near or on top of a TV or VCR. If interference is exper ience d, moving the cordl ess
telephone far ther away fr om the TV or VCR will of ten red uce or eliminate t he inter ference.
•
Recha rgea ble Batteries: This product cont ains eithe r Nickel- Cadmium or Nickel-Met al Hydride rec hargeable batter ies. Exerc ise care in handling batteries in
order not to create a short circui t with conducting materia l such as rings, bracelets, and keys. The battery or condu ctor may overheat and cause harm. Observe
proper p olarity between the batter y and the batter y charger.
•
Nickel -M etal Hydri de R echargeab le B atte ries: Disp ose of these b atteri es in a safe manner. Do no t bur n or punc ture. Like other batteries of th is t ype, if
burned o r punctured, they could release c austic materia l which c ould cause injury.
Warranty
What do es this l imited warran ty cove r?
The manufacturer of this V Tech Prod uct warrants to the holde r of a valid pr oof of purch ase (“ Consumer” or “you”) that the Product and all ac cesso ries provide d
in t he sales package (“Prod uct ”) are free from defects in materia l and workmanship, pursuant to the foll owing terms and conditions , when installed and used
normal ly and in accor dance with the Produ ct operating instru ction s. This limited warranty extends on ly to the Consumer for Product s purchased and used in the
United States of Am erica a nd Canad a.
What wil l VTech do if the Product is not free f rom defects i n mater ials an d workmanship d uring th e limited warranty period (“ Mate rially Defective Product ”)?
During the limited warranty period, VTech’s auth orized service representative will repair or replace at VTech’s option, without charge, a Materially Defective Product. If
we repair the Product, we may use new or refurbished replacement parts. If we choose to replace the Product, we may replace it with a new or refurbished Produ ct of
the same or similar design. We will retain defec tive parts, modules, or equipment . Repair or replacement of the Product, at VTech’s option, is your exclusive remedy.
VTech will return rep aired or r eplacement Pro ducts to you in working conditio n. You should ex pect the repair o r replacement to take appr oximate ly 30 days.
How long i s the limited warrant y perio d?
The limite d warranty period for the Product extends for ONE (1) YEAR from the date of purchas e. If VTech repairs or repl aces a Materially Defec tive Produ ct under
the terms of this limited warran ty, this limited warra nty als o applie s to repaire d or replac ement Pro duct for a period of ei ther (a) 90 days from the date th e repaire d
or replacement Pr oduct is shipped to you or (b) the time re mainin g on the original o ne-year warrant y; whic hever is longer.
What is not covered by this limited warran ty?
This lim ited warr anty does not cover:
1. Produ ct t hat ha s been subjecte d to misus e, ac cident, sh ipping or other physical d amage, impr oper installation , abn ormal oper ation or handlin g, ne glect ,
inundation, re, water or other liqui d intrus ion; or
2. Produ ct that ha s been da maged du e to repair, alteratio n or modi cation by anyone o ther tha n an autho rized servic e repres entati ve of VTech; or
3. Produ ct to the ex tent that the problem experienc ed is cau sed by sig nal con ditions, network reli abilit y, or cable o r antenna systems; or
40
www.vtechphones.com
Page 44

Warranty
4. Produ ct to the ex tent that the problem is caused by us e with no n-VTech acc essor ies; or
5. Produ ct whos e warranty/qual ity sti ckers, p roduc t serial number p lates or el ectro nic serial numb ers have be en remove d, altered or rend ered ill egibl e; or
6. Produc t purchased, used, servi ced, or shipped for repair from outside the United States of Ameri ca or Canada, or used for commercia l or inst itution al purposes
(inclu ding but not limit ed to Products us ed for rental purp oses); or
7. Produ ct retur ned wit hout valid proof of purcha se (see item 2 below); or
8. Charg es for ins tallation or set u p, adjust ment of cu stomer c ontrols, and installation or re pair of systems outside the unit.
How do you get warranty se rvic e?
To obtain warranty ser vice in the United States of America, please call 1 (800) 595-9511; In Canada, please call 1 (800) 267-7377. NOTE: Before calling for service,
please r eview the user’s manual - a che ck of the Pr oduct contro ls and features may save you a ser vice ca ll.
Except as prov ided by appli cable law, you assume the risk of loss or damage during transit and transp orta tion and are responsibl e for deliver y or handling charges
incurr ed in the tra nspor t of the Prod uct(s) to the ser vice locati on. VTech will return rep aired or replaced Product under thi s limited wa rrant y to you, trans port ation,
deliver y or handling charges prepaid. VTech assumes no risk for damage or loss of the Produ ct in transit. If the Product failure is not covered by this limited warrant y,
or proof of pur chase does not meet th e terms of thi s limited warrant y, VTech will notif y you and will request th at you authorize the cost of repair pr ior to any fur ther
repair ac tivit y. You must pay for th e cost of repair and r eturn sh ipping costs for the repair of Prod ucts th at are not covered by th is limited warran ty.
What must you ret urn with t he Prod uct to get warra nty se rvic e?
Return the entire o riginal package and contents in cludi ng the Pro duct to t he VTech ser vic e location alon g with a description of th e malfun ction o r dif culty; and
1.
2. Include “valid proo f of purchase” (sal es rece ipt) iden tifying the Pro duct purchas ed (Product mod el) and th e date of purchase or recei pt; and
3. Provid e your name, compl ete and correct m ailing address , and tele phone nu mber.
Other Limita tions
This warrant y is the c omplete and exclus ive agr eement between you and VTech. It supersedes all other writ ten or oral communicat ions related to this Pro duct.
VTech prov ides no other war rantie s for thi s Produ ct. The warrant y exclu sively d escribes all of VTech’s res ponsi biliti es rega rding t he Product. There are n o other
express w arranties. No on e is autho rized to ma ke modi catio ns to this l imited warrant y and you sh ould not r ely on any such mod icat ion.
State/ Provinc ial Law Rights: Th is warra nty gives you spe cic le gal rig hts, and you may also have other ri ghts, which var y from st ate to state or provin ce to prov ince.
Limitations: Impli ed wa rranti es, i nclud ing those of tness for a par ticular pur pose and merchantab ility (an u nwrit ten warrant y th at th e Product is t for ordinary
use) are li mited to one year from d ate of purchase. Some s tates/provin ces do not allow limit ations on how l ong an i mplie d warran ty lasts, so the above limit ation
may not app ly to you. In no event shall VTech be liable for any i ndirec t, s pecia l, in cidental, consequenti al, or simi lar d amages (inc luding, but not limited to lost
prots o r revenue, inabili ty to use t he Produ ct or oth er asso ciated equipme nt, the c ost of sub stitute equipm ent, and claims by t hird par ties) re sultin g from the u se
of this Produ ct. S ome st ates/p rovinc es do not al low th e exclu sion or limitation of incident al or conse quenti al dam ages, so the above limitation o r exclusion m ay
not appl y to you.
Please retain your original sales receipt as proof of purchase.
Appendix
www.vtechphones.com
41
Page 45

FCC, ACTA and IC regulations
FCC Part 15
This equipment has been tested and found to comply with the requirements for a Class B digital device under Part 15 of the Federal Communications Commission
(FCC) rules. These requirements are intended to provide reasonable protection against harmful interference in a residential installation. This equipment generates, uses
and can radiate radio frequency energy and, if not installed and used in accordance with the instructions, may cause harmful interference to radio communications.
However, there is no guarantee that interference will not occur in a particular installation. If this equipment does cause harmful interference to radio or television recep
tion, which can be determined by turning the equipment off and on, the user is encouraged to try to correct the interference by one or more of the following measures:
Reorient or relocate the receiving antenna.
•
Increase the separation between the equipment and receiver.
•
Connect the equipment into an outlet on a circuit different from that to which the receiver is connected.
•
Consult the dealer or an experienced radio/TV technician for help.
•
Changes or modications to this equipment not expressly approved by the party responsible for compliance could void the user’s authority to operate the equipment.
To ensure safety of users, the FCC has established criteria for the amount of radio frequency energy that can be safely absorbed by a user or by
stander according to the intended usage of the product. This product has been tested and found to comply with the FCC criteria. The handset may be safely
held against the ear of the user. The telephone base shall be installed and used such that parts of the user’s body other than the hands are maintained at a
distance of approximately 20 cm (8 inches) or more. If you choose to use a clipping device, please make sure to only use the supplied VTech belt clip.
This device complies with part 15 of the FCC rules. Operation is subject to the following two conditions: (1) This device may not cause harmful interference; and (2)
This device must accept any interference received, including interference that may cause undesired operation.
Privacy of communications may not be ensured when using this telephone.
FCC Part 68 and ACTA
This equipment complies with Part 68 of the FCC rules and with technical requirements adopted by the Administrative Council for Terminal Attachments (ACTA). The
label on the back or bottom of this equipment contains, among other things, a product identier in the format US:AAAEQ##TXXXX. This identier must be provided to
your local telephone company upon request.
The plug and jack used to connect this equipment to premises wiring and the telephone network must comply with applicable Part 68 rules and technical requirements
adopted by ACTA. A compliant telephone cord and modular plug is provided with this product. It is designed to be connected to a compatible modular jack that is also
compliant. An RJ11 jack should normally be used for connecting to a single line and an RJ14 jack for two lines. See Installation Instructions in the user’s manual.
The Ringer Equivalence Number (REN) is used to determine how many devices you may connect to your telephone line and still have them ring when you are called.
The REN for this product is encoded as the 6th and 7th characters following the US: in the product identier (e.g., if ## is 03, the REN is 0.3). In most, but not all areas,
the sum of all RENs should be ve (5.0) or less. For more information, please contact your local telephone company.
This equipment may not be used with Party Lines. If you have specially wired alarm dialing equipment connected to your telephone line, ensure the connection of this equip-
ment does not disable your alarm equipment. If you have questions about what will disable alarm equipment, consult your telephone company or a qualied installer.
If this equipment is malfunctioning, it must be unplugged from the modular jack until the problem has been corrected. Repairs to this telephone equipment can only
be made by the manufacturer or its authorized agents. For repair procedures, follow the instructions outlined under the Limited Warranty.
42
www.vtechphones.com
-
-
Page 46

FCC, ACTA and IC regulations
If this equipment is causing harm to the telephone network, the telephone company may temporarily discontinue your telephone service. The telephone company is
required to notify you before interrupting service. If advance notice is not practical, you will be notied as soon as possible. You will be given the opportunity to correct
the problem and the telephone company is required to inform you of your right to le a complaint with the FCC. Your telephone company may make changes in its
facilities, equipment, operation, or procedures that could affect the proper functioning of this product. The telephone company is required to notify you if such changes
are planned.
If this product is equipped with a corded or cordless handset, it is hearing aid compatible.
If this product has memory dialing locations, you may choose to store emergency telephone numbers (e.g., police, re, medical) in these locations. If you do store or
test emergency numbers, please:
Remain on the line and briey explain the reason for the call before hanging up.
•
Perform such activities in off-peak hours, such as early morning or late evening.
•
Industry Canada
This equipment complies with regulations RSS-213 and CS-03 of Industry Canada. Operation is subject to the following two conditions: (1) this device may not cause
interference, and (2) this device must accept any interference, including interference that may cause undesired operation of the device.
The term ‘’IC: ‘’ before the certication/registration number only signies that the Industry Canada technical specications were met.
The Ringer Equivalence Number (REN) for this terminal equipment is 0.1. The REN is an indication of the maximum number of devices allowed to be connected to
a telephone interface. The termination on an interface may consist of any combination of devices subject only to the requirement that the sum of the RENs of all the
devices does not exceed ve.
This Class B digital apparatus complies with Canadian ICES-003.
The RBRC® seal
The RBRC® Seal on th e nickel -meta l-hydr ide bat tery in dicates that VTech Communicatio ns, Inc. i s volunt arily pa rtic ipatin g in an
indus try program to c ollec t and recycle the se batteries at th e end of their useful lives, w hen taken out of ser vice w ithin the
United S tates an d Canada .
The RBRC
waste, wh ich may be i llegal in your area.
VTech’s par ticip ation in R BRC
or at auth orized V Tech produ ct ser vice c enters. Please c all 1-8 00 -8 -BATT ERYT M for informatio n on Ni-MH battery recycling and
disposal bans /restr ictio ns in your ar ea. VTech’s involvement in this program i s part of i ts commitment to protec ting our e nviron ment
and conservi ng natural resources.
RBRC
®
progra m provid es a convenient alternati ve to placi ng used nickel- metal -hydri de batteries into the tra sh or muni cipal
®
makes it ea sy for you to dr op off t he spent batter y at local retail ers par tici pating in the RBRC® progra m
®
is a regi stere d trad emark o f Rechargea ble Batter y Recycling Cor porat ion.
www.vtechphones.com
Appendix
43
Page 47

Technical specications
Frequency control Crystal controlled
PLL synthesizer
Transmit frequency
Channels 5
Nominal effective range Maximum power allowed by FCC and IC. Actual operating range may vary according
Size
Weight Handset: 131.0 grams (including battery)
Power requirements Handset: DC2.4V 600mAh NiMH battery
Memory Handset directory: 50 memor y locations; up to 24 digits and 15 characters
Handset: 1921.536-1928.448 MHz
Telephone base: 1921.536-1928.448MHz
to environmental conditions at the time of use.
Handset: 170.9mm X 48.1mm X 25.8mm
Telephone base: 129.5mm X 123.8mm X 95.0mm
Telephone base: 181.6 grams
Telephone base: DC6V @ 300mA
Handset call log: 50 memory locations; up to 20 digits and 15 characters
44
www.vtechphones.com
Page 48

Index
A
About cordless telephones 40
Advanced operation 16
E
Edit an entry in the directory 19
Edit handset name 11
B
Basic operation 14
Battery 9, 29
C
Caller ID 20
Call log 21, 28
Call waiting 14
Character of chart 17
Clear voicemail 12
D
Date and time 8
Delete from redial 25
Delete from the call log 23
Delete from the directory 19
Desk/table bracket installation 4
Dial a call log number 22
Dial a directory entry 18
Dial from redial 25
Dial type 4, 12
Director y 16
DSL lter 5
F
FCC, ACTA and IC regulations 42
Find handset 15
H
Handset and telephone base indicators 26
Handset display screen messages 27
Handset icons 26
Handset layout 6
Handset light 26
I
Important safety instructions 30
Index 45
Installation 1
Install handset battery 2
K
Key tone 10
L
Language 11
www.vtechphones.com
45
Page 49

Index
M
Maintenance 39
Make, answer and end calls 14
Mute 14
O
Operating range 39
Options while on calls 14
Out of range tone 10
P
Parts checklist 1
R
Redial 24
Reset to default settings 13
Review redial 24
Review the call log 21
Review the directory 16
Ring melody 8
Ring volume 9
S
Search the director y 16
Speakerphone 14
Store an entry in the directory 18
Store a number from redial to the directory 24
Store a number from the call log 22
T
Technical specications 44
Telephone base 3, 7
Telephone base lights 26
Telephone settings 6
Temporary tone dialing 13
The RBRC® seal 43
Troubleshooting 31
V
Volume 9
W
Warranty 40
46
www.vtechphones.com
Page 50

VTECH TELECOMMUNICATIONS LTD.
A member of THE VTECH GROUP OF COMPANIES.
Distributed in the U.S.A. by VTech Communications, Inc. Beaverton, Oregon
Distributed in Canada by VTech Telecommunications Canada, Ltd., Richmond, B.C.
Copyright ©2007 for VTECH TELECOMMUNICATIONS LTD.
Printed in China.
91-001079-080-100
Page 51

Model: 6031
User’s manual
w w w . vt e c h ph o n e s . c o m
 Loading...