

VQ Wasp Assembly Instructions Manual
Almost ready-to-fly
Wasp
TRAINER
RADIO CONTROL MODEL
Wingspan 1520mm
Fuselage length 1105mm
Engine: 40 - 46 2T / 52 - 60 4T
Electric Motor: 600-700W
Radio: 5 channel / 4-5 servo
RC Functions: Rudder - Elevator - Aileron - Throttle
ASSEMBLY INSTRUCTIONS
WARNING! This radio controlled model is NOT a toy. If modified or flown carelessly it could go out of controll and
cause serious human injury or property damage. Before flying your airplane, ensure the air field is spacious enough.
Always fly it outdoors in safe areas and seek professional advice if you are unexperienced.

Awl
.........................................................
.........................................................
.........................................................
.........................................................
.........................................................
.........................................................
.........................................................
.........................................................
.........................................................
.........................................................
.........................................................
SILICON
EPOXY A
EPOXY B
CA
Silicon sealer
Silicone tube
Extension for aileron servo.
Read through the manual before you begin, so you will have an overall idea of what to do.
Brushless Motor
600-720W
or equivalent.
LiPo 4500 mAh (5-6)S
REQUIRED FOR OPERATION (Purchase separetely)
10.5x6 for .40 - 2 cycle engine
11x6 for .46 - 2 cycle engine
11x7 for .52 - 4 cycle engine
12x7 ~13x6 - Electric motor
.40 - .46 - 2T
.52 - .70 4T
Radio a 5 channel (min)
4 servo (Motorx1, Rudderx1
Elevatorx1, Aileronx2: mini
or standard servo.
GLUE
(Purchase)
Cyanoacrylate
Glue
Epoxy glue (5 minute type)
Epoxy glue (30 minute type)
TOOL REQUIRED
Hobby knife
Needle nose Plier
Sander
Phillip screw driver
Scissor
Hex Wrench
Wire Cutters
Masking tape - Straight Edged Ruler - Drill and Assorted Drill Bits
TABELLA DI CONVERSIONE
1.0mm = 3/64”
1.5mm = 1/16”
2.0mm = 5/64”
2.5mm = 3/32”
3.0mm = 1/8”
4.0mm = 5/32”
5.0mm = 13/64”
6.0mm = 15/64”
10mm = 13/32”
12mm = 15/32”
15mm = 19/32”
20mm = 51/64”
25mm = 1”
30mm = 1-3/16”
45mm = 1-51/64”
If exposed to direct sunlight and / or heat, wrinkles can appear. Storing the model in a coll
place will let the wrinkles disappear. Otherwise, remove wrinkles in covering film with a hairdryer, starting with low temperature. You can fix the corners by using a hot iron.
1.5mm
A
B
!
CA
L/R
Assemble left and right
sides the same way.
X
Drill holes using the stated
size of drill
(in this case 1.5 mm Ø)
Use epoxy glue
Take particular care here
Hatched-in areas:
remove covering
film carefully
Not included.
These parts must be
purchased separately
Check during assembly that these
parts move freely, without binding
Apply cyano glue
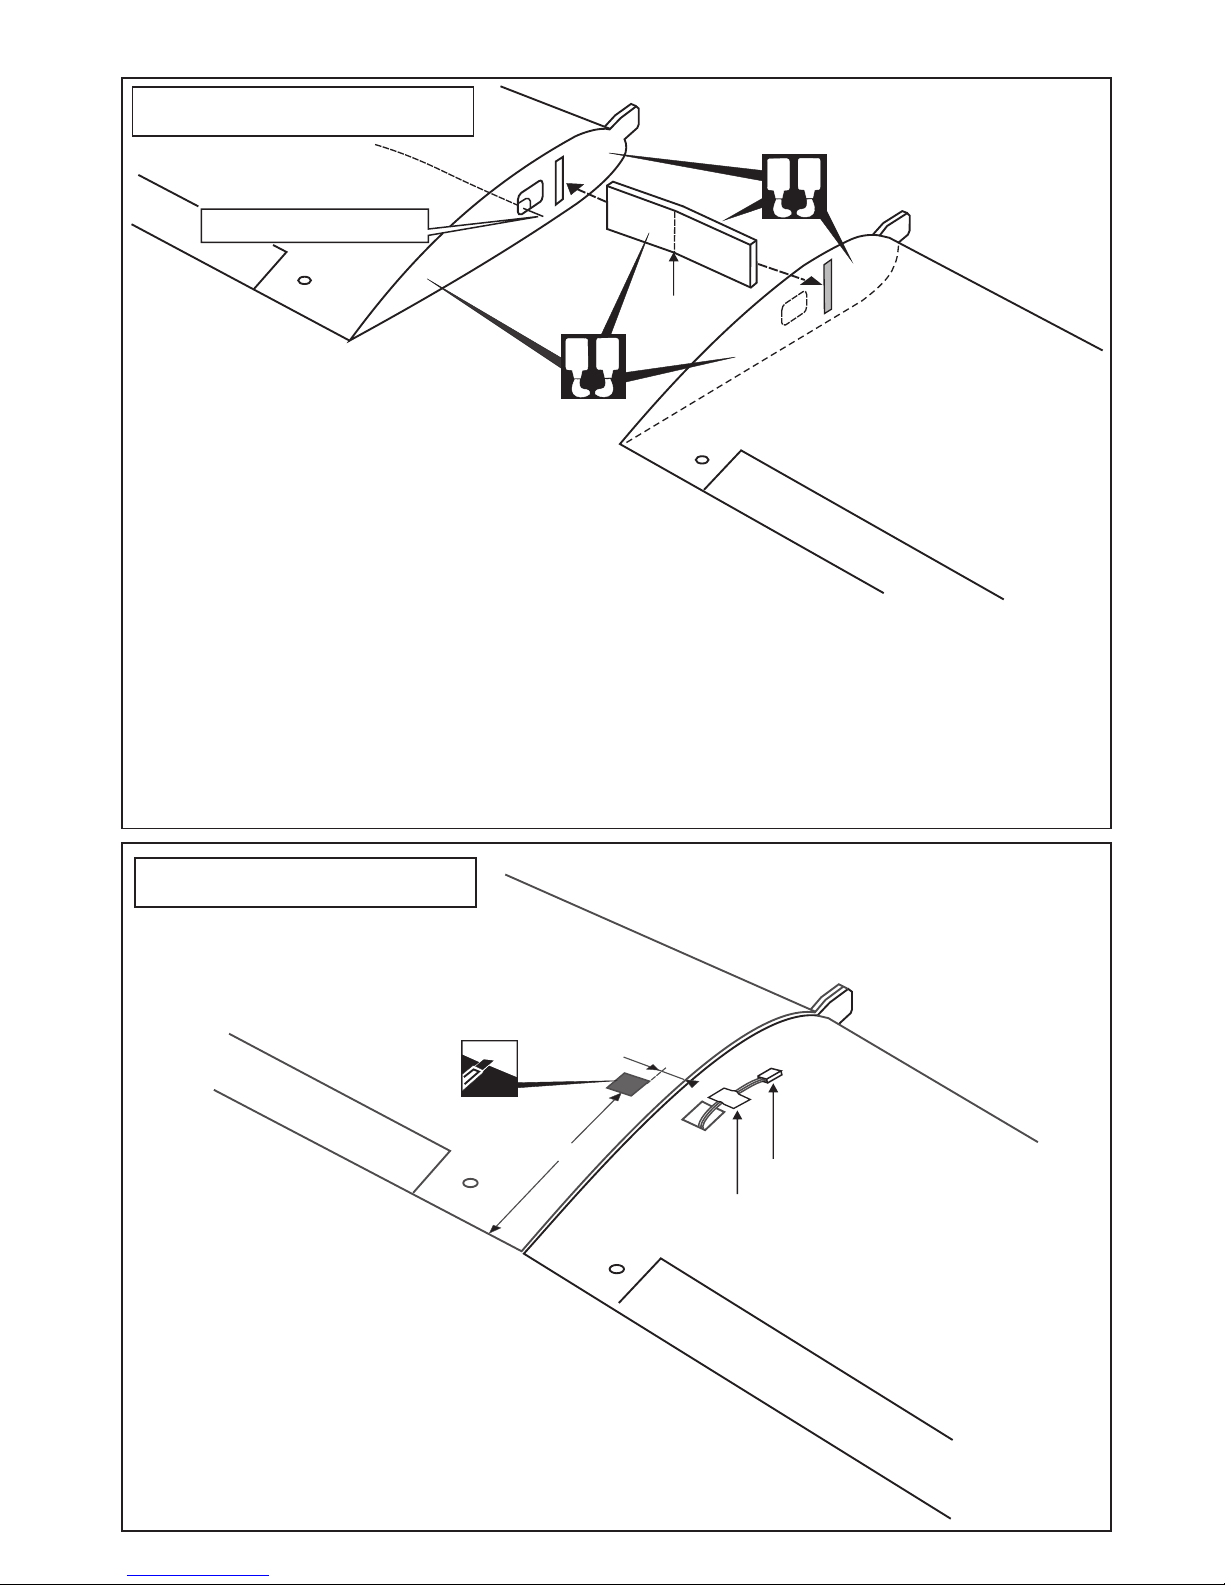
1- Using a pencil, mark the center of the brace.
2- Trial fit the wing joiner into one of the wing
panels. It should insert smoothly up to the
center line marked above.
3- Slide the other wing half onto the dihedral brace
until the wing panel meet. If the fit is over tight, it
may be necessary to lightly sand the dihedral brace.
4- Check for the correct dihedral angle.
5- Mix approximately 30 minute epoxy and apply a generous amount of epoxy into the wing joiner cavity
of one wing half.
6- Coat one half of the dihedral brace with epoxy up to the center line. Install the epoxy-coated side of
the dihedral brace into the wing joiner cavity up to the center line, marking sure that the “V” of the di hedral brace is positioned correctly
7- Do the same way with the other wing half.
8- Carefully slide the wing halves together, ensuring that they are accurately aligned. Firmly press the
two halves together, allowing the excess epoxy to run out. Clean off the excess epoxy.
A
B
! Make sure to glue securely, If not properly
glued, a failure in flight may occur.
BOTTOM VIEW
1- Joinning the wing
A
B
Center line
Thread (to aileron extension)
BOTTOM VIEW
2- Joinning the wing
Cut the hole for the
aileron servo extension.
15mm
160mm
Aileron servo extension cord
Adhesive
WARNING: Please do not clean off the excess epoxy on the wing with strong solvent or pure alcohol, only
use kerosene to keep the colour of your model not fade.
 Loading...