

Page 1
Owner’s Manual
Manuel d’utilisation
Bedienungsanleitung
Manual de usuario
取扱説明書
2S JGFE
Page 2
IMPORTANT SAFETY INSTRUCTIONS
• Read these instructions.
•Keep these instructions.
• Heed all warnings.
•Follow all instructions.
• Do not use this apparatus near water.
• Mains powered apparatus shall not be exposed to dripping or
splashing and that no objects filled with liquids, such as vases,
shall be placed on the apparatus.
• Clean only with dry cloth.
• Do not block any v entilation openings , install in accordance with
the manufacturer's instructions.
• Do not install near any heat sources such as radiators, heat
registers, stoves, or other apparatus (including amplifiers) that
produce heat.
• Do not defeat the safety purpose of the polarized or groundingtype plug. A polarized plug has two blades with one wider than
the other. A grounding type plug has two blades and a third
grounding prong. The wide blade or the third prong are provided
for your safety. If the provided plug does not fit into your outlet,
consult an electrician for replacement of the obsolete outlet. (for
U.S.A. and Canada)
• Protect the power cord from being walked on or pinched
particularly at plugs, convenience receptacles, and the point
where they exit from the apparatus.
• Only use attachments/accessories specified by the manufacturer.
• Unplug this apparatus during lightning storms or when unused
for long periods of time.
•Turning off the power switch does not completely isolate this
product from the power line so remove the plug from the soc ket if
not using it for extended periods of time.
• Refer all servicing to qualified service personnel. Servicing is
required when the apparatus has been damaged in any way,
such as power-supply cord or plug is damaged, liquid has been
spilled or objects have f allen into the appar atus , the appar atus
has been exposed to rain or moisture, does not operate normally,
or has been dropped.
• Do not install this equipment on the far position from wall outlet
and/or convenience receptacle.
• Do not install this equipment in a confined space such as a box
for the conveyance or similar unit.
• Use only with the cart, stand, tripod, bracket, or table specified by
the manufacturer , or sold with the appar atus . When a cart is
used, use caution when moving the cart/apparatus combination
to avoid injury from tip-over.
The lightning flash with arrowhead symbol
within an equilateral triangle, is intended to
alert the user to the presence of uninsulated
“dangerous voltage” within the product's
enclosure that may be of sufficient magnitude
to constitute a risk of electric shock to persons.
The exclamation point within an equilateral
triangle is intended to alert the user to the
presence of important operating and
maintenance (servicing) instructions in the
literature accompanying the product.
CE mark for European Harmonized Standards
CE mark which is attached to our company’s products of A C mains
operated apparatus until December 31, 1996 means it conforms to
EMC Directive (89/336/EEC) and CE mark Directive (93/68/EEC).
And, CE mark which is attached after January 1, 1997 means it
conforms to EMC Directive (89/336/EEC), CE mark Directive (93/
68/EEC) and Low Voltage Directive (73/23/EEC).
Also, CE mark which is attached to our company’ s products of
Battery operated apparatus means it conforms to EMC Directive
(89/336/EEC) and CE mark Directive (93/68/EEC).
IMPORTANT NOTICE TO CONSUMERS
This product has been manufactured according to strict
specifications and voltage requirements that are applicable in the
country in which it is intended that this product should be used. If
you hav e purchased this product via the internet, through mail
order, and/or via a telephone sale, y ou must v erify that this product
is intended to be used in the country in which you reside.
WARNING: Use of this product in any country other than that for
which it is intended could be dangerous and could invalidate the
manufacturer’ s or distributor’s warranty.
Please also retain your receipt as proof of purchase otherwise
your product may be disqualified from the manufacturer’s or
distributor’s warr anty.
* Company names, product names, and names of f ormats etc. are
the trademarks or registered trademarks of their respective owners.
Page 3

Welcome to VOX
Many thanks for adding the V OX VR30 amplifier to your sonic arsenal. It was designed by our UK based V OX engineering
team and built by our state of the art, vertically integrated manufacturing facility and we’re sure it’ll give you countless
hours of great guitar tones that will feel as good as they sound! To insure a long and happy relationship with your amplifier,
please read this manual at least once, and (as they say), “use the product as directed.” Keep the manual for future
reference after you’ve read it.
WHAT IS VR?
The VR series of amplifiers are designed, as to what we
believe are the next generation of “hybrid” guitar amplifiers.
What does HYBRID mean, you may ask? Well, basically
“hybrid” means that it utilizes a mixture of technologies —
in this case those technologies are Tube and Solid State.
The Preamp stages consist of discrete transistors for sound
generation, and integrated circuits (op-amps) to do signal
management that would not be done effectively with transistors alone — i.e. channel switching, etc.
The Power amp stage uses a 12AX7 v acuum tube (or valv e,
depending where you live in the world) in a configuration
that we at VOX call Valve Reactor.
The patented V alv e Reactor power amp technology is used
in all Valvetronix products. It was or iginally designed for
the award winning V O X Valv etronix modelling guitar amplifier range, and now we have taken that same technology
and further revised it into the format that is built into your
VR30 amplifier.
HOW DOES IT WORK?
It basically works by having each half of the 12AX7 (the
12AX7 tube is actually two identical tubes in one glass tube
a.k.a. dual triode) and configuring it to work as a small tube
power amplifier. This circuit provides all the tonality and
feel of an all-tube power amp . Obviously this “small” po wer
amp would not be very loud if it was connected directly to a
loudspeaker — therefore the tube circuit is connected to a
larger, completely transparent solid-state power amplifier,
that is run very cleanly so that it does not add its own
colouration to the tube signal.
This power output amplifier also has some special circuits
that feed the loudspeaker impedance infor mation back to
the tube power amplifier in order to give it the loose sound
& feel that an all-tube amp does.
SO WHAT DOES THIS MEAN?
We think that the VOX VR amplifier range brings you superb tone (vintage & modern) that includes the high harmonic content and compression that goes all the way back
to the original V O X A C15 & 30 amplifiers that were created
more than 40 years ago, and are still revered to this day.
Page 4
FRONT PANEL FEATURES
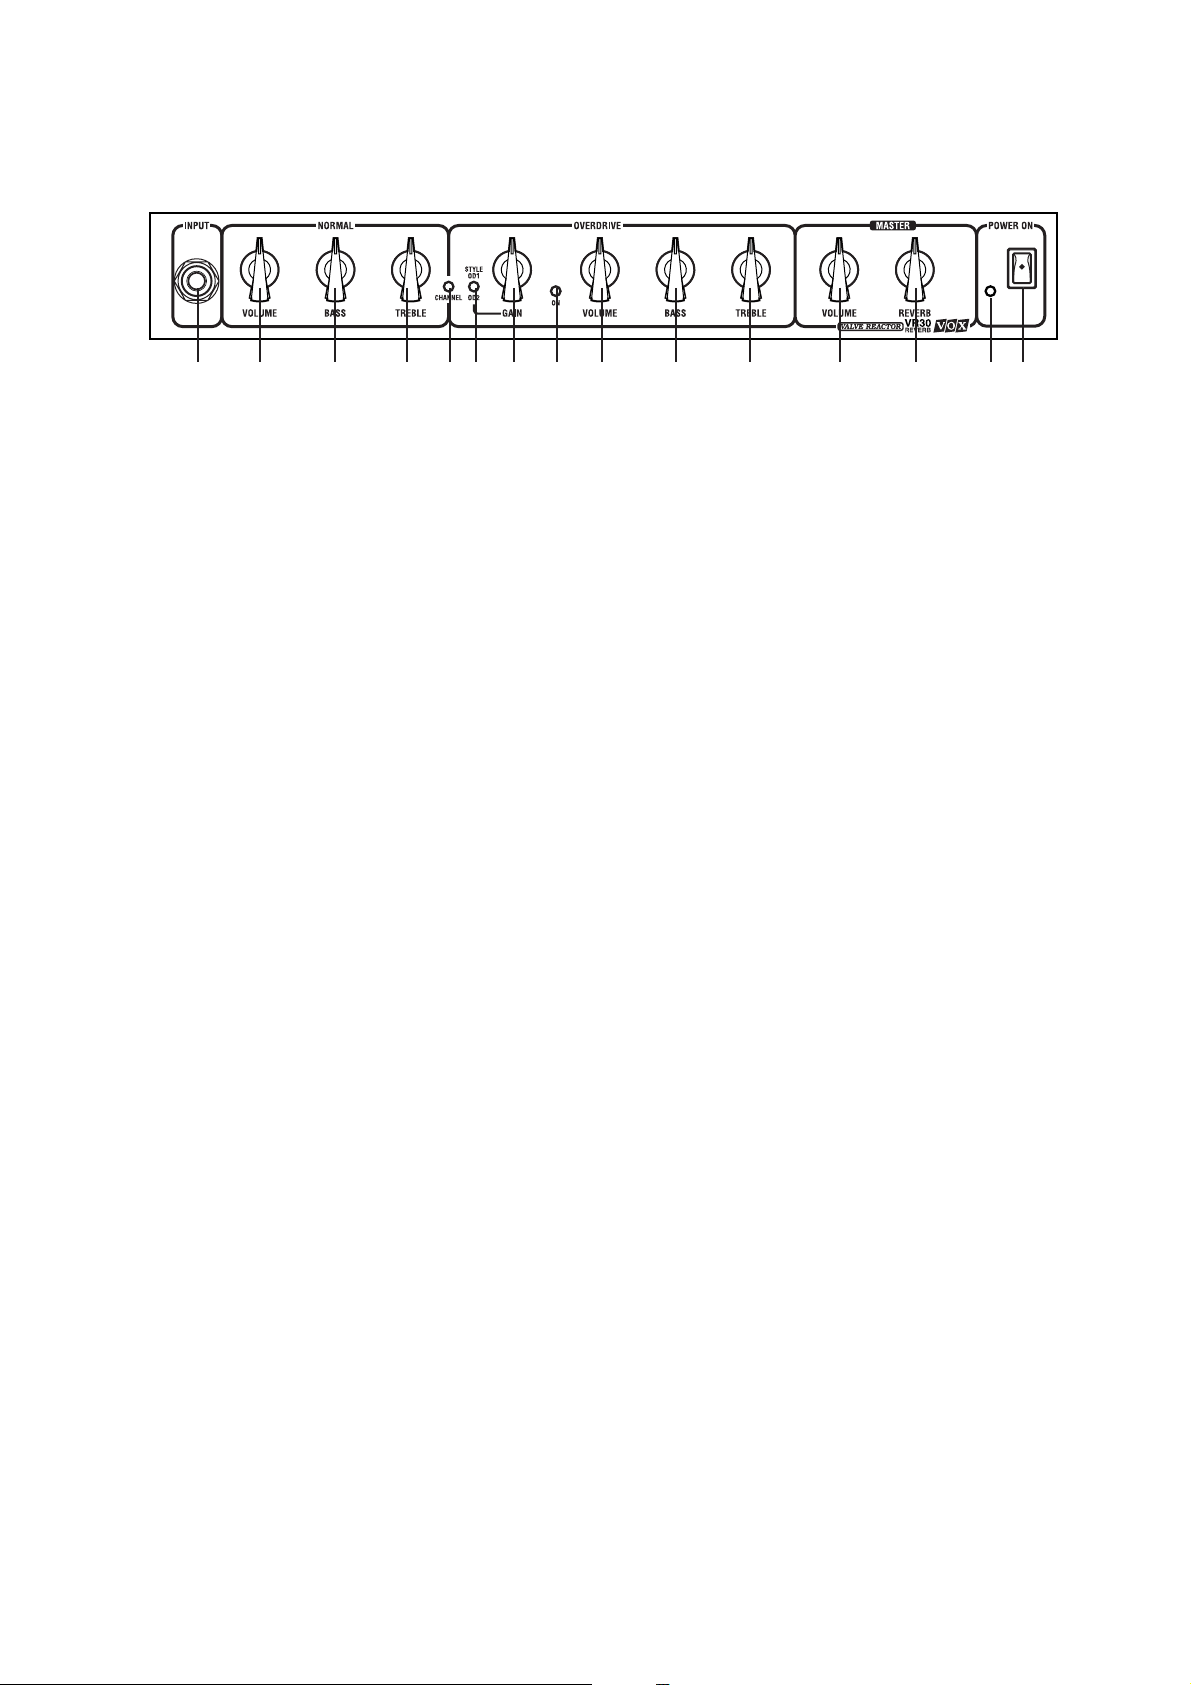
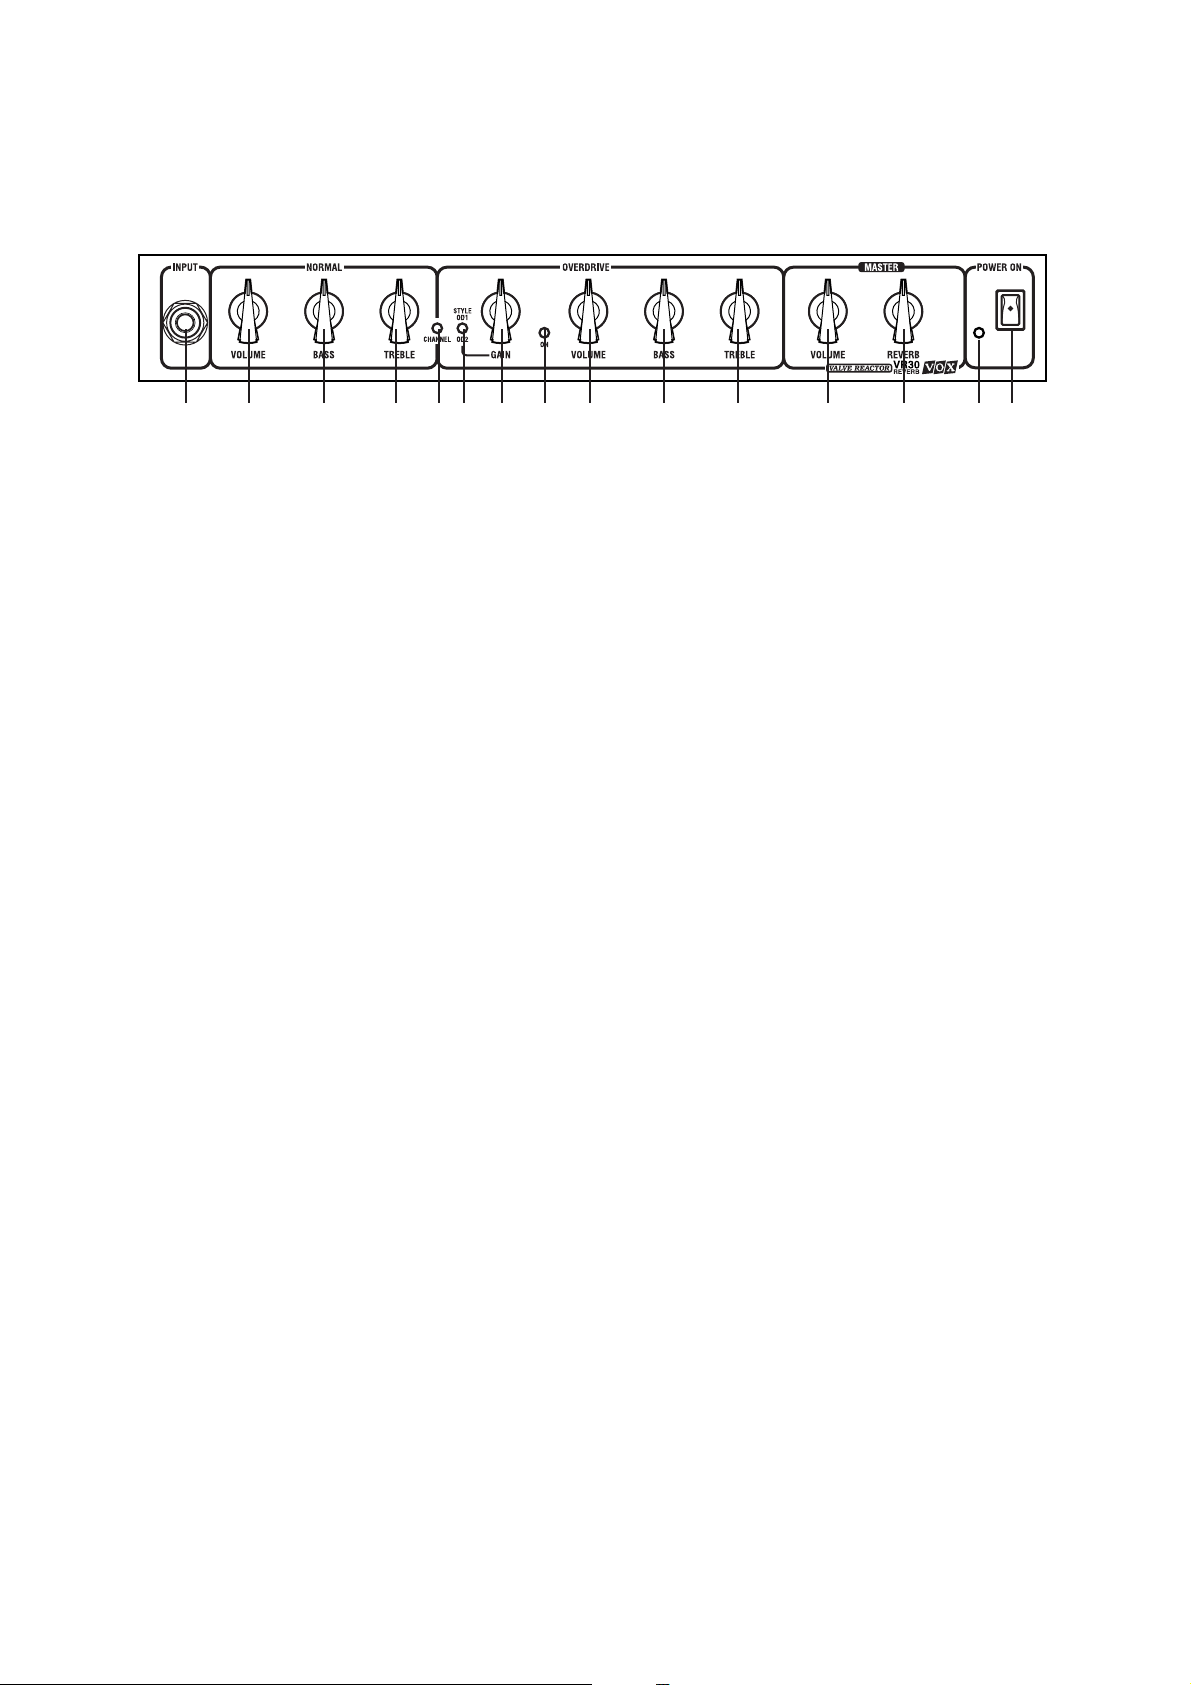
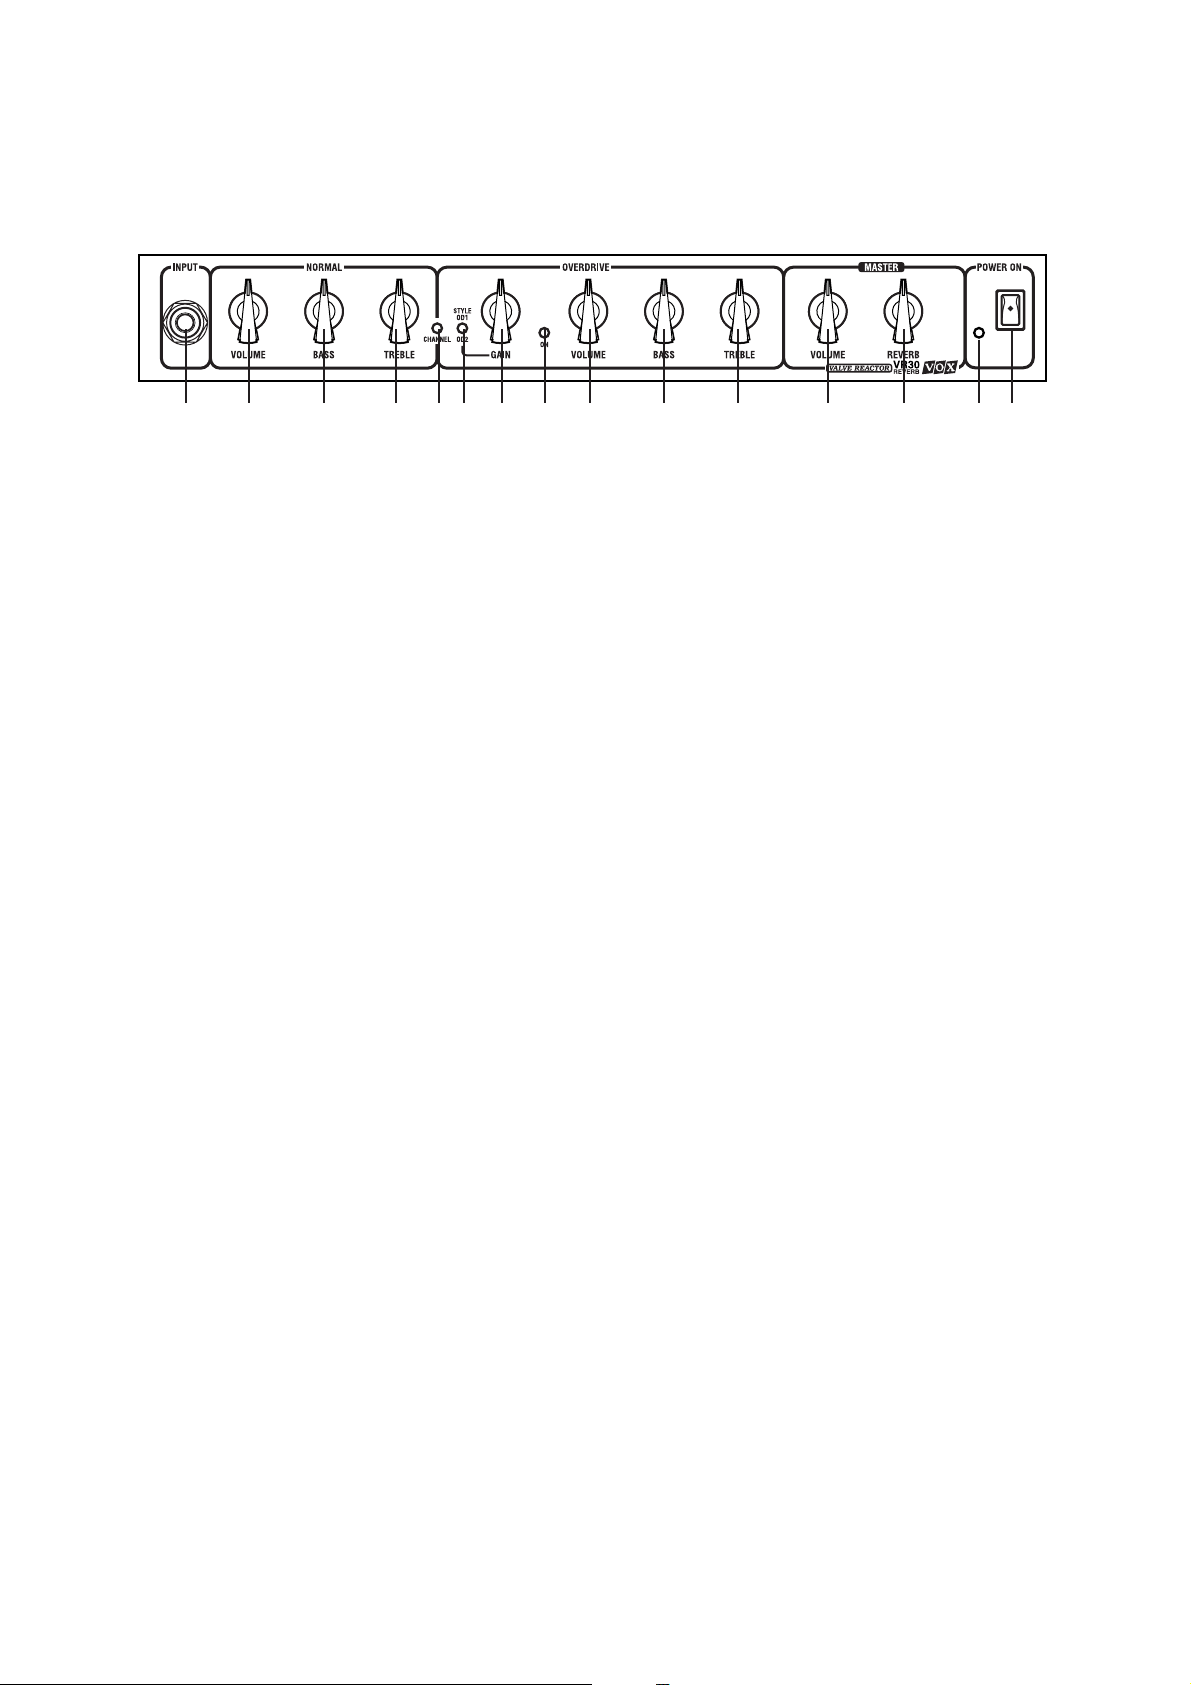
1 2 3 4 5 6 7 8 9 10 11 12 13 14 15
1 – INPUT JACK
Connect your guitar into this socket.
2 – NORMAL VOLUME CONTROL
This controls the volume of the clean (NORMAL) channel.
At lower settings the sound will be very clean and bright, at
higher settings the sound will become somewhat thicker
and warmer, whilst at the highest settings the sound will
“break up” into a natural vintage style distortion.
As different types of electric guitars have vastly different
amounts of tonal qualities and output levels, your guitar
will have a major influence on where you will need to set
the position of the controls on this amplifier to achieve the
response you desire.
Please Note — for this control to be functional
the amplifier channel switching facility needs to
be set to the Normal channel.
3 – BASS CONTROL
This controls the amount of BASS in the Normal channel.
4 – TREBLE CONTROL
This controls the amount of TREBLE in the Normal channel.
5 – CHANNEL SWITCHING BUTTON
This button controls whether your amplifier is set for Normal or Overdrive — OUT = NORMAL, IN = OVERDRIVE.
Your VR30 can also be channel switched by using the optional VF-002 Footswitch (connected via the back panel
Footswitch Jack (16)). This function can only be operated
when the front panel button is “IN” position.
When the Normal channel is selected, the LED (8) is not
illuminated — when the Overdrive channel is selected, the
Green LED is illuminated.
6 – OVERDRIVE STYLE BUTTON
This button changes the distortion characteristics (STYLE)
of the Overdrive channel — OD1 or OD2.
OD1 is a warm natural “vintage” ov erdrive fla v our, ideal for
“blues” based sounds.
OD2 is a harder, more aggressive, high gain style distortion, more suited to “modern” playing.
8 – CHANNEL SELECT LED
Illuminates GREEN when the Overdrive channel is selected.
9 – OVERDRIVE CHANNEL VOLUME CONTROL
This controls the amount of overdrive generated by the
preamp signal that is sent to the Valve Reactor power amplifier. Use this to set the loudness required for your use,
and also to balance the overdrive sound against your clean
(Normal) sound.
10 – BASS CONTROL
This controls the amount of BASS in the Overdrive channel.
11 – TREBLE CONTROL
This controls the amount of TREBLE in the Overdriv e channel.
12 – MASTER VOLUME
This controls the amount of volume produced by the VR30’ s
Valve Reactor power amplifier circuit, and therefore the
overall volume that your VR30 supplies to any of the loudspeaker systems that are connected — whether it is the
internal 10" loudspeaker, an external loudspeaker system,
or headphones.
13 – MASTER REVERB
This controls the amount of spring reverb that is mixed with
the direct signal to produce a slight shimmer of reverb (lo w
settings) to concert hall depth (at high settings).
The built-in spring reverb can be cancelled or activ ated by
the optional VF-002 Footswitch. (Channel-Reverb)
You may notice a splash of reverb when s witching between
the Overdrive and Normal channels depending on your
settings. This is normal.
14 – POWER LED
Illuminates RED when your amplifier is switched on, and is
also connected to a suitable mains power supply.
15 – MAINS POWER SWITCH
Turns your VR30 OFF/ON from the connected mains po wer.
7 – OVERDRIVE CHANNEL GAIN CONTROL
This regulates the amount of preamp “gain” and therefore
the amount of overdrive or distortion that is generated by
the Overdrive Channel. Like the Normal Volume control,
lower settings means less distortion, higher settings means
much, much more distortion!
Page 5
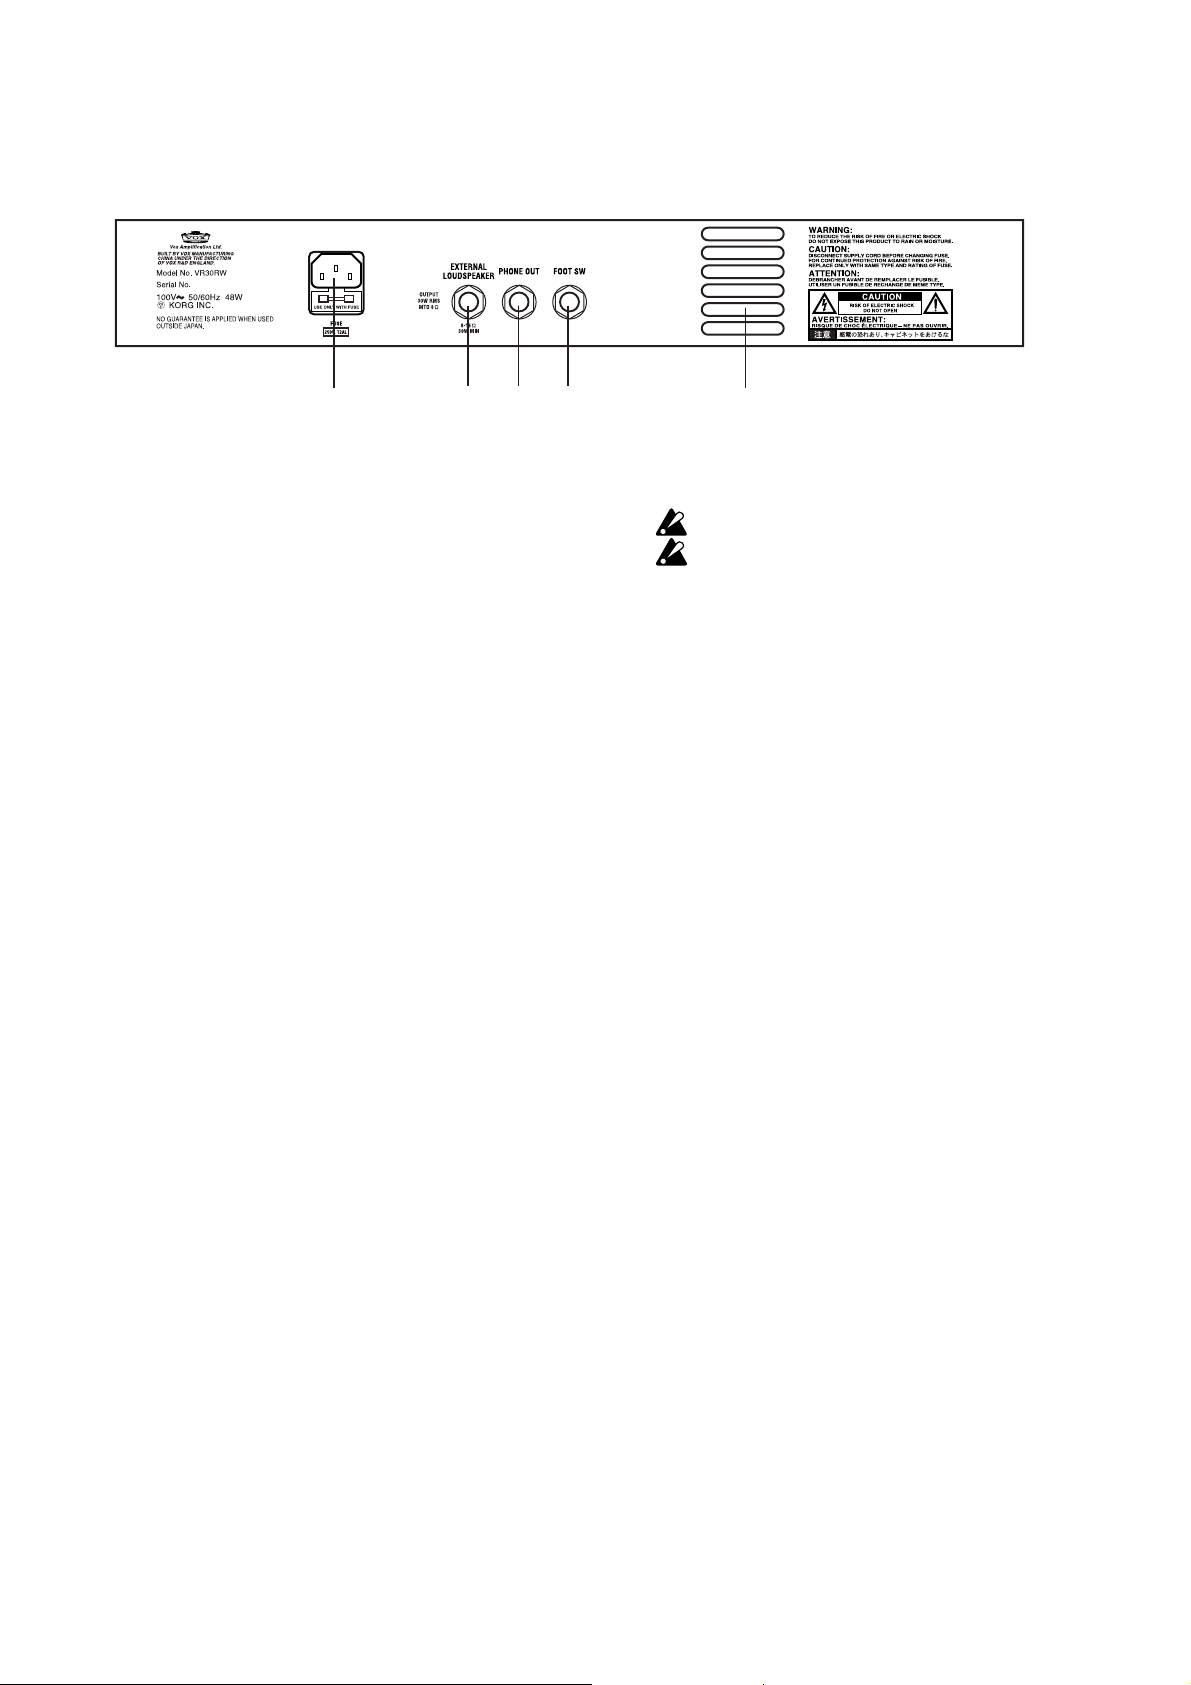
REAR PANEL FEATURES
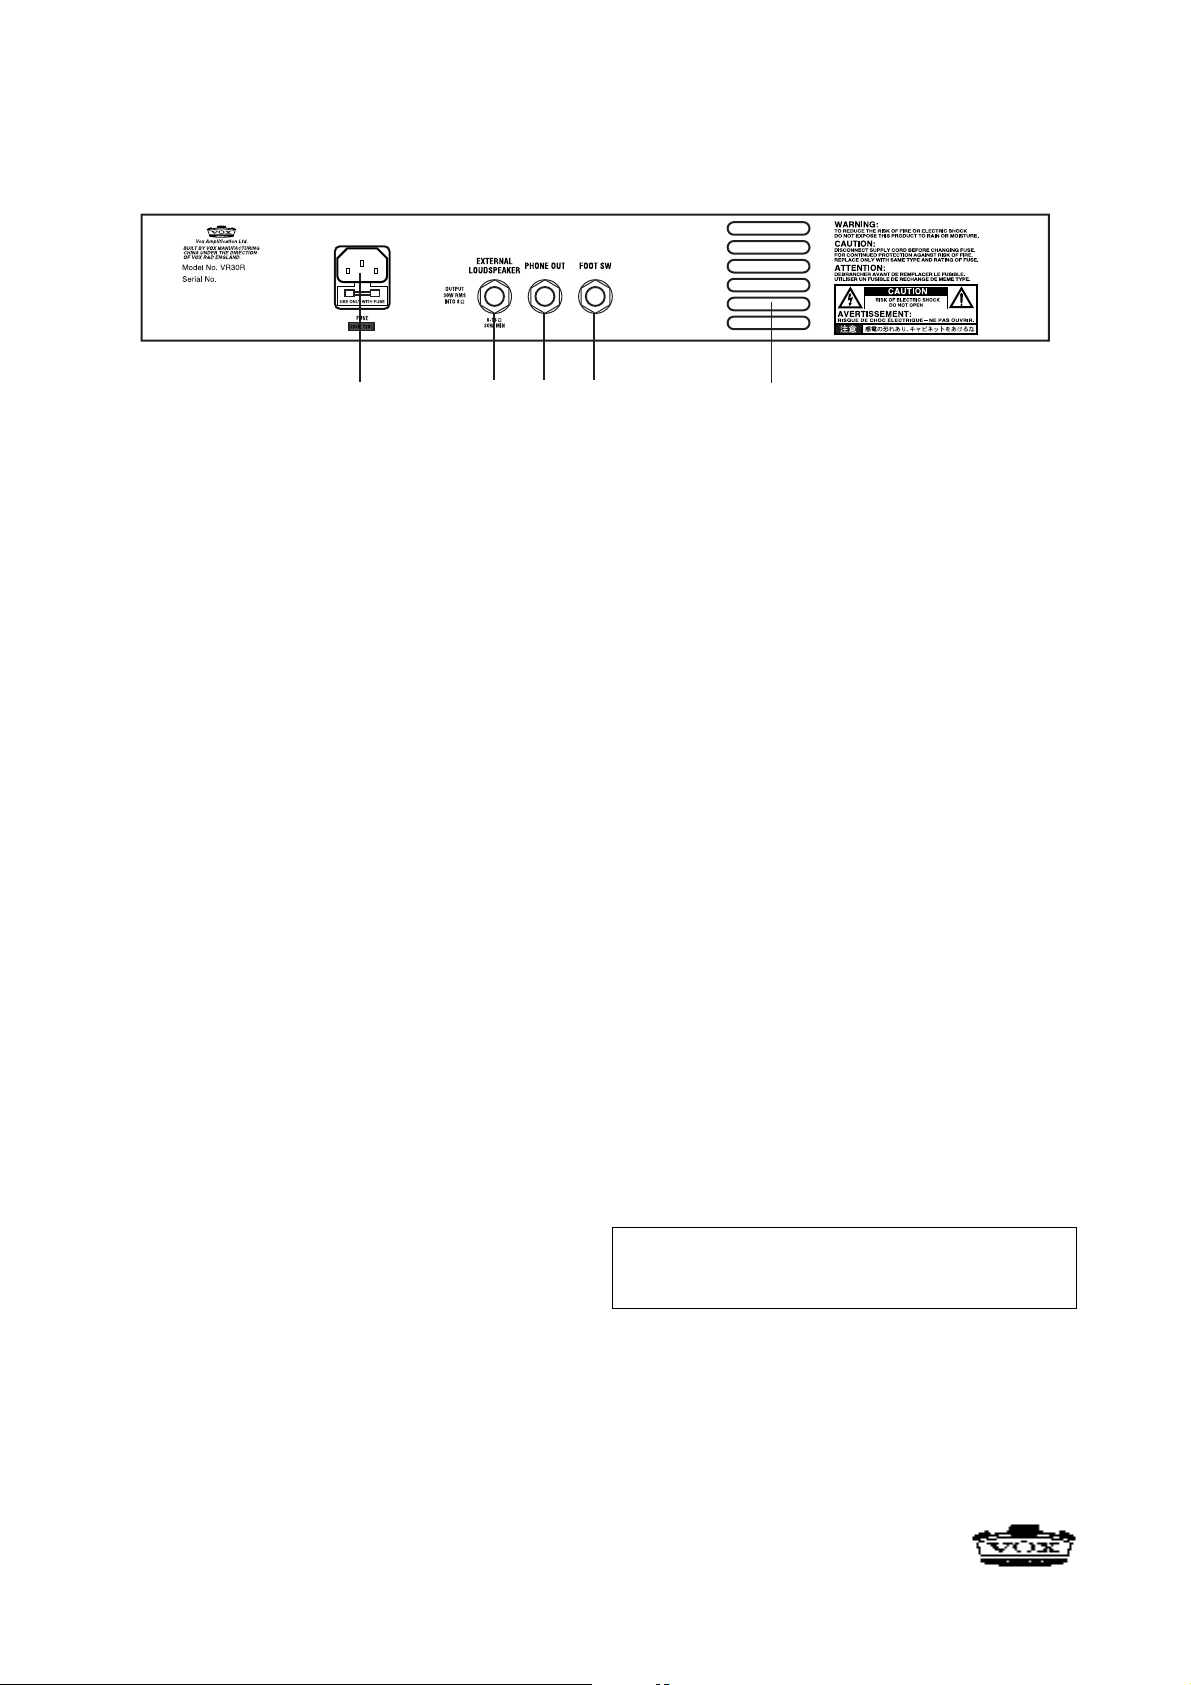
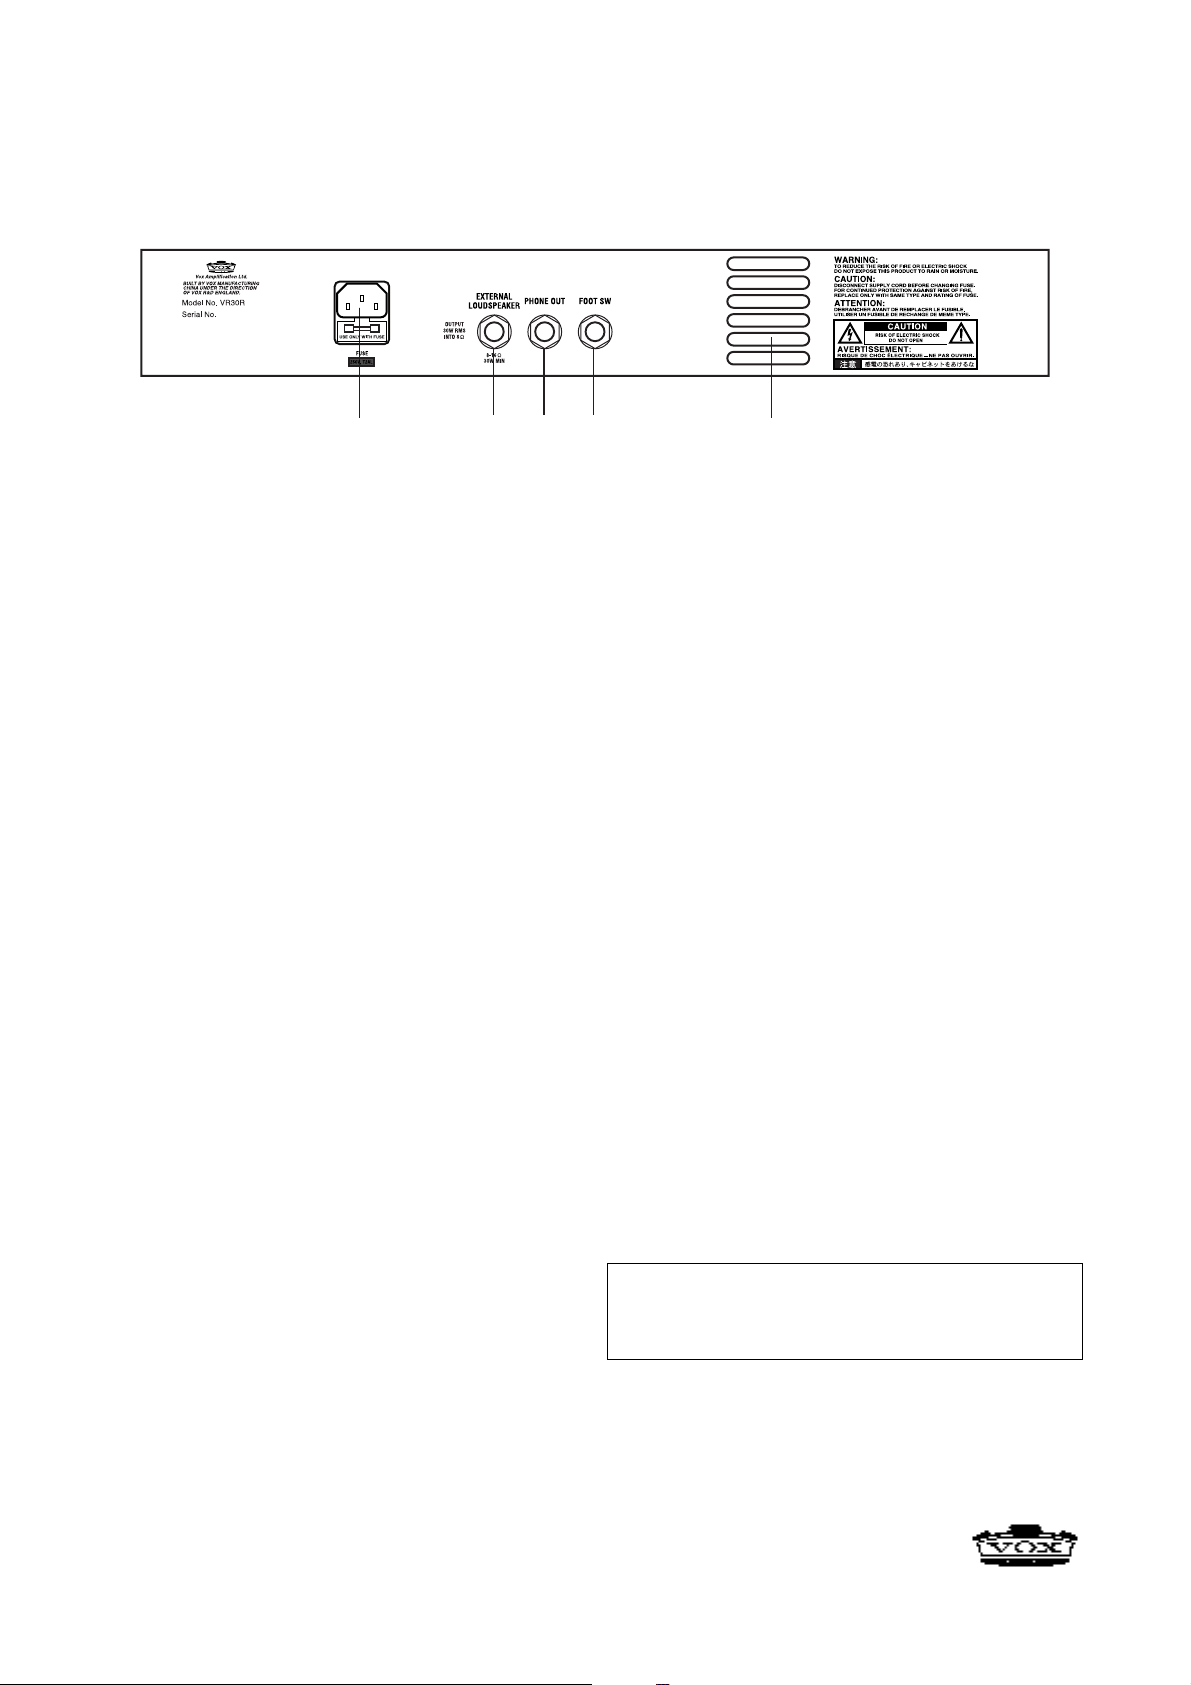
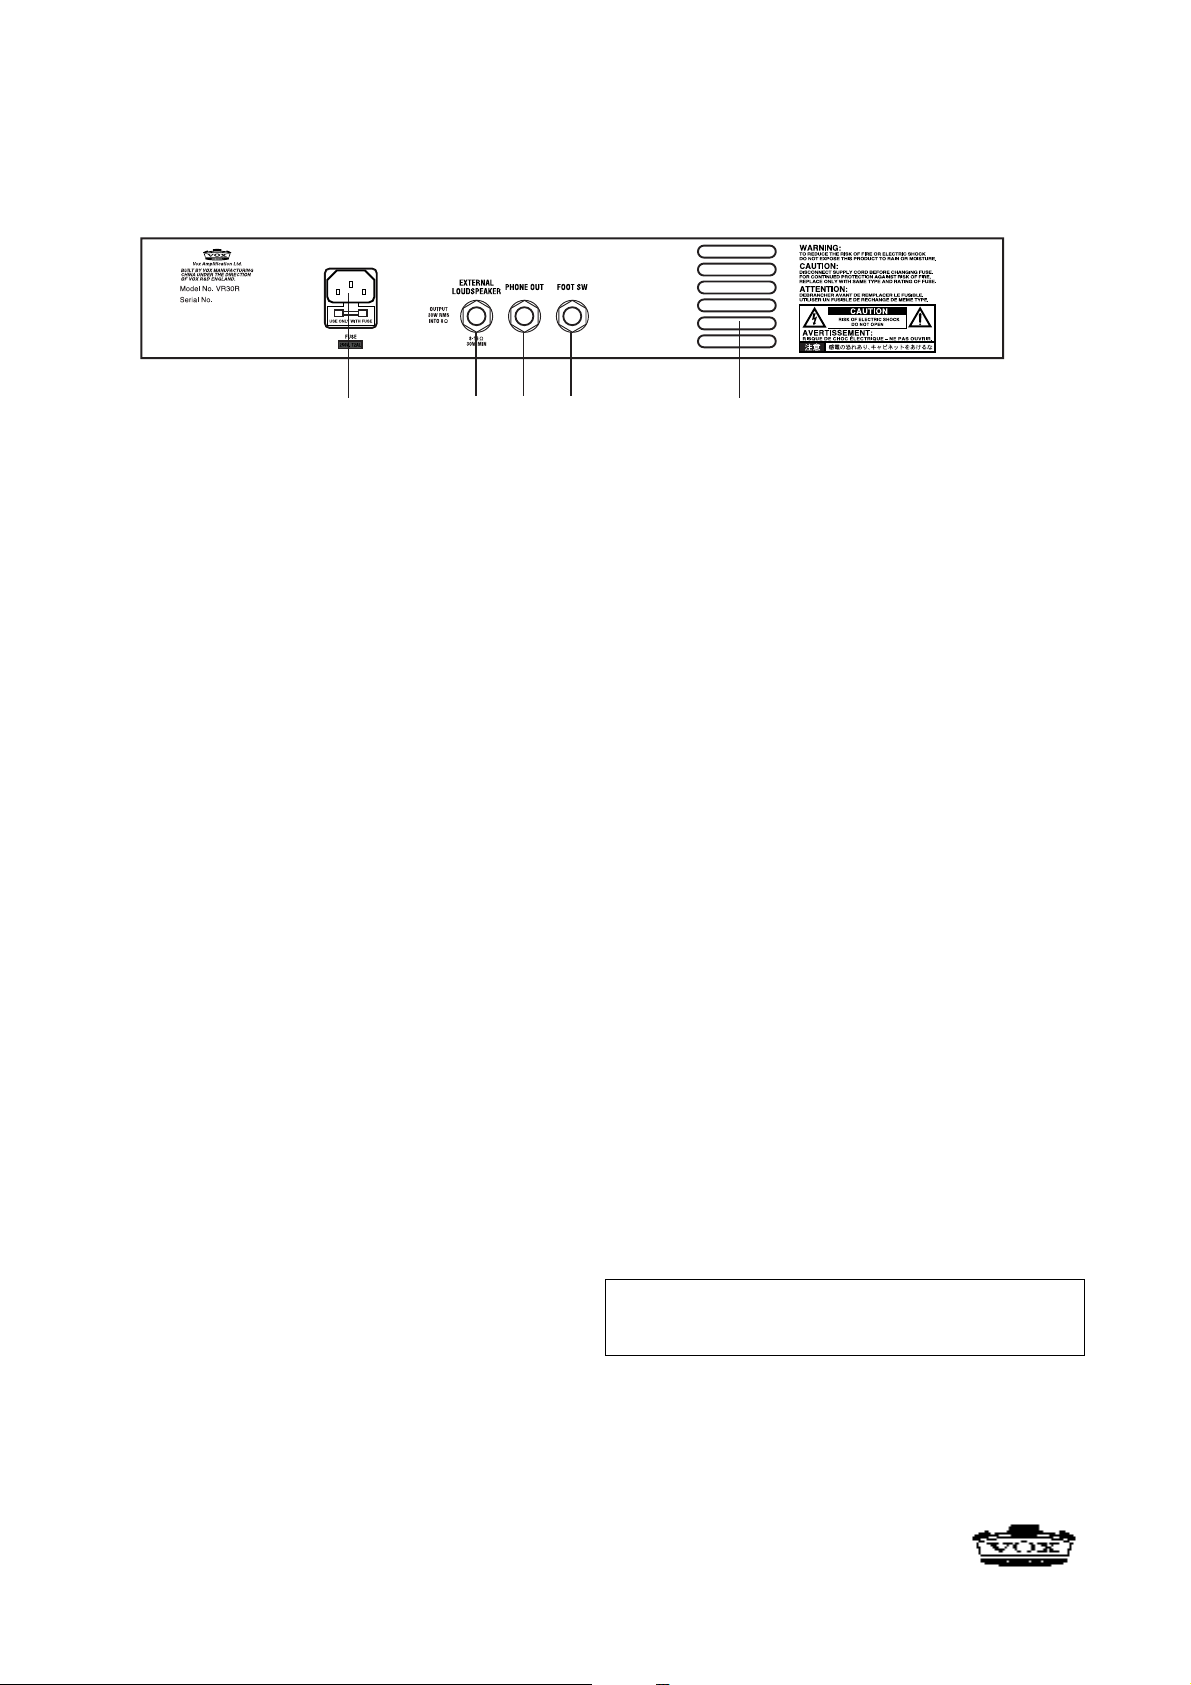
1718
19
16
20
16 – FOOTSWITCH JACK
Connect the optional VF-002 Footswitch to this jack.
17 – HEADPHONE JACK
A pair of stereo headphones, of between 8 & 600 ohms impedance, can be connected to your VR30 f or “silent” practise .
Inserting the headphone plug into this socket automatically
disconnects the power amplifier from both the internal loudspeaker, and the external loudspeaker jack.
Although great care has been taken in designing your VR30
to sound as good as it can into headphones, it must be
remembered that headphones are not guitar loudspeakers
(they have a ver y special frequency response), and with
the many different brands of headphones on the market,
the sound quality of the VR30 into headphones may not be
as good as it is into its own speaker system.
18 – EXTERNAL LOUDSPEAKER JACK
An external loudspeaker system can be connected to your
amplifier by using this socket. This socket disconnects the
amplifier from the internal loudspeaker. Any guitar loudspeaker cabinet can be used provided that the system impedance is between 8 and 16 ohms.
WARNING! To ensure that your system works
correctly, you must observe the following points.
a) Don’t use an external speaker whose impedance
is other than 8 ohms.
b) Don’t connect a speaker whose rated input
capacity is less than 30 watts. The speaker may be
destroyed if you ignore this caution — not recommended!
c) You must use a speaker cable to connect an
external speaker. Don’t use a shielded cable like the
one you use to connect a guitar to an amp.
d) You must turn off the power before connecting
the cable. Connecting the cable while the power is
turned on may damage your amp.
We think you will be very pleasantly surprised at
how good this amplifier will perform when connected to a 4x12" speaker cabinet!
19 – MAINS POWER CONNECTOR/FUSE
The mains power required by your amplifier is connected
using this device.
WARNING! Use only the power cord supplied with
your amplifier, or a replacement of the exact same
specification.
WARNING! Only connect this amplifier to a suitable
mains power supply that matches the rating
indicated on the back panel of your VR30 amplifier.
IF IN ANY DOUBT CONTACT YOUR DEALER!
20 – AIR VENTS
In no circumstances must these air vents be covered in
any way that prevents cooling air to circulate.
SPECIFICATIONS
Twin channel, guitar amplifier with 10 inch custom made
loudspeaker, and spring reverb.
30 watts RMS power output utilising V O X proprietary Valve
Reactor power amplifier technology with built-in 12AX7/
ECC83 tube (valve).
• Dimensions (W x H x D):495 x 410 x 210 mm
(19.49 x 16.14 x 8.27 inches)
• Weight: 13 kg (28.66 pounds)
• Output Power: 30 Watts RMS into 8 Ohms
• Speaker: Vox (10", 8 Ohm)
• Inputs: Input jack, Footswitch jack
• Outputs: External LoudSpeaker jack, Headphone jack
• Options: VF-002 Footswitch
*Specifications are subject to change without notice.
©2004 VOX AMPLIFICATION LTD.
IMPORT ANT REMINDER: Your VR30 should only be “e x-
amined”/repaired by an Authorized Vox Service Centre.
Failure to do so will void your warranty.
Page 6
INFORMATIONS IMPORTANTES DE SECURITE
• Lisez attentivement ces instructions.
•Veuillez conserver ces instructions.
• Observez tous les avertissements.
• Suivez toutes les consignes à la lettre.
• N’utilisez jamais cet appareil dans un endroit humide ni à
proximité d’eau.
•L’appareil alimenté par courant électrique ne peut pas être
exposé à des éclaboussures; évite en outre de placer des
récipients contenant des liquides, comme un vase (ou un verre
de bière), sur l’appareil.
• Nettoyez uniquement l’appareil avec un chiffon doux et sec.
• Ne bloquez jamais les orifices de ventilation de l’appareil et
installez-le toujours conformément aux instructions du fabricant.
• N’installez jamais l’appareil à proximité d’une source de chaleur ,
telle que des radiateurs, poêles ou tout autre dispositif (y compris
des amplificateurs) générant de la chaleur.
• N’essayez jamais de contourner le dispositif de sécurité d’une
prise de type polarisée ou d’une prise de terre. Une prise dite
polarisée dispose de deux broches, dont l’une est plus large que
l’autre. Une prise de terre comporte trois broches, dont une de
mise à la terre. Cette broche plus large ou broche de mise à la
terre vise à assurer votre sécurité. Si la fiche du cordon
d’alimentation ne correspond pas au type de prise de courant de
votre région, faites remplacer la prise obsolète par un électricien
qualifié (pour les Etats-Unis et le Canada).
• Placez toujours le cordon d’alimentation de sorte qu’on ne risque
pas de marcher dessus ni de le pincer. Cette précaution vise tout
spécialement la fiche du cordon et sa sortie de l’appareil.
• Utilisez exclusivement les fixations/accessoires préconisés par le
fabricant.
• S’il y a risque d’orage ou que vous ne comptez pas utiliser
l’appareil pendant une période prolongée, débranchez-le du
secteur.
• La mise sur OFF de l’interrupteur d’alimentation n’isole pas
totalement ce produit de la ligne secteur; aussi, retirez la fiche de
la prise s’il doit rester inutilisé pendant une période prolongée.
• Confiez tout travail de réparation uniquement à un S.A.V. qualifié.
Faites appel au S .A.V. si l’appareil a subi tout endommagement,
comme par exemple si sa fiche secteur ou son cordon
d’alimentation sont endommagés, si de l’eau ou des objets ont
pénétré à l’intérieur de l’appareil, si celui-ci a été exposé à la
pluie ou à la moisissure, s’il est tombé ou présente tout signe de
dysfonctionnement.
• N’utilisez jamais d’allonge trop longue avec cet appareil et ne
l’alimentez jamais via les prises secteur équipant d’autres
dispositifs.
• N’installez jamais cet appareil dans un endroit confiné comme
une caisse de transport ou tout autre récipient similaire.
• Utilisez l’appareil uniquement avec le chariot, stand, trépied,
fixation ou table spécifiés par le fabricant ou fourni av ec
l’appareil. Si vous avez placé l’appareil sur un chariot, soyez très
prudent quand vous déplacez le chariot, afin d’éviter une chute et
des blessures.
Marque CE pour les normes européennes harmonisées
La marque CE apposée sur tous les produits de notre firme
fonctionnant sur secteur jusqu’au 31 décembre 1996 signifie que
ces appareils répondent à la Directive EMC (89/336/CEE) et à la
Directive concernant la marque CE (93/68/CEE).
La marque CE apposée après le 1 janvier 1997 signifie que ces
appareils sont conformes à la Directive EMC (89/336/CEE), à la
Directive concernant la marque CE (93/68/CEE) ainsi qu’à la
Directive Basse Tension (73/23/CEE).
La marque CE apposée sur tous les produits de notre firme
fonctionnant sur piles signifie que ces appareils répondent à la
Directive EMC (89/336/CEE) et à la Directive concernant la marque
CE (93/68/CEE).
REMARQUE IMPORTANTE POUR LES CLIENTS
Ce produit a été fabriqué suivant des spécifications sév ères et des
besoins en tension applicables dans le pays où ce produit doit être
utilisé. Si v ous a v ez acheté ce produit via l’internet, par vente par
correspondance ou/et vente par téléphone, vous de v ez v érifier que
ce produit est bien utilisable dans le pays où v ous résidez.
ATTENTION: L’utilisation de ce produit dans un pays autre que
celui pour lequel il a été conçu peut être dangereuse et annulera la
garantie du fabricant ou du distributeur . Conservez bien v otre
récépissé qui est la preuve de votre achat, faute de quoi v otre
produit ne risque de ne plus être couvert par la garantie du
fabricant ou du distributeur .
* Les noms de sociétés, noms de produits et noms de formats, etc.
dans ce manuel sont des marques de fabrique ou des mar-ques
déposées de leurs propriétaires respectifs.
L’éclair dans le triangle est un symbole destiné
à attirer l’attention de l’utilisateur sur la
présence de parties non isolées et de “tension
dangereuse” à l’intérieur de l’appareil, qui
posent des risques d’électrocution pour
l’utilisateur.
Le point d’exclamation dans un triangle est un
symbole destiné à attirer l’attention de
l’utilisateur sur des sections de ce manuel
contenant des informations importantes, liées à
l’utilisation et à l’entretien de ce produit.
Page 7

Bienvenue à VOX !
Nous vous remercions d’avoir choisi l’amplificateur VOX VR30 pour compléter votre arsenal sonore. Conçu par notre équipe d’ingénieurs
VOX basée au Royaume-Uni, et monté dans nos installations de pointe, ver ticalement intégrées, il vous apportera, nous en sommes
certains, des heures et des heures de plaisir. Vous produirez des sons de guitare superbes à déguster sans modération ! Pour que votre
relation avec votre amplificateur soit longue et fructueuse, veuillez lire ce manuel au moins une fois, et puis, conseil de rigueur même si
vous le saviez déjà, “utilisez ce produit conformément aux instructions”. Enfin, veillez à conserver ce manuel pour référence ultérieure.
UN MOT SUR LA SÉRIE VR
Les amplificateurs de la série VR sont conçus comme ce que nous
estimons être la nouvelle génération d’amplis guitare “hybrides”.
Vous vous demandez cer tainement ce que nous entendons par
HYBRIDE. Et bien, à la base, “hybride” se réfère à l’utilisation de
tout un éventail de technologies — les technologies représentées
ici étant celles des lampes et des semi-conducteurs.
Les étages préamplificateur sont constitués de transistors distincts
pour la production des sons et de circuits intégrés (op-amps) pour
une gestion du signal qui ne pourrait pas être effectuée de façon
efficace au moyen des seuls transistors, notamment la commutation de canaux, etc.
L’étage amplificateur de puissance utilise une lampe (ou tube électronique) 12AX7 dans une configuration que nous avons nommée
Valve Reactor.
La technologie d’amplification de puissance avec Valve Reactor
brevetée par VOX est utilisée dans tous les produits Valvetronix.
Elle était à l’origine conçue pour la gamme d’amplis à modélisation
pour guitare VOX Valvetronix primée. Nous avons maintenant repris cette même technologie et l’avons remaniée pour l’intégrer à
votre amplificateur VR30.
COMMENT TOUT CELA FONCTIONNE-T-IL ?
Chaque moitié de la lampe 12AX7 (la lampe 12AX7 est en fait constituée de deux lampes identiques contenues dans un tube de verre,
constituant une triode double) travaille comme un petit amplificateur de puissance à lampe. Ce circuit offre toute la sonorité et le
feeling d’un amplificateur de puissance traditionnel à lampe. Il est
évident que ce “petit” amplificateur ne serait pas très puissant s’il
était raccordé directement à un haut-parleur — par conséquent, le
circuit de la lampe est raccordé à un amplificateur de puissance à
transistors plus important, complètement transparent, qui fonctionne
de façon très pure afin de ne pas ajouter sa propre coloration au
signal de la lampe.
Cet amplificateur de puissance de sortie est aussi muni de plusieurs circuits spéciaux qui redirigent les informations d’impédance
du haut-parleur vers l’amplificateur de puissance à lampe de manière à lui donner le son et le feeling détachés d’un amplificateur à
lampe traditionnel.
RÉSULTAT ?
Nous pensons que la série d’amplificateurs VOX VR vous offrira
une sonorité superbe (Vintage et moderne) intégrant le contenu
hautement harmonique et la compression représentatifs des amplificateurs originaux VOX AC15 & 30 créés il y a plus de 40 ans et
encore révérés à ce jour.
Page 8
FONCTIONS ET COMMANDES
DU PANNEAU AVANT
1 2 3 4 5 6 7 8 9 10 11 12 13 14 15
1. Prise INPUT
Branchez votre guitare sur cette prise.
2. Commande NORMAL VOLUME
Cette commande vous permet de régler le volume du son clean (NORMAL).
Avec un réglage sur les valeurs inférieures le son sera très pur et
brillant, tandis qu’aux valeurs supérieures le son s’épaissira et prendra de la chaleur. Aux valeurs les plus élevées, le son se “désintégrera” avec une saturation de style Vintage.
Les différent types de guitares électriques sur le marché présentant une vaste gamme de qualités sonores et de niveaux de sortie,
la position idéale des commandes de cet amplificateur pour obtenir
le son souhaité dépendra de la guitare utilisée.
3. Commande BASS
Cette commande vous permet de régler le niveau du grave sur le
canal normal.
4. Commande TREBLE
Cette commande vous permet de régler le niveau de l’aigu sur le
canal normal.
5. Touche de commutation de mode
CHANNEL
Cette touche vous permet de sélectionner le mode de l’amplificateur, normal ou overdrive — position haute = mode normal, position basse = mode overdrive.
Le mode de votre VR30 peut aussi être commuté à l’aide de la
pédale optionnelle (raccordée via la prise FOOT SW du panneau
arrière (16). Cette fonction ne peut être utilisée que lorsque le bouton du panneau avant est réglé sur la position “IN”.
Lorsque le canal normal est sélectionné, la LED (8) est éteinte.
Lorsque le canal overdrive est sélectionné, la LED ver te est allumée.
6. Touche OVERDRIVE STYLE
Cette touche vous permet de changer les caractéristiques de distorsion (STYLE) du canal overdrive — OD1 ou OD2.
OD1 est une couleur naturelle chaleureuse “Vintage” saturée, idéale
pour les sons basés sur le “blues”.
OD2 est une distorsion plus dure, plus agressive, à gain éle vé, mieux
adaptée à un jeu “moderne”.
7. Commande OVERDRIVE GAIN
Cette commande vous permet de régler le “gain” ou niv eau général
du préamplificateur et par conséquent le montant de saturation ou
de distorsion produit par le canal overdrive. Comme pour la commande Normal V olume , un réglage sur une v aleur inférieure épure
le son tandis qu’un réglage sur une valeur supérieure produit de la
distorsion à revendre !
8. LED indicatrice
S’allume en vert quand le canal overdrive est sélectioné.
9. Commande OVERDRIVE VOLUME
Cette commande vous permet de régler le montant de saturation
produit par le signal du préamplificateur envoy é à l’amplificateur de
puissance à Valve Reactor. Utilisez cette commande pour obtenir
le contour souhaité et équilibrer le son saturé par rapport au son
clean (normal).
10. Commande BASS
Cette commande vous permet de régler le niveau des grav es sur le
canal overdrive.
11. Commande TREBLE
Cette commande vous permet de régler le niveau des aigus sur le
canal overdrive.
12. Commande MASTER POWER LEVEL
Cette commande vous permet de régler le volume à la sortie du
circuit d’amplificateur de puissance à V alv e Reactor du VR30 et par
conséquent le volume général fourni par votre VR30 à l’un quelconque des systèmes acoustiques raccordés — que ce soit le hautparleur de 10 pouces intégré, un système acoustique externe ou
un casque.
13. Commande MASTER REVERB
Cette commande vous permet de régler le signal du réverbérateur
à ressort mixé avec le signal direct pour produire un effet allant
d’une réverbération légère comme un tremblotement (réglage sur
des valeurs inférieures) à la profondeur d’une salle de concert (réglage sur des valeurs supérieures).
Le réverbérateur à ressort intégré peut aussi être désactivé ou activé à l’aide de la pédale optionnelle VF-002. (Channel-Reverb)
Vous noterez peut-être un regain de ré verbér ation au moment de la
commutation entre les canaux overdrive et normal, suivant les réglages effectués auparavant. Il s’agit d’un phénomène normal.
14. LED indicatrice POWER ON
S’allume en rouge quand votre amplificateur est mis sous tension
(15) et quand il est branché sur une source d’alimentation appropriée.
15. Interrupteur POWER ON
Cet interrupteur vous permet de mettre sous/hors tension le VR30
quand il est branché sur le secteur.
Page 9
FONCTIONS ET COMMANDES
DU PANNEAU ARRIÈRE
1718
19
16. Prise FOOT SW
Branchez la pédale optionnelle VF-002 sur cette prise.
17. Prise PHONE OUT
Un casque d’une impédance comprise entre 8 et 600 ohms peut
être branché sur votre VR30 pour un entraînement “silencieux”.
Lorsque vous branchez la fiche du casque sur cette prise, l’amplificateur de puissance est automatiquement déconnecté, aussi bien
du haut-parleur intégré que de la prise de haut-parleur externe.
Bien que les plus grandes précautions aient été prises lors de la
conception, afin que votre VR30 produise les meilleurs sons possibles lors d’une écoute au casque, il convient de rappeler qu’un casque n’est pas un haut-parleur de guitare (dont la réponse en fréquence est très spéciale), et qu’étant donné le nombre de marques
actuellement commercialisées, la qualité sonore du VR30 utilisé
avec un casque risque de ne pas être aussi bonne que lorsque ce
dernier est utilisé avec son propre haut-parleur.
18. PRISE EXTERNAL LOUDSPEAKER
Une enceinte externe peut être raccordée à votre amplificateur à
l'aide de cette prise. Cette prise déconnecte l’amplificateur du hautparleur interne. Une enceinte pour guitare quelconque peut être
utilisée à condition que l’impédance du système soit comprise entre 8 et 16 ohms.
AVERTISSEMENT ! Pour que votre système fonctionne
correctement, respectez les points suivants.
a) Utilisez exclusivement des enceintes dont l’impédance
est de 8 ohm.
16
b) Ne branchez pas d’ enceinte dont la capacité d’entrée
nominale est inférieure à 30W. Si vous ne tenez pas
compte de cette remarque, vous risquez de détruire
l’enceinte!
c) Utilisez un câble pour enceinte afin de brancher une
enceinte externe. Ne vous servez pas de câble blindé
comme celui utilisé pour brancher une guitare à ampli.
d) Coupez l’alimentation avant de brancher le câble. Si
vous branchez le câble alors que l’ampli est sous tension,
vous risquez d’endommager ce dernier.
Vous ne manquerez pas d’être surpris par la qualité
exceptionnelle de cet amplificateur quand il est raccordé à
une enceinte 4 x 12" !
20
19. Prise d’alimentation secteur/Fusible
L’alimentation requise pour votre amplificateur passe par ce dispositif.
AVERTISSEMENT! Utilisez seulement le cordon
d’alimentation fourni avec votre amplificateur, ou un
cordon de rechange dont les spécifications sont
absolument identiques.
AVERTISSEMENT! Raccordez seulement cet
amplificateur à une alimentation secteur dont la tension
correspond à celle spécifiée sur le panneau arrière de
votre amplificateur VR30. EN CAS DE DOUTE
QUELCONQUE, CONTACTEZ VOTRE DISTRIBUTEUR!
20. Fentes d’aération
Ne recouvrez en aucun cas ces fentes d’aération indispensables à
la circulation de l’air dans l’appareil.
SPÉCIFICATIONS
Amplificateur de guitare deux canaux avec enceinte custom de 10
pouces et réverbérateur à ressort.
Puissance de sortie de 30 watts RMS. Technologie d’amplification
de puissance avec Valve Reactor brevetée par VOX à lampe (tube
électronique) intégrée 12AX7/ECC83.
Dimensions (L x H x P) : 495 x 410 x 210 mm
Poids : 13 kg
Puissance de sortie : 30 watts RMS sous 8 ohms
Haut-parleur : Vox (10 pouces, 8 ohms)
Entrées : prise Input, prise Footswitch
Sorties : prise de haut-parleur externe, prise de casque
Options : Pédale VF-002
*Les spécifications sont sujettes à modifications sans préavis.
©2004 VOX AMPLIFICATION LTD.
REMARQUE IMPORTANTE : Tout ”examen“/réparation de votre
VR30 doit être confié uniquement à un Centre de S.A.V. agréé de
Vox. Le non-respect de cette consigne entraînera l’annulation automatique de la garantie.
Page 10
WICHTIGE SICHERHEITSHINWEISE
• Bitte lesen Sie sich alle Bedienhinweise durch.
•Bewahren Sie diese Bedienhinweise auf.
• Beachten Sie alle W arnungen.
• Befolgen Sie alle Instruktionen.
•Verwenden Sie dieses Gerät niemals in der Nähe von Wasser.
• Ein netzgespeistes Gerät darf niemals Regen- oder
Wassertropfen ausgesetzt werden. Außerdem darf man keine
Flüssigkeitsbehälter wie Vasen usw. darauf stellen.
• Reinigen Sie es ausschließlich mit einem trockenen Tuch.
•Versperren Sie niemals die Lüftungsschlitze und stellen Sie das
Gerät nur an Orten auf, die vom Hersteller ausdrücklich
empfohlen werden.
• Stellen Sie das Gerät niemals in die Nähe einer W ärmequelle,
z.B. eines Heizk örpers, Ofens oder eines anderen Wärme
erzeugenden Gerätes (darunter auch Endstufen).
•Versuchen Sie niemals, die polarisierte Leitung bzw. Erde
hochzulegen oder zu umgehen. Ein polarisierter Stecker ist mit
zwei flachen Stiften unterschiedlicher Breite versehen. Ein
Stecker mit Erdung weist zwei Stifte und eine Erdungsb uchse
auf. Wenn der beiliegende Stecker nicht in Ihre Steckdose passt,
sollten Sie einen Elektriker bitten, die Steckdose zu erneuern (für
die USA und Kanada).
• Sorgen Sie dafür, dass man weder über das Netzkabel stolpern
kann, noch dass es in unmittelbarer Nähe einer Steckdose,
darunter auch Zusatzsteckdosen anderer Geräte, abgeklemmt
wird. A uch am Austritt aus dem Gerät darf das Netzkabel auf
keinen Fall gequetscht w erden.
•Verwenden Sie nur Halterungen/Zubehör, die/das vom Hersteller
ausdrücklich empfohlen werden/wird.
• Im Falle eines Gewitters bzw. wenn Sie das Gerät längere Zeit
nicht verwenden möchten, lösen Sie bitte den Netzanschluss.
• Durch Ausschalten des Hauptschalters wird dieses Erzeugnis
nicht vollständig vom Netz getrennt. Ziehen Sie deshalb den
Stecker des Netzkabels aus der Steckdose, wenn Sie das
Erzeugnis längere Zeit nicht verwenden.
• Überlassen Sie alle Wartungsarbeiten einem erfahrenen
Wartungstechniker. Wartungsarbeiten oder Reparaturen sind
erforderlich, wenn das Netzkabel oder der Stecker beschädigt ist,
wenn Flüssigkeit oder andere Gegenstände in das Geräteinnere
gefallen sind, wenn das Gerät im Regen gestanden hat, sich
nicht erwartungsgemäß verhält oder wenn es gefallen ist.
• Stellen Sie das Gerät niemals unmittelbar neben die Steckdose
und/oder Erweiterungssteckdose eines anderen Geräts.
• Stellen Sie das Gerät während des Betriebes niemals in einen
Türschrank oder den Lieferkarton.
• Stellen Sie das Gerät nur auf einen Wagen, Ständer, Stative,
Halterungen oder Tische, die vom Hersteller ausdrücklich
empfohlen werden oder ev entuell zum Lieferumfang gehören.
Seien Sie beim Verschieben eines geeigneten Wagens
vorsichtig, damit weder er, noch das Gerät selbst umkippt bzw.
hinfällt und Sie eventuell verletzt.
Das CE-Zeichen für die Europäische Gemeinschaft
Vor dem 31.12.1996 vergebene CE-Zeichen auf unseren
netzgespeisten Geräten zeigen an, daß diese Geräte gemäß der
EMC-Richtlinie (89/336/EWG) und der CE-Richtlinie (93/68/EWG)
der EU arbeiten.
Nach dem 01.01.1997 vergebene CE-Zeichen auf unseren
netzgespeisten Geräten zeigen an, daß diese Geräte gemäß der
EMC-Richtlinie (89/336/EWG), der CE-Richtlinie (93/68/EWG) und
der Niederspannungsstromrichtlinie (73/23/EWG) der EU arbeiten.
Die CE-Zeichen auf unseren batteriegespeisten Geräten zeigen
an, daß diese Geräte gemäß der EMC-Richtlinie (89/336/EWG)
und der CE-Richtlinie (93/68/EWG) der EU arbeiten.
Dieses Produkt wurde unter strenger Beachtung von
Spezifikationen und Spannungsanforderungen hergestellt, die im
Bestimmungsland gelten. W enn Sie dieses Produkt über das
Internet, per Postversand und/oder mit telef onischer Bestellung
gekauft haben, müssen Sie bestätigen, dass dieses Produkt für Ihr
Wohngebiet ausgelegt ist.
WARNUNG: V erw endung dieses Produkts in einem anderen Land
als dem, für das es bestimmt ist, verwendet wird, kann gefährlich
sein und die Garantie des Herstellers oder Importeurs hinfällig
lassen werden. Bitte be wahren Sie diese Quittung als Kaufbeleg
auf, da andernfalls das Produkt von der Gar antie des Herstellers
oder Importeurs ausgeschlossen werden kann.
Der als Pfeil dargestellte Blitz in einem Dreieck
weist den Anwender auf nicht isolierte,
„gefährliche Spannungen“ im Geräteinneren
hin, die so stark sein können, dass sie einen
Stromschlag verursachen.
Das Ausrufezeichen in einem Dreiec k weist den
Anwender darauf hin, dass zum Lieferumfang
des Gerätes wichtige Bedien- und
Wartungshinweise (e ventuell
Reparaturhinweise) gehören.
WICHTIGER HINWEIS FÜR KUNDEN
* Die ubrigen in dieser Bedienungsanleitung erwahnten Firmen-,
Produkt-, Formatnamen usw. sind W arenz eichen oder eingetr agene Warenzeichen der rechtlichen Eigentumer und werden
ausdrucklich anerkannt.
Page 11

Willkommen bei VOX
Vielen Dank, dass Sie sich entschieden haben, sich für Ihren Sound auf einen VOX VR30 zu verlassen. Er wurde von unserem VOXEntwicklungsteam in Großbritannien entworfen und in unseren hochmodernen, vertikal integrierten Produktionsanlagen gebaut, und wir
sind sicher, dass Sie zahlloste Stunden tollen Gitarrensounds damit erhalten werden, die sich genauso gut anfühlen wie die klingen! Um
eine lange und glückliche Beziehung mit Ihrem Verstärker sicherzustellen, sollten Sie diese Anleitung mindestens einmal lesen und anschließend das Produkt (nach der typischen Floskel) "sachgemäß verwenden". Bewahren Sie die Anleitung zum Nachschlagen auf.
WAS IST VR?
Die V erstärk er der VR-Baureihe sind darauf ausgelegt, die nächste
Generation von was wir als "Hybrid"-Gitarrenverstärker bezeichnen, zu werden.
Und was meinen wir hier mit HYBRID, fragen Sie? Im Pr inzip bedeutet "Hybrid", dass wir eine Mischung verschiedener Technologien einsetzen - in diesem Fall Röhren und Festkörper.
Die Vorverstärker-Stufe besteht aus diskreten Transistoren zur
Klangerzeugung und integrierten Schaltkreisen („Op-Amps“) für
Signalmanagement, das sich nicht effektiv mit Transistoren alleine
ausführen lässt - z.B. Kanalumschalten usw.
Die Endstufe arbeitet mit einer 12AX7-Röhre (manchmal auf Englisch auch „Valve“ genannt) in einer Konfiguration, die wir bei VOX
als „Valve Reactor“ bezeichnen.
Die patentierte Valv e Reactor Verstärkerendstufentechnologie wird
in allen Valvetronix-Produkten eingesetzt. Sie wurde ursprünglich
für die preisgekrönte V OX V alv etronix Modeling-GitarrenverstärkerProduktreihe entwickelt, und jetzt haben wir die gleiche Technologie genommen und sie zu dem Format überarbeitet, das in Ihrem
VR30-Verstärker eingebaut ist.
UND WIE FUNKTIONERT DAS?
Grundsätzlich ist das Funktionsprinzip, dass jede Hälfte der 12AX7
(die 12AX7-Röhre besteht aus zwei identischen Röhren in einer
Glasröhre, auch „Dual Tr iode“ genannt) zur Funktion als kleine
Röhrenendstufe konfiguriert ist. Diese Schaltung bietet die Tonalität und das Gefühl einer vollständigen Röhrenendstufe. Es ist klar,
dass diese „kleine“ Endstufe nicht sehr laut wäre, wenn sie direkt
an einen Lautsprecher angeschlossen würde — deshalb ist der
Röhrenschaltkreis an einen größere, vollständig transparenten
Festkörperendstufenverstär ker angeschlossen, der sehr sauber
arbeitet, um dem Röhrensignal keine eigene Färbung hinzuzufügen.
Dieser Endstufenverstärker enthält auch einige spezielle Schaltkreise, die die Lautsprecherimpedanzinformation zurück zum
Röhrenverstärker speisen, um ihm das lock ere Sound & Feel eines
echten Röhrenverstärkers zu geben.
UND WAS BEDEUTET DAS?
Wir glauben, dass die V erstärkerserie VO X VR Ihnen superben Klang
(sowohl vintage als auch modern), der hohen Harmonikanteil und
Kompression enthält, die ganz auf den originalen VOX AC15 und 30 Verstärkern aufbauen, die vor mehr als 40 Jahren gebaut wurden und auch heute noch geschätzt werden.
Page 12
MERKMALE DER
GERÄTEVORDERSEITE
1 2 3 4 5 6 7 8 9 10 11 12 13 14 15
1. INPUT-BUCHSE
Schließen Sie Ihre Gitarre an diese Buchse an.
2. NORMAL-LAUTSTÄRKEREGELUNG
Steuert die Lautstärke des sauberen Kanals (NORMAL).
Bei niedrigeren Einstellungen ist der Sound sehr sauber und hell,
bei höheren Einstellungen wird der Sound etwas dicker und wärmer, während er bei der höchsten Einstellung in natürliche Distortion
im Vintage-Stil „aufbricht“.
Da verschiedene Arten elektrischer Gitarren ganz verschiedene
tonale Eigenschaften und Ausgangspegel haben, hängt es zu einem großen Teil von Ihrer Gitarre ab, wo Sie die Position der Regler
an diesem Verstärker einstellen wollen, um das gewünschte Ansprechverhalten zu erzielen.
Bitte beachten - damit dieser Regler richtig arbeitet, muss
die Verstärker-Kanaleinstellung auf den Normal-Kanal gestellt sein.
3. BASSREGELUNG
Steuert den Anteil von BASS im Normal-Kanal.
4. HÖHENREGLER
Steuert den Anteil von Höhen (TREBLE) im Normal-Kanal.
5. KANALUMSCHALTTASTE
Dieser Knopf steuert, ob der V erstärker auf Normal oder Overdrive
gestellt ist — HERAUS = NORMAL, HEREIN = OVERDRIVE.
Kanalumschalten am VR30 ist auch mit dem optionalen VF-002
Fußschalter möglich (angeschlossen über die Fußschalterbuchse
(16) an der Rückseite). Diese Funktion kann nur bedient werden,
wenn der Vorderseitenschalter auf Stellung "IN" steht.
Wenn der Normalkanal gewählt ist, leuchtet die LED (8) nicht - wenn
der Overdrive-Kanal gewählt ist, leuchtet die grüne LED.
6. OVERDRIVE-STIL-TASTE
Diese Taste änder t die Distortion-Eigenschaften (STYLE) des
Overdrive-Kanals — OD1 oder OD2.
OD1 ist ein warmer natürlicher „vintage“ Overdrive-Stil, ideal für
auf „Blues“ basierende Sounds geeignet.
OD2 ist eine härtere, aggressivere Distortion mit höherem Gain,
die besser für „modernes“ Spiel geeignet ist.
7. OVERDRIVEKANAL GAIN-REGELUNG
Reguliert den Anteil von Vorverstärker-„Gain“ und dadurch den
Betrag von Overdrive oder Distortion, der vom Ov erdrive-Kanal erzeugt wird. Wie Normal-Lautstärkeregelung bedeutetn niedrigere
Einstellungen weniger Distortion und höhere Einstellungen wesentlich mehr Distortion.
8. KANALWAHL-LED
Leuchtet GRÜN auf, wenn der Overdrive-Kanal gewählt ist.
9. OVERDRIVEKANAL LAUTSTÄRKEREGELUNG
Reguliert den Betrag von Overdrive, der aus dem Vorverstärkersignal erzeugt wird, das zum Valve-Reactor-Endstufenverstärker
gespeist wird. Verwenden Sie dies zum Einstellen der zum Einsatz
erforderlichen Loudness und auch zum Ausgleichen des Overdriv eSounds gegen Ihren sauberen (Normal-) Sound.
10. BASSREGELUNG
Steuert den Anteil von BASS im Overdrive-Kanal.
11. HÖHENREGLER
Steuert den Anteil von Höhen (TREBLE) im Overdrive-Kanal.
12. HAUPTLAUTSTÄRKE
Steuert die Lautstärke, die von der Valve-Reactor-Endstufenverstärkerschaltung des VR30 erzeugt wird und dadurch die
Gesamtlautstärke, die Ihr VR30 an jedes angeschlossene
Lautsprechersystem liefert - ungeachtet obe es sich um den internen 10-Zoll-Lautsprecher, ein externes Lautsprechersystem oder
Kopfhörer handelt.
13. HAUPT-REVERB
Steuer den Betrag an Spring Reverb, der mit dem direkten Signal
gemischt wird, um einen leichten Hauch von Reverb (niedrige Einstellung) bis zum den Nachhall einer Konzerthalle (hohe Einstellung) zu erzeugen.
Der eingebaute Spring-Reverb kann mit dem optionalen VF-002
Fußschalter aufgehoben oder aktiviert werden. (Kanal-Reverb)
Sie bemerken vielleicht eine Spur von Reverb beim Umschalten
zwischen Overdrive- und Normal-Kanal, je nach Ihren Einstellungen. Dies ist normal.
14. POWER LED
Leuchtet ROT auf, wenn Ihr Verstärker eingeschaltet (15) und und
an eine geeignete Netzversorgung angeschlossen ist.
15. HAUPT-NETZSCHALTER
Schaltet die Netzstromversorgung für Ihren VR30 EIN/AUS.
Page 13
MERKMALE AN DER
RÜCKSEITE
1718
19
16
20
16. FUSSSCHALTERBUCHSE
Schließen Sie den optionalen Fußschalter VF-002 an diese Buchse an.
17. KOPFHÖRER-BUCHSE
Ein Paar Stereokopfhörer zwischen 8 und 600 Ohm Impedanz kann
an Ihren VR30 zum „ungestörten“ Üben angeschlossen werden.
Wenn der Kopfhörerstec ker in diese Buchse gesteckt wird, wird der
Endstufenverstärker automatisch sowohl vom internen Lautsprecher als auch von der externen Lautsprecherbuchse abgetrennt.
Obwohl der VR30 sehr sorgfältig dafür k onstruiert wurde, auch mit
Kopfhörern so gut wie möglich zu klingen, müssen Sie sich daran
erinnern, dass Kopfhörer keine Gitarrenlautsprecher sind (sie haben einen speziellen Frequenzgang), und angesichts der vielen
verschiedenen Kopfhörer auf dem Markt kann die Klangqualität des
VR30 nicht so gut sein wie beim eigenen Lautsprechersystem.
18. EXTERNE LAUTSPRECHERBUCHSE
Ein externes Lautsprechersystem kann über diese Buchse an Ihren Verstärker angeschlossen werden. Diese Buchse trennt den
Verstärker v om internen Lautsprecher ab. Ein Gitarrenlautsprechergehäuse kann verwendet werden, vorausgesetzt die Systemimpedanz liegt zwischen 8 und 16 Ohm.
Wichtig: Das System funktioniert nur, wenn du die folgenden Punkte beachtest.
a) Du darfst nur Boxen mit einer Impedanz von 8ohm anschließen.
b) Die externe Box muss eine Kapazität von mindestens
30W haben. Bo x en, die diese Anforderungen nicht erfüllen,
lösen sich sehr schnell in Luft auf — also nixgut!
c) Für die V erbindung der Bo x benötigst du ein Lautsprecherkabel. Geschirmte, d.h.Gitarrenkabel eignen sich hierfür
denkbar schlecht.
d) Schalte den V erstärker v or Anschließen der Box aus. W enn
du das nicht tust,überlebt der Amp den Anschlussversuch
eventuell nicht.
Wir glauben, dass Sie sehr positiv überrascht sein werden,
wie gut dieser Verstärker bei Anschluss an ein 4x12-ZollLautsprechergehäuse arbeitet!
19. HAUPT-NETZANSCHLUSS/SICHERUNG
Der vom Verstärker benötigte Netzstrom ist hier angeschlossen.
Wichtig: Verwenden Sie nur das mit Ihrem Verstärker mitgelieferte Netzkabel oder ein Ersatzteil mit genau den gleichen Spezifikationen.
Wichtig: Schließenb Sie diesen Verstärker nur an eine geeignete Netzversorgung an, die den Angaben auf dem T ypenschild auf der Rückseite des Verstärkers VR30 entspricht.
IM ZWEIFELSF ALL FRAGEN SIE BEI IHREM F A CHHÄNDLER NACH!
20. LÜFTUNGSÖFFNUNGEN
Auf keinen F all dürfen diese Lüftungsöffnungen abgedec kt werden,
so dass der Kühlluftstrom blockiert wird.
TECHNISCHE DATEN
Twin-Kanal, Gitarrenverstärker mit 10-Zoll speziell hergestelltem
Lautsprecher und Spring-Reverb. 30 Watt effektive Ausgangsleistung mit VOX-eigener Valve-Reactor-Endstufenverstärkertechnologie mit eingebauter 12AX7/ECC83-Röhre (Valve).
Abmessungen (B x T x H): 495 x 410 x 210 mm
Gewicht: 13 kg
Ausgangsleistung: 30 Watt effektiv an 8 Ohm
Lautsprecher: Vox (10 Zoll, 8 Ohm)
Eingänge: Eingangsbuchse, Fußschalterbuchse
Ausgänge: Externe Lautsprecherbuchse, K opfhörerb uchse
Optionen: Fußschalter VF-002
*Änderungen bei technischen Daten bleiben vorbehalten.
©2004 VOX AMPLIFICATION LTD.
WICHTIGER MERKPUNKT: Ihr VR30 darf nur bei einem VoxVertragshändler "geprüft"/repariert werden. W enn dies nicht beachtet wird, wird die Garantie hinfällig.
Page 14
Símbolo CE para Normas Unificadas Europeas
La marca CE que exhiben nuestros productos que funcionan a Corriente Alterna, hasta el 31 de Diciembre de
1996 significa que cumplen la Directiva EMC (89/336/EEC) y la Directiva sobre la marca CE (93/68/EEC).
Y, la marca CE que exhiben después del 1 de Enero de 1997, significa que cumplen la Directiva EMC
(89/336/EEC), la Directiva sobre la marca CE (93/68/EEC) y la Directiva de Bajo Voltaje (73/23/EEC).
Asimismo, la marca CE que exhiben nuestros productos que funcionan con baterías, significa que cumplen la
Directiva EMC (89/336/EEC) y la Directiva sobre la marca CE (93/68/EEC).
INSTRUCCIONES DE SEGURIDAD IMPORTANTES
ATENCIÓN: Al usar productos eléctricos, deben observarse unas precauciones básicas, incluyendo las
siguientes:
1. Lea todas las instrucciones antes de utilizar el producto.
2. No utilice este producto cerca del agua; por ejemplo, cerca de una bañera, lavabo, lavadero, en un sótano
húmedo, o cerca de una piscina o similar.
3. Este producto sólo debe ser utilizado en el soporte recomendado por el fabricante.
4. Este producto, ya sea solo o en combinación con un amplificador y auriculares o altavoces puede causar
pérdida auditiva permanente. No lo utilice durante largo tiempo a gran volumen, o a un volumen que resulte
incómodo. Si nota alguna pérdida de audición, consulte con un especialista.
5. El producto debe ser colocado en tal forma que no se interfiera con su adecuada ventilación.
6. El producto debe ser situado lejos de fuentes de calor, como radiadores, calefactores u otros aparatos que
produzcan calor.
7. El producto debe ser conectado a una fuente de corriente eléctrica del tipo descrito en las instrucciones de
funcionamiento o tal como esté marcado en el producto.
8. El cable de alimentación debe ser desenchufado cuando no se vaya a utilizar el aparato durante largo
tiempo.
9. Debe ponerse especial cuidado en que no caigan objetos o líquidos en el interior por las aberturas.
10. El producto debe ser revisado por personal cualificado cuando:
A. El cable de alimentación o el enchufe se haya dañado, o
B. Hayan caído objetos o líquidos en el producto, o
C. El producto haya sido expuesto a la lluvia, o
D. El producto no funcione normalmente o exhiba un cambio importante de prestaciones, o
E. El producto se haya caído, o el chasis se haya dañado.
11. No intente realizar mantenimiento de este producto más que como se describe en las instrucciones de
mantenimiento por parte del usuario. Todas las demás tareas deben ser llevadas a cabo por personal
cualificado.
GUARDE ESTAS INSTRUCCIONES
El símbolo del rayo significa que existen voltajes peligrosos sin
CAUTION
RISK OFELECTRICSHOCK
DONOTOPEN
aislar en el interior de la unidad, que pueden ser de magnitud
suficiente para constituir un riesgo de electrocución.
CAUTION: TO REDUCETHE RISK OF
ELECTRIC SHOCK,DONOT REMOVE
COVER (OR BACK). NOUSER-SERVICE ABLE
PARTSINSIDE.REFER SERVICINGTO
QUALIFIED SERVICEPERSONNEL.
El signo de admiración indica al usuario que existen
instrucciones de funcionamiento y mantenimiento importantes
en el manual que acompaña al producto.
Page 15

Welcome to VOX
Felicidades
Ha comprado usted un genuino amplificador de guitarra
VOX.
El VR 30 ha sido diseñado y construido con el mismo cuidado y atención al detalle que hemos dado a todos nuestros amplificadores desde 1957.
Le ofrecerá años de fenomenal sonido VOX.
Por favor, lea este manual para entender las funciones de
su amplificador.
Con la adición de funciones como BASS, volumen,
TREBLE, salida de auriculares, el VR 30 es un amplificador de guitarra verdaderamente versátil.
VR 30 dispone también de un control de Reverberación.
Su nuevo amplificador ser á una e xcelente adición a su arsenal sonoro. Como irá viendo a continuación este amplificador elegante y de estilo clásico suena tan bien como su
aspecto y le proporcionará gran cantidad de sonidos de
guitarra que no solamente suenan bien sino que podrá
sacar un gran partido de ellos. Su nuevo amplificador resulta excelente para practicar, incluso sin molestar a los
vecinos. En las siguientes páginas encontrará explicaciones sobre las características y controles de este nuevo y
compacto amplificador.
¿Qué es VR?
La serie VR de amplificador se ha diseñado como un nuevo concepto HÍBRIDO de amplificadores de guitarra.
El concepto HÍBRIDO se refiere a que utiliza tecnología
de válvulas y tecnología de transistores o estado sólido.
Ofrece por tanto lo mejor de dos mundos.
La etapa de amplificador de potencia dispone de una válvula 12AX7.
Para mantener en alto el espíritu pionero del amplificador
se ha empleado la nueva tecnología de circuitería Valve
Reactor que lleva a su nue v o amplificador a nuevas cotas
y lo convierte en una pieza de arte. Sin querer ponernos
demasiado técnicos esto es básicamente de lo que estamos hablando: mientras que mucho de la generación de
tono y modificación que lleva a cabo el amplificador se hace
en el campo digital su potencia de amplificación de estos
100 por 100 analógicas. Esto hace que la etapa de potencia analógica juegue un papel preponderante en cuanto a
la calidad del sonido y timbres consiguiendo la misma sensación que los amplificadores originales a partir de los
cuales se ha modelado. El resultado es un amplificador
que presenta toda la potencia de un amplificador de válvula, pero en miniatura. Utiliza una v álvula 12AX7 que supone en realidad un dispositivo de TRIODO DUAL que representa en realidad 2 válvulas.
Estamos seguros de que su nuevo amplificador VO X VR le
ofrecerá sonidos clásicos y modernos que son típicos de
los clásicos amplificadores V O X AC15 & 30 que salieron al
mercado hace más de 40 años, y que aún hoy día siguen
siendo mundialmente aclamados.
Page 16
Panel principal
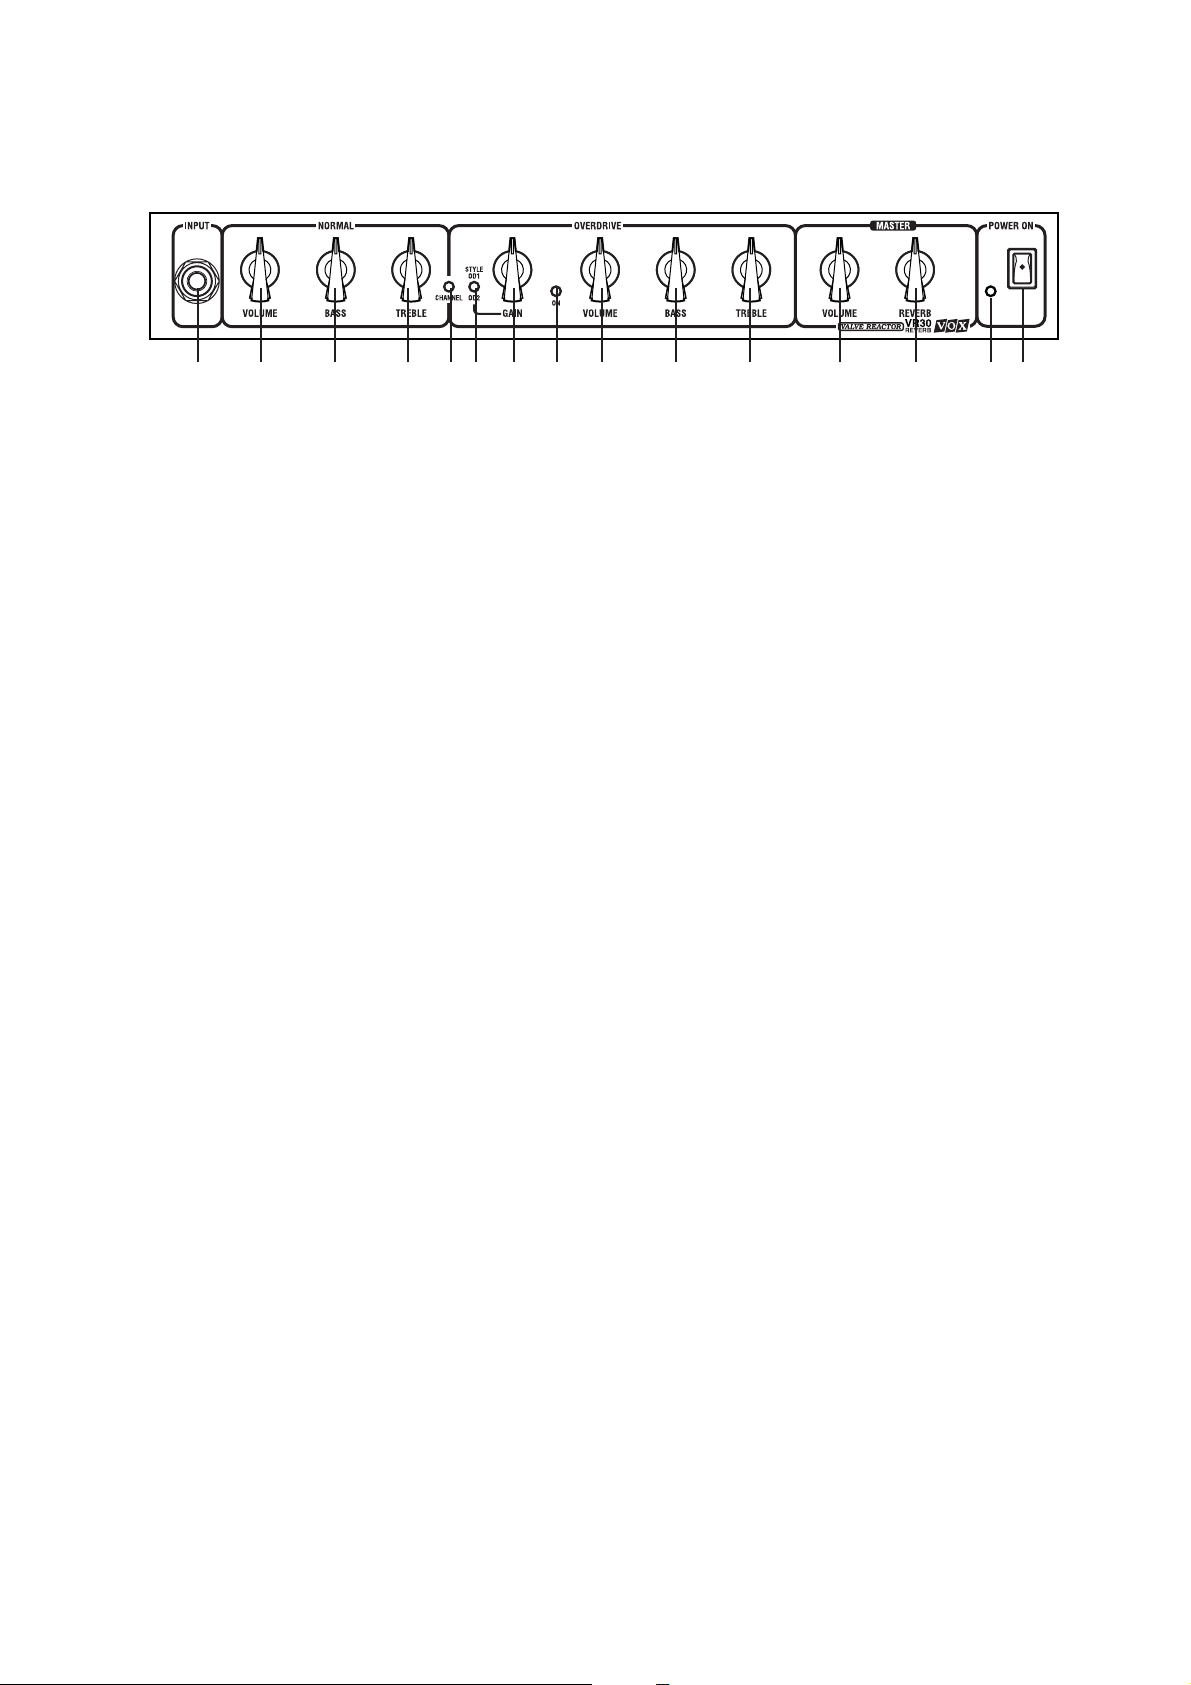
1 2 3 4 5 6 7 8 9 10 11 12 13 14 15
1. T oma INPUT: conecte aquí su guitarra favorita. Asegúrese de usar un cable de alta calidad.
2. NORMAL VOLUME: es un control de ganancia del canal claro. Súbalo para obtener sonidos de saturación y distorsión, y bájelo para obtener un sonido más limpio.
Este control puede producir una gran variedad de tonos
muy efectivos, desde sonidos claros hasta sonidos con
mayor pegada y distorsión, y todos los puntos intermedios.
Poco a poco irá viendo que las posibilidades son ilimitadas.
Para que este control sea operativo el modo de amplificador debe estar en normal.
3. NORMAL BASS: controla los graves del canal normal,
desde bajos suaves hasta fuertes.
4. NORMAL TREBLE: controla los agudos del canal normal. Desde agudos suaves hasta fuertes.
Podrá controlar la composición de agudos del material
sonoro. Obteniendo sonidos apagados, hasta los sonidos
más brillantes e impactantes con agudos muy elevados.
5. Conmutador de canal (saturación = overdrive / claro =
normal): púlselo para mayor ganancia y distorsión. Hacia
afuera proporciona sonidos más claros. Puede usar un interruptor de pedal opcional VF-002 para activ ar y desactivar
esta función.
Como su nombre implica ajusta el amplificador en 2 modos distintos: sonido claro, y sonido con saturación. En el
modo de saturación podrá obtener sonidos sucios, saturados, o sonidos muy cálidos, incluso distorsiones típicas de
rock. De manera que si desea más ganancia pulse este
botón y prepárese a disfrutar.
8. CHANNEL SELECT LED: Se ilumina en verde cuando
se selecciona el canal Overdrive.
9. O VERDRIVE VOLUME: utilice este control par a el volu-
men del canal OVERDRIVE.
10. BASS: controla los graves, desde bajos suaves hasta
fuertes.
11. TREBLE: controla los agudos. Desde agudos suaves
hasta fuertes.
Podrá controlar la composición de agudos del material
sonoro. Obteniendo sonidos apagados, hasta los sonidos
más brillantes e impactantes con agudos muy elevados.
12. MASTER VOLUME: utilice este control para el volu-
men PRINCIPAL del amplificador.
13. REVERB: Ajusta la intensidad del Ef ecto de Reverbe-
ración.
Se trata de un efecto de reverberación incorporado de
muelle quedara más profundidad a su interpretación. Pruebe distintos ajustes para adaptar la reverberación desde
niveles suaves hasta muy profundos.
14. POWER: se ilumina cuando está encendido.
15. POWER: es el interruptor de encendido.
6. O VERDRIVE STYLE: Este botón ajusta el estilo del ca-
nal Overdrive.
OD1 es un tono natural y clásico para sonidos tipo “blues”.
OD2 es más agresivo para sonidos más modernos.
7. O VERDRIVE GAIN: es un control de ganancia del canal
OVERDRIVE. Súbalo para obtener sonidos de saturación
y distorsión, y bájelo para obtener un sonido más limpio.
Page 17
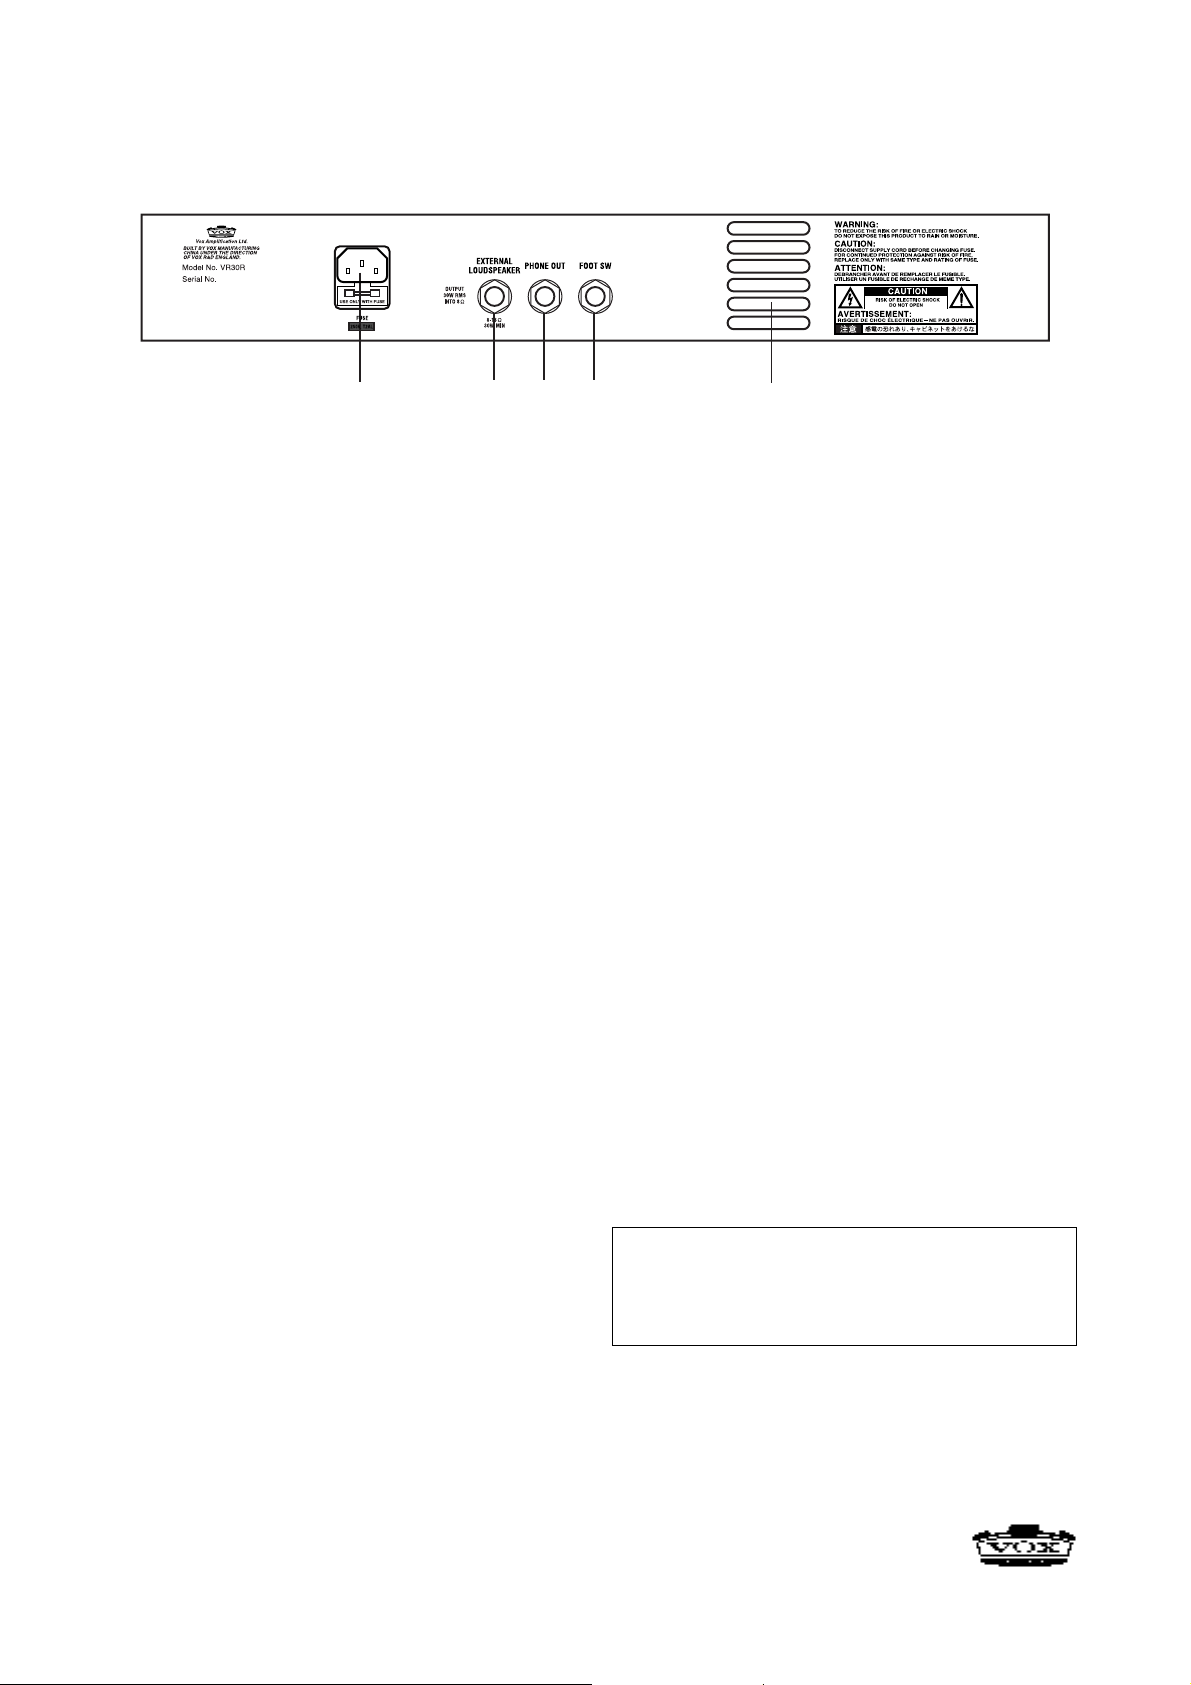
Panel posterior
1718
19
16
20
16. FOOT SWITCH: Puede usar un interruptor de pedal
opcional VF-002.
17. Toma para auriculares: al conectar unos auriculares
(no incluidos) se desconecta el altavoz interno.
Esta salida proporciona una señal especialmente filtrada
para su uso con auriculares. Nota importante: cuando conecte los auriculares a esta toma el sonido del altavoz interno será interrumpido, lo cual resulta perfecto para practicar a cualquier hora.
18. EXTERNAL SPEAKER: Aquí puede conectar un altavoz de extensión externo de 8 ó 16 OHMIOS.
Nota importante: si conecta un altavoz de
extensión externo a esta toma silenciará el
altavoz interno.
Use solamente altavoces externos de extensión con una impedancia de 8 ohmios o mayor.
Por ejemplo use altavoces de 16 ohmios. No
use nunca unos altavoces con una impedancia
inferior a 8 ohmios, ya que se podría producir
daños a la unidad.
19. Conector de alimentación eléctrica
20. Ventilaciones de aire: Evite que estas ventilaciones
queden cubiertas y asegúrese de que se dispone de suficiente espacio libre.
Especificaciones
• Dimensiones: 495 x 410 x 210 mm
• Peso: 13 kg.
• Potencia de salida: 30 W RMS @ 8 ohmios
• Altavoz: Vox 8 pulgadas 8 W
• Entradas: guitarra, interruptor de pedal
• Salidas: auriculares, altavoz externo
• Opción (se vende por separado): VFS002 Footswitch.
Especificaciones sujetas a cambios sin previo aviso como
consecuencia de mejoras en el producto.
©2004 VOX AMPLIFICATION LTD.
nota importante: si se produce cualquier fallo de
funcionamiento en el amplificador, por favor póngase
en contacto con su distribuidor autorizado. No existe
un ningún tipo de reparación ni mantenimiento que
pueda ser llevado a cabo por el usuario.
Page 18
安全上のご注意
ご使用になる前に必ずお読 みください
ここに記載した注意事項は、製品を安全に正しくご使用いただき、あな
たや他の方々への 危害や損害を未然に防ぐためのものです。
注意事項は誤った取り扱いで生じる危害や損害の大きさ、または切迫
の程度によって、内容を「警告」、「注意」の2つに分けています。これ
らは、あなたや他の方々の安全や機器の保全に関わる重要な内容です
ので、よく理解した上で必ずお守りください。
マークについて
製品には下記 のマークが表示されています。
マークには次のような意味があります。
このマークは、機器の内部に絶縁されていない「危険な電
圧」が存在し、感電の危険があることを警告しています。
このマークは注意喚起シンボルであり、取扱説明書などに
一般的な注意、警告、危険の説明が記載されていることを
表しています。
火災・感電・人身障害の危険を防止するには
図記号の例
記号は、注意(危険、警告を含む)を示し ていま す。
記号の中には、具体的は 注意内容が描かれています。左の図は「一
般的な注意、警告、危険」を表してい ます。
記号は、禁止(してはいけないこ と)を示し ています。
記号の中には、具体的な注意内容が描かれることがあります。 左の
図は「分解禁止」を表しています。
記号は、強制(必ず行うこと)を示し ていま す。
記号の中には、具体的な注意内容が描かれることがあります。 左の
図は「電源 プラグをコンセントから抜くこと」 を表してい ます。
以下の指示を守ってください
警告
この注意事 項を無 視した取り扱いをすると、
死亡や重傷を負う可能性が予想されます
・電源プラグは、必ずAC100Vの電源コンセントに差し
込む。
・電源プラグにほこりが付着している場合は、ほこりを拭
き取る。
感電やショートの恐れがあります。
・本製品はコンセントの近くに設置し、電源プラグへ容易
に手が届くようにする。
・次のような場合には、直ちに電源を 切って電源プラグを
コンセントから抜く。
○電源コードやプラグが破損したとき
○異物が内部に入ったとき
○製品に異常や故障が生じたとき
修理が必要なときは、サービス・センターへ修理を依頼
してください。
・本製品を分解したり改造した りしない。
・修理/部品の交換などで、取扱説明書に書かれている以
外のことは絶対にしない。
・電源コードを無理に曲げたり、発熱する機器に近づけな
い。また、電源コードの上に重いものを乗 せない。
電源コードが破損し、感電や火災の原因になり ま す。
・大音量や不快な程度の音量で長時間使用しない。
万一、聴力低下や耳鳴りを感 じたら、専門の医師に相談 し
てください。
・ 本製品に異物(燃えやすいもの、硬貨、針金など)を入れ
ない。
・ 温度が極端に高い場所(直射日光の当たる場所、暖房機
器の近く、発熱する機器の上など)で使用や保管はしな
い。
・振動の多い場所で使用や保管はしない。
・ホコリの多い場所で使用や保管はしない。
・風呂場、シャワ ー室で使用や保管はしない。
・雨天時の野外などのよ うな湿気の多い場所で、使用や保
管はしない。
・ 本製品の上に液体の入ったもの(水や薬品等)を置かな
い。
・本製品に液体をこぼさない。
・濡れた手で本製品を使用しない。
Page 19
注意
この注意事 項を無 視した取り扱いをすると、傷害を負う可能性
または物理的損害が発生する可能性があります
・正常な通気が妨げられない所に設置して使用する。
・ラジオ、テレビ、電子機器などから十分に離して使用す
る。
ラジオやテレビ等に接近して使用すると、本製品が雑音
を受けて誤動作する場合があります。また、ラジオ、テレ
ビ等に雑音が入ることがあり ます。
・外装のお手入れは、乾いた柔らか い 布を使って軽く拭
く。
・電源コードをコンセントから抜き差しするときは、必ず電
源プラグを持つ。
・電源スイッチをオフにしても、製品は完全に電源から切
断されていませんので、製品を使用しないときは電源プ
ラグをコンセン トから外してください。
・他の電気機器の電源コードと一緒にタコ足配線をしな
い。
本製品の定格消費電力に合ったコンセントに接続してく
ださい。
・スイッチやツマミなどに必要以上の力を加えない。
故障の原因になります。
・外装のお手入れに、ベンジンやシンナー系の液体、コン
パウンド質、強燃性のポリッシャーは使用しない。
・不安定な場所に置かない。
本製品が転倒してお客様がけがを したり 、本製品が故障
する恐れがあります。
・本製品の上に乗っ たり、重いものをのせたりしない。
本製品が損傷したり、お客様がけがをする原因となりま
す。
・地震時は本製品に近づかない。
・本製品に前後方向から無理な力を加えない。
本製品が転倒する危険性があります。
*掲載されている会社名、製品名、規格名などは、それぞれ各社の商標
または登録商標です。
保証規定(必ずお読みください)
本保証書は、保証期間中に本製品を保証するもので、付属品類(ヘッドホンなど)は
保証の対象になりません。保証期間内に本製品が故障した場合は、保証規定によっ
て無償修理いたします。
1.本保証書の有効期間はお買い上げ日より1ケ年です。
2.次の修理等は保証期間内であっても有料修理となります。
・消耗部品(電池、スピーカー、真空管、フェーダー など)の交換。
・お取扱い方法が不適 当のために生じた故障。
・天災(火災、浸水等)によって生じた故障。
・故障の原因が本製品以外の他の機器にある場合。
・不当な改造 、調整、部品交換などにより生じた故障または損傷。
・保証書にお買い上げ日、販売店名が未記入の場合、または字句が書き替えられ
ている場合。
・本保証書の提示がない場合。
尚、当社が修理した部分が再度故障した場合は、保証期間外であっても、修理し
た日より3ケ月以内に限り無償修理いたします。
3.本保証書は日本国内においてのみ有効です。
ThiswarrantyisvalidonlyinJapan.
4.お客様が保証期間中に移転された場合でも、保証は引き続きお使いいただけま
す。詳しくは、サービス・センターまでお問い合わせください。
5.修理、運送費用が製品の価格より高くなることがありま すので、あらかじめサービ
ス・センターへご相談ください。発送にかかる 費用は、お客様の負担とさせていた
だきます。
6.修理中の代替品、商品の貸し出し等は、いかなる場合にお いても一切行っており
ません。
本製品の故障、または使用上生じたお客様の直接、間接の損傷につきましては、弊
社はいっさいの責任を負いかねますのでご了承ください。
本保証書は、保証規定により無料修理をお約束するためのもので、これよりお
客様の法律上の権利を制限するものではありません。
■お願い
1.保証書に販売年月日等の記入がない場合は無効となります。記入できないとき
は、お買い上げ年月日を証明できる領収書等と一緒に保管してください。
2.保証書は再発行致しませんので、紛失しないように大切に保管してください。
VOX VR30 保証書
本保証書は、上記の保証規定により無料修理をお約束するものです。
お買い上げ日 年 月 日
販売店名
アフターサービス
アフターサービスについてのご質問、ご相談は、サービス・センターへお問い合わせ
ください。 商品のお取り扱いについてのご質問、ご相談は 、お客様相談窓口へお問い
合わせください。
お客様相談窓口 TEL03(3799)9086
●サービス・センター:〒143-0001東京都大田区東海5-4-1
明正大井 5号営業所コルグ物流センター内 TEL03(3799)9085
輸入販売元:KORGImportDivision
〒206-0812東京都稲城市矢野口4015-2
URL:http://www.korg.co.jp/KID/
Page 20

VOXにようこそ
このたびは、VOXVR30をお買い上げいただき、まことにありがとうございます。
本機はイギリスVOXチームの最高水準の技術で設計され、VOXが管理する工場によって製造されています。VR30の素
晴らしいサウンドを十分にお楽しみください!
(音楽を楽しむときは、周囲への音の配慮が必要です。演奏する時間によって、音量調節したり、ヘッドホンを使用してくだ
さい。)
なお、本製品を末永くお使いいただくためにも、この取扱説明書をよくお読みになって正しい方法でご使用ください。また
取扱説明書は、お読みになった後も大切に保管してください。
WHATISVR?
VRシリーズは、次世代の「ハイブリッド」ギター・アンプとして設計しました。
「ハイブリ ッド」とは?
「ハイブリ ッド」は複数のテクノロジーを混合して利用することを意味します−本機の場合、真空管とソリッド回路です。
プリアンプ部は、音作りのためのディスクリート・トランジスター回路とチャンネル切替え などの信号コントロール用のIC(オ
ペアンプ)回路で構成されています。
パワーアンプ部は、12AX7真空管を使用するVOXで開発したValveReactor回路で構成されています。
ValveReactorパワー・アンプ技術は、すべてのValvetronix製品において使われています。
このテクノロジーは元々VOXValvetronixのために開発され、さまざまなギター・アンプをモデルリ ングすることに成功
しま した。
そして、その同じテクノロジーをVRシリーズ・アンプへ組み込むために改良し搭載しました。
ValveReactorについて
ValveReactor回路は通常プリアンプに使用される12AX7をパワーアンプとして動作させます。
12AX7はデュアル三極管(ひとつのチューブの中に3極管が2つ入っている真空管)です。そのためギター・アンプの多
くに見られるプッシュプル回路を1本の真空管で作ることができ ま す。ただし、この小さな真空管をパワーアンプとして動
作させても、当然ながら得られる出力は大変小さいものです。そこで、極めてクリーンに出力だけを大きく するソリッドス
テートのパワーアンプと、動作したスピーカーのインピーダンスの変化を真空管に反映させることができる特別な回路を
接続しています。こうすることによって、小さく、どこでも手に入るも っともポピュラーな真空管12AX7だけを使ってオー
ル・真 空 管 の ア ンプと 同様のレスポンス、あるいはフィールと呼 ばれる弾き心 地を得 ることができるーこれ が
ValveReactor回路です。
Page 21
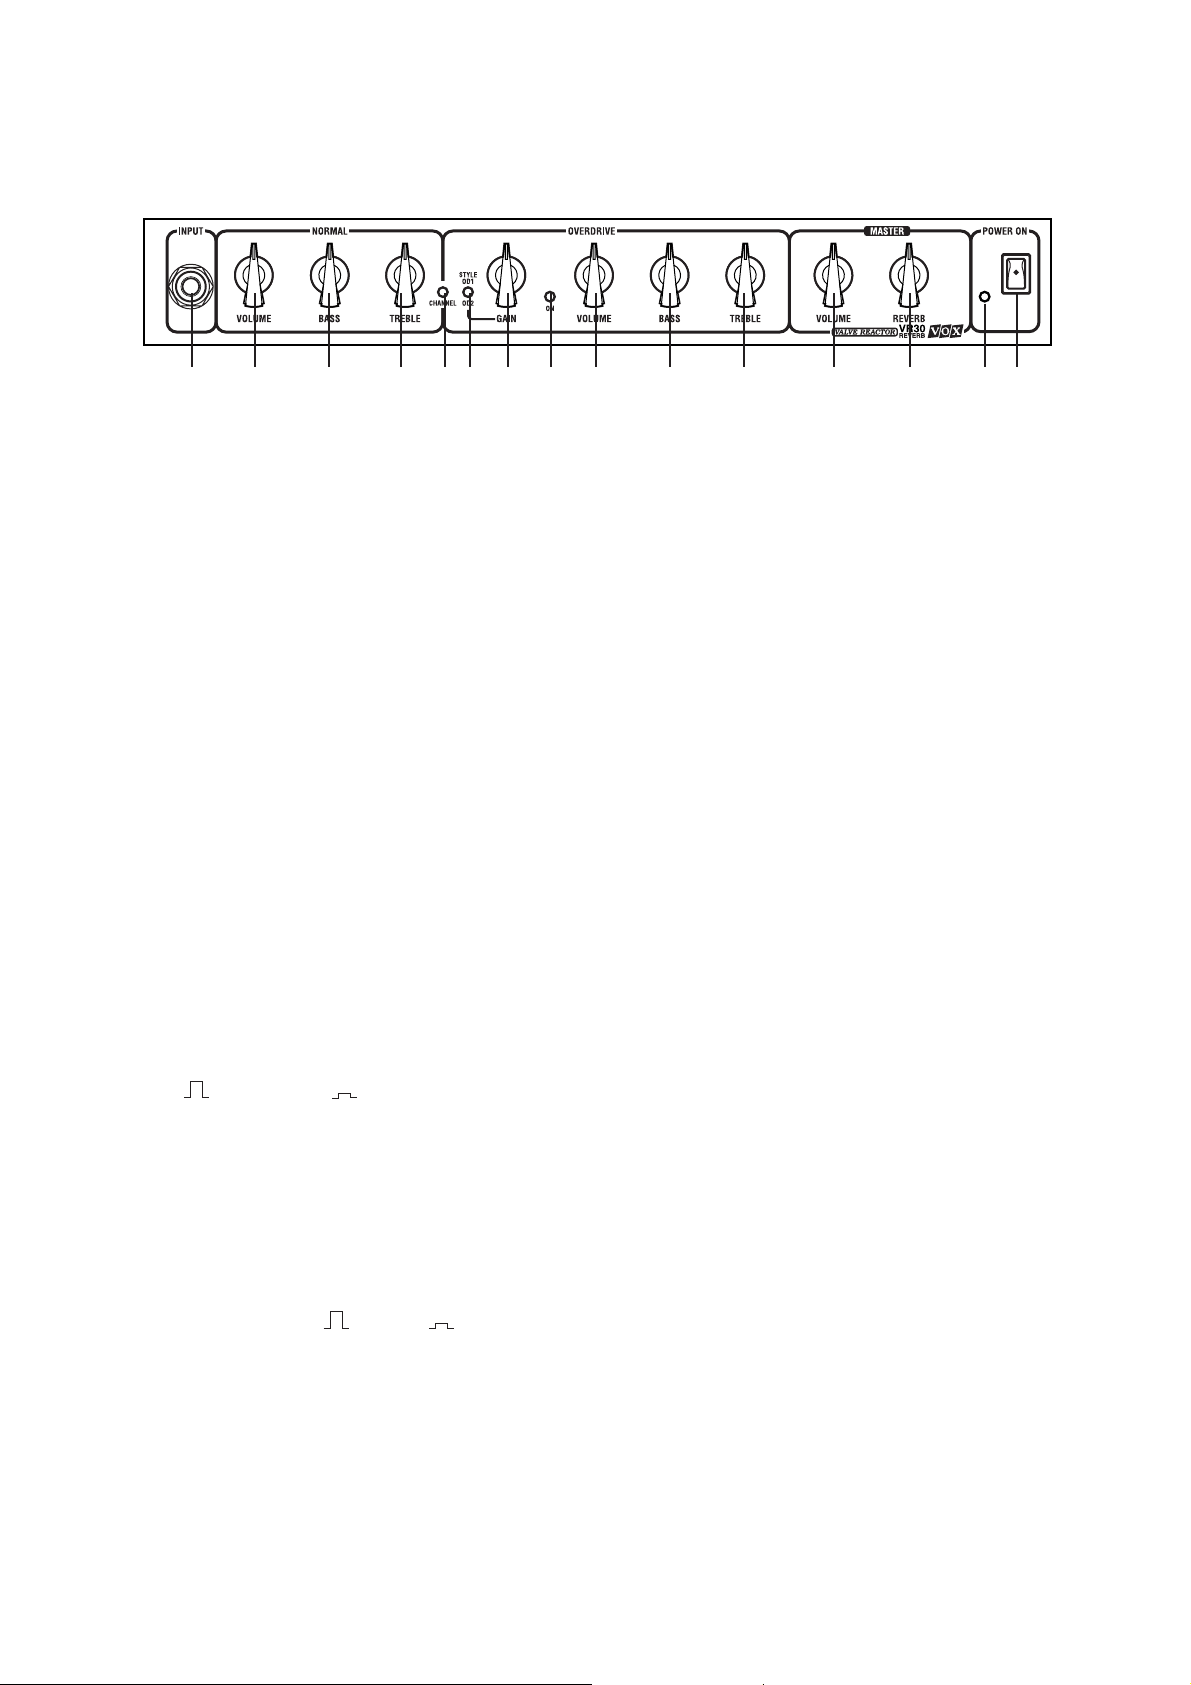
フロント・パ ネルにつ い て
1 2 3 4 5 6 7 8 9 10 11 12 13 14 15
1−INPUTジャック
ギターを接続します。
質の良いギター(シールド)・ケーブルを使用することをおす
すめします。
2−NORMALVOLUMEツマミ
NORMAL チャンネルの 音量を調節します。
このツマミを下げると 、美しいクリーン ・サウンドが出ます。
また、このツマ ミ を上げると、太く暖かいサウン ドになり、最
大にすると 、ビンテージスタイルのディストーションサウンド
にな ります。
接続するエレキギターによ っ て音の品質と出力レベルが異
なります。使用するギタ ーによってボリュームを調整してく
ださい。
3−NORMALBASSツマミ
NORMAL チャンネルを選択しているときの低音を調整
します。
4−NORMALTREBLEツマミ
NORMAL チャンネルを選択しているときの高音を調整
します。
5−CHANNELSWITCHINGボタン
NORMALまたはOVERDRIVEのチャンネルに切替えま
す。( =NORMAL、 =OVERDRIVE)
NORMALチャンネルを選ぶと、LED(8)は消灯します。
OVERDRIVE チャンネルを選ぶと、LED(8)は点灯しま
す。
また、オプションの VF-002フットペダルを接続すると、ペ
ダルによってチャンネルを切り替えることもできます。
6−OVERDRIVESTYLEボタン
OVERDRIVEチャンネル(OD1またはOD2)の歪みのス
タイルを切替えます。( =OD1、 =OD2)
OD1は、暖かい自然な「ヴ ィンテージ・タイプ」のオーバー
ドライ ブ音(「ブルース」を連想させるような)です。
OD2 は、よりハー ドでアグレッシブな、ハイゲインのオー
バードライブ音です。
8−CHANNELSELECTLED
OVERDRIVE チャンネルを選んだときに点灯します。
9−OVERDRIVECHANNELVOLUMEツマミ
オーバードライブの量を制御します。
必要な音量をセットして、OVERDRIVE チャンネルと
NORMAL チャンネルの音のバランスを調整してくださ
い。
10−OVERDRIVEBASSツマミ
OVERDRIVE チャンネルを選択しているときの低音を調
整します。
11−OVERDRIVETREBLEツマミ
OVERDRIVE チャンネルを選択しているときの高音を調
整します。
12−MASTERVOLUMEツマミ
全体的な音量を調節します。
接続 し た外部のスピーカーキャビネットやヘッドホンも含め
て全体的な音量を制御します。
13−MASTERREVERBツマミ
内蔵のスプリング・リバーブのミ ッ クス量を調整 します。
コンサート・ホールのような深さ(高いセッティングで)か
ら、ごくわずかなリバーブ音をダイレクト音と混ぜ合わせら
れます。オプション のVF-002フットスイッチでリバーブの
オン/オフができます。
注意:選択しているチャンネル(OVERDRIVE または
NORMAL)によって リ バーブ感が変化し ま す。チャンネル
を変更するごとに調整し直してください。
14−POWERLED
電源がオンのときは、ランプが点灯します。
15−MAINSPOWERスイッチ
アンプの電源スイッチです。
アンプの電源ケーブルがコンセントに差し込まれているか
を確かめてください。
7−OVERDRIVECHANNELGAINツマミ
OVERDRIVEチャンネルにおいて、プリアンプ ・ゲインを調
節し歪み具 合を調整します。
Page 22
リアパネルのついて
19
1718
16
20
16−FOOTSWITCHJACK
オプションの VF-002フットスイッチを接続します。
17−HEADPHONEJACK
ヘッドホンを接続します。8〜600Ωのインピーダンスの
ステレオ・ヘッドホンが使用できます。
要注意:ここにヘッドホンを接続すると内蔵スピーカーか
らは音が出なくなります。遅い時間の練習にも便利です。
ただし、ヘッドホンのスピーカーはギターアンプ用の ス
ピーカーとは、全く異なる特性を持っています。そのため、
ヘッドホンで音をモニターする場合、本機内蔵のスピー
カーの音とは異なるサウンドに聞こえるこ とがあり ます。
18−EXTERNALLOUDSPEAKERJACK
8〜16Ωのスピーカー・キャビ ネットを接続 します。
注意:ここにスピーカー ・キャビネットを接続すると内蔵ス
ピーカーからは音が出なくなります。
最高の演奏のために、下記の事項を守 ってご 使用いた だく
ことを強くおすすめします。
a)8Ω以上のインピーダンスのス ピ ーカー・キャビネット
をお使い ください。それより低い インピーダンス(例えば4
Ω)は絶対に使用しないでください。アンプが壊れる原因
となります。
注意:8Ωを超える(例えば16Ω)のイン ピー ダンスのス
ピーカー・キャビネ ットを使用した場合、出力パワーは 下が
ります。 8Ωのインピーダンスのスピーカー・キャビネット
を使用したときのみ30ワットのフルパワーで出力できま
す。
b)ワット数が30ワット以下のス ピーカー・キャビネットは
使用しないでください。この警告を無視した場合、スピー
カーが破損する可能性があります。
c)スピーカー・キャビネットとの接続には、常に質の良い
スピーカー ・ケーブルをご使用ください。ギター(シール
ド)・ケーブルは決して使用し ないでください。
d)ケーブルを接続するときは必ず電源をオフの状態で
行ってください。電源をオンのままケーブルを抜き差しす
るとアンプが壊れる原因となります。
19−MAINSPOWERCONNECTOR/FUSE
電源コードを接続します。
付属の電源コードを接続してください。
必ず100Vコンセントに接続してください。
20−AIRVENTS
アンプを冷却する通風孔です。この穴をふさがないでくだ
さい。
仕様
外形寸法(WxHxD):495x410x210mm
重量:12kg
出力:30ワットRMS
スピーカー:VOXオリジナル10インチスピーカー(8Ω)
ValveReactor回路真空管:12AX7
オプション :VF-002フットスイッチ
*仕様は、予告なしに変更されることがあります。
Page 23

Page 24

2004 VOX AMPLIFICATION LTD.
2S JGFE
 Loading...