

VOX Amplification MVX150H, MVX150C1 Owner's Manual
E F G S J 1
MVX150C1/MVX150H
Owner΄s Manual
Manuel d΄utilisation
Bedienungsanleitung
Manual de usuario


English
Introduction......................................5
Front Panel.......................................6
Rear Panel ........................................7
Specifications ..................................9
Français
Introduction......................................11
Panneau avant .................................12
Panneau arrière................................13
Spécifications ..................................15
Deutsche
Einführung........................................17
Vorderseite.......................................18
Rückseite..........................................19
Technische Daten............................21
Español
Introducción.....................................23
Panel frontal.....................................24
Panel posterior.................................25
Especificaciones..............................27
日本語
はじめに .................................... 30
フロント・パネル ........................ 30
リア・パネル .............................. 31
電源コードの接続について ............ 34
仕様 .......................................... 34
3
IMPORTANT SAFETY INSTRUCTIONS
1) Read these instructions.
2) Keep these instructions.
3) Heed all warnings.
4) Follow all instructions.
5) Do not use this apparatus near water.
6) Clean only with dry cloth.
7) Do not block any ventilation openings. Install in
accordance with the manufacturer’s instructions.
8) Do not install near any heat sources such as radiators,
heat registers, stoves, or other apparatus (including
amplifiers) that produce heat.
9) Do not defeat the safety purpose of the polarized or
grounding-type plug. A polarized plug has two blades with
one wider than the other. A grounding type plug has two
blades and a third grounding prong.
The wide blade or the third prong are provided for your
safety. If the provided plug does not fit into your outlet,
consult an electrician for replacement of the obsolete
outlet.
10) Protect the power cord from being walked on or pinched
particularly at plugs, convenience receptacles, and the
point where they exit from the apparatus.
11)Only use attachments/accessories specified by the
manufacturer.
12)Use only with the cart, stand, tripod,
bracket, or table specified by the
manufacturer, or sold with the apparatus.
When a cart is used, use caution when
moving the cart/apparatus combination to
avoid injury from tip-over.
13) Unplug this apparatus during lightning storms or when
unused for long periods of time.
14) Refer all servicing to qualified service personnel.
Servicing is required when the apparatus has been
damaged in any way, such as power-supply cord or plug
is damaged, liquid has been spilled or objects have fallen
into the apparatus, the apparatus has been exposed to
rain or moisture, does not operate normally, or has been
dropped.
• WARNING—This apparatus shall be connected to a
mains socket outlet with a protective earthing connection.
• Mains powered apparatus shall not be exposed to
dripping or splashing. No objects filled with liquids, such
as vases or drinking glasses, shall be placed on the
apparatus.
• Turning off the power switch does not completely isolate
this product from the power line.
• Keep the power plug easily accessible. Do not install this
equipment far from a power outlet and/or power strip.
• Do not install this equipment in a confined space such as
a box for the conveyance or similar unit.
• Excessive sound pressure from earphones and
headphones can cause hearing loss.
• This apparatus is for moderate climates areas use, not
suitable for use in tropical climates countries.
• The ventilation should not be impeded by covering the
ventilation openings with items, such as newspapers,
table-cloths, curtains, etc.
• No naked flame sources, such as lighted candles, should
be placed on the apparatus.
The lightning flash with arrowhead symbol
within an equilateral triangle, is intended to
alert the user to the presence of uninsulated
“dangerous voltage” within the product’s
enclosure that may be of sufficient magnitude
to constitute a risk of electric shock to persons.
The exclamation point within an equilateral
triangle is intended to alert the user to the
presence of important operating and
maintenance (servicing) instructions in the
literature accompanying the product.
THE FCC REGULATION WARNING (for USA)
NOTE: This equipment has been tested and found to
comply with the limits for a Class B digital device, pursuant
to Part 15 of the FCC Rules. These limits are designed to
provide reasonable protection against harmful interference
in a residential installation. This equipment generates,
uses, and can radiate radio frequency energy and, if not
installed and used in accordance with the instructions, may
cause harmful interference to radio communications.
However, there is no guarantee that interference will not
occur in a particular installation. If this equipment does
cause harmful interference to radio or television reception,
which can be determined by turning the equipment off and
on, the user is encouraged to try to correct the interference
by one or more of the following measures:
• Reorient or relocate the receiving antenna.
• Increase the separation between the equipment and
receiver.
• Connect the equipment into an outlet on a circuit
different from that to which the receiver is connected.
• Consult the dealer or an experienced radio/TV
technician for help.
If items such as cables are included with this equipment,
you must use those included items.
Unauthorized changes or modification to this system can
void the user’s authority to operate this equipment.
Notice regarding disposal (EU only)
When this “crossed-out wheeled bin” symbol is
displayed on the product, owner’s manual, battery,
or battery package, it signifies that when you wish to
dispose of this product, manual, package or battery
you must do so in an approved manner.
Do not discard this product, manual, package or
battery along with ordinary household waste.
Disposing in the correct manner will prevent harm to human
health and potential damage to the environment. Since the
correct method of disposal will depend on the applicable
laws and regulations in your locality, please contact your
local administrative body for details. If the battery contains
heavy metals in excess of the regulated amount, a
chemical symbol is displayed below the “crossed-out
wheeled bin” symbol on the battery or battery package.
* All product names and company names are the trademarks
or registered trademarks of their respective owners.
4

Introduction
Thank you for purchasing the VOX MVX150C1/MVX150H guitar amplifier. To help you get the most out of your new
instrument, please read this manual carefully.
Main Features
About Nutube
Nutube is a new vacuum tube developed by KORG INC and Noritake Itron Corporation and utilizes technology from
vacuum fluorescent displays.
As with conventional vacuum tubes, the Nutube is constructed with an anode, grid and filament, and operates as a
complete triode tube. Furthermore, it generates the response as well as the same rich harmonics characteristic of
conventional vacuum tubes.
5
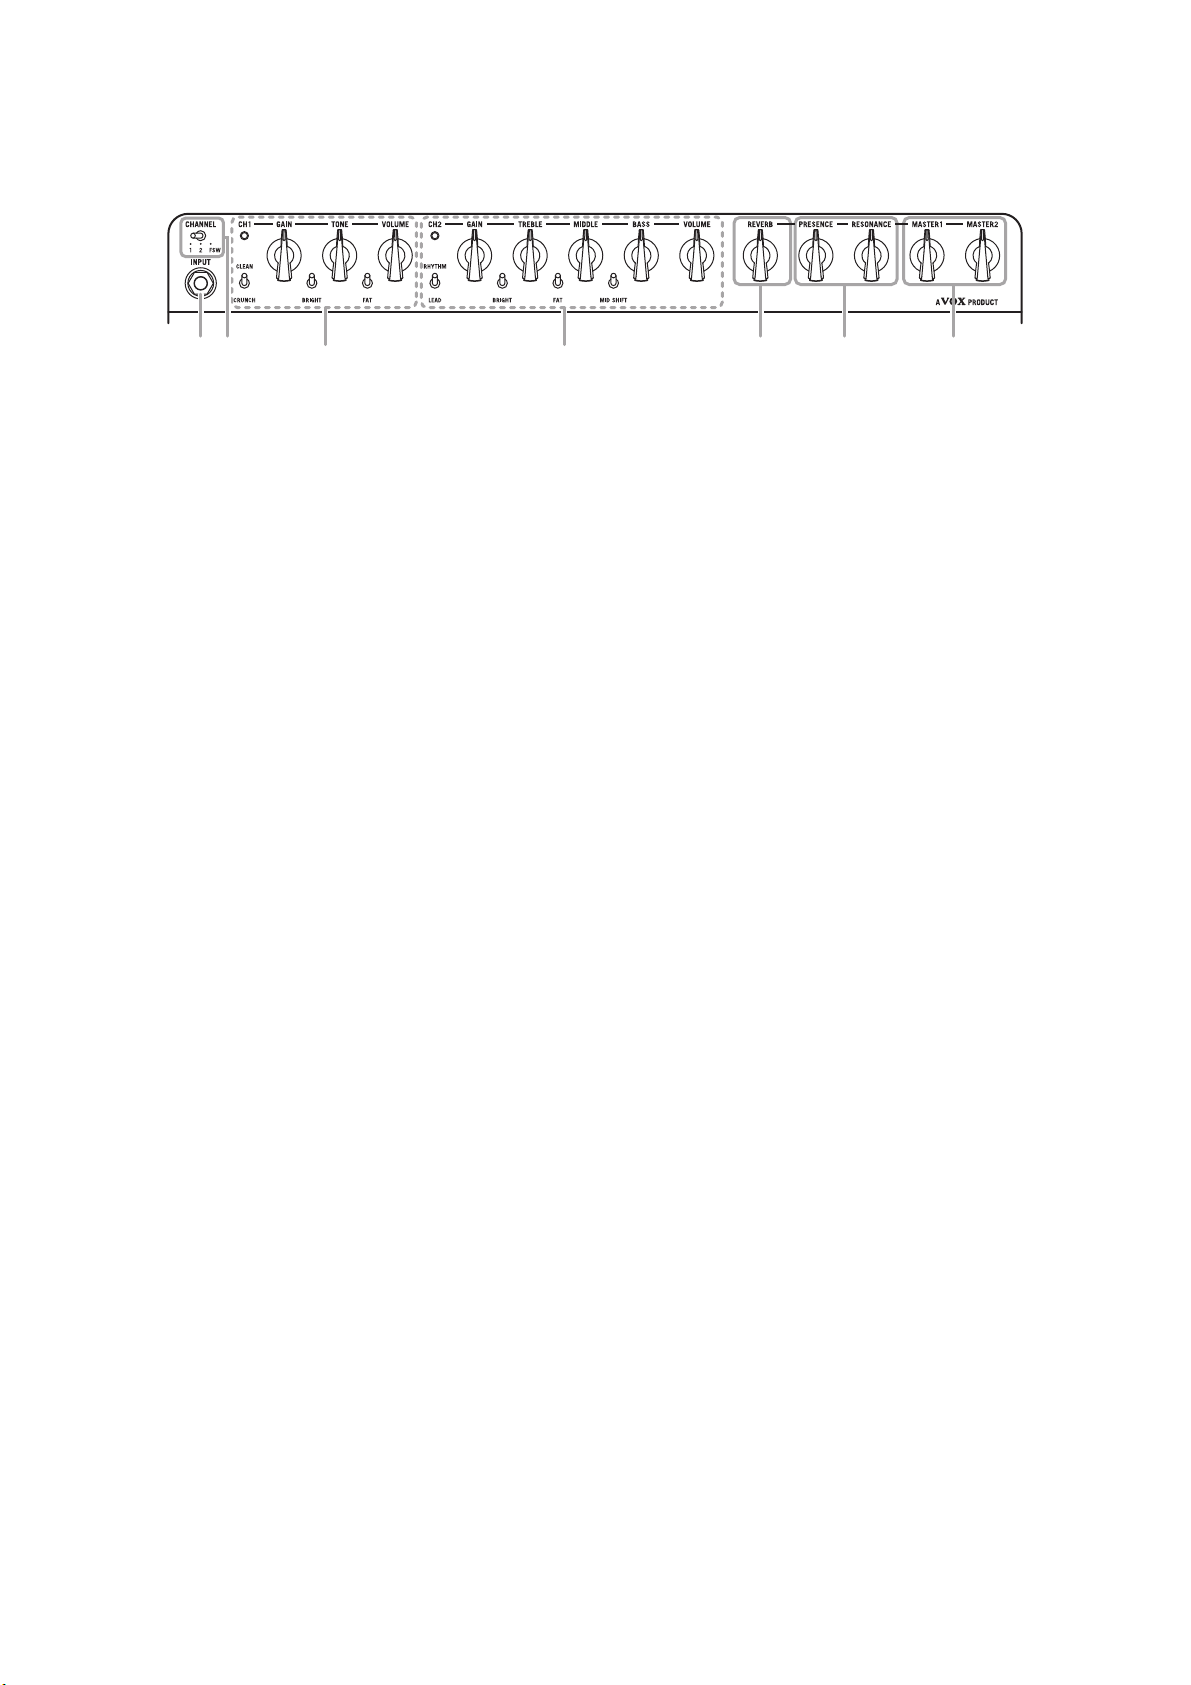
Front Panel
12 2-1 2-2 34 5
1. INPUT jack
Plug your guitar in here, ensuring you use a shielded guitar cable.
2. Channels
This amp has 2 channels, and each channel has 2 modes.
Channels can be selected with the CHANNEL switch.
Please set this switch to FSW position, to enable the optional foot switch.
2-1. CH1
CH1 has 2 modes, CLEAN and CRUNCH.
This channel has GAIN, TONE and VOLUME controls.
In addition, you can tweak your tone with the versatility of the BRIGHT and FAT switches.
2-2. CH2
CH2 has 2 modes, RHYTHM and LEAD.
This channel has GAIN, TREBLE, MIDDLE, BASS and VOLUME controls.
In addition, you can tweak your tone with the versatility of the BRIGHT, FAT and MID-SHIFT switches.
3. REVERB
This amp has a high quality digital reverb inside.
This can be switched On or Off by the foot switch.
4. PRESENCE, RESONANCE
These controls allow more detailed voicing of your tone.
PRESENCE controls the high-end frequency, whereas RESONANCE controls the low-end frequency.
5. MASTER1, 2
This amp has 2 MASTER volume controls, that can be switched by the foot switch.
Please use MASTER1 as a normal MASTER volume.
MASTER2 can be selected only when you connect a foot switch.
Setting this higher will push the Nutube in the power amp, into greater saturation.
6
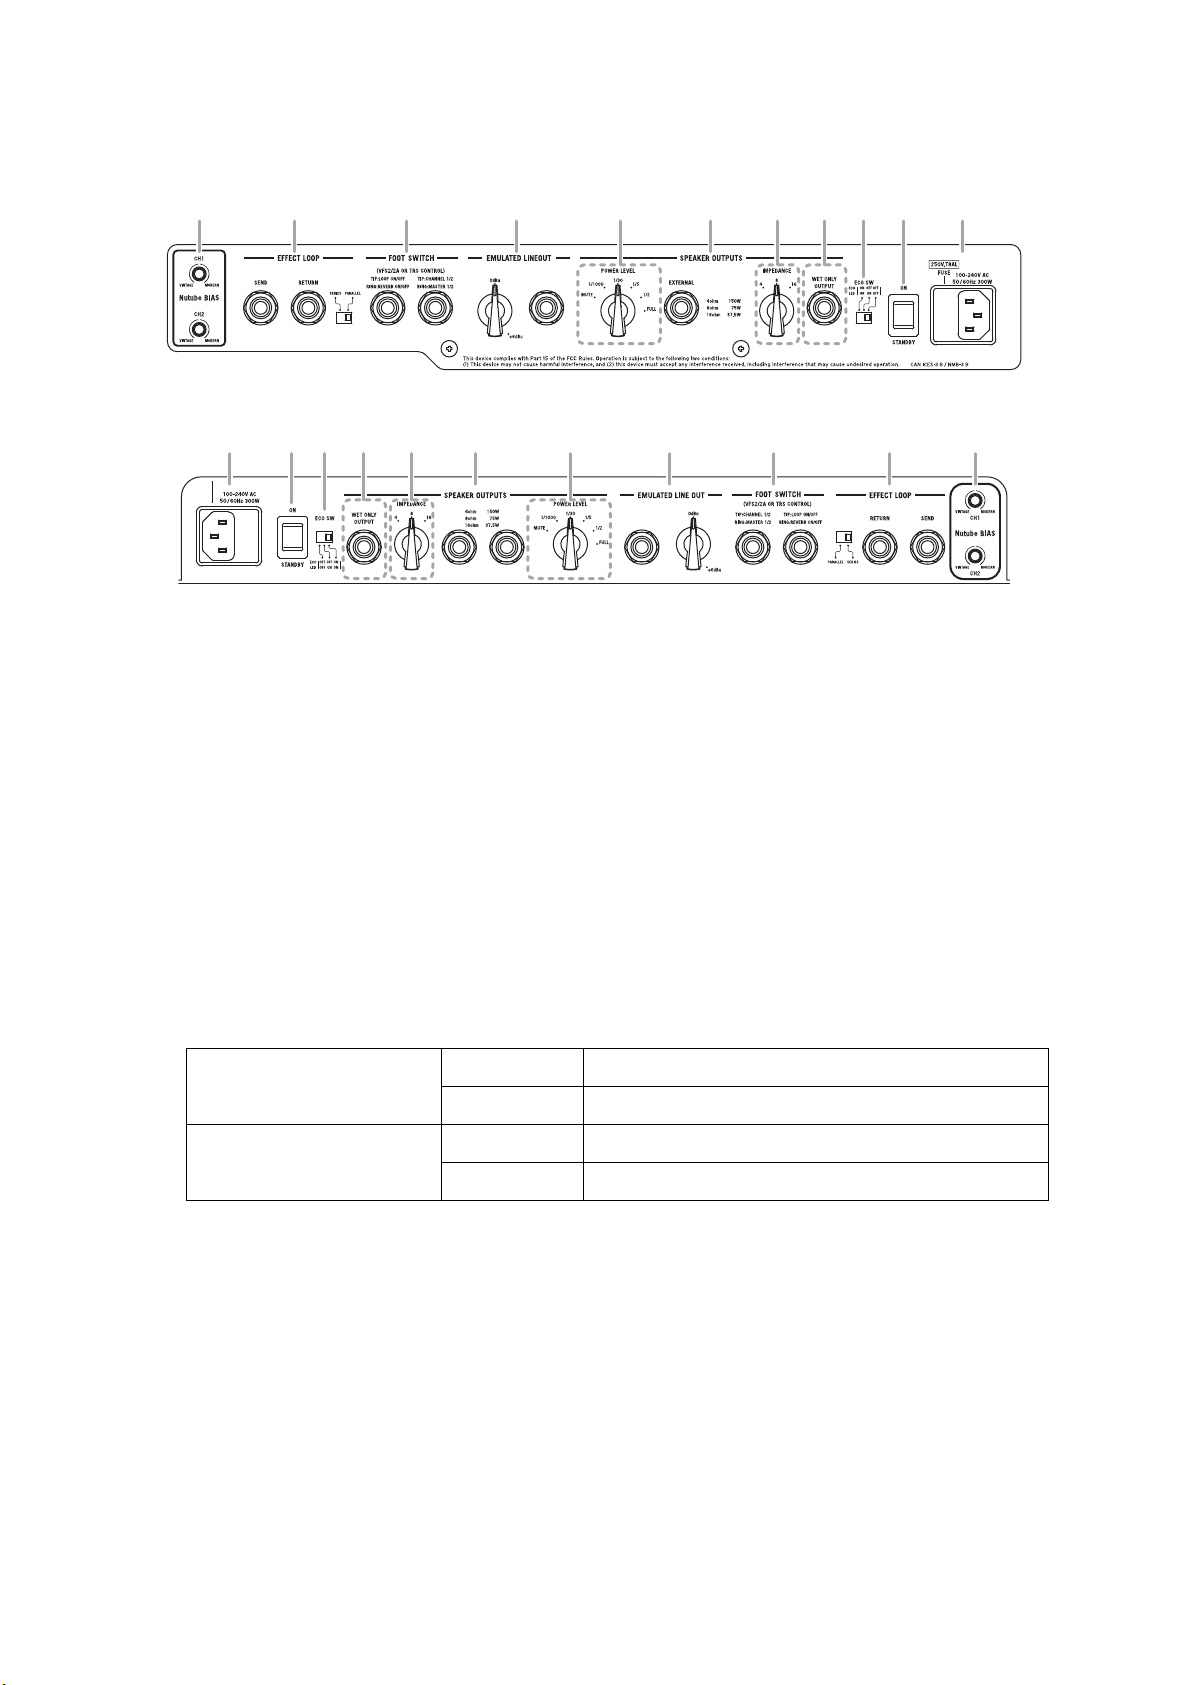
Rear Panel
1
8
7
2
5-3
3
5-2
5
4
5-1
1. Nutube BIAS
You can control the bias voltage of Nutube for CH1 and CH2 individually.
VINTAGE:
your tone feel a little more unstable (like the old days).
MODERN:
Decreasing the voltage makes the amp sound like a vintage guitar amp, this sometimes makes
Increasing the voltage creates more gain, and makes its tone smoother.
4
55-1
5-2
5-3
3
667
2
8
MVX150C1
1
MVX150H
2. EFFECT LOOP
This has SEND and RETURN jacks, and a SERIES/PARALLEL switch.
This can be switched On or Off by the foot switch.
3. FOOTSWITCH
There are 2 foot switch jacks to switch the setting of the amplifier as below.
Optional VFS2 or VFS2A is accepted.
TIP!
You can also use a commercially-available open/close type footswitch with a TRS standard phone jack
connection.
TIP: LOOP ON/OFF
RING: REVERB ON/OFF
TIP: CHANNEL 1/2
RING: MASTER 1/2
Switch 1 Switches the EFFECT LOOP on/off.
Switch 2 Switches the REVERB on/off.
Switch 1 Switches between CHANNEL 1 and CHANNEL 2.
Switch 2 Switches between MASTER1 and MASTER2.
4. EMULATED LINE OUT
This output has a built-in analog speaker cabinet emulation circuit. This sounds like you’re using a wellknown dynamic microphone in front of your speaker cabinet.
5. SPEAKER OUTPUTS
MVX150C1 has 1 EXTERNAL speaker jack. Use this jack to use another speaker cabinet. Connecting to this
jack disables the internal speaker. Minimum load is 4ohms.
MVX150H has 2 parallel speaker jacks.
With the MVX150H, you can connect two speakers at the same time, for a parallel connection. When doing
so, make sure that the combined impedance is not less than 4 ohms. When connecting two of the same
speakers, use speaker cabinets of 8 ohms or more on each.
7

5-1. POWER LEVEL
This 6 way selector decides the total output volume. MUTE position disables the power amp, so that you can
do a silent recording with the EMULATED LINE OUT.
5-2. IMPEDANCE
Please select the same value as the impedance of the speaker cabinet you use.
(MVX150C1 internal speaker is 4ohm)
5-3. WET ONLY SPEAKER OUTPUT
You can get only the WET signal from this speaker output, when using EFFECT LOOP or REVERB. Connecting to this jack makes the standard speaker output DRY automatically, so that you can achieve the professional DRY/WET setup very easily.
This output is independent from the standard speaker output. Minimum load is 4ohms.
If you use the WET ONLY OUTPUT, the total output wattage will be switched automatically.
For example, when you plug the speaker cabinet into both DRY and the WET ONLY OUTPUT, the maximum
output wattage will be limited to 75W for DRY, and 75W for WET.
NOTE!
Speaker jack does not need to be used if not required. This won’t harm the amp.
NOTE!
This is BTL (Bridge-Tied-Load) output. This means both tip and sleeve is the signal line, and sleeve is
not grounded. Only use this jack for connecting speakers to MVX150. Connecting anything else may result in
damages to MVX150.
WARNING!
a) Don’t connect a speaker whose rated input capacity is less than the total output wattages. The speaker
To ensure that your system works correctly, you must observe the following points.
may be destroyed if you ignore this caution—not recommended!
b) You must use a speaker cable to connect an external speaker. Don’t use a shielded cable like the one
you use to connect a guitar to an amp.
c) You must turn off the power before connecting the speaker cable. Connecting the cable while the power
is turned on may damage your amp.
NOTE!
It is recommended that all audio cables (with the exception of the speaker lead), used to connect to
the MVX150C1/MVX150H are of a high quality, screened type. These should not exceed 10 metres in length.
6. ECO switch
This switch decides the setting of ECO mode and LED mode.
ECO=ON enables the auto power-off function.
LED=ON turns the LED illumination on.
7. Power switch
Hold this switch, to turn the amp ON, or STANDBY (OFF).
8. MAINS INPUT
Connect the included power cord here.
WARNING!
WARNING!
other issues.
Be sure to plug the power cord into an outlet of the appropriate voltage.
Use only the included power cord. Using any different power cord may cause malfunctions or
8

Auto power-off function
The amp has an auto power-off function. With this function, the amp is automatically turned off if there is no output
for approximately 30 minutes.
When the amp is turned off, it is not turned back on, even if a control is operated. After the amp is turned off, turn it
on again.
NOTE!
When the input level is extremely low or there is very little change in the sound, the auto power-off function
may be activated. In addition, depending on the settings and environment, the amp may interpret noise as input,
even if the guitar is not being played.
TIP!
As the factory default setting, the auto power-off function is enabled (ECO SW=ECO: ON). The function can
be disabled by moving the ECO switch to the ECO: OFF position.
Over load protection function
This amp has an over load protection function for its safety.
The power amp will be disabled, if the speaker output was shorted, or had some trouble with an impedance of the
speaker cabinet you connect. Moreover, the amp will be shut down when the total output wattage exceeds 150W.
With these cases, please check the connection or the impedance of the speaker cabinet you connect, and re-start
the amp.
Specifications
Input/Output jacks:
Power amp output:
Speaker: MVX150C1: 1x 12" 4ohm Celestion G12H-150 Redback
Current consumption:
Dimensions (WxDxH):
Weight:
Included items:
Options: VFS2A Footswitch, VFS2 Footswitch
* Specifications and appearance are subject to change without notice for improvement.
INPUT, SEND, RETURN, EMULATED LINE OUT, SPEAKER OUTPUT
(MVX150H: 2x SPEAKER OUTPUT, MVX150C1: EXTERNAL), WET ONLY
SPEAKER OUTPUT
Maximum approx. 150W RMS@4ohms, 75W RMS@ 8ohms, 37.5W
RMS@16ohms
300W
MVX150C1: 520 mm x 260 mm x 535 mm / 20.47" x 10.24" x 21.06"
MVX150H: 520 mm x 219 mm x 194 mm / 20.47" x 8.62" x 7.64"
MVX150C1: 19.4 kg / 42.77 lbs.
MVX150H: 7.1 kg / 15.65 lbs.
Power cord, Owner’s manual
9
CONSIGNES IMPORTANTES DE SÉCURITÉ
1) Veuillez lire ces consignes.
2) Conservez ces consignes.
3) Tenez compte de tous les avertissements.
4) Suivez toutes les instructions.
5) N’utilisez pas ce produit à proximité d’eau.
6) Nettoyez le produit avec un chiffon sec uniquement.
7) N’obstruez aucun orifice d’aération. Installez le produit
conformément aux consignes du fabricant.
8) Ne l’installez pas à proximité de sources de chaleur
comme des radiateurs, des bouches d’air chaud, des
poêles ou d’autres appareils générateurs de chaleur
(amplificateurs compris).
Ne supprimez pas la sécurité offerte par la fiche polarisée
9)
ou dotée d’une broche de terre. Une fiche polarisée
dispose de deux lames dont une plus large que l’autre. Une
fiche avec broche de terre dispose de deux lames (ou
broches) et d’une broche de terre. La lame plus large ou la
troisième broche est conçue pour votre sécurité. Si la fiche
fournie ne s’adapte pas à votre prise de courant, consultez
un électricien pour faire remplacer cette ancienne prise.
10) Protégez le cordon d’alimentation pour éviter qu’il ne soit
piétiné ou abîmé notamment à la hauteur des fiches, des
rallonges et au point de connexion du produit.
11) Utilisez exclusivement des fixations ou accessoires
spécifiés par le fabricant.
12)Utilisez cet appareil exclusivement avec
un chariot, stand, pied, support ou table
du type spécifié par le constructeur ou
livré avec l’appareil. Si vous utilisez un
chariot, soyez prudent lors de son
déplacement afin d’éviter que le produit
ne bascule et ne blesse quelqu’un.
13) Débranchez cet appareil en cas d’orage ou s’il doit rester
inutilisé durant une période assez longue.
14) Pour tout dépannage ou entretien, veuillez consulter un
service ou un technicien qualifié. Il est impératif de faire
appel à un technicien qualifié si l’appareil a été endommagé
d’une quelconque façon, notamment, si le cordon
d’alimentation ou la fiche est endommagée, si du liquide
s’est renversé ou si des objets sont tombés dans l’appareil,
si l’appareil a été exposé à la pluie ou à l’humidité, s’il ne
fonctionne plus normalement ou s’il est tombé.
• AVERTISSEMENT—Ce produit doit être branché à une
prise secteur disposant d’une connexion de sécurité à la
terre.
• Un produit branché au secteur ne peut pas être exposé à
des gouttes ou des éclaboussures. Ne placez aucun
conteneur de liquide (vase, verre) sur le produit.
• Le fait de couper l’interrupteur n’isole pas complètement
le produit de la source de courant.
• Maintenez un accès facile à la prise d’alimentation.
N’installez pas ce produit trop loin d’une prise secteur et/
ou d’un multiprise.
• N’installez pas ce produit dans un espace confiné comme
un flightcase ou autre meuble de ce type.
• Une pression sonore excessive en provenance
d’oreillettes ou d’un casque peut entraîner une perte
auditive.
• Cet instrument est conçu pour être utilisé dans des
régions au climat tempéré et ne convient pas pour les
pays au climat tropical.
• Veillez à ne jamais bloquer les orifices de ventilation en
les couvrant d’objets tels que des journaux, nappes,
rideaux, etc.
• Ne placez aucune source de flamme nue, telle qu’une
bougie allumée, sur l’instrument.
Le symbole d’éclair dans un triangle
équilatéral est destiné à avertir l’utilisateur de
la présence d’une tension dangereuse non
isolée au sein du produit. Cette tension est
suffisante pour constituer un risque
d’électrocution.
Le point d’exclamation dans un triangle
équilatéral avertit l’utilisateur de la présence
d’importantes consignes de manipulation ou
d’entretien dans la documentation
accompagnant ce produit.
Note concernant les dispositions (Seulement EU)
Quand un symbole avec une poubelle barrée d’une
croix apparait sur le produit, le mode d’emploi, les
piles ou le pack de piles, cela signifie que ce
produit, manuel ou piles doit être déposé chez un
représentant compétent, et non pas dans une
poubelle ou toute autre déchetterie conventionnelle.
Disposer de cette manière, de prévenir les
dommages pour la santé humaine et les dommages
potentiels pour l’environnement. La bonne méthode
d’élimination dépendra des lois et règlements applicables
dans votre localité, s’il vous plaît, contactez votre
organisme administratif pour plus de détails. Si la pile
contient des métaux lourds au-delà du seuil réglementé, un
symbole chimique est affiché en dessous du symbole de la
poubelle barrée d’une croix sur la pile ou le pack de piles.
* Tous les noms de produits et de sociétés sont des marques
commerciales ou déposées de leur détenteur respectif.
10

Introduction
Merci d’avoir choisi l’amplificateur de guitare MVX150C1/MVX150H de VOX. Afin de pouvoir exploiter au mieux
toutes les possibilités offertes par l’amplificateur, veuillez lire attentivement ce manuel.
Caractéristiques principales
À propos de Nutube
Nutube désigne une nouvelle lampe développée par KORG INC. et Noritake Itron Corporation, et mettant à profit la
technologie des afficheurs fluorescents.
Tout comme les lampes conventionnelles, la Nutube comporte une anode, une grille et un filament, et fonctionne
comme une triode à part entière. En outre, elle produit la réponse et les mêmes riches harmoniques typiques des
lampes conventionnelles.
11
 Loading...