

Page 1
Page 2
English - 1 -
Safety Precautions
Please read these instructions fully
before installing or operating.
Preparation
Place the device on a solid even surface. For
ventilation, leave a free space of at least 10 cm
all around the set. To prevent any fault and unsafe
situations, do not place any objects on top of
the set. Use this device in moderate climates.
Operation temperature and operation humidity:
0ºC up to 40ºC, 85% rel. humidity max. (not blocking
ventilation openings).
Intended Use
This device is used to receive and display TV
programmmes. The different connection options
make an additional expansion of the reception and
display sources possible (various external devices).
This device is only suitable for the operation in
dry interiors. This appliance is intended solely
for private domestic use and may not be used for
industrial and commercial purposes. We exclude
liability in principle, if the device is not used as
intended, or unauthorized modications have been
made. To operate your LED TV in extreme ambient
conditions may cause the damage of the device.
WARNING: Never let people (including
children) with physical, sensory or mental
abilities or lack of experience and / or knowledge
unsupervised use electrical device!
Children may not recognize dangers right!
The swallowing of batteries can be fatal. Keep
batteries always out of reach of small children.
If a battery is swallowed, immediately seek
medical attention. Keep the packaging lms out
of reach of children. Risk of suffocation.
Power source
• The TV should be operated only from a 220-240 V
AC, 50 Hz outlet.
• Warning: Do not leave your TV in standby or
operating mode when you leave your house.
Positioning the TV
• For ventilation, please leave a clear space of at least
10cm all around the TV.
• Do not block the ventilation openings.
• Do not place the TV on sloping or unstable surfaces,
the TV may tip over.
• To prevent damage to the TV, do not place any
objects on top of the TV.
• Only use the TV in moderate climates.
Contents
Safety Precautions ................................................. 1
Accessories included .............................................. 3
Environmental Information ..................................... 3
TV - Features ......................................................... 3
Viewing the TV ...................................................... 4
TV Control button & Operation ............................... 4
Viewing remote control ........................................... 5
Using a Conditional Access Module ....................... 7
Standby Notications .............................................. 7
Installing the Batteries to the Remote..................... 8
Connect Power & Antenna/Cable ........................... 8
Switching On/Off ..................................................... 8
First Time Installation.............................................. 8
Media Playback via USB Input ............................. 10
Changing Image Size: Picture Formats ................ 10
Using the Channel List ......................................... 10
Quick Menu ...........................................................11
Menu Features and Functions .............................. 12
Menu Features and Functions .............................. 13
Menu Features and Functions .............................. 14
Electronic Programme Guide (EPG) .................... 15
Recording a Programme ...................................... 15
Timeshift Recording ............................................. 16
Instant Recording ................................................. 16
Watching Recorded Programmes ....................... 16
Recording Conguration ....................................... 16
Connectivity Functions ......................................... 16
Connectivity Troubleshooting ............................... 19
Teletext ................................................................. 22
Software Upgrade................................................. 22
Troubleshooting & Tips ......................................... 23
Getting Started with Skype ................................... 25
PC Typical Display Modes ................................... 30
Specications .............................................................31
Licence Notications............................................. 31
Supported File Formats for USB Media Browser . 32
Supported DVI Resolutions .................................. 33
Appendix: Nero MediaHome Installation .............. 34
Page 3

English - 2 -
Power cord and plug
• The power cord plug should be easily accessible.
In case of storms and lightning, when going on
holiday, or when the TV is not used for a long period
of time disconnect the power cord from the mains
power socket.
• The mains plug is used to disconnect TV set from
the mains and therefore it must remain readily
operable.
• Do not place the TV, furniture, etc. on the power
cord or pinch the cord.
• Handle the power cord by the plug, do not unplug
the TV by pulling the power cord.
• Never touch the power cord/plug with wet hands as
this could cause a short circuit or electric shock.
• Never make a knot in the power cord or tie it with
other cords.
• Power cords should be placed in such a way that
they are not likely to be stepped on or driven over.
• A damaged power cord/plug can cause re or give
you an electric shock. When damaged it must be
replaced, this should only be done by qualied
personnel.
Moisture and Water
• Do not use this TV in a humid or damp place (avoid
bathrooms, the sink in the kitchen, and near the
washing machine).
• Do not expose this TV to rain or water, as this may
be dangerous.
• Do not place objects lled with liquids, such as
ower vases, on top of the TV. Avoid from dripping
or splashing.
• If any solid object or liquid falls into the cabinet,
unplug the TV and have it checked by qualied
personnel before operating it any further.
Ventilation
• The slots and openings on the TV set are intended
for ventilation and to ensure reliable operation.
• To prevent overheating, these openings must not be
blocked or covered in anyway.
Heat sources and Flames
• Do not expose the TV to direct sunlight
or other heat sources.
• The TV should not be placed near to
open ames and sources of intense
heat such as an electric heater.
• Ensure that no open ame sources, such as lighted
candles, are placed on top of the TV.
Headphone Volume
• Excessive sound pressure from
earphones and headphones can cause
hearing loss, please take care.
Wall Mounting (optional)
• To prevent injury, this TV must be securely attached
to the wall in accordance with the installation
instructions (if the option is available).
Cleaning
• Before cleaning, unplug the TV from the wall
socket.
• Do not use liquid or aerosol cleaners. Only use a
soft, dry cloth.
Page 4
English - 3 -
TV - Features
• Remote controlled colour LED TV.
• Fully integrated digital/cable TV (DVB-
T/C).
• DVB-T2 Compliant.
• HDMI connectors for digital video and audio.This
connection is also designed to accept high denition
signals.
• USB input.
• Programme recording.
• Programme timeshifting.
• 1000 programmes.
• OSD menu system.
• Scart socket for external devices (such as video, video
games, audio set, etc.).
• Stereo sound system.
• Teletext, fastext, TOP text.
• Headphone connection.
• Automatic programming system.
• Forward or backward manual tuning.
• Automatic power down after up to six hours.
• Sleep timer.
• Child lock.
• Automatic sound mute when no transmission.
• NTSC playback.
• AVL (Automatic Volume Limiting).
• PLL (Frequency Search).
• PC input.
• Plug&Play for Windows 98, ME, 2000, XP, Vista,
Windows 7.
• Game Mode (optional).
• Picture off function.
• Ethernet (LAN) for Internet connectivity and service.
• DLNA.
Environmental Information
This television is designed to consume less energy
to save environment. You not only help to save the
environment but also you can save money by reducing
electricity bills thanks to the energy efciency feauture
of this TV. To reduce energy consumption, you should
take the following steps:
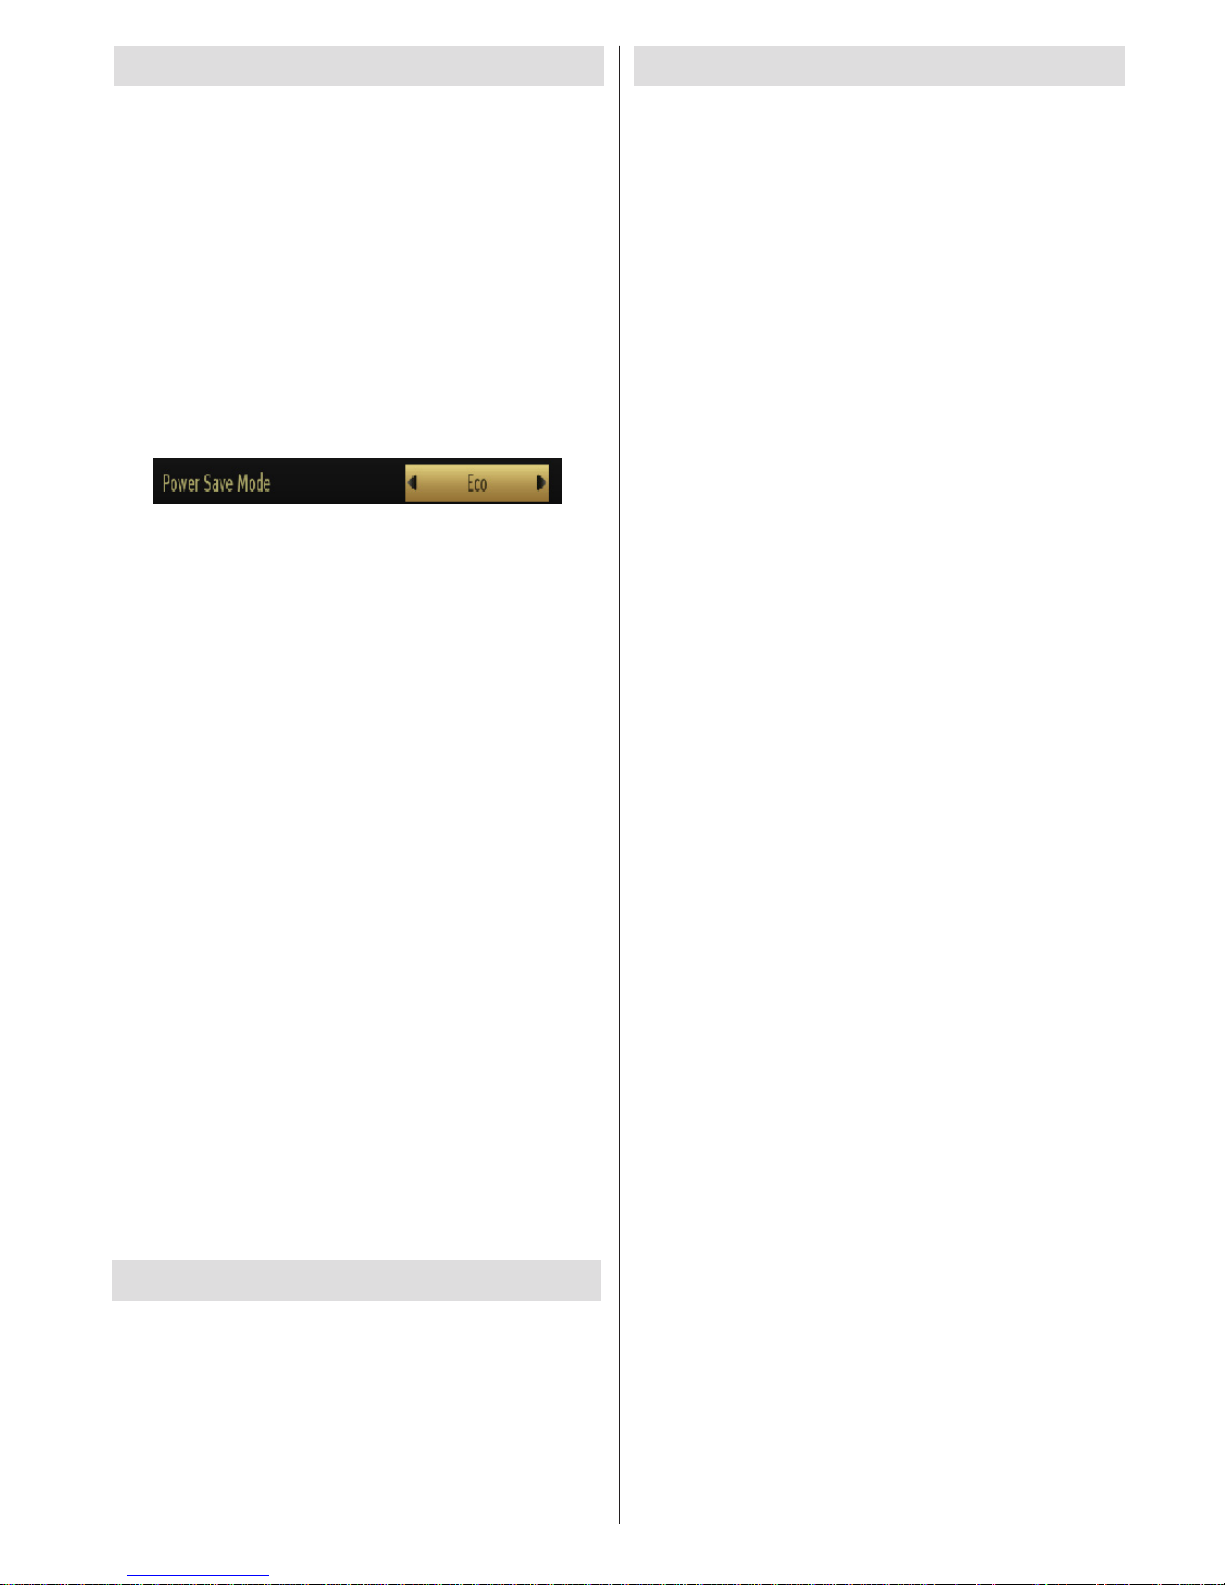
You can use Power Save Mode setting, located in the
Picture Settings menu. If you set Power Save Mode
as Eco, the TV will switch to energy-saving mode
and luminance level of TV set will be decreased to
optimum level. Note that some picture settings will be
unavailable to be changed when the TV is in Power
Save Mode.
If Picture Off is selected, “Screen will be off in 15
seconds.” message will be displayed on the screen.
Select PROCEED and press OK to continue. The
screen will be off in 15 seconds. If you disable Power
Save Mode, Picture mode will be automatically set
to Dynamic.
When the TV is not in use, please switch off or
disconnect the TV from the mains plug. This will also
reduce energy consumption.
Disconnect power when going away for longer time.
It is highly recommended to activate Power Save Mode
setting to reduce your annual power consumption. And
also it is recommended to disconnect the TV from the
mains plug to save energy more when you do not use.
Please helps us to save environment by following
these steps.
Repair Information
Please refer all servicing to qualied personnel. Only
qualied personnel must repair the TV. Please contact
your local dealer, where you have purchased this TV
for further information.
Accessories included
Remote Control
Batteries: 2 x AAA
Instruction Book
Side AV Connection Cable
Nero Media Home CD
Page 5
English - 4 -
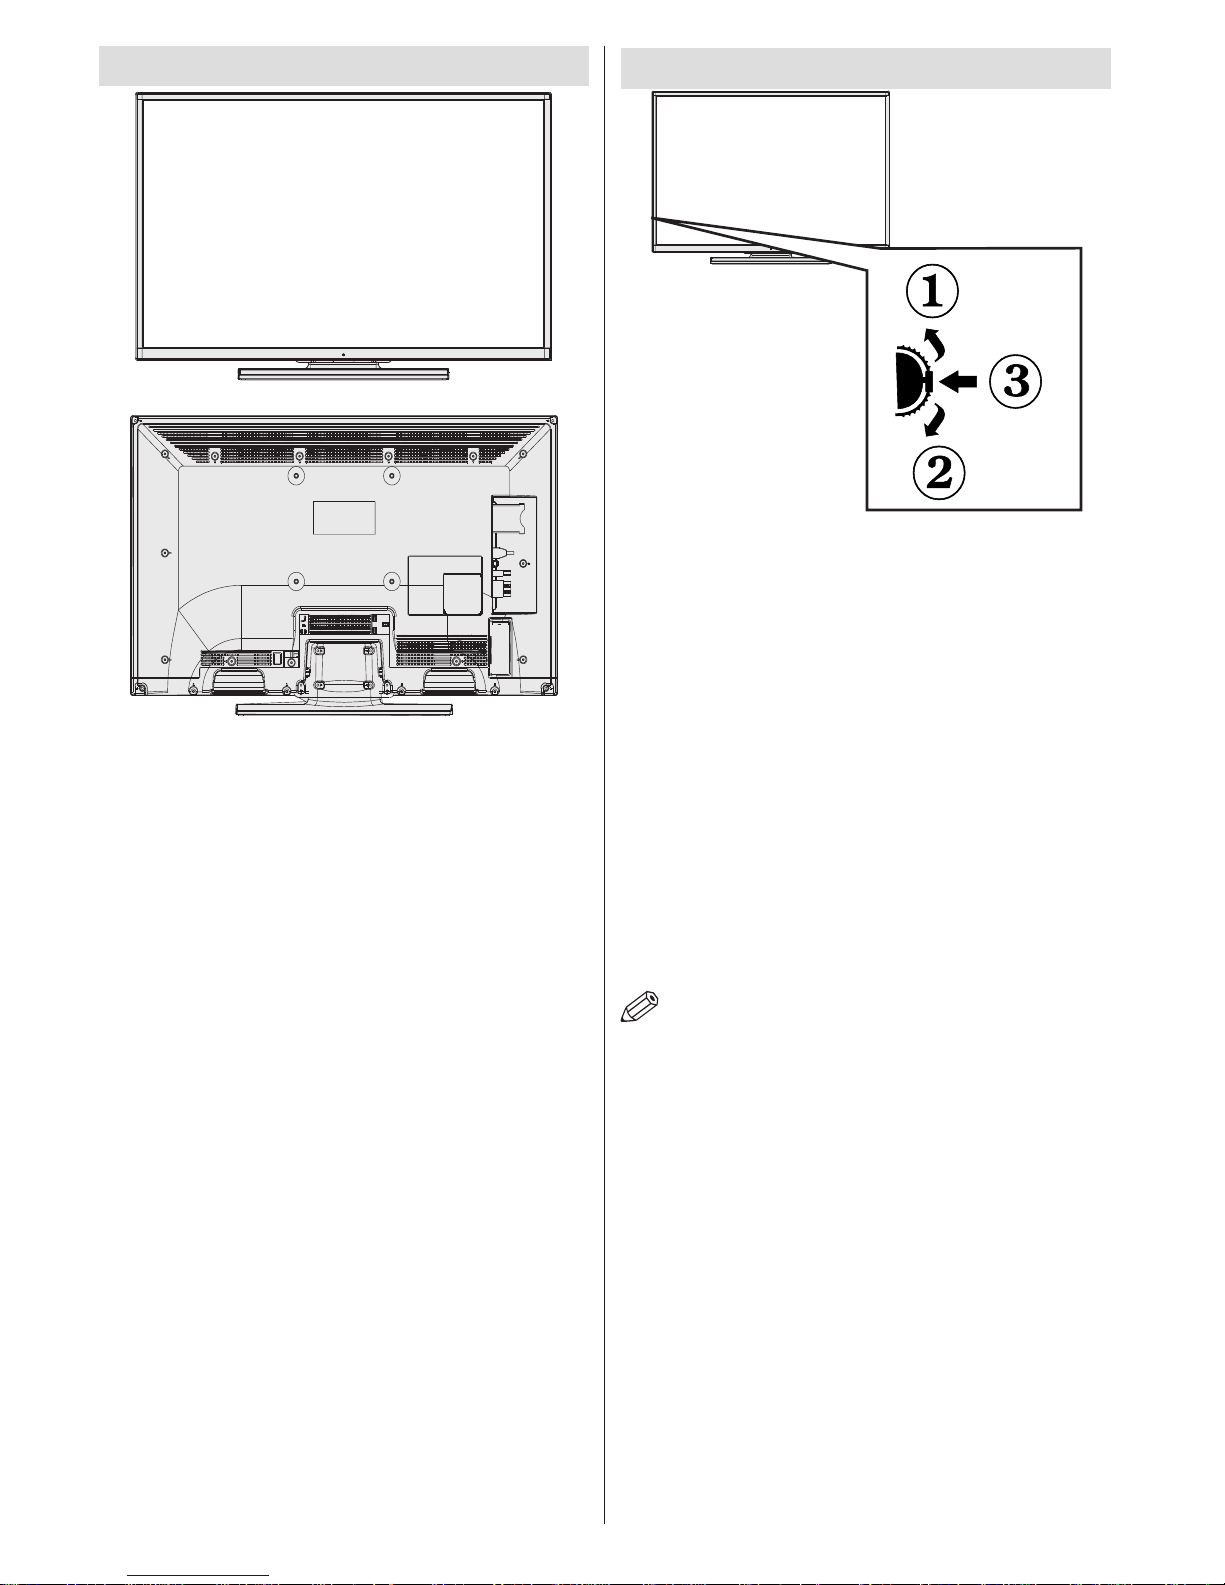
Viewing the TV
TV Control button & Operation
1.Up direction
2. Down direction
3. Programme/Volume / AV / Standby-On selection switch
The Control switch allows you to control the Volume/
Programme/ Source and Standby-On functions of the TV.
To change volume: Increase the volume by pushing the button
up. Decrease the volume by pushing the button down.
To change channel: Press the middle of the button, the
channel information banner will appear on screen. Scroll
through the stored channels by pushing the button up or
down
To change source: Press the middle of the button twice, the
source list will appear on screen. Scroll through the available
sources by pushing the button up or down.
To turn the TV off: Press the middle of the button down and
hold it down for a few seconds, the TV will turn into standby
mode.
NOTE: You can move the switch, upward or downward
to change the volume. If you want to change the channel,
press the middle of the switch once (Position 3) and then
move upward or downward. If you press the middle of the
switch once more, the source OSD will be displayed. To select
desired source, move the switch upward or downward and
release. If you press the middle of the switch and hold for a few
seconds, the TV will switch to standby mode. The Main menu
OSD cannot be displayed via the control buttons on the TV.
Page 6
English - 5 -
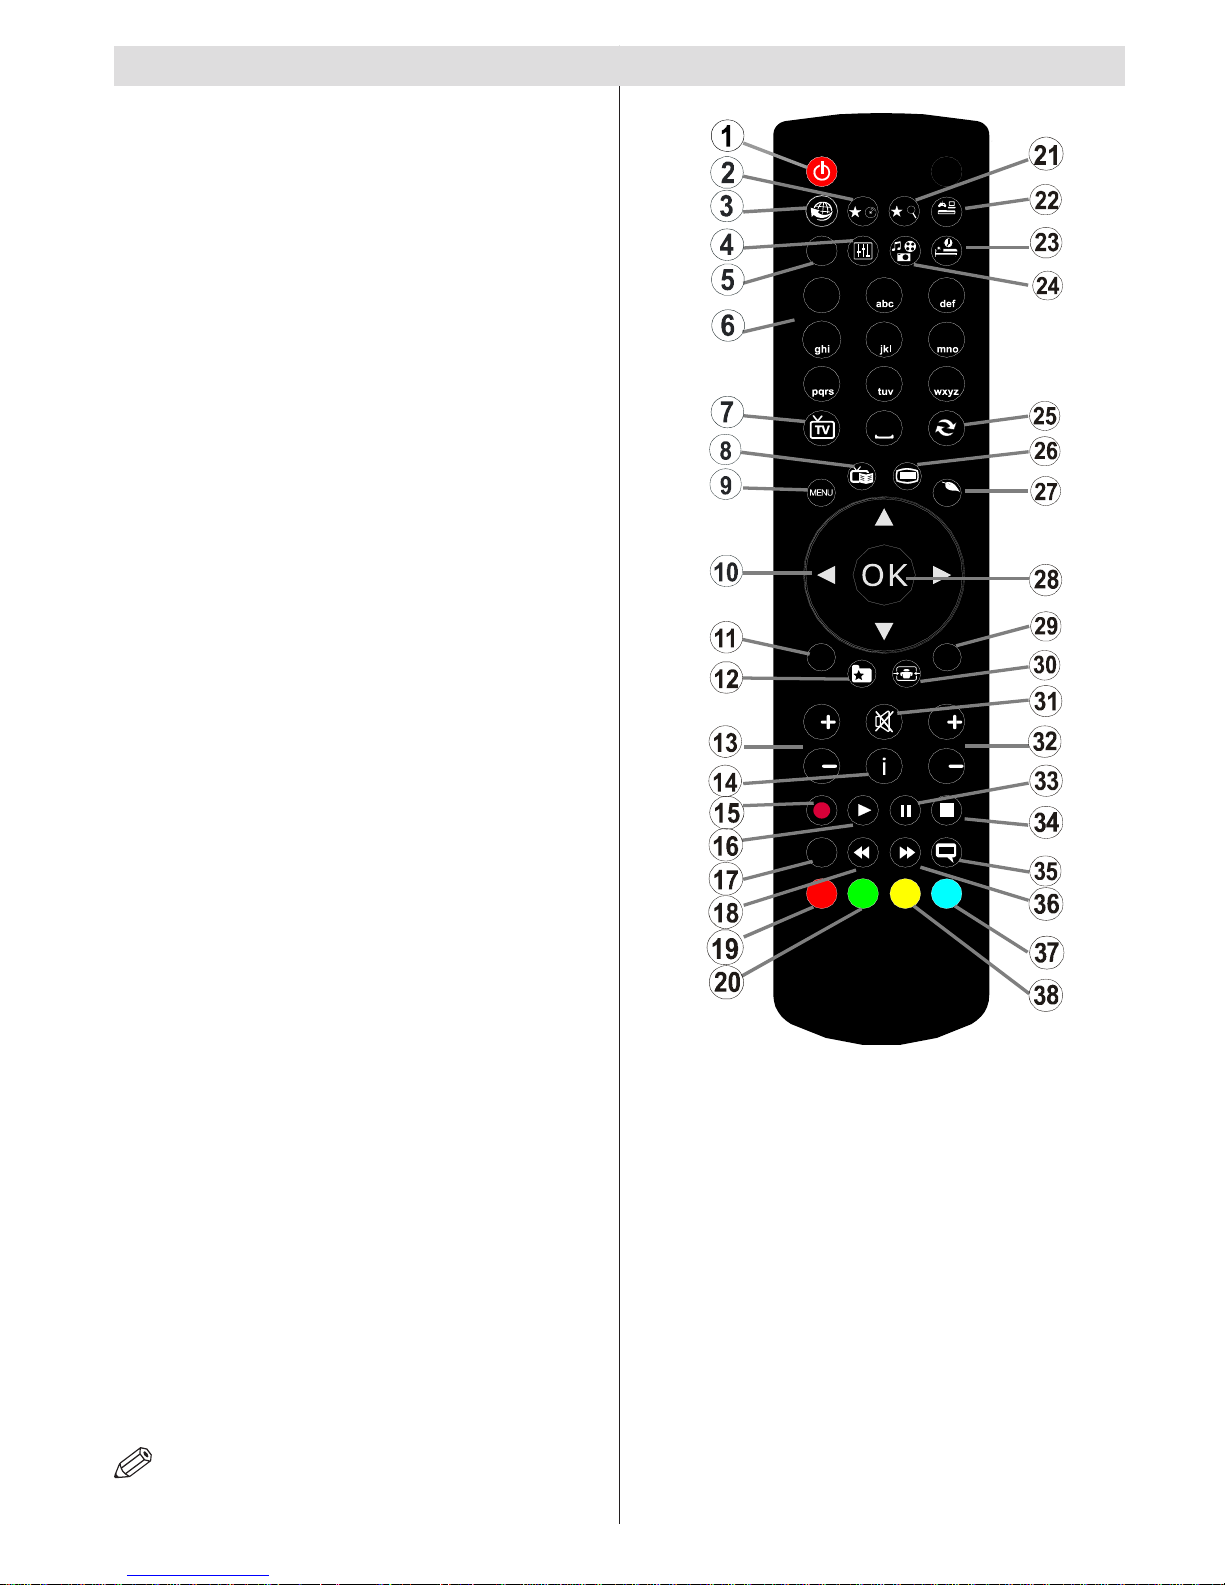
Viewing remote control
NOTE: The Remote Control range is approximately
7m / 23ft.
1. Standby
2. My button 1
3. Internet Portal
4. Equalizer settings mode
5. Picture mode selection
6. Numeric buttons
7. TV Button / Channel list
8. Electronic programme guide
9. Menu
10. Navigation buttons (Up/Down/Left/(Right-TXT
Subpage)
11. Back
12. Favourites
13. Volume Up / Down
14. Info
15. Record programme
16. Play
17. Current language / Mono/Stereo - Dual I-II
18. Rapid reverse
19. Red button
20. Green button
21. My button 2
22. Source selection
23. Sleep timer
24. Media browser
25. Channel swap
26. Teletext
27. Q. Menu
28. OK / Select / Hold (in TXT mode) / Channel List
(DTV mode)
29. Exit / Return / Index page (in TXT mode)
30. Image size
31. Mute
32. Program Up / Down
33. Pause / Timeshift
34. Stop
35. Subtitles
36. Rapid advance
37. Blue button
38. Yellow button
.
ZOOM
REPEAT
LANG.
12
3
4
56
7
8
9
0
V
P
EXIT
BACK
Q.
MENU
.,/@
V
P
SOURCE
1
/2/
PRESETS
Using My button 1 (*)
This button’s main function is to run Youtube link.
However, if you want to change this function, you can
press MY BUTTON 1 for ve seconds when on a desired
source, channel or link, until the “MY BUTTON IS SET”
message is displayed on the screen. This conrms
that the selected MY BUTTON is now associated with
the selected function. Note that if you perform rst time
installation, MY BUTTON 1 will return to its default
function.
Using My Button 2 (**)
Press MY BUTTON 2 for ve seconds when on a
desired source, channel or link, until the “MY BUTTON
IS SET” message is displayed on the screen. This
confirms that the selected MY BUTTON is now
associated with the selected function.
Page 7
English - 6 -
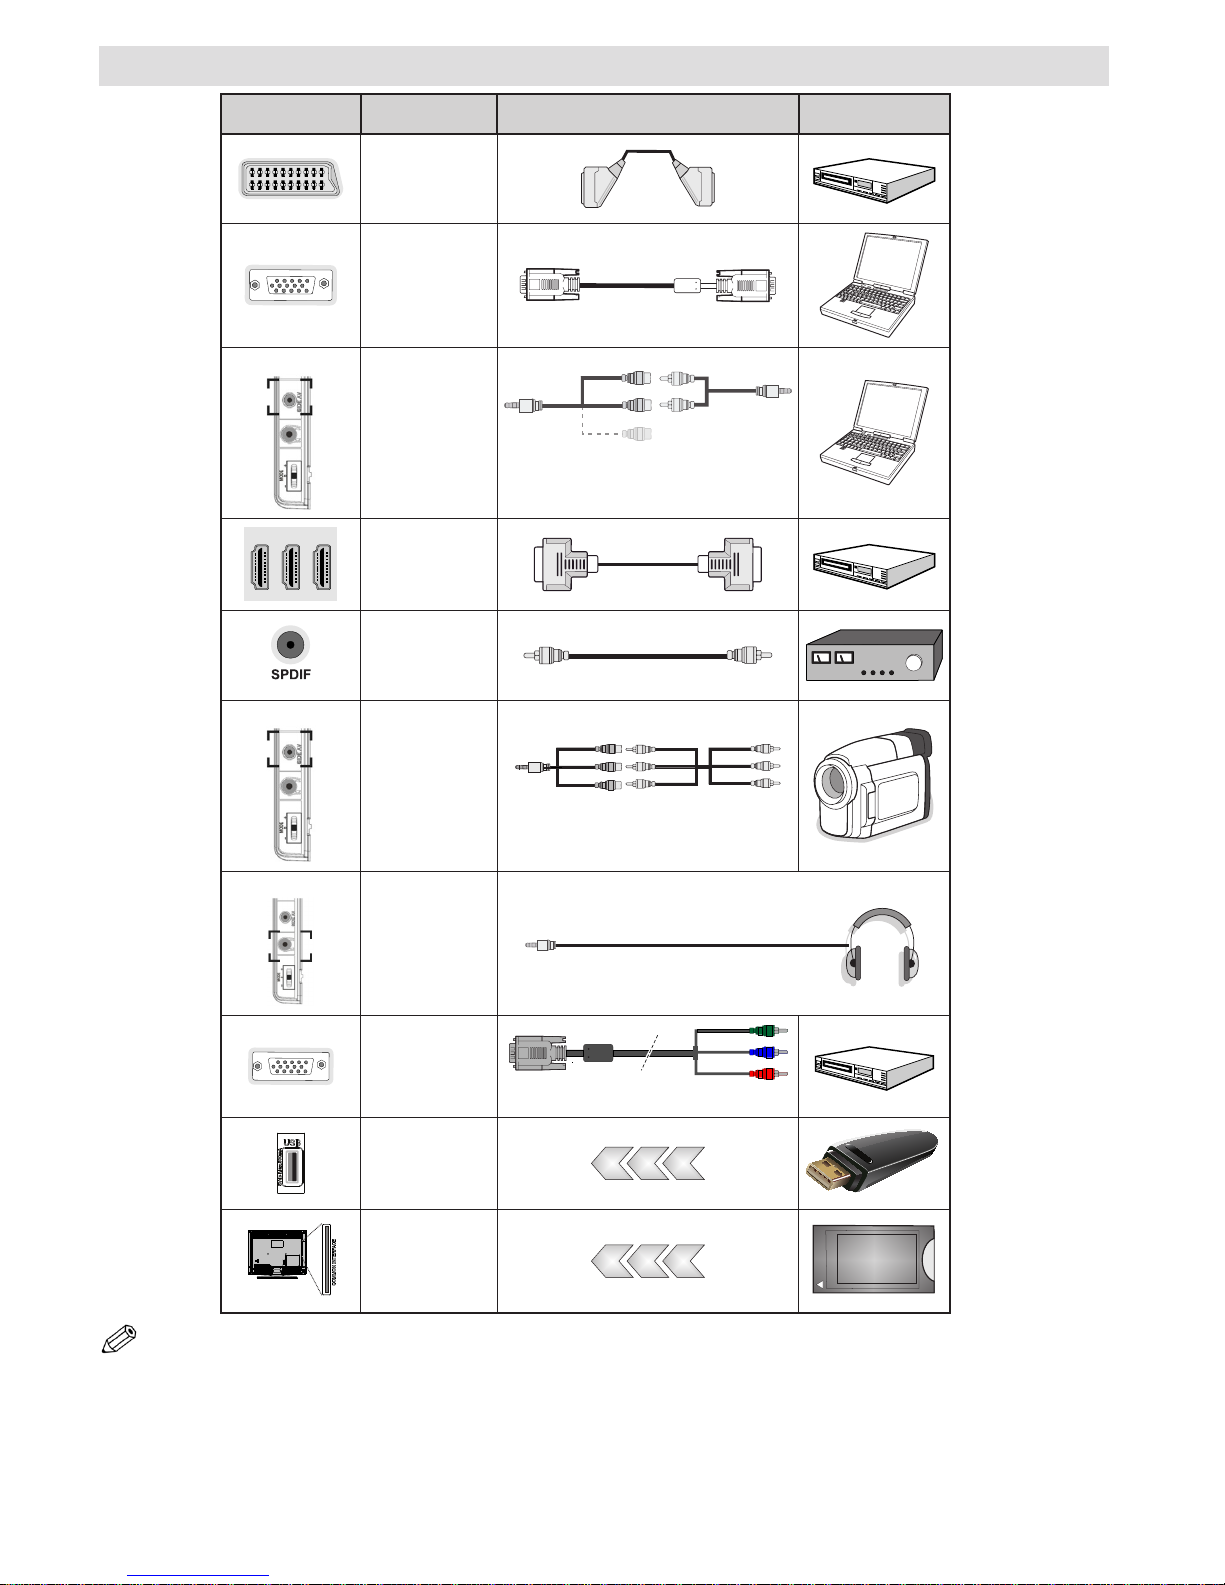
Viewing the Connections
NOTE: When connecting a device via the Side AV input, you must use the supplied connection cables to enable connection.
See the illustrations above. | YPbPr can be used only when you connect a device that has a YPbPr output through the PC
input with YPbPr to PC cable (YPbPr to PC cable is not supplied). When the connection is made, switch to YPbPr source.
To enable PC audio, you will need to use PC/YPBPR AUDIO CONNECTION WHITE & RED inputs. | If an external device is
connected via the SCART socket, the TV will automatically switch to AV mode.| When receiving DTV channels (Mpeg4 H.264)
or while in Media Browser mode, output will not be available via the scart socket. | When using the wall mounting kit (optional),
we recommend that you plug all your cables into the back of the TV before mounting on the wall. | Insert or remove the CI
module only when the TV is SWITCHED OFF. You should refer to the module instruction manual for details of the settings. .
Connector Type Cables Device
Scart
Connection
(back)
VGA
Connection
(back)
SIDE AV
PC/YPbPr
Audio
Connection
(side)
Side Audio/Video
Connection Cable
(Supplied)
PC Audio Cable
(Not supplied)
HDMI
Connection
(back)
SPDIF
Connection
(back)
SIDE AV
Side AV
Connection
(side)
AV Connection Cable
(supplied)
HEADPHONE
Headphone
Connection
(side)
YPbPr Video
Connection
(back)
PC to YPbPr Connection Cable (Not supplied)
USB
Connection
(side)
CI
Connection
(side)
CAM
module
Page 8
English - 7 -
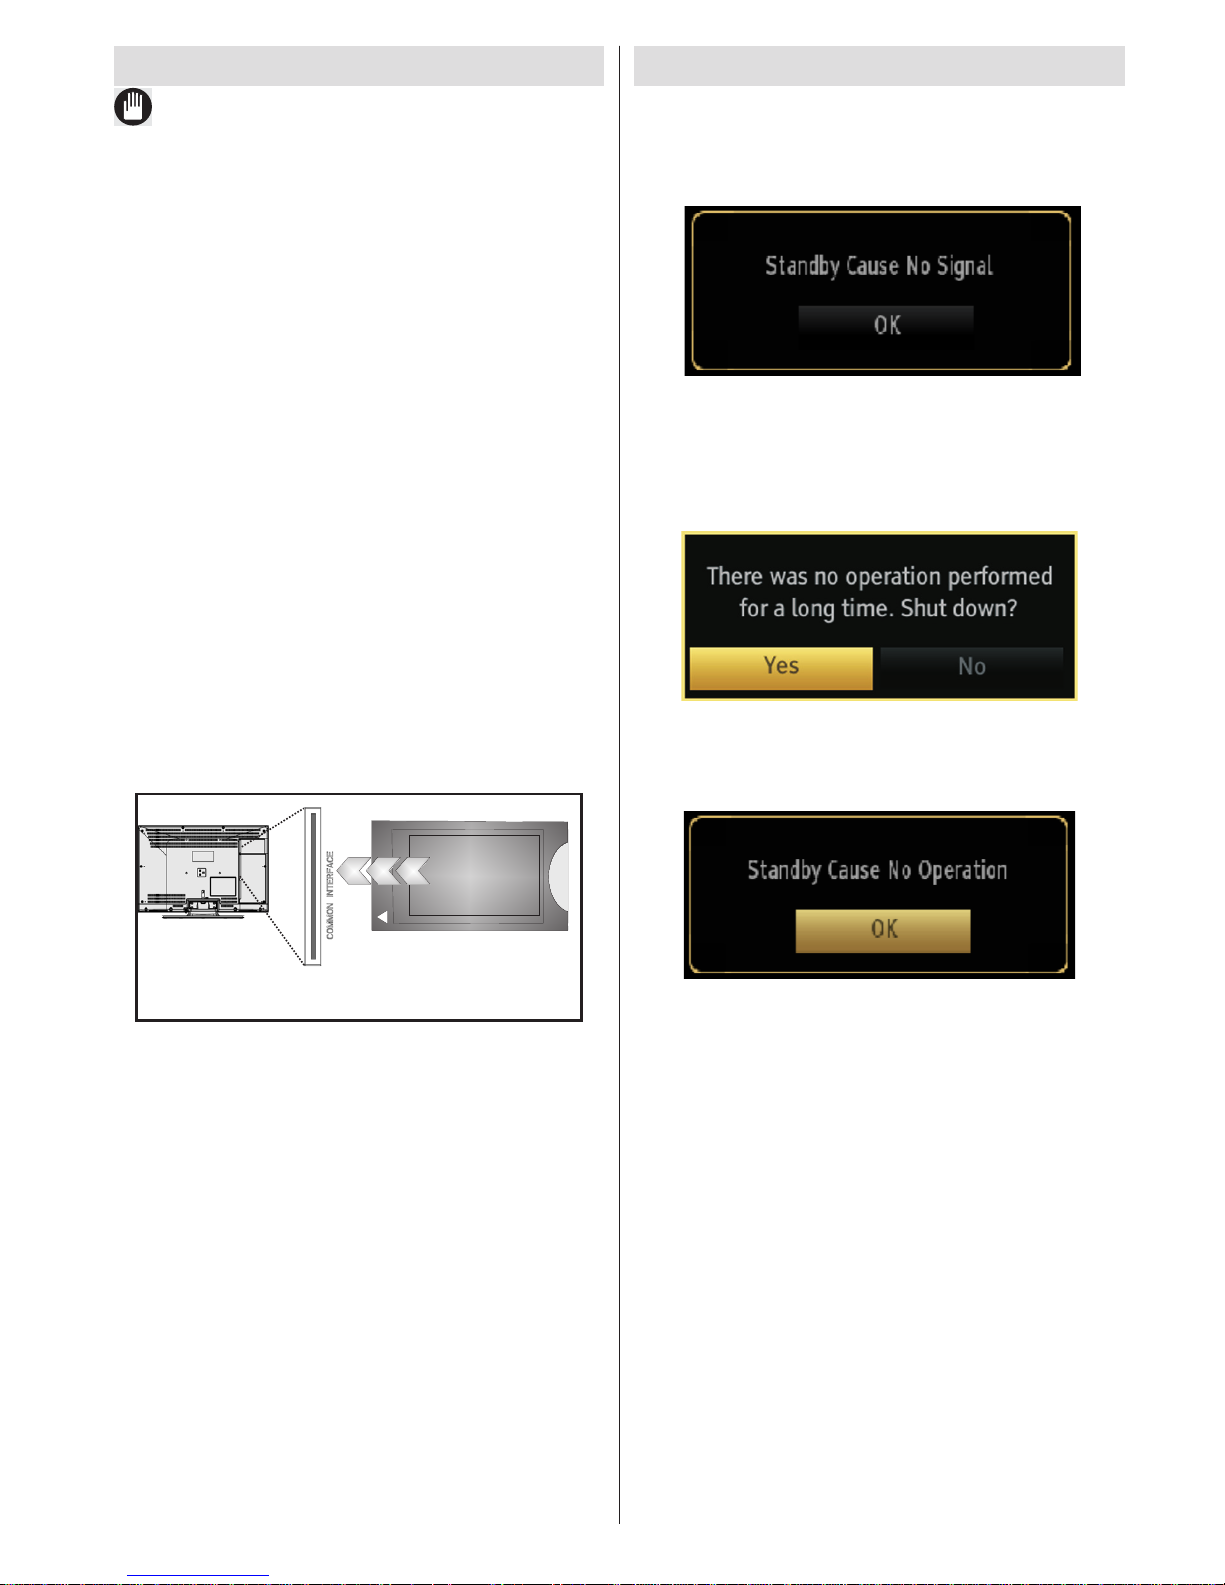
Using a Conditional Access Module
IMPORTANT: Insert or remove the CI module only when
the TV is SWITCHED OFF.
In order to watch certain digital channels, a conditional
access module (CAM) can be necessary. This module
must be inserted in the CI slot of your TV.
1. Obtain the Conditional Access Module (CAM) and the
viewing card by subscribing to a pay channel company,
then insert those to the TV using the following procedure.
2. Insert the CAM and then the viewing card to the
slot that is located in the terminal cover at the rear
side of the TV.
3. The CAM should be correctly inserted, it is
impossible to insert fully if reversed. The CAM or
the TV terminal may be damaged if the CAM is
forcefully inserted.
4. Connect the TV to the mains supply, switch on
and then wait for few moments until the card is
activated.
5. When no module is inserted, “No Common
Interface module detected” message appears
on the screen.
You can refer to the module instruction manual for details
of the settings.
CAM
module
Standby Notications
If the TV does not receive any input signal (e.g. From
an aerial or HDMI source) for 5 minutes, the TV will
go into standby. When you next switch-on the TV, the
following message will be displayed:
When the Auto Tv Off timeout is reached, the following
message will be displayed on the screen. Select YES
to shut down the TV. Select NO to cancel. The TV
will switch off as well, if you do not make a selection
on this screen.
If the TV has been left on and not been operated for
4 hours, the TV will go into standby. When you next
switch-on, the following message will be displayed:
Page 9

English - 8 -
Installing the Batteries to the Remote
1. Lift the cover on the back of the remote upward
gently.
2. Install two AAA batteries. Make sure to match the +
and - ends of the batteries in the battery compartment
(observe the correct polarity.
3. Replace the cover.
Connect Power & Antenna/Cable
IMPORTANT: The TV set is designed to operate on
220-240V AC, 50 Hz socket. After unpacking, allow
the TV set to reach the ambient room temperature
before you connect the set to the mains. Plug the
power cable to the mains socket outlet.
Aerial or Cable
Switching On/Off
To Switch the TV On
Connect the power cord to the 220-240V AC, 50 Hz.
Press button. Then the standby LED lights up.
To switch on the TV from standby mode either:
Press the “ ” button, P+ / P- or a numeric button on
the remote control.
To Switch the TV Off
Press the “ ” button on the remote control or press
the button or hold the control switch on the Tv
until shut down, so the TV will switch to standby mode.
(Depends model)
To power down the TV completely, unplug the power
cord from the mains socket.
Note: When the TV is switched to standby mode, standby LED
can blink to indicate that features such as Standby Search,
Over Air Download or Timer is active. The LED can also blink
when you switch on the TV from standby mode.
First Time Installation
When turned on for the rst time, the “language
selection” menu appears. The message “Welcome
please select your language!” is displayed in all
language options listed alphabetically.
Press the “ ” or “ ” button to highlight the required
language, press OK button to select. “First Time
Installation” appears. Use “ ” or “ ” button to set the
required country, and press “ ” button to select Search
Type. Use “ ” or “ ” to set the desired search type.
Available search types are Digital and analog, digital
only and analog only. When set, press “ ” to select
Teletext Language. Use “ ” or “ ” button to set the
“Teletext Language” and select “Scan Encrypted” using
“ ” or “ ” button. You can set Scan Encrypted as
Yes if you want to scan coded stations.
Deafult PIN code can change depending on the
selected country.
If you are asked to enter a PIN code for viewing a
menu option, use one of the following codes: 4725,
0000 or 1234.
Press OK button on the remote control to continue and
the following message will be displayed on the screen.
Page 10
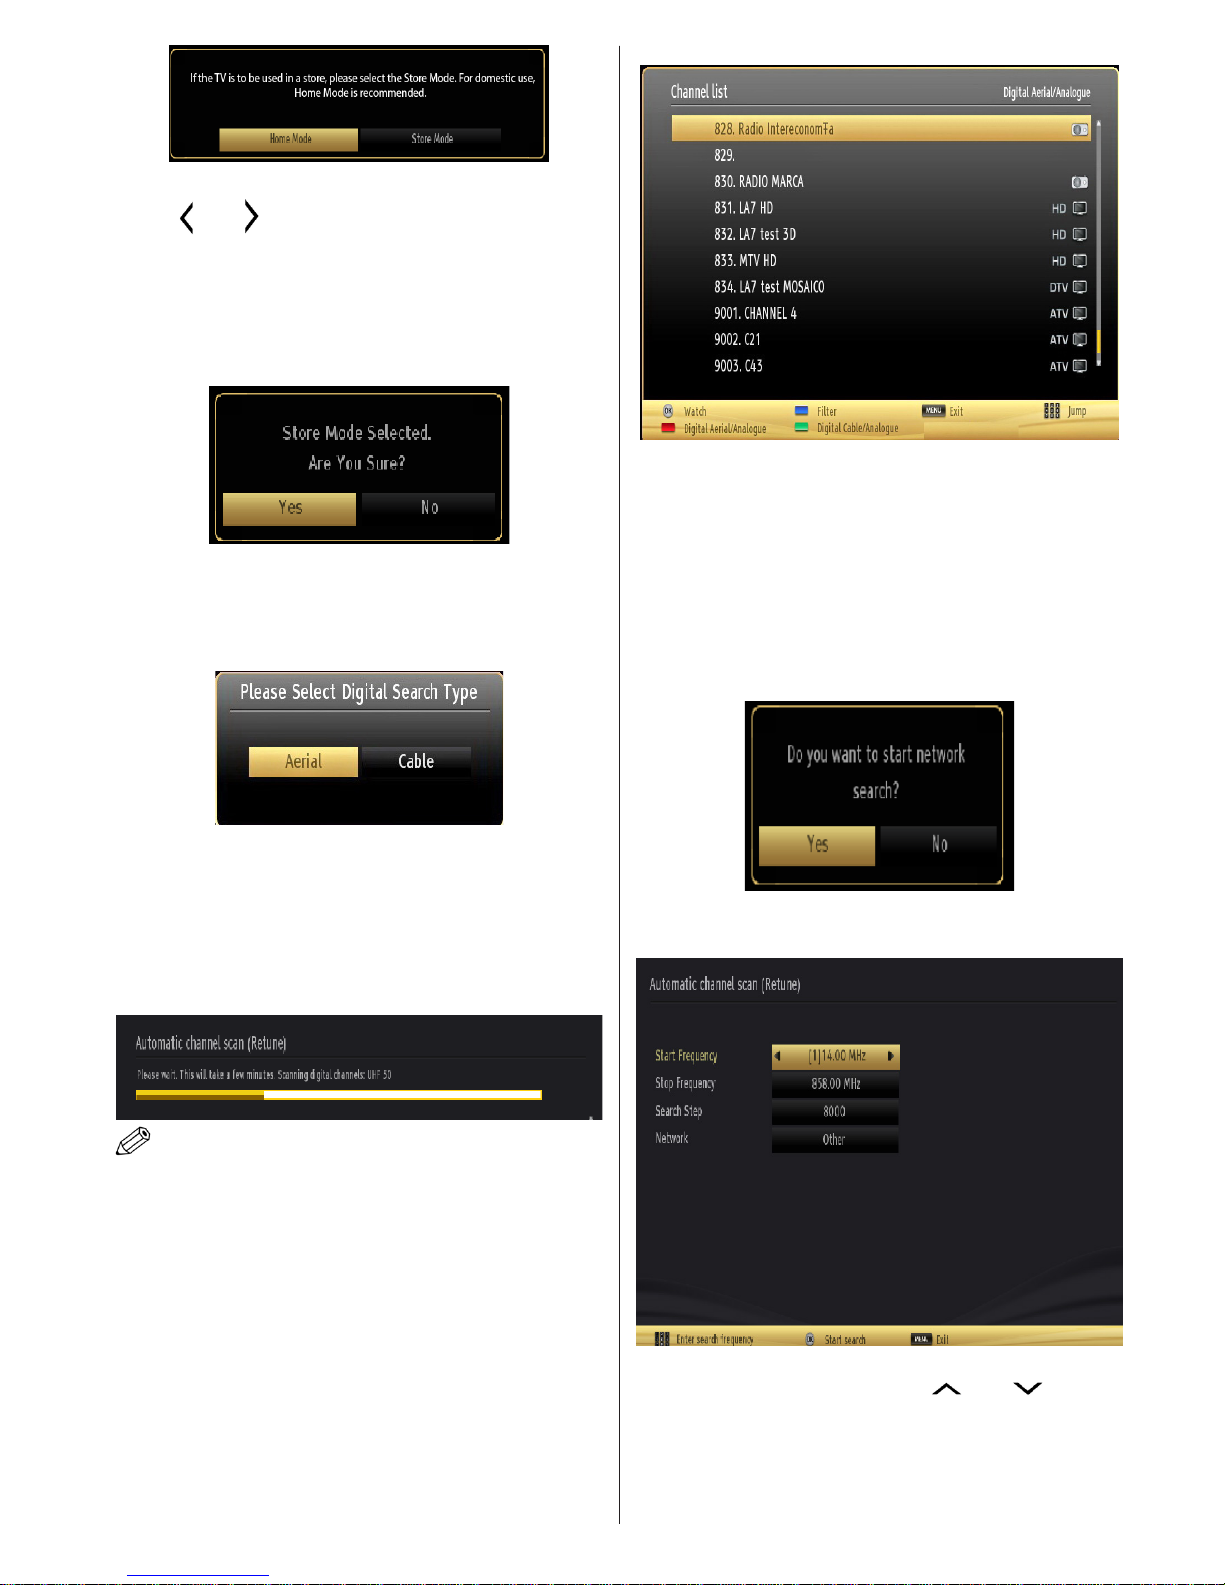
English - 9 -
You can activate Store mode (Optional) option by
using “ ” or “ ” button. If Store Mode is selected,
Store mode (Optional) option will be available
in other settings menu and your TV’s features
will be illustrated on the top of the screen.A
confirmation screen will be displayed after
selecting the Store Mode. Select YES to proceed.
If Home Mode is selected, Store mode will not be
available after the First Time Installation. Press OK
button on the remote control to continue and the following
message will be displayed on the screen.
You must select a search type to search and store
broadcasts from the desired source.
Aerial Installation
If you select AERIAL option from the Search Type
screen, the television will search for digital terrestrial
TV broadcasts.
NOTE: You can press MENU button to cancel.
After all the available stations are stored, Channel
List will be displayed on the screen. If you like the
sort channels, according to the LCN(*), please select
“Yes” and than press OK.
Press OK button to quit channel list and watch TV.
(*) LCN is the Logical Channel Number system that
organizes available broadcasts in accordance with a
recognizable channel sequence.
Cable Installation
If you select CABLE option and press OK button on
the remote control to continue, the following message
will be displayed on the screen:
To continue please select YES and press OK. To
cancel operation, select NO and press OK.
You can select frequency ranges from this screen. For
highlighting lines you see, use “ ” or “ ” button.
You can enter the frequency range manually by using
the numeric buttons on the remote control.
Set Start and Stop Frequency as desired by using
numeric buttons on the remote control.
*
Page 11
English - 10 -
After this operation, you can set Search Step as 8000
KHz or 1000 KHz.
If you select 1000 KHz, the TV will perform search
process in a detailed way. Searching duration will
thus increase accordingly. When nished, press OK
button to start automatic search. The TV will search
and store available broadcasts.
(*) Network option will not be available for UK.
Media Playback via USB Input
You can connect a USB hard disk drive or USB
memory stick to your TV by using the USB inputs of
the TV. This feature allows you to play les stored in a
USB drive. 2.5” and 3.5” inch (hdd with external power
supply) external hard disk drives are supported.
IMPORTANT! You should back up your les before
making any connections to the TV set in order to
avoid any possible data loss. Manufacturer will not
be responsible for any le damage or data loss. It is
possible that certain types of USB devices (e.g. MP3
Players) or USB hard disk drives/memory sticks may
not be compatible with this TV. The TV supports FAT32
and NTFS disk formatting but recording will not be
available with NTFS formatted disks. Note: While
formatting a USB hard disk that has 1TB (Tera Byte)
or more le capacity, you can experience problems
with the formatting process.
Quickly plugging and unplugging USB devices, is a
very hazardous operation. Do not repeatedly quickly
plug and unplug the drive. This may cause physical
damage to the USB player and USB device itself. Do
not pull out USB module while playing a le.
Media Browser Menu
You can play photo, music, and movie les stored
on a USB disk by connecting it to your TV and using
the Media Browser screen. To do this, perform the
following: Connect a USB disk to one of the USB
inputs located on the side of the TV.
You can connect two USB devices to your TV. If both
USB devices include music, picture or video les, USB
selection OSD will be displayed on the screen. The
rst USB device connected to the TV will be named
as USB Drive1. Select a device by using “ ” or
“ ” button and press OK.
Press MENU button and select Media Browser tab by
using Left/Right and OK buttons. Main media browser
screen will be displayed. You can display the related
content by selecting the Video, Music or Picture tab.
Follow the button indications under each on screen
menu for media playback features.
You can set your Media Browser preferences by using
the Settings dialog.
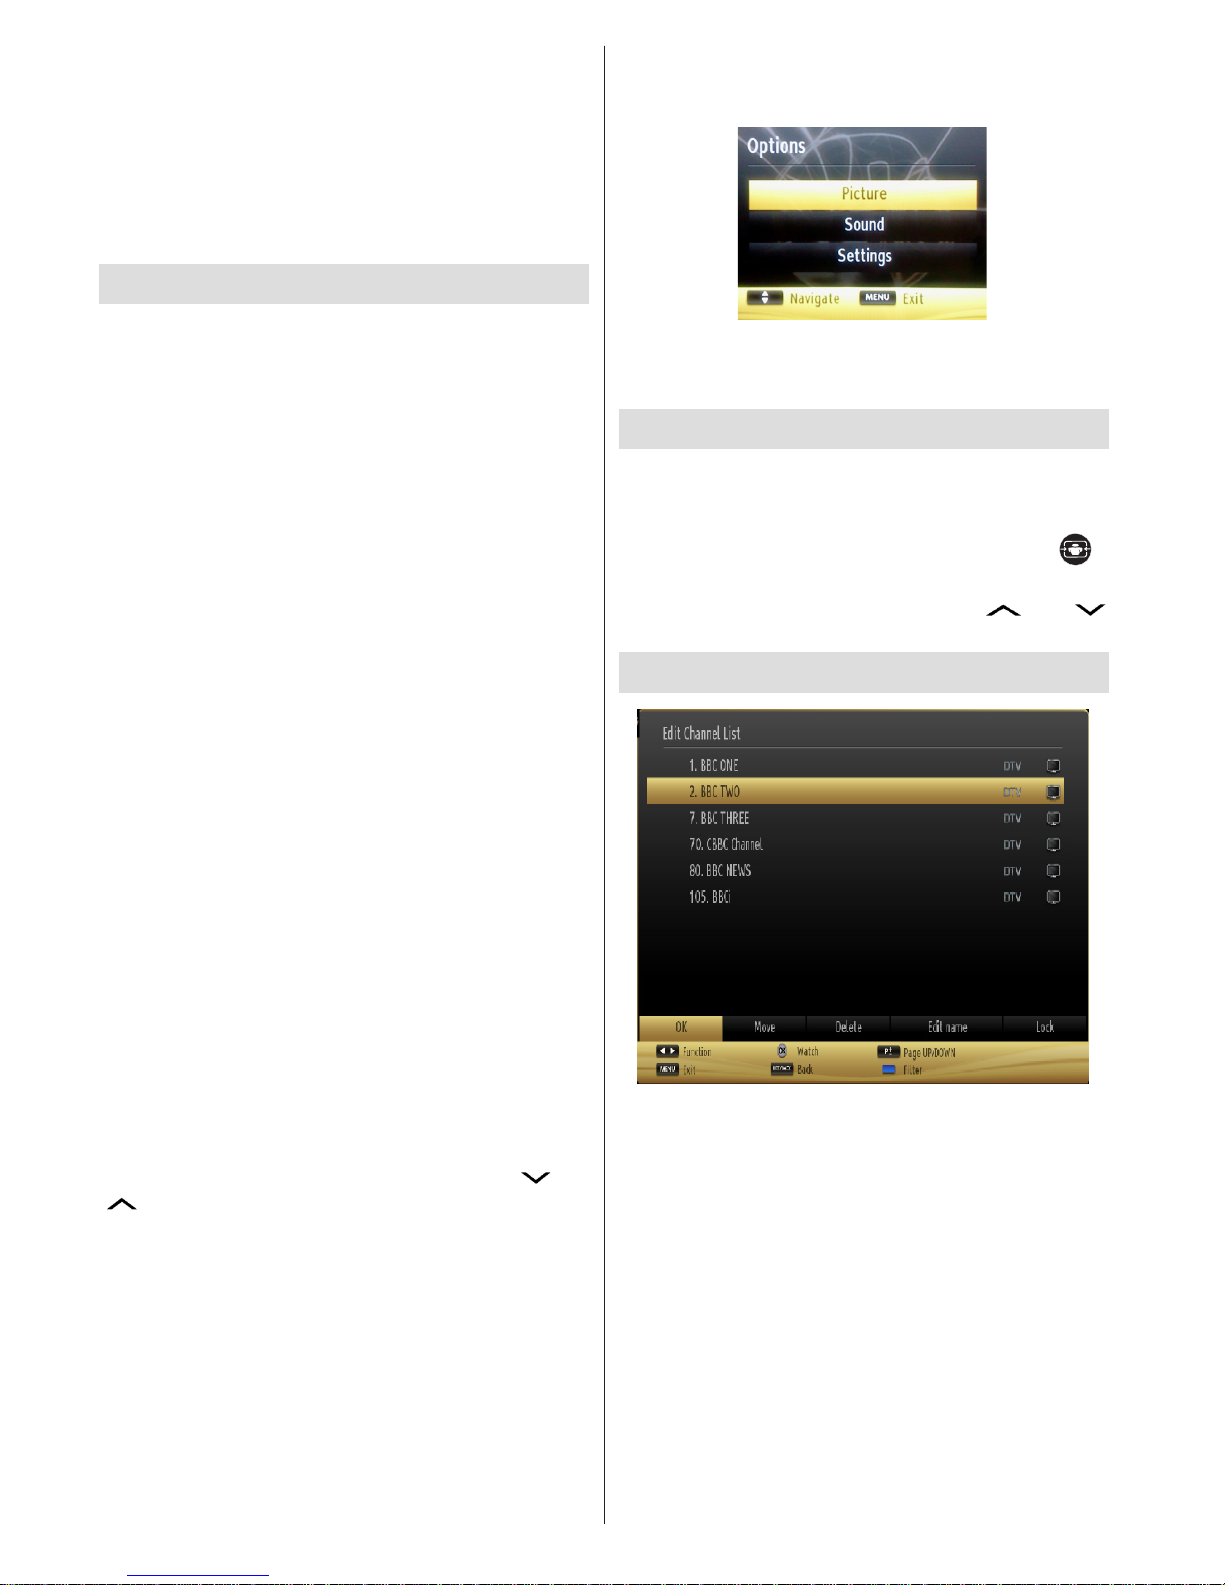
Using MENU button in Media Browser Mode
Pressing MENU button in Media Browser mode
displays the following menu screen:
You can access Picture, Sound and Settings menu
options using this screen. Press MENU again to exit
from this screen.
Changing Image Size: Picture Formats
Programmes can be watched in different picture formats,
depending on the transmission received. You can
change the aspect ratio (image size) of the TV for viewing
the picture in different zoom modes. Press “ ”
button repeatedly to change the image size. You can
shift the screen up or down by using “ ” or “
” buttons while in, 14:9 Zoom, Cinema or Subtitle.
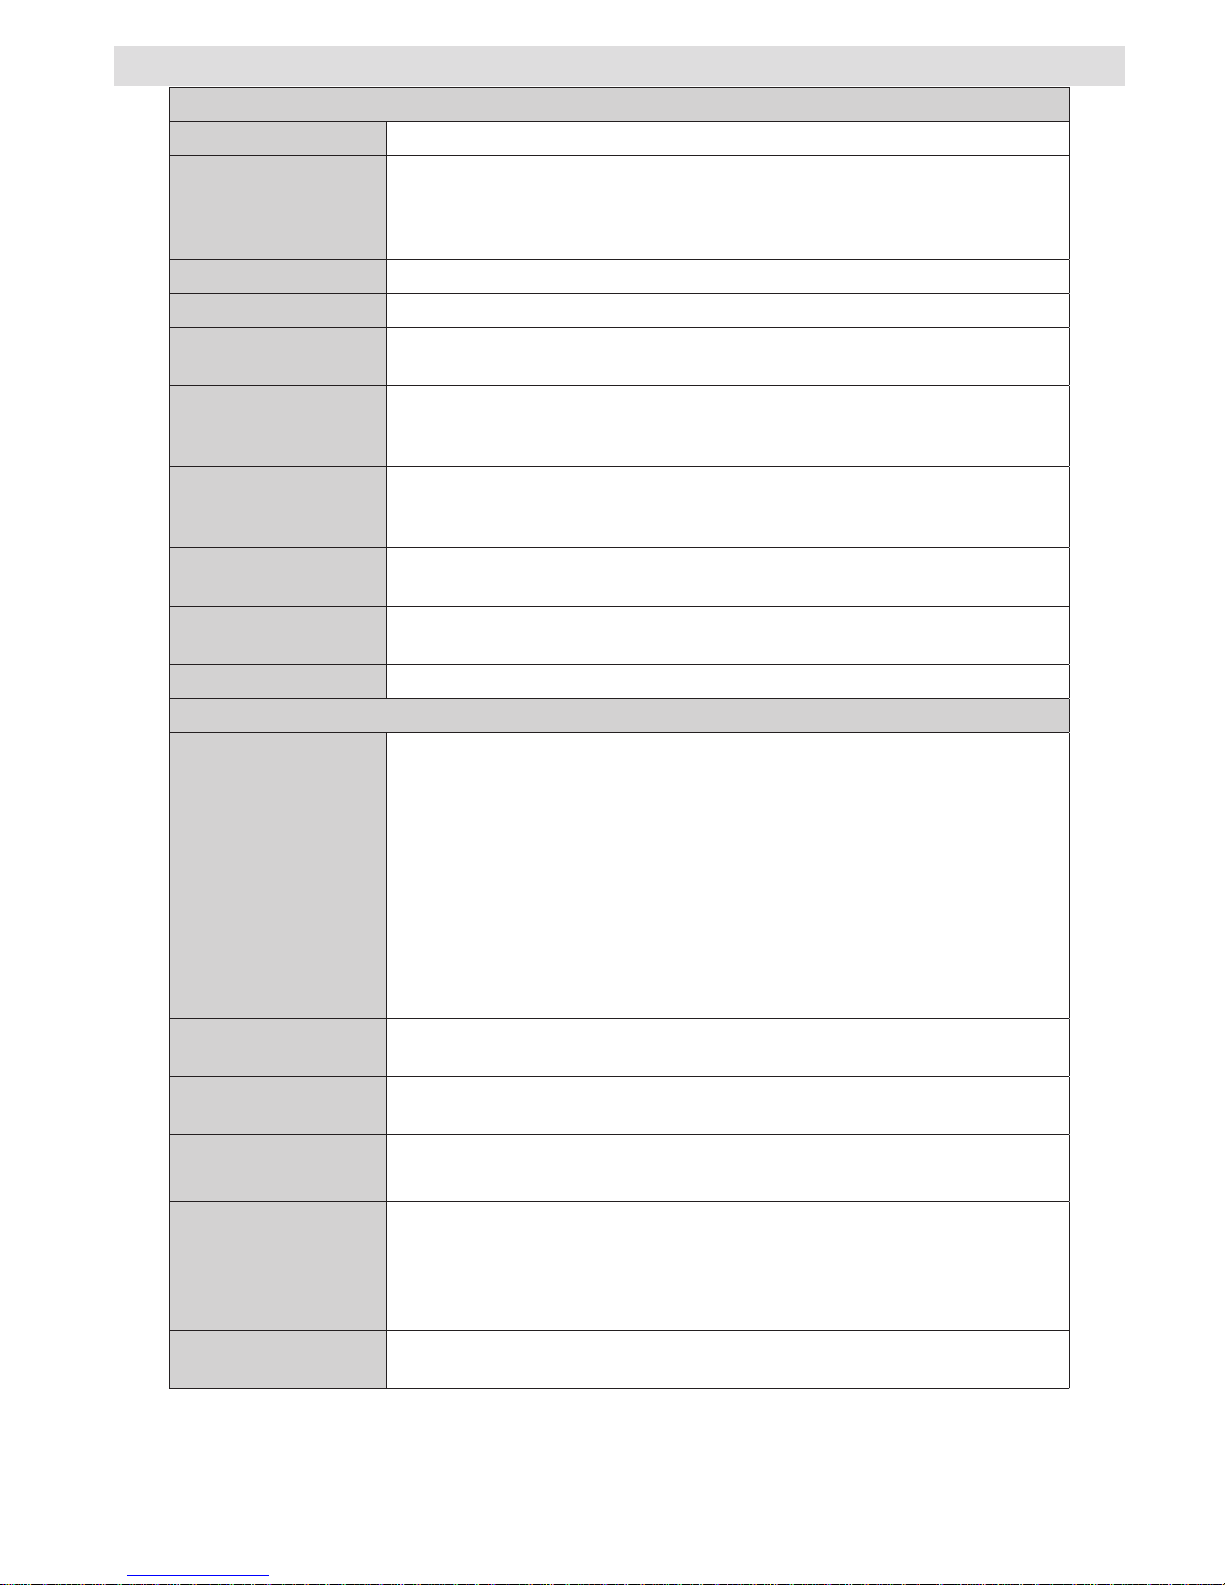
Using the Channel List
The TV sorts all stored stations in the Channel List.
You can edit this channel list, set favourites or set
active stations to be listed by using the Channel List
options. Press MENU button to view main menu.
Select Channel List item by using Left or Right button.
Press OK to view menu contents. Select Edit Channel
List to manage all stored channels. Use Up or Down
and OK buttons to select Edit Channel List. Press
Up or Down button to select the channel that will be
processed. Press Left or Right button to select a
function on Channel List menu. Use P+/P- buttons to
move page up or down. Press MENU button to exit.
Page 12

English - 11 -
Sorting Channel List
You can select broadcasts to be listed in the channel
list. To display specic types of broadcast, you
should use Active channel list setting. Select Active
channel list from the Channel list menu by using “
” or “ ” button. Press OK button to continue.
You can select a network type option from the list
by using “ ” or “ ” and OK buttons.
Quick Menu
The Quick Settings menu allows you to access some
options quickly. This menu includes Power Save Mode,
Picture Mode, Equalizer Settings, Favourites, Sleep
Timer, FollowMe TV, FollowMe TV to DMR ,CEC RC
Passthrough and Information booklet options. Press
Quick Menu button on the remote control to view the
quick menu. See the following chapters for details of
the listed features.
FollowMe TV
With your mobile device you can stream the current
broadcast from your smart TV using the FollowMe
TV feature. Install the appropriate Smart Center
application to your mobile device. Start the application.
For further information on using this feature refer to
the instructions of the application you use.
Note: This application is not compatible with all mobile device.
FollowMe TV to DMR
This feature allows video streaming from your TV
to another TV or mobile devices, using proper
applications (e.g. UPnP - Universal Plug and Play applications like BubbleUPnP). Activate FollowMe TV
to DMR and timeshifting starts. Press the red button
and device selection menu will be displayed. Choose
your device and press OK.
Note: FollowMeTV and FollowMe TV to DMR features
work correlated with the PVR feature and requires a
connected USB storage device with FAT32 format and
enough space in it. HD channels are not supported
and both of the devices must be connected to the
same network.
E-Manual
You can nd instructions for your TV’s features in
the E-Manual.
To use E-Manual, press to the Info button while main
menu is displayed on the screen.
By using the navigation buttons select a desired
category. Every category includes a different topics.
Select a topic and press OK to read instructions.
To close the E-Manual screen press the Exit button.
Note: The contents of the E-Manual may vary according to
the model..
CEC and CEC RC Passthrough
This function allows to control the CEC-enabled
devices, that are connected through HDMI ports by
using the remote control of the TV.
The CEC option in the Other Settings menu
under Settings menu should be set as Enabled
at rst. Press the Source button and select the
HDMI input of the connected CEC device from the
Source List menu. When new CEC source device
is connected, it will be listed in source menu with
its own name instead of the connected HDMI ports
name(DVD Player, Recorder 1 etc.).
The TV remote is automatically able to perform the
main functions after the connected HDMI source
has been selected.
To terminate this operation and control the TV
via the remote again, press and hold the “0-Zero”
button on the remote control for 3 seconds. Or
press Q.Menu button on the remote, highlight the
CEC RC Passthrough and set as Off by pressing
Left or Right button. This feature can also be
enabled or disabled under the Settings/Other
Settings menu.
The TV supports also ARC(Audio Return Channel)
feature. This feature is an audio link meant to
replace other cables between the TV and the audio
system (A/V receiver or speaker system).
When ARC is active, TV does not mute its other
audio outputs automatically. So you need to
decrease TV volume to zero manually, if you want
to hear audio from connected audio device only
(same as other optical or co-axial digital audio
outputs). If you want to change connected device’s
volume level, you should select that device from
the source list. In that case volume control keys are
directed to connected audio device.
Page 13

English - 12 -
Menu Features and Functions
Picture Menu Contents
Mode
For your viewing requirements, you can set the related mode option. Picture mode
can be set to one of these options: Cinema,Game,Sports, Dynamic and Natural.
Contrast
Sets the lightness and darkness values of the screen.
Brightness Sets the brightness value for the screen.
Sharpness Sets the sharpness value for the objects displayed on the screen.
Colour Sets the colour value, adjusting the colors.
Power Save
Mode
To set Power Save Mode as Eco, Picture Off and Disabled. See the section,
“Environmental Information” in this manual for further information on Power Save Mode.
Backlight
(optional)
This setting controls the backlight level and it can be set to Auto, Maximum,
Minimum and Eco Mode. Backlight function will be inactive if Power Save Mode
is set to On. Backlight cannot be activated in VGA, Media Browser mode or while
the picture mode is set to Game.
Noise
Reduction
If the broadcast signal is weak and the picture is noisy, use Noise Reduction
setting to reduce the noise amount. Noise Reduction can be set to one of these
options: Low, Medium, High or Off.
Advanced Settings
Dynamic
Contrast
You can change contrast rate by using dynamic contrast function. Dynamic contrast
can be set to one of these options: Low, Medium, High or Off.
Colour Temp Sets the desired colour tone.
Picture Zoom Sets the picture size to Auto,16:9, Subtitle,14:9, 14:9 Zoom, 4:3 or Cinema.
HDMI True
Black
While watching from HDMI source, this feature will be visible in the Picture Settings
menu. You can use this feature to enhance blackness in the picture.
Film Mode
Films are recorded at a different number of frames per second to normal television
programmes. Turn this feature on when you are watching lms to see the fast motion
scenes clearly.
Skin Tone
Adjust the desired skin tone.
Colour Shift
Adjust the desired colour tone.
RGB Gain
Press OK button to edit RGB gain. You can congure the colour temperature
values using the RGB Gain feature.
Reset
Resets the picture settings to factory default settings.
Autoposition
(in PC mode)
Automatically optimizes the display. Press OK to optimize.
H Position (in
PC mode)
This item shifts the image horizontally to right hand side or left hand side of the screen.
V Position (in
PC mode)
This item shifts the image vertically towards the top or bottom of the screen.
Dot Clock (in
PC mode)
Dot Clock adjustments correct the interference that appear as vertical banding in
dot intensive presentations like spreadsheets or paragraphs or text in smaller fonts.
Phase (in PC
mode)
Depending on the resolution and scan frequency that you input to the TV set, you
may see a hazy or noisy picture on the screen. In such a case you can use this
item to get a clear picture by trial and error method.
While in VGA (PC) mode, some items in Picture menu will be unavailable. Instead, VGA mode settings
will be added to the Picture Settings while in PC mode.
Page 14
English - 13 -
Menu Features and Functions
Sound Menu Contents
Volume Adjusts volume level.
Equalizer:
In equalizer menu, the preset can be changed to Music, Movie, Speech, Flat,
Classic and User. Press the MENU button to return to the previous menu.
Equalizer menu settings can be changed manually only when the Equalizer
Mode is in User.
Balance This setting is used for emphasizing left or right speaker balance.
Headphone Sets headphone volume.
Sound Mode
You can select Mono, Stereo, Dual I or Dual II mode, only if the selected channel
supports that mode.
AVL
Automatic Volume Limiting (AVL) function sets the sound to obtain xed output
level between programmes (For instance, volume level of advertisements tend
to be louder than programmes).
Headphone/Lineout
(Optional)
When you connect an external amplier to your TV using the headphone jack,
you can select this option as Lineout. If you have connected headphones to the
TV, set this option as Headphone.
Dynamic Bass
(Optional)
Enables or disables the Dynamic Bass.
Surround Sound
(Optional)
Surround sound mode can be changed as On or Off.
Digital Out Sets digital out audio type.
Install and Retune Menu Contents
Automatic Channel
Scan (Retune)
Displays automatic tuning options.
Digital Aerial: Searches and stores aerial DVB stations.
Digital Cable: Searches and stores cable DVB stations.
Analogue: Searches and stores analogue stations.
Digital Aerial & Analogue: Searches and stores aerial DVB and analogue
stations.
Digital Cable & Analogue: Searches and stores cable DVB and analogue
stations.
Manual Channel Scan This feature can be used for direct broadcast entry.
Network Channel
Scan (Optional)
Searches for the linked channels in the broadcast system.
Analogue Fine Tune
You can use this setting for ne tuning analogue channels. This feature is not
available if no analogue channels are stored.
First Time Installation
Deletes all stored channels and settings, resets TV to factory settings and starts
rst time installation. You can follow the instructions in the Initial Installation section
for more information on this process.
Clear Service List
(Optional)
(*) This setting is visible only when the Country option is set to Denmark, Sweden,
Norway or Finland. Use this setting to clear channels stored.
Page 15
English - 14 -
Menu Features and Functions
Settings Menu Contents
Conditional Access Controls conditional access modules when available.
Language Congures language settings.
Parental
Congures parental settings.
Deafult PIN code can change depending on the selected country.
If you are asked to enter a PIN code for viewing a menu option, use one of the
following codes: 4725, 0000 or 1234.
Timers Sets timers for selected programmes.
Recording
Conguration
Displays recording conguration menu.
Date/Time Sets date and time.
Sources
Enables or disables selected source options.
Network Settings Displays network settings.
Other Settings: Displays other setting options of the TV set:
Menu Timeout Changes timeout duration for menu screens.
Scan Encrypted
When this setting is on, search process will locate the encrypted channels as well. If it is
set as Off, encrypted channels will not be located in automatic search or manual search.
Blue Background Activates or deactivates blue background system when the signal is weak or absent.
Software Upgrade
To ensure that your TV always has the most update information, you can use this setting. In
order for the proper operation, please ensure that the TV is set to standby mode.
Application Version Displays application version.
Hard of Hearing
If the broadcaster enables any special signal concerning the audio, you can set this setting
as On to receive such signals.
Audio Description
Audio description refers to an additional narration track for blind and visually impaired
viewers of visual media, including television and movies. You can use this feature, only if
the broadcaster supports that additional narration track.
Auto TV Off
You can set the timeout value of auto off feature.After the timeout value is reached and the
Tv is not operated for selected time , the TV will go off.
Standby Search
(optional)
If you change Standby Search to Off, this function will be unavailable. To use Standby search
please make sure that you select Standby Search as On. If the Standby Search is set to On,
when the TV is in standby mode, available broadcasts will be searched. If the TV locates any
new or missing broadcasts, a menu screen will be displayed, asking you whether or not to
execute these changes. Channel list will be updated and changed after this process. Please
activate Standby Search setting in order to enable your TV for automatically updating the
broadcast frequency of the broadcaster, broadcast denition and similar changes.
Store Mode (optional)
If you are displaying the TV in a store, you can activate this mode. While Store Mode is
enabled, some items in the TV menu may not be available to be set.
DLNA Renderer
DLNA renderer feature allows you to share les stored on your smartphone. If you have a DLNA
renderer compatible smartphone and software installed, you can share/play photos with your
TV. See instructions of your sharing software for more information.
Power Up Mode
This setting congures the power up mode preference. Always On: The TV always switches on
when main on/off button is pressed. / Standby: The TV always powers up in Standby mode. /
Last State: The TV always switches on with the last selected channel/source.
Virtual Remote
(optional)
Enables or disables the virtual remote feature.
CEC
With this setting you can enable and disable CEC functionality completely.
Press Left or Right button to enable or disable the feature.
Page 16
English - 15 -
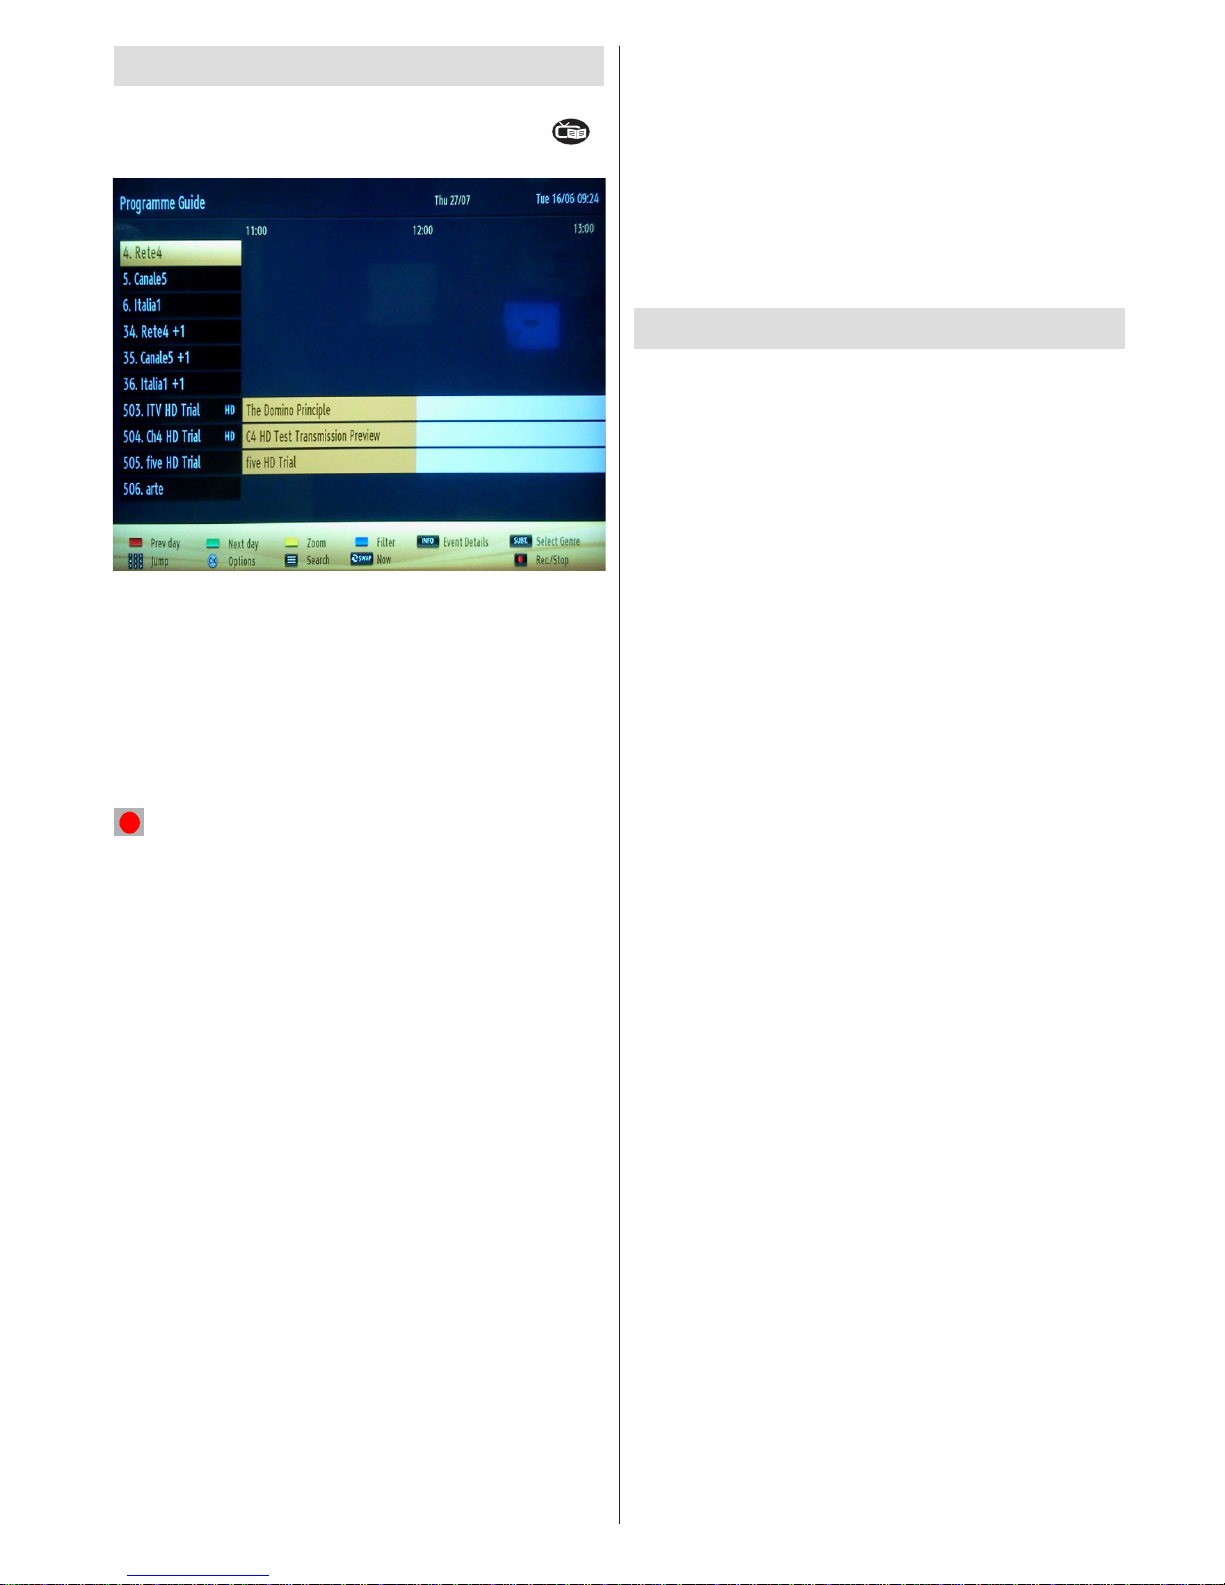
Electronic Programme Guide (EPG)
Some, but not all channels send information about
the current and next programmes. Press the “ ”
button to view the EPG menu.
Up/Down/Left/Right: Navigate EPG.
OK: Displays programme options.
INFO (İ): Displays, in detail information on programme
selected.
GREEN: Switches to List Schedule EPG.
YELLOW: Switches to Timeline Schedule EPG.
BLUE: displays ltering options.
(RECORD): the TV will start to record the
selected progamme. You can press again to stop
the recording.
IMPORTANT: To record a programme, you should first
connect a USB disk to your TV while the TV is switched off.
You should then switch on the TV to enable recording feature.
Otherwise, recording feature will not be available.
Note: Switching to a different broadcast or source is not
available during the recording.
Programme Options
In EPG menu, press the OK button to enter the Event
Options menu.
Select Channel
In EPG menu, using this option, you can switch to the
selected channel.
Record / Delete Record Timer
After you have selected a programme in EPG menu,
press the OK button and and Options screen will be
displayed. Select “Record” option and press the OK
button. After this operation, a recording becomes set
to the selected programme.
To cancel an already set recording, highlight that
programme and press the OK button and select the
option “Delete Rec. Timer”. The recording will be
cancelled.
Set Timer / Delete Timer
After you have selected a programme in EPG menu,
press the OK button and and Options screen will
be displayed. Select “Set Timer on Event” option
and press OK button. You can set a timer for future
programmes. To cancel an already set timer, highlight
that programme and press the OK button. Then select
“Delete Timer” option. The timer will be cancelled.
Note: It is not possible to record or set timer for two or more
individual events at the same time interval.
Recording a Programme
IMPORTANT: When using a new USB hard disk drive, it is
recommended that you rst format the disk using your TV’s
“Format Disk” option.
To record a programme, you should rst connect a
USB disk to your TV while the TV is switched off.
You should then switch on the TV to enable recording
feature.
For using recording function, you should connect a
USB disk or an external hard disk drive to the TV
and connected USB disk should have at least 1 GB
capacity and should have 2.0 speed compatibility.
If the connected USB device does not support 2.0
speed, an error message will be displayed.
Note: Recorded programmes are saved into the connected
USB disk. If desired, you can store/copy recordings on a
computer; however, these les will not be available to be
played on a computer. You can play the recordings only
via your TV.
Note: Lip Sync delay may occur during the timeshifting.
Radio record is not supported. The TV can record
programmes up to ten hours.
Recorded programmes are split into 4GB partitions.
If the writing speed of the connected USB disk is not
sufcient, recording may fail and timeshifting feaute
may not be available.
Recordings of HD programmes can occupy bigger
size on the USB disk depending on the broadcast’s
resolution. For this reason it is recommended
to use USB hard disk drives for recording HD
programmes.
Do not plug out the USB/HDD during the recording.
This may harm the connected USB/HDD.
Multipartiton support is available. Maximum two
different partitions are supported. If the disk have more
than two partitions, crash may occur. First partition
of the usb disk is used for PVR ready features. It also
must be formatted as primary partition to be used for
PVR ready features.
Some stream packets may not be recorded because
of signal problems, so sometimes video may freezes
during playback.
Page 17

English - 16 -
Record, Play, Pause, Display (for PlayListDialog)
keys could not be used when teletext is ON. If a
recording starts from timer when teletext is ON,
teletext is automatically turned off. Also teletext
usage is disabled when there is ongoing recording
or playback.
Timeshift Recording
Press (PAUSE) button while watching a broadcast
for switching to timeshifting mode. In timeshifting
mode, the programme is paused and simultaneously
recorded to the connected USB disk. Press (PLAY)
button again to watch the paused programme from
the stopped moment. You will see the timeshift gap
between the real and the timeshifted programme in
the info bar.
Instant Recording
Press (RECORD) button to start recording an
event instantly while watching a programme. You can
press (RECORD) button on the remote control
again to record the next event on the EPG. In this
case, OSD will display the programmed events for
recording. Press (STOP) button to cancel instant
recording. Switching to a different broadcast or source;
and viewing Media Browser are not available during
the recording.
Watching Recorded Programmes
In the main menu, use “ ” or “ ” buttons to select
Media Browser. Highlight Recordings Library item
by using “ ” or “ ” button and press OK button to
enter. Recordings Library will then be displayed.
Select a recorded item from the list (if previously
recorded) by using “ ” / “ ” button. Press OK button
to view Play Options. Select an option by using “ ”
/ “ ” or OK buttons.
Available playback options:
• Play from start: Plays the recording from the
beginning.
• Resume: Recommences the recordings.
• Play from offset: Species a playing point.
Note: Viewing main menu and menu items will not be available
during the playback.
Press (STOP) button to stop a playback and return
to return to Recordings Library.
Slow Forward
If you press (PAUSE) button while watching
recorded programmes, slow forward feature will be
available. You can use button to slow forward.
Pressing button consecutively will change slow
forwarding speed.
Recordings Library
To view the list of recordings, select “Recordings
Library” and press the OK button. Recordings Library
will then be displayed with available recordings. All the
recordings are kept in a list in the recordings library.
(Resume): Recommences the recordings.
RED button (Delete) :Erases the selected
recording.
GREEN button (Edit): Makes changes on the
selected recording.
BLUE button (Sort): Changes the order of the
recordings. You can select from a wide range of
sorting options.
OK button: Activates play options menu:
INFO (Details): Displays the short extended programmes
in detail.
Recording Conguration
Select Recording Conguration item in the Settings
menu to congure recording settings.
Format Disk: You can use Format Disk feature for
formatting the connected USB disk. IMPORTANT:
Note that ALL the data stored on the USB disk will
be lost and then the disk format will be converted to
FAT32 if you activate this feature. If your USB disk
malfunctions, you can try formatting the USB disk. In
most cases formatting the USB disk will restore normal
operation; however, ALL the data stored on the USB
disk will be lost in such a case.
Note: If “USB is too slow” message is displayed on the
screen while starting a recording, try restarting the recording.
If you still get the same error, it is possible that your USB
disk does not meet the speed requirements. Try connecting
another USB disk.
Connectivity Functions
Connecting to a Wired Network
For connecting to a wired LAN network, you
should perform the following steps:
• Connect broadband ISP connection ethernet cable
to the ETHERNET INPUT of your modem.
• Ensure that Nero Media Home software is installed
to your PC.(for DLNA function). See Appendix G for
more information on the installation process.
• Afterwards, you should connect your PC to the one
of your modem’s LAN connectors (e.g. LAN 1) by
using a proper LAN cable.
Page 18
English - 17 -
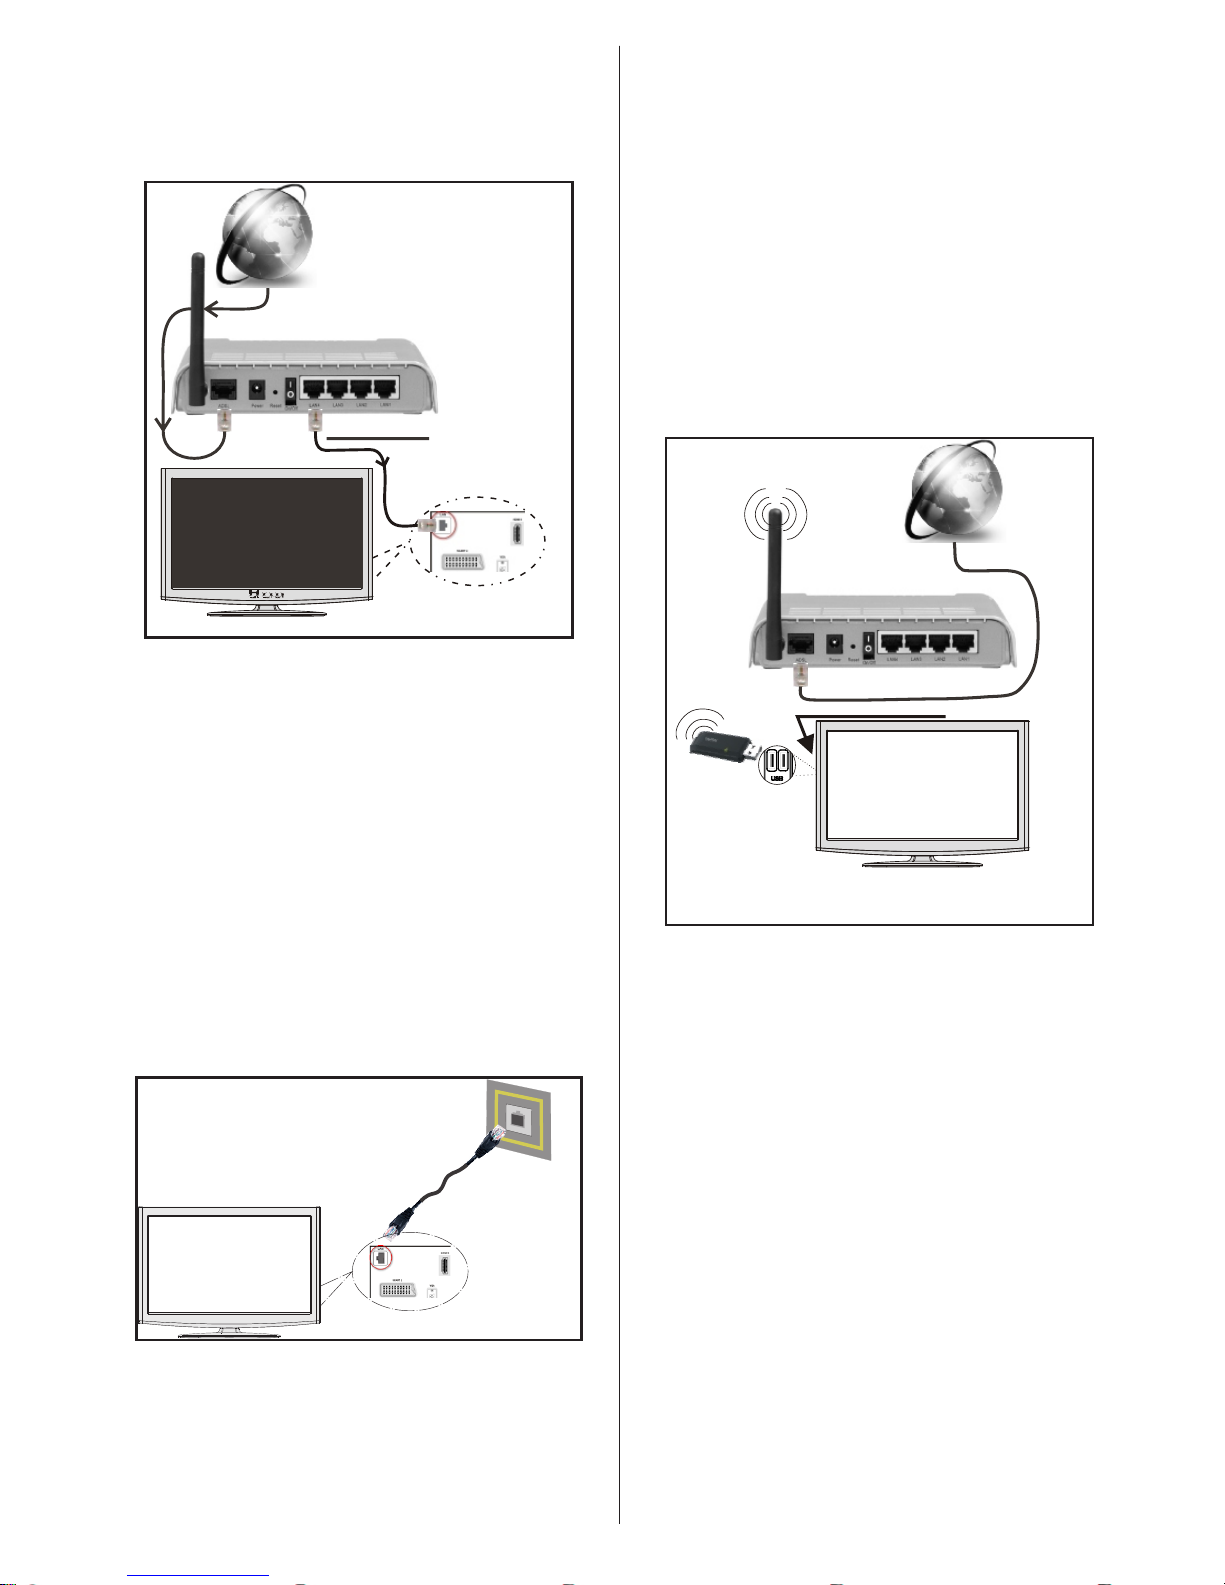
• Use another LAN output of your modem (e.g. LAN
2) to enable the connection to your TV. You can add
your TV to your LAN by connecting the LAN port at
the rear of your TV to your modem’s LAN connector
as illustrated.
Lan(Ethernet cable)
Broadband ISP
Connection
Rear of TV
• To access and play shared les, you must Select
Media Browser. Press Menu button and select Media
Browser by using Left or Right button. Press OK to
continue. Select the desired le type and press OK.
You must always use the Media Browser screen to
access and play shared network les.
• PC/HDD/Media Player or any other devices that are
DLNA 1.5 compatible should be used with wired
connection for higher playback quality.
To congure wired settings please refer Network
Settings section in Settings menu.
• You might be able to connect your TV to your LAN
network depending on your network’s conguration.
In such a case, use an ethernet cable to connect
your TV directly to the network wall outlet.
The modem port
on the wall
Rear of TV
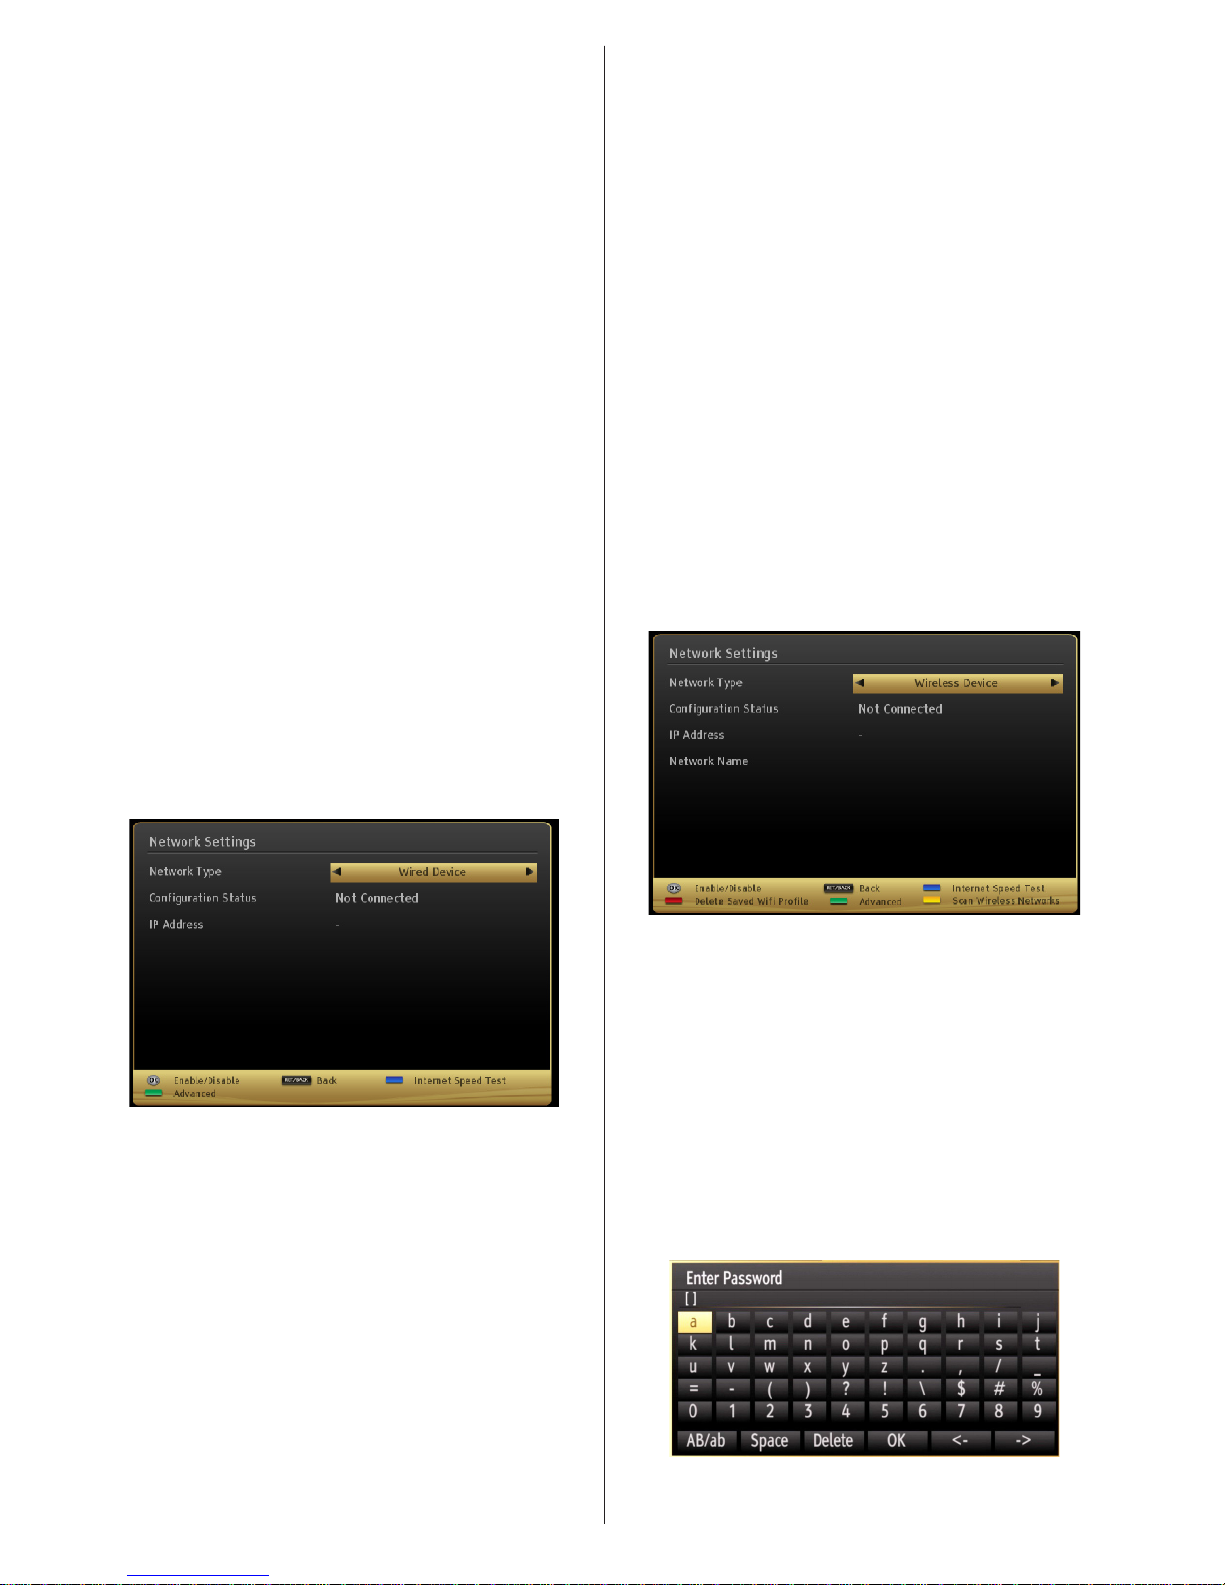
Connecting to a Wireless Network
IMPORTANT: “Veezy 200” USB dongle (sold
separately) is required to use wireless network
feature.
• To use your TV with your wireless network, you
need a Veezy 200 Wireless USB dongle. To make
your modem’ s SSID visible, you should change
your SSID settings via modem’s software. The TV
cannot connect to the networks with hidden SSID.
For connecting to a wireless LAN network, you
should perform the following steps:
1. Connect broadband ISP connection ethernet
cable to the ETHERNET INPUT of your modem.
2. Ensure that Nero Media Home software is
installed to your PC (for DLNA function).
3. Afterwards, you should connect wireless adaptor
to one of the USB inputs of the TV.
4. To configure wireless settings please refer
Network Settings section in the following sections.
Wireless Lan
Adaptor
USB Inputs (Side of the TV)
Broadband ISP
Connection
• A Wireless-N router (IEEE 802.11a/b/g/n) with
simultaneous 2.4 and 5 GHz bands designed to
increase bandwidth. Optimized for smoother and
faster HD video streaming, file transfers, and
wireless gaming.
• Use LAN connection for quicker le sharing between
other devices like computers.
• The frequency and channel differ depending on
the area.
• The transmission speed differs depending on the
distance and number of obstructions between the
transmission products, the conguration of these
products, the radio wave conditions, the line trafc,
and the products that you use. The transmission
may also be cut off or get disconnected depending
on the radio wave conditions DECT phones, or any
other WiFi 11b appliances. The standard values of
the transmission speed are the theoretical maximum
values for the wireless standards. They are not the
actual speeds of data transmission.
• The location where the transmission is most effective
differs depending on the usage environment.
Page 19
English - 18 -
• Wireless LAN adaptor should be connected
directly to the TV’s USB port. USB hubs are not
supported.
• To configure wireless settings please refer wifi
section in Settings menu.
• Wireless LAN adaptor supports 802.11 a,b,g & n
type modems. It is highly recommended that you
should use IEEE 802.11n communication protocol
in order to avoid any possible problems while
watching videos.
• Use the other usb input, if you experience problems
with audio/video performance.
• You must change your modem’s SSID when there
are any other modems around with the same SSID.
You can encounter connection problems otherwise.
Use wired connection instead if you experience
problems with wireless connection.
Conguring Network Settings
Your TV’s Network Settings include Wired and Wireless
Connection options. However, if your TV does not have
USB Wi-Fi dongle (sold separately), you should use Wired
Connection type. If you try to connect via Wireless Connection
when your TV does not have a USB Wi-Fi dongle, a warning
screen will appear and the TV will not get an IP address. Try
connecting the LAN cable after this and then the TV will be
able to get an IP address.
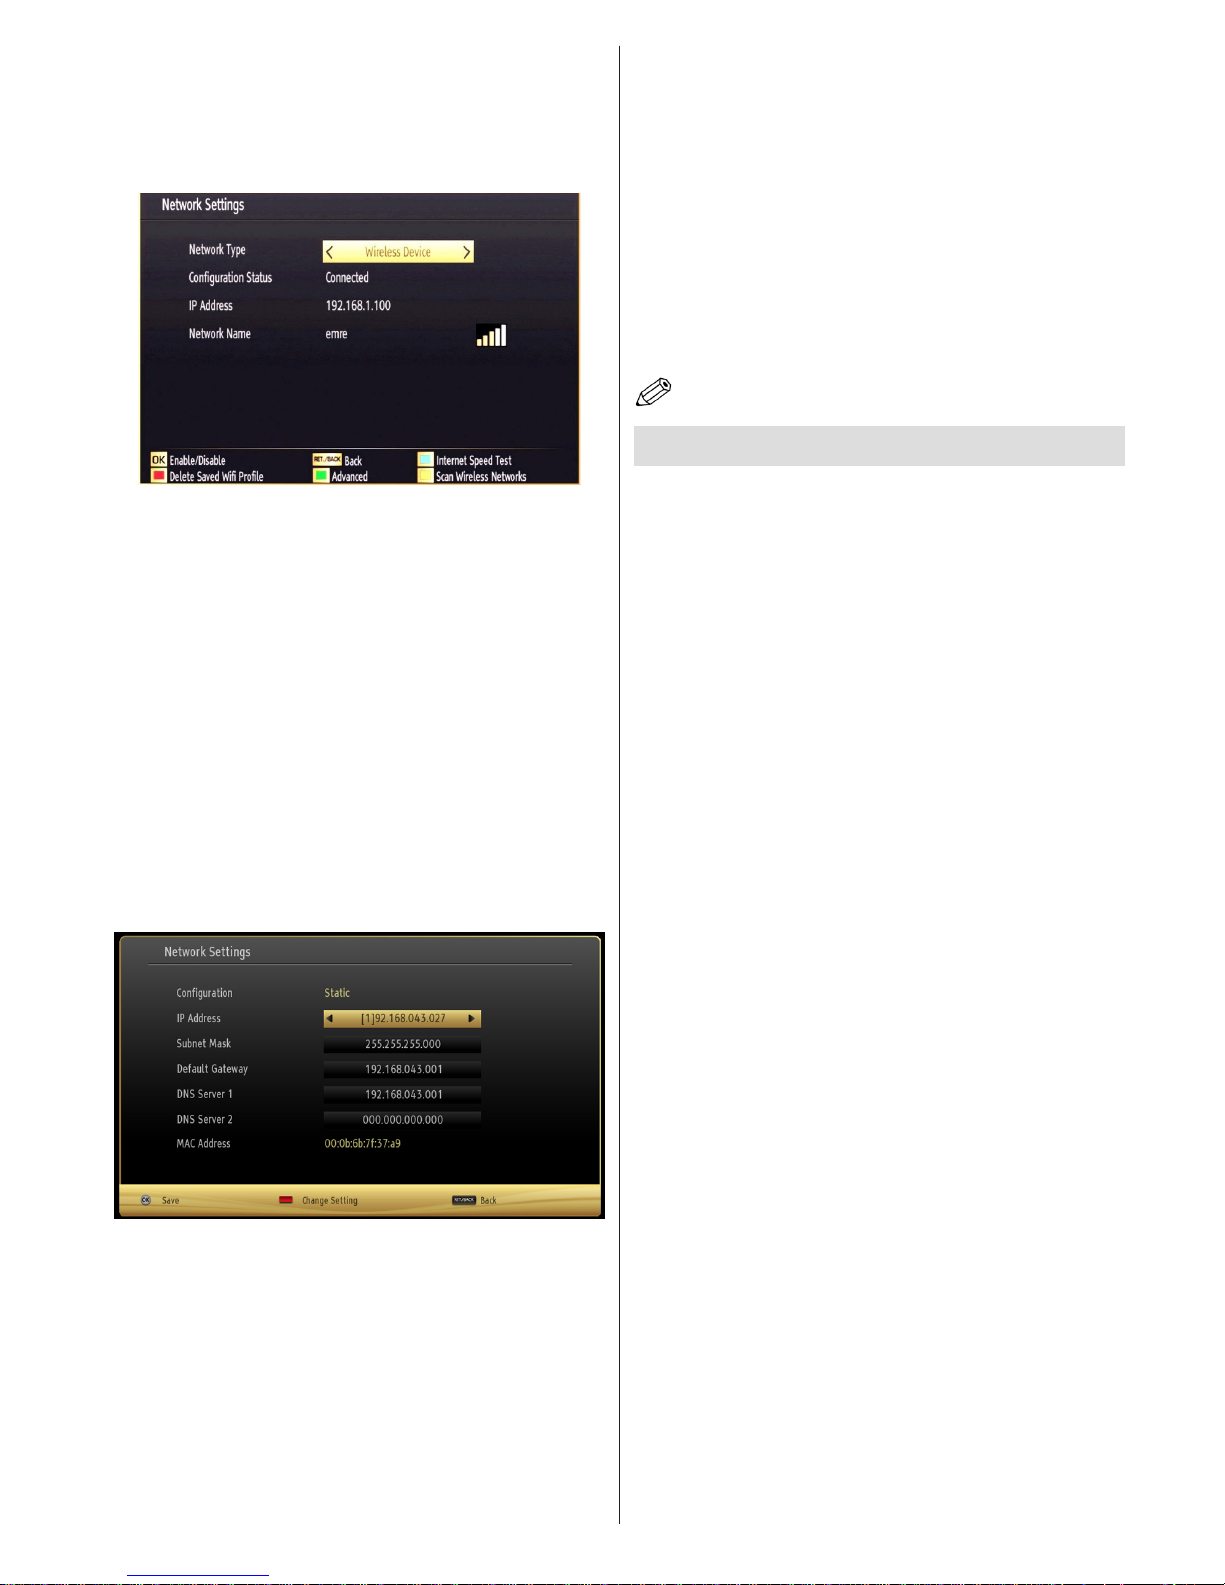
Conguring Wired Device Settings
If you are connecting the TV via ETHERNET INPUT,
select Network Type as Wired Device to congure.
Network Type
Network type can be selected as Wired or Wireless
device, in accordance with the active connection to the
TV set. Select this as Wired if you have connected to
the TV a LAN cable. Select as Wireless if you connect
via the wireless USB dongle (sold separately).
Conguration Status
This section displays the status of the connection. Select
Connected if you want to activate connection. Select
as Not Connected to end an active connection.
IP Address
If an active connection is available, the IP address will
be displayed on this section. If you want to congure
IP address preferences, press GREEN button and
switch to the advanced mode.
Conguring Wired Network Settings in
Advanced Mode
After pressing GREEN button, Advanced mode will
be available. While in Advanced Mode, press RED
button to edit settings. When nished, press OK to
save, Press RETURN/BACK to cancel.
Conguring Wireless Device Settings
(Optional)
IMPORTANT: “Veezy 200” USB dongle is required to
use wireless network feature. To use your TV with your
wireless network, you need a “Veezy 200” Wireless
USB dongle.
Wi-Fi feature can be used for a wireless network
connection. The feature is used for infrastructure
purposes only, such as connecting to the web, hbb
sites and connecting with DLNA servers (optional). If
you have the Veezy 200 Wi Dongle (sold separately),
select Network Type as Wireless Device to start
connection process.
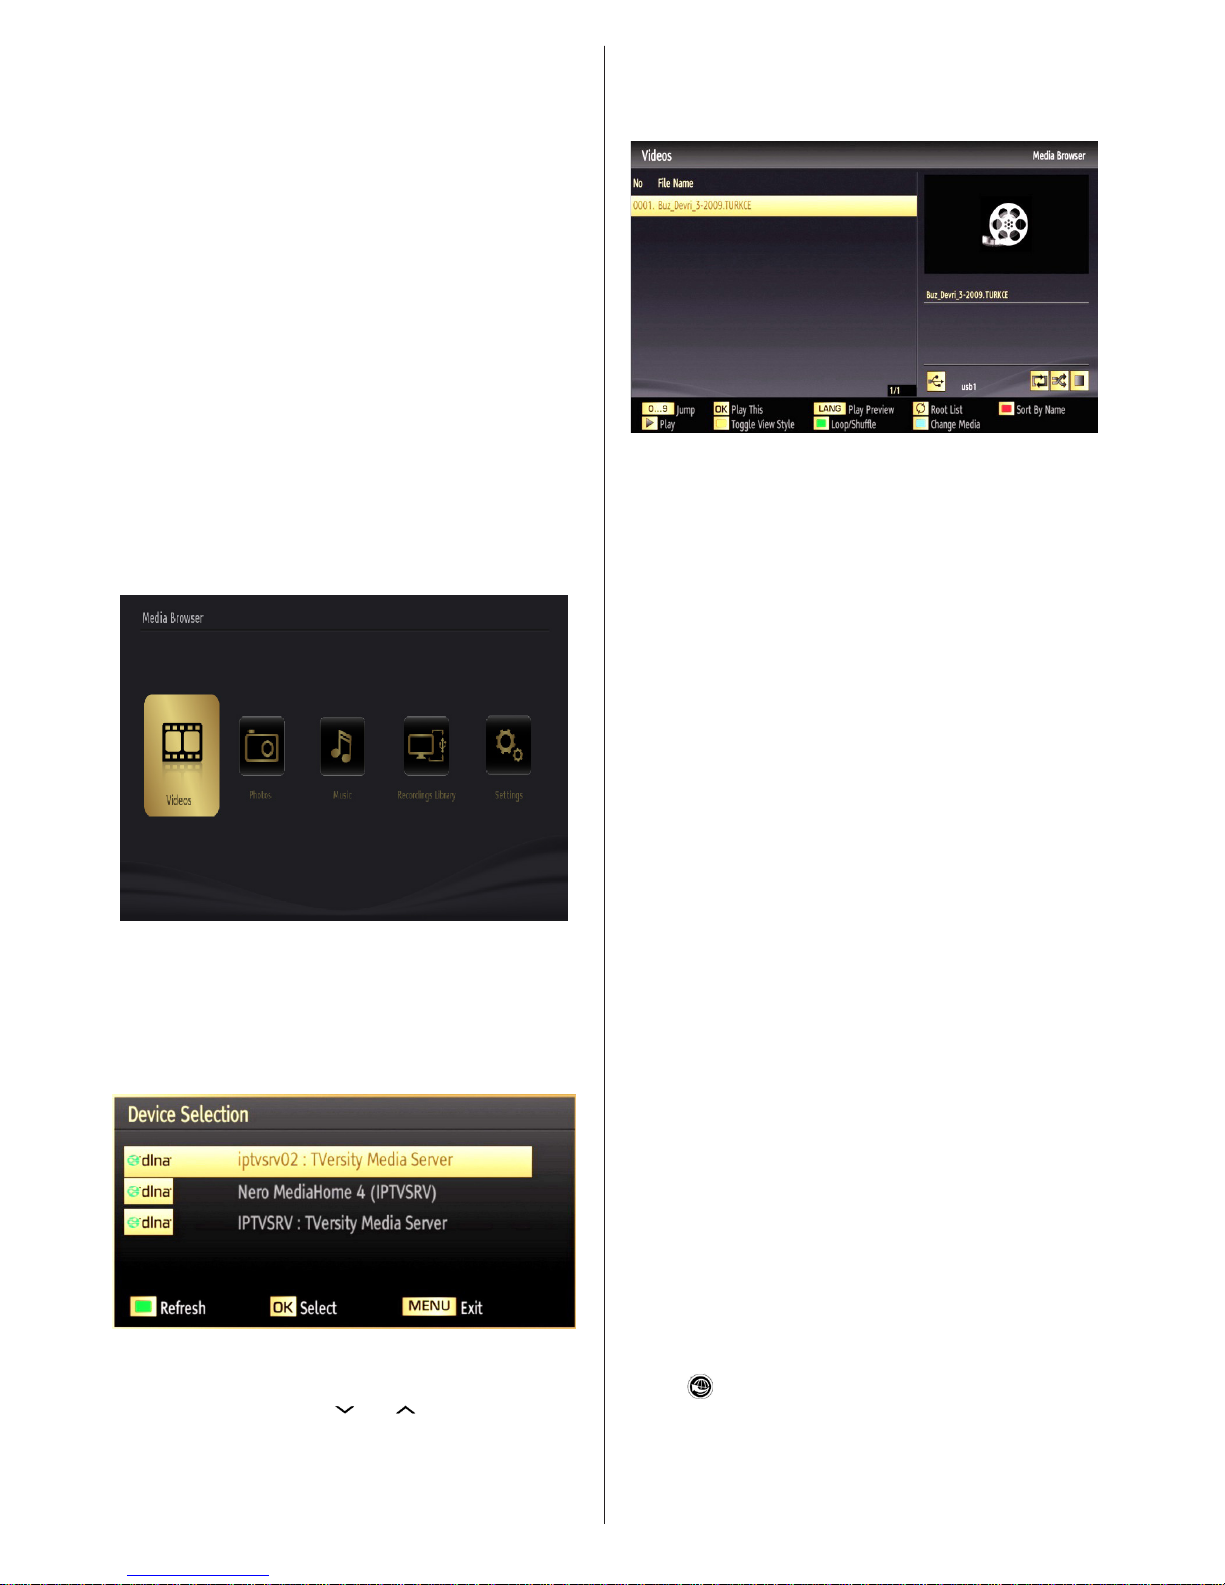
To enable Wi-Fi feature, proles should be congured
properly. Please plug in the Wi-Fi dongle (sold
separately) to one of the USB ports.
Press YELLOW button to scan wireless network from
network settings menu. Afterwards, available network
list will be displayed. Please select your desired
network from the list.
If the selected network is protected with a password,
please enter the correct key by using the virtual
keyboard. You can use this keyboard via navigation
buttons (Left/Right/Up/Down) and OK button on the
remote control.
Page 20
English - 19 -
Wait until the IP the address is shown on the
screen.
This means that the connection is now established.
To disconnect from a wireless network, you should
highlight Conguration Status and press OK.
You can navigate between menu tabs by pressing left/
right buttons. The help bar on the bottom of the dialog
shows features that you may use. Press BLUE button
to check your internet connection speed.
You can check the signal strenght by using the network
settings menu for the wireless device mode.
Information
Configuration Status: Displays wi-fi status as
connected or not connected.
IP Address: Displays the current IP address.
Network Name: Connected networks’ name will be
displayed.
Press GREEN button to switch to advanced mode
and then press OK button to edit settings.
Delete Saved Wi Proles
Saved proles will be deleted if you press red button
while wireless device selection osd is on the screen.
Connecting to your Cell Phone via WiFi
(Optional)
• If your cell phone has WiFi feature, you can connect
your cell phone to your TV by using WiFi connection
via a router, in order to play content from your phone.
For this, your cell phone must have an appropriate
sharing software.
• Connect to your router following the steps stated
above in the Wireless Connection section.
• Afterwards, engage your cell phone with the router
and then activate sharing software on your cell
phone. Then, select les that you would like to share
with your TV.
• If the connection is established correctly, you should
now access the shared les of your cell phone via
the Media Browser of your TV.
• Enter Media Browser menu and playback device
selection OSD will be displayed. Select your cell
phone’s ident and press OK to continue.
Note: This feature may not be supported by some cell
phones.
Connectivity Troubleshooting
Wireless Network Not Available
Ensure that the rewalls of your network allows the TV
wireless connection. “Veezy 200” usb wi dongle(sold
separately) should be plugged properly (if available).
If the wireless network does not function properly,
try using the wired network in your home. Refer to
the Wired Connection section for more information
on the process.
If the Net TV does not function, check the modem
(router) rst. If the router does not have a problem,
check the internet connection of your modem.
Try searching for wireless networks again, using the
Network Settings menu screen.
Connection is Slow
See the instruction book of your wireless modem to get
information on the internal service area, connection
speed, signal quality and other settings. You need to
have a high speed connection for your modem.
Distruption during playback or slow
reactions
You could try the following in such a case:
Keep at least three meters distance from microwave
ovens, mobile telephones, bluetooth devices or any
other Wi-Fi compatible devices. Try changing the
active channel on the WLAN router.
Using DLNA Network Service
DLNA (Digital Living Network Alliance) is a standard
that eases viewing process of digital electronics and
makes them more convenient to use on a home
network. For further information, visit www.dlna.org.
DLNA standard allows you to view and play photos,
music and videos stored in the DLNA media server
connected to your home network.
Page 21
English - 20 -
Step 1: Nero Media Home Installation
DLNA function cannot be used if the server program
is not install to your PC. Please prepare your PC
with the provided Nero Media Home programme. For
more information about the installation, please refer
to appendix H.
Step 2: Connect to a Wired or Wireless Network
See the chapter Network Settings for detailed conguration
information.
Step 3: Play Shared Files via Media Browser
Select Media Browser by using Left or Right button
from the main menu and press OK button. Media
browser will be then displayed.
DLNA support is available only with Media Browser
folder mode. To enable folder mode, go to Settings
tab in the main media browser screen and press
OK. In the settings options, highlight View Style and
change to Folder using Left or Right button.
Please select desired media type and press OK.
If sharing congurations are set properly, the following
OSD message will be displayed after selecting the
desired media type. Select OK to display the selected
network or USB memory content. If you want to refresh
the device list, press GREEN button. You can press
MENU to exit.
If available networks are found, they will be listed on
this screen. Select media server or network that you
want to connect by using “ ” or “ ” buttons and press
OK button.
If you select media type as Video and choose
a device from the selection menu, a new menu
screen will appear on the screen as below:
Select Videos from this screen to list all the available
video les from the selected network.
To play other media types from this screen, you
must go back to main Media Browser screen and
select media type as desired and then perform the
network selection again. Refer to Media Browser
USB Playback section for further information on le
playback.
Subtitle les do not work if you watch video from
network through DLNA.
You can connect only one television with DLNA to
same network. If a problem occurs with DLNA network,
please switch on/off your television. Trick mode and
jump are not supported with DLNA function.
CAUTION:
There may be some PC’s which may not be able to
utilize the DLNA function due to administrator and
security settings. (such as business PC’s).
For best home network streaming with this set, the
supplied Nero software should be installed.
Internet Portal
You can access PORTAL mode using your TV. To do
this, an active internet connection is required. Follow
the steps on Connecting to a Wired/Wireless(optional)
Network section to connect your TV to internet. After
the connection is established, you can select or view
portal options.
Note: Broadband internet connection is required
for high quality viewing. Ensure that the internet
connection is made properly. You must set the
Country and Language data correctly in the First
Time Installation for the proper operation of internet
portal.
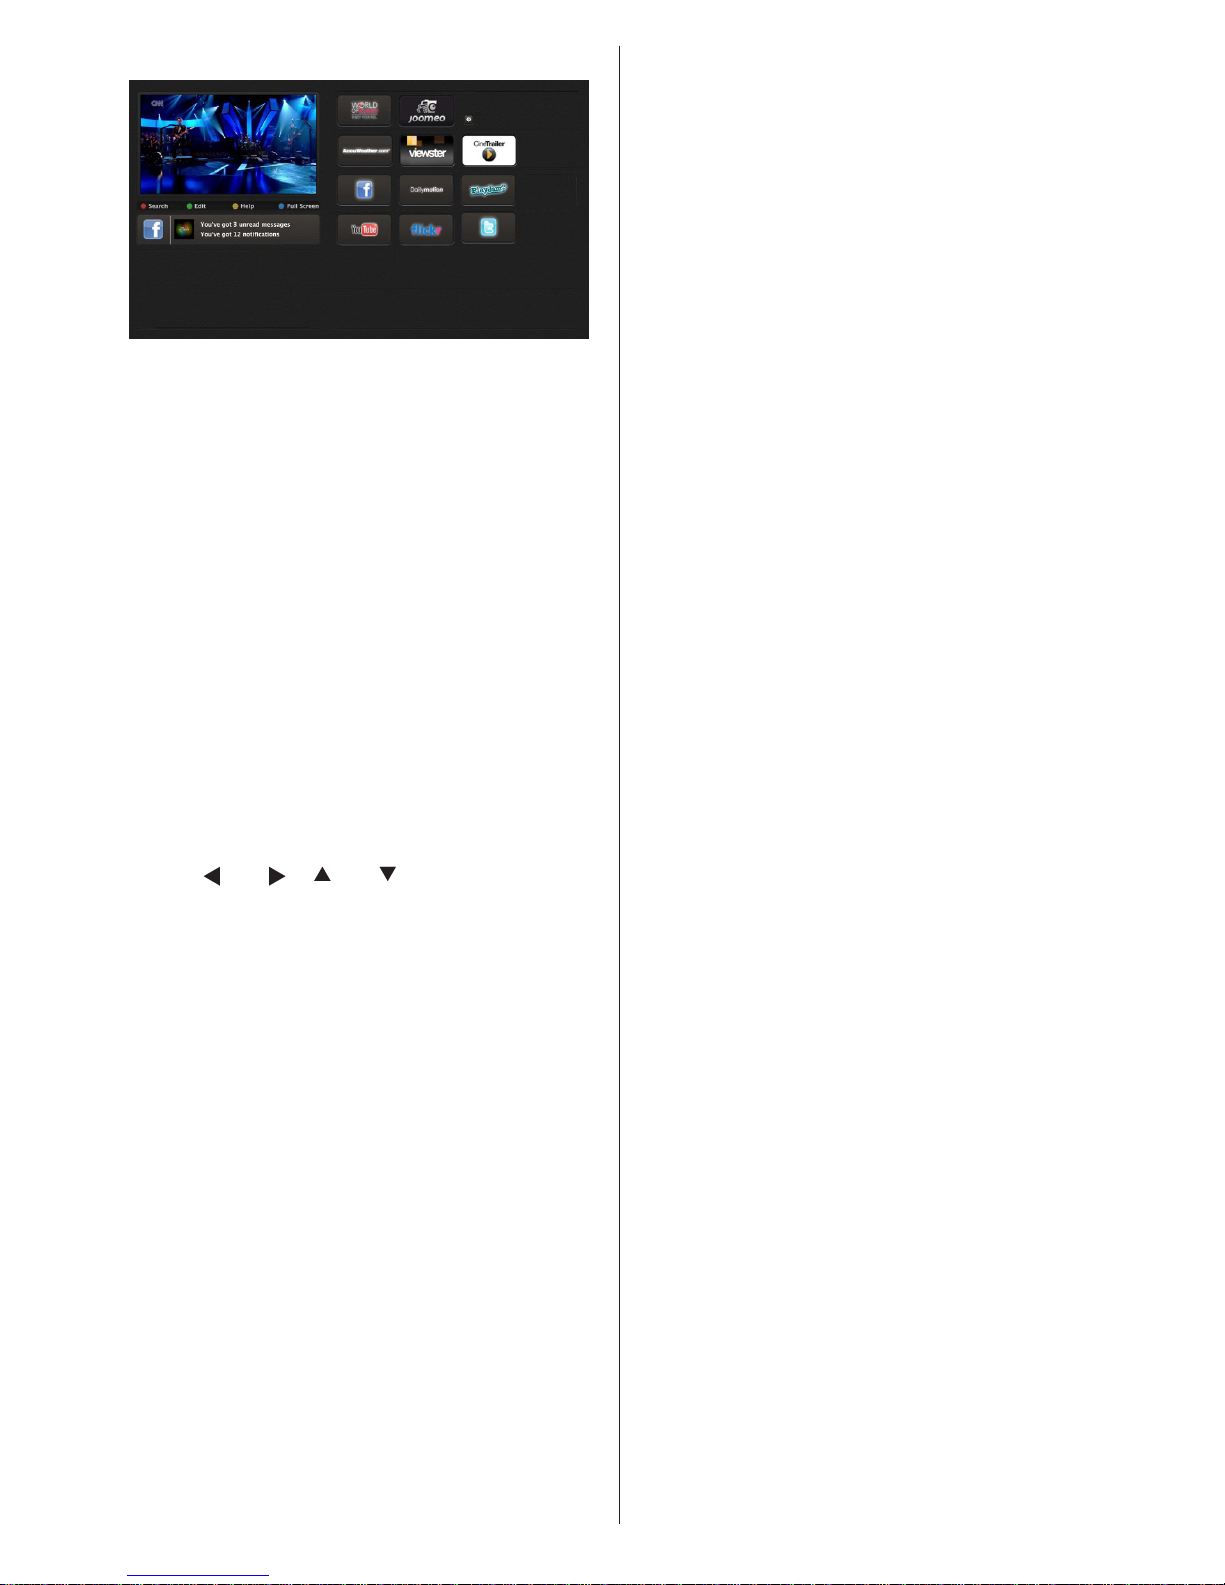
Press “ ” button on your remote control and portal
application options will be displayed. Application
options will be displayed as the template below.
Available applications’ contents may change
depending on the application content provider.
Page 22
English - 21 -
Select a link or application using the Left and Right or
Up or Down buttons and press OK to activate.
• Use Up/Down and Left/Right buttons to navigate
between the items on Portal screen.
• Press OK button to conrm your selection.
• Press BACK to go to the previous screen.
• Press EXIT to quit internet portal mode.
Note: Possible application dependent problems may
be caused by the content service provider.
Note on PIP Window
If you switch to portal mode while watching TV
channels, current programme will be displayed on
the PIP window. You can change channels using
P+/P- buttons.
Current HDMI content will be displayed on the PIP
window, if you switch to portal mode while watching
HDMI source.
Use the “ ” or “ ”, “ ” or “ ” to navigate between
the items on Portal screen. Press the OK button to
conrm your selection. Press the BACK button to go
to the previous screen.
Press the EXIT button to quit the Internet portal mode.
Page 23
English - 22 -
Teletext
“ ” Teletext / Mix: Activates teletext mode when
pressed once. Press again to place the teletext screen
over the programme (mix). Pressing again will quit
the teletext mode.
“BACK” Index: Selects the teletext index page.
“İ” Reveal: Shows hidden information (e.g. solutions
of games).
“OK” Hold: Holds a text page when convenient. Press
again to resume.
“ ”/“ ” Subcode Pages: Selects subcode pages if
available when the teletext is activated.
P+ / P- and numbers (0-9): Press to select a page.
Note: Most TV stations use code 100 for their index pages.
Your TV supports both FASTEXT and TOP text
systems. When these systems are available, the
pages are divided into groups or topics. When
FASTEXT system is available, sections in a teletext
page will become colour-coded and can be selected
by pressing the coloured buttons. Press a coloured
button that corresponds to with your needs. The
coloured writings will appear, showing you which
coloured buttons to use when TOP text transmission
is present. Pressing “ ” or “ ” commands will request
the next or previous page respec tively.
Digital Teletext (for UK only)
• Press the “ ” button. The digital teletext information
appears. Operate it with the coloured buttons, cursor
buttons and OK button.
The operation method may differ depending on the
contents of the digital teletext. Follow the instructions
displayed on digital teletext screen.
When the “ ” button is pressed again, the TV returns
to television broadcasting.
Software Upgrade
Your TV is capable of finding and updating new
software upgrades over broadcast channels. For
broadcast channels search, TV looks the available
channels stored in your settings. So before software
upgrade search, it is advised to auto search and
update all available channels.
1) Software upgrade search via user interface
• It is possible manually to check if there is a new
software upgrade for your TV set.
• Simply navigate on your main menu. Choose
Settings and select Other Settings menu. In Other
Settings menu navigate on to the Software Upgrade
item and press OK button to open Upgrade Options
menu.
• In Upgrade Options menu select Scan for upgrade
and press OK button.
• If a new upgrade is found, it starts to download
the upgrade. A progress bar indicates the remaining
download progress. When download completes with
success a message is displayed for reboot to activate
new software. Press OK to continue with the reboot
operation.
2) Background search and upgrade mode
• While TV is connected to Internet, in background
it searches for critical software upgrades. If a critical
software upgrade is found it downloads the upgrade
silently. When download completes with success a
message is displayed for reboot operation to activate
new software. Press OK to continue with the reboot
operation.
3) 3.AM search and upgrade mode
• If Automatic scanning in Upgrade Options menu
is enabled, TV wakes up at 03:00 and searches
broadcast channels for new software upgrade. If new
software is found and downloaded successfully, with
next power up TV opens with new software version.
Note on reboot operation: Reboot is the last step in software
upgrade operation if download of new software is nished
successfully. During reboot TV makes nal initialization. In
reboot sequence panel power is closed and front led indicates
the activity with blinking. Around 5 minutes later TV restarts
with new software activated.
• If your TV fails to restart in 10 minutes, unplug power
for 10 minutes and re-plug again. TV should open with
new software safely. If you still can not get TV working,
please kindly repeat unplug and plug sequence a few
times more. If your set still can not operate, please call
the service personnel to x the problem for you.
Caution: While led is blinking during reboot do not unplug
your TV’s power. Doing this may cause your TV not to re-
open again and can only be xed by service personnel.
Manual Software Update
Ensure that the ethernet cable is connected to your
TV. If the ethernet cable is connected to the TV, ensure
that the TV is receiving. Check that the Good is
present in the following menu path:
Menu -> Settings -> Network Settings -> Conguration
Status -> Connected
Go to Settings tab from the main menu and select
Other Settings. Highlight Software Upgrade and
press OK.
Select Scan for Upgrade and press OK button.
An OSD screen including the progress bar will be
visible under the Software upgrade” title.
A warning screen will be displayed on the screen,
stating that the TV will be rebooted. Press OK button
to nalize upgrade process and reboot TV.
Page 24

English - 23 -
Troubleshooting & Tips
Image persistence - ghosting
Please note that ghosting may occur while displaying
a persistent image (still or paused image). LED TVs’
image persistence may disappear after a short time.
Try turning off the TV for a while. To avoid this, do not
leave the screen in still picture mode for extended
periods.
No power
If your TV has no power, please check the power cord
plug is connect to the mains power socket.
Poor picture
1. Have you selected the correct TV system?
2. Is your TV or house aerial located too close to a
non-earthed audio equipment or neon lights, etc.?
3. Mountains or high buildings can cause double
pictures or ghost images. Sometimes you can improve
the picture quality by changing the direction of the
aerial. Is the picture or teletext unrecognisable?
4. Check if you have entered the correct frequency.
5. Please retune the channels.
6. The picture quality may degrade when two devices
are connected to the TV at the same time. In such a
case, disconnect one of the devices.
No picture
1. No Picture means that your TV is not receiving a
transmission. Have you selected the correct button on
the remote control? Try once more. Also make sure
the correct input source has been selected.
2. Is the aerial connected properly?
3. Are the plugs connected tightly to the aerial
socket?
4. Is the aerial cable damaged?
5. Are suitable plugs used to connect the aerial?
6. If you are in doubt, consult your dealer.
No sound
1. Has the TV been set to mute? To cancel mute, press
the “ ” button, or increase the volume level.
2. Sound is coming from only one speaker. Is the
balance set to one extreme? See Sound Menu
section.
Remote control - does not operate
Your TV no longer responds to the remote control. The
batteries may be exhausted, if so you can still use the
control buttons on the TV. (* Is only possible if they
are not blocked by parental control.)
Input sources - can not be selected
1. If you cannot select an input source, it is possible
that no device is connected.
2. Check the AV cables and connections if you have
tried to connect a device.
Recording Unavailable
To record a programme, you should rst connect
a USB disk to your TV while the TV is switched
off. You should then switch on the TV to enable
recording feature. Otherwise, recording feature will
not be available. If you cannot perform recording, try
switching off the TV and then re-inserting the USB
device while the TV is switched off.
USB Is too Slow
If “USB is too slow” message is displayed on the
screen while starting a recording, try restarting
the recording. If you still get the same error, it is
possible that your USB disk does not meet the speed
requirements. Try connecting another USB disk.
Internet Connection Not Available / DLNA Mode
Not Operating
If the MAC address (a unique identier number) of your
PC or modem has been permanently registered, it is
possible that your TV might not connect to the internet.
In such a case, the MAC address is authenticated
each time when you connect to the internet. This is a
precaution against unauthorized access. Since your
TV has its own MAC address, your internet service
provider cannot validate the MAC address of your
TV. For this reason, your TV cannot connect to the
internet. Contact your internet service provider and
request information on how to connect a different
device, such as your TV, to the internet.
It is also possible that the connection may not be
available due to a firewall problem. If you think
this causes your problem, contact your internet
service provider. A rewall might be the reason of a
connectivity and discovery problem while using the TV
in DLNA mode or while browsing via DLNA.
Invalid Domain
Ensure that you have already logged on to your PC
with an authorized username/password and also
ensure that your domain is active, prior to sharing
any les in your DLNA server program on your PC. If
the domain is invalid, this might cause problems while
browsing les in DLNA mode.
Page 25
English - 24 -
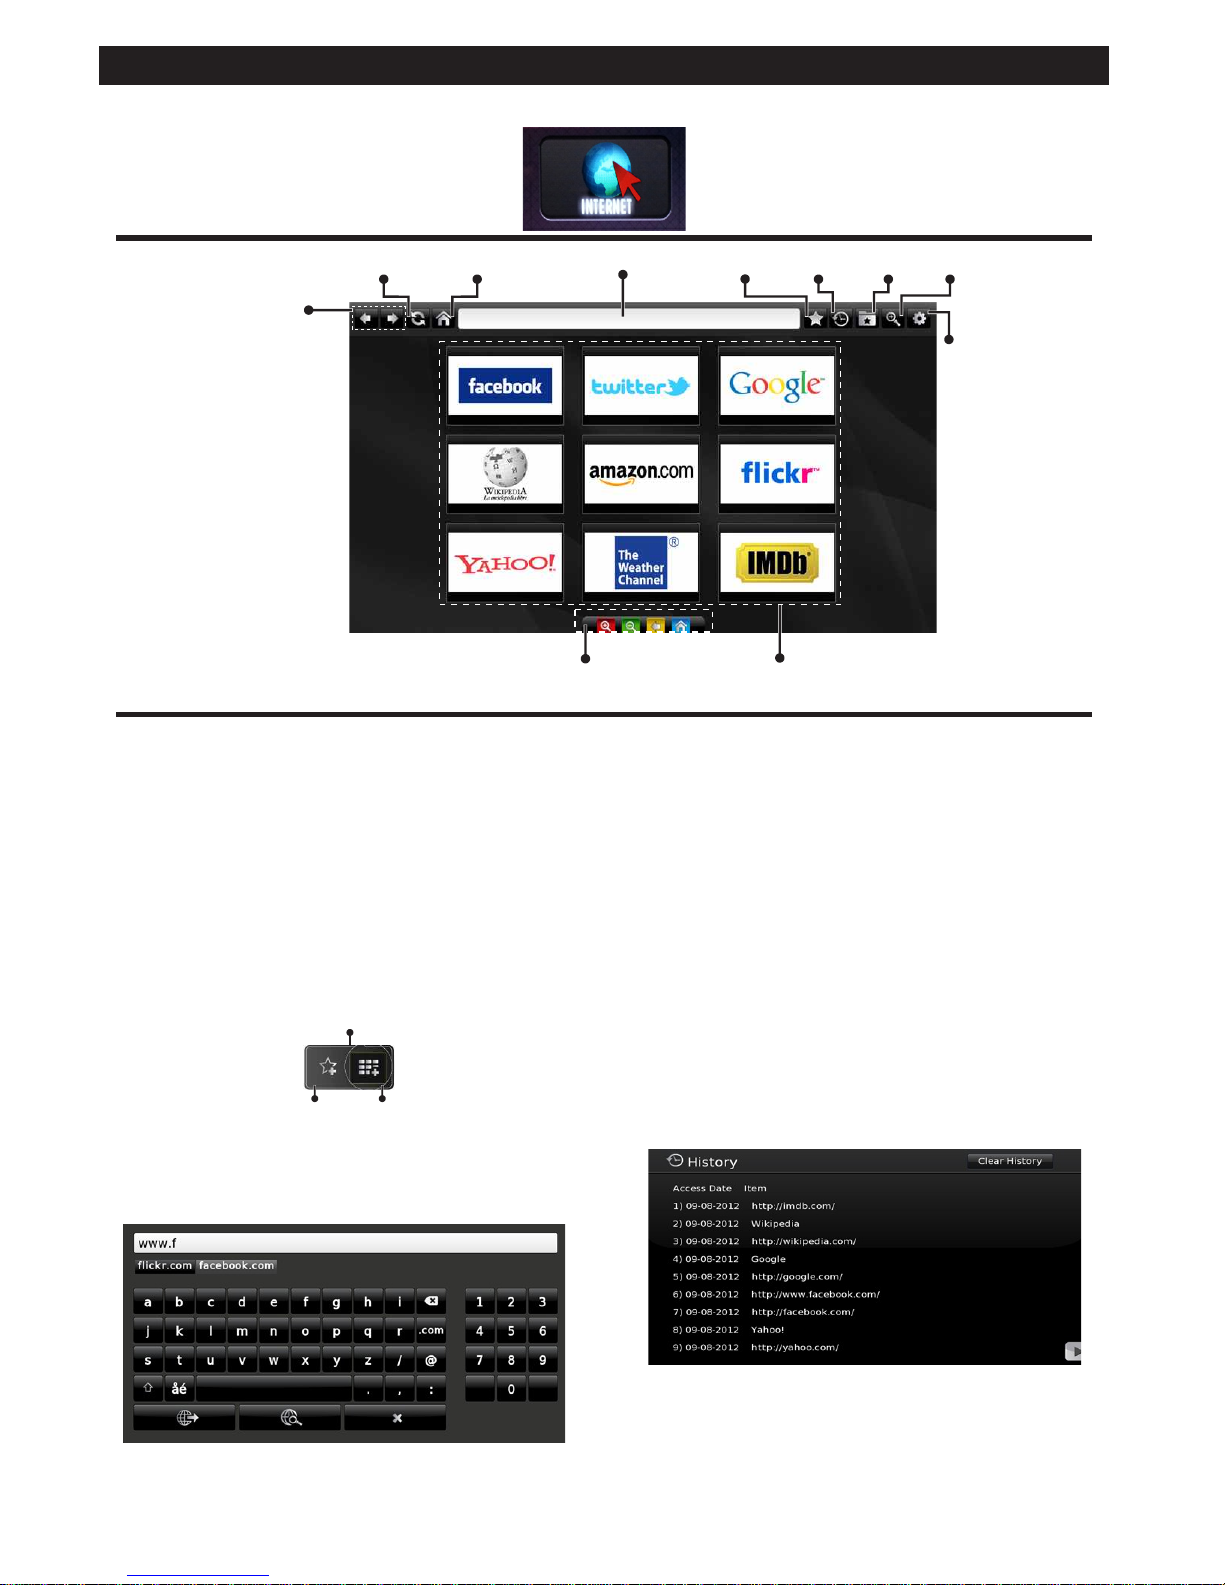
Internet Browser
Refresh
Previous
Next
Quick Access
Home Page
Address Bar
Add
History
Bookmarks
Zoom
Settings
Remote control shortcuts
(Zoom in-out/Back/Home)
• To navigate the web browser, use the arrow buttons
on the remote control. Press OK to continue.
• After First time installation, predened web sites and
logos will be displayed on the browser’s access page
(see image above). To add a desired web page to
the quick access page, whilst on the website you
wish to add, select the “Add” menu and select “Quick
Access” button.
• If you want to add bookmarks, select this item while
the desired web page is on the screen.
Quick
Access
Add
Bookmarks
• You can navigate the web browser in three ways.
First, enter any URL in the address bar.
• You can search keywords by clicking the search
button in the address dialog box or another way
to navigate to pages is by clicking on links on web
pages and these will take you to the appropriate
pages.
• When you scroll the pointer down to the middle of the
screen, the remote control’s shortcuts will be shown.
• Use the zoom shortcut buttons or the zoom menu
to zoom in or zoom out.
• You can clear cookies or clear all browser data from
the settings menu.
• Your TV is compatible with USB mice. Plug your
mouse or wireless mouse adaptor to the USB
input of your TV.
• To view your browsing history, click the history
button. You can also clear your browsing history
from here.
• The browser does not support multiple tabs.
• Some internet pages include ash content. These
are not supported by the browser.
• Your TV does not support any download processes
from the web browser.
To use the internet browser, please select the internet browser logo from the portal section.
Page 26

English - 25 -
Getting Started with Skype
Make voice calls and video calls with Skype on your TV. Select the Skype
app from the portal section to start a conversation.
Follow the on screen instructions to see how to operate related features.
NOTE
• Connect your supported webcam directly to the USB port on your TV.
• If the camera is not working properly, switch off and unplug the TV. Connect
your camera again and turn the TV on.
• As soon as the TV is turned off, Skype disconnects.
• Voice level and sound quality are affected by environmental noise.
• Call quality can change with accordance to your internet connection.
• Please visit www.skype.com to learn more information and to see the Terms of Use about Skype.
• The TV must be connected to a network for Skype connection.
• The Skype app will alert you when someone calls whilst you are watching your TV or operating the Skype
application.
• A Skype camera (can be sold separately) is required to get the full benet of Skype’s features. If you do not
already have one, you will need to purchase a camera (compatible with Vesca100) to get the full benets
of Skype.
Note : When you turn on the TV and no users have been
set up for Skype, the image shown to the side will appear
on screen.
Licence Notication
Skype is a trade mark of Skype or its related companies. This product/application has not been approved or
endorsed by Skype, Skype Communications S.a.r.l. or any of their related companies.
No emergency calls with Skype
Skype is not a replacement for your ordinary telephone and can't be
used for emergency calling. Select the Skype app from the portal
section to start a conversation.
Page 27
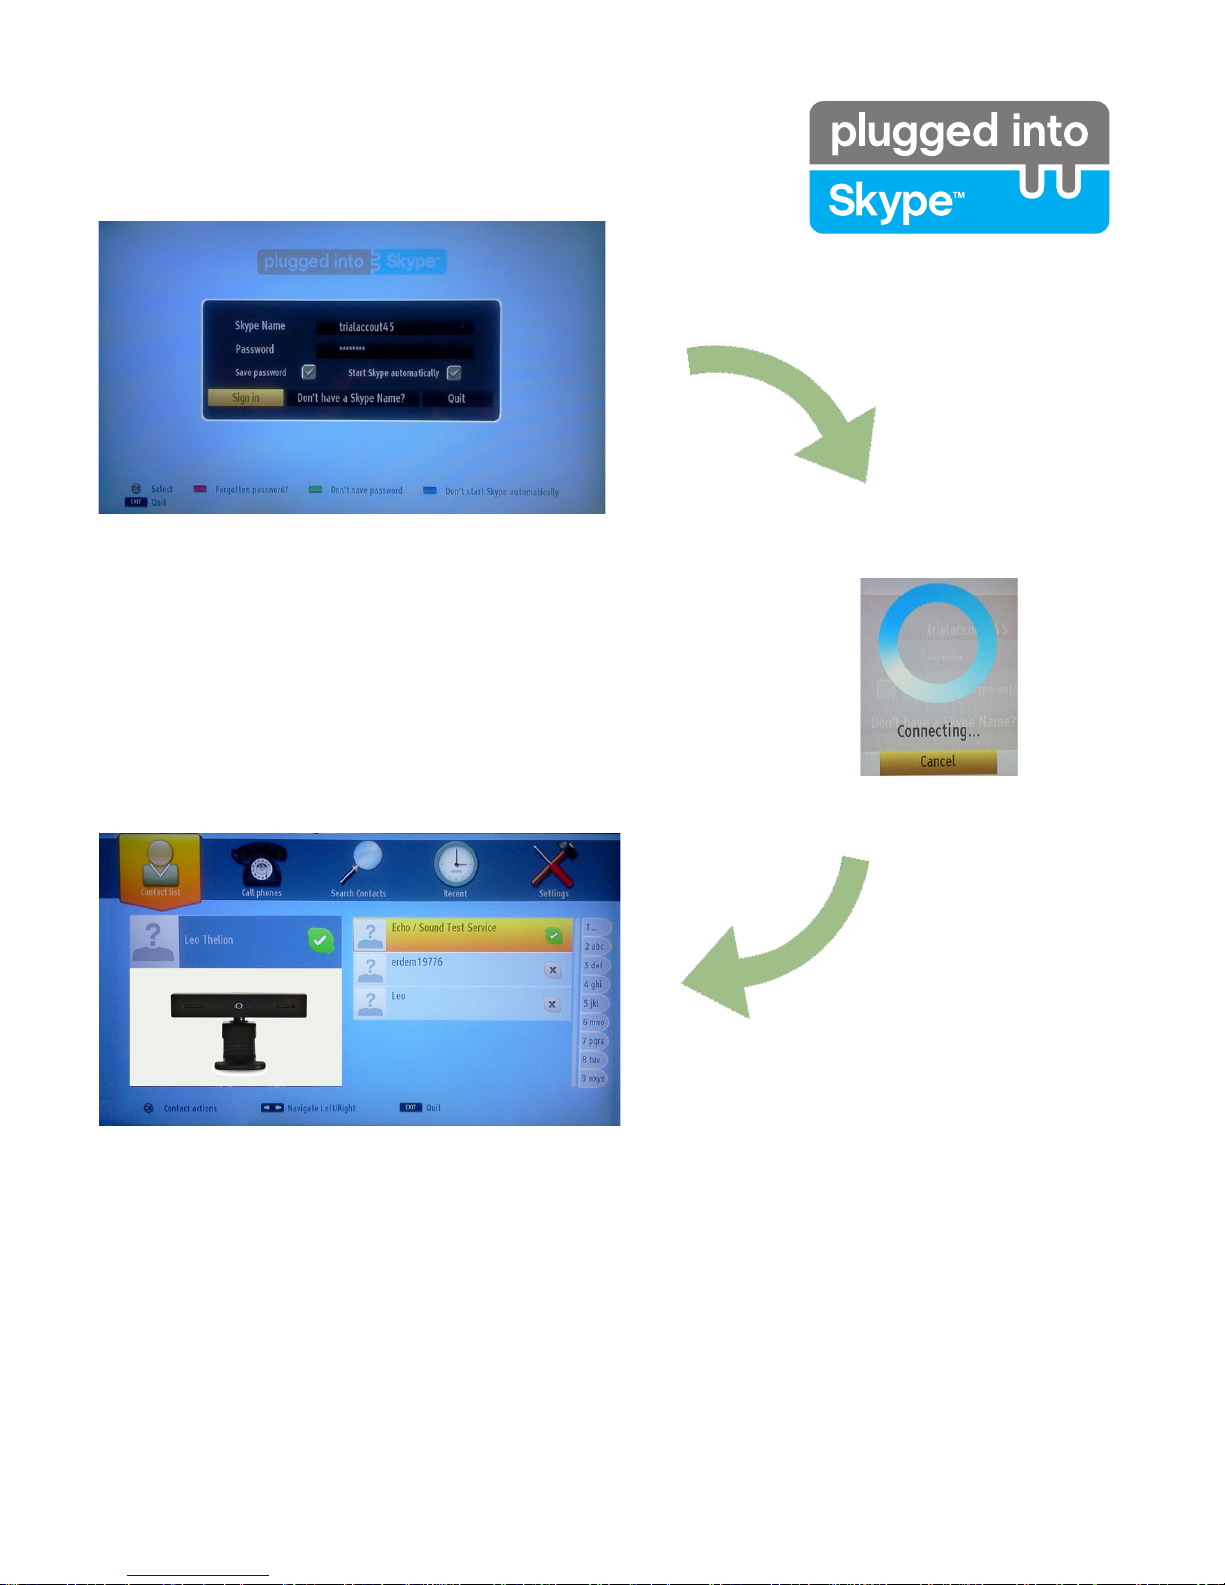
English - 26 -
Sign In & Sign Up Now
To use the Skype application, you need a Skype account.
You can create a Skype account, using this app, in the ‘Sign In & Sign Up Now’
menu if you don’t already have one. If you already have a Skype account,
enter your name and password correctly. Select Sign In and press OK.
If you have a Skype account and you forgot your password, press the Red
button to view the “reset password” screen.
After successfully logging in to your account, the contact list will be displayed
on screen.
You can review your contact list on the right side of the screen. Your Skype name, mood message and your
camera preview (if connected) will be displayed on the left hand side of screen.
Page 28
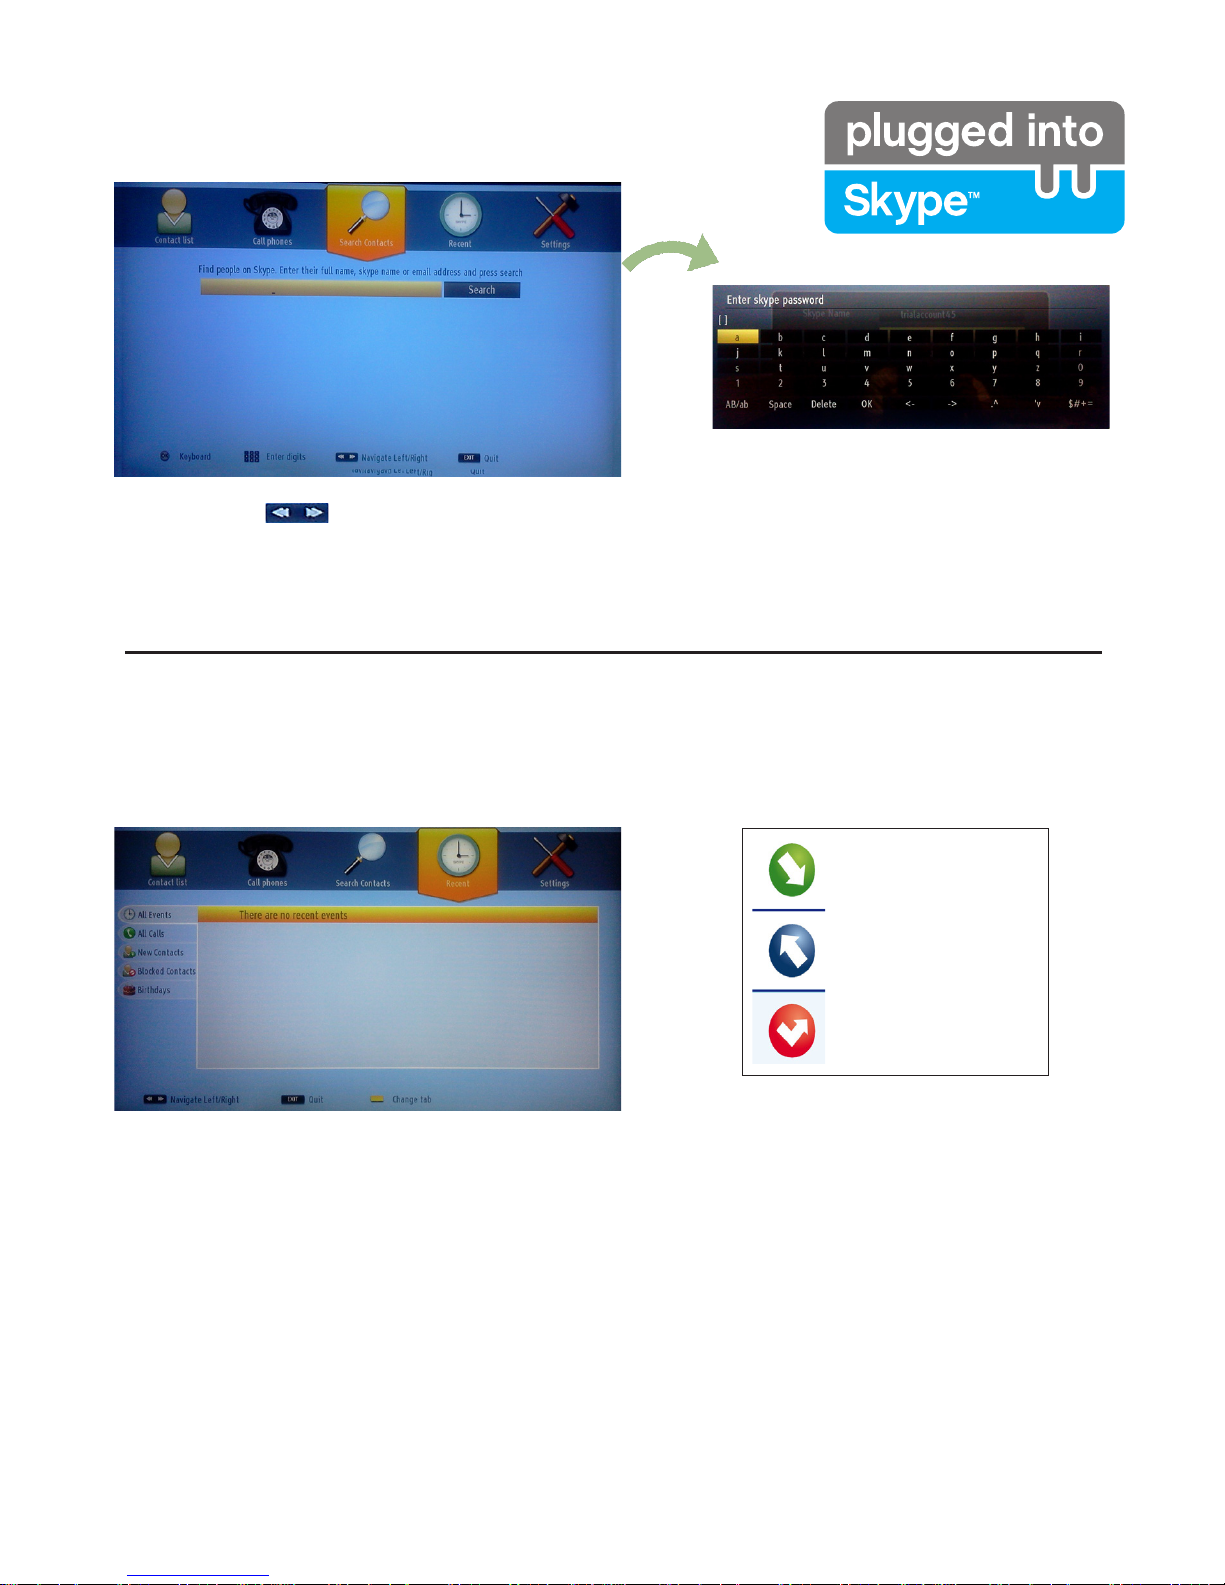
English - 27 -
Adding a contact
By pressing the button select the “Search Contacts” option. Enter the full name, skype name or email
address of the contact you want to nd and add.
Use the remote control or virtual keyboard to enter a keyword.
Your Skype history can be seen in this section. To view recent history options, use the p+ and p- buttons.
To delete a conversation, press the Red button. When you press the OK button , the contact review will be
displayed. Also Prole information can be displayed in this section.
Recent history
Incoming call
Outgoing call
Missed call
Icon meaning
Page 29
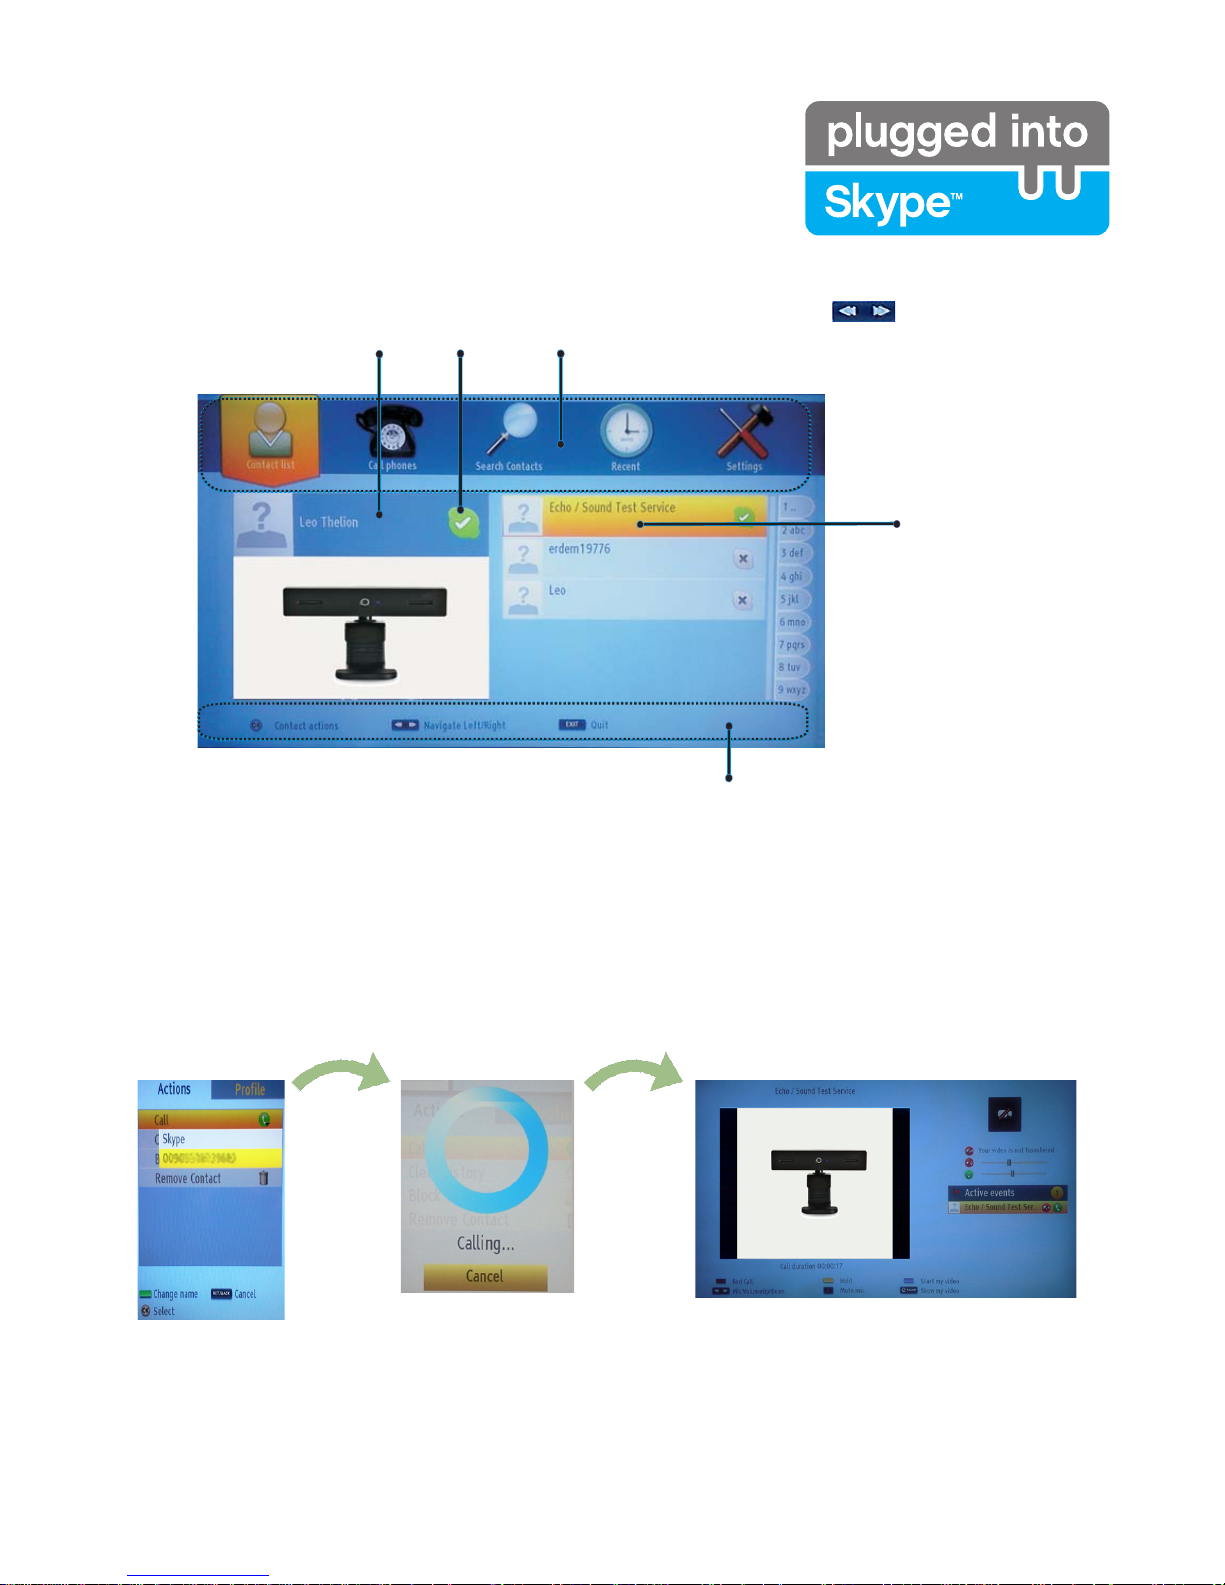
English - 28 -
Actions
Select a person from the contact list screen and press OK. Choose an action from the list and then press OK
to start the selected process. Voice and video call is ready for your use.
If available you will see the thumbnail view of yours and the other person’s camera feed.
Help bar
Your contact list
(Press Ok to use
video&voice call)
Select a Menu by pressing the button.
Online
status
Account Name,
mood message and
prole picture.
When a conversation is active, you can mute the microphone or put the other person on the line on hold.
Press the Red button to end a call.
Page 30

English - 29 -
Dialing Phones
The option to call phones is available if you have
Skype Credit. Please buy credit rst. Afterwards,
select a country then enter a phone number which
you want to call.
Press the Yellow button to save an entered
telephone number. Press the Green button to start
a conversation.
The incoming call dialog is shown when you are logged into Skype
and when other users initiate a Skype call.
A small dialog box will appear in the lower right corner of the TV
screen whether the user watches TV or is browsing through Skype.
Use the remote control button and choose your action.
Incoming call
Settings
All your Skype settings can be changed by using
the Settings menu. Please use P+ and P- buttons
on the remote control to move up or down. Select
an option, then change the selected option by using
the navigation buttons. In the about section, please
nd the Skype terms and conditions.
Please read this notice carefully.
Page 31

English - 30 -
Information for Users on Disposal of Old Equipment
and Batteries
[European Union only]
These symbols indicate that equipment with these
symbols should not be disposed of as general
household waste. If you want to dispose of the product
or battery, please consider the collection systems or
facilities for appropriate recycling.
Notice: The sign Pb below the symbol for batteries indicates
that this battery contains lead.
PC Typical Display Modes
The following table is an illustration of some of the
typical video display modes. Your TV may not support
all resolutions. Your TV supports up to 1920x1200.
Index Resolution Frequency
1 640x400 70Hz
2 640x350 85Hz
3 640x400 85Hz
4 640x480 60Hz
5 640x480 66Hz
6 640x480 72Hz
7 640x480 75Hz
8 640x480 85Hz
9 800x600 56Hz
10 800x600 60Hz
11 800x600 70Hz
12 800x600 72Hz
13 800x600 75Hz
14 800x600 85Hz
15 832x624 75Hz
16 1024x768 60Hz
17 1024x768 66Hz
18 1024x768 70Hz
19 1024x768 72Hz
20 1024x768 75Hz
21 1024x768 85Hz
22 1152x864 60Hz
23 1152x864 70Hz
24 1152x864 75Hz
25 1152x864 85Hz
26 1152x870 75Hz
27 1280x768 60Hz
28 1360x768 60Hz
29 1280x768 75Hz
30 1280x768 85Hz
31 1280x960 60Hz
32 1280x960 75Hz
33 1280x960 85Hz
34 1280x1024 60Hz
35 1280x1024 75Hz
36 1280x1024 85Hz
37 1400x1050 60Hz
38 1400x1050 75Hz
39 1400x1050 85Hz
40 1440x900 60Hz
41 1440x900 75Hz
42 1600x1200 60Hz
43 1680x1050 60Hz
44 1920x1080 60Hz
45 1920x1200 60Hz
Page 32
English - 31 -
Specications
TV BROADCASTING
PAL/SECAM B/G D/K K’ I/I’ L/L’
DIGITAL RECEPTION
DVB-T MPEG2
DVB-T MPEG4 HD
DVB-T MHEG-5 Engine (for UK only)
DVB-C MPEG2
DVB-C MPEG4 HD
RECEIVING CHANNELS
VHF (BAND I/III)
UHF (BAND U)
HYPERBAND
NUMBER OF PRESET CHANNELS
1000
CHANNEL INDICATOR
On Screen Display
RF AERIAL INPUT
75 Ohm (unbalanced)
OPERATING VOLTAGE
220-240V AC, 50 Hz.
AUDIO
German + Nicam Stereo
AUDIO OUTPUT POWER (W
RMS.
) (10% THD) 2 x 8
POWER CONSUMPTION (W) 100 W (max)
PANEL 16:9
Licence Notications
Manufactured under license from Dolby Laboratories.
TRADEMARK ACKNOWLEDGMENT
and the double-D symbol are
trademarks of Dolby Laboratories.
“DLNA®, the DLNA Logo and DLNA CERTIFIED® are
trademarks, service marks, or certication marks of
the Digital Living Network Alliance.”
“HDMI, the HDMI logo and High-Denition Multimedia
Interface are trademarks or registered trademarks of HDMI
Licensing LLC.”
Page 33

English - 32 -
Supported File Formats for USB Media Browser
Media Extension Format Notes
Video Audio
Movie dat, mpg,
mpeg
Mpeg1,2 MPEG1/2 Layer 1/2/3, AAC/HEAAC,
AC3/EAC3, LPCM/ADPCM
1080P@ 30fps 50Mbit/
sec
dat, mpg,
mpeg
MPEG2 ,H.264, VC1, AVS,
MVC
MPEG1/2 Layer 1/2/3, AAC/HEAAC,
AC3/EAC3, LPCM/ADPCM
H.264:1080Px2@25fps
1080P@ 50fps MVC:
1080P@ 24fps Other:
1080P@ 30fps” 50Mbit/
sec
.vob MPEG2 MPEG1/2 Layer 1/2/3, AC3, LPCM 1080P@ 30fps 50Mbit/
sec
.mkv MPEG1,2,4, XviD,
H.264,
VC1,WMV3,
Motion JPEG
MPEG1/2 Layer 1/2/3, AAC/HEAAC,
AC3/EAC3, LPCM
H.264:1080Px2@25fps
1080P@ 50fps
Other:1080P@ 30fps
50Mbit/sec
.mp4 .mov MPEG1/2 Layer 3, AAC/HEAAC,
AC3/EAC3, LPCM/ADPCM
H.264:
1080Px2@25fps
1080P@ 50fps Other:
1080P@ 30fps 50Mbit/
sec
.avi MPEG1,2,4
Xvid
H.264,
VC1,WMV3,
Sorenson H.263
Motion JPEG
MPEG1/2 Layer 1/2/3, AAC/HEAAC,
AC3/EAC3, LPCM/ADPCM, WMA
H.264:
1080Px2@25fps
1080P@ 50fps Other:
1080P@ 30fps”
50Mbit/sec
v H.264,
Sorenson H.263
MPEG1/2 Layer 3, AAC/HEAAC,
LPCM/ADPCM
H.264: 1080Px2@25fps
1080P@ 50fps Other:
1080P@ 30fps” 50Mbit/
sec
3gp,3g2 MPEG4, H.264 1920x1080 @ 30P
20Mbit/sec
asf, wmv MPEG2,4, XviD, H.264,
VC1,WMV3
MPEG1/2 Layer 1/2/3, AAC/HEAAC,
AC3/EAC3, LPCM, WMA
1080P@ 30fps 50Mbit/
sec
Music .mp3
-
MPEG1 Layer 1/2/3 (MP3)
.wav LPCM
WMA/ASF WMA, WMA Pro
.m4a/ .aac AAC, HEAAC
Photo .jpg .jpeg Baseline JPEG MAX WxH =
14592x12288
Up to 8 MegaByte
.png Progressive JPEG
.bmp non-interlace
.png
interlace
Subtitle
sub - -
srt - -
Page 34

English - 33 -
Supported DVI Resolutions
When connecting devices to your TV’s connectors by using DVI converter cables (not supplied), you can refer
to the following resolution information.
56Hz 60Hz 66Hz 70Hz 72Hz 75Hz
640x400
þ
640x480
þ þ þ þ
800x600
þ þ þ þ þ
832x624
þ
1024x768
þ þ þ þ þ
1152x864
þ þ þ
1152x870
þ
1280x768
þ
1360x768
þ þ
1280x960
þ þ
1280x1024
þ þ
1400x1050
þ þ
1440x900
þ þ
1600x1200
þ
1680x1050
þ
1920x1080
þ
1920x1200
þ
Page 35

English - 34 -
Appendix: Nero MediaHome Installation
To install Nero MediaHome, please proceed as
follows:
Note: To use DLNA function, this software should be installed
to your PC.
1. Insert the Nero MediaHome installation disc in
your optical disc drive.
• The Nero MultiInstaller screen with a button to start
the installation process will open automatically.
• If below window is not displayed automatically,
double-click on the le SetupX located on
the Nero MediaHome installation disc.
2. Click on the button labeled Nero MediaHome
Essentials to start the installation process.
• The Nero MediaHome installation wizard is
displayed.
• If necessary change installation language from the
language selection menu before continuing.
3. Click the Next button.
• The integrated serial is displayed.
• Please do not change displayed serial.
4. Click the Next button.
• The License Conditions (EULA) screen is displayed.
5. Please read the license agreement carefully
and select the appropriate check box if you
agree to the terms of the agreement. Installation
is not possible without this agreement.
6. Click the Next button.
• The Select Installation Type screen is displayed.
It is possible to choose between Typical, meaning
standard installation, or Custom installation. User
dened installation allows you to determine languages
to be installed and to choose the installation path.
Page 36

English - 35 -
7. Use Typical installation and click the Next
button.
• The Prerequisites screen is displayed.
The Nero MediaHome installation wizard checks the
availability of required third-party software on your PC.
If applications are missing they are listed and must be
installed before continuing installation.
8. Click the Install button.
• As soon as all prerequisites are installed, the Install
button will change to a Next button.
9. Click the Next button.
• The Ready to Start Installation Process screen
is displayed, installation begins and finishes
automatically. A progress bar informs you of the
progress of the installation process.
10. Installation nishes.
The Help us to Enhance Nero Software screen is
displayed. In order to offer a better service, Nero
is collecting anonymous data to determine which
features are used and what problems, if any, occur.
11. If you would like to help by participating in the
anonymous collection of usage data, select the
check box and click the Next button.
• The final screen of the installation wizard is
displayed.
12. Click the Exit button.
13. A shortcut called Nero MediaHome 4 is now
placed on your desktop
Congratulations! You successfully installed Nero
MediaHome 4 on your PC.
Page 37
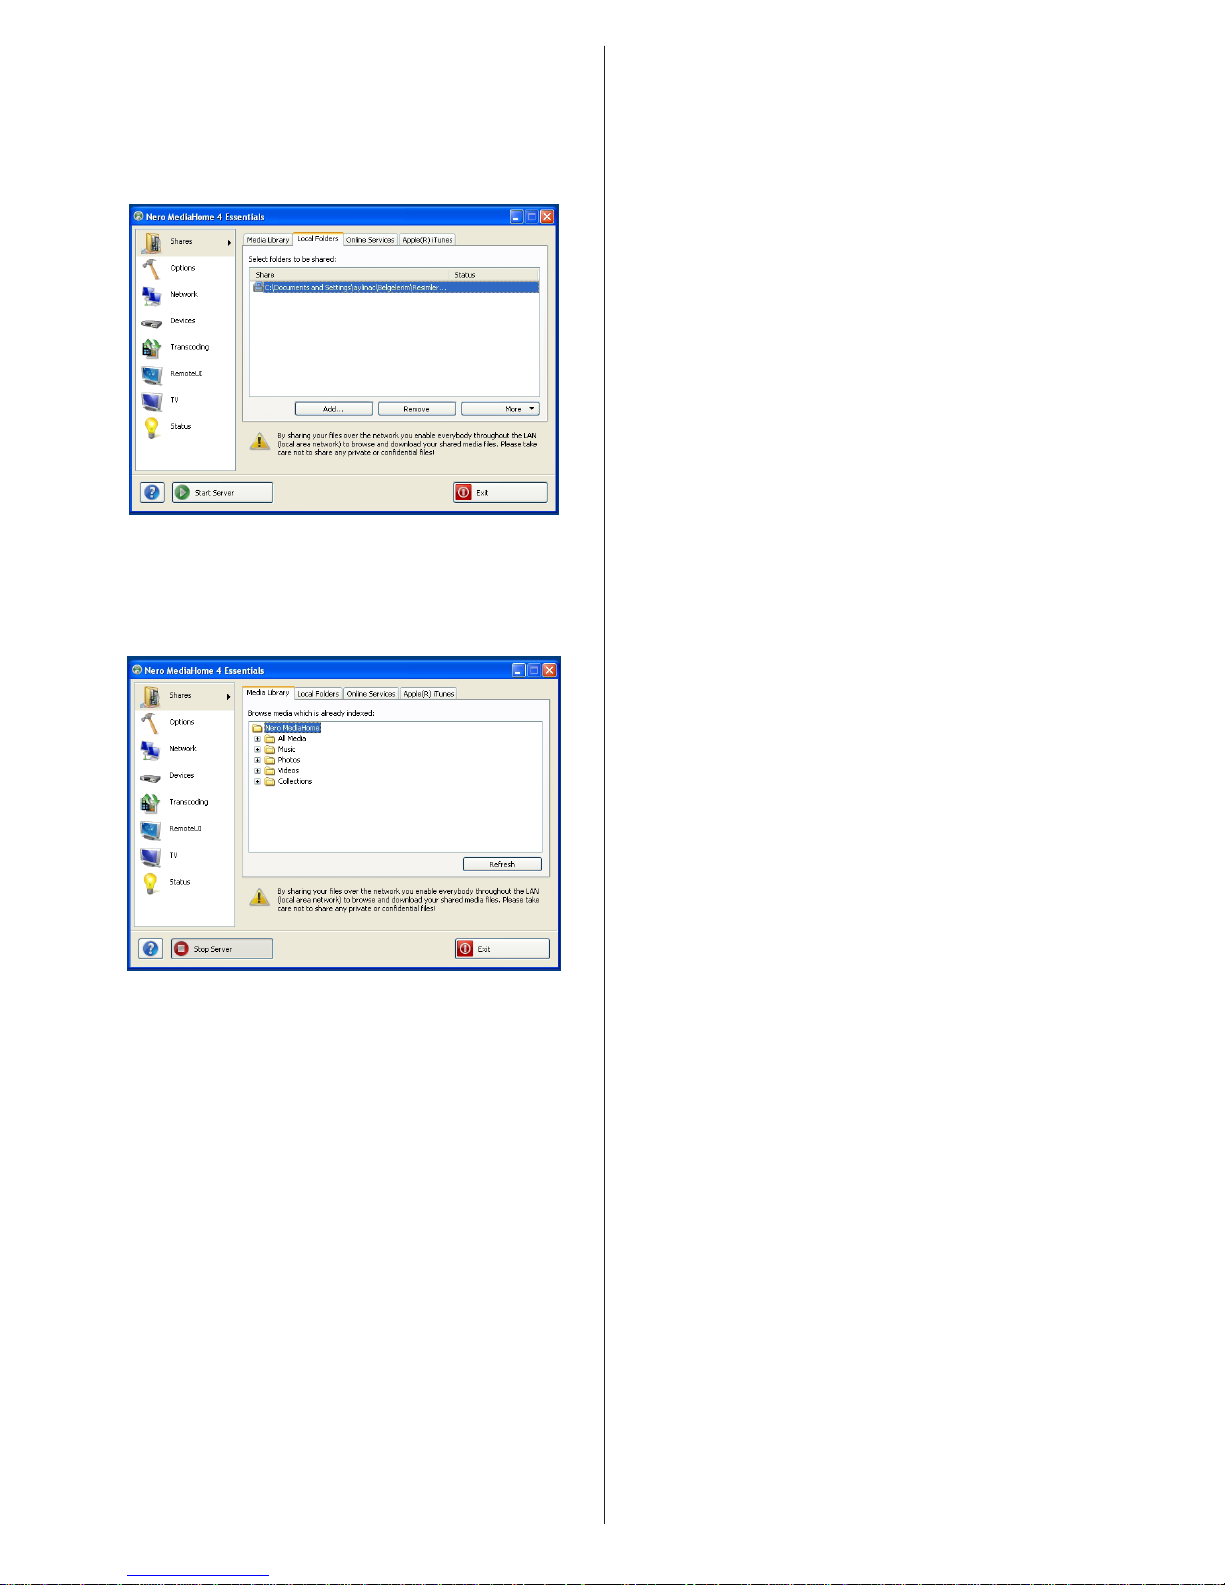
English - 36 -
14. Run Nero MediaHome by pressing shortcut icon.
• Click ADD icon from LOCAL FOLDERS to add the
folder you want to share with the network. Select
the folder that you want to share and click START
SERVER.
15. You can display all media types from the library.
Click Refresh icon to refresh. Click STOP
SERVER icon to stop server.
Page 38

Srpski - 37 -
Bezbednosne mere
Molimo u celosti pročitajte ove
instrukcije pre instalacije ili rukovanja.
Priprema
Postavite uređaj na ravnu čvrstu površinu. Za
ventilaciju ostavite slobodan prostor od najmanje
10 cm oko uređaja. Radi sprečavanja smetnji i
opasnih situacija, ne stavljajte nikakve predmete na
uređaj. Koristite uređaj u mestima umerene klime.
Temperatura i vlažnost vazduha tokom mrukovanja:
0ºC do 40ºC, 85% relativna maksimalna vlažnost
vazduha (bez blokade otvora ventilacije).
Namjena
Ovaj uređaj je namenjen za primanje i prikazivanje
TV programa. Različite opcije povezivanja dodatno
proširuju raspon mogućih izvora za prijem i
prikazivanje (različite spoljne uređaje). Ovaj uređaj
je pogodan samo za rad u suvim zatvorenim
prostorijama. Ovaj uređaj je namenjem isključivo
za privatnu kućnu upotrebu i ne sme se koristiti u
industrijske i komercijalne svrhe. Mi isključujemo
svaku odgovornost ako se uređaj ne koristi za svoju
namenu ili u slučaju da su izvršene modikacije na
njemu. Uključivanje LCD televizora pod ekstremnim
ambijentalnim uslovima može dovesti do oštećenja
uređaja.
UPOZORENJE: Nikada ne dozvolite ljudima
(uključujući i deca) sa zičkim, snezornim ili
mentalnim nedostacima ili nedostatka iskustva
i/ili znanja da bez nadzora koriste električne
uređaje!
Deca ne prepoznaju opasnosti pravilno! Gutanje
baterija može biti fatalno. Skladištite baterije
van domašaja male dece. Ukoliko je baterija
progutana, smesta tražite medicinsku pažnju.
Čuvajte ambalažu van domašaja dece. Rizik
ugušenja.
Izvor napajanja
• TV aparat se sme puštati u rad samo preko utičnice
od 220-240 V AC, 50 Hz.
• Upozorenje: Ne ostavljajte vaš TV u režimu
pripravnosti ili u režimu rada kada napuštate kuću.
Postavljanje TV-a
• Zbog ventilacije, istavite prazan prostor od desetak
centimetra sa sve strane TV-a.
• Nemojte blokirati otvore ventilacije.
• Nemojte postavljati TV na nagnute ili nestabilne
površine jer TV se može prevrnuti.
• Da sprečite oštečenje TV-a, ne stavljajte nikakve
objekte povrh TV-a.
• Koristite TV jedino u umerenim klimima.
Sadržaj
Bezbednosne mere .............................................. 37
Uključeni dodaci ................................................... 39
Informacije o zaštiti okoline ................................. 39
TV - odlike ........................................................... 39
Pregled TV-a ........................................................ 40
Kontrolni tasteri TV-a i rukovanje .......................... 40
Pregled daljinskog upravljača ............................... 41
Korišćenje uslovnog pristupnog modula ............... 43
Obaveštenja u režim pripravnosti ......................... 43
Instalacija baterije u daljinskom ............................ 44
Povezivanje struje I antene/kabla ......................... 44
Uključivanje / isključivanje .................................... 44
Prva instalacija ..................................................... 44
Reprodukcija preko USB ulaza............................. 46
Promena dimenzija slike: Formati slike ................ 46
Koriščenje Liste kanala......................................... 46
Brzi meni............................................................... 47
Karakteristike i funkcije menija ............................. 48
Karakteristike i funkcije menija ............................. 49
Karakteristike i funkcije menija ............................. 50
Elektronski programski vodič (EPG) ..................... 51
Snimanje programa .............................................. 51
Snimanje sa vremenskim programiranjem .......... 52
Instant snimanje ................................................... 52
Gledanje snimljenih programa ............................. 52
Konguracija snimanja ......................................... 52
Funkcije povezivanje ............................................ 52
Traženje greške povezivanje ................................ 55
Teletekst ............................................................... 58
Ažuriranje Softvera ............................................... 58
Rešavanje problema I saveti ................................ 59
kako početi na Skype ........................................... 61
PC Tipični režimi prikazivanja .............................. 66
Specikacije ................................................................67
Obaveštenje o licenciranju ................................... 67
Podržani formati datoteka za USB Pregledač
medija ................................................................... 68
Podržane DVI rezolucije ....................................... 69
Prilog: Instaliranje Nero MediaHome .................... 70
Page 39

Srpski - 38 -
Napojni kabl i utukač
• Utikač strujnog kabla treba biti lako dostupan. U
slučaju oluje i munje, kada idete na odmoru, ili
kada se TV neće koristiti dužeg vremena, isključite
strujnog kabla iz mreže.
• Napojni utikač služi za isključivanje TV aparata i
zbog toga mora uvek biti pristupačan.
• Ne postavljajte TV, nameštaj, itd, povrh kabla i
nemojte ga uštipavati.
• Rukovajte kabl preko utikača, nemojte isključivati
TV povlačenjem za kabl.
• Nikada ne dirajte kabl/utikača mokrim rukama, jer
to može dovesti do kratkog spoja ili strujnog udara.
• Nikada nemojte vezivati napojni kabl u čvor ili ga
povezivati s drugim kablovima.
• Napojne kablove treba postaviti tako da se preko
njih ne gazi ili vozi.
• Oštećeni napojni kabl može izazvati požar ili izložiti
Vas strujnom udaru. Kada je oštećen, mora se
zameniti i jedino kvalikovani radnik to može uraditi.
Vlaga i voda
• Ne upotrebljavajte TVna mestu gde ima vlage i pare
(izbegavajte kupatilo, sudoper i blizinu veš-mašine).
• Nemojte izlagati TV kiši ili vode, jer to može biti
opasno.
• Ne postavljajte predmete pune tečnostima, kao na
primer vaze, povrh TV-a. Izbegavajte prosipanje ili
prskanje.
• Ukoliko u aparat upadne neki tvrdi predmet ili
tečnost, isklučite ga iz napajanja i pre daljeg
rukovanja ga odnesite na proveru kod kvalikovanog
osoblja.
Ventilacija
• Priključci i otvori na TV aparatu namenjeni su
ventilaciji i obezbeđenju pravilnog rada.
• Da bi se sprečilo pregrejavanje, ove otvore se ne
smeju nikako blokirati ili pokrivati.
Toplota i plamen
• Nemojte izlagati TV na direktnoj sunčevu svetlost
ili ostale izvore toplote.
• Uređaj ne sme da se postavlja u blizini otvorenog
plamena ili izvora jake toplote, kako
npr. grejalice.
• Nemojte stavljati izvore otvorenog
plamena na TV aparat, npr. upaljene
sveće.
Jačina zvuka slušalica
• Preterani zvučni pritisak u slušalicama
može izazvati gubitak sluha.
Postavljanje na zid (opciono)
• Da bi se sprečile povrede, kada se montira na zid
(ako je ta opcija dostupna), uređaj mora da bude
sigurno pričvršćen na zidu prema uputstvima
montaže.
Čišćenje
• Pre čišćenja, izvucite uređaj iz utičnice.
• Nemojte koristiti tečna ili aerosol sredstva za
čišćenje. Upotrebite meku i suvu krpu.
Page 40

Srpski - 39 -
TV - odlike
• LED TV u boji sa daljinskim upravljanjem.
• Potpuno integrisani digitalni/kablovski TV-
uređaj (DVB-T/C).
• Kompatibilan sa DVB-T2.
• HDMI konektori za digitalni video I audio. Ova
veza takođe je sazdana da prihvaća signale visoke
denicije.
• USB ulaz.
• Snimanje programa.
• Vremensko programiranje programa.
• 1000 programa.
• OSD sistem menija.
• Ima skart utičnicu za spoljne uređaje (kao što su video
uređaji, uređaji za video igre, audio uređaji, itd.).
• Stereo zvučni sistem.
• Teletekst, brzi tekst, TOP tekst
• Povezivanje slušalica.
• Automatski sistem programiranja.
• Ručno podešavanje unapred ili unazad.
• Automatsko isključivanje nakon šest sati.
• Tajmer spavanja.
• Blokada za decu.
• Automatsko prigušivanje zvuka kada nema prenosa.
• NTSC reprodukcija.
• AVL (Automatsko ograničenje jačine zvuka).
• PLL (pretraga frekvencije).
• PC-ulaz.
• Plug&Play za Windows 98, ME, 2000, XP, Vista,
Windows 7.
• Režim igrica (po izboru).
• Fukcija Isključi sliku.
• Eternet (LAN) za Internet vezu i usluge.
• DLNA.
Informacije o zaštiti okoline
Ovaj televizor je projektovan tako da troši manje
energije da bi očuvao okolinu. Vi ne samo pomažete
sačuvati okolinu, vi takođe možete uštediti novac
tako što smanjite račune za električnu energiJu
zahvaljuJući karakteristike energetske ekasnosti
ovog TVa. Da biste smanjili potrošnju energiJe,
potrebno Je da preduzmete sledeće korake:
Možete da koristite postavku „Režim uštede energije",
koja se nalazi u meniju „Postavke slike". Ako podesite
režim uštede energiJe kao Eko, TV će se prebacili na
režim za uštedu energiJe i nivo osvetljenja televizora
će biti smanjen na optimalan nivo ImaJte na umu da
će neke postavke slike biti nedostupni za promenu
kada Je televizor u Režim uštede energiJe.
Ukoliko je izabrano Slika isključena, ona poruka
"Ekran će se isključiti kroz 15 sekundi" pojaviće se
na ekranu Izaberite NASTAVI I pritisnite OK. Ekran
će se isključiti kroz 15 sekundi. Ukoliko onemogućite
režim Uštede energije, režim slike biće automatski
postavljen na Dinamičan.
Kada TV se ne koristi, molimo vas da ga ugasite ili
isključite ga od dovoda struje. Time ćete smanjiti
potrošnju energije.
Izvucite utikač iz struje ako nameravate da budete
odsutni duže vreme.
Preporučuje se aktivirati režim uštede energije da
biste smanjili godišnju potrošnju energije. Takođe,
veoma je preporučljivo da isključite TV sa struje kada
ga ne koristite da biste uštedeli više energije.
Molimo vas da nas pomognete da začuvamo okolinu
s time šta ćete sledeti ove korake.
Informacija o popravkama
Prepustite servisiranje kvalikovanom osoblju. Samo
kvalikovano osoblje treba da popralja TV. Za dodatne
informacija, molimo vas da stupite u kontakt sa vašim
lokalnim trgovcem od koga ste kupili ovaj TV.
Uključeni dodaci
Daljinski upravljač
Baterije: 2 X AAA
Uputstvo
Bočni AV kabl za povezivanje
CD za Nero Media Home
Page 41

Srpski - 40 -
Pregled TV-a Kontrolni tasteri TV-a i rukovanje
1. Smer gore
2. Smer dole
3. Dugme izbora Programa/Jačina zvuka/AV/Pripravnost- Uklj
Kontrolni prekidač omogućava Vam da kontrolišete funkcije
Zvuk / Programa / Izvor i Mirovanje - Uključeno.
Promena jačine zvuka: Povečajte nivo zvuka pritiskom na
dugme ka gore. Smanjite nivo zvuka pritiskom na dugme
ka dole.
Promena kanala: Pritisnite sredinu dugmeta i na ekranu će se
pojaviti info traka kanala. Pomerajte se kroz snimljene kanale
pritiskom na dugme ka gore ili ka dole.
Promena izvora: Pritisnite sredinu dugmeta dva puta i na
ekranu će se pojaviti lista izvora. Pomerajte se kroz dostupnih
izvora pritiskom na dugme ka gore ili ka dole.
Da isključite televizor (OFF): Pritisnite sredinu dugmeta i
zadržite ga nekoliko sekundi i TV će preći u režim mirovanja.
NAPOMENA: Možete pomerati prekidača naviše ili
nadole da promenite jačinu zvuka. Ako želite promeniti
kanal, pritisnite sredinu prekidača jednom (pozicija 3) i zatim
pridvižite naviše ili nadole. Ukoliko pritisnite sredinu prekidača
još jednom, prikazaće se OSD izvora. Da biste izabrali željeni
izvor, pomerite prekidač nagore ili nadole i otpustite. Ukoliko
pritisnite sredinu prekidača i zadržite nekoliko sekundi, TV
će preći u režimu pripravnosti. Glavni OSD meni se ne može
prikazati putem komandnih dugmeta.
Page 42

Srpski - 41 -
Pregled daljinskog upravljača
NAPOMENA: Dalečinski upravljač je oko 7m/23ft.
.
ZOOM
REPEAT
LANG.
12
3
4
56
7
8
9
0
V
P
EXIT
BACK
Q.
MENU
.,/@
V
P
SOURCE
1
/2/
PRESETS
Upotreba mojeg tastera 1 (*)
Glavna funkcija ovog dugmeta je pustanje linkova Jutjuba. Ali ipak, ako želite promeniti mu funkciju, možete
pritisnitu MOJE DUGME 1 tokom pet sekundi kada se
nalazite na željenom izvoru, kanalu ili linku, sve dok se ne
pojavi na ekranu “MOJE DUGME JE POSTAVLJENO".
Ovo potvrрuje da je izabrano MOJE DUGME sad
povezano sa izabranom funkcijom. Napomenućemo da
ukoliko uradite Prvu instalaciju, MOJE DUGME 1 vratiće
se na svoju prvobitnu funkciju.
Upotreba mojeg dugmeta 2 (**)
Pritinite MOJE DUGME 2 pet sekundi kada se
nalayite na željenom izvoru, kanalu ili linku, sve
dok se na ekranu ne pojavi "MOJE DUGME JE
POSTAVLJENO". Ovo potvrрuje da je izabrano MOJE
DUGME sad povezano sa izabranom funkcijom.
1. Pripravnost
2. Moje dugme 1
3. Internet portal
4. Ekvilajyer mod režima
5. Biranje režima slike
6. Numerički tasteri
7. Dugme TV / Lista kanala
8. Elektronski programski vodič
9. Meni
10. Navigacijska dugmad (Gore/Dole/Levo/(Desno
– podstranica teleteksta)
11. Nazad
12. Omiljeni
13. Jačina zvuka gore/dole
14. Info
15. Snimanje programa
16. Reprodukcija
17. Trenutni jezik / Mono/Stereo - Dual I-II
18. Brzo premotavanje unazad
19. Crveno dugme
20. Zeleno dugme
21. Moje dugme 2
22. Izbor izvora
23. Tajmer za isključivanje
24. Pregledač medija
25. Menjanje kanala
26. Teletekst
27. Brzi meni
28. OK / Izaberi / Zadržati (u TXT režimu) / Lista
kanala (DTV režimu)
29. Izlaz /Vrati / Indeksna strana (u TXT režimu)
30. Veličina slike
31. Isključivanje zvuka
32. Program Gore / Dole
33. Pauza / Tajmšift
34. Stop
35. Titlovi
36. Brzo premotavanje unapred
37. Plavo dugme
38. Žuto dugme
Page 43

Srpski - 42 -
Pregled povezivanja
NAPOMENA: Kada povezivate neki uređaj preko ulaze bočni AV, morate koristiti dostavljene kable za povezivanje.
Pogledajte ilustracije gore. | YPbPr režim može da se koristi samo ako povežete uređaj koji imaYPbPr izlaz preko PC ulaza
sa YPbPr na PC kabl (YPbPr na PC kabl nije isporučen). Kada se ostvari veza, pređite na YPbPr izvor. Da biste omogućili
zvuk računara, morate koristiti BELOG i CRVENOG ulaza za PC/YPBPR AUDIO VEZU. | Ukoliko neku spoljašnu uređaj je
povezan preko SKART-a, TV automatski prelazi na AV režim.| Pri prijemu DTV kanala (Mpeg4 H.264) ili u Prelistaća medija,
nije moguć izlaz preko skart priključka. | kada se koristi sistem za zidnu montažu (opcionalni), preporučuje se prvo utaknuti sve
kable na zadnjoj strani TV-a pre negovog montiranja na zid. | Umetnite ili vadite CI modul samo kada je TV aparat ISKLJUČEN.
Pogledajte uputstvo modula za detaljne informacije o podešavanju.
Konektor Tip Kablovi Uređaj
Skart
Veza
(poleđina)
VGA
Veza
(poleđina)
Bočni AV
PC/YPbPr
Audio
Veza
(bočno)
Bočni video/audio
kabla za povezivanje
(isporučen)
PC audio kabl (nije
isporučen)
HDMI
Veza
(poleđina)
SPDIF
Veza
(poleđina)
Bočni AV
Bočni AV
Veza
(bočno)
AV kabl za
povezivanje
(isporučen)
SLUŠALICE
Slušalice
Veza
(bočno)
YPbPr Video
Veza
(poleđina)
YPbPr kabl za povezivanje (isporučen)
USB
Veza
(bočno)
CI
Veza
(bočno)
CAM
module
Page 44

Srpski - 43 -
Korišćenje uslovnog pristupnog
modula
VAŽNO: Umetnite ili vadite CI modul samo kada je TV
aparat ISKLJUČEN.
Da biste gledali neke digitalne kanale, može biti
neophodan uslovni pristupni modul (CAM). Ovaj
modul mora da se umetne u CI slot vašeg televizora.
1. Nabavite Uslovni pristupni modul (CAM) i karticu
za gledanje pretplatom kod kompanije koja emituje te
kanale, a zatim ga umetnite u televizor prema sledećem
postupku.
2. Umetnite CAM, a zatim karticu za gledanje u otvor
koji se nalazi na poklopcu terminala, na zadnjoj stani
TV aparata.
3. CAM treba da se umetne pravilno. Ceo modul se
ne može umetnuti ako je okrenut naopako. CAM ili
TV terminal se mogu ostetiti ako pokusate da na
silu umetnete CAM.
4. Priključite TV na mrežno napajanje, uključite ga i
sačekajte nekoliko trenutaka dok se kartica aktivira.
5. Kada nije umetnut modul, na ekranu se pojavljuje
poruka “Nije otkriven modul za zajednički
interfejs”.
Pogledajte uputstvo modula za detaljne informacije o
podešavanju.
CAM
module
Obaveštenja u režim pripravnosti
Ukoliko TV ne dobija nikakvog ulaznog signala (na
primer iz antene ili HDMI izvora) tokom 5 minuta, on
će preći u mirovanje. Kada naredni put uključite TV,
pojaviće se sledeća poruka:
Kada se dostigne kraj vremena Automatskog
isključivanja TV-a, na ekranu pojaviće se sledeća
poruka. Odaberite DA da biste isključili TV. Izaberite
NE da otkažete. Takođe, TV će se isključiti i ukoliko
ne odaberete ništa.
Ukoliko je TV bio ostavljen bez rukovanja tokom 4
sata, on će da pređe u stanju mirovanja. Kada naredni
put uključite TV, pojaviće se sledeća poruka:
Page 45
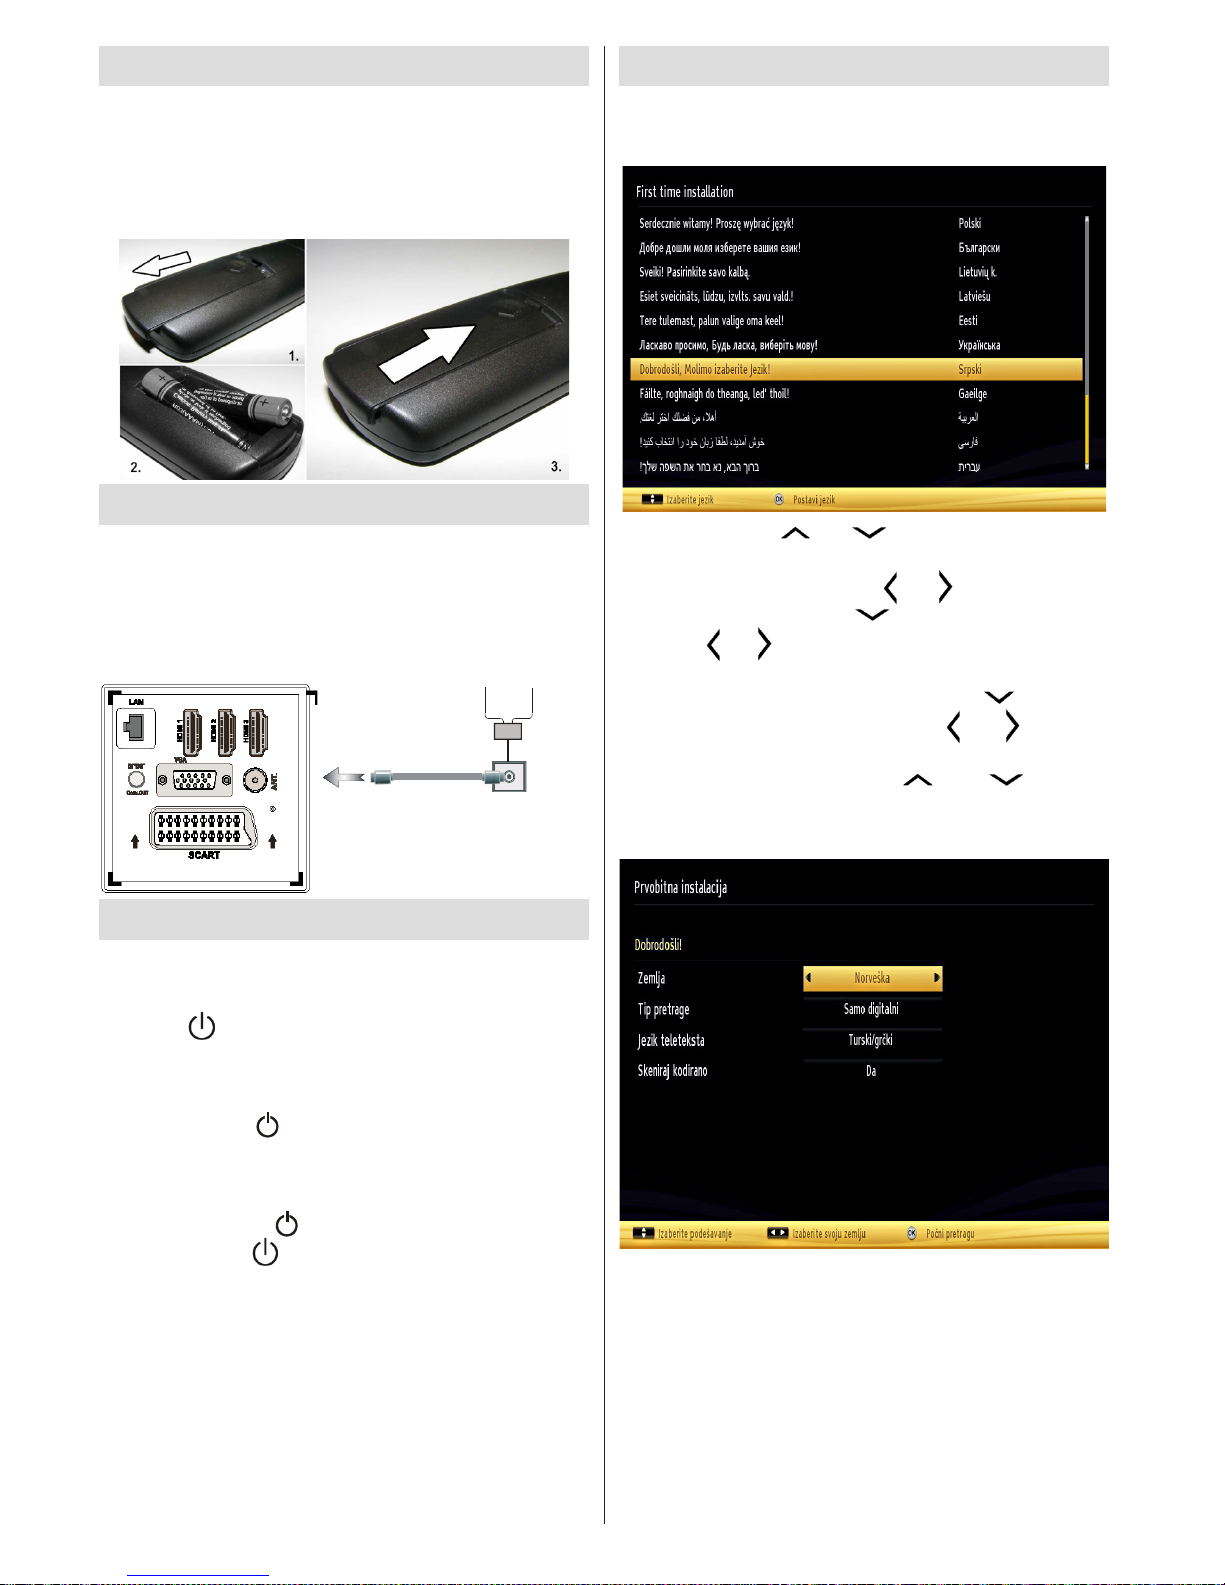
Srpski - 44 -
Instalacija baterije u daljinskom
1. Nežno podignite stražnji poklopac daljinskog.
2. Umetnite dve AAA baterije. Pazite da krajevi baterija
odgovaraju + i – u pregradi za baterije (obratite pažnju
na njihov polaritet).
3. Vratite poklopac baterije.
Povezivanje struje I antene/kabla
VAŽNO: TV-uređaj je projektovan za rad na 220-
240V AC, 50Hz. Nakon raspakovanja, dozvolite TV
uređaju da postigne sobnu temperaturu, pre nego
što ga priključite na napajanje. Umetnite utikač u
mrežnu utičnicu.
Aerial or Cable
Uključivanje / isključivanje
Uključivanje TV aparata
Priključite kabl za napajanje na 220-240V AC, 50 Hz.
Pritisnite dugme. Pali se svetleća dioda režima
pripravnosti.
Da bi uključili TV iz režima pripravnosti, uradite sledeće:
Pritisnite dugme “ ”, P+ / P- ili neko numeričko dugme
na daljinskom upravljaču.
Da biste isključili televizor
Pritisnite dugme “ ” na daljinskom upravljaču, ili
pritisnite dugme ili zadržite kontrolni prekidač na
televizoru i televizor će preći u režim pripravnosti. (u
zavisnosti od modela)
Da bi kompletno isključili TV-uređaj, izvucite napojni
kabl iz utičnice.
Napomena: Kada je TV aparat uključen u režimu pripravnosti,
LED dioda za režim pripravnosti trepće kako bi ukazala da su
aktivne funkcije kao što su Pretraživanje u režimu pripravnosti,
Preuzimanje preko etra ili Tajmer . LED takođe može da trepće
kada televizor uključujete iz režima pripravnosti.
Prva instalacija
Kada se prvi put uključi, pojavljuje se meni “Izbor
jezika”. Poruka “Dobrodošli, molimo odaberite
jezik!" se redom prikazuje na svim jezicima.
Pritisnite dugme “ ” ili “ ” za označiti željeni jezik
i pritisnite dugme OK za izbor. Pojavljuje se “Prva
instalacija“. Koristite dugme „ “ ili „ “ za izbor željene
zemlje i pritisnite dugme „ “ za izbor Tipa pretrage.
Pomoću “ ” ili “ ” izaberite željeni vid pretrage. Mogući
vidovi su: digitalan I analogni, smao digitalan i samo
analogni. Nakon podešenja, pritisnite “ ” da biste
odabrali Jezik teleteksta. Koristite “ ” ili “ ” da biste
postavili "Jezik teleteksta“ i izaberite "Skeniranje
kodiranih" pomoći dugmeta ” ili “ ”. Opciju
Skeniranje zaštićenih možete da aktivirate sa Da ako
želite da skenirate kodirane stanice.
Fabrički PIN broj može varirati u zavisnosti od
izabrane zemlje.
Ako vam se zatraži da upišete PIN da biste videli
opciju menija, koristite jedan od sledećih: 4725, 0000
ili 1234.
Pritisnite dugme OK na daljinski da biste produžili i zatim
na ekranu će se pojaviti sledeća poruka.
Page 46
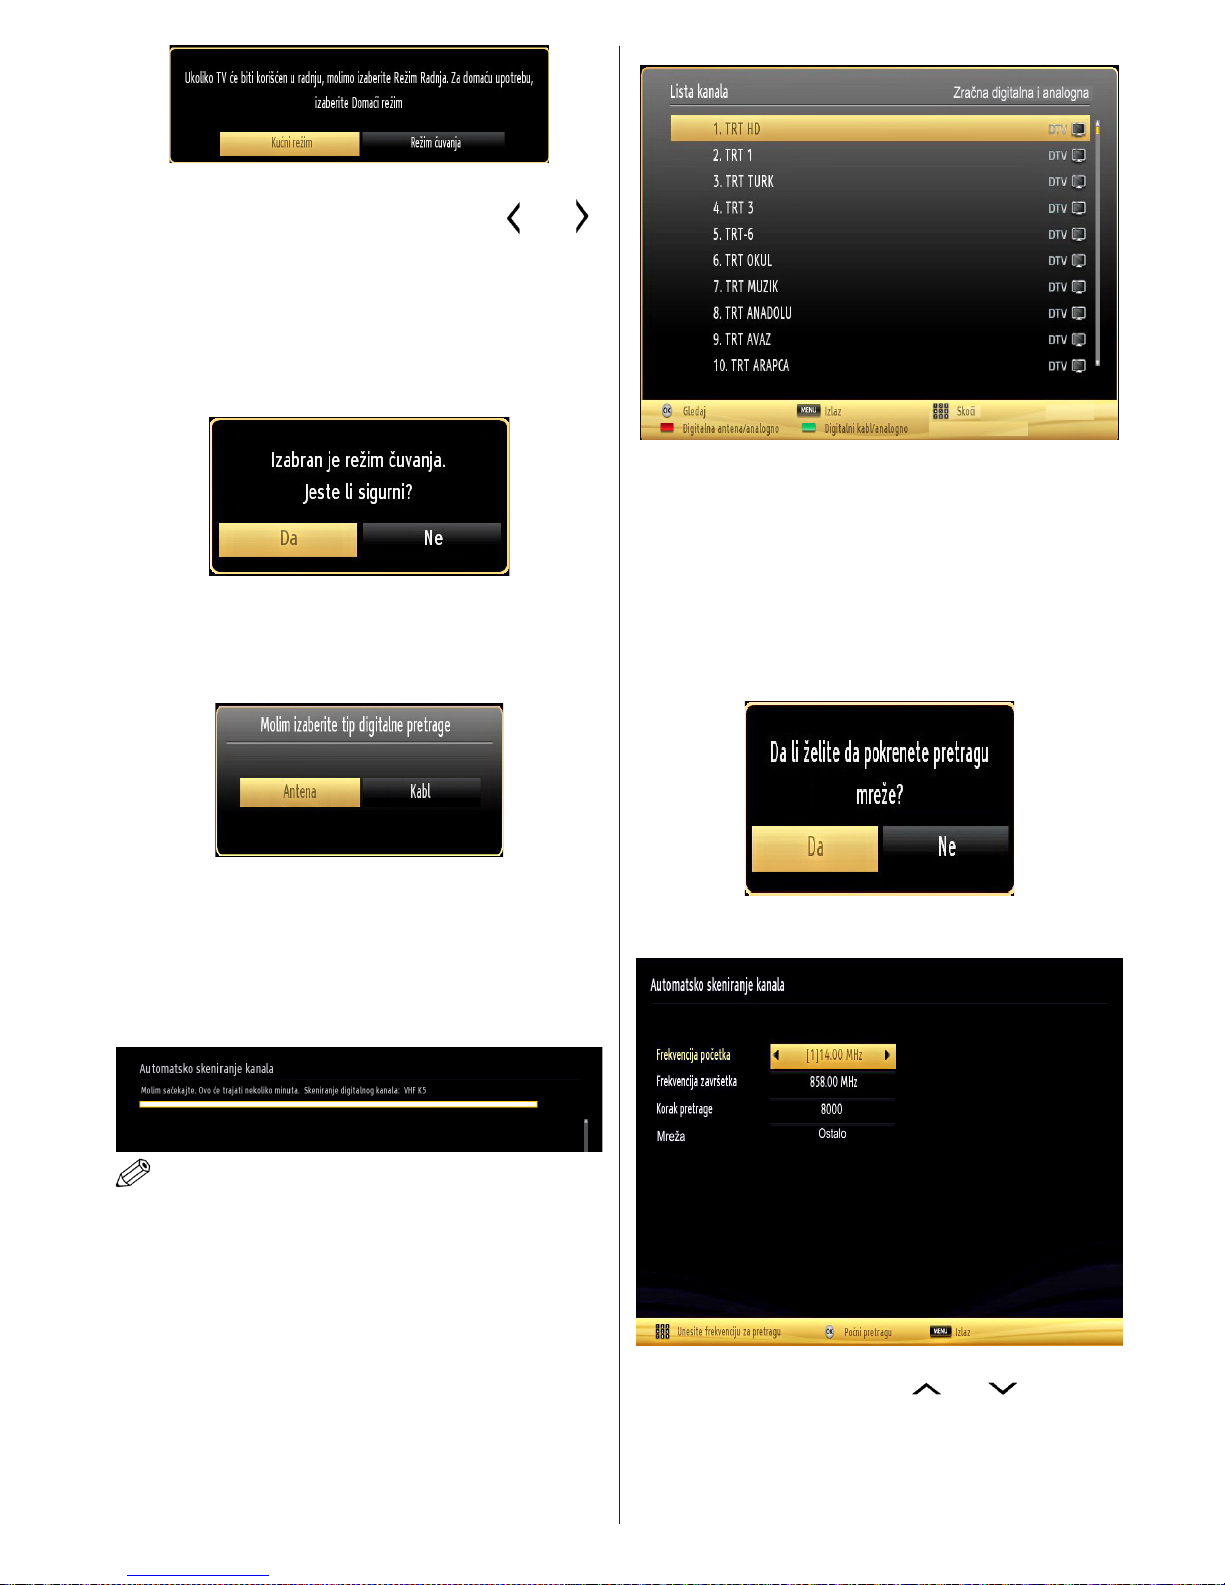
Srpski - 45 -
Vi možete aktivirati opciju Režima Prodavnice
(opcionalni) korišćenjem dugmeta i “ ” ili “ ”.
Ako izaberete Režim prodavnice, opcija režima
prodavnice biće dostupna u meniju Ostale
postavke i karakteristike vašeg TV-a biću
ilustrovane na vrhu ekrana. Nakon izbora
režima Radnja na ekranu će se pojaviti poruka
za potvrdu. Izaberite DA za nastavak.
Ukoliko je Kućni režim izabran, režim Prodavnica
neće biti dostupan nakon prve instalacije. Pritisnite
dugme OK na daljinski da biste produžili i zatim na
ekranu će se pojaviti sledeća poruka.
Morate izabrati tip pretrage da biste tražili i sačuvali
kanale iz željenog izvora.
Instalacija antene
Ako u meniju za tip pretraživanja izaberete opciju
ANTENE, digitalni televizor će tražiti digitalne
zemaljske TV emisije.
NAPOMENA: Možete da pritisnete dugme MENU za
otkazivanje.
Kada se memorišu sve stanice, na ekranu će se
prikazati lista kanala. Ako želite da sortirate kanale
prema LCN-u (*), izaberite “Da”, a zatim pritisnite OK.
Pritisnite dugme OK da uklonite listu kanala i gledate
televizor.
(*) LCN je sistem Logičkog broja kanala koji organizuje
dostupne emisije u skladu sa prepoznatljivim
sekvencama kanala.
Instalacija kablovske
Ukoliko izeberete opciju KABL i pritisnite taster OK
na daljinskom upravljaču da biste nastavili; na ekranu
će se prikazati sledeća poruka:
Da biste nastavili pritisnite DA i zatim OK. Da biste
otkazali operaciju, izaberite NO i pritisnite OK.
Tu možete izabrati frekventne opsege. Da biste
označili linije, koristite taster “ ” ili “ ”.
Frekventni opseg možete uneti i ručno, putem
numeričkih tastera na daljinskom upravljaču.
Unesite početnu i krajnju frekvenciju po želji putem
numeričkih tastera na daljinskom upravljaču.
*
Page 47
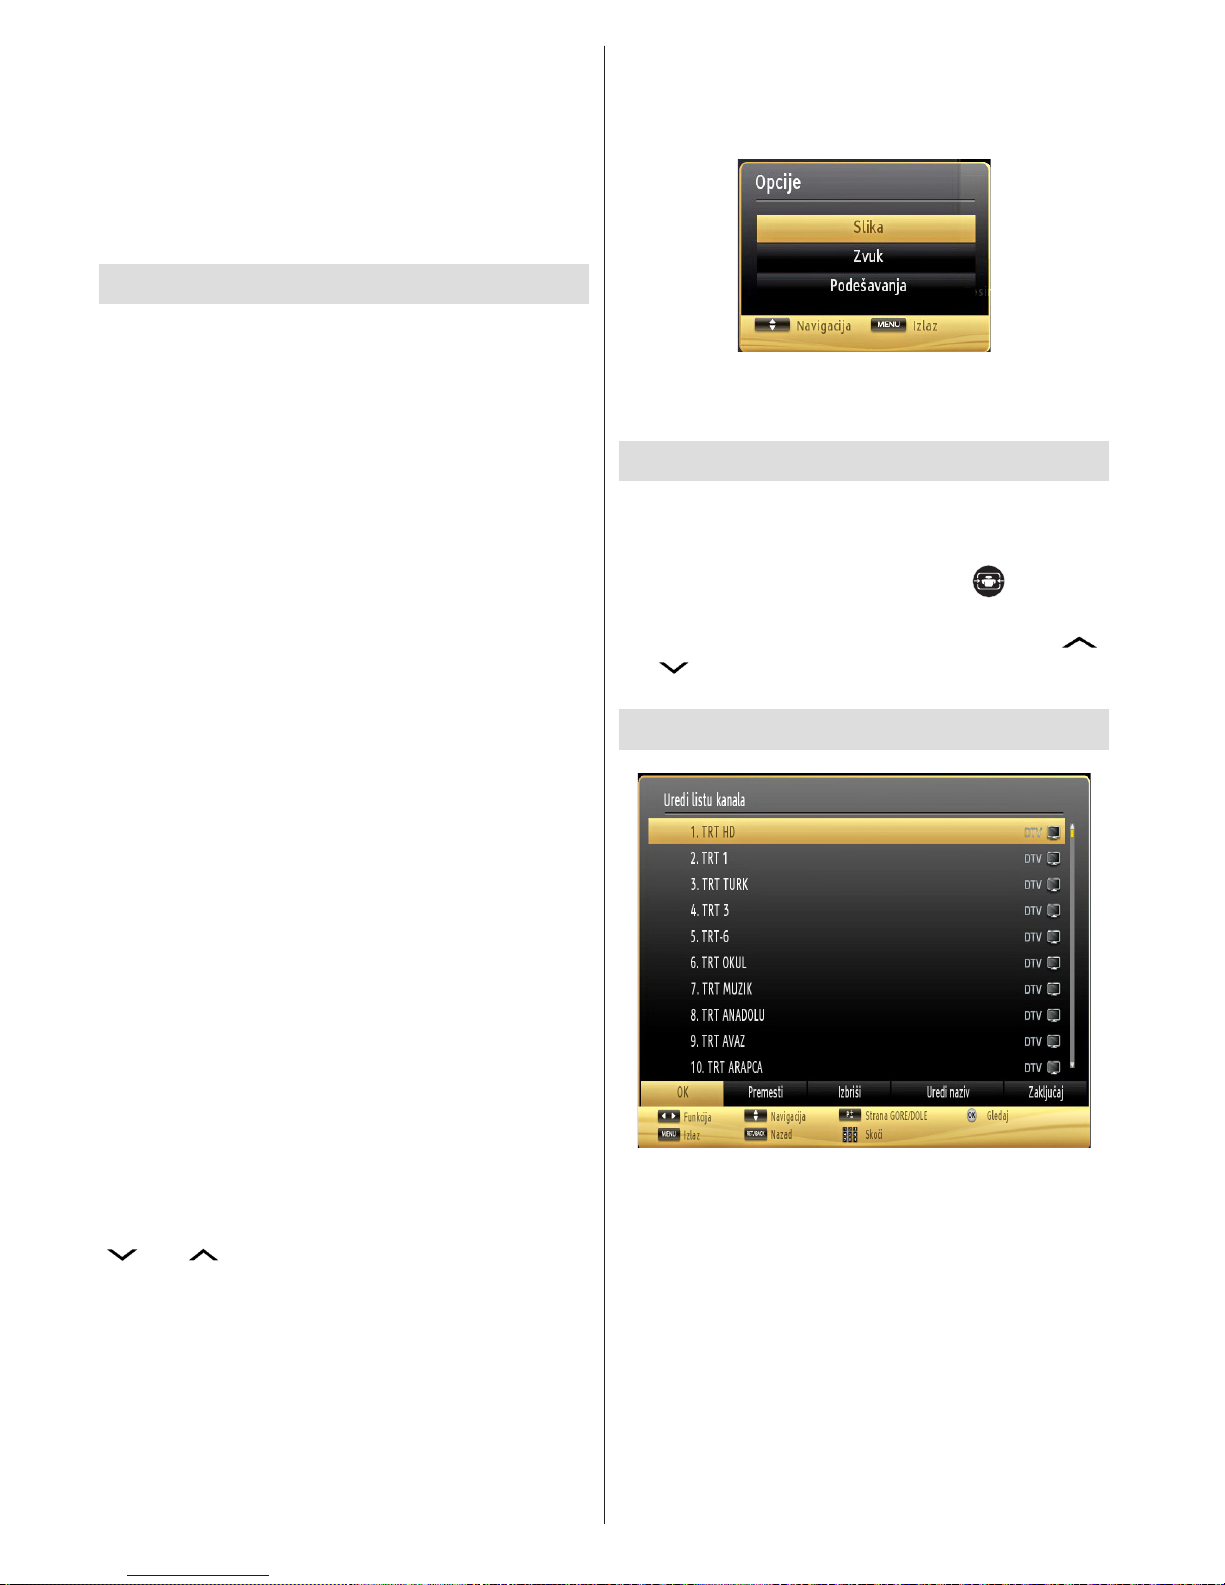
Srpski - 46 -
Nakon ove operacije, možete da podesite korak
pretraživanja od 8000 kHz ili 1000 kHz.
Ako izaberete 1000 kHz, televizor će detaljnije vršiti
pretraživanje. Trajanje pretraživanja će biti duže.
Kada završite, pritisnite dugme OK za pokretanje
automatske pretrage. TV će tražiti i sačuvati dostupne
signale.
(*)Mrežna opcija nije dostupna za UK.
Reprodukcija preko USB ulaza
Možete povezati USB hard disk ili USB memoriski
štapić na vašem TV-u pomoći USB ulaza. Ova vam
odlika omogućuje da puštate fajlove snimljene na
USB disku. Podržani su 2,5“ i 3,5" inčni spoljašni tvrdi
diskovi (hdd sa spoljašnim napajanjem).
VAŽNO! Treba napraviti rezervnu kopiju vaših
datoteka pre nego što izvršite bilo kakvo povezivanje
na TV aparat kako biste izbegli mogućnost gubitka
podataka. Proizvođač neće biti odgovoran ni za kakvo
oštećivanje datoteka ili gubitak podataka. Moguće je
da izvesni tipovi USB uređaja (MP3 plejeri) ili USB
hard diskove/memoriske štapiće možda neću biti
kompatibilni sa ovim TV aparatom. TV podržava
FAT32 i NTFS formatiranje diska, ali snimanje je
jedino moguće sa NTFS formatiranim diskovima.
Napomena: Dok formatirate USB hard disk koji
ima 1TB (tera bajt) ili više kapaciteta, problemi u
formatiranju mogu nastati.
Brzo umetanje i vađenje USB uređaja je veoma
opasna operacija. Naročito ne vršite brzo umetanje
i vađenje memorijskog uređaja više puta uzastopce.
To može dovesti do zičkog oљtećenja USB plejera,
pa i samog USB uređaja. Ne izvlačite USB modul dok
reprodukujete datoteku.
Meni Pregledač medija
Možete puštati slike, muziku ili lmove snimljene na
USB disku preko negovog povezivanja sa TV-om i
koriščenjem Pretraživača medija. Da biste to uradili,
izvršite sledeće: Povežite USB disk do jednog od USB
ulaza na boku vašeg TV-a.
Ne možete povezati dva USB uređaja na TV-u. Ukoliko
oba uređaja sadrže muziku, slike ili video datoteke,
OSD za izbor USB-a biće prikazan na ekranu. USB
uređaj koji je bio prvi povezan na TV će biti nazvan
USB uređaj 1. Odaberite uređaj pomoću dugmadi
„ “ ili „ “ i pritisnite OK.
Pritisnite MENU dugme i odaberite umetak Pretraživač
medija pomoći Levo/Desno i OK. Prikazaće se glavni
ekran pregledača medija. Možete prikazati povezane
sadržaje odabirom umetka Video, Muzika ili Slike.
Sledite indikacije tastera ispod svakog menija na
ekranu za osobine reprodukcije.
Parametre vašeg pregledača medija možete podesiti
pomoću dijaloga za postavke.
Korišćenje dugmeta MENU u režimu prelistača
medija
Pritisak na dugme MENU u režimu prelistala medija
prikazuje sledećeg ekrana:
Možete pristupiti opcijama menija Slike, Zvuka i
Postavke preko ovog ekrana. Pritisnite opet na MENU
da biste izašli iz ovog ekrana.
Promena dimenzija slike: Formati slike
Programi se mogu gledati u različitim formatima slike,
zavisno od primljene emisije. Možete menjati proporciju
slike (veličinu slike) TV aparata za gledanje u različitim
režimima zumiranja. Pritisnite dugme “ ” više puta
za menjanje dimenzija slike. Ekran možete pomerati
nagore ili nadole pritiskanjem dugmeta “ ”
ili “ ” za vreme kad je izabrana opcija 14:9
zumiranje, bioskop ili prevod.
Koriščenje Liste kanala
Televizor sortira sve memorisane stanice u listi
kanala. U ovoj listi kanala možete da vršite izmene,
da podešavate omiljene kanale ili da aktivirate stanice
koje treba da se prikažu koristeći opcije liste kanala.
Pritisnite dugme MENU da prikažete glavni meni.
Izaberite stavku Lista kanala pomoću dugmeta Levo
ili desno. Pritisnite dugme OK da prikažete sadržaje
menija. Izaberite stavku Uredi listu kanala da biste
upravljali svim memorisanim kanalima. Pomoću
dugmadi Gore ili Dole i dugmeta OK izaberite stavku
Uredi listu kanala. Pritsnite dugme Gore ili Dole da
biste odabrali kanal koji želite da obradite. Pritisnite
dugme Levo ili Desno da biste izabrali funkciju menija
liste kanala. Koristite dugmad P+/P- za pomeranje
Page 48

Srpski - 47 -
stranice na gore ili na dole. Pritisnite dugme MENU
za izlaz.
Sortiranje liste kanala
Možete da izaberete programe koji će biti navedeni
u listi kanala. Da biste prikazali određene tipove
programa, trebalo bi da koristite opciju liste aktivnih
kanala. Izaberite listu aktivnih kanala sa menija liste
kanala pomoću dugmeta “ ” ili “ ” . Pritisnite
taster OK za nastavak: Sa liste možete da izaberete
opciju za tip programa pomoću dugmadi „ “ ili
“ “ i OK.
Brzi meni
Meni Brzih postavki omogućava vam da brzo pristupite
nekim opcijama. Ovaj meni sadrži opcije Ušteda
energije, Režim slike, Postavci ekvilajzera, Omiljeni,
Tajmer spavanja, SlediMe TV ,CEC RC prolazi
knjižice informacija . Pritisnite dugme Q.MENU na
daljinskom da biste videli brzi meni. Obratite se sledećim
poglavljima za više detalja oko odlikama liste.
Prati me TV
Preko tableta možete strimovati trenutnu emisiju
od vašeg pametnog TV-a preko odlike SlediMe TV.
Instalirajte prikladnu aplikaciju Smart centar na vaš
mobilni uređaj. Pokrenite aplikaciju.
Za dodatne informacije koriščenjem ove odlike
pogledajte uputstva iz aplikacije koje koristite.
Napomena: Ova aplikacija nije kompatibilna sa svim
mobilnim uređajima.
SlediMe TV do DMR
Ova odlika omogućuje video strimovanje od vašeg
TV-a do drugog TV-a ili mobilnog uređaja preko
prikladne aplikacije (na pr. UPnP - Universal Plug and
Play - aplikacije kao na pr. BubbleUPnP). Aktivirati
SlediMe TV do DMR i tajmšifting počinje. Pritisnite
crveno dugme i pokazaće se meni izbora uređaja.
Izaberite vaš uređaj i pritisnite OK.
Napomena: SlediMe TV i SlediMe TV do DMR rade
u korelaciji sa PVR odliku i traže povezani USB disk
u FAT32 formatu i dovoljnog praznog prostora na
njemu. HD kanali nisu podržani i oba uređaja moraju
biti povezani na istu mrežu.
E uputstvo
Možete naći instrukcije oko odlike vašeg TV sa pomoći
E priručnika.
Za koristenjem E priručnika, pritisnite Info taster dok
je glavni meni prikazan na ekranu I
Sa korišćenjem na navigaciske tastere izaberite
željenu kategoriju. Svaka kategorija uključuje različite
teme. Izaberite temu i pritisnite OK da bi pročitali
instrukcije.
Za zatvaranje E priručnika pritisnite dugme Exit.
Napomena: Sadržine u E-priručnika mogu varirati u
zavisnosti modela.
CEC i CEC RC prolaz
Ova funkcija vam omogućava da preko daljinskog
upravljavate uređaje koje imaju CEC i su povezani
na TV preko HDMI ulaza.
CEC opcija u meniju Ostale postavke u meniju
Postavke postavite na početku na Omogućeno.
Pritisnite dugme Source i izaberite HDMI ulaz
povezanog CEC uređaja iz menija Lista izvora.
Nakon povezivanja novog CEC uređaja, pokazaće
se u meni izvora svojim imenon umesto imenom
povezanog HDMI porta (DVD plejer, Rekorder 1,
itd.)
Nakon izaboranja povezanog HDMI izvora, daljinski
TV može automatski obavljati glavne funkcije.
Da biste ovo završili i da vratite daljinski kontrolu
TV-a, pritisnite i tokom 3 sekundi zadržite dugme
"0" nula na daljinskim. Ili pritisnite Q.Menu dugme
na daljinskom, istaknite CEC RC prolazi postavite
ga na Isklj. pritiskom na dugme za levo ili desno.
Ova odlika se može omogućiti ili poništiti u meniju
Postavke/Ostale postavke.
TV takođe podržuje odliku ARC (Audio Return
Channel). Ovo je audio veza namenjena da zameni
ostale kablove među TV i audio sistema (A/V
prijemnik ili sistem zvučnika).
Ako ARC je aktivan, TV ne ušutkuje automatski
ostale ulaze. Onda morate da ručno smanjite jačinu
zvuka TV-a ako želite čuti jedino povezane audio
uređaje (isto kao ostale optičke ili koaksijalne
digitalen audio izlaze). Ako želite promeniti jačinu
zvuka povezanog uređaja, izaberite taj uređaj iz
list eizvora. Tada su dugmad za kontrolu zvuka
nasočeni ka audio uređaju.
Page 49

Srpski - 48 -
Karakteristike i funkcije menija
Sadržaj menija slike
Režim
Za potrebe gledanja možete podešavati odgovarajuću opciju režima. Režim slike se može
podesiti na neku od sledećih opcija: Bioskop, igrice, dinamiki, Sport i neutralno.
Kontrast Podešava vrednosti osvetljenja i zatamnjenja ekrana.
Svetlost Podešava vrednost svetline ekrana.
Oštrina Podešava vrednost oštrine za objekte prikazane na ekranu.
Boja Podešava vrednost boje, prilagoğavajući boje.
Režim uštede
struje
Da biste podesili Režim uštede kao Eko, Iskjučena slika ili Onemogućen.Pogledajte odeljak,
“Informacije o zaštiti okoline” u ovom uputstvu za više informacija o Režimu uštede energije.
Pozadinsko
osvetljenje
(opciono)
Ova postavka kontroliše nivo pozadinskog osvetljenja i može da se podesi na auto, maksimum,
minimum i ekonomičan režim. Funkcija Pozadinsko osvetljenje biće neaktivna ukoliko je
Eko-režim uključan. Pozadinsko osvetljenje ne moze se aktivirati u režimima VGA ili Prelistač
medija ili kada je režim slike postavljen na Igrice.
Redukcija
šuma
Ako je emitovani signal slab i ako slika ima šumove, koristite opciju Redukcija šuma da biste
redukovali iznos šuma. Redukcija šuma se može podesiti na neku od sledećih opcija: Niska,
Srednja, Visoka ili Isključena.
Napredne postavke
Dinamični
kontrast
Možete promeniti stopu kontrasta koristeći funkciju dinamičkog kontrasta. Dinamički kontrast se
može podesiti na neku od sledećih opcija: Niska, Srednja, Visoka ili Isključena.
Temperatura
boje
Podešava željeni ton boje.
Zumiranje slike Podešava dimenzije slike na auto, 16:9, titl,14:9, 14:9 zum, 4:3, panorama ili bioskop.
HDMI True
Black
Za vreme gledanja iz HDMI izvora, ova opcija biće vidjliba u meniju Postavke slike. Možete
koristiti ovu opciju da biste povećali crnilo slike.
Filmski režim
Filmovi se u odnosu na obične televizijske programe snimaju sa drugačijim brojem sličica u sekundi.
Uključite ovu opciju kada gledate lmove, da biste jasno videli scene sa brzim kretanjem.
Ton kože
Podešava željeni ton kože.
Nijansa boje
Podešava željeni ton boje.
RGB Pojač
Pritisnite OK dugme da biste uredili RGB dobit. Možete podesiti temperaturu boje pomoći
odlike RGB dobit.
Resetovanje Resetuje postavke slike na fabrički podešene vrednosti.
Autopozicija (u
PC-režimu)
Automatski optimizuje prikaz. Pritisnite OK radi optimizacije.
H pozicija (u PC
režimu)
Ova stavka horizontalno pomera sliku do leve ili desne strane ekrana.
V pozicija (u PC
režimu)
Ova stavka pomera sliku vertikalno do vrha ili do dna ekrana.
Takt sata (u PC
režimu)
Podešavanje takta piksela ispravlja smetnje koje se pojavljuju u vidu vertikalnih traka kod tačkasto
intenzivnih prezentacija, kao što su tabele ili paragra ili tekst u manjim fontovima.
Faza (u PCrežimu)
U zavisnosti od rezolucije i frekvencije skeniranja koje unesete u TV aparat, slika na ekranu
može biti zamućena ili sa smetnjama. U takvom slučaju, pomoću metode pokušaja i greške,
ovom opcijom možete postići jasnu sliku.
U VGA (PC) režimu, neke stavke menija slike neće biti dostupne. Umesto toga će u PC režimu postavkama slike
biti dodate postavke VGA režima.
Page 50

Srpski - 49 -
Karakteristike i funkcije menija
Sadržaj menija zvuka
Jačina zvuka Podešava jačinu zvuka.
Ekvilajzer
U meniju ekvilajzera, predhorno podešenje može da se menja u Muzika, Film, Govor, Ravno,
Klasika i Korisnik. Pritisnite taster MENU da biste se vratili u prethodni meni. Podešavanja
u meniju ekvilajzera mogu se menjati ručno samo kada je režim ekvilajzera postavljen na
Korisnik.
Bilans Ovo podešavanje se koristi za isticanje balansa levog ili desnog zvučnika.
Slušalice Podešava jačinu zvuka u slušalicama.
Režim zvuka
Možete odabrati režim MONO, STEREO, DUAL I ili DUAL II, ali samo ukoliko odabrani kanal
podržava taj režim.
AVL
Funkcija automatskog ograničavanja zvuka (AVL-Automatsko ograničenje jačine zvuka),
podešava zvuk da biste zadržao nivo izlaza, izmeğu programa (na primer, nivo jačine kod
reklama je obično veći nego kod ostalih programa).
Zvuk za slušalice
(opciono)
Kada povezivate vanjsko pojačalo na vašеm TV-u preko džeka slušalica, možete izabrati ovu
opciju kao “izlaz linije”. Ukoliko ste povezali slušalice na TV, postavite ovu opciju na “slušalice”.
Dinamički
bas(opciono)
Uključuje ili isključuje opciju “dinamički bas”.
Zvuk za slušalice (po
izboru)
Režim Surround zvuka može da se uključi ili isključi.
Digitalni izlaz Podešava tip zvuka audio izlaza.
Sadržaj menija Instalacija I novo štelovanje
Automatsko
skeniranje kanala
(novo štelovanje)
Prikazuje opcije automatskog štelovanja.
Digitalna antena: Pretražuje i memoriše DVB stanice.
Digitalni kabl: Pretražuje i memoriše kablovske DVB stanice.
Analogno: Pretražuje i memoriše analogne stanice.
Digitalna antena i analogna: Pretraћuje i memoriљe antenske DVB i analogne stanice.
Digitalni kabl i analogni: Pretražuje i memoriše i analogne i kablovkse DVB stanice.
Manuelno skeniranje
kanala
Ova funkcija se može koristiti za direktan unos emitera programa.
Skeniranje mrežnih
kanala (opciono)
Traži povezane kanale u sistemu kanala.
Analogno no
podešavanje
Ovu postavku možete koristiti za no podešavanje analognih kanala. Ovo neće biti dostupno
ako nema ni jednog sačuvanog analognog kanala.
Prvo instaliranje
Briše sve sačuvane kanale i postavke, resetuje TV na fabrička podešavanja i počinje sa
prvom instalacijom.Možete slediti instrukcije u delu Početna instalacija o više informacija
oko ovog procesa.
Brisanje liste usluga
(opciono)
(*) Ovo podešenje je vidljivo samo kada je opcija Zemlja postavljena na Dansku, Švedsku,
Norvešku ili Finsku. Upotrebite ovo podešenje za brisanje memorisanih kanala.
Page 51

Srpski - 50 -
Karakteristike i funkcije menija
Sadržaj menija podešavanja
Uslovni pristup
Kontroliše uslovne pristupne module kada postoje.
Jezik Konguriše jezičke postavke.
Roditeljski
Konguriše roditeljske postavke.
Fabrički PIN broj može varirati u zavisnosti od izabrane zemlje.
Ako vam se zatraži da upišete PIN da biste videli opciju menija, koristite jedan od
sledećih: 4725, 0000 ili 1234.
Merači vremena Podešava tajmere za izabrane programe.
Konguracija snimka Pokazuje meni za kongurisanje snimanja.
Datum/vreme Podešava datum i vreme.
Izvori
Omogućava ili onemogućava opcije izabranog izvora.
Postavke mreže
Prikazuje postavke.
Druge postavke: Prikazuje druge opcije podešavanja televizora:
Vreme prikazivanja
menija
Menja vreme prikazivanja ekrana menija.
Skeniraj kodirano
Kada je ovo podešenje uključeno, proces pretraživanja će locirati i zaštićene kanale. Ako je ova
opcija isključena, zaštićeni kanali neće biti locirani u toku automatskog ili ručnog pretraživanja.
Plava pozadina Aktivira ili deaktivira sistem plave pozadine ako je signal slab ili ne postoji.
Ažuriranje softvera
Da biste osigurali da TV uvek ima najnovije informacije, možete koristiti ovu postavku. Radi
pravilnog rada, pobrinite se da televizor postavite u režim pripravnosti.
Verzija Aplikacije Displays application version.
Za osobe sa
oštećenim sluhom
Ako emiter omogućava neke specijalne signale u odnosu na audio, ovo podešenje možete
postaviti na „uključeno“ da biste primali te signale.
Opis zvuka
Audio opis se odnosi na dodatnu narativnu traku za slepe i gledaocima sa oštećenim vidom, za
vizelne medije, uključujući televiziju i lmove. Ovu funkciju možete da koristite samo ako emiter
podržava dodatnu narativnu traku.
Automatsko
isključivanje
televizora
Možete da podesite vreme za funkciju automatskog isključivanja.Kada to vreme istekne i ako se
televizorom ne rukuje tokom određenog vremena, televizor će se isključiti.
Pretraživanje u režimu
pripravnosti (opcija)
Ako funkciju pretraživanja u pripravnosti prebacite na "isključeno", ova funkcija će biti nedostupna.
Da biste koristili pretraživanje u režimu pripravnosti, uverite se da ste opciju pretraživanje u
režimu pripravnosti podesili na Uklj. Ako je pretraživanje u režimu pripravnosti uključeno kada
je TV u režimu pripravnosti, pretražiće se dostupna emitovanja. Ako televizor pronađe nove ili
nedostajuće emisije, prikazuje se ekran menija sa upitom da li promene treba primeniti ili ne.
Nakon ovog procesa lista kanala će biti ažurirana i promenjena. Preporučuje se aktivirati „pretragu
tokom pripravnosti” kako bi vaš TV mogao automatski ažurirati frekvenciju emitera, denicija
kanala kao i slične stvari.
Puni režim (opcija)
Ukoliko postavljate TV u prodavnicu, možete aktivisati ovaj režim. Dok je režim Radnja aktivan,
neke stavke u TV meniju nisu dostupne za postavljanje.
DLNA Renderer
Odlika DLNA renderer omogucava vam da spodeljavate datoteke sacuvane na vašem smartfonu.
Ako imate DLNA kompatibilni pametni telefon ili tablet i prikladni softver je instaliran možete spodjeliti
slike na vašeg TV-a. O više informacija, vidite instrukcije vašeg softvera za spodeljivanje.
Režim startovanja
Ovo konguriše preference startovanja. Uvek uključeno: TV se uvek uključuje kada se pritisne glavno
dugme za uklj./isklj. / Standby: TV se uvek uključuje u režim mirovanja. / Zadnjo stanje: TV se uvek
uključuje na zadnje izabranom kanalom/izvorom.
Virtualni daljinski
upravljač (po izboru)
Aktiviše ili deaktiviše virtuelni daljinski.
CEC:
Preko ove postavke možete u ceosti omogućiti ili onemogućiti odliku CEC. Za
omogućavanj ili onemogućavanje pritisnite dugme za levo ili desno.
Page 52

Srpski - 51 -
Elektronski programski vodič (EPG)
Neki, ali ne svi, kanali šalju informacije o tekućim
i sledećim događajima. Da biste videli EPG meni,
pritisnite dugme “ ”.
Gore/Dole/Levo/Desno: Navigacija u EPG-u
OK: Prikazuje opcije programa.
INFO (İ): Prikazuje detalnu informaciju na izabranom
programu.
ZELENO: Prebacuje na EPG listu Raspored
ŽUTO: Prebacuje na EPG listu Vremenska linija
PLAVA: prikazuje opcije ltriranja.
(SNIMAJ): TV će početi snimati izabrane
programe. Možete ga opet pritisnuti da zaustavite
snimanje.
VAŽNO: Da biste snimili progamu, morate prvo povezati
USB disk na vapem TV-u dok je TV isključan. Zatim trebali bi
uključiti TV da biste omogućili odliku snimanja. U suprotnom,
odlika snimanja neće biti dostupna.
Napomena: Prelaženje na drugu emisiju ili izvor nije dostupno
u toku snimanja.
Programske opcije
U EPG meniju pritisnite dugme OK da biste ušli u
meni Programske opcije.
Biranje kanala
Koristite ovu opciju za prelazak na izabrani kanal.
Snimi/Izbriši tajmer za snimanje
Nakon što ste izabrali pragram u EPG meniju, pritisnite
dugme OK i i ekran Opcije biće prikazan. Izaberite
opciju “Snimaj“ i pritisnite dugme OK. Nakon ove
operacije, na odabranom programu se postavlja
snimanje.
Da biste otkazali postavljeno snimanje, označite
taj program i pritisnite dugme OKi odaberite opciju
“Izbriši snimanje. Tajmer”. Snimanje biće otkazano.
Podesite tajmer / Izbrisite tajmer
Nakon što ste izabrali pragram u EPG meniju, pritisnite
dugme OK i i ekran Opcije biće prikazan. Odaberite
“Postavi tajmer na događaj“ i pritisnite OK. Možete
podesiti tajmer za buduće događaje. Da biste otkazali
postavljeni tajmer, označite taj program i pritisnite
OK. Onda izaberite opciju “Briši tajmer“. Tajmer
biće otkazan.
Napomena: Nije moguće snimati ili postaviti tajmer za dva ili
više događaja u istom vremenskom intervalu.
Snimanje programa
VAŽNO: Kada koristite novi USB disk, preporučuje se da prvo
formatirate disk pomoću opcije "Formatiraj diska".
Da biste snimili progamu, morate prvo povezati USB
disk na vapem TV-u dok je TV isključan. Zatim trebali
bi uključiti TV da biste omogućili odliku snimanja.
Za koriščenje funkciju snimanja, trebalo bi povezati
USB disk ili spojlni uređaj sa vašim TV-u koji ima
najmanje 1 GB kapaciteit i brzinu 2.0. Ukoliko
povežete USB zuređaje koje ne podržavaju 2.0 brzinu,
na ekranu prikazaće se poruka o grešci.
Napomena: Snimljene programe čuvaju se na povezanom
USB disku. Po želji, možete ih sačuvati/kopirati na kompjuteru,
ali ipak, oni se ne mogu svirati na kompjuteru. Možete ih svirati
samo preko vašeg TV-a.
Napomena: Po vreme tajmšiftinga se može pojaviti kašnjenje
u sinhronizaciju govora. Snimanje radija nije podržano.
TV može snimato programe do deset časova.
Snimljene programe su podeljene na particije od 4GB.
Ukoliko je brzina snimanja povezanog USB diska
nedovoljna, snimanje može propasti i odlika tajmšifting
može biti nedostupna.
Snimke HD programa mogu zauzeti veći deo USB
diska zbog rezolucije emisije. Zato se preporučuje
korisiti USB diskove za snimanje HD programa.
Nemojte isključivate USB disk za vreme snimanja. To
može oštetiti povezani USB/HDD.
Podržavaju se višestruke particije. Najviše dve
različite particije su podržane. Ukoliko disk ima više
od dve particije, može nastati krah. Prva particija
USB diska korisit se za PVR ready odlike. Takođe,
mora biti formatirana kao primarna particija da bi se
koristila za PVR ready odlike.
Neki paketi striminga mogu da ne budu snimljeni
radi problema signala, pa nekad video se zaledi u
toku prikaza.
Dugmad za snimanje, puštanje, pauza, prikaz (za
dialog plej-liste) se ne mogu korisiti kada je teletekst
uključan. Ukoliko snimanje počinje od tajmera dok je
teletekst uključan, teletekst se automatski isključuje.
Takođe, upotreba teleteksta se onemogućava kada
je u toku snimanje ili reprodukcija.
Page 53

Srpski - 52 -
Snimanje sa vremenskim
programiranjem
Pritisnite dugme (PAUZA) dok gledate emisiju da
biste prebacili u režim tajmšifting. U režim tajmšifting,
program je pauziran i u isto vreme snimljan na
povezanom USB disku. Pritisnite (PUŠTANJE) još
jednom da biste gledali pauzirani program od trenutka
zaustavljanja. U info polugi videćete razliku u vremenu
među istinske i snimljene tajmšift emisije.
Instant snimanje
Pritisnite (SNIMAJ) da biste počeli snimati događaj
instantno dok gledate program. Možete opet pritisnuti
dugme (SNIMAJ) na daljinskom upravljaču da
snimite sledeći događaj na EPG. U ovom slučaju,
OSD prikazaće programirane događaje za snimanje.
Pritisnite dugme (STOP) da biste otkazali instant
snimanje. Menjanje na drugu emisiju ili izvor, kao i
gledanje Pretraživača medija, nisu dostupni u toku
snimanja.
Gledanje snimljenih programa
U glavni meni, izaberite Pretraživača pomoču
“ ” ili “ ” dugmad. Označite Biblioteku Sniamnja
pomoću “ ” ili “ ” i pritisnite OK da uđete. Prikazaće
se Biblioteka snimaka. Odaberite snimku sa liste
(ukoliko je neka ranije snimljena) pomoći “ ” / “
” dugmeta. Pritisnite dugme OK da prikažete opcije
reprodukcije. Možete izebrati opcije koristeći “ ” /
“ ” ili OK.
Dostupne opcije reprodukcije:
• Pusti iz početka: Pušta snimak iz početka.
• Nastavi: Produžuje prikazivanje snimka.
• Pusti iz tačke: Precizira tačku puštanja.
Napomena: Gledanje glavnog menija i stavke menija nisu
dostupne tokom prikazivanja.
Pritisnite (STOP) dugme da biste zaustavili
prikazivanje i da biste se vratili u Biblioteku snimaka.
Sporo unapred.
Ukoliko pritisnite (PAUZA) dok gledate snimljene
programe, odlika sporo unapred biće dostupna.
Možete koristiti dugme da idete sporo unapred.
Uzastopno pritiskanje dugmeta menja brzinu
sporog napredovanja.
Biblioteka snimaka
Da biste videli listu snimaka, izaberite “Biblioteku
Snimaka” i pritisnite OK. Prikazaće se Biblioteka
snimaka sa dostupnim snimcima, Svi snimci čuvaju
se u jednu listu u biblioteku snimaka.
(Nastavi): Produžuje prikazivanje snimka.
CRVENO dugme (Briši): Briše izabrani snimak.
Zeleno dugme (Obradi): Napravi promene na
odabranog snimka.
Plavo dugme (Sortiraj): Menja poredak snimaka.
Možete izabrati sa širokog spektra opcije podreðivanja.
Dugme OK: Aktivira meni opcije prikaza:
INFO (detalji): Prikazuje detaljno kratki prošireni
program.
Konguracija snimanja
Odaberite stavku Konguracija snimanja u meniju
Postavki da biste kongurirali podešivanja snimanja.
Formatiranje diska: Možete korisiti odliku Formatiraj
disk da biste formatirali povezani USB disk. VAŽNO:
Primetite da SVI podatci snimljeni na USB disku
bići izgubljeni i zatim format diska biće promenjen
na FAT32, ukoliko aktivirate ovu odliku. Ukoliko se
vaš USB disk pokvari, možete probati formatirati
ga. U večinu slučaja formatiranje USB diska vraća
normalni rad; ipak, SVI podatci snimljeni na njemu
bići izgubljeni.
Napomena: Ukoliko se na ekranu prikaže „USB je prebavan“
dok počev snimanja, pokušajte restartirati snimanje. Ukoliko
još dobijate istu grešku, moguće je da vaš USN disk ne
zadovoljava zahteve brzine. Povežite drugi USB disk.
Funkcije povezivanje
Povezivanje na mrežu žicom
Za povezivanje na LAN mrežu, uradite sledeće
korake:
• Priključite eternet kabl za broadbend ISP vezu u
ETERNET ULAZ na Vašem modemu.
• Osigurajte da Nero Media Home softver bude
instaliran na Vašem personalnom kompjuteru (za
DLNA funkciju). Vidite dodatak H o više informacije
oko procesa instalacije.
• Zatim, priključite Vaš personalni kompjuter na jedan
od LAN konektora na modemu (na primer LAN 1)
preko LAN kabla.
• Upotrebite drugi LAN izlaz na Vašem modemu (na
primer LAN 2) da biste dobili vezu na Vašem TV
uređaju. Možete dodati Vaš TV ureğaj na Vaš LAN
preko povezivanja LAN porta na zadnjem delu Vašeg
TV ureğaja na LAN konketor Vašeg modema na
način kako je prikazano u produžetku.
Page 54

Srpski - 53 -
Lan(Ethernet cable)
Broadband ISP
Connection
Rear of TV
• Da biste pristupili I svirali spodeljene datoteke,
morate izabrati Prelistača medija. Pritisnite MENI
dugme i odaberite umetak Pretraživač medija
pomoći Levo/Desno i OK. Pritisnite OK za nastavak.
Izaberite željeni tip datoteke i pritisnite OK Morate
uvek koristiti prozor prelistaća medija da biste
pristupili I svirali spodeljene mrežne datoteke.
• PC/HDD/Medija plejer ili bilo koji drugi uređaj koji
je kompatibilan sa DLNA 1,5 trebao bi se koristiti
sa žičanom mrežom za bolji kvalitet reprodukcije.
Za konguraciju postavke žičane mreže molimo
Vas konsultujte deo „Mrežne postavke“ u meniju
za postavke.
• Možda ćete moći da priključite Vaš TV uređaj na
Vašu LAN mrežu, ali to zavisi od konguracije Vaše
mreže. U tom slučaju koristite eternet kabl da biste
priključili Vaš TV uređaj direktno u mrežni zidni izlaz.
The modem port
on the wall
Rear of TV
Povezivanje na bežičnu mrežu
VAŽNO: Potreban je „Veezy 200“ USB dongl (prodaje
se samostojno) da biste koristili opciju za bežičnu
mrežu.
• Da biste koristili Važš TV uređaj sa bežičnom
mrežom, trebaće Vam bežični USB dongl Veezy 200.
Da biste napravili SSID vašeg modema vidljivim,
trebali biste promeniti podešavanja SSID-a preko
softvera modema. TV se ne može povezati na
mrežama sa skrivenim SSID-om.
Za povezivanje na LAN mrežu, uradite sledeće
korake:
1. Priključite eternet kabl za broadbend ISP vezu u
ETERNET ULAZ na Vašem modemu.
2. Osigurajte da Nero Media Home softver bude
instaliran na Vašem personalnom kompjuteru (za
DLNA funkciju).
3. Zatim povežite bežični adapter na jednom od USB
ulaza na TV uređaj.
4. Za konguraciju bežičnih postavki molimo Vas
konsultujte deo "Mrežne postavke" u meniju za
postavke.
Wireless Lan
Adaptor
USB Inputs (Side of the TV)
Broadband ISP
Connection
• Bežični-N ruter (IEEE 802.11a/b/g/n) sa istovremenim
2.4 i 5 GHz opsegom, dizajniran za povečivanje
protok opsega Optimiziran za glatkiji i brži HD video
protok, prenos datoteka i bežično igranje igrica.
• Koristite LAN vezu za brže deljenje datoteka izmeğu
drugih ureğaja, na primer kompjutera.
• Frekvencija i kanal zavise od lokaciju.
• Brzina prenosa razlikuje se u zavisnosti od razdaljine
i broja smetnji koje se nalaze izmeğu • prenosnih
ureğaja, njihove konguracije, uslova radio-talasa,
saobraćaja na liniji i proizvoda koje koristite. Prenos
može da bude prekinut ili isključen, u zavisnosti od
uslova radio-talasa u DECT-u telefona, ili drugih
WiFi 11b ureğaja. Standardne vrednosti brzine
prenosa su teoretske maksimalne vrednosti za
bežične standarde. Oni nisu stvarna brzina prenosa
podataka.
• Lokacija gde će prenos biti najekasniji zavisi od
okoline u kojoj se koristi.
• Bežični LAN adapter treba da bude direktno povezan
za USB port na TV ureğaju. Ne podržavaju se USB
razvodnici.
Page 55
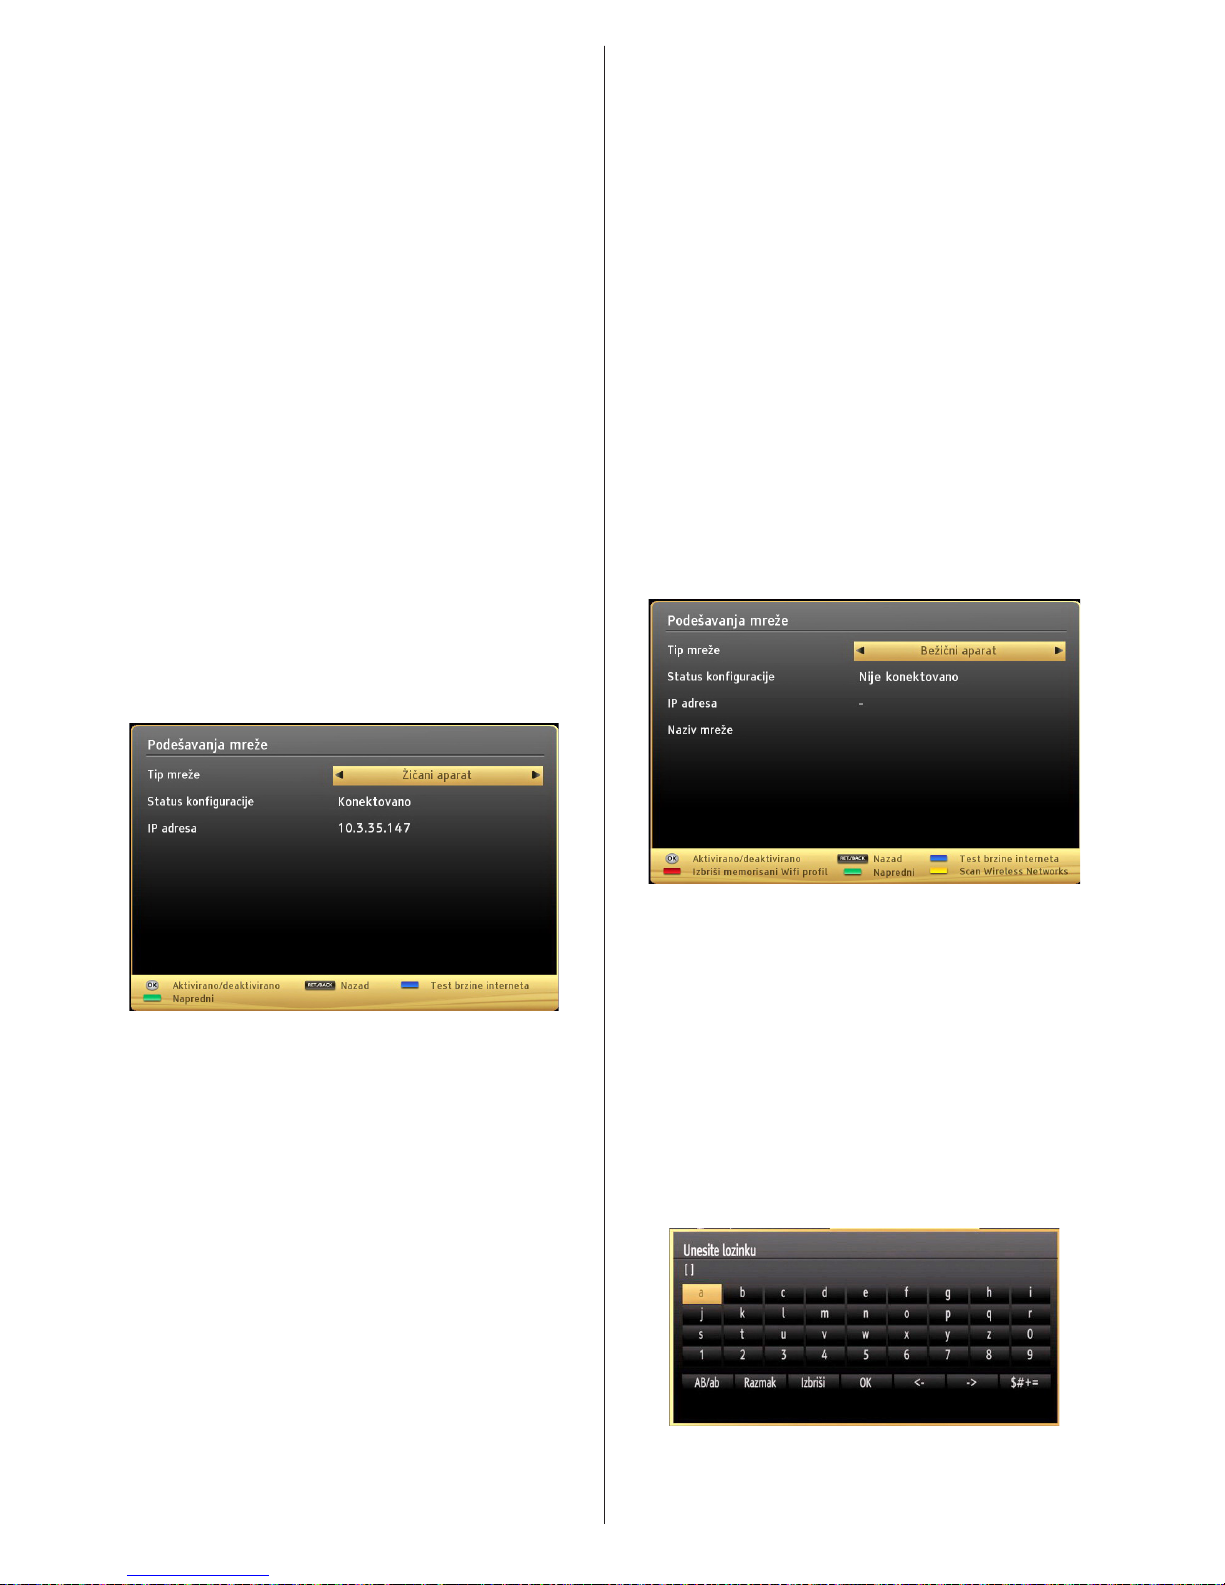
Srpski - 54 -
• Za konfiguraciju bežičnih postavki molimo Vas
konsultujte deo WiFi u meniju za postavke.
• Bežični LAN adapter podržuje modeme tipa 802.11
a, b, g i n. Veoma je preporučljivo da koristite IEEE
802.11n komunikacijski protokol da bi ste izbegli
moguće probleme tokom gledanja videa.
• Koristite drugi USB ulaz ako imate problema sa
radom audija/videa.
• Morate promeniti SSID vašeg modema kada u blizini
ima drugih modema sa istim SSID-om. U suprotnom
možete imate problema sa vezom. Alternativno
koristite žičanu vezu ako imate problema sa
bežičnom vezom.
Kongurisanje postavke mreže
Postavke mreže na TV uređaju imaju opcije za žičanu ili
bežičnu vezu. Ipak, ako TV uređaj nema USB WiFi dongle
(prodaje se oddeljno), koristite žičani tip mreže. Ako probate
da se povežete preko bežične veze kad na TV uređaju
nema USB WiFi dongle, javiće se ekran sa upozorenjem, a
TV uređaj neće dobiti IP adresu. Nakon toga pokušajte da
povežete LAN kabl – tada će TV uređaj dobiti IP adresu.
Kongurisanje postavke ureda
priključenim sa žicom
Ako povezujete TV uređaj preko ETHERNET IZLAZA,
izaberite Tip mreže kao žičani uređaj i kongurirajte.
Tip mreže
Tip mreže možete izabrati kao Žičani ili Bežični ureğaj,
u zavisnosti od aktivne veze na TV ureğaju. Izaberite
žičani ako ste na TV uređaj povezali LAN kabl. Izaberite
Bežični ako ste ga povezali koristeći bežični dongl
(prodaje se samostojno).
Konguracijski status
Ovaj deo prikazuje status veze. Izaberite Povezan
ako želite da aktivirate vezu. Izaberite Nije povezan
ako želite da prekinete aktivnu vezu.
IP adresa
Ako je dostupna aktivna veza, IP adresa će se pojaviti
u ovom delu. Ako želite da kongurirate postavke
IP adrese, pritisnite ZELENO dugme i preπite na
napredni režim.
Kongurisanje postavke za mrežu sa
žicom u naprednom režimu
Nakon što pritisnete ZELENO dugme, biće dostupan
napredni režim. Dok ste u Naprednjem režimu,
pritisnite CRVENO dugme da podesite postavke. Na
kraju, pritisnite OK da snimite, pritisnite RETURN/
BACK za otkazati.
Kongurisanje postavke ureda priključenim sa
bežičnu (po izboru)
VAŽNO: Potreban je “Veezy 200” USB dongl da biste
koristili opciju za bežićnu mrežu. Da biste koristili Važ
TV ureπaj sa bežićnom mrežom, trebaće Vam bežićni
USB dongl "Veezy 200".
WiFi opcija može se koristiti za bežičnu mrežnu vezu.
Opcija se koristi samo u infrastrukturne svrhe, kao
što je povezivanje za web, hbb internet stranice i za
povezivanje na DLNA serverima (opcija). Ukoliko
imate Veezy 200 Wi dongl (prodaje se samostojno),
postavite Tip mreže na Bežični uređaj kako bi
pokrenuli proces povezivanja.
Da biste omogućili WiFi opciju, proli bi trebalo da su
pravilno kongurisani. Utaknite WiFi dongl (prodaje se
odvojeno) u jedan od USB portova.
Pritisnite ŽUTO dugme da skenirate bežične mreže
sa menija postavke mreže. Zatim će se pojaviti spisak
dostupnih mreža. Izaberite željenu mrežu sa spiska.
Ako je izabrana mreža zaštićena lozinkom, unesite
pravilnu lozinku koristeći virtuelnu tastaturu. Ovu
tastaturu možete koristiti preko navigacionih
dugmadi (Levo/Desno/Gore/Dole) i dugmeta OK na
daljinskom upravljaču.
Sačekajte dok se ne pojavi IP adresa na ekranu.
Page 56
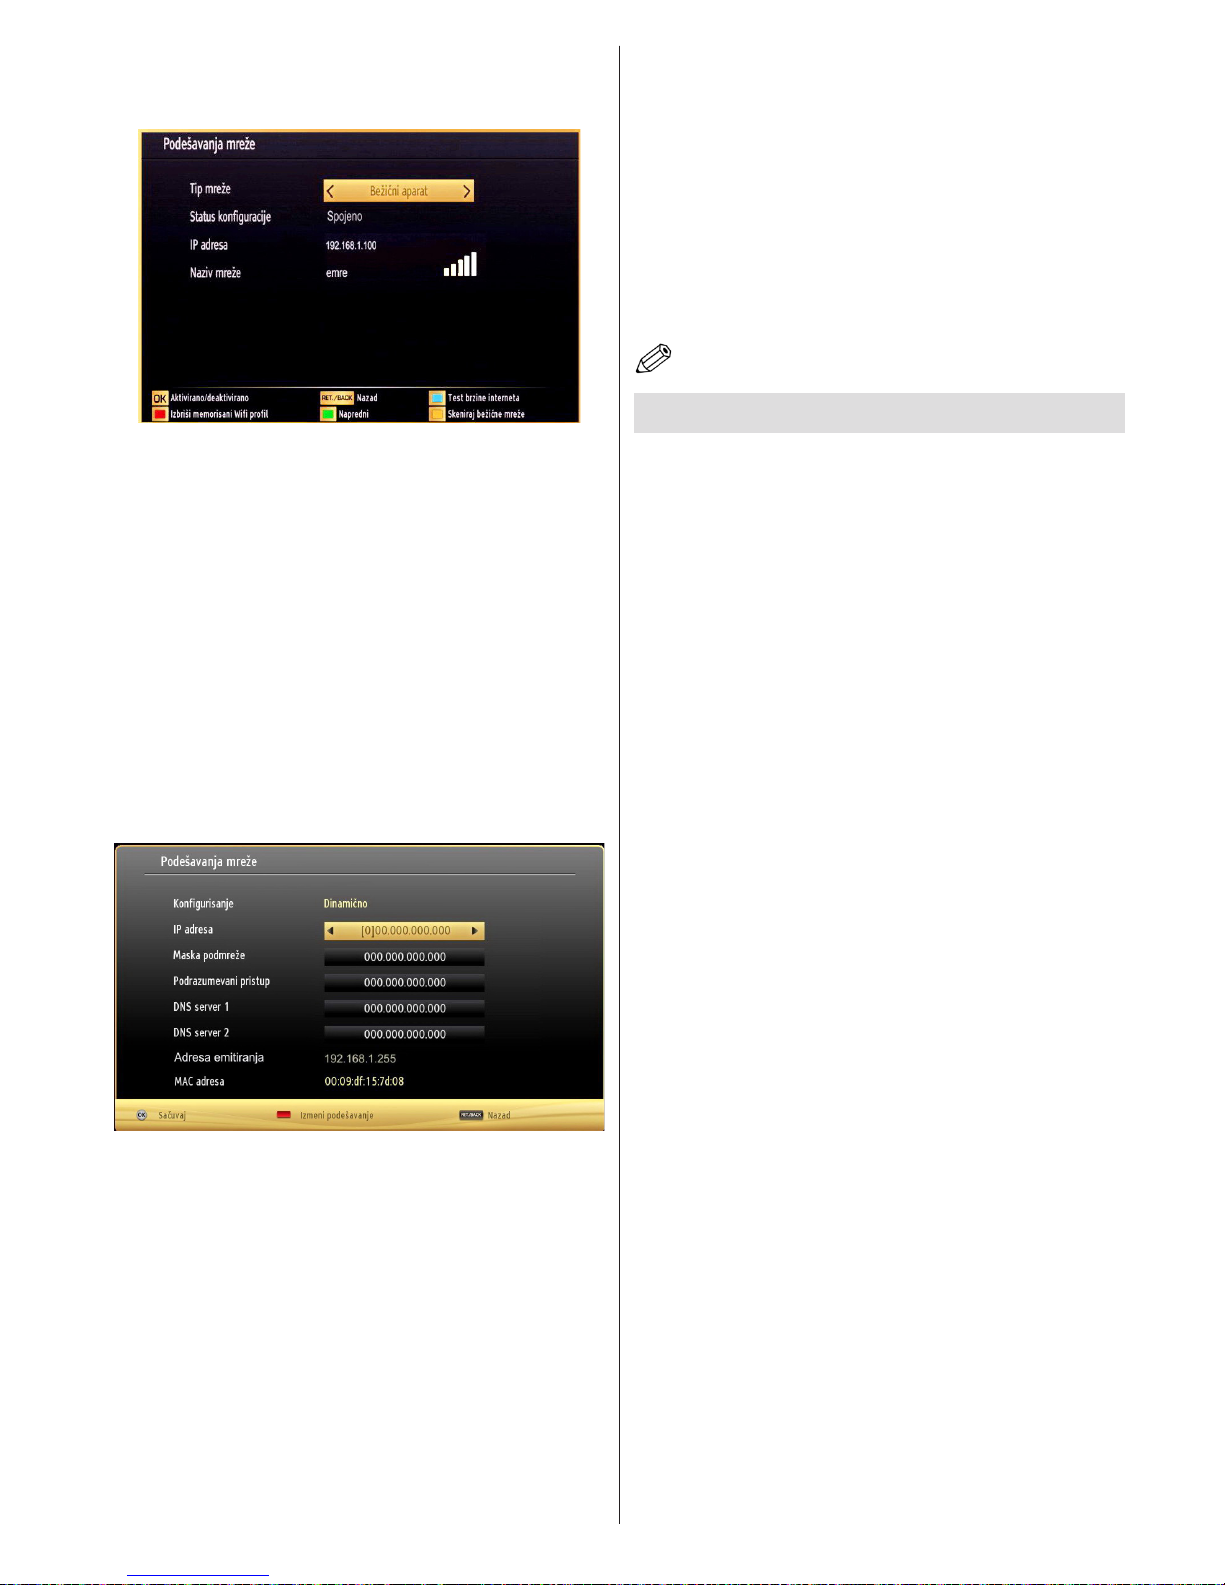
Srpski - 55 -
Ovo znači da je uspostavljena mreža. Da se iskljućite
sa bežićne mreže, oznaćite Konguracijski status
i pritisnite OK.
možete se kretati koristeći dugmad levo/desno. Traka
za pomoć na kraju dijaloga pokazuje opcije koje
možete koristiti. Pritisnite PLAVO dugme da biste
proverili brzinu vaše internet veze.
Možete proveriti jačinu signala pomoći meni postavke
mreže za režim bežičnog uređaja.
Informacije
Konguracijski status: Prikazuje WiFi status kao
povezan ili kao nepovezan.
IP adresa: Prikazuje momentalnu IP adresu.
Naziv mreže: Pojaviće se nazivi povezanija mreža.
Pritisnite ZELENO dugme da biste prešli na napredni
režim i zatim pritisnite OK dugme da uredite postavke.
Izbrišite snimljene WiFi prole
Memorisani proli biću izbrisani ako pritisnite crveno
dugme dok je osd za izbor bežične mreže na ekranu.
Povezivanje na vaš mobilni telefon preko
WiFi bežične mreže (opcija)
• Ako Vaš mobilni telefon ima opciju WiFi, možete
povezati Vaš mobilni i Vaš TV koristeći WiFi vezu
preko rutera da biste reprodukovali sadržaj sa Vašeg
telefona. Da biste to uradili, Vaš mobilni telefon mora
imati pravilni softver za deljenje.
• Povežite Vaš ruter sledeći korake navedene gore u
delu „Bežična veza“.
• Zatim povezite Vaš mobilni telefon sa ruterom i
aktivirajte softver za deljenje na Vašem mobilnom
telefonu. Onda izberite datoteke koje biste delili sa
TV ureπajem.
• Ako je veza pravilno postavljena, sada treba da
pristupite deljenim datotekama na Vašem mobilnom
telefonu preko Pretraživaća medija na Vašem TV-u.
• Uπite u meni pretraživaća medija i prikazaće se
OSD za izbor ureπaja za reprodukovanje. Izberite
Vaš mobilni telefon sa spiska i pritisnite OK da biste
produžili.
Napomena: Neki mobilni telefoni možda neće podržavati
ovu opciju.
Traženje greške povezivanje
Nije dostupna bežična mreža
Uverite se da zaštitni zidovi na Vašoj mreži dozvoljavaju
bežičnu mrežu za TV uređaj. Veezy 200 (prodaje se
odvojeno) usb wi dongle treba biti pravilno uključen
(ukoliko je dostupan). Ako bežična mreža ne radi
pravilno, pokušajte sa žičanom mrežom koju imate
kod kuće. Konsultirajte deo žične mreže za svže
informacije o procesu.
Ako nije dostupna funkcija Net TV, prvo proverite
modem (ruter). Ako nije problem u ruteru, proverite
internet vezu na modemu.
Pokušajte ponovo tražiti bežične mreže pomoći
ekrana menija mrežne postavke.
Veza je spora
Vidite knjigu sa uputstvima za bežični modem da
dobijete informacije o internom servisnom području,
brzina veze, kvalitet signal i druge postavke. Treba
Vam brza veza za modem.
Smetnje za vreme reprodukovanja ili
zakasnele reakcije
U tom slučaju možete pokušati sledeće:
Držite na najmanje tri metara razdaljine mikrotalasne
ureğaje, mobilne telefone, bluetooth ureğaje ili druge
ureğaje koje su WiFi kompatibilni. Pokušajte da
promenite aktivni kanal na WLAN ruteru.
Upotreba DLNA mrežne usluge
DNLA (Digital Living Network Alliance) je standard koji
olakšava proces gledanja digitalne elektronike i čini
ga prijatnim za korišćenje na domaćoj mreži. Za više
informacija posetite www.dlna.org.
DNLA standard omogućava da gledate i reprodukujete
fotograje, muziku i videa koji su uskladišteni na DLNA
medijskom serveru povezanom za Vašu domaću
mrežu.
Page 57

Srpski - 56 -
Korak 1: Instaliranje Nero Media Home
Ne može se koristiti DNLA funkcija ako program
servera nije instaliran na personalni kompjuter.
Molimo Vas, stavite program i spremite priloženi
Nero MediaHome na Vaš personalni kompjuter. Za
više informacija oko instaliranja, konsultujte prilog H.
Korak 2: Povezivanje na mrežu sa žicom ili na
bežićnu mrežu
Videti glavu „Mrežne postavke“ za više informacija o
konguraciji.
Korak 3: Preslušivanje zajedničkih datoteka
preko pregledača medija
Izaberite Pregledač medija, koristeći dugmad Levo
ili Desno od glavnog menija, i pritisnite dugme OK.
Prikazaće se pregledač medija.
Podrška za DLNA je dostupna samo u režimu
fascikle Pregledač medija. Da biste omogućili režim
fascikle, idite u tabulator Postavke na glavnom
ekranu pretragača medija i pritisnite OK. U opcije
za postavke, označite Stil prikaza i promenite na
Fascikla koristeći dugmad Levo ili Desno.
Izaberite željeni tip medija i pritisnite OK.
Ako su pravilno postavljene konguracije za deljenje,
posle izbora željenog tipa medija pojaviće se ova
OSD poruka. Izaberite OK da bi se prikazale izabrane
mreže ili sadržaj USB memorije. Ako želite da osvežite
spisak ureğaja, pritisnite ZELENO dugme. Možete
pritisnuti MENU da biste izašli.
Ako ima dostupnih mreža, pojaviće se spisak na ekranu.
Izaberite medijski server na koji želite da se priključite
koristeći " " ili " " dugmad i pritisnite dugme OK.
Ako izaberite tip medija Video i izaberite ureğaj
iz izbornog menija, pojaviće se novi ekran menija,
kao što je prikazano tu dole:
Izaberite Videa sa ovog ekrana da vidite spisak svih
dostupnih video datoteka na izabranoj mreži.
Da bi reprodukovalii druge vidove medija, morate se
vratiti na glavni ekran Pretraživača medija i izaberite
željeni tip medija i onda opet izaberite mrežu.
Konsultujte deo USB reprodukovanje pretraživača
medija za više informacija o reprodukovanju datoteka.
Datoteke sa titlovima ne rade ako gledate video preko
mreže, preko DLNA.
Možete povezati samo jedan TV uređaj sa DLNA za
istu mrežu. Ako se javi problem sa DLNA mrežom,
uključite/isključite televizor. Režimi za maskiranje i
preskakanje nisu dostupni sa DLNA funkcijom.
PAŽNJA:
Možda neki personalni kompjuteri neće moći da
koriste DLNA funkciju zbog administratorske i
bezbednosne postavke (kao na primer poslovni
personalni kompjuteri).
Za najbolji protok na domaćoj mreži sa ovom
postavkom treba instalirati Nero softver.
Internet portal
Možete pristupiti režimu PORTAL pomoći vašeg
TV-a. Za to vam je potrebna internet veza. Pratite
korake dela “Povezivanje na žičanu/bežičnu (opciono)
mrežu” da biste povezali vaš TV na internet. Nakon
uspostavljanja veze, možete odabrati ili pogledati
opcije portala.
Napomena: Neophodna je širokopojasna internet
veza za visokokvalitetne preglede. Osigurežite se
de ja internet veza pravilno urađena. Morate pravilno
podesiti zemlju u jezik tokom prve instalacije da biste
imali pravilan rad internet portala.
Pritisnite “ ” dugme vašeg daljinskog I opcije
portalskih aplikacija biće prikazane. Opcije aplikacija
biću prikazane kao šablon niže. Sadržaj dostupnih
aplikacija se može promeniti u zavisnosti od
snabdevača sadržaja aplikacije.
Page 58

Srpski - 57 -
Izaberite link ili aplikaciju pomoću dugmadi levo i
desno ili gore i dole i pritisnite OK za aktivirati.
• Upravljavajte među stavke portala pomoću gore/
dole i levo/desno.
• Pritisnite taster OK za potvrditi izbor.
• Pritisnite BACK da pređete na prethodni ekran.
• Pritisnite EXIT da izađete iz režima internet portala.
Napomena: Neke probleme povezane sa sadržajem
aplikacija mogu biti pričinjene od dostavljača sadržaja.
Napomena oko PIP prozora
Ako pređete na režim poratala dok gledate TV kanale,
trenutni program se pokazuje u prozoru PIP. You can
change channels using P+/P- buttons.
Ako pređete na režim portal dok gledate HDMI izvor,
trenutni HDMI sadržaj se prikazuje u PIP prozoru.
Upravljavajte među stavke Portala pomoću “ ” ili
“ ”, “ ” ili “ ”. Pritisnite taster OK za potvrditi izbor.
Pritisnite BACK da pređete na prethodni ekran.
Pritisnite EXIT da izađete iz režima internet portala.
Page 59

Srpski - 58 -
Teletekst
“ ” Teletekst / Miks: Aktivira režim teleteksta kada
ga jednom pritisnete. Postavlja ekran teleteksta preko
programa (miks). Ponovnim pritiskanjem otkazuje se
režim teleteksta.
“NAZAD” Indeks: Bira indeksnu stranicu teleteksta.
“İ”Reveal: Pokazuje skrivene informacije (npr.,
rešenja igara).
"OK" Zadrži: Prema potrebi zadržava stranicu teksta.
Pritisnite ponovo, da biste nastavili.
“ ”/“ ” Podstranice: Bira eventualno dostupne
podstranice kada je teletekst aktiviran.
P+ / P- i brojevi (0-9): Pritisnite da biste odabrali
stranicu.
Napomena: Većina TV stanica koristi šifru 100 kao svoju
indeksnu stranicu.
Vaš TV podržava i sistem za BRZI TEKST i sistem za
TOP-TEKST. Kada su ovi sistemi dostupni, stranice
su podeljene u grupe ili teme. Kada je dostupan sistem
BRZI TEKST, odeljci u stranici teleteksta postaće
šifrovani bojom i mogu se birati pritiskanjem obojenih
tastera. Pritisnite neko obojeno dugme, koje odgovara
Vašim potrebama. Pojaviće se pisani tekst u boji,
pokazujući koji od obojenih tastera da koristite kada
postoji prenos TOP-teksta. Pritiskanjem komandi
“ ” ili “ ” zahtevaće se sledeća, odnosno prethodna
stranica.
Digitalni teletekst (samo za UK)
• Pritisnite “ ” dugme. Prikazuju se informacije
digitalnog teleteksta. Za rad sa njim koristite dugmad
u boji, dugmad kursora i dugme OK.
Način rada se može razlikovati, zavisno od sadržaja
digtalnog teleteksta. Pratite uputstva koja su
prikazana na ekranu digitalnog teleteksta.
Kada se pritisne dugme „ “, TV aparat se vraća na
televizijski prenos.
Ažuriranje Softvera
Vaš televizor je u stanju da pronađe i ažurira nove
nadogradnje softvera preko televizijskih kanala.
Prilikom pretraživanja televizijskih kanala, televizor
traži dostupne kanale koji su memorisani u vašim
postavkama. Zato se savetuje da pre pretraživanja
novijih verzija uključi automatsko pretraživanje i
ažuriraju svi dostupni kanali.
1) Pretraživanje novijih verzija softvera preko
korisničkog interfejsa
• Moguće je ručno proveriti da li postoje novije verzije
softvera za vaš televizor.
• Jednostavno idite na glavni meni. Izaberite Postavke
i odaberite meni Druge postavke. U meniju Druge
postakve idite na stavku Ažuriranje softver i
pritisnite dugme OK da biste otvorili meni Opcije
ažuriranja.
U meniju Opcije ažuriranja izaberite Skeniranje za
ažuriranje i pritisnite dugme OK.
• Ako se pronađe novija verzija, on započinje
njeno preuzimanje. Traka napredovanja pokazuje
napredovanje preuzimanja. Kada se preuzimanje
završi uspešno, prikazuje se poruka kojom se
traži ponovno pokretanje radi aktiviranja novog
softvera. Pritisnite OK da biste nastavili sa ponovnim
pokretanjem.
2) Pretraživanje u pozadini i režim ažuriranja
• Dok je televizor povezan na internet, on u pozadini
vrši pretraživanje za važnim novijim verzijama
softvera. Ako se važna novija verzija softvera pronađe,
on je tiho preuzima. Kada se preuzimanje završi
uspešno, prikazuje se poruka kojom se traži ponovno
pokretanje radi aktiviranja novog softvera. Pritisnite
OK da biste nastavili sa ponovnim pokretanjem.
3) Pretraživanje u 3:00 AM i režim
ažuriranja
• Ako je omogućeno Automatsko skeniranje u
meniju Opcije ažuriranja, televizor se uključuje u
03:00 i pretražuje televizijske kanale kako bi pronašao
nove verzije softvera. Ako se novi softver pronađe i
uspešno preuzme, pri sledećem uključivanju televizor
se podiže sa novom verzijom softvera.
Napomena o operaciji ponovnog podizanja sistema:
Ponovno podizanje sistema je poslednji korak operacije
ažuriranja softvera u slučaju da je novi softver uspešno
preuzet. Tokom ponovnog podizanja sistema televizora vrši
se konačna inicijalizacija. U sekvenci ponovnog podizanja
sistema isključeno je napajanje ekrana, a svetleća dioda na
prednjoj ploči ukazuje na aktivnost svojim treperenjem. Oko
5 minuta kasnije televizor se ponovo pokreće sa aktiviranim
novim softverom.
• Ako se vaš televizor ne pokrene ponovo za 10
minuta, isključite ga iz struje na 10 minuta, a zatim ga
ponovo uključite u struju. Televizor treba da se uključi
bezbedno sa novim softverom. Ako vaš televizor i
dalje ne radi, ponovite postupak sa isključivanjem
iz struje i ponovnim uključivanjem još nekoliko puta.
Ako i dalje ne radi, pozovite servis da reši problem.
Pažnja: Dok svetleća dioda trepće tokom ponovnog
podizanja sistema ne isključujte televizor iz struje. U
tom slučaju se može desiti da televizor ne može ponovo
da podigne sistem, a takav problem može da reši samo
servis.
Ručno ažuriranje softvera
Uverite se da je eternet kabl povezan za TV ureğaj.
Ako Ethernet kabl nije povezan za TV ureπaj,
uverite se da TV prima. Proverite je li “Dobro” prisutan
u sledećem putu:
Meni -> Postavke -> Postavke mreže -> Konguraciski
status -> Povezano
Page 60

Srpski - 59 -
Idite na tabulator Postavke u glavnom meniju i
izaberite Druge postavke. Označite nadgradnja
softvera i pritisnite OK.
Izaberite skenirati za nadgradnje i pritisnite OK.
Pojaviće se OSD ekran, kao i traka koja pokazuje
progres i nalazi se pod nazivom „Ažuriranje softvera“.
Pojaviće se poruka sa upozorenjem na ekranu da
će TV ureğaj biti ponovno podignut. Pritisnite dugme
OK da završite proces ažuriranja i da ponovno
podignete TV.
Rešavanje problema I saveti
Istrajnost slike – udvajanje slike
Imajte u vidu da, kada prikazujete neprekidno istu sliku
(nepodvižna ili pauzirana), može doći do udvajanja
slike. Perzistencija slike na LED TV-uređaju može
nestati nakon kratkog vremena. Pokušajte na kratko
isključiti TV. Da biste izbegli ovu pojavu, ne ostavljajte
ekran duže vreme sa nepokretnom slikom.
Nema napajanja
Ukoliko vaš TV nema napajanja, proverite je li strujni
kabl povezan u strujnom kolu.
Loša slika
1. Jeste li odabrali pravilan TV sistem?
2. Jesu li Vaš TV uređaj ili kućna antena postavljeni
preblizu neuzemljene audio opreme ili neonskih
svetla, itd.?
3. Brda i visoke zgrade mogu izazvati duple ili
prividne slike Ponekad možete poboljšati kvalitet slike
menjanjem pravca antene. Jesu li slika ili teletekst
neprepoznatljivi?
4. Proverite da li ste uneli tačnu frekvenciju.
5. Ponovo podesite kanale.
6. Kvalitet slike može oslabiti ako ste istovremeno
priključili dva spoljna uređaja na TV. U tom slučaju,
otkačite jedan od spoljnih uređaja.
Nema slike
1. Nema slike znači da Vaš TV ne prima nikakav
prenos. Da li ste pritisnuli odgovarajuće dugme na
daljinskom upravljaču? Pokušajte ponovo. Uverite se
da ste izabrali pravilan ulazni izvor.
2. Je li antena pravilno priključena?
3. Jesu li utikači čvrsto umetnuti u antensku utičnicu?
4. Je li antenski kabl oštećen?
5. Jesu li umetnuti odgovarajući utikači za antenu?
6. Ako imate nekakvu sumnju, savetujte se sa Vašim
prodavcem.
Nema zvuka
1. Je li TV postavljen na “nemi”? Da otkažete "nemi",
pritisnite dugme " ", ili pojačajte nivo zvuka.
2. Zvuk dolazi samo iz jednog zvučnika. Da li je
balans podešen u jednu krajnost? Pogledajte deo
Meni zvuka.
Daljinski upravljač – ne radi
TV ne reaguje na daljinski upravljač. Baterije možda
su slabe, ako je tako, još uvek možete koristiti
kontrolne dugmadi na TV-u. jedino je moguće ukoliko
nisu zaključani preko roditeljske kontrole)
Izvori ulaza – ne mogu se izabrati
1. Ako ne možete odabrati izvor ulaza, moguće je da
nema priključenog uređaja.
2. Ako ste pokušali da priključite neki uređaj, proverite
AV kablove i povezivanja.
Snimanje nije dostupno
Da biste snimili progamu, morate prvo povezati USB
disk na vapem TV-u dok je TV isključan. Zatim trebali
bi uključiti TV da biste omogućili odliku snimanja.
U suprotnom, odlika snimanja neće biti dostupna.
Ukoliko ne možete snimati, isključite TV i onda
utaknite ponovo USB.
uređaj dok je TV isključan.
USB je suviše spor
Ukoliko se na ekranu prikaže „USB je prebavan“
dok počev snimanja, pokušajte restartirati snimanje.
Ukoliko još dobijate istu grešku, moguće je da vaš
USN disk ne zadovoljava zahteve brzine. Povežite
drugi USB disk.
Internet veza nije dostupna/Režim DLNA nije
operativan
Ako je MAC adresa (unikatni broj za identikaciju)
vašeg PC-ja ili modema već trajno registrirana,
moguće je da se vaš TV ne može povezati na internet.
U tom slučaju, MAC adresa je potvrđena svaki put
kada se povezujete na internet. Ovo je predostrožnost
od neautorizovanog pristupa. jer vaš TV ima svoju
MAC adresu, vaš internet provajder ne može overiti
MAC adresu vašeg TV-a. Zbog toga, vaš TV se
ne može povezati na internet. Kontaktirajte vašeg
dostavljača internet uslugi I potražite informacije o
tome kako povezati ostale uređaje, kao vaš TV, na
internet.
Takođe, moguće je da nema veze zbog problema
sa ognenim zidom. Ako smatrate da je ovo povod
vaših problema, kontaktirajte vašeg dostavljača.
Ognjeni zid može biti uzrok problema veze i otkrića
tokom korišćenja TV-a u DLNA režimu ili prelistanja
preko DLNA.
Nevalidni domen
Osigurite se da ste već logirani na vašem PC-ju sa
autirozavim korisničkim imenom/lozinkom i takoće
obezbedite da je vaš domen aktivan, pre negó što
delite falove preko DLNA servera na vašem PC-u.
Ukoliko je domen nevalidan, to može uzrokovati
probleme tokom prelistanja fajlova u DLNA režimu.
Page 61
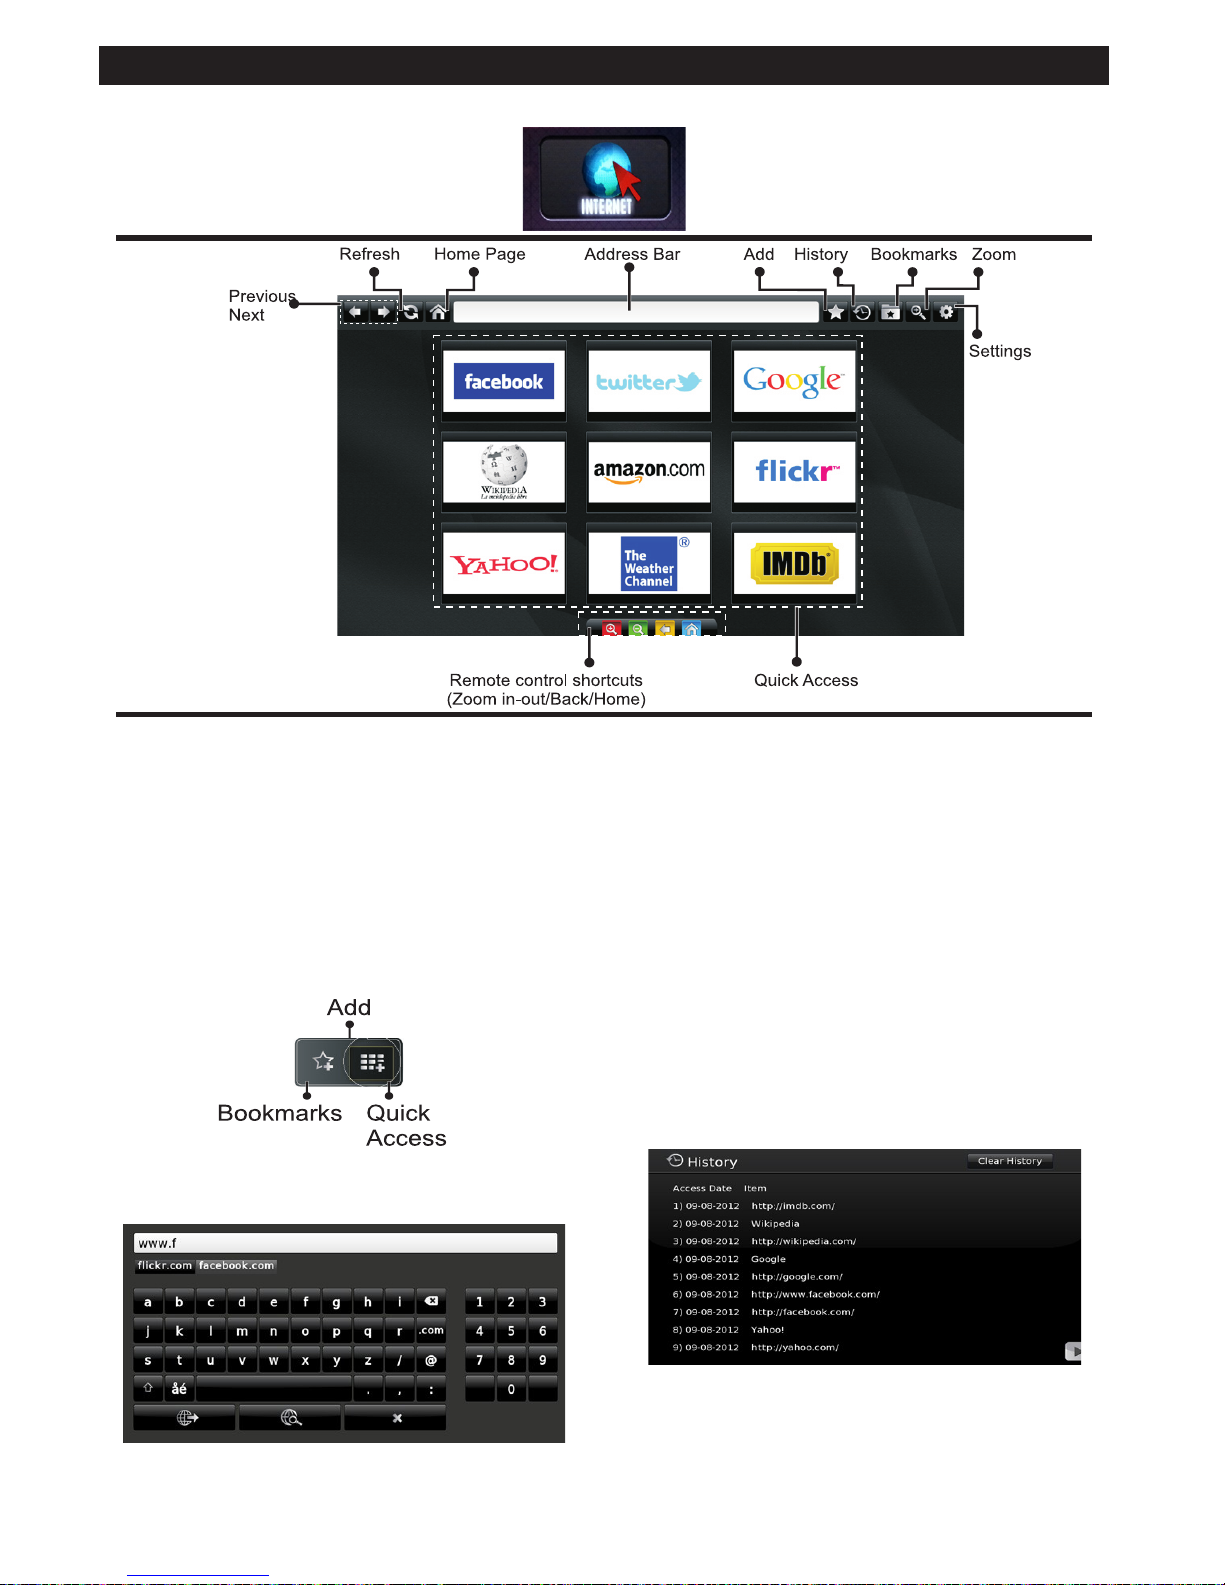
Srpski - 60 -
Internet brauzer
• Da biste upravljavali prelistaćem, koristite strelice
daljinskog. Pritisnite OK za nastavak.
• Nakon Prve instalacije, na prvoj stranici prelistača
pokazuju se zadane veb'strane i logoa (videti sliku
gore). Da biste dodali željenu stranicu na stranicu
brzog pristupa, dok ste na stranici koju želite dodati,
izaberite meni Dodati i izaberite dugme Brzi pritsup.
• Ako želite dodati Oznake, izaberite ovu stavku dok
je željena stranica na ekranu.
• Možete se dvižiti kroz prelistaća na tri načina. Prvi,
uneti bilo koji URL u mestu za adrese.
• Možete tražiti ključne zborove preko klikanja
dugmeta pretraga u polju adrese, a drugi način
za navigaciju kroz strana je klikanje na linkove na
stranice pa će vam oni odnesu na odnosne stranice.
• Kada pomerite pointer na sredinu ekrana, pokazuju
se prečice daljinskog upravljača.
• Koristite prećice zuma ili meni zuma da biste
uveličali ili umanjili zum.
• Možete očistiti kolače ili očistiti sve podatke iz
odeljka postavci.
• Vaš TV je kompatibilan sa USB mišem. Uključite
vaš miš ili adapter bežičnog miša u USB ulaza
TV-a.
• Da biste videli istoriju, kliknuti na dugme Istorija.
Takođe, iz ovog mesta možete počistiti istoriju
prelistanja.
• Prelistač ne podržava višestruke tabove.
• Neke internet strane imaju Fleš sadržaje. Ove nisu
podržane sa strane prelistača.
• Vaš TV ne podržuje nikakvo daunlodiranje preko
veb prelistača.
Da biste koristili internet prelistač, izaberite logo internet prelistača iz sekciju portala.
Page 62

Srpski - 61 -
kako početi na Skype
Preko Skyp-a na vašeg TV-a možete praviti normalne i video pozive. Da
biste počeli razgovor, izaberite aplikaciju Skype iz portala.
Sledite instrukcije na ekranu oko rukovanje sa odnosnim odlikama.
NAPOMENA:
• Diretkno povezite podržanu kameru na uSB ulaz TV-a.
• Ako kamera ne radi praviljno, isključite TV i izvucite ga iz struje. Povežite
opet vašu kameru i uključite TV.
• Kada se TV isključi, Skype se isključuje.
• Nivo glasa i kvalitet zvuka zavise od šuma okoline.
• Kvalitet poziva se može promeniti u zavisnosti od bežične veze.
• Idite na www.skype.com za više informacija oko Uslova korišćenja Skype-a.
• Za povezivanje Skype-a, TV mora biti povezan na mrežu.
• Aplikacija Skype če vas upozoriti kada vas neko traži dok gledate TV ili radite na Skype-u.
• Potrebna je Skype kamera (prodaje se zasobno) da biste koristili sve Skype opcije. Ako već nemate jednu,
morate kupiti kompatibilnu kameru da biste koristili sve odlike Skype-a.
Napomena: Kada uključite TV i kada ni jedan korisnik nije
postavljen na Skype-u, na ekranu će se pojaviti slika koja
je prikazana na stranu.
Obaveštenje o licenciranju
Skype je zaštitan znak Skype-a ili povezane kompanije. Ovaj proizvod/aplikacija nije odobrena ili prihvaćena
sa strane Skype-a, Skype Communications S.a.r.l. ili bilo koje od njihovih povezanih kompanija.
Nema hitne pozive preko Skype-a
Skype nije zamjena vašeg običnog telefona i ne može se koristiti za
hiten pozive. Da biste počeli razgovor, izaberite aplikaciju Skype iz
portala.
Page 63

Srpski - 62 -
Najaviti se i Sazdaj račun
Da biste koristili Skype, potreban vam je Skype račun.
Ako još nemate račun, možete sazdati ga preko ove aplikacije u meniju
"Najavi se i Sazdaj račun". Ako već imate Skype račun, uneti praviljno ime i
lozinku. Izabrati Najaviti se i pritisnuti OK.
Ako imate Skype račun ali ste zaboraili lozinku, pritisnite crveno dugme da
biste videli ekran za resetiranje lozine.
Nakon uspešne najave na vaš račun, pokazuje se lista kontakta.
Možete videti listu kontakta na desnoj strani ekrana. Vaše Skype ime, poruka o stanju i pregled kamere (ako
je povezana) se nalaze na levoj strani ekrana.
Page 64
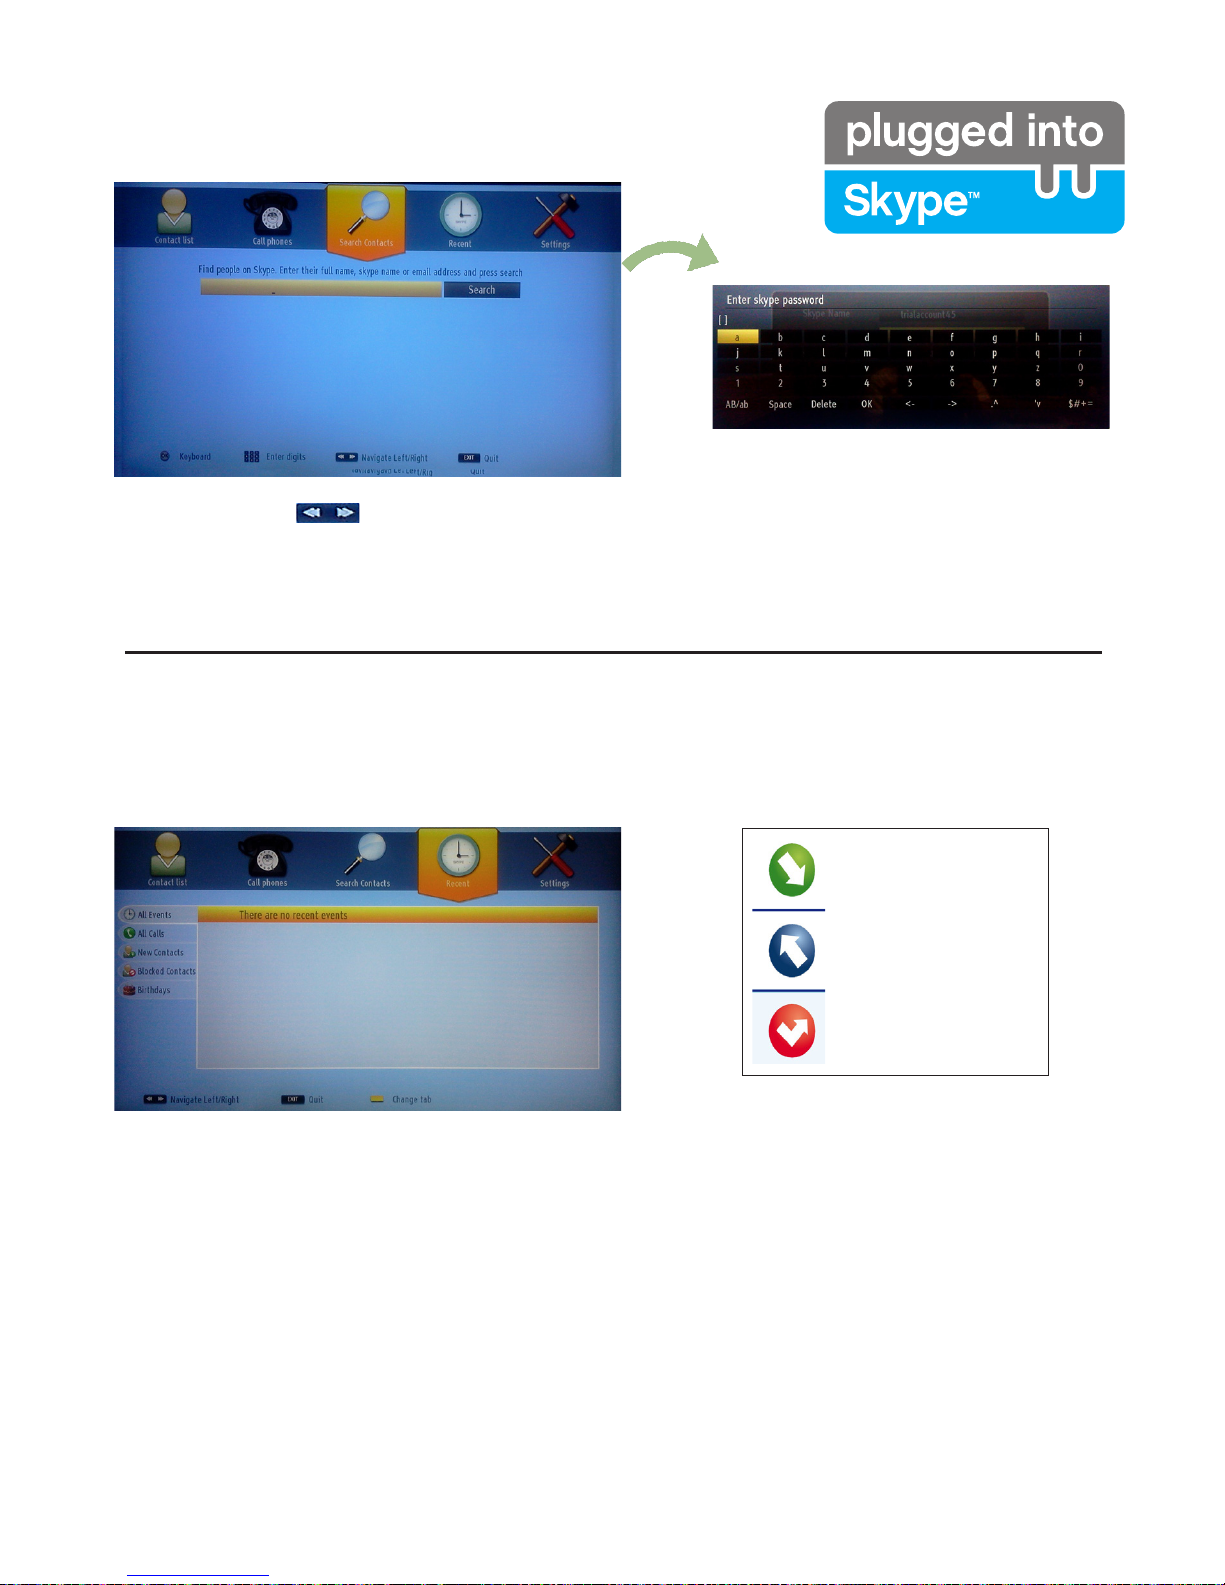
Srpski - 63 -
Dodati kontakt
Pritiskom dugmeta izaberite opciju Pretraga kotakta. Uneti puno ime, skajp ime ili imejl adresu.
Preko daljinskog ili virtuelne tastature unesite ključnu reč.
U ovom delu se može videti istorija Skype-a. Da biste videli opciju bliža istorija, koristite dugmad p+ i p-. Da bi
izbrisali neki program, pritisnite CRVENO dugme. Kada pritisnite OK dugme, prikazuje se pregled kontakta.
U ovom delu se takođe može pokazati informacija o prolu.
Bliža istorija
Dolazeći poziv
Izlazeći poziv
Propušteni poziv
Značaj ikone
Page 65

Srpski - 64 -
Akcije
Izaberite osobu iz liste kontakta i pritisnite OK. Izaberite akciju iz liste i pritisnite OK. Glasovni i video poziv
je spreman za upotrebu.
Ako je to dostupno, u maloj slićici videćete vaš prol i prol druge osobe.
Lestvica za pomoć
Lista vaših
kontakta
(Pritisnite Ok da
koristite video i
glasnovni poziv)
Izaberite meni pritiskom na dugme .
Onlajn
status
Ime računa, poruka
raspoloženja i slika
prola.
Kada je razgovor aktivan, možete ućutkati mikrofon ili staviti drugu osobu na liniju na čekanju. Pritisnite crveno
dugme za kraj razgovora.
Page 66
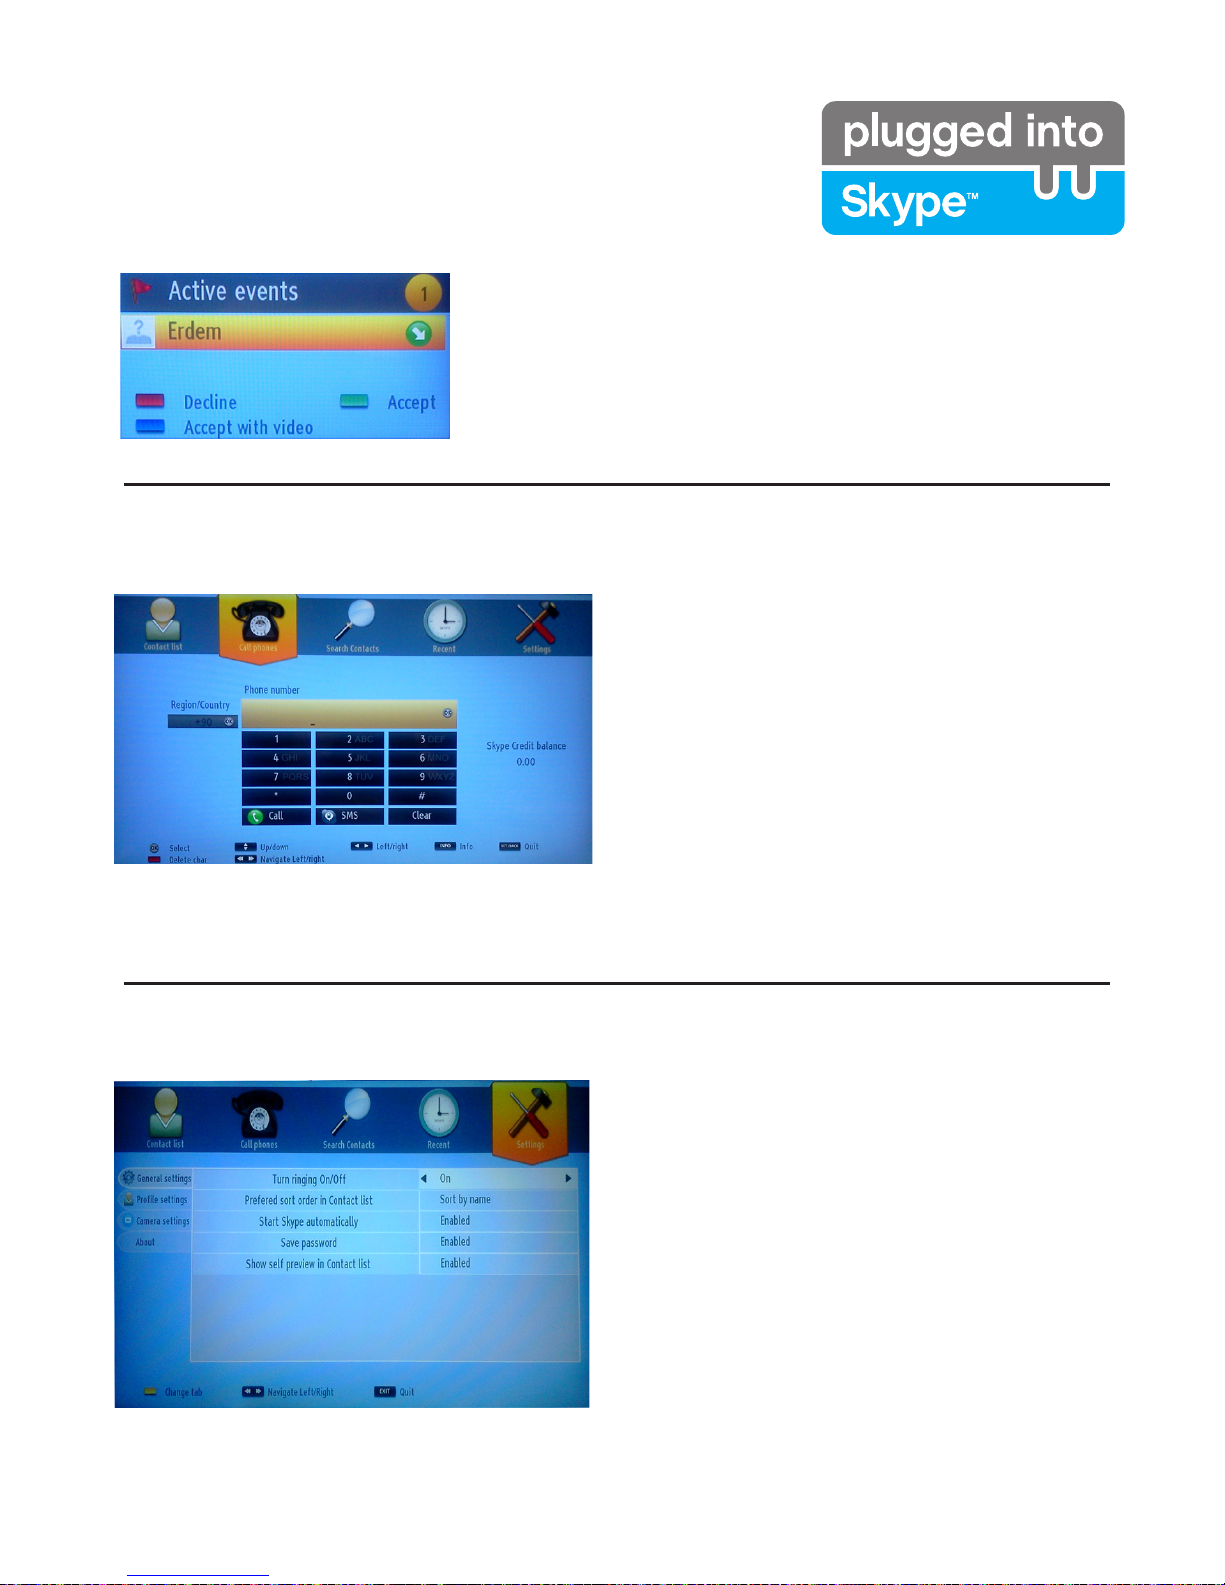
Srpski - 65 -
Biranje telefona
Opcija Nazovi telefon je moguća jedino ako imate
Skype kredit. Najprije kupite kredit. Zatim izaberite
zemlju, onda unesite broj koji želite nazvati.
Pritisnite Žuto dugme da biste sačuvali uneti
telefonski broj. Pritisnite zeleno dugme za početak
razgovora.
Dijalog Dolazećeg poziva se pojavljuje kada ste najavljeni u Skype
i neki drugi korisnik počinje Skype poziv.
U donjem desnom uglu TV-a pojavuje se mala kutija kada korisnik
gleda TV ili prelistava preko Skype-a. Koristite kontrolna dugmad
daljinskog i izaberite vašu akciju.
Dolazeći poziv
Postavke
Sve vaše postavke se mogu promeniti preko menija
Postavke. Koristite dugmad P+ i P- na daljinskim
za pokretanje gore ili dole. Izaberite opciju, zatim
promenite izabranu opciju preko navigacijskih
dugmadi. U odeljku "U vezi sa", možete naći Uslove
korišćenja Skype-a.
Molimo pažljivo pročitati ovu napomenu.
Page 67
Srpski - 66 -
Informacije za korisnike o odlaganju dotrajale
opreme i baterija u otpad
[Samo za Euvropsku uniju]
Ovi simboli ukazuju na to da oprema na kojima se
nalaze ne sme da se odlaže kao običan kućni otpad.
Ako želite da odložite proizvod ili bateriju, razmislite o
sistemima ili objektima za prikupljanje takvog otpada
radi odgovarajućeg recikliranja.
Napomena: Znak “Pb” ispod simbola baterije ukazuje na to
da baterija sadrži olovo.
PC Tipični režimi prikazivanja
Sledeća tabela je ilustracija nekih tipičnih režima
video prikaza. Moguće je da Vaš TV ne podržava
sve rezolucije. Vaš TV podržava sve do 1920x1200.
Indeks Rezolucija Frekvencija
1 640x400 70Hz
2 640x350 85Hz
3 640x400 85Hz
4 640x480 60Hz
5 640x480 66Hz
6 640x480 72Hz
7 640x480 75Hz
8 640x480 85Hz
9 800x600 56Hz
10 800x600 60Hz
11 800x600 70Hz
12 800x600 72Hz
13 800x600 75Hz
14 800x600 85Hz
15 832x624 75Hz
16 1024x768 60Hz
17 1024x768 66Hz
18 1024x768 70Hz
19 1024x768 72Hz
20 1024x768 75Hz
21 1024x768 85Hz
22 1152x864 60Hz
23 1152x864 70Hz
24 1152x864 75Hz
25 1152x864 85Hz
26 1152x870 75Hz
27 1280x768 60Hz
28 1360x768 60Hz
29 1280x768 75Hz
30 1280x768 85Hz
31 1280x960 60Hz
32 1280x960 75Hz
33 1280x960 85Hz
34 1280x1024 60Hz
35 1280x1024 75Hz
36 1280x1024 85Hz
37 1400x1050 60Hz
38 1400x1050 75Hz
39 1400x1050 85Hz
40 1440x900 60Hz
41 1440x900 75Hz
42 1600x1200 60Hz
43 1680x1050 60Hz
44 1920x1080 60Hz
45 1920x1200 60Hz
Page 68

Srpski - 67 -
Specikacije
TV EMITOVANJE
PAL/SECAM B/G D/K K’ I/I’ L/L’
DIGITALNI PRIJEM
DVB-T MPEG2
DVB-T MPEG4 HD
DVB-T MHEG-5 Engine (jedino za UK)
DVB-C MPEG2
DVB-C MPEG4 HD
PRIJEMNI KANALI
VHF (OPSEG I/III)
UHF (OPSEG U)
HIPER OPSEG
BROJ PRETHODNO PROGRAMIRANIH KANALA
1000
INDIKATOR KANALA
Prikaz na ekranu (OSD)
RF ANTENSKI ULAZ
75 oma (nebalansirano)
RADNI NAPON
220-240V AC, 50 Hz
AUDIO
Nemački (German) + Nicam Stereo
AUDIO IZLAZNA MOĆ (W
RMS.
) (10% THD) 2 x 8
POTROŠNJA STRUJE (W) 100 W (maks)
PANEL 16:9
Obaveštenje o licenciranju
Proizvedeno pod licencom Dolby Laboratories.
POTVRDA O ZAŠTINOM ZNAKU
i dupli-D simbol su zaštitni znaci
Dolby Laboratories.
“DLNA®, i DLNA Logo i DLNA CERTIFIED® su
trgovinski znaci, servisni znaci ili znaci sertikacije
Digital Living Network Alliance.”
“HDMI, HDMI logo i High-Denition Multimedia Interface
su zaštitini znaci ili registrovani zaštitni znaci kompanije
HDMI Licensing LLC.”
Page 69

Srpski - 68 -
Podržani formati datoteka za USB Pregledač medija
Mediji Ekstenzija Format Napomene
Video Audio
Film dat, mpg,
mpeg
Mpeg1,2 MPEG1/2 Layer 1/2/3, AAC/
HEAAC, AC3/EAC3, LPCM/
ADPCM
1080P@ 30fps 50Mbita/
sek
dat, mpg,
mpeg
MPEG2 ,H.264, VC1, AVS,
MVC
MPEG1/2 Layer 1/2/3, AAC/
HEAAC, AC3/EAC3, LPCM/
ADPCM
H.264:1080Px2@25fps
1080P@ 50fps MVC:
1080P@ 24fps Druga:
1080P@ 30fps” 50Mbita/
sek
.vob MPEG2 MPEG1/2 Layer 1/2/3, AC3,
LPCM
1080P@ 30fps 50Mbita/
sek
.mkv MPEG1,2,4, XviD,
H.264,
VC1,WMV3,
Motion JPEG
MPEG1/2 Layer 1/2/3, AAC/
HEAAC,
AC3/EAC3, LPCM
H.264:1080Px2@25fps
1080P@ 50fps
Druga:1080P@ 30fps
50Mbita/sek
.mp4 .mov MPEG1/2 Layer 3, AAC/
HEAAC, AC3/EAC3, LPCM/
ADPCM
H.264:
1080Px2@25fps1080P@
50fps Druga: 1080P@
30fps 50Mbita/sek
.avi MPEG1,2,4
Xvid
H.264,
VC1,WMV3,
Sorenson H.263
Motion JPEG
MPEG1/2 Layer 1/2/3, AAC/
HEAAC, AC3/EAC3, LPCM/
ADPCM, WMA
H.264: 1080Px2@25fps
1080P@ 50fps Druga:
1080P@ 30fps”
50Mbita/sek
v H.264,
Sorenson H.263
MPEG1/2 Layer 3, AAC/
HEAAC, LPCM/ADPCM
H.264: 1080Px2@25fps
1080P@ 50fps Druga:
1080P@ 30fps” 50Mbita/
sek
3gp,3g2 MPEG4, H.264 1920x1080 @ 30P
20Mbita/sek
asf, wmv MPEG2,4, XviD, H.264,
VC1,WMV3
MPEG1/2 Layer 1/2/3, AAC/
HEAAC, AC3/EAC3, LPCM,
WMA
1080P@ 30fps 50Mbita/
sek
Muzika .mp3
-
MPEG1 Layer 1/2/3 (MP3)
.wav LPCM
WMA / ASF WMA, WMA Pro
.m4a/ .aac AAC, HEAAC
Fotograja .jpg .jpeg Osnovni JPEG MAX WxH = 14592x12288
Do 8 megabajta
.png Progresivni JPEG
.bmp ne preplećeno
.png
ispreplet
Titl
sub - -
srt - -
Page 70

Srpski - 69 -
Podržane DVI rezolucije
Kada ureğaje povezujete na TV konektore pomoću DVI konvertorskih kablova (nisu isporučeni), možete da
proverite sledeće informacije o rezoluciji.
56Hz 60Hz 66Hz 70Hz 72Hz 75Hz
640x400
þ
640x480
þ þ þ þ
800x600
þ þ þ þ þ
832x624
þ
1024x768
þ þ þ þ þ
1152x864
þ þ þ
1152x870
þ
1280x768
þ
1360x768
þ þ
1280x960
þ þ
1280x1024
þ þ
1400x1050
þ þ
1440x900
þ þ
1600x1200
þ
1680x1050
þ
1920x1080
þ
1920x1200
þ
Page 71

Srpski - 70 -
Prilog: Instaliranje Nero MediaHome
Da instalirate Nero MediaHome postupite ovako:
Napomena: Za korišćenje DLNA funkcije, treba prvo da imate
ovaj softver na personalnom kompjuteru.
1. Ubacite instalacioni disk za Nero MediaHome u
optički disk drajv.
• Automatski će se pojaviti ekran Nero Multiinstaller sa
dugmetom za započinjanje instalacionog procesa.
• Ako se ovaj prozor ne prikaže automatski, kliknite
dva puta na datoteku SetupX, koja se nalazi na
instalacionom disku za Nero MediaHome.
2. Pritisnite na dugme sa oznakom Nero
MediaHome Essentials da započnite proces.
• Pojaviće se instalacioni čarobnjak za Nero
MediaHome.
• Pre nego što produžite, na meniju za biranje jezika,
ako ima potrebe, promenite jezik na kojem ide
instalacija.
3. Pritisnite dugme Sledeće.
• Prikazaće se integrisani serijski broj.
• Nemojte menjati prikazani serijski broj.
4. Pritisnite dugme Sledeće.
• Pojaviće se ekran sa licencnim uslovima (EULA).
5. Pročitajte pažljivo licencni ugovor i izaberite
odgovarajuću rubriku da prihvatite uslove
ugovora. Nije moguće izvržiti instalaciju bez
ugovora.
6. Pritisnite dugme Sledeće.
• Pojaviće se ekran Izaberi tip instalacije.
Moguće je birati meğu tipične - standardne instalacije,
ili instalacije po meri. Instalacija koju deniše korisnik
dozvoljava da odlućite koje ćete jezike instalirati i da
izaberete instalacionu prećicu.
7. Koristite tipičnu instalaciju i zatim pritisnite na
dugme Sledeće.
Page 72

Srpski - 71 -
• Prikazaće se ekran za Preduslove.
Čarobnjak za instaliranje Nero MediaHome proveriće
da li imate traženi softver od drugih proizvoğača na
personalnom kompjuteru. Ako nemate aplikacije,
pojaviće se spisak aplikacija koje se moraju instalirati
pre nego što produži instalacija.
8. Pritisnite dugme Instaliraj.
• Kad su svi preduslovi instalirani, dugme Instaliraj će
se promeniti u dugme sledeće.
9. Pritisnite dugme sledeće.
• Pojaviće se ekran Spreman da započne instalacioni
proces, poćeće instalacija i završiće automatski.
Traka koja prikazuje progres informisaće Vas o
napredovanju instalacionog procesa.
10. Instalacija će završiti.
Pojaviće se ekran Pomognite nam da unapredimo
Nero softver. Da bi pružili bolju uslugu, Nero prikuplja
anonimne podatke da bi utvrdio koje opcije se koriste
i koji se problemi pojavljaju, ako ih uopšte ima.
11. Ako želite da pomognete učestvovanjem u
anonimno skupljanje korisničkih podataka,
izaberite rubriku i kliknite dugme Sledeće.
• Pojaviće se zadnji ekran instalacionog čarobnjaka.
12. Pritisnite dugme Izaği.
13. Skraćenica sa nazivom Nero MediaHome 4
sada se nalazi na Vašoj radnoj površini
Čestitamo! Uspešno ste instalirali Nero MediaHome
4 na personalni kompjuter.
14. Aktivirajte Nero MediaHome koristeći ikonu
skraćenice.
• Kliknite na ikonu DODAJ iz LOKALNE FASCIKLE
da dodate fasciklu koju želite da delite na mrežu.
Izaberite fasciklu koju želite da delite i pritisnite
AKTIVIRAJ SERVER.
Page 73

Srpski - 72 -
15. Možete prikazati sve medijske tipove iz
biblioteke. Pritisnite ikonu Osveži da biste
osvežili. Pritisnite ikonu PREKINITE SERVER
da prekinete server.
Page 74

Bosanski - 73 -
Bezbjednosne mere
Molimo pročitajte u potpunosti ove
upute pre instaliranja ili rukovanja.
Priprema
Postavite uređaj na ravnu tvrdu površinu. Za
ventilaciju ostavite slobodan prostor od najmanje 10
cm oko uregaja. Radi sprečavanja smetnji i opasnih
situacija, ne stavljajte nikakve predmete na uređaj.
Koristite ovaj uređaj jedino u mjestima umjerene
klime. Temperatura i vlažnost upravljanja: 0ºC sve
do 40ºC, 85% rel. maks. Vlažnost (bez blokiranja
otvora ventilacije)
Namjena
Ovaj je uređaj namenjen da prima i prikazuje TV
programe. Različite opcije povjezivanja dodaju
dopunjske proširenja izvorima prijema i prikaza
(različiti spoljašni uređaji). Ovaj je uređaj pogodan
samo za upotrebu u zatvorenim prostorijama. Ovaj
je uređaj namenjen samo za privatnu domaću
upotrebu i ne može se koristiti u industrijske i
komercijalne svrhe. Isključujemo odgovornost
u principu, kada uređaj nije korisćen kao šta je
namenjeno, ili napravljene su neautorizirane
modifikacije. Uključivanje LED televizora pod
ekstremnim ambijentalnim uslovima može dovesti
do oštećenja uređaja.
UPOZORENJE: Nikad ne dopustite
da ljudi (uključujući djecu) sa fizičkim ili
mentalnim sposobnostimaniti ili osobama koje
nemaju dovoljno iskustva i / ili znanja, bez
nadzora koristiti električni uređaj!
Djeca ne mogu uvijek prepoznati pravu opasnost!
Gutanja baterija može biti fatalno. Skladištite
baterije dalje od djece. Ukoliko baterija bude
progutana, smjesta tražite lječničku pomoć.
Skladištite plastičnu ambalažu van dohvata
djece. Opasnost od gušenja.
Izvor napajanja
• TV aparat se smije puštati u rad samo preko utičnice
od 220-240 V AC, 50 Hz.
• Upozorenje: Nemoje ostavljajti vaš TV u
režimu pripravnosti ili da radi kada niste kod kuće.
Pozicioniranje TV-a
• Ostavite slobodan prostor za ventilaciju od najmanje
10cm sa sve strane uređaja.
• Ne blokirati otvore ventilacije .
• Nemojte postavljati TV na nagnute ili nestabilne
površine, jer TV se može prevrnuto.
• Kako bi se sprešilo oštećenje TV-a, nemojte stavljati
nikakve objekte na vrh TV-a
• Korisite TV jedino u umjerenim klimima.
Sadržaj
Bezbjednosne mere.............................................. 73
Uključeni dodaci ................................................... 75
Podaci o okolini ................................................... 75
TV- karakteristike ................................................. 75
Pregled TV-a ........................................................ 76
Kontrolni ključevi TV-a i upravljanje ...................... 76
Pregled daljinskog upravljača ............................... 77
Koriščenje modula uslovnog dostupa ................... 79
Notikacije u mirovanju......................................... 79
Instalacija baterija u daljinskom upravljaču .......... 80
Povezivanje u struju i Antena/kabl ........................ 80
Uključivanje/isključivanje ...................................... 80
Prva instalacija ..................................................... 80
Reprodukcija preko USB ulaza............................. 82
Promena dimenzija slike: Formati slike ................ 82
Koriščenje Listu kanala......................................... 82
Brzi meni............................................................... 83
Karakteristike i funkcije menija ............................. 84
Karakteristike i funkcije menija ............................. 85
Karakteristike i funkcije menija ............................. 86
Elektronički programski vodič (EPV) .................... 87
Snimanje programa .............................................. 87
Snimanje Tajmšifting ............................................ 88
Instant snimanje ................................................... 88
Gledanje snimljenih programa ............................. 88
Konguracija snimanja ......................................... 88
Funkcije povezivanja ............................................ 88
Rešavanje problema povezivanja......................... 91
Teletekst ............................................................... 94
Ažuriranje softvera................................................ 94
Rješavanje problema I savjeti............................... 95
Početak sa Skype-om........................................... 97
Tipični režimi prikaza PC-a ................................ 102
Tehnički podaci ........................................................ 103
Obaveštenje o licenciranju ................................. 103
Podržani formati datoteka za USB preglednik
medija ................................................................. 104
Podržane DVI rezolucije ..................................... 105
Dodatak: Nero MediaHome Instalacija ............... 106
Page 75

Bosanski - 74 -
Kabel za napajanje I utikač
• Utikač kabla mora biti lako dostupan. U slučaju oluje
I munje, kada idete nagodišnji odmor, ili kada TV se
ne koristi dulje vrjeme, isključite kabel iz utičnice.
• Mrežni utikač koristi se za odspajanje TV prijemnika
s mreže i stoga mora ostati nadohvat ruke.
• Nemojte postavljati TV, nameštaj itd. na vrh kabla i
nemojte prikliještiti ga.
• Rukovati kabel preko utikača, ne isključivati TV
povlačenjem za kabel.
• Nikada ne dirajte kabel/utikač mokrim rukama, to
može dovjesti do kratkog spoja ili električnog udara.
• Nikada nemojte vezivati kabl u čvor ili vezivati ga s
drugim kablovima.
• Napojne kabele treba postaviti tako da se preko
njih ne gazi.
• Oštećeni napojni kabel može izazvati požar ili
električni udar.
• Kada je oštećen, kabel se mora zamjeniti i to treba
obaviti kvalicirano osoblje.
Vlaga i voda
• Ne koristiti opremu na mjestima gdje ima vlage i pare
(izbegavati kupatilo, lavabo i blizinu veš-mašine).
• Ne izlagati TV kiši ili vode, to može biti opasno.
• Ne postavljati predmete pune tečnostima, kao što su
vaze, na vrhu TV-a. Izbjegavajte prskanje i kapanje.
• Ako neki tvrdi predmet ili tečnošt uğe u kućište,
isključite TV iz utičnice i odnesite ga na provjeru u
servis prije ponovnog korištenja.
Ventilacija
• Priključci i otvori na TV aparatu namenjeni su
ventilaciji i obezbeğenju pravilnog rada.
• Da bi se sprečilo pregrejavanje, ovi otvori se ne
smeju blokirati ili pokrivati.
Izvori topline i plamen
• Ne izlagati TV direktnoj sunčanu svjetlost ili ostale
izvore topline.
• Uređaj ne smje se postavljati u blizini
otvorenog plamena ili izvora jake
topline, kako npr. grijalice.
• Nemojte stavljati izvore otvorenog
plamena na TV aparat, npr. upaljene
sveće.
Glasnoća slušalica
• Preterani zvučni pritisak u slušalicama
može izazvati gubitak sluha, molimo
pazite se.
Ugradnja na zid (neobavezno)
• Da bi se spriječile povrede, kada se ugrađuje na
zid (ukoliko je ta opcija dostupna), uređaj mora
biti sigurno pričvršćen na zidu prema uputstvima
montaže.
Čišćenje
• Prije čišćenja, isključite uređaj iz utičnice.
• Ne koristiti tečna sredstva za čišćenje ili aerozole.
Potrebite meku i suvu krpu.
Page 76
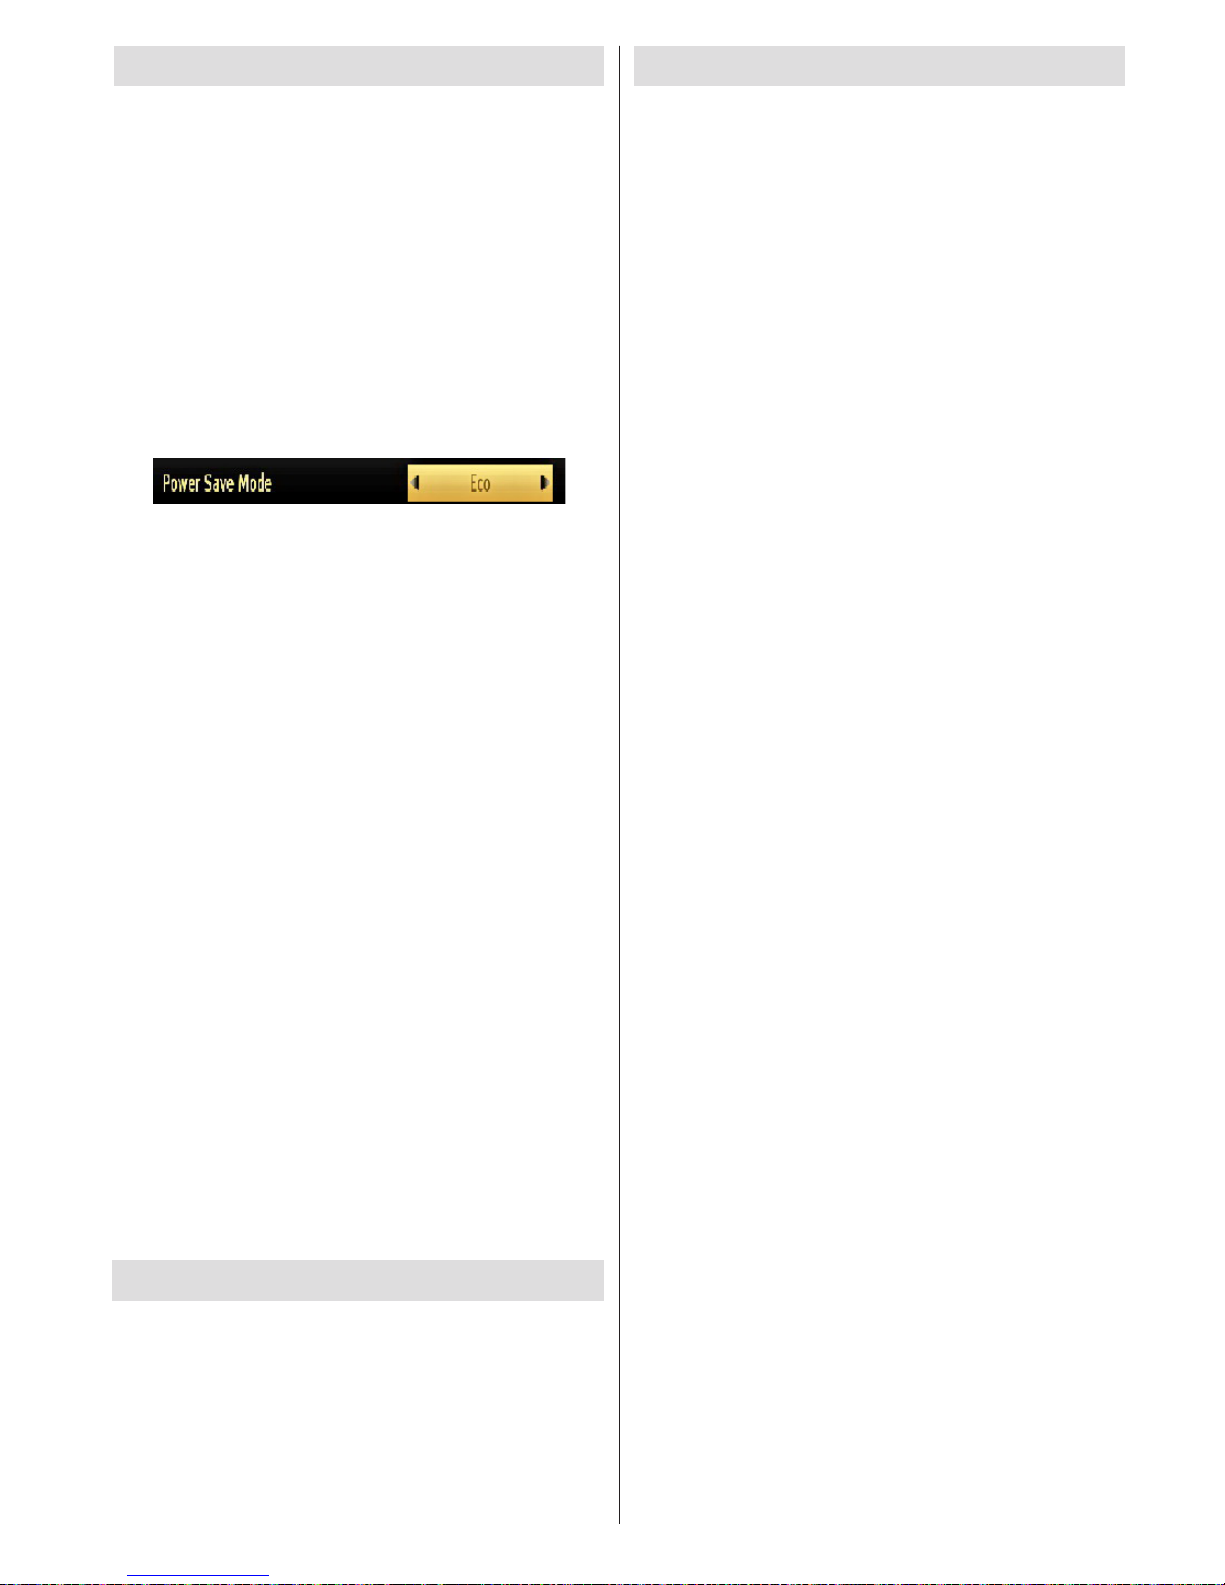
Bosanski - 75 -
TV- karakteristike
• LED TV u boji s daljinskim upravljanjem.
• Potpuno integrisani digitalni/kablovska TV
(DVB-T/C).
• Kompatibilan sa DVB-T2.
• HDMI konektori za digitalni audio I video. Ova
veza je takođe namenjena prijema signala visoke
denicije.
• USB ulaz.
• Snimanje programa.
• Snimanje Tajmšifting.
• 1000 programa.
• Sistem ekranskog menija.
• Scart utičnica za vanjske uređaje (kao što je video, video
igre, audio sistem, itd.).
• Stereo zvučni sistem.
• Teletekst, brzi tekst, TOP tekst.
• Priključak za slušalice.
• Sistem automatskog programiranja.
• Ručno podešavanje naprijed i unatrag.
• Automatsko isključivanje nakon i do šest sati.
• Tajmer za spavanje.
• Blokada za djecu.
• Automatsko utišavanje zvuka kada nema prijenosa.
• NTSC reprodukcija.
• AVL (AOG - automatsko ograničavanje glasnoće).
• PLL (traženje frekvencije).
• PC ulaz.
• Plug&Play za Windows 98, ME, 2000, XP, Vista,
Windows 7.
• Režim igranja (po izboru).
• Funkcija Isključi sliku
• Ethernet (LAN) za povezivanje na internet i usluge.
• DLNA.
Podaci o okolini
Ovaj televizor je projektovan tako da troši manje
energije da bi očuvao okolinu. Tako ne samo da
pomažete u očuvanju okoline, već štedite novac
smanjujući račun za struju zbog funkcije električne
ekasnosti ovog TV uređaja. Za smanjenje potrošnje
energije, preduzmite sljedeče korake:
Možete da koristite postavku Režim uštede energiJe,
koJa se nalazi u meniJu Postavke slike. Ako podesite
režim uštede energiJe kao Eko, TV će se prebacili na
režim za uštedu energiJe i nivo osvetljenja televizora
će biti smanjen na optimalan nivo. Zapamtite da neke
postavke slike neće biti dostupne za promjenu u
režimu uštede energije.
Ako je izabrano "Isključena slika", na ekranu pojaviće
se poruka “Ekran će biti isključen nakon 15
sekundi.” Izaberite PRODUŽITI i pritisnite OK za
nastavak. Ekran će se isključiti nakon 15 sekundi.
Ako onemogućite Režim uštede struje, Režim slike
biće automatski postavljen na Dinamični.
Kada TV se ne koristi, molimo vas da ga ugasite
ili isključite ga od dovoda struje. Tako se takoğe
smanjuje potrošnja energije.
Izvucite utikač televizora iz struje ako nameravate da
duže vreme budite odsutni.
Veoma je preporučeno da se režim uštede energije
aktivira da bi se smanjila godišnja potrošnja struje.
Takođe se preporučuje da se isključi TV iz strujnog
kola kada se ne koristi da bi se ušteđelo i više.
Pomozite nam u očuvanju okoliša tako da slijedite
ova uputstva.
Podaci o popravku
Prepustite servisiranje kvalikovanom osoblju. TV
smije popravljati samo kvalikovano osoblje. Dodatne
informacije zatražite od vašeg lokalnog trgovca gdje
ste kupili TV prijemnik.
Uključeni dodaci
Daljinski upravljač
Baterije: 2 X AAA
Uputstva
Kabl Bočne AV veze
Nero Media Home CD
Page 77

Bosanski - 76 -
Pregled TV-a Kontrolni ključevi TV-a i
upravljanje
1. Smer gore
2. Smjer dole
3. Ključ izbora Programa/Jačine zvuka/AV/Pripravnost- Uklj
KOntrolni prekidač daje vam mogućnost da kontrolišete
funkcije Jačinu zvuka/ Program/ Izvor i Pripravnost uključeno.
Da biste promenili zvuk: Povećati zvuk guranjem tipku na
gore. Smanjiti zvuk guranjem tipku na dole.
Da biste promenili kanal: Pritisnite sredinu tipke i na ekranu
će se pojaviti baner informacija o kanalu. Pomicajte se kroz
snimljene kanale guranjem tipke prema gore ili dole.
Da biste promenili izvora: Pritisnite sredinu tipke dvaput i na
ekranu će se pojaviti lista izvora. Pomicajte se kroz dostupne
izvore guranjem tipke prema gore ili dole.
Da biste isključili TV: Pritisnite sredinu tipke i zadržite nekoliko
sekunda i TV će da pređe u mirovanje.
NAPOMENA: Možete pomerati prekidača naviše ili
nadole da promenite jačinu zvuka. Ako želite promeniti
kanal, pritisnite sredinu prekidača jednom (pozicija 3) i zatim
pridvižite naviše ili nadole. Ukoliko pritisnite sredinu prekidača
još jednom, prikazaće se OSD izvora. Za odabir željenog
izvora, pomerite prekidač naviše ili naniže i pustite ga. Ukoliko
pritisnite sredinu prekidača i zadržite je nekoliko sekundi, TV
prelazi u režim pripravnosti. Pomoću kontrolne dugmadi nije
moguće prikazati OSD glavnog menija.
Page 78

Bosanski - 77 -
Pregled daljinskog upravljača
NAPOMENA: Domet daljinskog upravljača je približno
7 m/23 stopa.
1. Pripravnost
2. Mog tastera 1
3. Internet portal
4. Režim postavke ekvilajzera
5. Odabir moda slike
6. Numerička dugmad
7. TV Dugme / Lista kanala
8. Elektronski programski vodič
9. Meni
10. Navigacijski tasteri (Gore/Dole/Levo/Desno –
TXT podstranica)
11. Natrag
12. Omiljeni
13. Glasnoča viša / niža
14. Info
15. Snimiti program
16. Otsviraj
17. Trenutni jejzik / Mono/Stereo - Dual I-II
18. Brzo unazad
19. Crveno dugme
20. Zeleno dugme
21. Mog tastera 2
22. Izbor izvora
23. Tajmer za spavanje
24. Pretraživanje medija
25. Zamjena kanala
26. Teletekst
27. Q. Menu
28. OK / Odabir / Drži (u TXT modu) / Popis Kanala
(DTV mod)
29. Izlaz / Povratak / Stranica indeksa (u TXT
modu)
30. Veličina slike
31. Utišaj
32. Programa Viša / Niža
33. Pauza / Timeshift
34. Obustavi
35. Prevod
36. Brzo napredovanje
37. Plavo dugme
38. Zuto dugme
.
ZOOM
REPEAT
LANG.
12
3
4
56
7
8
9
0
V
P
EXIT
BACK
Q.
MENU
.,/@
V
P
SOURCE
1
/2/
PRESETS
Koriščenje Mog tastera 1 (*)
Glavna funkcija ovog tastera je pustanje link Youtub-a
Ipak, ukoliko želite promjeniti ovu funkciju, možete
pritisnuit MOJ TASTER 1 tokom 5 sekundi kada ste na
željenom izvoru, kanalu ili linku, sve dok se na ekranu
ne pojavi poruka "MOJ TASTER JE POSTAVLJEN". Ovo
potvrđuje da je izabrani MOJ TASTER sada povezan
sa izabranom funkcijom. Imajte na umu da ukoliko
uradite prvu instalaciju, MOJ TASTER 1 vratiće se na
prvobitnu funkciju.
Koriščenje Mog tastera 2 (**)
Pritisnite MOJ TASTER 2 tokom 5 sekudni kada se
nalazite na željenom izvoru, kanalu ili linku, sve dok
se na ekranu ne pojavi poruka "MOJ TASTER JE
POSTAVLJEN". Ovo potvrđuje da je izabrani MOJ
TASTER sada povezan sa izabranom funkcijom.
Page 79

Bosanski - 78 -
Pregled povezivanja
NAPOMENA: Kada se povezuje uređaj preko ulaze bočni AV, morate koristiti dostavljene kable za povezivanje. Pogledajte
ilustracije gore. | YPbPr mod može da se koristi samo kada priključite uređaj sa YPbPr izlazom putem PC ulaza pomoću YPbPr
na PC kabela (YPbPr na PC kabel nije isporučen). Kada se ostvari veza, pređite na YPbPr izvor. Da biste povezali zvuk PC-ja,
trebate koristiti CRVENI I BELI ulaz PC/YPBPR AUDIO kabla. | Ako neku spoljašnji uređaj se povezuje preko SKART-a, TV
automatski prelazi na AV režim. | Tokom prijema DTV kanala (Mpeg4 H.264) ili u Prelistaća medija, nije moguć izlaz preko
skart priključka. | kada se koristi sistem za ugradnju na zid (neobavezno), preporučujemo da se prvo utaknu svi kablovi na
zadnjoj strani TV-a pre njegovog ugrađivanja na zid. | Ubacite ili vadite CI modul samo kada je TV aparat ISKLJUČEN. Uputite
se uputstvima modula za detaljne informacije o podešavanja. .
Konektor Tip Kablovi Ureðaj
Skart
Veza
(straga)
VGA
Veza
(straga)
BOČNI AV
PC/YPbPr
Audio
Veza
(bočni)
Kabl za bočno
povezivanje Audio/
videa (u kompletu)
PC audio kabl (nije
dostavljen)
HDMI
Veza
(straga)
SPDIF
Veza
(straga)
BOČNI AV
Bočni AV
Veza
(bočni)
AV kabl za
povezivanje (u
kompletu)
SLUŠALICE
Slušalice
Veza
(bočni)
YPbPr Video
Veza
(straga)
YPbPr kabl za povezivanje (u kompletu)
USB
Veza
(bočni)
CI
Veza
(bočni)
CAM
module
Page 80

Bosanski - 79 -
Koriščenje modula uslovnog
dostupa
VAŽNO: Umetnite ili vadite CI modul samo kada je TV
aparat ISKLJUČEN.
Da biste gledali neke digitalne kanale, može biti
neophodan uslovni pristupni modul (CAM). Ovaj
modul mora da se umetne u CI slot vašeg televizora.
1. Otvorite pretplatnički račun kod tvrtke nadležne za
kanal s plaćanjem i nabavite Modul za uslovni pristup
(Conditional Access Module - CAM) te karticu za
gledanje, zatim ih umetnite u TV na sljedeći način.
2. Umetnite CAM, a zatim karticu za gledanje u otvor
koji se nalazi na poklopcu terminala, na zadnjoj stani
TV aparata.
3. CAM treba da se umetne pravilno. Ceo modul
se ne može umetnuti ako je okrenut naopako. CAM
ili TV priključak mogu se oštetiti u slučaju prisilnog
umetanja.
4. Priključite TV na mrežno napajanje, uključite ga i
sačekajte nekoliko trenutaka dok se kartica aktivira.
5. Kada nije umetnut modul, na ekranu se pojavljuje
poruka “Nije otkriven modul za zajednički
interfejs”.
Pogledajte uputstvo modula za detaljne informacije o
podešavanju.
CAM
module
Notikacije u mirovanju
Ako TV ne dobija nikakav signal (na pr. preko antene ili
HDMI izvora) tokom 5 minuta, TV prećiće u mirovanje.
Kada nakon toga uključite TV, pojaviće se sledeća
poruka:
Kada vreme automatskog isključivanja TV-a dostigne,
na ekranu pojaviće se sljedeča poruka. Da biste
isključili TV odaberite DA. Da biste otkazali izaberite
NE. TV će se takođe isklučiti i ukoliko ne odaberite
ništa sa ekrana.
Ako je TV bio ostavljen uključan i nije bio hvaćan, TV
će preći u mirovanje. Kada sledeći put uključite TV,
pojaviće se sledeća poruka:
Page 81
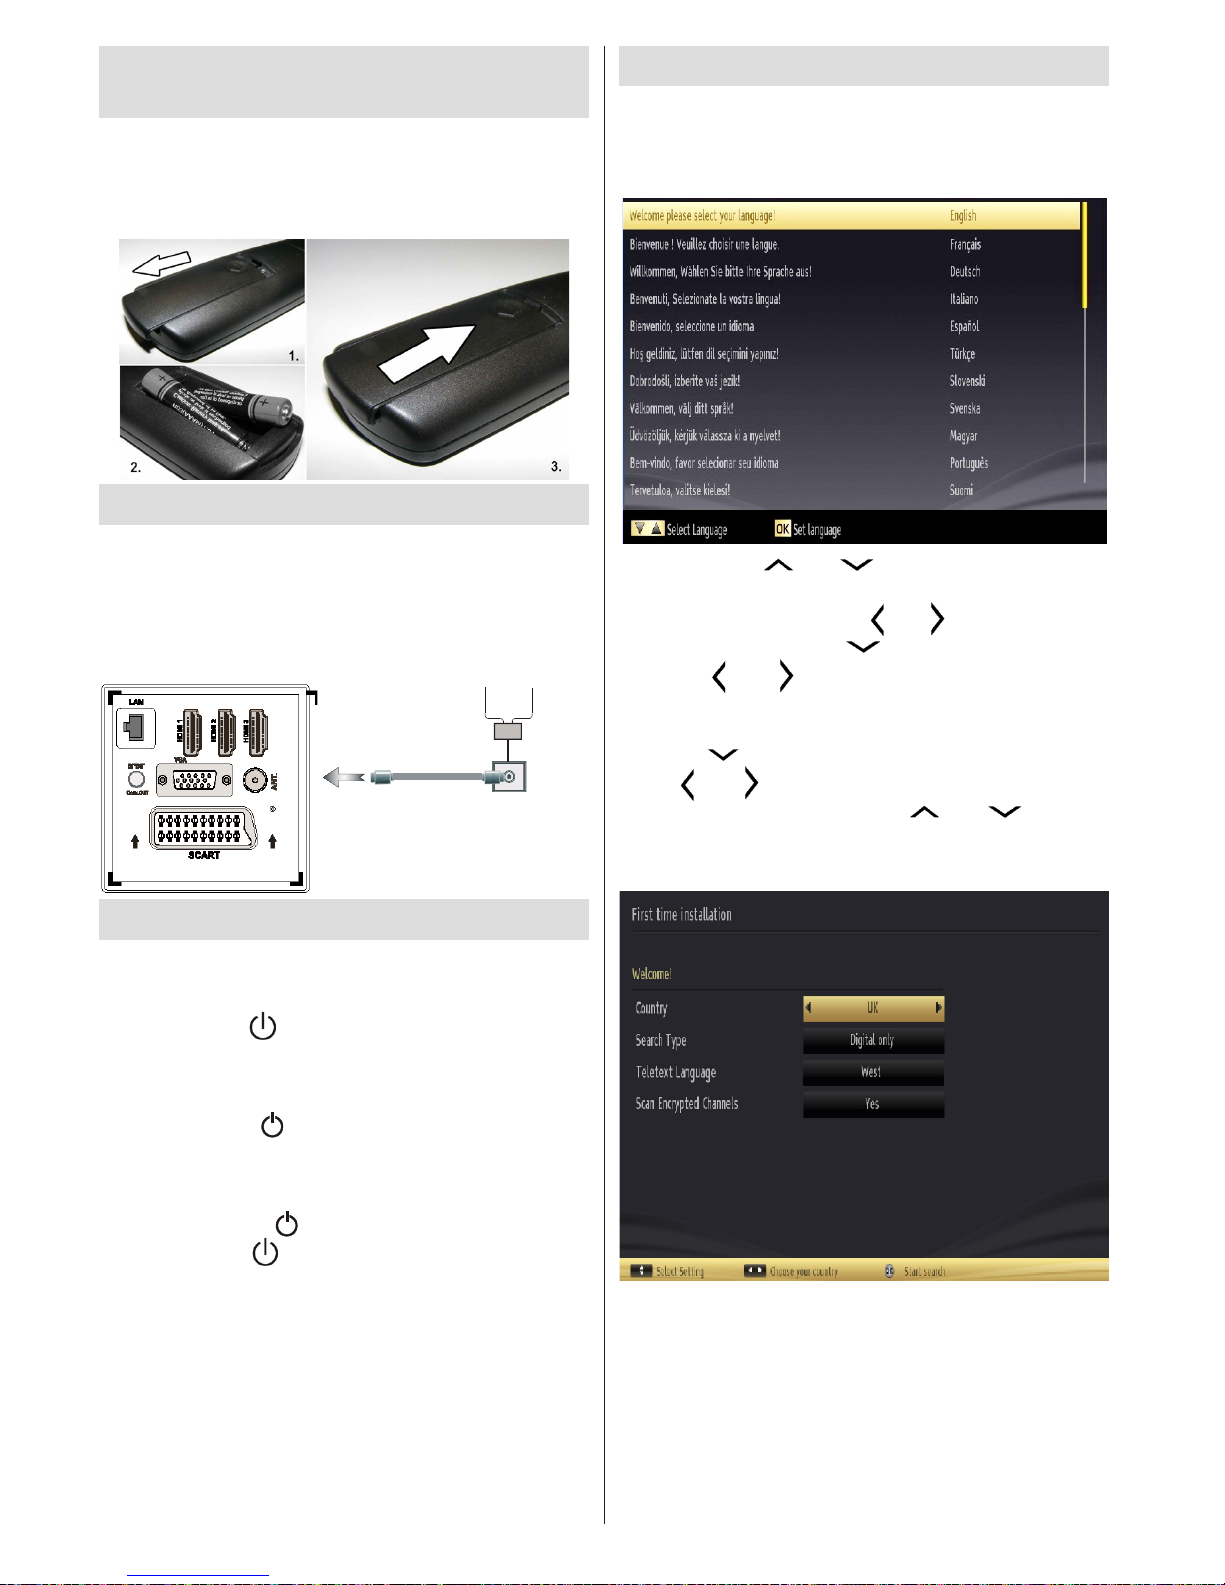
Bosanski - 80 -
Instalacija baterija u daljinskom
upravljaču
1.Nežno podignite stražnji poklopac daljinskog.
2.Umetnite dve AAA baterije. Obratite pažnju na
njihov polaritet.
3.Vratite poklopac baterije.
Povezivanje u struju i Antena/kabl
VAŽNO: TV-ureðaj sazdan je za rad na 220-240V
AC, 50Hz. Kad ga raspakujete, pričekajte da se TV
prijemnik prilagodi na temperaturu okoline prije nego
ga uključite u izvor napajanja. Umetnite kabl napajanja
u utičnicu mrežnog napajanja.
Aerial or Cable
Uključivanje/isključivanje
Uključivanje televizora
Priključite kabl za napajanje na 220-240V AC, 50 Hz.
Pritisnite dugme . Zatim će se uključiti LED indikator
pripranosti.
Da bi uključili TV iz režima pripravnosti, uradite sledeće:
Pritisnite dugme “ ”, P+ / P- ili numeričko dugme na
daljinskom upravljaču.
Kako isključiti televizor
Pritisnite dugme “ ” na daljinskom upravljaču, ili
pritisnite dugme ili zadržite kontrolni prekidač na
televizoru i televizor će preći u režim pripravnosti. (ovisi
od modela).
Da bi kompletno isključili TV-ureğaj, izvucite napojni
kabl iz utičnice.
Napomena: Ako je TV u režimu mirovanja, LED indikator
mirovanja može treptati označavajući da su aktivne funkcije
poput pretraživanja u mirovanju, preuzimanja putem etera i
tajmera. LED takoğe može da trepti kada televizor uključujete
iz režima pripravnosti.
Prva instalacija
Tokom prvog uključenja, pojavljuje se meni “Izbor
jezika”. Poruka “Dobrodošli molimo izabjerite
jezik!" prikazuje se na svim jezicima azbučnom
redom.
Pritisnite ključ “ ” ili “ ” da biste označili željeni
jezik i pritisnite ključ OK za izbor. Pojavljuje se “Prva
instalacija“. Koristite ključ „ “ ili „ “ za izbor željene
zemlje i pritisnite ključ „ “ za izbor Tipa traženja.
Pomoći “ ” ili “ ” postavite željeni tip traženja.
Raspoložive vrste traženja su Digitalna i analogna,
samo digitalna i samo analogna. Nakon postavljanja,
pritisnite “ ” da postavite Jezik teleteksta. Pomoći
tipke “ ” ili “ ” postavite "Jezik teleteksta" i izaberite
"Skeniranje kodiranih" pomoći “ ” ili “ ”. Možete
postaviti Skeniranje kodiranih na Da ukoliko želite
skenirati kodirane stanice.
Fabrički PIN kod može biti različan u zavisnosti
izabrane zemlje.
Ako vam se traži da umetnite PIN da biste vidjeli
opciju menija, možete koristite jedan od sledećih:
4725, 0000 ili 1234.
Pritisnite dugme OK na daljinskom da nastavite i na ekranu
prikazaće se sledeća poruka.
Page 82

Bosanski - 81 -
Možete omogućiti Režim Radnja pomoću tipke
(opcija) “ ” ili “ ” Ako je izabran režim Radnja
(opcija), opcija režima Radnje bieć dostupna u
meniju Ostale postavke i karakteristike vašeg
TV-a biću prikazane na vrhu ekrana. Nakon
izbora režima Radnja pojaviće se ekran za
konfirmaciju. Odaberite DA za nastavak.
Ukoliko izabran Domaći režim, režim Radnje neće
biti dostupan nakon prve instalacije. Pritisnite dugme
OK na daljinskom da nastavite i na ekranu prikazaće se
sledeća poruka.
Morate izabrati tip traženja da biste tražili i sačuvali
kanale iz željenog izvora.
Instalacija antene
Ukoliko u meniju za tip traženja izaberete opciju
ANTENA, digitalni televizor tražiće digitalne zemaljske
TV emisije.
NAPOMENA: Možete pritisnuti kluč MENU za
otkazivanje.
Kada se memorišu sve stanice, na ekranu će se
prikazati lista kanala. Ako želite sortirati kanale prema
LCN-u (*), izaberite Da a zatim pritisnite OK.
Pritisnite dugme OK da uklonite listu kanala i gledate
televizor.
(*) LCN je sistem Logičkog broja kanala koji organizuje
dostupne signale u skladu sa prepoznatljivim
sekvencama kanala.
Instalacija kabela
Ako izaberete opciju KABEL i pritisnite ključ OK
na daljinskim za nastavitgi; na ekranu prikazaće se
sledeća poruka:
Da biste nastavili izaberite DA i zatim OK. Da biste
otkazali operaciju, izaberite NE i pritisnite OK.
Možete izabrati domašaj frekfencija sa ovog ekrana.
Da biste označili linije koje vidite, koristite dugmad
„ “ ili „ “.
Možete ručno uneti domašaj frekfencija pomoći
numeričkih dugmad daljinskog upravljača.
*
Page 83

Bosanski - 82 -
Unesete početnu i krajnju frekvenciju po želji putem
numeričkih ključeva na daljinskim.
Nakon toga, možete postaviti korak pretraživanja
kao 8000 kHz ili 1000 kHz.
Ukoliko izaberete 1000 kHz, televizor vršiće
pretraživanje detaljnije. Zbog toga će trajanje pretrage
porasti. Kada završite, pritisnite dugme OK da biste
započeli automatsku pretragu. TV će tražiti i sačuvati
dostupne signale.
(*) Opcija mreže nije dostupna u UK.
Reprodukcija preko USB ulaza
Možete povezati USB hard disk ili USB memoriski
štapić na vašem TV-u pomoći USB ulaza. Ova vam
odlika omogućuje da puštate fajlove snimljene na
USB disku. Podržani su 2,5“ i 3,5" inčni spoljašni tvrdi
diskovi (hdd sa spoljašnim napajanjem).
VAŽNO! Treba napraviti rezervnu kopiju vaših
datoteka pre nego što izvršite bilo kakvo povezivanje
na TV aparat kako biste izbegli mogućnost gubitka
podataka. Proizvođač neće biti odgovoran ni za kakvo
oštećivanje datoteka ili gubitka podataka. Moguće je
da izvesni tipovi USB ureğaja (MP3 plejeri) ili USB
hard diskove/memoriske ğtapiãe moşda ne¿u biti
kompatibilni sa ovim TV aparatom. TV podržava
FAT32 i NTFS formatiranje diska, ali jedino sa NTFS
formatiranim diskovima snimanje je moguće.
Napomena: Dok formatirate USB hard disk koji
ima 1TB (tera bajt) ili više kapaciteta, problemi u
formatiranju mogu nastati.
Brzo ukopčavanje i vağenje USB ureğaja je vrlo
opasna radnja. Nemojte brzo umetati i vaditi
memorijski uređaj više puta uzastopce. To može
zički oљtetiti USB plejera, pa i samog USB uređaja.
Ne izvlačite USB modul dok reprodukujete datoteku.
Meni Pregledač medija
Možete puštati slike, muziku ili lmove snimljene na
USB disku preko negovog povezivanja sa TV-om i
koriščenjem Pretraživača medija. Da biste to uradili,
izvršite sledeće: Povežite USB na jednog od USB
ulaza sa strane vašeg TV-a.
Možete povezati dva USB ureðaja na TV-u. Ukoliko
oba USB diska sadrže muziku, slike ili video fajlove,
OSD za izbor USB-a prikazaće se na ekranu. USB
ureðaj koji je prvi bio povezan na TV biće nazvan USB
uređaj 1. Izaberite ureðaj pomoću tastere „ “ ili
„ “ i pritisnite OK.
Pritisnite MENU dugme i odaberite umetak Pretraživač
medija pomoći Levo/Desno i OK. Prikazaće se glavni
ekran pregledača medija. Možete prikazati povezane
sadržaje odabirom umetka Video, Muzika ili Slike.
Sledite indikacije tastera ispod svakog menija na
ekranu za osobine reprodukcije.
Možete podesiti preference prelistača medija
korišćenjem dijaloga Postavke.
Upotreba tastera MENU u režimu prelistača
medija
Pritiskom tastera MENU u režimu prelistača medija,
pokazuje se sledeći ekran:
Preko ovog ekrana možete pristupiti opcije menija
Slike, Zvuka i Postavci. Još jednom pritisnite MENU
da biste izašli iz ovog ekrana.
Promena dimenzija slike: Formati slike
Programi se mogu gledati u različitim formatima slike,
zavisno od primljene emisije. Format (veličinu slike)
TV-a možete mijenjati radi prikaza slike u različitim
režimima zumiranja. Pritisnite dugme “ ” više puta
za menjanje dimenzija slike. Možete pomjerati ekran
nagore ili nadole pritiskanjem tastera “ ” ili " ”
kad je izabrana opcija 14:9 zum, bioskop ili prevod.
Koriščenje Listu kanala
Televizor sortira sve memorisane stanice u listi
kanala. U ovoj listi kanala možete da vršite izmene,
da podešavate omiljene kanale ili da aktivirate stanice
koje treba da se prikažu koristeći opcije liste kanala.
Pritisnite dugme MENU da prikažete glavni meni.
Izaberite stavku Lista kanala pomoću dugmeta Levo
ili Desno. Pritisnite dugme OK da prikažete sadržaje
menija. Izaberite stavku Uredi listu kanala da biste
upravljali svim memorisanim kanalima. Pomoću
dugmadi Gore ili Dole i dugmeta OK izaberite stavku
Uredi listu kanala. Pritsnite dugme Gore ili Dole da
biste odabrali kanal koji želite da obradite. Pritisnite
dugme Levo ili Desno da biste izabrali funkciju menija
liste kanala. Koristite dugmad P+/P- za pomeranje
Page 84

Bosanski - 83 -
stranice na gore ili na dole. Pritisnite dugme MENU
za izlaz.
Sortiranje liste kanala
Možete izabrati programe koji će da budu navedeni
u listi kanala. Za prikazatli određenih tipova
programa, koristite opciju liste aktivnih kanala.
Odaberite listu aktivnih kanala iz menija liste kanala
pomoću tastera „ “ ili „ “. Za nastavak pritisnite
dugme OK. Iz liste izaberite opciju tipa mreže
pomoću tastere “ ” ili “ ” i OK.
Brzi meni
Brzi meni vam daje mogućnost da brže pristupite
nekim opcijama. Ovaj meni uključuje opcije Režim
zaštede energije, Režim slike, Postavke ekvilajzera,
Omiljene, tajmer za spavanje, SlijediMe TV, SlijediMe
TV do DMR-CEC RC propusnica a i knjižica
informacije. Pritisnite ključ Q.MENU na daljinskom kako
biste vidjeli brzi meni. Idite na sledeća poglavlja da biste
vidjeli više detalja oko navedenih odlika.
SlijediMe TV
Korišćenjem odlike SlijediMe TV možete glijdeati
trenutni TV program na vaš tablet. Instalirati prikladnu
aplikaciju Smart centar na vaš mobilni uređaj.
Otvorite aplikaciju.
Za više informacija idite do instrukcije aplikacije.
Napomena: Ova aplikacija nije kompatibilna sa svim
mobilnim uredima.
SlijediMe TV ka DMR (FollowMe TV to DMR)
Ova odlika omogućava video strimig iz vašeg TV-a na
drugi TV ili mobilni uređaj, preko prikladne aplivacije
(na pr. UPnP - univerzalne Uključi i pusti (Plug and
Play) aplikacije kao BubbleUPnP). Aktivirati FollowMe
TV to DMR tajmšifting počinje. Pritisnuti crveni gumb i
prikazaće se meni izbora uređaja. Izaberite vaš uređaj
i pritisnite OK.
Napomena:Odlike SlijediMe TV i SlijediMe TV ka
DMR rade u korelaciji sa PVR odlike i traže povezani
USB uređaj u FAT32 formatu i sa suvišnjem prostoru
na njega. HD kanali nisu podržani i oba uređaja moraju
biti povezani na istu mrežu.
E-priručnik
Mpožete naći korisnička uputstva u E-priručniku.
Da biste koristili E-priručnik, pritisnite taster Info dok
je glavni meni na ekranu.
Izaberite kategoriju preko tastera navigacije. Svaka
kategorija ima različite naslove. Izaberite naslov i
pritisnite OK da biste pročeli.
Za zatvaranje E-priručnika pritisnite taster Exit.
Napomena: Sadržaj E-priručnika može varirati u zavisnost
od modela.
CEC i CEC RC propusnice
Ova funkcija vam omogućuje dapreko daljinskog
upravljača TV-a kontrolišete uređaje koje imaju CEC
koji su povezani preko HDMI portova.
CEC opcija u meniju Ostale postavke koje se
nalazi u meniju Postavke treba se najprije postaviti
na Omogućeno. Pritisnite taster Source i izaberite
HDMI ulaz povjezanog CEC uređaja iz menija Lista
izvora.} kada se poveže novi CEC uređaj, on će biti
listani u izvorni meni svojim imenom mesto imena
povezanog HDMI porta (DVD plejer, rekorder 1, itd.)
TV može automatski raditi glavne funkcije nakon
izbiranja povezanog HDMI izvora.
Da biste prekinuli ovu operaciju i opet kontrolisati
TV preko daljinskog, pritisnite i držite tipku "0"
(nula) na daljinskom 3 sekundi. Ili pritisnite
Q.Menu na daljinski, istaknite CEC RC
propusnicui postavite je na Onemogućeno
pritiskom na tipku za lijevo ili desno. Ova odlika se
takođe može omogućiti/onemogućiti preko menija
Postavke/Ostale postavke
TV takođe pdržuje odliku ARC (Auto Return
Channel). Ovo je audio veza koji treba zamjeniti
ostale kable TV-a i audio sistema (A/V prijemnika ili
sistem zvučnika).
Ako je ARC aktivan, TV ne ušutkuje automatski
ostale audio izlaze. Tako morate ručno snižiti
ton TV-a do nule ako želite čuti jedino zvuk iz
drugog audio uređaja (isto kao i druge optičve
ili koaksijalne digitalne audio izlaze). Ako želite
promijeniti jačinu zvuka povjezanog uređaja, trebat
izabrati taj uređaj iz liste izvora. Tada tipke za jačinu
zvuka se odnose na povjezani uređaj.
Page 85

Bosanski - 84 -
Karakteristike i funkcije menija
Sadržaj menija slike
Režim
Možete postaviti povezanu mogučnost režima prema vašim željama. Režim slike se može
podesiti na neku od sledečih opcija: Bioskop, Igrice, dinamično i prirodno.
Kontrast Podešava vrednosti osvetljenja i zatamnjenja ekrana.
Svetlost Podešava vrednost svetline ekrana.
Oštrina Podešava vrednost oštrine za objekte prikazane na ekranu.
Boja Podešava vrednost boje, prilagoğavajuči boje.
Režim uštede
energije
Za podesivanja Režima uštede kao Eko, Iskjučena slika ili Onemogučen. Proučite odjeljak “Podaci
o okolini” u ovom priručniku ako su vam potrebne dodatne uputstva o režimu uštede energije.
Pozadinsko
osvjetljenje
(opciono)
Ova postavka kontroliše nivo pozadinskog osvetljenja i može da se podesi na Auto, maksimum,
minimum, srednji i ekonomičan režim (opcija). Funkcija pozadinskog osvjetljenja biti će
nevidljiva ako je uključen režim uštede energije. Pozadinsko osvijetlenje se ne može aktivirati
u režimima VGA ili Prelistač medija ili dok je režim slike Igra.
Smanjenje
šuma
Ako je emitovani signal slab i ako slika ima šumove, koristite opciju Redukcija šuma da biste
redukovali iznos šuma. Redukcija šuma se može podesiti na neku od sledečih opcija: Nisko,
Srednje, Visoko ili Isključeno.
Naprijedne postavke
Dinamični
kontrast
Možete promeniti stopu kontrasta pomoći funkcije dinamičkog kontrasta. Režim slike se može
podesiti na neku od sledećih opcija: Nisko, Srednje, Visoko ili Isključeno.
Temperatura
boje
Podešava željeni ton boje.
Zumiranje slike podešava dimenzije slike na auto, 16:9, Prevod,14:9, 14:9 zum, 4:3 ili bioskop.
HDMI True
Black
Tokom gledanja sa HDMI izvora, ova će odlika biti vidljiva u meni postavke slike. Možete ga
koristiti da povećate crnoću slike.
Režim lma
Filmovi se snimaju s različitom brzinom izmjene slika nego televizijski programi. Uključite ovu opciju
na „on“ kada gledate lmove, da biste jasno videli scene sa brzim kretanjem.
Detekcijom
tona
Podešava željeni ton boje.
Nijansa boje
Podešava željeni ton boje.
RGB dobit
Pritisnite taster OK da uredite RGB dobita. Možete kongurisati vrijednosti temperature boja
korišćenjem odlike RGB dobit
Resetovanje Resetuje postavke slike na fabrički podešene vrednosti.
Autopozicija (u
PC-režimu)
Automatski optimizuje prikaz. Pritisnite OK za optimizaciju.
H pozicija (u PC
režimu)
Ova stavka služi za pomicanje slike horizontalno udesno ili ulijevo na ekranu.
V pozicija (u PC
režimu)
Ova stavka služi za pomicanje slike vertikalno prema vrhu ili prema dnu ekrana.
Takt sata (u PC
režimu)
Podešavanjem takta točaka ispravljaju se smetnje koje se pojavljuju u vertikalnim prugama u
intenzivnim prikazima točaka kao u proračunskim tablicama, odlomcima ili u tekstu s manjim
fontovima.
Faza (u PCrežimu)
Ovisno o zadanoj rezoluciji i frekvenciji pretraživanja TV prijemnika, na ekranu se može
pojavljivati maglovita ili šumovita slika. U tom slučaju koristite ovu stavku da pročistite slike
metodom pokušaja i pogrešaka.
Dok u režimu VGA (PC) neki predmeti menija Slike neću biti dostupni. Umjesto toga, postavke VGA režima biću
dodani Postavkama slike do u PC režimu.
Page 86

Bosanski - 85 -
Karakteristike i funkcije menija
Sadržaj menija zvuka
Glasnoča Podešava jačinu zvuka.
Ekvilajzer
U meniju ekvilajzera, predhorno podešenje može da se menja u Muzika, Film, Govor, Ravno,
Klasika i Lično. Pritisnite taster MENU da biste se vratili u prethodni meni. Podešavanja u
meniju ekvilajzera mogu se menjati ručno samo kada je režim ekvilajzera postavljen na Korisnik.
Balans Ova postavka koristi se za naglašavanje ravnoteže prema lijevom ili desnom zvučniku.
Slušalice Podešava jačinu zvuka u slušalicama.
Režim zvuka
Možete odabrati režim MONO, STEREO, DUAL I ili DUAL II, ali samo ukoliko odabrani kanal
podržava taj režim.
AOG
Funkcija automatskog ograničavanja zvuka (AVL- automatsko ograničavanje glasnoće),
podešava zvuk da biste zadržao nivo izlaza, izmeğu programa (na primer, nivo jačine kod
reklama je obično veči nego kod ostalih programa).
Slušalice/Izlaz linije
(po izboru)
Pri povezivanjem spoljašneg pojačala na vaš TV pomoću džeka slušalica, možete postaviti
ovu opciju na Izlay linije. Ako ste povezali slušalice na vaš TV, postavite opciju na Slušalice.
Dinamički bas
(po izboru)
Uključuje ili isključuje dinamičkog basa.
Saraund saund
(po izboru)
Režim Surround zvuka može da se uključi ili isključi.
Digitalni izlaz Podešava tip zvuka audio izlaza.
Sadržaj menija Instalacija I novo štelovanje
Automatsko
skeniranje kanala
(novo štelovanje)
Prikazuje opcije automatskog štelovanja.
Digitalna antena: Pretražuje i čuva antenske DVB stanice.
Digitalan kabl: Pretražuje i čuva kablovkse DVB stanice.
Analogan: Pretražuje i čuva analogne stanice.
Digitalna antena i Analogna: Traži i memoriљe antenske DVB i analogne stanice.
Digitalan kabl i Analogna: Pretraћuje i memoriљe antenske DVB i analogne stanice.
Ručno pretraživanje
kanala
Ova funkcija se može koristiti za direktan unos emitera programa.
Skeniranje mrežnih
kanala (po izboru)
Traži povezane kanale u sistemu emitovanja.
Analogno no
podešavanje
Možete koristiti ove postavke za no podešivanje analognih kanala. This feature is not available
if no analogue channels are stored.
Prva instalacija
Prebrisuje sve sačuvane kanale i postavke, resetuje Tv do fabričkih postavki i počinje prvu
instalaciju. Možete slijediti instrukcije u odsijeku Početna instalacija oko više informacija oko
ovog procesa.
Brisanje liste usluga
(po izboru)
(*) Ova postavka vidljiva je samo ako je za državu odabrana Danska, Švedska, Norveška ili
Finska. Ova postavka služi za brisanje pohranjenih kanala.
Page 87

Bosanski - 86 -
Karakteristike i funkcije menija
Sadržaj menija podešavanja
Uslovni pristup
Kontroliše uslovne pristupne module kada postoje.
Jezik
Konguriše jezičke postavke.
Roditeljski
Konguriše roditeljske postavke.
Fabrički PIN kod može biti različan u zavisnosti izabrane zemlje.
Ako vam se traži da umetnite PIN da biste vidjeli opciju menija, možete koristite jedan
od sledećih: 4725, 0000 ili 1234.
Tajmeri
Podešava tajmere za izabrane programe.
Konguracija
snimanja
Prikazuje meni Konguracija snimanja.
Datum/Vreme
Podešava datum i vreme.
Izvori
Omogučava ili onemogučava opcije izabranog izvora.
Mrežne postavke
Prikazuje mrežne postavke.
Druge postavke: Prikazuje druge opcije podešavanja televizora:
Istek menija
Menja vreme prikazivanja ekrana menija.
Pretraživanje
šifriranih kanala
Kada je ova postavka uključena, pretragom če se pronači i šifrirani kanali. Ako je postavka
ručno isključena, šifrirani kanali neće biti pronalaženi u automatskoj ili ručnoj pretrazi.
Plava pozadina
Aktivira ili deaktivira sistem plave pozadine ako je signal slab ili ne postoji.
Ažuriranje softvera
Da biste osigurali da TV uvek ima najnovije informacije, možete koristiti ovu postavku. Radi
pravilnog rada, pobrinite se da televizor postavite u režim pripravnosti.
Verzija aplikacije
Prikazuje aplikaciju verzije.
Za osobe sa
oštečenim sluhom
Ako emiter omogučava neke specijalne signale u odnosu na audio, ovo podešenje možete
postaviti na „uključeno“ da biste primali te signale.
Audio opis
Audio opis jest dodatni narativni zapis za slijepe i osobe oštečenog vida koje gledaju vizualne
medije, uključujuči televiziju i lmove. Ovu funkciju možete koristiti samo ako medijska kuča
podržava mogučnost dodatnog narativnog zapisa.
Automatsko
isključivanje
televizora
Možete postaviti vrijednost funkcije Automatsko isključanje. Kada to vreme istekne i ako se
televizorom ne rukuje tokom odreğenog vremena, televizor će se isključiti.
Pretraživanje
u mirovanju
(opcionalno)
Ako isključite pretragu u mirovanju, ona neče biti dostupna. Da biste korisitli Pretraživanje
u mirovanju, osigurite se da izaberete Pretraživanje u mirovanju kao Uključeno. Ukoliko je
Pretraga took mirovanja Uključena, kada je TV u mirovanju, dostupne signale biću pretražene.
Ukoliko TV nađe neke nove ili stanice koje nedostaju, prikazaće se ekran sa menijem,
tražeći od vas da izaberete primenjiti ili ne pve promene. Lista kanala biće nadograđena i
promjenjena nakon ovog procesa. Molimo aktivirati Pretragu tokom mirovanja kako bi vaš TV
mogao automatski nadograditi frekvenciju stanice, deniciju, kao i ostale srodne promjene.
Režim Radnja
(Opcionalno)
IUkoliko pokazivate TV u neku radnju, možete aktivirati ovog režima. Dok je režim Radnja
aktivan, neke stavke u meniju TV-a neće biti dostupne za postavljanje.
DLNA renderer
Odlika DLNA omogućava vam spodjeljivati fajlove sačuvane na vašem smartfonu. Ukoliko imate
samrtfon kompatibilan sa DLNA i instalirani softver, možete podijeliti/pustiti fotograje na vaš TV.
Videti instrukcije vašeg softvera za podijelivanje za više informacija.
Režim startovanje
Ova postavka konguriše preference režima startovanja. Uvijek uključan: TV se uvijek uključuje
kada se glavni taster uklj./isklj. Pritisne. Pripravnost: TV uvijek startuje u režimu pripravnosti. /
Poslijedno stanje: TV se uvijek uključuje na zadnje izabranoga kanala/izvora.
Virtuelni daljinsku
(opcionalno)
Aktivira ili dekativira opciju virtuelnog daljinskog upravljača.
CEC
Preko ove postakve možete u cijelini omogućiti ili onemogućiti CEC odliku. Pritisnite tipku
za lijevo ili desno za omogućiti ili onemogućiti odliku.
Page 88
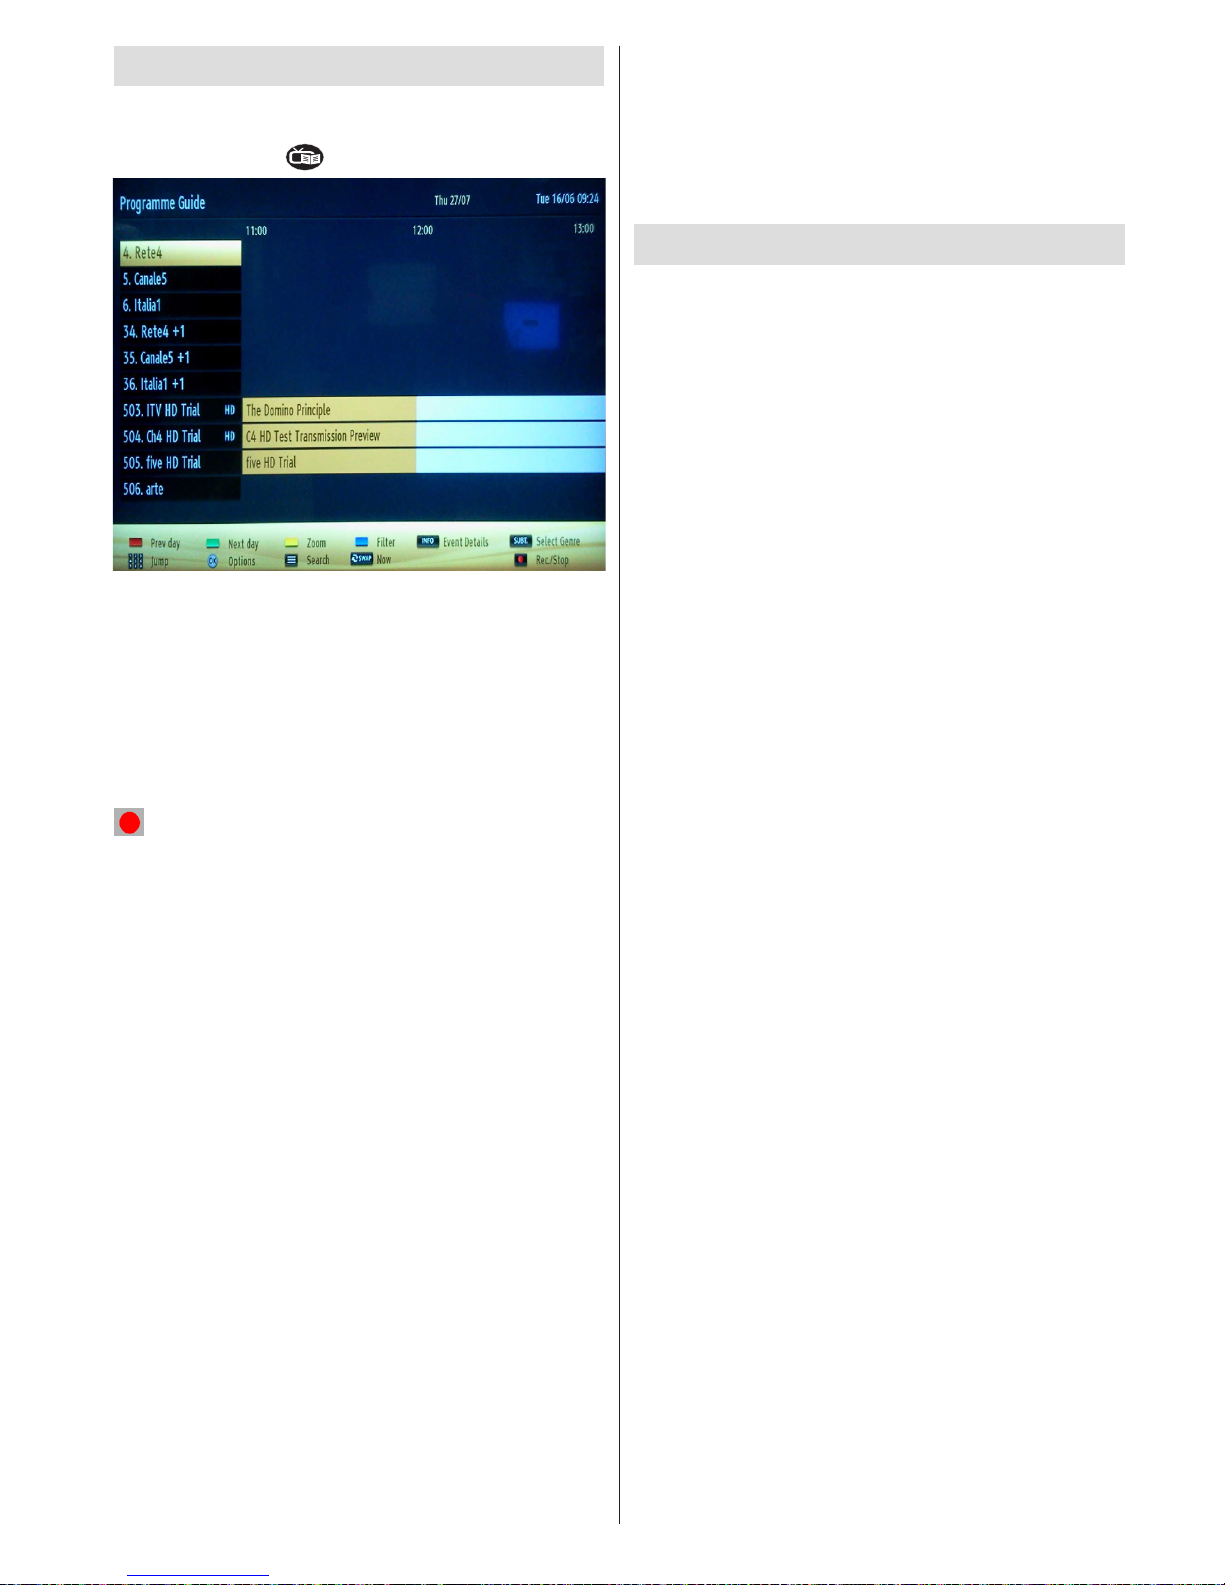
Bosanski - 87 -
Elektronički programski vodič (EPV)
Neki, ali ne svi, kanali šalju informacije o tekućim
i sljedećim događajima. Kako bi vidjeli EPG meni,
pritisnite dugme “ ” .
Gore/Dole/Lijevo/Desno: Navigacija u EPG-u
OK : Prikazuje opcije programa.
INFO (İ): Prikazuje informaciju u detaljima na
izabranom programu.
ZELENO: Prebacuje na EPG listu Raspored.
ŽUTO: Prebacuje na EPG listu Vremenska crta.
PLAVO: Prikazuje opcije ltriranja.
(SNIMAJ): TV počinje snimati izabrani program.
Možete ga opet pritisnuti da zaustavite snimanje.
VAŽNO: Da biste snimili progamu, morate prvo povezati
USB disk na vapem TV-u dok je TV isključan. Zatim trebali bi
uključiti TV da biste omogućili odliku snimanja. U suprotnom,
odlika snimanja neće biti dostupna.
Napomena: Prelaženje na drugu emisiju ili izvor nije dostupno
u toku snimanja.
Programske opcije
Dok u meniju EPG-a pritisnite gumb OK da uđete u
meni Programske opcije.
Biranje kanala
Koristite ovu opciju za prelazak na izabrani kanal.
Snimi/Izbriši tajmer za snimanje
Nakon što ste izabrali program u EPG meniju, pritisnite
dugme OK i ekran Opcije biće prikazan. Izaberite
opciju „Snimaj“ i pritisnite dugme OK. Nakon ove
operacije, na odabranom programu se postavlja
snimanje.
Da biste otkazali postavljeno snimanje, označite
taj program i pritisnite dugme OK i odaberite opciju
„Izbriši tajmer Tajmer“. Snimanje biče otkazano.
Podesite tajmer / Izbrisite tajmer
Nakon što ste izabrali program u EPG meniju, pritisnite
dugme OK i ekran Opcije biće prikazan. Odaberite
„Postavi tajmer na dogaðaj“ i pritisnite OK. Možete
podesiti tajmer za buduće događaje. Za otkazati već
postavljeni podsjetnik, označiti taj program i pritisnite
gumb OK. Nakon toga izaberite opciju „Briši tajmer“.
Tajmer biće otkazan.
Napomena: Nije moguće snimati ili postaviti tajmer za dva ili
više dogağaja u istom vremenskom intervalu.
Snimanje programa
VAŽNO: Kada koristite novi USB disk, preporučuje se da prvo
formatirate disk pomoću opcije "Formatiraj diska".
Da biste snimili progamu, morate prvo povezati USB
disk na vapem TV-u dok je TV isključan. Zatim trebali
bi uključiti TV da biste omogućili odliku snimanja.
Za koriščenje funkciju snimanja, trebalo bi povezati
USB disk ili spojlni ureğaj sa vašim TV-u koji ima
najmanje 1 GB kapaciteit i brzinu 2.0. Ukoliko
povežete USB uređaje koje ne podržavaju 2.0 brzinu,
na ekranu prikazaće se poruka o grešci.
Napomena: Snimljene programme su sačuvane na
povezanim USB disku. Po želji, možete sačuvati/kopirati
snimke na kompjuter, ipak, ove datoteke se ne mogu puštati
na kompjuteru. Možete ih pustati samo preko TV-a.
Napomena: Po vreme tajmšiftinga se može pojaviti
zadržavanje sinhronizacije usana. Snimanje radija nije
podržano. TV može snimato programe do deset
časova.
Snimljene programe su podijeljene na dijelove od
4GB.
Ukoliko je brzina snimanja povezanog USB diska
nedovoljna, snimanje može propasti i odlika tajmšifting
može biti nedostupna.
Snimke HD programa mogu zauzeti veći deo USB
diska zbog rezolucije emisije. Zato se preporučuje
korisiti USB diskove za snimanje HD programa.
Nemojte isključivate USB disk po vreme snimanja. To
može oštetiti disk.
Podržavaju se višestruke particije. Najviše dve
različite particije su podržane. Ukoliko disk ima više
od dve particije, može nastati krah. Prva particija USB
diska korisit se za PVR ready odlike. Takoğe, mora
biti formatirana kao primarna particija da bi se koristila
za PVR ready odlike.
Neki paketi striminga mogu da ne budu snimljeni
radi problema signala, pa nekad video se zaledi u
toku prikaza.
Dugmad za snimanje, puštanje, pauza, prikaz (za
dialog plej-liste) se ne mogu korisiti kada je teletekst
uključan. Ukoliko snimanje počinje od tajmera dok je
teletekst uključan, teletekst se automatski isključuje.
Takoğe, upotreba teleteksta se onemogućava kada
je u toku snimanje ili reprodukcija.
Page 89

Bosanski - 88 -
Snimanje Tajmšifting
Pritisnite (PAUZA) dugme dok gledate neku emisiju
da biste prebacili na režim Tajmšifting. U režim
tajmšifting, program je pauziran i u isto vreme snimljan
na povezanom USB disku. Pritisnite (PUŠTANJE)
još jednom da biste gledali pauzirani program od
trenutka zaustavljanja. U u info polugi videćete razliku
u vremenu meğu istinske i snimljene tajmšift emisije.
Instant snimanje
Pritisnite (SNIMAJ) da biste počeli snimati dogağaj
instantno dok gledate program. Možete pritisnuti
dugme (SNIMAJ) opet da biste snimili sledeći
dogağaj u EPG-u. U ovom slučaju, OSD prikazaće
programirane događaje za snimanje. Pritisnite dugme
STOP da biste otkazali instant snimanje. Menjanje
na drugu emisiju ili izvor, kao i gledanje Pretraživača
medija, nisu dostupni u toku snimanja.
Gledanje snimljenih programa
U glavni meni, izaberite Pretraživača medija pomoći
„ “ ili „ “ dugmad. Označite Biblioteku snimci
pomoću „ “ ili „ “ i pritisnite OK da uðete. Prikazuje
se Biblioteka snimaka. Odaberite snimku sa liste
(ukoliko je neka ranije snimljena) pomoći " " / " "
dugmeta. Pritisnite tipku OK kako biste vidjeli opcije
reprodukcije. Možete izebrati opcije koristeći “ ” /
“ ” i OK.
Dostupne opcije repordukcije:
• Pusti iz početka: Pušta snimak iz početka.
• Nastavi: Produžuje prikazivanje snimka.
• Pusti iz tačke: Precizira tačku puštanja.
Napomena: Gledanje glavnog menija i stavke menija nisu
dostupne tokom prikazivanja.
Pritisnite (STOP) gumb da biste zaustavili
prikazivanje i da biste se vratili u Biblioteku snimaka.
Sporo unapred.
Ukoliko pritisnite (PAUZA) dok gledate snimljene
programe, odlika sporo unapred biće dostupna.
Možete koristiti dugme da idete sporo unapred.
Uzastopno pritiskanje dugmeta menja brzinu
sporog napredovanja.
Biblioteka snimaka
Da biste videli listu snimaka, izaberite "Biblioteku
snimaka" i pritisnite OK. Prikazaće se Biblioteka
snimaka sa dostupnim snimcima, Svi snimci čuvaju
se u jednu listu u biblioteku snimaka.
(Nastavi): Produžuje prikazivanje snimka.
CRVENO dugme (Briši): briše odabrani snimak.
Zeleno dugme (Obradi): Napravi promene na
odabranog snimka.
Plavo dugme (Sortiraj): Menja poredak snimaka.
Možete izabrati sa širokog spektra opcije podreğivanja.
Dugme OK: Aktivira meni opcije prikaza:
INFO (Detalji): Prikazuje detaljno kratki prošireni
program.
Konguracija snimanja
Odaberite stavku Konguracija snimanja u meniju
Postavki da biste kongurirali podešivanja snimanja.
Formatiranje diska: Možete korisiti odliku Formatiraj
disk da biste formatirali povezani USB disk. VAŽNO:
Primetite da SVI podatci snimljeni na USB disku
bići izgubljeni i zatim format diska biće promenjen
na FAT32, ukoliko aktivirate ovu odliku. Ukoliko se
vaš USB disk pokvari, možete probati formatirati
ga. U večinu slučaja formatiranje USB diska vraća
normalni rad; ipak, SVI podatci snimljeni na njemu
bići izgubljeni.
Napomena: Ukoliko se na ekranu prikaže „USB je prebavan“
dok počev snimanja, pokušajte restartirati snimanje. Ukoliko
još dobijate istu grešku, moguće je da vaš USN disk ne
zadovoljava zahteve brzine. Povežite drugi USB disk.
Funkcije povezivanja
Povezivanje na mrežu preko kabla
Za povezivanje na LAN mrežu preko kabla, trebate
uraditi sledeće:
• Povežite ethernet kabl za širokopojasnu ISP
konekciju u ETHERNET ULAZ na vašem modemu.
• Osiguriti se da je Nero Media Home softver instaliran
na vašem PC-ju (za DLNA funkciju). Vidjeti Dodatak
E o više informacija oko procesa instalacije.
• Nakon toga, trebate povezati PC na jedan od LAN
konektora modema (na pr. LAN 1) pomoći pogodnim
LAN kabelom.
• Iskoristite drugi LAN izlaz vašeg modema (na pr.
LAN 2) da biste povezali na TV. Možete dodati vaš
TV na vašu LAN preko povjezivanja LAN porta na
zadnjoj strani TV-a na konektore vašeg modema
kao što je ilustrovano.
Page 90

Bosanski - 89 -
Lan(Ethernet cable)
Broadband ISP
Connection
Rear of TV
• Da dostupite i pustite spodeljene datoteke, morate
izabrati Prelistač medija. Pritisnite taster MENU i
odaberite umetak Pretraživač medija pomoći Levo/
Desno. Pritisnite OK za nastavak. Odaberite željeni
tip datoteke i pritisnite OK. Morate uvijek koristiti
eekran prelistača medija da biste pristupili i pustili
spodjeljene mrežne datoteke.
• PC/HDD/Media plejer ili bilo koji drugi uređaj koji
je kompatibilan sa DLNA 5.1 trebalo bi trebao
biti korišten uz vezu preko kabla za veći kvalitet
reprodukcije.
Za kongurisanje postavke mreže, idite na sekciju
Posavke mreže u meniju Postavci.
• Možda biste mogli povjezati vaš TV na LAN ovisno
o konguraciju vaše mreže. U tom slučaju, koristite
ethernet kabel da biste povezali vaš TV na zidnu
utičnicu mreže.
The modem port
on the wall
Rear of TV
Povezivanje na bežičnu mrežu.
VAŽNO: “Veezy 200” USB dongl (prodaje se
odvojeno) je potrijeban za korišćenje bežične mreže.
• Da biste koristili vaš TV na vašoj bežičnoj mreži,
treba vam Veezy 200 bežični USB dongl. Da biste
napravili SSID vašeg modema vidljivim, trebate
promijeniti postavke SSID preko softvera modema.
TV se ne može povezati na mreže sa skrivenim
SSID-om.
Za povezivanje na bežičnu LAN mrežu, trebate
uraditi sledeće:
1. Povežite ethernet kabl za širokopojasnu ISP
konekciju u ETHERNET ULAZ na vašem
modemu.
2. Osiguriti se da je Nero Media Home softver
instaliran na vašem PC-ju (za DLNA funkciju).
3. Nakon toga, povežite bežični adapter na jedan
od USB ulaza vašeg TV-a.
4. Za kongurisanje postavke bežične mreže, idite
na sekciju Postavke mreže u sledećim sekcijama.
Wireless Lan
Adaptor
USB Inputs (Side of the TV)
Broadband ISP
Connection
• Bežični-N ruter (Wireless-N) (IEEE 802.11a/b/g/n)
sa istovrijemenim 2,4 i 5 GHz pojasima, da bi se
povećala širina pojasa. Optimizirano za glatko i
brzije HD video strimovanje, transfer datoteka i
bežičnog igranja.
• Koristite LAN vezu za bržije spodjeljivanje datoteka
među druge uređaje kao na pr kompjutere.
• Frekvencija i kanal su različite ovisno o oblasti.
• Brzina prenosa oviso o rastojanja i broja preprijeka
među prenosnih uređaja, konfiguracija ovih
uređaja, stanje radio talasa, saobraćaj linije kao
i od proizvoda kojih koristite. Prenos se takođe
može prekinuti ili biti isklljučen ovisno o stanju radio
talasa, DECT telephona, ili ostalih WiFi 11b uređaja.
Standardne vrijednosti brzine prenosa su teoretski
maksimumi za bežične standarde. To nisu stvarne
brzine prenosa podataka.
• Mijesto gde prenos je najefektivniji ovisi od okoline
korišćenja.
• Bežični LAN adapter trebao bi biti povezan direktno
na USB port TV-a. USB habovi nisu podržani.
• Za kongurisanje postavke mreže, idite na sekciju
Posavke mreže u meniju Postavci.
Page 91
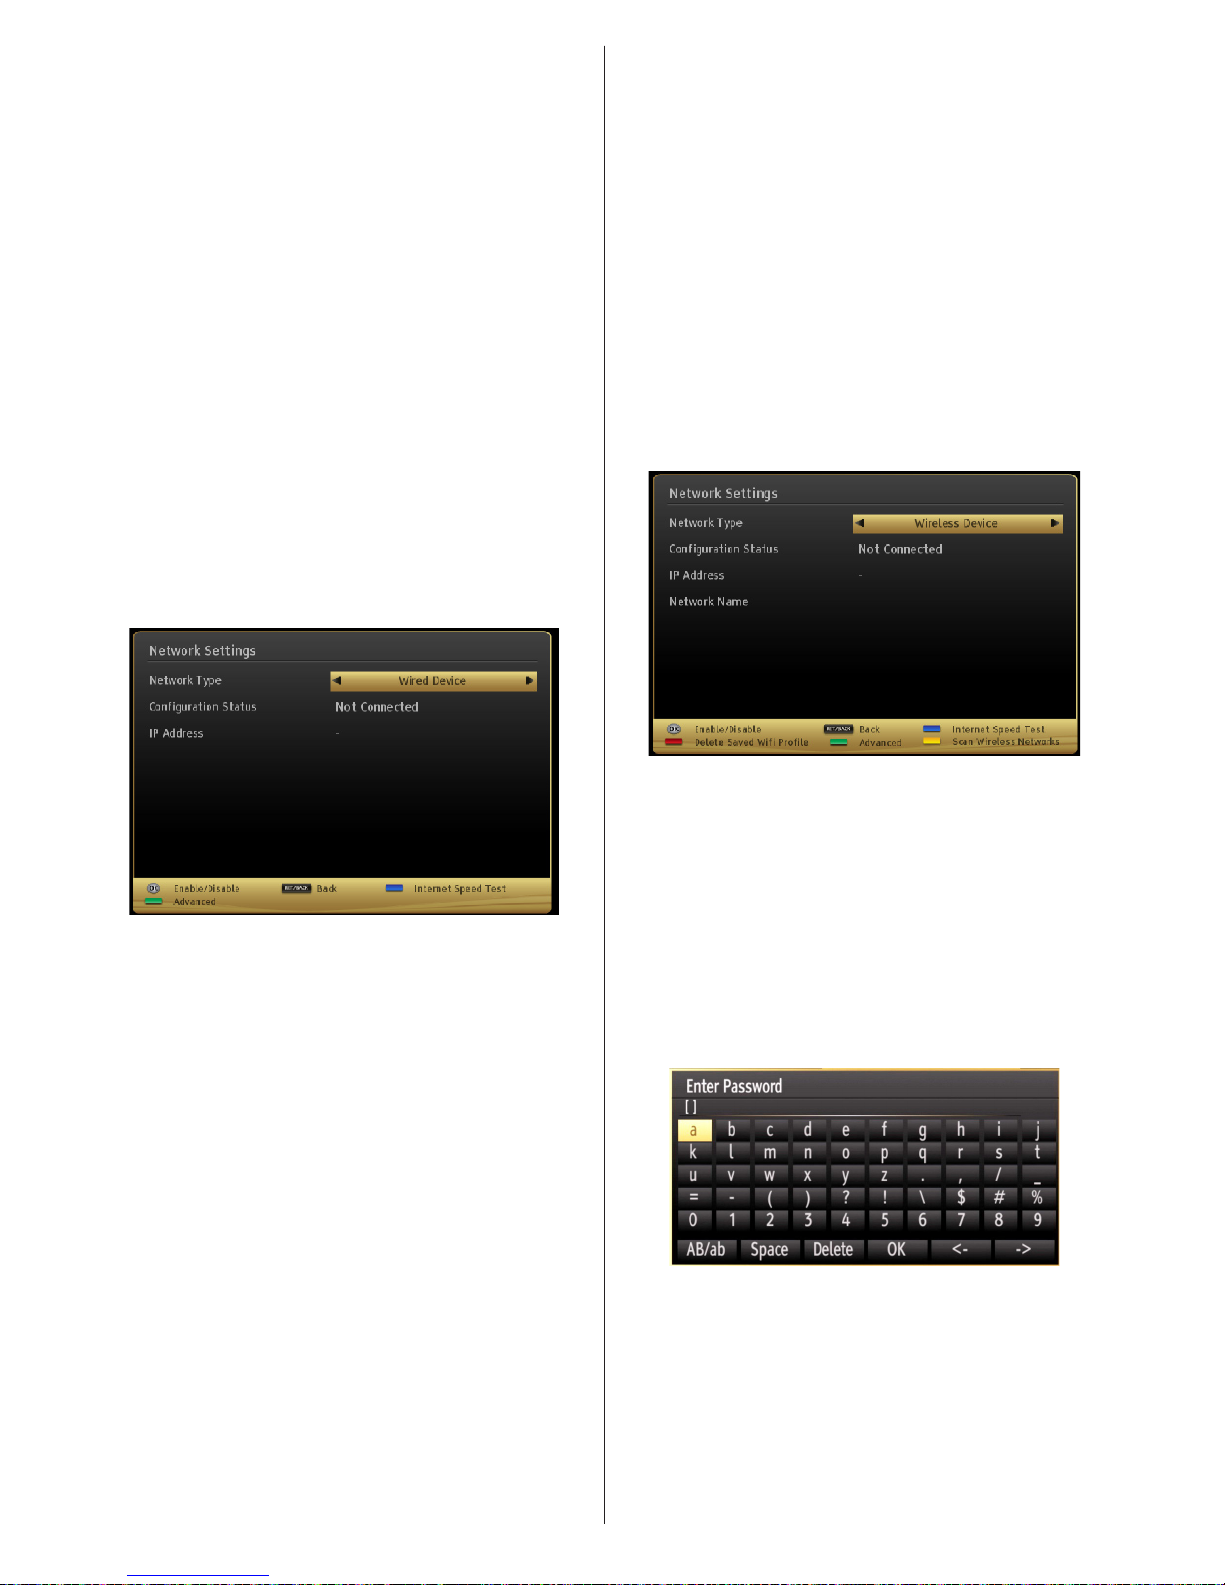
Bosanski - 90 -
• Bežični LAN adapter podržava 802.11 a, b, g i n tip
modema. Veoma je preporučljivo da koristite IEEE
802.11n protokol komunikacije da biste izbjegli
moguće probleme tokom gledanja videja.
• Upotrebite drugi USB ulaz ukoliko imate probleme
sa audio/video preformancima.
• Morate promeniti SSID vašeg modema kada u blizini
ima drugih modela sa istim SSID-om. U suprotnom,
moglo bi doći do problema povezivanja. Ukoliko
imate problema sa bežičnim povezivanjem, koristite
vezu preko kabela.
Kongurisanje postavki mreže
Mrežni postavci vašeg TV sadrže opcije za bežičnu i žičanu
vezu. Ipak, kao vaš Tv nema USB WiFi dongl (prodaje se
odvojeno), trebate koristiti Veza preko kabla. Ako pokušate
povezati se preko bežične veze kada vaš TV nema USB WiFi
dongl, na ekranu će se pojaviti poruka predupređenja i TV
neće dobiti IP adresu. Pokušajte povezati LAN kabela nakon
toga i tada TV će može dobiti IP adresu.
Konguracija postavke Žičanog uređaja.
Ako povezivate TV preko ETHERNET ULAZ, izaberite
Tip mreže kao Žičani uređaj da biste kongurisali.
Tip mreže
Tip mreže se može odabrati kao Žičani ili Bežični
uređaj, u skladu sa aktivnoj vezi ka TV-u. Izaberite ovo
kao Žičani ukoliko ste povezali TV preko LAN kabla.
Izaberite Bežični ako ste ga povezali preko bežičnog
USB dongla (prodaje se odvojeno).
Statusni konguracija
Ova sekcija pokazuje status veze. Izaberite Povezani
ako želite aktivirati vezu. Izaberite kao Nepovezani
da biste okončali aktivnu vezu.
IP adresa
Ako je aktivna veza dostupna, IP adresa biće
prikazana u ovoj sekciji. Ako želite konfigurisati
preference IP adrese, pritisnite ZELENU tipku i
prebacite se na naprijedni režim.
Kongurisanje postavke žičane mreže u
naprijednim režimom
Nakon pritiska ZELENE tipke, Napredni režim
biće dostupan. Dok i Naprednom režimu, pritisnite
CRVENU tipku da biste uredili postavke. Na kraju,
pritisnite OK da sačuvate, pritisnite RETURN/BACK
za otkazati.
Konguracija postavki Bežičnog uređaja
(opcionalno)
VAŽNO: “Veezy 200” USB dongl je potrijeban za
korišćenje bežične mreže. Da biste koristili vaš TV na
vašoj bežičnoj mreži, treba vam Veezy 200 bežični
USB dongl.
Odlika Wi-Fi se može koristiti za bežičnog povezivanja
na mrežu. Odlika se koristi jedino za infrastrukturnih
namijena, kao što su povezivanje na internetu, hbb
stranica i povezivanje sa DLNA servere (opcionalno).
Ako imate Veezy 200 WiFi dongl (prodaje se
odvojeno), izaberite Tip mreže kao Bežični uređaj
kako biste počeli proces povezivanja.
Da biste omogućili WiFi odliku, morate pravilno
kongurisati prole. Umetnite WiFi dongl (prodaje se
odvojeno) u jednom od USB portova.
Pritisnite ŽUTU tipku da biste skenirali bežične mreže
iz menija mrežnih postavki. Nakon toga, dostupne
mreže biće prikazane. Izaberite željenu mrežu sa liste.
Ako je željena mreža zaštićena lozinkom, unesite
pravilnu lozinku pomoći virtuelne tastature. Možete
koristiti ovu tastaturu preko tipke za navigaciju
(lijevo/desno/gore/dole) i OK na daljinskim upravljaču.
Sačekajte dok se IP adresa ne pojavi na ekranu.
To znači da je veza uspostavljena. Da biste okončali
bežičnu mrežu, označite Status konfiguracije i
pritisnite OK.
Page 92
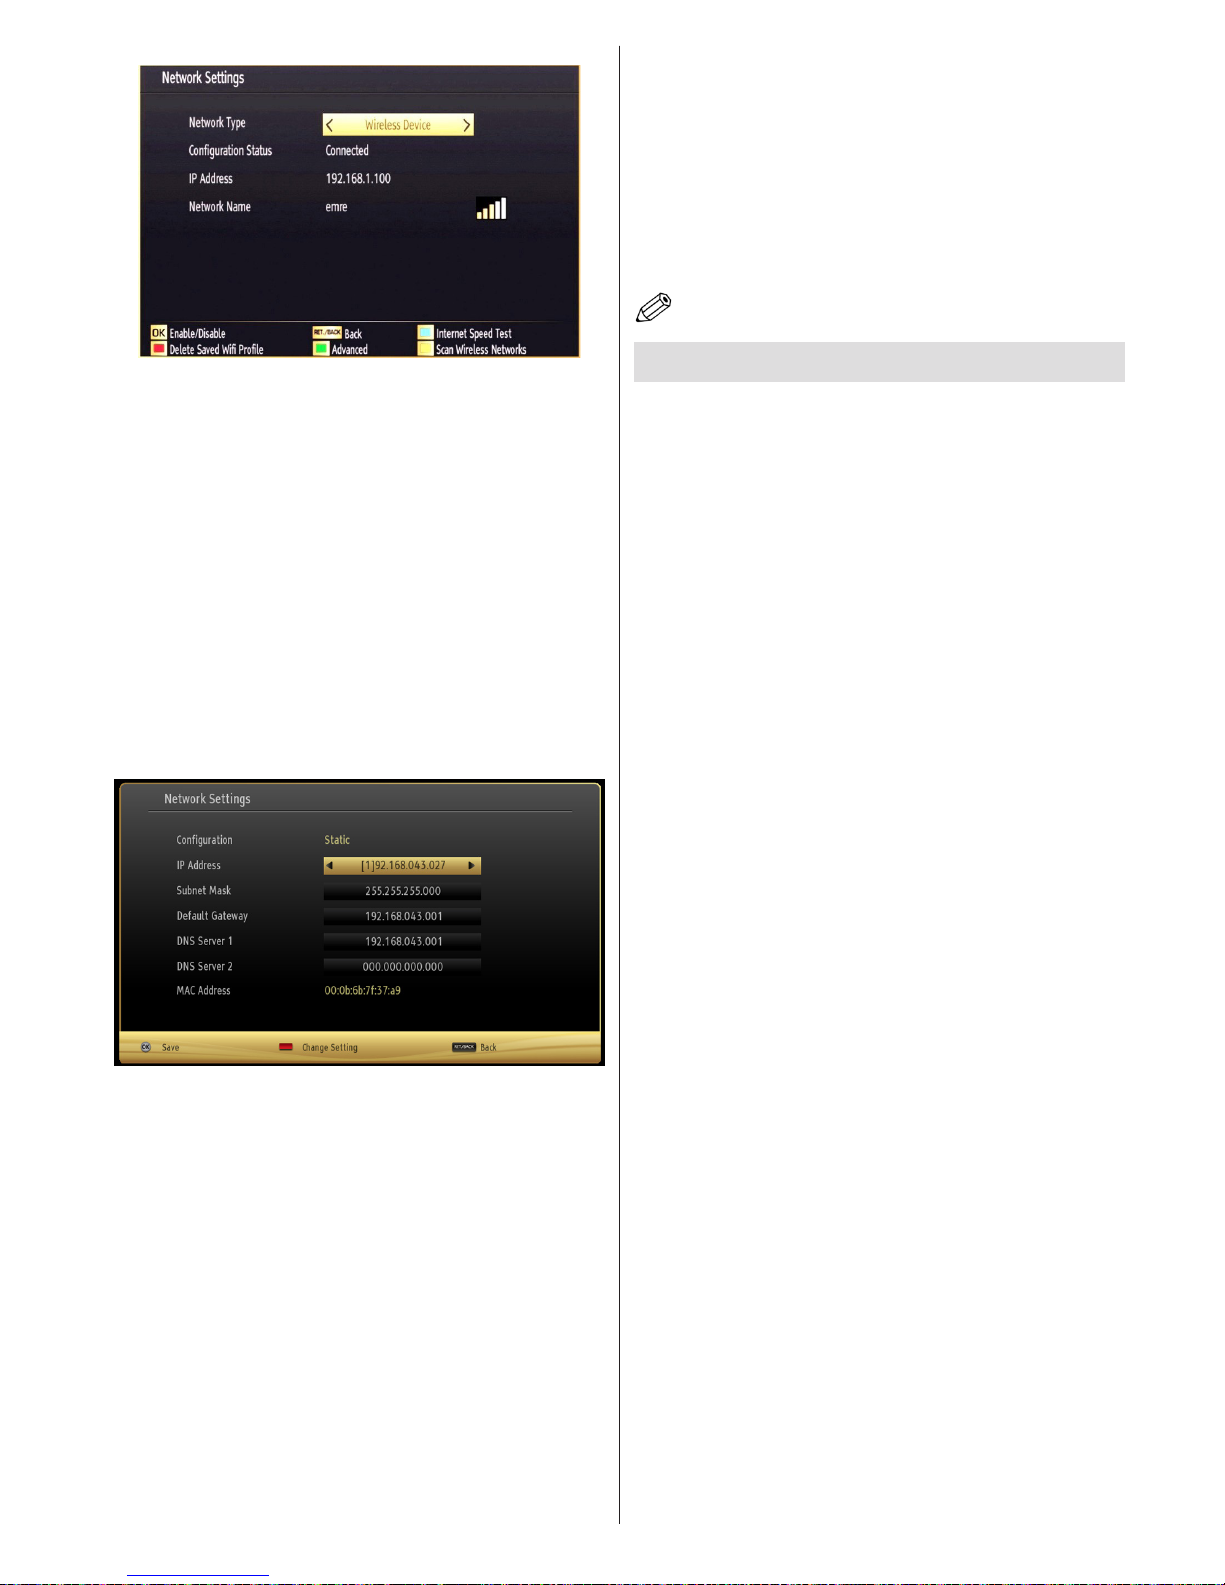
Bosanski - 91 -
Možete dvižiti se među umetka pritiskom tipki levo/
desno. Traka za pomoć na dnu dijaloga vam pokazuje
odlike koje možete koristiti. Pritisnite PLAVU tipku da
proverite brzinu vaše internet veze.
Možete provjeriti silu signala pomoći meni mrežnih
postavki za režim bežičnog uređaja.
Informacija
Statusni konguracija: Prikazuje wi status kao
povezani ili nepovezani.
IP aresa: Prikazuje trenutnu IP adresu.
Ime mreže: Prikazuje se ime povezane mreže.
Pritisnite ZELENU tipku da biste prešli na naprijedni
režim i zatim pritisnite OK da biste uredili postavke.
Brisanje sačuvanih WiFi prola
Sačuvane prole biću izbrisani ako pritisnite crvenu
tipku dok je na ekranu OSD za izbor bežičnog uređaja.
Povezivanje na vašeg mobitela preko WiFi
(opcionalno)
• Ako vaš mobitel ima WiFi odliku, možete povezati
vaš mobitel na vaš TV korišćenjem WiFi veze preko
rutera kako bi ste mogli pustiti sadržaj iz vašeg
telefona. Za to, vaš telefon mora imati prikladni
siftver za spodijeljivanje.
• POvežite se na vaš ruter sledeći korake navedene
niže u sekciji Bežično povezivanje.
• Nakon toga, povežite vaš mobitel sa ruterom i onda
aktivirajte softver za spodjelivanje vašeg telefona.
Tada, izaberite datoteke koje želite spodijeliti na
vaš TV.
• Ako je veza uspješno uspostavljena, sada možete
pristupiti spodjeljenim datotekama na vašem
mobitelu preko Prelistača medija vašeg TV-a.
• Uđite u meniju Prelistaća medija i prikazaće se
OSD izbora uređaja za reprodukciju. Izaberite
identikaciju vašeg mobitela i pritisnite OK da biste
produžili.
Napomena: Ova odlika može ne biti podržana sa strane
nekoh mobitela.
Rešavanje problema povezivanja
Bežična mreža nije dostupna
Osigurite se da fajrvol vaše mreže dopušta bežičnu
mrežu TV-a. USB WiFi dongl "Veezy 200" (prodaje
se odvojeno) treba biti umetnut praviljno (ako ga
imate). Ako bežična mreža ne funkcioniše kako treba,
probajte koristiti mrežu preko kabela. Konsultujte deo
Mreža preko kabela za više informacija o procesu.
Ako mreža TV-a ne radi, najprije proverite modem
(ruter). Ako je ruter u redu, proverite internet vezu
vašeg modema.
Probajte opet tražiti bežične mreže preko ekrana
menija Mrežne postavke.
Veza je bavna
Videti knjižicu instrukcije vašeg bežičnog modema oko
više informacija za unutrasnju servisnu obast, brzine
veze, kvalitet signala i ostale postavke. Trebate imati
vezu velike brzine za vaš modem.
Prekid tokom reprodukcije ili bavne
reakcije
U tom slučaju možete probati sledeće:
Držati udaljenost od najmanje tri metara od
mikrobranovih peći, mobilnih uređaja, blutut uređaja
ili ostalim uređajima kompatibilnim sa WiFi. Pokušajte
promeniti aktivni kanal WLAN rutera.
Korišćenje DLNA mrežne usluge
DLNA (Digital Living Network Alliance; Mrežna alijansa
Digitalni život) je standard koji olakšuje proces
gledanja digitalne elektronike i pravi je prikladnu za
korišćenje u domačoj mreži. O više informacija, ići
na www.dlna.org.
DLNA standard omogućuje vam gledanje i pustanje
slike, muzike i videja snimljene na DLNA servere koji
su povezani na vašoj domaćoj mreži.
Korak 1: Instalacija Nero Media Home
DLNA funkcija se ne može koristiti ako programa
servera nije instalirana na vaš PC. Pripremiti vaš PC
sa dostavljenoj Nero Media Home programu. Za više
informacije oko isntalacije, idite na dodatak H.
Page 93

Bosanski - 92 -
Korak 2: Povezivanje na žičanu ili bežičnu mrežu
Vidite odeljak Mrežne postavke o deteljnoj informaciji oko
instalacije.
Korak 3: Pustanje spodjeljenih datoteka preko
Prelistača medija
Iz glavnog menija izaberite Prelistač medija pomoći
tipke za lijevo ili desno i pritisnite OK. Prikazat će se
pretraživač medija.
DLNA podrška je dostupna jedino u režimu "Fascikla"
Prelistača medija Da biste omogućili režim fascikla,
idite na umetak Postavke u glavnom ekranu
prelistača medija i pritisnite OK. U opciju postavki,
označite Stil pregleda i promenite ga na Fascikla
pomoći tipke za lijevo ili desno.
Molimo izaberite željeni tip medija i pritisnite OK.
Ukoliko konfiguracija spodjeljivanja je propisno
postavljena, nakon izbora željenog tipa medija
pojaviće se sledeća OSD poruka. Izaberite OK
da biste prikazali izabranu mrežu ili sadržaj USB
memorije. Ako želite osviježiti listu uređaja, pritisnite
ZELENU tipku. Možete pritisnuti tipku MENU za izlaz.
Ako su nađene dostupne mreže, one će biti prikazane
na ekranu. Izaberote medijskog servera ili mrežu na
koji želite povezati se pomoći tipki “ ” ili “ ” i pritisnite
OK tipku.
Ako izaberete tip medija kao Video i izaberete
uređaj iz meni izbora, pojaviće se novi erkan
menija kao što je pokazano dole:
Izaberite Video iz ovog ekrana da biste listali sve
dostupne video datoteke iz izabrane mreže.
Za pustanje drugih tipova medija iz ovog ekrana,
morate ići natrag do glavnog ekrana Prelistača medija
i izabrati željeni tip medija i onda opet izabrati mrežu.
Obratite se sekciji Reprodukcija preko USB Prelistača
medija oko više informacija oko reprodukcije datoteka.
Datoteke prevoda ne rade kada se gleda video iz
mreže preko DLNA.
Možete povezati samo jedan TV sa DLNA na istoj
mreži. Ako iskrsne neki problem sa DLNA mrežom,
isključite i onda uključite vaš TV. Režim Trik i skok
nisu podržani tokom DLNA funkcije.
OPREZ:
Moguće je da ima nekih PC-ja koje ne mogu koristiti
DLNA funkciju zbog administratorksih i bjezbednosnih
postavcima. (kao na primer biznis PC-ja).
Za najbolji mrežni prenos na ovim televizorom, treba
se instalirati dostavljeni Nero softver.
Internet portal
Možete pristupiti režimu PORTAL preko vašeg TVa. Najprije, neophodna je internet veza. Uradite
korake opisane u sekciju POvezivanje na žičanu/
bežičnu mrežu (opciono) kako biste povezali vaš TV
na internet. Nakon utvrđenja veze, možete vidjeti ili
izabrati opcije portala.
Napomena: Potrebna je širokopjasna internet veza za
visokokvalitetno gledanje. Osigurite se da je internet
veza propisno urađena. Morate propisno postaviti
podatke o zemlji i jeziku tokom prve instalacije kako
bi imali propisni rad internet portala.
Pritisnite tipku “ ” na daljinskim i prikazaće se opcije
aplikacije portala. OPcije aplikacije biće prikazane kao
u šablonu dole. Sadržaj dostupne aplikacije so može
promijeniti ovisno od dostavljača sadržaja aplikacije.
Page 94

Bosanski - 93 -
Izaberite link ili aplikaciju pomoći tipki za lijevo i desno
ili dole i gore i pritisnite OK za aktivaciju.
• Koristite gore/dole i lijevo/desno da biste se
pomjerali među stavkama ekrana Portala.
• Pritisnite OK za potvrdi izbora.
• Pritisnite BACK da biste išli na prethodni ekran.
• Pritisnite EXIT da biste izašli iz režima internet
portala.
Napomena: Mogući problemi koji zavise od aplikacije
mogu biti uzrokovani sa strane dostavljača sadržaja.
Napomena oko PIP prozora
Trenutna programa biće prikazana na PIP prozor
ukoliko se prebacite na režim Portal dok gledate TV
kanale. Možete menjati kanale preko tastere P+/P-.
HDMI sadržaj u toku biće prikazani na PIP Prozoru,
ukoliko se prebacite na režim portal dok gledate
HDMI izvore.
Koristite “ ” ili “ ”, “ ” ili “ ” da biste se pomjerali
među stavkama ekrana Portala. Pritisnite OK za
potvrdi izbora. Pritisnite BACK da biste išli na
prethodni ekran.
Pritisnite EXIT da biste izašli iz režima internet portala.
Page 95

Bosanski - 94 -
Teletekst
“ ” Teletekst / Miks: Jednim pritiskom se aktivira
režim teleteksta. Pritisnite opet da biste postavili
teletekst vrhu programe (miješano). Još jednim
pritiskom, izlazi se iz režima teleteksta.
“BACK” Indeks: Služi za izbor početne stranice
teleteksta.
“I” Otkriti: Prikazuje skrivene informacije (npr.
rješenja igara).
"OK" Zadrži: Služi za zadržavanje stranice teksta.
Pritisnite opet za nastavak.
„ ”/“ ” Podkodirane stranice: Služi za odabir
podstranica, ako su dostupne i kada je teletekst
aktiviran.
P+ / P- i brojevi (0-9): Pritisnite za izbor stranice.
Napomena: Većina TV postaja koristi kod 100 za njihove
početne stranice.
Vaš TV podržava sisteme FASTEXT i TOP text.
Kada su ti sistemi dostupni, stranice se dijele prema
grupama ili temama. Kada je sistem FASTEXT
dostupan, odjeljci u stranici teleteksta postaju
označeni različitim bojama i mogu se birati pritiskanjem
obojenih tipki. Pritisnite željeni dugme u željenoj boji.
Pojavit će se natpis u odgovarajućoj boji, koji vas
upozorava na tipke koje trebate koristiti u slučaju TOP
text. Pritiskanjem komandi “ ” ili “ ” zahtevaće se
sljedeća, t.j. prethodna stranica.
Digitalni teletekst (samo za UK)
Pritisnite dugme „ “. Prikazuju se informacije
digitalnog teleteksta. Rukovajte ga tipkama u boji,
tipkama kursora i tipku OK.
Način rukovanja razlikuje se ovisno o sadržaju
digitalnog teleteksta. Slijedite uputstva sa ekrana
digitalnog teleteksta.
Kada se pritisne tipka „ “, TV aparat se vraća na
televizijski prenos.
Ažuriranje softvera
Vaš televizor može pronaći i ažurira nove nadogradnje
softvera preko televizijskih kanala. Tokom
pretraživanja kanala emitovanja, televizor traži
dostupne kanale sačuvani u vašim postavkama.
Savjetuje se da pre pretraživanju novijih verzija, da
se uključi automatsko pretraživanje i ažuriraju svi
dostupni kanali.
1) Traženje novijih verzija softvera preko
korisničkog interfejsa
• Moguće je ručno provjeriti da li postoje novije verzije
softvera za vaš televizor.
• Jednostavno idite na glavni meni. Izaberite Postavke
i odaberite meni Druge postavke. U meniju Druge
postavke idite do Ažuriranje softvera i pritisnite tipku
OK kako bi otvorili meni Opcije ažuriranja.
U meniju Opcije ažuriranja izaberite Skeniranje za
ažuriranje i pritisnite dugme OK.
• Ako se pronađe novija verzija, on započinje
njeno preuzimanje. Traka napredovanja pokazuje
napredovanje preuzimanja. Kada preuzimanje
uspješno završi, prikazuje se poruka kojom se traži
restartiranje TV-a radi aktivaciju novog softvera.
Pritisnite OK za nastaviti sa restartiranjem.
2) Pretraživanje u pozadini i režim ažuriranja
• Dok je televizor povezan na internetu, on u pozadini
traži važne novije verzije softvera. Ako se važna novija
verzija softvera pronađe, on je tiho preuzima. Kad
preuzimanje uspješno završi, prikazuje se poruka
kojom se traži restartiranje TV-a radi aktiviranja novog
softvera. Pritisnite OK za nastaviti sa restartiranjem.
3) Režim traženja i ažuriranja u 3:00 ujutro
• Ako je omogućeno Automatsko skeniranje u meniju
Opcije ažuriranja, televizor se uključuje u 03:00 i
pretražuje televizijske kanale kako bi pronašao nove
verzije softvera. Ako se novi softver pronaðe i uspešno
preuzme, pri sledećem uključivanju televizor se podiže
sa novom verzijom softvera.
Napomena o operaciji ponovnog podizanja sistema:
Ponovno podizanje sistema je poslednji korak operacije
ažuriranja softvera u slučaju da je novi softver uspješno
preuzet. Tokom ponovnog podizanja sistema televizora vrši
se konačna inicijalizacija. U sekvenci ponovnog podizanja
sistema isključeno je napajanje ekrana, a dioda naprijed
ukazuje na aktivnost svojim treperenjem. Nakon oko 5
minuta kasnije televizor se ponovo pokreće sa aktiviranim
novim softverom.
• Ako se vaš televizor ne pokrene ponovo za 10
minuta, isključite ga iz struje na 10 minuta, a zatim ga
ponovo uključite u struju. Televizor bi trebao uključiti
se bezbedno sa novim softverom. Ukoliko vaš TV i
dalje ne radi, ponovite postupak sa isključivanjem iz
struje i ponovnim uključivanjem još nekoliko puta. Ako
i dalje ne radi, pozovite osoblje servisa da popravi
vaš problem.
Pažnja: Dok svetleća dioda trepće tokom ponovnog
podizanja sistema ne isključujte televizora iz struje. U
suprotnom, moguće je doći do toga da televizor ne može
ponovo podići sistem, a takav problem može da popravi
jedino servis.
Ručno ažuriranje softvera
Osigurite se da je ethernet kabl povezan na vaš TV.
AKo je kabl povezan na TV, osigurite se
da TV dobija signal. Vidjeti je li "Dobro" postoji u
sljedećim putem:
Meni -> Postavke -> Postavci mreže -> Status
konguracije -> Povezano
Idite na umetak Postavci u glavnom meniju i izaberite
Ostali postavci. Označite Ažuriranje softvera i pritisnite
OK.
Izaberite Skeniranje za nove verzije i pritisnite OK.
Page 96

Bosanski - 95 -
Ispod nasloba "Ažuriranje softvera" biće vidljiv OSD
ekran koji uključuje traku napredovanja.
Ekran predupređenja će se pojaviti na ekranu,
navodeći da će TV biti restartirani. Pritisnite OK da
biste završili proces ažuriranja i restartirali TV.
Rješavanje problema I savjeti
Istrajnost slike – sjenke
Imajte u vidu da, kada se prikazuje neprekidno ista
slika, može doći do pojave sjenki. Postojanost slike
LED TV-a može se izgubiti nakon kratkog vremena.
Isključite TV na neko vrijeme. Da biste izbjegli
ovu pojavu, ne ostavljajte ekran duže vreme na
nepokretnom slikom.
Nema napajanja
Ukoliko vaš TV nema napajanja, provjerite je li strujni
kabel uključen u strujnim kolu.
Loša slika
1. Jeste li odabrali ispravan TV sistem?
2. Da li je vaљ TV prijemnik ili kućna antena
postavljena preblizu neuzemljenoj audio opremi,
neonskoj rasvjeti, i sl.?
3. Brda/planine i visoke zgrade mogu uzrokovati
pojavu dvostruke slike ili sjena. Kvalitet slike ponekad
možete poboljšati promjenom usmjerenosti antene.
Jesu li slika i teletekst neprepoznatljivi?
4. Provjerite jeste li unijeli točnu frekvenciju.
5. Ponovno ugodite kanale.
6. Kvalitet slike može degradirati ukoliko ste
istovremeno priključili dva spoljna uređaja na TV. U
tom slučaju, odbacite jedan od spoljnih uređaja.
Nema slike
1. To što nema slike, znači da vaš TV ne prima
signal. Jeste li odabrali pravo dugme na daljinskom
upravljaču? Pokušajte još jednom. Također, provjerite
je li odabran ispravan izvor.
2. Je li antena ispravno priključena?
3. Jesu li utikači čvrsto umetnuti u utičnicu antene?
4. Je li kabel antene oštećen?
5. Koriste li se odgovarajući utikači za priključivanje
antene?
6. Ako niste sigurni, potražite savjet na mjestu kupnje.
Nema zvuka
1. Je li TV postavljen na “njem”? Za otkazati "njem",
pritisnite tipku " ", ili pojačajte nivo zvuka.
2. Zvuk dolazi samo iz jednog zvučnika. Je li balans
zvučnika ekstreman? Pogledajte deo Meni zvuka.
Daljinski upravljač – ne radi
Vaš TV više ne reaguje na daljinski upravljač. Moguće
je da su baterije slabe, ako je tako, uvek možete
koristiti kontrolne tipke na TV-u. (* jedino je moguće
ukoliko nisu zaključani preko roditeljske kontrole)
Izvori ulaza – ne mogu biti izabrani
1. Ako ne možete odabrati ulazni izvor, možda nije
uređaj priključen.
2. Ako ste pokušali priključiti uređaj, provjerite AV
kablove i spojeve.
Snimanje nije moguće
Da biste snimili progamu, morate prvo povezati USB
disk na vapem TV-u dok je TV isključan. Zatim trebali
bi uključiti TV da biste omogućili odliku snimanja.
U suprotnom, odlika snimanja neće biti dostupna.
Ukoliko ne možete snimati, isključite TV I onda ponovo
umetnite USB
uređaj dok je TV ugašeni.
USB je suviše spor
Ukoliko se na ekranu prikaže „USB je prebavan“
dok počev snimanja, pokušajte restartirati snimanje.
Ukoliko još dobijate istu grešku, moguće je da vaš
USN disk ne zadovoljava zahteve brzine. Povežite
drugi USB disk.
Nedostupna internet veza/DLNA režim nije
operativan
Ukoliko je MAC adresa (unikatniidentikaciski broj)
vašeg PC-a ili modema trajno registrirana, moguće
je da se vaš TV ne može povezati na internet. U tom
slučaju, MAC adresa je potvrđena svaki put kada se
povezivate na internet. To je mjera predostrožnosti
protiv neutorizovanog pristupa. Jer vaš TV ima
svoju MAC adresu, vaš dostavljač internet usluga ne
može potvrditi MAC adresu vašeg TV-a. Zbog toga,
vaš TV se ne može povezati na internetu. Javite se
vašem internet provajderu I zatražite informacije oko
povezivanja drugačijeg uređaja, kao na primjer vaš
TV, na internetu.
Takođe, moguće je da nema konekcije zbog problema
sa rewall-om. Ukoloiko mislite da je to uzrok vaših
problema, obratite se vašem internet provajderu.
Firewall može biti uzrok problema povezivanja i otrkića
tokom korišćenja TV-a u DLNA modu ili tokom surfanja
preko DLNA.
Nepravilni domeijn
Osigurite se da ste se već logirali na vaš PC sa
autorizovanom lozinkom/korisničkim imenom i takođe
osigurite se da je vaš domeijn aktivan, pre negó šta
delite nekakve fajlove na vašem DLNA server una PCu. Ukolik oje domeijn nevalidan, to može uzrokovati
probleme tokom surfanja u DLNA modu.
Page 97

Bosanski - 96 -
Internet prelistač
Osvježiti
Prethodno/
sljedeæe
Brzi pristup
Domaæa strana
Mjesto za adresu
Dodati
Istorija
Markice
Zumirano
Postavke
Preèice daljinskog upravljaèa
(uveæati - smanjiti sliku/natrag/kuæi)
• Da biste upravljavali prelistačem, možete koristiti
strelice na daljinskim upravljačem. Pritisnite OK
za nastavak.
• Nakon prve instalacije, na pristupnoj stranici
prelistača biću prikazane odnaprijed zadane web
stranice i logoa (vidi sliku gore). Da biste dodali
željenu stranicu na stranici brzog pristupa, dok
ste još na stranici koji želite dodati, izaberite meni
"Dodaj" i izaberite taster "Brzi pristup".
• Ukoliko želite dodati markice, izaberite ovu tačku
dok je željena stranica na kranu.
Brzi pristup
Dodati
Markice
• Možete navigirati prelistačem na tri načina. Najprije,
uneti URL u liniju adrese.
• Možete pretraživati ključne reči klikanjem tastera
za pretragu u dijalogu adresa ili klikanjem na
linkova stranica koje če vas odnijeti na odnosnim
stranicama.
• Kada postavite kurzor na sredinu ekrana, pokazuju se
prečice daljinskog.
• Koristite tastere za zum prečice ili zum meni za
smanijavnje ili uveličavanje stranice.
• Možete očistiti kolačice ili sve podatke iz sekcije
Postavci.
• Vaš TV je kompatibilan sa USB mišem. Utaknite
vaš miš ili bežični adapter za miš u USB ulaz TV-a.
• Da biste vidjeli Istoriju, kliknite taster Istorija. Takođe
možete očistiti istoriju prelistanja tu.
• Prelistač ne podržava višestruke tabulatore.
• Neke internet stranice imaju eš sadržaj. One nisu
podržane sa strane prelistača.
• Vaš TV ne podržava daunlodiranje preko
prelistača.
Da biste koristili internet prelistača, izaberite njegovo logo iz portala.
Page 98
Bosanski - 97 -
Početak sa Skype-om
Preko SKype na vašem TV praviti video i audio pozive. Izaberite Skype iz
portala da biste počeli razgovor.
Slijedite instrukcije na ekranu da biste saznali kako rukovati odlikama.
NAPOMENA:
• Direktno povezati podržanu kameru preko USB ulaza na vaš TV.
• Ako kamera ne radi propisno, ugasiti TV i izvuciti ga iz struje. Povježite
opet vašu kameru i uključite TV.
• U trenutku kada se TV ugasi, Skype se isključuje.
• Buka iz okoline utiče na kvalitet zvuka i nivo glasa.
• Kvalitet zvuka se može promijeniti u ovisnosti od bežične veze.
• Idite na www.skype.com o više informacija oko Uvjeta korišćenja Skype-a.
• Za povezivanje Skype-a potrebna vam je veza na mrežu.
• Skype će vas upozoriti kada vas neko nazove dok gledate TV ili radite na Skype-u.
• Potrebna vam je Skype kamera (prodaje se odvojeno) da biste koristili sve odlike Skype-a. Ako do sada
nemate jednu, morate kupiti kameru (kompatibilna sa Vesca100).
Napomena: Kada uključite Tv i ni jedan korisnik nije bio
postavljen na Skype-u, na ekranu će se pojaviti slika
prikazana na strani.
Obaveštenje o licenciranju
Skype je zaštićeni znak Skype-a ili povezanih kompanija. Ova aplikacija/proizvod nije odobrena ili prihvaćena
sa strane Skype-a, Skype Communications S.a.r.l.-a ili povezanih preduzeća.
Nikakvih hitnih poziva preko Skype-a.
Skype nije zamijena vašeg običnog telefona i ne može se koristiti za
hitne pozive. Izaberite Skype iz portala da biste počeli razgovor.
Page 99

Bosanski - 98 -
Prijavi se i Otvori račun
Da biste koristili Skype, trebate Skype račun.
Možete otvoriti Skype račun preko ove aplikacije u meniju "Prijavi se i Otvori
račun" ukoliko već nemate jedan. Ako već imate Skype račun, praviljno uneti
ime i lozinku . Izaberite Prijavi se i pritisnuti OK.
Ako imate Skype račun i ste zaboravili lozinku, pritisnite crveni taster da
biste resetirali lozinku.
Nakon uspješne najave na vaš račun, na ekranu se pokazuje lista kontakta.
Možete je vidjeti na desnoj strani ekrana. Vaše Skype ime, poruka raspoloženja i pregled kamere (ako je
povezana) pokazuju se na levoj strani ekrana.
Page 100

Bosanski - 99 -
Dodati kontakt
Pritiskom na taster izabrati opciju Pretraga kontakta. Unjeti celo ime, skajp ime ili imejl adresu i dodati.
Koristiti kontrole daljinskog ili virtuelnu tastaturu za unošenje ključne reči.
U ovom djelu se može vidjeti istorija skajpa. Za ponoviju istoriju, pritisnuti tastere p+ i p-. Za brisanje razgovora
pritisnuti crveni taster. Kada pritisnete OK, prikazuje se pregled kontakta. U ovom djelu se takođe može vidjeti
informacija prola.
Novija istorija
Dolazeći poziv
Izlazeći poziv
Ispušteni poziv
Značenje ikone
 Loading...