

Page 1

AC15CC1
AC15CC1X
Owner’s Manual
Manuel d’utilisation
Bedienungsanleitung
Manual de Usuario
1SGFE
Page 2

IMPORTANT SAFETY INSTRUCTIONS
• Read these instructions.
•Keep these instructions.
• Heed all warnings.
•Follow all instructions.
• Do not use this apparatus near water.
• Mains powered apparatus shall not be exposed to dripping or
splashing and that no objects filled with liquids, such as vases,
shall be placed on the apparatus.
• Clean only with dry cloth.
• Do not block any v entilation openings . Install in accordance with
the manufacturer's instructions.
• Do not install near any heat sources such as radiators, heat
registers, stoves, or other apparatus (including amplifiers) that
produce heat.
• Do not defeat the safety purpose of the polarized or groundingtype plug. A polarized plug has two blades with one wider than
the other. A grounding type plug has two blades and a third
grounding prong. The wide blade or the third prong are provided
for your safety. If the provided plug does not fit into your outlet,
consult an electrician for replacement of the obsolete outlet. (for
U.S.A. and Canada)
• Protect the power cord from being walked on or pinched
particularly at plugs, convenience receptacles, and the point
where they exit from the apparatus.
• Only use attachments/accessories specified by the manufacturer.
• Unplug this apparatus during lightning storms or when unused
for long periods of time.
•Turning off the power switch does not completely isolate this
product from the power line so remove the plug from the soc ket if
not using it for extended periods of time.
• Install this product near the wall socket and k eep the po w er plug
easily accessible.
•WARNING—This apparatus shall be connected to a mains
socket outlet with a protective earthing connection.
• Refer all servicing to qualified service personnel. Servicing is
required when the apparatus has been damaged in any way,
such as power-supply cord or plug is damaged, liquid has been
spilled or objects have f allen into the appar atus , the appar atus
has been exposed to rain or moisture, does not operate normally,
or has been dropped.
• Do not install this equipment on the far position from wall outlet
and/or convenience receptacle.
• Do not install this equipment in a confined space such as a box
for the conveyance or similar unit.
• Use only with the cart, stand, tripod, bracket, or table specified by
the manufacturer , or sold with the appar atus . When a cart is
used, use caution when moving the cart/apparatus combination
to avoid injury from tip-over.
The lightning flash with arrowhead symbol
within an equilateral triangle, is intended to
alert the user to the presence of uninsulated
“dangerous voltage” within the product's
enclosure that may be of sufficient magnitude
to constitute a risk of electric shock to persons.
The exclamation point within an equilateral
triangle is intended to alert the user to the
presence of important operating and
maintenance (servicing) instructions in the
literature accompanying the product.
CE mark for European Harmonized Standards
CE mark which is attached to our company’s products of A C mains
operated apparatus until December 31, 1996 means it conforms to
EMC Directive (89/336/EEC) and CE mark Directive (93/68/EEC).
And, CE mark which is attached after January 1, 1997 means it
conforms to EMC Directive (89/336/EEC), CE mark Directive (93/
68/EEC) and Low Voltage Directive (73/23/EEC).
Also, CE mark which is attached to our company’ s products of
Battery operated apparatus means it conforms to EMC Directive
(89/336/EEC) and CE mark Directive (93/68/EEC).
* Company names, product names, and names of f ormats etc. are
the trademarks or registered trademarks of their respective owners.
AALWAYS use the supplied mains lead, if a replacement is
required please contact your authorized Vox Dealer.
B DO NOT switch the amplifier on without a loudspeaker
connected.
C ENSURE that any extension cabinets used are of the correct
impedance.
D NEVER attempt to bypass the fuses or fit ones of the
incorrect values.
E DO NOT attempt to remove the amplifier chassis, there are
no user serviceable parts.
F Refer all servicing to qualified service personnel including
replacement of fuses and valves. Servicing is required when
the apparatus has been damaged in any way, such as when
the power supply cord or plug is damaged, liquid has been
spilled or objects have fallen into the apparatus, the apparatus has been exposed to rain or moisture, does not operate
normally or has been dropped.
CAUTION: Any changes or modifications not expressly approved
by the party responsible for compliance may void the users
authority to operate the equipment.
Note: It is recommended that all audio cables, with the exception
of the speaker lead, used to connect to the AC15 Custom
Classic are of a high quality, screened type. These should not
exceed 10 metres in length.
Always use a non-screened Vox approved speaker lead with
the AC15 Amplifier and extension cabinets.
WARNING: Do not obstruct ventilation grilles and always ensure
free movement of air around the amplifier!
2
Page 3
INTRODUCTION
Congratulations on your purchase of the AC15 Custom Classic. This amp is the culmination of
years of manufacturing expertise in high quality, guitar amplifier design. We have taken the best AC15
designs, both old and new and added a number of useful and interesting features to give you the most
tonally flexible AC15 to date!
We’re confident you will find these improvements extremely useful and that your new amplifier will give you
many hours of tonal pleasure. Your AC15 is equipped with a number of modern features and conveniences
such as a master volume, global reverb and tremolo. Please read this manual carefully so that you can
familiarize yourself with these.
In order to ensure that this new AC15 meets exacting standards for tone, quality and reliability, it has been
built entirely in our vertically-integrated manufacturing facility, a facility capable of many processes not
usually found in guitar amplifier factories. We design and manufacture our own transformers, speakers
(except for the venerable Vox “Blue” made in the UK by Celestion), cabinets and electronics. What this
means to you is that the sound of your new AC15 Custom Classic is second to none.
There are two models in the range:
AC15CC1 that uses the VOX / Wharfedale custom GSH1230-16 speaker
AC15CC1X that uses the VOX / Celestion AlNiCo Blue loudspeaker
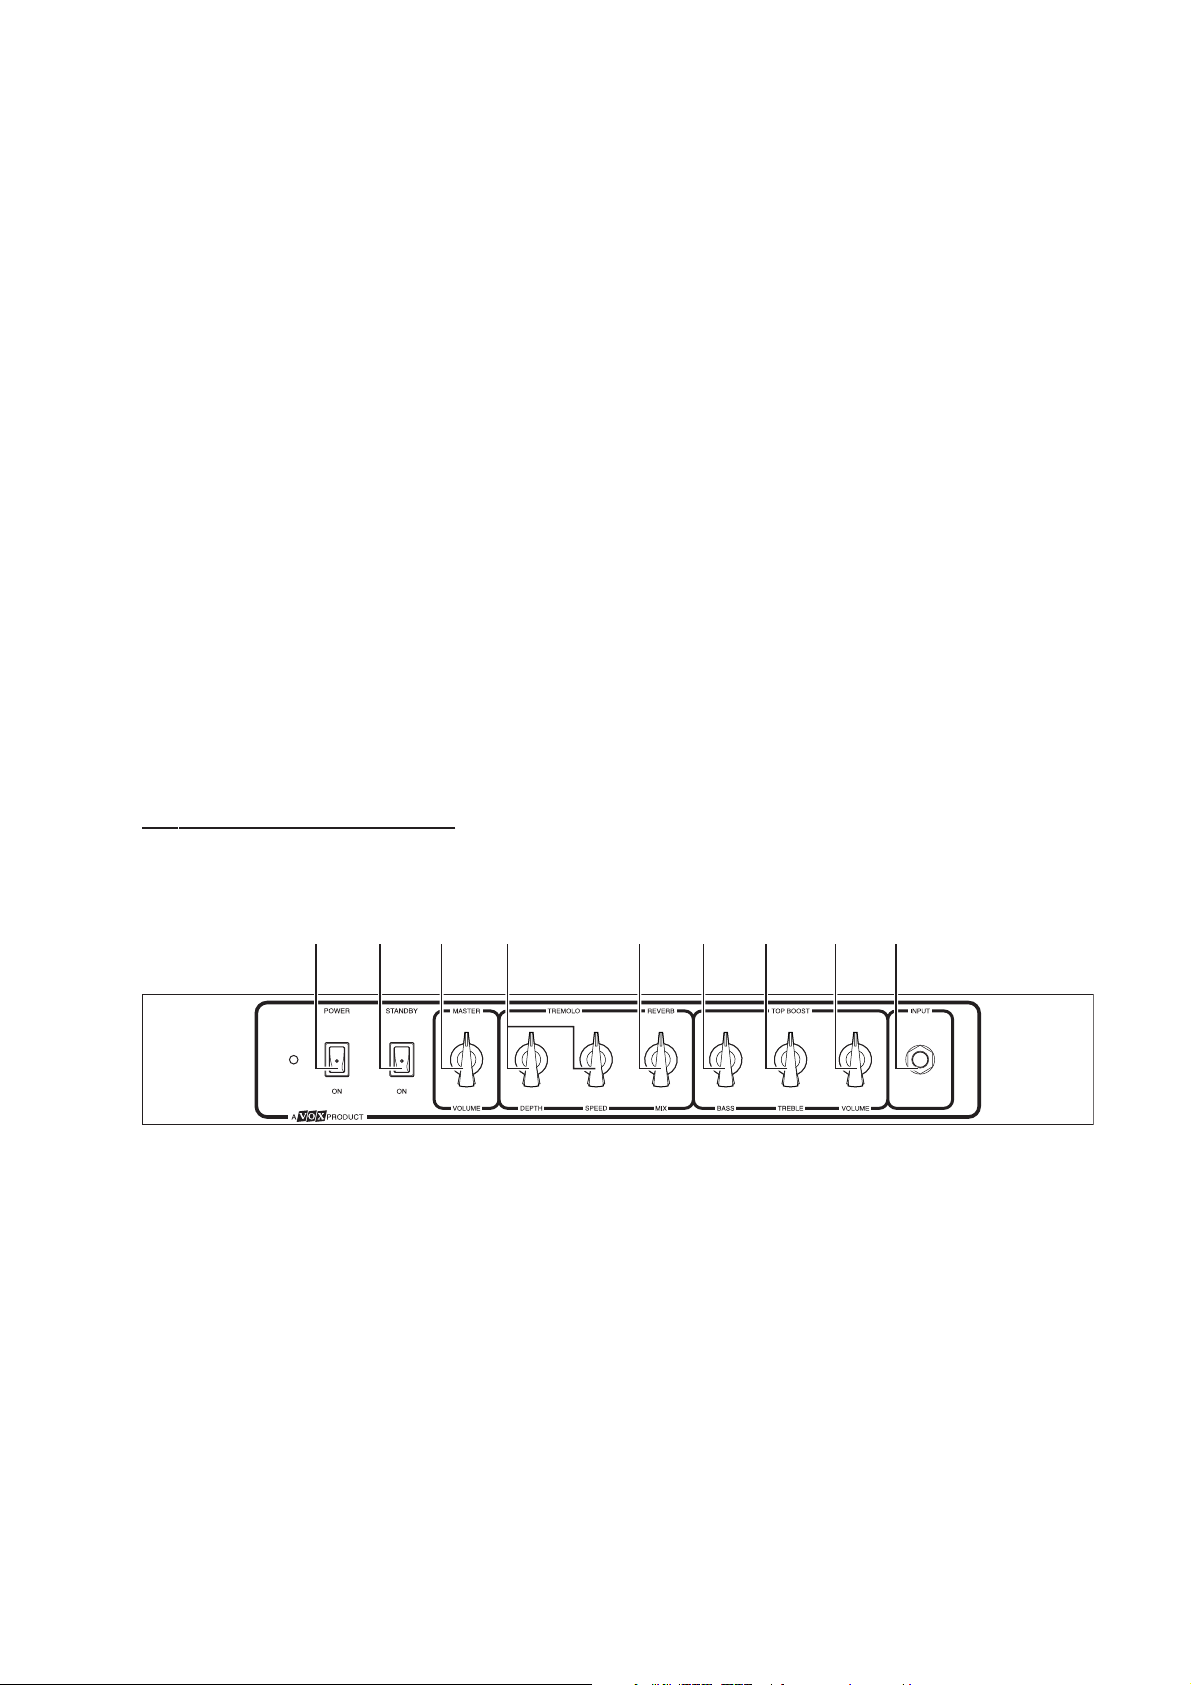
FRONT PANEL LAYOUT
1 2 3 4 5 6 7 8 9
1. Power Switch: This is the ON/OFF switch for the power to the amplifier.
Please ensure the amplifier is switched off and unplugged before being
moved.
2. Standby Switch: This switch allows the amplifier to attain the correct working temperature
before applying the H.T. supply.
Before connecting the amplifier to the Mains supply, ensure the Power and
Standby switches are in the off position.
Tu rn on the Power switch first and then wait 2–3 minutes before turning on
the Standby switch. Doing this each time you play helps prolong tube life.The
Standby switch is also very useful for playing live as it allows you to keep
the valves at a functional temperature between sets.
3
Page 4
3. Master Volume: This controls the overall (Master) volume of your amplifier. Cleaner sounds
can be achieved by lowering the Volume and raising the Master. Setting
the Master lower and the Volume higher will give you a fatter, more distorted tone.As with all the controls of this amplifier, please experiment with
different configurations to find the tones that fit your playing style.
4. Tremolo Section: This section allows you to control the overall Tremolo by adjusting the Speed
and Depth. You can remotely switch the Tremolo On or Off with the sup-
plied VF002 footswitch.
Speed: As you might have guessed, this controls the speed of the built-in Tremolo.
Depth: This controls the depth (intensity) of the built-in tremolo.
5. Reverb Section: This section allows you to control the global Reverb level. You can remotely
switch the reverb On or Off with the supplied VF002 footswitch.
6. Bass: This controls the bass (low) frequencies in your sound - from warm and
light when turned down (counterclockwise) to dark and heavy when turned
up full (clockwise) and all points in-between.
7. Treble: This controls the treble (high) frequencies in your sound - from soft and
round when turned down (counterclockwise) to bright and cutting when
cranked (clockwise) and all points in-between.
8. Volume: This determines the sensitivity of the preamp section. Depending on where
this is set, you can either blend in more gain by turning it clockwise or you
can set it lower for a cleaner, “chimey” sound. This works directly with the
Master Volume meaning that if you keep this volume lower and the Master
higher, you will get a cleaner sound and conversely, if you keep this higher
and the Master lower you will get more gain.
9. Input: This is where you plug in your guitar.
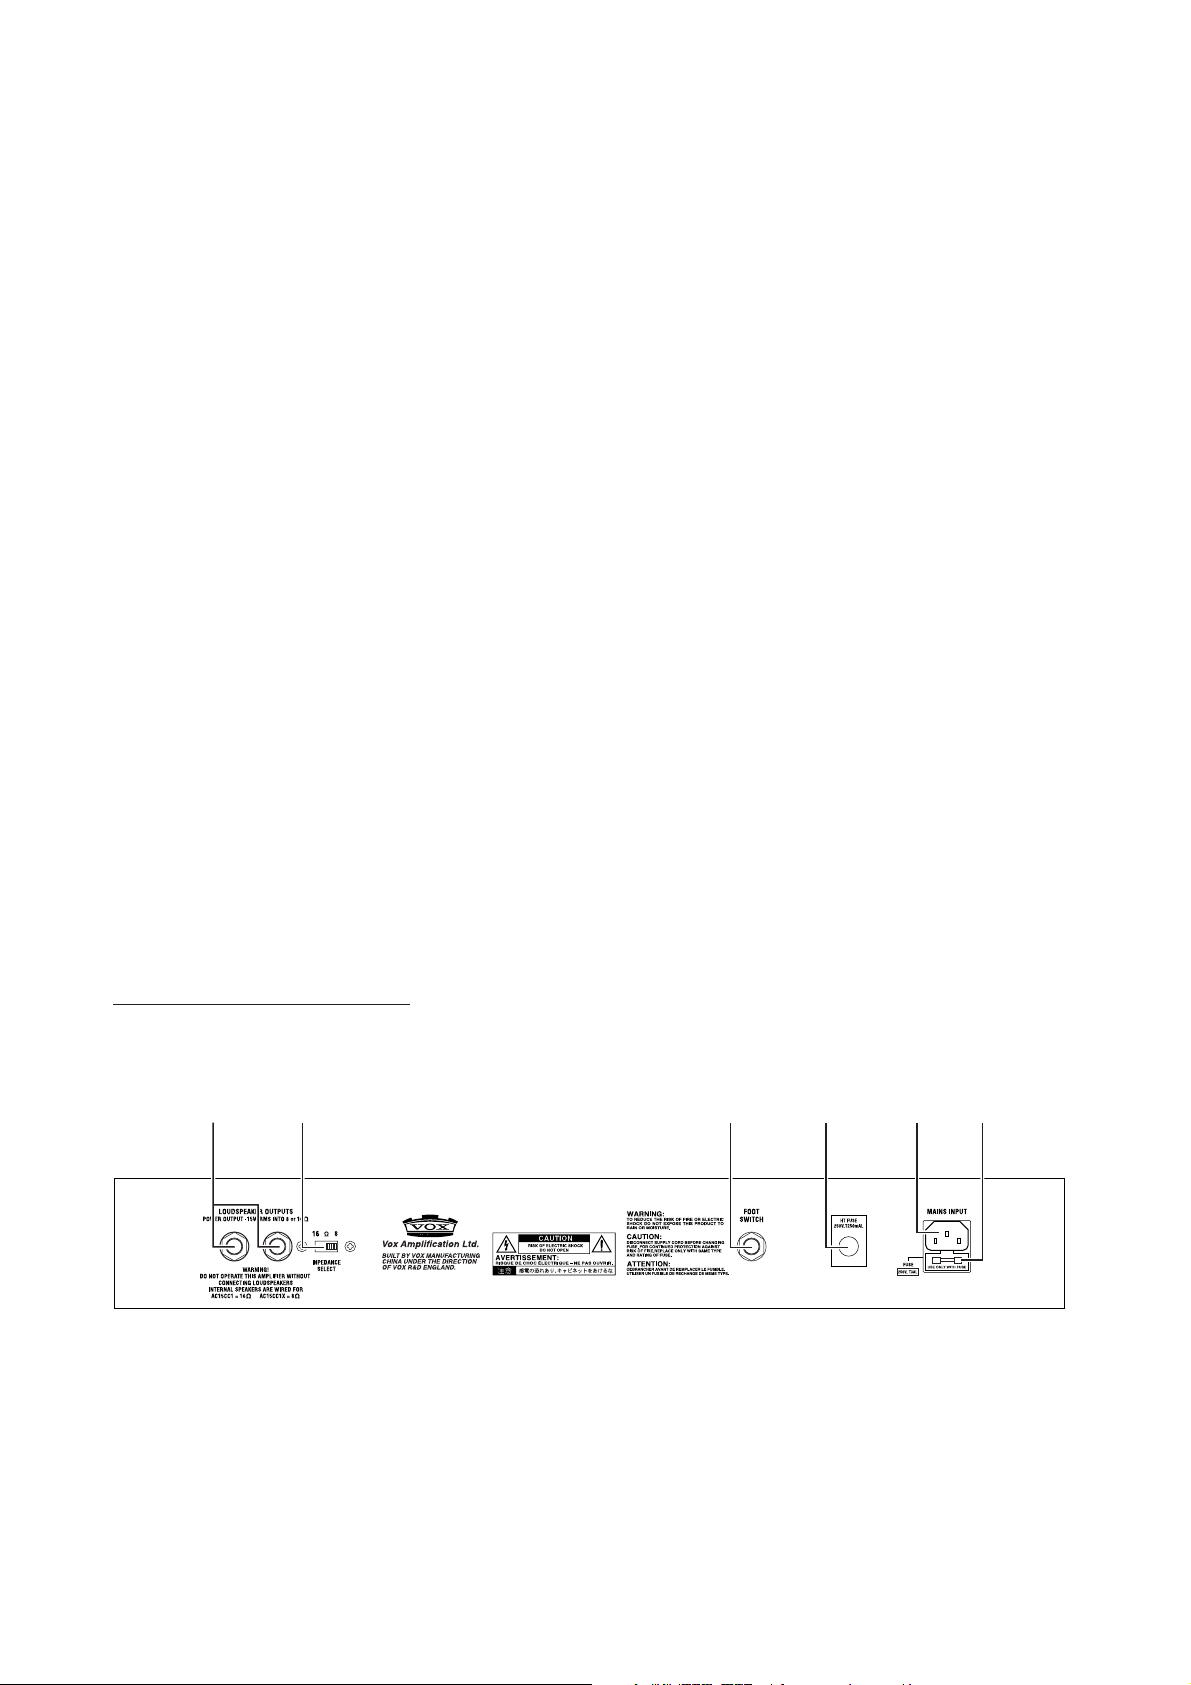
REAR PANEL LAYOUT
1 2 3 4 5 6
1. Loudspeaker Output Jacks:
This is where you can hook up an external speaker cabinet(s) if desired.
2. Impedance Select Switch
Model AC15CC1
16 Ohm: Allows for the following configurations:
1) Set it to this if you use the internal 16ohm speaker only or 16ohm exter-
nal cabinet only.
4
Page 5

8 Ohm: Allows for the following configurations:
1) Set it to this if you connect an extension cabinet. You’ll be running the
internal and external speaker in parallel. The impedance of the extension
cabinet must be 16 Ohms.
2) Set it to this if you connect an external 8 ohm cabinet and disconnect
the internal speaker.
Model AC15CC1X
This has an 8ohm loudspeaker internally fitted and the amplifier must be
set at 8ohm output. This speaker must be disconnected if amplifier is used
with an extension cabinet.
3. Footswitch jack: This is where you connect the supplied VF002 VOX footswitch so you can
turn the Reverb and Tremolo on and off.
4. HT Fuse: This fuse protects your amp should a fault occur with the power. The most
common reason for this fuse to blow is when an output tube becomes
faulty. The correct value of the HT fuse is located on the rear panel of the
amplifier and should only be replaced with one of the same value.
5. Mains Input: This is where the supplied, detachable Mains (power) cord is connected.
The specific mains input voltage rating that your amplifier needs to run at
is located on the rear panel of your amplifier. Before making any connections or powering up the amplifier, make sure the correct voltage is set. If
you have any doubt, refer to your local VOX dealer.
6. Mains Fuse: This fuse provides an overall safety protection in the event your amplifier
develops and electrical fault. The correct value of the fuse is located on the
rear panel of your amplifier and should only be replaced with one of the
same value.
Specifications
Power Output: 15 Watts RMS into an 8 or 16 ohm loudspeaker load.
Internal speaker: 16 ohm, 12", 30 Watt VOX/Wharfedale Custom—model AC15CC1
8 ohm 12", 15 Watt VOX/Celestion AlniCo Blue—model AC15CC1X
Valve/tube complement:
Rectifier: silicon rectifier with passive SAG circuit.
Mains input: preset 100V or 120V or 230V or 240 V ~ 50 or 60 Hz depending on country
Mains Fuse value: 250V, T1.6AL for 100V / 250V, T1.25AL for 120V
HT Fuse: 250V, T250mAL.
Dimensions: 605 x 262 x 440 mm / 23.82" x 10.31" x 17.32"
Weight: AC15CC1: 21.6kg / 47.62 lbs. , AC15CC1X: 21.7kg / 47.84 lbs.
Included items: Power cable, VF002 footswitch
2 x EL84/6BQ5 & 2 x 12AX7/ECC83.
of sale. Please see Rating Plate on rear of amplifier for exact specification.
250V, T630mAL for either 230V & 240V.
Warning!—Replace fuse with same type and rating
Appearance and specifications of this product are subject to change without notice.
URL = http://www.voxamps.co.uk
5
Page 6
INFORMATIONS IMPORTANTES DE SECURITE
• Lisez attentivement ces instructions.
•Veuillez conserver ces instructions.
• Observez tous les avertissements.
• Suivez toutes les consignes à la lettre.
• N’utilisez jamais cet appareil dans un endroit humide ni à
proximité d’eau.
•L’appareil alimenté par courant électrique ne peut pas être
exposé à des éclaboussures; évite en outre de placer des
récipients contenant des liquides, comme un vase (ou un verre
de bière), sur l’appareil.
• Nettoyez uniquement l’appareil avec un chiffon doux et sec.
• Ne bloquez jamais les orifices de ventilation de l’appareil et
installez-le toujours conformément aux instructions du fabricant.
• N’installez jamais l’appareil à proximité d’une source de chaleur ,
telle que des radiateurs, poêles ou tout autre dispositif (y compris
des amplificateurs) générant de la chaleur.
• N’essayez jamais de contourner le dispositif de sécurité d’une
prise de type polarisée ou d’une prise de terre. Une prise dite
polarisée dispose de deux broches, dont l’une est plus large que
l’autre. Une prise de terre comporte trois broches, dont une de
mise à la terre. Cette broche plus large ou broche de mise à la
terre vise à assurer votre sécurité. Si la fiche du cordon
d’alimentation ne correspond pas au type de prise de courant de
votre région, faites remplacer la prise obsolète par un électricien
qualifié (pour les Etats-Unis et le Canada).
• Placez toujours le cordon d’alimentation de sorte qu’on ne risque
pas de marcher dessus ni de le pincer. Cette précaution vise tout
spécialement la fiche du cordon et sa sortie de l’appareil.
• Utilisez exclusivement les fixations/accessoires préconisés par le
fabricant.
• S’il y a risque d’orage ou que vous ne comptez pas utiliser
l’appareil pendant une période prolongée, débranchez-le du
secteur.
• La mise sur OFF de l’interrupteur d’alimentation n’isole pas
totalement ce produit de la ligne secteur; aussi, retirez la fiche de
la prise s’il doit rester inutilisé pendant une période prolongée.
• Installez ce produit près de la prise électrique murale et gardez
un accès facile à la prise électrique et au cordon d’alimentation.
•ATTENTION: Cet appareil doit absolument être connecté à une
prise électrique reliée à la terre.
• Confiez tout travail de réparation uniquement à un S.A.V. qualifié.
Faites appel au S .A.V. si l’appareil a subi tout endommagement,
comme par exemple si sa fiche secteur ou son cordon
d’alimentation sont endommagés, si de l’eau ou des objets ont
pénétré à l’intérieur de l’appareil, si celui-ci a été exposé à la
pluie ou à la moisissure, s’il est tombé ou présente tout signe de
dysfonctionnement.
• N’utilisez jamais d’allonge trop longue avec cet appareil et ne
l’alimentez jamais via les prises secteur équipant d’autres
dispositifs.
• N’installez jamais cet appareil dans un endroit confiné comme
une caisse de transport ou tout autre récipient similaire.
• Utilisez l’appareil uniquement avec le chariot, stand, trépied,
fixation ou table spécifiés par le fabricant ou fourni av ec
l’appareil. Si v ous avez placé l’appareil sur un chariot, soyez très
prudent quand vous déplacez le chariot, afin d’éviter une chute et
des blessures.
Marque CE pour les normes européennes harmonisées
La marque CE apposée sur tous les produits de notre firme
fonctionnant sur secteur jusqu’au 31 décembre 1996 signifie que
ces appareils répondent à la Directive EMC (89/336/CEE) et à la
Directive concernant la marque CE (93/68/CEE).
La marque CE apposée après le 1 janvier 1997 signifie que ces
appareils sont conformes à la Directive EMC (89/336/CEE), à la
Directive concernant la marque CE (93/68/CEE) ainsi qu’à la
Directive Basse Tension (73/23/CEE).
La marque CE apposée sur tous les produits de notre firme
fonctionnant sur piles signifie que ces appareils répondent à la
Directive EMC (89/336/CEE) et à la Directive concernant la marque
CE (93/68/CEE).
* Les noms de sociétés, noms de produits et noms de f ormats, etc.
dans ce manuel sont des marques de fabrique ou des mar-ques
déposées de leurs propriétaires respectifs.
L’éclair dans le triangle est un symbole destiné
à attirer l’attention de l’utilisateur sur la
présence de parties non isolées et de “tension
dangereuse” à l’intérieur de l’appareil, qui
posent des risques d’électrocution pour
l’utilisateur.
Le point d’exclamation dans un triangle est un
symbole destiné à attirer l’attention de
l’utilisateur sur des sections de ce manuel
contenant des informations importantes, liées à
l’utilisation et à l’entretien de ce produit.
6
Page 7

INTRODUCTION
Nous vous remercions d’avoir choisi l’amplificateur AC15 Custom Classic. Cet amplificateur est le summum de longues années d’expertise dans la fabrication et la conception d’amplificateurs de haute qualité
pour guitares. Nous avons adopté les meilleures conceptions des AC15, aussi bien anciens que nouveaux,
et y avons ajouté un grand nombre de fonctions utiles et intéressantes pour vous offrir l'AC15 aux sonorités
les plus souples à ce jour !
Nous sommes certains que vous trouverez ces améliorations extrêmement utiles et que votre nouvel
amplificateur vous apportera des heures et des heures de plaisir sonore. Votre AC15 est muni de nombreuses
fonctions modernes et pratiques comme une commande générale de volume, une Reverb et un Trémolo
d’ensemble. Veuillez lire attentivement ce manuel de l’utilisateur afin de vous familiariser avec elles.
Pour rendre conforme ce nouvel AC15 à de strictes normes de sonorité, de qualité et de dépendance, nous
l'avons entièrement construit dans notre usine verticalement intégrée, une usine pouvant mettre en oeuvre
de nombreux processus rarement présents dans une usine de fabrication d’amplificateurs de guitare. Nous
concevons et fabriquons nos propres transformateurs, haut-parleurs (à l’exception du vénérable Vox “Blue”
construit au Royaume-Uni par Celestion), enceintes et composants électroniques. Cela veut dire que pour
vous le son de votre nouvel AC15 Custom Classic sera pareil à nul autre.
Il existe deux modèles dans la gamme :
AC15CC1 qui utilise le haut-parleur VOX/Wharfedale custom GSH1230-16
AC15CC1X qui utilise le haut-parleur VOX/Celestion AlNiCo Blue
FONCTIONS ET COMMANDES DU PANNEAU AVANT
1 2 3 4 5 6 7 8 9
1. Interrupteur de mise sous/hors tension
Cet interrupteur vous permet de mettre sous/hors tension l’amplificateur
Veillez à mettre l’aplificateur hors tension et à le débrancher avant de le déplacer.
2. Interrupteur STANDBY
Cet interrupteur permet à l’amplificateur d’atteindre la température de fonctionnement appropriée avant d’appliquer l’alimentation h.t.
Avant de raccorder l’amplificateur à la prise secteur, assurez-vous que les interrupteurs POWER et STANDBY sont dans la position OFF.
Commencez par mettre l’interrupteur POWER dans la position ON, puis attendez 2 à 3 minutes avant de mettre l’interrupteur STANDBY dans la position ON.
En agissant de la sorte chaque fois que vous utilisez l’amplificateur, vous prolongerez la durée de vie des lampes. L’interrupteur STANDBY est aussi très utile
quand vous jouez sur scène car il vous permet de conserver les lampes à leur
température de fonctionnement entre les morceaux.
7
Page 8

3. Commande MASTER VOLUME
Cette commande vous permet de régler le volume général (Master) de votre
amplificateur. Un son plus pur pourra être obtenu si vous baissez le niveau de la
commande VOLUME et augmentez celui de la commande MASTER VOLUME.
Inversement, vous obtiendrez un son plus gras avec de la distorsion si vous baissez le niveau de la commande MASTER VOLUME et augmentez celui de la
commande VOLUME. Comme pour les autres commandes de cet amplificateur,
nous vous conseillons d’expérimenter plusieurs configurations différentes afin de
trouver les sonorités correspondant à votre style de jeu.
4. Section TREMOLO
Cette section vous permet de contrôler le Trémolo d'ensemble en réglant la vitesse et la profondeur de l’effet. Vous pouvez activer ou désactiver le Trémolo à
distance à l’aide de la pédale VF002 fournie.
SPEED: Cette commande contrôle la vitesse du Trémolo intégré.
DEPTH: Cette commande contrôle la profondeur (intensité) du Trémolo intégré.
5. Section REVERB
Cette section vous permet de contrôler le Reverb d'ensemble. Vous pouvez activer ou désactiver le Reverb à distance à l’aide de la pédale VF002 fournie.
6. Commande BASS
Cette commande vous permet de régler le niveau des graves (basses fréquences) de votre son – de chaud et léger quand elle est complètement tournée dans
le sens contraire des aiguilles d’une montre, à sombre et lourd quand elle est
complètement tournée dans le sens des aiguilles d’une montre, et sur toutes les
valeurs intermédiaires.
7. Commande TREBLE
Cette commande vous permet de régler le niveau des aigus (hautes fréquences)
de votre son – de doux et arrondi quand elle est complètement tournée dans le
sens contraire des aiguilles d’une montre, à brillant et sec quand elle est complètement tournée dans le sens des aiguilles d’une montre, et sur toutes les valeurs
intermédiaires.
8. Commande VOLUME
Cette commande vous permet de spécifier la sensibilité de la section préampli.
Suivant son réglage vous pourrez introduire plus de gain en la tournant dans le
sens des aiguilles d’une montre ou produire un son “chimey”plus clair en la
réglant sur un niveau inférieur. Cette commande fonctionne conjointement avec
la commande MASTER VOLUME, ce qui veut dire que si vous réglez cette commande sur un niveau inférieur et MASTER VOLUME sur un niveau supérieur,
vous obtiendrez un son plus pur et inversement, si vous la réglez sur un niveau
supérieur et MASTER VOLUME sur un niveau inférieur vous obtiendrez plus de
gain.
9. Prise INPUT
Branchez votre guitare sur cette prise.
8
Page 9

FONCTIONS ET COMMANDES DU PANNEAU ARRIÈRE
1 2 3 4 5 6
1. Prises LOUDSPEAKER OUTPUTS
Raccordez à ces prises une ou des enceinte(s) extérieure(s), si vous le souhaitez.
2. Commutateur Impedance Select
Modèle AC15CC1
16 ohms: Autorise les configurations suivantes :
1) Choisissez ce réglage si vous utilisez le haut-parleur intégré 16 ohms seul ou
une enceinte extérieure 16 ohms seule.
8 ohms: Autorise les configurations suivantes :
1) Choisissez ce réglage si vous branchez une enceinte d’extension. Les hautparleurs intégré et extérieurs fonctionneront en parallèle. L’impédance de l’enceinte supplémentaire doit être de 16 ohms.
2) Choisissez ce réglage si vous branchez une enceinte extérieure 8 ohms et
désactivez le haut-parleur intégré.
Modèle AC15CC1X
Ce modèle est équipé d’un haut-parleur intégré 8 ohms et l’amplificateur doit être
réglé pour une sortie 8 ohms. Ce haut-parleur doit être désactivé si l’amplificateur est utilisé avec une enceinte d’extension.
3. Prise FOOT SWITCH
Vous brancherez sur cette prise la pédale VF002 VOX fournie afin de pouvoir
activer ou désactiver le Reverb et le Trémolo.
4. Fusible HT FUSE
Ce fusible protège votre amplificateur en cas de problème d’alimentation. La raison la plus fréquente pour laquelle ce fusible peut sauter est lorsqu’une lampe de
sortie est défectueuse. La valeur correcte du fusible HT est indiquée sur le panneau arrière de l’amplificateur et le fusible doit être remplacé seulement par un
fusible de la même valeur.
5. Prise d’alimentation secteur MAINS INPUT
Vous brancherez sur cette prise le cordon d’alimentation secteur fourni.
La tension nécessaire au fonctionnement de votre amplificateur est indiquée sur
le panneau arrière. Avant d’effectuer tout branchement ou de mettre l’amplificateur sous tension, assurez-vous que la tension du secteur correspond à celle
spécifiée pour votre amplificateur. En cas de doute quelconque, veuillez consulter votre revendeur VOX.
9
Page 10

6. Fusible d’alimentation FUSE
Ce fusible offre une protection d’ensemble en cas de défaut d'origine électrique.
La valeur correcte de ce fusible est indiquée sur le panneau arrière de l’amplificateur et le fusible doit être remplacé seulement par un fusible de la même valeur.
Spécifications
Puissance de sortie: 15 watts RMS sous 8 ou 16 ohms
Haut-parleur intégré:
Lampes: 2 x EL84/6BQ5 et 2 x 12AX7/ECC83.
Redresseur: Redresseur silicone avec circuit SAG passif
Alimentation: Préréglage 100 V ou 120 V ou 230 V ou 240 V ~ 50 or 60 Hz suivant le
Valeur du fusible d’alimentation:
Fusible HT: 250 V, T250mAL.
Dimensions (L x P x H): 605 x 262 x 440 (mm)
Poids: AC15CC1: 21,6 kg
Accessoires fournis: Cordon d’alimentation, pédale VF002
16 ohms, 12 pouces, 30 watts VOX/Wharfedale Custom—modèle AC15CC1
8 ohms 12 pouces, 15 watts VOX/Celestion AlniCo Blue—modèle AC15CC1X
pays de commercialisation. Veuillez consulter la plaque signalétique à
l’arrière de l’amplificateur pour connaître la tension de l’appareil.
250 V, T1,6AL pour 100 V / 250 V, T1,25AL pour 120 V
250 V, T630mAL pour 230 V ou 240 V.
Avertissement ! —Remplacez le fusible par un fusible du même type
et de même valeur
AC15CC1X: 21,7kg
*L’apparence et les spécifications sont sujettes à modifications sans préavis.
URL = http://www.voxamps.co.uk
A: Utilisez TOUJOURS le cordon d’alimentation fourni. Si vous devez remplacer le cordon, veuillez contacter votre
revendeur agréé Vox.
B: NE mettez PAS l’amplificateur sous tension quand un haut-parleur lui est raccordé.
C: ASSUREZ-VOUS que l’impédance de toutes les enceintes supplémentaires utilisées sont correctes
D: N’essayez JAMAIS de contourner les fusibles ou mettre en place de nouveaux dont les valeurs ne sont pas correctes.
E: N’essayez JAMAIS de déposer le châssis de l’amplificateur. Aucune partie ne peut être réparée par l’utilisateur.
F: Confiez toutes les réparations à un personnel qualifié, y compris pour le remplacement des fusibles et des lampes. Des
réparations seront nécessaires si l’appareil est endommagé de quelque façon que ce soit, notamment lorsque la fiche ou
le cordon d’alimentation sont endommagés, lorsqu’un liquide a été renversé sur l’appareil ou des objets sont tombés à
l’intérieur, l’appareil a été exposé à la pluie ou à l’humidité, ne fonctionne pas normalement ou est tombé par terre.
ATTENTION : Tout changement ou modification non expressément autorisés par l’autorité responsable de la conformité aux
normes entraînera l’interdiction d’utiliser l’appareil.
Remarque: Ils est conseillé d’utiliser uniquement comme câbles audio pour les raccordements au AC15 Custom Classic, à
l’exception des cordons d’enceintes, des cordons blindés de haute qualité. Ces cordons ne devraient pas dépasser 10
mètres de long.
Utilisez toujours un cordon d'enceinte non blindé approuvé par Vox avec l'amplificateur AC15 et les enceintes supplémentaires.
AVERTISSEMENT : Ne bouchez pas les grilles de ventilation et veillez à ce que l’air puisse toujours circuler librement autours
de l’amplificateur.
10
Page 11

WICHTIGE SICHERHEITSHINWEISE
• Bitte lesen Sie sich alle Bedienhinweise durch.
•Bewahren Sie diese Bedienhinweise auf.
• Beachten Sie alle W arnungen.
• Befolgen Sie alle Instruktionen.
•Verwenden Sie dieses Gerät niemals in der Nähe von Wasser.
• Ein netzgespeistes Gerät darf niemals Regen- oder
Wassertropfen ausgesetzt werden. Außerdem darf man keine
Flüssigkeitsbehälter wie Vasen usw. darauf stellen.
• Reinigen Sie es ausschließlich mit einem trockenen Tuch.
•Versperren Sie niemals die Lüftungsschlitze und stellen Sie das
Gerät nur an Orten auf, die vom Hersteller ausdrücklich
empfohlen werden.
• Stellen Sie das Gerät niemals in die Nähe einer W ärmequelle,
z.B. eines Heizkörpers, Ofens oder eines anderen Wärme
erzeugenden Gerätes (darunter auch Endstufen).
•Versuchen Sie niemals, die polarisierte Leitung bzw. Erde
hochzulegen oder zu umgehen. Ein polarisierter Stecker ist mit
zwei flachen Stiften unterschiedlicher Breite versehen. Ein
Stecker mit Erdung weist zwei Stifte und eine Erdungsb uchse
auf. Wenn der beiliegende Stecker nicht in Ihre Steckdose passt,
sollten Sie einen Elektriker bitten, die Steckdose zu erneuern (für
die USA und Kanada).
• Sorgen Sie dafür, dass man weder über das Netzkabel stolpern
kann, noch dass es in unmittelbarer Nähe einer Steckdose,
darunter auch Zusatzsteckdosen anderer Geräte, abgeklemmt
wird. A uch am Austritt aus dem Gerät darf das Netzkabel auf
keinen F all gequetscht w erden.
•Verwenden Sie nur Halterungen/Zubehör, die/das vom Hersteller
ausdrücklich empfohlen werden/wird.
• Im Falle eines Gewitters bzw. wenn Sie das Gerät längere Zeit
nicht verwenden möchten, lösen Sie bitte den Netzanschluss.
• Durch Ausschalten des Hauptschalters wird dieses Erzeugnis
nicht vollständig vom Netz getrennt. Ziehen Sie deshalb den
Stecker des Netzkabels aus der Steckdose, wenn Sie das
Erzeugnis längere Zeit nicht verwenden.
• Stellen Sie diesen Verstärker in der Nähe einer Wand
Schutzkontaktdose auf und achten Sie auf die freie
Zugänglichkeit des Netzanschlusskabels.
•Warnhinweis: Dieser Verstärker darf nur an Steckdosen mit
Schutzleiter (Erdung) betrieben werden.
• Überlassen Sie alle Wartungsarbeiten einem erfahrenen
Wartungstechniker. Wartungsarbeiten oder Reparaturen sind
erforderlich, wenn das Netzkabel oder der Stecker beschädigt ist,
wenn Flüssigkeit oder andere Gegenstände in das Geräteinnere
gefallen sind, wenn das Gerät im Regen gestanden hat, sich
nicht erwartungsgemäß verhält oder wenn es gefallen ist.
• Stellen Sie das Gerät niemals unmittelbar neben die Steckdose
und/oder Erweiterungssteckdose eines anderen Geräts.
• Stellen Sie das Gerät während des Betriebes niemals in einen
Türschrank oder den Lieferkarton.
• Stellen Sie das Gerät nur auf einen Wagen, Ständer, Stative,
Halterungen oder Tische, die v om Hersteller ausdrücklich
empfohlen werden oder ev entuell zum Lieferumfang gehören.
Seien Sie beim Verschieben eines geeigneten Wagens
vorsichtig, damit weder er, noch das Gerät selbst umkippt bzw.
hinfällt und Sie ev entuell verletzt.
Das CE-Zeichen für die Europäische Gemeinschaft
Vor dem 31.12.1996 vergebene CE-Zeichen auf unseren
netzgespeisten Geräten zeigen an, daß diese Geräte gemäß der
EMC-Richtlinie (89/336/EWG) und der CE-Richtlinie (93/68/EWG)
der EU arbeiten.
Nach dem 01.01.1997 vergebene CE-Zeichen auf unseren
netzgespeisten Geräten zeigen an, daß diese Geräte gemäß der
EMC-Richtlinie (89/336/EWG), der CE-Richtlinie (93/68/EWG) und
der Niederspannungsstromrichtlinie (73/23/EWG) der EU arbeiten.
Die CE-Zeichen auf unseren batteriegespeisten Geräten zeigen
an, daß diese Geräte gemäß der EMC-Richtlinie (89/336/EWG)
und der CE-Richtlinie (93/68/EWG) der EU arbeiten.
* Die ubrigen in dieser Bedienungsanleitung erwahnten Firmen-,
Produkt-, Formatnamen usw. sind Warenzeichen oder eingetragene Warenzeichen der rechtlichen Eigentumer und werden
ausdrucklich anerkannt.
Der als Pfeil dargestellte Blitz in einem Dreieck
weist den Anwender auf nicht isolierte,
„gefährliche Spannungen“ im Geräteinneren
hin, die so stark sein können, dass sie einen
Stromschlag verursachen.
Das Ausrufezeichen in einem Dreiec k w eist den
Anwender darauf hin, dass zum Lieferumfang
des Gerätes wichtige Bedien- und
Wartungshinweise (ev entuell
Reparaturhinweise) gehören.
11
Page 12

EINFÜHRUNG
Herzlichen Glückwunsch zum Kauf des AC15 Custom Classic. Dieser Verstärker stellt die Kulmination
jahrelanger Herstellungserfahrung bei hochwertigen Gitarrenverstärkern dar. Wir haben die besten AC15Designmerkmale, sowohl als auch neue, genommen und eine Reihe nützlicher und interessanter Merkmale
hinzugefügt, um Ihnen den tonal flexibelsten AC15 aller Zeiten zu geben!
Wir sind überzeugt, dass Sie diese Verbesserungen sehr nützlich finden werden und dass Ihr Verstärker
Ihnen zahlreiche Stunden tonaler Freude gibt. Ihr AC15 ist mit einer Reihe moderner Merkmale und
Funktionen ausgestattet, wie Master Volume, Global Reverb und Tremolo. Bitte lesen Sie diese Anleitung
sorgfältig, um sich mit diesen vertraut zu machen.
Um sicherzustellen, dass der neue AC15 die strengen Maßstäbe für Klang, Qualität und Zuverlässigkeit
erfüllt, wir d er ausschließlich in unserer vertikal integrierten Produktionsstätte hergestellt, wo Prozesse
möglich sind, die in normalen Fabriken nicht ausgeführt werden können. Wir entwerfen und bauen unsere
eigenen Trafos, Lautsprecher (ausgenommen den berühmten Vox “Blue”, der in Gr oßbritannien von Celestion
hergestellt wird), Boxen und Elektronikteile. Was dies für Sie bedeutet, ist dass der Sound Ihres neuen
AC15 Custom Classic unübertroffen ist.
Es gibt zwei Modelle in dieser Reihe:
AC15CC1 mit dem VOX/Wharfedale Custom GSH1230-16 Lautsprecher
AC15CC1X mit dem VOX/Celestion AlNiCo Blue Lautsprecher
VORDERSEITEN-LAYOUT
1 2 3 4 5 6 7 8 9
1. Netzschalter (POWER):
Dies ist der ON/OFF-Schalter für den Verstärker.
Bitte stellen Sie sicher, dass der Verstärker ausgeschaltet und vom Netz
getrennt ist, bevor er transportiert wird.
2. Standby-Schalter:
Dieser Schalter erlaubt es dem Verstärker, die richtige Arbeitstemperatur
zu erreichen, bevor die H.T.-Versorgung angelegt wird.
Vor dem Anschließen des Verstärkers an die Netzversorgung stellen Sie
sicher, dass die Netz- und Standbyschalter in Aus-Stellung sind.
Schalten Sie zuerst den Power-Schalter ein und warten dann 2 - 3 Minuten
vor dem Einschalten des Standby-Schalters. Wenn Sie jedesmal so verfahren, wird die Lebensdauer der Röhre verlängert. Der Standby-Schalter
ist auch sehr nützlich zum Live-Spielen, da er es erlaubt, die Röhren zwischen den Sets auf einer funktionellen Temperatur zu halten.
12
Page 13

3. Master Volume:
Steuert die Gesamtlautstärke (Master) Ihres Verstärkers. Sauberere Klänge können durch Senken der Lautstärke und Steigern von Master erzielt
werden. Durch niedrigere Einstellung von Master und höhere Einstellung
der Lautstärke erhalten Sie einen fetteren Klang mit mehr Verzerrung. Wie
bei anderen Reglern sollten Sie auch hier mit verschiedenen Konfigurationen experimentieren, um die Klänge zu finden, die am besten für Ihren
Spielstil geeignet sind.
4. Tremolo Section:
Diese Sektion erlaubt Steuerung des gesamten Tremolo durch Einstellung
von Geschwindigkeit und Tiefe. Sie können das Tremolo mit dem mitgelieferten Fußschalter VF002 ein- und ausschalten.
Speed: Wie Sie sicher schon geraten haben, regelt dieser Regler die Geschwin-
digkeit des eingebauten Tremolo.
Depth: Steuert den Anteil der Tiefe (Intensität) des eingebauten Tremolo.
5. Reverb Section:
Diese Sektion erlaubt Steuerung des globalen Reverb-Pegels. Sie können
den Reverb mit dem mitgelieferten Fußschalter VF002 ein- und ausschalten.
6. Bass:
Steuert die Bässe (Tiefen) in Ihrem Klang - von warm und leicht wenn
ganz heruntergedreht (gegen den Uhrzeigersinn) bis dunkel und schwer,
wenn ganz heraufgedreht (im Uhrzeigersinn) und alle Punkte dazwischen.
7. Treble:
8. Volume:
9. Input:
Steuert die Bässe (Tiefen) in Ihrem Klang - von warm und leicht wenn
ganz heruntergedreht (gegen den Uhrzeigersinn) bis dunkel und schwer,
wenn ganz heraufgedreht (im Uhrzeigersinn) und alle Punkte dazwischen.
Bestimmt die Empfindlichkeit der Vorverstärkersektion. Je nach Einstellung dieses Reglers können Sie entweder mehr Gain durch Drehen im
Uhrzeigersinn einmischen oder für einen klareren, "glockenartigen" Klang
niedriger stellen. Dies arbeitet direkt mit der Master-Lautstärke, was bedeutet, dass wenn diese Lautstärke niedriger und Master höher gestellt ist
ein saubererer Klang erhalten wird. Umgekehrt wird bei höherer Lautstärke und niedrigerer Master-Einstellung mehr Gain erhalten.
Hier stecken Sie Ihre Gitarre ein.
13
Page 14

RÜCKSEITEN-LAYOUT
1 2 3 4 5 6
1. Lautsprec her-Ausgangsb uchsen (LOUDSPEAKER OUTPUTS):
Hier können Sie ein oder mehrere externe Lautsprecherboxen anschließen.
2. Impedance Select-Schalter
Modell AC15CC1
16 Ohm: Erlaubt die folgenden Konfigurationen:
1) Auf diese Stellung stellen, wenn nur der interne 16-Ohm-Lautsprecher
oder die externe 16-Ohm-Box verwendet wird.
8 Ohm: Erlaubt die folgenden Konfigurationen:
1) Auf diese Stellung stellen, wenn eine Gitarrenbox angeschlossen wird.
Dabei wird der interne und externe Lautsprecher in Parallelschaltung betrieben. Die Impedanz der Gitarrenbox muss 16 Ohm betragen.
2) Auf diese Stellung stellen, wenn nur eine externe 8-Ohm-Box angeschlossen wird und der interne Lautsprecher ausgeschaltet wird.
Modell AC15CC1X
In diesem ist ein 8-Ohm-Lautsprecher intern montiert, und der Verstärker
muss auf 8-Ohm-Ausgang gestellt sein. Dieser Lautsprecher muss abgetrennt werden, wenn der Verstärker mit einer Gitarrenbox verwendet wird.
3. Fußschalterbuchse (FOOT SWITCH):
Hier können Sie den mitgelieferten Fußschalter VF002 VOX anschließen,
so dass Sie Reverb und Tremolo ein- und ausschalten können.
4. HT-Sic herung (HT FUSE):
Diese Sicherung schützt Ihren Verstärker bei Problemen mit der Stromversorgung. Der häufigste Grund für das Durchbrennen dieser Sicherung ist
eine fehlerhafte Ausgangsröhre. Der richtige Wert der HT-Sicherung ist auf
der Rückseite des Verstärkers angegeben. Zum Austausch muss immer
ein Bauteil mit dem gleichen Wert verwendet werden.
5. Netzeingang (MAINS INPUT):
Hier wird das mitgelieferte abziehbare Netzkabel angeschlossen.
Die spezifische Netzeingangsspannung, die Ihr Verstärker zum Betrieb
benötigt, ist an der Rückseite des Verstärkers angegeben. Vor dem Herstellen von Verbindungen oder Einschalten des Verstärkers prüfen Sie, ob
die richtige Spannung eingestellt ist. Im Zweifelsfall lassen Sie sich von
Ihrem VOX-Vertragshändler beraten.
14
Page 15

6. Hauptsic herung (FUSE):
Diese Sicherung bietet einen Gesamtschutz im Fall dass Ihr Verstärker
einen elektrischen Defekt entwickelt. Der richtige Wert der Sicherung ist
auf der Rückseite Ihres Verstärkers angegeben. Zum Austausch muss immer ein Bauteil mit dem gleichen Wert verwendet werden.
Technische Daten
Ausgangsleistung: 15 Watt eff. an 8 oder 16 Ohm Lautsprecher Last.
Interner Lautsprec her: 16 Ohm, 12", 30 W att VOX/Whar fedale Custom—Modell AC15CC1
8 Ohm 12", 15 W att VOX/Celestion AlniCo Blue—Model AC15CC1X
Röhren-Ausstattung: 2 x EL84/6BQ5 & 2 x 12AX7/ECC83.
Gleichrichter: Siliziumgleichrichter mit passiver SAG-Schaltung.
Netzeingang: Vo reinstellung 100 V oder 120 V oder 230 V oder 240 V ~ 50 oder 60 Hz je
nach Verkaufsland. Genaue Spezifikation siehe Typenschild auf der Rückseite des Verstärkers.
Hauptsic herungsstärke: 250 V, T1,6AL für 100 V / 250 V, T1,25AL für 120 V
250 V, T630mAL für sowohl 230 V als 240 V.
Warnung! — Zum Austausch Sicherung gleichen Typs und gleicher Stärke verwenden
HT-Sic herung: 250 V, T250mAL.
Abmessungen (B x T x H):
Gewicht: AC15CC1: 21,6 kg
Lief erumfang: Netzkabel, Fußschalter VF002
605 x 262 x 440 (mm)
AC15CC1X: 21,7 kg
* Änderungen des Designs und der technischen Daten ohne Vorankündigung bleiben vorbehalten.
URL = http://www .voxamps.co.uk
A: Verwenden Sie IMMER das mitgelieferte Netzkabel. Wenn Austausch erforderlich ist, wenden Sie sich an Ihren Vox-
Vertragshändler.
B: Schalten Sie NICHT den Verstärker ohne angeschlossenes Lautsprecherkabel ein.
C: STELLEN SIE SICHER, dass jegliche eventuell verwendete Gitarrenboxen die richtige Impedanz haben.
D: Versuchen Sie NIEMALS, die Sicherungen zu überbrücken oder Sicherungen falscher Impedanz einzusetzen.
E: Entfernen Sie NIEMALS das Verstärkergehäuse. Im Inneren befinden sich keine vom Anwender zu wartenden Teile.
F: Überlassen Sie alle Wartungsarbeiten, einschließlich Austausch von Sicherungen und Röhren, dem qualifizierten
Wartungspersonal. Wartung ist erforderlich, wenn das Gerät auf jegliche Weise beschädigt wurde, wie etwa bei
Beschädigung von Netzkabel oder Stecker, bei Eindringen von Flüssigkeiten oder Gegenständen ins Innere, wenn das
Gerät Regen oder Feuchtigkeit ausgesetzt wurde, nicht richtig arbeitet, oder fallengelassen wurde.
VORSICHT: Jegliche Änderungen oder Modifikationen, die nicht ausdrücklich von dem Aussteller der Konformitätserklärung
genehmigt wurden können die Erlaubnis zum Betrieb des Geräts hinfällig werden lassen.
Hinweis: Es wird empfohlen, als Audiokabel, mit Ausnahme des Lautsprecherkabels zum Anschluss des AC15 Custom
Classic, nur abgeschirmte Kabel höchster Qualität zu verwenden. Die Kabel sollen nicht länger als 10 Meter sein.
Immer ein nicht abgeschirmtes, von Vox zugelassenes Lautsprecherkabel mit dem Verstärker AC15 und Gitarrenboxen
verwenden.
WARNUNG: Nicht Ventilationsschlitze verdecken und immer freien Luftstrom um den Verstärker sicherstellen!
15
Page 16

INSTRUCCIONES DE SEGURIDAD
IMPORTANTES
• Lea todas las instrucciones antes de utilizar el producto.
• Guarde estas instrucciones.
• Cumpla estas instrucciones.
• Siga todas las intrucciones.
• No utilizar este aparato cerca del agua.
• Los aparatos enchufados a la corriente eléctrica no deben ser
expuestos a goteos o salpicaduras, así como no colocar recipientes
que contengan líquido encima de los mismos.
• Limpiar exclusivamente con un trapo sua ve.
• No bloquee las aberturas de ventilación. Instale según las
instrucciones del fabricante.
• El producto debe ser situado lejos de fuentes de calor, como
radiadores, calefactores u otros aparatos que produzcan calor.
• No elimine la toma de tierra del conector de corriente. Es un cab le
color amarillo con franjas vedes.
•Proteja el cable de alimentación de pinzamientos, así como el
conector de corriente.
• Use solamente los accesorios y soportes especificados por el
fabricante.
• Desenchufe este aparato durante tormentas eléctricas o si no lo
va a utilizar durante un largo periodo.
• Desconectar el interruptor de corriente no aisla completamente el
aparato de la línea de corriente, se debe desenchufar el conector
de corriente si no se va a usar por largos periodos de tiempo.
• Instale este aparato cerca de una toma de corriente y deje el enchufe
fácilmente accesible.
•ATENCIÓN - Este aparato debe ser conectado a un enchufe con
toma de tierra.
• Delegue el mantenimiento del aparato en manos de personal
autorizado. Se requiere de revisión cuando el aparato ha sido
dañado de algún modo, como daños en el cable de alimentación,
ha caído líquido dentro o el aparato ha sido expuesto a la lluvia, no
opera correctamente o se ha sufrido algún impacto.
• No instale este equipo en una posición alejada de la toma de
alimentación.
• No instale este equipo en un lugar confinado, tal como una caja o
similar.
• Use este equipo solamente con el carro, soporte, trípode o mesa
especificado por el fabricante. Si usa un carro tenga cuidado al
moverlo para evitar daños a personas si se cae del carro.
El símbolo del rayo significa que existen voltajes
peligrosos sin aislar en el interior de la unidad, que
pueden ser de magnitud suficiente para constituir
un riesgo de electrocución.
El signo de admiración indica al usuario que
existen instrucciones de funcionamiento y
mantenimiento importantes en el manual que
acompaña al producto.
Símbolo CE para Normas Unificadas Europeas
La marca CE que exhiben nuestros productos que funcionan a
Corriente Alterna, hasta el 31 de Diciembre de 1996 significa que
cumplen la Directiva EMC (89/336/EEC) y la Directiva sobre la
marca CE (93/68/EEC).
Y, la marca CE que exhiben después del 1 de Enero de 1997,
significa que cumplen la Directiva EMC (89/336/EEC), la Directiva
sobre la marca CE (93/68/EEC) y la Directiva de Bajo Voltaje (73/
23/EEC).
Asimismo, la marca CE que exhiben n uestros productos que
funcionan con baterías, significa que cumplen la Directiva EMC
(89/336/EEC) y la Directiva sobre la marca CE (93/68/EEC).
Los nombres de empresas, nombres de productos y nombres de
*
formatos, etc., son marcas registradas de sus respectivos propietarios.
A Use SIEMPRE el cable de red suministrado, si es necesario
reemplazarlo, por favor póngase en contacto con su distribui-
dor Vox autorizado.
B NO encienda el amplificador sin un altavoz conectado.
C ASEGÚRESE que si usa recintos acústicos de extensión éstos
sean de la impedancia adecuada.
D NO INTENTE NUNCA puentear los fusibles o usar fusibles que
no sean iguales a los suministrados.
E DO INTENTE abrir el chasis del amplificador, no existen partes
que requieran la intervención del usuario.
F
Cualquier mantenimiento o reparación debe ser llevado a cabo
por personal cualificado, incluyendo el reemplazo de fusibles y
válvulas. Es necesario llevar el aparato al servicio post venta
cuando se ha dañado de cualquier forma, por ejemplo si el cable
o enchufe de alimentación se han dañado, han caído líquidos u
objetos al aparato, el aparato ha sido expuesto a la lluvia o
humedad, el aparato no funciona normalmente o se ha caído.
16
PRECAUCIÓN: Cualquier cambio o modificación no aprobado
expresamente por la parte encargada del mantenimiento
puede anular la autoridad del usuario para operar el equipo.
Nota:
se recomienda que todos los cables de audio, con la excepción
del cable de altavoz, usados para conectar el AC15 Custom
Classic sean de gran calidad y apantallados. No deben exceder
los 10 metros de longitud.
Use siempre un cable de altavoz no apantallado aprobado por
Vox con el amplificador AC15 y recintos acústicos de extensión.
AVISO: ¡No obstruya las rejillas de ventilación y asegúrese
siempre que existe libre movimiento de aire alrededor del
amplificador!
Page 17

INTRODUCCIÓN
Felicidades por la compra del amplificador AC15 Custom Classic.
Este amplificador es la culminación de muchos años de experiencia en la fabricación y diseño de
Amplificadores de guitarra de gran calidad. Hemos tomado los mejores diseños del AC15 y hemos añadido toda una serie de útiles e interesantes funciones para ofrecerle ¡el AC15 más flexible hasta la fecha!
Estamos seguros de que disfrutará de estas mejoras durante muchas horas. Su AC15 está equipado con
un conjunto de modernas funciones como volumen global, Reverberación global y trémolo. Por favor lea
este manual para que se pueda familiarizar con las mismas.
Para asegurarse de que su nuevo AC15 cumple nuestras exigentes normas de sonido, calidad y fiabilidad,
ha sido construido por completo en nuestra fábrica de montaje vertical integrado, que es capaz de realizar
muchos procesos que normalmente no se encuentran en fábricas de amplificadores de guitarra. Diseñamos y fabricamos nuestros propios transformadores y altavoces (excepto el Vox “Blue” que se fabrica en el
Reino Unido por Celestion), cajas y sistemas electrónicos. Lo que todo esto significa es que el sonido de
su nuevo AC15 no tiene rival.
Esta gama dispone de dos modelos:
AC15CC1 que usa el altavoz exclusivo VOX / Wharfedale GSH1230-16
AC15CC1X que usa el altavoz VOX / Celestion AlNiCo Blue
PANEL FRONTAL
1 2 3 4 5 6 7 8 9
1) Power: Este es el interruptor principal de alimentación del amplificador. Asegúrese de que el amplificador está apagado y desconectado de la red antes de
moverlo.
2) Standby: Este control permite adquirir al amplificador una temperatura correcta de
funcionamiento antes de aplicar la alimentación H.T. Asegúrese de que
tanto el control POWER como STANDBY están desactivados. Ahora encienda el control POWER. Espere 2 ó 3 minutos, y encienda el control
STANDBY. Es importante esta espera para prolongar la vida de las válvulas. El control STANDBY es muy útil durante las actuaciones en directo, ya
que permite mantener las válvulas a una temperatura correcta entre actuaciones y antes de tocar, sin que salga sonido del amplificador.
3) Master Volume: Este control de Volumen Principal determina el nivel de salida del amplificador.
Si sube este nivel a la vez que mantiene el nivel de previo Volume bajo, irá
perfecto para sonidos claros.
17
Page 18

Baje este control y suba el volumen de previo Volume para un sonido
grueso y distorsionado.
4) Tremolo: Esta sección le permite controlar la velocidad y profundidad del Trémolo.
También puede usar el conmutador de pedal suministrado VF002. El
Trémolo varía cíclicamente el volumen (no el tono).
• Speed: Controla la velocidad del Trémolo.
• Depth: Controla la intensidad (o profundidad) del Trémolo.
5) Reverb: Permite controlar el nivel de Reverberación global. También puede activar
o desactivar la Reverberación mediante el conmutador de pedal suministrado VF002.
6) Bass: Ajusta el nivel de grabes, desde cálido (al mínimo) y ligero hasta oscuro y
fuerte (al máximo), y todos los puntos intermedios.
7) Treble: Ajusta el nivel de agudos, desde suave (al mínimo) a brillante (al máximo), y todos los puntos intermedios.
8) Volume: Determina la sensibilidad del pre amplificador. Para más ganancia gire
hacia la derecha. Este botón funciona junto con Master Volume: si este
botón está bajo y Master está alto, el sonido será más claro, y si este
botón está alto y Master está bajo tendrá más ganancia y distorsión.
9) Entrada: Input. Conecte su guitarra a esta toma.
PANEL POSTERIOR
1 2 3 4 5 6
1) Loudspeaker Output: Aquí puede conectar altavoces de extensión si lo desea.
2) Selección de Impedancia: IMPEDANCE SELECT
Modelo AC15CC1
16 Ohm: Permite las siguientes configuraciones:
1) Seleccione esta posición si usa el altavoz interno de 16 ohmios solamente o un recinto acústico externo de 16 ohmios solamente.
8 Ohm: Permite las siguientes configuraciones:
1) Seleccione esta posición si conecta un recinto acústico de extensión.
Los altavoces interno y externos estarán en paralelo. La impedancia del
recinto acústico externo debe ser 16 Ohmios.
2) Seleccione esta posición si conecta un recinto acústico externo de 8
ohmios y desconecta el altavoz interno.
18
Page 19

Modelo AC15CC1X
Tiene un altavoz de 8 ohmios interno y el amplificador debe ajustarse a
salida de 8 ohmios. Este altavoz debe ser desconectado se el amplificador
se usa con un recinto acústico de extensión.
3) Footswitch: Aquí puede conectar el conmutador de pedal VOX VF002 suministrado
para activar o desactivar la Reverberación y el Tremolo.
4) HT Fuse: Este fusible protege el amplificador si ocurre algún fallo en alguna parte
del circuito de alto voltaje. La razón más común es que falle alguna de las
válvulas de salida. El valor correcto del fusible H.T. está especificado en el
panel posterior del amplificador. Utilice solamente fusibles con el mismo
valor que el indicado.
5) Mains Input: El amplificador se suministra con un cable de alimentación extraíble que
debe conectarse aquí. El voltaje adecuado para el amplificador está indicado en el panel posterior. Antes de conectarlo por primera vez, asegúrese de que el voltaje es correcto para la zona en la que se encuentra. Si
tiene alguna duda consulte con un especialista: Su distribuidor VOX le
ayudará en estos temas.
6) Mains Fuse: Este fusible proporciona una protección de seguridad general en caso de
que el amplificador tenga un fallo eléctrico. El valor correcto del fusible
MAINS está especificado en el panel posterior del amplificador. Utilice
solamente fusibles con el mismo valor que el indicado.
ESPECIFICACIONES
POTENCIA DE SALIDA: 15 Vatios RMS, con una carga de salida de 8 ó 16 ohmios.
Altavoz Interno: 16 ohmios, 12", 30 Watt VOX/Wharfedale Custom - modelo AC15CC1
8 ohmios 12", 15 Watt VOX/Celestion AlniCo Blue - modelo AC15CC1X
Válvulas: 2 x EL84/6BQ5 & 2 x 12AX7/ECC83.
Rectificador: rectificador de sílice con circuito pasivo SAG.
Alimentación eléctrica: preseleccionada a 100V o 120V o 230V o 240 V ~ 50 o 60 Hz dependien-
do del país de venta. Por favor consulte la placa de alimentación en la
parte posterior del amplificador para el valor exacto.
Valor de fusible Mains Fuse:
Fusible HT Fuse: 250V, T250mAL.
Dimensiones (L x P x H): 605 x 262 x 440 (mm)
Peso: AC15CC1: 21.6 kg
Elementos incluidos: cable de alimentación, VF002 Footswitch
Apariencia y especificaciones sujetas a cambios sin previo aviso.
URL = http://www .voxamps.co.uk
250V, T1.6AL para 100V / 250V, T1.25AL para 120V
250V, T630mAL para 230V & 240V.
¡Aviso!—Reemplace el fusible con el mismo tipo y valor
AC15CC1X: 21.7kg
19
Page 20

IMPORTANT NOTICE TO CONSUMERS
This product has been manufactured according to strict specifications and voltage requirements that are applicab le in
the country in which it is intended that this product should be used. If you ha ve purchased this product via the internet,
through mail order, and/or via a telephone sale, y ou must v erify that this product is intended to be used in the country in
which you reside.
WARNING: Use of this product in any country other than that for which it is intended could be dangerous and could
invalidate the manuf acturer’ s or distributor’s warranty.
Please also retain your receipt as proof of purchase otherwise your product may be disqualified from the
manufacturer’ s or distributor’s warranty.
REMARQUE IMPORTANTE POUR LES CLIENTS
Ce produit a été fabriqué suivant des spécifications sé vères et des besoins en tension applicab les dans le pa ys où ce
produit doit être utilisé. Si vous avez acheté ce produit via l’internet, par vente par correspondance ou/et v ente par
téléphone, vous de vez v érifier que ce produit est bien utilisable dans le pa ys où v ous résidez.
ATTENTION: L’utilisation de ce produit dans un pays autre que celui pour lequel il a été conçu peut être dangereuse et
annulera la garantie du fabricant ou du distributeur. Conservez bien v otre récépissé qui est la preuv e de votre achat,
faute de quoi v otre produit ne risque de ne plus être couvert par la garantie du fabricant ou du distributeur.
AC15CC1 / AC15CC1X
WICHTIGER HINWEIS FÜR KUNDEN
Dieses Produkt wurde unter strenger Beachtung von Spezifikationen und Spannungsanforderungen hergestellt, die im
Bestimmungsland gelten. W enn Sie dieses Produkt über das Internet, per P ostv ersand und/oder mit telef onischer
Bestellung gekauft haben, müssen Sie bestätigen, dass dieses Produkt für Ihr W ohngebiet ausgelegt ist.
WARNUNG: Verwendung dieses Produkts in einem anderen Land als dem, für das es bestimmt ist, verw endet wird,
kann gefährlich sein und die Garantie des Herstellers oder Importeurs hinfällig lassen werden. Bitte be wahren Sie
diese Quittung als Kaufbeleg auf, da andernfalls das Produkt von der Gar antie des Herstellers oder Importeurs
ausgeschlossen werden kann.
NOTA IMPORTANTE PARA EL CONSUMIDOR
Este producto ha sido fabricado de acuerdo a estrictas especificaciones y requerimientos de voltaje aplicables en el
país para el cual está destinado. Si ha comprado este producto por internet, a través de correo , y/o v enta telef ónica,
debe usted verificar que el uso de este producto está destinado al país en el cual reside.
AVISO: El uso de este producto en un país distinto al cual está destinado podría resultar peligroso y podría inv alidar la
garantía del fabricante o distribuidor .
Por favor guarde su recibo como prueba de compra ya que de otro modo el producto puede v erse priv ado de la
garantía del fabricante o distribuidor .
2005 VOX AMPLIFICATION LTD.
1SGFE
 Loading...