

Page 1

GROUND
CONTROL
Pr o
PRO GRAMMA BLE
MID I FOOT
CONTROLLER
OWNER’S MANUAL
Page 2

Please visit our web site at:
www.voodoolab.com
Copyright 1991-2007 by Digital Music Corporation.
This publication is protected by copyright and all rights are reserved. No part of it may be reproduced or transmitted
y means or in an
by an
Voodoo Lab, Ground Control Pro, System Mix, and GCX are trademarks of Digital Music Cor
y form without the express prior consent in writing from Digital Music Corporation.
poration.
REV. 3 6/07
Page 3

TABLE OF CONTENTS
INTRODUCTION . . . . . . . . . . . . . . . . . . . . . . . . . . . . . . . . .2
CONNECTIONS . . . . . . . . . . . . . . . . . . . . . . . . . . . . . . . . . .3
Power . . . . . . . . . . . . . . . . . . . . . . . . . . . . . . . . . . . . .3
MIDI . . . . . . . . . . . . . . . . . . . . . . . . . . . . . . . . . . . . . .3
Expression Pedals . . . . . . . . . . . . . . . . . . . . . . . . . . . .3
QUICK START . . . . . . . . . . . . . . . . . . . . . . . . . . . . . . . . . . . .5
SETUP MODE . . . . . . . . . . . . . . . . . . . . . . . . . . . . . . . . . . . .6
Enter & Exit Setup Mode . . . . . . . . . . . . . . . . . . . . . .6
Device Name/Channel . . . . . . . . . . . . . . . . . . . . . . . . .6
Pedal . . . . . . . . . . . . . . . . . . . . . . . . . . . . . . . . . . . . . .8
Expanders . . . . . . . . . . . . . . . . . . . . . . . . . . . . . . . . . .8
MIDI . . . . . . . . . . . . . . . . . . . . . . . . . . . . . . . . . . . . . .9
Instant Access . . . . . . . . . . . . . . . . . . . . . . . . . . . . . .10
Utility . . . . . . . . . . . . . . . . . . . . . . . . . . . . . . . . . . . .12
Special . . . . . . . . . . . . . . . . . . . . . . . . . . . . . . . . . . . .13
SELECT PRESET . . . . . . . . . . . . . . . . . . . . . . . . . . . . . . . .14
10 Presets / Bank . . . . . . . . . . . . . . . . . . . . . . . . . . . .14
4 Presets / Bank with Instant Access . . . . . . . . . . . . .15
EDIT PRESET . . . . . . . . . . . . . . . . . . . . . . . . . . . . . . . . . . .16
Entering Edit Mode . . . . . . . . . . . . . . . . . . . . . . . . . .16
Assigning MIDI Program Changes . . . . . . . . . . . . . .17
Controlling the System Mix Plus VCA . . . . . . . . . . .18
Controlling the GCX Guitar Audio Switcher . . . . . . .19
Using Expression Pedals . . . . . . . . . . . . . . . . . . . . . .19
Naming Presets . . . . . . . . . . . . . . . . . . . . . . . . . . . . .20
Saving Presets . . . . . . . . . . . . . . . . . . . . . . . . . . . . . .20
LINE6 POD & FLEXTONE II . . . . . . . . . . . . . . . . . . . . . .22
ABOUT MIDI . . . . . . . . . . . . . . . . . . . . . . . . . . . . . . . . . . . .24
WARRANTY . . . . . . . . . . . . . . . . . . . . . . . . . . . . . . . . . . . . .25
1
Page 4

INTRODUCTION
Thank you for buying the Ground Control Pro, the finest full-featured MIDI foot controller available.
The Ground Control Pro is compatible with all MIDI controlled devices. It provides the flexibility,
ease-of-use, and rugged reliability necessary to meet the needs of the most demanding professional
players.
The Ground Control Pro allows you to simultaneously control up to eight different devices, each
on their own MIDI channel. It will also control up to four GCX Guitar Audio Switchers and our
System Mix Plus stereo mixer. But even if you only use a modeling amp or a single processor, the
Ground Control Pro is the perfect choice to meet your performance needs.
The Ground Control Pro lets you instantly reconfigure your entire sound with the touch of a single
button. With the addition of the GCX Guitar Audio Switcher, you aren’t limited to MIDI devices;
your presets can also control pedal effects, select amp channels, plus many other functions.
You can name each of your presets on the Ground Control Pro’s bright, stage-friendly alphanumeric
display. Plus it lets you use volume or expression pedals to add real-time control of your sound using
MIDI continuous controller messages. This gives you access to effects such as wah and volume.
If you want to immediately use your Ground Control Pro to change programs on a single MIDI device,
read “Quick Start”. To get the maximum use and flexibility from your Ground Control Pro, please
take a few minutes and go through the rest of this manual. If you are not familiar with MIDI, you
may want to first read the section “About MIDI.”
2
Page 5
CONNECTIONS
POWER
To use the supplied power adaptor, plug the body of the adaptor into a suitable power receptacle.
Then plug the cable into the jack marked “Power” on the Ground Control Pro.
If you have the GCX Guitar Audio Switcher, you don’t need to use the supplied power adapter.
The GCX will phantom power the Ground Control Pro through a standard 5-pin MIDI cable.
Note: If your Ground Control Pro doesn’t power up from the GCX, here’s the problem…
MIDI only requires 3 pins, so to save money some cables only have these 3 pins
wired. Since the GCX uses the 2 unused pins to send phantom power, these cables
won’t work! You need to make sure your cable has all 5 pins wired. Cables with all
5 pins wired are often labeled “5-Pin Active”.
If you are not using the GCX, but have a device that supports phantom power via a 7-pin MIDI
cable, this device can power the Ground Control Pro. Connect the 7-pin MIDI cable from
your Ground Control Pro’s MIDI Out to the 7-pin MIDI In on the device. Then connect the
Ground Control Pro’s Power Adaptor to the phantom power jack on the device.
MIDI
Connect a 5-pin MIDI cable from the Ground Control Pro MIDI OUT to the MIDI IN of your
first device. If you are using the GCX, it should always be your first device.
If you have additional devices, connect the MIDI THRU of the first device to the MIDI IN of
the next device. If the device has no MIDI THRU, then use its MIDI OUT. Continue to chain
your devices until they are all connected.
In some situations you may want to remotely call up presets on your Ground Control Pro, such
as slaving it from a sequencer or having your tech control it from off stage. You can also backup
or edit your presets with a computer. To do this, you’ll need to connect a MIDI cable from the
controlling device’s (computer, another foot controller, etc.) MIDI OUT to the Ground Control
Pro MIDI IN.
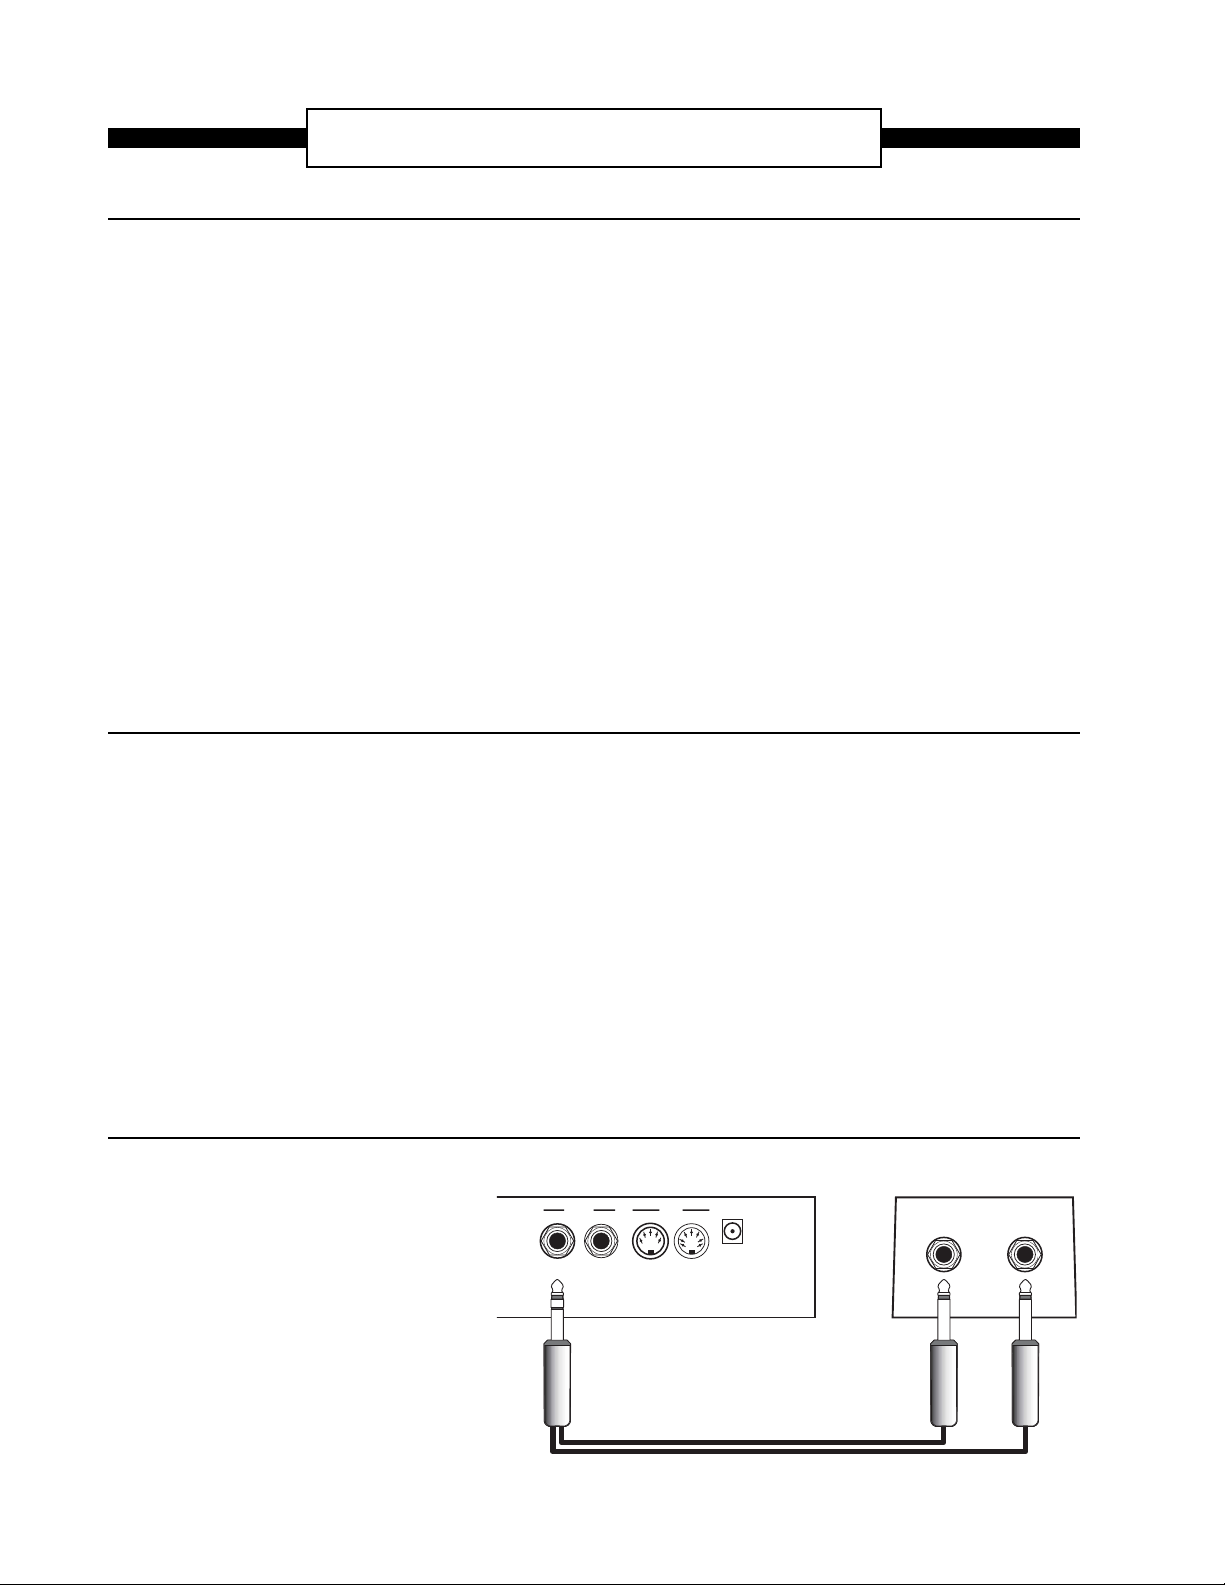
EXPRESSION PEDALS
There are two Pedal inputs on the
Ground Control Pro. Any passive
Expression or Volume pedal can
be used. You can tell if your
pedal is passive, because it won’t
use a battery or require any
external power.
GROUND CONTROL PRO VOLUME PEDAL
PEDAL MIDI POWER
12 INOUT
9VAC
INPUT OUTPUT
The Pedal input jacks take a
standard 1⁄4" stereo plug. To use a
volume pedal, you need a cable
3
RING
TIP
Page 6

which breaks out a stereo plug to 2 mono plugs. These are often called “insert point” cables.
Connect the “ring” end to the volume pedal input (sometimes labeled “instrument”) and the
“tip” end to the volume pedal output (sometimes labeled “amp”).
To use an expression pedal, you need a stereo
1
⁄4" patch cord. For detailed information on how
to setup and use expression pedals, please refer to the section titled “Expression Pedals”.
4
Page 7

QUICK START
You can use your Ground Control Pro right out of the box to select programs on any MIDI
controlled device. To do this, the Ground Control Pro must have its factory settings. If you’re
not sure, here’s how to restore them:
1. Enter Setup mode by pressing both [SETUP] buttons (the upper left and right) at the
same time.
2. Press [UTILITY].
3. Press [SELECT 2] twice, it says “INIT MEM Y/N”.
4. Press [+/YES]. It says “YOU SURE Y/N” and press [+/YES] again. When it says
“WORKING…DONE” the memory is restored.
5. To exit Setup mode, press either [SETUP] button. It says “EXIT Y/N” so press [+/YES].
Remember, Quick Start is for those users who want to just plug in your Ground Control Pro
and use it to control a single device as quickly as possible. To fully utilize its power and
flexibility, you should continue reading this manual!
CHANGING MIDI PROGRAMS
To call up a program on your device, choose a BANK for the first digit by pressing
[BANK 1 or 2], then press [0-9] to choose the second digit.
For example, to call up program #21:
1. Press [BANK 2] until you reach BANK 2. (The BANK number is the leftmost digit
in the display).
2. Press [1] to Load (activate) Preset 21; the display says:
2 1. INIT
Your device should change to its program #21. To access programs 100 through 128, just press
[BANK 2] and go to banks A (100-109), B (110-119) or C (120-128).
If your device isn’t changing programs, make sure that it’s set to respond to MIDI channel #1.
It can also be set for “omni”, which means that it will respond to any MIDI channel.
5
Page 8

SETUP MODE
Setup mode is used to configure the Ground Control Pro to properly control your system.
Setup mode is divided into the following categories:
DEVICE NAME/CHANNEL: Assign names and channels to each of your MIDI controlled
devices.
PEDAL: Enable any volume/expression pedals being used as MIDI expression pedals.
EXPANDERS: Enable up to 4 GCX Guitar Audio Switchers and the System Mix Plus
Remote Volume (VCA).
MIDI: Enable MIDI IN to receive program changes. Backup and restore memory with MIDI
System Exclusive.
INSTANT ACCESS: Define the function of the 8 Instant Access buttons.
UTILITY: Change speed of directory scrolling. Select number of presets/bank. Restore factory
settings.
SPECIAL: Load factory setups for use with specif ic devices.
ENTER & EXIT SETUP MODE
To enter Setup mode, press both [SETUP MODE] buttons at the same time.
The Ground Control Pro will display:
...
Buttons 2 through 8 are also labeled DEVICE NAME/CHANNEL, PEDAL, EXPANDERS, etc.
While you are in Setup mode, you can press buttons 2-8 at any time to select a new Setup
mode category.
To exit SETUP MODE at any time, press either [SETUP MODE] button and answer [+/YES]
to the prompt “EXIT Y/N”.
SELECT 2-8SETUP MODE
DEVICE NAME/CHANNEL
This is where you setup your Ground Control Pro to be able to change programs on your MIDI
controlled devices, such as multi-effects processors or a digital modeling amp.
The Ground Control Pro is capable of controlling up to eight different MIDI devices at the same
time. Each of your MIDI devices can be set to respond to program changes sent on a specific
MIDI channel (1-16). If you don’t know how to do this, please refer to that product’s instruction
manual. You’ll need to set each device to respond to a different channel.
For example, let’s say you have a MIDI preamp and a multi-effects processor. You should set the
preamp to respond to MIDI channel #1 and the processor to respond to MIDI channel #2.
6
Page 9

Note: You don’t have to enter anything here for the GCX or any non-MIDI devices (like
stompboxes) which will be switched through the GCX audio loops.
Enter Setup mode by pressing both [SETUP MODE] buttons at the same time. Then select this
category by pressing [DEVICE NAME/CHANNEL]. The display will read something like:
1. DEVICE /01
ChannelNameNumber
Number
The Ground Control Pro can control eight MIDI devices. This number tells you which of the
eight devices you are entering. Press [SELECT 1 or 2] to choose a different device location.
You can put each device in any of the eight locations. The only difference is that this is the
order that they will come up in when you edit your presets.
Tip: The channel # is after the “/”. If this is “--” then that device location is disabled. You
may want to scroll through each location by pressing [SELECT 2] and make sure
that every location you aren’t using has a “--” for the channel.
Name
Since after you have everything setup, it will be difficult to remember which devices were
assigned to which MIDI channels, we let you assign a name to each device. Now, when you
create and edit your presets you can refer to each of your devices by their name. You should
enter the actual name of your device here, such as “MPX-1”, “EVENTIDE” or “TRIAXIS”.
The Ground Control Pro starts with device #1 named “DEVICE”. Devices 2-8 are blank. You
change the name using the [DATA] and [CURSOR] buttons.
Note: If you press and hold a button it will repeat. You can press both [DATA] buttons at the
same time for a space.
Channel
Each of your devices must be set to respond to a particular MIDI channel, 1-16. The channel
must match the number you enter here.
Each of the devices (1-8) which are not being used must be set to “--”. This turns off the device.
To set the channel:
1. Press and hold [CURSOR 4] until the channel is blinking.
2. Press [DATA +/-] to select the desired channel number or “--” for off.
Note: Each device in your system must be set to its own MIDI channel to respond properly.
Start Number
Most MIDI controlled devices number their programs starting from 1. If your device starts
numbering its programs from 0, then the device will always be off by 1 from what is displayed
7
Page 10

on the Ground Control Pro. You can fix this by telling the Ground Control Pro that it should
“start at 0”. Here’s how:
1. Press [SELECT 1 or 2] to choose the device 1-8 that you need to change.
2. Press and hold [CURSOR4] until the channel is flashing. Then press [CURSOR 4]
one more time. The display will read:
STARTS AT 01
3. Press [-/NO] to select “STARTS AT 00” or press [+/YES] for “STARTS AT 01”.
PEDAL
To use guitar volume or expression pedals with the Ground Control Pro as MIDI expression
pedals, you must enable them here. If you don’t know how to connect a pedal to the Ground
Control Pro, please refer to the “Connections” section of this manual.
Enter Setup mode by pressing both [SETUP MODE] buttons at the same time. Then select this
category by pressing [PEDAL]. The display should read:
P1 IS OFF
To enable (turn on) the pedal connected to “PEDAL 1”, press [+/YES]. To disable (turn off),
press [-/NO]. Press [SELECT 2] to access “PEDAL 2”.
EXPANDERS
GCX Guitar Audio Switcher
If you have one or more GCX Guitar Audio Switchers, you must enable them here. The
Ground Control Pro can control up to 4 GCX units to provide any combination of 32 audio
loops and switches.
Enter Setup mode by pressing both [SETUP MODE] buttons at the same time. Then select
this category by pressing [EXPANDERS]. The display should read:
GCX-1 IS OFF
To enable the GCX, press [+/YES] to turn GCX #1 on. If you have more than one GCX, press
[SELECT 2] to access the next GCX. You can continue to enable GCX units 2 through 4.
For most applications, you will use loops as either audio loops or latching switches. If you
need to control a momentary switch function with one of the GCX loops, you must change it
from “normal” to “momentary” as follows:
1. Press [SELECT 2 or 1] to select the appropriate GCX.
2. Press [CURSOR 4] to access the desired loop. The display will look like:
8
Page 11

LOOP4=NORMAL
Press [+/YES] to select “MOM SW” for momentary switch operation. Press [-/NO] to return
to normal.
System Mix Plus
If your rig includes our System Mix Plus and you’d like to use its MIDI volume feature (VCA),
you must enable it here. From the “Expanders” category, press [SELECT 2] until you see:
VCA IS OFF
Press [+/YES] to turn the VCA function on.
Note: When the VCA is enabled (“VCA IS ON”), you can only use devices 1 through 7.
Memory for device #8 is used to store volume levels.
MIDI
Receive Program Changes
The Ground Control Pro can respond to program change commands sent to its MIDI IN jack.
This allows you to call up presets automatically from a MIDI sequencer or to have your guitar
tech do it from offstage using another MIDI controller.
To enable this function, enter Setup mode by pressing both [SETUP MODE] buttons at the
same time. Then select this category by pressing [MIDI]. The display will read “PGM RECV
OFF”. Turn it on by pressing [+/YES]. Next press [CURSOR 4] to show the display:
CHANNEL- 0 1
This is the MIDI channel that the Ground Control Pro will respond to. In most cases the
default value of 1 is just fine. If you need to change it, use the [DATA] buttons to select any
channel 1 to 16.
Memory Backup & Restore (System Exclusive)
Your Ground Control Pro can transmit and receive the contents of its memory using MIDI
System Exclusive messages. This is also sometimes refered to as a “bulk dump”. This allows
you to:
•Keep a backup of all your presets.
• Create and edit your presets on a computer.
•Transfer the memory contents from one Ground Control Pro to another.
To transmit the memory, first enter Setup mode by pressing both [SETUP MODE] buttons at
the same time. Then select this category by pressing [MIDI]. Press [SELECT 2] and the display will read:
9
Page 12

XMIT MEM Y/N
Press [+/YES] and you will see the message “SENDING MIDI” while the data is being sent
from the MIDI OUT jack.
The Ground Control Pro can have its memory loaded, either from a computer or from another
Ground Control Pro. To receive memory, enter Setup mode by pressing both [SETUP MODE]
buttons at the same time, then select this category by pressing [MIDI].
Press [SELECT 2] twice until the display says:
RECEIVE MEM
Once you see this message, you can load the memory back into the MIDI IN jack. As soon as
the Ground Control Pro starts receiving a valid System Exclusive message, it will display:
RECEIVED /001
The number “001” will count up showing your progress. When it has received the entire message, it will flash “DONE” for a few seconds.
INSTANT ACCESS
The Ground Control Pro allows you to use buttons 1 through 8 for instant access. Normally,
presets are organized in banks of 10. To use the Instant Access feature, you must select the “4
Presets/Bank” option. This frees the upper two rows since you only need the bottom row of 4
buttons to recall your presets.
To select the 4 preset/bank option, enter Setup mode by pressing both [SETUP MODE] buttons
at the same time, then press [UTILITY], followed by [SELECT 2]. The display should read:
10 PRST/BANK
Press [+/YES] to select “4 PRST/BANK”. Now you’re ready to setup your instant access buttons.
The factory setting is for buttons 1-8 to control loops 1-8 in GCX #1, respectively. You can
redefine each button to control any one of the following:
•Any loop of your GCX Guitar Audio Switcher(s).
• Start and Stop a MIDI sequencer.
• Send a MIDI continuous controller on/off message.
To configure your instant access buttons, enter Setup mode by pressing both [SETUP MODE]
buttons at the same time, then select this category by pressing [INSTANT ACCESS].
This display will show:
10
Page 13

1. GCX-1 LOOP1
The first number “1” tells you which instant access button you are setting up.
Pressing [BANK 2] will select buttons 1 through 8.
GCX Loops
Setting an instant access button to control a GCX loop means that you can simply press that
button to directly turn the loop on or off. This allows you to be more spontaneous rather than having to create a whole new preset in anticipation of which loops you’ll want on and off. The most
common uses of GCX loops are to switch stompbox effects in/out and to select amp channels.
When the display shows something like:
3. GCX-1 LOOP5
This means that instant access button ‘3’ will control loop ‘5’ on GCX ‘1’. Use [CURSOR] to
move between the GCX # and loop #. Then use [-/NO] and [+/YES] to change them. You can
select GCX #’s 1-4 and each GCX has loops 1-8.
Sequencer Start/Stop
You can setup one of the instant access buttons to start and stop a sequencer. With the cursor
on the GCX #, press [+/YES] until the display shows:
3. SEQ S/S
Now instant access button #3 will start and stop your sequencer.
MIDI Continuous Controller On/Off
If you are using a multi-effects processor or a modeling amp, it is very likely that you can turn
its internal effects on and off with MIDI Continuous Controller (CC) messages. By assigning
CC messages to instant access buttons, you can control these internal effects just like a stompbox pedal board. All you need to know is which MIDI channel (1-16) and controller numbers
(0-120) your device will respond to. Some devices will have the controller numbers fixed to
specific effects, and others will let you assign each controller to a different function.
With the cursor on the GCX #, press [+/YES] until the display shows:
1.CH01 CTL004
This indicates that Instant Access button #1 will control MIDI continuous controller #004 on
channel 1. You can use [CURSOR] to move between the channel and the controller number.
Then use [-/NO] and [+/YES] to select MIDI channels 1-16 and continuous controllers 0-120.
If you press [CURSOR 4] again, you can select between NORMAL, XMIT W/PRSET and
MOMENTARY. Here’s what that means:
11
Page 14

NORMAL. The CC message is only sent when you press the instant access button. You press
it once to turn it on, then again to turn it off.
XMIT W/PRSET. This stands for “Transmit with Preset”. When you call up a preset on the
Ground Control Pro, it will send out the current state (on or off) of this instant access
button. Of course it turns on and off when you press the button too.
MOMENTARY. This option means that it sends an “on” message when the instant access
button is pressed, then sends an “off ” message when it is released.
UTILITY
Utility allows you to change the speed of the scrolling preset directory, select the number of
presets per bank, and reinitialize memory to restore the factory defaults.
Directory Speed
This lets you control how fast the directory of presets scrolls when you enter a new Bank. To
change the directory speed, enter Setup mode by pressing both [SETUP MODE] buttons at the
same time, then press [UTILITY].
The display will read:
DIR SPEED=2
Press [-/NO] or [+/YES] to change the value from 1 (slowest) to 4 (fastest).
Presets / Bank
You can choose between having 10 or 4 presets in each bank.
10 Presets / Bank. With this selection you will use buttons 1-9 and 0 to select your presets.
Buttons [-/NO] and [+/YES] are used as increment and decrement so you can step through the
presets sequentially. This is a great feature if you have a rigid set list and want to pre-program
all of the changes. You will use [BANK 1 or 2] to select from 20 available banks, 0-9 then
A-J.
4 Presets / Bank. This way you will access your presets as banks of 4 presets each. You still
use [BANK 1 or 2] to choose the bank, but only buttons 1-4 on the bottom row (the large
white numbers on a gray background) to call up the presets. This frees the upper two rows for
instant access since you are only using the bottom row to recall your presets. If you want to
use the instant access buttons, you must choose 4 presets/bank.
The Ground Control Pro is initially set to 10 presets/bank. To change the selection, enter Setup
mode by pressing both [SETUP MODE] buttons at the same time, then press [UTILITY].
Press [SELECT 2] so the display reads:
10 PRST/BANK
Press [+/YES] to toggle between 10 and 4 presets/bank.
12
Page 15

Initialize Memory
This function restores the Ground Control’s memory to the factory settings. To do this, enter
Setup mode by pressing both [SETUP MODE] buttons at the same time, then press [UTILITY].
Press [SELECT 2] twice, so the display reads:
INIT MEM Y/N
Press [+/YES]. After the warning and “YOU SURE Y/N” message, press [+/YES] again. The
initialization process can take up to 30 seconds. The display will say “WORKING…” and
when it’s finished it will briefly say “DONE”.
SPECIAL
Special lets you set up your Ground Control Pro to work with the Line6 POD and Flextone2.
If you have one of these products, this is the quickest way to get up and running. You can call
up all of the amp models, plus use our 8 instant access buttons to have direct control of their
built-in effects.
Note: This function will reinitialize the memory in your Ground Control Pro. It will erase
any settings you have already programmed.
To do this, enter Setup mode by pressing both [SETUP MODE] buttons at the same time, then
press [SPECIAL]. Press [SELECT 2] to display the correct device, such as:
POD?
Then press [+/YES]. After the warning and “YOU SURE Y/N” message, press [+/YES] again.
The display will briefly say “WORKING…” and when it’s finished it will flash “DONE”.
13
Page 16

SELECT PRESET
The Ground Control Pro lets you create up to 200 presets. When you recall a preset, the
Ground Control Pro will set all of your MIDI controlled devices to the correct programs.
Plus, if you have one or more GCX Guitar Audio Switchers, it will switch all the loops too.
This allows you to completely control your sound with the press of a single button.
In the “Utility” section of Setup mode, you chose whether you wanted to access your presets
in groups of 10 or groups of 4. If you didn’t change this selection, the default is 10 presets in
each bank. The following sections will explain how you recall presets on your Ground Control
Pro depending on which selection you have made.
When you power up the Ground Control Pro, it displays a startup message which you can skip
by pressing any button. Then it shows a scrolling directory of the presets in Bank 0.
10 PRESETS / BANK
The 200 presets are arranged in 20 banks of 10 presets each. The banks are numbered from 0
to 9, then from A to J. Presets within the bank are numbered 0 to 9. The display will look
something like this:
07. RHYTHM
The “07” at the beginning indicates that the Ground Control Pro is currently set to bank #0, preset
#7. The name of the preset is “RHYTHM”. If your Ground Control Pro is new, the names of
all your presets will be “INIT”. Once you start creating your own presets, you will enter your
own names for them. Creating and editing presets is explained in the following chapter.
To recall a preset, first select the bank by pressing [BANK 1] or [BANK 2]. To move through
the banks quickly, hold down either [BANK] button and it will repeat. Then choose a preset
within that bank by pressing any of buttons [1] through [9] or [0].
Note: Use buttons “1” though “9” and “0” to select your presets. These are the small numbers
which are in the top two rows and the left side of the bottom row. The large numbers
“1” through “4” on a gray background are used with the 4 presets/bank selection only.
Forexample, if you’re currently in bank 0 (leftmost digit is a 0) and you want to recall preset #21,
press [BANK 1] twice to select bank #2, then press [1] to activate preset #1 within that bank.
You can also use the [-/NO] and [+/YES] buttons to step through your presets one at a time. This
is a handy feature if you have a rigid set list and all of the changes are already programmed in
order. Another use is to select the first preset in a song using the regular bank and number
buttons, then use [+/YES] to step through the changes within that song.
When you change banks, the Ground Control displays a directory of presets within the new
bank. The directory will continue to scroll until either a preset is selected or you return to the
original bank. If you forgot which bank you were in, when you get back to it the decimal point
14
Page 17

following the bank number will light until it finishes scrolling the directory.
4 PRESETS / BANK WITH INSTANT ACCESS
Using 4 presets/bank allows you to select your presets using only buttons [1] through [4] on
the bottom row. This frees the upper two rows to give you 8 instant access buttons. You can
define the function of each instant access button in the “Instant Access” section of Setup
mode. The default is for them to control the eight loops of your GCX Guitar Audio Switcher.
The presets are arranged in 36 banks of 4 presets each. The banks are numbered from 0 to 9,
then from A to Z. Presets within the bank are numbered 1 to 4.
To recall a preset, first select the bank by pressing [BANK 1] or [BANK 2]. To move through
the banks quickly, hold down either [BANK] button and it will repeat. Then choose a preset
within that bank by pressing any of buttons [1] through [4].
Note: Use buttons “1” though “4” on the bottom row to select your presets. These are the
large “1” through “4” numbers printed on a gray background. The smaller numbers
“1” through “8” on the upper two rows are your instant access buttons.
Buttons [1] to [8] on the upper two rows are your instant access buttons. These are commonly
used to make your Ground Control Pro function more like a traditional stompbox pedalboard.
They will switch actual pedal effects on or off using our GCX Guitar Audio Switcher, or provide
the same function with “virtual” effects built into your digital amp or multi-effects processor.
You can press these buttons at any time.
15
Page 18

EDIT PRESET
When the Ground Control Pro is shipped from the factory, it comes set up to control one MIDI
device responding on MIDI channel #1. The default presets call up MIDI programs sequentially,
meaning that Ground Control Pro preset ‘01’ calls up MIDI program #1, preset ‘02’ calls up
program #2, and so on. This is the same way that any “dumb” MIDI foot controller works.
The real flexibility of the Ground Control Pro is that you can edit the presets to make each one
do whatever you want. And you can organize them in whatever order you want. Some players
like to put their favorite sounds in the first one or two banks for easy access. Others organize
them according to a particular set list. And still others dedicate one bank to each song and
that’s where they put all the sounds they use for that song.
When you edit each preset, here’s what you can do:
• Select the program for each MIDI controlled device
• Specify what each of the two expression pedals will control
• Set the System Mix Plus volume
• Set the loops on or off in up to 4 GCX Guitar Audio Switchers
• Name your preset
Note: Only those items which you have enabled in Setup mode will appear.
These changes occur in “real time” while you edit your presets, so you can experiment with
new tone combinations interactively before you save them.
Here are the basic steps to edit or create a preset:
1. Select the preset you want to edit.
2. Enter Edit mode by holding down [EDIT] until the Edit LED comes on.
3. Use [SELECT 2] to step through each of the items within the preset.
4. When you are done, press [EDIT] again to exit Edit mode.
ENTERING EDIT MODE
Before you enter Edit mode, you must first select the preset you want to edit. The display will
show something like:
0 1. INIT
Now press and hold the [EDIT] button until the LED above it comes on and the display
changes. The delay in entering Edit mode is so that you don’t accidentally enter this mode
during performance.
Now that you’re in Edit mode, use [SELECT 2] to step through each of the items within the
preset. When you’re done, press [EDIT] again to exit Edit mode. If you’ve made any changes,
the display will show:
16
Page 19

SAVE Y/N
Press [+/YES] to save your changes, or press [-/NO] to exit Edit mode without saving.
Note: If you exit Edit mode without saving, your changes will still be there until you select
a new preset. So if you change your mind, just go back into Edit mode and save it.
ASSIGNING MIDI PROGRAM CHANGES
After selecting a preset, enter Edit mode by holding down [EDIT] until the edit LED comes on.
You will see the name of the first device that you entered in Setup mode. If you haven’t changed
the device in Setup mode, then you have only one MIDI device named “DEVICE” which
responds to MIDI channel #1. The Ground Control Pro display will look something like this:
ECLIPSE - 18
Program NumberDevice
Now enter the number of the program you want for this device. You can access any program
from 0 to 128.
For example:
1. For program 6, press [0] [6]
2. For program 36, press [3] [6]
3. For program 112, press [1] [1] [2]
Notice that there is a slight delay when you select programs 10, 11, or 12. This is because the
Ground Control is waiting for a third digit in case you wanted programs 100 through 128.
You can also press [-/NO] and [+/YES] to step through your device’s programs one at a time.
If you have additional MIDI devices, press [SELECT 2] to go to the next one and enter its
program.
Note: The Ground Control automatically filters redundant program changes when presets
are recalled to avoid audible glitches. So if you change from one preset to another
that has the same MIDI program specified, it won’t send the program change
command again.
You can instruct the Ground Control Pro to not send a MIDI Program Change with this preset.
How you do this depends on whether your device numbers its programs from 0 to 127, or
from 1 to 128 (see “Start Number” on page 7). To not send a MIDI Program Change, do one
of the following:
• If the device starts at 1, then choose program 0 by pressing [0] [0].
• If the device starts at 0, then choose program 128 by pressing [1] [2] [8].
When no program is selected, the display will show “--” instead of a program number.
17
Page 20

CONTROLLING THE SYSTEM MIX PLUS VCA
Before controlling the System Mix Plus VCA, you need to enable the VCA from the Expanders
category of Setup mode.
For each Ground Control Pro preset, you can assign a specific volume level, or you can control
the volume with expression pedals, or do both.
Controlling the VCA with Preset Volume Levels
Volume changes can be programmed for each preset. Press [SELECT 2] until you see the
display:
VCA LEVEL --
A value of “--” means no volume change will be sent when the preset is selected. Press and
hold the [DATA] buttons to enter a preset volume level from 00 (off) to 99 (maximum).
Controlling the VCA with Expression Pedals
To control the VCA with expression pedals, you set them up just like in “Using Expression
Pedals” below. Press [SELECT 2] until you get to the pedal display for the desired
Pedal (1 or 2):
P1. 064 CTL007
Press [CURSOR 4] to select the target device. Then press [+/YES] to choose VCA.
The display should look like:
P1-)-VCA-
Now press [CURSOR3] to return to the previous screen. Use [DATA] to select Stereo, Left,
Right, or Pan. The expression pedal now controls volume from 0 (off) to 127 (maximum).
Using Both Preset Level and Expression Pedals
You may use both the preset level and the expression pedals simultaneously. When a preset is
recalled, the preset level will be sent to the System Mix Plus. The expression pedal will override
the preset level only when the value of its position matches the value of the preset level. This
avoids any drastic volume changes when the pedal is moved.
For example, if the Preset Level is 99 (maximum volume), then the expression pedal won’t
take control of volume until it has reached its full on position. Then the volume will track the
movement of the expression pedal.
If the expression pedal is assigned to Left or Right, the preset level will control only the other
channel of the volume control. For example, if the expression pedal is assigned to the left
channel, then the preset level will control the right channel.
18
Page 21

CONTROLLING THE GCX GUITAR AUDIO SWITCHER
The Ground Control Pro is capable of controlling four GCX Guitar Audio Switchers for up to
32 loops. Before you can control your GCX(s), you must enable them from the Expanders category of Setup mode.
To program loops on a GCX, first select a preset and enter EDIT mode.
Then press [SELECT 2] until you see:
GCX-1
Now press [1] through [8] to turn on or off the appropriate loops. The LEDs above each button
show the current status of the loop. If you have additional GCX units, press [SELECT 2] to
select “GCX-2” and repeat as necessary.
If you don’t want the GCX loops to be changed, then you can disable the GCX for this preset.
To do this, while you’re at the “GCX-1” screen, press [-/NO]. The display will flash DISABLED,
then change to:
(GCX-1)
To enable the GCX again, you can either press [+/YES] or just change any loop by pressing
one of the buttons [1] through [8].
USING EXPRESSION PEDALS
Before using expression pedals, you need to enable them from the Pedal category of Setup mode.
After you select a preset and enter Edit mode, you can specify what each expression pedal will
control by pressing [SELECT 2] until you see the following display:
P1. 064 CTL007
Message TypeCurrent ValuePedal
Pedal
This tells you which pedal you are editing. Press [SELECT 2] again to select pedal #2.
Current V alue
This shows you what position is being read from the expression pedal. It’s really just a diagnostic
tool so that you know if the pedal is working properly. Wiggle the pedal and make sure the
numbers change and your device is responding properly. If the numbers are changing, then the
Ground Control Pro is definitely sending the specified MIDI messages.
Message T ype
Now you need to choose a MIDI message type. It doesn’t matter which you choose as long as
it matches the message type that your device is set to respond to. The choices are:
19
Page 22

• No output: “OFF”
• Pitch Bend: “PITCHB”
• Aftertouch: “AFTERT”
•Continuous Controllers 000 through 120: “CTL007”
To choose the MIDI message type press (or press and hold) [-/NO] or [+/YES]. Some devices
let you assign controller messages to whatever parameters you like. Others will have a list of
what each controller does. You need to check the manual for the device you are controlling to
see how it works.
Tip: Controller #7 (‘CTL007’) is almost always volume.
Target Device
If you have more than one MIDI device, you must specify which one the Expression Pedal
should control. Press [CURSOR 4] to get to the following display:
P1-) DEVICE
Target DevicePedal
Press [-/NO] and [+/YES] to select the correct device. Only those devices that you have specified
in the Device Name/Channel category of Setup mode will appear.
NAMING PRESETS
To enter the name for your new preset, press [SELECT 2] until you see:
"_INIT "
Press [-/NO] and [+/YES] to change the characters. Press [CURSOR3 4] to move the cursor
to each character position.
Tip: To save time, if you press and hold [-/NO] or [+/YES] they will autorepeat. If you
press them both at the same time, the character is replaced by a space.
SAVING PRESETS
If you have made any changes to your preset, when you press [EDIT] to leave Edit mode, the
Ground Control Pro will display:
SAVE Y/N
Press [+/YES] to save your preset. The Ground Control Pro will display briefly “SAVING TO
01”, before exiting Edit mode. If you press [-/NO] instead, you will exit Edit mode without
saving your changes. Your changes will not be lost until you select a new preset.
20
Page 23

Saving to a different location (Copy)
Sometimes you may want to save your preset to a new location. This is useful when you want
to start with an existing preset and just change one or two things. Also, it allows you to copy
presets from one location to another.
To copy a preset to a new location, first select the original preset. Then enter Edit mode by
holding down [EDIT] until the Edit LED comes on. Then press [SELECT 2] until you see:
SAVE TO 01
The first digit (bank#) will be flashing. Press [-/NO] or [+/YES] to select the new bank. Now
press [CURSOR 4] and the second digit (preset# within the bank) will flash. Use [-/NO] or
[+/YES] again to set this number. Then press [EDIT] and the display will flash alternately
between:
OVERWRITE Y/N
and the name of the PRESET currently in your chosen location. This will keep you from accidentally writing over a preset you want to keep. You can press [+/YES] to save or press [-/NO]
to go back and choose a new location.
21
Page 24

LINE6 POD & FLEXTONE II
The Ground Control Pro is a perfect companion to any MIDI controlled digital modeling amps
such as the Line6 POD and Flextone II. To make it even easier to use with these devices, we
have provided some special setups already programmed in for you.
First you need to initialize the Ground Control Pro’s memory with our special setup. To do
this, enter Setup mode by pressing both [SETUP MODE] buttons at the same time, then press
[SPECIAL]. Press [SELECT 2] to choose either “POD” or “Flextone II” (all models). The
display looks like this:
FLEXTONE2 ?
Then press [+/YES]. After the warning and “YOU SURE Y/N” message, press [+/YES] again.
The display will briefly say “WORKING…” and when it’s finished it will flash “DONE”.
Now you can exit Setup mode by pressing either [SETUP MODE] button and answer [+/YES]
to the prompt “EXIT Y/N”.
To access programs in your Flextone II or POD, use [BANK 1] and [BANK 2] to select
between banks 0 through 9. Then use [1] through [4] on the bottom row to call up each program.
The Ground Control Pro will show the names of each amp model on its display.
CONTROLLING INTERNAL EFFECTS
The buttons [1] through [8] on the upper two rows are your instant access buttons. Use them at
any time to control the following features of your Line6 product:
Button # Function
1Distortion
2Drive Boost
3EQ
4 Chorus/Rotary/Tremolo
5 Delay
6Reverb
7 Bright
8Wah Off
When you call up a new amp model, the LEDs above buttons [1] through [8] will show the
current status off these effects. If you want them to come up differently for that preset, after
you have changed them, press and hold [EDIT] until the Edit LED comes on. Then press
[EDIT] again so you see the display:
22
Page 25

SAVE Y/N
Press [+/YES] to save. Now when you call up this preset, you will get the new settings for the
effect state.
VOLUME & WAH WITH EXPRESSION PEDALS
You can use two expression pedals with these Line6 amps. Pedal #1 will control volume and
pedal #2 is the wah. You can use either one or both.
Plug expression or volume pedals into the Ground Control Pro according to the instructions in
Connections. Then you must enable them in Setup mode. To do this, enter Setup mode by
pressing both [SETUP MODE] buttons at the same time, then press [PEDAL]. The display
will read:
P1 IS OFF
Press [+/YES] to turn on pedal #1 (volume). Otherwise, press [SELECT 2] and press [+/YES]
to turn on pedal #2 (wah). Now exit Setup mode by pressing either [SETUP MODE] button
and answer [+/YES] to the prompt “EXIT Y/N”.
Both volume and wah are global on the Line6 amps. This means that when you change volume
with the expression pedal, the amp will stay at that master volume setting even if you select a
new preset.
The wah is turned on by rocking its expression pedal. It will stay on until you press [8], the
instant access button assigned to wah off.
23
Page 26

ABOUT MIDI
MIDI (Musical Instrument Digital Interface) is a universal language that allows electronic
devices made by different manufacturers to communicate with one another. Although using
your Ground Control Pro doesn’t require a thorough knowledge of MIDI, it is helpful to
understand Channels, Program Changes, and Continuous Controllers.
Channels
MIDI Channels are like channels on your television. When you select a channel on your TV,
you only receive the broadcast transmitted on that particular channel. Similarly, when you select
the channel on a MIDI device, it will only respond to messages sent on that Channel. MIDI
messages can be transmitted on 16 different channels (1-16) through a single MIDI cable.
Program Changes
Your MIDI controlled devices have a series of programs which can be recalled from the front
panel. Programs can also be recalled by sending a MIDI Program Change command.
MIDI Program Changes select one of 128 different programs. Some manufacturers number
their programs starting with 1 (1-128), some start with 0 (0-127).
Continuous Controllers
Unlike Program Changes, which select an entire program, Continuous Controllers change only
selected parameters within a program. Also known as Control Changes, these messages are
frequently used to add expression to an effect by adjusting parameters like volume, mix,
reverb depth, delay time, or EQ to name a few.
There are 121 different MIDI Continuous Controllers, numbered 0 to 120. Each controller is
like a slider or a knob; it can transmit a “continuous” stream of values ranging from 0 (all the
way off) to 128 (all the way on).
The Ground Control has inputs for two pedals which you can define to send any MIDI
Continuous Controllers you wish. The position of your pedal is converted into a value from 0
to 127. Whenever the pedal is moved, the Ground Control transmits a Continuous Controller
message with the new value.
Each MIDI device supports Continuous Controllers differently, so you should consult the
manual for that device to determine which controller to use, and what parameters may be
controlled with it.
24
Page 27

WARRANTY
Voodoo Lab warrants this product against any defects that are due to faulty material or workmanship
for a period of five years from the date of original retail purchase. This warranty does not include
damage to the product resulting from accident or misuse. This warranty is given to the original purchaser only and it is not assignable to any other person.
If the product should become defective within the warranty period, Voodoo Lab will repair it or replace it
free of charge, provided it is returned freight prepaid to Voodoo Lab with a valid RMA (return
material authorization) number. Return shipping will be paid by Voodoo Lab within the U.S. only.
This warranty shall not apply to any goods that have been repaired or altered by anyone other than
the manufacturer. There are no warranties which extend beyond the terms described herein.
Should you experience any difficulty with this Voodoo Lab product, contact us as described below.
If it is determined that the product must be returned to the factory for repair, you will be issued an
RMA and given shipping and packaging instructions.
You can reach us by any of the following:
Tel: 707 545 0600
Fax: 707 545 9777
Email: info@v
Website:
Mail: 3165 Coffey Lane, Santa Rosa, CA 95403
www.voodoolab.com
oodoolab.com
25
 Loading...