

Page 1

WEB EDITION
SENSUS NAVIGATION
Page 2
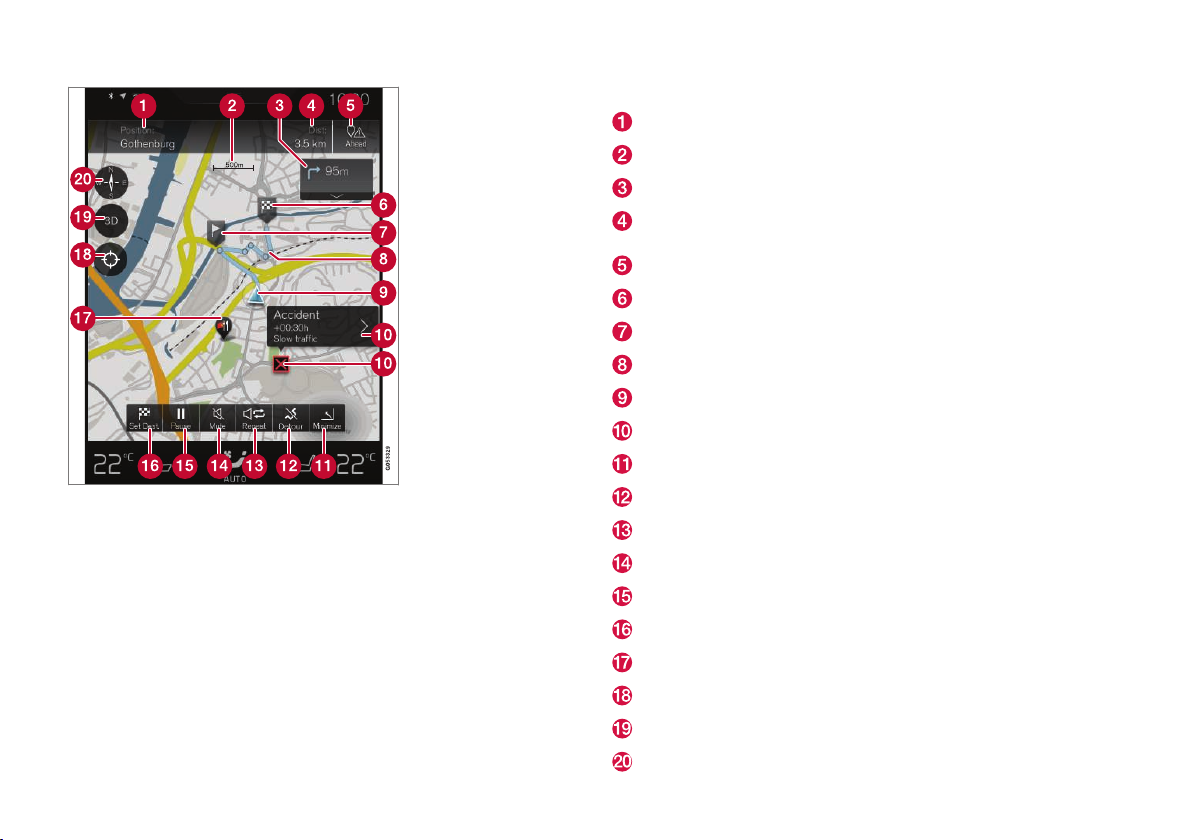
Text and symbols on the map
The car's current position + Point to press for opening the itinerary
Map scale
List with the itinerary's guidance points
Driving distance to the destination/Arrival time at the destination + Point
to press for switching between headings
Point to press for a list of the itinerary's POI and traffic information
Destination/final destination
Intermediate destinations
Guidance point
Car (blue triangle) on the planned route
Traffic problems with information
Minimise (expanded view) or maximise (full screen) the map view
Calculate detour
Repeat the current voice guidance
Voice guidance temporarily On/Off
Pause/resume guidance
Specifying destinations/intermediate destinations
POI (Restaurant)
Point to press to reset the map to follow the car (blue triangle)
Point to press to change between 2D/3D
Compass + Point to press for North up/Travel direction up
Page 3

SENSUS NAVIGATION
Sensus Navigation is a satellite based traffic information and route guidance system.
Sensus Navigation guides you to a destination and provides information
along the route. It notifies you of situations that could make driving difficult, such as accidents and road works, and suggests alternative routes
in such cases.
It is possible to draw up an itinerary, search for POI (Point of interest)
along the route, store your own favourite places etc.
Sensus Navigation shows the exact position of the car and can always
guide you to the destination even if you take a wrong turn.
For optimal understanding of the system we recommend that you make
yourself familiar with the information in this owner's manual.
In addition to its practical use, Sensus Navigation also contributes to a
better environment by facilitating accessibility and selecting the best
route based on the driver's settings.
Page 4

2
TABLE OF CONTENTS
GET STARTED NOW
Quick guide to map navigation
8
Simple guidance to a destination
8
GET TO KNOW SENSUS
NAVIGATION
Common operations during map navigation
12
CONTROLS
Displays and operating controls for
map navigation
16
Page 5

3
VOICE RECOGNITION
Voice recognition and map navigation
20
Voice recognition
21
Using voice recognition
22
Voice recognition settings
22
SPECIFY A DESTINATION
General information about entering a
destination
24
Define the destination by clicking on
the map
24
Specify destination with free text
searching
25
Specifying a destination with Latest/
Favourites/Library
27
Specifying a destination with POI
29
Specifying a destination with an address
30
Save the destination with "Send to Car"
30
ITINERARY AND ROUTE
Itinerary and Alternative route
34
Guidance points in the Itinerary
35
POIs along route
36
Traffic disruptions along the route
36
Information cards on the map
37
Select detour
38
Page 6

4
TRAFFIC INFORMATION
Traffic information
40
SETTINGS
Map navigation in the driver display
42
Sensus Navigation settings
42
Map settings
43
Route settings
46
Traffic settings
47
Guidance settings
48
System settings
49
MAP AND SYSTEM INFORMATION
Updating map data with MapCare
52
Updating map data via Remote updating
53
Updating map data via PC and USB
54
License agreement for map navigation
56
Copyright
58
Page 7

5
SOME COMMON "ERRORS"
Fault tracing for Sensus Navigation
60
ALPHABETICAL INDEX
Alphabetical Index 63
Page 8

Page 9

GET STARTED NOW
Page 10
GET STARTED NOW
8
Quick guide to map navigation
The car's electrical system is activated automatically when the driver's door is opened.
Navigation On/Off
On
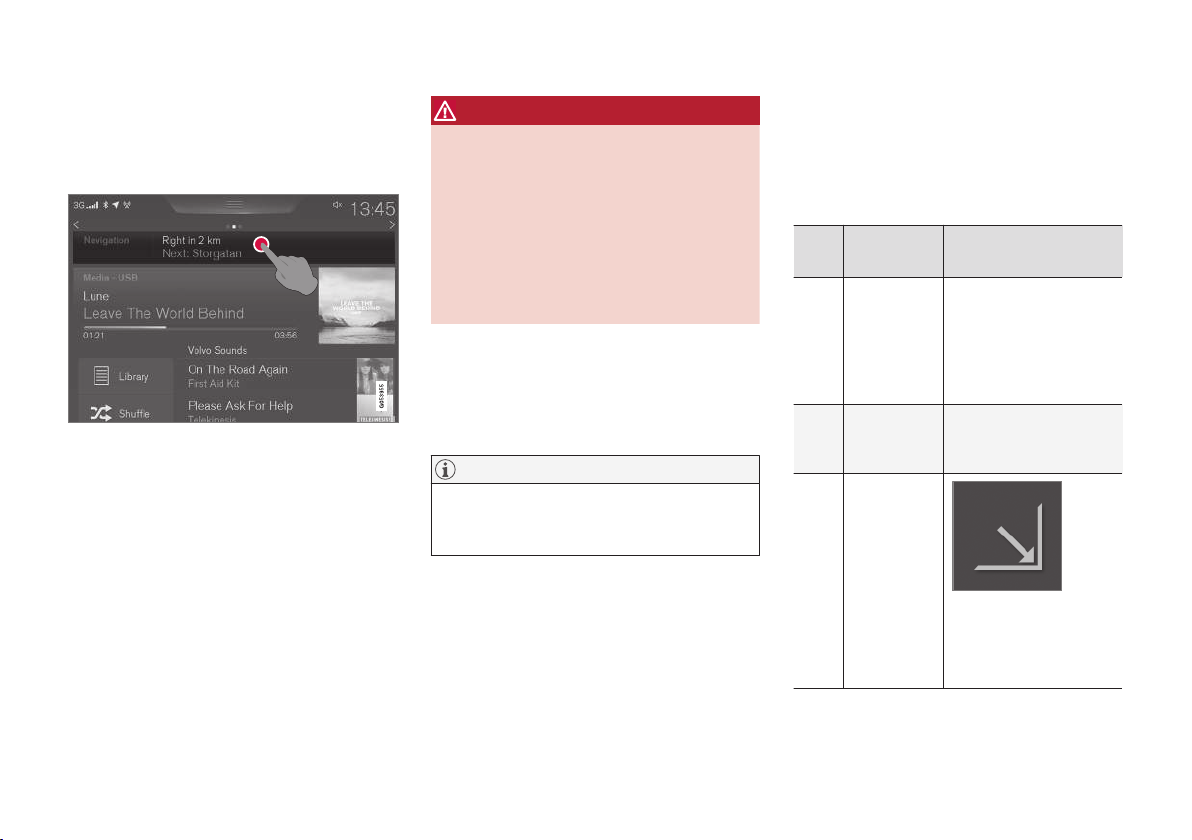
If the navigation system does not show a map on
the centre display - "click" on
Navigation on the
uppermost row.
Then a map of the current area is shown with the
car symbolised by a blue triangle.
WARNING
Observe the following.
•
Direct all your attention to the road and
make sure that all your concentration is
on driving.
•
Follow applicable traffic legislation and
drive with good judgment.
•
Due to weather conditions or time of year
affecting the road conditions, some recommendations may be less reliable.
Off
The navigation system cannot be switched off but
always works in the background - it is only
switched off when the driver locks and leaves the
car.
NOTE
The navigation system is also available when
the engine is switched off. When the battery
level gets too low the system switches off.
Related information
•
Displays and operating controls for map navigation (p. 16)
•
Simple guidance to a destination (p. 8)
Simple guidance to a destination
Setting guidance to the desired destination without having to first read the whole owner's manual.
Selecting a destination on the map
Step Screen/
menu
Action
1 If the
screen does
not show a
map image,
proceed as
follows:
Press the rectangular
button under the display
screen to come to the
home view.
2 The home
view is
shown.
Press Navigation on
the display screen's
upper menu row.
3 A map is
shown.
If that button is visible
on the screen - press it
to maximise the map
view.
Page 11

GET STARTED NOW
9
Step Screen/
menu
Action
4 A map is
shown.
Scroll to the desired
location on the map and
give a long press on the
position.
5 A field with
the text
Start navigation is
shown on
the screen.
Tap on Start naviga-
tion.
6 A map with
highlighted
route is
shown.
Guidance starts - follow
the instructions on the
driver display.
Page 12

Page 13

GET TO KNOW SENSUS NAVIGATION
Page 14
GET TO KNOW SENSUS NAVIGATION
12
Common operations during map navigation
Some common operations during map navigation are described below.
•
Where am I?
•
Driving direction or north up on the map
•
2D or 3D display
•
Zoom
•
Scroll
•
Find the car symbol on the map
•
Switching heading display
•
Return from a menu
•
"Wrong" language in the views
Where am I?
What geographic position does the car have
now?
•
Click on the map's car symbol (blue triangle)
- the information is shown directly on the
map.
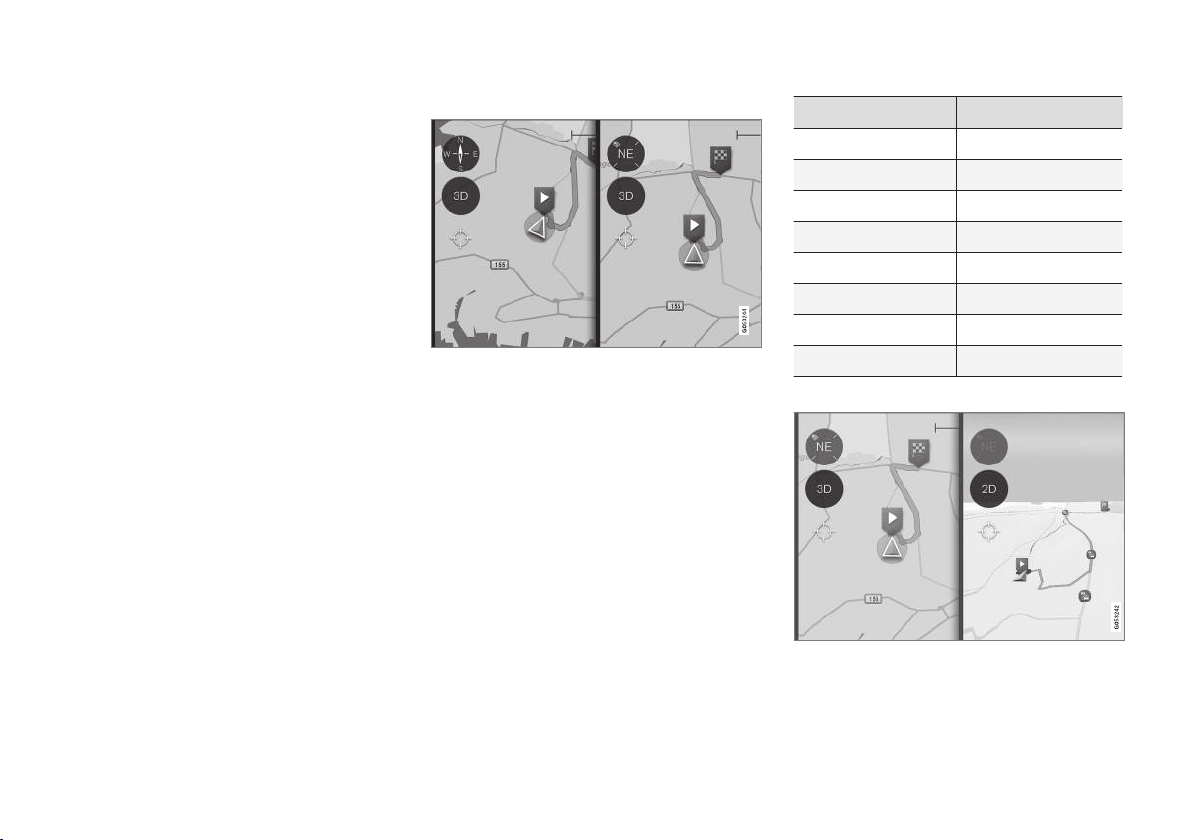
Driving direction or north up on the map
Click on the compass to change the car symbol’s movement on the map.
The driver can choose between two ways to represent the car’s movement in relation to the map:
•
The map is shown with north always upwards
on the centre display - the car symbol moves
or “drives” in its true compass direction on
the map. If the car symbol moves to the left
on the map then the car is driving westwards.
•
The car symbol points/drives upwards on the
centre display - the map rotates under the
car symbol according to how the car turns.
The compass symbol indicates which direction north is (N) on the map, and the centre
of the compass shows the direction in which
the front of the car is pointing (in this case
NE = Northeast).
Compass symbols Compass direction
N North
NE NorthEast
E East
SE SouthEast
S South
SW SouthWest
W West
NW NorthWest
2D or 3D display
Click on 2D/3D to change between 2D and 3D display.
In 3D display, the car’s heading is always
upwards on the centre display - the map rotates
Page 15
GET TO KNOW SENSUS NAVIGATION
13
around the car symbol according to how the car
turns.
The compass symbol indicates which direction
north is (N) on the map, and the centre of the
compass shows the direction in which the front
of the car is pointing.
The map scale is not shown in the 3D mode.
2D display is described under the previous heading "Driving direction or north up on the map"
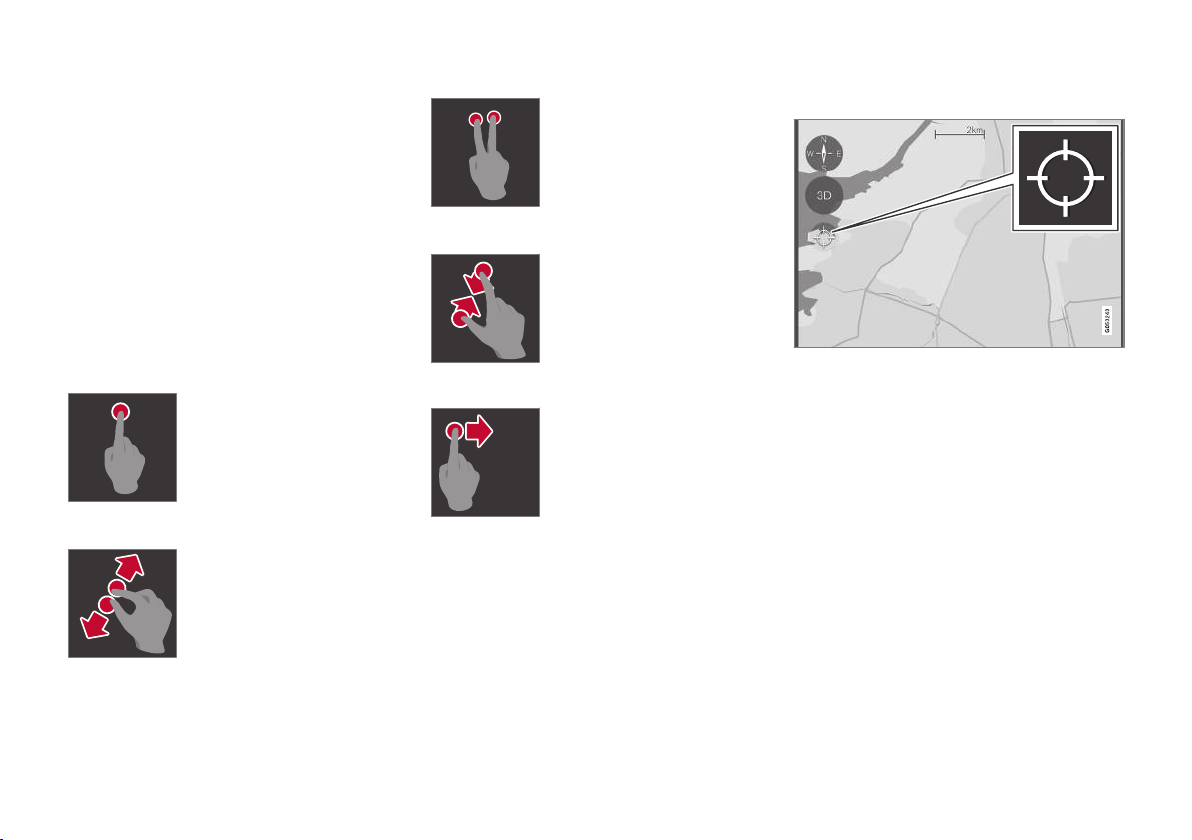
Zoom
Zoom in
Make the map bigger like this:
Double-tap the centre display
with one finger.
or
Touch the centre display with
two fingers close together, then
spread them apart.
Zoom out
Make the map smaller like this:
Tap once on the centre display
with two fingers spread apart.
or
Touch the centre display with
two fingers spread apart, then
draw them together.
Scroll
Place one finger on the map,
swipe in the desired direction,
and release.
The scroll function is only possible with the map in the maximum mode, not when it is mini-
mised.
Find the car symbol on the map
Click on the crosshairs symbol.
After zooming in and out and scrolling around on
the map it can sometimes be hard to find your
way back to the car's position on the map. This is
the simplest way to find it:
•
Click on the crosshairs symbol - the map is
then reset and thereafter follows the car
symbol.
Page 16

GET TO KNOW SENSUS NAVIGATION
14
Switching heading display
Click here to change the map heading.
Choose between the following displays as the
heading on the map:
•
Specification of destination (Destination) and
arrival time (ETA1) or remaining time to
arrival (RTA1)
or
•
Definition of the current position (Position)
and distance to the destination (Dist).
Change of heading is only possible with the map
in the maximum mode, not when it is minimised.
Finding the way back to the map view
The centre display Home button.
If the driver is "a long way away" in another part
of the system and wishes to quickly return to the
map view, this method can be used:
1. Press the Home button on the centre display.
2. If the centre display shows the home view
instead of the map view - press the upper
menu row
Navigation.
Related information
•
Map navigation in the driver display (p. 42)
•
Sensus Navigation settings (p. 42)
1
The selection ETA or RTA is made in the "Route settings" section.
Page 17

CONTROLS
Page 18
CONTROLS
16
Displays and operating controls for map navigation
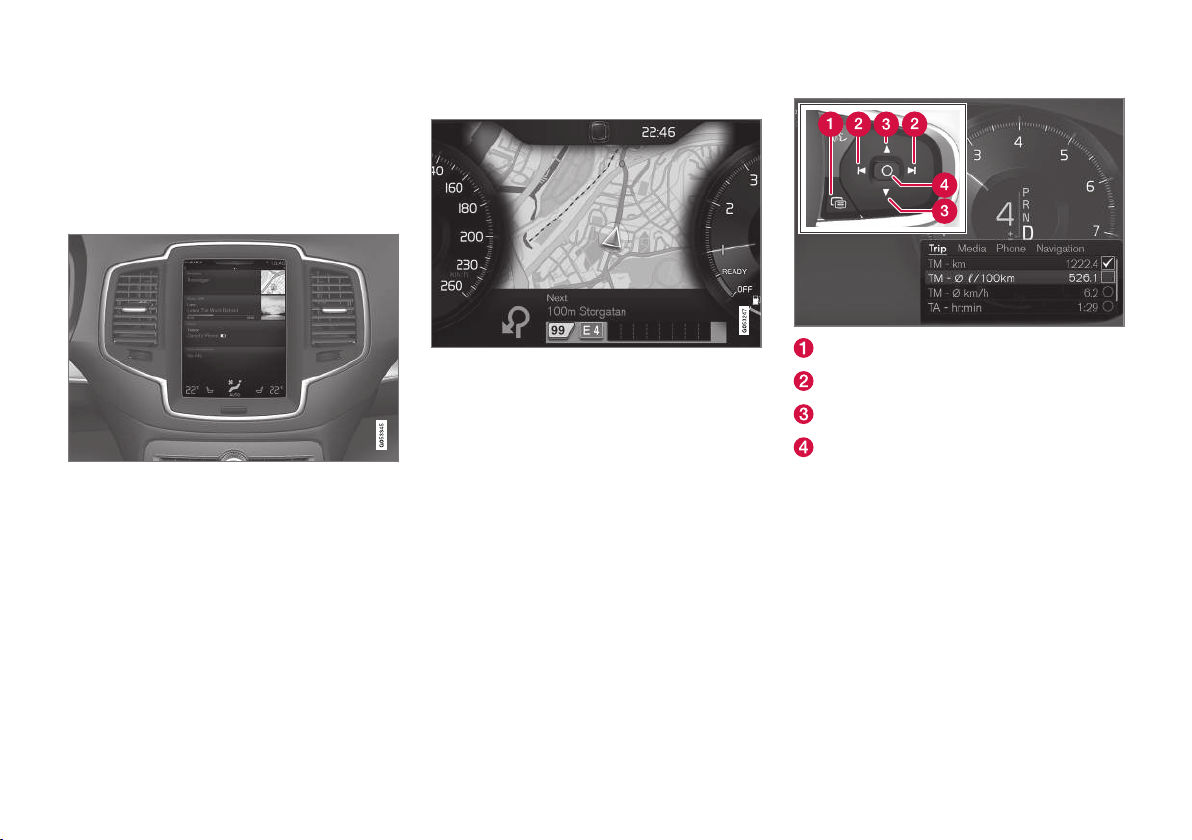
Volvo Sensus Navigation is presented and operated in several different ways, e.g. via the driver
display, Head-up display and voice commands.
The centre display screen
The centre display screen is used to define settings and to select and search for destinations.
If the map image is not shown on the centre display:
•
Press
Navigation on the home view's
uppermost menu row.
The driver display
During driving the driver is guided by voice guidance and instructions on the driver display.
The right-hand steering wheel keypad and the driver display
The right-hand steering wheel buttons can be
used to manage some of the map navigation
functions, e.g.
Take me home.
Open/close
Left/Right
Up/Down
Confirm
Opening/closing the menu
–
Press open/close (1)
> The menu with alternatives is opened/
closed - the menu closes automatically
after a period of inactivity or for certain
selections.
Page 19
CONTROLS
* Option/accessory, for more information, see Introduction.
17
Navigating and selecting in the menu
1. Scroll through the alternatives by pressing up
or down (3)
2. Confirm or mark a selected function by
pressing confirm (4).
> The function is activated and for some
selections the menu is closed.
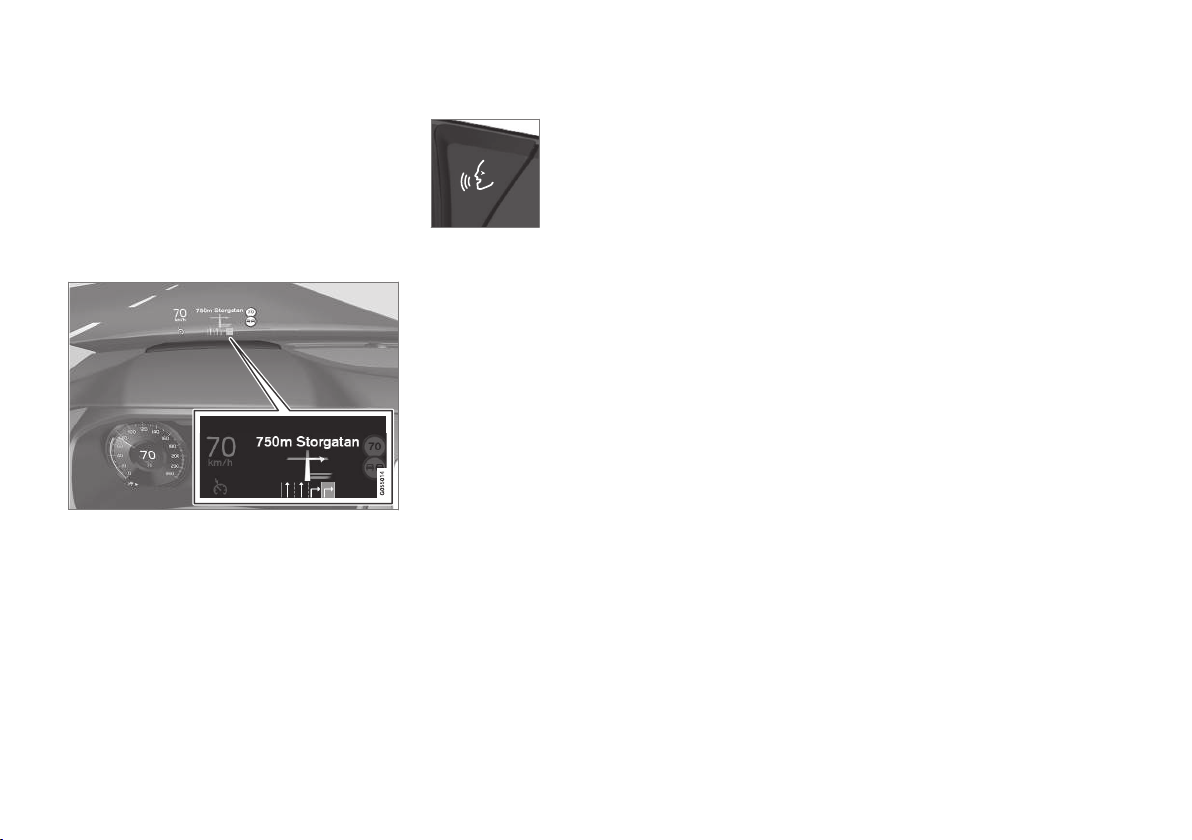
HUD – Head-up-display*
Map navigation on the windscreen.
The driver can also receive guidance and information from the navigation system display on the
bottom of the windscreen.
The position of the information field can be
adjusted. The HUD is comprehensively described
in the "Head-up-display" section.
Voice recognition
Many functions can also be
performed with voice commands.
Press the steering wheel button, wait for the signal, then
say, for example, “Drive
Home”.
Voice recognition is comprehensively described
in the "Voice recognition during map navigation",
"Use voice recognition" and "Voice recognition
settings" sections.
Related information
•
Specify destination with free text searching
(p. 25)
•
Voice recognition and map navigation
(p. 20)
•
Voice recognition (p. 21)
•
Using voice recognition (p. 22)
•
Voice recognition settings (p. 22)
Page 20

Page 21

VOICE RECOGNITION
Page 22

VOICE RECOGNITION
20
Voice recognition and map navigation
With voice recognition control, many functions in
the navigation system can be activated by spoken words.
Voice recognition is comprehensively described
in the "Voice recognition", ""Use voice recognition" and "Voice recognition settings" sections.
Voice commands
The following are some examples of voice commands that are unique to map navigation.
–
Press the steering wheel button and say
one of the following commands:
•
“
Navigation” - Initiates a navigation dia-
logue and shows examples of commands.
•
"
Take me home" - Guidance is given to
the Home position. (Home is programmed with the Set home address
function in the top menu alternative
Favourites)
•
"
Go to [City]" - Specifies a town as the
destination. E.g. "Drive to Coventry".
•
"
Go to [Address]" - Specifies an
address as the destination. E.g. "Drive to
5 King Street, Coventry".
•
"
Go to [Post code]" - Specifies a post
code as the destination. E.g. "Drive to LE5
4PQ".
•
"
Go to [Persons name]" - Specifies an
address from the telephone book as the
destination. E.g. "Drive to Robin Smith".
•
"
Search [POI]" - Searches for POIs
1
,
which are always sorted "round the car".
To sort the list along the route - say
"Along the route" when the result list is
shown.
•
"
Search [POI] in [a town]" - Searches
for POIs1 in a town/locality.
•
"
Search [POI category]" - Searches for
POIs1 within the specified category, which
are always sorted “around the vehicle”.
•
"
Search [POI category] in [a town]" -
Searches for POIs1 within the specified
category in a town/locality.
•
"
Enter contact" - Specifies a contact
from the telephone list as a destination.
•
"
Search POI" - Specifies a POI as a des-
tination.
•
"
Change country/Change state
2
" -
Changes the search area for navigation.
•
"
Enter address" - Specifies an address
as a destination.
•
"
Enter postcode" - Specifies a post
code as a destination.
•
"
Add intersection" - Specifies a cross-
ing as a destination.
•
"
Show favorites" - Shows, in the alter-
natives in the top menu, positions which
are marked as favourites Favourites.
•
"
Clear itinerary" - Erases all the stored
intermediate destinations in an itinerary.
•
"
Repeat voice guidance" - Repeats the
last spoken guidance.
•
"
Pause guidance" - Pauses the guid-
ance on the map.
1
The user has the option of calling the POI or specifying it as a destination.
2
In European countries, “Country” is used instead of “State”.
Page 23
VOICE RECOGNITION
* Option/accessory, for more information, see Introduction.
21
•
"
Resume guidance" - Resumes the
paused guidance on the map.
•
"
Turn off voice guidance" - Switches
off voice guidance.
•
"
Turn on voice guidance" - Starts the
switched-off voice guidance.
Related information
•
Displays and operating controls for map navigation (p. 16)
•
Voice recognition (p. 21)
•
Using voice recognition (p. 22)
•
Voice recognition settings (p. 22)
Voice recognition
The voice recognition system allows the driver to
use voice recognition to control certain functions
of the media player, Bluetooth-connected phone,
the climate system and Volvo's navigation system*.
Voice commands offer convenience and help the
driver to avoid being distracted, and instead concentrate on driving and focus attention on the
road and the traffic conditions.
WARNING
The driver always holds overall responsibility
for driving the vehicle in a safe manner and
complying with all applicable rules of the road.
Input takes place in dialogue form with spoken
commands from the user and verbal replies from
the system. The voice recognition system uses
the same microphone as the Bluetooth handsfree system and the voice recognition system's
replies come via the car's speakers. In some
cases, a text message is also shown in the driver
display. Functions are controlled from the righthand steering wheel keypad. Settings are made
via the centre display.
System updating
The voice recognition system is continuously
improved. Fetch updates for optimal performance,
see the "System updates" section and
support.volvocars.com.
Related information
•
Using voice recognition (p. 22)
•
Voice recognition and map navigation (p. 20)
•
Voice recognition settings (p. 22)
Page 24

VOICE RECOGNITION
22
Using voice recognition
Basic instructions for using voice recognition
control.
Depress the steering wheel
button for voice recognition
to activate the system and
initiate a dialogue using voice
commands.
Remember the following during communication:
•
For a command - speak after the tone in a
normal voice at normal speed.
•
Do not speak while the system is replying
(the system cannot understand commands
during this time).
•
Avoid background noise in the passenger
compartment by having the doors, windows
and tailgate closed.
Voice recognition can be deactivated as follows:
•
by saying "
Cancel".
•
with a long press on the voice recognition
button on the steering wheel
.
To speed up the command dialogue and skip the
prompts from the system before giving the next
command, depress the steering wheel button for
voice
recognition while the system voice is
speaking.
Example of voice recognition control
Press , say “Call [Forename] [Surname]
[number category]" - calls the selected contact
from the phone book if the contact has more
than one phone number (e.g. home, mobile,
work), e.g:
Press
, say "Call Robin Smith Mobile".
Commands/phrases
The following commands are always available for
use:
•
"
Repeat" - repeat the latest voice instruc-
tion.
•
"
Cancel" - discontinue the dialogue
•
"
Help" - starts a help dialogue. The system
replies with the commands available in the
current situation, a prompt or an example.
Commands for specific functions are described in
the corresponding sections, e.g. Voice recognition control of the phone.
Digits
The figures can be pronounced individually, in
groups, or the whole number at once.
Related information
•
Voice recognition (p. 21)
•
Voice recognition settings (p. 22)
Voice recognition settings
Several settings for the voice recognition system
can be made.
1.
Press
Settings in top view.
2.
Press
System Voice Control and select
settings.
•
Repeat Mode
•
Gender
•
Speech Rate
Audio settings
1.
Press
Settings in top view.
2.
Press
Sound System Volumes Voice
Control
and select settings.
Change language
The voice recognition system only understands
the languages that can be selected.
Changing the language also affects menu, message and help texts.
1.
Press
Settings in top view.
2.
Press
System Language and select lan-
guage.
Related information
•
Voice recognition (p. 21)
•
Using voice recognition (p. 22)
•
Voice recognition and map navigation (p. 20)
Page 25

SPECIFY A DESTINATION
Page 26

SPECIFY A DESTINATION
24
General information about entering a destination
A destination can be entered in different ways.
The following methods are available for entering
a destination:
•
Tap on the map
•
Free text searching and Map coordinates
•
Latest selected destination
•
Favourite marked positions from the library
•
Positions saved in Library
•
POI
1
•
Address: Country/city/street/intersection/
house number
Select one of the alternatives via the directions
under the heading "Destination and Intermediate
destinations" and follow the instructions.
Destination and Intermediate destinations
The first defined position will be the itinerary's
destination.
The subsequent positions will be the itinerary's
intermediate destinations.
An itinerary with its destination an intermediate
destinations can afterwards easily be edited - see
"Edit itinerary" in the "Itinerary and Alternative
route" section.
Related information
•
Itinerary and Alternative route (p. 34)
•
Define the destination by clicking on the map
(p. 24)
•
Specify destination with free text searching
(p. 25)
•
Specifying a destination with Latest/Favourites/Library (p. 27)
•
Specifying a destination with POI (p. 29)
•
Specifying a destination with an address
(p. 30)
Define the destination by clicking on the map
A destination can be specified in different ways marking with a finger on the map is one of them.
In many cases it is simplest to scroll to the
desired position and tap it with your finger.
Check first that the map view is
in the maximum mode: If that
button is visible on the screen press it to maximise the map
view.
Then continue as follows:
1. Scroll the map until the desired position is in
view.
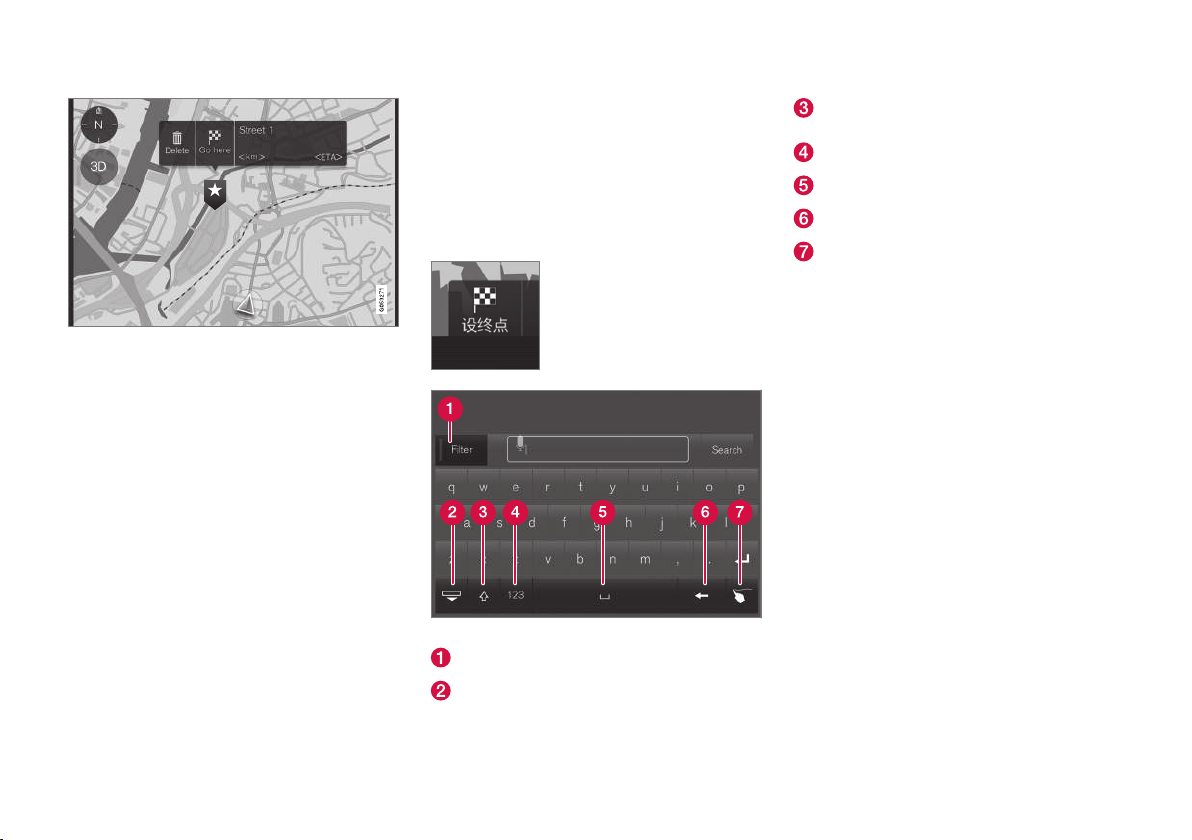
2. Tap and hold the position - an icon will be
created and a menu will be shown.
1
POI: Point of interest may even be called a facility or an attraction
Page 27
SPECIFY A DESTINATION
25
3. Select Go here - Guidance starts.
Delete the icon.
To erase the icon from the position:
•
Select
Delete
Adjust the position of the icon
To adjust the position of the icon:
1. Mark the icon with a short click.
2. Tap and hold the icon, drag it to the desired
position, and release.
Related information
•
General information about entering a destination (p. 24)
Specify destination with free text searching
A destination can be specified in different ways free text searching is one of them.
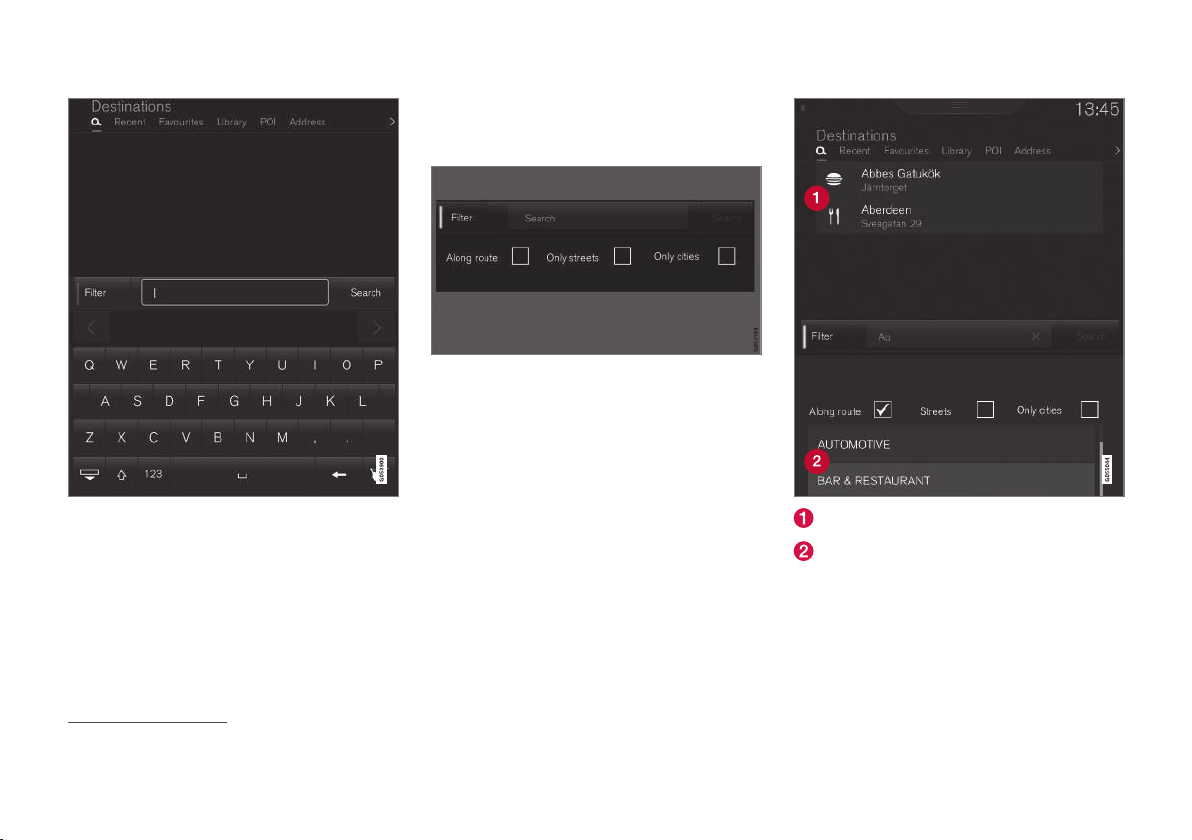
Keyboard
The on-screen “keyboard” can be used to type
most characters and to search for destinations.
To display the keyboard:
Click on
Set dest. in the lower
margin - free text searching
with its keyboard, search field
and filter is opened.
The keyboard function buttons.
Filter - Limits/filters the hit lists.
Hide the keyboard to display a larger/longer
hit list - click in the text field to display the
keyboard again
Switches between CAPITAL (uppercase) and
small (lowercase) letters
Figures and special characters
Blank (space)
Erase the text to the left of the marker
Writing pad — “Write” the desired character
with your finger on the on-screen “writing
pad”.
The keyboard and further functions are described
in detail in the "Using the keyboard in the centre
display" section.
Free text searching
Most things can be searched for with free text.
E.g. streets, towns, coordinates and POIs.
Page 28
SPECIFY A DESTINATION
26
1. Type in the search word - suggestions for
possible alternative destinations are listed in
order of their distance from the map's car
symbol or the centre of the map (if it has
been scrolled).
2. Select/mark a suitable suggestion in the list
- the
Info card
2
for the suggestion is shown.
3. Follow the instructions on the centre display
and activate the guidance to the destination.
Filter
A hit list can be specified and shortened with the
Filter button.
Filter for hit lists.
The availability of filters can vary from case to
case - the following filters are available:
•
Along route - Only hits along the route will
appear in the hit list.
•
Streets - Only streets/roads will appear in
the hit list.
•
Only cities - Only cities/towns will appear in
the hit list.
Filter for POIs
Available POI categories in the current area are
listed furthest down on the display screen.
POI filtered out from the marked category (2)
POI categories (there may even be subcategories in a POI category).
Only POIs from a marked POI category are listed
and only the "
Along route" filter can be com-
bined with POIs.
2
See information under the heading "Information card on the map".
Page 29
SPECIFY A DESTINATION
27
Coordinates
A destination can also be specified with its map
coordinates.
•
Type, for example, “N 58.1234 E 12.5678”
and tap
Search.
Map coordinates can be typed in various ways, as
shown in these examples:
N 58,1234 E 12,5678 (with spaces)
N58,1234 E12,5678 (without spaces)
58,1234N 12,5678E (with the point of the
compass after the coordinate)
58,1234 -12,5678 (with hyphen without point
of the compass)
You can use a comma [,] instead of a full stop [.]
if you prefer.
Related information
•
General information about entering a destination (p. 24)
•
Displays and operating controls for map navigation (p. 16)
•
Information cards on the map (p. 37)
Specifying a destination with Latest/Favourites/Library
A destination can be specified in different ways selecting from a list is one of them.
To display these lists:
1. Click on Set dest. in the
lower margin - the map view
switches to keyboard with a
search field and various search
alternatives in the upper margin.
2. Then select from the upper margin one of the
following lists:
•
Recent
•
Favourites
•
Library
After one alternative in a list has been marked, it
is added as a destination by using either the
Start navigation button or the Add as
waypoint button.
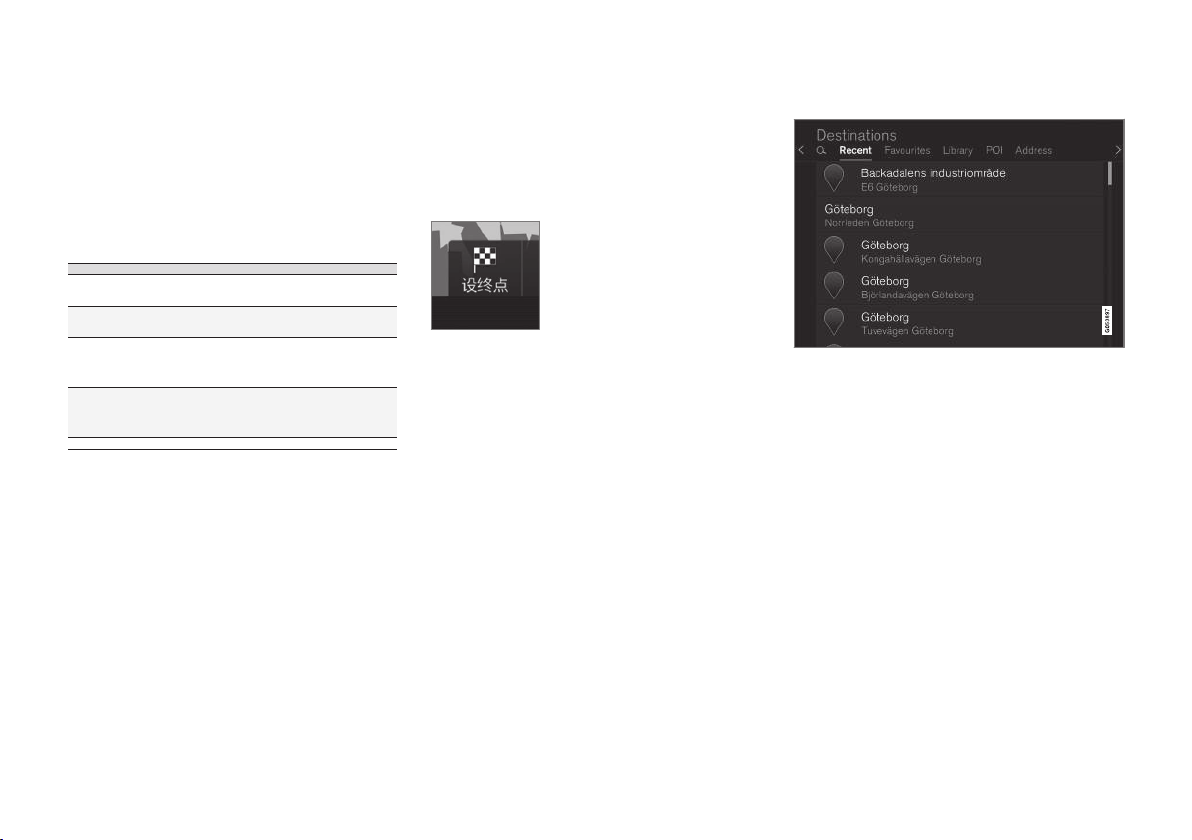
Last
The latest searches are listed here. Scroll and
select.
It is also available as a menu option on the driver
display and is selected using the steering wheel's
right-hand keypad. See "Displays and controls for
map navigation".
Page 30
SPECIFY A DESTINATION
28
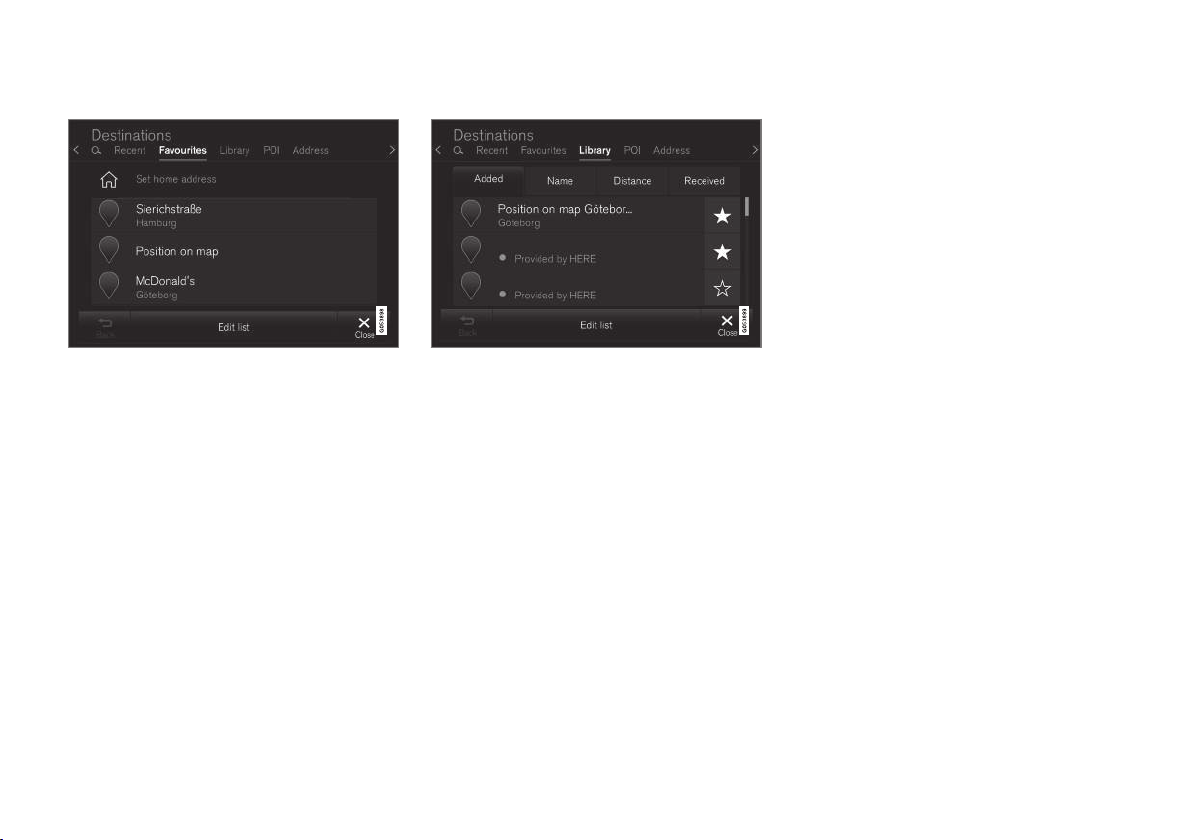
Favourites
Favourite marked positions from the Library are
listed here. Scroll and select.
A position erased from
Favourites remains in
the Library, but then with an "extinguished" star.
To put it back here in Favourites - go to the
Library and mark the position's star again.
A frequently used destination can be programmed and used with
Set home address. A
programmed Home destination is also available
as a menu option in the driver display and is
selected using the right-hand steering wheel keypad. See "Displays and controls".
The list can be edited using
Edit list.
Library
Saved positions and itineraries are saved in this
list. The most recently saved appear uppermost
on the list. Scroll and select.
Click on a position's "star" to select/deselect it
as a favourite. A position with a marked/"filled"
star is also listed under "
Favourites".
A position that is erased in the
Library will be
also erased in Favourites.
The library can be sorted in various ways:
•
Added
•
Name
•
Distance
•
Received - this is a filter
Positions sent to the car using "Send to Car" can
be filtered out using
Received. New positions
that have not been read have a BLUE marker.
Markers are extinguished when the positions
have been read. For more information see the
"Save destination with Send to car" section.
Each of the lists positions can be edited with
respect to Name, Position, Internet address and
Telephone number (max three tel.nos. per position) using
Edit list.
Related information
•
Save the destination with "Send to
Car" (p. 30)
•
Displays and operating controls for map navigation (p. 16)
•
General information about entering a destination (p. 24)
Page 31
SPECIFY A DESTINATION
29
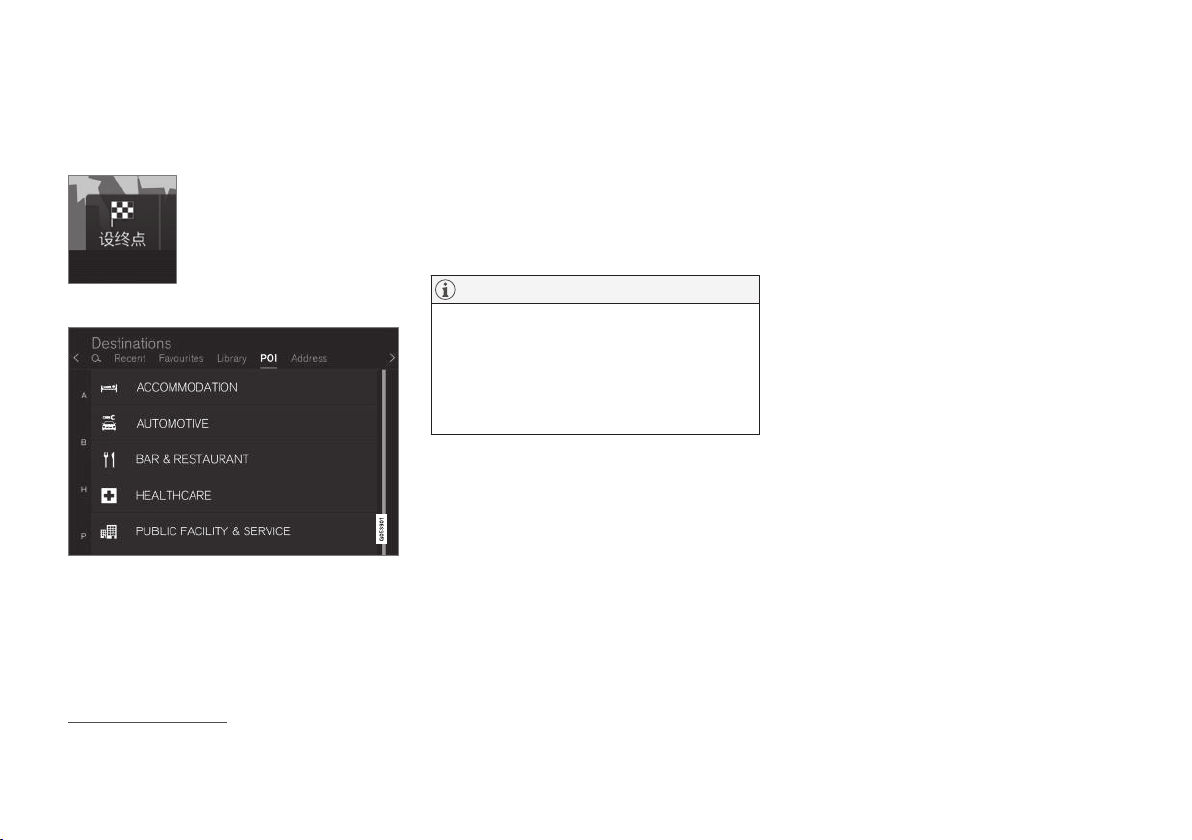
Specifying a destination with POI
A destination can be specified in different ways specifying a POI3 is one of them.
1. Click on Set dest. in the
lower margin - the map view
switches to keyboard with a
search field and various search
alternatives in the upper margin.
2. Then select
POI from the upper margin.
Example of POIs
Many POIs (e.g Restaurants) have subcategories
(e.g Chinese restaurants).
Proposed POIs are listed in order of their distance from the map's car symbol or the centre of
the map (if it has been scrolled).
In the "Map settings" section it is possible to
select which POIs shall be shown on the map. All
POIs that are available in the current region are
listed there. That setting does not affect the
searching of POIs as a destination - even excluded POIs are shown as alternative destinations.
Certain POIs are first shown on the map when
the scale is 1 km/1 mi or greater.
NOTE
•
The symbol for a POI and the number of
POIs varies between different markets.
•
New symbols may appear and others disappear after a map data update. You can
browse the menu system to find all the
symbols used in the current map system.
Filter
When an itinerary is activated and a POI category
selected, a filter is offered which shortens the
search list to only include POIs along the route.
The list can then be sorted by Name and Distance.
•
Along route - Only hits along the route will
appear in the hit list.
When the filter is activated, the list can be sorted
by
Name or Distance.
Proposed POIs are listed in order of their distance from the map's car symbol or the centre of
the map (if it has been scrolled).
Related information
•
General information about entering a destination (p. 24)
•
Map settings (p. 43)
3
POI = Point of interest - may even be called a "point of interest" or an "attraction".
Page 32
SPECIFY A DESTINATION
30
Specifying a destination with an address
A destination can be specified in different ways specifying an address is one of them.
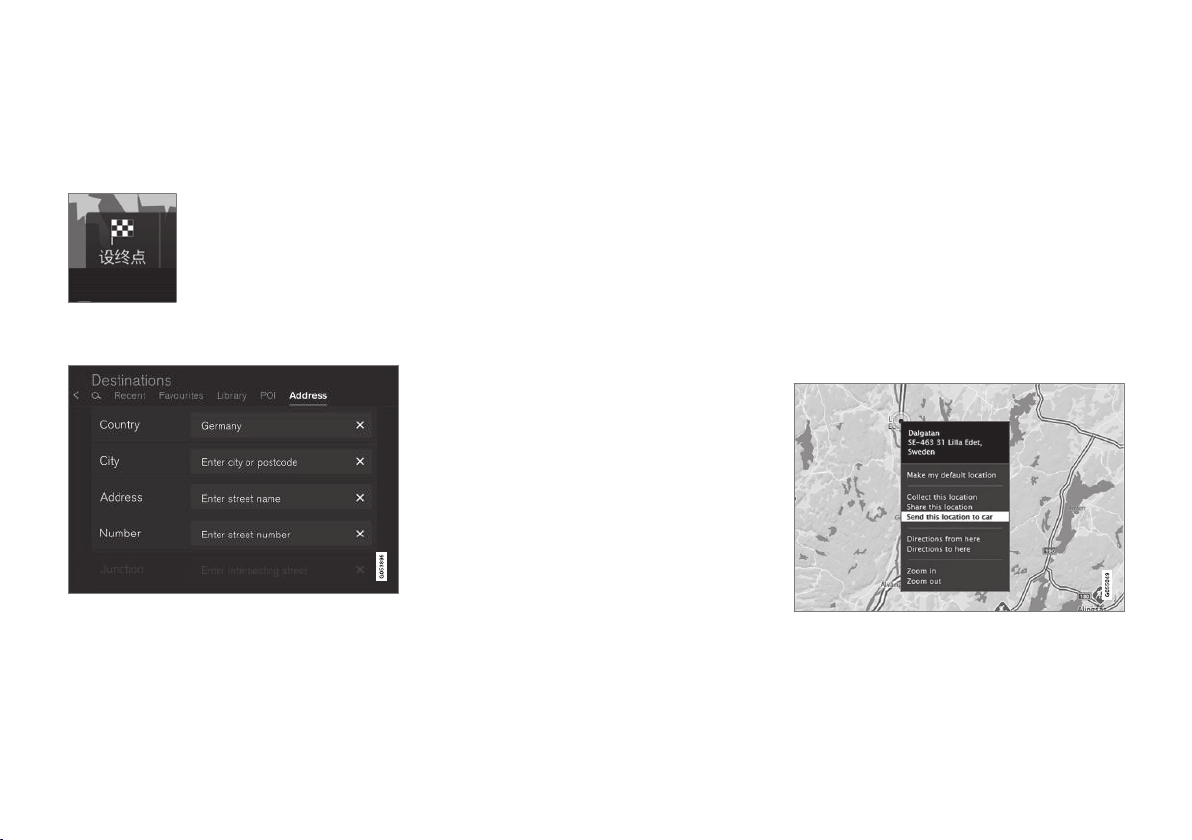
1. Click on Set dest. in the
lower margin - the map view
switches to keyboard with a
search field and various search
alternatives in the upper margin.
2. Then select
Address from the upper margin -
a further search field is added.
Example of a search field - they vary depending on the
market/region.
Note that the search alternatives described here
are not available for all markets/regions - the
centre display shows only the available search
alternatives for the market in question.
Select one of the available text field options and
type using the centre display keyboard:
•
Country/State/Province
•
City/Territory/Postcode
•
Address
•
Number
•
Junction
Related information
•
General information about entering a destination (p. 24)
Save the destination with "Send to Car"
A destination can be specified in different ways using the Send to Car function (Send to Car) is
one of them.
Send to Car (Send to car) is a function that
makes it possible to add a destination or position
to the car's navigation system via a computer.
The Send to Car function can also be effected
with a mobile telephone via Volvo's VOC (Volvo
On Call) service. VOC can even be used if a destination/position needs to be sent to the car from
the VOC centre.
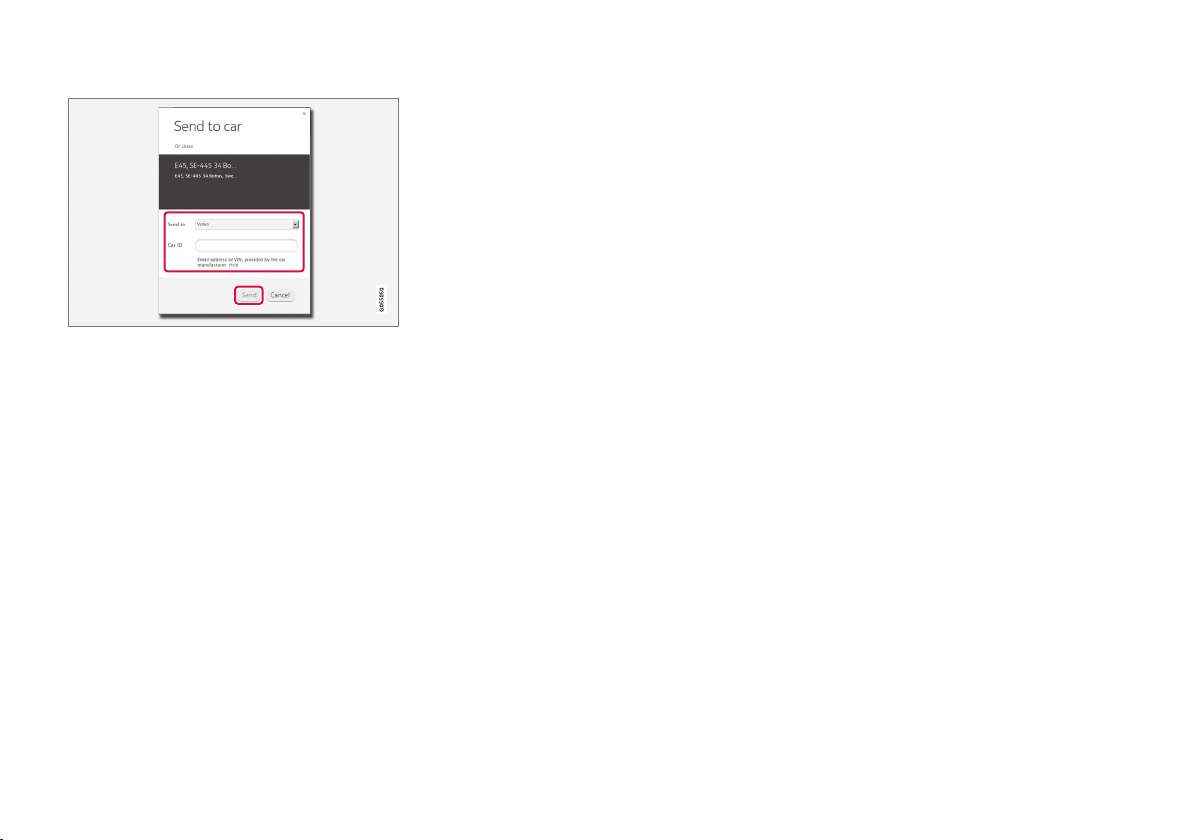
Right click on the desired position and select "Send this
location to car".
Page 33
SPECIFY A DESTINATION
31
Type in the VIN no. or Volvo ID and select "Send".
1. Connect to the internet (here.com) - a map
service is opened
2. Right click on the desired position
3. Select "Send this location to car"
4. Type in the car's VIN no. or Volvo ID
5. Select "Send" - the position is sent to the
car's Library list where it is identified with a
blue marker.
In the car a highlighted symbol on the centre display then alerts the driver to the fact that a destination or position has been sent to the car. Click
on the symbol and an information card shows
information about the contents and available
alternatives.
Note that the procedure shown here is only one
example from one of several map service suppliers.
More information about other suppliers and the
Send to Car function is available on the Volvo
Cars support page (support.volvocars.com).
Related information
•
Specifying a destination with Latest/Favourites/Library (p. 27)
•
General information about entering a destination (p. 24)
Page 34

Page 35

ITINERARY AND ROUTE
Page 36
ITINERARY AND ROUTE
34
Itinerary and Alternative route
While guidance is active you can look at the itinerary or check if there are alternative routes.
Show itinerary
To see/show the itinerary:
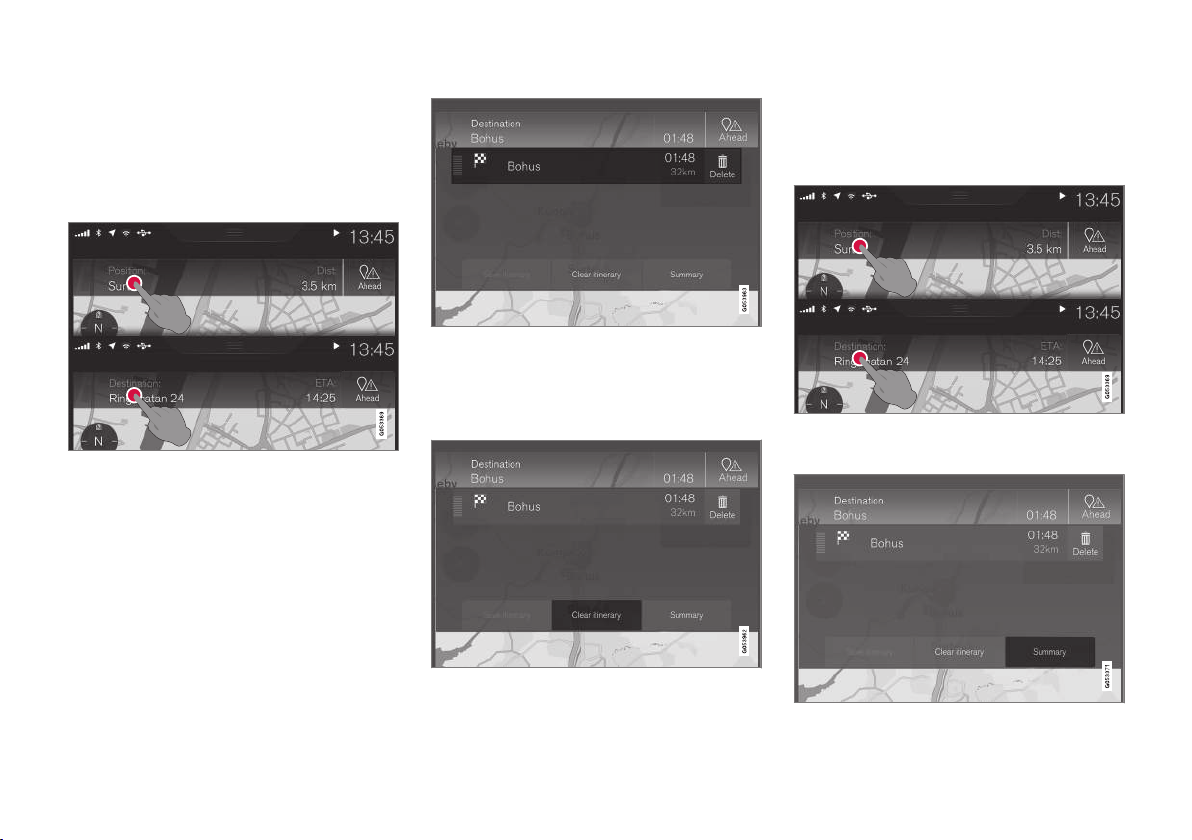
Click on Position: or Destination: - the current
itinerary is shown.
Edit itinerary
The itinerary can be adjusted:
Select one of the itinerary rows and follow the instructions.
Delete itinerary
The whole itinerary or individual Intermediate
destinations can be erased:
Select an individual Intermediate destination or "Clear
itinerary" (Clear itinerary) and verify the selection.
Show an alternative route
At any time while guidance is active the driver
can see if there are alternative routes. Proceed
as follows:
1.
Click on
Position: or Destination: - the cur-
rent itinerary is shown.
Page 37
ITINERARY AND ROUTE
35
2.
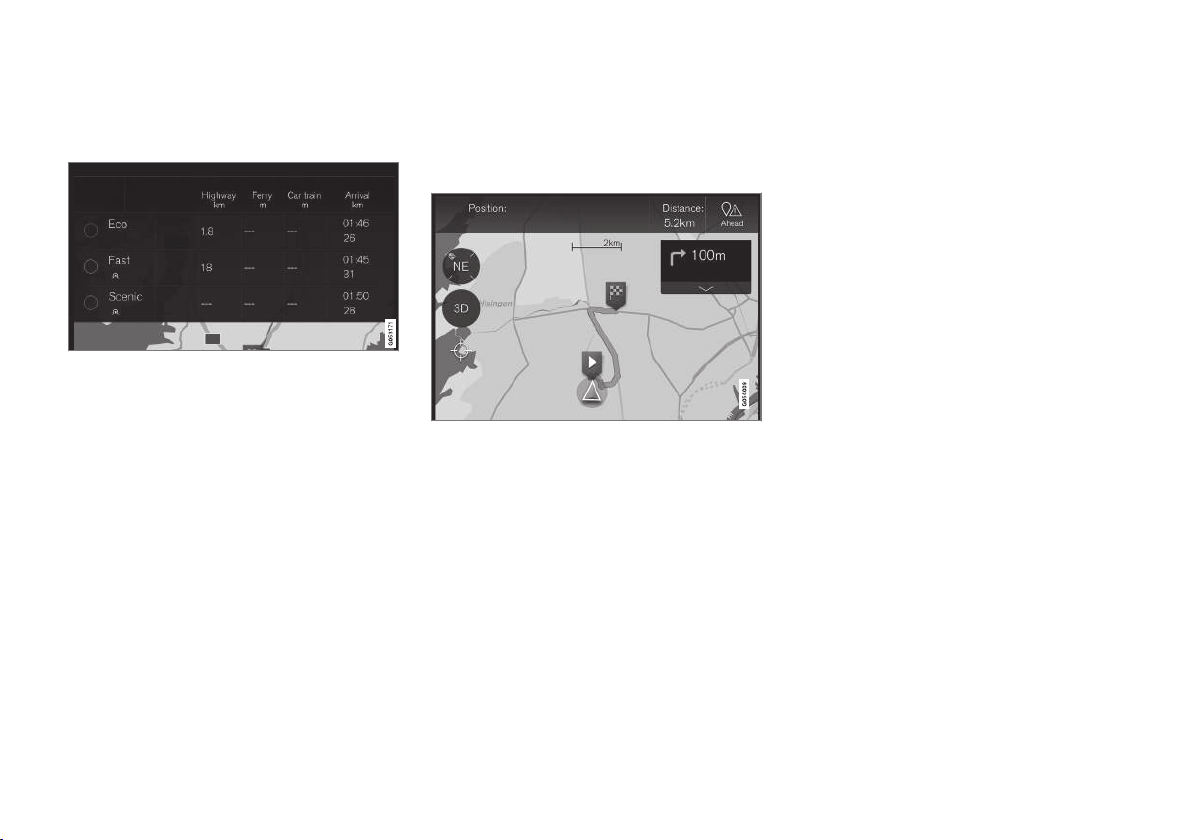
Click on
Alternative
routes - then any available alternative routes
for the rest of the journey are shown.
3. Select thereafter one of the alternatives:
•
Fast
•
Eco
•
Scenic
4. Click on the map - the updated route is then
shown on the map and guidance resumes.
See also "Alternative routes" in the "Route settings" section.
Related information
•
Guidance points in the Itinerary (p. 35)
•
Select detour (p. 38)
•
Information cards on the map (p. 37)
•
Route settings (p. 46)
Guidance points in the Itinerary
A list of the itinerary's future guidance points
helps the driver to plan/"see" up-coming
manoeuvres in good time.
The itinerary's guidance points.
A list of the itinerary's future guidance points is
shown on the map when an itinerary is activated.
The list can be expanded with a click on the
"Down" arrow or minimised with a click on the
"Up" arrow. The next guidance point is always
placed at the top of the list.
A click on one of the list's guidance points scrolls
the map forward to the related position. A subsequent click on the map's "crosshairs" symbol
(beneath the 2D/3D button) resets the map to
the guidance view, where the map follows the car.
Related information
•
Select detour (p. 38)
•
Itinerary and Alternative route (p. 34)
•
Information cards on the map (p. 37)
•
Route settings (p. 46)
Page 38
ITINERARY AND ROUTE
36
POIs along route
A list of POIs along the route can be presented.
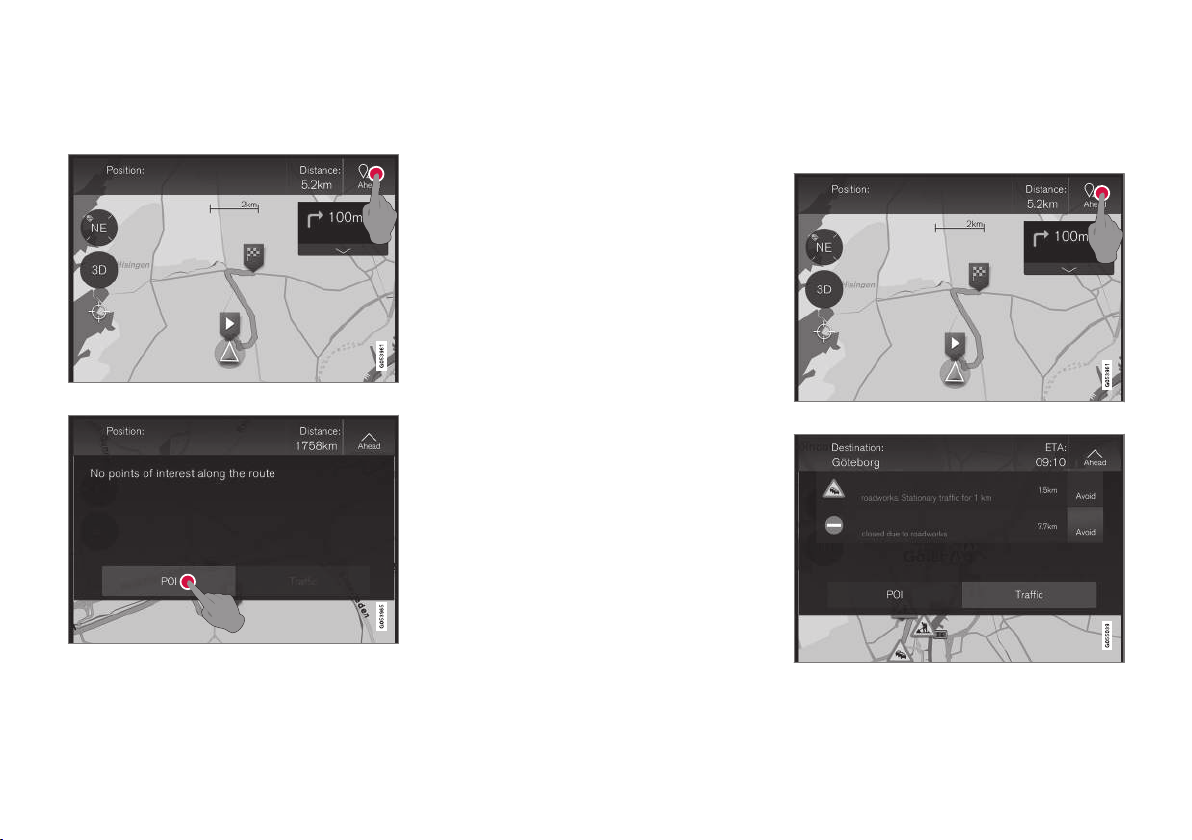
1 Click on "Ahead" (Ahead)
2. Then click on "POI" to get information about POIs
along the route.
A list then shows current POI categories at for
example a turn-off or a service area.
1. Select the desired category whereupon a
new list is opened - sometimes with subcategories.
2. Continue to "zoom in" until a single POI can
be selected.
3. Mark a POI in the list whereupon its information card is shown.
4. Select one of the information cards alternatives and follow the instructions.
Proposed POIs are listed according to the distance from the map's car symbol or the map's
centre (if it is scrolled) - the POI at the top of the
list is the nearest.
Related information
•
Specifying a destination with POI (p. 29)
Traffic disruptions along the route
A list of traffic disruptions along the route can be
presented.
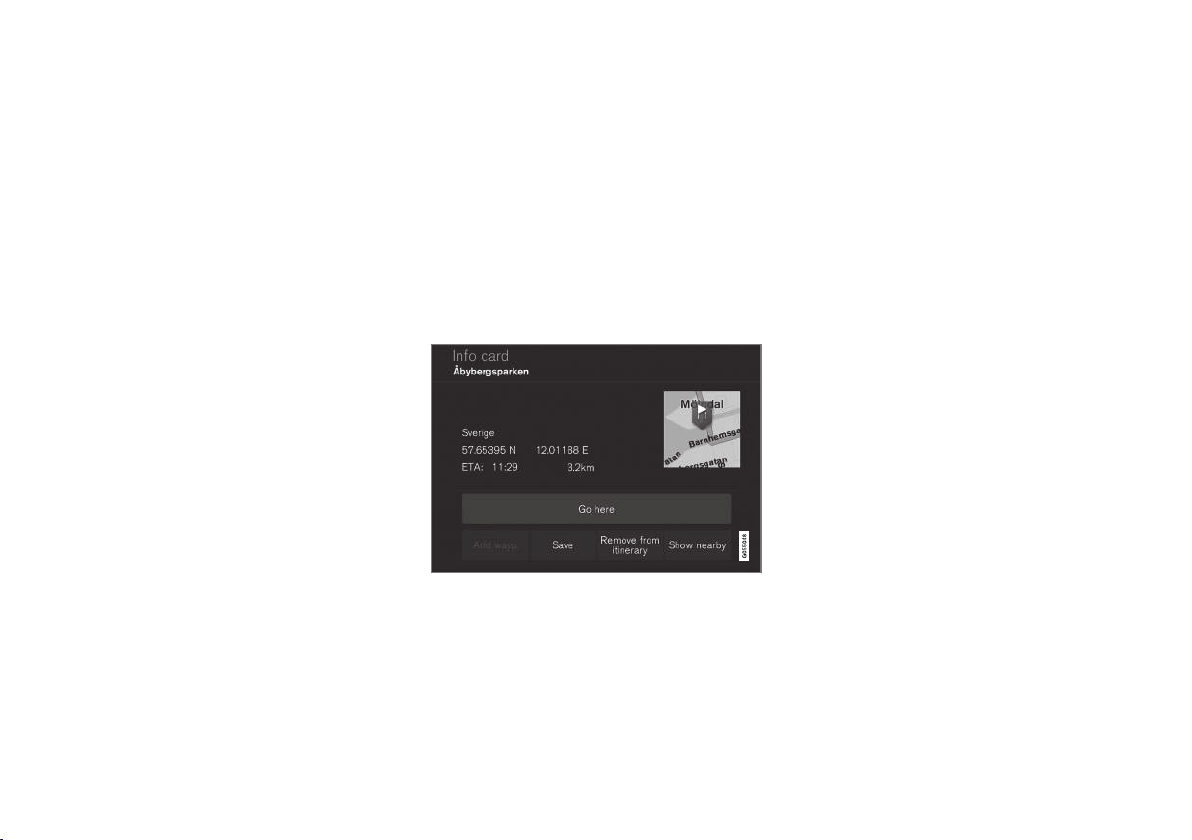
1 Click on "Ahead" (Ahead)
2. Then click on "Traffic" to get information about traffic
disruptions along the route.
Page 39
ITINERARY AND ROUTE
37
To see information about a specific traffic disruption:
•
Select from the list - information is given
about the disruption.
Guidance via an alternative route is given by
selecting
Avoid.
Related information
•
Traffic information (p. 40)
•
Traffic settings (p. 47)
Information cards on the map
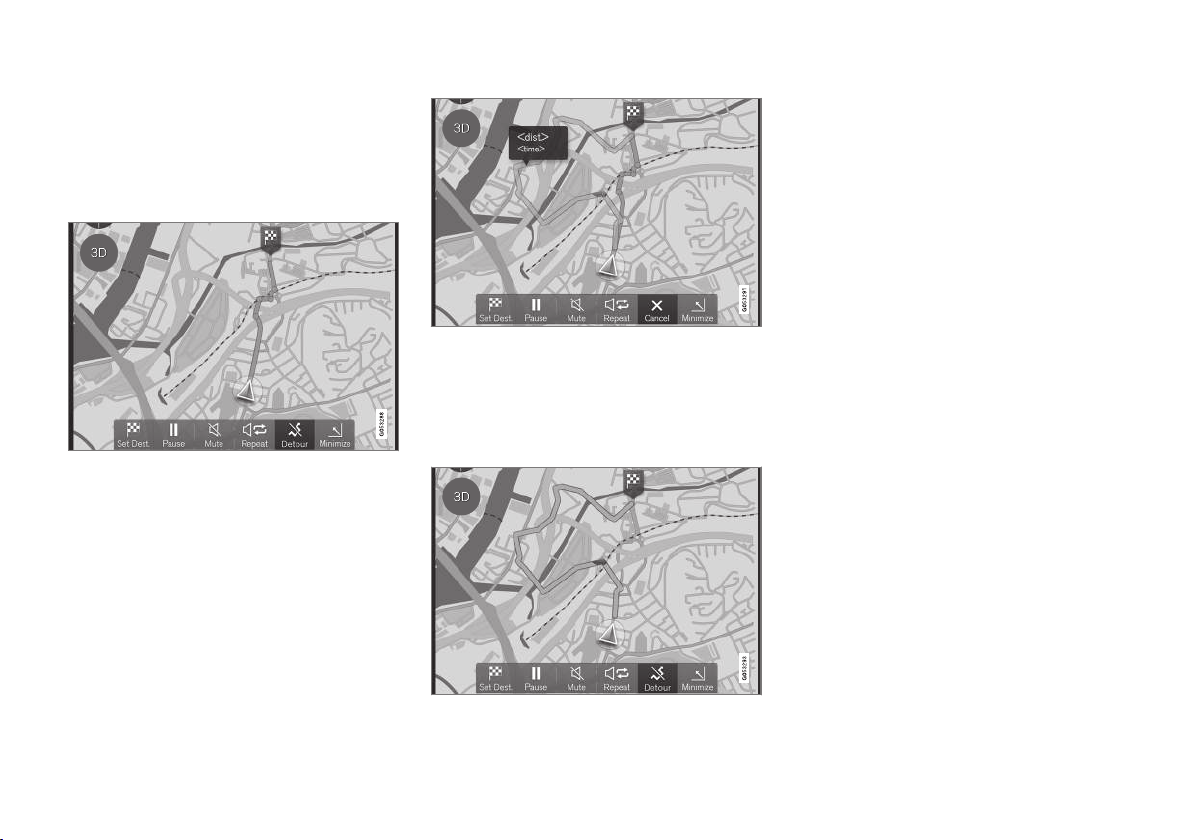
Every icon for destination, intermediate destinations, favourites, POIs, traffic disruptions, etc.
have an information card which can be opened
by "clicking" on the icon
Via an icon's Info card the driver can see current
information about it.
The information and possible alternatives vary
depending on whether it is an icon for a destination, intermediate destination, favourite, traffic
disruption or a POI.
A n example of a POI information card.
In this example with a marked POI the driver can
amongst other things select:
•
Start navigation - the position is saved as a
destination
•
Add as waypoint - the position is saved as
an intermediate destination
•
Save - the position is saved to the Library,
for further information see the section
"Specify destination with Latest/Favourites/
Library".
Related information
•
Itinerary and Alternative route (p. 34)
•
Guidance points in the Itinerary (p. 35)
•
Select detour (p. 38)
•
Route settings (p. 46)
•
Specifying a destination with Latest/Favourites/Library (p. 27)
Page 40
ITINERARY AND ROUTE
38
Select detour
If the driver wants to avoid the nearest segment
of a route, e.g. because the road is closed, the
Detour function can be selected.
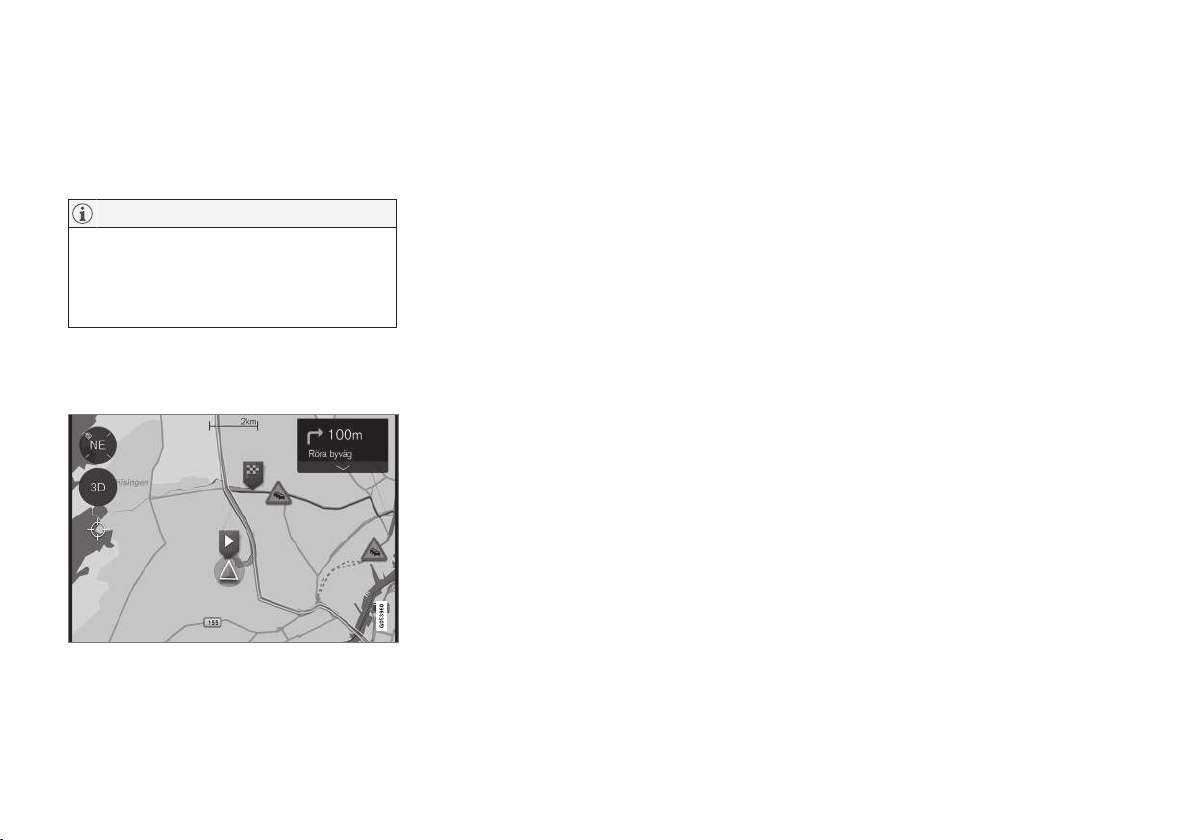
Detour
Button for "Detour" (Detour).
1.
Press the
Detour button - an alternative
route will be displayed on the map together
with information about how much longer or
shorter the route is and the estimated journey time.
Normally only a short detour is proposed
which quickly rejoins the original route of the
itinerary.
The detour and its details are shown.
2. To accept the suggestion, tap on the box
showing details about the detour.
If the proposal is not accepted: "Click" on X
button after which the guidance returns to
the current route.
The detour is activated.
3. After the proposal is accepted, guidance is
resumed - now with the detour selected as
the route.
An alternative to the
Detour function is to
choose another road and diverge from the itinerary's route - the system then updates the route
automatically and continues guidance to the destination along the most suitable route.
Another way to select an alternative route is
given in the "Itinerary and Alternative route" section.
Related information
•
Route settings (p. 46)
•
Select detour (p. 38)
•
Itinerary and Alternative route (p. 34)
•
Information cards on the map (p. 37)
Page 41

TRAFFIC INFORMATION
Page 42
TRAFFIC INFORMATION
40
Traffic information
The navigation system continuously receives
transmitted information about traffic flow and
events.
NOTE
Traffic information is not available in all
areas/countries.
The traffic information transmission areas are
constantly being expanded.
In the "Traffic settings" section the driver can
define a number of settings.
Directly on the map
Example of traffic information.
Traffic disturbances such as compact and slow
traffic, road works, accidents etc. are shown with
different symbols on the map.
When disturbances are more severe their extent
is also shown with a RED line along the side of
the road, e.g. in the event of road works. The line
indicates at the same time in which travel direction the disturbance applies - if the disturbance is
in both directions the road section is marked with
a line on both sides.
•
Click on the traffic disturbance symbol - an
information card is shown.
The information can describe for example the
position of the disturbance with the street name
or road number, and the disturbance's
nature,extent or duration.
If the disturbance is situated on the route the
Avoid option can be selected. The system then
calculates an alternative route.
Related information
•
Traffic settings (p. 47)
•
Traffic disruptions along the route (p. 36)
Page 43

SETTINGS
Page 44
SETTINGS
42
Map navigation in the driver display
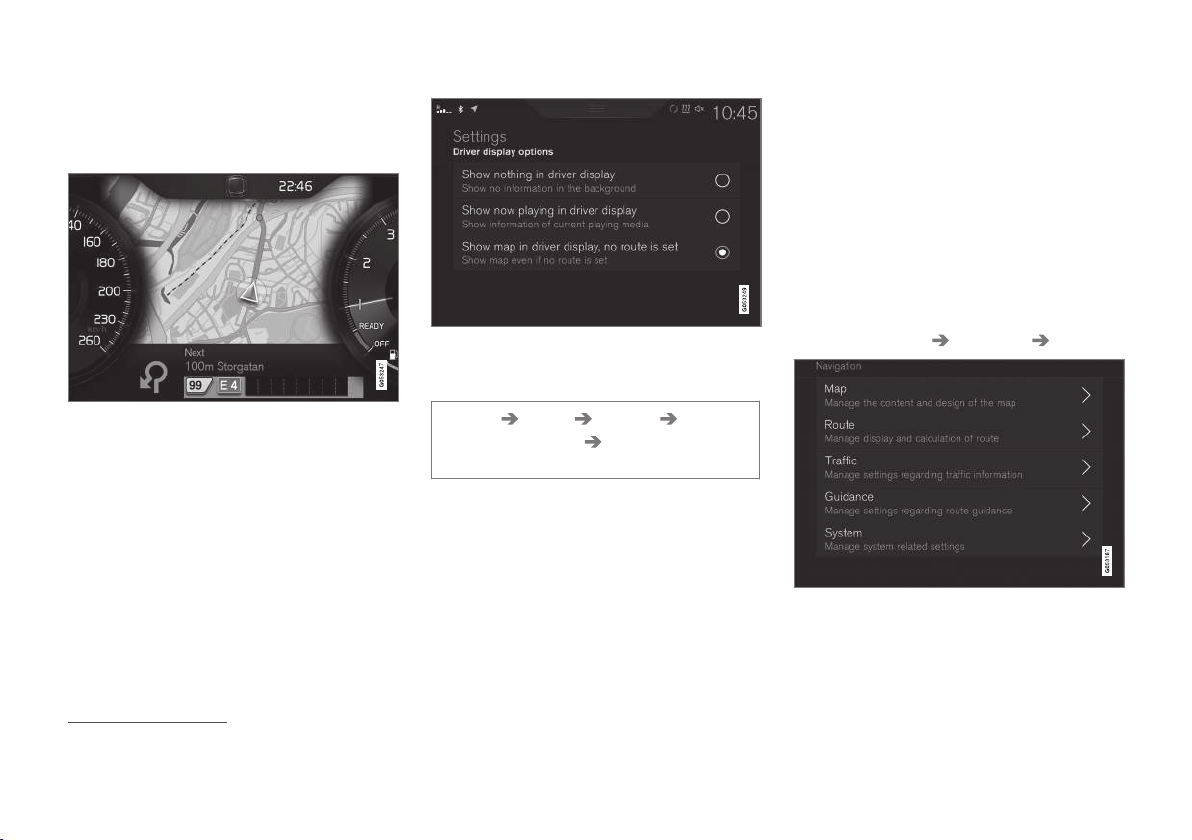
An activated route is automatically shown in the
driver display.
Driver display.
The driver can choose to have navigation information in the driver display even if there is no
route/itinerary.
Map display in the driver display is activated/deactivated
here.
Menu path:
Settings My Car Displays Driver
Display Center Area
Driver Display
Options
•
There highlight the option
Show Map.
Related information
•
Sensus Navigation settings (p. 42)
•
Displays and operating controls for map navigation (p. 16)
Sensus Navigation settings
The user can choose how the route and other
information shall be presented by making some
settings.
Map navigation can be presented in varying ways
- the user has the possibility of selecting settings
to personalise the map display.
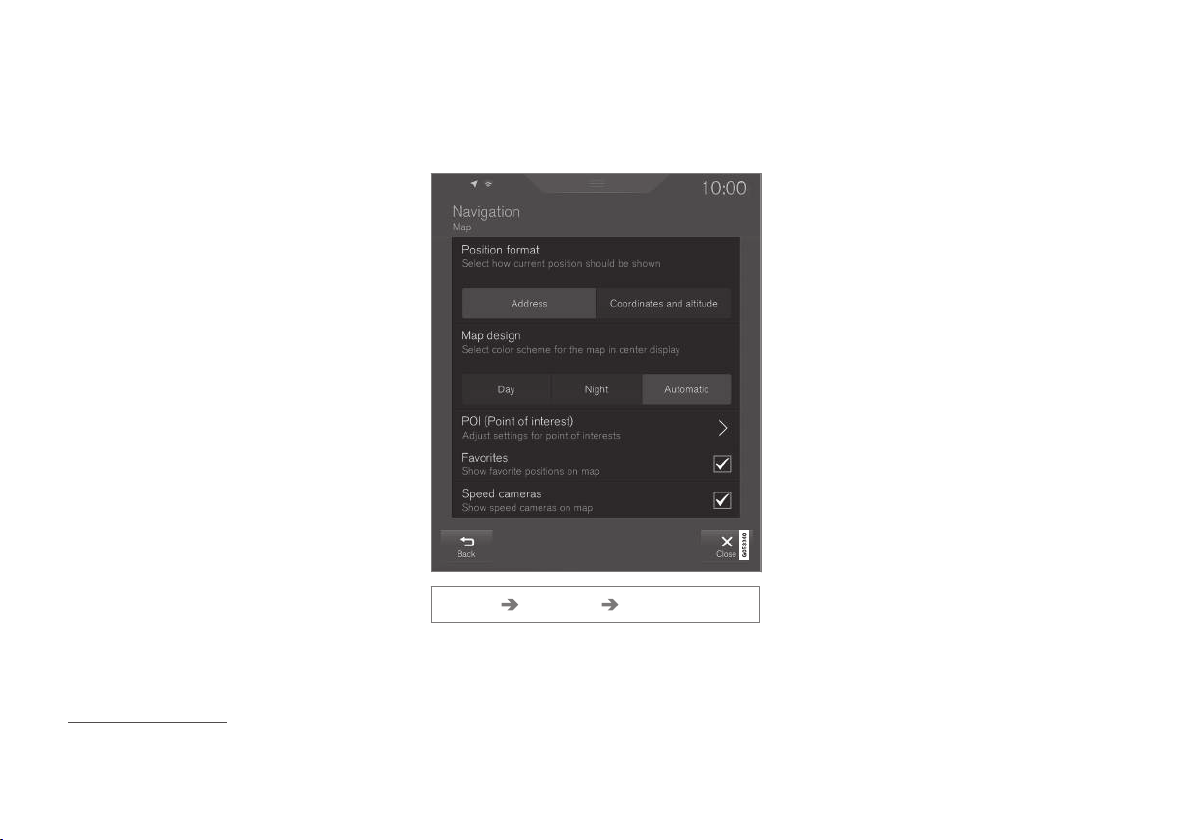
Proceed as follows to access the settings:
1.
Drag down the top view1 from the top section of the screen.
2.
Select
Settings Navigation Route.
The following settings can be made:
•
Map - Manage map content and appearance
•
Route - Manage route calculation and dis-
play
1
The top view is no. (5) in the "Overview of the centre console centre display" illustration.
Page 45
SETTINGS
43
•
Traffic - Manage information about traffic
disruptions
•
Guidance - Manage guidance
•
System - Information about updating the
software and maps.
Related information
•
Map settings (p. 43)
•
Map navigation in the driver display (p. 42)
•
Route settings (p. 46)
•
Traffic settings (p. 47)
•
Guidance settings (p. 48)
•
System settings (p. 49)
Map settings
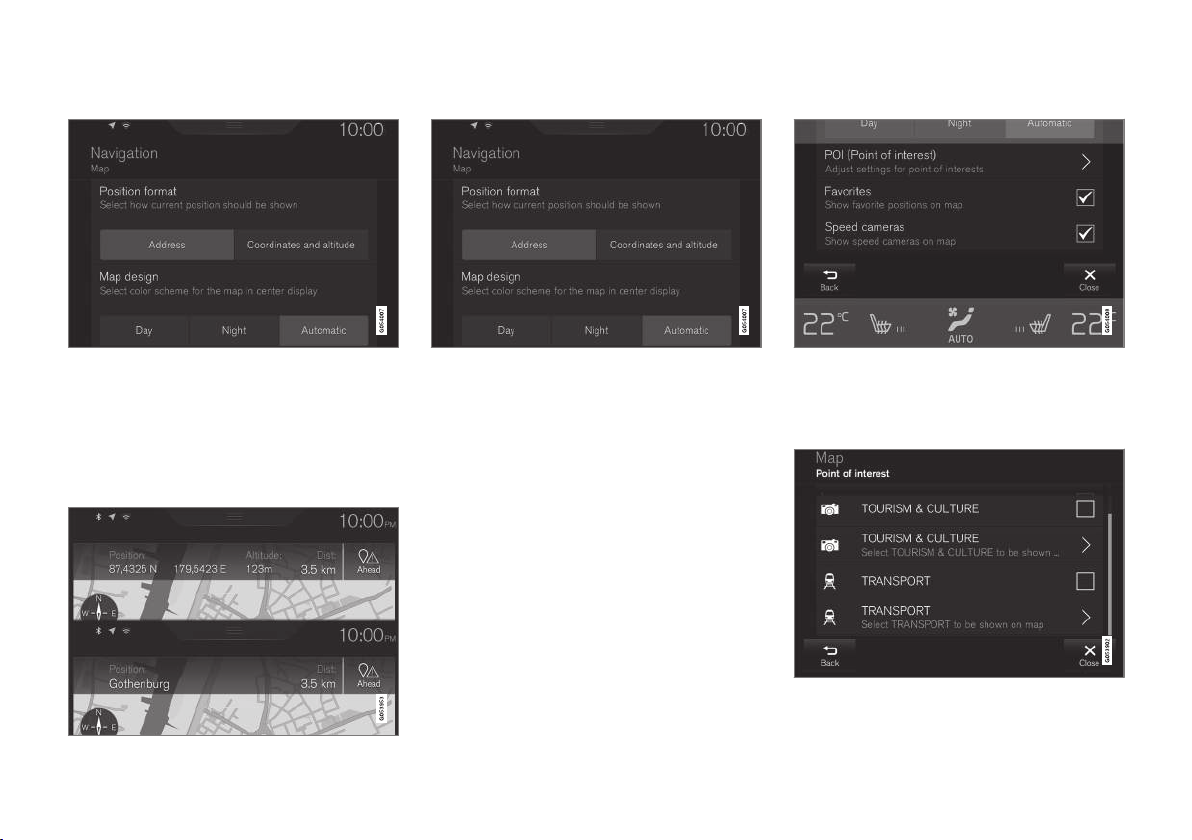
Settings are selected here to define how the
map should be shown on the screen.
Settings Navigation Map
Possible options:
•
Position Format
•
Map Design
•
POI
•
Favourites
•
Speed Cameras
2
2
The function is not available in all markets.
Page 46
SETTINGS
44
Position format
Choose whether the current position is to be
named/shown with its address or its coordinates.
•
Address
•
Coordinates and altitude
The following illustration shows both of the alternatives.
Map design
Select the colour scheme for the map display:
•
Day - Bright colours
•
Night - Dark colours so as not to interfere
with night vision.
•
Auto - The system switches between Day
and Night according to the light in the passenger compartment.
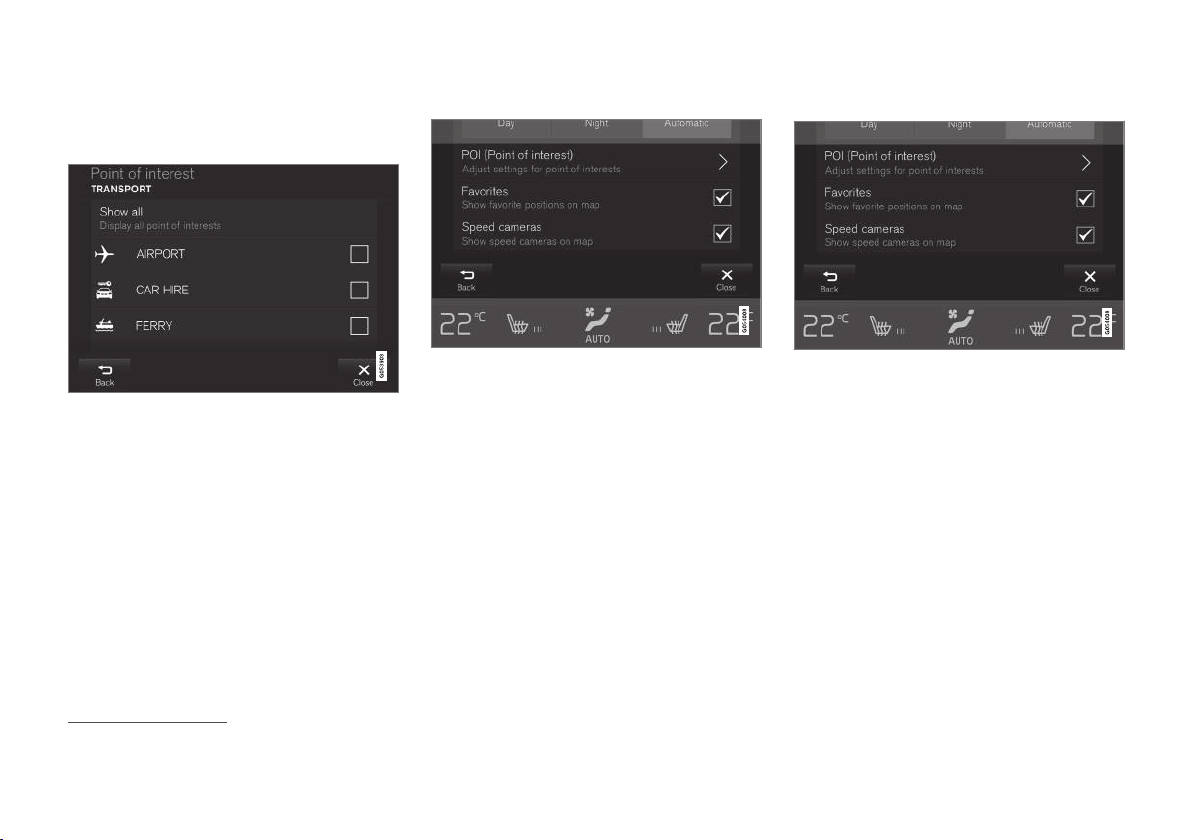
POI
Select here which POIs should appear on the
map. Every category has two alternatives - either
select that all POIs in a category are to be shown,
e.g. "Transport services".
POI main categories.
Page 47
SETTINGS
45
Or open the category with the ">" symbol and
then select which subcategories shall or shall not
be shown.
POI subcategories.
•
Mark which POI categories shall be shown
on the map with a click on
Back or Close.
For more information see "Specify destination
with a POI".
Favourites
Choose whether or not Favourites shall be
shown on the map:
•
Yes/No
For more information see the section "Specify
destination with Latest/Favourites/Library".
Speed cameras
3
Set whether to show speed cameras on the map:
•
Yes/No
Related information
•
Sensus Navigation settings (p. 42)
•
Specifying a destination with Latest/Favourites/Library (p. 27)
•
Specifying a destination with POI (p. 29)
3
The function is not available in all markets.
Page 48
SETTINGS
46
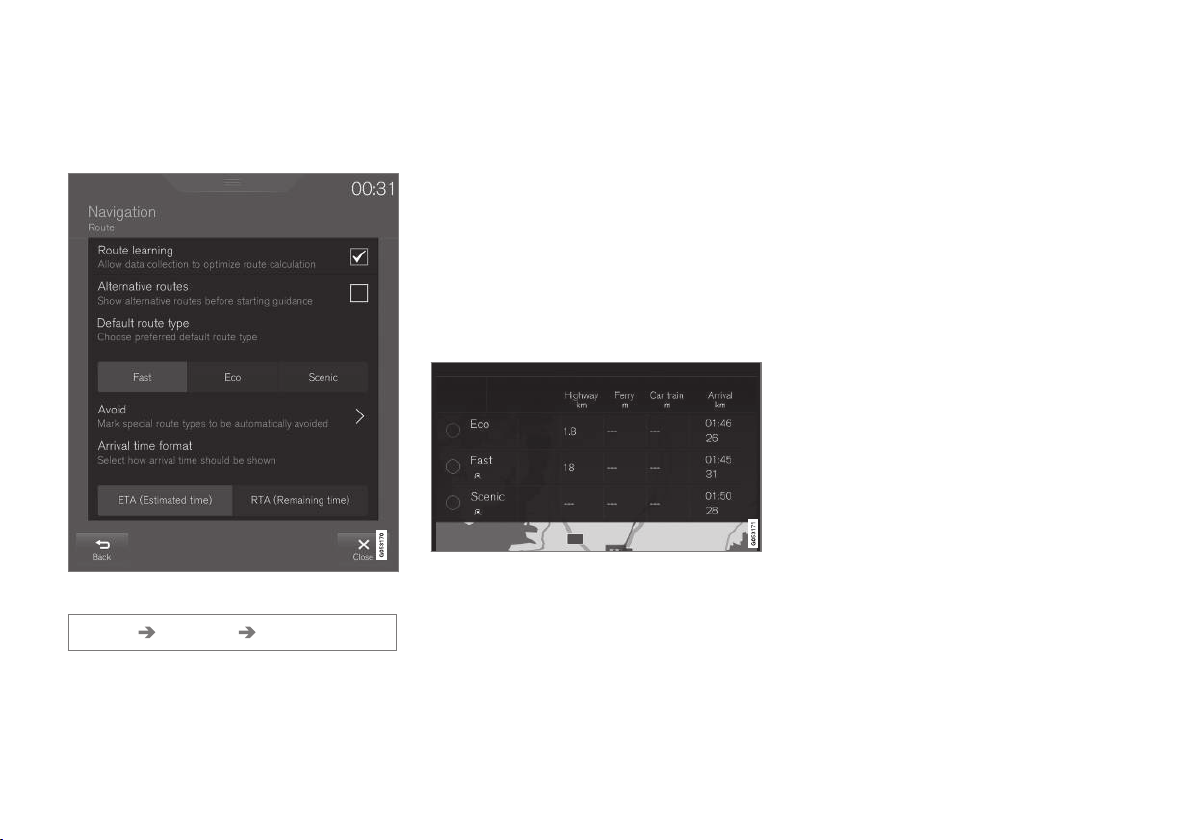
Route settings
Settings are selected here to define how the
route should be calculated.
Menu path:
Settings Navigation Route
Possible options:
•
Route Learning
•
Alternative Routes
•
Default Route Type
•
Avoid
•
Arrival Time Format
Route learning
Allow data collection to optimise route calculation. Set:
•
Yes/No
Alternative routes
Show 3 alternative routes before starting guidance:
•
Yes/No
Standard route types
Select preset standard type for the route:
•
Fast
•
Eco
•
Scenic
It is even possible to select alternative routes
during a current journey - see the "Itinerary and
Alternative route" section.
Page 49
SETTINGS
47
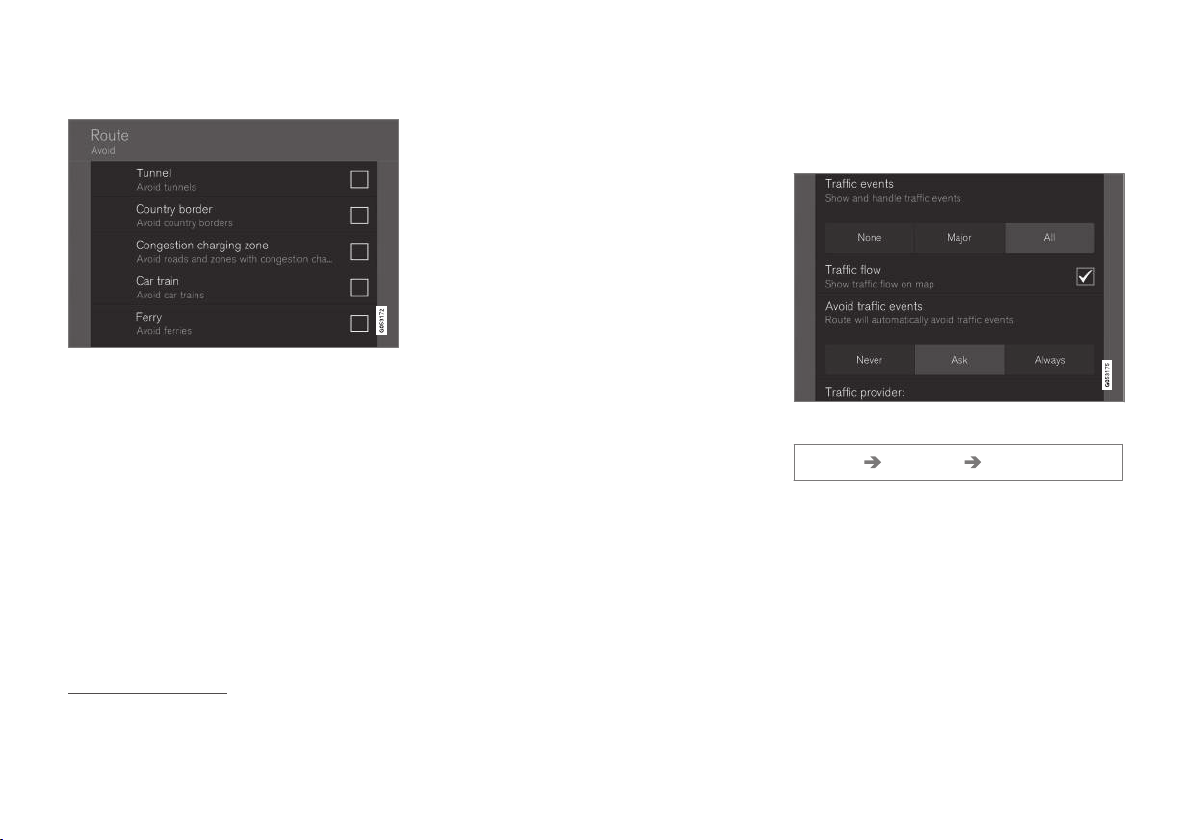
Avoid
Mark road types that should be automatically
avoided when calculating a route:
•
Tunnel
•
International Border
4
•
Congestion Charge Zone
•
Car train
•
Ferry
•
Motorway
•
Toll Roads
Time format
Select how arrival time should be specified:
•
ETA5 - Calculated time of arrival at the destination
•
RTA6 - Remaining time to arrival
The times shown apply to the time zone of the
destination.
Related information
•
Sensus Navigation settings (p. 42)
•
Itinerary and Alternative route (p. 34)
Traffic settings
Settings are selected here to define how traffic
information should be presented.
Menu path:
Settings Navigation Traffic
The driver can specify certain settings that affect
how traffic-related information is shown on the
map:
•
Traffic Events
•
Free Flowing Traffic
•
Avoid Traffic Events
•
Traffic Provider: %s
4
Not for all markets/regions.
5
ETA – Estimated Time of Arrival
6
RTA – Remaining Time to Arrival
Page 50
SETTINGS
48
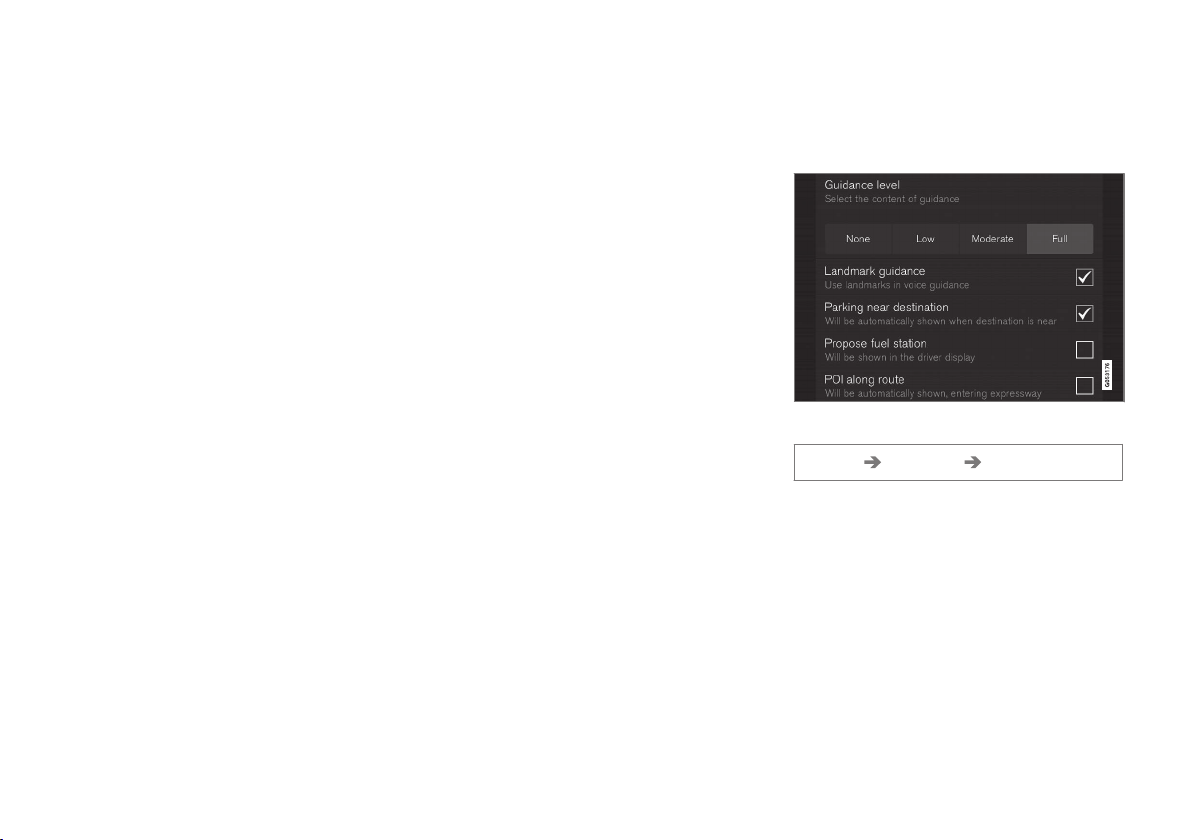
Traffic events
Decide which traffic events shall be shown on the
map and shall be used for route calculation.
Select one of the following options:
•
None
•
Major
•
All
Traffic flow
Decide whether or not the traffic flow should be
shown on the map, with green lines. Set:
•
Yes/No
Orange or Red lines are determined according to
the current traffic situation and cannot be deselected.
Avoid traffic incidents
Decide whether or not the system shall automatically avoid traffic incidents along the route. Select
one of the following options:
•
Never
•
Ask
•
Always
The system takes the driver's selection into
account when calculating the route. The selections that the driver must "confirm" are those
which occur during the journey.
Traffic provider:
The sources that are used for traffic information
are shown here.
Related information
•
Sensus Navigation settings (p. 42)
•
Traffic disruptions along the route (p. 36)
•
Traffic information (p. 40)
Guidance settings
Settings are selected here for how guidance
should be presented.
Menu path:
Settings Navigation Guidance
Page 51
SETTINGS
49
Possible options:
•
Voice Guidance
•
Landmark Guidance
7
•
Parking Near Destination
•
Suggest Fuel Station
•
POI Along Route
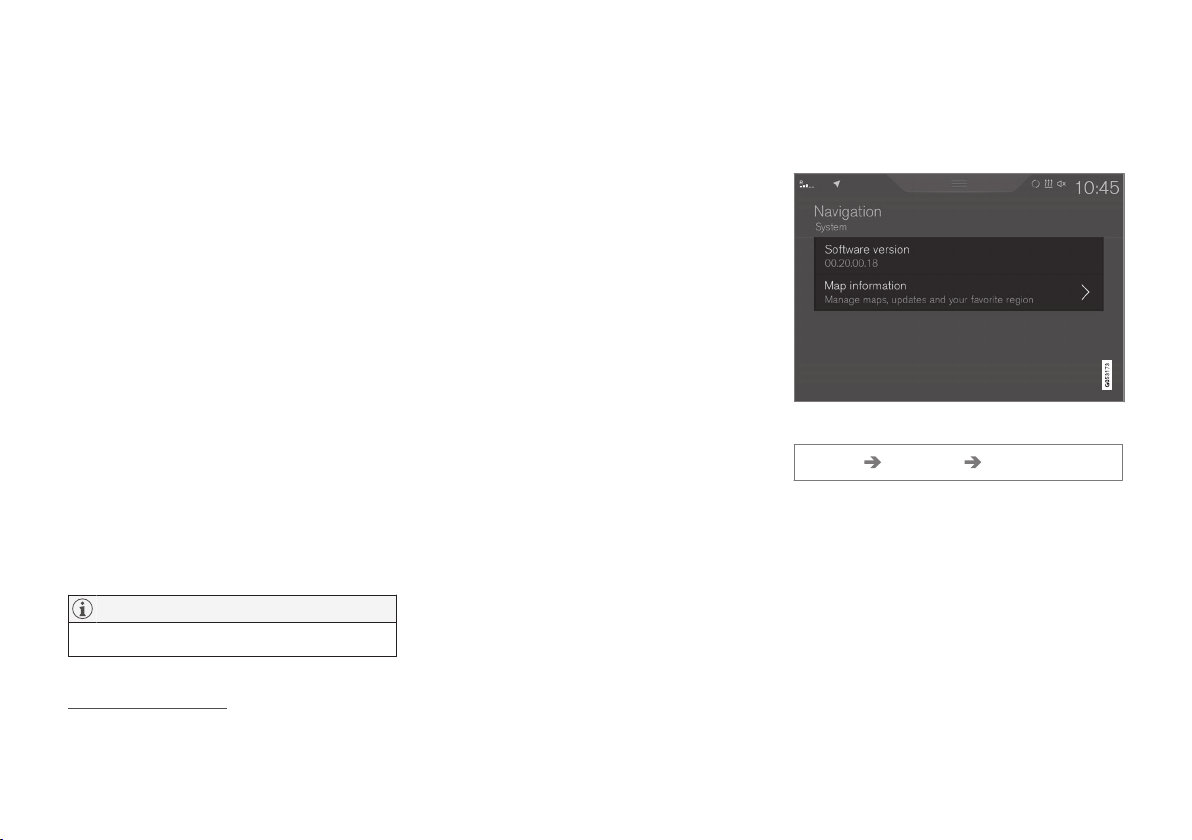
Level for voice guidance
Decide the amount of information in voice guidance - select:
•
None - No automatic voice guidance but the
possibility of manually requesting current
voice guidance once.
•
Low - Only one message per guidance point.
•
Moderate - Up to 3 messages per guidance
point, with limited information.
•
Full - Up to 4 messages per guidance point
and all available information.
Landmarks
8
Select whether or not landmarks shall be used
for guidance:
•
Yes/No
NOTE
The function is only in certain markets.
Parking near destination
Select whether or not proposed parking places
shall be shown when the car approaches the
destination.
•
Yes/No
Proposed petrol stations
Select whether or not proposed petrol stations
shall be shown when the fuel level is low.
•
Yes/No
POIs along route
Select whether or not to show POIs along the
route:
•
Yes/No
The list is selected automatically when travelling
on a motorway. For more information see the
"POIs along the route" section.
Related information
•
Sensus Navigation settings (p. 42)
•
POIs along route (p. 36)
System settings
Information about the updating of software and
map data is shown here.
Menu path:
Settings Navigation System
Software version
Information about the navigation systems base
map.
•
Base Map Version - e.g. 00.20.00.18
For more information see under "Updating of the
navigation system software" in the "Updating
map data with MapCare" section.
7
Only certain markets.
8
Only certain markets.
Page 52

SETTINGS
50
Map information
Information about the navigation system's map
data and short cuts to updates.
•
Map Information - Manage maps, updates
and select favourite region.
Related information
•
Sensus Navigation settings (p. 42)
•
Updating map data with MapCare (p. 52)
Page 53

MAP AND SYSTEM INFORMATION
Page 54
MAP AND SYSTEM INFORMATION
52
Updating map data with MapCare
An owner of Volvo Sensus Navigation can
update the navigation system's map data via the
internet.
General information about updating
Updating can be done direct to the car with
remote updating using a mobile telephone connection or via a computer using a USB memory.
The car's map is divided up into a number of predefined regions. When updating map data it is
not necessary to update all the regions - the
driver can choose to only update one or more
specific regions.
One or more regions can be updated over the
car’s Internet connection. If a large number of
regions - or the whole map - is to be updated, the
total quantity of map data can be so large that it
is much easier to update via a computer using a
USB memory.
NOTE
If an itinerary stretches over several regions,
all these should have the same version number. Otherwise there is a possibility that a calculated route can go an unexpected way.
Updating of the map structure
Sometimes the map structure must be changed this occurs if a region has to be added or when a
large region needs to be divided into smaller
regions. When this occurs any attempt to update
individual regions using a normal procedure will
fail and a message will indicate the reason.
Instead, the whole map must be reinstalled via a
USB memory. For further information - see Volvo
Cars support page (support.volvocars.com) or
contact a Volvo dealer.
Updating of the navigation system software
Besides the map data, the navigation system's
own software, which is subject to constant development, requires updating now and then. A situation can then arise where the latest updates of
map data cannot be supported by the existing
software of the navigation system. In which case
a message is shown to inform that the navigation
system software must be updated. It can be done
at a Volvo dealership or via a USB memory.
More information may be found under "Software
Version" in the "System Settings" section.
Updating via remote updating or USB
For information about how maps are updated see
the sections "Updating map data via remote
updating" and "Updating map data via PC and
USB".
Frequently asked questions
Question Answer
Is it possible
to change
the platform
for map
data, e.g.
from Europe
to North
America?
Yes, with some exceptions.
Contact a Volvo dealer for upto-date information.
How long
does it take
to download
a map
update?
It depends on the map file size
and the connection bandwidth.
How large is
an update?
This depends on the market.
Detailed information is given
with each market map - see
Volvo Cars support page
(support.volvocars.com).
None of this
updating
works - what
should I do?
Try by visiting Volvo Cars support page
(support.volvocars.com) or contact a Volvo dealer.
Related information
•
Updating map data via Remote updating
(p. 53)
•
Updating map data via PC and USB (p. 54)
Page 55
MAP AND SYSTEM INFORMATION
53
•
Fault tracing for Sensus Navigation (p. 60)
•
Copyright (p. 58)
•
License agreement for map navigation
(p. 56)
•
System settings (p. 49)
Updating map data via Remote updating
Before doing a remote update via a mobile telephone connection, certain details must be attended to.
Preparations
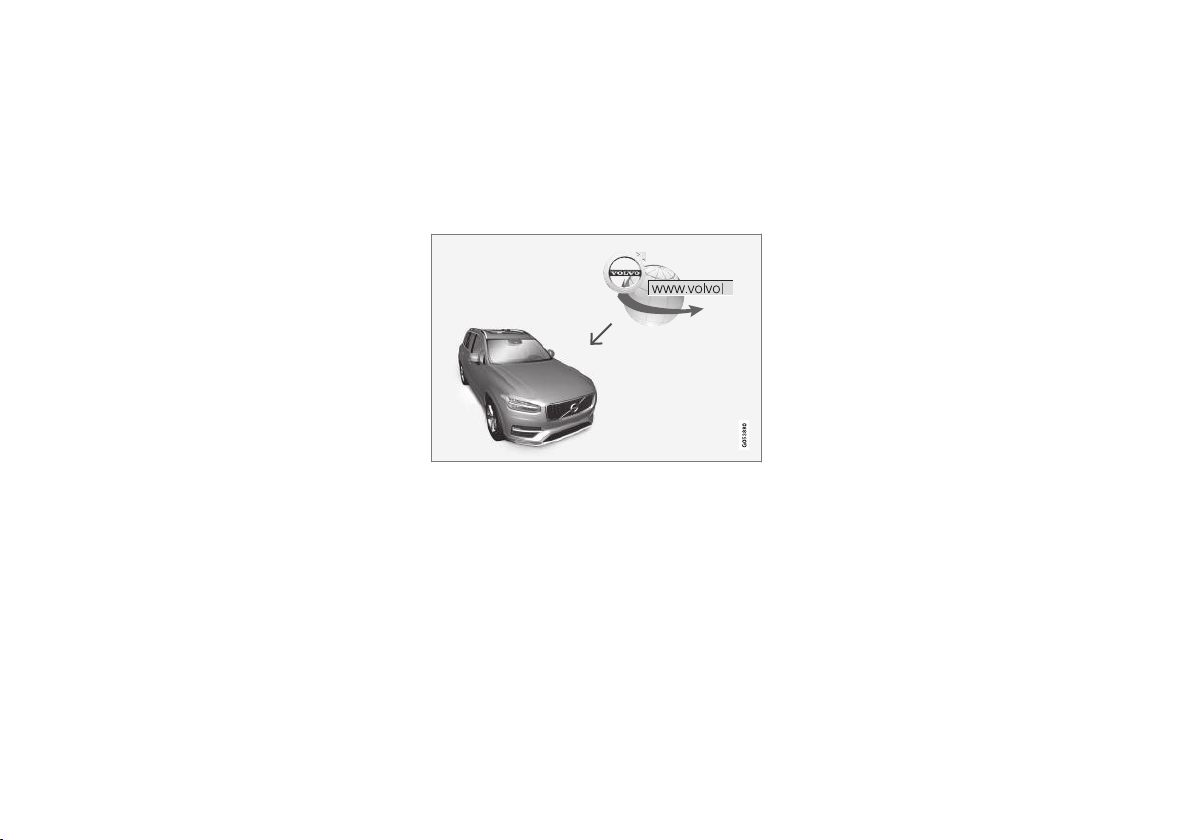
The principle of remote updating.
Connection
The car is connected to the internet either via
Bluetooth, using Wi-Fi or a cable connected to
the USB socket, or via the car's integral modem.
The connection status is shown with a symbol in
the status field of the centre display.
See the information/description in the "Connecting the car" and "Connected car" sections of the
centre display owner's manual.
Loading down map data from the internet
1. Sweep into view the centre display's application view.
2.
Choose the
Remote update service appli-
cation and follow the instructions.
For further information - see Volvo Cars support
page (support.volvocars.com) or contact a Volvo
dealer.
Related information
•
Updating map data with MapCare (p. 52)
Page 56
MAP AND SYSTEM INFORMATION
54
Updating map data via PC and USB
Before updating via a USB memory, some
details must be attended to.
Preparations
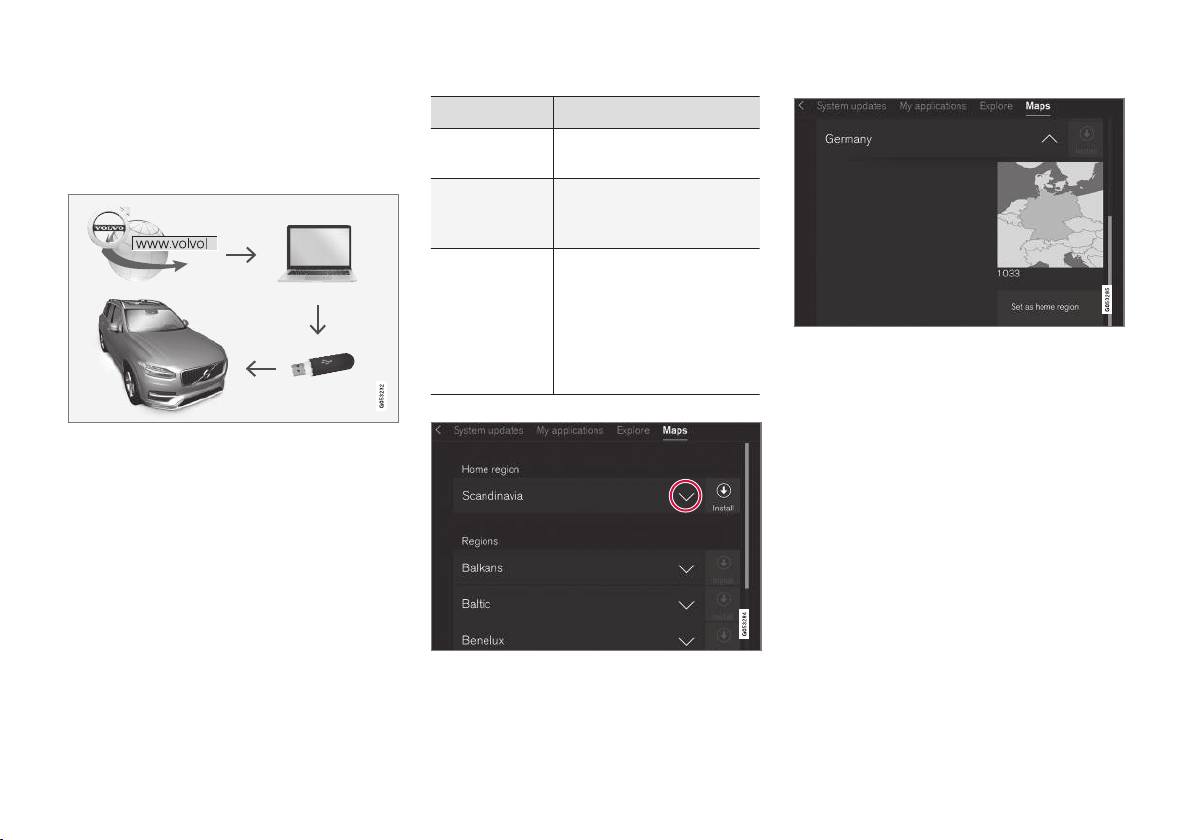
Diagram of updating process via computer and USB
memory.
USB memory
The following requirements apply if a USB memory is to manage an update:
Parameter Requirements
USB standard
(1.0/2.0/3.0):
At least 2.0
File system
(Ext2/NTFS/
FAT32):
FAT32
Capacity
(8/16/32/64
GB):
The size of the map files is
market related - see file size
under "Detailed information" for each respective
market on Volvo Cars support page
(support.volvocars.com).
Current map version
Examples of regions in the map data - press the DOWN
arrow for more information.
An example of a region - one press on "Set as home
region" (Set as home region) makes it the home region.
First, find out which map version is loaded in the
car before the map data download is started. This
can be done as follows:
1. Sweep into view the centre display's application view.
2.
Select the
Remote update service applica-
tion.
3. Mark the applicable region - click the DOWN
arrow for information on the current version
of map data or press Install to see if there is
a newer version.
Downloading of map data from the Internet to a USB memory
From a computer with Internet access - connect
to Volvo Cars support page
Page 57
MAP AND SYSTEM INFORMATION
55
(support.volvocars.com) and follow the instructions on the computer screen.
1. Click on "Detailed information" for the region
that is to be updated.
2. A map image with information about the latest map data for the region is shown — verify that it is newer than the version in the car.
3. Connect a USB memory to the computer and
download the update to the USB memory.
The time taken to load down the data varies
according to the map file size and the connection's bandwidth.
Transferring map data from a USB to the car
General
A transfer may take 30-60 minutes, depending
on the map file size, and the navigation/infotainment system must be activated.
A battery charger should be connected in order
not to risk draining the starter battery during the
update. An update can also be performed while
driving.
During an update of a complete map database
the following infotainment functions are not available or are limited:
•
Navigation
•
Voice command
•
Details/media stored on the hard disk drive
Updating
1. Activate the navigation system in accordance
with the earlier section "Current map version".
2. Connect the USB memory to the car's USB
socket.
3. The navigation system automatically detects
that an update is available, then during the
update the screen shows how much of the
process remains, counted in %.
To start the update, the driver must tap on
Confirm - or on Cancel to cancel it.
4.
Tap on
Confirm - The update starts and
information is shown in the centre display
about how the process is progressing.
5. The screen shows when the transfer is complete - at which point, remove the USB memory.
6. Verify that the correct map data have been
transferred to the car by repeating the steps
described under the previous heading "Current map version".
Interruptions
What happens
if...
Answer
...the Infotainment
system is
switched off during the update?
The process pauses and
resumes automatically
from where it stopped
when the system is reactivated, e.g. when the
engine is started.
...the USB memory is pulled out
before the update
is complete?
The process pauses and
resumes automatically
from where it stopped
when the USB memory is
reconnected to the car.
If there is an interruption during an update an
explanatory text message is always shown on the
centre display.
For further information - see Volvo Cars support
page (support.volvocars.com) or contact a Volvo
dealer.
Related information
•
Updating map data with MapCare (p. 52)
Page 58

MAP AND SYSTEM INFORMATION
56
License agreement for map navigation
A license is an agreement for the right to operate a certain activity or the right to use someone
else's entitlement according to the terms and
conditions in the agreement.
END USER LICENSE AGREEMENT
PLEASE READ THIS END USER LICENSE
AGREEMENT CAREFULLY BEFORE USING
THE HERE DATABASE.
NOTICE TO THE USER
THIS IS A LICENSE AGREEMENT - AND NOT
AN AGREEMENT FOR SALE – BETWEEN YOU
AND HERE EUROPE B.V. (“HERE”) FOR YOUR
COPY OF THE HERE NAVIGABLE MAP
DATABASE, INCLUDING ASSOCIATED
COMPUTER SOFTWARE, MEDIA AND
EXPLANATORY PRINTED DOCUMENTATION
PUBLISHED BY HERE (JOINTLY ”THE
DATABASE”). BY USING THE DATABASE, YOU
ACCEPT AND AGREE TO ALL TERMS AND
CONDITIONS OF THIS END USER LICENSE
AGREEMENT (”AGREEMENT”). IF YOU DO NOT
AGREE TO THE TERMS OF THIS AGREEMENT,
PROMPTLY RETURN THE DATABASE, ALONG
WITH ALL OTHER ACCOMPANYING ITEMS, TO
YOUR SUPPLIER FOR A REFUND.
OWNERSHIP
The Database and the copyrights and intellectual
property or neighboring rights therein are owned
by HERE and its licensors. Ownership of the
media on which the Database is contained is
retained by HERE and/or your supplier until you
have paid in full any amounts due to HERE
and/or your supplier pursuant to this Agreement
or similar agreement(s) under which the
Database is provided to you.
LICENSE GRANT
HERE grants you a non-exclusive license to use
the Database for your personal use or, if
applicable, for use in your business’ internal
operations. This license does not include the
right to grant sub-licenses.
LIMITATIONS ON USE
The Database is restricted for use in the specific
system for which it was created. Except to the
extent explicitly permitted by mandatory laws (e.g.
national laws based on the European Software
Directive (91/250) and the Database Directive
(96/9)), you may not extract or reutilize
substantial parts of the contents of the Database
nor reproduce, copy, modify, adapt, translate,
disassemble, decompile, reverse engineer any
portion of the Database. If you wish to obtain
interoperability information as meant in (the
national laws based on) the European Software
Directive, you shall grant HERE reasonable
opportunity to provide said information on
reasonable terms, including costs, to be
determined by HERE.
The Database includes information provided
under license to HERE from third parties and is
subject to the supplier terms and copyright
notices set forth at the following URL:
Here.com/supplierterms
TRANSFER OF LICENSE
You may not transfer the Database to third
parties, except when installed in the system for
which it was created or when you do not retain
any copy of the Database, and provided that the
transferee agrees to all terms and conditions of
this Agreement and confirms this in writing to
HERE. Multi-disc sets may only be transferred or
sold as a complete set as provided by HERE and
not as subset thereof.
Page 59

MAP AND SYSTEM INFORMATION
57
LIMITED WARRANTY
HERE warrants that, subject to the warnings set
out below, for a period of 12 months after
acquisition of your copy of the Database, it will
perform substantially in accordance with HERE’s
Criteria for Accuracy and Completeness existing
on the date you acquired the Database; these
criteria are available from HERE at your request.
If the Database does not perform in accordance
with this limited warranty, HERE will use
reasonable efforts to repair or replace your nonconforming copy of the Database. If these efforts
do not lead to performance of the Database in
accordance with the warranties set out herein,
you will have the option to either receive a
reasonable refund of the price you paid for the
Database or to rescind this Agreement. This shall
be HERE’s entire liability and your sole remedy
against HERE. Except as expressly provided in
this section, HERE does not warrant nor make
any representations regarding the use of results
of the use of the Database in terms of its
correctness, accuracy, reliability, or otherwise.
HERE does not warrant that the Database is or
will be error free. No oral or written information or
advice provided by HERE, your supplier or any
other person shall create a warranty or in any way
increase the scope of the limited warranty
described above. The limited warranty set forth in
this Agreement does not affect or prejudice any
statutory legal rights that you may have under the
legal warranty against hidden defects.
If you did not acquire the Database from HERE
directly, you may have statutory rights against the
person from whom you have acquired the
Database in addition to the rights granted by
HERE hereunder according to the law of your
jurisdiction. The above warranty of HERE shall
not affect such statutory rights and you may
assert such rights in addition to the warranty
rights granted herein.
LIMITATION OF LIABILITY
The price of the Database does not include any
consideration for assumption of risk of
consequential, indirect or unlimited direct
damages which may arise in connection with your
use of the Database. Accordingly, in no event
shall HERE be liable for any consequential or
indirect damages, including without limitation,
loss of revenue, data, or use, incurred by you or
any third party arising out of your use of the
Database, whether in an action in contract or tort
or based on a warranty, even if HERE has been
advised of the possibility of such damages. In any
event HERE’s liability for direct damages is
limited to the price of your copy of the Database.
THE LIMITED WARRANTY AND LIMITATION OF
LIABILITY, SET FORTH IN THIS AGREEMENT,
DO NOT AFFECT OR PREJUDICE YOUR
STATUTORY RIGHTS WHERE YOU HAVE
ACQUIRED THE DATABASE OTHERWISE
THAN IN THE COURSE OF A BUSINESS.
WARNINGS
The Database may contain inaccurate or
incomplete information due to the passage of
time, changing circumstances, sources used and
the nature of collecting comprehensive
geographic data, any of which may lead to
incorrect results. The Database does not include
or reflect information on - inter alia - travel time
and may not include neighborhood safety; law
enforcement; emergency assistance;
construction work; road or lane closures; road
slope or grade; bridge height, weight or other
limits; road conditions; special events depending
on the navigation system brand you possess.
GOVERNING LAW
This Agreement shall be governed by the laws of
the jurisdiction, in which you reside at the date of
acquisition of the Database. Should you at that
moment reside outside the European Union or
Switzerland, the law of the jurisdiction within the
European Union or Switzerland where you
acquired the Database shall apply. In all other
cases, or if the jurisdiction where you acquired
the Database cannot be defined, the laws of the
Netherlands shall apply. The courts competent at
your place of residence at the time you acquired
the Database shall have jurisdiction over any
dispute arising out of, or relating to this
Agreement, without prejudice to HERE’ right to
bring claims at your then current place of
residence.
Page 60

MAP AND SYSTEM INFORMATION
58
Related information
•
Updating map data with MapCare (p. 52)
•
Copyright (p. 58)
Copyright
For information about copyright (© Copyright) see the "License agreement for map navigation"
section
Related information
•
Updating map data with MapCare (p. 52)
•
License agreement for map navigation
(p. 56)
Page 61

SOME COMMON "ERRORS"
Page 62

SOME COMMON "ERRORS"
60
Fault tracing for Sensus Navigation
The following are examples of things that may be
interpreted as navigation system faults.
The position of the car on the map is wrong
The Navigation system shows the position of the
car to an accuracy of about 20 metres.
There is a greater chance of error when driving
on roads lying parallel to another road, on winding roads, on roads on several levels and after
driving a long distance without making any distinctive turns.
High mountains, buildings, tunnels, viaducts,
over/underpasses etc. also have a negative
effect on the reception of satellite signals, which
means that accuracy in calculating the position of
the car may decrease.
The system does not always calculate the fastest/shortest route
When calculating a route, several factors are
taken into account to determine the theoretically
best solution. Factors include route distance, road
width, road classification, traffic intensity and
speed limits. However, an experienced driver with
local knowledge can quite possibly select a better route.
The system may for example use toll roads or ferries while the driver has chosen to avoid them.
For technical reasons, the system can only use
larger roads when calculating a route extending
over a long distance.
If you selected to avoid toll roads and motorways,
then they are avoided to the greatest possible
extent and are only used if there is no other reasonable alternative available.
The position of the car on the map is incorrect after transportation
If the car is transported, for example by ferry or
train, or in such a way as to impede the reception
of satellite signals, it can take up to 5 minutes
before the position of the car is correctly calculated.
The car symbol on the screen behaves illogically after the tyres have been changed.
In addition to the satellite receiver, the car's
speed sensor and a gyroscope assist in calculating the current position and direction of travel of
the car. After fitting the spare wheel or changing
between summer and winter tyres the system
needs to "learn" the size of the new wheels.
In order that the system shall function optimally it
is therefore recommended that the car is driven
for a while on roads with good satellite reception
(good visibility).
The map image does not correspond with the real situation
Factors such as the constant expansion and
rebuilding of the road network, new traffic regulations constantly being introduced etc. mean that
the map database is not always, in every situation,
complete.
Because of this the map data is being constantly
developed and updated - check now and again to
see if there are any updates.
The car symbol on screen jumps forwards or spins
The system may need a few seconds to sense
the position and movement of the car before driving off.
Switch off both the system and the engine. Start
again, but remain stationary for a while before
starting to drive.
The map information is not up to date
See the answer under the next heading.
How can the driver easily check which map version is being used?
1. Sweep into view the centre display's application view.
2.
Select the
Remote update service applica-
tion.
Page 63

SOME COMMON "ERRORS"
61
Information about the current version is available.
In the "Updating map data - MapCare" there is
more information about the version and which
geographic area it covers.
See also the Volvo Cars support page
(support.volvocars.com) for further information
about updating maps. Or contact a Volvo dealer.
Related information
•
Quick guide to map navigation (p. 8)
•
Updating map data with MapCare (p. 52)
Page 64

Page 65

63
ALPHABETICAL INDEX
C
Copyright 56, 58
D
Destination 24, 29
Detour 38
F
Facilities
Symbols 29
G
Guidance
quick guide 8
Guidance points in Itinerary 35
Guiding options 42, 46, 48, 49
I
Information card 37
Itinerary and Alternative route 34
L
License agreement 56
M
Map options 43
Map view 43
P
POI along the route 36
Points of Interest (POI) 29
Q
Questions and answers 60
S
Send to Car 30
Set destination 24, 25, 27, 29, 30
Settings
Map options 43
Symbols
facilities 29
System activation 8
T
Traffic disruption along the route 36
Traffic information 47
broadcast 40
Transport of car 60
U
Update map data 52, 53, 54
Page 66

64
V
Voice control
settings 22
Voice recognition 20, 21
Page 67

Page 68

TP 18615 (English), AT 1505, MY16, Printed in Sweden, Göteborg 2015, Copyright © 2000-2015 Volvo Car Corporation
 Loading...