

Volvo 31414261 Installation Instructions Manual

Instruction No
Version
Part. No.
31414664
1.1
31414261
Parking assistance, pilot
Instruction No
Version
Part. No.
31414664
1.1
31414261
Parking assistance, pilot
Installation instructions, accessories
Volvo Car Corporation Gothenburg, Sweden
©
Volvo Car Corporation
Parking assistance, pilot- 31414664 - V1.1
Page 1 / 95

Special tools
999 7547 Hole punch
Tool number:999 7547
Tool description:Hole punch
Tool boards:80
951 2950 Glue gun (kit)
Tool number:951 2950
Tool description:Glue gun (kit)
Tool boards:08
999 7548 Hole punch
Tool number:999 7548
Tool description:Hole punch
Tool boards:80
981 4204 Expander pliers
Tool number:981 4204
Tool description:Expander pliers
Tool boards:87
951 2632 Terminal removal tool (Color code: RED)
Tool number:951 2632
Tool description:Terminal removal tool (Color code: RED)
Tool boards:39
Materials
Designation
Part number
Isopropanol
1161721
Masking tape
Bonding primer, plastic
31335448
Sand paper P1000
Volvo Original Touch-up paint
Varnish 2-
component
31335447
Primer
1161765
Glue 9511027
Installation instructions, accessories
Volvo Car Corporation Gothenburg, Sweden
©
Volvo Car Corporation
Parking assistance, pilot- 31414664 - V1.1
Page 2 / 95
Mixing pipe
1161730
Lubricant
1161150
Equipment
IMG-
242205
IMG-
345497
IMG-
239660
IMG-
402315
Installation instructions, accessories
Volvo Car Corporation Gothenburg, Sweden
©
Volvo Car Corporation
Parking assistance, pilot- 31414664 - V1.1
Page 3 / 95
IMG-
409736
Installation instructions, accessories
Volvo Car Corporation Gothenburg, Sweden
©
Volvo Car Corporation
Parking assistance, pilot- 31414664 - V1.1
Page 4 / 95
IMG-
402317
Installation instructions, accessories
Volvo Car Corporation Gothenburg, Sweden
©
Volvo Car Corporation
Parking assistance, pilot- 31414664 - V1.1
Page 5 / 95

Information
1
Read through all of the instructions before starting installation.
Notifications and warning texts are for your safety and to
minimise the risk of something breaking during installation.
Ensure that all tools stated in the instructions are available before
starting installation.
Certain steps in the instructions are only presented in the form of
images. Explanatory text is also given for more complicated
steps.
In the event of any problems with the instructions or the
accessory, contact your local Volvo dealer.
Conditions
2
When installing, the car must retain a temperature of 20 degrees
C.
After installation, the car must not be washed for 48 hours
After installation, the car must not be driven for 2 hours
There may be parts in the accessories kit that are not needed for
this installation.
Color symbols
3
IMG-
363036
1. Used for focused component, the component with which
you will do something.
2. Used as extra colors when you need to show or
differentiate additional parts.
3. Used for attachments that are to be removed/installed. May
be screws, clips, connectors, etc.
4. Used when the component is not fully removed from the
vehicle but only hung to the side.
5. Used for standard tools and special tools.
Note!
This colour chart displays (in colour print and electronic
version) the importance of the different colours used in the
images of the method steps.
Installation instructions, accessories
Volvo Car Corporation Gothenburg, Sweden
©
Volvo Car Corporation
Parking assistance, pilot- 31414664 - V1.1
Page 6 / 95
6. Used as background color for vehicle components.
Paintwork
4
IMG-
384329
Clean the surface.
Use:
1161721, Isopropanol
Allow to dry.
5
IMG-
384549
Clean the surface.
Use:
1161721, Isopropanol
Allow to dry.
Installation instructions, accessories
Volvo Car Corporation Gothenburg, Sweden
©
Volvo Car Corporation
Parking assistance, pilot- 31414664 - V1.1
Page 7 / 95
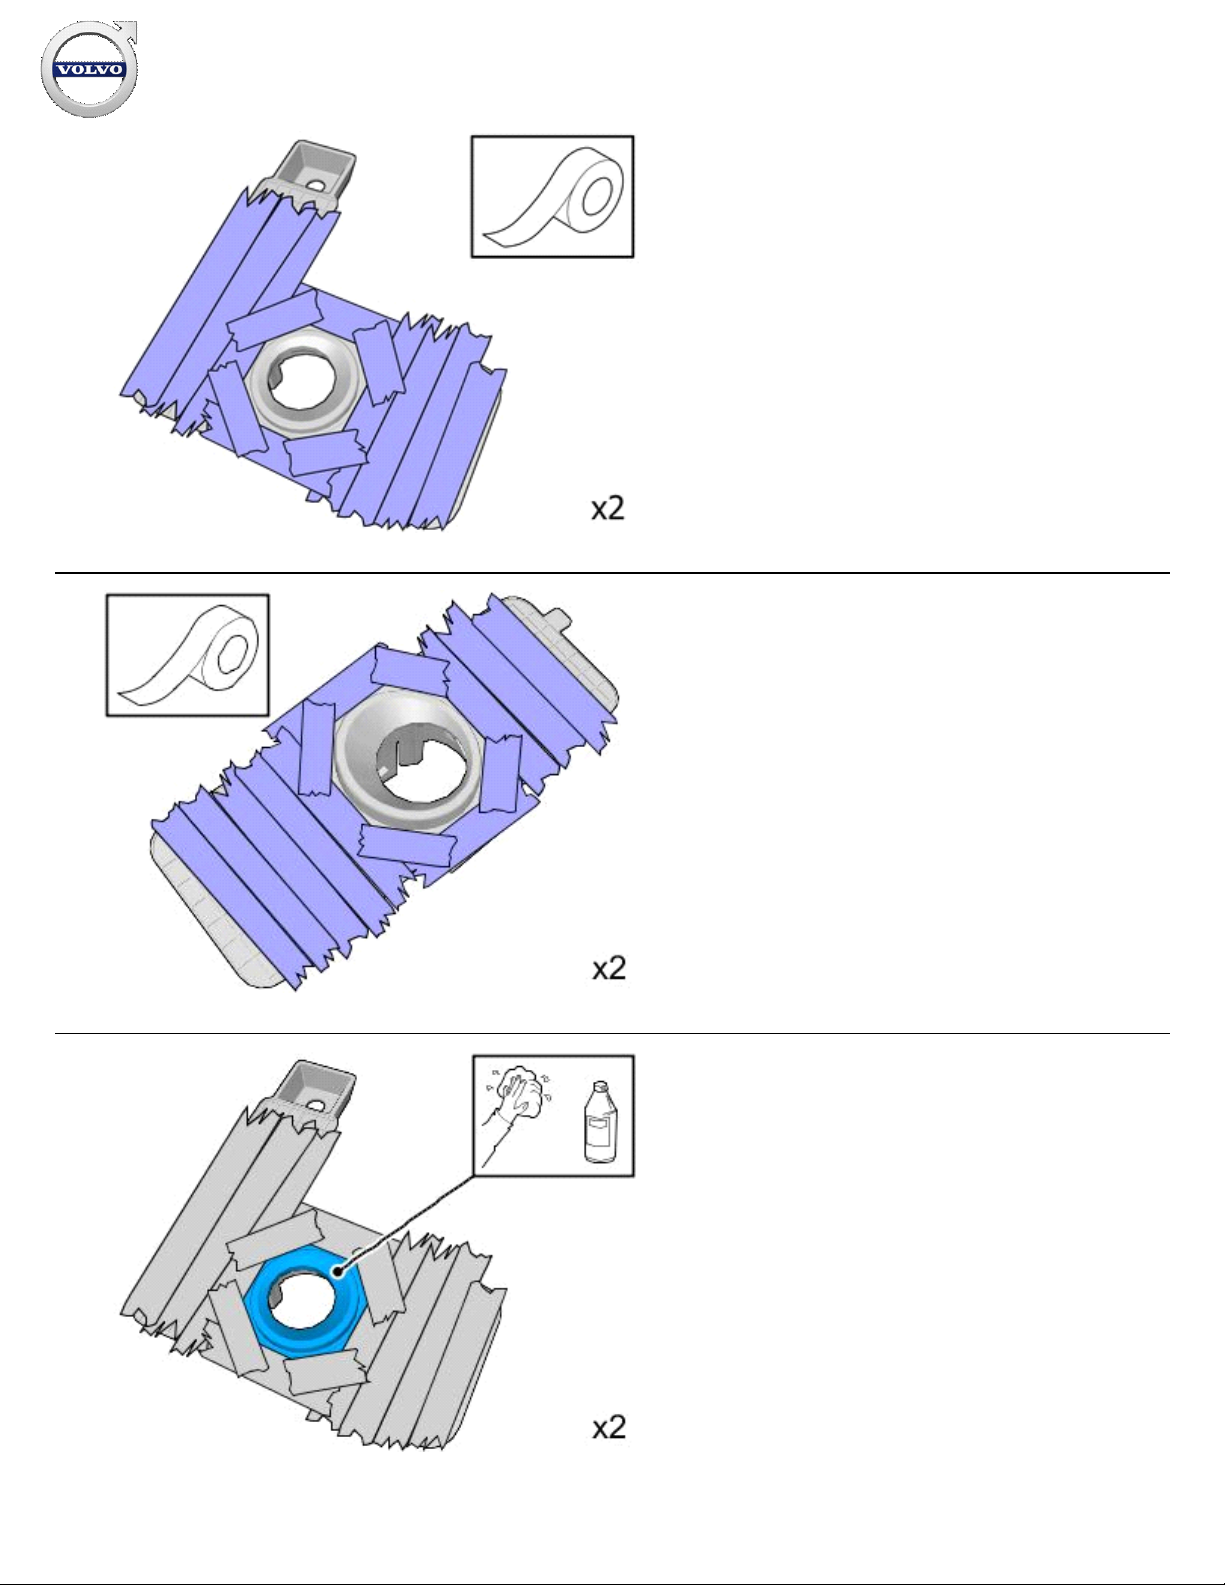
6
IMG-
384318
Use:
, Masking tape
7
IMG-
384550
Use:
, Masking tape
8
IMG-
384321
Clean the surface.
Use:
1161721, Isopropanol
Allow to dry.
Installation instructions, accessories
Volvo Car Corporation Gothenburg, Sweden
©
Volvo Car Corporation
Parking assistance, pilot- 31414664 - V1.1
Page 8 / 95
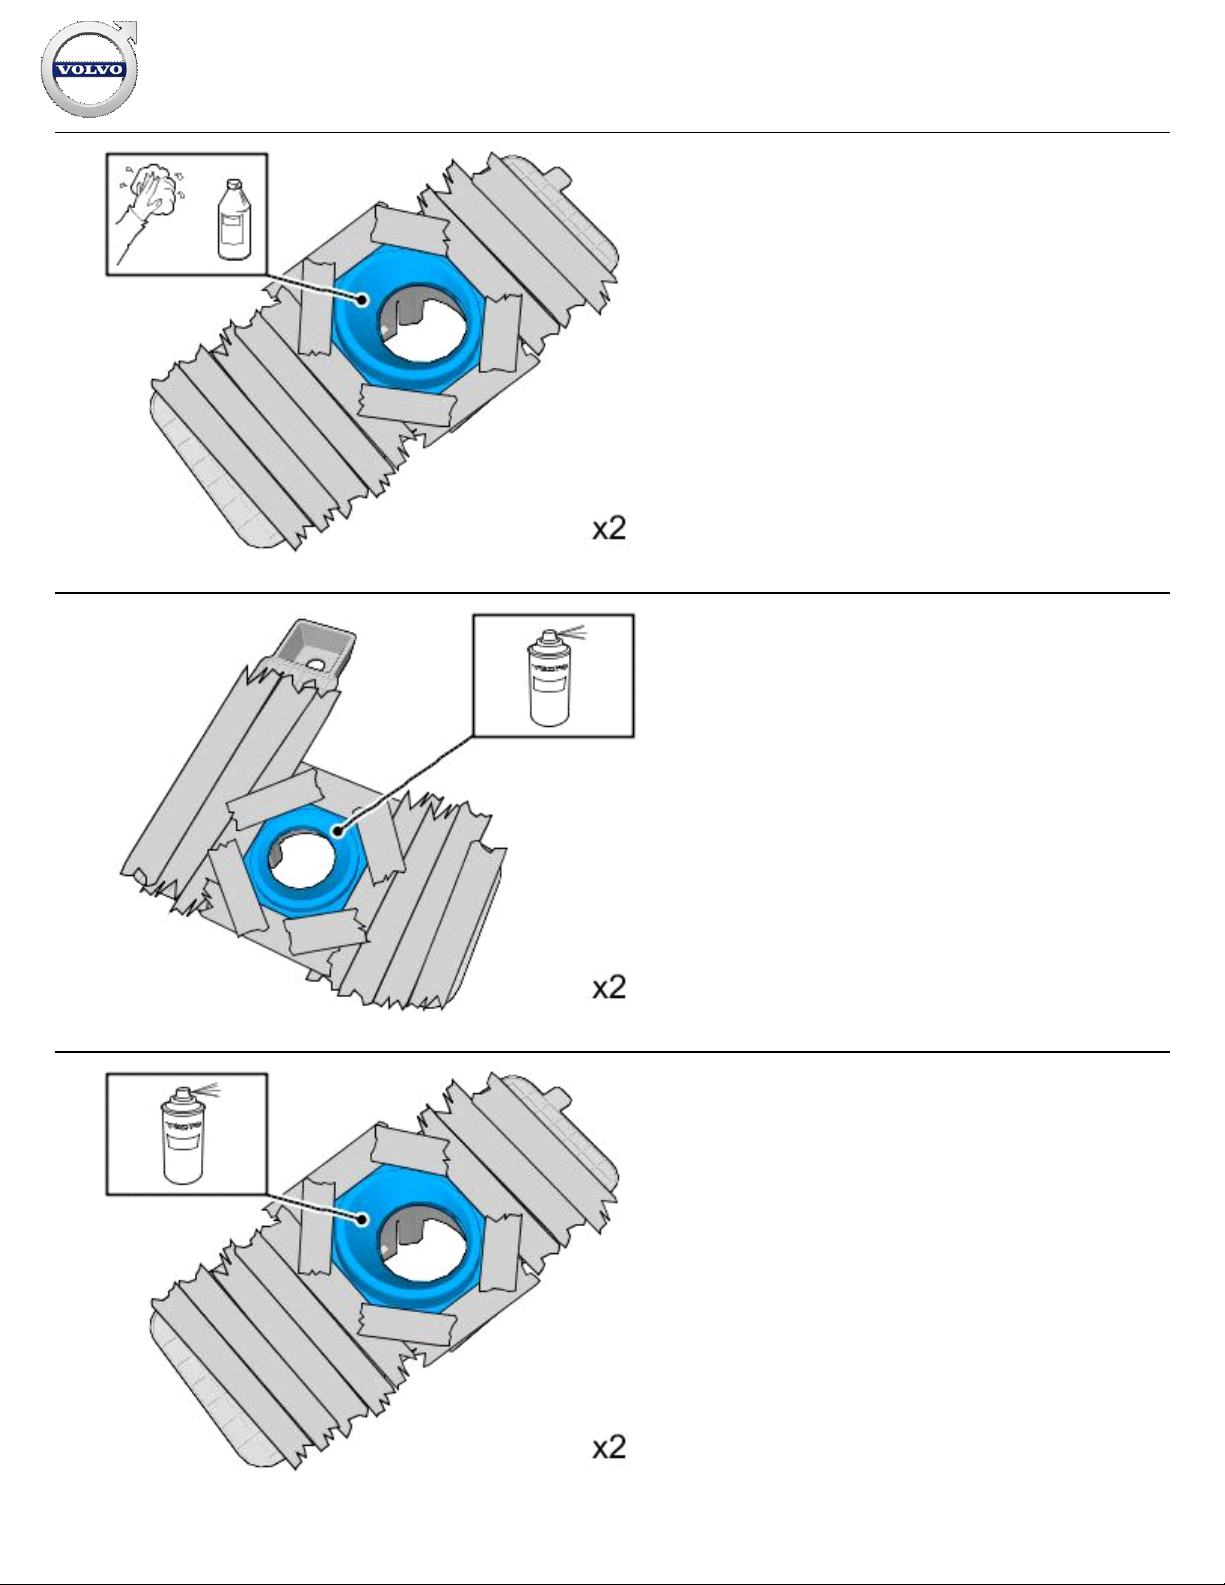
9
IMG-
384575
Clean the surface.
Use:
1161721, Isopropanol
Allow to dry.
10
IMG-
384322
Use:
31335448, Bonding primer, plastic
Also see the instructions on the container.
11
IMG-
384576
Use:
31335448, Bonding primer, plastic
Also see the instructions on the container.
Installation instructions, accessories
Volvo Car Corporation Gothenburg, Sweden
©
Volvo Car Corporation
Parking assistance, pilot- 31414664 - V1.1
Page 9 / 95
12
IMG-
384372
13
IMG-
384853
Installation instructions, accessories
Volvo Car Corporation Gothenburg, Sweden
©
Volvo Car Corporation
Parking assistance, pilot- 31414664 - V1.1
Page 10 / 95
14
IMG-
404275
Clean the surface.
Use:
1161721, Isopropanol
Allow to dry.
15
IMG-
404276
Matt the surface gently.
Use:
, Sand paper P1000
16
IMG-
404277
Clean the surface.
Use:
1161721, Isopropanol
Allow to dry.
Installation instructions, accessories
Volvo Car Corporation Gothenburg, Sweden
©
Volvo Car Corporation
Parking assistance, pilot- 31414664 - V1.1
Page 11 / 95
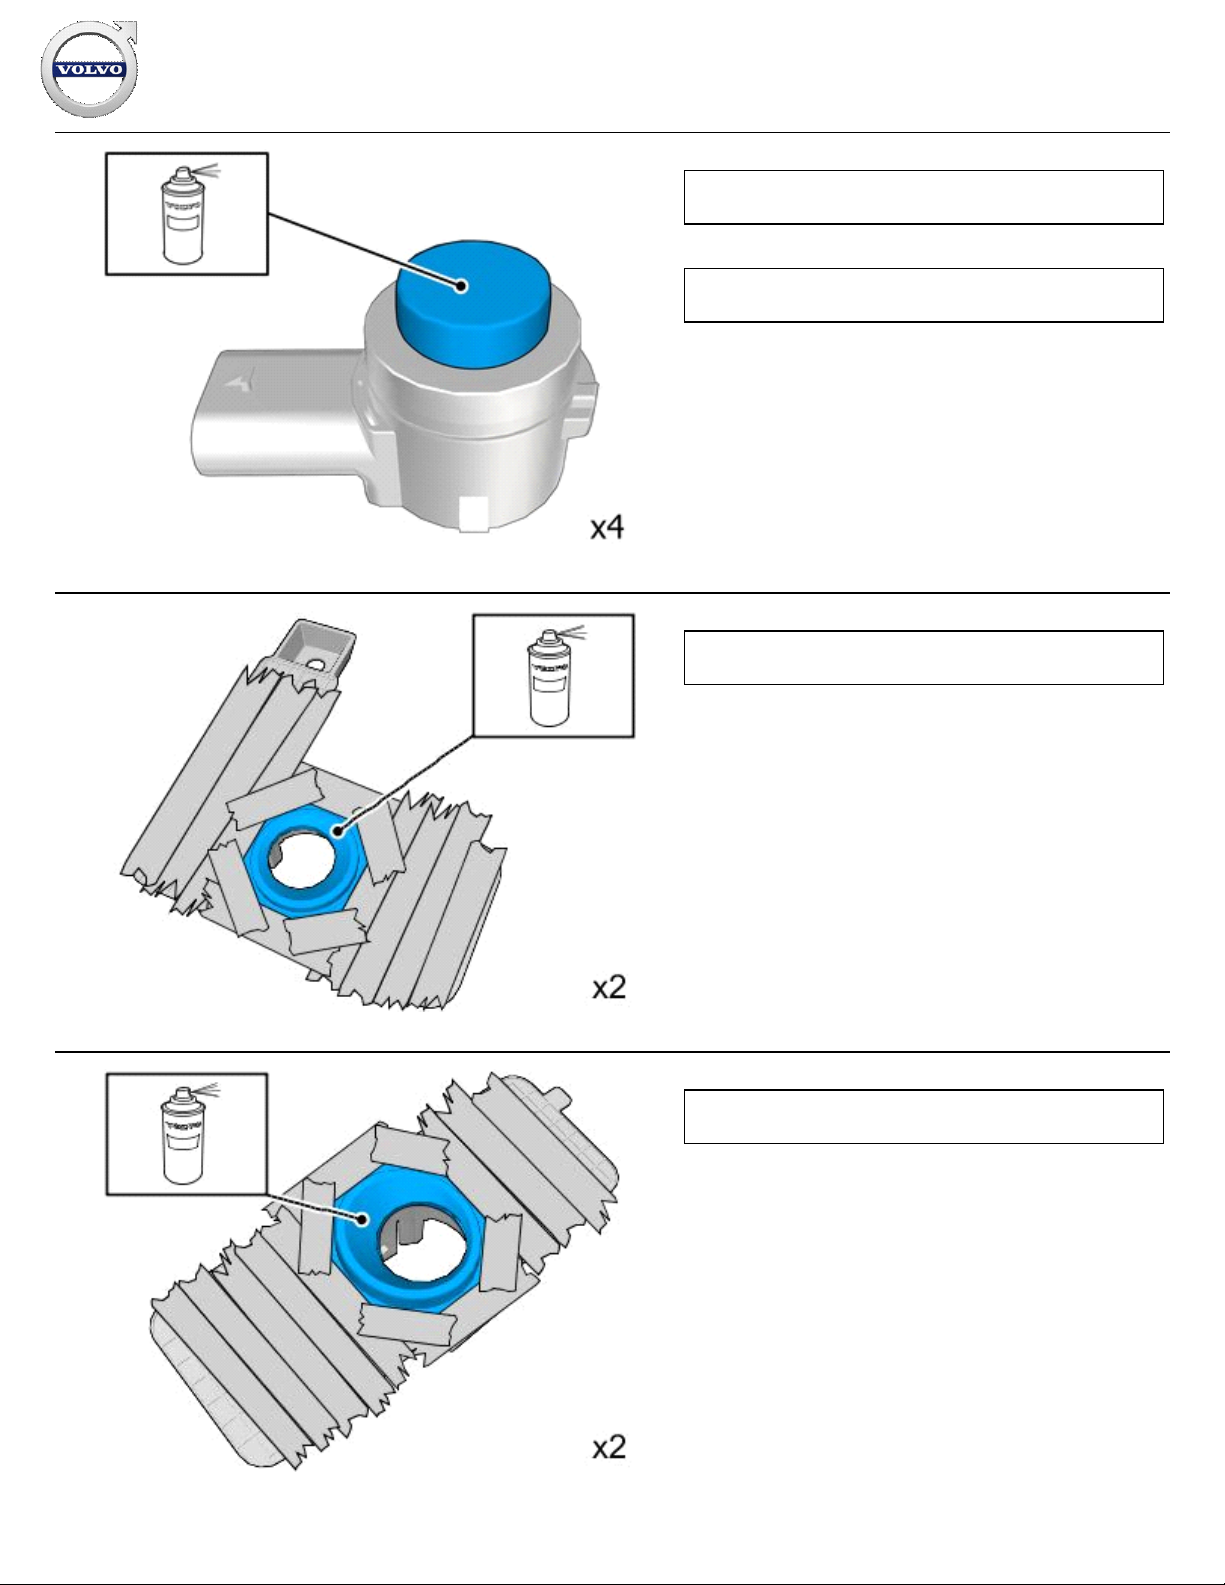
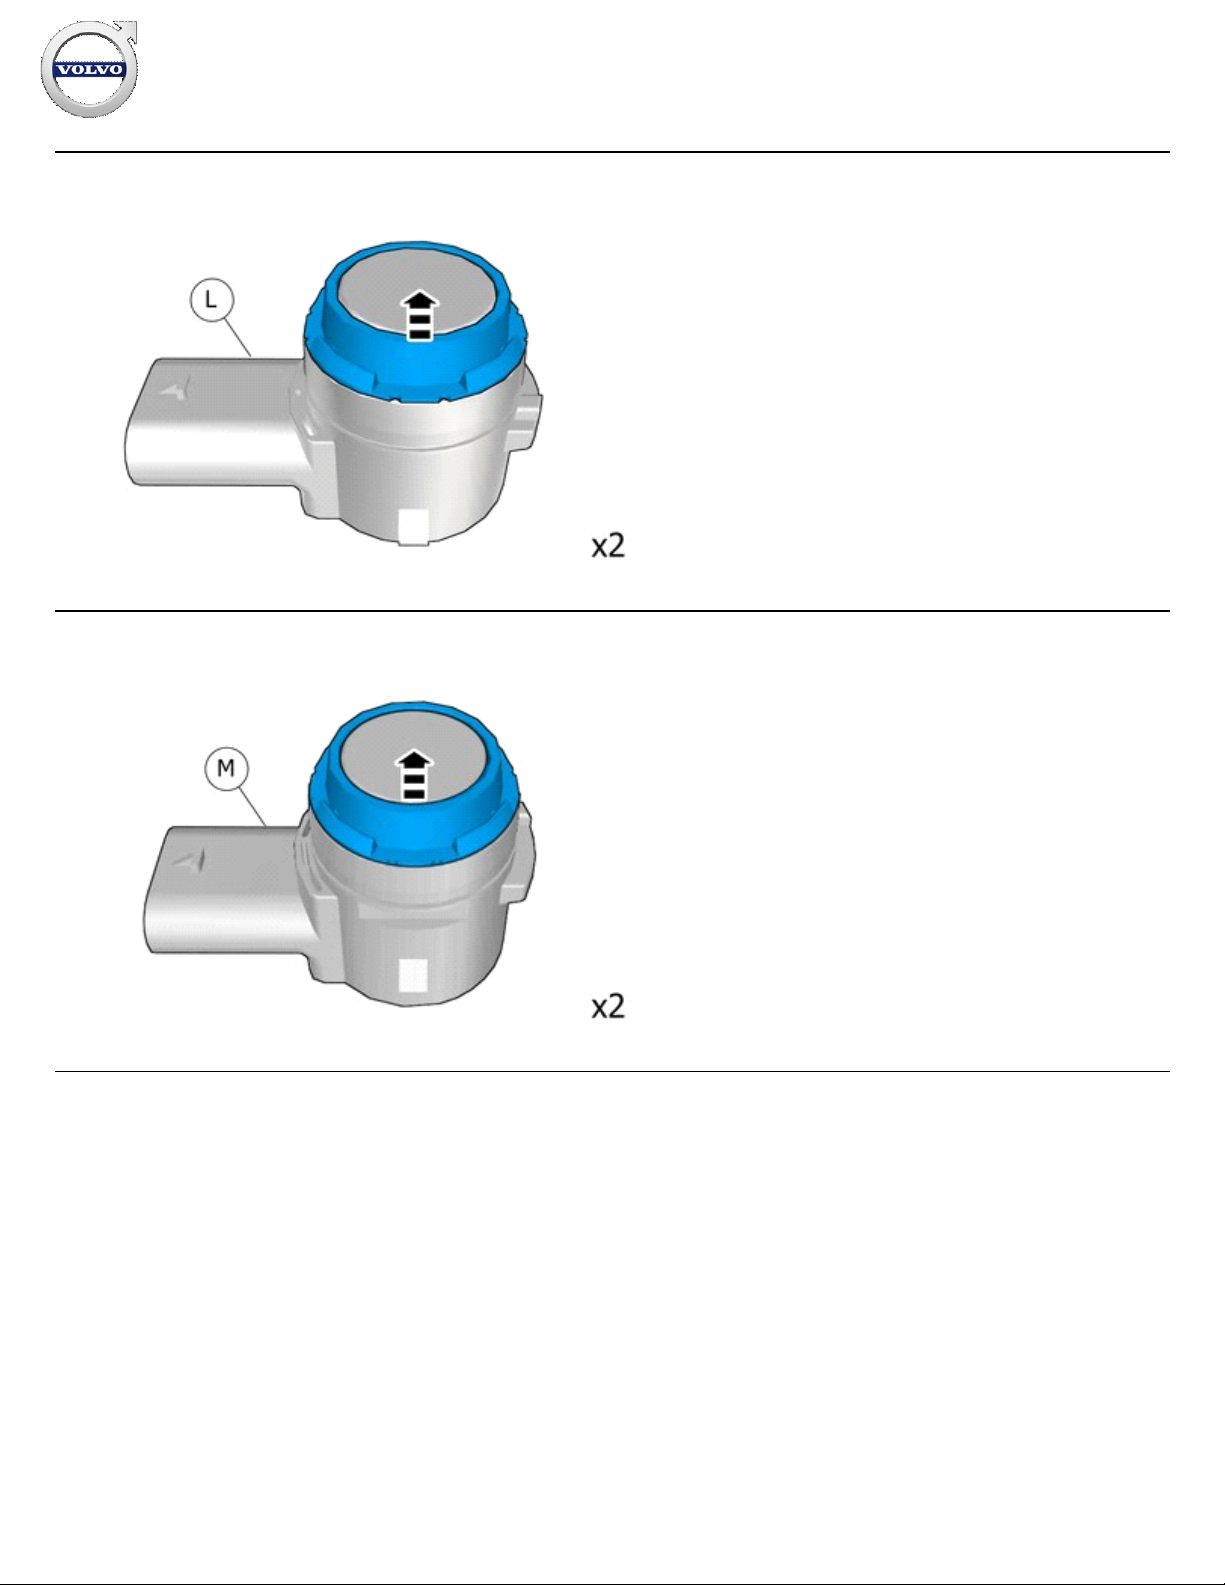
17
IMG-
404278
Use:
, Volvo Original Touch-up paint
Use: 31335447, Varnish 2-
component
Also see the instructions on the container.
Caution!
Protect connector surfaces against paint spray.
Note!
Paint the sensors the same colour code as the vehicle.
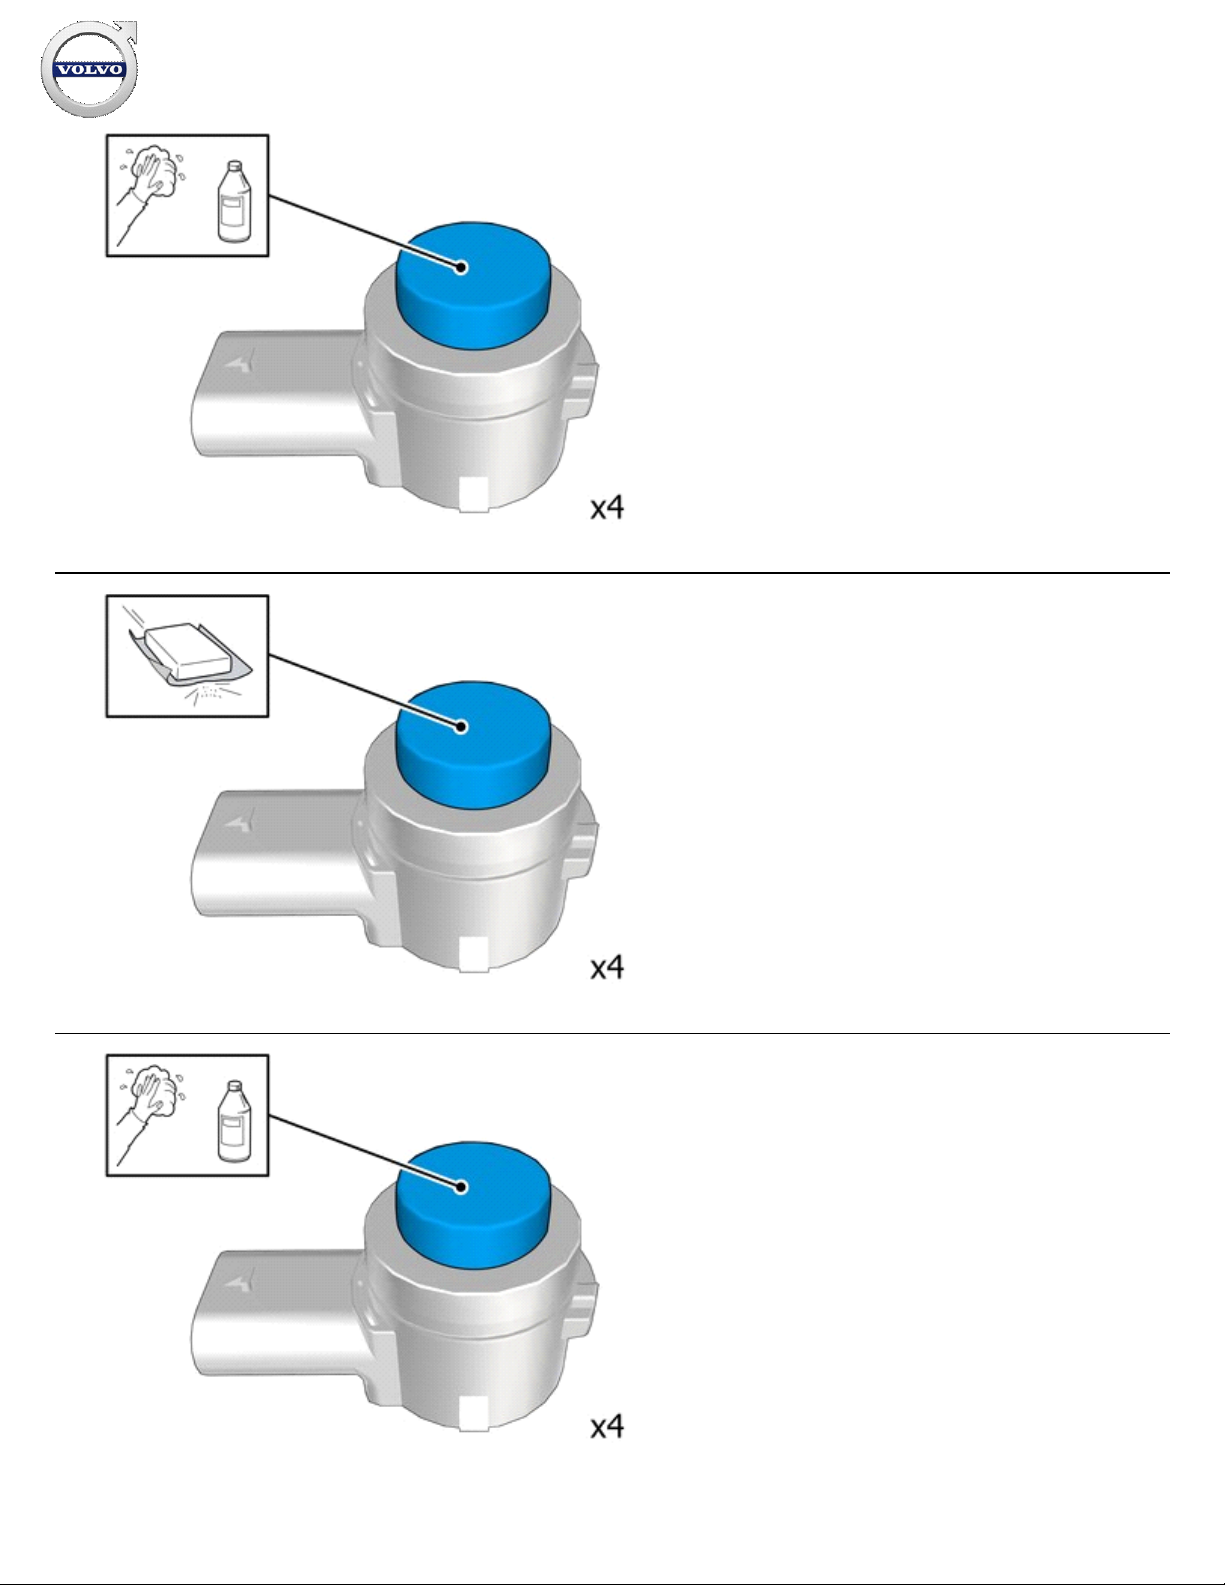
18
IMG-
384322
Use:
, Volvo Original Touch-up paint
Use: 31335447, Varnish 2-
component
Also see the instructions on the container.
Note!
Use correct color following the vehicle's paint code.
19
IMG-
384576
Use:
, Volvo Original Touch-up paint
Use: 31335447, Varnish 2-
component
Also see the instructions on the container.
Note!
Use correct color following the vehicle's paint code.
Installation instructions, accessories
Volvo Car Corporation Gothenburg, Sweden
©
Volvo Car Corporation
Parking assistance, pilot- 31414664 - V1.1
Page 12 / 95
20
IMG-
384373
Caution!
First the paint must dry after painting.
21
IMG-
384851
Caution!
First the paint must dry after painting.
Installation instructions, accessories
Volvo Car Corporation Gothenburg, Sweden
©
Volvo Car Corporation
Parking assistance, pilot- 31414664 - V1.1
Page 13 / 95

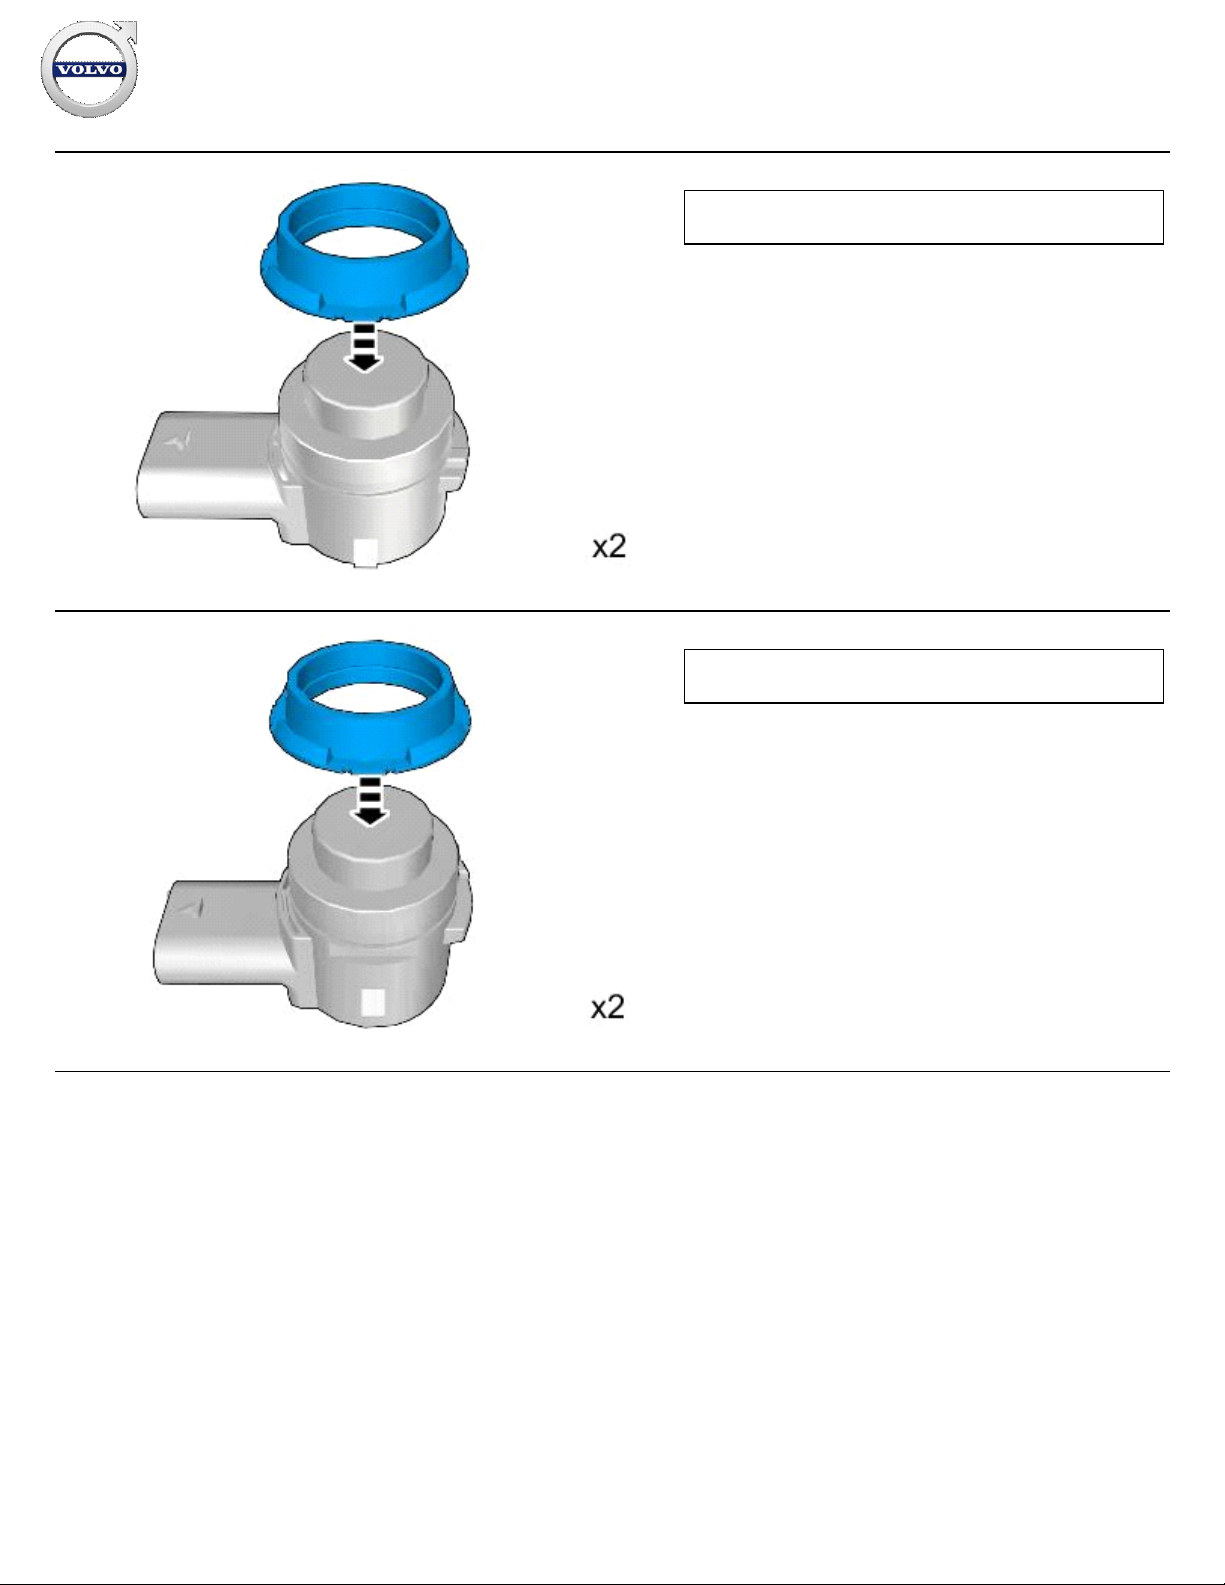
22
IMG-
384320
Remove the tape.
23
IMG-
384574
Remove the tape.
Removal
24
Note!
The removal steps may contain installation details.
Installation instructions, accessories
Volvo Car Corporation Gothenburg, Sweden
©
Volvo Car Corporation
Parking assistance, pilot- 31414664 - V1.1
Page 14 / 95

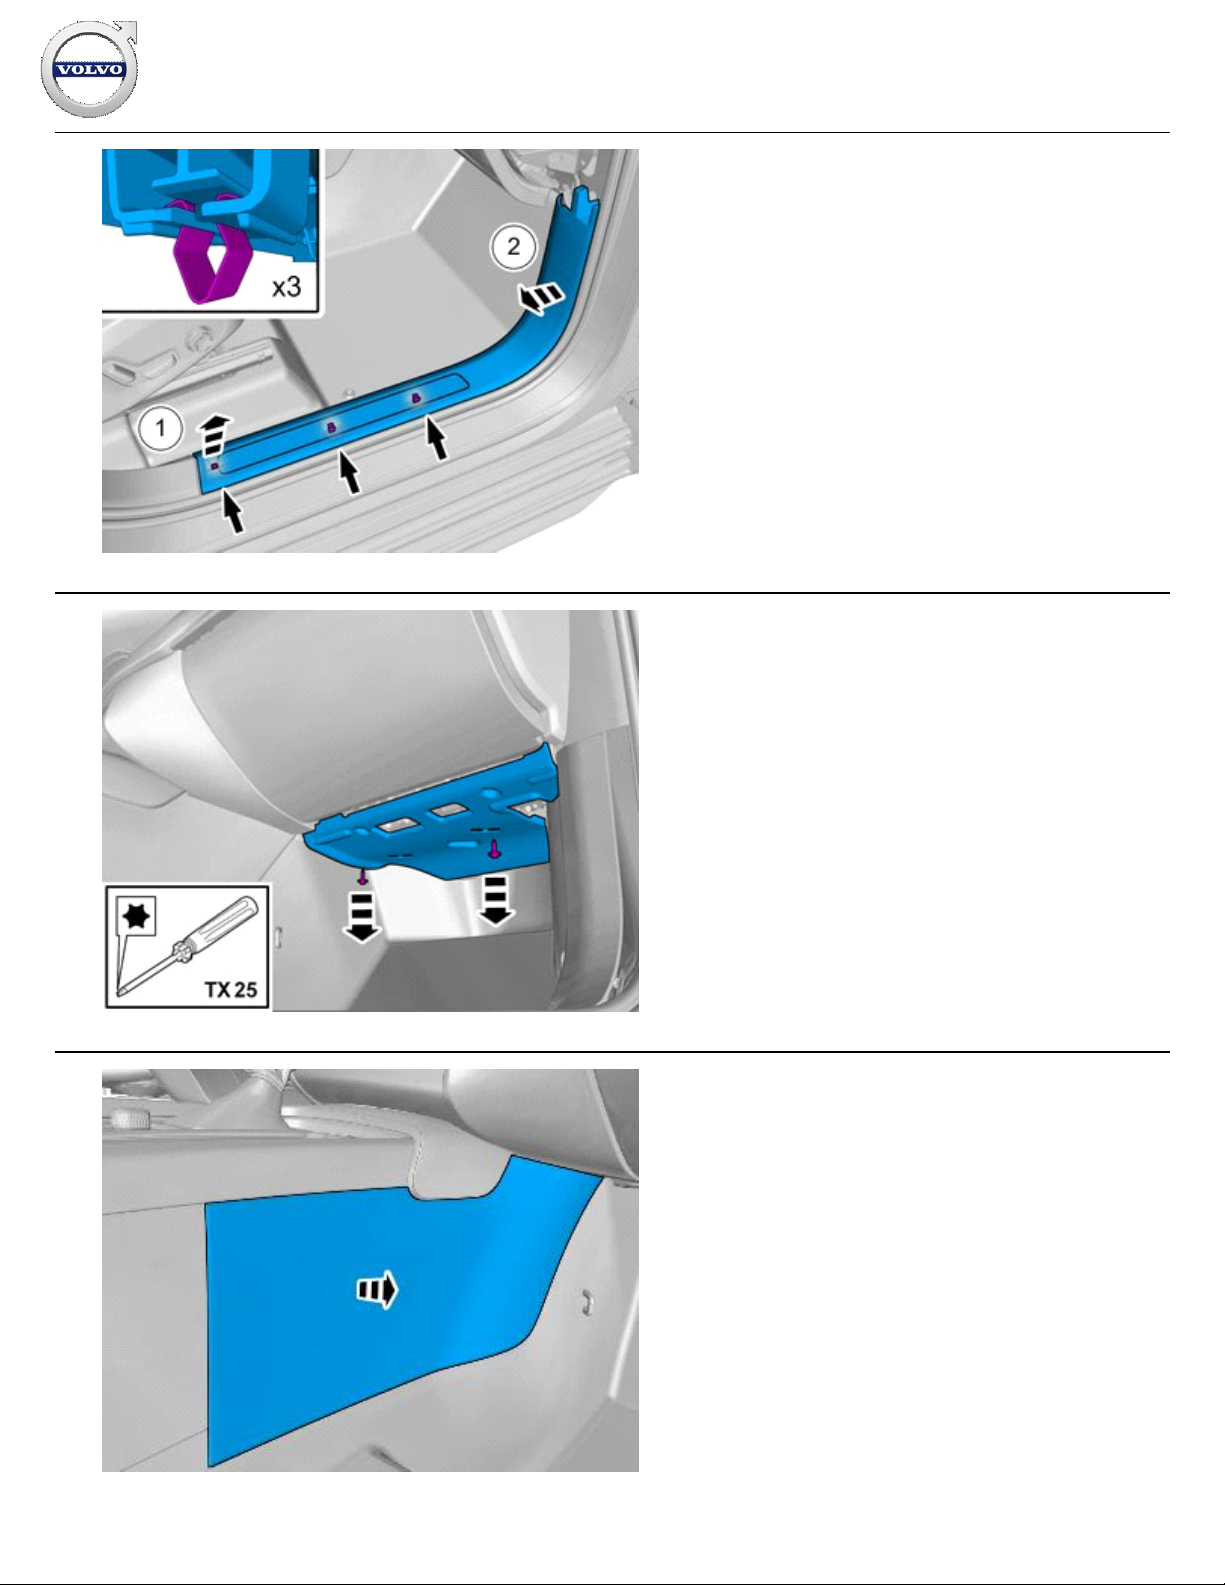
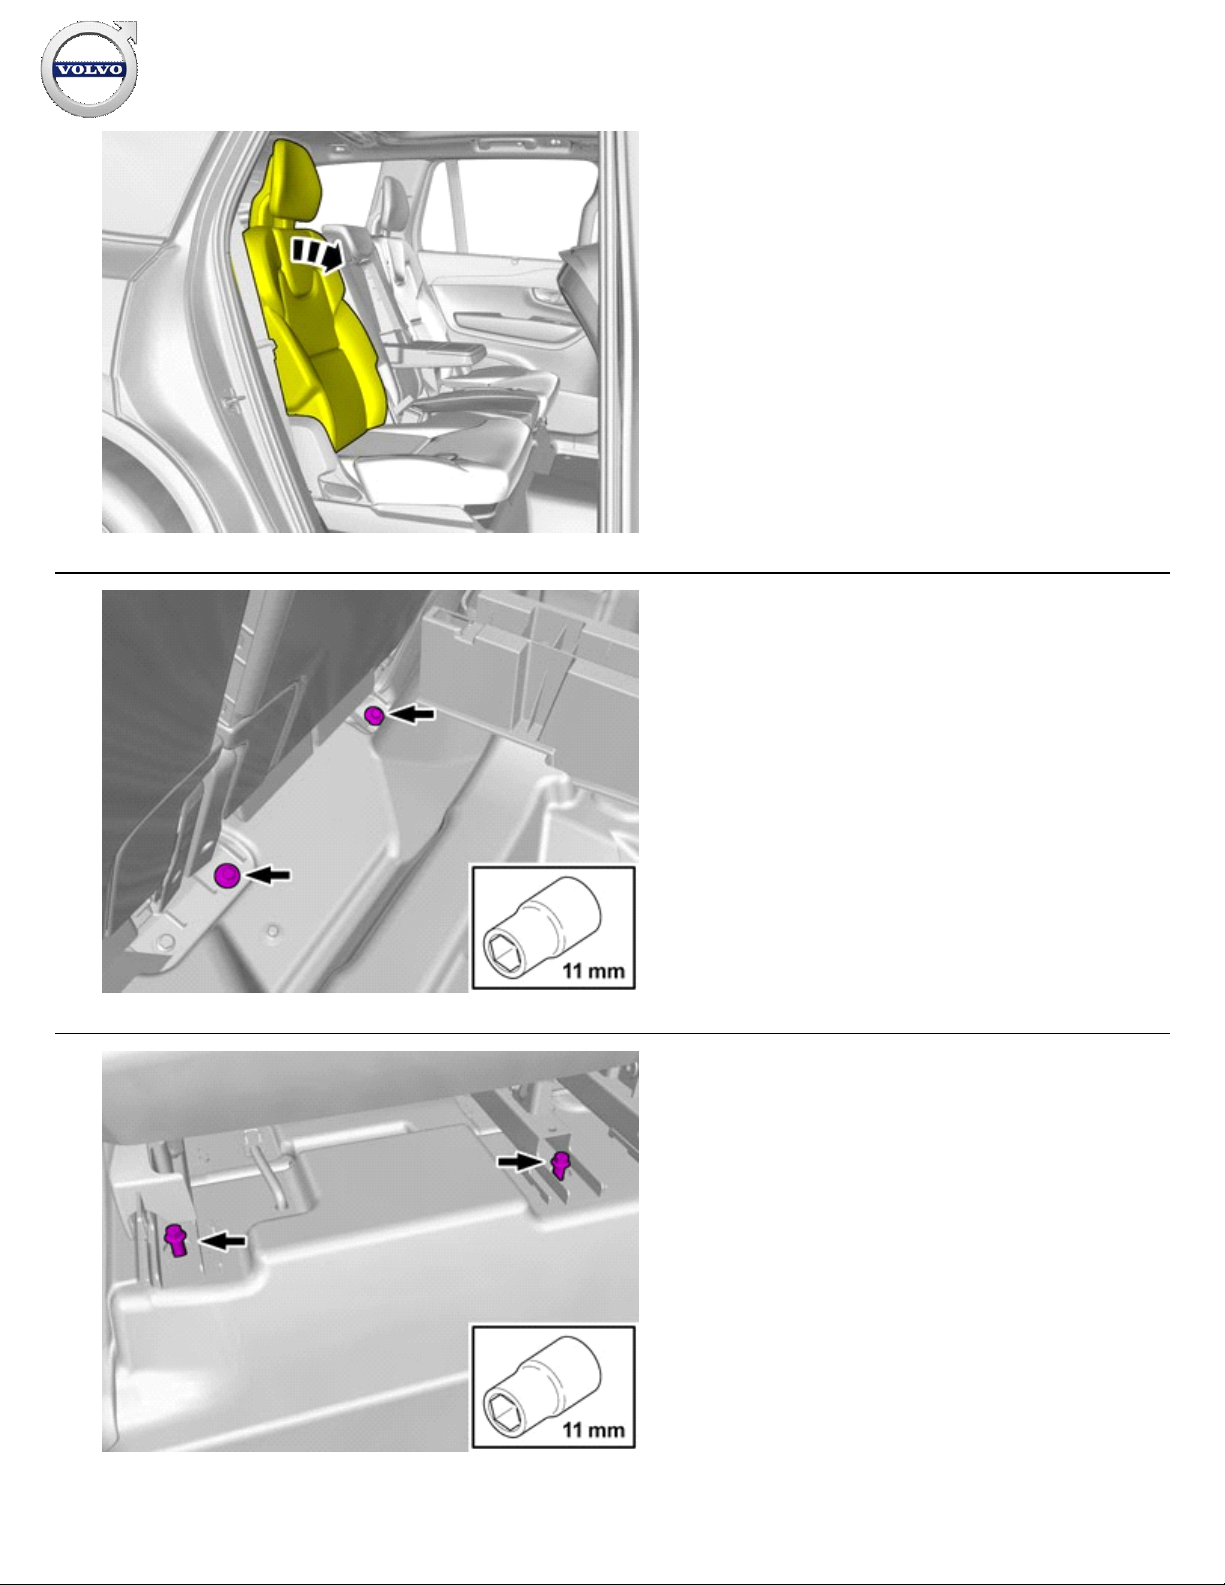
25
IMG-
390109
Remove the panel.
Disconnect the connector, if applicable.
26
IMG-
390116
Remove the panel.
27
IMG-
390091
Disconnect the connector, if applicable.
Installation instructions, accessories
Volvo Car Corporation Gothenburg, Sweden
©
Volvo Car Corporation
Parking assistance, pilot- 31414664 - V1.1
Page 15 / 95
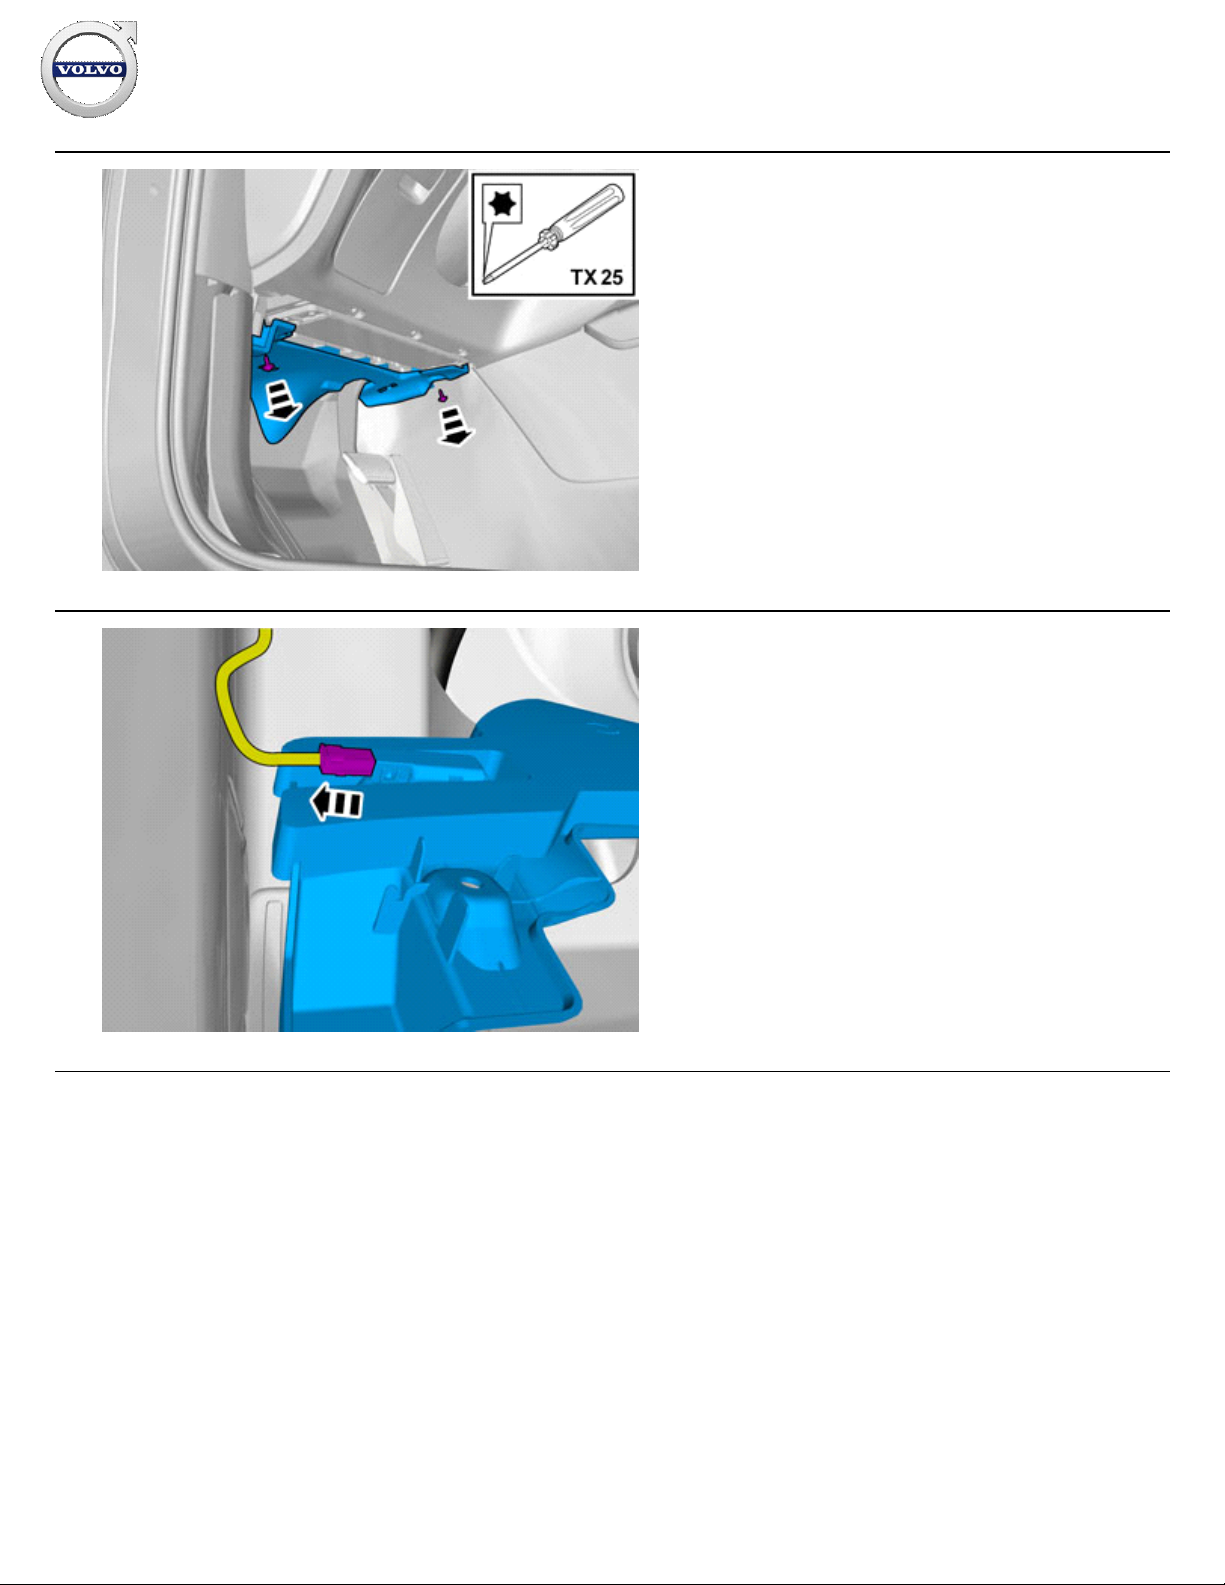
28
IMG-
390106
Remove the panel.
29
IMG-
383237
Remove the screws.
Remove the panel.
30
IMG-
383729
Remove the panel.
Installation instructions, accessories
Volvo Car Corporation Gothenburg, Sweden
©
Volvo Car Corporation
Parking assistance, pilot- 31414664 - V1.1
Page 16 / 95
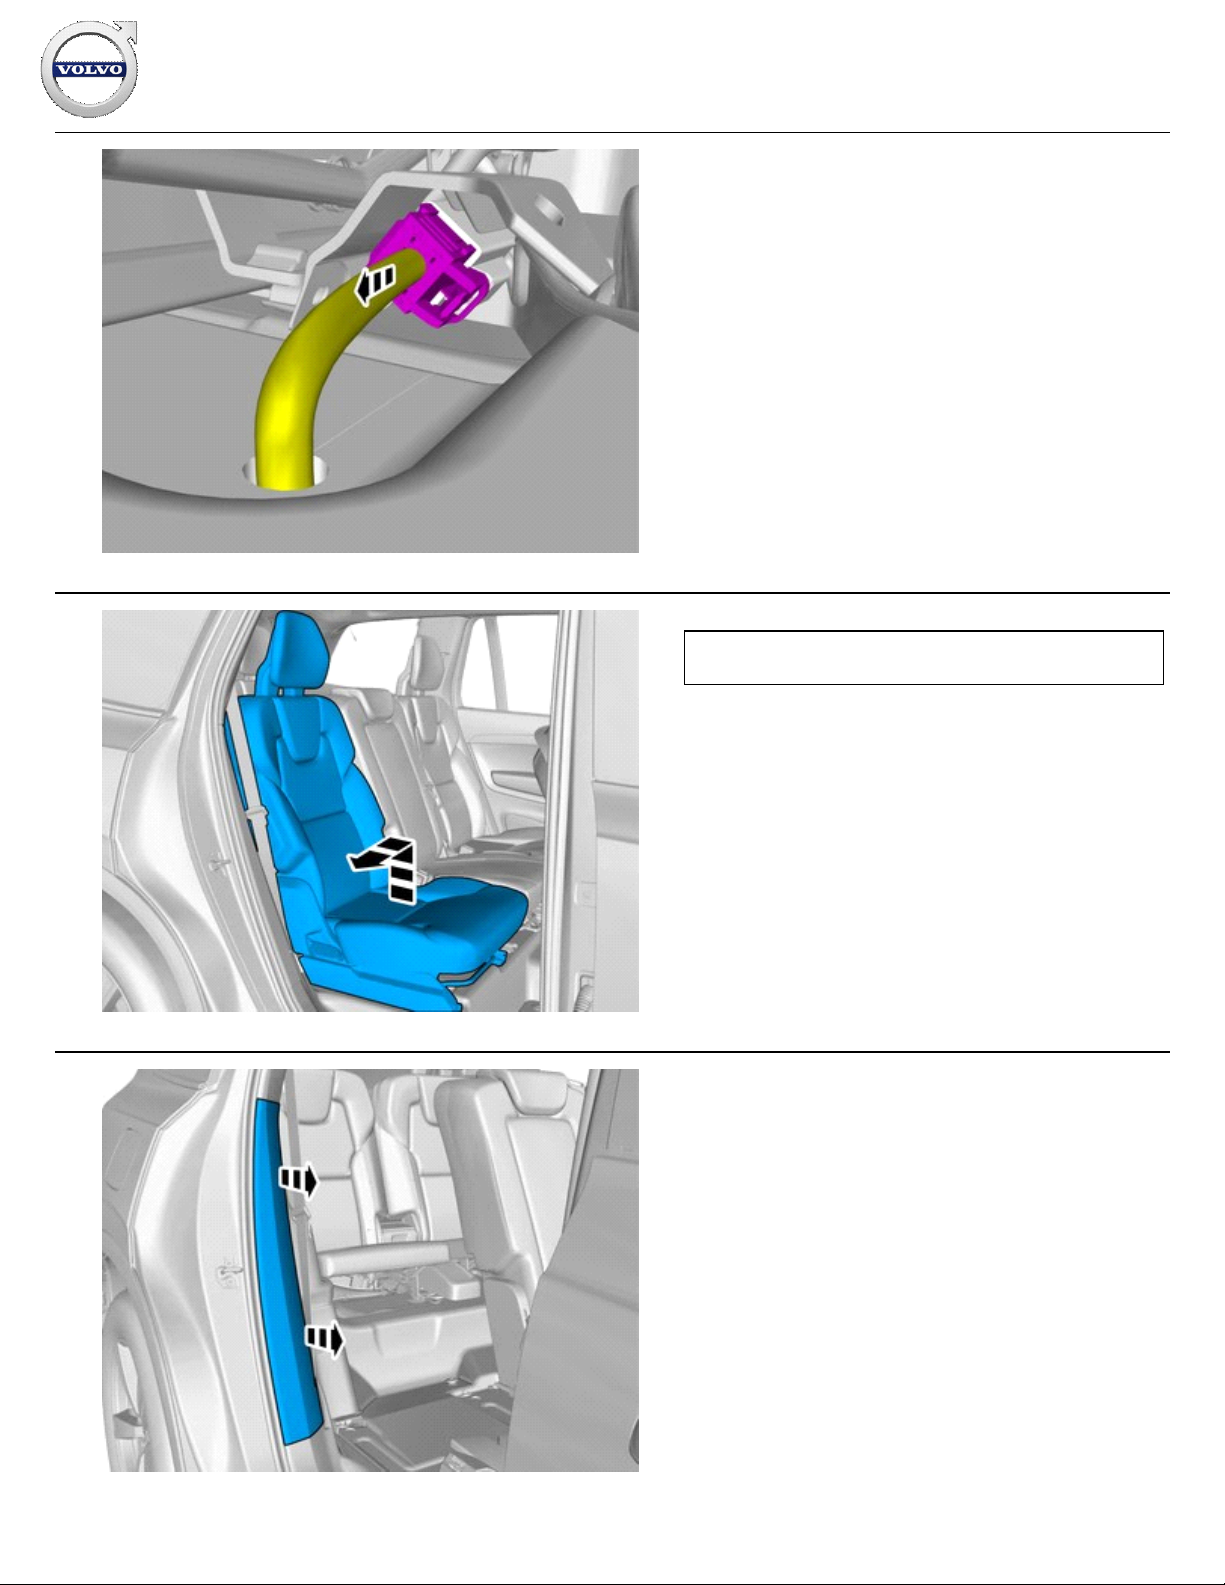
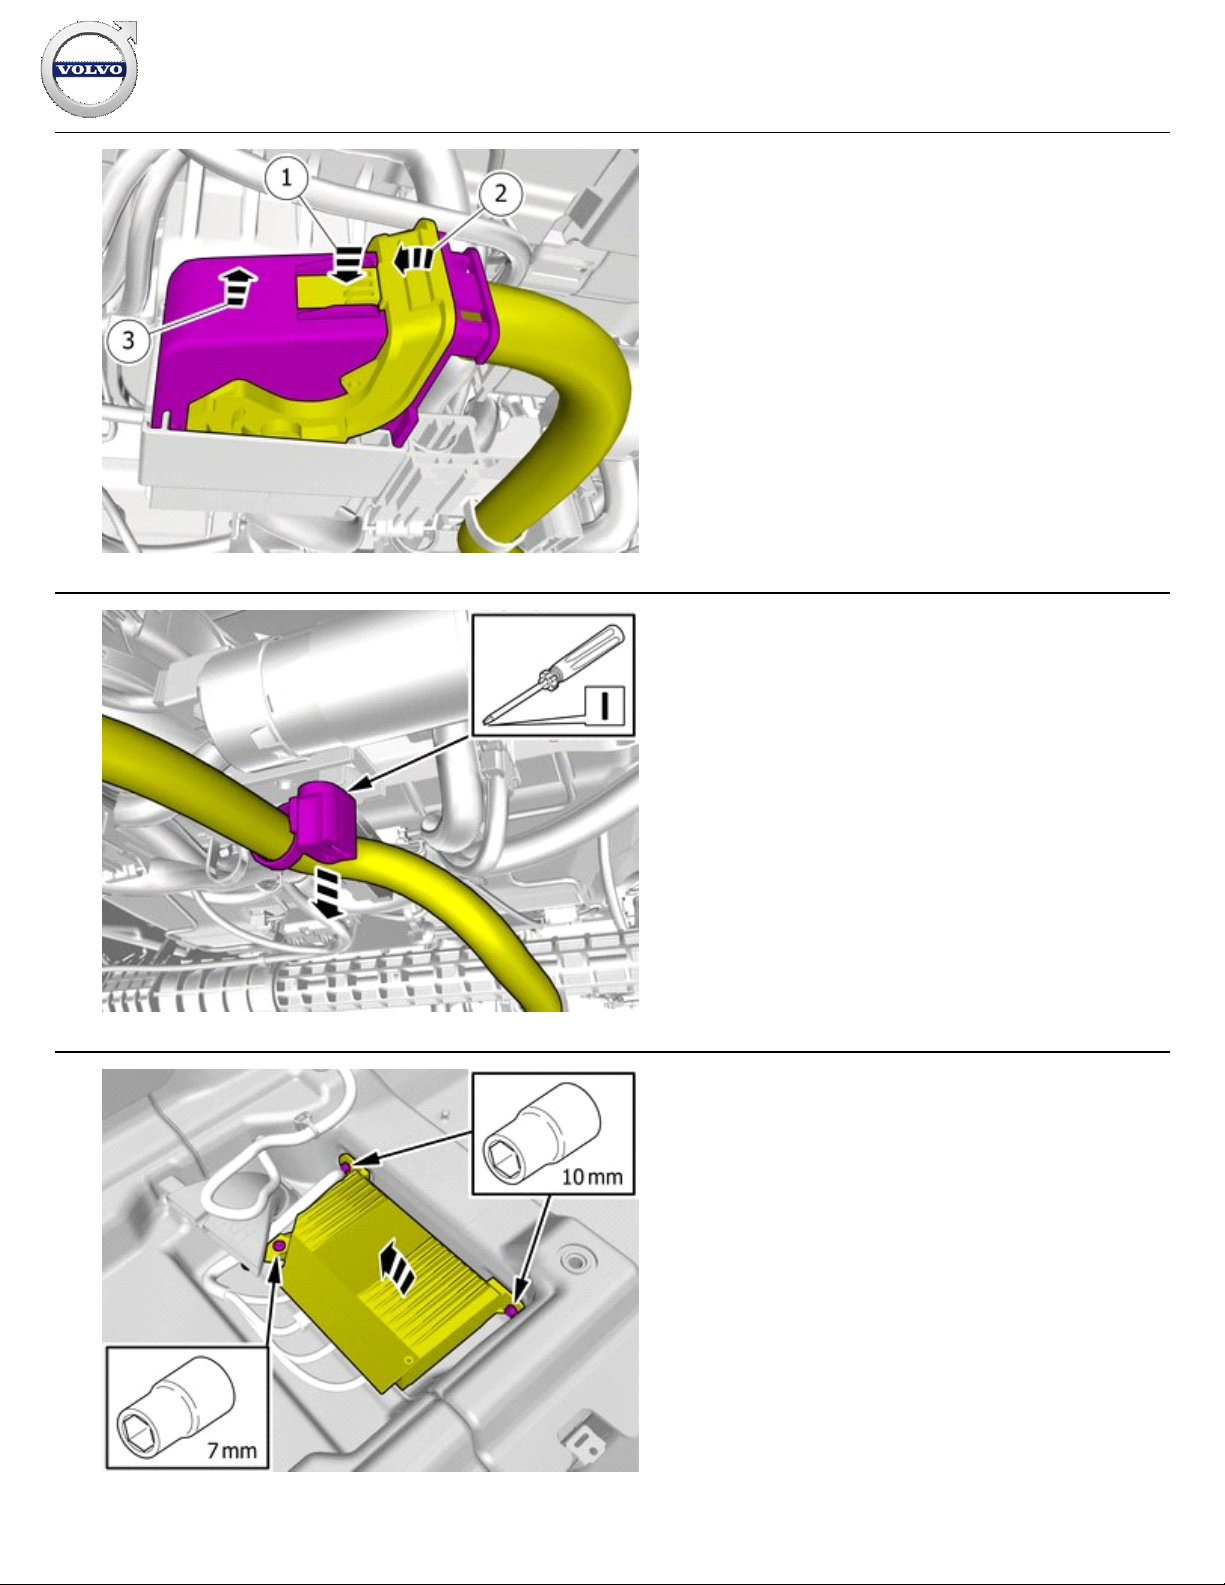
31
IMG-
383314
Remove the screws.
Detach the panel.
32
IMG-
383315
Disconnect the connector.
Remove the panel.
Installation instructions, accessories
Volvo Car Corporation Gothenburg, Sweden
©
Volvo Car Corporation
Parking assistance, pilot- 31414664 - V1.1
Page 17 / 95
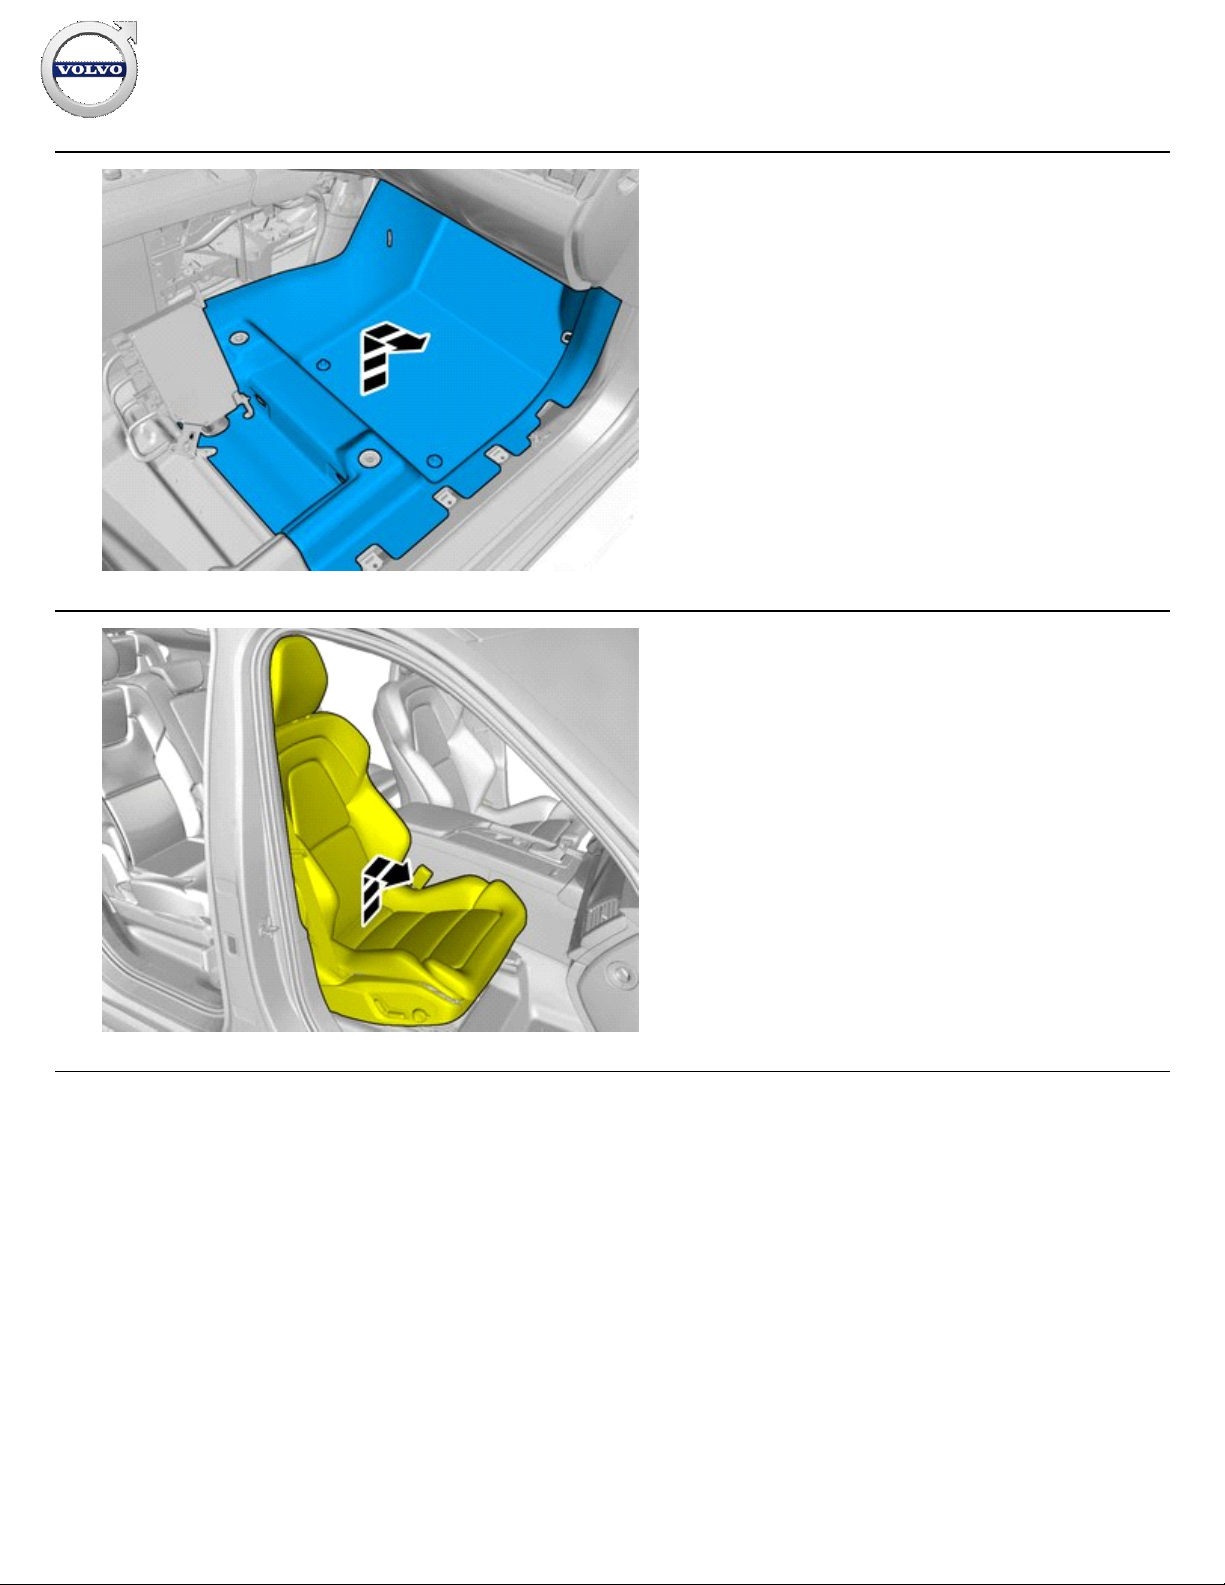
33
IMG-
397295
34
IMG-
383235
Remove the screws.
Tightening torque:
Seat, to Body , 40 Nm
35
IMG-
383236
Remove the screws.
Tightening torque:
Seat, to Body , 40 Nm
Installation instructions, accessories
Volvo Car Corporation Gothenburg, Sweden
©
Volvo Car Corporation
Parking assistance, pilot- 31414664 - V1.1
Page 18 / 95
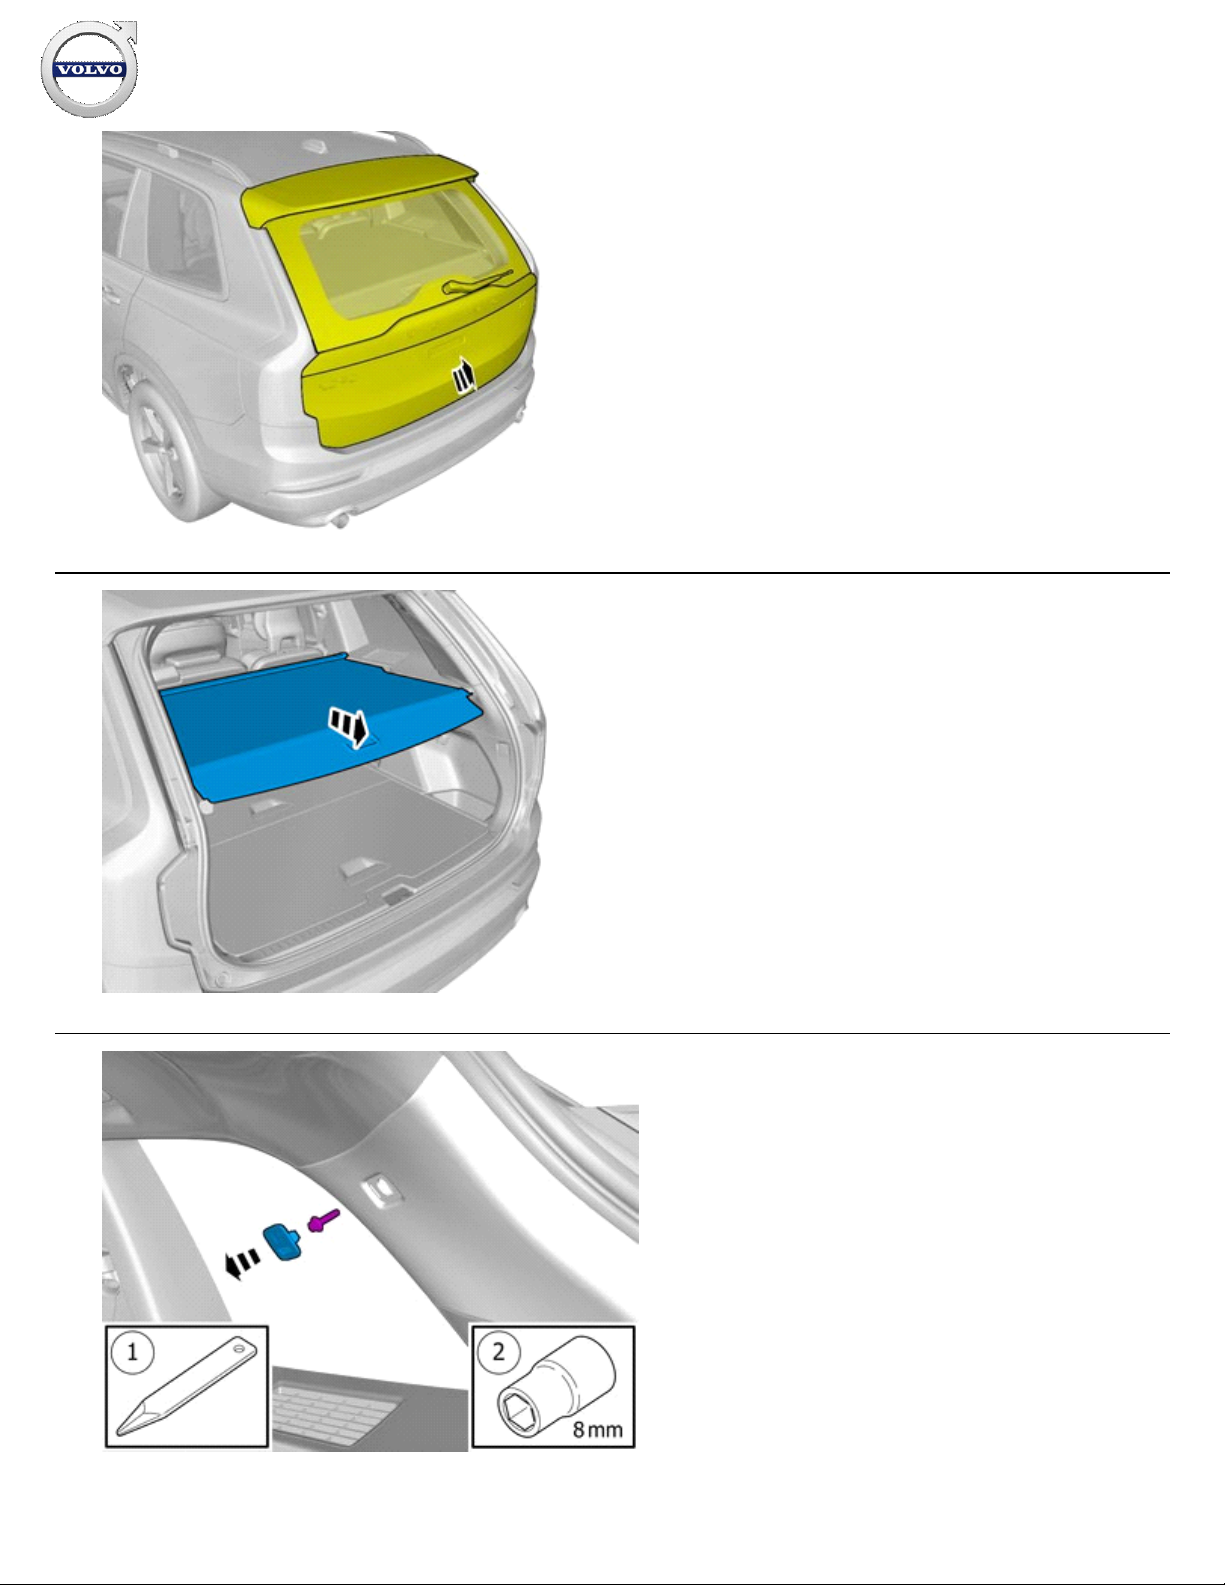
36
IMG-
404382
Disconnect the connector.
37
IMG-
404383
Caution!
Be extra careful when removing or installing this component.
38
IMG-
404384
Remove the panel.
Installation instructions, accessories
Volvo Car Corporation Gothenburg, Sweden
©
Volvo Car Corporation
Parking assistance, pilot- 31414664 - V1.1
Page 19 / 95
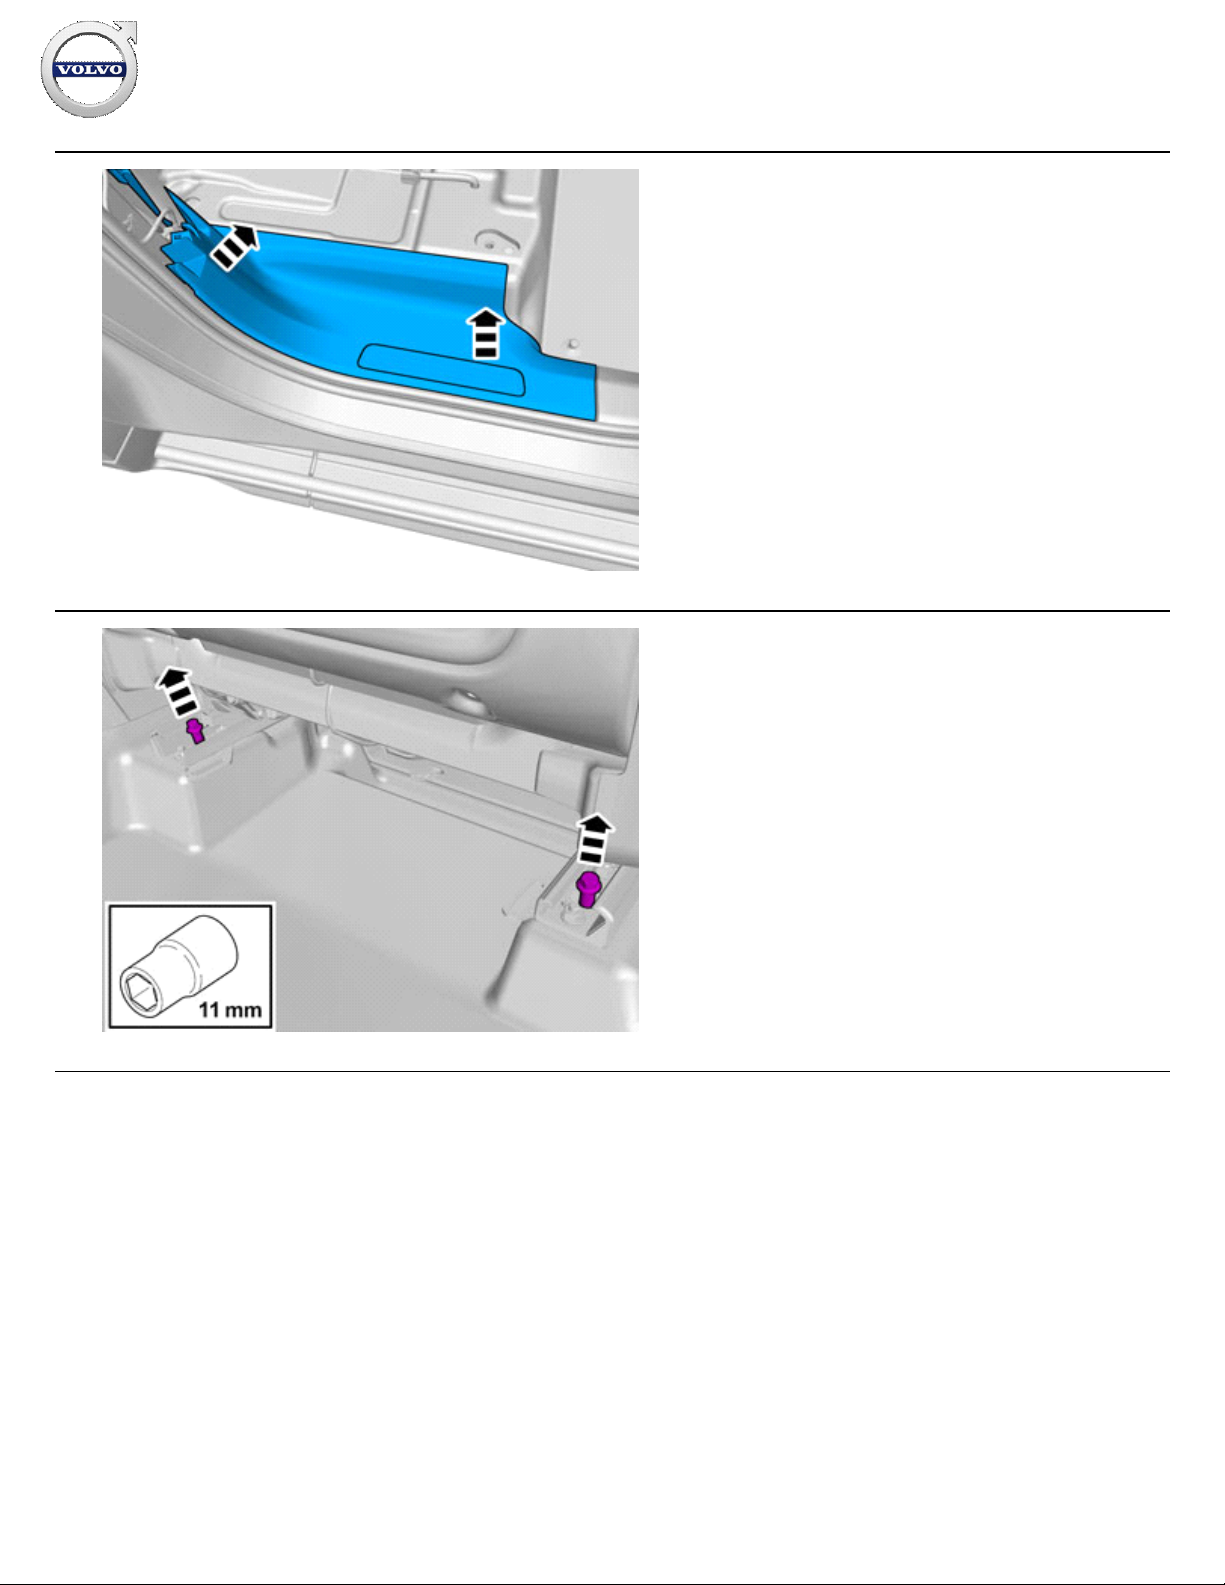
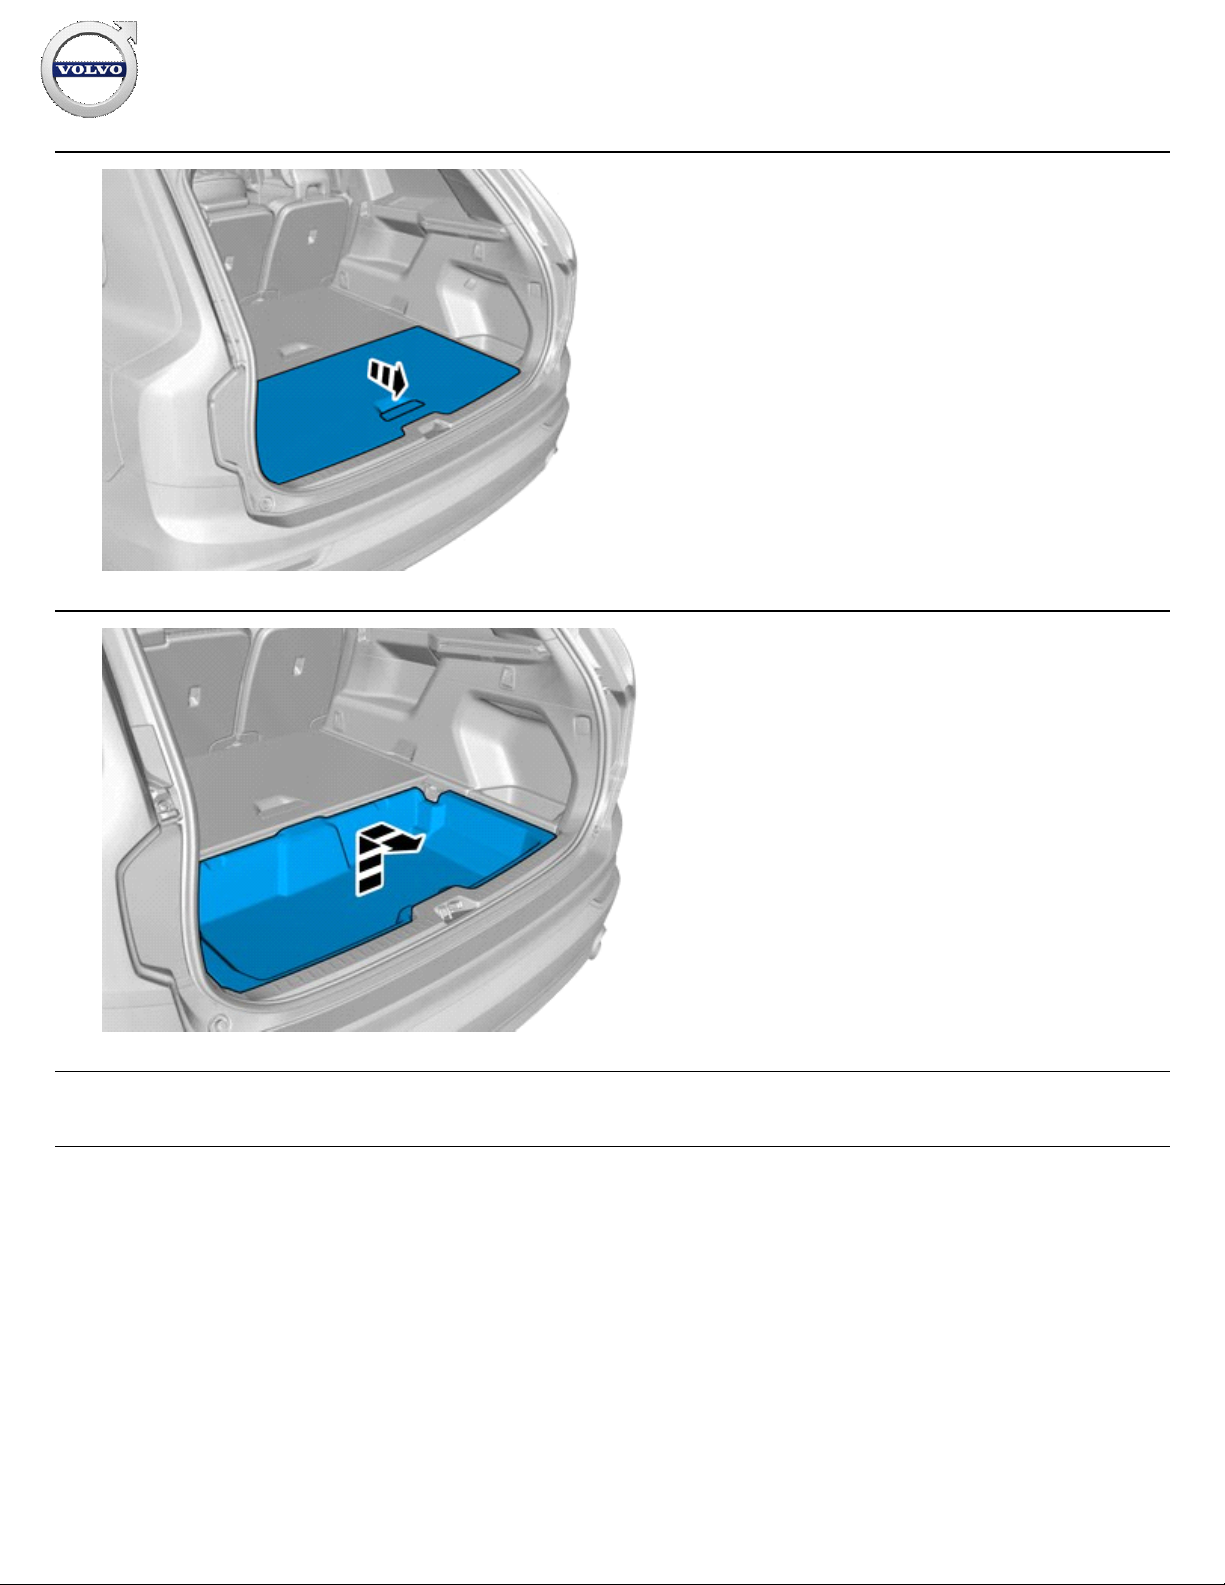
39
IMG-
383234
Remove the panel.
40
IMG-
383130
Remove the screws.
Tightening torque:
Front seat to body , 40 Nm
Installation instructions, accessories
Volvo Car Corporation Gothenburg, Sweden
©
Volvo Car Corporation
Parking assistance, pilot- 31414664 - V1.1
Page 20 / 95
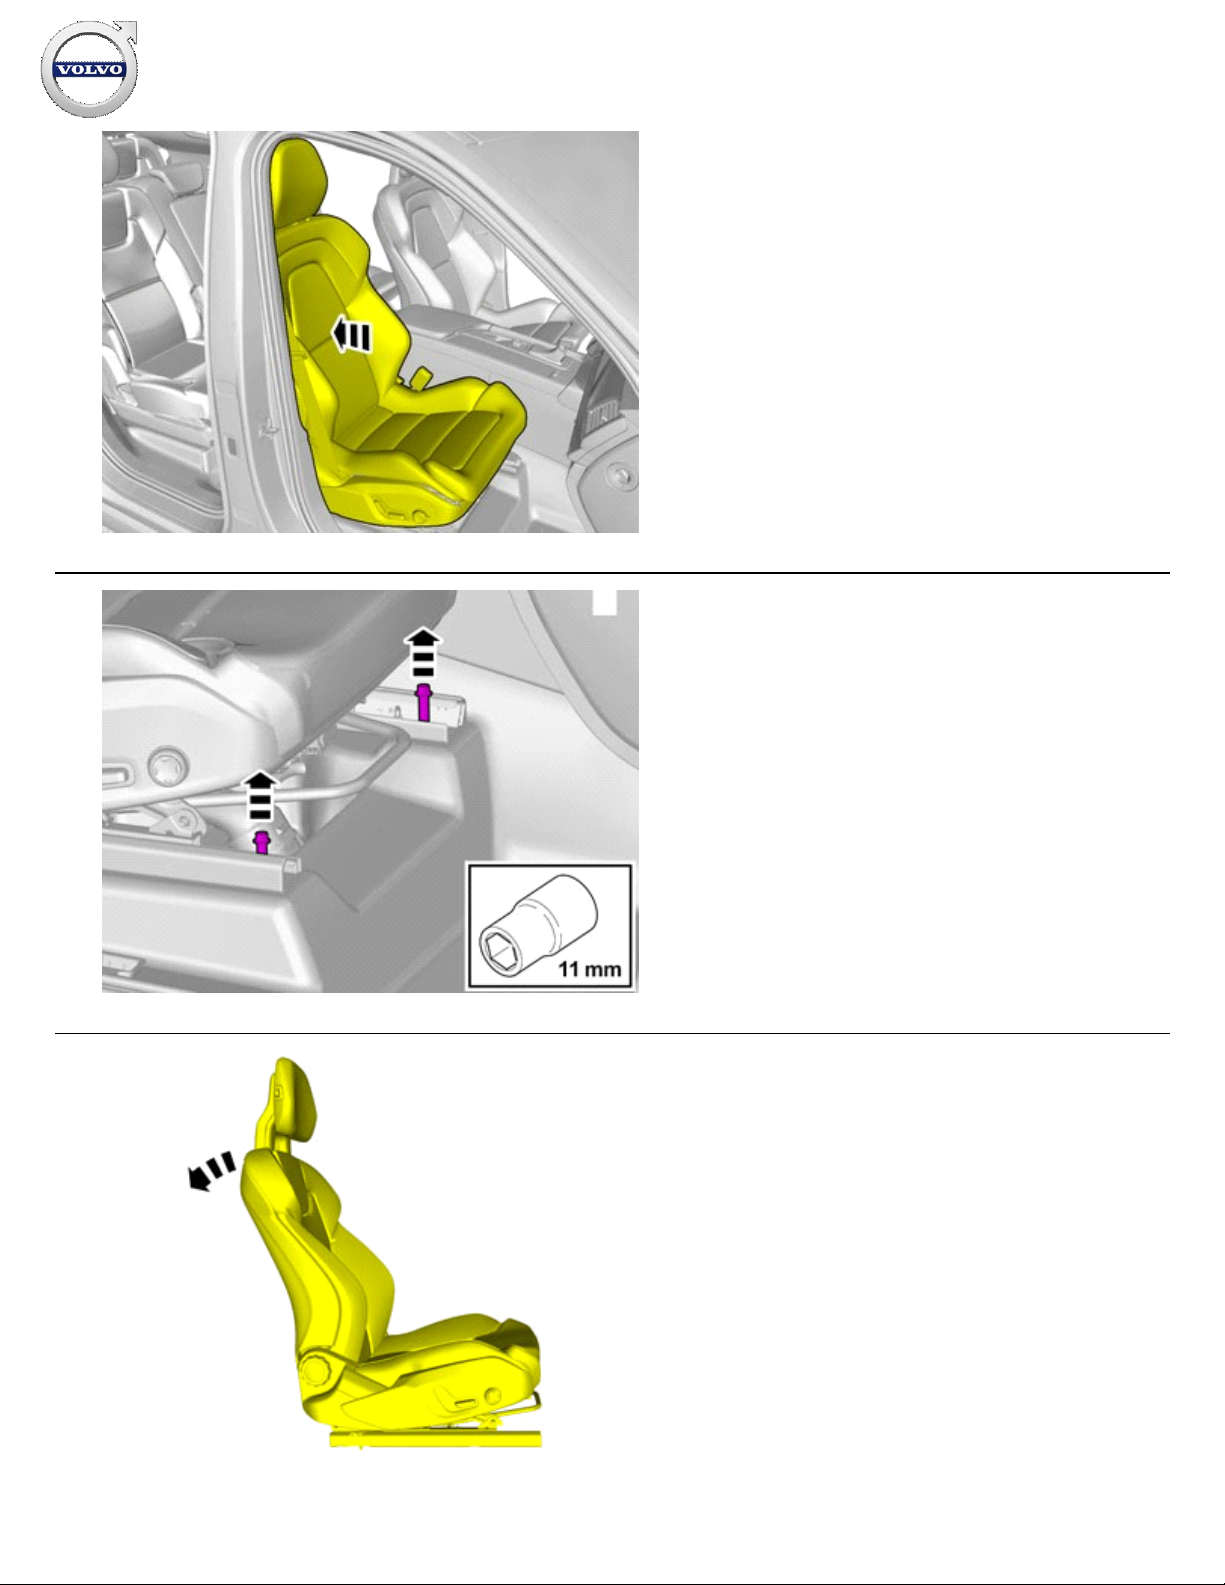
41
IMG-
397249
42
IMG-
383129
Remove the screws.
Tightening torque:
Front seat to body , 40 Nm
43
IMG-
383134
Installation instructions, accessories
Volvo Car Corporation Gothenburg, Sweden
©
Volvo Car Corporation
Parking assistance, pilot- 31414664 - V1.1
Page 21 / 95
44
IMG-
396605
Disconnect the connector.
45
IMG-
396606
Unhook the cable harness clips.
46
IMG-
397624
Remove the screws.
Fold marked part to one side.
Installation instructions, accessories
Volvo Car Corporation Gothenburg, Sweden
©
Volvo Car Corporation
Parking assistance, pilot- 31414664 - V1.1
Page 22 / 95
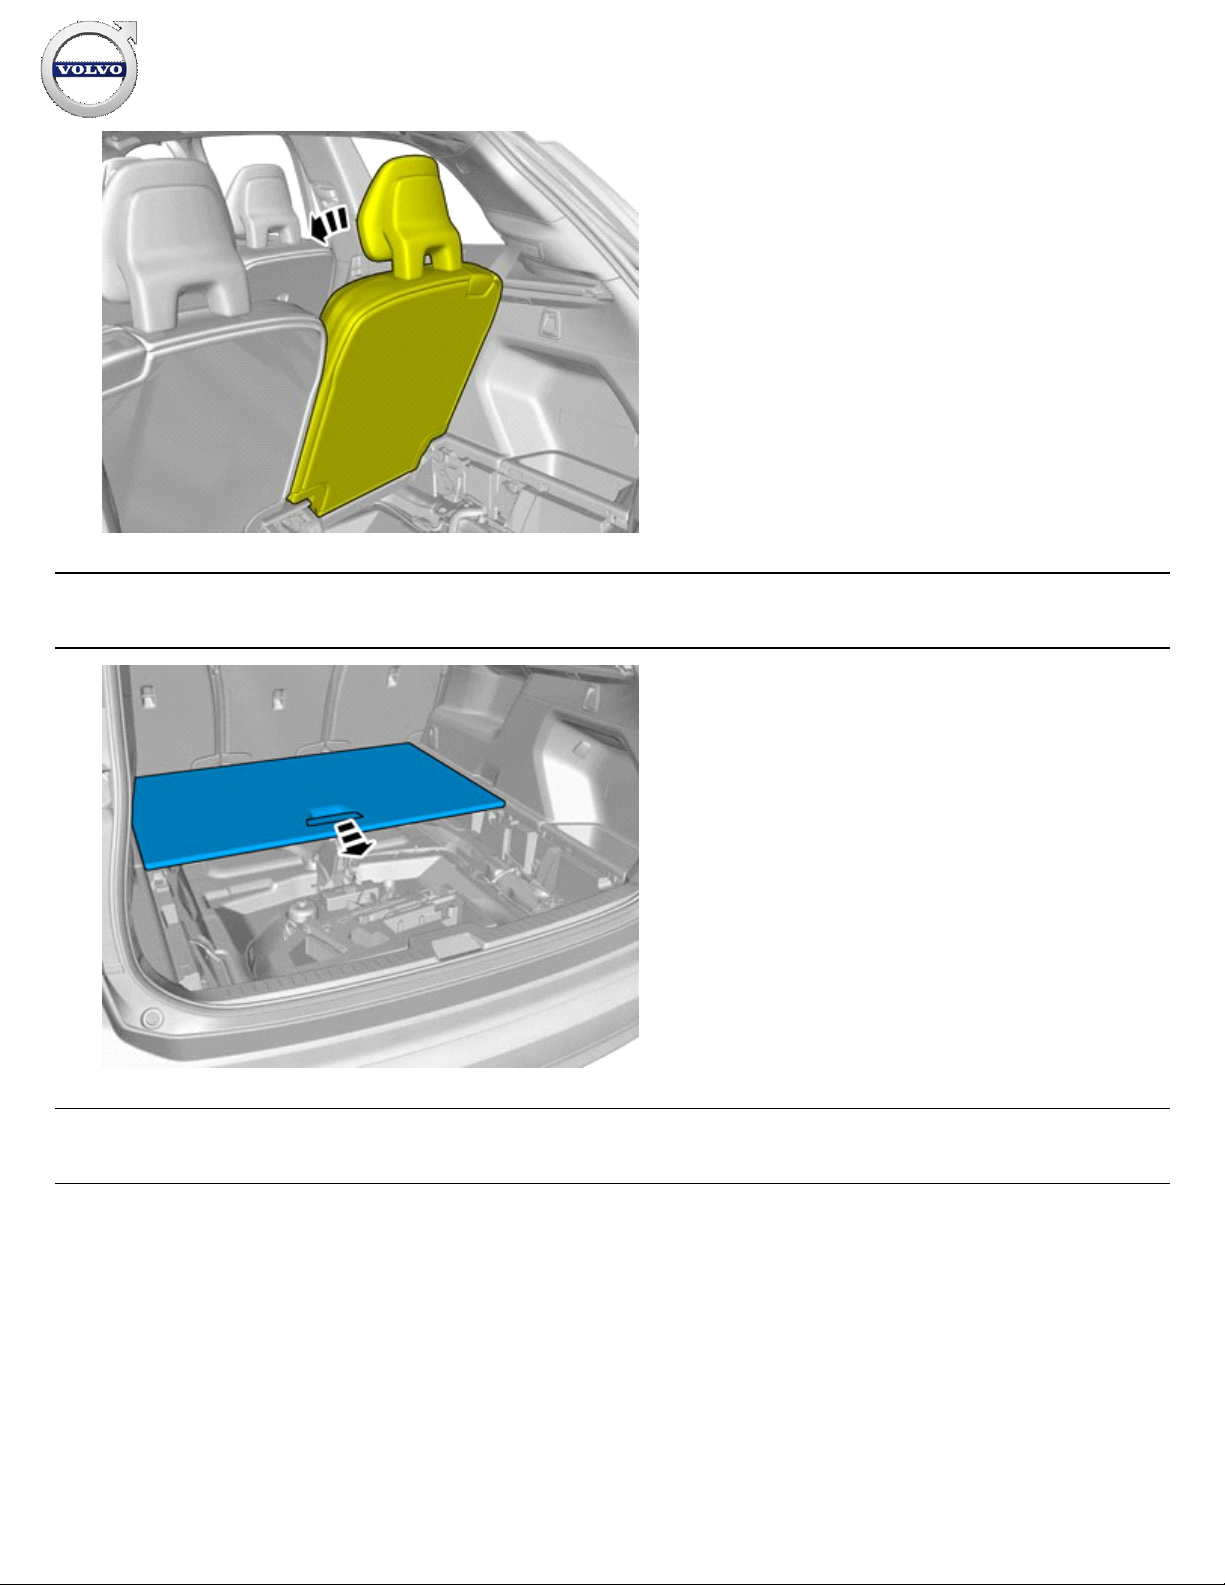
47
IMG-
397637
Remove the marked part.
48
IMG-
404390
Installation instructions, accessories
Volvo Car Corporation Gothenburg, Sweden
©
Volvo Car Corporation
Parking assistance, pilot- 31414664 - V1.1
Page 23 / 95
49
IMG-
394779
50
IMG-
383039
51
IMG-
383043
Installation instructions, accessories
Volvo Car Corporation Gothenburg, Sweden
©
Volvo Car Corporation
Parking assistance, pilot- 31414664 - V1.1
Page 24 / 95

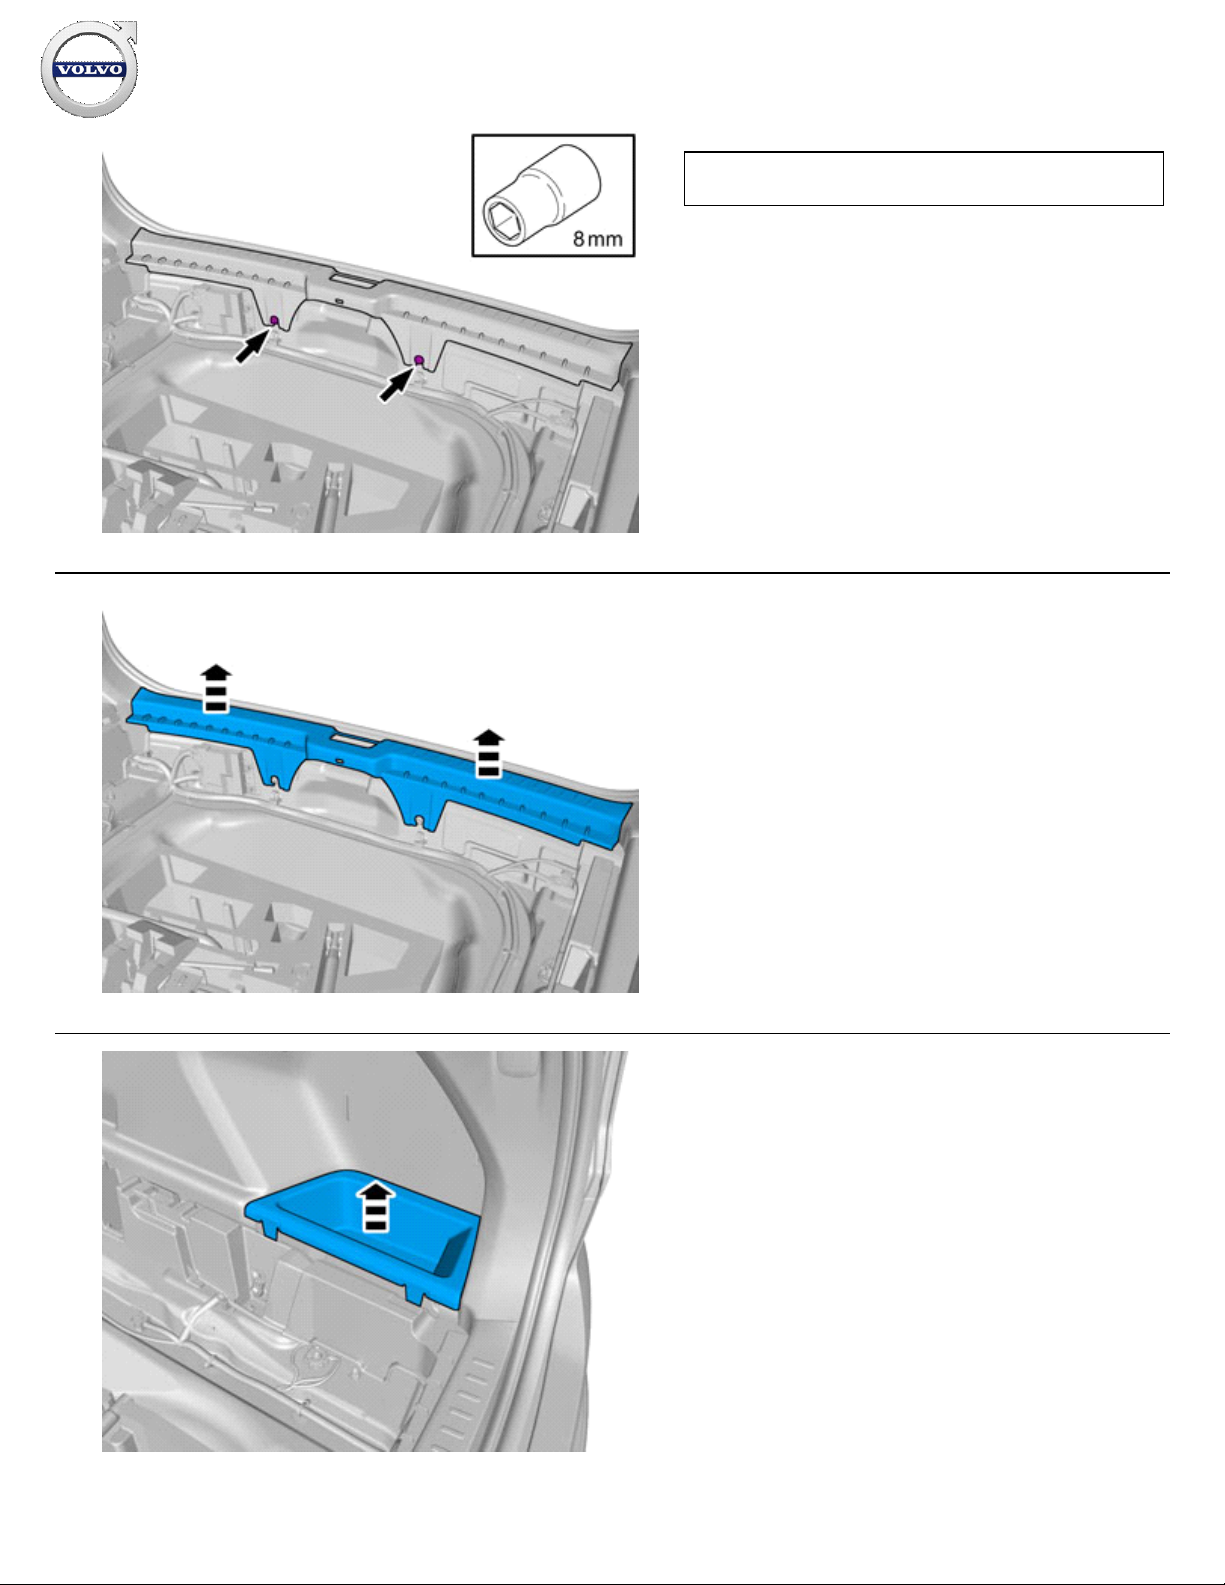
52
IMG-
383044
Remove the panel.
53
IMG-
383045
Remove the nut.
54
IMG-
383046
Remove the panel.
Installation instructions, accessories
Volvo Car Corporation Gothenburg, Sweden
©
Volvo Car Corporation
Parking assistance, pilot- 31414664 - V1.1
Page 25 / 95
55
IMG-
383040
56
IMG-
394727
Vehicles with seven seats
Installation instructions, accessories
Volvo Car Corporation Gothenburg, Sweden
©
Volvo Car Corporation
Parking assistance, pilot- 31414664 - V1.1
Page 26 / 95
57
IMG-
401374
Applies to all other vehicles
58
IMG-
383042
All vehicles
Installation instructions, accessories
Volvo Car Corporation Gothenburg, Sweden
©
Volvo Car Corporation
Parking assistance, pilot- 31414664 - V1.1
Page 27 / 95
59
IMG-
383047
Note!
Do not loosen the bolts more than 2 turns.
60
IMG-
383048
Remove the panel.
Check that the fasteners are undamaged before installation. If
not, they must be replaced with new ones.
61
IMG-
383066
Installation instructions, accessories
Volvo Car Corporation Gothenburg, Sweden
©
Volvo Car Corporation
Parking assistance, pilot- 31414664 - V1.1
Page 28 / 95

62
IMG-
393945
Remove the screws.
Tightening torque:
Cargo anchor, to body , 13 Nm
63
IMG-
396625
Remove the screw.
Vehicles with air suspension
Installation instructions, accessories
Volvo Car Corporation Gothenburg, Sweden
©
Volvo Car Corporation
Parking assistance, pilot- 31414664 - V1.1
Page 29 / 95
 Loading...