

Version 02/08
KFZ-Notebook-Wandler SMP-90 USB
Best.-Nr. 51 01 87
1. Bestimmungsgemäße Verwendung
Der Wandler wandelt die Spannung des Bordnetzes eines Fahrzeugs von 12 bis 16V in eine regulierbare
Ausgangsspannung für elektrische Geräte (z.B. Notebook-Computer) mit einer Leistungsaufnahme von bis zu
90W um. Über den USB-Ausgang können elektrische Geräte (z.B. Mobiltelefone) mit einer Stromaufnahme
von bis zu 2A angeschlossen werden.
Der Wandler ist aufgrund seiner stabilisierten Ausgangsleistung und geringen Störanfälligkeit ein
empfi ndliches elektronisches Produkt. Im Lieferumfang ist ein Set mit neun Notebook-Ausgangssteckern
für das Hauptausgangskabel enthalten, sowie ein Set mit acht Ausgangssteckern für Mobiltelefone und
Multimediageräte für das USB-Kabel.
Er darf nur in trockener Umgebung, d.h. in Innenräumen oder innerhalb eines Fahrzeugs, betrieben werden.
Setzen Sie ihn keiner Feuchtigkeit aus. Er sollte durch einen 12V-Zigarettenanzünder-Ausgang eines
Fahrzeugs betrieben werden.
Das Produkt ist EMV-geprüft und erfüllt die Anforderungen der geltenden europäischen und nationalen
Richtlinien. Die CE-Konformität wurde nachgewiesen, die entsprechenden Erklärungen sind beim
Hersteller hinterlegt.
Aus Sicherheits- und Zulassungsgründen (CE) ist das eigenmächtige Umbauen und/oder Verändern des Produktes
nicht gestattet. Eine andere Verwendung als oben beschrieben ist nicht erlaubt und kann zur Beschädigung
des Produkts führen. Darüber hinaus ist dies mit Gefahren, wie z. B. Kurzschluss, Brand, Stromschlag
usw. verbunden. Lesen Sie die Bedienungsanleitung genau durch und bewahren Sie diese für späteres
Nachschlagen auf.
Sämtliche genannten Firmennamen und Produktbezeichnungen sind Markenzeichen ihrer jeweiligen
Eigentümer. Alle Rechte vorbehalten.
2. Sicherheitshinweise
Bei Schäden, die durch Nichtbeachtung dieser Bedienungsanleitung verursacht werden,
erlischt der Garantieanspruch! Für Folgeschäden und bei Sach- und Personenschäden,
die durch unsachgemäße Handhabung oder Nichtbeachten der Sicherheitshinweise
verursacht werden, übernehmen wir keine Haftung!
Wichtige Hinweise, die unbedingt zu beachten sind, werden in dieser Bedienungsanleitung
durch das Ausrufezeichen gekennzeichnet.
Produktsicherheit
Das Gerät darf keinen schweren mechanischen Belastungen ausgesetzt werden.•
Der Wandler darf keinen extremen Temperaturen, direkter Sonneneinstrahlung, starken •
Vibrationen oder Feuchtigkeit ausgesetzt werden.
Die Lüftungsöffnungen an der Seite des Wandlers dürfen nicht von einem Gegenstand •
blockiert werden. Es muss eine ausreichende Luftzirkulation gewährleistet sein, da der
Wandler hauptsächlich über Umluft gekühlt wird.
Trennen Sie das Gerät bei Gewitter vom Zigarettenanzünder-Ausgang, um Beschädigungen •
durch Überspannung vorzubeugen.
Der Spannungsumwandler darf mit keinem elektrischen Verbraucher mit einer •
Leistungsaufnahme von mehr als 90W verbunden werden, bzw. mit einer Stromaufnahme
von mehr als 2A bei einer Verbindung über den USB-Ausgang.
Beachten Sie die Polarität und die Höhe der Ausgangsspannung. Durch falsche Polarität und •
eine überhöhte Betriebsspannung wird das angeschlossene elektrische Gerät zerstört.
Es dürfen ausschließlich Sicherungen des gleichen Typs und der in den „Technischen Daten“ •
spezifi zierte Nennstrom eingesetzt werden. Der Einsatz reparierter oder defekter Sicherungen
ist unter keinen Umständen gestattet.
Schalten Sie vor dem Einstecken/Ausstecken des Wandlers am Zigarettenanzünder-Ausgang •
das elektrische Gerät aus.
Stellen Sie sicher, dass der Wandlerausgang nicht kurzgeschlossen wird.•
Das Steckerset für Mobiltelefone und Multimediageräte ist ausschließlich für den Anschluss •
mit dem USB-Kabel vorgesehen. Verbinden Sie in keinem Fall einen Stecker aus diesem Set
mit dem Hauptausgangskabel.
Starten Sie niemals den Motor des Fahrzeugs, wenn der Wandler angeschlossen und in •
Betrieb ist. Spannungsspitzen können den Wandler sowie das angeschlossene elektrische
Gerät beschädigen. Stecken Sie den Wandler vor dem Starten des Motors aus dem
Zigarettenanzünder-Ausgang aus. Starten Sie dann den Motor und stecken Sie ihn wieder
ein.
Persönliche Sicherheit
Betreiben Sie entsprechend der StVZO (Straßenverkehrs-Zulassungs-Ordnung) keinerlei •
elektrischen Geräte, die mit dem Wandler verbunden wurden, während das Fahrzeug sich
in Bewegung befi ndet.
Das Produkt ist kein Spielzeug. Es gehört nicht in Kinderhände und ist von Haustieren •
fernzuhalten!
Stellen Sie beim Einstecken des Wandlersteckers in den Zigarettenanzünder sicher, dass er •
fest sitzt. Falls der Stecker unsachgemäß eingesteckt wurde, heizt sich der Wandler auf.
Das Gerät sollte nicht sofort angeschlossen werden, wenn es aus einem Bereich mit kalter •
Umgebungstemperatur in einen warmen Raum gebracht wurde. Kondenswasser kann das
Gerät zerstören. Warten Sie vor dem Einsatz des Produkts, bis es sich an die veränderte
Umgebungstemperatur angepasst hat.
Sonstiges
Eine Reparatur des Geräts darf nur durch eine Fachkraft bzw. einer Fachwerkstatt erfolgen.•
Sollten Sie noch Fragen zum Umgang mit dem Gerät haben, die in dieser Bedienungsanleitung •
nicht beantwortet werden, steht Ihnen unser Technischer Support unter folgender Anschrift
und Telefonnummer zur Verfügung:
Voltcraft®, 92242 Hirschau, Lindenweg 15, Telefon 0180 / 586 582 723 8
3. Betrieb
A) Ausgangsspannung auswählen
i) Für Notebook-Computer
Bestimmen Sie die Eingangsspannung des elektrischen Geräts, das betrieben werden soll. Normalerweise 1.
wird die notwendige Eingangsspannung in der Nähe der Stromanschlussbuchse oder auf dem Aufkleber
des elektrischen Gerätes angegeben. Stellen Sie sicher, dass die Leistungsaufnahme des elektrischen
Geräts 90W nicht übersteigt.
Stellen Sie die geeignete Ausgangsspannung am Wandler durch Betätigen des Schiebeschalters auf der 2.
Vorderseite ein (von 15, 16, 18, 19, 20, 22 bis 24V
).
ii) Für Mobiltelefone und Multimediageräte
Verbinden Sie das USB-Kabel mit dem USB-Anschluss am Wandler.
Das Hauptausgangskabel und das USB-Kabel können gleichzeitig verwendet werden.
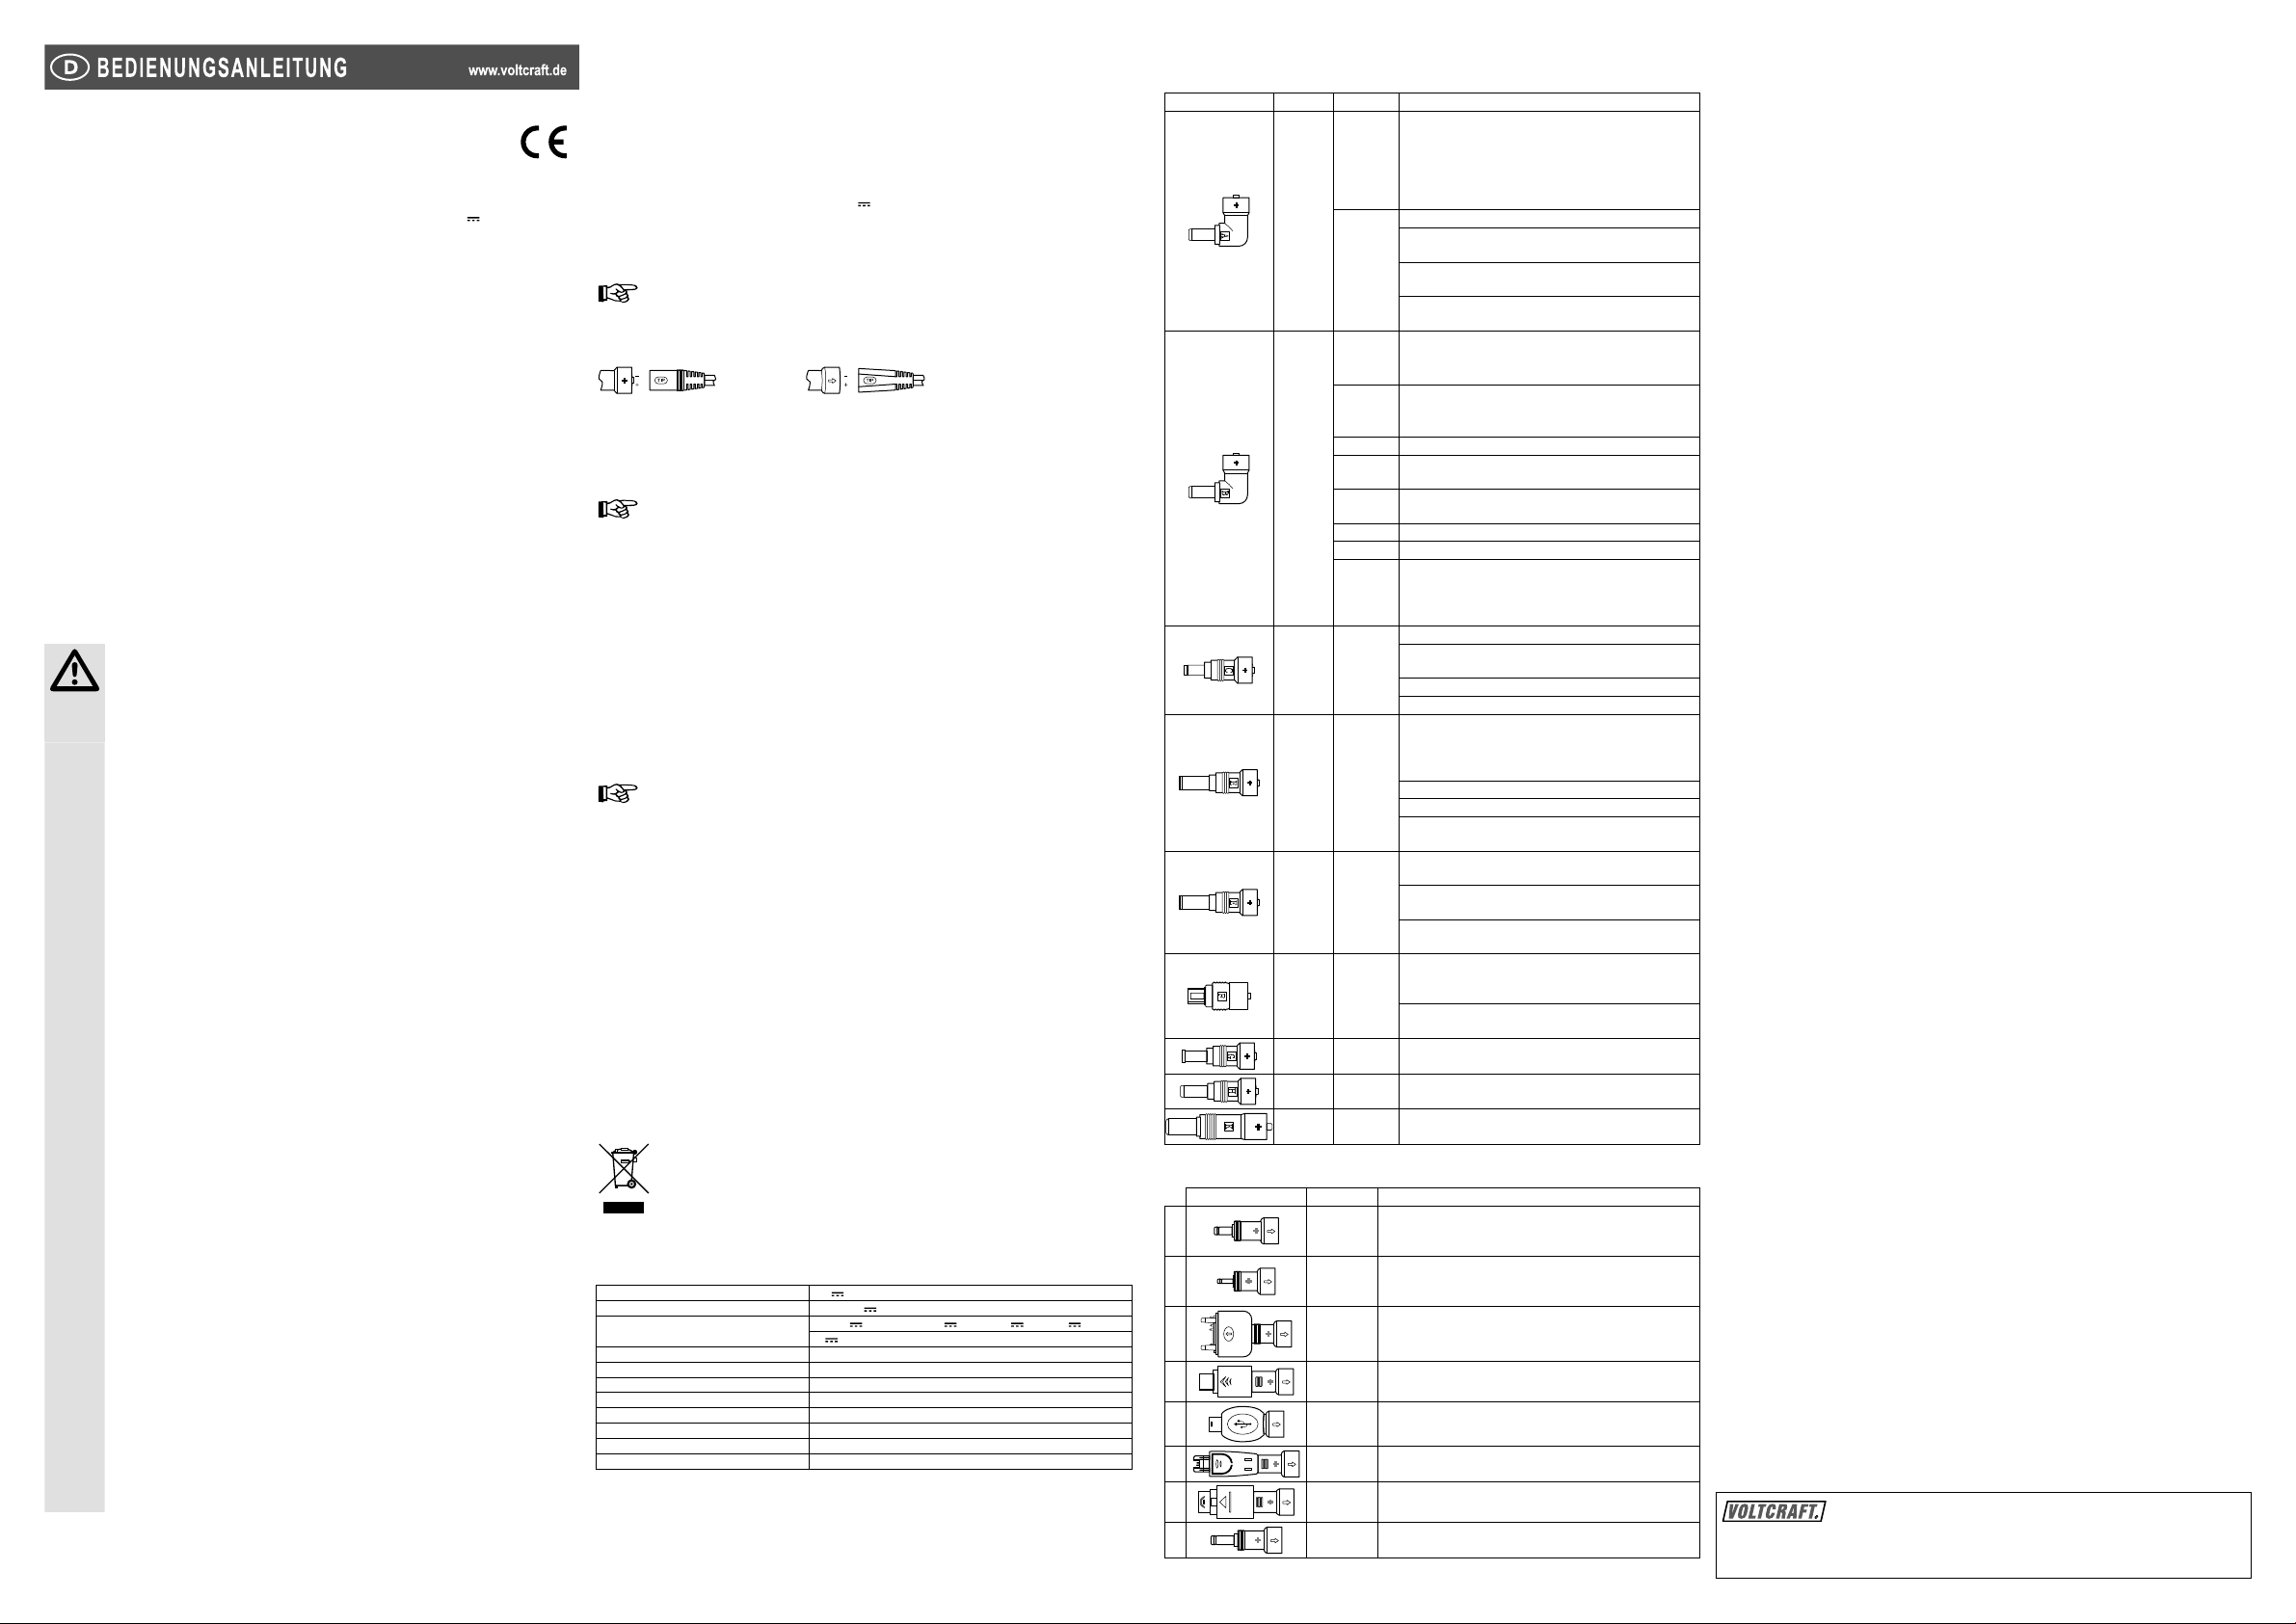
B) Ausgangsstecker auswählen
Wählen Sie den für die Applikation geeigneten Ausgangsstecker aus und verbinden Sie ihn mit dem Wandler.
Das Steckerset für Notebook-Computer (9 Stecker) kann ausschließlich mit dem Hauptausgangskabel
verbunden werden, und das Steckerset für Multimediageräte (8 Stecker) kann ausschließlich mit dem USBKabel verbunden werden.
Aus Sicherheitsgründen ist es nicht möglich, die Polarität des Ausgangssteckers zu ändern. Der innere Kontakt
ist positiv, „+“, und der äußere Kontakt ist negativ „–”.
Damit ein Kontaktverlust vermieden wird, wurde der Ausgangsstecker so konstruiert, dass er
schwergängig zu entfernen ist.
Nutzen Sie beim Austauschen des Ausgangssteckers immer die Griffbereiche.
Der Ausgangsstecker kann nur in eine Richtung in den Wandler gesteckt werden. Wenden Sie
beim Einstecken in den Wandler keine Gewalt an.
C) Verbinden des Wandlers mit dem elektrischen Gerät
Stecken Sie den Ausgangsstecker in die Stromanschlussbuchse des elektrischen Geräts, das 1.
angeschlossen werden soll.
Stecken Sie den Zigarettenanzünder-Stecker in einen 12V-Zigarettenanzünder-Ausgang. Am Wandler 2.
leuchten die grünen LED-Lampen auf, um die Funktionstüchtigkeit anzuzeigen.
Der Drehzapfen des Zigarettenanzünder-Steckers ist der positive Anschluss, „+“, die zwei Seitenklemmen 3.
sind die negativen Anschlüsse, „ –“.
Positionieren Sie den Wandler auf einer stabilen, nicht-entfl ammbaren Oberfl äche, die ausreichend 4.
Luftzirkulation für die Kühlung erlaubt.
Schalten Sie das angeschlossene elektrische Gerät ein.5.
Bei einer Fehlfunktion schalten Sie das angeschlossene elektrische Gerät aus, und entfernen Sie
den Wandler dann von dem 12V-Zigarettenanzünder-Ausgang. Untersuchen Sie anschließend
die eingebaute Sicherung und stellen Sie sicher, dass die eingestellte Ausgangsspannung auf
die Eingangsspannung des elektrischen Gerätes abgestimmt ist.
4. Sicherungswechsel
Ziehen Sie den Wandler aus dem Zigarettenanzünder-Ausgang heraus und entfernen Sie das elektrische 1.
Gerät.
Drehen Sie die Plastikspitze des Zigarettenanzünder-Steckers gegen den Uhrzeigersinn, um das 2.
Sicherungsfach zu öffnen.
Ersetzen Sie die defekte Sicherung mit einer neuen desselben Typs (bitte beachten Sie den Abschnitt 3.
„Technische Daten”).
Schließen Sie das Sicherungsfach wieder.4.
5. Pfl ege
Wischen Sie das Gehäuse des Wandlers mit einem leicht angefeuchteten Lappen ab. Verwenden Sie für
das Befeuchten des Lappens ausschließlich Wasser. Verwenden Sie zur Reinigung keine Chemikalien oder
Putzmittel.
6. Entsorgung
Im Interesse unserer Umwelt und um die verwendeten Rohstoffe möglichst vollständig zu
recyclen, ist der Verbraucher aufgefordert, gebrauchte und defekte Geräte zu den öffentlichen
Sammelstellen für Elektroschrott zu bringen.
Das Zeichen der durchgestrichenen Mülltonne mit Rädern bedeutet, dass dieses Produkt an
einer Sammelstelle für Elektronikschrott abgegeben werden muss, um es durch Recycling einer
bestmöglichen Rohstoffwiederverwertung zuzuführen.
7. Technische Daten
Nenneingangsspannung: 12V
Eingangsspannungsbereich: 12 bis 16V
Ausgangsstrom: 15, 16V / 5A, 18, 19, 20V / 4.5A, 22V / 4A, 24V / 3.5A
Maximale Ausgangsleistung: 90W + 10W (USB)
Sicherung: 15A
Betriebstemperatur: 0 bis 35 ºC
Betriebsluftfeuchtigkeit: 10 bis 85% relative Luftfeuchtigkeit, nicht kondensierend
Lagertemperatur: -10 bis 55ºC
Lagerluftfeuchtigkeit: 5 bis 95% relative Luftfeuchtigkeit, nicht kondensierend
Abmessungen (L x B x H): 100 x 60 x 30 mm
Gewicht: 100g
5V / 2A (USB)
8. Kompatibilitätsliste
A) Steckerset für Notebook-Computer
Stecker Aufdruck Marke Modellnummer / Produktbezeichnung
IBM Thinkpad
A
B
C Compaq
D Toshiba
E
Panasonic
F Dell
G Samsung Alle Modelle
H Acer Travelmate C100, Z9000
K Dell Inspiron 8600, 9100
AcerNote 350 Serie, 370 Serie, 850C
AcerNote
Light
Acer
Extensa
Travelmate
Acpire 1300 Serie
Acer
Acernote 367, 390 Serie
Extensa 360 Serie, 390 Serie, 900, ESS3-391T
Evo N115, N160, N180
Compaq
Presario
Dell Inspiron 3000, 3200, 3500 & 7000 Serie
Gateway Solo
HP Pavilion
Toshiba Satellite 1600, 1700 & 3000 Serie
Winbook Winbook XP, XP5, Si, Si2, X1, Z1 & J1 Serie
IBM Thinkpad
Armada 110, E500, E700, M300, M700 & V300 Serie
Evo
Prosignia 170, 190
Presario 300 & 2800 Serie
Satellite
Satellite Pro 400, 4200, 4300, 4600, 6000 & 6100 Serie
Tecra series Alle Modelle
Portege
Fujitsu Lifebook
Toughbook
series,
Sony Vaio
Inspiron
Latitude
B) Steckerset für Multimediageräte
1
2
3
4
5
6
7
8
Stecker Marke Modellnummer / Produktbezeichnung
Samsung
Motorola V3
Motorola V66, V120
E70, E60, 9500, 9300i, 8800, 7610, 7380, 7360, 7280, 7270,
Nokia
6820, 6680, 6260, 6230i, 6170, 6100, 6060, 6030, 6012, 3230,
1112, 1110, 1100, N-Gage QD
N93, N93i, NB91, N90, N80, N73, N72, N71, N70, E61, E50,
Nokia
7370, 7360, 6280, 6270, 6233, 6131, 6125, 6111, 6103, 6101,
6085, 6070, 5500, 3250
J100i, J230i, K550i, K610i, K750i, K800i, M600i, W200i, W300i,
Sony
W550i, W700i, W710i, W800i, W710i, W850i, W880i, W900i,
Z310i, Z710i, Z610i, Z550i, Z558i
D528, D808, D838, D848, E258, E428, E898, E908, i718, P308,
X828, X838, Z368, Z548, Z728
LG KG800
Sony PSP (Playstation Portable)
310 Serie, “i” Serie, i1412 2611-xxx, i1450
2611-xxx, i1451 2611-xxx, i1452 2611-xxx,
i1470 2611-xxx, i1471 2611-xxx, i1472 2611xxx, i1436 2611-xxx, i1411 2611-xxx,
i1500 2611-xxx, i1410 2611-xxx, i1434 2611xxx, i1435 2611-xxx
350 Serie, 370 Serie, 380 Serie, P100
355, 500, 501 Serie, 502, 503 Serie, 600, 610
Serie
351, 505, 506, 507 Serie, 524 Serie (nicht
kompatibel mit Travelmate 800 Serie)
700, 800, 1000, 1200, 1400, 1600, 1700, 1800
& 2700 Serie
200, 600, 1400, 1450, 5300, 5350, 9300, 9500
& 9550 Serie
2100, 3000, 3100, 4100, 6000, 6100, 7100,
N3000, N3100, N3200, N3300 & N5000 Serie
A, R, T & X Serie, 240, 365, 380, 385, 390,
560, 600, 701, 770 “i” Serie i1460 2621-xxx,
i1480 2621-xxx, i1500 2621-xxx, i1420 2621xxx
N110, N200, N400c, N600, N610c, N800c,
N800v
1200, 1400, 1500, 1600, 1700, 1800, 2000,
2100, 2200, 2400, 2500, 2600, 2700, 2800,
3000, 4000, 5000, 5100 & 5200 Serie (nicht
kompatibel mit Satellite 4330, 4500 Serie)
300, 320, 610, 620, 650, 660, 2000, 4000 &
7000 Serie, 7140, 7200 Serie
A, B, C, E, i, L, P & S Serie (nicht kompatibel
mit E-6600)
Alle Modelle
SR, GR &VX Serie, F, FX, FXA, GRX, R505
& Z505 Serie
2000, 2100, 2500, 2600, 2650, 3700, 3800,
4000, 4150, 5000, 5100*, 7500, 8000, 8100
Serie
C Serie ( nicht kompatibel mit C400 or C840
Serie ) & CP Serie
Diese Bedienungsanleitung ist eine Publikation von Voltcraft®, Lindenweg 15,
D-92242 Hirschau, Tel.-Nr. 0180/ 586 582 723 8.
Diese Bedienungsanleitung entspricht dem technischen Stand bei Drucklegung.
© Copyright 2008 by Voltcraft
Änderung in Technik und Ausstattung vorbehalten.
®
.
*02_02/08_01-RC
Version 02/08
Vehicle notebook voltage converter
SMP-90 USB
Item no. 51 01 87
1. Intended use
The voltage converter converts 12 to 16V from a vehicle’s onboard power supply to an adjustable voltage
output for electrical devices (e.g. notebook computer) with a power consumption up to 90W or through the USB
output to electrical devices (e.g. mobile phone) with a current consumption up to 2A.
The converter is sensitive electronic product due to its stabilised output and low interference. It includes a set of
nine notebook computer output plugs for the main output cable and a set of eight mobile phone and multimedia
device output plugs for the USB cable.
It is only authorized to be operated in dry environment, such as indoors or inside vehicles. Do not expose it to
moisture. It must be powered through a 12V vehicle cigarette lighter outlet.
This product fulfi ls European and national requirements related to electromagnetic compatibility (EMC).
CE conformity has been verifi ed and the relevant statements and documents have been deposited at
the manufacturer.
Unauthorised conversion and/or modifi cation of the device are inadmissible because of safety and approval
reasons (CE). Any usage other than described above is not permitted and can damage the product and lead to
associated risks such as short-circuit, fi re, electric shock, etc. Please read the operating instructions thoroughly
and keep them for further reference.
All company names and product designations contained herein are trademarks of the respective
owners. All rights reserved.
2. Safety instructions
We do not assume liability for resulting damages to property or personal injury if the
product has been abused in any way or damaged by improper use or failure to observe
these operating instructions. The warranty will then expire!
The icon with exclamation mark indicates important information in the operating
instructions. Carefully read the whole operating instructions before operating the device,
otherwise there is risk of danger.
Product safety
The device must not be subjected to heavy mechanical stress.•
The device must not be exposed to extreme temperatures, direct sunlight, intense vibration •
or dampness.
No object should block the ventilation holes located at the side of the voltage converter. •
Suffi cient air circulation must be provided since the voltage inverter is predominantly cooled
by convection ventilation.
During thunderstorms, unplug the device from the cigarette lighter socket in order to avoid •
damages due to excess voltage.
The voltage converter must not be connected to any electrical load with power consumption •
greater than 90W or with current consumption greater than 2A when connecting through the
USB output.
Observe the polarity and magnitude of the output voltage. Incorrect polarity or overvoltage •
leads to the destruction of the connected electrical load.
Only fuses of the same type and rated current as specifi ed in “Technical Data” may be used. •
The use of repaired or defective fuses is not permitted under any circumstances.
Always turn off the electrical load before plugging/unplugging the voltage converter to •
cigarette lighter outlet.
Make sure that the output of the converter is not short-circuited.•
The mobile phone and multimedia device plug set is designed to be connected with the USB •
cable only. Never the any plug from this set to the main output cable.
Never start engine of the vehicle when the voltage converter is connected and in operation. •
Voltage peaks can destroy the device as well as the connected electrical load. Disconnect
the voltage converter from the cigarette lighter outlet before starting, start the engine and
re-connect the converter.
Person safety
According to StVZO (Motor Vehicle Regulations), do not operate any electrical load connected •
to the converter while the vehicle is in motion.
The product is not a toy and should be kept out of reach of children and pets!•
When inserting the cigarette lighter plug, ensure that it is connected tightly. If the plug is •
connected improperly, the voltage converter will heat up.
The product should not be connected immediately after it has been brought from an area •
of cold temperature to an area of warm temperature. Condensed water might destroy the
product. Wait until the product stabilises to adapt to the new ambient temperature before
use.
Miscellaneous
Repair works must only be carried out by a specialist/ specialist workshop.•
If you have queries about handling the device, that are not answered in this operating •
instruction, our technical support is available under the following address and telephone
number:
®
Voltcraft
, 92242 Hirschau, Lindenweg 15, phone 0180 / 586 582 723 8
3. Operation
A) Selecting output voltage
i) For notebook computer
Determine the input voltage of the electrical load to be operated. Usually, the necessary input voltage 1.
is stated near the power receptacle or on the imprint label of the electrical load. Make sure the power
consumption of the electrical load does not excess 90W.
Set the appropriate output voltage on the converter by sliding the slide switch at the front (from 15, 16, 18, 2.
19, 20, 22 or 24V).
ii) For mobile phone and multimedia device
Connect the USB cable to the USB port on the voltage converter
The main output cable and the USB cable can be used at the same time
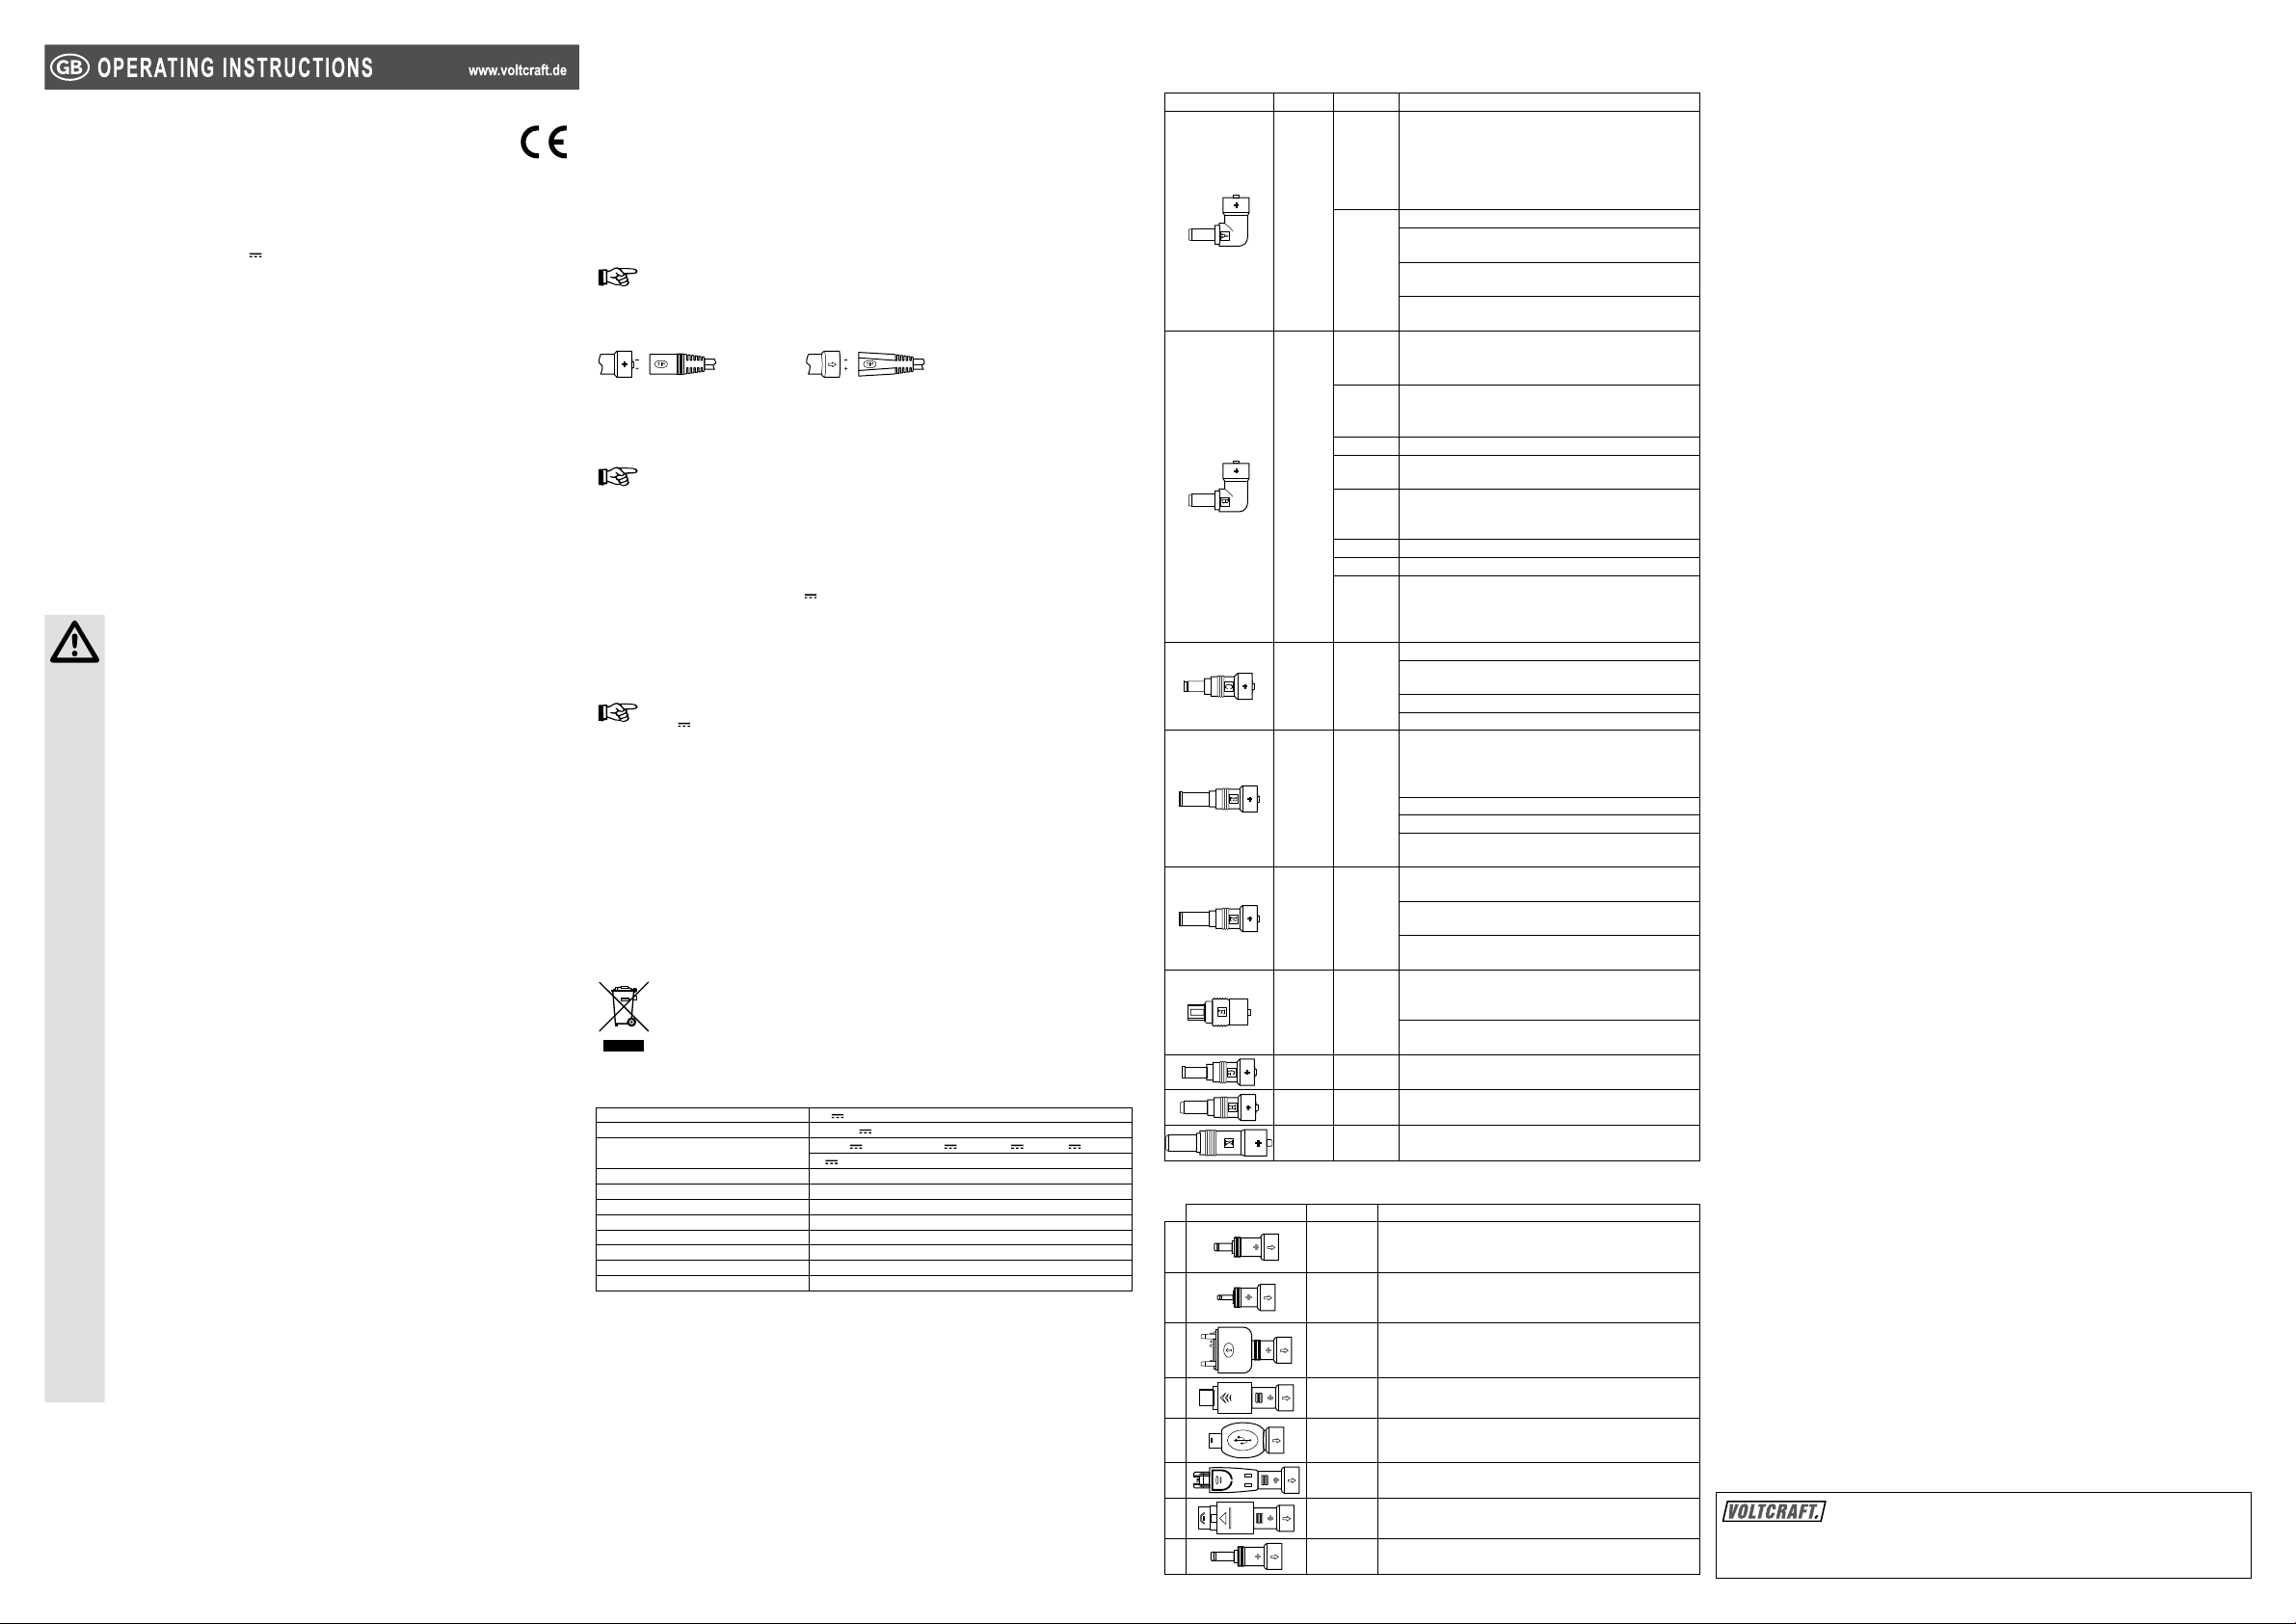
B) Selecting output plug
Select the output plug suitable for the application and connect it to the voltage converter.
The notebook computer plug set (9 plugs) can only be connected to the main output cable and the mobile
phone and multimedia device plug set (8 plugs) can only be connected to the USB cable.
For safety reasons, it’s impossible to change the polarity of the output plug. The inner contact is positive, “+”
and the outer contact is negative “–”.
In order to avoid loose contact, the output plug is designed to be stiff to remove.
Always use the grip areas provided when replacing output plug.
The output plug can only fi t in to the converter in one orientation. Do not force the it into the
converter.
C) Connecting the converter to electrical load
Insert the output plug into the power receptacle of the electrical load to be used.1.
Plug the cigarette lighter plug to a 12V2. cigarette lighter outlet. The green LED lights up on the voltage
converter to indicate normal function.
The centre pin of the cigarette lighter plug is the positive terminal, “+”, and the two side clamps are the
negative terminals, “–”.
Position the converter on a sturdy, non-fl ammable base, which allows suffi cient air circulation for cooling.3.
Switch on the connected electrical load.4.
In case of failure, switch off the connected electrical load and then remove the converter from the
cigarette lighter outlet. Afterward, examine the installed fuse and make sure that the set
12V
output voltage matches the input voltage of the electrical load.
4. Fuse replacement
Unplug the voltage converter from the cigarette lighter outlet and disconnect the electrical load.1.
Turn the plastic tip of the cigarette lighter plug anticlockwise to open the fuse compartment.2.
Replace the defective fuse with a new one of the same type (please refer to “Technical Data”).3.
Close the fuse compartment.4.
5. Care
Wipe the housing of the inverter with a slightly damp cloth. Only use water to moisten the cloth. Do not use
chemicals or cleaning agents when cleaning.
6. Disposal
In order to preserve, protect and improve the quality of environment, protect human health and
utilise natural resources prudently and rationally, the user should return unserviceable product to
relevant facilities in accordance with statutory regulations.
The crossed-out wheeled bin indicates the product needs to be disposed separately and not as
municipal waste.
7. Technical data
Nominal operating voltage: 12V
Operating voltage range: 12 to 16V
Output power: 15, 16V / 5A, 18, 19, 20V / 4.5A, 22V / 4A, 24V / 3.5A
Maximum power output: 90W + 10W (USB)
Fuse: 15A
Operating temperature: 0 to 35 ºC
Operating humidity: 10 to 85% relative humidity, non-condensing
Storage temperature: -10 to 55ºC
Storage humidity: 5 to 95% relative humidity, non-condensing
Dimension (L x W x H): 100 x 60 x 30 mm
Weight: 100g
5V
/ 2A (USB)
8. Compatibility List
A) Notebook computer plug set
Plug Imprint Brand Model number/ Product name
IBM Thinkpad
A
B
C Compaq
D Toshiba
E
Panasonic
F Dell
G Samsung All models
H Acer Travelmate C100, Z9000
K Dell Inspiron 8600, 9100
AcerNote 350 series, 370 series, 850C
AcerNote
Light
Acer
Extensa
Travelmate
Acpire 1300 series
Acer
Acernote 367, 390 series
Extensa 360 series, 390 series, 900, ESS3-391T
Evo N115, N160, N180
Compaq
Presario
Dell Inspiron 3000, 3200, 3500 & 7000 series
Gateway Solo
HP Pavilion
Toshiba Satellite 1600, 1700 & 3000 series
Winbook Winbook XP, XP5, Si, Si2, X1, Z1 & J1 series
IBM Thinkpad
Armada 110, E500, E700, M300, M700 & V300 series
Evo
Prosignia 170, 190
Presario 300 & 2800 series
Satellite
Satellite Pro 400, 4200, 4300, 4600, 6000 & 6100 series
Tecra series all models
Portege
Fujitsu Lifebook
Toughbook
series,
Sony Vaio
Inspiron
Latitude
B) Mobile phone and multimedia device plug set
1
2
3
4
5
6
7
8
Plug Brand Model number
Samsung
Motorola V3
Motorola V66, V120
E70, E60, 9500, 9300i, 8800, 7610, 7380, 7360, 7280, 7270,
Nokia
6820, 6680, 6260, 6230i, 6170, 6100, 6060, 6030, 6012, 3230,
1112, 1110, 1100, N-Gage QD
N93, N93i, NB91, N90, N80, N73, N72, N71, N70, E61, E50,
Nokia
7370, 7360, 6280, 6270, 6233, 6131, 6125, 6111, 6103, 6101,
6085, 6070, 5500, 3250
J100i, J230i, K550i, K610i, K750i, K800i, M600i, W200i, W300i,
Sony
W550i, W700i, W710i, W800i, W710i, W850i, W880i, W900i,
Z310i, Z710i, Z610i, Z550i, Z558i
D528, D808, D838, D848, E258, E428, E898, E908, i718, P308,
X828, X838, Z368, Z548, Z728
LG KG800
Sony PSP (Playstation Portable)
310 series “i” series i1412 2611-xxx, i1450
2611-xxx, i1451 2611-xxx, i1452 2611-xxx,
i1470 2611-xxx, i1471 2611-xxx, i1472 2611xxx, i1436 2611-xxx, i1411 2611-xxx,
i1500 2611-xxx, i1410 2611-xxx, i1434 2611xxx, i1435 2611-xxx
350 series, 370 series, 380 series, P100
355, 500, 501 series, 502, 503 series, 600,
610 series
351, 505, 506, 507 series, 524 series (Not
compatibile with Travelmate 800 series)
700, 800, 1000, 1200, 1400, 1600, 1700, 1800
& 2700 series
200, 600, 1400, 1450, 5300, 5350, 9300, 9500
& 9550 series
2100, 3000, 3100, 4100, 6000, 6100, 7100,
N3000, N3100, N3200, N3300 & N5000
series
A, R, T & X series, 240, 365, 380, 385, 390,
560, 600, 701, 770 “i” series i1460 2621-xxx,
i1480 2621-xxx, i1500 2621-xxx, i1420 2621xxx
N110, N200, N400c, N600, N610c, N800c,
N800v
1200, 1400, 1500, 1600, 1700, 1800, 2000,
2100, 2200, 2400, 2500, 2600, 2700, 2800,
3000, 4000, 5000, 5100 & 5200 series (Not
compatible with Satellite 4330, 4500 series)
300, 320, 610, 620, 650, 660, 2000, 4000 &
7000 series, 7140, 7200 series
A, B, C, E, i, L, P & S series (Not compatible
with E-6600)
all models
SR, GR &VX series, F, FX, FXA, GRX, R505
& Z505 series
2000, 2100, 2500, 2600, 2650, 3700, 3800,
4000, 4150, 5000, 5100*, 7500, 8000, 8100
series
C series ( Not compatible with C400 or C840
series ) & CP series
These operating instructions are published by Voltcraft®, Lindenweg 15,
D-92242 Hirschau/ Germany, Phone +49 180 586 582 723 8.
The operating instructions refl ect the current technical specifi cations at time of print.
© Copyright 2008 by Voltcraft
We reserve the right to change the technical or physical specifi cations.
®
.
*02_02/08_01-RC

Version 02/08
Adaptateur de tension pour ordinateurs
portables dans les véhicules SMP-90 USB
Nº de commande 51 01 87
1. Utilisation prévue
Le convertisseur de tension convertit les 12 à 16 V de l’alimentation en courant d’un véhicule, soit en
une tension de sortie réglable pour des appareils électriques (par ex. des ordinateurs portables) dont
la consommation en énergie va jusqu’à 90 W, soit par l’intermédiaire de la sortie USB pour des appareils
électriques (par ex. des téléphones portables) dont la consommation en courant s’élève jusqu’à 2 A.
Le convertisseur de tension est un produit électronique sensible grâce à une puissance de sortie stable et à une
faible interférence. Il comprend un ensemble de neuf prises de sortie pour ordinateurs portables à raccorder au
câble de sortie principal et, pour le câble USB, un ensemble de huit prises de sortie pour téléphones portables
et appareils multimédias.
Il ne peut être utilisé que dans un environnement sec à l’intérieur de bâtiments ou dans des véhicules. Ne
pas exposer le convertisseur à l’humidité. Il doit être alimenté par l’intermédiaire d’une sortie allume-cigares
de 12 V.
Ce produit respecte les conditions européennes et nationales relatives à la compatibilité
électromagnétique (CEM). Cette conformité a été vérifi ée, et les déclarations et documents en rapport
ont été déposés chez le fabricant.
Toute transformation et/ou modifi cation non autorisée de l’appareil est inadmissible pour des raisons de
sécurité et d’homologation (CE). T oute autre utilisation que celle décrite ci-dessus est interdite. Le non respect
des consignes d’utilisation peut conduire à une détérioration de l’appareil et faire courir des risques tels que
courts-circuits, incendie, décharges électriques, etc. Lisez attentivement ce mode d’emploi et conservez-le
pour future référence.
Tous les noms de sociétés et les désignations et appellations contenus sont des marques déposées
des propriétaires respectifs. Tous droits réservés.
2. Consignes de sécurité
Nous déclinons toute responsabilité en cas de dommages matériels ou de blessures dans
le cas où cet appareil aurait été maltraité de quelque façon que ce soit ou endommagé du
fait d’une mauvaise utilisation ou d’un non respect de ce mode d’emploi. La garantie en
serait d’ailleurs annulée!
Le point d’exclamation attire l’attention sur une information importante dont il convient de
tenir compte impérativement.
Sécurité du produit
Ne pas soumettre l’appareil à de fortes contraintes mécaniques.•
Ne pas exposer l’appareil à des extrêmes de température, à la lumière directe du soleil, à •
d’intenses vibrations ou à l’humidité.
Ne pas bloquer les orifi ces de ventilation situés sur le côté de le convertisseur. Ménager •
assez de circulation de l’air étant donné que l’onduleur de tension est principalement refroidi
par convection.
En cas d’orages, débrancher l’appareil de la prise de l’allume-cigares pour éviter les dégâts •
dus à la tension excessive.
Le convertisseur de tension doit être connecté à une charge électrique ayant une puissance •
consommée supérieure à 90W ou avec une consommation de courant supérieure à 2A
lorsqu’il est connecté par une sortie USB.
Respecter la polarité et la magnitude de la tension de sortie. Une polarité incorrecte ou une •
surtension entraîneront la destruction de la charge électrique connectée.
N’utiliser que les fusibles du même type et de même courant nominal ainsi que mentionné •
dans les « Caractéristiques techniques ». Il n’est permis, en aucun cas, d’utiliser des fusibles
réparés ou défectueux.
Toujours éteindre la charge électrique avant de brancher/débrancher le convertisseur de •
courant de la prise de l’allume-cigares.
Vérifi er que la sortie de le convertisseur de courant n’a pas été court-circuitée.•
L’ensemble de prises de sortie pour téléphones portables et appareils multimédias est conçu •
pour être raccordé au câble USB uniquement. Ne jamais raccorder aucune des prises de cet
ensemble au câble de sortie principal.
Ne jamais faire démarrer le moteur du véhicule lorsque le convertisseur est connecté et •
fonctionne. Les crêtes de tension peuvent détruire le convertisseur et l’appareil électrique
connecté. Débrancher le convertisseur de courant de la prise de l’allume-cigares avant de
faire démarrer le moteur, puis raccorder à nouveau le convertisseur de courant.
Sécurité des personnes
Selon StVZO (Réglementation des véhicules à moteur), il ne faut pas faire fonctionner •
d’appareil électrique connecté à le convertisseur de courant lorsque le véhicule est en
mouvement.
Cet appareil n’est pas un jouet et il doit être gardé hors de portée des enfants et des animaux !•
En insérant la prise de l’allume-cigares, vérifi er que celle-ci est connectée fermement. Si la •
prise est mal connectée, le convertisseur de courant chauffera.
Ne pas raccorder le produit immédiatement après l’avoir passé d’une zone froide à une zone •
chaude. De l’eau de condensation risque de détruire le produit. Attendre que le produit se soit
stabilisé et adapté à la nouvelle température ambiante avant utilisation.
Divers
La réparations ou de réglages ne peuvent être effectués que par un spécialiste ou un atelier •
spécialisé.
Si vous avez des questions concernant la manipulation du testeur qui ne sont pas abordées •
dans ces instructions, notre support technique est à votre disposition à l’adresse et au numéro
de téléphone suivants :
Voltcraft®, 92242 Hirschau, Lindenveg 15, Allemagne, téléphone 0180/586 582 723 8.
3. Utilisation
A) Sélection de la tension de sortie
i) Pour un ordinateur portable
Déterminer la tension d’entrée de l’appareil à faire fonctionner. En général, la tension d’entrée est indiquée 1.
près de la prise de courant ou sur l’étiquette imprimée de l’appareil. S’assurer que la consommation en
énergie de l’appareil ne dépasse pas 90 W.
Régler le convertisseur de tension sur la tension de sortie requise en faisant glisser l’interrupteur à glissière 2.
situé à l’avant (de 15, 16, 18, 19, 20, 22 à 24 V)
ii) Pour un téléphone portable ou un appareil multimédia
Raccorder le câble USB au port USB de le convertisseur de tension.
On peut utiliser le câble de sortie principal et le câble USB en même temps.
B) Sélection de la prise de sortie
Sélectionner la prise de sortie compatible avec l’appareil à brancher et la raccorder à le convertisseur de
tension.
Il ne faut raccorder les prises pour ordinateurs portables (un ensemble de 9 prises) qu’au câble de sortie
principal et celles pour téléphones portables et appareils multimédias (un ensemble de 8 prises) qu’au câble
USB.
Pour des raisons de sécurité, il est impossible de changer les polarités de la prise de sortie. Le contact intérieur
est positif « + » et le contact extérieur est négatif « – ».
Pour éviter un contact lâche, la prise de sortie a été conçue pour être diffi cile à enlever.
Toujours utiliser la zone de préhension pour remplacer une prise de sortie.
La prise de sortie ne peut être branchée dans le convertisseur de courant que dans un sens. Ne
pas l’insérer de force dans le convertisseur de courant.
C) Connexion de le convertisseur de courant à l’appareil électrique
Brancher la prise de sortie dans la prise de courant de l’appareil électrique devant être utilisé.1.
Brancher la prise allume-cigares dans une sortie pour allume-cigares de 12 V. La DEL verte de le 2.
convertisseur de courant s’allume pour indiquer le fonctionnement normal.
La broche centrale de l’allume-cigares est la borne positive, « + », et les deux brides latérales sont les
bornes négatives, « – ».
Placer le convertisseur de courant sur une surface solide et ininfl ammable, pour permettre à l’air de circuler 3.
suffi samment pour permettre le refroidissement.
Allumer l’appareil électrique raccordé.4.
En cas d’échec, éteindre l’appareil électrique connecté, puis enlever le convertisseur de courant
de l’allume-cigares de 12 V. Ensuite, inspecter le fusible installé et vérifi er que la tension de sortie
réglée correspond à la tension d’entrée de l’appareil électrique.
4. Remplacement des fusibles
Débrancher le convertisseur de courant de l’allume-cigares et débrancher l’appareil électrique.1.
Tourner l’embout en plastique de la fi che de l’allume-cigares dans le sens contraire des aiguilles d’une 2.
montre pour ouvrir le logement du fusible.
Remplacer le fusible défectueux par un nouveau fusible de même type (prière de consulter les « 3.
Caractéristiques techniques »).
Refermer le compartiment du fusible.4.
5. Entretien
Essuyer le boîtier de le convertisseur à l’aide d’un chiffon légèrement humide. N’humecter le chiffon qu’à l’eau.
Ne pas utiliser de produits chimiques ou de nettoyage pour nettoyer le produit.
6. Elimination des déchets
Afi n de respecter l’environnement et de recycler au maximum les objets usagés, il est demandé
à l’utilisateur de rapporter les appareils à mettre au rebut aux points de collecte et de recyclage
appropriés.
Le logo représentant une poubelle à roulettes barrée d’une croix signifi e que ce produit doit être
apporté à un point de collecte et de recyclage des produits électroniques pour que ses matières
premières soient recyclées au mieux.
7. Caractéristiques techniques
Tension nominale de fonctionnement : 12V
Gamme de tensions de fonctionnement : de 12 à 16V
Intensité de sortie : 15, 16V / 5A, 18, 19, 20V / 4.5A, 22V / 4A, 24V / 3.5A
Puissance maximum émise : 90W + 10W (USB)
Fusible : 15A
Température de service : de 0 à 35 ºC
Humidité de fonctionnement : de 10 à 85 % d’humidité relative, non-condensante
Température de stockage : de -10 à 55ºC
Humidité de stockage : de 5 à 95 % d’humidité relative, non-condensante
Dimension (L x l x H) : 100 x 60 x 30 mm
Poids : 100g
5V / 2A (USB)
8. Liste d’affectation
A) Prises pour ordinateurs portables
Fiche Empreinte Marque Référence/ Nom de l’appareil
IBM Thinkpad
A
B
C Compaq
D Toshiba
E
Panasonic
F Dell
G Samsung Toutes modèle
H Acer Travelmate C100, Z9000
K Dell Inspiron 8600, 9100
AcerNote 350 séries, 370 séries, 850C
AcerNote
Light
Acer
Extensa
Travelmate
Acpire 1300 séries
Acer
Acernote 367, 390 séries
Extensa 360 séries, 390 séries, 900, ESS3-391T
Evo N115, N160, N180
Compaq
Presario
Dell Inspiron 3000, 3200, 3500 & 7000 séries
Gateway Solo
HP Pavilion
Toshiba Satellite 1600, 1700 & 3000 séries
Winbook Winbook XP, XP5, Si, Si2, X1, Z1 & J1 séries
IBM Thinkpad
Armada 110, E500, E700, M300, M700 & V300 séries
Evo
Prosignia 170, 190
Presario 300 & 2800 séries
Satellite
Satellite Pro 400, 4200, 4300, 4600, 6000 & 6100 séries
Tecra series Toutes modèle
Portege
Fujitsu Lifebook
Toughbook
series,
Sony Vaio
Inspiron
Latitude
B) Prises pour téléphones portables et appareils multimédias
1
2
3
4
5
6
7
8
Fiche Marque Référence/ Nom de l’appareil
Samsung
Motorola V3
Motorola V66, V120
E70, E60, 9500, 9300i, 8800, 7610, 7380, 7360, 7280, 7270,
Nokia
6820, 6680, 6260, 6230i, 6170, 6100, 6060, 6030, 6012, 3230,
1112, 1110, 1100, N-Gage QD
N93, N93i, NB91, N90, N80, N73, N72, N71, N70, E61, E50,
Nokia
7370, 7360, 6280, 6270, 6233, 6131, 6125, 6111, 6103, 6101,
6085, 6070, 5500, 3250
J100i, J230i, K550i, K610i, K750i, K800i, M600i, W200i, W300i,
Sony
W550i, W700i, W710i, W800i, W710i, W850i, W880i, W900i,
Z310i, Z710i, Z610i, Z550i, Z558i
D528, D808, D838, D848, E258, E428, E898, E908, i718, P308,
X828, X838, Z368, Z548, Z728
LG KG800
Sony PSP (Playstation Portable)
310 séries “i” séries i1412 2611-xxx, i1450
2611-xxx, i1451 2611-xxx, i1452 2611-xxx,
i1470 2611-xxx, i1471 2611-xxx, i1472 2611xxx, i1436 2611-xxx, i1411 2611-xxx,
i1500 2611-xxx, i1410 2611-xxx, i1434 2611xxx, i1435 2611-xxx
350 séries, 370 séries, 380 séries, P100
355, 500, 501 séries, 502, 503 séries, 600,
610 séries
351, 505, 506, 507 séries, 524 séries (non
compatible avec Travelmate 800 séries)
700, 800, 1000, 1200, 1400, 1600, 1700, 1800
& 2700 séries
200, 600, 1400, 1450, 5300, 5350, 9300, 9500
& 9550 séries
2100, 3000, 3100, 4100, 6000, 6100, 7100,
N3000, N3100, N3200, N3300 & N5000
séries
A, R, T & X séries, 240, 365, 380, 385, 390,
560, 600, 701, 770 “i” séries i1460 2621-xxx,
i1480 2621-xxx, i1500 2621-xxx, i1420 2621xxx
N110, N200, N400c, N600, N610c, N800c,
N800v
1200, 1400, 1500, 1600, 1700, 1800, 2000,
2100, 2200, 2400, 2500, 2600, 2700, 2800,
3000, 4000, 5000, 5100 & 5200 séries (non
compatible avec Satellite 4330, 4500 séries)
300, 320, 610, 620, 650, 660, 2000, 4000 &
7000 séries, 7140, 7200 séries
A, B, C, E, i, L, P & S séries (non compatible
avec E-6600)
Toutes modèle
SR, GR &VX séries, F, FX, FXA, GRX, R505
& Z505 séries
2000, 2100, 2500, 2600, 2650, 3700, 3800,
4000, 4150, 5000, 5100*, 7500, 8000, 8100
séries
C séries ( non compatible avec C400 or C840
séries ) & CP séries
Cette notice est une publication de la société Voltcraft®, Lindenweg 15,
D-92242 Hirschau/Allemagne, Tél. +49 180 586 582 723 8.
Cette notice est conforme à la réglementation en vigueur lors de l´impression.
© Copyright 2008 par Voltcraft
Données techniques et conditionnement soumis à modifi cations sans aucun préalable.
®
.
*02_02/08_01-RC

Versie 02/08
Spanningsomzetter voor draagbare PC’s
in auto’s SMP-90 USB
Bestnr. 51 01 87
1. Bedoeld gebruik
De spanningsomzetter zet de 12 tot 16 V van de boordspanning van voertuigen om in een instelbare
uitgangsspanning voor elektrische apparaten (bijvoorbeeld draagbare PC’s) met een vermogensopname tot 90
W of via de USB uitgang voor elektrische apparaten (bijvoorbeeld mobiele telefoons) met een stroomopname
tot maximaal 2 A.
De spanningsomzetter is een stabiel elektronisch apparaat, dankzij de gestabiliseerde uitgang en het lage
stoorspanningsniveau. Er wordt een set van negen connectoren voor draagbare PC’s meegeleverd om op
de hoofdvoedingskabel aan te sluiten en een set van acht connectoren voor mobiele telefoons en multimedia
apparaten om aan te sluiten op de USB kabel.
De spanningsomzetter mag uitsluitend in een droge omgeving worden toegepast, zoals binnenshuis of in
auto’s. Stel de spanningsomzetter niet bloot aan vocht. De spanningsomzetter dient te worden gevoed vanuit
de 12 V sigarettenaansteker van het voertuig.
Dit product voldoet aan de Europese en nationale eisen betreffende elektromagnetische compatibiliteit
(EMC). De CE-conformiteit werd gecontroleerd en de betreffende verklaringen en documenten werden
neergelegd bij de fabrikant.
Het eigenhandig ombouwen en/of veranderen van het product is niet toegestaan om veiligheids- en
keuringsredenen (CE). Een andere toepassing dan hierboven beschreven, is niet toegestaan en kan leiden tot
beschadiging van het product. Daarnaast bestaat het risico van bijv. kortsluiting, brand, elektrische schokken,
enz. Lees de gebruiksaanwijzing grondig en bewaar deze voor raadpleging in de toekomst.
Alle fi rmanamen en productnamen in deze gebruiksaanwijzing zijn handelsmerken van de betreffende
bezitters. Alle rechten voorbehouden.
2. Veiligheidsinstructies
Wij zijn niet verantwoordelijk voor schade aan eigendom of lichamelijke letsels indien het
product verkeerd gebruikt werd op om het even welke manier of beschadigd werd door het
niet naleven van deze bedieningsinstructies. De waarborg vervalt dan!
Het uitroepteken geeft belangrijke informatie aan voor deze bedieningsinstructies waaraan
u zich strikt moet houden.
Productveiligheid
Het apparaat mag niet worden blootgesteld aan zware mechanische belastingen.•
De spanningsomzetter dient niet te worden blootgesteld aan extreme temperaturen, direct •
invallend zonlicht, heftige trillingen of vocht/damp.
De ventilatieopeningen aan de zijkant van de spanningsomzetter dienen nooit te worden •
afgedekt. Zorg voor voldoende luchtcirculatie omdat de spanningsomzetter voornamelijk
wordt gekoeld door convectie (stromende lucht).
Trek de spanningsomzetter uit de sigarettenaansteker tijdens onweer om beschadiging ten •
gevolge van hoge spanningspieken te voorkomen.
De spanningsomzetter mag niet worden aangesloten op elektrische belastingen met een •
vermogenopname groter dan 90 W of met een stroomopname van meer dan 2 A als deze zijn
aangesloten op de USB uitgang.
Controleer de polariteit en de hoogte van de uitgangsspanning. Een afwijkende polariteit of •
een te hoge spanning kan leiden tot vernieling van de aangesloten elektrische belasting.
Alleen zekeringen van hetzelfde type en met de opgegeven stroomsterkte, zoals gespecifi ceerd •
in de “Technische gegevens”, mogen worden toegepast. Het gebruik van gerepareerde of
defecte zekeringen is onder geen enkele omstandigheid toegestaan!
De elektrische belasting dient altijd te worden uitgeschakeld voordat de connector van de •
spanningsomzetter in de sigarettenaansteker wordt gestoken of daaruit wordt verwijderd.
Let er op dat de uitgang van de spanningsomzetter niet is kortgesloten.•
De connectorset voor mobiele telefoons en multimedia apparatuur is speciaal ontworpen om •
aan te sluiten op de USB kabel. Geen van deze connectoren mag op de hoofdvoedingskabel
worden aangesloten.
Start nooit de motor van het voertuig als de spanningsomzetter is aangesloten en in gebruik is. •
Piekspanningen kunnen het apparaat vernielen alsook de aangesloten elektrische belasting.
Trek voor het starten van de motor eerst de connector van de spanningsomzetter uit de
sigarettenaansteker; start vervolgens de motor en sluit de spanningsomzetter weer aan.
Persoonlijke veiligheid
Volgens de StVZO (Motor Vehicle Regulations) mogen elektrische belastingen die zijn •
aangesloten op de spanningsomzetter tijdens het rijden niet worden gebruikt.
Deze spanningsomzetter is geen speelgoed en moet buiten het bereik van kinderen en •
huisdieren worden gehouden!
Controleer of de connector stevig vast zit als deze in de sigarettenaansteker wordt gestoken. •
Als deze niet goed is bevestigd of te veel speling heeft, kan de spanningsomzetter te warm
worden.
De spanningsomzetter mag niet direct worden aangesloten nadat deze van een koude naar •
een warme omgeving is overgebracht. Condens kan de spanningsomzetter beschadigen.
Wacht tot de spanningsomzetter is geacclimatiseerd alvorens deze te gebruiken.
Divers
Reparaties mogen alleen worden uitgevoerd door een vakman/gespecialiseerde •
onderhoudsdienst.
Voor vragen over het omgaan met de batterij tester, die niet beantwoord worden in deze •
gebruiksaanwijzing, is onze afdeling technische ondersteuning bereikbaar op het volgende
adres en telefoonnummer:
Voltcraft®, 92242 Hirschau, Lindenweg 15, Duitsland, telefoon 0180/586 582 723 8
3. Werking
A) Kiezen van de uitgangsspanning
i) Voor draagbare computer
Bepaal de ingangsspanning van de elektrische belasting die wordt aangesloten. Meestal wordt de 1.
noodzakelijke ingangsspanning vermeld in de buurt van het voedingschassisdeel of op het ingedrukte
typeplaatje van het apparaat. Let er op dat de vermogensopname van de elektrische belasting niet hoger
is dan 90 W.
Stel de gewenste uitgangsspanning van de spanningsomzetter in met behulp van de schuifschakelaar aan 2.
de voorzijde (van 15, 16, 18, 19, 20, 22 tot 24 V).
ii) Voor mobiele telefoons en multimedia apparatuur
Sluit de USB kabel aan op de USB poort van de spanningsomzetter.
De hoofdvoedingskabel en de USB kabel mogen tegelijkertijd worden gebruikt.
B) Kiezen van de uitgangsconnector
Selecteer de uitgangsconnector die geschikt is voor de toepassing en sluit deze aan op de
spanningsomzetter.
De connectorset (9 connectoren) voor draagbare computers kan uitsluitend worden aangesloten op de
hoofdvoedingskabel en de connectorset (8 connectoren) voor mobiele telefoon en multimedia apparatuur kan
uitsluitend worden aangesloten op de USB kabel.
Om veiligheidsredenen is het onmogelijk om de polariteit van de uitgangsconnector te veranderen. Het
binnenste contact is positief, “+” en het buitenste contact is negatief, “-“.
Om loszittende contacten te voorkomen is de uitgangsconnector zodanig ontworpen dat deze
moeilijk kan worden verwijderd.
Plaats de vingers altijd op de aangegeven aangrijppunten tijdens het vervangen van de
uitgangsconnector.
De uitgangsconnector kan slechts in één stand in de spanningsomzetter worden gestoken.
Forceer daarom niets tijdens deze handelingen.
C) Aansluiten van de spanningsomzetter op elektrische belastingen
Steek de uitgangsconnector in het voedingschassisdeel van de elektrische belasting die wordt gebruikt.1.
Steek de ingangsconnector in een 12 V sigarettenaansteker. De groene LED op de spanningsomzetter 2.
gaat branden om aan te geven dat deze normaal werkt.
De middenpen van de sigarettenaansteker is de positieve aansluiting, “+” en de twee zijklemmen zijn de
negatieve aansluitingen, “–”.
Plaats de spanningsomzetter op een stabiele, niet brandbare ondergrond met voldoende luchtcirculatie 3.
voor het koelen.
Schakel de aangesloten elektrische belasting in.4.
Schakel bij storingen de aangesloten elektrische belasting uit en verwijder de spanningsomzetter
dan van de 12 V sigarettenaansteker. Controleer daarna of de zekering nog heel is en let er op
dat de ingestelde uitgangsspanning overeenkomt met de ingangsspanning van de elektrische
belasting.
4. Zekering vervangen
Trek de connector van de spanningsomzetter uit de sigarettenaansteker en verwijder ook de elektrische 1.
belasting.
Draai het kunststof dopje op de sigarettenaansteker-connector linksom om de zekeringhouder te openen.2.
Vervang de defecte zekering door een andere van hetzelfde type (zie de “Technische gegevens”).3.
Sluit de zekeringhouder weer .4.
5. Onderhoud
Reinig de behuizing van de spanningsomzetter met een licht bevochtigde poetsdoek. Gebruik uitsluitend
water om de poetsdoek te bevochtigen. Voor het reinigen mogen geen schoonmaakmiddelen of chemische
oplopsmiddelen worden gebruikt.
6. Verwijdering
In het belang van het behoud, de bescherming en de verbetering van de kwaliteit van het milieu,
de bescherming van de gezondheid van de mens en een behoedzaam en rationeel gebruik van
natuurlijke hulpbronnen dient de gebruiker een niet te repareren of afgedankt product in te leveren
bij de desbetreffende inzamelpunten overeenkomstig de wettelijke voorschriften.
Het symbool met de doorgekruiste afvalbak geeft aan dat dit product gescheiden van het gewone
huishoudelijke afval moet worden ingeleverd.
7. Technische gegevens
Nominale werkspanning: 12V
Werkspanningsbereik: 12 tot 16V
Uitgangsstroom: 15, 16V / 5A, 18, 19, 20V / 4.5A, 22V / 4A, 24V / 3.5A
Maximum uitgangsvermogen: 90W + 10W (USB)
Zekering: 15A
Werktemperatuurbereik: 0 tot 35ºC
Relatieve luchtvochtigheid: 10 tot 85% relatieve luchtvochtigheid, niet condenserend
Opslagtemperatuur: -10 tot 55ºC
Opslagvochtigheid: 5 tot 95% relatieve luchtvochtigheid, niet condenserend
Afmetingen (L x B x H): 100 x 60 x 30 mm
Gewicht: 100g
5V
/ 2A (USB)
8. Compatibiliteitslijst
A) connectorset voor draagbare computers
Stekker Afdruk Merk Modelnummer/ Productnaam
IBM Thinkpad
A
B
C Compaq
D Toshiba
E
Panasonic
F Dell
G Samsung Alle modellen
H Acer Travelmate C100, Z9000
K Dell Inspiron 8600, 9100
AcerNote 350 series, 370 series, 850C
AcerNote
Light
Acer
Extensa
Travelmate
Acpire 1300 series
Acer
Acernote 367, 390 series
Extensa 360 series, 390 series, 900, ESS3-391T
Evo N115, N160, N180
Compaq
Presario
Dell Inspiron 3000, 3200, 3500 & 7000 series
Gateway Solo
HP Pavilion
Toshiba Satellite 1600, 1700 & 3000 series
Winbook Winbook XP, XP5, Si, Si2, X1, Z1 & J1 series
IBM Thinkpad
Armada 110, E500, E700, M300, M700 & V300 series
Evo
Prosignia 170, 190
Presario 300 & 2800 series
Satellite
Satellite Pro 400, 4200, 4300, 4600, 6000 & 6100 series
Tecra series Alle modellen
Portege
Fujitsu Lifebook
Toughbook
series,
Sony Vaio
Inspiron
Latitude
B) connectorset voor mobiele telefoon en multimedia apparatuur
1
2
3
4
5
6
7
8
Stekker Merk Modelnummer/ Productnaam
Samsung
Motorola V3
Motorola V66, V120
E70, E60, 9500, 9300i, 8800, 7610, 7380, 7360, 7280, 7270,
Nokia
6820, 6680, 6260, 6230i, 6170, 6100, 6060, 6030, 6012, 3230,
1112, 1110, 1100, N-Gage QD
N93, N93i, NB91, N90, N80, N73, N72, N71, N70, E61, E50,
Nokia
7370, 7360, 6280, 6270, 6233, 6131, 6125, 6111, 6103, 6101,
6085, 6070, 5500, 3250
J100i, J230i, K550i, K610i, K750i, K800i, M600i, W200i, W300i,
Sony
W550i, W700i, W710i, W800i, W710i, W850i, W880i, W900i,
Z310i, Z710i, Z610i, Z550i, Z558i
D528, D808, D838, D848, E258, E428, E898, E908, i718, P308,
X828, X838, Z368, Z548, Z728
LG KG800
Sony PSP (Playstation Portable)
310 series “i” series i1412 2611-xxx, i1450
2611-xxx, i1451 2611-xxx, i1452 2611-xxx,
i1470 2611-xxx, i1471 2611-xxx, i1472 2611xxx, i1436 2611-xxx, i1411 2611-xxx,
i1500 2611-xxx, i1410 2611-xxx, i1434 2611xxx, i1435 2611-xxx
350 series, 370 series, 380 series, P100
355, 500, 501 series, 502, 503 series, 600,
610 series
351, 505, 506, 507 series, 524 series (niet
compatibel met Travelmate 800 series)
700, 800, 1000, 1200, 1400, 1600, 1700, 1800
& 2700 series
200, 600, 1400, 1450, 5300, 5350, 9300, 9500
& 9550 series
2100, 3000, 3100, 4100, 6000, 6100, 7100,
N3000, N3100, N3200, N3300 & N5000
series
A, R, T & X series, 240, 365, 380, 385, 390,
560, 600, 701, 770 “i” series i1460 2621-xxx,
i1480 2621-xxx, i1500 2621-xxx, i1420 2621xxx
N110, N200, N400c, N600, N610c, N800c,
N800v
1200, 1400, 1500, 1600, 1700, 1800, 2000,
2100, 2200, 2400, 2500, 2600, 2700, 2800,
3000, 4000, 5000, 5100 & 5200 series (niet
compatibel met Satellite 4330, 4500 series)
300, 320, 610, 620, 650, 660, 2000, 4000 &
7000 series, 7140, 7200 series
A, B, C, E, i, L, P & S series (niet compatibel
met E-6600)
Alle modellen
SR, GR &VX series, F, FX, FXA, GRX, R505
& Z505 series
2000, 2100, 2500, 2600, 2650, 3700, 3800,
4000, 4150, 5000, 5100*, 7500, 8000, 8100
series
C series ( niet compatibel met C400 or C840
series ) & CP series
Deze gebruiksaanwijzing is een publicatie van Voltcraft®, Lindenweg 15,
D-92242 Hirschau/Duitsland, Tel. +49 180 586 582 723 8.
Deze gebruiksaanwijzing voldoet aan de technische eisen bij het ter perse gaan.
© Copyright 2008 bei Voltcraft
Wijzigingen in techniek en uitrusting voorbehouden.
®
.
*02_02/08_01-RC
 Loading...