

Page 1

Multi-Ladegerät B6 Quadro
쮕
BEDIENUNGSANLEITUNG
Seite 4 - 38
Multi charger B6 Quadro
OPERATING INSTRUCTIONS Page 39 - 73
Chargeur multifonction B6 Quadro
NOTICE D’EMPLOI Page 74 - 109
Multi-laadapparaat B6 Quadro
GEBRUIKSAANWIJZING Pagina 110 - 145
Best.-Nr. / Item-No. /
N° de commande / Bestnr.:
23 73 33
Version 04/10
®
°
Page 2

VOLTCRAFT IM INTERNET http://www.voltcraft.de
Impressum
Diese Bedienungsanleitung ist eine Publikation von Voltcraft®, Lindenweg 15, D-92242 Hirschau, Tel.-Nr. 0180/586 582 7
(www.voltcraft.de).
Alle Rechte einschließlich Übersetzung vorbehalten. Reproduktionen jeder Art, z.B. Fotokopie, Mikroverfilmung, oder die Erfassung in
elektronischen Datenverarbeitungsanlagen, bedürfen der schriftlichen Genehmigung des Herausgebers. Nachdruck, auch auszugsweise, verboten.
Diese Bedienungsanleitung entspricht dem technischen Stand bei Drucklegung. Änderung in Technik und Ausstattung vorbehalten.
© Copyright 2010 by Voltcraft
®
Impressum /legal notice in our operating instructions
These operating instructions are a publication by Voltcraft®, Lindenweg 15, D-92242 Hirschau/Germany, Phone +49 180/586 582 7
(www.voltcraft.de).
All rights including translation reserved. Reproduction by any method, e.g. photocopy, microfilming, or the capture in electronic data
processing systems require the prior written approval by the editor. Reprinting, also in part, is prohibited.
These operating instructions represent the technical status at the time of printing. Changes in technology and equipment reserved.
© Copyright 2010 by Voltcraft
®
Informations /légales dans nos modes d'emploi
Ce mode d'emploi est une publication de la société Voltcraft®, Lindenweg 15, D-92242 Hirschau/Allemagne, Tél. +49 180/586 582 7
(www.voltcraft.de).
Tous droits réservés, y compris de traduction. Toute reproduction, quelle qu'elle soit (p. ex. photocopie, microfilm, saisie dans des
installations de traitement de données) nécessite une autorisation écrite de l'éditeur. Il est interdit de le réimprimer, même par extraits.
Ce mode d'emploi correspond au niveau technique du moment de la mise sous presse. Sous réserve de modifications techniques et de
l'équipement.
© Copyright 2010 by Voltcraft
®
Colofon in onze gebruiksaanwijzingen
Deze gebruiksaanwijzing is een publicatie van de firma Voltcraft®, Lindenweg 15, D-92242 Hirschau/Duitsland, Tel. +49 180/586 582 7
(www.voltcraft.de).
Alle rechten, vertaling inbegrepen, voorbehouden. Reproducties van welke aard dan ook, bijvoorbeeld fotokopie, microverfilming of de
registratie in elektronische gegevensverwerkingsapparatuur, vereisen de schriftelijke toestemming van de uitgever. Nadruk, ook van
uittreksels, verboden.
Deze gebruiksaanwijzing voldoet aan de technische stand bij het in druk bezorgen. Wijziging van techniek en uitrusting voorbehouden.
© Copyright 2010 by Voltcraft
®
01_0410_01/AB
쮕
Page 3

쮕
Diese Bedienungsanleitung gehört zu diesem Produkt. Sie enthält wichtige Hinweise zur Inbetriebnahme und Handhabung. Achten Sie hierauf, auch wenn Sie dieses Produkt an Dritte weitergeben.
Heben Sie deshalb diese Bedienungsanleitung zum Nachlesen auf!
Eine Auflistung der Inhalte finden Sie in dem Inhaltsverzeichnis mit Angabe der entsprechenden
Seitenzahlen auf Seite 5.
These operating instructions belong with this product. They contain important information for
putting it into service and operating it. This should be noted also when this product is passed on
to a third party.
Therefore look after these operating instructions for future reference!
A list of contents with the corresponding page numbers can be found in the index on page 40.
Ce mode d'emploi appartient à ce produit. Il contient des recommandations en ce qui concerne
sa mise en service et sa manutention. Veuillez en tenir compte et ceci également lorsque vous
remettez le produit à des tiers.
Conservez ce mode d'emploi afin de pouvoir vous documenter en temps utile.!
Vous trouverez le récapitulatif des indications du contenu à la table des matières avec mention
de la page correspondante à la page 75.
Deze gebruiksaanwijzing hoort bij dit product. Er staan belangrijke aanwijzingen in betreffende
de ingebruikname en gebruik, ook als u dit product doorgeeft aan derden.
Bewaar deze handleiding zorgvuldig, zodat u deze later nog eens kunt nalezen!
U vindt een opsomming van de inhoud in de inhoudsopgave met aanduiding van de paginanummers op pagina 111.
Page 4
Page 5

4
4
쮕
Einführung
Sehr geehrter Kunde,
mit diesem Voltcraft®-Produkt haben Sie eine sehr gute Entscheidung getroffen, für die wir Ihnen
danken möchten.
Sie haben ein überdurchschnittliches Qualitätsprodukt aus einer Marken-Familie erworben, die sich auf
dem Gebiet der Mess-, Lade- und Netztechnik durch besondere Kompetenz und permanente Innovation
auszeichnet.
Mit Voltcraft® werden Sie als anspruchsvoller Bastler ebenso wie als professioneller Anwender auch
schwierigen Aufgaben gerecht. Voltcraft® bietet Ihnen zuverlässige Technologie zu einem außergewöhnlich günstigen Preis-Leistungs-Verhältnis.
Wir sind uns sicher: Ihr Start mit Voltcraft ist zugleich der Beginn einer langen und guten Zusammenarbeit.
Viel Spaß mit Ihrem neuen Voltcraft®-Produkt!
Page 6

5
2. Inhaltsverzeichnis
1. Einführung ........................................................................................................................................4
2. Inhaltsverzeichnis ..............................................................................................................................5
3. Bestimmungsgemäße Verwendung ..................................................................................................6
4. Lieferumfang ......................................................................................................................................6
5. Sicherheitshinweise ..........................................................................................................................7
6. Akku-Hinweise ..................................................................................................................................9
a) Allgemein ......................................................................................................................................9
b) Zusätzliche Informationen zu Lithium-Akkus ..............................................................................10
7. Verwendbare Akkutypen ..................................................................................................................12
8. Bedienelemente ..............................................................................................................................13
9. Inbetriebnahme ................................................................................................................................15
10. Lithium-Akkus (LiPo, LiIon, LiFe) ....................................................................................................16
a) Allgemein ....................................................................................................................................16
b) Akku ohne Balancer-Anschluss laden („CHARGE“) ....................................................................17
c) Akku mit Balanceranschluss laden („BALANCE“) ......................................................................18
d) Schnellladung („FAST CHG“) ......................................................................................................19
e) Akku einlagern („STORAGE“) ....................................................................................................20
f) Akku entladen („DISCHARGE“) ....................................................................................................20
11. NiMH- und NiCd-Akkus ..................................................................................................................21
a) Akku laden („CHARGE“) ..............................................................................................................21
b) Akku entladen („DISCHARGE“) ..................................................................................................22
c) Zyklus-Programm („CYCLE“) ......................................................................................................23
12. Bleiakkus (Pb) ................................................................................................................................24
a) Allgemein ....................................................................................................................................24
b) Akku laden („CHARGE“) ..............................................................................................................25
c) Akku entladen („DISCHARGE“) ..................................................................................................26
13. Akkudaten speichern ......................................................................................................................27
14. Akkudaten laden ..............................................................................................................................28
15. Diverse Grundeinstellungen („USER SET“) ....................................................................................29
16. Warnmeldungen im Display ............................................................................................................34
17. Informationen des Ladegeräts ........................................................................................................35
18. Wartung und Reinigung ..................................................................................................................36
19. Handhabung ....................................................................................................................................36
20. Entsorgung ......................................................................................................................................37
a) Entsorgung von gebrauchten Batterien! ......................................................................................37
21. Technische Daten ............................................................................................................................38
Page 7

6
3. Bestimmungsgemäße Verwendung
Das Multi-Ladegerät B6 Quadro dient zum Aufladen von Akkus des Typs NiCd/NiMH (1-15 Zellen),
LiPo/LiIon/LiFe (1-6 Zellen) sowie für Bleiakkus (1-10 Zellen, 2V-20V). Der Ladestrom kann zwischen
0,1A und 5,0Aeingestellt werden. Die maximale Ladeleistung je Ausgang beträgt 50 W.
Weiterhin können Akkus auch entladen werden; der Entladestrom kann 0,1-1,0Abetragen. Die maximale
Entladeleistung je Ausgang beträgt 5 W.
An den Lade-/Entladekanälen 1 und 2 können optionale Temperaturfühler zur Akkuüberwachung oder
wahlweise ein USB-Schnittstellenadapter zur Datenaufzeichnung angeschlossen werden.
Das Ladegerät hat vier voneinander unabhängige Lade-/ Entladekanäle. Es darf nur an einer Gleichspannung von 11 bis 15V/DC betrieben werden.
Je ein zweizeiliges, beleuchtetes Display und vier Bedientasten stehen für jeden Ausgang zur Verfügung.
Für LiPo-/LiIon-/LiFe-Akkus ist im Ladegerät ein Balancer integriert, seitlich am Ladegerät finden Sie
dazu die Balancer-Anschlüsse für den Akku.
Das Produkt ist nur zum Betrieb in trockenen Innenräumen geeignet, es darf nicht feucht oder nass werden.
Eine andere Verwendung als zuvor beschrieben, führt zur Beschädigung dieses Produktes, außerdem
ist dies mit Gefahren wie z.B. Kurzschluss, Brand, elektrischer Schlag etc. verbunden. Das gesamte
Produkt darf nicht geändert bzw. umgebaut werden!
Lesen Sie die Bedienungsanleitung sorgfältig durch, und bewahren Sie diese für späteres Nachschlagen
auf.
Die Sicherheitshinweise sind unbedingt zu beachten!
4. Lieferumfang
Ladegerät
2 Polklemmen
Bedienungsanleitung
Page 8

7
5. Sicherheitshinweise
Lesen Sie bitte vor Inbetriebnahme die komplette Anleitung durch, sie enthält
wichtige Hinweise zum korrekten Betrieb.
Bei Schäden, die durch Nichtbeachten dieser Bedienungsanleitung verursacht
werden, erlischt die Gewährleistung/Garantie! Für Folgeschäden übernehmen
wir keine Haftung!
Bei Sach- oder Personenschäden, die durch unsachgemäße Handhabung oder
Nichtbeachten der Sicherheitshinweise verursacht werden, übernehmen wir keine
Haftung! In solchen Fällen erlischt die Gewährleistung/Garantie.
Sehr geehrte Kundin, sehr geehrter Kunde, die folgenden Sicherheitshinweise dienen nicht nur zum
Schutz Ihrer Gesundheit, sondern auch zum Schutz des Geräts. Lesen Sie sich bitte die folgenden
Punkte aufmerksam durch:
Folgende Symbole gilt es zu beachten:
Ein in einem Dreieck befindliches Ausrufezeichen weist auf wichtige Hinweise in dieser
Bedienungsanleitung hin, die unbedingt zu beachten sind.
☞
Das „Hand“-Symbol ist zu finden, wenn Ihnen besondere Tipps und Hinweise zur
Bedienung gegeben werden sollen.
Dieses Gerät ist CE-konform und erfüllt die erforderlichen nationalen und europäi-
schen Richtlinien
Aus Sicherheits- und Zulassungsgründen (CE) ist das eigenmächtige Umbauen und/oder Verändern
des Gerätes nicht gestattet.
Wenden Sie sich an eine Fachkraft, wenn Sie Zweifel über die Arbeitsweise, die Sicherheit oder den
Anschluss des Gerätes haben.
Ladegeräte und Akkus sind kein Spielzeug und gehören nicht in Kinderhände! Das Produkt darf nur an
einer solchen Stelle aufgestellt, betrieben oder gelagert werden, an der es für Kinder nicht erreichbar ist.
Kinder könnten Einstellungen verändern oder den Akku/Akkupack kurzschließen, was zu einer Explosion
führen kann. Lebensgefahr!
In gewerblichen Einrichtungen sind die Unfallverhütungsvorschriften des Verbandes der gewerblichen
Berufsgenossenschaften für elektrische Anlagen und Betriebsmittel zu beachten.
In Schulen und Ausbildungseinrichtungen, Hobby- und Selbsthilfewerkstätten ist der Umgang mit Ladegeräten und Akkus durch geschultes Personal verantwortlich zu überwachen.
Das Produkt darf nur in trockenen Innenräumen betrieben werden. Es darf nicht feucht oder nass werden.
Vermeiden Sie direkte Sonneneinstrahlung, starke Hitze (>35°C) oder Kälte (<0°C). Halten Sie es fern
von Staub und Schmutz. Gleiches gilt für den angeschlossenen Akku. Achten Sie auf gute Raumbelüftung
beim Laden von Bleiakkus (Pb).
Page 9

8
Betreiben Sie das Ladegerät nicht im Innenraum von Fahrzeugen.
Stellen Sie z.B. keine mit Flüssigkeit gefüllten Gefäße, Vasen oder Pflanzen auf oder neben das Lade-
gerät. Ein Umfallen kann das Ladegerät zerstören, außerdem besteht höchste Gefahr eines Brandes.
Betreiben Sie das Produkt niemals unbeaufsichtigt. Trotz der umfangreichen und vielfältigen Schutzschal-
tungen können Fehlfunktionen oder Probleme beim Aufladen eines Akkus nicht ausgeschlossen werden.
Betreiben Sie das Produkt nur in gemäßigtem Klima, niemals in tropischem Klima. Beachten Sie für die
zulässigen Umgebungsbedingungen das Kapitel „Technische Daten“.
Wählen Sie einen stabilen, ebenen, ausreichend großen und glatten Standort. Stellen Sie Ladegerät
und Akku niemals auf brennbaren Flächen auf (z.B. Teppich). Verwenden Sie immer eine geeignete
unbrennbare, hitzefeste Unterlage.
Achten Sie auf ausreichende Belüftung während der Betriebsphase, decken Sie das Ladegerät und/oder
den angeschlossenen Akku niemals ab. Lassen Sie ausreichend Abstand (mind. 20cm) zwischen Ladegerät, Akku und anderen Objekten.
Verwenden Sie das Produkt niemals gleich dann, wenn es von einem kalten Raum in einen warmen
Raum gebracht wurde. Das dabei entstehende Kondenswasser kann unter Umständen zu Funktionsstörungen oder Beschädigungen führen! Lassen Sie das Ladegerät (und den/die Akkus) zuerst auf Zimmertemperatur kommen, bevor Sie das Ladegerät mit der Versorgungsspannung verbinden und in
Betrieb nehmen. Dies kann mehrere Stunden dauern!
Wartungs-, Einstellungs- oder Reparaturarbeiten dürfen nur von einer Fachkraft/Fachwerkstatt durchgeführt
werden. Es sind keine für Sie einzustellenden bzw. zu wartenden Produktbestandteile im Geräteinneren.
Gehen Sie vorsichtig mit dem Produkt um, durch Stöße, Schläge oder dem Fall aus bereits geringer
Höhe kann es beschädigt werden.
Vermeiden Sie den Betrieb in unmittelbarer Nähe von:
- starken magnetischen oder elektromagnetischen Feldern
- Sendeantennen oder HF-Generatoren.
Dadurch kann die Steuerelektronik beeinflusst werden.
Wenn anzunehmen ist, dass ein gefahrloser Betrieb nicht mehr möglich ist, so ist das Gerät außer
Betrieb zu setzen und gegen unbeabsichtigten Betrieb zu sichern. Es ist anzunehmen, dass ein gefahrloser Betrieb nicht mehr möglich ist, wenn:
- das Gerät sichtbare Beschädigungen aufweist,
- das Gerät nicht mehr arbeitet und
- nach längerer Lagerung unter ungünstigen Verhältnissen oder
- nach schweren Transportbeanspruchungen.
Lassen Sie das Verpackungsmaterial nicht achtlos liegen; dieses könnte für Kinder zu einem gefährlichen
Spielzeug werden.
Beachten Sie auch die Sicherheitshinweise in den einzelnen Kapiteln.
Page 10

9
6. Akku-Hinweise
Obwohl der Umgang mit Akkus im täglichen Leben heute eine Selbstverständlichkeit ist, bestehen zahlreiche Gefahren und Probleme. Speziell bei LiPo-/LiIon-/LiFe-Akkus mit ihrem hohen Energieinhalt (im
Vergleich zu herkömmlichen NiCd- oder NiMH-Akkus) sind diverse Vorschriften unbedingt einzuhalten,
da andernfalls Explosions- und Brandgefahr besteht.
Beachten Sie deshalb unbedingt die nachfolgend genannten Informationen und
Sicherheitshinweise zum Umgang mit Akkus.
a) Allgemein
Akkus gehören nicht in Kinderhände. Bewahren Sie Akkus außerhalb der Reichweite von Kindern auf.
Gleiches gilt für Ladegeräte. Akkus und Ladegeräte sind kein Spielzeug!
Lassen Sie Akkus nicht offen herumliegen, es besteht die Gefahr, dass diese von Kindern oder Haustieren
verschluckt werden. Suchen Sie in einem solchen Fall sofort einen Arzt auf!
Akkus dürfen niemals kurzgeschlossen, zerlegt oder ins Feuer geworfen werden. Es besteht Brand- und
Explosionsgefahr!
Ausgelaufene oder beschädigte Akkus können bei Berührung mit der Haut Verätzungen verursachen,
benutzen Sie deshalb in diesem Fall geeignete Schutzhandschuhe.
Herkömmliche nicht wiederaufladbare Batterien dürfen nicht aufgeladen werden. Es besteht Brand- und
Explosionsgefahr! Nicht wiederaufladbare Batterien sind nur für den einmaligen Gebrauch vorgesehen
und müssen ordnungsgemäß entsorgt werden, wenn sie leer sind. Laden Sie ausschließlich dafür vorgesehene Akkus.
Akkus dürfen nicht feucht oder nass werden.
Achten Sie beim Anschluss des Akkus an Ihr Modell oder Ladegerät auf die richtige Polung (Plus/+ und
Minus/- beachten). Bei Falschpolung wird nicht nur ihr Modell, sondern auch der Akku beschädigt. Es
besteht Brand- und Explosionsgefahr!
Das hier gelieferte Ladegerät verfügt über eine Schutzschaltung gegen Falschpolung. Trotzdem kann
eine Falschpolung hier in bestimmten Situationen zu Beschädigungen führen.
Bei längerem Nichtgebrauch (z.B. bei Lagerung) trennen Sie einen evtl. angeschlossenen Akku vom
Ladegerät, trennen Sie das Ladegerät von der Versorgungsspannung.
Laden/Entladen Sie keine Akkus, die noch heiß sind (z.B. durch hohe Entladeströme im Modell verursacht). Lassen Sie den Akku zuerst auf Zimmertemperatur abkühlen, bevor Sie ihn wieder aufladen.
Laden/Entladen Sie niemals beschädigte, ausgelaufene oder verformte Akkus. Dies kann zu einem
Brand oder einer Explosion führen!
Verwenden Sie niemals Akkupacks, die aus unterschiedlichen Zellen zusammengestellt sind.
Laden Sie Akkus etwa alle 3 Monate nach, da es andernfalls durch die Selbstentladung zu einer sog.
Tiefentladung kommen kann, wodurch die Akkus unbrauchbar werden.
Trennen Sie den Akku vom Ladegerät, wenn dieser vollständig aufgeladen ist.
Page 11

10
Beschädigen Sie niemals die Außenhülle eines Akkus. Es besteht Brand- und Explosionsgefahr!
Laden/Entladen Sie einen Akku niemals direkt im Modell. Entnehmen Sie den Akku zuerst aus dem
Modell.
Platzieren Sie Ladegerät und Akku auf einer nicht brennbaren, hitzebeständigen Oberfläche (z.B. einer
Steinfliese). Halten Sie ausreichend Abstand zu brennbaren Gegenständen. Lassen Sie zwischen Ladegerät und Akku ausreichend Abstand, legen Sie den Akku niemals auf das Ladegerät.
Da sich sowohl das Ladegerät als auch der angeschlossene Akku während des Lade-/Entladevorgangs
erwärmen, ist es erforderlich, auf eine ausreichende Belüftung zu achten. Decken Sie das Ladegerät
und den Akku niemals ab!
Laden/Entladen Sie Akkus niemals unbeaufsichtigt.
Falls Anschlusskabel des Akkus gekürzt werden müssen (z.B. wenn der Akku ohne Anschlussstecker gelie-
fert wird), so kürzen Sie jede Leitung einzeln, damit kein Kurzschluss entsteht. Brand- und Explosionsgefahr!
b) Zusätzliche Informationen zu Lithium-Akkus
Moderne Akkus mit Lithium-Technik verfügen nicht nur über eine deutlich höhere Kapazität als NiMHoder NiCd-Akkus, sie haben auch ein wesentlich geringeres Gewicht. Dies macht diesen Akkutyp z.B. für
den Einsatz im Modellbaubereich sehr interessant, meist werden hier sog. LiPo-Akkus (Lithium-Polymer)
verwendet.
LiPo-Akkus (und auch die vom Ladegerät aufladbaren LiFe- und LiIon-Akkus) benötigen jedoch eine
besondere Sorgfalt beim Laden/Entladen sowie bei Betrieb und Handhabung. Deshalb möchten wir Sie
in den folgenden Abschnitten darüber informieren, welche Gefahren bestehen und wie Sie diese vermeiden können, damit solche Akkus lange Zeit ihre Leistungsfähigkeit behalten.
Beachten Sie zusätzlich das Kapitel 6. a).
Die Außenhülle von LiPo-Akkus ist sehr empfindlich, sie besteht nur aus einer dicken Folie.
Zerlegen oder beschädigen Sie den Akku niemals, lassen Sie den Akku niemals fallen, stechen Sie keine
Gegenstände in den Akku! Vermeiden Sie jegliche mechanische Belastung des Akkus, ziehen Sie auch
niemals an den Anschlusskabeln des Akkus! Es besteht Brand- und Explosionsgefahr!
Achten Sie ebenfalls hierauf, wenn der Akku im Modell befestigt wird (bzw. aus dem Modell entnommen
wird).
Achten Sie bei Betrieb, Auf- oder Entladen, Transport und Aufbewahrung des Akkus darauf, dass dieser
nicht überhitzt. Platzieren Sie den Akku nicht neben Wärmequellen (z.B. Fahrtregler, Motor), halten Sie den
Akku fern von direkter Sonneneinstrahlung. Bei Überhitzung des Akkus besteht Brand- und Explosionsgefahr!
Der Akku darf niemals eine höhere Temperatur als 60°C haben (ggf. zusätzliche Herstellerangaben
beachten!).
Page 12

11
Falls der Akku Beschädigungen aufweist (z.B. nach einem Absturz eines Flugzeug- oder Hubschraubermodells) oder die Außenhülle aufgequollen/aufgebläht ist, so verwenden Sie den Akku nicht mehr.
Laden Sie ihn nicht mehr auf. Es besteht Brand- und Explosionsgefahr! Fassen Sie den Akku nur vorsichtig an, verwenden Sie geeignete Schutzhandschuhe. Entsorgen Sie den Akku umweltgerecht.
Verwenden Sie zum Aufladen eines Akkus mit Lithiumtechnik nur ein dafür geeignetes Ladegerät. Herkömmliche Ladegeräte für NiCd-, NiMH- oder Bleiakkus dürfen nicht verwendet werden, es besteht
Brand- und Explosionsgefahr!
Wenn Sie einen Akku mit Lithiumtechnik mit mehr als einer Zelle aufladen, so verwenden Sie unbedingt
einen sog. Balancer (z.B. im hier gelieferten Ladegerät bereits integriert).
Laden Sie LiPo-Akkus mit einem Ladestrom von max. 1C. Das bedeutet, dass der Ladestrom den auf
dem Akku aufgedruckten Kapazitätswert nicht überschreiten darf (z.B. Akkukapazität 1000mAh, max.
Ladestrom 1000mA = 1A). Bei LiFe- oder LiIon-Akkus beachten Sie unbedingt die Angaben des Akkuherstellers.
Der Entladestrom darf den auf dem Akku aufgedruckten Wert nicht überschreiten. Ist beispielsweise bei
einem LiPo-Akku ein Wert von „20C“ auf dem Akku aufgedruckt, so entspricht der max. Entladestrom
dem 20fachen der Kapazität des Akkus (z.B. Akkukapazität 1000mAh, max. Entladestrom 20C = 20x
1000mA = 20A).
Andernfalls überhitzt der Akku, was zum Verformen/Aufblähen des Akkus oder zu einer Explosion und
einem Brand führen kann! Der aufgedruckte Wert (z.B. „20C“) bezieht sich aber in der Regel nicht auf
den Dauerstrom, sondern nur auf den Maximalstrom, den der Akku kurzzeitig liefern kann. Der Dauerstrom sollte nicht höher sein als die Hälfte des angegebenen Wertes.
Keine Zelle eines LiPo-Akkus darf unter 3V (LiFe = 2.0V, LiIon = 2.5V) entladen werden, dies führt zur
Zerstörung des Akkus. Verfügt das Modell nicht über einen Tiefentladeschutz oder eine optische Anzeige
der zu geringen Akkuspannung, so stellen Sie den Betrieb des Modells rechtzeitig ein.
Page 13

12
7. Verwendbare Akkutypen
NiCd
Nennspannung: 1,2V/Zelle
Max. Ladestrom für Schnellladen: 1C (oder niedriger); bei speziellen dafür ausgelegten Akkus
bis zu 2C
Entladestrom-Abschaltung bei: 0,85V/Zelle (oder höher)
NiMH
Nennspannung: 1,2V/Zelle
Max. Ladestrom für Schnellladen: 1C (oder niedriger); bei speziellen dafür ausgelegten Akkus
bis zu 2C
Entladestrom-Abschaltung bei: 1,0V/Zelle (oder höher)
LiPo
Nennspannung: 3,7V/Zelle
Max. Ladespannung: 4,2V/Zelle
Max. Ladestrom für Schnellladen: 1C (oder niedriger)
Entladestrom-Abschaltung bei: 3,0V/Zelle (oder höher)
LiIon
Nennspannung: 3,6V/Zelle
Max. Ladespannung: 4,1V/Zelle
Max. Ladestrom für Schnellladen: 1C (oder niedriger)
Entladestrom-Abschaltung bei: 2,5V/Zelle (oder höher)
LiFe
Nennspannung: 3,3V/Zelle
Max. Ladespannung: 3,6V/Zelle
Max. Ladestrom für Schnellladen: 4C (oder niedriger)
Entladestrom-Abschaltung bei: 2,0V/Zelle (oder höher)
Pb
Spannung: 2,0V/Zelle
Max. Ladespannung: 2,46V/Zelle
Max. Ladestrom für Schnellladen: 0,4C (oder niedriger)
Entladestrom-Abschaltung bei: 1,75V/Zelle (oder höher)
Falls Sie verschiedene Lithium-Akkus besitzen und mit dem Ladegerät laden bzw. entladen möchten, ist vor dem Anschluss der richtige Akkutyp (LiPo, LiIon, LiFe) einzustellen.
Bei falscher Wahl des Akkutyps kann der Akku explodieren oder in Brand geraten!
Page 14
13
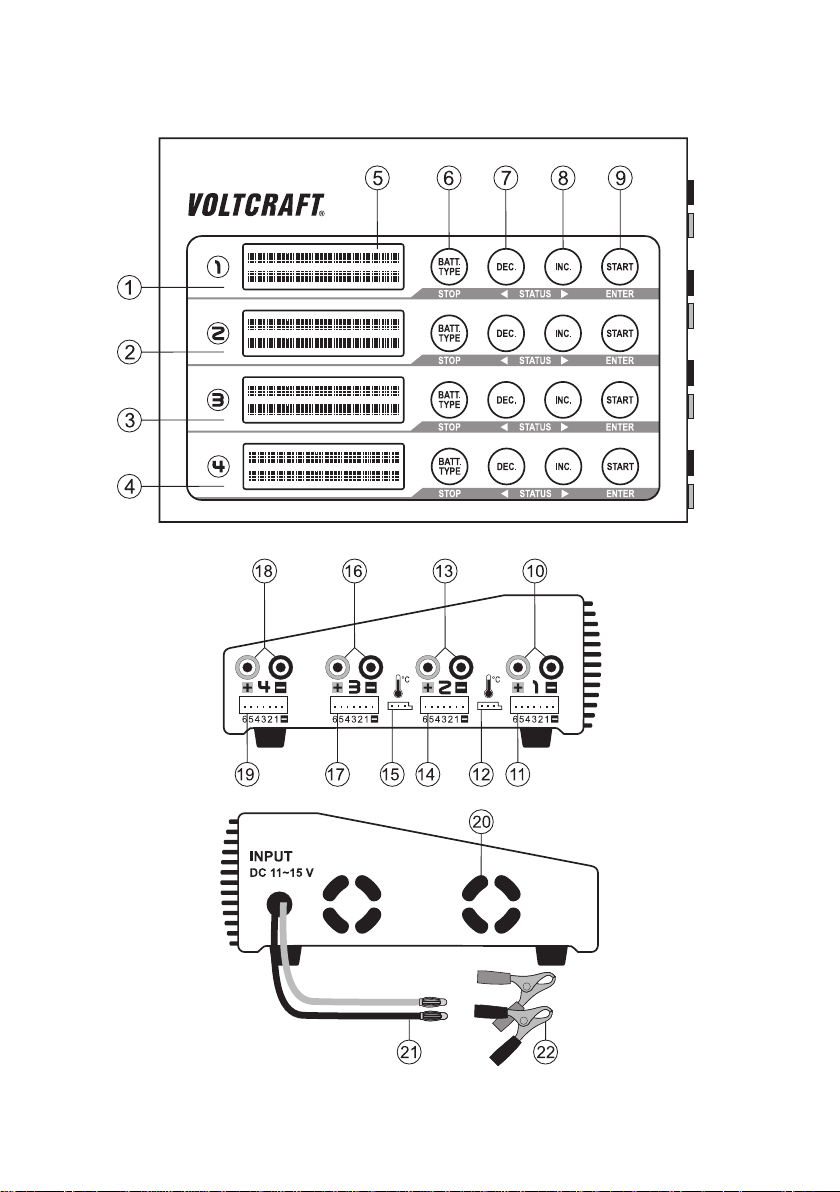
8. Bedienelemente
Page 15

14
1 Lade-/Entladekanal 1
2 Lade-/Entladekanal 2
3 Lade-/Entladekanal 3
4 Lade-/Entladekanal 4
5 Beleuchtete Anzeige (Display), 2zeilig
6 Taste „BATT.TYPE/STOP“ für Menü-Auswahl (vorwärts) und zum Anhalten des Ladevorgangs
7 Taste „DEC“ für Werte-Eingabe (Wert reduzieren) und Menü-Auswahl (zurück) und Anzeige der Werte
der Einzelzellen beim Balance-Lademodus
8 Taste „INC“ für Werte-Eingabe (Wert erhöhen) und Anzeige der Werte der Einzelzellen beim Balance-
Lademodus
9 Taste „START/ENTER“ für Starten/Fortsetzen des Ladevorgangs bzw. zur Bestätigung einer Ein-
stell-/Bedienfunktion
10 Buchsen für Akkuanschluss Kanal 1 (rot = Pluspol, schwarz = Minuspol)
11 Balancer-Anschlüsse für 2- bis 6zellige LiPo-/LiIon-/LiFe-Akkus an Kanal 1
12 Buchse für optionalen Temperatursensor oder optionale USB-Schnittstelle für Kanal 1
13 Buchsen für Akkuanschluss Kanal 2 (rot = Pluspol, schwarz = Minuspol)
14 Balancer-Anschlüsse für 2- bis 6zellige LiPo-/LiIon-/LiFe-Akkus an Kanal 2
15 Buchse für optionalen Temperatursensor oder optionale USB-Schnittstelle für Kanal 2
16 Buchsen für Akkuanschluss Kanal 3 (rot = Pluspol, schwarz = Minuspol)
17 Balancer-Anschlüsse für 2- bis 6zellige LiPo-/LiIon-/LiFe-Akkus an Kanal 3
18 Buchsen für Akkuanschluss Kanal 4 (rot = Pluspol, schwarz = Minuspol)
19 Balancer-Anschlüsse für 2- bis 6zellige LiPo-/LiIon-/LiFe-Akkus an Kanal 4
20 Seitliche Lüftungsöffnungen. Nicht verdecken!
21 Anschlusskabel mit 4 mm Federkorbstecker für Netzgeräteanschluss (rot = Pluspol, schwarz =
Minuspol)
22 Steckbare Polklemmen für direkten Anschluss an 12 V Bleiakkus (z.B. am Kfz etc.)
Page 16

15
9. Inbetriebnahme
Das Ladegerät muss mit einer stabilisierten Gleichspannung (11-15V/DC) betrieben werden.
Betreiben Sie das Ladegerät niemals an einer anderen Spannung, dies zerstört das
Ladegerät, Verlust von Gewährleistung/Garantie!
Je nach angeschlossenem Akku ist je Kanal ein Ladestrom von bis zu 5Amöglich. Aus
diesem Grund muss die Stromversorgung entsprechend stark gewählt werden.
Verbinden Sie die Anschlusskabel (21) polungsrichtig mit der Stromversorgung. Verwenden Sie ggf. die
beiliegenden Polklemmen (22).
Das Ladegerät gibt einen kurzen Signalton ab, die Displays leuchten auf.
Das Ladegerät befindet sich jetzt im Hauptmenü (Beispiel).
Beachten Sie bitte folgende Punkte, bevor Sie einen Akku anschließen/laden:
Falls noch nicht geschehen, lesen Sie unbedingt das Kapitel 5 und 6 vollständig und
aufmerksam durch.
Wissen Sie genau, welche Daten der Akku hat? Unbekannte oder unbedruckte Akkus,
deren Werte Sie nicht kennen, dürfen nicht angeschlossen/geladen werden!
Haben Sie das richtige Ladeprogramm entsprechend dem vorhandenen Akkutyp
gewählt? Falsche Einstellungen beschädigen das Ladegerät und den Akku, außerdem
besteht Brand- und Explosionsgefahr!
Haben Sie den passenden Ladestrom eingestellt?
Haben Sie die richtige Spannung eingestellt (z.B. bei mehrzelligen LiPo-Akkus)? Ein
zweizelliger LiPo-Akku kann u.U. parallelgeschaltet sein (3,7V) oder in Reihe (7,4V).
Sind alle Verbindungskabel und Anschlüsse einwandfrei, halten die Stecker fest in den
Anschlussbuchsen? Ausgeleierte Stecker und beschädigte Kabel sollten ausgetauscht
werden.
Beim Anschluss eines Akkus an das Ladegerät verbinden Sie immer zuerst das Ladekabel mit dem Ladegerät und erst danach den Akku mit dem Ladegerät/Ladekabel.
Beim Abstecken gehen Sie in umgekehrter Reihenfolge vor. Andernfalls besteht die
Gefahr eines Kurzschlusses (z.B. durch die beiden 4mm-Rundstecker des Ladekabels).
Laden Sie an einem Kanal immer nur einen Akku bzw. einen Akkupack.
Wenn Sie selbst-konfektionierte Akkupacks aufladen wollen, so müssen die Zellen bau-
gleich sein (gleicher Typ, gleiche Kapazität, gleicher Hersteller). Außerdem müssen die
Zellen den gleichen Ladezustand haben (LiPo-Akkus können über den Balancer entsprechend ausgeglichen werden, andere Akkuspacks, z.B. NiMH oder NiCd, jedoch nicht).
Page 17

16
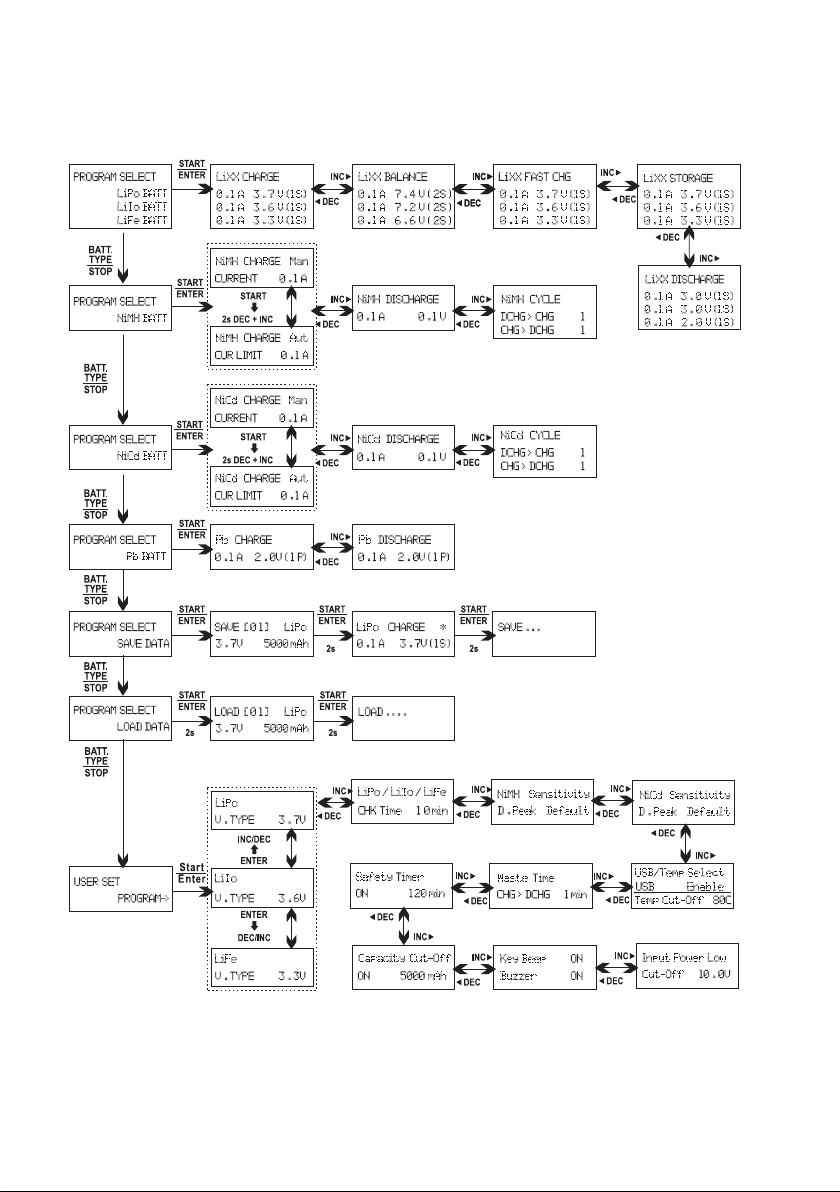
Bedienung der Menüs (Übersicht siehe Ausklappseite):
Wählen Sie im Hauptmenü mit der Taste „BATT.TYPE/STOP“ oder „DEC“ das gewünschte Untermenü
aus und bestätigen Sie die Auswahl mit der Taste „START/ENTER“.
Mit den Tasten „INC“ und „DEC“ lassen sich die verschiedenen Einstellungen aufrufen.
Um einen Wert zu verändern, drücken Sie die Taste „START/ENTER“, der entsprechende Parameter
blinkt.
Verändern Sie den im Display angezeigten Wert mit der Taste „INC“ bzw. „DEC“.
Speichern Sie den (veränderten) Wert mit der Taste „START/ENTER“. Bei mehrfach angezeigten Para-
metern (z.B. LiPo CHARGE -> Ladestrom und Zellenspannung) wird zum nächsten Parameter weitergeschaltet.
Verlassen Sie das Einstellmenü mit der Taste „BATT.TYPE/STOP“, Sie befinden sich dann wieder im
Hauptmenü.
☞
Die Menüstruktur finden Sie zur leichteren Bedienung und besseren Übersicht auf der
Ausklappseite.
10. Lithium-Akkus (LiPo, LiIon, LiFe)
☞
Die gesamte Menüstruktur können Sie auf der Ausklappseite in der richtigen Reihenfolge einsehen. Hier sind auch die Tastenfunktionen zur Bedienung mit angegeben.
a) Allgemein
Dieses Ladeprogramm ist nur geeignet für Akkus mit Lithium-Technik „LiPo“, „LiIon“ und „LiFe“. Die
jeweilige Bauart des Akkus, den Sie am Ladegerät anschließen wollen, muss vor dem Start eines Lade/Entladevorgangs eingestellt werden (in den „User“-Einstellungen, siehe Kapitel 15).
Wenn der Akku einen Balancer-Anschluss besitzt, so müssen beim Laden/Entladen
sowohl der Balancer-Akku-Anschluss als auch die Anschlusskabel des Akkus am
Ladegerät angeschlossen werden.
Wählen Sie den richtigen Balancer-Anschluss je nach Zellenzahl.
Es gibt verschiedene Bauarten für den Balancer-Stecker. Wenden Sie deshalb keine
Gewalt an, wenn der Stecker nicht passt! Im Zubehörhandel gibt es passende Adapter
für die Balancer-Stecker.
Nur bei Verwendung eines Balancers (im Ladegerät „B6 Quadro“ integriert) haben alle
Zellen nach dem Ladevorgang die gleiche Spannung und es kommt nicht zu einer
Überladung einer der Zellen. Letzteres ist für einen LiPo-Akku nicht nur negativ für die
Lebensdauer, sondern es besteht auch die Gefahr der Zerstörung des Akkus, sowie
Brand- und Explosionsgefahr!
Page 18

17
Der einzustellende Ladestrom ist abhängig von der Kapazität des Akkus und sollte üblicherweise 1C betragen. Beachten Sie dazu jedoch die Angaben des Akkuherstellers.
Die Angabe „1C“ bedeutet, dass der Ladestrom dem Wert der Kapazität des Akkus entspricht. Beispielsweise ist bei einem 1800mAh-LiPo-Akku mit 1C ein Ladestrom von
1.8A einzustellen.
Wählen Sie im Hauptmenü mit der Taste „BATT.TYPE/STOP“ das Akku-Programm
„LiXX BATT“ aus und bestätigen Sie dies mit der Taste „START/ENTER“.
☞
Je nachdem, welchen Akkutyp Sie in den „User“-Einstellungen ausgewählt haben, wird
im Display „LiPo“, „LiIo“ oder „LiFe“ angezeigt.
Kontrollieren Sie, ob der im Display angezeigte Akkutyp mit dem Akku übereinstimmt, den Sie laden
bzw. entladen wollen.
Danach können mit den Tasten „INC“ und „DEC“ die verschiedenen Funktionen ausgewählt werden:
• „CHARGE“: Lithium-Akku ohne Balanceranschluss laden
• „BALANCE“: Lithium-Akku mit Balanceranschluss laden
• „FAST CHG“: Schnellladung eines Akkus
• „STORAGE“: Akkus auf einen bestimmten Spannungswert laden bzw. entladen
• „DISCHARGE“: Akku entladen
b) Akku ohne Balancer-Anschluss laden („CHARGE“)
Nach Auswahl von „CHARGE“ erscheint z.B. folgende Anzeige:
Der Wert links in der zweiten Zeile gibt den Ladestrom an, der Wert rechts
die Spannung bzw. die Zellenzahl des Akkupacks (hier im Beispiel ein
1zelliger LiPo-Akkupack, 1x 3.7V = 3,7 V).
☞
Den Akkutyp (LiPo, LiIon, LiFe) wählen Sie wie in Kapitel 15 beschrieben aus.
Wenn die Werte verändert werden sollen, so drücken Sie die Taste „START/ENTER“. Der Ladestrom
blinkt. Verändern Sie den Ladestrom mit den Tasten „INC“ und „DEC“, bestätigen Sie den Wert mit der
Taste „START/ENTER“.
Daraufhin blinkt die Spannung. Verändern Sie diese mit den Tasten „INC“ und „DEC“. Dabei ist zu beachten, dass die Spannung nur anhand der Zellenzahl verändert wird (z.B. eine Zelle = 3.7V, zwei Zellen =
7.4V usw.). Bestätigen Sie die Einstellung mit der Taste „START/ENTER“.
Um den Ladevorgang zu starten, halten Sie die Taste „START/ENTER“ länger gedrückt (ca. 3 Sekunden).
Falls die Einstellungen falsch sind bzw. das Ladegerät einen Fehler feststellt, so wird ein Warnsignal aus-
gegeben und eine entsprechende Information im Display. Mit der Taste „BATT.TYPE/STOP“ beenden Sie
das Warnsignal; Sie gelangen wieder ins vorherige Einstellmenü zurück.
Page 19
18
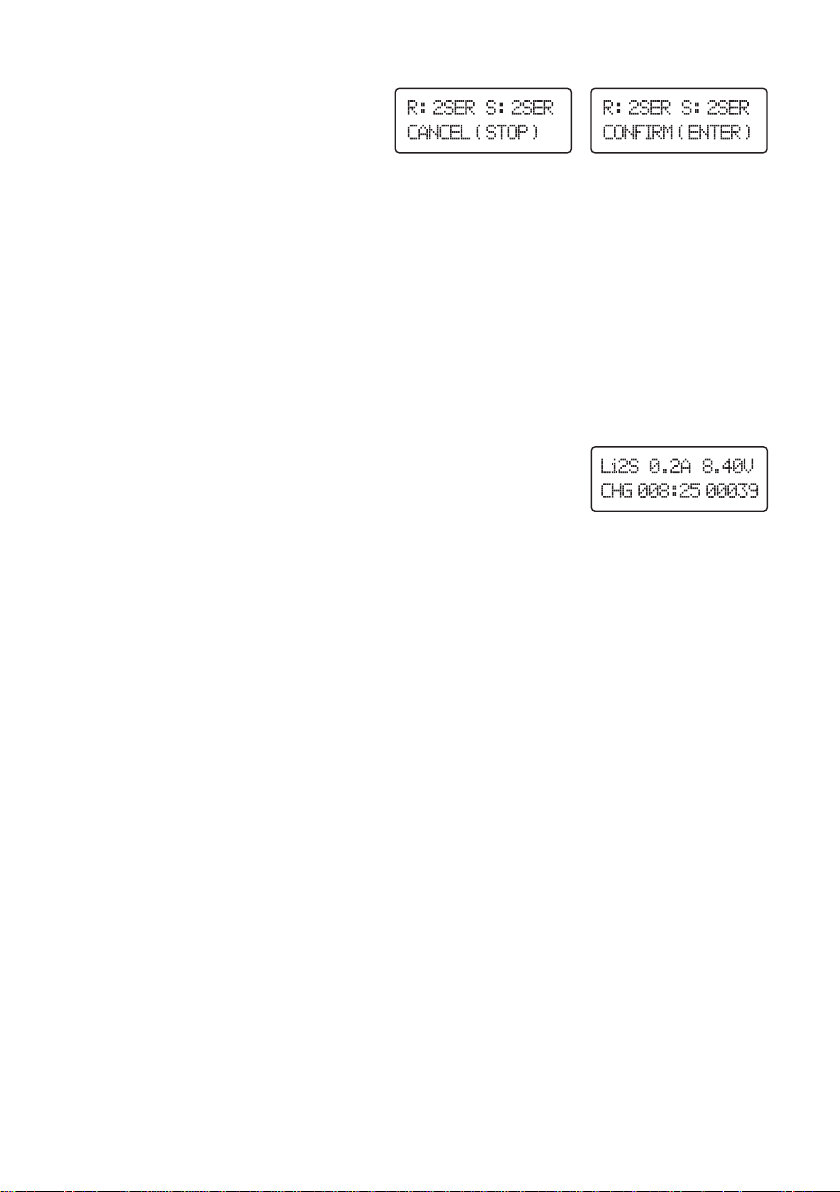
Andernfalls erscheint z.B. folgende Anzeige
(abwechselnd):
Der Wert bei „R:“ gibt die Zellenzahl an, die das Ladegerät erkannt hat.
Der Wert bei „S:“ gibt die Zellenzahl an, die Sie im Menü eingestellt haben.
Falls diese beiden Zellenzahlen nicht übereinstimmen, prüfen Sie bitte sowohl die
Einstellungen im Ladegerät als auch den Akku. Eventuell ist der LiPo-Akku tiefentladen, oder eine Zelle ist defekt. Solche Akkus sollten Sie nicht laden, da andernfalls Brand- und Explosionsgefahr besteht! Mit der Taste „BATT.TYPE/STOP“
gelangen Sie zurück ins vorherige Einstellmenü.
Stimmen die beiden Zellenzahlen überein, so starten Sie den Ladevorgang, indem Sie die Taste
„START/ENTER“ kurz drücken.
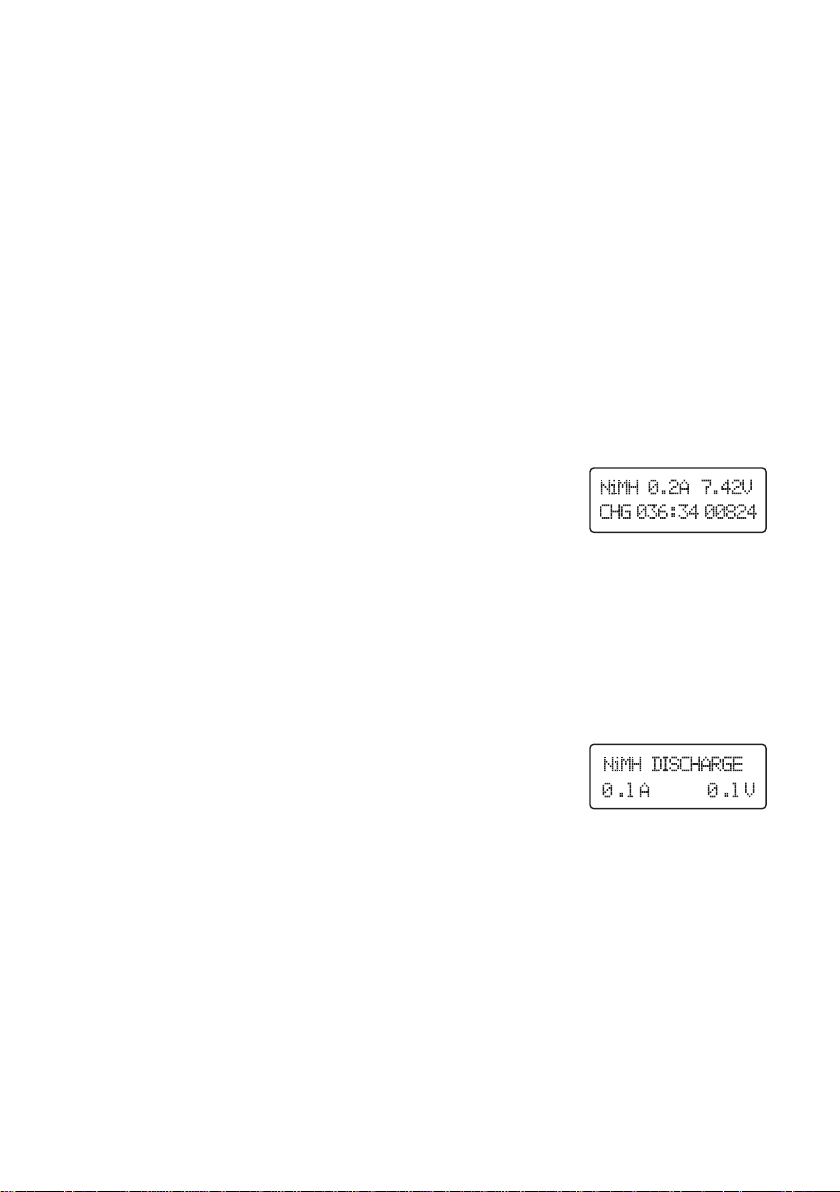
Nach dem Start des Ladevorgangs erscheinen im Display diverse Informationen über den aktuellen
Ladefortschritt, siehe nächstes Bild:
Beispiel:
1. Zeile: Zellentyp und Zellenzahl, Ladestrom, Akkuspannung
2. Zeile: Aktuelle Ladedauer, Geladene Kapazität in mAh
Wenn der Ladevorgang abgeschlossen ist, wird ein Tonsignal ausgegeben (sofern nicht ausgeschaltet).
☞
Falls Sie den Ladevorgang vorher beenden wollen, drücken Sie die Taste
„BATT.TYPE/STOP“.
c) Akku mit Balanceranschluss laden („BALANCE“)
Im Gegensatz zum einfachen Ladeprogramm „CHARGE“ wird hier die Spannung jeder einzelnen Zelle
überwacht und der Ladestrom entsprechend eingestellt.
Neben den normalen zwei Akkuanschlüssen muss auch der Balancer-Anschluss des Akkus an das
Ladegerät angeschlossen werden, siehe Kapitel 10. a).
Die restliche Vorgehensweise beim Laden ist im Kapitel 10. b) beschrieben.
☞
Wenn ein mehrzelliger Akku über die Balancer-Anschlüsse verbunden ist, so kann
während dem Ladevorgang mit der Taste „INC“ zwischen der normalen Anzeige und
der Anzeige der Zellenspannungen umgeschaltet werden.
Nur ein Akkupack mit exakt gleicher Spannung pro Zelle liefert die maximale Leistung
und Betriebsdauer für ein Modellflugzeug/-fahrzeug.
Aufgrund von Schwankungen in der Materialqualität und dem inneren Aufbau z.B.
eines mehrzelligen LiPo-Akkupacks kommt es beim Entladen dazu, dass die Zellen am
Entlade-Ende eine unterschiedliche Spannung haben können.
Page 20

19
Lädt man solch einen LiPo-Akku ohne Balancer, stellen sich sehr schnell große Unterschiede in der Zellenspannung ein. Dies führt nicht nur zu einer kürzeren Betriebsdauer
(weil eine Zelle in der Spannung einbricht), sondern der Akku wird durch eine Tiefentladung beschädigt.
Weiterhin besteht beim Aufladen solcher unterschiedlicher Zellen (mit verschiedener
Spannung) ohne Balancer die Gefahr der Überladung: Die maximal zulässige Spannung einer LiPo-Zelle von etwa 4,2V (+/- 1%) wird überschritten
(Daten für LiIon und LiFe siehe Kapitel 7).
Beispiel:
Nach außen hin hat ein ohne Balancer geladener LiPo-Akkupack mit 2 Zellen eine Spannung von 8,4V
und erscheint damit voll geladen. Die einzelnen Zellen haben aber eine Spannung von 4,5V und 3,9V
(eine Zelle ist gefährlich überladen, die andere halb leer).
Eine solch überladene Zelle kann auslaufen oder im schlimmsten Fall in Brand geraten oder
explodieren!
Sollte Ihr LiPo-Akkupack über einen Balancer-Anschluss verfügen, ist deshalb immer das Ladeprogramm „BALANCE“ zu benutzen.
Sollte Ihr „LiFe“ bzw. „LiIon“-Pack ebenfalls einen Balancer-Anschluss haben, so gelten o.g. Informationen analog, nur die Spannungswerte unterscheiden sich, siehe Kapitel 7.
d) Schnellladung („FAST CHG“)
Beim Laden eines Lithium-Akkus wird der Ladestrom durch das verwendete Ladeverfahren bei LithiumAkkus immer geringer, je voller der Akku ist. Dadurch steigt natürlich auch die Ladezeit.
Durch ein spezielles Ladeverfahren wird bei der Schnellladung ein höherer Ladestrom erreicht. Dies
geht jedoch auf Kosten der Kapazität, da aufgrund der Sicherheitsschaltungen im Ladegerät der Ladevorgang früher beendet wird.
Das bedeutet, z.B. ein LiPo-Akku kann bei der Schnellladung nicht vollständig aufgeladen werden. Es
stehen nur etwa 90% der Kapazität zur Verfügung, die mit dem normalen Ladeverfahren möglich sind.
☞
Die Schnellladung ist also nur dann sinnvoll, wenn es darauf ankommt, einen Akku
möglichst schnell wieder im Einsatz zu haben.
Die Vorgehensweise beim Einstellen von Ladestrom und Spannung/Zellenzahl ist genauso durchzuführen wie beim normalen Ladeverfahren, siehe Kapitel 10. b).
Page 21

20
e) Akku einlagern („STORAGE“)
Diese Funktion kann verwendet werden, um den Akku auf eine bestimmte Spannungslage zu bringen,
die für die Lagerung als ideal angesehen wird (LiPo = 3,85V, LiIon = 3,75V, LiFe = 3,3V).
Je nach Zellenspannung wird der Akku entweder entladen oder geladen. Dies ist natürlich bei einem
mehrzelligen Akkupack nur dann sinnvoll, wenn ein Balancer-Anschluss vorhanden ist.
Die Vorgehensweise beim Einstellen von Strom und Spannung/Zellenzahl ist genauso durchzuführen
wie beim normalen Ladeverfahren, siehe Kapitel 10. b).
☞
Der eingestellte Strom wird für das Auf- und Entladen verwendet.
f) Akku entladen („DISCHARGE“)
Normalerweise ist es bei Lithium-Akkus nicht erforderlich, diese zu entladen (entgegen NiCd- Akkus).
Der Akku kann unabhängig von seinem vorhandenem Zustand sofort aufgeladen werden.
Falls Sie trotzdem einen solchen Akku entladen möchten, so kann der Entladestrom zwischen 0,1Aund
1,0A eingestellt werden.
Die weitere Vorgehensweise ist wie in Kapitel 10. b) beschrieben durchzuführen, nur dass eben der
Akku nicht geladen, sondern entladen wird.
Die Entladeschlussspannung ist je nach eingestelltem Akkutyp unterschiedlich und im Ladegerät bereits
voreingestellt. Zusätzlich zum Akkutyp wird die zugehörige Spannung im Display angezeigt.
• LiPo: 3,0V pro Zelle
• LiIon: 2,5V pro Zelle
• LiFe: 2,0V pro Zelle
☞
Wenn ein mehrzelliger Akku über die Balancer-Anschlüsse verbunden ist, so kann
während dem Entladevorgang mit der Taste „INC“ zwischen der normalen Anzeige und
der Anzeige der Zellenspannungen umgeschaltet werden.
Page 22
21
11. NiMH- und NiCd-Akkus
☞
Die gesamte Menüstruktur können Sie auf der Ausklappseite in der richtigen Reihenfolge einsehen. Hier sind auch die Tastenfunktionen zur Bedienung mit angegeben.
a) Akku laden („CHARGE“)
Der einzustellende Ladestrom ist abhängig von der Kapazität des Akkus und sollte üblicherweise 1C
betragen. Beachten Sie dazu jedoch die Angaben des Akkuherstellers.
Die Angabe „1C“ bedeutet, dass der Ladestrom dem Wert der Kapazität des Akkus entspricht.
Bei einem 3000mAh-NiMH-Akku ist bei 1C also ein Ladestrom von 3.0A einzustellen.
☞
Je nach Akkutyp und Bauart ist ein Ladestrom von 1C nicht möglich. Beispielsweise
bestehen Empfängerakkus in der Regel aus Mignon/AA-Zellen, die einen so hohen
Ladestrom nicht schadlos überstehen.
In der Regel gilt: Je kleiner der Akku (also die einzelne Zelle), umso geringer ist der maximale Ladestrom. Viele NiMH-Mignon/AA-Zellen mit einer Kapazität von ca. 2000mAh
erlauben z.B. für eine Schnellladung einen Ladestrom von 400-500mA.
Gehen Sie zum Laden eines NiMH- bzw. NiCd-Akkus wie folgt vor:
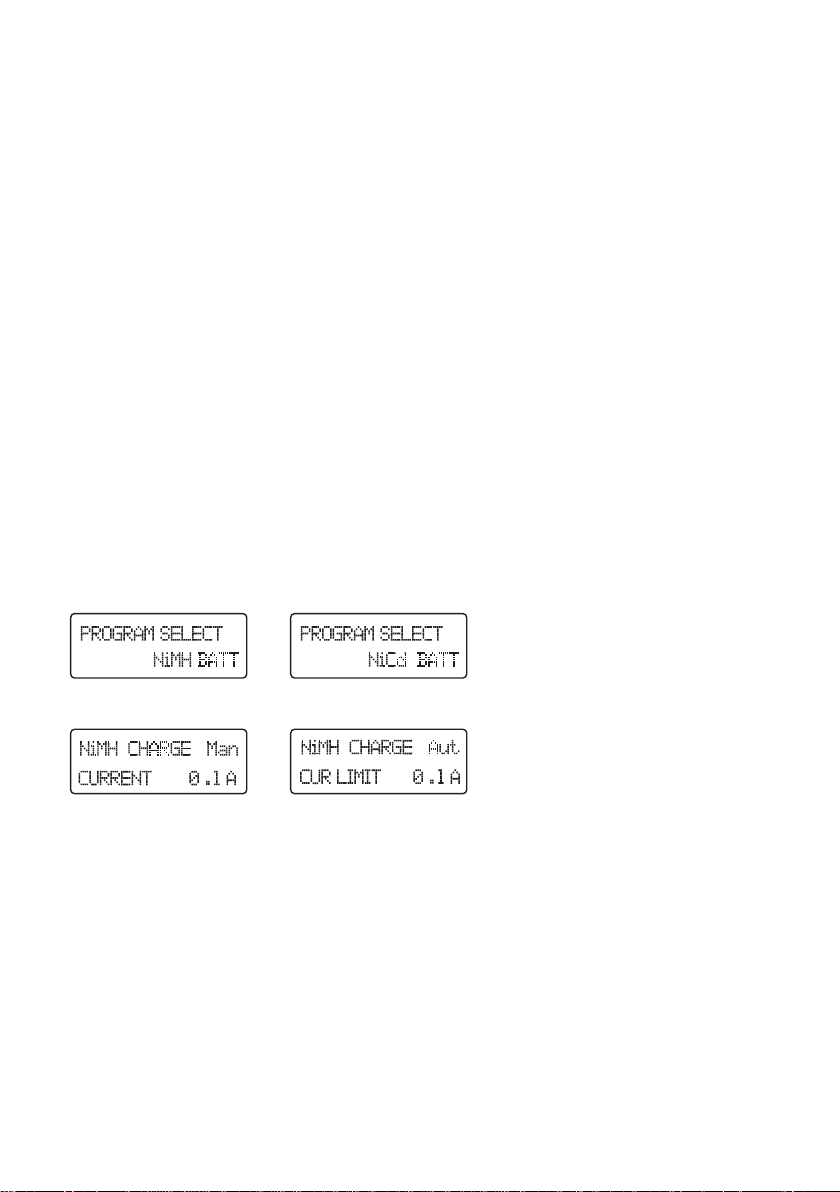
• Wählen Sie im Hauptmenü mit der Taste „BATT.TYPE/STOP“ das „NiMH“- bzw. „NiCd“-Ladeprogramm
aus.
• Drücken Sie die Taste „START/ENTER“, es erscheint im Display z.B. folgende Anzeige:
Das linke Bild zeigt den manuellen Modus (der Ladestrom wird von Ihnen vorgegeben), das rechte Bild
den automatischen Modus (der Ladestrom wird vom Ladegerät selbst eingestellt, Sie geben nur eine
Obergrenze vor).
☞
Wird jetzt die Taste „INC“ oder „DEC“ kurz gedrückt, so gelangen Sie zum Entladeprogramm („DISCHARGE“), zum Zyklus-Programm („CYCLE“) und wieder zurück zum
Ladeprogramm („CHARGE“), siehe Kapitel 11. b) und 11. c).
• Drücken Sie kurz die Taste „START/ENTER“, um in den Einstellmodus zu gelangen. Daraufhin blinkt
der Stromwert unten rechts im Display.
Page 23
22
Wenn der Stromwert blinkt, kann durch gleichzeitiges Drücken der Tasten „INC“ und „DEC“ zwischen dem manuellen und dem automatischen Modus umgeschaltet werden.
☞
Beim manuellen Modus wird mit dem Strom geladen, den Sie einstellen.
Beim automatischen Modus berechnet das Ladegerät den Ladestrom automatisch, Sie
stellen nur eine Obergrenze für den Ladestrom ein. Abhängig vom Akku und dessen
Innenwiderstand können u.U. kürzere Ladezeiten erzielt werden.
• Verändern Sie den Ladestrom (bzw. im automatischen Modus die Obergrenze für den Ladestrom) mit
den Tasten „INC“ und „DEC“, bestätigen Sie den Wert mit der Taste „START/ENTER“. Die Zellenzahl
wird automatisch ermittelt!
• Um den Ladevorgang zu starten, halten Sie die Taste „START/ENTER“ länger gedrückt (ca. 3 Sekunden).
• Falls das Ladegerät einen Fehler feststellt (z.B. kein Akku angeschlossen), so wird ein Warnsignal ausgegeben und eine entsprechende Information im Display erscheint.
• Mit der Taste „BATT.TYPE/STOP“ beenden Sie das Warnsignal; Sie gelangen wieder ins vorherige Einstellmenü zurück.
• Wird der Akku korrekt erkannt, erscheint z.B. folgende Anzeige:
1. Zeile: Akkutyp, Ladestrom, Akkuspannung
2. Zeile: Aktuelle Ladedauer, Geladene Kapazität in mAh
• Wenn der Ladevorgang abgeschlossen ist, wird ein Tonsignal ausgegeben.
☞
Falls Sie den Ladevorgang vorher beenden wollen, drücken Sie die Taste
„BATT.TYPE/STOP“.
b) Akku entladen („DISCHARGE“)
• Nachdem Sie im Hauptmenü mit der Taste „BATT.TYPE/STOP“ das
„NiMH“- bzw. „NiCd“-Programm ausgewählt und mit der Taste
„START/ENTER“ bestätigt haben, können Sie mittels der Taste „INC“ bzw.
„DEC“ die Entladefunktion auswählen (Abbildung zeigt NiMH-Akku):
• Wenn der Entladestrom und die Entladeschluss-Spannung eingestellt werden soll, so drücken Sie die
Taste „START/ENTER“. Der Entladestrom blinkt.
• Verändern Sie den Entladestrom mit den Tasten „INC“ und „DEC“, bestätigen Sie den Wert mit der
Taste „START/ENTER“. Einstellbar ist ein Wert zwischen 0,1A und 1,0A.
• Anschließend blinkt die Entladeschluss-Spannung, die ebenfalls mit den Tasten „INC“ und „DEC“ eingestellt wird. Möglich sind Spannungswerte zwischen 0,1V und 25,0V.
Bitte achten Sie beim Einstellen des Spannungswertes darauf, dass die Zellenspannung bei NiMH nicht unter 1,0V betragen darf, bei NiCd nicht unter 0,85V.
Andernfalls kann der Akku beschädigt werden!
Page 24

23
• Um den Entladevorgang zu starten, halten Sie die Taste „START/ENTER“ länger gedrückt (ca. 3
Sekunden). Im Display werden nun wie beim Ladevorgang verschiedene Informationen angezeigt
(Entladedauer, Entladekapazität, Entladestrom und aktuelle Spannung des Akkus).
• Falls die Einstellungen falsch sind bzw. das Ladegerät einen Fehler feststellt, so wird ein Warnsignal
ausgegeben und eine entsprechende Information im Display wird angezeigt. Mit der Taste
„BATT.TYPE/STOP“ beenden Sie das Warnsignal; Sie gelangen wieder ins vorherige Einstellmenü
zurück.
• Wird während dem Entladevorgang die Taste „START/ENTER“ gedrückt, lässt sich der Entladestrom
verändern, siehe oben.
• Wenn der Entladevorgang abgeschlossen ist, wird ein Tonsignal ausgegeben.
☞
Falls Sie den Entladevorgang vorher beenden wollen, drücken Sie die Taste
„BATT.TYPE/STOP“.
c) Zyklus-Programm („CYCLE“)
Um Akkus zu testen oder zu „Refreshen“ (einen schwachen, alten Akku leistungsfähiger zu machen),
können Sie bis zu 5 Zyklen automatisch nacheinander durchführen. Sowohl die Kombination „Entladen/Laden“ („DCHG>CHG“) bzw. „Laden/Entladen“ („CHG>DCHG“) ist möglich.
• Nachdem Sie im Hauptmenü mit der Taste „BATT. TYPE/STOP“ das „NiMH“- bzw. „NiCd“-Programm
ausgewählt und mit der Taste „START/ENTER“ bestätigt haben, können Sie mittels der Taste „INC“
bzw. „DEC“ das Zyklus-Programm auswählen (Abbildung zeigt NiMH-Akku):
• Wenn die Reihenfolge von Entladen und Laden vertauscht bzw. die Zykluszahl eingestellt werden soll,
so drücken Sie die Taste „START/ENTER“. Im Display blinkt nun in der unteren Zeile der Text für die
Programm-Reihenfolge.
Verändern Sie die Programm-Reihenfolge mit den Tasten „INC“ und „DEC“:
Im linken Bild wird zuerst entladen und anschließend geladen. Im rechten Bild ist die Reihenfolge umgekehrt, es wird zuerst geladen, anschließend entladen.
• Bestätigen Sie die Auswahl mit der Taste „START/ENTER“.
• Die Zykluszahl beginnt zu blinken. Dies ist die Anzahl, wie oft die gerade eingestellte Reihenfolge von Entladen/Laden bzw. Laden/Entladen ausgeführt wird. Einstellbar ist ein Wert von 1 bis 5 Zyklen, benutzen Sie
dazu die Tasten „INC“ bzw. „DEC“, bestätigen Sie die Einstellung wie üblich mit der Taste „START/ENTER“.
Page 25

24
• Um den Zyklus zu starten, halten Sie die Taste „START/ENTER“ länger gedrückt (ca. 3 Sekunden).
• Falls die Einstellungen falsch sind bzw. das Ladegerät einen Fehler feststellt, so wird ein Warnsignal
ausgegeben und eine entsprechende Information im Display wird angezeigt.
• Wenn der Zyklus abgeschlossen ist, wird ein Tonsignal ausgegeben. Im Display werden die erfassten
Daten angezeigt. Mit den Tasten „INC“ bzw. „DEC“, können die einzelnen Zyklen angewählt werden.
☞
Falls Sie den Zyklus vorher beenden wollen, drücken Sie die Taste
„BATT.TYPE/STOP“.
• Betätigen Sie die Taste „BATT. TYPE/STOP“ um diese Anzeige zu verlassen.
12. Bleiakkus (Pb)
☞
Die gesamte Menüstruktur können Sie auf der Ausklappseite in der richtigen Reihenfolge einsehen. Hier sind auch die Tastenfunktionen zur Bedienung mit angegeben.
a) Allgemein
Bleiakkus unterscheiden sich völlig von NiMH- oder NiCd-Akkus. Sie können verglichen mit ihrer hohen
Kapazität nur geringe Ströme liefern, außerdem ist der Ladevorgang anders.
Der Ladestrom für Bleiakkus darf nur maximal 1/10 (1/10 C) der Kapazität des Akkus betragen.
Bei einem 5000mAh-Bleiakku (5Ah) darf deshalb maximal ein Ladestrom von 0.5A (500mA) eingestellt
werden.
Eine Schnellladung von Bleiakkus ist nicht zulässig, dadurch wird der Akku überlastet Explosions- und Brandgefahr!
Beachten Sie unbedingt die auf dem Akku aufgedruckten Informationen bzw. die Daten
vom Akkuhersteller, welcher Ladestrom erlaubt ist.
Page 26
25
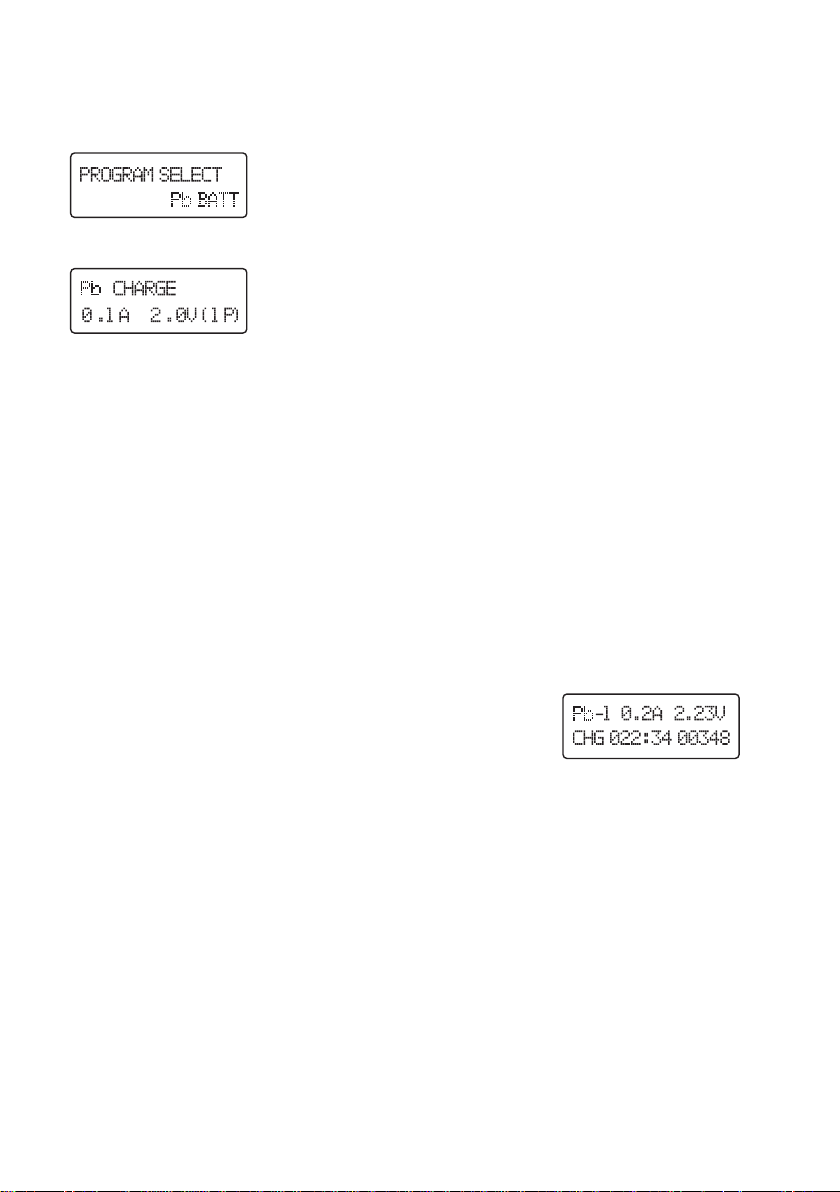
b) Akku laden („CHARGE“)
• Wählen Sie im Hauptmenü mit der Taste „BATT.TYPE/STOP“ das „Pb“-Ladeprogramm aus.
• Drücken Sie die Taste „START/ENTER“, es erscheint im Display z.B. folgende Anzeige:
Der Wert links in der zweiten Zeile gibt den Ladestrom an, der Wert rechts die Spannung bzw. die Zellenzahl des Akkus (hier im Beispiel ein 1zelliger Bleiakku, 1x 2,0V = 2,0V).
• Wenn die Werte verändert werden sollen, so drücken Sie die Taste „START/ENTER“. Der Ladestrom
blinkt. Verändern Sie den Ladestrom mit den Tasten „INC“ und „DEC“, bestätigen Sie den Wert mit der
Taste „START/ENTER“.
• Daraufhin blinkt die Spannung/Zellenzahl. Verändern Sie diese mit den Tasten „INC“ und „DEC“. Dabei
ist zu beachten, dass die Spannung nur anhand der Zellenzahl verändert wird (z.B. eine Zelle = 2,0V,
zwei Zellen = 4,0V usw.). Bestätigen Sie die Einstellung mit der Taste „START/ENTER“.
• Um den Ladevorgang zu starten, halten Sie die Taste „START/ENTER“ länger gedrückt (ca. 3 Sekunden).
• Falls die Einstellungen falsch sind bzw. das Ladegerät einen Fehler feststellt, so wird ein Warnsignal
ausgegeben und eine entsprechende Information im Display.
Mit der Taste „BATT.TYPE/STOP“ beenden Sie das Warnsignal; Sie gelangen wieder ins vorherige Einstellmenü zurück.
• Wird der Akku korrekt erkannt, erscheint z.B. folgende Anzeige:
1. Zeile: Akkutyp und Zellenanzahl, Ladestrom, Akkuspannung
2. Zeile: Aktuelle Ladedauer, Geladene Kapazität in mAh
• Wenn der Ladevorgang abgeschlossen ist, wird ein Tonsignal ausgegeben.
☞
Falls Sie den Ladevorgang vorher beenden wollen, drücken Sie die Taste
„BATT.TYPE/STOP“.
Page 27

26
c) Akku entladen („DISCHARGE“)
• Nachdem Sie im Hauptmenü mit der Taste „BATT.TYPE/STOP“ das „Pb“-Programm ausgewählt und
mit der Taste „START/ENTER“ bestätigt haben, können Sie mittels der Taste „INC“ bzw. „DEC“ die Entladefunktion auswählen:
Der Wert links in der zweiten Zeile gibt den Entladestrom an, der Wert rechts die Spannung bzw. die Zellenzahl des Akkus (hier im Beispiel ein 1zelliger Bleiakku, 1x 2,0V = 2,0V).
• Wenn die Werte verändert werden sollen, so drücken Sie die Taste „START/ENTER“. Der Entladestrom
blinkt. Verändern Sie den Entladestrom mit den Tasten „INC“ und „DEC“, bestätigen Sie den Wert mit der
Taste „START/ENTER“.
• Daraufhin blinkt die Spannung/Zellenzahl. Verändern Sie diese mit den Tasten „INC“ und „DEC“. Dabei
ist zu beachten, dass die Spannung nur anhand der Zellenzahl verändert wird (z.B. eine Zelle = 2,0V,
zwei Zellen = 4,0V usw.). Bestätigen Sie die Einstellung mit der Taste „START/ENTER“.
☞
Die Entladeschlussspannung wird vom Ladegerät aus Sicherheitsgründen automatisch eingestellt.
• Um den Entladevorgang zu starten, halten Sie die Taste „START/ENTER“ länger gedrückt (ca. 3
Sekunden).
• Falls die Einstellungen falsch sind bzw. das Ladegerät einen Fehler feststellt, so wird ein Warnsignal
ausgegeben und eine entsprechende Information im Display erscheint.
• Mit der Taste „BATT.TYPE/STOP“ beenden Sie das Warnsignal; Sie gelangen wieder ins vorherige Einstellmenü zurück.
• Wird während dem Entladevorgang die Taste „START/ENTER“ gedrückt, lässt sich der Entladestrom
verändern, siehe oben.
• Wenn der Entladevorgang abgeschlossen ist, wird ein Tonsignal ausgegeben.
☞
Falls Sie den Entladevorgang vorher beenden wollen, drücken Sie die Taste
„BATT.TYPE/STOP“.
Page 28
27
13. Akkudaten speichern
☞
Die gesamte Menüstruktur können Sie auf der Ausklappseite in der richtigen Reihenfolge einsehen. Hier sind auch die Tastenfunktionen zur Bedienung mit angegeben.
Das Ladegerät hat insgesamt 10 Speicher, in dem Sie Akkudaten/Einstellungen ablegen können.
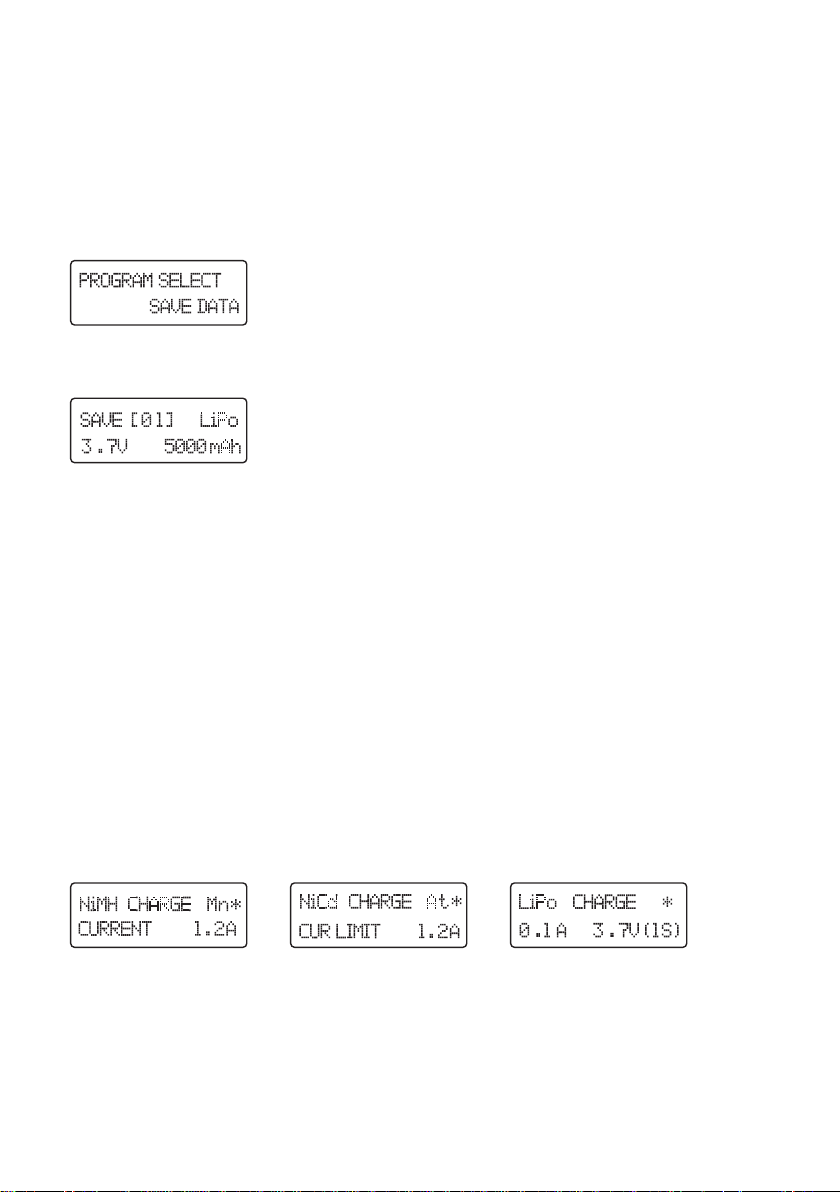
• Wählen Sie im Hauptmenü mit der Taste „BATT.TYPE/STOP“ die Funktion „SAVE DATA“ aus:
• Drücken Sie die Taste „START/ENTER“, es erscheint im Display z.B. folgende Anzeige, der Speicher
„01“ blinkt:
• Wählen Sie mit den Tasten „INC“ bzw. „DEC“ den gewünschten Speicher (1....10) aus, bestätigen Sie
die Auswahl mit der Taste „START/ENTER“.
• Nun blinkt oben rechts im Display der Akkutyp, den Sie mit den Tasten „INC“ bzw. „DEC“ verändern
können. Bestätigen Sie die Auswahl mit der Taste „START/ENTER“.
☞
Eine Auswahl der Lithium-Akkus zwischen „LiPo“, „LiIon“ und „LiFe“ ist nicht möglich,
es wird immer der im User-Menü eingestellte Typ benutzt.
• Unten links beginnt die Spannung zu blinken. Verstellen Sie diese wie gewohnt mit den Tasten „INC“
bzw. „DEC“, bestätigen Sie sie mit der Taste „START/ENTER“.
• Unten rechts blinkt jetzt die Akkukapazität. Stellen Sie sie mit den Tasten „INC“ bzw. „DEC“, ein (Taste
länger gedrückt halten für Schnellverstellung) und bestätigen Sie sie mit der Taste „START/ENTER“.
• Danach blinkt wieder die Speichernummer.
• Halten Sie die Taste „START/ENTER“ länger gedrückt (ca. 3 Sekunden), um zum nächsten Menü zu
kommen, lassen Sie dann sofort die Taste wieder los. Es erscheint z.B. folgende Anzeige (abhängig
vom vorhin gewählten Akkutyp):
Wird die Taste „START/ENTER“ zu lang festgehalten, erscheint im Display „SAVE . . .“,
die Einstellungen werden gespeichert. Starten Sie in diesem Fall einfach die Einstellung
erneut, um im Menü fortzufahren.
Page 29
28
• Drücken Sie kurz die Taste „START/ENTER“, der Stromwert (A) in der unteren Zeile blinkt.
☞
Bei NiCd- bzw. NiMH-Akkus kann bei blinkendem Stromwert durch gleichzeitiges
Drücken der Tasten „INC“ und „DEC“ zwischen dem manuellen und dem automatischen Modus umgeschaltet werden (siehe Kapitel 11. a).
Bei Lithium-Akkus muss neben der Einstellung des Ladestroms auch die Einstellung
der Zellenzahl (S) erfolgen.
Die Einstellung ist wie üblich mit den Tasten „INC“ bzw. „DEC“ möglich, bestätigen Sie mit der Taste
„START/ENTER“.
• Wenn die Werte nicht blinken, kann mit den Tasten „INC“ bzw. „DEC“ zwischen den unterschiedlichen
Programmen gewählt werden - je nach Akkutyp sind „DISCHARGE“, „CHARGE“, „STORAGE“,
„BALANCE“, „CYCLE“ usw. möglich.
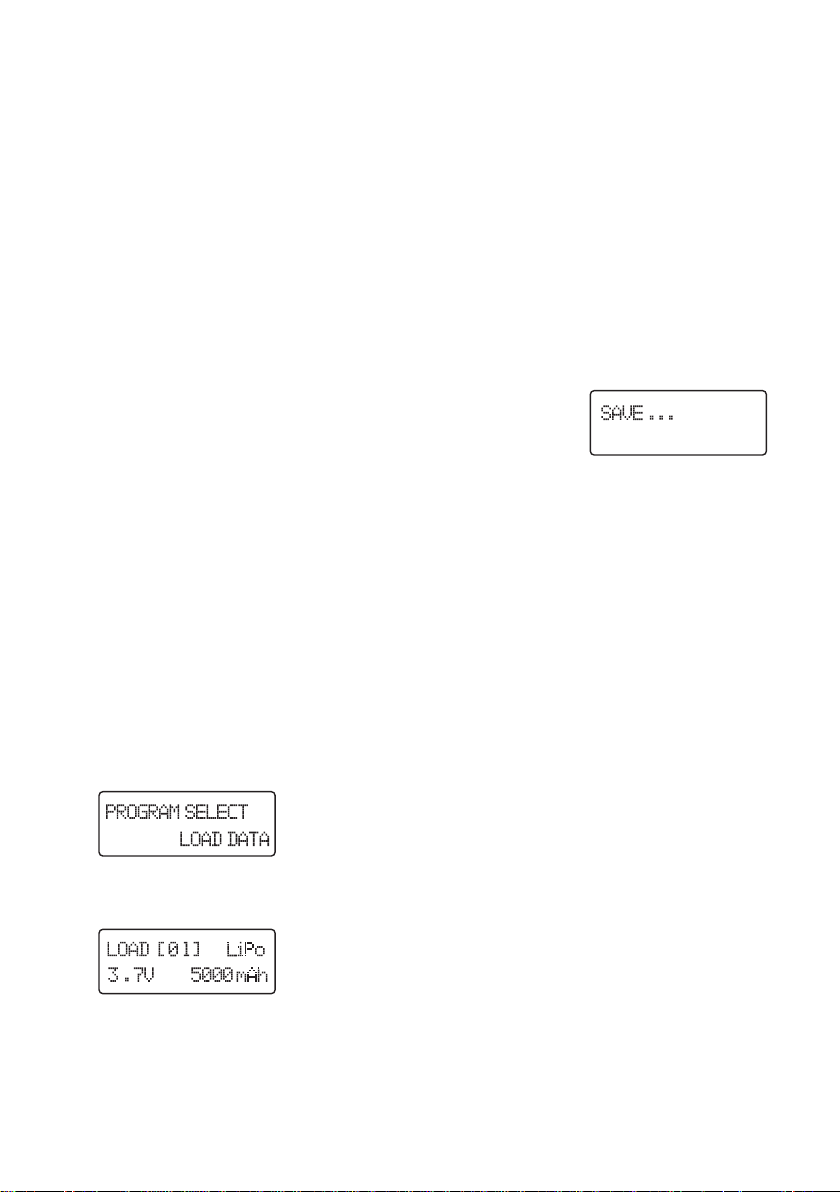
• Wird nun die Taste „START/ENTER“ länger gedrückt (ca. 3 Sekunden),
so werden alle Einstellungen im zuvor ausgewählten Speicherplatz abgelegt. Im Display erscheint „SAVE“. Der Speicherfortschritt wird über Punkte angezeigt.
☞
Die Daten in den 10 Speicherplätzen bleiben selbstverständlich erhalten, auch wenn
das Ladegerät von der Versorgungsspannung getrennt wird.
So können Sie beispielsweise die Daten für den Senderakku speichern (z.B. NiMH,
Ladestrom 400mA) und für einen Flugakku (LiPo, 1A Ladestrom, 3 Zellen).
14. Akkudaten laden
☞
Die gesamte Menüstruktur können Sie auf der Ausklappseite in der richtigen Reihenfolge einsehen. Hier sind auch die Tastenfunktionen zur Bedienung mit angegeben.
• Wählen Sie im Hauptmenü mit der Taste „BATT.TYPE/STOP“ die Funktion „LOAD DATA“ aus:
• Drücken Sie die Taste „START/ENTER“, es erscheint im Display z.B. folgende Anzeige, der Speicher
„01“ blinkt:
• Wählen Sie mit den Tasten „INC“ bzw. „DEC“ den gewünschten Speicher (1....10) aus.
Page 30
29
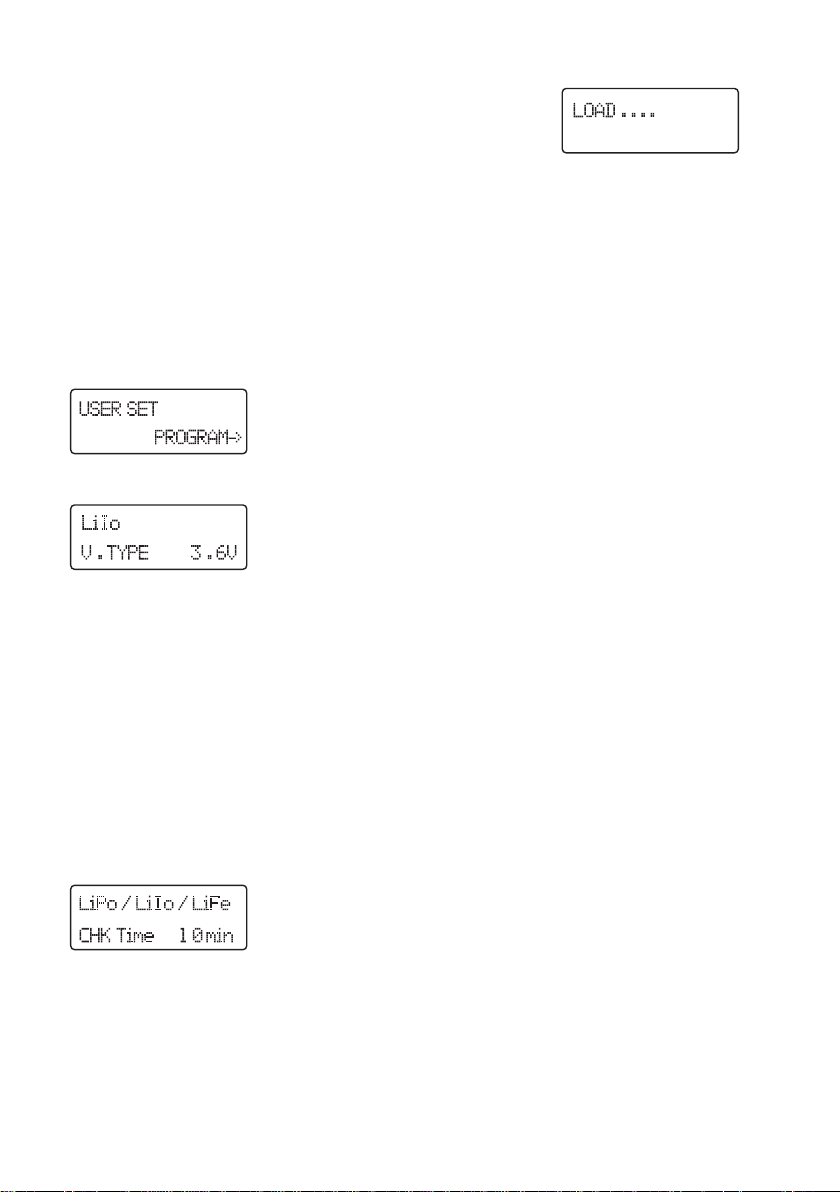
• Wird nun die Taste „START/ENTER“ länger gedrückt (ca. 3 Sekunden),
so werden alle Einstellungen aus dem zuvor ausgewählten Speicherplatz
geladen. Im Display erscheint „LOAD“.
Die Daten werden übernommen, alle Einstellungen entsprechend den abgespeicherten Werten
15. Diverse Grundeinstellungen („USER SET“)
☞
Die gesamte Menüstruktur können Sie auf der Ausklappseite in der richtigen Reihenfolge einsehen. Hier sind auch die Tastenfunktionen zur Bedienung mit angegeben.
• Wählen Sie im Hauptmenü mit der Taste „BATT.TYPE/STOP“ das „USER“-Menü aus.
• Drücken Sie die Taste „START/ENTER“, es erscheint im Display z.B. folgende Anzeige:
• Hier kann einer der drei Lithium-Akkutypen ausgewählt werden, mit dem das Ladegerät arbeiten kann
(„LiIo“, „LiPo“, „LiFe“).
• Drücken Sie kurz die Taste „START/ENTER“. Daraufhin blinkt der Spannungswert.
• Mit den Tasten „INC“ bzw. „DEC“ kann die Zellenspannung „3.3“, „3.6“ oder „3.7“ ausgewählt werden.
Gleichzeitig wechselt in der oberen Zeile der zugehörige Akkutyp.
• Bestätigen Sie die Auswahl des Lithium-Akkutyps mit der Taste „START/ENTER“, der Spannungswert
hört auf, zu blinken.
☞
Die hier getroffene Einstellung des Lithium-Akkutyps gilt anschließend für ALLE weiteren
Funktionen, z.B. dem Laden, Entladen usw., siehe Kapitel 10.
• Wechseln Sie mit der Taste „INC“ zur nächsten Einstellung (bzw. mit der Taste „DEC“ zur vorhergehenden Einstellung).
• Hier kann die Zeit eingestellt werden, die das Ladegerät einen angeschlossenen Lithium-Akku auf korrekte Zellenzahl überprüft und ggf. den Ladevorgang abbricht.
• Vor allem bei tiefentladenen Akkus kann dies hilfreich sein. Stellen Sie bei einem Akku mit höherer
Kapazität eine längere Zeit ein, bei einem Akku mit kleiner Kapazität eine entsprechend kurze Zeit.
Page 31

30
• Drücken Sie kurz die Taste „START/ENTER“. Daraufhin blinkt die Zeitanzeige. Mit den Tasten „INC“
bzw. „DEC“ kann die Zeit eingestellt werden (5....60 Minuten). Speichern Sie die Einstellung mit der
Taste „START/ENTER“, die Zeitanzeige hört auf, zu blinken.
• Mit der Taste „INC“ gelangen Sie zur nächsten Einstellung (bzw. mit der Taste „DEC“ zur vorhergehenden
Einstellung oder mit der Taste „BATT.TYPE/STOP“ zurück ins Hauptmenü).
Hier lässt sich die Empfindlichkeit bei der Delta-U-Erkennung von NiMH-Akkus einstellen (Spannungsdifferenz beim Delta-U-Ladeverfahren).
Ein zu hoher Wert kann zum Überladen des Akkus führen, ein zu geringer Wert zu
einem nicht vollständig geladenen Akku.
• Drücken Sie kurz die Taste „START/ENTER“. Daraufhin blinkt der Spannungswert. Mit den Tasten
„INC“ bzw. „DEC“ kann der Spannungswert eingestellt werden (5....20mV).
• Bei Auswahl von „Default“ verwendet das Ladegerät eine vorgegebene Spannung von 7mV. Diese Einstellung wird empfohlen.
• Speichern Sie die Einstellung mit der Taste „START/ENTER“, der Spannungswert hört auf zu blinken.
• Mit der Taste „INC“ gelangen Sie zur nächsten Einstellung (bzw. mit der Taste „DEC“ zur vorhergehenden Einstellung oder mit der Taste „BATT.TYPE/STOP“ zurück ins Hauptmenü).
Hier lässt sich die Empfindlichkeit bei der Delta-U-Erkennung von NiCd-Akkus einstellen (Spannungsdifferenz beim Delta-U-Ladeverfahren).
Ein zu hoher Wert kann zum Überladen des Akkus führen, ein zu geringer Wert zu
einem nicht vollständig geladenen Akku.
• Drücken Sie kurz die Taste „START/ENTER“. Daraufhin blinkt der Spannungswert.
• Mit den Tasten „INC“ bzw. „DEC“ kann der Spannungswert eingestellt werden (5....20mV). Bei Auswahl
von „Default“ verwendet das Ladegerät eine Spannung von 12mV. Diese Einstellung wird empfohlen.
• Speichern Sie die Einstellung mit der Taste „START/ENTER“, der Spannungswert hört auf zu blinken.
• Mit der Taste „INC“ gelangen Sie zur nächsten Einstellung (bzw. mit der Taste „DEC“ zur vorhergehenden
Einstellung oder mit der Taste „BATT.TYPE/STOP“ zurück ins Hauptmenü).
Page 32

31
In diesem Menü kann die USB-Schnittstelle oder die Temperaturüberwachung ein-/ausgeschaltet werden.
☞
Für diese Funktion ist ein optionaler USB-Adapter bzw. ein optionaler Temperatursensor notwendig, die am Ladegerät wahlweise angeschlossen werden (siehe Kapitel 8,
Pos. 12 und 15).
Der USB-Adapter und der Temperatursensor sind nicht im Lieferumfang des Ladegeräts enthalten und müssen separat bestellt werden.
Die Schnittstellen- und Temperaturfunktion ist nur bei Kanal 1 und 2 möglich.
Bei Kanal 3 und 4 sind diese Einstellungen unwirksam.
Der Einsatz von Schnittstelle und Temperaturüberwachung ist für den selben
Kanal nur abwechselnd möglich, da sich diese Funktionen den seitlichen
Anschluss (12 oder 15) teilen.
Bestätigen Sie die Auswahl mit der Taste „START/ENTER“. Im Display blinkt der Parameter “USB”. Die
USB-Schnittstelle ist ausgewählt („Enable“).
Mit den Tasten „INC“ bzw. „DEC“ kann zwischen USB-Schnittstelle (USB) und Temperatur-Überwachung
umgeschaltet werden. Bei gewählter Temperaturüberwachung wird folgendes angezeigt:
Bestätigen Sie die Einstellung mit der Taste „START/ENTER“.
Im Display blinkt jetzt der Temperaturwert. Mit den Tasten „INC“ bzw. „DEC“ lässt sich die Temperatur
einstellen, bei der später ein Lade- oder Entladevorgang abgebrochen wird. Die Einstellung kann von
20....80°C erfolgen.
Speichern Sie die Einstellung, indem Sie kurz die Taste „START/ENTER“ drücken.
• Mit der Taste „INC“ gelangen Sie zur nächsten Einstellung (bzw. mit der Taste „DEC“ zur vorhergehenden
Einstellung oder mit der Taste „BATT.TYPE/STOP“ zurück ins Hauptmenü).
Beim Zyklus-Programm (automatisch aufeinander folgendes Entladen/Laden) erwärmt sich der Akku
teils recht stark. Um dem Akku Gelegenheit zu geben, sich ausreichend abzukühlen, kann hier eine Pausenzeit eingestellt werden.
Drücken Sie kurz die Taste „START/ENTER“. Daraufhin blinkt die Zeitanzeige. Mit den Tasten „INC“
bzw.„DEC“ kann die Zeit eingestellt werden (0....60min). Speichern Sie die Einstellung mit der Taste
„START/ENTER“, die Zeitanzeige hört auf zu blinken.
Page 33

32
• Mit der Taste „INC“ gelangen Sie zur nächsten Einstellung (bzw. mit der Taste „DEC“ zur vorhergehenden Einstellung oder mit der Taste „BATT.TYPE/STOP“ zurück ins Hauptmenü).
Wenn ein Ladevorgang startet, so startet auch der interne Timer. Wenn das Ladegerät aus irgendeinem
Grund nicht feststellen kann, ob der Akku voll geladen ist (z.B. bei der Delta-U-Erkennung), so wird bei
aktiviertem Sicherheitstimer („ON“ = Ein) der Ladevorgang nach Ablauf der hier eingestellten Zeit automatisch beendet.
Dies schützt den Akku vor Überladung. Stellen Sie die Zeit aber nicht zu kurz ein, da sonst der Akku
nicht voll geladen werden kann.
Berechnen Sie die Zeit für den Sicherheitstimer wie folgt:
Beispiel:
Akkukapazität Ladestrom Timerzeit
2000mAh 2.0A 2000 / 2.0 = 1000 / 11.9 = 84 Minuten
3300mAh 3.0A 3300 / 3.0 = 1100 / 11.9 = 92 Minuten
1000mAh 1.2A 1000 / 1.2 = 833 / 11.9 = 70 Minuten
Durch den Faktor 11.9 wird der Akku mit 140% der Kapazität geladen, bevor der Sicherheitstimer
anspricht.
Drücken Sie kurz die Taste „START/ENTER“. Daraufhin blinkt „ON“ (bzw. „OFF“) in der unteren Displayzeile.
Mit den Tasten „INC“ bzw. „DEC“ kann zwischen „ON“ (= Sicherheitstimer aktiviert) und „OFF“ (Sicherheitstimer ausgeschaltet) gewählt werden.
Speichern Sie die Einstellung mit der Taste „START/ENTER“.
Nun beginnt die Zeitanzeige für den Sicherheitstimer (untere Zeile, rechts) zu blinken.
Mit den Tasten „INC“ bzw. „DEC“ lässt sich die Zeit einstellen (10....720min). Halten Sie die jeweilige
Taste für eine Schnellverstellung gedrückt.
Speichern Sie die Einstellung mit der Taste „START/ENTER“.
• Mit der Taste „INC“ gelangen Sie zur nächsten Einstellung (bzw. mit der Taste „DEC“ zur vorhergehenden
Einstellung oder mit der Taste „BATT.TYPE/STOP“ zurück ins Hauptmenü).
Eine weitere Sicherheitsfunktion des Ladegeräts kann den Ladevorgang beenden, wenn eine bestimmte
Kapazität in den Akku „hineingeladen“ wurde.
Page 34

33
Drücken Sie kurz die Taste „START/ENTER“. Daraufhin blinkt „ON“ (bzw. „OFF“) in der unteren Displayzeile.
Mit den Tasten „INC“ bzw. „DEC“ kann zwischen „ON“ (= Sicherheitsabschaltung aktiviert) und „OFF“
(Sicherheitsabschaltung ausgeschaltet) gewählt werden.
Speichern Sie die Einstellung mit der Taste „START/ENTER“.
Nun beginnt die Kapazitätsanzeige (untere Zeile, rechts) zu blinken.
Mit den Tasten „INC“ bzw. „DEC“ lässt sich die Kapazität einstellen (10....50000mAh).
Halten Sie die jeweilige Taste für eine Schnellverstellung gedrückt.
Speichern Sie die Einstellung mit der Taste „START/ENTER“.
• Mit der Taste „INC“ gelangen Sie zur nächsten Einstellung (bzw. mit der Taste „DEC“ zur vorhergehenden
Einstellung oder mit der Taste „BATT.TYPE/STOP“ zurück ins Hauptmenü).
Mit der Option „Key Beep“ wird der Bestätigungston bei jedem Tastendruck ein- bzw. ausgeschaltet.
Die Option „Buzzer“ schaltet den Signalton bei diversen Funktionen/Warnmeldungen ein bzw. aus.
Drücken Sie kurz die Taste „START/ENTER“. Daraufhin blinkt „ON“ (bzw. „OFF“) in der oberen Display-
zeile.
Mit den Tasten „INC“ bzw. „DEC“ kann zwischen „ON“ (= Ein) und „OFF“ (= Aus) gewählt werden.
Drücken Sie kurz die Taste „START/ENTER“ zum Speichern. Daraufhin blinkt „ON“ (bzw. „OFF“) in der
unteren Displayzeile.
Mit den Tasten „INC“ bzw. „DEC“ kann zwischen „ON“ (= Ein) und „OFF“ (= Aus) gewählt werden.
Speichern Sie die Einstellung mit der Taste „START/ENTER“.
• Mit der Taste „INC“ gelangen Sie zur nächsten Einstellung (bzw. mit der Taste „DEC“ zur vorhergehenden
Einstellung oder mit der Taste „BATT.TYPE/STOP“ zurück ins Hauptmenü).
Diese Funktion überwacht die Spannung am Eingang des Ladegeräts (z.B. bei einem 12V-Akku). Fällt
die Spannung unter den eingestellten Wert, wird der Ladevorgang abgebrochen. Dies schützt die Spannungsquelle vor einer Tiefentladung 8 (Unterspannungsabschaltung).
Drücken Sie kurz die Taste „START/ENTER“. Daraufhin blinkt der Spannungswert.
Mit den Tasten „INC“ bzw. „DEC“ kann der Spannungswert eingestellt werden (10....11V).
Speichern Sie die Einstellung mit der Taste „START/ENTER“, der Spannungswert hört auf zu blinken.
• Mit der Taste „INC“ gelangen Sie zum ersten Einstellungspunkt zurück (bzw. mit der Taste „DEC“ zur
vorhergehenden Einstellung oder mit der Taste „BATT.TYPE/STOP“ zurück ins Hauptmenü).
Page 35

34
16. Warnmeldungen im Display
Die Polarität der Akkuanschlüsse ist vertauscht.
Die Verbindung zum Akku ist unberbrochen, z.B. wenn der Akku
während dem Ladevorgang abgesteckt wurde.
Es wurde ein Kurzschluss am Ausgang des Ladegeräts festgestellt.
Die Eingangsspannung (Betriebsspannung) für das Ladegerät ist zu
gering.
Die Spannung eines zu ladenden Lithium-Akkus (LiPo, LiIon, LiFe) ist
falsch eingestellt worden.
Das Ladegerät hat ein internes Problem festgestellt. Wenn dies dauerhaft angezeigt wird, ist das Ladegerät evtl. defekt; lassen Sie es von
einer Fachwerkstatt bzw. einer Fachkraft prüfen.
Während dem Ladevorgang wurde festgestellt, dass der Akku tiefentladen ist.
Hier ist zu prüfen, ob die Spannung des Akkus für den Ladevorgang
richtig eingestellt wurde.
Die Spannung in einer Zelle eines Lithium-Akkus (LiPo, LiIon, LiFe) ist
zu niedrig. Dies kann vorkommen, wenn ein mehrzelliger Akku vorher
ohne Balancer geladen wurde.
Die Spannung in einer Zelle eines Lithium-Akkus (LiPo, LiIon, LiFe) ist
zu hoch. Dies kann vorkommen, wenn ein mehrzelliger Akku vorher
ohne Balancer geladen wurde.
Page 36

35
Das Balancer-Kabel wurde falsch angeschlossen oder passt nicht zur
Anschlussbelegung des Ladegeräts.
Das Ladegerät hat ein internes Problem festgestellt. Wenn dies dauerhaft angezeigt wird, ist das Ladegerät evtl. defekt; lassen Sie es von
einer Fachwerkstatt bzw. einer Fachkraft prüfen.
17. Informationen des Ladegeräts
Während einem Lade-/Entladevorgang werden durch mehrfachen Druck auf die Taste „DEC“ diverse
Informationen im Display angezeigt.
Spannung des Akkus bei Lade-/Entlade-Ende
Akku-Kapazität für Sicherheitsabschaltung
Zeit für Sicherheitstimer
Temperatur-Abschaltung ein/aus; ausgewählte Abschalt-Temperatur
(nur mit externem Temperatursensor, nicht im Lieferumfang)
Temperatur, die vom externen Temperatursensor (nicht im Lieferumfang) bzw. vom internen Temperatursensor gemessen wurde
Aktuelle Eingangsspannung
Durch mehrfaches Drücken der Taste „INC“ kann z.B. bei Lithium-Akkus zur Anzeige der einzelnen Zellenspannungen umgeschaltet werden (nur sinnvoll, wenn bei Lithium-Akkus die Balancer-Anschlüsse
verwendet werden).
Page 37

36
Beispiel für einen 3zelligen LiPo-Akku:
18. Wartung und Reinigung
Das Produkt ist für Sie wartungsfrei, zerlegen Sie es deshalb niemals.
Lassen Sie eine Reparatur ausschließlich von einer Fachkraft bzw. Fachwerkstatt durchführen, andern-
falls besteht die Gefahr der Zerstörung des Produkts, außerdem erlischt die Zulassung (CE) und die
Gewährleistung/Garantie.
Reinigen Sie das Produkt nur mit einem weichen, sauberen, trockenen und fusselfreien Tuch, verwenden Sie keine Reinigungsmittel, das Gehäuse und die Beschriftung kann dadurch angegriffen werden.
Staub kann mit einem sauberen weichen Pinsel und einem Staubsauger leicht entfernt werden.
19. Handhabung
• Beachten Sie sämtliche Sicherheitshinweise dieser Bedienungsanleitung. Sie geben
Ihnen wichtige Informationen über Gefahren, die im Umgang mit Ladegeräten und
Akkus bestehen.
• Das Produkt ist kein Spielzeug, es gehört nicht in Kinderhände. Kinder können die
Gefahren, die im Umgang mit Ladegeräten oder Akkus bestehen, nicht einschätzen.
• Vermeiden Sie folgende widrige Umgebungsbedingungen am Aufstellort, bei Betrieb
oder beim Transport:
- Nässe oder zu hohe Luftfeuchtigkeit
- Extreme Kälte (<0°C) oder Hitze (>+35°C), direkte Sonneneinstrahlung
- Staub oder brennbare Gase, Dämpfe oder Lösungsmittel
- starke Vibrationen, Stöße, Schläge
- starke Magnetfelder, wie in der Nähe von Maschinen oder Lautsprechern
• Stellen Sie das Ladegerät auf eine ebene, feste Fläche. Diese muss so groß sein,
dass auch der angeschlossene Akku/Akkupack sicher daneben Platz findet. Halten
Sie zwischen Ladegerät und Akku (sowie der Stromversorgung) jeweils einen Mindestabstand von 20cm ein, um gegenseitige Erwärmung zu vermeiden.
Der Akku/Akkupack darf nicht auf oder unter dem Ladegerät platziert werden!
• Achten Sie beim Aufstellen und bei Betrieb darauf, dass die Kabel nicht geknickt oder
gequetscht werden.
• Decken Sie Ladegerät und Akku niemals ab. Durch einen Hitzestau wird nicht nur das
Ladegerät zerstört, sondern es besteht Brand- und Explosionsgefahr!
Page 38

37
• Sowohl durch die Gerätefüße als auch durch die Temperatur des Gehäuses kann es
auf empfindlichen Oberflächen zu Druckstellen oder Verfärbungen kommen. Gleiches
gilt für den Akku.
• Wie bereits in den Sicherheitshinweisen beschrieben, ist eine geeignete, nicht brennbare und hitzefeste Unterlage für das Ladegerät und den aufzuladenden Akku zu verwenden. Platzieren Sie Ladegerät und Akku nicht auf wertvollen Möbeloberflächen!
• Halten Sie ausreichend Abstand zu leicht brennbaren Oberflächen oder Gegenständen.
• Betreiben Sie das Ladegerät nicht unbeaufsichtigt.
• Obwohl das Ladegerät über zahlreiche Sicherheitsfunktionen verfügt, ist es nie vollständig auszuschließen, dass es zu übermäßiger Erwärmung des Akkus bzw. des
Ladegeräts kommen kann oder zu einem Defekt des Akkus.
• Auch die Verwendung von zu dünnen Ladekabeln oder auftretende Kontaktprobleme
führen zu gefährlichen Betriebszuständen!
• Prüfen Sie gelegentlich die Temperatur des Akkus während dem Ladevorgang.
• NiMH- und NiCd-Akkus erwärmen sich bei hohen Ladeströmen (1C) sehr stark, es
können Temperaturen von 50°C und mehr erreicht werden. Fassen Sie deshalb den
Akku vorsichtig an. Eine zu starke Erwärmung des Akkus kann zu dessen Beschädigung führen. Verringern Sie dann den Ladestrom.
• LiPo-Akkus sollten während dem Ladevorgang (Ladestrom max. 1C) in der Regel
nicht mehr als handwarm werden. Eine stärkere Erwärmung deutet auf einen
defekten Akku bzw. eine defekte Zelle des Akkupacks hin.
• Lithium-Akkus (LiPo, LiIon, LiFe) mit mehr als einer Zelle müssen aus Sicherheitsgründen grundsätzlich über ein Ladeverfahren mit Balancer geladen werden.
• Falls der Stecker Ihres Balancers nicht in den jeweiligen Anschluss des Ladegeräts
passt, ist ein entsprechender Adapter zu verwenden.
20. Entsorgung
Elektronische Altgeräte sind Wertstoffe und gehören nicht in den Hausmüll. Ist das
Gerät am Ende seiner Lebensdauer, so entsorgen Sie es nach den geltenden gesetzlichen Bestimmungen bei den kommunalen Sammelstellen. Eine Entsorgung über den
Hausmüll ist untersagt.
a) Entsorgung von gebrauchten Akkus/Batterien!
Sie als Endverbraucher sind gesetzlich (Batterieverordnung) zur Rückgabe aller gebrauchten Batterien
und Akkus verpflichtet; eine Entsorgung über den Hausmüll ist untersagt!
Page 39

38
Schadstoffhaltige Batterien/Akkus sind mit nebenstehenden Symbolen gekennzeichnet,
die auf das Verbot der Entsorgung über den Hausmüll hinweisen. Die Bezeichnungen
für das ausschlaggebende Schwermetall sind: Cd = Cadmium, Hg = Quecksilber,
Pb = Blei. Ihre verbrauchten Batterien/Akkus können Sie unentgeltlich bei den Sammelstellen Ihrer Gemeinde, unseren Filialen oder überall dort abgeben, wo Batterien/Akkus
verkauft werden!
Sie erfüllen damit die gesetzlichen Verpflichtungen und leisten Ihren Beitrag zum Umweltschutz!
21. Technische Daten
Betriebsspannung: ........................11 - 15V/DC, stabilisiert
Stromaufnahme: ............................Abhängig vom Ladestrom und Akku (20A-Netzteil oder Kfz-Blei-Akku
empfohlen)
Ladestrom/Kanal: ..........................0,1A – 5,0Aeinstellbar
Ladeleistung/Kanal: ......................max. 50 W
Entladestrom/Kanal: ....................0,1A – 1,0A einstellbar
Entladeleistung/Kanal: ..................max. 5 W
Akkutypen: ....................................NiCd, 1 - 15 Zellen
NiMH, 1 - 15 Zellen
LiPo/LiIon/LiFe, 1 - 6 Zellen
Pb, 1 - 10 Zellen (2V pro Zelle, 2 - 20V)
Ausgang: ......................................4mm-Buchsen
Universal-Balancer-Anschlüsse für 2 bis 6 Zellen, Rastermaß 2,54 mm
Entladestrom für Balancer: ..........300mA pro Zelle
Gewicht: ........................................ca. 1,09 kg
Abmessungen: ..............................ca. 226 x 158 x 63
Umgebungstemperatur: ................0°C bis +35°C
Umgebungsluftfeuchte:..................Max. 90% relativ, nicht kondensierend
Besonderheiten:
• Integrierter Balancer für LiPo-Akku
• Delta-U-Abschaltung
• Eingangsspannungs-Überwachung (zum Schutz vor Tiefentladung)
• Kapazitäts-Limit einstellbar (schützt vor Überladung des angeschlossenen Akkus)
• Ladedauer einstellbar (schützt vor Überladung des angeschlossenen Akkus
Page 40

39
1. Introduction
Dear customer,
Thank you for making the excellent decision of purchasing this Voltcraft® product.
You have acquired a quality product from a brand family which has distinguished itself in the fields of
measuring, charging and network technology thanks to its particular expertise and its permanent innovation.
With Voltcraft®, you will be able to cope even with difficult tasks as an ambitious hobbyist or as a professional user. Voltcraft® offers reliable technology and a great price-performance-ratio.
Therefore, we are absolutely sure: starting to use Voltcraft will also be the beginning of a long, successful relationship.
Enjoy your new Voltcraft® product!
Page 41

40
2. Table of Contents
1. Introduction ......................................................................................................................................39
2. Table of Contents ............................................................................................................................40
3. Intended Use ..................................................................................................................................41
4. Scope of Delivery ............................................................................................................................41
5. Safety Information ..........................................................................................................................42
6. Notes on rechargeable batteries ....................................................................................................44
a) General information ....................................................................................................................44
b) Additional information on lithium batteries ..................................................................................45
7. Usable Battery Types ......................................................................................................................47
8. Operating Controls ..........................................................................................................................48
9. Start-up ............................................................................................................................................50
10. Lithium Batteries (LiPo, LiIon, LiFe) ................................................................................................51
a) General information ....................................................................................................................51
b) Charging batteries without balancer connection (“CHARGE”) ....................................................52
c) Charging batteries with balancer connection (“BALANCE”) ........................................................53
d) Fast charge (“FAST CHG“) ..........................................................................................................54
e) Storing batteries (“STORAGE“) ..................................................................................................55
f) Discharging batteries (“DISCHARGE“) ........................................................................................55
11. NiMH and NiCd Batteries ................................................................................................................56
a) Charging batteries (“CHARGE“) ..................................................................................................56
b) Discharging batteries (“DISCHARGE“) ......................................................................................57
c) Cycle program (“CYCLE“) ..........................................................................................................58
12. Lead Batteries (Pb) ..........................................................................................................................59
a) General information ....................................................................................................................59
b) Charging batteries (“CHARGE“) ..................................................................................................60
c) Discharging batteries (“DISCHARGE“) ........................................................................................61
13. Saving Battery Data ........................................................................................................................62
14. Loading Battery Data ......................................................................................................................63
15. Various Basic Settings (“USER SET”) ............................................................................................64
16. Warning Messages on the Display ..................................................................................................69
17. Information on the Charger ..............................................................................................................70
18. Maintenance and Cleaning ..............................................................................................................71
19. Handling ..........................................................................................................................................71
20. Disposal ..........................................................................................................................................72
a) Disposal of used batteries! ..........................................................................................................72
21. Technical Data ................................................................................................................................73
Page 42

41
3. Intended Use
The Multicharger B6 Quadro is used to charge NiCD + NiMH type batteries (1-15 cells), LiPo/LiIon/LiFe
batteries (1-6 cells) and lead acid batteries (1-10 cells, 2V-20V). The charge current can be set at
between 0.1A and 5.0 A. The maximum charging power per output is 50W.
Accumulators can also be discharged; the discharge current is between 0.1 and 1.0A. The maximum discharging power per output is 50W.
Optional temperature sensors can be connected to the charging channels 1 and 2 in order to monitor the
battery or alternatively a USB interface adapter can be connected to record data.
The charger has four independent charging/discharging channels. It may only be operated on a direct
current voltage of 11 to 15V/DC.
Each output has a two-line, illuminated display and four control keys.
A balancer is integrated into the charger for LiPo/LiIon/LiFe batteries, with balancer connector sockets
for the battery located on the side of the charger.
The product is intended for use in dry indoor spaces, it must not get damp or wet!
Any use other than that described above damages the product. Moreover, this is linked to dangers such
as short circuits, fire, electric shock, etc. No part of the product may be modified or rebuilt!
Read the operating instructions carefully and keep them for later reference.
Observe the safety instructions under all circumstances!
4. Scope of Delivery
Battery charger
2 terminals
Operating instructions
Page 43

42
5. Safety Information
Please read the entire operating instructions before using the product for the
first time; they contain important information on how to operate the device correctly.
The guarantee/warranty will be void if damage is incurred resulting from noncompliance with the operating instructions. We do not assume any responsibility for consequential damage!
We do not assume any liability for material and personal damage caused by
improper use or non-compliance with the safety instructions! In such cases the
warranty/guarantee is void.
Dear customer, the following safety information is intended not only for the protection of your health but
also for the protection of the device. Please read the following points carefully:
Please pay attention to the following symbols:
An exclamation mark in a triangle shows important information in this user’s manual
that must be observed.
☞
The “hand” symbol informs you that there are special tips and hints concerning the
operation.
This product has been CE-tested and meets the necessary national and European guidelines.
For safety and licensing reasons (CE), unauthorised conversion and/or modification of the device is not
permitted.
Consult an expert when in doubt as to the operation, the safety or the connection of the device.
Chargers and batteries are not toys and do not belong in the hands of children! The product may only be
set up, used or stored in places that are not accessible to children. Children could change the settings or
short-circuit the battery/battery pack, which can lead to an explosion. Danger to life!
On industrial sites, the accident prevention regulations of the association of the industrial workers’ society for electrical equipment and utilities must be followed.
In schools, training centres, hobby and self-help workshops, the handling of chargers and batteries must
be supervised by trained personnel in a responsible manner.
The product may only be operated in dry indoor spaces. It must not get damp or wet. Do not expose the
device to direct sunlight, high temperatures (>35°C) or extreme cold (<0°C). Keep it away from dust and
dirt. The same applies to any battery that may be connected. Ensure there is good ventilation when charging lead batteries (Pb).
Do not use the battery charger inside a vehicle.
Page 44

43
Do not place any containers filled with liquid, e.g. vases or plants, on or next to the charger. Falling over
could destroy the charger, moreover there is a high risk of fire.
Never leave the product unattended while operating. Despite a considerable number of protective circuits,
it is impossible to exclude the possibility of malfunctions or problems when charging a battery.
Only operate the product in moderate climate, never in tropical climate. For more information on acceptable environmental conditions, see the chapter “Technical Data”.
Select a stable, flat surface which is large enough and clean. Never place the battery charger and the
battery on a flammable surface (e.g. carpet). Always use a suitable, non-flammable, heatproof surface.
Ensure that there is sufficient ventilation during operation. Never cover the battery charger and/or the
connected battery. Leave enough distance (at least 20cm) between the charger, the battery and other
objects.
Never operate the device immediately after it has been taken from a cold room to a warm room. Under
certain circumstances the resulting condensation may lead to malfunctions or damage! Allow the charger (and the battery/batteries) to reach room temperature before connecting the charger to the power supply and using it. This may take several hours!
Services, adjustments and repairs may only be carried out by a specialist/specialist workshop. The device
contains no parts that require servicing or adjusting.
Handle the product with care - hits, knocks or falls from even a low height can damage the product.
Avoid operating the product near:
- strong magnetic or electromagnetic fields
- transmitter aerials or HF generators,
This can affect the control electronics.
If you have reason to believe that the device can no longer be operated safely, disconnect it immediately and make sure it is not unintentionally operated. It can be assumed that safe operation is no longer
possible if:
- the device shows visible damage,
- the device no longer works and
- the device was stored under unfavourable conditions for a long period of time or
- after it was exposed to extraordinary stress caused by transport.
Do not leave the packaging material lying around carelessly since such materials can become dangerous
toys in the hands of children.
You should also observe the safety instructions in each chapter.
Page 45

44
6. Notes on rechargeable batteries
Despite the fact that batteries have become a normal part of today’s life, there are still numerous dangers and problems involved. In particular, with LiPo/LiIon/LiFe rechargeable batteries with their high
energy content (in comparison with conventional NiCd or NiMH rechargeable batteries), various regulations must be observed in order to avoid the danger of explosion and fire.
For this reason, always ensure that you have read and understood the following information and safety measures when handling batteries.
a) General
Batteries do not belong in the hands of children. Always keep batteries out of the reach of children. The
same applies to chargers. Batteries and battery chargers are not toys!
Do not leave batteries lying around openly; there is a risk of them being swallowed by children or pets. If
swallowed, consult a doctor immediately!
Rechargeable batteries may not be short-circuited, taken apart or thrown into fire. There is a risk of fire
and explosion!
Leaking or damaged rechargeable batteries may cause caustic burns if they come into contact with skin.
Therefore, in this case you should use suitable protective gloves.
Do not recharge normal, non-rechargeable batteries. There is a risk of fire and explosion! Non-rechargeable batteries are meant to be used once only and must be disposed of properly when empty. Charge
rechargeable batteries intended for that use only.
Batteries must not get damp or wet.
Please observe correct polarity (plus/+ and minus/-) when connecting the rechargeable battery to your
model or charger. Connecting the battery incorrectly will not only damage the model but also the battery.
There is a risk of fire and explosion!
This charger has a mechanism that protects against connecting the poles incorrectly. Nonetheless, it is
possible that an incorrectly connected battery may lead to damage in certain situations.
If the product is not to be used for a long period of time (e.g. storage), disconnect any connected battery
from the charger and disconnect the charger from the power supply.
Do not charge/discharge any battery that is still hot (e.g. caused by high discharge current from the model) Allow the battery to cool down to room temperature before attempting to charge it again.
Never charge/discharge damaged, leaking or deformed batteries. This can result in a fire or explosion!
Never use battery packs that are composed of different types of cells.
Recharge the rechargeable batteries about every 3 months, because otherwise there may be a total dis-
charge due to self-discharge, which makes the rechargeable batteries useless.
Remove the battery from the charger when it is fully charged.
Never damage the exterior cover of a battery. There is a risk of fire and explosion!
Never charge/discharge a battery directly in the model. Remove the battery from the model first.
Page 46

45
Place the charger and battery on a non-flammable, heat-resistant surface (e.g. stone tiles). Maintain
enough distance from flammable objects. Allow enough distance between the charger and the battery never place the battery on the charger.
As both the charger and the battery heat up during the charge/discharge procedure, it is necessary to
ensure sufficient ventilation. Never cover the charger or the battery!
Never leave the charging/discharging batteries unattended.
If any battery connector cables need to be cut to size (e.g. if the battery is supplied without a connector
plug), cut each cable individually to prevent a short circuit occurring. Risk of fire and explosion!
b) Additional information on lithium batteries
Modern rechargeable batteries with lithium technology do not only have a clearly higher capacity than
NiMH or NiCd rechargeable battery packs but they are also considerably lighter. This makes this type of
battery very interesting for application in model construction; so-called LiPo batteries (lithium-polymer) are
often used here.
LiPo batteries (and the LiFe and LiIon batteries that can be charged with the device) do require special
care however during charging/discharging as well as when being operated and handled. For this reason,
we would like to provide you with some information in the sections below about the dangers and how you
can avoid them, thus helping such batteries to maintain their performance for a long time to come.
See also chapter 6. a).
The exterior cover of a LiPo battery, consisting solely of a very thick film, is extremely sensitive.
Never destroy or damage the battery, never let the battery fall and do not pierce the battery with any
objects! Avoid applying any mechanical loads to the battery, never pull on the battery’s connector cables!
There is a risk of fire and explosion!
These guidelines must also be observed when the battery is inserted into the model (or removed from
the model)
Ensure that the battery does not overheat during usage, recharging, discharging, transport or storage. Do
not place the battery next to sources of heat (e.g. cruise control, motor), keep the battery away from direct
sunlight. There is a risk of fire and explosion if the battery overheats!
Never allow the battery to reach temperatures higher than 60°C (see also manufacturer information if
necessary!).
Page 47

46
If the battery is damaged (e.g. after the crash of an aircraft or helicopter model) or the exterior cover is
soaked/has expanded, do not use the battery. Do not recharge it. There is a risk of fire and explosion!
Handle the battery with care, use suitable protective gloves. Dispose of the battery in an ecologically
sound fashion.
Only use a suitable charger to charge lithium batteries. Due to a risk of fire and explosion, conventional
chargers for NiCd, NiMH and lead acid batteries may not be used!
When charging a lithium battery with more than one cell, always use a so-called “balancer” (one is
already integrated into the supplied charger).
Charge LiPo batteries with a max. charge current of 1C. This means that the charge current may not
exceed the capacity value imprinted on the battery (e.g. battery capacity 1000mAh, max. charge current
1000mA = 1A). With LiFe or LiIon batteries, you must observe the instructions of the battery manufacturer.
The discharge current must not exceed the value displayed on the battery. For example, if a value of
“20C” is printed on the battery, the max. discharge current is 20 times the battery’s capacity (e.g. battery
capacity 1000mAh, max. discharge current 20C = 20x 1000mA = 20A).
If these guidelines are not adhered to, the battery will overheat, which will lead to the battery becoming
deformed/swollen or result in an explosion and fire! The printed value (e.g “20C”) does not generally
refer to the constant current, but to the maximum current that the battery is capable of producing in the
short-term. The constant current should not be higher than one half of the given value.
No cell of a LiPo battery may be discharged below 3V (LiFe = 2.0V, LiIon = 2.5V), as this will destroy the
battery. If the model does not provide protection against total discharge or possess a visual display indicating a low battery, remember to switch off the model in time.
Page 48

47
7. Usable Battery Types
NiCd
Nominal voltage: 1.2V/cell
Max. charge current for fast charging: 1C (or lower); with specially designed batteries up to 2C
Discharge current cut-off at: 0.85V/cell (or higher)
NiMH
Nominal voltage: 1.2V/cell
Max. charge current for fast charging: 1C (or lower); with specially designed batteries up to 2C
Discharge current cut-off at: 1.0V/cell (or higher)
LiPo
Nominal voltage: 3.7V/cell
Max. charge voltage: 4.2V/cell
Max. charge current for fast charging: 1C (or lower)
Discharge current cut-off at: 3.0V/cell (or higher)
LiIon
Nominal voltage: 3.6V/cell
Max. charge voltage: 4.1V/cell
Max. charge current for fast charging: 1C (or lower)
Discharge current cut-off at: 2.5V/cell (or higher)
LiFe
Nominal voltage: 3.3V/cell
Max. charge voltage: 3.6V/cell
Max. charge current for fast charging: 4C (or lower)
Discharge current cut-off at: 2.0V/cell (or higher)
Pb
Voltage: 2.0V/cell
Max. charge voltage: 2.46V/cell
Max. charge current for fast charging: 0.4C (or lower)
Discharge current cut-off at: 1.75V/cell (or higher)
If you own different lithium batteries and want to charge/discharge these with the
charger, set the correct battery type prior to connection (LiPo, LiIon, LiFe).
If you select the wrong battery type, the battery may explode or catch fire!
Page 49

48
8. Operating Controls
Page 50

49
1 Charging/discharging channel 1
2 Charging/discharging channel 2
3 Charging/discharging channel 3
4 Charging/discharging channel 4
5 Illuminated display, 2 line
6 “BATTTYPE/STOP” button for menu selection (forward) and stopping the charging process
7 “DEC” button for entering values (decreasing value) and menu selection (backwards) and displaying
the values of the individual cells in the balance charge mode.
8 “INC” button for entering values (increasing value) and displaying the values of the individual cells in
the balance charge mode.
9 “START/ENTER” button for starting/continuing the charging process or confirming an adjust-
ment/operating function
10 Sockets for battery connection channel 1 (red = positive terminal, black = negative terminal)
11 Balancer connections for 2 to 6-cell Lipo/LiIon/LiFe batteries to channel 1
12 Socket for optional temperature sensor or optional USB interface for channel 1
13 Sockets for battery connection channel 2 (red = positive terminal, black = negative terminal)
14 Balancer connections for 2 to 6-cell Lipo/LiIon/LiFe batteries to channel 2
15 Socket for optional temperature sensor or optional USB interface for channel 2
16 Sockets for battery connection channel 3 (red = positive terminal, black = negative terminal)
17 Balancer connections for 2 to 6-cell Lipo/LiIon/LiFe batteries to channel 3
18 Sockets for battery connection channel 4 (red = positive terminal, black = negative terminal)
19 Balancer connections for 2 to 6-cell Lipo/LiIon/LiFe batteries to channel 4
20 Ventilation openings on the side Do not cover!
21 Connection cable with 4mm spring-loaded plug for power supply connection (red=positive terminal,
black = negative terminal)
22 Pluggable terminals for direct connection to 12 V lead battery (e.g. in a car etc.)
Page 51

50
9. Start-up
The charger must be used with a stabilised direct current voltage (11-15V/DC).
Never use the charger with another voltage as this will destroy the charger and invalidate the warranty/guarantee!
Depending on the battery connected, a charge current of up to 5A is possible per channel. For this reason, the power supply chosen must be strong enough.
Connect the connection cables (21) to the power supply with the correct polarity. If necessary, use the
enclosed terminals (22).
The charger emits a brief audio signal and the displays illuminate. .
The charger is now in the main menu (example).
Please observe the following points before connecting/charging the battery:
If you have not done so already, please read chapter 5 and 6 completely and ensure
that you have understood the information there.
Do you know all of the information you need to know about your battery? Unknown or
unlabelled batteries, the necessary values of which you do not know, may not be connected/charged!
Have you selected the correct charging program for the type of battery you are using?
Selecting the wrong settings will damage the charger and the battery and present a risk
of fire and explosion!
Have you selected the appropriate charge current?
Have you selected the correct voltage (e.g. for multiple-cell LiPo batteries)? Adual-cell
LiPo battery can, under certain circumstances, be connected in parallel (3.7V) or in
series (7.4V).
Are all connector cables and plugs undamaged, do the plugs stay firmly in the sockets?
Worn-out plugs and damaged cables should be replaced.
When connecting a battery to the charger, always connect the charging cable to the
charger first, then the battery to the charger/charging cable. When disconnecting, do
the above in reverse order. Failure to do so presents the danger of a short circuit (e.g.
from the two 4mm circular connectors on the charging cable).
Only ever charge one battery or battery pack on one channel at a time.
If you wish to charge battery packs that you have manufactured yourself, the cells must be
identical in their construction (same type, same capacity, same manufacturer). The cells
must also be charged to the same level (LiPo batteries can be balanced out using the balancer. This is, however, not possible with other battery packs such as NiMH or NiCd).
Page 52

51
Operating the menus (For overview see fold-out page):
Select the desired submenu from the main menu using the “BATTTYPE/STOP” button and confirm your
selection with the “START/ENTER” button.
Using the buttons “INC” and “DEC”, the various configuration options are called up.
To modify a value, press the “START/ENTER” button - the corresponding parameter then flashes.
Modify the value shown in the display using the “INC” and “DEC” buttons.
Save the (modified) value with the “START/ENTER” button. If several parameters are shown at once
(e.g. LiPo CHARGE -> charging current and cell voltage) it will move on to the next parameter.
Exit the configuration menu using the “BATTTYPE/STOP” button. It then returns to the main menu.
☞
You can find the menu structure on the fold-out page for easier operation and a better
overview.
10. Lithium Batteries (LiPo, LiIon, LiFe)
☞
You can view the entire menu structure in the correct order on the fold-out page. Here
the key functions for operating are also given.
a) General
This charge program is only suited for batteries with lithium technology, “LiPo“, „LiIon“ and “LiFe“. The
respective battery type, which you want to connect to the charger, must be set prior to starting a
charge/discharge procedure (in the “User” settings, see chapter 15).
If the battery has a balancer connection, the balancer battery connector as well as the
battery connection cable must be connected to the charger when charging/discharging.
Use the correct balancer connector depending on the number of cells.
There are different types of balancer plug. For this reason, do not use force if the plug
does not fit! Suitable adapters are available to purchase for the balancer plug.
When using a balancer (integrated in the charger “B6 Quadro“), all cells have the same
voltage after the charge process, which prevents the individual cells from being overcharged. The latter is not only bad for the durability of a LiPo battery but there is the
risk of destroying the battery as well as a risk of fire and explosion!
Page 53

52
The charging current which is to be set depends on the capacity of the battery and
should normally be 1C. However, you should observe the battery manufacturer’s
instructions.
The value “1C” means that the charging current is equivalent to the battery’s capacity.
As such, a charge current of 1.8A should be set for a 1800mAh LiPo battery with 1C.
In the main menu, select the battery program “LiXX BATT” with the button “BATT
TYPE/STOP” and confirm your selection with the “START/ENTER” button.
☞
Depending on the battery type selected in the “User” settings, the display shows
„LiPo”, „LiIo“ or „LiFe“.
Check whether the battery type indicated on the display coincides with the battery you want to
charge/discharge.
Afterwards, you can select the different functions with the buttons “INC” and “DEC”.
• “CHARGE”: Charge lithium battery without balancer connection
• “BALANCE”: Charge lithium battery with balancer connection
• “FAST CHG”: Fast battery charging
• “STORAGE”: Charging/discharging batteries at a set voltage value
• “DISCHARGE”: Discharging the battery
b) Charging batteries without balancer connection (“CHARGE”)
After selecting “CHARGE”, the following display appears, for example:
The value on the left in the second line shows the charge current, the
value on the right shows the voltage or number of cells of the battery pack
(in this example, a one-cell LiPo battery pack, 3x3.7V=3.7V)
☞
Select the battery type (LiPo, LiIon, LiFe) as described in chapter 15.
If the values need to be changed, press the “START/ENTER” button. The charge current begins to flash.
Change the charge current using the keys “INC” and “DEC” and confirm the value using the
“START/ENTER” key.
The voltage then begins to flash. Change this using the buttons “INC” and “DEC”. You should be aware
while doing this that the voltage only changes with the number of cells (e.g. one cell = 3.7V, two cells 7.4V
etc.) Confirm the setting by pressing the “START/ENTER“ button.
To begin the charging process, keep the “START/ENTER” button pressed for longer (approx. 3 seconds).
If the settings are wrong, or if the charger detects a problem, an audio signal is emitted and the appropri-
ate information is shown on the display. You can stop the warning signal by pressing the
“BATT.TYPE/STOP” button. You then return to the previous configuration menu.
Page 54

53
If you do not, the following display appears
(alternating):
The “R” value indicates the number of cells
detected by the charger.
The “S” value indicates the number of cells set in the menu.
If these two numbers do not match, please check the settings on the charger and
the battery itself. It may be that the LiPo battery has been completely discharged,
or a cell may be faulty. In this case, the battery should not be charged, as there is a
risk of fire and explosion! You can return to the previous configuration menu using
the “BATT TYPE/STOP” button.
If the two numbers match, you can start the charging process by shortly pressing the “START/ENTER”
button.
Once the charging process has been started, various pieces of information about the current charging
progress are shown on the display - see next image:
Example:
1. Line: Cell type and number of cells, charge current, battery voltage
2. Line: Current duration of charge, charged capacity in mAh
Once the charging process has been completed, an audio signal is emitted (if not turned off).
☞
If you wish to terminate the charging process beforehand, press the “BATT
TYPE/STOP” button.
c) Charging batteries with balancer connection (“BALANCE”)
In contrast to the simple charging program “CHARGE”, here the voltage of each individual cell is monitored and the charge current is adjusted correspondingly.
Besides the two normal battery connections, the balancer connector for the battery must also be connected to the charger, see chapter 10. a).
The remaining procedure for charging is described in chapter 10. b).
☞
If a multi-cell battery is connected via the balancer connections, you can switch
between the normal display and the display of the cell voltages during the charge
process using the “INC“ button.
Only an battery pack with exactly the same voltage for each cell provides the maximum
performance and service life for a model aeroplane/vehicle.
Due to weaknesses in the quality of the material and in internal structure, e.g. of a LiPo
battery pack with several cells, the cells could have a different voltage at the end of the
discharge process.
Page 55

54
If such a LiPo battery is charged without a balancer, large differences in the cell voltage
become apparent very quickly. This not only shortens the operating life (as one cell may
have a very low voltage), but also damages the battery as a result of a total discharge.
In addition, without the balancer, there is the danger of overcharging when charging
such different cells (with different voltage): the maximum permitted voltage of a LiPo
cell of approx. 4.2V (+/- 1%) is exceeded!
(For information on Lilon and LiFe, see chapter 7)
Example:
A dual-cell LiPo battery pack charged without the use of a balancer appears to have a voltage of 8.4V
and thus appears to be fully charged. However, the two cells have a respective voltage of 4.5V and 3.9V
(one cell is dangerously overloaded, the other is half-empty).
A cell overloaded in this way may leak or, in a worst case scenario, catch fire or explode!
If your LiPo battery pack has a balancer connection, the charging program “BALANCE” should always
be used.
If your “LiFe“ or “LiIon“ pack also has a balancer connection, the above information applies analogously,
only the voltage values differ, see chapter 7.
d) Fast charge (“FAST CHG”)
When charging a lithium battery, the fuller the battery is, the smaller the charge current becomes due to
the charge procedure used for lithium batteries. Of course, this also increases the charging time.
A special charging procedure achieves a higher charge current in fast charging. However, this reduces
the capacity, because the charge process is terminated earlier due to the safety cut-off in the charger.
This means, a LiPo battery, for example, cannot be fully charged using the fast charge function. Only
approx. 90% of the capacity achievable with the normal charge process is available.
☞
Therefore, fast charging is only wise if the battery has to be used again as quickly as
possible.
The procedure of setting the charge current and the voltage/cell count is the same as with the normal
charge process (see chapter 10. b).
Page 56

55
e) Storing batteries (“STORAGE”)
This function can be used to set the battery to a certain voltage level, which is regarded as ideal for storage (LiPo = 3.85V, LiIon = 3.75V, LiFe = 3.3V).
Depending on the cell voltage, the battery is either charged or discharged. Of course, with a multi-cell
battery pack, this is only wise if a balancer connection is available.
The procedure of setting the current and the voltage/cell count is the same as with the normal charge
process (see chapter 10. b).
☞
The set current is used for charging/discharging.
f) Discharging batteries (“DISCHARGE”)
Normally, it is not necessary to discharge lithium batteries (contrary to NiCd batteries). The battery can
be charged immediately, independent of its current status.
If you still want to discharge such a battery, you can set the discharge current between 0.1Aand 1.0A.
Proceed as described in chapter 10. b) with the only difference being, that the battery is not charged but
discharged.
The final discharge voltage differs depending on the set battery type and already preset in the charger.
In addition to the battery type, the display shows the associated voltage.
• LiPo: 3.0V per cell
• LiIon: 2.5V per cell
• LiFe: 2.0V per cell
☞
If a multi-cell battery is connected via the balancer connections, you can switch
between the normal display and the display of the cell voltages during the discharge
process using the “INC” button.
Page 57

56
11. NiMH and NiCd Batteries
☞
You can view the entire menu structure in the correct order on the fold-out page. Here
the key functions for operating are also given.
a) Charging batteries (“CHARGE”)
The charge current to be set depends on the battery capacity and is usually 1C. However, you should
observe the battery manufacturer’s instructions.
The value “1C” means that the charge current is equivalent to the battery’s capacity.
As such, a charge current of 3.0A should be set for a 3000mAh NiMH battery at 1C.
☞
Depending on the battery connected and its structure, a charge current of 1C may not be
possible. For example, receiver batteries usually consist of Mignon/AA cells that cannot
withstand such a high charge current without incurring damage.
In general: The smaller the battery (i.e. the individual cell), the lower the maximum charge
current. Many NiMH Mignon/AA cells with a capacity of approx. 2000mAh allow a charge
current of 400-500mA for a fast charge.
Charge a NiMH or NiCd battery as follows:
• In the main menu, select the “NiMH” or “NiCd” charge program with the button “BATT. TYPE/STOP”.
• Press the button “START/ENTER”; the display shows the following, for example:
The left image shows the manual mode (you specify the charge current), the right image the automatic
mode (the charger sets the charge current, all you specify is the top limit).
☞
If you now briefly press the button “INC” or “DEC”, you access the discharge program
(“DISCHARGE”), then the cycle program (“CYCLE”) and return to the charge program
(“CHARGE”), see chapter 11. b) and 11. c).
• Briefly press the button “START/ENTER” to access setup mode. Now the current value blinks on the
bottom right of the display.
Page 58

57
If the current value blinks, you can switch between manual and automatic mode by simultaneously pressing the buttons “INC” and “DEC”.
☞
In manual mode, the batteries are charged with the current you set.
In automatic mode, the charger calculates the charge current automatically, all you do
is set the top limit for the charge current. Shorter charging times can be achieved
depending on the battery and its internal resistance.
• Change the charge current (or in automatic mode, the top limit for the charge current) using the buttons
“INC” and “DEC” and confirm the value using the “START/ENTER” button. The number of cells is automatically identified!
• To begin the charging process, keep the “START/ENTER” button pressed for longer (approx. 3 seconds).
• If the charger detects an error (e.g. no battery connected), a warning signal is emitted and corresponding information appears on the display.
• You can stop the warning signal by pressing the “BATT.TYPE/STOP” button. You then return to the previous configuration menu.
• If the battery is detected correctly, the following display appears, :
for example:
1. Line: Battery type, charge current, battery voltage
2. Line: Current duration of charge, charged capacity in mAh
• Once the charging process is complete, an audio signal is emitted.
☞
If you wish to terminate the charging process beforehand, press the “BATTTYPE/STOP”
button.
b) Discharging batteries (“DISCHARGE”)
• After you have selected the “NiMH” or “NiCd” program in the main menu
with the button “BATT.TYPE/STOP” and confirmed this with the button
“START/ENTER”, you can select the discharge function using the button
“INC” or “DEC” (illustration shows NiMH battery):
• If the discharge current and the discharge voltage need to be set, press the “START/ENTER” button.
The discharge current blinks.
• Change the charge current using the keys “INC” and “DEC” and confirm the value using the
“START/ENTER” key. You can set a value between 0.1A and 1.0A.
• Afterwards, the final discharge voltage blinks, which is also set with the buttons “INC” and “DEC”. Voltage values between 0.1V and 25.0V are possible.
Page 59

58
When setting the voltage value, make sure that the cell voltage for NiMH is not
below 1.0V and not below 0.85V for NiCd. Otherwise the battery can get damaged!
• To begin the discharge process, keep the “START/ENTER” button pressed for longer (approx. 3 seconds). Now the display shows different information just like during the charge process (discharge time,
discharge capacity, discharge current and current battery voltage).
• If the settings are wrong, or if the charger detects a problem, an audio signal is emitted and the appropriate information is shown on the display. You can stop the warning signal by pressing the
“BATT.TYPE/STOP” button. You then return to the previous configuration menu.
• If you press the “Start/Enter” button during the discharge process, the discharge current can be
changed (see above).
• Once the discharge process is complete, an audio signal is emitted.
☞
If you wish to terminate the discharging process beforehand, press the “BATT
TYPE/STOP” button.
c) Cycle program (“CYCLE”)
To test or “refresh” batteries (e.g. to make a weak, old battery more efficient), you can perform up to 5
cycles automatically after one another. The two possible combinations are “Discharge/Charge”
(“DCHG>CHG”) and “Charge/Discharge” (“CHG>DCHG”).
• After you have selected the “NiMH” or “NiCd” program with the button “BATT.TYPE/STOP” in the main
menu and confirmed this with the button “START/ENTER”, you can select the cycle program using the
button “INC” or “DEC” (illustration shows NiMH battery):
• If you want to switch the charge/discharge sequence or set the cycle number, press the button
“START/ENTER”. The text for the program sequence now blinks in the bottom line of the display.
Change the program sequence using the buttons “INC” and “DEC”.
In the left image the battery is firstly discharged and then charged. In the right image, this sequence is
reversed, meaning first the battery is charged and then discharged.
• Confirm the selection by pressing the “START/ENTER“ button.
Page 60

59
• The cycle number starts to flash. This number shows how often the set sequence of discharging/charging
or charging/discharging is carried out. You can set a value of 1 to 5 cycles with the buttons “INC” or “DEC”.
Confirm your entry as usual with the button “START/ENTER”.
• To start the cycle, keep the “START/ENTER” button pressed for longer (approx. 3 seconds).
• If the settings are wrong, or if the charger detects a problem, an audio signal is emitted and the appropriate information is shown on the display.
• Once the cycle is completed, an audio signal is emitted. The display shows the data gathered. The buttons “INC” or “DEC” are used to select the individual cycles.
☞
If you wish to terminate the cycle beforehand, press the “BATTTYPE/STOP” button.
• Press the “BATT. TYPE/STOP” button to exit this display.
12. Lead Batteries (Pb)
☞
You can view the entire menu structure in the correct order on the fold-out page. Here
the key functions for operating are also given.
a) General
Lead acid batteries are completely different to NiMH or NiCd batteries. Despite their high capacity they
can only provide low currents. The charging process is also different.
The charge current for lead acid batteries may only be a maximum of one-tenth (1/10 C) the battery’s
capacity.
A maximum charge current of 0.5A(500mA) may be set for a 5000mAh (5Ah) lead acid battery.
Fast charging lead acid batteries is not permitted as this would overload the battery -
resulting in a risk of fire and explosion!
Always observe the information printed on the battery or the information provided by
the battery manufacturer on the permitted charge current.
Page 61

60
b) Charging batteries (“CHARGE”)
• In the main menu, select the “Pb” charge program with the button “BATT.TYPE/STOP”.
• Press the button “START/ENTER”; the display shows the following, for example:
The value on the left in the second line shows the charge current, the value on the right shows the voltage
or number of cells of the battery (in this example, a one-cell lead battery, 6x 2.0V = 2.0V).
• If the values need to be changed, press the “START/ENTER” button. The charge current begins to
flash. Change the charge current using the keys “INC” and “DEC” and confirm the value using the
“START/ENTER” key.
• The voltage/cell number then begins to flash. Change this using the buttons “INC” and “DEC”. You
should be aware while doing this that the voltage only changes with the number of cells (e.g. one cell =
2.0V, two cells 4.0V etc.) Confirm the setting by pressing the “START/ENTER“ button.
• To begin the charging process, keep the “START/ENTER” button pressed for longer (approx. 3 seconds).
• If the settings are wrong, or if the charger detects a problem, an audio signal is emitted and the appropriate information is shown on the display.
You can stop the warning signal by pressing the “BATT.TYPE/STOP” button. You then return to the previous configuration menu.
• If the battery is detected correctly, the following display appears,
for example:
1. Line: Cell type and number of cells, charge current, battery voltage
2. Line: Current duration of charge, charged capacity in mAh
• Once the charging process is complete, an audio signal is emitted.
☞
If you wish to terminate the charging process beforehand, press the “BATT
TYPE/STOP” button.
Page 62

61
c) Discharging batteries (“DISCHARGE”)
• After you have selected the “Pb” program in the main menu with the button “BATT.TYPE/STOP” and
confirmed this with the button “START/ENTER”, you can select the discharge function using the button
“INC” or “DEC”:
The value on the left in the second line shows the discharge current, the value on the right shows the voltage
or number of cells of the battery (in this example, a one-cell lead battery, 6x 2.0V = 2.0V).
• If the values need to be changed, press the “START/ENTER” button. The discharge current blinks.
Change the discharge current using the keys “INC” and “DEC” and confirm the value using the
“START/ENTER” key.
• The voltage/cell number then begins to flash. Change this using the buttons “INC” and “DEC”. You
should be aware while doing this that the voltage only changes with the number of cells (e.g. one cell =
2.0V, two cells 4.0V etc.) Confirm the setting by pressing the “START/ENTER“ button.
☞
For safety reasons, the charger sets the final discharge voltage automatically.
• To begin the discharge process, keep the “START/ENTER” button pressed for longer (approx. 3 seconds).
• If the settings are wrong, or if the charger detects a problem, an audio signal is emitted and the appropriate information is shown on the display.
• You can stop the warning signal by pressing the “BATT.TYPE/STOP” button. You then return to the previous configuration menu.
• If you press the button “Start/Enter” during the discharge process, the discharge current can be
changed (see above).
• Once the discharge process is complete, an audio signal is emitted.
☞
If you wish to terminate the discharging process beforehand, press the
“BATT.TYPE/STOP” button.
Page 63

62
13. Saving Battery Data
☞
You can view the entire menu structure in the correct order on the fold-out page. Here
the key functions for operating are also given.
The charger has altogether 10 memories in which you can save battery data/settings.
• In the main menu, select the function “SAVE DATA” with the button “BATT.TYPE/STOP”:
• Press the button “START/ENTER”; the display shows the following, for example, and memory “01”
blinks:
• Select the desired memory with the buttons “INC” or “DEC” (1...10) and confirm your entry with the button “START/ENTER”.
• Now the battery type, which you can change with the buttons “INC” or “DEC”, blinks on the top right of
the display. Confirm the selection by pressing the “START/ENTER“ button.
☞
It is not possible to select between lithium batteries “LiPo”, “LiIon” and “LiFe”. The type
set in the user menu is always applied.
• The voltage starts to blink on the bottom left. Change this as usual using the buttons “INC” and “DEC”
and confirm the value using the “START/ENTER” button.
• Now the battery capacity blinks on the bottom right. Set this with the buttons “INC” or “DEC” (keep button depressed for longer for fast changing) and confirm this with the button “START/ENTER”.
• Then the memory number blinks again.
• Keep the button “START/ENTER” depressed for longer (approx. 3 seconds) to access the next menu,
then let the button go again immediately. The following display appears (depending on the previously
selected battery type):
If the button “START/ENTER” is held down too long, “SAVE” appears in the display . and
the settings are saved. In this case, simply restart the setting in order to continue in the
menu.
Page 64

63
• Briefly press the button “START/ENTER”; the current value (A) in the bottom line starts to blink.
☞
With NiCd or NiMH batteries, if the current value is flashing, you can switch between
manual and automatic mode by simultaneously pressing the buttons “INC” and “DEC”
(see chapter 11. a).
With lithium batteries, the cell number (S) must be set as well as the charge current.
Change this as usual using the buttons “INC” and “DEC” and confirm the value using the
“START/ENTER” button.
• If the values do not blink, you can select between the individual programs with the buttons “INC” or
“DEC”. Depending on the battery type, these are “DISCHARGE”, “CHARGE”, “STORAGE”, “BALANCE”, “CYCLE”, etc.
• If you now keep the button “START/ENTER” depressed for longer ,
(approx. 3 seconds), all settings are saved in the memory previously
selected. “SAVE” appears in the display. The saving stage is shown in
points.
☞
The data in the 10 memory spaces is, of course, preserved, even if the charger is separated from the supply voltage.
This way, you can save the data for the transmitter battery, for example (e.g. NiMH,
charge current 400mA) and for a flight battery (LiPo, 1A charge current, 3 cells).
14. Loading Battery Data
☞
You can view the entire menu structure in the correct order on the fold-out page. Here
the key functions for operating are also given.
• In the main menu, select the function “LOAD DATA” with the button “BATT.TYPE/STOP”:
• Press the button “START/ENTER”; the display shows the following, for example, and memory “01”
blinks:
• With the buttons “INC” or “DEC”, select the desired memory (1....10).
Page 65

64
• If you now keep the button “START/ENTER” depressed for longer ,
(approx. 3 seconds), all settings from the memory previously selected are
loaded. “LOAD” appears in the display.
The data is transferred and all settings are changed in accordance with the saved values.
15. Various Basic Settings (“USER SET”)
☞
You can view the entire menu structure in the correct order on the fold-out page. Here
the key functions for operating are also given.
• In the main menu, select the “USER” menu with the “BATT.TYPE/STOP” button.
• Press the button “START/ENTER”; the display shows the following, for example:
• Here you can select one of the three lithium battery types the charger is able to work with (“Lilo”, “LiPo”,
“LiFe”).
• Briefly press the button “START/ENTER”. The voltage value then begins to flash.
• With the buttons “INC” or “DEC”, you can select the cell voltage “3.3”, “3.6” or “3.7”. At the same time,
the corresponding battery type changes in the top line.
• Confirm the selection of the lithium battery type with the button “START/ENTER”, and the voltage value will stop blinking.
☞
The settings made here for the lithium battery type then apply to ALLother functions, e.g.
charging, discharging, etc. (see chapter 10).
• With the button “INC”, switch to the next setting (or to the previous one with the button “DEC”).
• Here you can set the time in which the charger checks a connected lithium battery for the correct cell
count and terminates the charge process, if necessary.
• This may be especially helpful with fully discharged batteries. For a battery with a higher capacity set a
longer time; for one with a lower capacity set a correspondingly shorter time.
Page 66

65
• Briefly press the button “START/ENTER”. The time display then begins to flash. With the buttons “INC”
or “DEC”, you can select the time (5 to 60 minutes). Save the setting with the button “START/ENTER”;
the voltage then stops blinking.
• With the “INC” button, you access the next setting (or with the button “DEC” the previous setting or return
to the main menu with the button “BATT. TYPE/STOP”.)
Here you can set the sensitivity of the delta-U detection of NiMH battery (voltage difference in the delta-U
charge procedure).
A value which is too high may overcharge the battery but if the value is too low, the battery may not be completely charged.
• Briefly press the button “START/ENTER”. The voltage value then begins to flash. With the buttons
“INC” or “DEC”, you can set the voltage value (5 to 20mV).
• If you select “Default”, the charger uses a pre-specified voltage of 7mV. This setting is recommended.
• Save the setting with the button “START/ENTER”; the voltage then stops blinking.
• With the “INC” button, you access the next setting (or with the button “DEC” the previous setting or
return to the main menu with the button “BATT. TYPE/STOP”.)
Here you can set the sensitivity of the delta-U detection of NiCd batteries (voltage difference in the deltaU charge procedure).
A value which is too high may overcharge the battery but if the value is too low, the battery may not be completely charged.
• Briefly press the button “START/ENTER”. The voltage value then begins to flash.
• With the buttons “INC” or “DEC”, you can set the voltage value (5 to 20mV). If you select “Default”, the
charger uses a voltage of 12mV. This setting is recommended.
• Save the setting with the button “START/ENTER”; the voltage then stops blinking.
• With the “INC” button, you access the next setting (or with the button “DEC” the previous setting or return
to the main menu with the button “BATT. TYPE/STOP”.)
Page 67

66
The USB interface or the temperature monitoring can be switched on/off in this menu.
☞
For this function, it is necessary to have an optional USB adapter or an optional temperature sensor, which are optionally connected to the charger ( see chapter 8, positions 12 and 15).
The USB adapter and the temperature sensor are not contained in the scope of deliv-
ery of the charger and must be ordered separately.
The interface and temperature function is only possible with channel 1 and 2.
These settings are invalid with channels 3 and 4.
The use of interfaces and temperature monitoring is only possible for the same
channel in turns as these functions both use the side connection (12 or 15).
Confirm the selection by pressing the “START/ENTER“ button. The “USB” parameter blinks in the display. The USB interface is selected (“enable”).
You can switch between the USB interface (USB) and the temperature monitoring function with the buttons “INC” or “DEC”. When the temperature monitoring function is selected, the following is shown:
Confirm the setting by pressing the “START/ENTER“ button.
The temperature value blinks on the display. With the buttons “INC” or “DEC”, you can set the tempera-
ture at which a subsequent charge or discharge process is later terminated. The setting can range from
20 to 80°C.
Save the setting by briefly pressing the “START/ENTER” button.
• With the “INC” button, you access the next setting (or with the button “DEC” the previous setting or return
to the main menu with the button “BATT. TYPE/STOP”.)
The battery becomes quite hot using the cycle program (automatic discharge/charge cycles in
sequence). In order to give the battery enough time to cool off sufficiently, a break time can be set here.
Briefly press the button “START/ENTER”. The time display then begins to flash. With the buttons “INC”
or “DEC”, you can select the time (0 to 60 min). Save the setting with the button “START/ENTER”; the
time display then stops blinking.
Page 68

67
• With the “INC” button, you access the next setting (or with the button “DEC” the previous setting or
return to the main menu with the button “BATT. TYPE/STOP”.)
As soon as a charge process starts, the internal timer starts as well. If the charger cannot detect whether
the battery is fully charged for whatever reason (e.g. with delta-U detection), the charge process is terminated automatically after a set time if the safety timer is set to ON.
This protects the battery from overloading. However, do not set a time which is too short, otherwise the
battery cannot be fully charged.
Calculate the time for the safety timer as follows:
Example:
Battery capacity Charge current Timer time
2000mAh 2.0A 2000 / 2.0 = 1000 / 11.9 = 84 minutes
3300mAh 3.0A 3300 / 3.0 = 1100 / 11.9 = 92 minutes
1000mAh 1.2A 1000/ 1.2 = 833 / 11.9 = 70 minutes
With factor 11.9, the battery is charged with 140% capacity before the safety timer kicks in.
Briefly press the button “START/ENTER”. “ON” (or “OFF”) then starts to blink in the bottom display line.
With the buttons “INC” or “DEC”, you can select between “ON” (= safety timer activated) and “OFF”
(safety timer deactivated).
Save the setting by pressing the “START/ENTER“ button.
Now the time display for the safety timer starts to blink (bottom line on the right).
With the buttons “INC” or “DEC”, you can set the time (10 to 720 min). For a quick adjustment, hold the
corresponding button down.
Save the setting by pressing the “START/ENTER“ button.
• With the “INC” button, you access the next setting (or with the button “DEC” the previous setting or return
to the main menu with the button “BATT. TYPE/STOP”.)
Another safety function of the charger can terminate the charge process if a certain capacity was “loaded”
into the battery.
Briefly press the button “START/ENTER”. “ON” (or “OFF”) then starts to blink in the bottom display line.
With the buttons “INC” or “DEC”, you can select between “ON” (= safety cut-off activated) and “OFF”
(safety cut-off deactivated).
Page 69

68
Save the setting by pressing the “START/ENTER“ button.
Now the capacity display starts to blink (bottom line on the right).
With the buttons “INC” or “DEC”, you can select the capacity (10 to 50000mAh).
For a quick adjustment, hold the corresponding button down.
Save the setting by pressing the “START/ENTER“ button.
• With the “INC” button, you access the next setting (or with the button “DEC” the previous setting or return
to the main menu with the button “BATT. TYPE/STOP”.)
With the option “Key Beep”, you activate/deactivate the confirmation beep for each push of a button.
The “Buzzer” option switches the signal tone for functions/warning messages on or off.
Briefly press the button “START/ENTER”. “ON” (or “OFF”) starts to blink in the top display line.
With the buttons “INC” or “DEC”, you can select between “ON” and “OFF”.
Briefly press the button “START/ENTER” in order to save. “ON” (or “OFF”) then starts to blink in the bot-
tom display line.
With the buttons “INC” or “DEC”, you can select between “ON” and “OFF”.
Save the setting by pressing the “START/ENTER“ button.
• With the “INC” button, you access the next setting (or with the button “DEC” the previous setting or return
to the main menu with the button “BATT. TYPE/STOP”.)
This function monitors the voltage at the charger input (e.g. for a 12V battery). If the voltage drops below
the configured value, the charging process is stopped. This protects the voltage source against completely discharging (lower voltage cut-off).
Briefly press the button “START/ENTER”. The voltage value then begins to flash.
With the buttons “INC” or “DEC”, you can set the voltage value (10 to 11V).
Save the setting with the button “START/ENTER”; the voltage then stops blinking.
• With the “INC” button, you return to the first setting (or with the button “DEC” the previous setting or
return to the main menu with the button “BATT. TYPE/STOP”.)
Page 70

69
16. Warning Messages on the Display
The polarity of the battery connections has been switched.
The connection to the battery has been disrupted, e.g. if the battery
was disconnected during the charging process.
A short-circuit has been identified on the charger output.
The input voltage (operating voltage) for the charger is too low.
The voltage of a LiPo, LiIon, LiFe battery to be charged has been
incorrectly configured.
The charger has identified an internal problem. Should this message
be displayed permanently, it is possible that the charger is faulty; have
it checked by a specialist workshop or qualified technician.
During the charging process it was identified that the battery is totally
discharged.
In this case you should check if the voltage of the battery has been
correctly set for the charging process.
The voltage in one of the cells of a lithium battery (LiPo, LiIon, LiFe) is
too low. This can occur if a multi-cell battery was previously charged
without a balancer.
The voltage in one of the cells of a lithium battery (LiPo, LiIon, LiFe) is
too high. This can occur if a multi-cell battery was previously charged
without a balancer.
Page 71

70
The balancer cable was connected incorrectly or does not match the
pin assignment of the charger.
The charger has identified an internal problem. Should this message
be displayed permanently, it is possible that the charger is faulty; have
it checked by a specialist workshop or qualified technician.
17. Information on the Charger
Various information is indicated on the display during a charge/discharge process by repeatedly pressing the button “DEC”.
Voltage of the battery at the end of charging/discharging
Battery capacity for safety cut-off
Time for safety timer
Temperature cut-off on/off; selected cut-off temperature (only with
external temperature sensor, not part of the delivery)
Temperature measured by the external temperature sensor (not part
of the delivery) or the internal temperature sensor.
Current input voltage
By repeatedly pressing the “INC” button, you can switch to the display of the individual cell voltage, e.g.
with lithium batteries (this is only sensible if the balancer connections are used with lithium batteries).
Page 72

71
Example for a 3 line LiPo battery:
18. Maintenance and Cleaning
The product does not require any maintenance therefore you should never take it apart.
The product should only be repaired by a specialist or specialist workshop or it may be damaged. Fur-
thermore, the CE approval and the guarantee/warranty will become void.
Clean the product only with a soft, clean, dry and fuzz-free cloth. Do not use cleaning agents as they
may corrode the casing and wear off the labelling.
Dust can be removed using a clean, soft brush and a vacuum cleaner.
19. Handling
• Observe all safety information in these operating instructions! They provide you with
important information about the dangers involved when handling battery chargers and
batteries.
• The product is not a toy and must be kept out of reach of children. Children cannot judge
the dangers involved when handling chargers or batteries.
• Avoid the following unfavourable ambient conditions at the place of installation, during
operation or when transporting:
- Dampness or high humidity
- extreme cold (<0°C) or heat (>+35°C), direct sunlight,
- Dust or flammable gases, fumes or solvents
- strong vibration, hits or blows,
- strong magnetic fields such as those near machines or loudspeakers
• Place the charger on a level, firm surface. It must be large enough so that the battery or
battery pack attached can be safely placed alongside the charger. Maintain a minimum
of 20cm between the charger and battery (and the power supply) to prevent them from
heating each other up.
The battery/battery pack may not be placed on or under the charger!
• When setting up and using the product, make sure that the cable is not folded or
squeezed.
• Never cover the charger and the battery! By preventing heat from escaping, not only will
the battery be destroyed, there is also a risk of fire and explosion!
Page 73

72
• The feet of the device and the temperature of the casing may produce pressure marks
and discolouration on sensitive surfaces. The same applies to the battery.
• As already described in the safety information, a suitable non-flammable and heatproof base should be used for the charger and the battery to be charged. Do not
place the charger or battery on expensive furniture!
• Maintain enough distance away from flammable objects or surfaces.
• Do not leave the charger unattended while it is in operation.
• Although there are a wide range of safety mechanisms on the charger, the possibility
of the battery or charger becoming overheated or damage to the battery can never be
excluded.
• The use of charging cables that are too thin or problems with the contacts may lead to
dangerous operating conditions!
• Check the temperature of the battery from time to time during the charging process.
• NiMH and NiCd batteries become very hot when using high charge currents (1C).
Temperatures of 50°C or above can be reached. For this reason, handle the battery
with care. If the battery overheats, it could be damaged. In this case, reduce the
charge current.
• In general, LiPo batteries should not get warmer than is safe to touch during the
charging process (charge current max. 1C) Alarge temperature increase indicates a
defective battery or a defective cell in the battery pack.
• For safety reasons, lithium batteries (LiPo, LiIon, LiFe) with more than one cell must
always be charged using a charge process with balancer.
• If the balancer plug does not fit in the appropriate charger socket, an appropriate
adapter must be used.
20. Disposal
Old electronic devices are recyclable and should not be disposed of in the household
waste. At the end of its service life, dispose of the product at the community collection
point according to the relevant statutory regulations. It is prohibited to dispose of the
device in the household waste.
a) Disposal of used batteries!
As a consumer you are legally required (Battery Ordinance)to responsibly dispose of all used batteries
and rechargeable batteries;it is forbidden to throw them away with the normal household waste!
Page 74

73
Batteries containing toxic substances are marked with the symbols shown, which indi-
cate they cannot be disposed of in the household waste. The descriptions for the respective heavy metal are: Cd = cadmium, Hg = mercury, Pb = lead. You can return used
batteries/rechargeable batteries free of charge at the official collection points of your
community, in our stores, or wherever batteries/rechargeable batteries are sold!
You thus fulfil the legal requirements and contribute to protecting the environment!
21. Technical Data
Operating voltage: ........................11 15V/DC, stabilised
Current consumption:....................Dependent on charge current and battery (20A power supply unit or
car lead battery recommended)
Charge current/channel: ..............0.1A - 5.0A adjustable
Charging power/channel: ..............max. 50 W
Discharge current/channel: ..........0.1A - 1.0A adjustable
Discharge current/channel: ..........max. 5 W
Battery types: ................................NiCd, 1 - 15 cells
NiMH, 1 - 15 cells
LiPo/LiIon/LiFe, 1 - 6 cells
Pb, 1 - 10 cells (2V per cell, 2 - 20V)
Output: ..........................................4mm sockets
Universal Balancer connections for 2 to 6 cells,
modular dimensions 2.54mm
Discharge current for balancer: ....300mA per cell
Weight: ..........................................approx. 1.09 kg
Dimensions: ..................................approx. 226 x 158 x 63
Ambient temperature:....................0°C to +35°C
Ambient air humidity: ....................Max. 90% relative, non-condensing
Special features:
• Integrated balancer for LiPo battery
• Delta-U cut-off
• Input voltage monitoring (for protection against total discharge)
• Capacity limit configurable (prevents the connected battery from overloading)
• Charge duration configurable (prevents the connected battery from overloading)
Page 75

74
1. Introduction
Chère cliente, cher client,
Vous avez pris une très bonne décision en achetant ce produit Voltcraft ® et nous vous en
remercions.
Vous avez acquis un produit de qualité issu d’une marque se distinguant par sa compétence technique,
son extraordinaire performance et une innovation permanente dans le domaine de la métrologie et de la
technique de charge et de réseau.
Voltcraft® permet de répondre aux tâches exigeantes du bricoleur ambitieux ou de l’utilisateur professionnel. Voltcraft® vous offre une technologie fiable à un rapport qualité-prix particulièrement avantageux.
Nous en sommes convaincus : votre premier contact avec Voltcraft marque le début d’une coopération
efficace de longue durée.
Nous vous souhaitons beaucoup de plaisir avec votre nouveau produit Voltcraft® !
Page 76

75
2. Table des matières
1. Introduction ......................................................................................................................................74
2. Table des matières ..........................................................................................................................75
3. Utilisation conforme ........................................................................................................................76
4. Contenu de la livraison ....................................................................................................................76
5. Consignes de sécurité ....................................................................................................................77
6. Remarques sur les batteries ............................................................................................................79
a) Généralités ..................................................................................................................................79
b) Informations supplémentaires sur les batteries au lithium ..........................................................80
7. Types de batteries utilisables ..........................................................................................................82
8. Eléments de commande ..................................................................................................................83
9. Mise en service ................................................................................................................................85
10. Batteries au lithium (LiPo, Lilon, LiFe) ............................................................................................86
a) Généralités ..................................................................................................................................86
b) Chargement de la batterie sans raccordement Balancer (“CHARGE”) ......................................87
c) Chargement de la batterie avec raccordement Balancer (“BALANCE”) ......................................88
d) Chargement rapide (“FAST CHG“) ..............................................................................................89
e) Stockage de la batterie (“STORAGE“) ........................................................................................90
f) Déchargement de la batterie (“DISCHARGE“) ............................................................................90
11. Batteries NiMH et NiCd ..................................................................................................................91
a) Chargement de la batterie (“CHARGE”) ......................................................................................91
b) Déchargement de la batterie (“DISCHARGE“) ............................................................................92
c) Programme-cycle (“CYCLE“) ......................................................................................................93
12. Batteries au plomb (Pb) ..................................................................................................................94
a) Généralités ..................................................................................................................................94
b) Chargement de la batterie (“CHARGE”) ......................................................................................95
c) Déchargement de la batterie (“DISCHARGE“) ............................................................................96
13. Sauvegarde des données de la batterie ..........................................................................................97
14. Chargement des données de la batterie ..........................................................................................98
15. Réglages de base divers (“USER SET“) ........................................................................................99
16. Messages d’avertissement à l’écran ..............................................................................................105
17. Informations du chargeur ..............................................................................................................106
18. Maintenance et nettoyage ............................................................................................................107
19. Manipulation ..................................................................................................................................107
20. Élimination ....................................................................................................................................108
a) Elimination des piles usagées ! ................................................................................................108
21. Caractéristiques techniques ..........................................................................................................109
Page 77

76
3. Utilisation conforme
Le chargeur multifonction B6 Quadro est destiné à recharger les batteries de type NiCd/NiMH (1-15 cellules), LiPo/LiIon/LiFe (1-6 cellules) ainsi que les batteries au plomb (1-10 cellules, 2V-20V). Le courant
de charge peut être réglé entre 0,1A et 5,0A. La puissance de charge maximale est de 50 W par sortie.
Il est également possible de décharger les batteries; le courant de décharge est alors compris entre 0,11,0A. La puissance de décharge maximale est de 5 W par sortie.
Sur les canaux de chargement / déchargement, il est possible de raccorder en option une sonde de température en vue de la surveillance de la batterie, ou bien un adaptateur de terminal USB pour l’enregistrement des données.
Le chargeur présente quatre canaux de charge / décharge indépendants les uns des autres. Seule une
tension continue comprise entre 11 et 15 V/DC doit être utilisée.
Chaque sortie présente un écran éclairé à deux lignes et quatres touches.
Dans le cas des batteries LiPo-/LiIon-/LiFe, un Balancer est intégré au chargeur; vous trouverez les rac-
cordements- Balancer pour la batterie sur le coté du chargeur.
Le produit est prévu pour une utilisation dans des locaux secs à l’intérieur, il ne doit pas être mouillé ou humi-
de.
Toute utilisation autre que celle stipulée ci-dessus peut endommager le produit et entraîner des risques,
ex. : courts-circuits, incendies, décharges électriques, etc. Il est interdit de modifier ou de transformer
l’ensemble du produit.
Lisez attentivement le mode d’emploi et conservez-le pour pouvoir le consulter ultérieurement.
Respectez impérativement les consignes de sécurité.
4. Contenu de la livraison
Chargeur
2 Borne polaire
Notice d’utilisation
Page 78

77
5. Consignes de sécurité
Lisez intégralement le mode d’emploi avant la mise en service de l’appareil ; il
contient des consignes importantes pour son bon fonctionnement.
Tout dommage résultant d’un non-respect du présent mode d’emploi entraîne
l’annulation de la garantie ! Nous déclinons toute responsabilité en cas d’éventuels dommages consécutifs.
De même, nous n’assumons aucune responsabilité en cas de dommages matériels ou corporels résultant d’une utilisation de l’appareil non conforme aux spécifications ou d’un non-respect des présentes consignes de sécurité ! De tels cas
entraînent l’annulation de la garantie.
Chère cliente, cher client, les consignes de sécurité suivantes ne sont pas seulement destinées à protéger votre santé, mais aussi à préserver le bon fonctionnement de l´appareil. Veuillez lire attentivement
les points suivants :
Respectez les pictogrammes suivants :
Dans ce mode d’emploi, un point d’exclamation placé dans un triangle signale des
informations importantes à respecter impérativement.
☞
Le symbole de la “main” précède les recommandations et indications d’utilisation particulières.
Cet appareil est homologué CE et répond aux directives nationales et européennes
requises
Pour des raisons de sécurité et d’homologation (CE), les transformations et/ou modifications de l’appareil réalisées à titre individuel sont interdites.
Veuillez consulter un spécialiste si vous avez des doutes sur la manière dont fonctionne le produit ou sur
des questions de sécurité ou de branchement.
Les chargeurs et les batteries ne sont pas des jouets; ne pas les laisser à la portée des enfants! N’installez, n’utilisez et ne rangez le produit qu’à un endroit situé hors de portée des enfants. Ceux-ci pourraient
modifier les réglages ou court-circuiter la batterie ou le pack de batteries, pouvant entraîner une explosion. Danger de mort !
Dans les installations industrielles, il convient d’observer les prescriptions de prévention des accidents
relatives aux installations et aux matériels électriques des associations professionnelles.
Dans les écoles, les centres de formation, les ateliers de loisirs et de réinsertion, la manipulation des
chargeurs et des batteries doit être surveillée par un personnel spécialement formé à cet effet.
Page 79

78
Le produit n’est conçu que pour fonctionner dans des locaux secs. Ne pas exposer le produit ni à l´humidité ni aux liquides. N’exposez jamais le produit à des températures trop élevées (>35°C) ou trop basses
(<0°C) ou à l’ensoleillement direct. Protégez-le de la poussière et de toute saleté. Il en est de même pour
la batterie raccordée. Lors du chargement de batteries au plomb (Pb), veillez à ce que la pièce soit bien
aérée.
N’utilisez pas le chargeur à l’intérieur de véhicules.
Ne déposer aucun récipient rempli de liquides tels que récipient, vases ou plantes sur ou à côté du char-
geur. S’il tombe, le chargeur peut être détruit. Il existe en outre un risque élevé d’incendie.
Ne laissez jamais le produit en marche sans surveillance. En dépit des circuits protecteurs importants et
variés, des dysfonctionnements ou des problèmes lors de la recharge d´une batterie ne peuvent être
exclus.
Utilisez le produit uniquement en climat modéré et non tropical. Respectez le chapitre « Caractéristiques techniques » en ce qui concerne les conditions ambiantes autorisées.
Choisissez un emplacement stable, plane, suffisamment grand et lisse. N’installez jamais le chargeur ou
la batterie sur des surfaces inflammables tels que tapis. Utilisez toujours un support approprié, non
inflammable et résistant à la chaleur.
Veillez à une aération suffisante pendant la phase de fonctionnement, ne couvrez jamais le chargeur
et/ou la batterie raccordée. Respectez une distance suffisante (au moins 20 cm) entre le chargeur, la
batterie et les autres objets.
N’allumez jamais l’appareil immédiatement quand il vient d’être mis d’une pièce froide dans une pièce
chaude. L’eau de condensation en résultant peut causer des dysfonctionnementsou des dommages!
Attendez d´abord que le chargeur (et la batterie / les batteries) soit à température ambiante avant de le
brancher à la tension d’alimentation et de le mettre en service. Cela peut durer plusieurs heures !
Toute intervention de maintenance, de réglage ou de réparation doit uniquement être effectuée par un spécialiste ou un atelier spécialisé. L´intérieur du boîtier ne comporte aucune pièce détachée nécessitant un
réglage ou une maintenance de votre part.
Ce produit doit être manipulé avec précaution – les coups, les chocs, ou une chute, même d’une faible
hauteur, peuvent l’endommager.
Evitez de faire fonctionner l’appareil à proximité immédiate de ce qui suit :
- champs électromagnétiques ou magnétiques intenses,
- antennes émettrices ou générateurs HF.
L’électronique de commande peut s’en retrouver affectée.
Lorsque le bon fonctionnement de l’appareil n’est plus garanti, il convient de mettre celui-ci hors service
et d’empêcher toute remise en marche intempestive. Une utilisation sans danger n’est plus possible si :
- l’appareil présente des dommages visibles,
- l’appareil ne fonctionne plus et
- l’appareil a été stocké durant une période prolongée dans des conditions défavorables,
- lorsqu’il a subi de sévères contraintes liées au transport.
Ne laissez pas le matériel d’emballage sans surveillance ; il pourrait constituer un jouet dangereux pour
les enfants.
Observez également les consignes de sécurité figurant dans les différents chapitres.
Page 80

79
6. Remarques sur les batteries
Bien que la manipulation des batteries fasse désormais partie de notre quotidien, celles-ci représentent
toutefois de nombreux dangers et problèmes. En particulier en ce qui concerne les batteries LiPo/LiIon
/LiFe, avec leur haut contenu énergétique (en comparaison avec des batteries conventionnelles NiCd ou
NiMH), il faut impérativement observer diverses prescriptions, car sinon il y existe un risque d’explosion
et d’incendie.
Pour cette raison, observez impérativement les informations et consignes de sécurité
indiquées ci-dessous relatives à l’utilisation de piles et de batteries.
a) Généralités
Les batteries ne doivent pas se retrouver entre les mains des enfants. Conservez les batteries hors de
portée des enfants ! Il en est de même pour les chargeurs. Les chargeurs et les batteries ne sont pas
des jouets!
Ne laissez pas les batteries à la portée de tous, les enfants ou les animaux domestiques pourraient les avaler. Consultez dans ce cas immédiatement un médecin !
Faites attention à ne pas court-circuiter les batteries, ne les ouvrez pas et ne les jetez pas dans le feu. Il
existe un danger d’incendie et d’explosion !
Des batteries corrodées ou endommagées peuvent, au toucher, causer des brûlures sur la peau ; mettez donc des gants de protection adaptés pour retirer de telles batteries.
Les piles normales ne sont pas rechargeables. Il existe un danger d’incendie et d’explosion ! Les piles
non rechargeables sont uniquement prévues pour être utilisées une seule fois. Une fois vides, elles doivent être éliminées selon les prescriptions. Ne rechargez que les batteries prévues à cet effet.
Les batteries ne doivent pas être exposées à l´humidité, ni aux liquides.
Faites attention à brancher les batteries à votre modèle réduit ou à votre chargeur en respectant la pola-
rité (positive/+ et -/négative). Le non respect de la polarité risque non seulement d’endommager votre
modèle réduit, mais aussi la batterie. Il existe un danger d’incendie et d’explosion !
Le chargeur livré ici dispose d’un circuit de protection contre l’inversion de polarité. Cependant, dans
certaines situations, une inversion de polarité peut entraîner des dommages.
En cas d’inutilisation prolongée (par ex. lors du stockage), débranchez l’éventuelle batterie raccordée au
chargeur, et débranchez celui-ci de la tension d’alimentation.
N’effectuez jamais le chargement / déchargement d’une batterie qui est encore chaude (par ex. causé
par des courants de déchargement importants dans le modèle réduit). Laissez d’abord les batteries se
refroidir à la température ambiante avant de les recharger.
Ne chargez / déchargez jamais des batteries endommagées, corrodées ou déformées. Cela peut entraîner un incendie ou une explosion !
N’utilisez jamais de packs de batteries composés de différentes cellules.
Rechargez les batteries environ tous les 3 mois, autrement, l’autodécharge provoque une décharge dite
complète, ce qui rend les batteries inutilisables.
Page 81

80
Retirez la batterie du chargeur lorsqu’elle est complètement rechargée.
Veillez à ne jamais endommager l’enveloppe extérieur de la batterie. Il existe un danger d’incendie et
d’explosion !
Ne rechargez / déchargez jamais la batterie directement dans le modèle réduit. Retirez d’abord la bat-
terie du modèle réduit.
Intallez le chargeur ou la batterie sur des surfaces non inflammables et thermorésistantes (par ex. car-
relage en pierre). Respectez une distance suffisante par rapport aux objets inflammables. Laissez une
distance suffisance entre le chargeur et la batterie. Ne placez jamais la batterie sur le chargeur.
Étant donné le réchauffement du le chargeur et de la batterie raccordée durant le processus de chargement / déchargement, il est impératif de veiller à une aération suffisante. Ne recouvrez jamais le chargeur ni la batterie!
Ne jamais charger / décharger des batteries sans surveillance.
Si les câbles de raccordement de la batterie doivent être raccourcis (par ex. lorsque la batterie est livrée
sans connecteur), veuillez alors raccourcir chaque ligne séparément, afin d’éviter tout court-circuit. Danger
d´incendie et d´explosion !
b) Informations supplémentaires sur les batteries au lithium
Les batteries modernes dotées de la technologie Lithium ne montrent pas seulement une capacité significativement plus élevée que les batteries NiMH ou NiCd, mais présentent aussi un poids bien inférieur.
Ces caractéristiques rendent ce type de batterie très intéressant, par ex. pour une utilisation dans la
construction de modèles réduits. Les batteries LiPo (Lithium-Polymère) sont les plus utilisées ici.
Les batteries LiPo ( ainsi que les batteries LiFe et Lilon rechargeables avec le chargeur) nécessitent
cependant un soin particulier lors du chargement / déchargement, ainsi que lors de leur fonctionnement
et de leur manipulation. Par conséquent, nous souhaitons, au cours des sections suivantes, vous informer des risques potentiels et de la façon d’éviter ceux-ci, en vue de conserver les capacités de ces batteries à long terme.
Veuillez également consulter le chapitre 6. a).
L’enveloppe extérieure des batteries LiPo est très fragile; elle est seulement composée d’un film épais.
En aucun cas vous ne devez détruire ou endommager la batterie! Ne faites jamais tomber la batterie! Ne
piquez aucun objet dans la batterie! Évitez toute contrainte mécanique sur la batterie! Pour débrancher la batterie, ne tirez jamais sur les câbles de raccordement! Ceci représente un danger d´incendie et d´explosion !
Agissez toujours avec précaution lors de la mise en place de la batterie dans le modèle réduit (ou de son
retrait du modèle réduit).
Lors du fonctionnement, du chargement / déchargement, transport et stockage de la batterie, veillez à ce
que celle-ci ne présente pas de surchauffe. Ne placez jamais la batterie à proximité de sources de chaleur
( par ex. régulateur de vitesse, moteur) et gardez la batterie à distance du rayonnement solaire direct. En
cas de surchauffe de la batterie, il existe un danger d´incendie et d´explosion !
Page 82

81
La batterie ne doit jamais présenter une température supérieure à 60°C (le cas échéant, respecter les
indications du fabricant!
Dans le cas où la batterie présente des dommages (par ex. après la chute d’un modèle réduit d’avion ou
d’hélicoptère) ou que l’enveloppe extérieure est gonflée / boursouflée, veuillez ne plus utiliser la batterie.
Ne la rechargez plus. Il existe un danger d’incendie et d’explosion ! Prenez la batterie avec prudence en
utilisant des gants de protection appropriés. Eliminez la batterie de manière respectueuse de l’environnement.
En vue du chargement d’une batterie au lithium, veuillez uniquement utiliser un chargeur conçu à cet
effet. Ne jamais utiliser de chargeurs traditionnels destinés aux batteries NiCd, NiMH ou au plomb! Il
existe un risque d’incendie et d’explosion!
Dans le cas où vous rechargez une batterie au lithium avec plus d’une cellule, il est impératif d’utiliser ce
qu’on appelle un Balancer (déjà intégré au chargeur livré ici par ex.).
Les batteries LiPo doivent être rechargées avec un courant de charge de 1 C maximum. Cela signifie
que le courant de charge ne doit pas dépasser la valeur de capacité indiquée sur la batterie (par ex.
Capacité de la batterie 1000 mAh, courant de charge max. 1000 mA = 1A). En ce qui concerne les batteries LiFe ou LiIon, veuillez impérativement vous conformer aux indications du fabricant de la batterie.
Le courant de décharge ne doit pas dépasser la valeur imprimée sur la batterie. Par exemple, si la valeur
“20 C” est imprimée sur une batterie LiPo, alors le courant de décharge maximal correspond à 20 fois la
capacité de la batterie (par ex. capacité de batterie 1000 mAh, courant de décharge max. 20 C = 20 x
1000 mA = 20 A).
Le non-respect de ces indications entraîne une surchauffe de la batterie risquant de déformer / d’endommager celle-ci, et pouvant entraîner une explosion et un incendie! Toutefois, en règle générale, la
valeur imprimée (par ex. “20 C”) ne se rapporte pas au courant permanent, mais seulement au courant
maximal pouvant être délivré par la batterie durant un court laps de temps. Le courant permanent doit
être inférieur à la moitié de la valeur indiquée.
Aucune cellule d’une batterie LiPo ne doit être déchargée en dessous de 3V (LiFe = 2.0V, LiIon = 2.5V)
car cela entraîne la destruction de la batterie. Si le modèle réduit ne possède pas de protection contre le
déchargement complet de la batterie ou bien un affichage optique de la tension insuffisante de la batterie,
vous devez alors régler à temps le fonctionnement du modèle réduit.
Page 83

82
7. Types de batteries utilisables
NiCd
Tension nominale : 1,2V/cellule
Courant de charge max. pour le chargement rapide: 1C (ou inférieur); dans le cas de batteries
spécialement conçues à cet effet, jusqu’à 2C
Arrêt du courant de décharge pour: 0,85V / cellule ( ou supérieur)
NiMH
Tension nominale : 1,2V/cellule
Courant de charge max. pour le chargement rapide: 1C (ou inférieur); dans le cas de batteries
spécialement conçues à cet effet, jusqu’à 2C
Arrêt du courant de décharge pour: 1,0V / cellule ( ou supérieur)
LiPo
Tension nominale : 3,7V/cellule
Tension de charge max. : 4,2V/cellule
Courant de charge max. pour le chargement rapide: 1C (ou inférieur)
Arrêt du courant de décharge pour: 3,0V / cellule ( ou supérieur)
LiIon
Tension nominale : 3,6V/cellule
Tension de charge max. : 4,1V/cellule
Courant de charge max. pour le chargement rapide: 1C (ou inférieur)
Arrêt du courant de décharge pour: 2,5V / cellule ( ou supérieur)
LiFe
Tension nominale : 3,3V/cellule
Tension de charge max. : 3,6V/cellule
Courant de charge max. pour le chargement rapide: 4C (ou inférieur)
Arrêt du courant de décharge pour: 2,0V / cellule ( ou supérieur)
Pb
Tension : 2,0V/cellule
Tension de charge max. : 2,46V/cellule
Courant de charge max. pour le chargement rapide: 0,4C (ou inférieur)
Arrêt du courant de décharge pour: 1,75V / cellule ( ou supérieur)
Si vous possédez plusieurs batteries au lithium et que vous souhaitez les recharger ou
les décharger à l’aide du chargeur, vous devez d’abord régler le type de batterie approprié (LiPo, LiIon, LiFe) avant d’effectuer le raccordement.
La sélection d’un type incorrect de batterie peut faire exploser la batterie ou entraîner
un incendie!
Page 84

83
8. Eléments de commande
Page 85

84
1 Canal de charge / décharge 1
2 Canal de charge / décharge 2
3 Canal de charge / décharge 3
4 Canal de charge / décharge 4
5 Affichage éclairé (écran), 2 lignes
6 touche “BATT.TYPE/STOP“ pour la sélection du menu (en avant) et pour arrêter le processus de
chargement.
7 Touche “DEC” pour la saisie de valeurs (réduire la valeur) et la sélection du menu (retour) ainsi que l’af-
fichage des valeurs des cellules distinctes lors du mode de chargement-Balance
8 Touche “INC” pour la saisie de valeurs (augmenter la valeur) et l’affichage des valeurs des cellules
distinctes lors du mode de chargement-Balance
9 Touche “START/ENTER” pour lancer / continuer le processus de chargement resp. pour confirmer
une fonction de réglage/ de commande.
10 Prises pour le raccordement de la batterie, canal 1 (rouge = borne positive, noir = borne négative)
11 Raccordements Balancer pour batteries LiPo / LiIon / LiFe de 2 à 6 lignes au canal 1
12 Prises pour les capteurs de température optionnels ou les interfaces USB optionnelles pour le
canal 1
13 Prises pour le raccordement de la batterie, canal 2 (rouge = borne positive, noir = borne négative)
14 Raccordements Balancer pour batteries LiPo / LiIon / LiFe de 2 à 6 lignes au canal 2
15 Prises pour les capteurs de température optionnels ou les interfaces USB optionnelles pour le
canal 2
16 Prises pour le raccordement de la batterie, canal 3 (rouge = borne positive, noir = borne négative)
17 Raccordements Balancer pour batteries LiPo / LiIon / LiFe de 2 à 6 lignes au canal 3
18 Prises pour le raccordement de la batterie, canal 4 (rouge = borne positive, noir = borne négative)
19 Raccordements Balancer pour batteries LiPo / LiIon / LiFe de 2 à 6 lignes au canal 4
20 Ouvertures latérales de ventilation. Ne pas recouvrir!
21 Câble de raccordement avec fiche à ressort pour raccordement à l’appareil d’alimentation ( rouge
= borne positive, noir = borne négative)
22 Bornes polaires enfichables pour le raccordement direct à des batteries au plomb 12 V (par ex.
dans la voiture etc.)
Page 86

85
9. Mise en service
Le chargeur doit être utilisé avec une tension continue stabilisée (11-15V/DC).
Ne faites jamais fonctionner le chargeur avec une autre tension, ceci entraînerait la
destruction du chargeur, ainsi que l’annulation de la garantie!
Selon la batterie qui est raccordée, il est possible d’avoir un courant de charge jusqu’à
5A par canal. Par conséquent, il faut choisir une alimentation électrique de puissance
appropriée.
Reliez le câble de raccordement (21) à l’alimentation électrique, en respectant la polarité. Utilisez éventuellement les bornes polaires fournies (22).
Le chargeur émet un bref signal sonore, les écrans s’allument..
Le chargeur présente maintenant le menu principal (exemple).
Veuillez observer les points suivants avant d’effectuer le raccordement / chargement d’une batterie:
Si vous ne l’avez pas déjà fait, lisez impérativement les chapitres 5 et 6 avec attention,
et dans leur intégralité.
Connaissez-vous précisément les données correspondant à votre batterie? Ne raccordez / chargez jamais des batteries inconnues ou sans imprimé, dont vous ne connaissez pas les valeurs!
Avez-vous sélectionné le programme de chargement approprié qui correspond au type
de batterie présente? Des réglages erronés endommagent le chargeur et la batterie,
de plus, il existe un danger d´incendie et d´explosion !
Avez-vous réglé le courant de charge approprié?
Avez-vous sélectionné la tension appropriée (par ex. batteries LiPo à muti-cellule)? Une
batterie LiPo à deux cellules peut être branchée en parallèle (3,7V) ou en série (7,4V).
Tous les câbles de jonction et raccords sont-ils en bon état, les fiches sont-elles cor-
rectement insérées dans les prises? Les fiches usées et les câbles endommagés doivent être remplacés.
Lors du raccordement d’une batterie au chargeur, branchez toujours d’abord le câble de
charge sur le chargeur, et ensuite seulement, la batterie sur le chargeur / câble de charge.
Pour effectuer le débranchement, procédez dans l’ordre inverse. Sinon, il existe le risque de
court-circuit ( par ex. via les deux connecteurs ronds de 4 mm du câble de charge).
Ne chargez toujours qu’une seule batterie resp. un seul pack de batteries sur un canal.
Si vous souhaitez recharger des packs de batteries que vous avez confectionnés vous-
même, il faut que les cellules soient de construction identique (même type, même capacité, même fabricant). En outre, les celllules doivent présenter le même état de charge (les
batteries LiPo peuvent être équilibrées au moyen du Balancer, ce qui n’est toutefois pas
possible pour les autres packs de batteries, par ex. NiMH ou NiCd).
Page 87

86
Utilisation des menus ( Aperçu, voir coté rabattabble):
Dans le menu principal, sélectionnez le sous-menu souhaité à l’aide de la touche “BATT.TYPE/STOP”
ou “DEC“ et confirmez la sélection avec la touche “START/ENTER“.
Les touches “INC” et “DEC” permettent d’accéder à différents réglages.
Pour modifier une valeur, appuyez sur la touche “START / ENTER”, le paramètre correspondant clignote.
Modifiez la valeur affichée à l’écran en appuyant sur la touche “INC” resp. “DEC”.
Sauvegardez la valeur (modifiée) à l’aide de la touche “START/ENTER”. Dans le cas d’affichage multiple
de paramètres (par ex. LiPo CHARGE -> Courant de charge et tension des cellules), on passe au paramètre suivant.
Pour quitter le menu de réglage, activez la touche “BATT.TYPE/STOP”; vous vous retrouvez à nouveau
dans le menu principal.
☞
En vue d’une utilisation facilitée et d’un meilleur aperçu, vous trouverez la structure du
menu sur le coté rabattable.
10. Batteries au lithium (LiPo, Lilon, LiFe)
☞
Vous pouvez consulter l’intégralité de la structure du menu sur le coté rabattable, dans
l’ordre approprié. Ici, les fonctions des touches sont également indiquées en vue de
l’utilisation.
a) Généralités
Ce programme de chargement est uniquement destiné pour les batteries au lithium “LiPo”, “LiIon” et
“LiFe”. Avant de commencer le processus de chargement / déchargement, il est impératif de régler le
modèle de batterie que vous souhaitez raccorder au chargeur (pour ce faire, aller dans les réglages
“User”, voir chapitre 15).
Si la batterie possède un raccordement Balancer, alors, durant le chargement / déchargement, le raccord-batterie-Balancer et le câble de raccordement de la batterie doivent
être branchés sur le chargeur.
Sélectionnez le raccordement Balancer approprié en fonction du nombre de cellules.
Il existe différents modèles de connecteur -Balancer. Ceci étant, ne forcez pas si un
connecteur ne rentre pas! Dans les commerces d’accessoires, vous trouverez l’adaptateur approprié au connecteur -Balancer.
Seule l’utilisation d’un Balancer ( intégré au chargeur “B6 Quadro”) permet à toutes les
cellules d’avoir la même tension après le processus de chargement. Ainsi, on n’observe pas de surcharge sur l’une des cellules. Enfin, le non-respect de ces indications
n’entraîne pas seulement des répercussions négatives sur la durée de vie des batteries, mais aussi le risque de destruction de la batterie, ainsi que d’incendie et d’explosion!
Page 88

87
Le courant de charge à régler dépend de la capacité de la batterie et est habituellement
de 1 C. Pour ce faire, observez les indications du fabricant de la batterie.
L’indication “1C” signifie que le courant de charge correspond à la valeur de la capaci-
té de la batterie. Par exemple, il faut régler un courant de charge de 1,8A dans le cas
d’une batterie LiPo de 1800 mAh.
Dans le menu principal, sélectionnez le programme-batterie “LiXX BATT” à l’aide de la
touche “BATT.TYPE/STOP“ et confirmez la sélection avec la touche “START/ENTER“.
☞
Selon le type de batterie que vous avez sélectionné dans les réglages “User”, la mention “LiPo”, “LiIo” ou”LiFe” s’affiche à l’écran.
Vérifiez que le type de batterie affiché à l’écran correspond à celui de la batterie que vous souhaitez
charger ou décharger.
Les touches “INC” et “DEC” permettent ensuite de sélectionner les différentes fonctions:
• “CHARGE“: Chargement de la batterie au lithium sans raccordement Balancer
• “BALANCE“: Chargement de la batterie au lithium avec raccordement Balancer
• “FAST CHG“: Chargement rapide de la batterie
• “STORAGE“: Chargement ou déchargement de la batterie à une valeur de tension déterminée
• “DISCHARGE“: Déchargement de la batterie
b) Chargement de la batterie sans raccordement Balancer (“CHARGE”)
Une fois “CHARGE” sélectionné, on obtient par ex. l’affichage suivant:
La valeur située à gauche de la deuxième ligne indique le courant de charge, tandis que la valeur située à droite indique la tension resp. le nombre
de cellules du pack de batteries (dans l’exemple ici, un pack de batteries LiPo à 1 cellule, 1x 3.7V = 3,7 V).
☞
Pour sélectionner le type de batterie (LiPo, LiIon, LiFe), veuillez procéder comme indiqué dans le chapitre 15.
Si vous souhaitez modifier les valeurs, appuyez sur la touche “START/ENTER”. Le courant de charge
clignote. Modifiez le courant de charge à l’aide des touches “INC” et “DEC”, puis confirmez la valeur à
l’aide de la touche “START/ENTER”.
À présent, la tension clignote. Modifiez celle-ci à l’aide des touches “INC” et “DEC”. Ce faisant, il faut noter
que la tension peut uniquement être modifiée par le biais du nombre de cellules (par ex. une celllule =
3.7V, deux cellules = 7.4V etc). Validez le réglage avec la touche “START/ENTER“.
Pour lancer le processus de chargement, maintenez la touche “START / ENTER” enfoncée pendant
3 secondes environ.
Page 89

88
Si les réglages sont erronés ou que le chargeur détecte une erreur, un signal d’avertissement est émis, et
l’information correspondante est affichée à l’écran. Pour mettre fin au signal d’avertissement, appuyez sur
la touche “BATT.TYPE/STOP”; vous vous retrouvez à nouveau dans le menu de réglage précédent.
Dans le cas contraire, on obtient par ex .
l’affichage suivant (alternativement):
La valeur pour “R:“ indique le nombre de cellules détecté par le chargeur.
La valeur pour “S:“ indique le nombre de cellules que vous avez paramétré dans le menu.
Si ces deux nombres de cellules divergent, veuillez vérifier les réglages du chargeur ainsi que la batterie. Il se peut que la batterie LiPo soit entièrement déchargée
ou qu’une cellule soit défectueuse. N’effectuez jamais le chargement de telles batteries; il existe un danger d´incendie et d´explosion ! Appuyez sur la touche
“BATT.TYPE/STOP”; vous vous retrouvez à nouveau dans le menu de réglage précédent.
Si les deux nombres de cellules correspondent, lancez le processus de chargement en appuyant brièvement sur la touche “START/ENTER”.
Une fois le processus de chargement lancé, diverses informations sur la progression du chargement en
cours s’affichent alors à l’écran, voir illustration suivante:
Exemple :
1. Ligne: Type de cellules et nombre de cellules, courant de charge,
tension de la batterie
2. Ligne: Durée de chargement actuelle, capacité chargée en mAh
Une fois le processus de chargement terminé, un signal sonore est émis (dans la mesure où l’appareil
n’est pas éteint).
☞
Si vous souhaitez terminer le processus de chargement avant, appuyez sur la touche
“BATT.TYPE/STOP“.
c) Chargement de la batterie avec raccordement Balancer (“BALANCE“)
Contrairement au simple programme de chargement “CHARGE”, ici la tension de chaque cellule est surveillée, et le courant de charge est réglé en conséquence.
Outre les deux raccordements normaux de la batterie, le raccordement -Balancer de la batterie doit aussi être branché au chargeur, voir chapitre 10. a).
Le reste de la procédure lors du chargement est décrit dans le chapitre 10.b).
☞
Dans le cas où une batterie à multi-cellule est reliée à des raccordements Balancer,
alors, durant le processus de chargement, il est possible de commuter entre l’affichage
normal et l’affichage des tensions des cellules, au moyen de la touche “INC”.
Page 90

89
Seul un pack de batteries présentant exactement la même tension par cellule permet
de fournir la puissance maximale et la durée de fonctionnement maximale au modèle
réduit d’avion ou de véhicule.
Étant donné les variations de qualité des matériaux et de structure interne, par ex.
dans le cas d’un pack de batteries LiPo à multi-cellule, il arrive en outre que, lors du
déchargement, les cellules présentent une tension différente à la fin du déchargement.
Si l’on charge ce genre de batterie LiPo sans Balancer, on obseve très rapidement de
grandes différences quant à la tension des cellules. Ceci n’entraîne pas seulement une
durée de vie réduite (car une cellule fait baisser la tension) mais endommage également
la batterie en raison d’un déchargement complet.
En outre, lors du chargement de ce genre de cellules différentes (présentant une tension différente) sans Balancer, il existe un risque de surcharge: La tension maximale
autorisée d’une cellule LiPo, d’environ 4,2V (+/- 1%) est dépassée.
(données pour LiIon et Life, voir chapitre 7).
Exemple :
Un pack de batteries LiPo sans Balancer, chargé et doté de 2 cellules présente une tension de 8,4 V et
semble ainsi complètement chargé, de l’extérieur. Cependant, les cellules présentent une tension de
4,5 V et de 3,9 V (une cellule est dangereusement en surcharge, tandis que l’autre est à moitié vide).
Une cellule présentant une telle surcharge peut couler, ou au pire des cas, prendre feu ou même
exploser!
Ceci étant, si votre pack de batteries LiPo possède un raccordement Balancer, il faut toujours utiliser le
programme de chargement “BALANCE”.
Il en est de même si votre pack “LiFe” ou “LiIon” possède également un raccordement Balancer. Seules
les valeurs de tension diffèrent; voir chapitre 7.
c) Chargement rapide (“FAST CHG“)
Étant donné le processus de chargement utilisé pour les batteries au lithium, lors du chargement d’une
batterie au lithium, le courant de charge diminue de plus en plus au fur et à mesure que la batterie se
remplit. Ce faisant, la durée de chargement s’en trouve naturellement accrue.
Lors du chargement rapide, un processus de chargement spécial permet d’atteindre un courant de charge plus élevé. Cependant, ceci s’effectue aux dépens de la capacité, car, en raison des circuits de sécurité dans le chargeur, le processus de chargement est achevé plus tôt.
Ceci signifie par exemple qu’une batterie LiPo peut ne pas être entièrement chargée dans le cas d’un
chargement rapide. Par rapport au processus de chargement normal, seulement 90 % environ de la
capacité sont disponibles.
☞
Ceci étant, le chargement rapide n’a de sens que si l’on souhaite pouvoir utiliser une
batterie le plus rapidement possible.
Page 91

90
La procédure lors du réglage du courant de charge et de la tension / nombre de cellules est exactement
identique à la procédure de chargement normale, voir chapitre 10. b).
e) Stockage de la batterie (“STORAGE“)
Cette fonction peut être utilisée afin d’amener la batterie à un certain niveau de tension, considéré comme optimal pour le stockage (LiPo = 3,85V, LiIon = 3,75V, LiFe = 3,3V).
La batterie sera alors déchargée ou rechargée en fonction de la tension de la cellule. Dans le cas d’un
pack de batteries à multi-cellule, ceci n’a évidemment du sens que si un raccordement -Balancer est
présent.
La procédure lors du réglage du courant et de la tension / nombre de cellules est exactement identique
à la procédure de chargement normale, voir chapitre 10. b).
☞
Le courant paramétré sera utilisé pour le chargement et le déchargement.
f) Déchargement de la batterie (“DISCHARGE“)
Normalement, il n’est pas nécessaire de décharger les batteries au lithium (contrairement aux batteries
NiCd). La batterie peut être immédiatement chargée, indépendamment de son état actuel.
Si vous souhaitez malgré tout décharger ce genre de batterie, alors il faut régler le courant de décharge
entre 0,1 Aet 1,0 A.
La procédure suivante doit être ensuite exécutée comme décrit dans le chapitre 10.b), à la seule différence que l’on n’effectue pas le chargement, de la batterie, mais sondéchargement.
La tension finale de déchargement varie selon le type de batterie paramétré, et est déjà paramétrée par
défaut dans le chargeur. Outre le type de batterie, la tension correspondante est affichée à l’écran.
• LiPo: 3,0V / cellule
• LiIon: 2,5V / cellule
• LiFe: 2,0V / cellule
☞
Dans le cas où une batterie à multi-cellule est reliée à des raccordements Balancer,
alors, durant le processus de déchargement, il est possible de commuter entre l’affichage normal et l’affichage des tensions des cellules, au moyen de la touche “INC”.
Page 92

91
11. Batteries NiMH et NiCd
☞
Vous pouvez consulter l’intégralité de la structure du menu sur le coté rabattable, dans
l’ordre approprié. Ici, les fonctions des touches sont également indiquées en vue de
l’utilisation.
a) Chargement de la batterie (“CHARGE”)
Le courant de charge à paramétrer varie en fonction de la capacité de la batterie, et est généralement de
1 C. Respectez à cet effet les indications du fabricant de la batterie.
L’indication “1C” signifie que le courant de charge correspond à la valeur de la capacité de la batterie.
Dans le cas d’une batterie NiMH de 3000mAh et 1C, le courant de charge doit être réglé à 3,0 A.
☞
Selon le type de batterie et le modèle, il n’est pas toujours possible d’avoir un courant de
charge de 1C. Par exemple, les batteries de récepteur sont généralement constituées de
piles Mignon /AA qui ne peuvent pas résister à un courant de charge aussi élevé.
En règle générale, il faut appliquer le principe suivant: Plus la batterie est petite (c’est à
dire les différentes cellules), plus le courant de charge maximal doit être faible. De nombreuses piles NiMH Mignon /AA dotés d’une capacité de 2000 mAh permettent par ex.
d’avoir un courant de charge de 400-500mA lors d’un chargement rapide.
En vue du chargement d’une batterie NiMH ou NiCd, veuillez effectuer la procédure suivante:
• Dans le menu principal, sélectionnez le programme de chargement “NiCd” à l’aide de la touche
“BATT.TYPE/STOP”.
• Appuyez sur la touche “START/ENTER”; l’affichage suivant apparaît:
L’illustration située à gauche montre le mode manuel ( le courant de charge est indiqué par vos soins),
tandis que l’illustration de droite montre le mode automatique (le courant de charge est paramétré par le
chargeur, vous vous contentez seulement d’indiquer une limite supérieure).
☞
À présent, si vous appuyez brièvement sur la touche “INC” ou “DEC”, vous retournez
dans le programme de déchargement (“DISCHARGE”, au programme-cycle
(“CYCLE”), et au programme de chargement (“CHARGE”), voir chapitre 11.b) et 11.c).
• Appuyez brièvement sur la touche “START/ENTER” afin d’accéder au mode de réglage. À présent, la
valeur du courant clignote, en bas à droite de l’écran.
Page 93

92
Lorsque la valeur du courant clignote, il est possible de commuter entre le mode manuel et le
mode automatique en appuyant simultanément sur les touches “INC” et “DEC”.
☞
Dans le cas du mode manuel, le chargement est effectué avec le courant que vous
avez réglé.
Dans le mode automatique, le chargeur calcule automatiquement le courant de charge, vous vous contentez seulement de définir la limite supérieure pour le courant de
charge.. Il est possible d’obtenir des durées de chargement plus courtes, selon la batterie et sa résistance intérieure.
• Modifiez le courant de charge (ou, en mode automatique, la limite supérieure du courant de charge) à
l’aide des touches “INC” et “DEC”, puis confirmez la valeur à l’aide de la touche “START/ENTER”. Le
nombre de cellules est automatiquement déterminé!
• Pour lancer le processus de chargement, maintenez la touche “START / ENTER” enfoncée pendant 3
secondes environ.
• Si le chargeur détecte une erreur (par ex. aucune batterie de branchée), alors un signal d’avertissement est émis, et l’information correspondante est affichée à l’écran.
• Pour mettre fin au signal d’avertissement, appuyez sur la touche “BATT.TYPE/STOP”; vous vous
retrouvez à nouveau dans le menu de réglage précédent.
• Si la batterie est correctement reconnue, on obtient par ex
l’affichage suivant:
1. Ligne: Type de batterie, courant de charge, tension de la batterie
2. Ligne: Durée de chargement actuelle, capacité chargée en mAh
• Une fois le processus de chargement terminé, un signal sonore est émis.
☞
Si vous souhaitez terminer le processus de chargement de façon anticipée, appuyez sur la
touche “BATT.TYPE/STOP“.
b) Déchargement de la batterie (“DISCHARGE“)
Après avoir sélectionné le programme “NiMH“-ou “NiCd” à l’aide de la s
touche “BATT.TYPE/STOP“ dans le menu principal et avoir effectué la
confirmation en ctivant la touche “START/ENTER“, vous pouvez sélectionner la fonction de déchargement au moyen de la touche “INC” resp. “DEC”
(l’illustration montre une batterie NiMH):
• Dans le cas où le courant de décharge et la tension finale de déchargement doivent être réglés,
appuyez sur la touche “START/ENTER”. Le courant de décharge clignote.
• Modifiez le courant de décharge à l’aide des touches “INC” et “DEC”, puis confirmez la valeur à l’aide
de la touche “START/ENTER”. Il est possible de régler la valeur entre 0,1A et1,0A.
Page 94

93
• Ensuite, la tension finale de déchargement clignote - cele-ci peut également être réglée à l’aide des
touches “INC” et “DEC”. Les valeurs de tension possibles sont comprises entre 0,1V et 25,0 V.
Lors du paramétrage de la valeur de la tension, veillez à ce que la tension de cellule ne soit pas inférieure à 1,0 V dans le cas des NiMH, et à 0,85 V dans le cas
des NiCd. Sinon, la batterie peut se retrouver endommagée!
• Pour lancer le processus de déchargement, maintenez la touche “START/ ENTER” enfoncée pendant
3 secondes environ. Différentes informations s’affichent alors à l’écran, comme dans le cas du processus de chargement (durée de déchargement, capacité de déchargement, courant de décharge et tension actuelle de la batterie).
• Si les réglages sont erronés ou que le chargeur détecte une erreur, un signal d’avertissement est émis,
et l’information correspondante est affichée à l’écran. Pour mettre fin au signal d’avertissement,
appuyez sur la touche “BATT.TYPE/STOP”; vous vous retrouvez à nouveau dans le menu de réglage
précédent.
• Si l’on appuie sur la touche “START/ENTER” durant le processus de déchargement, il est possible de
modifier le courant de décharge, voir ci-dessus.
• Une fois le processus de déchargement terminé, un signal sonore est émis.
☞
Si vous souhaitez terminer le processus de déchargement de façon anticipée, appuyez
sur la touche “BATT.TYPE/STOP“.
c) Programme-cycle (“CYCLE“)
Pour tester des batteries ou les “rafraîchir” (c’est à dire rendre une ancienne batterie faible plus performante), vous pouvez effectuer automatiquement jusqu’à 5 cycles en continu. De même, la combinaison
“Déchargement /Chargement” (“DCHG >CHG”) resp. “Chargement / Déchargement” (CHG>DCHG”) est
aussi possible.
• Après avoir sélectionné le programme “NiMH“-ou “NiCd” à l’aide de la touche “BATT. TYPE/STOP“
dans le menu principal et avoir effectué la confirmation en activant la touche “START/ENTER“, vous
pouvez sélectionner le programme-Cycle à l’aide de la touche “INC” resp. “DEC” (l’illustration montre
une batterie NiMH):
• Dans le cas où vous souhaitez intervertir l’ordre de déchargement et de chargement resp. que le
nombre de cycles doit être paramétré, appuyez sur la touche “START/ENTER”. Sur l´écran, le texte
correspondant à l’ordre du programme clignote à présent sur la ligne inférieure.
Pour modifier l’ordre du programme, utilisez les touches “INC” et “DEC”:
Page 95

94
Sur l’illustration de gauche, on procède d’abord au déchargement, puis au chargement- Sur l’illustration
de droite, l’ordre est inversé, on procède d’abord au chargement, puis au déchargement.
• Validez la sélection avec la touche “START/ENTER“.
• Le nombre de cycles commence à clignoter. Il s’agit du nombre indiquant combien de fois la séquence de
déchargement / chargement ou de chargement / déchargement paramétrée doit être exécutée. Il est possible de paramétrer une valeur comprise entre 1 et 5 cycles. Pour ce faire, utilisez les touches “INC” resp.
“DEC”, et confirmez le réglage comme vous en avez l’habitude, avec la touche “START/ENTER”.
• Pour lancer le cycle, maintenez la touche “START / ENTER” enfoncée pendant 3 secondes environ.
• Si les réglages sont erronés ou que le chargeur détecte une erreur, un signal d’avertissement est émis,
et l’information correspondante est affichée à l’écran.
• Une fois le cycle terminé, un signal sonore est émis. Les données enregistrées s’affichent sur l’écran.
Les touches “INC” et “DEC” permettent de sélectionner les différents cycles.
☞
Si vous souhaitez terminer le cycle de façon anticipée, appuyez sur la touche
“BATT.TYPE/STOP“.
• Appuyez sur la touche “BATT. TYPE/STOP“ afin de quitter cette fenêtre.
12. Batteries au plomb (Pb)
☞
Vous pouvez consulter l’intégralité de la structure du menu sur le coté rabattable, dans
l’ordre approprié. Ici, les fonctions des touches sont également indiquées en vue de
l’utilisation.
a) Généralités
Les batteries au plomb sont complètement différentes des batteries NiMh ou NiCd. Par rapport à leur capacité élevée, elles ne peuvent délivrer que de faibles courants. De plus, le processus de chargement diffère.
Le courant de charge des batteries au plomb ne doit pas dépasser 1/10 (1/10 C) de la capacité de la batterie.
Dans le cas d’une batterie au plomb de 5000 mAh (5 Ah), il faut donc paramétrer un courant de charge
de 0,5 A(500 mA) au maximum.
Le chargement rapide des batteries au plomb n’est pas autorisé, car il cause une surcharge dans la batterie- Risque d’exploision et d’incendie!
En ce qui concerne le courant de charge autorisé, veuillez vous conformer strictement
aux informations imprimées sur la batterie, resp. aux données indiquées par le fabricant de la batterie.
Page 96

95
b) Chargement de la batterie (“CHARGE”)
• Dans le menu principal, sélectionnez le programme de chargement “Pb” à l’aide de la touche
“BATT.TYPE/STOP”.
• Appuyez sur la touche “START/ENTER”; l’affichage suivant apparaît:
La valeur située à gauche de la deuxième ligne indique le courant de charge, tandis que la valeur située
à droite indique la tension resp. le nombre de cellules de la batterie (dans l’exemple ici, une batterie au
plomb à 1 cellule, 1x 2,0V = 2,0V).
• Si vous souhaitez modifier les valeurs, appuyez sur la touche “START/ENTER”. Le courant de charge
clignote. Modifiez le courant de charge à l’aide des touches “INC” et “DEC”, puis confirmez la valeur à
l’aide de la touche “START/ENTER”.
• À présent, la tension / nombre de cellules clignote. Modifiez celle-ci à l’aide des touches “INC” et
“DEC”. Ce faisant, il faut noter que la tension peut uniquement être modifiée par le biais du nombre de
cellules (par ex. une celllule = 2,0V, deux cellules = 4,0V etc). Validez le réglage avec la touche
“START/ENTER“.
• Pour lancer le processus de chargement, maintenez la touche “START / ENTER” enfoncée pendant 3
secondes environ.
• Si les réglages sont erronés ou que le chargeur détecte une erreur, un signal d’avertissement est émis,
et l’information correspondante est affichée à l’écran.
Pour mettre fin au signal d’avertissement, appuyez sur la touche “BATT.TYPE/STOP”; vous vous retrouvez à nouveau dans le menu de réglage précédent.
• Si la batterie est correctement reconnue, on obtient par ex.
l’affichage suivant:
1. Ligne: Type de batterie et nombre de cellules, courant de charge,
tension de la batterie
2. Ligne: Durée de chargement actuelle, capacité chargée en mAh
• Une fois le processus de chargement terminé, un signal sonore est émis.
☞
Si vous souhaitez terminer le processus de chargement avant, appuyez sur la touche
“BATT.TYPE/STOP“.
Page 97

96
c) Déchargement de la batterie (“DISCHARGE“)
• Après avoir sélectionné le programme “Pb” à l’aide de la touche “BATT.TYPE/STOP“ dans le menu
principal et avoir effectué la confirmation en ctivant la touche “START/ENTER“, vous pouvez sélectionner la fonction de déchargement au moyen de la touche “INC” resp. “DEC”.
La valeur située à gauche de la deuxième ligne indique le courant de décharge, tandis que la valeur située à
droite indique la tension resp. le nombre de cellules de la batterie (dans l’exemple ici, une batterie au plomb
à 1 cellule, 1x 2,0V = 2,0V).
• Si vous souhaitez modifier les valeurs, appuyez sur la touche “START/ENTER”. Le courant de décharge
clignote. Modifiez le courant de décharge à l’aide des touches “INC” et “DEC”, puis confirmez la valeur à
l’aide de la touche “START/ENTER”.
• À présent, la tension / nombre de cellules clignote. Modifiez celle-ci à l’aide des touches “INC” et
“DEC”. Ce faisant, il faut noter que la tension peut uniquement être modifiée par le biais du nombre de
cellules (par ex. une celllule = 2,0V, deux cellules = 4,0V etc). Validez le réglage avec la touche
“START/ENTER“.
☞
La tension finale de déchargement est automatiquement paramétrée par le chargeur,
pour des raisons de sécurité.
• Pour lancer le processus de déchargement, maintenez la touche “START/ ENTER” enfoncée pendant
3 secondes environ.
• Si les réglages sont erronés ou que le chargeur détecte une erreur, un signal d’avertissement est émis,
et l’information correspondante est affichée à l’écran.
• Pour mettre fin au signal d’avertissement, appuyez sur la touche “BATT.TYPE/STOP”; vous vous
retrouvez à nouveau dans le menu de réglage précédent.
• Si l’on appuie sur la touche “START/ENTER” durant le processus de déchargement, il est possible de
modifier le courant de décharge, voir ci-dessus.
• Une fois le processus de déchargement terminé, un signal sonore est émis.
☞
Si vous souhaitez terminer le processus de déchargement de façon anticipée, appuyez
sur la touche “BATT.TYPE/STOP“.
Page 98

97
13. Sauvegarde des données de la batterie
☞
Vous pouvez consulter l’intégralité de la structure du menu sur le coté rabattable, dans
l’ordre approprié. Ici, les fonctions des touches sont également indiquées en vue de
l’utilisation.
Le chargeur présente un total de 10 mémoires permettant le dépôt des données de la batterie /
réglages.
• Dans le menu principal, sélectionnez la fonction “SAVE DATA” à l’aide de la touche
“BATT.TYPE/STOP”.
• Appuyez sur la touche “START/ENTER”; l’écran affiche par ex. l’affichage suivant, la mémoire “01”
clignote:
• Sélectionnez la mémoire souhaitée (1....10) à l’aide des touches “INC” resp. “DEC”, puis confirmez la
sélection à l’aide de la touche “START/ENTER”.
• À présent, le type de batterie clignote en haut à droite sur l’écran. Vous pouvez modifier le type de batterie à l’aide des touches “INC” et “DEC”. Validez la sélection avec la touche “START/ENTER“.
☞
Il n’est pas possible de séleectionner les batteries au lithium entre “LiPo”, “LiIon” et
“LiFe”, c’est toujours le type paramétré dans le menu “User” qui sera utilisé.
• En bas à gauche, la tension commence à clignoter. Modifiez celle-ci comme d’habitude, à l’aide des
touches “INC” et “DEC”, puis confirmez la valeur à l’aide de la touche “START/ENTER”.
• À présent, la capacité de la batterie clignote en bas à droite. Réglez-la à l’aide des touches “INC” resp.
“DEC” (appuyez plus longtemps sur la touche pour le réglage rapide) puis confirmez à l’aide de la
touche “START/ENTER”.
•Le numéro de la mémoire clignote à nouveau.
• Maintenez la touche “START/ENTER” enfoncée pendant 3 secondes environ, pour aller au menu suivant, relâchez immédiatement la touche. On obtient par ex. l’affichage suivant (selon le type de batterie précédemment sélectionné):
Page 99

98
Si vous avez appuyé trop longtemps sur la touche”START/ENTER”; l’écran affiche
“SAVE. . .“, les réglages sont sauvegardés. Dans ce cas, recommencez simplement le
paramétrage afin de poursuivre dans le menu.
• Appuyez brièvement sur la touche “START/ENTER”, la valeur du courant (A) clignote sur la ligne inférieure.
☞
Dans le cas des batteries NiCd resp. NiMH, lorsque la valeur du courant clignote, il est
possible de commuter entre le mode manuel et le mode automatique en appuyant
simultanément sur les touches “INC” et “DEC”.
Dans le cas des batteries au lithium, il faut également, outre le réglage du courant de
charge, effectuer le réglage du nombre de cellules (S).
Le réglage peut être effectué comme d’habitude, à l’aide des touches “INC” et “DEC”. Confirmez à l’aide
de la touche “START/ENTER”.
• Une fois que les valeurs ne clignotent plus, les touches “INC” resp. “DEC” vous permettent de sélectionner l’un des différents programmes -selon le type de batterie, il est possible de choisir le programme “DISCHARGE“, “CHARGE“, “STORAGE“, “BALANCE“, “CYCLE”.
• À présent, si vous enfoncez la touche “START/ENTER” pendant ,
3 secondes environ, tous les réglages seront enregistrés sur l’espacemémoire auparavant sélectionné. L’écran affiche « SAVE” La progression de la mémoire est représentée par des points.
☞
Les données enregistrées sur les 10 espaces-mémoire restent évidemment conservées, même lorsqu’on débranche le chargeur de la tension d’alimentation.
Ainsi, il est possible par exemple d’enregistrer les données pour la batterie de l’émetteur (par ex. NiMH, courant de charge 400mA) et pour la batterie d’un avion (LiPo, courant de charge 1A, 3 celllules).
14. Chargement des données de la batterie
☞
Vous pouvez consulter l’intégralité de la structure du menu sur le coté rabattable, dans
l’ordre approprié. Ici, les fonctions des touches sont également indiquées en vue de
l’utilisation.
• Dans le menu principal, sélectionnez la fonction “LOAD DATA” à l’aide de la touche
“BATT.TYPE/STOP”.
Page 100

99
• Appuyez sur la touche “START/ENTER”; l’écran affiche par ex. l’affichage suivant, la mémoire “01”
clignote:
•Sélectionnez la mémoire souhaitée (1....10) à l’aide des touches “INC” resp. “DEC”.
• À présent, si vous enfoncez la touche “START/ENTER” pendant 3 secondes environ, tous les réglages
auparavant enregistrés sur l’espace-mémoire seront chargés. L’écran affiche “LOAD”.
Les données sont prises en compte, tous les réglages correspondant aux valeurs enregistrées.
15. Réglages de base divers (“USER SET“)
☞
Vous pouvez consulter l’intégralité de la structure du menu sur le coté rabattable, dans
l’ordre approprié. Ici, les fonctions des touches sont également indiquées en vue de
l’utilisation.
• Dans le menu principal, sélectionnez le menu “USER” à l’aide de la touche “BATT.TYPE/STOP”.
• Appuyez sur la touche “START/ENTER”; l’affichage suivant apparaît:
• Ici, il est possible de sélectionner l’un des trois types de batteries au lithium avec lequel le chargeur
peut fonctionner (“Lilo”, “LiPo”, LiFe”).
• Appuyez brièvement sur la touche “START / ENTER”. À présent, la valeur de tension clignote.
• Les touches “INC” et “DEC” permettent de sélectionner la tension de cellule; “3,3”, “3,6” ou “3,7”. En
même temps, le type de batterie correspondant change dans la ligne supérieure.
• Confirmez la sélection du type de batterie au lithium avec la touche “START/ENTER“, la valeur de tension cesse de clignoter.
☞
Ici, le réglage concerné de la batterie au lithium vaut pour TOUTES les autres fonctions,
par ex. le chargement, le déchargement, etc. voir chapitre 10.
 Loading...