


MULTILADER „B5“
BEDIENUNGSANLEITUNG SEITE 2 - 34
MULTI CHARGER „B5“
OPERATING INSTRUCTIONS PAGE 35 - 67
CHARGEUR MULTIPLE « B5 »
NOTICE D’EMPLOI PAGE 68 - 100
MULTILADER „B5“
GEBRUIKSAANWIJZING PAGINA 101 - 133
Best.-Nr. / Item No. /
N° de commande / Bestnr.:
23 57 10
VERSION 10/09

Inhaltsverzeichnis
1. Einführung ..................................................................................................................... 3
2. Bestimmungsgemäße Verwendung ............................................................................. 4
3. Lieferumfang ................................................................................................................. 4
4. Symbol-Erklärung ......................................................................................................... 5
5. Sicherheitshinweise ......................................................................................................5
6. Akkuhinweise ................................................................................................................ 8
a) Allgemein ............................................................................................................... 8
b) Zusätzliche Informationen zu LiPo-Akkus .......................................................... 10
7. Bedienelemente .......................................................................................................... 12
8. Inbetriebnahme ........................................................................................................... 13
9. Hauptmenü .................................................................................................................. 14
10. Einstellmenü „USER SET“..........................................................................................16
11. Ladeprogramm „LiPo CHARGE“ ................................................................................17
12. Ladeprogramm „LiPo BALANCE CHG“ ..................................................................... 19
13. Ladeprogramm „NiMH CHARGE“ .............................................................................. 23
14. Ladeprogramm „NiCd CHARGE“ ............................................................................... 25
15. Ladeprogramm „Pb CHARGE“ ...................................................................................27
16. Warnmeldungen im Display .......................................................................................29
17. Wartung und Reinigung .............................................................................................. 30
18. Handhabung ............................................................................................................... 31
19. Entsorgung ..................................................................................................................33
a) Allgemein ............................................................................................................. 33
b) Batterien und Akkus............................................................................................. 33
20. Technische Daten ....................................................................................................... 34
Seite
2

1. Einführung
Sehr geehrte Kundin, sehr geehrter Kunde,
mit dem Kauf eines Voltcraft®-Produktes haben Sie eine sehr gute Entscheidung getroffen,
für die wir Ihnen danken.
Voltcraft® - Dieser Name steht auf dem Gebiet der Mess-, Lade- sowie Netztechnik für
überdurchschnittliche Qualitätsprodukte, die sich durch fachliche Kompetenz, außergewöhnliche Leistungsfähigkeit und permanente Innovation auszeichnen.
Vom ambitionierten Hobby-Elektroniker bis hin zum professionellen Anwender haben Sie mit
einem Produkt der Voltcraft® - Markenfamilie selbst für die anspruchsvollsten Aufgaben
immer die optimale Lösung zur Hand. Und das Besondere: Die ausgereifte Technik und die
zuverlässige Qualität unserer Voltcraft® - Produkte bieten wir Ihnen mit einem fast unschlagbar günstigen Preis-/Leistungsverhältnis an. Darum schaffen wir die Basis für eine lange, gute
und auch erfolgreiche Zusammenarbeit.
Wir wünschen Ihnen nun viel Spaß mit Ihrem neuen Voltcraft® - Produkt!
Alle enthaltenen Firmennamen und Produktbezeichnungen sind Warenzeichen der
jeweiligen Inhaber. Alle Rechte vorbehalten.
3
2. Bestimmungsgemäße Verwendung
Der „Multilader B5“ dient zum Aufladen von Akkus des Typs NiCd + NiMH (1-14 Zellen), LiPo
(1-5 Zellen) sowie für Bleiakkus (1-6 Zellen, 2-12V). Der Ladestrom kann abhängig von den
angeschlossenen Akkus zwischen 0.1A und 5.0A eingestellt werden.
Das Ladegerät darf nur an einer Gleichspannung von 11V= bis 18V= betrieben werden.
Ein zweizeiliges beleuchtetes LC-Display und vier Bedientasten dienen zur Bedienung.
Für LiPo-Akkus ist im Ladegerät ein Balancer integriert, seitlich am Ladegerät finden Sie dazu
die Balancer-Anschlüsse für den Akku.
Das Produkt ist nur zum Betrieb in trockenen Innenräumen geeignet, es darf nicht feucht oder
nass werden.
Eine andere Verwendung als zuvor beschrieben führt zur Beschädigung dieses Produktes,
darüber hinaus ist dies mit Gefahren, wie z.B. Kurzschluss, Brand, elektrischer Schlag etc.
verbunden.
Das gesamte Produkt darf nicht geändert bzw. umgebaut werden.
Beachten Sie alle Sicherheitshinweise und Informationen dieser Bedienungsanleitung.
3. Lieferumfang
• Ladegerät
• Stromanschlusskabel mit Krokoklemmen, für Anschluss an die Betriebsspannung
• Anschlusskabelset
• Bedienungsanleitung
4
4. Symbol-Erklärung
Das Symbol mit dem Ausrufezeichen im Dreieck weist auf wichtige Hinweise
in dieser Bedienungsanleitung hin, die unbedingt zu beachten sind.
Das „Hand“-Symbol ist zu finden, wenn besondere Tipps und Hinweise zur
Bedienung gegeben werden.
5. Sicherheitshinweise
Bei Schäden, die durch Nichtbeachten dieser Bedienungsanleitung verursacht werden, erlischt der Garantieanspruch! Für Folgeschäden übernehmen wir keine Haftung!
Bei Sach- oder Personenschäden, die durch unsachgemäße Handhabung oder Nichtbeachten der Sicherheitshinweis verursacht werden,
übernehmen wir keine Haftung. In solchen Fällen erlischt jeder Garantieanspruch.
Sehr geehrte Kundin, sehr geehrter Kunde, die folgenden Sicherheitshinweise dienen nicht
nur zum Schutz Ihrer Gesundheit, sondern auch zum Schutz des Geräts. Lesen Sie sich bitte
die folgenden Punkte aufmerksam durch:
• Aus Sicherheits- und Zulassungsgründen (CE) ist das eigenmächtige Umbauen und/oder Verändern des Produkts nicht gestattet.
• Zur Spannungs-/Stromversorgung darf das Ladegerät nur an einer stabilisierten Gleichspannung von 11-18V= betrieben werden.
• Das Produkt darf nur in trockenen, geschlossenen Innenräumen betrieben
werden. Es darf nicht feucht oder nass werden. Vermeiden Sie direkte
Sonneneinstrahlung, starke Hitze (>35°C) oder Kälte (<0°C). Halten Sie es
fern von Staub und Schmutz. Gleiches gilt für den angeschlossenen Akku.
• Betreiben Sie das Ladegerät nicht im Innenraum von Fahrzeugen.
• Stellen Sie z.B. keine mit Flüssigkeit gefüllten Gefäße, Vasen oder Pflanzen
auf oder neben das Ladegerät.
5

Dadurch wird das Ladegerät zerstört, außerdem besteht höchste Gefahr
eines Brandes.
Trennen Sie in diesem Fall das Produkt sofort von der Betriebsspannung,
trennen Sie danach den Akku vom Ladegerät.
Der Akku ist außen komplett abzutrocknen bzw. zu reinigen. Betreiben Sie
das Ladegerät nicht mehr, bringen Sie es in eine Fachwerkstatt.
• Das Produkt ist kein Spielzeug. Es ist nicht für Kinderhände geeignet.
Lassen Sie in Anwesenheit von Kindern besondere Vorsicht walten! Kinder
könnten versuchen, Gegenstände durch die Gehäuseöffnungen ins Gerät
zu stecken. Dabei wird das Gerät zerstört, außerdem besteht Lebensgefahr
durch einen elektrischen Schlag!
Das Produkt darf nur an einer solchen Stelle aufgestellt, betrieben oder
gelagert werden, an der es für Kinder nicht erreichbar ist. Kinder könnten
Einstellungen verändern oder den Akku/Akkupack kurzschließen, was zu
einer Explosion führen kann. Lebensgefahr!
• Betreiben Sie das Produkt niemals unbeaufsichtigt. Trotz der umfangreichen und vielfältigen Schutzschaltungen können Fehlfunktionen oder Probleme beim Aufladen eines Akkus nicht ausgeschlossen werden.
• Betreiben Sie das Produkt nur in gemäßigtem Klima, niemals in tropischem
Klima. Beachten Sie für die zulässigen Umgebungsbedingungen das Kapitel „Technische Daten“.
• Wählen Sie einen stabilen, ebenen, ausreichend großen und glatten Standort.
Stellen Sie Ladegerät und Akku niemals auf brennbaren Flächen auf (z.B.
Teppich). Verwenden Sie immer eine geeignete unbrennbare , hitzefeste
Unterlage.
• Achten Sie auf ausreichende Belüftung während der Betriebsphase, decken
Sie das Ladegerät und/oder den angeschlossenen Akku niemals ab. Lassen
Sie ausreichend Abstand (mind. 20cm) zwischen Ladegerät, Akku und
anderen Objekten.
• Verwenden Sie das Produkt niemals gleich dann, wenn es von einem kalten
Raum in einen warmen Raum gebracht wurde. Das dabei entstehende
Kondenswasser kann unter Umständen zu Funktionsstörungen oder Beschädigungen führen!
6

Lassen Sie das Ladegerät (und den/die Akkus) zuerst auf Zimmertemperatur kommen, bevor Sie das Ladegerät mit der Versorgungsspannung verbinden und in Betrieb nehmen. Dies kann mehrere Stunden dauern!
• Wartungs-, Einstellungs- oder Reparaturarbeiten dürfen nur von einem
Fachmann/Fachwerkstatt durchgeführt werden. Es sind keine für Sie einzustellenden bzw. zu wartenden Produktbestandteile im Geräteinneren.
• In gewerblichen Einrichtungen sind die Unfallverhütungsvorschriften des
Verbandes der gewerblichen Berufsgenossenschaft für elektrische Anlagen
und Betriebsmittel zu beachten.
• In Schulen, Ausbildungseinrichtungen, Hobby- und Selbsthilfewerkstätten
ist das Betreiben des Produkts durch geschultes Personal verantwortlich zu
überwachen.
• Lassen Sie das Verpackungsmaterial nicht achtlos liegen. Dieses könnte für
Kinder zu einem gefährlichen Spielzeug werden!
• Gehen Sie vorsichtig mit dem Produkt um, durch Stöße, Schläge oder dem
Fall aus bereits geringer Höhe wird es beschädigt.
Sollten Sie sich über den korrekten Anschluss bzw. Betrieb nicht im Klaren sein
oder sollten sich Fragen ergeben, die nicht im Laufe der Bedienungsanleitung
abgeklärt werden, so setzen Sie sich bitte mit unserer technischen Auskunft
oder einem anderen Fachmann in Verbindung.
7

6. Akku-Hinweise
Obwohl der Umgang mit Akkus im täglichen Leben heute eine Selbstverständlichkeit ist,
bestehen zahlreiche Gefahren und Probleme. Speziell bei LiPo-/LiIon-Akkus mit ihrem hohen
Energieinhalt (im Vergleich zu herkömmlichen NiCd- oder NiMH-Akkus) sind diverse Vorschriften unbedingt einzuhalten, da andernfalls Explosions- und Brandgefahr besteht.
Beachten Sie deshalb unbedingt die nachfolgend genannten Informationen und Sicherheitshinweise zum Umgang mit Akkus.
a) Allgemein
• Akkus gehören nicht in Kinderhände. Bewahren Sie Akkus außerhalb der
Reichweite von Kindern auf. Gleiches gilt für Ladegeräte.
Akkus und Ladegeräte sind kein Spielzeug!
• Lassen Sie Akkus nicht offen herumliegen, es besteht die Gefahr, dass diese
von Kindern oder Haustieren verschluckt werden. Suchen Sie in einem
solchen Fall sofort einen Arzt auf!
• Akkus dürfen niemals kurzgeschlossen, zerlegt oder ins Feuer geworfen
werden. Es besteht Brand- und Explosionsgefahr!
• Ausgelaufene oder beschädigte Akkus können bei Berührung mit der Haut
Verätzungen verursachen, benutzen Sie deshalb in diesem Fall geeignete
Schutzhandschuhe.
• Herkömmliche nicht wiederaufladbare Batterien dürfen nicht aufgeladen
werden. Es besteht Brand- und Explosionsgefahr!
Nicht wiederaufladbare Batterien sind nur für den einmaligen Gebrauch
vorgesehen und müssen ordnungsgemäß entsorgt werden, wenn sie leer
sind.
Laden Sie ausschließlich dafür vorgesehene Akkus.
• Akkus dürfen nicht feucht oder nass werden.
• Achten Sie beim Anschluss des Akkus an Ihr Modell oder Ladegerät auf die
richtige Polung (Plus/+ und Minus/- beachten). Bei Falschpolung wird nicht
nur ihr Modell, sondern auch der Akku beschädigt. Es besteht Brand- und
Explosionsgefahr!
8

Das hier gelieferte Ladegerät verfügt über eine Schutzschaltung gegen
Falschpolung. Trotzdem kann eine Falschpolung hier in bestimmten Situationen zu Beschädigungen führen.
• Bei längerem Nichtgebrauch (z.B. bei Lagerung) trennen Sie einen evtl.
angeschlossenen Akku vom Ladegerät, trennen Sie das Ladegerät von der
Versorgungsspannung.
• Laden Sie keine Akkus, die noch heiß sind (z.B. durch hohe Ladeströme im
Modell verursacht). Lassen Sie den Akku zuerst auf Zimmertemperatur
abkühlen, bevor Sie ihn wieder aufladen.
• Laden Sie niemals beschädigte, ausgelaufene oder verformte Akkus. Dies
kann zu einem Brand oder einer Explosion führen!
• Verwenden Sie niemals Akkupacks, die aus unterschiedlichen Zellen zusammengestellt sind.
• Laden Sie Akkus etwa alle 3 Monate nach, da es andernfalls durch die
Selbstentladung zu einer sog. Tiefentladung kommen kann, wodurch die
Akkus unbrauchbar werden.
• Trennen Sie den Akku vom Ladegerät, wenn dieser vollständig aufgeladen
ist.
• Beschädigen Sie niemals die Außenhülle eines Akkus. Es besteht Brandund Explosionsgefahr!
• Laden Sie einen Akku niemals direkt im Modell. Entnehmen Sie den Akku
zum Laden zuerst aus dem Modell.
• Platzieren Sie Ladegerät und Akku auf einer nicht brennbaren, hitzebeständigen Oberfläche (z.B. einer Steinfliese). Halten Sie ausreichend Abstand
zu brennbaren Gegenständen. Lassen Sie zwischen Ladegerät und Akku
ausreichend Abstand, legen Sie den Akku niemals auf das Ladegerät.
• Da sich sowohl das Ladegerät als auch der angeschlossene Akku während
des Ladevorgangs erwärmen, ist es erforderlich, auf eine ausreichende
Belüftung zu achten. Decken Sie das Ladegerät und den Akku niemals ab!
• Laden Sie Akkus niemals unbeaufsichtigt.
• Falls Anschlusskabel des Akkus gekürzt werden müssen (z.B. wenn der
Akku ohne Anschlussstecker geliefert wird), so kürzen Sie jede Leitung
einzeln, damit kein Kurzschluss entsteht. Brand- und Explosionsgefahr!
9

b) Zusätzliche Informationen zu LiPo-Akkus
Moderne LiPo-Akkus („LiPo“ = Lithium Polymer) verfügen nicht nur über eine deutlich höhere
Kapazität als NiMH- oder NiCd-Akkus, sie haben auch ein wesentlich geringeres Gewicht.
Dies macht diesen Akkutyp z.B. für den Einsatz im Modellbaubereich sehr interessant.
Allerdings erfordern LiPo-Akkus besondere Sorgfalt beim Laden sowie bei Betrieb und
Handhabung.
Deshalb möchten wir Sie in den folgenden Abschnitten darüber informieren, welche Gefahren
bestehen und wie Sie diese vermeiden können, damit der LiPo-Akku lange Zeit seine
Leistungsfähigkeit behält.
Beachten Sie zusätzlich das Kapitel 6. a).
• Die Außenhülle von LiPo-Akkus ist sehr empfindlich, sie besteht nur aus
einer dicken Folie. Zerlegen oder beschädigen Sie den Akku niemals, lassen
Sie den Akku niemals fallen, stechen Sie keine Gegenstände in den Akku!
Vermeiden Sie jegliche mechanische Belastung des Akkus, ziehen Sie auch
niemals an den Anschlusskabeln des Akkus! Es besteht Brand- und Explosionsgefahr!
Achten Sie ebenfalls hierauf, wenn der Akku im Modell befestigt wird (bzw.
aus dem Modell entnommen wird).
• Achten Sie bei Betrieb, Auf- oder Entladen, Transport und Aufbewahrung
des Akkus darauf, dass dieser nicht überhitzt. Platzieren Sie den Akku nicht
neben Wärmequellen (z.B. Fahrtregler, Motor), halten Sie den Akku fern von
direkter Sonneneinstrahlung. Bei Überhitzung des Akkus besteht Brandund Explosionsgefahr! Der Akku darf niemals eine höhere Temperatur als
60°C haben (ggf. zusätzliche Herstellerangaben beachten!).
• Falls der Akku Beschädigungen aufweist (z.B. nach einem Absturz eines
Flugzeug- oder Hubschraubermodells) oder die Außenhülle aufgequollen/
aufgebläht ist, so verwenden Sie den Akku nicht mehr. Laden Sie ihn nicht
mehr auf. Es besteht Brand- und Explosionsgefahr!
Fassen Sie den Akku nur vorsichtig an, verwenden Sie geeignete Schutzhandschuhe. Entsorgen Sie den Akku umweltgerecht.
• Verwenden Sie zum Aufladen eines LiPo-Akkus nur ein dafür geeignetes
Ladegerät. Herkömmliche Ladegeräte für NiCd-, NiMH- oder Bleiakkus
dürfen nicht verwendet werden, es besteht Brand- und Explosionsgefahr!
10

• Wenn Sie einen LiPo-Akku mit mehr als einer Zelle aufladen, so verwenden
Sie unbedingt einen sog. Balancer (z.B. im hier gelieferten Ladegerät bereits
integriert).
• Laden Sie LiPo-Akkus mit einem Ladestrom von max. 1C. Das bedeutet,
dass der Ladestrom den auf dem Akku aufgedruckten Kapazitätswert nicht
überschreiten darf (z.B. Akkukapazität 1000mAh, max. Ladestrom 1000mA
= 1A).
• Der Entladestrom darf den auf dem Akku aufgedruckten Wert nicht überschreiten.
Ist beispielsweise bei einem LiPo-Akku ein Wert von „20C“ auf dem Akku
aufgedruckt, so entspricht der max. Entladestrom dem 20fachen der Kapazität des Akkus (z.B. Akkukapazität 1000mAh, max. Entladestrom 20C = 20x
1000mA = 20A).
Andernfalls überhitzt der Akku, was zum Verformen/Aufblähen des Akkus
oder zu einer Explosion und einem Brand führen kann!
Der aufgedruckte Wert (z.B. „20C“) bezieht sich aber in der Regel nicht auf
den Dauerstrom, sondern nur auf den Maximalstrom, den der Akku kurzzeitig liefern kann. Der Dauerstrom sollte nicht höher sein als die Hälfte des
angegebenen Wertes.
• Keine Zelle des Akkus darf unter 3V entladen werden, dies führt zur
Zerstörung des Akkus.
Verfügt das Modell nicht über einen Tiefentladeschutz oder eine optische
Anzeige der zu geringen Akkuspannung, so stellen Sie den Betrieb des
Modells rechtzeitig ein.
11
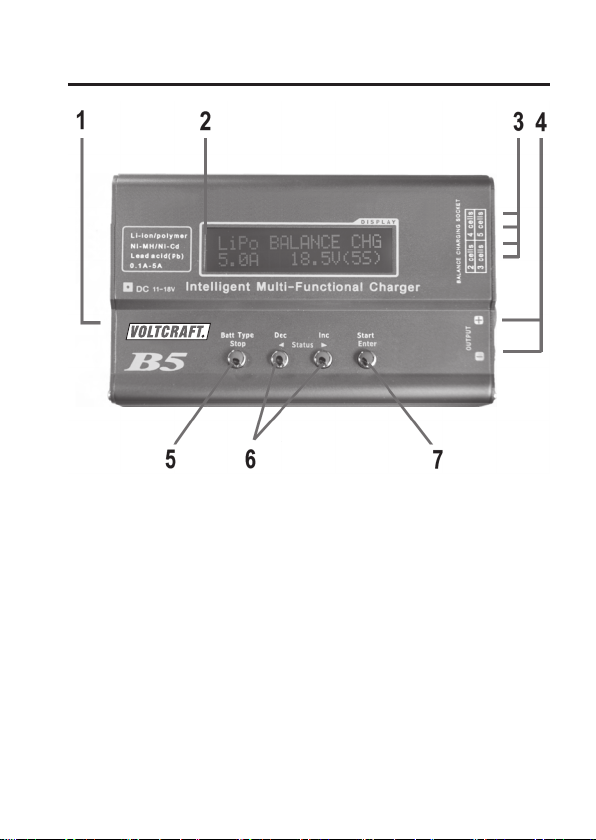
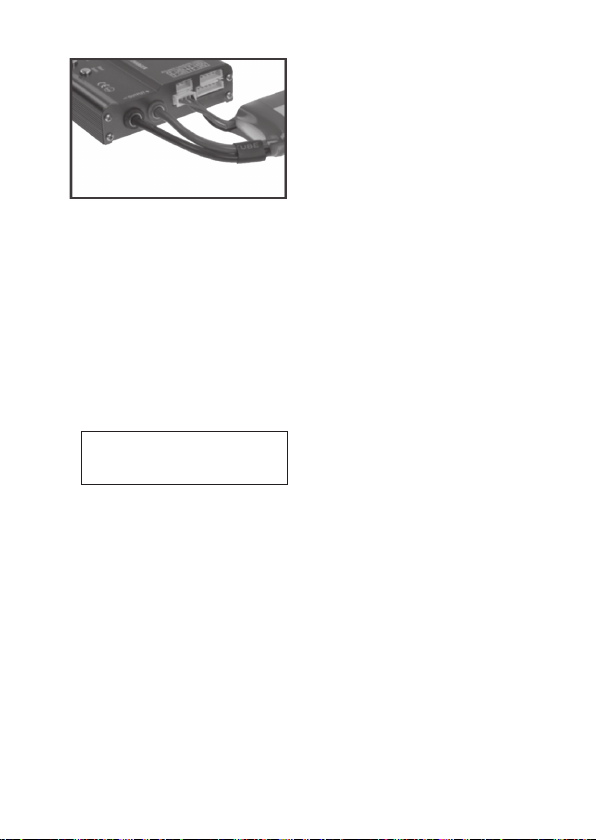
7. Bedienelemente
Multilader
1 Anschlussbuchse für Versorgungsspannung (11-18V=, stabilisiert)
2 Beleuchtetes LC-Display
3 Balancer-Anschlüsse für 2-, 3-, 4- und 5zellige LiPo-Akkus
4 Rundbuchsen 4mm zum Anschluss des Akkus
5 Taste „Batt Type/Stop“ für Menü-Auswahl und zum Anhalten des Ladevorgangs
6 Tasten „DEC“ und „INC“ für Werte-Eingabe und Anzeige der Werte der Einzelzellen
beim Balance-Lademodus
7 Taste „Start/Enter“ für Starten/Fortsetzen des Ladevorgangs bzw. zur Bestätigung einer
Einstell-/Bedienfunktion
12
8. Inbetriebnahme
Das Ladegerät muss mit einer stabilisierten Gleichspannung (11-18V=) betrieben werden.
Betreiben Sie das Ladegerät niemals an einer anderen Spannung, dies
zerstört das Ladegerät, Verlust von Garantie/Gewährleistung!
Je nach angeschlossenem Akku ist ein Ladestrom von bis zu 5A möglich. Aus
diesem Grund muss die Stromversorgung entsprechend stark gewählt werden.
Verbinden Sie das mitgelieferte Anschlusskabel (2 Kroko-Klemmen auf 1 Rundstecker) mit
der Stromversorgung, stecken Sie den Rundstecker in die entsprechende Buchse des
Ladegeräts (siehe Kapitel 7, Position 1).
Das Ladegerät gibt einen kurzen Signalton ab, das LC-Display leuchtet auf. Das Ladegerät
befindet sich jetzt im Hauptmenü:
Beispiel:
NiMH CHARGENiMH CHARGE
NiMH CHARGE
NiMH CHARGENiMH CHARGE
CURRENT 2.0ACURRENT 2.0A
CURRENT 2.0A
CURRENT 2.0ACURRENT 2.0A
Bevor ein Akku angeschlossen und geladen werden darf, ist zuerst der
entsprechende Akkutyp und die gewünschten Werte einzustellen. Beachten
Sie bitte die nächsten Kapitel.
13
9. Hauptmenü
Mit mehrfachem kurzen Drücken der Taste „Batt Type/Stop“ können die verschiedenen
Funktionen im Hauptmenü ausgewählt werden.
Bestätigen Sie die Auswahl mit der Taste „Start/Enter“.
LiPo CHARGELiPo CHARGE
LiPo CHARGE
LiPo CHARGELiPo CHARGE
v
LiPo BALANCE CHGLiPo BALANCE CHG
LiPo BALANCE CHG
LiPo BALANCE CHGLiPo BALANCE CHG
v
NiMH CHARGENiMH CHARGE
NiMH CHARGE
NiMH CHARGENiMH CHARGE
USER SETUSER SET
USER SET
USER SETUSER SET
s
PROGRAM-> PROGRAM->
PROGRAM->
PROGRAM-> PROGRAM->
Pb CHARGEPb CHARGE
Pb CHARGE
Pb CHARGEPb CHARGE
NiCd CHARGENiCd CHARGE
NiCd CHARGE
NiCd CHARGENiCd CHARGE
u
u
t
Beachten Sie bitte folgende Punkte, bevor Sie einen Akku anschließen/laden:
• Falls noch nicht geschehen, lesen Sie unbedingt das Kapitel 5 und 6
vollständig und aufmerksam durch.
• Wissen Sie genau, welche Daten der Akku hat? Unbekannte oder unbedruckte Akkus, deren Werte Sie nicht kennen, dürfen nicht angeschlossen/
geladen werden!
• Haben Sie das richtige Ladeprogramm entsprechend dem vorhandenen
Akkutyp gewählt? Falsche Einstellungen beschädigen das Ladegerät und
den Akku, außerdem besteht Brand- und Explosionsgefahr!
• Haben Sie den passenden Ladestrom eingestellt?
• Haben Sie die richtige Spannung eingestellt (z.B. bei mehrzelligen LiPoAkkus)? Ein zweizelliger LiPo-Akku kann u.U. parallelgeschaltet sein (3.7V)
oder in Reihe (7.4V).
14

• Sind alle Verbindungskabel und Anschlüsse einwandfrei, halten die Stecker
fest in den Anschlussbuchsen? Ausgeleierte Stecker und beschädigte
Kabel sollten ausgetauscht werden.
• Beim Anschluss eines Akkus an das Ladegerät verbinden Sie immer zuerst
das Ladekabel mit dem Ladegerät und erst danach den Akku mit dem
Ladegerät/Ladekabel. Beim Abstecken gehen Sie in umgekehrter Reihenfolge vor. Andernfalls besteht die Gefahr eines Kurzschlusses (z.B. durch
die beiden 4mm-Rundstecker des Ladekabels).
• Laden Sie immer nur einen Akkupack.
• Wenn Sie selbst-konfektionierte Akkupacks aufladen wollen, so müssen die
Zellen baugleich sein (gleicher Typ, gleiche Kapazität, gleicher Hersteller).
Außerdem müssen die Zellen den gleichen Ladezustand haben (LiPoAkkus können über den Balancer entsprechend ausgeglichen werden,
andere Akkuspacks, z.B. NiMH oder NiCd, jedoch nicht).
Bedienung der Menüs:
• Wählen Sie im Hauptmenü wie beschrieben mit der Taste „Batt Type/Stop“ das gewünschte
Untermenü aus und bestätigen Sie die Auswahl mit der Taste „Start/Enter“.
• Mit den Tasten „INC“ und „DEC“ lassen sich die verschiedenen Einstellungen aufrufen.
• Um einen Wert zu verändern, drücken Sie die Taste „Start/Enter“, die Anzeige blinkt.
• Verändern Sie den im Display angezeigten Wert mit der Taste „INC“ bzw. „DEC“.
• Speichern Sie den (veränderten) Wert mit der Taste „Start/Enter“.
• Verlassen Sie das Einstellmenü mit der Taste „Batt Type/Stop“, Sie befinden sich dann
wieder im Hauptmenü.
15

10. Einstellmenü „USER SET“
USER SETUSER SET
USER SET
USER SETUSER SET
t
PROGRAM-> PROGRAM->
PROGRAM->
PROGRAM-> PROGRAM->
DEC
TEMP CUT OFFTEMP CUT OFF
TEMP CUT OFF
TEMP CUT OFFTEMP CUT OFF
s
ON 50CON 50C
ON 50C
ON 50CON 50C
INC
v
SAFETY TIMERSAFETY TIMER
SAFETY TIMER
SAFETY TIMERSAFETY TIMER
ON 180minON 180min
ON 180min
ON 180minON 180min
INC
CAPACITY CUT OFFCAPACITY CUT OFF
CAPACITY CUT OFF
CAPACITY CUT OFFCAPACITY CUT OFF
ON 5000mAhON 5000mAh
ON 5000mAh
ON 5000mAhON 5000mAh
INC
KEY BEEP ONKEY BEEP ON
KEY BEEP ON
KEY BEEP ONKEY BEEP ON
BUZZER ONBUZZER ON
BUZZER ON
BUZZER ONBUZZER ON
INC
INPUT POWER LOWINPUT POWER LOW
INPUT POWER LOW
INPUT POWER LOWINPUT POWER LOW
CUT-OFF 10.0VCUT-OFF 10.0V
CUT-OFF 10.0V
CUT-OFF 10.0VCUT-OFF 10.0V
INC
s
Batt Type/Stop
INC
BACK-LIGHTBACK-LIGHT
BACK-LIGHT
BACK-LIGHTBACK-LIGHT
100% 100%
100%
100% 100%
Start/Enter
v
vu
vu
vu
vu
vu
DEC
DEC
DEC
DEC
DEC
Wählen Sie im Hauptmenü mit der Taste „Batt
Type/Stop“ die Option „USER SET“, bestätigen
Sie mit derTaste „Start/Enter“.
Bei dieser Version des Ladegeräts ohne Funktion.
Der Sicherheitstimer startet automatisch beim
Ladevorgang; er schützt den Akku vor Überladung (oder wenn die Delta-U-Abschaltung keinen Peak findet). Stellen Sie die Zeit nicht kürzer
ein, als der Ladevorgang voraussichtlich dauert!
Stellen Sie hier die maximal in den Akku zu
ladende Kapazität ein. Dies schützt ebenfalls vor
Überladung (oder wenn die Delta-U-Abschaltung nicht funktionieren sollte).
Bei „KEY BEEP“ kann der Bestätigungston beim
Drücken einer Taste ein-/ausgeschaltet werden.
Bei „BUZZER“ kann der Alarmton im Fehlerfall
oder bei Änderungen im Ladevorgang ein-/ausgeschaltet werden.
Diese Funktion überwacht die Spannung am Eingang des Ladegeräts (z.B. ein 12V-Akku). Fällt
die Spannung unter den eingestellten Wert, wird
der Ladevorgang abgebrochen.
Stellen Sie hier die Helligkeit der Hintergrundbeleuchtung ein.
16
11. Ladeprogramm „LiPo CHARGE“
Dieses Ladeprogramm ist nur geeignet für LiPo-Akkus mit einer Spannung von
3.7V pro Zelle, die nicht über einen Balancer-Anschluss verfügen. Versuchen
Sie niemals, einen anderen Akku mit diesem Ladeprogramm aufzuladen.
Falls Ihr LiPo-Akku einen Balancer-Anschluss hat, so ist das Ladeprogramm „LiPo BALANCE CHG“ zu verwenden, siehe Kapitel 12.
Nur so haben alle Zellen nach dem Ladevorgang die gleiche Spannung
und es kommt nicht zu einer Überladung einer der Zellen. Letzteres ist für
einen LiPo-Akku nicht nur negativ für die Lebensdauer, sondern es
besteht auch die Gefahr der Zerstörung des Akkus, sowie Brand- und
Explosionsgefahr!
Der einzustellende Ladestrom ist abhängig von der Kapazität des Akkus und sollte üblicherweise 1C betragen. Beachten Sie dazu jedoch die Angaben des Akkuherstellers.
Die Angabe „1C“ bedeutet, dass der Ladestrom dem Wert der Kapazität des Akkus entspricht.
Bei einem 1800mAh-LiPo-Akku ist bei 1C also ein Ladestrom von 1.8A einzustellen.
Gehen Sie zum Laden eines LiPo-Akkus wie folgt vor:
• Nachdem Sie im Hauptmenü das „LiPo CHARGE“-Ladeprogramm ausgewählt und mit der
Taste „Start/Enter“ aufgerufen haben, erscheint im Display z.B. folgende Anzeige:
LiPo CHARGELiPo CHARGE
LiPo CHARGE
LiPo CHARGELiPo CHARGE
2.0A 11.1V(3S)2.0A 11.1V(3S)
2.0A 11.1V(3S)
2.0A 11.1V(3S)2.0A 11.1V(3S)
Der Wert links in der zweiten Zeile gibt den Ladestrom an, der Wert rechts die Spannung
bzw. die Zellenzahl des LiPo-Akkus (hier im Beispiel ein 3zelliger LiPo-Akkupack,
3x 3.7V = 11.1V).
• Wenn die Werte verändert werden sollen, so drücken Sie die Taste „Start/Enter“. Der
Ladestrom blinkt. Verändern Sie den Ladestrom mit den Tasten „INC“ und „DEC“, bestätigen
Sie den Wert mit der Taste „Start/Enter“.
Daraufhin blinkt die Spannung. Verändern Sie diese mit den Tasten „INC“ und „DEC“. Dabei
ist zu beachten, dass die Spannung nur anhand der Zellenzahl verändert wird (z.B. eine
Zelle = 3.7V, zwei Zellen = 7.4V usw.). Bestätigen Sie die Einstellung mit der Taste „Start/
Enter“.
• Um den Ladevorgang zu starten, halten Sie die Taste „Start/Enter“ länger gedrückt.
17
• Falls die Einstellungen falsch sind bzw. das Ladegerät einen Fehler feststellt, so wird ein
Warnsignal ausgegeben und eine entsprechende Information im Display (siehe Kapitel 16).
Mit der Taste „Batt Type/Stop“ beenden Sie das Warnsignal; Sie gelangen wieder ins
vorherige Einstellmenü zurück.
Andernfalls erscheint z.B. folgende Anzeige:
S:3SER R:3SER S:3SER R:3SER
S:3SER R:3SER
S:3SER R:3SER S:3SER R:3SER
CONFIRM (ENTER)CONFIRM (ENTER)
CONFIRM (ENTER)
CONFIRM (ENTER)CONFIRM (ENTER)
Der Wert bei „S:“ gibt die Zellenzahl an, die Sie im Menü eingestellt haben.
Der Wert bei „R:“ gibt die Zellenzahl an, die das Ladegerät erkannt hat.
Falls diese beiden Zellenzahlen nicht übereinstimmen, prüfen Sie bitte sowohl
die Einstellungen im Ladegerät als auch den Akku. Eventuell ist der LiPo-Akku
tiefentladen, oder eine Zelle ist defekt. Solche Akkus sollten Sie nicht laden, da
andernfalls Brand- und Explosionsgefahr besteht!
Mit der Taste „Batt Type/Stop“ gelangen Sie zurück ins vorherige Einstellmenü.
• Stimmen die beiden Zellenzahlen überein, so starten Sie den Ladevorgang, indem Sie die
Taste „Start/Enter“ kurz drücken.
Nach dem Start des Ladevorgangs erscheinen im Display diverse Informationen über den
aktuellen Ladefortschritt.
Beispiel:
Zellenzahl Ladestrom Akkuspannung
Li3S 1.2A 12.59VLi3S 1.2A 12.59V
Li3S 1.2A 12.59V
Li3S 1.2A 12.59VLi3S 1.2A 12.59V
CHG 022:43 00682CHG 022:43 00682
CHG 022:43 00682
CHG 022:43 00682CHG 022:43 00682
Aktuelle Ladedauer Geladene Kapazität in mAh
• Wenn der Ladevorgang abgeschlossen ist, wird ein Tonsignal ausgegeben.
Falls Sie den Ladevorgang vorher beenden wollen, drücken Sie die Taste „Batt
Type/Stop“.
18

12. Ladeprogramm „LiPo BALANCE CHG“
Dieses Ladeprogramm ist nur geeignet für LiPo-Akkus mit einer Spannung von
3.7V pro Zelle, die über einen Balancer-Anschluss verfügen. Versuchen Sie
niemals, einen anderen Akku mit diesem Ladeprogramm aufzuladen.
Der einzustellende Ladestrom ist abhängig von der Kapazität des Akkus und sollte üblicherweise 1C betragen. Beachten Sie dazu jedoch die Angaben des Akkuherstellers.
Die Angabe „1C“ bedeutet, dass der Ladestrom dem Wert der Kapazität des Akkus entspricht.
Bei einem 1800mAh-LiPo-Akku ist bei 1C also ein Ladestrom von 1.8A einzustellen.
Im Gegensatz zum einfachen LiPo-Ladeprogramm „LiPo CHARGE“ wird hier die Spannung
jeder einzelnen Zelle überwacht und der Ladestrom entsprechend eingestellt.
Nur ein LiPo-Akku mit exakt gleicher Spannung pro Zelle liefert die maximale
Leistung und Betriebsdauer für ein Modellflugzeug/-fahrzeug.
Aufgrund von Schwankungen in der Materialqualität und dem inneren Aufbau
von mehrzelligen LiPo-Akkus kommt es beim Entladen dazu, dass die Zellen
am Entlade-Ende eine unterschiedliche Spannung haben können.
Lädt man solch einen LiPo-Akku ohne Balancer, stellen sich sehr schnell große
Unterschiede in der Zellenspannung ein. Dies führt nicht nur zu einer kürzeren
Betriebsdauer (weil eine Zelle in der Spannung einbricht), sondern der Akku
wird durch eine Tiefentladung beschädigt.
Weiterhin besteht beim Aufladen solcher unterschiedlicher Zellen (mit verschiedener Spannung) ohne Balancer die Gefahr der Überladung: Die maximal zulässige Spannung einer LiPo-Zelle von etwa 4.2V (+/- 1%) wird überschritten!
Beispiel:
Nach außen hin hat ein ohne Balancer geladener LiPo-Akkupack mit 2 Zellen
eine Spannung von 8.4V und erscheint damit voll geladen. Die einzelnen
Zellen haben aber eine Spannung von 4.5V und 3.9V (eine Zelle ist gefährlich
überladen, die andere halb leer).
Eine solch überladene Zelle kann auslaufen oder im schlimmsten Fall in
Brand geraten oder explodieren!
Sollte Ihr LiPo-Akkupack über einen Balancer-Anschluss verfügen, ist deshalb
immer das Ladeprogramm „LiPo BALANCE CHG“ zu benutzen.
19
Achten Sie darauf, dass im Ladeprogramm „LiPo BALANCE CHG“ sowohl der
Gehen Sie zum Laden eines LiPo-Akkus wie folgt vor:
• Nachdem Sie im Hauptmenü das „LiPo BALANCE CHG“-Ladeprogramm ausgewählt und
mit der Taste „Start/Enter“ aufgerufen haben, erscheint im Display z.B. folgende Anzeige:
Der Wert links in der zweiten Zeile gibt den Ladestrom an, der Wert rechts die Spannung
bzw. die Zellenzahl des LiPo-Akkus (hier im Beispiel ein 3zelliger LiPo-Akkupack,
3x 3.7V = 11.1V).
• Wenn die Werte verändert werden sollen, so drücken Sie die Taste „Start/Enter“. Der
Ladestrom blinkt. Verändern Sie den Ladestrom mit den Tasten „INC“ und „DEC“, bestätigen
Sie den Wert mit der Taste „Start/Enter“.
Daraufhin blinkt die Spannung. Verändern Sie diese mit den Tasten „INC“ und „DEC“. Dabei
ist zu beachten, dass die Spannung nur anhand der Zellenzahl verändert wird (z.B. eine
Zelle = 3.7V, zwei Zellen = 7.4V usw.). Bestätigen Sie die Einstellung mit der Taste „Start/
Enter“.
• Um den Ladevorgang zu starten, halten Sie die Taste „Start/Enter“ länger gedrückt.
Balancer-Akku-Anschluss als auch die Anschlusskabel des Akkus am Ladegerät angeschlossen werden müssen.
Wählen Sie den richtigen Balancer-Anschluss je nach Zellenzahl.
Es gibt verschiedene Bauarten für den Balancer-Stecker. Wenden Sie deshalb
keine Gewalt an, wenn der Stecker nicht passt! Im Zubehörhandel gibt es
passende Adapter für die Balancer-Stecker.
LiPo BALANCE CHGLiPo BALANCE CHG
LiPo BALANCE CHG
LiPo BALANCE CHGLiPo BALANCE CHG
2.0A 11.1V(3S)2.0A 11.1V(3S)
2.0A 11.1V(3S)
2.0A 11.1V(3S)2.0A 11.1V(3S)
20
• Falls die Einstellungen falsch sind bzw. das Ladegerät einen Fehler feststellt, so wird ein
Warnsignal ausgegeben und eine entsprechende Information im Display (siehe Kapitel 16).
Mit der Taste „Batt Type/Stop“ beenden Sie das Warnsignal; Sie gelangen wieder ins
vorherige Einstellmenü zurück.
Andernfalls erscheint z.B. folgende Anzeige:
S:3SER R:3SER S:3SER R:3SER
S:3SER R:3SER
S:3SER R:3SER S:3SER R:3SER
CONFIRM (ENTER)CONFIRM (ENTER)
CONFIRM (ENTER)
CONFIRM (ENTER)CONFIRM (ENTER)
Der Wert bei „S:“ gibt die Zellenzahl an, die Sie im Menü eingestellt haben.
Der Wert bei „R:“ gibt die Zellenzahl an, die das Ladegerät erkannt hat.
Falls diese beiden Zellenzahlen nicht übereinstimmen, prüfen Sie bitte sowohl
die Einstellungen im Ladegerät als auch den Akku. Eventuell ist der LiPo-Akku
tiefentladen, oder eine Zelle ist defekt. Solche Akkus sollten Sie nicht laden, da
andernfalls Brand- und Explosionsgefahr besteht!
Mit der Taste „Batt Type/Stop“ gelangen Sie zurück ins vorherige Einstellmenü.
• Stimmen die beiden Zellenzahlen überein, so starten Sie den Ladevorgang, indem Sie die
Taste „Start/Enter“ kurz drücken.
Nach dem Start des Ladevorgangs erscheinen im Display diverse Informationen über den
aktuellen Ladefortschritt.
Beispiel:
Zellenzahl Ladestrom Akkuspannung
Li3S 1.2A 12.59VLi3S 1.2A 12.59V
Li3S 1.2A 12.59V
Li3S 1.2A 12.59VLi3S 1.2A 12.59V
CHG 022:43 00682CHG 022:43 00682
CHG 022:43 00682
CHG 022:43 00682CHG 022:43 00682
Aktuelle Ladedauer Geladene Kapazität in mAh
• Während dem Ladevorgang kann die Anzeige mittels den Tasten „INC“ bzw. „DEC“
umgeschaltet werden, wenn Sie die Spannung der einzelnen Zellen ansehen möchten,
siehe nächstes Bild.
21

Spannung Zelle 1 Spannung Zelle 2 Spannung Zelle 3
4.17 4.20V 4.19V4.17 4.20V 4.19V
4.17 4.20V 4.19V
4.17 4.20V 4.19V4.17 4.20V 4.19V
0.4A 0.00V 0.00V0.4A 0.00V 0.00V
0.4A 0.00V 0.00V
0.4A 0.00V 0.00V0.4A 0.00V 0.00V
Ladestrom Spannung Zelle 4 Spannung Zelle 5
• Wenn der Ladevorgang abgeschlossen ist, wird ein Tonsignal ausgegeben.
Falls Sie den Ladevorgang vorher beenden wollen, drücken Sie die Taste „Batt
Type/Stop“.
22
13. Ladeprogramm „NiMH CHARGE“
Dieses Ladeprogramm ist nur geeignet für NiMH-Akkus mit einer Spannung
von 1.2V pro Zelle. Versuchen Sie niemals, einen anderen Akku mit diesem
Ladeprogramm aufzuladen.
Der einzustellende Ladestrom ist abhängig von der Kapazität des Akkus und sollte üblicherweise 1C betragen. Beachten Sie dazu jedoch die Angaben des Akkuherstellers.
Die Angabe „1C“ bedeutet, dass der Ladestrom dem Wert der Kapazität des Akkus entspricht.
Bei einem 3000mAh-NiMH-Akku ist bei 1C also ein Ladestrom von 3.0A einzustellen.
Je nach Akkutyp und Bauart ist ein Ladestrom von 1C nicht möglich. Beispiels-
Gehen Sie zum Laden eines NiMH-Akkus wie folgt vor:
• Nachdem Sie im Hauptmenü das „NiMH CHARGE“-Ladeprogramm ausgewählt und mit der
Taste „Start/Enter“ aufgerufen haben, erscheint im Display z.B. folgende Anzeige:
Der Wert rechts in der zweiten Zeile gibt den Ladestrom an.
• Wenn der Ladestrom verändert werden soll, so drücken Sie die Taste „Start/Enter“. Der
Ladestrom blinkt. Verändern Sie den Ladestrom mit den Tasten „INC“ und „DEC“, bestätigen
Sie den Wert mit der Taste „Start/Enter“. Die Zellenzahl wird automatisch ermittelt!
• Um den Ladevorgang zu starten, halten Sie die Taste „Start/Enter“ länger gedrückt.
• Falls die Einstellungen falsch sind bzw. das Ladegerät einen Fehler feststellt, so wird ein
Warnsignal ausgegeben und eine entsprechende Information im Display (siehe Kapitel 16).
Mit der Taste „Batt Type/Stop“ beenden Sie das Warnsignal; Sie gelangen wieder ins
vorherige Einstellmenü zurück.
Andernfalls erscheint z.B. folgende Anzeige (siehe nächste Seite):
weise bestehen Empfängerakkus in der Regel aus Mignon/AA-Zellen, die
einen so hohen Ladestrom nicht schadlos überstehen.
In der Regel gilt: Je kleiner der Akku (also die einzelne Zelle), umso geringer
ist der maximale Ladestrom. Viele NiMH-Mignon/AA-Zellen mit einer Kapazität
von ca. 2000mAh erlauben z.B. für eine Schnellladung einen Ladestrom von
400-500mA.
NiMH CHARGENiMH CHARGE
NiMH CHARGE
NiMH CHARGENiMH CHARGE
CURRENT 2.0ACURRENT 2.0A
CURRENT 2.0A
CURRENT 2.0ACURRENT 2.0A
23

Akkutyp Ladestrom Akkuspannung
NiCd 2.0A 7.42VNiCd 2.0A 7.42V
NiCd 2.0A 7.42V
NiCd 2.0A 7.42VNiCd 2.0A 7.42V
CHG 043:20 01253CHG 043:20 01253
CHG 043:20 01253
CHG 043:20 01253CHG 043:20 01253
Aktuelle Ladedauer Geladene Kapazität in mAh
• Wenn der Ladevorgang abgeschlossen ist, wird ein Tonsignal ausgegeben.
Falls Sie den Ladevorgang vorher beenden wollen, drücken Sie die Taste „Batt
Type/Stop“.
24

14. Ladeprogramm „NiCd CHARGE“
Dieses Ladeprogramm ist nur geeignet für NiCd-Akkus mit einer Spannung
von 1.2V pro Zelle. Versuchen Sie niemals, einen anderen Akku mit diesem
Ladeprogramm aufzuladen.
Der einzustellende Ladestrom ist abhängig von der Kapazität des Akkus und sollte üblicherweise 1C betragen. Beachten Sie dazu jedoch die Angaben des Akkuherstellers.
Die Angabe „1C“ bedeutet, dass der Ladestrom dem Wert der Kapazität des Akkus entspricht.
Bei einem 2000mAh-NiCd-Akku ist bei 1C also ein Ladestrom von 2.0A einzustellen.
Je nach Akkutyp und Bauart ist ein Ladestrom von 1C nicht möglich. Beispiels-
Gehen Sie zum Laden eines NiCd-Akkus wie folgt vor:
• Nachdem Sie im Hauptmenü das „NiCd CHARGE“-Ladeprogramm ausgewählt und mit der
Taste „Start/Enter“ aufgerufen haben, erscheint im Display z.B. folgende Anzeige:
Der Wert rechts in der zweiten Zeile gibt den Ladestrom an.
• Wenn der Ladestrom verändert werden soll, so drücken Sie die Taste „Start/Enter“. Der
Ladestrom blinkt. Verändern Sie den Ladestrom mit den Tasten „INC“ und „DEC“, bestätigen
Sie den Wert mit der Taste „Start/Enter“. Die Zellenzahl wird automatisch ermittelt!
• Um den Ladevorgang zu starten, halten Sie die Taste „Start/Enter“ länger gedrückt.
• Falls die Einstellungen falsch sind bzw. das Ladegerät einen Fehler feststellt, so wird ein
Warnsignal ausgegeben und eine entsprechende Information im Display (siehe Kapitel 16).
Mit der Taste „Batt Type/Stop“ beenden Sie das Warnsignal; Sie gelangen wieder ins
vorherige Einstellmenü zurück.
Andernfalls erscheint z.B. folgende Anzeige (siehe nächste Seite):
weise bestehen Empfängerakkus in der Regel aus Mignon/AA-Zellen, die
einen so hohen Ladestrom nicht schadlos überstehen.
In der Regel gilt: Je kleiner der Akku (also die einzelne Zelle), umso geringer
ist der maximale Ladestrom. Viele NiCd-Mignon/AA-Zellen mit einer Kapazität
von ca. 1000mAh erlauben z.B. für eine Schnellladung einen Ladestrom von
200-250mA.
NiCd CHARGENiCd CHARGE
NiCd CHARGE
NiCd CHARGENiCd CHARGE
CURRENT 1.6ACURRENT 1.6A
CURRENT 1.6A
CURRENT 1.6ACURRENT 1.6A
25

Akkutyp Ladestrom Akkuspannung
NiCd 2.0A 7.42VNiCd 2.0A 7.42V
NiCd 2.0A 7.42V
NiCd 2.0A 7.42VNiCd 2.0A 7.42V
CHG 043:20 01253CHG 043:20 01253
CHG 043:20 01253
CHG 043:20 01253CHG 043:20 01253
Aktuelle Ladedauer Geladene Kapazität in mAh
• Wenn der Ladevorgang abgeschlossen ist, wird ein Tonsignal ausgegeben.
Falls Sie den Ladevorgang vorher beenden wollen, drücken Sie die Taste „Batt
Type/Stop“.
26
15. Ladeprogramm „Pb CHARGE“
Dieses Ladeprogramm ist nur geeignet für Bleiakkus mit einer Spannung von
2V pro Zelle. Versuchen Sie niemals, einen anderen Akku mit diesem Ladeprogramm aufzuladen.
Bleiakkus unterscheiden sich völlig von NiMH- oder NiCd-Akkus. Sie können verglichen mit
ihrer hohen Kapazität nur geringe Ströme liefern, außerdem ist der Ladevorgang anders.
Der Ladestrom für Bleiakkus darf nur maximal 1/10 (1/10 C) der Kapazität des Akkus betragen.
Bei einem 5000mAh-Bleiakku darf deshalb maximal ein Ladestrom von 0.5A (500mA)
eingestellt werden.
Eine Schnellladung von Bleiakkus ist nicht zulässig, dadurch wird der Akku
überlastet - Explosions- und Brandgefahr!
Beachten Sie unbedingt die auf dem Akku aufgedruckten Informationen bzw.
die Daten vom Akkuhersteller, welcher Ladestrom erlaubt ist.
Gehen Sie zum Laden eines Bleiakkus wie folgt vor:
• Nachdem Sie im Hauptmenü das „PB CHARGE“-Ladeprogramm ausgewählt und mit der
Taste „Start/Enter“ aufgerufen haben, erscheint im Display z.B. folgende Anzeige:
Pb CHARGEPb CHARGE
Pb CHARGE
Pb CHARGEPb CHARGE
1.0A 12.0V1.0A 12.0V
1.0A 12.0V
1.0A 12.0V1.0A 12.0V
Der Wert links in der zweiten Zeile gibt den Ladestrom an, der Wert rechts die Nennspannung des Akkus.
• Wenn die Werte verändert werden sollen, so drücken Sie die Taste „Start/Enter“. Der
Ladestrom blinkt. Verändern Sie den Ladestrom mit den Tasten „INC“ und „DEC“, bestätigen
Sie den Wert mit der Taste „Start/Enter“.
Daraufhin blinkt die Spannung. Verändern Sie diese mit den Tasten „INC“ und „DEC“. Dabei
ist zu beachten, dass die Spannung nur anhand der Zellenzahl verändert wird (z.B. eine
Zelle = 2V, zwei Zellen = 4V usw.). Bestätigen Sie die Einstellung mit der Taste „Start/Enter“.
• Um den Ladevorgang zu starten, halten Sie die Taste „Start/Enter“ länger gedrückt.
• Falls die Einstellungen falsch sind bzw. das Ladegerät einen Fehler feststellt, so wird ein
Warnsignal ausgegeben und eine entsprechende Information im Display (siehe Kapitel 16).
27

Mit der Taste „Batt Type/Stop“ beenden Sie das Warnsignal; Sie gelangen wieder ins
vorherige Einstellmenü zurück.
Andernfalls erscheint z.B. folgende Anzeige:
Akkutyp Ladestrom Akkuspannung
Pb6s 2.0A 12.59VPb6s 2.0A 12.59V
Pb6s 2.0A 12.59V
Pb6s 2.0A 12.59VPb6s 2.0A 12.59V
CHG 043:20 01253CHG 043:20 01253
CHG 043:20 01253
CHG 043:20 01253CHG 043:20 01253
Aktuelle Ladedauer Geladene Kapazität in mAh
• Wenn der Ladevorgang abgeschlossen ist, wird ein Tonsignal ausgegeben.
Falls Sie den Ladevorgang vorher beenden wollen, drücken Sie die Taste „Batt
Type/Stop“.
28
16. Warnmeldungen im Display
REVERSEDREVERSED
REVERSED
REVERSEDREVERSED
POLARITYPOLARITY
POLARITY
POLARITYPOLARITY
Die Polarität der Akkuanschlüsse ist vertauscht.
CONNECTIONCONNECTION
CONNECTION
CONNECTIONCONNECTION
BREAKBREAK
BREAK
BREAKBREAK
SHORT ERRSHORT ERR
SHORT ERR
SHORT ERRSHORT ERR
IN VOLTAGEIN VOLTAGE
IN VOLTAGE
IN VOLTAGEIN VOLTAGE
ERRERR
ERR
ERRERR
VOL SELECTVOL SELECT
VOL SELECT
VOL SELECTVOL SELECT
ERRERR
ERR
ERRERR
BREAKDOWNBREAKDOWN
BREAKDOWN
BREAKDOWNBREAKDOWN
BATTERY CHECKBATTERY CHECK
BATTERY CHECK
BATTERY CHECKBATTERY CHECK
LOW VOLTAGELOW VOLTAGE
LOW VOLTAGE
LOW VOLTAGELOW VOLTAGE
BATTERY CHECKBATTERY CHECK
BATTERY CHECK
BATTERY CHECKBATTERY CHECK
OVER VOLTAGEOVER VOLTAGE
OVER VOLTAGE
OVER VOLTAGEOVER VOLTAGE
BATTERY VOL ERRBATTERY VOL ERR
BATTERY VOL ERR
BATTERY VOL ERRBATTERY VOL ERR
BATTERY VOL ERRBATTERY VOL ERR
BATTERY VOL ERR
BATTERY VOL ERRBATTERY VOL ERR
CELL LOW VOLCELL LOW VOL
CELL LOW VOL
CELL LOW VOLCELL LOW VOL
Die Verbindung zum Akku ist unberbrochen, z.B.
wenn der Akku während dem Ladevorgang abgesteckt wurde.
Es wurde ein Kurzschluss am Ausgang des Ladegeräts festgestellt.
Die Eingangsspannung (Betriebsspannung) für
das Ladegerät ist zu gering.
Die Spannung eines zu ladenden LiPo-Akkus ist
falsch eingestellt worden.
Das Ladegerät hat ein internes Problem festgestellt. Wenn dies dauerhaft angezeigt wird, ist das
Ladegerät evtl. defekt; lassen Sie es von einer
Fachwerkstatt bzw. einem Fachmann prüfen.
Während dem Ladevorgang wurde festgestellt,
dass der Akku tiefentladen ist.
Hier ist zu prüfen, ob die Spannung des Akkus für
den Ladevorgang richtig eingestellt wurde.
Die Spannung in einer Zelle eines LiPo-Akkus ist
zu hoch/niedrig. Dies kann vorkommen, wenn ein
mehrzelliger LiPo-Akku vorher ohne Balancer
geladen wurde.
29

17. Wartung und Reinigung
Das Produkt ist für Sie wartungsfrei, zerlegen Sie es deshalb niemals.
Lassen Sie eine Reparatur ausschließlich von einer Fachkraft bzw. Fachwerkstatt durchfüh-
ren, andernfalls besteht die Gefahr der Zerstörung des Produkts, außerdem erlischt die
Zulassung (CE) und die Garantie/Gewährleistung.
Reinigen Sie das Produkt nur mit einem weichen, sauberen, trockenen und fusselfreien Tuch,
verwenden Sie keine Reinigungsmittel, das Gehäuse und die Beschriftung kann dadurch
angegriffen werden.
Staub kann mit einem sauberen weichen Pinsel und einem Staubsauger leicht entfernt
werden.
30

18. Handhabung
• Beachten Sie sämtliche Sicherheitshinweise dieser Bedienungsanleitung.
Sie geben Ihnen wichtige Informationen über Gefahren, die im Umgang mit
Ladegeräten und Akkus bestehen.
• Das Produkt ist kein Spielzeug, es gehört nicht in Kinderhände. Kinder
können die Gefahren, die im Umgang mit Ladegeräten oder Akkus bestehen, nicht einschätzen.
• Vermeiden Sie folgende widrige Umgebungsbedingungen am Aufstellort,
bei Betrieb oder beim Transport:
- Nässe oder zu hohe Luftfeuchtigkeit
- Extreme Kälte (<0°C) oder Hitze (>+35°C), direkte Sonneneinstrahlung
- Staub oder brennbare Gase, Dämpfe oder Lösungsmittel
- starke Vibrationen, Stöße, Schläge
- starke Magnetfelder, wie in der Nähe von Maschinen oder Lautsprechern
• Stellen Sie das Ladegerät auf eine ebene, feste Fläche. Diese muss so groß
sein, dass auch der angeschlossene Akku/Akkupack sicher daneben gelegt
werden kann. Halten Sie zwischen Ladegerät und Akku (sowie der Stromversorgung) jeweils einen Mindestabstand von 20cm ein, um gegenseitige
Erwärmung zu vermeiden.
Der Akku/Akkupack darf nicht auf oder unter dem Ladegerät platziert
werden!
• Achten Sie beim Aufstellen und bei Betrieb darauf, dass die Kabel nicht
geknickt oder gequetscht werden.
• Decken Sie Ladegerät und Akku niemals ab. Durch einen Hitzestau wird
nicht nur das Ladegerät zerstört, sondern es besteht Brand- und Explosionsgefahr!
• Sowohl durch die Gerätefüße als auch durch die Temperatur des Gehäuses
kann es auf empfindlichen Oberflächen zu Druckstellen oder Verfärbungen
kommen. Gleiches gilt für den Akku.
Wie bereits in den Sicherheitshinweisen beschrieben, ist eine geeignete
unbrennbare und hitzefeste Unterlage für das Ladegerät und den aufzuladenden Akku zu verwenden. Platzieren Sie Ladegerät und Akku nicht auf
wertvollen Möbeloberflächen!
• Halten Sie ausreichend Abstand zu brennbaren Oberflächen oder Gegenständen.
31

• Betreiben Sie das Ladegerät nicht unbeaufsichtigt.
Obwohl das Ladegerät über zahlreiche Sicherheitsfunktionen verfügt, ist es
nie vollständig auszuschließen, dass es zu übermäßiger Erwärmung des
Akkus bzw. des Ladegeräts kommen kann. Auch die Verwendung von zu
dünnen Ladekabeln oder auftretende Kontaktprobleme führen zu gefährlichen Betriebszuständen!
• Prüfen Sie gelegentlich die Temperatur des Akkus während dem Ladevorgang.
NiMH- und NiCd-Akkus erwärmen sich bei hohen Ladeströmen (1C) sehr
stark, es können Temperaturen von 50°C und mehr erreicht werden. Fassen
Sie deshalb den Akku vorsichtig an. Eine zu starke Erwärmung des Akkus
kann zu dessen Beschädigung führen. Verringern Sie dann den Ladestrom.
LiPo-Akkus sollten während dem Ladevorgang (Ladestrom max. 1C) in der
Regel nicht mehr als handwarm werden. Eine stärkere Erwärmung deutet
auf einen defekten Akku bzw. eine defekte Zelle des Akkupacks hin.
• LiPo-Akkus mit mehr als einer Zelle (Akkuspannung mehr als 3.7V) müssen
aus Sicherheitsgründen grundsätzlich über ein Ladeverfahren mit Balancer
geladen werden. Verwenden Sie das Ladeprogramm „LiPo BALANCE
CHG“.
Falls der Stecker Ihres Balancers nicht in den jeweiligen Anschluss des
Ladegeräts passt, ist ein entsprechender Adapter zu verwenden.
32

19. Entsorgung
a) Allgemein
Entsorgen Sie das unbrauchbar gewordene Produkt am Ende seiner Lebensdauer gemäß den geltenden gesetzlichen Bestimmungen.
b) Batterien und Akkus
Sie als Endverbraucher sind gesetzlich (Batterieverordnung) zur Rückgabe
aller gebrauchten Batterien und Akkus verpflichtet; eine Entsorgung über
den Hausmüll ist untersagt!
Sie erfüllen damit die gesetzlichen Verpflichtungen und leisten Ihren Beitrag zum Umweltschutz.
Schadstoffhaltige Batterien/Akkus sind mit nebenstehenden Symbolen gekennzeichnet, die auf das Verbot der Entsorgung über den Hausmüll hinweisen. Die Bezeichnungen für das ausschlaggebende Schwermetall sind:
Cd=Cadmium, Hg=Quecksilber, Pb=Blei (Bezeichnung steht auf Batterie/
Akku z.B. unter den links abgebildeten Mülltonnen-Symbolen).
Ihre verbrauchten Batterien/Akkus können Sie unentgeltlich bei den Sammelstellen Ihrer Gemeinde, unseren Filialen oder überall dort abgeben, wo
Batterien/Akkus verkauft werden.
33

20. Technische Daten
Betriebsspannung: ........................ 11 - 18V=, stabilisiert
Stromaufnahme: ........................... Abhängig vom Ladestrom und Akku
(5A-Netzteil empfohlen)
Ladestrom: .................................... 0.1A - 5.0A einstellbar
Akkutypen: .................................... NiCd, 1 - 14 Zellen
NiMH, 1 - 14 Zellen
LiPo, 1 - 5 Zellen
Pb, 1 - 6 Zellen (2V pro Zelle, 2 - 12V)
Ausgang: ....................................... 4mm-Buchsen
Balancer-Anschlüsse (JST-XH) für 2, 3, 4 oder 5 Zellen
Entladestrom für Balancer: ........... 200mA pro Zelle
Gewicht: ........................................ Ca. 280g
Abmessungen: .............................. Ca. 130 x 80 x 23mm
Umgebungstemperatur: ................ 0°C bis +35°C
Umgebungsluftfeuchte: ................ Max. 90% relativ, nicht kondensierend
Besonderheiten:
• Integrierter Balancer für LiPo-Akku mit 2, 3, 4 oder 5 Zellen
• Delta-U-Abschaltung
• Eingangsspannungs-Überwachung (zum Schutz vor Tiefentladung)
• Kapazitäts-Limit einstellbar (schützt vor Überladung des angeschlossenen Akkus)
• Ladedauer einstellbar (schützt vor Überladung des angeschlossenen Akkus)
• Max. Leistung der Elektronik 50W (je nach Zellenzahl geringeren Ladestrom wählen!)
34

Table of contents
1. Introduction ................................................................................................................. 36
2. Appropriate usage ...................................................................................................... 37
3. Contents ...................................................................................................................... 37
4. Explanation of symbols .............................................................................................. 38
5. Safety instructions ...................................................................................................... 38
6. Notes on rechargeable batteries ................................................................................ 41
a) General information .............................................................................................41
b) Additional information on LiPo batteries .............................................................43
7. Controls ....................................................................................................................... 45
8. First use ....................................................................................................................... 46
9. Main menu .................................................................................................................. 47
10. "USER SET" configuration menu ...............................................................................49
11. "LiPo CHARGE" charging program ........................................................................... 50
12. "LiPo BALANCE CHG" charging program .................................................................52
13. "NiMH CHARGE" charging program .......................................................................... 56
14. "NiCD CHARGE" charging program .......................................................................... 58
15. "Pb CHARGE" charging program .............................................................................. 60
16. Warning messages ..................................................................................................... 62
17. Maintenance and cleaning ......................................................................................... 63
18. Handling ...................................................................................................................... 64
19. Disposal....................................................................................................................... 66
a) General information .............................................................................................66
b) Batteries (rechargeable and non-rechargeable) ................................................66
20. Technical data ............................................................................................................. 67
Page
35

1. Introduction
Dear Customer,
We would like to thank you for the taking the wise decision of purchasing your Voltcraft®
product.
Voltcraft® - a name synonymous with high-quality products in the field of measuring, charging
and networking technology. The products are recognisable by the specialist skill that has been
applied in their manufacture, their extraordinary efficiency and consistent innovation.
Whether your are an ambitious do-it-yourself electronics enthusiast or a professional user,
with a product of the Voltcraft® brand family you always have the optimal solution to hand, even
for solving the most difficult problems. We also offer highly-developed technology and reliable
Voltcraft® quality with almost unbeatable value for money. This helps our Voltcraft® series to
lay the foundations for a long, pleasant and successful cooperation.
Enjoy your new Voltcraft® product!
All corporation and product names included are trademarks of the respective owner.
All rights reserved.
36

2. Appropriate usage
The "Multicharger B5" is used to charge NiCD + NiMH type batteries (1-14 cells), LiPo batteries
(1-5 cells) and lead acid batteries (1-6 cells, 2-12V). The charge current can be set between
0.1A and 5.0A independently of the battery attached.
The charger may only be connected to a direct current between 11V and 18V.
A two-line illuminated LCD display and four keys are used to control the charger.
A balancer is integrated into the charger for LiPo batteries, with balancer connector sockets
for the battery located on the side of the charger.
The product is intended for use in dry indoor environments and must not get damp or wet!
Any use other than that described above could lead to damage to the product and increase the
risk of a short circuit, fire, electric shock, etc.
No part of the product should be modified or reassembled.
Observe all safety instructions and information within this operating
manual.
3. Contents
• battery charger
• current connection cable with crocodile clips for connecting to supply voltage
• set of connector cables
• operating instructions
37

4. Symbol explanation
An exclamation mark in a triangle indicates important instructions in this
operating manual which must be observed without fail.
The "hand" symbol is used for tips and information on using the product.
5. Safety instructions
Any damage resulting from actions carried out as a result of failure to
heed to this operating manual will result in the warranty becoming void!
We accept no liability for any consequential damage!
We also assume no liability for damage to property or personal injury,
caused by improper use or failure to observe the safety instructions. The
warranty is void in these cases.
Dear Customer, the following safety instructions are intended not only to protect your health
but also the device. Please read the following points carefully:
• For reasons of safety and licensing (CE), you are not permitted to convert or
modify the product yourself.
• The charger may only be connected to a stabilised direct current of 11-18V.
• The product may only be used in dry, enclosed rooms. It must not get damp
or wet. Avoid bringing into contact with direct sunlight, high temperatures
(>35°C) or extreme cold (<0°C). Keep it away from dust and dirt. The same
is valid for any battery that may be connected.
• Do not use the charger within a vehicle.
• Do not place any containers filled with liquid, e.g. vases or plants, on or next
to the charger.
This will result in the charger being destroyed and is a considerable fire
hazard.
38

If this occurs, immediately disconnect the product from the power supply,
then disconnect the battery from the charger.
The exterior of the battery must be completely dried off and/or cleaned. Do
not use the charger again - bring it to a specialist workshop.
• This product is not a toy. It is not suitable for children. Pay particular attention
if children are present! Children could attempt to poke objects into the device.
This will result in the device being destroyed and there is a considerable risk
to life from electrical shock!
The product may only be set up, used or stored in places that are not
accessible to children. Children may change the settings or short-circuit the
battery/battery pack, which can lead to an explosion. Danger of death!
• Do not leave the charger unattended while it is in operation. Although there
are a wide range of comprehensive safety mechanisms on the device, it is
impossible to exclude the possibility of malfunctions or problems occurring
while charging a battery.
• Only use the device under normal environmental conditions, not in a hot and
humid environment. For more information on acceptable environmental
conditions, see the chapter "Technical Data".
• Select a stable, level, sufficiently large and flat surface.
Never place the charger and battery on a flammable surface (e.g. carpet).
Always use a suitable, non-flammable, heatproof base.
• Ensure that there is sufficient ventilation during operation, never cover up the
charger and/or the connected battery. Allow enough distance (min. 20cm)
between the charger, battery and other objects.
• Never use the product immediately after it has been brought in from a cold
room into a warm one. The resulting condensation may lead to malfunctions
or damage under certain circumstances!
Allow the charger (and the battery/batteries) to reach room temperature
before connecting the charger to the power supply and using it. This may take
several hours!
• Maintenance, adjustments or repairs may only be carried out by a qualified
technician or specialist workshop. There are no components for you to adjust
or maintain within the device.
39

• In industrial facilities, the regulations as established by professional trade
associations for the prevention of accidents when handling electrical
equipment and facilities must be adhered to.
• If the product is used at schools, training facilities, do-it-yourself and hobby
workshops, it should not be handled unless supervised by trained qualified
personnel in a responsible manner.
• Do not leave packaging material laying around carelessly. Children may use
it as a very dangerous toy!
• Handle the product carefully as it can be damaged by impacts, strikes or by
falling from even a small height.
If you are not sure about the correct method of connection or usage, or if
questions arise which are not covered by these operating instructions, please
do not hesitate to contact our technical support or another qualified specialist.
40

6. Notes on rechargeable batteries
Despite the fact that batteries, both rechargeable and non-rechargeable, have become a
normal part of today's life, there are still numerous dangers and problems involved. The use
of LiPo/LiIon rechargeable batteries with their high energy content (compared to conventional
NiCd or NiMH rechargeable batteries) in particular require various regular regulations to be
observed under all circumstances as failure to do presents a risk of fire and explosion.
For this reason, always ensure that you have read and understood the following information
and safety measures when handling batteries.
a) General information
• Batteries are not suitable for children. Always keep batteries out of the reach
of children. The same applies to chargers.
Batteries and battery chargers are not toys!
• Do not leave batteries lying around. There is a risk of batteries being
swallowed by children or pets. If this occurs, seek urgent medical attention!
• Rechargeable batteries must never be short-circuited, taken apart or thrown
into a fire. There is a risk of fire and explosion!
• Leaking or damaged batteries may cause acid burns when coming into
contact with skin. Use suitable protective gloves when handling damaged
batteries.
• Do not recharge normal, non-rechargeable batteries. There is a risk of fire
and explosion!
Non-rechargeable batteries are meant to be used once only and must be
disposed of when empty.
Only charge batteries that are intended to be charged
• Batteries must not get damp or wet.
• Please observe correct polarity (plus/+ and minus/-) on your model or
charger when connecting the rechargeable battery. Should you connect the
battery incorrectly, not only will the model be damaged but also the battery.
There is a risk of fire and explosion!
41

This charger has a mechanism that helps to protect against having the poles
incorrectly connected. Nonetheless, it is possible that incorrectly connected
the battery may lead to damage in certain situations.
• If the product is not to be used for a long period of time (e.g. storage),
disconnect any battery from the charger that may be attached, disconnect
the charger from the power supply.
• Do not charge any battery that is still hot (e.g. caused by high charge current
from the model) Allow the battery to cool down to room temperature before
attempting to charge it again.
• Never charge damaged, leaking or deformed batteries. This can result in a
fire or explosion!
• Never use battery packs that are composed of different types of cells.
• Recharge batteries about every 3 months, as they may become completely
discharged as a result of self-discharge, making the battery unusable.
• Disconnect the battery from the charger when the battery is fully charged.
• Never damage the exterior of a battery. There is a risk of fire and explosion!
• Never charge a battery directly in the model. Remove the battery to be
charged from the model first.
• Place the charger and battery on a non-flammable, heat-resistant surface
(e.g. stone tiles). Maintain enough distance to flammable objects. Allow
enough distance between the charger and the battery - never place the
battery on the charger.
• As both the charger and the battery heat up during the charging procedure,
it is necessary to ensure sufficient ventilation. Never cover the charger or the
battery!
• Never leave charging batteries unattended.
• If any battery connector cables need to be cut to size (e.g. if the battery is
supplied without a connector plug), cut each cable individually to prevent a
short circuit occurring. Risk of fire and explosion!
42

b) Additional information on LiPo batteries
Modern LiPo batteries ("LiPo" = Lithium Polymer) do not only have a much higher capacity than
NiMH or NiCd batteries, they also have a considerably lower weight. These factors make this
type of battery highly interesting for use in, for example, model construction.
However, LiPo batteries require particular care and attention when charging, using and
handling.
For this reason, we would like to provide you with some information in the sections below about
the dangers and how you can avoid them, thus helping the LiPo battery to maintain its
performance for a long time to come.
See also chapter 6. a).
• The exterior covering of a LiPo battery, consisting solely of a very thick film,
is extremely sensitive. Never destroy or damage the battery, never let the
battery fall, do not pierce the battery with any objects. Avoid applying any
mechanical loads to the battery, never pull on the battery's connector cables!
There is a risk of fire and explosion!
These guidelines must also be observed when the battery is inserted into the
model (if the model is removed, for example)
• Ensure that the battery does not overheat during usage, recharging,
discharging, transport or storage. Do not place the battery adjacent to
sources of heat (e.g. cruise control, motor), keep the battery away from direct
sunlight. There is a risk of fire and explosion if the battery overheats! The
battery must not reach a temperature of more than 60°C (any other
manufacturer warnings must also be heeded as applicable!).
• If the battery is damaged (e.g. after an airplane or helicopter model crashes)
or the exterior shell is inflated/swollen, do not continue to use the battery. Do
not recharge it. There is a risk of fire and explosion!
Only touch the battery with care, use suitable protective gloves. Dispose of
the battery in an ecologically sound fashion.
• Only use a suitable charger to charge LiPo batteries. Due to a risk of fire and
explosion, ordinary chargers for NiCd, NiMH and lead acid batteries may not
be used!
• When charging a LiPo battery with more than one cell, always use a so-called
"balancer" (one is already integrated into the supplied charger)
43

• Always charge LiPo batteries with a charge current of max. 1C. This means
that the charge current must not exceed the capacity displayed on the battery
(e.g. battery capacity 1000mAh, max. charge current 1000mA = 1A).
• The discharge current must not exceed the value displayed on the battery.
For example, if a value of "20C" is printed on the battery, the max. discharge
current is 20 times the battery's capacity (e.g. battery capacity 1000mAh,
max. discharge current 20C = 20x 1000mA = 20A).
If these guidelines are not adhered to, the battery will overheat, which will
lead to the battery becoming deformed/swollen or result in an explosion and
fire!
The printed value (e.g. "20C") does not generally refer to the constant
current, but to the maximum current that the battery is capable of producing
in the short-term. The constant current should not be higher than one half of
the given value.
• None of the battery's cells should be discharged to below 3V - this will result
in the battery being destroyed.
If the model does not provide protection against total discharge or possess
a visual display indicating a low battery, remember to switch off the model in
time.
44

7. Operating elements
Multilader
1 Connector socket for power supply (11-18V=, stabilised)
2 Illuminated LCD display
3 Balancer connector sockets for 2, 3, 4 and 5 cell LiPo batteries
4 4mm round sockets for connecting the battery
5 "Batt Type/Stop" button for menu selections and stopping the charging process
6 "DEC" and "INC" keys for entering values and displaying the values of the individual cells
when in balance charge mode
7 "Start/Enter" key for starting/continuing the charging process or confirming a configuration
change or operating function
45

8. Initial operation
The charger must be used with a stabilised direct current voltage (11-18V=).
Never use the charger with another voltage as this will destroy the charger and
invalidate the warranty/guarantee!
Depending on the battery connected, a charge current of up to 5A is possible.
For this reason, the electrical supply chosen must be strong enough.
Connect the supplied connector cable (2 crocodile clips on 1 circular connector) with the power
supply, plug the circular connector into the appropriate socket in the charger (see chapter 7,
position 1).
The charger emits a brief audio signal and the LCD display is illuminated. The charger is now
on the main menu:
Example:
NiMH CHARGENiMH CHARGE
NiMH CHARGE
NiMH CHARGENiMH CHARGE
CURRENT 2.0ACURRENT 2.0A
CURRENT 2.0A
CURRENT 2.0ACURRENT 2.0A
Before a battery can be attached and charged, the appropriate battery type and
desired values must first be selected. Please heed the information contained
within the next chapter.
46

9. Main menu
By briefly pressing the "Batt Type/Stop" key several times, you can select the various functions
in the main menu.
Confirm the selection by pressing the “Start/Enter“ button.
LiPo CHARGELiPo CHARGE
LiPo CHARGE
LiPo CHARGELiPo CHARGE
v
LiPo BALANCE CHGLiPo BALANCE CHG
LiPo BALANCE CHG
LiPo BALANCE CHGLiPo BALANCE CHG
v
NiMH CHARGENiMH CHARGE
NiMH CHARGE
NiMH CHARGENiMH CHARGE
USER SETUSER SET
USER SET
USER SETUSER SET
s
PROGRAM-> PROGRAM->
PROGRAM->
PROGRAM-> PROGRAM->
Pb CHARGEPb CHARGE
Pb CHARGE
Pb CHARGEPb CHARGE
NiCd CHARGENiCd CHARGE
NiCd CHARGE
NiCd CHARGENiCd CHARGE
u
u
t
Please heed the following points before connecting/charging the battery:
• If you have not done so already, please read chapter 5 and 6 completely and
ensure that you have understood the information there.
• Do you know all of the information about your battery that you need to know?
Unknown or unlabelled batteries for which you do not know the necessary
values may not be connected/charged!
• Have you selected the correct charging program for the type of battery you
are using? Selecting the wrong settings will damage the charger and the
battery and present a risk of fire and explosion!
• Have you selected the appropriate charge current?
• Have you selected the correct voltage (e.g. for multiple-cell LiPo batteries)?
A dual-cell LiPo battery can, under certain circumstances, be connected in
parallel (3.7V) or in series (7.4V).
47

• Are all connector cables and plugs undamaged, do the plugs stay firmly in
the sockets? Worn-out plugs and damaged cables should be replaced.
• When connecting a battery to the charge, always connect the charging cable
to the charger first, then the battery to the charger/charging cable. When
disconnecting, do so in reverse order to the above. Failure to do so presents
the danger of a short circuit (e.g. from the two 4mm circular connectors on the
charging cable).
• Only ever charge one battery pack at a time.
• If you wish to charge battery packs that you have manufactured yourself, the
cells must be identical in their construction (same type, same capacity, same
manufacturer). The cells must also be charged to the same level (LiPo
batteries can be balanced out using the balancer, this is, however, not
possible with other battery packs such as NiMH or NiCd).
Using the menus:
• Select the desired submenu from the main menu using the "Batt Type/Stop" key as
described and confirm your selection with the key "Start/Enter".
• Using the keys "INC" and "DEC", the various configuration options can be called up.
• To modify a value, press the "Start/Enter" key - the display then flashes.
• Modify the value displayed using the "INC" and "DEC" keys.
• Save the (modified) value with the "Start/Enter" key.
• Exit the configuration menu using the "Batt Type/Stop" key. It then returns to the main menu.
48

10. "USER SET" configuration menu
USER SETUSER SET
USER SET
USER SETUSER SET
t
PROGRAM-> PROGRAM->
PROGRAM->
PROGRAM-> PROGRAM->
DEC
TEMP CUT OFFTEMP CUT OFF
TEMP CUT OFF
TEMP CUT OFFTEMP CUT OFF
s
ON 50CON 50C
ON 50C
ON 50CON 50C
INC
v
SAFETY TIMERSAFETY TIMER
SAFETY TIMER
SAFETY TIMERSAFETY TIMER
ON 180minON 180min
ON 180min
ON 180minON 180min
INC
CAPACITY CUT OFFCAPACITY CUT OFF
CAPACITY CUT OFF
CAPACITY CUT OFFCAPACITY CUT OFF
ON 5000mAhON 5000mAh
ON 5000mAh
ON 5000mAhON 5000mAh
INC
KEY BEEP ONKEY BEEP ON
KEY BEEP ON
KEY BEEP ONKEY BEEP ON
BUZZER ONBUZZER ON
BUZZER ON
BUZZER ONBUZZER ON
INC
INPUT POWER LOWINPUT POWER LOW
INPUT POWER LOW
INPUT POWER LOWINPUT POWER LOW
CUT-OFF 10.0VCUT-OFF 10.0V
CUT-OFF 10.0V
CUT-OFF 10.0VCUT-OFF 10.0V
INC
s
Batt Type/Stop
INC
BACK-LIGHTBACK-LIGHT
BACK-LIGHT
BACK-LIGHTBACK-LIGHT
100% 100%
100%
100% 100%
Start/Enter
v
vu
vu
vu
vu
vu
DEC
DEC
DEC
DEC
DEC
Select the option "USER SET" from the main
menu using the "Batt Type/Stop" key, confirm
with the "Start/Enter" key.
Does not apply to this charger model.
The safety timer starts automatically when
charging begins; it protects the battery from being
overloaded (or if the delta-U cut-off mechanism
cannot find a peak). Do not set the time to be
shorter than the anticipated charging time!
Set the maximum battery charge capacity here.
This also protects against overloading (or if the
delta-U cut-off is not working).
"KEY BEEP" can be used to switch the key press
sound on or off. "BUZZER" can be used to switch
the alarm signifying an error in charging or
changes in the charging process on or off.
This function monitors the voltage at the charger
input (e.g. for a 12V battery). If the voltage drops
below the configured value, the charging process
is stopped.
Adjust the background lighting brightness here.
49

11. "LiPo CHARGE" charging program
This charging program is only suitable for LiPo batteries with a voltage of 3.7V
per cell which do not have a balancer connection. Never try to charge another
type of battery using this charging program.
If your LiPo battery has a balancer connection, the charging program
"LiPo BALANCE CHG" should be used, see chapter 12.
This is the only way to ensure that all of the cells have the same voltage
after charging and avoid overloading one of the cells. Overloading a cell
in a LiPo battery does not only reduce the battery's life, but also runs the
risk of having the battery explode and creates a danger of fire and
explosion!
The charge current to be set is independent of the battery capacity and is usually 1C. However,
you should take the battery manufacturer's instructions into account.
The value "1C" means that the charging current is equivalent to the battery's capacity. As such,
a charge current of 1.8A should be set for a 1800mAh LiPo battery at 1C.
Charge the LiPo battery as follows:
• After you have selected the "LiPo CHARGE" charging program and confirmed with the
"Start/Enter" key, the following display appears (example):
LiPo CHARGELiPo CHARGE
LiPo CHARGE
LiPo CHARGELiPo CHARGE
2.0A 11.1V(3S)2.0A 11.1V(3S)
2.0A 11.1V(3S)
2.0A 11.1V(3S)2.0A 11.1V(3S)
The value on the left in the second row shows the charge current, the value on the right shows
the voltage or number of cells in the LiPo battery (in this example, a 3-cell LiPo battery pack,
3x 3.7V = 11.1V).
• If the values need to be changed, press the "Start/Enter" key. The charge current begins to
flash. Change the charge current using the keys "INC" and "DEC", confirm the value using
the "Start/Enter" key.
The voltage then begins to flash. Change it using the keys "INC" and "DEC". You should be
aware while doing this that the voltage only changes with the number of cells (e.g. one cell
= 3.7V, two cells 7.4V etc.) Confirm the setting by pressing the “Start/Enter“ button.
• To begin the charging process, keep the "Start/Enter" key pressed.
50

• If the settings are wrong, or if the charger detects a problem, an audio signal is emitted and
the appropriate information is shown on the display (see chapter 16).
You can stop the audio signal by pressing the "Batt Type/Stop" key. You then return to the
previous configuration menu.
If you do not, the following display appears (example):
S:3SER R:3SER S:3SER R:3SER
S:3SER R:3SER
S:3SER R:3SER S:3SER R:3SER
CONFIRM (ENTER)CONFIRM (ENTER)
CONFIRM (ENTER)
CONFIRM (ENTER)CONFIRM (ENTER)
The value "S" shows the number of cells that you have configured in the menu.
The value "R" shows the number of cells that the charger has recognised.
If these two numbers do not match, please check the settings on the charger
and check the battery itself. It may be that the LiPo battery has been completely
discharged, or a cell may be defective. In this case, the battery should not be
charged, as there is a risk of fire and explosion!
You can return to the previous configuration menu using the "Batt Type/Stop"
key.
• If the two numbers match, you can start the charging process by quickly pressing the "Start/
Enter" key.
Once the charging process has been started, various pieces of information about the current
charging progress are displayed.
Example:
Number of cells Charge current Battery voltage
Li3S 1.2A 12.59VLi3S 1.2A 12.59V
Li3S 1.2A 12.59V
Li3S 1.2A 12.59VLi3S 1.2A 12.59V
CHG 022:43 00682CHG 022:43 00682
CHG 022:43 00682
CHG 022:43 00682CHG 022:43 00682
Current charging duration Charge capacity in mAh
• Once the charging process has been completed, an audio signal is emitted.
If you wish to terminate the charging process beforehand, press the "Batt Type/
Stop" key.
51

12. "LiPo BALANCE CHG" charging program
This charging program is only suitable for LiPo batteries with a voltage of 3.7V
per cell with a balancer connection. Never try to charge another type of battery
using this charging program.
The charge current to be set is independent of the battery capacity and is usually 1C. However,
you should take the battery manufacturer's instructions into account.
The value "1C" means that the charging current is equivalent to the battery's capacity. As such,
a charge current of 1.8A should be set for a 1800mAh LiPo battery at 1C.
In contrast to the simpler LiPo charging program "LiPo CHARGE", the voltage of each
individual cell is monitored and the charge current is adjusted correspondingly.
Only a LiPo battery with exactly the same voltage for each cell provides the
maximum performance and service life for a model airplane/vehicle.
Variations in the quality of the materials used and the internal structure of
multiple-cell LiPo batteries mean that the cells may have different voltages
once discharged.
If such a LiPo battery is charged without the use of a balancer, large differences
in the cell voltages emerge very rapidly. This not only shortens the charge life
(as one cell may give in under the voltage), but also damages the battery as a
result of a total discharge.
There is also the danger of overload when charging different cells (with
different voltages) without a balancer - the maximum permitted voltage of a
LiPo cell of approx. 4.2V (+/- 1%) would be exceeded!
Example:
A dual-cell LiPo battery pack charged without the use of a balancer appears to
have a voltage of 8.4V and thus appears to be fully charged. However, the two
cells have a respective voltage of 4.5V and 3.9V (one cell is dangerously
overloaded, the other is half-empty).
A cell overloaded in this way may leak or, in the worst case scenario,
catch fire or explode!
If your LiPo battery has a balancer connection, the charging program "LiPo
BALANCE CHG" should always be used.
52

Be aware that when using the charging program "LiPo BALANCE CHG", both
Charge the LiPo battery as follows:
• After you have selected the "LiPo BALANCE CHG" charging program and confirmed with the
"Start/Enter" key, the following display appears (example):
The value on the left in the second row shows the charge current, the value on the right shows
the voltage or number of cells in the LiPo battery (in this example, a 3-cell LiPo battery pack,
3x 3.7V = 11.1V).
• If the values need to be changed, press the "Start/Enter" key. The charge current begins to
flash. Change the charge current using the keys "INC" and "DEC", confirm the value using
the "Start/Enter" key.
The voltage then begins to flash. Change it using the keys "INC" and "DEC". You should be
aware while doing this that the voltage only changes with the number of cells (e.g. one cell
= 3.7V, two cells 7.4V etc.) Confirm the setting by pressing the “Start/Enter“ button.
• To begin the charging process, keep the "Start/Enter" key pressed.
the balancer battery connector and the battery connector cable must be
connected to the charger.
Use the correct balancer connector depending on the number of cells.
There are different types of balancer plug. For this reason, do not use force if
the plug does not fit! Suitable adapters are available to purchase for the
balancer plug.
LiPo BALANCE CHGLiPo BALANCE CHG
LiPo BALANCE CHG
LiPo BALANCE CHGLiPo BALANCE CHG
2.0A 11.1V(3S)2.0A 11.1V(3S)
2.0A 11.1V(3S)
2.0A 11.1V(3S)2.0A 11.1V(3S)
53

• If the settings are wrong, or if the charger detects a problem, an audio signal is emitted and
the appropriate information is shown on the display (see chapter 16).
You can stop the audio signal by pressing the "Batt Type/Stop" key. You then return to the
previous configuration menu.
If you do not, the following display appears (example):
S:3SER R:3SER S:3SER R:3SER
S:3SER R:3SER
S:3SER R:3SER S:3SER R:3SER
CONFIRM (ENTER)CONFIRM (ENTER)
CONFIRM (ENTER)
CONFIRM (ENTER)CONFIRM (ENTER)
The value "S" shows the number of cells that you have configured in the menu.
The value "R" shows the number of cells that the charger has recognised.
If these two numbers do not match, please check the settings on the charger
and check the battery itself. It may be that the LiPo battery has been completely
discharged, or a cell may be defective. In this case, the battery should not be
charged, as there is a risk of fire and explosion!
You can return to the previous configuration menu using the "Batt Type/Stop"
key.
• If the two numbers match, you can start the charging process by quickly pressing the "Start/
Enter" key.
Once the charging process has been started, various pieces of information about the current
charging progress are displayed.
Example:
Number of cells Charge current Battery voltage
Li3S 1.2A 12.59VLi3S 1.2A 12.59V
Li3S 1.2A 12.59V
Li3S 1.2A 12.59VLi3S 1.2A 12.59V
CHG 022:43 00682CHG 022:43 00682
CHG 022:43 00682
CHG 022:43 00682CHG 022:43 00682
Current charging duration Charge capacity in mAh
• During the charging process you can use the "INC" and "DEC" keys switch between the
voltage of individual cells - see next image for details.
54

Voltage cell 1 Voltage cell 2 Voltage cell 3
4.17 4.20V 4.19V4.17 4.20V 4.19V
4.17 4.20V 4.19V
4.17 4.20V 4.19V4.17 4.20V 4.19V
0.4A 0.00V 0.00V0.4A 0.00V 0.00V
0.4A 0.00V 0.00V
0.4A 0.00V 0.00V0.4A 0.00V 0.00V
Charge current Voltage cell 4 Voltage cell 5
• Once the charging process has been completed, an audio signal is emitted.
If you wish to terminate the charging process beforehand, press the "Batt Type/
Stop" key.
55

13. "NiMH CHARGE" charging program
This charging program is only suitable for NiMH batteries with a voltage of 1.2V
per cell. Never try to charge another type of battery using this charging
program.
The charge current to be set is independent of the battery capacity and is usually 1C. However,
you should take the battery manufacturer's instructions into account.
The value "1C" means that the charging current is equivalent to the battery's capacity. As such,
a charge current of 3.0A should be set for a 3000mAh NiMH battery at 1C.
Depending on the battery connected and its structure, a charge current of 1C
Charge a NiMH battery as follows:
• After you have selected the "NiMH CHARGE" charging program and confirmed with the
"Start/Enter" key, the following display appears (example):
The value on the right in the second row shows the charge current.
• If the charge current needs to be changed, press the "Start/Enter" key. The charge current
begins to flash. Change the charge current using the keys "INC" and "DEC", confirm the
value using the "Start/Enter" key. The number of cells is established automatically!
• To begin the charging process, keep the "Start/Enter" key pressed.
• If the settings are wrong, or if the charger detects a problem, an audio signal is emitted and
the appropriate information is shown on the display (see chapter 16).
You can stop the audio signal by pressing the "Batt Type/Stop" key. You then return to the
previous configuration menu.
If you do not, the following display appears as an example (see next page):
may not be possible. For example, receiver batteries usually consist of Mignon/
AA cells that cannot withstand such a high charge current without incurring
damage.
As a rule of thumb: the smaller the battery (i.e. the individual cell), the lower the
maximum charge current. Many NiMH mignon/AA cells with a capacity of
2000mAh allow a charge current of 400-500mA for a rapid recharge.
NiMH CHARGENiMH CHARGE
NiMH CHARGE
NiMH CHARGENiMH CHARGE
CURRENT 2.0ACURRENT 2.0A
CURRENT 2.0A
CURRENT 2.0ACURRENT 2.0A
56

Battery type Charge current Battery voltage
NiCd 2.0A 7.42VNiCd 2.0A 7.42V
NiCd 2.0A 7.42V
NiCd 2.0A 7.42VNiCd 2.0A 7.42V
CHG 043:20 01253CHG 043:20 01253
CHG 043:20 01253
CHG 043:20 01253CHG 043:20 01253
Current charging duration Charge capacity in mAh
• Once the charging process has been completed, an audio signal is emitted.
If you wish to terminate the charging process beforehand, press the "Batt Type/
Stop" key.
57

14. "NiCD CHARGE" charging program
This charging program is only suitable for NiCd batteries with a voltage of 1.2V
per cell. Never try to charge another type of battery using this charging
program.
The charge current to be set is independent of the battery capacity and is usually 1C. However,
you should take the battery manufacturer's instructions into account.
The value "1C" means that the charging current is equivalent to the battery's capacity. As such,
a charge current of 2.0A should be set for a 2000mAh NiCd battery at 1C.
Depending on the battery connected and its structure, a charge current of 1C
Charge the NiCd battery as follows:
• After you have selected the "NiCd CHARGE" charging program and confirmed with the
"Start/Enter" key, the following display appears (example):
The value on the right in the second row shows the charge current.
• If the charge current needs to be changed, press the "Start/Enter" key. The charge current
begins to flash. Change the charge current using the keys "INC" and "DEC", confirm the
value using the "Start/Enter" key. The number of cells is established automatically!
• To begin the charging process, keep the "Start/Enter" key pressed.
• If the settings are wrong, or if the charger detects a problem, an audio signal is emitted and
the appropriate information is shown on the display (see chapter 16).
You can stop the audio signal by pressing the "Batt Type/Stop" key. You then return to the
previous configuration menu.
If you do not, the following display appears as an example (see next page):
may not be possible. For example, receiver batteries usually consist of Mignon/
AA cells that cannot withstand such a high charge current without incurring
damage.
As a rule of thumb: the smaller the battery (i.e. the individual cell), the lower the
maximum charge current. Many NiCd mignon/AA cells with a capacity of
1000mAh allow a charge current of 200-250mA for a rapid recharge.
NiCd CHARGENiCd CHARGE
NiCd CHARGE
NiCd CHARGENiCd CHARGE
CURRENT 1.6ACURRENT 1.6A
CURRENT 1.6A
CURRENT 1.6ACURRENT 1.6A
58

Battery type Charge current Battery voltage
NiCd 2.0A 7.42VNiCd 2.0A 7.42V
NiCd 2.0A 7.42V
NiCd 2.0A 7.42VNiCd 2.0A 7.42V
CHG 043:20 01253CHG 043:20 01253
CHG 043:20 01253
CHG 043:20 01253CHG 043:20 01253
Current charging duration Charge capacity in mAh
• Once the charging process has been completed, an audio signal is emitted.
If you wish to terminate the charging process beforehand, press the "Batt Type/
Stop" key.
59

15. "Pb CHARGE" charging program
This charging program is only suitable for lead acid batteries with a voltage of
2V per cell. Never try to charge another type of battery using this charging
program.
Lead acid batteries are completely different to NiMH or NiCd batteries. In comparison to their
high capacity they can only provide low currents. The charging process is also different.
The charge current for lead acid batteries may only be a maximum of one-tenth (1/10 C) the
battery's capacity.
A maximum charge current of 0.5A (500mA) may be set for a 5000mAh lead acid battery.
It is not permitted to rapidly charge lead acid batteries, as this would overload
the battery - resulting in a risk of fire and explosion!
Always heed the information printed on the battery or the details provided by
the battery manufacturer on the permitted charge current.
Charge the lead acid battery as follows:
• After you have selected the "PB CHARGE" charging program and confirmed with the "Start/
Enter" key, the following display appears (example):
Pb CHARGEPb CHARGE
Pb CHARGE
Pb CHARGEPb CHARGE
1.0A 12.0V1.0A 12.0V
1.0A 12.0V
1.0A 12.0V1.0A 12.0V
The value on the left in the second row shows the charge current, the value on the right shows
the rated voltage of the battery.
• If the values need to be changed, press the "Start/Enter" key. The charge current begins to
flash. Change the charge current using the keys "INC" and "DEC", confirm the value using
the "Start/Enter" key.
The voltage then begins to flash. Change it using the keys "INC" and "DEC". You should keep
in mind while doing this that the voltage only changes with the number of cells (e.g. one cell
= 2V, two cells 4V etc.) Confirm the setting by pressing the “Start/Enter“ button.
• To begin the charging process, keep the "Start/Enter" key pressed.
• If the settings are wrong, or if the charger detects a problem, an audio signal is emitted and
the appropriate information is shown on the display (see chapter 16).
60

You can stop the audio signal by pressing the "Batt Type/Stop" key. You then return to the
previous configuration menu.
If you do not, the following display appears as an example:
Battery type Charge current Battery voltage
Pb6s 2.0A 12.59VPb6s 2.0A 12.59V
Pb6s 2.0A 12.59V
Pb6s 2.0A 12.59VPb6s 2.0A 12.59V
CHG 043:20 01253CHG 043:20 01253
CHG 043:20 01253
CHG 043:20 01253CHG 043:20 01253
Current charging duration Charge capacity in mAh
• Once the charging process has been completed, an audio signal is emitted.
If you wish to terminate the charging process beforehand, press the "Batt Type/
Stop" key.
61

16. Warning messages
REVERSEDREVERSED
REVERSED
REVERSEDREVERSED
POLARITYPOLARITY
POLARITY
POLARITYPOLARITY
CONNECTIONCONNECTION
CONNECTION
CONNECTIONCONNECTION
BREAKBREAK
BREAK
BREAKBREAK
The polarity of the battery poles has been switched.
The connection to the battery has been broken,
e.g. if the battery has been disconnected during
the charging process.
SHORT ERRSHORT ERR
SHORT ERR
SHORT ERRSHORT ERR
IN VOLTAGEIN VOLTAGE
IN VOLTAGE
IN VOLTAGEIN VOLTAGE
ERRERR
ERR
ERRERR
VOL SELECTVOL SELECT
VOL SELECT
VOL SELECTVOL SELECT
ERRERR
ERR
ERRERR
BREAKDOWNBREAKDOWN
BREAKDOWN
BREAKDOWNBREAKDOWN
BATTERY CHECKBATTERY CHECK
BATTERY CHECK
BATTERY CHECKBATTERY CHECK
LOW VOLTAGELOW VOLTAGE
LOW VOLTAGE
LOW VOLTAGELOW VOLTAGE
BATTERY CHECKBATTERY CHECK
BATTERY CHECK
BATTERY CHECKBATTERY CHECK
OVER VOLTAGEOVER VOLTAGE
OVER VOLTAGE
OVER VOLTAGEOVER VOLTAGE
BATTERY VOL ERRBATTERY VOL ERR
BATTERY VOL ERR
BATTERY VOL ERRBATTERY VOL ERR
BATTERY VOL ERRBATTERY VOL ERR
BATTERY VOL ERR
BATTERY VOL ERRBATTERY VOL ERR
CELL LOW VOLCELL LOW VOL
CELL LOW VOL
CELL LOW VOLCELL LOW VOL
62
A short-circuit has been established on the charger
output.
The input voltage (operating voltage) for the
charger is too low.
The voltage of a LiPo battery to be charged is
incorrectly configured.
The charger has established that there is an internal
problem. Should this message permanently be
displayed, it is possible that the charger is defective;
have it checked by a specialist workshop or
qualified technician.
During the charging process it has been established
that the battery has been totally discharged.
In this case you should check if the voltage of the
battery has been correctly set for the charging
process.
The voltage in one of the cells of a LiPo battery is
too high/low. This can occur if a multicell LiPo
battery has been charged previously without a
balancer.

17. Maintenance and cleaning
The product does not require any maintenance. You should never take it apart.
The product should only be repaired by a specialist or specialist workshop. If not, it may be
damaged, and the CE approval and guarantee/warranty will become void.
Clean the product only with a soft, clean and fuzz-free cloth. Do not use cleaning agents as
they may corrode the plastic housing and wear off the labelling.
Dust can be removed using a clean, soft brush and a vacuum cleaner.
63

18. Handling
• Observe all safety instructions in this manual! They provide you with
important information about dangers that exist when handling battery chargers
and batteries.
• The product is not a toy and should be kept out of the reach of children.
Children cannot judge the dangers involved when handling chargers or
batteries .
• Avoid subjecting the battery or charger to the following unsuitable environment
conditions during usage or transport.
- Excessive humidity or damp
- Extreme cold (<0°C) or heat (>+35°C), direct sunlight
- Dust or flammable gases, vapours or solvents
- Strong vibrations, impacts or blows,
- strong magnetic fields such as those found in the vicinity of machinery or
• Place the charger on a level, firm surface. It must be large enough so that the
battery or battery pack attached can be safety placed alongside the charger.
Maintain a distance of minimum 20cm between the charger and battery (and
the power supply) to prevent them from heating each other up.
The battery/battery pack may not be placed on or under the charger!
• When setting up and using the product, make sure that the cable has not
been folded or squeezed.
• Never cover the charger and the battery! By preventing heat from escaping,
not only will the battery be destroyed, there is also a risk of fire and explosion!
• The feet of the device and the temperature of the casing may produce
pressure marks and discolourations on sensitive surfaces. The same applies
to the battery.
As already described in the safety warnings, a suitable non-flammable and
heatproof base should be used for the charger and the battery to be charged.
Do not place the charger or battery on expensive furniture!
• Maintain enough distance to flammable objects or surfaces.
• Do not leave the charger unattended while it is in operation.
loudspeakers
64

Although there are a wide range of safety mechanisms on the charger, it is
never possible to exclude the possibility of the battery or charger becoming
overheated. The use of charging cables that are too thin or problems with the
contacts may be dangerous!
• Check the temperature of the battery from time to time during the charging
process.
NiMH and NiCd batteries become very hot when using high charge currents,
with temperatures of 50°C or above possible. For this reason, only touch the
battery with care. If the battery overheats, it may be damaged. In this case,
reduce the charge current.
LiPo batteries should generally not get warmer than is safe to touch during
the charging process (charge current max. 1C) A large temperature increase
indicates a defective battery or a defective cell in the battery pack.
• LiPo batteries with more than one cell (battery voltage more than 3.7V) must
almost always be charged with a balancer for reasons of safety. Use the
charging program "LiPo BALANCE CHG".
If the balancer plug does not fit in the appropriate charger socket, the correct
adapter must be used.
65

19. Disposal
a) General information
If the product becomes unusable, please dispose of it in accordance with
applicable law.
b) Batteries (rechargeable and non-rechargeable)
The user is under a legal obligation (battery handling act) to return used
batteries and exhausted rechargeable batteries. Do not throw used batteries
into your household waste!
In doing so you fulfil your statutory obligations and contribute to the protection of the
environment.
Contaminated batteries/rechargeable batteries are labelled with these symbols
to indicate that disposal in domestic waste is forbidden. The designations for
the most significant heavy metals are: Cd=Cadmium, Hg=Mercury, Pb=Lead
(designation is on battery, e.g. under the waste disposal symbols shown on the
left).
You can return used batteries/rechargeable batteries free of charge to any
collecting point in your local community, in our stores or in any other store
where batteries/rechargeable batteries are sold.
66

20. Technical data
Operating voltage: ........................ 11 - 18V=, stabilised
Current consumption: ................... Depends on charge current and battery
(5A adapter recommended)
Charge current: ............................. 0.1A - 5.0A adjustable
Battery types: ................................ NiCd, 1 - 14 cells
NiMH, 1 - 14 cells
LiPo, 1 - 5 cells
Pb, 1 - 6 cells (2V per cells, 2 - 12V
Output: ........................................... 4mm sockets
Balancer sockets (JST-XH) for 2, 3, 4 or 5 cells
Discharge current for balancer: ... 200mA per cell
Weight: .......................................... approx. 280g
Dimensions: .................................. Ca. 130 x 80 x 23mm
Ambient temperature: ................... 0°C to +35°C
Ambient air humidity: .................... Max. 90% relative, non-condensing
Special characteristics:
• Integrated balancer for LiPo batteries with 2, 3, 4 or 5 cells
• Delta-U cut-off
• Input voltage monitoring (for protection against total discharge)
• Capacity limit configurable (prevents the connected battery from overload)
• Charge duration configurable (prevents the connected battery from overload)
• Max. Output of the electronics 50W (select lower charge current depending on the number
of cells!)
67

Table des matières
1. Introduction ................................................................................................................. 69
2. Utilisation conforme .................................................................................................... 70
3. Contenu de la livraison ...............................................................................................70
4. Explication des symboles ...........................................................................................71
5. Consignes de sécurité ................................................................................................71
6. Indications afférentes aux accumulateurs .................................................................74
a) Généralités ...........................................................................................................74
b) Informations supplémentaires sur les accus LiPo ............................................. 76
7. Éléments de commande ............................................................................................. 78
8. Mise en service ........................................................................................................... 79
9. Menu principal ............................................................................................................. 80
10. Menu de réglage « USER SET » ............................................................................... 82
11. Programme de charge « LiPo CHARGE » ................................................................ 83
12. Programme de charge « LiPo BALANCE CHG » ..................................................... 85
13. Programme de charge « NiMH CHARGE » .............................................................. 89
14. Programme de charge « NiCd CHARGE » ............................................................... 91
15. Programme de charge « Pb CHARGE » ................................................................... 93
16. Messages d’avertissement à l’écran ......................................................................... 95
17. Maintenance et nettoyage ..........................................................................................96
18. Manipulation ................................................................................................................ 97
19. Élimination...................................................................................................................99
a) Généralités ...........................................................................................................99
b) Piles et accumulateurs ........................................................................................ 99
20. Caractéristiques techniques ..................................................................................... 100
Page
68

1. Introduction
Chère cliente, cher client,
En choisissant un produit Voltcraft ®, vous avez choisi un produit d’une qualité exceptionnelle,
ce dont nous vous remercions vivement.
Voltcraft® - Ce nom est en effet garant d'une qualité au dessus de la moyenne dans les
domaines de la mesure, de la recharge ainsi que des appareils de réseau, tous se distinguant
par leur compétence technique, leur fiabilité, leur longévité et une innovation permanente.
Que vous soyez des électroniciens amateurs chevronnés ou des utilisateurs professionnels,
vous trouverez dans les produits de la famille Voltcraft® des appareils vous mettant à
disposition la solution optimale pour les tâches les plus exigeantes. Et notre particularité: c’est
la technique éprouvée et la qualité fiable des produits Voltcraft® que nous sommes en mesure
de vous offrir à des prix imbattables du point de vue rapport qualité/prix. Ainsi, nous mettons
à votre disposition des produits aptes à satisfaire vos exigences les plus pointues.
Nous vous souhaitons beaucoup de plaisir avec votre nouvel appareil Voltcraft® !
Tous les noms de société et toutes les désignations de produit sont des marques
déposées de leurs propriétaires respectifs. Tous droits réservés.
69

2. Utilisation conforme
Le « Multichargeur B5 » sert à charger des accus de type NiCd + NiMH (1-14 éléments), LiPo
(1-5 éléments) ainsi que des accus au plomb (1-6 éléments, 2...12V). Le courant de charge
peut être réglé entre 0,1 A et 5,0 A en fonction de l’accu branché.
Le chargeur ne peut être utilisé que sur une tension continue de 11V= à 18V=.
Il est utilisé à l’aide d’un écran LCD rétroéclairé de deux lignes, et de quatre touches.
Un équilibreur est intégré au chargeur pour les accus LiPo. Vous trouverez à cet effet les
raccords d’équilibreur pour l'accu sur le côté du chargeur.
Le produit est uniquement prévu pour une utilisation dans des locaux secs à l’intérieur, il ne
doit pas être mouillé ou humide !
Toute utilisation autre que celle stipulée ci-dessus entraîne des dommages sur le produit et
par conséquent des risques de court-circuit, d'incendie, d'électrocution, etc.
Le produit dans son ensemble ne doit être ni transformé, ni modifié.
Tenez compte de toutes les consignes de sécurité et des informations du
présent mode d'emploi !
3. Contenu de la livraison
• Chargeur
• Câble électrique avec pinces crocodile pour branchement sur la tension de fonctionnement
• Jeu de câbles de raccordement
• Notice d'emploi
70

4. Explication des symboles
Le symbole du point d'exclamation dans un triangle signale les informations
importantes du présent mode d'emploi qu’il faut impérativement respecter.
Le symbole de la main renvoie à des astuces et conseils d'utilisation spécifiques.
5. Consignes de sécurité
Tout dommage résultant d'un non-respect du présent mode d'emploi
entraîne l'annulation de la garantie ! Nous déclinons toute responsabilité
pour les dommages consécutifs !
Nous déclinons toute responsabilité pour d'éventuels dommages
matériels ou corporels dus à un maniement incorrect ou à la non
observation des précautions d'emploi. Dans ces cas, tout droit à la
garantie est annulé.
Chère Cliente, cher Client, Les consignes de sécurité suivantes ne sont pas destinées à
préserver uniquement votre santé, mais aussi à préserver le bon fonctionnement de l´appareil.
Veuillez lire attentivement les points suivants :
• Pour des raisons de sécurité et d'homologation (CE), les transformations et
/ ou modifications du produit par vos soins sont interdites.
• Pour son alimentation électrique, le chargeur ne doit être utilisé que sur une
tension continue stabilisée de 11-18 V=.
• Le produit n'est conçu que pour fonctionner dans des locaux clos et secs. Il
faut impérativement veiller à ce que le produit ne soit pas mouillé et ne
prenne pas l'humidité. N'exposez jamais le produit à des températures trop
élevées (>35°C) ou trop basses (<0°C) ou à l'ensoleillement direct. Tenezle éloigné de la poussière et de la saleté. Il en va de même pour l’accu
branché.
• N’utilisez pas le chargeur à l’intérieur d’un véhicule.
• Ne déposez par ex. aucun récipient rempli de liquides tels que vases ou
plantes sur ou à côté du chargeur.
71

Cela détruirait le chargeur. Il y a en plus un risque élevé d’incendie.
Dans ce cas, débranchez le produit immédiatement de la tension de
fonctionnement puis retirez l’accu du chargeur.
Séchez et nettoyez complètement l’extérieur de l’accu. N'utilisez plus le
chargeur, amenez-le pour réparation chez un spécialiste.
• Ce produit n'est pas un jouet. Il ne doit pas être laissé à la portée des enfants.
Soyez particulièrement vigilant en leur présence ! Ils pourraient essayer
d’introduire des objets dans les ouvertures de l´appareil. L’appareil serait
détruit. Il y a en outre danger de mort par choc électrique !
Le produit doit être posé, utilisé ou rangé uniquement dans des endroits
inaccessibles aux enfants. Ils pourraient modifier les réglages ou courtcircuiter l’accu / pack d'accus au risque de provoquer une explosion. Danger
de mort !
• Ne laisser jamais le produit en marche sans surveillance. Malgré de nombreux
circuits de protection, des défaillances ou problèmes ne sont pas exclus
pendant la charge d’un accu.
• N'utilisez l'appareil que dans des régions climatiques modérées et non
tropicales. Veuillez respecter les conditions environnementales du chapitre
« Caractéristiques techniques ».
• Choisissez un emplacement stable, plan et suffisamment grand.
Ne mettez jamais le chargeur et l’accu sur des surfaces inflammables (par
ex. tapis). Utilisez toujours un support adapté, ininflammable et résistant à
la chaleur.
• Veillez à ce qu’il y ait une ventilation suffisante en cours de fonctionnement.
Ne couvrez jamais le chargeur et/ou l’accu branché. Laissez un intervalle
suffisant (au moins 20 cm) entre le chargeur, l’accu et d’autre objets.
• N'allumez jamais l'appareil immédiatement quand il vient d'être déplacé
d'une pièce froide dans une pièce chaude. La condensation produite peut
éventuellement provoquer des dysfonctionnements ou des dommages !
Laissez d’abord le chargeur (et le(s) accu(s)) passer à la température
ambiante avant de relier le chargeur à la tension d'alimentation et de le
mettre en marche. Ceci peut prendre plusieurs heures !
• Les travaux d'entretien, de réglage ou de réparation ne doivent être effectués
que par du personnel qualifié ou par un atelier spécialisé. Il n'y a à l'intérieur
de l'appareil aucun composant que vous puissiez régler ou entretenir.
72

• Dans les installations industrielles, il convient d'observer les consignes de
prévention des accidents relatives aux installations et moyens d'exploitation
électriques, édictées par les syndicats professionnels.
• Dans les écoles, les centres de formation, les ateliers de loisirs et de
réinsertion, la manipulation du produit doit être surveillée par un personnel
responsable, spécialement formé à cet effet.
• Ne laissez pas traîner le matériel d'emballage. Il pourrait devenir un jouet
dangereux pour les enfants.
• Ce produit doit être manipulé avec précaution – les coups, les chocs, ou une
chute, même d'une faible hauteur, peuvent l'endommager.
En cas de doute sur le branchement ou le fonctionnement correct de l'appareil
ou si vous aviez des questions auxquelles le mode d'emploi n'aurait pu
répondre, prenez contact avec notre service technique ou demandez l'avis
d'un autre spécialiste.
73

6. Informations relatives aux accus
Bien que le maniement d’accus soit aujourd’hui habituel au quotidien, il présente toutefois de
nombreux problèmes et dangers. Il faut impérativement respecter diverses prescriptions, en
particulier avec les accus LiPo/LiIon et leur contenu énergétique important (par rapport aux
accus conventionnels NiCd ou NiMH). Dans le cas contraire, il y a risque d’explosion et
d’incendie.
Pour cette raison, respectez impérativement les informations et consignes de sécurité
indiquées ci-dessous relatives au maniement d’accus.
a) Généralités
• Les accus ne conviennent pas aux enfants. Conservez-les hors de leur
portée. Il en est de même pour les chargeurs.
Accus et chargeurs ne sont pas des jouets !
• Ne laissez pas les accus à la portée de tous. Ils risqueraient d'être avalés par
un enfant ou un animal domestique. Dans ce cas, consultez immédiatement
un médecin !
• Faites attention à ne pas court-circuiter les accus, ne les ouvrez pas et ne les
jetez pas dans le feu. Il y a danger d´incendie et d´explosion !
• Des accus corrodés ou endommagés peuvent provoquer des brûlures en
cas de contact avec la peau ; mettez des gants de protection.
• N’essayez jamais de recharger des piles conventionnelles non rechargeables.
Il y a danger d´incendie et d´explosion !
Les piles non rechargeables ne sont prévues que pour être utilisées une
seule fois. Une fois vides, elles doivent être éliminées selon les prescriptions.
Ne rechargez que les accus prévus à cet effet.
• Les accus ne doivent pas être mouillés et ou prendre l'humidité.
• Veillez à brancher les accus sur votre modèle ou votre chargeur en respectant
la polarité (positive/+ et négative/-). En cas d’inversion de polarité, votre
modèle et l’accu sont tous deux endommagés. Il y a danger d´incendie et
d´explosion !
Le chargeur fourni dispose d’un circuit de protection contre l’inversion de
polarité. Dans certaines situations, une inversion de polarité peut entraîner
des dommages.
74

• En cas d’inutilisation prolongée (par ex. rangement), retirez l’accu
éventuellement branché du chargeur et débranchez ce dernier de la tension
d'alimentation.
• Ne chargez aucun accu encore chaud (par ex. en raison de courants de
charge élevés dans le modèle réduit). Laissez tout d’abord l’accu refroidir à
température ambiante avant de le recharger.
• Ne chargez jamais des accumulateurs endommagés, corrodés ou déformés.
Cela peut provoquer un incendie ou une explosion !
• N’utilisez jamais un pack d’accus composés d’éléments hétérogènes.
• Rechargez les accus environ tous les 3 mois. Dans le cas contraire,
l’autodécharge provoque une décharge dite complète, ce qui rend les accus
inutilisables.
• Retirez l’accu du chargeur lorsqu’il est complètement rechargé.
• N’endommagez jamais l’enveloppe de protection d’un accu. Il y a danger
d´incendie et d´explosion !
• Ne chargez jamais un accu directement dans le modèle réduit. Pour le
charger, retire-le d’abord du modèle réduit.
• Placez le chargeur et l’accu sur une surface ininflammable et résistante à la
chaleur (par ex. carrelage). Maintenez une distance suffisante avec les
objets inflammables. Laissez une distance suffisante entre le chargeur et
l’accu. Ne mettez jamais l’accu sur le chargeur.
• Comme le chargeur et l’accu branché s’échauffent pendant la charge, il est
nécessaire d’assurer une ventilation suffisante. Ne recouvrez jamais le
chargeur ni l'accu !
• Ne chargez jamais des accus sans surveillance.
• Si le câble de raccordement doit être raccourci (par ex. si l’accu est fourni
sans fiche de raccordement), raccourcissez chaque fil séparément pour
éviter les courts-circuits. Risque d'incendie et d'explosion!
75

b) Informations supplémentaires sur les accus LiPo
Les accus LiPo modernes (« LiPo » = lithium polymère) disposent non seulement d'une
capacité clairement plus élevée que les accus NiMH ou NiCd, mais ils sont aussi beaucoup
plus légers. C'est pourquoi ce type d'accu est très intéressant par exemple pour l'utilisation
dans le domaine de modélisme.
Les accus LiPo nécessitent toutefois une attention particulière lors du chargement mais aussi
de leur fonctionnement et de leur manipulation.
Nous souhaitons donc vous informer dans les sections suivantes sur les risques existants et
comment les éviter pour que l’accu Li-Po conserve sa capacité pendant longtemps.
Veuillez consulter en outre le chapitre 6. a).
• L’enveloppe extérieure d’un accu LiPo est très fragile. Elle n’est composée
que d’un film épais. Ne démontez et n’endommagez jamais l’accu. Ne le
laissez jamais tomber, n’y introduisez jamais aucun objet ! Évitez toute
charge mécanique de l’accu. Ne tirez jamais sur ses câbles de raccordement !
Il y a danger d´incendie et d´explosion !
Veillez y également quand l’accu est fixé dans le modèle (ou est retiré du
modèle).
• Veillez à ce que l’accu ne surchauffe pas en cours d’utilisation, de charge,
décharge, transport et conservation. Ne placez pas l’accu à proximité de
sources de chaleur (par ex. régulateur, moteur). Tenez-le éloigné du
rayonnement direct du soleil. Il y a danger d´incendie et d´explosion en cas
de surchauffe de l’accu ! L’accu ne doit jamais avoir une température
supérieure à 60°C (le cas échéant, respectez aussi les indications du
fabricant !).
• Si l’accu présente des dommages (par ex. après la chute d'un modèle réduit
d'avion ou d'hélicoptère) ou si l'enveloppe extérieure a boursouflé, n’utilisez
plus l’accu. Ne le chargez plus. Il y a danger d´incendie et d´explosion !
Prenez l’accu avec précaution, utilisez des gants de protection adéquats.
Mettez l’accu au rebut en respectant l’environnement.
• Pour charger un accu LiPo, utilisez un chargeur adéquat. N’utilisez pas de
chargeurs habituels pour accus NiCD, NiMH ou au plomb. Il y a danger
d´incendie et d´explosion !
76

• Si vous chargez un accu LiPo comportant plus d’un élément, utilisez
impérativement un équilibreur (par ex. déjà intégré dans le chargeur fourni
ici).
• Chargez les accus LiPo avec un courant de charge maximum de 1C. Cela
signifie que le courant de charge ne doit pas dépasser la valeur de la
capacité figurant sur l’accu (par ex. capacité de l’accu 1 000 mAh, courant
de charge maxi 1 000 mA = 1 A).
• Le courant de décharge ne doit pas dépasser la valeur figurant sur l’accu.
Si une valeur de « 20C » figure par exemple sur un accu LiPo, le courant de
décharge maximum correspond à 20 fois la capacité de l’accu (par ex.
capacité de l’accu de 1 000 mAh, courant de décharge maximum
20C = 20 x 1 000 mA = 20 A).
Dans le cas contraire, l’accu surchauffe ce qui peut provoquer une déformation
/ un gonflement de l’accu ou une explosion et un incendie !
La valeur apposée (par ex. « 20C ») ne repose en règle générale pas sur le
courant permanent mais uniquement sur le courant maximum que l’accu
peut fournir temporairement. Le courant permanent ne doit pas dépasser la
moitié de la valeur indiquée.
• Aucun élément de l’accu ne doit être déchargé en dessous de 3 V. Cela
entraîne la destruction de l’accu.
Si le modèle dispose d’une protection contre la décharge totale ou d’un
indicateur visuel de tension insuffisante de l’accu, régler le fonctionnement
du modèle à temps.
77

7. Éléments de commande
Multilader
1 Prise pour la tension d'alimentation (11-18V=, stabilisée)
2 Écran à cristaux liquides rétroéclairé
3 Raccords d'équilibreur pour accus LiPo à 2, 3, 4 et 5 éléments
4 Prise ronde 4 mm pour brancher l’accu
5 Touche « Batt Type/Stop » pour sélectionner le menu et poursuivre la charge
6 Touches « DEC » et « INC » pour saisir les valeurs et afficher celles de chaque élément
en cas de charge avec un équilibreur
7 Touche « Star/Enter » pour commencer/poursuivre la charge ou confirmer une fonction de
réglage ou d’utilisation
78

8. Mise en service
Le chargeur doit être utilisé avec une tension continue stabilisée (11-18V=).
N’utilisez jamais le chargeur sur une autre tension sous peine de le détruire.
Perte de garantie !
Un courant de charge jusqu’à 5 A est possible en fonction de l’accu branché.
L’alimentation électrique doit de ce fait être choisie suffisamment élevée.
Reliez le câble de raccordement fourni (2 pinces croco et une fiche ronde) à l’alimentation
électrique. Mettez la fiche ronde dans la prise correspondante du chargeur (cf. chapitre 7,
point 1).
Le chargeur émet un signal sonore court, l’écran LCD s’allume. Le chargeur se trouve alors
dans le menu principal.
Exemple :
NiMH CHARGENiMH CHARGE
NiMH CHARGE
NiMH CHARGENiMH CHARGE
CURRENT 2.0ACURRENT 2.0A
CURRENT 2.0A
CURRENT 2.0ACURRENT 2.0A
Avant de brancher et de charger un accu, il faut d’abord régler le type d’accu
correspondant et les valeurs souhaitées. Veuillez tenir compte du chapitre
suivant.
79

9. Menu principal
Les différentes fonctions du menu principal peuvent être choisies à l'aide de plusieurs
pressions rapides sur la touche « Batt Type/Stop ».
Confirmez la sélection à l'aide de la touche « Start/Enter ».
LiPo CHARGELiPo CHARGE
LiPo CHARGE
LiPo CHARGELiPo CHARGE
v
LiPo BALANCE CHGLiPo BALANCE CHG
LiPo BALANCE CHG
LiPo BALANCE CHGLiPo BALANCE CHG
v
NiMH CHARGENiMH CHARGE
NiMH CHARGE
NiMH CHARGENiMH CHARGE
USER SETUSER SET
USER SET
USER SETUSER SET
s
PROGRAM-> PROGRAM->
PROGRAM->
PROGRAM-> PROGRAM->
Pb CHARGEPb CHARGE
Pb CHARGE
Pb CHARGEPb CHARGE
NiCd CHARGENiCd CHARGE
NiCd CHARGE
NiCd CHARGENiCd CHARGE
u
u
t
Veuillez tenir compte des points suivants avant de brancher/charger un accu :
• Si ce n’est pas encore fait, lisez impérativement les chapitres 5 et 6 en
intégralité et avec attention.
• Savez-vous précisément quelles sont les caractéristiques de l’accu ? Ne
branchez/chargez pas les accus inconnus ou sans signalétique dont vous
ne connaissez pas les valeurs !
• Avez-vous choisi le bon programme de charge conforme à l’accu ? Les
mauvais réglages endommagent le chargeur et l’accu. Il y a en outre danger
d’incendie et d’explosion !
• Avez-vous réglé le courant de charge adapté ?
• Avez-vous réglé la bonne tension (par ex. en cas d’accus LiPo à plusieurs
éléments) ? Un accu LiPo à 2 éléments peut éventuellement être branché en
parallèle (3,7 V) ou en série (7,4 V).
80

• Tous les câbles de connexion et raccords sont-ils impeccables. Les fiches
tiennent-elles biens dans les prises ? Les fiches lâches et les câbles
endommagés doivent être remplacés.
• Quand vous branchez un accu au chargeur, reliez toujours le câble de
charge au chargeur en premier puis l’accu au chargeur / câble de charge.
Pour débrancher, procédez dans l'ordre inverse. Dans le cas contraire, il y
a risque de court-circuit (par ex. à cause des deux fiches rondes de 4 mm du
câble de charge).
• Chargez toujours un seul pack d’accus.
• Si vous voulez charger des packs d’accus que vous avez faits vous-même,
les éléments doivent avoir la même conception (même type, même capacité,
même fabricant). Les éléments doivent en outre avoir le même état de
charge (les accus LiPo peuvent être équilibrés en conséquence avec
l'équilibreur ce qui n'est pas le cas d'autres packs d'accus tels que NiMH ou
NiCd).
Utilisation des menus :
• Dans le menu principal, choisissez comme décrit le sous-menu souhaité à l’aide de la
touche « Batt Type/Stop » et confirmez la sélection avec la touche « Start/Enter ».
• Les touches « INC » et « DEC » permettent d’accéder à différents réglages.
• Pour modifier une valeur, appuyez sur la touche « Start/Enter ». L’écran clignote.
• Modifiez la valeur affichée à l’écran avec la touche « INC » ou « DEC ».
• Sauvegardez la valeur (modifiée) à l'aide de la touche « Start/Enter ».
• Quittez le menu de réglage avec la touche « Batt Type/Stop ». Vous retournez au menu
principal.
81

10. Menu de réglage « USER SET »
USER SETUSER SET
USER SET
USER SETUSER SET
t
PROGRAM-> PROGRAM->
PROGRAM->
PROGRAM-> PROGRAM->
DEC
TEMP CUT OFFTEMP CUT OFF
TEMP CUT OFF
TEMP CUT OFFTEMP CUT OFF
s
ON 50CON 50C
ON 50C
ON 50CON 50C
INC
v
SAFETY TIMERSAFETY TIMER
SAFETY TIMER
SAFETY TIMERSAFETY TIMER
ON 180minON 180min
ON 180min
ON 180minON 180min
INC
CAPACITY CUT OFFCAPACITY CUT OFF
CAPACITY CUT OFF
CAPACITY CUT OFFCAPACITY CUT OFF
ON 5000mAhON 5000mAh
ON 5000mAh
ON 5000mAhON 5000mAh
INC
KEY BEEP ONKEY BEEP ON
KEY BEEP ON
KEY BEEP ONKEY BEEP ON
BUZZER ONBUZZER ON
BUZZER ON
BUZZER ONBUZZER ON
INC
INPUT POWER LOWINPUT POWER LOW
INPUT POWER LOW
INPUT POWER LOWINPUT POWER LOW
CUT-OFF 10.0VCUT-OFF 10.0V
CUT-OFF 10.0V
CUT-OFF 10.0VCUT-OFF 10.0V
INC
s
Batt Type/Stop
INC
BACK-LIGHTBACK-LIGHT
BACK-LIGHT
BACK-LIGHTBACK-LIGHT
100% 100%
100%
100% 100%
Start/Enter
v
vu
vu
vu
vu
vu
DEC
DEC
DEC
DEC
DEC
Dans le menu principal, choisissez l’option «
USER SET » à l’aide de la touche « Batt Type/
Stop ». Confirmez avec la touche « Star/Enter ».
Sans fonction avec cette version du chargeur.
La minuterie de sécurité démarre automatiquement pendant la charge. Elle protège l’accu d’une
surcharge (ou si la déconnexion delta U ne trouve
pas de pic). Ne réglez pas une durée plus courte
que ce que la charge dure probablement !
Réglez ici la capacité maximale chargeable dans
l’accu. Cela protège également contre la
surcharge (ou si la déconnexion delta U devait
ne pas fonctionner).
Avec « KEY BEEP », le signal de confirmation
peut être activé/désactivée en appuyant sur une
touche. Avec « BUZZER », le signal d’alarme en
cas d’erreur ou de modifications de la charge
peut être activé/désactivé.
Cette fonction surveille la tension à l’entrée du
chargeur (par ex. un accu de 12 V). Si la tension
baisse en dessous de la valeur réglée, la charge
est interrompue.
Réglez ici la luminosité du rétroéclairage.
82

11. Programme de charge « LiPo CHARGE »
Ce programme de charge ne convient que pour les accus LiPo ayant une
tension de 3,7 V par élément et ne disposant pas d’un raccord d'équilibreur.
N’essayez jamais de charger un autre accu avec ce programme de charge.
Si votre accu LiPo a un raccord d'équilibreur, le programme de charge
« LiPo BALANCE CHG » doit être utilisé, voir chapitre 12.
Ce n’est qu’ainsi que tous les éléments auront la même tension après la
charge et qu’il n’y aura pas de surcharge dans l’un des éléments. Pour
finir, ce n’est pas négatif que pour la durée de vie d’un accu LiPo ; il y a
aussi le risque de détruire l’accu et de provoquer un incendie et une
explosion !
Le courant de charge à régler dépend de la capacité de l’accu et doit habituellement être de
1C. Respectez à cet effet les indications du fabricant de l’accu.
L’indication « 1C » signifie que le courant de charge correspond à la valeur de la capacité de
l’accu. Pour un accu LiPo de 1 800 mAh, il faut régler un courant de charge de 1,8 A.
Pour charger un accu LiPo, procédez de la manière suivante :
• Après avoir choisi le programme de charge « LiPo CHARGE » dans le menu principal et
l’avoir ouvert avec la touche « Start/Enter », l’affichage suivant apparaît par ex. à l’écran :
LiPo CHARGELiPo CHARGE
LiPo CHARGE
LiPo CHARGELiPo CHARGE
2.0A 11.1V(3S)2.0A 11.1V(3S)
2.0A 11.1V(3S)
2.0A 11.1V(3S)2.0A 11.1V(3S)
La valeur à gauche de la deuxième ligne indique le courant de charge, la valeur à droite la
tension ou le nombre d’éléments de l’accu LiPo (ici à l’exemple un pack d’accus de 3
éléments 3 x 3,7 V = 11,1 V).
• Si les valeurs doivent être modifiées, appuyez sur la touche « Start/Enter ». Le courant de
charge clignote. Modifiez le courant de charge avec les touches « INC » et « DEC ».
Confirmez la valeur avec la touche « Start/Enter ».
La tension clignote ensuite. Modifiez-la avec les touches « INC » et « DEC ». Il convient de
veiller à ce que la tension ne soit modifiée qu’à l’aide du nombre d’éléments (par ex. un
élément = 3,7 V, deux éléments = 7,4 V, etc.) Confirmez le réglage à l'aide de la touche
« Start/Enter ».
• Pour commencer la charge, maintenez la touche « Start/Enter » appuyée longtemps.
83

• Si les réglages sont faux ou si le chargeur constate une erreur, le signal d’alarme est émis
et une information correspondante est affichée à l’écran (voir chapitre 16).
Vous arrêtez le signal d’alarme à l’aide de la touche « Batt Type/Stop ». Vous retournez alors
au menu de réglage précédent.
Dans le cas contraire, l’écran suivant apparaît :
S:3SER R:3SER S:3SER R:3SER
S:3SER R:3SER
S:3SER R:3SER S:3SER R:3SER
CONFIRM (ENTER)CONFIRM (ENTER)
CONFIRM (ENTER)
CONFIRM (ENTER)CONFIRM (ENTER)
La valeur à côté de « S » indique le nombre d’éléments que vous avez réglés dans le menu.
La valeur à côté de « R » indique le nombre d’éléments que le chargeur a identifié.
Si les deux valeurs ne correspondent pas, contrôlez à la fois les réglages du chargeur et
l'accu. L’accu LiPo a éventuellement subi une décharge profonde ou un élément est
défectueux. Vous ne devez pas charger de tels accus. Il y a dans le cas contraire danger
d’incendie et d’explosion !
La touche « Batt Type/Stop » vous permet de retourner au menu de réglage précédent.
• Si les deux valeurs correspondent, commencez la charge en appuyant rapidement sur la
touche « Start/Enter ».
Après le début de la charge, diverses informations sur l’étape de charge en cours
apparaissent à l’écran.
Exemple :
Nombre d´éléments Courant de charge Tension d'accumulateur
Li3S 1.2A 12.59VLi3S 1.2A 12.59V
Li3S 1.2A 12.59V
Li3S 1.2A 12.59VLi3S 1.2A 12.59V
CHG 022:43 00682CHG 022:43 00682
CHG 022:43 00682
CHG 022:43 00682CHG 022:43 00682
Durée de charge actuelle Capacité chargée en mAh
• Quand la charge est terminée, un signal sonore est émis.
Si vous voulez arrêter la charge avant, appuyez sur la touche « Batt Type/
Stop ».
84

12. Programme de charge « LiPo BALANCE CHG »
Ce programme de charge ne convient que pour les accus LiPo ayant une
tension de 3,7 V par élément et disposant d’un raccord d'équilibreur. N’essayez
jamais de charger un autre accu avec ce programme de charge.
Le courant de charge à régler dépend de la capacité de l’accu et doit habituellement être de
1C. Respectez à cet effet les indications du fabricant de l’accu.
L’indication « 1C » signifie que le courant de charge correspond à la valeur de la capacité de
l’accu. Pour un accu LiPo de 1 800 mAh, il faut régler un courant de charge de 1,8 A.
Contrairement au programme de charge simple « LiPo CHARGE », la tension de chaque
élément est ici surveillée et le courant de charge réglé en conséquence.
Seul un accu LiPo avec une tension strictement identique par élément donne
une puissance et une durée de fonctionnement maximale pour un avion ou
véhicule en modèle réduit.
En raison des variations dans la qualité du matériau et la structure interne
d’accus LiPo à plusieurs cellules, il arrive que les éléments présentent une
tension différente en fin de décharge.
Si l’on charge un tel accu LiPo sans équilibreur, de grandes différences de
tension entre les éléments surviennent très rapidement. Ceci entraîne non
seulement une durée de fonctionnement plus courte (parce qu’un élément
subit une chute en tension) mais aussi un endommagement de l’accu en raison
d’une décharge profonde.
Il y a en outre un risque de surcharge lors de la charge d'éléments différents
(présentant une tension différente) sans équilibreur. La tension maximale
admise d’un élément LiPo de 4,2 V environ (+/- 1%) est dépassée !
Exemple :
De l’extérieur, un pack d’accus LiPo à 2 éléments, chargé sans équilibreur, a
une tension de 8,4 V et semble ainsi complètement chargé. Les éléments ont
néanmoins une tension de 4,5 V et 3,9 V (un élément est dangereusement
surchargé, l’autre est à moitié vide).
Un élément ainsi surchargé peut corroder ou dans le cas le plus grave
prendre feu et exploser !
Si votre pack d’accus LiPo dispose d’un raccord d'équilibreur, il faut toujours
utiliser le programme de charge « LiPo BALANCE CHG ».
85

Notez que pendant le programme de charge « LiPo BALANCE CHG », le
Pour charger un accu LiPo, procédez de la manière suivante :
• Après avoir choisi le programme de charge « LiPo BALANCE CHG » dans le menu principal
et l’avoir ouvert avec la touche « Start/Enter », l’affichage suivant apparaît par ex. à l’écran :
La valeur à gauche de la deuxième ligne indique le courant de charge, la valeur à droite la
tension ou le nombre d’éléments de l’accu LiPo (ici à l’exemple un pack d’accus de 3
éléments 3 x 3,7 V = 11,1 V).
• Si les valeurs doivent être modifiées, appuyez sur la touche « Start/Enter ». Le courant de
charge clignote. Modifiez le courant de charge avec les touches « INC » et « DEC ».
Confirmez la valeur avec la touche « Start/Enter ».
La tension clignote ensuite. Modifiez-la avec les touches « INC » et « DEC ». Il convient de
veiller à ce que la tension ne soit modifiée qu’à l’aide du nombre d’éléments (par ex. un
élément = 3,7 V, deux éléments = 7,4 V, etc.) Confirmez le réglage à l'aide de la touche
« Start/Enter ».
• Pour commencer la charge, maintenez la touche « Start/Enter » appuyée longtemps.
raccord d’équilibreur de l’accu et le câble de raccordement de l’accu doivent
tous deux être branchés au chargeur.
Choisissez le bon raccord d’équilibreur en fonction du nombre d’éléments.
Il existe différentes sortes de raccord d’équilibreur. Ne forcez pas si la fiche ne
va pas ! Vous trouverez un adaptateur pour la fiche d’équilibreur dans les
accessoires.
LiPo BALANCE CHGLiPo BALANCE CHG
LiPo BALANCE CHG
LiPo BALANCE CHGLiPo BALANCE CHG
2.0A 11.1V(3S)2.0A 11.1V(3S)
2.0A 11.1V(3S)
2.0A 11.1V(3S)2.0A 11.1V(3S)
86

• Si les réglages sont faux ou si le chargeur constate une erreur, le signal d’alarme est émis
et une information correspondante est affichée à l’écran (voir chapitre 16).
Vous arrêtez le signal d’alarme à l’aide de la touche « Batt Type/Stop ». Vous retournez alors
au menu de réglage précédent.
Dans le cas contraire, l’écran suivant apparaît :
S:3SER R:3SER S:3SER R:3SER
S:3SER R:3SER
S:3SER R:3SER S:3SER R:3SER
CONFIRM (ENTER)CONFIRM (ENTER)
CONFIRM (ENTER)
CONFIRM (ENTER)CONFIRM (ENTER)
La valeur à côté de « S » indique le nombre d’éléments que vous avez réglés dans le menu.
La valeur à côté de « R » indique le nombre d’éléments que le chargeur a identifié.
Si les deux valeurs ne correspondent pas, contrôlez à la fois les réglages du
chargeur et l'accu. L’accu LiPo a éventuellement subi une décharge profonde
ou un élément est défectueux. Vous ne devez pas charger de tels accus. Il y
a dans le cas contraire danger d’incendie et d’explosion !
La touche « Batt Type/Stop » vous permet de retourner au menu de réglage
précédent.
• Si les deux valeurs correspondent, commencez la charge en appuyant rapidement sur la
touche « Start/Enter ».
Après le début de la charge, diverses informations sur l’étape de charge en cours
apparaissent à l’écran.
Exemple :
Nombre d´éléments Courant de charge Tension d'accumulateur
Li3S 1.2A 12.59VLi3S 1.2A 12.59V
Li3S 1.2A 12.59V
Li3S 1.2A 12.59VLi3S 1.2A 12.59V
CHG 022:43 00682CHG 022:43 00682
CHG 022:43 00682
CHG 022:43 00682CHG 022:43 00682
Durée de charge actuelle Capacité chargée en mAh
• Pendant la charge, l’affichage peut être changé à l’aide des touches « INC » ou « DEC » si
vous souhaitez voir la tension de chaque élément. Voir illustration ci-après.
87

Tension élément 1 Tension élément 2 Tension élément 3
4.17 4.20V 4.19V4.17 4.20V 4.19V
4.17 4.20V 4.19V
4.17 4.20V 4.19V4.17 4.20V 4.19V
0.4A 0.00V 0.00V0.4A 0.00V 0.00V
0.4A 0.00V 0.00V
0.4A 0.00V 0.00V0.4A 0.00V 0.00V
Courant de charge Tension élément 4 Tension élément 5
• Quand la charge est terminée, un signal sonore est émis.
Si vous voulez arrêter la charge avant, appuyez sur la touche « Batt Type/
Stop ».
88

13. Programme de charge « NiMH CHARGE »
Ce programme de charge ne convient que pour les accus NiMH ayant une
tension de 1,2 V par élément. N’essayez jamais de charger un autre accu avec
ce programme de charge.
Le courant de charge à régler dépend de la capacité de l’accu et doit habituellement être de
1C. Respectez à cet effet les indications du fabricant de l’accu.
L’indication « 1C » signifie que le courant de charge correspond à la valeur de la capacité de
l’accu. Pour un accu NiMH de 3 000 mAh, il faut régler un courant de charge de 3,0 A.
Selon le type d’accu et le modèle, un courant de charge de 1C n’est pas
Pour charger un accu NiMH, procédez de la manière suivante :
• Après avoir choisi le programme de charge « NiMH CHARGE » dans le menu principal et
l’avoir ouvert avec la touche « Start/Enter », l’affichage suivant apparaît par ex. à l’écran :
La valeur à droite de la deuxième ligne indique le courant de charge.
• Si le courant de charge doit être modifié, appuyez sur la touche « Start/Enter ». Le courant
de charge clignote. Modifiez le courant de charge avec les touches « INC » et « DEC ».
Confirmez la valeur avec la touche « Start/Enter ». Le nombre d’éléments est déterminé
automatiquement !
• Pour commencer la charge, maintenez la touche « Start/Enter » appuyée longtemps.
• Si les réglages sont faux ou si le chargeur constate une erreur, le signal d’alarme est émis
et une information correspondante est affichée à l’écran (voir chapitre 16).
Vous arrêtez le signal d’alarme à l’aide de la touche « Batt Type/Stop ». Vous retournez alors
au menu de réglage précédent.
possible. Par exemple, les accus du récepteur sont en général composés de
piles Mignon/AA qui ne supportent pas un courant de charge aussi élevé sans
dommages.
D’une manière générale : plus l’accu (et donc chaque élément) est petit, plus
le courant de charge maximum est faible. De nombreuses piles NiMH Mignon/
AA d’une capacité de 2 000 mAh environ permettent par exemple un courant
de charge de 400-500 mA pour un chargement rapide.
NiMH CHARGENiMH CHARGE
NiMH CHARGE
NiMH CHARGENiMH CHARGE
CURRENT 2.0ACURRENT 2.0A
CURRENT 2.0A
CURRENT 2.0ACURRENT 2.0A
89

Dans le cas contraire, l’écran suivant apparaît :
Type d'accumulateur Courant de charge Tension d'accumulateur
NiCd 2.0A 7.42VNiCd 2.0A 7.42V
NiCd 2.0A 7.42V
NiCd 2.0A 7.42VNiCd 2.0A 7.42V
CHG 043:20 01253CHG 043:20 01253
CHG 043:20 01253
CHG 043:20 01253CHG 043:20 01253
Durée de charge actuelle Capacité chargée en mAh
• Quand la charge est terminée, un signal sonore est émis.
Si vous voulez arrêter la charge avant, appuyez sur la touche « Batt Type/
Stop ».
90

14. Programme de charge « NiCd CHARGE »
Ce programme de charge ne convient que pour les accus NiCd ayant une
tension de 1,2 V par élément. N’essayez jamais de charger un autre accu avec
ce programme de charge.
Le courant de charge à régler dépend de la capacité de l’accu et doit habituellement être de
1C. Respectez à cet effet les indications du fabricant de l’accu.
L’indication « 1C » signifie que le courant de charge correspond à la valeur de la capacité de
l’accu. Pour un accu NiCd de 2 000 mAh, il faut régler un courant de charge de 2,0A.
Selon le type d’accu et le modèle, un courant de charge de 1C n’est pas
Pour charger un accu NiCd, procédez de la manière suivante :
• Après avoir choisi le programme de charge « NiCd CHARGE » dans le menu principal et
l’avoir ouvert avec la touche « Start/Enter », l’affichage suivant apparaît par ex. à l’écran :
La valeur à droite de la deuxième ligne indique le courant de charge.
• Si le courant de charge doit être modifié, appuyez sur la touche « Start/Enter ». Le courant
de charge clignote. Modifiez le courant de charge avec les touches « INC » et « DEC ».
Confirmez la valeur avec la touche « Start/Enter ». Le nombre d’éléments est déterminé
automatiquement !
• Pour commencer la charge, maintenez la touche « Start/Enter » appuyée longtemps.
• Si les réglages sont faux ou si le chargeur constate une erreur, le signal d’alarme est émis
et une information correspondante est affichée à l’écran (voir chapitre 16).
Vous arrêtez le signal d’alarme à l’aide de la touche « Batt Type/Stop ». Vous retournez alors
au menu de réglage précédent.
possible. Par exemple, les accus du récepteur sont en général composés de
piles Mignon/AA qui ne supportent pas un courant de charge aussi élevé sans
dommages.
D’une manière générale : plus l’accu (et donc chaque élément) est petit, plus
le courant de charge maximum est faible. De nombreuses piles NiCd Mignon/
AA d’une capacité de 1 000 mAh environ permettent par exemple un courant
de charge de 200-250mA pour un chargement rapide.
NiCd CHARGENiCd CHARGE
NiCd CHARGE
NiCd CHARGENiCd CHARGE
CURRENT 1.6ACURRENT 1.6A
CURRENT 1.6A
CURRENT 1.6ACURRENT 1.6A
91

Dans le cas contraire, l’écran suivant apparaît :
Type d'accumulateur Courant de charge Tension d'accumulateur
NiCd 2.0A 7.42VNiCd 2.0A 7.42V
NiCd 2.0A 7.42V
NiCd 2.0A 7.42VNiCd 2.0A 7.42V
CHG 043:20 01253CHG 043:20 01253
CHG 043:20 01253
CHG 043:20 01253CHG 043:20 01253
Durée de charge actuelle Capacité chargée en mAh
• Quand la charge est terminée, un signal sonore est émis.
Si vous voulez arrêter la charge avant, appuyez sur la touche « Batt Type/
Stop ».
92

15. Programme de charge « Pb CHARGE »
Ce programme de charge ne convient que pour les accus au plomb ayant une
tension de 2 V par élément. N’essayez jamais de charger un autre accu avec
ce programme de charge.
Les accus au plomb diffèrent complètement des accus NiMH ou NiCd. Par rapport à leur
capacité élevée, ils ne peuvent fournir que des courants faibles. Leur charge est en outre
différente.
Le courant de charge d’accus au plomb doit être au maximum de 1/10 (1/10 C) de la capacité
de l’accu.
Pour un accu au plomb de 5 000 mAh, un courant de charge maximum de 0,5A (500 mA) peut
être réglé.
Un chargement rapide d’accus au plomb n’est pas permis. L’accu serait
surchargé – Risque d’explosion et d’incendie !
Respectez impérativement les informations apposées sur l’accu ou les
caractéristiques du fabricant de l’accu indiquant quel courant de charge est
admis.
Pour charger un accu au plomb, procédez de la manière suivante :
• Après avoir choisi le programme de charge « PB CHARGE » dans le menu principal et l’avoir
ouvert avec la touche « Start/Enter », l’affichage suivant apparaît par ex. à l’écran :
Pb CHARGEPb CHARGE
Pb CHARGE
Pb CHARGEPb CHARGE
1.0A 12.0V1.0A 12.0V
1.0A 12.0V
1.0A 12.0V1.0A 12.0V
La valeur à gauche de la deuxième ligne indique le courant de charge, la valeur à droite la
tension nominale de l’accu.
• Si les valeurs doivent être modifiées, appuyez sur la touche « Start/Enter ». Le courant de
charge clignote. Modifiez le courant de charge avec les touches « INC » et « DEC ».
Confirmez la valeur avec la touche « Start/Enter ».
La tension clignote ensuite. Modifiez-la avec les touches « INC » et « DEC ». Il convient de
veiller à ce que la tension ne soit modifiée qu’à l’aide du nombre d’éléments (par ex. un
élément = 2V, deux éléments = 4V, etc.) Confirmez le réglage à l'aide de la touche « Start/
Enter ».
93

• Pour commencer la charge, maintenez la touche « Start/Enter » appuyée longtemps.
• Si les réglages sont faux ou si le chargeur constate une erreur, le signal d’alarme est émis
et une information correspondante est affichée à l’écran (voir chapitre 16).
Vous arrêtez le signal d’alarme à l’aide de la touche « Batt Type/Stop ». Vous retournez alors
au menu de réglage précédent.
Dans le cas contraire, l’écran suivant apparaît (voir page suivante) :
Type d'accumulateur Courant de charge Tension d'accumulateur
Pb6s 2.0A 12.59VPb6s 2.0A 12.59V
Pb6s 2.0A 12.59V
Pb6s 2.0A 12.59VPb6s 2.0A 12.59V
CHG 043:20 01253CHG 043:20 01253
CHG 043:20 01253
CHG 043:20 01253CHG 043:20 01253
Durée de charge actuelle Capacité chargée en mAh
• Quand la charge est terminée, un signal sonore est émis.
Si vous voulez arrêter la charge avant, appuyez sur la touche « Batt Type/
Stop ».
94

16. Messages d’avertissement à l’écran
REVERSEDREVERSED
REVERSED
REVERSEDREVERSED
POLARITYPOLARITY
POLARITY
POLARITYPOLARITY
CONNECTIONCONNECTION
CONNECTION
CONNECTIONCONNECTION
BREAKBREAK
BREAK
BREAKBREAK
SHORT ERRSHORT ERR
SHORT ERR
SHORT ERRSHORT ERR
La polarité des raccords de l’accu est inversée.
Le branchement à l’accu est coupé, par ex. si
l’accu a été retiré pendant la charge.
Un court-circuit a été constaté en sortie de
chargeur.
IN VOLTAGEIN VOLTAGE
IN VOLTAGE
IN VOLTAGEIN VOLTAGE
ERRERR
ERR
ERRERR
VOL SELECTVOL SELECT
VOL SELECT
VOL SELECTVOL SELECT
ERRERR
ERR
ERRERR
BREAKDOWNBREAKDOWN
BREAKDOWN
BREAKDOWNBREAKDOWN
BATTERY CHECKBATTERY CHECK
BATTERY CHECK
BATTERY CHECKBATTERY CHECK
LOW VOLTAGELOW VOLTAGE
LOW VOLTAGE
LOW VOLTAGELOW VOLTAGE
BATTERY CHECKBATTERY CHECK
BATTERY CHECK
BATTERY CHECKBATTERY CHECK
OVER VOLTAGEOVER VOLTAGE
OVER VOLTAGE
OVER VOLTAGEOVER VOLTAGE
BATTERY VOL ERRBATTERY VOL ERR
BATTERY VOL ERR
BATTERY VOL ERRBATTERY VOL ERR
BATTERY VOL ERRBATTERY VOL ERR
BATTERY VOL ERR
BATTERY VOL ERRBATTERY VOL ERR
CELL LOW VOLCELL LOW VOL
CELL LOW VOL
CELL LOW VOLCELL LOW VOL
La tension d’entrée (tension de fonctionnement)
du chargeur est trop faible.
La tension d’un accu LiPo à charger a été mal
réglée.
Le chargeur a constaté un problème. Si ceci est
affiché en permanence, le chargeur est
éventuellement défectueux. Faites-le contrôler par
un atelier spécialisé ou un professionnel.
Il a été constaté en cours de charge que l’accu a
subi une décharge profonde.
Il faut contrôler ici si la tension de l’accu a été
réglée correctement pour la charge.
La tension dans un élément d’un accu LiPo est
trop élevée/faible. Ceci peut survenir si un accu
LiPo à plusieurs éléments a été préalablement
chargé sans équilibreur.
95

17. Maintenance et nettoyage
Le produit ne nécessite aucun entretien de votre part, par conséquent, ne le démontez jamais.
Ne laissez qu'un atelier spécialisé effectuer d'éventuelles réparations, sinon il y a risque
d'endommagement du produit, de plus la conformité (CE) et la garantie seront annulés.
Nettoyer le produit uniquement avec un chiffon doux, propre, sec et non pelucheux ; ne pas
utiliser de nettoyants susceptibles d´attaquer le boîtier et l’inscription.
La poussière peut être facilement enlevée à l’aide d’un pinceau doux et propre ou d’un
aspirateur.
96

18. Manipulation
• Tenez compte de toutes les consignes de sécurité du présent mode d'emploi !
Elles vous donnent des informations importantes sur les dangers pouvant
survenir lors de la manipulation de chargeurs et d’accus.
• Ce produit n'est pas un jouet, tenez-le hors de portée des enfants. Les
enfants ne sont pas en mesure d'évaluer les risques résultant de la
manipulation de chargeurs ou d’accus.
• Évitez les conditions défavorables mentionnées ci-dessous au niveau de
l’emplacement de l’installation, du fonctionnement ou du transport:
- présence de liquides ou humidité de l'air trop élevée
- des températures extrêmes ; froid (<0°C) ou chaleur (>+35°C), l'exposition
directe aux rayons du soleil,
- la poussière ou des gaz, vapeurs ou solvants inflammables,
- de fortes vibrations, des coups, des chocs
- les champs magnétiques intenses à proximité de machines ou de haut-
parleurs par ex.
• Placez le chargeur sur une surface plane et solide. Celle-ci doit être
suffisamment grande pour l’accu / pack d’accus branché puisse être posé à
côté. Laissez un intervalle minimum de 20 cm entre le chargeur et l’accu
(ainsi que l’alimentation) afin d’éviter un échauffement mutuel.
L'accu / pack d'accus ne doit pas être placé sur ou sous le chargeur !
• Lors de l’installation et du fonctionnement, veillez à ce que le câble ne soit
ni coudé ni écrasé.
• Ne couvrez jamais le chargeur. En cas d’accumulation de chaleur, non
seulement le chargeur est détruit mais il y a en outre un risque d'explosion !
• Des marques ou décolorations peuvent survenir sur les surfaces fragiles à
cause des pieds de l’appareil mais aussi de la température. Il en est de même
pour l’accu.
Comme déjà décrits dans les consignes de sécurité, il faut utiliser une base
adéquate ininflammable et résistante à la chaleur pour le chargeur et l’accu
à charger. Ne placez pas le chargeur et l’accu sur des surfaces de meuble
de valeur !
• Maintenez une distance suffisante avec les surfaces ou objets inflammables.
• N'utilisez pas le chargeur sans surveillance.
97

Bien que le chargeur dispose de nombreux dispositifs de sécurité, il n'est
jamais complètement exclu qu'un échauffement excessif de l'accu ou du
chargeur survienne. L’utilisation de câbles de charge trop minces ou des
problèmes de contact conduisent à des états de fonctionnement dangereux !
• Vérifiez de temps en temps la température de l’accu en cours de charge.
Les accus NiMH et NiCd s’échauffent fortement en cas de courants de
charges élevés (1C). Ces températures peuvent atteindre 50°C et plus. De
ce fait, prenez l’accu avec précaution. Un échauffement trop élevé de l'accu
peut l’endommager. Réduisez alors le courant de charge.
En règle générale, les accus LiPo doivent être juste tièdes en cours de
charge (courant de charge max. 1C). Un échauffement plus important
signifie que l’accu ou un élément du pack d’accus est défectueux.
• Les accus LiPo comportant plus d’un élément (tension d’accu supérieure à
3,7 V) doivent être chargés par un processus de charge avec équilibreur.
Utilisez le programme de charge « LiPo BALANCE CHG ».
Si la fiche de votre équilibreur ne convient par pour le raccord du chargeur,
il faut utiliser un adaptateur adéquat.
98

19. Élimination
a) Généralités
Il convient de procéder à l’élimination du produit au terme de sa durée de vie
conformément aux prescriptions légales en vigueur.
b) Piles et accumulateurs
Le consommateur est tenu de par la loi (loi sur la récupération et l’élimination
des piles) de restituer les piles et accus usagés ; il est interdit de les jeter dans
la poubelle ordinaire !
Les piles et accumulateurs qui contiennent des substances toxiques sont
Vous répondez ainsi aux exigences légales et contribuez à la protection de l'environnement.
caractérisés par les symboles ci-contre qui indiquent l´interdiction de les jeter
dans les ordures ménagères. Les désignations pour le métal lourd prépondérant
sont : Cd=cadmium, Hg=mercure, Pb=plomb (vous trouverez la désignation
sur la pile ou l'accu, par ex. au-dessous des symboles de poubelles figurant à
gauche).
Vous pouvez rapporter gratuitement vos piles et accumulateurs usagés aux
centres de récupération de votre commune, à nos succursales ou à tous les
points de vente de piles et d’accumulateurs !
99

20. Caractéristiques techniques
Tension de service : ..................... 11 - 18V=, stabilisée
Consommation de courant : ......... dépend du courant de charge de l’accu
(bloc d'alimentation 5A recommandé)
Courant de charge : ...................... réglable de 0,1 A à 5,0 A
Types d'accu : ............................... NiCd, 1 - 14 éléments
NiMH, 1 - 14 éléments
LiPo, 1 - 5 éléments
Pb, 1 - 6 éléments (2 V par élément, 2 - 12V)
Sortie : ........................................... prise 4 mm
Raccords équilibreur (JST-XH) pour 2, 3, 4 ou 5 éléments
Courant de décharge
pour équilibreur : ........................... 200mA par élément
Poids : ........................................... env. 280g
Dimensions : ................................. env. 130 x 80 x 23mm
Température environnante : ......... de 0°C à +35°C
Humidité environnante : ............... relative 90% maximum, non condensée
Particularités :
• Équilibreur intégré pour accu LiPo avec 2, 3, 4 ou 5 éléments
• Déconnexion Delta U
• Surveillance de la décharge (pour protéger contre la décharge profonde)
• Limite de capacité réglable (protège contre la surcharge de l’accu branché)
• Durée de charge réglable (protège contre la surcharge de l’accu branché)
• Puissance max. de l’électronique 50 W (choisir un courant de charge plus faible en fonction
du nombre d’éléments !)
100
 Loading...