

Vollrath 97326 Owner’s Manual

Knocked Down Stainless Steel Utility Cart
CAUTION: Handle cart parts carefully to prevent injury. Although edges and corners have been deburred, they should still be considered sharp.
Open the package and remove the contents. The Knocked Down Stainless Steel Utility Cart kit contains the following parts:
E (4) Flathead
style handle bolts
A (16) Self-locking
nuts
B (16) Washers
F (4) Nuts with
lockwashers
C (20) Allen style
leg/shelf bolts
H (1) Allen wrench
G (1) Hex wrench
D (12) Plastic nut
caps
Assembly Instructions
ITEM
CAPACITY
LBS. (kG)
CASTER SIZE
IN (CM)
MAXIMUM DIMENSIONS
(L X W X H) - IN (CM)
SHELf SIZE
IN (CM)
HEIGHT BETWEEN
SHELVES IN (CM)
97320 300 (135)
31/2 (9)
271/2 x 151/2 x 325/8
(70 x 40 x 84)
151/2 x 24
(39.4 x 60.9)
12 (30)
97326 400 (180) 4 (10)
307/8 x 173/4 x 333/4
(79 x 45 x 86)
173/4 x 27
(45 x 69)
12 (30)
M Front
leg—
handle
side
(cutaway
end with 4
bolt holes)
N Back
leg—
handle
side
(square
end with 4
bolt holes)
O Front
leg—
plain
side
(cutaway
end with 2
bolt holes)
P Back
leg—
plain
side
(square
end with 2
bolt holes)
I Top shelf
K Middle shelf
L Base
J Handle
Page 1 Item No. 23322-1 • Rev 2/07
Rounded
corners
Square
corners
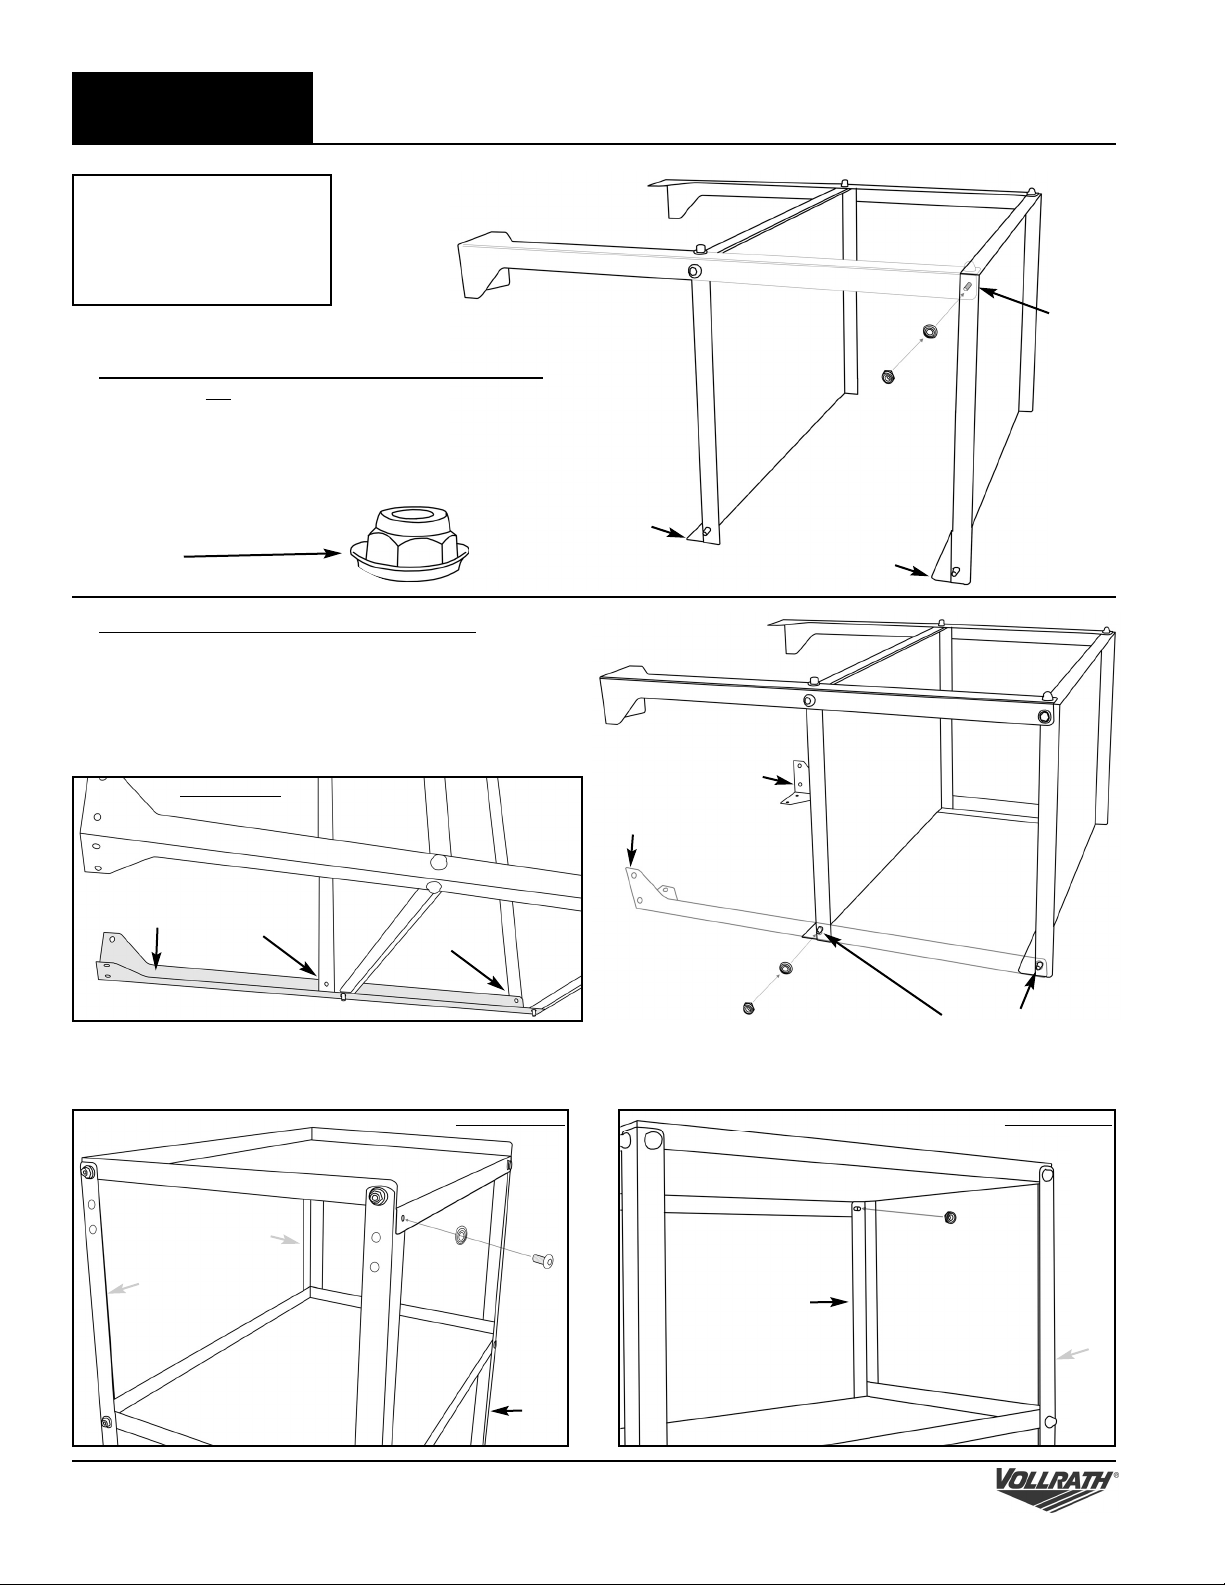
1) Attach back legs (N & P) to top and middle shelves.
The legs are not interchangeable—be sure to use the
correct ones (see illustrations on page 1 for
identification). Place (8) washers (B) on studs. Thread (8)
nuts (A) loosely onto studs so that cart stays flexible for
the remainder of assembly.
Threaded
stud
Top shelf—
round corner
Middle shelf—
square corner
B
N
K
I
P
A
2) Attach front legs to top and middle shelves.
Slide the front legs (M & O) into place and loosely thread
on the (8) washers (B) and (8) nuts (A) on the sides of
the cart.
Be sure to put the front legs on so they overlap on the
inside of the top shelf and the outside of the middle
shelf (see diagram below).
Tip the cart upright and place (4) allen bolts (C) through (4) washers (B) and then through the holes in the front of the cart (see
diagram below left). Then thread (4) self-locking nuts (A) onto the bolts (C) from the inside of the cart (see diagram below right).
Threaded studs
Overhead View
B
B
C
N
N
N
M
M
M
M
O
N
O
K
K
K
K
I
I
I
I
P
P
A
A
IN FRONT
BEHIND
Front of cart view
Back of cart view
Page 2
Item No. 23322-1 • Rev 2/07
ASSEMBLY
INSTRUCTIONS
Knocked-Down Stainless Steel Utility Cart
Note: build your cart on a
durable surface that will not
scratch or damage the cart or
be damaged by the cart. A
carpeted surface is ideal.
*
Note: always use the washer
with the cup facing up as
illustrated.
B
Remove protective plastic from shelves prior to assembly.
A
 Loading...