

Page 1

ENGLISH
Operator’s Manual
DELUXE AFFORDABLE PORTABLE BUFFET EQUIPMENT
STANDARD AFFORDABLE PORTABLE BUFFET EQUIPMENT
Hot Food Stations (Standard or Deluxe)
Refrigerated Cold Stations
Non Refrigerated Cold Stations
Utility Stations
Cashier Station
Thank you for purchasing this Vollrath Affordable Portable Buffet Equipment. Before operating the unit, read and familiarize yourself with the following
operating and safety instructions. SAVE THESE INSTRUCTIONS FOR FUTURE REFERENCE. Save the orginal box and packaging. Use this packaging
to ship the unit if repairs are needed.
Item No. 08014-3 Rev 07/11
Page 2

AffordAble PortAble buffet equiPment
Safety PrecautionS
unPacking the equiPment and initial SetuP
Carefully remove crating or packaging materials from the unit. Dispose of all
To ensure safe operation, read the following statements and
understand their meaning. This manual contains safety precautions
which are explained below. Please read carefully.
packaging, materials in an environmentally responsible manner.
electrical Power cord (Some modelS)
WARNING
Warning is used to indicate the presence of a hazard that can cause
severe personal injury, death, or substantial property damage if the
warning is ignored.
CAUTION
Caution is used to indicate the presence of a hazard that will or can
cause minor personal injury or property damage if the caution is
ignored.
NOTE
Note is used to notify people of installation, operation, or
maintenance information that is important but not hazard-related.
For Your Safety!
These precautions should be followed at all times. Failure to follow
these precautions could result in injury to yourself and others.
To reduce risk of injury or damage to the unit:
Plug only into grounded electrical outlets matching the nameplate rated
voltage.
Unit should only be used in a at, level position.
Unplug unit and let it cool before cleaning or moving.
Do not spray controls or outside of unit with liquids or cleaning agents.
Unplug when not in use.
Keep unit and power cord away from open ames, electric burners or
excessive heat.
Do not operate unattended.
Closely supervise units operating in public areas and/or around
children.
Do not use food pans deeper than 4” (10 cm).
Do not operate if unit has been damaged or is malfunctioning in any
way.
Do not place any objects inside the air intake or exhaust panels.
Do not place weight on controls.
Do not operate hot well without water.
Free the power cord from its secure shipping location. It is usually coiled
inside the cabinet.
NOTE:
When moving or transporting this unit use caution to not damage the
electrical power cord.
lighting information (Some modelS)
If lighting is used, it is recommended that plastic coated type lamps or
equivalent are used to reduce the possibility of breakage.
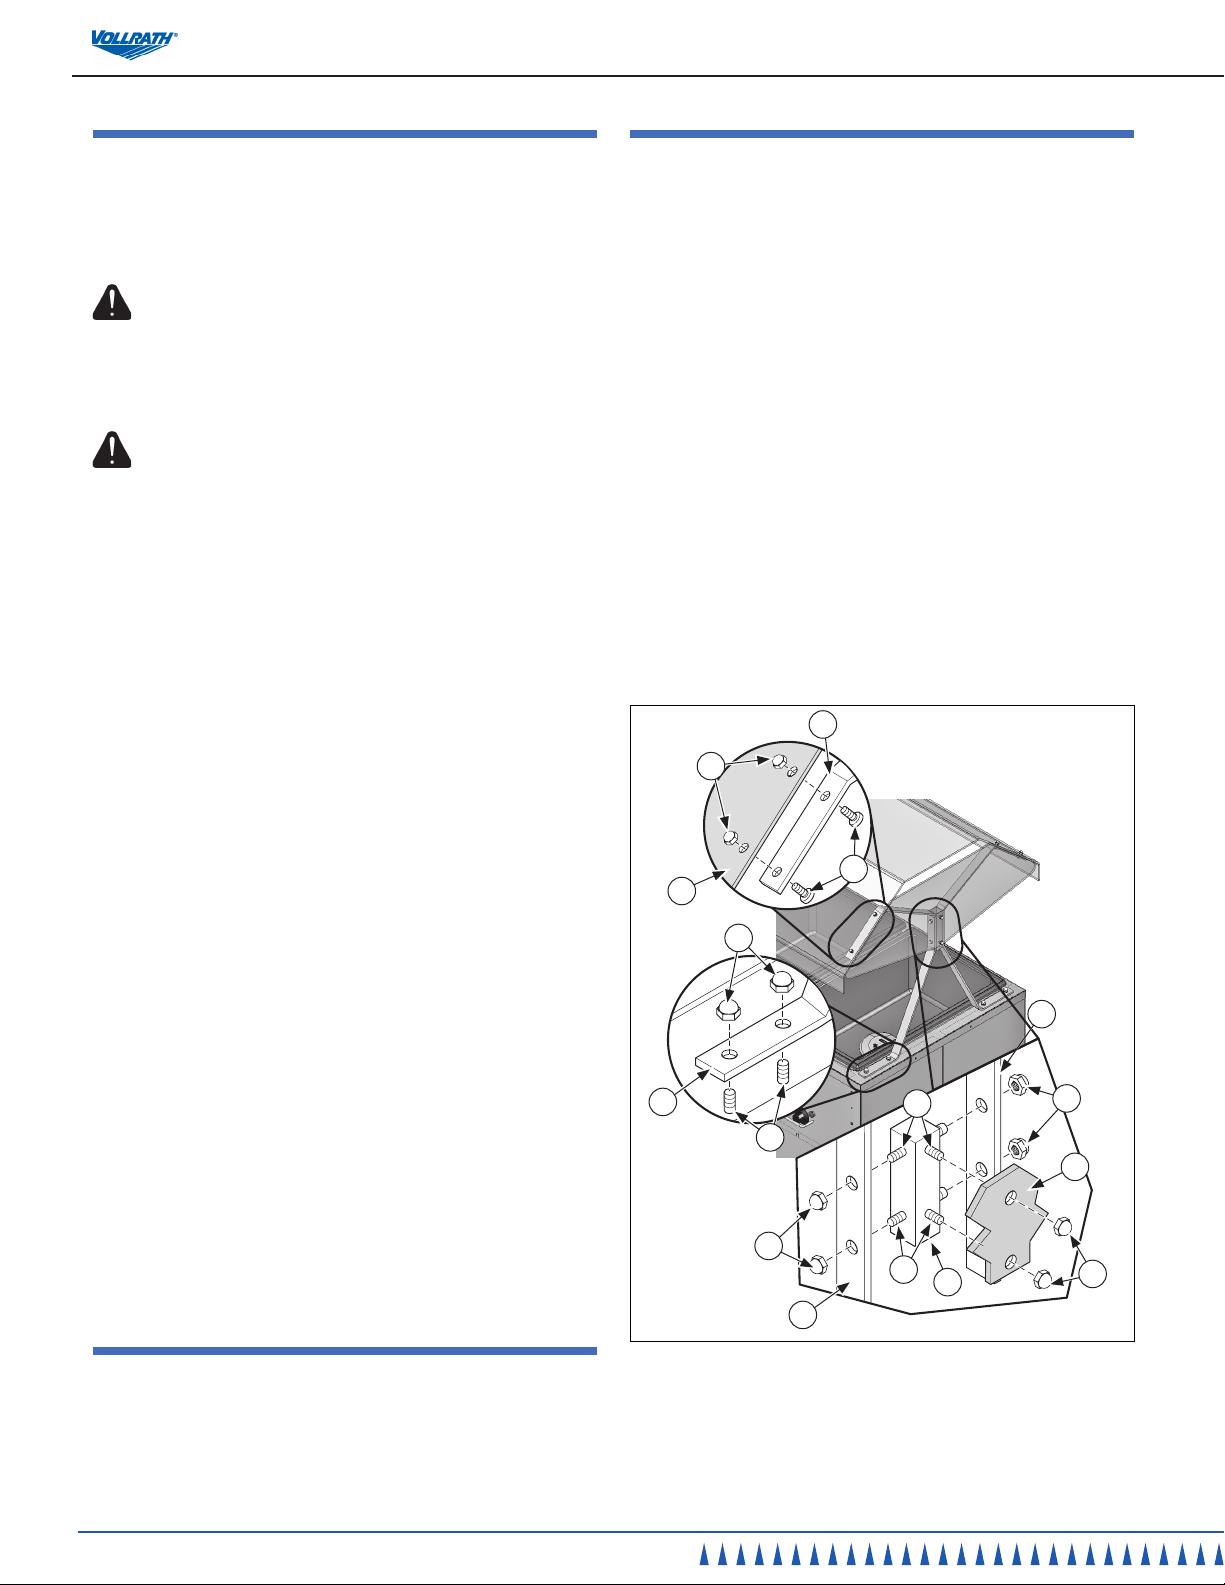
Breath guard inStallation (Some modelS)
Some units are shipped with a breath guard not installed. To install the breath
guard follow these steps:
1. Install the breath guard uprights (A) to the studs (B) securing with cap
function and PurPoSe
This unit is intended and designed to keep food at proper serving
temperatures. Hot food stations are not intended or designed to cook raw
food or to reheat prepared food. Cold food stations are not intended or
designed to cool or chill food. Food must be prepared and placed in food
stations at proper serving temperatures.
Figure 1. Breath Guard Installation
2. Install the breath guard support tube (D) between the uprights (A)
3. Install the top breath protector (E) securing with screws (F) and cap nuts
4. Install the side breath protector (G) to the support tube (D) securing with
nuts (C) as shown. See Figure 1. Repeat for all four uprights.
A
C
F
E
C
A
A
B
C
A
B
B
D
C
G
C
securing with cap nuts (C) as shown. Repeat on the other side.
(C) as shown. Repeat for all four mounting locations.
cap nuts (C) as shown. Repeat on the other side.
2
OperatOr’s Manual
Page 3

AffordAble PortAble buffet equiPment
unit inStallation
Deluxe Hot Station ControlS anD operation
This unit is to be used on a at, level surface. If this unit has controls and
drains they need to be accessible at all times of operation. If the unit has a
vent the vent needs to face an open area so that air can circulate.
NOTE:
Do move the unit by pushing or pulling on the breath guard.
There must be a minimum of 24” (61 cm) of space between one side of
solid surfaces and on two sides for heating units.
There must be a minimum of 24” (61 cm) of space between the vents
and any solid surfaces for units with vents.
Sufcient airow must be allowed around the unit. Blocking the airow
could cause the unit to overheat.
oPeration
WARNING
Burn Hazard.
Do not touch heating surfaces, liquid, or food while
unit is heating or operating.
Hot food, steam and liquids can burn skin. Allow the hot liquid,
spillage pans and trays to cool before handling. Use gloves, mitts or
pot holders if it is necessary to handle hot pans.
WARNING
Electrical Shock Hazard.
Keep water and other liquids from entering the
inside of the unit. Liquid inside the unit could cause
an electrical shock. Do not damaged power cord.
Do not over ll wells, pans or trays. Liquid could contact the
electrical components and cause a short circuit or an electrical
shock. Unplug unit before performing service, draining or removing
spillage pans and trays. Do not spray water or cleaning products.
Do not use a power cord that has been modied or damaged.
Figure 2. Deluxe Hot Station Controls
A
ON/OFF switch. Set switch to the up position for “ON”. Set
switch to the down position for “OFF”. The switch will illuminate
when in the “ON” position.
B
ACCESS DOOR for drain valve. Open or remove to access the
drain valve.
C
DRAIN VALVE. Used to empty water from the well(s).
D
WATER LEVEL MARKS. Used to indicate the correct water
level.
E
TEMPERATURE CONTROL dial. Used to set or adjust the
temperature of the well. The larger the number the higher the
temperature, the smaller the number the lower the temperature.
The “0” position is off.
D
D
A
F
B
0
1
I
2
3
4
5
6
E
1
0
9
8
7
H
C
G
ENGLISH
F
DIAL REFERENCE indicator. Used to show what position the
temperature control is set at.
G
LOW WATER light. Illuminates when the well needs water. If
the light illuminates during operation, clean fresh water must be
added to the well.
H
DRAIN VALVE CLOSED position. When the valve is in this
position the drain is closed.
I
DRAIN VALVE OPEN position. When the valve is in this
position the drain valve is open.
OperatOr’s Manual
3
Page 4

AffordAble PortAble buffet equiPment
1. Open the valve access door (B) and check that the drain valve (C) is in
the closed position (H). See Figure 2.
2. Fill the well to the correct level marks (D) with clean fresh water. Correct
level is about 1” (2.5 CM) of water. Do not over ll.
3. Plug electrical power cord into a grounded outlet matching the nameplate
rated voltage.
4. Preheat the water in the wells by covering wells with empty food
containers or covers. Turn the power switch (A) to the “ON” position
A
ON/OFF switch. Set switch to the up position for “ON”. Set
switch to the down position for “OFF”. The switch will illuminate
when in the “ON” position.
B
ACCESS DOOR for drain valve. Open or remove to access the
drain valve.
C
DRAIN VALVE. Used to empty water from the well(s).
and set the heat control(s) (E) to the maximum setting. Preheat for 45
minutes. The water will be boiling.
5. Remove empty food containers or covers. Place containers rated for hot
food that contain hot food into the preheated wells. Do not use food pans
deeper than 4” (10 cm).
6. Place covers on food containers. Leave covers on food containers unless
D
DRAIN VALVE CLOSED position. When the valve is in this
position the drain is closed.
E
DRAIN VALVE OPEN position. When the valve is in this
position the drain valve is open.
serving food.
7. Set the heat control(s) (E) to maintain proper hot holding temperature for
food safety. Regularly check food temperature.
NOTE:
Monitor food temperature closely for food safety. The United States
Public Health Service recommends that hot food be held at a minimum
of 140 ºF (60 ºC) to help prevent bacteria growth. Maintain correct water
level and temperature setting. Periodically remove food container and
check the water level. Add water if needed.
8. When nished using the unit. Turn the temperature control(s) (E) to “0”
setting, turn the power switch (A) to the “OFF” position and unplug unit.
When removing hot food containers from unit use gloves, mitts or pot
holders to protect hands.
9. Allow the unit and water to cool completely.
10. Open access the access door (B).
11. Place a suitable container directly under the drain valve (C). Turn the
drain valve (C) to the open position (I) monitoring the ow of liquid going
into the container. Use caution to avoid spills that may create a slippery
condition. Turn drain valve (C) to the closed position (H) off before the
container is full. Dispose of the drained water. This procedure may need
to be repeated.
12. Turn drain valve (C) to the closed position (H) and close the access
door (B).
Deluxe refrigerateD ControlS anD operation
A
1. Open the valve access door (A) and check that the drain valve is in the
closed position (D). See Figure 2.
2. Plug electrical power cord into a grounded outlet matching the nameplate
rated voltage.
3. Turn the power switch (A) to the “ON” position. This unit does not have
an adjustable temperature setting. Allow the unit to run for approximately
30 minutes. For the best performance when using ice with this unit, allow
unit to run for approximately 2 hours before adding ice. This will help the
ice remain solid.
4. Place containers of properly chilled food into the pre-chilled unit.
5. Regularly check the food temperature.
NOTE:
Monitor food temperature closely for food safety. The United States
Public Health Service recommends that hot food be held at a maximum
of 41 ºF (5 ºC) to help prevent bacteria growth.
6. When nished using the unit turn the power switch to the off position.
7. Open access the access door (B).
8. If unit requires that water be drained place a suitable container directly
under the drain valve (C). Turn the drain valve (C) to the open position
(E) monitoring the ow of liquid going into the container. Use caution to
avoid spills that may create a slippery condition. Turn drain valve (C)
to the closed position (D) off before the container is full. Dispose of the
drained water. This procedure may need to be repeated.
9. Turn drain valve (C) to the closed position (D) and close the access
door (B).
4
B
E
D
C
Figure 3. Deluxe Cold Pan Controls
OperatOr’s Manual
Page 5

AffordAble PortAble buffet equiPment
StanDarD Hot Station ControlS anD operation
A
3
○
B
0
○
1
○
2
StanDarD non-refrigerateD ControlS anD operation
Figure 4. Standard Hot Well Controls
A
TEMPERATURE CONTROL dial. Used to set or adjust the
temperature of the well. The higher the number the higher the
temperature, the lower the number the lower the temperature.
The “0” position is off.
B
POWER light. Illuminates when the well is in the heating mode.
1. Place spillage pans in the well opening.
Figure 5. Standard Cold Controls
A
DRAIN VALVE. Used to empty water from the well(s).
B
DRAIN VALVE OPEN position. When the valve is in this
position the drain is Open.
2. Fill each spillage pan with 2 quarts (approximately) of clean fresh water.
Do not over ll.
3. Plug electrical power cord into a grounded outlet matching the nameplate
rated voltage.
4. Preheat the water in the wells by covering wells with empty food
containers or covers. Turn the temperature control (A) to the maximum
heat setting. See Figure 4. Preheat for 60 minutes.
5. Place containers rated for hot food that contain hot food into the
preheated unit. Do not use food pans deeper than 4” (10 cm).
6. Place covers on food containers. Leave covers on food containers unless
serving food.
C
DRAIN VALVE CLOSED position. When the valve is in this
position the drain valve is closed.
1. Place ice into the non-refrigerated well. For best performance allow unit
to cool for approximately 1 hour before using.
2. Place containers of properly chilled food into the pre-chilled unit.
3. Regularly check the food temperature.
NOTE:
Monitor food temperature closely for food safety. The United States
Public Health Service recommends that hot food be held at a maximum
of 41 ºF (5 ºC) to help prevent bacteria growth.
7. Set the heat control to maintain proper hot holding temperature for
food safety. Regularly check the food temperature. Adjust temperature
controls as necessary.
NOTE:
Monitor food temperature closely for food safety. The United States
Public Health Service recommends that hot food be held at a minimum
of 140 ºF (60 ºC) to help prevent bacteria growth. Maintain correct water
level and temperature setting. Periodically remove food container and
check the water level. Add water in needed.
8. When nished using the unit turn the heat control (A) to the “0” setting
and unplug unit.
9. When removing hot food containers from unit use gloves, mitts or pot
4. When nished using the unit remove food from the cold well.
5. Place a suitable container directly under the drain valve (A) or over a
oor drain. Turn the drain valve (A) to the open position (B) monitoring
the ow of liquid going into the container. Use caution to avoid spills
that may create a slippery condition. Turn drain valve (A) to the closed
position (C) before the container is full. Dispose of the drained water.
Repeat this procedure if necessary.
6. Turn drain valve (A) to the closed position (C).
utility StationS anD CaSHier StationS
Utility stations and cashier stations are intended for display of nonperishable
items or equipment.
holders to protect hands.
10. Allow the unit and water to cool completely.
11. Remove the spillage pans and dispose of the water.
A
C
B
ENGLISH
OperatOr’s Manual
5
Page 6

AffordAble PortAble buffet equiPment
cleaning
To maintain the appearance and increase the service life, clean your induction
range daily.
WARNING
Burn Hazard.
Do not touch heating surfaces, liquid, or food while
unit is heating or operating.
Hot food, steam and liquids can burn skin. Allow the hot liquid,
spillage pans and trays to cool before handling. Use gloves, mitts or
pot holders if it is necessary to handle hot pans.
trouBleShooting
Problem It might be caused by Course of Action
Switch does not light up when in the “ON”
position.
Unit does not get to correct temperature or
to a high temperature.
Unit is not plugged in. Plug unit in.
Low or incorrect voltage to unit. Verify that voltage rating in unit matches the source voltage. If not
No water or incorrect water level. Add water to correct level.
Do not spray water or cleaning products. Liquid could contact the
electrical components and cause a short circuit or an electrical
shock.
1. Turn off and unplug the unit.
2. Begin cleaning after hot well units have completely cooled or cold well
units have been drained.
3. Wipe the unit exterior with a clean damp cloth.
4. Do not use abrasive materials, scratching cleansers or souring pad to
clean the unit. These can damage the nish.
5. Thoroughly wipe off any mild soap or chemical cleaners. Residue
could corrode the surface of the unit.
have qualied electrical personal install proper source voltage.
WARNING
Electrical Shock Hazard.
Keep water and other liquids from entering the
inside of the unit. Liquid inside the unit could cause
an electrical shock.
Service and rePair
There are no user serviceable parts within this appliance. To avoid serious injury or damage, never attempt to repair the unit or replace a damaged power cord
yourself. Do not send units directly to the Vollrath Company. Please contact the qualied professional repair service listed below.
VOLLRATH Repair Service • 1-800-628-0832
When contacting the Authorized Professional Service Center, please be ready with the model number, serial number, and proof of purchase showing the date
the unit was purchased.
6
OperatOr’s Manual
Page 7

AffordAble PortAble buffet equiPment
wiring drawing ~ 120 volt deluxe 3 - 4 hot well
Optional
Lights
BLK
WHT
GRN
120V
3 - 4 Well Hot
20A Fuse
Power
Switch
Light
Switch
Light
250W
Max
Temp.
Control
Low
Water
Switch
Heater
Element
Low
Water
Light
High
Limit
Switch
Well #1 Well #2 Well #3 Well #4
ENGLISH
wiring drawing ~ 120 volt deluxe 3 - 4 hot well with relay
Optional
Lights
BLK
WHT
GRN
120V 700W
4 Well Hot
Light
Switch
20A Fuse
Power
Switch
Light
250W
Max
Temp.
Control
Low
Water
Switch
Heater
Element
Relay
Low
Water
Light
High
Limit
Switch
Well #1 Well #2 Well #3 Well #4
OperatOr’s Manual
7
Page 8

AffordAble PortAble buffet equiPment
wiring diagram ~ 120/208-240 volt deluxe 3 - 4 hot well
Optional
Lights
BLK
WHT
GRN
120V 700W
4 Well Hot
Light
Switch
20A Fuse
Power
Switch
Light
250W
Max
Temp.
Control
Low
Water
Switch
Heater
Element
Relay
Low
Water
Light
High
Limit
Switch
Well #1 Well #2 Well #3 Well #4
8
OperatOr’s Manual
Page 9

AffordAble PortAble buffet equiPment
noteS
ENGLISH
OperatOr’s Manual
9
Page 10

AffordAble PortAble buffet equiPment
warranty Statement for the vollrath co. l.l.c.
The Vollrath Company LLC warrants the products it manufactures and distributes against defects in materials and workmanship for a period of one year, except as specically
provided below. The warranty runs 12 months from the date of original installation. (End user receipt)
1. Refrigeration compressors – The warranty period is 5 years.
2. Replacement parts – The warranty period is 90 days.
3. Fry pans and coated cookware – The warranty period is 90 days
4. EverTite™ Riveting System – The warranty covers loose rivets
only, forever.
5. Cayenne® Heat Strips – The warranty period is 1 year plus an
additional 1 year period on heating element parts only.
6. Ultra and Professional Induction Ranges – The warranty period
is 2 years.
7. Mirage and Commercial Induction ranges - The warranty period
is 1 year.
8. ServeWell® Induction Workstations – The warranty period is one
year on the workstation table and 2 years on induction hobs.
9. Slicers – The warranty period is 10 years on gears and 5 years
on belts.
10. Mixers – The warranty period is 2 years.
11. Extended warranties are available at the time of sale.
12. Boxer Mixers – 1 Year exchange Warranty.
13. Vollrath – Redco products – The warranty period is 2 years.
14. Optio / Arkadia product lines – The warranty period is 90 days.
15. All non-stick products (i.e. fry pans and surfaces) are 90 days for
the non stick surfaces.
All products in the Jacob’s Pride® collection, including
the following, have a lifetime warranty:
• NSF Certied One-Piece Dishers
• NSF Certied Spoodle® Utensils
• NSF Certied Heavy-Duty Spoons with Ergonomic Handle
• NSF Certied Heavy-Duty Basting Spoons
• Heavy duty Turners with Ergonomic handle
• One-Piece Tongs*
• Heavy-Duty One-Piece Ladles*
• Nylon Handle Whips
• One-Piece Skimmers
• Tribute®, Intrigue®, and Classic Select® Cookware*
*Jacob’s Pride® warranty does not cover Kool-Touch®,
non stick coatings and silicone handles.
Items sold having no warranty:
• Meat Grinder Knives
• Light Bulbs in Convection Ovens and
Hot Food Merchandiser
• Oven Door Seals
• Oven Door Glass
• Hot Food Merchandisers / Display Case
Glass
• Calibration and set up of gas equipment
• Slicer / Dicer blades (table top food
prep) – Redco and Vollrath
THIS WARRANTY IS IN LIEU OF ANY OTHER WARRANTIES, EXPRESS OR IMPLIED, INCLUDING ANY IMPLIED WARRANTY OF
MERCHANTABILITY OR FITNESS FOR A PARTICULAR PURPOSE
As The Vollrath Company LLC’s only responsibility and the purchaser’s only remedy, for any breach of warranty, The Vollrath Company LLC will repair or, at its discretion, replace the
defective product or part without charge, except as otherwise provided below:
• For refrigeration compressors and the second year of the warranty on Cayenne® Heat Strips and mixers, The Vollrath Company LLC will provide the repaired
or replacement part only; and the buyer will be responsible for all labor charges incurred in performing the repair or replacement.
• To obtain warranty service, the buyer will be responsible to return to The Vollrath Company LLC any product (other than gas equipment that is permanently
installed) weighing less than 110 lbs. or located outside of a 50-mile radius of a certied technician designated by The Vollrath Company LLC to perform warranty repairs. If a Vollrath Technician cannot be contacted check the website for service contact points (Refer to the Product Catalogue for weights and sizes).
• No remedy will be available for products that have been damaged by accident, carelessness, improper installation, lack of proper setup or supervision when
required, neglect, improper use, installation or operation contrary to installation and operating instructions or other causes not arising out of defects in materials or workmanship. At the buyer’s request, The Vollrath Company LLC will repair and or replace such products at a reasonable cost.
• No remedy will be available for slicers where blade has not been sharpened (Refer to owner’s manual for sharpening instructions).
• No remedy will be available for mixers damaged by changing gears while unit is running or overloading, in either case as determined by a Vollrath Certied
Technician.
• Warranty work must be authorized in advance by The Vollrath Company LLC. See the operating and safety instructions for each product for detailed warranty
claim procedures.
• No remedy will be available for product returned and found to be acceptable to the product specication.
• No remedy will be available under any warranty not registered as required below.
LIMITATION OF LIABILITY:
THE VOLLRATH COMPANY LLC SHALL HAVE NO LIABILITY FOR INCIDENTAL OR CONSEQUENTIAL DAMAGES OF ANY KIND,
WHETHER BASED UPON NEGLIGENCE OR OTHER TORT, BREACH OF WARRANTY, OR ANY OTHER THEORY.
10
OperatOr’s Manual
Page 11

AffordAble PortAble buffet equiPment
Warranty proCeDure
On all warranty calls, the following process and information is required:
• All warranty claims will start with a call to Vollrath Technical Service support line.(800-628-0832).
• A technical support professional will work to diagnose the issues, and provide the details for the service solution.
• Name and phone number of person calling
• Business name, street address, city, state and zip
• Model and serial number
• Date of purchase and proof of purchase (Receipt)
• Name of dealer where unit was purchased
NOTE: Vollrath will not accept products sent without the proper procedure being followed.
Important:
TO MAKE A CLAIM FOR ANY REMEDY UNDER THIS WARRANTY, YOU MUST REGISTER YOUR WARRANTY.
regiSter toDay
ONLINE: Register your warranty on-line now at www.Vollrathco.com
NO WEB ACCESS: If you do not have access to the web, kindly register by completing the warranty registration form and faxing it to The Vollrath Co. LLC ofce in the country of
purchase.
warranty regiStration
BuSineSS name
Key ContaCt name email
Street aDDreSS
City State Zip CoDe
Country pHone fax
moDel item numBer
Serial numBer - -
operation type
R Limited Service Restaurant R Full Service Restaurant R Bars and Taverns R Supermarket
R Convenience Store R Recreation R Hotel/Lodging R Airlines
R Business/Industry R Primary/Secondary School R Colleges/University R Hospitals
R Long-Term Care R Senior Living R Military R Corrections
reaSon for SeleCting our proDuCt
R Appearance R Full Service Restaurant R Availability R Sellers Recommendation
R Ease of Operation R Versatility of Use R Price R Brand
WoulD you liKe to reCeive our full-line Catalog anD remain on our mailing liSt? R Yes R No
ENGLISH
OperatOr’s Manual
11
Page 12

The Vollrath Company, L.L.C.
1236 North 18th Street
Sheboygan, WI 53081-3201
U.S.A.
Technical Services: 800.628.0832
Service Fax: 920.459.5462
Canada Service: 800.695.8560
www.vollrathco.com
Main Tel: 800.628.0830
Fax: 800.752.5620
© 2010 The Vollrath Company, L.L.C.
Page 13

ESPAÑOL
Manual del operador
EQUIPO AFFORDABLE PORTABLE DE LUJO PARA BANQUETES
EQUIPO AFFORDABLE PORTABLE ESTÁNDAR PARA BANQUETES
Estaciones de comida caliente (estándar o de lujo)
Estaciones frías refrigeradas
Estaciones frías no refrigeradas
Estaciones utilitarias
Estación de caja registradora
Gracias por comprar este equipo Affordable Portable de Vollrath para banquetes. Antes de operar la unidad, lea y familiarícese con las siguientes
instrucciones de operación y seguridad. CONSERVE ESTAS INSTRUCCIONES COMO REFERENCIA PARA EL FUTURO. Conserve la caja y embalado
originales. Deberá utilizarlos para devolver la unidad en caso de que requiera reparaciones.
Núm. 08014-3 ES Mod 07/01
Page 14
Equipo AffordAblE portAblE pArA bAnquEtEs
PrecaucioneS de Seguridad
Para garantizar una operación segura, lea las siguientes
armaciones y comprenda su signicado. Este manual contiene
precauciones de seguridad que se explican a continuación. Léalas
atentamente.
ADVERTENCIA
Advertencia se usa para indicar la presencia de un peligro que puede
provocar lesiones personales graves, muerte o daños materiales
considerables si se ignora el aviso.
PRECAUCIÓN
Precaución se usa para indicar la presencia de un peligro que
provocará o puede provocar lesiones personales o daños materiales
leves si se ignora el aviso.
NOTA
Nota se utiliza para indicar información sobre instalación,
funcionamiento o mantenimiento que es importante, pero que no
reviste peligros.
¡Por su propia seguridad!
Debe acatar estas precauciones en todo momento, ya que si no lo
hace podría lesionarse a sí mismo y a otras personas.
deSemBalado del equiPo y configuración inicial
Retire cuidadosamente de la unidad la caja o los materiales de embalado.
Deseche todos los materiales de embalado de una manera ambientalmente
responsable.
caBle eléctrico (algunoS modeloS)
Libere el cable eléctrico de su ubicación segura de despacho. Generalmente
viene enrollado dentro del armario.
NOTA:
Tenga cuidado de no dañar el cable eléctrico cuando mueva o
transporte esta unidad.
información SoBre iluminación (algunoS modeloS)
Si se usa iluminación, se recomienda usar lámparas con revestimiento
plástico o similares para reducir la posibilidad de rompimiento.
inStalación de la Protección contra aliento
(algunoS modeloS)
Algunas unidades se despachan sin la protección contra aliento instalada.
Siga estos pasos para instalarla:
1. Instale los postes de la protección (A) en los vástagos (B) aanzándolos
con los tapones roscados (C) tal como se muestra. Consulte la Figura 1.
Repita el procedimiento con los cuatro postes.
A
C
Para disminuir el riesgo de lesiones personales o daños en la unidad:
Enchúfela sólo en tomacorrientes con puesta a tierra cuyo voltaje
nominal corresponda al indicado en la placa identicatoria.
Esta unidad debe utilizarse sólo en posición plana y nivelada.
Desenchufe la unidad y deje que se enfríe antes de limpiarla o
E
trasladarla.
No rocíe con líquidos ni agentes de limpieza los controles ni la parte
externa de la unidad.
Desenchúfela cuando no esté en uso.
Mantenga la unidad y el cable eléctrico lejos de llamas expuestas,
quemadores eléctricos o calor excesivo.
No deje la unidad operando sola.
Supervise de cerca las unidades en áreas públicas y/o cerca de niños.
A
No use fuentes de más de 10 cm (4”) de profundidad.
No opere la unidad si se ha dañado o si funciona defectuosamente de
algún modo.
No coloque ningún objeto dentro de los paneles de entrada o salida de
aire.
No coloque peso en los controles.
No opere el receptáculo caliente sin agua.
función y ProPóSito
Esta unidad está diseñada para mantener los alimentos a temperaturas
de servicio apropiadas. Las estaciones de alimentos calientes no están
diseñadas ni tienen el propósito de cocer alimentos crudos ni de recalentar
comida preparada. Las estaciones de alimentos fríos no están diseñadas ni
tienen el propósito de enfriar ni helar la comida. La comida debe prepararse
y colocarse en las estaciones de alimentos a temperaturas de servicio
apropiadas.
Figura 1. Instalación de la protección contra aliento
2. Instale el tubo de apoyo (D) de la protección contra aliento entre los
postes (A) aanzándolo con los tapones roscados (C) tal como se
muestra. Repita el procedimiento en el lado opuesto.
3. Instale la protección superior contra aliento (E) aanzándola con los
tornillos (E) y los tapones roscados (C) tal como se muestra. Repita este
procedimiento en las cuatro ubicaciones de montaje.
F
C
A
B
B
C
B
D
A
C
G
C
2
Manual del operador
Page 15

Equipo AffordAblE portAblE pArA bAnquEtEs
4. Instale la protección lateral contra aliento (G) en el tubo de apoyo (D)
ControleS y operaCión De la eStaCión Caliente De lujo
aanzándola con los tapones roscados (C) tal como se muestra. Repita
el procedimiento en el lado opuesto.
inStalación de la unidad
Esta unidad debe utilizarse en una supercie plana y nivelada. Si tiene
controles y drenajes, se debe poder acceder a ellos en todo momento de
la operación. Si la unidad tiene un oricio de ventilación, éste debe estar
orientado hacia un área abierta de modo que pueda circular el aire.
NOTA:
No mueva la unidad empujando o jalando la protección contra aliento.
Debe haber un espacio mínimo de 61 cm (24”) entre un lado de
las supercies sólidas y en los dos lados de las unidades de
calentamiento.
Debe haber un espacio mínimo de 61 cm (24”) entre los oricios
de ventilación y toda supercie sólida de las unidades con dichos
oricios.
Se debe proporcionar un ujo de aire suciente alrededor de la unidad.
Bloquear el ujo de aire podría sobrecalentarla.
oPeración
ADVERTENCIA
Peligro de quemaduras.
No toque las supercies de calentamiento, los
líquidos ni la comida calientes cuando la unidad
esté calentando o funcionando.
Los alimentos, vapores y líquidos calientes pueden quemar la piel.
Deje que el líquido caliente, las bandejas y los recipientes para
derrame se enfríen antes de manipularlos. Use guantes, mitones o
tomaollas si es necesario para manipular las fuentes calientes.
Figura 2. Controles de la estación caliente de lujo
A
Interruptor de ENCENDIDO/APAGADO Mueva el interruptor
hacia arriba para encender la unidad. Mueva el interruptor
hacia abajo para apagarla. El interruptor se iluminará cuando
esté en la posición de encendido.
B
PUERTA DE ACCESO para la válvula de drenaje. Ábrala o
retírela para acceder a la válvula de drenaje.
C
VÁLVULA DE DRENAJE. Se usa para vaciar el agua de el o
los receptáculos.
D
D
A
F
B
0
1
I
2
3
4
5
6
E
1
0
9
8
7
H
C
G
ESPAÑOL
ADVERTENCIA
Peligro de descarga eléctrica.
Evite que ingrese agua o cualquier otro tipo de
líquido al interior de la unidad, ya que ello podría
causar una descarga eléctrica. No use un cable
eléctrico dañado
No llene excesivamente los receptáculos, fuentes ni bandejas. El
líquido podría hacer contacto con los componentes electrónicos y
causar un cortocircuito o descarga eléctrica. Desenchufe la unidad
antes de darle servicio, drenar o retirar las bandejas y fuentes para
derrame. No rocíe agua ni agentes de limpieza.
D
MARCAS DEL NIVEL DEL AGUA. Se usan para indicar el
nivel correcto del agua.
E
Selector del CONTROL DE TEMPERATURA. Se usa para jar
o ajustar la temperatura del receptáculo. Mientras más grande
o más pequeño sea el número, más alta o más baja es la
temperatura respectivamente. La posición de “0” corresponde
a apagado.
F
Indicador de REFERENCIA DEL SELECTOR. Se usa para
mostrar la posición en que se jó el control de temperatura.
G Luz de NIVEL DE AGUA BAJO Se ilumina cuando el
receptáculo necesita agua. Si la luz se ilumina durante la
operación, se debe agregar agua limpia y fresca al receptáculo.
H
Posición de VÁLVULA DE DRENAJE CERRADA. Cuando la
válvula está en esta posición, el drenaje está cerrado.
I
Posición de VÁLVULA DE DRENAJE ABIERTA. Cuando la
válvula está en esta posición, el drenaje está abierto.
Manual del operador
3
Page 16

Equipo AffordAblE portAblE pArA bAnquEtEs
1. Abra la puerta de acceso (B) y verique que la válvula de drenaje (C)
esté en la posición cerrada (H). Consulte la Figura 2.
2. Llene el receptáculo hasta las marcas de nivel correcto (D) con agua
limpia y fresca. El nivel correcto es de aproximadamente 2.5 cm (1”) de
agua. No lo llene excesivamente.
A
Interruptor de ENCENDIDO/APAGADO Mueva el interruptor
hacia arriba para encender la unidad. Mueva el interruptor
hacia abajo para apagarla. El interruptor se iluminará cuando
esté en la posición de encendido.
3. Enchufe el cable eléctrico en un tomacorriente con puesta a tierra cuyo
voltaje nominal corresponda al indicado en la placa identicatoria.
4. Precaliente el agua en los receptáculos cubriéndolos con tapas o
recipientes de alimento vacíos. Gire el interruptor de suministro (A) hasta
la posición de encendido “ON” y je el o los controles de calor (E) en su
ajuste máximo. Precaliente el agua durante 45 minutos. El agua debiera
hervir.
5. Retire las tapas o los recipientes de alimento vacíos. Coloque en
los receptáculos precalentados los recipientes aptos para alimentos
calientes que contengan comida caliente. No use fuentes de más de 10
B
PUERTA DE ACCESO para la válvula de drenaje. Ábrala o
retírela para acceder a la válvula de drenaje.
C
VÁLVULA DE DRENAJE. Se usa para vaciar el agua de el o
los receptáculos.
D
Posición de VÁLVULA DE DRENAJE CERRADA. Cuando la
válvula está en esta posición, el drenaje está cerrado.
cm (4”) de profundidad.
6. Tape los recipientes de alimento. Deje las tapas en los recipientes si no
va a servir comida.
7. Fije el o los controles de calor (E) para mantener la temperatura de
conservación caliente y los alimentos seguros. Revise regularmente la
temperatura de los alimentos.
NOTA:
Supervise estrechamente la temperatura de los alimentos para
mantenerlos seguros. El Servicio de Salud Pública de los Estados
Unidos (United States Public Health Service) recomienda mantener los
alimentos a un mínimo de 60 ºC (140 ºF) para prevenir el crecimiento
de bacterias. Mantenga correctamente el nivel del agua y el ajuste de
la temperatura. Retire periódicamente el recipiente para alimentos y
revise el nivel del agua. Agregue agua si es necesario.
8. Cuando termine de usar la unidad. Gire el o los controles de temperatura
(E) hasta el cero “0”, luego el interruptor de suministro (A) hasta la
posición de apagado “OFF” y desenchufe la unidad. Use guantes,
mitones o tomaollas para protegerse las manos cuando retire recipientes
de comida caliente de la unidad.
E
Posición de VÁLVULA DE DRENAJE ABIERTA. Cuando la
válvula está en esta posición, el drenaje está abierto.
1. Abra la puerta de acceso (A) y verique que la válvula de drenaje esté
en la posición cerrada (D). Consulte la Figura 2.
2. Enchufe el cable eléctrico en un tomacorriente con puesta a tierra cuyo
voltaje nominal corresponda al indicado en la placa identicatoria.
3. Gire el interruptor de suministro (A) hasta la posición de encendido “ON”.
Esta unidad no tiene un valor de temperatura ajustable. Deje que la
unidad funcione durante aproximadamente 30 minutos. Para obtener el
mejor rendimiento al usar hielo con esta unidad, déjela funcionar durante
aproximadamente 2 horas antes de agregar el hielo. Ello ayudará a
mantener el hielo sólido.
4. Coloque los recipientes de alimentos correctamente enfriados en la
unidad previamente enfriada.
5. Revise regularmente la temperatura de los alimentos.
9. Deje que la unidad y el agua se enfríen totalmente.
10. Abra la puerta de acceso (B).
11. Coloque un recipiente adecuado directamente debajo de la válvula de
drenaje (C). Gire la válvula de drenaje (C) hasta la posición abierta (I)
supervisando el ujo de líquido que va a ingresar al recipiente. Tenga
cuidado de evitar derrames que puedan crear una condición resbalosa.
Gire la válvula de drenaje (C) hasta la posición cerrada (H) antes de que
el recipiente se llene. Deseche el agua drenada. Es posible que deba
repetir este procedimiento.
12. Gire la válvula de drenaje (C) hasta la posición cerrada (H) y cierre la
puerta de acceso (B).
ControleS y operaCión De la eStaCión refrigeraDa De lujo
NOTA:
Supervise estrechamente la temperatura de los alimentos para
mantenerlos seguros. El Servicio de Salud Pública de los Estados
Unidos (United States Public Health Service) recomienda mantener los
alimentos a un máximo de 5 ºC (41 ºF) para prevenir el crecimiento de
bacterias.
6. Cuando termine de usar la unidad, gire el interruptor de suministro hasta
la posición de apagado.
7. Abra la puerta de acceso (B).
8. Si se debe drenar agua de la unidad, coloque un recipiente adecuado
A
directamente debajo de la válvula de drenaje (C).Gire la válvula
de drenaje (C) hasta la posición abierta (E) supervisando el ujo
de líquido que va a ingresar al recipiente. Tenga cuidado de evitar
derrames que puedan crear una condición resbalosa. Gire la válvula
de drenaje (C) hasta la posición cerrada (D) antes de que el recipiente
se llene. Deseche el agua drenada. Es posible que deba repetir este
procedimiento.
B
9. Gire la válvula de drenaje (C) hasta la posición cerrada (D) y cierre la
puerta de acceso (B).
4
E
D
C
Figura 3. Controles de la fuente fría de lujo
Manual del operador
Page 17

Equipo AffordAblE portAblE pArA bAnquEtEs
ControleS y operaCión De la eStaCión Caliente eStánDar
A
0
3
○
B
○
○
2
1
ControleS y operaCión De la eStaCión no refrigeraDa eStánDar
Figura 4. Controles del receptáculo caliente estándar
A
Selector del CONTROL DE TEMPERATURA. Se usa para jar
o ajustar la temperatura del receptáculo. Mientras más alto o
más bajo sea el número, más alta o más baja es la temperatura
respectivamente. La posición de “0” corresponde a apagado.
B
Luz de SUMINISTRO. Se ilumina cuando el receptáculo está
en el modo de calentamiento.
1. Coloque las fuentes para derrame en la abertura del receptáculo.
Figura 5. Controles de la estación fría estándar
A
VÁLVULA DE DRENAJE. Se usa para vaciar el agua de el o
los receptáculos.
B
Posición de VÁLVULA DE DRENAJE ABIERTA. Cuando la
válvula está en esta posición, el drenaje está abierto.
2. Llene cada fuente con 1.9 litros (2 cuartos de galón aproximadamente)
de agua limpia y fresca. No las llene excesivamente.
3. Enchufe el cable eléctrico en un tomacorriente con puesta a tierra cuyo
voltaje nominal corresponda al indicado en la placa identicatoria.
4. Precaliente el agua en los receptáculos cubriéndolos con tapas o
recipientes de alimento vacíos. Gire el control de temperatura (A) hasta
el ajuste máximo de calor. Consulte la Figura 4. Precaliente el agua
durante 60 minutos.
5. Coloque en la unidad precalentada los recipientes aptos para alimentos
calientes que contengan comida caliente. No use fuentes de más de 10
cm (4”) de profundidad.
6. Tape los recipientes de alimento. Deje las tapas en los recipientes si no
va a servir comida.
7. Fije el control de calor para mantener la temperatura de conservación
caliente y los alimentos seguros. Revise regularmente la temperatura de
C
Posición de VÁLVULA DE DRENAJE CERRADA. Cuando la
válvula está en esta posición, el drenaje está cerrado.
1. Coloque hielo en el receptáculo no refrigerado. Para obtener el mejor
rendimiento deje que la unidad se enfríe durante aproximadamente 1
hora antes de usarla.
2. Coloque los recipientes de alimentos correctamente enfriados en la
unidad previamente enfriada.
3. Revise regularmente la temperatura de los alimentos.
NOTA:
Supervise estrechamente la temperatura de los alimentos para
mantenerlos seguros. El Servicio de Salud Pública de los Estados
Unidos (United States Public Health Service) recomienda mantener los
alimentos a un máximo de 5 ºC (41 ºF) para prevenir el crecimiento de
bacterias.
los alimentos. Ajuste los controles si fuera necesario.
NOTA:
Supervise estrechamente la temperatura de los alimentos para
mantenerlos seguros. El Servicio de Salud Pública de los Estados
Unidos (United States Public Health Service) recomienda mantener los
alimentos a un mínimo de 60 ºC (140 ºF) para prevenir el crecimiento
de bacterias. Mantenga correctamente el nivel del agua y el ajuste de
la temperatura. Retire periódicamente el recipiente para alimentos y
revise el nivel del agua. Agregue agua si es necesario.
8. Cuando termine de usar la unidad, gire el control de calor (A) hasta el
ajuste del cero “0” y desenchufe la unidad.
9. Use guantes, mitones o tomaollas para protegerse las manos cuando
retire recipientes de comida caliente de la unidad.
4. Cuando termine de usar la unidad, retire la comida del receptáculo frío.
5. Coloque un recipiente adecuado directamente debajo de la válvula de
drenaje (A) o sobre el drenaje del piso. Gire la válvula de drenaje (A)
hasta la posición abierta (B) supervisando el ujo de líquido que va a
ingresar al recipiente. Tenga cuidado de evitar derrames que puedan
crear una condición resbalosa. Gire la válvula de drenaje (A) hasta la
posición cerrada (C) antes de que el recipiente se llene. Deseche el
agua drenada. Repita este procedimiento si es necesario.
6. Gire la válvula de drenaje (A) hasta la posición de cerrada (C).
eStaCioneS utilitariaS y De CajaS regiStraDoraS
Las estaciones utilitarias y de cajas registradoras están diseñadas para
exhibir artículos o equipos no perecibles.
10. Deje que la unidad y el agua se enfríen totalmente.
11. Retire los recipientes para derrame y deseche el agua.
A
C
B
ESPAÑOL
Manual del operador
5
Page 18

Equipo AffordAblE portAblE pArA bAnquEtEs
limPieza
Para conservar su aspecto hermoso y prolongar su vida útil, limpie diariamente
la estufa de inducción.
ADVERTENCIA
Peligro de quemaduras.
No toque las supercies de calentamiento, los
líquidos ni la comida calientes cuando la unidad
esté calentando o funcionando.
Los alimentos, vapores y líquidos calientes pueden quemar la piel.
Deje que el líquido caliente, las bandejas y los recipientes para
derrame se enfríen antes de manipularlos. Use guantes, mitones o
tomaollas si es necesario para manipular las fuentes calientes.
Solución de ProBlemaS
Problema Podría deberse a Solución
El interruptor no se ilumina cuando está en
la posición de encendido “ON”.
La unidad no llega a la temperatura
correcta o no alcanza la temperatura alta.
La unidad no está enchufada. Enchúfela.
Voltaje de la unidad bajo o
incorrecto.
Sin agua o nivel de agua incorrecto. Agregue agua hasta el nivel correcto.
No rocíe agua ni agentes de limpieza. El líquido podría hacer
contacto con los componentes electrónicos y causar un
cortocircuito o descarga eléctrica.
1. Apague y desenchufe la unidad.
2. Comience la limpieza una vez que los receptáculos calientes se
hayan enfriado completamente o los receptáculos fríos se hayan
drenado.
3. Limpie el exterior de la unidad con un paño húmedo y limpio.
4. No emplee materiales abrasivos, limpiadores que rayen ni esponjas
metálicas para limpiar la unidad, ya que pueden dañar el acabado.
5. Elimine totalmente los restos de detergente o limpiadores químicos
suaves, ya que los residuos podrían corroer la supercie de la
unidad.
Verique que el voltaje de la unidad coincida con el voltaje nominal
indicado en la placa identicatoria. Si no es así, pida a personal
eléctrico calicado que instale el suministro de voltaje correcto.
ADVERTENCIA
Peligro de descarga eléctrica.
Evite que ingrese agua o cualquier otro tipo de
líquido al interior de la unidad, ya que ello podría
causar una descarga eléctrica.
Servicio y reParación
Este artefacto no tiene piezas que puedan ser reparadas por el usuario. Para evitar lesiones o daños materiales graves, no trate de reparar la unidad ni
reemplazar un cable eléctrico por su cuenta. No envíe las unidades directamente a The Vollrath Company. Comuníquese con el servicio de reparación
profesional calicado que se menciona a continuación.
Servicio de reparaciones de VOLLRATH • 1-800-628-0832
Al comunicarse con el centro del servicio de reparación profesional autorizado, esté listo para proporcionar el número de modelo, número de serie y el
comprobante de compra que muestre la fecha en que adquirió la unidad.
6
Manual del operador
Page 19

Equipo AffordAblE portAblE pArA bAnquEtEs
diagrama de caBleado ~ 120 voltioS, 3 a 4 recePtáculoS calienteS
Luces
opcionales
NEGRO
BLANCO
VERDE
120V
3-4 receptáculos
calientes
20A Fusible
Interruptor
de
potencia
Interruptor
de iluminación
diagrama de caBleado ~ 120 voltioS, 3 a 4 recePtáculoS calienteS con relé
Luz,
250W
máx
Control
de baja
temp.
Interrup.,
nivel de
agua bajo
Interrup.
limitador
alto
Elemento
calefactor
Receptáculo
núm. 2
Luz,
nivel de
agua bajo
Receptáculo
núm. 2
Receptáculo
núm. 3
Recep. 4
ESPAÑOL
Luces
opcionales
NEGRO
BLANCO
VERDE
120V 700W
4 receptáculos
calientes
Interruptor
de iluminación
20A Fusible
Interruptor
de
potencia
Luz,
250W
máx
Control
de baja
temp.
Interrup.,
nivel de
agua bajo
Interrup.
limitador
alto
Elemento
calefactor
Receptáculo
Relé
núm. 2
Luz,
nivel de
agua bajo
Receptáculo
núm. 2
Receptáculo
núm. 3
Recep. núm. 4
Manual del operador
7
Page 20

Equipo AffordAblE portAblE pArA bAnquEtEs
diagrama de caBleado ~ 120/208-240 voltioS, 3 a 4 recePtáculoS calienteS
Luces
opcionales
NEGRO
BLANCO
VERDE
120V 700W
4 receptáculos
calientes
Interruptor
de iluminación
20A Fusible
Interruptor
de
potencia
Luz,
250W
máx
Control
de baja
temp.
Interrup.,
nivel de
agua bajo
Interrup.
limitador
alto
Elemento
calefactor
Receptáculo
Relé
núm. 2
Luz,
nivel de
agua bajo
Receptáculo
núm. 2
Receptáculo
núm. 3
Recep. núm. 4
8
Manual del operador
Page 21

Equipo AffordAblE portAblE pArA bAnquEtEs
notaS
ESPAÑOL
Manual del operador
9
Page 22

Equipo AffordAblE portAblE pArA bAnquEtEs
cláuSula de garantía de the vollrath co. l.l.c.
The Vollrath Company L.L.C. garantiza los productos que fabrica y distribuye contra defectos en materiales y fabricación por un período de un año, salvo según se especica a
continuación: La garantía dura por 12 meses a partir de la fecha de instalación original. (Recibo de usuario nal)
1. Compresores de refrigeración – período de garantía de 5 años.
2. Repuestos – período de garantía de 90 días.
3. Sartenes y baterías de cocina recubiertas – período de garantía
de 90 días.
4. Sistema de remachado EverTite™ – la garantía cubre los
remaches sueltos solamente, para siempre.
5. Tiras calentadoras Cayenne® – período de garantía de 1 año
más 1 año adicional para las piezas del elemento calefactor
solamente.
6. Estufas de inducción serie Ultra y Profesional – período de
garantía de 2 años.
7. Estufas de inducción Mirage y serie Comercial – período de
garantía de 1 año.
8. Estaciones de trabajo ServeWell® a inducción – período de
garantía de un año para la mesa de la estación de trabajo y 2
años para los quemadores de inducción.
9. Rebanadoras – período de garantía de 10 años para los
engranajes y 5 años para las correas.
10. Batidoras – período de garantía de 2 años.
11. Se ofrecen garantías extendidas al momento de la venta.
12. Batidoras de Boxer – intercambio por 1 año.
13. Productos Vollrath – Redco – período de garantía de 2 años.
14. Líneas de productos Optio/Arkadia – período de garantía de
90 días.
15. Todos los productos no adherentes (por ejemplo sartenes y
supercies) tienen una garantía de 90 días para las supercies
no adherentes.
ESTA GARANTÍA REEMPLAZA A TODAS LAS DEMÁS GARANTÍAS, EXPRESAS O IMPLÍCITAS, INCLUYENDO GARANTÍAS IMPLÍCITAS
DE COMERCIABILIDAD E IDONEIDAD PARA UN FIN O USO EN PARTICULAR
Todos los productos de la colección Jacob’s Pride®,
incluyendo los siguientes, tienen garantía vitalicia:
• Porcionadores de una sola pieza certicados
por NSF
• Utensilios Spoodle® certicados por NSF
• Cucharas altamente resistentes con mango
ergonómico certicadas por NSF
• Cucharas para servir altamente resistentes
certicadas por NSF
• Volteadores de servicio pesado con mango
ergonómico
• Tenazas de una sola pieza*
• Cucharones de una sola pieza altamente
resistentes*
Artículos vendidos sin garantía:
• Cuchillos para moledoras de carne
• Bombillas en hornos de convección y
exhibidores de comida caliente
• Sellos para puertas de hornos
• Vidrio para puertas de hornos
• Vidrio para exhibidores de comida caliente/vitrinas de presentación
• Calibración e instalación de equipos a gas
• Hojas de rebanadora/cortadora
(preparación en sobremesa) –
Redco y Vollrath
• Batidores con mango de nylon
• Espumaderas de una sola pieza
• Baterías de cocina Tribute®, Intrigue®
y Classic Select®*
*La garantía de Jacob’s Pride® no cubre los
revestimientos Kool-Touch® no adherentes ni los
mangos de silicona.
A menos que se indique lo contrario a continuación, la única responsabilidad de The Vollrath Company LLC y la única solución para el comprador, en caso de violación de garantía,
The Vollrath Company LLC reparará o, a su criterio, reemplazará el producto defectuoso:
• Para los compresores de refrigeración y el segundo año de garantía para las batidoras y tiras calentadoras Cayenne
®
, The Vollrath Company LLC proporcionará la pieza reparada o el repuesto solamente; y el comprador asumirá la responsabilidad por todos los gastos de mano de obra en que se incurra en la
reparación o reemplazo.
• Para obtener el servicio de garantía, el comprador debe devolver a The Vollrath Company LLC todo producto (que no sea el equipo a gas instalado
permanentemente) que pese menos de 50 kg (110 lbs.) o que se encuentre fuera de un radio de 80 km (50 miles) de un técnico de servicio certicado por
The Vollrath Company LLC para efectuar reparaciones. Si no es posible comunicarse con un técnico de Vollrath, en el sitio web encontrará los puntos de
contacto para obtener servicio. (En el catálogo de productos encontrará los pesos y tamaños de los productos).
• No se ofrece ninguna solución para los productos dañados debido a accidente, descuido, instalación incorrecta, falta de conguración o supervisión correctas cuando era necesario, negligencia, uso incorrecto, instalación u operación contraria a las instrucciones de instalación y operación u otras causas
que estén relacionadas con defectos de mano de obra o fabricación. Si el cliente lo solicita, The Vollrath Company LLC reparará y o reemplazará dichos
productos a un precio razonable.
• No se ofrece ninguna solución para las rebanadoras cuya hoja no se haya alado (en el manual del propietario encontrará las instrucciones para alarla).
• No se ofrece ninguna solución para las batidoras dañadas al cambiar velocidades con la unidad en marcha o al sobrecargarla, ambos casos determinados
por un técnico certicado de Vollrath
• El trabajo de garantía debe contar con la aprobación previa de The Vollrath Company LLC. Consulte las instrucciones de operación y seguridad de cada
producto para ver los procedimientos de reclamos bajo garantía.
• No se ofrece solución para los productos devueltos que se determine que son aceptables según su especicación.
• No se ofrece ninguna solución bajo una garantía que no esté inscrita según se exige a continuación.
LIMITACIÓN DE GARANTÍA:
THE VOLLRATH COMPANY LLC NO SERÁ RESPONSABLE DE DAÑOS INCIDENTALES O CONSECUENTES DE NINGÚN TIPO,
QUE SE BASEN EN NEGLIGENCIA U OTRO AGRAVIO, VIOLACIÓN DE GARANTÍA O CUALQUIER OTRA TEORÍA.
10
Manual del operador
Page 23

Equipo AffordAblE portAblE pArA bAnquEtEs
proCeDimiento De garantía:
Para todos los servicios de garantía, se requiere el proceso e información siguientes:
• Todos los reclamos de garantía se inician llamando a la línea de servicio de asistencia técnica de Vollrath (800-628-0832).
• Un profesional del servicio técnico se encargará de diagnosticar los problemas y proporcionará detalles sobre la solución correspondiente.
• Nombre y teléfono de la persona que llama
• Nombre de la empresa, calle, ciudad, estado y código postal
• Modelo y número de serie
• Fecha de compra y comprobante de compra (recibo)
• Nombre del distribuidor donde se adquirió la unidad
NOTA: Vollrath no aceptará productos que se envíen sin haber seguido correctamente el procedimiento antedicho.
Importante:
PARA EFECTUAR UN RECLAMO Y OBTENER SOLUCIÓN BAJO GARANTÍA, LA GARANTÍA DEBE ESTAR INSCRITA.
inSCriBa Su garantía Hoy miSmo
EN LÍNEA: Inscriba hoy mismo su producto en línea en www.Vollrathco.com
SIN ACCESO A INTERNET: Si no tiene acceso a la red, por favor inscriba la garantía completando el formulario de inscripción correspondiente y envíelo por fax a la ocina de
The Vollrath Co. LLC en el país donde efectuó la compra.
Procedimiento de garantía
nomBre De empreSa
nomBre De ContaCto Clave Correo eleCtróniCo
DireCCión
CiuDaD eStaDo CóDigo poStal
paíS teléfono fax
moDelo número De artíCulo
número De Serie - tipo De operaCion
R Restaurante de servicio limitado R Restaurante de servicio completo R Bares y tabernas R Supermercado
R Minimercado R Recreación R Hotel/hospedaje R Líneas aéreas
R Empresa/industria R Escuela primaria/secundaria R Institutos/universidades R Hospitales
R Cuidado de largo plazo R Residencia de adultos mayores R Fuerzas armadas R Correccionales
Motivo para SeleCCionar nueStro proDuCto
R Aspecto R Restaurante de servicio completo R Disponibilidad R Recomen. del vendedor
R Facilidad de operación R Versatilidad de uso R Precio R Marca
¿le guStaría reCiBir nueStro Completo Catálogo y permaneCer en nueStra liSta De Correo? R Sí R No
ESPAÑOL
Manual del operador
11
Page 24

The Vollrath Company, L.L.C.
1236 North 18th Street
Sheboygan, WI 53081-3201
U.S.A.
Tel. de servicio: 800.628.0832
Fax de servicio: 920.459.5462
Canada Service: 800.695.8560
www.vollrathco.com
Teléfono: 800.628.0830
Fax: 800.752.5620
© 2010 The Vollrath Company, L.L.C.
Page 25

FRANÇAIS
Manuel d’utilisation
ÉQUIPEMENT MOBILE AFFORDABLE PORTABLE DELUXE
ÉQUIPEMENT MOBILE AFFORDABLE PORTABLE STANDARD
Stations plats chauds (Standard ou Deluxe)
Stations froides réfrigérées
Stations froides non réfrigérées
Stations utilitaires
Station pour caissier
Merci d’avoir acheté cet appareil Affordable Portable Vollrath pour buffet. Avant d’utiliser cet appareil, lisez et familiarisez-vous avec le mode d’emploi
et les consignes d’utilisation qui suivent. CONSERVEZ CES INSTRUCTIONS POUR RÉFÉRENCE ULTÉRIEURE. Conservez l’emballage et le carton
d’origine. Ils devront être réutilisés pour expédier l’appareil si une réparation est nécessaire.
Réf. 08014-3 FR Rév. 07/01
Page 26

Équipement mobile AffordAble portAble
conSigneS de Sécurité
déBallage et inStallation initiale
Enlevez avec précaution les caisses et le matériel d’emballage de l’appareil.
Pour garantir un fonctionnement sûr, lisez les avertissements
suivants et comprenez leur signication. Ce manuel contient
des consignes de sécurité, présentées ci-dessous. Lisez-les
attentivement.
Jetez tout le matériel d’emballage en respectant l’environnement.
cordon électrique (certainS modèleS)
Dégagez le cordon d’alimentation de l’endroit où il a été xé pour
l’expédition. Il est généralement enroulé à l’intérieur de l’armoire.
AVERTISSEMENT
Un avertissement indique la présence d’un danger qui peut causer
des blessures graves, un décès ou des dégâts matériels importants
s’il est ignoré.
REMARQUE :
Lors du déplacement ou du transport de cet appareil, veillez à ne pas
abîmer le cordon électrique.
éclairage (certainS modèleS)
ATTENTION
Une mise en garde indique la présence d’un danger qui causera ou
pourra causer des blessures mineures ou des dégâts matériels si elle
est ignorée.
REMARQUE
Une remarque signale des informations importantes sur l’installation,
l’utilisation et la maintenance mais ne présentant pas de danger.
Pour votre sécurité !
Ces consignes de sécurité doivent être suivies à tout moment sous
peine de blessures.
Pour réduire le risque de blessures et d’endommagement de l’appareil :
Branchez l’appareil uniquement sur une prise de terre correspondant à
la tension nominale de la plaque signalétique.
Cet appareil doit uniquement être utilisé en position horizontale.
Débranchez l’appareil et laissez-le refroidir avant de le nettoyer ou de
le déplacer.
Ne vaporisez pas les commandes ou l’extérieur de l’appareil avec des
liquides ou des produits nettoyants.
Débranchez l’appareil lorsque vous ne comptez pas l’utiliser.
Tenez les plaques à induction et leur cordon d’alimentation à l’écart des
ammes nues, des brûleurs électriques ou d’une chaleur excessive.
N’utilisez pas l’appareil sans le surveiller.
Surveillez de près les appareils utilisés dans des lieux publics et/ou à
proximité d’enfants.
N’utilisez pas de bacs à aliments de plus de 10 cm (4 po) de
profondeur.
N’utilisez pas l’appareil s’il a été endommagé ou s’il fonctionne mal.
Ne placez aucun objet derrière les panneaux d’admission ou
d’évacuation d’air.
Ne placez aucun poids sur les commandes.
N’utilisez pas le compartiment chaud sans eau.
Si un éclairage est utilisé, il est recommandé d’utiliser des lampes revêtues
de plastique ou de type équivalent pour réduire le risque de bris.
inStallation du Pare-haleine (certainS modèleS)
Certains modèles sont expédiés avec un pare-haleine non installé. Pour
installer le pare-haleine, procédez comme suit :
1. Installez les montants du pare-haleine (A) aux goujons (B) en les xant
Figure 1. Installation du pare-haleine
avec les écrous borgnes (C), comme illustré. Voir la gure 1. Répétez
pour les quatre montants.
A
C
F
E
C
A
A
B
C
A
B
B
D
C
G
C
2
fonction et oBjet
Cet appareil a été conçu pour maintenir les aliments aux températures de
service adéquates. Les stations pour aliments chauds ne sont pas prévues
pour la cuisson d’aliments crus ou la remise en température de plats
préparés. Les stations pour aliments froids ne sont pas prévues ou conçues
pour refroidir ou rafraîchir les aliments. Les aliments doivent être préparés
et placés dans les stations pour aliments aux températures correctes de
service.
2. Installez le tube-support du pare-haleine (D) entre les montants (A) en
les xant avec les écrous borgnes (C), comme illustré. Reprenez de
l’autre côté.
3. Installez la protection du pare-haleine (E) en la xant avec les vis (F) et
les écrous borgnes (C). Reprenez aux quatre points de montage.
4. Installez la protection du pare-haleine (G) au tube-support (D) les xant
avec les écrous borgnes (C), comme illustré. Reprenez de l’autre côté.
Manuel d’utilisation
Page 27

Équipement mobile AffordAble portAble
inStallation
Cet appareil doit uniquement être utilisé sur une surface horizontale. Si
CommanDeS De Station pour alimentS CHauDS Deluxe
et moDe D’emploi
cet appareil a des commandes et des trous d’évacuation, ils doivent être
accessibles à tout moment de l’utilisation. Si l’appareil a un évent, celui-ci
doit être dégagé pour permettre la circulation d’air.
REMARQUE :
Ne déplacez pas l’appareil en poussant ou tirant sur le pare-haleine.
Il doit y avoir un dégagement minimum de 61 cm (24 po) entre les
surfaces pleines (un côté) et les modèles chauffants (deux côtés).
Il doit y avoir un dégagement minimum de 61 cm (24 po) entre les
évents et toute surface pleine pour les modèles à évents.
Une circulation d’air sufsante doit être assurée autour de l’appareil.
Une circulation d’air insufsante risque d’entraîner la surchauffe de
l’appareil.
mode d’emPloi
AVERTISSEMENT
Risque de brûlure.
Ne touchez pas les surfaces de chauffe, le liquide
ou les aliments quand l’appareil chauffe ou
fonctionne.
Les aliments, la vapeur et les liquides chauds peuvent causer des
brûlures. Laissez refroidir le liquide, les bacs à eau et les plateaux
chauds avant manipulation. Utilisez des gants, gants de four ou
Figure 2. Commandes de station pour aliments chauds Deluxe
A
maniques au besoin pour saisir les bacs chauds.
AVERTISSEMENT
Risque d’électrocution.
Empêchez toute inltration d’eau et autres
liquides dans l’appareil. L’inltration de liquide
dans l’appareil risque de causer une électrocution.
N’utilisez pas de cordon d’alimentation
endommagé.
Ne remplissez pas trop les compartiments, les bacs ou les
plateaux. Du liquide risque d’entrer en contact avec les composants
électriques et de causer un court-circuit ou une décharge
électrique. Débranchez l’appareil avant toute maintenance, vidange
ou retrait des bacs à eaux et plateaux. Ne vaporisez pas d’eau
ou de produits nettoyants. N’utilisez pas l’appareil si le cordon
d’alimentation est abîmé ou a été modié.
B
C
D
E
D
D
A
F
B
0
1
I
2
3
4
5
6
E
1
0
9
8
7
H
C
G
Interrupteur de marche/arrêt (ON/OFF) Placez l’interrupteur en
position relevée pour mettre en marche. Placez l’interrupteur en
position abaissée pour arrêter. L’interrupteur s’allume quand il
est en position Marche.
PORTE D’ACCÈS au robinet de vidange. Ouvrez ou enlevez
pour accéder au robinet de vidange.
ROBINET DE VIDANGE. Permet de vider l’eau du ou des
compartiments.
REPÈRES DE NIVEAU D’EAU. Permet d’indiquer le niveau
d’eau correct.
CADRAN DU THERMOSTAT. Permet de régler la température
du bac. Plus le nombre est élevé, plus la température est haute,
et inversement. À la position 0, l’appareil est arrêté.
FRANÇAIS
F
POINT DE RÉFÉRENCE DU CADRAN. Permet de montrer à
quelle température le thermostat est réglé.
G
VOYANT DE NIVEAU D’EAU BAS. S’allume quand le
compartiment a besoin d’eau. Si le voyant s’allume en cours
d’utilisation, de l’eau fraîche et claire doit être ajoutée au
compartiment.
H
ROBINET DE VIDANGE EN POSITION FERMÉE. Quand le
robinet est dans cette position, le trou d’évacuation est fermé.
I
ROBINET DE VIDANGE EN POSITION OUVERTE. Quand le
robinet est dans cette position, le robinet de vidange est ouvert.
Manuel d’utilisation
3
Page 28

Équipement mobile AffordAble portAble
1. Ouvrez la porte d’accès au robinet (B) et assurez-vous que le robinet de
vidange (C) est en position fermée (H). Voir la gure 2.
A
Interrupteur de marche/arrêt. Placez l’interrupteur en position
2. Remplissez le compartiment d’eau fraîche et claire jusqu’au repère de
niveau correct (D). Le niveau correct se situe à 2,5 cm (1 po) environ. Ne
remplissez pas trop.
3. Branchez le cordon d’alimentation sur une prise de terre indiquant la
tension nominale de la plaque signalétique.
B
PORTE D’ACCÈS au robinet de vidange. Ouvrez ou enlevez
4. Préchauffez l’eau dans les compartiments en les couvrant avec des
bacs à aliments vides ou des couvercles. Mettez l’interrupteur (A) en
position Marche ou tournez le thermostat (E) à la température maximum.
C
ROBINET DE VIDANGE. Permet de vider l’eau du ou des
Préchauffez pendant 45 minutes. L’eau est portée à ébullition.
5. Enlevez les bacs à aliments vides ou les couvercles. Installez des bacs
prévus pour contenir des aliments chauds et chargés d’aliments chauds
D
ROBINET DE VIDANGE EN POSITION FERMÉE. Quand le
dans les compartiments préchauffés. N’utilisez pas de bacs à aliments
de plus de 10 cm (4 po) de profondeur.
E
6. Placez les couvercles sur les bacs à aliments. Laissez les couvercles en
ROBINET DE VIDANGE EN POSITION OUVERTE. Quand le
place jusqu’à ce que vous serviez les aliments.
7. Réglez le ou les thermostats (E) pour maintenir les aliments à la
température correcte de maintien au chaud pour préserver la sécurité.
Vériez régulièrement la température des aliments.
REMARQUE :
Surveillez de près la température des aliments pour maintenir la
sécurité des aliments. Les services d’hygiène publique des ÉtatsUnis préconisent le maintien des aliments chauds à 60 ºC (140 ºF)
minimum pour éviter la prolifération des bactéries. Maintenez l’eau
et la température au niveau correct. Enlevez périodiquement le bac
contenant les aliments et vériez le niveau d’eau. Ajoutez de l’eau au
besoin.
8. Quand vous aurez ni d’utiliser l’appareil : Mettez le ou les thermostats
(E) à 0, mettez l’interrupteur (A) en position Arrêt et débranchez
l’appareil. Lorsque vous retirez des bacs à aliments chauds de l’appareil,
munissez-vous de gants de four ou de maniques pour vous protéger les
mains.
9. Laissez complètement refroidir l’appareil et l’eau.
10. Ouvrez la porte d’accès (B).
11. Placez un récipient adapté juste sous le robinet de vidange (C). Ouvrez
(I) le robinet de vidange (C) en surveillant le débit de liquide qui nit dans
le récipient. Usez de prudence pour éviter les déversements pouvant
1. Ouvrez la porte d’accès au robinet (A) et assurez-vous que le robinet de
vidange est en position fermée (D). Voir la gure 2.
2. Branchez le cordon d’alimentation sur une prise de terre indiquant la
tension nominale de la plaque signalétique.
3. Placez l’interrupteur (A) en position Marche. Cet appareil n’a pas de
thermostat. Laissez fonctionner l’appareil pendant 30 minutes environ.
Pour la meilleure performance en utilisant de la glace avec cet appareil,
laissez fonctionner l’appareil pendant 2 heures environ avant d’ajouter
de la glace. Ceci permettra à la glace de rester solide.
4. Placez les bacs contenant les aliments correctement réfrigérés dans
l’appareil prérefroidi.
5. Vériez régulièrement la température des aliments.
REMARQUE :
Surveillez de près la température des aliments pour maintenir la
sécurité des aliments. Les services d’hygiène publique des États-Unis
préconisent le maintien des aliments chauds à 5 ºC (41 ºF) maximum
pour éviter la prolifération des bactéries.
causer des glissades. Fermez (H) le robinet de vidange (C) avant que
le récipient ne soit plein. Jetez l’eau de vidange. Cette procédure devra
peut-être être répétée.
12. Fermez (H) le robinet de vidange (C) et fermez la porte d’accès (B).
CommanDeS De Station réfrigérée Deluxe et moDe D’emploi
A
6. Une fois que vous aurez ni d’utiliser l’appareil, mettez l’interrupteur en
position Arrêt.
7. Ouvrez la porte d’accès (B).
8. Si l’appareil doit être vidé de son eau, placez un récipient adapté juste
sous le robinet de vidange (C). Ouvrez (E) le robinet de vidange (C) en
surveillant le débit de liquide qui nit dans le récipient. Usez de prudence
pour éviter les déversements pouvant causer des glissades. Fermez (D)
le robinet de vidange (C) avant que le récipient ne soit plein. Jetez l’eau
de vidange. Cette procédure devra peut-être être répétée.
9. Fermez (D) le robinet de vidange (C) et fermez la porte d’accès (B).
relevée pour mettre en marche. Placez l’interrupteur en position
abaissée pour arrêter. L’interrupteur s’allume quand il est en
position Marche.
pour accéder au robinet de vidange.
compartiments.
robinet est dans cette position, le trou d’évacuation est fermé.
robinet est dans cette position, le robinet de vidange est ouvert.
4
B
E
D
C
Figure 3. Commandes de station pour aliments froids Deluxe
Manuel d’utilisation
Page 29

Équipement mobile AffordAble portAble
CommanDeS De Station pour alimentS CHauDS StanDarD
et moDe D’emploi
A
0
3
○
B
○
2
○
1
CommanDeS De Station non réfrigérée StanDarD et moDe D’emploi
Figure 4. Commandes de station pour aliments chauds Standard
A
CADRAN DU THERMOSTAT. Permet de régler la température
du bac. Plus le nombre est élevé, plus la température est haute,
et inversement. À la position 0, l’appareil est arrêté.
B
VOYANT MARCHE. S’allume quand le compartiment est en
mode Chauffe.
1. Placez les bacs à eau dans l’ouverture du compartiment.
Figure 5. Commandes de station pour aliments froids Standard
A
ROBINET DE VIDANGE. Permet de vider l’eau du ou des
compartiments.
B
ROBINET DE VIDANGE EN POSITION OUVERTE. Quand le
robinet est dans cette position, le trou d’évacuation est ouvert.
2. Remplissez chaque bac de 2 litres d’eau fraîche et claire environ. Ne
remplissez pas trop.
3. Branchez le cordon d’alimentation sur une prise de terre indiquant la
tension nominale de la plaque signalétique.
4. Préchauffez l’eau dans les compartiments en les couvrant avec des bacs
à aliments vides ou des couvercles. Tournez le thermostat (A) au réglage
maximum. Voir la gure 4. Préchauffez pendant 60 minutes.
5. Installez des bacs prévus pour contenir des aliments chauds et chargés
d’aliments chauds dans l’appareil préchauffé. N’utilisez pas de bacs à
aliments de plus de 10 cm (4 po) de profondeur.
6. Placez les couvercles sur les bacs à aliments. Laissez les couvercles en
place jusqu’à ce que vous serviez les aliments.
7. Réglez le thermostats pour maintenir les aliments à la température
correcte de maintien au chaud pour préserver la sécurité. Vériez
C
ROBINET DE VIDANGE EN POSITION FERMÉE. Quand le
robinet est dans cette position, le trou d’évacuation est fermé.
1. Mettez de la glace dans le compartiment non réfrigéré. Pour une
performance optimale, laissez refroidir l’appareil pendant 1 heure environ
avant utilisation.
2. Placez les bacs contenant les aliments correctement réfrigérés dans
l’appareil prérefroidi.
3. Vériez régulièrement la température des aliments.
REMARQUE :
Surveillez de près la température des aliments pour maintenir la
sécurité des aliments. Les services d’hygiène publique des États-Unis
préconisent le maintien des aliments chauds à 41 ºF (5 ºC) maximum
pour éviter la prolifération des bactéries.
régulièrement la température des aliments. Ajustez le thermostat au
besoin.
4. Une fois que vous aurez ni d’utiliser l’appareil, retirez les aliments du
compartiment froid.
REMARQUE :
Surveillez de près la température des aliments pour maintenir la
sécurité des aliments. Les services d’hygiène publique des ÉtatsUnis préconisent le maintien des aliments chauds à 60 ºC (140 ºF)
minimum pour éviter la prolifération des bactéries. Maintenez l’eau
et la température au niveau correct. Enlevez périodiquement le bac
contenant les aliments et vériez le niveau d’eau. Ajoutez de l’eau au
5. Placez un récipient adapté juste sous le robinet de vidange (A) ou sur un
siphon de sol. Ouvrez (B) le robinet de vidange (A) en surveillant le débit
de liquide qui nit dans le récipient. Usez de prudence pour éviter les
déversements pouvant causer des glissades. Fermez (C) le robinet de
vidange (A) avant que le récipient ne soit plein. Jetez l’eau de vidange.
Reprenez cette procédure au besoin.
6. Fermez (C) le robinet de vidange (A).
besoin.
8. Une fois que vous aurez ni d’utiliser l’appareil, mettez le thermostat (A)
à 0 et débranchez l’appareil.
9. Lorsque vous retirez des bacs à aliments chauds de l’appareil,
StationS utilitaireS et StationS pour CaiSSier
Les stations utilitaires et stations pour caissier sont prévues pour la
présentation d’aliments non périssables ou d’équipement.
munissez-vous de gants de four ou de maniques pour vous protéger les
mains.
10. Laissez complètement refroidir l’appareil et l’eau.
11. Enlevez les bacs à eau et jetez l’eau.
A
C
B
FRANÇAIS
Manuel d’utilisation
5
Page 30

Équipement mobile AffordAble portAble
nettoyage
Pour maintenir l’apparence et augmenter la durée de service de la plaque à
induction, nettoyez-la chaque jour.
AVERTISSEMENT
Risque de brûlure.
Ne touchez pas les surfaces de chauffe, le liquide
ou les aliments quand l’appareil chauffe ou
fonctionne.
Les aliments, la vapeur et les liquides chauds peuvent causer des
brûlures. Laissez refroidir le liquide, les bacs à eau et les plateaux
chauds avant manipulation. Utilisez des gants, gants de four ou
maniques au besoin pour saisir les bacs chauds.
Ne vaporisez pas d’eau ou de produits nettoyants. Du liquide risque
d’entrer en contact avec les composants électriques et de causer
un court-circuit ou une décharge électrique.
1. Arrêtez et débranchez l’appareil.
2. Commencez à nettoyer une fois les appareils à compartiments chauds
3. Essuyez l’extérieur de l’appareil avec un chiffon humide propre.
4. N’utilisez pas de produits ou nettoyants abrasifs, ni de tampons
5. Essuyez bien tout résidu de savon doux ou de nettoyants chimiques.
entièrement refroidis ou les appareils à compartiments froids vidés.
récurants pour nettoyer l’appareil sous peine d’endommager la nition.
Les résidus risquent de corroder la surface de l’appareil.
Risque d’électrocution.
Empêchez toute inltration d’eau et autres liquides
dans l’appareil. L’inltration de liquide dans
l’appareil risque de causer une électrocution.
déPannage
Problème La cause en est peut-être Mesure corrective
L’interrupteur ne s’allume pas quand il est
en position Marche.
L’appareil ne chauffe pas à la température
correcte ou à une température élevée.
L’appareil n’est pas branché. Branchez-le.
Tension d’alimentation basse ou
incorrecte.
Vériez si la tension nominale de l’appareil correspond à la
tension d’alimentation. Sinon, demandez à un électricien
qualié d’installer une alimentation de la tension correcte.
Pas d’eau ou niveau d’eau incorrect. Ajoutez de l’eau jusqu’au niveau correct.
AVERTISSEMENT
Sav et réParationS
Cet appareil ne contient aucune pièce réparable par l’utilisateur. Pour éviter toute blessure grave ou tout dommage sévère, n’essayez jamais de réparer
l’appareil ou de remplacer vous-même un cordon d’alimentation endommagé. N’envoyez aucun appareil directement à la Vollrath Company. Contactez le
service de réparation professionnel qualié indiqué ci-dessous.
Service technique VOLLRATH • 1-800-628-0832
Lorsque vous contacterez le service de réparation professionnel, tenez-vous prêt à fournir le numéro de modèle, le numéro de série et le justicatif d’achat
indiquant la date d’achat de l’appareil.
6
Manuel d’utilisation
Page 31

Équipement mobile AffordAble portAble
Schéma de câBlage ~ 120 v 3 - 4 comPartimentS chaudS
Schéma de câBlage ~ 120 v 3 - 4 comPartimentS chaudS avec relaiS
FRANÇAIS
Manuel d’utilisation
7
Page 32

Équipement mobile AffordAble portAble
Schéma de câBlage ~ 120/208-240 v 3 - 4 comPartimentS chaudS
8
Manuel d’utilisation
Page 33

Équipement mobile AffordAble portAble
remarqueS
FRANÇAIS
Manuel d’utilisation
9
Page 34

Équipement mobile AffordAble portAble
garantie de la vollrath co. l.l.c.
La Vollrath Company L.L.C. garantit que les produits qu’elle fabrique et distribue seront dépourvus de vices de matériaux et de fabrication pendant une période d’un an, sauf
dispositions contraires ci-dessous. La garantie court sur 12 mois à partir de la date d’installation initiale. (Reçu de l’utilisateur nal)
1. Compresseurs de réfrigération – La période de garantie est de
5 ans.
2. Pièces détachées – La période de garantie est de 90 jours.
3. Poêles et articles de cuisson à revêtement – La période de
garantie est de 90 jours.
4. Système de rivets EverTite™ – La garantie couvre les rivets
desserrés seulement, à vie.
5. Rampes chauffantes Cayenne® – La période de garantie est de
1 an, plus une période de 1 an supplémentaire sur les pièces
des élément chauffants seulement.
6. Plaques de cuisson à induction Ultra et Professional –
La période de garantie est de 2 ans.
7. Plaques de cuisson à induction Mirage et Commercial –
La période de garantie est de 1 an.
8. Postes de travail à induction ServeWell® – La période de
garantie est de 1 an pour la table et de 2 ans pour les
inducteurs.
9. Trancheurs – La période de garantie est de 10 ans pour les
engrenages et de 5 ans pour les courroies.
10. Mélangeurs – La période de garantie est de 2 ans.
11. Des prolongations de garantie sont disponibles au moment de
la vente.
12. Mélangeurs Boxer – Garantie-échange de 1 an.
13. Vollrath – produits Redco – La période de garantie est de 2 ans.
14. Gammes de produits Optio / Arkadia – La période de garantie
est de 90 jours.
15. Tous les produits anti-adhésifs (poêles et surfaces) – La période
de garantie est de 90 jours pour les surfaces anti-adhésives.
CETTE GARANTIE REMPLACE TOUTE AUTRE GARANTIE, EXPRESSE OU TACITE, Y COMPRIS TOUTE GARANTIE TACITE DE
QUALITÉE MARCHANDE OU D’ADAPTATION À UNE UTILISATION PARTICULIÈRE.
Tous les produits de la collection Jacob’s Pride,® y
compris les suivants, sont assortis d’une garantie à
vie :
• Cuillères à servir une pièce certiées NSF
• Ustensiles Spoodle® certiés NSF
• Cuillères ultra-solides certiées NSF avec
manche ergonomique
• Cuillères à arroser ultra-solides certiées
NSF
• Pelles extra-robustes à manche ergonomique
• Pinces une pièce*
Articles vendus sans garantie :
• Lames de hachoirs à viande
• Ampoules de fours à convection et
• Joints de porte de four
• Vitre de porte de four
• Vitre de vitrine/présentoir d’aliments
• Étalonnage et installation des équipe-
• Lames de trancheuse / découpeuse en
• Louches une pièce extra-robustes*
• Fouets à manche en nylon
• Écumoires une pièce
• Batteries de cuisine Tribute®, Intrigue® et
Classic Select®*
*La garantie Jacob’s Pride® ne couvre pas le
revêtement Kool-Touch®, les revêtements antiadhésifs et les manches en silicone.
présentoirs d’aliments chauds
chauds
ments au gaz
dés (préparation des aliments sur table) –
Redco et Vollrath
Comme seule responsabilité de la Vollrath Company LLC et seul recours de l’acheteur, en cas de violation de garantie, la Vollrath Company LLC réparera ou, au choix, remplacera
le produit ou le composant défectueux, gratuitement, aux exceptions près ci-dessous :
• Pour les compresseurs de réfrigération et la seconde année de garantie sur les rampes chauffantes Cayenne® et les mixeurs, la Vollrath Company LLC
fournira uniquement la pièce de rechange ou réparée et l’acheteur sera responsable de tous les frais de main-d’œuvre encourus pour l’exécution de la
réparation ou du remplacement.
• Pour faire jouer la garantie, l’acheteur devra retourner à la Vollrath Company LLC tout produit (sauf les équipements au gaz à installation permanente) pesant
moins de 50 kg (110 lbs.) ou situé à un rayon de plus de 80 km (50 miles) d’un technicien certié désigné par la Vollrath Company LLC pour effectuer les
réparations sous garantie. Si un technicien Vollrath ne peut être contacté, consultez le site Web pour y trouver un centre de SAV. (Pour le poids et les dimensions du produit, reportez-vous au catalogue de produits.)
• Aucun recours ne sera disponible pour des produits qui ont été endommagés par accident ou négligence, suite à une mauvaise installation, par manque de
supervision ou d’installation adéquate, pour cause d’utilisation, d’installation ou d’utilisation incorrecte contraire aux instructions d’installation et d’utilisation
ou pour d’autres causes ne résultant pas de vices de matériel ou de défauts de fabrication. À la demande de l’acheteur, la Vollrath Company LLC réparera
ou remplacera ces produits pour un prix raisonnable.
• Aucun recours ne sera proposé pour les trancheuses dont la lame n’a pas été affûtée (voir les instructions d’affûtage dans le manuel d’utilisation)
• Aucun recours ne sera proposé pour les mixeurs endommagés suite au changement d’engrenages pendant le fonctionnement ou la surcharge de l’appareil,
comme déterminé par un technicien certié Vollrath.
• Tout travail sous garantie doit être autorisé à l’avance par la Vollrath Company LLC. Pour des détails sur la procédure de réclamation sous garantie, voir le
mode d’emploi et les consignes de sécurité fournies avec chaque produit.
• Aucun recours ne sera proposé pour un produit retourné qui s’avère conforme aux spécications.
• Aucun recours ne sera proposé pour une garantie non enregistrée comme indiqué ci-dessous.
LIMITATION DE RESPONSABILITÉ :
LA VOLLRATH COMPANY LLC NE POURRA ÊTRE TENUE POUR RESPONSABLE DE DOMMAGES INDIRECTS OU ACCESSOIRES DE
TOUTE SORTE, SUR LA BASE D’UNE NÉGLIGENCE OU AUTRE DÉLIT CIVIL, VIOLATION DE GARANTIE OU TOUT AUTRE PRINCIPE.
10
Manuel d’utilisation
Page 35

Équipement mobile AffordAble portAble
proCéDure De garantie
Pour tous les appels de service sous garantie, la procédure et les informations suivantes sont obligatoires :
• Toutes les demandes sous garantie commenceront par un appel à l’assistance technique Vollrath (800-628-0832).
• Un professionnel de l’assistance technique essaiera de diagnostiquer le problème et fournira des détails sur la marche à suivre.
• Numéro de la personne qui appelle
• Adresse, ville et code postal
• Numéros de modèle et de série
• Date et justicaif (reçu) d’achat
• Nom du revendeur chez qui l’appareil a été acheté
REMARQUE : Vollrath n’acceptera pas les produits envoyés si la procédure correcte n’a pas été suivie.
Important :
POUR FAIRE UNE DEMANDE SOUS GARANTIE, VOUS DEVEZ ENREGISTRER VOTRE GARANTIE.
enregiStreZ votre garantie aujourD’Hui
EN LIGNE : Enregistrez votre produit en ligne sans attendre sur www.Vollrathco.com
PAS D’ACCÈS AU WEB : Si vous n’avez pas accès au Web, enregistrez-la en remplissant le formulaire d’enregistrement à envoyer par fax au bureau Vollrath Co. LLC
du pays d’achat.
enregiStrement de la garantie
nom De l’entrepriSe
nom Du prinCipal ContaCt Courriel
aDreSSe
ville provinCe CoDe poStal
payS télépHone fax
moDel numéro D’artiCle
numéro De Série - -
type De l’entrepriSe
R Restaurant à service limité R Restaurant à service complet R Bars et tavernes R Supermarché
R Libre-service R Divertissement R Hôtel/hébergement R Companies aériennes
R Entreprises/industrie R Écols primaires/secondaires R Universités R Hôpitaux
R Soins au long cours R Maison de repos R Armée R Prisons
motif De SéleCtion De notre proDuit
R Apparence R Restaurant à service complet R Disponibilités R Recomman. du vendeur
R Libre-service R Divertissement R Prix R Marque
aimerieZ-vouS reCevoir le Catalogue De noS gammeS ComplèteS et reSter DanS notre fiCHier D’aDreSSeS ? R Oui R Non
FRANÇAIS
Manuel d’utilisation
11
Page 36

The Vollrath Company, L.L.C.
1236 North 18th Street
Sheboygan, WI 53081-3201
U.S.A.
Standard : 800.628.0830
Fax : 800.752.5620
Services techniques : 800.628.0832
Service fax : 920.459.5462
Service Canada : 800.695.8560
© 2010 The Vollrath Company, L.L.C.
 Loading...