

Page 1
Owner'sManual
GLI, Jetta
Edition 01/2021
United States version, model year 2021
Teile-Nr.: 17A012723SG
Print status: 16.09.2020
English USA: 2021.01
V1, R1, USA, en_US
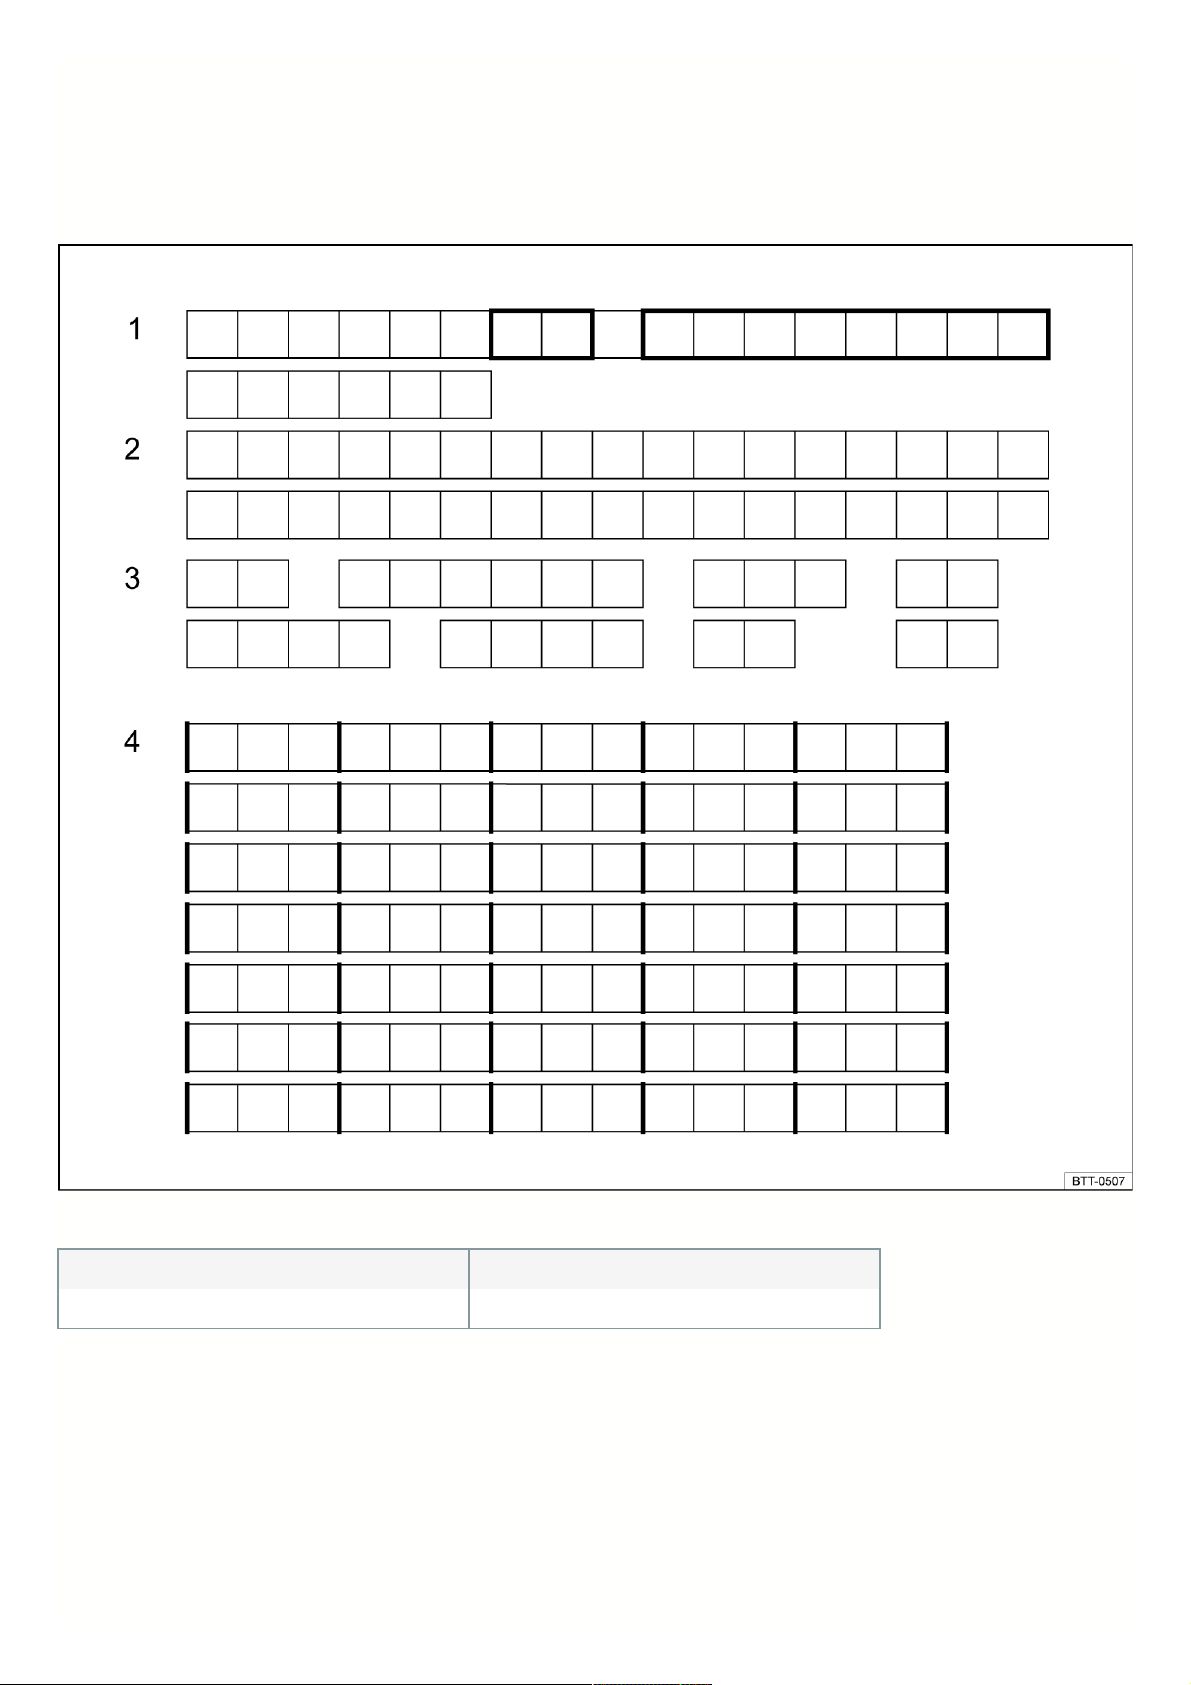
Fig.1Vehicledatalabel.1:VIN;2:Vehiclemodel,engineoutput,transmission;3:Enginecode,transmissioncode,paintnumber,interiorequipment;4:Optional
equipment,PRnumbers.
Delivery inspection was performed on: Date of delivery/first approval (whichever occurs first):
Volkswagen dealer stamp Volkswagen dealer stamp
1
Page 2
Fig.2
Volkswagen AG works constantly to improve all of its products. Due to ongoing vehicle development, changes in design, equipment, and technology are possible at
any time. The information regarding equipment, appearance, performance, dimensions, weights, fuel consumption, standards, and functions of the vehicle is the
information that was available at the time of the editorial deadline for this manual. Some of the equipment and functions may not be available until later or may be
available only in certain countries. Contact your local authorized Volkswagen dealer or authorized Volkswagen Service Facility for more information.
The vehicle pictured on the cover may be equipped with special equipment that is obtained for an additional price and may only be available in certain markets. An
authorized Volkswagen dealer can inform you about differences in your particular country. Subject to change. No legal obligations or commitments may be derived
from the information, illustrations, and descriptions in this manual.
No reprint, reproduction, or translation of this Manual is permitted, even in excerpts, without the express written consent of Volkswagen AG.
Volkswagen AG expressly reserves all rights under applicable copyright law. Subject to change.
© 2021 Volkswagen AG
2
Page 3

WethankyouforbuyingaVolkswagenvehicle
This Volkswagen vehicle is equipped with advanced technology incorporating a number of convenience features for you to enjoy in your daily driving.
Please carefully read and follow the information in this Owner's Manual. It will help you to become more familiar with your vehicle and to be able to
recognize and avoid hazardous situations for you and others.
If you have questions about your vehicle or if you believe that the manual is not complete, please contact your authorized Volkswagen dealer or your authorized
Volkswagen Service Facility. Authorized Volkswagen dealers and authorized Volkswagen Service Facilities always welcome your questions, suggestions, and
constructive criticism.
We hope you enjoy driving your vehicle and we wish you safe and pleasant motoring.
WARNING
Please note the important safety information about using a child restraint system in the front passenger seat ⇒ Introduction
3
Page 4

AboutthisOwner'sManual
This Owner's Manual is valid for all models and versions of your Volkswagen. The Owner's Manual describes all equipment and models without indicating special
equipment or model versions. Equipment that your vehicle may not have or that may only be available in some markets will be described. For more detailed
information on your vehicle equipment, refer to the sales documents or contact an authorized Volkswagen dealer or authorized Volkswagen Service Facility.
This Owner's Manual describes a passenger vehicle.
All information in this Owner's Manual was correct at the time of printing. Due to continuous vehicle development, there may be differences between your vehicle
and the information in this Owner's Manual. No legal commitment can be derived from the information, illustrations, or descriptions in this manual.
Make sure the entire Owner’s Manual is in the vehicle if you sell or lend the car. Volkswagen also recommends resetting the Infotainment system to its factory
settings in order to delete all personal data.
At the end of this manual, you will find an alphabetical index.
A list of abbreviations at the end of this manual explains technical abbreviations and terminology.
Directions (left, right, front, back) are in reference to the driving direction unless noted otherwise.
Illustrations are only for orientation and are simply used to provide a visual display of descriptions and instructions.
This Owner's Manual was created for left-hand drive vehicles. For vehicles with right-hand drive steering , controls are sometimes arranged differently from
what is shown in the illustrations or described in the text.
The display in miles instead of kilometers or mph instead of km/h is determined by the versions of the instrument cluster and Infotainment system that are
installed, which varies depending on the country where the vehicle is sold.
Brief definitions are placed in front of some sections in this manual in a different color to summarize the function and usage of a system or equipment. Detailed
information about the systems and equipment along with their properties, conditions, and system limitations is included in the associated sections.
Technical modifications to the vehicle or safety-critical matters that may have occurred after the print date will be included in a supplement to the Manual.
To improve readability, plural pronouns are used here to refer to a singular subject of any gender.
Owner'sManualmaterials:
Owner's Manual
Supplement (optional)
Other documents
4
Page 5
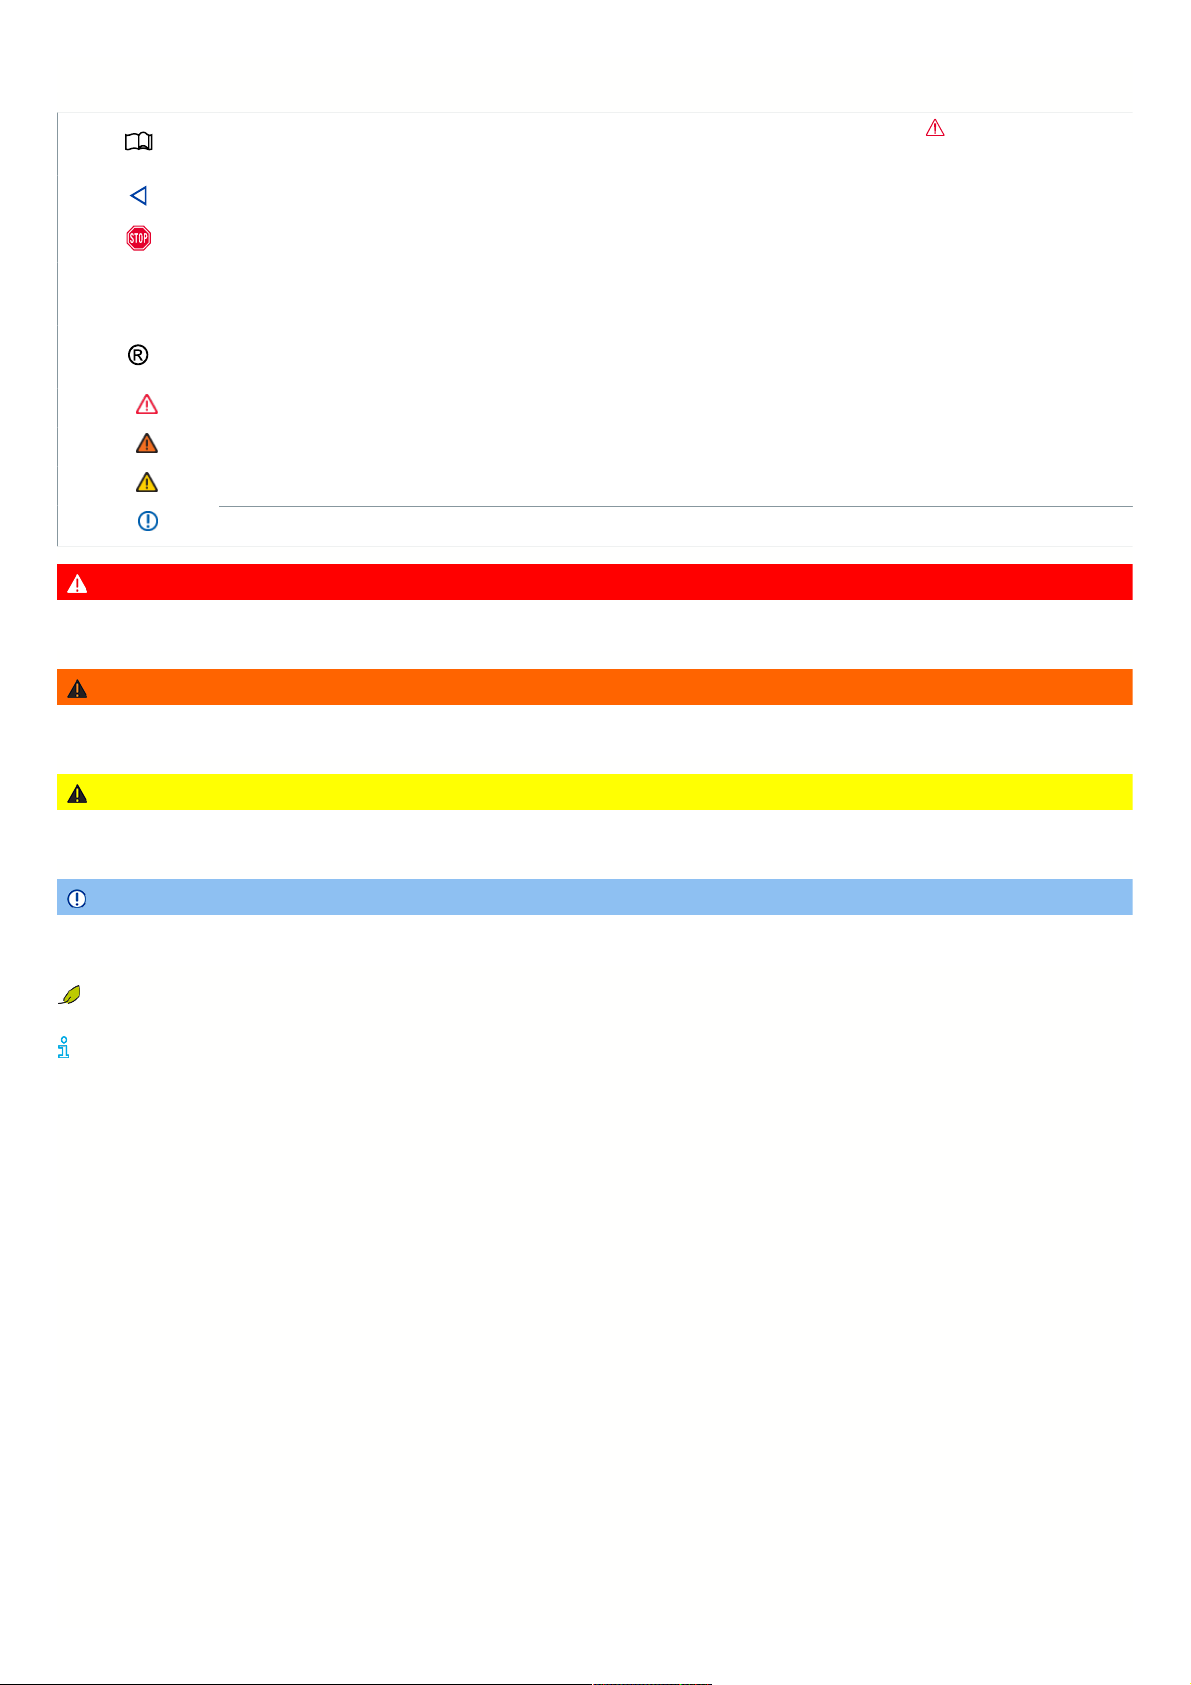
Explanationofsymbols
Indicates a reference to a section within a chapter containing important information and safety warnings that should always be
heeded.
The arrow indicates the end of a section.
This symbol indicates situations where the vehicle must be stopped as quickly as possible.
TM
The symbol means “Trademark” and indicates a recognized but not (yet) officially registered trademark. However, the absence of this
symbol does not constitute a waiver of any rights associated with intellectual property.
This symbol indicates a registered trademark. However, the absence of this symbol does not constitute a waiver of any rights associated
with intellectual property.
⇒
Symbols of this type refer to warnings in the same section or on the specified page, pointing out possible risks that can cause accidents
and personal injuries and how to help prevent them.
⇒
⇒
⇒
Cross-reference to a warning of potential property damage, in the same section or on the specified page.
DANGER
Texts with this symbol contain information regarding hazardous situations which will cause death or severe injuries if ignored.
WARNING
Texts with this symbol contain information regarding hazardous situations which could cause death or severe injuries if ignored.
CAUTION
Texts with this symbol contain information regarding hazardous situations which could cause minor to moderate injuries if ignored.
NOTICE
Texts with this symbol contain information regarding situations which could cause vehicle damage if ignored.
Texts with this symbol contain information about the environment and how you can help to protect it.
Textswiththissymbolcontainsupplementaryinformation.
5
Page 6
Vehicleoverviews
Frontview
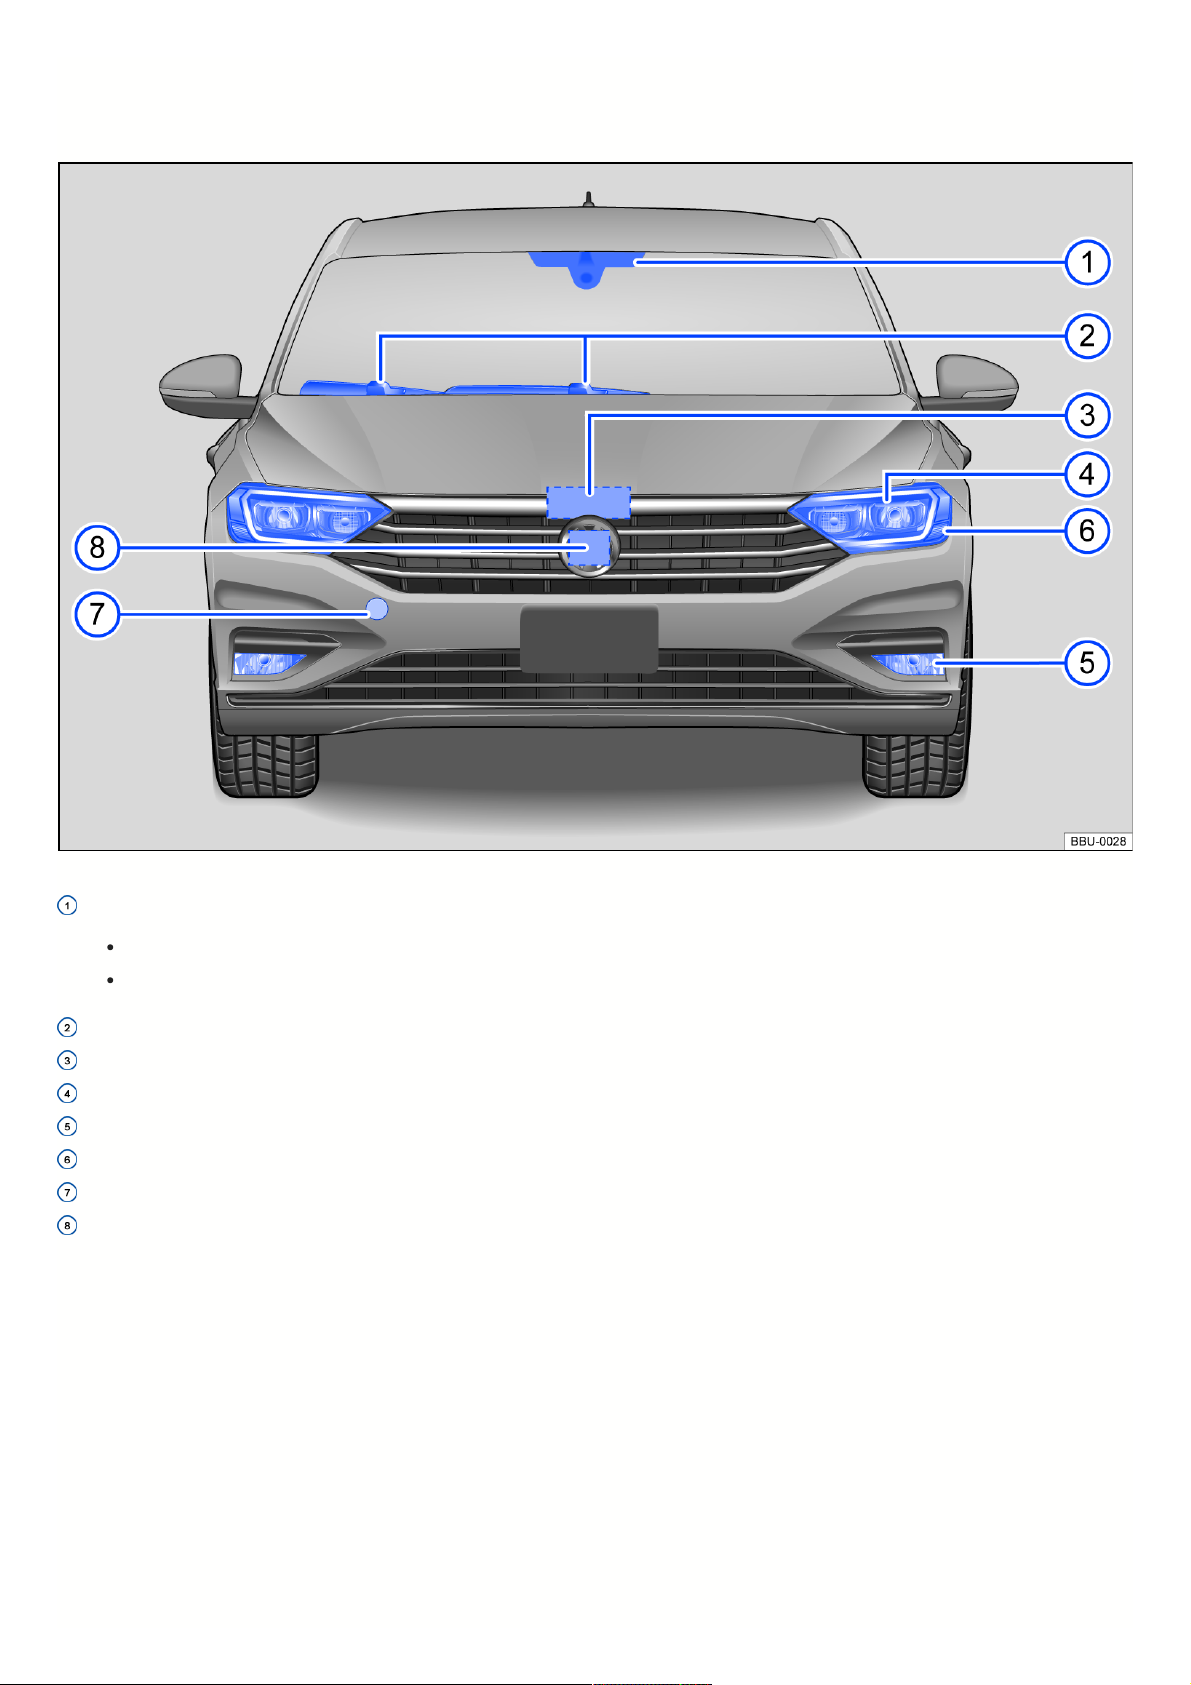
Fig.3Vehiclefrontoverview.
Interior rearview mirror:
With camera window for assistance systems ⇒ Exterior care and cleaning
With rain/light sensor in the interior rearview mirror area ⇒ Rain/light sensor , ⇒ Exterior care and cleaning
Windshield wiper ⇒ Operating the windshield wiper lever
Opening lever for the hood ⇒ Opening and closing the hood
Headlights ⇒ Exterior lighting
Lights in the bumper ⇒ Exterior lighting
Marker light
Behind a cover: mount for towing eye ⇒ Towing
Behind the Volkswagen emblem: radar sensor for assistance systems ⇒ Exterior care and cleaning
Sideview
6
Page 7
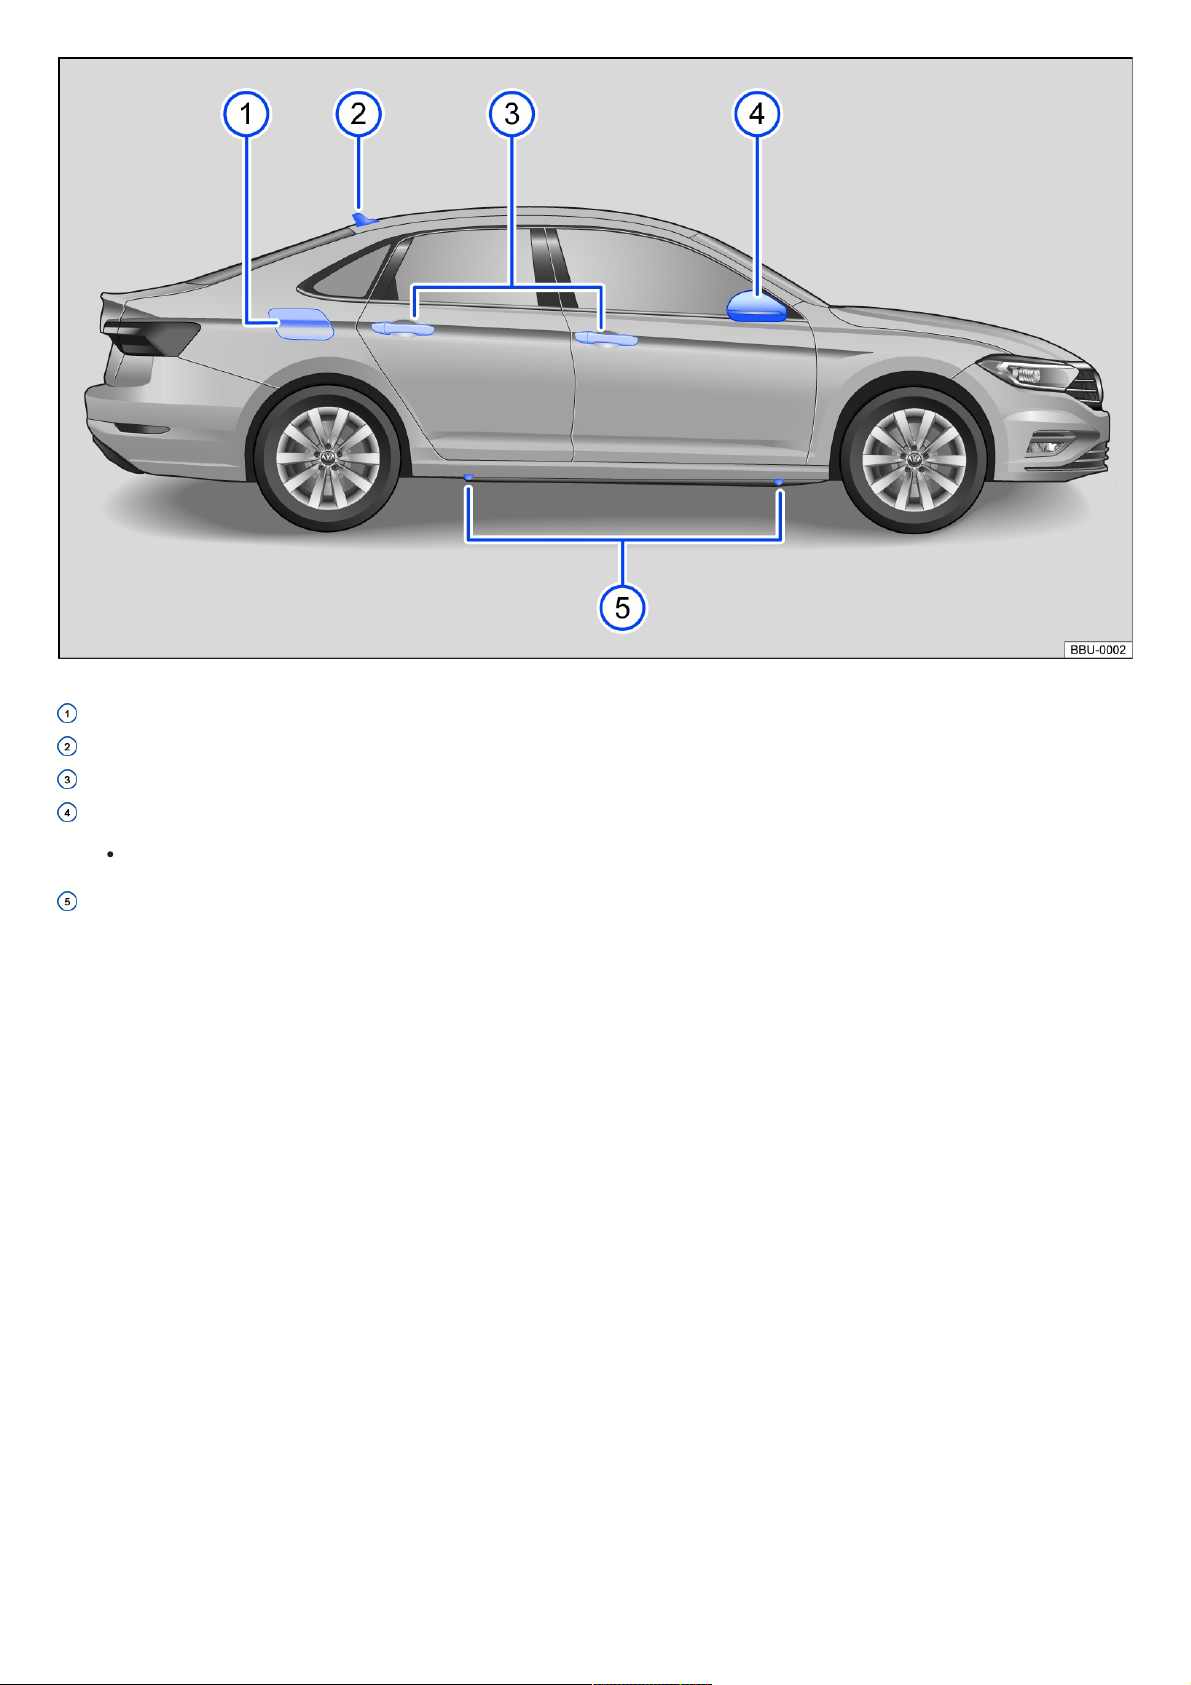
Fig.4Overviewofrightsideofthevehicle.
Fuel filler flap ⇒ Fuel types and refueling
Roof antenna ⇒ Infotainment system and aerials
Door handles ⇒ Doors and central locking button
Outside mirrors ⇒ Outside mirrors
With “Blind Spot” Monitor display ⇒ “Blind Spot” Monitor
Mounting points for the vehicle jack ⇒ Wheel change
Rearview
7
Page 8
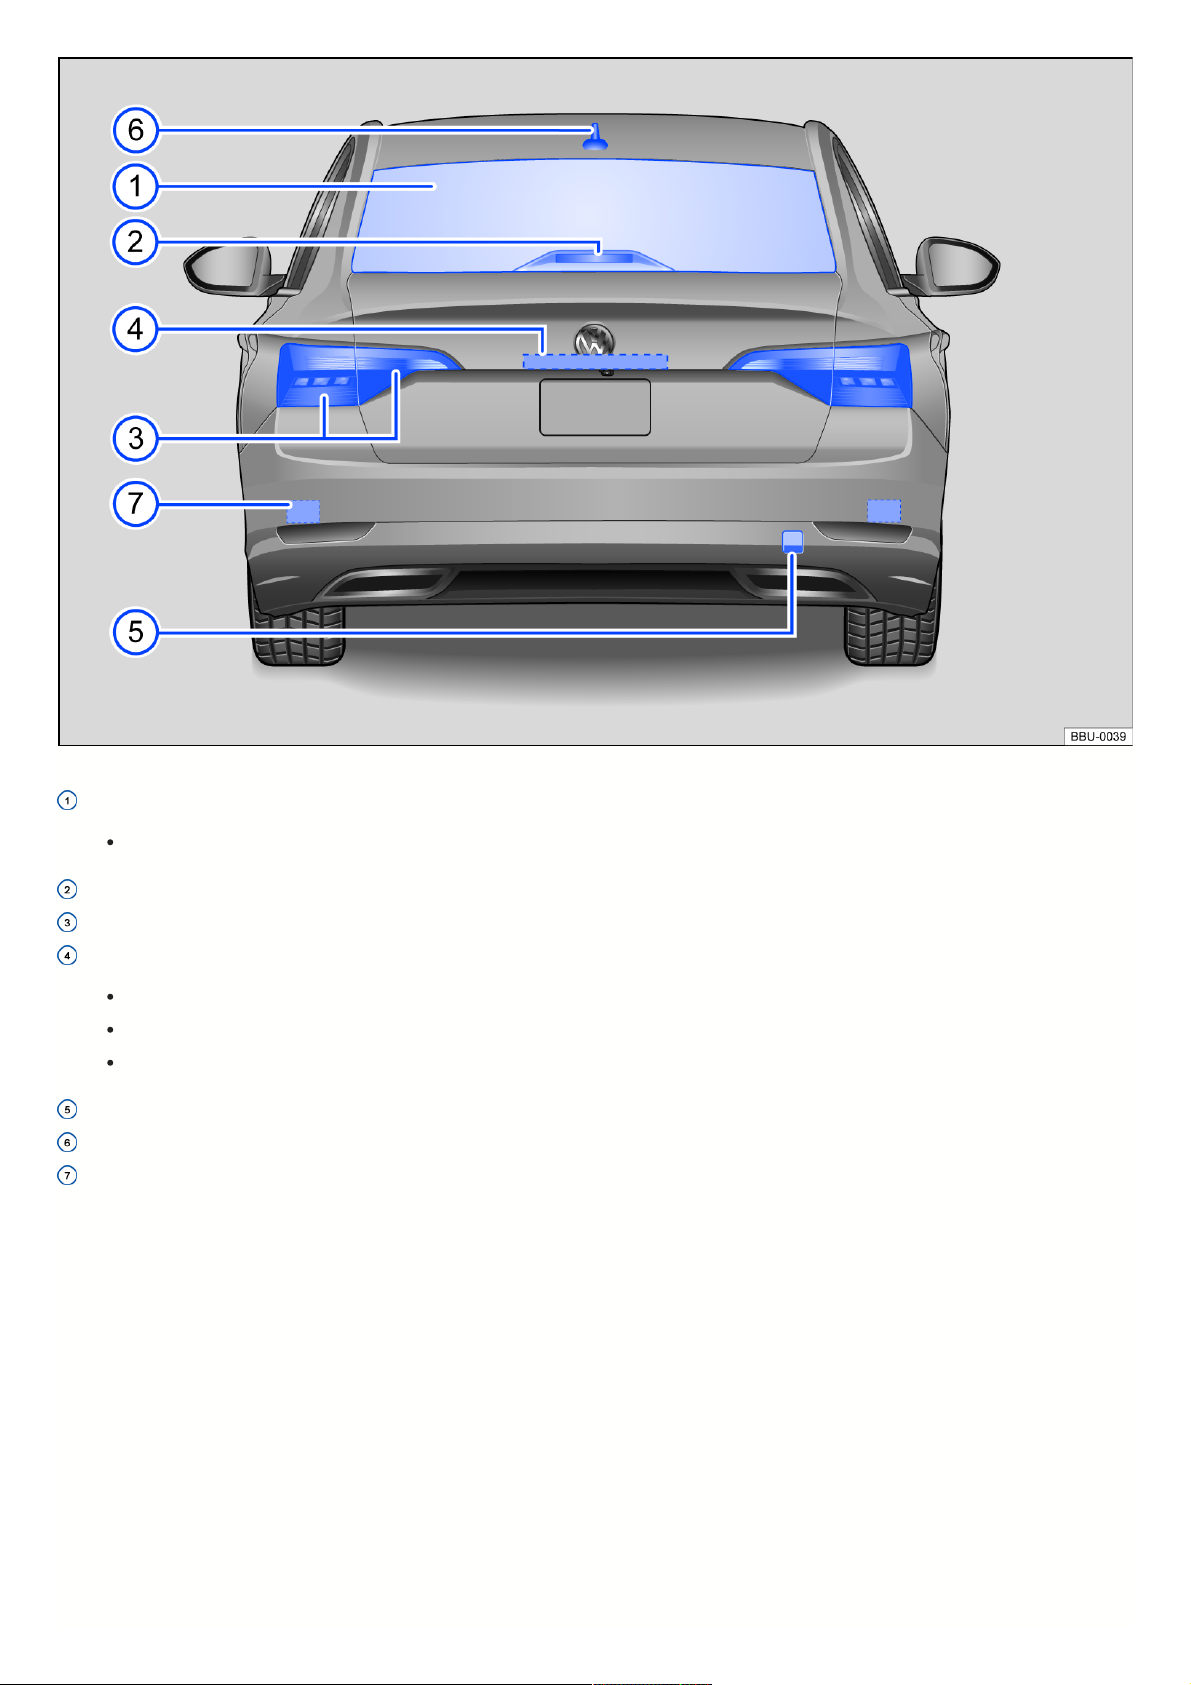
Fig.5Vehiclerearoverview.
Rear window:
With rear window defroster ⇒ Heating, ventilation, and air conditioning
High-mounted brake light
Taillights ⇒ Exterior lighting
Area:
Button to open the trunk lid ⇒ Trunk lid
Camera for parking systems ⇒ Rear View Camera , ⇒ Exterior care and cleaning
License plate light ⇒ Exterior lighting
Behind a cover: mount for towing eye ⇒ Towing
Roof antenna ⇒ Infotainment system and aerials
Behind the bumper: radar sensor for assistance systems ⇒ Exterior care and cleaning
Driverdoor
8
Page 9
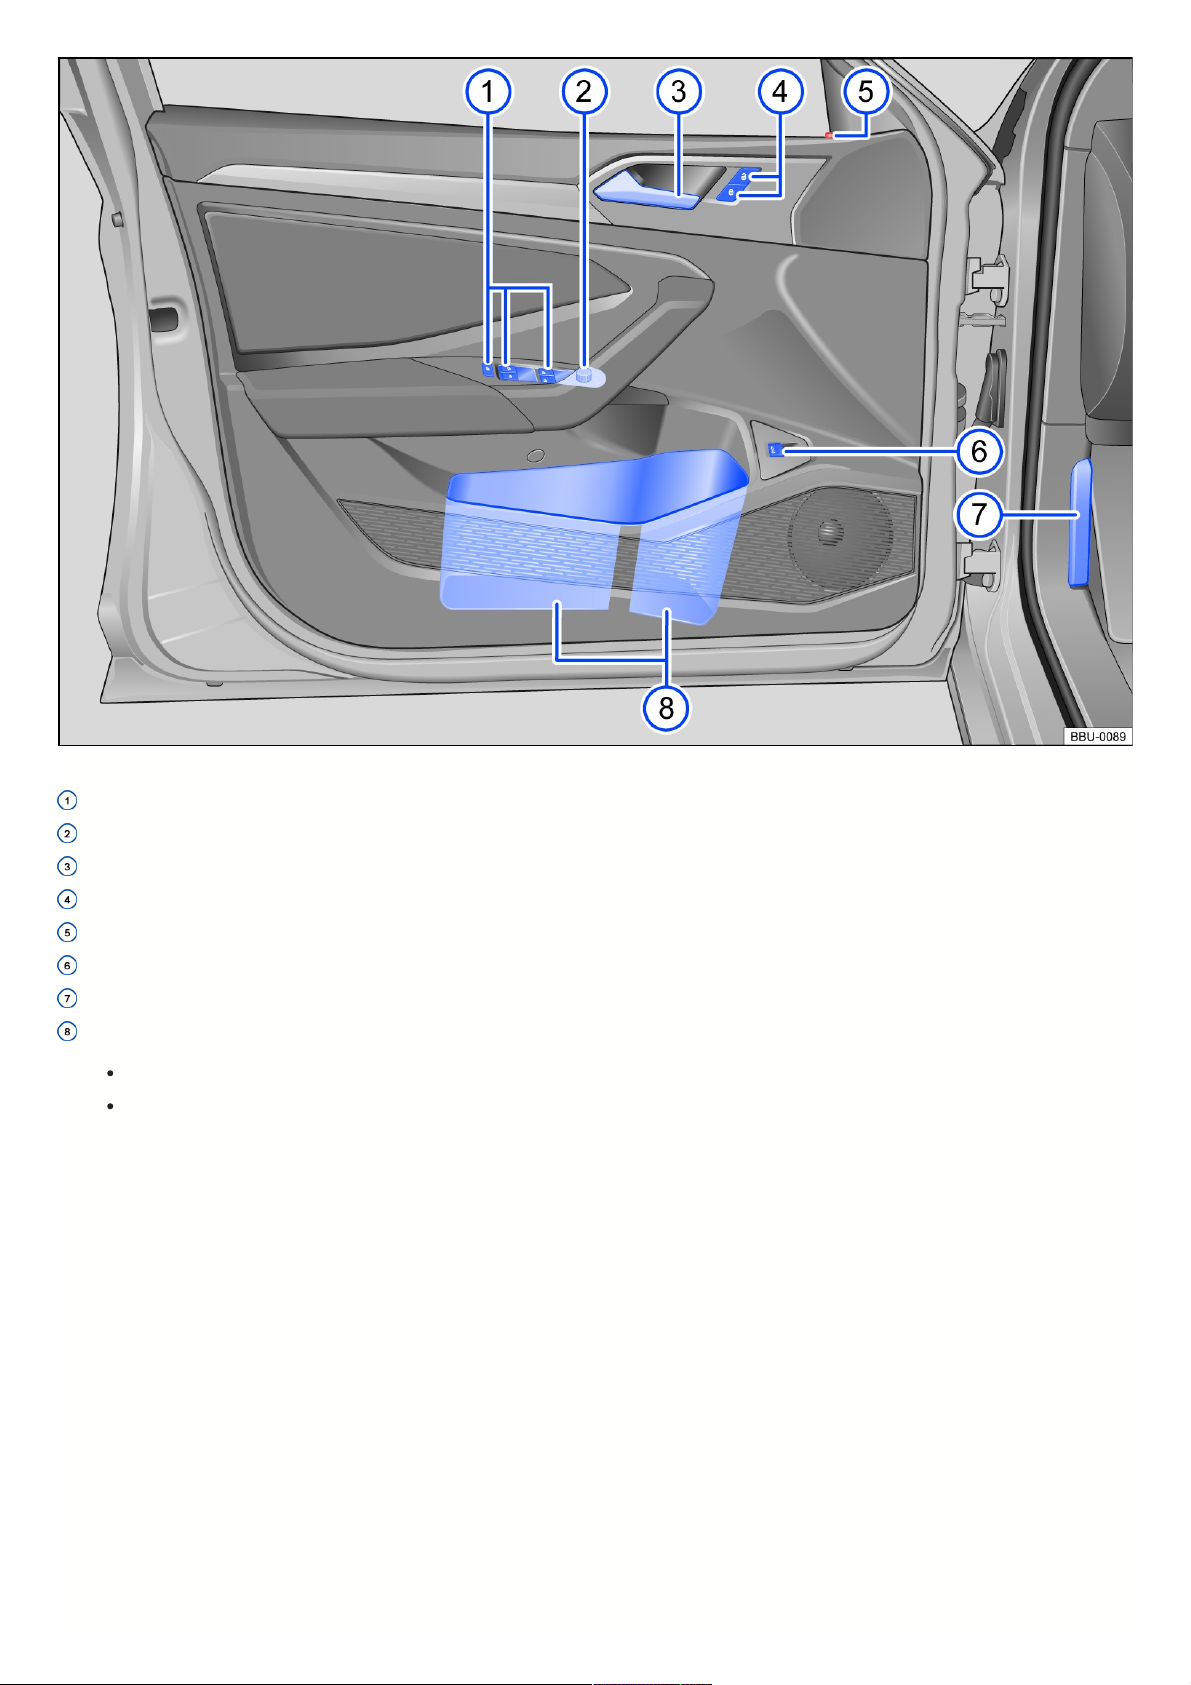
Fig.6Driverdoor:Controls.
Buttons for operating the power windows ⇒ Opening and closing the windows
Knob for outside mirror position and functions ⇒ Outside mirrors
Door handle
Central locking button to lock and unlock the vehicle ⇒ Indicator light in the driver's door
Central locking indicator light ⇒ Indicator light in the driver's door
Button for unlocking the trunk lid ⇒ Trunk lid
Hood release lever ⇒ Opening and closing the hood
Storage compartment:
With cup holder
With storage option for a reflective vest ⇒ Emergency equipment
Driverside
9
Page 10
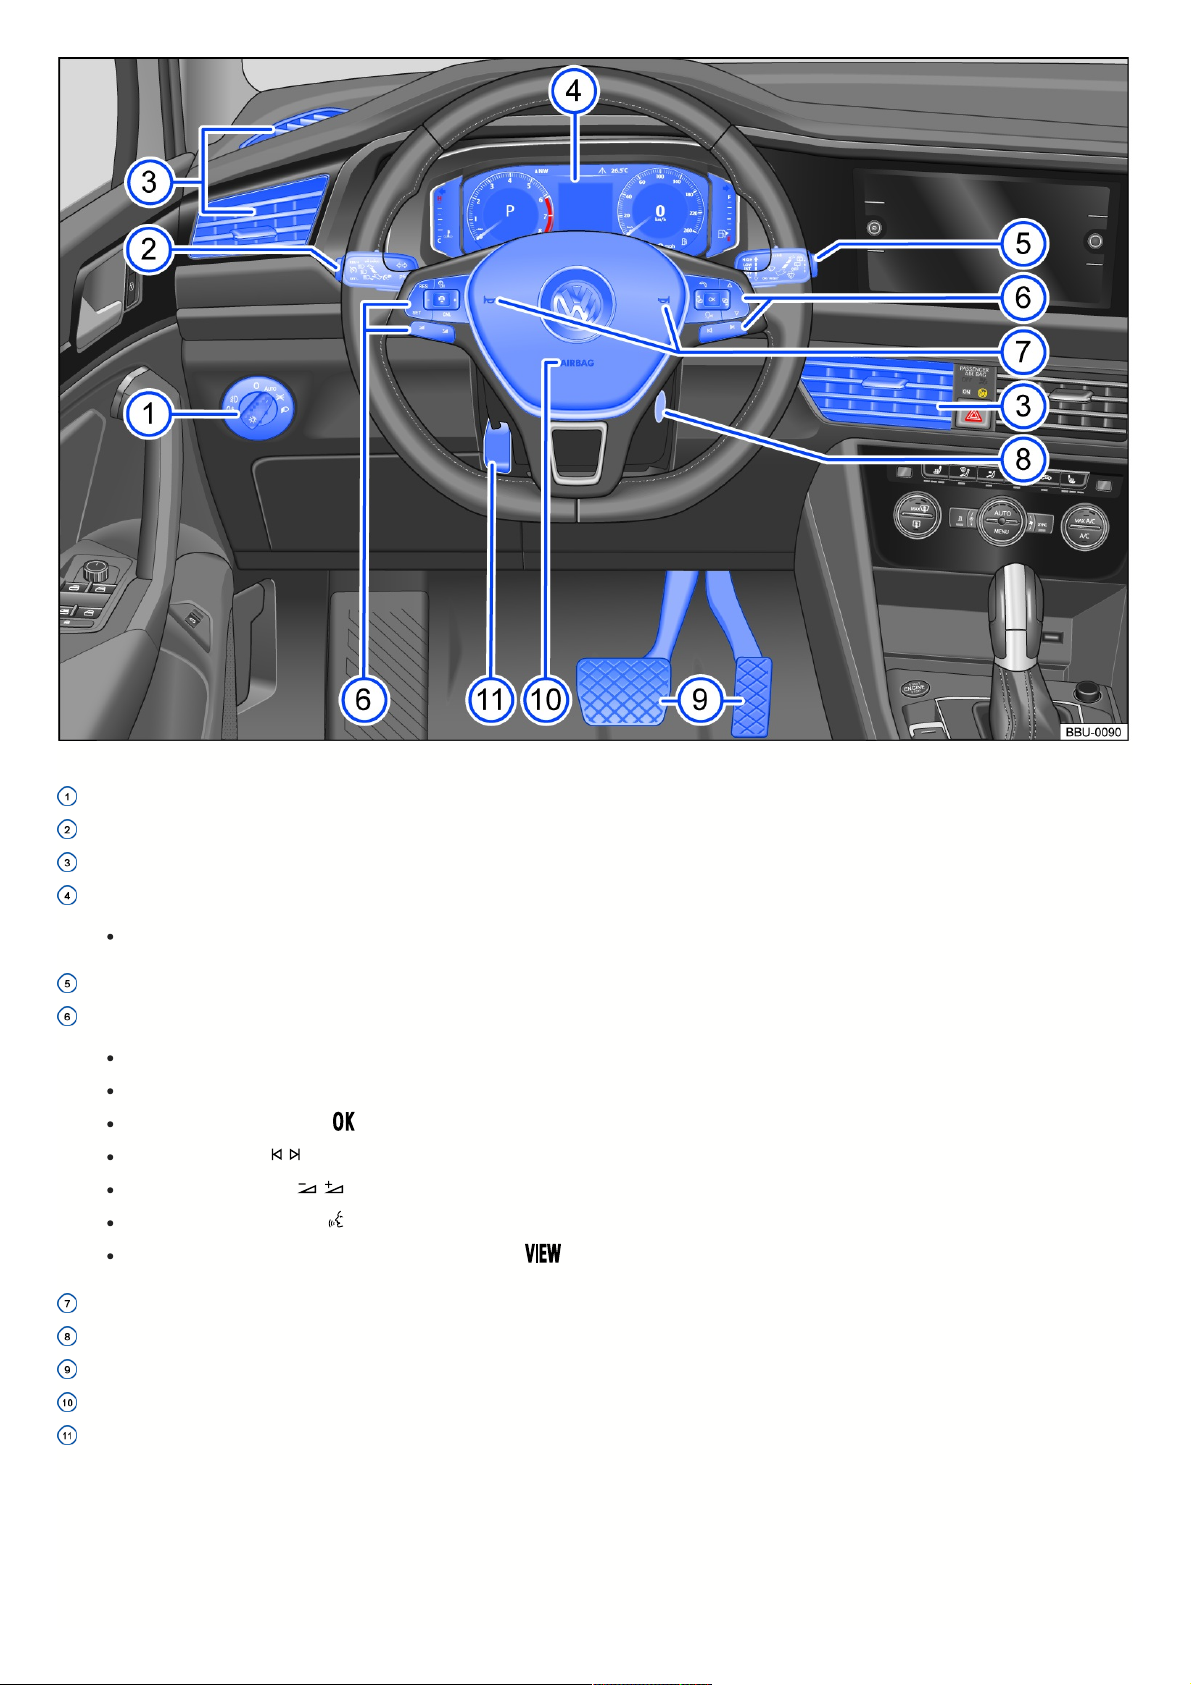
Fig.7Driver’ssideoverview.
Light switch ⇒ Headlights
Turn signal and high beam lever ⇒ Switching the turn signals on and off , ⇒ Switching the high beam headlights on and off
Vents ⇒ Heating, ventilation, and air conditioning
Instrument cluster ⇒ Instrument cluster
With warning and indicator lights ⇒ Symbols in the instrument cluster
Windshield wiper/washer lever ⇒ Window wipers
Multi-function steering wheel controls:
For driver assistance systems ⇒ Driver assistance systems
For menu selection ⇒ Menus in the instrument cluster
For accepting telephone calls
For audio, navigation , ⇒ Infotainment system , ⇒ Navigation
For adjusting the volume
For voice operation activation (may not function depending on the equipment) ⇒ Voice control
In order to switch between the current and previous menus
⇒
Digital instrument cluster (Digital Cockpit)
Horn
Ignition switch ⇒ Ignition switch
Pedals ⇒ Pedals
Installation location of driver’s front airbag ⇒ Airbag system
Lever for adjusting the steering wheel position ⇒ Steering wheel
Centerconsole
10
Page 11
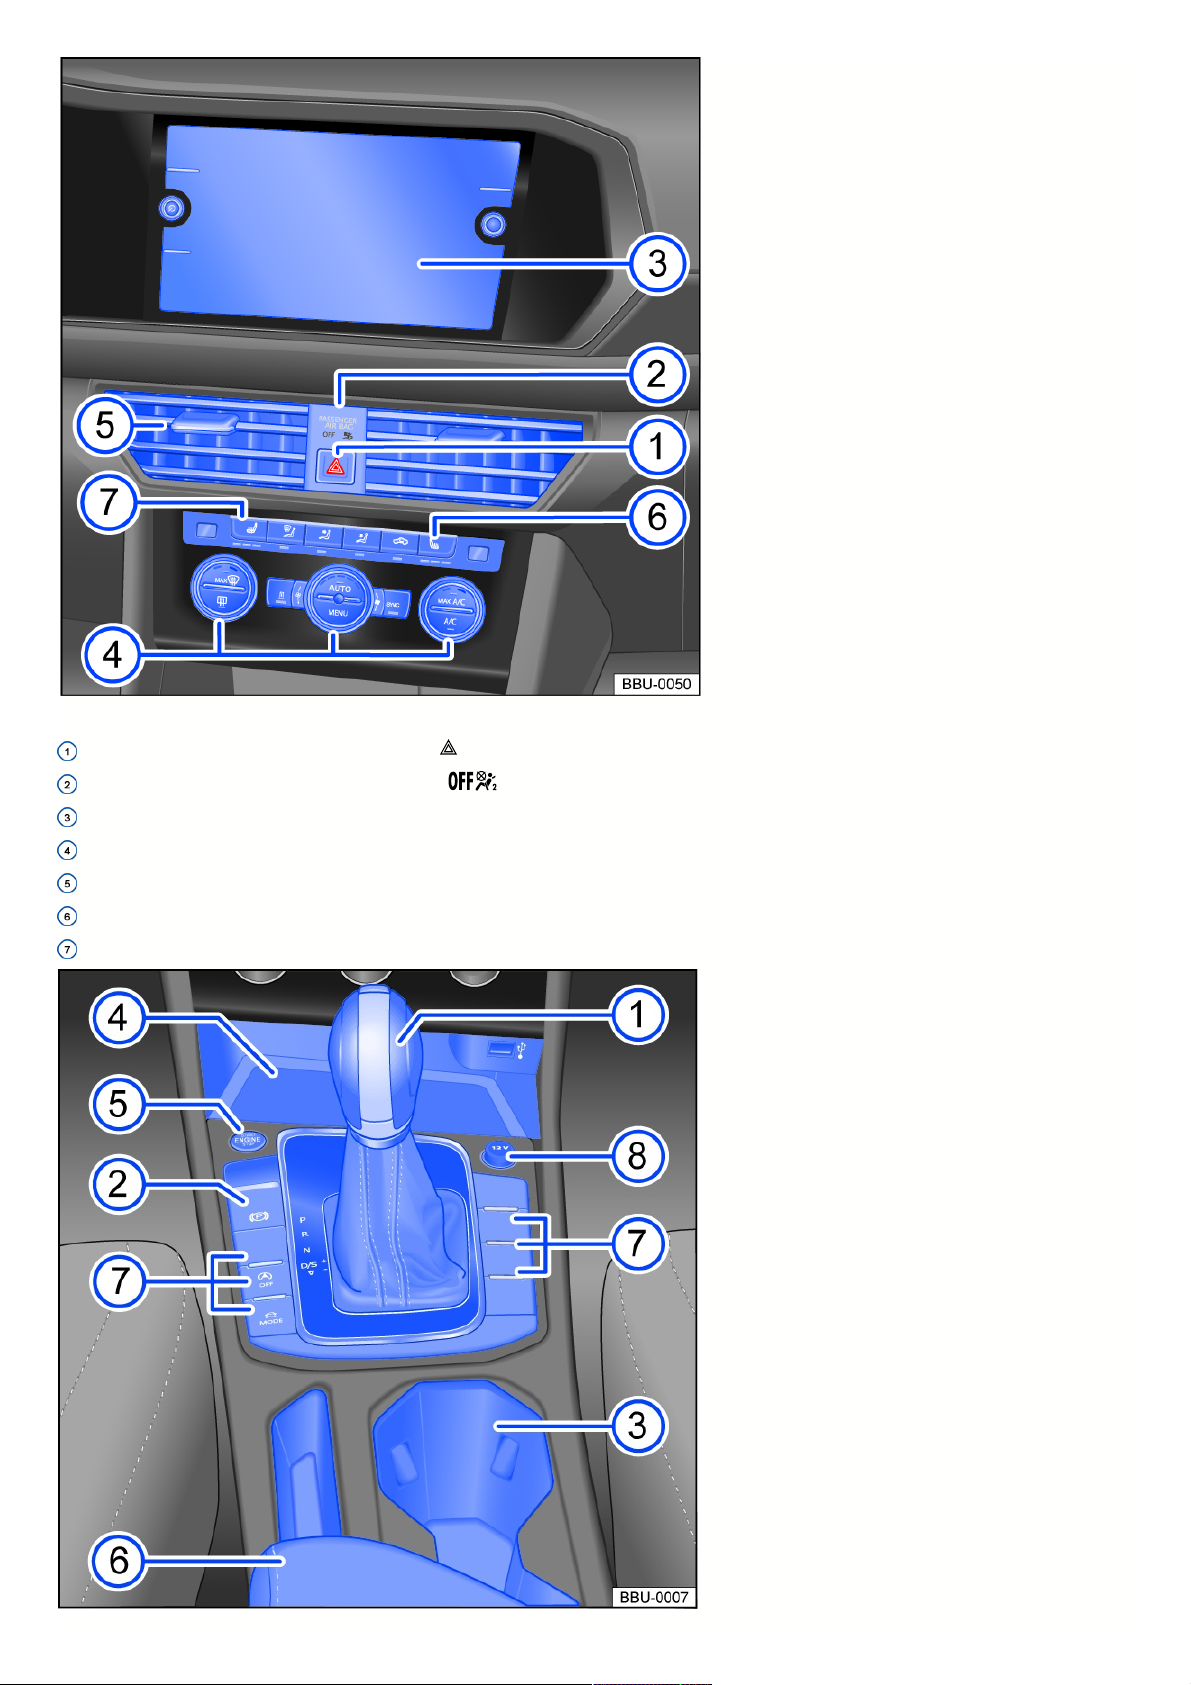
Fig.8Overviewoftheuppersectionofthecenterconsole.
Button for switching the emergency flashers on or off ⇒ In case of an emergency
Indicator light for front passenger’s airbag deactivation
⇒
Indicator light for front passenger’s front airbag
Infotainment system ⇒ First steps
Controls for the air conditioning system ⇒ Heating, ventilation, and air conditioning
Vents ⇒ Heating, ventilation, and air conditioning
Button for right seat heating ⇒ Heating, ventilation, and air conditioning
Button for the left seat heating and the steering wheel heating ⇒ Heating, ventilation, and air conditioning
11
Page 12
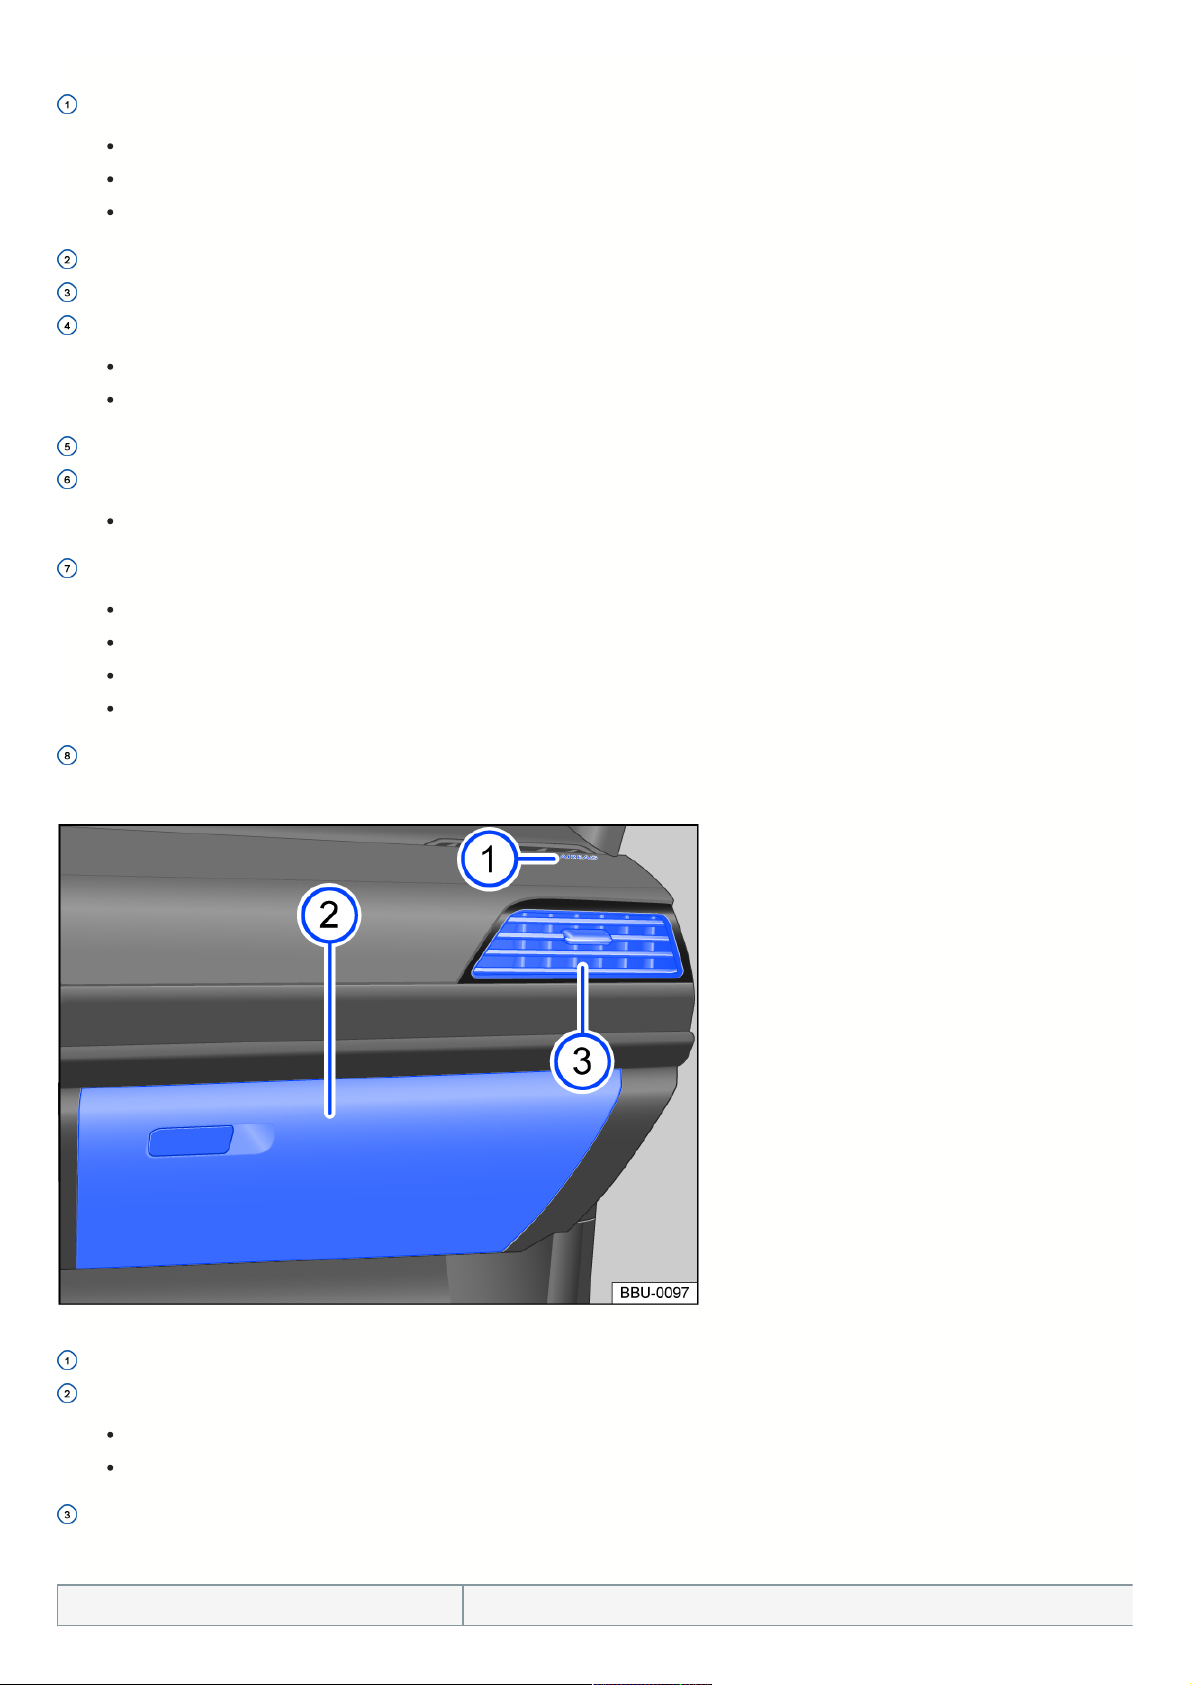
Fig.9Overviewofthelowersectionofthecenterconsole.
Lever:
For manual transmission ⇒ Manual transmission
or DSG automated transmission ⇒ Automatic transmission
or automatic gearbox ⇒ Automatic transmission
Electronic parking brake ⇒ Electronic parking brake
Storage compartment with cup holders
Storage compartment:
With USB socket ⇒ Wired and wireless connections
With functionality for wireless charging in accordance with Qi standard ⇒ Wireless charging function
Button to start and stop the engine (Keyless Access with push-button start) ⇒ Starting and stopping the engine
Center armrest with storage compartment:
With USB socket with charge function for external device rechargeable batteries (depending on the equipment) ⇒ Wired and wireless connections
Buttons:
For start/stop system ⇒ Start/Stop system
For assist systems for parking and maneuvering ⇒ Parking and maneuvering
For ECO mode ⇒ Selecting the driving mode, ⇒ ECO mode , ⇒ Driving Mode Selection
For Driving Mode Selection ⇒ Driving Mode Selection
12 V socket ⇒ Sockets
Passenger’sside
Fig.10Passenger'sside:instrumentpaneloverview
Installation location of the front passenger’s airbag in the instrument panel ⇒ Airbag system
Glove compartment:
With handle
With media drives for the Infotainment system ⇒ Media drives
Vent ⇒ Heating, ventilation, and air conditioning
Controlsintheheadliner
Symbol Meaning
®
12
Page 13

Buttons for interior/reading lights ⇒ Interior/reading lights, ambient lighting .
Sunroof switch ⇒ Sunroof.
Emergency call system button ⇒ Information Call, Roadside Assistance Call and Emergency Call
Service.
Symbol Meaning
13
Page 14
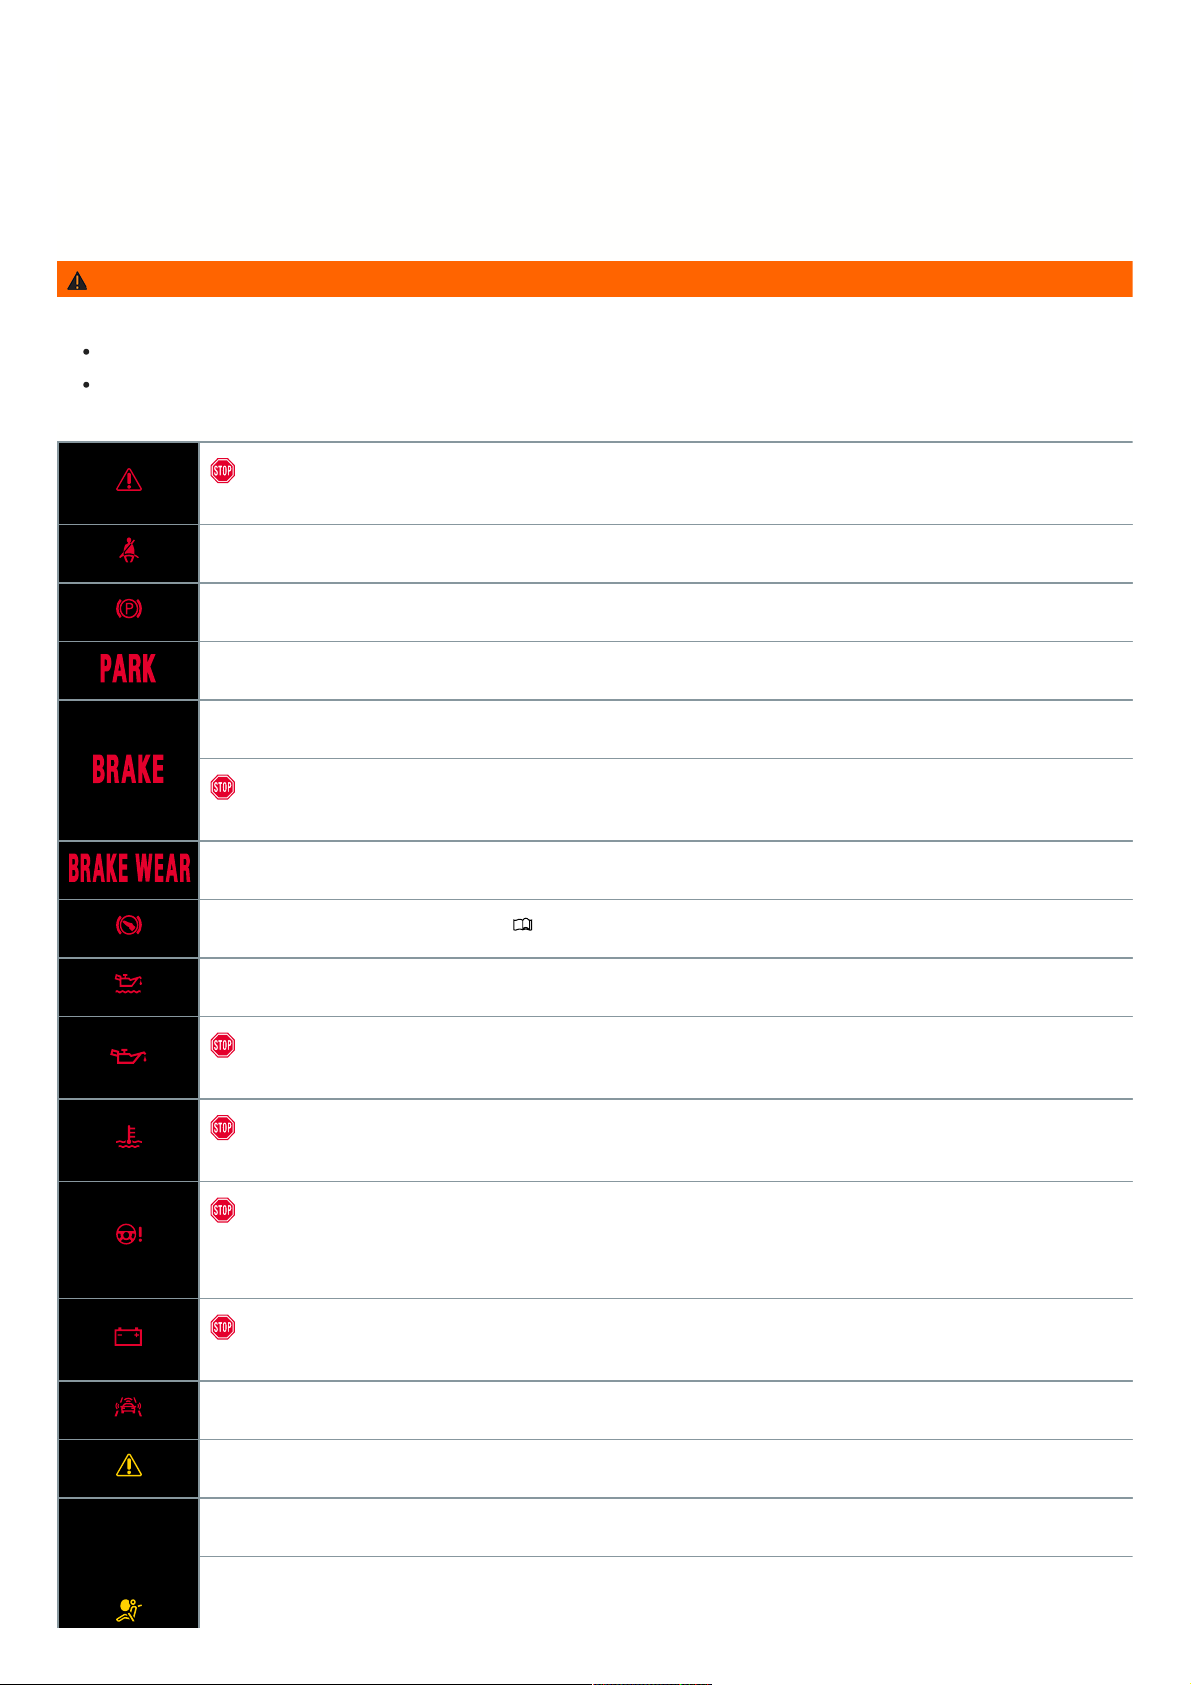
Driverinformation
Symbolsintheinstrumentcluster
The warning and indicator lights can turn on individually or in combination with each other and indicate warnings, malfunctions and certain functions. Some warning
and indicator lights come on when you switch the ignition on and must turn off after some time.
Indicator lights that turn on in the light switch are described in the “Lights” chapter ⇒ Switching the lights on and off .
WARNING
Failure to respond to illuminated warning lights and messages may result in a vehicle breakdown, accidents and serious injuries.
Never ignore warning lights and messages.
Stop the vehicle as soon as it is safe to do so.
Do not continue driving!
Central warning light ⇒ Engine coolant, ⇒ Priority 1 warning message
Fasten safety belt ⇒ Warning light
Electronic parking brake ⇒ Using the electronic parking brake
Electronic parking brake ⇒ Using the electronic parking brake
Brake system malfunction ⇒ Brake system malfunction
Do not continue driving!
Brake fluid level too low ⇒ Brake fluid level
Check brake system ⇒ Brake pad wear indicator
Take over steering and be ready to brake. ⇒ Introduction
Engine oil level too low ⇒ Engine oil level very low
Do not continue to drive!
Engine oil pressure too low ⇒ Engine oil pressure too low
Do not continue to drive!
Engine coolant system malfunction ⇒ Engine coolant, ⇒ Engine coolant, ⇒ Checking and filling engine coolant
Do not continue driving!
Steering malfunction ⇒ Steering malfunction
Do not continue to drive!
12 V vehicle battery ⇒ 12 V vehicle battery
Collision warning ⇒ Advance warning
Central warning light ⇒ Priority 2 warning message
Airbag system or safety belt pretensioner malfunction ⇒ Airbag system or safety belt pretensioners malfunction
14
Page 15
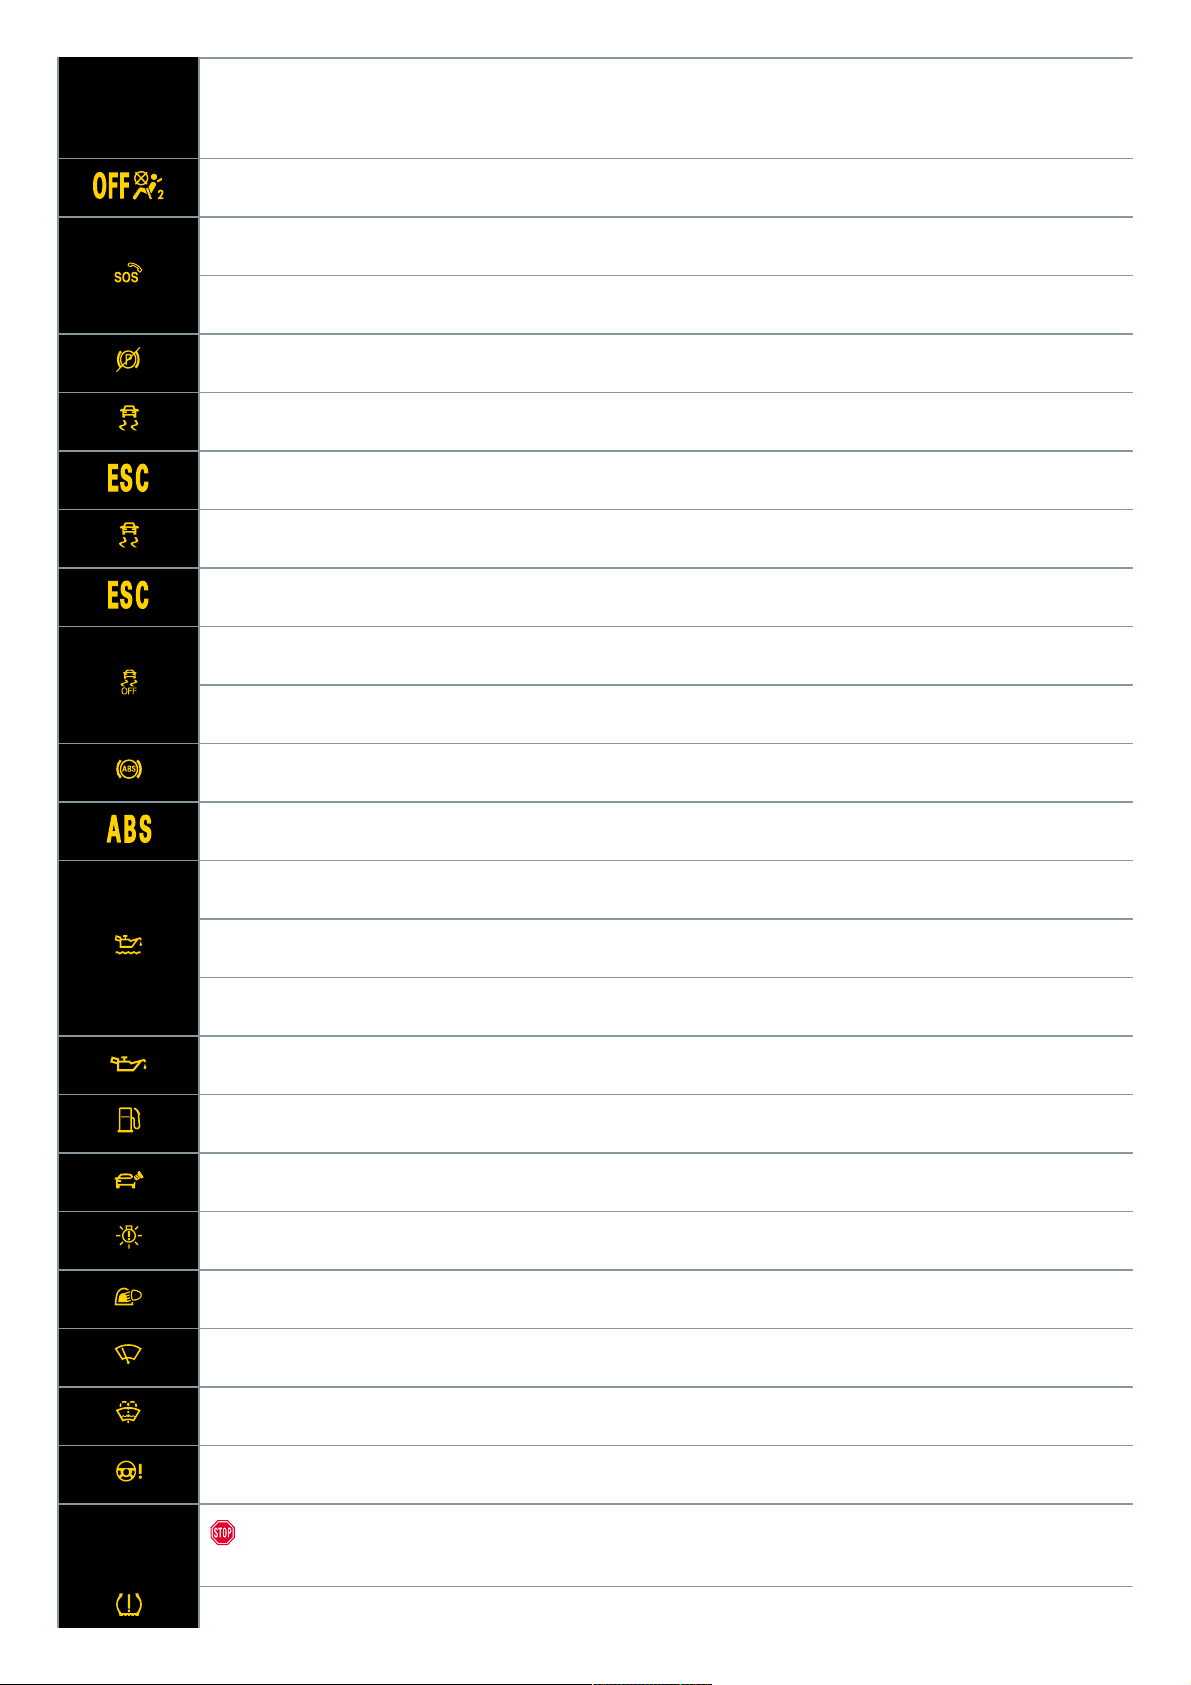
Airbag system or safety belt pretensioner deactivated with diagnostic equipment ⇒ Airbag system or safety belt pretensioners
deactivated with diagnostic equipment
Front passenger’s airbag disabled ⇒ Front passenger's front airbag disabled
Malfunction in the emergency call system ⇒ Emergency Call Service faulty
Limited function in the emergency call system ⇒ Emergency Call Service limited
Electronic parking brake malfunction ⇒ Electronic parking brake malfunction
Flashes: Electronic Stability Control (ESC) or Anti-slip regulation (ASR) in operation ⇒ ESC or ASR in operation
Electronic Stability Control (ESC) or Anti-Slip Regulation (ASR) regulating ⇒ ESC or ASR in operation
Comes on: Electronic Stability Control (ESC) malfunction ⇒ ESC malfunction
Electronic Stability Control (ESC) malfunction ⇒ ESC malfunction
Anti-Slip Regulation (ASR) switched off ⇒ ASR switched off manually
ESC Sport switched on ⇒ ESC Sport switched on
Anti-Lock Braking System (ABS) malfunction ⇒ ABS failure or malfunction
Anti-Lock Braking System (ABS) malfunction ⇒ ABS failure or malfunction
Engine oil level too low ⇒ Engine oil level too low
Engine oil level too high ⇒ Engine oil level too high
Engine oil system malfunction ⇒ Engine oil system malfunction
Engine oil system malfunction ⇒ Engine oil system malfunction
Tank almost empty ⇒ Fuel tank almost empty
Tank cap not closed ⇒ Fuel tank cap open
Driving light failure ⇒ Exterior lighting malfunction
Rain/light sensor malfunction ⇒ Rain/light sensor malfunction
Windshield wiper malfunction ⇒ Windshield wiper malfunction
Washer fluid level too low ⇒ Washer fluid level too low
Steering malfunction ⇒ Steering malfunction
Do not continue to drive!
Tire pressure low ⇒ Tire pressure low
15
Page 16
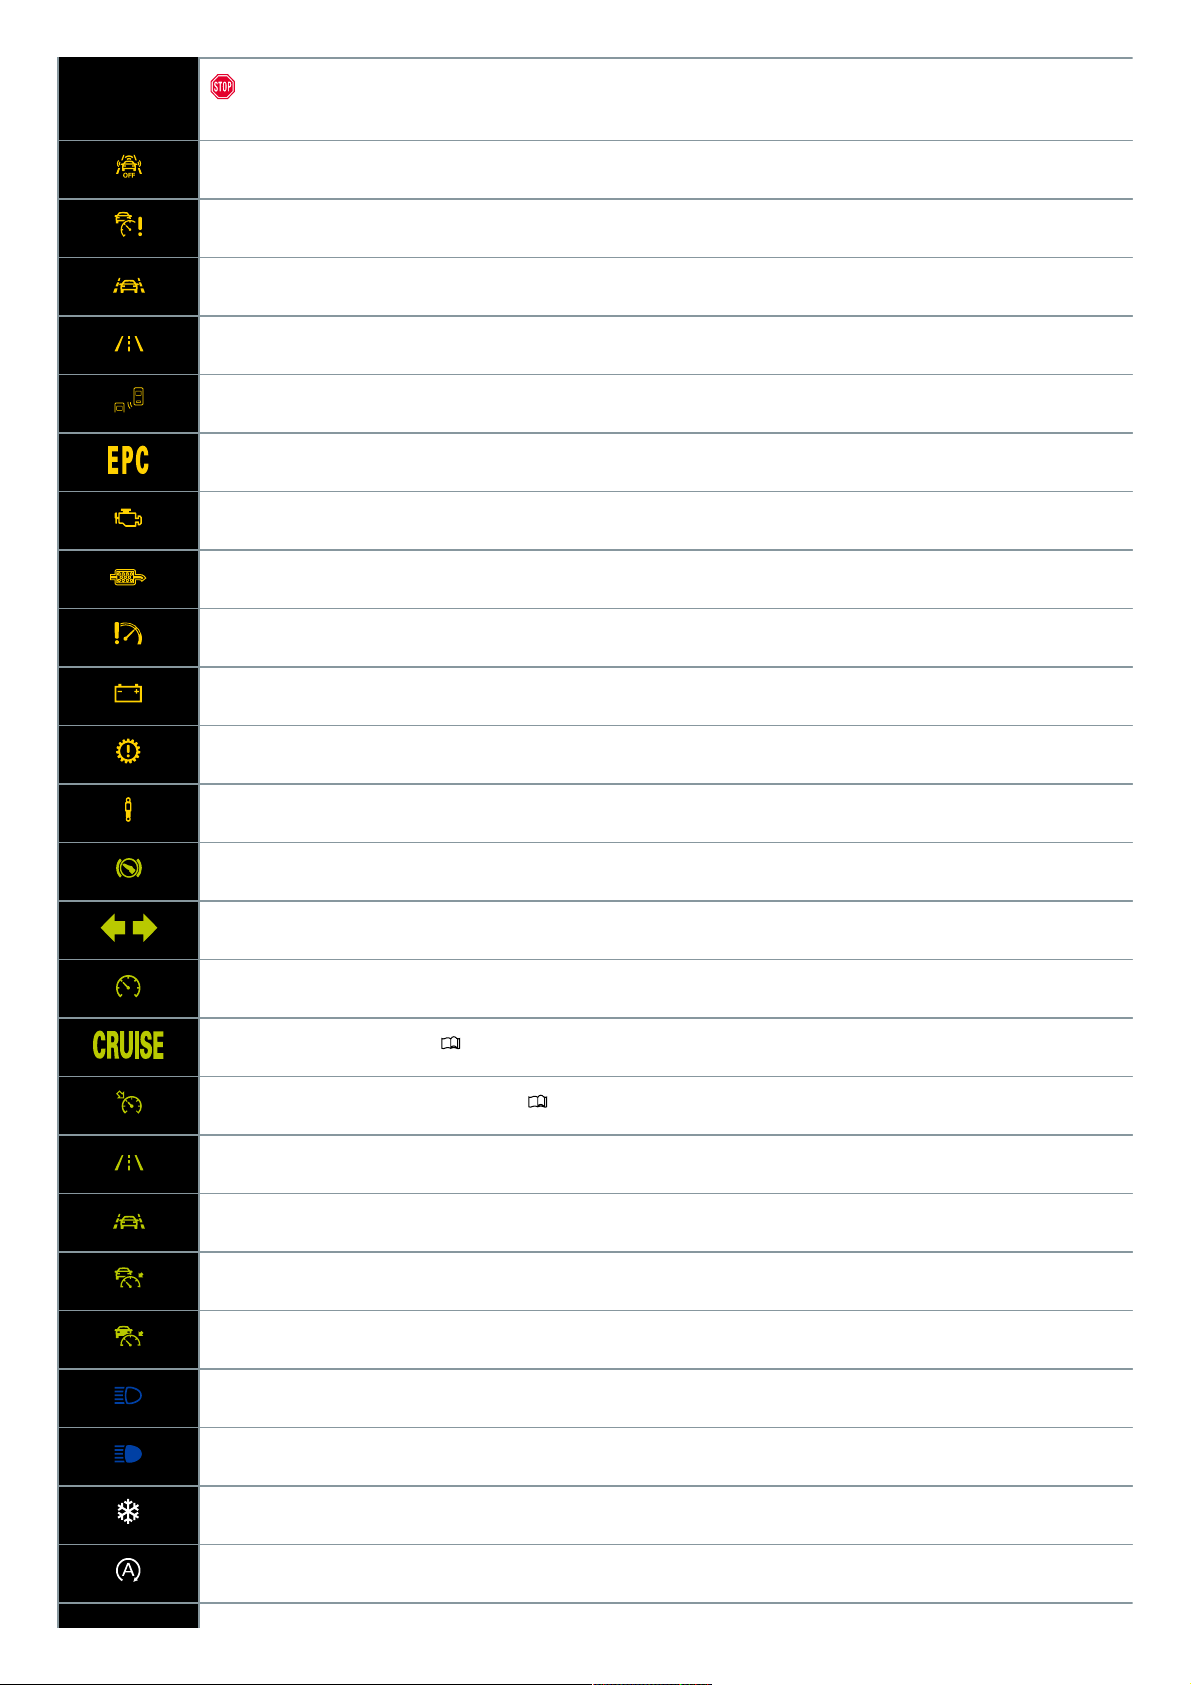
Do not continue to drive!
Tire Pressure Monitoring System faulty ⇒ Tire Pressure Monitoring System malfunction
Front Assist is switched off ⇒ Switching on and off
Adaptive cruise control (ACC) not available ⇒ ACC is not available
Lane Assist in control ⇒ Driving with Lane Assist
Lane Assist in control ⇒ Driving with Lane Assist
Blind Spot Monitor active ⇒ “Blind Spot” Monitor malfunction
Engine control malfunction ⇒ Engine control malfunction
Exhaust system malfunction ⇒ Exhaust-related malfunction
Particulate filter clogged with soot ⇒ Particulate filter clogged with soot
Engine RPM limited ⇒ Engine speed limited
12 Volt vehicle battery ⇒ 12 V vehicle battery
Transmission malfunction ⇒ Clutch “slips” , ⇒ Transmission overheating
Adaptive chassis control (DCC) malfunction ⇒ Adaptive chassis control malfunction
Press the brake pedal. ⇒ The engine is not starting
Turn signals ⇒ Turn signal indicator light
Speed stored, regulation active ⇒ Switching ACC on and off
Speed stored, regulation active ⇒ Introduction
Cruise control switched on, regulation active ⇒ Introduction
Lane Assist active ⇒ Driving with Lane Assist
Lane Assist active ⇒ Driving with Lane Assist
Adaptive Cruise Control (ACC) regulates, no vehicle driving ahead is detected ⇒ Switching ACC on and off
Adaptive Cruise Control (ACC) regulates, vehicle driving ahead is detected ⇒ Switching ACC on and off
High beams or headlight flasher ⇒ Switching the high beam headlights on and off
High beam or headlight flasher ⇒ Switching the high beam headlights on and off
Outside temperature is below +39 °F (+4 °C) ⇒ Displays
Start/Stop system active ⇒ Start-stop system
16
Page 17
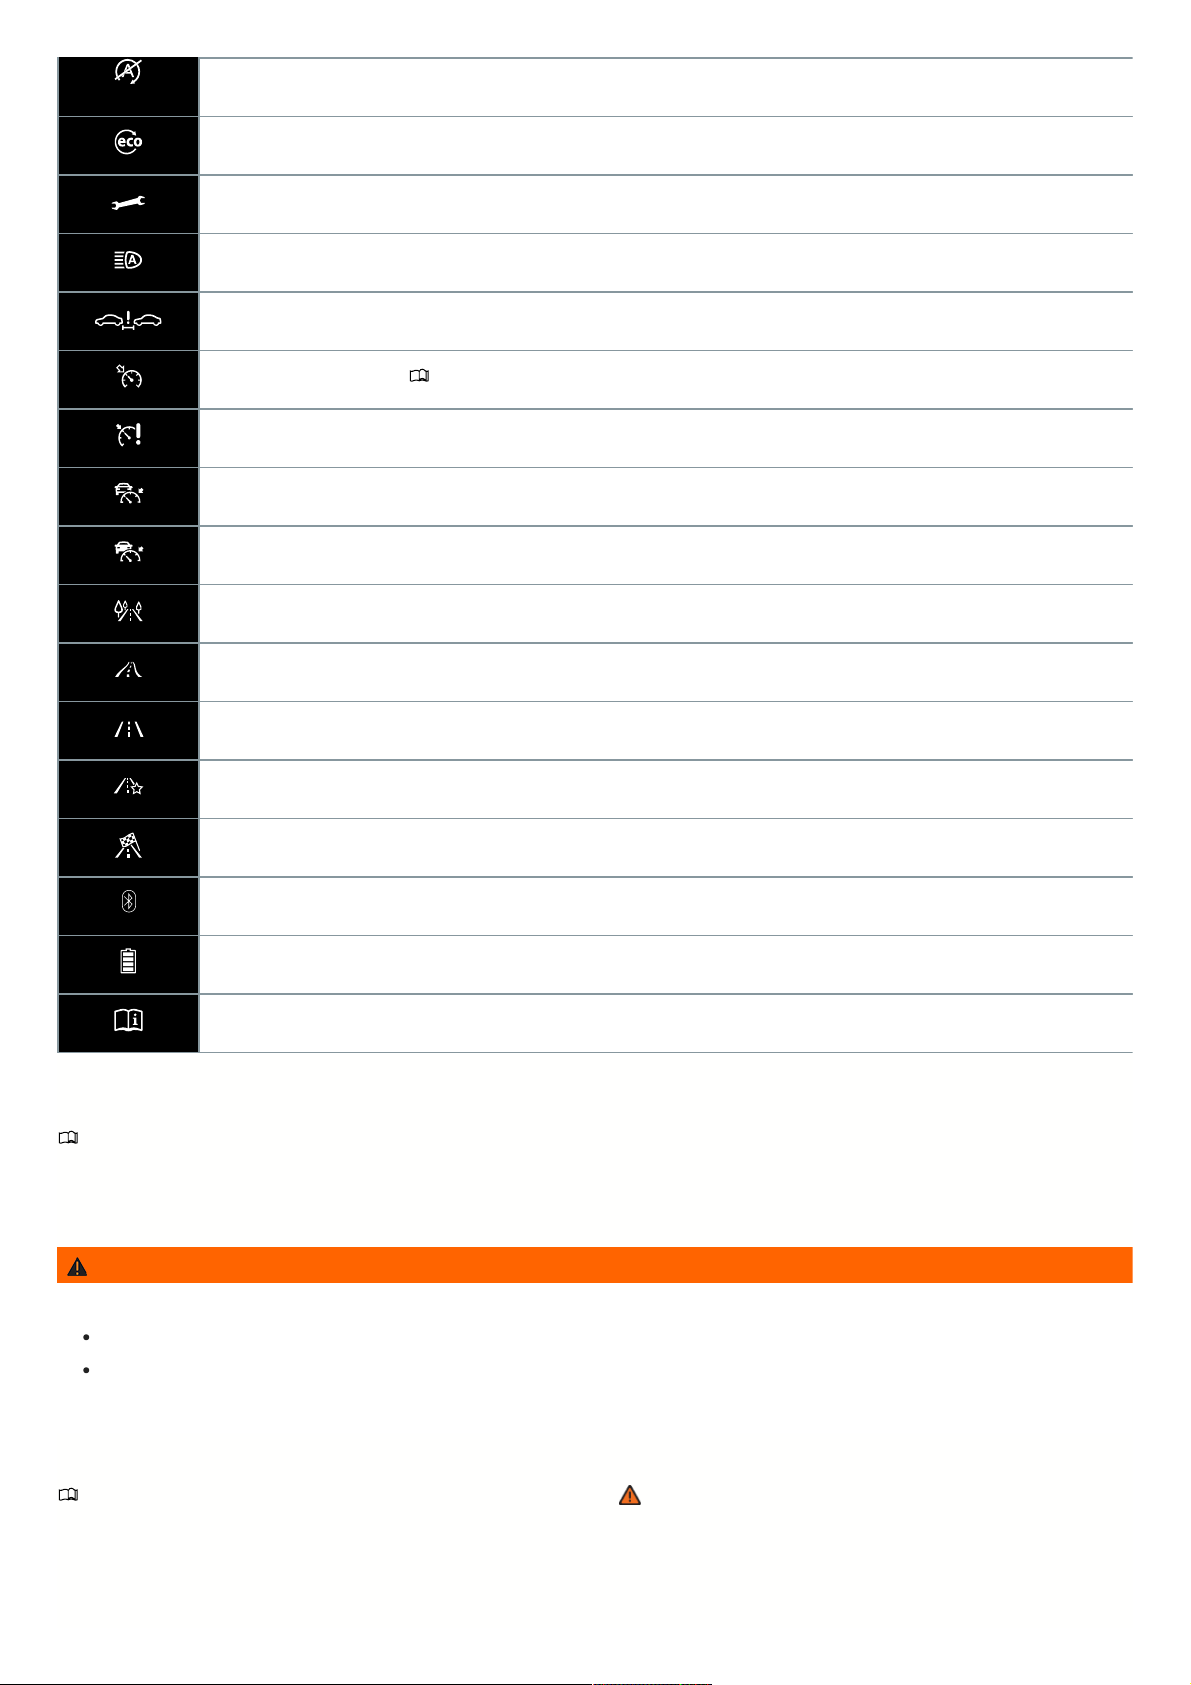
Start/Stop system not available ⇒ Start-stop system
Economical driving condition ⇒ Displays
Service due ⇒ Service interval display
High beam control active ⇒ Switching on Light Assist
Distance warning ⇒ Distance warning
Cruise control switched on ⇒ Introduction
Cruise control system malfunction ⇒ Cruise control system is malfunctioning
Adaptive Cruise Control (ACC) regulates, no vehicle driving ahead is detected ⇒ Switching ACC on and off
Adaptive Cruise Control (ACC) regulates, vehicle driving ahead is detected ⇒ Switching ACC on and off
Eco driving mode ⇒ Driving mode properties
Comfort driving mode ⇒ Driving mode properties
Normal driving mode ⇒ Driving mode properties
Individual driving mode ⇒ Driving mode properties
Sport driving mode ⇒ Driving mode properties
Mobile phone connected via Bluetooth® ⇒ Displays
Mobile phone battery charge level ⇒ Displays
Note about information in the Owner's Manual ⇒ Note about information in the Owner's Manual
Instrumentcluster
Introduction
After starting the engine when the 12 V vehicle battery is severely drained or when it has been replaced or jump-started, the system settings, e.g. personal
convenience settings and programming, and user profiles may be changed or erased. Check and correct the settings after the 12 V vehicle battery is sufficiently
recharged.
WARNING
Driver distraction can cause accidents and injuries.
Never operate the instrument cluster while driving.
Only change settings for the displays in the instrument cluster and the displays on the Infotainment system screen when the vehicle is stationary, in order
to reduce the risk of accidents and injuries.
Analoginstrumentcluster
PleasereadtheintroductoryinformationandheedtheWarningsandNotice
⇒ Introduction
.
17
Page 18
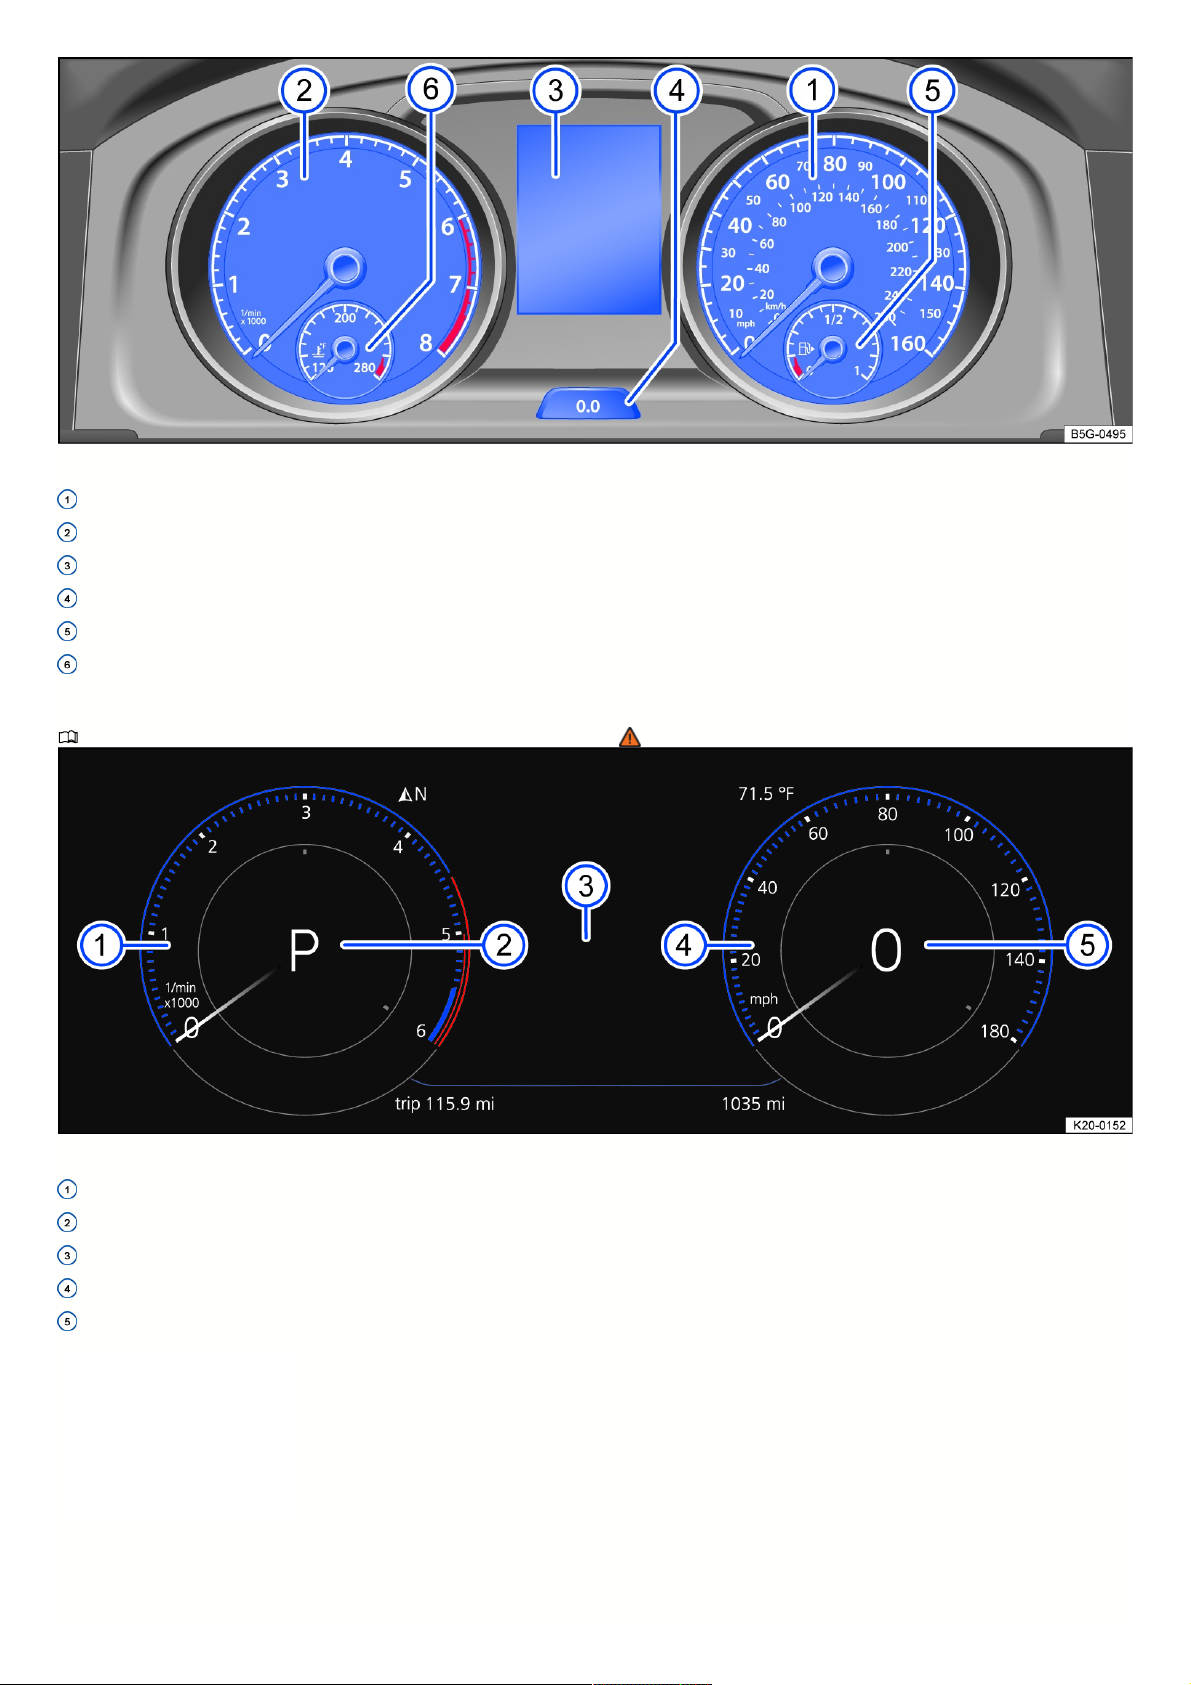
Fig.11Generalexample:Analoginstrumentclusterintheinstrumentpanel.
Speedometer
Tachometer (RPM of the running engine) ⇒ Tachometer.
Displays⇒ Displays.
Reset, set, and display button
Fuel gauge⇒ Fuel gauge.
Engine coolant temperature gauge⇒ Engine coolant temperature gauge .
Digitalinstrumentcluster(DigitalCockpit)
PleasereadtheintroductoryinformationandheedtheWarningsandNotice
⇒ Introduction
.
Fig.12Digitalinstrumentclusterintheinstrumentpanel(generalexample).
Tachometer (RPM of the running engine) ⇒ Tachometer.
Currently engaged gear or selector lever level⇒ Driving.
Displays⇒ Displays.
Speedometer
Digital speed display.
TheDigitalCockpitisadigital
instrumentclusterwithahigh-resolution
TFTcolordisplay.Byselectingdifferent
informationprofiles,otherdisplayscan
beshowninadditiontothestandard
dials,suchasthetachometerand
speedometer.Theterm“Volkswagen
DigitalCockpit”isusedtorefertothe
digitalinstrumentclusterinthe
following.
Informationprofiles
Using the Digital Cockpit menu item in the vehicle Infotainment system vehicle settings, you can select different, topic-specific information profiles ⇒ Vehicle
settings menu. Depending on the selected information profile, the digital instrument cluster may show additional information in the center of the dials or the dials may
18
Page 19
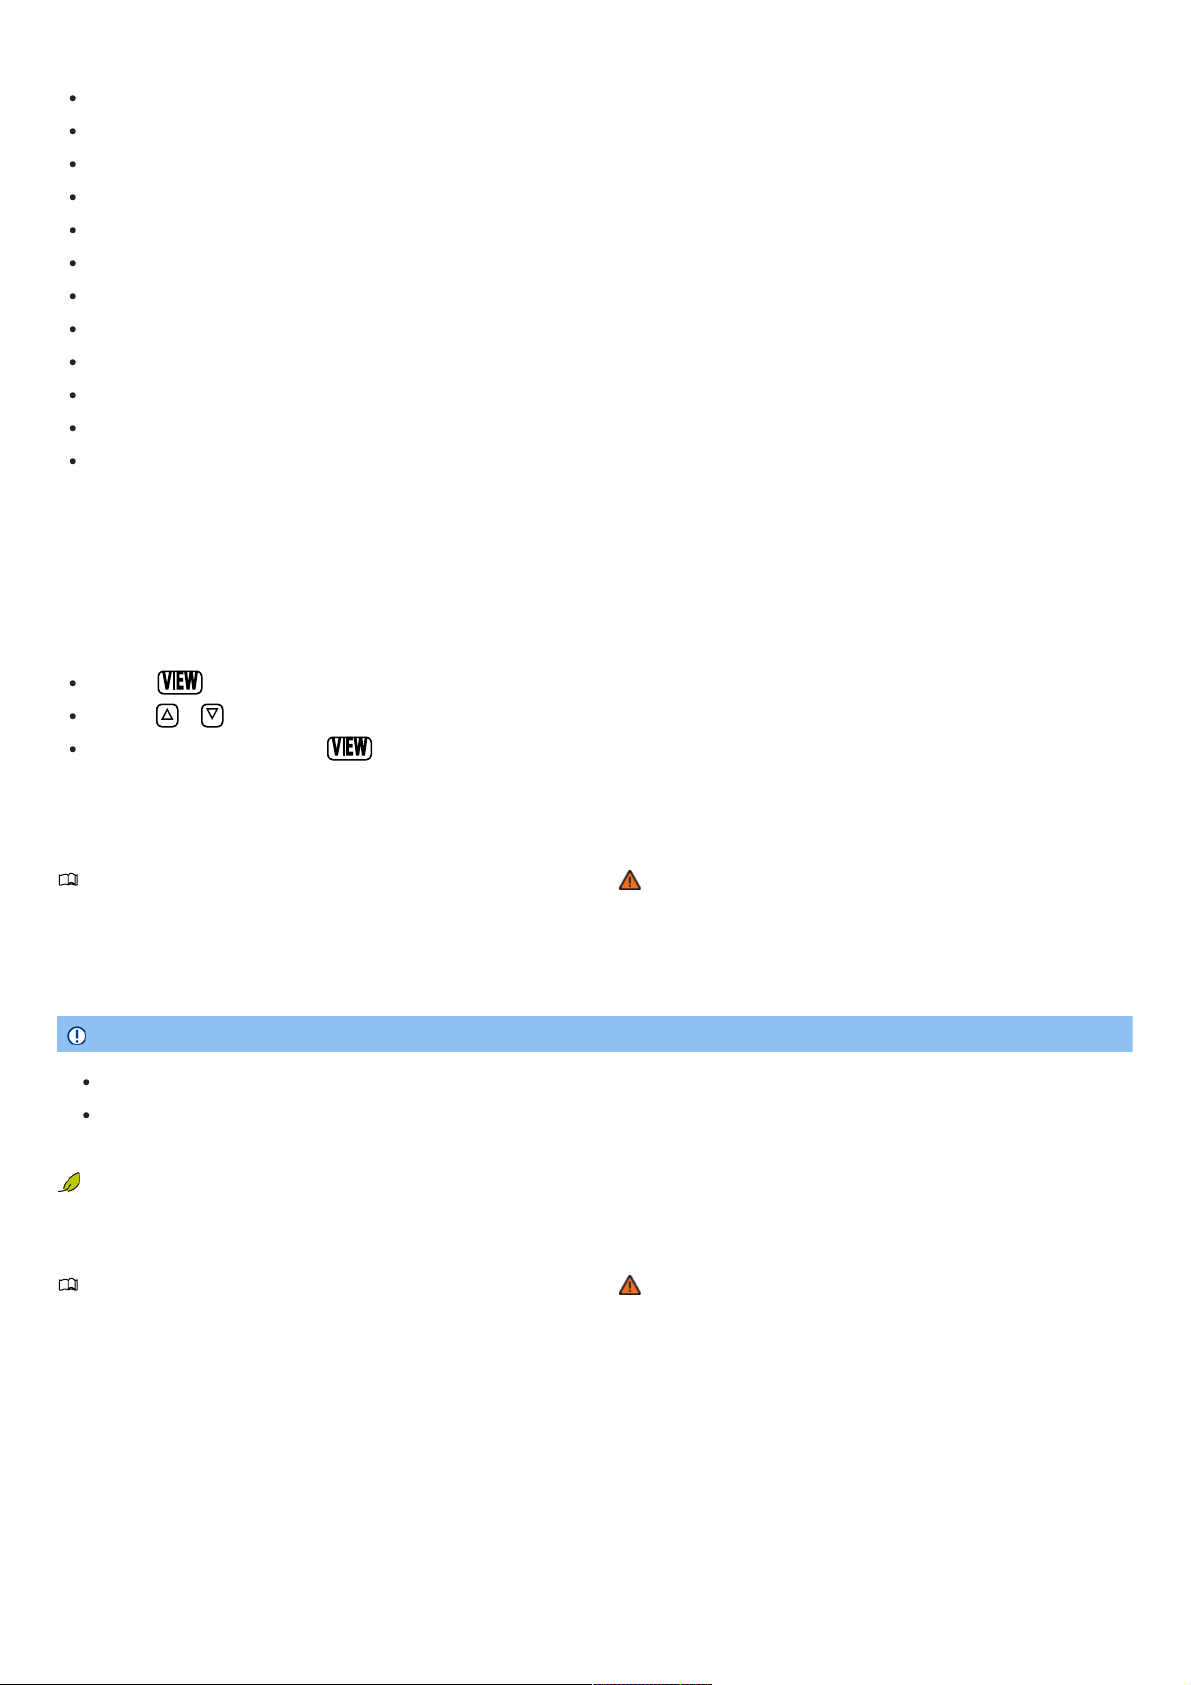
be hidden and the additional information shown across the entire display. The following information profiles can be selected:
Gear indicator The digital display of the current gear or the selected gear.
Speed Digital display of speed
Consumption Graphic display of the current consumption and the digital display of the average consumption
Range Digital display of range
Distance Digital display of the distance driven
Destination arrival information. Digital display of remaining driving time, the distance to the destination, and the estimated arrival time.
Acceleration Graphic display of the longitudinal and lateral acceleration
Assistance systems Visual display of various assistance systems
Elevation Digital display of the current elevation above sea level
Navigation Graphic display of arrow navigation
Compass Digital compass display
Audio Digital display of the current audio playback
Depending on the equipment, the number and scope of the information profiles that can be selected may vary.
Navigationmapinthedigitalinstrumentcluster
Depending on the vehicle equipment, the digital instrument cluster may display a detailed map. To do this, select the Navigation menu item in the instrument cluster
⇒
Menus in the instrument cluster .
The navigation map can be displayed in three sizes. With the larger map view, the navigation map is shown across the entire display. To select the desired map
size, proceed as follows:
Press the button on the multi-function steering wheel to switch between the two map sizes ⇒ Menus in the instrument cluster .
Press the or arrow buttons on the multi-function steering wheel to zoom in or out.
When zooming manually, press the button on the multi-function steering wheel to switch to auto-zoom.
Depending on the equipment, navigation will be shown on two screens or only on one screen. The navigation map may appear in the digital instrument cluster and
in the Infotainment system or just in the Infotainment system. In the last scenario, only navigation arrows are listed in the digital instrument cluster.
Tachometer
PleasereadtheintroductoryinformationandheedtheWarningsandNotice
⇒ Introduction
.
Tachometer
The start of the red area on the tachometer indicates the maximum permissible engine speed for all gears when the engine is run in and at operating temperature.
Before reaching the red area, shift to the next highest gear, select the selector lever position D/S or take your foot off the accelerator pedal.
NOTICE
Avoid high engine speeds, full acceleration, and heavy engine loads when the engine is cold.
To prevent engine damage, the tachometer indicator may only be in the red area of the scale briefly.
Shifting up early helps save fuel and reduce operating noises.
Fuelgauge
PleasereadtheintroductoryinformationandheedtheWarningsandNotice
⇒ Introduction
.
19
Page 20
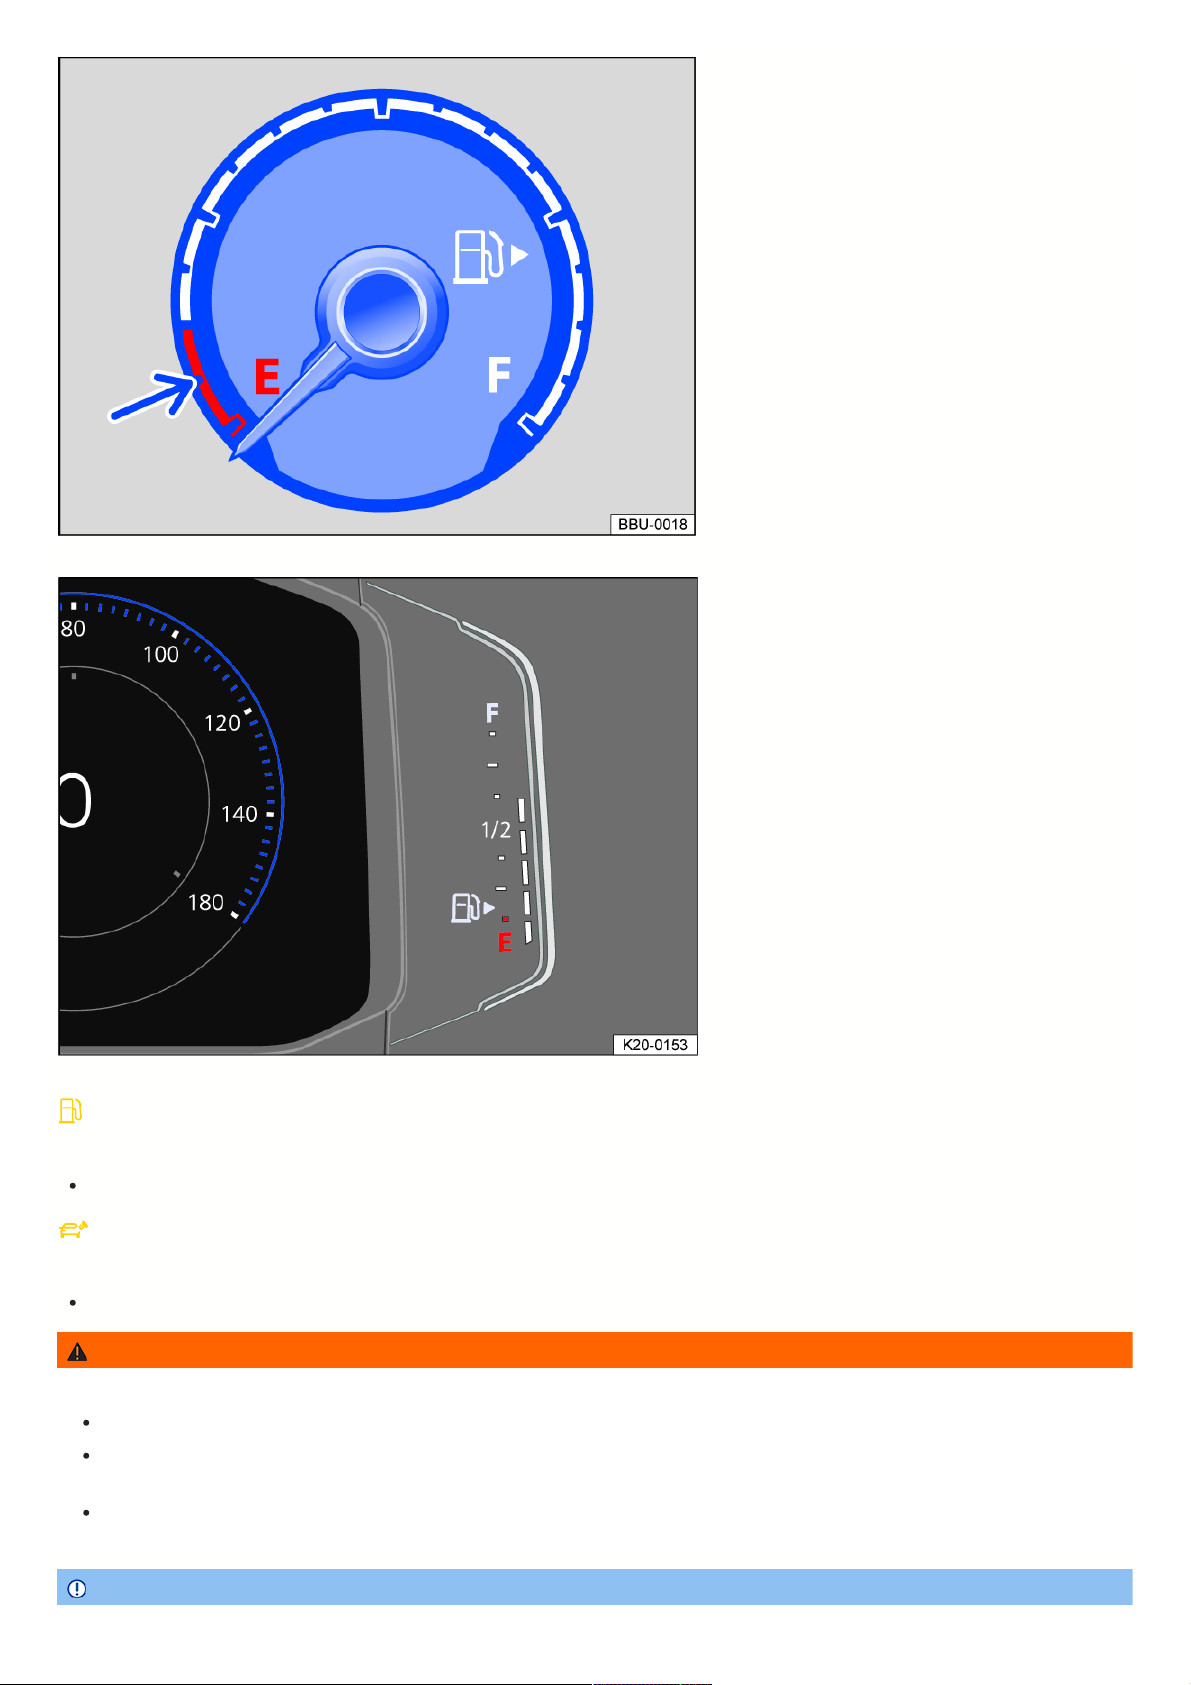
Fig.13Generalexample:Fuelgaugeonanaloginstrumentcluster.
Fig.14Generalexample:fuelgaugeonthedigitalinstrumentcluster.
Fueltankalmostempty
The yellow indicator light turns on. The reserve supply (red marking ) is being used.
Refuel at the next opportunity.
Fueltankcapopen
The yellow indicator light turns on.
Close the fuel tank cap.
WARNING
Driving with low fuel level that is too low can lead to a vehicle breakdown in traffic, accidents, and serious injuries.
If the fuel level is too low, this can result in irregular fuel supply to the engine, particularly when going uphill or downhill.
The steering, all driver assistance systems and brake support systems will not work if the engine is “sputtering” or cuts out due to fuel shortage or
irregular fuel supply.
Always refuel when the tank is only 1/4 full to prevent a breakdown due to fuel shortage.
NOTICE
20
Page 21
Never run the tank completely empty. Irregular fuel supply can result in misfiring and unburnt fuel entering the exhaust system.
Thesmallarrownexttothefuelpumpsymbolonthefuelgaugeindicateswhichsideofthevehiclethefuelfillerflapison.
Enginecoolanttemperaturegauge
PleasereadtheintroductoryinformationandheedtheWarningsandNotice
⇒ Introduction
.
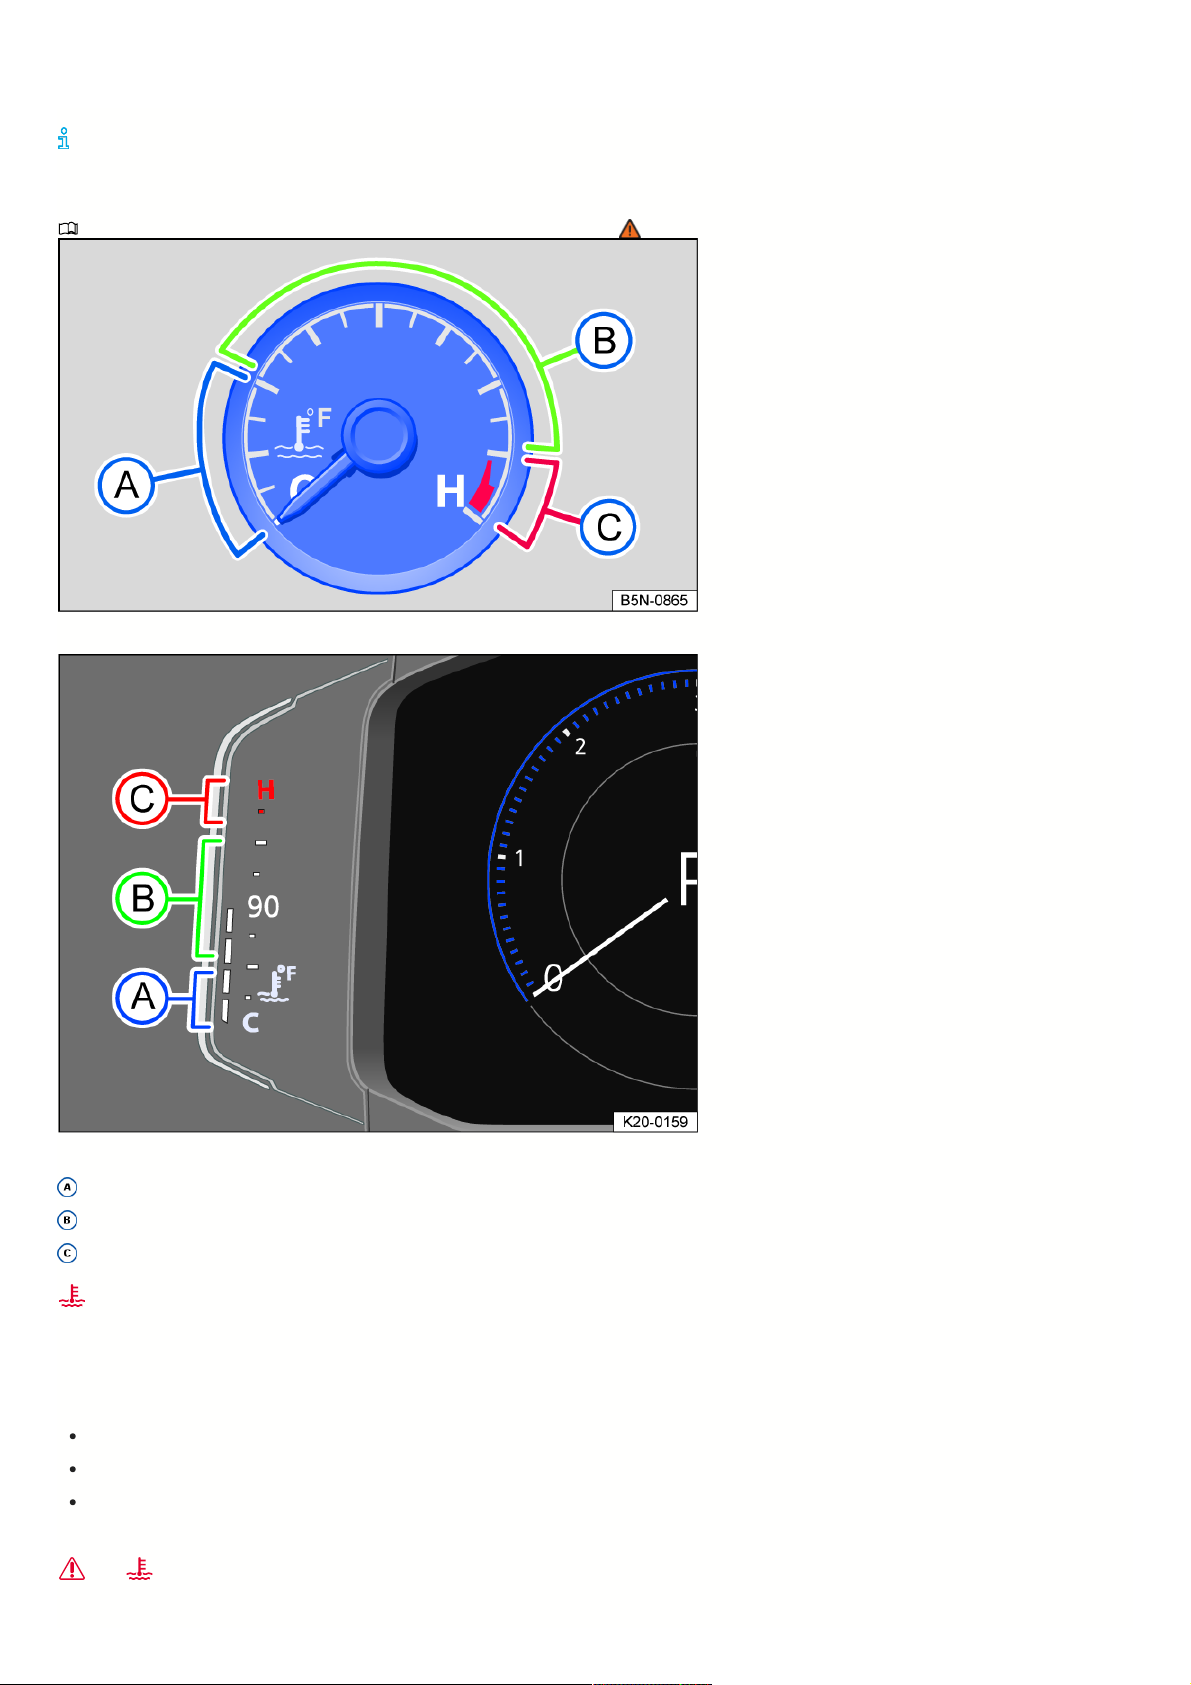
Fig.15Enginecoolanttemperaturegaugeintheanaloginstrumentcluster.
Fig.16Enginecoolanttemperaturegaugeinthedigitalinstrumentcluster.
Cold range. The engine is not at operating temperature yet. Avoid high engine RPMs and heavy engine load when the engine is not at operating temperature.
Normal range.
Warning range. The needle may move into the warning range when engine load is heavy, especially when outside temperatures are high.
Enginecoolant
Vehicles with analog instrument cluster: The red indicator light flashes.
The engine coolant level is incorrect or the engine coolant system is malfunctioning.
Do not continue driving!
Stop the vehicle, stop the engine, and let it cool down.
Check the engine coolant level ⇒ Checking and filling engine coolant .
If the warning light does not turn off even if the engine coolant level is correct, contact an authorized Volkswagen dealer or authorized Volkswagen Service
Facility.
and Enginecoolant
Vehicles with digital instrument cluster: The red central warning light turns on. A message also appears in the instrument cluster display.
21
Page 22

The engine coolant level is incorrect or the engine coolant system is malfunctioning.
Do not continue driving!
Stop the vehicle, stop the engine, and let it cool down.
Check the engine coolant level ⇒ Checking and filling engine coolant .
If the warning light does not turn off even if the engine coolant level is correct, contact an authorized Volkswagen dealer or authorized Volkswagen Service
Facility.
Displays
PleasereadtheintroductoryinformationandheedtheWarningsandNotice
⇒ Introduction
.
Possibledisplaysintheinstrumentcluster
Different information may be shown in the instrument cluster display depending on the vehicle equipment:
Open doors, hood, and trunk lid.
Warning and information texts.
Odometer displays.
Time ⇒ Time.
Multimedia and navigation information.
Phone information.
Outside temperature.
Compass display.
Selector lever position.
Gear recommendation ⇒ Gear recommendation.
Driving data menu (Multi-Function Display) and menus for various settings ⇒ Driving data menu.
Service interval display ⇒ Service interval display.
Speed warning system ⇒ Menus in the instrument cluster .
Speed warning for winter tires.
Status display for the start-stop system ⇒ Start/Stop system.
Depending on the vehicle equipment: Status display for Active Cylinder Management (ACT ) ⇒ Eco tips.
Fuel-efficient driving .
Engine code ().
Driver assistance systems display.
Opendoors,hoodandtrunklid
If the doors and/or the engine compartment or trunk lid are open after unlocking the vehicle and while driving, this will be indicated in the instrument cluster display
and may also be indicated audibly. The display may vary depending on the instrument cluster version.
Selectorleverposition
The selector lever position that is engaged is shown on the left side of the selector lever and in the instrument cluster display.
The respective gear is displayed in the instrument cluster display when in the D/S selector lever position as well as when in tiptronic mode.
Outsidetemperaturedisplay
When outside temperatures are colder than approximately +4°C (+39°F), a snowflake symbol also appears on the outside temperature display . This symbol
remains on until the outside temperature rises above +43 °F (+6 °C) → .
In the following situations, the temperature displayed may be higher than the actual outside temperature due to heat radiating from the engine:
When the vehicle is stationary
When the driving speed is very low
The measurement range is from -45 °C (-49 °F) to +169 °F (+76 °C)
WARNING
Streets and bridges may be icy when outside temperatures are above the freezing point.
The snowflake symbol indicates a possible risk of black ice.
Black ice may also be present when outside temperatures are above +39 °F (+4 °C) when the snowflake symbol is not displayed.
Never rely solely on the outside temperature display.
22
Page 23

Phoneinformation
If a mobile device is connected via Bluetooth®, the Bluetooth® symbol will be displayed in the instrument cluster display.
The symbol also indicates the charge level of the mobile device.
Gearrecommendation
A recommendation to select a fuel-saving gear is displayed in the instrument cluster ⇒ Gear recommendation.
Odometerdisplays
The odometer registers the total distance that the vehicle has driven.
The trip odometer (trip) shows the miles that were driven since the trip odometer was last reset.
Vehicles with analog instrument cluster: To reset the trip odometer to zero, press the button in the instrument cluster briefly ⇒ Analog instrument cluster.
Vehicles with a digital instrument cluster: Reset the odometer via the Infotainment system or the service menu ⇒ Service menu.
Speedwarningforwintertires
If the set maximum speed is exceeded, this will be indicated in the instrument cluster display ⇒ Menus in the instrument cluster .
Settings for the speed warning can be adjusted in the vehicle settings in the Infotainment system ⇒ Vehicle settings menu.
Compassdisplay
When the ignition is switched on, the instrument cluster display shows an abbreviation to indicate the direction the vehicle is currently traveling, for example “NW”
for northwest.
If the Infotainment system is switched on and route guidance is not active, the graphic display of a compass is also available.
Fuel-efficientdriving
If the vehicle is driving in a fuel-efficient manner, this will be indicated in the instrument cluster while driving .
Enginecode
Vehicleswithanaloginstrumentcluster:
1. Switch the ignition on, but do not run the engine.
2. To display the engine code, press and hold the button in the instrument cluster for about 15 seconds.
Vehicleswithadigitalinstrumentcluster:
1. Open the service menu ⇒ Service menu.
2. Select the Engine code menu item.
Therearedifferentinstrumentclusters;thereforetheversionsandappearancesofthedisplaysmayvary.Malfunctionswillonlybeindicatedbyindicatorlights
ifthedisplaydoesnothavewarningorinformationtexts.
Someindicatorsintheinstrumentclusterdisplaycanbehiddenduetoeventsthatoccursuddenly,forexampleifthereisanincomingphonecall.
Dependingontheequipment,somesettingsanddisplaysmayalsoappearintheInfotainmentsystem.
Iftherearemultiplewarningmessages,thesymbolswillappearconsecutivelyforseveralseconds.Thesymbolswillappearuntilthemalfunctioniscorrected.
Ifwarningmessagesaboutmalfunctionsappearwhentheignitionisswitchedon,settingsorinformationdisplaysmaynotappearasdescribed.Ifthisisthe
case,havemalfunctionscorrectedbyanauthorizedVolkswagendealerorauthorizedVolkswagenServiceFacility.
Drivingdatamenu
PleasereadtheintroductoryinformationandheedtheWarningsandNotice
⇒ Introduction
.
The driving data menu shows driving and consumption data.
Depending on the vehicle equipment, various driving data can be displayed. The displayed driving data is dependent on the current driving style, the vehicle status
(e.g. particle filter regeneration) and the current driving situation (e.g. city traffic, highway journeys). The driving data is determined as an average value over
sections of different distances and the currently displayed value may therefore differ from the actual average value.
Switchingbetweenthedisplays
Vehicleswithmulti-functionsteeringwheel:
Press the or button ⇒ Operation with the multi-function steering wheel .
Switchingmemories
Vehicleswithmulti-functionsteeringwheel:
Press the button on the multi-function steering wheel ⇒ Operation with the multi-function steering wheel .
Since start memory
If the trip is interrupted for more than two hours, the memory is erased.
23
Page 24

Since refuel memory
Display and memory of the collective driving and consumption data. The memory is erased when the vehicle is refueled.
Extended period memory
The memory collects the driving data up to 19 hours and 59 minutes or 99 hours and 59 minutes driving time or 1999.9 miles (km) or 9999.9 miles (km) distance
driven. If one of these maximum thresholds is met, the memory is erased. The maximum thresholds may vary depending on the version of the instrument cluster.
Erasingthedrivingdatamemory
Select the memory to be erased.
Vehicleswithmulti-functionsteeringwheel:
Press the button on the multi-function steering wheel ⇒ Operation with the multi-function steering wheel .
Selectingdisplays
You can select the driving data you would like to display using the vehicle settings in the Infotainment system ⇒ Vehicle settings menu.
fuel consumption display
The average fuel consumption is displayed after approximately 984 feet (300 meters).
Range display
This indicates the approximate distance in miles (km) the vehicle can travel under the same driving conditions.
speed display
The average speed is displayed after approximately 328 ft. (approximately 100 meters).
Settingaspeedwarning
Vehicleswithmulti-functionsteeringwheel:
1. Select Warning at --- km/h or Warning at --- mph.
2. Press the button on the multi-function steering wheel to save the current speed and to activate the warning.
3. Set the speed on the multi-function steering wheel within approximately five seconds by pressing the or button. Then press the button or wait
several seconds. The speed will then be saved and the warning will be activated.
4. Press the button again to deactivate. The stored speed is erased.
The warning can be set for speeds between 18 mph (30 km/h) and 155 mph (250 km/h).
Warningandinformationtexts
PleasereadtheintroductoryinformationandheedtheWarningsandNotice
⇒ Introduction
.
The status of some functions inside the vehicle and vehicle components are checked when the ignition is switched on or while driving. Malfunctions are indicated by
red and yellow warning symbols in the instrument cluster display and may also be signaled audibly in some cases. The appearance of texts and symbols may vary
depending on the instrument cluster version.
Any malfunctions currently occurring can also be manually called up. To do this, open the Vehicle status or Vehicle menu ⇒ Menus in the instrument cluster .
Priority1warningmessage
The red central warning light flashes or comes on, in some cases together with warning tones or additional symbols. Do not continue driving! There is a hazard.
Check the malfunction. If necessary, contact an authorized Volkswagen dealer or authorized Volkswagen Service Facility for assistance.
Priority2warningmessage
The yellow central warning light flashes or comes on, in some cases together with warning tones or additional symbols. Malfunctions or insufficient operating fluids
can cause vehicle damage and vehicle malfunctions. Check the malfunction as soon as possible. If necessary, contact an authorized Volkswagen dealer or
authorized Volkswagen Service Facility for assistance.
NoteaboutinformationintheOwner'sManual
You can find more information about the existing warning message in the Owner's Manual.
Informationaltext
Information about various processes in the vehicle.
Iftherearemultiplewarningmessages,thesymbolswillappearconsecutivelyforseveralseconds.Thesymbolswillappearuntilthemalfunctioniscorrected.
Ifwarningmessagesaboutmalfunctionsappearwhentheignitionisswitchedon,settingsorinformationdisplaysmaynotappearasdescribed.Ifthisisthe
case,havemalfunctionscorrectedbyanauthorizedVolkswagendealerorauthorizedVolkswagenServiceFacility.
Time
PleasereadtheintroductoryinformationandheedtheWarningsandNotice
⇒ Introduction
.
24
Page 25

Start
Since start
Statistics
Stop
Resume
Split time
New lap
Cancel lap
End
Setting the time using the Infotainment system
1. Depending on the vehicle equipment, press the button or function key ⇒ Operation and displays in the Infotainment system and open the Vehicle menu
in the Infotainment system.
OR:
Depending on vehicle equipment, press the button or function key.
2. Depending on how your vehicle is equipped, open the Settings menu.
3. Select the Time and date menu item to set the time ⇒ Vehicle settings menu.
Setting the time using the analog instrument cluster
1. To set the time (all clocks in the vehicle), press and hold the button in the instrument cluster until Time appears in the instrument cluster display ⇒ Analog
instrument cluster.
2. Release the button. The time will appear in the instrument cluster display and the hour display is marked.
3. Then press the button repeatedly until the desired hour is displayed. Press and hold the button to move through the numbers faster.
4. When the hour setting is complete, wait until the minute display is marked in the instrument cluster display.
5. Then press the button repeatedly until the desired minute is displayed. Press and hold the button to move through the numbers faster.
6. Release the button to finish setting the time.
Setting the time using the digital instrument cluster
1. Open the service menu ⇒ Service menu.
2. Select the Time menu.
3. Set the correct time using the or arrow buttons.
It is not possible technically to display the time on the digital instrument cluster.
Laptimer
PleasereadtheintroductoryinformationandheedtheWarningsandNotice
⇒ Introduction
.
Depending on the equipment, the lap timer can be displayed in the instrument cluster ⇒ Instrument cluster operation.
The lap timer offers the option to measure and save the individual lap times on a racing course manually in the vehicle as well as compare these times to the best
times previously recorded.
The following main menus can be displayed:
Lap timer.
Lap (with current lap specification).
Statistics.
Switchingbetweenmenus
Press the or button on the multi-function steering wheel.
For example, the following list will show the layout of the menus in the instrument cluster display. The actual scope of the menus and the names of individual menu
items depend on the instrument cluster version and the vehicle electronics.
Menudisplaysandfunctions
Lap timer menu:
The time measurement of a lap is started.
The time measurement begins when the vehicle begins to drive. If it is already moving, the time measurement starts when the vehicle comes to a
stop in the meantime.
An overview of the laps previously recorded is displayed.
Lap menu:
The active time measurement is paused. The lap is not finished.
The paused time measurement is resumed.
A split time is displayed for approximately five seconds. The active time measurement continues to run simultaneously.
The time of the current lap is stopped and a new lap is started. The time for the finished lap is transferred to the statistics.
The time measurement is stopped and discarded. The current lap will not be recorded in the statistics.
The time measurement is finished. The lap will be recorded in the statistics.
Statistics menu:
25
Page 26
Back
Reset
The display switches back to the previous menu.
All saved statistics data is reset.
The previously driven lap times are displayed in the statistics menu. If the maximum lap number of 99 laps or the maximum total duration of 99 hours, 59 minutes
and 59 seconds is reached, a new time measurement can be started before the statistics are reset.
WARNING
Driver distraction can cause accidents and injuries.
Only adjust lap timer presets and open the statistics when the vehicle is stationary.
Only operate the lap timer while driving if the driving situation is easy to control and monitor.
Driverassistancesystemsbutton
PleasereadtheintroductoryinformationandheedtheWarningsandNotice
⇒ Introduction
.
Depending on the equipment, the driver assistance systems button is either located on the turn signal and high beam lever or on the multi-function steering wheel.
Using this button, the driver assistance systems can be switched on and off in the Assist systems menu.
1. Press the button to open the Assist systems menu.
2. Select the driver assistance system and switch it on or off. A check mark indicates if a driver assistance system is switched on.
3. Confirm the selection with the button on the windshield wiper lever or the button on the multi-function steering wheel.
Or you can also switch the driver assistance systems on and off in the Infotainment system vehicle settings ⇒ Vehicle settings menu.
Servicemenu
PleasereadtheintroductoryinformationandheedtheWarningsandNotice
⇒ Introduction
.
Depending on the equipment, settings can be applied in the service menu.
Openingtheservicemenu
To open the service menu, select the Range information profile in the instrument cluster and press and hold the button on the multi-function steering wheel
for approximately four seconds. You can now navigate in the menu as usual using the buttons on the multi-function steering wheel.
Resettingtheserviceintervaldisplay
Select the Service menu and follow the instructions on the instrument cluster display.
Resettingtheoilchangeservice
Select the Reset oil change service menu and follow the instructions on the instrument cluster display.
Resettingthetripodometer
Select the Reset trip menu and follow the instructions on the instrument cluster display to reset the trip odometer.
Enginecode
Select the Engine code menu. The engine code will appear in the instrument cluster display.
Settingthetime
Select the Time menu and set the correct time using the or arrow buttons.
Copyright
Select the Copyright menu to access the copyright information.
Serviceintervaldisplay
PleasereadtheintroductoryinformationandheedtheWarningsandNotice
⇒ Introduction
.
Displays about service events appear in the instrument cluster display and in the Infotainment system.
There are different versions of the instrument cluster and Infotainment system; therefore, the versions and appearances of the displays may vary.
Fixed service intervals are specified for vehicles with the fixed oil change service.
Intervals are determined individually on vehicles with the flexible oil change service. Oil change services only need to be performed if the vehicle requires it. The
specific operating conditions and the personal driving style are also taken into consideration. The service early warning message is first displayed 30 days prior to
the calculated service due date. The displayed remaining distance to be traveled is always rounded to 100 miles (km) and the remaining time is rounded to whole
days.
Servicenotification
If a service or an inspection is due in the near future, a service notification will be displayed when the ignition is switched on.
26
Page 27

The specified distance or time is the distance or time until the next service can be completed.
Serviceevent
When a service is due or an inspection is due, a warning chime will sound and a wrench symbol may appear on the instrument cluster display for a few
seconds together with one of the following messages when you switch on the ignition:
Inspection now!
Oil change now!
Oil change service and inspection now!
Checkingaserviceduedate
When the ignition is on, the engine is off, and the vehicle is stationary, the current service due date can be viewed at any time:
CheckingtheserviceduedateintheInfotainmentsystem:
1. Depending on the vehicle equipment, press the button or function key ⇒ Operation and displays in the Infotainment system and open the Vehicle menu
in the Infotainment system.
OR:
Depending on vehicle equipment, press the button or function key.
2. Depending on how your vehicle is equipped, open the Settings menu.
3. Select the Service menu item to display the service information.
Vehicleswithanaloginstrumentcluster:
1. Press and hold the button in the instrument cluster until Service appears in the display.
2. Release the button. The current service due date is shown in the display.
Vehicles with a digital instrument cluster: The service due date can only be checked through the service menu ⇒ Service menu.
Resettingtheserviceintervaldisplay
If the service or inspection was not performed by an authorized Volkswagen dealer or an authorized Volkswagen Service Facility, the service reminder can be reset
as follows:
Vehicleswithanaloginstrumentcluster:
1. Switch the ignition off.
2. Press and hold the button in the instrument cluster.
3. Switch the ignition back on.
4. Release the button when one of the following messages appears in the instrument cluster display: Reset oil change service? or Reset inspection service?.
5. Press the button in the instrument cluster to confirm.
Vehicles with a digital instrument cluster: The service interval display can only be reset through the service menu ⇒ Service menu.
Do not reset the service interval display between service intervals or incorrect information will be displayed.
If the oil change service was manually reset, the service interval display then also switches to a fixed service interval, even on vehicles with flexible oil change
service.
Theservicemessagewillgooutafterafewsecondsiftheengineisrunningorifyouacknowledgethemessageontheinstrumentcluster.
Ifthe12Vvehiclebatteryinavehiclewithflexibleservicewasdisconnectedforanextendedperiod,thetimeforthenextservicecannotbecalculated.
Therefore,theserviceintervaldisplaysmayshowincorrectcalculations.Ifthisisthecase,followthemaximumpermissiblemaintenanceintervals.
Instrumentclusteroperation
Introduction
Somemenuitemscanonlybeaccessed
whenthevehicleisstationary.
WARNING
Driver distraction can cause accidents and injuries.
Never operate the menus in the instrument cluster display while driving.
Afterstartingtheenginewhenthe12Vvehiclebatteryistotallydischargedorhasbeenreplaced,thesystemsettings,e.g.time,date,personalconvenience
settings,andprogramming,maybechangedordeleted.Checkandcorrectthesettingsafterthe12Vvehiclebatteryissufficientlyrecharged.
Ifwarningmessagesaboutmalfunctionsappearwhentheignitionisswitchedon,settingsorinformationdisplaysmaynotappearasdescribed.Ifthisisthe
case,havemalfunctionscorrectedbyanauthorizedVolkswagendealerorauthorizedVolkswagenServiceFacility.
27
Page 28
Menusintheinstrumentcluster
PleasereadtheintroductoryinformationandheedtheWarningsandNotice
⇒ Introduction
.
The scope of menus and informational displays depends on the vehicle electronics and equipment.
An authorized Volkswagen dealer or authorized Volkswagen Service Facility can program or modify additional functions depending on the vehicle equipment.
Volkswagen recommends contacting an authorized Volkswagen dealer or authorized Volkswagen Service Facility.
Some menu items can only be accessed when the vehicle is stationary.
Trip data⇒ Driving data menu.
Assistance systems
Navigation
Audio
Telephone.
Vehicle status⇒ Warning and information texts.
Views⇒ Digital instrument cluster (Digital Cockpit) .
Operationwiththemulti-functionsteeringwheel
PleasereadtheintroductoryinformationandheedtheWarningsandNotice
⇒ Introduction
.
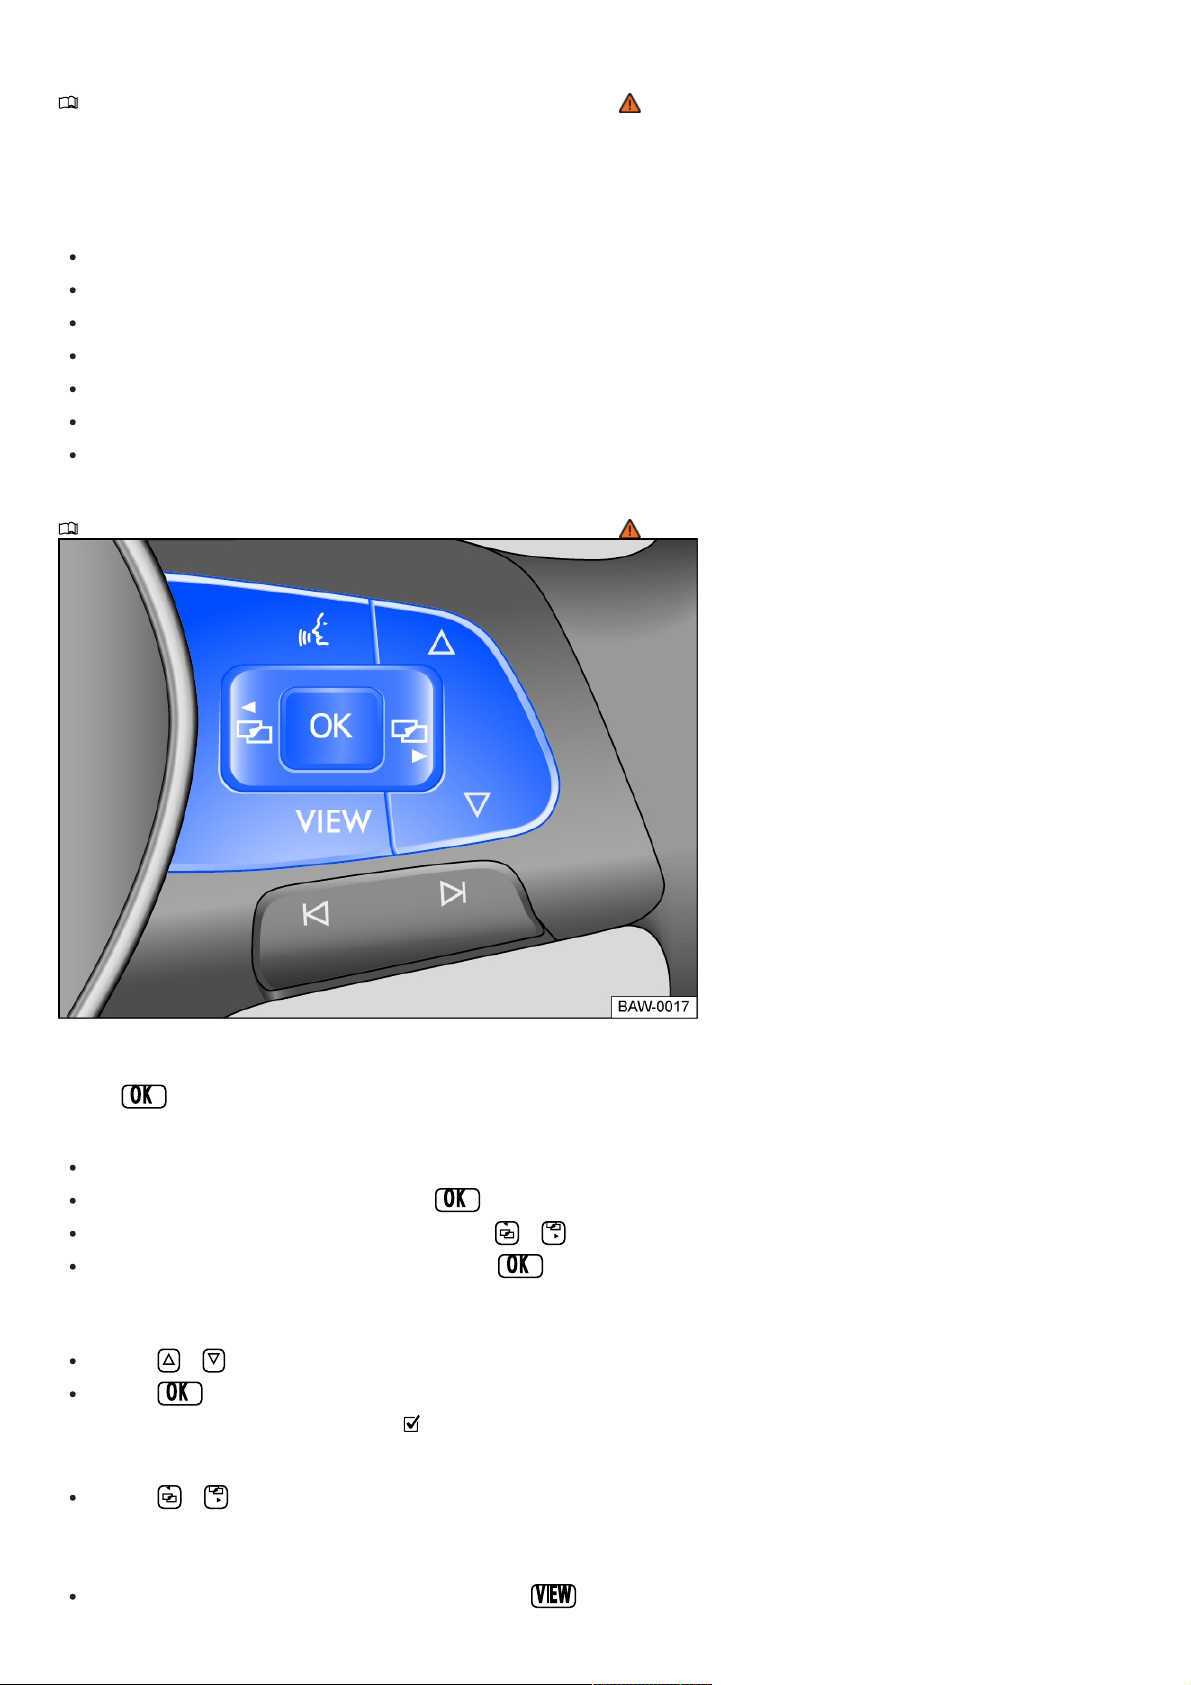
Fig.17Rightsideofthemulti-functionsteeringwheel:buttonsforoperatingthemenusandinformationdisplaysintheinstrumentcluster
Menus cannot be accessed when a priority 1 warning message is displayed ⇒ Warning and information texts. You can confirm and hide some warning messages
using the button on the multi-function steering wheel fig. 17.
Selectingamenuorinformationdisplay
Switch the ignition on.
If a message or vehicle icon is displayed, press the fig. 17 button, repeatedly if necessary.
To display a menu and to scroll through the menu, press the or button fig. 17.
To open the displayed menu or information display, press the button fig. 17 or wait until the menu or the information display opens automatically after
several seconds.
Applyingsettingsinthemenus
Press the or arrow buttons fig. 17 in the displayed menu until the desired menu item is marked. The item is marked with a frame around it.
Press the fig. 17 button to apply the desired changes.
If the checkbox in the function key is activated , that function is switched on.
Returningtomenuselection
Press the or button fig. 17.
VIEWbuttononthemulti-functionsteeringwheel
Vehicles with analog instrument cluster:
You can switch between the current and previous menu using the button fig. 17.
28
Page 29
Classic
Automatic
Preset 1
Preset 2
Preset 3
Vehicles with a digital instrument cluster:
You can use the button fig. 17 to switch between the classic display of dials, the large platform without information profiles, and the enhanced view with
highlighted information profiles. The classic display shows the large dials on the right and left side, and the selected information profile is displayed in the
center. Press and hold the button to select from the preset information profiles in the list:
View without information profiles.
The information profiles adjust to the selected driving mode. Only for vehicles with Driving Mode Selection.
Individual selection of information profiles
Individual selection of information profiles
Only on vehicles with standard factory-installed navigation system
Ifwarningmessagesaboutmalfunctionsappearwhentheignitionisswitchedon,settingsorinformationdisplaysmaynotappearasdescribed.Ifthisisthe
case,havemalfunctionscorrectedbyanauthorizedVolkswagendealerorauthorizedVolkswagenServiceFacility.
OperationanddisplaysintheInfotainmentsystem
Introduction
ThisInfotainmentsystemconsolidates
essentialvehiclesystemsinacentral
controlpanel,suchasmenusettings,
radio,oranavigationsystem.
Generalinformationforoperation
The relevant information for the settings in the Vehicle settings menu is included in the following section.
Systemsettingsandvehicleinformationdisplay
Depending on the version, you can press the button and open the Vehicle menu, or, after pressing the button, open the Settings menu and tap the
relevant function keys to display information or adjust settings:
Vehicle settings (setup) ⇒ Vehicle settings menu.
Depending on vehicle equipment: Performance monitor ⇒ Performance monitor.
Depending on vehicle equipment: Lap timer ⇒ Lap timer.
Digital Instrument cluster.
Active media.
Driving Data.
Vehicle status.
Radio station selection.
WARNING
Driver distraction can cause accidents and injuries. Operating the Infotainment system can distract you from traffic.
Always drive attentively and responsibly.
Afterstartingtheenginewhenthe12Vvehiclebatteryisseverelydrainedorisareplacement,systemsettings(time,date,personalconveniencesettings,and
programming)anduserprofilesmaybeadjustedordeleted.Checkandcorrectthesettingsafterthe12Vvehiclebatteryissufficientlyrecharged.
Vehiclesettingsmenu
PleasereadtheintroductoryinformationandheedtheWarningsandNotice
⇒ Introduction
.
Youcanswitchindividualfunctionsand
systemsonandoffandadjustsettings
inthevehiclesettingsmenuinthe
Infotainmentsystem.
Opening the Vehicle settings menu
1. Switch the ignition on.
2. If necessary, switch on the Infotainment system.
3. Tap the Vehicle function key.
4. To open other submenus in the Vehicle menu or to adjust settings in the menu items, tap the respective function keys from the Inner or Outer areas.
5. Open the required menu and adjust the settings as you wish.
Theactivatedfunctionsarehighlightedincolor.
29
Page 30
Performancemonitor
PleasereadtheintroductoryinformationandheedtheWarningsandNotice
⇒ Introduction
.
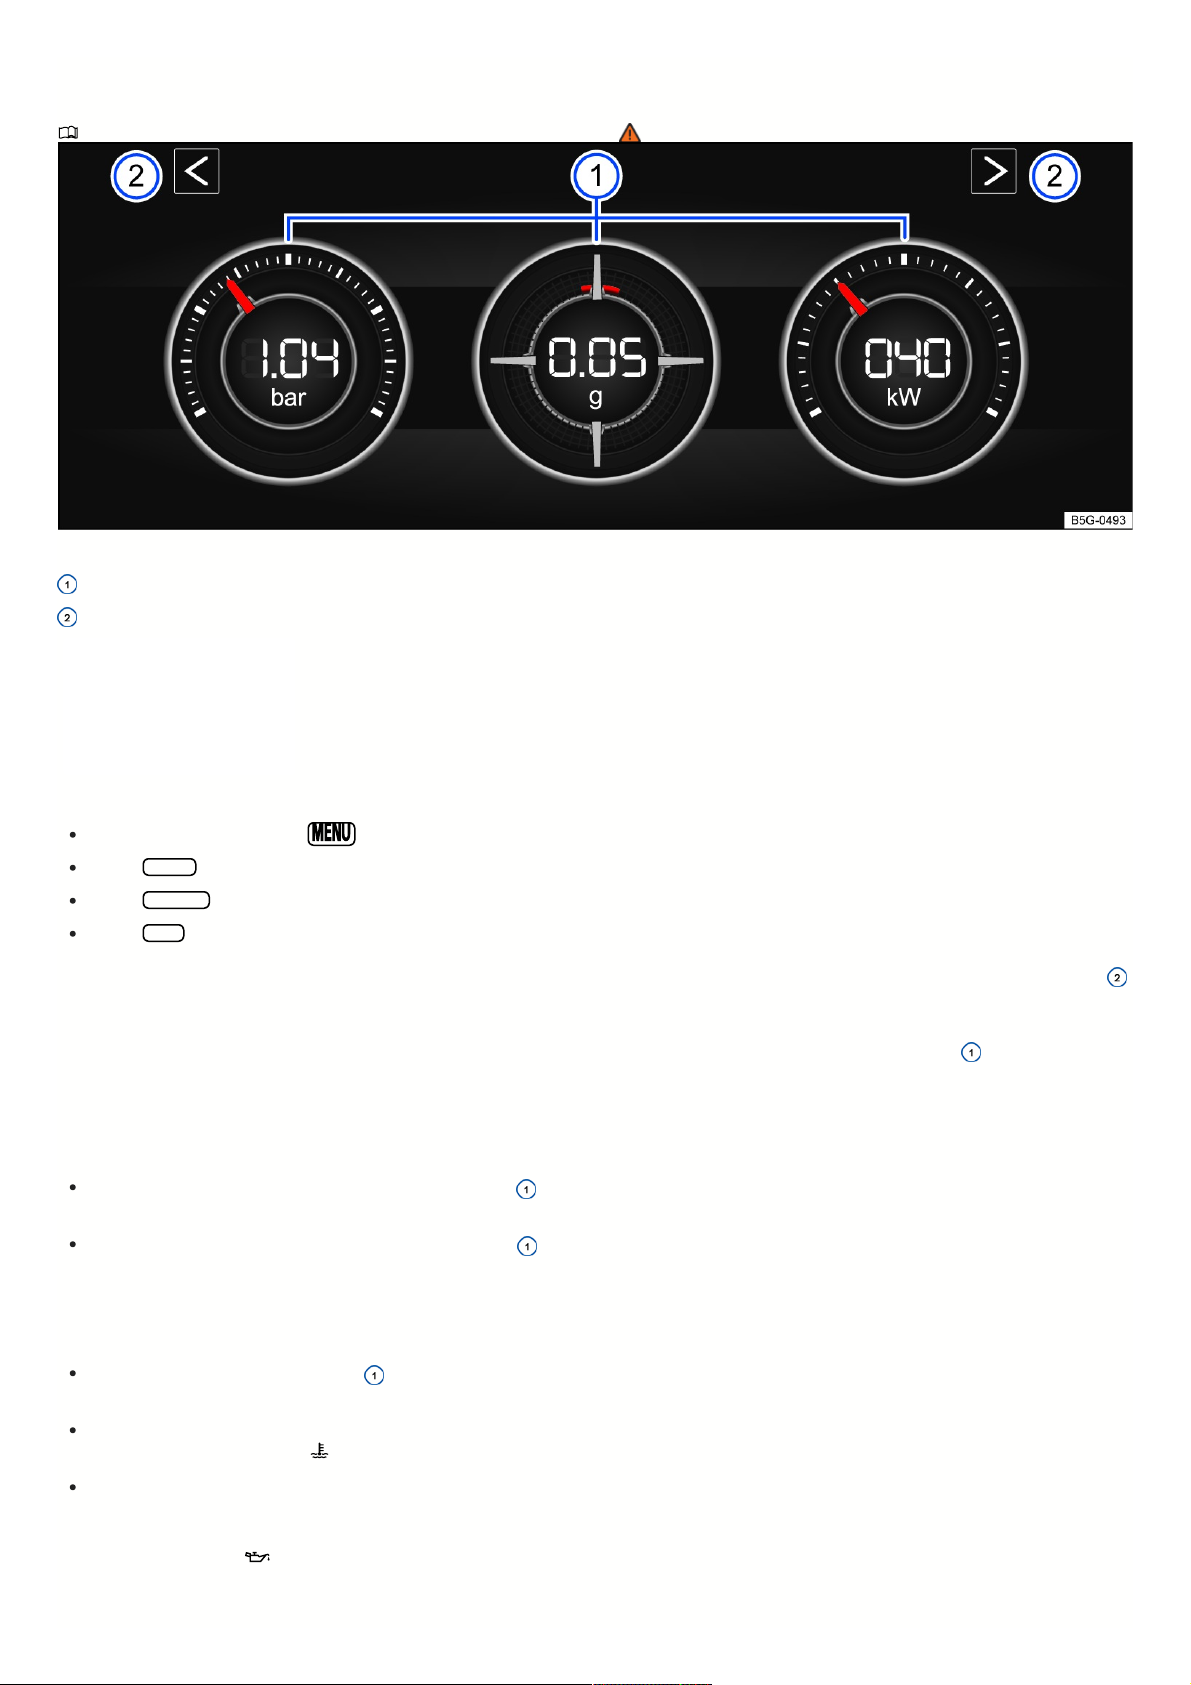
Fig.18OntheInfotainmentsystemscreen:performancemonitor.
Displays
Arrow buttons to switch to the lap timer
Theperformancemonitorisadisplay
forsportydriving.Thedigital
instrumentsshowvaluesinrealtimefor
enginepower,temperature,and
accelerationthataredeterminedby
sensorsinthevehicle.Thisgivesthe
driveranoverviewofthedriving
dynamics.
Openingtheperformancemonitor
Press the button or function key in the Infotainment system.
Tap the Vehicle function key.
Tap the Selection function key.
Tap the Sport function key.
If you want to switch between the performance monitor and the lap timer ⇒ Lap timer, tap one of the left or right arrow buttons above the instruments fig. 18 .
Selectinginstrumentsandadjustingunits
The display can show a maximum of three instruments at the same time. Every instrument can be selected for any display area fig. 18 (left, center, right).
To switch between instruments, swipe upward above the display. The instrument that is currently selected will disappear and a new instrument will appear.
The units on some instruments can be adjusted in the Infotainment system ⇒ Vehicle settings menu.
Thefollowinginstrumentscanbedisplayed:
Boost pressure indicator: the boost pressure indicator fig. 18 (left) displays the boost pressure between the turbocharger and the engine (in “bar”). The
farther to the right that the needle on the scale is, the more engine power is being used.
Accelerometer (G meter): the accelerometer (G meter) fig. 18 (center) displays the acceleration value in the center area (in “g”). The red marking in the
tab area shows the intensity of the acceleration and the direction of the force that is in effect (contrary to the physical laws). For example, if you drive to the left,
the red marking will move in the right area of the instrument (and vice versa). When accelerating, the red marking will move downward. When braking, the red
marking will move upward. The intensity of acceleration is indicated by the position of the red marking from the inside to the outside. If you accelerate faster, the
red marking will disappear from the center area.
Power gauge: The power gauge fig. 18 (right) shows the engine power that is being currently used as a digital value displayed on the surrounding scale
(in kW).
Engine coolant temperature gauge: when engine load is heavy and outside temperatures are high, the gauge may move farther to the right. This is not a
cause for concern as long as the indicator light in the instrument cluster display is off or flashes ⇒ Engine coolant temperature gauge .
Oil temperature gauge: the needle stays in the center area under normal driving conditions. If the pointer is in the left, lower area, the engine operating
temperature has not yet been reached. If the engine operating temperature has not been reached yet, avoid excessive high speeds and acceleration. Engine
coolant temperature gauge: when engine load is heavy and outside temperatures are high, the gauge may move farther to the right. This is not a cause for
concern as long as the indicator light in the instrument cluster display is off or flashing.
Adjustingthedisplayareastothedrivingsituation
30
Page 31
You can select the three instruments that best fit your individual driving style and the driving situation.
WARNING
Driver distraction can cause accidents and injuries. Operating the Infotainment system can distract you from traffic.
Always drive attentively and responsibly.
NOTICE
Avoid high engine speeds, full acceleration, and heavy engine loads after starting the engine when it is cold.
Becauseofthemethodsthatareusedtodeterminepowerinthevehicle,thedisplayedvaluesmaynotbecompletelyprecise.
Laptimer
PleasereadtheintroductoryinformationandheedtheWarningsandNotice
⇒ Introduction
.
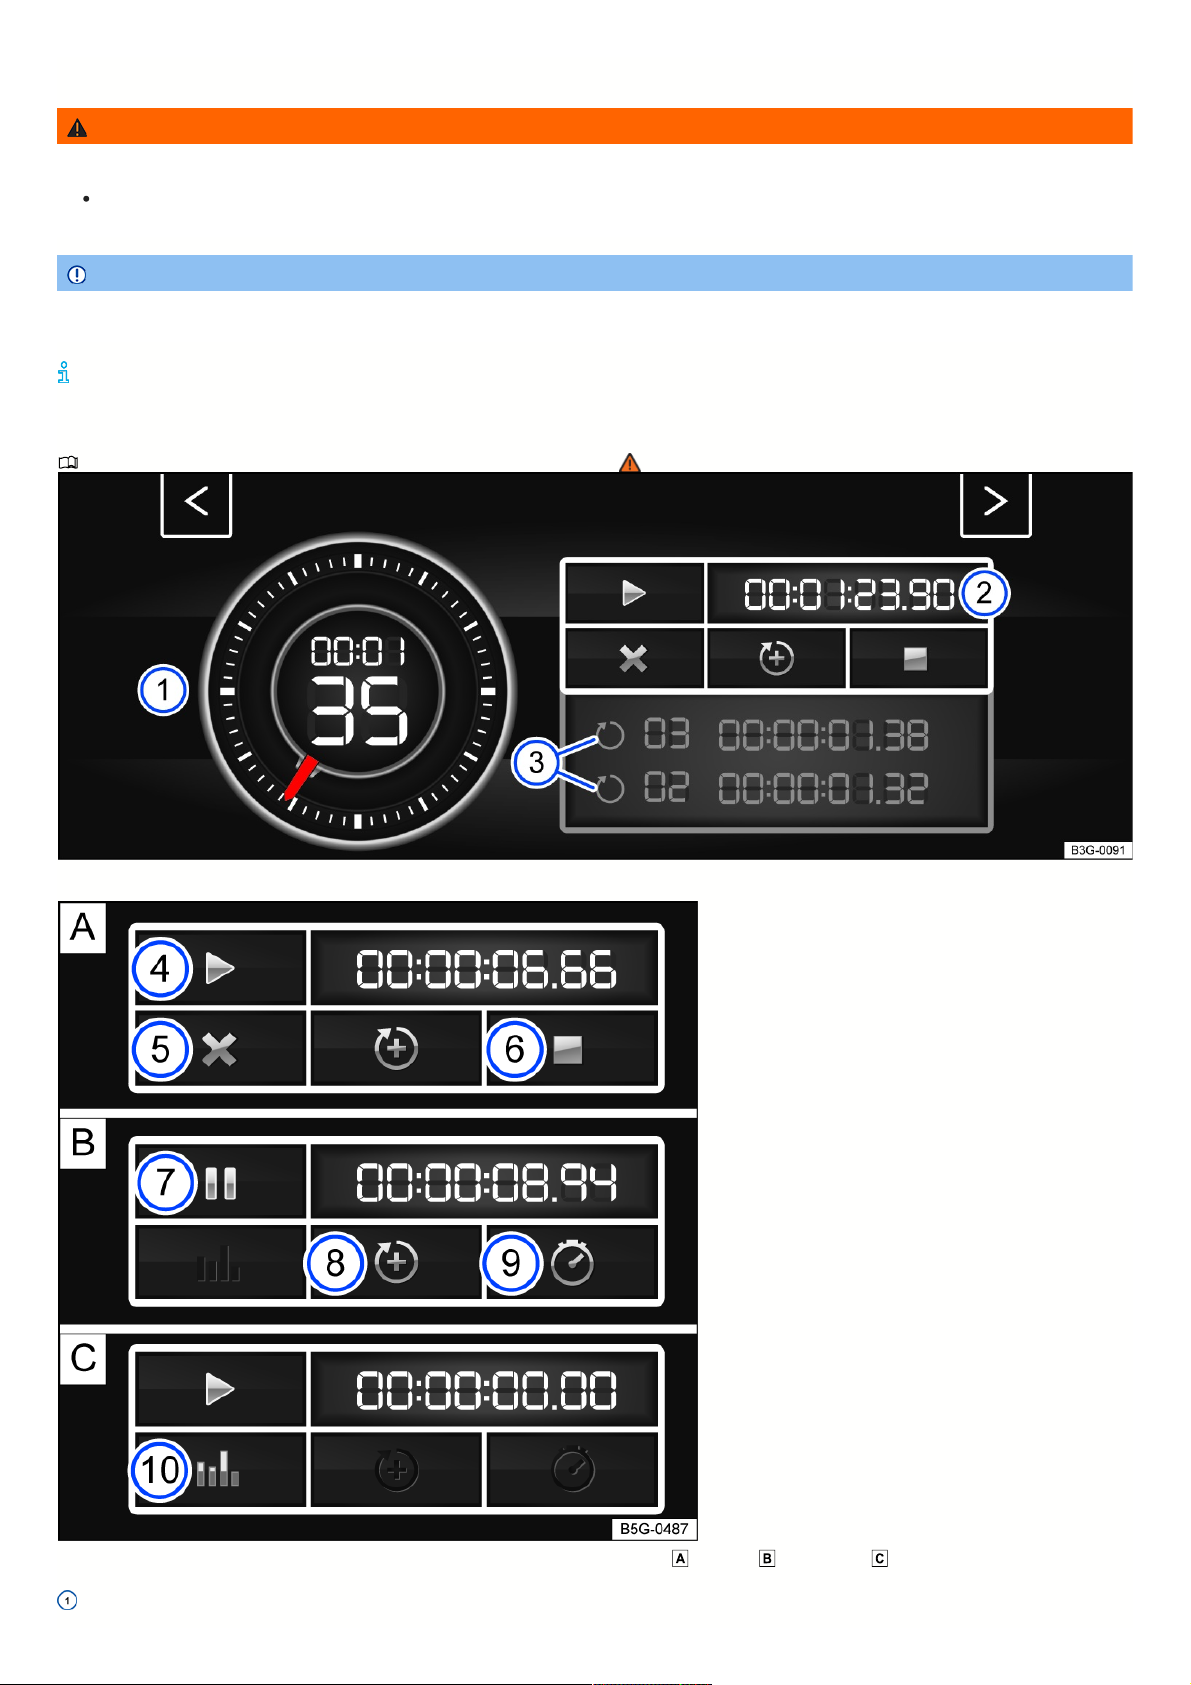
Fig.19OntheInfotainmentsystemscreen:laptimerwithstopwatch,functionkey,andlaptimes.
Fig.20FunctionkeyontheInfotainmentsystemscreen:timemeasurementwhenthelapis stopped, running,and finished.
Stopwatch
31
Page 32
Function key with current lap time
Saved lap times
Start or resume time measurement (only possible when the ignition is switched on) Press Start to begin the time measurement. The time measurement starts
automatically once the vehicle moves forward. If the data has been reset in the statistics, a new first round can be started.
Cancel the current lap. The lap time is deleted. --: --:--.-- is displayed in the statistics.
End the time measurement.
Stop the time measurement or cancel the current lap (when the time measurement is running).
Start new lap. The last lap time is saved and a new lap time starts. The total time of the laps is displayed in the statistics.
Display the split time. The stopwatch stops for several seconds and the split time is displayed.
Display the statistics after ending or canceling the time measurement (number of laps, total time, fastest and slowest lap, average lap time of all laps, all lap
times). Press Reset to reset the statistics.
Thelaptimerofferstheoptionto
measureandsavetheindividuallap
timesonaracecoursemanuallyinthe
vehicleaswellascomparethesetimes
tothebesttimespreviouslyrecorded.
Amaximumof99lapsandamaximumdurationof99hours,59minutesand59secondscanberecorded.Ifoneoftheselimitsisreached,datainthestatistics
mustbedeletedbeforestartinganothertimemeasurement.
Openingthelaptimer
1. Depending on the version of the Infotainment system, press the button or function key.
2. Tap the Vehicle function key.
3. Tap the Selection function key.
4. Tap the Sport function key. The performance monitor will be displayed.
5. Tap one of the arrow buttons in the performance monitor to switch to the lap timer.
You can switch between the lap timer and performance monitor using the arrow buttons.
Measuringlaptimes
The stopwatch measures the lap time in two areas:
The red needle and the number in the center indicate the running time in seconds, and the smaller display in the inner area shows minutes and hours.
The display on the right side shows the current lap time with an accuracy of 1/100 of a second. If no laps with split times have been saved yet in the lap timer, then
there is no difference between the stopwatch and the lap time.
WARNING
If possible, do not use the lap timer while driving.
Only adjust lap timer presets and open the statistics when the vehicle is stationary.
Only operate the lap timer while driving if the driving situation is easy to control and monitor.
32
Page 33

Safety
Generalinformation
Drivingpreparationsanddrivingsafety
You must observe the following points before and during every trip for your own safety and for the safety of your passengers and others on the road → :
Make sure the vehicle lighting and turn signals are functioning correctly.
Check the tire pressure and fuel level ⇒ Tire pressure, ⇒ Fuel gauge.
Check the washer fluid level ⇒ Washer fluid.
Make sure the windows are clear and provide good visibility ⇒ Exterior care and cleaning.
The air intake for the engine must not be blocked. The engine must not be covered with covers or insulation ⇒ Safety precautions for working in the engine
compartment.
Secure all objects and luggage in the storage compartments and the luggage compartment ⇒ Transporting.
It must be possible to press the pedals without interference.
Secure children with child restraint systems that are appropriate for their weight and height ⇒ Transporting children safely.
Adjust the front seats, head restraints, and mirrors according to the size of the occupants ⇒ Seating position, ⇒ Mirrors.
Wear shoes that give your feet good grip for operating the pedals.
The floormat in the driver side footwell must be kept clear from the pedal area and be secured.
Assume the correct seating position before driving and remain that way while driving. This also applies to all passengers ⇒ Seating position.
Fasten the safety belt correctly before you begin driving and keep it fastened while driving. This also applies to all passengers ⇒ Safety belts.
The number of passengers must not exceed the number of seats and safety belts.
Never drive when impaired, like by medication, alcohol, or drugs.
Never allow yourself to be distracted from traffic, like by adjusting settings, by opening menus, by passengers, or by phone calls.
Always adapt your speed and driving style to the current visual, weather, road, and traffic conditions.
Follow driving rules and posted speed limits.
Take regular breaks on long trips. You should take a break at least every two hours.
Secure animals in the vehicle restraint systems that are appropriate for their weight and size.
Drivinginothercountries
Some countries have special safety standards and regulations that differ from the vehicle configuration. Volkswagen recommends to inform yourself about legal
regulations and about the following points from an authorized Volkswagen dealer or authorized Volkswagen Service Facility before driving in other countries:
Do technical modifications need to be made to the vehicle before driving in other countries, such as covering or adjusting the headlights?
Are the tools, diagnostic equipment, and replacement parts that are needed for maintenance and repair work available?
Is there an authorized Volkswagen dealer or authorized Volkswagen Service Facility in the country where you will be driving?
Are fluids that meet Volkswagen specifications available in the country where you will be driving ⇒ Operating fluids and operating equipment ?
Will the navigation function in the factory-installed Infotainment system work with the existing navigation data in the country where you will be driving?
Are special tires needed in the country where you will be driving?
Is a fire extinguisher required in the country where you will be driving?
What are the requirements for a safety vest?
Is fuel with sufficient quality available ⇒ Fuel and emissions control system ?
Checkswhenrefueling
Only perform work on the engine and in the engine compartment if you are familiar with the necessary steps and the general safety precautions, and if the correct
operating equipment, fluids, and suitable tools are available ⇒ Safety precautions for working in the engine compartment ! Otherwise have all work performed by an
authorized Volkswagen dealer or authorized Volkswagen Service Facility. Make sure that the following items are checked regularly:
Washer fluid level ⇒ Washer fluid.
Engine oil level ⇒ Engine oil, ⇒ Engine oil consumption.
Engine coolant level ⇒ Engine coolant.
Brake fluid level ⇒ Brake fluid.
Tire inflation pressure ⇒ Tire pressure.
Vehicle lighting ⇒ Headlights which is necessary for traffic safety:
33
Page 34

Information on changing bulbs ⇒ Exterior lighting.
DANGER
Read and heed the important safety information for the front passenger’s front airbag ⇒ Safety notes on using child restraints .
WARNING
Driving under the influence of alcohol, drugs, medication, and prescription narcotics can cause serious accidents and fatal injuries.
Alcohol, drugs, medication, and prescription narcotics can considerably impair perception, reaction times, and driving safety, which can result in loss of
vehicle control.
WARNING
Always heed the applicable driving regulations and speed limits and drive proactively. Evaluating driving situations correctly can make the difference between
safely reaching your destination and being involved in a collision with serious injuries.
NOTICE
Volkswagen is not responsible for damage to the vehicle caused by substandard fuel, insufficient service, or not using Volkswagen Genuine parts.
Havingthevehicleservicedregularlynotonlymaintainsthevalueofthevehicle,butalsocontributestooperationalsafetyandroadworthiness.Therefore,have
maintenanceproceduresperformedaccordingtoVolkswageninstructions.Underextremeoperatingconditions,someworkmayneedtobeperformedbeforethe
nextserviceisdue.Extremeoperatingconditionscanincludefrequent“stop-and-godriving”ordrivinginareaswithalotofdustintheair.Youcanobtain
additionalinformationfromanauthorizedVolkswagendealerorauthorizedVolkswagenServiceFacility.
Seatingposition
Introduction
Numberofseats
The vehicle has a total of five seats: two seats in the front and three seats in the back.
Every seat is equipped with a safety belt.
WARNING
Sitting incorrectly in the vehicle can increase the risk of serious or fatal injuries during sudden driving or braking maneuvers, in the event of a collision or
accident, and if the airbags are deployed.
Before the vehicle starts to move, all vehicle occupants must always be in the correct seating position and maintain it while driving. Safety belts must
also be fastened and remain fastened.
The number of persons in the vehicle must not exceed the number of seats with safety belts.
Always secure children in the vehicle with an approved and suitable child restraint according to the child's body size and weight ⇒ Transporting children
safely and⇒ Airbag system.
Always keep feet in the footwell while driving. For example, never rest feet on the seat or on the instrument panel and never stick feet out of the window.
Otherwise, if the airbag and the safety belt deploy, they could increase the risk of injury in the event of an accident instead of providing protection.
Riskofinjuryduetoanincorrectseatingposition
PleasereadtheintroductoryinformationandheedtheWarningsandNotice
⇒ Introduction
.
The risk of serious or fatal injuries will increase if safety belts are not worn or are incorrectly fastened. Safety belts can only achieve the optimum protection if they
are routed correctly. An incorrect seating position significantly impairs the protective function of the safety belt. This could result in serious or fatal injuries. The risk of
serious or fatal injuries increases even more if a deployed airbag strikes a passenger who is sitting in an incorrect seating position. The driver is responsible for all
vehicle occupants and especially for children who are being transported in the vehicle.
The following list includes examples of seating positions that could be dangerous for all vehicle occupants.
Thefollowingpointsalwaysapplywhenthevehicleisinmotion:
Never stand inside the vehicle.
Never stand on the seats.
Never kneel on the seats.
Never tilt your seat backrest too far back.
34
Page 35
Never lean against the instrument panel.
Never lay down in the passenger compartment or on the rear bench seat.
Never sit only on the front section of the seat.
Never sit sideways on the seat.
Never lean against the window.
Never place your feet out of the window.
Never place your feet on the instrument panel.
Never place your feet on the seat cushion or on the seat backrest.
Never ride in the footwell.
Never sit on the armrests.
Never drive or ride in a seat without fastening your safety belt.
Never ride in the trunk.
WARNING
Incorrect seating positions in the vehicle increase the risk of serious or fatal injuries in the event of an accident or sudden driving and braking maneuvers.
All vehicle occupants must always sit in the correct seating position and have their own safety belts correctly fastened while driving.
Incorrect seating positions, failure to wear a safety belt, or being too close to an airbag increases the risk of serious injury or death to vehicle occupants,
especially if the airbags deploy and come into contact with occupants who are not seated correctly.
Correctseatingposition
PleasereadtheintroductoryinformationandheedtheWarningsandNotice
⇒ Introduction
.
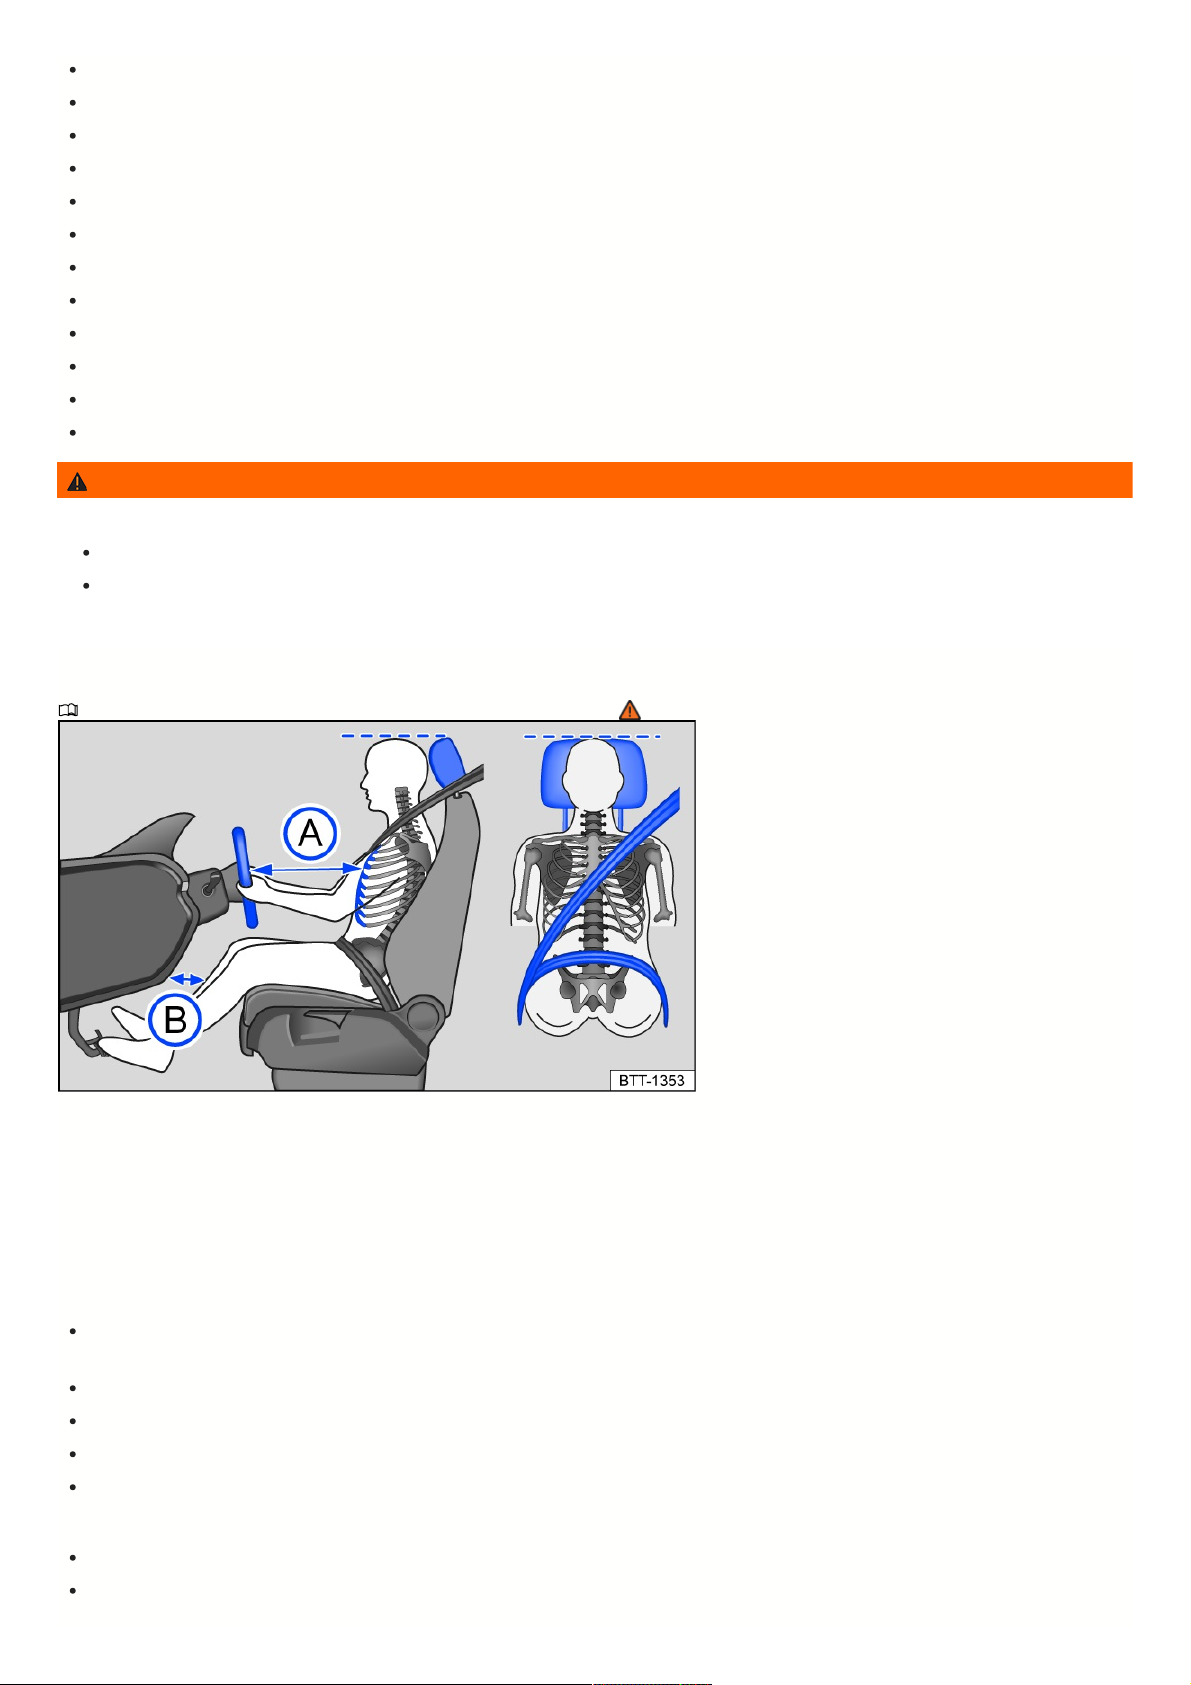
Fig.21Generalexample:correctdistancebetweenthedriverandsteeringwheel,correctsafetybeltrouting,andcorrectheadrestraintadjustment.
The correct seating positions for the driver and passengers are specified in the information that follows.
If individuals cannot achieve the correct seating position due to physical conditions, contact an authorized Volkswagen dealer or authorized Volkswagen Service
Facility for more information about possible special modifications. The safety belt and airbags only provide the optimum protection when vehicle occupants are
seated in a correct seating position. Volkswagen recommends contacting an authorized Volkswagen dealer or authorized Volkswagen Service Facility.
For your safety and to reduce the risk of injuries in the event of a sudden braking maneuver or accident, Volkswagen recommends the following seating positions:
Thefollowingappliestoallvehicleoccupants:
Adjust the head restraint so that the upper edge of the head restraint is in line with the upper portion of the head as much as possible, but not lower than eye
level. Position the back of the head as close as possible to the head restraint fig. 21.
For shorter individuals, slide the head restraint all the way downward, even if the head is then below the upper edge of the head restraint.
For taller individuals, move the head restraint upward all the way.
Keep both feet in the footwell while driving.
Adjust and fasten the safety belts correctly ⇒ Safety belts.
Thefollowingadditionalpointsapplytothedriver:
In vehicles with head restraints that can be moved forward or back, position the head restraint so that it is as close as possible to the back of the head.
Adjust the steering wheel so that the distance between the steering wheel and your chest is at least 25 cm (around 10 inches) fig. 21 and you can hold the
steering wheel firmly at the sides with both hands and your elbows slightly bent.
35
Page 36

When adjusted, the steering wheel must always face your chest and not be directed toward your face.
Position the seat backrest in an upright position, so that your back rests completely on the seat backrest.
Adjust the forward/back position of the driver seat so that you can press the pedals while your legs are slightly bent and there is at least 10 cm (around
4 inches) of space between the instrument panel and your knees fig. 21.
Adjust the driver seat so that the top point of the steering wheel can be reached.
Always keep both feet in the footwell to keep control of the vehicle at all times.
Thefollowingadditionalpointsapplytothefrontpassenger:
In vehicles with head restraints that can be moved forward or back, position the head restraint so that it is as close as possible to the back of the head.
Position the seat backrest in an upright position, so that your back rests completely on the seat backrest.
Move the front passenger seat back as far as possible so that the airbag can provide optimum protection if it deploys.
Safetybelts
Introduction
Check the condition of all of the safety belts regularly. If there is damage to the belt webbing, the belt connections, the retractor, or the buckle, have the affected
safety belt replaced immediately by an authorized Volkswagen dealer or authorized Volkswagen Service Facility ⇒ . The authorized Volkswagen dealer or
authorized Volkswagen Service Facility must use the correct parts for the vehicle, trim level, and model year. Volkswagen recommends contacting an authorized
Volkswagen dealer or authorized Volkswagen Service Facility.
WARNING
The risk of serious and fatal injuries increases if the safety belts are not worn or are worn incorrectly. The optimum protection is only achieved if the safety belts
are worn and used correctly.
Safety belts are the most effective way to reduce the risk of serious and fatal injuries in a collision. To protect the driver and passengers, the safety belts
must always be worn correctly when the vehicle is in motion.
Before every trip, everyone in the vehicle must seat themselves correctly, fasten the safety belt that belongs to the seat they are using, and keep it
fastened while the vehicle is in motion. This applies to all passengers and at all times, including during city driving.
Secure children in the vehicle with a child restraint that is appropriate for their weight and height and with the safety belt used correctly ⇒ Transporting
children safely.
Only begin driving once all passengers are wearing their own safety belts correctly.
Insert and latch the buckle tongue in the safety belt buckle that belongs to that seat. Using a buckle from another seat reduces the protection provided by
the safety belt and can cause serious injuries.
Never allow foreign objects or fluid to enter the slots in the belt buckles. This could impair the function of the belt buckles and safety belts.
Never unfasten the safety belt while the vehicle is in motion.
Secure only one person with a safety belt.
Never allow children or infants to ride on anyone's lap and to be secured together with anyone in the same safety belt.
Do not wear extremely bulky, loose clothing in the vehicle, such as a coat over a sports jacket, because this could impair the function of the seat and the
safety belt.
WARNING
Damaged safety belts create a serious risk and can cause serious or fatal injuries.
Never allow safety belts to become caught in the door or the seat mechanisms because the belts could be damaged.
If the belt webbing or other parts of the safety belt are damaged, the safety belts could tear during a collision or sudden breaking maneuver.
Have damaged safety belts replaced immediately with new safety belts that are approved for the vehicle by Volkswagen. Safety belts that are stretched
during a collision must be replaced by an authorized Volkswagen dealer or authorized Volkswagen Service Facility. It may be necessary to replace them
even if there is no visible damage. The anchors for the safety belts must also be checked.
Never try to repair, modify, or remove the safety belts yourself. Have all repairs to safety belts, safety belt retractors, and buckle components performed
only by an authorized Volkswagen dealer or authorized Volkswagen Service Facility.
Warninglight
PleasereadtheintroductoryinformationandheedtheWarningsandNotice
⇒ Introduction
.
36
Page 37
Fig.22Intheinstrumentclusterdisplay:warninglight.
Thedriverorfrontpassengerhasnotfastenedtheirsafetybelt.Fastenallsafetybelts.
When the ignition is switched on, several warning and indicator lamps light up temporarily as a function check. They then turn off after a few seconds.
A chime also sounds.
When the ignition is switched on, the red warning light comes on for six seconds. A chime also sounds for up to six seconds if the driver safety belt is not
fastened. The chime ends when the driver fastens their safety belt. The warning lamps and chime go off when the driver and front passenger have fastened their
safety belts.
If the driver and front passenger do not both fasten their safety belts within 24 seconds after the warning chime has ended and the vehicle is driving at a speed
above approx. 15 mph (approx. 25 km/h), the chime sounds again for approx. 6 seconds, then stops for approx. 24 seconds, and then sounds again for approx. 6
seconds. The same happens if one of the safety belts is released while driving. The red warning light comes on. A warning chime also sounds for up to two
minutes at 24-second intervals. The chime does not sound at speeds below approx. 5 mph (approx. 8 km/h).
When the ignition is switched on, the red warning light comes on until the driver and front passenger have both fastened their safety belts.
WARNING
The risk of serious and fatal injuries increases if the safety belts are not worn or are worn incorrectly. The optimum protection is only achieved if the safety belts
are worn and used correctly.
Frontalcollisionsandthelawsofphysics
PleasereadtheintroductoryinformationandheedtheWarningsandNotice
⇒ Introduction
.
Fig.23Avehiclewithoccupantswhoarenotwearingsafetybeltsdrivestowardawall.
37
Page 38
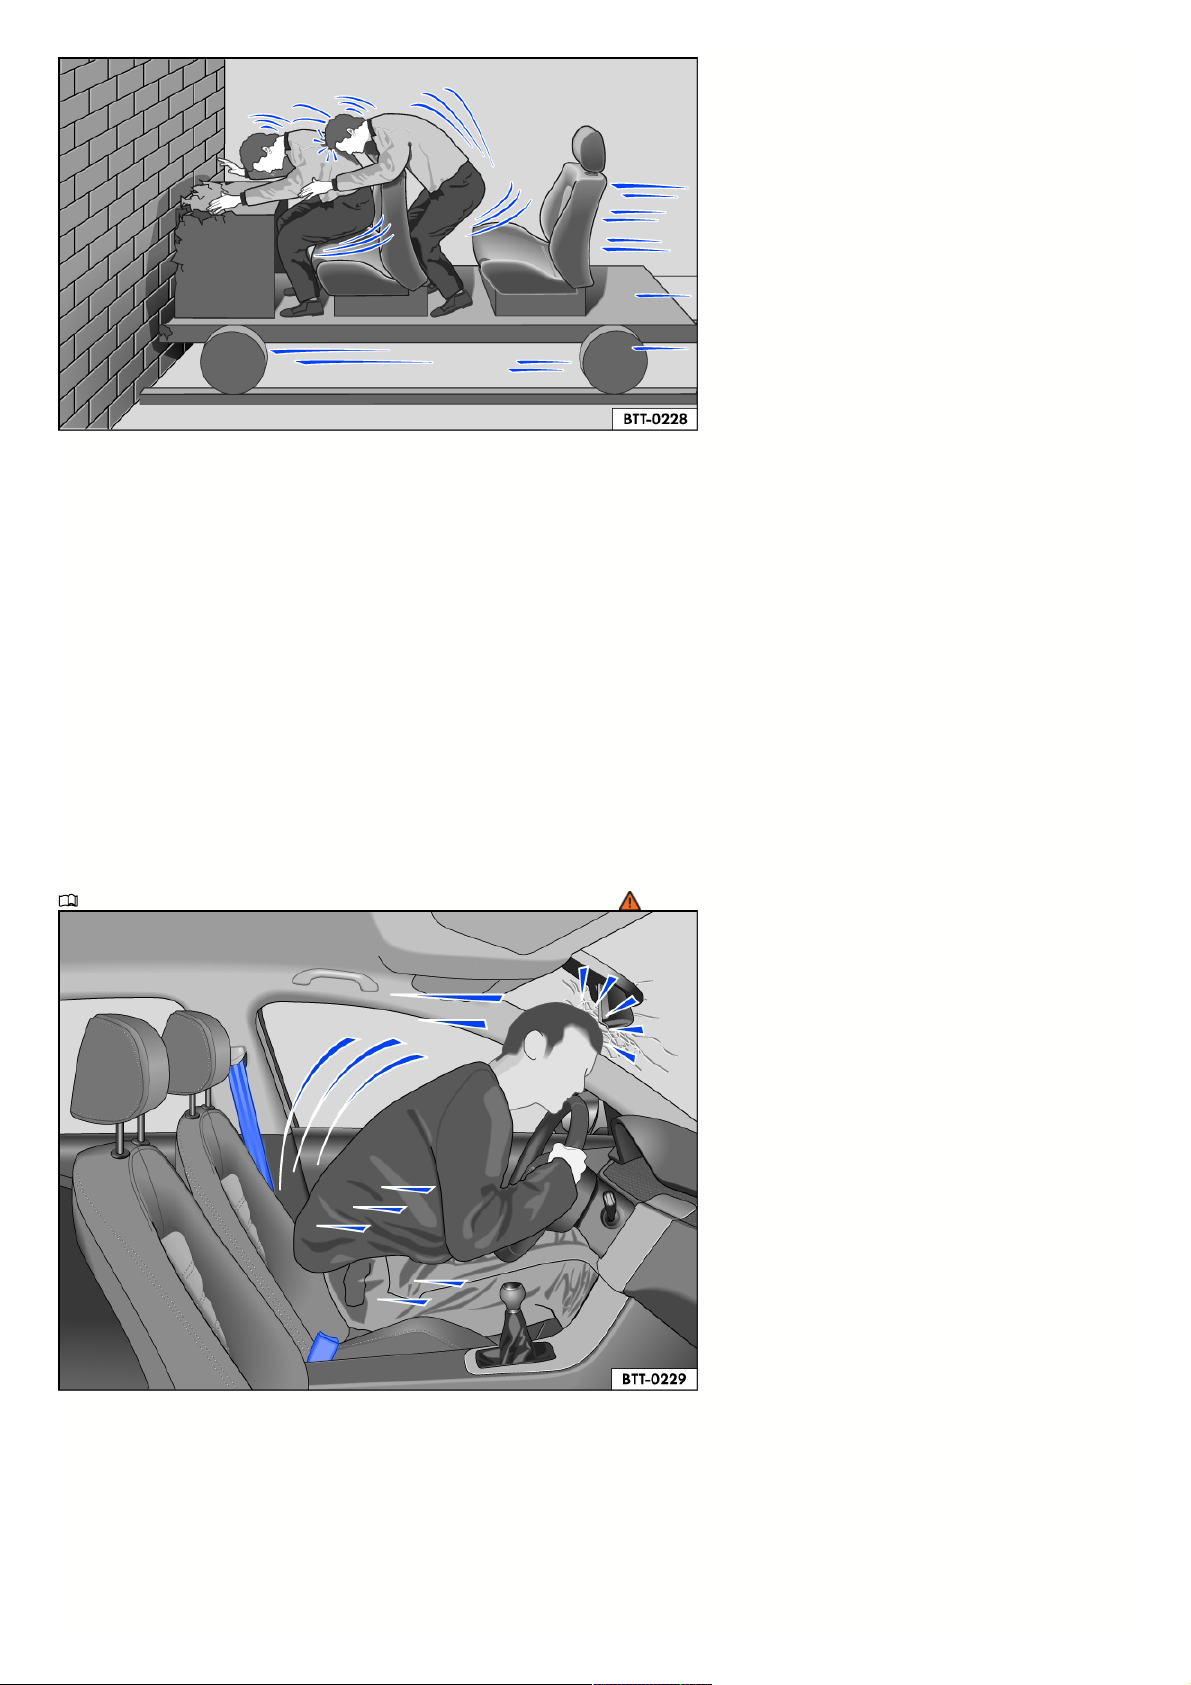
Fig.24Avehiclewithoccupantswhoarenotwearingsafetybeltscollideswithawall.
The physical principle of a frontal collision is a simple concept. Once the vehicle is in motion, the vehicle and its occupants possess energy called “kinetic energy”
fig. 23.
The higher the vehicle speed and the higher the weight, the more energy must be absorbed in the event of a collision.
However, the vehicle speed is the more significant factor. For example, if the speed doubles from approx. 15 mph (approx. 25 km/h) to approx. 31 mph (50 km/h),
then the kinetic energy quadruples.
The amount of “kinetic energy” depends greatly on the vehicle speed and on the weight of the vehicle and the occupants. If speed and weight increase, more energy
must be absorbed in the event of an accident.
Vehicle occupants who are not wearing safety belts are also not “connected” to the vehicle. In a frontal collision, individuals who are not wearing safety belts will
continue to move at the same speed the vehicle was moving before the collision, until something stops their movement. Since the vehicle occupants in the example
are not wearing safety belts, the entire amount of kinetic energy possessed by the vehicle occupants would only be absorbed by the impact on the wall fig. 24.
At speeds of approx. 19 mph (approx. 30 km/h) to approx. 31 mph (approx. 50 km/h), the force applied against the bodies of passengers can easily exceed approx.
2200 lbs (1000 kg) in the event of a collision. The force applied against a person’s body will increase even more at higher speeds.
This example applies not just to frontal collisions, but to all types of accidents and collisions.
Whathappenstovehicleoccupantswhodonotwearsafetybelts?
PleasereadtheintroductoryinformationandheedtheWarningsandNotice
⇒ Introduction
.
Fig.25Adrivernotwearingasafetybeltispropelledforward.
38
Page 39
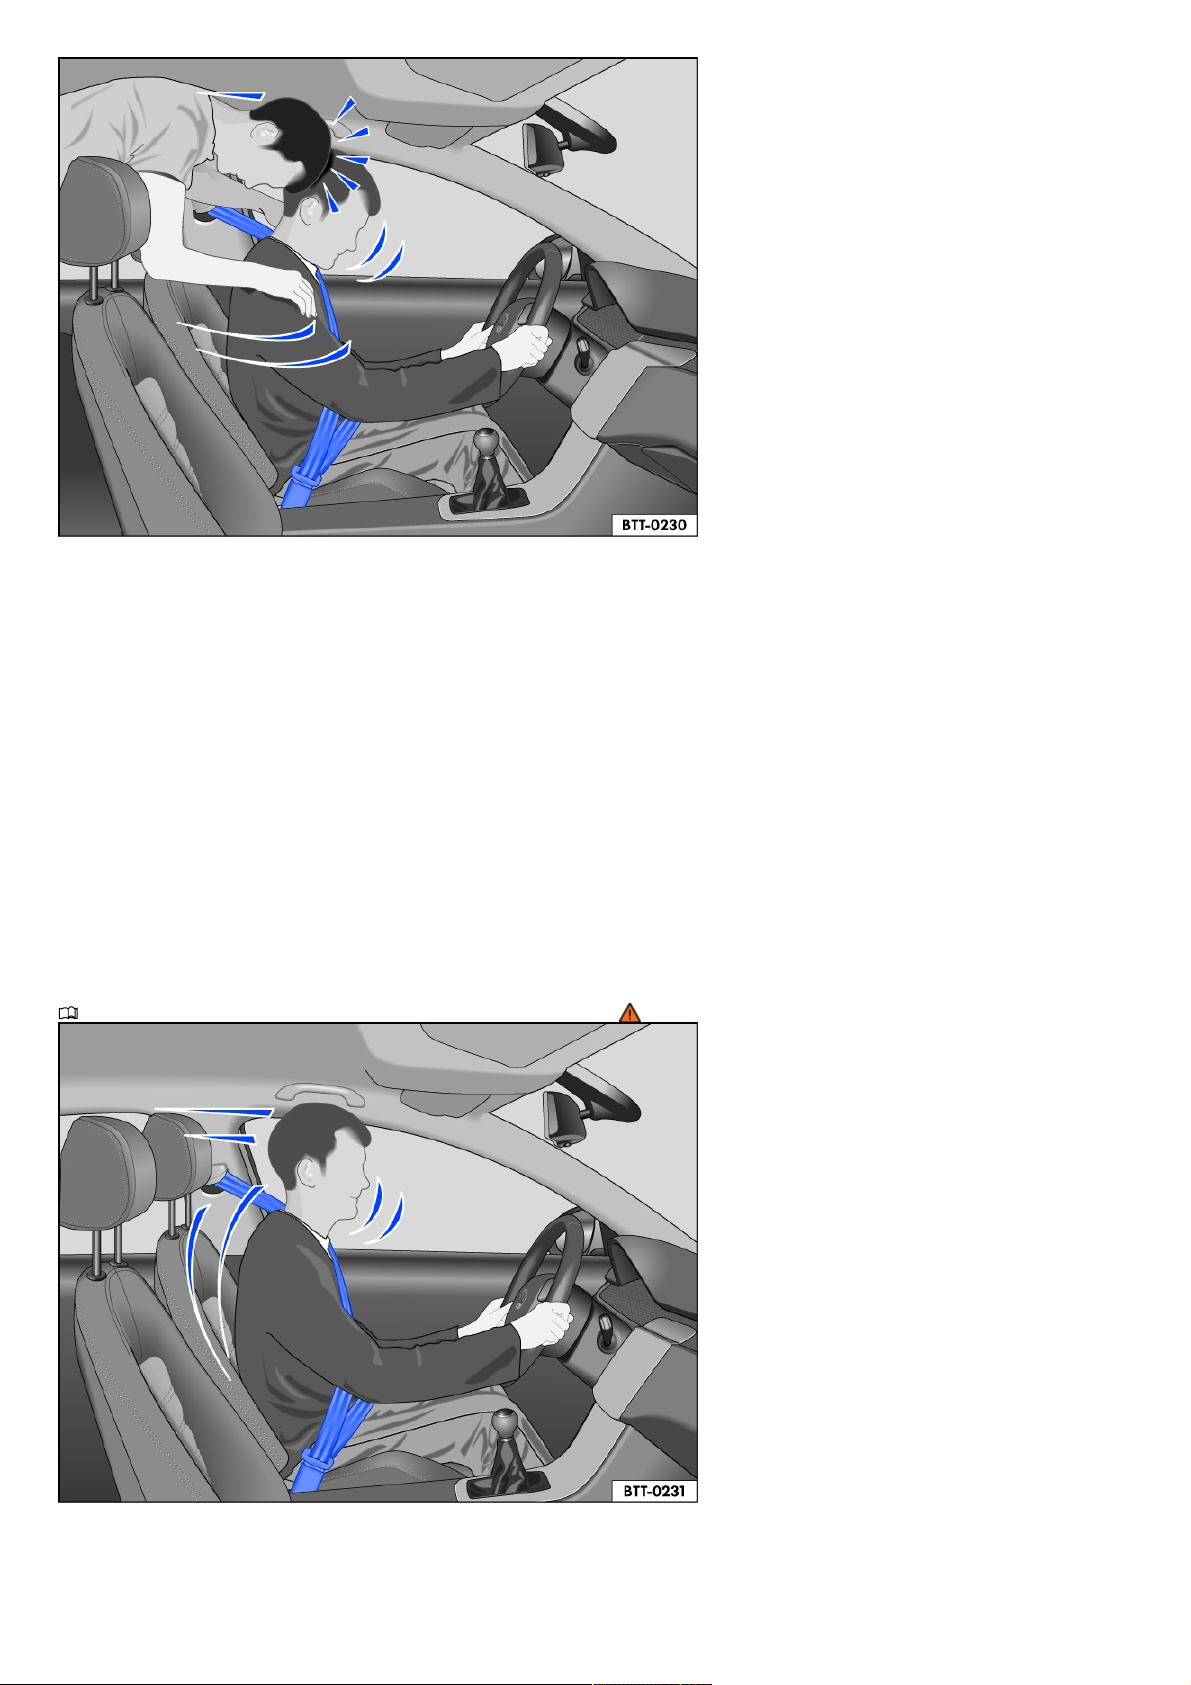
Fig.26Apassengerintherearseatwhoisnotwearingasafetybeltwillbepropelledforwardtowardthedriverwhohastheirownsafetybeltfastened.
Many believe that a person can support their body with their hands during a minor collision. That is incorrect.
Even at low impact speeds, enough force is applied to the body that it is not possible to support the body with arms and hands. In the event of a frontal collision,
vehicle occupants who are not wearing safety belts could be propelled forward and collide with components in the vehicle interior, such as the steering wheel,
instrument panel, or windshield fig. 25.
The airbag system is not a replacement for safety belts. Deployed airbags only offer supplemental protection. Airbags do not deploy during all types of collisions.
Even if the vehicle is equipped with an airbag system, all vehicle occupants, including the driver, must fasten their own safety belts and keep them fastened
correctly while the vehicle is in motion. This reduces the risk of severe or fatal injuries in the event of a collision, regardless of whether the seating position is
equipped with an airbag.
An airbag only deploys one time. To achieve the optimum protective function, the safety belts must always be fastened correctly. This is also true during accidents
where the airbags do not deploy. Vehicle occupants who are not wearing safety belts could be propelled out of the vehicle and this could result in even more severe
or fatal injuries.
It is also important for passengers on the rear seats to have their own safety belts fastened correctly, since they could be propelled through the vehicle without
control. A passenger on the rear seat without their own safety belt fastened is endangering themselves as well as the driver and the other passengers in the vehicle
fig. 26.
Protectionprovidedbysafetybelts
PleasereadtheintroductoryinformationandheedtheWarningsandNotice
⇒ Introduction
.
Fig.27Driverthatisrestrainedduringabrakingmaneuverbyasafetybeltthatisfastenedcorrectly.
Safety belts that are fastened correctly can make a significant difference. Safety belts that are fastened correctly hold vehicle occupants in the correct seating
position and considerably reduce the kinetic energy in the event of a collision. The safety belts also help to reduce the risk of uncontrolled movements that could
otherwise cause serious injuries. Safety belts that are fastened correctly also reduce the risk of being propelled out of the vehicle fig. 27.
39
Page 40

Vehicle occupants with safety belts that are fastened correctly benefit greatly from this, because the kinetic energy is absorbed by the safety belts. The structure in
the front of the vehicle and other passive safety features in the vehicle such as the airbag system also ensure that the kinetic energy will be reduced. The
accumulated energy reduces along with the risk of injury.
These examples describe frontal collisions. It should be understood that safety belts that are fastened correctly also substantially reduce the risk of injury in all other
types of collisions. Therefore, safety belts must always be fastened before every trip, even if driving “just around the corner”. Make sure that all passengers also
have their own safety belts fastened correctly.
Accident statistics have indicated that safety belts that are fastened correctly considerably reduce the risk of injuries and increase the probability of survival in the
event of a severe collision. Safety belts that are fastened correctly also increase the protective effect of deployed airbags in the event of an accident. For this
reason, the use of safety belts is legally required in most countries.
Even though the vehicle is equipped with airbags, the safety belts must be fastened. For example, the front airbags only deploy in certain frontal collisions. The front
airbags do not deploy in minor frontal collisions, minor side-impact collisions, rear collisions, rollovers, or in accidents where the airbag deployment value in the
control module was not exceeded. The same also applies to other airbags in the vehicle.
Therefore, always wear the appropriate safety belt correctly, and make sure all passengers have their own safety belts fastened correctly.
Usingsafetybelts
PleasereadtheintroductoryinformationandheedtheWarningsandNotice
⇒ Introduction
.
Checklist
Using safety belts → :
Check the condition of all of the safety belts regularly.
Keep safety belts clean.
Always keep foreign objects and fluids far away from the safety belt, the safety belt buckle, and the slot in the safety belt buckle.
Do not pinch or damage the safety belt and/or belt buckle, for example closing it in a door.
Never remove, modify, or repair the safety belt and belt fastening elements.
Always fasten the safety belt correctly before you begin driving and keep it fastened while driving.
Twistedsafetybelt
If the safety belt is difficult to pull out of the belt guide, the safety belt may have been pulled out too quickly when positioning the belt and may have become twisted
within the side trim panel:
Slowly and carefully pull the safety belt out completely by the belt buckle.
Untwist any twisted sections of the safety belt and guide the belt back slowly by hand.
If you cannot untwist the safety belt, fasten the safety belt anyway. The twist must not be in a section of the belt that rests directly on the body. Go to an authorized
Volkswagen dealer or authorized Volkswagen Service Facility immediately to have the belt untwisted.
Lockablesafetybelt
The safety belts on the rear seats and the safety belt on the front passenger seat are lockable and have an emergency locking function. If a child restraint system is
installed with a safety belt, the safety belt must be locked so that the belt webbing cannot unroll. With the locking function, you can adjust the safety belt so that a
child restraint is properly installed. A child restraint can be secured accordingly, for example so that it does not tilt sideways when cornering.
Pull the safety belt fully out to determine whether a safety belt is lockable. If the belt webbing is fully pulled out and you hear a “clicking” sound when it is rolled up, it
is a lockable safety belt. Test the locking function by pulling on the safety belt. If the locking function is active, do not pull out the safety belt any further.
The locking mechanism on the safety belt must only be used to fasten specific child restraint systems ⇒ Child restraints – overview .
An activated locking mechanism must be released when a vehicle occupant fastens their safety belt. To release the locking mechanism, push the red button in the
belt buckle and guide the belt back fully by hand ⇒ Fastening and unfastening the safety belts .
WARNING
Incorrect handling of the safety belts increases the risk of severe or fatal injuries.
Check the safety belts and associated components regularly to ensure they function correctly.
Safety belts cannot be repaired; they must be replaced.
Always keep the safety belts clean.
Do not pinch or damage the safety belt or allow it to rub against any objects with sharp edges.
Always keep the belt buckle and insertion guide for the belt buckle free of foreign objects and fluids.
Fasteningandunfasteningthesafetybelts
PleasereadtheintroductoryinformationandheedtheWarningsandNotice
⇒ Introduction
.
Safety belts that are fastened correctly hold vehicle occupants in the correct position during braking maneuvers or in a collision, in order to provide the maximum
protection → .
40
Page 41
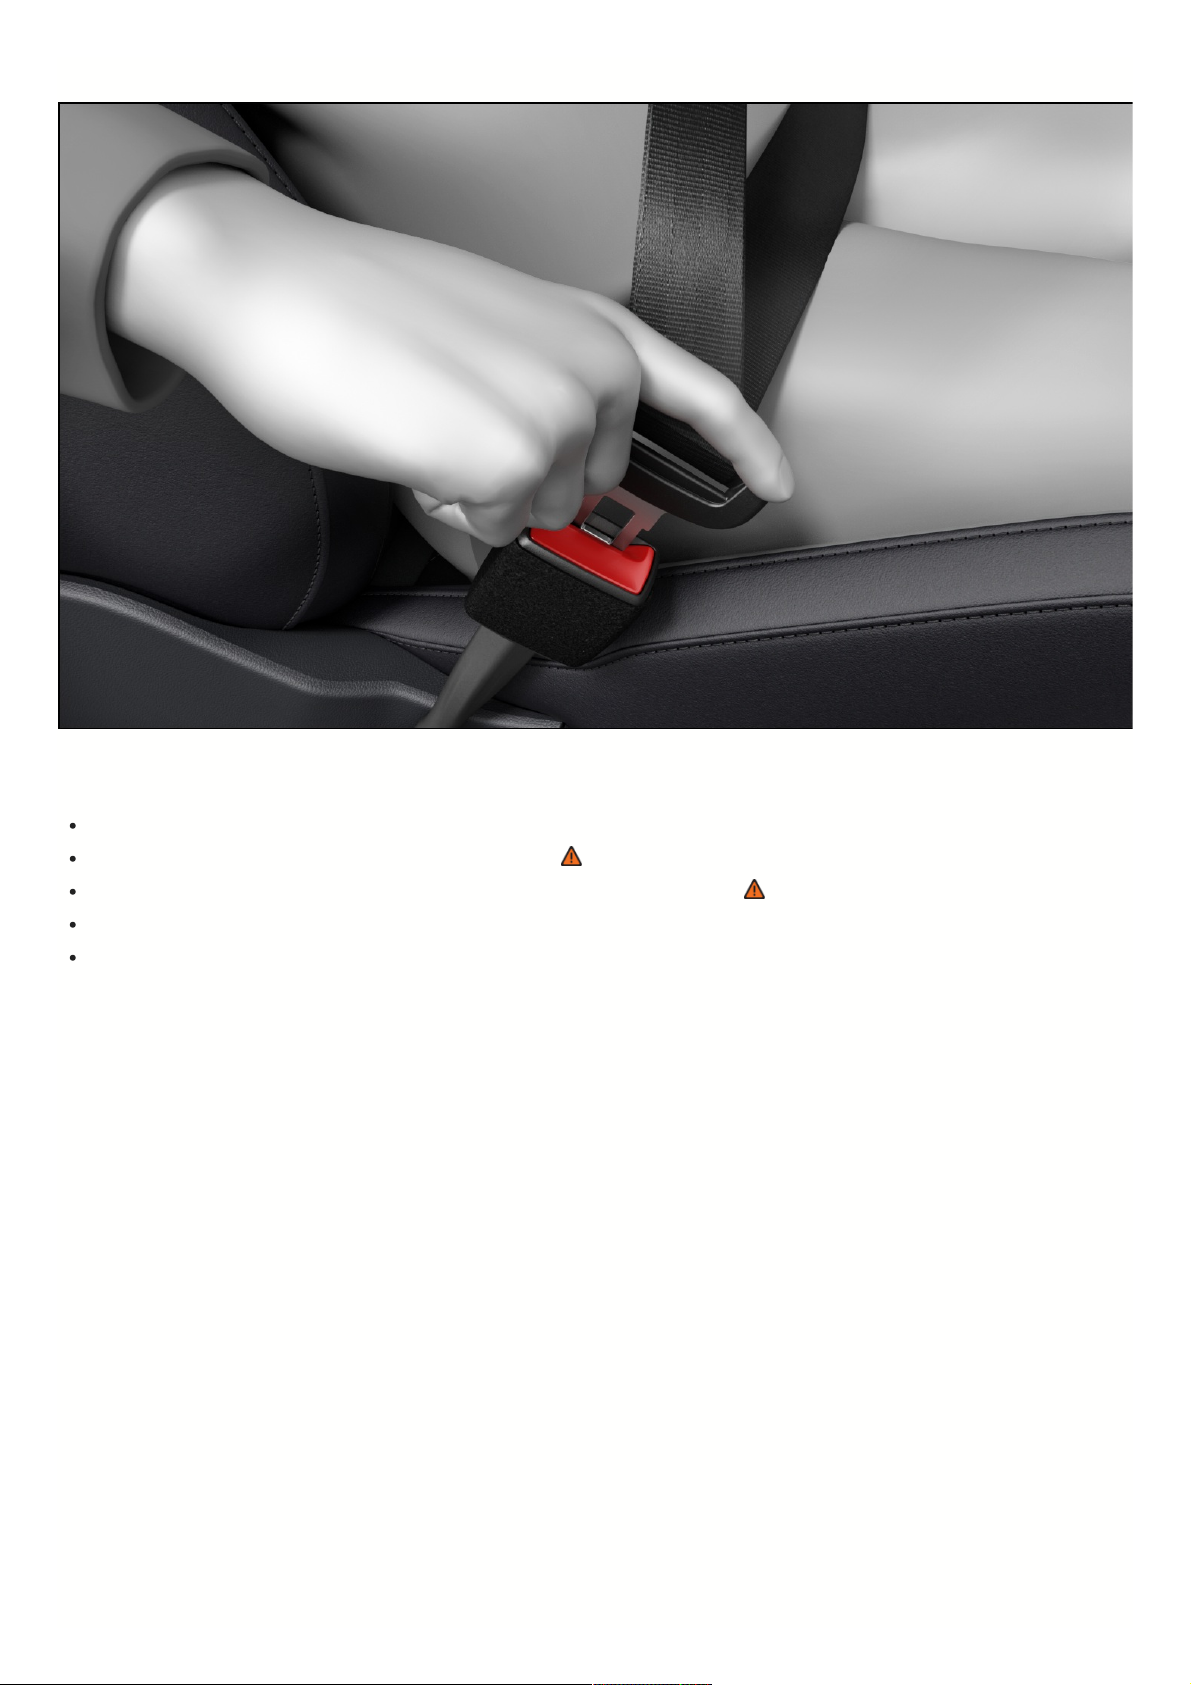
Fasteningthesafetybelt
Fig.28Insertingthebuckletongueintothesafetybeltbuckle.
Always fasten the safety belts before driving.
Adjust the front seat and head restraint correctly ⇒ Seating position.
Have the rear seat backrest locked into place in an upright position → .
Grab the belt and pull it evenly over the chest and pelvis. Do not twist the belt while doing this → .
Insert the buckle tongue securely in the safety belt buckle for that seat fig. 28.
Pull on the safety belt to make sure the buckle tongue is latched correctly in the safety belt buckle.
Unfasteningthesafetybelt
41
Page 42
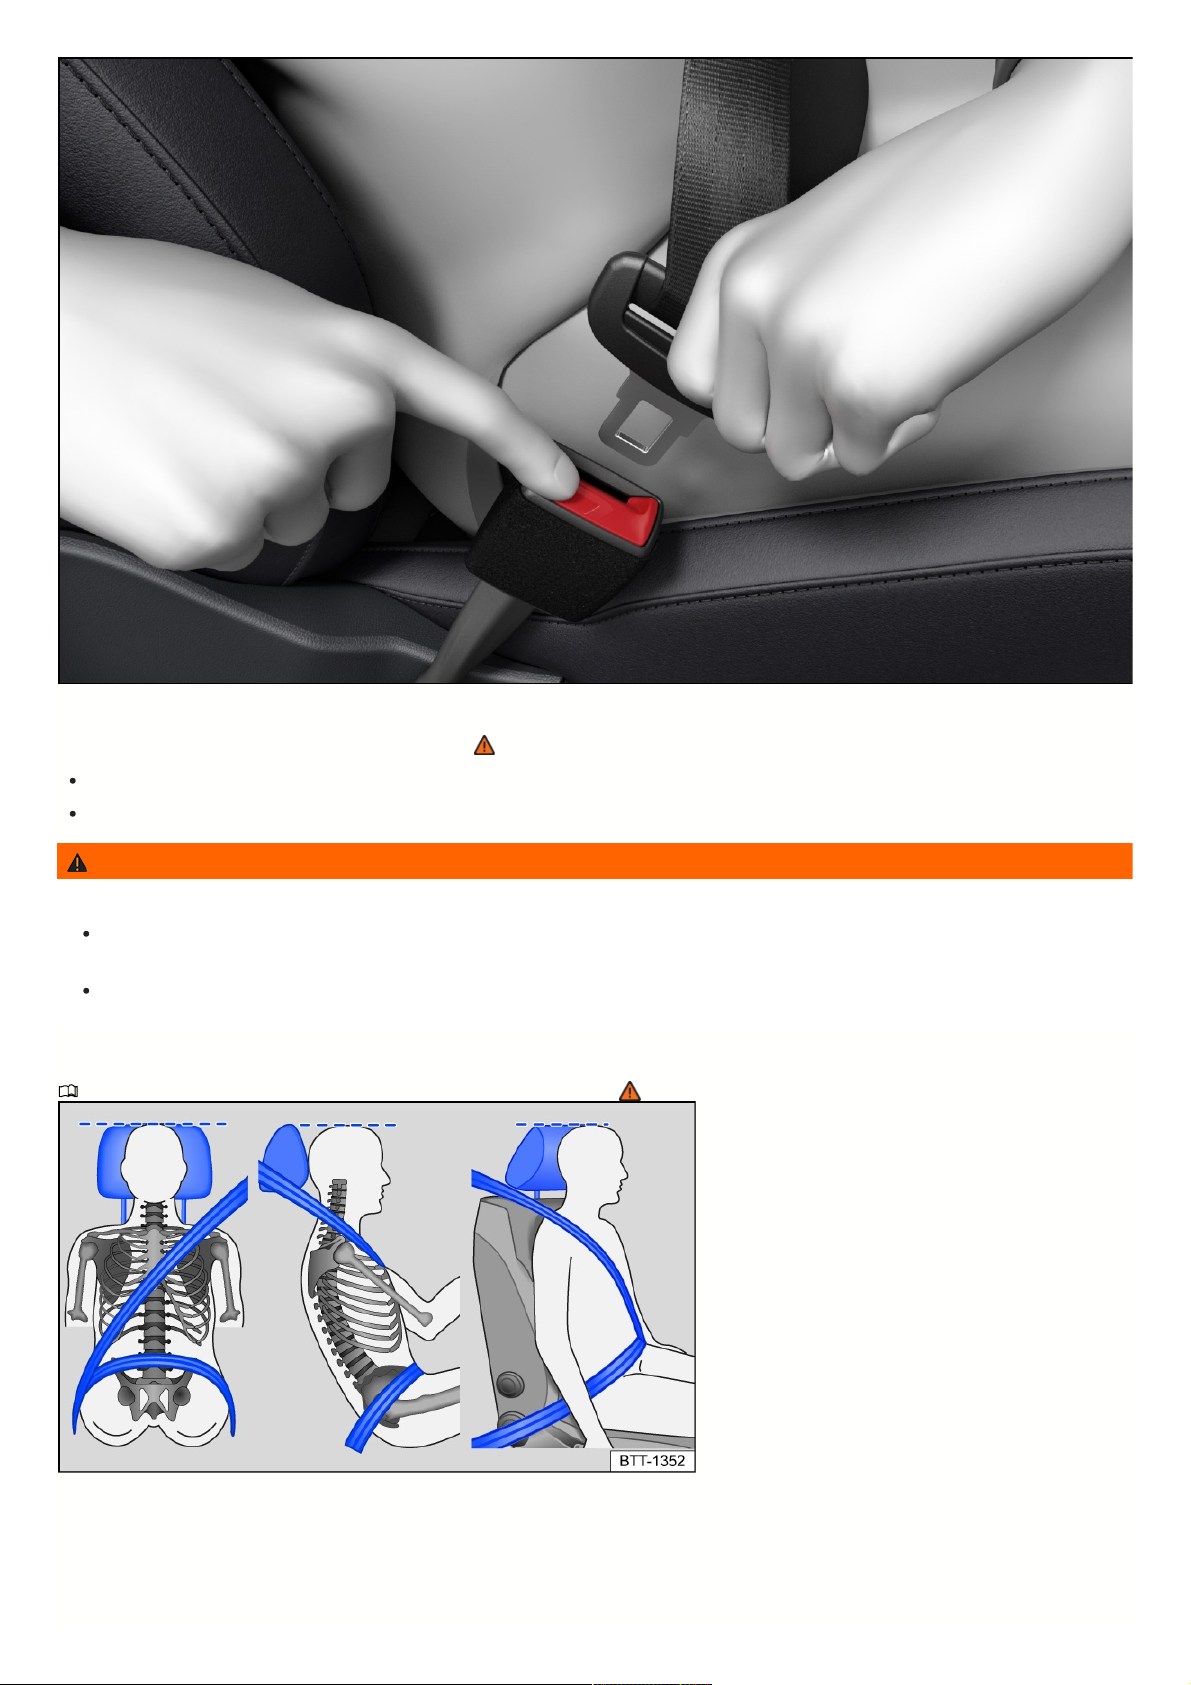
Fig.29Releasingthebuckletonguefromthesafetybeltbuckle.
Only unfasten the safety belt while the vehicle is stationary → .
Press the red button in the safety belt buckle fig. 29. The buckle tongue will pop out.
Guide the belt back by hand so that the belt rolls up easily, the belt does not twist, and the trim panel is not damaged.
WARNING
Incorrect belt routing can cause serious or fatal injuries in the event of an accident.
Optimum protection from the safety belts is only possible when the backrest is in an upright position and the safety belts are worn correctly according to
the body size of the passenger.
Unfastening the safety belt while driving can lead to serious or fatal injuries in the event of an accident or braking maneuver.
Safetybeltpositioning
PleasereadtheintroductoryinformationandheedtheWarningsandNotice
⇒ Introduction
.
Fig.30Correctsafetybeltpositioningandcorrectheadrestraintadjustment.
42
Page 43
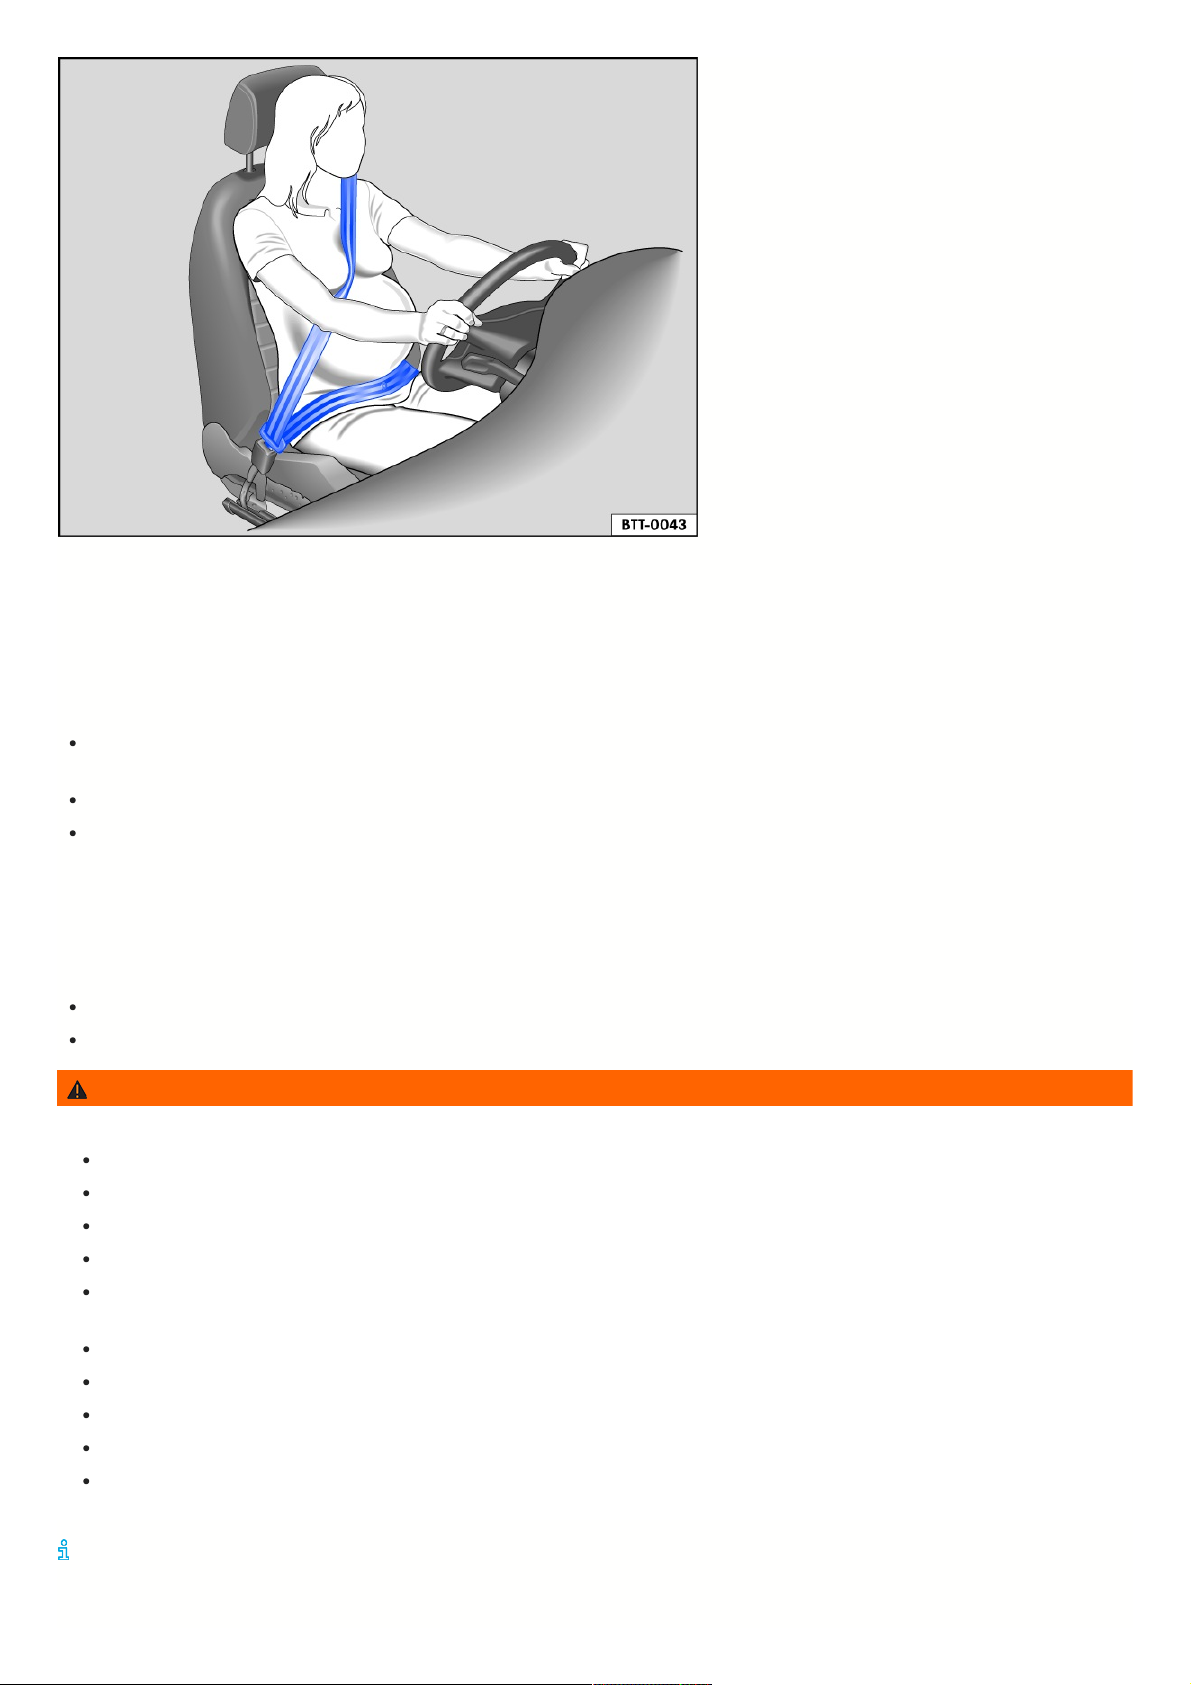
Fig.31Correctsafetybeltpositioningforpregnantwomen.
Safety belts only offer the optimum protection during a collision and reduce the risk of serious injury or death if they are fastened and positioned correctly. The
correct safety belt position also holds the vehicle occupant in place so that the airbags can provide their maximum protection if they deploy. Therefore, all vehicle
occupants should always fasten their own safety belts and make sure they are positioned correctly fig. 30.
An incorrect seating position can cause severe or fatal injuries ⇒ Seating position.
Correctsafetybeltpositioning
The shoulder belt section of the safety belt must always be positioned over the center of the shoulder and never across the neck, above the arm, under the
arm, or behind the back.
The lap section of the safety belt must always lie across the lap and never over the stomach.
The safety belt must always rest flat and securely on the body. Retighten the belt if necessary.
For pregnant women, the safety belt must rest evenly across the chest and as low and flat as possible on the lap, so that no pressure is applied to the lower
abdomen. This should be done throughout the entire pregnancy fig. 31.
Adjustingthesafetybeltpositiontobodysize
The belt positioning can be adjusted with the following equipment:
Belt height adjusters for the front seats ⇒ Safety belt height adjuster.
Height-adjustable front seats ⇒ Seating position.
WARNING
Incorrect safety belt positioning can cause serious injuries in the event of an accident or during sudden braking or driving maneuvers.
Optimum protection from the safety belts is only possible when the backrest is in an upright position and the safety belts are worn correctly.
The safety belt itself or a loose safety belt can cause serious injuries if it shifts onto soft areas of the body, such as the stomach.
The shoulder portion of the safety belt must lie over the center of the shoulder, and never under the arm or across the neck.
The safety belt must lie flat and securely on the upper part of the body.
The lap section of the safety belt must lie across the lap and never over the stomach. The safety belt must lie flat and securely on the lap. Retighten the
belt if necessary.
The lap belt section of the safety belt must sit as low as possible on the lap of pregnant women and lie flat under the “rounding” of the abdomen.
Do not twist the safety belt while wearing it.
Never hold the safety belt away from the body with your hand.
Do not guide the belt over hard or breakable objects, such as eyeglasses, pens, or keys.
Do not modify how the belt is routed using belt clips, retaining loops, or similar objects.
Individualswhocannotachievetheoptimumbeltroutingduetophysicalconditionsshouldcontactaqualifiedprofessionalaboutpossiblespecialmodifications
thatcanbeusedtoattaintheoptimumprotectivefunctionfromthesafetybeltandairbags.VolkswagenrecommendscontactinganauthorizedVolkswagen
dealerorauthorizedVolkswagenServiceFacility.
43
Page 44
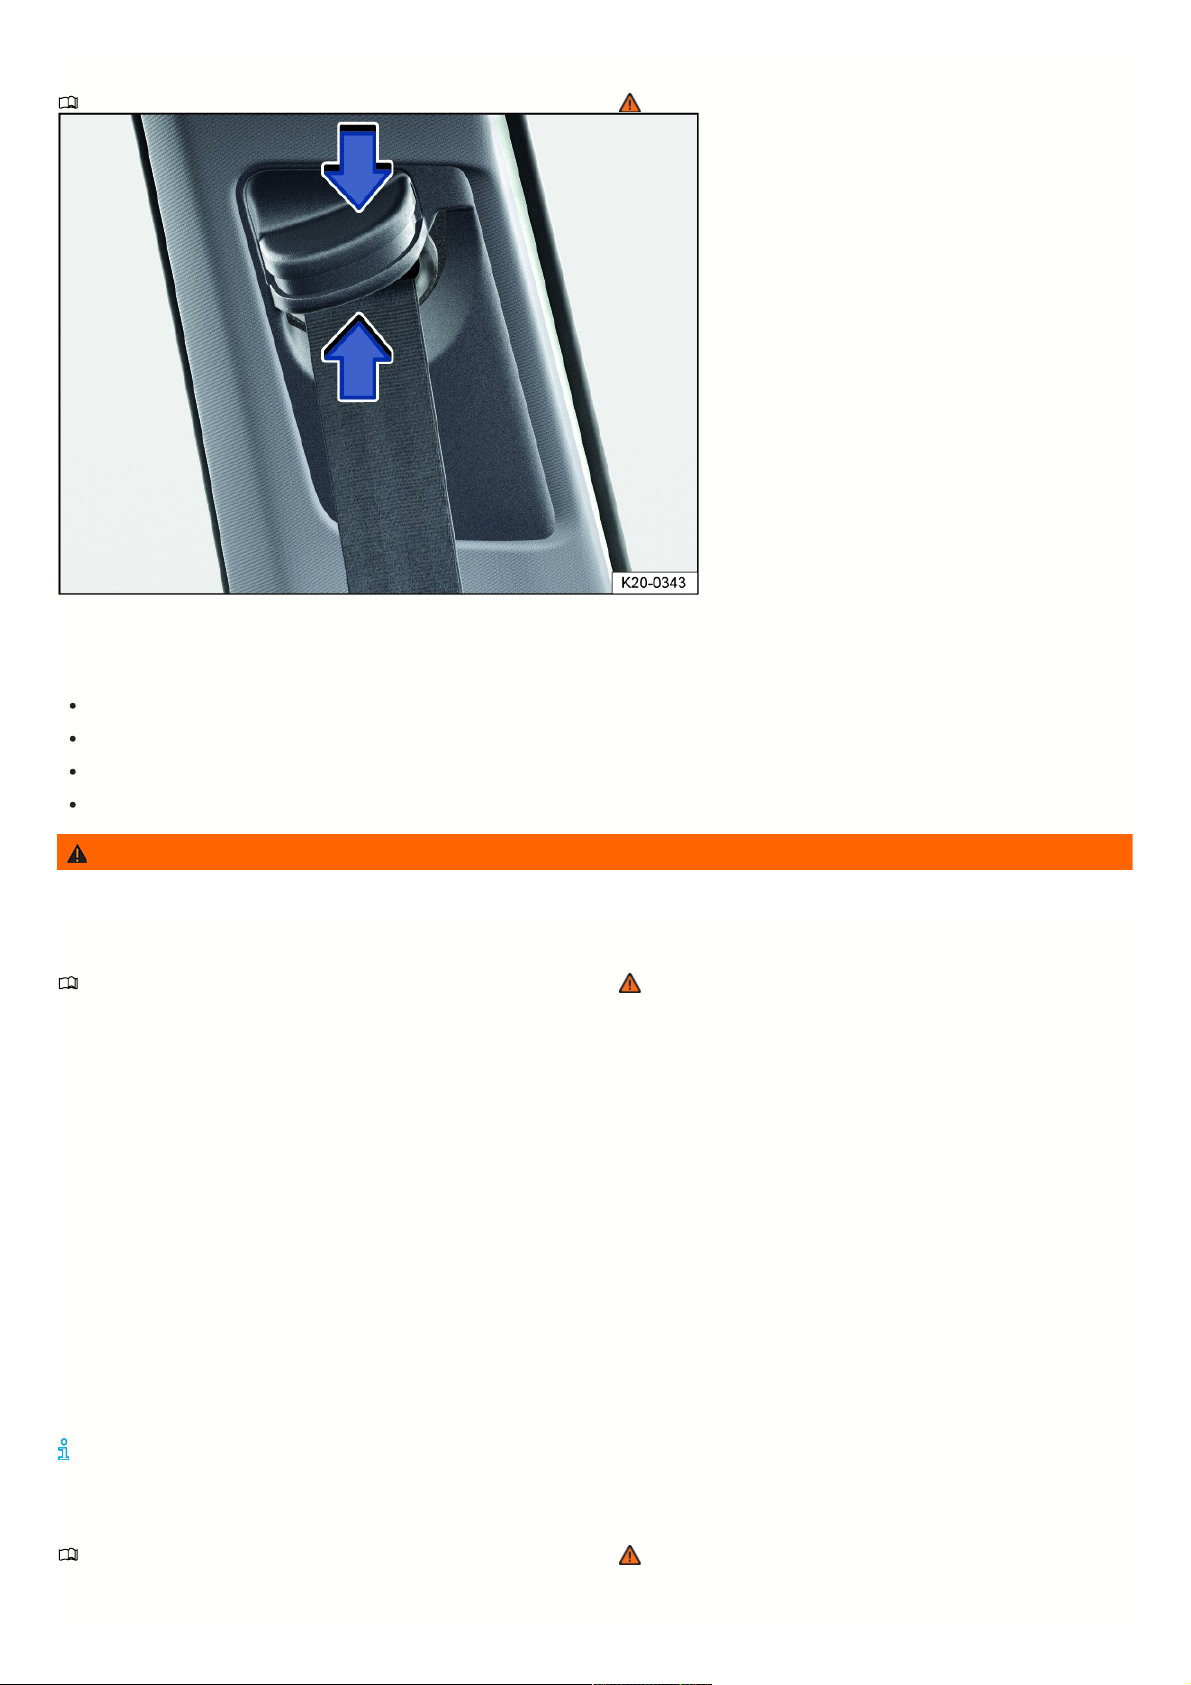
Safetybeltheightadjuster
PleasereadtheintroductoryinformationandheedtheWarningsandNotice
⇒ Introduction
.
Fig.32Nexttothefrontseats:safetybeltheightadjuster.
You can use the safety belt height adjuster to adjust the safety belt routing on the front seats in the shoulder region according to the individual’s body size, so that
the safety belt can be correctly fastened:
Press the safety belt attachment together in the direction of the arrows and hold fig. 32.
Slide the safety belt attachment upward or downward until the safety belt lies over the center of the shoulder ⇒ Safety belt positioning.
Release the safety belt attachment.
Pull hard on the safety belt to check if the safety belt attachment is engaged.
WARNING
Never adjust the safety belt height while driving.
Automaticsafetybeltretractor,safetybeltpretensioner,safetybeltloadlimiter
PleasereadtheintroductoryinformationandheedtheWarningsandNotice
⇒ Introduction
.
The vehicle seat belts are part of the vehicle safety concept⇒ Airbag system. The vehicle safety concept has the following key functions:
Automaticsafetybeltretractor
Every safety belt is equipped with an automatic safety belt retractor on the shoulder belt section. If the safety belt is pulled slowly or while driving normally, the
shoulder belt will be able to move freely. The automatic safety belt retractor blocks the safety belt from moving if the safety belt is pulled out quickly, for example
during sudden braking maneuvers, when driving on hills, when driving around curves and when accelerating.
Safetybeltpretensioners
The safety belts for the driver and front seat passenger are equipped with safety belt pretensioners.
Safety belt pretensioners are activated by sensors in the event of severe front-on, side and rear collisions or if the vehicle rolls over, if necessary. They tighten the
safety belts so that they do not extend any farther. If the safety belt is loose, it retracts to reduce the forward movement of the vehicle occupants or movement in the
direction of the collision. The safety belt pretensioner works together with the airbag system. The safety belt pretensioner is not activated during a rollover accident if
the Side Curtain Protection® airbags are not deployed.
Fine dust may appear if airbags deploy. This is completely normal and does not indicate a fire in the vehicle.
Safetybeltloadlimiter
Safety belt load limiters reduce the force placed on the body by the safety belts during a collision.
Whendisposingofthevehicleorofindividualsystemcomponents,allsafetyprecautionsmustbeobserved.AnauthorizedVolkswagendealerorauthorized
VolkswagenServiceFacilitywillbefamiliarwiththeseprovisions
⇒Safetybeltpretensionerservicinganddisposal
.
Safetybeltpretensionerservicinganddisposal
PleasereadtheintroductoryinformationandheedtheWarningsandNotice
⇒ Introduction
.
When working on safety belt pretensioners, as well as when removing and installing other vehicle components as part of repair work, the safety belts can become
damaged without you noticing. This may cause the safety belt pretensioner to function incorrectly or prevent it from functioning in the event of an accident.
44
Page 45

The instructions must be followed so that the effectiveness of the safety belt pretensioner is not impaired and removed components do not cause injuries and
environmental pollution. An authorized Volkswagen dealer or authorized Volkswagen Service Facility is familiar with these instructions.
WARNING
Repairs that you perform yourself or that are performed incorrectly on the safety belts, automatic safety belt retractors, and safety belt pretensioners can
increase the risk of severe or fatal injuries. The safety belt pretensioner may not deploy when it should, or it may deploy unexpectedly.
Never perform repairs, adjustments, or removal and installation of components of the safety belt pretensioners or safety belts yourself. Only have these
procedures performed by a authorized Volkswagen dealer or authorized Volkswagen Service Facility ⇒ Accessories, replacement parts, repairs, and
modifications.
Safety belts, safety belt pretensioners and automatic safety belt retractors cannot be repaired. These components must be replaced.
Some parts of the vehicle, such as the airbag module and safety belt pretensioners, may contain perchlorate. Special handling may be necessary. For further
information, visit https://dtsc.ca.gov/perchlorate.
Airbagsystem
Introduction
The vehicle is equipped with a front airbag for the driver and one for the front passenger. The front airbags can offer additional protection for the chest and head of
the driver and front passenger as long as the seat, the safety belt, the head restraint, and the steering wheel are adjusted and used correctly. Airbags are only
designed to offer supplementary protection. Airbags are not a replacement for safety belts. Safety belts must always be worn, even if the front seats are fitted with
front airbags.
WARNING
Never rely only on the airbag system for protection.
Even when an airbag deploys, it only offers supplementary protection.
The airbag system provides optimum protection when the safety belt is worn correctly and it reduces the risk of injury ⇒ Safety belts.
Before every trip, everyone in the vehicle must seat themselves correctly, fasten the safety belt that belongs to the seat they are using, and keep it
fastened while the vehicle is in motion. This applies to all passengers and at all times, including during city driving.
WARNING
Sitting too close to the steering wheel or the instrument panel reduces the effectiveness of the airbags and increases the risk of injury in the event of a collision.
Adjust the driver's seat so that there is at least 10 inches (approximately 25 cm) between your chest and the center of the steering wheel.
Adjust the front passenger's seat so that there is the most possible distance between the front passenger and the instrument panel.
If your physical characteristics will not allow you to do this, see an authorized Volkswagen dealer or authorized Volkswagen Service Facility to have
modifications made.
If you have not fastened your safety belt correctly, if you lean forwards, sit sideways or are in any way seated outside the intended sitting position, the
risk of you being injured is far higher.
Make sure that your safety belt is fastened correctly to reduce the risk of being injured if an airbag deploys.
When using a rear-facing child restraint on the front passenger’s seat, the risk of life-threatening or fatal injuries in the event of a collision increases for
the child. Never use rear-facing child restraints on the front passenger’s seat.
Make sure that children under 12 years of age always sit on a rear seat. Children that are not correctly strapped in can suffer serious or even fatal injuries
if the airbag deploys.
Secure children in the vehicle with a child restraint that is appropriate for their weight and height and with the safety belt used correctly.
Adjust the front seats correctly.
Never drive with the backrest angled too far back or forward.
Position the seat backrest in an upright position, so that your back rests completely on the seat backrest.
Always keep feet in the footwell while driving. For example, never rest feet on the seat or on the instrument panel and never stick feet out of the window.
Otherwise, if the airbag and the safety belt deploy, they could increase the risk of injury in the event of an accident instead of providing protection.
WARNING
The risk of injury if the airbag deploys increases if there are objects located between vehicle occupants and the airbag deployment zone. These objects could
change the deployment zone of the airbag or could strike the vehicle occupants.
45
Page 46

Never hold objects in your hands or on your lap while driving.
Never transport objects on the front passenger's seat. During sudden braking or driving maneuvers, the objects could move into the airbag deployment
zone and then be thrown through the vehicle interior if the airbag deploys.
There should be no people, animals, or objects between the occupants of the front seats or outer rear seats and the airbag deployment zone. Make sure
that child and adult passengers also follow these instructions.
WARNING
The airbag system only provides protection for one deployment. If the airbags deploy, the system must be replaced.
Have deployed airbags and affected system components replaced immediately by new parts that are approved by Volkswagen for the vehicle.
Only have an authorized Volkswagen dealer or authorized Volkswagen Service Facility make vehicle repairs or modifications. Authorized Volkswagen
dealers and authorized Volkswagen Service Facilities have the required tools, diagnostic devices, repair information, and qualified personnel.
Never install airbag components that were removed from scrap vehicles or that were recycled.
Never modify any components of the airbag system.
WARNING
Fine dust and water vapor can develop when the airbags deploy. This is normal and does not indicate a fire in the vehicle.
The fine dust can irritate the skin and mucous membranes in the eyes and can cause breathing problems, particularly for individuals who have asthma or
other respiratory conditions. To reduce the risk of breathing problems, exit the vehicle or open the windows or doors for fresh air.
If you come into contact with the dust, wash your hands and face with mild soap and water before eating anything.
Do not allow the dust to come into contact with your eyes or any open wounds.
Flush your eyes with water if dust enters them.
WARNING
Cleaners that contain solvents can make the surface of the airbag module porous. Plastic pieces that come loose could cause serious injuries in the event of a
collision with airbag deployment.
Never treat the instrument panel and the surface of the airbag modules with cleaners that contain solvents.
AdvancedAirbagSystem
PleasereadtheintroductoryinformationandheedtheWarningsandNotice
⇒ Introduction
.
Read and follow the introductory information and safety precautions ⇒ Safety notes on using child restraints .
An active passenger’s front airbag presents serious dangers for a child → . Therefore, all children under the age of twelve must be secured in the rear seats
while the vehicle is in motion.
The Advanced Airbag System, together with the side and Side Curtain Protection® airbags, is checked every time the ignition is switched on. The yellow airbag
indicator light comes on briefly and turns off after several seconds.
Features of the Advanced Airbag System:
Front passenger's front airbag in the instrument panel
Yellow indicator light in the instrument cluster display.
Yellow PASSENGER AIR BAG indicator light .
Ifthestatusofthe indicatorlightisoneofthefollowing,havetheAdvancedAirbagSysteminspectedbyanauthorizedVolkswagendealeror
authorizedVolkswagenServiceFacility:
The indicator light does not come on for several seconds when the ignition is switched on.
The indicator light stays on after the ignition is switched on.
The indicator light comes on or flashes again after it is turned off.
The indicator light comes on while driving.
AdvancedAirbagSystem,smallchildren,childrestraintsandchildrenonthefrontpassengerseat
The Advanced Airbag System in your vehicle has been certified and complies with the regulations of the United States Federal Motor Vehicle Safety Standard
(FMVSS) 208 and the Canada Motor Vehicle Safety Standard (CMVSS) 208 at the time of vehicle manufacture. In accordance with the requirements, the system on
the passenger's side has been designed to “inhibit” deployment for small children of up to 12 months of age and “low-risk deployment” for children of between three
and six years of age.
46
Page 47
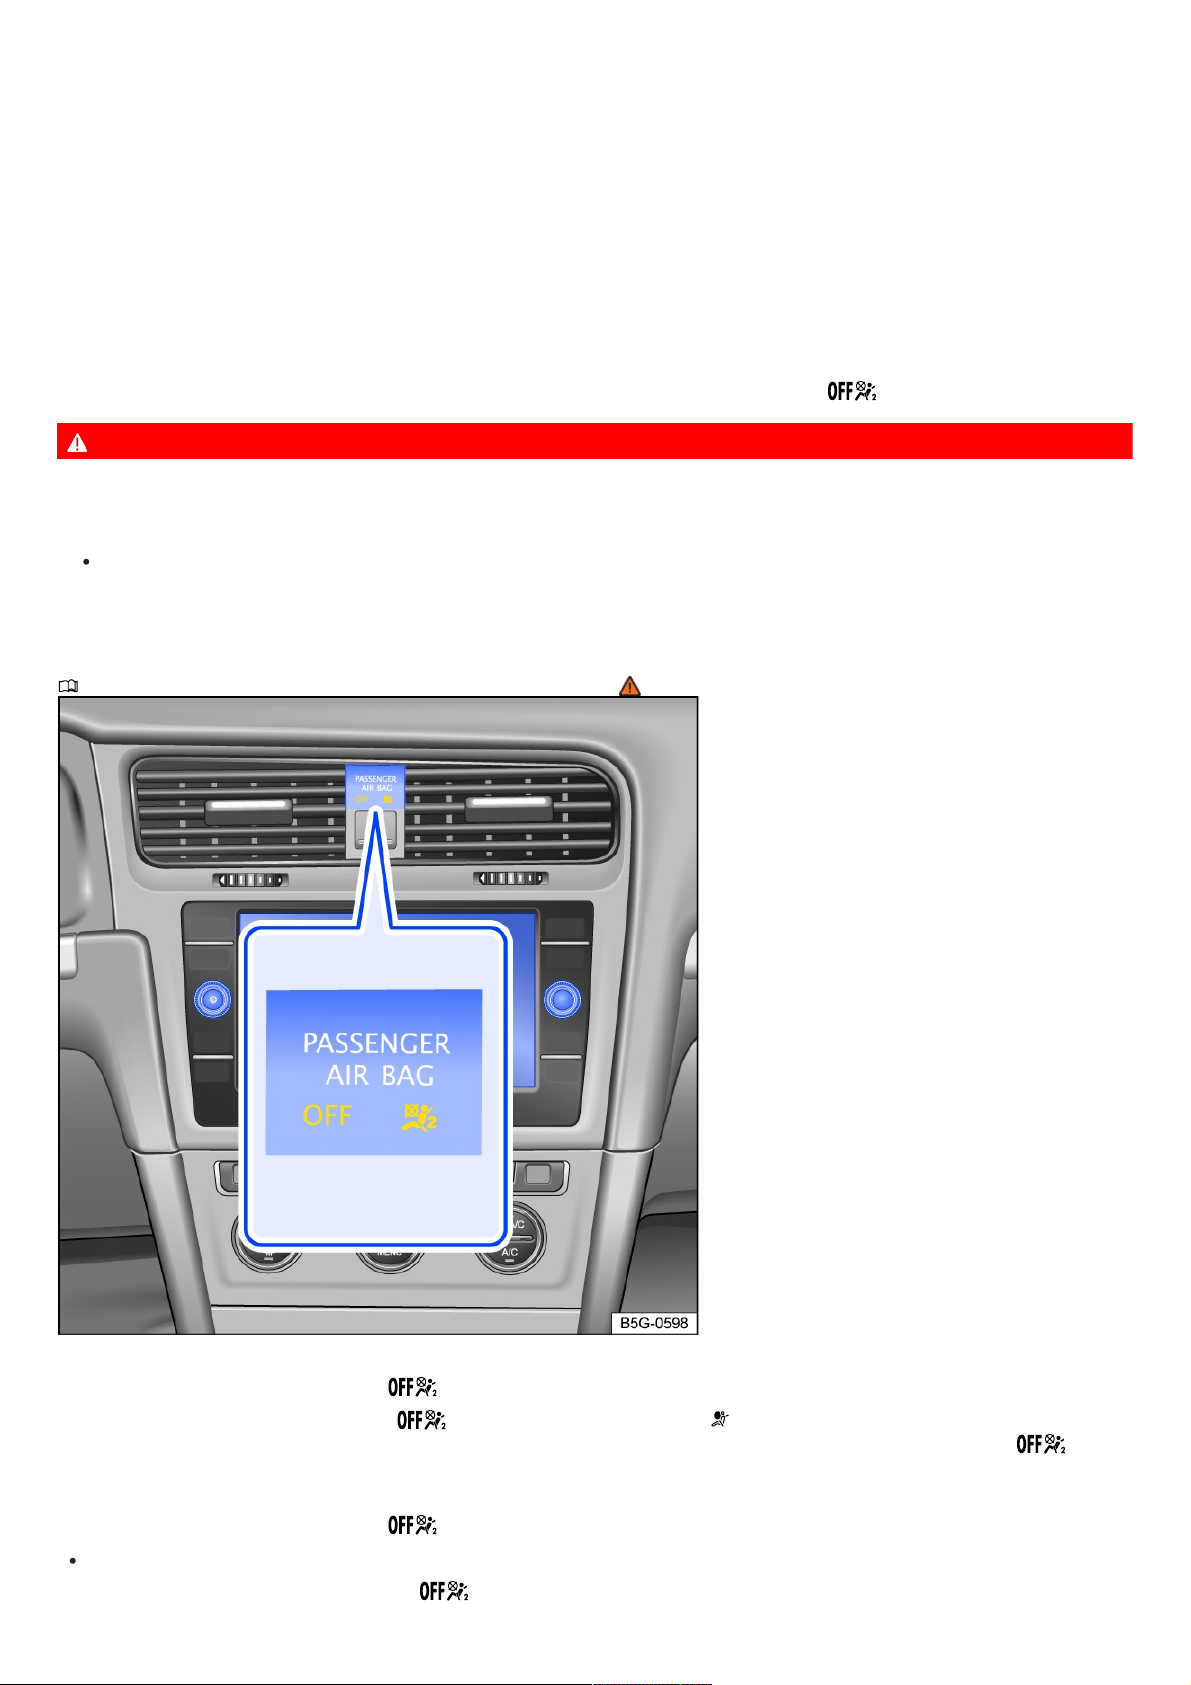
The airbag on the passenger's side is a potential danger for children when it is deployed. The front passenger seat is not the safest seat for a child in a forward-
facing child restraint and is a very dangerous seat for a child or small child in a backward-facing child restraint.
The Advanced Airbag System has a capacitive detection system in the seat cushion of the front passenger seat which detects whether a baby, small child or child is
in a child restraint on the front passenger seat.
The capacitive detective detection system measures the electrical capacity of a child, the child restraint and a child's blanket on the front passenger seat.
The electrical capacity of a child restraint depends on the child restraint type. Together with the average capacity values of small children and one-year-old children,
the capacity values of all child restraints specified in accordance with FMVSS 208 and CMVSS 208 are stored in the Advanced Airbag System control module.
These are compared with the values detected. Only use child restraints that are specified according to these standards and have been approved by the child
restraint manufacturer for use with airbag systems. The U.S. National Highway Traffic Safety Administration (NHTSA) has published a list of certified child restraint
models for use with the Advanced Airbag System in accordance with FMVSS 208.
Only install child restraints on the front passenger seat under exceptional circumstances. Carefully read all of the information about child restraints and the
Advanced Airbag System beforehand and follow all instructions and warnings. Make sure that the system has correctly detected the child restraint on the front
passenger seat and the front passenger's front air bag has been switched off (indicator light PASSENGER AIR BAG ).
DANGER
The front passenger seat of a vehicle is a potential danger to children (even for advanced airbags). In the event that front passenger seat air bags are deployed,
children who are completely unsecured in an unsecured child restraint or in a rear-facing child restraint on the front passenger seat may suffer serious or fatal
injuries.
Even if your vehicle is equipped with an Advanced Airbag System, make sure that children (particularly children younger than 12 years of age) are
always transported in such a way that they are secured to the rear seats according to their age and size.
Indicatorlightforfrontpassenger’sfrontairbag
PleasereadtheintroductoryinformationandheedtheWarningsandNotice
⇒ Introduction
.
Fig.33Intheinstrumentpanel:Indicatorlightforthedeactivatedfrontpassenger'sfrontairbag.
The yellow PASSENGER AIR BAG indicator light comes on as soon as the Advanced Airbag System has deactivated the front passenger airbag.
If the yellow PASSENGER AIR BAG indicator light malfunctions, the yellow indicator light appears in the instrument cluster to indicate a malfunction.
Although a faulty indicator light does not affect the function of the front passenger's front airbag, the yellow PASSENGER AIR BAG indicator light can no
longer be used to display the status of the front passenger's front airbag. Immediately go to an authorized Volkswagen dealer or authorized Volkswagen Service
Facility and have the system inspected.
The yellow PASSENGER AIR BAG indicator light blinks for around five seconds in the following situations:
The capacitive passenger detection system detects a change in the load on the front passenger seat.
After the yellow PASSENGER AIR BAG indicator light stops blinking, ensure that the status of the airbag (on or off) is shown correctly according to the load
on the seat. The indicator light remains on if the front passenger seat is unoccupied or the system has detected a child restraint that corresponds to FMVSS 208 or
47
Page 48

CMVSS 208 ⇒ Airbag system. The indicator light switches off if the seat is occupied by an adult.
The yellow PASSENGER AIR BAG indicator light must come on when the ignition is switched on and an infant carrier or child restraint is installed on the
front passenger seat and the measured capacity is less than or equal to the capacity of an average one-year old child in a child restraint system as per FMVSS 208.
If the front passenger seat is not occupied, the front passenger's front airbag is also deactivated and the indicator light remains on.
Never install a rear-facing child restraint on the front passenger seat. The safest place for a child restraint is on the rear seat.
Under these conditions, the yellow PASSENGER AIR BAG indicator light must come on permanently whenever the ignition is on. If this is not the case, stop
the vehicle as soon as it is safe to do so and follow these instructions:
Switch the ignition off for at least 4 seconds and then on again.
Remove the child restraint from the front passenger seat and install it again according to the manufacturer's instructions. When doing so, ensure that the child
restraint is installed correctly.
Ensure that the safety belt has been guided around the child restraint correctly and that it is secure.
Ensure that there are no electronic devices on the front passenger seat.
Ensure that the safety belt and belt buckle are working correctly and not blocked.
Ensure that no seat heating or similar systems have been retrofitted.
Ensure that there are no damp objects on the front passenger seat.
If the yellow PASSENGER AIR BAG indicator light still does not come on, remove the child restraint immediately and install it on the rear seat. Go to an
authorized Volkswagen dealer or authorized Volkswagen Service Facility as soon as possible and have the airbag system inspected.
The yellow PASSENGER AIR BAG indicator light must not come on if the front passenger seat is occupied by an adult. However, if this is the case, stop the
vehicle as soon as it is safe to do so and ensure the following:
Ensure that the passenger is sitting in the middle of the seat and that the backrest is upright.
Ensure that the belt is correctly positioned and tight.
Ensure that there are no other objects on the seat cushion, such as blankets or booster seats, that could affect the system's ability to detect a passenger.
If the yellow PASSENGER AIR BAG indicator light still does not turn off, the passenger must move to the rear seat. Go to an authorized Volkswagen dealer
or authorized Volkswagen Service Facility as soon as possible and have the airbag system inspected.
If the status of the Advanced Airbag System changes when you are driving, the yellow PASSENGER AIR BAG indicator light blinks for around five seconds.
Stop the vehicle as soon as it is safe to do so and follow the steps specified here.
If the system recognizes that the front passenger seat is unoccupied, the front passenger's front airbag remains deactivated and the yellow PASSENGER AIR BAG
indicator light comes on.
If the front passenger seat is unoccupied and the passenger's safety belt is fastened, the yellow PASSENGER AIR BAG indicator light comes on and
remains on.
Troubleshooting
PleasereadtheintroductoryinformationandheedtheWarningsandNotice
⇒ Introduction
.
Airbagsystemorsafetybeltpretensionersmalfunction
The yellow indicator light stays on. There may also be a message in the instrument cluster display.
A malfunction has been detected in at least one of the airbags or safety belt pretensioners.
Get professional assistance.
Have the airbag system and safety belt pretensioners checked.
Airbagsystemorsafetybeltpretensionersdeactivatedwithdiagnosticequipment
After the ignition is switched on, the yellow indicator light turns on for about four seconds and then blinks for about twelve seconds. There may also be a message in
the instrument cluster display.
At least one airbag or safety belt pretensioner has been deactivated by a diagnostic device.
Get professional assistance.
Check if the airbag system or safety belt pretensioners must remain deactivated.
Frontpassenger'sfrontairbagdisabled
The yellow indicator light stays on.
The front passenger's front airbag has been deactivated.
48
Page 49

Check whether the front passenger's front airbag has to be deactivated.
If the front passenger's front airbag is incorrectly deactivated, there may be a malfunction in the airbag system. Get professional assistance.
Airbagdescriptionandfunction
PleasereadtheintroductoryinformationandheedtheWarningsandNotice
⇒ Introduction
.
The airbag can protect vehicle occupants in a collision by reducing the movement of vehicle occupants in the direction of the impact during frontal and side
collisions.
The airbag is filled by a gas generator when it deploys. When this occurs, the airbag covers open and the airbags unfold with great force into the deployment zone
within milliseconds. When vehicle occupants who are wearing safety belts sink into the airbags, the gas contained in the airbags is released in order to cushion the
individuals and slow their movement. This can reduce the risk of serious and fatal injuries. The airbag cannot always prevent other injuries, such as swelling,
bruises, burns, and abrasions. Heat from friction can develop when the airbag deploys.
Airbags do not provide any protection for arms and the lower part of the body.
The most important factors for triggering airbag deployment are the type of collision, the angle of impact, the vehicle speed, and the characteristics of the object with
which the vehicle is colliding. Therefore, the airbags will not deploy in all situations where there is visible vehicle damage.
The deployment of the airbag system depends on the vehicle deceleration rate resulting from the impact, which is detected by an electronic control module. If the
deceleration rate is below the minimum value programmed into the control module, then the airbags will not be deployed even though there may be significant
vehicle damage. The extent of vehicle damage, the repair costs, or even the absence of vehicle damage in a collision are not indicators of whether the airbag should
have deployed or not. Because situations can vary greatly among different collisions, it is not possible to define a range of vehicle speeds and reference values.
Therefore, it is not possible to cover every conceivable type of impact and impact angle that could trigger airbag deployment. Among other things, important factors
for airbag deployment include the characteristics of the object with which the vehicle collides (hard or soft), the angle of impact, and the vehicle speed.
Airbags are only a supplement to the three-point safety belts in some collisions when the deceleration of the vehicle is great enough to trigger airbag deployment.
Airbags can only deploy once, and only under certain conditions. The safety belts are always there to provide protection in situations where the airbags do not
deploy or if they have already deployed — for example, this may be the case if the vehicle collides with another vehicle or is hit by another vehicle after the initial
impact.
The airbag system is part of the entire passive vehicle safety concept. The airbag system can only provide the best possible protection when it works in conjunction
with safety belts that are fastened correctly and a correct seating position ⇒ Seating position.
Componentsofthevehiclesafetyconcept
The vehicle safety concept is comprised of the following safety features in the vehicle that reduces the risk of serious and fatal injuries. Depending on vehicle
equipment, some equipment may not be installed in the vehicle or may not be available in some markets.
Optimized safety belts in all seating positions.
Safety belt pretensioners for the driver and front passenger.
Safety belt load limiters for the driver and front passenger.
Belt height adjusters for the front seats.
Red warning light .
Front airbags for the driver and front passenger.
Advanced Airbag System for the driver and front passenger.
Capacitive passenger detection system for the front passenger's airbag.
Side airbags for the driver and front passenger.
Side Curtain Protection® for outer seats.
Yellow airbag indicator light .
Yellow PASSENGER AIR BAG indicator light in the center console.
Control modules and sensors.
Safety-optimized and height-adjustable head restraints.
Adjustable steering column.
Anchorage points for child restraints on the rear seats.
Anchorage points for the top tether strap for child restraints.
HowthecomponentsoftheAdvancedAirbagSystemworktogether:
On the front passenger side, regardless of whether the safety belt is being used or not, the front passenger’s front airbag is deactivated if the electrical capacity
measured on the front passenger seat by the capacitive passenger detection system is smaller than the value saved in the control unit. The front passenger’s front
airbag is also deactivated if the measured capacity corresponds to the value for an infant of around one year old in a child restraint certified by the Federal Motor
Vehicle Safety Standard 208.
The indicator light for the front passenger's front airbag lights up continuously to tell you that the Advanced Airbag System on the front passenger side has been
deactivated.
49
Page 50

Situationswherefrontairbags,sideairbagsorSideCurtainProtection®airbagsdonotdeploy:
If the ignition is switched off in a collision.
Deceleration measured at the vehicle front end during the collision is too low for the control module.
In minor side collisions.
If the speed of rotation measured by the control module is too low during a rollover.
In rear collisions.
If the collision speed is lower than the required reference value in the control module.
ComponentsoftheAdvancedAirbagSystem
PleasereadtheintroductoryinformationandheedtheWarningsandNotice
⇒ Introduction
.
The following components are essential parts of the Advanced Airbag System:
The capacitive passenger detection system in the front passenger seat.
Optimized safety belts with safety belt pretensioners and safety belt load limiters.
Front airbags for the driver and front passenger.
Airbag indicator light .
PASSENGER AIR BAG indicator light
Control modules and sensors.
WARNING
Airbags and safety belt pretensioners that do not function properly can cause serious or fatal injuries in the event of an accident.
If the airbag indicator light turns on, have the system inspected by an authorized Volkswagen dealer or authorized Volkswagen Service Facility as soon
as possible.
Only use original Volkswagen replacement parts and have the installation performed by authorized specialists only.
Never use used or recycled airbags or parts in the Advanced Airbag System. Only use new parts.
WARNING
Damage to the front passenger seat may affect the function of the Advanced Airbag System and cause severe or fatal injuries.
Have damaged components in the front passenger seat and the capacitive detection system replaced by authorized specialists as soon as possible.
Never remove the front passenger seat or components of the front passenger seat, such as seat surfaces, wires, lines or seat covers.
Never damage the seat covers or the seat surface of the front passenger seat.
Never use protective covers or seat surfaces on the front passenger seat as these affect the capacitive detection system.
Never transport electronic or electrical objects on or under the front passenger seat as these affect the capacitive detection system.
Never use protective covers, cushions or similar items on the front passenger seat as these affect the capacitive detection system.
Never install seat heating on the front passenger seat.
Never replace the seat cover on the front passenger seat.
WARNING
If the front passenger seat becomes wet or damp, this can cause the Advanced Airbag System to malfunction.
Allow the seat to dry as soon as possible and check it for damage.
Frontairbags
PleasereadtheintroductoryinformationandheedtheWarningsandNotice
⇒ Introduction
.
50
Page 51
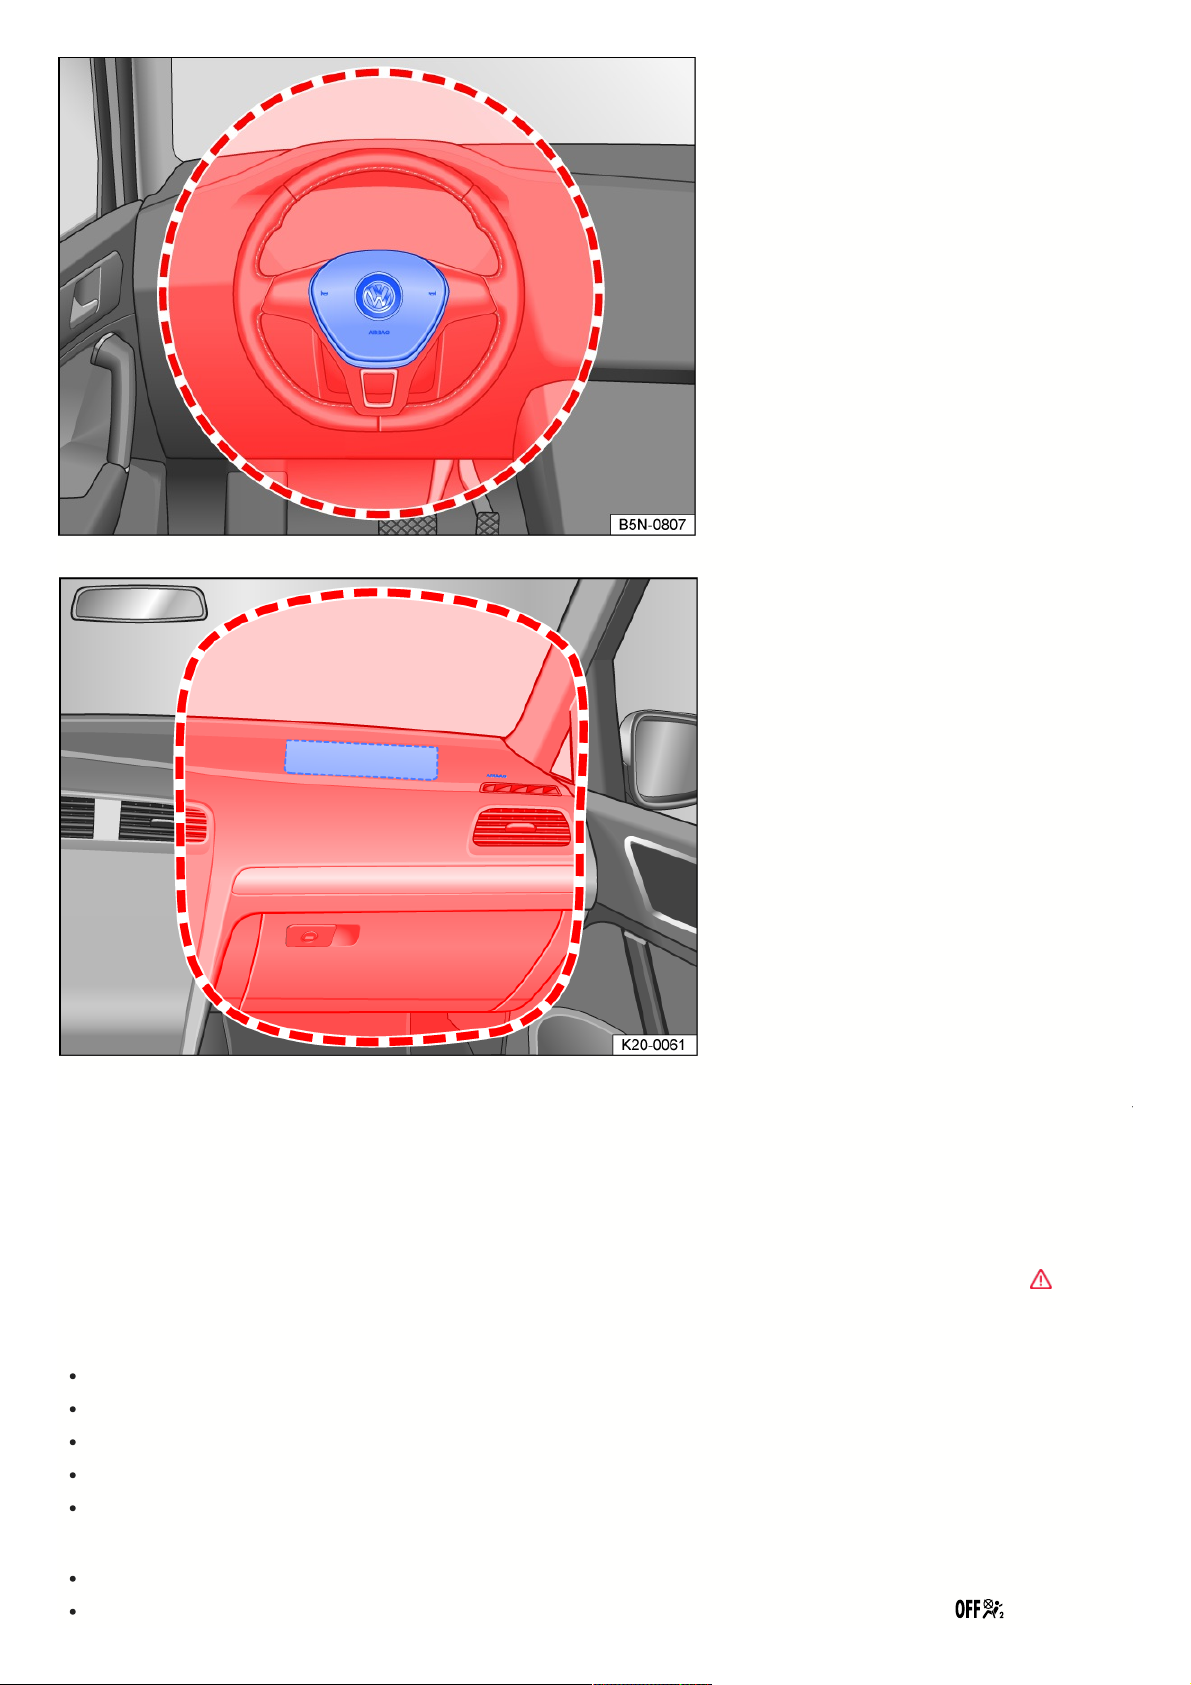
Fig.34Installationlocationanddeploymentzoneofthedriver’sfrontairbag.
Fig.35Installationlocationanddeploymentzoneofthefrontpassenger’sfrontairbag.
As a supplement to the safety belts, the front airbag system offers additional protection for the head and chest regions of the driver and front passenger during frontal
collisions with higher impact severity. In certain head-on collisions, the Side Curtain Protection® airbags will also deploy on both sides.
Always maintain as much distance as possible to the front airbag ⇒ Seating position. This allows the front airbags to expand completely during collisions and thus
provide maximum protection.
The front airbag for the driver is located in the steering wheel fig. 34 and the front airbag for the front passenger is located in the instrument panel fig. 35. The
airbag installation locations are indicated by the word “AIRBAG”.
The area outlined in red defines where the front airbags will deploy (deployment zone). Therefore, never place or attach objects in these areas → . The
attachments mounted at the factory will not be affected by the deployed driver’s and front passenger’s front airbag.
Thefrontairbagsdonotdeployinthefollowingsituations:
In case of crashes when the ignition is switched off.
In side-on collisions.
In case of a rear-end collision.
If the vehicle rolls over.
If the impact speed is too low.
Thefrontpassenger’sfrontairbagsdonotdeployinthefollowingsituations:
If the front passenger seat is not occupied.
If the passenger seat recognition system recognizes that the front passenger seat is unoccupied and the PASSENGER AIR BAG indicator light comes
51
Page 52
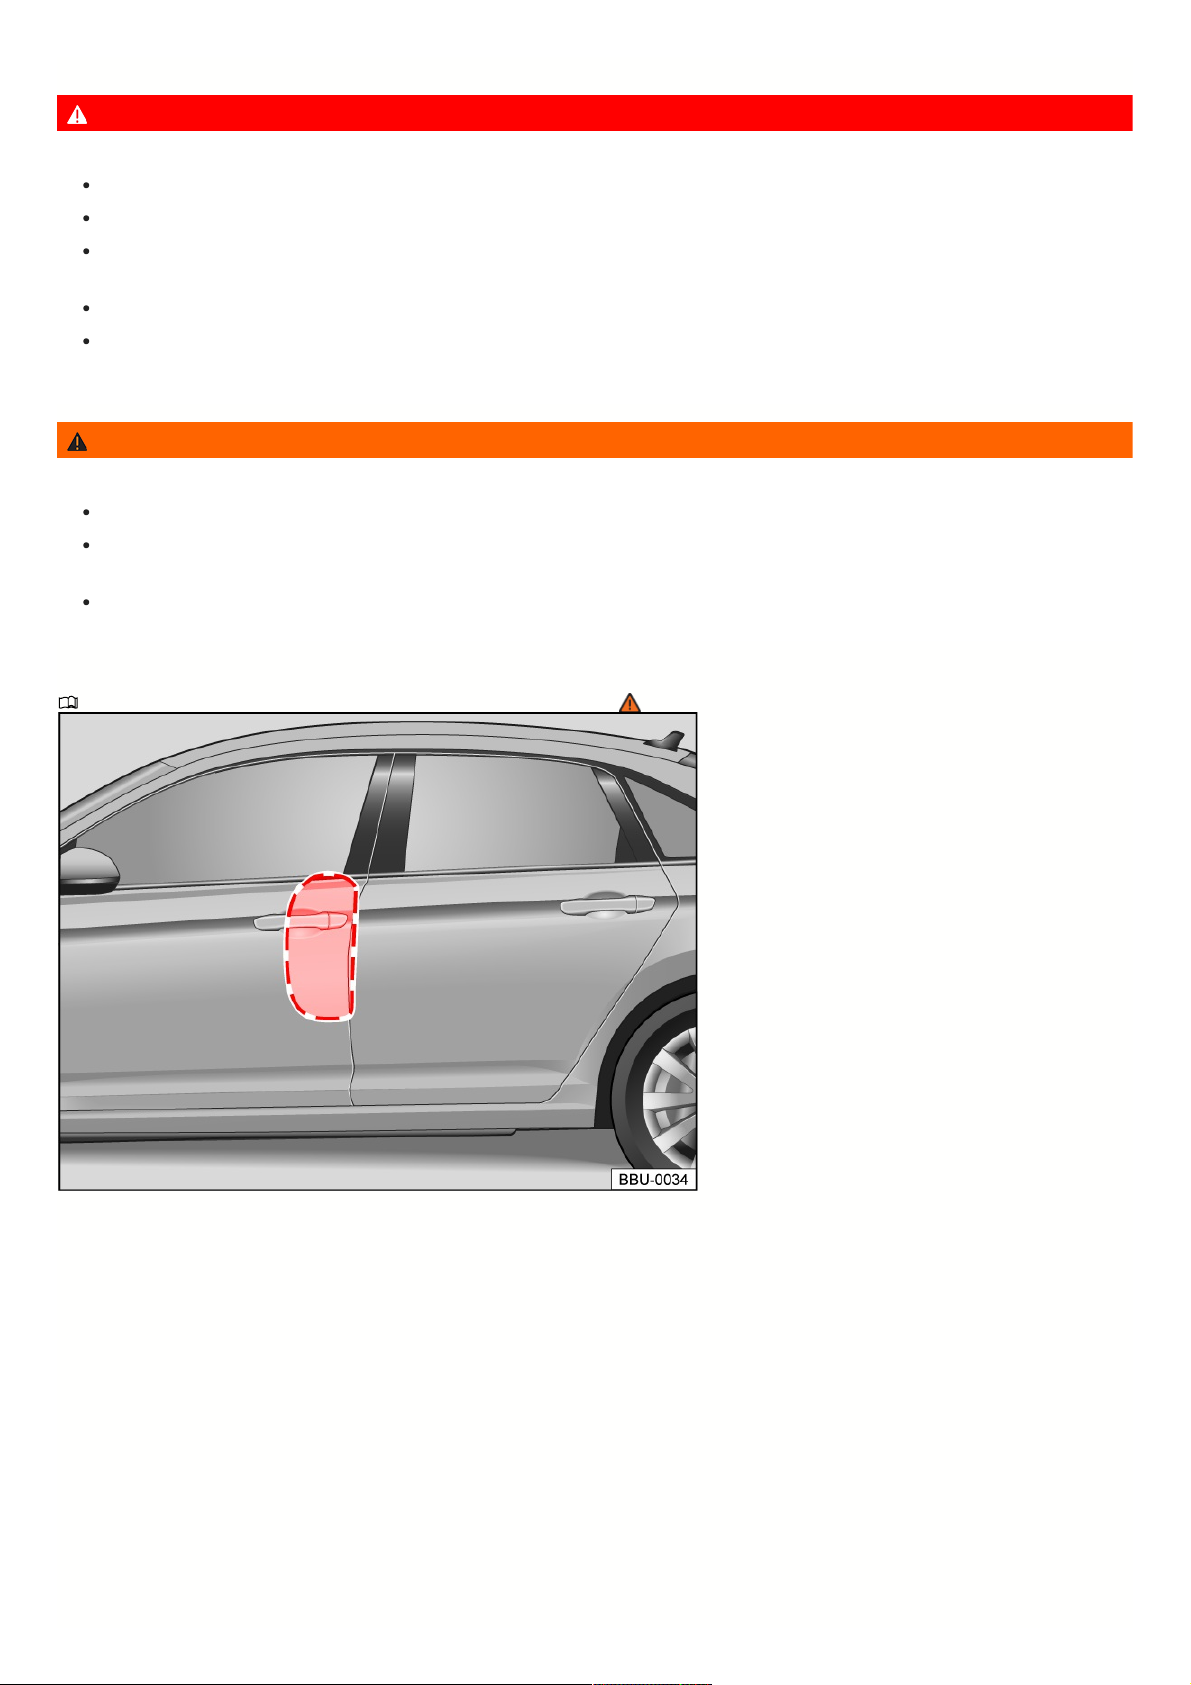
on.
DANGER
An airbag deploys within a fraction of a second and at a very high speed.
Always keep the deployment zones of front airbags clear.
Never attach objects on the covers or in the deployment zone of the airbag module, such as cup holders or phone holders.
There should be no people, animals, or objects between the occupants of the front seats and the airbag deployment zone. Make sure that children and
passengers also follow this guideline.
Do not attach any objects to the windshield above the front airbag on the passenger's side, such as mobile navigation devices.
Do not tape over or cover the steering wheel airbag module or the instrument panel in the deployment zone of the front passenger's front airbag, or modify
them in another way.
WARNING
The front airbags expand in front of the steering wheel fig. 34 and the instrument panel fig. 35.
Always hold the steering wheel with both hands on the sides of the outer edge: Nine o'clock and three o'clock position.
Adjust the driver's seat so that there is at least 10 inches (approximately 25 cm) between your chest and the center of the steering wheel. If you are not
physically able to do this, you must contact an authorized Volkswagen dealer or authorized Volkswagen Service Facility.
Adjust the front passenger's seat so that there is the most possible distance between the front passenger and the instrument panel.
Sideairbags
PleasereadtheintroductoryinformationandheedtheWarningsandNotice
⇒ Introduction
.
Fig.36Inthevehicleinteriorontheleft-handside:Sideairbagdeploymentzone.
52
Page 53
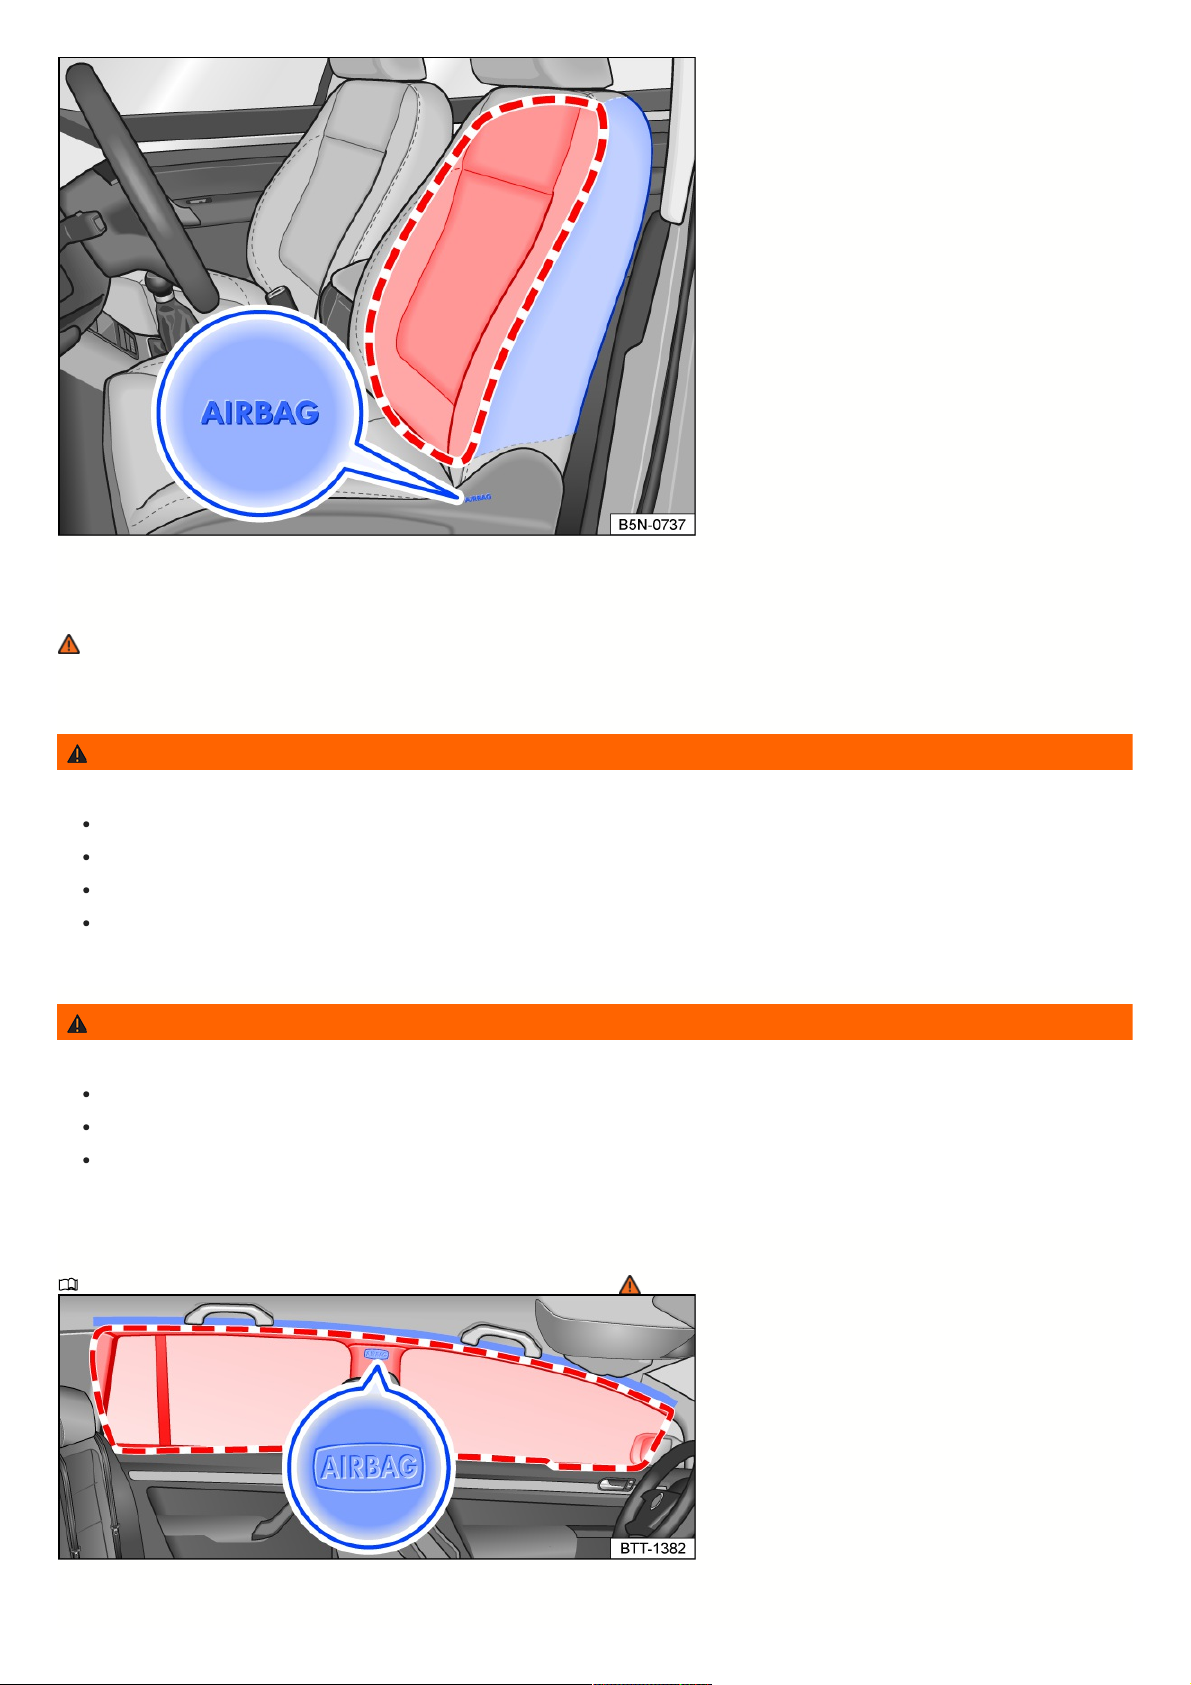
Fig.37Onthesideofthefrontseat:Sideairbaginstallationlocationanddeploymentzone
The installation locations of the side airbags are marked with the word “AIRBAG”.
The area outlined in red defines where the side airbags will deploy (deployment zones) fig. 37 , fig. 36. Therefore, never place or attach objects in these areas →
.
In the event of a side impact collision, the side airbags reduce the risk of injury to the vehicle occupants on the side of impact. The Side Curtain Protection® airbags
will also deploy on both sides.
WARNING
An airbag deploys within a fraction of a second and at a very high speed.
Always keep the deployment zones of side airbags clear.
Only hang lightweight clothing from the garment hooks in the vehicle. Never store heavy or sharp-edged objects in pockets.
Do not attach any accessories to the doors.
Only use seat covers or protective covers that are specifically approved for use in your vehicle. Otherwise, the side airbag may not expand when
deployed.
WARNING
Incorrect handling and use of the driver’s and front passenger ’s seat can inhibit the side airbags from functioning correctly and cause serious injuries.
Never remove the front seats from the vehicle or modify parts of them.
If too much force is applied to the seat backrest bolsters, the side airbags may not deploy correctly, deploy unexpectedly, or not deploy at all.
Have any damage to the original seat covers or the seam in the side airbag module areas repaired immediately by an authorized Volkswagen dealer or
authorized Volkswagen Service Facility.
SideCurtainProtection
PleasereadtheintroductoryinformationandheedtheWarningsandNotice
⇒ Introduction
.
Fig.38Ontheleftsideofthevehicle:installationlocationanddeploymentzoneoftheSideCurtainProtection®.
Side Curtain Protection® airbags are located on the driver and passenger side inside the vehicle above the doors fig. 38.
53
Page 54

The installation locations of the Side Curtain Protection® are marked with the word “AIRBAG”.
The area outlined in red defines where the Side Curtain Protection® airbags will deploy (deployment zone) fig. 38. Therefore, never place or attach objects in this
area → .
In side collisions and certain head-on collisions, the Side Curtain Protection® airbags will trigger on both sides.
Side Curtain Protection® airbags offer the “ejection mitigation” function, which protects the vehicle occupants and body parts from being completely or partially
ejected from the vehicle in the event of a side impact collision or if the vehicle rolls over.
The Side Curtain Protection® airbags reduce the risk of injury to vehicle occupants in the front and outer rear seats during a side collision and certain head-on
collisions.
SideCurtainProtection®airbagsarecomposedofthefollowingcomponents:
Control module and sensors.
Side Curtain Protection® airbags.
Airbag indicator light ⇒ Indicator light for front passenger’s front airbag .
TheSideCurtainProtection®airbagsdonotdeployinthefollowingsituations:
In case of crashes when the ignition is switched off.
In certain side collisions with a low force that does not trigger the sensor.
In case of a rear-end collision.
In the case of certain head-on collisions.
In certain rollovers with a low momentum that do not trigger the sensor.
If the impact speed is too low.
WARNING
An airbag deploys within a fraction of a second and at a very high speed.
Always keep the Side Curtain Protection® deployment zones clear.
Never attach objects to the cover or to the Side Curtain Protection® deployment zone.
There should be no people, animals, or objects between the occupants of the front seats or outer rear seats and the airbag deployment zone. Make sure
that children and passengers also follow this guideline.
Only hang lightweight clothing from the garment hooks in the vehicle. Never store heavy or sharp-edged objects in pockets.
Do not attach any accessories to the doors.
Do not attach any sunshades to the side windows that are not specifically approved for use in the vehicle.
Only pivot sunshades toward the side windows if no objects such as pens or garage door openers are attached to the visor.
Transportingchildrensafely
Introduction
The physical principles in the event of an accident also apply to children. However, due to their size and other factors, they face a greater risk of injury.
Children and babies must therefore always be transported in child restraint systems that are designed for their age, size, weight and body structure. In the USA and
Canada, the use of tested and certified child restraint systems is required by law.
In the case of head-on collisions at speeds of between around 20 and 35 mph (30–55 km/h), a small child weighing 13 lbs (6 kg) will be subjected to forces of more
than 20 times their body weight. This means that the child's effective weight will suddenly increase to up to 120 kg (260 lbs). Under such conditions, only a child
restraint used in accordance with regulations can reduce the risk of injury. However, a child restraint which is not used in accordance with regulations may further
increase the risk of injury!
All children (particularly children under 12 years of age) should always be transported on the rear seats in appropriate child restraint systems. However, if you must
use a child restraint on the front passenger seat in exceptional circumstances, always follow all the information and warnings available at ⇒ Introduction.
You can find more information on this subject at:
National Highway Traffic Safety Administration (NHTSA): http://www.safercar.gov (USA)
Transport Canada Information Centre: http://www.tc.gc.ca (Canada)
Read and follow the instructions from the child seat manufacturer to ensure that the seat is appropriate for your child. Also be sure to read and follow all the
information and warnings on child restraint systems in this manual!
WARNING
In the event of an accident, people sitting on the front passenger seat (particularly children and small children) may suffer severe or fatal injuries if there is not
54
Page 55
sufficient distance between them and the airbag, if it is deployed (even with the Advanced Airbag System)!
The safest place for children is on the rear seats.
A suitable child restraint that is installed on the rear seat in accordance with regulations provides the highest level of protection for children and small
children in most accidents.
Even though the Advanced Airbag System is designed to detect child restraint systems on the front passenger seat and to switch off the front passenger's
front airbag, it is not possible to guarantee that the system will perform correctly under all circumstances and over the vehicle's service life.
In compliance with the “low risk” option for children of 3–6 years of age according to the U.S. Federal Standard, the Advanced Airbag System may be
deployed if the electrical capacity of a typical one-year-old child combined with a child restraint system on the front passenger seat is exceeded and the
criteria for deployment of the Advanced Airbag System are met.
Childrestraints–overview
PleasereadtheintroductoryinformationandheedtheWarningsandNotice
⇒ Introduction
.
All children (particularly small children and infants) must be transported in child restraints suitable for them. These child restraints must always be installed correctly.
The information in the following table will help you to find the suitable child restraint for your child.
Child restraint type Use
Rear-facing child restraint
Birth–12 months old: A child of up to 12 months of age must always be transported in a rear-facing
child restraint. There are different types of these:
– Rear-facing for infants only.
– Convertible and multi-purpose child restraints with greater weight and size restrictions for transporting
your child in the rear-facing position for longer periods of time.
Rear-facing child restraint before transitioning to the
forward-facing child restraint
1 – 3 years old: Transport your child in a rear-facing child restraint for as long as possible until they
have reached the weight and size restrictions. After your child has reached the weight and size
restrictions, you can transport them in a forward-facing child restraint with the appropriate safety belts.
Forward facing child restraints
4 – 7 years old: Transport your child in a forward-facing child restraint for as long as possible until they
have reached the weight and size restrictions. After your child has reached the weight and size
restrictions, you can transport them in a booster seat but only on the rear seats.
Booster seat
7 – 12 years old: Transport your child using a booster seat until they have grown enough to sit on the
seats with a safety belt without a booster seat. The safety belt must be routed correctly ⇒ Safety belt
positioning. You should continue to transport your child on the rear seats.
The current child restraints can be secured either with a standard three-point belt or the LATCH/UAS anchor system. Many child restraints also require the use of
Top Tether systems. Depending on countries and federal states, the use of Top Tether may even be required by law.
Howtodeterminewhetherachildrestraintisinstalledcorrectly
The child restraint lies flush against the seat cushion and the backrest unless the child restraint manufacturer allows a gap between the seat and child restraint.
The overhang of the child restraint on the seat cushion is not longer than the usual 20% of the child restraint. Always follow the instructions for the permitted
child restraint overhangs.
You should always position the child restraint centrally on the seat.
The clearance of the child restraint forward and sideways is no greater than approximately one inch (2.5 cm).
The child restraint must not rest on the belt buckles of the seats. These could be damaged as a result.
When installing multiple child restraints, they must not block each other and must be free-standing and remain accessible.
The child restraint has been secured correctly using the three-point belt or LATCH/UAS system. The Top Tether system of the child restraint has also been
used correctly as specified by the manufacturer.
DANGER
Not using the child restraint, using it incorrectly or using the wrong child restraint increases the risk of suffering severe or fatal injuries in the event of a collision or
an accident.
Children sitting on the front seats may suffer severe or fatal injuries if the air bag is deployed (even if advanced airbags are used).
Children in a rear-facing child restraint on the front passenger seat may suffer severe or fatal injuries if the air bag is deployed.
Always install child restraints on the rear seats.
If, in exceptional circumstances, you nevertheless install a child restraint on the front passenger seat and the yellow PASSENGER AIR BAG indicator
light does not come on and stay on, remove the seat immediately and have the airbag system checked by an authorized Volkswagen dealer or
authorized Volkswagen Service Facility.
55
Page 56
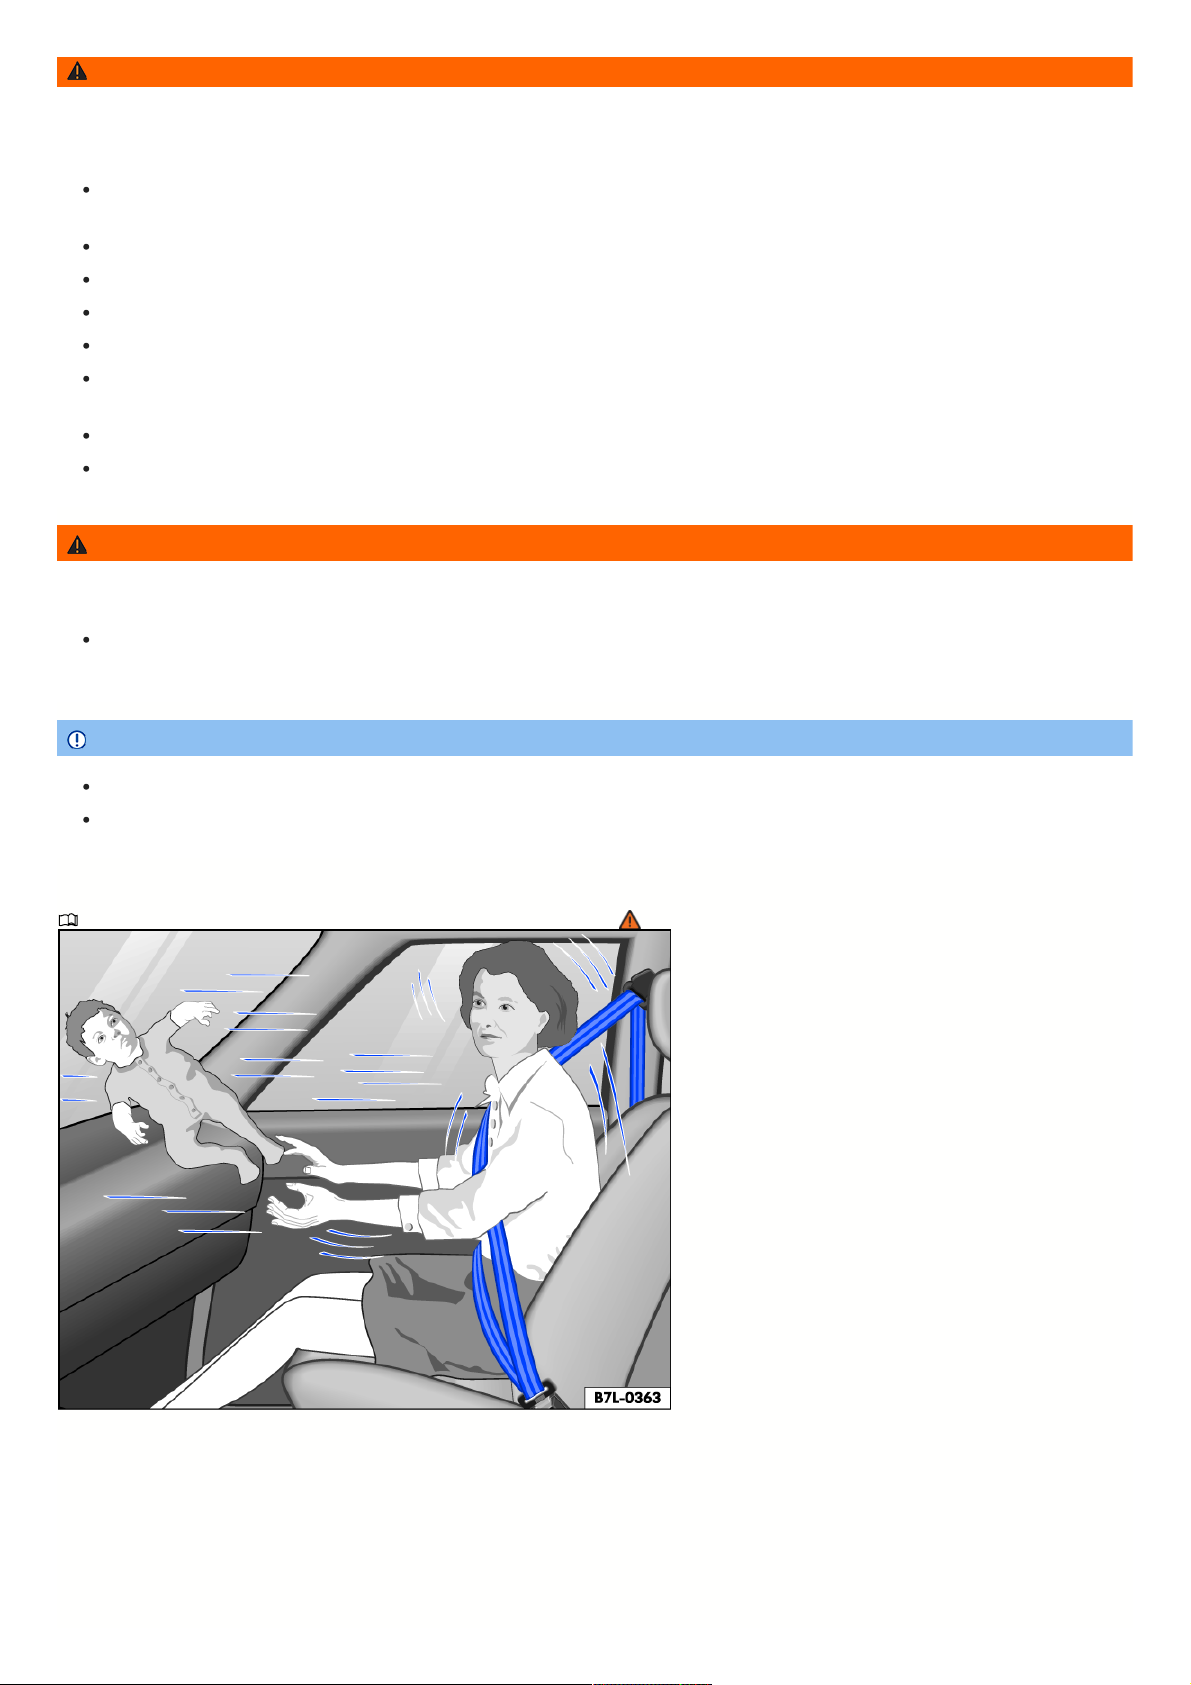
WARNING
If the airbag is deployed, a child restraint on the front passenger seat may collide with the airbag and the child in the child restraint may suffer severe or even
fatal injuries (even if advanced airbags are used). If, in exceptional circumstances, you nevertheless install a child restraint on the front passenger seat, observe
the following points:
Forward-facing child restraints may be situated in the deployment zone of a front passenger's front airbag and may result in severe or fatal injuries if the
airbag is deployed. Always ensure that the child restraint in use has been approved by the manufacturer for use on the front passenger seat.
Read and always follow the child seat manufacturer's instructions.
Never install a child restraint without a top tether strap if this is required by the manufacturer or by law.
Never position a forward-facing child restraint directly on the instrument panel.
Adjust the seat belt adjuster so that the seat can be installed correctly.
Position the front passenger seat as high as possible and move it as far back as possible in order to obtain the largest possible distance to the instrument
panel.
Make sure that the upper anchorage of the safety belt is behind the child restraint to ensure that the safety belt is routed correctly.
Make sue that the backrest is in the upright position.
WARNING
Any unused safety belts on the rear seats are a danger to your child when transported in a child restraint on the rear seats. By playing with the safety belts, the
child may get tangled up and this could result in severe or fatal injuries.
Always secure unused safety belts to the rear seat. You can do this by putting them around the head restraints which are furthest away from the installed
child restraint and secure the safety belt.
NOTICE
Make sure not to activate the lockable belt system when you secure the safety belts that are not being used.
Make sure that the belt is not damaged when installing the child restraint with the safety belt, particularly if you are using the lockable belt system.
Safetynotesonusingchildrestraints
PleasereadtheintroductoryinformationandheedtheWarningsandNotice
⇒ Introduction
.
Fig.39Neverallowchildrenorinfantstotravelonyourlap.
The correct use of child restraints significantly reduces the risk of injury in the event of an accident or collision!
All children, in particular children under the age of 12, must always travel in suitable child restraints on the rear seat.
Only use child restraints that are suitable for the height and weight of the child.
LATCH/UAS anchors can be used to secure child restraints on the seats without using the vehicle's safety belts. If you do want to install a child seat using the safety
belts instead of LATCH/UAS anchors, please follow all instructions given by the child restraint manufacturer for guiding the belt around the child restraint and
securing the child in the child restraint. Ensure that the child restraint cannot move forward or sideways by more than 1 inch (2.5 cm) after installation.
56
Page 57

When installing a child restraint with the safety belt, you must activate the lockable belt system.
Never activate the lockable belt system when installing a booster seat or if a child is traveling without a child restraint.
Importantadditionalinformationforinstallingchildrestraintsonthefrontpassengerseat
If, under exceptional circumstances, you need to install a child restraint on the front passenger seat, read and follow all warnings and instructions here ⇒
Introduction.
You can find additional information on the selection and use of child restraints here:
TransportCanadaInformationCentreTel.:1-800-333-0371Tel.:1-613-998-8616(Ottawa)http://www.tc.gc.ca/roadsafety
NationalHighwayTrafficSafetyAdministrationTel.:1-888-327-4236(TTY:1-800-424-9153)http://www.nhtsa.govhttp://www.safercar.gov
NationalSAFEKIDSCampaignTel.:1-202-662-0600http://www.safekids.org
SafetyBeltSafeU.S.A.Tel.:1-800-745-SAFEor1-800-745-7233(English)Tel.:1-800-747-SANOor1-800-747-7266(Spanish)http://www.carseat.org
VolkswagenCustomerCARETel.:1-800-822-8987
DANGER
The use of rear-facing child restraints or infant carriers on the front passenger seat can cause severe or fatal injuries.
Always install rear-facing child restraints or infant carriers on the rear seat.
WARNING
Transporting children without a child restraint or with an unsuitable child restraint, or incorrectly installing a child restraint, increases the risk of severe or fatal
injuries in the event of an accident or collision.
Only use child restraints that are suitable for the child and that comply with the regulations set out by FMVSS 210 (CMVSS 213 in Canada).
Only use child restraints that sit fully and evenly on the seat cushion.
Always follow the installation instructions given by the manufacturer of the child restraint.
Always observe all legal requirements regarding the installation and use of child restraints.
Children smaller than 4'9" (57 inches, 145 cm) must always be secured in a suitable child restraint when traveling in the vehicle.
Only one child must be allowed to travel in a child restraint.
Never drive with children, toddlers or babies on the driver's or a passenger's lap.
WARNING
Forward-facing child restraints on the front passenger seat may collide with the airbag if it is triggered, which can lead to severe or fatal injuries.
Always install child restraints on the rear seat.
Securingsystems
PleasereadtheintroductoryinformationandheedtheWarningsandNotice
⇒ Introduction
.
Different securing systems are used for safe installation of child restraints depending on the country.
Overviewofsecuringsystems
ISOFIX: ISOFIX is a standardized securing system to quickly and securely install child restraints in a vehicle. The ISOFIX fastener creates a fixed connection
between the child restraint and the vehicle body.
The child restraint has two fixed fastening brackets or arms. The arms snap into the ISOFIX eyelets that are located between the seat and the rear seat backrest (on
the outer rear seats) ⇒ Securing a child restraint with LATCH/UAS . Supplement the ISOFIX fastener with a top tether or a support bracket, if necessary.
LATCH/UAS: LATCH/UAS is a securing system to quickly and securely install child restraints in a vehicle. The LATCH/UAS fastener creates a fixed
connection between the child restraint and the vehicle body.
Three-point automatic safety belt . If available, it is better to secure child restraints to the ISOFIX fastener using a three-point automatic safety belt
⇒
Securing a child restraint with a safety belt .
Additional fasteners:
Top Tether: the upper belt is guided over the rear seat backrest and secured to the anchorage point on the rear side of the rear seats using a hook ⇒ Securing
the child restraint with the upper strap (top tether). Top Tether fastening eyelets are labeled with an anchor symbol.
Support base: some child restraints are supported with a support base on the vehicle floor. The support base reduces the risk of the child restraint tipping
forward in the event of a collision. Only use child restraints with a support base on the front passenger's seat and the outer rear positions of the bench seat →
.
57
Page 58
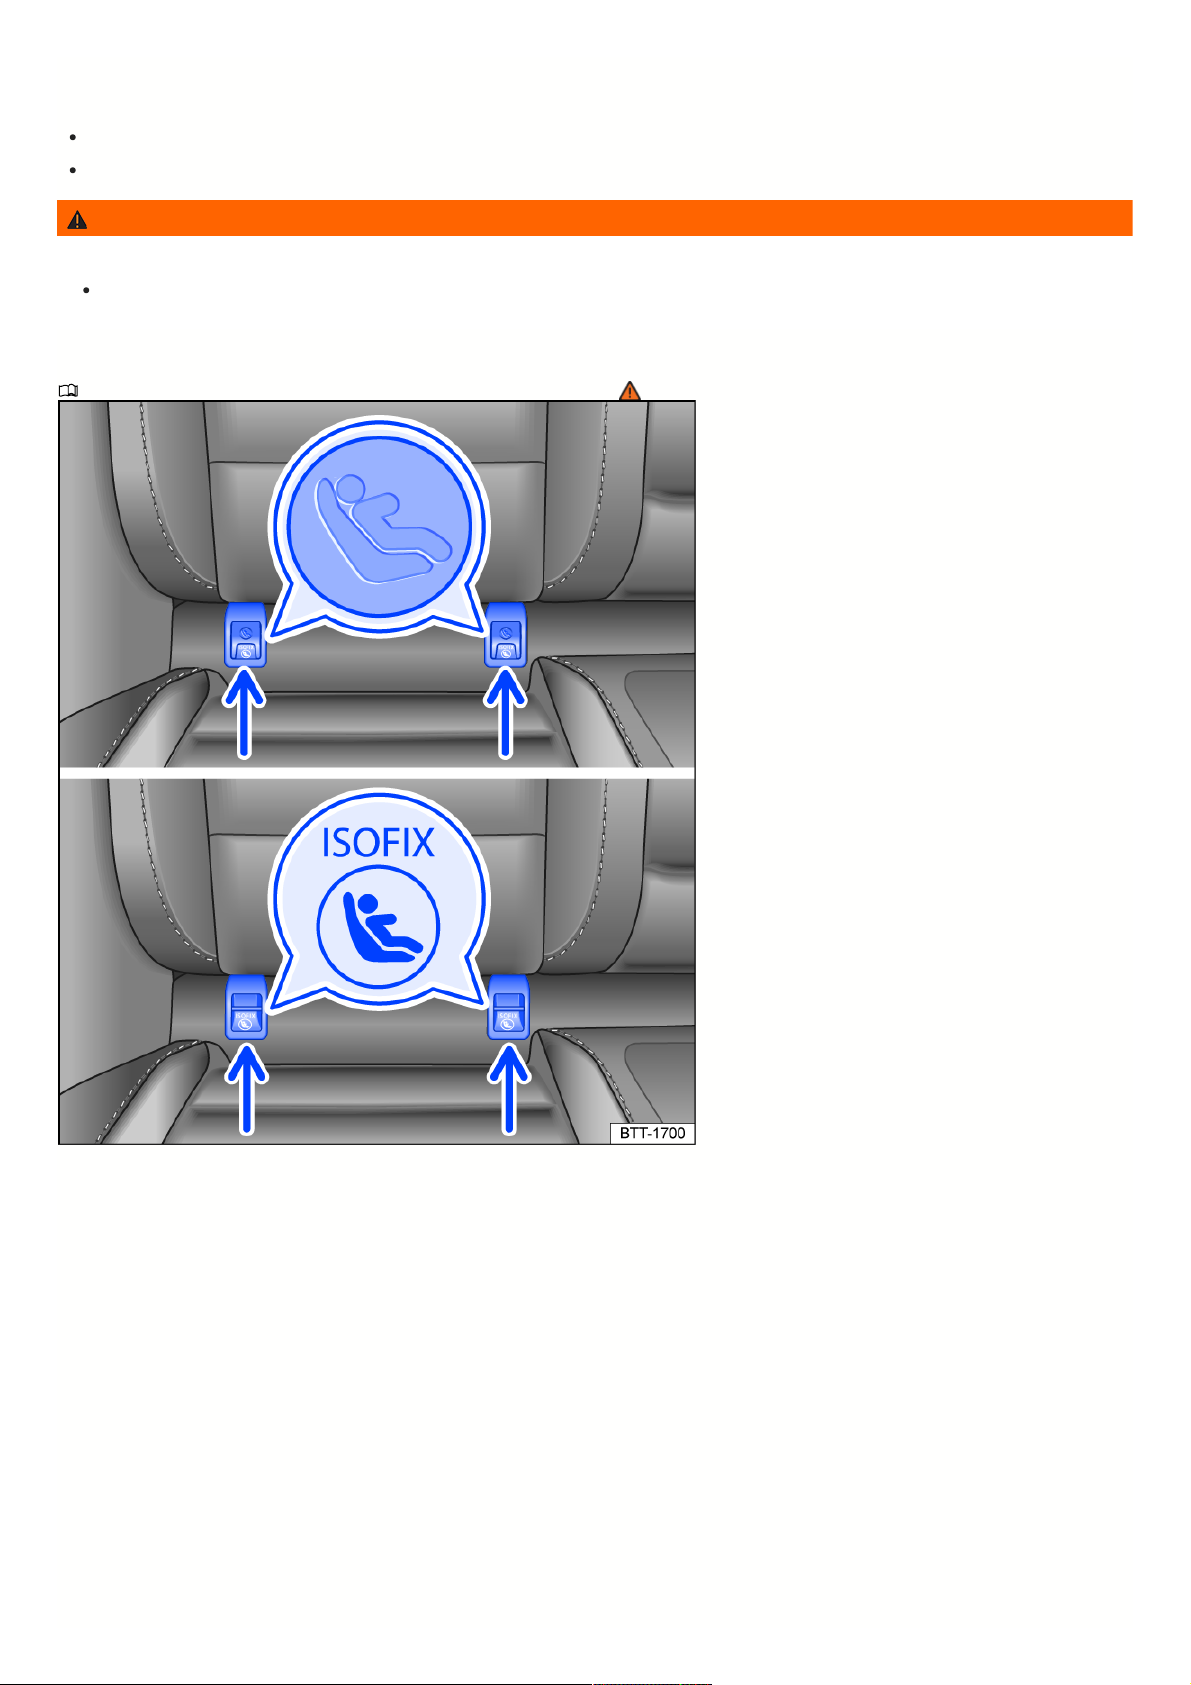
Recommendedsecuringsystemsforchildrestraints
Volkswagen recommends securing child restraints as follows:
Infant restraints or rear-facing child restraints : ISOFIX and support base.
Forward facing child restraints : ISOFIX and Top Tether and possible additional support base.
WARNING
Incorrect use of the support base can cause severe or fatal injuries.
Make sure the support base is installed correctly and securely.
SecuringachildrestraintwithLATCH/UAS
PleasereadtheintroductoryinformationandheedtheWarningsandNotice
⇒ Introduction
.
Fig.40Onthevehicleseat:labelforchildrestraintLATCH/UASanchorpoints.
58
Page 59
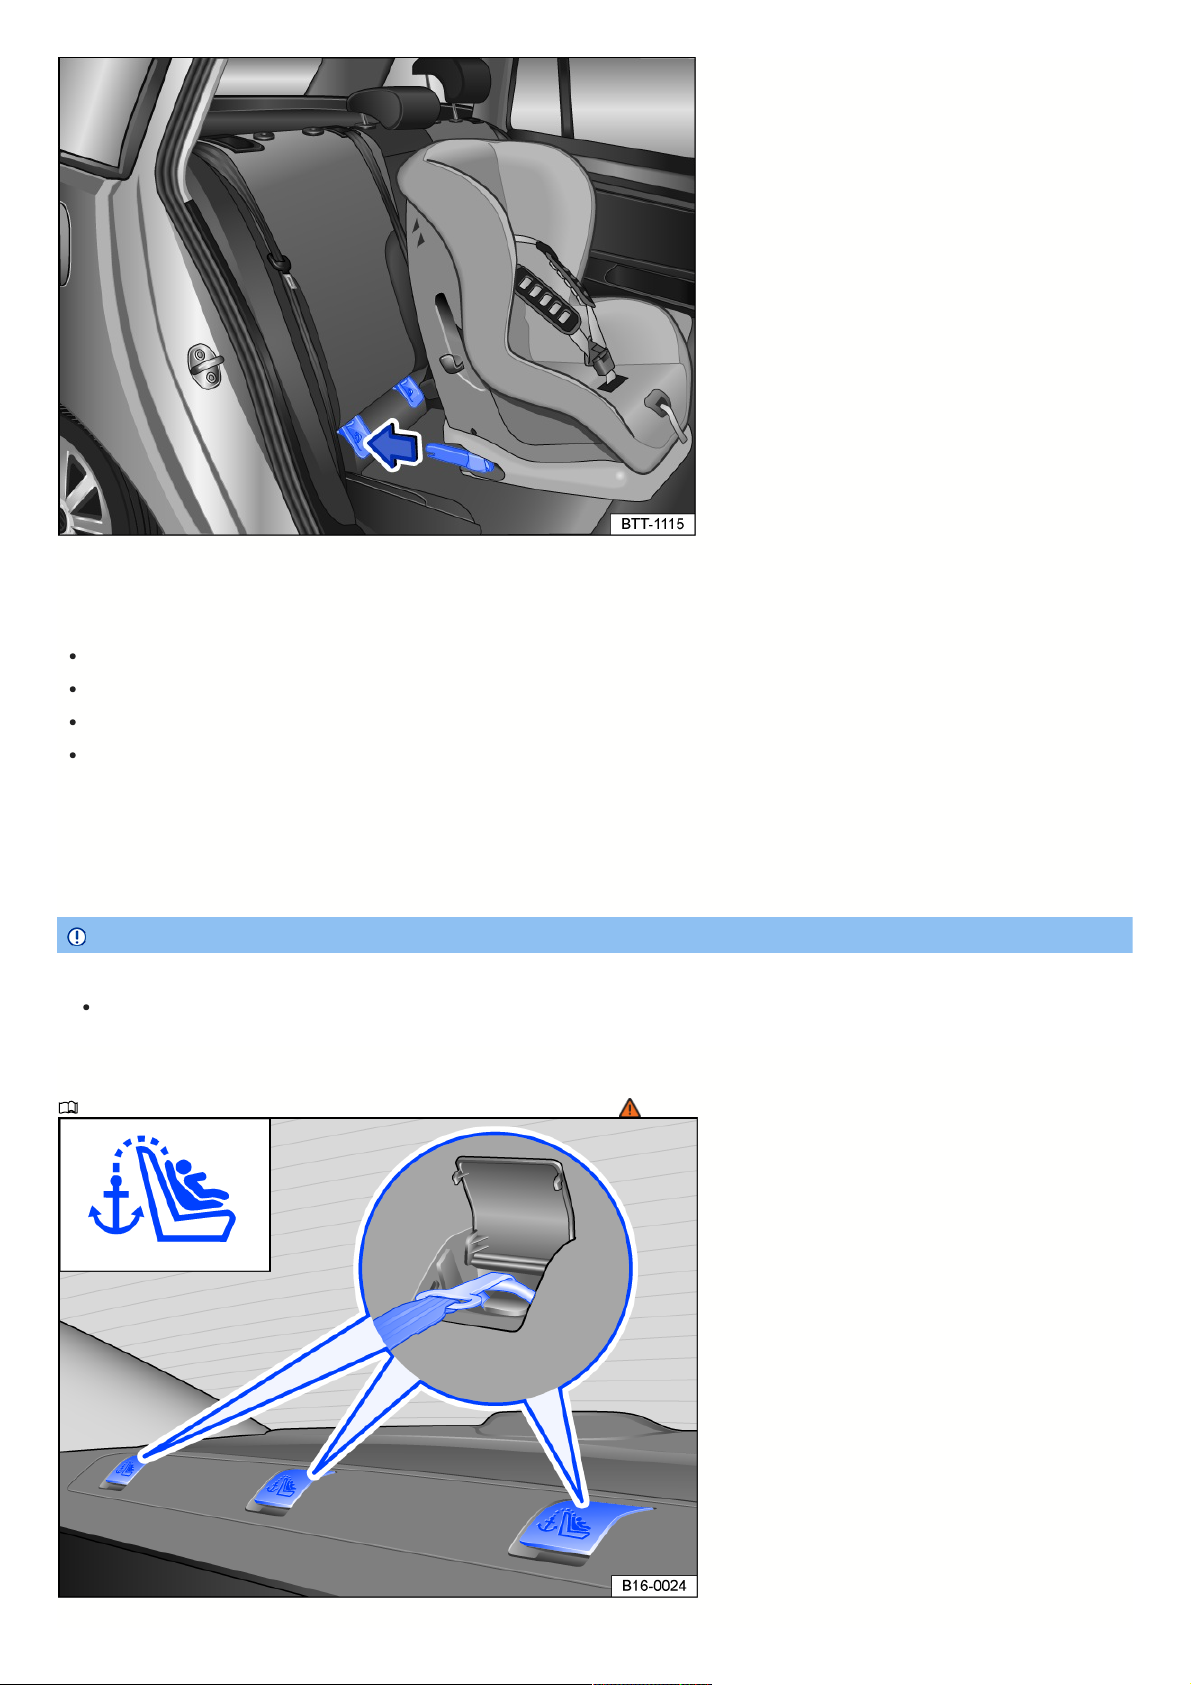
Fig.41Generalexample:fittingachildrestraintwithattachmentarms.
InstallingchildrestraintswithLATCH/UAS
The installation location of the anchor points is indicated by a symbol fig. 40.
Pay attention to and follow the information ⇒ Safety notes on using child restraints .
If necessary, remove the anchorage caps.
Push the child restraint attachment arms in the direction of the arrow onto the anchors fig. 41. The child restraint must engage securely and audibly.
Pull on both sides of the child restraint to check if the child restraint is securely locked in place.
If the child seat is equipped with a support base, this base must be positioned securely on the vehicle floor.
Usinginsertionguides
If anchor points for child restraints are not directly accessible, guidance fixtures can make the installation and removal of child restraints easier. To do this, first
position the insertion guides at the anchor points. Then fasten the child restraint according to the installation instructions.
NOTICE
Prevent permanent marks or damage to seat covers and cushions due to insert guides.
Before folding the rear seats forward or when the child restraint is removed, always remove the insert guides from the anchor points.
Securingthechildrestraintwiththeupperstrap(toptether)
PleasereadtheintroductoryinformationandheedtheWarningsandNotice
⇒ Introduction
.
Fig.42Inthestoragecompartmentbehindtherearbenchseat:Anchoragesfortheupperstrap.
59
Page 60
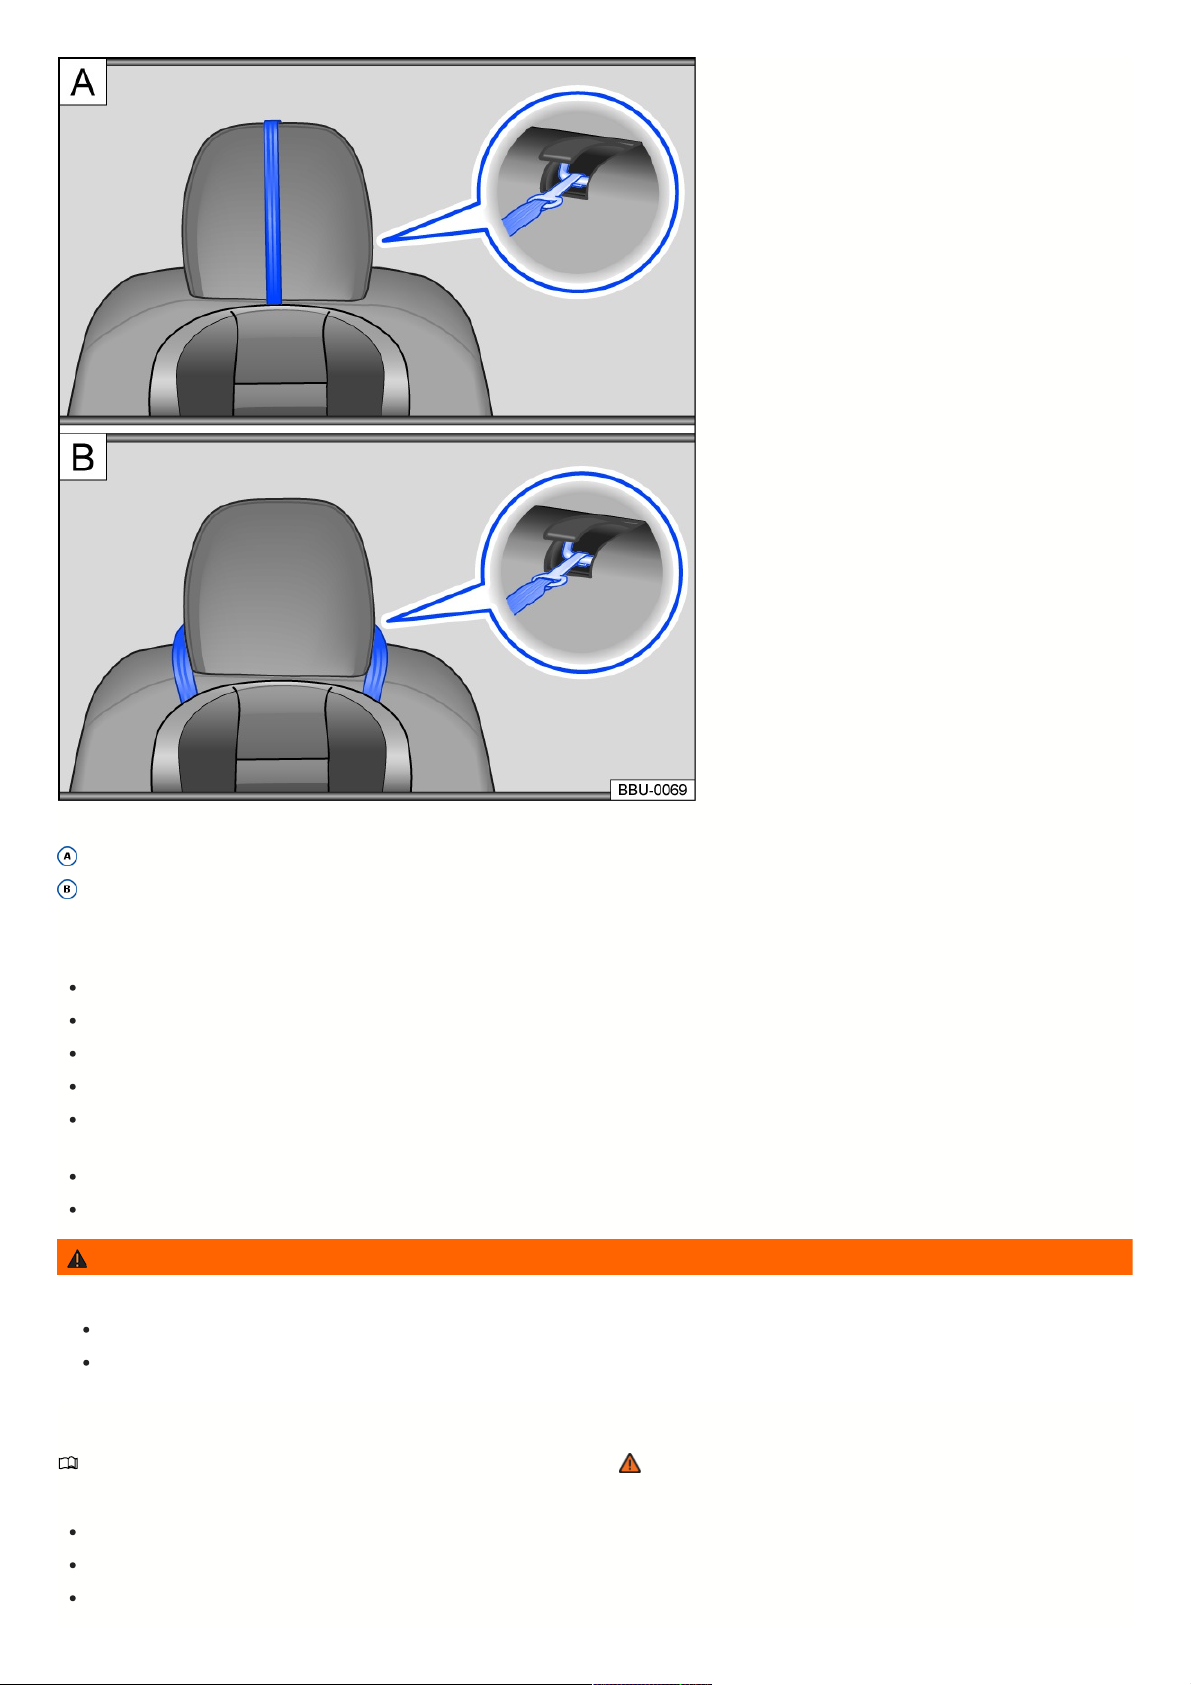
Fig.43Ontherearseatbackrest:Examplesforseatbeltroutingwithnon-adjustableheadrestraints.
Seat belt routing with non-adjustable head restraints with a single strap.
Seat belt routing with non-adjustable head restraints with a double strap.
LATCH/UAS child restraints with “universal” approval must also be fastened to the LATCH/UAS anchor points using an upper strap (top tether).
Only secure the strap on the anchorages designed for it. Anchorages suitable for Top Tether are labeled with a symbol and may have the label “TOP TETHER”.
Pay attention to and follow the information ⇒ Safety notes on using child restraints .
Remove the screen separator if necessary.
Push the head restraint on the vehicle seat all the way upward or remove it.
Place the child restraint in the center of the vehicle seat surface.
Push the child restraint arm in the direction of the arrow onto the anchors ⇒ Securing a child restraint with LATCH/UAS . The child restraint must engage
securely and audibly.
Adjust the rear seat backrest of the vehicle seat to the backrest of the child restraint.
Tighten the upper strap so that the child restraint is upright on the rear seat backrest.
WARNING
Only secure the strap on the anchorages designed for it. Otherwise, serious injuries could result.
Always only fasten one strap on a child restraint to one retaining eye.
Never secure a child restraint strap to a tie-down.
Securingachildrestraintwithasafetybelt
PleasereadtheintroductoryinformationandheedtheWarningsandNotice
⇒ Introduction
.
Securingachildrestraintwithasafetybelt
Pay attention to and follow the information ⇒ Safety notes on using child restraints .
Adjust the height of the safety belt so that the belt webbing runs naturally along the child restraint without any sharp bends in the webbing.
Route the safety belt according to the instructions provided by the child restraint manufacturer and guide the belt through the child restraint.
60
Page 61
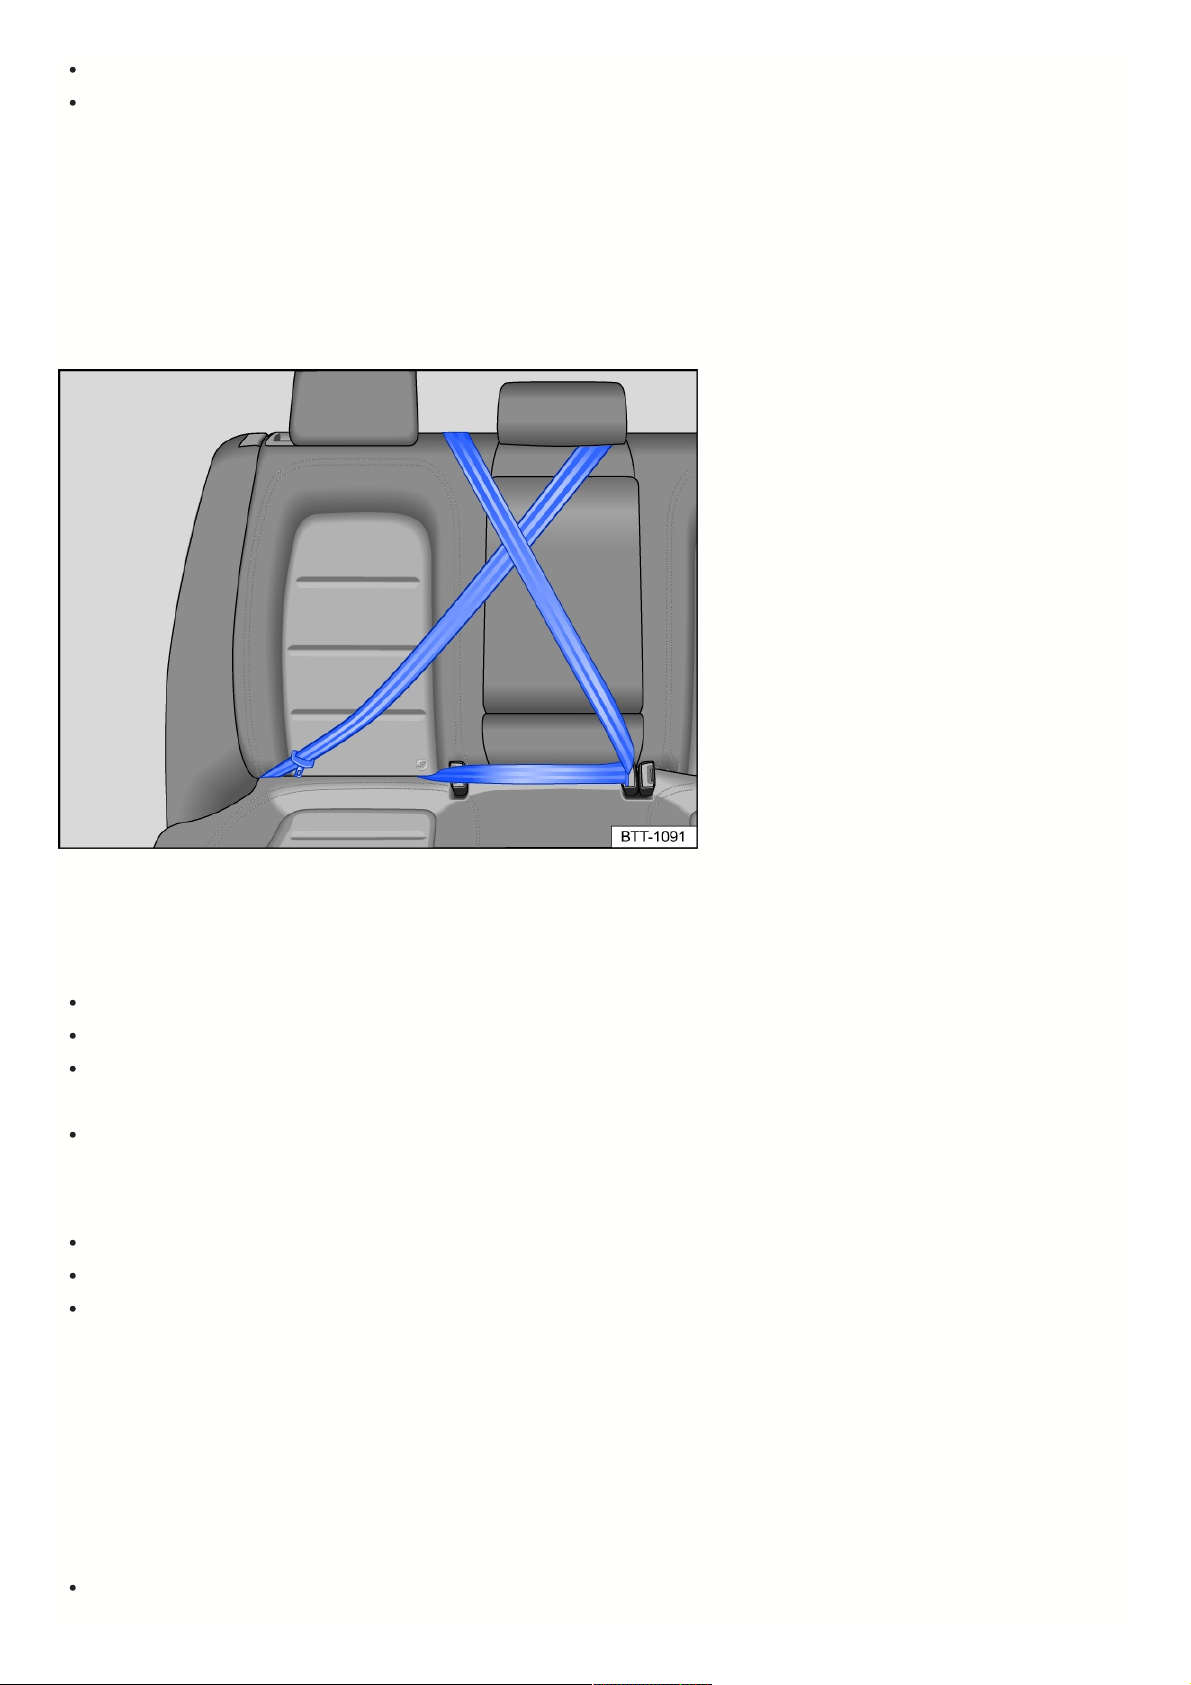
Make sure the safety belt is not twisted.
Insert the buckle tongue into the safety belt buckle belonging to the corresponding seat, until the safety belt buckle latches into place.
Child restraints from the “semi-universal” approval category, where the child restraint is secured by the safety belt and a support foot, must not be secured on the
center rear bench seat.
Lockablesafetybelt
If the belt webbing is fully pulled out and you hear a clicking sound when the safety belt is retracted, this is a lockable safety belt ⇒ Using safety belts . The locking
mechanism on the safety belt must only be used to fasten specific child restraint systems ⇒ Child restraints – overview . An activated locking mechanism must be
released when a vehicle occupant fastens their safety belt. To release the locking mechanism, push the red button in the belt buckle and guide the belt back fully by
hand ⇒ Fastening and unfastening the safety belts .
Keepanysafetybeltsthatarenotbeingusedoutofthereachofchildren
Fig.44Keepanysafetybeltsthatarenotbeingusedawayfromchildren.
Secure any safety belts not being used to prevent a child from playing with the safety belt and getting caught in it. The procedure for securing a safety belt that is not
being used depends on the seating position.
To secure a safety belt that is not being used for one of the outer seats:
Position the safety belt around the head restraint of the center seating position fig. 44.
Make sure that the safety belt is out of range of the child so that the child cannot touch it or play with it.
Make sure that the safety belt is not blocking the lower anchors.
If the anchor points are blocked, this may mean that you cannot install the child restraint properly in the anchor points.
Do not activate the lockable safety belt.
Otherwise, it is very difficult to retract the safety belt into its normal position. You should not hear any clicking noises when the safety belt is retracted.
To secure a safety belt that is not being used for the middle seat:
Fasten the safety belt fig. 44.
Pull the shoulder strap on the safety belt out fully to activate the lockable safety belt. You should hear a clicking noise when the safety belt is rolled up again.
Let the safety belt roll up fully. Pull the safety belt to make sure that the lockable safety belt is activated and the safety belt is properly fastened and tightened so
that the child cannot get hold of the belt or play with it.
If a child is secured on a seat in the second row, adjust the position in front of the child restraint to ensure that the child has enough space. For example, adjust the
front passenger seat to the size of the child and the child directly behind them. Always pay attention to the correct seating position ⇒ Seating position.
if no child restraints are needed, move all the safety belts back into their normal storage positions so that the safety belts are available for normal use.
Installingonthecenterseatingposition
When installing a child restraint on the center seating position, it is especially important to install correctly because this seating position is narrower than both of the
outer seats. If the child restraint is wider than the seat surface, the belt buckle of the adjacent seating position may be covered and could then be damaged. When
installing child seats, always ensure that all belt buckles are easily accessible.
If nothing else is specified by the child restraint manufacturer, the child restraint must rest close against the backrest and seat surface and must not overlap seat
surfaces.
61
Page 62
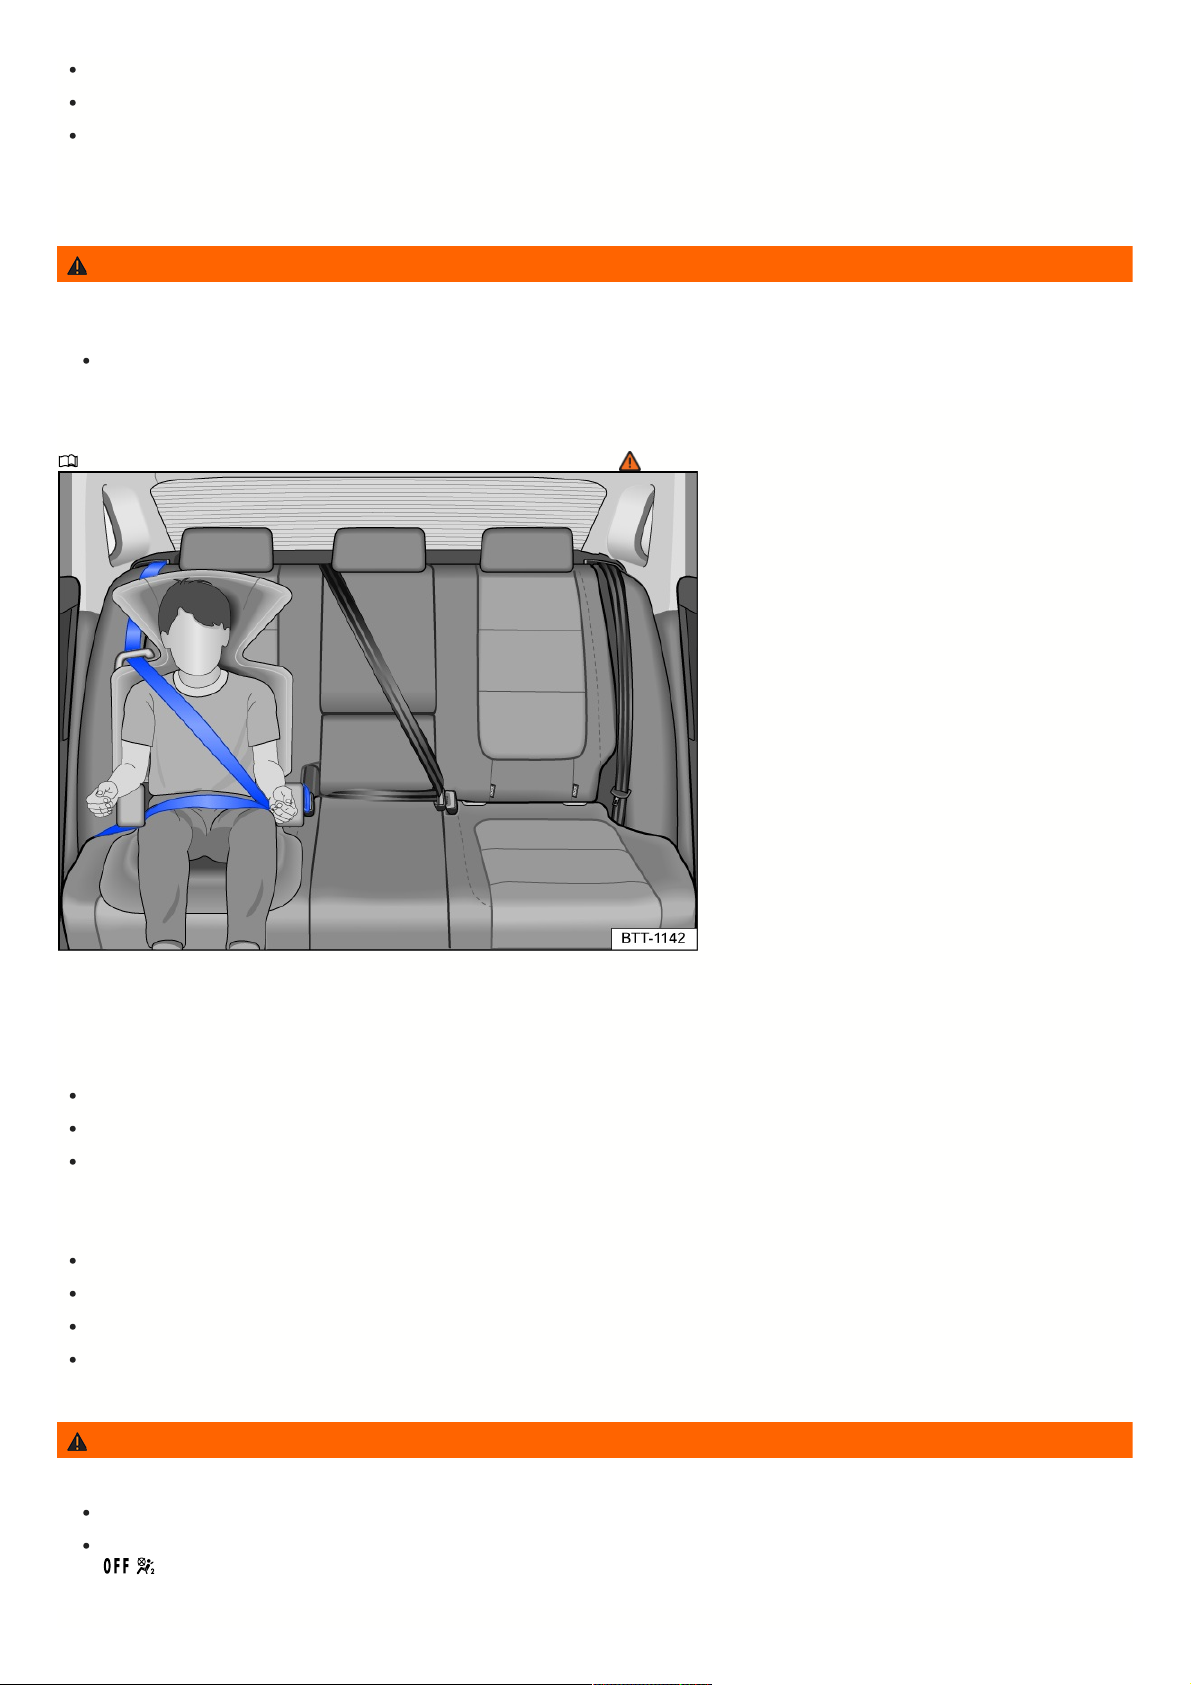
The child restraint must be installed straight and centered on the seating position, and it must not be able to move more than 2.5 cm (approx. 1 inch).
The child restraint must not rest on the belt buckles.
When installing multiple child restraints, the child restraints must not become caught on one another.
In some cases, even if a child restraint is installed correctly on the center seating position, it may cover the belt buckles and could then damage them and make the
belt buckles unusable. This can occur if the child restraint slides on the seat surface while driving. Therefore, check the position of the child restraint regularly to
ensure that the belt buckles are neither covered nor damaged.
WARNING
A child that is in a child restraint that has been secured with the anchor points or with a safety belt may play with any unused safety belts on the rear seat and get
tangled up, which could result in serious or even fatal injuries.
Always keep any safety belts for the rear seats that are not being used out of the reach of children.
Securingaboosterseatwithasafetybelt
PleasereadtheintroductoryinformationandheedtheWarningsandNotice
⇒ Introduction
.
Fig.45Correctlysecuredchildonaboosterseat.
Children between the ages of around 8 and 12 are best protected when they travel on a booster seat that is suitable for their age and height.
The safety belts in the vehicle are usually only suitable for children taller than 4'9" (57 inches, 145 cm). Booster seats ensure that children under this height can be
correctly secured using the safety belt.
Never activate the lockable belt system when securing a child with a booster seat.
The upper area of the belt must always be positioned on the child's shoulder. Ensure that the belt does not rest on the child's face or neck.
The lap belt must always run across the child's lap. It must never run across the child's stomach.
Children taller than 4'9" (57 inches, 145 cm) can generally be secured using the safety belt. Pay attention to the information at ⇒ Safety belt positioning.
A child no longer needs a booster seat when they are taller than 4'9" (57 inches, 145 cm) if the following requirements are met:
The child can sit with their back fully against the backrest.
The child's knees bend over the edge of the seat.
The child's feet sit fully flat on the vehicle floor.
The child can comfortably stay in this position for the entire journey.
Children aged 12 or under must always travel on a rear seat.
WARNING
Not using a booster seat or incorrectly using a booster seat or safety belt can cause severe or fatal injuries in the event of an accident or collision.
Always observe all instructions regarding the installation and use of child restraints and booster seats.
If, under exceptional circumstances, you need to install a booster seat on the front passenger seat, ensure that the PASSENGER AIR BAG indicator light
turns on and remains on.
62
Page 63

Incaseofanemergency
Securingyourselfandthevehicle
Follow all legal regulations regarding securing a vehicle during a breakdown. For example, in many countries you must switch on the emergency flashers and wear
a reflective vest.
Checklist
For your own safety and the safety of your passengers, follow the points below in the order they are given → :
1. Park your vehicle a safe distance from traffic and on suitable ground → .
2. Switch on the emergency flashers ⇒ Center console.
3. Set the electronic parking brake.
4. Move the gear lever into the neutral position or move the selector lever into the P position.
5. Stop the engine and remove the vehicle key from the ignition lock ⇒ Stopping the engine.
6. Have all vehicle occupants exit the vehicle on the side facing away from traffic and move to a safe area, such as behind a guard rail. Follow the local regulations
regarding wearing a reflective vest.
7. Take all vehicle keys with you if you are leaving the vehicle.
8. Set up the warning triangle to notify others on the road about the vehicle.
9. Allow the engine to cool and see an authorized Volkswagen dealer or authorized Volkswagen Service Facility for assistance if necessary.
When the emergency flashers are switched on, for example while towing the vehicle, you can indicate any turns or lane changes using the turn signal lever. The
emergency flashers will stop temporarily.
Switchontheemergencyflashersinthefollowingsituations,forexample:
To warn traffic behind your vehicle if the traffic ahead slows suddenly or you reach the end of a traffic jam.
If there has been an accident.
If the vehicle malfunctions.
When towing the vehicle.
Always follow the applicable local requirements for use of the emergency flashers.
If the emergency flashers do not work, others on the road must be informed about the stalled vehicle in some other way that meets the applicable legal regulations.
WARNING
A stalled vehicle increases the risk of a crash that could cause injury to you, your vehicle occupants, or others on the road.
Stop the vehicle as soon as it is safe to do so.
Park the vehicle a safe distance from moving traffic.
Switch on the emergency flashers.
Never leave people behind in the vehicle, especially children or those who need assistance. This is especially true when the doors are locked. Individuals
locked in the vehicle could be exposed to very high or very low temperatures.
WARNING
Failing to heed this checklist that is provided for your own safety can cause accidents and serious injuries.
Always follow the instructions in the checklist as well as the general safety precautions.
WARNING
Exhaust system components will become very hot. This can result in fires and serious injuries.
Never park the vehicle in such a way that parts of the exhaust system could come into contact with flammable materials under the vehicle, such as dry
grass or fuel.
NOTICE
When pushing the vehicle by hand, do not press on the taillights, the rear spoiler, or large pieces of sheet metal. Doing so could cause vehicle damage and
detach the rear spoiler.
63
Page 64
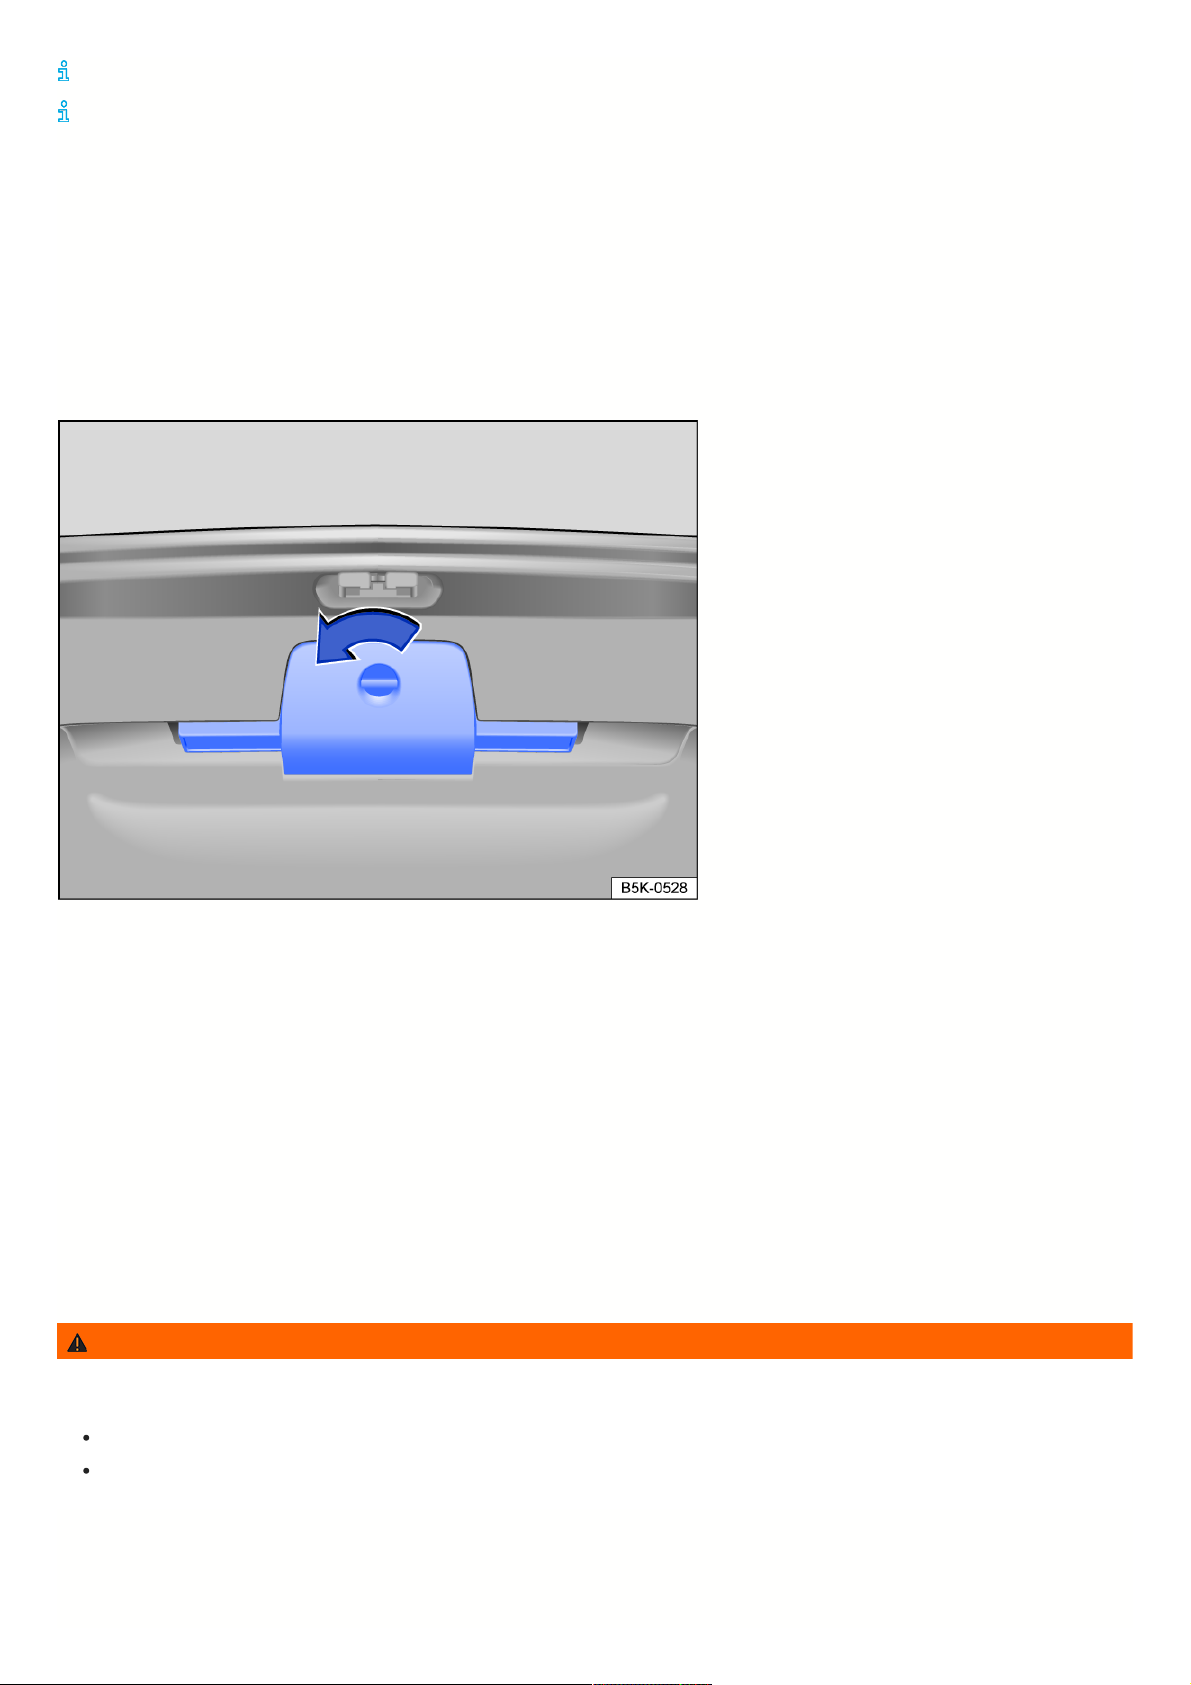
The12Vvehiclebatterywilldrainiftheemergencyflashersremainonforalongperiodoftime,eveniftheignitionisswitchedoff.
Dependingonvehicleequipment,thebrakelightsmayblinkquicklyifyoubrakehardwhiledrivingatspeedsaboveapprox.50mph(approx.80km/h)or
brakethevehicletoacompletestop.Thisisdonetowarntrafficbehindyourvehicle.Ifthebrakingcontinues,theemergencyflasherswillswitchonautomatically
whenthevehiclespeedisbelowapprox.6mph(approx.10km/h).Theemergencyflasherswillswitchoffautomaticallywhenyouaccelerate.
Emergencyequipment
Firstaidkit
Depending on vehicle equipment, the first aid kit may be in a storage compartment, in a holder in the luggage compartment, under the luggage compartment floor,
or in the vehicle interior.
The first aid kit must meet the legal regulations. Note the expiration date of the contents.
Replace contents after use, if necessary, and put the first aid kit securely back into place.
Warningtriangle
Fig.46Inthetrunklid:Holderforthewarningtriangle.
Depending on the vehicle equipment, the warning triangle may be located in the trunk lid. When the trunk lid is open, turn the holder lock fig. 46 90°
counterclockwise, open the holder, and remove the warning triangle.
The warning triangle must meet the legal regulations.
After use, insert the warning triangle back into the holder and lock.
Reflectivevest
Depending on vehicle equipment, the high-visibility waistcoat may be in a storage compartment in the front door trim panel or in the glove box ⇒ Driver door ,
⇒
Passenger’s side.
The reflective vest must meet the legal regulations.
Fireextinguisher
Depending on vehicle equipment, a fire extinguisher may be located in a holder in the footwell under the front passenger’s seat.
The fire extinguisher must meet the legal regulations, always be ready to operate, and be checked regularly (see inspection seal on the fire extinguisher).
WARNING
Objects that are loose or secured incorrectly can be thrown around the vehicle interior during sudden driving or braking maneuvers or in a collision and cause
serious injuries.
Always position the first aid kit, warning triangle, and fire extinguisher securely in the holders in the vehicle.
Store the reflective vest in a storage compartment so that it is easy to access.
InformationCall,RoadsideAssistanceCallandEmergencyCallService
64
Page 65
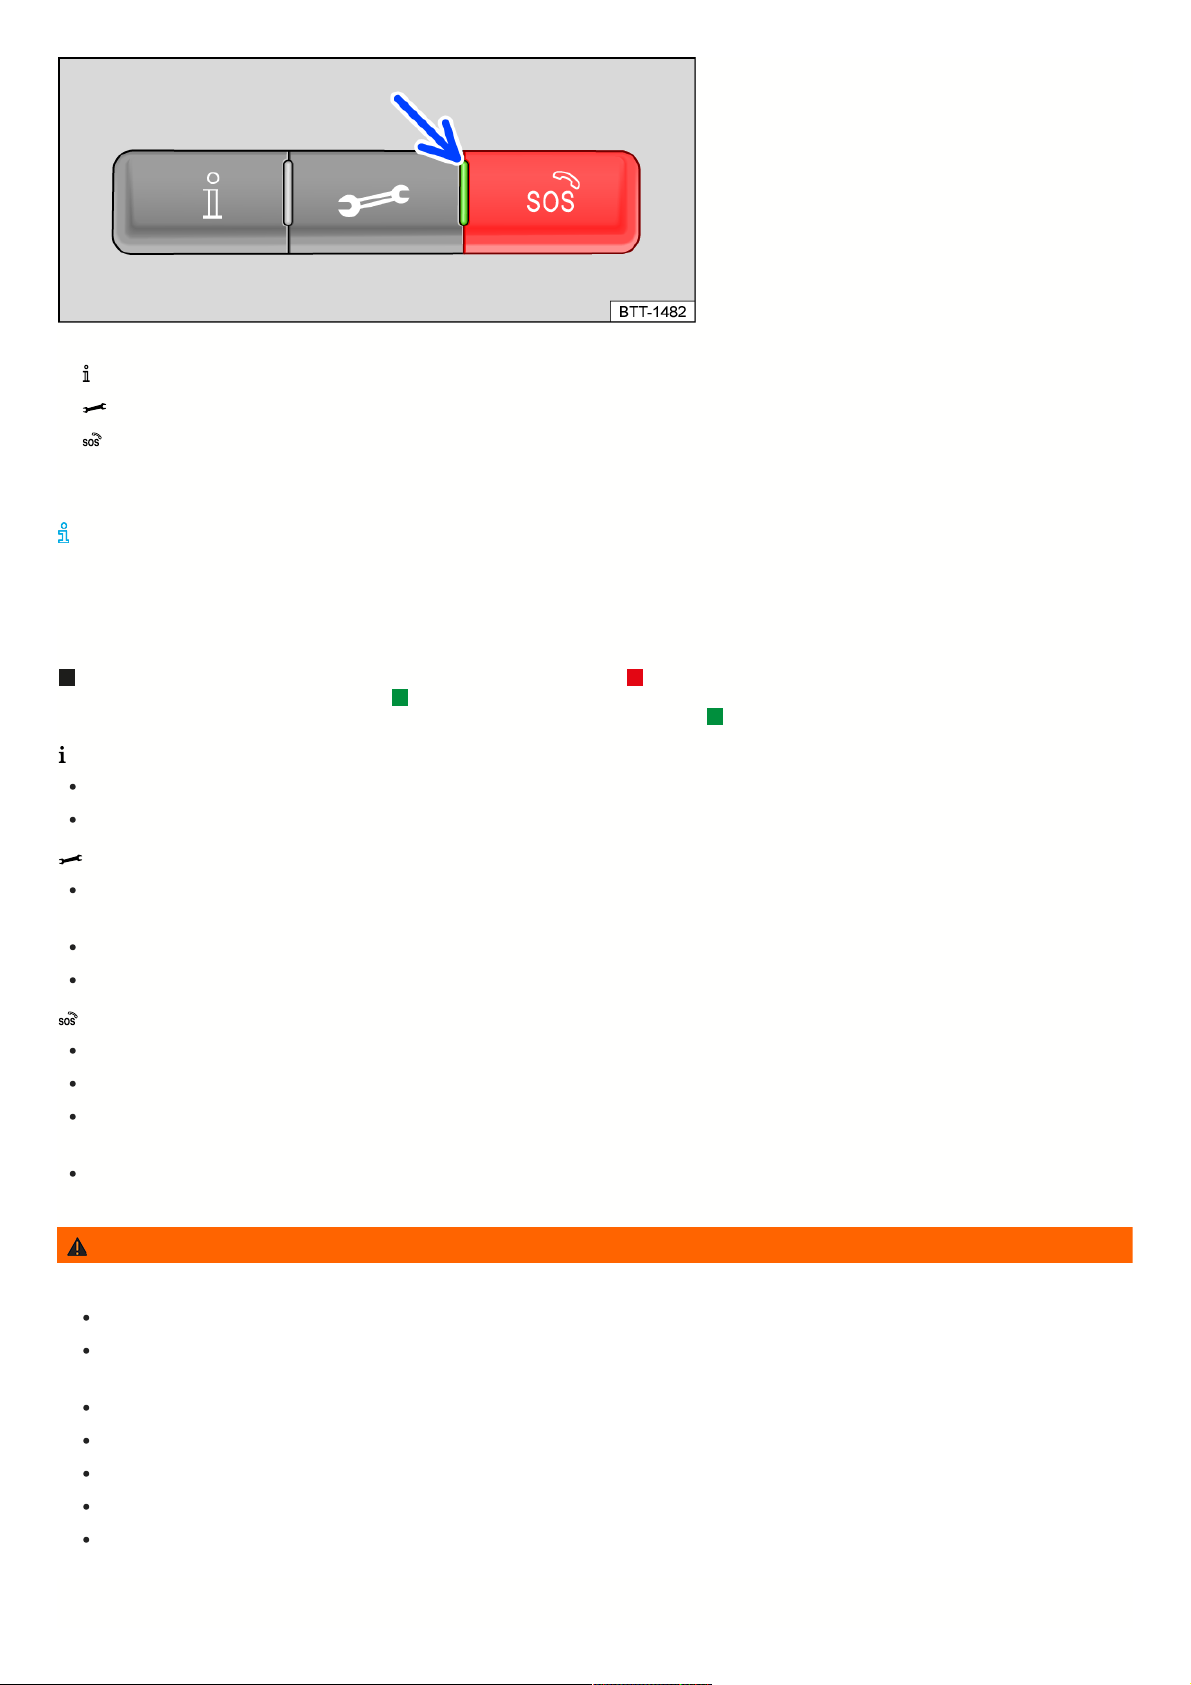
Fig.47Intheroofconsole:controlsforcallservices.
Information call.
Roadside assistance call.
Emergency Call Service.
The control in the roof console fig. 47 can be used for voice services, depending on the vehicle equipment and country of use. The required connection is produced
by a control module installed by the manufacturer.
NotetheadditionalinformationonVWCar-Net®⇒.
Indicatorlight
An indicator light fig. 47 (arrow) for voice and data transmission services is located in the control panel. The indicator light comes on in different colors and light
patterns depending on the vehicle operating status:
Theindicatorlightdoesnotlightup:Thevehicleisofflineandhasnoconnectivity. Theredindicatorlightturnsonandremainson:systemmalfunction.The
EmergencyCallServiceislimitedornotavailable. Thegreenindicatorlightlightsup:Displaystheavailabilityofmobileradiosignal.Doesnotdisplaywhether
VWCar-Netserviceshavebeenpurchasedandareactive,exceptfortheEmergencyCallService. Theindicatorlightflashesgreen:thereisacallinprogress.
Informationcall
With an information call, a call can be made to the VW Car-Net call center for questions regarding VW Car-Net services.
The contact person will communicate in the language in which the vehicle was registered via VW Car-Net.
Roadsideassistancecall
If you break down, you can contact an authorized Volkswagen dealer or authorized Volkswagen Service Facility for assistance with the roadside assistance
call.
Some vehicle data, e.g. its current location, is transferred in parallel to the voice call.
The contact person will communicate in the language in which the vehicle was registered via VW Car-Net.
EmergencyCallService
The Emergency Call Service is only available if a corresponding license is acquired.
When the Emergency Call Service is initiated, a connection will be established with the Volkswagen emergency call center.
If an emergency call is triggered manually or by a collision with airbag deployment, data that is relevant to the emergency call, such as the vehicle's current
location, is automatically transmitted ⇒ Customer information.
The contact partner will communicate in the language that is set in the vehicle's Infotainment system. If this language is not available at the current emergency
call location, English will be used.
WARNING
The following conditions may restrict or prevent a manual or automatic emergency call:
If the emergency call location is in an area with no cell phone and GPS reception, or insufficient reception.
If you are in a location where there is sufficient mobile phone and GPS reception, but the telecommunications provider's mobile communications network
is unavailable.
The Emergency Call Service is not permitted by law in some countries.
VW Car-Net has not been activated.
No valid license for the use of the Emergency Call Service has been acquired or the license has expired.
The vehicle components required for manual or automatic emergency calls are damaged or do not have sufficient power.
The vehicle's ignition is not switched on.
Triggeringanemergencycallmanually
65
Page 66

Press the emergency call button until the green indicator light starts to blink. The emergency call will be triggered and a voice call will be made to the
Volkswagen emergency call center.
If you pressed the emergency call button by mistake, cancel the emergency call immediately:
Press the emergency call button again until the indicator light remains green.
Automaticemergencycall
The automatic emergency call is only triggered when the ignition is on.
A call will automatically be made to the VW Car-Net call center immediately after the airbags or safety belt pretensioners deploy. The automatic emergency call
cannot be stopped by pressing the emergency call button .
If questions from the VW Car-Net call center are not answered, rescue operations will automatically start.
Integratedbattery
The integrated battery ensures that the Emergency Call Service will still be available for some time if the 12-volt vehicle battery is disconnected or faulty.
If the integrated battery is drained or faulty, a message indicating this will be displayed in the instrument cluster. When the relevant message is shown, immediately
consult an authorized Volkswagen dealer or authorized Volkswagen Service Facility and have the integrated battery replaced.
Havetheintegratedbatterychecked,andifnecessary,replacedbyanauthorizedVolkswagendealerorauthorizedVolkswagenServiceFacilityafter
approximately3years.
Datatransmission
The available data will be sent to the Volkswagen emergency call center during an emergency call to determine what rescue measures are needed.
Among other things, the following data will be sent:
Vehicle location
Vehicle Identification number.
Type of vehicle drive.
Vehicle model
TheEmergencyCallServicefunctionmaybelimitedbyanyafter-marketInfotainmentsystemsthatareinstalled.
Troubleshooting
EmergencyCallServicefaulty
The red indicator light in the emergency call button turns on and remains on . The message Error: Emergency call function. Service vehicle may also be
displayed in the instrument cluster.
There is a system error with the Emergency Call Service. You cannot make an emergency call.
Contact an authorized Volkswagen dealer or authorized Volkswagen Service Facility immediately.
Have the malfunction corrected.
EmergencyCallServicelimited
The red indicator light in the emergency call button turns on and remains on . The message Emergency call function limited. Service vehicle may also be
displayed in the instrument cluster.
The Emergency Call Service function has restricted availability. For example, you cannot make a voice call to the VW Car-Net call center.
Contact an authorized Volkswagen dealer or authorized Volkswagen Service Facility immediately.
Have the malfunction corrected.
66
Page 67
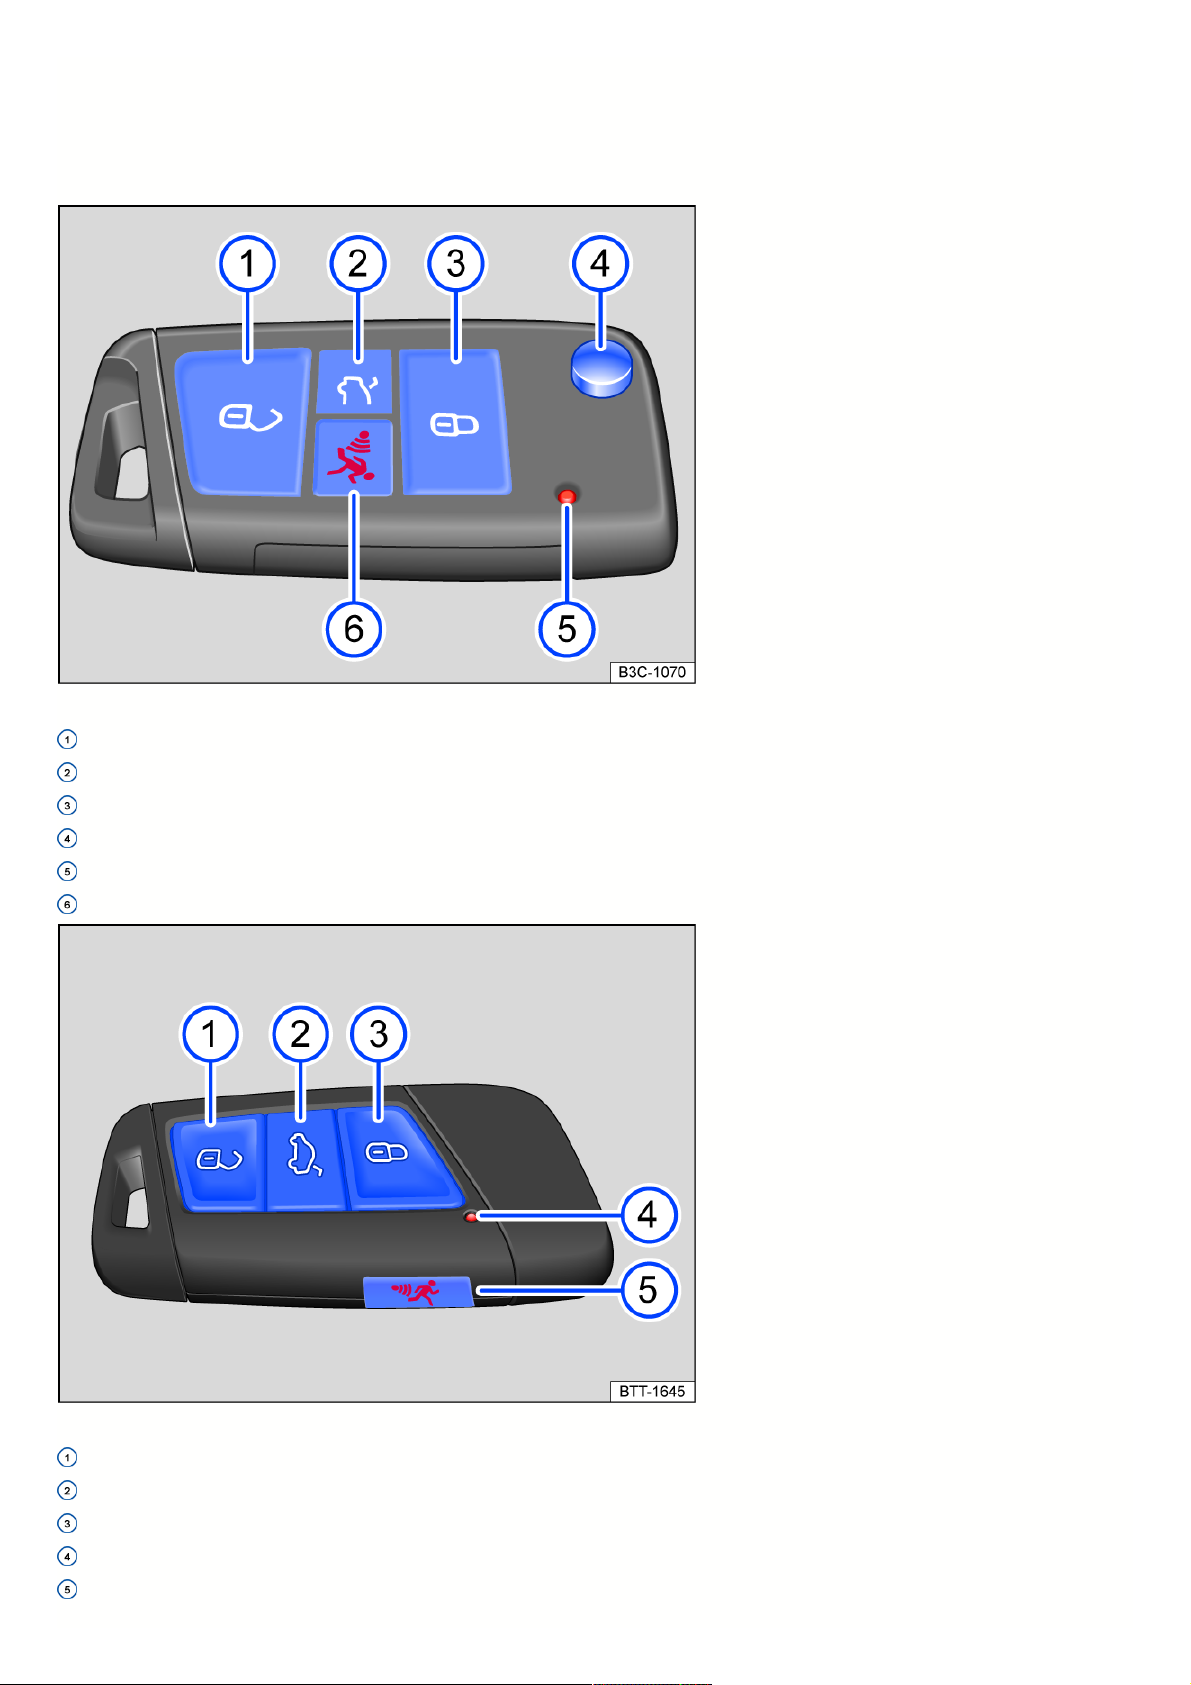
OpeningandClosing
Vehiclekey
Vehiclekeyfunctions
Fig.48Vehiclekeywithkeybit.
Unlock the vehicle. All turn signals will flash twice.
Unlock the trunk lid separately.
Lock the vehicle. All turn signals will flash once.
Fold the key bit out and in.
Indicator light: flashes when a button is pressed.
Panic button (depending on vehicle equipment).
Fig.49Vehiclekey.
Unlock the vehicle. All turn signals will flash twice.
Unlock the trunk lid separately. All turn signals will flash twice.
Lock the vehicle. All turn signals will flash once.
Indicator light: flashes when a button is pressed.
Panic button (depending on vehicle equipment).
67
Page 68
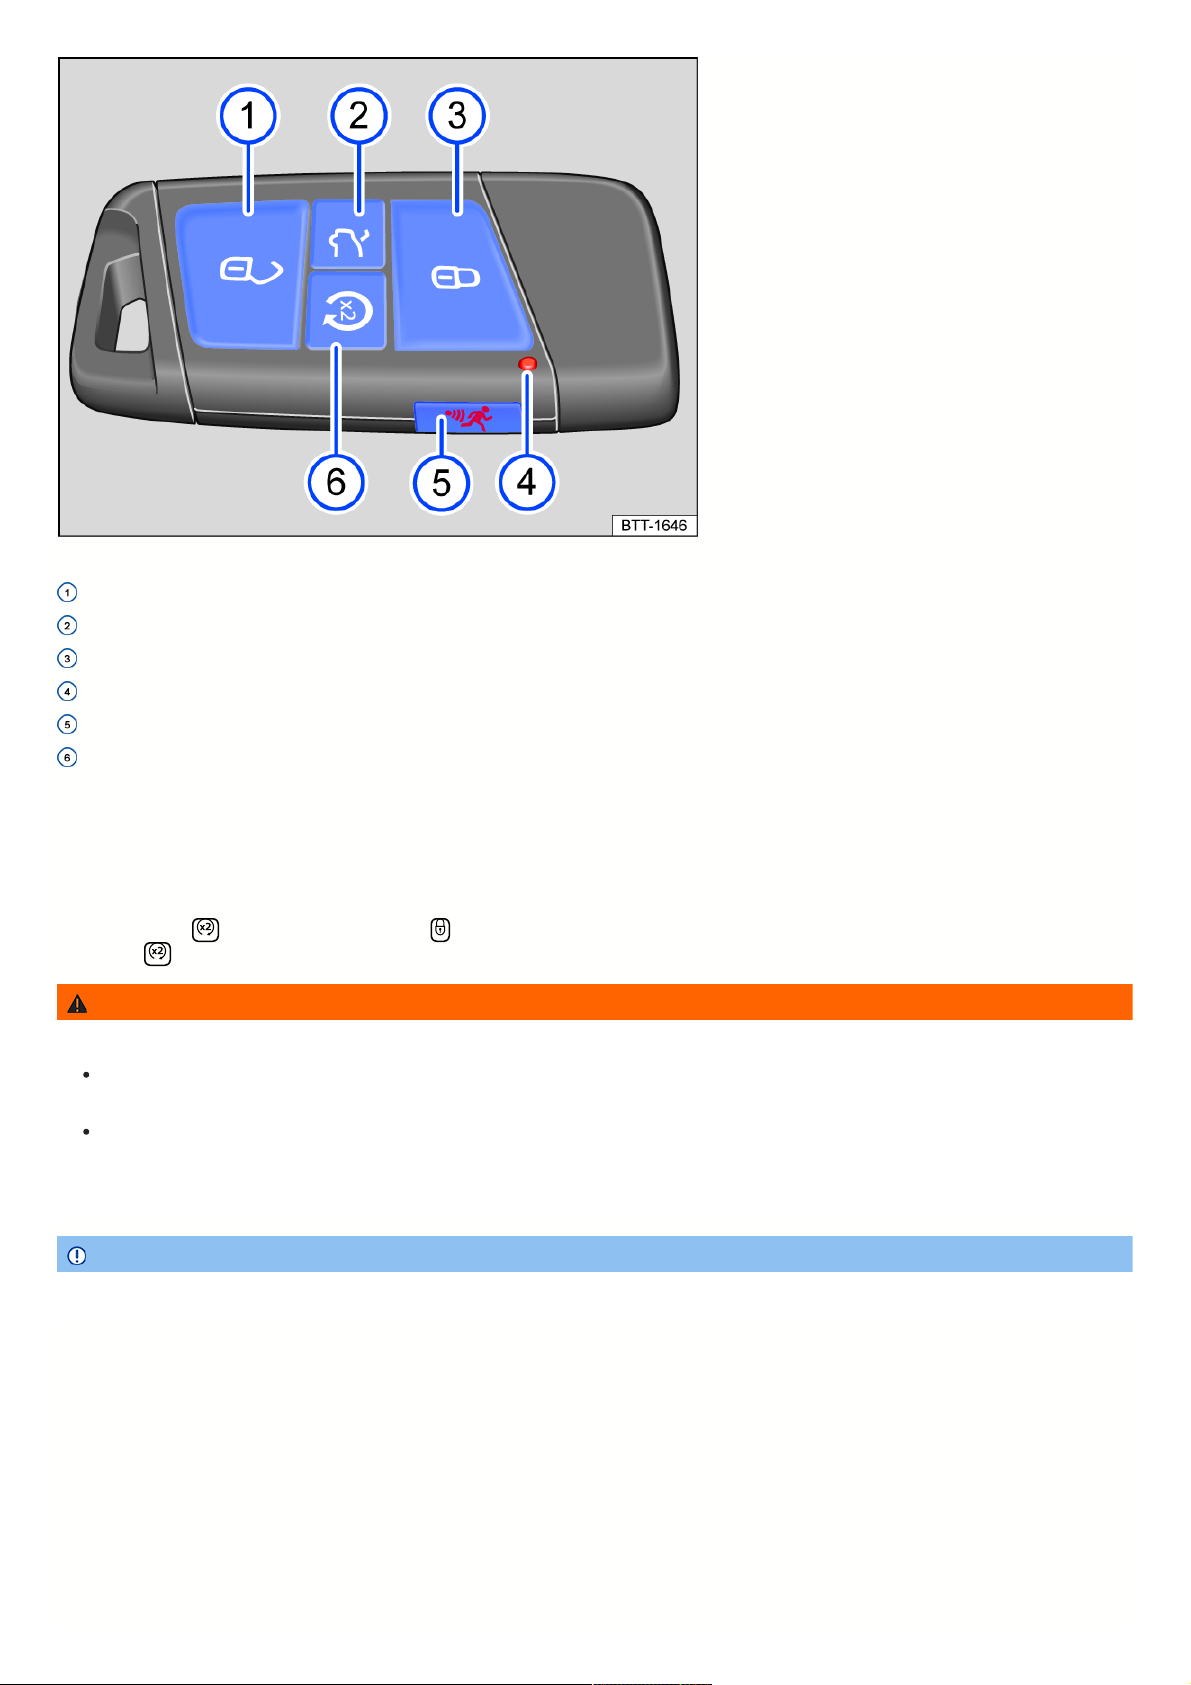
Fig.50Vehiclekeywithremotestartrelaybutton.
Unlock the vehicle. All turn signals will flash twice.
Unlock the trunk lid separately. All turn signals will flash twice.
Lock the vehicle. All turn signals will flash once.
Indicator light: flashes when a button is pressed.
Panic button (depending on vehicle equipment).
Remote start relay button (depending on vehicle equipment).
Panicbutton(dependingonvehicleequipment)
Only use the panic button in case of an emergency. When you press the panic button, the horn will sound and the vehicle lights will flash. Pressing the panic button
again switches off the alarm.
Remotestartrelaybutton(dependingonvehicleequipment)
Pressing the button twice after pressing the button carries out the remote start ⇒ Remote start function. During remote start, the parking light turns on.
Pressing the button switches off the engine.
WARNING
Careless or unintended use of the vehicle key can cause crashes and serious injuries.
Take all vehicle keys with you when leaving the vehicle. Children or unauthorized people could lock the doors and/or the trunk lid, start the engine, or
switch on the ignition and activate electrical equipment, such as the power windows.
Never leave children or people requiring assistance unattended in the vehicle. In an emergency, they will not be able to leave the vehicle unassisted or
care for themselves. For example, depending on the season, the temperature inside the vehicle could become very high or low, which can lead to serious
injuries, illness or death, especially for very young children.
NOTICE
Protect the vehicle key from moisture and strong impacts.
Emergencykey
68
Page 69
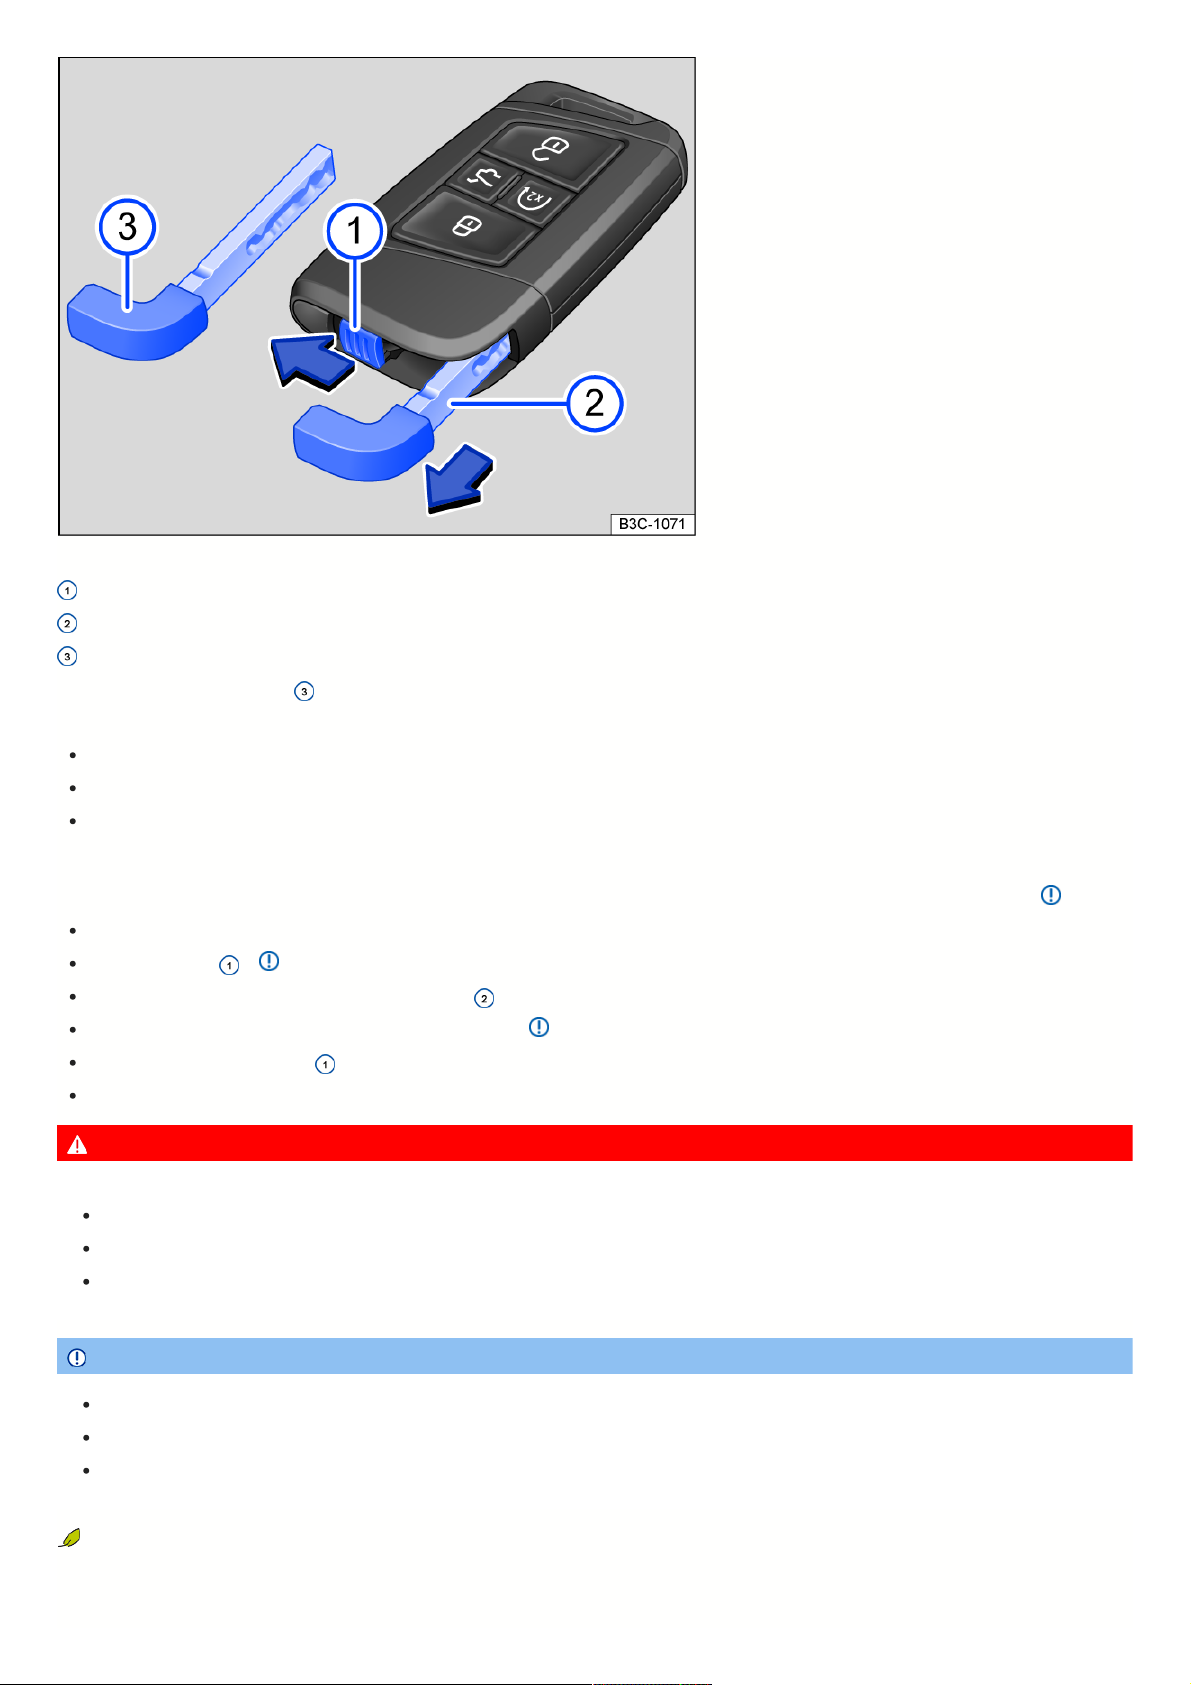
Fig.51Vehiclekey:releasingtheemergencykey.
Push the locking mechanism in the direction of the arrow.
Remove the emergency key in the direction of the arrow.
Emergency key.
There is an emergency key fig. 51 located in the vehicle key that can be used to manually unlock and lock the vehicle.
Possible functions:
Unlock and lock the glove compartment.
Unlock and lock the vehicle manually ⇒ Vehicle key functions .
Switch the childproof lock on and off ⇒ Child safety lock .
Replacingthebuttoncellbattery(vehiclekeyswithkeybit)
Volkswagen recommends having the button cell battery replaced by an authorized Volkswagen dealer or authorized Volkswagen Service Facility ⇒ .
Fold the key bit out.
Lever off the cover ⇒ .
Lift the button cell battery out of the battery compartment .
Press the new button cell battery into the battery compartment ⇒ .
Press the cover onto the housing .
Dispose of drained battery in a way that will not harm the environment.
DANGER
If button cell batteries are swallowed or enter the air ducts, serious or fatal injuries could occur within a very short time due to choking or internal burns.
Seek medical assistance immediately if you suspect that a button cell battery has been swallowed.
If the battery cover cannot be closed, do not use the remote control.
Always keep the remote control and key fob with button cell batteries out of the reach of children.
NOTICE
If the button cell battery is replaced incorrectly, it can damage the vehicle key.
Using incorrect batteries can damage the vehicle key. Only replace drained batteries with a new battery in the same voltage, size, and specification.
Make sure the battery is facing in the right direction when inserting it.
The type of batteries used in the remote control of your vehicle key can contain perchlorate. This requires special handling. Observe all legal requirements
regarding the handling and disposal of these batteries. We recommend that you have this service performed by an authorized Volkswagen dealer or authorized
Volkswagen Service Facility.
69
Page 70
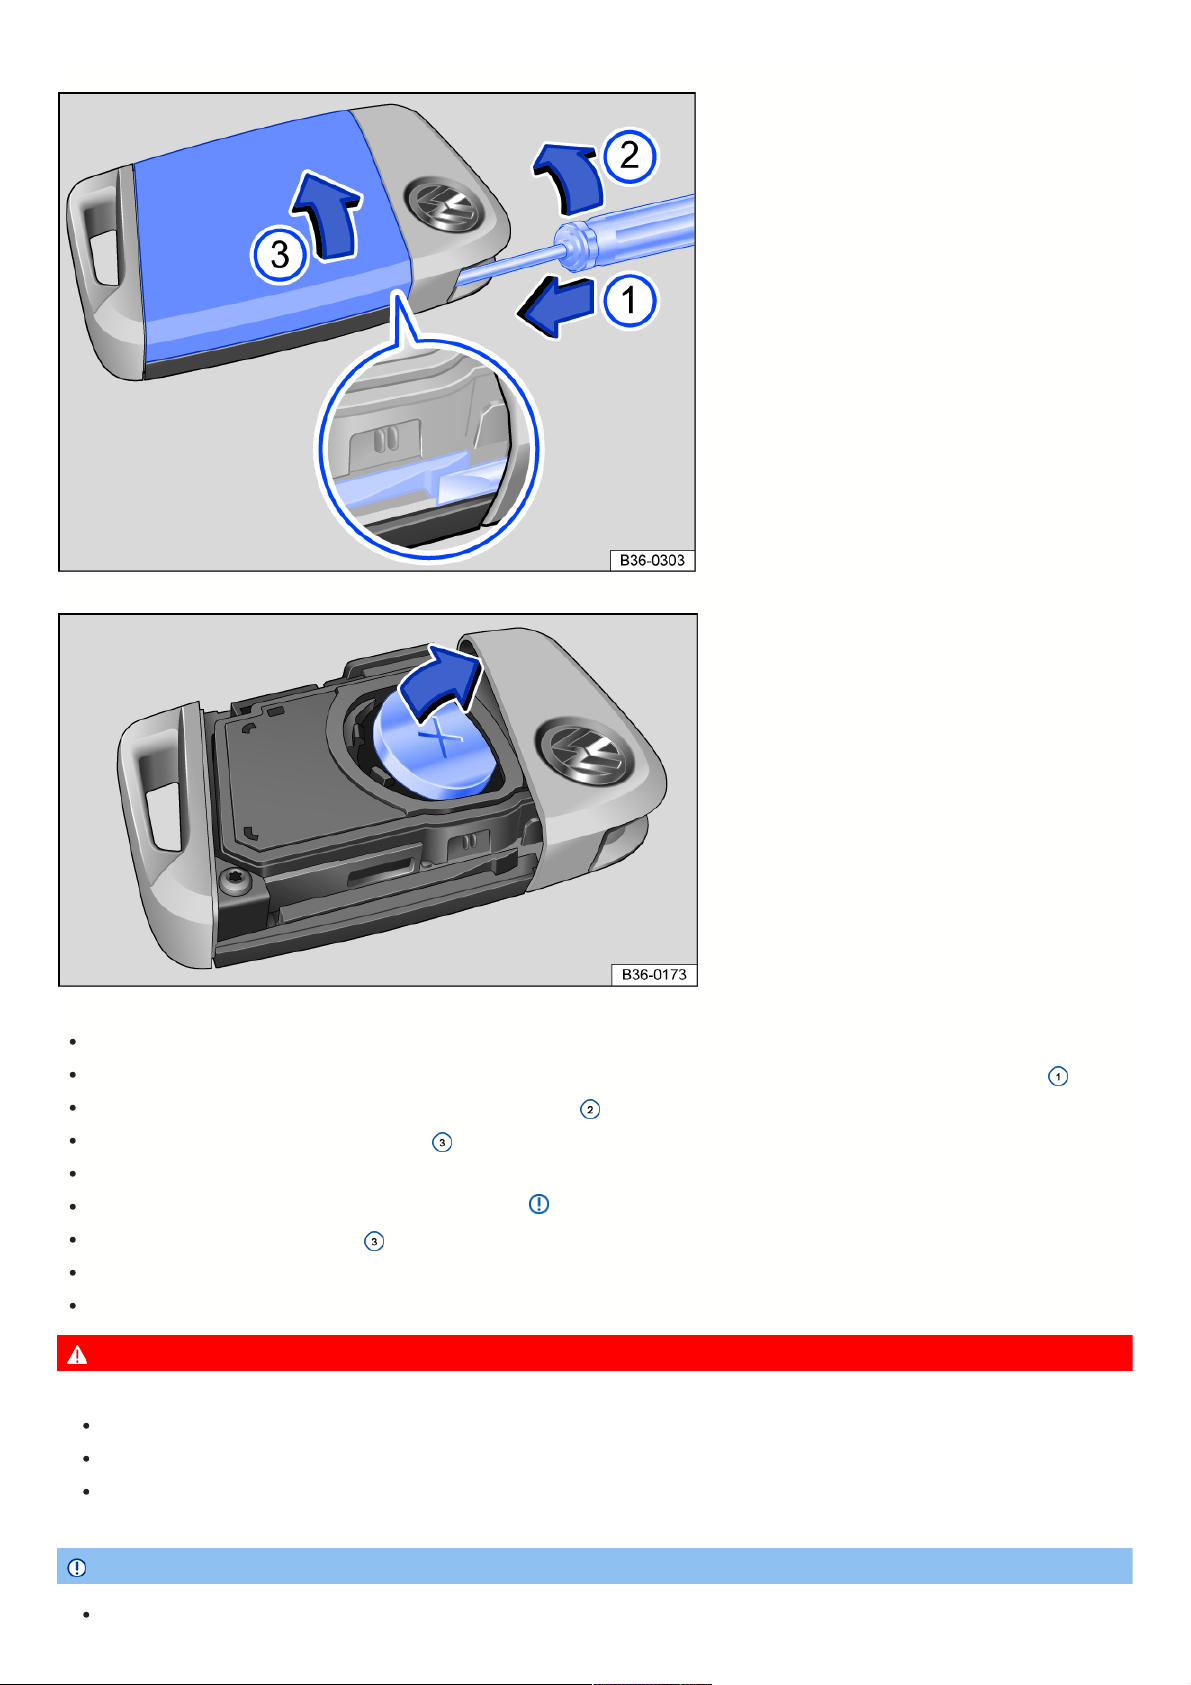
Replacingthebuttoncellbattery
Fig.52Vehiclekey:openingthebatterycompartmentcover.
Fig.53Vehiclekey:replacingthebuttoncellbattery
Remove the emergency key ⇒ Emergency key .
Slide the blade of the flat-bladed screwdriver in the direction of the arrow approximately 1 cm into the outer guide on the mechanical key fig. 52 .
Turn the flat-bladed screwdriver clockwise until the cover pops up fig. 52 .
Push the cover in the direction of the arrow fig. 52 and remove it.
Lift the button cell battery out of the battery compartment fig. 53.
Press the new button cell battery into the battery compartment ⇒ .
Press the cover onto the housing fig. 52 .
Store the emergency key ⇒ Emergency key .
Dispose of drained battery in a way that will not harm the environment.
DANGER
If button cell batteries are swallowed or enter the air ducts, serious or fatal injuries could occur within a very short time due to choking or internal burns.
Seek medical assistance immediately if you suspect that a button cell battery has been swallowed.
If the battery cover cannot be closed, do not use the remote control.
Always keep the remote control and key fob with button cell batteries out of the reach of children.
NOTICE
If the button cell battery is replaced incorrectly, it can damage the vehicle key.
70
Page 71

Using incorrect batteries can damage the vehicle key. Only replace drained batteries with a new battery in the same voltage, size, and specification.
Make sure the battery is facing in the right direction when inserting it.
The type of batteries used in the remote control of your vehicle key can contain perchlorate. This requires special handling. Observe all legal requirements
regarding the handling and disposal of these batteries. We recommend to have this service performed by an authorized Volkswagen dealer or authorized
Volkswagen Service Facility.
Synchronizingavehiclekey
If the vehicle cannot be unlocked or locked using the vehicle key, synchronize the vehicle key or replace the button cell battery ⇒ Replacing the button cell battery
(vehicle keys with key bit), ⇒ Replacing the button cell battery .
Synchronizing a vehicle key:
Fold out the key bit and remove the spare key.
If necessary, remove the cap from the driver's door handle ⇒ Locking the front passenger door and rear doors in an emergency .
Press the button on the vehicle key.
Unlock the vehicle using the key bit.
Open the driver door. If the vehicle is equipped with an anti-theft alarm system, the alarm will be triggered immediately ⇒ Anti-theft alarm system.
Switch the ignition on.
This completes the synchronization.
Troubleshooting
Vehiclecannotbelockedorunlocked
Remote control is disrupted by objects, poor weather conditions or transmitters on the same frequency band close to the vehicle (e.g. mobile devices), as well as by
the button cell being discharged.
OR: the central locking system switches off briefly to protect it from overloading.
Close the driver door.
OR: synchronize the vehicle key ⇒ Synchronizing a vehicle key .
OR: Change the battery cell in the vehicle key ⇒ Replacing the button cell battery (vehicle keys with key bit) , ⇒ Replacing the button cell battery .
Theindicatorlightisnotblinking
If the indicator light in the vehicle key does not blink when you press one of the buttons, then the button cell battery in the vehicle key must be replaced ⇒ Replacing
the button cell battery (vehicle keys with key bit), ⇒ Replacing the button cell battery .
YoucangetanadditionalorreplacementvehiclekeyataVolkswagendealership.
KeylessAccess
Introduction
Keyless Access makes it possible to unlock and lock the vehicle without actively using the key. A valid vehicle key must be present within the vicinity of the vehicle to
use this function.
UnlockingorlockingusingKeylessAccess
71
Page 72
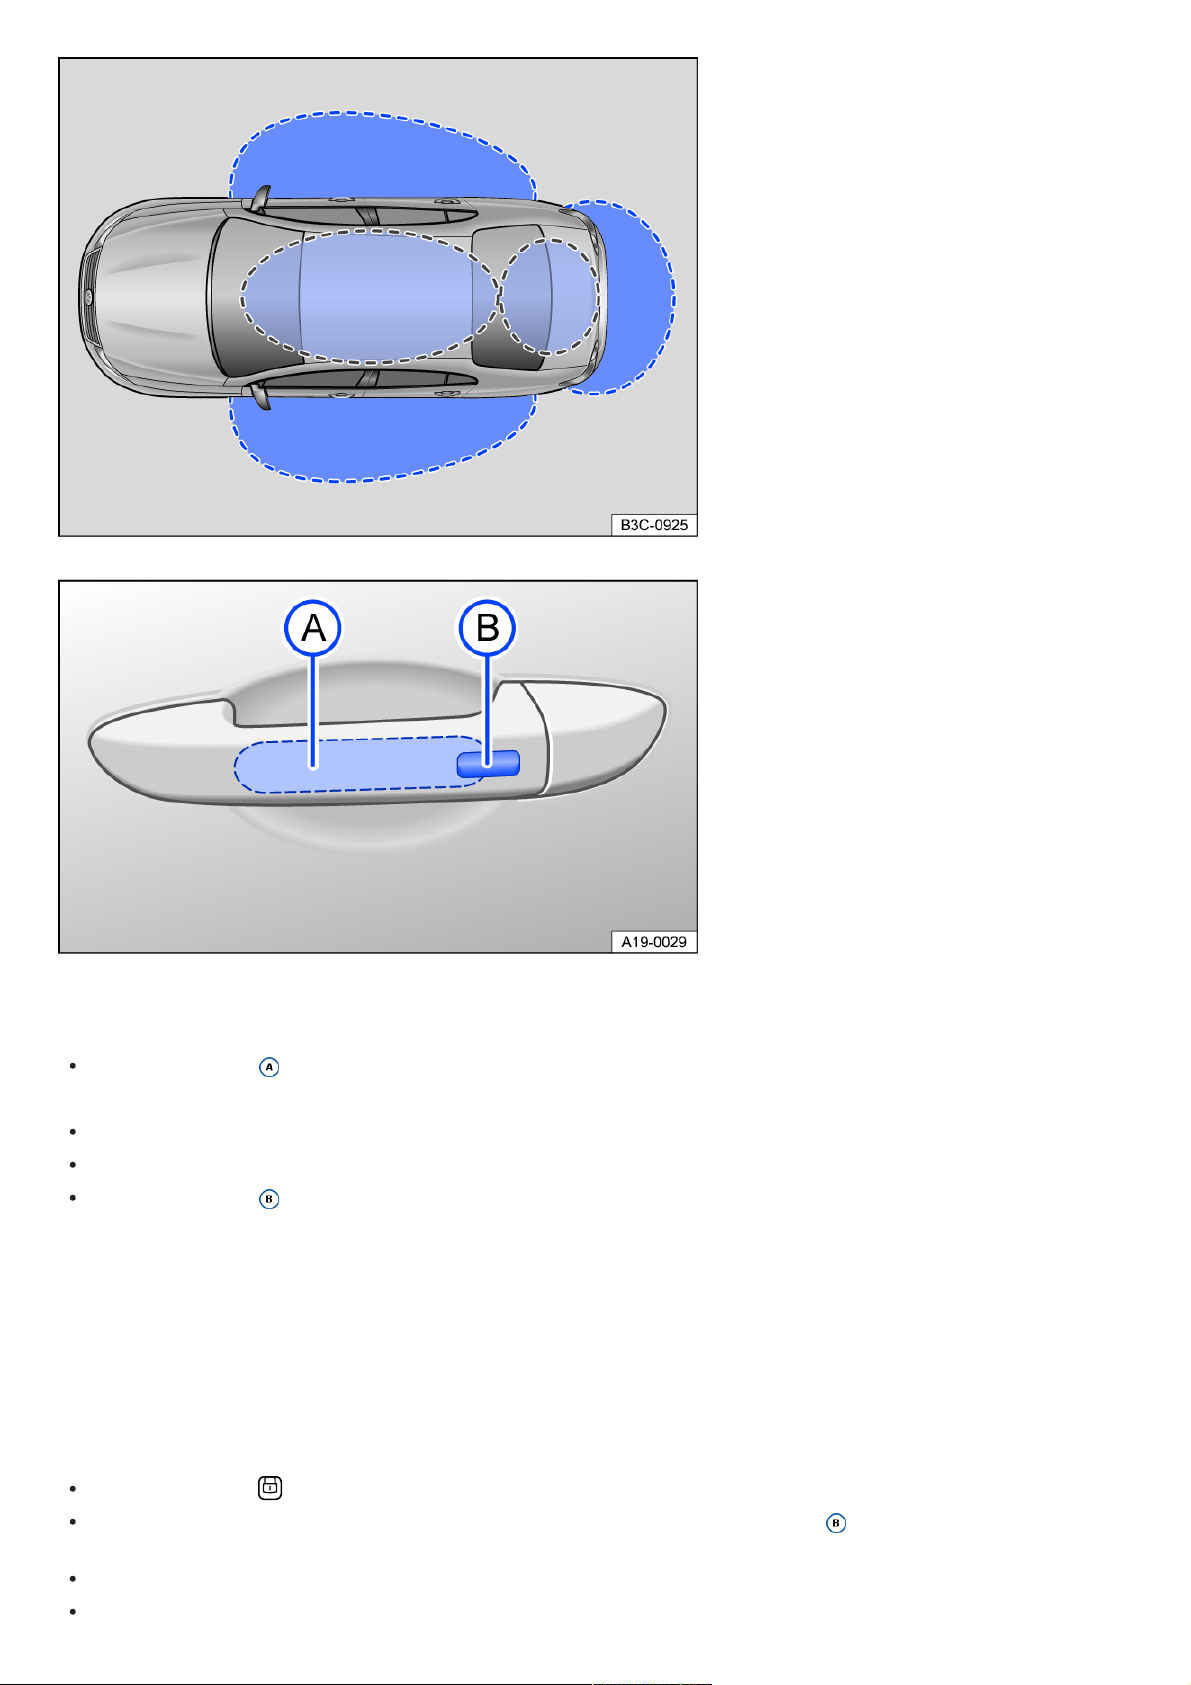
Fig.54KeylessAccess:sensorrange.
Fig.55Indoorhandle:sensors.
Unlockingandlockingthevehicle
Unlocking:
Touch the sensor fig. 55 on the inside of the door handle.
Locking:
Switch the ignition off.
Close the door.
Touch the sensor fig. 55 on the outside of the door handle.
The turn signals flash twice when unlocking and blink once when locking.
Unlockingandlockingthetrunklid
If the vehicle is locked and a vehicle key is within the trunk lid sensor range, the trunk lid will unlock automatically when opened fig. 54.
The trunk lid locks automatically after it closes.
The trunk lid will not lock automatically if the vehicle is completely unlocked.
DeactivatingKeylessAccesstemporarily
You can temporarily deactivate Keyless Access using the following steps to prevent the vehicle from being unlocked and started by unauthorized people:
Lock the vehicle with the button on the vehicle key.
Then, within 5 seconds of locking the vehicle, touch the sensor on the outside of the door handle once fig. 55 . Do not grasp the door handle during this
process.
Keyless Access is now temporarily deactivated.
Check if it is deactivated by waiting at least ten seconds and then pulling on the door handle. The door should not open.
72
Page 73

The next time the vehicle is unlocked, you must use the vehicle key. Keyless Access will be reactivated the next time the vehicle is unlocked.
Operatingconveniencefunctions
All of the power windows and the sunroof can close automatically.
Hold your finger on the driver's or front passenger’s door handle sensor fig. 55 for several seconds until the windows and power sunroof are closed.
The sensor functions can be adjusted in the Vehicle settings menu in the Infotainment system.
Theunlockfunctionisdeactivatedforseveralsecondssothatyoucancheckifthevehiclelockedcorrectly.
Thevehiclecanonlybelockedwhen P(Park)isengaged.
Ifthesensoristouchedtwice,theentirevehiclewillunlockevenafterasingledoorisunlocked.
Troubleshooting
IfKeylessAccessisnotworking
The sensor function may be impaired if the sensor is dirty.
Clean the sensors.
Ifallturnsignalsflashfourtimes
The vehicle key that was last used is still in the vehicle.
Remove the key and lock the vehicle.
Automaticsensordeactivation
The sensors will deactivate automatically under the following conditions:
If the vehicle is not unlocked or locked for a long period of time
If a sensor is triggered too frequently
Reactivating the sensor pads:
Unlock the vehicle using the button on the vehicle key.
NOTICE
Strong streams of water or vapor could activate the sensors in the door handles if a valid vehicle key is located near the vehicle. If at least one window is open
and the sensors in one door handle are permanently activated, then all windows will close. If the stream of water or vapor is removed briefly from the sensor in a
door handle and then redirected at the sensor, all of the windows may open ⇒ Introduction.
IfthemessageKeylessfaulty.appearsintheinstrumentclusterdisplay,theremaybeamalfunctionintheKeylessAccesssystem.Getprofessionalassistance.
Doorsandcentrallockingbutton
Introduction
The doors can be manually locked and in some cases unlocked, for example if the vehicle key or the central locking system is malfunctioning.
The central locking system allows you to unlock and lock all doors, the trunk lid, and the fuel filler flap from one location.
The vehicle can be locked when the ignition has been switched off or if the driver has exited the vehicle when the engine is stopped.
An image in the instrument cluster display indicates if one or more doors have not opened or closed correctly. Do not continue driving! Open the respective
door and close it again.
The image is also displayed when the ignition is switched off, and it turns off several seconds after the doors are closed and the vehicle has been locked.
WARNING
If a door is not closed correctly, it can open suddenly while driving and cause serious injuries.
Stop immediately and close the door.
When closing the door, make sure it is securely and completely latched. When closed, the door must be flush with the areas of the vehicle body that are
around the door.
Do not open or close the doors if anyone is in the way.
WARNING
73
Page 74

When the door is being held open by the door arrester, it may close by itself in high winds or on inclines, which can cause injuries.
Always hold the door handle firmly when opening and closing the door.
WARNING
The area within the range of motion for the doors and trunk lid can be dangerous and there is the potential for injuries.
Do not open or close the doors and trunk lid if anyone is in the way.
WARNING
Locking the doors carelessly can cause serious injuries.
When the vehicle is locked from the outside, the doors and power windows cannot be opened from the inside.
The central locking system locks all the doors. When the vehicle is locked from the inside, it reduces the risk of opening the doors unintentionally and of
unauthorized people entering the vehicle. In case of an emergency or an accident, locked doors can make it more difficult for first responders to access
the vehicle interior to help the passengers.
Never leave children or people requiring assistance unattended in the vehicle. All doors can be locked from the inside using the central locking button.
This can result in locking yourself inside the vehicle. Individuals locked in the vehicle could be exposed to very high or very low temperatures.
Depending on the season, the temperature inside the vehicle could become very high or low, which can lead to serious injuries, illness or death,
especially for very young children.
Never leave anyone in a locked vehicle. In an emergency, these people may not be able to exit the vehicle without assistance or help themselves.
NOTICE
When using the emergency locking or unlocking feature, remove and reinstall the affected parts carefully and correctly to reduce the risk of vehicle damage.
Somesettingscanbesavedinthedriverpersonalizationuserprofiles.
Indicatorlightinthedriver'sdoor
PleasereadtheintroductoryinformationandheedtheWarningsandNotice
⇒
and
Introduction
.
The indicator light for the central locking system is located in the driver's door.
Vehicle is locked: the red LED flashes quickly for approximately two seconds, and then flashes more slowly after that. The indicator light does not flash if the vehicle
was locked using the central locking button in the driver's door ⇒ Central locking button.
Automaticlockingandunlocking
PleasereadtheintroductoryinformationandheedtheWarningsandNotice
⇒
and
Introduction
.
Depending on how your vehicle is equipped, settings for the central locking can be configured in the Vehicle settings menu in the Infotainment system.
Automaticlocking(AutoLock)
The vehicle locks automatically at speeds of about 9 mph (15 km/h) or higher. If the vehicle is locked, the indicator light will turn yellow in the central locking
button.
Automaticunlocking(AutoUnlock)
If one of the following conditions apply, all doors and the trunk lid will unlock automatically:
If the vehicle is stationary and the vehicle key has been removed
Vehicles with an automatic transmission: If the parking lock P is engaged and the ignition is switched off.
OR: if the door handle has been pulled.
OR: if airbags have deployed during a collision ⇒ Troubleshooting.
TheAutoUnlockfunctionmakesitpossibleforfirstresponderstoaccesstheinsideofthevehicle.
DependingonthecentrallockingsystemsettingintheInfotainmentsystem,itmayonlybepossibletounlockallofthedoorsandthetrunklidafterthe
buttonispressedtwice.
Centrallockingbutton
PleasereadtheintroductoryinformationandheedtheWarningsandNotice
⇒
and
Introduction
.
74
Page 75
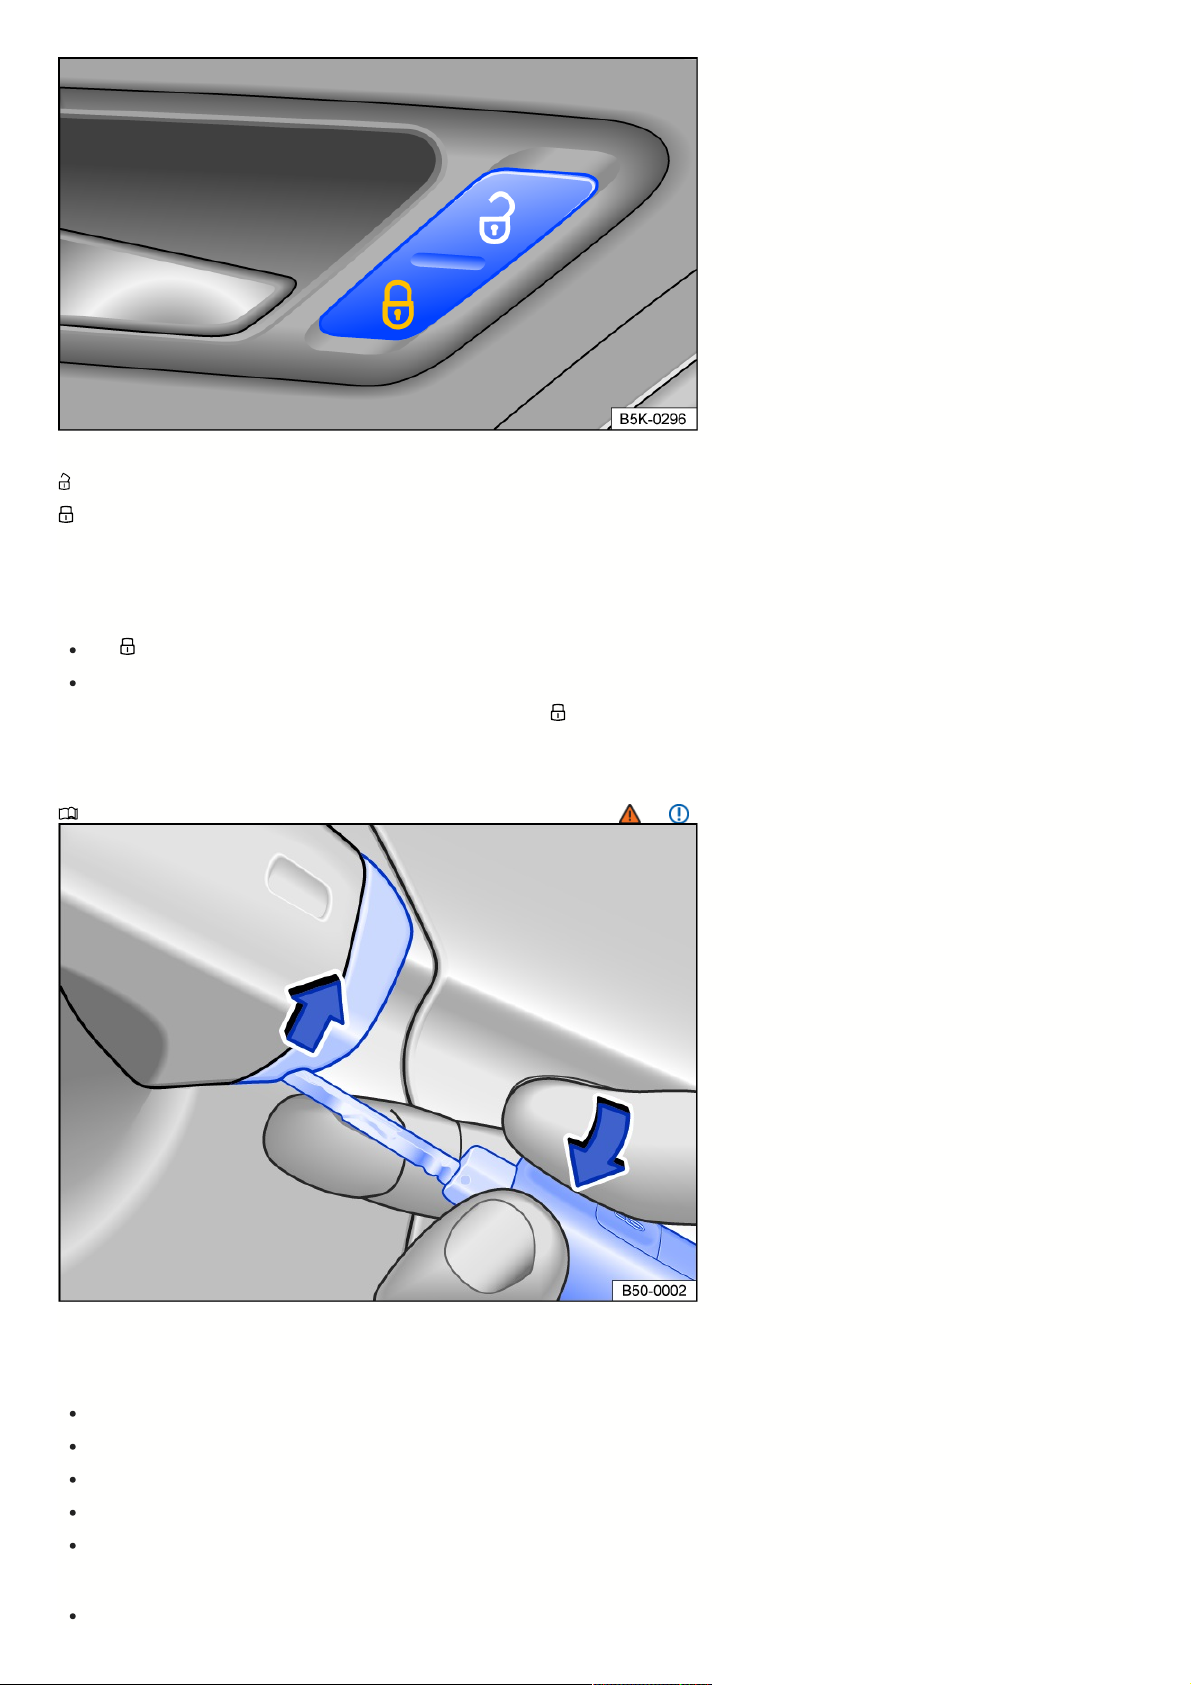
Fig.56Inthedriver'sdoor:centrallockingbutton.
– Unlock the vehicle.
– Lock the vehicle.
The central locking button functions both when the ignition is on or off, but only when all the doors are closed.
If the vehicle is locked from the outside using the vehicle key, the central locking buttons will be disabled.
If the vehicle is locked from the inside using the central locking button, then:
The indicator light in the button will turn yellow if all doors are closed and locked.
The anti-theft alarm system will not be activated ⇒ Anti-theft alarm system.
The doors can be opened from the inside by pulling the door handle. The indicator light in the button will turn off. The unopened doors and the trunk lid will
remain locked and cannot be opened from the outside.
Openingandclosingthedriver'sdoorinanemergency
PleasereadtheintroductoryinformationandheedtheWarningsandNotice
⇒
and
Introduction
.
Fig.57Driver’sdoorhandle:pryingoffthecap.
Generally, all doors will lock when locking manually. Only the driver door will unlock when unlocking manually. Note the information about the anti-theft alarm
system ⇒ Anti-theft alarm system.
Position the key bit or emergency key on the notch in the driver door handle from below.
Hold your index finger under the key bit.
Use the vehicle key to pry the cap off in the direction of the arrow fig. 57.
Insert the key bit in the lock cylinder and unlock or lock the vehicle.
Pull on the door handle and reinstall the cap.
Specialcircumstancestonotewhenunlockingmanually
An alarm is triggered when the driver's door is opened ⇒ Anti-theft alarm system.
75
Page 76
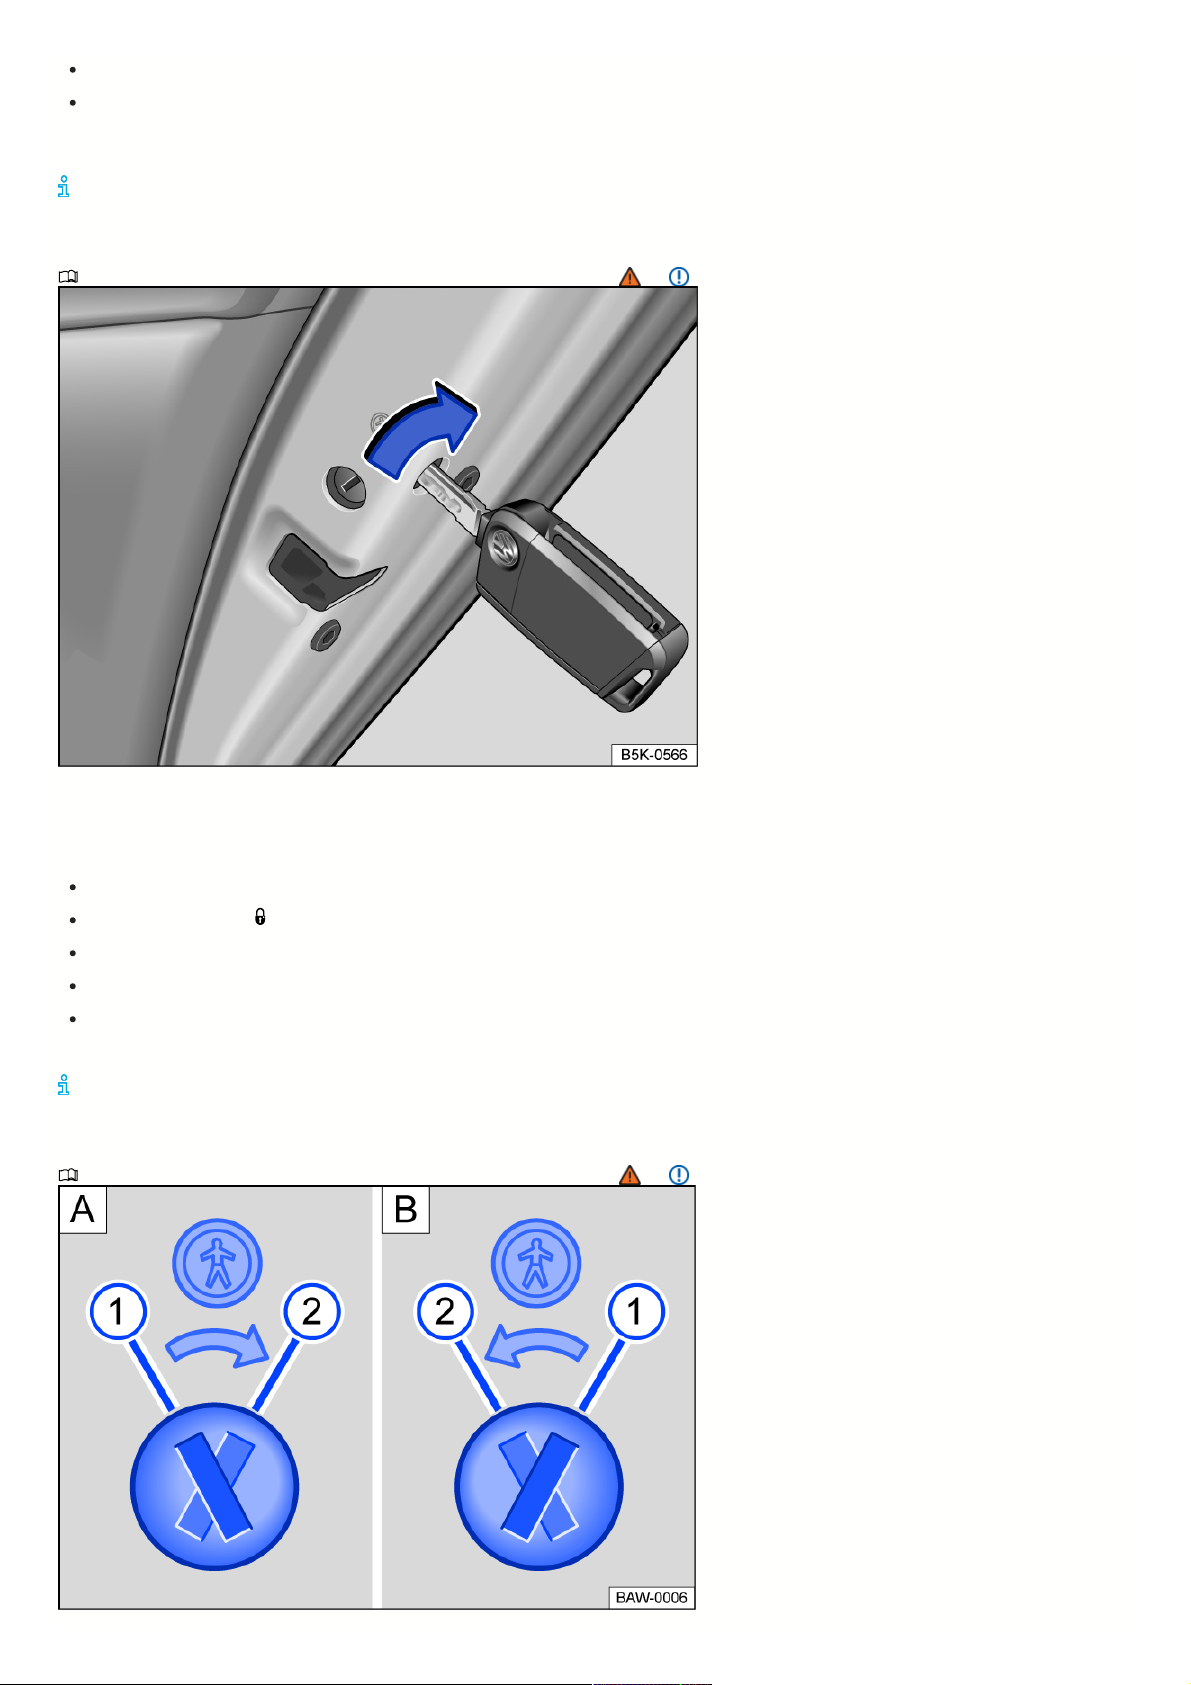
An emergency start must be performed after unlocking ⇒ Starting and stopping the engine .
Switch the ignition on to turn off the alarm.
The electronic immobilizer will detect a valid vehicle key.
Theanti-theftalarmsystemisnotactivatedwhenthevehicleismanuallylockedusingthekeybit
⇒Anti-theftalarmsystem
.
Lockingthefrontpassengerdoorandreardoorsinanemergency
PleasereadtheintroductoryinformationandheedtheWarningsandNotice
⇒
and
Introduction
.
Fig.58Onthefrontoftherightreardoor:manuallylockingthevehiclewiththevehiclekey.
The front passenger door and the rear doors can each be locked manually.
The anti-theft alarm system is not activated when this happens ⇒ Anti-theft alarm system.
Open the door.
Remove the rubber seal in the front of the door.
Insert the key bit or emergency key into the slot and turn it fig. 58.
Reattach the rubber seal.
Check if the door is locked.
If a door is locked manually, it will unlock again when the vehicle is unlocked or if that door is opened from the inside.
Doorscanbeunlockedandopenedfromtheinsidebypullingthedoorhandle.
Childsafetylock
PleasereadtheintroductoryinformationandheedtheWarningsandNotice
⇒
and
Introduction
.
76
Page 77

Fig.59Childsafetylock: leftreardoor, rightreardoor.
Child safety lock is switched off.
Child safety lock is switched on.
The child safety lock reduces the risk of the rear doors being opened from the inside.
When the child safety lock is switched on, the door can only be opened from the outside.
Switchingthechildsafetylockonoroff
Unlock the vehicle the open the respective rear door.
Bring the slot into the corresponding position.
WARNING
When the child safety lock is switched on, that door cannot be opened from the inside.
Never leave children or people requiring assistance unattended in the vehicle when the doors are locked. Otherwise, they could become locked inside the
vehicle. In case of an emergency, these individuals would not be able to leave the vehicle without assistance or care for themselves. Individuals locked in
the vehicle could be exposed to very high or very low temperatures.
Depending on the season, the temperature inside the vehicle could become very high or low, which can lead to serious injuries, illness or death,
especially for very young children.
Troubleshooting
PleasereadtheintroductoryinformationandheedtheWarningsandNotice
⇒
and
Introduction
.
Iftheindicatorlightdoesnotturnoff
The red LED in the vehicle door flashes briefly and then stays on.
There is a malfunction in the locking system.
Get professional assistance. Volkswagen recommends contacting an authorized Volkswagen dealer or authorized Volkswagen Service Facility.
Iftheturnsignalsarenotflashing
If the turn signals are not flashing as confirmation when locking the vehicle:
At least one of the doors or the trunk lid is not closed or
The hood is not closed
Ifthevehicleislockingautomatically
The vehicle will lock again automatically after approximately 45 seconds if one of the following conditions apply:
The vehicle was unlocked, but not opened
The ignition was not switched on
The trunk lid was not opened.
Lockingwithasecondvehiclekey
Keyless Access: The vehicle key inside the vehicle will be blocked from starting the engine if the vehicle is locked from the outside with a different vehicle key.
However, an emergency start is possible ⇒ Troubleshooting. Press the button on the vehicle key inside the vehicle to enable it so that it can be used to start the
engine normally ⇒ Starting the engine.
Lockingthevehicleafteranairbagdeploys
The entire vehicle unlocks when an airbag deploys in a collision. Depending on the severity of the damage, it may be possible to lock the vehicle as follows after the
collision:
Switch the ignition off.
Open the driver door and shut it again.
Lock the vehicle.
Automaticsensordeactivation
The sensors will deactivate automatically under the following conditions:
If the vehicle is not unlocked or locked for a long period of time
If a sensor is triggered too frequently
Reactivating the sensor pads:
77
Page 78

Unlock the vehicle using the button on the vehicle key.
NOTICE
Strong streams of water or vapor could activate the sensors in the door handles if a valid vehicle key is located near the vehicle. If at least one window is open
and the sensors in one door handle are permanently activated, then all windows will close ⇒ Introduction.
ItmaynotbepossibletounlockorlockthevehicleusingKeylessAccessifthe12Vvehiclebatteryorbuttoncellbatteryinthevehicleisweakordrained.The
vehiclecanbemanuallyunlockedorlocked
⇒ Introduction
.
Ifthereisnovalidvehiclekeyinthevehicleoroneisnotdetected,amessagewillappearintheinstrumentclusterdisplay.Thiscanoccurifanothersignal
interfereswiththeremotecontrolvehiclekeyoriftheremotecontrolvehiclekeyiscoveredbyanobject,suchasametalcase
⇒Startingandstoppingthe
engine
.
Anti-theftalarmsystem
The vehicle may be equipped with an anti-theft alarm system.
The anti-theft alarm system monitors the doors, the hood, and the trunk lid.
The anti-theft alarm system is automatically activated when you lock the vehicle.
If the vehicle is opened without using the valid vehicle key, then the anti-theft alarm system will go on and emit audible and visual warning signals for up to 5
minutes.
Whenisthealarmtriggered?
If a door that was unlocked manually using the vehicle key is opened.
If the hood is opened.
If the trunk lid is opened.
If the ignition is switched on with an invalid vehicle key.
Switchingoffthealarm
Unlock the vehicle with the unlock button on the vehicle key.
OR: switch on the ignition using a valid vehicle key. This may cause the alarm to sound briefly for approximately one second.
In vehicles with Keyless Access: grasp the door handle ⇒ Keyless Access.
Theanti-theftalarmsystemwillnotworkcorrectlyifthe12Vvehiclebatteryisweakordrained.
Trunklid
Introduction
The trunk lid is unlocked and locked together with the doors.
On vehicles with Keyless Access, the trunk lid is automatically unlocked when opening ⇒ Keyless Access.
If individual door opening or the opening of one side of doors is activated in the Infotainment system settings for opening and closing, you must press the button
on the remote control vehicle key twice to unlock the trunk lid.
On vehicles with Keyless Access you must press the sensor on the inside of the driver's or front passenger's door handle twice to do this.
WARNING
Uncontrolled or unintentional release: opening and closing the trunk lid can cause accidents and serious injuries.
Do not open or close the trunk lid if anyone is in the way.
After closing the trunk lid, check if it has closed correctly. When closed, the trunk lid must be flush with the areas of the vehicle body that are around the
door.
Always keep the trunk lid closed while driving.
Never open the trunk lid when cargo is secured on it, such as bicycles. Additional weight can cause the trunk lid to begin closing by itself. If necessary,
support the trunk lid or remove the weight beforehand.
Close and lock the trunk lid and all doors when the vehicle is not in use. Make sure that no one remains in the vehicle.
Never let children play in or on the vehicle unattended, especially when the trunk lid is open. Children could enter the luggage compartment, close the lid,
and then lock themselves in. Depending on the season, the temperature inside the vehicle could become very high or low, which can lead to serious
injuries, illness or death, especially for very young children.
78
Page 79
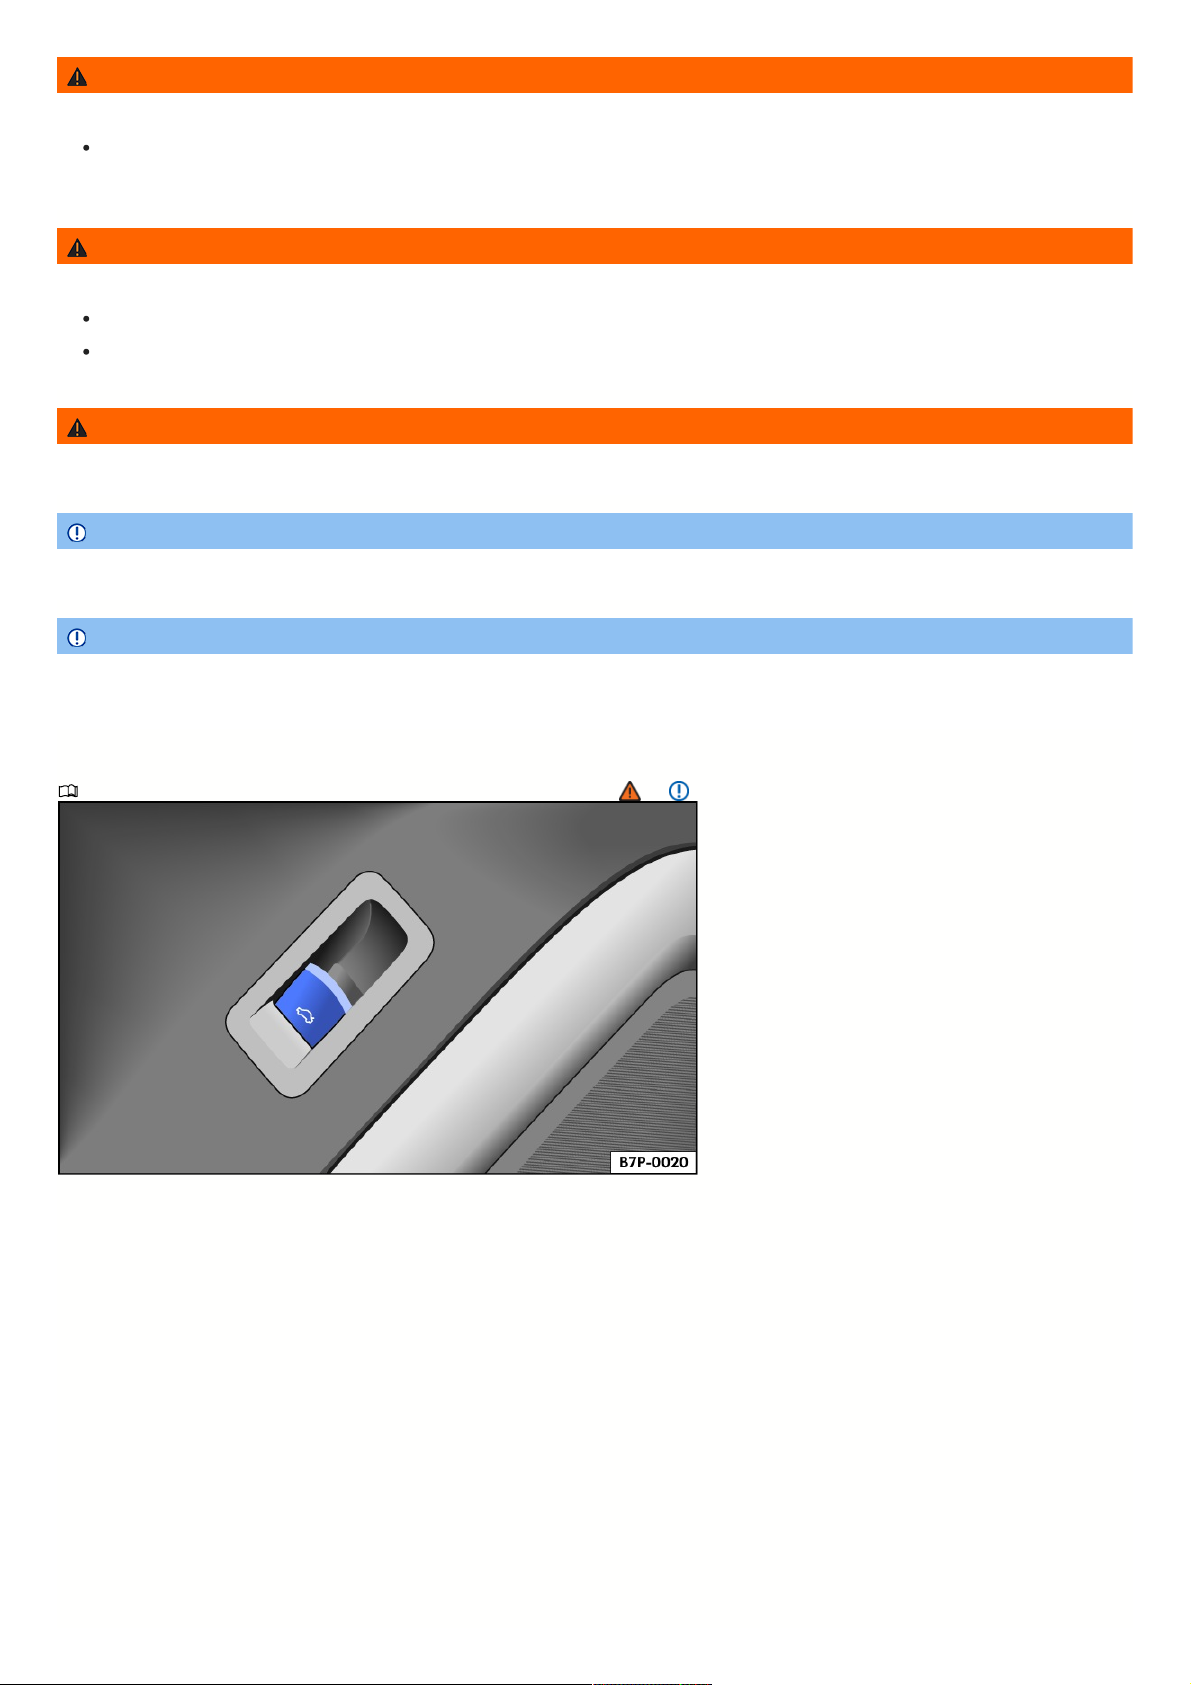
WARNING
Unlocking or opening the trunk lid incorrectly or carelessly may lead to serious injuries.
The vehicle may not always detect when the trunk lid is not latched if a cargo rack that is carrying cargo is mounted on the trunk lid. If the trunk lid is not
latched, it may open suddenly while driving.
WARNING
If there is a heavy load of snow or cargo on the trunk lid, the additional weight may cause the lid to lower, which can result in serious injuries.
Never open the trunk lid if there is a heavy load of snow or cargo such as a cargo rack on it.
Remove the snow or cargo before opening the trunk lid.
WARNING
Do not press on the rear window of the trunk lid with your hand. The rear window could crack, which can result in injuries.
NOTICE
Never attach or secure cargo on the opening mechanisms. This could cause damage that could prevent the trunk lid from closing.
NOTICE
Never use the rear window wiper or rear spoiler to attach or secure cargo. This could cause damage that may result in the rear window wiper or rear spoiler
detaching from the vehicle.
Openingandclosingthetrunklid
PleasereadtheintroductoryinformationandheedtheWarningsandNotice
⇒
and
Introduction
.
Fig.60Inthedriver'sdoor:unlockbuttonforthetrunklid.
79
Page 80
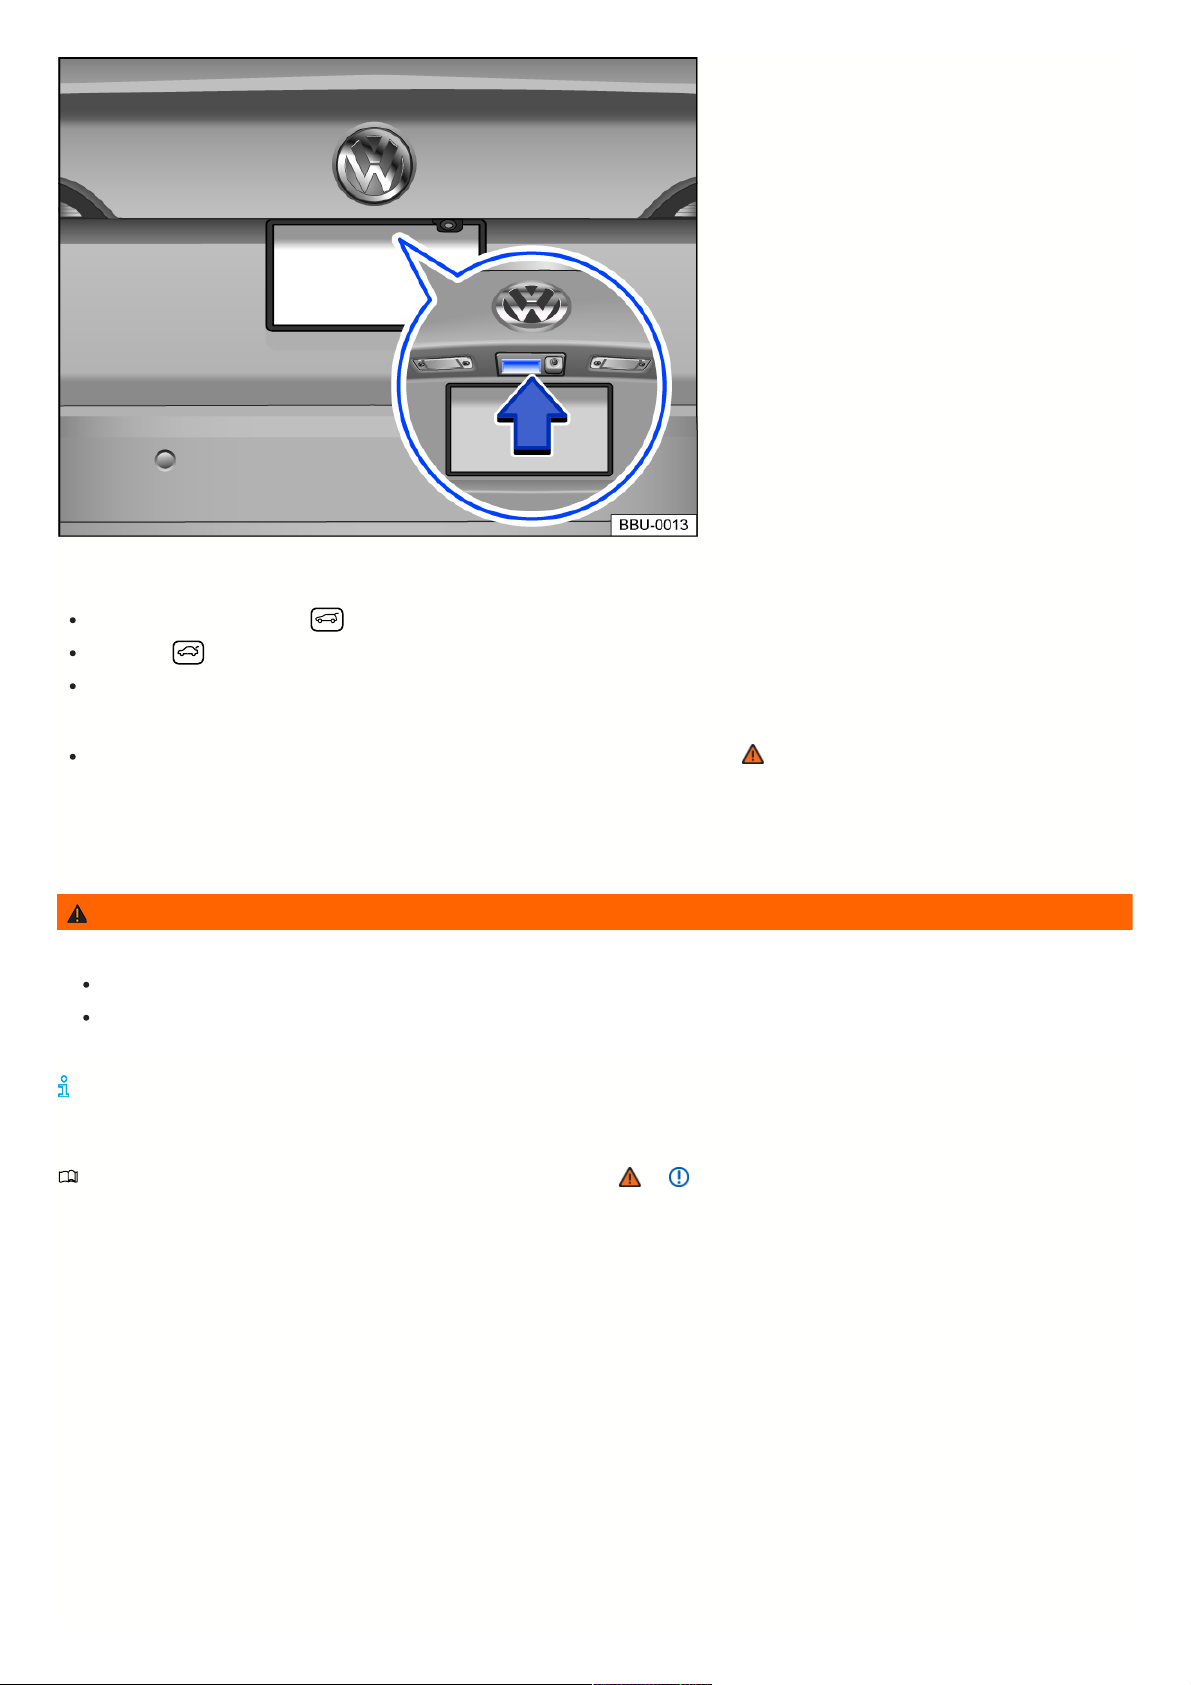
Fig.61Inthetrunklid:buttontoopenthetrunklid.
Openingthetrunklid
To unlock the trunk lid, press the button on the vehicle key.
OR: pull the switch in the driver's door upward fig. 60.
Raise the trunk lid using the button fig. 61 and pull all the way up.
Closingthetrunklid
Pull the trunk lid downward firmly using the handle in the interior trim panel until it latches shut ⇒ .
The trunk lid will also lock when the doors are locked.
An image in the instrument cluster display indicates if the trunk lid has not opened or closed correctly.
The trunk lid locks automatically while driving.
WARNING
Closing the trunk lid incorrectly or carelessly may lead to serious injuries.
When closing the trunk lid, make sure your hands are not within the closing range of the lid.
When opening the trunk lid, take care to pull it all the way up.
Ifthetrunklidisnotopenedwithinseveralminutesafterunlocking,itwilllockagainautomatically.
Mechanicallyunlockingthetrunklidusingtheemergencyrelease
PleasereadtheintroductoryinformationandheedtheWarningsandNotice
⇒
and
Introduction
.
80
Page 81
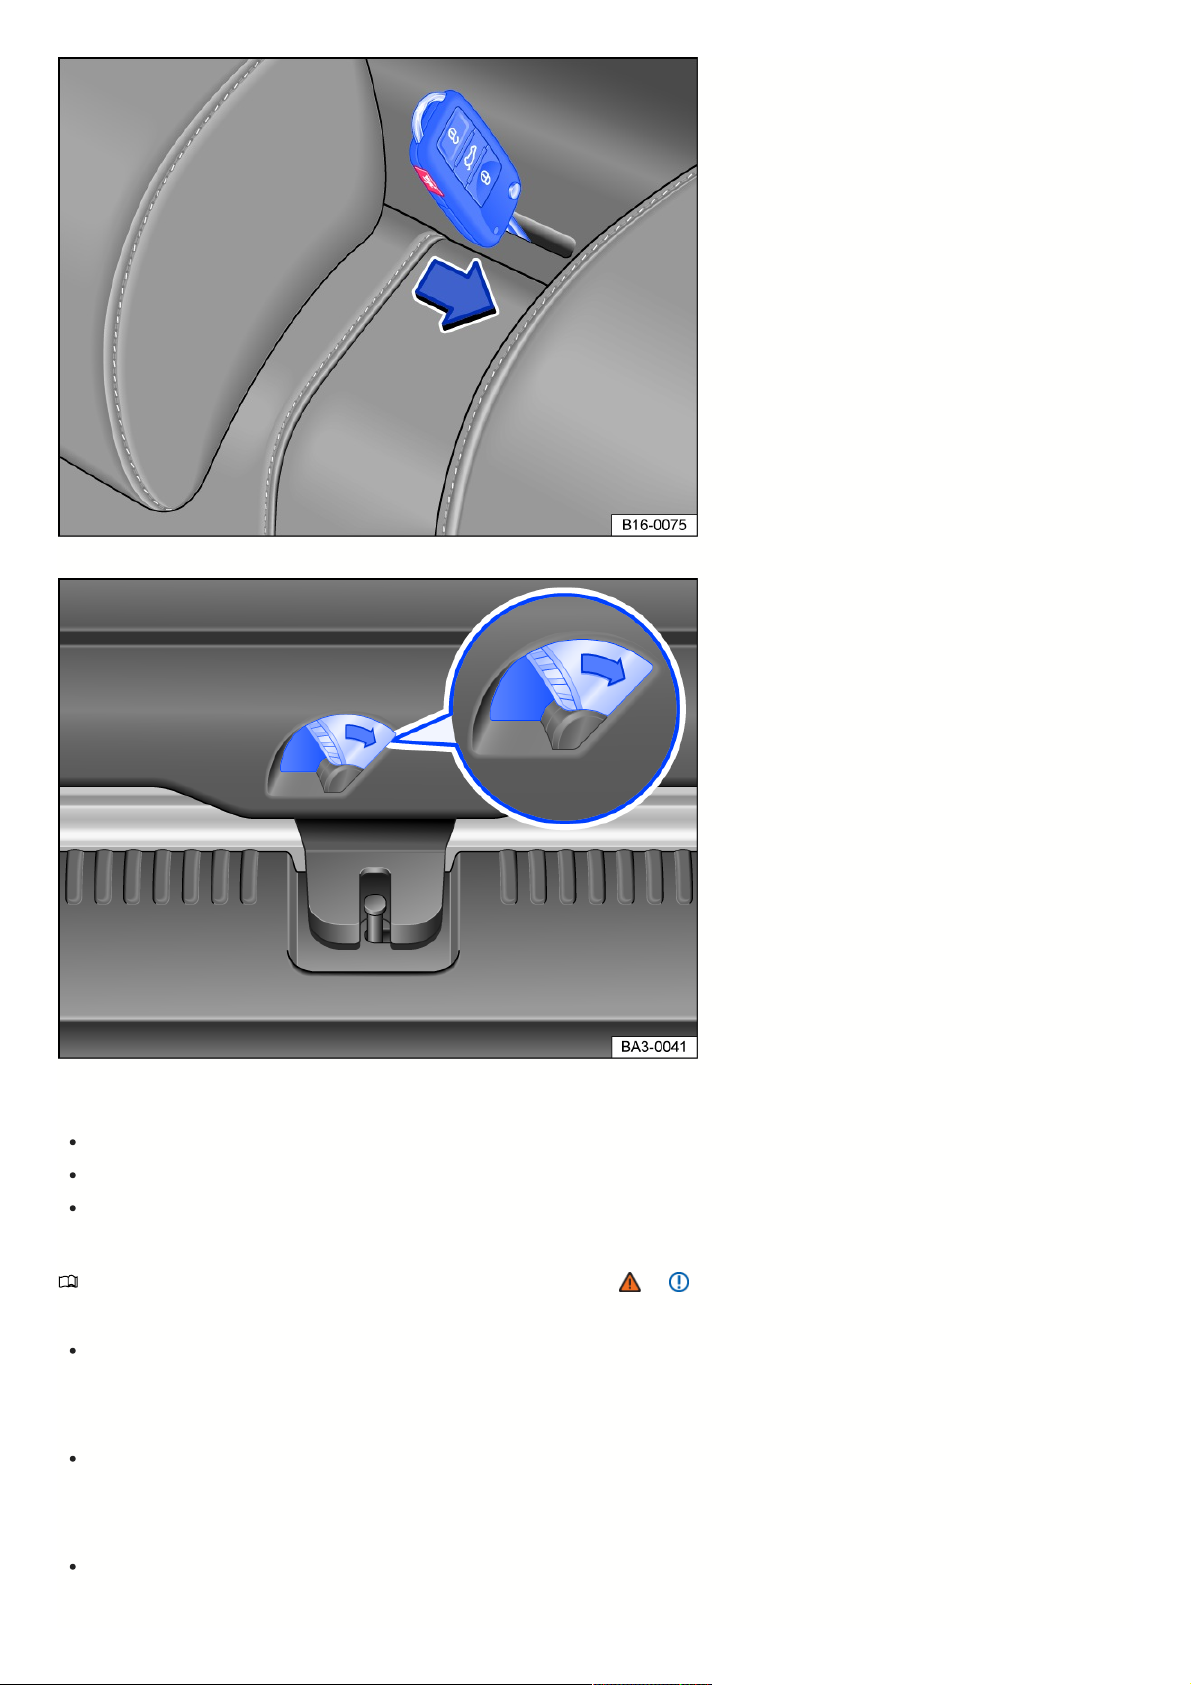
Fig.62Behindtherearseatbackrest:mechanicallyunlockingtherearseatbackrestusingtheemergencyrelease.
Fig.63Intheluggagecompartment:mechanicallyunlockingthetrunklidusingtheemergencyrelease.
Mechanicallyunlockingthetrunklidusingtheemergencyrelease
Insert the vehicle key in the slot fig. 62 to unlock the rear seat backrest and press in the direction of the arrow.
Fold the rear seat backrest forward.
Push the lever fig. 63 in the direction of the arrow and open the trunk lid.
Troubleshooting
PleasereadtheintroductoryinformationandheedtheWarningsandNotice
⇒
and
Introduction
.
Ifthetrunklidwillnotopenorclose
Check if the trunk lid is being blocked by an object. The trunk lid can be moved by hand. It is necessary to use more force when doing this.
Ifallturnsignalsflashfourtimes
The vehicle key that was last used is still in the vehicle.
Remove the key and lock the vehicle.
Ifthetrunklidisdifficulttomove
The mechanism for opening the trunk lid may not always work automatically when the outside temperatures are around the freezing point.
Guide the trunk lid farther upward by hand.
TheEasyOpensensorfunctionisnotworking
81
Page 82

Easy Open only works when the ignition is switched off.
Clean the sensors in the rear bumper.
Easy Open may be deactivated in heavy precipitation to reduce the risk of false activation.
Windows
Openingandclosingthewindows
The switches are located in the doors ⇒ Driver door .
Opening the window: press the switch. Closing the window: pull the switch.
Press to disable the power window switches in the rear doors.
The windows can still be opened or closed using the switches in the doors for a brief period after the ignition has been switched off, as long as the driver’s or front
passenger’s door is not opened.
One-touchup/downfeature
The one-touch up/down feature allows the windows to be completely opened or closed. To use this feature, do not hold the window switch up or down.
Automatic closing: pull the window switch upward briefly to the second level.
Automatic opening: press the window switch downward briefly to the second level.
Stopping the automatic closing/opening: pull or press the switch for that window again.
Convenienceopeningandclosing
The windows can be opened and closed from outside the vehicle using the vehicle key when the ignition is switched off.
Press and hold the unlock or lock button on the vehicle key.
On vehicles with Keyless Access with push-button start: hold your finger on the unlock sensor in the door handle for several seconds until the windows are
closed ⇒ Keyless Access. The vehicle key must be nearby to use this feature.
To stop the function, release the unlock or lock button, OR remove your finger from the sensor.
A valid vehicle key must be located nearby to use this feature. When all of the windows are closed, the turn signals will flash once as a confirmation.
The power sunroof is also closed in this case.
It is also possible to open and close the windows using the power window control button in the driver door once the driver door has been opened.
You can select the convenience opening settings in the Vehicle settings menu in the Infotainment system.
WARNING
Careless or unintended use of the power windows can cause serious injuries.
Do not open or close the power windows if anyone is in the way.
Never leave children or people requiring assistance unattended in the vehicle when the vehicle is locked. The windows cannot open in an emergency
situation.
Always take all vehicle keys with you when leaving the vehicle. The windows can still be opened or closed using the switches in the doors for a brief
period after the ignition has been switched off, as long as the driver’s or front passenger’s door is not opened.
When driving with children seated on the rear bench seat, always disable the rear power windows by pressing the child safety lock button so that the
windows cannot be opened or closed.
NOTICE
If the windows are open, rain could enter the vehicle and soak the interior, causing vehicle damage.
Ifthepowerwindowsaremalfunctioning,theone-touchup/downfeatureandthepinchprotectionmaynotfunctioncorrectly.Getprofessionalassistance.
Convenienceopeningandclosingonlyfunctionsiftheone-touchup/downfunctionisactivatedforallthepowerwindows.
Powerwindowpinchprotection
The power window pinch protection can reduce the risk of being pinched and injured when the windows are closing.
If the window cannot close due to resistance or an obstacle, then the window will reopen immediately ⇒ .
Check why the window did not close.
Try again to close the window.
82
Page 83
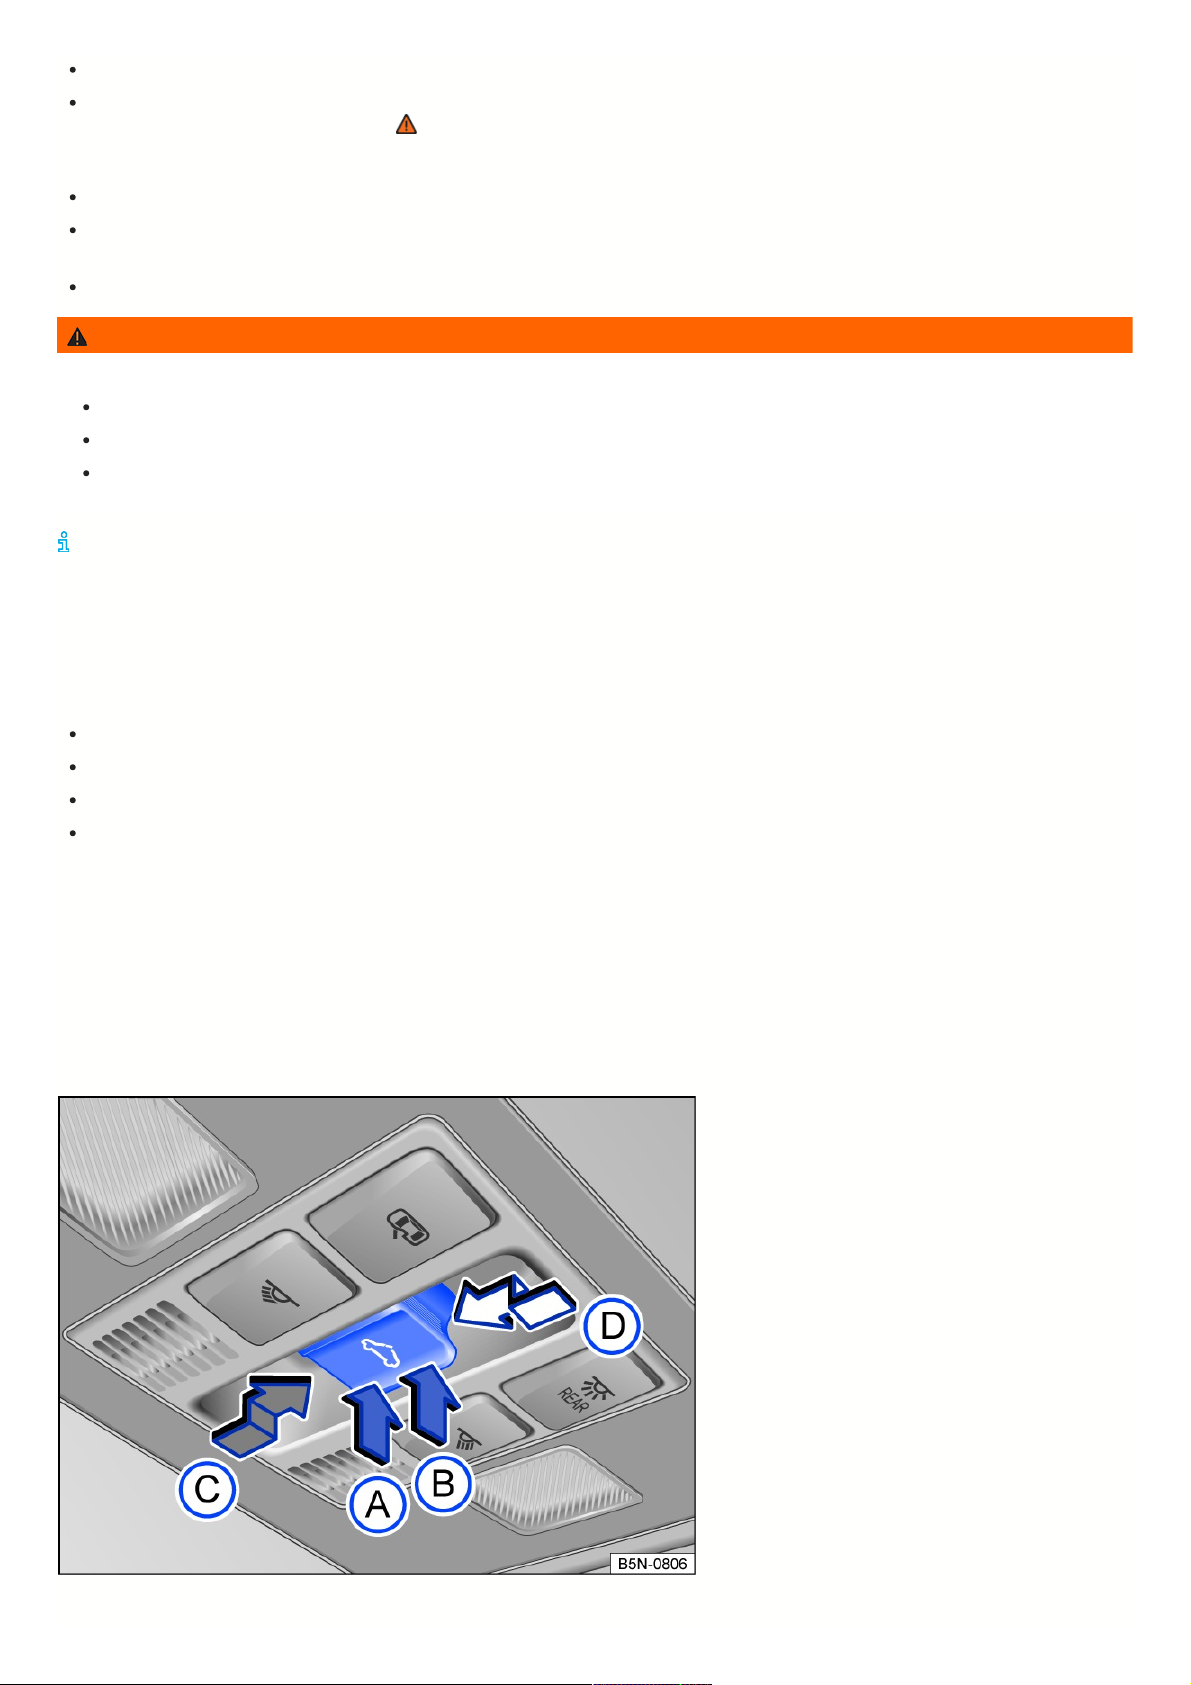
If the window will not close again, then the pinch protection will be disabled for several seconds.
If the window still cannot close, then the window will stop at the place where it meets resistance. If you press the switch again within several seconds, the
window will close without pinch protection⇒ .
Closingwindowswithoutpinchprotection
Try to close the windows again within a few seconds by holding the switch. This will disable the pinch protection.
If the closing process takes longer than several seconds, then pinch protection will be enabled again. If there is resistance to the window moving or an obstacle
is blocking the window, then the window will reopen automatically.
If the window still cannot close, then contact an authorized Volkswagen dealer or authorized Volkswagen Service Facility.
WARNING
Closing the window when pinch protection is disabled can result in serious injuries.
Always be careful when closing the windows.
Never allow anyone to be in the window operating area, especially if a window is closing when pinch protection is disabled.
The pinch protection does not prevent fingers or other parts of the body from becoming injured by being pressed against the window frame.
Pinchprotectionalsooccurswhenusingtheconvenienceclosingfunctionwiththevehiclekey.
Troubleshooting
One-touchup/downfeature
If the 12 V vehicle battery is disconnected or drained when the windows are not completely closed, then the one-touch up/down feature will not work. It must be
reprogrammed using the following steps:
Switch the ignition on.
Close all windows and doors.
Pull the switch for the desired window and hold it in that position for several seconds.
Release the switch, then pull it upward again and hold it. The one-touch up and down features will then be fully functional.
The automatic power windows can be reprogrammed individually, or multiple windows can be reprogrammed at the same time.
Controlsarerespondingdifferentlythanexpected
Moisture, dirt, grease, etc. may limit the functioning of the control. Make sure that the controls are always clean and dry.
Sunroof
Openingorclosingthesunroof
The term “sunroof” is used as a synonym for the panoramic sliding/tilting sunroof.
Fig.64Intheheadliner:sunroofbutton.
83
Page 84
The sunroof is a roof opening system consisting of two glass pieces. The rear glass piece is fixed and cannot be opened.
The sunshade automatically opens automatically with the sunroof when it is in front of the sunroof. The sunshade can be completely closed only if the sunroof is
closed.
The button has two levels:
First level: tilt, open, or close the sunroof completely or partially.
Second level: automatically open or close the sunroof completely.
You can stop the automatic process by pressing the button again.
Tilting,opening,andclosingthesunroof
To tilt the tilting and sliding panoramic sunroof:
Manual process: Press the fig. 64 button to the first level.
Automatic process: Press the button to the second level.
To close the tilting and sliding panoramic sunroof when tilted:
Manual process: Press the button to the first level.
Automatic process: Press the button to the second level.
To open the tilting and sliding panoramic sunroof:
Manual process: Press the button to the first level.
Automatic process up to comfort position: Press the button to the second level.
To close the tilting and sliding panoramic sunroof:
Manual process: Press the button to the first level.
Automatic process: Press the button to the second level.
To stop the automatic opening or closing process:
Press the or button again.
WARNING
Careless or inattentive use of the sunroof can cause serious injuries.
Do not open or close the sunroof if anyone is in the way.
Always take all vehicle keys with you when leaving the vehicle.
Never leave children or people requiring assistance unattended in the vehicle, especially if they have access to the vehicle key. Inattentive use of the
vehicle key can lock the vehicle, start the engine, switch the ignition on, or operate the sunroof.
The sunroof can still be opened or closed for a brief period after the ignition has been switched off, as long as the driver’s or front passenger's door has
not been opened.
NOTICE
To reduce the risk of damage, remove ice and snow from the vehicle roof before opening or tilting it in winter weather.
Always close the sunroof before leaving the vehicle and when there is precipitation. If the sunroof is open or tilted, rain or snow could enter the vehicle
interior and cause extensive damage to the electrical system. This could also result in further vehicle damage.
Removeleavesandotherlooseobjectsfromthesunroofguiderailsregularly,eitherbyhandorwithavacuumcleaner.
Thepinchprotectionwillnotfunctioncorrectlyifthesunroofismalfunctioning.Getprofessionalassistance.
Convenienceopeningorclosingthesunroof
Convenienceopeningandclosing
The sunroof can be opened and closed from outside the vehicle using the vehicle key.
Does not apply to the US or Canada: Press and hold the unlock or lock button on the vehicle key. The sunroof will be tilted or closed.
Vehicles with Keyless Access with push-button start: Hold your finger on the unlock sensor in the door handle for several seconds until the tilting and sliding
panoramic sunroof is closed ⇒ Unlocking or locking using Keyless Access .
Remove your finger from the unlock or lock button to stop the function.
When using the convenience closing function, all windows in the doors and the sunroof will be closed. When all of the windows and the power sunroof are closed,
84
Page 85

the turn signals will flash once as a confirmation.
Settings for the sunroof can be adjusted in the vehicle settings in the Infotainment system ⇒ Vehicle settings menu.
Sunroofpinchprotection
The pinch protection reduces the risk of pinching injuries ⇒ . If the sunroof is obstructed while it is closing, it will open again automatically.
Check why the sunroof is not closing.
Try again to close the sunroof.
If the sunroof is still not able to close, close the sunroof without pinch protection.
Closingthesunroofwithoutpinchprotection
Press the button to the second level until the sunroof is completely closed ⇒ Opening or closing the sunroof .
This will close the sunroof without pinch protection.
If the sunroof is still not able to close, contact an authorized Volkswagen dealer or authorized Volkswagen Service Facility.
If you release the switch during the closing process, then the sunroof will open again automatically.
WARNING
Closing the sunroof without pinch protection may result in serious injuries.
Always be careful when closing the sunroof.
Never allow anyone to be within the sunroof range of operation, especially if it is closing without pinch protection.
The pinch protection does not prevent fingers or other parts of the body from becoming injured by being pressed against the roof frame.
Pinchprotectionalsooccurswhenconvenienceclosingthewindowsandsunroofwiththevehiclekey.
Troubleshooting
Ifthesunroofisnotclosing
The sunroof only works when the ignition is on. The sunroof can still be opened or closed for a brief period after the ignition has been switched off, as long as
the driver’s or front passenger's door has not been opened.
If it is not possible to close the sunroof using the power controls, the sunroof must be closed manually. Some vehicle components must be removed in order to
close the sunroof manually. Get professional assistance.
Controlsarerespondingdifferentlythanexpected
Moisture, dirt, grease, etc. may limit the functioning of the control. Make sure that the controls are always clean and dry.
85
Page 86
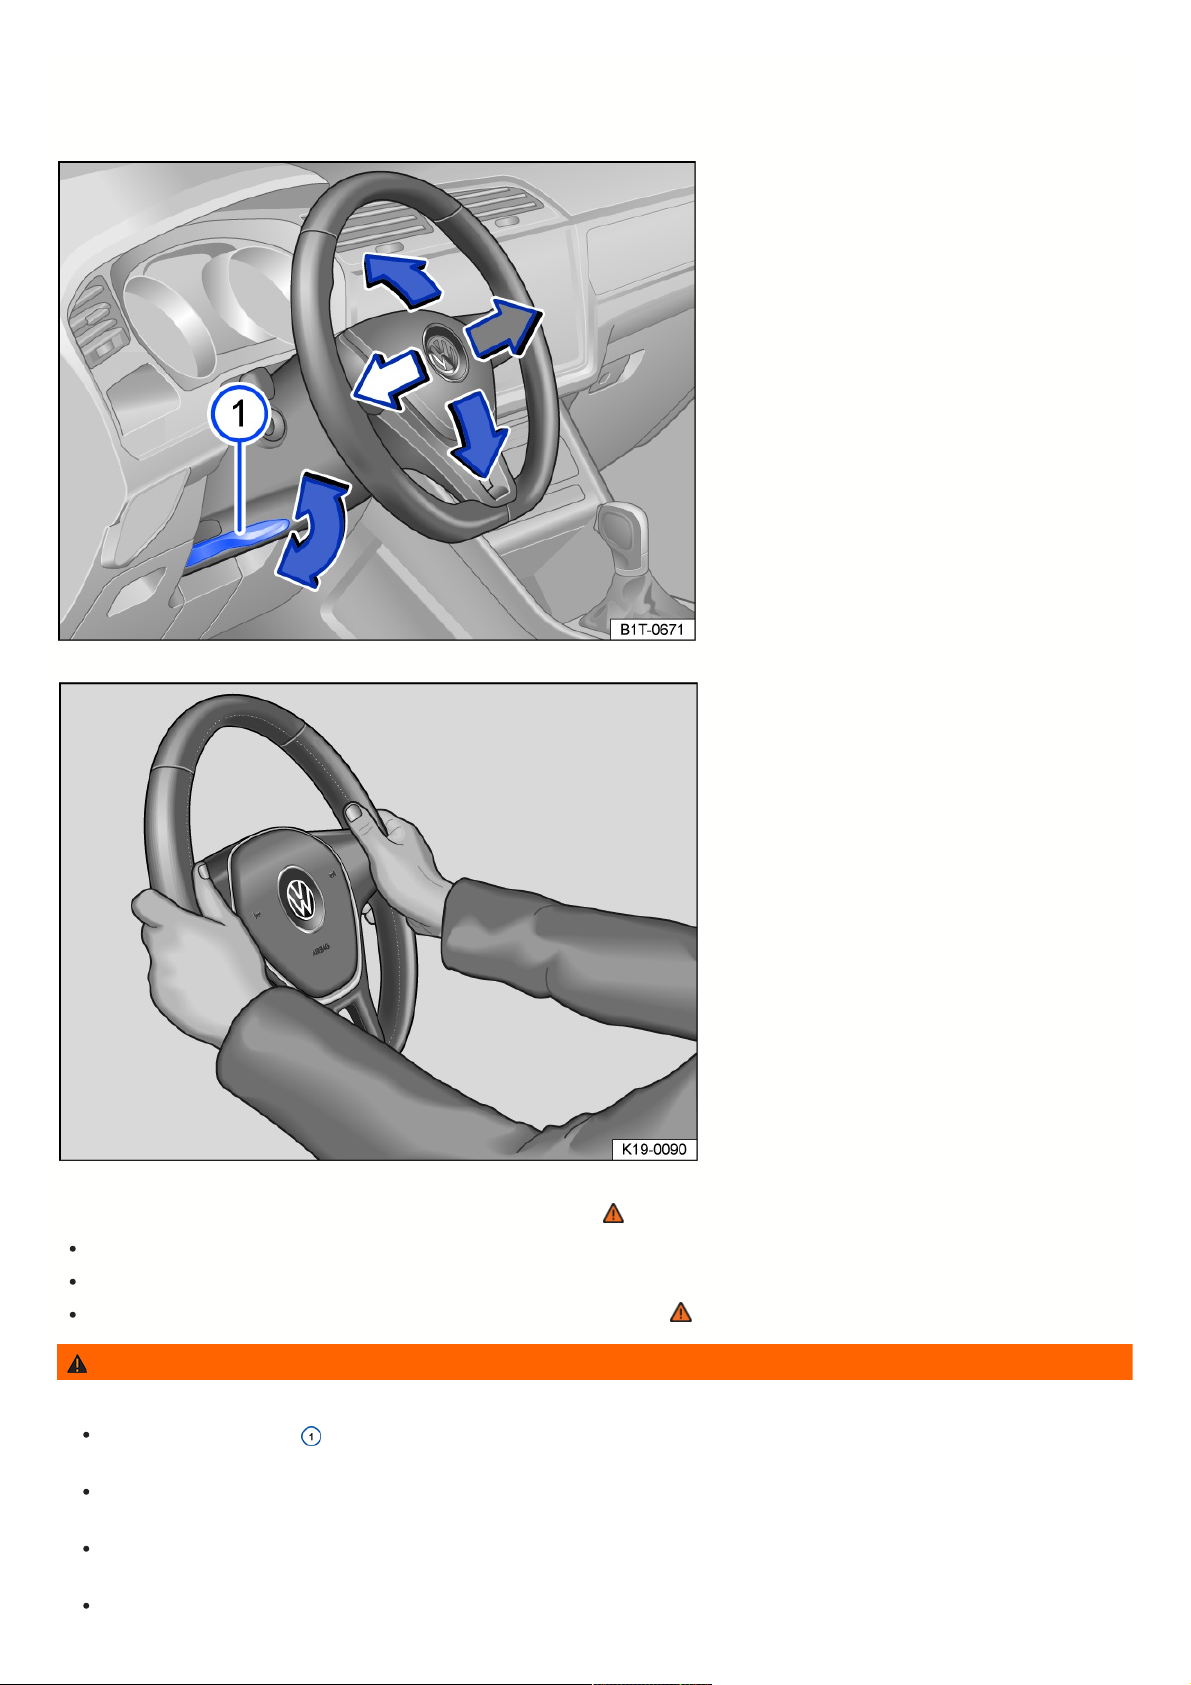
Steeringwheel
Adjustingthesteeringwheelposition
Fig.65Underthesteeringwheelinthesteeringcolumntrimpanel:levertoadjustthesteeringwheelpositionmanually.
Fig.66Onthesteeringwheel:nineo’clockandthreeo’clockposition.
Only adjust the steering wheel before driving or while the vehicle is stationary → .
Tilt the lever fig. 65 downward.
Adjust the steering wheel so that it can be firmly held at the outer edge with both hands at the nine o’clock and three o’clock position fig. 66.
Press the lever all the way up until it locks flush with the steering column trim panel → .
WARNING
Incorrect use of the steering wheel adjuster and an incorrect steering wheel adjustment could cause serious or fatal injuries.
Always push the lever fig. 65 upward into its locked position after adjusting so that you do not change the steering wheel position unintentionally while
driving.
Never adjust the steering wheel while driving. If you find the steering wheel must be adjusted while driving, then stop the vehicle safely and adjust the
steering wheel correctly.
The steering wheel must always face toward the chest and never toward the face. Otherwise, the protective function of the driver’s front airbag may be
limited in the event of an accident.
To reduce the risk of injuries if the driver’s front airbag deploys, always hold the outer edge of the steering wheel firmly with both hands in the nine o’clock
86
Page 87

and three o’clock position fig. 66.
Never hold the steering wheel in the twelve o’clock position or in any other way, such as holding the center of the steering wheel. Otherwise, the arms,
hands, and head could be seriously injured if the driver’s front airbag deploys.
87
Page 88

Seatsandheadrestraints
Frontseats
Introduction
The following information describes the various options for adjusting the front seats. Always make sure the seats are adjusted to the correct position ⇒
Introduction.
WARNING
Adjust the front seats correctly before each drive and make sure all passengers have their own safety belts fastened correctly.
Move the front passenger’s seat all the way back.
Adjust the driver's seat so that there is at least 10 inches (25 cm) of space between your chest and the center of the steering wheel. Adjust the
forward/back position of the driver's seat so that you can press the pedals with your legs slightly bent, and there is at least 4 inches (10 cm) of space
between the instrument panel and your knees. If your physical characteristics will not allow you to do this, see an authorized Volkswagen dealer or
authorized Volkswagen Service Facility to have modifications made.
Never drive with the backrest angled back far. The farther back the backrest is angled, the greater the risk of injury due to incorrect routing of the safety
belt and an incorrect seating position.
Never drive with the backrest angled sharply forward. If the front airbag deploys, it could push the backrest back and injure passengers in the rear seat.
Always sit upright, with your back against the backrest and the front seats adjusted correctly. Never position any part of your body close to or directly on
the location where the airbag is installed.
WARNING
Adjusting the seats incorrectly can cause accidents and serious injuries.
Only adjust the seats when the vehicle is stationary. Otherwise, the position of the seat could change unexpectedly while driving and you could lose
control of the vehicle. Also, the seat could be adjusted to a position that is incorrect.
Only adjust the height, angle, and forward/back position of the front seats when there is no one within the seat’s range of movement.
Do not restrict the movement of the seats by placing objects within their range of movement.
Only adjust the height and angle of the rear seats when there is no one within the seat’s range of movement.
The adjusting and locking areas of the seats must not be dirty.
WARNING
Using seat covers or protective covers incorrectly can result in unintentionally operating the seat adjusters, and the front seats could move unexpectedly while
driving. This could cause you to lose control of the vehicle. This can cause accidents and injuries. The electrical components in the front seats could also be
damaged.
Never install or secure seat covers and protective covers on the electrical seat controls.
Only use seat covers or protective covers that are specifically approved for use in your vehicle.
WARNING
Lighters in the vehicle can become damaged or ignite unintentionally. This can cause severe burns and vehicle damage.
Before adjusting seats, always make sure that there are no cigarette lighters near the moving parts of the seat.
NOTICE
Objects with sharp edges can damage the seats.
Never touch the seats with sharp-edged objects. Sharp-edged objects, such as zippers, rivets on clothing, or belts, can cause surface damage. Open
hook and loop fasteners can also cause damage.
Manuallyadjustingfrontseats
PleasereadtheintroductoryinformationandheedtheWarningsandNotice
⇒
and
Introduction
.
The information that follows describes all possible controls. Depending on the seat version, the number of controls may vary.
The controls on the right front seat are a mirror image of the left.
88
Page 89
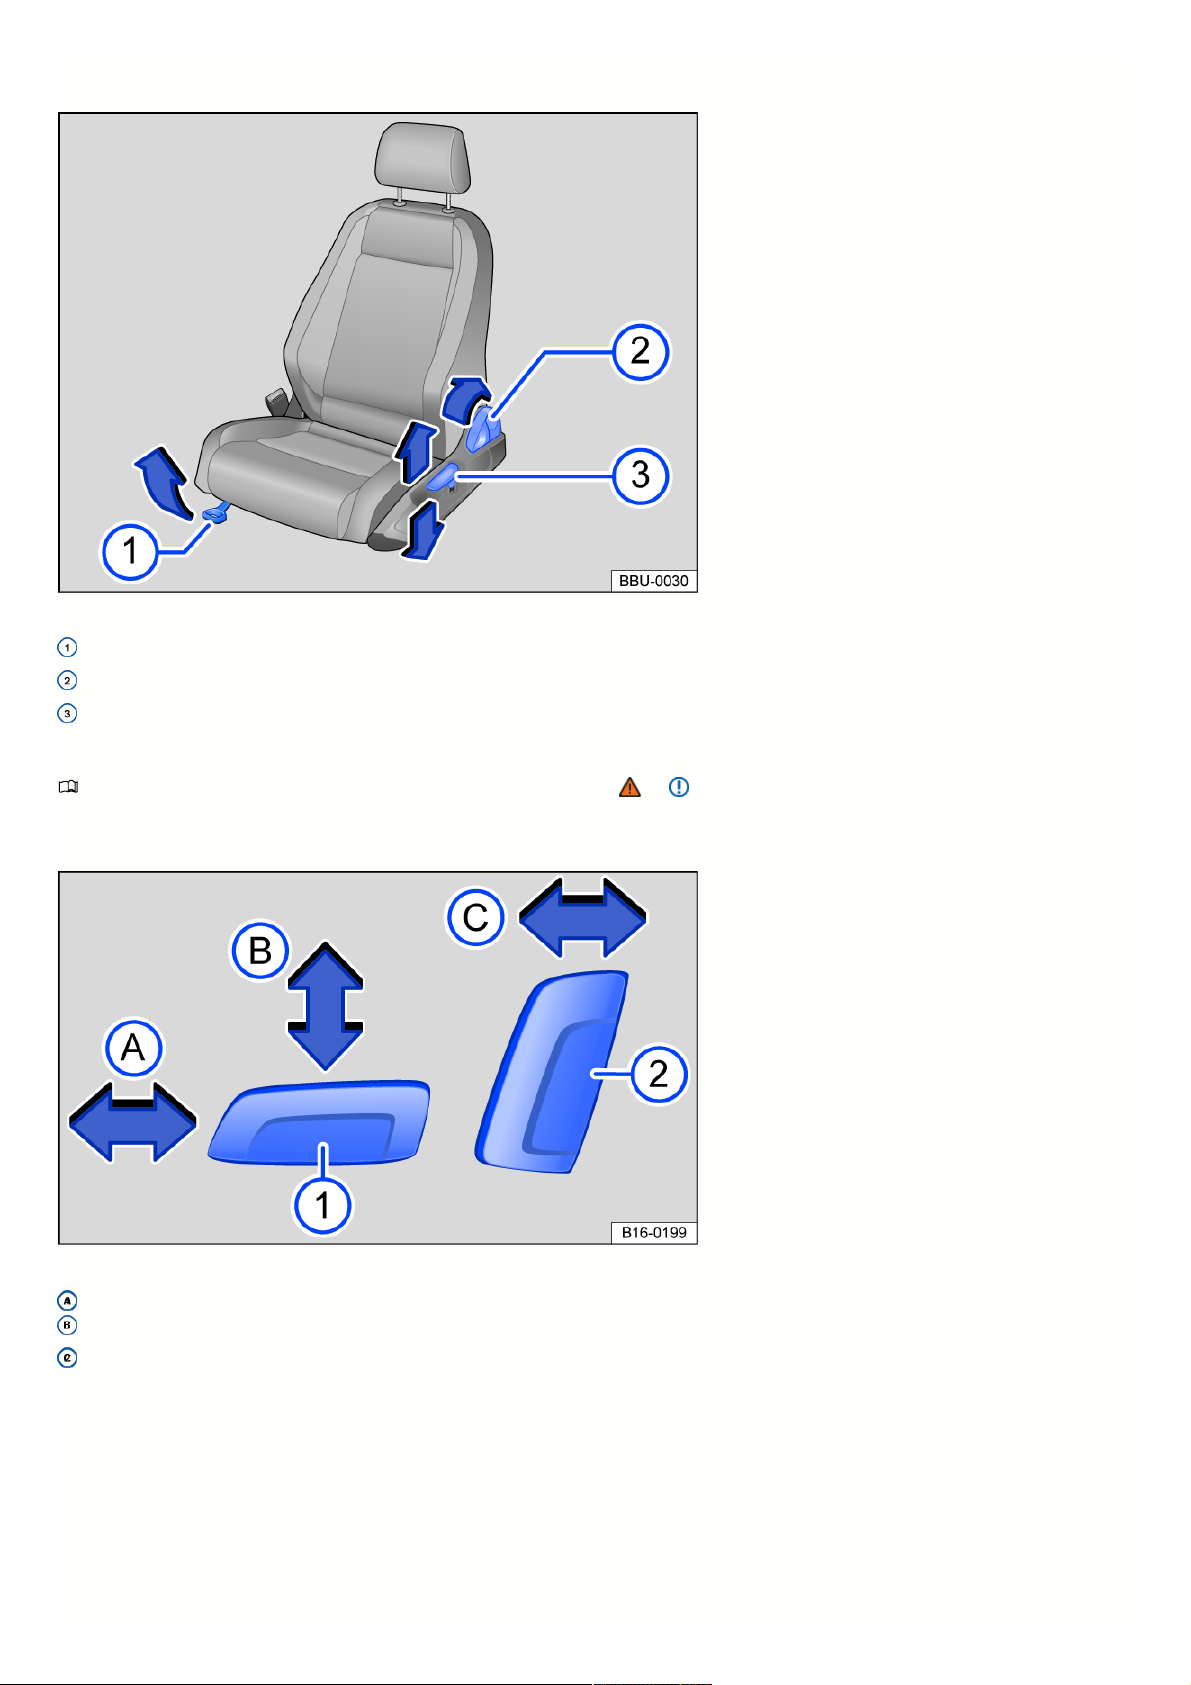
A seat may have both manual and power controls.
Fig.67Ontheleftfrontseat:controls.
Pull the lever to slide the front seat forward or backward. The front seat must lock into place after the lever is released.
Pull the lever, lean forwards or backwards and release the lever again to adjust the backrest.
If necessary, move the lever multiple times upward or downward to adjust the height of the seat.
Adjustingpowerfrontseats
PleasereadtheintroductoryinformationandheedtheWarningsandNotice
⇒
and
Introduction
.
The controls on the right front seat are a mirror image of the left.
A seat may have both manual and power controls.
Fig.68Switchontheleftfrontseat:adjustingthefrontseatforward/back,theheightandangleoftheseatsurface,andthefrontseatbackrest.
Slide the seat forward or backward.
Adjust the height of the seat.
Adjust the angle of the backrest.
89
Page 90
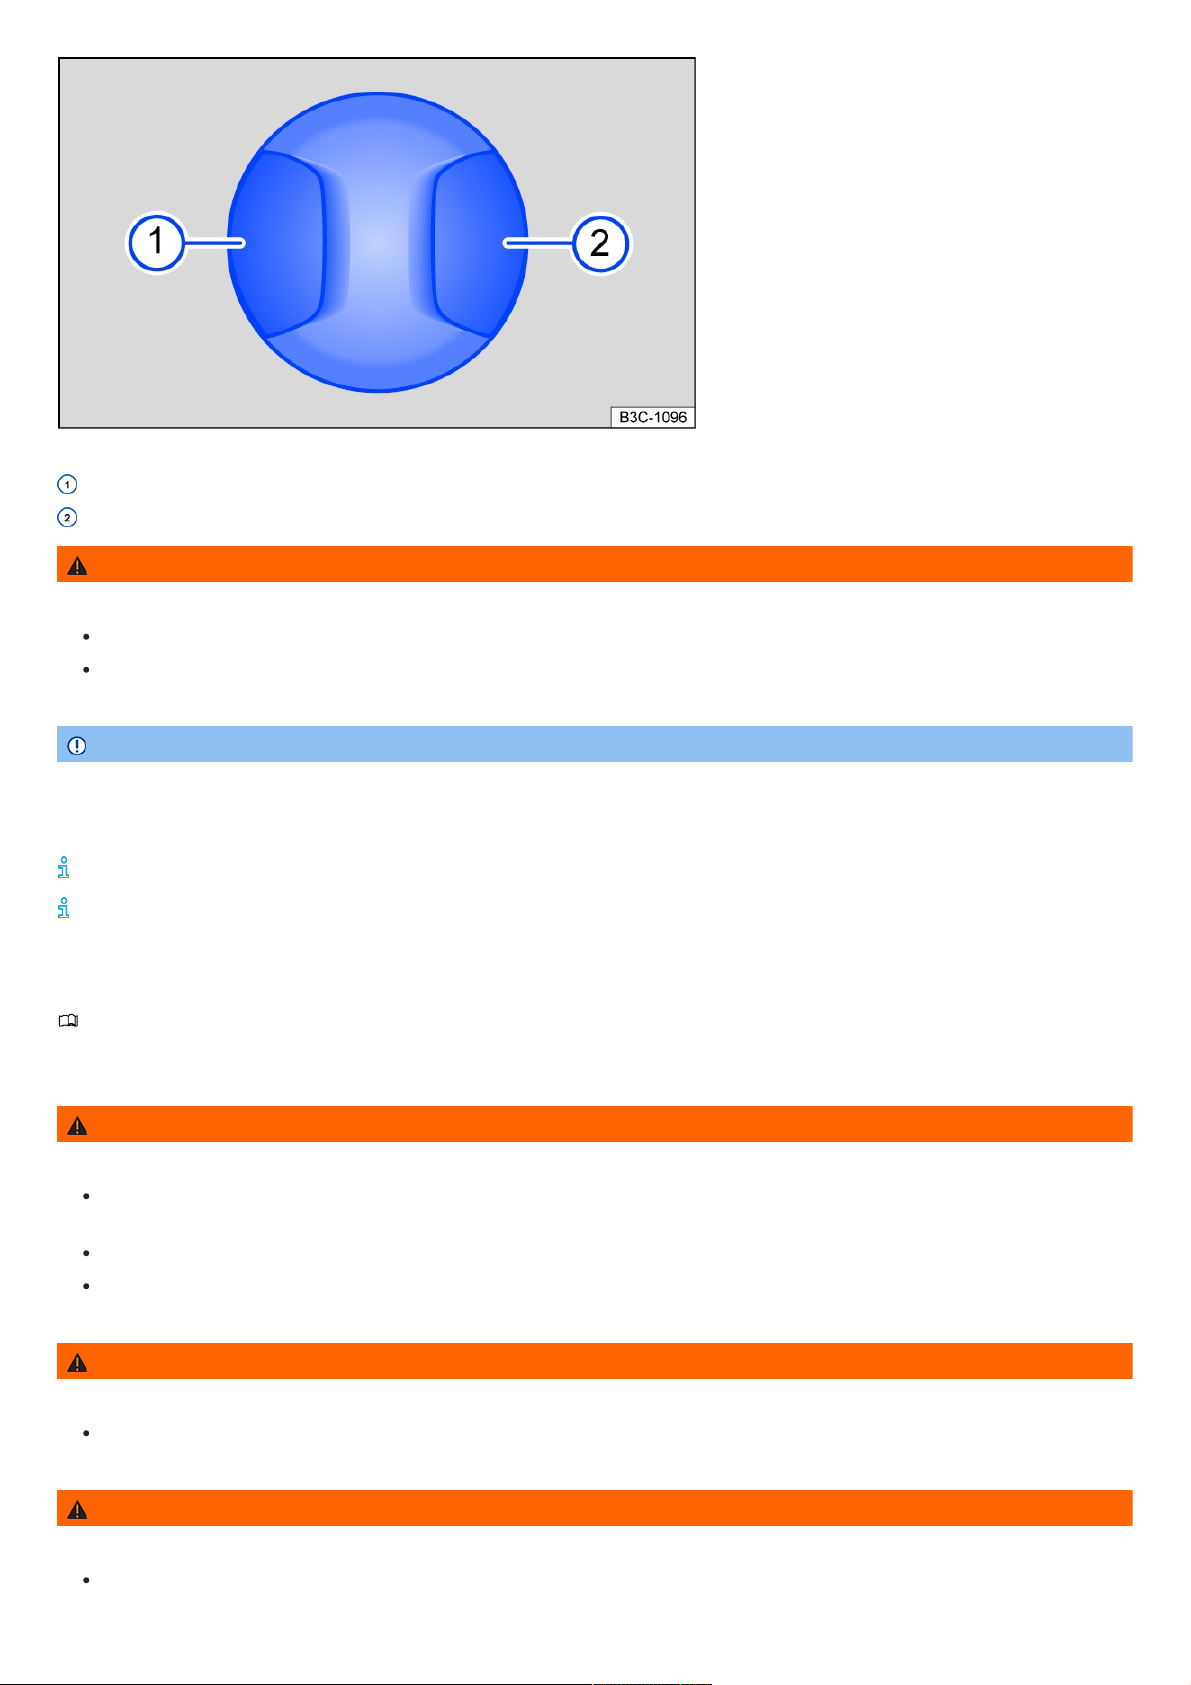
Fig.69Switchontheleftfrontseat:adjustingthelumbarsupport.
Move the curvature of the lumbar support forward.
Move the curvature of the lumbar support backward.
WARNING
Careless or unintended use of the power front seats can cause serious injuries.
The power front seats can also be adjusted when the ignition is switched off. Never leave children or people requiring assistance in the vehicle.
In case of an emergency, interrupt the power adjustment by pressing another switch.
NOTICE
To reduce the risk of damage to the electrical components in the front seats, never kneel on the front seats or exert pressure on the seat surface and backrest
with sharp or pointed objects.
Ifthe12Vvehiclebatterychargelevelistoolow,theseatmaynotbeabletobeadjustedwiththepowercontrols.
Aseatadjustmentmaybecanceledwhiletheengineisstarting.
Rearseats
Introduction
The following information describes the various options for adjusting the rear seats. Always make sure the seats are adjusted to the correct position ⇒ Correct
seating position.
WARNING
Adjust or fold up the rear seats correctly before each journey and make sure all passengers have their own safety belts fastened correctly.
Only adjust or fold down the rear seats when the vehicle is stationary. Otherwise, the rear seats could move unexpectedly while driving. In addition, the
seat could be adjusted or folded down to a position that is incorrect.
For passengers in the rear seats, the risk of serious injuries increases if they do not sit upright, because the safety belts will not be positioned correctly.
Only adjust the rear seat or fold it down when there is no one within the seat’s range of movement.
WARNING
Lighters in the vehicle can become damaged or ignite unintentionally. This can cause severe burns and vehicle damage.
Before adjusting or folding downs seats, always make sure that there are no lighters near the moving parts of the seat.
WARNING
To reduce the risk of injury while driving, the center armrest must always be folded upward.
If the center armrest is folded down, the center rear seat must never be used by either adults or children. Doing so would create an incorrect seating
position that could result in serious injuries.
90
Page 91
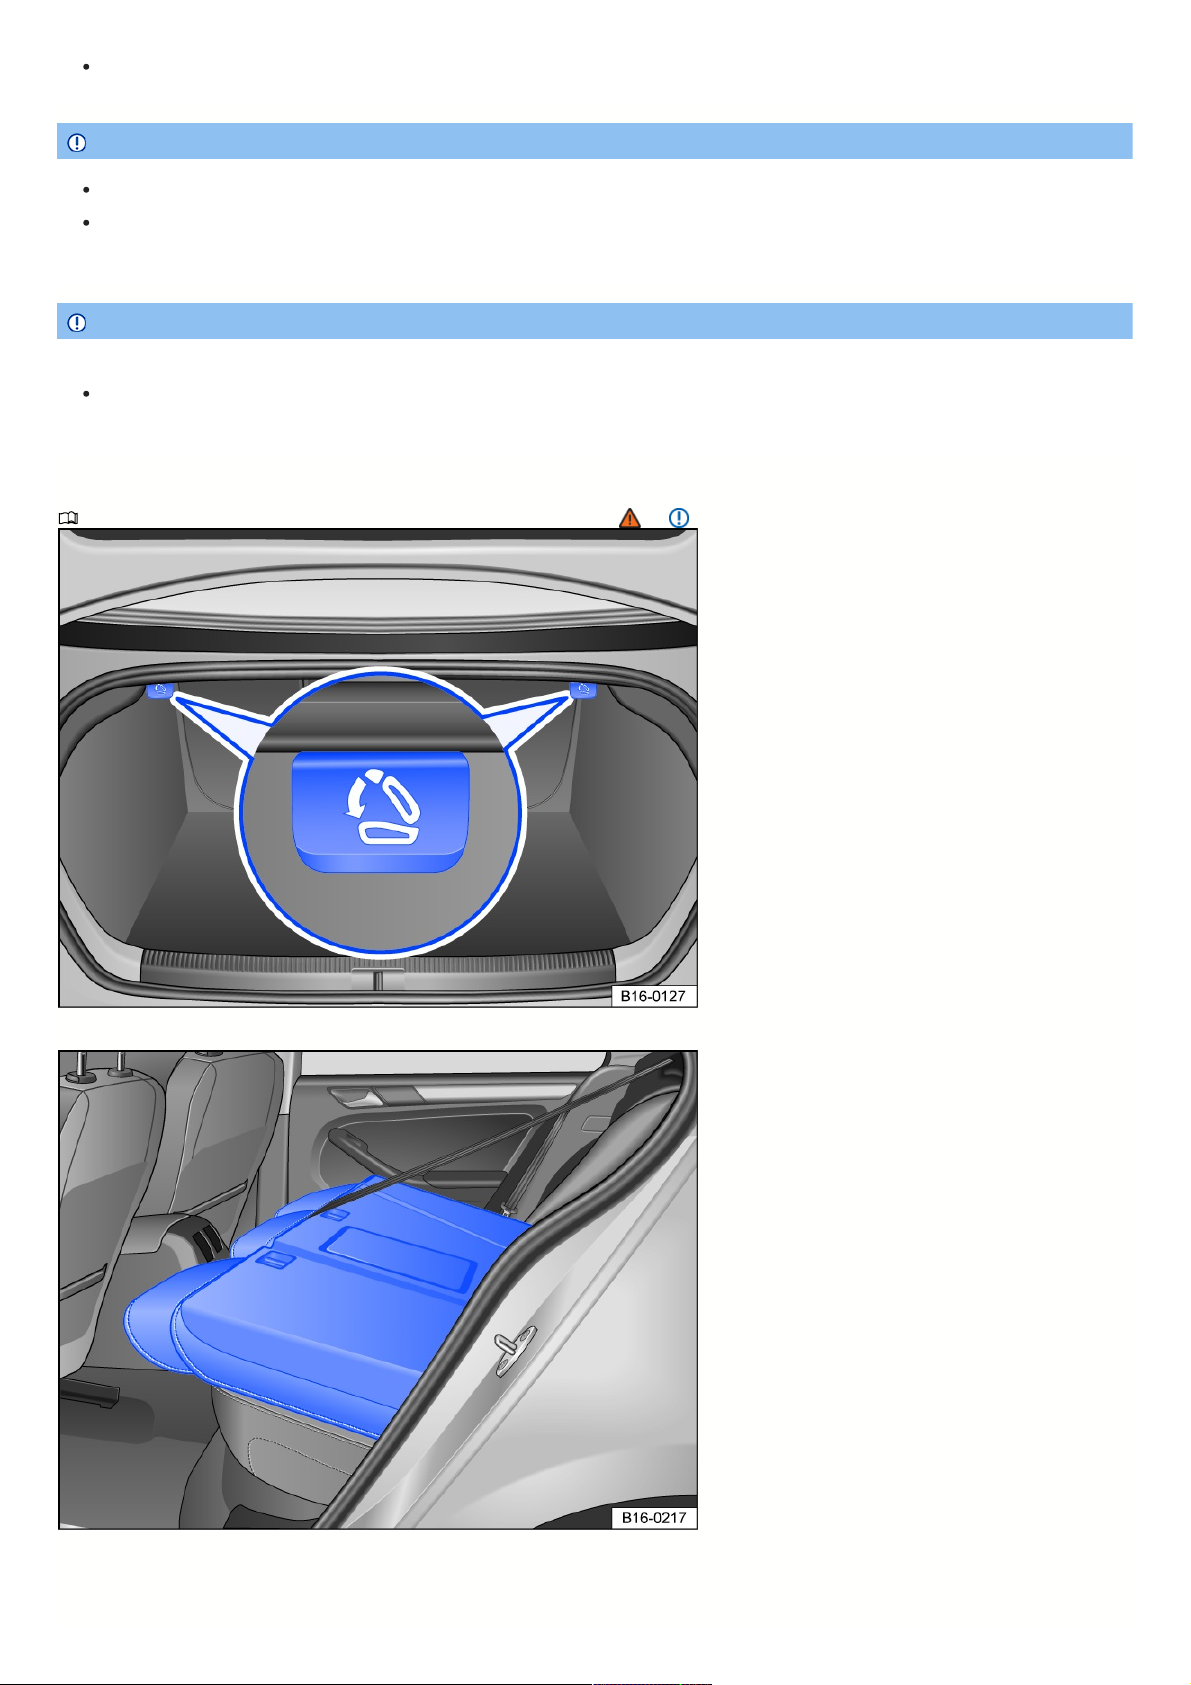
Never allow an adult or child to ride on the center armrest.
NOTICE
Objects in the luggage compartment can cause damage when folding down the rear seat or adjusting it forward or backward.
If the rear seat is positioned forward or folded, objects can become caught between the seat and the luggage compartment floor. Remove any objects
from this area before sliding the rear seat back.
NOTICE
Objects with sharp edges can damage the seats.
Never touch the seats with sharp-edged objects. Sharp-edged objects, such as zippers, rivets on clothing, or belts, can cause surface damage. Open
hook and loop fasteners can also cause damage.
Foldingtherearbenchseatbackrestforwardorbackward
PleasereadtheintroductoryinformationandheedtheWarningsandNotice
⇒
and
Introduction
.
Fig.70Intheluggagecompartment:Remotereleaselever.
Fig.71Rearbenchseat:Rearseatbackrestfoldedforwards.
The seat backrest is divided. Each section of the seat backrest may be folded forwards individually to increase the size of the luggage compartment.
91
Page 92

Foldingtheseatbackrestforwardsusingtheremotereleaselever
Move the head restraints all the way down.
Open the trunk lid.
Pull the remote release lever fig. 70 for the backrest section to be folded forwards. The respective rear seat backrest section is released.
Fold the rear seat backrest section forward.
Close the trunk lid if necessary.
Foldingtherearseatbackrestupandback
Fold the rear seat backrest to the back and push firmly into the catch until it securely engages ⇒ .
WARNING
Folding and unfolding the rear seat backrest in an uncontrolled or careless manner may cause severe injury.
Always take care that no people or animals are in the way of the rear seat backrest when folding it forward and down.
Never fold the rear seat backrest forward or back while driving.
Make sure the safety belt is not pinched or damaged when folding the rear seat backrest back.
Keep hands, fingers, feet and other body parts away from the rear seat backrest when folding up and down.
Each rear seat backrest must always be securely engaged to ensure that the safety belts in the rear seats can provide the maximum protection. Take
extra care especially with the middle seat in the rear bench seat. If a seat on the rear bench is used without the rear seat backrest being engaged, the
vehicle occupant will move forward with the rear seat backrest in the event of sudden braking and driving maneuvers or a collision.
Never allow adults or children to sit in a rear seat if that seat backrest is folded forward or is not engaged.
NOTICE
Folding and unfolding the rear seat backrest in an uncontrolled or careless manner may cause damage to the vehicle or other objects.
Before folding the rear seat backrest forward, always adjust the front seats so that the head restraint or padding on the rear seat backrest does not press
against the front seat.
Before folding the rear seat backrest forward, always take care that there are no objects in its path.
Headrestraints
Introduction
The information that follows describes how the head restraints can be adjusted and removed. Always make sure the seats are adjusted to the correct position
⇒
Correct seating position.
All seats are equipped with head restraints. The center rear head restraint (depending on the vehicle equipment) is only intended for the center seat on the rear
bench seat. Therefore do not install this head restraint in any other position.
There are notches in the head restraint supports so that they can be locked in different positions. Only head restraints which are correctly mounted can lock into the
notches within the adjustable range. To prevent the head restraints from being removed unintentionally after mounting, there are stops at the top and bottom of the
adjustable range.
Correctheadrestraintadjustment
Adjust the head restraint so that the upper edge of the head restraint is in line with the upper portion of the head as much as possible, but not lower than eye level.
Position the back of the head as close as possible to the head restraint.
Headrestraintadjustmentforshorterpersons
Slide the head restraint all the way down, even if the head is then below the upper edge of the head restraint. When the head restraint is in the lowest position, there
may be a small gap between the head restraint and the backrest.
Headrestraintadjustmentfortallerpersons
Move the head restraint up all the way.
WARNING
Driving with head restraint that have been removed or adjusted incorrectly increases the risk of serious or fatal injuries in the event of an accident or sudden
driving and braking maneuvers.
If a person is sitting in a seat, only drive with the head restraints correctly installed and adjusted on that seat.
To reduce the risk of neck injuries in an accident, every occupant in the vehicle, including the driver, must have the head restraint adjusted correctly
92
Page 93
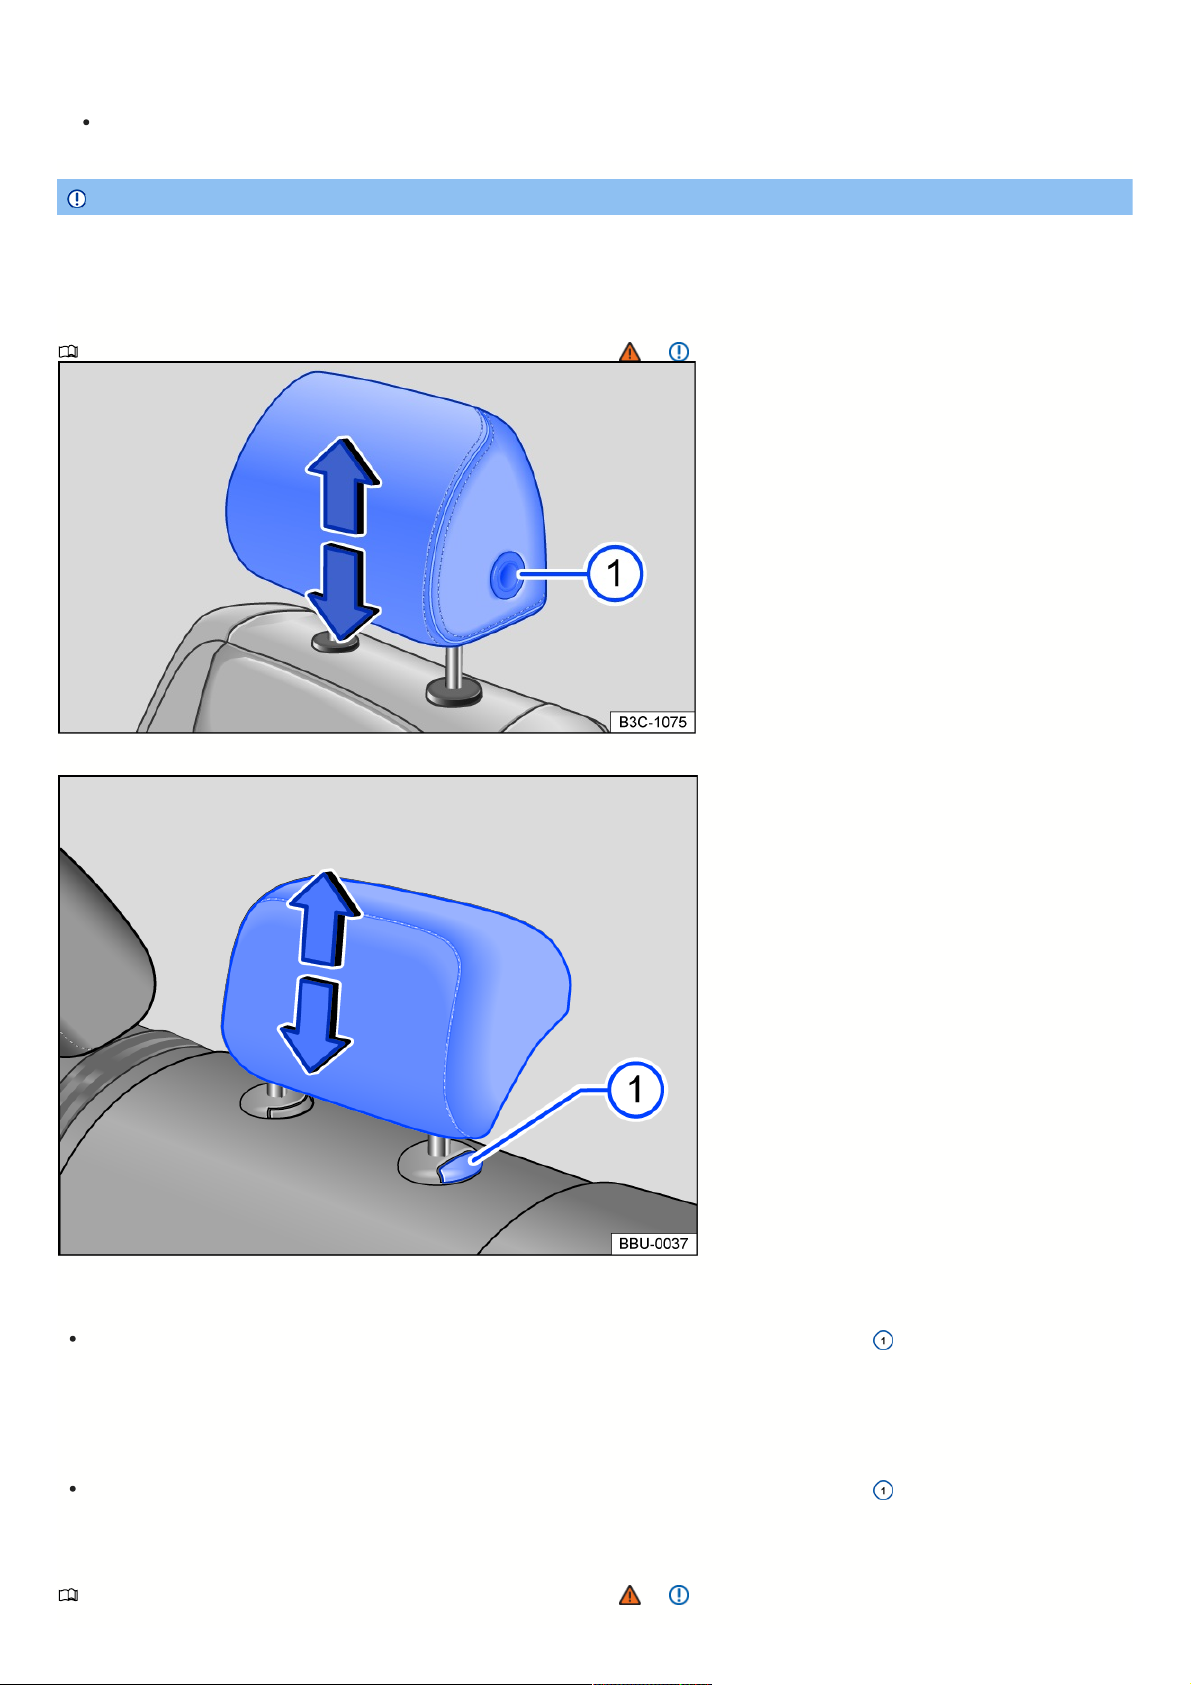
according to their body size. To do this, the upper edge of the head restraint must be in line with the upper portion of the head as much as possible, but
not lower than eye level. Position the back of the head as close as possible and centered to the head restraint.
Never adjust the head restraint while driving.
NOTICE
When removing and installing the head restraints, make sure the head restraint does not hit the headliner, the front seat backrest, or other vehicle components.
Otherwise, damage could result.
Adjustingtheheadrestraints
PleasereadtheintroductoryinformationandheedtheWarningsandNotice
⇒
and
Introduction
.
Fig.72Frontheadrestraint:adjusting.
Fig.73Rearcenterheadrestraint:adjust.
Adjustingtheheightofthefrontheadrestraint
If necessary, slide the head restraint upward or downward in the direction of the arrow and when pressing the fig. 72 button.
The head restraint must lock securely into place.
Adjustingtheheightoftherearcenterheadrestraint
The head restraint of the center seat can be adjusted.
If necessary, slide the head restraint upward or downward in the direction of the arrow and when pressing the fig. 73 button.
The head restraint must lock securely into place.
Removingandinstallingtheheadrestraints
PleasereadtheintroductoryinformationandheedtheWarningsandNotice
⇒
and
Introduction
.
93
Page 94
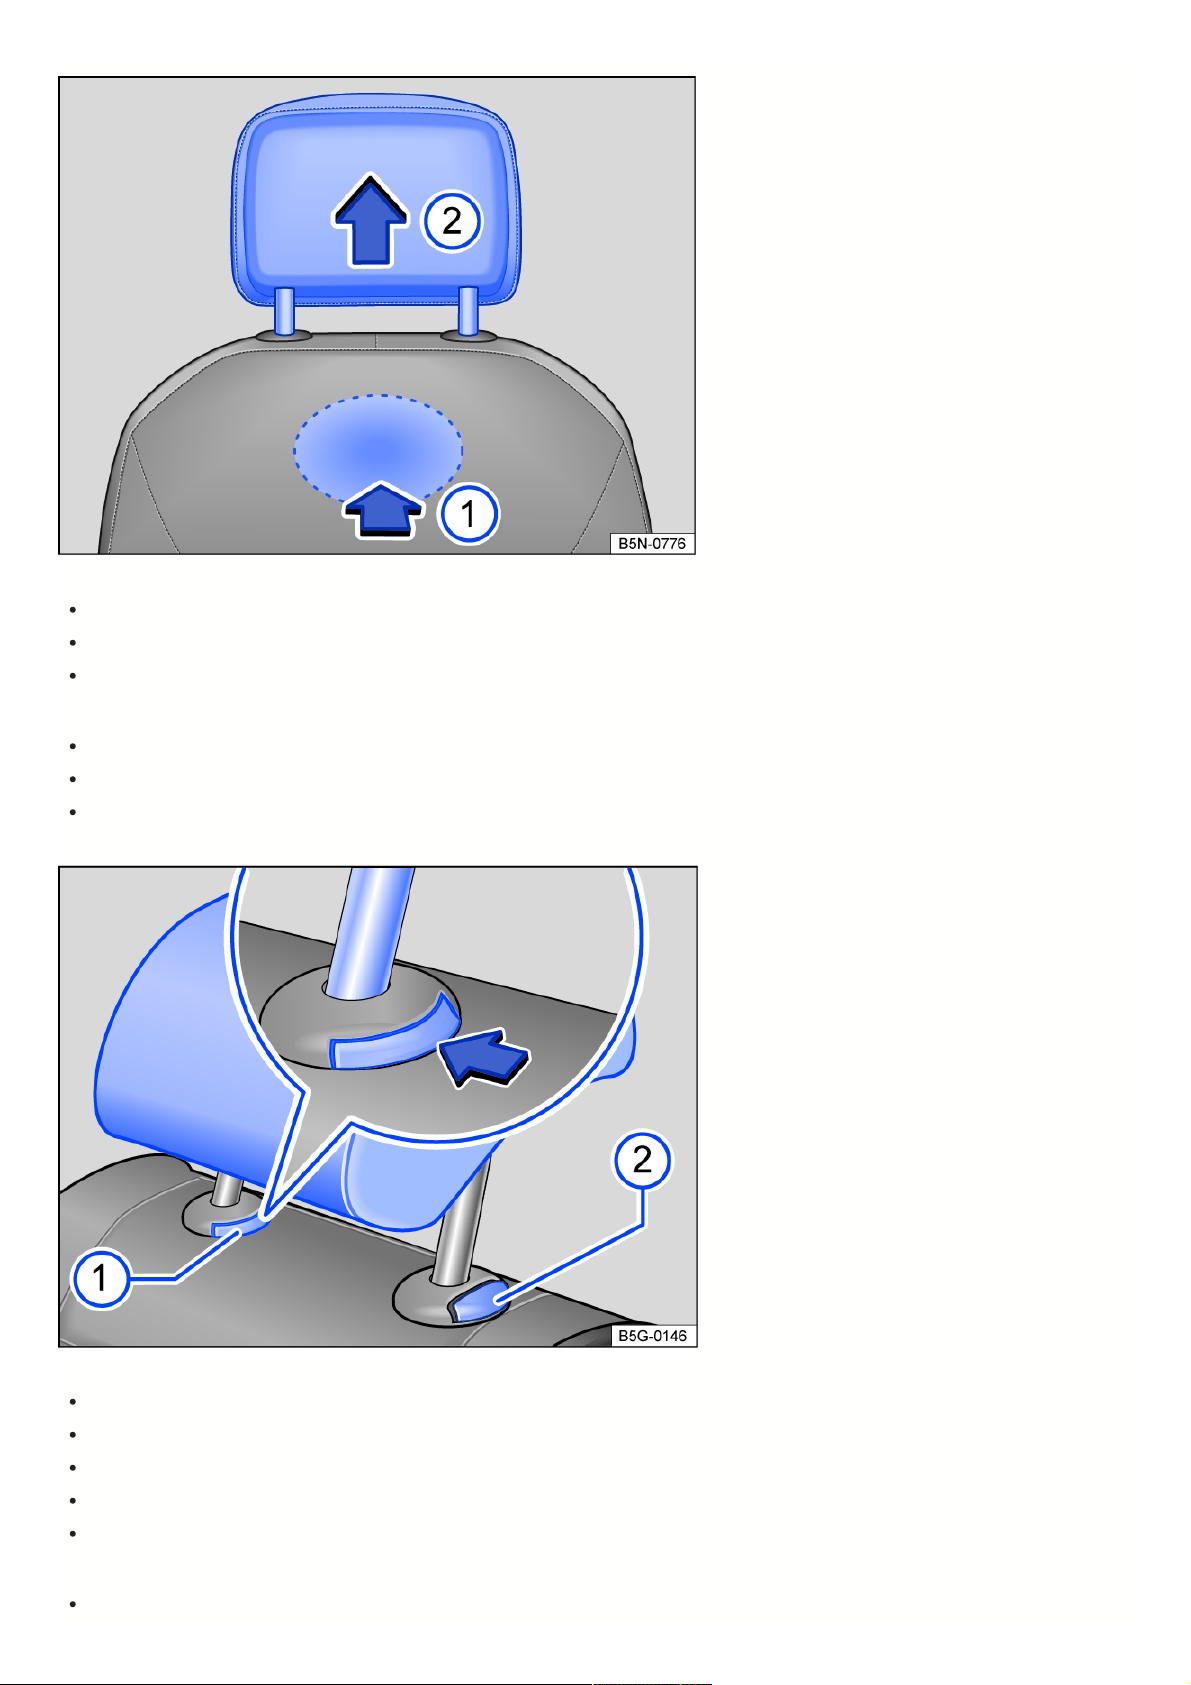
Removingthefrontheadrestraints
Fig.74Frontheadrestraints:removing.
Lower the head restraint if necessary.
To release, find the notch on the rear side in the marked area fig. 74 and push and hold in the direction of the arrow.
Pull out the head restraint in the direction of the arrow fig. 74.
Installingthefrontheadrestraints
Position the head restraint correctly above the head restraint guides and insert into the guides on the seat backrest.
Slide the head restraint downward until it engages into the guide rods.
Adjust the head restraint to the correct position.
Removingthemiddlerearheadrestraint
Fig.75Rearheadrestraint:removing.
Release the middle backrest part of the rear bench seat and fold it forwards.
Slide the head restraint all the way upward.
Press the button fig. 75 on the head restraint guide.
At the same time, press button fig. 75 while a second person pulls the head restraint all the way out.
Fold the rear bench seat backrest toward the rear and lock it securely into place.
Installingthemiddlerearheadrestraint
Release the middle backrest part of the rear bench seat and fold it forwards.
94
Page 95
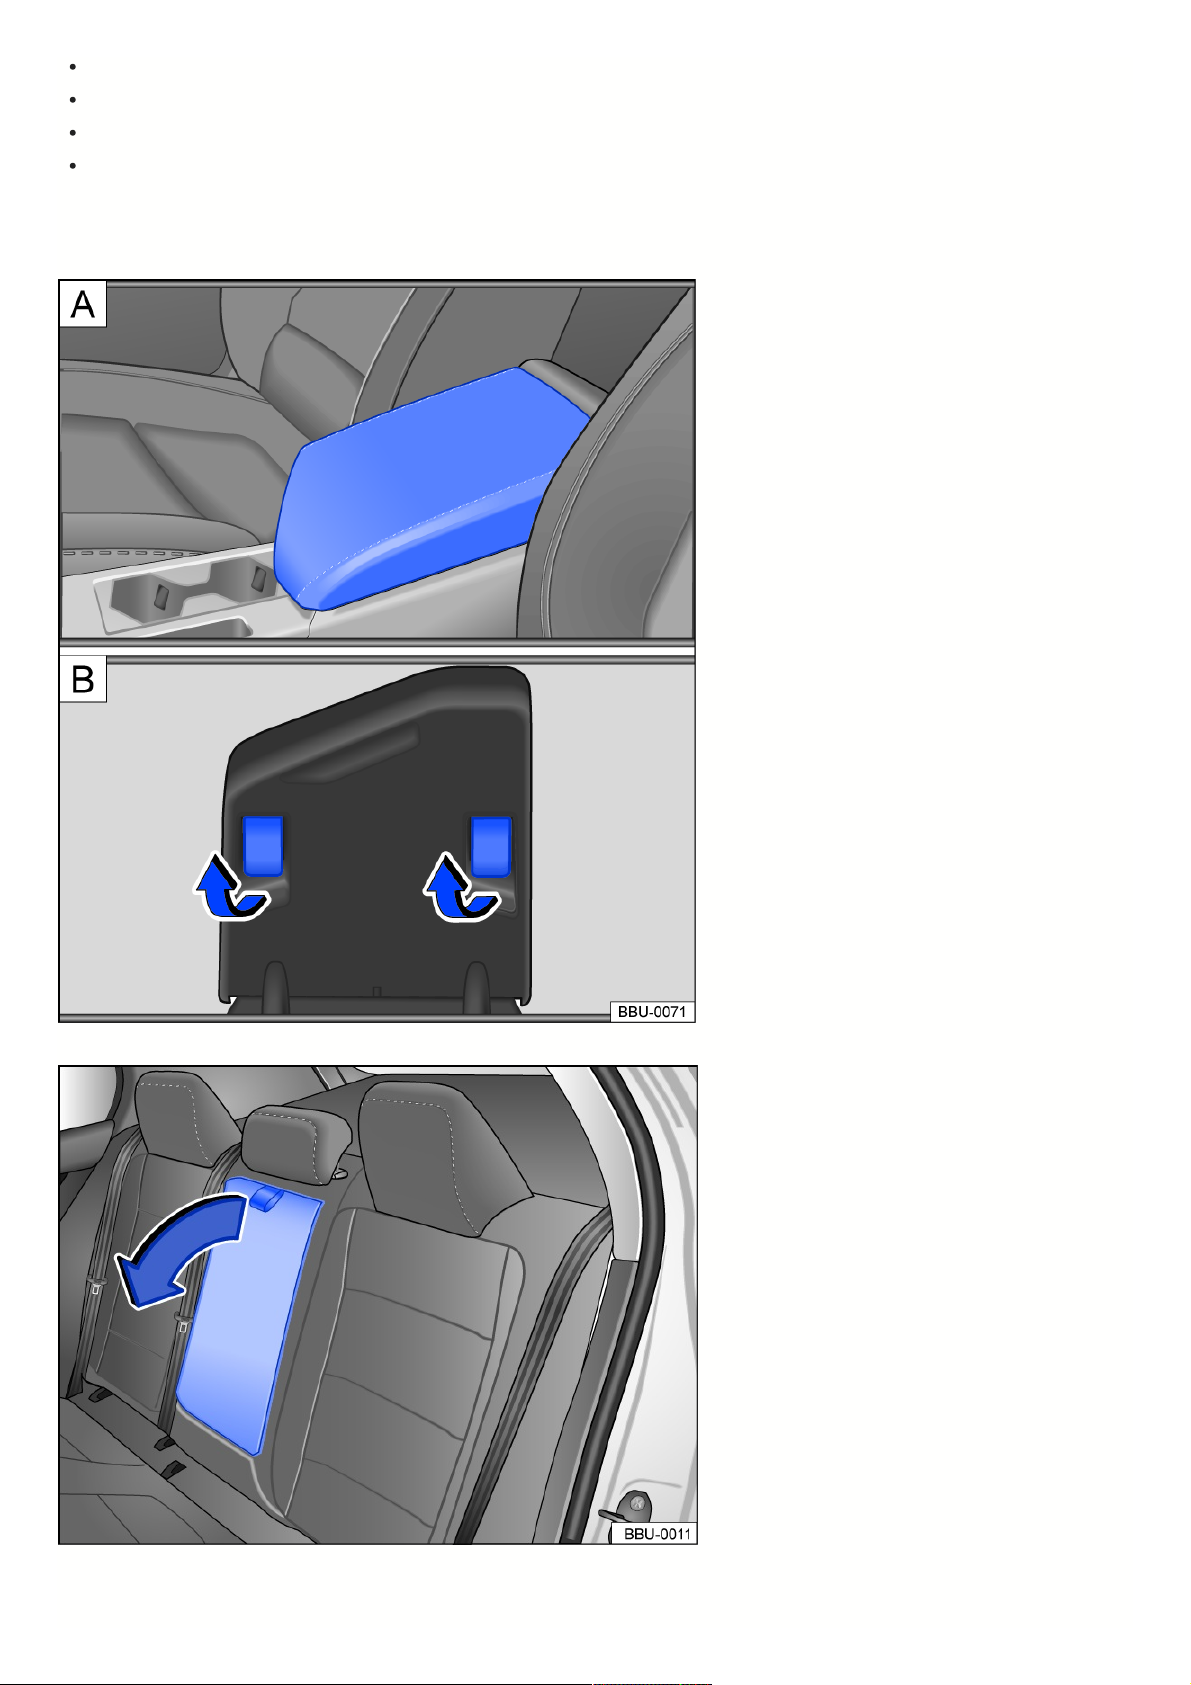
Position the head restraint correctly above the head restraint guides for the middle seat and insert it into the guides on the backrest.
Push the head restraint downward while pressing the fig. 75 button.
Fold the rear bench seat backrest toward the rear and lock it securely into place.
Adjust the head restraint to the correct position.
Seatfunctions
Centerarmrest
Fig.76Frontcenterarmrest.
Fig.77Foldingcenterarmrestintherear.
Frontcenterarmrest
95
Page 96
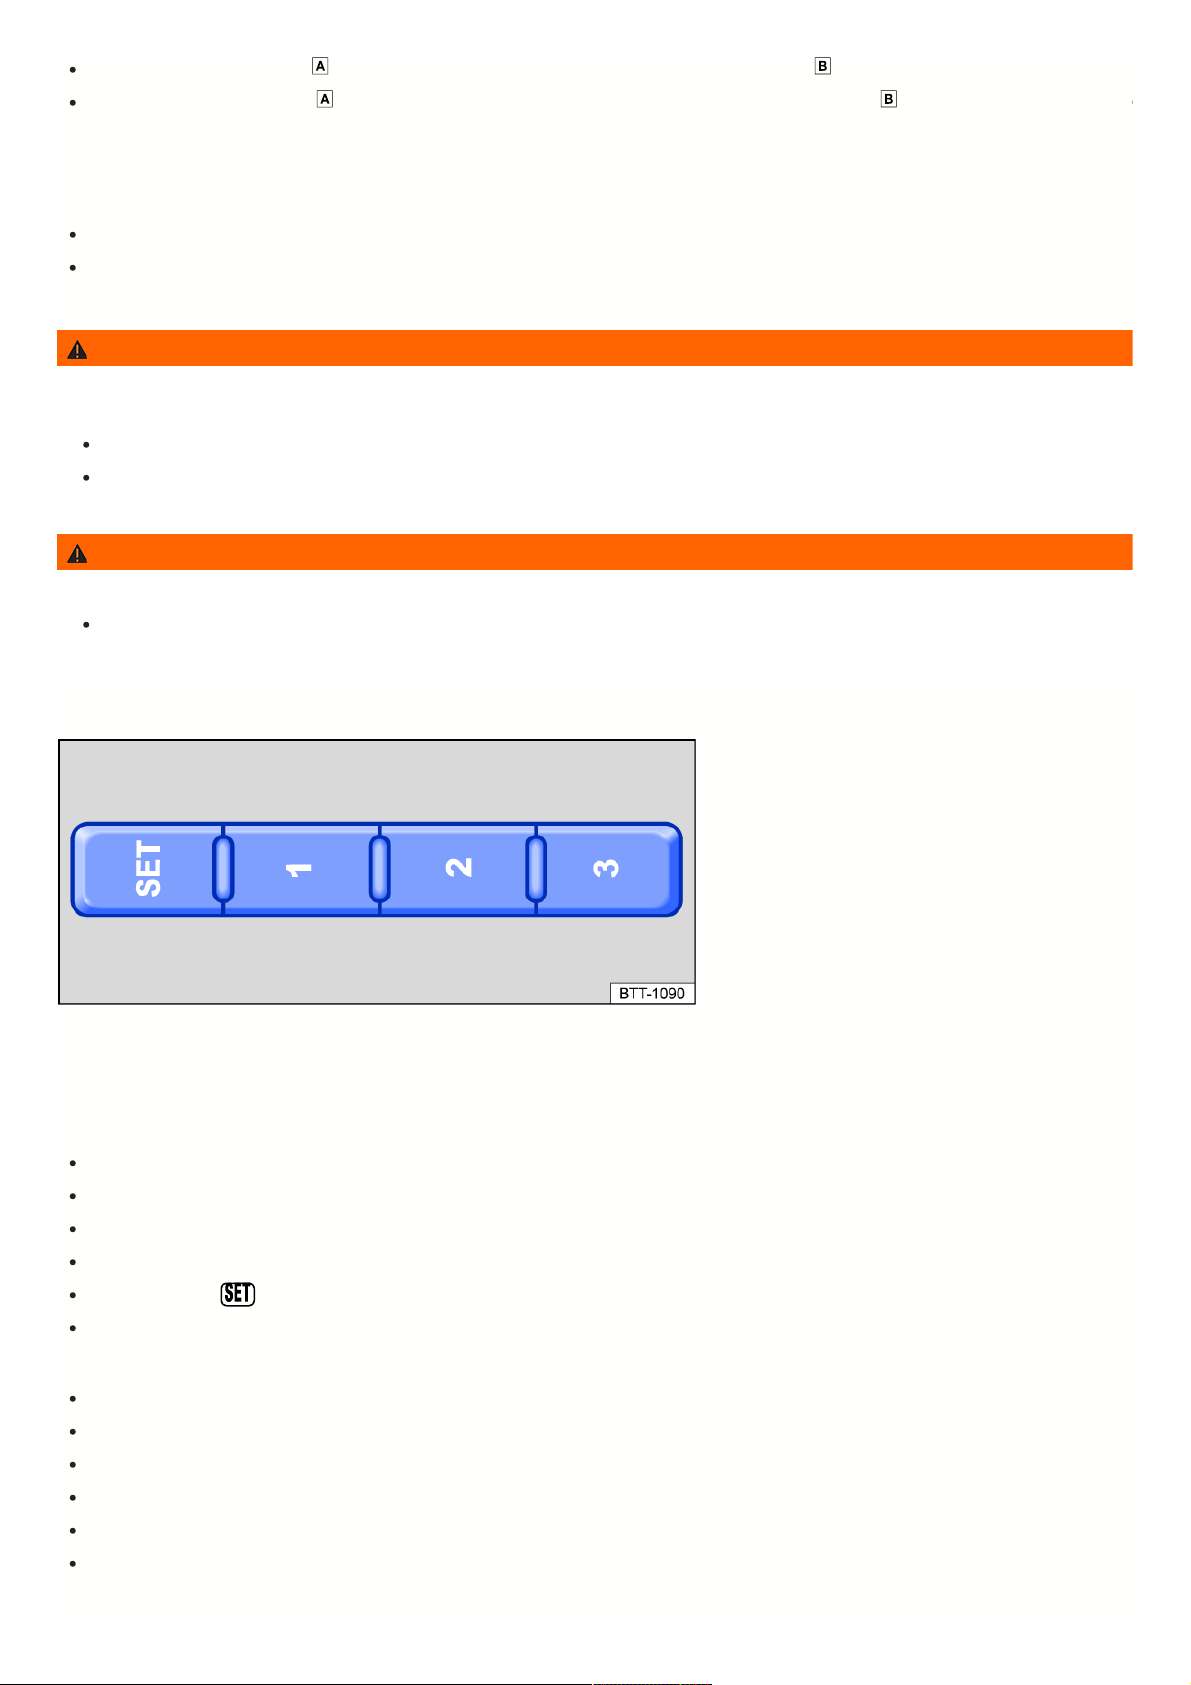
To raise: Pull the center armrest fig. 76 upward and fold the plastic supports in the direction of the arrow fig. 76. Then press the center armrest down.
To lower: Pull the center armrest fig. 76 upward and fold the plastic supports in the opposite direction to the arrow fig. 76. Then press the center armrest
down.
Rearcenterarmrest
There may be a folding armrest in the backrest of the rear center seat.
To fold out: pull the loop in the direction of the arrow fig. 77.
To fold back: fold the center armrest upward in the opposite direction of the arrow fig. 77 and press it all the way toward the seat backrest.
Passengers must not sit in the center rear seat when the center armrest is folded down.
WARNING
If the front center armrest is opened all the way or not completely closed, it can limit the driver ’s ability to move his or her arms, which can cause accidents and
serious injuries.
Always keep storage compartments closed while driving.
Never allow an adult or child to ride on the center armrest. This incorrect seating position can cause serious injuries.
WARNING
To reduce the risk of injuries while driving, the rear center armrest must always be folded up.
If the center armrest is folded down, the center rear seat must never be used by either adults or children. Doing so would create an incorrect seating
position that could result in serious injuries.
Memoryfunction
Fig.78Ontheoutersideofthedriver’sseat:memorybuttons.
Memorybuttons
Driver seat and outside mirror settings can be saved and called up using the memory buttons.
Storingthedriver'sseatandoutsidemirrorsettingsfordrivingforward
Set the electronic parking brake.
Shift the transmission to neutral.
Switch the ignition on.
Adjust the driver's seat and outside mirror.
Press and hold the button for several seconds fig. 78.
Press the desired memory button within approximately ten seconds. A chime will confirm that the settings were saved.
Storingthefrontpassenger'soutsidemirrorsettingsfordrivinginreverse
Set the electronic parking brake.
Shift the transmission to neutral.
Switch the ignition on.
Press the desired memory button fig. 78.
Select the reverse gear.
Adjust the front passenger's outside mirror so that the edge of the curb can be seen clearly, for example.
The selected mirror position will be stored automatically and assigned to the vehicle key that was used to unlock the vehicle.
96
Page 97

Recallingdriver'sseatandoutsidemirrorsettings
When the vehicle is stationary, the ignition is switched off, and a door is open, press the respective memory button briefly. After approximately ten minutes, the
stored positions can no longer be adjusted automatically. The adjustment process will be canceled if one of the memory buttons is pressed again.
OR: when the ignition is switched on or the door is closed, press and hold the respective memory button until the stored position is reached.
The front passenger's outside mirror automatically leaves the position stored for driving in reverse once you begin driving forward at speeds of at least approx.
10 mph (approx. 15 km/h) or when you turn the knob for the outside mirrors from the R position to another position.
Ifthedriver'sdoorisopenedmorethanapproximatelytenminutesafterthevehicleisunlocked,thenthedriver'sseatandtheoutsidemirrorswillnotbe
adjustedautomatically.
WARNING
Improper use of seat functions can cause injuries.
Assume the correct seating position before pulling away and remain that way while driving. This also applies to all passengers.
Set the memory function only with the vehicle stationary.
Always keep your hands, fingers, feet and other parts of your body clear of the area in which the seats operate and move during adjustment.
97
Page 98
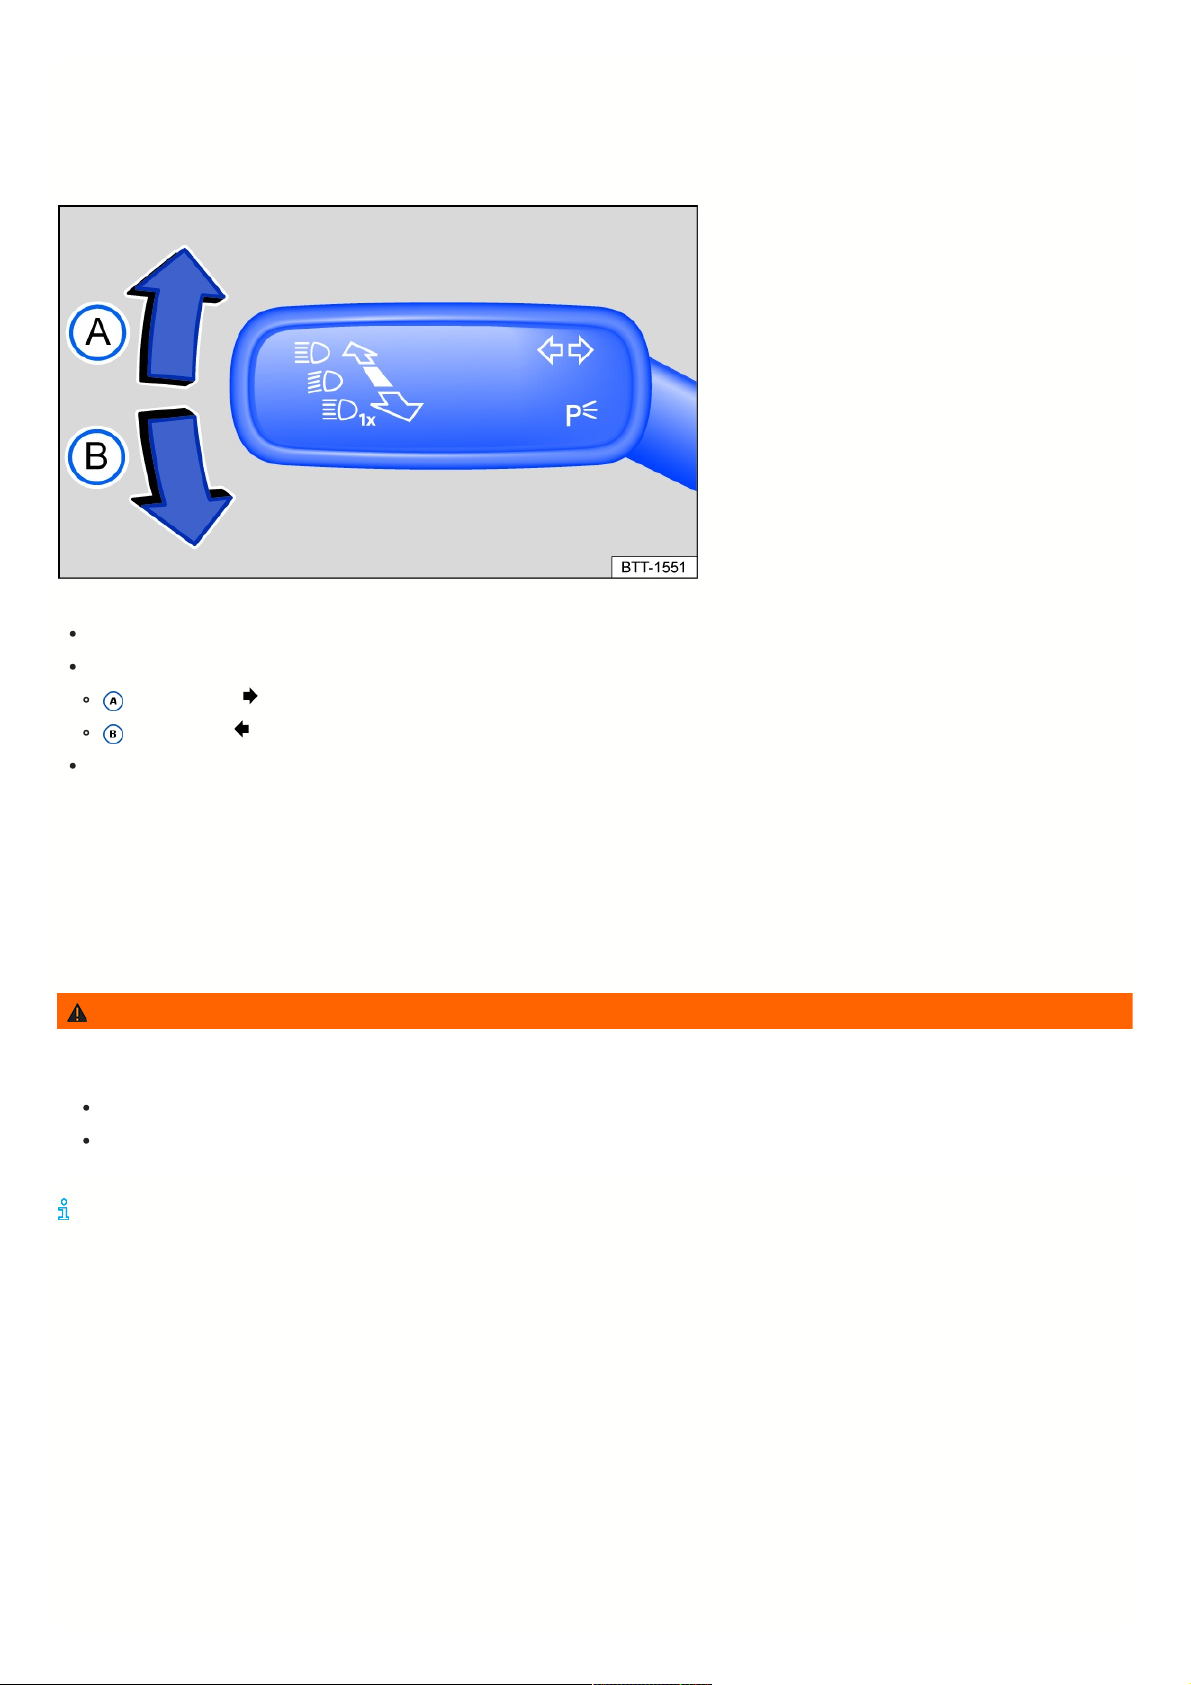
Lights
Turnsignals
Switchingtheturnsignalsonandoff
Fig.79Ontheleftsideofthesteeringcolumn:turnsignalandhighbeamlever.
Switch on the ignition.
Move the turn signal and high beam lever from the center position to the following position fig. 79:
Right turn signal .
Left turn signal .
Move the turn signal and high beam lever back to the original position to turn off the turn signal.
If there is no sound when the turn signal is on, contact an authorized Volkswagen dealer or authorized Volkswagen Service Facility and have the vehicle inspected.
3-blinkturnsignal
To use the 3-blink turn signal, move the turn signal and high beam lever upward or downward to the pressure point and then release the lever. The turn signal will
blink three times.
To stop the 3-blink turn signal before it ends, move the turn signal and high beam lever immediately to the pressure point in the opposite direction and release.
The 3-blink turn signal can be activated and deactivated in the vehicle settings in the Infotainment system ⇒ Vehicle settings menu.
WARNING
Using the turn signals incorrectly, not using the turn signals, or forgetting to turn the turn signal off can mislead other road users. This can cause accidents and
serious injuries.
Always use the turn signals correctly when changing lanes, passing, or turning.
Switch the turn signal off again once you have finished changing lanes, passing, or turning.
Theemergencyflashersalsoworkwhentheignitionisswitchedoff
⇒Incaseofanemergency
.
Headlights
Switchingthelightsonandoff
98
Page 99
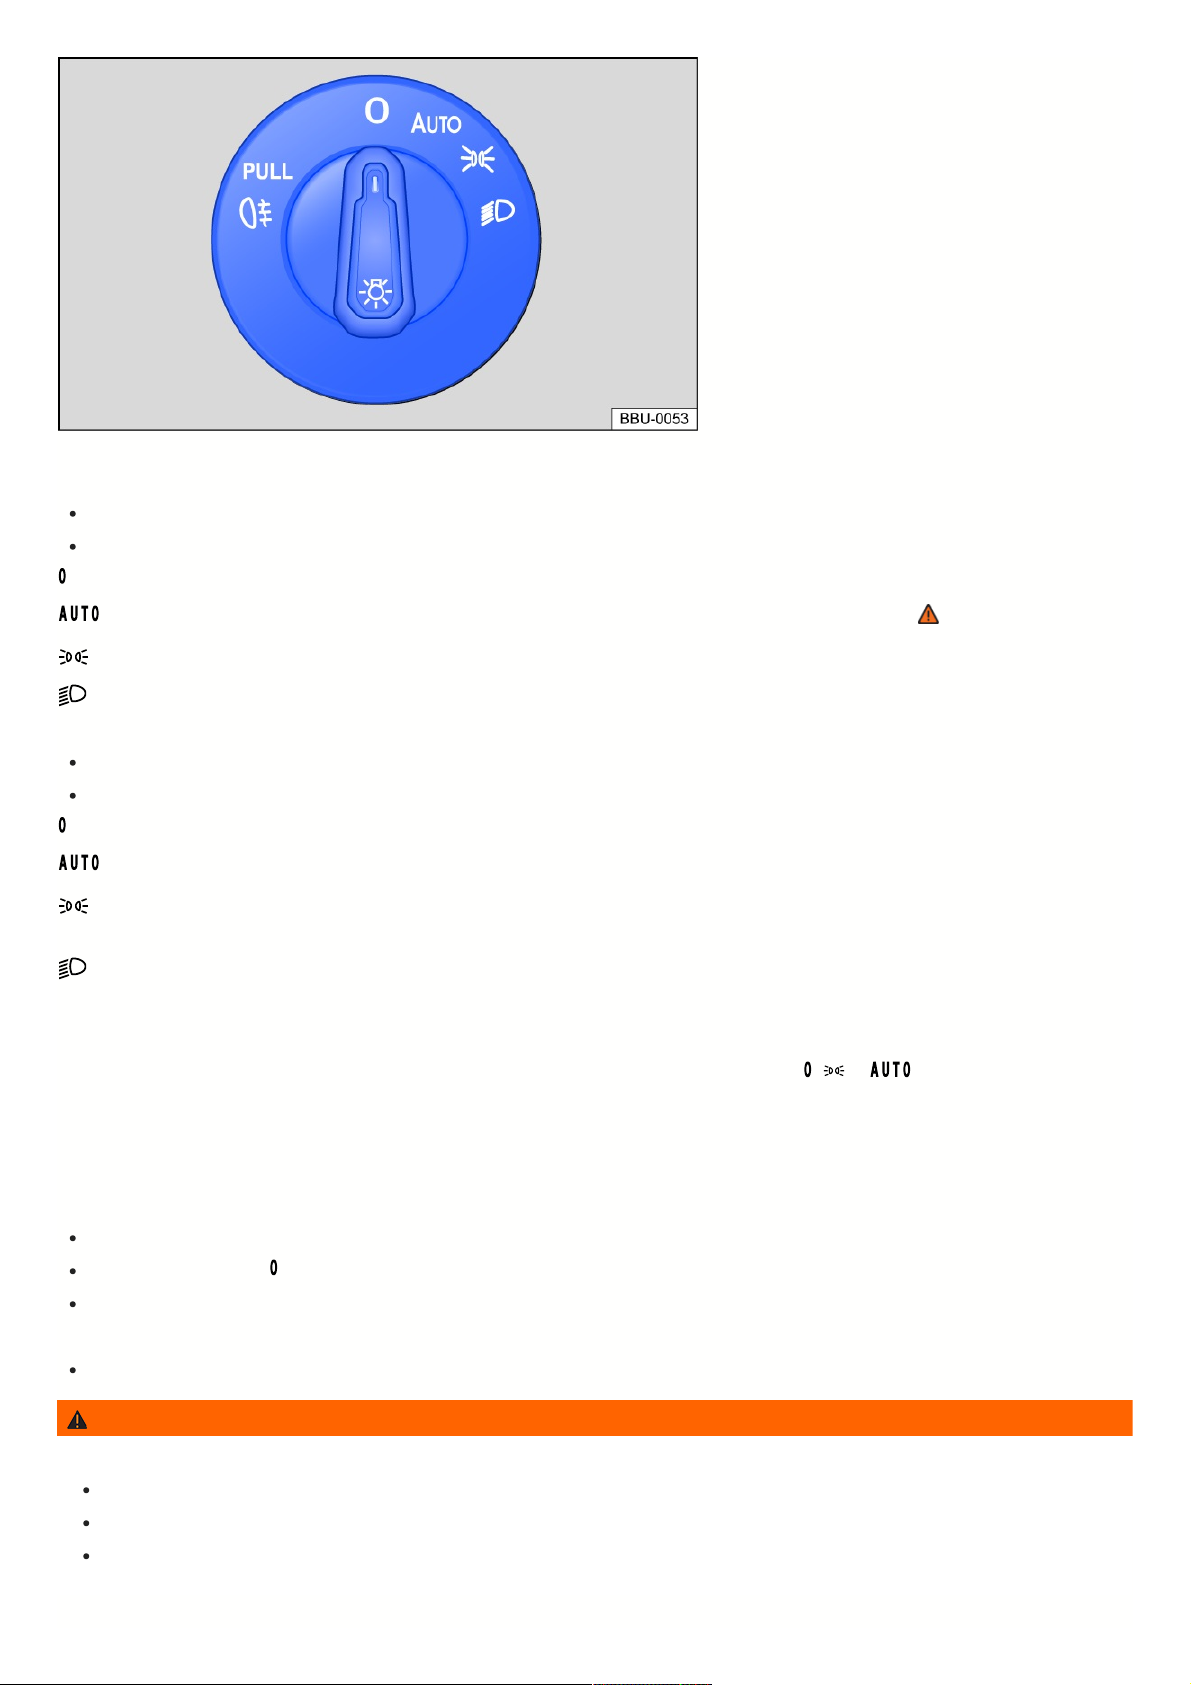
Fig.80Nexttothesteeringwheel:lightswitch(oneversion).
Switchingthelightson
Switch on the ignition.
Turn the light switch to the desired position:
The daytime running light is switched on.
Automatic headlight control: the headlights will switch on or off depending on the brightness and weather conditions ⇒ , ⇒ Light functions .
The parking lights and daytime running lights are turned on. The green symbol in the light switch turns on.
The low beam headlights are switched on.
Switchingthelightsoff
Switch the ignition off.
Turn the light switch to the desired position:
The lights are switched off.
The orientation lighting can be switched on ⇒ “Exit lighting” and “Entry lighting” function (orientation lighting) .
The parking lights or continuous parking light on both sides of the vehicle are switched on ⇒ Switching the continuous parking light on both sides of the
vehicle on and off. The green symbol in the light switch turns on.
Low beam headlight switched off – as long as the remote control vehicle key is in the ignition switch, the parking light remains on.
Daytimerunninglights
The optional daytime running lights can increase the visibility of your vehicle in traffic during the daytime.
The daytime running light turns on automatically every time the ignition is switched on if the light switch is in the , or position (if brightness detected).
Daytimerunninglightsparkingfunction
Depending on the equipment, the vehicle may have a daytime running lights parking function to turn off the daytime running lights temporarily when the ignition is
switched on.
Switch off the daytime running lights:
Switch the ignition on.
Turn the light switch to the position.
Set the electronic parking brake.
Switch on the daytime running lights:
Switch off the electronic parking brake.
WARNING
Accidents and serious injuries may occur if the road is not well lit and the vehicle cannot be seen by others on the road, or is very difficult to see.
The light assistance systems are only aids. The driver is always responsible for turning on the correct vehicle lighting.
Always turn on the low beam headlights in the dark, in the fog, and when visibility is poor.
Regularly check that the lighting systems and turn signals are functioning correctly.
99
Page 100

WARNING
The parking lights or daytime running lights are not bright enough to illuminate the road sufficiently and to be seen by other road users.
Always turn on the low beam headlights in the dark, in the fog, and when visibility is poor.
The taillights do not switch on with the daytime running lights. A vehicle without its taillights turned on may not be seen by other road users in the dark, in
the fog, and when visibility is poor.
WARNING
Automatic headlight control only turns the low beam headlights on and off when there are changes in brightness.
Turn on the low beam headlights manually in certain weather conditions, such as in fog.
Whenreversegearisengaged,thecorneringlightonbothsidesofthevehiclemayturnontobetterilluminatethesurroundingswhilemaneuvering.
Switchingthefoglightsonandoff
When the ignition is switched on, the fog lights can be switched on with the light switch in the positions, parking lights and low beam headlights
⇒
Switching the lights on and off :
Switching on the fog lights : pull the light switch up to the first level. The green indicator light in the light switch will turn on.
To switch off the fog lights, push in the light switch or turn to the position.
Whentheautomaticheadlightcontrolisswitchedon andthefoglightsorrearfoglightsareswitchedon,thelowbeamheadlightswillalsobeon
regardlessofthesurroundingbrightness.
Lightfunctions
Parkinglights
If the parking light function is switched on, both headlights will turn on along with the parking lights, sections of the taillights, the license plate lighting, and the
buttons in the center console and in the instrument panel. When the ignition is switched on, the daytime running lights also turn on.
If the vehicle is not locked from the outside when the ignition is switched off, the continuous parking lights on both sides of the vehicle will turn on automatically after
approximately ten minutes to reduce the load on the 12 V vehicle battery ⇒ Switching the continuous parking light on both sides of the vehicle on and off .
Automaticheadlightcontrol
If automatic headlight control is switched on, the vehicle lighting switches on and off automatically along with the instrument and switch lighting, depending
on the lighting conditions. When the lights are turned on, the yellow indicator light turns on.
Automatic headlight control is merely an aid and cannot always accurately detect all driving situations.
If the vehicle is equipped accordingly, the activation time of the automatic headlights can be adjusted in the vehicle settings in the Infotainment system ⇒ Vehicle
settings menu.
Corneringlights
The cornering light turns on automatically when turning slowly or around very tight curves.
Dynamiccorneringlight
The dynamic cornering lights provide optimum illumination of the roadway. The dynamic cornering light only works when the automatic headlights are
switched on and at speeds of more than approximately 10 km/h (6 mph).
If the vehicle is equipped accordingly, the dynamic cornering light can be activated or deactivated in the Vehicle Settings menu of the Infotainment system
⇒
Vehicle settings menu.
Warningtoneswhenlightsarenotturnedoff
If the vehicle key was removed from the ignition lock or the ignition was switched off with the starter button and the driver door was opened, the warning tones will
sound under the following conditions:
With the parking lights switched on.
If the parking light function is turned on or the fog lights are turned on.
If the “Coming home” function is switched on, the warning tone to indicate that the lights are still turned on will not sound when leaving the vehicle.
Switchingthehighbeamheadlightsonandoff
100
 Loading...