

Page 1

TVM 3460 Series
TVM 3660 Series
Full Installation Guide
Everything you need to get your TV safely on the wall, in no time
Before you start
…we just wanted to say thanks for choosing Vogel’s. Smart choice.
And you’re already making another smart choice – reading the manual! Keep reading to learn all about
safe, efficient installation, and how to use your new mount.
TVM 3460/3660 Series - English 1
Page 2

Stay safe
Warning
Always read these safety instructions carefully before installing and using this product.
Following these instructions is strictly required. Incorrect mounting and/or installation could put
you, your TV, and your family at substantial risk.
Don’t dare risk it… Read all
l Vogel’s recommends that the mounting and/or installation of this product should be carried out
by a suitably qualified expert.
l Vogel’s cannot be held responsible for any injury and/or damage caused by incorrect
installation.
l Please consult the manual for your TV and ensure that the weight and size of the TV is within
the maximum weight and size limits specified for this product, and that the TV mounting bolts
used are of a suitable length and diameter. Note that not all the TV mounting accessories
provided are required for the installation of any one TV.
l The wall mounting accessories provided are exclusively intended for installation on walls made
of solid brick, solid concrete or solid wood columns.
l Any material covering the wall must not exceed 3 mm/ 0.12 inch.
l For mounting on walls made of other materials, such as hollow bricks, wood panels or
plasterboard, please consult your installer and/or specialist supplier.
l Clean the product with a dry, lint-free cloth. Do not use detergents or other solvents to clean the
product.
l Only qualified, certified personnel may repair the product. Use only original spare parts. The
use of other parts will result in voiding the warranty, and could lead to injuries.
l Alterations to the product and technical modifications are not permitted. This will void the
warranty, and could lead to injuries.
l Always store the product in a dry and safe place with a temperature between -10°C to +50°C.
l Handle and transport the product with care.
l Repack the product when transporting or not using it for a longer period of time.
l Lifting your TV is a two-person job. Don’t be bold!
TVM 3460/3660 Series - English 2
Page 3

What’s in your box?
l Something missing? Make sure your packaging has everything in place:
A. Wall mount
B. Interface bars
C. Interface clips
D. Safety instructions
E. Bolts for fastening strips on TV (see contents below)
F. Spacers
G. Washers Ø 18 mm
H. Screws
I. Plugs (fischer© DuoPower)
J. Washers Ø 22 mm
K. Covers
L. Protective TV patches
M. Cable clips
N. Cable clip for wall plate
O. Spirit level
P. Thumbnut
Q. Clip covers
R. Hole reducers
TVM 3460/3660 Series - English 3
Page 4

l Contents of the TV fasteners kit:
l 4x M6*12mm bolts
l 4x M6*25mm bolts
l 4x M6*35mm bolts
l 4x M8*12mm bolts
l 4x M8*25mm bolts
l 4x M8*45mm bolts
l 4x M6 washer
l 4x spacer 10mm
l 4x spacer 5mm
You don't need all fasteners to mount your TV. Store the rest for later or other use!
Got your tools ready?
l
Don’t start without all the necessary tools:
l Crosshead screwdriver
l Drilling machine
l 10 mm or 25/64” concrete/brick drill (for concrete/brick walls only)
l 5 mm or 13/64” concrete/brick drill (for concrete/brick walls only)
TVM 3460/3660 Series - English 4
Page 5

l 5 mm or 13/64” wood drill (for wooden walls only)
l Stud finder (optional)
l Socket wrench no. 13
l Pencil
l M4 (4mm) Allen key
Take care of your safety
l Who cares about looking cool? Always wear personal protective equipment:
l Eye protection
l Ear protection
l Safety shoes
TVM 3460/3660 Series - English 5
Page 6

Ready… set… get installing!
Step 1: Attach the clips to the TV
1.
Carefully place the TV face down, on a clean surface without any obstacles.
2. Fix the protective TV patches Ⓛ onto the interface clips Ⓒ . Screw the interface clips Ⓒ onto
the TV with the bolts Ⓔ and the hole reducers Ⓡ.
Are you missing any bolts? Or need different ones? The friendly team at Vogel’s Consumer
Care are waiting to help: vogels.com/contact
Make sure bolts and spacers are positioned correctly.
TVM 3460/3660 Series - English 6
Page 7

Refer to the user manual of your TV for the correct mounting material.
3. Loosen the pre-attached bolts Ⓒ with the allen key Ⓞ .
4. Remove both thumbnuts Ⓟ from the interface bars Ⓑ.
5. Slide the lower interfac e bar Ⓑ through the designated spacing of the interface clips Ⓒ . Make
sure the interface bar Ⓑ is placed in a centered position. Notice the holes on the side of this
interface bar Ⓑ . They need to face downwards.
6. Slide the upper interface bar Ⓑ through the designated spacing of the interface clips Ⓒ. Make
sure this interface bar Ⓑ is also placed in a centered position.
7. Attach both interfac e bars Ⓑ to the strips by tightening the pre-attached bolts Ⓒ with the allen
key Ⓞ .
8. Screw the thumbnut Ⓟ into the upper bar. Make sure you don’t screw it in completely, yet.
9. Click the clip cov ers Ⓠ onto the clips.
TVM 3460/3660 Series - English 7
Page 8

TVM 3460/3660 Series - English 8
Page 9
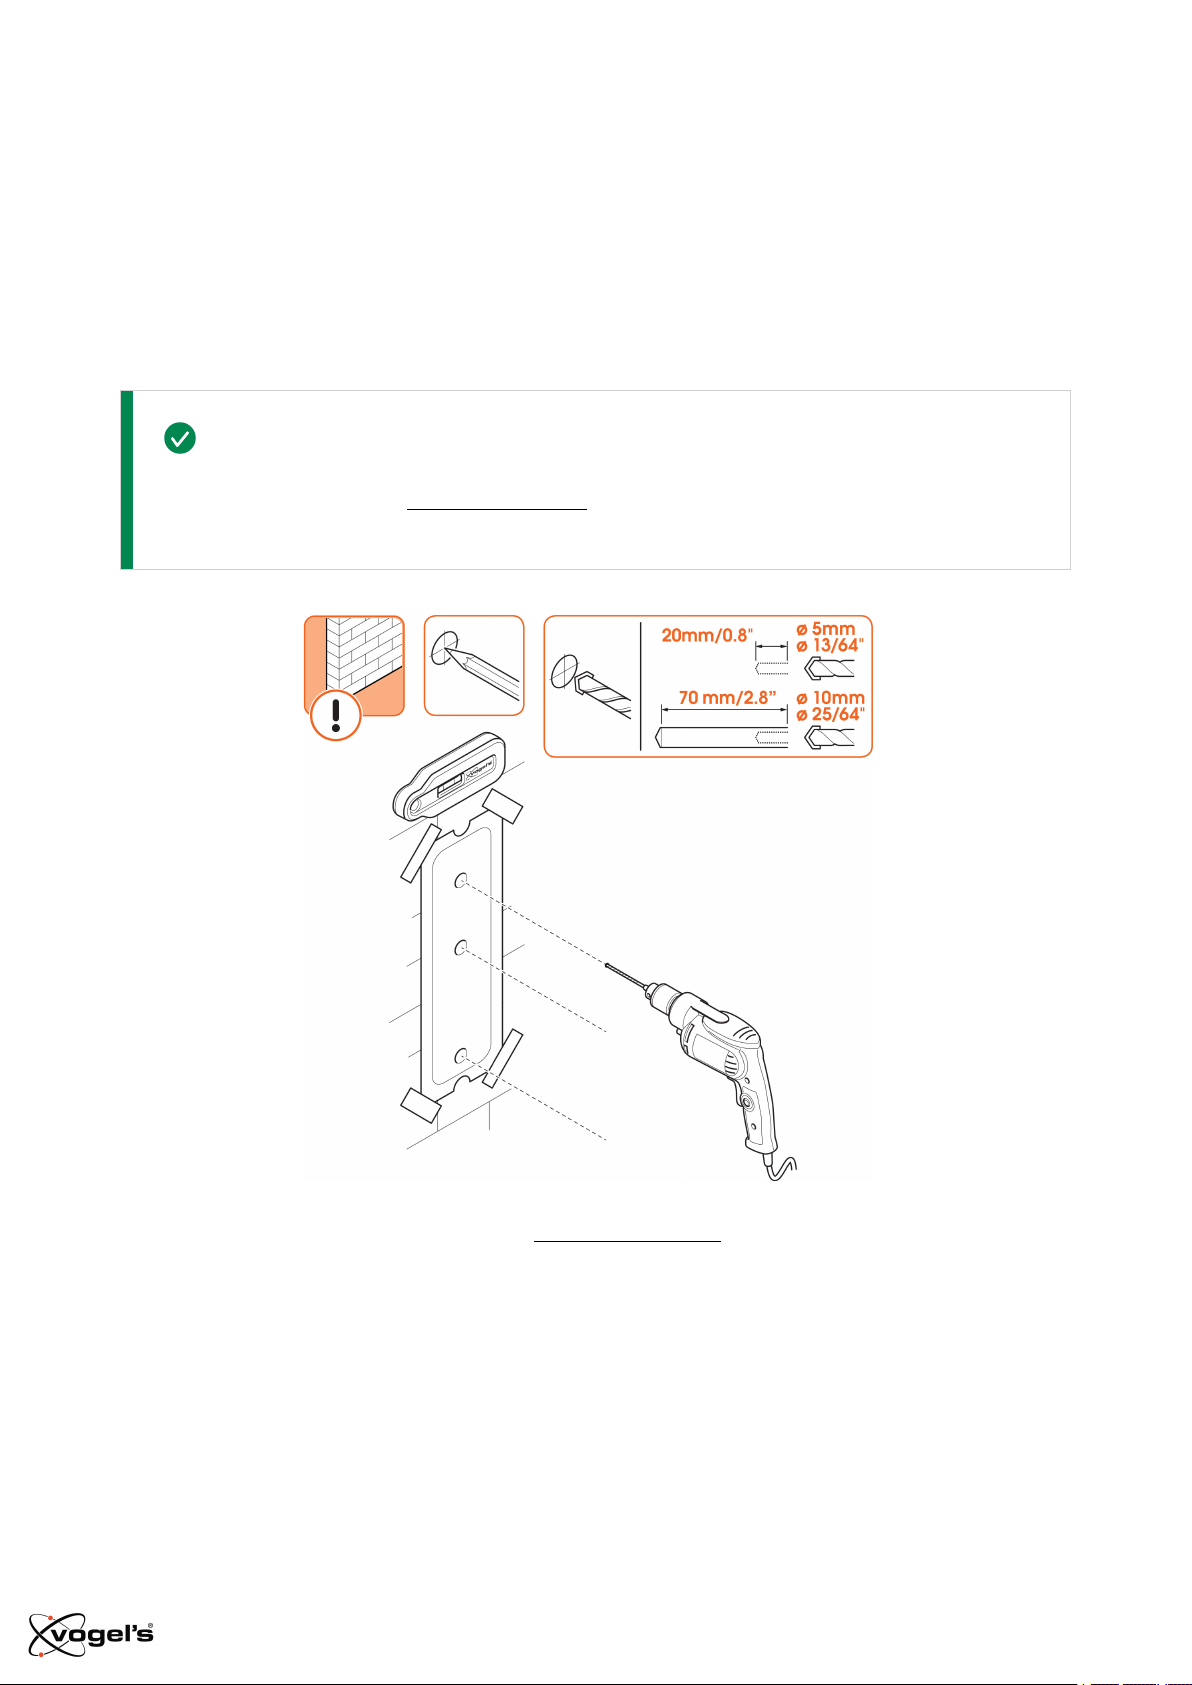
Step 2: Attach the wall mount to the wall
How well do you know your walls? What they’re made of matters more than you think…
Concrete/Brick wall
Don’t drill yet! Try our free DrillRight™ AR app to find just the right height and mark the first
hole, easily.
1. Find the perfect spot for drilling with our DrillRight™ AR app and the included drilling template.
2.
Drill the holes.
TVM 3460/3660 Series - English 9
Page 10
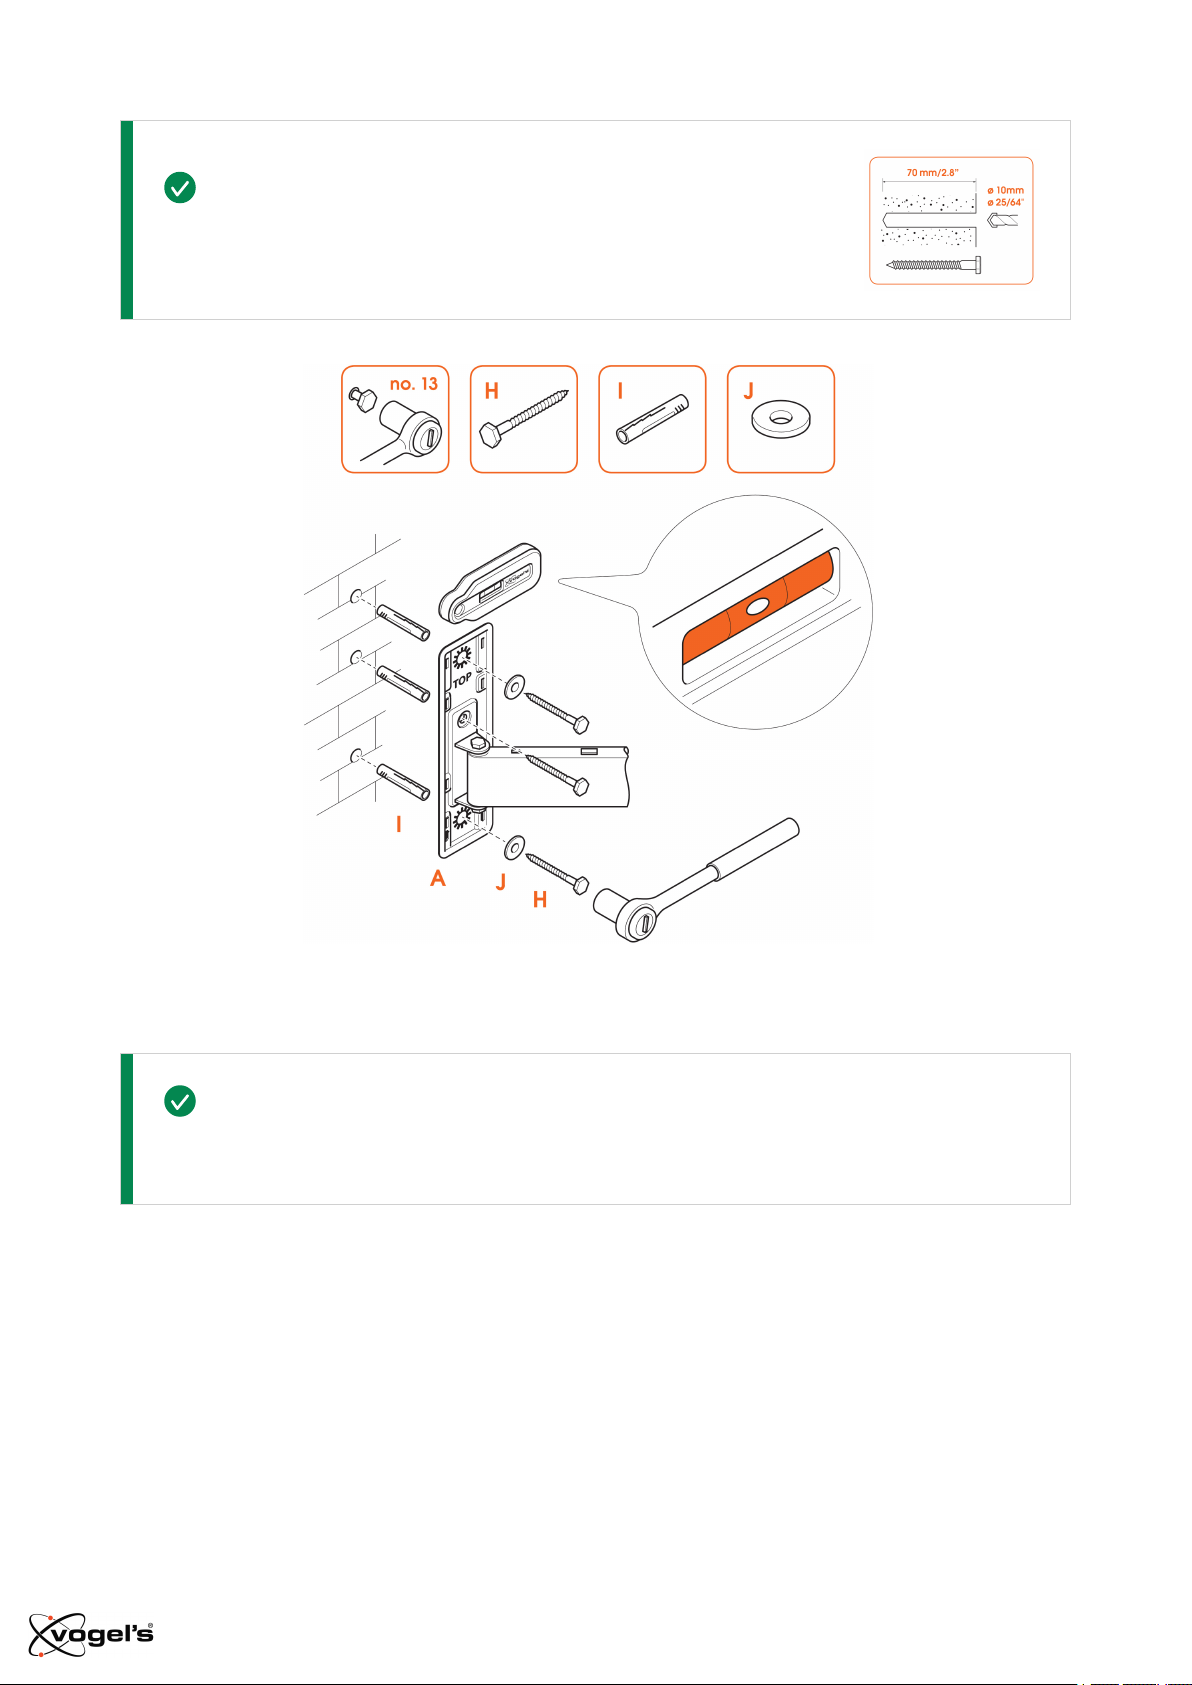
How deep do you drill? Check the length of the screw (not the plug!) to find
the right depth – this stops things from breaking.
3. Attach the wall mount Ⓐ to the wall with the screws Ⓗ , washers Ⓙ and plugs Ⓘ . Use the
spirit level to level the wall mount.
Lubricate the screws for easy screwing in.
TVM 3460/3660 Series - English 10
Page 11
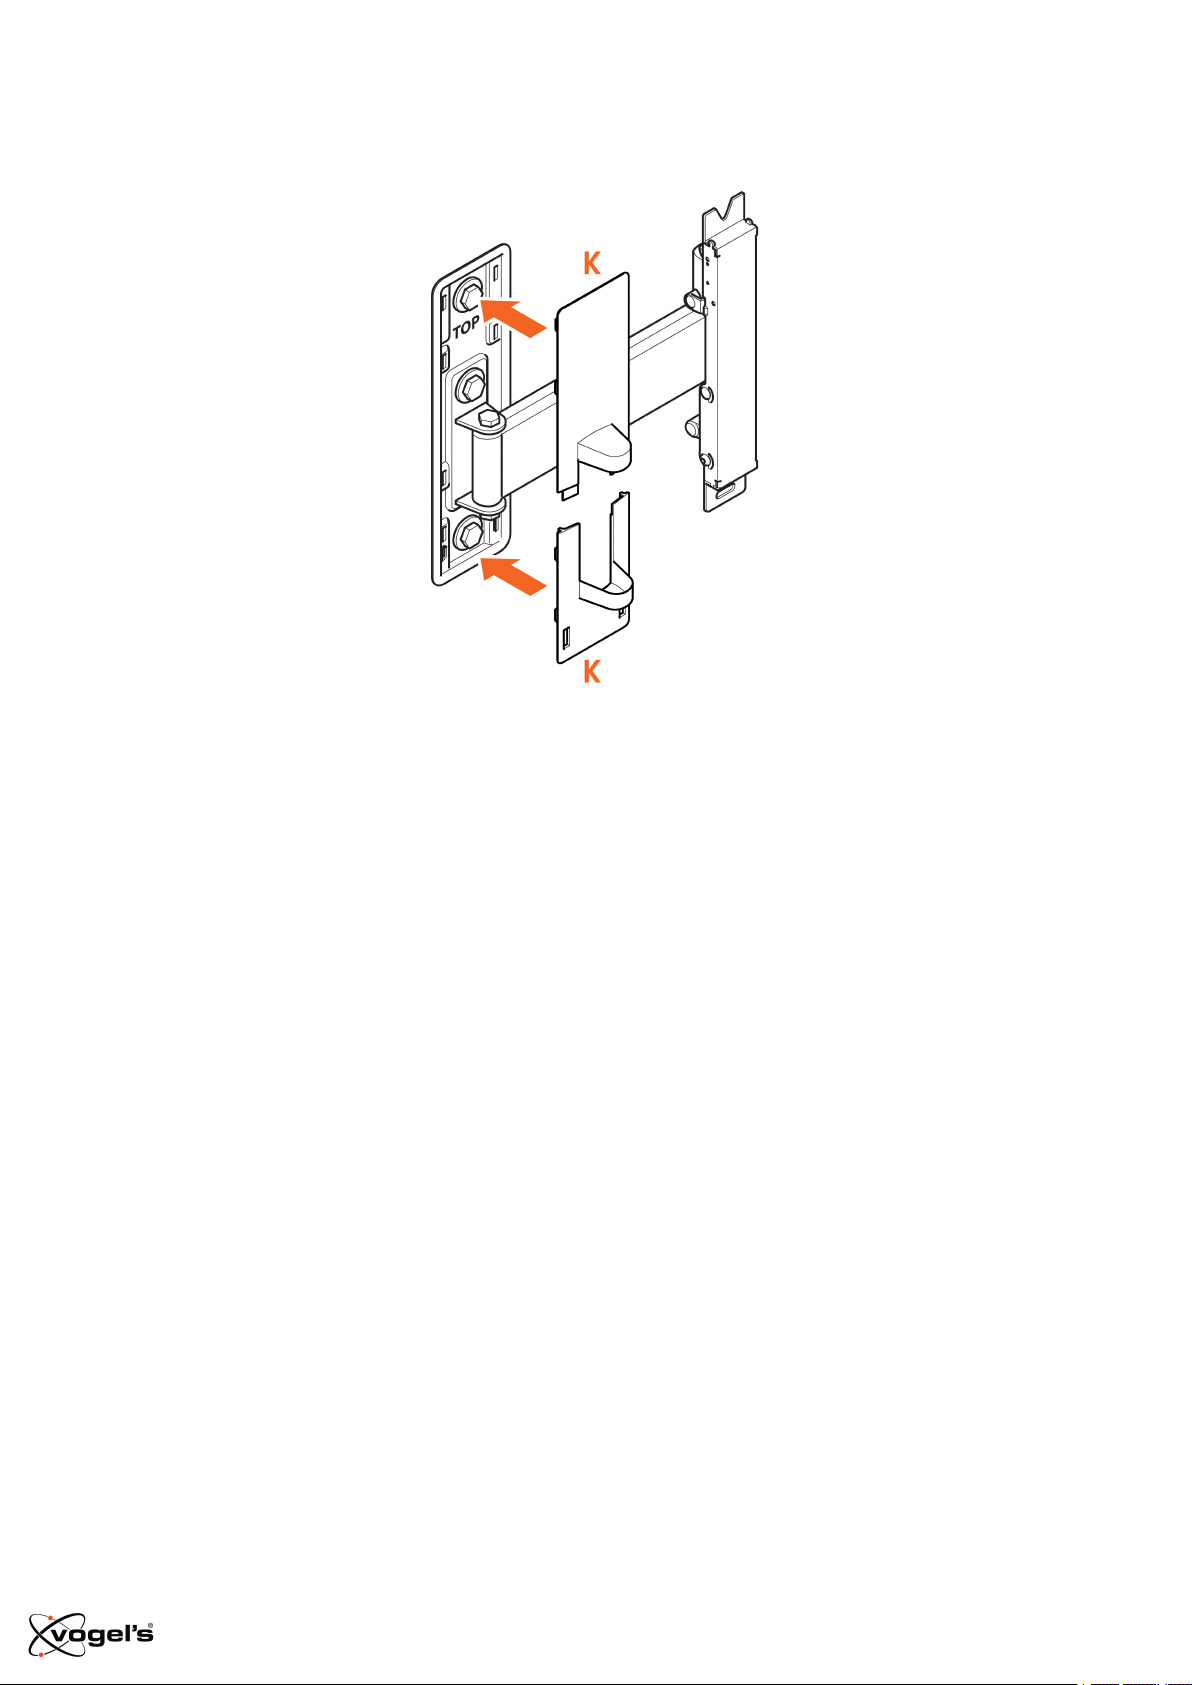
4.
Place the covers Ⓚ .
TVM 3460/3660 Series - English 11
Page 12
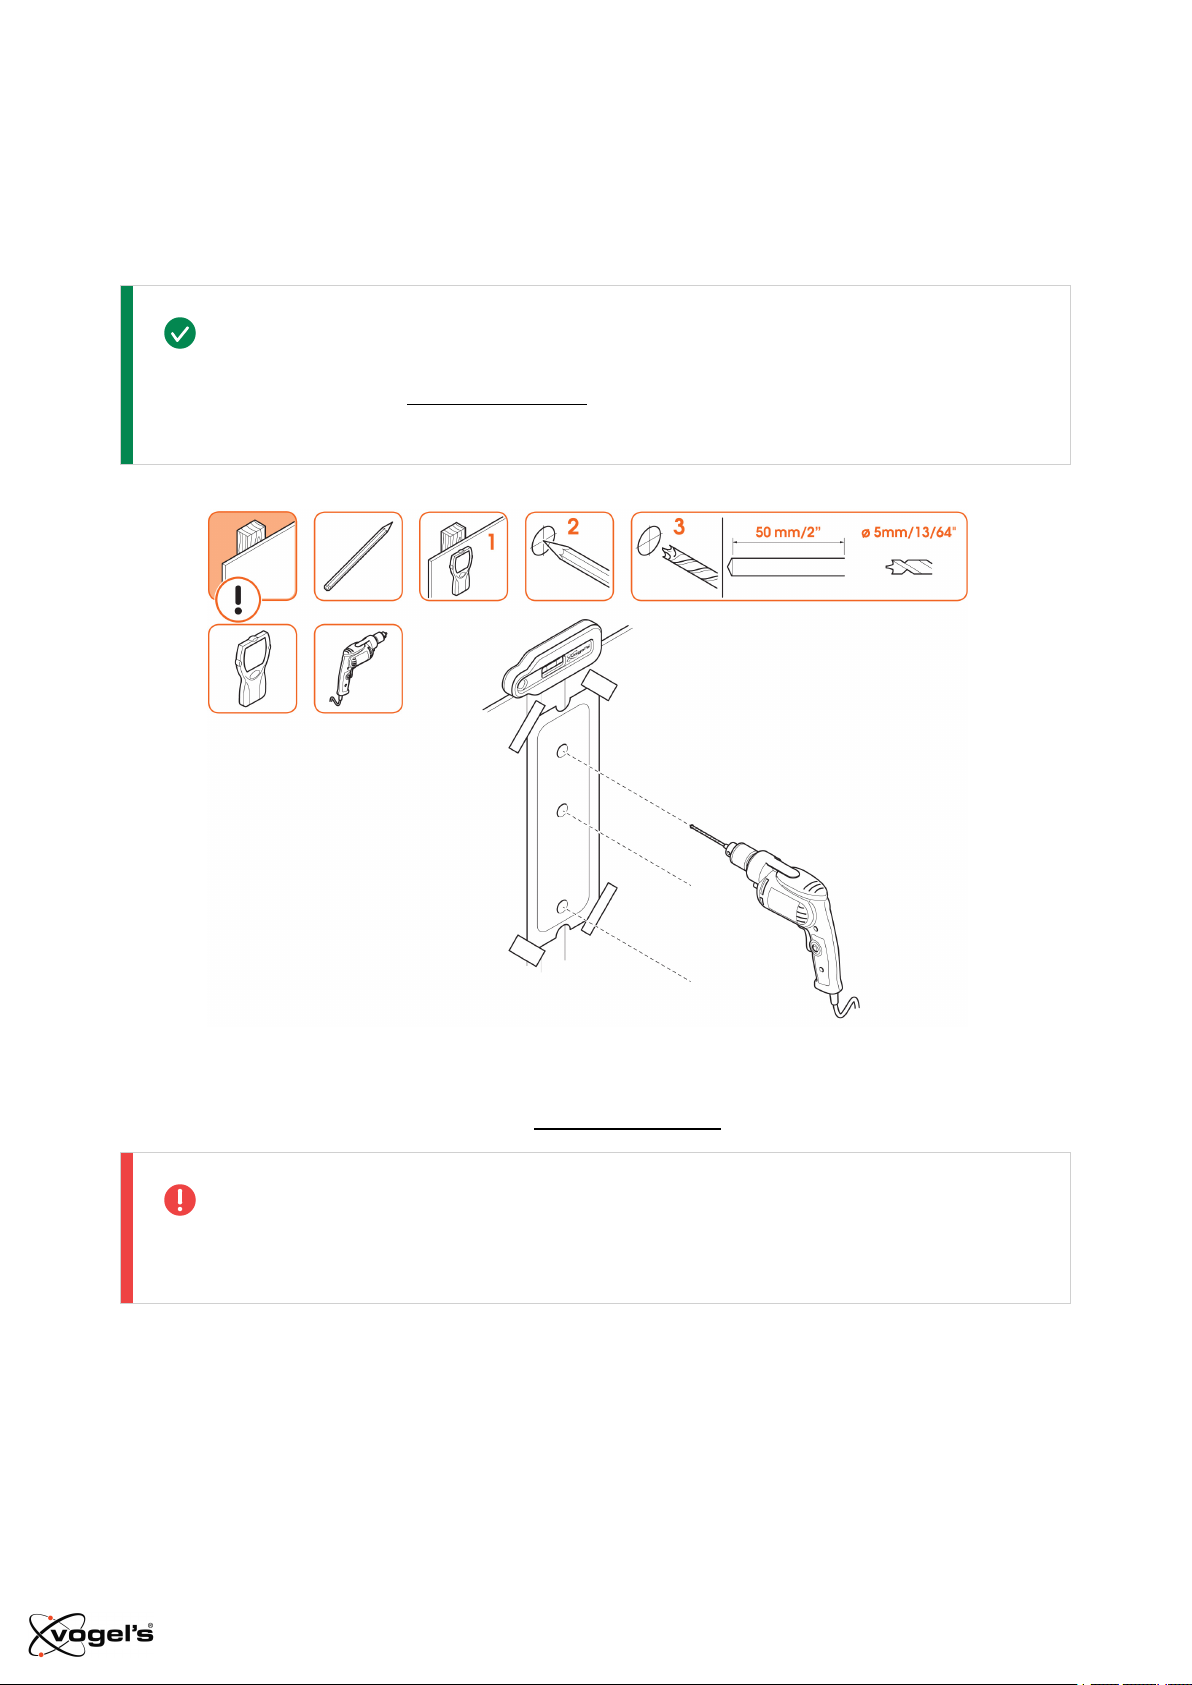
Wooden wall with studs
Don’t drill yet! Try our free DrillRight™ AR app to find just the right height and mark the first
hole, easily.
1. Don’t just guess! Always use a stud fi nder to determine the position of studs.
2. Find the perfect spot for drilling with our DrillRight™ AR app and the included drilling template.
Don’t destroy your belongings! The wall mount must always be attached to the studs.
3.
Now for the fun part… drilling the holes.
TVM 3460/3660 Series - English 12
Page 13
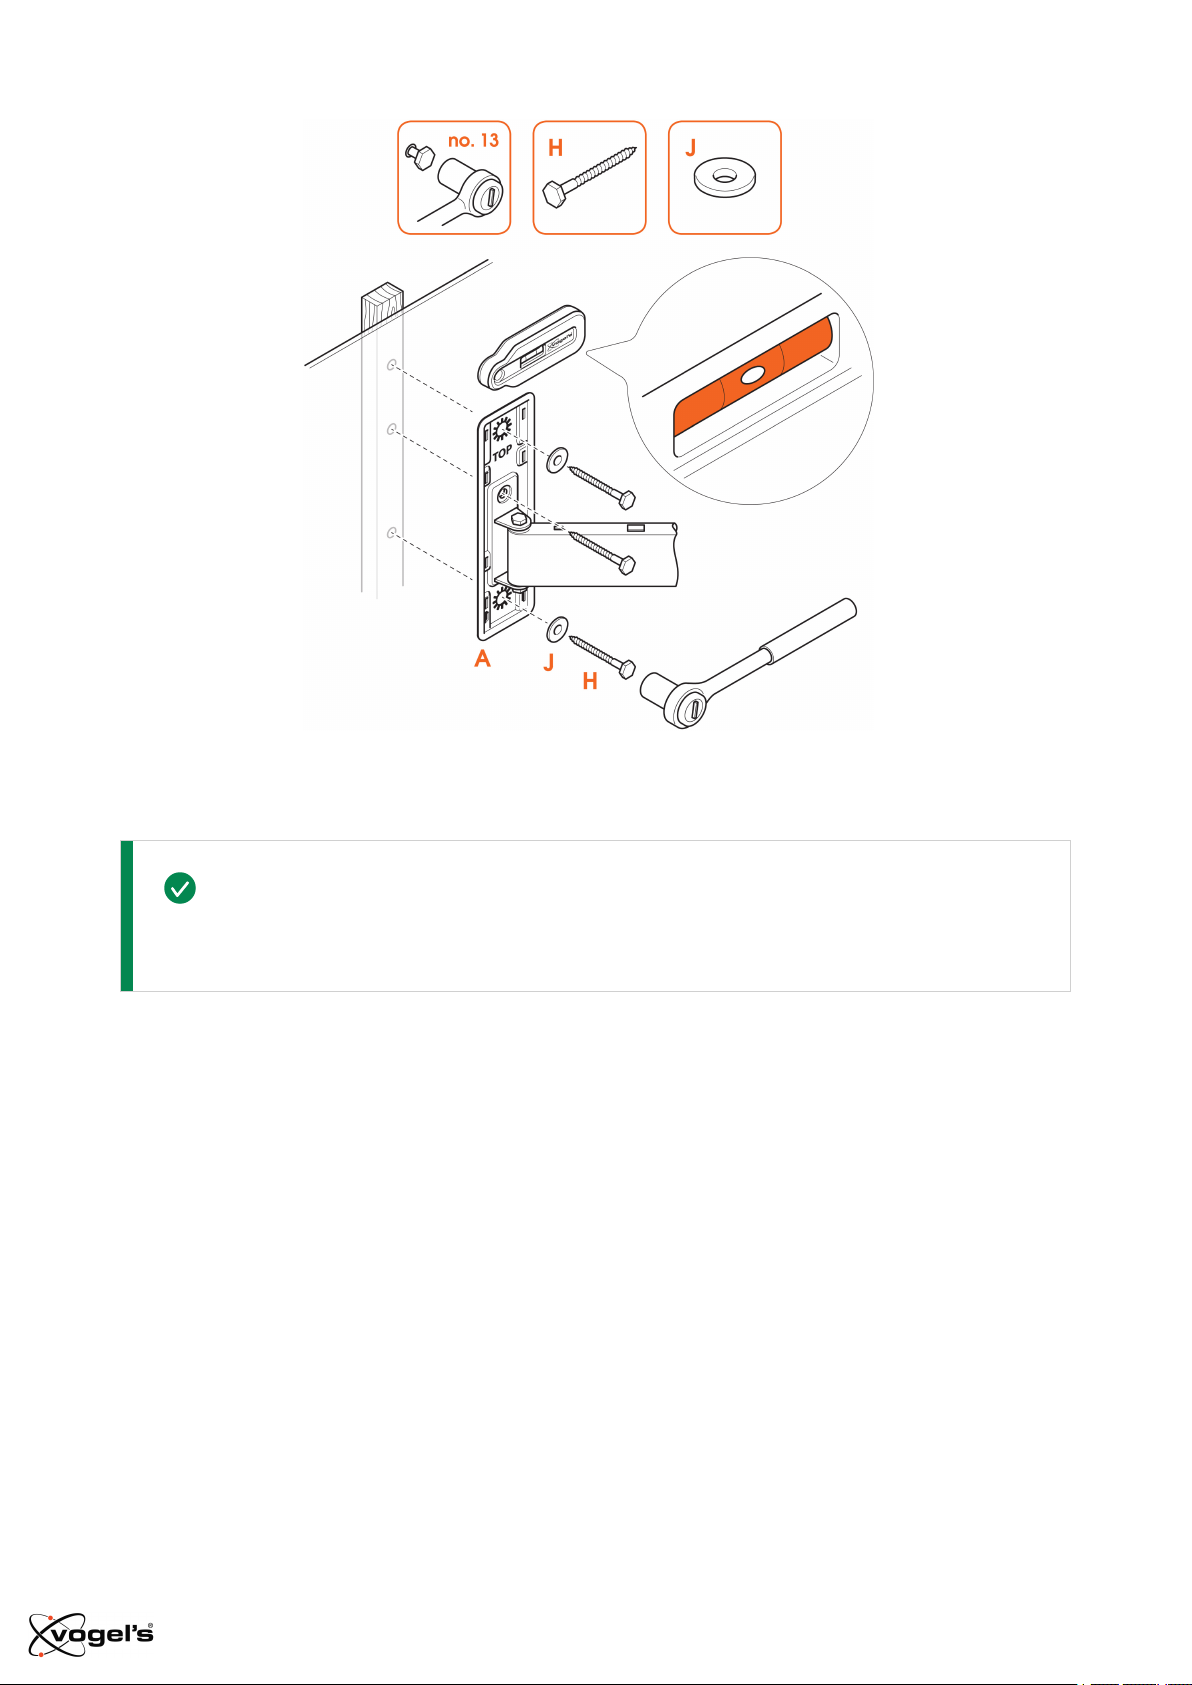
4. Attach the wall mount Ⓐ to the wooden wall with the screws Ⓗ and washers Ⓙ . Use the spirit
level to level the wall mount.
Lubricate the screws for easy screwing in.
TVM 3460/3660 Series - English 13
Page 14
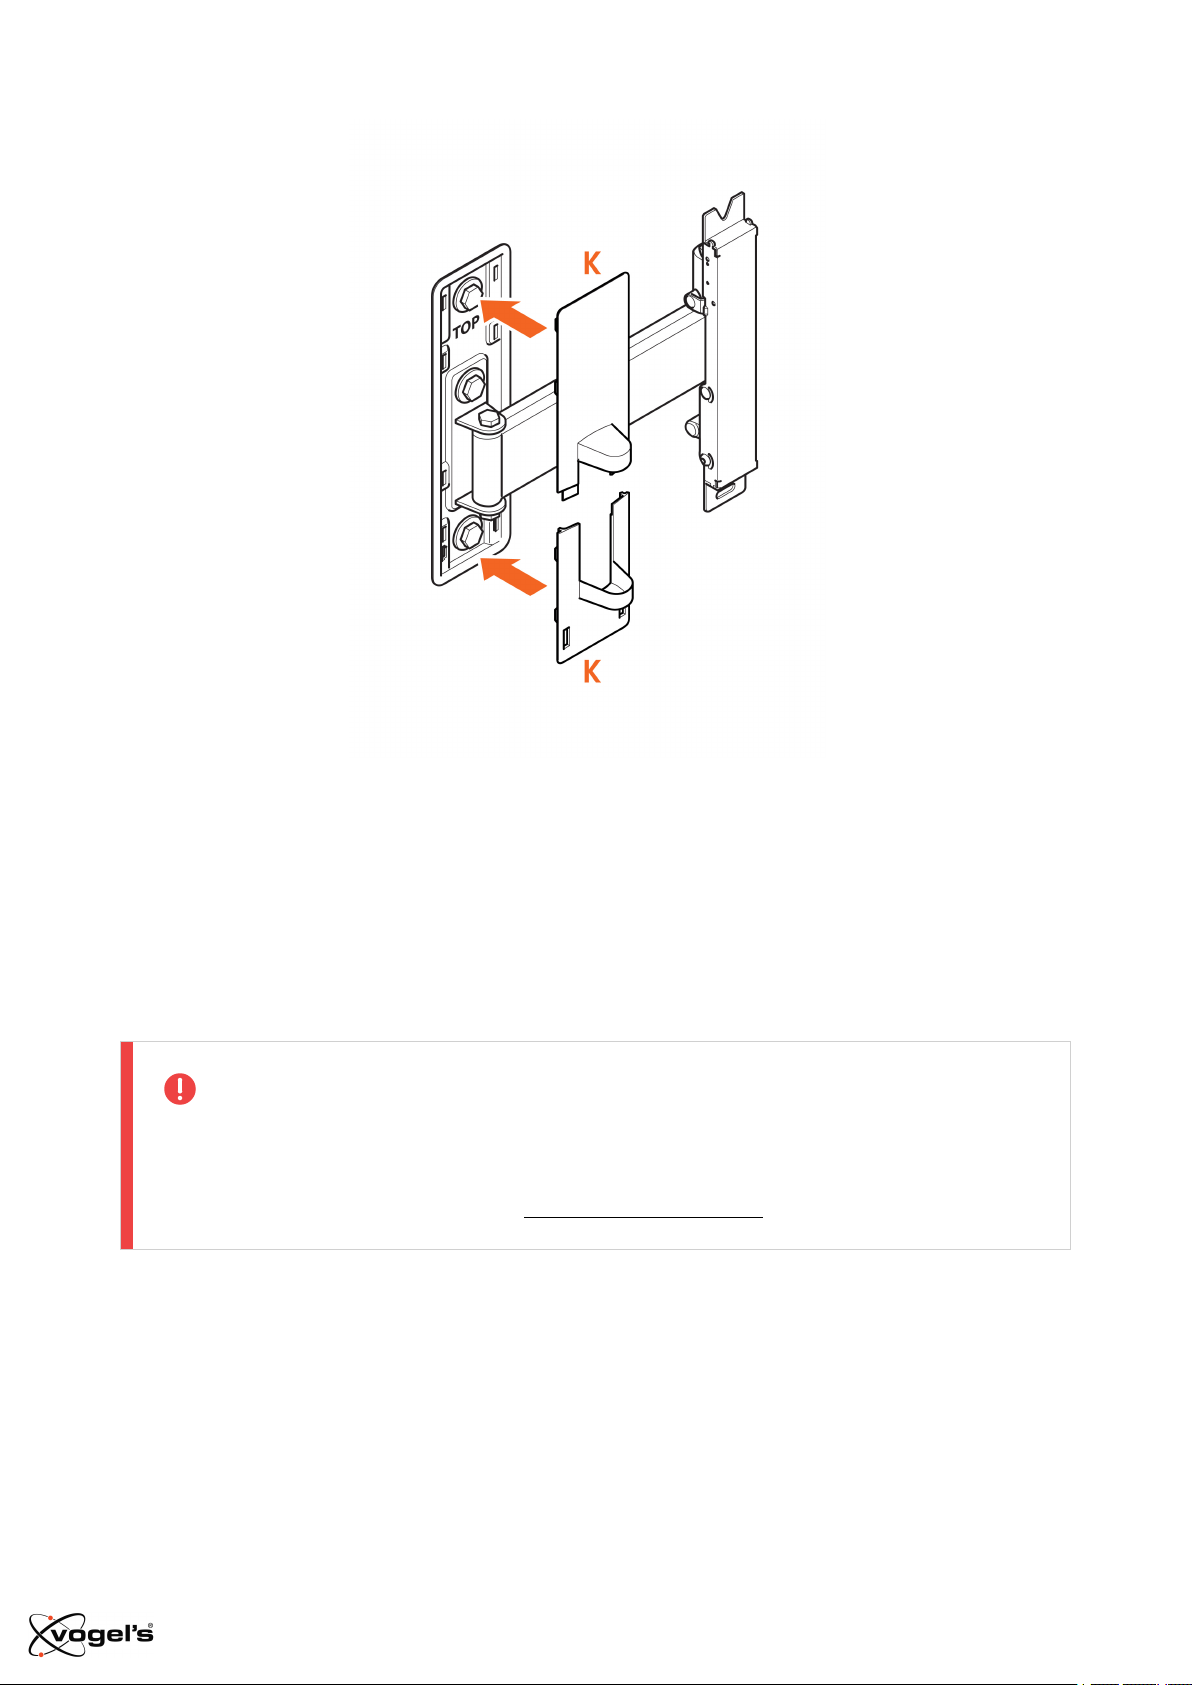
5.
Place the covers Ⓚ .
Other wall type/I don’t know my wall type
If your wall is a little special – for example, hollow bricks, metal stud walls, wood panels or
plasterboard – or you simply aren’t sure, don’t worry! Just ask your installer, specialist supplier
or the Vogel’s Consumer Care team at www.vogels.com/contact.
TVM 3460/3660 Series - English 14
Page 15
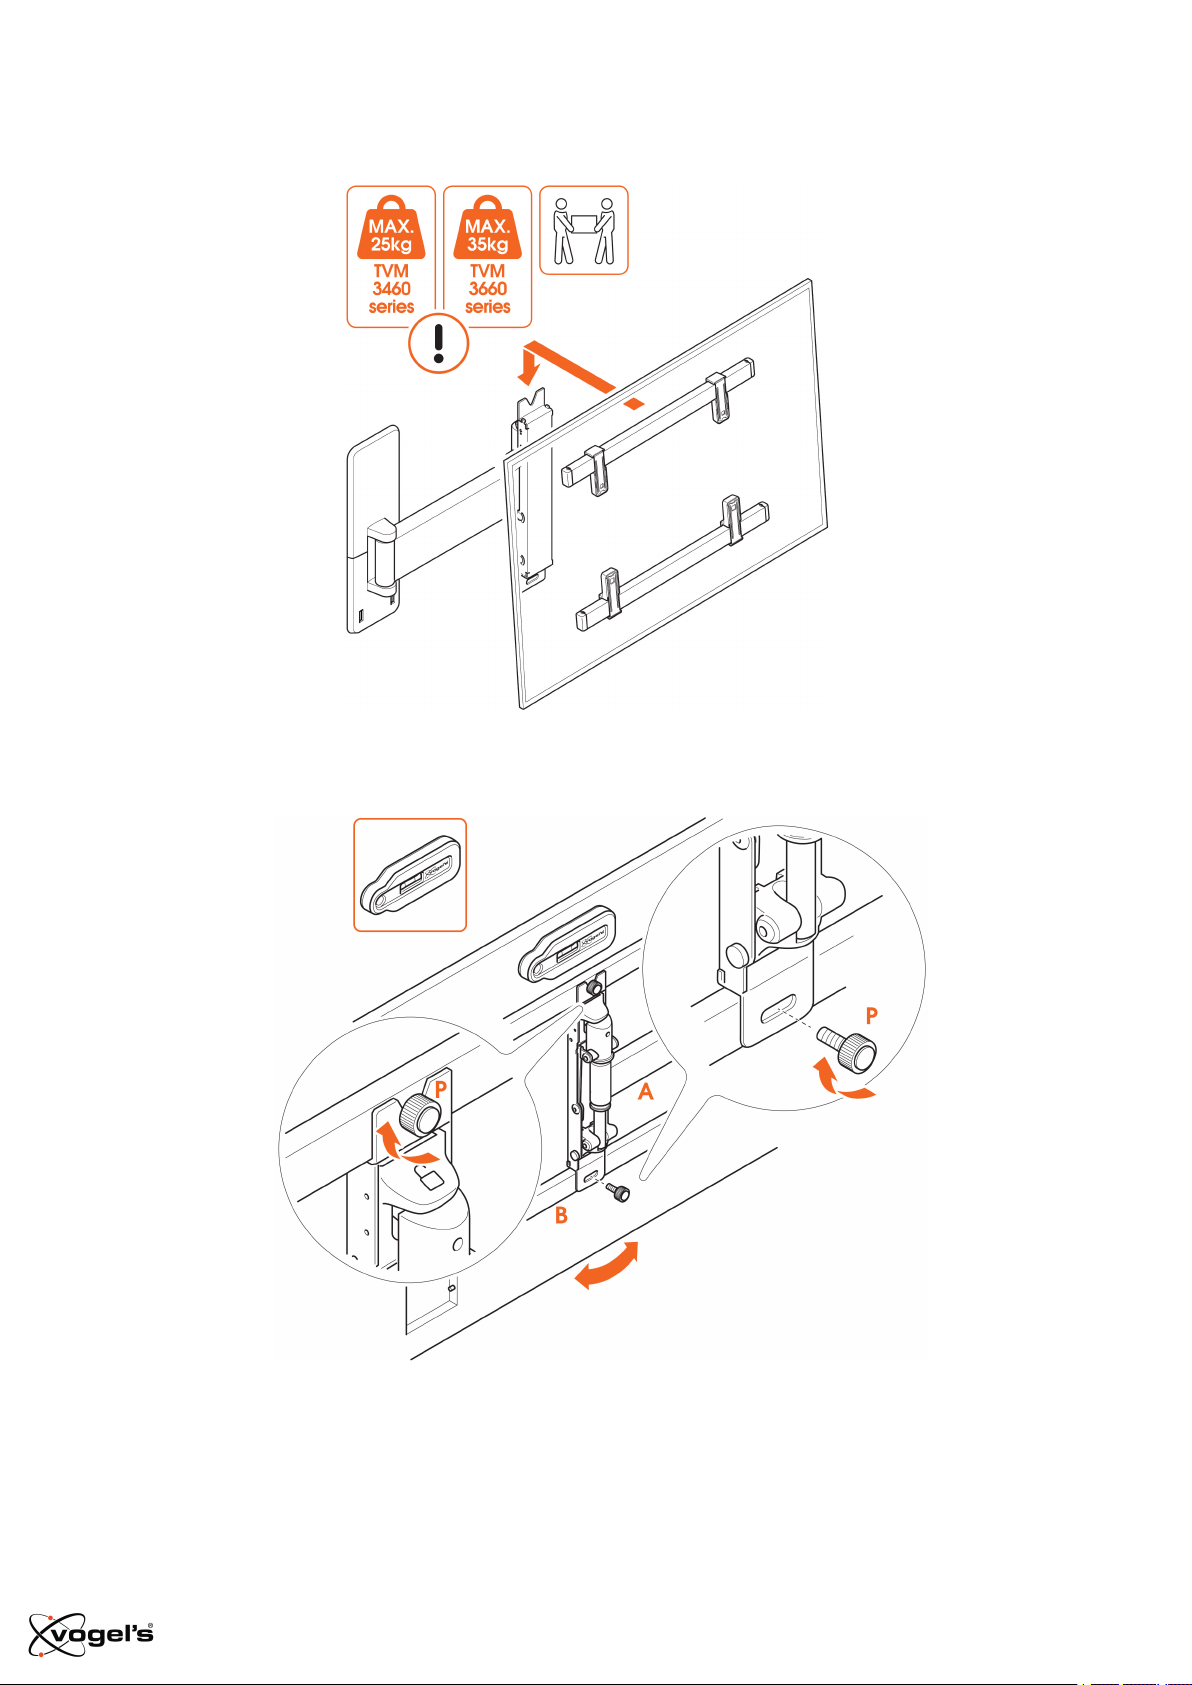
Step 3: Attach the TV to the wall mount
1. Carefully lift and attach the TV to the wall mount Ⓐ.
2. Attach the TV with the interface bars Ⓑ and clips Ⓒ to the wall mount Ⓐ .
3. Fasten the thum bnut Ⓟ . Make sure the TV is levelled, using the spirit level.
TVM 3460/3660 Series - English 15
Page 16
Lifting your TV is a two-person job. Don’t be bold!
Job done now! Enjoy watching your TV!
Handy features
Having a cable mess? Do you need inspiration about how to hide and guide your cables or how
to place other TV accessories? Take a look at our website vogels.com!
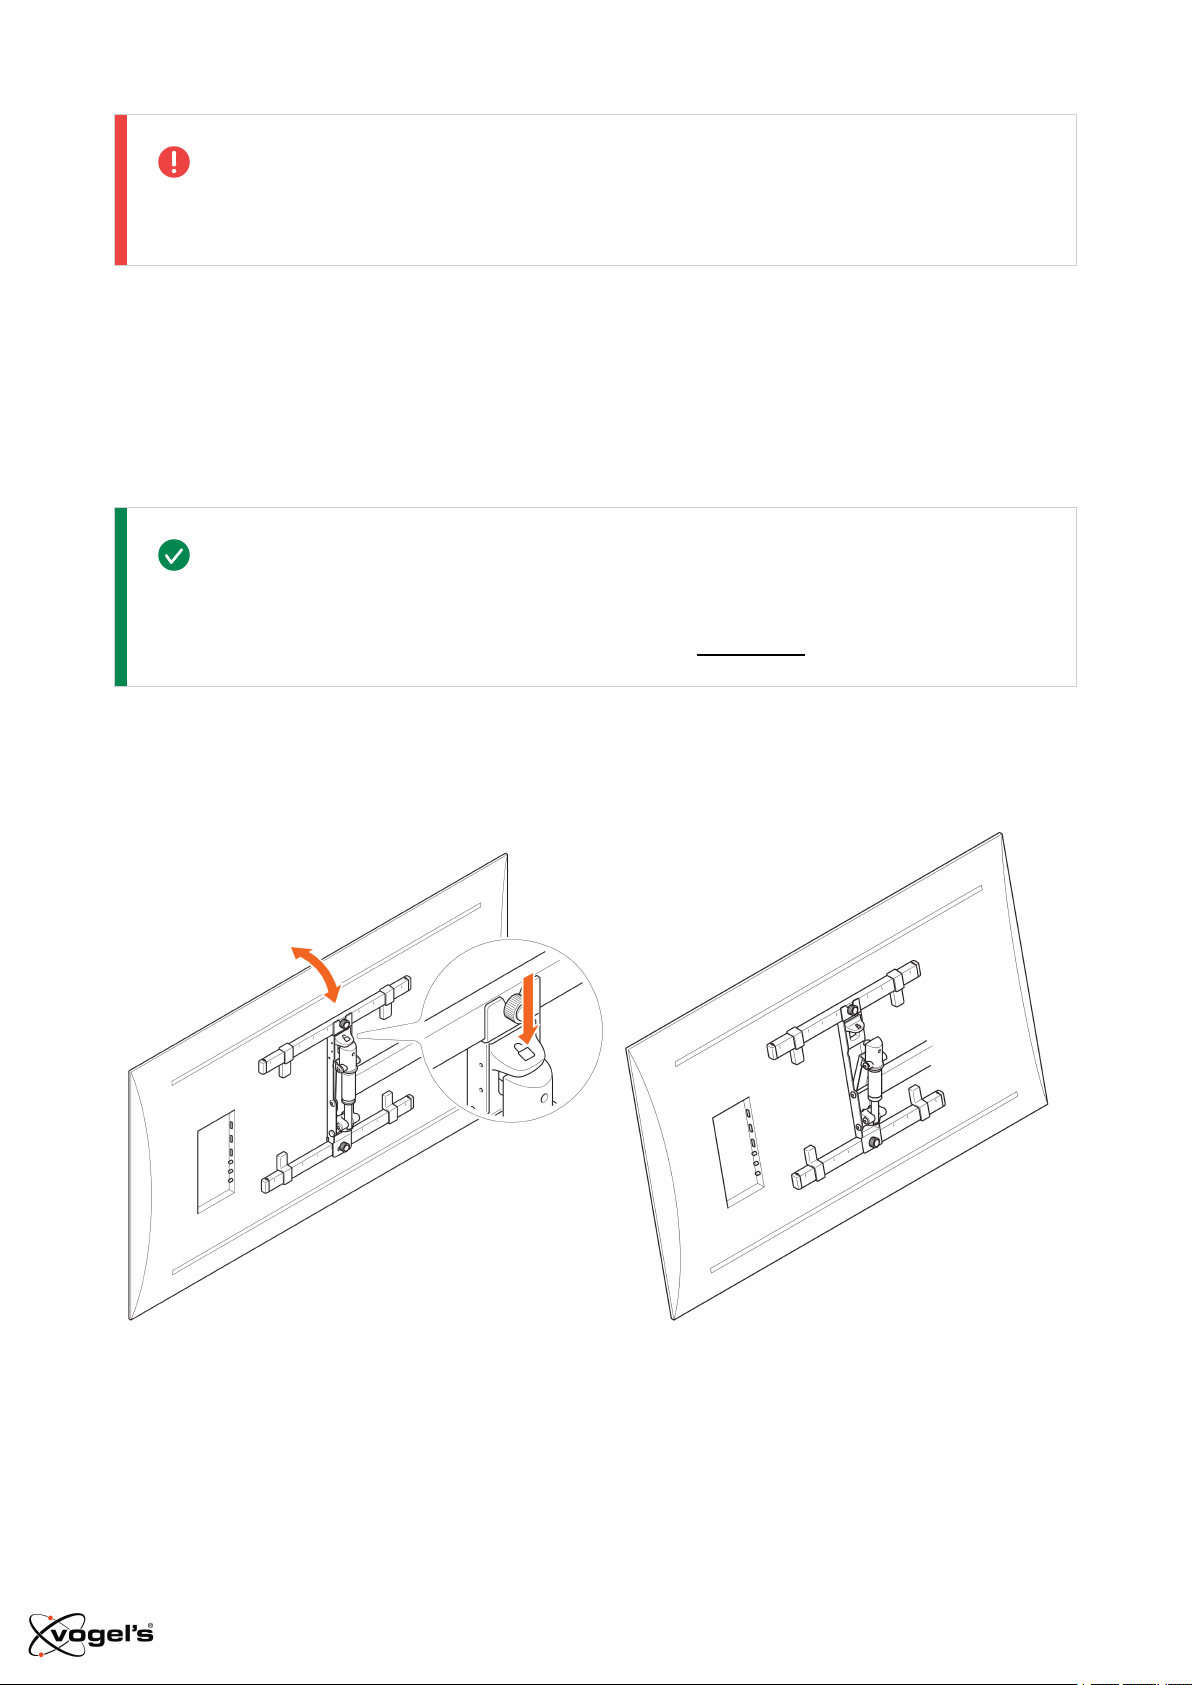
Tilt to avoid reflections
1.
Click the TiltAnchor™ button to release the TV from home position.
2.
Adjust the tilt angle.
TVM 3460/3660 Series - English 16
Page 17
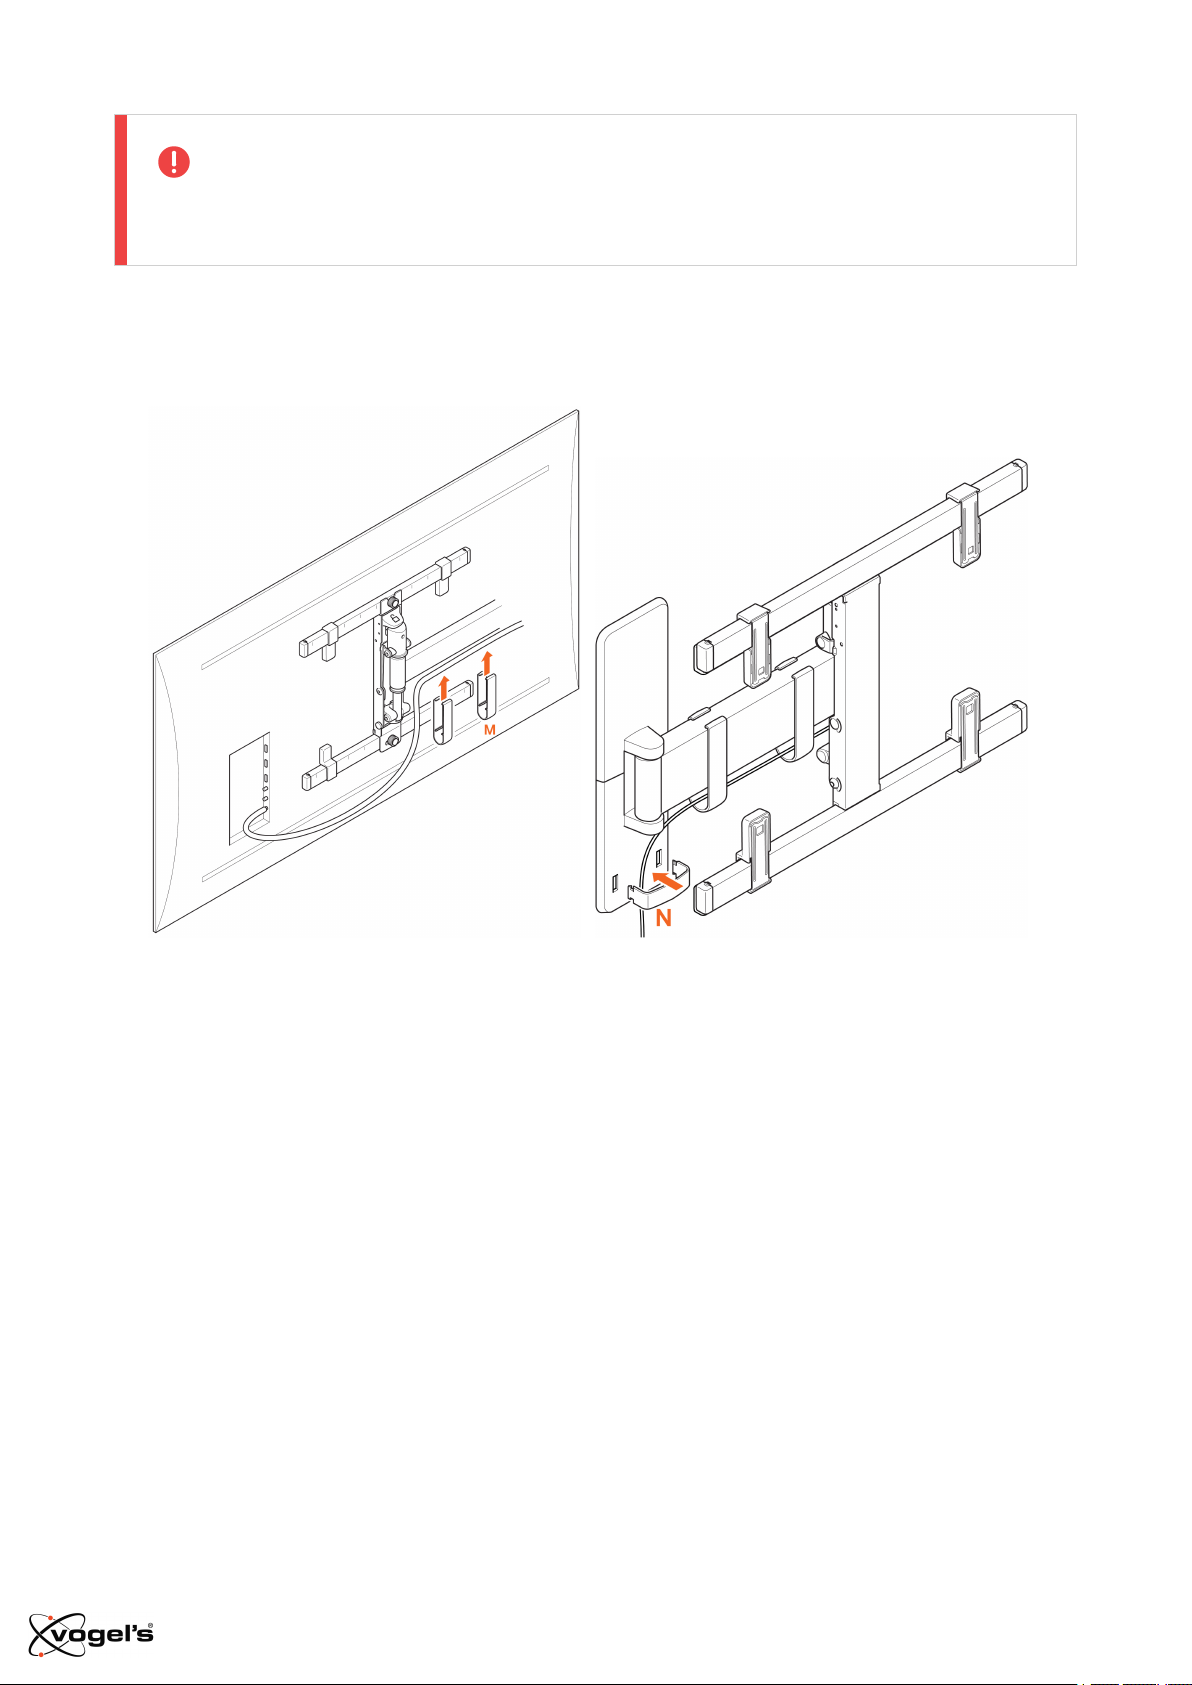
Be careful. This is a two-person job!
Guide your cables
1.
Guide the cables.
2. Place the cable clip Ⓜ on the arm, where needed.
3. Place the cable clip Ⓝ on the wall plate.
TVM 3460/3660 Series - English 17
Page 18
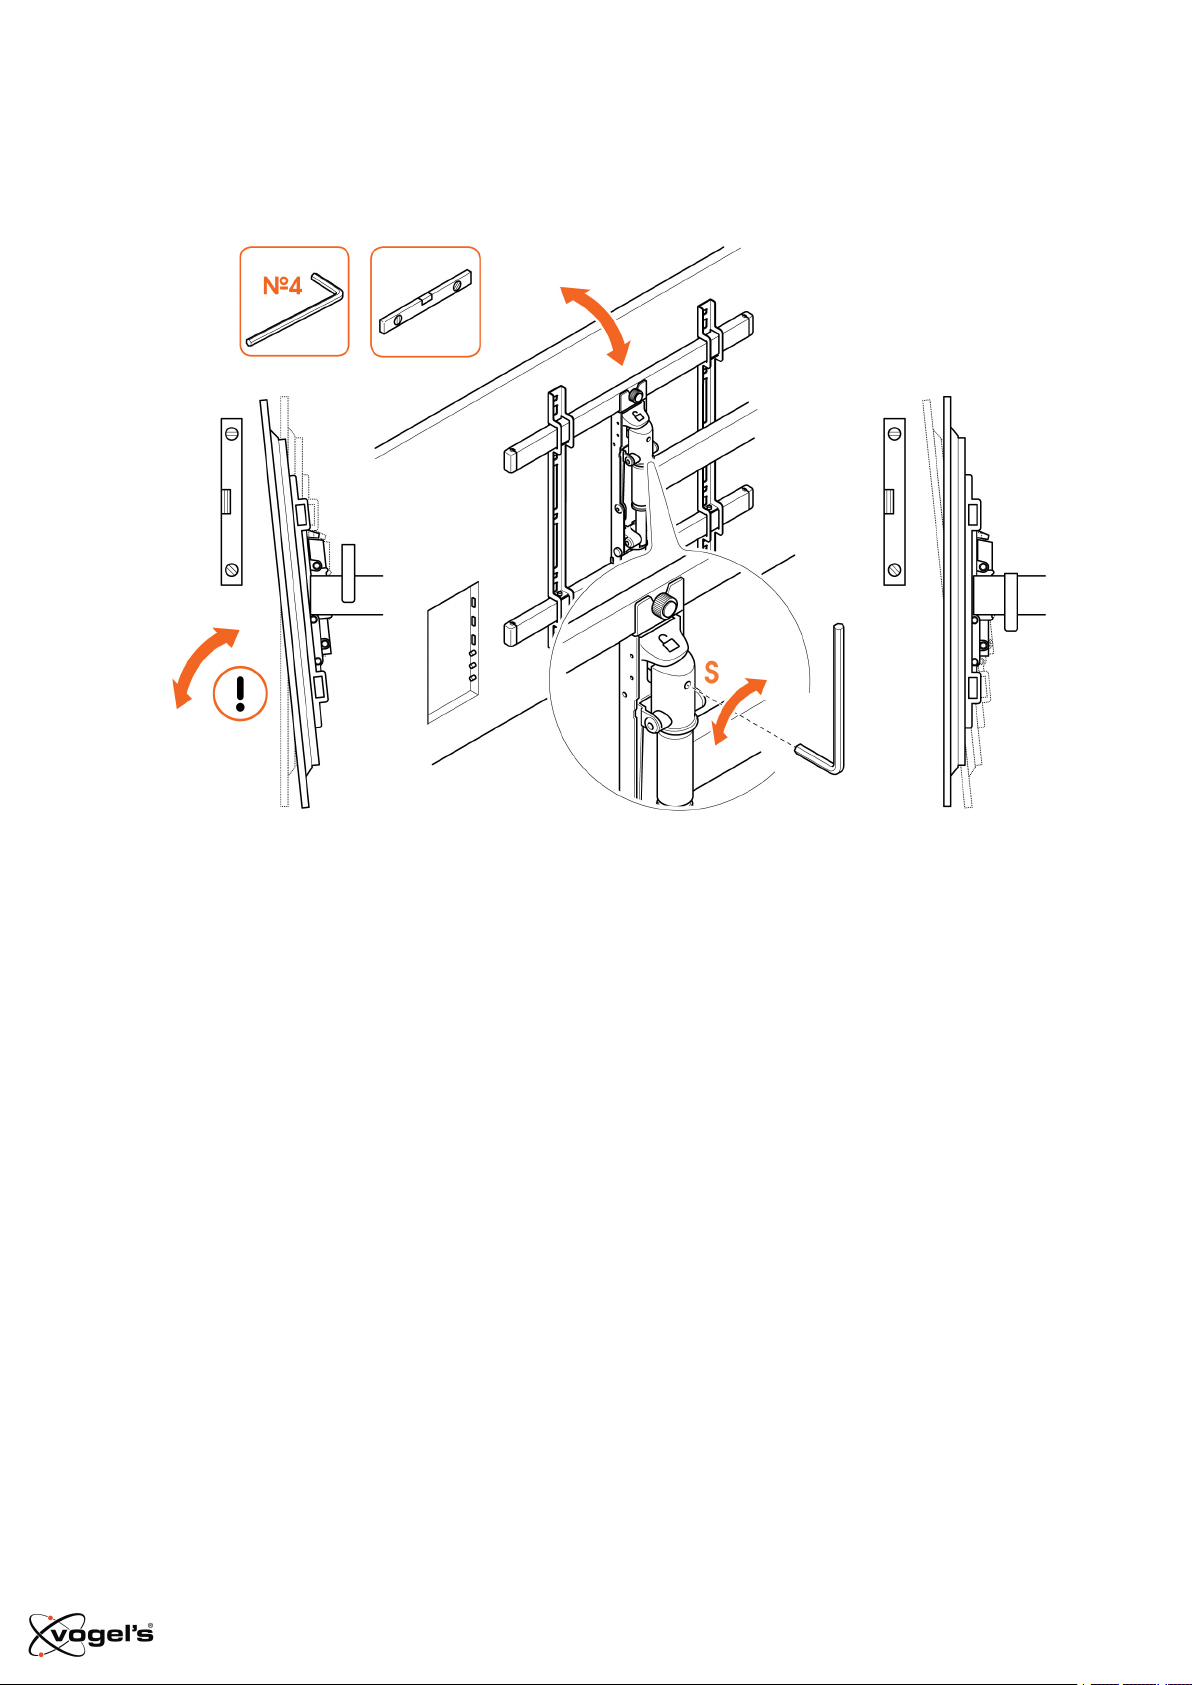
Vertical correction
1.
If the tilt option is not used and the screen still tilts downwards/upwards: tighten/loosen screw Ⓢ .
TVM 3460/3660 Series - English 18
Page 19
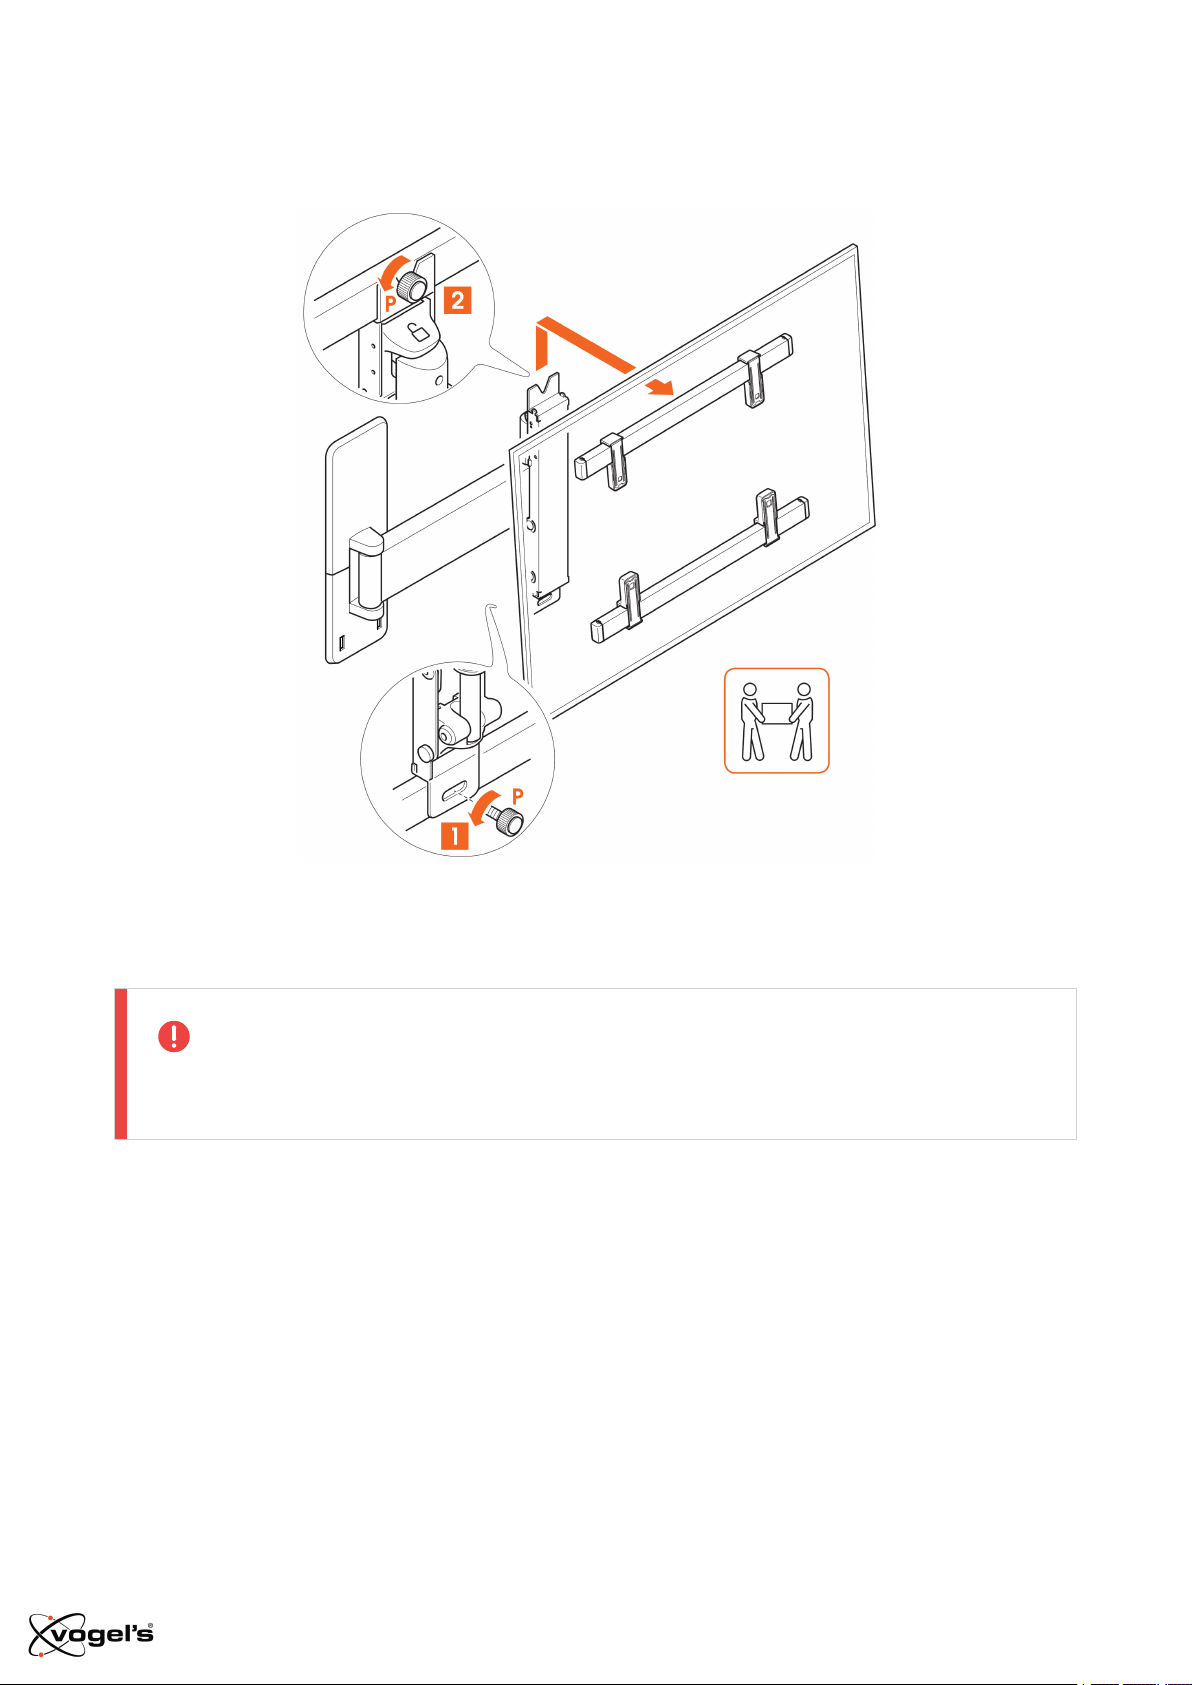
Removing your TV
1. Remove the lower thum bnut Ⓟ and loosen upper thumbnut Ⓟ.
2.
Remove the TV, and put it down somewhere safe.
Again, lifting your TV is a two-person job. Always get help.
TVM 3460/3660 Series - English 19
Page 20
Tell us how you feel!
Your opinion matters more than you might think. It helps us make better products, and helps other
customers make informed choices.
Share your feedback, and sign up to win Vogel’s products!
Simply visit vogels.com/review for sharing or the Terms and Conditions.
Confused? Unsure? Going crazy?
There’s plenty of help waiting for you, online:
[email protected]
www.vogels.com/contact
facebook.com/
VogelsForSure/
instagram.com/
vogels_official/
www.youtube.com/
c/VogelsForSure
TVM 3460/3660 Series - English 20
Page 21
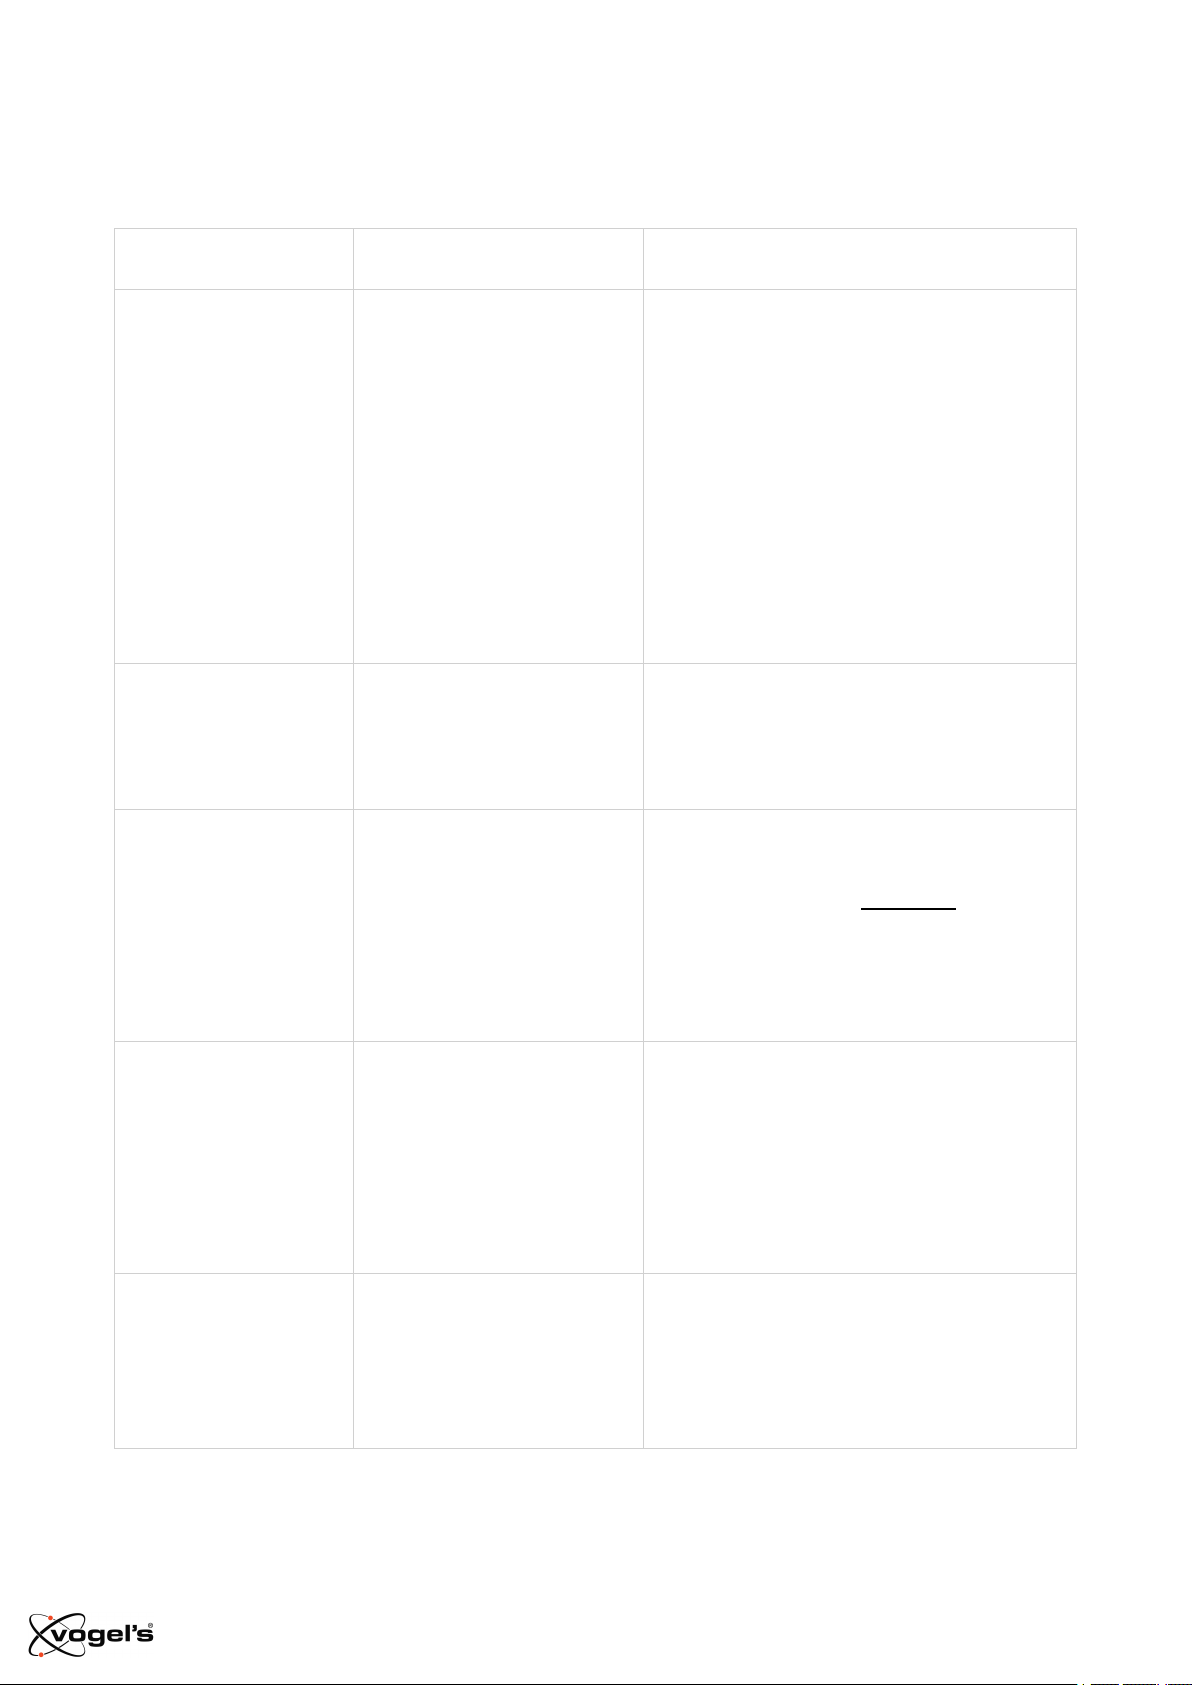
Simple troubleshooting
Found a problem you can’t fix? Don’t panic… try these!
Problem Cause Solution
‘There are stains on
the arms of the wall
mount’
‘My TV does not
remain horizontal
levelled, with
moving/turning it’
‘I don’t have the right
bolts for my TV!’
The stains are caused by
the paper pulp interior in
the box. We decided to
reduce the amount of
plastic in the packaging
and therefore there is no
plastic bag around the
product anymore to
prevent from some paper
dust on the product. So,
these stains might occur,
unfortunately.
When you level your TV
and tighten the thumbnut
by hand, it might not be
tight enough to stay level.
The world of TV technology
is always changing – it can
be hard to keep up
sometimes. So, it might be
the case that the correct
bolt size is not included…
you’re just too advanced!
The stains are easy to remove with a cloth.
Level the TV with a spirit level and tighten
the thumbnut thoroughly with a 4 mm allen
key, instead of by hand.
Just ask Vogel’s Consumer Care to
request a service kit, and we’ll send
everything you need. Click here to contact
Vogel's Consumer Care.
‘I have a lot of leftover
bolts, is something
wrong?’
‘My wall screws have
snapped!’
No, you did it very well! You
only need 4 bolts to install
the mount to your TV.
Because of all the different
types of TVs, we have
included the most common
sizes for the most sold TVs.
You might not be drilling
deep enough… or your drill
could be too blunt, so that
the hole is too narrow and
the screw gets stuck.
TVM 3460/3660 Series - English 21
Don’t waste the other bolts, save them!
You can use them for another TV when
you buy a new one or use it elsewhere.
Use another hole in the wall plate to fix the
wall mount to the wall. Make sure you use
a sharp drill of the correct size. Use the
size of the screw as indication of the depth
to be drilled.
Page 22
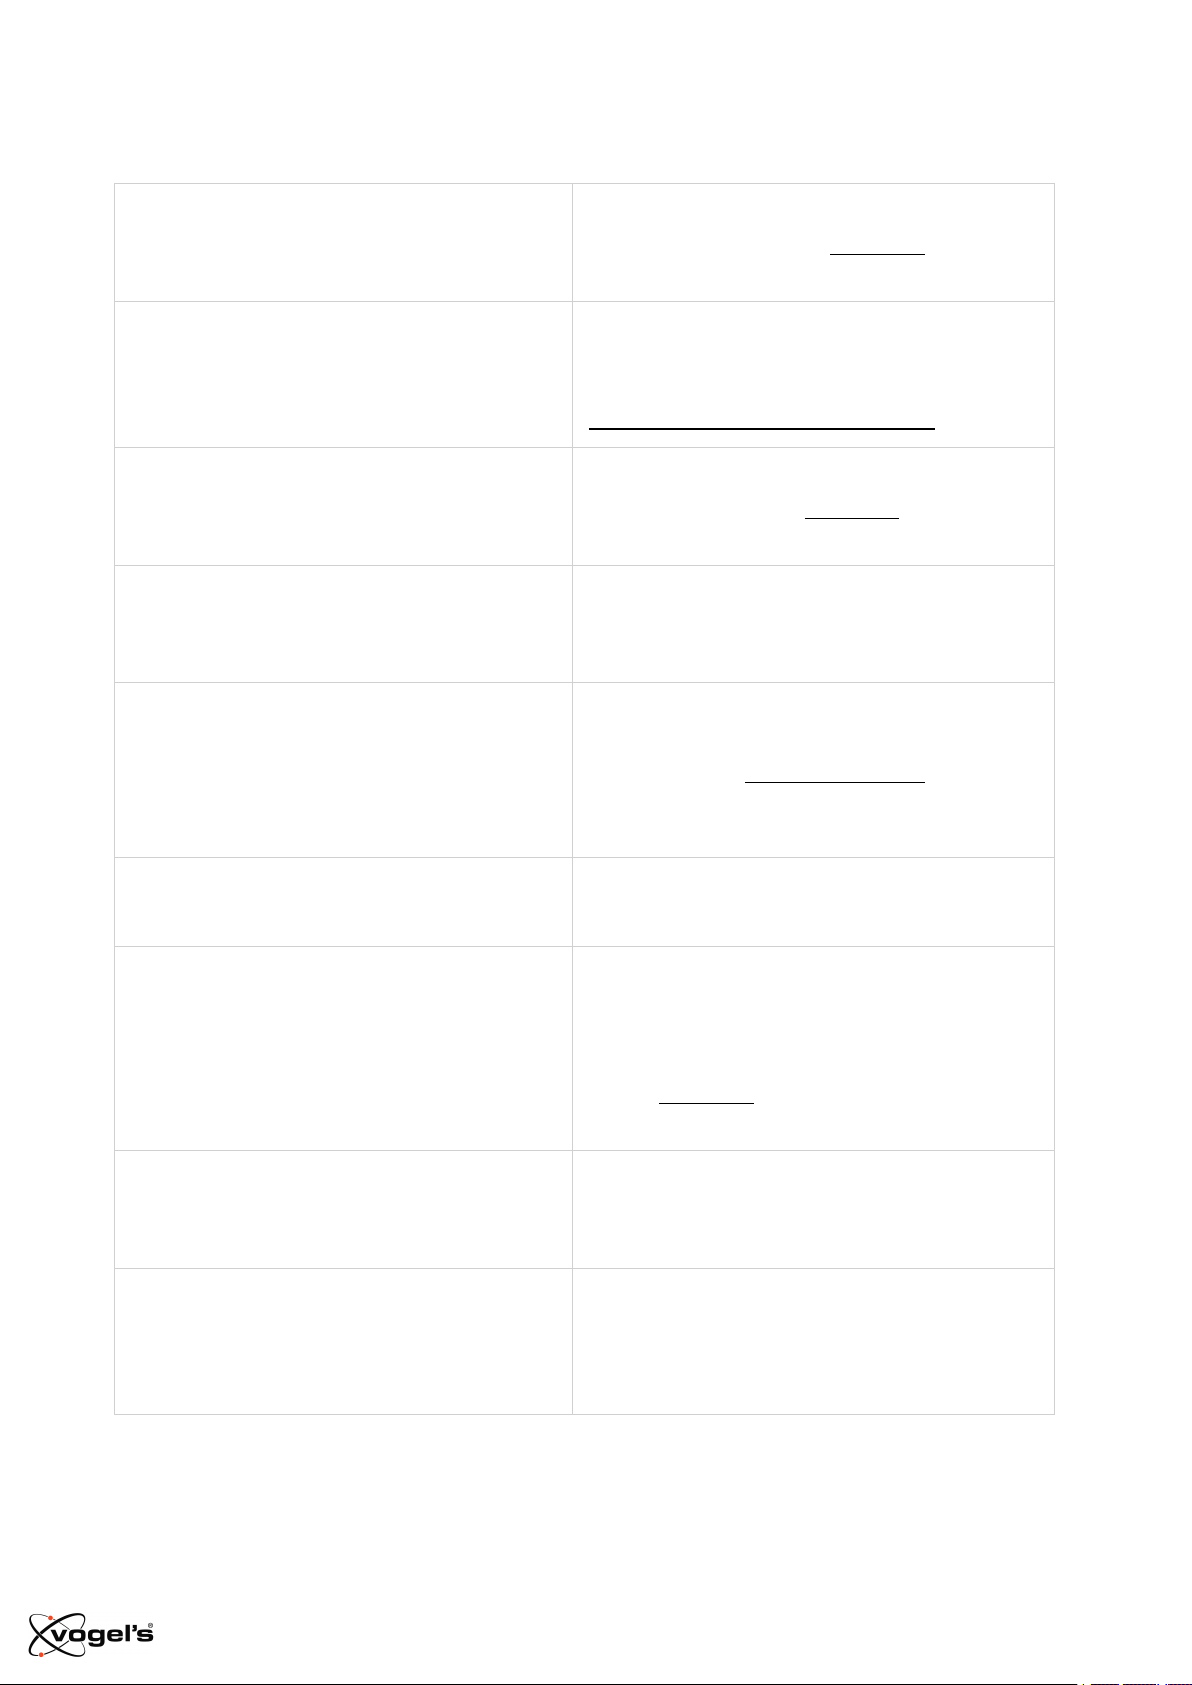
FAQs
‘Where can I request the correct bolts for my
TV (a service kit)?’
‘Where can I find installation videos?’ The installation video can be found at the
Whatever you need, simply contact your local
Vogel's dealer or Vogel's. Click here to contact
Vogel's Consumer Care.
product page of your product on our website. It
can also be found on our YouTube channel:
www.youtube.com/c/VogelsForSure
‘What if I need spare parts?’ If you require a spare part, please contact your
local dealer or Vogel's. Click here to contact
Vogel's Consumer Care.
‘Where can I find the drilling template?’ The drilling template is printed on the inlay card
in the box. You can cut it out for your
convenience.
‘How high do I need to hang my TV?’ The center of your TV should ideally be
positioned at eye level, while seated. Download
and use the free DrillRight™ AR app to
determine the height of the TV and to mark the
first hole.
‘How high do I need to hang my TV in case of
a tilt mount?’
‘Which bolts or screws do I need to use?’ Vogel's offers a complete assembly kit with all
‘Why do you use Fischer© plugs?’ The Fischer© DuoPower plug is widely
‘What is VESA?’ VESA is a standard pattern of mounting location
When a wall mount with tilt function is used, your
TV can be mounted above eye level.
mounting materials included in the box, for both
your TV and wall. Do you miss the correct bolts
for your TV? Please contact your local Vogel's
dealer. Click here to contact Vogel's Consumer
Care.
regarded as the best standard in plugs. Don’t
settle for less!
holes on the back of a TV which allows many
standard TV mounts to be easily fitted to your
TV.
TVM 3460/3660 Series - English 22
Page 23

Go green!
We care about the planet. If you’re getting rid of the packaging or the TV mount itself, please visit your
local recycling facility, or contact your municipal office. Recycling matters!
TVM 3460/3660 Series - English 23
Page 24
Guarantee
Thanks again for choosing Vogel’s! Just like every product we make, your new purchase is made of
durable materials and is based on a meticulous design. That is why Vogel’s gives you a 10-year
guarantee for defects in materials and manufacturing.
1.
Vogel’s guarantees that if during the guarantee period of a product, faults arise due to defects in
manufacturing and/or materials, it will, at its discretion, repair or if necessary replace the product,
free of charge. A guarantee for normal wear and tear is hereby expressly excluded.
2.
If the guarantee is invoked, the product should be sent to Vogel’s, together with the original
purchase document (invoice, sales slip or cash receipt). The purchase document should clearly
show the name of the supplier and the date of purchase.
3.
Vogel’s guarantee shall lapse in the following cases:
l If the product has not been drilled, installed and used in accordance with the Instructions for
Use;
l If the product has been altered or repaired by someone other than Vogel’s;
l If a fault arises due to external causes (outside the product) such as for example lightning,
water nuisance, fire, scuffing, exposure to extreme temperatures, weather conditions,
solvents or acids, wrong use or negligence;
l If the product is used for different equipment than is mentioned on or in the packing.
Vogel’s Products BV - Hondsruglaan 93 - 5628 DB Eindhoven - The Netherlands
Vogel’s Products BV 2021 © All rights reserved.
TVM 3460/3660 Series - English 24
 Loading...