

Page 1

XTS-IP and XTSc-IP
Telephone Systems
Station User Guide
March 2007 - Issue 3.0 P/N: 3152-00
Page 2
I
Issue Release Changes
1.0 12-02 Initial Release
1.1 2-03 Minor revisions for correctness & clarity.
1.2 3-04
1.3 5-04 Additional telephone instrument added.
1.4 9-04
1.5 11-04 IP Phone procedures added.
2.0 1-05
2.1 4-05
2.2 12-05 S/W version 2.2 features are added.
Includes Trunk-to-Trunk Trans procedure.
Includes Enhanced ACD AVA/UNA feature.
Includes ACD Wrapup End feature.
Includes Call Forward Off-Net button.
Revises Attendant Unavailable feature to reflect increase of
Attendant station capacity from 3 to 6.
Flash-based Voice Mail Quick Reference page is added.
An In and Out Button feature is added.
A Page Block option is added to the DND button.
A UCD Wrapup End feature is added.
Call Park locations increased from 8 to 14 for XTS systems.
Call Pickup Groups increased from 8 to 20 for XTS systems.
Internal Page Zones increased from 8 to 20 for XTS systems.
ICLID Call Mgmt Table entries are increased.
LNR button feature code (650) is added for XTS systems.
Call Park locations increased from 8 to 14 for XTSc systems.
Call Pickup Groups increased from 8 to 20 for XTSc systems.
Internal Page Zones increased from 8 to 20 for XTc systems.
LNR button feature code (650) also applies to XTSc systems.
ACD Supervisor One-Touch Record is added.
ACD Supervisor Status feature is added.
Calls in Queue Pickup feature is modified.
Call Coverage / DSS Transfer to Voice Mail procedure is
modified.
Trouble Notification Procedure is added.
Relay activation flexible feature code is added.
Hot Desk feature is added.
Caller ID Scrolling is modified so that scrolling is either
enabled on a station basis or a system-wide basis.
IP7008D Phone is added.
IP7024D Phone is added.
Page 3

Issue Release Changes
3.0 3-07 A Logout procedure is added to the Hot Desk feature.
S/W version 3.0 features are added:
A Macro Buttons feature is added.
The ACD feature is modified to allow an agent to be
logged into five ACD groups at the same time. The
Secondary Agent Login/Logout feature codes 581 & 582
are deleted. ACD Help requests go to supervisors of the
first ACD group that the agent logs into. An ACD Agent
Priority Code (1-9) is added to the login procedure.
The Trouble Notification feature is enhanced to include a
bypass feature code which bypasses timers to provide
immediate notification.
Scrolling in the ICLID Answered/Unanswered Call Tables is
changed to use the Volume Up/Down buttons.
Page 4

LIFE SUPPORT APPLICATIONS POLICY
Vertical Communications, Inc. products are not authorized for and should not
be used within Life Support applications. Life Support systems are equipment
intended to support or sustain life and whose failure to perform when properly
used in accordance with instructions provided can be reasonably expected to
result in significant personal injury or death.
Vertical Communications, Inc. warranty is limited to replacement of defective
components and does not cover injury to persons or property or other
consequential damages.
“WARNING: Handling the cord on this product will expose you to lead, a chemical known to the State
of California to cause [cancer, and] birth defects or other reproductive harm. Wash hands after
handling.”
Copyright © 2002 Vertical Communications, Inc.
All Rights Reserved
This material is copyrighted by Vertical Communications, Inc. Any unauthorized
reproductions, use or disclosure of this material, or any part thereof, is strictly
prohibited and is a violation of the Copyright Laws of the United States (17 U.S.C.
Section 101 et. seq.). Vertical Communications, Inc. reserves the right to make
changes in specifications at any time and without notice. The information furnished
by Vertical Communications, Inc. in this material is believed to be accurate and
reliable, but is not warranted to be true in all cases.
XTS is a registered trademark of Vertical Communications, Inc.
mlj/2007
Page 5

Contents i
Contents
Digital Telephone Features ............................................................ vi
IP Telephone Features ..................................................................... xii
About This User Guide ..................................................................... 1
911 Alert................................................................................................2
Account Codes ...................................................................................3
Using Account Codes...............................................................3
Verified Account Codes...........................................................3
Account Codes - Traveling COS (Verified) ........................4
ACD/UCD..............................................................................................5
ACD Call Factor...........................................................................5
ACD Call Qualifier ......................................................................6
ACD Help ......................................................................................7
ACD Calls In Queue Status Display......................................8
ACD Calls in Queue Pickup.....................................................9
ACD Login/Logout ....................................................................9
ACD Member Status .................................................................10
ACD Overflow Available/Unavailable.................................11
ACD Supervisor Display...........................................................11
ACD Supervisor Login/Logout.............................................. 12
ACD Supervisor Monitor with Barge-In .............................13
ACD Supervisor One-Touch Record.................................... 14
Supervisor Station Status........................................................14
ACD/UCD Available/Unavailable .........................................15
ACD/UCD Wrapup End............................................................15
UCD Calls In Queue Display ...................................................16
UCD Overflow Station Forward............................................ 16
Alternate Dial Plan ............................................................................17
Answering Machine Emulation ....................................................18
Notification Methods ...............................................................18
Attendant Features...........................................................................20
Attendant Clear Alarm.............................................................20
XTS-IP / XTSc-IP Station User Guide March 2007
Page 6

ii Contents
Attendant CO Line External (Off-Net) Forward............... 20
Attendant Custom Message..................................................20
Attendant Day/Night/Special ...............................................22
Attendant Directory List Programming.............................22
Attendant Disable Outgoing CO Line................................ 26
Attendant Override...................................................................26
Attendant Setting Time and Date .......................................27
Attendant Speed Dial - System Storing............................. 27
Attendant Unavailable.............................................................28
Attendant Voice Mail Alarm Clear .......................................29
Background Music (Optional) .......................................................29
Call Back................................................................................................30
Call Coverage......................................................................................31
Call Forward.........................................................................................33
Call Forward - External (Off-Net).......................................... 34
Call Forward - External (Off-Net) Redirect ........................35
Call Forward - Follow Me ........................................................36
Call Park.................................................................................................38
Call Park - Personal....................................................................38
Call Park - Station....................................................................... 39
Call Park - System ......................................................................40
Call Pickup............................................................................................41
Directed Call Pickup..................................................................41
Group Call Pickup......................................................................42
Call Transfer.........................................................................................43
Executive/Secretary Transfer................................................. 43
PBX/Centrex Transfer ............................................................... 43
Screened Transfer......................................................................44
Transfer Search...........................................................................44
Unanswered CO Call Transfer ...............................................45
Unscreened Transfer ................................................................45
Trunk-To-Trunk Transfer .........................................................45
Caller ID Display .................................................................................46
Caller ID Display (Answered Calls).......................................46
XTS-IP / XTSc-IP Station User Guide March 2007
Page 7

Contents iii
Caller ID Display (Unanswered Calls).................................. 47
Caller ID Name/Number .................................................................48
Calling Forward Override ...............................................................48
Calling Station Handsfree Mode Override................................49
Calling Station Tone Mode Override.......................................... 49
Camp On............................................................................................... 50
CO Line - Access.................................................................................51
CO Line Queue....................................................................................52
Conference ..........................................................................................53
Conference Combinations .....................................................53
Conference Procedures...........................................................53
Dial-By-Name...................................................................................... 56
Directory Dial ......................................................................................57
Do Not Disturb / Page Block..........................................................59
Door Opener .......................................................................................61
Executive Override............................................................................61
Flash .......................................................................................................62
Flash Key on Intercom .............................................................62
Flexible Button Programming ......................................................62
Group Listening .................................................................................63
Headset Mode ....................................................................................64
Hot Desk ...............................................................................................65
In and Out Button..............................................................................67
Intercom ...............................................................................................67
Using an Intercom Button ..................................................... 67
Answering an Intercom Call ..................................................68
Intercom Transfer ......................................................................69
Intercom Calls .............................................................................69
IP Phone................................................................................................71
IP7008D Phone Characteristics.............................................71
IP7024D Phone Characteristics.............................................73
Keyset Mode........................................................................................ 78
Last Number Redial...........................................................................79
LCR Operation.....................................................................................80
XTS-IP / XTSc-IP Station User Guide March 2007
Page 8

iv Contents
Loop Key...............................................................................................81
Macro Buttons ....................................................................................81
Mailbox Buttons.................................................................................83
Message Wait......................................................................................83
Modem..................................................................................................85
Voice Mail Modem Access......................................................85
Telephone System Modem Access .....................................85
Mute .......................................................................................................85
Name In Display .................................................................................86
Night Service.......................................................................................87
Off-Hook Voice Over (OHVO) ........................................................88
Outside Calls........................................................................................90
Placing an Outside Line on Hold.......................................... 90
Answering a Recall....................................................................90
Answering an Outside Call.....................................................90
Placing an Outside Call............................................................90
Paging....................................................................................................91
Paging - Meet Me.......................................................................92
Personalized Messages....................................................................92
Pre-assigned Messages ...........................................................92
Custom Messages......................................................................93
Date and Time Entry Messages ............................................94
Scrollable Canned Messages.................................................96
Personal Messages Flexible Button.....................................97
PBX/Centrex Codes on a Flex Button......................................... 98
PRI Call Pair Assignment .................................................................98
Release Button....................................................................................99
Redial .....................................................................................................99
Last Number Redial...................................................................99
Save Number For Redial..........................................................99
Redial a Saved Number ...........................................................100
Repeat Redial .............................................................................100
Ring Down/Hot Line/Off-Hook Preference ..............................101
Ring Tone .............................................................................................102
XTS-IP / XTSc-IP Station User Guide March 2007
Page 9

Contents v
School Zone.........................................................................................103
Speakerphone ....................................................................................105
Speed Dial ............................................................................................105
System Speed Dial Access...................................................... 107
Station/Port Fixed Number............................................................ 108
Station Relocate.................................................................................108
Text Messaging (Silent Response)...............................................109
Trouble Notification .........................................................................110
Universal Day/Night Answer ......................................................... 111
Voice Mail .............................................................................................112
Call Forwarding to Voice Mail Groups................................112
Retrieving Voice Messages.....................................................112
Voice Mail Transfer with ID Digits........................................ 113
Voice Mailbox Button............................................................... 113
Voice Mail Group Button.........................................................113
Voice Mail Group Access.........................................................114
Voice Mail One-Touch Recording........................................ 114
Voice Mail (Flash-Based) Quick Reference........................ 116
Voice Mail (Flash-Based) Quick Start ..................................117
Voice Mail (Hard Drive-Based) Quick Reference............. 118
Voice Mail (Hard Drive-Based) Quick Start .......................119
Volume Control..................................................................................120
Quick Reference ................................................................................ 122
Worksheets ..................................................................................122
Default Numbering Plan .........................................................125
XTS-IP / XTSc-IP Station User Guide March 2007
Page 10
vi Contents
Digital Telephone Features
Vodavi Digital Telephones have flexible buttons and dual color LEDs
that can be customized for each application.
» When flexible buttons are used as DSS buttons, station status can
be seen in a single glance. When they are used as CO/PBX/Centrex
buttons, line status is easily monitored.
» The integrated speakerphone offers call announce with hands-free
intercom, and a hot keypad that allows dialing while the phone is
on-hook.
» Executive Display models include interactive soft keys that provide
additional feature functionality.
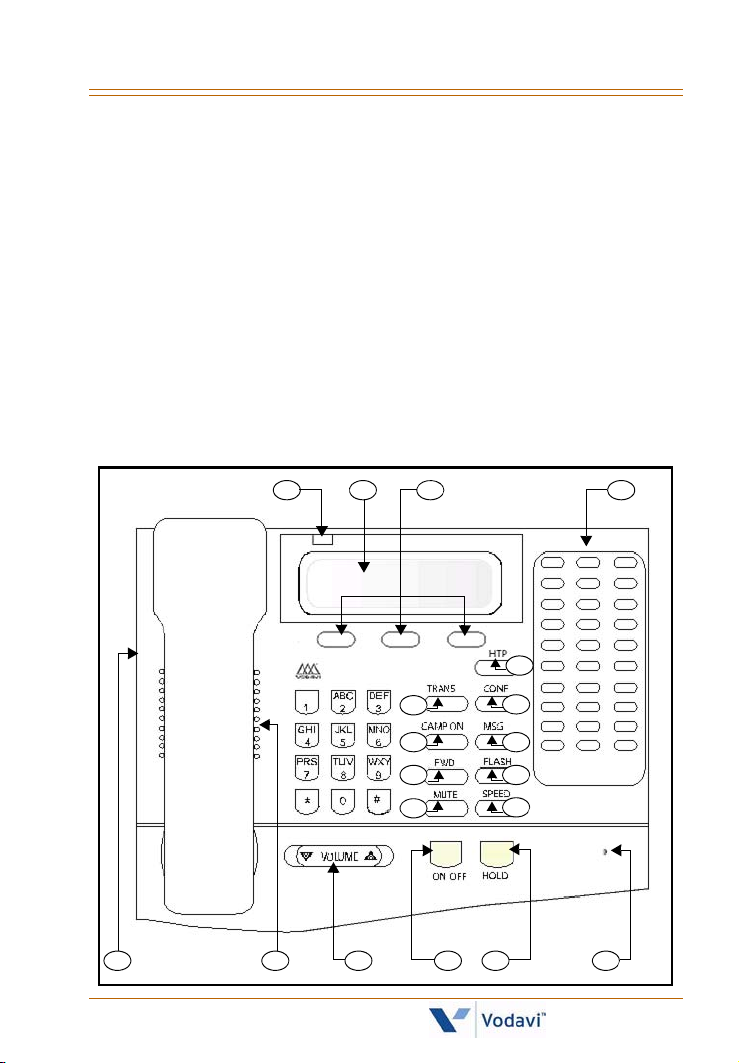
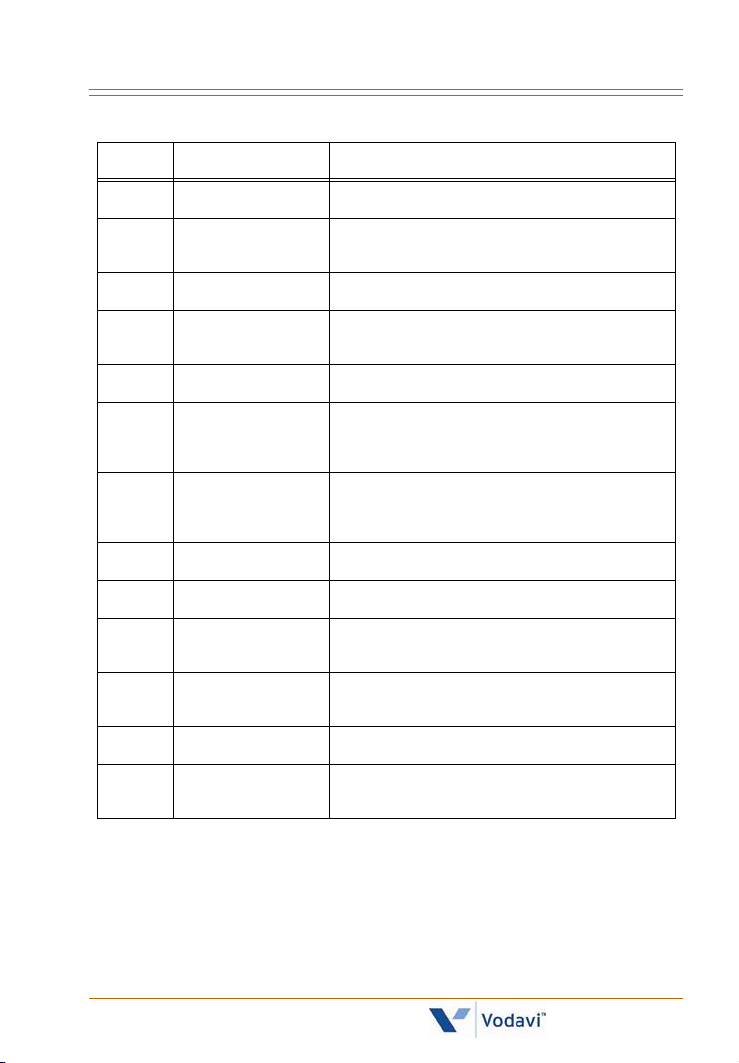
30-Button Executive Telephone
1
19
18
2 3 4
5
6
8
10
12
7
9
11
13
14151617
XTS-IP / XTSc-IP Station User Guide March 2007
Page 11
Contents vii
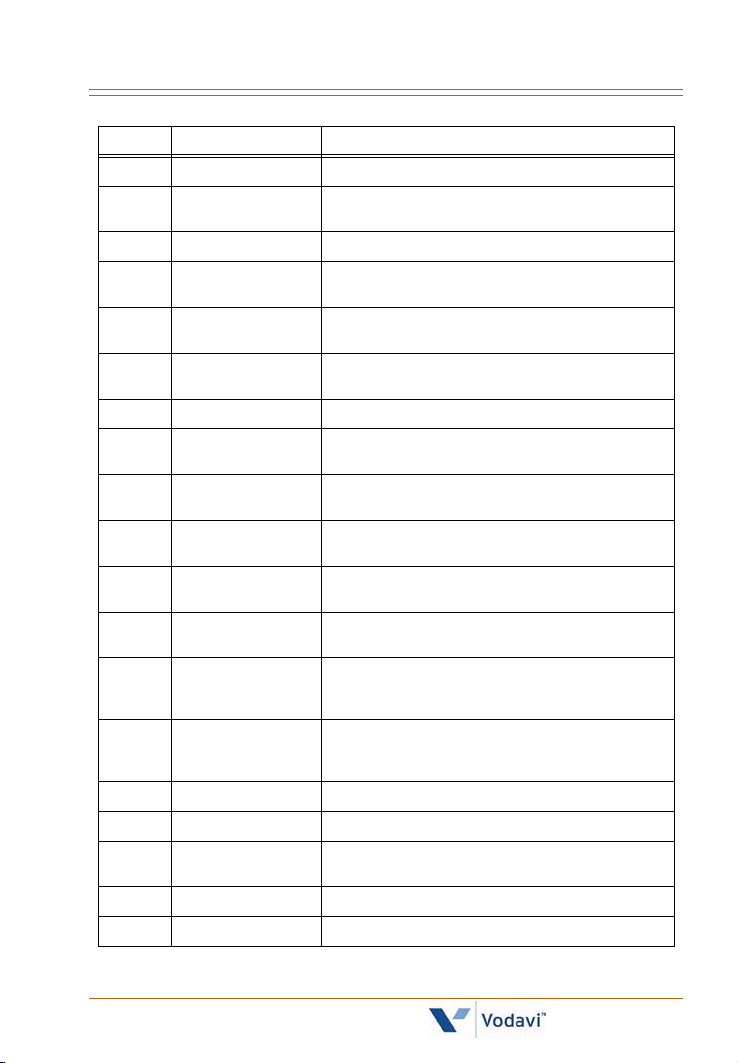
Number Feature Description
1 Message Indicator Indicates that you have a message.
2 24-Character
Display
3 Interactive Soft Keys Works in conjuction with fixed & flexible features.
4 Flexible Button Keys Used to access outside line or call-handling
5 H-T-P Used to select mode of operation: Handsfree, Tone,
6 TRANS Key Used to transfer an outside call from one station to
7 CONF Key Used to establish conference calls.
8 CAMP ON Used to alert a busy station that an outside line is
9 MSG Key Used for Auto-CallBack to a telephone which has
10 FWD Key Used to forward your calls to another station or
11 FLASH Key Used to end an outside call and to restore dial tone
12 MUTE Key Used to activate/deactivate MUTE function. When
13 SPEED Key Used to access speed dialing, save number redial
14 Microphone Used to talk with other party without using the
15 HOLD Key Used to hold calls, to retrieve held calls.
16 ON/OFF Key Used to make a call without lifting the handset.
17 VOLUME Key Used to adjust level of tones, background music,
18 Speaker Outputs tones and voice at your extension.
19 Headset Jack 2.5 mm Headset Jack located on left side of phone.
Displays information about telephone status,
dialing directories, and text message information.
features.
or Privacy.
another.
on hold and waiting for them.
left a text message or to access voice messages.
voice mail.
without hanging up receiver.
activated, party on other end cannot hear you.
and last number redial. This button also is used to
access flex button programming.
handset. One of the two Executive models includes
Full Duplex capability.
ringing, receiver volume, and display contrast.
XTS-IP / XTSc-IP Station User Guide March 2007
Page 12
viii Contents
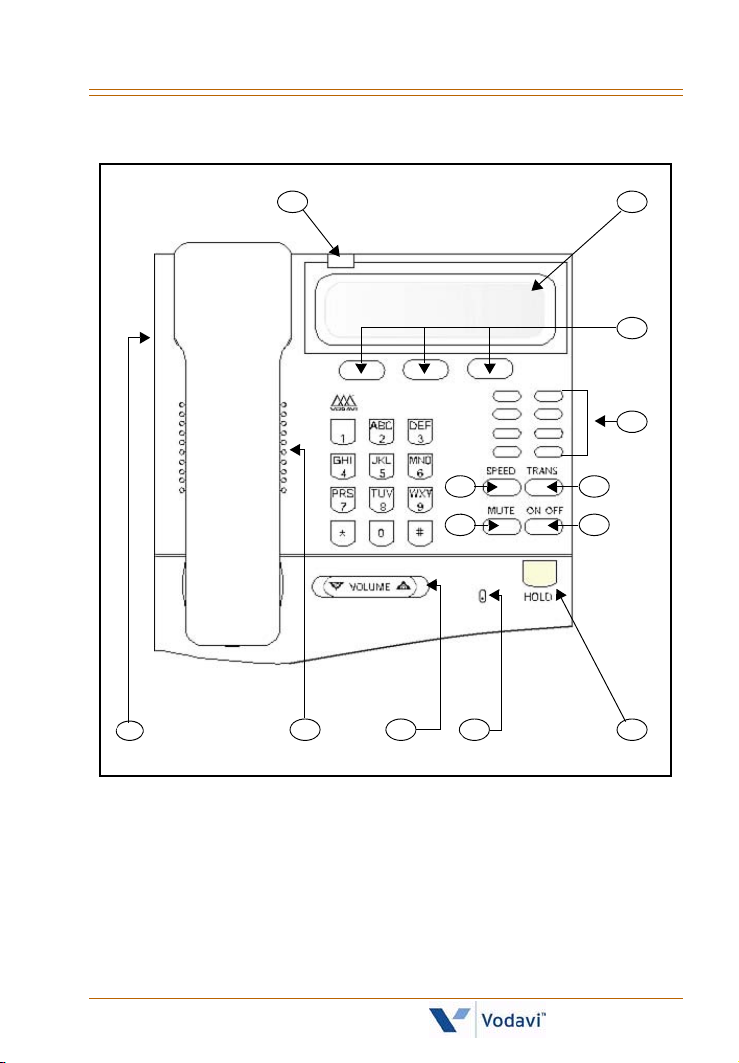
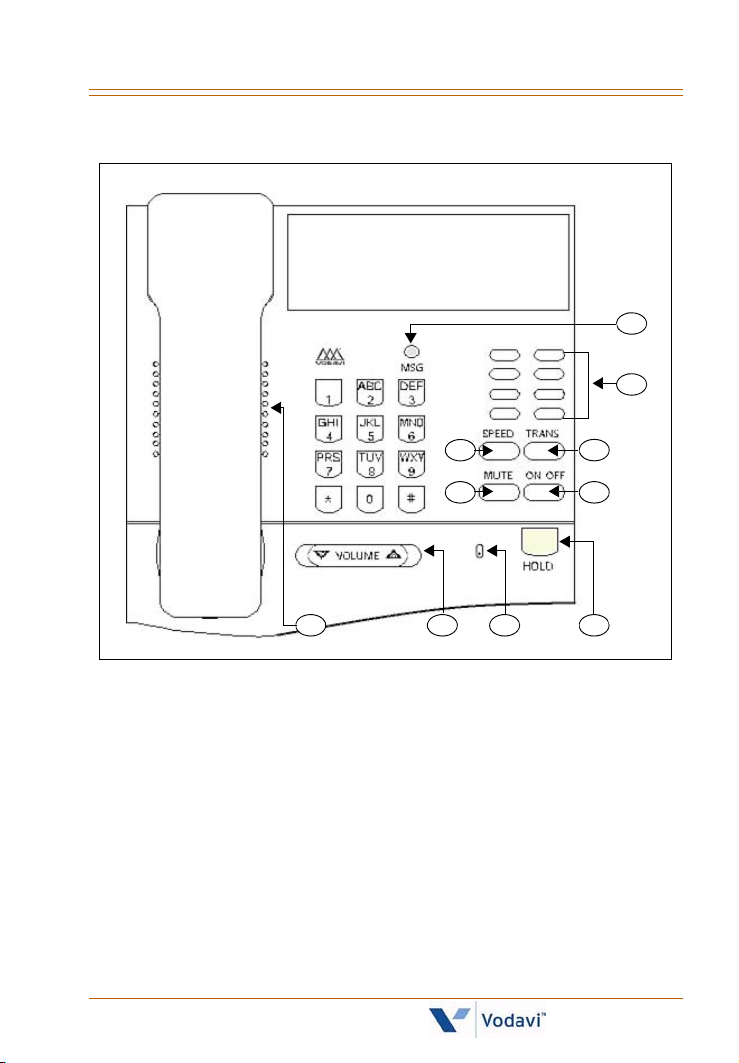
8-Button Executive Telephone
1
6 5
7
13
1112
10
2
3
4
8
9
XTS-IP / XTSc-IP Station User Guide March 2007
Page 13
Contents ix
Number Feature Description
1 Message Indicator Indicates that you have a message.
2 24-Character Display Displays information about telephone status,
3 Interactive Soft Keys Used to program phone feature/functions.
4 Flexible Button Keys Used to access outside lines or access call-
5 TRANS Key Used to transfer an outside call between stations.
6 SPEED Key Used to access speed dialing, save number redial
7 MUTE Key Used to activate/deactivate MUTE function.
8 ON/OFF Key Used to make a call without lifting the handset.
9 HOLD Key Used to hold calls, to retrieve held calls.
10 Microphone Used to talk with other party without using the
11 VOLUME Key Used to adjust level of tones, background music,
12 Speaker Outputs tones and voice at your extension.
13 Headset Jack 2.5 mm Headset Jack is located on the left side of
dialing directories, and text message information.
handling features.
and last numbe r redial. This button also is used to
access flex button programming.
When activated, the party on other end cannot
hear you.
handset.
ringing, receiver volume, and display contrast.
the telephone.
XTS-IP / XTSc-IP Station User Guide March 2007
Page 14
x Contents
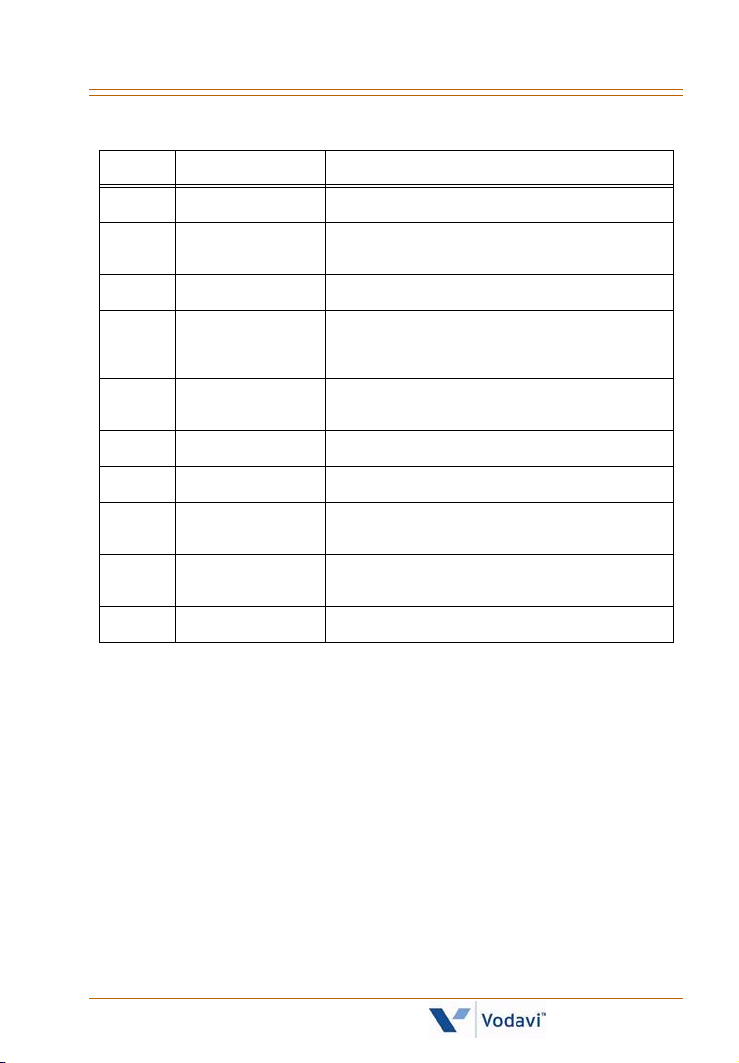
8-Button Enhanced Telephone (Non-Display)
1
2
3
7
10
4
5 6
9
8
XTS-IP / XTSc-IP Station User Guide March 2007
Page 15
Contents xi
Number Feature Description
1 Message Indicator Indicates that you have a message.
2 Flexible Button Keys Used to access outside lines or access
3 TRANS Key Used to transfer an outside call between stations.
4 SPEED Key Used to access speed dialing, save number redial
5 MUTE Key Used to activate/deactivate MUTE function. When
6 ON/OFF Key Used to make a call without lifting the handset.
7 HOLD Key Used to hold calls, to retrieve held calls.
8 Microphone Used to talk with other party without using the
9 VOLUME Key Used to adjust level of tones, background music,
10 Speaker Outputs tones and voice at your extension.
call-handling features.
and last number redial. This button also is used to
access flex button programming.
activated, the party on other end cannot hear you.
handset.
ringing, receiver volume, and display contrast.
XTS-IP / XTSc-IP Station User Guide March 2007
Page 16
xii Contents
IP Telephone Features
The feature operation of the Vodavi IP Phones are the same as the
Vodavi-branded Digital Executive Key Telephones as used with the
XTS-IP and XTSc-IP systems. The following IP Phones provide both fixed
and flexible buttons: IP-24DH, IP7008D, & IP7024D.
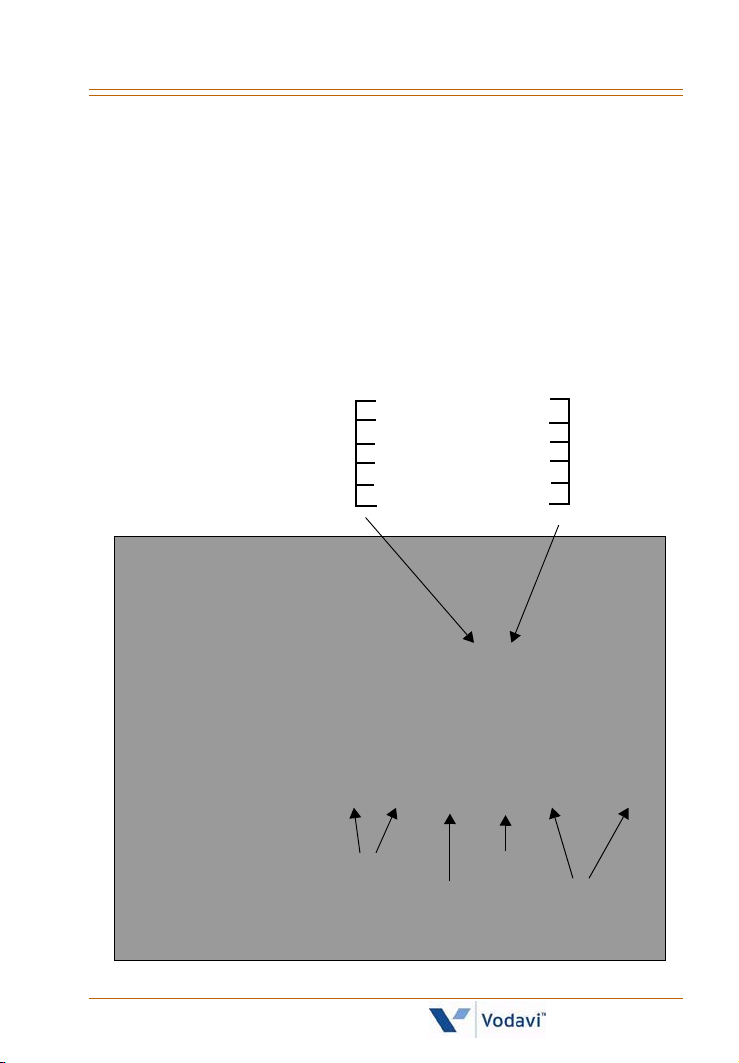
IP-24DH Telephone
FIXED BUTTONS
TRANS
FWD
DND
MUTE
ICM
SPEED
REDIAL
CONF
MSG/CALLBK
FLASH
PGM
SAVE
VOLUME
SPEAKER
XTS-IP / XTSc-IP Station User Guide March 2007
HOLD
FLEXIBLE
BUTTONS
Page 17
Contents xiii
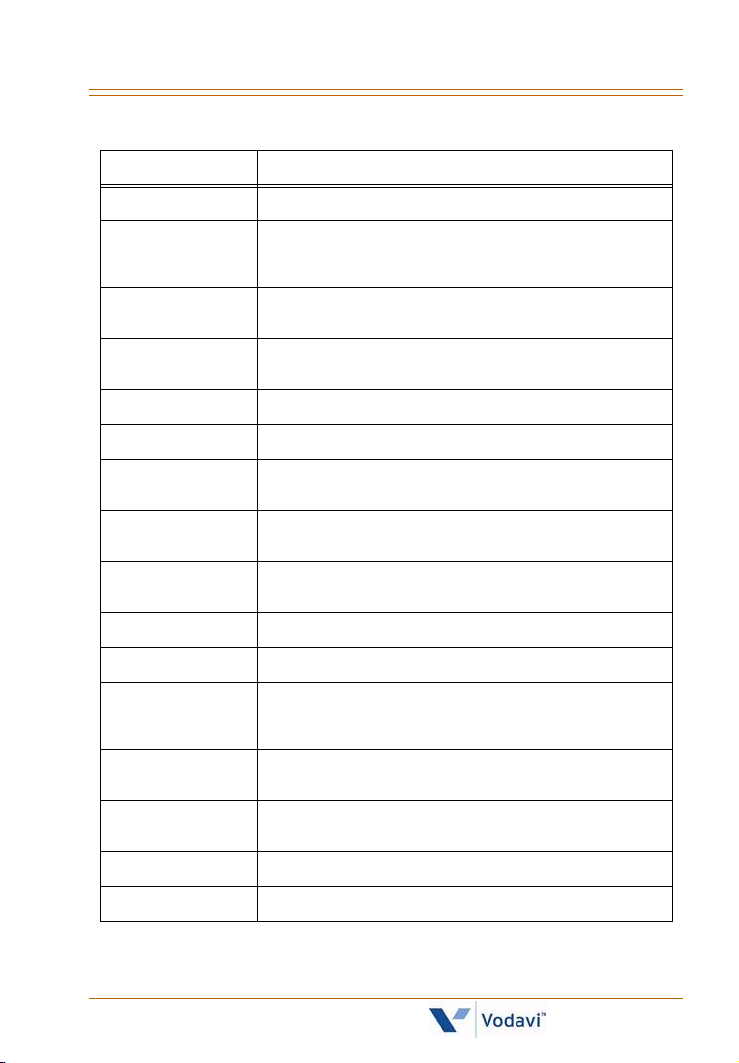
Features Description
CONF Used to establish conference calls.
DND Used to prevent calls from ringing at your station when on
FLASH Used to end an outside call and to restore dial tone without
FWD Use to send unanswered calls to another station, Hunt
HOLD Used to hold calls and to retrieve held calls.
ICM Not used at this time.
MSG / CALLBK Used for Auto-CallBack to a phone that has left a text
MUTE Used to activate/deactivate MUTE function. When
PGM Used as a rotary to select mode of operation: Handsfree
REDIAL Used to access and dial the last number dialed.
SAVE Not used at this time.
SPEED Used to access speed dialing, save number redial, and last
SPEAKER Used to make a call without lifting the handset. Serves as
a call or busy. Also can be used to activate a Page Block
feature.
hanging up the receiver.
group, or voice mailbox.
message or to access voice messages.
activated, the party on the other end cannot hear you.
(LED not lit), Tone (LED lit solid), or Privacy(LED blinking).
number redial. Button is also used to access flexible button
programming.
an ON/OFF button.
TRANS Used to transfer intercom or outside call from one station
VOLUME Used to adjust level of tones, ringing, and receiver volume.
24 Flexible Buttons Used to access outside lines or call-handling features.
to another.
XTS-IP / XTSc-IP Station User Guide March 2007
Page 18
xiv Contents
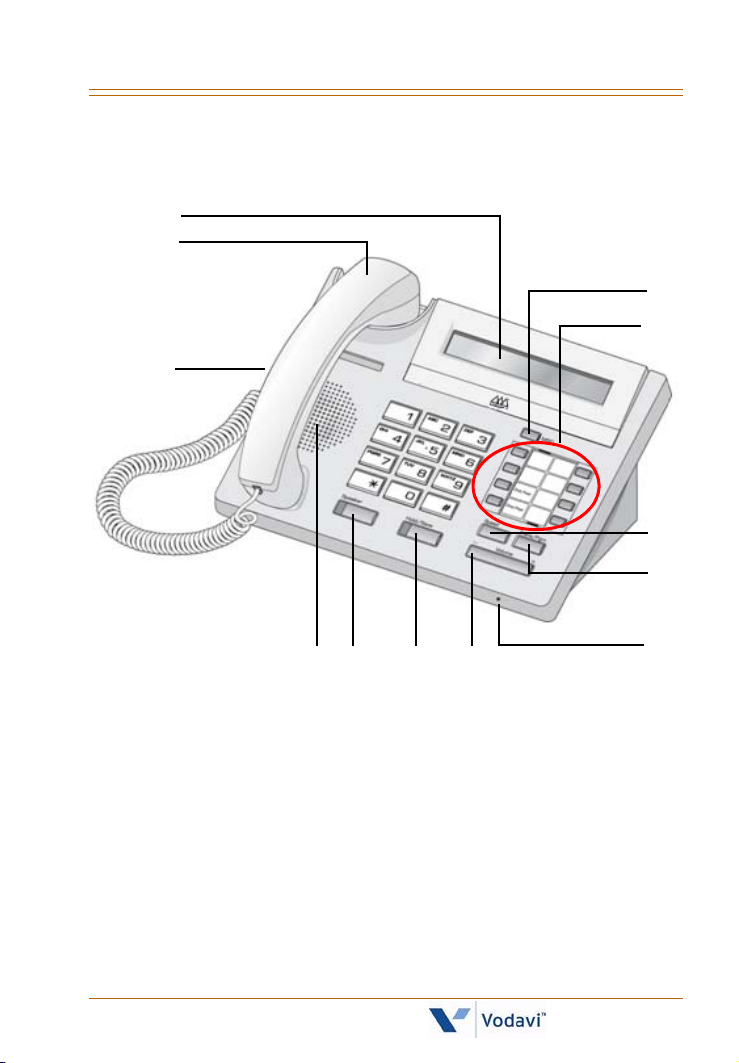
IP7008D Telephone
1
2
8
9
3
10
11
4 567
XTS-IP / XTSc-IP Station User Guide March 2007
12
Page 19
Contents xv
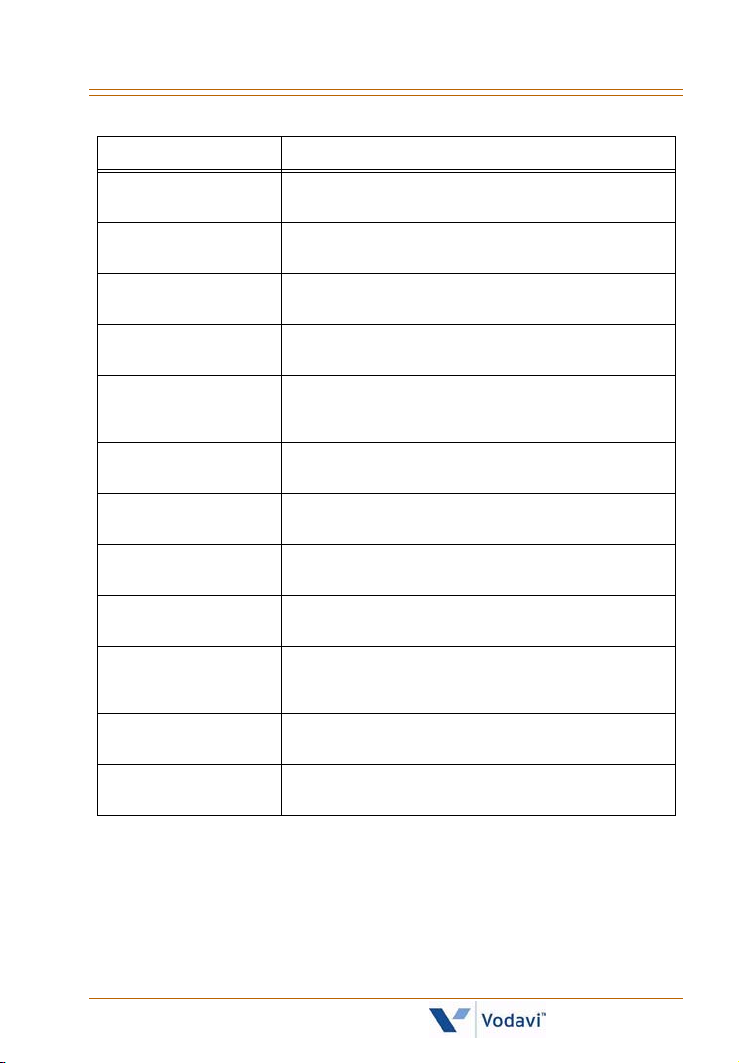
Features Description
1 = LCD Display Displays information about telephone status, dialing
2 = Handset Device used to listen/speak when on a call in handset
3 = Headphone When using a headphone, this button toggles the
4 = Speaker Device used to listen to a caller in a handsfree mode
5 = Speaker Button Speaker toggles speakerphone state between speaker
6 = Hold/Save Button This button is used to hold calls and to retrieve held
7 = Volume The volume button adjusts the level of tones,
8 = MSG LED This button illuminated to indicate you have a message
9 = Flexible Buttons The 8 flexible buttons are used to access outside lines or
10 = Speed Button Used to access speed dialing, save number redial, and
11 = Trans/PGM Button This button is used to stransfer intercom or outside call
directories, and test message information.
mode.
headphone state.
when in speaker mode.
mode and handset mode. The button is red when
speakerphone is active.
calls.
background music, ringing, and receiver volume
waiting.
call-handling features.
last number redial. Also used to access flexible button
programming.
from one station to another.
12 = MIC Microphone used to speak to a caller in a handsfree
mode when in speaker mode.
XTS-IP / XTSc-IP Station User Guide March 2007
Page 20
xvi Contents
8
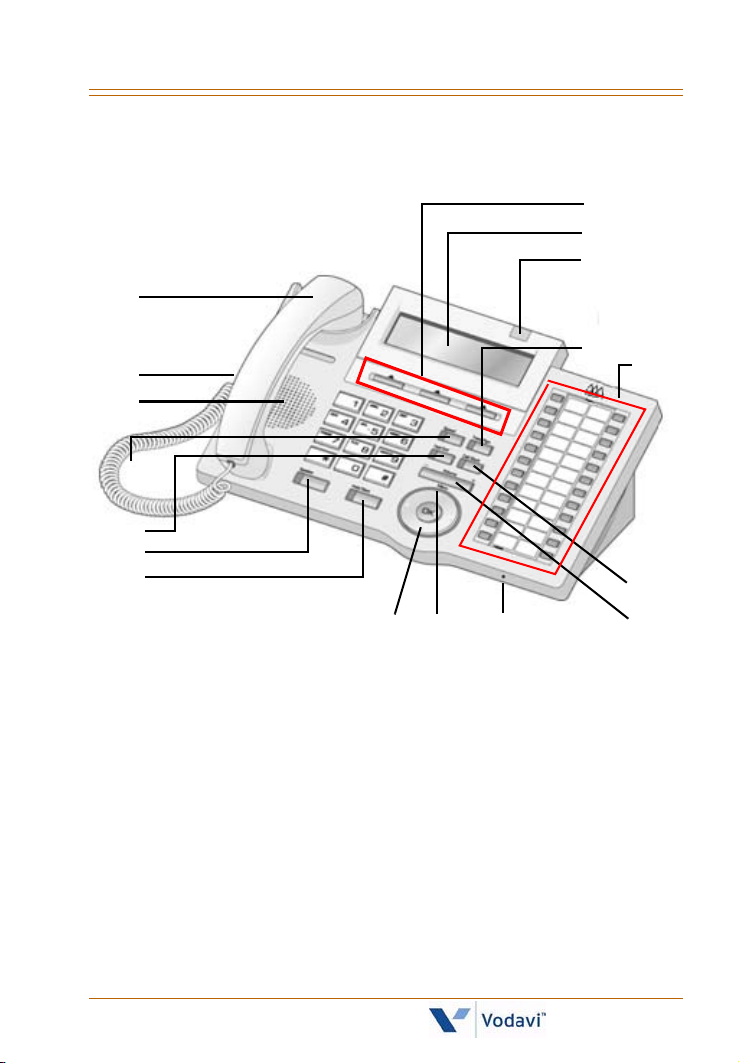
IP7024D Telephone
9
10
1
11
2
12
3
4
5
6
7
13
14151617
XTS-IP / XTSc-IP Station User Guide March 2007
Page 21
Contents xvii
Features Description
1 = Handset Used to listen/speak when on a call in handset mode.
2 = Headphone When using a headphone, button toggles headphone state.
3 = Speaker Used to listen to a caller in handsfree mode when in speaker
4 = Speed Button Used to access speed dialing, save number redial, and last
5 = DND Button The DND (Do Not Disturb) feature blocks all incoming calls.
6 = Speaker Button Used to toggle between speaker & handset modes when in
7 = Hold/Save Button Used to hold calls and to retrieve held calls.
8 = 3 Soft Buttons Used to work in conjunction with fixed and flexible features.
9 = LCD Display Shows information about telephone status, dialing directories,
10 = Ring LED Illuminates when the phone is ringing.
11 = Trans/PGM Button Used to transfer an intercom or outside call from one station to
12 = Flexible Buttons The 24 flexible buttons are used to access outside lines or
13 = Call Back Button Used to initiate a call back request to a busy station. Once that
14 = Volume Bar Adjusts the level of tones, background music, ringing, and
mode.
number redial. This button is also used to access flexible button
programming.
When DND is active, the red LED in this button is illuminated.
speakerphone state. Button is red when speakerphone is active.
and text messages.
another.
call-handling features.
station becomes idle, the initiating station is signaled.
receiver volume
15 = MIC (Microphone) Used to speak to a caller in a handsfree mode when in speaker
16 = Menu Button Used to move to the desired option(Dial, MSG, Program), and to
17 = Phone Book Used to access speed dialing, save number redial, and last
mode.
select the next screen when indicated by an arrow on the LCD
display.
number redial, and to access flexible button programming.
XTS-IP / XTSc-IP Station User Guide March 2007
Page 22

Page 23
ABOUT THIS USER GUIDE
The features described in this book apply to the XTS-IP & XTSc-IP Digital
Telephone Systems when using Vodavi Telephones … unless an
exception is specifically noted.
GUIDELINES
Flexible Buttons -- Most system features can be set up on a flexible
button for easy one-button access. (For more details, refer to “Flexible
Button Programming” on page 62.)
This “Flex Btn” symbol indicates those features that need
preprogrammed button to function properly. (IP Phones
have several fixed feature buttons that can be used instead.)
-
EXCEPTION -
When the “Soft Key” symbol is also
either a preprogrammed button or a Soft Key.
Flexible Numbering -- This feature allows the system numbering plan
to be modified, as well as the length of the feature access codes (2-4
digits).
For consistency, the following programming and operating
procedures refer to “3-digit” default codes.
present, you may use
a
Soft Key
1
To verify the numbering plan for your system, consult
with your System Administrator.
Single Line Telephones -- A “telephone” symbol appears when
the Single Line Telephone (SLT) operation differs from the
Digital Telephone.
If your single line telephone does not have a FLASH key, quickly
press and release the hookswitch when instructed to press the
FLASH key.
XTS-IP / XTSc-IP Station User Guide March 2007
SLT
Page 24
2 911 Alert
911 Alert
Any station user or Attendant who programs a flexible button for 911
ALERT (feature code 608) will be alerted of internal stations placing 911
calls. The system can store the 16 most recent 911 calls. Calling
information includes the time/date of the call and the station number
from which the call was placed. The initial 911 Alert indicators include:
Audible ringing tone
Green flashing 911 ALERT flexible button LED
Automatic LCD display of 911 call information
E911 CALL XX: STA XXXX
MM/DD/YY HH:MM
XX = Index number (01-16)
Station users and Attendants can press the flexible button as necessary
to view additional 911 call information in the stored list. Once a station
user or Attendant views the data for all 911 calls in the system list:
LEDs at all stations will change to a solid red indication.
Audible ringing tone at all stations ceases.
LCDs at all stations will revert to a normal display.
The list remains available for review by pressing the 911 ALERT flexible
button until all messages are deleted.
A preprogrammed 608 button is a dual function button.
It provides call information for either E911 calls or for
Trouble Notification. The LCD displays which condition is
the trigger.
XTS-IP / XTSc-IP Station User Guide March 2007
Page 25
Account Codes 3
To delete logged 911 Alert messages:
An Attendant must use the following steps to delete the messages on a
system-wide basis.
1. Press the 911 ALERT flexible button to display the 911 call
information for deletion.
2. Press FLASH to delete that message.
Dialing 911 from any station overrides previously
enabled features such as Do Not Disturb.
Account Codes
Using Account Codes
Prior to placing, or during, an outside line call:
1. Press the preprogrammed ACCOUNT CODE button (627).
2. Dial account code up to 12 digits. (The other party does not hear
the digits being dialed).
If account code is less than 12 digits, an [] must be entered to
return to the call.
If account codes are forced, the account code must be entered
prior to dialing the outside number.
3. Dial [9] or CO Access code. A dial tone will sound.
4. Dial the desired number.
Verified Account Codes
Prior to placing an outside line call:
1. Press the preprogrammed ACCOUNT CODE button (627).
2. Dial account code up to 12 digits.
XTS-IP / XTSc-IP Station User Guide March 2007
Page 26
4Account Codes
SINGLE LINE TELEPHONE
To enter an Account Code before a call:
1. Lift the handset.
2. Dial [627].
3. Dial the account code.
If the account code contains fewer than 12 digits, dial [] to
automatically return to the call.
4. Dial [9] or CO Access code. A dial tone will sound.
5. Dial the desired number.
To enter an Account Code during a call:
1. Press the FLASH button. Call is placed on executive hold while
you enter your account code.
2. Dial [627].
3. Dial the account code.
If the account code contains fewer than 12 digits, dial [] to
automatically return to the call.
Account Codes - Traveling COS (Verified)
To use Verified Account Codes:
1. Press the preprogrammed ACCOUNT CODE button (627) before
accessing a CO line.
2. Dial account code up to 12-digits. If account code matches a
verified account code, intercom dial tone is returned. Otherwise an
error tone is presented.
3. Access an outside CO line, or dial the LCR code, and then dial the
desired number.
SMDR must be enabled for the Account Code feature
to operate, and become part of the SMDR record.
XTS-IP / XTSc-IP Station User Guide March 2007
Page 27
ACD/UCD 5
SINGLE LINE TELEPHONE
To enter an Account Code before a call:
1. Lift the handset.
2. Dial [627].
3. Dial account code.
If Account Code contains fewer than 12 digits, dial []
to return to intercom dial tone.
4. Dial [9] or CO Access code. A dial tone will sound.
5. Dial desired number.
ACD/UCD
The Automatic Call Distribution (ACD) feature is available with optional
software. When purchased, Uniform Call Distribution (UCD) is not used
and is replaced by the ACD functions.
ACD Call Factor
The Call Factor feature is used exclusively with digital voice mail to
provide average call duration to the caller. This feature can be activated
from administration or the ACD supervisor can use a flexible button
[580]+[ACD group number]+ [FFF] (FFF=Call Factor) to enter the factor
(average call duration).
This formula is used to calculate the average call duration:
(Place in Queue) (Call Factor)
------------------------------------------------------- Number of Agents Logged into Group
XTS-IP / XTSc-IP Station User Guide March 2007
Page 28
6ACD/UCD
ACD Call Qualifier
While agent is on a call:
1. Press the preprogrammed CALL QUALIFIER flexible button, followed
by the qualifier code.
2. If the qualifier code has less than 12 digits, enter a [
the sequence. A confirmation tone sounds.
-or-
Press the one-touch preprogrammed CALL QUALIFIER flexible button.
The Discovery Manager reporting package will only receive
up to the first 4 digits of the qualifier code.
To create a CALL QUALIFIER flexible button:
1. Press SPEED twice.
2. Press the button to be programmed (must be programmed in
database as a flexible button).
3. Dial the CALL QUALIFIER feature code [570] and then press [#].
A confirmation tone will sound.
4. Press the ON/OFF button (SPEAKER button on IP Phone).
To create a one-touch CALL QUALIFIER flexible button:
1. Press SPEED twice.
2. Press the button to be programmed (must be programmed in
database as a flexible button).
3. Dial the CALL QUALIFIER feature code [570] + [YYY]. A confirmation
tone will sound.
(YYY = the last three digits of a desired speed bin 9000-9099, that
has been preprogrammed with a qualifier code).
4. Press the ON/OFF button (SPEAKER button on IP Phone).
] to complete
XTS-IP / XTSc-IP Station User Guide March 2007
Page 29
ACD/UCD 7
ACD Help
While on a call in progress, the following results will occur when an
Agent presses their preprogrammed HELP flexible button.
AGENT -- The Agent will hear a confirmation tone and their HELP button
will illuminate if a supervisor is logged into their ACD group.
If no supervisor is logged in, the Agent will receive an error tone and the
HELP button will not illuminate.
If the agent is logged into several groups simultaneously,
the supervisors of the first group logged into are the ones
that will be contacted.
SUPERVISOR -- An ACD supervisor station will receive a Help message
when an ACD member in the same group initiates a Help request. If an
agent is logged into more than one ACD group, the help request goes
to supervisors of the first ACD group logged into.
This function will also send a Camp-On tone to the supervisor’s
keyset speaker. A Help message will take precedence over other
messages. The supervisor can clear the message by pressing their
HELP button.
At the time the supervisor receives a Help request, they can press
their HELP flexible button followed by the OVERRIDE feature button
to bridge onto the ACD group member’s call.
Once the HELP button is pressed, an intercom call is placed to the
station requesting Help, and the Help message will be cleared.
The Help message will also be cleared if the agent was on a call and
went back on-hook before the supervisor could respond. In this
case, Help message converts to message wait indication.
(The Agent can also clear the Help request by pressing their HELP
button a second time.)
XTS-IP / XTSc-IP Station User Guide March 2007
Page 30
8ACD/UCD
SINGLE LINE TELEPHONE
While on a call-in-progress, the agent:
Presses the FLASH button and then dials the HELP code [574] on
the dial pad. The agent must press FLASH again to return to their
call after the code is dialed.
ACD Calls In Queue Status Display
There are two methods for stations not assigned to the ACD Group to
monitor the ACD Calls In Queue Status Display.
FIRST METHOD -- From an idle key telephone:
1. Dial [567] on the dial pad,
-orPress the preprogrammed flexible button.
2. Dial the ACD group number (5XX). The ON/OFF button LED
(SPEAKER button LED on IP Phone) will light steady.
This idle display will show how many calls are in queue.
ACD5XX 00 CALLS IN QUEUE
MMM DD YY HH:MM am
5XX = ACD Group Number (534-565 or 550-565 for XTSc-IP)
3. Replace the handset or press ON/OFF (SPEAKER button on IP
Phone) to terminate the display.
SECOND METHOD -- From an idle key telephone:
The preprogrammed flexible button for the ACD group being monitored
will flash, indicating there are calls in queue.
1. Press the preprogrammed ACD CALLS IN QUEUE DISPLAY flexible
button. This idle display shows how many calls are in queue.
ACD5XX 00 CALLS IN QUEUE
MMM DD YY HH:MM am
5XX = ACD Group Number (534-565 or 550-565 for XTSc-IP)
XTS-IP / XTSc-IP Station User Guide March 2007
Page 31

ACD/UCD 9
2. Replace the handset, or press the ON/OFF button (SPEAKER button
on IP Phone) to terminate display.
To assign an ACD CALLS IN QUEUE DISPLAY flexible button:
Dial [579]+[XXX].
(XXX = ACD group number 534-565 or 550-565 for XTSc-IP)
ACD Calls in Queue Pickup
This will allow stations that are not logged into an ACD group to pick up
the next call in queue. The call that has been in queue the longest will
be answered.
To answer the next call in queue:
Dial ACD CALLS IN QUEUE PICKUP code [585] on the dial pad,
followed by the desired ACD Group number (5XX),
-orPress the preprogrammed ACD CALLS IN QUEUE PICKUP flexible
button. Button will remain flashing as long as unanswered calls are
in queue.
ACD Login/Logout
To log into an ACD Group (up to 5 groups can be logged into
simultaneously):
1. Dial LOGIN CODE [572] on the dial pad, followed by the desired ACD
group number (5XX),
-or-
Press a preprogrammed Login flexible button.
2. Enter the priority code (1-9) that has been established for you
by your supervisor or system administrator.
3. Enter your four-digit AGENT ID code (0000-9999).
The LOGIN flexible button LED will light steady and a confirmation
tone will sound to verify the login process.
The ON/OFF LED (SPEAKER button LED on IP Phone) will
extinguish if the login sequence was started in the handsfree
mode.
XTS-IP / XTSc-IP Station User Guide March 2007
Page 32

10 ACD/UCD
The ACD Agent Login LED will only light for the ACD group that
is assigned to that button.
To log out of an ACD Group:
Dial LOGOUT CODE [571] on the dial pad and dial the group
number,
-orPress the preprogrammed LOGOUT flexible button. The LOGIN
flexible button LED will extinguish.
ACD Member Status
Any station (Supervisor or Agent) logged onto the ACD group can view
the status of the ACD group members:
To view group member status:
1. Dial ACD Group Member Status code [573] on the dial pad,
-orPress the preprogrammed flexible button. The display will show:
ACD Group 5XX (XX=ACD group #).
The status of the ACD agents is displayed with a letter following the
station number where the agent is logged in.
A5XX: 110AP 111DP
112AP 113OP 114UP
A = Available D = Do not Disturb O = Out of service
B = Busy on a call N = Not Equipped U = Unavailable
last digit (P) = agent priority (1-9)
NOTE -- If an Agent makes a call while out of service, their status is
out of service, not
busy.
2. Press [] to scroll up to the next ACD Group.
If more than five members are in the ACD group, the next
depression of the [
] displays the additional members,
3. Press [#] to scroll down to the previous ACD Group.
To return to an idle display … Supvr/Agent station must go on-hook.
XTS-IP / XTSc-IP Station User Guide March 2007
Page 33

ACD/UCD 11
ACD Overflow Available/Unavailable
To place a station in Available Mode:
Dial [578] on the dial pad to start receiving ACD calls,
-orPress the preprogrammed AVAILABLE/UNAVAILABLE button.
To place a station in Unavailable Mode:
Dial [578] on the dial pad to block incoming ACD calls,
-orPress the preprogrammed AVAILABLE/UNAVAILABLE button.
ACD Supervisor Display
To view the ACD Supervisor Display:
Dial the ACD Supervisor Display code [577] on the dial pad,
followed by the ACD group (5XX) you want to observe,
-orPress the preprogrammed flexible button.
The ACD Supervisor Display shows the following:
5XX: CIQ: XX AGENTS: XX
OC: HH:MM:SS
5XX = ACD Group (534-565 or 550-565 for XTSc-IP)
CIQ: XX = Calls in queue
AGENT(S): XX = Agents logged in
OC: hh:mm:ss = Oldest call in hours, minutes, and seconds
To change the display to a different group:
Dial the ACD Supervisor Display code [577] on the dial pad,
followed by the ACD group you want to observe,
-orPress the preprogrammed flexible button.
XTS-IP / XTSc-IP Station User Guide March 2007
Page 34

12 ACD/UCD
ACD Supervisor Login/Logout
To log in to an ACD group:
1. Dial LOGIN CODE [576] on the dial pad, followed by the desired ACD
group number (5XX),
-orPress the preprogrammed LOGIN flexible button. (Flexible button
must have [576]+[5XX] programmed onto it.)
2. Enter your 4-digit SUPERVISOR ID code (0000-9999).
The LOGIN flexible button LED will light steady and a confirmation
tone will sound to verify the login process.
If active, an ACD login event will also be sent to the ACD Events
Trace port.
If the login sequence was started in the handsfree mode, the
ON/OFF LED (SPEAKER button LED on IP Phone) will extinguish.
To log out of an ACD group:
Dial LOGOUT CODE [575] on the dial pad, followed by the
appropriate ACD group number (5XX),
-orPress the preprogrammed LOGIN/LOGOUT flexible button, the LED
will extinguish.
ACD Supervisor Log-in LED only lights for ACD group
assigned to that button.
The same flexible button can be used to toggle the
Login/Logout feature.
XTS-IP / XTSc-IP Station User Guide March 2007
Page 35
ACD/UCD 13
ACD Supervisor Monitor with Barge-In
The ACD Supervisor Monitor with Barge-In feature provides a means for
an ACD Supervisor to monitor an agent’s call.
Up to five supervisors per ACD group can simultaneously monitor /
listen in to an agent’s call by pressing a preprogrammed flexible feature
button (feature code 583). The supervisors are able to monitor both
sides of the conversation, but they are not able to talk with either party
while in this mode.
- A warning tone is available to alert parties that someone is
monitoring their call.
Executive Override is a system feature and, therefore, takes
precedence over this feature. For this feature to be used
properly, Executive Override MUST be disabled.
A change in volume may occur on the CO line or intercom
call after the barge-in occurs.
The use of Supervisor Monitor with Barge-In is limited by
federal law and may also be limited or prohibited by state or
local law, so check the relevant laws in your area before
employing these features.
Up to five ACD supervisors can simultaneously monitor an
agent’s call as follows:
1. Dial the agent’s station number. Receive a busy signal.
2. Press the preprogrammed Supervisor Monitor flexible button
(feature code 583). The supervisor is able to hear the conversation
of both parties and the supervisor’s LCD displays the following:
MONITORING XXXX
MMM DD YY HH:MM: am
3. Replace the handset or press ON/OFF (SPEAKER button on IP
Phone) to terminate Supervisor Monitoring.
CONDITIONS
» Supervisors can only barge-in on calls of ACD group members of
the group into which they are logged.
XTS-IP / XTSc-IP Station User Guide March 2007
Page 36
14 ACD/UCD
ACD Supervisor One-Touch Record
This feature allows a supervisor, who monitors/barges-into an ACD call,
to record the conversation into their voice mailbox.
While monitoring an ACD call, press the preprogrammed One-Touch
Record button (feature code 649).
To stop or to pause recording and to resume recording after a
pause, press the preprogrammed Pause/Resume button (feature
code 655).
When the call concludes, the recording ceases.
CONDITIONS
» The supervisor must be logged in as a supervisor of the ACD group.
» The ACD agent’s station must be programmed to enable Supervisor
Monitor/Barge-In.
» The Supervisor must have a One-Touch Record button.
Supervisor Station Status
This feature is established to display the stations in the systems that are
assigned as ACD supervisors and their status.
To view ACD supervisors:
1. Dial the SUPERVISOR STATION STATUS code (586) and the display
will show the following:
XXXX: ####S ####S ####S
####S ####S ####S ####S
XXXX = the ACD group #
#### = the station # that is assigned as a supervisor station.
S denotes the status of the Supervisor:
A = Available
B = Busy
N = Not Available
XTS-IP / XTSc-IP Station User Guide March 2007
Page 37

ACD/UCD 15
2. To view additional supervisors within the same group, press [*].
If all supervisors within the group have been viewed, pressing [*]
will advance to view supervisors of the next group.
3. Press [#] to view supervisors of the previous group.
ACD/UCD Available/Unavailable
If you are an ACD/UCD Agent, you can place your station in the
Available mode to receive ACD/UCD calls, or in the Unavailable mode to
block ACD/UCD calls from ringing to your station.
If the enhanced mode is enabled in administrative database
programming, agents can specify the reason for their unavailable
status. This enhanced feature is used in conjunction with the Discovery
Manager product.
To make a station available/unavailable (normal mode):
Dial the ACD Available/Unavailable feature code [566],
-orPress the preprogrammed AVAILABLE/UNAVAILABLE button to
toggle between being in an available or unavailable status.
To make a station available/unavailable (enhanced mode):
1. Make a preprogrammed AVAILABLE/UNAVAILABLE button by
pressing [SPEED] + [SPEED] + dial [566] + dial a unique identifier
code (0-9, #, or * that will be sent to the PC ACD trace for Discovery
Manager use).
2. Press the preprogrammed AVAILABLE/UNAVAILABLE button to
toggle between being in an available or unavailable status.
ACD/UCD Wrapup End
An agent that wants to override the Wrapup Timer and immediately go
back into an available ACD/UCD status can use a preprogrammed
WRAPUP END flexible button.
To override the Wrapup Timer:
1. Preprogram a WRAPUP END flexible button using feature code 584.
2. Press the preprogrammed WRAPUP END flexible button.
XTS-IP / XTSc-IP Station User Guide March 2007
Page 38
16 ACD/UCD
UCD Calls In Queue Display
From an idle display key telephone:
1. Dial [567],
-orPress the preprogrammed flexible button.
2. Dial the desired UCD group number (550-565). The ON/OFF button
LED (SPEAKER button LED on IP Phone) will light steady.
This idle display prompts a Supervisor that a group is having
problems answering their calls.
The display tells the agent and their supervisor how many calls
are in queue.
The agent automatically receives the calls in queue display
whenever there is a call in queue.
3. Replace the handset or press ON/OFF (SPEAKER button on IP
Phone) to terminate display.
This feature cannot be used with a call in progress. The
station is considered busy for incoming calls during
this operation.
UCD Overflow Station Forward
This feature allows UCD calls reaching the Overflow Station to call
forward to another station.
To activate call forwarding:
1. Lift the handset or press the ON/OFF button (SPEAKER button on IP
Phone).
2. Press the FWD button or dial [640].
3. Dial the desired code:
[6] = All Calls [8] = Busy
[7] = No Answer [9] = Busy/No Answer
4. Dial the 3- or 4-digit destination number where calls are to be
forwarded (Station, Voice Mail, UCD group, Hunt group). A
confirmation tone will sound.
XTS-IP / XTSc-IP Station User Guide March 2007
Page 39

Alternate Dial Plan 17
5. Replace the handset or press the ON/OFF button (SPEAKER button
on IP Phone).
To remove call forwarding:
1. Lift the handset or press the ON/OFF button (SPEAKER button on IP
Phone).
2. Press the FWD button. A confirmation tone will sound and the FWD
LED will extinguish.
Alternate Dial Plan
When you use an MPBE, the 3-digit default dial plan uses station
numbering of 100-419 (320 stations) and feature code numbering
beginning with feature code 420 as shown in the “Default Numbering
Plan” on page 125.
When your system has more than 320 stations, default station
numbering would cause conflicts with default feature code numbering.
For example … physical station number 321 would be station 420 in the
default numbering plan, and this conflicts with VM Msg Set default
feature code of 420.
The Alternate Dial Plan programming feature is used when your system
has more than 320 stations (using an MPBE). The default Alternate Dial
Plan uses station numbering of 100-591 (492 stations) and feature code
numbering that uses the 3-digit default dial plan with a leading digit of
8, resulting in a 4-digit feature code plan.
For example … the VM Msg Set default feature code of 420 becomes
8420.
EXCEPTIONS -- Feature code numbering under the default Alternate Dial
Plan is as described above with the following exceptions:
6540 (Answering Machine Emulation w/ringing) is changed to 8665
6541 (Answering Machine Emulation w/speaker) is changed to 8666
88 (CO Line Direct Access) is changed to 8888
XTS-IP / XTSc-IP Station User Guide March 2007
Page 40
18 Answering Machine Emulation
89 (Loop Key) is changed to 8889
The Alternate Dial Plan does not apply to MPB1 or MPB2
systems.
Answering Machine Emulation
When a call is sent to your voice mailbox, you can press a
preprogrammed flexible button to listen to the caller leaving the voice
mail message. If you decide to speak with the caller, you can press the
preprogrammed button to be connected to the caller.
Notification Methods
There are two methods of notification, a Ring Mode or a Speaker Mode.
These methods are controlled by the type of flexible button assigned
on the telephone.
The preprogrammed button type defines the operation mode
(654+0=Ring Mode, 654+1=Spkr Mode; 8665=Ring Mode - Alt Dial
Plan, 8666=Spkr Mode - Alt Dial Plan). An incoming CO call rings at
a station and forwards (except busy type) to station’s VM mailbox.
Ring Mode
The preprogrammed flexible button flashes red while the caller is in your
mailbox. You can press the flashing button and the audio is broadcast
over the speaker of the keyset. The MUTE key is also enabled and the
LED lights solid red. When the call is ringing the station in the ring
mode, the display shows:
VM SCREENING RING
MMM DD YY HH:MM am
XTS-IP / XTSc-IP Station User Guide March 2007
Page 41

Answering Machine Emulation 19
Speaker Mode
The VM message is broadcast over the speaker. The MUTE key is
enabled and the LED lights solid red. When the station is monitoring the
caller in VM, the display shows.
VM SCREENING
MMM DD YY HH:MM am
MAILBOX OPTIONS
The Mailbox Owner can select from the following options when a call is
sent to their voice mailbox.
To leave caller in VM and turn off speaker:
Press the ON/OFF button (SPEAKER button on IP Phone) and
continue to listen to message being left without taking action at
the keyset. After the VM message is left, the preprogrammed button
will be solid red and the keyset will return to idle.
To talk to party leaving the message:
Press the MUTE key. Station is still in CONF and caller can hear both
VM and you.
To pick up call:
Press the flexible button. When the call is picked up, the voice mail
system will disconnect from the call.
XTS-IP / XTSc-IP Station User Guide March 2007
Page 42

20 Attendant Features
Attendant Features
If your station is designated as the Attendant station, use the following
features to assist you in efficiently operating your telephone.
Attendant Clear Alarm
The Attendant can dial feature code [606] to clear any alarm. This
function does not clear the condition, only the display.
Attendant CO Line External (Off-Net) Forward
To activate off-net forwarding:
1. Dial [603] on the dial pad,
-or-
2. Press the preprogrammed CO OFF-NET FORWARD button.
3. Dial the CO group access code of group to be forwarded:
[801-823] = CO Group 1-23 [824] = All CO Groups
4. Dial the speed bin number that contains the number where calls
are to forward. A confirmation tone will sound.
To cancel off-net forwarding:
1. Dial [603] on the dial pad,
-orPress preprogrammed CO OFF-NET FORWARD button.
2. Dial the CO group access code.
3. Dial [#] on the dial pad. A confirmation tone will sound.
Attendant Custom Message
Up to ten custom messages can be programmed for system-wide use at
the first Attendant station.
XTS-IP / XTSc-IP Station User Guide March 2007
Page 43
Attendant Features 21
To program a custom message:
1. Dial the Custom Message program code [694] on the dial pad. The
following message displays:
ENTER MSG NO
MMM DD YY HH:MM am
2. Enter a valid message bin number [21-30]. The following message
displays after the bin number has been selected.
mmmmmmmmmm...
ENTER MSG:
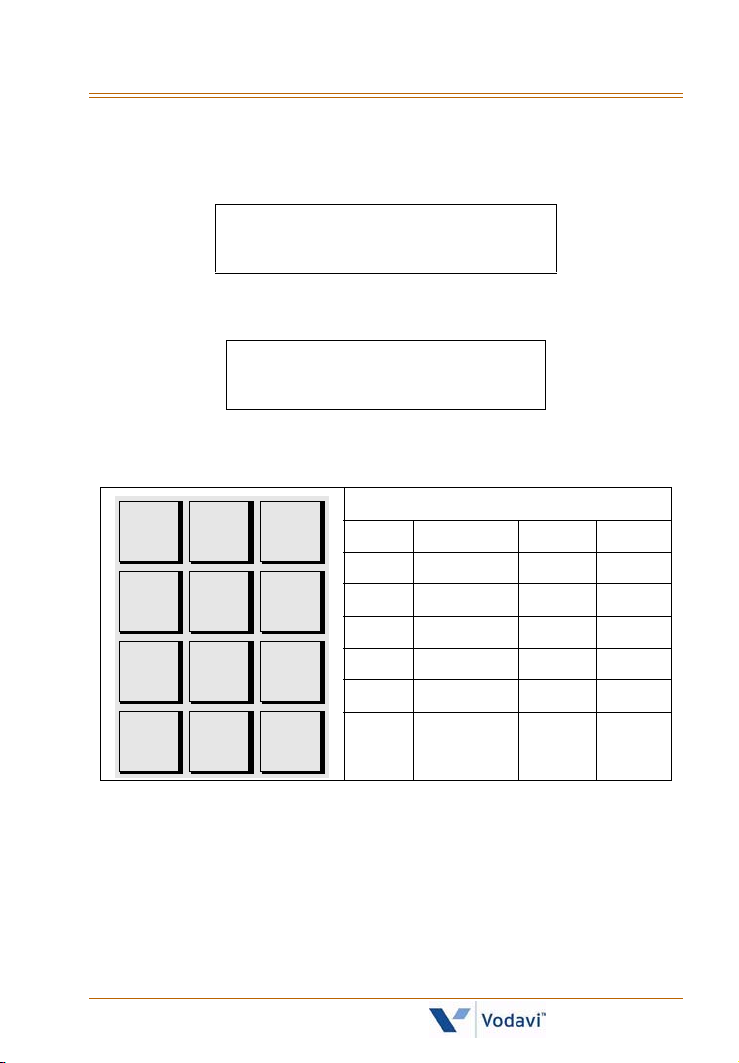
3. Enter the letters for the custom message using the dial pad keys as
shown in the following chart:
A - 21
1
B - 22
C - 23
D - 31
D - 31
E - 32
E - 32
F - 33
F - 33
1 = 1# 8 = 8# “ = 01 * = *#
Other Codes
2 = 2# 9 = 9# , = 02 ( = #1
G - 41
H - 42
I - 43
P - 71
R - 72
S - 73
Q - 74
J - 51
K - 52
L - 53
T - 81
U - 82
V - 83
0PER
*
0
Up to 24 alphanumeric characters may be entered (represents
M - 61
N - 62
O - 63
W - 91
X - 92
Y - 93
Z - 94
#
3 = 3# 0 = 0# ? = 03 ) = #2
4 = 4# Space = 11 / = 04 + = #3
5 = 5# : = 12 ! = *1 = = #4
6 = 6# - = 13 $ = *2 # = ##
7 = 7# ‘ = 14 & = *4 . = 24
48 digits). Characters display when entered.
Attendant must go idle after programming a message before
another message may be programmed.
4. Press the HOLD button to enter message. A confirmation tone will
sound.
XTS-IP / XTSc-IP Station User Guide March 2007
Page 44
22 Attendant Features
Attendant Day/Night/Special
OR
The system’s Automatic Night Mode Feature can be overridden by the
Attendant station. Any Attendant station user can press their DND
button or a Soft Key to place the system into Night Mode.
The Night Service feature provides a means to place the
system in night mode or remove the system from night mode
from any keyset, providing the system was put in night
mode by the night service feature flexible button [604].
If the system was placed in night mode by the Attendant
using the DND button, or if the system was placed in night
mode by the automatic schedule, the night service flexible
button cannot remove the system from night mode.
To use this feature:
1. Press the preprogrammed NIGHT SERVICE button once
(631, DND by default),
-orUse the Soft Key’s DND option when in an idle condition (LED is lit
solid).
2. Press the DND button or Soft Key again to activate the Special
mode (LED flashes).
The DND button (by default) or Soft Key acts as a rotary in this
manner, starting in Day mode, Night mode, then Special mode.
When one Attendant activates this mode, other Attendant
stations’ DND buttons are lit accordingly.
Attendant Directory List Programming
The Attendant can program up to 200 names in the directory list. When
the directory list is accessed by any display telephone user, the system
displays the name associated with a speed dial number so when the
desired name is shown, the user may have the system dial the number.
XTS-IP / XTSc-IP Station User Guide March 2007
Page 45

Attendant Features 23
To access Directory List Programming:
Dial the Directory List program code [693]. The HOLD button will
illuminate and the first entry (000) in the Directory List will display:
DIR LST AAA BIN/ICM: XXXX
nnnnnnnnnnnnnnnnnnnnnnn
AAA = Directory List entry number (000-199)
XXXX = One of the following:
» 3- or 4-digit station number (100-8999)
» 3-digit local number/name translation table number
(600-799 minus station numbers that would overlap)
» 4-digit remote device number (1000-8999 minus
(1000-8999 minus station numbers that would overlap)
» 4-digit system speed bin number (9020-9999 for XTS-IP,
9020-9099 for XTSc-IP)
nnn = Programmed Name (blank, if none)
Directory List
The following procedure is used to enter, edit, and erase names in the
Directory List for stations or speed dial numbers.
To modify the Directory List:
1. Enter the desired 3-digit Directory List number (000-199), or dial
[] to scroll up (next entry) or [#] to scroll down (previous entry)
through the list.
If changing a name already associated with an existing station, skip
to Step 4.
2. Press TRANS.
3. Enter the 3- or 4-digit station intercom number.
4. Press the MUTE button.
XTS-IP / XTSc-IP Station User Guide March 2007
Page 46
24 Attendant Features
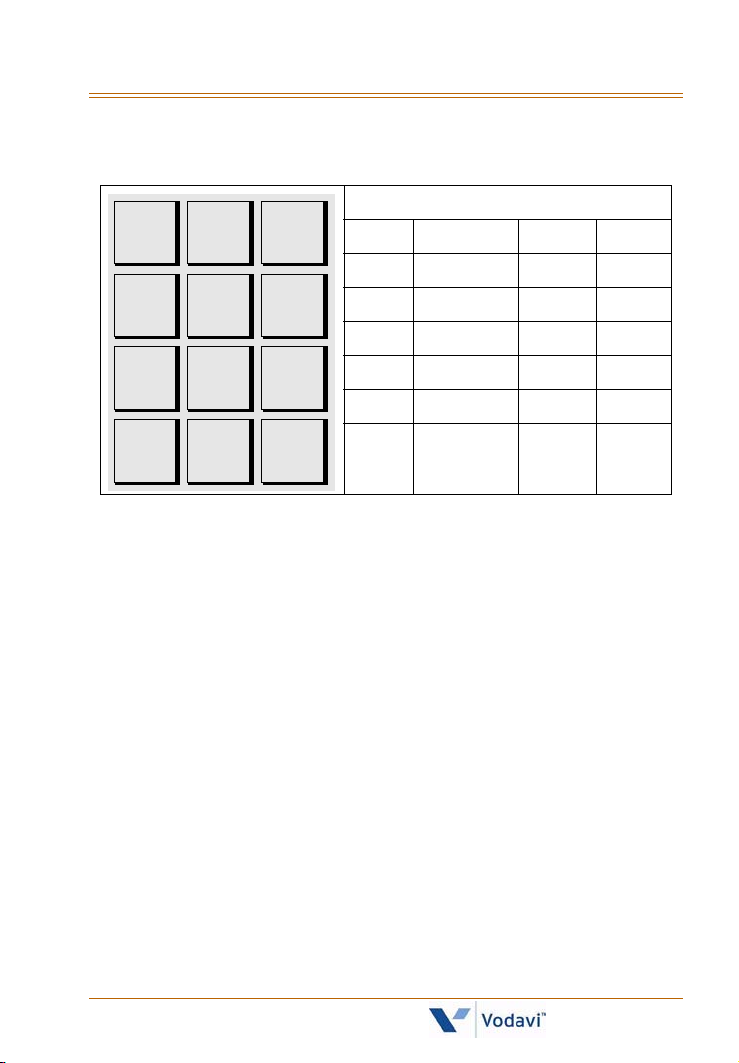
5. Enter the name (up to 24 characters may be entered) by using the
keys. The display updates as the name is entered.
A - 21
1
B - 22
C - 23
D - 31
D - 31
E - 32
E - 32
F - 33
F - 33
1 = 1# 8 = 8# “ = 01 * = *#
Other Codes
2 = 2# 9 = 9# , = 02 ( = #1
G - 41
H - 42
I - 43
J - 51
K - 52
L - 53
M - 61
N - 62
O - 63
3 = 3# 0 = 0# ? = 03 ) = #2
4 = 4# Space = 11 / = 04 + = #3
P - 71
R - 72
S - 73
Q - 74
*
T - 81
U - 82
V - 83
0PER
0
W - 91
X - 92
Y - 93
Z - 94
#
5 = 5# : = 12 ! = *1 = = #4
6 = 6# - = 13 $ = *2 # = ##
7 = 7# ‘ = 14 & = *4 . = 24
6. Press SPEED when finished. A confirmation tone sounds and the
display shows the new or changed name.
7. Press HOLD, then use [] or [#] to scroll to next entry.
-orHang up to end programming.
To clear an entry:
1. Select the desired entry.
2. Press the TRANS button, then press FLASH.
3. Press SPEED, a confirmation tone will sound and the entry is erased.
Local Translation Table
The following procedure is used to associate names to the Local
Number/Name Translation Table number only.
To add names to Local Translation number:
1. Enter desired three-digit Directory List number (000-199), or dial
[] to scroll up (next entry) or [#] to scroll down (previous entry)
through the list.
XTS-IP / XTSc-IP Station User Guide March 2007
Page 47
Attendant Features 25
If just changing a name associated with an existing Table entry, skip
to Step 4.
2. Press TRANS.
3. Dial three-digit Local Number/Name Translation Table number
(600-799) that represents the desired telephone number.
4. Press MUTE.
5. Use the keys on the dial pad to enter the name (up to 24 characters
may be entered). The display updates as the name is entered.
If an error is made during keystroke entry, press FLASH
to clear the current name.
6. Press SPEED when finished. Confirmation tone sounds and the
display shows the new or changed name.
7. Press HOLD, then use [] or [#] to scroll to next entry.
-orHang up to end programming.
Speed Dial Bin
The following procedure is used to associate names to a system speed
dial bin only.
To add names to a System Speed Bin:
1. Enter desired 3-digit Directory List number (000-199), or dial [] to
scroll up (next entry) or [#] to scroll down (previous entry) through
the list. (If changing a name already associated with an existing
System Speed Dial Bin entry, skip to Step 4.)
2. Press TRANS.
3. Dial system speed dial bin location (9020–9999 or
9020-9099 for XTSc-IP).
4. Press MUTE.
5. Use keys on the dial pad to enter the name (up to 24 characters may
be entered). The display updates as the name is entered.
6. Press SPEED when finished. Confirmation tone sounds and the
display updates.
XTS-IP / XTSc-IP Station User Guide March 2007
Page 48

26 Attendant Features
7. Press HOLD, then use [] or [#] to scroll to next entry.
-orHang up to end programming.
Attendant Disable Outgoing CO Line
The first Attendant can disable CO lines to prevent outgoing access to
those lines.
To disable CO Lines:
1. Lift the handset, or press the ON/OFF button (SPEAKER button on IP
Phone).
2. Dial [602] on the dial pad. A confirmation tone will sound.
3. Press the line button(s) of the CO Line(s) to disable. The CO Line
button(s) LED flashes; a confirmation tone sounds.
To reactivate the CO Line(s):
Repeat Steps 1-3 to disable this feature.
Attendant Override
When Attendant Override is enabled, Attendant stations may override
or call stations that are busy or in Do Not Disturb.
To call a station busy on a CO call:
Press the preprogrammed ATTN OVERRIDE button [601]. Three short
tone bursts are presented to the called party.
After five (5) seconds, the station’s CO line is automatically placed
on hold and the Attendant is cut-through.
To call a station in Do Not Disturb mode:
Press the preprogrammed ATTN OVERRIDE button. The station is
signaled with a Camp On tone.
XTS-IP / XTSc-IP Station User Guide March 2007
Page 49

Attendant Features 27
Attendant Setting Time and Date
System Time/Date must be set by the first programmed Attendant via
admin programming or using feature code 692.
To set using the feature code:
1. Dial [692] on the dial pad. A confirmation tone will sound.
2. Enter date and time as follows: YYMMDDHHMM
YY = Year (00-99) HH = Hour (00-23)
MM = Month (01-12) MM = Minute (00-59)
DD = Day (01-31)
When the correct number of digits are entered, a confirmation tone
will sound.
3. Press the ON/OFF button (SPEAKER button on IP Phone) to OFF to
update the display.
Attendant Speed Dial - System Storing
System Speed numbers must be entered by the first programmed
Attendant. If an Attendant is not specified, enter at Station 100.
To program a system speed number:
1. Press SPEED once, then press the desired outside line key,
-orPress SPEED twice to select an outside line automatically.
2. Dial the System Speed bin location (9020-9999 or
9020-9099 for XTSc-IP).
3. Dial telephone number.
4. Press SPEED.
5. Hang up.
XTS-IP / XTSc-IP Station User Guide March 2007
Page 50

28 Attendant Features
Speed Dial Options
To use the following speed dial options, enter as shown:
Initiate a Pulse-To-
- Press TRANS during number entry.
Tone Switch over
Insert a Pause - Press HOLD during number entry.
Insert a Flash into
- Press FLASH.
the Speed Number
Insert a Non-Display
Character
- Press TRANS as the first entry in the speed bin.
This causes the numbers stored in the bin not
to display on the Digital Telephones when the
bin is accessed.
Speed Bin numbers 9060-9099 are not monitored by Toll
Restriction.
Attendant Unavailable
The Attendant Unavailable feature lets Attendant stations have a
button that places their station in an Unavailable Mode. When the
station is in the Unavailable Mode, the next Attendant station receives
dial “0” calls and recalls.
To activate Unavailable Mode:
As the (first programmed) Attendant …
Press the preprogrammed UNAVAILABLE flexible button,
-orDial the Attendant Unavailable code [607] on the dial pad, and the
following results occur:
The flexible button LED will light solid, if programmed.
Recalls and dial “0” calls will ring at the second Attendant’s
station.
If the second Attendant places their phone in unavailable, the
third Attendant will receive recalls and dial “0” calls, and so
forth through the sixth Attendant.
XTS-IP / XTSc-IP Station User Guide March 2007
Page 51
Background Music (Optional) 29
To deactivate Unavailable Mode:
As the (first programmed) Attendant …
Repeat activation process shown above (press Unavailable button
or dial code 607), the following results will occur:
The flexible button LED, if programmed, will extinguish.
The first Attendant will resume normal operation.
The second through sixth Attendants will not receive recalls or
dial “0” calls.
Attendant Voice Mail Alarm Clear
The Attendant display shows an alarm condition when the system
detects that the digital voice mail is out of service.
To clear any alarm:
Dial feature code [656] to clear any alarm from the display.
This function does not clear the condition, only the display.
Background Music (Optional)
To activate Background Music:
1. Dial [632] or press the preprogrammed BGM flexible button, then
enter desired channel number on the keypad.
-orUse the Soft Key’s BGM option.
0:OFF 1/2/3: CH-1/2/3
MMM DD YY HH:MM am
LCD Display for XTS-IP Systems
0:OFF 1:CH-1 2:CH-2
MMM DD YY HH:MM am
LCD Display for XTSc-IP Systems
A confirmation tone will sound; music is audible through speakers.
XTS-IP / XTSc-IP Station User Guide March 2007
Page 52
30 Call Back
2. Press Volume Bar to change the volume. The LCD displays:
SPEAKER BGM [#########]
MMM DD YY HH:MM am
To deactivate Background Music:
1. Dial [632] again or press BGM flexible button, then enter [0].
-orUse the Soft Key’s BGM option.
2. A confirmation tone will sound and music will discontinue.
SINGLE LINE TELEPHONE
The Background Music feature is not compatible with SLTs.
IP Phones do not support the Background Music
feature.
Call Back
A station can initiate a call back request to another busy station. Once
that station becomes idle, the station that left the call back request is
signaled.
To leave a Call Back request when a number is busy:
1. Either press the preprogrammed CALL BACK flexible button or use
the Soft Key’s CALL-BK option (press the MSG/CALLBK button on
IP-24DH or IP7024D Phone).
2. Replace the handset or press the ON/OFF button (SPEAKER button
on IP Phone). When the busy station hangs up, you will be signaled.
3. Answer the call; the station you called will then be signaled. (If your
station is busy when signaled, an automatic MSG will be placed at
your phone.) Only one Call Back request can be left at a station; the
second request will leave a message wait callback request.
XTS-IP / XTSc-IP Station User Guide March 2007
Page 53
Call Coverage 31
When the Automatic Call Back Timer is enabled, a call
back request is automatically invoked anytime you
listen to a busy intercom tone for a preset period of
time (default = 10 seconds).
SINGLE LINE TELEPHONE
To leave a Call Back request when a number is busy:
1. Press the FLASH button.
2. Dial [622] and replace the handset.
Only one Call Back request can be left at a station; the
second request will convert to a message waiting
request.
Call Coverage
The Call Coverage feature provides the functionality for stations to
answer calls for other stations by utilizing call coverage buttons. Visual
and Audible status of ringing stations to an assigned coverage station
are provided. Multiple coverage stations can have the same remote
ringing station(s) programmed on their stations. Once a coverage
station answers the call, other stations attempting to answer the call
receive a busy tone and the call coverage button extinguishes on all
appearances of that button.
The Call Coverage button also functions as a DSS/BLF button for the
covered station; therefore, when the Call Coverage button is
pressed, the covered station is called. Also, when the covered
station goes off hook, the Call Coverage button’s BLF is lit.
Direct CO calls have ring and LCD priority over call coverage calls.
The coverage station must have a direct CO appearance or Loop
button in order to pick up an external call. If the coverage station is
in DND, no audible ringing occurs, however visual and LCD
information is presented.
XTS-IP / XTSc-IP Station User Guide March 2007
Page 54
32 Call Coverage
To assign a Call Coverage Button:
1. Press [SPEED] + [SPEED].
2. Press a desired flexible button.
3. Dial [647] for Non-Ringing or [646] for Ringing, followed by the
station number to cover. A confirmation tone will sound.
After a button is assigned, and that station receives a call:
1. You will receive audible and/or visual indications after a
programmable period of time: an internal ring tone, and/or the
same flash rate as the incoming CO line ringing rate.
Ringing option = ringing, flashing Call Coverage LED, LCD
display as in following illustration:
CALL FOR STA XXXX
MMM DD YY HH:MM am
Non-Ringing option = flashing Call Coverage LED only (no
ringing or change to LCD)
2. Then press the flashing COVERAGE flexible button,
-orPress the ON/OFF button (SPEAKER button on IP Phone).
The call is answered and will cease to ring at any other stations that
may have the same coverage appearance. After call is answered,
one of the following messages will display:
Non-network system or in same Node:
CALL FOR STA XXXX
FROM STA YYYY HH:MM:SS
Network system with call passed across a switch:
XXXXXXXXX CALLING
YYYYYY HH:MM:SS
XXXXXXXXX = Name of calling party
YYYYYY = Specific CO Line type being used (e.g., PRI #23)
HH:MM:SS = Amount of time on the call
XTS-IP / XTSc-IP Station User Guide March 2007
Page 55

Call Forward 33
3. If caller wants to be transferred to covered station’s voice mail:
a. Press the TRANS button.
b. Press the Voice Mail button.
c. Press the COVERAGE flexible button.
d. Hang up.
SINGLE LINE TELEPHONE
This feature can cover SLT extensions, however an SLT cannot
perform the call coverage function. The SLT extension need not be
physically installed, only the SLT card must be installed.
Call Forward
The Call Forward feature allows a station to have internal or external
calls forwarded to a designated station, an ACD or UCD group pilot
number, Voice Mail group number, or Hunt group. This feature must be
enabled in Admin Programming.
To activate Call Forwarding:
1. Lift the handset or press the ON/OFF button (SPEAKER button on IP
Phone), press the FWD button or dial [640], then dial the
appropriate forwarding condition code.
[6] = All Calls [8] = Busy
[7] = No Answer [9] = Busy/No Answer
-orUse the applicable Soft Key’s ALL-FWD, N/A-FWD, BSY-FWD, or
B/NA-FWD option.
2. Press the DSS button of desired station,
-orDial the desired extension number where to forward calls,
including ACD or UCD, Voice Mail, Hunt Group pilot numbers and
Speed Dial bins for off-net forwarding.
3. Replace the handset or press the ON/OFF button (SPEAKER button
on IP Phone).
XTS-IP / XTSc-IP Station User Guide March 2007
Page 56

34 Call Forward
To remove Call Forwarding:
1. Lift the handset, or press the ON/OFF button (SPEAKER button on IP
Phone).
2. Either press the FWD button, dial [640] or [662], or use the Soft Key’s
CLR-FWD option. A confirmation tone sounds and the FWD LED
extinguishes.
SINGLE LINE TELEPHONE
The SLT operation uses the same procedures as used in Digital
Telephone operation described above, except there is no FWD
button or Soft Keys. You must use feature codes 640 and 662.
Call Forward - External (Off-Net)
Stations are allowed to forward intercom and transferred CO line calls to
an off-net location. The Call Forward Off-Net feature allows a station to
reroute calls that would normally be lost. Calls can be forwarded to
home or another off-net site. Initially ringing CO calls cannot be
forwarded with this feature.
To activate Off-Net Call Forwarding:
1. Lift handset or press ON/OFF button (SPEAKER button on IP Phone).
2. Press the FWD button or dial [640] on the dial pad.
3. Press the desired preprogrammed speed bin flexible button. A
confirmation tone sounds and the FWD button LED is Red Steady
On.
4. Replace handset; ON/OFF button (SPEAKER button on IP Phone)
extinguishes automatically, if used instead of handset.
-or-
1. Lift handset or press ON/OFF button (SPEAKER button on IP Phone).
2. Press the FWD button or dial [640] on the dial pad.
3. Dial [
4. Replace handset; ON/OFF button (SPEAKER button on IP Phone)
] on the dial pad. Dial the station/system speed bin number
that contains the number where calls are to be forwarded. A
confirmation tone sounds and the FWD button LED is Red Steady
On.
extinguishes automatically, if used instead of handset.
XTS-IP / XTSc-IP Station User Guide March 2007
Page 57

Call Forward 35
To remove Off-Net Call Forwarding:
1. Lift the handset or press ON/OFF (SPEAKER button on IP Phone).
2. Press the FWD button or dial either [640] or [662]. A confirmation
tone sounds and the FWD LED extinguishes.
SINGLE LINE TELEPHONE
The SLT operation uses the same procedures as used in Digital
Telephone operation described above, except there is no FWD
button. The user must use the 640 feature code to activate and 662
to clear.
Call Forward - External (Off-Net) Redirect
This feature allows a user who receives a call, that has been forwarded
off-net via PRI, to redirect that call back to a destination within the
XTS-IP / XTSc-IP system.
Feature operation sequence:
Off-net forward is set.
Call is received from CO on XTSc-IP trunk (can be any type of CO
trunk).
Call is sent to a PRI trunk and forwarded to an off-net destination,
e.g., a cell phone.
Cell phone user answers the call.
Cell phone user dials [*] + [*] + destination number within the
XTS-IP / XTSc-IP to which the call is redirected.
While in the dialing state, the cell phone user does not receive dial
tone, both parties are still connected, the original caller hears DTMF
tones as the cell phone user dials. At the conclusion of dialing the
destination number, the calling party is connected to the new
destination and the cell phone user is disconnected from the call.
If the off-net forward is made on a trunk other than PRI, the Redirect
feature will not work.
XTS-IP / XTSc-IP Station User Guide March 2007
Page 58

36 Call Forward
Call Forward - Follow Me
The Follow Me feature lets a user who is away from their station,
activate/deactivate call forwarding from another station in the system.
This lets the user forward their calls to their current location or into
Voice Mail, ACD/UCD, Hunt Group, any other station in the system, or to
an off-net location. When this call forward is activated, all calls
presented to the forwarded station forward to the destination station
immediately.
To activate Follow Me Call Forwarding:
1. Lift handset or press ON/OFF button (SPEAKER button on IP Phone).
2. Dial the Follow Me Forward code [642] on the dial pad.
3. Dial station number of the station from which forwarding is desired.
4. Dial the appropriate forwarding condition code.
[6] = All Calls [8] = Busy[
[7] = No Answer [9] = Busy/No Answer
5. Dial the three- or four-digit destination number where calls are to
be forwarded (Station, Voice Mail, ACD/UCD, Hunt Group, or speed
bin (only for off-net)).
6. Replace handset or press ON/OFF button (SPEAKER button on IP
Phone).
To remove Follow Me Call Forwarding:
1. Lift the handset or press the ON/OFF button (SPEAKER button on IP
Phone).
2. Dial the Follow Me Forward code [642] on the dial pad.
3. Dial station number of station that forwarding is to be cancelled.
4. Dial [6] (regardless of the forward condition).
5. Redial the same station number. Confirmation tone sounds and
FWD LED extinguishes.
] = Off-Net
To establish Follow Me Call Forwarding (off-site location):
1. Dial into the system on a DISA or TIE trunk. Enter the DISA access
code, if applicable.
2. Dial the Follow Me Forward code [642] on the dial pad.
XTS-IP / XTSc-IP Station User Guide March 2007
Page 59

Call Forward 37
3. Dial the station number of the station from which forwarding is
desired.
4. Dial the appropriate forwarding condition code.
[6] = All Calls [8] = Busy[
] = Off-Net
[7] = No Answer [9] = Busy/No Answer
5. Dial the three- or four-digit destination number where calls are to
be forwarded (System Speed Bin (off-net only), Station, Voice Mail,
ACD/UCD, or Hunt Group). A confirmation tone sounds; five
seconds later a dial tone is received.
To remove Follow Me Call Forwarding (off-site location):
1. Dial into the system on a DISA or TIE trunk. Enter the DISA access
code, if applicable.
2. Dial the Follow Me Forward code [642] on the dial pad.
3. Dial the station number of the station that forwarding is to be
cancelled.
4. Dial [6] (regardless of the forward condition).
5. Redial the same station number. Confirmation tone sounds; 5 secs
later = dial tone.
XTS-IP / XTSc-IP Station User Guide March 2007
Page 60

38 Call Park
Call Park
Call Park - Personal
Each digital telephone in the system can place a call into a personal park
location and then later retrieve that call from the originating station.
Internal calls and external calls can be placed into the stations’ personal
park location. Calls parked in a personal park location are subject to the
system call park recall timer.
To park a call:
1. Press the TRANS button. The caller is put on Exclusive Hold.
2. Dial the Personal Park location code [438] on the dial pad,
-orPress the preprogrammed PERSONAL PARK button. A dial tone will
sound.
To retrieve a parked call:
Dial Personal Call Park location code [438] on the dial pad,
-orPress the preprogrammed PERSONAL PARK button. A talk path will
be established between the two parties.
SINGLE LINE TELEPHONE
To p ark a call:
1. Press the FLASH button. A dial tone will sound.
2. Dial [438]. The call is placed in personal park.
To retrieve a parked call:
Dial [438]. The call is returned.
CONDITIONS
» If the Call Park user receives or makes a 2nd call while the 1st call is
parked, they can alternately connect to the two calls by pressing
the preprogrammed PERSONAL PARK button or by dialing [438].
XTS-IP / XTSc-IP Station User Guide March 2007
Page 61

Call Park 39
Call Park - Station
Call park (by station number) allows external calls to be parked at a
station other than your own.
To park a call:
1. Press the TRANS button. The call is put on Exclusive Hold.
2. Dial [439] + [XXX] (XXX=station number).
-or-
1. Press the TRANS button. The call is put on Exclusive Hold.
2. Press the preprogrammed CALL PARK (Station) button.
3. Dial [XXX] (XXX = station number).
To retrieve a parked call:
Dial [# 6] + [XXX] (XXX = the station number used to park the call)
while at any telephone in the system, including the initiator’s.
-orDial [438] from the initiator’s station.
To create a CALL PARK (Station) button:
1. Press [SPEED] + [SPEED].
2. Press the desired flexible button.
3. Dial [439] + [#]. A confirmation tone sounds.
SINGLE LINE TELEPHONE
The SLT user cannot park a call using the Call Park - Station feature.
The SLT user can retrieve a Call Park - Station call by using the [#6]
procedure in the digital keyset section above.
XTS-IP / XTSc-IP Station User Guide March 2007
Page 62

40 Call Park
Call Park - System
An external call can be placed into one of 14 parking locations and can
be retrieved by any station that has a direct line appearance or an
available Loop button. Parked calls have their own recall timer that
recalls the originating station, and if still unanswered, the Attendant(s).
To park a call, either:
1. Press the TRANS button. The caller will be put on hold.
2. Dial the parking location (424-437). A confirmation tone will sound.
3. If a busy tone is received, press TRANS twice and dial another park
location, or press the CALL PARK flexible button for a different
parking location.
-or-
1. Press the CALL PARK flexible button. The caller will be parked at the
location programmed on the button.
2. If a busy tone is received, press TRANS twice and dial another park
location, or press the CALL PARK flexible button for a different
parking location.
To retrieve a parked call, either:
1. Lift the handset or press the ON/OFF button (SPEAKER button on IP
Phone).
2. Press [#].
3. Dial parking location (424-437) where call was parked, or press the
preprogrammed PARKED CALL PICKUP flexible button.
-orUse the Soft Key’s P-PKP 1 option when in an idle condition (to
pickup from park location 1 only).
To create a PARKED CALL PICKUP button:
1. Press [SPEED] + [SPEED].
2. Press the desired flexible button.
3. Dial [#] + the desired parking location (424-437).
XTS-IP / XTSc-IP Station User Guide March 2007
Page 63

Call Pickup 41
SINGLE LINE TELEPHONE
To p ark a call:
1. Press the FLASH button. The caller is put on Exclusive Hold.
2. Dial parking location (424-437). A confirmation tone will sound.
3. If busy, press FLASH button twice and dial another park
location.
To retrieve a parked call:
1. Lift the handset and press the [#] button.
2. Dial parking location (424 to 437) where call was parked.
Call Pickup
A station can pickup a call ringing to any specific unattended station by
using the Directed Call Pickup procedure.
A station can pickup a call ringing to an unattended station within the
same ACD/UCD group by using the Group Call Pickup procedure.
Directed Call Pickup
To create a Pickup Button:
1. Press [SPEED] + [SPEED].
2. Press the desired flexible button, then dial #0.
To use Directed Call Pickup:
1. Dial the station number of the known ringing telephone. Receive
ringback tone or call announce tone depending on the intercom
selector switch setting.
2. Press the preprogrammed PICKUP button to answer the call.
XTS-IP / XTSc-IP Station User Guide March 2007
Page 64
42 Call Pickup
SINGLE LINE TELEPHONE
To use Directed Call Pickup:
1. Lift the handset.
2. Dial [#1].
3. Dial station number of ringing telephone.
You MUST have access to the specific outside line or a
LOOP button to do a directed call pickup.
Group Call Pickup
To create a Pickup Button:
1. Press [SPEED] + [SPEED].
2. Press the desired flexible button.
3. Dial #0.
To use Group Call Pickup:
1. Lift the handset or press the ON/OFF button (SPEAKER button on IP
Phone).
2. Dial [#0] on the dial pad,
-orPress preprogrammed PICKUP button to answer call.
SINGLE LINE TELEPHONE
To use Group Call Pickup:
1. Lift the handset.
2. Dial [#0]. You will be connected to the incoming intercom or
outside line call.
You must be in the same Pickup group as the ringing
telephone to pickup the call.
You MUST have access to the specific outside line or
LOOP button to use Group Call Pickup.
XTS-IP / XTSc-IP Station User Guide March 2007
Page 65

Call Transfer 43
Call Transfer
Outside lines can be transferred from one phone to another within the
system. The transfer can be either screened (announced) or unscreened
to either an idle or busy station, an ACD/UCD Group, or a Hunt Group.
Outside line calls can also be transferred to another outside destination
by using a trunk-to-trunk transfer.
Executive/Secretary Transfer
If you are designated as the:
Executive station, and your phone is busy or in DND, all calls will be
routed to the Secretary station.
Secretary station, you can signal the Executive that is busy or in
DND by using the Camp On feature.
PBX/Centrex Transfer
While connected to an outside line (PBX/Centrex):
1. Press FLASH. The transfer dial tone sounds.
2. Dial the PBX/Centrex station number.
3. Hang up to complete the transfer.
SINGLE LINE TELEPHONE
To make a PBX/Centrex Transfer:
1. Press the FLASH button. An intercom dial tone will sound.
2. Dial [660]. A Flash command is presented to the PBX or Centrex
CO Line (a stutter tone will sound).
3. Dial the desired telephone number.
4. Replace the handset to complete the transfer.
XTS-IP / XTSc-IP Station User Guide March 2007
Page 66
44 Call Transfer
Screened Transfer
To conduct the transfer, while connected to an outside line:
1. Press the station button where call is to be transferred (if
programmed on your telephone) or press TRANS and dial station
number.
The called extension signals according to the selected intercom H,
T, or P mode.
2. When that extension answers, announce the transfer.
3. Hang up to complete the transfer.
To answer the Screened Transfer:
Your intercom will be signaling according to the selected intercom
H-T-P mode.
1. Answer the intercom and receive the transfer notice.
2. Press OUTSIDE LINE or flashing LOOP button on hold.
If Direct Transfer is enabled, the screened transfer will
go directly to the handset. You do not have to press a
LINE or LOOP button to answer.
Transfer Search
When attempting to locate a party:
1. Press a station DSS button to signal the station or press TRANS and
dial desired station.
2. If the station is unavailable, press another station DSS button to
enter a new station number or press TRANS twice and dial the
station number.
3. When the station answers, hang up to complete transfer.
XTS-IP / XTSc-IP Station User Guide March 2007
Page 67

Call Transfer 45
Unanswered CO Call Transfer
While idle or on an internal/external call and an incoming or
transferred CO call is ringing at your station:
1. If on another call, place the current call on hold and replace the
handset or press ON/OFF (SPEAKER button on IP Phone).
2. Dial the INC CO XSFR code [639] or press preprogrammed INC CO
XSFR flexible button.
3. Press a DSS, Group button, or dial a station or group number. Call
automatically transfers to that destination.
4. You can then return to the call placed on hold.
Unscreened Transfer
To transfer a call (unscreemed):
1. Press the TRANS button.
2. When the called extension begins to signal, hang up to transfer the
call (the Recall Timer will start).
3. Replace the handset or press the ON/OFF button (SPEAKER button
on IP Phone).
Trunk-To-Trunk Transfer
While connected to an outside line (PBX/Centrex):
1. Press TRANS. The transfer dial tone sounds.
2. Press a CO line / Loop flexible button.
-orDial [9].
-orDial a CO line/group access code.
3. Dial the desired outside line destination number.
4. Hang up to complete the transfer.
E911 feature enabled precludes dial 9 access.
LCR feature enabled precludes Loop button access.
XTS-IP / XTSc-IP Station User Guide March 2007
Page 68
46 Caller ID Display
SINGLE LINE TELEPHONE
While connected to an outside line (PBX/Centrex):
1. Press the FLASH button. A dial tone will sound.
2. Dial [9].
-orDial a CO line/group access code.
3. Dial the desired outside line destination number.
4. Hang up to complete the transfer.
E911 feature enabled precludes dial 9 access.
Caller ID Display
Caller ID Display (Answered Calls)
The Answered Caller ID Table feature can store up to
100 (XTSc-IP/MPB1), 250 (MPB2), or 1000 (MPBE) system-wide entries of
the most recently answered calls with caller ID. A station may dial a
unique access code to view the entries, scroll through the entries, and
dial a desired entry back. The table displays the caller ID number and
the identity of the station that answered the call.
The Answered Call table may be accessed from any user station
display phone. Any Attendant station can delete a table entry, one
entry at a time.
Programming provides an option to allow scrolling through Call
Management Tables at either the Station level or at the system
level.
To start the review process at the beginning of the table:
Dial [659].
Refer to the table in the next section for navigation instructions.
XTS-IP / XTSc-IP Station User Guide March 2007
Page 69
Caller ID Display 47
Caller ID Display (Unanswered Calls)
An Unanswered Call Management Table with 100 (XTSc-IP/MPB1), 250
(MPB2), or 1000 (MPBE) system-wide entry capacity is maintained in the
system. The calling number/name information pertaining to any
unanswered call is placed in this table at the time the system
determines the call was abandoned.
The Unanswered Call table may be accessed from any display
telephone to review unanswered calls. Only an Attendant station(s)
can delete an entry from this table.
To start the review process at the beginning of the table:
Dial [635].
Keypad Functions
The following functions apply to both Answered and Unanswered Call
Management Tables:
Function Button
Review next item in table entry MUTE
Step to next/previous table entry Volume Up/Down
Delete table entry (Attendant only) FLASH
Exit table review function ON/OFF (SPEAKER for IP Phone)
Call Back SPEED
The oldest call information displays upon initial entry of
the table. Press Hold after initial entry of the table to view
the next to oldest call information. Press Trans after initial
entry of the table to view the most current call information.
The call information is presented in a rotary method by
using the Hold and Trans buttons - oldest to newest via
Hold and newest to oldest via Trans.
XTS-IP / XTSc-IP Station User Guide March 2007
Page 70

48 Caller ID Name/Number
Caller ID Name/Number
This feature allows you to program a flexible button [653] to view both
the number and name on the LCD when receiving a Caller ID CO call.
When the feature is enabled, the flexible button LED is lit solid and the
name and number is displayed.
During the call:
Press the flexible button to toggle between the normal call
information display, and the name/number display.
The top line of the LCD displays the number of the caller and the
bottom line of the LCD displays the name.
Calling Forward Override
The Call Forward Override feature allows a user to reach a busy station
that is call forwarded. This allows the calling station to override the
forwarding which then allows the user to utilize Off Hook Voice Over
(OHVO), Executive Override, Monitor, Message Wait Indication, Camp
On, or Call Back Request at that station rather than forwarding to
another destination.
To override another station’s Call Forward setting:
1. Dial [5#] followed by the desired station extension.
2. Press the appropriate preprogrammed button.
Call Back = [622]
Camp On = [620]
Executive Override = [625]
Message Wait = [623]
OHVO = [628]
XTS-IP / XTSc-IP Station User Guide March 2007
Page 71

Calling Station Handsfree Mode Override 49
Calling Station Handsfree Mode Override
This feature enables a calling station to override a called station’s
T intercom setting.
When placing a call to a station and handsfree is desired:
1. Dial [7#] on the dial pad.
2. Dial the extension number,
-orPress the DSS button of desired station (call connects to the station
in a handsfree mode).
Calling Station Tone Mode Override
This feature enables a calling station to override a called station’s
H or P intercom settings.
When placing a call to a station and tone ringing is desired:
1. Dial [6#] on the dial pad.
2. Dial the extension number,
-orPress the DSS button of the desired station (call tone rings station).
XTS-IP / XTSc-IP Station User Guide March 2007
Page 72
50 Camp On
Camp On
OR
A station may alert a busy party that an outside line is on hold and
waiting for them by using the CAMP ON button. To camp on a call, press
the TRANS button to transfer the call to the desired busy station, then
press the CAMP ON button. The busy party receives a muted ring over
the keyset speaker, and a visual flashing CAMP ON LED. By pressing the
CAMP ON button, the person called places their existing outside call on
hold and is connected to the person placing the Camp On. They can
then pick up the call on the appropriate line.
To alert a busy station of your call:
1. Press the CAMP ON button,
-orUse the Soft Key’s CAMP-ON option.
The called station will receive one burst of ringing.
2. When the called party answers, consult with them or hang up to
transfer call.
If a station is in DND, only the Attendant can Camp On
using the Attendant override feature. Camp On or
Override drops any internal callers to which that
station is talking.
To answer a call that is waiting:
1. Press your flashing CAMP ON button when you hear one burst of
muted ringing. Any outside line you are connected to will be placed
on hold.
2. Converse with the station placing the call,
-orIf a call is being transferred, press the flashing OUTSIDE LINE button.
If you do not have a CAMP ON button:
Go on-hook with present call; Camp On call will ring through,
-or-
Place the present call on hold, then go on-hook, the Camp On
call will ring through.
XTS-IP / XTSc-IP Station User Guide March 2007
Page 73

CO Line - Access 51
SINGLE LINE TELEPHONE
To alert a busy station of your call:
1. Press the FLASH button.
2. Dial [620]. When the called line is alerted, they can choose to
pick up your call or remain on original call.
To answer a call that is waiting (while on a CO line call):
1. Receive Camp On warning tone through the handset.
2. Choose desired call (hang up on present call and take new call,
or ignore Camp On signal).
CO Line - Access
To access an outside line:
1. Press an idle CO line button or a POOL button,
-orDial a CO line group access code or an LCR code: 9, 801-823, 88+LLL
(LLL = CO Line number). Use 8888+LLL if using an Alt Dialing Plan.
2. Dial the desired number for outside call.
3. Lift the handset to converse or use the speakerphone.
SINGLE LINE TELEPHONE
To access an outside line:
1. Lift the handset.
2. Dial access code: 9, 801-823, 88+LLL (LLL = CO line number).
Use 8888+LLL if using an Alt Dialing Plan.
3. Dial telephone number.
XTS-IP / XTSc-IP Station User Guide March 2007
Page 74

52 CO Line Queue
CO Line Queue
This feature allows you to be placed on a waiting list for a particular
outside line that is busy, when it becomes available.
To be placed in the CO Line queue:
1. Press desired busy OUTSIDE LINE button,
-orPress the POOL button. (A busy tone will sound.)
2. Press the preprogrammed CO LINE QUEUE button (621).
3. Replace the handset or press the ON/OFF button (SPEAKER button
on IP Phone).
To answer a queue:
If you hear ringing and an outside line of the line group or a LOOP
button you queued onto is rapidly flashing:
1. Lift the handset or press the ON/OFF button (SPEAKER button on IP
Phone).
2. Press the flashing OUTSIDE LINE button, or LOOP button.
To cancel a call back request:
1. Dial the CO Line Queue Cancel code [626] on the dial pad.
2. Replace the handset or press the ON/OFF button (SPEAKER button
on IP Phone).
SINGLE LINE TELEPHONE
To be placed in the CO Line queue:
1. Dial an outside line access code, a busy tone will sound.
2. Press the FLASH button.
3. Dial [621]. A confirmation tone will sound.
XTS-IP / XTSc-IP Station User Guide March 2007
Page 75
Conference 53
Conference
Conference Combinations
Only stations that have conference enabled can establish a conference.
Add-On Conference -- Up to eight internal parties can engage in a
conference, or seven internal parties with one external party. A
maximum of five 8-party conferences (five external parties
maximum) can be established.
Multi-Line Conference -- One internal station can engage in a
conference with up to four outside parties.
A maximum of eight parties can be included in a
conference.
Conference Procedures
» 8-button digital telephones can assign a Conference button by
using feature code 624.
To establish a Conference:
1. Lift the handset.
2. Select an intercom station or dial desired outside party.
3. When called party answers, press the CONF button.
4. Add the next conference party by selecting another outside line or
intercom station, or by using the Soft Key’s ADD MEM option.
5. If the next conference party is an outside line and a busy or wrong
number is encountered, press one of the conference parties on
hold. This drops the busy or wrong number party. Press the
conference button again and repeat Step 4.
6. When the last party answers, press the CONF button twice (All
parties will be connected).
XTS-IP / XTSc-IP Station User Guide March 2007
Page 76

54 Conference
To exit a Conference (controller only):
For a Single-line conference …
1. Press the ON/OFF button (SPEAKER button on IP Phone) to ON.
2. Press the MUTE button, then replace the handset to monitor the
conference.
For a Multi-line
1. Press the HOLD button to place outside parties on hold. The Hold
Timer starts. If one of the two parties is internal, that party is
dropped.
2. Either press CONF and hang up or press the ON/OFF button
(SPEAKER button on IP Phone) or use the Soft Key’s EXIT option to
leave the other conference parties still connected in an
unsupervised conference. The CONF button flashes and the timer
starts. There is a warning tone before the other parties are dropped.
conference …
To re-enter a Conference:
When the controller re-enters the conference, the disconnect timer is
reset.
1. Lift the handset to re-enter a monitored conference.
2. To re-enter a conference placed on hold, repeat the steps for
establishing a conference.
3. To re-enter an unsupervised conference, lift the handset and press
the flashing CONF button or use the Soft Key’s RE-ENTER option.
CONF button will light steady and a confirmation tone will sound.
To terminate a Conference, the conference initiator who is
actively in the conference must:
Replace the handset or press the ON/OFF button (SPEAKER button
on IP Phone) to OFF.
To terminate an Unsupervised Conference:
Press the flashing CONF button or use the Soft Key’s END option
while on-hook, all parties will be dropped.
XTS-IP / XTSc-IP Station User Guide March 2007
Page 77

Conference 55
To terminate a party during a Conference call:
1. Press the line button of the party you wish to drop.
2. Replace the handset, or press the ON/OFF button (SPEAKER button
on IP Phone).
3. Lift the handset, or press the ON/OFF button (SPEAKER button on IP
Phone).
4. Press the flashing CONF button.
SINGLE LINE TELEPHONE
To set up a Conference with one external & one other internal station:
1. Make outside call.
2. Press the FLASH button to put the call on hold.
3. Dial number of internal station you wish to add.
4. When the station answers, press the FLASH button again. All
three parties are connected.
To set up a Conference with Personal Park:
1. While connected to an outside line, press the FLASH button.
The intercom dial tone will sound.
2. Dial [438]. The first call will be placed in personal park.
3. Dial the desired number for the second call.
4. Press the FLASH button. The Intercom dial tone will sound.
5. Dial the code for SLT Conference Park [664]. All three parties
will be conferenced.
6. Hang up to terminate the conference.
XTS-IP / XTSc-IP Station User Guide March 2007
Page 78
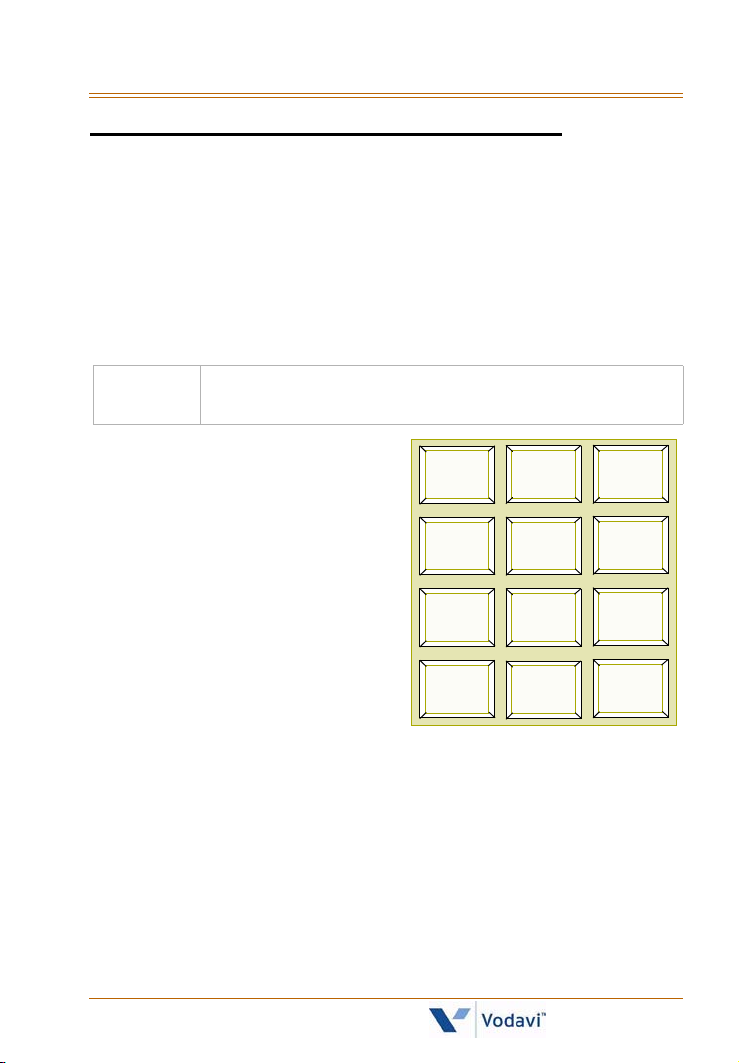
56 Dial-By-Name
Dial-By-Name
The system allows station users to dial extension numbers or speed
bins, by entering the name of a person that has been programmed for
that station.
The system database allows the entry of a name (alphanumeric) up to
24 characters in length for each station. The programmed name can be
used for dial-by-name station users and in directory dialing.
This feature should not be confused with the Name In
Display function.
To use this feature:
1. Dial the Dial-By-Name code
[6
] on the dial pad,
-orPress the preprogrammed DIAL-
G-4
H-4
I-4
1
A-2
B-2
C-2
J-5
K-5
L-5
D-3
E-3
F-3
M-6
N-6
O-6
BY-NAME flexible button.
2. Dial the person’s last name on
the keypad as shown.
Example …
To search for the name BROWN,
P-7
R-7
S-7
Q-7
T-8
U-8
V-8
OPER
*
0
W-9
X-9
Y-9
Z-9
#
press [2] [7] [6] [9] [6].
When the system finds a numeric match for the name being dialed:
A call will be placed to the station matching the name.
An intercom call will signal the station according to the
intercom mode selected: H, T, or P.
If fewer than 8 digits are dialed, the numeric match is dialed
after a 10-second interdigit time-out occurs, or when the [#]
key is pressed.
XTS-IP / XTSc-IP Station User Guide March 2007
Page 79

Directory Dial 57
Directory Dial
Display telephone users may view a list of up to 200 names from the
System Directory on the station’s LCD display. You can dial the station
or speed dial bin by pressing a single button.
Names placed in the Directory List may be associated to intercom
numbers, System Speed dial bins, or entries in the Local Number/Name
Translation Table. You may view the Directory List beginning with any
letter of the alphabet, then scroll through the list either forward or
backwards.
Directory Dialing may also be used to transfer a call from one station to
another.
To view the Directory List:
1. Dial the Directory List dial code [680] on the dial pad,
-orPress flexible button programmed as a directory dialing button,
-orUse the Soft Key’s DIR-DIAL option when in an idle condition.
2. Press a button on the keypad that represents the letter of the
alphabet to begin viewing the list of names.
Example … pressing 2 once will produce names starting with A.
When 2 is pressed a second time, names that start with B will
display. Pressing 2 a third time will display names that start with C.
XTS-IP / XTSc-IP Station User Guide March 2007
Page 80
58 Directory Dial
3. The alphabet is represented on the keypad as shown:
A B C D E F
1
23
A = 2
B = 22
C = 222
G H I J K L M N O
456
T U V
W X Y ZP Q R S
789
O P E R
*
Names beginning with the letter chosen will show on the LCD
display.
If there are no names in the Directory List beginning
with the desired letter, a name with the next higher
letter displays on the LCD display.
Letters “Q” and “Z” are not marked on many telephone
keypads; however, the illustration above shows the
correct keys used to access these letters.
4. Dial [
5. When the desired name displays on the LCD, press the SPEED
] to scroll up (next entry) through the list,
-orDial [#] to scroll down (previous entry) through the list,
-orPress another key to view the list for a different letter of the
alphabet.
button to automatically dial the destination station or outside
phone number (via speed dial).
0
#
XTS-IP / XTSc-IP Station User Guide March 2007
Page 81
Do Not Disturb / Page Block 59
To transfer a call using Directory Dialing while on a call:
1. Press the TRANS button.
2. Dial the Directory Dial Code [680] on the dial pad,
-orPress the flexible button programmed for directory dialing.
3. Press digit associated with person’s name, when it displays, press
SPEED to automatically dial destination station.
4. Hang up to complete the transfer.
Calls may be transferred to internal stations only. An
attempt to transfer a call off-net (via a speed dial bin)
results in the call recalling upon going on-hook.
SINGLE LINE TELEPHONE
Not applicable
Do Not Disturb / Page Block
To activate Do Not Disturb:
Press the preprogrammed DND button once (DND button lights
steady). The DND button can be pressed while the phone is ringing
to stop the ringing.
-orUse the Soft Key’s DND option when in an idle condition.
XTS-IP / XTSc-IP Station User Guide March 2007
Page 82
60 Do Not Disturb / Page Block
To activate Page Blocking:
Press the preprogrammed DND button a second time (DND button
flashes).
-orUse the Soft Key’s DND option a second time when in an idle
condition.
Press the DND fixed feature button on the IP Phone a second time
(DND button flashes).
IP Phones do not support Page Blocking.
To remove Do Not Disturb:
Press the preprogrammed DND button a third time, use the Soft
Key’s DND option a third time, or dial either [631] or [662]. The
button LED extinguishes and DND cancels.
To activate One-time Do Not Disturb:
Pre ss preprogrammed DND button while you are off-hook and connected
to a CO line or intercom call (DND fixe d feature button on the IP
Phone). The DND button LED will light, and off-hook tones at your
station are cancelled.
To cancel One-time Do Not Disturb:
Replace the handset. The DND button LED will extinguish and DND
will be cancelled.
SINGLE LINE TELEPHONE
To activate Do Not Disturb:
1. Lift the handset.
2. Dial [631].
3. Replace the handset.
To remove Do Not Disturb:
1. Lift the handset.
2. Dial [631] or [662].
3. Replace the handset.
XTS-IP / XTSc-IP Station User Guide March 2007
Page 83
Door Opener 61
Door Opener
When the system’s administrative programming is set to use the relay
contact as a door opener, the relay is activated by either dialing flexible
feature code 665 or by pressing a preprogrammed flexible button that
has code 665 assigned (use 654 for MPBE systems). When the relay is
open, the flexible button LED lights steady; when the relay is closed, the
LED is off.
Executive Override
Use of this feature when the executive override
warning tone is disabled may be a violation of Federal,
State or Local Laws, and an invasion of privacy. Check
applicable laws in your area before using this feature.
Executive Override allows stations designated as “Executive” the ability
to override and “barge in” on other keysets engaged in CO Line
conversations. A change in volume may occur on the CO Line or
intercom call after the barge-in occurs.
If you call a busy station:
1. Press the preprogrammed EXECUTIVE OVERRIDE button (625). The
Executive station is bridged onto the CO line conversation in
progress at the called station. An optional warning tone is
presented to all parties prior to cut-thru.
The conversation in progress is received on the Supervisor’s
handset and the Executive’s MUTE button LED is lit to indicate
that the Executive’s transmit is muted.
To participate in the conversation in a true conference mode,
the Executive can press the MUTE button to remove the mute
condition.
2. Replace the Executive station handset to terminate the override.
XTS-IP / XTSc-IP Station User Guide March 2007
Page 84

62 Flash
Flash
When connected to an outside line:
Press FLASH to disconnect the outside line and reseize an outside
line dial tone.
» » » 8-button telephone users can assign a FLASH button by using
code [660].
Flash Key on Intercom
When connected to a page zone or another internal party:
Press FLASH to disconnect page or intercom call. An intercom dial
tone will sound.
Flexible Button Programming
To program a flexible button (to use feature codes):
1. Press SPEED twice.
2. Press the button to be programmed (must be programmed in
database as a flexible button).
3. Dial the desired code (refer to the “Default Numbering Plan” on
page 125, and the feature’s description for any additional digits to
enter). A confirmation tone will sound.
4. Press the ON/OFF button (SPEAKER button on IP Phone).
To program a flexible button (to use speed bin dialing):
1. Press SPEED twice.
2. Press the button to be programmed (must be programmed in
database as a flexible button).
3. Press the SPEED button.
4. Dial the speed bin number. A confirmation tone will sound.
5. Press the ON/OFF button (SPEAKER button on IP Phone).
XTS-IP / XTSc-IP Station User Guide March 2007
Page 85

Group Listening 63
To erase a flexible button:
1. Press SPEED twice.
2. Press the flexible button to be erased.
3. Press FLASH. A confirmation tone will sound.
4. Press the ON/OFF button (SPEAKER button on IP Phone).
To check flexible button programming:
1. Lift the handset.
2. Press SPEED, then dial [7] + [#].
3. Dial [2] to select the KEYBTN option.
4. Press the desired flexible button(s) to display programming for the
button(s) on the LCD.
5. When finished, replace the handset.
Group Listening
All digital key stations have a built-in speakerphone. You can use the
speaker to monitor a call while using the handset to consult with the
outside party. This enables other people in the room to listen to both
parties in the conversation.
To activate Group Listening:
While conversing on the handset, press the ON/OFF button
(SPEAKER button on IP Phone).
Both parties of the conversation can then be heard on the digital
station's speaker. The speakerphone microphone is muted while
the handset is off-hook.
To deactivate Group Listening:
While off-hook, press the ON/OFF button (SPEAKER button on IP
Phone).
Group Listening is NOT available when the station is in
the Headset Mode.
XTS-IP / XTSc-IP Station User Guide March 2007
Page 86
64 Headset Mode
Headset Mode
A modular headset may be used by connecting the headset to the
handset jack on the keyset (leaving the handset in place). A headset can
also be connected to the 2.5 mm jack that is located on the left side of
most Vodavi digital telephone models. The ON/OFF button on the
digital telephone (SPEAKER button on IP Phone) is used to initiate and
end calls while using the headset.
To activate Headset Mode:
Dial [634] on the dial pad,
-orPress the preprogrammed HEADSET MODE button.
-orUse the Soft Key’s HEADSET option when in an idle condition. The
LED will light steady.
While Headset mode is active, the ON/OFF button
SPEAKER button on the IP Phone) activates the headset
and disables speakerphone and intercom call
announce operation at your station. To install the
headset, see the Installation Manual.
To deactivate Headset Mode:
Dial [634] on the dial pad,
-orPress the preprogrammed HEADSET MODE button.
-orUse the Soft Key’s HEADSET option when in an idle condition. The
LED will extinguish.
Station must be programmed in database
programming for headset operation before the flexible
button can be programmed.
SINGLE LINE TELEPHONE
Not applicable
XTS-IP / XTSc-IP Station User Guide March 2007
Page 87

Hot Desk 65
Hot Desk
Vodavi digital keysets can use the Hot Desk feature by using the 636
(Station Relocate feature code). This feature allows any keyset in the
system to dial 636 and a different station number, that will change the
station’s number to the dialed station number.
The keyset inherits the new station’s attributes, e.g., CO routing, ring
assignments, DID routing, speed dial, voice mail, and hunt group
assignments.
The keyset and the new station must be of the same model
designation (Flash 50/51, Page B, Button #1) and the new station
must have been in an Out of Service (OOS) condition, i.e., not
plugged in.
For example … One application of this feature is that several
employees can use the same physical keyset at different time
frames and they can quickly change the station number to use
features that they have customized for their own use.
To make a Hot Desk flexible feature Login button:
1. Press the SPEED button twice.
2. Press the desired button to program (it must be programmed in the
database as a multifunction button).
3. Dial [636] on the keypad, then dial the station number of an OOS
station with the same model designation as the keyset you are
dialing from.
XTS-IP / XTSc-IP Station User Guide March 2007
Page 88

66 Hot Desk
To make a Hot Desk flexible feature Logout button:
When you are logged into a Hot Desk station and you log out. This
returns you to the physical station. Then you can either remain
operating from the physical station or log into another Hot Desk station.
Do not establish other Hot Desk Login buttons while operating as a Hot
Desk. You cannot directly change from one Hot Desk station to another.
You must log out of a Hot Desk station before logging into another Hot
Desk station.
1. While operating in the Hot Desk mode, press the SPEED button
twice.
2. Press the desired button to program (it must be programmed in the
database as a multifunction button).
3. Dial [636] on the keypad, then dial the physical station number.
To change to a Hot Desk station number:
1. Dial [636].
2. Dial the station number of an OOS station with the same model
designation as the keyset you are dialing from.
-or-
Press a flexible button that has been preprogrammed with the 636
feature code and the station number of an OOS station with the same
model designation as the keyset.
CONDITIONS
» If a keyset user dials a station number that is in service, an error
tone sounds.
» If a keyset user dials a station number of an OOS keyset that has a
different model designation (Flash 50/51, Page B, Button #1), the
keyset will lose all of it’s configured station attributes. In this case,
the keyset will assume default attributes.
» This feature does not apply to Vodavi IP keysets.
XTS-IP / XTSc-IP Station User Guide March 2007
Page 89
In and Out Button 67
In and Out Button
An In and Out Button will toggle a station from an in status to an out
status and from an out status to an in status. When in an out status, the
LCD will display “STA IN OUT OF OFFICE” and all incoming calls will
forward to the Preset Internal Busy Forward destination (Flash 50/51,
Page C, Button #2). If no forwarding destination is programmed in Flash
50/51, the call will be presented without forwarding. Attendant stations
and SLT stations do not have the In and Out feature capability.
To change In and Out status:
Press the preprogrammed In and Out Button (feature code 644).
Intercom
Using an Intercom Button
To program a Flexible Button as an Intercom Button:
1. Press the SPEED button twice.
2. Press the desired flexible button to program.
3. Dial [645] on the dial pad. A confirmation tone will sound. If an error
was made during entry, an error tone will sound.
When intercom call rings a busy station (w/intercom btn):
1. The calling station receives ringback tone instead of busy tone. The
called station hears muted or reminder ring and their intercom
button LED starts flashing at the incoming CO line rate. This
indicates an incoming intercom call.
2. The called station can place the current CO call on hold by pressing
the HOLD button,
-orPlace current intercom call on hold by pressing the HOLD button;
intercom call is placed on hold on the available intercom button.
XTS-IP / XTSc-IP Station User Guide March 2007
Page 90
68 Intercom
3. The called station then presses the flashing intercom button to
answer incoming intercom call. When answered, the following
message displays on the called station LCD:
CALL FROM STA XXX
MMM DD YY HH:MM am
Sta XXX can be a programmed station name.
SINGLE LINE TELEPHONE
Not applicable
Answering an Intercom Call
Depending on the selected intercom operating mode, answer the
intercom call as indicated:
H
andsfree Mode (No LED) -- You will hear three bursts of tone and an
announcement.
Reply handsfree or lift the handset for privacy.
T
one Mode (LED On) -- You will hear repeated bursts of intercom tone
ringing and HOLD button slow flashes.
Lift the handset or press the ON/OFF button (SPEAKER button on IP
Phone) to answer.
-orPress the H-T-P button to the H mode to answer.
P
rivacy Mode (LED Flashing) -- You will hear three bursts of tone and a
one-way announcement. The calling party cannot hear conversations in
progress.
Lift the handset or press the ON/OFF button (SPEAKER button on IP
Phone) to answer.
-orPress the H-T-P button to the H mode to answer.
Use feature code 667 to select an H, T, or P mode for
8-button digital telephones. Each use of this feature
code acts as a rotary through the three options.
XTS-IP / XTSc-IP Station User Guide March 2007
Page 91
Intercom 69
Intercom Transfer
To use Intercom Transfer without DSS Buttons:
1. Receive or make an intercom call.
2. Press the TRANS button. An intercom dial tone will sound.
3. Dial the desired station number.
4. When the second station answers, you are in a supervised transfer
mode (first station is staged for transfer).
5. Hang up (stations 1 and 2 will be connected).
To use Intercom Transfer with DSS Buttons:
1. Receive or make an intercom call using a DSS button.
2. Press the TRANS button. An intercom dial tone will sound.
3. Press the DSS button where to transfer the call.
4. Hang up (stations 1 and 2 will be connected).
Intercom Calls
To place an Intercom Call:
1. Press the DSS button of the party to be called (if programmed at
your phone),
-orDial the extension number.
Dialing a number in the numbering plan activates the
telephone automatically.
(You will hear ringing if the called station is in the T mode; or three
bursts of tone if called station is in H or P modes.)
2. Lift the handset or use the speakerphone after the tone bursts stop.
3. Hang up to end the call.
XTS-IP / XTSc-IP Station User Guide March 2007
Page 92

70 Intercom
To answer an Intercom Call:
In the T mode (LED On), you will hear repeated bursts of intercom tone
ringing and the HOLD button slow flashes.
Lift the handset or press the ON/OFF button (SPEAKER button on IP
Phone) to answer,
-orPress the H-T-P button to the H mode to reply.
In the P mode (LED flashes), you will hear three bursts of tone and one-
way announcement. The calling party cannot hear conversations in
progress.
Lift the handset or press the ON/OFF button (SPEAKER button on IP
Phone) to answer,
-orPress the H-T-P button to the H mode to reply.
In the H mode (No LED), you will hear three bursts of tone and an
announcement.
Reply handsfree or lift the handset for privacy.
SINGLE LINE TELEPHONE
To place an intercom call:
1. Lift the handset.
2. Dial the intercom number. You will hear ringing if the called
station is in the “T” answering mode or two bursts of tone if the
called station is in the “H” or “P” modes.
3. Hang up to end the call.
To answer an intercom call:
Lift the handset,
-orIf your SLT is equipped with a speakerphone, press the Speaker
button to converse in a handsfree mode.
XTS-IP / XTSc-IP Station User Guide March 2007
Page 93
IP Phone 71
IP Phone
The IP Phone provides the same functionality as other Vodavi digital
telephones, with the following differences.
Features not supported: OHVO, Background Music, feature code
695 for changing ring codes.
Can make pages, but cannot receive pages.
The PGM button of the IP-24DH phone is the H-P-T rotary. The H-P-T
function is controlled using a flexible button of the IP7008D
(feature code 667) and via soft keys for the IP7024D.
ICM and SAVE buttons on the IP-24D are non-functional at this time.
IP7008D Phone Characteristics
The feature operation for the IP7008D is the same as the Vodavibranded 8-button Executive Key Telephone sets as used with the
XTS-IP / XTSc-IP systems. This section describes the distinctive attributes
of the IP7008D phone.
Button Map
The IP7008D provides both fixed and flexible buttons. This table
describes the available buttons and their functions.
Fixed/Flexible Feature Buttons
SPEED Used to access speed dialing, save number redial,
and last number redial. Button is also used to
access flexible button programming.
TRANS/PGM Used to transfer intercom or outside call from
one station to another.
VOLUME Used to adjust level of tones, background music,
ringing, and receiver volume.
SPEAKER Used to make a call without lifting the handset.
HOLD/SAVE Used to hold calls and to retrieve held calls
Flexible Buttons Used to access outside lines or call-handling
features.
XTS-IP / XTSc-IP Station User Guide March 2007
Page 94
72 IP Phone
Default Flexible Button Map
Station 100 Station 101
Loop Pool
Call Back Pickup
DND VM
LCD Display
The display for the 8 button IP7008D supports 2 rows by 24 characters.
STA 1234 NAME
NOV 10 05 11:04 am
Backlight Display
The IP7008D phones are enhanced to allow backlight of the LCD. The
backlight feature can be set to always be on, always be off, or on when
the phone is in use.
If the setting is “on when the phone is in use”, the backlight will remain
lit after going to the idle state for the period of time established in the
Backlight Display Timer programming.
To use the Backlight Display feature:
Dial feature code[ 637] to cycle through the options:
Off, On, and In Use .
CONDITIONS
The Message Waiting LED is controlled by:
Flash 50/51, Page B, Button 15 (Light Control) can be variable
assignment.
XTS-IP / XTSc-IP Station User Guide March 2007
Page 95
IP Phone 73
IP7024D Phone Characteristics
The feature operation for the IP-7024D is the same as the Vodavibranded 24-button Executive Key Telephone sets as used with the
XTS-IP / XTSc-IP systems. This section describes the distinctive attributes
of the IP7024D phone.
Button Map
The IP-7024D provides both fixed and flexible buttons. The following
table describes the available buttons and their functions.
Fixed/Flexible Feature Buttons
SPEED Used to access speed dialing, save number
redial, and last number redial. Button is also used
to access flexible button programming.
TRANS/PGM Used to transfer intercom or outside call from
one station to another.
DND Used to place telephone in Do Not Disturb.
CALL BACK Used to access Voice Mail.
VOLUME Used to adjust level of tones, background music,
ringing, and receiver volume.
MENU User Directory Scroll Up function.
PHONE BOOK User Directory Scroll Down function.
Left Arrow Soft Key Display Scroll Up function.
Right Arrow Soft Key Display Scroll Down function.
OK Button Dial User Directory Entry function.
SPEAKER Used to make a call without lifting the handset.
HOLD/SAVE Used to hold, retrieve held calls, and save
programming changes.
Flexible Buttons Used to access outside lines or call-handling
features.
XTS-IP / XTSc-IP Station User Guide March 2007
Page 96
74 IP Phone
Default Flexible Button Map
Station 100 CO1
Station 101 CO2
Station 102 CO3
Station 103 CO4
Station 104 CO5
Station 105 CO6
Station 106 Loop
Station 107 Pool
Station 108 Conf
Station 109 Pickup
Station 110 Mute
Station 111 VM
LCD Display
The LCD for the IP-7024D displays 3 rows by 24 characters.
STA 1234 NAME
NOV 10 05 11:04 am
PICKUP VM1 LNR
Soft Keys
Soft Key Operation
Soft key operation is accomplished by accessing and activating one of
the 24 pre-programmed soft keys that are offered to the user from
various call states.
Control of the soft keys is via the Navigation key on the phone. The Left
and Right keys of the Navigation key will control the "Next" function of
the soft key display. Pressing the Right Key will scroll up through the list
of soft keys, while pressing the Left key will scroll down through the list
of soft keys. Activation of an individual soft key function is via the
button below the specific soft key shown on the IP7024D display.
XTS-IP / XTSc-IP Station User Guide March 2007
Page 97
IP Phone 75
Soft Key Displays
Idle State
Key 1Key 2Key 3
PICKUP VM1 LNR
ANS-CALL UA-CALL SNR
PERS-MSG BGM (N/A) P-PKP1
ALLPG-IN ALLPG-EX UNA
BIN FWD ALL FWD N/A-FWD
BSY-FWD B/NA-FWD CLR-FWD
H-MODE T-MODE P-MODE
BKL-OFF BKL-ON BKL-INUSE
Misc-Tone State (Busy Tone)
Key 1Key 2Key 3
MSG CALL-BK CAMP-ON
Incoming CO Call State (Talk State)
Key 1Key 2Key 3
CONF REC FLASH
Outgoing CO Call State (Talk State)
Key 1Key 2Key 3
CONF REC FLASH
XTS-IP / XTSc-IP Station User Guide March 2007
Page 98
76 IP Phone
Recording State
Key 1Key 2Key 3
STOP -- --
Conference Call State
There are two conference call states for the IP7024D - Active and
Idle.
- In conference call Active state, the following display is presented.
Key 1Key 2Key 3
EXIT END ADD-MEM
- In conference call Idle state, the following display is presented.
Key 1Key 2Key 3
RE-ENTER -- --
ICM Call State
Key 1Key 2Key 3
CONF -- --
XTS-IP / XTSc-IP Station User Guide March 2007
Page 99

IP Phone 77
Directory Dial
Access to the directory will be via the Phonebook key on the Navigation
button of the IP7024D telephone.
Pressing the Phonebook key once -- activates the directory display
and simultaneously displays the first name in the directory list
(alphabetical listing - descending order by default).
Pressing the Phonebook key again while in the directory -- advances
the display to the next name in the directory (in descending order).
Pressing the Menu key while in the Phonebook mode -- moves the
display back one listing per key press. Pressing the menu key at the
first entry in the directory list causes the display to move to the last
entry in the directory list in a round robin mode.
Pressing the OK Button -- dials the number associated with the
directory name displayed on the IP7024D.
The IP7024D allows a user to activate and navigate the Phonebook from
either the navigation key or via the Directory Dial feature operation as
currently supported by digital phones of the XTS-IP / XTSc-IP systems.
This means that:
The user can either use the navigation key or the Directory Dial
feature code of 680 to access the Phonebook.
If 680 is used to access the Phonebook, the user initially types a
letter of the alphabet to navigate to the beginning of that alpha
character's listing, then scrolls with the * and # keys to select the
desired name, then presses SPEED to dial.
Backlight Display
The IP7024D phones are enhanced to allow backlight of the LCD. The
backlight feature can be set to always be on, always be off, or on when
the phone is in use.
If the setting is “on when the phone is in use”, the backlight will remain
lit after going to the idle state for the period of time established in the
Backlight Display Timer programming.
To use the Backlight Display feature:
Dial feature code[ 637] to cycle through the options:
Off, On, and In Use.
XTS-IP / XTSc-IP Station User Guide March 2007
Page 100
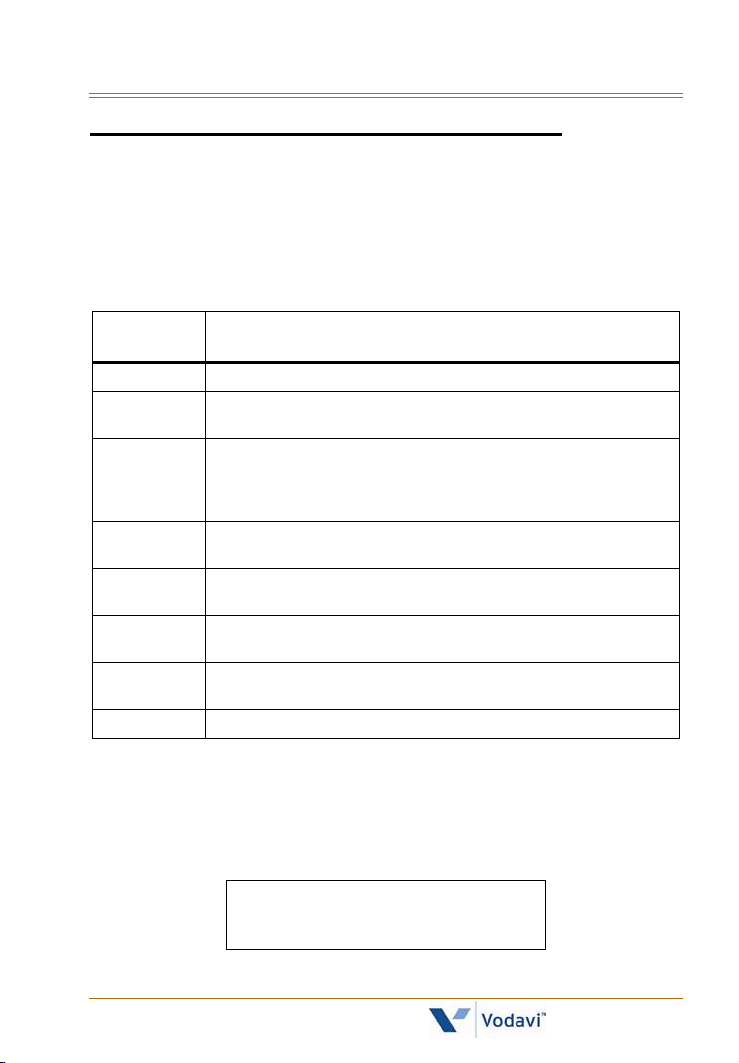
78 Keyset Mode
Keyset Mode
This feature allows you to determine the mode and baud rate of the
optional CTI Module connected to your phone. This setting is stored in
back-up memory in the case of a power outage or system reset. When
phone is set to AT command mode, these AT commands are supported:
Command
Mode
Inactive No CTI information is sent/received by the telephone.
ATD Modem Dialing Command -- The telephone will recognize
ATH o r ATHX
(X= 0 or 1)
CKTU Command used with Wanderer (a cordless key telephone unit).
PC Phone CTI information used with Discovery Desktop and Discovery
SPI Service Provider Interface -- Command used with 1st Party
TAPI For 3rd Party Call Control TAPI applications such as Discovery
CKTU & TAPI For simultaneous use of CKTU and 3rd Party Call Control TAPI
the ATD and accept digits after the command.
Modem On-Hook / Off-Hook Command -- ATH or ATH0 will
force the telephone to go to the on-hook state from its
current state. ATH1 will force the telephone to go to the offhook state from it’s current state.
Baud rate is not used in this mode; no change is necessary.
PCPhone software must be set to 4800 baud rate.
Call Control TAPI applications such as Discovery Link
Net Phone.
Description
At an idle station:
1. Dial the Keyset Mode code [648] on the dial pad,
-orPress the preprogrammed KEYSET MODE button, the display shows:
INACTIVE 2400
MODE= SAVE=HOLD BAUD=#
2. Press [
XTS-IP / XTSc-IP Station User Guide March 2007
] to scroll through the keyset modes.
 Loading...