

Page 1
Vodafone Station
Complete User Manual
Page 2

1 Introduction
1.1 Vodafone Station features
1.2 Your Vodafone Station
1.3 What’s in the box
2 Installation Guide
2.1 Connecting your Vodafone Station to the fi xed network
2.2 Connecting a computer to your Vodafone Station using the PC/LAN cable
2.3 Connecting a computer to your Vodafone Station using a wireless connection (WiFi)
2.4 Factory resetting the Vodafone Station
2.5 Using Vodafone mobile broadband with your Vodafone Station
3 LCD screen
3.1 Menu screens
3.2 LCD icons
3.3 Adjust LCD screen intensity
4 Instructions
4.1 Web portal
4.2 Home storage function (hard drives)
4.3 Sharing a USB printer
4.4 Setting up user permissions
4.5 Device connection history
4.6 MAC address fi ltering
4.7 URL fi ltering
4,8 VPN
4.9 Access Control
4.10 Parental control
4.11 Vodafone Media Manager
4.12 DLNA
4.13 Firewall
4.14 Port forwarding
5 Glossary
Contents
1. Introduction
Vodafone Station is a WiFi modem that gives you the
fl exibility to connect everyone in your home or offi ce
to the one device.
Vodafone Station is fi bre capable, includes 2 USB
ports for fi le and print sharing and is DLNA compatible
- so you can make the most of your connection.
It comes with 1 included phone line fi lter and has an
LCD screen so with our easy set-up wizard you’ll be
online in minutes.
Page 3
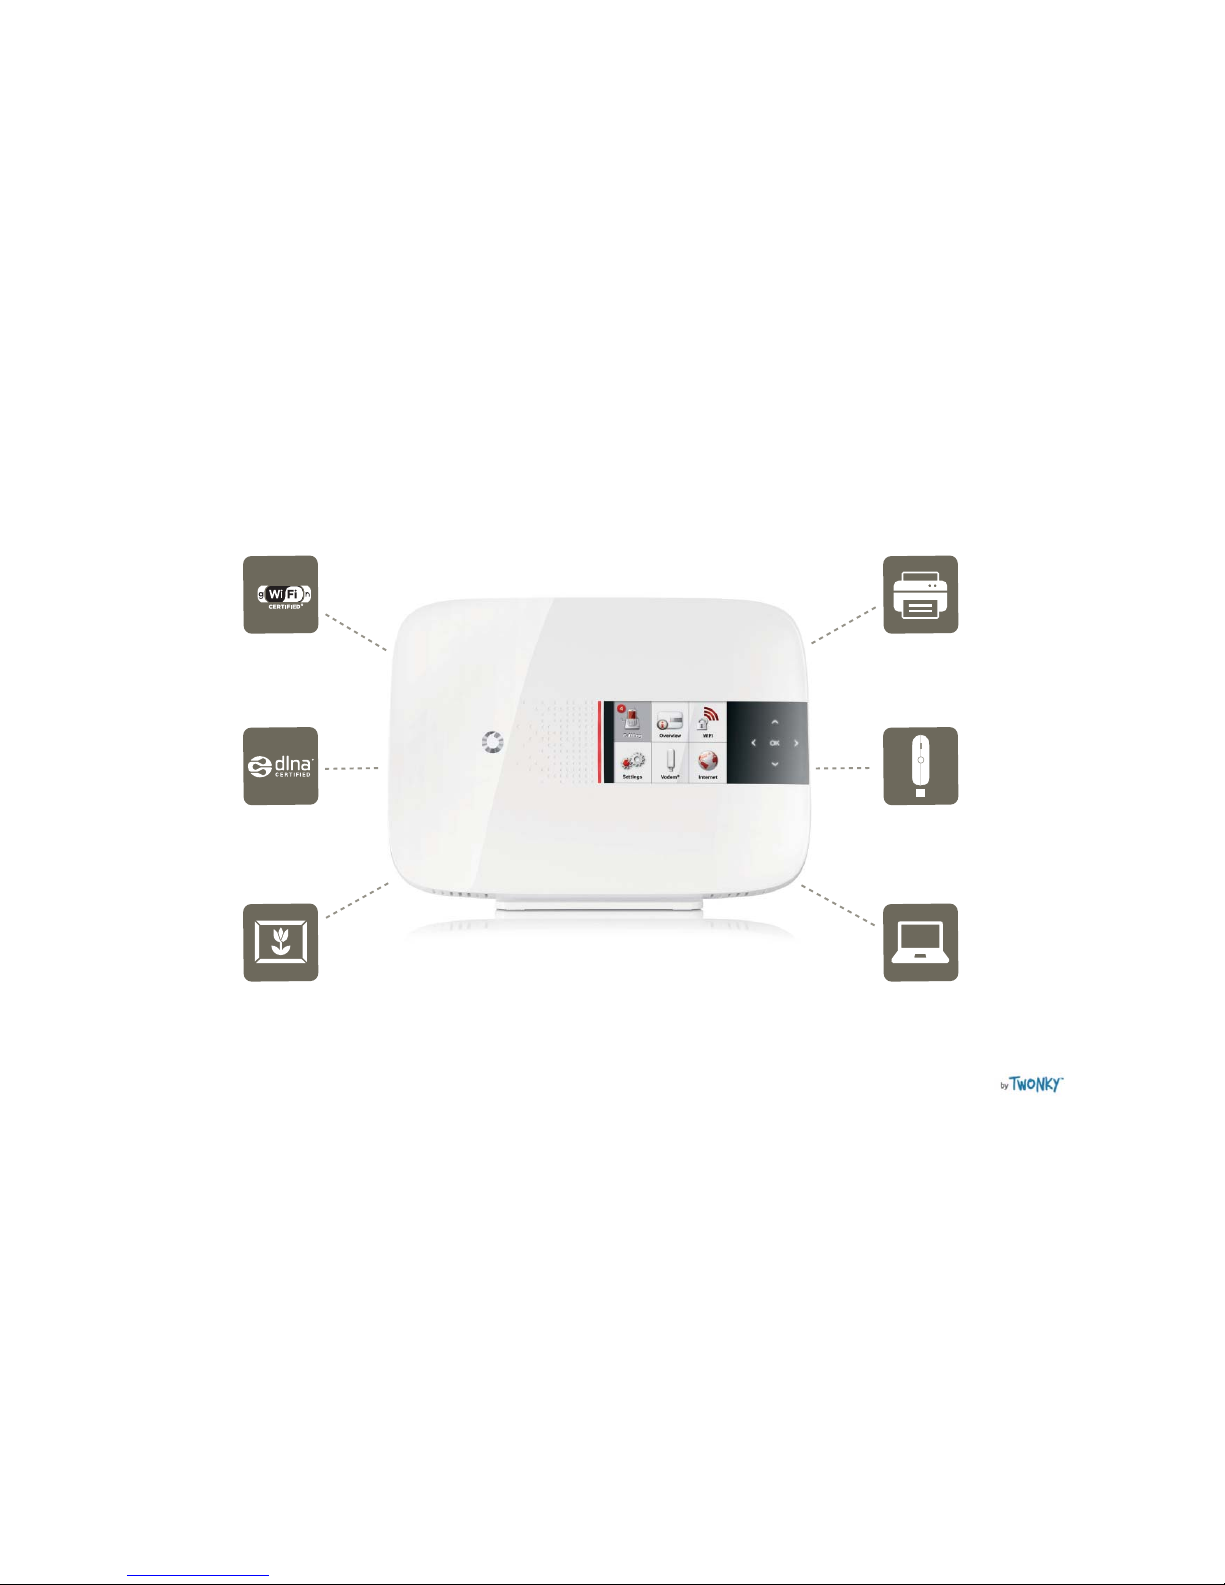
1.1 Vodafone Station features
WiFi
Manage your WiFi connection
directly from the modem.
Share a printer
Connect a printer to the
Vodafone Station via USB and
you can print to it from any
device connected to your
network in your home or offi ce.
Back up Vodem
Stay online using a Vodem® as
a back up internet connection if
there’s an outage or you’re waiting
to be connected. Additional data
charges will apply.
Vodafone Media Manager
Your Vodafone Station comes with
a user licence for Vodafone Media
Manager by Twonky® – this media
management software for Windows
PCs allows you to share all your
music, photos and videos with UPnP
or DLNA-compatible digital media
players throughout your home.
To set up Media Manager go to
vodafone.co.nz/station
DLNA compatible
Enable DLNA so you can share
media and content between
the Vodafone Station and other
DLNA compatible devices, such
as Sony’s Playstation3, Smart
TVs and smart phones.
Share a hard drive
Connect a hard drive to the Vodafone
Station via USB and you can share
all your saved documents, photos,
music and videos to any device
connected to your network in your
home or offi ce.
Page 4
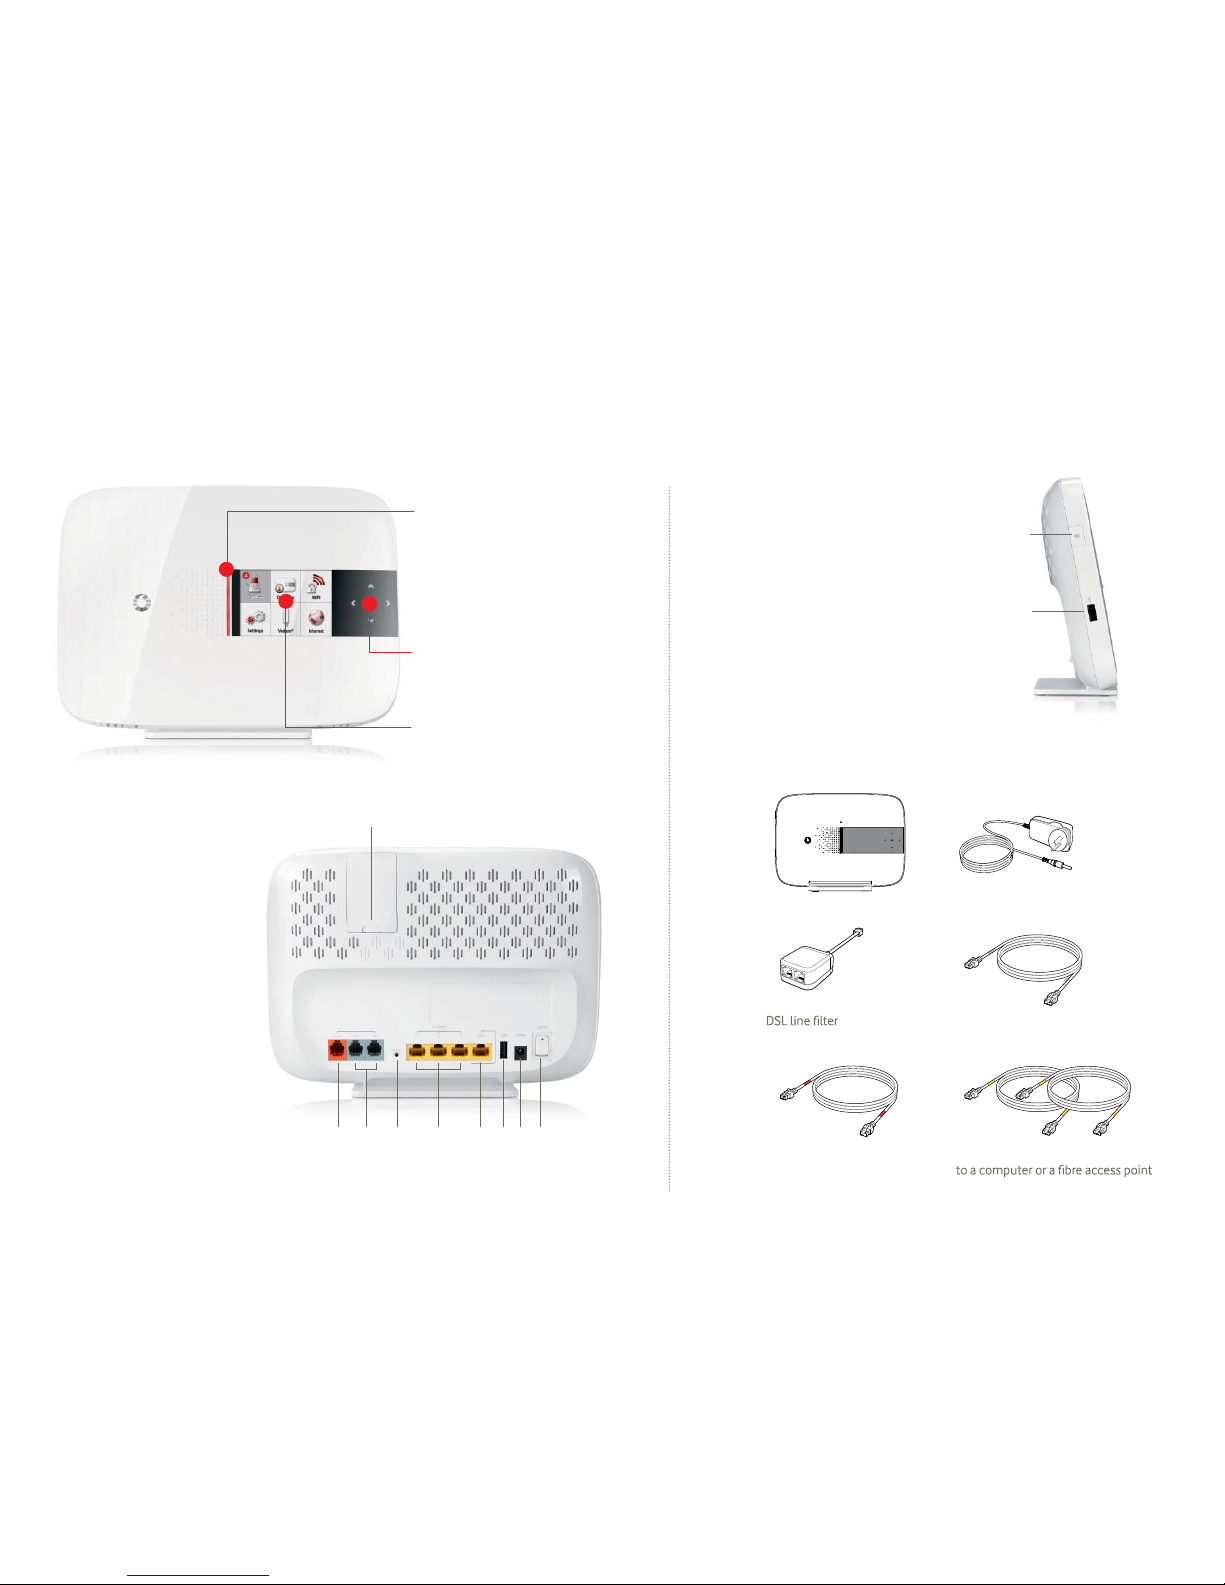
1.2 Your Vodafone Station
Indicator
Light on
Vodafone Station is powered on.
Intermittent/fl ashing
Indicates you have an incoming
call, missed call, fi rmware
upgrade or any other notifi cation
that requires your attention.
Arrow keys
To move around the menus or to
go back a screen, and press OK to
select the highlighted item.
LCD Screen
Colour display with quick
access to all key features
The screen will light up every time
you turn on your modem
1 2 3 4 4a 5 6 7
ADSL port
Phone ports
Reset button
Ethernet ports 10/100
GIGA Ethernet port
USB port
Power supply port
On/Off switch
USB port that supports 3G Vodems®
1
2
3
4
4a
5
6
7
8
WiFi On/Off button
Switches your WiFi option on or off.
You can also turn the WiFi on and off
directly from display. For more details
about the WiFi button, see
2.3 Connecting a computer to your
Vodafone Station using a wireless
connection (WiFi)
Second USB Port
Connects a USB storage device,
such as a USB disk, a printer etc.
1.3 What’s in the box
connecting to a phone
Cable (red tags) for
connecting to a phone jack
2 cables (yellow tags) for connecting
Cable (gray tags) for
Power supplyVodafone Station
8
9
9
10
10
Page 5
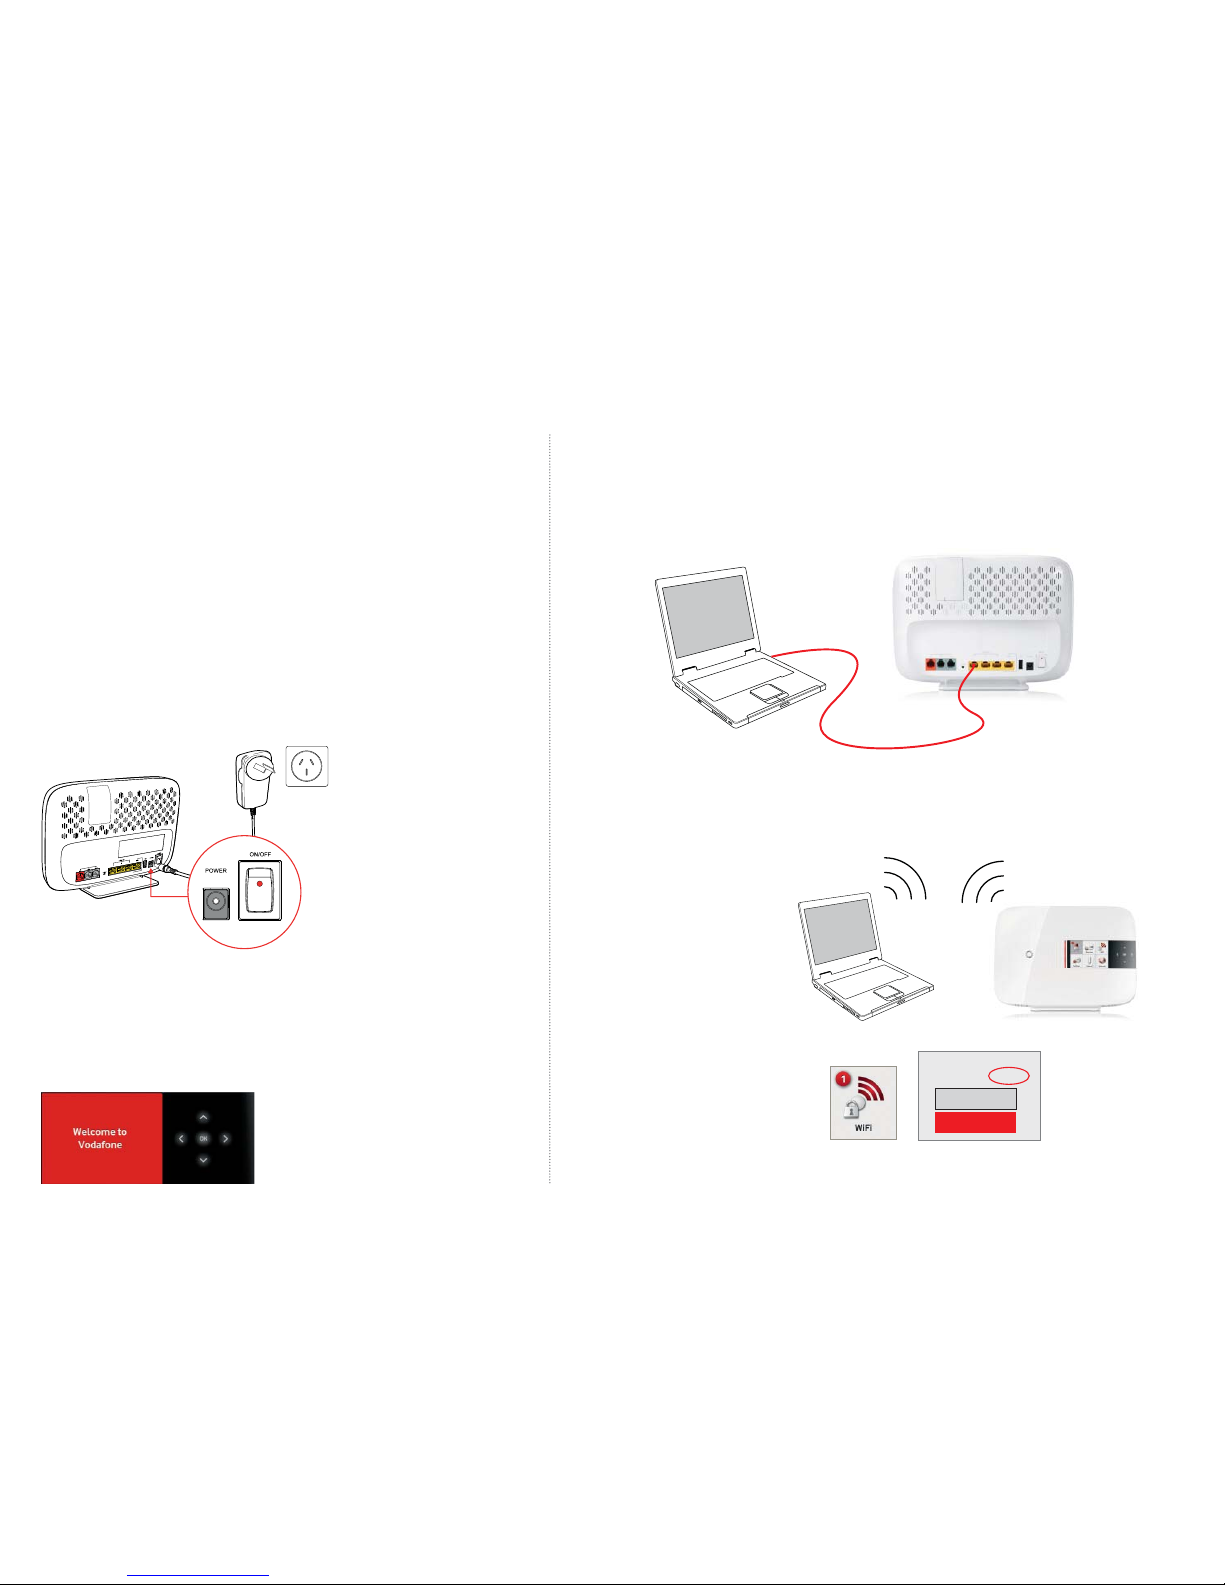
2. Installation guide
2.2. Connecting a computer to your
Vodafone Station using the PC/LAN cable
2.3 Connecting a computer to your
Vodafone Station using a wireless
connection (WiFi)
2.1 Connecting your Vodafone Station
to the fi xed network
Follow these instructions to connect your Vodafone Station in just a few easy steps.
Before you start, please make sure that you’ve received confi rmation by email or
TXT message that your Vodafone broadband connection is activated.
1 Connect the power supply
Connect the supplied power supply into the power port of your Vodafone Station
and a mains wall outlet or a power strip as shown below.
2 Turn the device on
Turn the Vodafone Station on by pressing the On/Off switch on the back of the
Vodafone Station. Once connected you will see the LCD
screen on the Vodafone Station light up.
3 Follow the instructions on screen
Press OK on the LCD screen to start the Set-up Wizard.
The simple instructions on screen will guide you through the
installation of the Vodafone Station. Use the arrow keys to move
around the menus or to go back a screen, and press OK
to select the highlighted item.
As per the Set-up Wizard step on your LCD screen, please connect your computer to the Vodafone Station
using the white cable with yellow tags provided.
To connect your laptop,
smart phone, tablet or other
WiFi enabled device to your
network, select the WiFi icon
on the LCD screen on the front
of the Vodafone Station.
You will be able to see the
WiFi name (SSID) and the WiFi
password for your Vodafone
Station’s wireless network.
On your laptop or smart
phone, fi nd the WiFi name
on the WiFi network selector.
Then enter the password when
prompted, and you should be
connected to the network.
WiFi name: Vodafone
Password (WPA2): XXXXXXXX
WiFi Off
WiFi Settings
Page 6
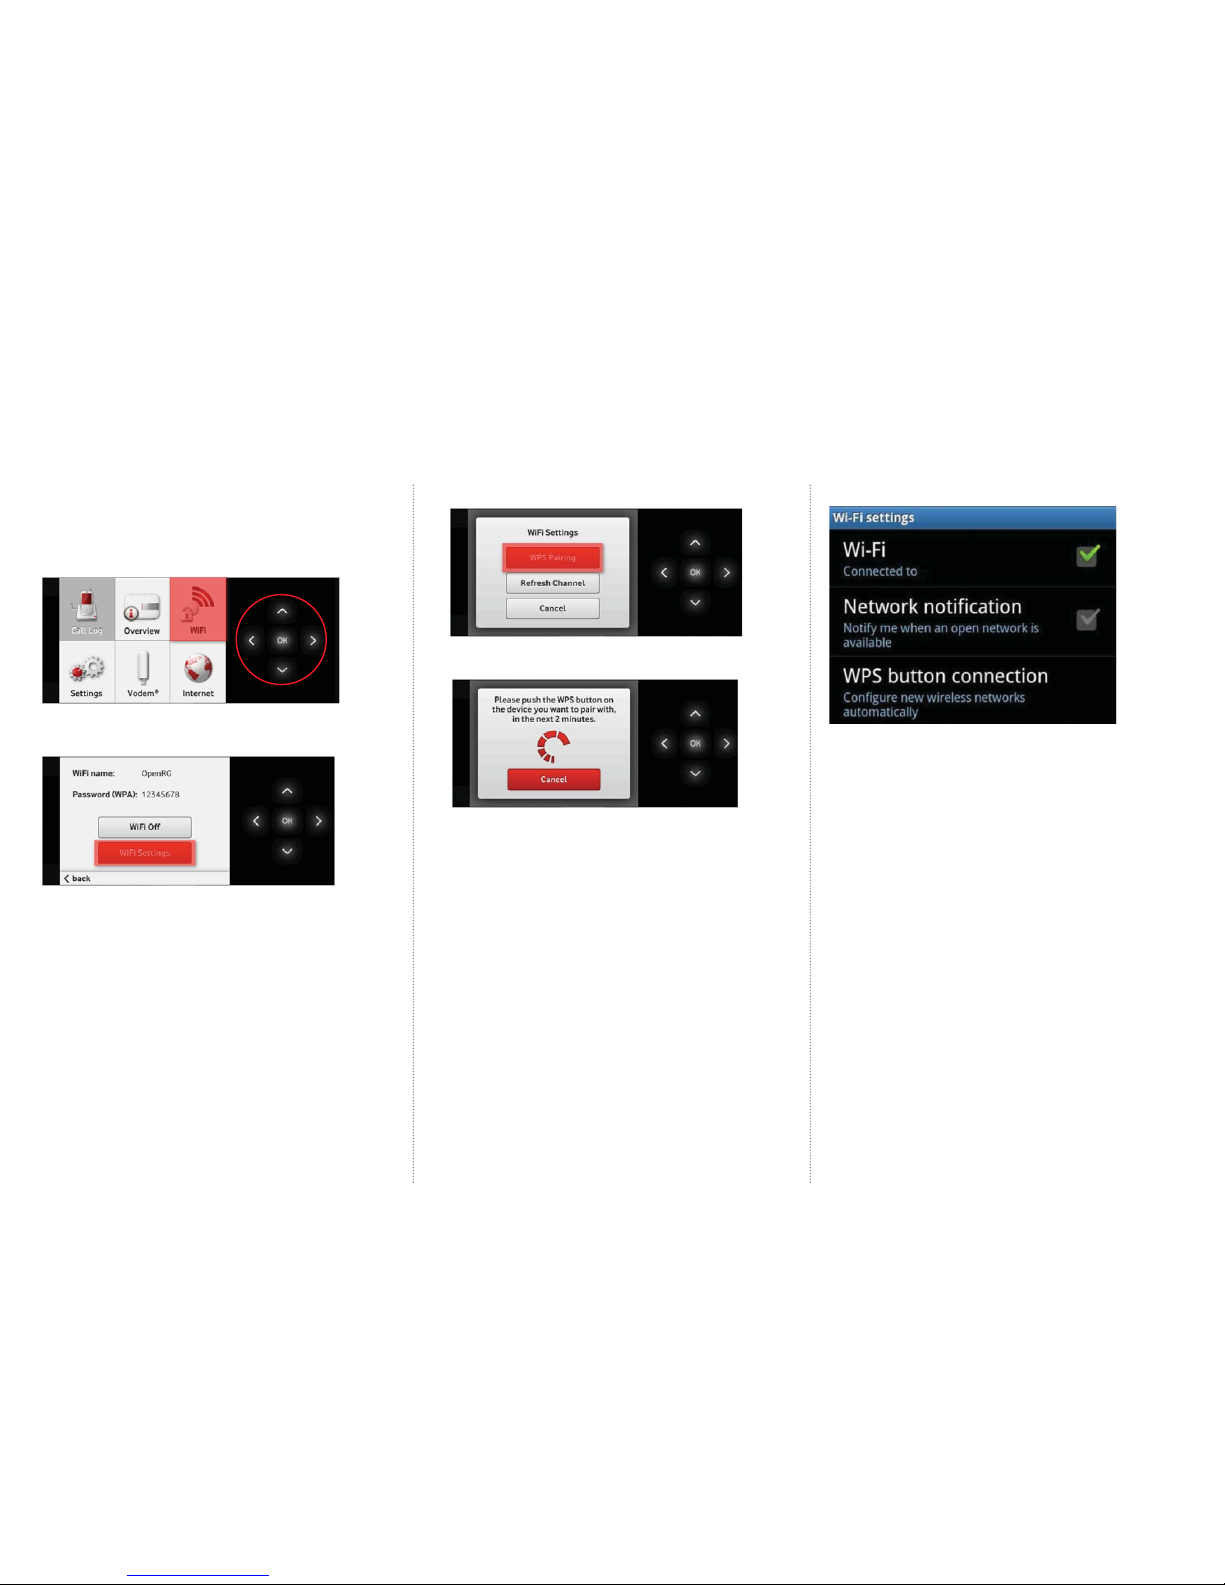
Enable the WPS (WiFi Protected Setup) function
Alternatively, if you want to connect a device via WiFi but don’t
want to have to enter the WiFi password you can connect using WPS.
1. Navigate to the WiFi menu by pressing the arrow keys on
the LCD screen of the Vodafone Station.
2. Select OK.
3. Select WiFi Settings.
6. Push the WPS button on the device you wish to connect.
Example of an Android mobile phone
4. Under WiFi Settings select WPS Pairing.
5. The Vodafone Station’s WPS will now be active for 2 minutes.
Page 7
2.5 Using Vodafone mobile
broadband with your
Vodafone Station
2.4 Factory resetting the
Vodafone Station
To factory reset your Vodafone Station to the default factory settings,
please use the following:
1. Log into the Vodafone station by entering the following URL
into your internet browser: http://vodafone.station OR 192.168.1.1
2. Click on Advanced on the top menu
3. Click on Additional Settings in the sub-menu
4. To factory reset the Vodafone Station, click on the Reset button to
perform a factory reset
5. The Vodafone Station will now lose connectivity and the device will restart
6. Once the Vodafone Station has powered back on and gained a DSL
connection, you will be asked if you want to keep your personal confi guration
or cancel. You need to select one of these options to complete the reset.
7. The Vodafone Station will then run the automatic process to gain
authentication details and connect to the internet.
8. Internet connectivity can be checked via the icons on the
front of the router on the LCD screen. Please refer to LCD icons.
Note: Your Vodafone Station will re-start while Vodafone remotely
confi gures it.
A Vodafone Vodem can be used with your Vodafone Station as a backup
internet connection if there is an outage on your fi xed broadband or while
you’re waiting for your fi xed line broadband connection to get set up.
List of Supported Vodems:
The following Vodafone Vodems are compatible with the Vodafone Station:
• K3772
• K3806
• K4201
®
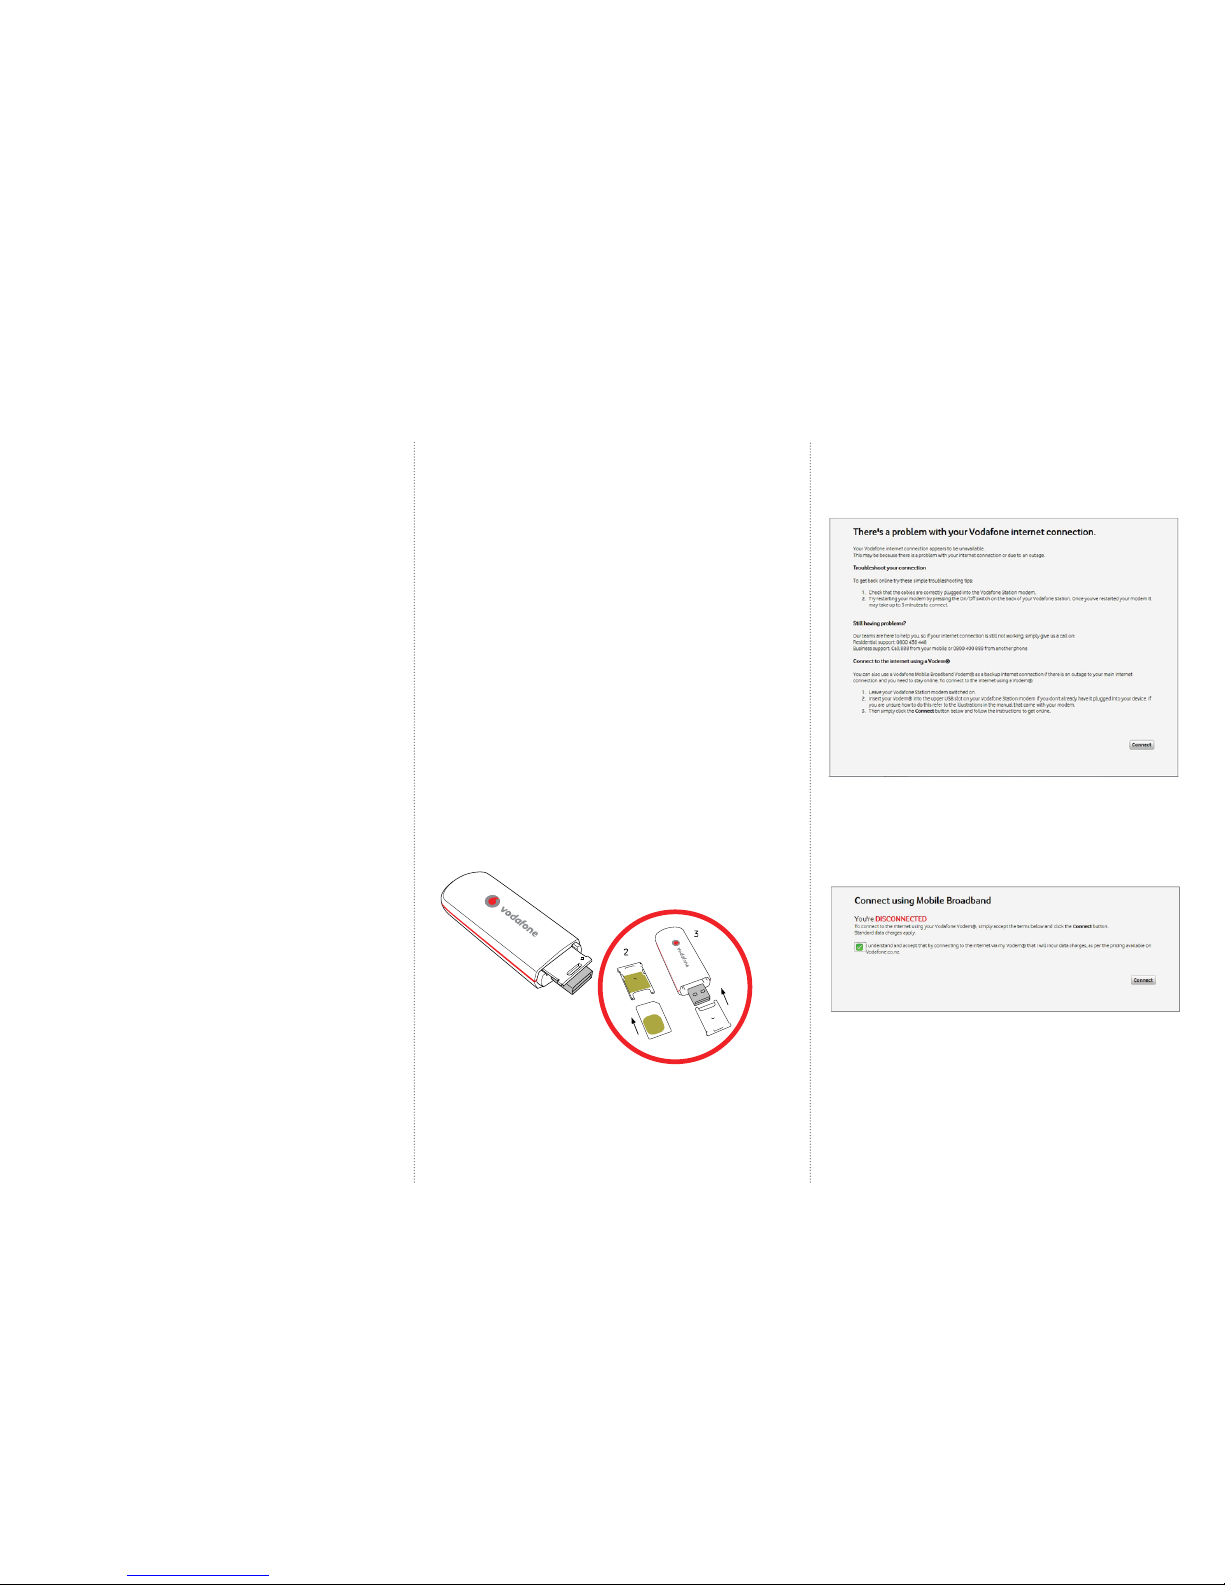
Inserting the Vodafone mobile broadband vodem stick:
1. Remove the SIM card holder from the Vodafone mobile broadband vodem.
2. Insert the SIM card into the card holder.
3. Re-insert the SIM card holder into the Vodafone mobile broadband vodem.
4. Connect your vodem to the Vodafone Station
5. Now whenever your broadband or fi bre connection disconnects and you try
to access a webpage you will receive the below message asking if you would
like to connect using your vodem.
6. Click connect to begin
Please make sure that you understand that the vodem account holder will
incur data charges for data used by the vodem before proceeding.
Tick the box to indicate that you understand that using the Vodem will incur
data charges and click connect.
After a few moments the Vodem will connect to the Vodafone mobile network
and you will receive the following screen. Once this screen appears you will be
able to browse the internet as you normally would.
Page 8
Please remember that the ability to use a back up Vodem connection is
subject to 3G coverage in your area. Vodem is not included and needs to be
purchased seperately. Connecting to the internet with a vodem will incur data
charges as per the pricing on vodafone.co.nz. Voice services are not supported.
3. LCD screen
The LCD screen on the Vodafone Station is like the Start button on your
computer. It provides you with quick and easy access to the device.
To navigate through the LCD menu, use the arrow keys and OK button
on the right hand side of the screen.
3.1 Menu screens
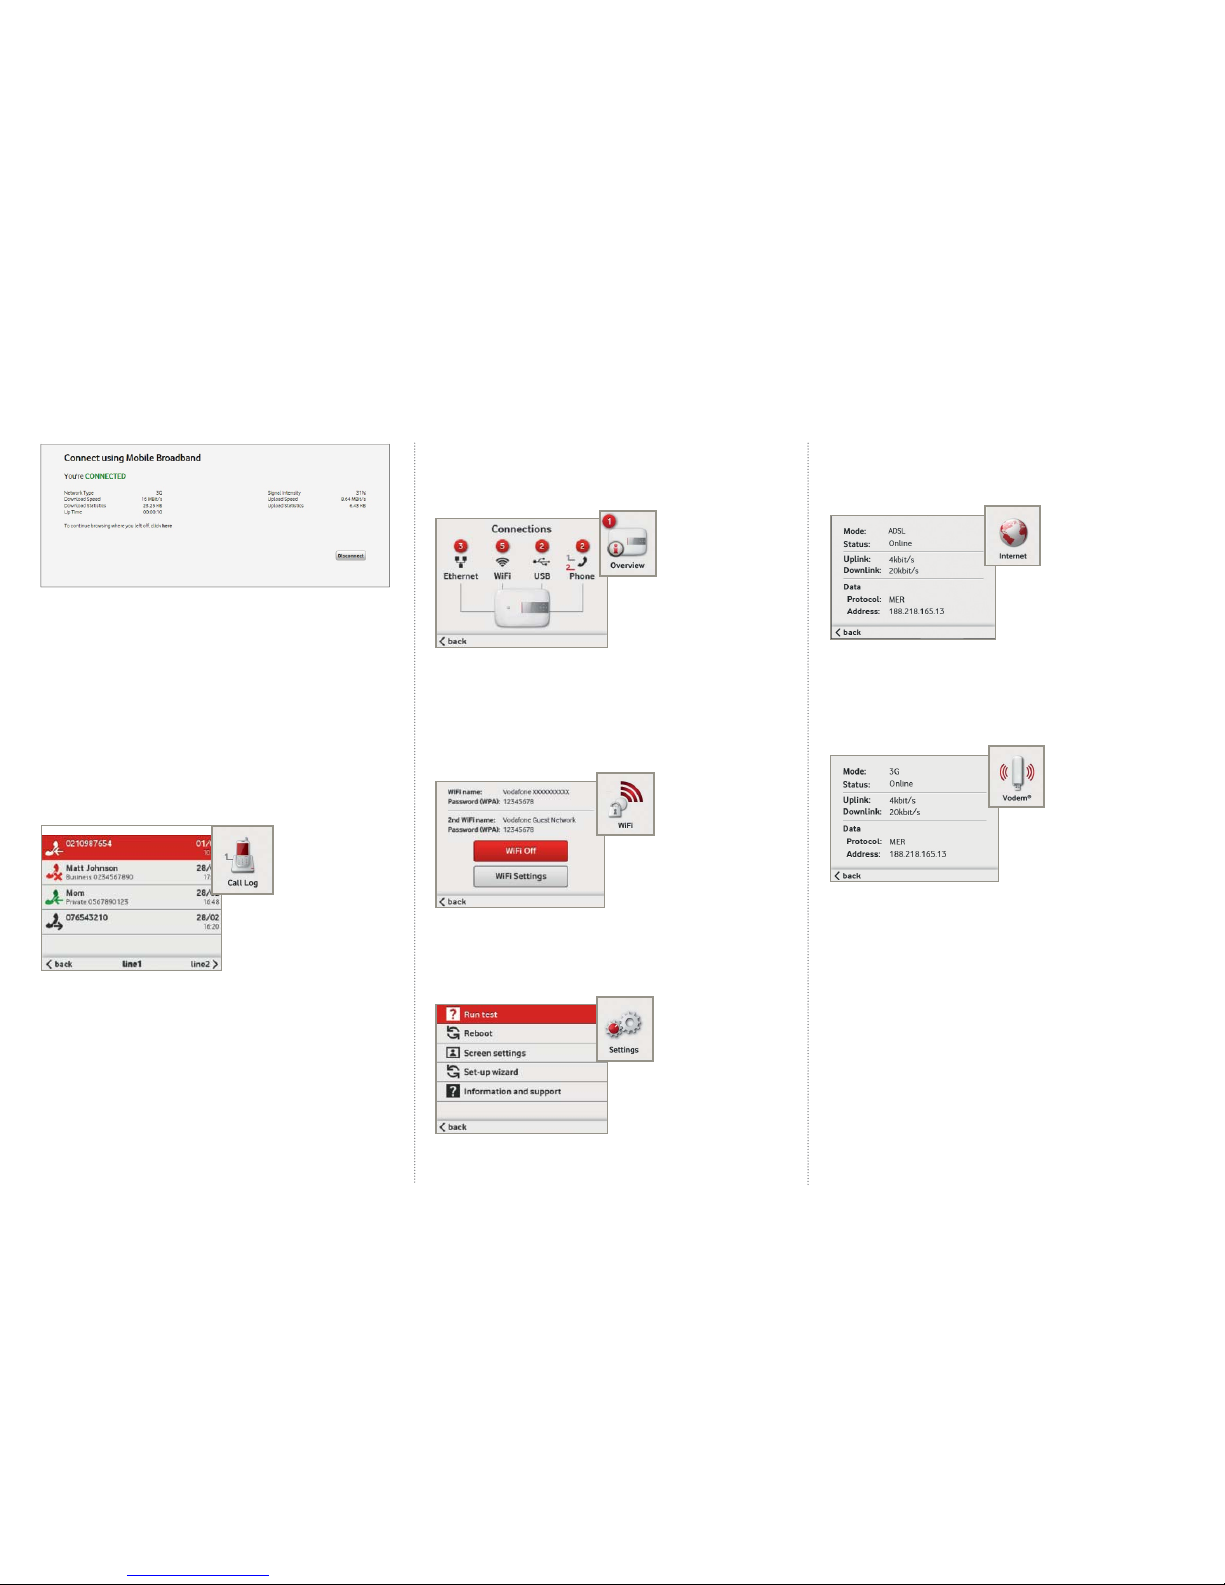
Call Log menu*
The Call Log screen allows you to view the call history for the phones
connected to your Vodafone Station.
From here you’ll be able to see incoming (green) calls, missed (red) calls and
calls you’ve made (black). Then by highlighting a call and pressing the OK
button you can call that number.
If you have a second line, you will be able to access the call log for your second
line by using the right hand arrow to move between your call logs.
You can also add your favourite numbers to an address book on the device
through the web portal at http://vodafone.station OR 192.168.1.1
Overview menu
The Overview screen allows you to quickly see what devices you have
connected to your Vodafone Station. The number in the red circle in the icon
indicates how many devices are connected.
WiFi menu
The WiFi screen allows you to manage your WiFi network. From here you’ll
be able to quickly view your WiFi username and password, turn your WiFi
connection on and off and access your WiFi Settings.
Settings menu
The Settings screen allows you to run a diagnostic test, reboot or fi nd out where
to go for support if you experience any problems.
Internet menu
The normal Internet icon shows that your Internet connection is enabled and
is working properly. Pressing OK when the icon is highlighted lets you see the
state of the connection.
Vodem® menu
The Vodem® icon shows you the state of your Vodafone 3G connection if
you are connecting via a Vodem® USB stick. Pressing OK when the icon is
highlighted lets you see the state of the connection.
Page 9
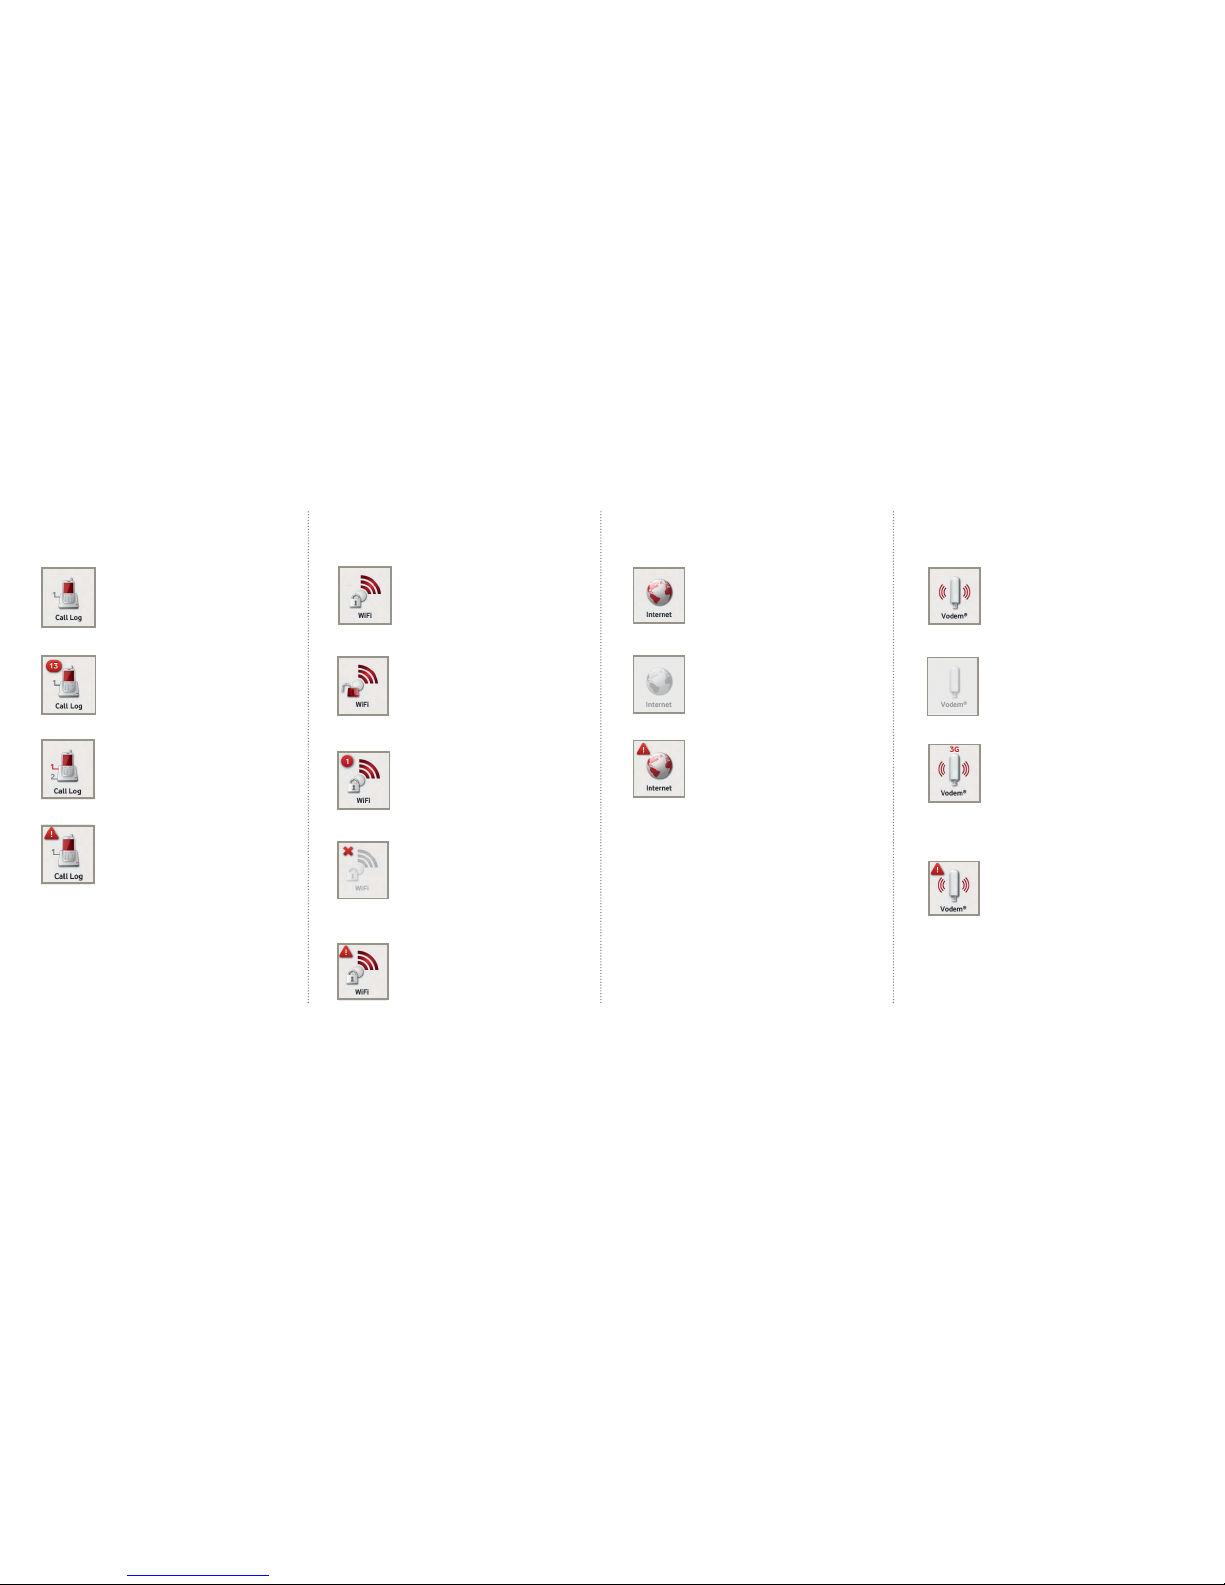
WiFi
WiFi is working properly and
is password-protected.
This shows that WiFi is turned on
and working but is not password
protected.
The number in the red circle shows
how many WiFi devices are connected.
WiFi is turned off. Select the icon and
press OK to have the option to turn it
on again.
An alert symbol shows that the
WiFi is not working properly
3.2 LCD icons
Call Log
The phone is connected and working
properly. There are no active calls.
You have a number of missed calls
(shown in the red circle).
When a phone line is busy it will be
shown in red on the Call Log icon.
An alert symbol signals that there
may be an issue with your voice service.
Call log functionality is only available
on some Vodafone plans
Vodem
This shows that a vodem is plugged
into the Vodafone Station.
No vodem is plugged in or it is
plugged in incorrectly.
A vodem is plugged into the Vodafone
Station and is connected to the
internet. The signal bars indicate the
signal strength and will include
the type of network connection
(GPRS, 3G, HSPD).
An alert symbol shows there is an issue
with the vodem connection and it is
not working properly.
Internet
The Vodafone Station is
connected to the internet.
This shows that the modem
cannot detect a connection.
An alert symbol means that the
internet cable has been connected,
however the Vodafone Station has
not yet established a connection
to the internet
®
Page 10
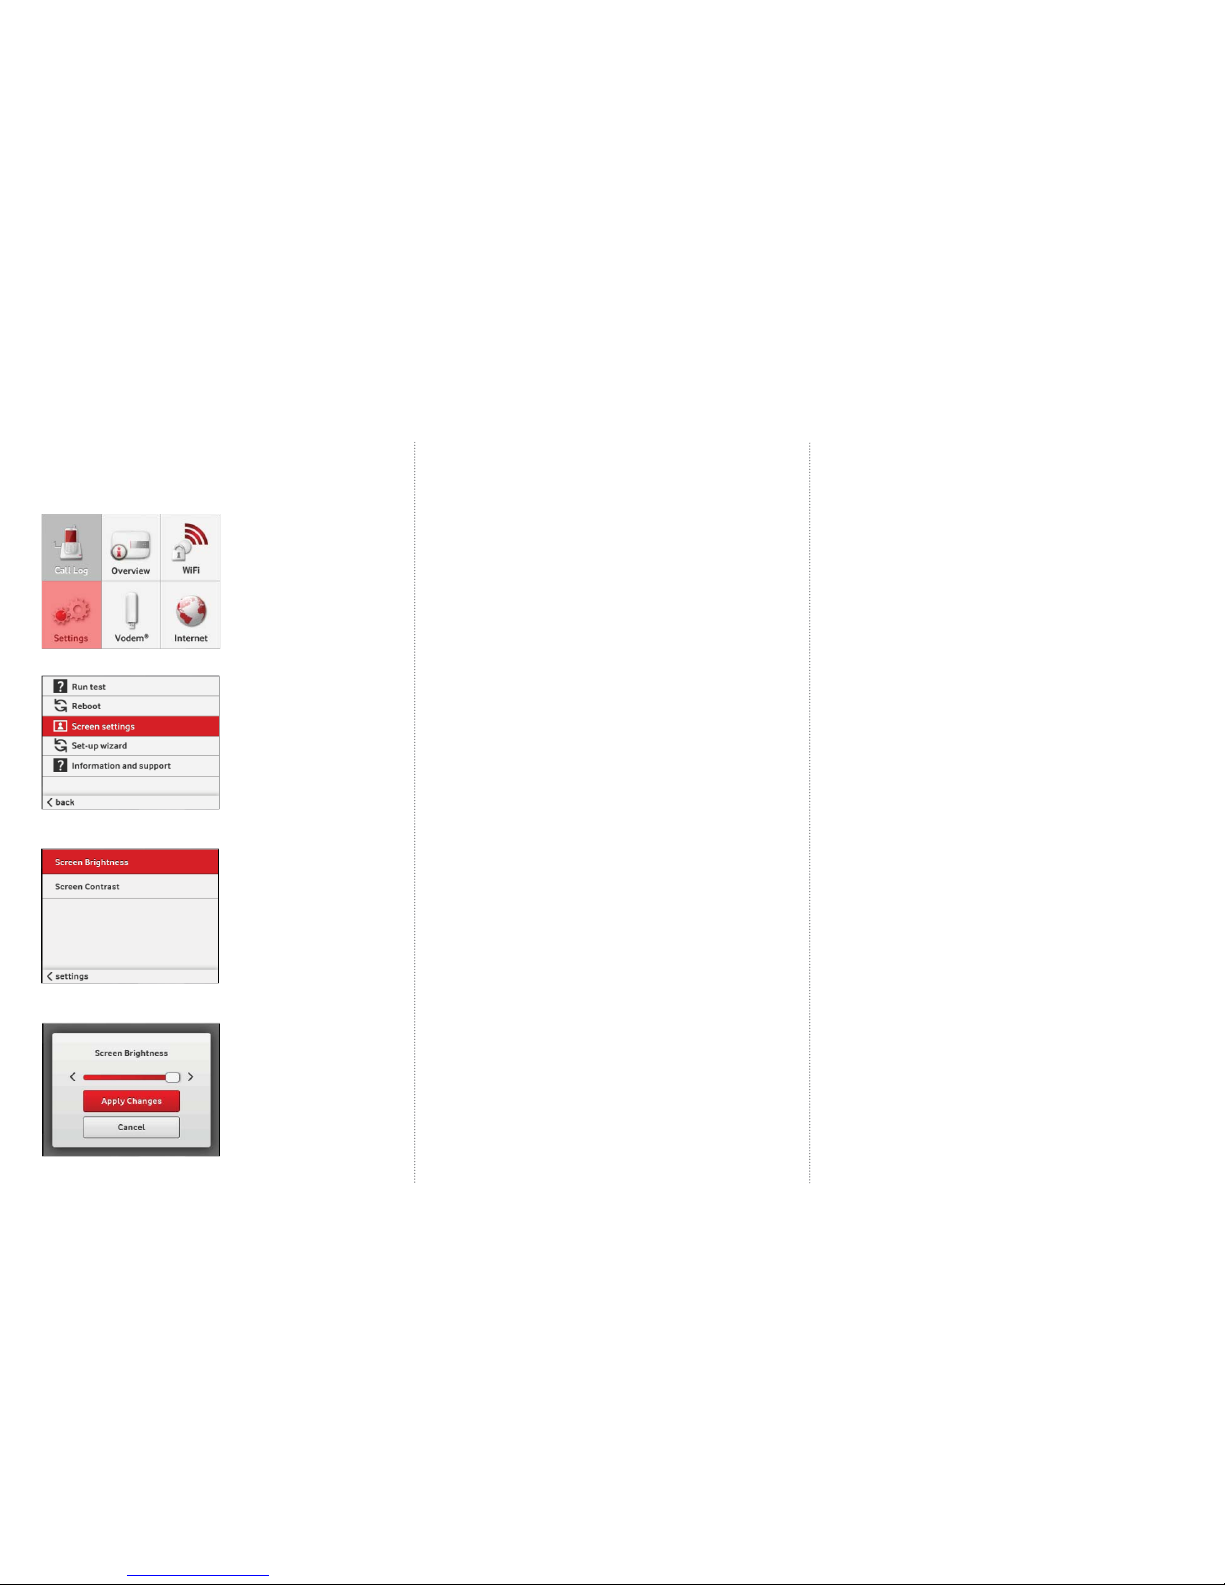
3.3 Adjust LCD screen intensity
To adjust the brightness on the screen of your Vodafone Station;
1. On the LCD, select Settings
2. Select Screen settings
3. Select either Brightness or Contrast
depending on what you want to adjust
4. Use the arrows to adjust the slider and select
Apply Changes when done
4. Instructions
4.1 Web portal
You can manage every aspect of your Vodafone Station from simple
to advanced settings by accessing the web portal.
• See the general state of your connections.
• View your Call History to enter numbers in the phonebook.
• Customise your WiFi username and password.
• Set up hard drive and printer sharing with one simple click.
• And, if you’re an advanced user, you can edit the advanced
settings for the Vodafone Station.
To access the web portal, open the internet browser on your computer and
type in the URL bar: http://vodafone.station
If you are using a custom DNS server, you can access the Vodafone Station
by typing in 192.168.1.1
4.2 Home storage function
(hard drives)
Set up a Network hard drive
The Vodafone station supports many types of USB hard drives. Setting up a
network hard drive will provide faster access to your content than accessing your
content through the web portal.
Set up instructions
1. Plug your external hard drive into the side or back USB port of your
Vodafone Station. A message should display on the LCD screen
advising that a USB device has been detected
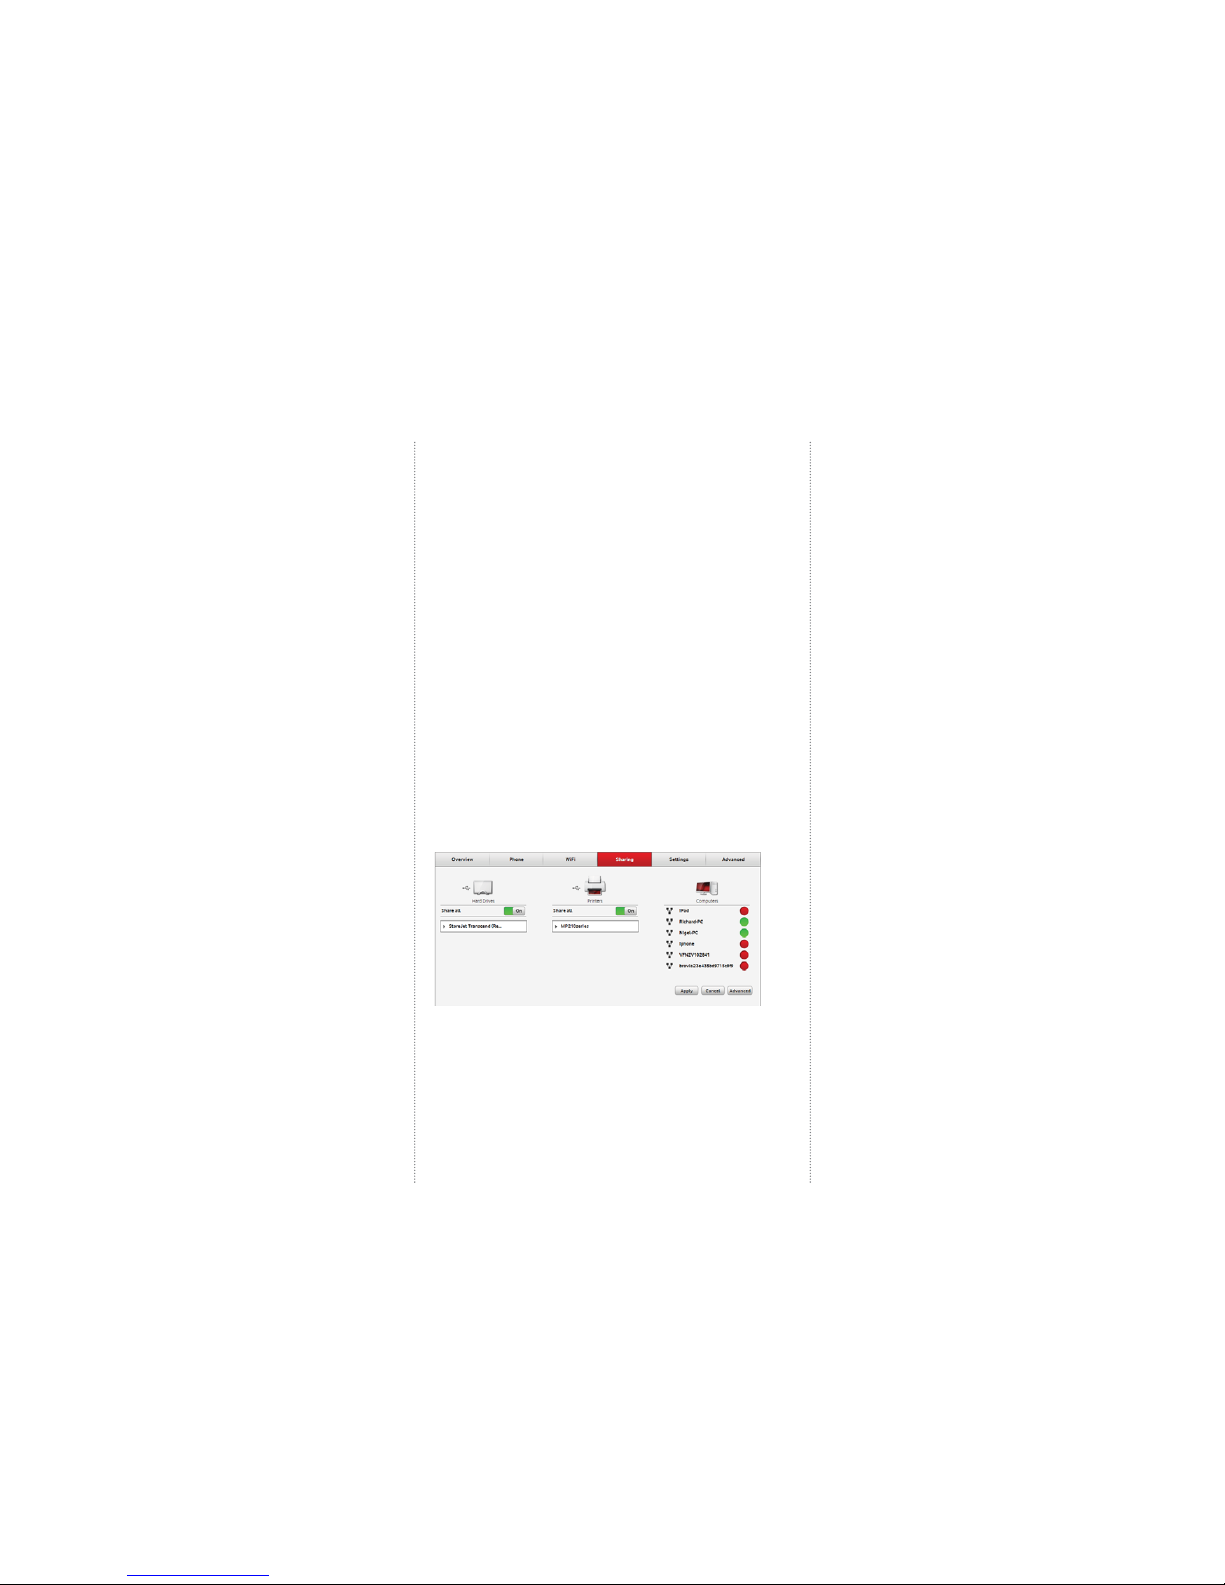
2. Login to the Vodafone Station by browsing to
http://vodafone.station OR 192.168.1.1
3. Click on Sharing
4. Under Hard Drives, you should see your hard drive listed
5. Slide the Share All switch to On
6. Click on the arrow next to your hard drive, this will tell
you the network location of your drive.
7. If you have multiple partitions on your hard drive, these will be listed here.
8. Simply click on the drive and you can upload, download,
delete and open fi les
9. You can also map this network drive so it appears on your computers
storage system. Instructions for this vary depending on the type and version of
your operating system.
Mapping a network drive in Windows 8
1. From the Start screen click windows explorer.
2. From the menu on the left hand side of the window click Computer.
3. Select the Computer tab at the top of your screen.
4. Select Map network drive
5. In the Folder fi eld, enter the network location of your drive (identifi ed in
step 6 of the setup instructions above). This should look something like \\
vodafone.station\a
6. Click Finish
Mapping a network drive in Windows 7
1. Open My Computer
2. Select Tools from the menu bar
3. Select Map a network drive
4. In the Folder fi eld, enter the network location of
your drive (identifi ed in step 6 of the setup instructions).
This should look something like \\vodafone.station\a
5. Click Finish
Mapping a network drive in Windows Vista
1. Open My Computer
2. Select Map Network Drive from the toolbar and the Map Network Drive
window will open
3. Choose an available letter from the dropdown list located next to the
Drive: option. If any drives are currently mapped they will have a folder name
displayed next to the letter.
4. Enter the network name
of of your drive (identifi ed in step 6 of the setup
instructions) This should look something like \\vodafone.station\a
5. Click the “reconnect at login” check box if this network drive should be
mapped permenantly, otherwise this will only be temporary until you log out
of your computer
6. Click fi nish
Page 11
Require Authentication to On.
To add a user
1. Click on + Add user
2. Enter a username and password
3. Set the permissions to either read+write or read only
4. Click apply
4.3 Sharing a USB printer
By connecting a USB printer to the Vodafone Station you can easily
print from any device on your network.
To enable the USB printer function
1. Connect the USB cable of the printer to the
USB port on your Vodafone Station
2. Log into the Vodafone station by entering the
following URL into your internet browser:
http://vodafone.station OR 192.168.1.1
3. Click on Sharing on the top menu
4. Turn on the Share all function under Printers on the page
5. Click on Apply
Windows 7 / Windows Vista
1. From the start menu open Devices and Printers
2. Click Add a printer
3. Select Add a network, wireless or Bluetooth printer
4. Select The printer that I want isn’t listed . Under Select a shared printer
by name enter the network address of your printer. This can be found in the
sharing section of the Vodafone Station web portal, it should look something
like http://vodafone.station:631/printers/yourpintermodel
Mapping a network drive in Windows XP
1. Open My Computer
2. From the tools menu, click map network drive, this will open a map
network drive window
3. In the map network drive window, choose an available letter from the
dropdown list located next to the ‘Drive’ option. If any drives are currently
mapped they will have a folder name displayed next to the letter.
4. Enter the network name of of your drive (identifi ed in step 6 of the setup
instructions) This should look something like \\vodafone.station\a
5. Click the reconnect at login check box if this network drive should be
mapped permenantly, otherwise this will only be temporary until you log out
of your computer
6. Click fi nish
Mapping a network drive on Mac OS X
The drive will be automatically detected in your Mac device.
However, if this doesn’t work you can:
1. From the Mac OS X Finder, hit Command+K to bring up the
‘Connect to Server’ window
2. Enter the path to the network drive you want to map,
\\vodafone.station\a and click ‘Connect’
3. Enter your login/password and click “OK” to mount the network drive
4
. The drive will now appear on your desktop and in the
Finder window sidebar
Set up Disk Sharing Privileges
You can set up a username and password for USB hard drives connected to
your Vodafone Station.
Note: A password restriction only applies while the device is attached to the
Vodafone Station. If someone unplugs the hard drive and plugs it directly into
a computer, this authentication will no longer work.
You can confi gure different levels of access to the hard drives. For example
you might give yourself read+write privelages, but other users read only.
1. Login to the modem by browsing to http://vodafone.station
2. Click on Advanced
3. Click on Advanced Sharing
4. In the Disk Sharing Privileges section, click on your hard drive
5. If you are using Samba/FTP, slide the switch beside
5. Select Next
6. Select your printer make and model number from
the list and click Next
7. Click “Finish”
Windows 8
1. From the Start screen click windows explorer.
2. From the menu on the left hand side of the window click Computer.
3. Select the Computer tab at the top of your screen.
4. Select Open control Panel
5. Select Not fi nding what you are looking for. At this point you will need to
make sure the View by option in the top right hand corner of the window is set
to Category
6. Click Hardware and Sound
7. Under Devices and Printers click Advanced printer setup
8. Select The printer that I want isn’t listed. Under Select a shared printer
by name enter the network address of your printer. This can be found in the
sharing section of the Vodafone Station Web Portal, it should look something
like http://vodafone.station:631/printers/yourpintermodel
9. Select Next
10. Selet your printer make and model number from the list and click Next
11. Click Finish
Windows XP
1. Choose Start > Printers and Faxes. Click the Add Printer icon on the left
side of the displayed page.
2. Click Next in the Welcome to the Add Printer Wizard page.
3. Select a network printer, or a printer attached to another computer
and then click Next.
4. Select Connect to a printer on the Internet or on a home or offi ce
network.
5. Enter http://vodafone.station:631/printers/yourpintermodel/
myprinter in the URL text box. Then click Next.
Page 12
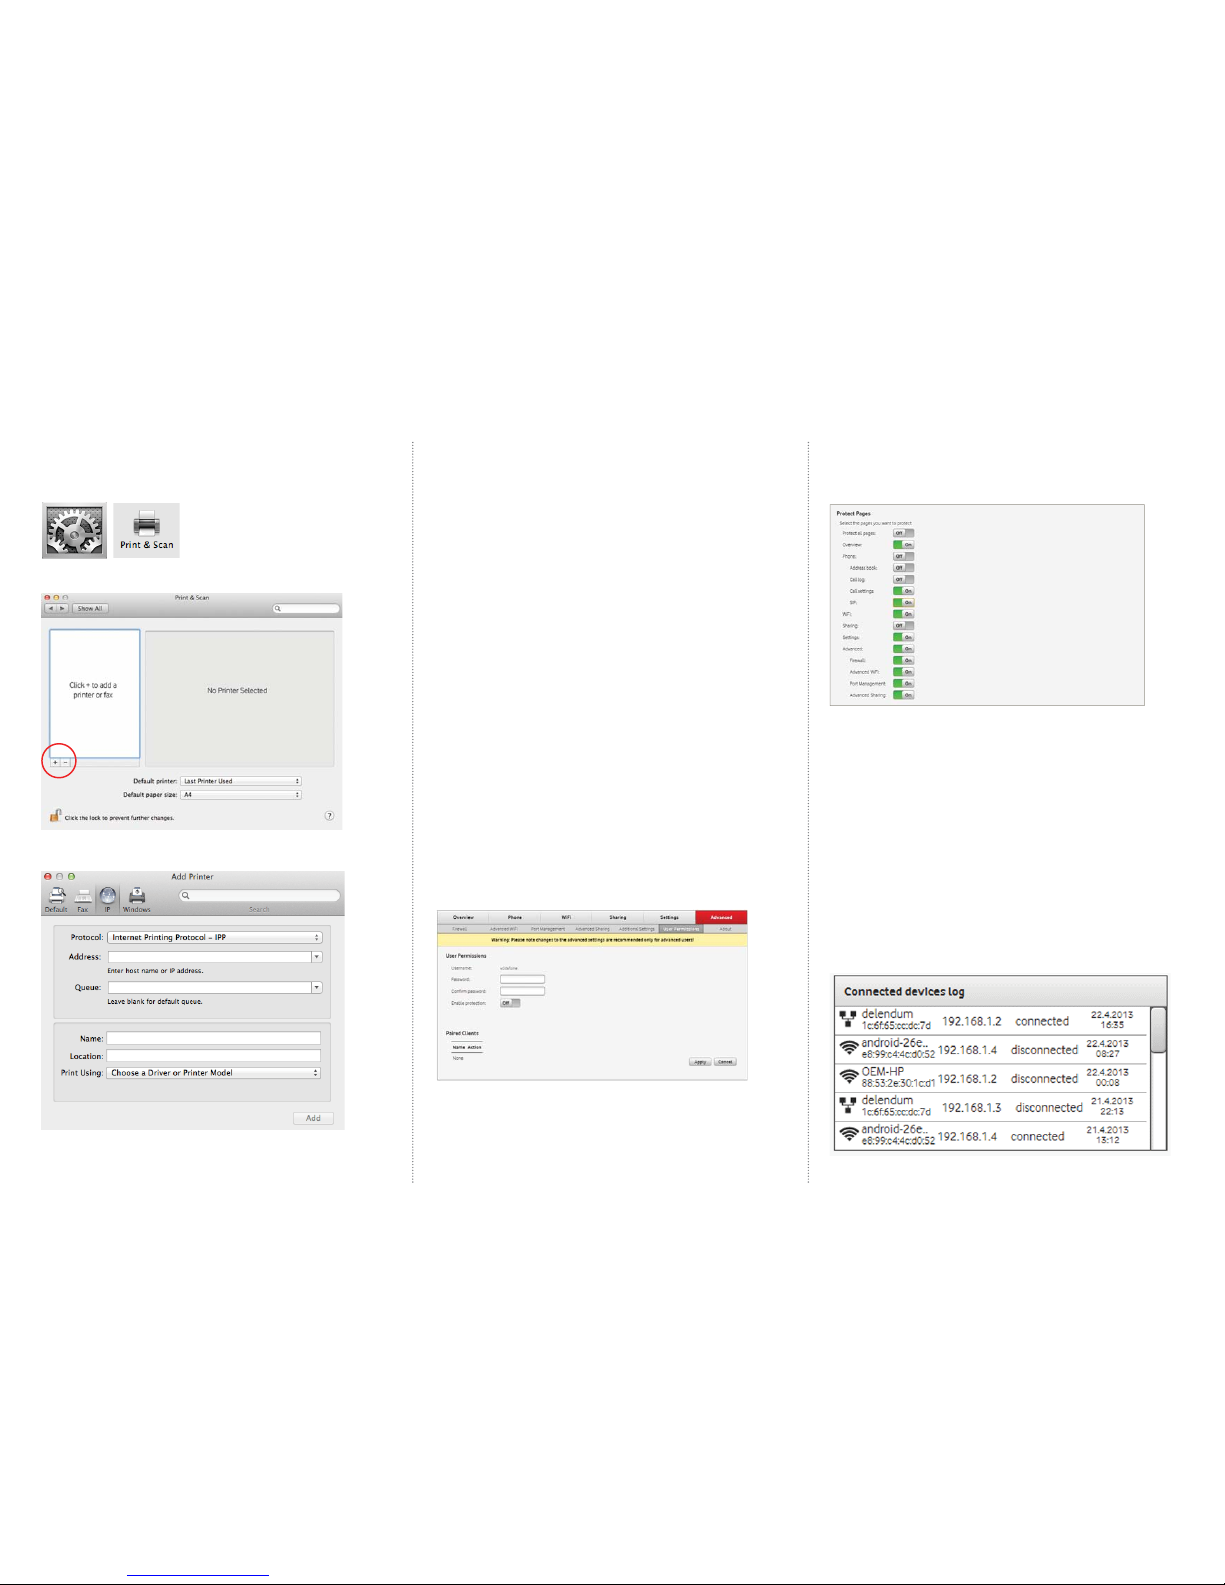
Mac
1. Connect the Printer to the Vodafone Station using a USB cable
2. Open up System Preferences and select Print and Scan
3. Select the + Button to add a new printer
4. In the box that opens select IP
Protocol: Internet Printing Protocol – IPP
1. Enter the Address: 192.168.1.1:631
2. Queue: printers/printer (or whatever you
named the printer where it says printer)
3. Name and Location: Type whatever you like
4. Print Using: It will change to a generic driver, if you know the model you can
manually select it from a list.
5. Click Add
4.4 Setting up user permissions
Setting up user permissions allow you to restrict access to either the
entire web portal or sections of it. For example, you could restrict access to
everything but phone and sharing sections.
To change the password on your Vodafone Station
1. Log into the Vodafone station by entering the following URL into your
internet browser: http://vodafone.station OR 192.168.1.1
2. Click on Advanced on the top menu
3. Click on User Permissions
4. Enter a new password in the Password fi eld
5. Click Apply
6. The Vodafone Station will now only be able
to accessed with the security password
To enable password protection for specifi c
Vodafone Station menu pages
1. Turn the option Enable Protection on by clicking
on the button next to it
2. Click and turn on all pages that you would like protected with a password
3. Click Apply
4. The selected pages will now only be able to
be accessed with the security password
4.5 Device connection history
The connected device log allows you to view devices that are currently and
have previously been connected to your network.
Along with the name of the connected device you will be able to tell you how
the device is connected (Ethernet or WIFI), its MAC address and the IP address
that it connected with.
To access the connected device log
1. Login to the modem by browsing to
http://vodafone.station OR 192.168.1.1
2. Click on Settings
3. The connected device log will be located at the
bottom right hand corner of the window.
Page 13
4.6 MAC address fi ltering
Every computer, phone or tablet in the world will have a MAC address. This
function allows you to block or allow a particular device to connect to the
internet based on the device’s MAC address.
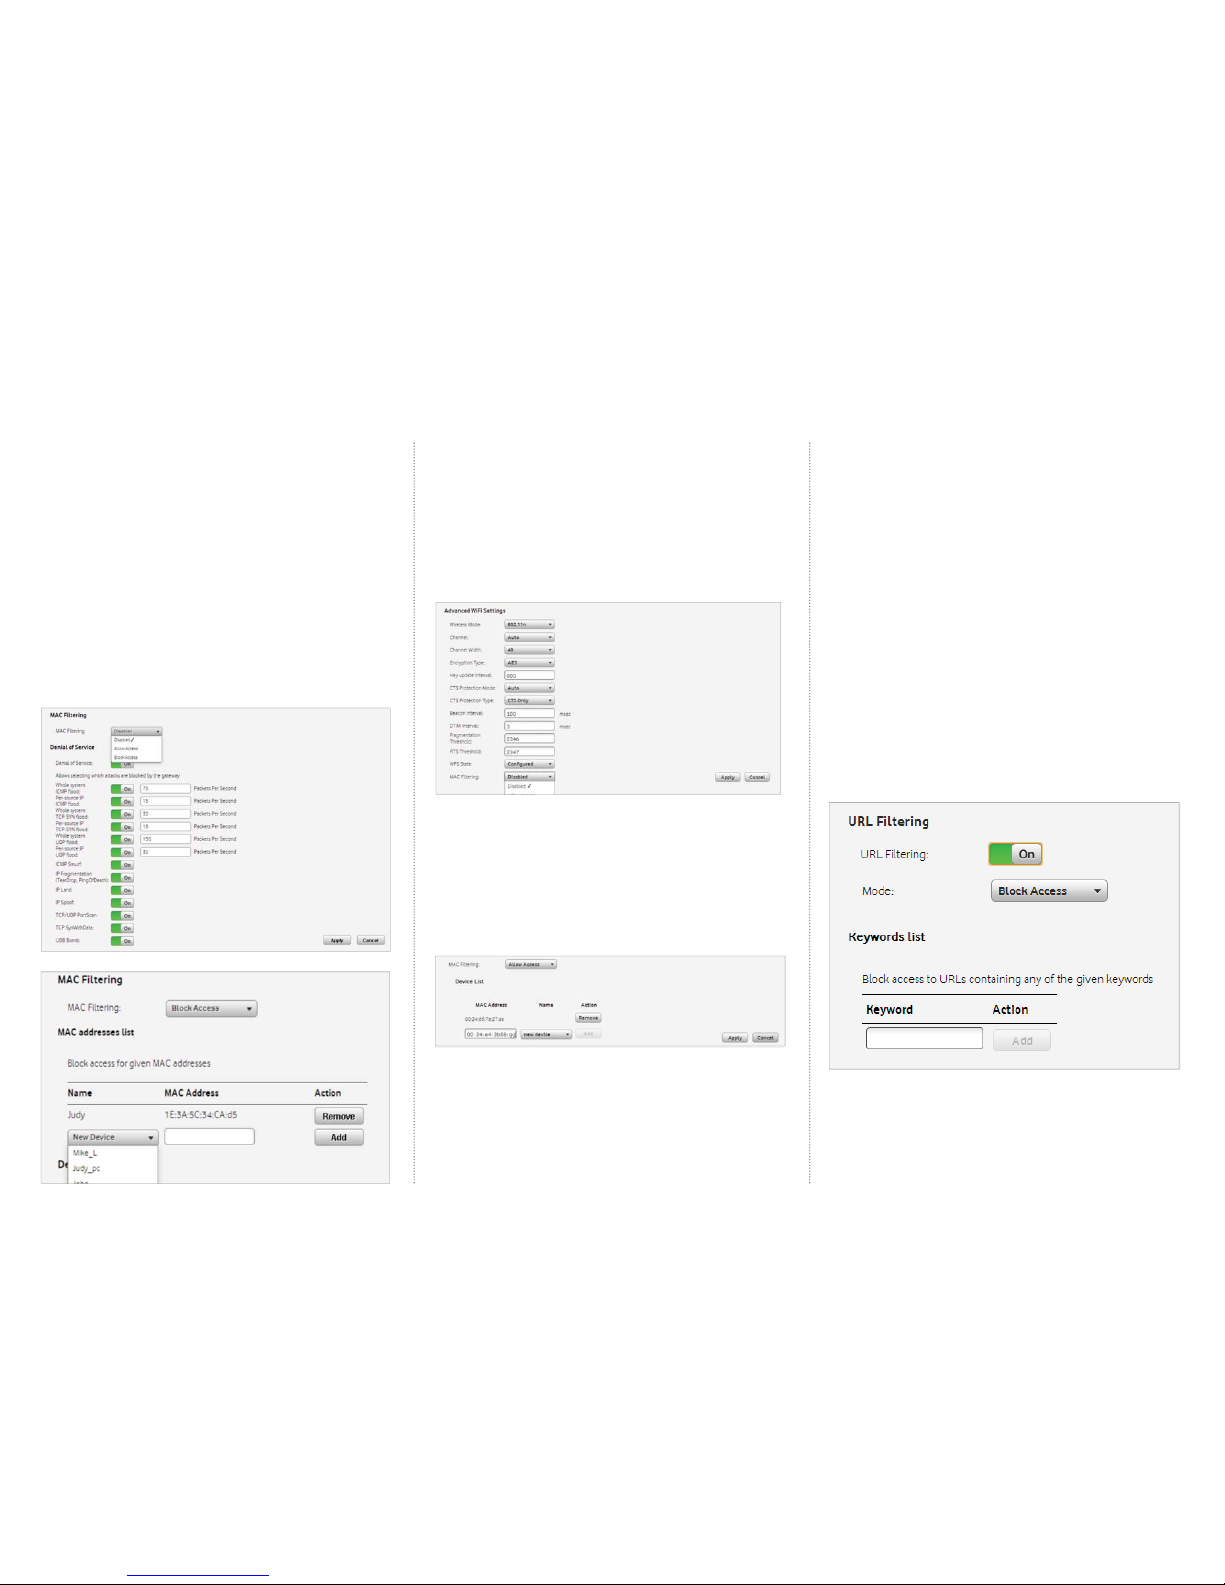
Filter a Mac address for ethernet connections
1. Log into the Vodafone Station by entering the following URL into your web
browser: http://vodafone.station OR 192.168.1.1
2. Click on Advanced on the top menu
3. Scroll down the page to Mac Filtering
4. Adding a device to the Allow Access list will only allow devices in the allow
list to access the Vodafone Station
5. Adding a device to the Block Access list will deny access to that particular
device to access the Vodafone Station
6. Select a device from the drop down menu to add to the list or select
new device and add the MAC address for the device. Click on the Add button
and click on Apply
To fi lter a Mac address for wireless connections
1. Log into the Vodafone Station by entering the following URL into your
internet browser: http://vodafone.station OR 192.168.1.1
2. Click on Advanced on the top menu and then select Advanced WiFi
3. Scroll down the page to Mac fi ltering
4. Adding a device to the Allow Access list will only allow devices in the allow
list to access the Vodafone Station
5. Adding a device to the Block Access list will deny access to that particular
device to access the Vodafone Station
6. Select a device from the drop down menu to add to the list or select
new device and add the MAC address for the device. Click on the Add button
and click on Apply
4.7 URL fi ltering
URL fi ltering allows you to restrict access to web pages. If you set the mode
to blocked, web pages whose URL includes a keyword that you select will be
blocked. If you set it to allow, only websites with the specifi c keywords you
have provided will be accessible.
For example, you may want to block access to torrenting websites if you
suspect people in your house may be downloading illegally.
You could add keywords such as torrent and pirate to your URL fi lter.
Remember that this will only restrict keywords in the URL of the webpage, not
the content of the webpage itself.
1. Login to the Vodafone Station by entering the following URL in to your
internet browser http://vodafone.station OR 192.168.1.1
2. Click on Advanced
3. Click on Firewall
4. Scroll down to the section URL Filtering and set the slider to on
5. Select if you wish to block or allow access
6. In the keywords list, enter the keywords you wish to allow or deny
and click add
7. Click Apply at the bottom of the Firewall page
8. You may need to reboot your Vodafone Station for these changes
to take effect
9. When removing a URL fi lter, you may also need to clear your internet
browser’s cache
Page 14
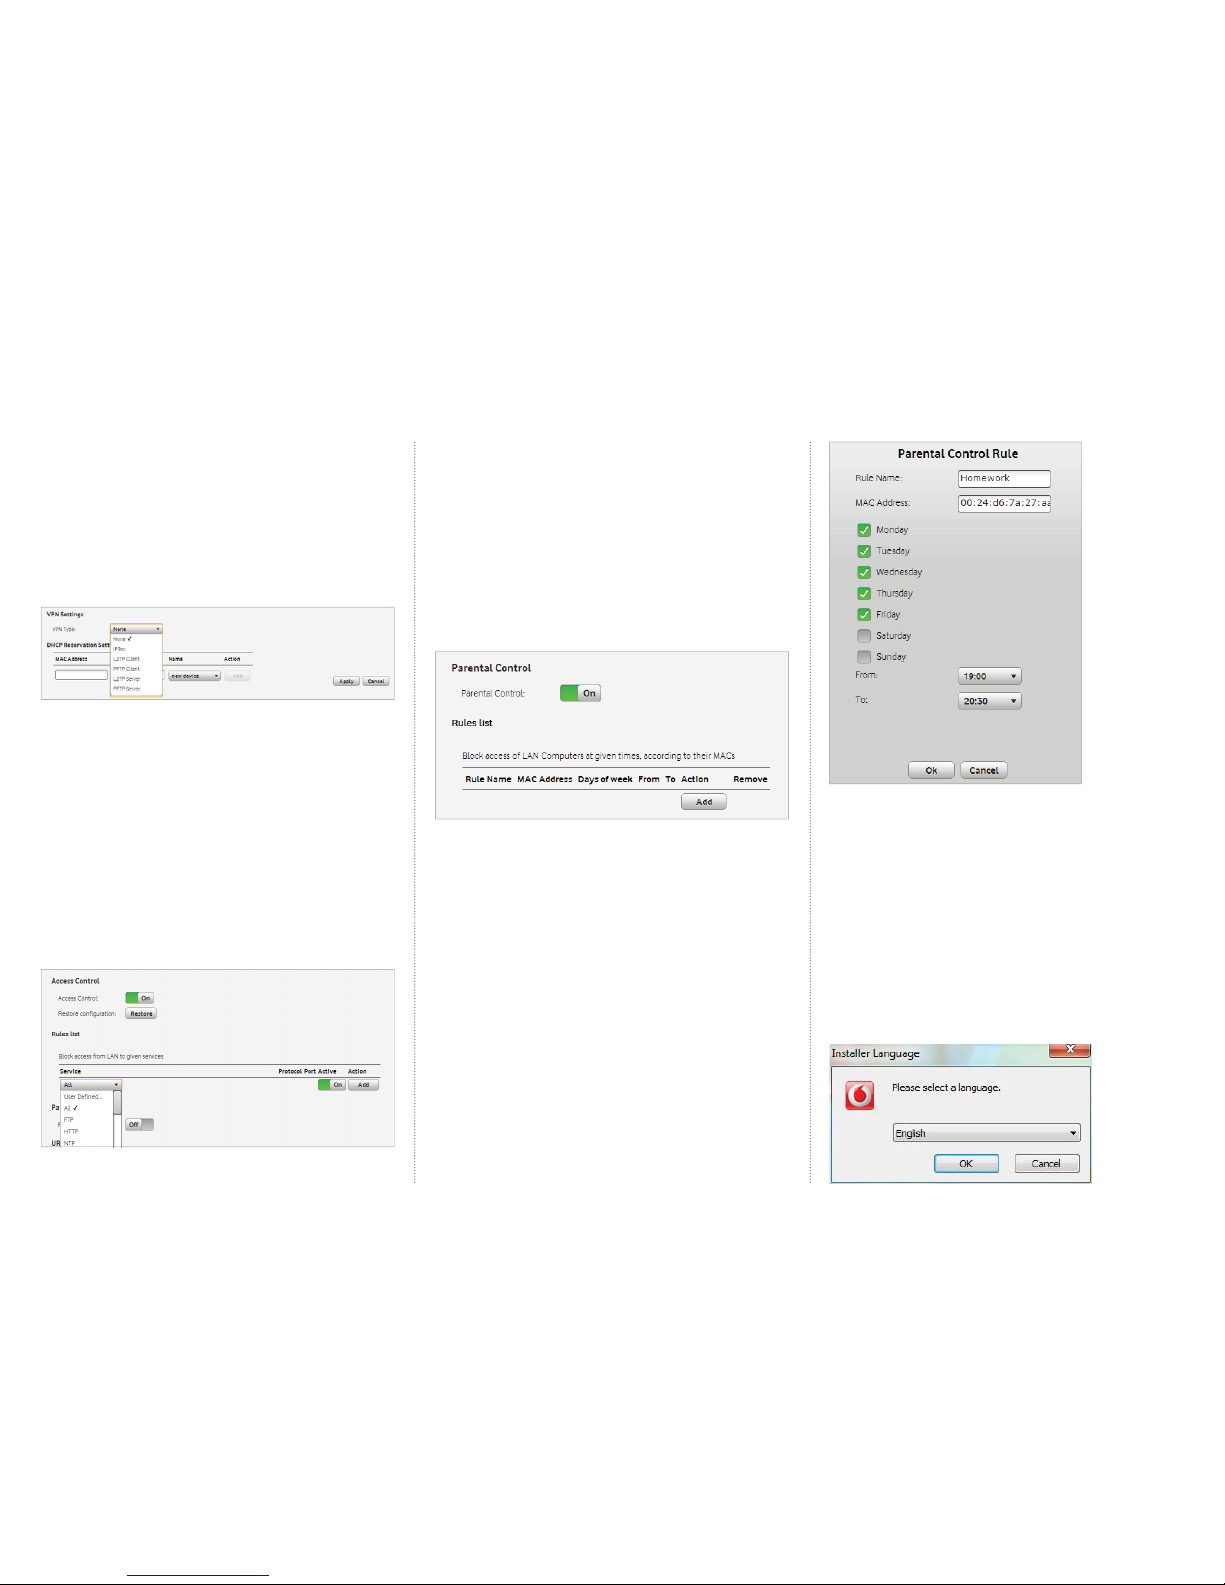
4.8 VPN
Use this function for Virtual Private Networks
To set up a VPN connection
1. Log into the Vodafone Station by entering the following URL into your
internet browser: http://vodafone.station OR 192.168.1.1
2. Click on Advanced on the top menu
3. Click on Additional Settings on the sub menu
4. Select the type of VPN setup that you are trying to
set up from the dropdown menu
5. Enter the required details and click apply
4.9 Access Control
Access control is the opposite of port forwarding (see 4.13) as it allows you to
block access to a particular port or service such as games or internet.
To set up Access Control:
1. Log into the Vodafone Station by entering the following URL into your
internet browser: http://vodafone.station OR 192.168.1.1
2. Click on Advanced on the top menu
3. Move the On/Off switch to the On position
4. Select a service or game that you wish to block. Click on the Add button
and click on Apply at the bottom right of the screen.
4.10 Parental Control
Parental Controls allow you to restrict a specifi c computer or device’s
internet access at certain times of the day. For example you may want to
block a games console, such as a Playstation or Xbox from accessing the
internet during exams.
To set up a Parental Control:
1. Log into the Vodafone Station by entering the following URL into your
internet browser: http://vodafone.station OR 192.168.1.1
2. Click on Advanced
3. Click on Firewall
4. Scroll down to the section Parental Control and set the slider to On
5. Click Add
6. Give the rule a name
7. Enter the MAC address of the computer or device you want to
restrict access too.You can view the MAC addresses of attached devices
in the settings menu of the Vodafone Station, under the Connected
Device History
8. Select the days and times you wish to restrict access
9. Click Ok
10. Click Apply at the bottom of the Firewall page
11. You may need to reboot your Vodafone Station for
these changes to take effect
4.11 Vodafone Media Manager
Vodafone Media Manager is software designed to share your music, movies
and pictures over your home network.
To set up Vodafone Media Manager
1. Go to http://downloads.vodafone.co.nz/
VodafoneMediaManagerSetup.exe and download the Media Manager
software
2. Once you have downloaded Media Manager,
double click on the fi le to begin.
3. Select your preferred language and click OK
Page 15
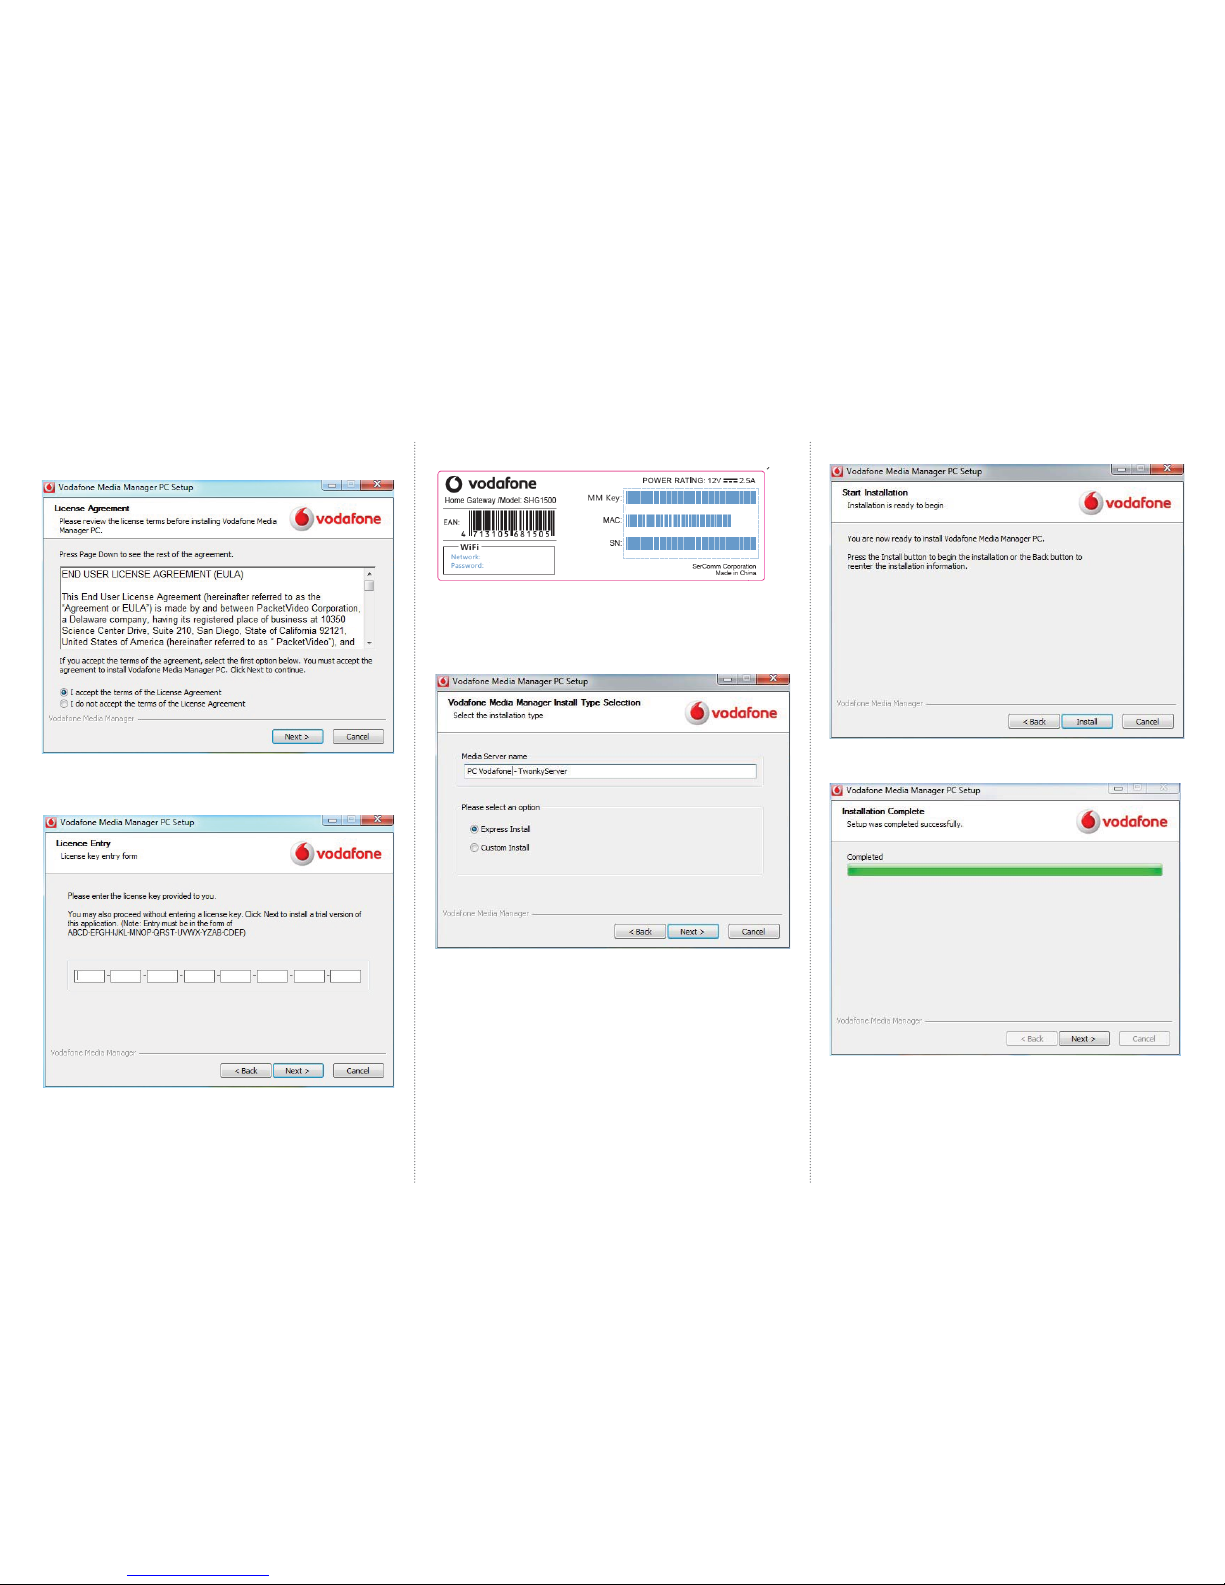
7. Vodafone Media Manager is now ready to install. Click Install to proceed.
8. Once complete, click next to fi nish.
Congratulations you have successfully installed Media Manager.
To open Media Manager please double click the Media Manager icon
on your desktop.
Once opened you will be able to view media on your computer and other
devices connected to your network by selecting the device from the drop
down box.
3. Continue through the Licence Agreement by
selecting the appropriate choice and then select Next.
4. Enter in the MM key (Media Manager Key), this can be found
on the back of your Vodafone Station and then click Next.
The sticker on the backof Vodafone Station looks like this:
5. Enter in a server name. You can either use the default name or any name
of your choice. We recommend using the default Express Install option
unless you have specifi c installation requirements in which case select
Custom Install.
6. Click next.
Page 16
For more information on Media Manager please refer to the full user guide.
This can be downloaded from:
vodafone.co.nz/station/pdfs/media-manager-user-guide.pdf
The Vodafone Media Manager user guide includes easy instructions of how to
share fi les, a printer or your music, photos & video using the Vodafone Media
Manager (by Twonky).
Vodafone Media Manager is DLNA compatible, so you can make the most of
your Vodafone connection.
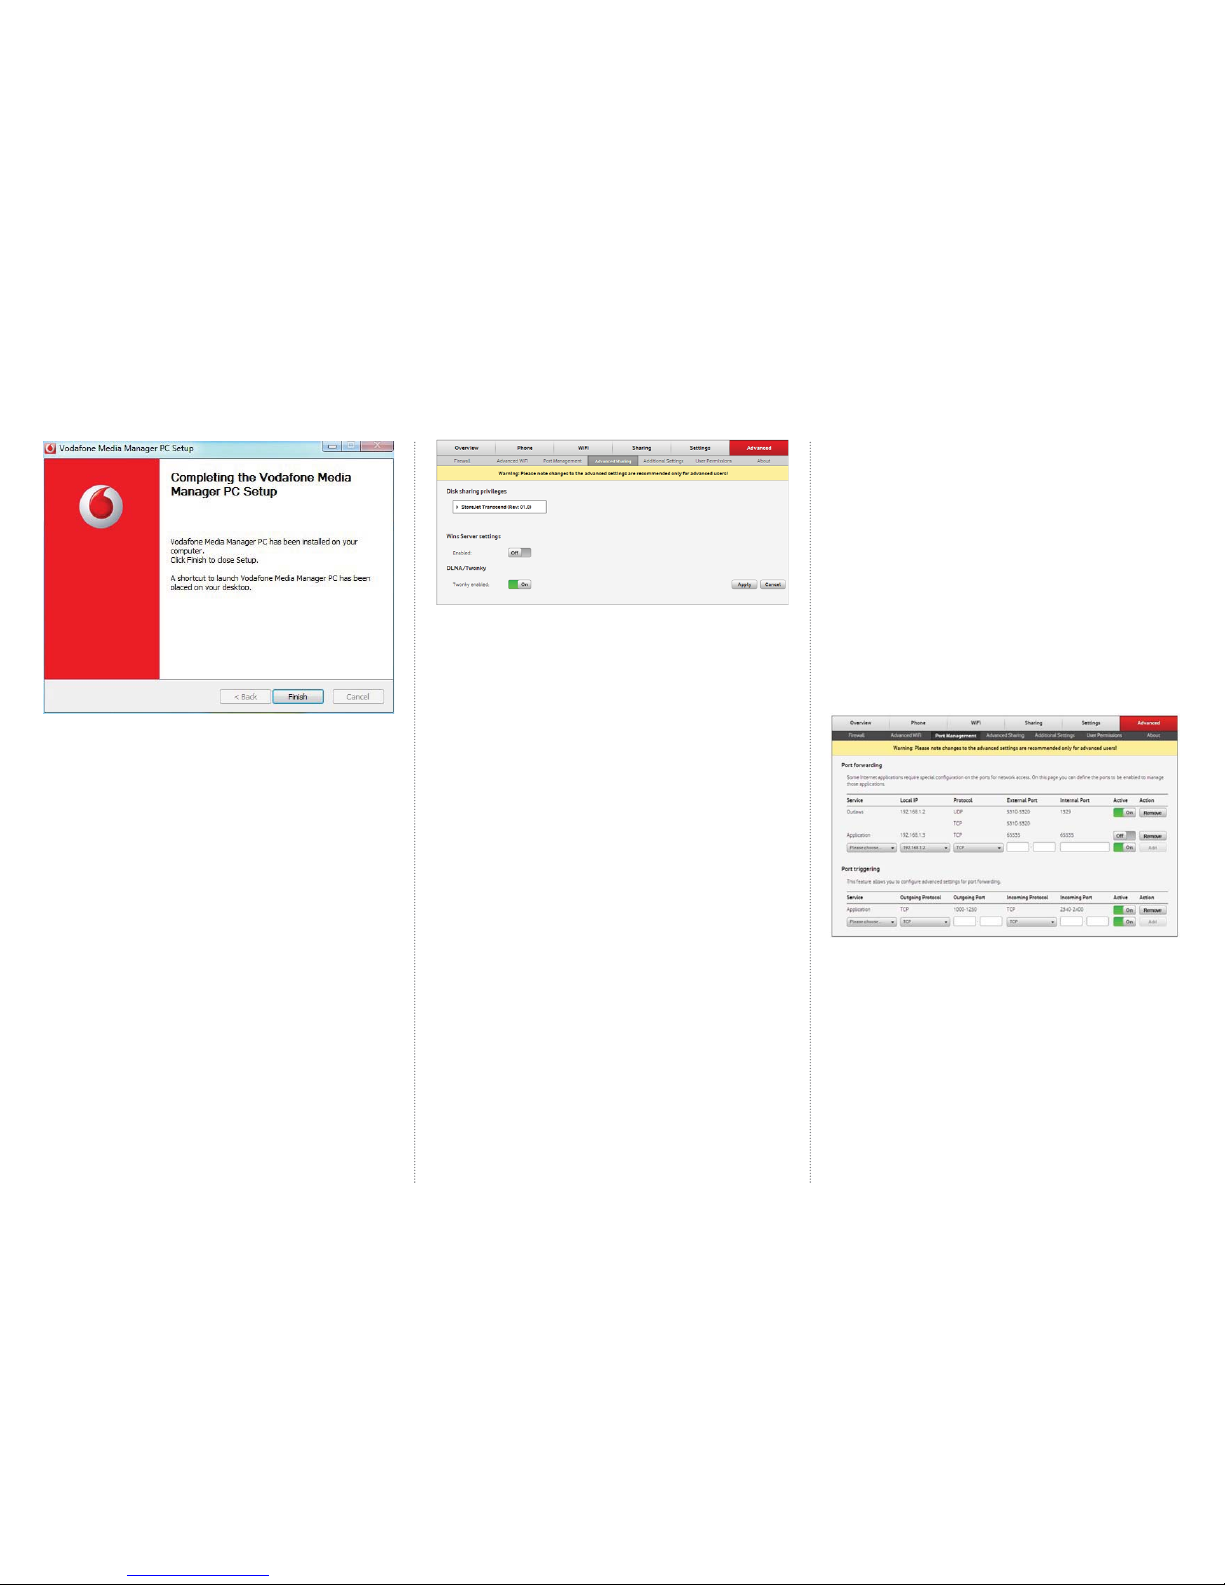
4.12 DLNA
How to enable or disable DLNA.
Enabling DLNA means that you can plug an external hard drive into your
Vodafone Station and share any media content on your drive will be indexed
and available on your home network and any other DLNA compatible devices,
such as Sony’s Playstation 3.
1. Log into the Vodafone Station by entering the following URL into your
internet browser: http://vodafone.station
2. Click on Advanced on the top menu
3. Click on Advanced Sharing on the sub menu
4. Turn DLNA on by selecting On with the button below it
4.13 Firewall
1. Log into the Vodafone Station by entering the following
URL in to your internet browser: http://vodafone.station
2. Click on Advanced on the top menu
3. Select the level of security on the fi rewall you prefer.
By default this is set to medium.
4. To block certain services, select Custom from the
drop down menu and Add details to blocked
5. Scroll to the bottom of the page and click Apply
The preset fi rewall profi les work like this:
Disabled
All ingoing and outgoing traffi c shall be allowed to pass through
the modem including Game and Application Sharing.
All outgoing connections are allowed. All incoming connections
are blocked, except for ICMP (Internet Control Management
Protocol) and inbound connections assigned to a local host via
Game and Application Sharing
All outgoing connections are allowed. All incoming connections
are blocked, except for inbound connections assigned to a local
host via Game and Application Sharing
All outgoing connections are blocked except MS Windows
protocols such as NetBIOS, RPC and SMB. All incoming
connections are blocked. Game and Application Sharing is
allowed.
All outgoing connections are blocked, except for traffi c from
well-known protocols such as DNS, HTTP, HTTPS, FTP, TELNET,
IMAP and POP. All incoming connections are blocked. Game and
Application Sharing are allowed.
All traffi c coming from and going to the Internet is blocked.
Game and Application Sharing is not allowed
Low
Standard
Medium
High
Block All
4.14 Port forwarding
Some internet applications may require a special confi guration on the ports
for network access. Port forwarding allows you to defi ne the ports to be
enabled to allow/block those applications.
To set up port forwarding on the Vodafone Station:
1. Log into the Vodafone station by entering the following URL into your
internet browser: http://vodafone.station
2. Click on Advanced on the top menu
3. Click on Port Management
4. Choose an option from the drop-down menu under Service. Local IP,
Protocol, External Port, Internal Port settings can be entered from the
recommended service/application.
5. Click on Add
Page 17

5. Glossary
ADSL
Asymmetric Digital Subscriber Line
ADSL is a technology for transmitting digital
information at a high bandwidth on existing
phone lines to homes and businesses.
Unlike regular dial-up phone service, ADSL
provides continuously-available, “always
on” connection. ADSL is asymmetric in
that it uses most of the channel to transmit
downstream to the user and only a small
part to receive information from the user.
ADSL simultaneously accommodates analog
(voice) information on the same line. ADSL is
generally offered at downstream data rates
from 512 kbit/s to about 6 Mbit/s.
ADSL2+
Asymmetric Digital Subscriber Line 2+
ADSL2 plus doubles the bandwidth used for
downstream data transmission, effectively
doubling the maximum downstream data
rates, and achieving rates of 20 Mbit/s on
phone lines as long at 5,000 feet. ADSL2+
solutions will most commonly be multimode,
interoperating with ADSL and ADSL2, as
well as with ADSL2+ chipsets.
Chat
The content of audio/video streaming
Client
On a local area network or the Internet, a
computer that accesses shared network
resources provided by another computer
(called a server).
DHCP
Dynamic Host Confi guration Protocol
DHCP is a client-server networking protocol.
Most organizations use DHCP. A DHCP server
provides confi guration parameters specifi c to
the DHCP client host requesting, generally,
information required by the host to participate
on the Internet network. DHCP also provides a
mechanism for allocation of IP addresses
to hosts.
DLNA
Digital Living Network Alliance defi nes a
standard for moving movies, photos, music
and other media from device to device. DLNA
servers can store media in one location
without setup or confi guration, can stream
the media to DLNA compliant devices
like Playstation 3 and Xbox 360. For more
information see www.dlna.org
DNS
Domain Name System
A hierarchical way of tracking domain names
and their addresses, devised in the mid-1980s.
The DNS database does not rely on one fi le or
even one server, but rather is distributed over
several key computers across the Internet
to prevent catastrophic failure if one or a few
computers go down. DNS is a TCP/IP service
that belongs to the Application layer of the
OSI model.
Ethernet
Architecture developed by Xerox Corporation
in cooperation with DEC and Intel in 1976.
Ethernet uses a bus or star topology and
supports data transfer rates of 10 Mbit/s. The
Ethernet specifi cation ser ved as the basis for
the IEEE 802.3 standard, which specifi es the
physical and lower software layers. Ethernet
uses the CSMA/CD access method to handle
simultaneous demands. It is one of the most
widely implemented LAN standards.
IEEE
Institute of Electrical and
Electronics Engineers (IEEE) is a standards
organization for computer and electronic
devices. Its senior members are IEEE fellows.
Internet
Largest global internet work, connecting
tens of thousands of networks worldwide and
having a ‘culture’ that focuses on research and
standardization based on real-life use. Many
leading-edge network technologies come from
the Internet community. The most important
uses for the internet are:
Email
The world wide web (www)
Transfer of data
Discussion forums
Transfer of data peer-to-peer
Internet browser
A computer program that allows users to view
information from the Internet. To use an
internet browser, you type in the URL of
a website, and the internet browser then
connects your computer to the website, and
shows the information there on your screen.
IP
Internet Protocol
The set of standards responsible for ensuring
that data packets transmitted over the Internet
are routed to their intended destinations.
IP address
An IP address is the logical address of a
network adapter. The IP address uniquely
identifi es computers on a network. An IP
address can be private, for use on a LAN, or
public for use on the internet.
Kbit/s
Kilobit per second
A unit used to express the speed of a network.
LAN
Local Area Network
A computer network covering a small local
area, like a home, offi ce, or small group of
buildings such as a home, offi ce, or college.
Current LANs are most likely to be based on
switched Ethernet or Wi-Fi technology
running at 10, 100 or 1,000 Mbit/s (1,000
Mbit/s is also known as 1 Gbit/s).
MAC address
It is a hardware address that uniquely identifi es
each node of a network.
Mbit/s
Megabit per second
A unit used to express the speed of a network.
NAPT
Network Address Port Translation
NAPT enables a local area network (LAN)
to use one set of IP addresses for internal
traffi c and a second set of addresses for
external traffi c.
PPPoE
Point-to-Point Protocol over Ethernet
PPPoE is a network protocol for encapsulating
PPP frames in Ethernet frames. It is used
mainly with DSL services. It offers standard PPP
features such as authentication, encryption,
and compression.
Protocol
On the Internet, “protocol” usually refers to
a set of rules that defi ne an exact format for
communication between systems.
Server
A computer or program that responds to
commands from a client. For example, a fi le
server may contain an archive of data or
program fi les. When a client submits a request
for a
fi le, the server transfers a copy of the fi le
to the client.
SSID
A SSID (Service Set Identifi er) is the name of a
particular local wireless network to which a
user wants to connect. Broadbcasting SSID’s
displays a list of wirelss networks in range
allowing the user to select a preferred one.
Subnet mask
The technique used by the IP protocol to
determine which network segment packets
are destined for. The subnet mask is a binary
pattern that is stored in the client machine,
server or router, and is matched with the IP
address.
TCP
Transmission Control Protocol
The reliable transport protocol within the TCP/
IP protocol suite. TCP ensures that all data
arrive accurately and 100% intact at the other
end. TCP’s unreliable counterpart is UDP, which
is used for streaming media, VoIP and video
conferencing.
TCP/IP
A suite of communications protocols used to
connect hosts on the Internet. TCP/IP uses
several protocols, the two main ones being
TCP and IP.
TKIP
Temporal Key Integrity Protocol
Using TKIP, automatically changes the keys at
a preset time interval, making it much more
diffi cult for hackers to fi nd and exploit them.
UDP
User Datagram Protocol
One of the TCP/IP suite of protocols for data
transfer, which allows an application program
on one machine to send a datagram to an
application program on another machine.
URL
Universal Resource Locator
The global address of documents and other
resources on the world wide web.
USB
Universal Serial Bus
USB is a serial protocol and physical link, which
transmits all data differentially on a single
pair of wires. Another pair provides power to
downstream peripherals.
Virtual server
A virtual server allows you to direct incoming
traffi c from the Internet (identifi ed by protocol
and external port) to an internal server with a
private IP address on the LAN.
WAN
Wide Area Network
WAN usually refers to a network which covers a
large geographical area, and uses
communications circuits to connect the
intermediate nodes. A major factor impacting
WAN design and performance is a requirement
that they lease communications circuits
from telephone companies or other
communications carriers.
WEP
Wired Equivalent Privacy
Part of the IEEE 802.11 standard (ratifi ed in
September 1999), and is a scheme used to
secure wireless networks (Wi-Fi). Because
a wireless network broadcasts messages
using radio, it is particularly susceptible to
eavesdropping; WEP was designed to provide
comparable confi dentiality to a traditional
wired network, hence the name.
WiFi
Wireless Fidelity
A wireless data networking protocol generally
used to connect PCs to a network. Also known
as 802.11b and WLAN (Wireless LAN), it is the
most common means of wireless networking
and operates at 2.4 GHz.
WPA Key
This is your Network Key to access your secure
wireless connection. You will fi nd your default
one on the rear panel of your Vodafone Station.
WPS
Wireless Protected Setup is a standard for
easy and secure establishment of a wireless
home network. A WPS (Push Button) allows
home users who know little of wireless security
to confi gure their WiFi Protected Access at the
touch of a button.
Page 18

Vodafone Station NZ 04/13
 Loading...