

Page 1
Smart N9 lite
User Manual
Page 2

Table of Contents
1 Your phone ................................................................ 4
1.1 Keys and connectors ..................................................... 4
1.2 Getting started ................................................................. 6
1.3 Home screen ..................................................................... 9
2 Text input .................................................................19
2.1 Using the onscreen keyboard ..................................19
2.2 Text editing ......................................................................20
3 Phone call, Call log & People ............................21
3.1 Phone call ........................................................................21
3.2 Recents ..............................................................................28
3.3 Contacts ............................................................................29
4 Messaging & Email ...............................................35
4.1 Messaging ........................................................................35
4.2 Gmail ..................................................................................39
5 Calendar , Alarm clock & Calculator ..............41
5.1 Calendar ............................................................................41
5.2 Clock ...................................................................................42
5.3 Calculator .........................................................................45
6 Getting connected ................................................47
6.1 Connecting to the Internet .......................................47
6.2 Chrome ..............................................................................49
6.3 Connecting to Bluetooth devices...........................50
1
Page 3

6.4 Connecting to a computer via USB .......................51
6.5 To safely remove the microSD card from your
phone .................................................................................52
6.6
Sharing your phone’s mobile data connection
6.7 Connecting to virtual private networks ...............54
...52
7 Google Play Store .................................................55
8 Multimedia applications ....................................56
8.1 Camera...............................................................................56
8.2 Gallery ................................................................................59
8.3 Play music ........................................................................62
9 Maps Go ....................................................................65
9.1 Get My Location .............................................................65
9.2 Search for a location ....................................................66
9.3 Save a location ...............................................................66
9.4 Open Street View for a location ..............................67
9.5 Get driving, public transportation or walking
directions ..........................................................................67
10 Others .......................................................................68
10.1 Files Go ..............................................................................68
10.2 Sound Recorder .............................................................68
10.3 Radio ...................................................................................68
11 Settings ....................................................................70
11.1 Network & Internet .......................................................70
11.2 Connected devices .......................................................72
2
Page 4

11.3 Apps & notifications .....................................................73
11.4 Battery ...............................................................................73
11.5 Display ...............................................................................73
11.6 Sound .................................................................................75
11.7 Storage ..............................................................................76
11.8 Security & location .......................................................76
11.9 Parental restrictions .....................................................79
11.10 Users & account .............................................................80
11.11 Accessibility .....................................................................80
11.12 Google ................................................................................82
11.13 System ...............................................................................83
11.14 Software updates ..........................................................87
12 Update your phone’s software ..........................88
13 Pictograms and graphic symbols ...................89
14 Regulatory information ......................................91
15 Warranty information ....................................... 103
16 Accessories .......................................................... 105
17 Specifications ...................................................... 106
3
Page 5
1 Your phone
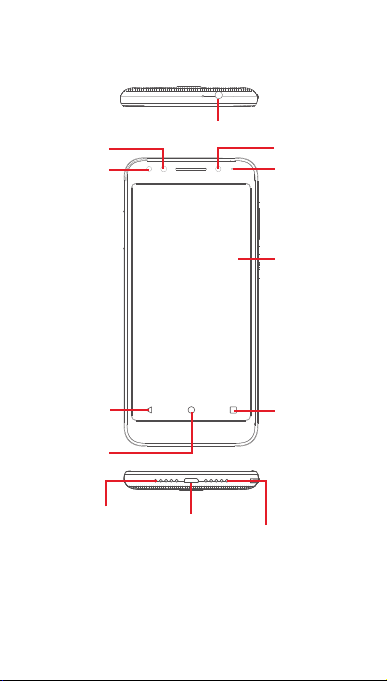
1.1 Keys and connectors
Front camera
Proximity
sensor and
Lighting
sensor
Back key
Home key
Microphone
Headset connector
Micro-USB
connector
4
Flash
LED indicator
Touch screen
Recents key
Speaker
Page 6
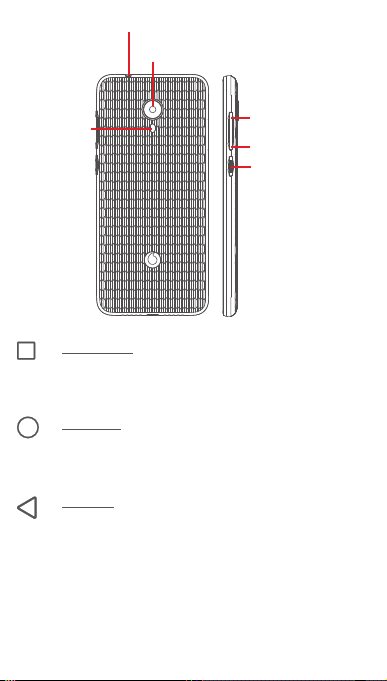
Audio jack
Camera
Flash
Recents key
• Touch: this shows your recently-used apps. Touch
an app to open it, or swipe it left or right to remove
it from the list.
Home key
• While on any app or screen, touch the Home key to
return to the main Home screen.
• Long press this key to access Google Assistant Go.
Back key
• Touch to go back to the previous screen, or to close
a dialogue box, options menu, the notification panel,
etc.
5
Volume up
Volume down
Power key
Page 7
Volume keys
• During a call, these keys serve to adjust the volume of
the earpiece or headset.
• In Music/Video/Streaming mode, these keys serve to
adjust the media volume.
• These keys also serve to adjust the ringtone volume.
• Mute the ringtone of an incoming call.
Power key
• Press and hold: Power on/Power off.
• Press: activate the lock screen/wake up the screen.
• Long press: show the pop-up menu to select from
Power off, Restart, Screen capture, Flight mode.
• Long press the Power key and the Volume down key
to capture a screenshot.
• In some cases you can scroll down the screenshot to
choose which part to capture. Touch to scroll the
phone screen, then to save the screen capture.
1.2 Getting started
1.2.1 Setup
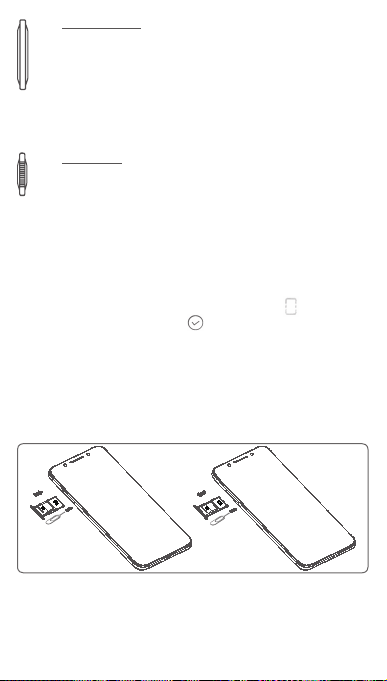
Inserting or removing the SIM card or microSD card
You must insert your SIM card to make phone calls.
6
Page 8
Insert the pin into the hole and pull out the tray. Place the SIM
card or microSD card with the chip facing downwards on the tray,
and put the tray into its housing. Make sure that it is correctly
inserted. To remove the SIM card or microSD card, pull out the
tra y.
Your phone only supports nano SIM cards. Do not attempt
to insert other SIM types like mini or micro cards, as you
may damage your phone.
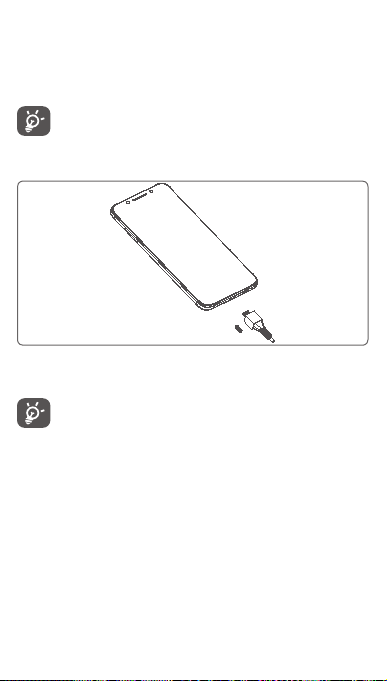
Charging the battery
To charge the battery, connect the charger to your phone and
main socket. You can also charge your phone via a USB cable.
To reduce your phone’s power consumption, switch off
Wi-Fi, GPS, Bluetooth or apps running in the background
when not needed. In Settings you can also lower the
brightness of the screen, and shorten the length of time
before the screen goes to sleep.
1.2.2 Power on your phone
Hold down the Power key until the phone powers on. It will take
a few seconds before the screen lights up. Swipe to unlock your
phone, or use the PIN, Password, Pattern if you have set this up
already.
If you do not know your SIM PIN code or if you have forgotten it,
contact your network operator. Do not leave your PIN code with
your phone. Store this information in a safe place when not in use.
7
Page 9

Set up your phone for the first time
The first time you power on the phone you will be asked to set
the following options: language, mobile data, date & time, etc.
1. Select the phone’s language, then touch START.
2. Insert a SIM card or touch SKIP.
3. Select a Wi-Fi network, or touch SKIP and then CONTINUE.
4. Adjust Date & time if needed, then touch NEXT.
5. Input your Name, then touch NEXT.
6. Protect your phone, set screen lock now or touch Not now and
then touch SKIP ANYWAY.
7. Touch the switch on/off to select Google servies, once
finished, then touch AGREE.
8. Touch the switch on/off to disable/enable the
improvement of your phone by sending anonymous
diagnostics and usage data, touch NEXT.
9. Set up additional features or touch No thanks to next setup.
10. Touch the switch on/off to enable/disable the showing
of features and Help tips, then touch ALL SET.
11. Read more warnings about this device before you using it,
then touch Done.
When the other options (Font size, Display size, etc) are also
configured, you will have completed setting up your phone.
If you power on your phone with no SIM card inserted, you will
still be able to connect to a Wi-Fi network to sign into your Google
account and to use some features.
8
Page 10
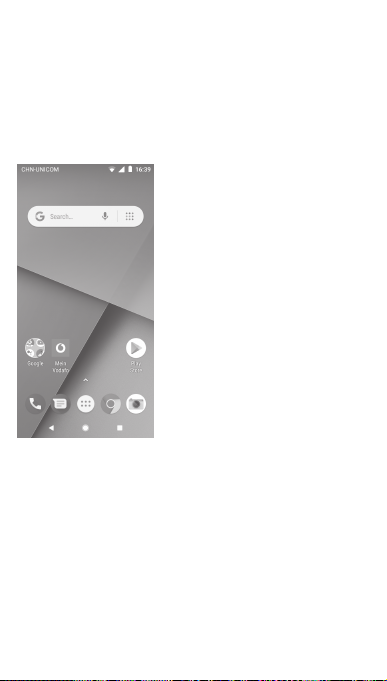
1.2.3 Power off your phone
Hold down the Power key from the Home screen until the Phone
options appear, then select Power off.
1.3 Home screen
Touching the Home key always takes you to your main Home
screen, and you can personalise all your Home screens by adding
your favourite apps, shortcuts and widgets to them.
In the standard Home screen the bottom set of icons is always
visible, whichever of your Home panels you are on. This also
includes the Application tab, which will show all your available
apps.
9
Page 11
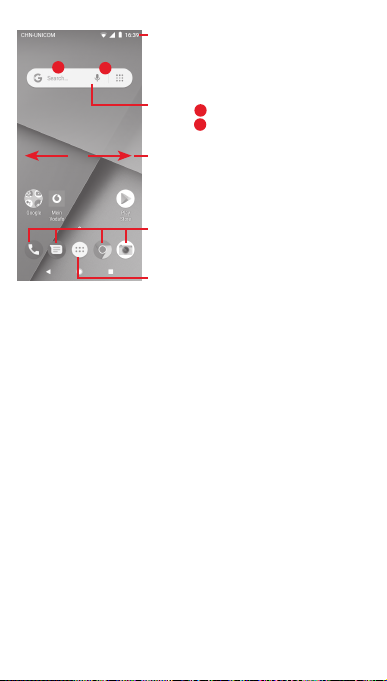
Status bar
• Status/Notification indicators
• Touch and drag down to open the
a
b
Notification panel
Google Search bar
• Touch
• Touch
Slide left or right to view other panels
on the Home screen
Favourite tray apps
• Touch to enter the app
• Long press to move or access to more
options for apps
Application tab
• Touch to open all apps
to enter text search screen
a
to enter voice search screen
b
The Home screen extends on either side of the screen to allow
more space for adding apps, shortcuts, etc. Slide the Home
screen horizontally left and right to get a complete view of the
Home screen.
In the standard Home screen, you can slide right to access your
favourite app. You can change this to open a different app by
going to Settings > Display > Favourite Home screen app.
10
Page 12

1.3.1 Using the touchscreen
Touch
To access an app, touch it with your finger.
Long press
Long press the Home screen to access the available options for
setting the wallpaper.
Drag
Long press an item to be able to drag it to another location.
Slide/Swipe
Slide the screen to scroll up and down lists, screens of apps,
images, web pages, etc.
Flick
Similar to swiping, but flicking makes it move quicker.
Pinch/Spread
Place your fingers of one hand on the screen surface and draw
them apart or together to scale an element on the screen.
Rotate
Automatically change the screen orientation from portrait to
landscape by turning the phone sideways.
11
Page 13
1.3.2 Status bar
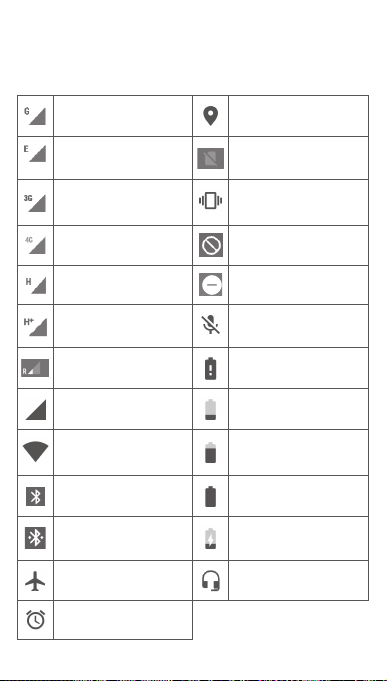
From status bar, you can view both phone status (on the right
side) and notification information (on the left side).
Status icons
GPRS connected GPS is on
EDGE connected No SIM card inserted
3G connected Vibrate mode
4G connected Ring tone is silenced
HSDPA (3G) connected Do not disturb mode
HSPA (3G) connected
Data roaming Battery is very low
Signal strength Battery is low
Phone microphone
muted
Connected to a Wi-Fi
network
Bluetooth is on Battery is full
Connected to a
Bluetooth device
Flight mode Headset connected
Alarm is set
Battery is partially
drained
Battery is charging
12
Page 14
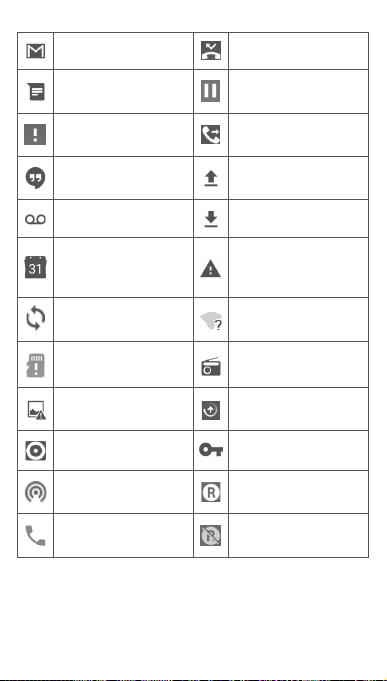
Notification icons
New Gmail TM message Missed call
New text or multimedia
message
Problem with SMS or
MMS delivery
New Hangouts
message
New voicemail
Upcoming event
Data is synchronising
No microSD card
installed
Screenshot error
USB tethering is on
Portable Wi-Fi hotspot
is on
Call in progress
Call on hold
Call forwarding is on
Uploading data
Download finished
Carrier data use
threshold approaching
or exceeded
An open Wi-Fi network
is available
Radio is on
System update
available
Connected to VPN
International Roaming
is enabled
International Roaming
is disabled
13
Page 15
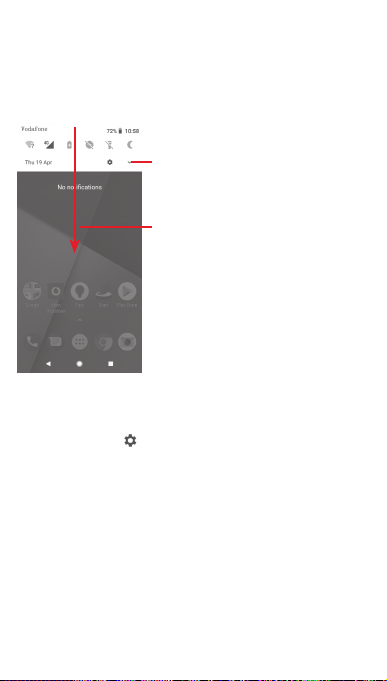
Notification panel
Touch and drag down the Status bar to open the Quick settings
panel and drag down again to extend the Quick settings panel.
Touch and drag up to close it. From the Notification panel, you can
open items and other reminders indicated by notification icons or
view wireless service information.
Touch to access the Quick
settings bar
Touch and drag downwards twice
to access the Quick settings bar
Touch a notification and slide it sideways to delete it.
Touch CLEAR ALL to clear all event–based notifications (other
ongoing notifications will remain).
Touch the Settings icon to access Settings.
14
Page 16
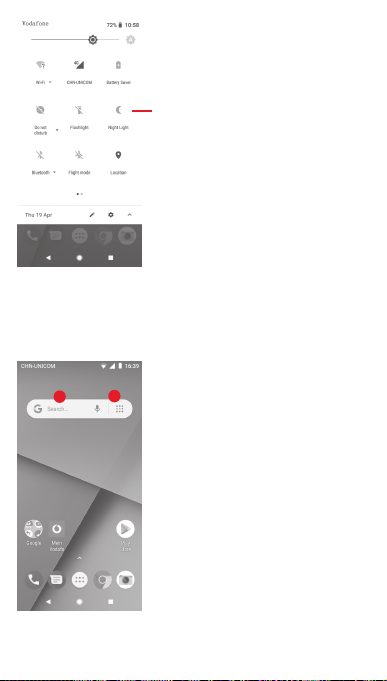
Quick settings bar
•Touchiconstoenable/disable
functions or to change modes
1.3.3 Search bar
The phone provides a Search function which can be used to find
the information you want on your phone, in your applications or
on the web.
b
a
15
Page 17
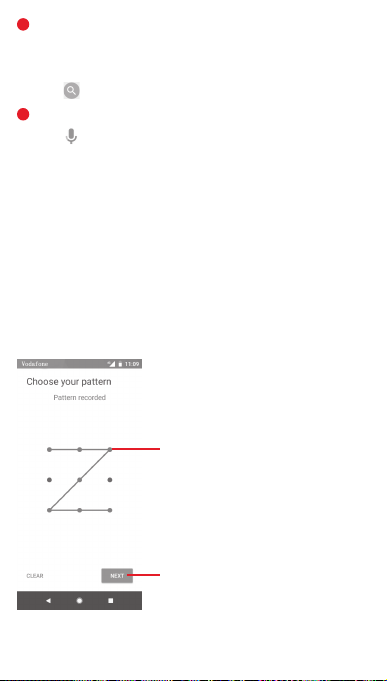
Search by text
a
• Touch the Search bar from the Home screen.
• Enter the text/phrase you want to search for.
• Touch on the keyboard if you want to search on the web.
Search by voice
b
• Touch from the Search bar to display a dialogue screen.
• Speak the word/phrase you want to search for. A list of search
results will display for you to select from.
1.3.4 Lock/Unlock your screen
To protect your phone and privacy, you can lock your phone
screen with a variety of patterns, PIN or password, etc. Go to
Settings > Security & location > Screen lock.
To create a screen unlock pattern (follow the onscreen
instructions)
• Go to Settings > Security & location > Screen lock > Pattern.
• Draw your own pattern.
Draw your unlock pattern
Touch Next to confirm
by repeating the pattern.
To create a screen unlock PIN/Password
• Go to Settings > Security > Screen lock > PIN or Password.
16
Page 18
• Set your PIN or password.
To lock phone screen
Press the Power key once to lock the screen.
To unlock phone screen
Press the Power key once to light up the screen, draw the unlock
pattern you have created or enter PIN or password to unlock
the screen.
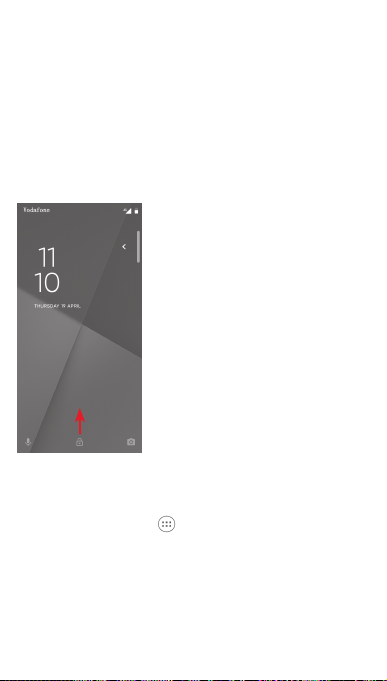
If you have chosen Swipe as the screen lock, slide upward to
unlock the screen.
1.3.5 Personalise your Home screen
Add an app or widget
Touch the Application tab , then long press the app to activate
the Move mode, and drag the item to any Home screen.
17
Page 19

Reposition an app or widget
Long press the item that you want to reposition to activate the
Move mode, drag the item to the desired position and then
release. You can move items both on the Home screen and the
Favourites tray. Hold the icon on the left or right edge of the
screen to drag the item to another Home screen.
Remove
Long press the item to be removed to activate the Move mode,
drag the item up to the top of Remove icon, and release after the
item turns grey.
Create folders
To make it easier to organise apps and shortcuts on the Home
screen and the Favourite tray, you can add them to a folder by
stacking one item on top of another. To rename a folder, open it
and touch the folder’s title bar to input the new name.
Wallpaper customisation
Long press an empty area on the Home screen or go to Settings >
Display > Wallpaper to customise your wallpaper.
1.3.6 Volume adjustment
Using volume key
Press Volume key to adjust the volume. To activate the vibrate
mode, press the Volume down key until the phone vibrates.
Press the Volume down key once more to activate the silent
mode.
Using Settings menu
Drag down twice from the notification panel and touch the
settings icon to open Settings, then touch Sound. You can
set the volume of Ringtone, Media, Notification and etc. to your
preference.
18
Page 20
2 Text input
2.1 Using the onscreen keyboard
Onscreen keyboard settings
Touch the Application tab from the Home screen, select
Settings > System > Language & input.
Adjust the onscreen keyboard orientation
Turn the phone sideways or upright to adjust the Onscreen
Keyboard orientation. You can also adjust it by changing the
settings (go to Settings > Display > Auto-rotate screen).
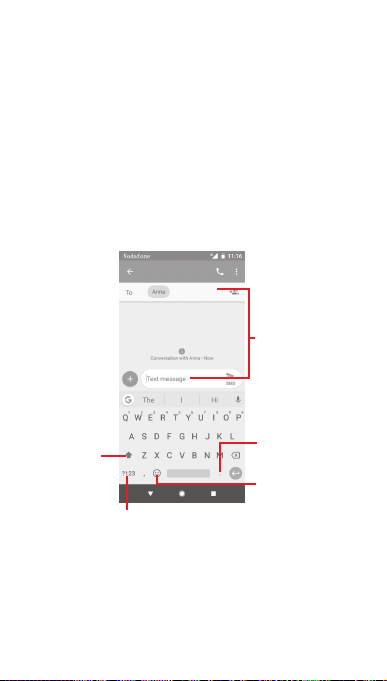
2.1.1 Google keyboard
Touch to enter text
or numbers
Touch to switch
between "abc/
Abc" mode;
Double tap to
switch between
"abc/ABC" mode
Touch to switch between the
symbol and numeric keyboard
19
Long press,
then select to
enter symbols
Touch to select
emoticons.
Page 21
2.2 Text editing
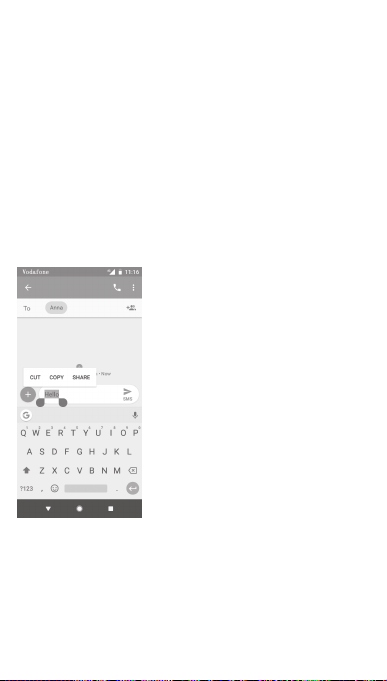
You can edit the text you have entered.
• Long press or double touch the text you want to edit.
• Drag the tabs to change the highlighted selection.
• The following options will show: CUT, COPY, SHARE, SELECT
ALL.
You can also insert new text
• Touch where you want to type, or long press a blank space, the
cursor will blink and the tab will show. Drag the tab to move
the cursor.
• If you have selected any text, touch the tab to show PASTE
which allows you to paste any text you have previously copied.
20
Page 22
3 Phone call, Call log & People
3.1 Phone call
3.1.1 Placing a call
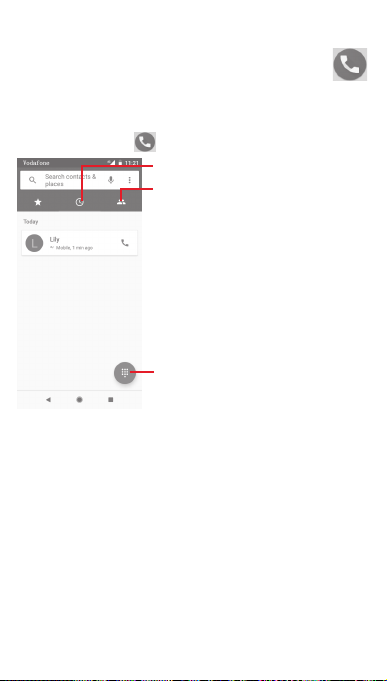
To make a call when the phone is active, go to the Home screen
and touch the Phone icon in the Favourites tray.
Call history
Contacts
Touch to show the dial pad
21
Page 23
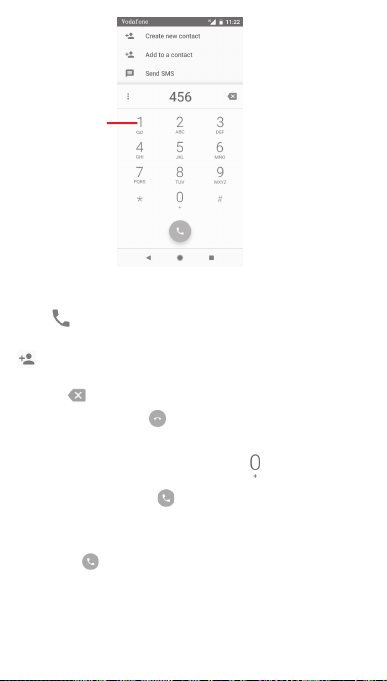
Long press to
access voicemail
Enter the number you want from the dial pad directly or select
a contact from Contacts or Call history by touching tabs, then
touch to place the call.
The number you entered can be saved to Contacts by touching
.
If you make a mistake, you can delete the incorrect digits by
touching .
To hang up a call, touch .
International call
To dial an international call, long press to enter "+", then
enter the international country prefix followed by the full phone
number and finally touch .
Emergency call
If your phone has network coverage, dial the emergency number
and touch to make an emergency call. This works even
without a SIM card and without typing the PIN code.
22
Page 24
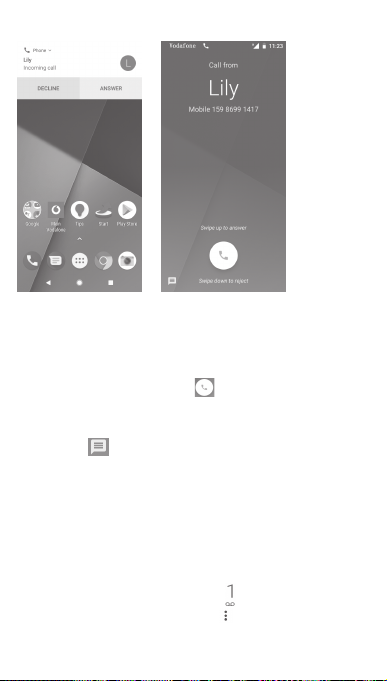
3.1.2 Answering or rejecting a call
When you receive a call, a call window will be presented on top
of the screen. Touch DECLINE to dismiss a call or ANSWER to
answer a call.
Touch the call window to open the Phone call screen.
On the Phone call screen, touch
• Swipe the icon up to answer the call;
• Swipe the icon down to reject the call;
• Swipe the up to reject the call by sending a predefined
message.
To mute incoming calls, press the Volume up/down key.
3.1.3 Calling your voicemail
Your voicemail is provided by your network to avoid missing
calls. It works like an answering machine that you can access
at any time.
To listen to your voicemail, long press on Phone tab.
To set your voicemail number, touch key and touch Phone >
Settings > Voicemail.
23
Page 25
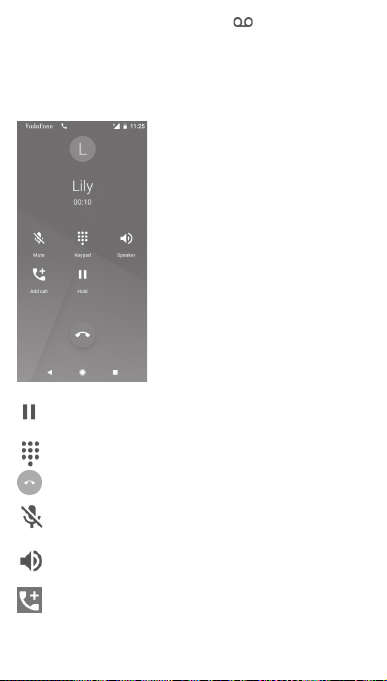
If you receive a voicemail, a voicemail icon appears on the
Status bar. Open the Notification panel, touch New voicemail.
3.1.4 During a call
To adjust the volume during a call, press the Volume up/down
key.
Touch to hold the current call. Touch this icon again to
retrieve the call.
Touch to display the dial pad.
Touch to end the current call.
Touch to mute the current call. Touch this icon again to
unmute the call.
Touch to activate the speaker during the current call.
Touch this icon again to deactivate the speaker.
Touch to place a call to another contact.
24
Page 26
To avoid accidentally pressing the touchscreen during a
call, the screen will be locked automatically when you
put your phone close to your ear; and it will be unlocked
when the phone is taken away from your ear.
3.1.5 Managing multiple calls
With this phone you can handle multiple calls at the same time.
Conference calls
You can set up a conference call.
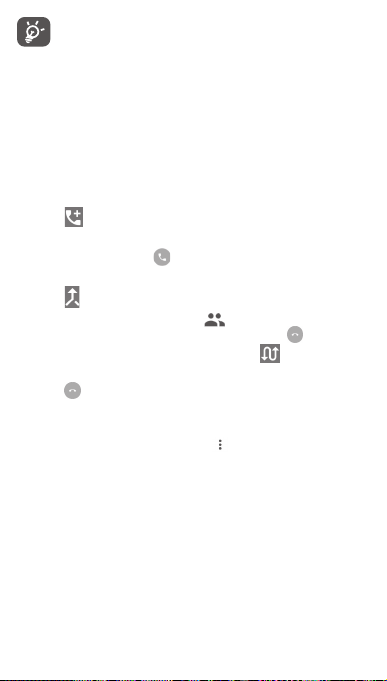
• Place a call to the first participant of the conference call.
• Touch .
• Enter the phone number of the person you want to add to
conference and touch . You can also add participants from
CALLS or CONTACTS.
• Touch to start a conference call.
• During a conference call, touch to drop a participant or to
talk privately to one of the participants. Touch to drop the
participant from the conference, or touch to talk privately
to the participant and put the other participants on hold.
• Touch to end the conference call and disconnect all callers.
(1)
3.1.6 Call settings
From the phone screen, touch the key and select Settings.
The following options are available:
Display options
• Sort by
Touch to set the contacts display to First name or Last name.
• Name format
Touch to set the name format to First name first or Last name
first.
(1)
Depending on your network operator.
25
Page 27

Sounds and vibration
• Phone ringtone
Touch to set the ringtone of phone.
• Also vibrate for calls
Touch to enable/disable vibration for incoming calls.
• Keypad tones
Touch to enable/disable Keypad tones.
Quick responses
Touch to edit quick responses which will be used when you reject
a call with messages.
Calls
• Fixed dialling numbers
Fixed Dialling Number (FDN) is a service mode of SIM, where
outgoing calls are restricted to a set of phone numbers. These
numbers are added to the FDN list. The most common practical
application of FDN is for parents to restrict the phone numbers
which their children can dial.
For security reasons, you’ll be prompted to enable FDN by
entering SIM PIN2 which is usually acquired from your service
provider or SIM card provider.
• Call forwarding
Touch to configure whether your calls are always forwarded
or only when you are busy, not able to answer or unreachable.
• Call barring
You can activate or deactivate the call barring for outgoing and
incoming calls. The various options are:
All outgoing calls
All outgoing calls are barred.
International outgoing calls
Outgoing international calls are barred.
26
Page 28

International outgoing calls while roaming
Outgoing international calls are barred when you are abroad.
All incoming calls
All incoming calls are barred.
Incoming calls while roaming
Incoming calls are barred when you are abroad.
Cancel all
Deactivate all call barring.
Change barring password
Change the original barring password for activating call barring.
• Additional settings
Caller ID
Opens a dialogue box where you can set whether your phone
number is displayed when making calls.
Call waiting
Touch the to notify you of a new incoming call.
• WiFi Calling
(1)
Touch the to enable/disable WiFi Calling.
Blocked numbers
Select ADD A NUMBER to block a specific number. You will not
receive any calls or texts from that number.
Voicemail
• Notifications
Touch to set notifications when a voicemail is received.
• Advanced Settings
Service
Opens a dialogue box where you can select your carrier’s
voicemail service or another service.
(1)
Depending on your country and operator.
27
Page 29

Setup
If you are using your carrier’s voicemail service, this opens a
dialogue box where you can enter the phone number to use for
listening to and managing your voicemail.
Accessibility
• Hearing aids
Touch to enable/disable hearing-aid compatibility.
• Noise Reduction
Touch to enable/disable your background noise during
calls.
Caller ID & spam
Touch enable/disable Caller ID & spam when you receive
a call.
Nearby palces
Touch enable/disable Nearby places, which will use your
location to find nearby places that match your query.
• Personalised search results
Touch to enable/disable function of Personalised search
results, which improves your results from your search history.
• Google Account
Touch to add your Google account in order to use the
functionality of Nearby places.
• Location settings
Touch to get more location settings information.
3.2 Recents
You can view your call history by touching from the Phone
screen to view your call history.
Touch a contact or number to view information or further
operations.
28
Page 30
You can view detailed information of a call, launch a new call
or send messages to a contact or number, or add numbers to
Contacts (only available for unsaved phone numbers), etc.
Touch the photo to add numbers to Contacts.
To clear the entire call memory, touch key from the phone
screen and touch Clear frequents.
3.3 Contacts
You can view and create contacts on your phone and synchronise
these with your Gmail contacts or other apps on the web or on
your phone.
3.3.1 View your contacts
To access the Contacts app, touch the Application tab on the
Home screen, then select Contacts.
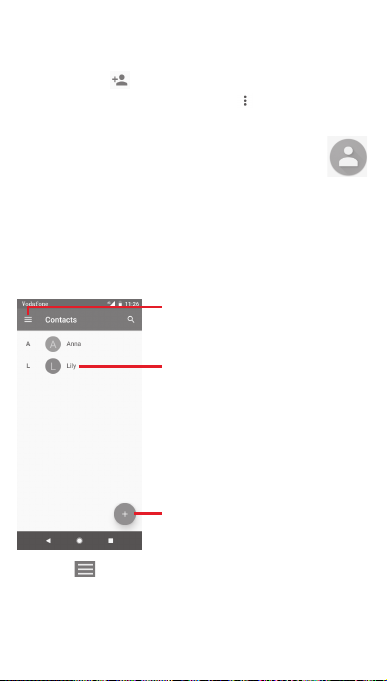
Touch the key to display the contacts list option menu.
Following options are available:
Touch icon to open the Quick Contact
panel and view the contact’s detailed
information
Contact list
Touch to add a new contact
29
Page 31

Labels
Touch to create label, which allows you to add contacts in the
label.
Accounts
Manage the synchronisation for Contacts in the Google, Phone
and SIM accounts.
Settings
• My info
Set up your profile.
• Accounts
Manage the synchronisation settings for different accounts.
• Default account for new contacts
Manage the default account for new contacts.
• Contacts to display
Choose which contacts to display.
• Sort by
Touch to set the contacts display to First name or Last name.
• Name format
Touch to set the name format to First name first or Last name
first.
• Phonetic name
Touch to set phonetic name to show or hide.
• Import/Export
Import or export contacts between phone, SIM card, and
microSD card, or share contacts.
• Blocked numbers
When defining specific numbers as as blocked numbers, then
you won't receive calls and texts from them any more.
30
Page 32
• Show SIM capacity
Touch to show number of contacts stored on SIM card.
• About Contacts
Display information about contacts.
3.3.2 Adding a contact
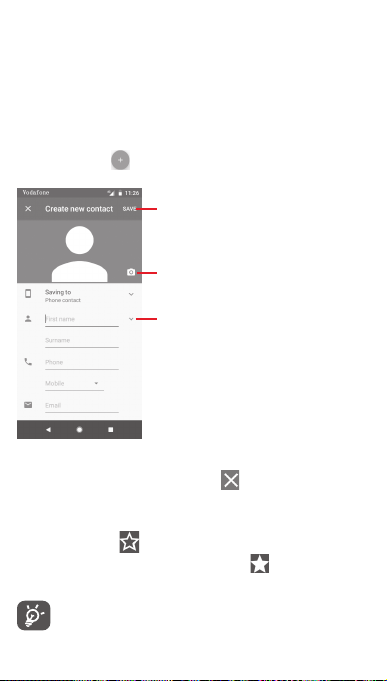
Touch the Application tab on the Home screen, select Contacts,
then touch the icon in the contact list to create a new
contact.
Touch to save
Touch to take a photo or select a picture for
the contact
Touch to add a new label
When you're finished, touch SAVE to save.
To exit without saving, you can touch and then DISCARD.
Add to/remove from Favourites
To add a contact to favourites, you can touch a contact to view
details then touch to add the contact to favourites.
To remove a contact from favourites, touch on contact details
screen.
Only phone and account contacts can be added to
favourites.
31
Page 33

3.3.3 Editing your contacts
To edit contact information, touch key in the contact details
screen. When finished, touch SAVE.
Change a contact’s default phone number
The default phone number (the number which has priority when
making a call or sending a message) will always be displayed
under the contact name.
To change the default phone number, long press the number
you want to set as the default number from the contact’s details
screen, then select Set default. A appears before the number.
This choice is only available when the contact has more than
one number.
Delete a contact
To delete a contact, touch and touch Delete from the contact
(details) screen.
The contact you have deleted will also be removed from
other applications on the phone or web the next time
you synchronise your phone.
3.3.4 Communicating with your contacts
From contact details screen you can communicate with your
contacts by making a call or sending a message.
To launch a call, touch the phone number.
To send a message, touch the icon on the right side of the
number.
Use Quick Contact for Android
Touch a contact’s picture to open Quick Contact for Android,
then you can touch the number or the icon for the way you
want to connect.
32
Page 34
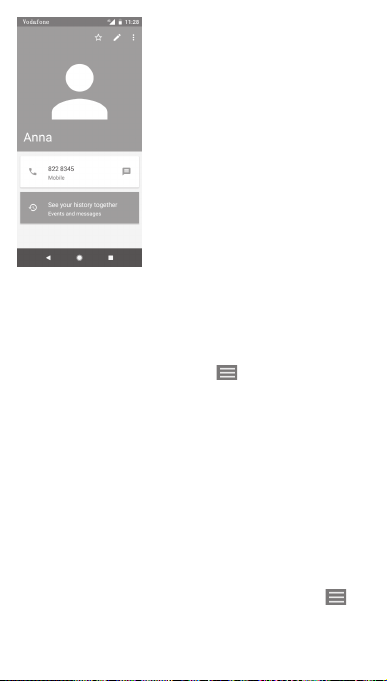
The icons available on the Quick Contact panel depend on the
information you have for the contact and the applications/
accounts on your phone.
3.3.5 Importing, exporting and sharing contacts
From the Contacts screen, touch the key to open the options
menu, touch Settings then touch Import or Export to import/
export contacts from/to your SIM card, Phone, microSD card,
Phone storage, Accounts, etc.
To import/export a single contact from/to your SIM card, choose
an account and target SIM card, select the contact you want to
import/export, and touch OK to confirm.
To import/export all contacts from/to your SIM card, choose an
account and select SIM card, touch Select all and touch OK to
confirm.
You can share a single contact or multiple contacts with others
via Bluetooth, Gmail, etc.
To do this, touch a contact you want to share, touch the key
and Share from the contact details screen, then select the app to
perform this action.
33
Page 35

3.3.6 Displaying contacts
You can configure which group of contacts you want to display in
the People list. Touch the key then touch Settings, and then
Contacts to display from the contacts list screen, then you can
choose which contacts to display.
Touch the key and then Settings. You can Sort by First name
or Last name, as well as Name format as First name first or Last
name first.
3.3.7 Joining/Discarding contacts
To avoid duplicating information you can easily add a new
contact's details to an existing contact.
Touch the contact which you want to add information to, touch
the key, then touch the key in edit screen and touch Link.
Then you will be asked to choose the contact whose information
you want to merge with the first contact. The information from
the second contact is added to the first one, and the second
contact will no longer be displayed in the contacts list.
To separate contact information, touch the contact whose
information you want to separate, touch the key, then touch
the key in the edit screen. Then touch View liked contacts
and touch UNLINK to confirm.
3.3.8 Synchronising contacts in multiple accounts
Contacts, data or other information can be synchronised from
multiple accounts, depending on the apps installed on your
phone.
To add an account, touch on the Quick settings bar to get to
Settings, then touch Users & accounts.
You will be asked to select the kind of account you are adding, like
Google, Exchange, etc.
As with other account setups, you need to enter detailed
information, like username, password, etc.
34
Page 36
You can remove an account and all associated information from
the phone. Open the Settings screen, touch the account you
want to delete, then touch REMOVE ACCOUNT to confirm.
Sync
You can synchronise an account on Users & accounts screen,
touch beside Automatically sync data.
4 Messaging & Email
4.1 Messaging
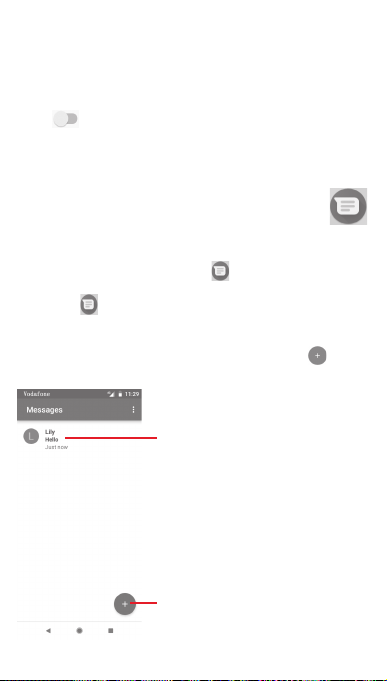
Your phone can create, edit and receive chat, SMS and MMS
messages.
Go to the Home page and touch the icon in the Favourites tray
if available, or touch the Application tab from the Home screen,
then touch .
4.1.1 Create a new message
On the message list screen, touch the new message icon to
write new text/multimedia messages.
• Touch to view the whole message thread
• Long press message threads to access
other options available with this contact.
Touch to create a new message
or a new group chat
35
Page 37
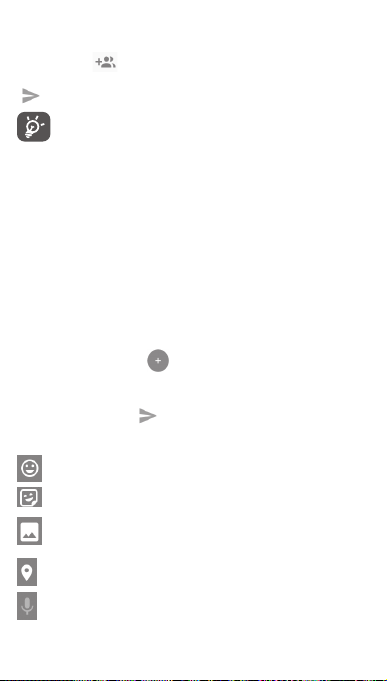
Sending a text message
Enter the mobile phone number of the recipient on the recipients'
bar or touch to add recipients. Touch the content bar to
enter the text of the message. When you have finished, touch
to send the text message.
A SMS of more than 160 characters will be charged as
several SMS. Specific letters (e.g. accents will also
increase the size of the SMS. This may cause multiple
SMS to be sent to your recipient.
Sending a multimedia message
MMS enables you to send video clips, images, photos, animations,
slides and audio to other compatible phones and e-mail
addresses.
An SMS will be converted to MMS automatically when media
files (image, video, audio, etc.) are attached or email addresses
are added.
To send a multimedia message, enter the recipient’s phone
number in the recipients bar, touch content bar to enter the text
of the message. Touch to open attachment options, select
a picture, the location, an audio file or contacts that you want to
add as attachments.
When finished, touch to send the multimedia message.
Attach options:
Touch to select an emoji as an attachment.
Touch to select a sticker.
View your Photos, Gallery, or File Manager to select a
picture as an attachment.
Touch and share your location.
Touch and hold the voice message recorder to record a
voice message.
36
Page 38
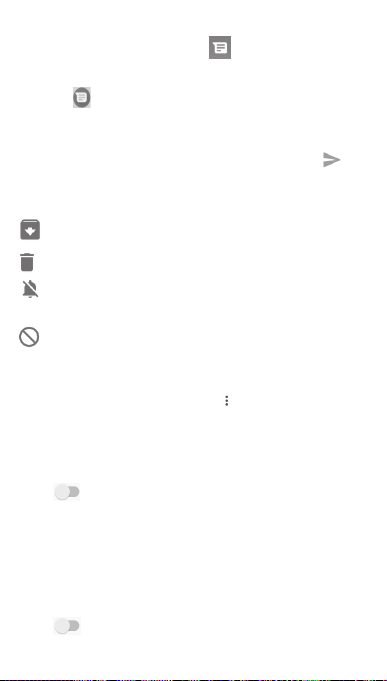
4.1.2 Manage messages
When a new message comes, an icon will appear on the
status bar as a notification. Drag down the status bar to open the
Notification panel, touch the new message to open it. You can
also open and touch the new message to open it.
Messages are displayed as a conversation.
To reply to a message, touch the current message to enter the
message-composing screen, enter the text, then touch .
If you long press a message in the message details screen, the
following options will be available:
Touch to archive the current message.
Touch to delete the current message.
Touch to mute mute phone notifications when receiving
a new message.
Touch to block the selected number. You will not receive
any calls or texts from this number.
4.1.3 Adjust message settings
In the message list screen, touch the key and select Settings.
Default SMS app
Touch to change default SMS app.
Notifications
Touch to turn on/off notifications for Messages.
• Importance
Touch to choose the notification type for incoming messages.
• Additional settings in the app
Touch to set additional settings for Messages.
Hear outgoing message sounds
Touch to enable/disable to hear message sounds when you
send a message.
37
Page 39

Your current country
Touch to choose your current country.
Advanced
• Group messaging
Mark the checkbox to send a single message to multiple recipients.
• Auto-download MMS
Touch to enable/disable the automatic download of MMS.
• Auto-download MMS when roaming
Touch to enable/disable the automatic download of MMS
when roaming.
• Use simple characters
Touch to enable/disable the use of simple characters
in MMS.
• Get SMS delivery reports
Touch to enable/disable the use of simple characters
in MMS.
• Wireless alerts
Touch to access wireless alerts settings.
• SIM card messages
Touch to view messages on SIM card.
• Phone number
Show your phone number.
38
Page 40

4.2 Gmail
The first time you set up your phone, you can select to use an
existing Gmail account or to create a new Email account.
As Google’s web-based email service, Gmail is configured
when you first set up your phone. Gmail on your phone can
be automatically synchronised with your Gmail account on
the web. Unlike other kinds of email accounts, each message
and its replies in Gmail are grouped in your inbox as a single
conversation; all emails are organised by labels instead of folders.
To access Gmail
From the Home screen, touch the Application tab to enter the
applications list, then touch Gmail.
Gmail displays messages and conversations from one single Gmail
account at a time. If you own more than one account, you can add
an account by touching the icon and select Settings from
the inbox screen, then touch Add account. Besides your Gmail
account, you can also add or set up external email accounts by
choosing Personal (IMAP/POP) or Exchange. When finished, you
can switch to another account by touching the account name
from Inbox screen.
To create and send emails
1 Touch from the Inbox screen.
2 Enter the recipients' email addresses in the To field.
3 If necessary, touch the popup menu icon Add Cc/Bcc to add
a copy or a blind copy to the message.
4 Enter the subject and the content of the message.
5 Touch the icon and select Attach file to add an attachment.
6 Finally, touch the icon to send.
7 If you do not want to send the mail out right away, you can
touch the icon and then Save draft or touch the Back key
to save a copy. To view the draft, touch your account name to
display all labels, then select Drafts.
39
Page 41

If you do not want to send or save the mail, you can touch the
icon and then touch Discard.
To add a signature to emails, touch the icon and then touch
Settings from the inbox screen, choose an account, then touch
Signature.
To receive and read your emails
When you receive a new email, you will be notified by a ringtone
or a vibration, and an icon will appear on the Status bar.
Drag down the Status bar to display the Notification panel. Select
the new email to view it. You can also open the Gmail Inbox to
view the new email.
You can search for an email by sender, recipient, subject, etc.
• Touch the icon from the Inbox screen.
• Enter the keyword you want to search for in the searching box
and touch on the software keyboard.
To reply or forward emails
• Reply
When viewing an email, touch to reply to it.
• Reply all
Touch and select Reply all to send a message to all people
in a mail loop.
• Forward
Touch and select Forward to forward the received mail to
other people.
40
Page 42
5 Calendar , Alarm clock &
Calculator
5.1 Calendar
Use Calendar to keep track of important meetings, appointments,
etc.
To access this function, touch the Application tab from the Home
screen, then touch Calendar.
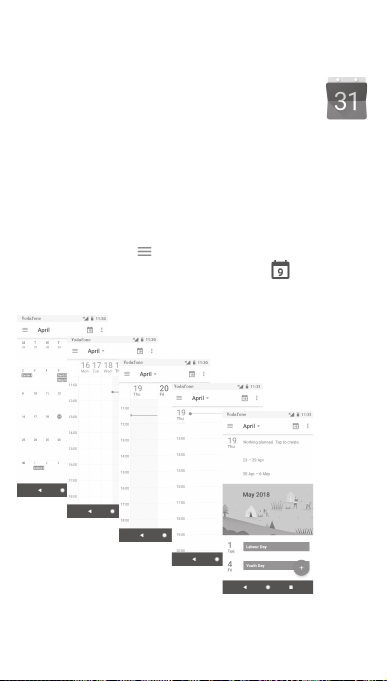
5.1.1 Multimode view
To change your Calendar view, touch the date title to open the
month view, or touch and select Schedule, Day, 3 Day, Week
or Month to access different views. Touch the icon to return
to Today’s view.
Month view
Week view
3 day view
Day view
Schedule
view
41
Page 43
5.1.2 To create new events
You can add new events from any Calendar view.
• Touch .
• Fill in all required information for this new event. If it is a full day
event, you can select All-day.
When finished, touch SAVE from the top of the screen.
Before you can add an event, you must add at least one
Calendar account+.
To delete or edit an event
To edit or delete an event, touch the icon to edit the event
and touch Delete to delete an event.
5.1.3 Event reminder
If a reminder is set for an event, the upcoming event icon
will appear on the Status bar as a notification when the reminder
time arrives.
Touch and drag down the status bar to open the Notification
panel. Select the event to view the Calendar notification.
Touch the Back key to keep the reminders pending in the status
bar and the Notification panel.
5.2 Clock
Your mobile phone has a built-in clock.
To access this function, touch the Application tab from the Home
screen, then touch Clock.
Touch to add or set an alarm.
5.2.1 To set an alarm
From the Clock screen, touch to enter the Alarms screen,
then touch to add a new alarm. Following options will show:
42
Page 44

• Time
Set the time for your alarm.
Touch next to the time you have set to turn the alarm
on/off.
• Repeat
Mark the checkbox to activate Repeat. Select the days you
want the alarm to be repeated.
• Ringtone
Touch to select an alarm ringtone.
• Vibrate
Mark the checkbox to activate/deactivate vibration.
• Label
Touch to set a name for the alarm.
Touch an already existing alarm and touch to delete the
selected alarm.
5.2.2 To adjust alarm settings
Touch the key from Clock screen. The following options will
be available under Settings:
Clock
• Style
Touch to set Analogue or Digital style.
• Display time with seconds
Touch to switch to display time with seconds.
• Automatic home clock
Touch to switch to set home clock while travelling
outside.
• Home time zone
Touch to set home time zone.
43
Page 45

• Change date & time
Touch to set date and time.
• Night clock
Touch to enable night clock.
Alarms
• Wake device
Touch to switch on to activate the alarm sound even if
your phone is powered off.
• Silence after
Touch to set the time limit for the alarm tone duration.
• Snooze length
Touch to choose length of snooze.
• Alarm volume
Touch to set the alarm tone volume.
• Gradually increase volume
Touch to set gradually increase volume.
• Volume buttons
Touch to choose Snooze, Dismiss or Do nothing as volume
buttons.
• Start week on
Touch to select the first day of a week as per your preference
from Saturday, Sunday or Monday.
Timers
• Timer sound
Touch to select timer sound.
• Gradually increase volume
Touch to set gradually increase volume.
• Timer vibrate
Touch to switch to enable vibration for timer.
44
Page 46
5.3 Calculator
With Calculator you can solve many mathematical problems.
To open it, touch the Application tab from the Home screen, then
touch Calculator.
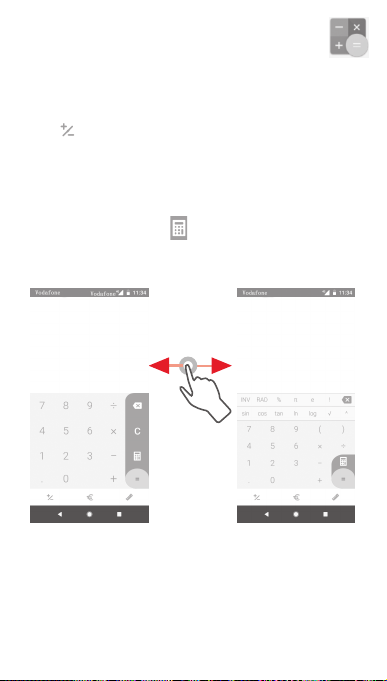
Touch , there are two panels available: Basic panel and
Advanced panel.
To switch between panels, select one of the following two
options:
• Touch and drag the basic screen to the left to open the
Advanced panel, or touch to open Advanced panel.
• Turn the phone horizontally to switch to the Advanced Panel
To view the calculation history, drag down the screen.
(1)
.
(1)
If "Settings\Display\Auto-rotate screen” is off, this item will not
display.
45
Page 47
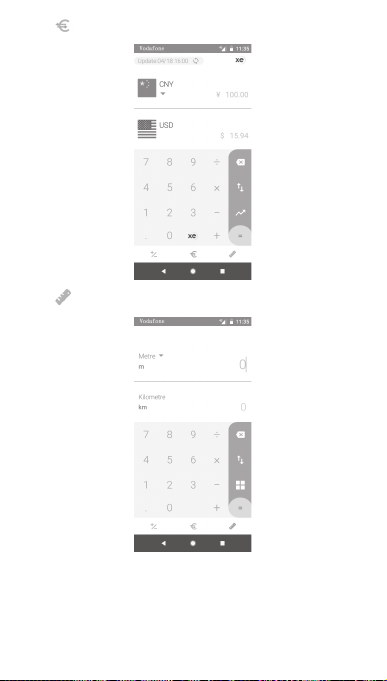
Touch to access the Currency Conversion panel.
Touch to access the unit Conversion panel.
46
Page 48

6 Getting connected
Your phone can connect to the Internet using either GPRS/
EDGE/3G/4G or Wi-Fi.
6.1 Connecting to the Internet
6.1.1 GPRS/EDGE/3G/4G
The first time you turn on your phone with the SIM card inserted,
it will automatically configure a mobile network service: GPRS,
EDGE, 3G or 4G. If the network is not connected, you can turn on
Mobile data on Settings > Network & Internet > Data usage.
To check the network connection you are using, touch the
Application tab on the Home screen, then touch Settings >
Network & Internet > Mobile network > Access point names
or Network operators.
To create a new access point
A new mobile network connection can be added to your phone
with the following steps:
1 Touch on the Quick settings bar to go to Settings.
2 Touch Network & Internet > Mobile network > Access point
names.
3 Then touch key to add new APN.
4 Enter the required APN information.
5 When finished, touch the key and Save .
To activate/deactivate Data roaming
When roaming, you can decide to connect/disconnect to a data
service.
1 Touch on the Quick settings bar to go to Settings.
2 Touch Network & Internet > Mobile network.
3 Touch the switch to activate or deactivate data roaming.
4 When Data roaming is deactivated, you can still perform data
exchange with a Wi-Fi connection (see "6.1.2 Wi-Fi").
47
Page 49
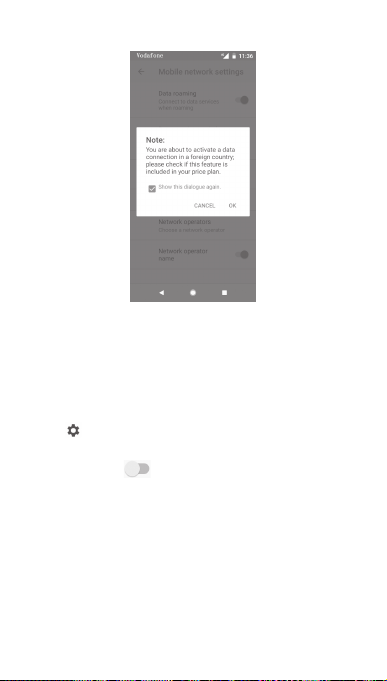
When you are abroad, a fixed panel will appear in the notification
drawer to allow you to enable or disable the service.
6.1.2 Wi-Fi
You can connect to the Internet when your phone is within range
of a wireless network. Wi-Fi can be used on your phone even
without a SIM card inserted.
To turn Wi-Fi on and connect to a wireless network
1 Touch on the Quick settings bar to get to Settings, then
touch Network & Internet > Wi-Fi.
2 Touch the switch to turn on/off Wi-Fi.
3 Turn on Wi-Fi: detailed information of all detected Wi-Fi
networks is displayed in the Wi-Fi networks section.
4 Touch a Wi-Fi network to connect to it. If the network you
selected is secured, you will need to enter a password or other
credentials (contact network operator for details). When you are
finished, touch CONNECT.
To add a Wi-Fi network
When Wi-Fi is on, you can add new Wi-Fi networks.
48
Page 50

1 Touch on the Quick settings bar to get to Settings.
2 Touch Network & Internet> Wi-Fi, and then touch Add
network.
3 Enter the name of the network and any required network
information.
4 Touch CONNECT.
When successfully connected, your phone will be connected
automatically the next time you are within range of this network.
To forget a Wi-Fi network
The following steps prevent automatic connections to networks
which you no longer wish to use.
1 Turn on Wi-Fi.
2 In the Wi-Fi screen, long press the name of the saved network.
3 Touch FORGET.
6.2 Chrome
Using the Chrome browser you can enjoy surfing the Web.
To get onto the Web, go to the Home screen and touch the
Chrome icon in the Favourites.
To go to a web page
On the Chrome browser screen, touch the URL box at the top,
enter the address of the web page, then touch to confirm.
49
Page 51
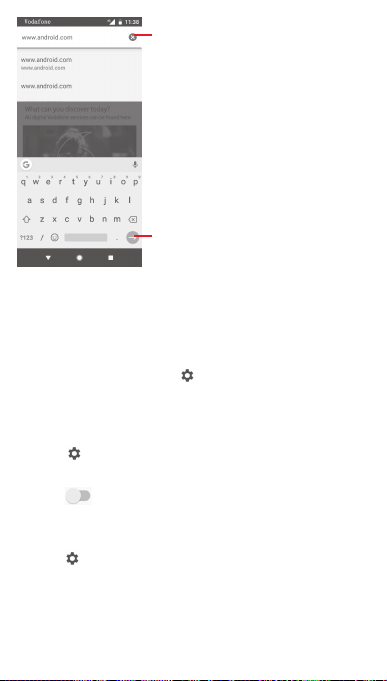
Touch to delete all contents
Touch to search or go to a web page
address
6.3 Connecting to Bluetooth devices
Bluetooth is a short-range wireless communication technology
that you can use to exchange data, or connect to other Bluetooth
devices for various uses.
To access this function, touch on the Quick settings bar to get
to Settings, then touch Connected devices > Bluetooth. Your
device and other available ones will show on the screen.
To turn on Bluetooth
1 Touch on the Quick settings bar to get to Settings, then
touch Connected devices > Bluetooth.
2 Touch to activate/deactivate this function.
To make your phone more recognisable, you can give your phone
a new name which will be visible to others.
1 Touch on the Quick settings bar to get to Settings.
2 Touch Connected devices > Bluetooth.
3 Touch Device name.
4 Enter a name, and touch RENAME to confirm.
50
Page 52

To pair/connect your phone with a Bluetooth device
To exchange data with another device, you need to turn Bluetooth
on and pair your phone with the Bluetooth device with which you
want to exchange data.
1 Touch on the Quick settings bar to get to Settings.
2 Touch Connected devices > Bluetooth.
3 Pair new device.
4 Touch a Bluetooth device you want to be paired with in the list.
5 A dialogue will pop up touch PAIR to confirm.
6 If the pairing is successful, your phone connects to the device.
To disconnect/unpair from a Bluetooth device
1 Touch after the device name you want to unpair.
2 Touch FORGET.
6.4 Connecting to a computer via USB
With the USB cable, you can transfer media files and other files
between your phone and computer.
To connect:
• Use the USB cable that came with your phone to connect
the phone to a USB port on your computer. You will receive a
notification that the USB is connected.
• Open the Notification panel andtouchUSB for file transfer,
then, in the next dialogue, choose the way in which you want
to transfer files.
To locate data you have transferred or downloaded in the
internal storage:
1 Touch the Application tab from the Home screen to open the
apps list.
2 Touch Files Go.
All data you have downloaded is stored in Files Go, where you
can view media files (images, videos, audio and others), rename
files, install apps onto your phone, etc.
51
Page 53

6.5 To safely remove the microSD card from
your phone
The microSD card can be removed from your phone any time
the phone is powered off. To remove the microSD card while the
phone is on, you must unmount the storage card from the phone
first, to prevent corrupting or damaging the storage card.
To remove a microSD card
1 Touch on the Quick settings bar to get to Settings.
2 Touch Storage > SD card.
3 Touch and select Storage settings.
4 Touch the EJECT button to confirm.
Additionally, you can simply touch the icon besides the SD
card to eject it.
Both options serve to safely remove the microSD card from the
phone.
To format a microSD card
1 Touch on the Quick settings bar to get to Settings.
2 Touch Storage > SD card.
3 Touch and select Storage settings > Format.
4 Touch to confirm.
6.6 Sharing your phone’s mobile data
connection
You can share your phone’s mobile data connection with a
single computer via a USB cable (USB tethering) or with up to
ten devices at once by turning your phone into a portable Wi-Fi
hotspot or via Bluetooth.
Sharing data may incur additional charges from your
network operator. Extra fees may also be charged in
roaming areas.
52
Page 54

To share your phone’s data connection via USB
Use the USB cable that came along with your phone to connect
the phone to a USB port on your computer.
1 Touch on the Quick settings bar to go to Settings.
2 Touch Network & Internet > Hotspot & tethering.
3 Touch the switch beside USB tethering to activate/
deactivate this function.
To share your phone’s data connection via Bluetooth
1 Touch on the Quick settings bar to go to Settings.
2 Touch Network & Internet > Hotspot & tethering.
3 Touch the switch next to Bluetooth tethering to
activate/deactivate this function.
To share your phone’s data connection as a portable Wi-Fi
hotspot
1 Touch on the Quick settings bar to go to Settings.
2 Touch Network & Internet > Hotspot & tethering > Wi-Fi
hotspot.
3 Touch the switch to activate/deactivate this function.
To rename or secure your portable hotspot
When Portable Wi-Fi hotspot is activated, you can change the
name of your phone’s Wi-Fi network (SSID) and secure its Wi-Fi
network.
1 Touch on the Quick settings bar to go to Settings.
2 Touch Network & Internet > Hotspot & tethering > Wi-Fi
hotspot.
3 Touch Set up Wi-Fi hotspot to change the network SSID or set
your network security.
4 Touch SAVE.
53
Page 55

6.7 Connecting to virtual private networks
Virtual private networks (VPNs) allow you to connect to the
resources inside a secured local network from outside that
network. VPNs are commonly deployed by corporations, schools,
and other institutions so that their users can access local network
resources when not inside that network, or when connected to a
wireless network.
To add a VPN
1 Touch on the Quick settings bar to get to Settings.
2 Touch Network & Internet > VPN and then touch .
3 In the screen that opens, follow the instructions from your
network administrator to configure each component of the
VPN settings.
4 Touch SAVE.
The VPN is added to the list on the VPN settings screen.
Before adding a VPN, you should set a lock screen
pattern, PIN code or password for your phone.
To connect/disconnect to a VPN
To connect to a VPN:
1 Touch on the Quick settings bar to get to Settings.
2 Touch Network & Internet > VPN.
3 VPNs you have added are listed. Touch the VPN you want to
connect with.
4 In the dialogue that opens. Enter any requested credentials in
the dialogue and touch CONNECT.
To disconnect:
• Open the Notification panel and touch the resulting notification
for VPN disconnection.
To edit/delete a VPN
To edit a VPN:
1 Touch on the Quick settings bar to go to Settings.
54
Page 56

2 Touch Network & Internet > VPN.
3 VPNs you have added are listed; touch the icon next to the
VPN you want to edit.
4 When you have finished, touch SAVE.
To delete:
Touch the icon next to the selected VPN, touch FORGET to
delete it.
7 Google Play Store
Google Play Store is an online software store, where you can
download and install applications and games to your Android
Powered Phone.
• Touch the Application tab from the Home screen, then touch
Play Store.
• For the first time you access Google Play Store, a screen with
terms of service will appear. Touch ACCEPT to continue.
Touch the icon and then select Help & feedback to enter
Google Play Store help page for more information on this
function.
(1)
(1)
Depending on your country and operator.
55
Page 57
8 Multimedia applications
8.1 Camera
Your mobile phone is equipped with a Camera for taking photos
and shooting videos.
Before using the camera, make sure you have removed the
protective lens foil from the camera.
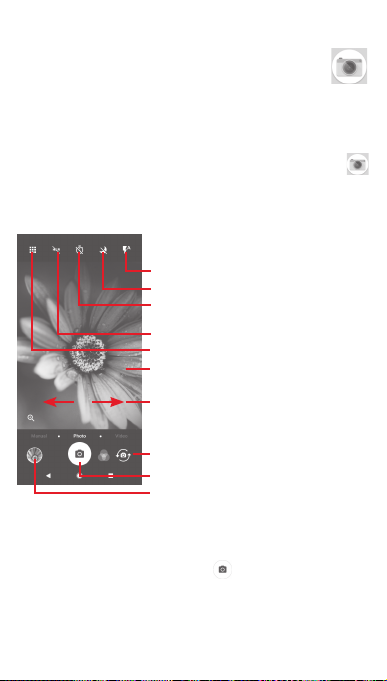
To take a photo when your phone is active, touch the Camera
icon in the Favourites tray on your Home screen.
If the phone is locked, press the Power button and then swipe the
camera icon to the left to open the camera.
Touch to turn on flash
Touch to turn on or off night mode
Touch to turn on Timer
Touch to turn on HDR (high-dynamic
range) function
Touch to open modes screen
Pinch/Spread to zoom in/out
Slide to switch camera mode from
Manual, Photo or Video
Touch to switch between front/
back camera
Touch to take a picture
Touch to view pictures or videos
you have taken
To take a picture
The screen acts as the viewfinder. First position the object or
landscape in the viewfinder, touch icon to take the picture
which will be automatically saved.
56
Page 58
To shoot a video
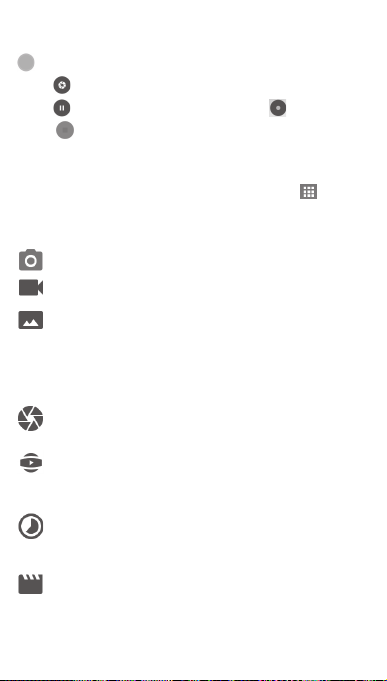
Slide to swith camera mode to Video and touch the red spot
in the bottom centre of the screen to start recording a video.
Touch to take the picture which will be automatically saved.
Touch to pause video recording and touch to continue.
Touch to stop recording. The video will be automatically
saved.
8.1.1 Camera settings
Before taking a photo/shooting a video, touch the icon and
below options will display for you to choose from:
Modes
Touch to get into Photo mode to take a picture.
Touch to get into Video mode to record a video.
Get into Pano mode. Touch the shutter button to start
taking panoramic photo and move the phone steadily
along the direction indicated by the onscreen line. Once
the preview frame is filled, the phone will automatically
save the photo.
Allows you to take full control of the camera settings,
letting you adjust aperture, shutter, ISO and more.
Allows you to create impressive and immersive
360-degree panorama pictures you can share on
Facebook
Allows you to create time lapse videos by capturing a
series of photos over a period of time and replay them
at a faster speed.
Allows you to create a short video which could be easily
and quickly shared on social networks.
57
Page 59

Touch to edit favourite/other modes. Favourite modes
can easily be accessed by swiping horizontally in the
view finder. Other modes can be accessed from the
modes screen.
Touch to access camera settings and below options will
display for you to choose from:
Photo
• Photo size (rear)
Touch to select photo size.
Video
• Video quality (rear)
Touch to select either HD or VGA for video quality.
• Anti shake
Touch the switch to anti shake.
General
• Edit modes
Touch to edit camera modes.
• Grid
Touch the switch to set/cancel grid in camera screen.
• Shutter sound
Touch the switch to activate/deactivate shutter sound while
taking pictures.
• Location tag
Touch the switch to enable/disable Location tag function.
• Volume key control
Touch to choose from Shutter, Zoom and Off.
• Camera quick launch
Touch the switch to enable/disable camera quick launch
by double pressing volume key when in sleep or lock screen.
58
Page 60
• Storage
Touch to select either Phone or SD card for pictures/videos
storage.
• Zoom
Touch the switch to enable/disable zoom function.
• Reset to factory settings
Touch to reset Camera to factory settings.
8.2 Gallery
Photos acts as a media player for you to view photos and
playback videos.
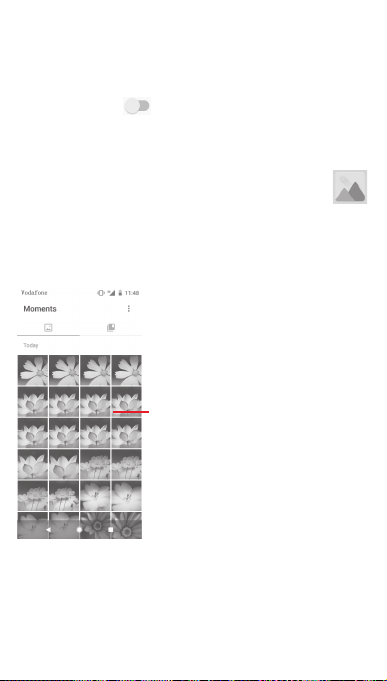
To open your Photos, touch the Application tab from the Home
screen, then touch Gallery.
Slide upward or downward to view
more albums
59
Page 61
To view a picture/play a video
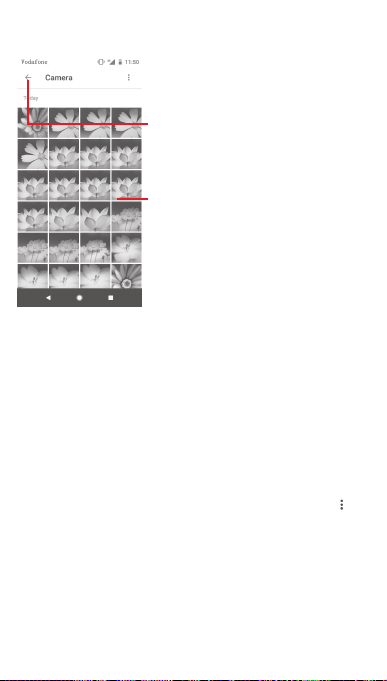
Pictures and videos are displayed by albums in Gallery.
Touch to return to gallery’s main
screen
Slide upward or downward to
view more pictures
• Touch an album and all pictures or videos will show on the
screen.
• Touch the picture/video directly to view or play it.
• Slide upward/downward to view previous or next pictures/
videos.
Editing pictures
You can edit pictures, add effects, crop, share, and set them as
contact photo or wallpaper.
Select the picture you want to work on and touch the options
available such as edit, share, crop or delete. Touch the for
more options.
60
Page 62
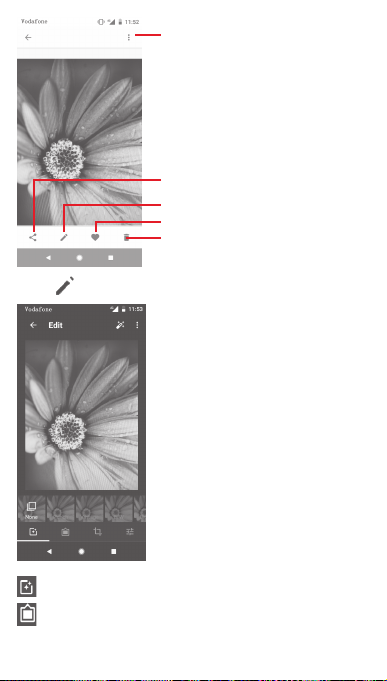
Touch to access available options.
Touch to share the picture
through selected apps
Touch to edit the picture.
Touch to add the picture to favourites.
Touch to delete the picture
Touch in the full-screen picture view to edit a picture.
Touch to add effects such as Original, Auto, West etc.
Touch to add a border.
61
Page 63

Touch to Crop, Straighten, Rotate, Mirror or Draw the
picture.
Touch to adjust picture settings such as Exposure,
vignette, etc.
After activating the crop mode, the cropping square
appears in the middle of the picture. Select the portion to
crop, touch to confirm and Save, or touch icon
to cancel.
8.3 Play music
You can play music files stored on the microSD card in your
phone. Music files can be downloaded from computer to microSD
card using a USB cable.
To play your music, touch the Application tab from the Home
screen, then touch Play Music.
You will find four categories in which all songs are classified:
PLAYLISTS, ARTISTS, ALBUMS, SONGS and GENRES. Slide
left and right to see them all. Touch SHUFFLE ALL to shuffle
all songs.
62
Page 64
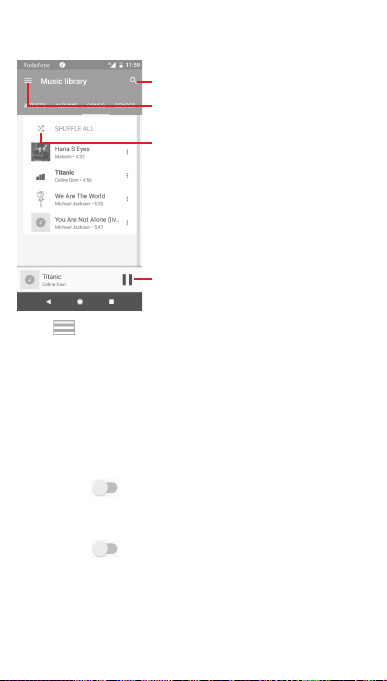
8.3.1 Playing music
Touch a song to play it.
Touch to search music
Touch to select Listen now or
Music Library
Touch to play the current playlist
in shuffle mode (tracks are played
in random order)
Touch to pause/resume playback
Touch key to get to Settings
ACCOUNT
Touch to choose an account.
PLAYBACK
Equaliser
Touch to adjust audio settings.
Allow external devices to start playback
Touch switch to allow external devices to start playback,
such as car Bluetooth, wired headsets, etc.
Show album art on lock screen
Touch switch to enable to show album art on lock screen.
ABOUT PLAY MUSIC
Privacy policy
Touch to read Privacy policy with the app.
63
Page 65

While playing songs with Music you can still Pause, Play
or Skip your music even if the screen is locked.
Touch when a song is highlighted for the following options:
Play next
Touch to play the song you choose next.
Add to queue
Touch to add the song into the now-playing queue.
Add to playlist
Touch to add to a playlist.
Go to artist
Touch to go to artist.
Go to album
Touch to go to album.
Delete
Touch to delete the song.
64
Page 66
9 Maps Go
9.1 Get My Location
9.1.1 Turn on GPS
To turn on your phone’s global positioning system (GPS) satellite
receiver:
1 Touch on the Quick settings bar to go to Settings.
2 Touch Security & location > Location.
3 Touch the switch beside Location and choose location mode
you preferred.
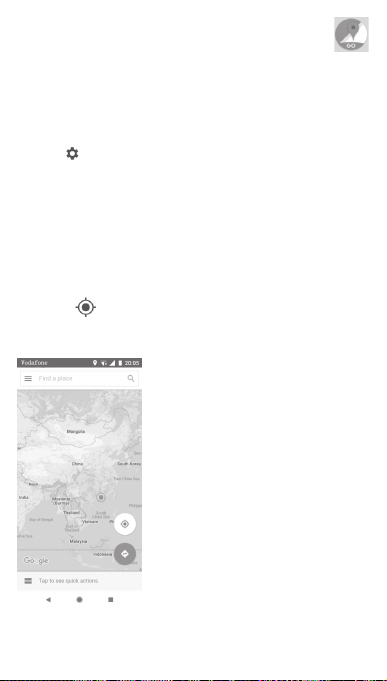
9.1.2 Open Maps Go and view My Location
Touch the Application tab from the Home screen, then touch
Maps Go.
Touch the icon on the map to view My Location.
The map will then centre on a blue dot. Your actual position will be
at the blue dot.
To move the map, drag the map with your finger.
65
Page 67
To zoom in and out of a map, pinch or spread your fingers, or you
can also zoom in by double-tapping a location on screen.
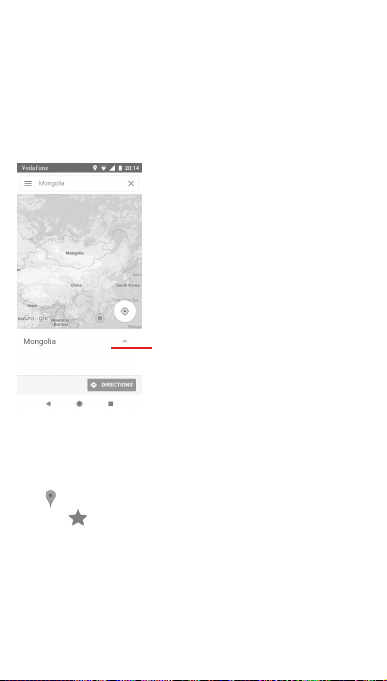
9.2 Search for a location
In the search box, enter an address, a city or a local business.
Touch the search icon to search, and in a while your search
results will appear on the map as red dots. You can touch one
to show a label.
Drag upward to view more
search results
9.3 Save a location
Just like bookmarking a web address on the Internet, you can
save any position on the map for later use. Just touch the red
drop icon to bring up a menu about the location, then touch
the SAVE icon to save it.
If there is no icon on the point you want to save, tap and hold on
that location on the screen to create one.
66
Page 68
9.4 Open Street View for a location
1 Long press a location to display its address at the bottom of the
maps screen.
2 Drag up the details screen to save for offline usage.
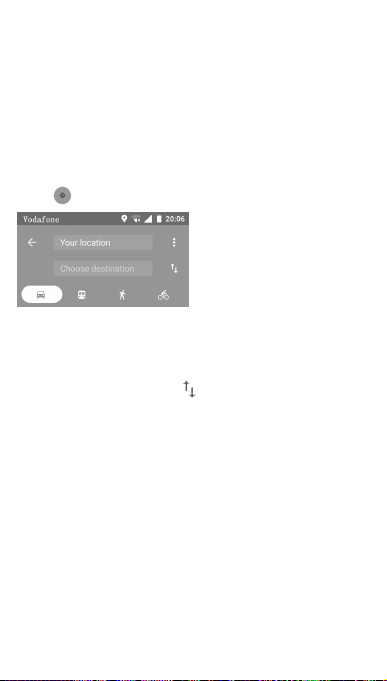
9.5 Get driving, public transportation or
walking directions
9.5.1 Get suggested routes for your trip
Touch icon from Maps screen.
1 Touch enter bar to edit your start point by entering an address
or selecting a saved item.
2 Do likewise for your end point.
3 To reverse directions, touch .
4 Then select a transport mode: driving by car, using public
transportation, or walking directions.
5 Touch Route options to select Avoid motorways, Avoid toll
roads or Avoid ferries.
6 A couple of suggested routes will appear in a list. Touch any
route to view its respective detailed direction.
67
Page 69

10 Others
10.1 Files Go
To access this function, touch the Application tab from the Home
screen, then touch Files Go.
Files Go works with both microSD card and phone storage.
Files Go displays all data stored on both microSD card and phone
storage, including applications, media files; videos, pictures or
audios you have captured; other data transferred via Bluetooth,
USB cable, etc.
When you download an application from PC to microSD card, you
can locate the application on Files Go, then touch it to install it
in your phone.
Files Go allows you to perform and be really efficient with the
following common operations: view, rename, move, copy, delete,
play, share, etc.
10.2 Sound Recorder
To record a sound or voice memo, touch the Application tab from
the Home screen, then touch Sound Recorder.
10.3 Radio
Your phone is equipped with a radio
as a traditional radio with saved channels or with parallel visual
information related to the radio program on the display if you
turn to stations that offer Visual Radio service.
To listen to the radio, touch the Application tab from the Home
screen, then touch Radio.
Please insert a headset to listen to the radio. The headset is used
as an antenna for the radio.
(1)
The quality of the radio depends on the coverage of the radio station in
that particular area.
(1)
. You can use the application
68
Page 70
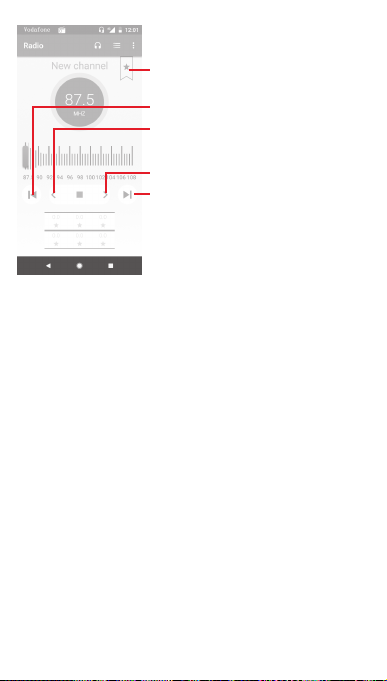
Touch to add the current station
to favourites or remove it from the
favourites.
Touch to go to previous channel
Touch to decrease 0.1MHz
Long press to search and go to the
nearest lower frequency channel
Touch to increase 0.1MHz
Touch to go to next channel
Available options:
• Scan channels
Scan all channels.
• Edit name
Touch to edit channel name.
• Delete
Delete the channel.
• Enter frequency
Enter the frequency manually.
• Station info
Mark the checkbox to view the station info.
• Exit
Turn off the radio and exit radio application.
69
Page 71

11 Settings
Drag down twice from the Notification panel and touch the
Settings icon to access Settings.
11.1 Network & Internet
11.1.1 Wi-Fi
Using Wi-Fi you can now surf the Internet without using your SIM
card whenever you are in range of a wireless network. The only
thing you have to do is to enter the Wi-Fi screen and configure
an access point to connect your phone to the wireless network.
For detailed instructions on using Wi-Fi, please refer to "6.1.2
Wi-Fi".
11.1.2 Mobile networks
• Data roaming
Touch the switch to connect to data services when roaming.
• Data roaming reminder
Touch the switch to allow/disallow ask before connecting to
data when your phone is switched on.
• Preferred network type
Touch to select the preferred network type.
• Access point names
You can select your preferred network with this menu.
• Network operators
You can select a network operator.
• Network operator name
Touch the switch to allow/disallow the display of network
operator name in the status bar.
11.1.3 Data usage
To enable/disable mobile data by touching the switch .
70
Page 72

Touch Billing cycle and then the Set data limit switch, then
touch Data limit to set the maximum amount of mobile data that
you want to use. Your mobile data connection will be disabled
when the specified limit is reached. You can also choose a data
usage cycle to view the statistics and related applications of used
data by your phone.
Touch the icon, and you can view more settings related to
your data usage.
Data usage is measured by your phone, and your
carrier may count differently.
11.1.4 Hotspot & tethering
This function allows you to share your phone’s mobile data
connection via USB or as a portable Wi-Fi access point (Please
refer to "6.6 Sharing your phone’s mobile data connection"
You can also select Flight mode in the phone options when
pressing Power key.
11.1.5 VPN
A mobile virtual private network (mobile VPN or mVPN) provides
mobile phones with access to network resources and software
applications on their home network, when they connect via other
wireless or wired networks. Mobile VPNs are used in environments
where workers need to keep application sessions open at all
times, throughout the working day, as the user connects via
various wireless networks, encounters gaps in coverage, or
suspend-and-resumes their phones to preserve battery life. A
conventional VPN can't survive such events because the network
tunnel is disrupted, causing applications to disconnect, time out,
fail, or even the computing device itself to crash.
For more information on VPN, please refer to "6.7 Connecting to
virtual private networks"
11.1.6 Flight mode
Use the Flight mode to simultaneously disable all wireless
connections including Wi-Fi, Bluetooth and more.
71
Page 73

You can also select Flight mode in the phone options when
pressing Power key.
11.1.7 Wi-Fi Calling
Touch the switch to enable/disable Wi-Fi Calling.
11.2 Connected devices
11.2.1 Bluetooth
Bluetooth allows your phone to exchange data (videos, images,
music, etc.) in a small range with another Bluetooth supported
device (phone, computer, printer, headset, car kit, etc.).
For more information on Bluetooth, please refer to "6.3
Connecting to Bluetooth devices".
11.2.2 Cast
Touch to set wireless display.
11.2.3 NFC
Touch the switch to allow/disallow data exchange when the
phone touched another device.
11.2.4 Android Beam
Touch the switch to turn Android Beam on/off.
When this feature is turned on, you can beam app content
to another NFC-capable device by holding the devices close
together. For example, you can beam Browser pages, YouTube
videos, People contacts and more.
Just bring the devices together (typically back to back) and then
tap your screen. The app determines what gets beamed.
11.2.5 Printing
Your phone supports wireless printing to enabled printers and
online services.
72
Page 74

11.2.6 USB
Touch to view the default apps installed on your phone.
With the USB cable, you can transfer media files and other files
between your phone and computer. For more information on
USB, please refer to "6.4 Connecting to a computer via USB".
11.3 Apps & notifications
You use the Apps settings to view details about the applications
installed on your phone, to manage their data and force them
to stop, and to set whether you want to permit installation of
applications that you obtain from web sites and emails. And you
can also get further app or system notification settings.
11.4 Battery
In the Battery screen you can view the battery usage data since
you last connected the phone to a power source. The screen also
shows your battery status and how long it has been used since
last charging. Touch a category to find out its specific power
consumption.
You can adjust power use via the screen brightness or screen
timeout in the Display screen.
11.5 Display
Home screen
Touch to set the Home screen style.
Favourite app panel
Touch to switch to turn on the function of launching your
favourite app by swiping right.
Favourite Home screen app
Touch to select the app that you prefer to be opened when you
right swipe.
73
Page 75

Lock Home screen layout
Touch to switch to turn on the function of locking home screen
layout.
Navigation buttons
Drag an icon to rearrange navigation buttons.
Screen mode
Touch to set screen mode.
Brightness level
Touch to adjust the brightness of the screen.
Night light
Touch to set night light.
Full screen apps
Touch to choose which apps you want to use for full screen.
Adaptive brightness
Touch to switch to turn on the function of optimising brightness
level for available light.
Wallpaper
Touch to set the wallpaper.
Sleep
Touch to set the screen timeout.
Pulse notification light
Touch the switch to enable/disable Pulse notification light.
Auto-rotate screen
Touch the switch to enable/disable the function of Auto-rotate
screen.
Font size
Touch to set the font size.
Display size
Touch to set display size.
74
Page 76

11.6 Sound
Use the Sound settings to configure ringtones for different events
and environments.
Ring volume
Slide to adjust the volume of your ringtones.
Media volume
Slide to adjust the volume of music, video, games, etc.
Notification volume
Slide to adjust the volume of your notifications.
Alarm volume
Slide to adjust the volume of your alarms.
Also vibrate for calls
Touch to vibrate the phone for incoming calls.
Do not disturb preferences
Touch to select the prioritised apps for notification permission or
customise the automatic rules.
Silent mode mute switch
Touch the switch to enable/disable to block all sounds and
vibrations from the lock screen.
Turn on mute switch to
Touch to mute switch to Allow alarms only or Total silence.
Phone ringtone
Touch to set your default incoming call ringtone.
Default notification sound
Touch to set your default notification sound.
Default alarm sound
Touch to set your default alarm sound.
75
Page 77

Other sounds and vibration
Touch to set Dial pad tones, Screen locking sounds, Touch sounds
and Vibrate on tap.
11.7 Storage
Use these settings to monitor the total and available space on
your phone and, on your microSD card; to manage your microSD
card; and, if necessary, to reset the phone, erasing all of your
personal information.
Internal shared storage
This menu displays the amount of internal phone storage. The
used space will be shown in green, which shows the amount
of internal phone storage used by the operating system, its
components, applications (including those you downloaded),
permanent and temporary data.
11.8 Security & location
Google Play Project
Check apps and your phone for harmful behaviour.
Find My Device
Touch the switch to enable to locate your phone.
Security update
Touch to check current system version and check for updating
your system.
Screen lock
• None
Touch to disable screen unlock security.
• Swipe
Touch to enable slide unlock mode.
• Pattern
Touch to draw pattern to unlock screen.
76
Page 78

• PIN
Touch to enter a numeric PIN to unlock screen.
• Password
Touch to enter a password to unlock screen.
Lock screen preferences
Touch to choose lock screen preferences.
Smart lock
You must set a screen lock first when you enable this function.
Location
Mode
Choose a mode for location access.
• High accuracy
Use GPS, Wi-Fi, Bluetooth, or mobile networks to determine
location.
• Battery saving
Use Wi-Fi, Bluetooth, or mobile networks to determine location.
• Device only
Use GPS to determine your location.
App-level permissions
Touch to set location permissions for apps.
Scanning
Improve location by allowing system apps and services to detect
Wi-Fi networks and Bluetooth devices at any time.
Recent location requests
Review recent location requests.
Location services
Review location services for Google.
Show passwords
Touch the switch show passwords as you type.
77
Page 79

Device admin apps
Touch to view or deactivate your phone's administrators.
SIM card lock
Choose a SIM card you want to configure.
Switch the icon beside Lock SIM card to lock the SIM card
with PIN code.
Touch Change SIM PIN to change the PIN code.
Encryption & credentials
• Encrypt phone
View if your phone is encrypted.
• Storage type
It displays the storage type of your phone.
• Trusted credentials
Touch to display trusted CA certificates.
• User credentials
Touch to view and modify stored credentials.
• Install from SD card
Touch to install encrypted certificates from the SD card.
• Clear credentials
Touch to remove all credentials.
Trusted agents
Touch to view or deactivate trusted agents.
Screen pinning
Touch to set screen pinning.
Apps with usage access
Touch to set usage access for apps.
78
Page 80

11.9 Parental restrictions
This Smart phone comes with basic parental restrictions
functions built in, allowing you for example to limit or disable
access to the apps store, games. You can set time limits for app
usage, and also easily locate the phone and user via the Google
Device Manager app website.
Touch Parental restrictions from Settings phone screen. A
wizard will guide you through the steps to set up your parental
restrictions information.
1. Touch START SETUP. Enter a 6-digit password for Parental
restrictions. Touch NEXT.
2. Enter the password again and then touch NEXT.
3. Enter your (or a guardian's) name and contact number as an
emergency contact and to retrieve your PIN in case you forget
it. Touch NEXT.
4. Enter the verification PIN number sent to your contact number.
Touch VERIFY.
5. Touch Device access control.
Touch the to access restriction and set a schedule when
your phone is accessible. If outside of the scheduled times, your
phone will be automatically locked.
6. Touch App access control.
7. Select the application you want to add access control or set
time limit for access.
8. Touch the to enable restriction.
9. Touch the days and select period options to set time limit.
Further operations
Lock device settings
Touch the switch to enable to lock your phone's settings so a PIN
will be needed to access settings next time.
79
Page 81

Lock home screen
Touch the switch to prevent add/edit/delete widgets and apps
on the home screen.
Disable install/uninstall apps
Touch the switch to disable to install/uninstall apps.
Show emergency contact
Touch the switch to enable to display guardian's contact number
on lockscreen.
Force ring
Touch the switch to enable incoming calls ring at maximum
volume.
10. Touch ALL SET to enable all parental restrictions.
11.10 Users & account
You can use the settings to add, remove, and manage your Email
and other supported accounts. You can also use these settings
to control how and whether all applications send, receive, and
synchronise data on their own schedules, and whether all
applications can synchronise user data automatically.
Add account
Touch to add an account for selected app.
Emergency information
Touch to set emergency information.
Emergency mode
Touch to set emergency mode
Automatically sync data
Touch the switch to enable apps refresh data automatically.
11.11 Accessibility
You use the Accessibility settings to configure any accessibility
plug-ins you have installed on your phone.
80
Page 82

Help tips
Touch the switch to enable/disable help tips.
Volume key shortcut
Touch to access volume key shortcut settings.
Select to Speak
Touch to set to off/hear selected text.
Switch Access
Touch to turn on/off switch access.
TalkBack
Touch to turn on/off TalkBack. With TalkBack on, your phone
provides spoken feedback to help blind and low-vision users by
describing what you touch, select and activate.
To exit TalkBack, touch the on switch and a square frame will
focus on the switch. Then double tap the switch quickly until a
message appears to enquire if stop Talkback. Touch OK and a
square frame will focus on the icon. Then double tap OK quickly
to turn off TalkBack.
Text-to-speech output
Refer to "Preferred engine/Speech rate/Pitch/Listen to an
example/Default language status" setting before.
Font size
Touch to set and make the text on screen smaller or larger.
Display size
Touch to set and make the items on your screen smaller or larger.
Magnification
Touch to turn on/off to activate/deactivate zoom in/out function
by triple-tapping the screen.
Colour correction
Touch to turn on/off colour correction
81
Page 83

Colour inversion
Touch the switch to turn on/off colour inversion.
Large mouse cursor
Touch the switch to enable/disable large mouse cursor.
Click after cursor stops moving
Touch then switch the to enable/disable click after cursor
stops moving.
Power button ends call
Touch the switch to enable/disable Power button ends call.
Auto-rotate screen
Touch the switch to activate/deactivate auto-rotate screen.
Touch & hold delay
Touch to adjust the duration of touch and hold delay. This
function enables your phone to set how long you need to hold
your touch down before it registers.
Mono audio
Touch the switch to allow/disallow combining channels when
playing audio.
Captions
Touch to activate/deactivate captions for phone screen.
High-contrast text
Touch the switch to activate/deactivate high contrast text.
Scheduled power on and off
Touch to set automatic power on/off of the phone.
11.12 Google
This phone offers you Google account and services setting
options.
82
Page 84

11.13 System
11.13.1 Languages & input
Use the Language & input settings to select the language for the
text on your phone and for configuring the onscreen keyboard.
You can also configure voice input settings and the pointer speed.
Languages
Touch to select the language and the region you want.
Virtual keyboard
• Gboard Go
Languages
Touch to set input language and method.
Preferences
Touch to select your typing preference, such as One-handed
mode, Customised input styles, Long-press for symbols,
Keyboard height etc.
Theme
Touch to select the keyboard theme and the customised input
styles you preferred.
Text correction
Touch to show various options that aim to facilitate the text
organisation, such as Auto correction which could correct
mistyped words automatically, Show correction suggestions
which could display suggested words while typing, etc.
Glide typing
Touch to set up your Glide typing, such as Enable Glide typing,
Show gesture trail, etc.
Dictionary
Touch to view Personal dictionary settings.
Search
Touch to access to search settings.
83
Page 85

Advanced
Touch to view more advanced settings for Google keyboard,
such as Emoji for physical keyboard, Show app icon, Share
usage statistics, Share snippets etc.
• Google voice typing
Touch to configure settings for Google voice typing.
• Manage keyboards
Touch to manage keyboards.
Physical keyboard
Touch for more keyboard assistance.
Spell checker
Touch to access to spell checker setting.
Auto-fill service
Touch to set auto-fill service.
Personal dictionary
Touch to add words as your own dictionary.
Pointer speed
Touch to open a dialogue where you can change the pointer
speed, touch OK to confirm.
Text-to-speech output
Touch to configure settings for Google voice typing.
• Preferred engine
Touch to choose a preferred text-to-speech engine, touch the
Settings icon to show more choices for each engine.
• Language
Touch to select languages for text-to speech.
• Speech rate
Slide to set how quickly you want the synthesiser to speak.
84
Page 86

• Pitch
Slide to set the pitch you want the synthesiser to speak.
Touch the icon to play a brief sample of the speech
synthesiser, using your current settings.
Touch the icon reset the speed or pitch at which the
text is spoken to normal or default.
11.13.2 Date & time
Use Date & time settings to customise your preferences for how
date and time are displayed.
Automatic date & time
Touch to select Use network-provided time or Off.
Automatic time zone
Touch to use the network-provided time zone. Or turn it off to set
all values manually.
Set date
Touch to open a dialogue where you can manually set the
phone’s date.
Set time
Touch to open a dialogue where you can manually set the
phone’s time.
Select time zone
Touch to open a dialogue where you can set the phone’s time
zone.
Use 24-hour format
Switch on to display the time using 24-hour clock format.
Choose date format
Touch to open a dialogue where you can select the format for
displaying dates.
85
Page 87

11.13.3 Backup
Back up to Google Drive
Touch and then switch the icon on to automatically back
up your phone’s settings and other application data to Google
Servers, with your Google Account. If you replace your phone,
the settings and data you’ve backed up are restored onto the new
phone for the first time you sign in with your Google Account.
If you mark this option, a wide variety of settings and data are
backed up, including your Wi-Fi passwords, bookmarks, a list
of the applications you’ve installed, the words you’ve added to
the dictionary used by the onscreen keyboard, and most of the
settings that you configure with the Settings application. If you
unmark this option, you stop backing up your settings, and any
existing backups are deleted from Google Servers.
11.13.4 Reset options
Reset Wi-Fi, mobile & Bluetooth
Touch and press RESET SETTINGS button to reset all network
settings, including Wi-Fi, Mobile data and Bluetooth.
Reset app preferences
Touch RESET APPS to reset all apps settings, including disabled
apps, app notifications, background data restrictions for apps, etc.
Erase all data (factory reset)
Erase all of your personal data from internal phone storage,
including information about your Google Account, any other
accounts, your system and application settings, and any
downloaded applications. Resetting the phone does not erase
any system software updates you’ve downloaded or any files
on your microSD card, such as music or photos. If you reset the
phone in this way, you’re prompted to re-enter the same kind of
information as when you first started Android.
When you are unable to power on your phone, there is another
way to perform a factory data reset by using hardware keys. Press
the Volume up key and the Power key at same time until the
screen lights up.
86
Page 88

11.13.5 Regulatory & safety
Touch to view Regulatory & safety information, including Product
model, Manufacturer name, etc.
11.13.6 About phone
This contains information about things ranging from Legal
information, Model number, Android version, Baseband version,
Kernel version, Build number to those listed below:
Status
This contains the status of the Battery status, Battery level, SIM
status, IP address, etc.
Legal information
Touch to view legal information.
11.14 Software updates
Software updates allow you to download new software for your
device, with the intention to improve the user experience and
product performance.
11.14.1 Check for updates
Touch to check for updating latest software version.
11.14.2 Settings
Wi-Fi only
Touch to enable/disable software updates will only operate
when Wi-Fi is enabled.
Auto-check intervals
Touch to select intervals, which allows the device to automatically
check for new software at regular intervals.
Auto download
Touch to enable/disable automatically download software
update when connect to Wi-Fi.
11.14.3 Help
Touch to know more information about Software updates.
87
Page 89

12 Update your phone’s
software
Using the FOTA (Firmware Over The Air) Upgrade tool you can
update your phone’s software.
To access Software updates, touch Settings > Software
updates. Touch Check for updates and the phone will search
for the latest software. If you want to update the system, please
touch DOWNLOAD, and when that’s finished, touch INSTALL to
complete the upgrade. Now your phone will have the latest version
of the software.
You should turn on data connection before searching for updates.
Settings for auto-check intervals and reminders about upgrades
are also available once you restart the phone.
If you have chosen auto-check, when the system discovers the
new version, the icon will appear in the status bar. Touch the
notification to access the Software updates directly.
During FOTA downloading or updating do not change
your default storage location, to avoid errors in locating
the correct update packages.
Please read this safety information before you use the device.
Following the warnings will help prevent injury to yourself or
others and damage to your device.
Additional safety warnings may be given for the operation of
specific Apps on your device, you should also follow these
instructions.
88
Page 90
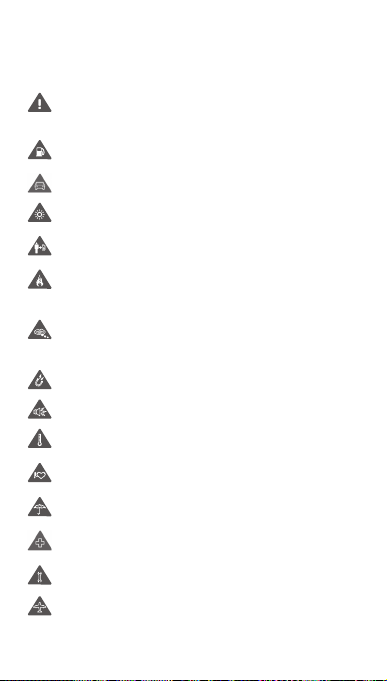
13 Pictograms and graphic
symbols
Read the Safety Information section of this user guide
[on page 2] before using this device. Failure to comply
with safety warnings can result in serious injury.
Do not use while refuelling or near gas or flammable
liquids
Do not use while driving
This device may produce a bright or flashing light
For body-worn operation maintain a separation of 5
mm
Do not dispose of this device or its battery in a fire.
This device is not intended for use by young children.
If you allow a child to use it ensure the child is strictly
supervised. This device contains small parts which are
a choking hazard
Avoid contact with magnetic media
This device may produce a loud sound
Avoid extreme temperatures
Keep away from pacemakers and other personal
medical devices
Avoid contact with liquid, keep dry
Switch off when instructed in hospitals and medical
facilities
Do not try to disassemble
Switch off when instructed in aircraft and airports
89
Page 91

Do not rely on this device for emergency
communications
Switch off in explosive environments
Only use approved accessories
Do not use this device whilst walking across a road
or cycling
Product safety information
RF exposure
General statement on RF energy
Your phone contains a transmitter and a receiver. When it is ON,
it receives and transmits RF energy. When you communicate with
your phone, the system handling your call controls the power
level at which your phone transmits.
Specific Absorption Rate (SAR)
Your mobile device is a radio transmitter and receiver. It is
designed not to exceed the limits for exposure to radio waves
recommended by international guidelines. These guidelines were
developed by the independent scientific organisation ICNIRP and
include safety margins designed to assure the protection of all
persons, regardless of age and health.
The guidelines use a unit of measurement known as the Specific
Absorption Rate, or SAR. The SAR limit for mobile devices is 2 W/kg
and the highest SAR value for this device when tested at the ear
was 0.90 W/kg
5 mm) the highest SAR value was 1.69 W/kg
As mobile devices offer a range of functions, they can be used
in other positions, such as on the body as described in this user
guide, see page 91 for more information.
(1)
The tests are carried out in accordance with[CENELEC EN50360] [IEC
62209-1].
(2)
The tests are carried out in accordance with[CENELEC EN50566] [IEC
62209-2].
(1)
and when tested near the body (at a distance of
(2)
.
90
Page 92

SAR is measured utilising the device’s highest transmitting
power and where supported with multiple simultaneous
transmitters. The actual SAR of this device while operating
is typically well below that indicated above. This is due to
automatic changes to the power level of the device to ensure
it only uses the minimum power required to communicate
with the network.
Body worn operation
To ensure compliance with RF exposure guidelines the phone
must be used with a minimum of 5 mm separation from the body.
Failure to observe these instructions could result in your RF
exposure exceeding the relevant guideline limits and may use
more power than necessary.
Limiting exposure to radio frequency (RF) fields
For individuals concerned about limiting their exposure to RF fields,
the World Health Organisation (WHO) provides the following advice
in Fact Sheet 193 Electromagnetic fields and public health: mobile
phones (October 2014)
Precautionary measures: Present scientific information does
not indicate the need for any special precautions for the use of
mobile phones. If individuals are concerned, they might choose
to limit their own or their children’s RF exposure by limiting the
length of calls, or using ‘hands-free’ devices to keep mobile
phones away from the head and body.
Further information on exposure to radio waves can be obtained
from the WHO http://www.who.int/mediacentre/factsheets/
fs193/en/
14 Regulatory information
The following safety approvals and notices apply in specific
regions as noted.
Hereby, Vodafone declares that the radio equipment type VFD
620 is in compliance with Directive 2014/53/EU.
91
Page 93

The full text of the EU declaration of conformity is available at the
following internet address:
http://vodafone.com/smartn9lite/ec-declaration
Data protection and software updates
By continuing to use this device, you indicate that you have read
and agree to the following content:
In order to provide better service, this device will automatically
check for/obtain software update information from Vodafone
and its partners after connecting to the Internet. This process
may use mobile data, and requires access to your device's unique
identifier (IMEI/SN) and the service provider network ID (PLMN) to
check whether your device needs to be updated.
Note that neither Vodafone nor its partners will use the IMEI/SN
information for the purposes of personally identifying you, this is
only used for scheduling/managing software updates.
Distraction
Using a mobile device to communicate, listen to music or watch
other media could potentially distract you from performing any
activity which requires your full attention. It may also reduce
your awareness of the environment around you.
Driving
Full attention must be given to driving at all times in order to
reduce the risk of an accident. Using a phone mobile phones
(even with a hands free kit) causes distraction and can lead to
an accident. You must comply with local laws and regulations
restricting the use of mobile phones while driving.
Operating machinery
Full attention must be given to operating the machinery in order
to reduce the risk of an accident.
Walking and Cycling
Using a mobile device while walking or cycling will reduce
concentration on the environment around you and may increase
your risk of an accident.
92
Page 94

Product Handling
General statement on handling and use
You alone are responsible for how you use your phone and any
consequences of its use.
You must always switch off your phone wherever the use of
a phone is prohibited. Use of your phone is subject to safety
measures designed to protect users and their environment.
• Always treat your phone and its accessories with care and keep
it in a clean and dust-free place.
• Do not expose your phone or its accessories to open flames or
lit tobacco products.
• Do not expose your phone or its accessories to liquid, moisture
or high humidity.
• Do not drop, throw or try to bend your phone or its accessories.
• Do not use harsh chemicals, cleaning solvents, or aerosols to
clean the device or its accessories.
• Do not paint your phone or its accessories.
• Do not attempt to disassemble your phone or its accessories,
only authorised personnel must do so.
• Do not expose your phone or its accessories to extreme
temperatures, minimum -10 and maximum +50 degrees
Celsius.
• Please check local regulations for disposal of electronic
products.
• Do not carry your phone in your back pocket as it could break
when you sit down.
Small Children
Do not leave your phone and its accessories within the reach of
small children or allow them to play with it.
They could hurt themselves or others, or may accidentally
damage the phone.
93
Page 95
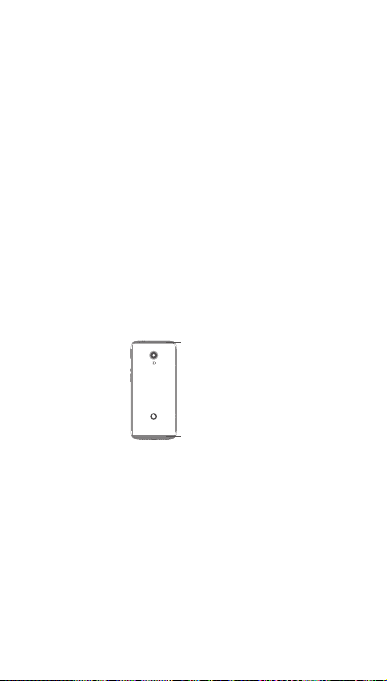
Your phone contains small parts with sharp edges that may
cause an injury or which could become detached and create a
choking hazard.
Demagnetisation
To avoid the risk of demagnetisation, do not allow electronic
devices or magnetic media close to your phone for a long time.
Avoid other magnetic sources as these may cause the internal
magnetometer or other sensors to malfunction and provide
incorrect data.
Electrostatic discharge (ESD)
Do not touch the SIM card’s metal connectors.
Power supply
Do not connect your device to the power supply or switch it on
until instructed to do so in the installation instructions.
Antenna
Do not touch the antenna unnecessarily.
Normal hand-held use position
When placing or receiving a phone call, hold your phone to your
ear, with the bottom towards your mouth or as you would hold a
conventional fixed line phone.
Antenna area
Antenna area
94
Page 96

Air Bags
Do not place a phone in the area near or over an air bag or in the
air bag deployment area.
Store the phone safely before driving your vehicle.
Seizures/Blackouts
This phone is capable of producing bright flashing lights.
Repetitive Motion Injuries
To minimise the risk of repetitive strain injury (RSI), when Texting
or playing games with your phone:
• Do not grip the phone too tightly
• Press the buttons or screen lightly
• Make use of the special features in the handset which minimise
the number of buttons which have to be pressed, such as
message templates and predictive text
• Take lots of breaks to stretch and relax
• If you continue to have discomfort stop using this device and
consult your doctor
Emergency Calls
This phone, like any wireless phone, operates using radio signals,
which cannot guarantee connection in all conditions. Therefore,
you must never rely solely on any wireless phone for emergency
communications.
95
Page 97

Loud Noise
This phone is capable of producing loud noises which may
damage your hearing.
PROTECT YOUR HEARING
To prevent possible hearing damage, do not listen at
high volume levels for long periods. Exercise caution
when holding your device near your ear while the
loudspeaker is in use.
MP3 and video player function
When listening to pre-recorded music or watching videos on
your device, with headphones or earphones at high volumes,
you run the risk of permanent damage to your hearing. Even if
you are used to listening to music at a high volume and it seems
acceptable to you, you still risk damaging your hearing.
Reduce the sound volume to a reasonable level and avoid using
headphones for an excessive period of time to avoid hearing
damage.
Different headphones, earphones or ear buds may deliver a
higher or lower volume, at the same volume setting on your
device. Always start at a low volume setting.
Do not listen to music or video with headphones while driving,
riding, cycling or crossing the road.
Prolonged periods of listening to music, playing games or using
other content from your device, at high volume, may lead to
hearing damage.
Bright Light
This phone is capable of producing flash of light or use as a torch,
do not use it too close to the eyes.
Phone Heating
Your phone may become warm during charging and during
normal use, do not use this phone if it is overheated (showing an
overheating warning or feels hot to touch).
96
Page 98

Electrical Safety
Accessories
Use only approved accessories and chargers.
Do not connect with incompatible products or accessories.
Take care not to touch or allow metal objects, such as coins or key
rings, to contact or short-circuit the battery terminals, charger,
device charging point or any electrical contacts on accessories.
Do not touch your device with wet hands. Doing so may cause
an electric shock.
Do not touch the power cord with wet hands or disconnect the
charger by pulling the cord. Doing so may result in electrocution.
Connection to a Car
Seek professional advice when connecting a physical phone
interface to the vehicle electrical system.
Faulty and Damaged Products
Do not attempt to disassemble the phone or its accessories.
Only qualified personnel should service or repair the phone or
its accessory.
If your phone or its accessory has been submerged in water or
other liquid, punctured, or subjected to a severe fall, do not use
it until you have taken it to be checked at an authorised service
centre.
Battery Handling and Safety
The battery in this device is not user removable.
Do not make any attempt to remove the battery or disassemble
the device to access the battery.
Only use the charger supplied, or manufacturer approved
replacements intended for use with your device. Using other
chargers could be dangerous.
Improper use of your device may result in fire, explosion or other
hazards.
97
Page 99

If you believe the battery has been damaged, do not use or
re-charge the device and take it to a authorised service centre
for testing.
Do not puncture or crush the device or allow it to be subjected to
any external pressure or force.
Interference
Care must be taken when using the phone in close proximity to
personal medical devices, such as pacemakers and hearing aids.
Pacemakers
Pacemaker manufacturers recommend that a minimum
separation of 15 cm be maintained between a mobile phone and
a pacemaker to avoid potential interference with the pacemaker.
To achieve this use the phone on the opposite ear to your
pacemaker and do not carry it in a breast pocket.
Hearing Aids
People with hearing aids or other cochlear implants may
experience interfering noises when using wireless devices or
when one is nearby.
The level of interference will depend on the type of hearing
device and the distance from the interference source, increasing
the separation between them may reduce the interference.
You may also consult your hearing aid manufacturer to discuss
alternatives.
Medical devices
Please consult your doctor and the device manufacturer to
determine if operation of your phone may interfere with the
operation of your medical device.
Hospitals
Switch off your wireless device when requested to do so in
hospitals, clinics or health care facilities. These requests are
designed to prevent possible interference with sensitive medical
equipment.
98
Page 100

Aircraft
Switch off your wireless device whenever you are instructed to do
so by airport or airline staff.
Consult the airline staff about the use of wireless devices on
board the aircraft, if your device offers a ‘flight mode’ this must
be enabled prior to boarding an aircraft.
Interference in cars
Please note that because of possible interference to electronic
equipment, some vehicle manufacturers forbid the use of mobile
phones in their vehicles unless a handsfree kit with an external
antenna is included in the installation.
Explosive environments
Petrol stations and explosive atmospheres
In locations with potentially explosive atmospheres, obey all
posted signs to turn off wireless devices such as your phone or
other radio equipment.
Areas with potentially explosive atmospheres include fuelling
areas, below decks on boats, fuel or chemical transfer or storage
facilities, areas where the air contains chemicals or particles, such
as grain, dust, or metal powders.
Blasting Caps and Areas
Turn off your mobile phone or wireless device when in a blasting
area or in areas posted turn off “two-way radios” or “electronic
devices” to avoid interfering with blasting operations.
Disposal and Recycling
To dispose of or recycle your device in a safe and appropriate
manner, contact your Customer Services centre for information.
99
 Loading...