

Page 1

Some services and apps may not be available in all countries. Please
ask in-store for details.
Android is a trademark of Google Inc. The Android robot is reproduced or
modied from work created and shared by Google and used according to
terms described in the Creative Commons 3.0 Attribution Licence.
© Vodafone Group 2014. Vodafone and the Vodafone logos are trade
marks of Vodafone Group. Any product or company names mentioned
herein may be the trade marks of their respective owners.
User manual
Smart 4 max
Page 2

1. Your mobile ············································································1
1.1 Charging the battery ········································································· 1
1.2 SIM card and microSD card ································································ 2
1.3 Powering on/off, Restart and Aeroplane mode ··································· 3
1.4 Locking/unlocking the screen ·························································· 3
1.5 Home screen ···················································································· 4
1.6 Using the touchscreen ······································································ 4
1.7 Using the virtual keys ······································································· 5
1.8 Notification and status icons ····························································· 6
1.9 Notification panel ············································································· 7
1.10 Managing applications ···································································· 9
1.11 Managing Home screen··································································· 9
1.12 Managing folders ············································································ 9
2. Phone calls ·············································································10
2.1 Making a call ···················································································· 10
2.2 Answering or rejecting a call ····························································· 11
2.3 Single-handed mode········································································· 11
2.4 During a call ····················································································· 11
2.5 Conference calls ·············································································· 12
2.6 Answering another incoming call ······················································ 12
2.7 Supplementary services ··································································· 13
2.8 Voicemail························································································· 13
3. People ·····················································································14
3.1 Adding a contact ·············································································· 14
3.2 Quick Contact ·················································································· 14
3.3 Managing contacts ··········································································· 15
3.4 Managing groups ·············································································· 16
3.5 Importing contacts from SIM card or storage······································ 17
4. Text input methods ································································· 17
4.1 Using the text input panel ································································· 17
4.2 Switching input methods ·································································· 17
4.3 Editing text ······················································································ 18
4.4 Horizontal keyboard ········································································· 19
4.5 Input method settings ······································································ 19
5. Message+ ················································································19
5.1 Verify number ·················································································· 19
Page 3

5.2 Start a message ················································································ 20
5.3 Start a group chat ············································································· 20
5.4 Settings ··························································································· 20
6. Messaging ··············································································20
6.1 Creating a message ·········································································· 20
6.2 Replying to a message ······································································ 21
6.3 Searching messages ········································································· 21
6.4 Deleting a message ·········································································· 21
6.5 Customising message settings ························································· 21
7. Email ·······················································································21
7.1 Adding an email account··································································· 22
7.2 Switching accounts ·········································································· 22
7.3 Combined account view ···································································· 22
7.4 Viewing emails ················································································· 22
7.5 Creating and sending emails ····························································· 22
7.6 Replying to and forwarding emails ···················································· 23
7.7 Saving email attachments ································································ 23
7.8 Deleting an email account ································································ 23
7.9 Customising email account settings·················································· 24
8. Data service ············································································24
8.1 Turning on the data service ······························································· 24
8.2 Wi-Fi ································································································ 24
8.3 Sharing your phone's data connection ··············································· 26
8.4 Bluetooth························································································· 27
9. Browser···················································································29
9.1 Browsing web pages ········································································· 29
9.2 Managing bookmarks ······································································· 29
9.3 Setting a home page ········································································· 30
9.4 Customising browser settings ··························································· 30
10. Camera and video camera ·····················································30
10.1 Taking a photo ················································································ 30
10.2 Recording a video ··········································································· 31
10.3 Panoramic mode ············································································ 32
11. Gallery ··················································································32
11.1 Viewing pictures and videos ···························································· 32
Page 4

11.2 Editing a picture ············································································· 33
12. Google PlayTM Music ······························································34
12.1 Adding music to a playlist ······························································· 34
12.2 Playing a playlist ············································································ 34
12.3 Playing a music file ········································································· 34
13. Accounts and syncing ···························································35
13.1 Adding an account ·········································································· 35
13.2 Enabling syncing ············································································ 36
14. More applications ·································································36
14.1 Calendar ························································································ 36
14.2 Alarm clock ···················································································· 37
14.3 Calculator ······················································································ 38
15. Settings ················································································38
15.1 Setting the date & time ··································································· 38
15.2 Setting the display·········································································· 38
15.3 Adjusting the volume ····································································· 39
15.4 Changing the phone ringtone ·························································· 40
15.5 Managing applications ···································································· 40
15.6 Security settings ············································································ 41
16. NFC ·······················································································42
17. Location access ····································································42
18. Restoring factory settings ····················································43
19. FOTA (Firmware Over The Air) u pdating································43
Frequently Asked Questions ······················································45
Product Safety Information ·······················································48
Technical data ············································································64
Accessories ················································································65
Page 5
1. Your mobile
1.1 Charging the battery
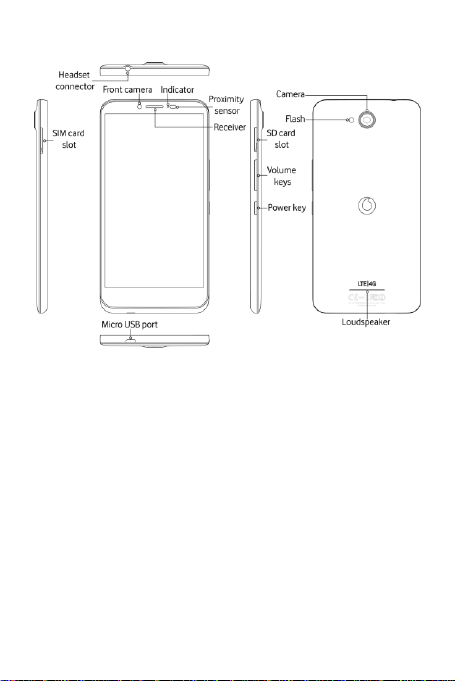
1. Connect the small end of the supplied USB charging/data cable to your
phone, using the Micro USB port at the bottom.
2. Connect the other end to the supplied plug and insert that into a mains
socket to start charging your phone.
3. The power L ED will glow green when battery level is at least 98%.
Notes:
• You can also charge your phone, thou gh more slowly, using the
powered USB ports on your computer.
• You can view the battery in formation by touching the battery icon in the
quick access panel.
• The phone will power off automatically when th e battery is too low.
Charge the battery if this happens. When the battery is critically low, the
charging status may not be displayed immediately (you mu st wait
1
Page 6
before it is displayed). Using the phone to play games or perform other
activities during the charging process may cause the phone to power off
due to low battery.
• The battery will gradually discharge if is left for a long period of time.
Before using the battery again, you must recharge it in order to power on
and use your phone as normal. A dapter shall be installed near the
equipment and shall be easily accessible.
• The battery of this phone can’t be removed. Do not attempt to open the
cover.
1.2 SIM card and microSD card
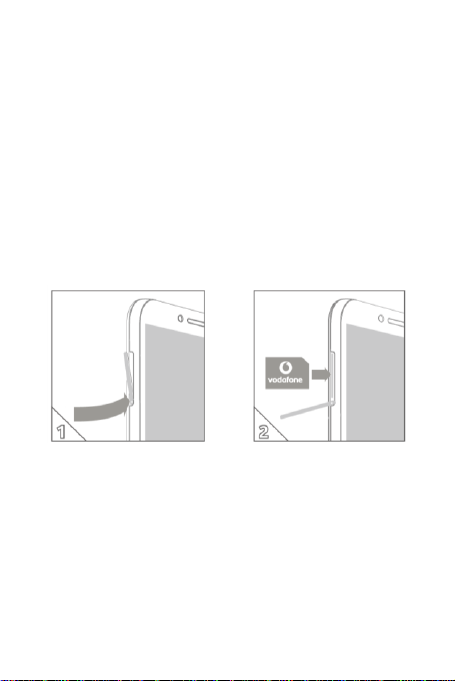
Insert the SIM card as shown in the image below. The microSD car d slot is
located on the other side of th e device.
Notes:
• Take care to keep the SIM card safe. Do not bend it, damage it, or allow it
to come into contact with static electricity o r water.
• The SIM card must be inserted correctly accor ding to the markings on
the case.
• Make sure that your SIM card is a micro SIM (3FF) type.
• This phone supports hot swapping.
• To safely remove the microSD card, please go to Settings > Storage,
scroll down, tap Unmount SD card, and then tap OK to unmount it.
2
Page 7
1.3 Powering on/off, Restart and Aeroplane mode
Power on: When the phone is off, press and hold the Power key to turn on
the phone.
Power off: When the phone is o n, press and hold the Power key until the
options pop up. Select Power off and then OK to turn off the phone.
Restart: When the phone is on, press and hold the Power key until the
options pop up. Select Restart to restart the phone.
Aeroplane mode: When the phone is on, press and hold the Power key
until the options pop up. Select Aeroplane mo de and the phone will
automatically disable all signal transmission.
1.4 Locking/unlocking the screen
Locking the phone turns the screen off and stops any unwanted button
presses. To lock the screen while using the phone, simply press the Power
key.
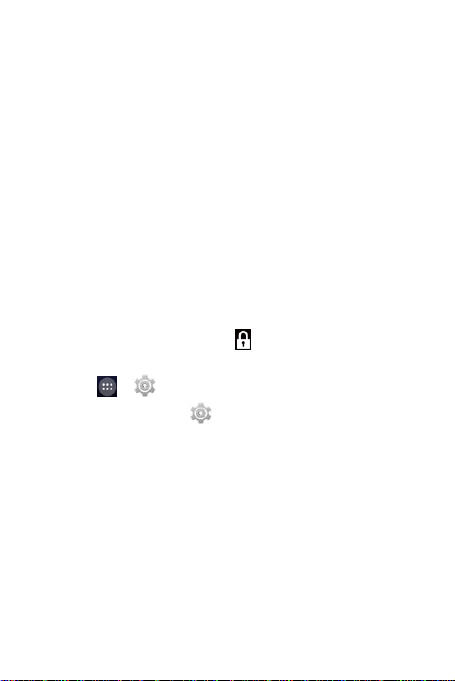
To unlock it, press the Power key, drag to the right, you can also drag it
in other directions.
Note: Touch > > Security > Screen lock to set the type of
lock screen. Yo u can also find on the right-most Home screen.
3
Page 8
1
2 4 3
1.5 Home screen
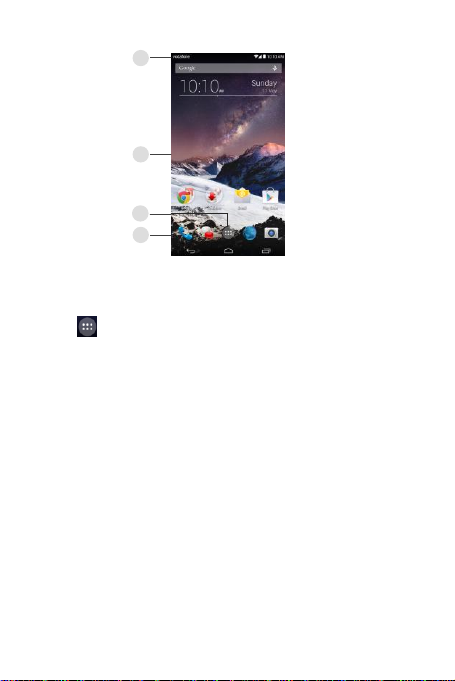
1. Status bar: Displays notification s and status icons. Gently slide down to
open the Notification panel.
2. Display area: The main display area of the phone.
3. Touch to open the applications list.
4. Shortcut bar: Touch to enter the corresponding application.
Hints:
1. Swipe your finger left or right to access other home screen panels.
2. Go to Settings > Display, m ark the Home screen checkbox to enable the
home screen looping function.
1.6 Using the touchscreen
Touch: Launch applications and other functions.
Touch and hold: Touch and hold the screen for 2 or more seconds to open
the control options for the current screen.
Slide/swipe: Slide the screen up, down, left and right to view information,
applications, web pages, etc.
Drag: Touch and hold the selected application and drag it to another
location.
Pinch/spread: Place two fingers on the screen and draw them apart to
zoom in or together to zoom out.
4
Page 9

Rotate: Automatically change the screen or ientation from portr ait to
landscape by turning the phone sideways.
1.7 Using the virtual keys
(Back key): Touch the back key to view the screen for the previous
operation.
(Home key): Touch the home key to view the home scr een. To open
Google Now
applications. To open an app, touch it. To close an app, swipe it left or right.
TM
, swipe up.
(Recent apps key): Touch the recent apps key to view the multiple
5
Page 10
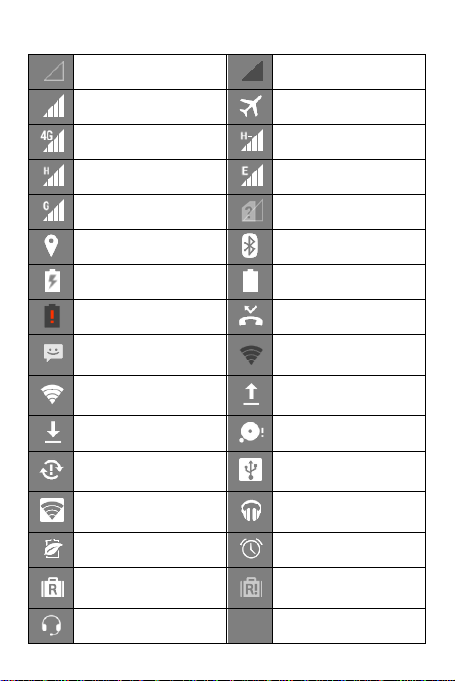
No signal
No Network
Signal strength
Aeroplane mode
4G in use
HSPAP in use
HSDPA in use
EDGE in use
GPRS in use
No SIM card
GPS is on
Bluetooth is on
Battery is charging
Battery is full
Battery is very low
Missed call
New message
An open Wi-Fi network is
available
Connected to a Wi-Fi
network
Uploading data
Downloading data
microSD card is full
Problem with sign-in or
synchronisation
USB tethering is on
Portable Wi-Fi hotspot is
on
Google Play Music is
running
Battery Saver
Alarm is set
Data Roaming is on
Data Roaming is off
Headset connected
1.8 Notification and status icons
6
Page 11
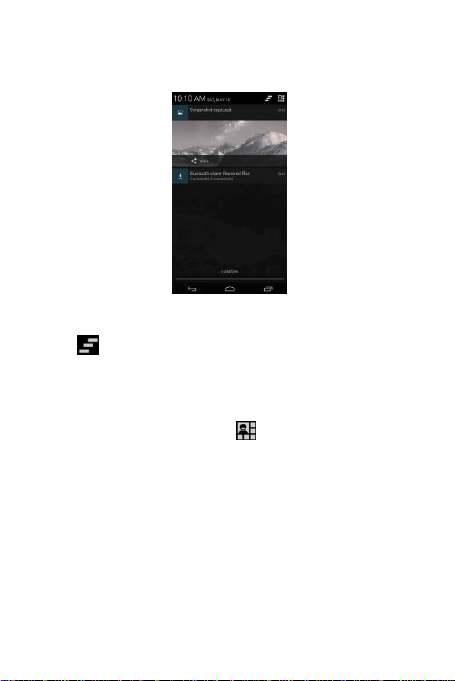
1.9 Notification panel
Pull down the Status bar to open th e Notification panel. You can view
phone network information, new events, etc.
From the Notification panel, you can do any of the following:
• Quickly open or close relevant applications.
• Touch to clear all notifications.
• Pull up from the bottom of the panel to close th e Notification panel.
Using the Quick Settings button
Open the Notification panel and touch to switch to the Quick Settings
button panel. Dragging down the status bar with two fingers also opens the
Quick Settings panel.
7
Page 12
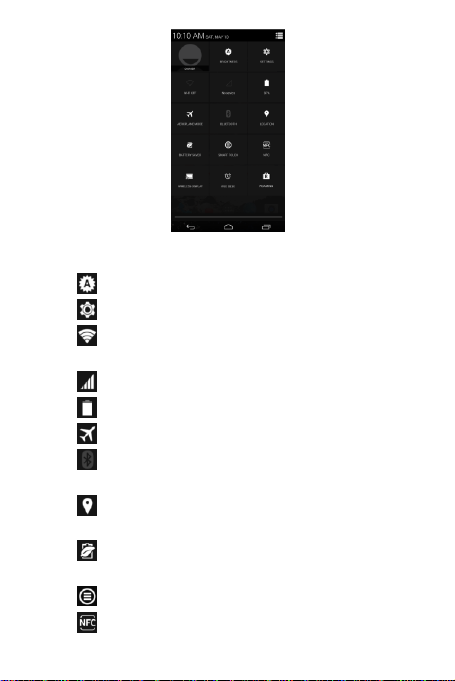
In the Quick Settings button panel, you can configure the following
settings:
• Touch to set the brightness.
• Touch to open the Settings.
• Touch to check the Wi-Fi settings, and long press to turn Wi-Fi on or
off quickly.
• Touch to change mobile data usage.
• Touch to check the battery status.
• Touch to turn Aeroplane Mode on or off.
• Touch to open the Bluetooth settings, and long press to turn
Bluetooth on or off quickly.
• Touch to open the Location settings, and long press to turn
Location on or off q uickly.
• Touch to open the Battery Saver settings, and long press to turn
Battery Saver on or off qu ickly.
• Touch to turn Smart Touch on or off.
• Touch to turn NFC on or off.
8
Page 13
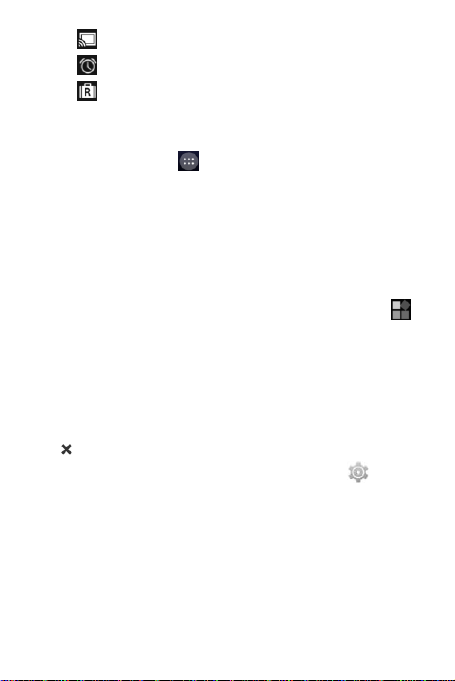
• Touch to turn Wireless Display on or off.
• Touch to open the Clock settings.
• Touch to turn Data Roaming on or off.
1.10 Managing applications
On the Home screen, touch to enter the applications list. In the
applications list, you can do any of the following:
• Touch an application icon to open it.
• Swipe left or right to view another list screen.
• Touch and hold an application icon, an d drag it onto the Home screen.
1.11 Managing Home screen
• Touch and hold the background of an y Home screen, then touch to
enter the widgets list.
• In the widgets list, touch and hold a widget, and drag it onto the Home
screen.
• Touch and hold the background of any Home screen, then touch and
hold a Home screen panel to rearrange the order.
• On the Home screen, touch and hold a shortcut or widget and drag it to
the to delete it.
Tip: To help you set up your phone the way you like it, drag from the
right-most Home screen to the main Home screen, so you can access it
more easily.
1.12 Managing folders
• Add folders: On the Home screen, tou ch and hold an application icon
and stack it on top of another application icon to create a folder.
• Rename folders: On the Home screen, tou ch a folder and then touch
the folder name in the popup to rename the folder.
9
Page 14
• Delete folders: On the Home screen, touch and hold a folder and drag it
to the to delete it.
• Move folders to the shortcut bar: When th ere is space on the shortcut
bar at the bottom of the screen, touch and hold a folder and drag it to
the shortcut bar.
2. Phone calls
You can make a phone call fro m the keypad, People or the C all log. While
you are in a call, you can also answer another incoming call, send it to your
voicemail or conduct a conference call.
Touch at the bottom of the Home screen or touch > to open
the dial application.
2.1 Making a call
• On the dial application screen, touch to open the keypad.
• Touch the number keys to enter the telephone number.
• Touch at the bottom of the screen to dial the number.
Note: To avoid affectin g the quality of the call, do not cover the r eceiver or
loudspeaker when making or answering a call.
Making a call from Contacts
• On the dial application screen, touch to open the All
contacts list.
• Touch a contact to make th e call.
Making a call from Call log
• On the dial application screen, touch to view the call log.
• Touch a call in the Call log to make a call.
• Touch on the right side of the Call log to view the Call details.
10
Page 15
2.2 Answering or rejecting a call
When you receive an incoming call, you can do any of the following:
• Answer the call: Slide to on the right to answer the call.
• Reject the call: Slide to on the left to reject the call.
• Rejection SMS: Slide to upward to reject the call and send an SMS
message to the caller.
Note: On the dial application screen, touch > Settings > Quick responses
to edit the rejection SMS.
2.3 Single-handed mode
• On the dial application screen, touch > > Single-handed mode,
mark the checkbox to turn on the Single-handed operation function.
• Once users turn on the functio n, the size of keypad is automatically
reduced to fit single-handed operation.
• Tap the arrow of the screen to slide the keypad to right or left.
• By enabling Dynamic control, users can move the incoming call
interface left or right with a flick gesture.
Notes:
• When you open Single-handed dial mode for th e first time, the keypad is
on the right side.
• The system will remember the last used side and show it by default for
next use.
2.4 During a call
On the call screen, you can do any of the following:
• Hang up the call: Touch to hang up the call.
• Enter another number: Touch to open the keypad and enter another
number.
11
Page 16
• Turn on Speakerphone: Touch to hear the caller on the loudspeaker
(so you don’t need to hold it to your ear).
• Mute: Touch to mute the call so that the other person cannot hear
your voice.
• Hold the call: Touch to put the current call on hold.
• Add a third person to the call: Touch to enter the dial screen and
add a third person to the call.
Hint: You can touch and use other functions during a call. To return to the
call screen, open the Notification panel and tou ch the current call.
2.5 Conference calls
You can hold a conference call with mu ltiple participants.
• Place a call to the first participant.
• Touch during th e call with the first participant.
• Use the keypad to enter the phone nu mber of the second participant
you want to add, or tou ch to select the call log.
• After connecting with the second participant, touch to start the
conference call.
• Touch to end the conference call.
Hint: You can have up to 6 participants in conference call. See the
Vodafone website or contact Vodafone customer services for details.
2.6 Answering another incoming call
If you receive another incoming call while you are in a call, you can accept
the incoming call and automatically place the cu rrent call on hold without
hanging up.
Hint: You need to enable call waiting before you can use this service. See
the Vodafone website or contact Vodafone customer services for details.
12
Page 17

2.7 Supplementary services
Your phone supports a variety of supplementary services. These include
call forwarding and call waiting.
Hint: These services require network support. See the Vodafone website or
contact Vodafone customer services for details.
Setting up call forwarding
If you are unable to answer calls, you can set up this function to forward
incoming calls to another number.
• On the dial application screen, touch > Settings > Call forwarding.
• Select a forwarding type, enter the number you want to forward calls to.
• Select Enable to enable this function.
Setting up call waiting
After setting up this function, the phone will no tify you if you receive an
incoming call while already in a call. It will also inform the incoming caller
to wait for you to end your current call before they are connected. You can
also answer the incoming call and switch between the two calls .
• On the dial application screen, touch > Settings > Additional settings >
Call waiting.
• Mark the Call waiting checkbox to en able this function.
2.8 Voicemail
If you activate and set up voicemail, your phone will automatically send
unanswered calls to voicemail (including calls that are unanswered when
you are in another call and when your phone is off).
• On the dial application screen, touch > Settings > Voicemail > Setup.
• Touch Voicemail number, enter your voicemai l number and then touch
OK to set up voicemail.
13
Page 18
• To listen to your voicemail, press and hold the 1 key on the dial keypad
screen and follow the server instructions.
Hint: Before using this function, contact Vodafone customer services to
activate voicemail. See the Vodafone website or contact Vodafone
customer services for details.
3. People
You can use the People application to save and manage phone numbers,
addresses and other information.
To open the People application, swipe the main Home screen to the right
to reveal another Home screen, then touch . You can also touch >
.
3.1 Adding a contact
• On the Contacts screen, touch .
• Select where to save the contact.
• Enter the contact information.
• Touch to save the contact infor mation.
Hint: In the Call log, touch on the right side of the call log you want to
save to save it directly as a contact.
3.2 Quick Contact
On the Contacts screen, touch the avatar (image) of a contact and select
the icon for the way you want to co mmunicate with the contact. You can
quickly call the contact or send them an SMS or email. The icons available
depend on the informatio n you have for the contact and the applications
and accounts on your phone.
14
Page 19
3.3 Managing contacts
Adding a contact to Favourites
On the Contacts screen, select the contact you want to add to Favourites
and then touch the at the right of the contact name. The star will fill
colour ( ) to indicate that the contact has been added to Favourites.
Searching for a contact
• On the Contacts screen, touch .
• Enter the name of the contact you want to search for. Search results will
be displayed below the search bar.
Hint: You can also slide the scroll bar at the right of Contacts to quickly
search for a contact.
Editing a contact
• On the Contacts screen, select the contact you want to edit then touch
> Edit.
• Edit relevant information and then touch to save the contact.
Alternatively, touch > Discard to cancel your changes.
Deleting a contact
• On the Contacts screen, select the contact you want to delete then
touch > Delete.
• Touch OK to co nfirm that you want to delete the contact.
Sending a contact vCard
You can send a “.vcf ” format vCar d via email, Bluetooth or MMS. Before
using email to send a vCard, you need to set up an email account o n the
phone. (Read the “7.1 Adding an email account” section of this user
manual, on page 22.)
15
Page 20
• Touch a contact on the Con tacts screen.
• Touch > Share.
• Select how to send the vCard.
3.4 Managing groups
Creating a group
• On the Contacts screen, touch to switch to th e Groups screen.
• Touch and select an account.
• Enter the group name.
• Touch , select one o r multiple contacts and then touch .
• Touch to save the group informatio n.
Editing a group
You can always make changes to the in formation you have stored for a
group.
• Select a group and touch > Edit.
• Edit the group name and add or delete members.
• Touch .
Adding a contact to your groups
To add a contact to your groups, you can do any of the following:
• When editing contact information, tou ch the group names below
GROUPS to select groups.
• When editing a group, enter a contact name. The phone will
automatically display the names of stored contacts as you enter the
name. Touch the contact you want to add to the group.
16
Page 21
3.5 Importing contacts from SIM card or storage
• On the People screen, touch > I mport/export, and select the
corresponding option.
• Select one or multiple contacts.
• Touch to finish copying the contact(s).
Hint: Read the “Frequently Asked Questions” section of this user manual
to get more information about how to import contacts from another phone
by using the microSD card, on page 45.)
4. Text input methods
4.1 Using the text input panel
The input panel can be used to enter text. Wh en you need to enter text,
touch the text input area to open the input panel. Touch Back key to hide
the input panel.
4.2 Switching input methods
When you installed other different input m ethods, you can switch the input
methods.
• When the keyboard is displayed on the screen, gently slide down the
Status bar to open the Notification Panel.
17
Page 22
• Touch Select Input Method and select the input metho d you want to
use.
Hint: Touch > > Language & in put > Default, then select which
input method to set as the default.
4.3 Editing text
Touch and hold the text you have entered and select the content you want
to edit. You can use the icons that appear on the top right of the screen to
quickly edit the text.
• : Select all text.
• : Cut selected text. Touch and hold the text you have entered, move
the cursor to select the text you want to edit and touch this icon to cut
the text. After cutting, you can to uch and hold a blank area in the text
field until appears. Move to the location where you
want to paste the text and then touch to paste the text you
previously cut.
• : Copy selected text. Touch and hold the text you have entered.
Move the cursor to select the text you want to copy and touch this icon
to copy the text. After copying, you can touch and hold a blank area in
the text field until appears. Move to the location
where you want to paste the text and then touch to paste the
text you previously copied
• : Replace text. Touch and hold the text you have entered. Move the
cursor to select the text you want to replace and tou ch this icon to
replace the selected text with the text you previously cut or copied.
18
Page 23
4.4 Horizontal keyboard
If you have enabled auto-rotate (in > Display), rotate the phone when
entering text to switch to a h orizontal onscreen keyboard for easier input.
4.5 Input method settings
After selecting an input method, you can co nfigure its specific settings.
• On the right-most Home screen touch > Language & input, or
touch > > Language & input.
• In Keyboard & Input Methods, touch next to an in put method to
configure its settings.
5. Message+
Message+ allows you to share the photo, video and audio to your friends, it
also allows you to make chat or grou p chat with your friends.
Touch at the bottom of the Home screen or touch > to open
the Message+.
5.1 Verify number
You should verify your number on first start up.
• Follow the onscreen instructions to enter your phone number.
• Touch OK to confirm the number.
• The app will connects to the Message+ provisioning system and sends
back a hidden confirmation SMS. If the SMS has been received after a
specific time, the app is registered and starts .
Hint: Make sure you already connected to the internet to activate the Chat
& File Share.
19
Page 24
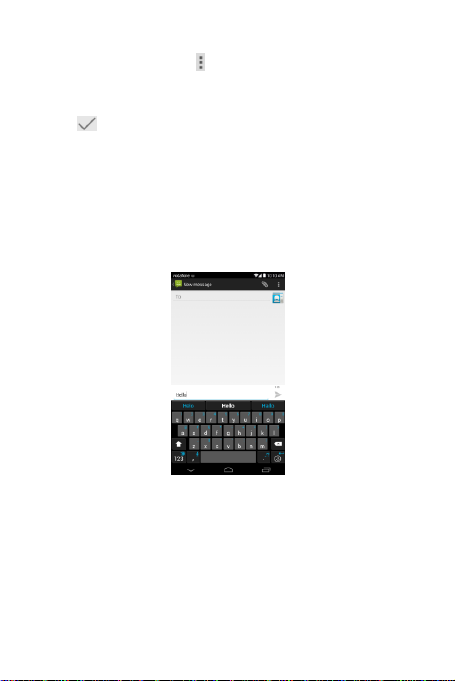
5.2 Start a message
• On the Message+ screen, touch .
• Choose the recipients and add your message. Touch to choose the
attachment you want to share, such as photo, video, location, file, etc.
• Touch Send to send the message.
• You can check the status of message after you sent.
Hint: The message will be sent as an SMS/MMS if your friends didn’t
activate the Message+.
5.3 Start a group chat
• On the Message+ screen, touch .
• Enter the topic for this chat group.
• Type a name or number to search the co ntact. Or you can touch to
choose the contact. Then start your chat.
• Touch the chat title to check the status of your friends or add a new
contact to this group when during a chat.
5.4 Settings
On the Message+ screen, touch > Settings to configure Look & Feel,
Chat & SMS, Sharing, Notifications, Help.
6. Messaging
On the Home screen touch > to open the Messaging.
6.1 Creating a message
• On the Messaging screen, touch .
• Enter the recipient's number or you can touch to select contacts.
20
Page 25
• Add your message. Touch to attach media files such as photo,
audio and slides.
• Touch to send the message.
Hint: An SMS will be sent as an MMS when media files are added.
6.2 Replying to a message
• On the Messaging screen, select the message you want to reply to.
• Compose your message and touch to send it.
6.3 Searching messages
On the Messaging screen, you can touch and en ter message content
or keywords to quickly search for the message you need.
6.4 Deleting a message
On the Messaging screen, touch and hold the message co nversation you
want to delete. Touch to delete the message conversation.
6.5 Customising message settings
On the Messaging screen, touch > Settings to co nfigure SMS, MMS,
message notifications and other settings.
7. Email
You can use the email application to send and receive emails.
Touch on the Home screen or touch > to open the Email.
21
Page 26

7.1 Adding an email account
You must configure an email account before you can send and receive
emails. Sending and receiving emails requ ires you to have a Vodafone data
service for your phone. This is usually part of you r Vodafone price plan.
• Select an account, enter the email address and password, and then
touch Next. Follow the onscreen instru ctions to configure the
relevant settin gs.
Hints:
1. After cr eating your initial email account, from the Inbox screen you can
touch > Settings > ADD ACCOUNT to add another email account.
2. Set up your email account according to the instructions provided by
your email service provider. Log on to the email service provider's
website for specific settings.
7.2 Switching accounts
On the Inbox screen, touch the email address field at the top of the screen.
Select an email account from the list that is displayed. After making your
selection, the Inbox for the selected account will be opened autom atically.
7.3 Combined account view
You can show the Inbox emails from all your accounts on one screen . On
the Inbox screen, touch the em ail address field at the top of the screen,
then select Combined view.
7.4 Viewing emails
On the Inbox screen, touch the email you want to view to o pen it.
7.5 Creating and sending emails
• On the Inbox screen, touch .
22
Page 27
• Enter the recipient's email address in the To field. Or you can touch
to select contacts.
• Enter the subject and content of the message in the relevant fields.
• Touch to send the email.
7.6 Replying to and forwarding emails
On the Inbox screen, touch the email you want to reply to.
• Touch to reply directly to the sender.
• Touch > Reply all to reply to everyone.
• Touch > Forward to forward the email.
7.7 Saving email attachments
• On the Inbox screen, touch the email you want to view.
• Slide down to find the attachments after the content.
• Touch > Save to download the attachment.
Hints:
1. If your phone h as a microSD card installed, the downloaded file will sa ve
to the download folder (/storage/external_sd/Downloa d) in microSD
card by default.
2. You can change the default storage location in Settings > Storage >
DEFAULT WRITE DISK.
7.8 Deleting an email account
• On the Settings screen (On the Home screen touch > ).
• In ACCOUNTS, touch an email account.
• Touch the name of account, then touch > Remove account to delete
the account.
23
Page 28
7.9 Customising email account settings
• On the Inbox screen, touch > Settings to enter the account settings
screen.
• Touch an email account.
• Change account settings such as data usage, notification setting s, server
settings, etc.
8. Data service
8.1 Turning on the data service
• Touch > .
• In WIRELESS & NETWORKS, touch M ore... > Mobile networks.
• Mark the Data enabled checkbox to turn on the data service.
• Mark the Data Roaming checkbox to turn on the data roaming service.
Hints:
1. To extend standby time an d save data usage, switch off the data service
when network services are not n eeded.
2. Using mobile networks while ro aming may incur additional charges. See
the Vodafone website for details.
3. The phone's access points have already been configured for you. Do not
change access point parameters without permission; otherwise you may
be unable to access networks.
8.2 Wi-Fi
You can use the phone's Wi-F i function to access the Internet and pick up
and send emails.
• Touch > .
• In WIRELESS & NETWORKS, touch W i-Fi switch to turn on/off Wi-Fi.
• In WIRELESS & NETWORKS, touch Wi-Fi to enter the Wi-Fi settings screen.
The phone will search for and list near by Wi-Fi hotspots.
24
Page 29

• Select the Wi-Fi hotspot you want to connect to. If the network you
selected is secured, you are req uired to enter a password before you can
connect.
Hints:
1. If you turn on Wi-Fi and the data service simultaneously, the phone will
automatically use the Wi-Fi connection. If Wi-Fi is disconnected, the
phone will use the data service to continue the data connection.
2. On the Wi-Fi settings screen, touch and configure authentication to
add a new Wi-Fi hotspot SSID (service set identifier ).
3. Wi-Fi signals may be obstructed and weakened by obstacles like walls.
Connecting to Wi-Fi using WPS
WPS (Wi-Fi Protected Setup), also called quick secure setup, is an operation
that can simplify Wi-Fi connection settings. You can simply press the WPS
button or enter a PIN number to automatically establish a secure
connection. There is no need to configure complicated settings in the Wi -Fi
hotspot administration software.
Hint: When using WPS to connect to a Wi-Fi hotspot, make sure that the
Wi-Fi hotspot supports WPS; other wise you will be unable to use this
function.
WPS button connection
• Enable Wi-Fi.
• On the Wi-Fi settings screen, touch .
• Press the WPS button on the Wi -Fi hotspot device.
WPS PIN number connection
• Enable Wi-Fi.
• On the Wi-Fi settings screen, touch > WPS Pin Entry. The phone will
automatically create a PIN nu mber.
• Enter this PIN number into the Wi -Fi hotspot device.
25
Page 30
Hint: You can also connect by creating a PIN number using the Wi -Fi device
and entering this PIN number into the phone.
8.3 Sharing your phone's data connection
You can share your phone's mo bile network with a single computer via a
USB data cable. This is called USB tethering. You can also share your
phone’s mobile network as a portable Wi -Fi hotspot or Bluetooth.
Hint: Using this function may incur additional data charges, depending on
your data plan. See the Vodafone website for more details, or contact
Vodafone customer support.
Sharing your phone's mobile network via USB
If your computer's operating system is Windows XP or a later or a new
release of Linux, you can use USB tethering without changing any settings
on your computer. If you use USB tether ing with computers with diffe rent
operating systems, you may need to establish corresponding n etwork
connections on each computer.
• Touch > .
• In WIRELESS & NETWORKS, touch M ore... > Tethering & portable
hotspot.
• Mark the USB tethering checkbox to shar e your phone's mobile network
with a computer and use the co mputer to connect to the internet.
Hint: While you are sharin g your phone's data connection via USB tethering,
you cannot set the microSD card as a mass storage device.
Sharing your phone's data connection as a portable Wi-Fi
hotspot
By setting your phone as a Wi -Fi hotspot you can connect up to eight
wireless devices at most.
26
Page 31
• Touch > .
• In WIRELESS & NETWORKS, touch M ore... > Tethering & portable
hotspot.
• Touch the Portable Wi-Fi hotspot checkbox to activate the Wi-Fi hotspot
and share your mobile network.
Hints:
1. You can touch Set up Wi-Fi hotspot to set the n ame, security and
password for the Wi-F i hotspot. To protect your network, it is
recommended that you secure it using WPA2 PSK.
2. You cannot use Wi-Fi hotspot and Wi-Fi at the same time.
Sharing your phone's data connection via Bluetooth
You can also use the Bluetoo th to sharing your mobile networks.
• Touch > .
• In WIRELESS & NETWORKS, touch Mor e... > Tethering & portable
hotspot.
• Touch the Bluetooth tethering ch eckbox to share your mobile network.
• In WIRELESS & NETWORKS, touch Bluetooth, in PAIRED DEVICES list,
touch of device that you want to shar e the mobile network. In
device settings screen, touch the Internet access checkbox to allow the
internet access.
8.4 Bluetooth
Your phone supports Bluetooth, which allows you to create a wireless
connection with other compatible devices so you can share data.
Hint: Bluetooth has a maxim um reception distance of 10 metr es. Keep
devices connected by Bluetooth within 10 metres of each other. Obstacles
like walls or other electronic equipment m ay interfere with Bluetooth
signals.
27
Page 32

Turning on Bluetooth
• Touch > .
• In WIRELESS & NETWORKS, touch th e Bluetooth switch to turn on
Bluetooth. The Status bar will display the Bluetooth icon.
• If you need to change the device name of your phone, touch >
Rename phone. Enter a name and touch Rename to save your change.
Searching for and pairing with other Bluetooth devices
You need to pair with a Bluetooth device before you can share data with it.
Once a device is paired with your phone, it will au tomatically connect to
your phone whenever it is turned on.
• Check your phone's settings to make sur e that the Bluetooth is enabled.
• In WIRELESS & NETWORKS, touch B luetooth list to enter the Bluetooth
settings screen. The phone will automatically scan for nearby Bluetooth
devices.
• Touch the one that you want to pair with and follow the onscreen
instructions to pair with it. If you don’t know the password for the device
you’re trying to pair with, try 00 00 (this is the default password for most
BT devices).
• If you want to unpair, in Paired devices touch > Unpair to stop it
connecting automatically. You can always go thr ough the pairing
process again if you change your mind.
• To stop a connection with a Bluetooth device, the simplest way is to turn
the device off. Otherwise, just turn Blueto oth off on your phone using
the Quick Settings panel.
Sending files via Bluetooth
With Bluetooth, you can share pictures, videos or music files with your
family and friends.
• In ES File Explorer application, touch and hold the file you want to send.
After the file has been selected, touch > Share, on the options menu
28
Page 33
that pops up, select Bluetooth.
• The screen will list the Bluetooth devices that have been found. Select
the device you want to send the file to.
9. Browser
Touch at the bottom of the Home screen or touch > to open
the Browser.
9.1 Browsing web pages
• Enter a web page address in the URL field at the top.
• Touch on the top right of the screen to browse thumbnails of
multiple open web pages and switch to any web page win dow.
• Touch to open a new window.
Hint: If you have installed other browsers, it will pop up a selection for
choosing browsers when you click a w eb link.
9.2 Managing bookmarks
Adding a bookmark
• Use the browser to open the web page you want to bookmark.
• Touch > Save to bookmarks.
• Enter the bookmark name and touch OK to add the bookmark.
Opening a bookmark
• On the browser screen, touch > B ookmarks.
• Select the bookmark of the website you want to view.
• On the Bookmarks screen, touch the History tab to view the web pages
you have visited.
29
Page 34
9.3 Setting a home page
• On the browser screen, touch > Settings > General > Set homepage.
• Select a home page from the list or touch Other to enter a web address
and then touch OK to save the home page.
9.4 Customising browser settings
• On the browser screen, touch > Settings.
• On the Settings list, you can select menus to customise the browser.
10. Camera and video camera
You can use your phone to shoot and shar e both photos and videos. Your
camera supports numerous modes.
Touch at the bottom of the Home screen or touch > to open
the Camera. On the Lock screen, long press the volume key or slide from
right side of screen to left, can open the Camera quickly.
10.1 Taking a photo
• Open the camera and aim the lens at the subject.
• Touch the screen where you want to focus, when the lines in the circle
turn green, then that point is in focus.
• Pinch or spread in the viewfinder, you can change the focal length.
• Touch to take the photo.
30
Page 35
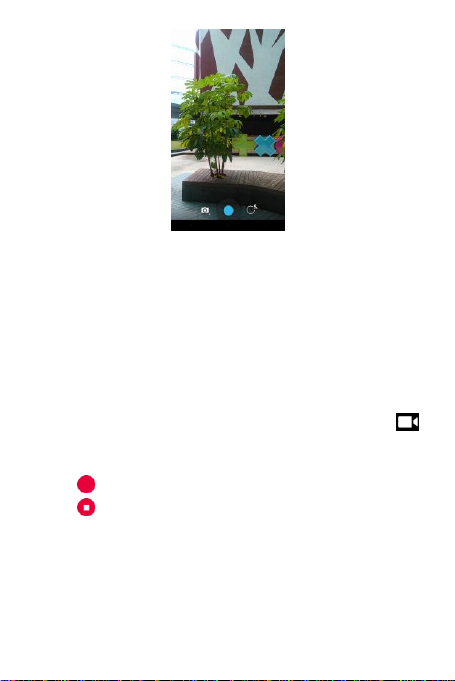
• Before you take a photo you can t ouch and hold anywhere on the
screen to see the camer a options. You have to keep touching and slide
onto the option button, then select the option or value.
Hint: For a better result, you can o pen the settings menu and adjust
camera parameters before taking the photo. The viewfinder will change
accordingly after you have adjusted the settings.
10.2 Recording a video
• Open the camera and aim the lens at the subject.
• Touch the Camera icon on the lower left of the screen, and select
to activate video mode.
• Pinch or spread in the viewfinder, you can change the focal length.
• Touch to start recording.
• Touch to stop when you finish recording.
• Before you record a video you can t ouch and hold anywhere on the
screen to see the options. You have to keep touching and slide onto the
option button, then select the option or value.
Hints:
1. To share the video via MMS, the video size should be less than 300KB.
31
Page 36
2. For a better result, you can open the settings menu and adjust camera
parameters before recording the video. The viewfinder will change
accordingly after you have adjusted the settings.
10.3 Panoramic mode
• Open the camera, touch the Camera icon on the lower left of the screen,
and select to activate panoramic mode.
• Touch to start capturing panorama.
• You can check the progress under the viewfinder.
• Touch to stop when you finish.
After taking your photo or video, you can slide from right to left to view the
photo or video you just took.
When viewing a photo or video, you can do any of the following:
• Touch to send the photo or video to a friend via MMS, email,
Bluetooth or another method.
• Touch to delete the photo or video.
11. Gallery
You can use the Gallery to manage picture and video files.
On the right-most Home screen touch or touch > to open
the Gallery.
11.1 Viewing pictures and videos
• On the library screen, touch the folder you want to view.
• Touch the picture or video you want to view.
32
Page 37
11.2 Editing a picture
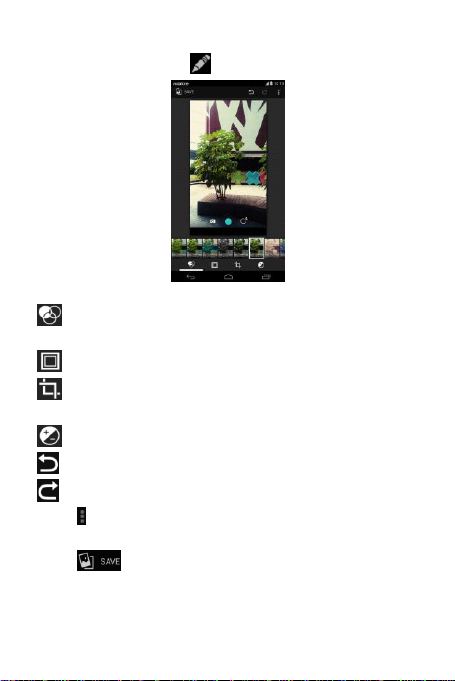
When viewing a picture, touch to edit it.
On the editing screen, you can do any o f the following:
• : Perform photo effects such as P unch, Vintage, B/W, Bleach, etc. on
the image.
• : Perform photo border on the im ages.
• : Perform operations such as Crop, Straighten, Rotate and Mirror on
the image.
• : Perform operations such as Autocolour, Exposure, Vignette, etc.
• : Undo the last step.
• : Redo the operation.
• Touch to select Reset, Information, Show Applied Effects, Export, or
Print to perform corresponding operations.
• Touch to save a picture after you have finished editing it.
33
Page 38

12. Google PlayTM Music
On the Home screen touch > to open the Google Play M usic.
On the Google Play Music screen, to uch in the upper left of the
screen to switch between Listen Now, M y Library and Playlists.
My Library contains the following tabs: GENRES, ARTISTS, ALBUMS and
SONGS. You can slide left and r ight to view and select the content of each
tab.
Hint: You can play music files stored on the microSD card in your phone.
Music files can be downloaded from computer to microSD card by using an
USB cable.
12.1 Adding music to a playlist
• Touch on the music file that you want to add to a playlist.
• On the options menu that pops up, touch A dd to playlist.
• On the playlist that pops up, select a playlist to add the song to it.
12.2 Playing a playlist
• On the Playlists screen, touch the playlist you want to play.
• Touch the cover of the playlist to play this playlist.
12.3 Playing a music file
• On the My Library screen, slide to SONGS tab.
• Touch a music file to play it.
• Touch or slide up the bottom of the screen to see the mu sic playback
screen.
On the music playback screen, you can do any o f the following:
• Touch to enter the playlist screen.
• Check music playback progress.
34
Page 39
• Touch to pause or touch to resume. Touch to play the next
song. Touch to play the previous song.
• Touch or slide down the top of the screen to back to the My L ibrary.
Hints: During music playback, touch the Home key to go back to the Home
screen. The music will continue to play in the background and you can use
other applications. Open the Status bar and select the cur rently playing
song to go back to the music playback screen.
13. Accounts and syncing
Use the Accounts settings to add, remove, and manage your accounts,
such as Corporate, Email, Facebook, Google, Message+, Twitter an d other
supported accounts. You can also use these settings to control how and
whether all applications send, receive, and synchronize data on their own
schedules, and whether all applications can synchronize user data
automatically.
Gmail, Google Calendar, and other applications may also have their own
settings to control how they synchronize data.
On the right-most Home scre en touch or touch > . In
ACCOUNTS, you can see the acco unts you already added or manage your
accounts.
13.1 Adding an account
• In ACCOUNTS, touch Add account.
• Select the kind of account to add.
• Follow the onscreen instructions to enter the required inform ation
about the account.
• Configure the account. Set what info rmation you want to sync to the
phone.
• When you are finished, the account you configured is added to
ACCOUNTS.
35
Page 40
Hint: The information you are able to configure for syncing depends on the
kind of account you added.
13.2 Enabling syncing
• In ACCOUNTS, select the account yo u want enable syncing for.
• Mark the check box to permit applications to synchronise data on their
own schedule.
14. More applications
14.1 Calendar
You can use Calendar to man age and arrange events.
On the right-most Home screen touch or touch > to open
the Calendar.
Multimode view
On the Calendar screen, you can display the Calendar in daily, weekly,
monthly, or agenda view. Touch the time in the upper left of the screen to
switch between Day, Week, Month and A genda view.
Adding a new event
• On the Calendar screen, touch > New event.
• Edit upcoming event information such as a name, location, time, etc.
• Touch to save the event.
Hint: You can double touch any day on the screen to create a new event.
You can also tap and hold for a Quick Event entry.
Customising Calendar settings
On the Calendar screen, touch > Settings to configure Calendar.
36
Page 41
Setting an event reminder
• On any calendar view, touch an event to view its details or summary.
• Touch Add reminder to add a reminder fo r the event. Alternatively,
touch to delete a reminder that has already been set.
• Touch the reminder time. In the drop-down list that opens, select a time
period to set the length of time befor e the event when you want to be
reminded. When the time comes, you will receive a notification o r an
email about the event.
Syncing and displaying the Calendar
Calendar events for accounts ( e.g. email accounts) that have been added
to your phone can be synced to and displayed in your Calendar application.
• On any Calendar view, touch > Calendars to display.
• Mark the check box to enable or disable syncing.
Hint: I f you have already configured an account to sync events to your
phone, that account will appear on the C alendars to display list.
14.2 Alarm clock
On the Home screen to uch > to enter the Clock screen, and then
touch to switch to the Alar m tab.
On the alarm list screen, follow th e instructions below to set your alarm:
• Touch Time to set the time of the alarm.
• Mark the REPEAT check box to set the days when you want the alarm to
sound.
• Touch Ringtone to select a ringtone for the alarm.
• Mark the VIBRATE checkbox to ha ve the phone vibrate, in addition to
playing the ringtone.
• Touch Label to enter a name for the alarm.
• Touch the switch of the alarm to turn on the alarm.
37
Page 42

14.3 Calculator
On Home screen touch > to open the Calculator.
On the Calculator screen, swipe the screen right or left to switch between
the Advanced panel and Basic panel.
15. Settings
On the right-most Home screen touch or touch > to
configure detailed phone settings.
15.1 Setting the date & time
• On the Settings screen, touch Date & tim e.
• Unmark the Automatic date & tim e checkbox.
• Unmark the Automatic time zone checkbox.
• Touch Set date. Slide up and down to adjust the date an d then touch
Done.
• Touch Set time. Slide up and down to adjust the time and then touch
Done.
• Touch Select time zone and then select the desired time zone from the
list. Scroll the list to view more time zones.
• Mark or unmark the Use 24 -hour format checkbox to switch between
24-hour format and 12-hour format.
• Touch Choose date format to select how you want the date to display on
your phone.
Hint: When your phone is using date and time settings pro vided
automatically by the network, you cannot manually set the date, time and
time zone.
15.2 Setting the display
On the Settings screen, touch Display to set the screen display.
• Brightness: Set the brightness of the display. To uch AUTO to turn off
38
Page 43

the auto-brightness, or adjust the brightness manually.
• Wallpaper: Change the background picture of the Home screen.
• Home screen: Mark or unmar k this checkbox to turn on or o ff loop
panels function.
• Auto-rotate screen: After setting this function, the phone will
automatically switch orientation if you rotate the phone while browsing
web pages, viewing pictures, editing information and perfo rming other
operations.
• Sleep: Set the screen sleep time. Your screen will automatically turn off
if no operations are performed within the time set.
• Daydream: When Daydream is on, your device displays photos, colours,
and more while it is charging or docked. Set the daydream type or when
to daydream. Touch the daydream switch to tur n off this function.
• Font size: Set the font size according to you r preference.
• Pulse notification light: Mark or unmark this checkbox to control the
phone’s light pulse when has a new notification.
• Smart Touch: Mark or un mark this checkbox to enable or disable Smart
Touch for single-handed operation.
• Wireless display: When you tu rn on this function, the phone will
automatically search for nearby displays.
15.3 Adjusting the volume
You can use the Volume key to adjust the volume from the Home screen
or many application screens. For example, during a call or when playing
music or videos.
You can also adjust the volume using the following method:
• On the Settings screen, touch Sound.
• Select Volumes and drag the slider left to make the volume lower, or
right to make it higher.
• Touch OK to save the adjustment.
39
Page 44

15.4 Changing the phone ringtone
• On the Settings screen, touch Sound > Phone ringtone.
• On the options menu that pops up, select a path of the ringtone.
• Select the ringtone you want to use.
15.5 Managing applications
On the Settings screen, touch Apps to open a list of all applications.
Viewing and uninstalling applications
• Touch an application to view its informatio n.
• If you want to uninstall the application, touch Uninstall and follow the
onscreen instructions.
Hints:
1. Some applications are subject to system restrictions and cannot be
uninstalled. The Uninstall option will not appear on the Application info
screen for such applications.
2. On the list of all applications, touch > Sort by size to rearrange
applications by file size.
Moving larger applications to microSD
The storage location of some applications can be chan ged. Moving larger
applications to microSD card can free up more space to stor e applications
that cannot be moved.
• Touch the application you want to m ove and then touch Move to SD
card to move the entire application out o f the phone's internal storage.
• Touch Move to phone to move the application back to the phone's
internal storage.
Hints:
1. The Storage list on the Application info screen displays detailed data
showing which storage space the application occupies.
2. If the application can be moved, you can use a move button.
40
Page 45

15.6 Security settings
Turning on screen unlock pattern protection
You can set a screen unlock pattern. Once the screen has locked, it needs
to be drawn correctly in order to unlock the screen.
• On the Settings screen, touch Security > Scr een lock > Pattern.
• Follow the onscreen instructions to draw the unlock pattern.
• Touch Continue.
• Draw the same unlock pattern again and touch Confirm.
Turning on numeric PIN protection
You can set a numeric PIN to lock your phone. Once the screen has locked,
it needs to be entered correctly in order to unlock the phone.
• On the Settings screen, touch Security > Scr een lock > PIN.
• Enter at least four-digit numbers.
• Touch Continue.
• Enter the same number again and touch OK.
Turning on SIM card PIN protection
A PIN (personal identification number) can prevent other people using your
SIM card without permission. A PUK (personal unlock key) can be used to
unlock a blocked PIN. If an incorrect PIN is entered three times in a row,
your SIM will be blocked. To unblock your SI M, you'll need to enter your
PUK. If the wrong PUK is entere d ten times in a row, your SIM will be
blocked permanently. If these two codes were not provided with your SIM
card or if you forget either one, con tact Vodafone customer services. If you
turn on SIM card PIN protection, your SIM card PIN needs to be entered
every time you turn on your phone.
• On the Settings screen, touch Security > Set up SIM card lock.
• Mark the Lock SIM card checkbox.
• Enter the SIM card PIN and tou ch OK to turn on PIN protection.
Hint: To change your SIM card PIN, touch Change SIM PIN.
41
Page 46

16. NFC
NFC (Near Field Communication ) is a new, short-range wireless
connectivity technology which allows mobile users to read and write NFC
tags, pair with other NFC devices, and even make fast and secure mobile
payments. With NFC activated, you can use this application to open, act on
and organize the tags you've scanned. I n Settings > WIRELESS &
NETWORKS, touch More..., check NFC to turn on/off NFC function. You can
also touch on Quick Settings panel to turn NFC on or off.
Tap & pay
When NFC is turned on, you can use the tap & pay feature to pay for items
just by touching your phone to a reader at a register.
To manage your apps for the tap & pay option, follow these steps:
• On the Settings screen, touch Tap & pay.
• Touch an app to make it your default payment app.
If your device doesn’t have a default app, you can browse Google PlayTM for
other payment apps.
Hints:
1. The tap & pay option doesn’t apply to Android Beam and won’t include
certain apps, such as money transfer apps.
2. NFC is on ly available in some countries/areas.
17. Location access
You can let your device access GPS, Wi-Fi networks, and mobile networks to
estimate your location. Apps that have your permission can use this
information to deliver location-based services , such as the ability to check
in, view commute traffic, or find nearby restaurants.
To control what location informatio n your device can use, go to Settings >
PERSONAL > Location.
When the Location switch is on, you can do any of the following:
42
Page 47

• Change the location mode between High accuracy, Battery saving and
Device only.
• Check the Recent location r equests.
• Check the Location services.
• AGPS Setting: Touch to set the AGPS server address and the port.
Hint: Using location access does make more demands on your battery. If
you need to save battery life then you can turn it off in Settings, though
when the switch is off, your device won’t be able to find your precise
location or share it with any apps.
18. Restoring factory settings
Restoring factory settings erases all of your personal data stored on the
phone, including email accounts, system settings, application setting s, and
any applications you have installed.
• On the Settings screen, touch Backup & reset > Factory data reset.
• Follow the onscreen instructions and to uch Reset phone. Then touch
Erase everything. The phone will restore the facto ry settings and restart
automatically.
Warning: Before restoring factory settings, it is vital that you first back up
any important data on the phone; other wise all data will be lost after
factory settings have been restored.
19. FOTA (Firmware Over The Air)
updating
Using the FOTA Upgrade tool you can update your phone's software.
• On the right-most Home screen touch > About phone > System
updates, or touch > > About phone > System updates.
• Touch Check for updates, and the phone will search for the latest
software. If you want to update the system, please tou ch the button
43
Page 48

Download, after it done please touch Update now to complete the
upgrade. Then your phone's software will have the latest version.
Hints:
1. During FOTA downloading or updating, do not change your default
storage location, to avoid error s in locating the correct update packages.
2. Upgrading your phone software will not affect your mobile phone data.
44
Page 49

Frequently Asked Questions
How do I free up my phone's internal storage?
• Move files and email attachments to the microSD card.
• In Browser, clear all temporary In ternet files and Browser history
information.
• Uninstall any applications that you no lon ger use.
• Reset your phone to factory settings.
How can I use the microSD card to import contacts from
another phone onto my phone?
Your phone supports “.vcf” format contact files. “.vcf” is the standard
format for storing personal and company contacts. It u sually includes
name, address, telephone number, mobile phone number, email and o ther
contact information. It also supports custom fields, pictures and other
media information.
• Back up the contact you want to import as a “.vcf” file and save it to the
microSD card.
• Insert the microSD car d into your phone. In ES File Explorer, find the “.vcf”
file saved on the microSD car d.
• Touch the “.vcf” file. On the window that pop s up, select the account you
want to import the contact to.
Hint: Because “.vcf” files backed up by differ ent systems may cause
compatibility problems, some contact infor mation may be lost after the
contact has been imported.
How do I turn off auto-rotate?
• On the right-most Home screen touch > Display, or touch >
> Display.
• Unmark the Auto-rotate screen checkbox to disable this function.
45
Page 50

How do I set the screen unlock pattern?
• On the right-most Home screen touch > Security > Screen lock >
Pattern, or touch > > Security > Screen lock > Pattern.
• Follow the onscreen instructions to set the unlock pattern.
How do I switch input method?
When you installed other different input m ethods, you can switch the input
methods.
• When the keyboard is displayed on the screen, gently drag down the
Status bar to open the Notification Panel.
• Touch Choose input meth od and select the input method you want to
use.
How do I stop music playing in the background?
Gently drag down Status bar to open the Notification panel. Touch the
music playback information bar to enter the music playback screen and
stop playback.
How do I return to the call screen?
If you are in another screen dur ing a phone call, you can get back to the
call screen by gently dragging down the Status bar to open the Notification
panel and the touching the current call.
How do I create a shortcut on the Home screen?
On the applications list, touch and h old an application icon until th e Home
screen is displayed. Then drag the icon where you want it to go and release
your finger.
How do I hide the keyboard?
Touch Back key to h ide the keyboard when it is displayed on the screen .
46
Page 51

How do I forward a message?
Touch and open the message you want to forward. Touch and h old the
message content. On the options menu that pops up, touch Forward.
How do I take a quick capture of the current screen?
Press the Volume key (Down) and Power key at the same time, and make a
little pause to take a capture of the current screen. You can also capture
the screen by touching the specified option in Smart Touch.
If your phone has a microSD card installed, the screenshots will save to the
screenshots folder (/storage/external_sd/Pictu res/Screenshots/) in
microSD card by default.
47
Page 52
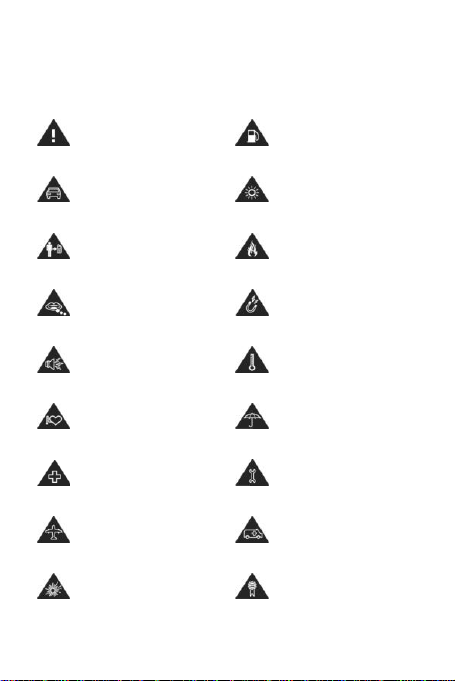
Read the Safety
Information section of this
user guide on page 49
Do not use while
re-fuelling
Do not use hand-held
while driving
This device may produce
a bright or flashing light
For body-worn operation
maintain a separation of
15 mm
Do not dispose of in a fire
Small parts may cause a
choking hazard
Avoid contact with
magnetic media
This device may produce
a loud sound
Avoid Extreme
Temperatures
Keep away from
pacemakers and other
personal medical devices
Avoid contact with liquid,
keep dry
Switch off when instructed
in hospitals and medical
facilities
Do not try and
disassemble
Switch off when instructed
in aircrafts and airports
Do not rely on this device
for emergency
communications
Switch off in explosive
environments
Only use approved
accessories
Product Safety Information
Pictograms and Graphic Symbols
48
Page 53

RF Exposure
General Statement on RF energy
Your phone contains a tran smitter and a receiver. When it is ON, it receives
and transmits RF energy. When you communicate with your phone, the
system handling your call controls the power level at which your phone
transmits.
Specific Absorption Rate (SAR)
Your mobile device is a r adio transmitter and receiver. It is designed not to
exceed the limits for exposure to r adio waves recommended by
international guidelines. These guidelines were develope d by the
independent scientific organisation ICNIRP an d include safety margins
designed to assure the protection of all persons, regardless of age and
health.
The guidelines use a unit of measurement known as the Specific
Absorption Rate, or SAR. The SAR limit for mobile devices is 2 W/kg and the
highest SAR value for this device when tested at the ear was 0.374 W/kg
and when tested near the body (at a distance of 15 mm) the highest SAR
value was 0.401 W/kg. As mobile devices offer a range of functions, they
can be used in other positions, such as on the body as described in this user
guide.
As SAR is measured utilising the device’s highest transmitting pow er, the
actual SAR of this device while operating is typically below that indicated
above. This is due to automatic changes to the power level of the device to
ensure it only uses the m inimum power required to communicate with the
network.
Body worn operation
Important safety information regarding radiofreq uency radiation (RF)
exposure.
To ensure compliance with RF exposure guidelines the phone must be
used with a minimum of 15 mm separation from the body.
Failure to observe these instructions could result in your RF exposure
exceeding the relevant guideline limits.
49
Page 54
Limiting exposure to radio frequency (RF) fields
For individuals concerned about limiting their exposure to RF fields, the
World Health Organisation (WHO) provides the following advice:
Precautionary measures: Present scientific information does not indicate
the need for any special precautions for the use of mobile phones. If
individuals are concerned, they might choose t o limit their own or their
children’s RF exposure by limiting the length of calls, or using ‘hands-free’
devices to keep mobile phones away from the head and body.
Further information on this subject can be o btained from the WHO home
page http://www.who.int/peh-emf WHO Fact sheet 193: June 2000.
Regulatory information
The following approvals and notices apply in specific regions as noted .
50
Page 55
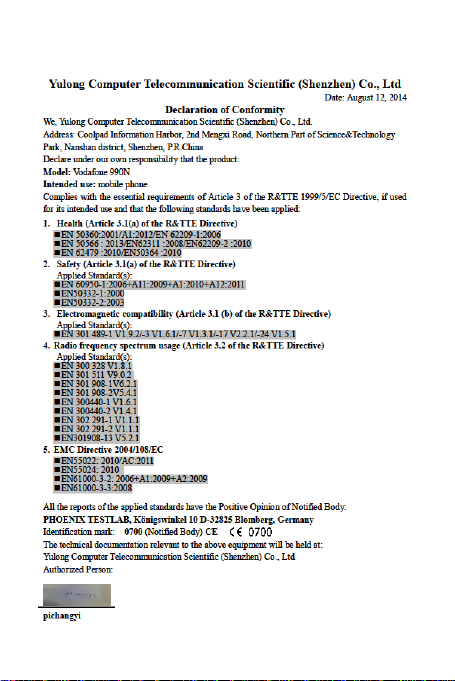
Declaration of Conformity
51
Page 56

Distraction
Driving
Full attention must be given to driving at all times in order to reduce the
risk of an accident. Using a phone w hile driving (even with a hands-free kit)
causes distraction and can lead to an accident. You must comply with local
laws and regulations restricting the use of wireless devices while driving.
Operating machinery
Full attention must be given to operating the machinery in order to reduce
the risk of an accident.
Product Handling
General Statement on handling and use
You alone are responsible for how you use your phone an d any
consequences of its use.
You must always switch off your phone wherever the use of a phone is
prohibited. Use of your phone is subject to safety measures designed to
protect users and their environment.
• Always treat your phone and its accesso ries with care and keep it in a
clean and dust-free place.
• Do not expose your phone or its accessories to o pen flames or lit
tobacco products.
• Do not expose your phone or its accessories to liq uid, moisture or high
humidity.
• Do not drop, throw or try to bend your phone or its accessories.
• Do not use harsh chemicals, cleaning solvents, or aer osols to clean the
device or its accessories.
• Do not paint your phone or its accessories.
• Do not attempt to disassemble your phone or its accessories, only
authorised personnel must do so.
• Do not expose your phone or its accessories to extreme temperatures,
minimum 0 and maximum + 45 degrees Celsius.
• Please check local regulations for disposal of electronic pro ducts.
52
Page 57

• Do not carry your phone in your back pocket as it could break when you
sit down.
Small Children
Do not leave your phone and its accessories within the reach of small
children or allow them to play with it.
They could hurt themselves or other s, or could accidentally damage the
phone.
Your phone contains small parts with sharp edges that may cause an injur y
or which could become detached and create a choking hazard.
Demagnetisation
To avoid the risk of demagnetisation, do not allow electronic devices or
magnetic media close to your phone fo r a long time.
Electrostatic discharge (ESD)
Do not touch the SIM card’s metal connectors.
Power supply
Do not connect your device to the power supply or switch it on until
instructed to do so in the installation in structions.
Antenna
Do not touch the antenna un necessarily.
Normal use position
When placing or receiving a phone call, hold your phone to your ear, with
the bottom towards your mouth or as you would a fixed line phone.
53
Page 58

Air Bags
Do not place a phone in the ar ea over an air bag or in the air bag
deployment area.
Store the phone safely before driving your vehicle.
Seizures/Blackouts
This phone is capable of producing bright flashing lights.
Repetitive Motion Injuries
To minimise the risk of RSI, when Texting or playing games with your
phone:
• Do not grip the phone too tightly.
• Press the buttons lightly.
• Make use of the special features in the handset which minimise the
number of buttons which have to be pressed, such as message
templates and predictive text.
• Take lots of breaks to stretch and r elax.
Emergency Calls
This phone, like any wireless phone, operates using radio signals, which
cannot guarantee connection in all conditions. Therefore, you must never
rely solely on any wireless phone for em ergency communications.
54
Page 59

Loud Noise
This phone is capable of producing loud noises which may damage your
hearing. Prolonged exposure to music at full volume on the music player
may damage the listener's hearing. Use the reco mmended headphones
only.
PROTECT YOUR HEARING
To prevent possible hearing damage, do not listen at high
volume levels for long periods. Exercise caution when
holding your device near your ear while the loudspeaker is in
Bright Light
This phone is capable of producing flash of light or use as a torch, do not
use it too close to the eyes.
Phone Heating
Your phone may become warm during char ging and during normal use.
Electrical Safety
Accessories
Use only approved accessories.
Do not connect with incompatible products or accessories.
Take care not to touch or allow metal objects, such as coins or key rings, to
contact or short-circuit the battery terminals.
Connection to a Car
Seek professional advice when connecting a phone interface to the vehicle
electrical system.
Faulty and Damaged Products
Do not attempt to disassemble the phone or its accessory.
Only qualified personnel must service or repair the phone or its accessory.
use.
55
Page 60

If your phone or its accessory has been submerged in water, punctured , or
subjected to a severe fall, do not use it until you have taken it to be
checked at an authorised service centre.
Battery Handling & Safety
Always switch the device off and disconnect the char ger before removing
the battery.
Only use the battery and charger supplied, or m anufacturer approved
replacements intended for use with your phone. Using other batteries and
chargers could be dangerous.
Do not disassemble or short-circu it the battery. Accidental short-circuiting
can occur if a metallic object such as a key, paper clip, or pen touches the
terminals of the battery.
Improper battery use may result in a fire, explosion, or other hazard. If you
believe the battery has been damaged, do not u se it, take it to a service
centre for testing.
Interference
General statement on interference
Care must be taken when using the phone in close proximity to personal
medical devices, such as pacemakers and hearing aids.
Pacemakers
Pacemaker manufacturers recommend that a minimum separation of 15
cm be maintained between a mobile phone and a pacemaker to avoid
potential interference with the pacemaker. To achieve this use the phone
on the opposite ear to your pacemaker and do not carry it in a breast
pocket.
Hearing Aids
People with hearing aids or other cochlear implants may experience
interfering noises when using wireless devices or when one is nearby.
The level of interference will depend on the type of hearing device and the
distance from the interference sour ce, increasing the separation between
56
Page 61

them may reduce the interference. You may also consult your hearing aid
manufacturer to discuss alternatives.
Medical devices
Please consult your doctor and the device manufacturer to determine if
operation of your phone may inter fere with the operation of your medical
device.
Hospitals
Switch off your wireless device when req uested to do so in hospitals, clinics
or health care facilities. These requests are designed to prevent possible
interference with sensitive medical equipment.
Aircraft
Switch off your wireless device whenever you ar e instructed to do so by
airport or airline staff.
Consult the airline staff about the use of wireless devices on board the
aircraft, if your device offers a ‘flight mode’ this must be enabled prior to
boarding an aircraft.
Interference in cars
Please note that because of possible inter ference to electronic equipment,
some vehicle manufacturers forbid the u se of mobile phones in their
vehicles unless a hands-free kit with an external antenna is included in the
installation.
Explosive environments
Petrol stations and explosive atmospheres
In locations with potentially explosive atmospheres, obey all poste d signs
to turn off wireless devices such as your phone or other radio eq uipment.
Areas with potentially explosive atmospheres include fuelling ar eas, below
decks on boats, fuel or chemical transfer or storage facilities, areas where
the air contains chemicals or particles, such as grain, dust, or metal
powders.
57
Page 62
Blasting Caps and Areas
Turn off your mobile phone or wireless device when in a blasting area or in
areas posted turn off “two-way radios” or “electronic devices” to avoid
interfering with blasting operations.
Protection against theft
Your telephone is identified by an IMEI (phone serial number) shown on the
packaging label and in the product’s memory. W e recommend that you
note the number the first time you use you r telephone by entering * # 0 6
# and keep it in a safe place. It may be requested by the police or your
operator if your telephone is stolen. This number allows your mobile
telephone to be blocked preventing a third person fr om using it, even with
a different SIM card.
Recycling information
They will then be recycled, preventing substances being disposed of in the
environment, so that their components can be r eused.
In European Union countries:
These collection points are accessible free of charge.
All products with this sign must be brought to these collection points.
In non-European Union jurisdictions:
Items of equipment with this symbol are not to be thrown into ordinary
bins if your jurisdiction or your region has suitable recycling and collection
facilities; instead they are to be taken to collection points for them to be
recycled.
This symbol on your telephone, the battery and the
accessories means that these products must be taken to
collection points at the end of their life:
- Municipal waste disposal centres with specific bins for
these items of equipment
- Collection bins at points of sale.
58
Page 63

CAUTION: RISK OF EXPLOSION IF BA TTERY IS REPLACED BY AN INCORRECT
TYPE. DISPOSE OF USED BATTERIES ACC ORDING TO THE INSTRUCTIONS.
FCC Regulations
• This mobile phone complies with part 15 of the FCC Rules. Operation is
subject to the following two conditions: (1) This device m ay not cause
harmful interference, and (2) this device must accept any interference
received, including interference that may cause undesired operation.
• This mobile phone has been tested and found to comply with the limits
for a Class B digital device, pursuant to Par t 15 of the FCC Rules. These
limits are designed to provide reasonable protection against har mful
interference in a residential installation. This equipment generate s, uses
and can radiate radio frequency ener gy and, if not installed and used in
accordance with the instructions, may cause h armful interference to
radio communications. However, there is n o guarantee that interference
will not occur in a particular in stallation If this equipment does cause
harmful interference to radio or television reception, which can be
determined by turning the equipment off an d on, the user is encouraged
to try to correct the interference by one or more of the following
measures:
a) Reorient or relocate the receiving antenna.
b) Increase the separation between the equipment and receiver.
c) Connect the equipment into an outlet on a circuit different from that
to which the receiver is connected.
d) Consult the dealer or an experienced radio/TV technician for help.
Caution: Changes or modifications not expressly approved by the party
responsible for compliance could void the user‘s autho rity to operate the
equipment.
• The antenna(s) used for this transmitter must not be co-located or
operating in conjunction with any other antenna or transmitter.
RF Exposure Information (SAR)
This phone is designed and manufactured not to exceed the emission
limits for exposure to radio frequ ency (RF) energy set by the Federal
Communications Commission of the United States.
59
Page 64
FCC ID:
R38YL990N
Highest SAR for head
0.48 W/kg
Highest SAR for body
1.44 W/kg
During SAR testing, this device was set to transmit at its highest certified
power level in all tested frequency bands, and placed in positions that
simulate RF exposure in usage against the head with no separation, and
near the body with the separation of 10 mm. Although the SAR is
determined at the highest certified power level, the actual SAR level of the
device while operating can be well below the maximum value. This is
because the phone is designed to operate at mu ltiple power levels so as to
use only the power req uired to reach the network. In general, the closer
you are to a wireless base station antenna, the lower the power output.
The exposure standard for wireless devices employing a unit of
measurement is known as the Specific Absorption Rate, or SAR. The SAR
limit set by the FCC is 1.6W/kg for an uncontrolled environment.
Tests for SAR are conducted using standard operating positio ns accepted
by the FCC with the device transmitting at its highest certified power level
in all tested frequency bands.
The FCC has granted an Equipment A uthorization for this model phone
with all reported SAR levels evaluated as in com pliance with the FCC RF
exposure guidelines.
SAR information on this model phone :
While there may be differences between the SA R levels of various phones
and at various positions, they all meet the government requirements.
SAR compliance for body-worn operatio n is based on a separation distance
of 10 mm between the unit and the human body. C arry this device at least
10 mm away from your body to ensure RF exposure level compliant or
lower to the reported level. To support body-wor n operation, choose the
belt clips or holsters, which do not contain metallic components, to
maintain a separation of 10 mm between this device an d your body.
RF exposure compliance with any body-wor n accessory, which contains
metal, was not tested and certified, and use such body- worn accessory
should be avoided.
60
Page 65

Licences
Some services and apps may not be available in all countries. Please ask
in-store for details.
Android is a trademark of Google Inc. The A ndroid robot is reproduced or
modified from work created and shared by Google and used accor ding to
terms described in the Creative Commons 3.0 Attribution Licence.
© Vodafone Group 2014. Vodafone and th e Vodafone logos are trademarks
of Vodafone Group. Any product or co mpany names mentio ned herein
may be the trademarks of their r espective owners.
Notice
The information in this manual is subject to change without notice. Every
effort has been made in the preparation of this manual to ensure accuracy
of the contents, but all statements, information, and r ecommendations in
this manual do not constitute a warranty of any kind, expressed or implied.
Read the safety precautions and safety inform ation carefully to ensure that
you use this wireless device in a corr ect and safe manner.
Yulong Computer Telecommunication Scientific (Shenzhen) Co., Ltd.
Address:
Coolpad Information Harbor, 2n d Mengxi Road, Northern Part of
Science&Technology Park, Nanshan district, Shenzhen, P.R.China
61
Page 66

Telephone warranty
WARRANTY TERMS AND CONDITIONS
1. Vodafone undertakes the warr anty of this Mobile Phone for a period of
two (2) years from the date of Purch ase by the original owner (not
transferable) under normal use.
2. The Battery has a limited warranty for twelve (12) months, and Charger
for twenty-four (24) months against manufactur ing defects. Other
accessories have a limited warranty for twenty-four (24) months against
manufacturing defects.
3. This Warr anty does not cover damage resulting from:
a) Normal wear & tear of the equ ipment;
b) Defects and damages due to the equipment being used other than its
normal and customary manner;
c) An unauthorised disassembly, repair, alteration or modification being
carried out;
d) Misuse, abuse, negligence or accident howsoever caused;
e) Defects or damage arising from improper testing, operation,
maintenance, installation, or any alteration or modification;
f) Defects or damage due to spillage of food or liquids, corr osion, rust or
the use of wrong voltage;
g) Scratches or damage to plastic surfaces and all other externally
exposed parts that are due to normal customer use;
4. The Handset requir ing service/repair must be delivered at the user's
cost.
5. This warranty will be nu ll and void in any of the following events:
a) If the serial number or warranty seal on the equipment has been
defaced or removed.
b) If any term contained in this warranty has been altered or modified in
any way without prior written consent of Vodafone.
6. The limited warran ty extends only to customer who purchase the
product in one of the countries (or areas) set forth at the end of this
document. The limited warranty is only valid in Vodafone's intende d
country (or area) of sale of the Pro duct.
7. If the pro duct is returned to Vodafone after the e xpiration of the
warranty period, Vodafone's normal service policies shall apply and the
62
Page 67

Consumer will be charged accordingly.
a) Vodafone neither assumes for it any other obligation or liability
beyond that which is expressly provided for in this limited warranty.
b) All warranty information, product features and specifications are
subject to change without notice.
8. THIS WARRA NTY IS IN LIEU OF ANY AND OTHER WARRANTIES
EXPRESSED OR IMPLIED, SPECIFI CALLY INCLUDING ANY IMPLIED
WARRANTY OF MERCHA NTABILITY OR FITNESS FOR A PARTIC ULAR
PURPOSE. VODAFONE ASSUMES NO LIA BILITY FOR THE BREACH OF THE
WARRANTY BEYOND CORRECTING THE BREAC H IN THE MANNER
DESCRIBED ABOVE. IN NO EVENT SHALL VODAFONE BE LIABLE FOR
CONSEQUENCES.
63
Page 68
Basic specifications
Processor
Qualcomm MSM8926
Platform
Android 4.4
Dimensions
164× 83.4 × 7.9 mm
Form factor
Bar
Antenna
Internal
SIM card
Micro-SIM
Network
GSM (900/1800/1900MHz)
WCDMA (900/2100MHz)
LTE (800/1800/2600MHz)
WLAN
2.4 GHz
Camera
Front 2M pixel + Rear 13M pixel AF
Headset connector
Ф3.5mm CTIA standard
Screen parameters
Type
Dimensions
Resolution
LCD, FWVGA
6.0-inch
1280× 720
Accessories
Battery
Battery name
Lithium-ion polymer
rechargeable battery
Rated capacity
3,000 mAh
Nominal voltage
3.7 V
Technical data
64
Page 69
No.
Name
Quantity
1
Phone
1 2 Battery (built-in)
1
3
Travel charger
1
4
USB charge/data cable
1
5
Headset
1 6 Quick start guide
1 7 Safety & warranty informatio n
1
Accessories
Note: Accessories included are dependent on the final seller. Contact the
retailer for details.
65
 Loading...