


Digital TV
Recorder
user guide
Vodafone
Power to you
VTCR088_T-Box_UserGuide_1013.indd 1 30/10/13 3:49 pm

Welcome to your Digital TV Recorder set top box
Digital TV Recorder user guide
This is your guide to using the Digital TV Recorder
set top box, including user settings that can be used
to customise the experience.
The features and channels available will depend on the subscription
chosen, and therefore the options shown in this guide may be different to
that actually displayed on your sy stem.
To discuss or change subscription please call customer serv ices
on 0508 8 88 800.
Vodafone contact information
To contact Vodafone for help, questions on your subscription or any
other reason please use the contact detail s below;
Sales & customer care enquiries
Phone: 0508 88 8 800
Fax : 0508 88 8 801
Hours: 24/7
Faults and technical assistance
Phone: 0508 88 8 800
Hours: 24/7
On the web
You can also visit us on the web: vodafone.co.nz
Page 1 Digita l TV Record er User Gui de
VTCR088_T-Box_UserGuide_1013.indd 1 30/10/13 3:49 pm

What is a Digital TV Recorder?
This is a personal video recorder set top box giving the latest in entertainment technology and is available to Vodafone customers.
3 tuners
This allows recording on 2 channels w hilst watching another
channel OR to watch a pre-recorded programme while
recording 2 others .
At least 300GB of hard drive space
To record up to 180hrs of SD (standard definition) and 50hrs of
HD T V.
Up to 1080P HD playout through HDMI 1.3
Important if playing the highest qualit y movies through the set
top box.
MPEG2 and H264 compliant
This provides video capabilit y using the industries bes t, open
standards.
Dolby AC3, MP2 and AAC audio compliant
The best options to cover all the best audio formats.
Java based middleware from Digisoft.tv
Enabling very fast and flexible upgrades to software allowing
simple addition of new applications.
Supports future internet video delivery.
Page 2Digita l TV Record er User Gui de
VTCR088_T-Box_UserGuide_1013.indd 2 30/10/13 3:49 pm

Digital TV Recorder user guide
About this user guide
This user guide is to help make the most of your Digital TV
Recorder STB (set top box) experience. The Digital TV Recorder
provides an easy to use on-screen menu guide to the service.
All Digital TV Recorder features are controllable using the
remote control unit.
This allows you to:
• Find out what’s on now/next while continuing to watch current programme.
• See what is on the listings for the next 7 days.
• Browse and purchase content like movies, with Now’s Good.
• Set recording options to record now or in the future.
• Play programmes already recorded.
• Prevent children from viewing unsuitable programmes.
• Set reminders from the planner, TV guide or channel bar.
• Create and modify the favourites list; channels viewed mos t.
• View additional information about the programme being watched.
• Change the Digital T V Recorder settings.
User guide format
Guide conventions
The personal video recorder set top box will be termed
‘Digital TV Recorder’ throughout this user guide.
The user guide is organised as follows:
• Welcome to Digital T V Recorder
• About this user guide
• Contents
• Safety notice
• General information – About the Digital T V Recorder and the TV
• Get star ted – Turn on the equipment, introducing the remote control
and the remote control f unctions.
• On-screen symbols – A quick guide to the symbols that may
be seen while using the Digital T V Recorder.
• Navigating the Digital TV Re corder functions
• The full T V screen – the normal TV v iewing mode
• QuickJump menu – Quick access to the main menus of the Digital T V Recorder
• TV guide screen – Shows channel information, resized TV screen and menu options
• Using the channel bar – View channel information while continuing to watch T V
• The planner – Scheduling and recording.
• Playing recordings, replaying live TV
• Now’s Good – Movie rental s.
• Favourites – Managing favourite channels
• Parental contro l – Options
• Notifications – Messages that may be displayed while using the decoder.
• Settings – Choosing how to use the decoder, parental control settings ,
disk space management options.
• Troubleshooting – Some steps or suggestions to help resolve simple issues.
• Specifications
Page 3 Digita l TV Record er User Gui de
VTCR088_T-Box_UserGuide_1013.indd 3 30/10/13 3:49 pm

Contents
Welcome to Digital TV Recorder personal set top box 1
Digital T V Recorder user guide 1
Vodafone contact information ..................................................................................................................................... 1
On the web ................................................................................................................................................................................. 1
What is Digital TV Recorder? 2
Digital TV Recorder user guide 4
About this user g uide .......................................................................................................................................................... 4
Digital T V Recorder user guide format ................................................................................................................... 4
Contents 4
Safety and maintenance 5
Safety notice ............................................................................................................................................................................. 5
Maintenance ............................................................................................................................................................................. 5
General information 6
Information on your Digital TV Recorder ............................................................................................................. 6
Information for your TV ..................................................................................................................................................... 6
Getting started 7
Connecting the box, the rear panel .......................................................................................................................... 7
Connecting to the Digital T V Recorder .................................................................................................................. 8
Connecting to your TV ....................................................................................................................................................... 8
Turn on the equipment ...................................................................................................................................................... 9
The remote control ............................................................................................................................................................ 10
Remote control functions ............................................................................................................................................. 11
On-screen symbols - a quick guide 13
Dialog symbols ...................................................................................................................................................................... 13
Ratings symbols ................................................................................................................................................................... 13
Information symbols ......................................................................................................................................................... 14
Navigating the Digital TV Recorder functions 15
Basic rule “point and select” ........................................................................................................................................ 15
The full T V screen .............................................................................................................................................................15
PIN .................................................................................................................................................................................................. 15
QuickJump menu ................................................................................................................................................................ 16
Interactive T V guide ........................................................................................................................................................... 17
Navigating the TV guide screen ................................................................................................................................ 18
Using the channel banner 19
Using the planner 20
Recordings .............................................................................................................................................................................. 22
Recording conflicts ........................................................................................................................................................... 22
Recording a series .............................................................................................................................................................. 23
Removing a series link .................................................................................................................................................... 23
Removing a recording ..................................................................................................................................................... 23
Playing a recording, replaying live TV 24
Playing recordings .............................................................................................................................................................. 24
Pause/play live T V ............................................................................................................................................................. 25
Now’s Good (Pay per View) 26
Purchasing Now’s Good (Pay per View) .............................................................................................................. 28
Managing favourite channels and parental control 29
Notifications 30
Settings 31
My settings ............................................................................................................................................................................... 31
HDMI options .......................................................................................................................................................................... 33
Managing the disk space ............................................................................................................................................... 34
General settings .................................................................................................................................................................. 35
Engineering settings ........................................................................................................................................................ 35
Troubleshooting 36
Specifications 38
Page 4Digita l TV Record er User Gui de
VTCR088_T-Box_UserGuide_1013.indd 4 30/10/13 3:49 pm

Safety and maintenance
Safety notice
The Digital TV Recorder is shipped with an external power
adapter that operates at 110 – 240 V AC, 50-60 Hz and produces
a 12V DC supply to the Digital TV Recorder
• Ensure all electrical connections are properly made before connecting the Digital TV
Recorder (including the power adapter) to the mains supply. Always disconnect the
power adapter from the mains supply before connecting or removing cables
• When connecting the power adapter, always plug the adapter into the Digital T V
Recorder before connecting the adapter to the mains supply
• Do not allow the Digital TV Recorder to come into contact with water. If the Digital TV
Recorder gets wet disconnect from the power supply immediately
• Always al low adequate air to circulate around the Digital TV Recorder to avoid internal
heat build-up. Avoid placing next to or on top of radiators, and keep the top surface
vents clear
• Never attempt to repair, deconstruc t or modify the Digital T V Recorder. There are no
user serv iceable parts inside. Remov ing the cover will void your warranty and may
incur further replacement charges from Vodafone
• As there is a hard disk in the Digital TV Recorder, never move the Digital T V Recorder
while operating. If the Digital TV Recorder is to be moved, stop any recordings currently
running, and put the Digital TV Recorder into standby for 30 – 60 seconds. Disconnect
from the power. The Dig ital TV Recorder is now ready for mov ing. The Digital TV
Recorder must be handled carefully. Any damage will invalidate the warrant y
• Do not expose or operate the Digital TV Recorder in places that are hot, damp, dusty or
cold, or in direct sunlight
• Do not place objects such as candles, vases or any object containing liquids on top of
the Digital T V Recorder
• Do not place heavy object s on top of the Digital TV Recorder
• Do not place the Digital T V Recorder on fabric furnishings, carpets or other flammable
materials
• Do not place the Digital T V Recorder on an unstable surface, from where the Digital
TV Recorder may fall, risking injury and damage. Only use wit h mounting accessories
recommended by the supplier.
Maintenance
To clean the Digital TV Recorder disconnec t it from the power supply. To clean the Digital
TV Recorder use a soft dry cloth. For very dir ty surfaces dip a soft cloth in a weak soap and
water solution and wring well. After cleaning wipe with a soft dr y cloth. Never use alcohol,
paint thinner s, or a chemically treated cloth to clean this Digital TV Recorder. Use of such
chemicals may damage the sur face of the Digital TV Recorder.
In the event of a breakdown, please contact us on 0 508 888 800. A n authorised service
agent or ser vice centre will repair or replace the Digital T V Recorder if required.
Page 5 Digita l TV Record er User Gui de
VTCR088_T-Box_UserGuide_1013.indd 5 30/10/13 3:49 pm

General information
Information on your Digital TV Recorder
Important
Your Digital TV Recorder employs the latest 2-way communication technology in order to
bring you a rich user experience. This is possible as the Digital TV Recorder has a highspeed internet connection in addition to the regular cable TV and antenna connections.
The internet connection is made by a cable modem device.
The high-speed internet connection is used for the fol lowing purpose
• Delivery of electronic programme guide information
• Decr yption and entitlement information to ensure you can watch the TV channel s you
have subscribed to
• On-demand movie purchasing
• Remote diagnostics, messaging and soft ware upgrades
To ensure you are able to use the full features of the Digital T V Recorder it is important t hat
the Digital T V Recorder be connected to the internet at all times .
The instal ler should have demonstrated the basics of the Digital TV Recorder and using the
remote control. Here’s a brief overview on the Digital T V Recorder system (box and remote
control) again.
The Digital TV Recorder is the personal video re corder set top box that connects our
services. It includes an internal disk storage facility that stores programmes t hat have been
chosen for recording .
To keep the Digital T V Recorder up to date, each night during a scheduled off peak
time (e.g. 2 am), the Digital TV Recorder will be updated by us, with any chang es to TV
schedules or sof tware updates that may be needed from time to time.
Viewing will not be interrupted but if watching TV, use of the remote cont rol will be limited
to changing channels (CH+/-) while the update is in progress. Once the update completes,
all normal functions are restored automatically.
During this update the loading/processing indicator will be displayed in the top corner of
the screen. The upload period will typically take 1 minute.
Information for your TV
Still images cannot be left displayed on the TV screen over an
extended period of time otherwise a condition termed ‘screen burn’
can occur. This can be seen as a permanent residual image on
the screen.
To prevent screen burn, the Digital TV Re corder employs a screen saver feature, so if a still
graphics image is displayed without user interact ion over a pre-configured time period (5
minutes by default ) full screen video, or normal TV, is resumed.
However some Digital TV Recorder screens do not have a screen saver timeout in
operation and care should be taken not to ignore these screens while displayed. These are:
• Parental PIN input - displayed on attempting to access res tricted channels.
• Access denied message – displ ayed after 3 unsuccessful PIN input attempts .
• All playback control screens .
• Pause transport screen – displayed when pausing live TV or recorded content.
• Un-entitled channel message – displayed when the user attempts to tune to an un-
entitled channel from full screen video.
• UI lockout dialog - displayed while l istings are being updated.
Plasma, LCD and rear projection televisions are more prone to screen burn, especially
during the f irst two to four weeks of operation.
Please consult your television manufacturer’s instructions for appropriate
operating details.
Page 6Digita l TV Record er User Gui de
VTCR088_T-Box_UserGuide_1013.indd 6 30/10/13 3:49 pm

Getting started
The Digital TV Recorder is connected to our service using the
connections to the rear of the Digital TV Recorder, while it
is controlled from the front using the remote control or the
manual controls on the front panel.
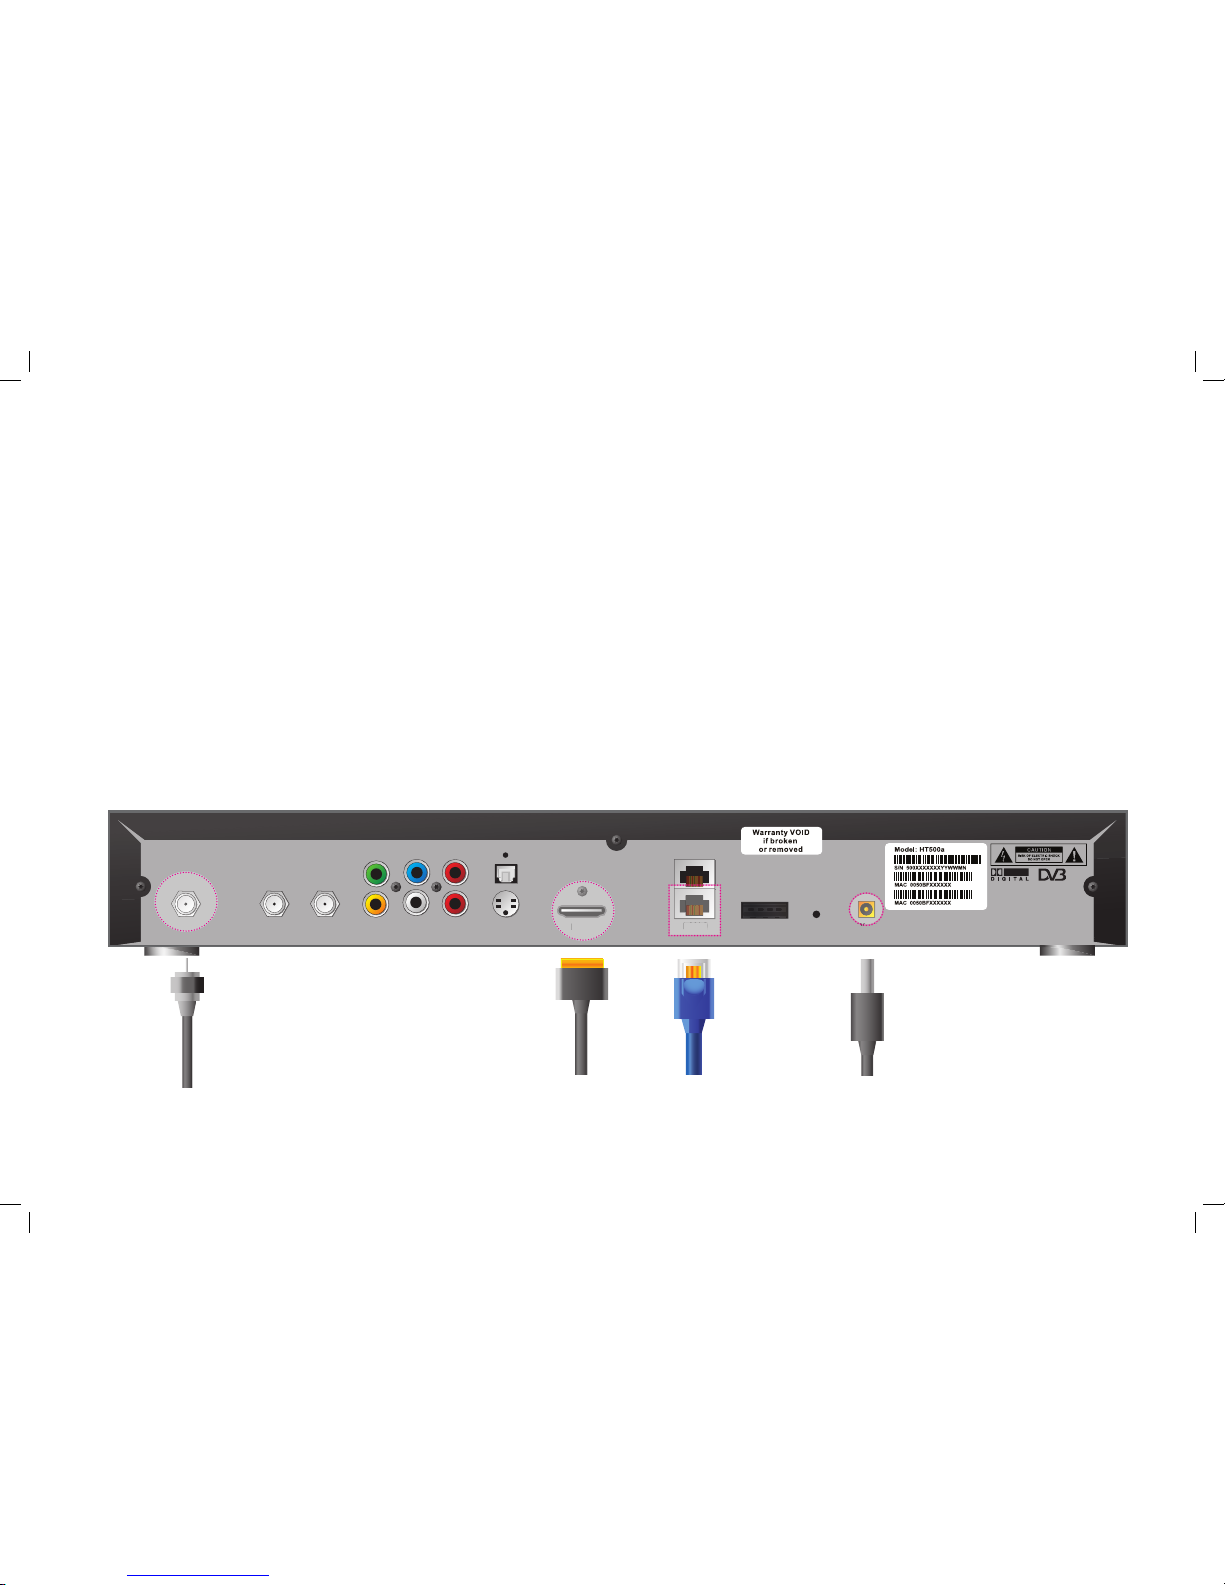
Connecting the box, the rear panel
The rear of the Digital TV Recorder contains all the connections that are needed to
connect the Digital TV Recorder to the TV, to the power outlet, to the Vodafone ser vice
and to our management for the Digital T V Recorder. It also comes with an external power
unit, 1 x composite cable, 1 x HDMI cable.
RF IN
ANT IN RF OUT
COMPONENT VIDEO OUT
VIDEO OUT AUDIO OUT
OPTICAL AUDIO OUT
S-VIDEO OUT
HDMI
LAN 1
LAN 0
USB
RESET 12VDC - 3.5A
“DOLBY” is a Trademark of Dolby
Laboratories
1992 - 1997 DOLBY LABORATORIES, INC
Compliant with H.264, AAC
ANT IN: TV
aerial input
Component video
out connections
HDMI to TV
(preferred)
SPDIF
RF Input (RF IN;
DVB-C, connects to
our cable services)
Composite
video
output
Analogue
audio
output
S-Vid eo out;
optionally used w ith
composite audio out
LAN 0; Box
management
LAN1 not used.
Reset
Note: The res et button shoul d only be used if
request ed by our suppor t services. I t is equivalent to
power off a nd power on.
USB 2.0 ;
Reserved for
future use
LAN 1; Disabled /
Reserved for
future use
12 V DC connectorRF OUT: Used for
output to TV
Page 7 Digita l TV Record er User Gui de
VTCR088_T-Box_UserGuide_1013.indd 7 30/10/13 3:49 pm
Getting started
Connecting to Digital TV Recorder
As standard there will be two connections required for the signal from our service, one
a circular F-type coaxial connector to be connected to ‘RF IN’ and the other an ethernet
data cable to be connected to ‘LAN 0’ using an RJ-45 t ype connector. Both of these
connections are to be found on the rear panel of the box.
Connecting to your TV
Depending on the TV/DVD/audio equipment to be connected, different t ypes of
connections can be used. Most HD T V’s will use the HDMI connection, but the
composite (RCA ) audio and video connectors can also be used if preferable. For future
reference please become familiar with t he connectors used and note which cables
are connected e.g. if moving the equipment, or checking connecti vity during any
troubleshooting exercises.
Connecting to the power supply
The Digital TV Recorder is supplied with an external power adapter. Plug the 12v DC barrel
type connector into the box and the other end to the mains power supply.
RF IN
ANT IN RF OUT
COMPONENT VIDEO OUT
VIDEO OUT AUDIO OUT
OPTICAL AUDIO OUT
S-VIDEO OUT
HDMI
LAN 1
LAN 0
USB
RESET 12VDC - 3.5A
“DOLBY” is a Trademark of Dolby
Laboratories
1992 - 1997 DOLBY LABORATORIES, INC
Compliant with H.264, AAC
HDMI
LAN 0
RF IN: Signal input
from Vodafone
HDMI connection to/
from HD TV (preferred
for HD TV)
Ethernet cable
from our box
management
Power input from
external power adapter
Page 8Digita l TV Record er User Gui de
VTCR088_T-Box_UserGuide_1013.indd 8 30/10/13 3:49 pm
Getting started
Turn on the equipment
Before operating the Digital T V Recorder ensure all equipment is plugged in and tur ned on.
• Switch on the TV and any other connected equipment.
• Set the Dig ital TV Recorder to operate mode by pressing the operate/power button
on the remote control or the power button on the front panel of the box.
The operate mode is indicated by a blue backlight around the
button on the
front panel .
When the box is in standby mode the
button will have a red backlight .
If there are no lights on the front of the box, make sure the box is correctly connected to
the external power supply, and the power switch is set to on.
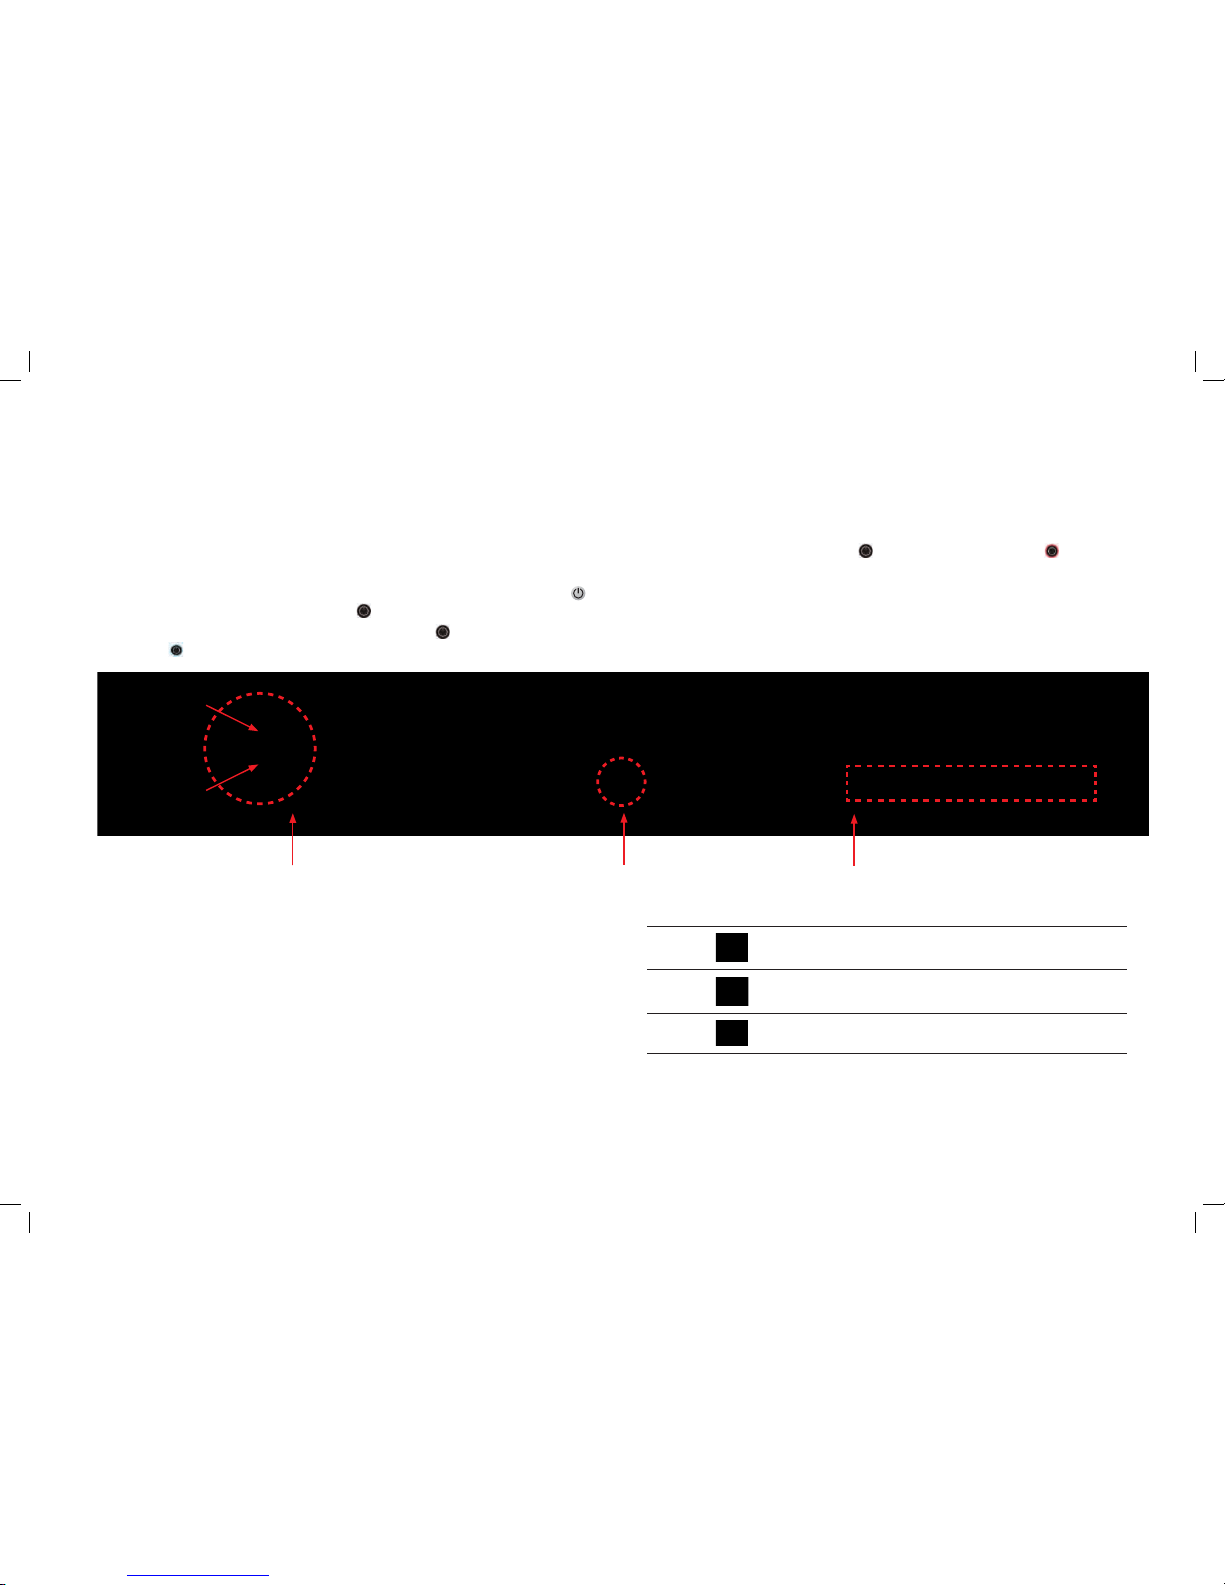
Manual controls and status indicators
The Digital TV Recorder is equipped with a set of manual
controls on the front panel and a number of status indicators
indicating what the Digital TV Recorder is doing.
The controls are grouped together into a button cluster on the left hand side of the box.
The options are up, down, left, r ight, menu and OK.
From full TV (normal) screen the up, down, lef t and right buttons will invoke the channel
banner. Pressing menu will display the TV guide screen. When TV g uide screen
is displayed the up, down, left and r ight buttons are used to navigate, and OK chooses the
highlighted selection.
All the func tionality available from the front panel cont rols is available using the
remote control.
The status indicators are found on the right of the front panel of the Digital T V Recorder.
Red This indicator is lit when the box is recording a program
otherwise it is switched off.
Green
This indicator is lit when the box is playing a program other wise
it is switched of f.
Amber
This indicator is lit when there is a message waiting.
The USB 2.0 connector on the right of the front panel is reser ved for future use.
Note: The Di gital TV Reco rder will alrea dy have been inst alled by our engi neer, and set to work wi th the TV and
other equ ipment. If unsu re please refer to the ma nual that came wi th the Digital T V Recorder or ca ll Vodafone
helpline on 0508 88 8 800 to verify connectivity.
Digital TV Re corder
control panel
Digital TV Re corder
operate/power
Digital TV Recorder Indicators
and USB connector
Left Right
Up
Menu
Ok
Down
Page 9 Digita l TV Record er User Gui de
VTCR088_T-Box_UserGuide_1013.indd 9 30/10/13 3:49 pm

Getting started
The remote control
The batteries
The remote control requires 2 new AA alkaline batteries.
Remove the battery cover from the back of the remote control.
Match the batteries to the (+) and (–) marks inside the battery compartment,
then inser t the batteries.
Press the battery cover back into place.
Operation
After inser ting the batteries, the remote control unit (RCU) is ready to operate the Digital
TV Recorder, by pressing the STB key.
The RCU can also be used to control the television and DVD/VCR player/recorder, by
choosing the operating mode from T V, STB or DVD (see the remote control documentation
for further information on set ting up and using the remote control in this way).
Brief description of the remote control functionalit y for the box is outlined overleaf.
Page 10Digi tal TV Rec order User G uide
VTCR088_T-Box_UserGuide_1013.indd 10 30/10/13 3:49 pm

Getting started
Remote control functions
1
Mute Turns the sound OFF or ON .
2
Live TV When using the g uide this key switches back to full screen TV
(live or recorded TV).
3
Power Switches the box bet ween operate mode and standby mode.
4
TV Switches to universal television mode.
STB Switches to Digital TV Recorder mode.
DVD Switches to universal DVD/VCR mode.
5
Guide Invokes the TV guide screen.
6
Favs Invokes the favourites screen.
7
Planner Invokes the planner screen where recordings and reminder s are listed.
8
Now’s good Shows available Pay per View movies , including those already rented.
9
Back While watching T V, tunes to the previously tuned channel. When using the
guide goes back to previous screen.
10
Menu When the T V guide is displayed, pressing t his key puts the focus of the
remote control on the QuickJump menu. While watching nor mal
full-screen T V, this key displays the QuickJ ump menu on the lower third
of the screen.
11
Information Opens and closes the information banner when available.
12
Vol + / - Increases and decreases the audio volume.
2
3
7
8
11
1
4
6
5
10
9
12
Pag e 11 Digita l TV Record er User Gui de
VTCR088_T-Box_UserGuide_1013.indd 11 30/10/13 3:49 pm