

Vodafone 527 User Manual
English
English


Congratulations! you have just purchased this phone from
Vodafone. It is recommended that you read this handbook
carefully in order to use your phone efficiently and in the best
conditions.
Your phone can be used internationally on different networks
(GSM 900 MHz and DCS 1800 MHz) depending on the
roaming arrangements with your network provider.
This phone is approved to meet European standards.
WARNING
Your phone is identified by its IMEI number. Write this number
down, and do not keep it with your phone, because you may be
asked for it in the event of your phone being stolen, in order to
prevent it from being used, even with a different SIM card. In
order to display the IMEI on your phone's screen, type: *#06#.
SAGEM is a trademark of Sagem Mobiles, SAFRAN group.
T9® Text Input is a trademark of ©Tegic Communications Inc.
Java™ and all Java™ based trademarks and logos are
trademarks or registered trademarks of Sun Microsystems, Inc.
in the U.S. and other countries.
The WAP navigator and some message software (i-mode™)
are under licence Openwave.
The WAP navigator and the software included are the exclusive
property of Openwave. For this reason, it is forbidden to modify,
translate, disassemble or even decompile all or part of these
software programs.
The Bluetooth
Bluetooth
B013487.
microSD™ is a trade mark of SD Card Association.
Wellphone™ and SmartCom™ are registered trademarks
owned by SmartCom SARL France.
Windows is a trademark of Microsoft Corporation.
®
word mark and logos are owned by the
®
SIG, Inc. Bluetooth® QDID (Qualified Design ID):
3

Contents
Menus ...................................................................... 7
Description ............................................................. 9
Installing the SIM card and the battery .............. 12
Inserting the memory card ................................. 13
Using the memory card ...................................... 13
Navigation principles ........................................... 14
Idle screen ............................................................ 15
Activating your phone ......................................... 16
Information on the Vodafone SIM card .............. 16
Getting started ................................................... 16
PIN number........................................................ 16
Setting time and date ......................................... 17
Network.............................................................. 18
First call.............................................................. 18
Receiving a call.................................................. 19
Call log ............................................................... 20
Switching off....................................................... 20
Using your phone................................................. 21
Improving antenna performance ........................ 21
Increase the efficiency of your phone ................ 21
Charging the battery .......................................... 22
Contacts ................................................................ 24
Using the phonebook......................................... 24
Storing a new contact ........................................ 24
Calling a contact ................................................ 25
Speed Dialing..................................................... 25
Displaying a contact........................................... 25
Top 3 contacts ................................................... 25
Contacts options ................................................ 26
Groups ............................................................... 28
4
Contents

Messaging............................................................. 29
Creating a message........................................... 29
Live! Postcard .................................................... 32
Receiving messages.......................................... 32
Inbox .................................................................. 33
Drafts ................................................................. 33
Sent messages .................................................. 33
Outbox ............................................................... 33
Vodafone Mail.................................................... 33
Live! Studio ........................................................ 34
Messenger ......................................................... 34
Call Voice Mail ................................................... 35
Templates .......................................................... 35
Settings .............................................................. 35
Local information ............................................... 36
Groups ............................................................... 36
Memory.............................................................. 36
Camera .................................................................. 37
Taking and saving a photo................................. 37
My Files ................................................................. 39
Vodafone live!....................................................... 40
Entertainment ....................................................... 41
Music player....................................................... 41
FM Radio ........................................................... 42
Games ............................................................... 43
Applications ....................................................... 43
Organiser & Tools ................................................ 44
Services ............................................................. 44
Alarm ................................................................. 44
Timer.................................................................. 44
Calendar ............................................................ 44
Calculator and converter.................................... 45
Todo................................................................... 46
Contents 5

Settings ................................................................. 48
Phone................................................................. 48
Display ............................................................... 50
Messaging.......................................................... 52
Connectivity ....................................................... 52
Calls ................................................................... 56
Network.............................................................. 58
Security .............................................................. 58
Browser.............................................................. 60
Java™................................................................ 60
Multimedia.......................................................... 60
Help.................................................................... 61
Technical features ................................................ 62
Care and safety information................................ 64
SAR.................................................................... 64
Advice for limiting exposure to radiofrequency (RF)
fields................................................................... 65
Safety................................................................. 65
Environment....................................................... 68
Warranty................................................................ 69
End User Licence Agreement (EULA), for the
software ................................................................ 74
Java™.................................................................... 81
Troubleshooting ................................................... 86
Customer care ...................................................... 90
Index ...................................................................... 91
6
Contents
Menus
Entertainment
Music player
FM Radio
Games
Applications
Vodafone live!
Vodafone live!
Go to URL
Bookmarks
Saved pages
History
Settings
Vodafone Mail
What’s New?
Live! Studio (*)
Games
Sounds
Pictures
News
Sport
Camera
Messaging
Create Message
Inbox
Drafts
Sent messages
Outbox
Vodafone Mail
Messenger (*)
Live! Studio (*)
Call Voice Mail
Templates
Settings
Local info.
Groups
Memory
My Files
Pictures
Sounds
Calls
(*) Service depending on the operator
Menus 7

Organiser &
Tools
Services
Alarm
Timer
Calendar
Calculator
Todo
Contacts
Settings
Phone
Display
Messaging
Connectivity
Calls
Network
Security
Browser
Java™
Multimedia
Help
8
Menus
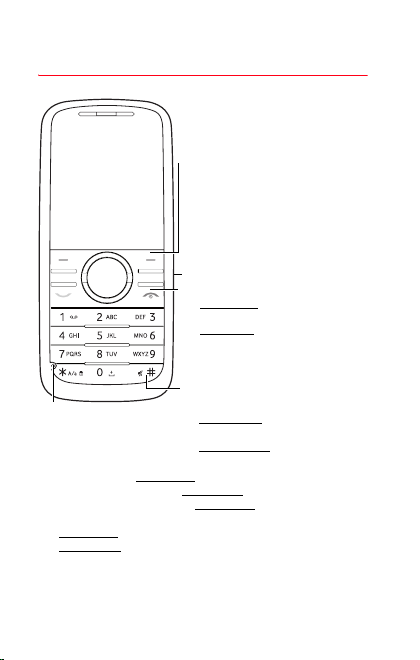
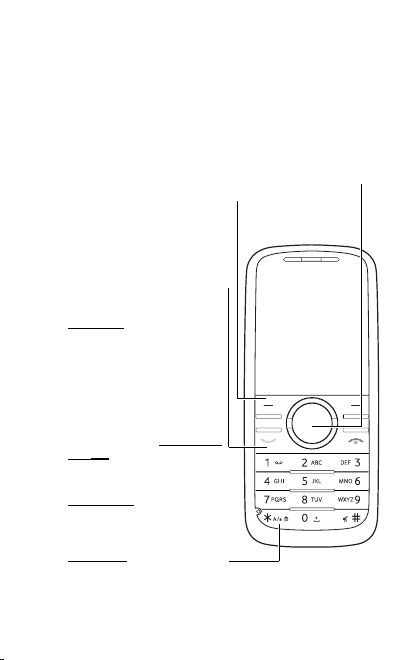
Description
Right key
- In idle screen: access to
Vodafone live! (shortcut)
- In menus: access to the
selection shown on screen in
the tab
Charger connector
Stop key
- Short press: switch on/wake up
to idle screen
- Long press
- In a call context: reject a call -
- In menus: return to idle screen
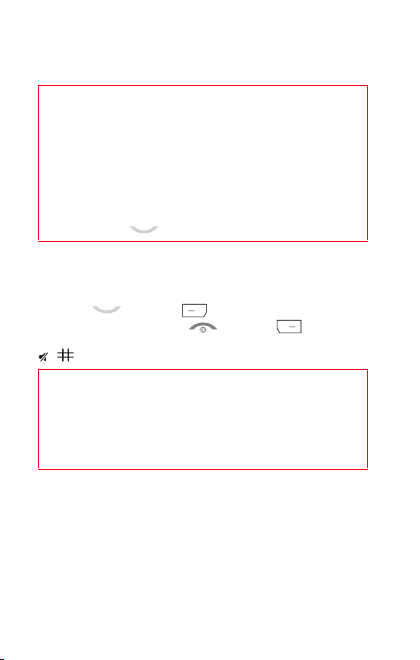
# key
Microphone
WARNING: Ensure that
you are not obstructing the
microphone in call context
- In idle screen: Long press: silent mode
- In call reception mode: Short press
- In ring tone setting mode: Short press: activate/deactivate
ring tone
- Long press
- Short press: stops sound in a message with a ring tone
Description 9
: stops sound in a game
attached
When composing a message
- Long press: modifies the T9
- Short press
: switch off
hang up
mode language
symbol table
: displays the
: stops ring tone
The
navigator
- to navigate in the various functions pressing the relevant
direction (up, down, right, left),
- to confirm your selection pressing the central part (
In idle screen, pressing
Pressing
you can display a menu directly.
Note:
access a menu typing the various numbers.
Left key
- In idle screen: access to the
main menu (shortcut)
- In menus: access to the
selection shown on screen in
the tab
Start key
- In dialling/phonebook/call log
context: call - receiving a call
- Short press
activate/Deactivate hands-free
mode during a call (
in this mode do not bring the
phone up to your ear)
- In idle screen:
log
* key
- In idle screen: short press
and OK: activate/deactivate
the keypad locking
When composing a message
- Short press: switches from
one input mode to another
(upper case/lower case, 123
mode)
- Long press
activate/deactivate T9 mode
10
allows you:
OK
OK
followed by one of the nine keys of the keypad,
goes to the main menu.
OK
the phone menus being numbered, you can directly
:
WARNING
:
displays the call
:
Description
).
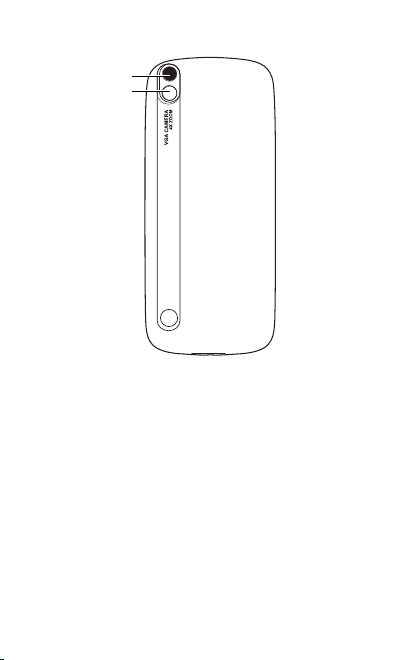
Camera
Mirror
Alphanumeric keypad
1
A long press on the key 1 calls voicemail (if the
number has been stored in
menu)
2 to 9
A long press on one of the 2 to 9 keys starts the speed
dialing (if the number has been saved in the
Settings/Phone/Shortcuts/Speed Dialing
Otherwise, the speed dialing number empty screen for
the key is displayed. You can then save a number.
Description 11
Settings/Calls/Voi ce ma il
menu).
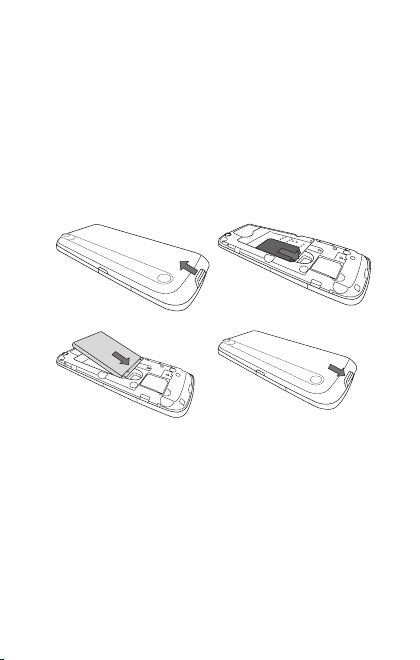
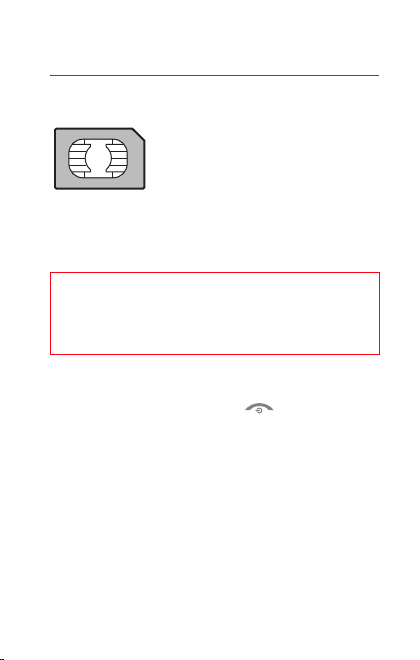
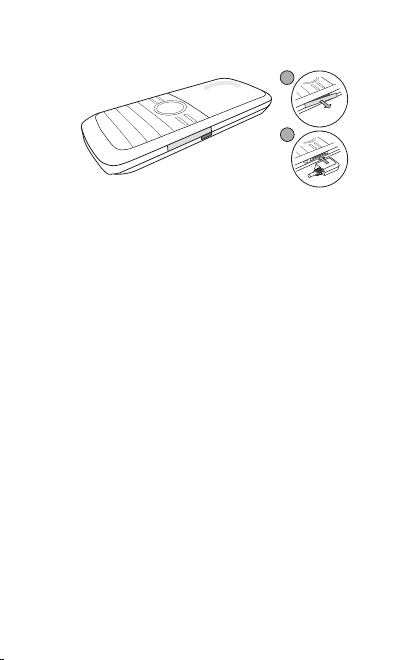
Installing the SIM card and the battery
Ensure that the phone is switched off and the charger
disconnected.
1 Open the back cover using the notch located at the bottom of
the phone. Take out battery if already installed.
2 Slide the SIM card into the card holder with gold face down
and cut corner as shown in the figure below.
3 Insert the battery by positioning the bottom first
4 Relace the back cover, clicking in the upper part first and
then the lower part.
12
3
WARNING
Depending on the model, network configuration and associated
subscription cards, certain functions may not be available.
Your phone is identified by its IMEI number. Write this number
down, and do not keep it with your phone, because you may be
asked for it in the event of your phone being stolen, in order to
prevent it from being used, even with a different SIM card. In
order to display the IMEI on your phone's screen, type: *#06#.
12
4
Description
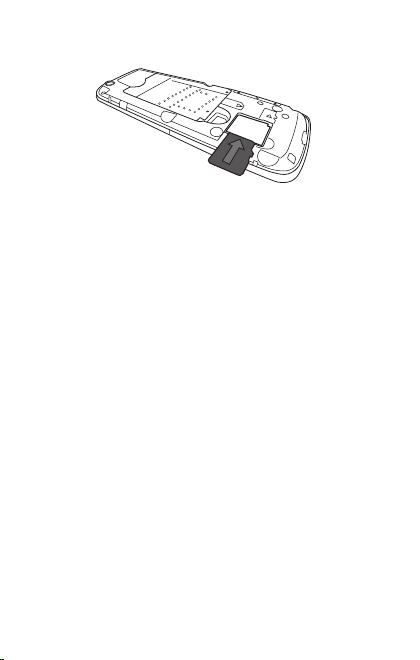
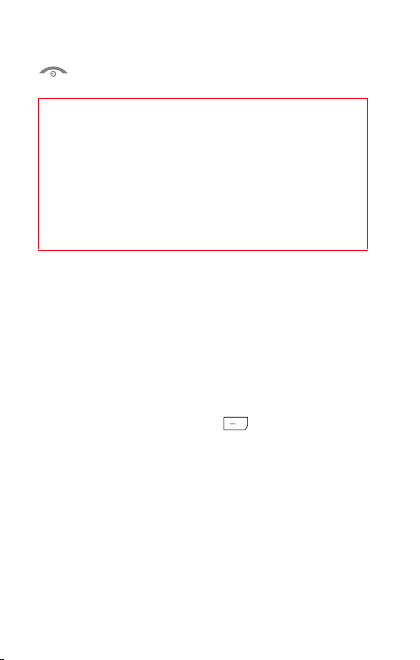
Inserting the memory card
- Remove the back cover.
- Insert the memory card into the card holder as shown in the
figure.
Using the memory card
The memory card is very fragile. Take care when you insert or
remove the memory card.
Some memory cards must be formatted with a PC before first
use with the phone.
Description 13
Navigation principles
These basic principles provide a great intuitiveness to your
phone.
Validate
by pressing the key or the navigator.
Cancel
by pressing the key.
The thumbnails at the bottom of the screen refer to the
keys.
In the menus, a title bar reminds you of the previous level.
From the home page, pressing the navigator displays the icons
of the main menus.
When pressing the navigator followed by a figure, you can
display a menu directly. For instance, pressing the navigator
then
8
displays the Phonebook.
key is used to go from a menu to a sub-menu.
The
The key is used to go from a sub-menu to a menu.
key (press briefly) is used to go back to the idle
The
screen (current function is abandoned).
14
Navigation principles
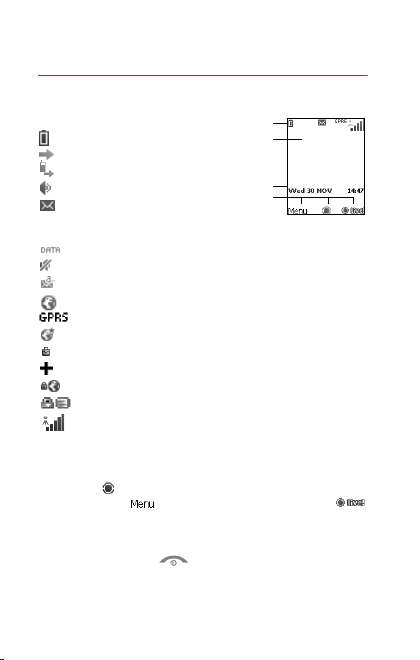
Idle screen
The idle screen contains the following information:
1 - The title bar icons:
Battery
Calls forwarded
Call (establishing the call)
Call (hands free)
Message (reception of a
message, message memory
full)
DATA communication
Silent mode
Message in answering machine
WAP (@) communication
GPRS
Home zone
Roaming
Only emergency call is possible
Protected WAP logon
Protected WAP logon icon with certificate
Signal strength level (5 bars).
2 - Network provider’s name
3 - Date and time, in digital or analog mode
4 - Symbols and tab centred on bottom line:
-
The main thumbnail shows that the menu can be accessed via
the navigator
Shortcut to
- Information messages on calls, messages or network
messages received may also be displayed. They can be
deleted by pressing key briefly.
Idle screen 15
. : Shortcut to the main menu - :
Vodafone live!
menu.
1
2
Vod afo ne
3
4
Activating your phone
Information on the Vod a f o ne SIM card
To use your phone, you need Vodafone
SIM card. It contains personal information
that you can modify:
- Secret codes (PIN(s): Personal
Identification Numbers), these codes
allow you to protect access to your SIM
- Phonebook
- Messages
- How special services work.
WARNING
This card must be handled and stored with care to avoid
being damaged. If you should lose your SIM card, contact
Vodafone immediately.
Please keep your SIM card out of reach of young children.
Getting started
You are now ready to use your phone for the first time.
Switch on the phone by pressing the key.
Enter your PIN code then the date and time.
PIN number
This is your SIM's secret code.
If access to the Vodafone SIM card is protected, the device
prompts you to enter the PIN:
Enter the code
SIM card was issued. These digits do not appear on the screen
for security reasons.
OK
] or the navigator to validate.
Press [
card and phone
between 4 and 8 digits given to you when the
16
Activating your phone
If your phone indicates that the SIM is missing, press the
key to switch off your phone and check that the SIM card
is correctly installed.
WARNING
If a wrong PIN is entered three times in succession, your
SIM card is blocked. You must then:
- Enter the PUK (Personal Unblocking Key) code
provided by your operator, and validate.
- Enter your PIN and validate.
- Enter your PIN again and validate.
After 5 or 10 failed attempts (depending on the type of SIM
card), the Vodafone SIM card is permanently locked. You
must then contact your operator to obtain a new card.
Setting time and date
When you use your phone for the first time, you need to set the
date and time.
In due course, when the battery is completely discharged, or if
it has been removed, you will be prompted systematically to
confirm date and time.
Setting the date
Set the date by entering it directly in numerical form or by using
the navigator to increase or decrease the default values.
Use the navigator to access the next (or last) data input field.
Once the date is correct, press the key to validate.
Setting the time
Same procedure as for setting the date.
Activating your phone 17
Network
The phone will now search for a network on which it can make
calls. If it finds one, it displays the name of the network on the
screen. You are then ready to send or receive a call.
If the network icon appears, calls are possible on your
operator's network.
If the the icon and a network name are displayed, calls
are possible on the network of a different operator.
If the the icon is displayed without any network name,
only the emergency services are accessible (ambulance,
police, fire brigade).
If the network icon flashes, the phone is in permanent
search mode. There is no network available. The received
signal strength indicator displays the quality of reception.
If it indicates less than three bars, search for better
reception in order to call in good conditions.
First call
Dial the number of your correspondent.
Press the key.
During the call, the call in progress icon flashes on screen and
tones may indicate the establishment of the call.
Once communication has been established, the call icon stops
flashing.
You can adjust the sound level (volume) using the
At the end of the conversation press the key to hang up.
navigator.
18
Activating your phone
Calling voicemail
In the idle screen, press and hold down the 1key.
International call
Press (hold down) 0 to display « + », then dial the country
code without waiting for the dial tone, then the number of
the called party.
Emergency services
Depending on the operators you can obtain the
emergency service with or without a SIM card. It is enough
to be in an area served by a network.
To obtain the international emergency service, dial
then press the key.
112
Receiving a call
When you receive a call, the number of your correspondent is
displayed when it is presented by the network.
Press the key or the key to answer, and speak.
To refuse the call, press the key or the key.
To stop the ring tone, without refusing the call, press the
key.
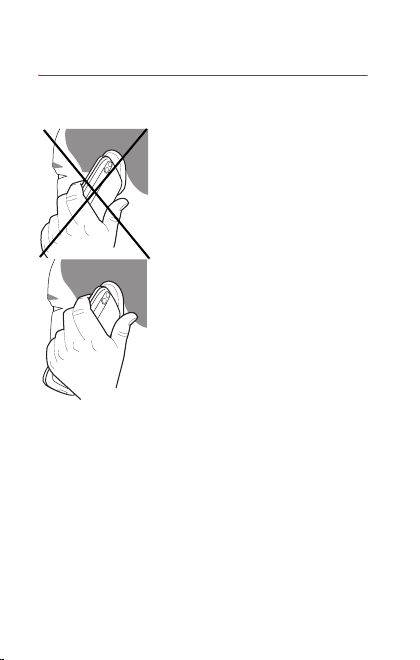
Hands-free mode
To change to hands-free mode during a call, short press on
the green key then press [
amplified mode.
WARNING:
your ear.
When a call is on hand, pressing [
access to different functions.
Pressing [
temporarily when you do not want that your correspondent
listens when you want to speak to other people.
Activating your phone 19
in this mode do not position the phone near
Mute on
Yes
] to confirm activation of the
Options
] allows you to have
] allows you to switch off the sound

Call log
The
Calls
menu allows you to access the call log divided into
five lists that you can display by the navigator: all calls, dialled calls,
received calls, missed calls and call manager.
Various options are proposed: store a number in your phonebook,
call, send a message, etc.
You can also make a call to a number by pressing the key.
Fast access to the list of calls from the idle screen: press the
key.
Switching off
Press the key (long press).
The end message is displayed. The phone switches off.
20
Activating your phone
Using your phone
Improving antenna performance
The antenna is integrated in your
phone, under the lower part of the back
cover.
Avoid putting your fingers on this area
when the phone is switched ON.
If your fingers obstruct the antenna, the
phone may have to operate with a
higher power level than usual,
decreasing its efficiency quickly. It
could also affect the quality of your
communications.
Non ionising radiation
Use the phone in a vertical position.
Your personal safety can only be
improved by doing so.
Increase the efficiency of your phone
- Don't press the keys when not necessary: each keypress
activates the backlight, and uses power.
- Don't obstruct the antenna with your fingers.
- Activation of the Bluetooth® function reduces the life time of the
phone. We recommend you deactivate it when not in use.
Using your phone 21
Charging the battery
1
2
Your phone is powered by a rechargeable battery. A new
battery must be charged for 4 hours at least before being used
for the first time. It reaches its optimum capacity after a few
cycles of use.
When your battery has been discharged, the phone displays the
state (empty battery icon flashes). In this case recharge your
battery for at least 15 minutes before making any calls in order
not to be cut off in the middle of a call.
To recharge the battery:
- Pull out the small connector cover.
- Connect the charger to the socket.
- Plug the end of the cable into the phone connector.
The phone is starting charging. The battery icon is scrolling up
and down to indicate that it is charging. When the battery is fully
charged, the charging stops on its own. Disconnect the cable.
Replace the connector cover.
When charging, the battery may warm up, this phenomenon is
normal.
When you charge the battery, the socket on which the charger
is plugged must be easily accessible.
22
Using your phone

WARNING
If the battery has entirely discharged, the phone cannot
start. Plug the phone into the charger. The phone will
switch on after a few minutes of charge. You can use the
phone again when the
screen.
WARNING
There is danger of explosion if the battery is placed in an
incorrect way or if it is exposed to fire.
Do not short circuit it.
The battery does not have any part that you can change.
Do not try to open the battery casing.
Use only the appropriate chargers and batteries as shown
in the phone manufacturer's catalogue.
The use of other types of chargers or batteries may be
dangerous or invalidate the warranty.
Used batteries must be disposed of in the appropriate
places.
We recommend you to take the battery out if you plan not
to use the phone for extended periods.
You are strongly advised not to connect your phone to the
charger if it doesn’t contain a battery.
The charger is a safety step-down transformer, it is
forbidden to modify, alter or replace it by another
component (power supply plug, etc).
If the battery has entirely discharged, the phone cannot
start. Plug the phone to the charger. The phone will switch
on after a few minutes of charge. You can use the phone
again when the Start option is displayed on the screen.
Using your phone 23
Start
option is displayed on the
Contacts
The phonebook allows you to store numbers that you call
regularly. These numbers can be stored on the SIM card or on
the phone.
To store a contact on the phone memory, the following fields
can be filled: last name, first name, numbers, emails, URL,
address, company, birthday, comments, ringtone, photo.
To store a contact on the SIM card, only the last name and
number fields can be filled.
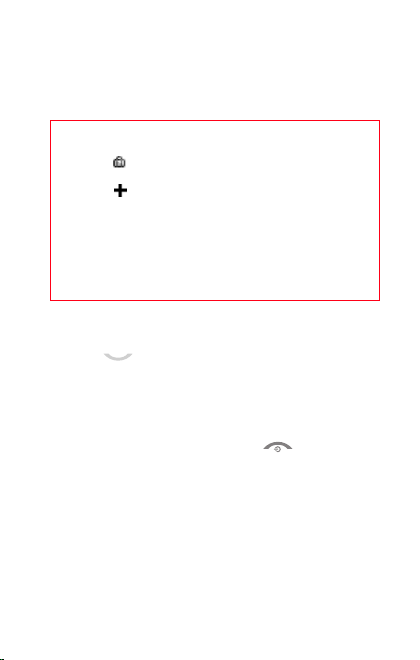
Using the phonebook
Display the
The location where the contact is stored (SIM card or phone) is
indicated by the icon at the top of the screen when the cursor is
located on a contact.
Storing a new contact
There are two ways to store a contact:
1) by selecting
2)
- Then enter the last name and press
- Enter the number and press
- Press [
Contacts
menu. The list of your contacts appears.
contact stored in the SIM card
contact stored in the phone
contact stored in the Fixed Dialling. See
Fixed dialling
activation.
or
Add SIM contact
Contacts/Add contact/Telephone, SIM card
directory
.
Save
page 58 for more details about this
Contacts/[Options
.
] to store it.
OK
] then
.
Add phone contact
OK
.
PIN2
or
and
Fixed
24
Contacts

Calling a contact
Several ways are possible:
- Select a contact. Press the key to start the call.
- Select a contact, press
[
Options]/Call
- Direct call from the idle screen (only for the contacts stored
in the SIM card memory): type the number with which the
contact was saved (example : 21 ) or the
number , the number is displayed, confirm.
OK
to start the call.
, their number is displayed, press
Speed Dialing
You can assign a short number to a contact (from 2 to 9).
- From the idle screen, make a long press on the short number
selected.
- The Speed Dialing function is displayed.
- Enter the phone number of your contact or press the
[
Contacts
- Press [OK] to confirm.
] key to select a contact already saved.
Displaying a contact
Select a contact from the list and press OK. The name, the
phone number and the order number with which the contact is
stored are displayed.
Note:
By directly pressing three characters, the phone will
display the first contact saved in the phonebook, starting with it.
To display the different options, select a contact from the list
Options
and press [
].
Top 3 contacts
For the most incoming and outgoing calls there are three
contact names shown in the first three positions in the
phonebook.
All the options available for a contact also apply to these three
contacts. Be careful if you delete a Top 3 contact, then it is
deleted from your phonebook.
Note:
if you remove the battery, the Top 3 Contacts are not
displayed when the phone is switched on again.
Contacts 25

Contacts options
To display the various options, select a contact and press
[
Options
].
Edit contact
Modify what you want and validate then select
modifications are completed.
Send message
To send an SMS or a postcard to a contact (see chapter
Messaging
).
Send by message
To send a contact details by message (see chapter
Messaging
).
Send via Bluetooth
To send the details of one, several or all the contacts by
®
Bluetooth
.
Add Speed-Dialing
You can assign one of the numbers proposed to the contact
selected (see
Speed Dialing
on page 25).
Copy to phone/Copy one to SIM
This allows you to copy your phonebook contacts from one
memory to the other. Only the name and the first phone number
will be copied.
-
Copy of a phone contact to the SIM card
current contact or several contacts then, if necessary, modify
the name and the number.
-
Copy of a SIM contact to the phone
contact, several contacts or all the SIM contacts.
Save
once the
: select the
: select the current
26
Contacts

Export
It allows you to copy one or several contact details to the
Files
/
My Contacts
Several options:
-
current
-
multiple
-
all
: the details of all the contacts are copied.
directory.
: the details of the contact selected are copied,
: the details of the contacts you select are copied,
My
My numbers
You can create the entries corresponding to your own numbers
in order to consult them when necessary.
Enter the different details and validate.
Memory
Select
Memory
validate.
-
Telephone
used. The memory capacity is shared between the
phonebook and various other features. If you are short on
memory, check if you can free some space from another
feature.
-
SIM
and validate. Select
: the screen displays the amount of memory
: available memory only for contacts.
SIM
or
Telephone
and
Delete
This allows you to delete the contact selected, several contacts
or all the contacts.
Set as my card/Business card
The details of a contact stored in the phone memory can be
saved in a business card.
- Select a contact and press [
- Select
Set as my card
Business card
message or Bluetooth
. Then you can read it, modify it or send it by
Options
and [OK]. The details are saved as
®
.
].
Copy all to phone/Copy all to SIM
This allows you to copy all the SIM card contacts to the phone
memory and vice versa.
Contacts 27

Synchronize
You can synchronize your phonebook with your archives stored
in Vodafone's network depending on the options offered by your
subscription with a GSM or GPRS connection from your phone.
You can also synchronize your phonebook with your archives
stored in your computer. You just need to activate Bluetooth
configure your USB connection in your phone (see chapter
Settings/Connectivity
).
®
or
Add to mailing list
This menu allows you to add a contact to a mailing list.
Settings
-
List choice
phonebook (SIM, Phone, SIM and Phone) displayed when
the phone switches on.
-
Sorting
contacts in the phonebook (by name or first name).
-
New number
number not stored in the phonebook, this option allows you
to activate or deactivate a request to store the number in the
phonebook.
: this menu allows you to select the default
: this menu allows you to select the way to sort
: after an incoming or outgoing call with a
Groups
A group allows you to send the same message to several
recipients at the same time.
- In the phonebook, select the
- Press [
Options
Add group
].
- Select
- Enter a name and press
- Then, on a list press [
time you want to add a contact in the list.
.
OK
.
Options
Groups
]. Select
tab.
Add contact
each
28
Contacts

Messaging
From this menu, you can send an SMS and MMS. MMS is the
Multimedia Message Service, which allows you to send photos,
audio files and other rich content in your messages; these
messages can even be composed of several slides. An MMS is
not charged at the same rate as an SMS. Please contact
Vodafone to get more information on their cost.
Creating a message
- Select
Messaging/Create Message/Message
- Type your text. The T9 mode is applied by default.
The language used is the one selected on the display of the
phone (if the language selected is not compatible with the Easy
Message T9®, the English language will be automatically
selected).
When the text has been entered, [
the functions offered:
-
Input mode: ABC mode/123 mode
T9 options
-
-
-
-
-
-
-
-
-
Messaging 29
(see page 31).
Add recipient
recipient's number or selecting it in the phonebook.
Add Photo/Sounds/Objects/Calendar/Business cards
insert various objects into your message.
Add Subject
message.
New word
Preview
composed.
Slide duration
text scroll automatically before sending the message.
Symbols
or punctuation.
Message type
Send Options
: to send the message by entering the
: allows you to precise a subject to your
: to add a word in the dictionary.
: to display a preview of the message once
: allows you to select a duration to make the
: to insert accented characters, special characters
: to select the message type (SMS or MMS).
(see page 35).
Options
.
] is used to access
(see page 31)
: to
,
 Loading...