

Page 1

VMware vRealize Operations for
Published Applications Installation and
Administration
vRealize Operations for Published Applications 6.3
This document supports the version of each product listed and
supports all subsequent versions until the document is
replaced by a new edition. To check for more recent editions
of this document, see http://www.vmware.com/support/pubs.
EN-002130-00
Page 2

VMware vRealize Operations for Published Applications Installation and Administration
You can find the most up-to-date technical documentation on the VMware Web site at:
http://www.vmware.com/support/
The VMware Web site also provides the latest product updates.
If you have comments about this documentation, submit your feedback to:
docfeedback@vmware.com
Copyright © 2016 VMware, Inc. All rights reserved. Copyright and trademark information.
VMware, Inc.
3401 Hillview Ave.
Palo Alto, CA 94304
www.vmware.com
2 VMware, Inc.
Page 3

Contents
VMware vRealize Operations for Published Applications Installation and
1
Administration 7
Introducing vRealize Operations for Published Applications 9
2
vRealize Operations for Published Applications Architecture 10
vRealize Operations for Published Applications Desktop Agent 10
vRealize Operations for Published Applications Broker Agent 11
vRealize Operations for Published Applications Adapter 11
System Requirements for vRealize Operations for Published Applications 13
3
Product Compatibility for vRealize Operations for Published Applications 13
Software Requirements for vRealize Operations for Published Applications 13
Installing and Configuring vRealize Operations for Published Applications 15
4
Install and Configure vRealize Operations for Published Applications 15
Enable PowerShell Remoting on the Server 29
5
Enable HTTP Protocol for PowerShell Remoting 31
6
Enable HTTPS Protocol for PowerShell Remoting 33
7
Acquire SSL Certificate 33
Create Self-Signed SSL Certificate Using the IIS Manager 34
Create Self-Signed SSL Certificate Using Makecert.exe 34
Create Self-Signed SSL Certificate Using OpenSSL 34
Import SSL Certificate on Remote Machine 35
Configure Configure WinRM HTTPS Listener 35
VMware, Inc.
Configure Firewall 37
8
Update the etc/host file for DNS Resolution 39
9
Install the Certificate on the Client 41
10
Test Connection from Client Machine 43
11
Flow of Commands for SSL cert Using makecert 45
12
Monitoring Your Citrix XenDesktop and Citrix XenApp Environments 47
13
Using the XD-XA Dashboards 47
3
Page 4

VMware vRealize Operations for Published Applications Installation and Administration
Using the XD-XA Reports 53
Managing RMI Communication in
14
vRealize Operations for Published Applications 57
RMI Services 57
Default Ports for RMI Services 58
Changing the Default RMI Service Ports 58
Changing the Default TLS Configuration in
15
vRealize Operations for Published Applications 61
Default TLS Protocols and Ciphers for vRealize Operations for Published Applications 61
TLS Configuration Properties 62
Change the Default TLS Configuration for Servers 62
Change the Default TLS for Agents 62
Managing Authentication in vRealize Operations for Published Applications 65
16
Understanding Authentication for Each Component 65
Certificate and Trust Store Files 67
17
vRealize Operations for Published Applications Adapter Certificate and Trust Store Files 67
Broker Agent Certificate and Trust Store Files 68
Replacing the Default Certificates 69
18
Replace the Default Certificate for the vRealize Operations for Published Applications Adapter 69
Replace the Default Certificate for the Broker Agent 71
Certificate Pairing 73
19
SSL/TLS and Authentication-Related Log Messages 75
20
Upgrade vRealize Operations for Published Applications 77
21
Upgrade Broker Agent 78
Upgrade Desktop Agent 79
Create a vRealize Operations Manager Support Bundle 81
22
Download vRealize Operations for Published Applications Broker Agent Log
23
Files 83
Download vRealize Operations for Published Applications Desktop Agent Log
24
Files 85
View Collector and vRealize Operations for Published Applications Adapter
25
Log Files 87
4 VMware, Inc.
Page 5

Modify the Logging Level for vRealize Operations for Published Applications
26
Adapter Log Files 89
Index 91
Contents
VMware, Inc. 5
Page 6

VMware vRealize Operations for Published Applications Installation and Administration
6 VMware, Inc.
Page 7

VMware vRealize Operations for
Published Applications Installation
and Administration 1
VMware vRealize Operations for Published Applications Installation and Administration provides information about how to monitor the performance of your Citrix XenDesktop/Citrix XenApp 7.6, 7.7, and 7.8 environments in VMware vRealize™ Operations Manager™.
Intended Audience
This information is intended for users who monitor the performance of a Citrix XenDesktop/Citrix XenApp
7.6, 7.7, and 7.8 environments in VMware vRealize Operations Manager and administrators who are
responsible for maintaining and troubleshooting a Citrix XenDesktop/Citrix XenApp 7.6, 7.7, and 7.8
environments.
VMware, Inc.
7
Page 8

VMware vRealize Operations for Published Applications Installation and Administration
8 VMware, Inc.
Page 9

Introducing
vRealize Operations for Published
Applications 2
vRealize Operations for Published Applications collects performance data from monitored software and
hardware objects in your XenDesktop/XenApp 7.6/7.7/7.8, and vCenter environments and provides
predictive analysis and real-time information about problems in your XD-XA infrastructure.
vRealize Operations for Published Applications presents data through alerts, on configurable dashboards,
and on predefined pages in vRealize Operations Manager.
IT administrators can use vRealize Operations for Published Applications to quickly obtain an overview of
how the XenDesktop and XenApp environments are behaving and view important metrics associated with
that environment. Help desk specialists can view objects related to end user sessions, perform basic
troubleshooting, and resolve user problems.
This chapter includes the following topics:
“vRealize Operations for Published Applications Architecture,” on page 10
n
“vRealize Operations for Published Applications Desktop Agent,” on page 10
n
“vRealize Operations for Published Applications Broker Agent,” on page 11
n
“vRealize Operations for Published Applications Adapter,” on page 11
n
VMware, Inc.
9
Page 10
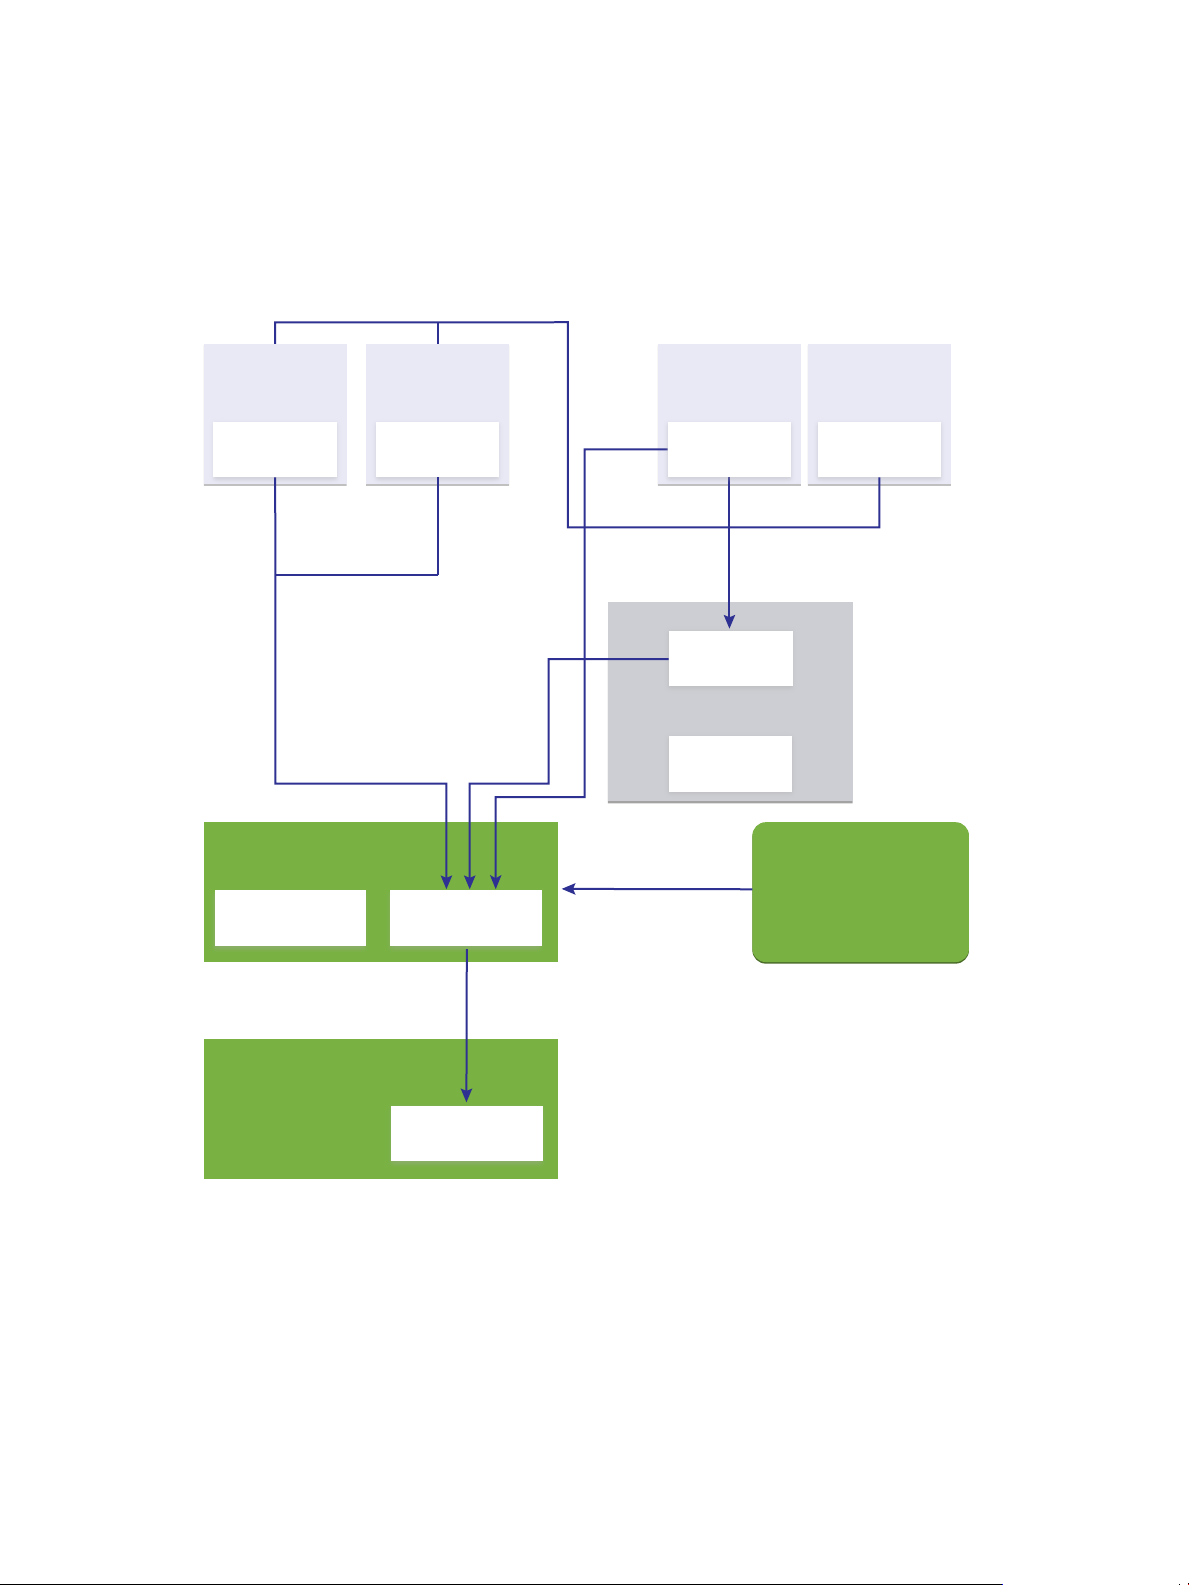
Desktop
agent
Desktop
agent
XD/XA Controller Server
Broker
agent
vRealize Operations
Manager
vCenter
adapter
Published Apps
adapter
vRealize Operations
Manager User Interface
Published Apps
dashboards
Resources, metrics, relationships,
KPIs, alerts, views and reports
XA metrics:
CPU, memory,disk,
ICA, session information,
published app information,
topology and Health monitoring
XD/XA
Session-host
Server
XD/XA
Licensing
Server
XD/XA
Storefront
Server
XA Powershell script/
Monitor Service API/WMI
vCenter Server
vSphere metrics:
ESXi, VM,
datastore,
datacenter
Desktop
agent
XD/XA Desktop
OS Machine
Desktop
agent
Desktop
agent
VMware vRealize Operations for Published Applications Installation and Administration
vRealize Operations for Published Applications Architecture
The vRealize Operations for Published Applications components include the XD-XA adapter, broker agent,
and desktop agents.
VMware vRealize Operations for Published Applications Architecture
vRealize Operations for Published Applications Desktop Agent
The vRealize Operations for Published Applications desktop agent runs as a service on the XenDesktop
Delivery Controller on each XenDesktop Session host server, License server, RDS host, Store Front server,
and on all the VDI machines.
The desktop agent monitors Citrix ICA sessions and HDX sessions and applications launched in the Citrix
ICA and HDX sessions by using standard functions and APIs of Windows OS. The desktop agent
periodically collects the Citrix ICA sessions' data on properties and performance, and sends the data to the
adapter using a secure connection.
10 VMware, Inc.
Page 11

Chapter 2 Introducing vRealize Operations for Published Applications
The desktop agent service is configured to restart automatically by default. You can change the default
configuration by accessing services.msc, right-click Desktop Agent Service, and select Properties >
Recovery.
vRealize Operations for Published Applications Broker Agent
The vRealize Operations for Published Applications broker agent runs on an active delivery controller, and
collects and sends information to the XD-XA adapter.
When you configure a broker agent, you pair the broker agent with a XD-XA adapter instance.
vRealize Operations for Published Applications Adapter
The vRealize Operations for Published Applications adapter collects Citrix XenDesktop inventory
information from the broker agent and collects metrics and performance data from desktop agents. The
vRealize Operations for Published Applications adapter sends that information to
vRealize Operations Manager. The information is displayed in pre-configured XenDesktop dashboards in
the vRealize Operations Manager user interface.
The vRealize Operations for Published Applications adapter runs on a cluster node or remote collector node
in vRealize Operations Manager. You can create a single vRealize Operations for Published Applications
adapter instance to monitor multiple XenDesktop 7.6/7.7/7.8 sites. During broker agent configuration, you
pair the broker agent with a vRealize Operations for Published Applications adapter instance.
If you are monitoring multiple XenDesktop sites, you can pair the broker agent installed in each site with
the same vRealize Operations for Published Applications adapter instance as long as the total number of
objects that the vRealize Operations for Published Applications adapter instance handles does not exceed
10,000. You can create more vRealize Operations for Published Applications adapter instances on different
remote nodes to support large scale environments.
IMPORTANT Creating more than one vRealize Operations for Published Applications adapter instance for
each cluster node or remote collector is not supported. Also, creating more than one
vRealize Operations for Published Applications adapter instance for each site is not supported. vRealize
Operations for Published Applications 7.6/7.7/7.8 adapter cannot monitor the XenApp 6.5 environments.
If your vRealize Operations for Published Applications environment resembles one of the following
configurations, VMware recommends that you create the vRealize Operations for Published Applications
adapter instance on a remote collector node.
XenDesktop
deployments with
multiple sites
Remote datacenters
To improve scalability, create the
vRealize Operations for Published Applications adapter instance on a remote
collector node to offload processing from the vRealize Operations Manager
cluster data nodes.
To minimize network traffic across WAN or other slow connections, install a
remote collector node with a separate
vRealize Operations for Published Applications adapter instance in remote
datacenters. Pair each vRealize Operations for Published Applications
adapter instance with the broker agent that is located in the same remote
datacenter.
VMware, Inc. 11
Page 12

VMware vRealize Operations for Published Applications Installation and Administration
12 VMware, Inc.
Page 13

System Requirements for
vRealize Operations for Published
Applications 3
vRealize Operations for Published Applications has specific system requirements. Verify that your
environment meets these system requirements before you install
vRealize Operations for Published Applications.
This chapter includes the following topics:
“Product Compatibility for vRealize Operations for Published Applications,” on page 13
n
“Software Requirements for vRealize Operations for Published Applications,” on page 13
n
Product Compatibility for vRealize Operations for Published Applications
vRealize Operations for Published Applications is compatible with the following products.
vCenter Server 5.5 and 6.0
n
vRealize Operations Manager 6.1 and 6.2.1
n
Citrix XenDesktop/XenApp 7.6/7.7/7.8 running on Windows Server 2008R2 (SP1) and Windows Server
n
2012.
NOTE Refer to vRealize Operations for Published Application 6.1 for support of Citrix XenApp 6.5.
Software Requirements for vRealize Operations for Published Applications
Each component of vRealize Operations for Published Applications has requirements for the software on
the system where it is installed.
vRealize Operations for Published Applications Desktop Agent Software
Requirements
You install the vRealize Operations for Published Applications desktop agent on Citrix Delivery Controllers,
Session RDS servers, Store Front server, License server, and the VDI machines.
vRealize Operations for Published Applications Broker Agent Software
Requirements
You install the vRealize Operations for Published Applications broker agent on an active delivery controller.
VMware, Inc.
13
Page 14

VMware vRealize Operations for Published Applications Installation and Administration
The vRealize Operations for Published Applications broker agent has the following software requirements.
Verify that you enable PS remoting on the deliver controller by using Microsoft PowerShell before you
install the broker agent.
Windows Server 2008R2 SP1 or Windows Server 2012
n
Microsoft .Net Framework 4.5.1
n
vRealize Operations for Published Applications Adapter Software
Requirements
You install the vRealize Operations for Published Applications adapter on a vRealize Operations Manager
server that is running.
The vRealize Operations for Published Applications adapter has the following software requirements.
VMware vRealize Operations Manager 6.1 and 6.2.1
n
Setting Remote Signed Execution Policy
To set the remote signed execution policy, perform the following steps:
Set-ExecutionPolicy RemoteSigned
Enable-PSRemoting
Restart WinRM service
net stop winrm
net start winrm
Restart Broker-Agent service
14 VMware, Inc.
Page 15

Installing and Configuring
vRealize Operations for Published
Applications 4
Installing vRealize Operations for Published Applications involves downloading the installation files from
the VMware product download page and installing and configuring software components on machines in
your vRealize Operations for Published Applications environment.
Install and Configure vRealize Operations for Published Applications
You install and configure vRealize Operations for Published Applications software components on
machines in your Citrix XenDesktop/XenApp 7.6/7.7/7.8 and vRealize Operations Manager environments.
Prerequisites
Verify that your environment meets product compatibility, hardware, and software requirements. See
n
Chapter 3, “System Requirements for vRealize Operations for Published Applications,” on page 13.
Verify that vRealize Operations Manager is deployed and running. If you need to upgrade
n
vRealize Operations Manager, perform the upgrade before you install
vRealize Operations for Published Applications.
Download the vRealize Operations for Published Applications installation files from the product
n
download page. See “Downloading the vRealize Operations for Published Applications Installation
Files,” on page 17.
Verify that you have a license key for the vRealize Operations for Published Applications solution.
n
Verify that you have a license key for vRealize Operations Manager.
n
The time on all the servers must be synced to a NTP server.
n
NOTE Upgrading from vRealize Operations for Published Applications 6.1 to vRealize Operations for
Published Applications 6.3 is not supported.
NOTE For vRealize Operations for Published Applications 6.1 and
vRealize Operations for Published Applications 6.3 to co-exist, they must be installed on different collector
nodes.
Procedure
1 Downloading the vRealize Operations for Published Applications Installation Files on page 17
Registered VMware users can download the vRealize Operations for Published Applications
installation files from the product download page.
2 Install the vRealize Operations for Published Applications Solution on page 17
You install the vRealize Operations for Published Applications solution from a PAK file in
vRealize Operations Manager.
VMware, Inc.
15
Page 16

VMware vRealize Operations for Published Applications Installation and Administration
3 Open the Ports Used by vRealize Operations for Published Applications on page 18
After you install the vRealize Operations for Published Applications adapter, you disable the firewall
service, open the default ports, and restart the firewall.
4 Adding a vRealize Operations for Published Applications License Key on page 18
After you install the vRealize Operations for Published Applications solution, you must add a
vRealize Operations for Published Applications license key in the vRealize Operations Manager user
interface. vRealize Operations for Published Applications is not functional until it is licensed.
5 Associate XD-XA Objects with Your vRealize Operations for Published Applications License Key on
page 19
You must associate XD-XA objects with your vRealize Operations for Published Applications license
key by editing license groups in vRealize Operations Manager.
6 Create an Instance of the vRealize Operations for Published Applications 6.3 Adapter on page 20
After you install the vRealize Operations for Published Applications solution, you must create an
instance of the vRealize Operations for Published Applications adapter in
vRealize Operations Manager.
7 Enabling Firewall Rules for XenDesktop Delivery Controllers and PVS Server on page 21
Before you install the broker agent and desktop agent, you must enable specific firewall rules for the
XenDesktop Delivery Controller and PVS server.
8 Install the vRealize Operations for Published Applications Broker Agent on page 22
You install the vRealize Operations for Published Applications broker agent on an Active XenDesktop
Delivery Controller.
9 Configure the vRealize Operations for Published Applications Broker Agent on page 23
After you install the broker agent, you use the Broker Agent Configuration wizard to configure the
broker agent on the Citrix XenDesktop Delivery Controller where you installed the broker agent. You
can also use the Broker Agent Configuration wizard to make changes to your broker agent
configuration.
10 Configure Broker Agent to use Non-Admin User for Citrix Desktop Delivery Controller on page 24
You can configure broker agent to use non-admin user for Citrix Desktop Delivery Controller.
11 Install a vRealize Operations for Published Applications Desktop Agent on page 25
You install desktop agents on all Delivery Controllers, Store Front server, RDS host, License server,
and VDI machines.
12 Push the vRealize Operations for Published Applications Desktop Agent Pair Token Using a Group
Policy on page 26
To use vRealize Operations for Published Applications to monitor a XenDesktop Site, you must create
a Group Policy (GPO) to contain the vRealize Operations for Published Applications group policies.
You then apply the GPO to the remote desktops that you want to monitor.
16 VMware, Inc.
Page 17

Chapter 4 Installing and Configuring vRealize Operations for Published Applications
Downloading the vRealize Operations for Published Applications Installation Files
Registered VMware users can download the vRealize Operations for Published Applications installation
files from the product download page.
Table 4‑1. vRealize Operations for Published Applications Installation Files
File Name Component Where to Install
VMware-vrops-v4paadapter-6.3buildnumber.pak
VMware-v4pabrokeragentx86_64-6.3-buildnumber.exe
VMware-v4padesktopagentx86_64-6.3-buildnumber.exe
VMware-v4padesktopagent-6.3buildnumber.exe
Adapter vRealize Operations Manager server
Broker agent installer for 64-bit
Windows OS
Desktop agent installer for 64-bit
Windows OS
Desktop agent installer for 32-bit
Windows OS
On XenDesktop Controller
On XenDesktop Controllers and
Session Host servers, RDS server, Store
Front server, Licence server, and VDI
machines
On Session Host servers and VDI
machines
Install the vRealize Operations for Published Applications Solution
You install the vRealize Operations for Published Applications solution from a PAK file in
vRealize Operations Manager.
Procedure
1 Copy the VMware-vrops-v4paadapter-6.3-buildnumber.pak file to a temporary folder.
2 Log in to the vRealize Operations Manager user interface with administrator privileges.
3 In the left pane of vRealize Operations Manager, click the Administration icon and click Solutions.
4 Install the vRealize Operations for Published Applications solution.
a On the Solutions tab, click the plus sign.
b Browse to locate the temporary folder and select the PAK file.
c Click Upload.
The upload might take several minutes.
d Read and accept the EULA and click Next.
Installation details appear in the window during the upload process.
e When the installation is complete, click Finish.
After the installation is finished, vRealize Operations for Published Applications is listed as a solution.
NOTE Upgrading from vRealize Operations for Published Applications 6.1 to vRealize Operations for
Published Applications 6.2 is not supported.
What to do next
Provide licensing information for the vRealize Operations for Published Applications solution. See “Adding
a vRealize Operations for Published Applications License Key,” on page 18.
VMware, Inc. 17
Page 18

VMware vRealize Operations for Published Applications Installation and Administration
Open the Ports Used by vRealize Operations for Published Applications
After you install the vRealize Operations for Published Applications adapter, you disable the firewall
service, open the default ports, and restart the firewall.
Prerequisites
Install the vRealize Operations for Published Applications adapter.
n
Verify that you have root privileges.
n
Procedure
1 Log in to vRealize Operations Manager collector server.
2 Access the command prompt and run the service vmware-vcops-firewall stop to disable the
vRealize Operations Manager firewall service.
3 Open the default ports by editing the configuration file.
Option Action
a
Linux
Windows
4 Run the vmware-vcops-firewall start command to start the service.
Access the vmware-vcops-firewall.conf file in
the/opt/vmware/etc/vmware-vcops-firewall.conf directory.
b In a text editor, modify the properties for the RMI service ports that
you want to change, for example TCPPORTS="$TCPPORTS
3095:3098" .
a Access Windows Firewall and select Windows Firewall > Advanced
Settings > Inbound Rules > New Rule > Port and click Next.
b Select Specific local ports and type the ports that you are using, for
example3095-3098.
The default ports are 3095-3098. If you changed the default ports,
specify the ports that you are using.
If the service vmware-vcops-firewall start command does not enable the ports, start the collector
server.
What to do next
Add a vRealize Operations for Published Applications license key. See “Adding a vRealize Operations for
Published Applications License Key,” on page 18
Adding a vRealize Operations for Published Applications License Key
After you install the vRealize Operations for Published Applications solution, you must add a
vRealize Operations for Published Applications license key in the vRealize Operations Manager user
interface. vRealize Operations for Published Applications is not functional until it is licensed.
NOTE You must also add a license key for vRealize Operations Manager.
You can have an evaluation license key or a product license key for
vRealize Operations for Published Applications. The evaluation license key (eval/EVAL) provides 60 days of
unlimited product use. A product license key is encoded with an expiration date and a license count.
To add your vRealize Operations for Published Applications license key, select Administration > Licensing
in the vRealize Operations Manager user interface and add your license key to VMware Published Apps
Solution on the License Keys tab.
18 VMware, Inc.
Page 19

Chapter 4 Installing and Configuring vRealize Operations for Published Applications
For detailed information about adding license keys, see the vRealize Operations Manager Customization and
Administration Guide.
If your vRealize Operations for Published Applications license key expires, the
vRealize Operations for Published Applications adapter stops populating vRealize Operations Manager
with data. If you have a valid license key but you exceed the license count, vRealize Operations Manager
generates alerts on certain dashboards. The vRealize Operations for Published Applications adapter does
not restrict data when the license count is exceeded.
Associate XD-XA Objects with Your vRealize Operations for Published Applications License Key
You must associate XD-XA objects with your vRealize Operations for Published Applications license key by
editing license groups in vRealize Operations Manager.
A license group is a way to gather certain objects, called license group members, under a particular license
key. By default, the vRealize Operations Manager and vRealize Operations for Published Applications
license groups both include all host, virtual machine, and datastore objects. Because these objects are
members of both license groups, they are covered by both your vRealize Operations Manager license and
your vRealize Operations for Published Applications license.
Each license group includes membership criteria that you can use to filter the objects that are members of
the license group. By editing the membership criteria for the vRealize Operations Manager and
vRealize Operations for Published Applications license groups, you can specify that certain objects are
covered only under your vRealize Operations for Published Applications license key.
Prerequisites
Add your vRealize Operations for Published Applications license key. See “Adding a vRealize Operations
for Published Applications License Key,” on page 18.
Procedure
1 Log in to the vRealize Operations Manager user interface.
2 In the left pane, select Administration > Licensing.
3 Click the License Groups tab.
License groups appear in the top pane. The license group for
vRealize Operations for Published Applications is called VMware VRealize Operations for Published
Apps 6.3 Licensing. The license group for vRealize Operations Manager is called Product Licensing.
4 Edit the membership criteria for the VMware Published Application Licensing group.
a Select VMware vRealize Operations for Published Apps 6.3 Licensing and click Edit on the
toolbar.
b Select the vRealize Operations for Published Applications license key under VMware vRealize
Operations for Published Applications and click Next.
c In the first Select the Object Type that matches all of the following criteria drop-down menu,
select XSite, define the criteria Relationship, Descendant of, is, and type XEnvironment in the
Object name text box.
d In the second Select the Object Type that matches all of the following criteria drop-down menu,
select Host System, define the criteria Relationship, Descendant of, is, and type XEnvironment in
the Object name text box.
e In the third Select the Object Type that matches all of the following criteria drop-down menu,
select Virtual Machine, define the criteria Relationship, Descendant of, is, and type XEnvironment
in the Object name text box.
VMware, Inc. 19
Page 20

VMware vRealize Operations for Published Applications Installation and Administration
f In the fourth Select the Object Type that matches all of the following criteria drop-down menu,
select Datastore, define the criteria Relationship, Descendant of, is, and type XEnvironment in the
Object name text box.
g Click Next and then click Finish to save your configuration.
5 Edit the membership criteria for the Product Licensing group.
You must edit the membership criteria for the Product Licensing group to exclude the objects that you
included in the VMware Published Application Licensing group.
a Select Product Licensing and click Edit on the toolbar.
b Select the vRealize Operations Manager license key under vRealize Operations Manager and click
Next.
c In the first Select the Object Type that matches all of the following criteria drop-down menu,
select Host System, define the criteria Relationship, Descendant of, is not, and type Xenvironment
in the Object name text box.
d In the second Select the Object Type that matches all of the following criteria drop-down menu,
select Virtual Machine, define the criteria Relationship, Descendant of, is not, and type
Xenvironment in the Object name text box.
e In the third Select the Object Type that matches all of the following criteria drop-down menu,
select Datastore, define the criteria Relationship, Descendant of, is not, and type Xenvironment in
the Object name text box.
f In the fourth Select the Object Type that matches all of the following criteria drop-down menu,
select Datastore, define the criteria Relationship, Descendant of, is not, and type Xenvironment in
the Object name text box.
g Click Next and then click Finish to save your configuration.
Create an Instance of the vRealize Operations for Published Applications 6.3 Adapter
After you install the vRealize Operations for Published Applications solution, you must create an instance of
the vRealize Operations for Published Applications adapter in vRealize Operations Manager.
You can create a single vRealize Operations for Published Applications adapter instance to monitor multiple
XenDesktop sites. If you need to create multiple vRealize Operations for Published Applications adapter
instances, you must create each adapter instance on a unique cluster node or remote collector.
When you restart a vRealize Operations for Published Applications adapter instance, it takes several
minutes before the vRealize Operations for Published Applications desktop agent and broker agent send
information to the vRealize Operations for Published Applications adapter.
Prerequisites
Install the vRealize Operations for Published Applications solution and add your license key.
Procedure
1 Log in to the vRealize Operations Manager user interface with administrator privileges.
2 Click the Administration icon and click Solutions.
3 Select VMware vRealize Operations for Published Apps XD-XA and click the Configure (gear) icon
on the toolbar.
4 Select vRealize Operations for Published Apps XD-XA in the adapter table.
5 Click the Add (plus sign) icon on the lower pane toolbar to add an adapter instance.
20 VMware, Inc.
Page 21

Chapter 4 Installing and Configuring vRealize Operations for Published Applications
6 In Adapter Settings, type a name and description for the adapter instance.
7 In Basic Settings, configure an adapter ID and credential for the adapter instance.
a Type an identifier for the adapter instance in the Adapter ID text box.
The identifier must be unique across all vRealize Operations for Published Applications adapter
instances in the cluster.
b Configure the credential to use when the broker agent pairs with the
vRealize Operations for Published Applications adapter instance.
Option Action
Use an existing credential
Add a new credential
Select the credential from the Credential drop-down menu. When you
create a vRealize Operations for Published Applications adapter
instance for the first time, the Credential drop-down menu is empty.
1 Click the Add New (plus sign) icon .
2 Type a name for the credential in the Credential name text box.
3 Type a server key for the adapter instance in the Server Key text
box. The server key is required to enable pairing between the
broker agent and the adapter. You must provide the server key
when you configure the broker agent.
4 Click OK to save the new credential.
5 Select the new credential from the Credential drop-down menu.
c Click Test Connection to test the connection with the credential that you selected.
8 In Advanced Settings, select a collector to manage the adapter processes from the Collector/Groups
drop-down menu.
To run the adapter instance on a remote collector, select the remote collector. If you do not have a
remote collector, select Default collector group.
9 Click Save Settings to save the adapter instance.
The adapter instance is added to the list.
What to do next
Install the vRealize Operations for Published Applications broker agent. See “Install the vRealize Operations
for Published Applications Broker Agent,” on page 22.
Enabling Firewall Rules for XenDesktop Delivery Controllers and PVS Server
Before you install the broker agent and desktop agent, you must enable specific firewall rules for the
XenDesktop Delivery Controller and PVS server.
The broker agent cannot communicate with the XenDesktop Delivery Controller and PVS server if the
firewall is enabled on these servers.
Enable the following rules in XenDesktop Delivery Controller servers and PVS server.
Enable Ping in the firewall for all servers using the File and Printer Sharing (Echo Request - ICMPv4-In)
n
rule.
Enable Remote WMI in the firewall for all servers using the Windows Management Instrumentation
n
(WMI-In) rule.
Enable the following rule in XenDesktop Delivery Controller Server.
Enable Remote Powershell by running the Enable-PSRemoting command in PowerShell command
n
prompt.
VMware, Inc. 21
Page 22

VMware vRealize Operations for Published Applications Installation and Administration
If the PVS Server in Citrix XenDesktop environment is not in same domain as Delivery Controller, you can
add a new field manually in broker agent configuration file: <pvs_server_credentials>
</pvs_server_credentials>
Broker Agent configuration file can be found at following location: C:\ProgramData\VMware\vRealize
Operations for Published Apps\Broker Agent\conf\v4pa-brokeragent.config.
Install the vRealize Operations for Published Applications Broker Agent
You install the vRealize Operations for Published Applications broker agent on an Active XenDesktop
Delivery Controller.
You only install one broker agent for each XenDesktop Site.
A check box in the Broker Agent Setup wizard controls whether the Broker Agent Configuration wizard
opens immediately after you install the broker agent. This check box is selected by default.
Prerequisites
Install the vRealize Operations for Published Applications solution, add your license key, and create an
n
instance of the vRealize Operations for Published Applications adapter.
Verify that you downloaded the broker agent installation file.
n
Verify that you configured the XenDesktop Controller, Store Front, and PVS server for remote WMI by
n
granting DCOM remote access/activation permissions to the servers. The user name must include the
user name that you indicated for the servers.
XenDesktop Delivery controller's SSL certificate should be added as a trusted certificate if HTTPS (SSL)
n
is enabled for OData (Monitoring Service).
If OData (Citrix Monitoring Service) is configured on listen on SSL, the Broker Agent will create
n
connections to XenDesktop Delivery Controller using HTTPS.
So a valid certificate should be installed on Delivery Controller and this certificate should be added as a
trusted certificate in Delivery Controller.
OR
If the certificate is issued by a Certificate Authority, this CA should be a trusted publisher in Delivery
Controller.
Procedure
1 Log in to the machine where you plan to install the broker agent using a domain account that is part of
the local administrators group.
2 Install the broker agent.
Option Action
Command line
EXE file
a Access the command prompt.
b
Install the broker agent for your environment using the /s, v, or /qn
options.
n
Run the VMware-v4pabrokeragent-x86_64-6.3buildnumber.exe command.
a Copy the file for your environment to a temporary folder, and double-
click the EXE file to start the installation procedure.
n
Double-click the VMware-v4pabrokeragent-x86_64-6.3-
buildnumber.exe file.
b Follow the steps in the installer.
The broker agent is installed and saved to the Program Files folder.
22 VMware, Inc.
Page 23

Chapter 4 Installing and Configuring vRealize Operations for Published Applications
What to do next
Configure the broker agent. See “Configure the vRealize Operations for Published Applications Broker
Agent,” on page 23.
Configure the vRealize Operations for Published Applications Broker Agent
After you install the broker agent, you use the Broker Agent Configuration wizard to configure the broker
agent on the Citrix XenDesktop Delivery Controller where you installed the broker agent. You can also use
the Broker Agent Configuration wizard to make changes to your broker agent configuration.
A check box in the Broker Agent Setup wizard controls whether the Broker Agent Configuration wizard
opens immediately after you install the broker agent. This check box is selected by default.
During broker agent configuration, you pair the broker agent with a
vRealize Operations for Published Applications adapter instance. Pairing the broker agent with a
vRealize Operations for Published Applications adapter instance is a necessary authentication step that
enables the broker agent and desktop agents to communicate with the
vRealize Operations for Published Applications adapter. The broker agent and desktop agents cannot
communicate with the vRealize Operations for Published Applications adapter until the pairing process is
complete.
If you are monitoring multiple XenDesktop Sites, you can pair the broker agent installed in each Site with
the same vRealize Operations for Published Applications adapter instance as long as the total number of
desktops that the vRealize Operations for Published Applications adapter instance handles does not exceed
10,000.
Each time you restart the broker agent service, a new log file is created.
If a log file was created for the day and the broker agent is restarted on that day, a new log file is created.
The name of the new log file is v4pa_brokeragent_svc_<date>_00.log, and the log rotation follows this
series.
Prerequisites
Install the vRealize Operations for Published Applications broker agent. See “Install the vRealize
n
Operations for Published Applications Broker Agent,” on page 22.
Verify that you have the server key for the vRealize Operations for Published Applications adapter.
n
You specified the server key when you created a credential for the adapter instance.
Verify that you have the IP address or FQDN of the machine where you installed the
n
vRealize Operations for Published Applications adapter.
Procedure
1 If the Broker Agent Configuration wizard is not already open, start it by selecting Start > VMware >
vRealize Operations for Published Apps Broker Agent Settings.
2 In the Adapter IP/FQDN Address text box, type the IP address of the vRealize Operations Manager
node or remote collector where the vRealize Operations for Published Applications adapter instance is
running.
3 In the Port text box, type the port used to connect to the vRealize Operations for Published Applications
adapter.
By default, the broker agent uses port 3095 to communicate with the
vRealize Operations for Published Applications adapter. You can modify the default port number,
depending on your network configuration.
4 Type and confirm the pairing key for the vRealize Operations for Published Applications adapter.
VMware, Inc. 23
Page 24

VMware vRealize Operations for Published Applications Installation and Administration
5 Click Pair to pair the broker agent with the vRealize Operations for Published Applications adapter,
and click Test to test the connection.
The status of the pairing process appears in the Text area.
6 After the pairing process succeeds, click Next.
7 On the Copy Information page, click Copy to copy the certificate string to the clipboard and click Next.
Save this text to copy to the GPO Template.
8 Provide the requested information on the Citrix Delivery Controller Information window.
a Type the XenDesktop environment domain name, domain administrator, and credentials.
b Click Test to validate the connection to the XenDesktop Controller server.
c Click Next.
9 (Optional) Edit the interval values on the Intervals and Timeouts page, and click Next.
10 (Optional) Configure the logging level and log rotation on the Configure the logging parameters page,
and click Next.
11 When the Service Configuration window appears, select Start/Restart, and then click Next.
12 Review the configurations and click Finish to apply the configurations.
The vRealize Operations for Published Applications broker agent is configured and available.
NOTE To configure the Broker-Agent to use a Read-Only/Custom Administrator account for XenDesktop
Delivery Controller, go to “Configure Broker Agent to use Non-Admin User for Citrix Desktop Delivery
Controller,” on page 24.
What to do next
Verify the status of the vRealize Operations for Published Applications broker agent in the Windows
Services Management Console.
Review the logs by browsing to the C:\ProgramData\VMware\VMware vRealize Operations for Published
Apps\Broker Agent\logs directory.
Configure Broker Agent to use Non-Admin User for Citrix Desktop Delivery Controller
You can configure broker agent to use non-admin user for Citrix Desktop Delivery Controller.
Prerequisites
If you want to configure broker agent to use Read-Only/Custom administrator for connecting to Citrix
delivery controller, follow these steps:
Ensure that the Read-Only/Custom Administrator has read access to Site and Monitoring Databases.
n
Ensure that Read-Only/Custom Administrator has read/execute/remote access over WinRM,
n
RemotePowershell and WMI (Root\CIMV2).
Procedure
1 You can achieve this by adding the user to local "Administrators" group of the delivery controller
machine.
or
24 VMware, Inc.
Page 25

Chapter 4 Installing and Configuring vRealize Operations for Published Applications
2 Follow these steps if you don't want the user to have Administrator access on delivery controller.
a Login to delivery controller as full administrator.
b Run command winrm configSDDL default from command prompt. Add Read/Execute permissions
for Read-Only/Custom Administrator.
c Run Set-PSSessionConfiguration -name Microsoft.PowerShell -ShowSecurityDescriptorUI from
powershell prompt. Add Read/Execute permissions for Read-Only/Custom Administrator.
d Go to Computer Management > Services and Applications > WMI Control.
e Right click and select Properties.
f Go to Security tab.
g Click CIMV2 > Security.
Add Execute Methods and Remote Enable permissions for Read-Only/Custom Administrator.
h Restart the WinRM Service.
i Download and install the "subinacl" tool from
http://www.microsoft.com/en-us/download/details.aspx?id=23510.
j Add Execute Methods and Remote Enable permissions for Read-Only/Custom Administrator.
k From Command Prompt, navigate to subinacl installation directory. By default, it gets installed in
"C:\Program Files (x86)\Windows Resource Kits\Tools".
l Run subinacl.exe /service CitrixBrokerService /grant=DOMAIN\USER_NAME=S.
Install a vRealize Operations for Published Applications Desktop Agent
You install desktop agents on all Delivery Controllers, Store Front server, RDS host, License server, and VDI
machines.
Prerequisites
Verify that you downloaded the desktop agent installation file.
Procedure
1 Log in to the machine where you plan to install the desktop agent, using a domain account that is part
of the local administrators group.
2 Install the desktop agent.
Option Action
Command line
EXE file
a Access the command prompt.
b Run the Desktop agent:
n
For 64-bit: Run the VMware-v4padesktopagent-x86_64-6.3buildnumber.exe command using the /s /v/qn options.
n
For 32-bit: Run the VMware-v4padesktopagent-6.3buildnumber.exe command using the /s /v/qn options.
a
Copy the VMware-v4padesktopagent-x86_64-6.3-
buildnumber.exe (64-bit) or VMware-v4padesktopagent-6.3-
buildnumber.exe (32-bit) file to a temporary folder.
b
Double-click the VMware-v4padesktopagent-x86_64-6.3-
buildnumber.exe or the VMware-v4padesktopagent-x86_64-6.3-
buildnumber.exe (64-bit) or VMware-v4padesktopagent-6.3-
buildnumber.exe (32-bit)file.
c Follow the steps to complete the installer.
VMware, Inc. 25
Page 26

VMware vRealize Operations for Published Applications Installation and Administration
The desktop agent is installed in Program Files folder.
Push the vRealize Operations for Published Applications Desktop Agent Pair Token Using a Group Policy
To use vRealize Operations for Published Applications to monitor a XenDesktop Site, you must create a
Group Policy (GPO) to contain the vRealize Operations for Published Applications group policies. You then
apply the GPO to the remote desktops that you want to monitor.
You use the Microsoft Group Policy Editor to create the GPO. After you create the GPO, you must apply it
to a base image or to an Organizational Unit (OU) on your Active Directory server, depending on your
configuration.
vRealize Operations for Published Applications group-policy settings are provided in the
v4pa_desktopagent.admx file that is installed in the %programfiles%\VMware\vRealize Operations for
Published Apps\Broker Agent\extras\GroupPolicyFiles directory.
The language-specific resources, for example .adml files, are installed in the %programfiles
%\VMware\vRealize Operations for Published Apps\Broker Agent\extras\GroupPolicyFilese\language
directory.
If there is an Authentication Failure for a desktop agent you must update the GPO policy for desktop agent
authentication. When you update the GPO policy for desktop agent authentication, and there are other
policies that require updating, all pending policies are updated, not just the GPO policy for desktop agent
authentication.
Procedure
1 Create an organizational unit (OU) in the domain controller machine.
2 If the XD-XA server was already added to the computer account, move the XD-XA server to the OU.
a Access Active Directory Users Computers, and select Computer, right-click your XD-XA server,
and in the context menu select Move....
b In the Move object into container window, select the OU you created.
The XD-XA server is now moved to the OU.
3 Create a Group Policy object using the Group Policy Management Console (GPMC).
4 Copy the certificate string and the RMI URL from the broker agent configuration utility.
5 Copy the v4pa_desktopagent.admx file to PolicyDefinitions folder, which is in the
c:\Windows\PolicyDefinitions directory.
The v4pa_desktopagent.admx file is in the "%ProgramFiles%\VMware\vRealize Operations for
Published Apps\Broker Agent\extras\GroupPolicyFiles directory.
6 Copy the v4pa_desktopagent.adml file to en-us folder, which is in the
c:\Windows\PolicyDefinitions\en-us directory.
The v4pa_desktopagent.adml file is in the "%ProgramFiles%\VMware\vRealize Operations for
Published Apps\Broker Agent\extras\GroupPolicyFiles\en_us directory.
7 Set the Group Policy.
a On the controller machine, click Start and type the gpmc.msc command in the search box.
b Right-click the GPO that you created and select Edit.
c Select Computer Configuration > Policies > Administrative Templates > VMware Published
Apps Agent Configuration > vRealize Operations, and double-click the item in the right pane.
26 VMware, Inc.
Page 27

Chapter 4 Installing and Configuring vRealize Operations for Published Applications
d Select Enable and copy the RMI URL and certificate string in the policy template.
You might receive a warning that you exceeded the maximum number of characters per line.
e (Optional) Break the line by pressing Enter, and click Apply, and then click OK.
8 Verify on the XD-XA server machine that the RMI URL and certificate string in the
HKLM\Software\Policies\VMware, Inc.\vRealize operations for published Apps\Desktop Agent
directory. RMI URL is of the format rmi://<vrops_ip>:3095.
What to do next
Install desktop agent on the VDI and RDSH hosts you want to monitor. If you already installed a desktop
agent and planned to push through GPO at later stage, there might be exceptions in the desktop agent log
files. After the pair token is pushed using the GPO, you should restart the desktop agent service.
VMware, Inc. 27
Page 28

VMware vRealize Operations for Published Applications Installation and Administration
28 VMware, Inc.
Page 29

Enable PowerShell Remoting on the
Server 5
You must enable the PowerShell remoting on the machine where the broker agent is installed. This is a onetime activity to enable the broker agent to collect the data from the Citrix Controller and send to the
vRealize Operations for Published Applications adapter.
Procedure
1 Open PowerShell prompt and run the following command:
Enable-PSRemoting -Force
2 To change scripts execution policy to allow remote scripts, run the following command:
Set-ExecutionPolicy RemoteSigned
VMware, Inc.
29
Page 30

VMware vRealize Operations for Published Applications Installation and Administration
30 VMware, Inc.
Page 31

Enable HTTP Protocol for PowerShell
Remoting 6
Procedure
To use HTTP for PowerShell remoting, run the following command on the host:
u
winrm quickconfig
Port 5985 is opened to listen to incoming connection. Sometimes, the connection from the remote PowerShell
does not work because of the following error:
Connecting to remote server failed with the following error message : The WinRM client cannot
process the request.
If the authentication scheme is different from Kerberos or if the client computer is not connected to a
domain, you must use HTTPS transport. Or, add the destination machine to the TrustedHosts configuration
setting.
Use the following command to configure TrustedHosts:
winrm.cmd
NOTE Computers in the TrustedHosts list might not be authenticated. For more information, run the
following command:
winrm help config
What to do next
You can also run the following command to remote host as trusted host on the client.
winrm set winrm/config/client'@{TrustedHosts="10.0.5.35"}'
VMware, Inc.
31
Page 32

VMware vRealize Operations for Published Applications Installation and Administration
32 VMware, Inc.
Page 33

Enable HTTPS Protocol for
PowerShell Remoting 7
If you plan to use HTTP, you can skip this section. However, it is recommend to implement HTTPS for
encrypting the traffic between the client and remote server.
This chapter includes the following topics:
“Acquire SSL Certificate,” on page 33
n
“Create Self-Signed SSL Certificate Using the IIS Manager,” on page 34
n
“Create Self-Signed SSL Certificate Using Makecert.exe,” on page 34
n
“Create Self-Signed SSL Certificate Using OpenSSL,” on page 34
n
“Import SSL Certificate on Remote Machine,” on page 35
n
“Configure Configure WinRM HTTPS Listener,” on page 35
n
Acquire SSL Certificate
To set up PowerShell remoting to use HTTPS protocol, deploy an SSL certificate to the remote server.
To acquire an SSL certificate, first generate a self-signed certificate. There are two purposes for using SSL
certificates with PowerShell remoting:
Encrypting traffic between client and server
n
Verifying server identity (CN check)
n
The following are the methods to generate a self-signed SSL certificate:
“Create Self-Signed SSL Certificate Using the IIS Manager,” on page 34
“Create Self-Signed SSL Certificate Using Makecert.exe,” on page 34
“Create Self-Signed SSL Certificate Using OpenSSL,” on page 34
In all these methods, replace HOSTNAME with either the remote server host name or the IP address to be
used to connect to that server. For example, srv1.mycompany.com or 32.53.2.87.
Ensure that your setup meets the following requirements when generating SSL certificate to use with
PowerShell remoting:
Set the Certificate Enhanced Key Usage (EKU) "Server Authentication" (OID=1.3.6.1.5.5.7.3.1).
n
Set the Certificate Subject to "CN=HOSTNAME".
n
In all these methods, an SSL certificate in PKCS12 format (PFX file) without a password is generated.
VMware, Inc.
33
Page 34

VMware vRealize Operations for Published Applications Installation and Administration
Create Self-Signed SSL Certificate Using the IIS Manager
If IIS 7 or IIS 8 is installed on the remote server, you can use the IIS Manager to generate self-signed SSL
certificates.
Procedure
1 Open IIS Manager.
2 In the Connections pane, select the top-most machine node.
3 Click Server Certificates in the Details pane.
4 Click Create Self-Signed Certificate in the Actions pane.
5 Enter HOSTNAME as certificate friendly name.
6 Select Personal as the certificate store.
Create Self-Signed SSL Certificate Using Makecert.exe
makecert.exe is a part of Microsoft Windows SDK. If you have Microsoft Visual Studio .NET installed, you
can use both the makecert.exe and pvk2pfx.exe tools.
Procedure
1 Open the Visual Studio command prompt in the as an Administrator).
2 Navigate to the folder where you want to create the certificate files.
3 To create a certificate and a private key file, run the following command:
makecert -r -pe -n "CN=HOSTNAME" -eku 1.3.6.1.5.5.7.3.1 -sky exchange -sv HOSTNAME.pvk
HOSTNAME.cer
4 To convert the files into a .pfx file, run the following command:
pvk2pfx -pvk HOSTNAME.pvk -spc HOSTNAME.cer -pfx HOSTNAME.pfx
5 Deploy the generated SSL certificate to the remote server and import it there.
Create Self-Signed SSL Certificate Using OpenSSL
You can create self-signed certificate using OpenSSL.
Prerequisites
Download package Win32 OpenSSL Light for generating SSL certificate from
http://slproweb.com/products/Win32OpenSSL.html to a folder of your choice. For example,
C:\Utils\OpenSSL.
Procedure
1 To add Server Authentication to EKU, open openssl.cfg and add extendedKeyUsage setting under the
v3_ca section.
[ v3_ca ] extendedKeyUsage = serverAuth
2 Open command prompt, go to C:\Utils\OpenSSL\bin, and set default OpenSSL configuration variable.
set OPENSSL_CONF=C:\Utils\OpenSSL-Win32\bin\openssl.cfg
34 VMware, Inc.
Page 35

3 Generate a self-signed certificate with a new private key.
openssl req -x509 -nodes -days 9999 -newkey rsa:2048 -keyout HOSTNAME.key -out HOSTNAME.cer subj "/CN=HOSTNAME"
4 Convert the certificate and the private key to a .pfx file.
openssl pkcs12 -export -out HOSTNAME.pfx -inkey HOSTNAME.key -in HOSTNAME.cer -name
"HOSTNAME" -passout pass:
5 Deploy the generated SSL certificate (HOSTNAME.PFX file in the bin folder) to the remote server and
import it there .
Import SSL Certificate on Remote Machine
Upload the certificate PFX file to the remote server. You can do so by attaching your local disk drive to the
Remote Desktop session and copying the file in Explorer.
Procedure
Import the certificate into the Local Machine certificate store by pasting the following script in the
u
PowerShell console:
Replace path-to-pfx-file with the path to the PFX file. For example, C:\OpenSSL-Win64\bin\.
Chapter 7 Enable HTTPS Protocol for PowerShell Remoting
function Install-Certificate ($certPath, [string]$storeLocation = "LocalMachine", [string]
$storeName = "My")
{
$cert = New-Object
System.Security.Cryptography.X509Certificates.X509Certificate2($certPath,"",
"MachineKeySet,PersistKeySet")
$store = New-Object
System.Security.Cryptography.X509Certificates.X509Store($storeName, $storeLocation)
$store.Open("ReadWrite")
$store.Add($cert)
$store.Close()
"Thumbprint: $($cert.Thumbprint)"
}
Install-Certificate path-to-pfx-file\xenapp-dc.vcops.local.pfx
The output of this script is a certificate thumbprint, which is required when setting up HTTPS listener
for the WinRM service. If you generated SSL certificate in the IIS Manager, you can get its thumbprint
using the following PowerShell command:
Get-ChildItem cert:\LocalMachine\My | Where-Object { $_.Subject -eq "CN=HOSTNAME" }
Configure Configure WinRM HTTPS Listener
All the queries go through WinRM. Therefore, configure the WinRM HTTPS listener on the machine where
the broker agent is installed.
Procedure
To configure WinRM HTTPS listener on the remote server, run the following command on the
u
PowerShell prompt:
winrm create winrm/config/Listener?Address=*+Transport=HTTPS @{Hostname="xenappdc.vcops.local";CertificateThumbprint= " 4D9157F66867A73A55A0B9F6DAC045EB52D4BF9A"}
VMware, Inc. 35
Page 36

VMware vRealize Operations for Published Applications Installation and Administration
36 VMware, Inc.
Page 37

Configure Firewall 8
By default, WinRM uses port 5986 for HTTPS listener. Add a new firewall rule to allow inbound connections
on 5986 port.
Procedure
To add a new firewall rule to allow inbound connections on 5986 port, run the following command:
u
netsh advfirewall firewall add rule name="Windows Remote Management (HTTPS-In)" dir=in
action=allow protocol=TCP localport=5986
If you work with Azure VM, add a new endpoint for 5986 port on the VM settings page. If you work
with AWS EC2 instance, add a new rule to its security group.
VMware, Inc.
37
Page 38

VMware vRealize Operations for Published Applications Installation and Administration
38 VMware, Inc.
Page 39

Update the etc/host file for DNS
Resolution 9
Update the etc/host file to fix the DNS resolution if you are using HOSTNAME as the fully qualified domain
name instead of the IP address.
VMware, Inc. 39
Page 40

VMware vRealize Operations for Published Applications Installation and Administration
40 VMware, Inc.
Page 41

Install the Certificate on the Client 10
Procedure
1 Open Windows Management Console.
2 Go to File > Remove Snap In.
3 Click Certificates > Add.
4 Select Computer Account, click Next, and then click Finish. Click OK on the wizard to continue.
The wizard closes and Console1 snap in is visible.
5 Select and expand the Certificates.
6 Select Trusted Root Certification Authorities > Certificates, go the tree panel on the right, and right-
click All Tasks > Import.
The Welcome to Certificate Import wizard appears.
7 Click Next and browse to the certificate copied from the host.
8 Click Next.
A message confirms the success of the import operation.
VMware, Inc.
The imported certificates are displayed in the tree panel on the right.
41
Page 42

VMware vRealize Operations for Published Applications Installation and Administration
42 VMware, Inc.
Page 43

Test Connection from Client Machine 11
Procedure
1 If you want to use HTTP protocol for PowerShell remoting, run the following command on the client
machine to allow connections to all hosts:
winrm set winrm/config/client @{TrustedHosts="*"}
2 Test it on the PowerShell console by running the following commands:
Invoke-Command -ComputerName XENAPP-DC -Port 5986 -Credential (Get-Credential) `
-UseSSL -SessionOption (New-PSSessionOption -SkipCACheck -SkipCNCheck) `
-ScriptBlock { Write-Host "Hello from $($env:ComputerName)" }
Testing of the connection is successful if you see the greeting from remote machine.
VMware, Inc.
43
Page 44

VMware vRealize Operations for Published Applications Installation and Administration
44 VMware, Inc.
Page 45

Flow of Commands for SSL cert
Using makecert 12
Procedure
1 Run the following command:
makecert -r -pe -n "CN=[HOSTNAME]" -eku 1.3.6.1.5.5.7.3.1 -sky exchange -sv
xenapp6.stengdomain.fvt.pvk xenapp6.stengdomain.fvt.cer
2 Enter 1234 as password.
pvk2pfx -pvk [HOSTNAME] -spc xenapp6.stengdomain.fvt.cer -pfx xenapp6.stengdomain.fvt.pfx
3 Enter 1234 as password again.
Invoke-Command -ComputerName [HOSTNAME] -Port 5986 -Credential (Get-Credential) `
-UseSSL -SessionOption (New-PSSessionOption -SkipCACheck -SkipCNCheck) `
-ScriptBlock { Write-Host "Hello from $($env:ComputerName)" }
Invoke-Command -ComputerName [HOSTNAME] -Port 5986 -Credential (Get-Credential) `
-UseSSL -SessionOption(New-PSSessionOption -SkipCACheck -SkipCNCheck) `
-ScriptBlock { Write-Host "Hello from $($env:ComputerName)" }
Invoke-Command -ComputerName [HOSTNAME] -Port 5986 -Credential (Get-Credential) `
-UseSSL -SessionOption New-PSSessionOption -SkipCACheck -SkipCNCheck) `
-ScriptBlock {Write-Host "Hello from $($env:ComputerName)"}
Update etc/host to put remote computer IP and DNS name for using it in .net
VMware, Inc.
45
Page 46

VMware vRealize Operations for Published Applications Installation and Administration
46 VMware, Inc.
Page 47

Monitoring Your Citrix XenDesktop
and Citrix XenApp Environments 13
When you install the vRealize Operations for Published Applications solution, preconfigured dashboards
and predefined report templates appear in the vRealize Operations Manager user interface. You can use the
Citrix XenDesktop and Citrix XenApp dashboards and reports along with the standard
vRealize Operations Manager object monitoring features to monitor your Citrix XenDesktop and Citrix
XenApp environments.
This chapter includes the following topics:
“Using the XD-XA Dashboards,” on page 47
n
“Using the XD-XA Reports,” on page 53
n
Using the XD-XA Dashboards
The XD-XA dashboards are in the Published Applications group in the Dashboard List menu in the
vRealize Operations Manager user interface.
Widget Interaction in XD-XA Dashboards
vRealize Operations Manager supports interaction between widgets in a single dashboard. Widgets are
combined so that the content of the destination widget is updated according to the value selected in the
source widget.
For information about creating and modifying dashboards and customizing widgets see
vRealize Operations Manager Customization and Administration Guide.
Table 13‑1. Widget Interaction in XD-XA Dashboards
Dashboard Source Widget Destination Widget
XD-XA Overview Sites Site Indicator Metrics
XD-XA Overview Sites SQL Connectivity
XD-XA Overview Sites VCenter Server
XD-XA Overview VCenter Server Reclaimable Capacity
XD-XA Overview VCenter Server Capacity Remaining
XD-XA Help Desk Session Details Session Logon Breakdown
XD-XA Help Desk Session Details Session Processes
XD-XA Help Desk Session Details Selected Session Related Objects
XD-XA Help Desk Session Details Selected User Session Alerts
XD-XA Help Desk Session Details Machine Object
VMware, Inc. 47
Page 48

VMware vRealize Operations for Published Applications Installation and Administration
Table 13‑1. Widget Interaction in XD-XA Dashboards (Continued)
Dashboard Source Widget Destination Widget
XD-XA Help Desk Session Details Client
XD-XA Help Desk Virtual Machine VM Metrics
XD-XA Help Desk Selected Session Related Objects Session Related Metrics
XD-XA Help Desk Machine Object Virtual Machine
XD-XA Server Desktops Session-host Servers Session Host Server Resource
XD-XA Servers Desktops Session-host Servers Session Host Server Indicator Metrics
XD-XA Servers Desktops Session-host Servers Top Alerts
XD-XA Servers Applications Applications Application Users
XD-XA Servers Applications Applications Application Instance Trend
XD-XA Servers Applications Applications Application Instances
XD-XA Servers Applications Applications Application Launch Duration Trend
XD-XA Servers Applications Applications Session-Host Servers
XD-XA Servers Applications Applications Instances Application Instance Resource Trend
XD-XA Servers Applications Session Host Servers Session Indicator Metrics
XD-XA VDI Desktops VDI Desktops VDI Session Details
XD-XA VDI Desktops VDI Desktops VDI Desktop Resource Utilization
XD-XA VDI Desktops VDI Desktops Running Application List
XD-XA VDI Desktops VDI Desktops Top Alerts
XD-XA Session Details Session Details Session logon Breakdown
XD-XA Session Details Session Details Session Metrics
XD-XA Session Details Session Details Session Processes
XD-XA Session Details Users User Logon Duration Trend
XD-XA Session Details Users Application Launched by User
XD-XA User Experience vCPU Experience vCPU Relationship
XD-XA User Experience vDisk Experience vDisk Relationship
XD-XA User Experience vDisk Experience vDisk Latency Chart
XD-XA User Experience vRAM Experience vRAM Relationship
XD-XA User Experience vRAM Experience vRAM Chart
Utilization
48 VMware, Inc.
Page 49

Chapter 13 Monitoring Your Citrix XenDesktop and Citrix XenApp Environments
Introducing the XD-XA Dashboards
You can use the preconfigured XD-XA dashboards to monitor the performance of your XenDesktop
environment.
Table 13‑2. XD-XA Dashboard Summary
Dashboard What It Shows When To Use It
“XD-XA Overview,” on
page 51
“XD-XA Help Desk,” on
page 51
“XD-XA Server Desktops,” on
page 52
“XD-XA Session Details,” on
page 52
“XD-XA Server Applications,”
on page 53
“XD-XA VDI Desktops,” on
page 53
“XD-XA User Experience,” on
page 53
Status of your end-to-end XD-XA
environment, including the XD-XA-related
alerts, key Site metrics, Site related vCenter
capacity.
Information about all sessions running in your
environment. The Sessions Details widget lists
all of connected VDI desktop sessions, RDS
desktop sessions, and application sessions in
your environment and is the master widget for
the dashboard.
Session-host server metrics and related
vSphere VMs, server resource utilization and
server indicator metrics.
Detailed information of all the sessions,
session logon breakdown, session performance
metrics, running processes of the session, users
summary, User logon duration trend, and the
report of what application are launched by a
user and when.
Application summary data, application
instance number trend, application instance
summary data, application instance resource
utilizaiton, application launch duration trend,
application users, Application related servers,
and server indicator metrics.
VDI Desktops related alerts, VDI Desktop
summary information and VDI session
detailed information, VDI desktop session
resource utilization, and running application
list of a VDI desktop session.
vCPU Experience heatmap, vDisk Experience
heatmap, vRAM Experience heatmap, vCPU
relationship, vDisk relationship, vRAM
relationship, vCPU chart, vDisk chart, vRAM
chart, and Delivery Group critical alerts.
Assess overall XD-XA
n
performance, and the overall
user experience.
View the top XD-XA-related
n
alerts.
View Site related vCenter
n
remaining capacity and
reclaimable capacity.
View existing alerts of the
n
system and the selected session.
Metrics of selected session,
n
Health, Workload, Logon Time,
ICA Round Trip Latency, ICA
Input Bandwidth, and ICA
Output Bandwidth.
View important logon metrics,
n
Brokering Duration, HDX
Connection Duration,
n
Authentication Duration, GPO
duration, Profile Load Duration,
and Interactive Duration.
Check servers alerts, server
n
indicator metrics, and resource
utilization metrics.
Check detailed session
n
information, check session logon
details, retrieve session running
processes for trouble shooting,
check users summary, check
user logon duration trend, and
look at the report of what
application are launched by a
user and when.
Check application summary
n
data, performance data, launch
duration historical trend, the
report of which users launched
applications and when,
application related server
indicator metrics.
Check VDI Desktop overall
n
status, top alerts, resource
utilization, and retrieving
session running application list
for troubleshooting.
Check overall and detailed
n
vCPU/vDisk/vRAM experience,
check delivery controller critial
alerts.
VMware, Inc. 49
Page 50

VMware vRealize Operations for Published Applications Installation and Administration
Understanding the Health Badge
The health badge indicates immediate issues that might require your attention. It helps you identify the
current health of your system.
vRealize Operations Manager combines workload, anomalies, and faults to assess the overall health of your
system and to determine the expected workload level in that environment. A low health score might
indicate a potential issue.
The health badge is enabled on vRealize Operations for Published Applications objects.
Table 13‑3. Understanding the Health Badge
Object Description
XD-XA Application
Instance
XD-XA Application
Session
XD-XA Broker Agent
Collector
XD-XA Desktop OS
Machine
XD-XA Desktop Session The Desktop Session Network alert is triggered when the session latency is too high.
XD-XA Delivery
Controller
XD-XA Licensing Server Published Apps Adapter is not Receiving Data from the Desktop Agent alert is triggered
XD-XA PVS The PVS Server is not reachable from XD Controller alert is triggered when PVS server is not
XD-XA Store Front StoreFront Server cannot be accessed alert is triggered when store front service is down.
The Application Performance Problem alert is triggered when application instance
performance problem is detected, when CPU processor time is too high, or memory
consumed is more.
The Application Session Network alert is triggered when the session latency is too high.
The Application Session performance Problem alert is triggered when CPU processor time is
too high or memory consumed is more.
Not receiving data from the Broker Agent alert is triggered when Broker agent is not
reachable.
Desktop OS Machine is not available for use alert is triggered when VDA machine is not
available
Published Apps Adapter is not receiving Data from the Desktop Agent alert is triggered when
Desktop agent is not working/not working on server on Store front.
Desktop OS Machine Performance Problem alert is triggered when CPU processor time is too
high.
The Desktop Session performance Problem alert is triggered when CPU processor time is too
high or memory consumed is more.
Delivery Controller Database Configuration Fault alert is triggered when Citrix Broker
Service is down or there is no connectivity.
The StoreFront Service has Failed alert is triggered when store front service is not accessible
from Delivery Controller
The Host service has failed alert is triggered when Citrix host service is down.
The Monitor service has failed alert is triggered when Citrix monitor service is down.
The Machine Creation Service has failed alert is triggered when machine service is down
service is down.
Published Apps adapter is not receiving data from the Desktop Agent alert is triggered when
Desktop agent is not working on Delivery controller.
Delivery Controller Performance Problem alert is triggered when CPU processor time is too
high.
when Desktop agent is not working on licensing server.
License Server Performance Problem alert is triggered when CPU processor time is too high.
reachable.
Published Apps Adapter is not Receiving Data from the desktop agent alert is triggered when
Desktop agent is not working on the Store Front.
StoreFront Performance Problem alert is triggered when CPU processor time is too high.
50 VMware, Inc.
Page 51

Chapter 13 Monitoring Your Citrix XenDesktop and Citrix XenApp Environments
Table 13‑3. Understanding the Health Badge (Continued)
Object Description
XD-XA Site The Site Database service has Failed alert is triggered when site database is down.
This alert is triggered in the following scenarios:
A site performance problem has been detected. One or more store front servers of this site
have performance problem. Check the CPU usage or memory for possible cause.
A site performance problem has been detected. One or more license servers of this site have
performance problem. Check the CPU usage or memory for possible cause.
A site performance problem has been detected. One or more delivery controllers of this site
have performance problem. Check the CPU usage or memory for possible cause.
A site performance problem has been detected. One or more desktop os machines of this site
have performance problem. Check the CPU usage or memory for possible cause.
A site performance problem has been detected. One or more server os machines of this site
have performance problem. Check the CPU usage or memory for possible cause.
XD-XA Server OS
machine
Published Apps Adapter is not receiving data from the desktop agent alert is triggered when
Desktop agent is not working on session host machine.
Server OS Machine Performance Problem alert is triggered when CPU processor time is too
high.
XD-XA Overview
The XD-XA Overview dashboard shows the overall status of your environment. Use the XD-XA Overview
dashboard to visualize the end-to-end XenDesktop and XenApp environments, XD-XA-related alerts, key
Site metrics, and Site-related vCenter capacity.
Tips for using the XD-XA Overview Dashboard
To view the overall status of a Site, view the values of the Site Session Metrics and Site Capacity Metrics
n
widgets.
Use the Virtual Machine of Controller Server widget to view badge health and badge workload for the
n
VM of the controller server.
To view the overall status of a Site, view the Top Alerts, values of the Site Session Metrics widgets.
n
To view the overall capacity of the site related vCenter, view Remaining Capacity and reclaimable
n
capacity widgets.
XD-XA Help Desk
Thee Help Desk dashboard helps you view detailed information about all sessions running in your
environment. The Sessions Details widget lists all the connected VDI desktop sessions, RDS desktop
sessions, and application sessions in your environment and is the master widget for the dashboard.
Tips for using the Help Desk Dashboard
Use the All Environment Alerts widget to view all existing alerts of the system. Click each alert to view
detailed information.
Use the Selected User Session Alerts widget to view alerts of the selected session. Click each alert to view
detailed information.
Use the Selected Session Related Objects widget to look at the related object of the selected session .
Use the Session Related Metrics widget to metrics of selected session, Health, Workload, Logon Time, ICA
Round Trip Latency, ICA Input Bandwidth, and ICA Output Bandwidth.
VMware, Inc. 51
Page 52

VMware vRealize Operations for Published Applications Installation and Administration
Use the Session Logon Breakdown widget to view important logon metrics, Brokering Duration, HDX
Connection Duration, Authentication Duration, GPO duration, Profile Load Duration, and Interactive
Duration.
Run actions in the Session Processes widget to obtain information about in-guest desktop processes and
their resource usage, including CPU, memory, and I/O use. The Get Desktop Processes and Get Desktop
Services actions can help you determine which desktop processes and applications are using the most
resources. The Get Desktop/Client Traceroute action provides information about network distance and
quality between the desktop and client .
Use Machine Object widget to show the machine object (created by
vRealize Operations for Published Applications) of selected session.
Use Virtual Machine widget to show the related virtual machine of selected session.
Use VM Metrics widget to show metrics of related virtual machine, VM Health, VM Workload, CPU, CPU
Ready, CPU Contention, Co-stop, vCPU Count, vCPU recommended, Memory, Disk Latency, Disk IOPs,
and Memory Swap.
Use Client widget to show the client info of selected session.
XD-XA Server Desktops
Use the XD-XA Servers dashboard to assess server metrics and related vSphere VMs, server resource
utilization, and server indicator metrics.
Tips for using the XD-XA Server Desktops Dashboard
Use the Virtual Machine of Session-host Server widget to view the badge health and badge workload
n
for the VM of the session-host server.
Use the Session-host Server Resource Utilization widget to view the CPU Processor Time, Disk Read
n
and Write, and Memory Available.
Use the Top Alert and Session-host Servers widget to view the server alerts and server summary data.
n
Use the Session-host server resource utilization widget to view server resource utilization data.
n
Use the Session-host Server Indicator Metrics widget to view server users and sessions summary data.
n
XD-XA Session Details
Use the XD-XA Session Details dashboard to view detailed information about sessions, application sessions,
and server sessions.
Tips for using the XD-XA Session Details Dashboard
To view session processes, select a session from the Sessions widget and view the information in the
n
Session Processes widget.
Use the Session Indicator Metrics widget to view session health, reconnect duration, logon duration,
n
profile load duration, session duration and session state.
To view session processes, select a session from the Sessions widget and view the information in the
n
Session Processes widget.
Use the Session Logon Breakdown widget to view various session logon sections.
n
Use the Users widget to view all Users in XD-XA environment.
n
Use the User logon duration trend to view user logon historical trend.
n
Use the Applications Launched By User widget to get the report of what application are launched by a
n
user and when.
52 VMware, Inc.
Page 53

Chapter 13 Monitoring Your Citrix XenDesktop and Citrix XenApp Environments
XD-XA Server Applications
Use the XD-XA Server Applications dashboard to check application summary data, performance data,
launch duration historical trend, the report of which users launched applications and when, and
application-related server indicator metrics.
Tips for using the XD-XA Server Applications Dashboard
Use the Application Launch Duration widget to view application launch historical trend.
n
Use the Application User widget to view the report of which users launched applications and when and
n
application-related server indicator metrics.
XD-XA VDI Desktops
Use the XD-XA VDI Desktops dashboard to view VDI Desktops-related alerts, VDI Desktop summary
information and VDI session detailed information, VDI desktop session resource utilization. and running
application list of a VDI desktop session.
NOTE Get Process to retrieve applications running in a VDI session is not supported.
Tips for using the XD-XA VDI Desktops Dashboard
Use the Top Alerts widet to view all desktop OS machine-related alerts.
n
Use the Running Application List widget to view the current running applications on a VDI desktop.
n
XD-XA User Experience
Use the XD-XA User Experience dashboard to view detailed information of vCPU Experience heatmap,
vDisk Experience heatmap, vRAM Experience heatmap, vCPU relationship, vDisk relationship, vRAM
relationship, vCPU chart, vDisk chart, vRAM chart, and Delivery Group critical alerts.
Tips for using the XD-XA User Experience Dashboard
Use the vCPU/vDisk/vRAM experience heat map widgets to view overall user experience.
n
Use the Delivery Group Critical Alerts widget to view overall critical alert number of all Delivery
n
Groups.
Using the XD-XA Reports
VMware vRealize Operations Manager has several report templates that you can generate for detailed
information about sites, license usage, and servers. You can also create new report templates, edit existing
report templates, and clone report templates.
To access the vRealize Operations for Published Applications report templates, select Content > Report in
vRealize Operations Manager.
VMware, Inc. 53
Page 54

VMware vRealize Operations for Published Applications Installation and Administration
Introducing the XD-XA Reports
The predefined report templates provide detailed information about your XenDesktop and XenApp
environments. You can generate the report as a PDF or CSV file.
Table 13‑4. Summary of XD-XA Report Templates
XD-XA Report Templates Report Content
XD-XA Application Report Includes information about your applications.
XD-XA Server Report Includes overall information about your servers.
XD-XA Site Overview Report Includes summary information about your Sites. You can
see application statistics, application instance trend, and
session trend.
XD-XA License Trend Report Includes information about the trend of XenDesktop and
XenApp license usage.
XD-XA License Usage Report Includes information about the total duration of three
kinds of session (VDI desktop session, RDS desktop
session, and application session) of the users.
Subjects for Reports
When you configure reports, vRealize Operations Manager generates the report subjects according to your
configurations.
To ensure the best possible reports, use the following report subjects.
Table 13‑5. Subjects for Reports
Report Subject
XD-XA Site Overview Report Site
XD-XA Server Report Server OS Machine
XD-XA Application Report Application and Site
XD-XA License Usage Report Licensing Server
XD-XA License Trend Report License
XD-XA User Usage Summary Report Site
Subjects for Report Views
When you configure the views for a report, vRealize Operations Manager generates the views according to
your configurations.
To ensure the best possible report views, use the following view subjects.
Table 13‑6. Subjects for Report Views
Report View Subject
XD-XA Application Daily User Count Trend Application
XD-XA Application Instance Count Trend Application
XD-XA Application Instance Summary Application Instance
XD-XA Application Launch Duration Trend Application
XD-XA Farm Application Summary Application
XD-XA License Usage Summary Licensing Server
54 VMware, Inc.
Page 55

Chapter 13 Monitoring Your Citrix XenDesktop and Citrix XenApp Environments
Table 13‑6. Subjects for Report Views (Continued)
Report View Subject
XD-XA License Usage Trend License
XD-XA License Usage Trend License
XD-XA Site App Instance Trend Site
XD-XA Site Session Trend Site
XD-XA Site Summary Site
XD-XA Server CPU Trend Server OS Machine, Delivery Controller
XD-XA Server Disk Trend Server OS Machine, Delivery Controller
XD-XA Server ICA Bandwidth Trend Server OS Machine
XD-XA Server Memory Trend Server OS Machine, Delivery Controller
XD-XA Server Network Trend Server OS Machine, Delivery Controller
XD-XA Server Summary Server OS Machine, Delivery Controller
XD-XA User Session Logon Duration Trend User
XD-XA User Usage View User
VMware, Inc. 55
Page 56

VMware vRealize Operations for Published Applications Installation and Administration
56 VMware, Inc.
Page 57

Managing RMI Communication in
vRealize Operations for Published
Applications 14
The vRealize Operations for Published Applications components communicate by using Remote Method
Invocation (RMI). The vRealize Operations for Published Applications adapter exposes RMI services that
can be called by an external client. The vRealize Operations for Published Applications adapter acts as a
server and the broker agents and desktop agents act as clients. You can change the default ports for these
RMI services.
For detailed descriptions of the vRealize Operations for Published Applications components, see “vRealize
Operations for Published Applications Architecture,” on page 10.
This chapter includes the following topics:
“RMI Services,” on page 57
n
“Default Ports for RMI Services,” on page 58
n
“Changing the Default RMI Service Ports,” on page 58
n
RMI Services
The vRealize Operations for Published Applications adapter exposes various RMI service.
RMI registry service
Desktop message
server
Broker message server
Certificate management
server
The broker and desktop agents initially connect to the RMI registry service
and request the address of a specific RMI server. Because the RMI registry
service is used only for lookup and no sensitive data is transmitted to it, it
does not use an encrypted channel.
The desktop agents connect to the desktop message server and use it to send
XD-XA performance data collected by the desktop agent. The desktop
message server uses an SSL/TLS channel to encrypt the data that is sent from
the desktop agents.
The broker agent connects to the broker message server and uses it for
sending XD-XA inventory information to the
vRealize Operations for Published Applications adapter. The broker message
server uses an SSL/TLS channel to encrypt the data that is sent from the
broker agent.
The broker agent connects to the certificate management server during the
certificate pairing process. The certificate management server does not use an
encrypted channel. Certificates are encrypted by using the server key during
the certificate pairing process. For information, see Chapter 19, “Certificate
Pairing,” on page 73.
VMware, Inc. 57
Page 58

VMware vRealize Operations for Published Applications Installation and Administration
Default Ports for RMI Services
The RMI services use certain default ports. The default ports are left open on the firewall on cluster nodes
and remote collector nodes.
Table 14‑1. Default Ports for RMI Services
RMI Service Default Port
RMI registry 3095
Desktop message server 3096
Broker message server 3097
Certificate management server 3098
Changing the Default RMI Service Ports
You can change the default ports for the RMI registry service, desktop message server, broker message
server, and certificate management server.
RMI Service Port Properties
The RMI service ports are defined in properties in the msgserver.properties file on the server where the
vRealize Operations for Published Applications adapter is running.
Table 14‑2. RMI Service Port Properties
RMI Service Property
RMI registry registry-port
Desktop message server desktop-port
Broker message server broker-port
Certificate management server certificate-port
Change the Default RMI Service Ports
You can change the default RMI service ports by modifying the msgserver.properties file on the server
where the vRealize Operations for Published Applications adapter is running.
Prerequisites
Verify that you can connect to the node where the vRealize Operations for Published Applications
n
adapter is running.
Become familiar with the RMI service port properties. See “RMI Service Port Properties,” on page 58.
n
Procedure
1 Log in to the node where the vRealize Operations for Published Applications adapter is running.
58 VMware, Inc.
Page 59

Chapter 14 Managing RMI Communication in vRealize Operations for Published Applications
2 In a text editor, open the msgserver.properties file.
Platform File Location
Linux
Windows
/usr/lib/vmwarevcops/user/plugins/inbound/V4PA_adapter3/work/msgserver.pro
perties
C:\vmware\vcenteroperations\user\plugins\inbound\V4PA_adapter3\work\msgserve
r.properties
3 Modify the properties for the RMI service ports that you want to change.
4 Save your changes and close the msgserver.properties file.
What to do next
Open the new RMI service port or ports on the vRealize Operations Manager firewall. See “Open the Ports
Used by vRealize Operations for Published Applications,” on page 18.
Update the vRealize Operations Manager Firewall
If you change the default port for an RMI service, you must open the new port on the
vRealize Operations Manager firewall.
NOTE If the vRealize Operations for Published Applications adapter is running on a remote collector, see
the documentation for the firewall on the remote collector node for information about updating the firewall.
Procedure
1 On the cluster node where the vRealize Operations for Published Applications adapter is running, use a
text editor to open the vmware-vcops-firewall.conf file.
The vmware-vcops-firewall.conf file is in the /opt/vmware/etc/ directory.
2 Update the appropriate ports in the vmware-vcops-firewall.conf file and save the file.
3 Restart the firewall service to make your changes take effect.
a Execute service vmware-vcops-firewall restart.
4 On windows, Access Windows Firewall and select Windows Firewall > Advanced Settings > Inbound
Rules > New Rule > Port and click Next. Select Specific local ports and type the ports that you are
using, for example, 3095-3098. The default ports are 3095-3098.
VMware, Inc. 59
Page 60

VMware vRealize Operations for Published Applications Installation and Administration
60 VMware, Inc.
Page 61

Changing the Default TLS
Configuration in
vRealize Operations for Published
Applications 15
The vRealize Operations for Published Applications broker message server uses an TLS channel to
communicate with the broker agents. The vRealize Operations for Published Applications desktop message
server uses an TLS channel to communicate with the desktop agents. You can change the default TLS
configuration for servers and agents by modifying TLS configuration properties.
This chapter includes the following topics:
“Default TLS Protocols and Ciphers for vRealize Operations for Published Applications,” on page 61
n
“TLS Configuration Properties,” on page 62
n
“Change the Default TLS Configuration for Servers,” on page 62
n
“Change the Default TLS for Agents,” on page 62
n
Default TLS Protocols and Ciphers for vRealize Operations for Published Applications
When an RMI connection is established between an agent and a server, the agent and server negotiate the
protocol and cipher to use
Each agent and server has a list of protocols and ciphers that it supports. The strongest protocol and cipher
that is common to both the agent list and server list is selected for the TLS channel.
By default, RMI agents and servers are configured to accept only TLSv1.2 connections with the following
ciphers.
TLS_DHE_DSS_WITH_AES_128_GCM_SHA256
n
TLS_ECDHE_ECDSA_WITH_AES_128_GCM_SHA256
n
TLS_DHE_RSA_WITH_AES_128_GCM_SHA256
n
TLS_ECDHE_RSA_WITH_AES_128_GCM_SHA256
n
VMware, Inc.
61
Page 62

VMware vRealize Operations for Published Applications Installation and Administration
TLS Configuration Properties
The TLS protocols and ciphers for the desktop and broker message servers are specified in properties in the
msgserver.properties file. The TLS protocols and ciphers for the desktop and broker agents are specified in
properties in the msgclient.properties file.
Table 15‑1. SSL/TLS Configuration Properties
Property Default Value
sslProtocols List of accepted TLS protocols,
separated by commas.
sslCiphers List of accepted TLS ciphers, separated
by commas.
TLSv1.2
TLS_DHE_DSS_WITH_AES_128_GCM_SHA256
TLS_ECDHE_ECDSA_WITH_AES_128_GCM_SHA256
TLS_DHE_RSA_WITH_AES_128_GCM_SHA256
TLS_ECDHE_RSA_WITH_AES_128_GCM_SHA256
Change the Default TLS Configuration for Servers
You can change the default TLS configuration that the desktop message server and broker message server
use by modifying the msgserver.properties file on the server where the
vRealize Operations for Published Applications adapter is running.
Prerequisites
Verify that you can connect to the node where the vRealize Operations for Published Applications
n
adapter is running.
Become familiar with the TLS configuration properties. See “TLS Configuration Properties,” on page 62.
n
Procedure
1 Log in to the node where the vRealize Operations for Published Applications adapter is running.
2 In a text editor, open the msgserver.properties file.
Platform File Location
Linux
Windows
/usr/lib/vmwarevcops/user/plugins/inbound/V4PA_adapter3/work/msgserver.pro
perties
C:\vmware\vcenteroperations\user\plugins\inbound\V4PA_adapter3\work\msgserve
r.properties
3 Modify the SSL/TLS configuration properties.
4 Save your changes and close the msgserver.properties file.
Change the Default TLS for Agents
You can change the TLS configuration that the desktop agents and broker agents use to connect to the
desktop and broker message servers by modifying the msgclient.properties file.
Prerequisites
For the desktop agents, verify that you can connect to the remote XD-XA server.
n
For a broker agent, verify that you can connect to the host where the XD-XA broker agent is installed.
n
Become familiar with the TLS configuration properties. See “TLS Configuration Properties,” on page 62.
n
62 VMware, Inc.
Page 63

Chapter 15 Changing the Default TLS Configuration in vRealize Operations for Published Applications
Procedure
1 Modify the TLS configuration properties for a desktop agent.
a Log in to the XD-XA server where the XD-XA agent is running.
b In a text editor, open the msgclient.properties file.
The msgclient.properties file is in the C:\ProgramData\VMware\vRealize Operations for
Published Apps\Desktop Agent\conf directory.
c Modify the TLS configuration properties.
d Save your changes and close the msgclient.properties file.
2 Modify the TLS configuration properties for a broker agent.
a Log in to the remote collector host where the broker agent is installed.
b In a text editor, open the msgclient.properties file.
The msgclient.properties file is in the C:\ProgramData\VMware\vRealize Operations for
Published Apps\Broker Agent\conf directory.
c Modify the TLS configuration properties.
d Save your changes and close the msgclient.properties file.
VMware, Inc. 63
Page 64

VMware vRealize Operations for Published Applications Installation and Administration
64 VMware, Inc.
Page 65

Managing Authentication in
vRealize Operations for Published
Applications 16
RMI servers provide a certificate that the agents use to authenticate the
vRealize Operations for Published Applications adapter. Broker agents use SSL/TLS client authentication
with a certificate that the vRealize Operations for Published Applications adapter uses to authenticate the
broker agents. Desktop agents provide tokens that the vRealize Operations for Published Applications
adapter uses to authenticate the desktop agents.
To increase security, you can replace the default self-signed certificates that the
vRealize Operations for Published Applications adapter and broker agents use.
Understanding Authentication for Each Component
Each vRealize Operations for Published Applications component handles authentication differently.
vRealize Operations for Published Applications Adapter Authentication
When an RMI connection is established between the desktop message server and a desktop agent, or
between the broker message server and a broker agent, the agent requests a certificate from the server to
perform authentication. This certificate is validated against the agent's trust store before proceeding with the
connection. If the server does not provide a certificate, or the server certificate cannot be validated, the
connection is rejected.
When the vRealize Operations for Published Applications adapter is first installed, a self-signed certificate is
generated. The desktop message server and broker message server use this self-signed certificate by default
to authenticate to their agents. Because this certificate is generated dynamically, you must manually pair the
vRealize Operations for Published Applications adapter and broker agent before the agents can
communicate with the vRealize Operations for Published Applications adapter. See Chapter 19, “Certificate
Pairing,” on page 73.
Desktop Agent Authentication
Connections to the desktop message server require an authentication token to verify that the connection is
coming from a valid desktop agent. The desktop agent generates a unique authentication token for each
remote desktop.
In addition, the desktop agent generates a serverID for the XD-XA server and write the serverID into
vRealize Operations Manager. When a desktop agent attempts to send data to the
vRealize Operations for Published Applications adapter, the adapter will verify whether the authentication
token has been cached in memory. If there is no server with same name, the adapter caches the server name
and authentication token in memory. If the server has been cached, compare the cached authentication
token and the one sent. If the tokens are same, accept the message, else reject the desktop agent message.
VMware, Inc.
65
Page 66

VMware vRealize Operations for Published Applications Installation and Administration
The vRealize Operations for Published Applications adapter also checks whether a VM with same serverID
exists in vRealize Operations Manager, and adds the VM into the topology when a VM with the same name
exists.
Broker Agent Authentication
When an RMI connection is established to the broker message server, the broker message server requests a
certificate from the client to perform client authentication. The certificate is validated against the trust store
for the vRealize Operations for Published Applications adapter before proceeding with the connection.
If the client does not provide a certificate, or the agent's certificate cannot be validated, the connection is
rejected. When you first install the broker agent, a self-signed certificate is generated. The broker agent uses
this self-signed certificate by default to authenticate to the vRealize Operations for Published Applications
adapter. Because this certificate is generated dynamically, you must manually pair the
vRealize Operations for Published Applications adapter and broker agent before the broker agent can
communicate with the vRealize Operations for Published Applications adapter. For more information, see
Chapter 19, “Certificate Pairing,” on page 73.
66 VMware, Inc.
Page 67

Certificate and Trust Store Files 17
The vRealize Operations for Published Applications components use a certificate trust store to store trusted
certificates and root certificates for certificate authorities. Certificates and trust stores are stored in Java key
store format.
This chapter includes the following topics:
“vRealize Operations for Published Applications Adapter Certificate and Trust Store Files,” on
n
page 67
“Broker Agent Certificate and Trust Store Files,” on page 68
n
vRealize Operations for Published Applications Adapter Certificate and Trust Store Files
The certificate and trust store files for the vRealize Operations for Published Applications adapter are in the
adapter's work directory. These files are in Java key store format.
The work directory is on the node where the vRealize Operations for Published Applications adapter is
installed. On Linux, the path to the work directory
is /usr/lib/vmwarevcops/user/plugins/inbound/V4PA_adapter3/. On Windows, the path to the work
directory is C:\vmware\vcenteroperations\user\plugins\inbound\V4PA_adapter3\.
You can use the Java keytool utility to view and control the certificate store and trust store files.
Table 17‑1. Java Key Stores in the work Directory
Java Key Store Description
v4pa-adapter.jks
v4pa-truststore.jks
The names of the key store files and their credentials are defined in the msgserver.properties file, which is
also in the work directory.
Table 17‑2. Adapter Key Store Configuration Properties in the msgserver.properties File
Property Default Value Description
keyfile
keypass Password to the key store file
VMware, Inc. 67
v4pa-adapter.jks
Contains the certificate that the adapter uses to
authenticate itself to agents.
Contains the trust store that the adapter uses to
authenticate the broker agent certificate.
Name of the key store file that
contains the adapter certificate.
that contains the adapter
certificate. The password is
dynamically generated.
Page 68

VMware vRealize Operations for Published Applications Installation and Administration
Table 17‑2. Adapter Key Store Configuration Properties in the msgserver.properties File (Continued)
Property Default Value Description
trustfile
trustpass Password to the key store file
v4pa-truststore.jks
Broker Agent Certificate and Trust Store Files
The broker agent certificate and trust store files are in the C:\ProgramData\VMware\vRealize Operations for
Published Apps\Broker Agent\conf directory on the vRealize Operations for Published Applications broker
server host. These files are Java key store files.
You can use the Java keytool utility to view and control the certificate store and trust store files.
Table 17‑3. Java Key Stores in the conf Directory
Java Key Store Description
v4pa-brokeragent.jks
v4pa-truststore.jks
Contains the certificate that the broker agent uses to
authenticate itself to the
vRealize Operations for Published Applications adapter.
Contains the trust store that the broker agent uses to
authenticate the
vRealize Operations for Published Applications adapter
certificate.
Name of the key store file that
contains the adapter trust store.
that contains the adapter trust
store. The password is
dynamically generated.
The names of the key store files and their credentials are defined in the msgclient.properties file, which is
also in the conf directory.
Table 17‑4. Broker Agent Key Store Configuration Properties in the msgclient.properties File
Property Default Value Description
keyfile
keypass The password to the key store file that
trustfile
trustpass The password to the key store file that
v4pa-brokeragent.jks
v4pa-truststore.jks
The name of the key store file that
contains the broker agent's certificate.
contains the broker agent's certificate.
The password is dynamically
generated.
The name of the key store file that
contains the broker agent's trust store.
contains the broker agent's trust store.
The password is dynamically
generated.
68 VMware, Inc.
Page 69

Replacing the Default Certificates 18
By default, the vRealize Operations for Published Applications adapter and the broker agent use self-signed
certificates for authentication and data encryption. For increased security, you can replace the default selfsigned certificates with certificates that are signed by a certificate authority.
This chapter includes the following topics:
“Replace the Default Certificate for the vRealize Operations for Published Applications Adapter,” on
n
page 69
“Replace the Default Certificate for the Broker Agent,” on page 71
n
Replace the Default Certificate for the vRealize Operations for Published Applications Adapter
A self-signed certificate is generated when you first install the
vRealize Operations for Published Applications adapter. The desktop message server and the broker
message server use this certificate by default to authenticate to the agents. You can replace the self-signed
certificate with a certificate that is signed by a valid certificate authority.
Prerequisites
VMware, Inc.
Verify that you can connect to the node where the vRealize Operations for Published Applications
n
adapter is running.
Verify that you have the password for certificate store. You can obtain the password from the
n
msgserver.properties file. See “vRealize Operations for Published Applications Adapter Certificate
and Trust Store Files,” on page 67.
Become familiar with the Java keytool utility. Documentation is available at http://docs.oracle.com.
n
Procedure
1 Log in to the node where the vRealize Operations for Published Applications adapter is running.
2 Navigate to the vRealize Operations for Published Applications adapter's work directory.
Platform Directory Location
Linux
Windows
/usr/lib/vmwarevcops/user/plugins/inbound/V4PA_adapter3/work
C:\vmware\vcenteroperations\user\plugins\inbound\V4PA_adapt
er3\work
69
Page 70

VMware vRealize Operations for Published Applications Installation and Administration
3
Use the keytool utility with the -selfcert option to generate a new self-signed certificate for the
vRealize Operations for Published Applications adapter.
Because the default self-signed certificate is issued to VMware, you must generate a new self-signed
certificate before you can request a signed certificate. The signed certificate must be issued to your
organization.
For example:
keytool –selfcert –alias v4pa-adapter –dname dn-of-org –keystore v4pa-adapter.jks
dn-of-org is the distinguished name of the organization to which the certificate is issued, for example,
"OU=Management Platform, O=VMware, Inc., C=US".
By default, the certificate signature uses the SHA1withRSA algorithm. You can override this default by
specifying the name of the algorithm with the -sigalg option.
4
Use the keytool utility with the -certreq option from the adapter work directory to generate a
certificate signing request.
A certificate signing request is required to request a certificate from a certificate signing authority.
For example:
keytool –certreq –alias v4pa-adapter –file certificate-request-file -keystore v4paadapter.jks
certificate-request-file is the name of the file that will contain the certificate signing request.
5 Upload the certificate signing request to a certificate authority and request a signed certificate.
If the certificate authority requests a password for the certificate private key, use the password
configured for the certificate store.
The certificate authority returns a signed certificate.
6 To import the certificate, copy the certificate file to the vRealize Operations for Published Applications
adapter work directory and run the keytool utility with the –import option.
For example:
keytool –import –alias v4pa-adapter –file certificate-filename -keystore v4pa-adapter.jks
certificate-filename is the name of the certificate file from the certificate authority.
When the keytool utility is finished, the signed certificate is imported to the adapter certificate store.
7 To start using the new certificate, restart the vRealize Operations for Published Applications adapter on
the node where the adapter is running.
Platform Action
Linux
Windows
Run the service vmware-vcops restart command.
Use the Windows Services tool (services.msc) to restart the
vRealize Operations for Published Applications Adapter service.
What to do next
After you restart the vRealize Operations for Published Applications adapter, you must pair any broker
agents that are attached to the vRealize Operations for Published Applications adapter. See Chapter 19,
“Certificate Pairing,” on page 73.
70 VMware, Inc.
Page 71

Chapter 18 Replacing the Default Certificates
Replace the Default Certificate for the Broker Agent
A self-signed certificate is generated when you first install the broker agent. The broker agent uses this
certificate by default to authenticate to the vRealize Operations for Published Applications adapter. You can
replace the self-signed certificate with a certificate that is signed by a valid certificate authority.
Prerequisites
Verify that you can connect to the XD-XA Session host where the broker agent is installed.
n
Verify that the keytool utility is added to the system path on the data collector host where the broker
n
agent is installed.
Verify that you have the password for the certificate store. You can obtain this password from the
n
msgserver.properties file. See “Broker Agent Certificate and Trust Store Files,” on page 68.
Become familiar with the Java keytool utility. Documentation is available at http://docs.oracle.com
n
Procedure
1 Log in to the vRealize Operations for Published Applications Server host where the broker agent is
installed.
2
Use the keytool utility with the -selfcert to generate a new self-signed certificate.
Because the default self-signed certificate is issued to VMware, you must generate a new self-signed
certificate before you request a signed certificate. The signed certificate must be issued to your
organization.
For example:
keytool –selfcert –alias v4pa-brokeragent –dname dn-of-org –keystore v4pa-brokeragent.jks
dn-of-org is the distinguished name of the organization to which the certificate is issued, for example,
"OU=Management Platform, O=VMware, Inc. , C=US".
By default, the certificate signature uses the SHA1withRSA algorithm. You can override this default by
specifying the name of the algorithm in the keytool utility.
3
Use the keytool utility with the -certreq option to generate the certificate signing request.
A certificate signing request is required to request a certificate from a certificate signing authority.
For example:
keytool –certreq –alias v4pa-brokeragent –file certificate-request-file -keystore v4pabrokeragent.jks
certificate-request-file is the name of the file that will contain the certificate signing request.
4 Upload the certificate signing request to a certificate authority and request a signed certificate.
If the certificate authority requests a password for the certificate private key, use the password
configured for the certificate store.
The certificate authority returns a signed certificate.
VMware, Inc. 71
Page 72

VMware vRealize Operations for Published Applications Installation and Administration
5
Copy the certificate file to the conf directory and run the keytool utility with the -import option to
import the signed certificate into the certificate store for the broker agent.
You must import the certificate file to the certificate store for the broker agent so that the broker agent
can start using the signed certificate.
For example:
keytool –import –alias v4pa-brokeragent –file certificate-filename -keystore v4pabrokeragent.jks
certificate-filename is the name of the certificate file from the certificate authority.
6
Run the keytool utility with the -import option to import the certificate authority root certificate into
the trust store file for the broker agent.
For example:
keytool -import -alias aliasname -file root_certificate -keystore v4pa-truststore.jks trustcacerts
root_certificate is the name of the certificate authority root certificate.
7 Restart the broker agent to start using the new certificate.
You can restart the broker agent by using the vRealize Operations for Published Applications Broker
Agent Settings wizard, or by restarting the vRealize Operations for Published Applications Broker
Agent Service.
What to do next
After you restart the broker agent, you must pair it with the vRealize Operations for Published Applications
adapter. See Chapter 19, “Certificate Pairing,” on page 73.
72 VMware, Inc.
Page 73

Certificate Pairing 19
Before broker agents can communicate with the vRealize Operations for Published Applications adapter, the
adapter certificate must be shared with the agents, and the broker agent certificate must be shared with the
adapter. The process of sharing these certificates if referred to as certificate pairing.
The following actions occur during the certificate pairing process:
1 The broker agent's certificate is encrypted with the adapter's server key.
2 A connection is opened to the certificate management server and the encrypted certificate is passed to
the adapter instance. The adapter decrypts the broker agent's certificate by using the server key. If
decryption fails, an error is returned to the broker agent.
3 The broker agent's certificate is placed in the adapter's trust store.
4 The adapter's certificate is encrypted with the adapter's server key.
5 The encrypted certificate is returned to the broker agent. The broker agent decrypts the adapter's
certificate by using the server key. If decryption fails, an error is returned to the user.
6 The adapter's certificate is placed in the broker agent's trust store.
7 The adapter's certificate is sent to all XD-XA hosts via Group Policy.
After the certificates are successfully paired, they are cached in the trust stores for each individual
component. The broker certificate and the trust store are sent to all session hosts. The adapter certificate is
stored in the trust store and the broker certificate is stored in the v4pa-brokeragent.jks. If you provision a
new XD-XA server, the adapter's certificate is sent to the server by using the Group Policy, and you do not
need to pair the certificates again. However, if either the adapter or broker agent certificate changes, you
must pair the certificates again.
VMware, Inc.
You use the vRealize Operations for Published Applications Broker Agent Settings wizard to pair
certificates.
73
Page 74

VMware vRealize Operations for Published Applications Installation and Administration
74 VMware, Inc.
Page 75

SSL/TLS and Authentication-Related
Log Messages 20
The vRealize Operations for Published Applications adapter logs SSL/TLS configuration and authenticationrelated messages.
Table 20‑1. vRealize Operations for Published Applications Adapter Log Message Types
Log Message Type Description
CONFIGURATION The SSL/TLS configuration that is being used.
AUTHENTICATION SUCCESS A remote desktop has been successfully authenticated.
AUTHENTICATION FAILED A remote desktop has failed authentication.
Only CONFIGURATION and AUTHENTICATION FAILED events are written to the log by default. To
troubleshoot problems, you can raise the logging level to log other types of events.
You can view log messages and modify logging levels in the vRealize Operations Manager user interface.
VMware, Inc.
75
Page 76

VMware vRealize Operations for Published Applications Installation and Administration
76 VMware, Inc.
Page 77

Upgrade
vRealize Operations for Published
Applications 21
You can directly upgrade from vRealize Operations for Published Applications 6.2 or
vRealize Operations for Published Applications 6.2.1 to vRealize Operations for Published Applications 6.3.
NOTE Upgrading from vRealize Operations for Published Applications 6.1 to
vRealize Operations for Published Applications 6.3 is not supported.
Prerequisites
Verify that your environment meets product compatibility, hardware, and software requirements.
n
Verify that XD Controller is installed and running.
n
Verify that vRealize Operations Manager is deployed and running.
n
If you have not yet upgraded to vRealize Operations Manager 6.1 or
n
vRealize Operations for Published Applications 6.2, upgrade vRealize Operations Manager before you
upgrade vRealize Operations for Published Applications.
Verify that a vCenter adapter is configured for each vCenter Server instance in your Published
n
Applications infrastructure. The vCenter adapter is provided with vRealize Operations Manager.
Download the vRealize Operations for Published Applications installation files from the product
n
download page.
Verify that you have a license key for the vRealize Operations for Published Applications solution.
n
Procedure
1 On the XD Controller host where the previous broker agent is installed, select VMware > vRealize
Operation for Published Applications Broker Agent Settings and stop the Broker Agent service.
Stopping the broker agent service prevents errors or unhandled messages from occurring while the
vRealize Operations for Published Applications solution is being upgraded.
2 Copy the VMware-vrops-v4paadapter-6.3-buildnumber.pak file to a temporary folder.
3 Log in to the vRealize Operations Manager user interface with admin privileges.
4 In the left pane of vRealize Operations Manager, click the Administration tab and click Solutions.
5 On the Solutions tab, select vRealize Operation for Published Apps XD-XA and click the Add (plus
sign) icon.
6 Browse to locate the temporary folder and select the PAK file.
7 Select Force installation and Reset out-of-the-box content and click Upload to overwrite the previous
solution.
VMware, Inc.
77
Page 78

VMware vRealize Operations for Published Applications Installation and Administration
8 Read and accept the EULA and click Next.
Installation details appear in the window during the upload process.
9 When the upgrade is complete, click Finish.
NOTE You must restart vRealize Operations Manager cluster after the upgrade for the process to
complete. To do so, run service vmware-vcops --full-restart on the master node of the
vRealize Operations Manager.
10 If the port numbers are already not present in the /opt/vmware/etc/vmware-vcops-firewall.conf file on
the vRealize Operations Manager, add the following command after TCPPORTS="$TCPPORTS
3091:3094":
TCPPORTS="$TCPPORTS 3095:3098"
11 Restart the firewall by running the following command.
/etc/init.d/vmware-vcops-firewall restart
12 Check the status of the firewall by running the following command.
/etc/init.d/vmware-vcops-firewall status
What to do next
After the upgrade is finished, you must delete the existing solution for
vRealize Operations for Published Applications 6.2/6.2.1 and add new license for XD-XA solution.
After the vRealize Operations for Published Applications solution is licensed, you can install/upgrade and
configure the new version of the vRealize Operations for Published Applications solution.
This chapter includes the following topics:
“Upgrade Broker Agent,” on page 78
n
“Upgrade Desktop Agent,” on page 79
n
Upgrade Broker Agent
vRealize Operations for Published Applications Broker Agent 6.2 and 6.2.1 can be upgraded to
vRealize Operations for Published Applications Broker Agent 6.3.
Prerequisites
Install the vRealize Operations for Published Applications solution, add your license key, and create an
instance of the vRealize Operations for Published Applications adapter.
Verify that you downloaded the Broker Agent installation file.
Procedure
1 Using a domain account that is part of the local administrators group, log in to the XD Controller where
you plan to install the Broker Agent.
2 Copy the VMware-v4pabrokeragent-x86_64-6.3-buildnumber.exe file to a temporary folder on the XD
Controller.
3 In the temporary folder, double-click the EXE file to start the Broker Agent setup wizard.
4 Accept the EULA and click Next.
5 Select the Launch the vRealize Operations for Published Applications Broker Agent configuration
utility check box for the Broker Agent Configuration wizard to open immediately after the Broker
Agent is installed .
78 VMware, Inc.
Page 79

6 Click Install to begin the upgrade.
7 When the installation finishes, click Finish to exit the Broker Agent setup wizard.
During this process, the earlier version of Broker Agent service is stopped, its configuration is
preserved, Broker Agent is uninstalled, and the new version of Broker Agent is installed.
8 When the configuration utility opens, enter the vRealize Operations Manager IP address and the
pairing credentials, and pair them on the first screen of the wizard. Subsequent screen have the data
such as Controller Credentials populated from the previous installation .
9 On the Configure The Broker Agent Service page of the wizard, restart the Broker Agent service and
click Next.
NOTE In case of upgrade, the Broker Agent service is not started automatically.
10 Click Finish.
Upgrade Desktop Agent
vRealize Operations for Published Applications Desktop Agent 6.2/6.2.1 can be upgraded to
vRealize Operations for Published Applications Desktop Agent 6.3 on all the required machines.
To upgrade the Desktop Agent, perform the following task:
Chapter 21 Upgrade vRealize Operations for Published Applications
Procedure
1 Using a domain account that is part of the local administrators group, log in to the desktop machine
where you plan to upgrade the Desktop Agent.
2 Copy the VMware-v4padesktopagent-x86_64-6.3-buildnumber.exe or VMware-v4padesktopagent-6.3-
buildnumber.exe file to a temporary folder on the required machines.
3 In the temporary folder, run the EXE file to start the Desktop Agent setup wizard.
4 Accept the EULA and click Next.
5 Click Install to begin the upgrade.
6 When the installation finishes, click Finish to exit the Desktop Agent setup wizard.
NOTE You can only upgrade Desktop Agent 6.2/6.2.1 to 6.3. If you have Desktop Agent 6.1 or 6.0
installed, you must uninstall the Desktop Agents and install Desktop Agent 6.3.
VMware, Inc. 79
Page 80

VMware vRealize Operations for Published Applications Installation and Administration
80 VMware, Inc.
Page 81

Create a
vRealize Operations Manager
Support Bundle 22
If the vRealize Operations for Published Applications adapter does not operate as expected, you can collect
log and configuration files in a support bundle and send the support bundle to VMware for analysis.
Procedure
1 Log in to the vRealize Operations Manager user interface with admin privileges.
2 Click the Administration tab and select Support > Support Bundles.
3 Click the Create Support Bundle (plus sign) icon.
4 Select the type of support bundle to generate and the nodes to include in the support bundle.
5 Click OK to create the support bundle.
The progress of the support bundle appears in the Status column on the Support Bundles pane. Support
bundle creation might take several minutes, depending on the size of the logs and the number nodes.
You can click the Reload Support Bundle icon to refresh the status.
6 Select the support bundle and click the Download Support Bundle icon to download the support
bundle to the server.
You cannot download a support bundle until its status is Succeed. For security,
vRealize Operations Manager prompts you for credentials when you download a support bundle.
7 (Optional) Send the support bundle to VMware for support.
VMware, Inc.
81
Page 82

VMware vRealize Operations for Published Applications Installation and Administration
82 VMware, Inc.
Page 83

Download
vRealize Operations for Published
Applications Broker Agent Log Files 23
If the vRealize Operations for Published Applications broker agent does not operate as expected, you can
download the broker agent log files.
Prerequisites
Verify that you have administrator privileges.
Procedure
1 Log in to the machine where the broker agent is installed.
2 Navigate to C:\programdata\VMware\vRealize Operations for Published Apps\Broker Agent\logs on
broker agent machine.
The logs directory contains the broker agent log files.
3 Use an archive program to create a ZIP file that contains the log files in the logs directory.
4 Send the ZIP file to VMware for support.
VMware, Inc.
83
Page 84

VMware vRealize Operations for Published Applications Installation and Administration
84 VMware, Inc.
Page 85

Download
vRealize Operations for Published
Applications Desktop Agent Log
Files 24
If the vRealize Operations for Published Applications desktop agent is not operating as expected, you can
download the desktop agent log files from the remote desktop and send the log files to VMware for support.
vRealize Operations for Published Applications retains desktop agent log files of the previous seven days by
default. You can specify the number of days that vRealize Operations for Published Applications retains
desktop agent log files by updating the registry entry LogPruneThreshold under
HKEY_LOCAL_MACHINE\SOFTWARE\VMware, Inc.\vRealize Operations for Published Apps\Desktop Agent.
Procedure
1 Log in to the controller server or session host server where the desktop agent is installed.
2 Navigate to C:\ProgramData\VMware\vRealize Operations for Published Apps\Desktop Agent\logs
and locate the desktop agent log files.
Desktop agent log file names begin with v4pa-.
3 Use an archive program to create a ZIP file that contains the desktop agent log files.
4 Send the ZIP file to VMware for support.
VMware, Inc.
85
Page 86

VMware vRealize Operations for Published Applications Installation and Administration
86 VMware, Inc.
Page 87

View Collector and
vRealize Operations for Published
Applications Adapter Log Files 25
You can view collector and vRealize Operations for Published Applications adapter log files in the
vRealize Operations Manager user interface. Log files are organized in log type folders.
Prerequisites
Verify that you have administrator privileges.
Procedure
1 Log in to the vRealize Operations Manager user interface with admin privileges.
2 Click the Administration tab, click Support, and click Logs.
3 Select Log Type from the Group by drop-down menu.
4 Double-click the Collector folder and double-click the folder for the node on which the adapter instance
is running.
5 View the log files.
a Double-click a log file to view the contents of the log file.
b Type line numbers in the Starting line and # of lines text boxes and click the Load log content icon
(>) to view a specific part of the log file.
6 Click the Reload Tree icon to reload the log tree information and collapse all open folders.
VMware, Inc.
87
Page 88

VMware vRealize Operations for Published Applications Installation and Administration
88 VMware, Inc.
Page 89

Modify the Logging Level for
vRealize Operations for Published
Applications Adapter Log Files 26
You can modify the logging level for the collector node that contains the log files for a
vRealize Operations for Published Applications adapter instance.
Prerequisites
Verify that you have administrator privileges.
Procedure
1 Log in to the vRealize Operations Manager user interface.
2 Click the Administration tab, click Support, and click Logs.
3 Select Log Type from the Group by drop-down menu.
4 Expand the Collector folder.
5 Select the node on which the vRealize Operations for Published Applications adapter instance is
running and click the Edit Properties icon.
6 Add V4PA_adapterx as a new log name.
7 Select a logging level from the drop-down menu in the Logging Level column.
To troubleshoot problems, set the logging level to Info. To view detailed messages, including micro
steps, queries, and returned results, set the logging level to Debug.
NOTE If you set the logging level to Debug, log files can become large very quickly. Set the logging
level to Debug only for short periods of time.
VMware, Inc.
89
Page 90

VMware vRealize Operations for Published Applications Installation and Administration
90 VMware, Inc.
Page 91

Index
A
about 7
accessing dashboards 47
adapter
certificates 67
configuring 20
installation 17
instance 20
trust store files 67
adapter authentication 65
architecture 10
authentication, broker agent 66
B
broker agent
authentication 66
certificates 68, 71
configuring 23
installing 22
Broker Agent 78
C
certificate pairing 73
Certificate on Client 41
certificates
adapter 69
broker agent 71
changing default 69
managing 65
pairing 73
self-signed 69
changing default ports, RMI services 58
ciphers 61
Client Machine 43
components
adapter 11
broker agent 11
desktop agent 10
configuration
broker agent 23
desktop agents 26
configuring 15
D
dashboards
health badge 50
Published Applications servers 52
XD-XA Overview 51
XD-XA Session Details Dashboard 52
desktop agent, authentication 65
desktop agents
configuring 26
installing 25
Desktop Agent 79
E
etc/host file for DNS Resolution 39
F
firewall, rules 21
Firewall 37
firewalls, updating 59
G
generating reports 54
GPO 26
group policies 26
H
health badge 50
Help Desk 51
HTTP Protocol for PowerShell Remoting 31
HTTPS Protocol for PowerShell 33
I
installation
broker agent 22
desktop agents 25
installation files 17
installation overview 15
installing
adapter 17
components 15
installation files 17
overview 15
introduction 9
L
License server, firewall rules 21
license groups 19
licensing, vRealize Operations for Published
Applications 18
VMware, Inc. 91
Page 92

VMware vRealize Operations for Published Applications Installation and Administration
log messages, authentication 75
M
managing certificates 65
monitoring a Citrix XenDesktop environment 47
msgclient.properties file 62
msgserver.properties file 58, 62
O
overview 9
P
ports
default 18
RMI services 58
PowerShell Remoting on the Server 29
product compatibility 13
R
replacing the default certificate, broker agent 71
reports, subjects 54
RMI communication 57
RMI services
changing default ports 58
ports 58
U
upgrading 77
Using makecert 45
using reports 53
V
VDI Desktops Dashboard 53
W
WinRM HTTPS Listener 35
X
XD-XA Overview dashboard 51
XD-XA Servers dashboard 52
XD-XA Session Details Dashboard 52
XD-XA dashboard overview 49
XenDesktop server, firewall rules 21
S
security, RMI communication 57
Self-Signed Certificate using OpenSSL 34
Self-signed SSL Certificate using
Makercert.exe 34
Self-Signed SSL Certificate using IIS
Manager 34
software requirements 13
SSL Certificate 33
SSL Certificate on Remote Machine 35
SSL/TLS
ciphers 61
configuration 61
Store Front server, firewall rules 21
system requirements 13
system components 10
T
TLS configuration properties 62
troubleshooting
adapter 87, 89
broker agent 83
configuration files 81
desktop agent 85
log files 81, 83, 85, 87, 89
support bundle 81
trust store files, broker agent 68
TSL configuration 61
92 VMware, Inc.
 Loading...