

Page 1

Installing vRealize
Automation
12 April 2018
vRealize Automation 7.4
Page 2

Installing vRealize Automation
You can find the most up-to-date technical documentation on the VMware website at:
https://docs.vmware.com/
If you have comments about this documentation, submit your feedback to
docfeedback@vmware.com
VMware, Inc.
3401 Hillview Ave.
Palo Alto, CA 94304
www.vmware.com
Copyright © 2014–2018 VMware, Inc. All rights reserved. Copyright and trademark information.
VMware, Inc. 2
Page 3

Contents
vRealize Automation Installation 7
vRealize Automation Installation Overview 8
1
About vRealize Automation Installation 8
New in this vRealize Automation Installation 8
vRealize Automation Installation Components 9
The vRealize Automation Appliance 9
Infrastructure as a Service 10
Deployment Type 12
Minimal vRealize Automation Deployments 12
Distributed vRealize Automation Deployments 13
Choosing Your Installation Method 16
Preparing for vRealize Automation Installation 17
2
General Preparation 17
Accounts and Passwords 18
Host Names and IP Addresses 20
Latency and Bandwidth 20
vRealize Automation Appliance 21
vRealize Automation Appliance Ports 21
IaaS Windows Servers 23
IaaS Windows Server Ports 24
IaaS Web Server 25
IaaS Manager Service Host 26
IaaS SQL Server Host 27
IaaS Distributed Execution Manager Host 28
DEM Workers with Amazon Web Services 28
DEM Workers with Openstack or PowerVC 29
DEM Workers with Red Hat Enterprise Virtualization 29
DEM Workers with SCVMM 30
Certificates 31
vRealize Automation Certificate Requirements 32
Extracting Certificates and Private Keys 33
VMware, Inc.
Deploying the vRealize Automation Appliance 35
3
About vRealize Automation Appliance Deployment 35
Deploy the vRealize Automation Appliance 35
Add Network Interface Controllers Before Running the Installer 38
3
Page 4

Installing vRealize Automation
Installing vRealize Automation with the Installation Wizard 41
4
Using the Installation Wizard for Minimal Deployments 41
Start the Installation Wizard for a Minimal Deployment 41
Install the vRealize Automation Management Agent 42
Completing the Installation Wizard 44
Using the Installation Wizard for Enterprise Deployments 44
Start the Installation Wizard for an Enterprise Deployment 44
Install the vRealize Automation Management Agent 45
Completing the Installation Wizard 46
The Standard vRealize Automation Installation Interfaces 48
5
Using the Standard Interfaces for Minimal Deployments 48
Minimal Deployment Checklist 49
Configure the vRealize Automation Appliance 49
Installing IaaS Components 53
Using the Standard Interfaces for Distributed Deployments 59
Distributed Deployment Checklist 59
Disabling Load Balancer Health Checks 60
Certificate Trust Requirements in a Distributed Deployment 60
Configure Web Component, Manager Service and DEM Host Certificate Trust 62
Installation Worksheets 62
Configuring Your Load Balancer 65
Configuring Appliances for vRealize Automation 66
Install the IaaS Components in a Distributed Configuration 72
Installing vRealize Automation Agents 98
Set the PowerShell Execution Policy to RemoteSigned 99
Choosing the Agent Installation Scenario 99
Agent Installation Location and Requirements 100
Installing and Configuring the Proxy Agent for vSphere 100
Installing the Proxy Agent for Hyper-V or XenServer 106
Installing the VDI Agent for XenDesktop 110
Installing the EPI Agent for Citrix 114
Installing the EPI Agent for Visual Basic Scripting 117
Installing the WMI Agent for Remote WMI Requests 121
Silent vRealize Automation Installation 124
6
About Silent vRealize Automation Installation 124
Perform a Silent vRealize Automation Installation 124
Perform a Silent vRealize Automation Management Agent Installation 125
Silent vRealize Automation Installation Answer File 126
VMware, Inc. 4
Page 5

Installing vRealize Automation
The vRealize Automation Installation Command Line 127
vRealize Automation Installation Command-Line Basics 127
vRealize Automation Installation Command Names 128
The vRealize Automation Installation API 129
Convert Between vRealize Automation Silent Properties and JSON 130
vRealize Automation Post-Installation Tasks 132
7
Configure Federal Information Processing Standard Compliant Encryption 132
Enable Automatic Manager Service Failover 133
About Automatic Manager Service Failover 133
Automatic vRealize Automation PostgreSQL Database Failover 134
Replacing Self-Signed Certificates with Certificates Provided by an Authority 135
Changing Host Names and IP Addresses 135
Change the vRealize Automation Appliance Host Name 135
Change the vRealize Automation Appliance IP Address 136
Adjusting the SQL Database for a Changed Host Name 138
Change an IaaS Server IP Address 138
Change an IaaS Server Host Name 139
Set the vRealize Automation Login URL to a Custom Name 141
Licensing vRealize Code Stream 142
Installing the vRealize Log Insight Agent on IaaS Servers 142
Change the VMware Remote Console Proxy Port 142
Change a vRealize Automation Appliance FQDN Back to the Original FQDN 143
Configure SQL AlwaysOn Availability Group 144
Add Network Interface Controllers After Installing vRealize Automation 144
Configure Static Routes 145
Access Patch Management 146
Install a New Patch 147
Install the Current Patch on New Nodes 148
Remove the Current Patch 148
Configure Access to the Default Tenant 149
Troubleshooting a vRealize Automation Installation 151
8
Default Log Locations 151
Rolling Back a Failed Installation 152
Roll Back a Minimal Installation 153
Roll Back a Distributed Installation 153
Create a vRealize Automation Support Bundle 154
General Installation Troubleshooting 155
Installation or Upgrade Fails with a Load Balancer Timeout Error 155
Server Times Are Not Synchronized 155
Blank Pages May Appear When Using Internet Explorer 9 or 10 on Windows 7 156
VMware, Inc. 5
Page 6

Installing vRealize Automation
Cannot Establish Trust Relationship for the SSL/TLS Secure Channel 156
Connect to the Network Through a Proxy Server 157
Console Steps for Initial Content Configuration 158
Cannot Downgrade vRealize Automation Licenses 159
Troubleshooting the vRealize Automation Appliance 159
Installers Fail to Download 159
Encryption.key File has Incorrect Permissions 160
Directories Management Identity Manager Fails to Start After Horizon-Workspace Restart 160
Incorrect Appliance Role Assignments After Failover 162
Failures After Promotion of Replica and Master Nodes 162
Incorrect vRealize Automation Component Service Registrations 163
Additional NIC Causes Management Interface Errors 165
Cannot Promote a Secondary Virtual Appliance to Master 166
Active Directory Sync Log Retention Time Is Too Short 166
RabbitMQ Cannot Resolve Host Names 167
Troubleshooting IaaS Components 168
Prerequisite Fixer Cannot Install .NET Features 168
Validating Server Certificates for IaaS 169
Credentials Error When Running the IaaS Installer 169
Save Settings Warning Appears During IaaS Installation 170
Website Server and Distributed Execution Managers Fail to Install 170
IaaS Authentication Fails During IaaS Web and Model Management Installation 170
Failed to Install Model Manager Data and Web Components 171
IaaS Windows Servers Do Not Support FIPS 172
Adding an XaaS Endpoint Causes an Internal Error 173
Uninstalling a Proxy Agent Fails 173
Machine Requests Fail When Remote Transactions Are Disabled 174
Error in Manager Service Communication 175
Email Customization Behavior Has Changed 175
Troubleshooting Log-In Errors 176
Attempts to Log In as the IaaS Administrator with Incorrect UPN Format Credentials Fails with
No Explanation 176
Log In Fails with High Availability 177
Proxy Prevents VMware Identity Manager User Log In 178
VMware, Inc. 6
Page 7

vRealize Automation Installation
This vRealize Automation Installation guide contains wizard, manual, and silent installation instructions for
VMware vRealize ™ Automation.
Note Not all features and capabilities of vRealize Automation are available in all editions. For a
comparison of feature sets in each edition, see https://www.vmware.com/products/vrealize-automation/.
Intended Audience
This information is intended for experienced Windows or Linux system administrators who are familiar
with virtual machine technology and data center operations.
VMware Technical Publications Glossary
VMware Technical Publications provides a glossary of terms that might be unfamiliar to you. For
definitions of terms as they are used in VMware technical documentation, go to
http://www.vmware.com/support/pubs.
VMware, Inc.
7
Page 8

vRealize Automation Installation
Overview 1
You can install vRealize Automation to support minimal, proof of concept environments, or in different
sizes of distributed, enterprise configurations that are capable of handling production workloads.
Installation can be interactive or silent.
After installation, you start using vRealize Automation by customizing your setup and configuring tenants,
which provides users with access to self-service provisioning and life-cycle management of cloud
services.
This chapter includes the following topics:
n
About vRealize Automation Installation
n
New in this vRealize Automation Installation
n
vRealize Automation Installation Components
n
Deployment Type
n
Choosing Your Installation Method
About vRealize Automation Installation
You can install vRealize Automation through different means, each with varying levels of interactivity.
To install, you deploy a vRealize Automation appliance and then complete the actual installation using
one of the following options:
n
A consolidated, browser-based Installation Wizard
n
Separate browser-based appliance configuration, and separate Windows installations for IaaS server
components
n
A command line based, silent installer that accepts input from an answer properties file
n
An installation REST API that accepts JSON formatted input
New in this vRealize Automation Installation
If you installed earlier versions of vRealize Automation, be aware of changes in the installation for this
release before you begin.
n
This release simplifies the vRealize Automation appliance renaming process. See Change the
vRealize Automation Appliance Host Name.
VMware, Inc.
8
Page 9

Installing vRealize Automation
n
In this release, the vRealize Automation appliance uses TLS 1.2 by default. The administration
interface includes an option to temporarily enable TLS 1.0 and 1.1, which is needed for updating
existing agents to this release.
n
The vRealize Automation appliance administration interface now includes a page for installing and
managing patches. See Access Patch Management.
n
This release describes how to change the default proxy port for VMware Remote Console. See
Change the VMware Remote Console Proxy Port.
n
This release fixes some broken Help links in the installation wizard.
vRealize Automation Installation Components
A typical vRealize Automation installation consists of a vRealize Automation appliance and one or more
Windows servers that, taken together, provide vRealize Automation Infrastructure as a Service (IaaS).
The vRealize Automation Appliance
The vRealize Automation appliance is a preconfigured Linux virtual appliance. The vRealize Automation
appliance is delivered as an open virtualization file that you deploy on existing virtualized infrastructure
such as vSphere.
The vRealize Automation appliance performs several functions central to vRealize Automation.
n
The appliance contains the server that hosts the vRealize Automation product portal, where users log
in to access self-service provisioning and management of cloud services.
n
The appliance manages single sign-on (SSO) for user authorization and authentication.
n
The appliance server hosts a management interface for vRealize Automation appliance settings.
n
The appliance includes a preconfigured PostgreSQL database used for internal vRealize Automation
appliance operations.
In large deployments with redundant appliances, the secondary appliance databases serve as
replicas to provide high availability.
n
The appliance includes a preconfigured instance of vRealize Orchestrator. vRealize Automation uses
vRealize Orchestrator workflows and actions to extend its capabilities.
The embedded instance of vRealize Orchestrator is now recommended. In older deployments or
special cases, however, users might connect vRealize Automation to an external
vRealize Orchestrator instead.
n
The appliance contains the downloadable Management Agent installer. All Windows servers that
make up your vRealize Automation IaaS must install the Management Agent.
The Management Agent registers IaaS Windows servers with the vRealize Automation appliance,
automates the installation and management of IaaS components, and collects support and telemetry
information.
VMware, Inc. 9
Page 10

Installing vRealize Automation
Infrastructure as a Service
vRealize Automation IaaS consists of one or more Windows servers that work together to model and
provision systems in private, public, or hybrid cloud infrastructures.
You install vRealize Automation IaaS components on one or more virtual or physical Windows servers.
After installation, IaaS operations appear under the Infrastructure tab in the product interface.
IaaS consists of the following components, which can be installed together or separately, depending on
deployment size.
Web Server
The IaaS Web server provides infrastructure administration and service authoring to the
vRealize Automation product interface. The Web server component communicates with the Manager
Service, which provides updates from the Distributed Execution Manager (DEM), SQL Server database,
and agents.
Model Manager
vRealize Automation uses models to facilitate integration with external systems and databases. The
models implement business logic used by the DEM.
The Model Manager provides services and utilities for persisting, versioning, securing, and distributing
model elements. Model Manager is hosted on one of the IaaS Web servers and communicates with
DEMs, the SQL Server database, and the product interface website.
Manager Service
The Manager Service is a Windows service that coordinates communication between IaaS DEMs, the
SQL Server database, agents, and SMTP. In addition, the Manager Service communicates with the Web
server through the Model Manager and must be run under a domain account with local administrator
privileges on all IaaS Windows servers.
Unless you enable automatic Manager Service failover, IaaS requires that only one Windows machine
actively runs the Manager Service at a time. For backup or high availability, you may deploy additional
Manager Service machines, but the manual failover approach requires that backup machines have the
service stopped and configured to start manually.
For more information, see About Automatic Manager Service Failover.
SQL Server Database
IaaS uses a Microsoft SQL Server database to maintain information about the machines it manages, plus
its own elements and policies. Most users allow vRealize Automation to create the database during
installation. Alternatively, you may create the database separately according to your site policies.
VMware, Inc. 10
Page 11

Installing vRealize Automation
Distributed Execution Manager
The IaaS DEM component runs the business logic of custom models, interacting with the IaaS SQL
Server database, and with external databases and systems. A common approach is to install DEMs on
the IaaS Windows server that hosts the active Manager Service, but it is not required.
Each DEM instance acts as a worker or orchestrator. The roles can be installed on the same or separate
servers.
DEM Worker—A DEM worker has one function, to run workflows. Multiple DEM workers increase
capacity and can be installed on the same or separate servers.
DEM Orchestrator—A DEM orchestrator performs the following oversight functions.
n
Monitors DEM workers. If a worker stops or loses its connection to Model Manager, the DEM
orchestrator moves the workflows to another DEM worker.
n
Schedules workflows by creating workflow instances at the scheduled time.
n
Ensures that only one instance of a scheduled workflow is running at a given time.
n
Preprocesses workflows before they run. Preprocessing includes checking preconditions for
workflows and creating the workflow execution history.
The active DEM orchestrator needs a strong network connection to the Model Manager host. In large
deployments with multiple DEM orchestrators on separate servers, the secondary orchestrators serve as
backups. The secondary DEM orchestrators monitor the active DEM orchestrator, and provide
redundancy and failover when a problem occurs with the active DEM orchestrator. For this kind of failover
configuration, you might consider installing the active DEM orchestrator with the active Manager Service
host, and secondary DEM orchestrators with the standby Manager Service hosts.
Agents
vRealize Automation IaaS uses agents to integrate with external systems and to manage information
among vRealize Automation components.
A common approach is to install vRealize Automation agents on the IaaS Windows server that hosts the
active Manager Service, but it is not required. Multiple agents increase capacity and can be installed on
the same or separate servers.
Virtualization Proxy Agents
vRealize Automation creates and manages virtual machines on virtualization hosts. Virtualization proxy
agents send commands to, and collect data from, vSphere ESX Server, XenServer, and Hyper-V hosts,
and the virtual machines provisioned on them.
A virtualization proxy agent has the following characteristics.
n
Typically requires administrator privileges on the virtualization platform that it manages.
n
Communicates with the IaaS Manager Service.
VMware, Inc. 11
Page 12

Installing vRealize Automation
n
Is installed separately and has its own configuration file.
Most vRealize Automation deployments install the vSphere proxy agent. You might install other proxy
agents depending on the virtualization resources in use at your site.
Virtual Desktop Integration Agents
Virtual desktop integration (VDI) PowerShell agents allow vRealize Automation to integrate with external
virtual desktop systems. VDI agents require administrator privileges on the external systems.
You can register virtual machines provisioned by vRealize Automation with XenDesktop on a Citrix
Desktop Delivery Controller (DDC), which allows the user to access the XenDesktop Web interface from
vRealize Automation.
External Provisioning Integration Agents
External provisioning integration (EPI) PowerShell agents allow vRealize Automation to integrate external
systems into the machine provisioning process.
For example, integration with Citrix Provisioning Server enables provisioning of machines by on-demand
disk streaming, and an EPI agent allows you to run Visual Basic scripts as extra steps during the
provisioning process.
EPI agents require administrator privileges on the external systems with which they interact.
Windows Management Instrumentation Agent
The vRealize Automation Windows Management Instrumentation (WMI) agent enhances your ability to
monitor and control Windows system information, and allows you to manage remote Windows servers
from a central location. The WMI agent also enables collection of data from Windows servers that
vRealize Automation manages.
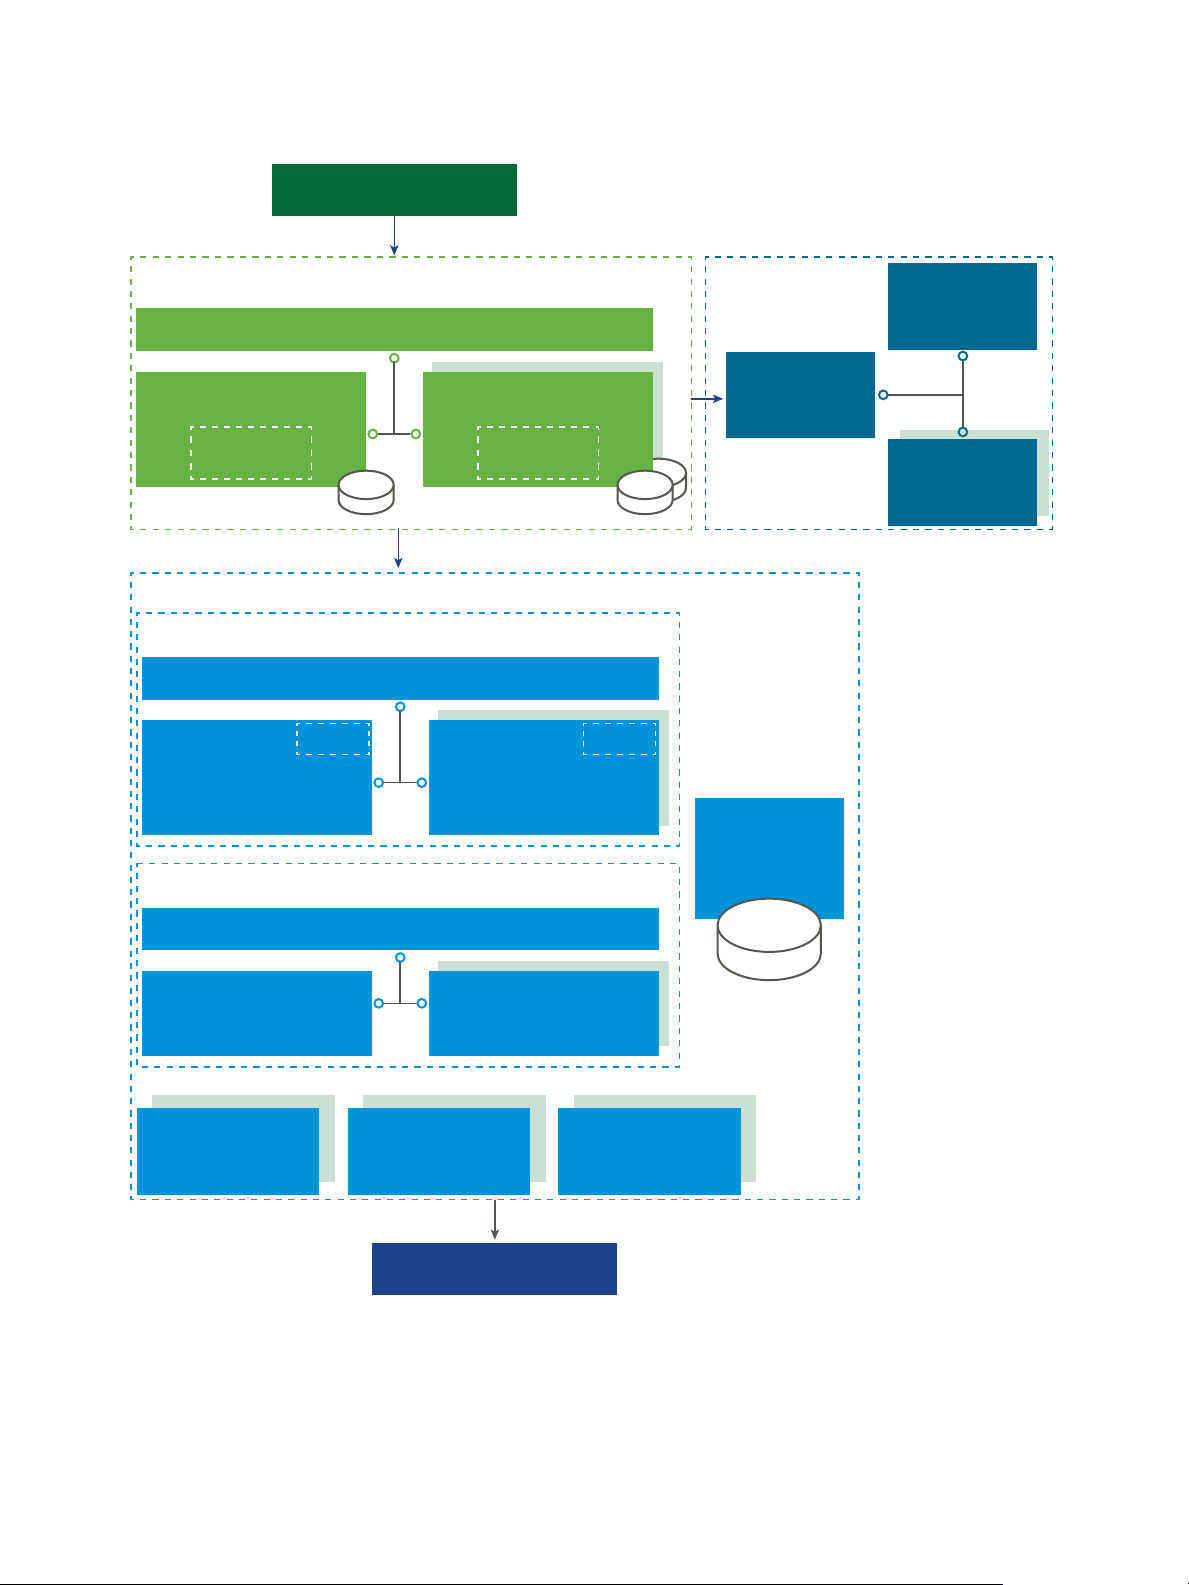
Deployment Type
You can install vRealize Automation as a minimal deployment for proof of concept or development work,
or in a distributed configuration suitable for medium to large production workloads.
Minimal vRealize Automation Deployments
Minimal deployments include one vRealize Automation appliance and one Windows server that hosts the
IaaS components. In a minimal deployment, the vRealize Automation SQL Server database can be on
the same IaaS Windows server with the IaaS components, or on a separate Windows server.
VMware, Inc. 12
Page 13

Appliance
Postgres DB
vRealize
Orchestrator
IIS
vRealize Automation
Appliance
vRealize Automation
Infrastructure
as a Service (IaaS)
IaaS
SQL Server
Database
• Web Server
• Model Manager Host
• Manager Service Host
• Distributed Execution
Manager (DEM)
• Agent
Virtualization Resources
Users
Installing vRealize Automation
Figure 1‑1. Minimal vRealize Automation Deployment
You cannot convert a minimal deployment to an enterprise deployment. To scale a deployment up, start
with a small enterprise deployment, and add components to that. Starting with a minimal deployment is
not supported.
Note The vRealize Automation documentation includes a complete, sample minimal deployment
scenario that walks you through installation and how to start using the product for proof of concept. See
Installing and Configuring vRealize Automation for the Rainpole Scenario.
Distributed vRealize Automation Deployments
Distributed, enterprise deployments can be of varying size. A basic distributed deployment might improve
vRealize Automation simply by hosting IaaS components on separate Windows servers as shown in the
following figure.
VMware, Inc. 13
Page 14

Appliance
Postgres DB
vRealize Automation Infrastructure as a Service (IaaS)
vRealize
Orchestrator
vRealize Automation
Appliance
IaaS
SQL Server
Database
IaaS
Agent(s)
IaaS
DEM(s)
IaaS
Web Server
and
Model Manager Host
Virtualization Resources
Users
IIS
IaaS
Manager Service
Host
Installing vRealize Automation
Figure 1‑2. Distributed vRealize Automation Deployment
Many production deployments go even further, with redundant appliances, redundant servers, and load
balancing for even more capacity. Large, distributed deployments provide for better scale, high
availability, and disaster recovery. Note that the embedded instance of vRealize Orchestrator is now
recommended, but you might see vRealize Automation connected to an external vRealize Orchestrator in
older deployments.
VMware, Inc. 14
Page 15
Appliance Postgres DB
vRealize Automation Infrastructure as a Service (IaaS)
Primary vRealize
Automation Appliance
Additional vRealize
Automation Appliances
vRealize
Orchestrator
Load
Balancer
Additional
vRealize
Orchestrators
vRealize Automation Appliance Optional
Load Balancer
IaaS Web Server
and
Model Manager Host
Additional IaaS
Web Servers without
Model Manager
IaaS Web Server
Load Balancer
IaaS
SQL Server
Database
IaaS
Agent(s)
IaaS
DEM
Orchestrator(s)
IaaS
DEM
Worker(s)
Virtualization Resources
Users
IIS IIS
Active IaaS
Manager Service
Host
Passive IaaS
Manager Service
Hosts
IaaS Manager Service
Load Balancer
vRealize
Orchestrator
vRealize
Orchestrator
Installing vRealize Automation
Figure 1‑3. Large Distributed and Load Balanced vRealize Automation Deployment
For more information about scalability and high availability, see the vRealize Automation Reference
Architecture guide.
VMware, Inc. 15
Page 16

Installing vRealize Automation
Choosing Your Installation Method
The consolidated vRealize Automation Installation Wizard is your primary tool for new
vRealize Automation installations. Alternatively, you might want to perform the manual, separate
installation processes or a silent installation.
n
The Installation Wizard provides a simple and fast way to install, from minimal deployments to
distributed enterprise deployments with or without load balancers. Most users run the Installation
Wizard.
n
If you want to expand a vRealize Automation deployment or if the Installation Wizard stopped for any
reason, you need the manual installation steps. After you begin a manual installation, you cannot go
back and run the Installation Wizard.
n
Depending on your site needs, you might also take advantage of silent, command line or API-based
installation.
VMware, Inc. 16
Page 17

Preparing for
vRealize Automation Installation 2
You install vRealize Automation into existing virtualization infrastructure. Before you begin an installation,
you need to address certain environmental and system requirements.
This chapter includes the following topics:
n
General Preparation
n
Accounts and Passwords
n
Host Names and IP Addresses
n
Latency and Bandwidth
n
vRealize Automation Appliance
n
IaaS Windows Servers
n
IaaS Web Server
n
IaaS Manager Service Host
n
IaaS SQL Server Host
n
IaaS Distributed Execution Manager Host
n
Certificates
General Preparation
There are several deployment-wide considerations to be aware of before installing vRealize Automation.
For more about high-level environment requirements, including supported operating system and browser
versions, see the vRealize Automation Support Matrix.
User Web Browsers
Multiple browser windows and tabs are not supported. vRealize Automation supports one session per
user.
VMware Remote Consoles provisioned on vSphere support only a subset of vRealize Automation
supported browsers.
VMware, Inc.
17
Page 18

Installing vRealize Automation
Third Party Software
All third-party software should have the latest vendor patches. Third party software includes Microsoft
Windows and SQL Server.
Time Synchronization
All vRealize Automation appliances and IaaS Windows servers must synchronize to the same time
source. You may use only one of the following sources. Do not mix time sources.
n
The vRealize Automation appliance host
n
One external network time protocol (NTP) server
To use the vRealize Automation appliance host, you must run NTP on the ESXi host. For more about
timekeeping, see VMware Knowledge Base article 1318.
You select the time source on the Installation Prerequisites page of the Installation Wizard.
Accounts and Passwords
There are several user accounts and passwords that you might need to create or plan settings for, before
installing vRealize Automation.
IaaS Service Account
IaaS installs several Windows services that must run under a single user account.
n
The account must be a domain user.
n
The account does not need to be a domain administrator, but must have local administrator
permission, before installation, on all IaaS Windows servers.
n
The account password cannot contain a double quotation mark ( " ) character.
n
The Management Agent installer for IaaS Windows servers prompts you for the account credentials.
n
The account must have Log on as a service permission, which lets the Manager Service start and
generate log files.
n
The account must have dbo permission on the IaaS database.
If you use the installer to create the database, add the account login to SQL Server before
installation. The installer grants the dbo permission after it creates the database.
n
If you use the installer to create the database, in SQL, add the sysadmin role to the account before
installation.
The sysadmin role is not required if you choose to use a pre-existing empty database.
VMware, Inc. 18
Page 19

Installing vRealize Automation
IIS Application Pool Identity
The account you use as the IIS application pool identity for the Model Manager Web service must have
Log on as batch job permission.
IaaS Database Credentials
You can let the vRealize Automation installer create the database, or you can create it separately using
SQL Server. When the vRealize Automation installer creates the database, the following requirements
apply.
n
For the vRealize Automation installer, if you select Windows Authentication, the account that runs the
Management Agent on the primary IaaS Web server must have the sysadmin role in SQL to create
and alter the size of the database.
n
For the vRealize Automation installer, even if you do not select Windows Authentication, the account
that runs the Management Agent on the primary IaaS Web server must have the sysadmin role in
SQL because the credentials are used at runtime.
n
If you separately create the database, the Windows user or SQL user credentials that you provide
only need dbo permission on the database.
IaaS Database Security Passphrase
The database security passphrase generates an encryption key that protects data in the IaaS SQL
database. You specify the security passphrase on the IaaS Host page of the Installation Wizard.
n
Plan to use the same database security passphrase across the entire installation so that each
component has the same encryption key.
n
Record the passphrase, because you need the passphrase to restore the database if there is a failure
or to add components after initial installation.
n
The database security passphrase cannot contain a double quotation mark ( " ) character. The
passphrase is accepted when you create it but causes the installation to fail.
vSphere Endpoints
If you plan to provision to a vSphere endpoint, you need a domain or local account with enough
permission to perform operations on the target. The account also needs the appropriate level of
permission configured in vRealize Orchestrator.
vRealize Automation Administrator Password
After installation, the vRealize Automation administrator password logs you in to the default tenant. You
specify the administrator password on the Single Sign-On page of the Installation Wizard.
VMware, Inc. 19
Page 20

Installing vRealize Automation
The vRealize Automation administrator password cannot contain a trailing equals ( = ) character. The
password is accepted when you create it but results in errors later, when you perform operations such as
saving endpoints.
Host Names and IP Addresses
vRealize Automation requires that you name the hosts in your installation according to certain
requirements.
n
All vRealize Automation machines in your installation must be able to resolve each other by fully
qualified domain name (FQDN).
While performing the installation, always enter the complete FQDN when identifying or selecting a
vRealize Automation machine. Do not enter IP addresses or short machine names.
n
In addition to the FQDN requirement, Windows machines that host the Model Manager Web service,
Manager Service, and Microsoft SQL Server database must be able to resolve each other by
Windows Internet Name Service (WINS) name.
Configure your Domain Name System (DNS) to resolve these short WINS host names.
n
Preplan domain and machine naming so that vRealize Automation machine names begin with letters
(a–z, A–Z), end with letters or digits (0–9), and have only letters, digits, or hyphens ( - ) in the middle.
The underscore character ( _ ) must not appear in the host name or anywhere in the FQDN.
For more information about allowable names, review the host name specifications from the Internet
Engineering Task Force. See www.ietf.org.
n
In general, you should expect to keep the host names and FQDNs that you planned for
vRealize Automation systems. Changing a host name is not always possible. When a change is
possible, it might be a complicated procedure.
n
A best practice is to reserve and use static IP addresses for all vRealize Automation appliances and
IaaS Windows servers. vRealize Automation supports DHCP, but static IP addresses are
recommended for long-term deployments such as production environments.
n
You apply an IP address to the vRealize Automation appliance during OVF or OVA deployment.
n
For the IaaS Windows servers, you follow the usual operating system process. Set the IP address
before installing vRealize Automation IaaS.
Latency and Bandwidth
vRealize Automation supports multiple site, distributed installation, but data transmission speed and
volume must meet minimum prerequisites.
vRealize Automation needs an environment of 5 ms or lower network latency, and 1 GB or higher
bandwidth, among the following components.
n
vRealize Automation appliance
n
IaaS Web server
VMware, Inc. 20
Page 21

Installing vRealize Automation
n
IaaS Model Manager host
n
IaaS Manager Service host
n
IaaS SQL Server database
n
IaaS DEM Orchestrator
The following component might work at a higher latency site, but the practice is not recommended.
n
IaaS DEM Worker
You may install the following component at the site of the endpoint with which it communicates.
n
IaaS Proxy Agent
vRealize Automation Appliance
Most vRealize Automation appliance requirements are preconfigured in the OVF or OVA that you deploy.
The same requirements apply to standalone, master, or replica vRealize Automation appliances.
The minimum virtual machine hardware on which you can deploy is Version 7, or ESX/ESXi 4.x or later.
See VMware Knowledge Base article 2007240. Because of the hardware resource demand, do not
deploy on VMware Workstation.
After deployment, you might use vSphere to adjust vRealize Automation appliance hardware settings to
meet Active Directory requirements. See the following table.
Table 2‑1. vRealize Automation Appliance Hardware Requirements for Active Directory
vRealize Automation Appliance for Small Active Directories vRealize Automation Appliance for Large Active Directories
n
4 CPUs
n
18 GB memory
n
60 GB disk storage
n
4 CPUs
n
22 GB memory
n
60 GB disk storage
A small Active Directory has up to 25,000 users in the organizational unit (OU) to be synced in the ID
Store configuration. A large Active Directory has more than 25,000 users in the OU.
vRealize Automation Appliance Ports
Ports on the vRealize Automation appliance are usually preconfigured in the OVF or OVA that you deploy.
The following ports are used by the vRealize Automation appliance.
Table 2‑2. Incoming Ports
Port Protocol Comments
22 TCP Optional. Access for SSH sessions.
80 TCP Optional. Redirects to 443.
88 TCP (UDP
optional)
443 TCP Access to the vRealize Automation console and API calls.
VMware, Inc. 21
Cloud KDC Kerberos authentication from external mobile devices.
Page 22

Installing vRealize Automation
Table 2‑2. Incoming Ports (Continued)
Port Protocol Comments
Access for machines to download the guest agent and software bootstrap agent.
Access for load balancer, browser.
4369, 5671,
5672, 25672
5480 TCP Access to the virtual appliance management interface.
5488, 5489 TCP Internally used by the vRealize Automation appliance for updates.
8230, 8280,
8281, 8283
8443 TCP Access for browser. Identity Manager administrator port over HTTPS.
8444 TCP Console proxy communication for vSphere VMware Remote Console connections.
9300–9400 TCP Access for Identity Manager audits.
54328 UDP
TCP RabbitMQ messaging.
Used by the Management Agent.
TCP Internal vRealize Orchestrator instance.
Table 2‑3. Outgoing Ports
Port Protocol Comments
25, 587 TCP, UDP SMTP for sending outbound notification email.
53 TCP, UDP DNS server.
67, 68, 546, 547 TCP, UDP DHCP.
80 TCP Optional. For fetching software updates. Updates can be downloaded separately and
applied.
88, 464, 135 TCP, UDP Domain controller.
110, 995 TCP, UDP POP for receiving inbound notification email.
143, 993 TCP, UDP IMAP for receiving inbound notification email.
123 TCP, UDP Optional. For connecting directly to NTP instead of using host time.
389 TCP Access to View Connection Server.
389, 636, 3268,
3269
443 TCP Communication with IaaS Manager Service and infrastructure endpoint hosts over HTTPS.
445 TCP Access to ThinApp repository for Identity Manager.
902 TCP ESXi network file copy operations and VMware Remote Console connections.
5050 TCP Optional. For communicating with vRealize Business for Cloud.
5432 TCP, UDP Optional. For communicating with another appliance PostgreSQL database.
TCP Active Directory. Default ports shown, but are configurable.
Communication with the vRealize Automation software service over HTTPS.
Access to the Identity Manager upgrade server.
Access to View Connection Server.
VMware, Inc. 22
Page 23

Installing vRealize Automation
Table 2‑3. Outgoing Ports (Continued)
Port Protocol Comments
5500 TCP RSA SecurID system. Default port shown, but is configurable.
8281 TCP Optional. For communicating with an external vRealize Orchestrator instance.
9300–9400 TCP Access for Identity Manager audits.
54328 UDP
Other ports might be required by specific vRealize Orchestrator plug-ins that communicate with external
systems. See the documentation for the vRealize Orchestrator plug-in.
IaaS Windows Servers
All Windows servers that host IaaS components must meet certain requirements. Address requirements
before you run the vRealize Automation Installation Wizard or the standard Windows-based installer.
n
Place all IaaS Windows servers on the same domain. Do not use Workgroups.
n
Each server needs the following minimum hardware.
n
2 CPUs
n
8 GB memory
n
40 GB disk storage
A server that hosts the SQL database together with IaaS components might need additional
hardware.
n
Because of the hardware resource demand, do not deploy on VMware Workstation.
n
Install Microsoft .NET Framework 4.5.2 or later.
A copy of .NET is available from any vRealize Automation appliance:
https://vrealize-automation-appliance-fqdn:5480/installer/
If you use Internet Explorer for the download, verify that Enhanced Security Configuration is disabled.
Navigate to res://iesetup.dll/SoftAdmin.htm on the Windows server.
n
Install Microsoft PowerShell 2.0, 3.0, or 4.0, based on your version of Windows.
Note that some vRealize Automation upgrades or migrations might require an older or newer
PowerShell version, in addition to the one that you are currently running.
n
If you install more than one IaaS component on the same Windows server, plan to install them to the
same installation folder. Do not use different paths.
n
IaaS servers use TLS for authentication, which is enabled by default on some Windows servers.
Some sites disable TLS for security reasons, but you must leave at least one TLS protocol enabled.
This version of vRealize Automation supports TLS 1.2.
VMware, Inc. 23
Page 24

Installing vRealize Automation
n
Enable the Distributed Transaction Coordinator (DTC) service. IaaS uses DTC for database
transactions and actions such as workflow creation.
Note If you clone a machine to make an IaaS Windows server, install DTC on the clone after
cloning. If you clone a machine that already has DTC, its unique identifier is copied to the clone,
which causes communication to fail. See Error in Manager Service Communication.
Also enable DTC on the server that hosts the SQL database, if it is separate from IaaS. For more
about DTC enablement, see VMware Knowledge Base article 2038943.
n
Verify that the Secondary Log On service is running. If desired, you may stop the service after
installation is complete.
IaaS Windows Server Ports
Ports on the IaaS Windows servers must be configured before vRealize Automation installation.
Open ports between all IaaS Windows servers according to the following tables. Include the server that
hosts the SQL database, if it is separate from IaaS. Alternatively, if site policies allow, you may disable
firewalls between IaaS Windows servers and SQL Server.
Table 2‑4. Incoming Ports
Port Protocol Component Comments
443 TCP Manager Service Communication with IaaS components and vRealize Automation
appliance over HTTPS
443 TCP vRealize Automation
appliance
443 TCP Infrastructure Endpoint Hosts Communication with IaaS components and vRealize Automation
443 TCP Guest agent
Software bootstrap agent
443 TCP DEM Worker Communication with NSX Manager
1433 TCP SQL Server instance MSSQL
Communication with IaaS components and vRealize Automation
appliance over HTTPS
appliance over HTTPS. Typically, 443 is the default
communication port for virtual and cloud infrastructure endpoint
hosts, but refer to the documentation provided by your
infrastructure hosts for a full list of default and required ports
Communication with Manager Service over HTTPS
Table 2‑5. Outgoing Ports
Port Protocol Component Comments
53 TCP, UDP All DNS
67, 68, 546,
547
123 TCP, UDP All Optional. NTP
443 TCP Manager Service Communication with vRealize Automation appliance over
VMware, Inc. 24
TCP, UDP All DHCP
HTTPS
Page 25

Installing vRealize Automation
Table 2‑5. Outgoing Ports (Continued)
Port Protocol Component Comments
443 TCP Distributed Execution
Managers
443 TCP Proxy agents Communication with Manager Service and infrastructure
443 TCP Management Agent Communication with the vRealize Automation appliance
443 TCP Guest agent
Software bootstrap agent
1433 TCP Manager Service
Website
5480 TCP All Communication with the vRealize Automation appliance.
Communication with Manager Service over HTTPS
endpoint hosts over HTTPS
Communication with Manager Service over HTTPS
MSSQL
Also, because you enable DTC between all servers, DTC requires port 135 over TCP and a random port
between 1024 and 65535. Note that the Prerequisite Checker validates that DTC is running and the
required ports are open.
IaaS Web Server
A Windows server that hosts the Web component must meet additional requirements, in addition to those
for all IaaS Windows servers.
The requirements are the same, whether or not the Web component hosts the Model Manager.
n
Configure Java.
n
Install 64-bit Java 1.8 or later. Do not use 32-bit.
The JRE is enough. You do not need the full JDK.
n
Set the JAVA_HOME environment variable to the Java installation folder.
n
Verify that %JAVA_HOME%\bin\java.exe is available.
n
Configure Internet Information Services (IIS) according to the following table.
VMware, Inc. 25
Page 26

Installing vRealize Automation
You need IIS 7.5 for Windows 2008 variants, IIS 8 for Windows 2012, and IIS 8.5 for Windows 2012
R2.
In addition to the configuration settings, avoid hosting additional Web sites in IIS.
vRealize Automation sets the binding on its communication port to all unassigned IP addresses,
making no additional bindings possible. The default vRealize Automation communication port is 443.
Table 2‑6. IaaS Manager Service Host Internet Information Services
IIS Component Setting
Internet Information Services (IIS) roles
IIS Windows Process Activation Service
roles
n
Windows Authentication
n
Static Content
n
Default Document
n
ASPNET 3.5 and ASPNET 4.5
n
ISAPI Extensions
n
ISAPI Filter
n
Configuration API
n
Net Environment
n
Process Model
n
WCF Activation (Windows 2008 variants only)
n
HTTP Activation
n
Non-HTTP Activation (Windows 2008 variants only)
(Windows 2012 variants: Go to Features > .Net Framework 3.5 Features >
Non-HTTP Activation)
IIS Authentication settings Set the following non-defaults.
n
Windows Authentication enabled
n
Anonymous Authentication disabled
Do not change the following defaults.
n
Negotiate Provider enabled
n
NTLM Provider enabled
n
Windows Authentication Kernel Mode enabled
n
Windows Authentication Extended Protection disabled
n
For certificates using SHA512, TLS1.2 must be disabled on Windows 2012
variants
IaaS Manager Service Host
A Windows server that hosts the Manager Service component must meet additional requirements, in
addition to those for all IaaS Windows servers.
The requirements are the same, whether the Manager Service host is a primary or backup.
n
No firewalls can exist between a Manager Service host and DEM host. For port information, see IaaS
Windows Server Ports.
n
The Manager Service host must be able to resolve the NETBIOS name of the SQL Server database
host. If it cannot resolve the NETBIOS name, add the SQL Server NETBIOS name to the Manager
Service machine /etc/hosts file.
VMware, Inc. 26
Page 27

Installing vRealize Automation
n
Configure Internet Information Services (IIS) according to the following table.
You need IIS 7.5 for Windows 2008 variants, IIS 8 for Windows 2012, and IIS 8.5 for Windows 2012
R2.
In addition to the configuration settings, avoid hosting additional Web sites in IIS.
vRealize Automation sets the binding on its communication port to all unassigned IP addresses,
making no additional bindings possible. The default vRealize Automation communication port is 443.
Table 2‑7. IaaS Manager Service Host Internet Information Services
IIS Component Setting
Internet Information Services (IIS) roles
IIS Windows Process Activation Service
roles
n
Windows Authentication
n
Static Content
n
Default Document
n
ASPNET 3.5 and ASPNET 4.5
n
ISAPI Extensions
n
ISAPI Filter
n
Configuration API
n
Net Environment
n
Process Model
n
WCF Activation (Windows 2008 variants only)
n
HTTP Activation
n
Non-HTTP Activation (Windows 2008 variants only)
(Windows 2012 variants: Go to Features > .Net Framework 3.5 Features >
Non-HTTP Activation)
IIS Authentication settings Set the following non-defaults.
n
Windows Authentication enabled
n
Anonymous Authentication disabled
Do not change the following defaults.
n
Negotiate Provider enabled
n
NTLM Provider enabled
n
Windows Authentication Kernel Mode enabled
n
Windows Authentication Extended Protection disabled
n
For certificates using SHA512, TLS1.2 must be disabled on Windows 2012
variants
IaaS SQL Server Host
A Windows server that hosts the IaaS SQL database must meet certain requirements.
VMware, Inc. 27
Page 28

Installing vRealize Automation
Your SQL Server can reside on one of your IaaS Windows servers, or on a separate host. When hosted
together with IaaS components, these requirements are in addition to those for all IaaS Windows servers.
n
This release of vRealize Automation does not support the default SQL Server 2016 130 compatibility
mode. If you separately create an empty SQL Server 2016 database for use with IaaS, use 100 or
120 compatibility mode.
If you create the database through the vRealize Automation installer, compatibility is already
configured.
n
AlwaysOn Availability Group (AAG) is only supported with SQL Server 2016 Enterprise. When you
use AAG, you specify the AAG listener FQDN as the SQL Server host.
n
When hosted together with IaaS components, configure Java.
n
Install 64-bit Java 1.8 or later. Do not use 32-bit.
The JRE is enough. You do not need the full JDK.
n
Set the JAVA_HOME environment variable to the Java installation folder.
n
Verify that %JAVA_HOME%\bin\java.exe is available.
n
Use a supported SQL Server version from the vRealize Automation Support Matrix.
n
Enable TCP/IP protocol for SQL Server.
n
SQL Server includes a model database that is the template for all databases created on the SQL
instance. For IaaS to install correctly, do not change the model database size.
n
Usually, the server needs more hardware than the minimums described in IaaS Windows Servers.
n
Before running the vRealize Automation installer, you need to identify accounts and add permissions
in SQL. See Accounts and Passwords.
IaaS Distributed Execution Manager Host
A Windows server that hosts the Distributed Execution Manager (DEM) Orchestrator or Worker
component must meet additional requirements, in addition to those for all IaaS Windows servers.
No firewalls can exist between a DEM host and Manager Service host. For port information, see IaaS
Windows Server Ports.
DEM Workers might have additional requirements depending on the provisioning resources with which
they interact.
DEM Workers with Amazon Web Services
A vRealize Automation IaaS DEM Worker that communicates with Amazon Web Services (AWS) must
meet additional requirements, in addition to those for all IaaS Windows servers and DEMs in general.
A DEM Worker can communicate with AWS for provisioning. The DEM Worker communicates with, and
collects data from, an Amazon EC2 account.
n
The DEM Worker must have Internet access.
VMware, Inc. 28
Page 29

Installing vRealize Automation
n
If the DEM Worker is behind a firewall, HTTPS traffic must be allowed to and from aws.amazon.com
as well as the URLs for EC2 regions that your AWS accounts have access to, such as ec2.us-
east-1.amazonaws.com for the US East region.
Each URL resolves to a range of IP addresses, so you might need to use a tool, such as the one
available from the Network Solutions Web site, to list and configure these IP addresses.
n
If the DEM Worker reaches the Internet through a proxy server, the DEM service must be running
under credentials that can authenticate to the proxy server.
DEM Workers with Openstack or PowerVC
A vRealize Automation IaaS DEM Worker that communicates with and collects data from Openstack or
PowerVC must meet additional requirements, in addition to those for all IaaS Windows servers and DEMs
in general.
Table 2‑8. DEM Worker Openstack and PowerVC Requirements
Your Installation Requirements
All In Windows Registry, enable TLS v1.2 support for .NET framework. For example:
[HKEY_LOCAL_MACHINE\SOFTWARE\Microsoft\.NETFramework\v4.0.30319]
"SchUseStrongCrypto"=dword:00000001
[HKEY_LOCAL_MACHINE\SOFTWARE\Wow6432Node\Microsoft\.NETFramework\v4.0.30319]
"SchUseStrongCrypto"=dword:00000001
Windows 2008 DEM Host In Windows Registry, enable TLS v1.2 protocol. For example:
[HKEY_LOCAL_MACHINE\SYSTEM\CurrentControlSet\Control\SecurityProviders\SCHAN
NEL\Protocols\TLS 1.2]
[HKEY_LOCAL_MACHINE\SYSTEM\CurrentControlSet\Control\SecurityProviders\SCHAN
NEL\Protocols\TLS 1.2\Client]
"DisabledByDefault"=dword:00000000
"Enabled"=dword:00000001
[HKEY_LOCAL_MACHINE\SYSTEM\CurrentControlSet\Control\SecurityProviders\SCHAN
NEL\Protocols\TLS 1.2\Server]
"DisabledByDefault"=dword:00000000
"Enabled"=dword:00000001
Self-signed certificates on your
infrastructure endpoint host
If your PowerVC or Openstack instance is not using trusted certificates, import the SSL certificate
from your PowerVC or Openstack instance into the Trusted Root Certificate Authorities store on
each IaaS Windows server where you intend to install a vRealize Automation DEM.
DEM Workers with Red Hat Enterprise Virtualization
A vRealize Automation IaaS DEM Worker that communicates with and collects data from Red Hat
Enterprise Virtualization (RHEV) must meet additional requirements, in addition to those for all IaaS
Windows servers and DEMs in general.
n
You must join each RHEV environment to the domain containing the DEM Worker server.
VMware, Inc. 29
Page 30

Installing vRealize Automation
n
The credentials used to manage the endpoint representing an RHEV environment must have
administrator privileges on the RHEV environment. When you use RHEV for provisioning, the DEM
Worker communicates with and collects data from that account.
n
The credentials must also have enough privileges to create objects on the hosts within the
environment.
DEM Workers with SCVMM
A vRealize Automation IaaS DEM Worker that manages virtual machines through System Center Virtual
Machine Manager (SCVMM) must meet additional requirements, in addition to those for all IaaS Windows
servers and DEMs in general.
n
Install the DEM Worker on the same machine with the SCVMM console.
A best practice is to install the SCVMM console on a separate DEM Worker.
n
The DEM worker must have access to the SCVMM PowerShell module installed with the console.
n
The PowerShell Execution Policy must be set to RemoteSigned or Unrestricted.
To verify the PowerShell Execution Policy, enter one of the following commands at the PowerShell
command prompt.
help about_signing
help Set-ExecutionPolicy
n
If all DEM Workers within the instance are not on machines that meet these requirements, use Skill
commands to direct SCVMM-related workflows to DEM Workers that are.
vRealize Automation does not support a deployment environment that uses an SCVMM private cloud
configuration. vRealize Automation cannot currently collect from, allocate to, or provision based on
SCVMM private clouds.
The following additional requirements apply to SCVMM.
n
vRealize Automation supports SCVMM 2012 R2, which requires PowerShell 3 or later.
n
Install the SCVMM console before you install vRealize Automation DEM Workers that consume
SCVMM work items.
If you install the DEM Worker before the SCVMM console, you see log errors similar to the following
example.
Workflow 'ScvmmEndpointDataCollection' failed with the following exception: The
term 'Get-VMMServer' is not recognized as the name of a cmdlet, function, script
file, or operable program. Check the spelling of the name, or if a path was
included, verify that the path is correct and try again.
To correct the problem, verify that the SCVMM console is installed, and restart the DEM Worker
service.
n
Each SCVMM instance must be joined to the domain containing the server.
VMware, Inc. 30
Page 31

Installing vRealize Automation
n
The credentials used to manage the endpoint representing an SCVMM instance must have
administrator privileges on the SCVMM server.
The credentials must also have administrator privileges on the Hyper-V servers within the instance.
n
To provision machines on an SCVMM resource, the vRealize Automation user who is requesting the
catalog item must have the administrator role within the SCVMM instance.
n
Hyper-V servers within an SCVMM instance to be managed must be Windows 2008 R2 SP1 Servers
with Hyper-V installed. The processor must be equipped with the necessary virtualization
extensions .NET Framework 4.5.2 or later must be installed and Windows Management
Instrumentation (WMI) must be enabled.
n
To provision a Generation-2 machine on an SCVMM 2012 R2 resource, you must add the following
properties in the blueprint.
Scvmm.Generation2 = true
Hyperv.Network.Type = synthetic
Generation-2 blueprints should have an existing data-collected virtualHardDisk (vHDX) in the
blueprint build information page. Having it blank causes Generation-2 provisioning to fail.
For additional information about preparing your SCVMM environment, see Configuring vRealize
Automation.
Certificates
vRealize Automation uses SSL certificates for secure communication among IaaS components and
instances of the vRealize Automation appliance. The appliances and the Windows installation machines
exchange these certificates to establish a trusted connection. You can obtain certificates from an internal
or external certificate authority, or generate self-signed certificates during the deployment process for
each component.
For important information about troubleshooting, support, and trust requirements for certificates, see
VMware Knowledge Base article 2106583.
Note vRealize Automation supports SHA2 certificates. The self-signed certificates generated by the
system use SHA-256 With RSA Encryption. You might need to update to SHA2 certificates due to
operating system or browser requirements.
You can update or replace certificates after deployment. For example, a certificate may expire or you may
choose to use self-signed certificates during your initial deployment, but then obtain certificates from a
trusted authority before going live with your vRealize Automation implementation.
VMware, Inc. 31
Page 32

Installing vRealize Automation
Table 2‑9. Certificate Implementations
Minimal Deployment (non-
Component
production) Distributed Deployment (production-ready)
vRealize
Automation
Appliance
IaaS Components During installation, accept the
Generate a self-signed certificate
during appliance configuration.
generated self-signed certificates or
select certificate suppression.
For each appliance cluster, you can use a certificate from an
internal or external certificate authority. Multi-use and wildcard
certificates are supported.
Obtain a multi-use certificate, such as a Subject Alternative Name
(SAN) certificate, from an internal or external certificate authority
that your Web client trusts.
Certificate Chains
If you use certificate chains, specify the certificates in the following order.
n
Client/server certificate signed by the intermediate CA certificate
n
One or more intermediate certificates
n
A root CA certificate
Include the BEGIN CERTIFICATE header and END CERTIFICATE footer for each certificate when you
import certificates.
Certificate Changes if Customizing the vRealize Automation Login
URL
If you want users to log in to a URL name other than a vRealize Automation appliance or load balancer
name, see the pre and post installation CNAME steps in Set the vRealize Automation Login URL to a
Custom Name.
vRealize Automation Certificate Requirements
When using your own certificates with vRealize Automation, the certificates need to meet certain
requirements.
Supported Certificate Types
In many organizations, certificates are issued or requested by external authorities according to company
requirements.
The following requirements address common identity format and certificate types used with typical
vRealize Automation deployments.
VMware, Inc. 32
Page 33

Installing vRealize Automation
Certificate Property Requirements
Hash Algorithm SHA1, SHA2, (256, 584, 512)
Signature Algorithm RSASSA-PKCS1_V!_5
Key Length 2084, 4096
Note The RSASSA-PSS signature is not supported for vRealize Automation deployments. This
signature is the default for a Microsoft CA on Windows 2012 R2. The signature is a configurable
parameter, so you must ensure that it is set appropriately when using a Microsoft CA.
vRealize Automation Certificate Support Matrix
Hash
Algorithm SHA1 SHA2-256
Signature
Algorithm
Key Size 2048 4096 2048 4096 2048 4096 2048 4096
vRealize
Automation
Supported
Hash
Algorithm SHA2-384 SHA2-512
Signature
Algorithm
Key Size 2048 4096 2048 4096 2048 4096 2048 4096
vRealize
Automation
Supported
RSASSAPKCS1_V1_5
Supporte
d Verified
RSASSA-PKCS1_V1_5 RSASSA-PSS RSASSA-PKCS1_V1_5 RSASSA-PSS
Supported
Verified
Supporte
d Verified
Supported
Verified
RSASSA-PSS RSASSA-PKCS1_V1_5 RSASSA-PSS
Not
Supported
Not
Supported
Not
Supported
Not
Supported
Supported
Verified
Supported
Verified
Supported
Verified
Supported
Verified
Not
Supported
Not
Supported
Not
Supported
Not
Supported
Extracting Certificates and Private Keys
Certificates that you use with the virtual appliances must be in the PEM file format.
The examples in the following table use Gnu openssl commands to extract the certificate information you
need to configure the virtual appliances.
VMware, Inc. 33
Page 34

Installing vRealize Automation
Table 2‑10. Sample Certificate Values and Commands (openssl)
Certificate Authority Provides Command Virtual Appliance Entries
RSA Private Key openssl pkcs12 -in path _to_.pfx
certificate_file -nocerts -out key.pem
PEM File openssl pkcs12 -in path _to_.pfx
certificate_file -clcerts -nokeys -out
cert.pem
(Optional) Pass Phrase n/a Pass Phrase
RSA Private Key
Certificate Chain
VMware, Inc. 34
Page 35

Deploying the
vRealize Automation Appliance 3
The vRealize Automation appliance is delivered as an open virtualization file that you deploy on existing
virtualized infrastructure.
This chapter includes the following topics:
n
About vRealize Automation Appliance Deployment
n
Deploy the vRealize Automation Appliance
n
Add Network Interface Controllers Before Running the Installer
About vRealize Automation Appliance Deployment
All installations first require a deployed but unconfigured vRealize Automation appliance, before you
proceed with one of the actual vRealize Automation installation options.
n
The consolidated, browser-based Installation Wizard
n
Separate browser-based appliance configuration, followed by separate Windows installations for IaaS
servers
n
Command line based, silent installer that accepts input from an answer properties file
n
The installation REST API that accepts JSON formatted input
Deploy the vRealize Automation Appliance
Before you can take any of the installation paths, vRealize Automation requires that you deploy at least
one vRealize Automation appliance.
To create the appliance, you use the vSphere Client to download and deploy a partially configured virtual
machine from a template. You might need to perform the procedure more than once, if you expect to
create an enterprise deployment for high availability and failover. Such a deployment typically has
multiple vRealize Automation appliances behind a load balancer.
Prerequisites
n
Log in to the vSphere Client with an account that has permission to deploy OVF templates to the
inventory.
n
Download the vRealize Automation appliance .ovf or .ova file to a location accessible to the
vSphere Client.
VMware, Inc.
35
Page 36

Installing vRealize Automation
Procedure
1 Select the vSphere Deploy OVF Template option.
2 Enter the path to the vRealize Automation appliance .ovf or .ova file.
3 Review the template details.
4 Read and accept the end-user license agreement.
5 Enter an appliance name and inventory location.
When you deploy appliances, use a different name for each one, and do not include nonalphanumeric characters such as underscores ( _ ) in names.
6 Select the host and cluster in which the appliance will reside.
7 Select the resource pool in which the appliance will reside.
8 Select the storage that will host the appliance.
9 Select a disk format.
Thick formats improve performance, and thin formats save storage space.
Format does not affect appliance disk size. If an appliance needs more space for data, add disk by
using vSphere after deploying.
10 From the drop-down menu, select a Destination Network.
11 Complete the appliance properties.
a Enter and confirm a root password.
The root account credentials log you in to the browser-based administration interface hosted by
the appliance, or the appliance operating system command-line console.
b Select whether or not to allow remote SSH connections to the command-line console.
Disabling SSH is more secure but requires that you access the console directly in vSphere
instead of through a separate terminal client.
VMware, Inc. 36
Page 37

Installing vRealize Automation
c For Hostname, enter the appliance FQDN.
For best results, enter the FQDN even if using DHCP.
Note vRealize Automation supports DHCP, but static IP addresses are recommended for
production deployments.
d In Network Properties, when using static IP addresses, enter the values for gateway, netmask,
and DNS servers. You must also enter the IP address, FQDN, and domain for the appliance itself,
as shown in the following example.
Figure 3‑1. Example Virtual Appliance Properties
12 Depending on your deployment, vCenter Server, and DNS configuration, select one of the following
ways of finishing deployment and powering up the appliance.
n
If you deployed to vSphere, and Power on after deployment is available on the Ready to
Complete page, take the following steps.
a Select Power on after deployment and click Finish.
b After the file finishes deploying into vCenter Server, click Close.
VMware, Inc. 37
Page 38

Installing vRealize Automation
c Wait for the virtual machine to start, which might take up to 5 minutes.
n
If you deployed to vSphere, and Power on after deployment is not available on the Ready to
Complete page, take the following steps.
a After the file finishes deploying into vCenter Server, click Close.
b Power on the vRealize Automation appliance.
c Wait for the virtual machine to start, which might take up to 5 minutes.
d Verify that the vRealize Automation appliance is deployed by pinging its FQDN. If you cannot
ping the appliance, restart the virtual machine.
e Wait for the virtual machine to start, which might take up to 5 minutes.
n
If you deployed the vRealize Automation appliance to vCloud using vCloud Director, vCloud might
override the password that you entered during OVA deployment. To prevent the override, take the
following steps.
a After deploying in vCloud Director, click your vApp to view the vRealize Automation
appliance.
b Right-click the vRealize Automation appliance, and select Properties.
c Click the Guest OS Customization tab.
d Under Password Reset, clear the Allow local administrator password option, and click
OK.
e Power on the vRealize Automation appliance.
f Wait for the virtual machine to start, which might take up to 5 minutes.
13 Verify that the vRealize Automation appliance is deployed by pinging its FQDN.
What to do next
n
(Optional) Add NICs. See Add Network Interface Controllers Before Running the Installer.
n
Log in to the browser-based administration interface to run the consolidated Installation Wizard or to
manually configure the appliance.
https://vrealize-automation-appliance-FQDN:5480
n
Alternatively, you can skip logging in so that you can take advantage of vRealize Automation silent or
API based installation.
Add Network Interface Controllers Before Running the Installer
vRealize Automation supports multiple network interface controllers (NICs). Before running the installer, it
is possible to add NICs to the vRealize Automation appliance or IaaS Windows server.
VMware, Inc. 38
Page 39

Installing vRealize Automation
If you need multiple NICs to be in place before running the vRealize Automation installation wizard, add
them after deploying in vCenter but before starting the wizard. Reasons that you might want additional
NICs in place early include the following examples:
n
You want separate user and infrastructure networks.
n
You need an additional NIC so that IaaS servers can join an Active Directory domain.
For more information about multiple NIC scenarios, see this VMware Cloud Management blog post.
For three or more NICs, be aware of the following limitations.
n
VIDM needs access to the Postgres database and Active Directory.
n
In an HA cluster, VIDM needs access to the load balancer URL.
n
The preceding VIDM connections must come through the first two NICs.
n
NICs after the second NIC must not be used or recognized by VIDM.
n
NICs after the second NIC must not be used to connect to Active Directory.
Use the first or second NIC when configuring a directory in vRealize Automation.
Prerequisites
Deploy the vRealize Automation appliance OVF and Windows virtual machines, but do not log in or start
the installation wizard.
Procedure
1 In vCenter, add NICs to each vRealize Automation appliance.
a Right click the newly deployed appliance and select Edit Settings.
b Add VMXNETn NICs.
c If it is powered on, restart the appliance.
2 Log in to the vRealize Automation appliance command line as root.
3 Configure the NICs by running the following command for each NIC.
Make sure to include the default gateway address. You can configure static routes after finishing this
procedure.
/opt/vmware/share/vami/vami_set_network network-interface (STATICV4|
STATICV4+DHCPV6|STATICV4+AUTOV6) IPv4-address netmask gateway-v4-address
For example:
/opt/vmware/share/vami/vami_set_network eth1 STATICV4 192.168.100.20
255.255.255.0 192.168.100.1
4 Verify that all vRealize Automation nodes can resolve each other by DNS name.
5 Verify that all vRealize Automation nodes can access any load balanced FQDNs for
vRealize Automation components.
VMware, Inc. 39
Page 40

Installing vRealize Automation
6 If you are using Split-Brain DNS, verify that all vRealize Automation nodes and VIPs have the same
FQDN in DNS for each node IP and VIP.
7 In vCenter, add NICs to IaaS Windows servers.
a Right click the IaaS server and select Edit Settings.
b Add NICs to the IaaS server virtual machine.
8 In Windows, configure the added IaaS server NICs and their IP addresses. See the Microsoft
documentation if necessary.
What to do next
n
(Optional) If you need static routes, follow the guidelines in Configure Static Routes before continuing
with installation.
n
Log in to the browser-based administration interface to run the consolidated Installation Wizard or to
manually configure the appliance.
https://vrealize-automation-appliance-FQDN:5480
n
Alternatively, you can skip logging in so that you can take advantage of vRealize Automation silent or
API based installation.
VMware, Inc. 40
Page 41

Installing vRealize Automation
with the Installation Wizard 4
The vRealize Automation Installation Wizard provides a simple and fast way to install minimal or
enterprise deployments.
Before you launch the wizard, you deploy a vRealize Automation appliance and configure IaaS Windows
servers to meet prerequisites. The Installation Wizard appears the first time you log in to the newly
deployed vRealize Automation appliance.
n
To stop the wizard and return later, click Logout.
n
To disable the wizard, click Cancel, or log out and begin manual installation through the standard
interfaces.
The wizard is your primary tool for new vRealize Automation installations. If you want to expand an
existing vRealize Automation deployment after running the wizard, see the procedures in Chapter 5 The
Standard vRealize Automation Installation Interfaces.
This chapter includes the following topics:
n
Using the Installation Wizard for Minimal Deployments
n
Using the Installation Wizard for Enterprise Deployments
Using the Installation Wizard for Minimal Deployments
Minimal deployments demonstrate how vRealize Automation works but usually do not have enough
capacity to support enterprise production environments.
Install a minimal deployment for proof-of-concept work or to become familiar with vRealize Automation.
Start the Installation Wizard for a Minimal Deployment
Minimal deployments typically consist of one vRealize Automation appliance, one IaaS Windows server,
and the vSphere agent for endpoints. Minimal installation places all IaaS components on a single
Windows server.
Prerequisites
n
Address the prerequisites in Chapter 2 Preparing for vRealize Automation Installation.
n
Create an unconfigured appliance. See Deploy the vRealize Automation Appliance.
VMware, Inc.
41
Page 42

Installing vRealize Automation
Procedure
1 Log in as root to the vRealize Automation appliance administration interface.
https://vrealize-automation-appliance-FQDN:5480
2 When the Installation Wizard appears, click Next.
3 Accept the license agreement and click Next.
4 On the Deployment Type page, select Minimal deployment and Install Infrastructure as a Service,
and click Next.
5 On the Installation Prerequisites page, you pause to log in to your IaaS Windows server and install
the Management Agent. The Management Agent allows the vRealize Automation appliance to
discover and connect to the IaaS server.
What to do next
Install the Management Agent on your IaaS Windows server. See Install the vRealize Automation
Management Agent.
Install the vRealize Automation Management Agent
All IaaS Windows servers require the Management Agent, which links them to their specific
vRealize Automation appliance.
If you host the vRealize Automation SQL Server database on a separate Windows machine that does not
host IaaS components, the SQL Server machine does not need the Management Agent.
The Management Agent registers the IaaS Windows server with the specific vRealize Automation
appliance, automates the installation and management of IaaS components, and collects support and
telemetry information. The Management Agent runs as a Windows service under a domain account with
administrator rights on IaaS Windows servers.
Prerequisites
Create a vRealize Automation appliance and begin the Installation Wizard.
See Deploy the vRealize Automation Appliance and Start the Installation Wizard for a Minimal
Deployment.
Procedure
1 Log in to the vRealize Automation appliance console as root.
2 Enter the following command:
openssl x509 -in /opt/vmware/etc/lighttpd/server.pem -fingerprint -noout -sha1
3 Copy the fingerprint so that you can verify it later. For example:
71:84:47:72:03:57:C8:C2:68:65:00:06:BC:D8:23:98:92:54:BF:89
4 Log in to the IaaS Windows server using an account that has administrator rights.
VMware, Inc. 42
Page 43

Installing vRealize Automation
5 Open a Web browser to the vRealize Automation appliance installer URL.
https://vrealize-automation-appliance-FQDN:5480/installer
6 Click Management Agent installer, and save and run the .msi file.
7 Read the welcome.
8 Accept the end user license agreement.
9 Accept or change the installation folder.
Program Files (x86)\VMware\vCAC\Management Agent
10 Enter vRealize Automation appliance details:
a Enter the appliance HTTPS address, including FQDN and :5480 port number.
b Enter the appliance root account credentials.
c Click Load, and confirm that the fingerprint matches the one you copied earlier. Ignore colons.
If the fingerprints do not match, verify that you have the correct appliance address.
Figure 4‑1. Management Agent—vRealize Automation Appliance Details
11 Enter the domain\username and password for the service account.
The service account must be a domain account with administrator rights on IaaS Windows servers.
Use the same service account throughout.
12 Follow the prompts to finish installing the Management Agent.
Note Because they are linked, you must reinstall the Management Agent if you replace the
vRealize Automation appliance.
Uninstalling IaaS from a Windows server does not remove the Management Agent. To uninstall a
Management Agent, separately use the Add or Remove Programs option in Windows.
What to do next
Return to the browser-based Installation Wizard. IaaS Windows servers with the Management Agent
installed appear under Discovered Hosts.
VMware, Inc. 43
Page 44

Installing vRealize Automation
Completing the Installation Wizard
After installing the Management Agent, return to the wizard and follow the prompts. If you need additional
instructions about settings, click the Help link at the upper right of the wizard.
n
When you finish the wizard, the last page displays the path and name to a properties file. You can edit
the file and use it to perform a silent vRealize Automation installation with the same or similar settings
from your wizard session. See Chapter 6 Silent vRealize Automation Installation.
n
If you created initial content, you can log in to the default tenant as the configurationadmin user and
request the catalog items. For an example of how to request the item and complete the manual user
action, see Installing and Configuring vRealize Automation for the Rainpole Scenario.
n
To configure access to the default tenant for other users, see Configure Access to the Default Tenant.
Using the Installation Wizard for Enterprise Deployments
You can tailor your enterprise deployment to the needs of your organization. An enterprise deployment
can consist of distributed components or high-availability deployments configured with load balancers.
Enterprise deployments are designed for more complex installation structures with distributed and
redundant components and generally include load balancers. Installation of IaaS components is optional
with either type of deployment.
For load-balanced deployments, multiple active Web server instances and vRealize Automation appliance
appliances cause the installation to fail. Only a single Web server instance and a single
vRealize Automation appliance should be active during the installation.
Start the Installation Wizard for an Enterprise Deployment
Enterprise deployments are large enough for production environments. You can use the Installation
Wizard to deploy a distributed installation, or a distributed installation with load balancers for high
availability and failover.
If you deploy a distributed installation with load balancers, notify the team responsible for configuring your
vRealize Automation environment. Your tenant administrators must configure Directories Management for
high availability when they configure the link to Active Directory.
Prerequisites
n
Address the prerequisites in Chapter 2 Preparing for vRealize Automation Installation.
n
Create an unconfigured appliance. See Deploy the vRealize Automation Appliance.
Procedure
1 Log in as root to the vRealize Automation appliance administration interface.
https://vrealize-automation-appliance-FQDN:5480
2 When the Installation Wizard appears, click Next.
VMware, Inc. 44
Page 45

Installing vRealize Automation
3 Accept the End User License Agreement and click Next.
4 On the Deployment Type page, select Enterprise deployment and Install Infrastructure as a
Service.
5 On the Installation Prerequisites page, you pause to log in to your IaaS Windows servers and install
the Management Agent. The Management Agent allows the vRealize Automation appliance to
discover and connect to those IaaS servers.
What to do next
Install the Management Agent on your IaaS Windows servers. See Install the vRealize Automation
Management Agent.
Install the vRealize Automation Management Agent
All IaaS Windows servers require the Management Agent, which links them to their specific
vRealize Automation appliance.
If you host the vRealize Automation SQL Server database on a separate Windows machine that does not
host IaaS components, the SQL Server machine does not need the Management Agent.
The Management Agent registers the IaaS Windows server with the specific vRealize Automation
appliance, automates the installation and management of IaaS components, and collects support and
telemetry information. The Management Agent runs as a Windows service under a domain account with
administrator rights on IaaS Windows servers.
Prerequisites
Create a vRealize Automation appliance and begin the Installation Wizard.
See Deploy the vRealize Automation Appliance and Start the Installation Wizard for an Enterprise
Deployment.
Procedure
1 Log in to the vRealize Automation appliance console as root.
2 Enter the following command:
openssl x509 -in /opt/vmware/etc/lighttpd/server.pem -fingerprint -noout -sha1
3 Copy the fingerprint so that you can verify it later. For example:
71:84:47:72:03:57:C8:C2:68:65:00:06:BC:D8:23:98:92:54:BF:89
4 Log in to the IaaS Windows server using an account that has administrator rights.
5 Open a Web browser to the vRealize Automation appliance installer URL.
https://vrealize-automation-appliance-FQDN:5480/installer
6 Click Management Agent installer, and save and run the .msi file.
7 Read the welcome.
VMware, Inc. 45
Page 46

Installing vRealize Automation
8 Accept the end user license agreement.
9 Accept or change the installation folder.
Program Files (x86)\VMware\vCAC\Management Agent
10 Enter vRealize Automation appliance details:
a Enter the appliance HTTPS address, including FQDN and :5480 port number.
b Enter the appliance root account credentials.
c Click Load, and confirm that the fingerprint matches the one you copied earlier. Ignore colons.
If the fingerprints do not match, verify that you have the correct appliance address.
Figure 4‑2. Management Agent—vRealize Automation Appliance Details
11 Enter the domain\username and password for the service account.
The service account must be a domain account with administrator rights on IaaS Windows servers.
Use the same service account throughout.
12 Follow the prompts to finish installing the Management Agent.
Repeat the procedure for all Windows servers that will host IaaS components.
Note Because they are linked, you must reinstall the Management Agent if you replace the
vRealize Automation appliance.
Uninstalling IaaS from a Windows server does not remove the Management Agent. To uninstall a
Management Agent, separately use the Add or Remove Programs option in Windows.
What to do next
Return to the browser-based Installation Wizard. IaaS Windows servers with the Management Agent
installed appear under Discovered Hosts.
Completing the Installation Wizard
After installing the Management Agent, return to the wizard and follow the prompts. If you need additional
instructions about settings, click the Help link at the upper right of the wizard.
VMware, Inc. 46
Page 47

Installing vRealize Automation
n
When you finish the wizard, the last page displays the path and name to a properties file. You can edit
the file and use it to perform a silent vRealize Automation installation with the same or similar settings
from your wizard session. See Chapter 6 Silent vRealize Automation Installation.
n
If you created initial content, you can log in to the default tenant as the configurationadmin user and
request the catalog items. For an example of how to request the item and complete the manual user
action, see Installing and Configuring vRealize Automation for the Rainpole Scenario.
n
To configure access to the default tenant for other users, see Configure Access to the Default Tenant.
VMware, Inc. 47
Page 48

The Standard
vRealize Automation Installation
Interfaces 5
After running the Installation Wizard, you might need or want to perform certain installation tasks
manually, through the standard interfaces.
The Installation Wizard described in Chapter 4 Installing vRealize Automation with the Installation Wizard
is your primary tool for new vRealize Automation installations. However, after you run the wizard, some
operations still require the older, manual installation process.
You need the manual steps if you want to expand a vRealize Automation deployment or if the wizard
stopped for any reason. Situations when you might need to refer to the procedures in this section include
the following examples.
n
You chose to cancel the wizard before finishing the installation.
n
Installation through the wizard failed.
n
You want to add another vRealize Automation appliance for high availability.
n
You want to add another IaaS Web server for high availability.
n
You need another proxy agent.
n
You need another DEM Worker or Orchestrator.
You might use all or only some of the manual processes. Review the material throughout this section, and
follow the procedures that apply to your situation.
This chapter includes the following topics:
n
Using the Standard Interfaces for Minimal Deployments
n
Using the Standard Interfaces for Distributed Deployments
n
Installing vRealize Automation Agents
Using the Standard Interfaces for Minimal Deployments
You can install a standalone, minimal deployment for use in a development environment or as a proof of
concept. Minimal deployments are not suitable for a production environment.
VMware, Inc.
48
Page 49

Installing vRealize Automation
Minimal Deployment Checklist
You install vRealize Automation in a minimal configuration for proof of concept or development work.
Minimal deployments require fewer steps to install but lack the production capacity of an enterprise
deployment.
Complete the high-level tasks in the following order.
Table 5‑1. Minimal Deployment Checklist
Task Details
Plan the environment and address installation prerequisites. Chapter 2 Preparing for vRealize Automation
Installation
Create an unconfigured vRealize Automation appliance. Deploy the vRealize Automation Appliance
Manually configure the vRealize Automation appliance. Configure the vRealize Automation Appliance
Install IaaS components on a single Windows server. Installing IaaS Components
Install additional agents, if required. Installing vRealize Automation Agents
Perform post-installation tasks such as configuring the
default tenant.
Configure Access to the Default Tenant
Configure the vRealize Automation Appliance
The vRealize Automation appliance is a partially configured virtual machine that hosts the
vRealize Automation server and user web portal. You download and deploy the appliance open
virtualization format (OVF) template to vCenter Server or ESX/ESXi inventory.
Prerequisites
Create an unconfigured appliance. See Deploy the vRealize Automation Appliance.
Procedure
1 Log in to the unconfigured vRealize Automation appliance management interface as root.
https://vrealize-automation-appliance-FQDN:5480
Continue past any certificate warnings.
2 If the installation wizard appears, cancel it so that you can go to the management interface instead of
the wizard.
VMware, Inc. 49
Page 50

Installing vRealize Automation
3 Select Admin > Time Settings, and set the time synchronization source.
Option Description
Host Time Synchronize to the vRealize Automation appliance ESXi host.
Time Server Synchronize to one external Network Time Protocol (NTP) server. Enter the
FQDN or IP address of the NTP server.
You must synchronize vRealize Automation appliances and IaaS Windows servers to the same time
source. Do not mix time sources within a vRealize Automation deployment.
4 Select vRA Settings > Host Settings.
Option Action
Resolve Automatically Select Resolve Automatically to specify the name of the current host for
the vRealize Automation appliance.
Update Host For new hosts, select Update Host. Enter the fully qualified domain name
of the vRealize Automation appliance, vra-hostname.domain.name, in the
Host Name text box.
For distributed deployments that use load balancers, select Update Host.
Enter the fully qualified domain name for the load balancer server, vra-
loadbalancername.domain.name, in the Host Name text box.
Note Configure SSO settings as described later in this procedure whenever you use Update Host
to set the host name.
5 Select the certificate type from the Certificate Action menu.
If you are using a PEM-encoded certificate, for example for a distributed environment, select Import.
Certificates that you import must be trusted and must also be applicable to all instances of
vRealize Automation appliance and any load balancer through the use of Subject Alternative Name
(SAN) certificates.
VMware, Inc. 50
Page 51

Installing vRealize Automation
If you want to generate a CSR request for a new certificate that you can submit to a certificate
authority, select Generate Signing Request. A CSR helps your CA create a certificate with the
correct values for you to import.
Note If you use certificate chains, specify the certificates in the following order:
a Client/server certificate signed by the intermediate CA certificate
b One or more intermediate certificates
c A root CA certificate
Option Action
Keep Existing Leave the current SSL configuration. Select this option to cancel your changes.
Generate Certificate a The value displayed in the Common Name text box is the Host Name as it
appears on the upper part of the page. If any additional instances of the
vRealize Automation appliance available, their FQDNs are included in the
SAN attribute of the certificate.
b Enter your organization name, such as your company name, in the
Organization text box.
c Enter your organizational unit, such as your department name or location, in
the Organizational Unit text box.
d Enter a two-letter ISO 3166 country code, such as US, in the Country text
box.
Generate Signing Request a Select Generate Signing Request.
b Review the entries in the Organization, Organization Unit, Country Code,
and Common Name text boxes. These entries are populated from the
existing certificate. You can edit these entries if needed.
c Click Generate CSR to generate a certificate signing request, and then click
the Download the generated CSR here link to open a dialog that enables
you to save the CSR to a location where you can send it to a certificate
authority.
d When you receive the prepared certificate, click Import and follow
instructions for importing a certificate into vRealize Automation.
Import a Copy the certificate values from BEGIN PRIVATE KEY to END PRIVATE KEY,
including the header and footer, and paste them in the RSA Private Key text
box.
b Copy the certificate values from BEGIN CERTIFICATE to END
CERTIFICATE, including the header and footer, and paste them in the
Certificate Chain text box. For multiple certificate values, include a BEGIN
CERTIFICATE header and END CERTIFICATE footer for each certificate.
Note In the case of chained certificates, additional attributes may be
available.
c (Optional) If your certificate uses a pass phrase to encrypt the certificate key,
copy the pass phrase and paste it in the Passphrase text box.
6 Click Save Settings to save host information and SSL configuration.
7 Configure the SSO settings.
VMware, Inc. 51
Page 52

Installing vRealize Automation
8 Click Messaging. The configuration settings and status of messaging for your appliance is displayed.
Do not change these settings.
9 Click the Telemetry tab to choose whether to join the VMware Customer Experience Improvement
Program (CEIP).
Details regarding the data collected through CEIP and the purposes for which it is used by VMware
are set forth at the Trust & Assurance Center at http://www.vmware.com/trustvmware/ceip.html.
n
Select Join the VMware Customer Experience Improvement Program to participate in the
program.
n
Deselect Join the VMware Customer Experience Improvement Program to not participate in
the program.
10 Click Services and verify that services are registered.
Depending on your site configuration, this can take about 10 minutes.
Note You can log in to the appliance and run tail -f /var/log/vcac/catalina.out to monitor
startup of the services.
11 Enter your license information.
a Click vRA Settings > Licensing.
b Click Licensing.
c Enter a valid vRealize Automation license key that you downloaded when you downloaded the
installation files, and click Submit Key.
Note If you experience a connection error, you might have a problem with the load balancer. Check
network connectivity to the load balancer.
12 Select whether to enable vRealize Code Stream and enter a vRealize Code Stream license.
vRealize Code Stream is not supported for high-availability or production vRealize Automation
deployments.
13 Confirm that you can log in to vRealize Automation.
a Open a Web browser to the vRealize Automation product interface URL.
https://vrealize-automation-appliance-FQDN/vcac
b Accept the vRealize Automation certificate.
c Accept the SSO certificate.
d Log in with administrator@vsphere.local and the password you specified when you configured
SSO.
The interface opens to the Tenants page on the Administration tab. A single tenant named
vsphere.local appears in the list.
VMware, Inc. 52
Page 53

Installing vRealize Automation
You have finished the deployment and configuration of your vRealize Automation appliance. If the
appliance does not function correctly after configuration, redeploy and reconfigure the appliance. Do not
make changes to the existing appliance.
What to do next
See Install the Infrastructure Components.
Installing IaaS Components
The administrator installs a complete set of infrastructure (IaaS) components on a Windows machine
(physical or virtual). Administrator rights are required to perform these tasks.
A minimal installation installs all of the components on the same Windows server, except for the SQL
database, which you can install on a separate server.
Enable Time Synchronization on the Windows Server
Clocks on the vRealize Automation server and Windows servers must be synchronized to ensure that the
installation is successful.
The following steps describe how to enable time synchronization with the ESX/ESXi host by using
VMware Tools. If you are installing the IaaS components on a physical host or do not want to use VMware
Tools for time synchronization, ensure that the server time is accurate by using your preferred method.
Procedure
1 Open a command prompt on the Windows installation machine.
2 Type the following command to navigate to the VMware Tools directory.
cd C:\Program Files\VMware\VMware Tools
3 Type the command to display the timesync status.
VMwareToolboxCmd.exe timesync status
4 If timesync is disabled, type the following command to enable it.
VMwareToolboxCmd.exe timesync enable
IaaS Certificates
vRealize Automation IaaS components use certificates and SSL to secure communications between
components. In a minimal installation for proof-of-concept purposes, you can use self-signed certificates.
In a distributed environment, obtain a domain certificate from a trusted certificate authority. For
information about installing domain certificates for IaaS components, see Install IaaS Certificates in the
distributed deployment chapter.
VMware, Inc. 53
Page 54

Installing vRealize Automation
Install the Infrastructure Components
The system administrator logs into the Windows machine and uses the installation wizard to install the
IaaS services on the Windows virtual or physical machine.
Prerequisites
n
Verify that the server meets the requirements in IaaS Windows Servers.
n
Enable Time Synchronization on the Windows Server.
n
Verify that you have deployed and fully configured the vRealize Automation appliance, and that the
necessary services are running (plugin-service, catalog-service, iaas-proxy-provider).
Procedure
1 Download the vRealize Automation IaaS Installer
To install IaaS on your minimal virtual or physical Windows server, you download a copy of the IaaS
installer from the vRealize Automation appliance.
2 Select the Installation Type
The system administrator runs the installer wizard from the Windows 2008 or 2012 installation
machine.
3 Check Prerequisites
The Prerequisite Checker verifies that your machine meets IaaS installation requirements.
4 Specify Server and Account Settings
The vRealize Automation system administrator specifies server and account settings for the
Windows installation server and selects a SQL database server instance and authentication method.
5 Specify Managers and Agents
The minimum installation installs the required Distributed Execution Managers and the default
vSphere proxy agent. The system administrator can install additional proxy agents (XenServer, or
Hyper-V, for example) after installation using the custom installer.
6 Register the IaaS Components
The system administrator installs the IaaS certificate and registers the IaaS components with the
SSO.
7 Finish the Installation
The system administrator finishes the IaaS installation.
Download the vRealize Automation IaaS Installer
To install IaaS on your minimal virtual or physical Windows server, you download a copy of the IaaS
installer from the vRealize Automation appliance.
If you see certificate warnings during this process, continue past them to finish the installation.
VMware, Inc. 54
Page 55

Installing vRealize Automation
Prerequisites
n
Review the IaaS Windows server requirements. See IaaS Windows Servers.
n
If you are using Internet Explorer for the download, verify that Enhanced Security Configuration is not
enabled. Navigate to res://iesetup.dll/SoftAdmin.htm on the Windows server.
Procedure
1 Log in to the IaaS Windows server using an account that has administrator rights.
2 Open a Web browser directly to the vRealize Automation appliance installer URL.
https://vrealize-automation-appliance-FQDN:5480/installer
3 Click IaaS Installer.
4 Save setup__vrealize-automation-appliance-FQDN@5480 to the Windows server.
Do not change the installer file name. It is used to connect the installation to the vRealize Automation
appliance.
Select the Installation Type
The system administrator runs the installer wizard from the Windows 2008 or 2012 installation machine.
Prerequisites
Download the vRealize Automation IaaS Installer.
Procedure
1 Right-click the setup__vrealize-automation-appliance-FQDN@5480.exe setup file and select
Run as administrator.
2 Click Next.
3 Accept the license agreement and click Next.
4 On the Log in page, supply administrator credentials for the vRealize Automation appliance and verify
the SSL Certificate.
a Type the user name, which is root, and the password.
The password is the password that you specified when you deployed the vRealize Automation
appliance.
b Select Accept Certificate.
c Click View Certificate.
Compare the certificate thumbprint with the thumbprint set for the vRealize Automation appliance.
You can view the vRealize Automation appliance certificate in the client browser when the
management console is accessed on port 5480.
5 Select Accept Certificate.
6 Click Next.
VMware, Inc. 55
Page 56

Installing vRealize Automation
7 Select Complete Install on the Installation Type page if you are creating a minimal deployment and
click Next.
Check Prerequisites
The Prerequisite Checker verifies that your machine meets IaaS installation requirements.
Prerequisites
Select the Installation Type.
Procedure
1 Complete the Prerequisite Check.
Option Description
No errors Click Next.
Noncritical errors Click Bypass.
Critical errors Bypassing critical errors causes the installation to fail. If warnings appear, select
the warning in the left pane and follow the instructions on the right. Address all
critical errors and click Check Again to verify.
2 Click Next.
The machine meets installation requirements.
Specify Server and Account Settings
The vRealize Automation system administrator specifies server and account settings for the Windows
installation server and selects a SQL database server instance and authentication method.
Prerequisites
Check Prerequisites.
Procedure
1 On the Server and Account Settings page or the Detected Settings page, enter the user name and
password for the Windows service account. This service account must be a local administrator
account that also has SQL administrative privileges.
2 Type a phrase in the Passphrase text box.
The passphrase is a series of words that generates the encryption key used to secure database data.
Note Save your passphrase so that it is available for future installations or system recovery.
3 To install the database instance on the same server with the IaaS components, accept the default
server in the Server text box in the SQL Server Database Installation Information section.
If the database is on a different machine, enter the server in the following format.
machine-FQDN,port-number\named-database-instance
VMware, Inc. 56
Page 57

Installing vRealize Automation
4 Accept the default in the Database name text box, or enter the appropriate name if applicable.
5 Select the authentication method.
u
Select Use Windows authentication if you want to create the database using the Windows
credentials of the current user. The user must have SQL sys_admin privileges.
u
Deselect Use Windows authentication if you want to create the database using SQL
authentication. Type the User name and Password of the SQL Server user with SQL sys_admin
privileges on the SQL server instance.
Windows authentication is recommended. When you choose SQL authentication, the unencrypted
database password appears in certain configuration files.
6 (Optional) Select the Use SSL for database connection checkbox.
By default, the checkbox is enabled. SSL provides a more secure connection between the IaaS
server and SQL database. However, you must first configure SSL on the SQL server to support this
option. For more about configuring SSL on the SQL server, see Microsoft Technet article 189067.
7 Click Next.
Specify Managers and Agents
The minimum installation installs the required Distributed Execution Managers and the default vSphere
proxy agent. The system administrator can install additional proxy agents (XenServer, or Hyper-V, for
example) after installation using the custom installer.
Prerequisites
Specify Server and Account Settings.
Procedure
1 On the Distributed Execution Managers And Proxy vSphere Agent page, accept the defaults or
change the names if appropriate.
2 Accept the default to install a vSphere agent to enable provisioning with vSphere or deselect it if
applicable.
a Select Install and configure vSphere agent.
b Accept the default agent and endpoint, or type a name.
Make a note of the Endpoint name value. You must type this information correctly when you
configure the vSphere endpoint in the vRealize Automation console or configuration may fail.
3 Click Next.
Register the IaaS Components
The system administrator installs the IaaS certificate and registers the IaaS components with the SSO.
Prerequisites
Download the vRealize Automation IaaS Installer.
VMware, Inc. 57
Page 58

Installing vRealize Automation
Procedure
1 Accept the default Server value, which is populated with the fully qualified domain name of the
vRealize Automation appliance server from which you downloaded the installer. Verify that a fully
qualified domain name is used to identify the server and not an IP address.
If you have multiple virtual appliances and are using a load balancer, enter the load balancer virtual
appliance path.
2 Click Load to populate the value of SSO Default Tenant (vsphere.local).
3 Click Download to retrieve the certificate from the vRealize Automation appliance.
You can click View Certificate to view the certificate details.
4 Select Accept Certificate to install the SSO certificate.
5 In the SSO Administrator panel, type administrator in the User name text box and the password
you defined for this user when you configured SSO in Password and Confirm password.
6 Click the test link to the right of the User name field to validate the entered password.
7 Accept the default in IaaS Server, which contains the host name of the Windows machine where you
are installing.
8 Click the test link to the right of the IaaS Server field to validate connectivity.
9 Click Next.
If any errors appear after you click Next, resolve them before proceeding.
Finish the Installation
The system administrator finishes the IaaS installation.
Prerequisites
n
Register the IaaS Components.
n
Verify that machine on which you are installing is connected to the network and is able to connect to
the vRealize Automation appliance from which you download the IaaS installer.
Procedure
1 Review the information on the Ready to Install page and click Install.
The installation starts. Depending on your network configuration, installation can take between five
minutes and one hour.
2 When the success message appears, leave the Guide me through initial configuration check box
selected and click Next, and Finish.
3 Close the Configure the System message box.
The installation is now finished.
VMware, Inc. 58
Page 59

Installing vRealize Automation
What to do next
Verify IaaS Services.
Using the Standard Interfaces for Distributed Deployments
Enterprise deployments are designed for greater vRealize Automation capacity in production and require
that you distribute components across multiple machines. Enterprise deployments also might include
redundant systems behind load balancers.
Distributed Deployment Checklist
A system administrator can deploy vRealize Automation in a distributed configuration, which provides
failover protection and high-availability through redundancy.
The Distributed Deployment Checklist provides a high-level overview of the steps required to perform a
distributed installation.
Table 5‑2. Distributed Deployment Checklist
Task Details
Plan and prepare the installation environment and
verify that all installation prerequisites are met.
Plan for and obtain your SSL certificates.
Deploy the lead vRealize Automation appliance
server, and any additional appliances you require for
redundancy and high availability.
Configure your load balancer to handle
vRealize Automation appliance traffic.
Configure the lead vRealize Automation appliance
server, and any additional appliances you deployed
for redundancy and high availability.
Configure your load balancer to handle the
vRealize Automation IaaS component traffic and
install vRealize Automation IaaS components.
If required, install agents to integrate with external
systems.
Configure the default tenant and provide the IaaS
license.
Chapter 2 Preparing for vRealize Automation Installation
Certificate Trust Requirements in a Distributed Deployment
Deploy the vRealize Automation Appliance
Configuring Your Load Balancer
Configuring Appliances for vRealize Automation
Install the IaaS Components in a Distributed Configuration
Installing vRealize Automation Agents
Configure Access to the Default Tenant
VMware, Inc. 59
Page 60

Installing vRealize Automation
vRealize Orchestrator
The vRealize Automation appliance includes an embedded version of vRealize Orchestrator that is now
recommended for use with new installations. In older deployments or special cases, however, users might
connect vRealize Automation to a separate, external vRealize Orchestrator. See
https://www.vmware.com/products/vrealize-orchestrator.html.
For information about connecting vRealize Automation and vRealize Orchestrator, see Using the vRealize
Orchestrator Plug-In for vRealize Automation.
Directories Management
If you install a distributed installation with load balancers for high availability and failover, notify the team
responsible for configuring your vRealize Automation environment. Your tenant administrators must
configure Directories Management for high availability when they configure the link to your Active
Directory.
For more information about configuring Directories Management for high availability, see the Configuring
vRealize Automation guide.
Disabling Load Balancer Health Checks
Health checks ensure that a load balancer sends traffic only to nodes that are working. The load balancer
sends a health check at a specified frequency to every node. Nodes that exceed the failure threshold
become ineligible for new traffic.
For workload distribution and failover, you can place multiple vRealize Automation appliances behind a
load balancer. In addition, you can place multiple IaaS Web servers and multiple IaaS Manager Service
servers behind their respective load balancers.
When using load balancers, do not allow the load balancers to send health checks at any time during
installation. Health checks might interfere with installation or cause the installation to behave
unpredictably.
n
When deploying vRealize Automation appliance or IaaS components behind existing load balancers,
disable health checks on all load balancers in the proposed configuration before installing any
components.
n
After installing and configuring all of vRealize Automation, including all vRealize Automation
appliance and IaaS components, you may re-enable health checks.
Certificate Trust Requirements in a Distributed Deployment
vRealize Automation uses certificates to maintain trust relationships and provide secure communication
among components in distributed deployments.
VMware, Inc. 60
Page 61

Installing vRealize Automation
In a distributed, or clustered, deployment, vRealize Automation certificate organization largely conforms
to the three tiered architectural structure of vRealize Automation. The three tiers are vRealize Automation
appliance, IaaS Website components, and Manager Service components. In a distributed system, each
hardware machine in a particular tier shares a certificate. That is, each vRealize Automation appliance
shares a common certificate, and each Manager Service machine shares the common certificate that
applies to that layer.
You can use system or user generated self-signed certificates, or CA supplied certificates with distributed
vRealize Automation deployments. Starting in vRealize Automation 7.0 and newer, if no certificates are
supplied by the user, the installer automatically generates self-signed certificates for all applicable nodes
and places them in the appropriate trust stores.
You can use load balancers with distributed vRealize Automation components to provide high availability
and failover support. VMware recommends that vRealize Automation deployments use a pass-through
configuration for deployments that use load balancers. In a pass-through configuration, load balancers
pass requests along to the appropriate components rather than decrypting them. The vRealize
Automation appliance and IaaS web servers must then perform the necessary decryption.
For more information about using and configuring load balancers, see vRealize Automation Load
Balancing.
If you supply or generate your own certificates using Openssl or another tool, you can use either wildcard
or Subject Alternative Name (SAN) certificates. Note that the IaaS certificates must be multi-use
certificates.
If you are supplying certificates, you must obtain a multiple-use certificate that includes the IaaS
component in the cluster, and then copy that certificate to the trust store for each component. If you use
load balancers, you must include the load balancer FQDN in the trusted address of the cluster multipleuse certificate.
f you are need to update system generated self-signed certificates with user or CA supplied certificates,
see Managing vRealize Automation.
The Certificate Trust Requirements table summarizes the trust registration requirements for various
imported certificates.
Table 5‑3. Certificate Trust Requirements
Import Register
vRealize Automation appliance cluster IaaS Web components cluster
IaaS Web component cluster
Manager Service component cluster
n
vRealize Automation appliance cluster
n
Manager Service components cluster
n
DEM Orchestrators and DEM Worker components
n
DEM Orchestrators and DEM Worker components
n
Agents and Proxy Agents
VMware, Inc. 61
Page 62

Installing vRealize Automation
Configure Web Component, Manager Service and DEM Host
Certificate Trust
Customers who use a thumb print with pre installed PFX files to support user authentication must
configure thumb print trust on the web host, manager service, and DEM Orchestrator and Worker host
machines.
Customers who import PEM files or use self-signed certificates can ignore this procedure.
Prerequisites
Valid web.pfx and ms.pfx available for thumb print authentication.
Procedure
1 Import the web.pfx and ms.pfx files to the following locations on the web component and manager
service host machines:
n
Host Computer/Certificates/Personal certificate store
n
Host Computer/Certificates/Trusted People certificate store
2 Import the web.pfx and ms.pfx files to the following locations on the DEM Orchestrator and Worker
host machines:
Host Computer/Certificates/Trusted People certificate store
3 Open a Microsoft Management Console window on each of the applicable host machines.
Note Actual paths and options in the Management Console may differ somewhat based on
Windows versions and system configurations.
a Select Add/Remove Snap-in.
b Select Certificates.
c Select Local Computer.
d Open the certificate files that you imported previously and copy the thumb prints.
What to do next
Insert the thumb print into the vRealize Automation wizard Certificate page for the Manager Service, Web
components and DEM components.
Installation Worksheets
Worksheets record important information that you need to reference during installation.
Settings are case sensitive. Note that there are additional spaces for more components, if you are
installing a distributed deployment. You might not need all the spaces in the worksheets. In addition, a
machine might host more than one IaaS component. For example, the primary Web server and DEM
Orchestrator might be on the same FQDN.
VMware, Inc. 62
Page 63

Installing vRealize Automation
Table 5‑4. vRealize Automation Appliance
Variable My Value Example
Primary vRealize Automation appliance
FQDN
Primary vRealize Automation appliance IP
address
For reference only; do not enter IP
addresses
Additional vRealize Automation appliance
FQDN
Additional vRealize Automation appliance
IP address
For reference only; do not enter IP
addresses
vRealize Automation appliance load
balancer FQDN
vRealize Automation appliance load
balancer IP address
For reference only; do not enter IP
addresses
Management interface (https://appliance-
FQDN:5480) username
Management interface password admin123
root (default) root
automation.mycompany.com
123.234.1.105
automation2.mycompany.com
123.234.1.106
automation-balance.mycompany.com
123.234.1.201
Default tenant vsphere.local (default) vsphere.local
Default tenant username administrator@vsphere.local (default) administrator@vsphere.local
Default tenant password login123
Table 5‑5. IaaS Windows Servers
Variable My Value Example
Primary IaaS Web Server with Model
Manager Data FQDN
Primary IaaS Web Server with Model
Manager Data IP address
For reference only; do not enter IP
addresses
Additional IaaS Web Server FQDN web2.mycompany.com
Additional IaaS Web Server IP address
For reference only; do not enter IP
addresses
IaaS Web Server load balancer FQDN web-balance.mycompany.com
web.mycompany.com
123.234.1.107
123.234.1.108
VMware, Inc. 63
Page 64

Installing vRealize Automation
Table 5‑5. IaaS Windows Servers (Continued)
Variable My Value Example
IaaS Web Server load balancer IP
address
For reference only; do not enter IP
addresses
Active IaaS Manager Service host FQDN mgr-svc.mycompany.com
Active IaaS Manager Service host IP
address
For reference only; do not enter IP
addresses
Passive IaaS Manager Service host
FQDN
Passive IaaS Manager Service host IP
address
For reference only; do not enter IP
addresses
IaaS Manager Service host load balancer
FQDN
IaaS Manager Service host load balancer
IP address
For reference only; do not enter IP
addresses
123.234.1.202
123.234.1.109
mgr-svc2.mycompany.com
123.234.1.110
mgr-svc-balance.mycompany.com
123.234.203
For IaaS services, domain account with
administrator rights on hosts
Account password login123
SUPPORT\provisioner
Table 5‑6. IaaS SQL Server Database
Variable My Value Example
Database instance IAASSQL
Database name vcac (default) vcac
Passphrase (used at installation, upgrade,
and migration)
login123
Table 5‑7. IaaS Distributed Execution Managers
Variable My Value Example
DEM host FQDN dem.mycompany.com
DEM host IP address
For reference only; do not enter IP
addresses
DEM host FQDN dem2.mycompany.com
123.234.1.111
VMware, Inc. 64
Page 65

Installing vRealize Automation
Table 5‑7. IaaS Distributed Execution Managers (Continued)
Variable My Value Example
DEM host IP address
For reference only; do not enter IP
addresses
Unique DEM Orchestrator name Orchestrator-1
Unique DEM Orchestrator name Orchestrator-2
Unique DEM Worker name Worker-1
Unique DEM Worker name Worker-2
Unique DEM Worker name Worker-3
Unique DEM Worker name Worker-4
123.234.1.112
Configuring Your Load Balancer
After you deploy the appliances for vRealize Automation, you can set up a load balancer to distribute
traffic among multiple instances of the vRealize Automation appliance.
The following list provides an overview of the general steps required to configure a load balancer for
vRealize Automation traffic:
1 Install your load balancer.
2 Enable session affinity, also known as sticky sessions.
3 Ensure that the timeout on the load balancer is at least 100 seconds.
4 If your network or load balancer requires it, import a certificate to your load balancer. For information
about trust relationships and certificates, see Certificate Trust Requirements in a Distributed
Deployment. For information about extracting certificates, see Extracting Certificates and Private
Keys
5 Configure the load balancer for vRealize Automation appliance traffic.
6 Configure the appliances for vRealize Automation. See Configuring Appliances for vRealize
Automation.
Note When you set up virtual appliances under the load balancer, do so only for virtual appliances that
have been configured for use with vRealize Automation. If unconfigured appliances are set up, you see
fault responses.
For more about load balancers, see the vRealize Automation Load Balancing Configuration Guide
technical white paper.
For information about scalability and high availability, see the vRealize Automation Reference
Architecture guide.
VMware, Inc. 65
Page 66

Installing vRealize Automation
Configuring Appliances for vRealize Automation
After deploying your appliances and configuring load balancing, you configure the appliances for
vRealize Automation.
Configure the First vRealize Automation Appliance in a Cluster
The vRealize Automation appliance is a partially configured virtual machine that hosts the
vRealize Automation server and user web portal. You download and deploy the appliance open
virtualization format (OVF) template to vCenter Server or ESX/ESXi inventory.
Prerequisites
n
Create an unconfigured appliance. See Deploy the vRealize Automation Appliance.
n
Obtain an authentication certificate for the vRealize Automation appliance.
If your network or load balancer requires it, later procedures copy the certificate to the load balancer
and additional appliances.
Procedure
1 Log in to the unconfigured vRealize Automation appliance management interface as root.
https://vrealize-automation-appliance-FQDN:5480
Continue past any certificate warnings.
2 If the installation wizard appears, cancel it so that you can go to the management interface instead of
the wizard.
3 Select Admin > Time Settings, and set the time synchronization source.
Option Description
Host Time Synchronize to the vRealize Automation appliance ESXi host.
Time Server Synchronize to one external Network Time Protocol (NTP) server. Enter the
FQDN or IP address of the NTP server.
You must synchronize all vRealize Automation appliances and IaaS Windows servers to the same
time source. Do not mix time sources within a vRealize Automation deployment.
VMware, Inc. 66
Page 67

Installing vRealize Automation
4 Select vRA Settings > Host Settings.
Option Action
Resolve Automatically Select Resolve Automatically to specify the name of the current host for
the vRealize Automation appliance.
Update Host For new hosts, select Update Host. Enter the fully qualified domain name
of the vRealize Automation appliance, vra-hostname.domain.name, in the
Host Name text box.
For distributed deployments that use load balancers, select Update Host.
Enter the fully qualified domain name for the load balancer server, vra-
loadbalancername.domain.name, in the Host Name text box.
Note Configure SSO settings as described later in this procedure whenever you use Update Host
to set the host name.
5 Select the certificate type from the Certificate Action menu.
If you are using a PEM-encoded certificate, for example for a distributed environment, select Import.
Certificates that you import must be trusted and must also be applicable to all instances of
vRealize Automation appliance and any load balancer through the use of Subject Alternative Name
(SAN) certificates.
If you want to generate a CSR request for a new certificate that you can submit to a certificate
authority, select Generate Signing Request. A CSR helps your CA create a certificate with the
correct values for you to import.
Note If you use certificate chains, specify the certificates in the following order:
a Client/server certificate signed by the intermediate CA certificate
b One or more intermediate certificates
c A root CA certificate
Option Action
Keep Existing Leave the current SSL configuration. Select this option to cancel your changes.
Generate Certificate a The value displayed in the Common Name text box is the Host Name as it
appears on the upper part of the page. If any additional instances of the
vRealize Automation appliance available, their FQDNs are included in the
SAN attribute of the certificate.
b Enter your organization name, such as your company name, in the
Organization text box.
c Enter your organizational unit, such as your department name or location, in
the Organizational Unit text box.
d Enter a two-letter ISO 3166 country code, such as US, in the Country text
box.
VMware, Inc. 67
Page 68

Installing vRealize Automation
Option Action
Generate Signing Request a Select Generate Signing Request.
b Review the entries in the Organization, Organization Unit, Country Code,
and Common Name text boxes. These entries are populated from the
existing certificate. You can edit these entries if needed.
c Click Generate CSR to generate a certificate signing request, and then click
the Download the generated CSR here link to open a dialog that enables
you to save the CSR to a location where you can send it to a certificate
authority.
d When you receive the prepared certificate, click Import and follow
instructions for importing a certificate into vRealize Automation.
Import a Copy the certificate values from BEGIN PRIVATE KEY to END PRIVATE KEY,
including the header and footer, and paste them in the RSA Private Key text
box.
b Copy the certificate values from BEGIN CERTIFICATE to END
CERTIFICATE, including the header and footer, and paste them in the
Certificate Chain text box. For multiple certificate values, include a BEGIN
CERTIFICATE header and END CERTIFICATE footer for each certificate.
Note In the case of chained certificates, additional attributes may be
available.
c (Optional) If your certificate uses a pass phrase to encrypt the certificate key,
copy the pass phrase and paste it in the Passphrase text box.
6 Click Save Settings to save host information and SSL configuration.
7 If required by your network or load balancer, copy the imported or newly created certificate to the
virtual appliance load balancer.
You might need to enable root SSH access in order to export the certificate.
a If not already logged in, log in to the vRealize Automation appliance Management Console as
root.
b Click the Admin tab.
c Click the Admin sub menu.
d Select the SSH service enabled check box.
Deselect the check box to disable SSH when finished.
e Select the Administrator SSH login check box.
Deselect the check box to disable SSH when finished.
f Click Save Settings.
8 Configure the SSO settings.
VMware, Inc. 68
Page 69

Installing vRealize Automation
9 Click Services.
All services must be running before you can install a license or log in to the console. They usually
start in about 10 minutes.
Note You can also log in to the appliance and run tail -f /var/log/vcac/catalina.out to
monitor service startup.
10 Enter your license information.
a Click vRA Settings > Licensing.
b Click Licensing.
c Enter a valid vRealize Automation license key that you downloaded when you downloaded the
installation files, and click Submit Key.
Note If you experience a connection error, you might have a problem with the load balancer. Check
network connectivity to the load balancer.
11 Select whether to enable vRealize Code Stream and enter a vRealize Code Stream license.
vRealize Code Stream is not supported for high-availability or production vRealize Automation
deployments.
12 Click Messaging. The configuration settings and status of messaging for your appliance is displayed.
Do not change these settings.
13 Click the Telemetry tab to choose whether to join the VMware Customer Experience Improvement
Program (CEIP).
Details regarding the data collected through CEIP and the purposes for which it is used by VMware
are set forth at the Trust & Assurance Center at http://www.vmware.com/trustvmware/ceip.html.
n
Select Join the VMware Customer Experience Improvement Program to participate in the
program.
n
Deselect Join the VMware Customer Experience Improvement Program to not participate in
the program.
14 Click Save Settings.
15 Confirm that you can log in to vRealize Automation.
a Open a Web browser to the vRealize Automation product interface URL.
https://vrealize-automation-appliance-FQDN/vcac
b If prompted, continue past the certificate warnings.
c Log in with administrator@vsphere.local and the password you specified when you configured
SSO.
The interface opens to the Tenants page on the Administration tab. A single tenant named
vsphere.local appears in the list.
VMware, Inc. 69
Page 70

Installing vRealize Automation
Configuring Additional Instances of the vRealize Automation Appliance
The system administrator can deploy multiple instances of the vRealize Automation appliance to ensure
redundancy in a high-availability environment.
For each vRealize Automation appliance, you must enable time synchronization and add the appliance to
a cluster. Configuration information based on settings for the initial (primary) vRealize Automation
appliance is added automatically when you add the appliance to the cluster.
If you install a distributed installation with load balancers for high availability and failover, notify the team
responsible for configuring your vRealize Automation environment. Your tenant administrators must
configure Directories Management for high availability when they configure the link to your Active
Directory.
Add Another vRealize Automation Appliance to the Cluster
For high availability, distributed installations can use a load balancer in front of a cluster of
vRealize Automation appliance nodes.
You use the management interface on the new vRealize Automation appliance to join it to an existing
cluster of one or more appliances. The join operation copies configuration information to the new
appliance that you are adding, including certificate, SSO, licensing, database, and messaging
information.
You must add appliances to a cluster one at a time and not in parallel.
Prerequisites
n
Have one or more vRealize Automation appliances already in the cluster, where one is the primary
node. See Configure the First vRealize Automation Appliance in a Cluster.
You can set a new appliance to be the primary node only after joining it to the cluster.
n
Create the new appliance node. See Deploy the vRealize Automation Appliance.
n
Verify that the load balancer is configured for use with the new appliance.
n
Verify that traffic can pass through the load balancer to reach all current nodes and the new node that
you are about to add.
n
Verify that all vRealize Automation services are started on the current nodes.
Procedure
1 Log in to the new vRealize Automation appliance management interface as root.
https://vrealize-automation-appliance-FQDN:5480
Continue past any certificate warnings.
2 If the installation wizard appears, cancel it so that you can go to the management interface instead of
the wizard.
3 Select Admin > Time Settings, and set the time source to the same one that the rest of the cluster
appliances use.
VMware, Inc. 70
Page 71

Installing vRealize Automation
4 Select vRA Settings > Cluster.
5 Enter the FQDN of a previously configured vRealize Automation appliance in the Leading Cluster
Node text box.
You can use the FQDN of the primary vRealize Automation appliance, or any vRealize Automation
appliance that is already joined to the cluster.
6 Type the root password in the Password text box.
7 Click Join Cluster.
8 Continue past any certificate warnings.
Services for the cluster are restarted.
9 Verify that services are running.
a Click the Services tab.
b Click the Refresh tab to monitor the progress of service startup.
Disable Unused Services
To conserve internal resources in cases where an external instance of vRealize Orchestrator is used, you
may disable the embedded vRealize Orchestrator service.
Prerequisites
Add Another vRealize Automation Appliance to the Cluster
Procedure
1 Log in to the vRealize Automation appliance console.
2 Stop the vRealize Orchestrator service.
service vco-server stop
chkconfig vco-server off
Validate the Distributed Deployment
After deploying additional instances of the vRealize Automation appliance, you validate that you can
access the clustered appliances.
Procedure
1 In the load balancer management interface or configuration file, temporarily disable all nodes except
the node that you are testing.
2 Confirm that you can log in to vRealize Automation through the load balancer address:
https://vrealize-automation-appliance-load-balancer-FQDN/vcac
3 After verifying that you can access the new vRealize Automation appliance through the load balancer,
re-enable the other nodes.
VMware, Inc. 71
Page 72

Installing vRealize Automation
Install the IaaS Components in a Distributed Configuration
The system administrator installs the IaaS components after the appliances are deployed and fully
configured. The IaaS components provide access to vRealize Automation Infrastructure features.
All components must run under the same service account user, which must be a domain account that has
privileges on each distributed IaaS server. Do not use local system accounts.
Prerequisites
n
Configure the First vRealize Automation Appliance in a Cluster.
n
If your site includes multiple vRealize Automation appliances, Add Another vRealize Automation
Appliance to the Cluster.
n
Verify that the server meets the requirements in IaaS Windows Servers.
n
Obtain a certificate from a trusted certificate authority for import to the trusted root certificate store of
the machines on which you intend to install the Component Website and Model Manager data.
n
If you are using load balancers in your environment, verify that they meet the configuration
requirements.
Procedure
1 Install IaaS Certificates
For production environments, obtain a domain certificate from a trusted certificate authority. Import
the certificate to the trusted root certificate store of all machines on which you intend to install the
Website Component and Manager Service (the IIS machines) during the IaaS installation.
2 Download the vRealize Automation IaaS Installer
To install IaaS on your distributed virtual or physical Windows servers, you download a copy of the
IaaS installer from the vRealize Automation appliance.
3 Choosing an IaaS Database Scenario
vRealize Automation IaaS uses a Microsoft SQL Server database to maintain information about the
machines it manages and its own elements and policies.
4 Install an IaaS Website Component and Model Manager Data
The system administrator installs the Website component to provide access to infrastructure
capabilities in the vRealize Automation web console. You can install one or many instances of the
Website component, but you must configure Model Manager Data on the machine that hosts the first
Website component. You install Model Manager Data only once.
5 Install Additional IaaS Web Server Components
The Web server provides access to infrastructure capabilities in vRealize Automation. After the first
Web server is installed, you might increase performance by installing additional IaaS Web servers.
6 Install the Active Manager Service
The active Manager Service is a Windows service that coordinates communication between IaaS
Distributed Execution Managers, the database, agents, proxy agents, and SMTP.
VMware, Inc. 72
Page 73

Installing vRealize Automation
7 Install a Backup Manager Service Component
The backup Manager Service provides redundancy and high availability, and may be started
manually if the active service stops.
8 Installing Distributed Execution Managers
You install the Distributed Execution Manager as one of two roles: DEM Orchestrator or DEM
Worker. You must install at least one DEM instance for each role, and you can install additional DEM
instances to support failover and high-availability.
9 Configuring Windows Service to Access the IaaS Database
A system administrator can change the authentication method used to access the SQL database
during run time (after the installation is complete). By default, the Windows identity of the currently
logged on account is used to connect to the database after it is installed.
10 Verify IaaS Services
After installation, the system administrator verifies that the IaaS services are running. If the services
are running, the installation is a success.
What to do next
Install a DEM Orchestrator and at least one DEM Worker instance. See Installing Distributed Execution
Managers.
Install IaaS Certificates
For production environments, obtain a domain certificate from a trusted certificate authority. Import the
certificate to the trusted root certificate store of all machines on which you intend to install the Website
Component and Manager Service (the IIS machines) during the IaaS installation.
Prerequisites
On Windows 2012 machines, you must disable TLS1.2 for certificates that use SHA512. For more
information about disabling TLS1.2, see Microsoft Knowledge Base article 245030.
Procedure
1 Obtain a certificate from a trusted certificate authority.
2 Open the Internet Information Services (IIS) Manager.
3 Double-click Server Certificates from Features View.
4 Click Import in the Actions pane.
a Enter a file name in the Certificate file text box, or click the browse button (…), to navigate to the
name of a file where the exported certificate is stored.
b Enter a password in the Password text box if the certificate was exported with a password.
c Select Mark this key as exportable.
5 Click OK.
VMware, Inc. 73
Page 74

Installing vRealize Automation
6 Click on the imported certificate and select View.
7 Verify that the certificate and its chain is trusted.
If the certificate is untrusted, you see the message, This CA root certificate is not trusted.
Note You must resolve the trust issue before proceeding with the installation. If you continue, your
deployment fails.
8 Restart IIS or open an elevated command prompt window and type iisreset.
What to do next
Download the vRealize Automation IaaS Installer.
Download the vRealize Automation IaaS Installer
To install IaaS on your distributed virtual or physical Windows servers, you download a copy of the IaaS
installer from the vRealize Automation appliance.
If you see certificate warnings during this process, continue past them to finish the installation.
Prerequisites
n
Configure the First vRealize Automation Appliance in a Cluster and, optionally, Add Another vRealize
Automation Appliance to the Cluster.
n
Verify that the server meets the requirements in IaaS Windows Servers.
n
Verify that you imported a certificate to IIS and that the certificate root or the certificate authority is in
the trusted root on the installation machine.
n
If you are using load balancers in your environment, verify that they meet the configuration
requirements.
Procedure
1 (Optional) Activate HTTP if you are installing on a Windows 2012 machine.
a Select Features > Add Features from Server Manager.
b Expand WCF Services under .NET Framework Features.
c Select HTTP Activation.
2 Log in to the IaaS Windows server using an account that has administrator rights.
3 Open a Web browser directly to the vRealize Automation appliance installer URL. Do not use a load
balancer address.
https://vrealize-automation-appliance-FQDN:5480/installer
4 Click IaaS Installer.
VMware, Inc. 74
Page 75

Installing vRealize Automation
5 Save setup__vrealize-automation-appliance-FQDN@5480 to the Windows server.
Do not change the installer file name. It is used to connect the installation to the vRealize Automation
appliance.
6 Download the installer file to each IaaS Windows server on which you are installing components.
What to do next
Install an IaaS database, see Choosing an IaaS Database Scenario.
Choosing an IaaS Database Scenario
vRealize Automation IaaS uses a Microsoft SQL Server database to maintain information about the
machines it manages and its own elements and policies.
Depending on your preferences and privileges, there are several procedures to choose from to create the
IaaS database.
Note You can enable secure SSL when creating or upgrading the SQL database. For example, when
you create or upgrade the SQL database, you can use the Secure SSL option to specify that the SSL
configuration which is already specified in the SQL server be enforced when connecting to the SQL
database. SSL provides a more secure connection between the IaaS server and SQL database. This
option, which is available in the custom installation wizard, requires that you have already configured SSL
on the SQL server. For related information about configuring SSL on the SQL server, see Microsoft
Technet article 189067.
Table 5‑8. Choosing an IaaS Database Scenario
Scenario Procedure
Create the IaaS database manually using the provided database
scripts. This option enables a database administrator to review
the changes carefully before creating the database.
Prepare an empty database and use the installer to populate the
database schema. This option enables the installer to use a
database user with dbo privileges to populate the database.
Use the installer to create the database. This is the simplest
option but requires the use of sysadmin privileges in the
installer.
Create the IaaS Database Manually.
Prepare an Empty Database.
Create the IaaS Database Using the Installation Wizard.
Create the IaaS Database Manually
The vRealize Automation system administrator can create the database manually using VMware-provided
scripts.
Prerequisites
n
Install Microsoft .NET Framework 4.5.2 or later on the SQL Server host.
n
Use Windows Authentication, rather than SQL Authentication, to connect to the database.
n
Verify the database installation prerequisites. See IaaS SQL Server Host.
VMware, Inc. 75
Page 76

Installing vRealize Automation
n
Open a Web browser to the vRealize Automation appliance installer URL, and download the IaaS
database installation scripts.
https://vrealize-automation-appliance-FQDN:5480/installer
Procedure
1 Navigate to the Database subdirectory in the directory where you extracted the installation zip
archive.
2 Extract the DBInstall.zip archive to a local directory.
3 Log in to the Windows database host with sufficient rights to create and drop databases sysadmin
privileges in the SQL Server instance.
4 Review the database deployment scripts as needed. In particular, review the settings in the
DBSettings section of CreateDatabase.sql and edit them if necessary.
The settings in the script are the recommended settings. Only ALLOW_SNAPSHOT_ISOLATION ON and
READ_COMMITTED_SNAPSHOT ON are required.
5 Execute the following command with the arguments described in the table.
BuildDB.bat /p:DBServer=db_server;
DBName=db_name;DBDir=db_dir;
LogDir=[log_dir];ServiceUser=service_user;
ReportLogin=web_user;
VersionString=version_string
Table 5‑9. Database Values
Variable Value
db_server Specifies the SQL Server instance in the format
dbhostname[,port number]\SQL instance. Specify a port
number only if you are using a non-default port. The Microsoft SQL
default port number is 1433. The default value for db_server is
localhost.
db_name Name of the database. The default value is vra. Database names
must consist of no more than 128 ASCII characters.
db_dir Path to the data directory for the database, excluding the final
slash.
log_dir Path to the log directory for the database, excluding the final slash.
service_user User name under which the Manager Service runs.
Web_user User name under which the Web services run.
version_string The vRealize Automation version, found by logging in to the
vRealize Automation appliance and clicking the Update tab.
For example, the vRealize Automation 6.1 version string is
6.1.0.1200.
The database is created.
VMware, Inc. 76
Page 77

Installing vRealize Automation
What to do next
Install the IaaS Components in a Distributed Configuration.
Prepare an Empty Database
A vRealize Automation system administrator can install the IaaS schema on an empty database. This
installation method provides maximum control over database security.
Prerequisites
n
Verify the database installation prerequisites. See IaaS SQL Server Host.
n
Open a Web browser to the vRealize Automation appliance installer URL, and download the IaaS
database installation scripts.
https://vrealize-automation-appliance-FQDN:5480/installer
Procedure
1 Navigate to the Database directory within the directory where you extracted the installation zip
archive.
2 Extract the DBInstall.zip archive to a local directory.
3 Log in to the Windows database host with sysadmin privileges within the SQL Server instance.
4 Edit the following files, and replace all instances of the variables in the table with the correct values
for your environment.
CreateDatabase.sql
SetDatabaseSettings.sql
Table 5‑10. Database Values
Variable Value
$(DBName) Name of the database, such as vra. Database names must consist
of no more than 128 ASCII characters.
$(DBDir) Path to the data directory for the database, excluding the final
slash.
$(LogDir) Path to the log directory for the database, excluding the final slash.
5 Review the settings in the DB Settings section of SetDatabaseSettings.sql and edit them if
needed.
The settings in the script are the recommended settings for the IaaS database. Only
ALLOW_SNAPSHOT_ISOLATION ON and READ_COMMITTED_SNAPSHOT ON are required.
6 Open SQL Server Management Studio.
7 Click New Query.
An SQL Query window opens.
8 On the Query menu, ensure that SQLCMD Mode is selected.
VMware, Inc. 77
Page 78

Installing vRealize Automation
9 Paste the entire modified contents of CreateDatabase.sql into the query pane.
10 Below the CreateDatabase.sql content, paste the entire modified contents of
SetDatabaseSettings.sql.
11 Click Execute.
The script runs and creates the database.
What to do next
Install the IaaS Components in a Distributed Configuration.
Create the IaaS Database Using the Installation Wizard
vRealize Automation uses a Microsoft SQL Server database to maintain information about the machines
it manages and its own elements and policies.
The following steps describe how to create the IaaS database using the installer or populate an existing
empty database. It is also possible to create the database manually. See Create the IaaS Database
Manually.
Prerequisites
n
If you are creating the database with Windows authentication, instead of SQL authentication, verify
that the user who runs the installer has sysadmin rights on the SQL server.
n
Download the vRealize Automation IaaS Installer.
Procedure
1 Right-click the setup__vrealize-automation-appliance-FQDN@5480.exe setup file and select
Run as administrator.
2 Click Next.
3 Accept the license agreement and click Next.
4 On the Log in page, supply administrator credentials for the vRealize Automation appliance and verify
the SSL Certificate.
a Type the user name, which is root, and the password.
The password is the password that you specified when you deployed the vRealize Automation
appliance.
b Select Accept Certificate.
c Click View Certificate.
Compare the certificate thumbprint with the thumbprint set for the vRealize Automation appliance.
You can view the vRealize Automation appliance certificate in the client browser when the
management console is accessed on port 5480.
5 Click Next.
6 Select Custom Install on the Installation Type page.
VMware, Inc. 78
Page 79

Installing vRealize Automation
7 Select IaaS Server under Component Selection on the Installation Type page.
8 Accept the root install location or click Change and select an installation path.
Even in a distributed deployment, you might sometimes install more than one IaaS component on the
same Windows server.
If you install more than one IaaS component, always install them to the same path.
9 Click Next.
10 On the IaaS Server Custom Install page, select Database.
11 In the Database Instance text box, specify the database instance or click Scan and select from the
list of instances. If the database instance is on a non-default port, include the port number in instance
specification by using the form dbhost,SQL_port_number\SQLinstance. The Microsoft SQL default
port number is 1443.
12 (Optional) Select the Use SSL for database connection checkbox.
By default, the checkbox is enabled. SSL provides a more secure connection between the IaaS
server and SQL database. However, you must first configure SSL on the SQL server to support this
option. For more about configuring SSL on the SQL server, see Microsoft Technet article 189067.
13 Choose your database installation type from the Database Name panel.
n
Select Use existing empty database to create the schema in an existing database.
n
Enter a new database name or use the default name vra to create a new database. Database
names must consist of no more than 128 ASCII characters.
14 Deselect Use default data and log directories to specify alternative locations or leave it selected to
use the default directories (recommended).
15 Select an authentication method for installing the database from the Authentication list.
n
To use the credentials under which you are running the installer to create the database, select
User Windows identity....
n
To use SQL authentication, deselect Use Windows identity.... Type SQL credentials in the user
and password text boxes.
By default, the Windows service user account is used during runtime access to the database, and
must have sysadmin rights to the SQL Server instance. The credentials used to access the database
at runtime can be configured to use SQL credentials.
Windows authentication is recommended. When you choose SQL authentication, the unencrypted
database password appears in certain configuration files.
16 Click Next.
VMware, Inc. 79
Page 80

Installing vRealize Automation
17 Complete the Prerequisite Check.
Option Description
No errors Click Next.
Noncritical errors Click Bypass.
Critical errors Bypassing critical errors causes the installation to fail. If warnings appear, select
the warning in the left pane and follow the instructions on the right. Address all
critical errors and click Check Again to verify.
18 Click Install.
19 When the success message appears, deselect Guide me through initial configuration and click
Next.
20 Click Finish.
The database is ready for use.
Install an IaaS Website Component and Model Manager Data
The system administrator installs the Website component to provide access to infrastructure capabilities
in the vRealize Automation web console. You can install one or many instances of the Website
component, but you must configure Model Manager Data on the machine that hosts the first Website
component. You install Model Manager Data only once.
Prerequisites
n
Install the IaaS Database, see Choosing an IaaS Database Scenario.
n
If you already installed other IaaS components, know the database passphrase that you created.
n
If you are using load balancers in your environment, verify that they meet the configuration
requirements.
Procedure
1 Install the First IaaS Web Server Component
You install the IaaS Web server component to provide access to infrastructure capabilities in
vRealize Automation.
2 Configure Model Manager Data
You install the Model Manager component on the same machine that hosts the first Web server
component. You only install Model Manager Data once.
You can install additional Website components or install the Manager Service. See Install Additional IaaS
Web Server Components or Install the Active Manager Service.
Install the First IaaS Web Server Component
You install the IaaS Web server component to provide access to infrastructure capabilities in
vRealize Automation.
VMware, Inc. 80
Page 81

Installing vRealize Automation
You can install multiple IaaS Web servers, but only the first one includes Model Manager Data.
Prerequisites
n
Create the IaaS Database Using the Installation Wizard.
n
Verify that the server meets the requirements in IaaS Windows Servers.
n
If you already installed other IaaS components, know the database passphrase that you created.
n
If you are using load balancers in your environment, verify that they meet the configuration
requirements.
Procedure
1 If using a load balancer, disable the other nodes under the load balancer, and verify that traffic is
directed to the node that you want.
In addition, disable load balancer health checks until all vRealize Automation components are
installed and configured.
2 Right-click the setup__vrealize-automation-appliance-FQDN@5480.exe setup file and select
Run as administrator.
3 Click Next.
4 Accept the license agreement and click Next.
5 On the Log in page, supply administrator credentials for the vRealize Automation appliance and verify
the SSL Certificate.
a Type the user name, which is root, and the password.
The password is the password that you specified when you deployed the vRealize Automation
appliance.
b Select Accept Certificate.
c Click View Certificate.
Compare the certificate thumbprint with the thumbprint set for the vRealize Automation appliance.
You can view the vRealize Automation appliance certificate in the client browser when the
management console is accessed on port 5480.
6 Click Next.
7 Select Custom Install on the Installation Type page.
8 Select IaaS Server under Component Selection on the Installation Type page.
9 Accept the root install location or click Change and select an installation path.
Even in a distributed deployment, you might sometimes install more than one IaaS component on the
same Windows server.
If you install more than one IaaS component, always install them to the same path.
10 Click Next.
VMware, Inc. 81
Page 82

Installing vRealize Automation
11 Select Website and ModelManagerData on the IaaS Server Custom Install page.
12 Select a Web site from available Web sites or accept the default Web site on the Administration &
Model Manager Web Site tab.
13 Type an available port number in the Port number text box, or accept the default port 443.
14 Click Test Binding to confirm that the port number is available for use.
15 Select the certificate for this component.
a If you imported a certificate after you began the installation, click Refresh to update the list.
b Select the certificate to use from Available certificates.
c If you imported a certificate that does not have a friendly name and it does not appear in the list,
deselect Display certificates using friendly names and click Refresh.
If you are installing in an environment that does not use load balancers, you can select Generate a
Self-Signed Certificate instead of selecting a certificate. If you are installing additional Web site
components behind a load balancer, do not generate self-signed certificates. Import the certificate
from the main IaaS Web server to ensure that you use the same certificate on all servers behind the
load balancer.
16 (Optional) Click View Certificate, view the certificate, and click OK to close the information window.
17 (Optional) Select Suppress certificate mismatch to suppress certificate errors. The installation
ignores certificate name mismatch errors as well as any remote certificate-revocation list match
errors.
This is a less secure option.
Configure Model Manager Data
You install the Model Manager component on the same machine that hosts the first Web server
component. You only install Model Manager Data once.
Prerequisites
Install the First IaaS Web Server Component.
Procedure
1 Click the Model Manager Data tab.
2 In the Server text box, enter the vRealize Automation appliance fully qualified domain name.
vrealize-automation-appliance.mycompany.com
Do not enter an IP address.
3 Click Load to display the SSO Default Tenant.
The vsphere.local default tenant is created automatically when you configure single sign-on. Do
not modify it.
VMware, Inc. 82
Page 83

Installing vRealize Automation
4 Click Download to import the certificate from the virtual appliance.
It might take several minutes to download the certificate.
5 (Optional) Click View Certificate, view the certificate, and click OK to close the information window.
6 Click Accept Certificate.
7 Enter administrator@vsphere.local in the User name text box and enter the password you
created when you configured the SSO in the Password and Confirm text boxes.
8 (Optional) Click Test to verify the credentials.
9 In the IaaS Server text box, identify the IaaS Web server component.
Option Description
With a load balancer Enter the fully qualified domain name and port number of the load balancer for the
IaaS Web server component, web-load-balancer.mycompany.com:443.
Do not enter IP addresses.
Without a load balancer Enter the fully qualified domain name and port number of the machine where you
installed the IaaS Web server component, web.mycompany.com:443.
Do not enter IP addresses.
The default port is 443.
10 Click Test to verify the server connection.
11 Click Next.
12 Complete the Prerequisite Check.
Option Description
No errors Click Next.
Noncritical errors Click Bypass.
Critical errors Bypassing critical errors causes the installation to fail. If warnings appear, select
the warning in the left pane and follow the instructions on the right. Address all
critical errors and click Check Again to verify.
13 On the Server and Account Settings page, in the Server Installation Information text boxes, enter
the user name and password of the service account user that has administrative privileges on the
current installation server.
The service account user must be one domain account that has privileges on each distributed IaaS
server. Do not use local system accounts.
VMware, Inc. 83
Page 84

Installing vRealize Automation
14 Provide the passphrase used to generate the encryption key that protects the database.
Option Description
If you have already installed
components in this environment
If this is the first installation Type a passphrase in the Passphrase and Confirm text boxes. You must use
Type the passphrase you created previously in the Passphrase and Confirm text
boxes.
this passphrase every time you install a new component.
Keep this passphrase in a secure place for later use.
15 Specify the IaaS database server, database name, and authentication method for the database
server in the Microsoft SQL Database Installation Information text box.
This is the IaaS database server, name, and authentication information that you created previously.
16 Click Next.
17 Click Install.
18 When the installation finishes, deselect Guide me through the initial configuration and click Next.
What to do next
You can install additional Web server components or install the Manager Service. See Install Additional
IaaS Web Server Components or Install the Active Manager Service.
Install Additional IaaS Web Server Components
The Web server provides access to infrastructure capabilities in vRealize Automation. After the first Web
server is installed, you might increase performance by installing additional IaaS Web servers.
Do not install Model Manager Data with an additional Web server component. Only the first Web server
component hosts Model Manager Data.
Prerequisites
n
Install an IaaS Website Component and Model Manager Data.
n
Verify that the server meets the requirements in IaaS Windows Servers.
n
If you already installed other IaaS components, know the database passphrase that you created.
n
If you are using load balancers in your environment, verify that they meet the configuration
requirements.
Procedure
1 If using a load balancer, disable the other nodes under the load balancer, and verify that traffic is
directed to the node that you want.
In addition, disable load balancer health checks until all vRealize Automation components are
installed and configured.
2 Right-click the setup__vrealize-automation-appliance-FQDN@5480.exe setup file and select
Run as administrator.
VMware, Inc. 84
Page 85

Installing vRealize Automation
3 Click Next.
4 Accept the license agreement and click Next.
5 On the Log in page, supply administrator credentials for the vRealize Automation appliance and verify
the SSL Certificate.
a Type the user name, which is root, and the password.
The password is the password that you specified when you deployed the vRealize Automation
appliance.
b Select Accept Certificate.
c Click View Certificate.
Compare the certificate thumbprint with the thumbprint set for the vRealize Automation appliance.
You can view the vRealize Automation appliance certificate in the client browser when the
management console is accessed on port 5480.
6 Click Next.
7 Select Custom Install on the Installation Type page.
8 Select IaaS Server under Component Selection on the Installation Type page.
9 Accept the root install location or click Change and select an installation path.
Even in a distributed deployment, you might sometimes install more than one IaaS component on the
same Windows server.
If you install more than one IaaS component, always install them to the same path.
10 Click Next.
11 Select Website on the IaaS Server Custom Install page.
12 Select a Web site from available Web sites or accept the default Web site on the Administration &
Model Manager Web Site tab.
13 Type an available port number in the Port number text box, or accept the default port 443.
14 Click Test Binding to confirm that the port number is available for use.
15 Select the certificate for this component.
a If you imported a certificate after you began the installation, click Refresh to update the list.
b Select the certificate to use from Available certificates.
c If you imported a certificate that does not have a friendly name and it does not appear in the list,
deselect Display certificates using friendly names and click Refresh.
If you are installing in an environment that does not use load balancers, you can select Generate a
Self-Signed Certificate instead of selecting a certificate. If you are installing additional Web site
components behind a load balancer, do not generate self-signed certificates. Import the certificate
from the main IaaS Web server to ensure that you use the same certificate on all servers behind the
load balancer.
VMware, Inc. 85
Page 86

Installing vRealize Automation
16 (Optional) Click View Certificate, view the certificate, and click OK to close the information window.
17 (Optional) Select Suppress certificate mismatch to suppress certificate errors. The installation
ignores certificate name mismatch errors as well as any remote certificate-revocation list match
errors.
This is a less secure option.
18 In the IaaS Server text box, identify the first IaaS Web server component.
Option Description
With a load balancer Enter the fully qualified domain name and port number of the load balancer for the
IaaS Web server component, web-load-balancer.mycompany.com:443.
Do not enter IP addresses.
Without a load balancer Enter the fully qualified domain name and port number of the machine where you
installed the IaaS first Web server component, web.mycompany.com:443.
Do not enter IP addresses.
The default port is 443.
19 Click Test to verify the server connection.
20 Click Next.
21 Complete the Prerequisite Check.
Option Description
No errors Click Next.
Noncritical errors Click Bypass.
Critical errors Bypassing critical errors causes the installation to fail. If warnings appear, select
the warning in the left pane and follow the instructions on the right. Address all
critical errors and click Check Again to verify.
22 On the Server and Account Settings page, in the Server Installation Information text boxes, enter
the user name and password of the service account user that has administrative privileges on the
current installation server.
The service account user must be one domain account that has privileges on each distributed IaaS
server. Do not use local system accounts.
23 Provide the passphrase used to generate the encryption key that protects the database.
Option Description
If you have already installed
components in this environment
If this is the first installation Type a passphrase in the Passphrase and Confirm text boxes. You must use
Type the passphrase you created previously in the Passphrase and Confirm text
boxes.
this passphrase every time you install a new component.
Keep this passphrase in a secure place for later use.
VMware, Inc. 86
Page 87

Installing vRealize Automation
24 Specify the IaaS database server, database name, and authentication method for the database
server in the Microsoft SQL Database Installation Information text box.
This is the IaaS database server, name, and authentication information that you created previously.
25 Click Next.
26 Click Install.
27 When the installation finishes, deselect Guide me through the initial configuration and click Next.
What to do next
Install the Active Manager Service.
Install the Active Manager Service
The active Manager Service is a Windows service that coordinates communication between IaaS
Distributed Execution Managers, the database, agents, proxy agents, and SMTP.
Unless you enable automatic Manager Service failover, your IaaS deployment requires that only one
Windows machine actively run the Manager Service at a time. Backup machines must have the service
stopped and configured to start manually.
See About Automatic Manager Service Failover.
Prerequisites
n
If you already installed other IaaS components, know the database passphrase that you created.
n
(Optional) If you want to install the Manager Service in a Website other than the default Website, first
create a Website in Internet Information Services.
n
Verify that you have a certificate from a certificate authority imported into IIS and that the root
certificate or certificate authority is trusted. All components under the load balancer must have the
same certificate.
n
Verify that the Website load balancer is configured and that the timeout value for the load balancer is
set to a minimum of 180 seconds.
n
Install an IaaS Website Component and Model Manager Data.
Procedure
1 If using a load balancer, disable the other nodes under the load balancer, and verify that traffic is
directed to the node that you want.
In addition, disable load balancer health checks until all vRealize Automation components are
installed and configured.
2 Right-click the setup__vrealize-automation-appliance-FQDN@5480.exe setup file and select
Run as administrator.
3 Accept the license agreement and click Next.
VMware, Inc. 87
Page 88

Installing vRealize Automation
4 On the Log in page, supply administrator credentials for the vRealize Automation appliance and verify
the SSL Certificate.
a Type the user name, which is root, and the password.
The password is the password that you specified when you deployed the vRealize Automation
appliance.
b Select Accept Certificate.
c Click View Certificate.
Compare the certificate thumbprint with the thumbprint set for the vRealize Automation appliance.
You can view the vRealize Automation appliance certificate in the client browser when the
management console is accessed on port 5480.
5 Click Next.
6 Select Custom Install on the Installation Type page.
7 Select IaaS Server under Component Selection on the Installation Type page.
8 Accept the root install location or click Change and select an installation path.
Even in a distributed deployment, you might sometimes install more than one IaaS component on the
same Windows server.
If you install more than one IaaS component, always install them to the same path.
9 Click Next.
10 Select Manager Service on the IaaS Server Custom Install page.
11 In the IaaS Server text box, identify the IaaS Web server component.
Option Description
With a load balancer Enter the fully qualified domain name and port number of the load balancer for the
IaaS Web server component, web-load-balancer.mycompany.com:443.
Do not enter IP addresses.
Without a load balancer Enter the fully qualified domain name and port number of the machine where you
installed the IaaS Web server component, web.mycompany.com:443.
Do not enter IP addresses.
The default port is 443.
12 Select Active node with startup type set to automatic.
13 Select a Web site from available Web sites or accept the default Web site on the Administration &
Model Manager Web Site tab.
14 Type an available port number in the Port number text box, or accept the default port 443.
15 Click Test Binding to confirm that the port number is available for use.
VMware, Inc. 88
Page 89

Installing vRealize Automation
16 Select the certificate for this component.
a If you imported a certificate after you began the installation, click Refresh to update the list.
b Select the certificate to use from Available certificates.
c If you imported a certificate that does not have a friendly name and it does not appear in the list,
deselect Display certificates using friendly names and click Refresh.
If you are installing in an environment that does not use load balancers, you can select Generate a
Self-Signed Certificate instead of selecting a certificate. If you are installing additional Web site
components behind a load balancer, do not generate self-signed certificates. Import the certificate
from the main IaaS Web server to ensure that you use the same certificate on all servers behind the
load balancer.
17 (Optional) Click View Certificate, view the certificate, and click OK to close the information window.
18 Click Next.
19 Check the prerequisites and click Next.
20 On the Server and Account Settings page, in the Server Installation Information text boxes, enter
the user name and password of the service account user that has administrative privileges on the
current installation server.
The service account user must be one domain account that has privileges on each distributed IaaS
server. Do not use local system accounts.
21 Provide the passphrase used to generate the encryption key that protects the database.
Option Description
If you have already installed
components in this environment
If this is the first installation Type a passphrase in the Passphrase and Confirm text boxes. You must use
Type the passphrase you created previously in the Passphrase and Confirm text
boxes.
this passphrase every time you install a new component.
Keep this passphrase in a secure place for later use.
22 Specify the IaaS database server, database name, and authentication method for the database
server in the Microsoft SQL Database Installation Information text box.
This is the IaaS database server, name, and authentication information that you created previously.
23 Click Next.
24 Click Install.
25 When the installation finishes, deselect Guide me through the initial configuration and click Next.
26 Click Finish.
What to do next
n
To ensure that the Manager Service you installed is the active instance, verify that the vCloud
Automation Center Service is running and set it to "Automatic" startup type.
VMware, Inc. 89
Page 90

Installing vRealize Automation
n
You can install another instance of the Manager Service component as a passive backup that you can
start manually if the active instance fails. See Install a Backup Manager Service Component.
n
A system administrator can change the authentication method used to access the SQL database
during run time (after the installation is complete). See Configuring Windows Service to Access the
IaaS Database.
Install a Backup Manager Service Component
The backup Manager Service provides redundancy and high availability, and may be started manually if
the active service stops.
Unless you enable automatic Manager Service failover, your IaaS deployment requires that only one
Windows machine actively run the Manager Service at a time. Backup machines must have the service
stopped and configured to start manually.
See About Automatic Manager Service Failover.
Prerequisites
n
If you already installed other IaaS components, know the database passphrase that you created.
n
(Optional) If you want to install the Manager Service in a Web site other than the default Web site,
first create a Web site in Internet Information Services.
n
Verify that you have a certificate from a certificate authority imported into IIS and that the root
certificate or certificate authority is trusted. All components under the load balancer must have the
same certificate.
n
Verify that the Website load balancer is configured.
n
Install an IaaS Website Component and Model Manager Data.
Procedure
1 If using a load balancer, disable the other nodes under the load balancer, and verify that traffic is
directed to the node that you want.
In addition, disable load balancer health checks until all vRealize Automation components are
installed and configured.
2 Right-click the setup__vrealize-automation-appliance-FQDN@5480.exe setup file and select
Run as administrator.
3 Click Next.
4 Accept the license agreement and click Next.
VMware, Inc. 90
Page 91

Installing vRealize Automation
5 On the Log in page, supply administrator credentials for the vRealize Automation appliance and verify
the SSL Certificate.
a Type the user name, which is root, and the password.
The password is the password that you specified when you deployed the vRealize Automation
appliance.
b Select Accept Certificate.
c Click View Certificate.
Compare the certificate thumbprint with the thumbprint set for the vRealize Automation appliance.
You can view the vRealize Automation appliance certificate in the client browser when the
management console is accessed on port 5480.
6 Click Next.
7 Select Custom Install on the Installation Type page.
8 Select IaaS Server under Component Selection on the Installation Type page.
9 Accept the root install location or click Change and select an installation path.
Even in a distributed deployment, you might sometimes install more than one IaaS component on the
same Windows server.
If you install more than one IaaS component, always install them to the same path.
10 Click Next.
11 Select Manager Service on the IaaS Server Custom Install page.
12 In the IaaS Server text box, identify the IaaS Web server component.
Option Description
With a load balancer Enter the fully qualified domain name and port number of the load balancer for the
IaaS Web server component, web-load-balancer.mycompany.com:443.
Do not enter IP addresses.
Without a load balancer Enter the fully qualified domain name and port number of the machine where you
installed the IaaS Web server component, web.mycompany.com:443.
Do not enter IP addresses.
The default port is 443.
13 Select Disaster recovery cold standby node.
14 Select a Web site from available Web sites or accept the default Web site on the Administration &
Model Manager Web Site tab.
15 Type an available port number in the Port number text box, or accept the default port 443.
16 Click Test Binding to confirm that the port number is available for use.
VMware, Inc. 91
Page 92

Installing vRealize Automation
17 Select the certificate for this component.
a If you imported a certificate after you began the installation, click Refresh to update the list.
b Select the certificate to use from Available certificates.
c If you imported a certificate that does not have a friendly name and it does not appear in the list,
deselect Display certificates using friendly names and click Refresh.
If you are installing in an environment that does not use load balancers, you can select Generate a
Self-Signed Certificate instead of selecting a certificate. If you are installing additional Web site
components behind a load balancer, do not generate self-signed certificates. Import the certificate
from the main IaaS Web server to ensure that you use the same certificate on all servers behind the
load balancer.
18 (Optional) Click View Certificate, view the certificate, and click OK to close the information window.
19 Click Next.
20 Check the prerequisites and click Next.
21 On the Server and Account Settings page, in the Server Installation Information text boxes, enter
the user name and password of the service account user that has administrative privileges on the
current installation server.
The service account user must be one domain account that has privileges on each distributed IaaS
server. Do not use local system accounts.
22 Provide the passphrase used to generate the encryption key that protects the database.
Option Description
If you have already installed
components in this environment
If this is the first installation Type a passphrase in the Passphrase and Confirm text boxes. You must use
Type the passphrase you created previously in the Passphrase and Confirm text
boxes.
this passphrase every time you install a new component.
Keep this passphrase in a secure place for later use.
23 Specify the IaaS database server, database name, and authentication method for the database
server in the Microsoft SQL Database Installation Information text box.
This is the IaaS database server, name, and authentication information that you created previously.
24 Click Next.
25 Click Install.
26 When the installation finishes, deselect Guide me through the initial configuration and click Next.
27 Click Finish.
What to do next
n
To ensure that the Manager Service you installed is a passive backup instance, verify that the
vRealize Automation Service is not running and set it to "Manual" startup type.
VMware, Inc. 92
Page 93

Installing vRealize Automation
n
A system administrator can change the authentication method used to access the SQL database
during run time (after the installation is complete). See Configuring Windows Service to Access the
IaaS Database.
Installing Distributed Execution Managers
You install the Distributed Execution Manager as one of two roles: DEM Orchestrator or DEM Worker. You
must install at least one DEM instance for each role, and you can install additional DEM instances to
support failover and high-availability.
The system administrator must choose installation machines that meet predefined system requirements.
The DEM Orchestrator and the Worker can reside on the same machine.
As you plan to install Distributed Execution Managers, keep in mind the following considerations:
n
DEM Orchestrators support active-active high availability. Typically, you install one DEM Orchestrator
on each Manager Service machine.
n
Install the Orchestrator on a machine with strong network connectivity to the Model Manager host.
n
Install a second DEM Orchestrator on a different machine for failover.
n
Typically, you install DEM Workers on the IaaS Manager Service server or on a separate server. The
server must have network connectivity to the Model Manager host.
n
You can install additional DEM instances for redundancy and scalability, including multiple instances
on the same machine.
There are specific requirements for the DEM installation that depend on the endpoints you use. See IaaS
Distributed Execution Manager Host.
Install the Distributed Execution Managers
You must install at least one DEM Worker and one DEM Orchestrator. The installation procedure is the
same for both roles.
DEM Orchestrators support active-active high availability. Typically, you install a single DEM Orchestrator
on each Manager Service machine. You can install DEM Orchestrators and DEM workers on the same
machine.
Prerequisites
Download the vRealize Automation IaaS Installer.
Procedure
1 Right-click the setup__vrealize-automation-appliance-FQDN@5480.exe setup file and select
Run as administrator.
2 Click Next.
3 Accept the license agreement and click Next.
VMware, Inc. 93
Page 94

Installing vRealize Automation
4 On the Log in page, supply administrator credentials for the vRealize Automation appliance and verify
the SSL Certificate.
a Type the user name, which is root, and the password.
The password is the password that you specified when you deployed the vRealize Automation
appliance.
b Select Accept Certificate.
c Click View Certificate.
Compare the certificate thumbprint with the thumbprint set for the vRealize Automation appliance.
You can view the vRealize Automation appliance certificate in the client browser when the
management console is accessed on port 5480.
5 Click Next.
6 Select Custom Install on the Installation Type page.
7 Select Distributed Execution Managers under Component Selection on the Installation Type page.
8 Accept the root install location or click Change and select an installation path.
Even in a distributed deployment, you might sometimes install more than one IaaS component on the
same Windows server.
If you install more than one IaaS component, always install them to the same path.
9 Click Next.
10 Check prerequisites and click Next.
11 Enter the log in credentials under which the service will run.
The service account must have local administrator privileges and be the domain account that you
have been using throughout IaaS installation. The service account has privileges on each distributed
IaaS server and must not be a local system account.
12 Click Next.
13 Select the installation type from the DEM role drop-down menu.
Option Description
Worker The Worker executes workflows.
Orchestrator The Orchestrator oversees DEM worker activities, including scheduling and
preprocessing workflows, and monitors DEM worker online status.
14 Enter a unique name that identifies this DEM in the DEM name text box.
If you plan to use the migration tool, this name must exactly match the name you used in your vCloud
Automation Center 5.2.3 installation. The name cannot include spaces and cannot exceed 128
characters. If you enter a previously used name, the following message appears: "DEM name already
exists. To enter a different name for this DEM, click Yes. If you are restoring or reinstalling a DEM with
the same name, click No."
VMware, Inc. 94
Page 95

Installing vRealize Automation
15 (Optional) Enter a description of this instance in DEM description.
16 Enter the host names and ports in the Manager Service Host name and Model Manager Web
Service Host name text boxes.
Option Description
With a load balancer Enter the fully qualified domain name and port number of the load balancers for
the Manager Service component and the Web server that hosts Model Manager,
mgr-svc-load-balancer.mycompany.com:443 and web-loadbalancer.mycompany.com:443.
Do not enter IP addresses.
Without a load balancer Enter the fully qualified domain name and port number of the machine where you
installed the Manager Service component and the Web server that hosts Model
Manager, mgr-svc.mycompany.com:443 and web.mycompany.com:443.
Do not enter IP addresses.
The default port is 443.
17 (Optional) Click Test to test the connections to the Manager Service and Model Manager Web
Service.
18 Click Add.
19 Click Next.
20 Click Install.
21 When the installation finishes, deselect Guide me through the initial configuration and click Next.
22 Click Finish.
What to do next
n
Verify that the service is running and that the log shows no errors. The service name is VMware DEM
Role - Name where role is Orchestrator or Worker. The log location is Install Location\Distributed
Execution Manager\Name\Logs.
n
Repeat this procedure to install additional DEM instances.
Configure the DEM to Connect to SCVMM at a Dierent Installation Path
By default, the DEM Worker configuration file uses the default installation path of Microsoft System
Center Virtual Machine Manager (SCVMM) console. You must update the file if you install the SCVMM
console to a non-default location.
You only need this procedure if you have SCVMM endpoints and agents.
Prerequisites
n
Know the non-default path where you installed the SCVMM console.
The following is the default path that you must replace in the configuration file.
path="{ProgramFiles}\Microsoft System Center 2012 R2\Virtual Machine Manager\bin"
VMware, Inc. 95
Page 96

Installing vRealize Automation
Procedure
1 Stop the DEM Worker service.
2 Open the following file in a text editor.
Program Files (x86)\VMware\vCAC\Distributed Execution Manager\instance-
name\DynamicOps.DEM.exe.config
3 Locate the <assemblyLoadConfiguration> section.
4 Update each path, using the following example as a guideline.
<assemblyLoadConfiguration>
<assemblies>
<!-- List of required assemblies for Scvmm -->
<add name="Errors" path="D:\Microsoft System Center 2012 R2\Virtual Machine Manager\bin"/>
<add name="Microsoft.SystemCenter.VirtualMachineManager" path="D:\Microsoft System Center 2012
R2\Virtual Machine Manager\bin"/>
<add name="Remoting" path="D:\Microsoft System Center 2012 R2\Virtual Machine Manager\bin"/>
<add name="TraceWrapper" path="D:\Microsoft System Center 2012 R2\Virtual Machine Manager\bin"/>
<add name="Utils" path="D:\Microsoft System Center 2012 R2\Virtual Machine Manager\bin"/>
</assemblies>
</assemblyLoadConfiguration>
5 Save and close DynamicOps.DEM.exe.config.
6 Restart the DEM Worker service.
For more information, see DEM Workers with SCVMM.
Additional information about preparing the SCVMM environment and creating an SCVMM endpoint is
available in Configuring vRealize Automation.
Configuring Windows Service to Access the IaaS Database
A system administrator can change the authentication method used to access the SQL database during
run time (after the installation is complete). By default, the Windows identity of the currently logged on
account is used to connect to the database after it is installed.
Enable IaaS Database Access from the Service User
If the SQL database is installed on a separate host from the Manager Service, database access from the
Manager Service must be enabled. If the user name under which the Manager Service will run is the
owner of the database, no action is required. If the user is not the owner of the database, the system
administrator must grant access.
Prerequisites
n
Choosing an IaaS Database Scenario.
n
Verify that the user name under which the Manager Service will run is not the owner of the database.
VMware, Inc. 96
Page 97

Installing vRealize Automation
Procedure
1 Navigate to the Database subdirectory within the directory where you extracted the installation zip
archive.
2 Extract the DBInstall.zip archive to a local directory.
3 Log in to the database host as a user with the sysadmin role in the SQL Server instance.
4 Edit VMPSOpsUser.sql and replace all instances of $(Service User) with user (from Step 3) under
which the Manager Service will run.
Do not replace ServiceUser in the line ending with WHERE name = N'ServiceUser').
5 Open SQL Server Management Studio.
6 Select the database (vCAC by default) in Databases in the left-hand pane.
7 Click New Query.
The SQL Query window opens in the right-hand pane.
8 Paste the modified contents of VMPSOpsUser.sql into the query window.
9 Click Execute.
Database access is enabled from the Manager Service.
Configure the Windows Services Account to Use SQL Authentication
By default, the Windows service account accesses the database during run-time, even if you configured
the database for SQL authentication. You can change run-time authentication from Windows to SQL.
One reason to change run-time authentication might be when, for example, the database is on an
untrusted domain.
Prerequisites
Verify that the vRealize Automation SQL Server database exists. Begin with Choosing an IaaS Database
Scenario.
Procedure
1 Using an account with administrator privileges, log in to the IaaS Windows server that hosts the
Manager Service.
2 In Administrative Tools > Services, stop the VMware vCloud Automation Center service.
3 Open the following files in a text editor.
C:\Program Files (x86)\VMware\vCAC\Server\ManagerService.exe.config
C:\Program Files (x86)\VMware\vCAC\Server\Model Manager Web\Web.config
4 In each file, locate the <connectionStrings> section.
VMware, Inc. 97
Page 98

Installing vRealize Automation
5 Replace
Integrated Security=True;
with
User Id=database-username;Password=database-password;
6 Save and close the files.
ManagerService.exe.config
Web.config
7 Start the VMware vCloud Automation Center service.
8 Use the iisreset command to restart IIS.
Verify IaaS Services
After installation, the system administrator verifies that the IaaS services are running. If the services are
running, the installation is a success.
Procedure
1 From the Windows desktop of the IaaS machine, select Administrative Tools > Services.
2 Locate the following services and verify that their status is Started and the Startup Type is set to
Automatic.
n
VMware DEM – Orchestrator – Name where Name is the string provided in the DEM Name box
during installation.
n
VMware DEM – Worker – Name where Name is the string provided in the DEM Name box during
installation.
n
VMware vCloud Automation Center Agent Agent name
n
VMware vCloud Automation Center Service
3 Close the Services window.
Installing vRealize Automation Agents
vRealize Automation uses agents to integrate with external systems. A system administrator can select
agents to install to communicate with other virtualization platforms.
vRealize Automation uses the following types of agents to manage external systems:
n
Hypervisor proxy agents (vSphere, Citrix Xen Servers and Microsoft Hyper-V servers)
n
External provisioning infrastructure (EPI) integration agents
n
Virtual Desktop Infrastructure (VDI) agents
n
Windows Management Instrumentation (WMI) agents
VMware, Inc. 98
Page 99

Installing vRealize Automation
For high-availability, you can install multiple agents for a single endpoint. Install each redundant agent on
a separate server, but name and configure them identically. Redundant agents provide some fault
tolerance, but do not provide failover. For example, if you install two vSphere agents, one on server A and
one on server B, and server A becomes unavailable, the agent installed on server B continues to process
work items. However, the server B agent cannot finish processing a work item that the server A agent had
already started.
You have the option to install a vSphere agent as part of your minimal installation, but after the installation
you can also add other agents, including an additional vSphere agent. In a distributed deployment, you
install all your agents after you complete the base distributed installation. The agents you install depend
on the resources in your infrastructure.
For information about using vSphere agents, see vSphere Agent Requirements.
Set the PowerShell Execution Policy to RemoteSigned
You must set the PowerShell Execution Policy from Restricted to RemoteSigned or Unrestricted to allow
local PowerShell scripts to be run.
For more information about the PowerShell Execution Policy, see the Microsoft PowerShell article about
Execution Policies. If your PowerShell Execution Policy is managed at the group policy level, contact your
IT support for about their restrictions on policy changes, and see the Microsoft PowerShell article about
Group Policy Settings.
Prerequisites
n
Verify that Microsoft PowerShell is installed on the installation host before agent installation. The
version required depends on the operating system of the installation host. See Microsoft Help and
Support.
n
For more information about PowerShell Execution Policy, run help about_signing or help SetExecutionPolicy at the PowerShell command prompt.
Procedure
1 Using an administrator account, log in to the IaaS host machine where the agent is installed.
2 Select Start > All Programs > Windows PowerShell version > Windows PowerShell.
3 For Remote Signed, run Set-ExecutionPolicy RemoteSigned.
4 For Unrestricted, run Set-ExecutionPolicy Unrestricted.
5 Verify that the command did not produce any errors.
6 Type Exit at the PowerShell command prompt.
Choosing the Agent Installation Scenario
The agents that you need to install depend on the external systems with which you plan to integrate.
VMware, Inc. 99
Page 100

Installing vRealize Automation
Table 5‑11. Choosing an Agent Scenario
Integration Scenario Agent Requirements and Procedures
Provision cloud machines by integrating with a cloud
environment such as Amazon Web Services or
Red Hat Enterprise Linux OpenStack Platform.
Provision virtual machines by integrating with a vSphere
environment.
Provision virtual machines by integrating with a
Microsoft Hyper-V Server environment.
Provision virtual machines by integrating with a XenServer
environment.
Provision virtual machines by integrating with a XenDesktop
environment.
Run Visual Basic scripts as additional steps in the provisioning
process before or after provisioning a machine, or when
deprovisioning.
Collect data from the provisioned Windows machines, for
example the Active Directory status of the owner of a machine.
Provision virtual machines by integrating with any other
supported virtual platform.
You do not need to install an agent.
Installing and Configuring the Proxy Agent for vSphere
Installing the Proxy Agent for Hyper-V or XenServer
n
Installing the Proxy Agent for Hyper-V or XenServer
n
Installing the EPI Agent for Citrix
n
Installing the VDI Agent for XenDesktop
n
Installing the EPI Agent for Citrix
Installing the EPI Agent for Visual Basic Scripting
Installing the WMI Agent for Remote WMI Requests
You do not need to install an agent.
Agent Installation Location and Requirements
A system administrator typically installs the agents on the vRealize Automation server that hosts the
active Manager Service component.
If an agent is installed on another host, the network configuration must allow communication between the
agent and Manager Services installation machine.
Each agent is installed under a unique name in its own directory, Agents\agentname, under the
vRealize Automation installation directory (typically Program Files(x86)\VMware\vCAC), with its
configuration stored in the file VRMAgent.exe.config in that directory.
Installing and Configuring the Proxy Agent for vSphere
A system administrator installs proxy agents to communicate with vSphere server instances. The agents
discover available work, retrieve host information, and report completed work items and other host status
changes.
vSphere Agent Requirements
vSphere endpoint credentials, or the credentials under which the agent service runs, must have
administrative access to the installation host. Multiple vSphere agents must meet vRealize Automation
configuration requirements.
VMware, Inc. 100
 Loading...