

Vizio L15 User Manual

VIZIO L15 User Guide
Table of Contents
Chapter 1 - Introduction................................................................................................................................2
1.1 - Before Use ......................................................................................................................................... 2
1.2 – Specifications*................................................................................................................................... 2
1.3 - Opening the Package......................................................................................................................... 3
1.4 - Installation.......................................................................................................................................... 3
1.5 - Important Safety Guidelines............................................................................................................... 4
1.6 - Television Antenna Connection Protection ........................................................................................ 5
1.7 - Package Contents.............................................................................................................................. 6
1.8 - Front Panel ........................................................................................................................................ 7
1.9 - Rear Panel Connections .................................................................................................................... 8
1.10 - VIZIO L15 Remote Control............................................................................................................... 9
1.10.1 - Remote Control Description ..................................................................................................... 9
1.10.2 - Insertion of Batteries in the Remote Control............................................................................10
1.10.3 - Remote Control Range............................................................................................................10
1.10.4 - Precautions for the VIZIO Remote Control..............................................................................10
Chapter 2 - Connecting Components.........................................................................................................11
2.1 - Which Video Connection Should I Use? ...........................................................................................11
2.2 - Connecting Your DVD Player............................................................................................................12
2.2.1 - Using S-Video ...........................................................................................................................12
2.2.2 - Using Composite Video.............................................................................................................13
2.3 - Connecting Your VCR or Video Camera...........................................................................................13
2.4 - Connecting Coaxial (RF)...................................................................................................................14
2.4.1 – Using an Antenna .....................................................................................................................14
2.4.2 – Connecting Basic Cable Directly to the TV...............................................................................15
2.4.3 - Using Your Cable Box Connections ..........................................................................................15
2.5 - Connecting the Computer ..................................................................................................
...............16
Chapter 3 - Getting Started .........................................................................................................................17
3.1 - Turning your LCD TV On and Off......................................................................................................17
3.2 - Installation of Wall Mount (Optional) .................................................................................................17
3.3 - Adjusting Basic LCD TV Settings......................................................................................................18
3.4 - Using the On-Screen Display (OSD).................................................................................................19
3.4.1 - Menu Operations.......................................................................................................................19
3.4.2 - OSD Menus and Options ..........................................................................................................20
3.4.3 - Using the Parental Controls ......................................................................................................24
3.4.4 - Setting a Password ...................................................................................................................25
Chapter 4 - Maintenance and Troubleshooting.........................................................................................26
4.1 - Maintenance .....................................................................................................................................26
4.2 - Troubleshooting Guide......................................................................................................................26
4.3 - Telephone & Technical Support........................................................................................................27
4.4 - Compliance .......................................................................................................................................28
4.5 - FCC Class B Radio Frequency Interference Statement....................................................................28
Appendix A: Glossary - Standard Definitions...........................................................................................29
Appendix B: VIZIO LCD Television Warranty............................................................................................30
Version - 4/5/2005
1
www.vizioce.com

VIZIO L15 User Guide
Chapter 1 - Introduction
1.1 - Before Use
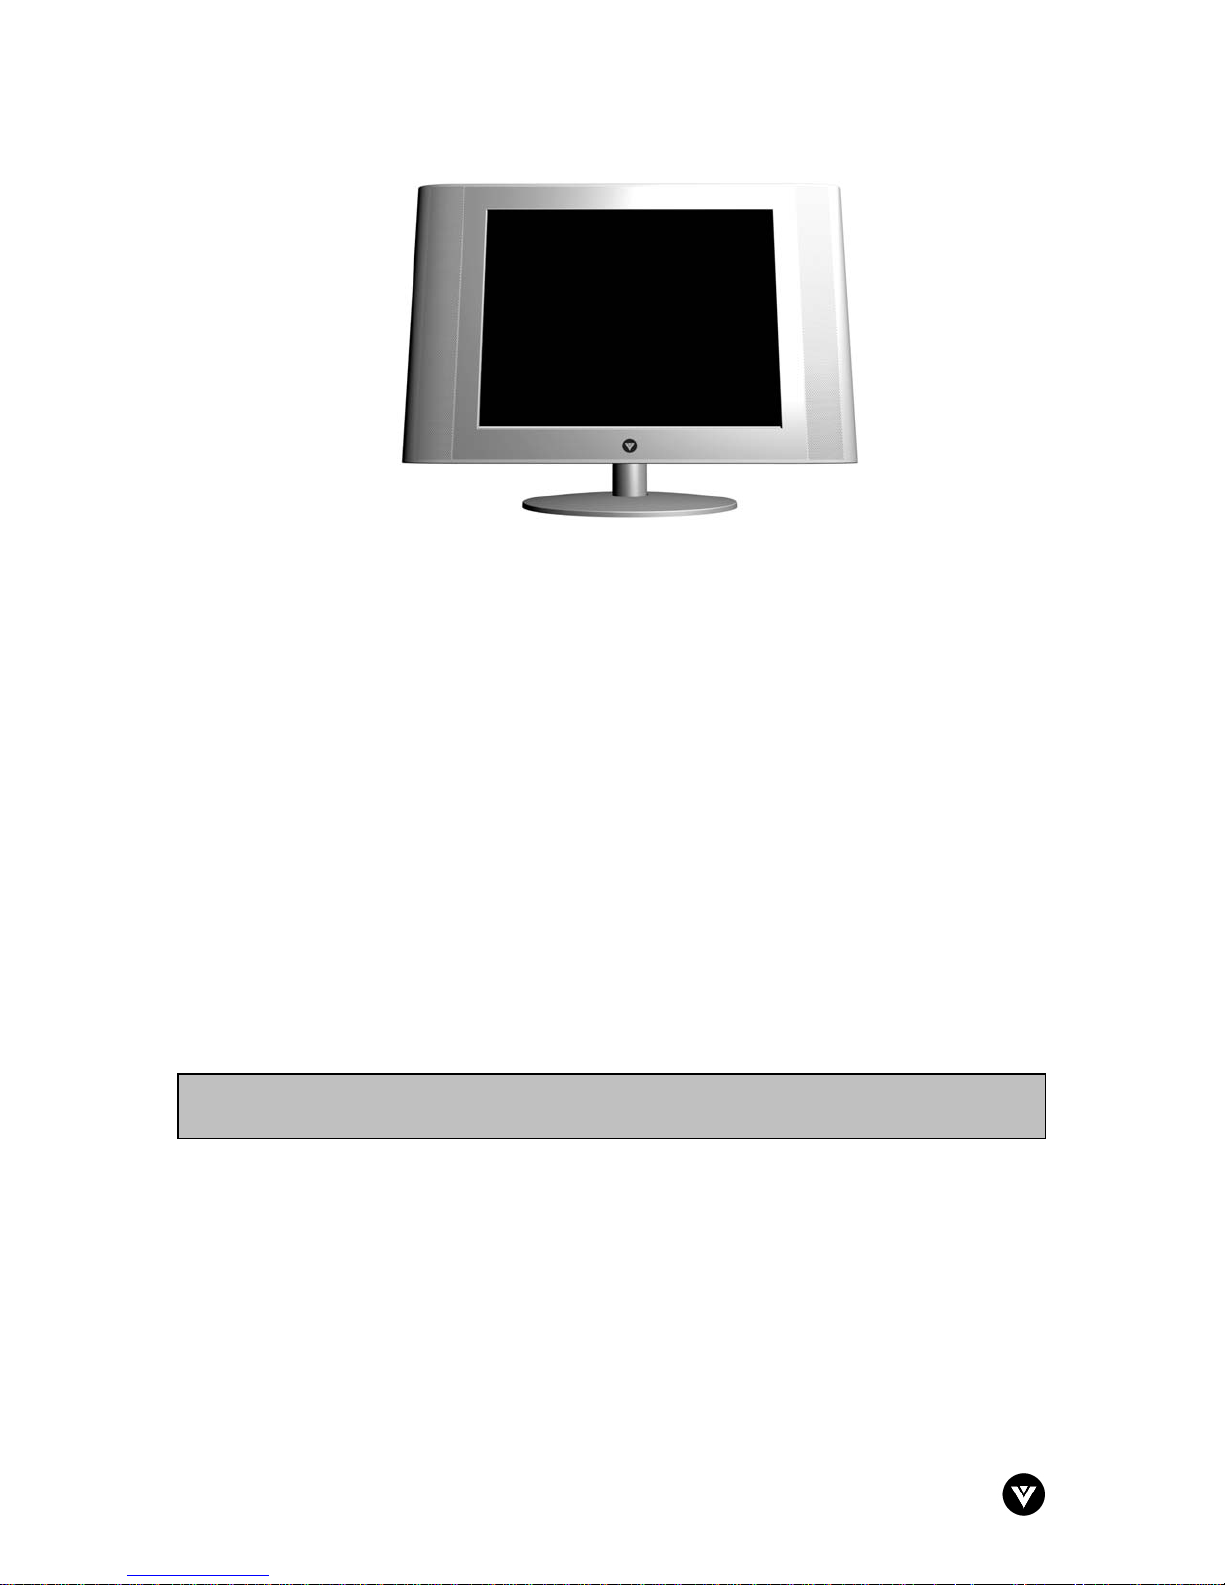
Congratulations on your VIZIO L15 15” LCD Television purchase. Thank you for your support of
VIZIO and its LCD Television product line. The L15 is a precise electronic product and you
should read the following instructions carefully to maximize the performance of the product. It has
passed regulatory safety certifications and you can be assured of the highest quality display with
the utmost reliability. After you have finished reading the instructions, put them away in a safe
place for future reference.
Note: In some countries or regions, the shape of the power plug and power outlet may
sometimes differ from that shown in the explanatory drawings. However, the m ethod of
connecting and operating the unit is the same.
1.2 – Specifications*
Panel: 15" Diagonal, 4:3 Aspect Ratio, TFT Panel
Resolution: 1024 x 768 pixels
Display Compatibility: SDTV (480i) Native
Signal Compatibility: 480i (SDTV)
Response Time: 25mS (typical)
Brightness: 300 nits (typical)
Contrast: 450:1 (typical)
Viewing Angle: 150 degrees (H) / 110 degrees (V) for CR>5
Inputs:
Features:
Speakers: Built-in 2 x 2 W
Lamp Life: 50,000 hours (typical)
Operating Environment:
Temperature: 5~35°C (41~95°F)
Humidity: 10%~90% (no-condensation)
Altitude: 0~10,000 ft.
Storage Environment:
Temperature: -20~60°C (-4~140°F)
Humidity: 10%~90% (no-condensation)
Altitude: 0~40,000 ft.
Power Input: IEC connector for power line connection.
Voltage Range: 100-240 Vac at 50/60 Hz
Power consumption: 60W
Dimensions: 18.5" (w) x 11.4" (h) x 3.33" (d) without Stand, 18.5”(w) x 13.05” (h) x 6.9” (d) with Stand
Net Weight: 10.14 lbs (4.6 kg) with stand
Gross Weight: 15.4 lbs (7.0 kg)
Certifications: UL, C-UL, FCC Class B
*Product specifications are subject to change without notice or obligation.
1 x RF (1 x F Connector for internal NTSC Tuner), 1 x Composite Video (1 x RCA), 1 x
RGB D-Sub (1 x analog RGB), 1 x S-Video (1xDIN) plus 2 x Audio (2 x RCA, L+R)
CC, V-Chip, Comb Filter, Scalar and De-Interlacer, NTSC Video Decoding via RF
Antenna, Cable or Satellite (Set Top Box may be required)
Version - 4/5/2005
2
www.vizioce.com

VIZIO L15 User Guide
1.3 - Opening the Package
• The VIZIO L15 is packaged in a carton together with other standard accessories. Any
optional accessories are packed separately in another carton.
• Never place the unit on a surface with the glass facing downwards unless it is on protective
padding.
• When opening the carton, check that the product is in good condition and that all standard
accessories and items are included.
• Save the original box and all packing materials for future shipping needs.
1.4 - Installation
• Please read the user manual carefully before performing the installation.
• The power consumption of the display is approximately 60 Watts. Please use the power cord
designated for the product. When an extension cord is required, use one with the correct
power rating. The cord must be grounded and the grounding feature must not be defeated.
• The product should be installed on a flat surface to avoid tipping. Space should be
maintained between the back of the product and the wall for proper ventilation. See Section
3.2 - Installation of Wall Mount, page 17, for additional information.
• Please ensure the product is installed with the screen in landscape orientation. Any 90°
clockwise or counterclockwise installation may induce poor ventilation and subsequent
component damage.
Version - 4/5/2005
3
www.vizioce.com

VIZIO L15 User Guide
1.5 - Important Safety Guidelines
This product is designed and manufactured to operate within defined design limits, and misuse may result in electric shock or fire.
To prevent the product from being damaged, the following rules should be observed for the installation, use and maintenance of the
product. Read the following safety instructions before operating the display. Keep these instructions in a safe place for future
reference.
• To avoid the risk of electric shock or component damage, switch off the power before connecting other components to the L15
LCD TV.
• Unplug the power cord before cleaning the L15 LCD TV. A damp cloth is sufficient for cleaning the L15 LCD TV. Do not use a
liquid or a spray cleaner for cleaning the product. Do not use abrasive cleaners.
• Always use the accessories recommended by the manufacturer to insure compatibility.
• When moving the L15 LCD TV from an area of low temperature to an area of high temperature, condensation may form on the
housing. Do not turn on the L15 LCD TV immediately after this to avoid causing fire, electric shock or component damage.
• Do not place the L15 LCD TV on an unstable cart, stand, or table. If the L15 LCD TV falls, it can injure a person and cause
serious damage to the appliance.
• A distance of at least 2 feet should be maintained between the L15 LCD and any heat source, i.e. radiator, heater, oven,
amplifier etc. Do not install the product close to smoke. Operating the product close to smoke or moisture may cause fire or
electric shock.
• Slots and openings in the back and bottom of the cabinet are provided for ventilation. To ensure reliable operation of the L15
LCD TV and to protect it from overheating, be sure these openings are not blocked or covered. Do not place the L15 LCD TV
in a bookcase or cabinet unless proper ventilation is provided.
• Never push any object into the slot on the L15 LCD TV cabinet. Do not place any objects on the top of the product. It could
short circuit parts causing a fire or electric shock. Never spill liquids on the L15 LCD TV.
• The L15 LCD TV should be operated only from the type of power source indicated on the label. If you are not sure of the type
of power supplied to your home, consult your dealer or local power company.
• The power cable must be replaced when using different voltage from that specified in the User Manual. For more information,
contact your dealer.
• The L15 LCD TV is equipped with a three-pronged grounded plug, a plug with a third (grounding) pin. This plug will fit only into
a grounded power outlet as a safety feature. If your outlet does not accommodate the three-wire plug, have an electrician
install the correct outlet, or use an adapter to ground the appliance safely. Do not defeat the safety purpose of the grounded
plug.
• Do not overload power strips and extension cords. Overloading can result in fire or electric shock.
• The wall socket shall be installed near the equipment and shall be easily accessible.
• Only the marked power source can be used for the product. Any power source other than the specified one may cause fire or
electric shock.
• Do not touch the power cord during lightning. To avoid electric shock, avoid handling the power cord during electrical storms.
• Unplug the unit during a lightening storm or when it will not be used for long period of time. This will protect the L15 LCD TV
from damage due to power surges.
• Do not attempt to repair or service the product yourself. Opening or removing the back cover may expose you to high
voltages, the risk of electric shock, and other hazards. If repair is required, please contact your dealer and refer all servic
qualified service personnel.
• Keep the product away from moisture. Do not expose this appliance to rain or moisture. If water penetrates into the product,
unplug the power cord and contact your dealer. Continuous use in this case may result in fire or electric shock.
• Do not use the product if any abnormality occurs. If any smoke or odor becomes apparent, unplug the power cord and contact
your dealer immediately. Do not try to repair the product yourself.
• Avoid using dropped or damaged appliances. If the product is dropped and the housing is damaged, the internal components
may function abnormally. Unplug the power cord immediately and contact your dealer for repair. Continued use of the
product may cause fire or electric shock.
• Follow instructions for moving the product. Ensure that the power connector and any other cables are unplugged before
moving the product.
• Hold the power connector when removing the power cable. Pulling the power cable itself may damage the wires inside the
cable and cause fire or electric shock. When the product will not be used for an extended period of time, unplug the power
connector.
• To avoid risk of electric shock, do not touch the connector with wet hands.
• Insert batteries for the remote control in accordance with instructions. Incorrect polarities may cause damage and leakage of
the batteries, operator injury and contamination the remote controller.
• If any of the following occurs please contact the dealer:
o The power connector fails or frays.
o Liquid sprays or any object drops into the L15 LCD TV.
o The display is exposed to rain or other moisture.
o The display is dropped or damaged in any way.
o The performance of the Display changes substantially.
• Operating environment: Temperature: 5°C ~ 35°C (41°F ~ 95°F), Humidity: 10% to 90% non-condensing
ing to
Version - 4/5/2005
4
www.vizioce.com
VIZIO L15 User Guide
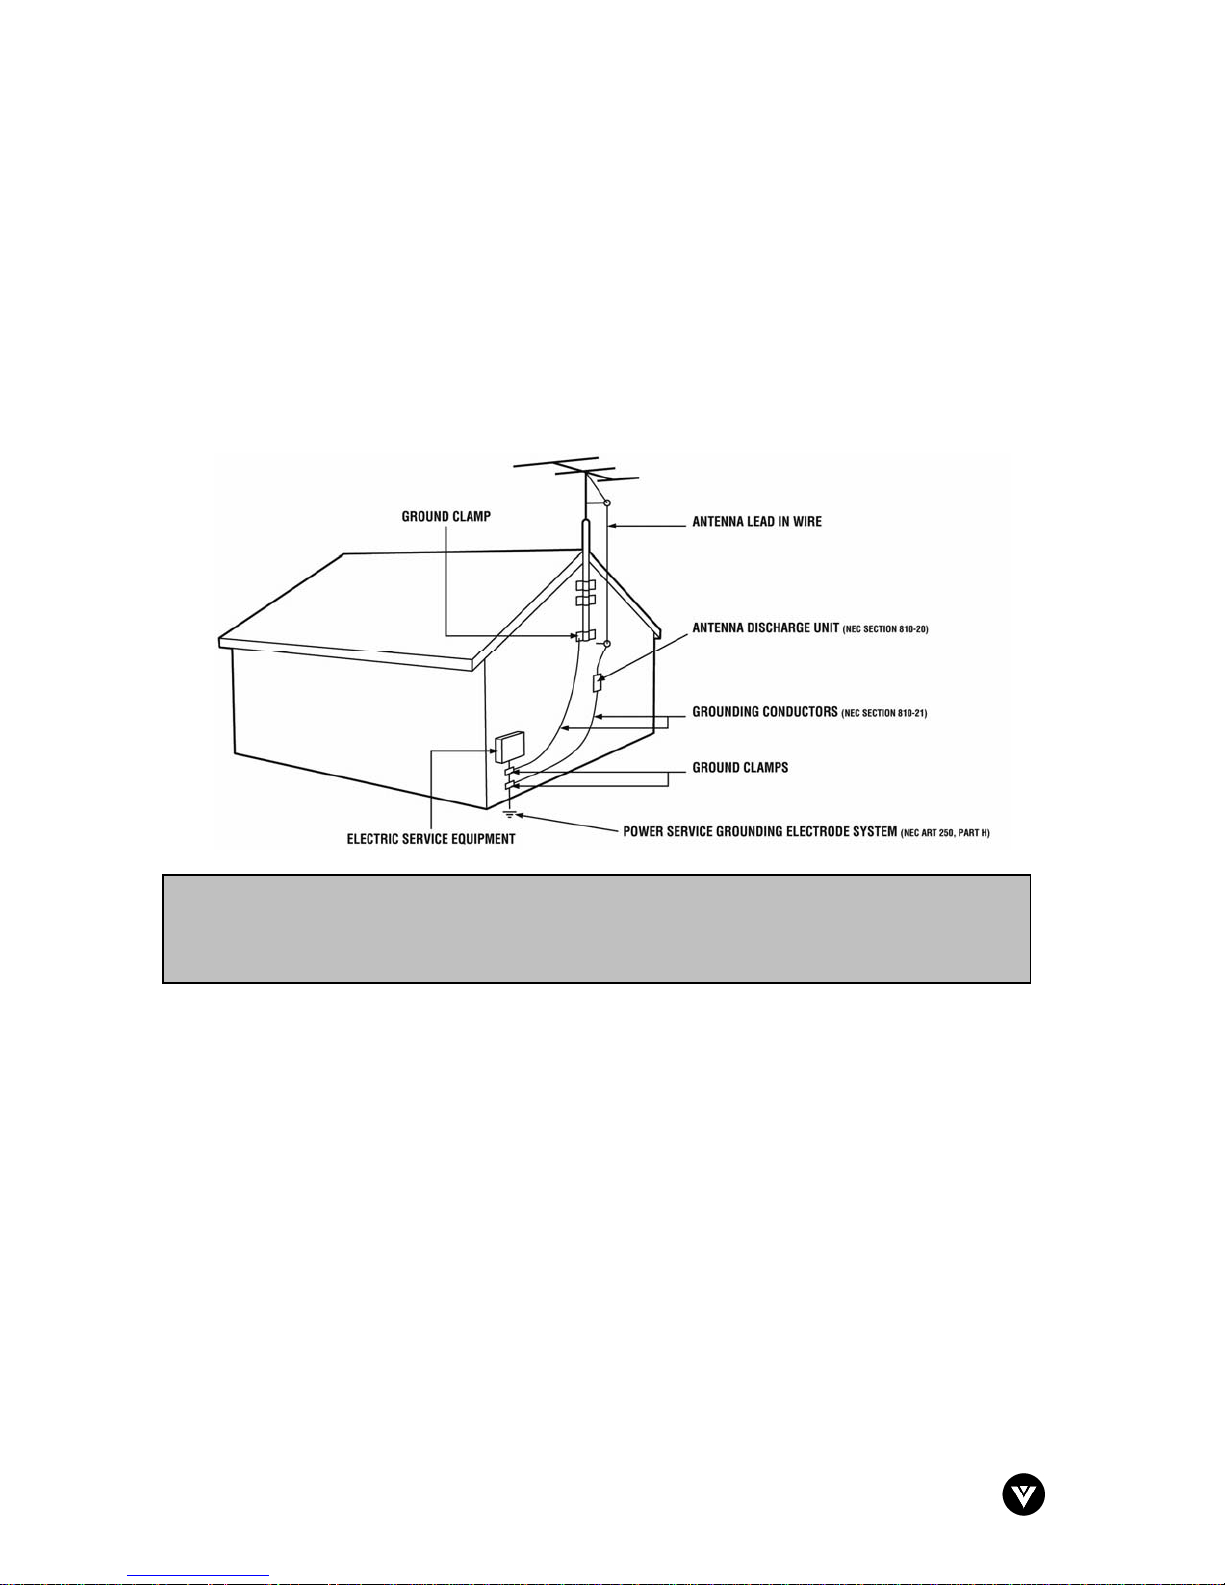
1.6 - Television Antenna Connection Protection
External Television Antenna Grounding
If an outside antenna or cable system is to be connected to the LCD TV, make sure that the
antenna or cable system is electrically grounded to provide some protection against voltage
surges and static charges.
Article 810 of the National Electrical Code, ANSI/NFPSA 70, provides information with regard to
proper grounding of the mast and supporting structure, grounding of the lead-in wire to an
antenna discharge unit, size of the grounding conductors, location of antenna discharge unit,
connection to grounding electrodes, and requirements of the grounding electrode. See figure
below for proper configuration.
Note to the CATV system installer: This reminder is provided to call the CATV system installer's
attention to Article 820-40 of the NEC that provides guidelines for proper grounding and, in particular,
specifies that the cable ground shall be connected to the grounding system of the building, as close to
the point of cable entry as practical.
Lightning Protection
For added protection of the LCD TV during a lightning storm or when it is left unattended or
unused for long periods of time, unplug the LCD TV from the wall outlet and disconnect the
antenna or cable system.
Power Lines
Do not locate the antenna near overhead light or power circuits, or where it could fall into such
power lines or circuits.
Version - 4/5/2005
5
www.vizioce.com
VIZIO L15 User Guide
1.7 - Package Contents
VIZIO L15 15” LCD TV
Standard Remote Control
Power Cord and DC Adapter
Audio Cable and adapter
Video Adapter
Quick Set up Guide
Registration Card
Warranty Information
This User Guide
IMPORTANT: Save the original box and all the packing material for future shipping needs.
Note: Your product may also include various other accessories depending on region of
purchase.
Version - 4/5/2005
6
www.vizioce.com
VIZIO L15 User Guide
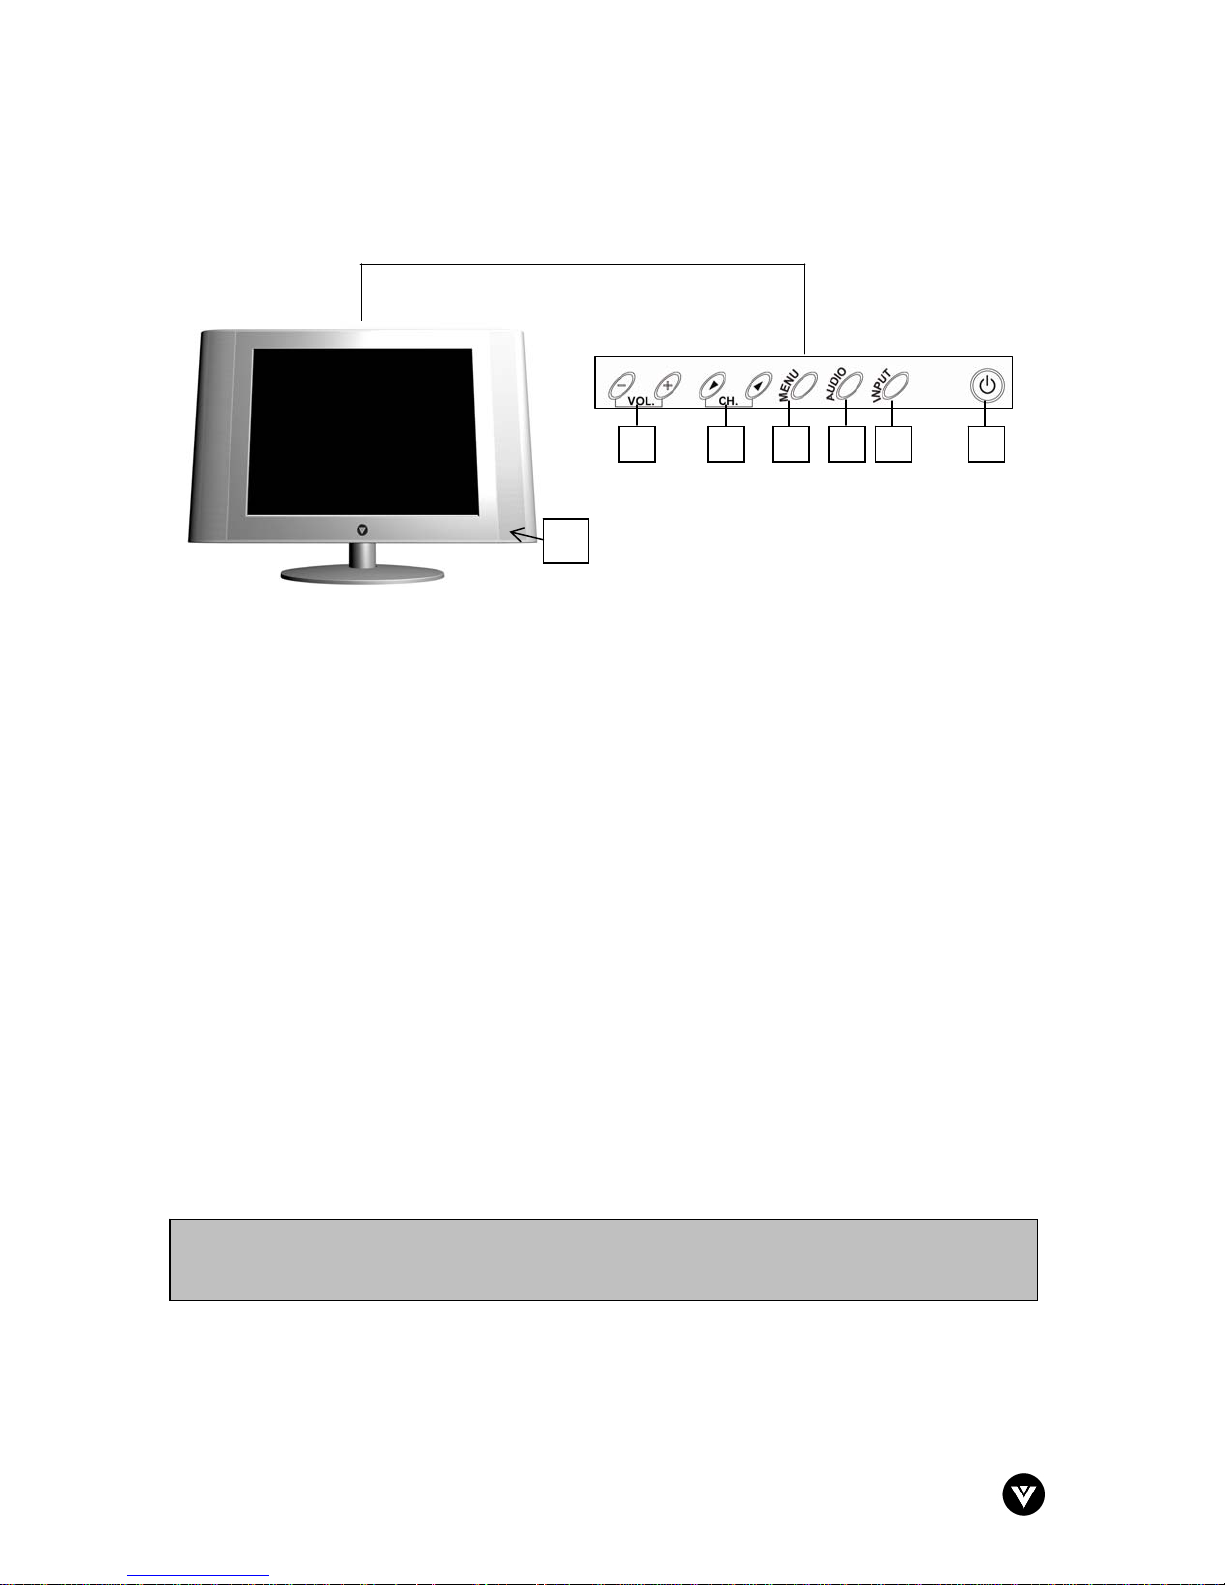
1.8 - Front Panel
Use the buttons on the front panel control to display and adjust the On Screen Display (OSD).
1 2 3 4 5 6
7
1) Volume - /+ – These buttons are used to increase or decrease the speaker volume. While the
OSD is active, these buttons function as adjustment controls in the OSD menus.
2) Channel d/c – These buttons are used to increase or decrease the selected channels. While
the OSD is active, these buttons function as select controls in the OSD menus.
3) Menu – When this button is pressed, the OSD main menu will appear on the screen. If it is
pressed while the main menu is displayed, the main menu will disappear. If pressed while an
OSD sub menu is displayed, it will exit the sub menu and go back to the last menu.
4) Audio – This button switches between the available audio sources in the following sequence:
TV, Audio 1 (PC), or Audio 2 (AV).
5) Input – This button switches between the available input sources in the following sequence:
AIR (TV), PC Mode (RGB), and Video (AV or S-Video).
6) Power – Switch the TV on by pressing the button once. Press the button again to turn the TV
off. If the TV is plugged in, but powered off, the indicator light will be orange.
7) Remote Control Sensor – This is the window that passes all of the remote signals to the
sensor. Point the remote control directly at this window for the best response to the remote
signal.
Note: In all submenus, the cursor movement is circulatory. For example, if the d Ch button is
pressed when the cursor is on the last item in the submenu, the cursor will move to the main
icon.
Version - 4/5/2005
7
www.vizioce.com
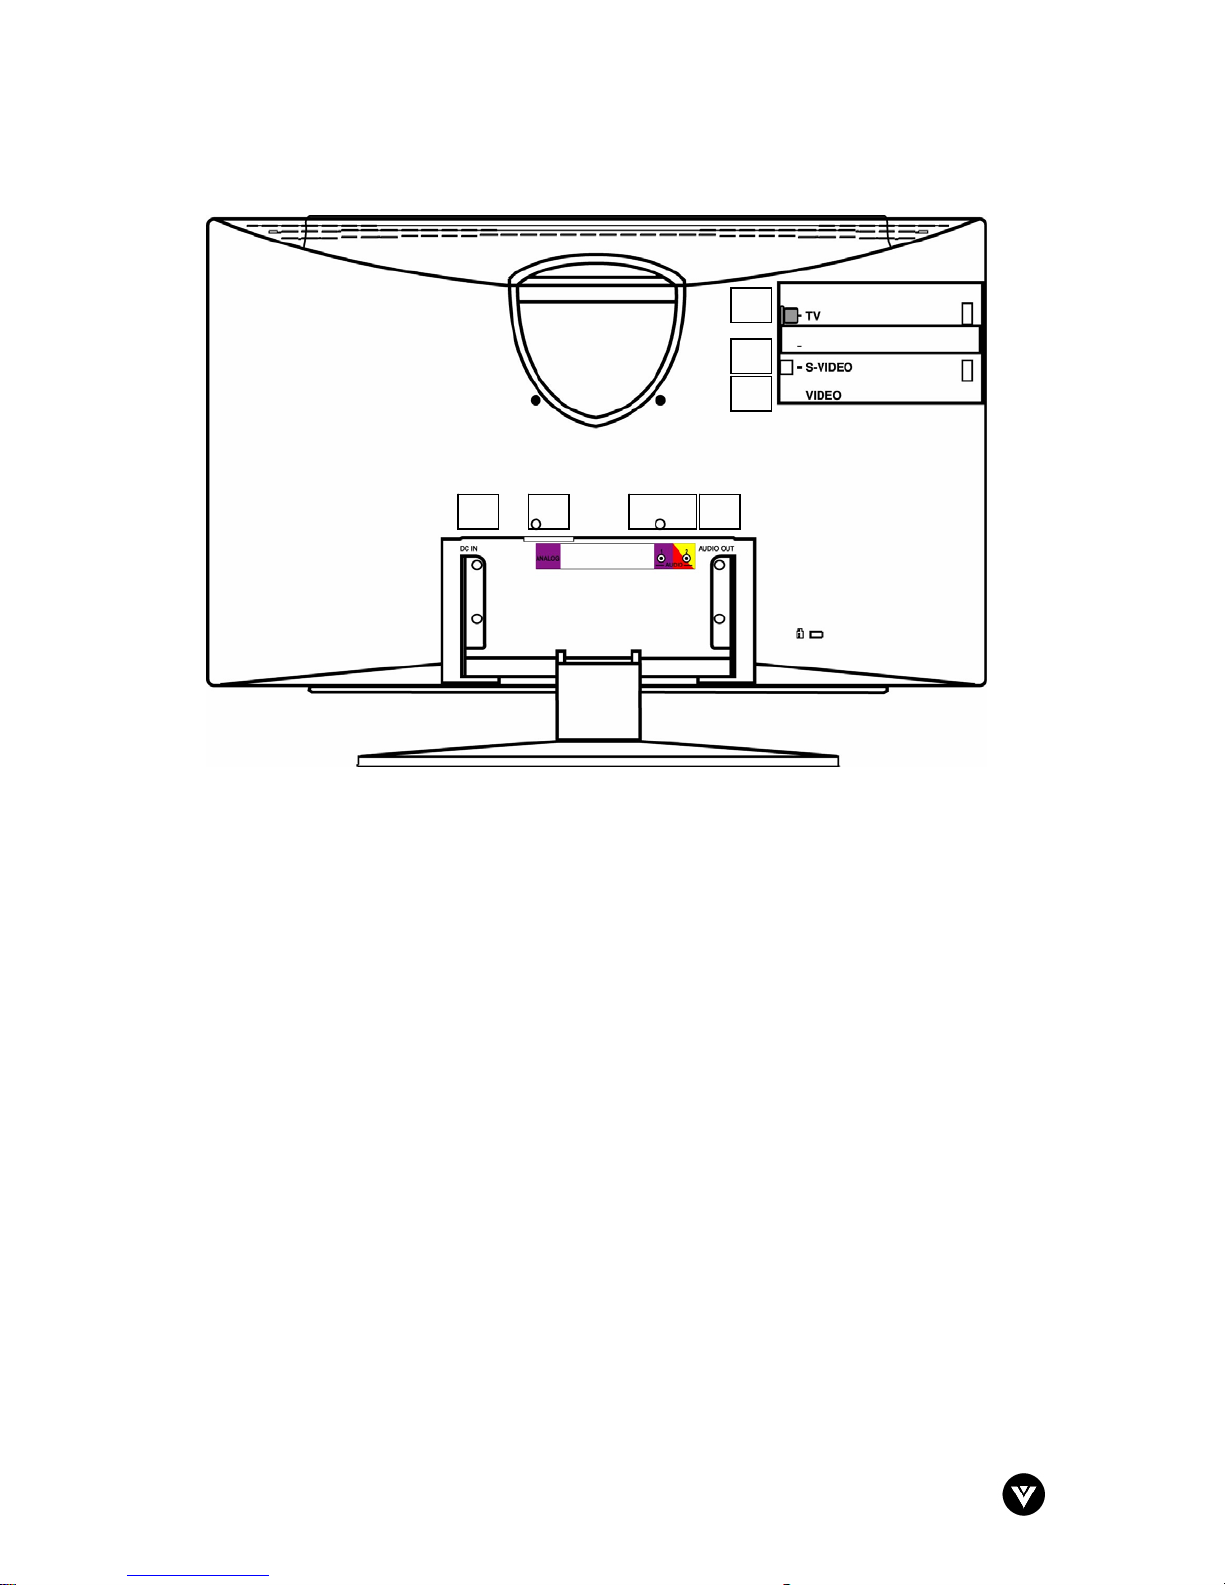
1.9 - Rear Panel Connections
1 2
3a 3b
VIZIO L15 User Guide
5
6
7
4
1. DC In – Connect one end of the DC Adapter here and connect the power cord to a
properly grounded outlet.
2. Analog (RGB) – Connect the analog (RGB) input to external video source such as a PC.
3. Audio Input
a) Audio 1 – Connect the external audio from a PC source.
b) Audio 2 – Connect the external audio from the video source such as a DVD player or
set-top box.
Note: Please use the audio cable adapter supplied by VIZIO when connecting external
audio to the L15 LCD TV.
4. Audio Out – Connect the internal audio to an external amplifier or receiver.
5. TV – Connect to the antenna, satellite or cable service source.
6. S-Video – Connect the S-Video input to external video device such as VCR, DVD and
video games.
7. AV – Connect the composite video input to external video device such as VCR, DVD and
video games.
Version - 4/5/2005
8
www.vizioce.com
VIZIO L15 User Guide
1.10 - VIZIO L15 Remote Control
1.10.1 - Remote Control Description
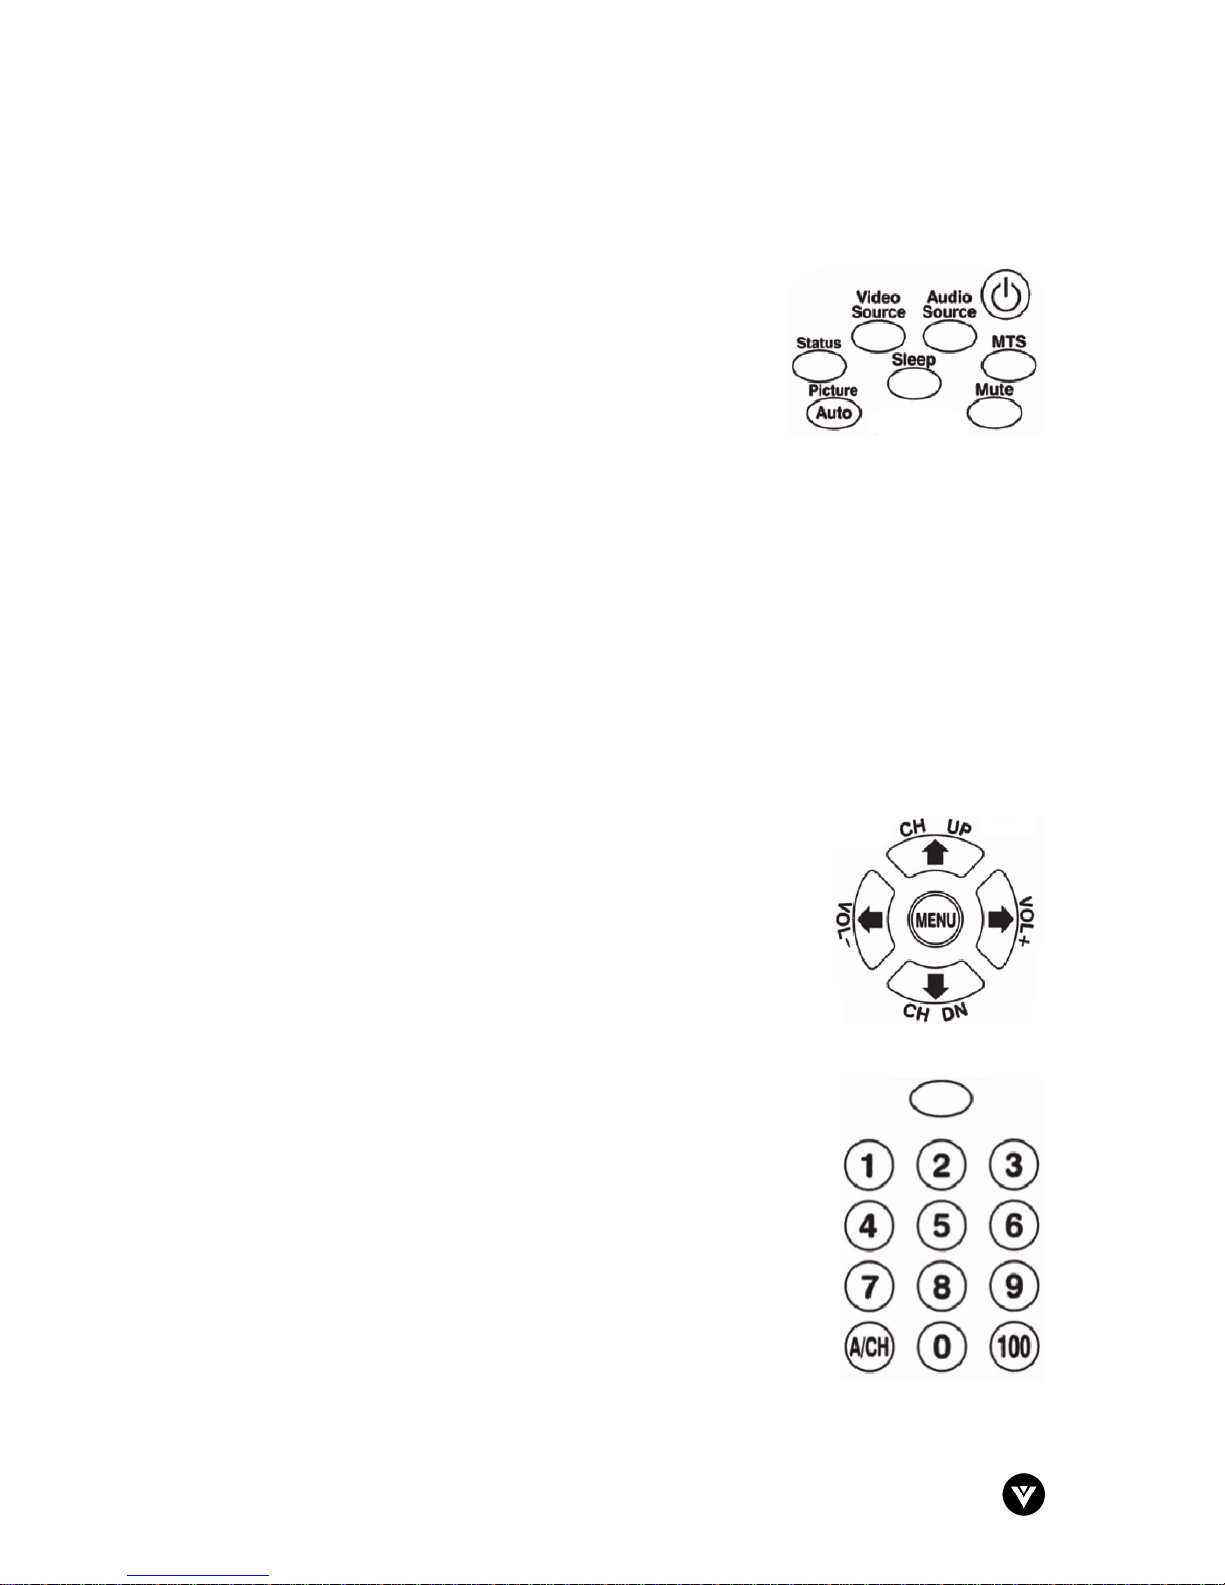
1. Video Source - Press this button to select the video input
source: PC mode, Video and TV (AIR).
2. Audio Source - Press this button to select the video input
source: Audio 1: PC, Audio 2: AV and TV.
3. Status - Press this button to display the current system
status (i.e., channel, input source, etc.).
4. Picture/AUTO - Press this button to Auto adjust the PC function. Also press this button
to adjust some of the LCD TV monitor picture menu items. Please see Section 3.4.2.5 –
Image Adjust, page 23 for additional details regarding the PC functions.
5. Sleep - Press this button to set the LCD TV Monitor to turn itself off within a certain time.
Choose from the following options: 30, 60, 90 or 120 minutes. Please see Section
3.4.2.4a- Features for TV and Video Mode, page 22 for additional details.
6. MTS - Press this button to select a sound mode if available with the TV programming:
Mono, Stereo and SAP. Please see Section 3.4.2.3 - Sound, page 21 for additional
details.
7. Mute - Press this button to eliminate or restore the LCD TV Monitor sound. Mute on will
appear on the screen when the sound is muted.
8. VOL (-/+) - Press these buttons to decrease or increase the
sound. Also press to select or adjust items in the OSD (onscreen display) menu.
9. CH (UP/DN) - Press these buttons to adjust the channel up or
down. Also press to select or adjust items in the OSD (onscreen display) menu.
10. Menu - Press this button to open the OSD (on-screen display)
menu. Also this button will allow you to exit the OSD menu.
Favorites
11. Favorites - Press this button to store your favorite channel.
Please see Section 3.4.2.1 – TV Install, page 20 for additional
details.
12. Number buttons - Press this button to select TV channels.
When selecting single-digit channels, then press the number of
the desired channel. Note: The LCD TV monitor will pause for a
few seconds then tune to the selected channel.
13. A/CH button - Press this button to alternate from current
channel selection to previous channel selection.
Note: The remote control layout is for reference only.
Version - 4/5/2005
9
www.vizioce.com
 Loading...