

Page 1

42″LCD TV Vizio E422VA
Service
Service
Service
31.469~66.587 kHz
Table of Contents
Description Page Description Page
Table of Contents.......……..............................…...........1
Important Safety Notice.......................................…….....2
Revision List…………………………………………………3
1. General Specification.............................………….........4
2. Operating Instructions………………….………............5
2.1 The Use Of Remote Control…….………….………......5
2.2 To Use The Menu…...…………………….……….........6
2.3 How To Connect…….……….………….….……..…....20
2.4 Front Panel Control Knobs……….……….….…….....21
3. Input/Output Specification…………......................…....22
3.1 RGB Signal input.…………...............................…...22
3.2 HDMI Digital connector pin assignments..........…...22
3.3 Compatible Mode Table....................................…....23
4. Mechanical Instructions……………………..................24
5. Repair Flow Chart ……………………….…….……......27
6. PCB Layout ….……………..………………....…...........34
SAFETY NOTICE
ANY PERSON ATTEMPTING TO SERVICE THIS CHASSIS MUST FAMILIARIZE HIMSELF WITH THE CHASSIS
6.1 Main Board………...…..………........…………......34
6.2 Power Board…….………..……………..………....38
6.3 Key Board……..……………………..…..………....44
6.4 IR Board…………………………..……….……....44
7. Adjustment..........................................................45
7.1 White Balance Adjustment…..……………………45
7.2 Firmware Instruction…….………………………..46
7.3 DDC Instruction…………..…………………….…49
8. Block Diagram.…….............................................53
9. Schematic Diagram…...…………..……..………...54
9.1 Main Board………………………………….........54
9.2 Power Board…………….…………...…………...70
9.3 Key Board……………….……….………….…....73
9.4 IR Board……………….……….………….….......74
10. Exploded View……..……………………………….75
11. BOM List…….……..….…………………………….77
Horizontal Frequency
AND BE AWARE OF THE NECESSARY SAFETY PRECAUTIONS TO BE USED WHEN SERVICING
ELECTRONIC EQUIPMENT CONTAINING HIGH VOLTAGES.
CAUTION: USE A SEPARATE ISOLATION TRANSFOMER FOR THIS UNIT WHEN SERVICING
1
Page 2

Important Safety Notice
Proper service and repair is important to the safe, reliable operation of all AOC Company Equipment. The service
procedures recommended by AOC and described in this service manual are effective methods of performing service
operations. Some of these service operations require the use of tools specially designed for the purpose. The
special tools should be used when and as recommended.
It is important to note that this manual contains various CAUTIONS and NOTICES which should be carefully read in
order to minimize the risk of personal injury to service personnel. The possibility exists that improper service
methods may damage the equipment. It is also important to understand that these CAUTIONS and NOTICES ARE
NOT EXHAUSTIVE. AOC could not possibly know, evaluate and advise the service trade of all conceivable ways in
which service might be done or of the possible hazardous consequences of each way. Consequently, AOC has not
undertaken any such broad evaluation. Accordingly, a servicer who uses a service procedure or tool which is not
recommended by AOC must first satisfy himself thoroughly that neither his safety nor the safe operation of the
equipment will be jeopardized by the service method selected.
Hereafter throughout this manual, AOC Company will be referred to as AOC.
WARNING
Use of substitute replacement parts, which do not have the same, specified safety characteristics, might create
shock, fire, or other hazards.
Under no circumstances should the original design be modified or altered without written permission from AOC.
AOC assumes no liability, express or implied, arising out of any unauthorized modification of design.
Servicer assumes all liability.
FOR PRODUCTS CONTAINING LASER:
DANGER-Invisible laser radiations when open AVOID DIRECT EXPOSURE TO BEAM.
CAUTION-Use of controls or adjustments or performance of procedures other than those specified herein may
result in hazardous radiation exposure.
CAUTION -The use of optical instruments with this product will increase eye hazard.
TO ENSURE THE CONTINUED RELIABILITY OF THIS PRODUCT, USE ONLY ORIGINAL MANUFACTURER'S
REPLACEMENT PARTS, WHICH ARE LISTED WITH THEIR PART NUMBERS IN THE PARTS LIST SECTION OF
THIS SERVICE MANUAL.
Take care during handling the LCD module with backlight unit
-Must mount the module using mounting holes arranged in four corners.
-Do not press on the panel, edge of the frame strongly or electric shock as this will result in damage to the screen.
-Do not scratch or press on the panel with any sharp objects, such as pencil or pen as this may result in damage to
the panel.
-Protect the module from the ESD as it may damage the electronic circuit (C-MOS).
-Make certain that treatment person’s body is grounded through wristband.
-Do not leave the module in high temperature and in areas of high humidity for a long time.
-Avoid contact with water as it may a short circuit within the module.
-If the surface of panel becomes dirty, please wipe it off with a soft material. (Cleaning with a dirty or rough cloth may
damage the panel.)
2
Page 3

Revision List
Version Release Date Revision Instructions Customer Model TPV Model
A00 Oct.25,2010 Initial Release E422VA E42AG5NKWKVCXNX
Add new power board:
715G3885P03W30003M
A01 Sep.16,2011
A02 Sep.17,2011 Add new model E422VA E42BA5NKWKVANNX
A03 Sep.25,2011 Add new model
A04 May.16,2012 Add new model
Update:
PCB Layout
Schematic Diagram
BOM List
E422VA E42BA5NKWKVGXNX
E422VA E42BA5NKWKVGNNX
E422VA E42BA5NKWKVG9NX
E422VA E42BA5NKWKVG5NX
E422VA E42BG5NKWKVGNNX
3
Page 4

1. General Specification
E422VA Specifications
Panel
Resolution 1920 x 1080 pixels
Pixel (Dot) Pitch 0.4845mm x 0.4845mm
Display Compatibility 1080P (FHDTV)
Colors 1.06 billion @ 10 bit
Brightness 500 cd/m2 (typical)
Contrast Ratio 1500 : 1 (typical)
Dynamic Contrast Ratio 50,000:1
Response Time 5 msec (typical)
Viewing Angle
Inputs And Connections
Outputs 1x 5.1 S/PDIF Optical Digital Audio, 1x Stereo Audio
Features
Special Features
Speakers 2xBuilt-in, 10W Speakers
42″ Diagonal (42.02″ Diagonal viewing), 16:9 Aspect Ratio
178° (horizontal/vertical)
4 x HDMI with HDCP
1 x RF (F connector for internal tuner)
1x Component YPbPr plus Stereo Audio (via Component)
1x Computer RGB plus Stereo Audio
1x Ethernet (10/100 Base-TX)
2x USB
1x WIFI 802.11n Single Band
ATSC/Clear QAM Tuner, NTSC Video Decoder, 3:2 or 2:2 Reverse Pull-Down,1080P
FHDTV, Color Temperature adjustments of 6500K/9300K/11000K and Independent
Red/Green/Blue for Color Temperature for Color Temperature adjustments, HDMI
v1.4 (ARC), 3D Comb Filter, Digital Audio Amplifier, Dolby Digital for ATSC/QAM,
Signal Compatibility: 480I(SDTV), 480P(EDTV), 720P(HDTV), 1080I(HDTV),
1080P(FHDTV), Channel Skip/Add, VIDEO/INPUT Naming Capability, Closed
Caption, Parental Control/VCHIP 2.0, Programmable Sleep Timer, Computer Support
of 640x480, 800x600, 1024x768 and 1920x1080 resolutions via VGA/HDMI, SRS
TSHD, SRS TruVolume, HD Game Port, Noise Reduction, 10-bit video processing,
MTS Stereo Decoder, Dolby Digital for ATSC/QAM, VESA Mount Compatible,
Broadband Internet and Services Connectivity.
• HDMI CEC
• HDMI 1.4 (ARC), Insta Port
• DCR
• Light Sensor
• Detachable Base
Panel Life 30,000 hours to half the original brightness
Power
Input IEC Connector for direct power line connection
Voltage Range 120 Vac at 50/60 Hz
Power Consumption 93.36W, <1W (Standby)
Environmental Conditions
Operating
Non-Operating
Dimensions
Net Weight 37.37 lbs with stand; 31.99 lbs without stand
Gross Weight 51.10 lbs
Certifications UL, CUL, FCC Class B, BQB
Certifications EIA/CEA-766-A
Compliances Energy Star 4.1. ATSC Spec A/65, EIA/CEA-766-A
Temperature: 5°C~35°C, Relative Humidity: 20~80%, Altitude: 0~6,561ft
Temperature: -20°C~50°C, Relative Humidity: 10~70%, Altitude: 0~40,000 ft
39.73″ W x 26.70″ H x 9.99″ D with stand; 39.73″ W x 25.27″ H x 3.64″ D
without stand.
4
Page 5
2. Operating Instructions
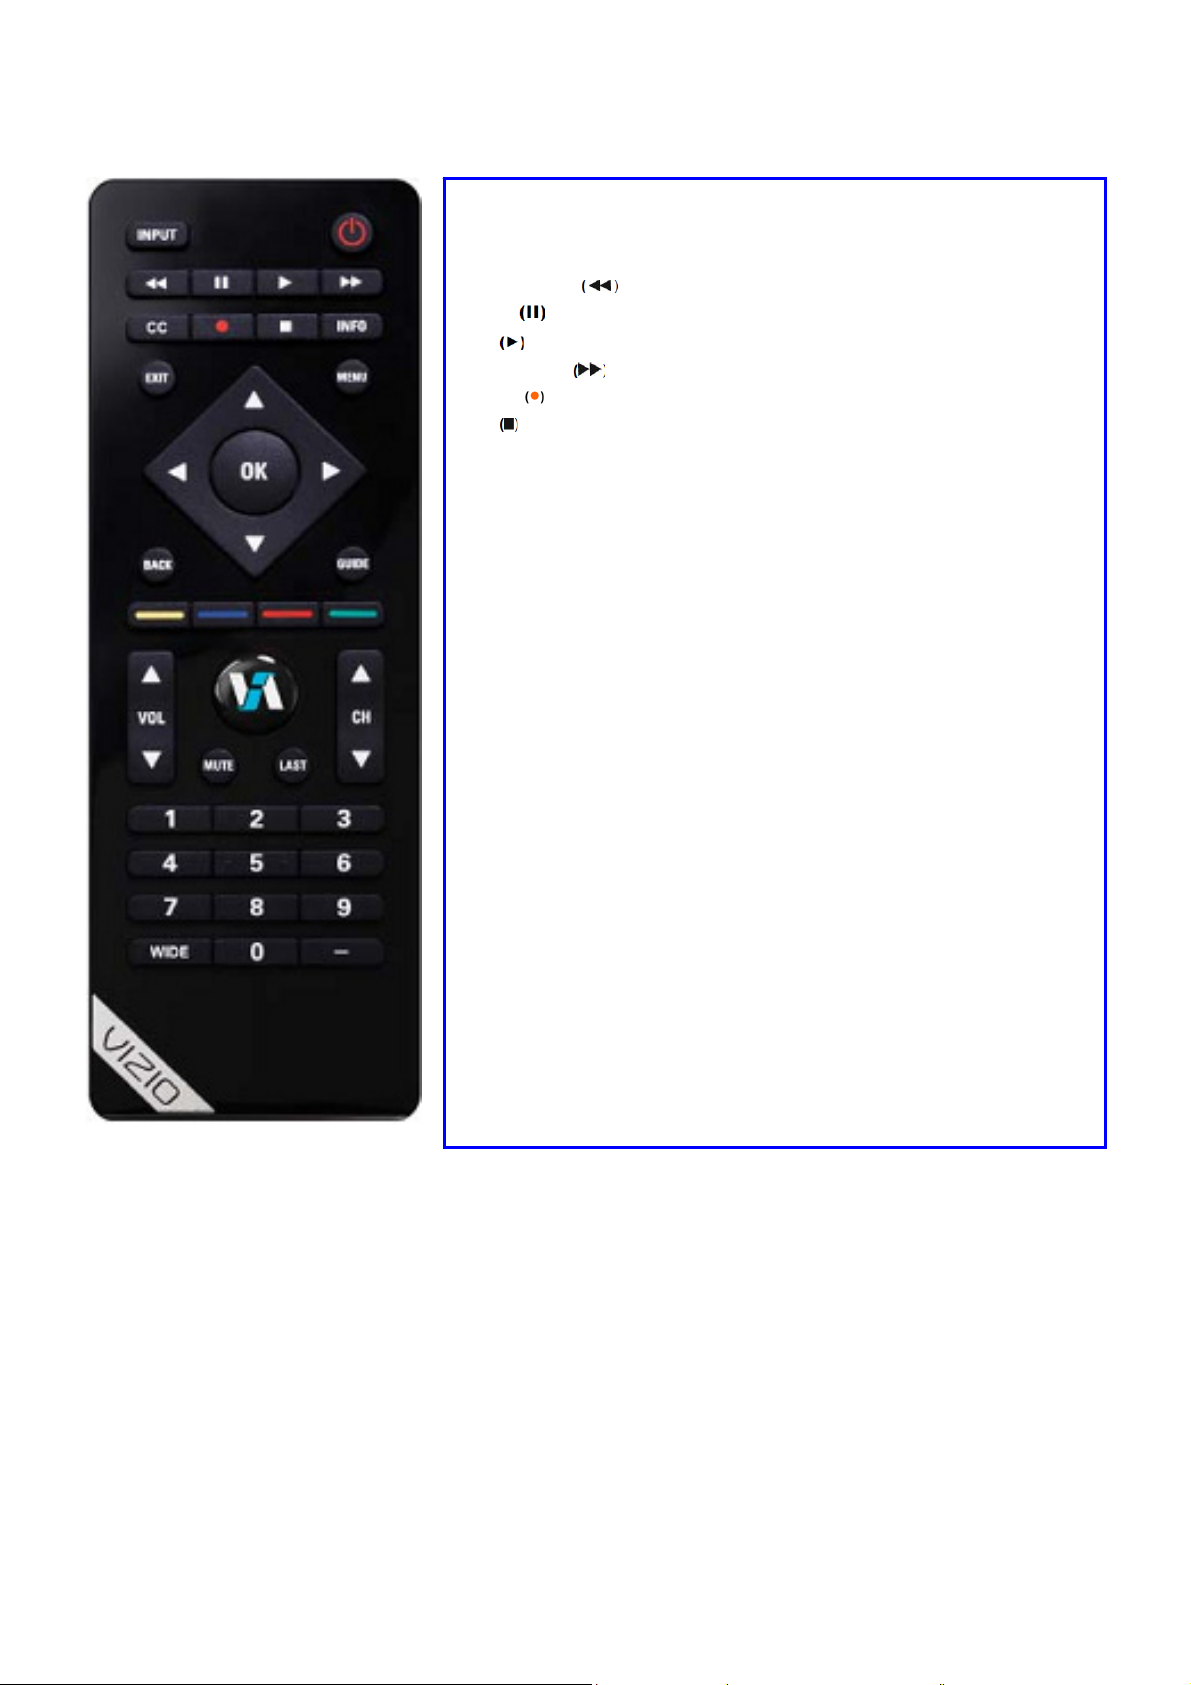
2.1 The Use of Remote Control
POWER: Press to turn on/off the TV from or to standby mode.
INPUT: Press to select TV/AV/Comp/HDMI1/HDMI2/HDMI3/HDMI4/
VGA/Photos/Music
Fast Reverse
Pause
Play
: Press to pause playback
: Press to start playback
Fast forward
Record
Stop
: Press to begin recording
: Press to stop playback/recording
: Press to reverse playback
: Press to skip to the next chapter
INFO: To display information of currently channel/source.
CC: To display CC information.
MENU: Press to activate OSD menu and activate the setting/selection
of OSD
EXIT: Exit OSD
Cursor Key: 1. Press button to navigate OSD menu
2. Cursor right key perform confirmation as well as precede
next level of OSD
OK: the setting/selection of OSD
GUIDE: Press to display detailed information when viewing a digital TV
program
BACK: Back to upper OSD
- Button: Use the button for digital channels and widgets.
VOL +/ -: Press to adjust the volume
CH +/ - : Press to browse channels
VIA: Press to enter widget list
MUTE: Interrupt the sound or restore it.
LAST: Press to alternate between the currently viewed program and
previously viewed program
Number Key: 1. Press number button to direct access to TV channel
2. Press the pass code to activate the factory mode
3. Press to activate the Channel Lock (enter PIN code for
Channel lock)
SWAP: no support
WIDE: Press to change picture mode
5
Page 6
2.2 Setting Up to Watch Television
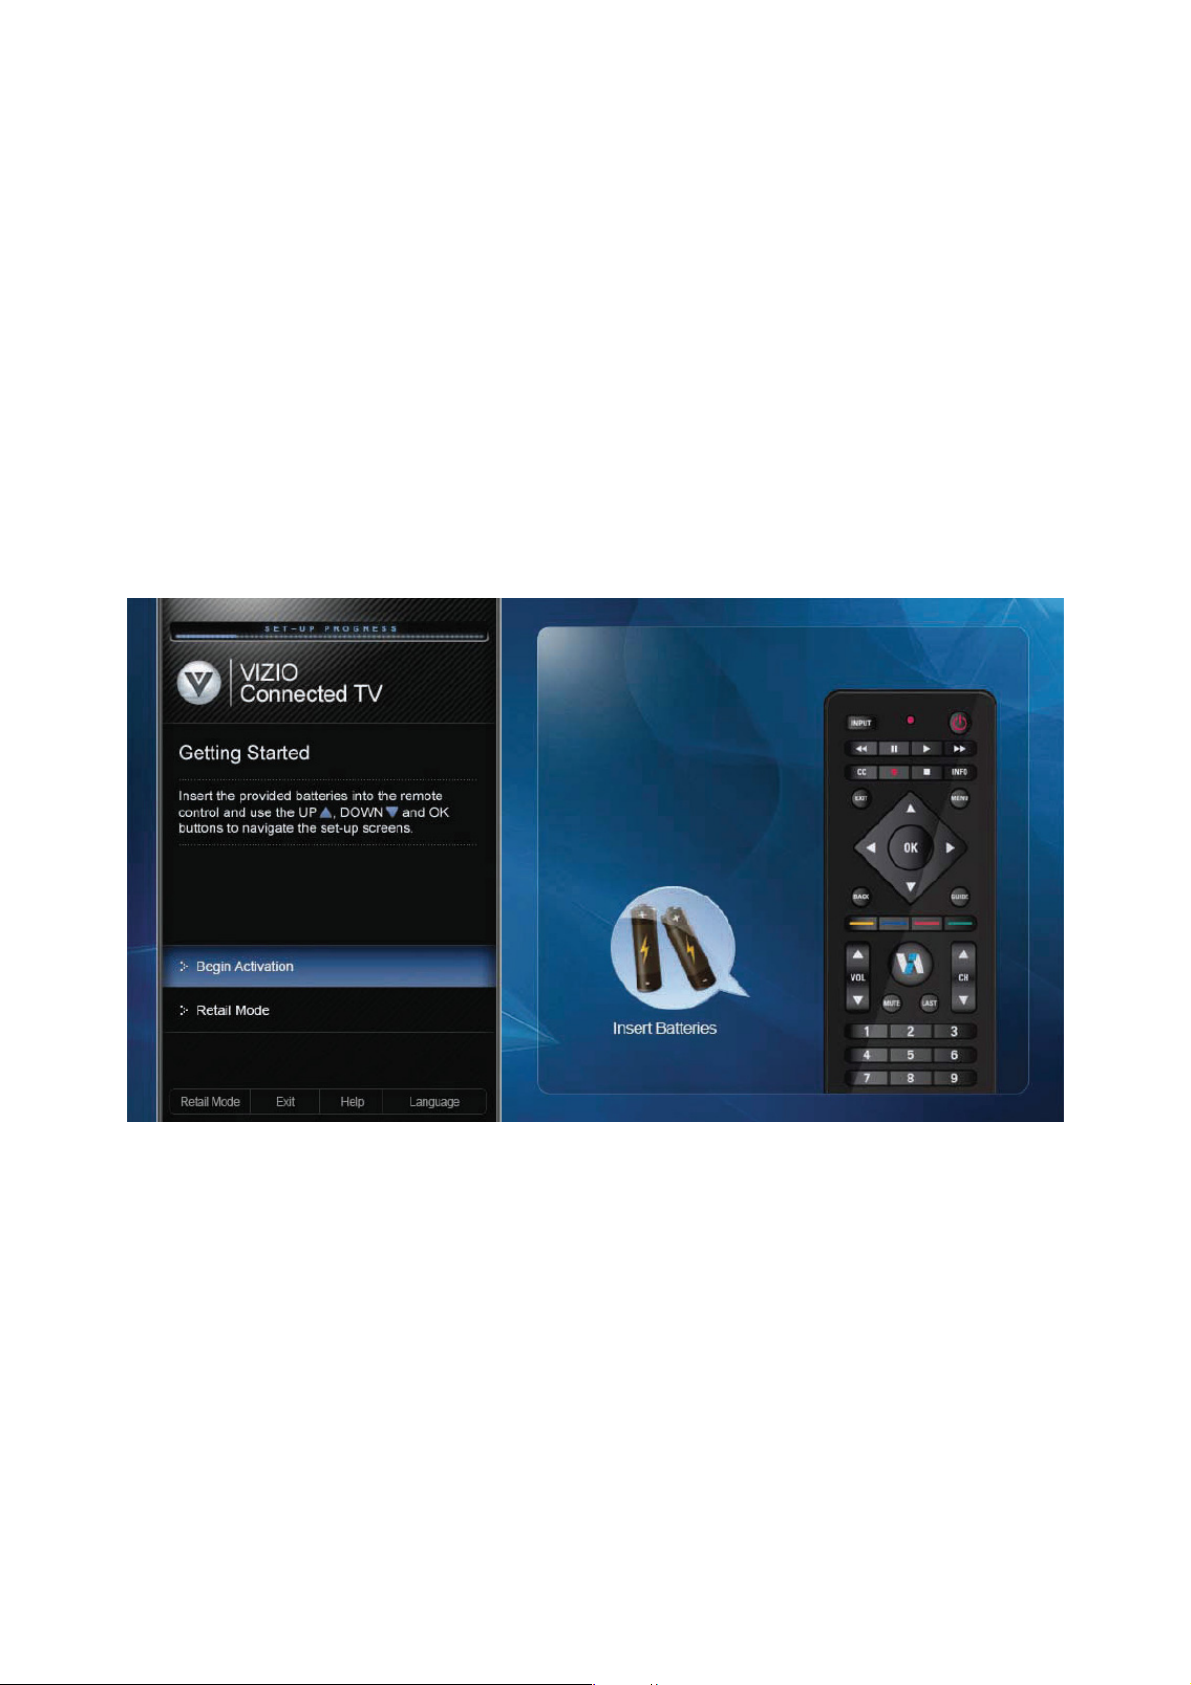
2.2.1 Getting Started
Your VIA-enabled HDTV has a built-in Setup App that plays when you turn on your TV for the first time.
Follow the on-screen directions to easily setup your new HDTV.
1. Insert batteries into the remote control.
2. Connect the power cord to the power cord connector on your HDTV, and then plug the power cord into an AC wall
socket.
3. Gather the devices your want to connect to your HDTV. Don’t connect them yet. We will help you do that in the
Setup App.
4. Turn on your TV. The Setup App will automatically play and guide you thru the initial setup of your HDTV. Use the
arrow and OK buttons to navigate through the Setup App. During the setup process you will:
• Connect to the Internet
• Add your TV channels (unless you have a Cable/Satellite set-top box)
• Connect your devices and set up your remote to control them.
6
Page 7
2.2.2 Using your HDTV for the first time
Connecting to the Internet
Set up the Internet connection using the initial Setup App or the Network Menu in the HDTV Settings App.
Your HDTV has 802.11n single-band wireless, so you can connect your TV to the Internet through your wireless
home network. Or you can also connect to the Internet by plugging in an Ethernet cable from your Internet
connection into the Ethernet port on your HDTV. A wired connection may provide a more consistent connection
depending on the conditions in your home environment.
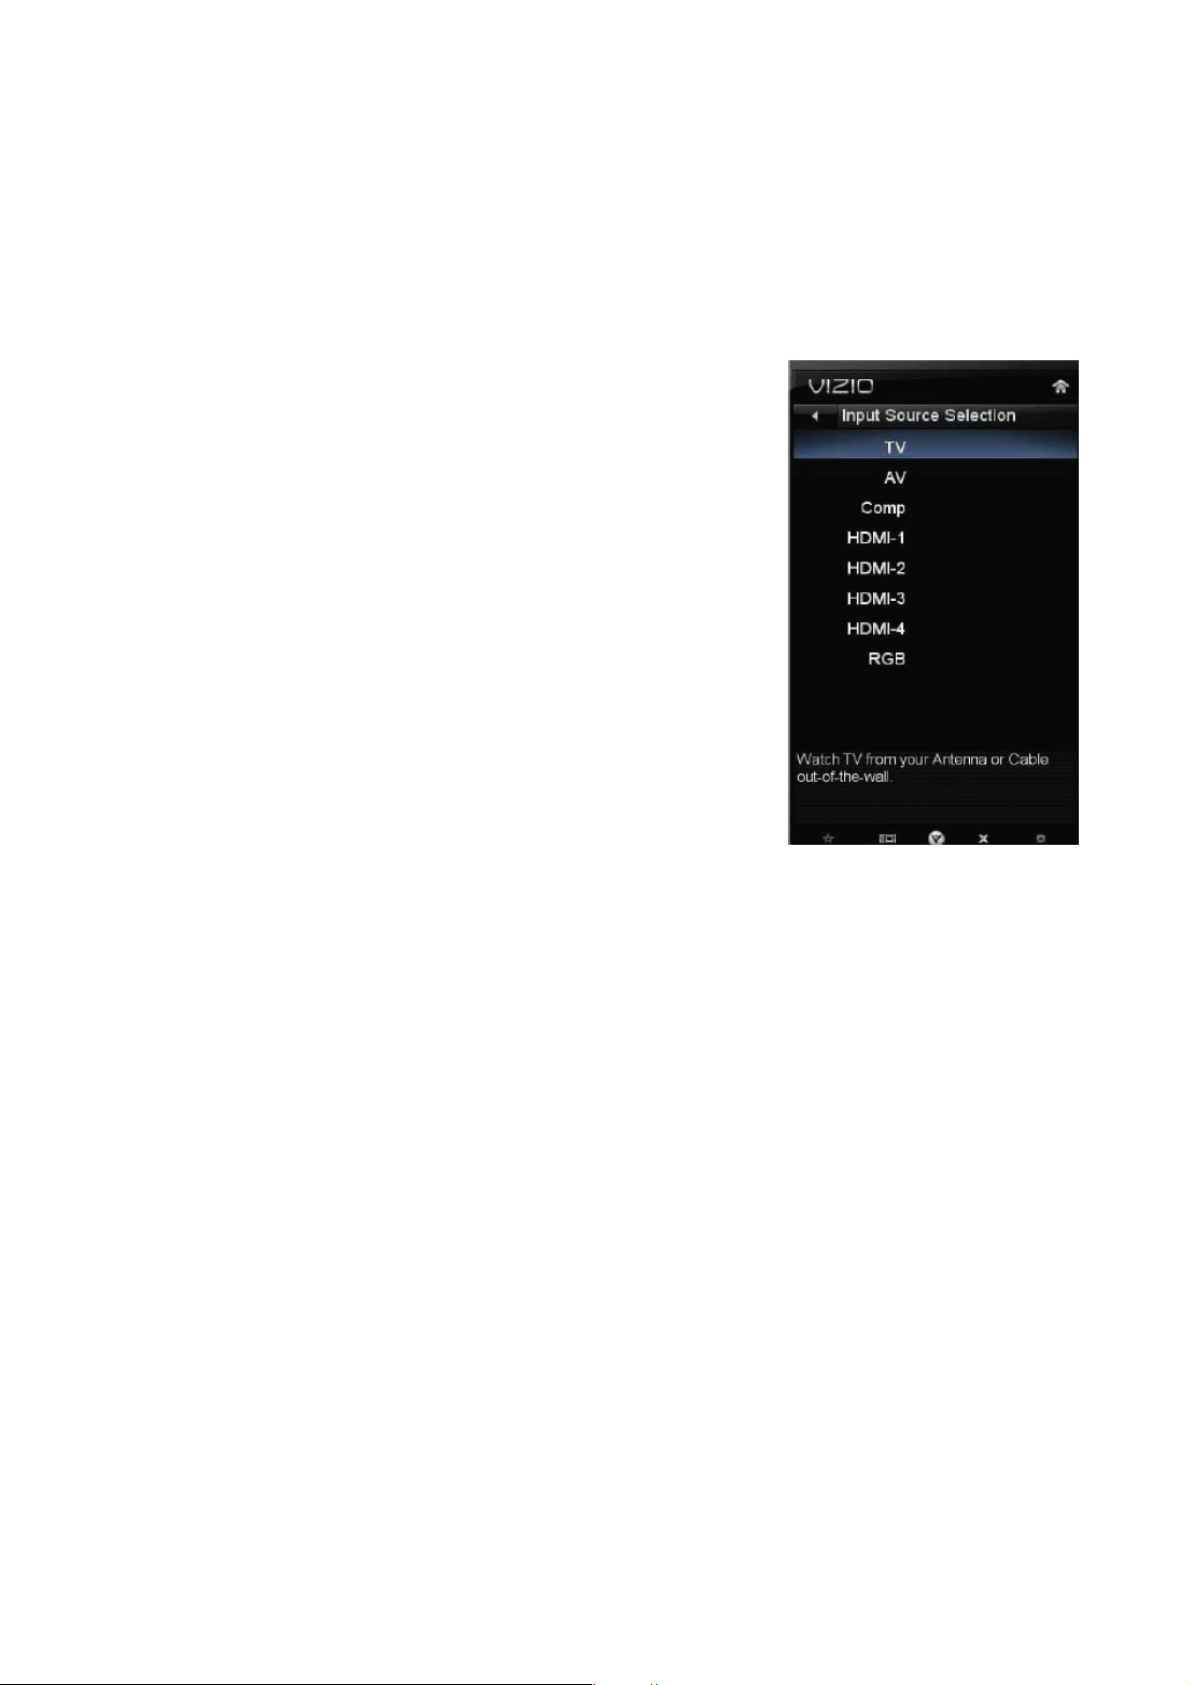
Select Input Source
Select the input source for your HDTV by pressing INPUT on the remote
control or the side of your TV. Pressing this button will cycle you through the
following options: TV, AV, Comp, HDMI-1, HDMI-2, HDMI-3, HDMI-4, and
RGB.
Turn on your device and you will see a picture on your HDTV. If there is no
picture, make sure you have selected the correct input on your HDTV.
Note: If the selected device is RF connected, your HDTV must be in TV mode
and on either channel 3 or channel 4 matching the channel which has been
selected on the back of the VCR, Cable Box, External TV Tuner or Satellite
Receiver. Refer to Owner or User’s Manual of such equipment for details.
Watching a TV Program
Before you start watching TV, make sure that any Cable, Satellite or off-air
antenna connections are secure. Also, verify that the power cord is plugged
into a correctly grounded electrical outlet or surge protector.
1. Press the power button on the remote control. The small window on the bottom right hand side of the front bezel
will light up white
2. Select the input to which your device is connected that provides TV programming (e.g. TV, HDMI, and COMP).
Note: You should be able to see a picture. If you do not, make sure that all of your HDTV connections are secure
and you have selected the correct video input source. Each press of INPUT on the remote control will cycle through
the available inputs. Press the button until the input associated with the device you want to view is shown.
3. When using the TV input, press the channel buttons on the remote control to change the channel. The channel
buttons will not work if you are watching a program using HDMI, Component, or AV inputs.
Note: If your HDTV is in TV mode, pressing CH+ and CH- will not work until a channel scan has been run.
Note: You can use your HDTV Component input to accept A/V signal (Composite) from a source with A/V out,
please plug your video signal (yellow connector) into the Component input (green connector) and match up the
audio connectors (R and L) for the sound. Expect to see a black/white video in the Component input, if it is selected
by accident.
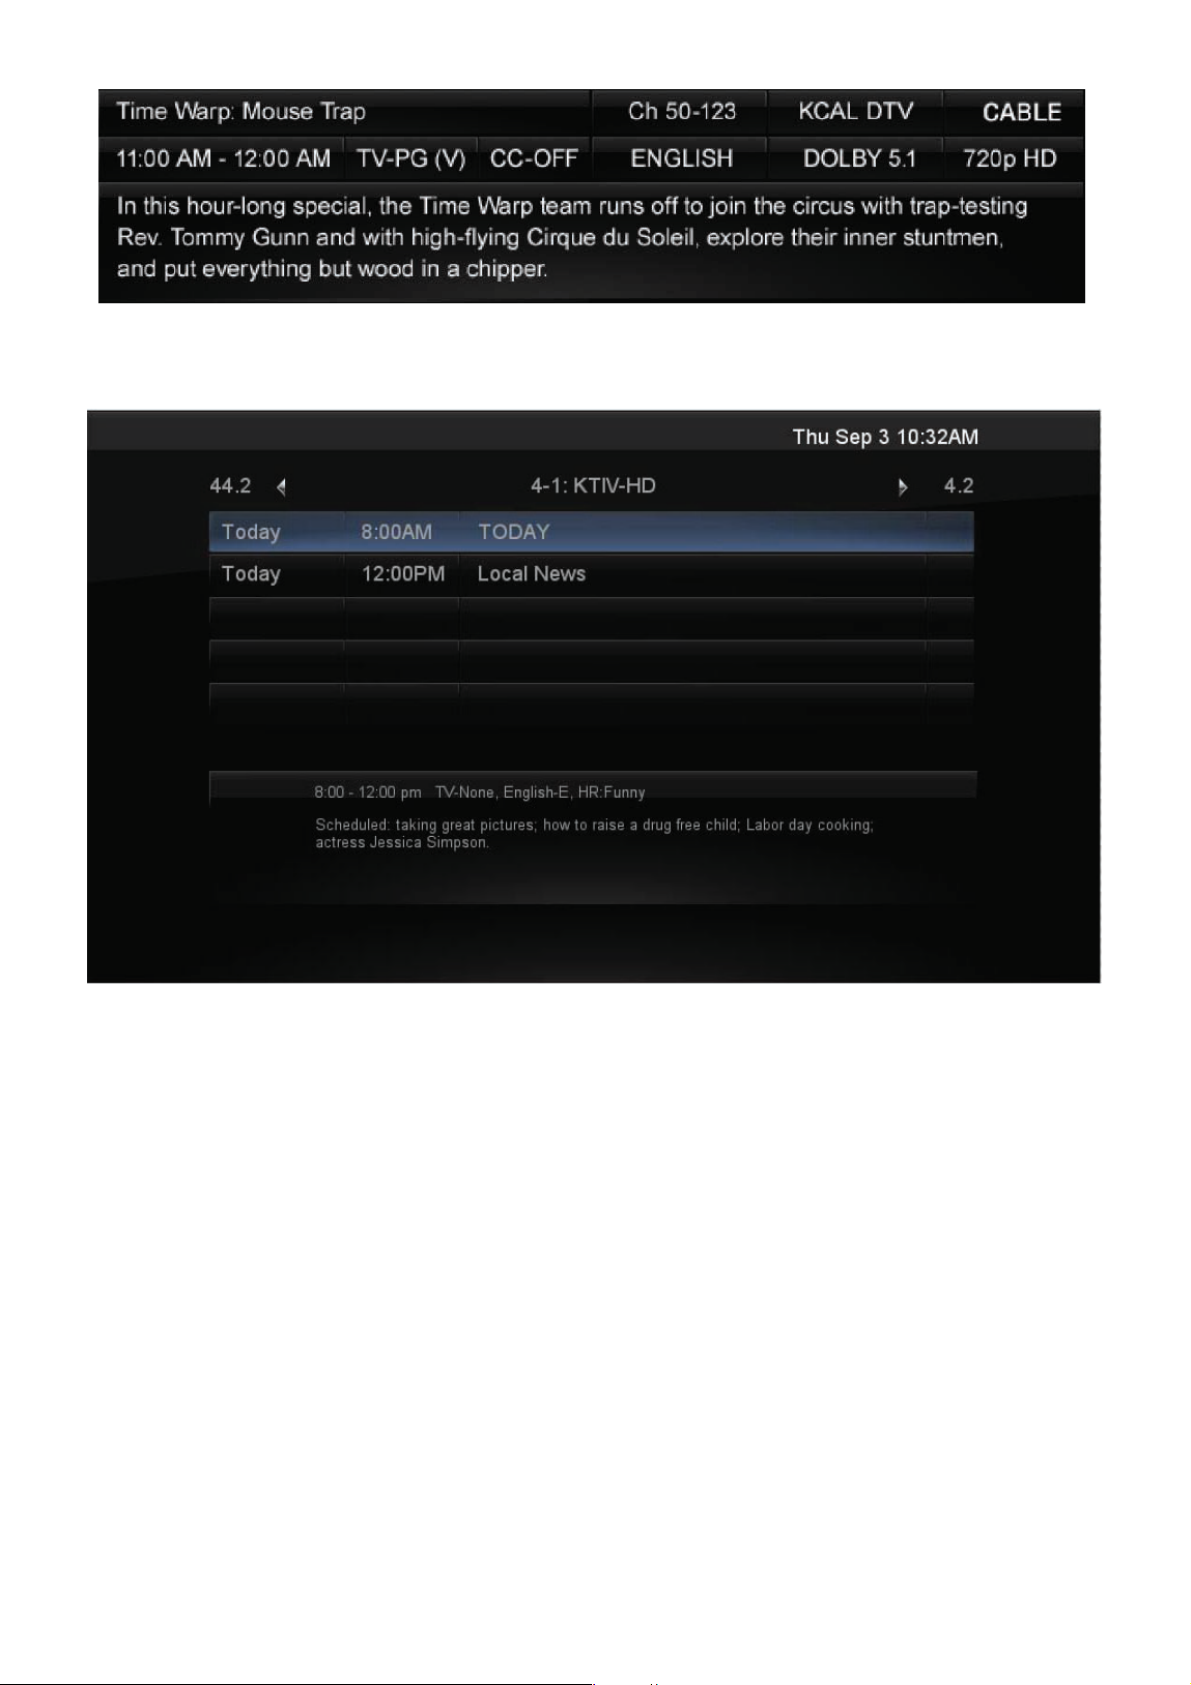
Viewing Digital TV Program Information
When the channel is changed an information header is shown over the picture for a few seconds. Press GUIDE to
display more information about the program and schedule. Press INFO repeatedly to display additional information
for that channel.
7
Page 8
8
Page 9
2.2.3 Adjusting Your HDTV Settings
Using the On-screen Display (OSD)
The remote control can control all the function settings. The OSD allows you to select the different parameter to be
adjusted.
The HDTV Settings App allows you to adjust contrast, brightness and other settings. The TV will save changes
made to the settings, even if the TV is turned off.
The HDTV Settings App consists of several menu options. The main menu options may vary depending on your
selected input source.
Note: Some of the main menu options may have additional submenus, for example, the TV Rating submenu for
Parental Controls.
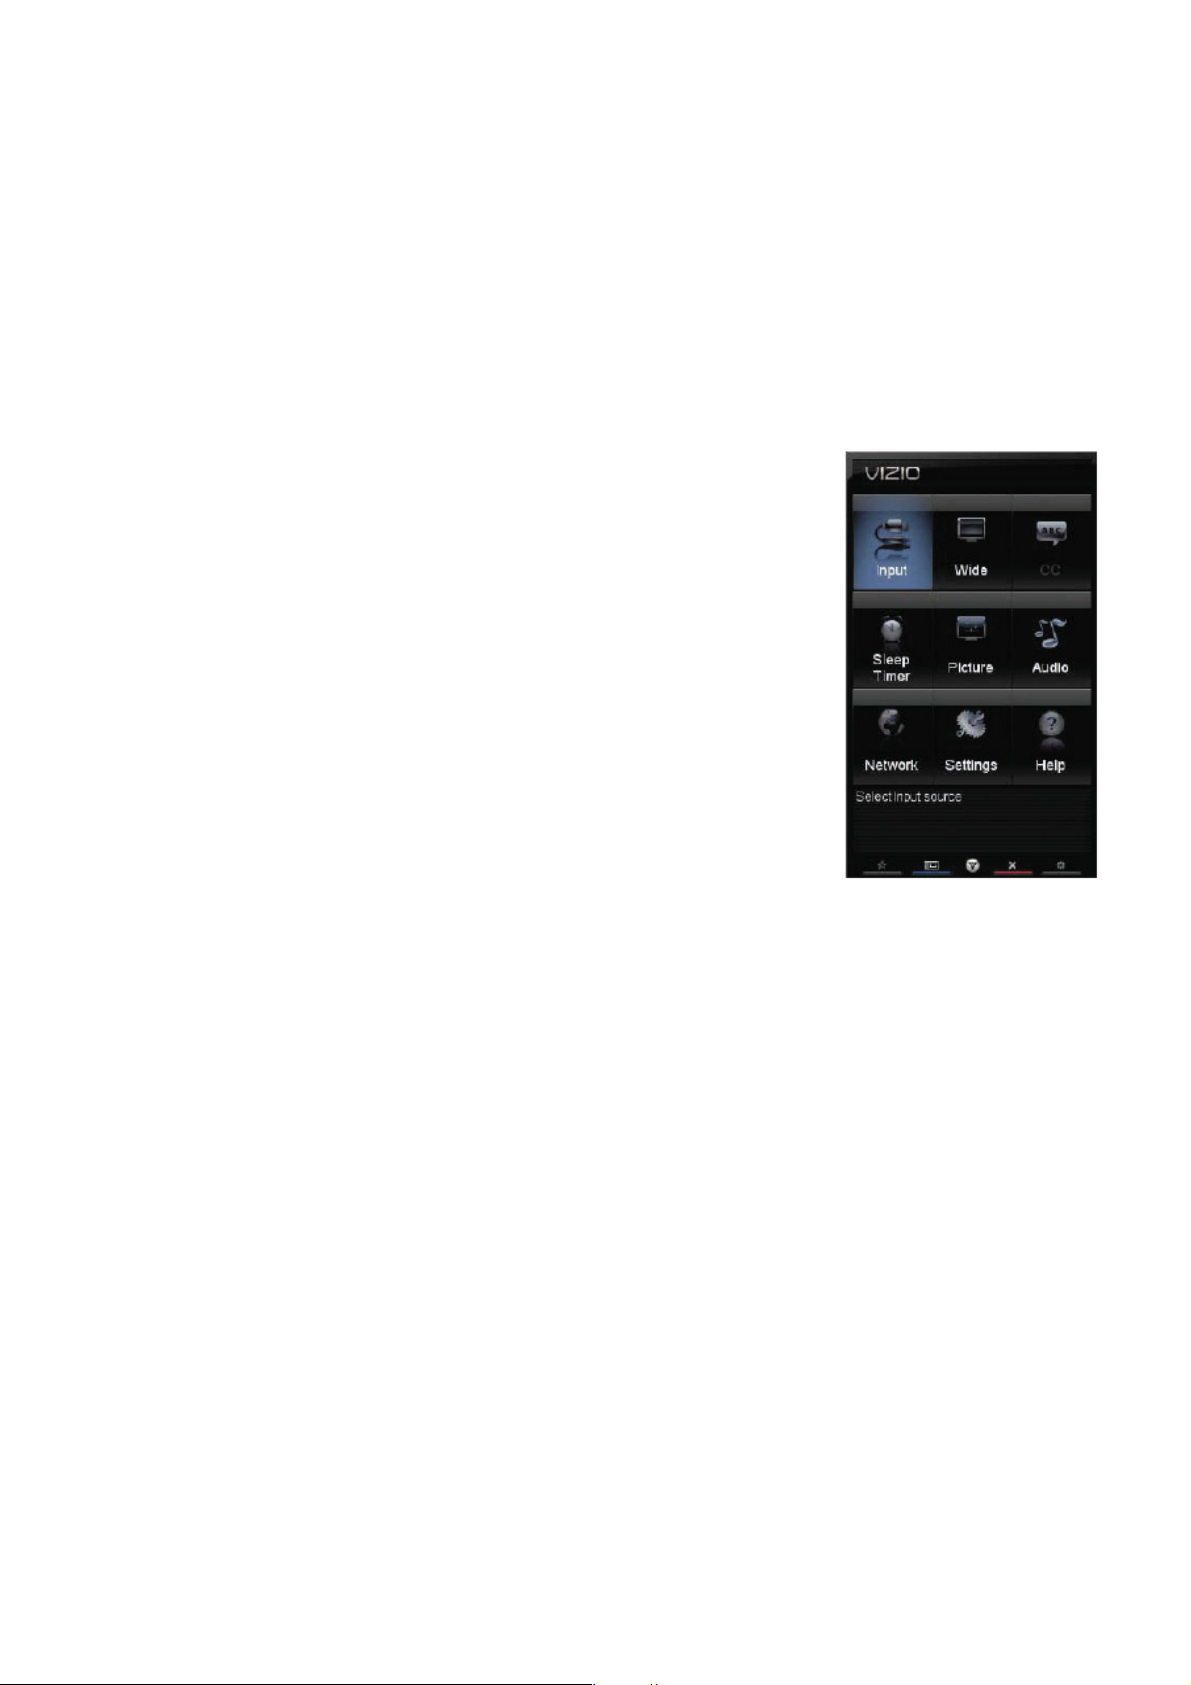
1. Press the VIA button.
2. Press ◄ or ► on the remote control to select the HDTV Settings App, and then
press OK. The Main Menu will be shown on the screen.
3. Press ◄, ►, ▲, or ▼ on the remote control to select one of the menu options:
• Input
• Wide
• CC
• Sleep Timer
• Picture Settings
• Audio Settings
• Network
• Settings (TVT)
• Help
4. Press OK to select the option or feature you want to adjust.
5. Once the menu option is displayed, press ▲ or ▼ on the remote control to select one of the items to adjust.
6. Press OK to select it, and then press ◄, ►, ▲, or ▼ to adjust the selection.
7. Press BACK once to return to the previous screen. To return to your program once adjustments have been
completed, you can do one of the following:
a. Press EXIT on the remote control.
b. Press the RED button on the remote control.
c. Highlight and select the RED X in any menu.
1. Input Menu
Select the Input Source for your HDTV. Choose from TV, AV (Composite), Comp (Component), HDMI-1, HDMI-2,
HDMI-3, HDMI-4, and RGB (VGA).
9
Page 10

2. Wide Menu
The following table shows the different screen modes and display sizes according to the content being sent to the
HDTV.
Note: The red lines show the video signal being over scanned.
SD (4:3) with cropping 3% and maintain aspect.
Normal
Zoom
Panoramic
Stretch
Wide
SD/HD (16:9) with no cropping.
RGB with no cropping.
For signal with Letter Box,
4:3 signal -- the H cropping: 3%. V cropping: 14% (reference only)
16:9 signal -- the H cropping: 14%. V cropping:14% (reference only)
H & V over scan cropping 3% and stretched out full screen(Only
support for SD(4:3))
H & V over scan with cropping 12.5% V over scan with cropping
2.5%(Only support for SD/HD(16:9))
RGB(4:3) extend to full screen
RGB(16:9) H over scan with cropping 12.5%
SD (4:3) H & V with cropping 3%.
SD/HD (16:9) H & V with cropping 2.5%.
10
Page 11
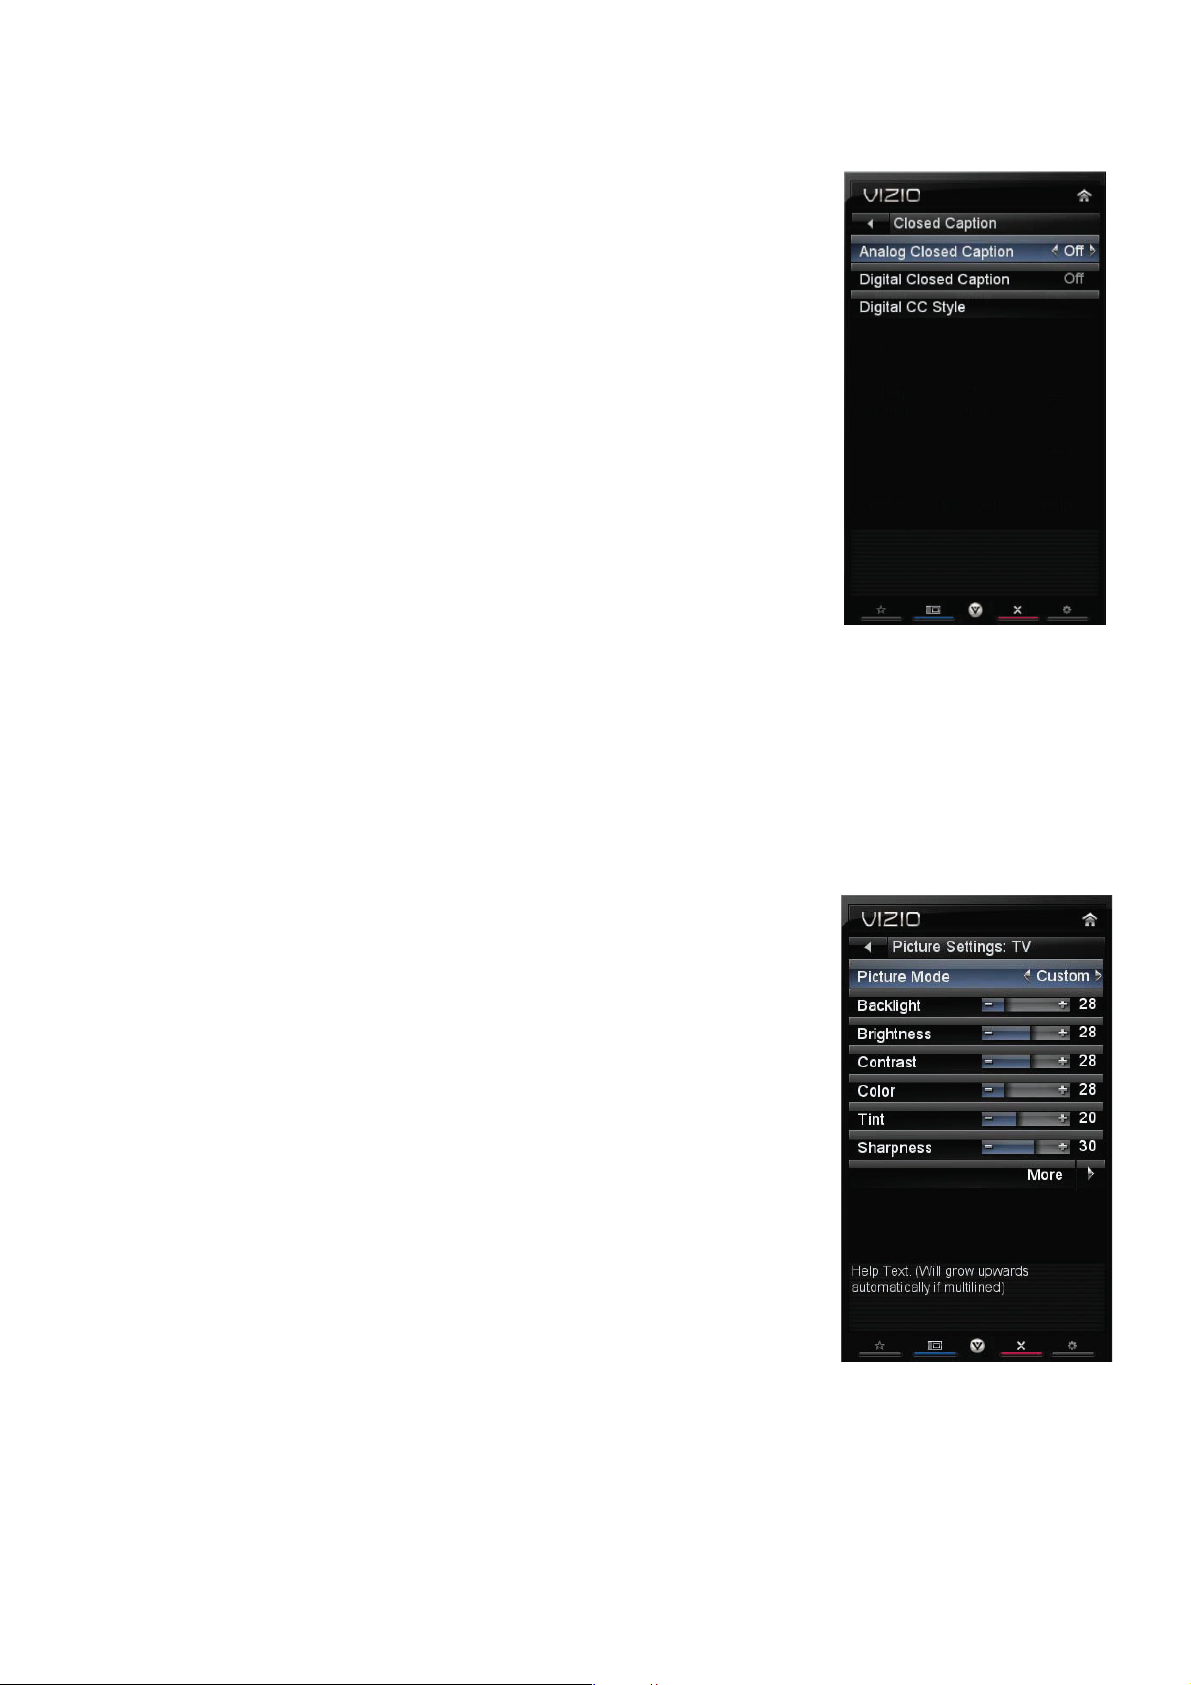
3. CC (Closed Caption) Menu
Adjust closed caption options.
Analog Closed Caption
The CC feature is available when watching regular analog TV. Select from Off, CC1,
CC2, CC3, and CC4. Closed Caption for regular TV is usually CC1 or CC2.
Digital Closed Caption
The CC feature is available when watching digital TV. Select from Off, CC1, CC2,
CC3, CC4, or CS1, CS2, CS3, CS4, CS5, or CS6.
Digital CC Style
The Digital CC Style feature is available when watching digital TV.
• Caption Style: Select either As Broadcaster or Custom. If Custom is selected
you can customize the way Closed Caption is displayed. The options available are:
• Text Size: Make CC text larger or smaller.
• Color: Choose a text color for CC display
• Opacity: Make text more or less transparent.
• BG Color: Choose a background color for CC text.
• BG Opacity: Make the background for CC text more or less transparent.
• Window Color: Choose a text frame color for CC text.
• Window Opacity: Make the text frame for CC text more or less transparent.
4. Sleep Timer Menu
Select the timer to turn off the TV in 30, 60, 90, 120 or 180 minutes. Or you can choose to turn the timer Off.
5. Picture Menu
Picture Mode
Choose from Standard, Movie, Game, Vivid, Football, Golf, Basketball,
Baseball, and Custom. Each input (i.e. HDMI, COMP, etc) remembers the custom
setting you created.
Backlight
The backlight level adjusts the lamp current and this affects the overall brilliance of
the picture but does not affect the Brightness (black level) or Contrast (white level)
of the picture.
Brightness
The brightness adjusts the black levels in the picture. If the brightness is too low you
will not be able to see the detail in darker parts of the picture and if the brightness is
too high the picture will look washed out.
Contrast
The contrast adjusts the white levels in the picture. If the contrast is too low the picture will look washed out and if
the contrast is too high you will not be able to see any detail in the bright parts of a picture.
Color
Color adjusts the amount of color in the picture.
Tint
The tint adjusts the hue of the picture. The easiest way to set tint is to look at flesh tones and adjust for a realistic
appearance. In most cases, the default middle position is correct. If people’s faces look too orange try reducing the
11
Page 12
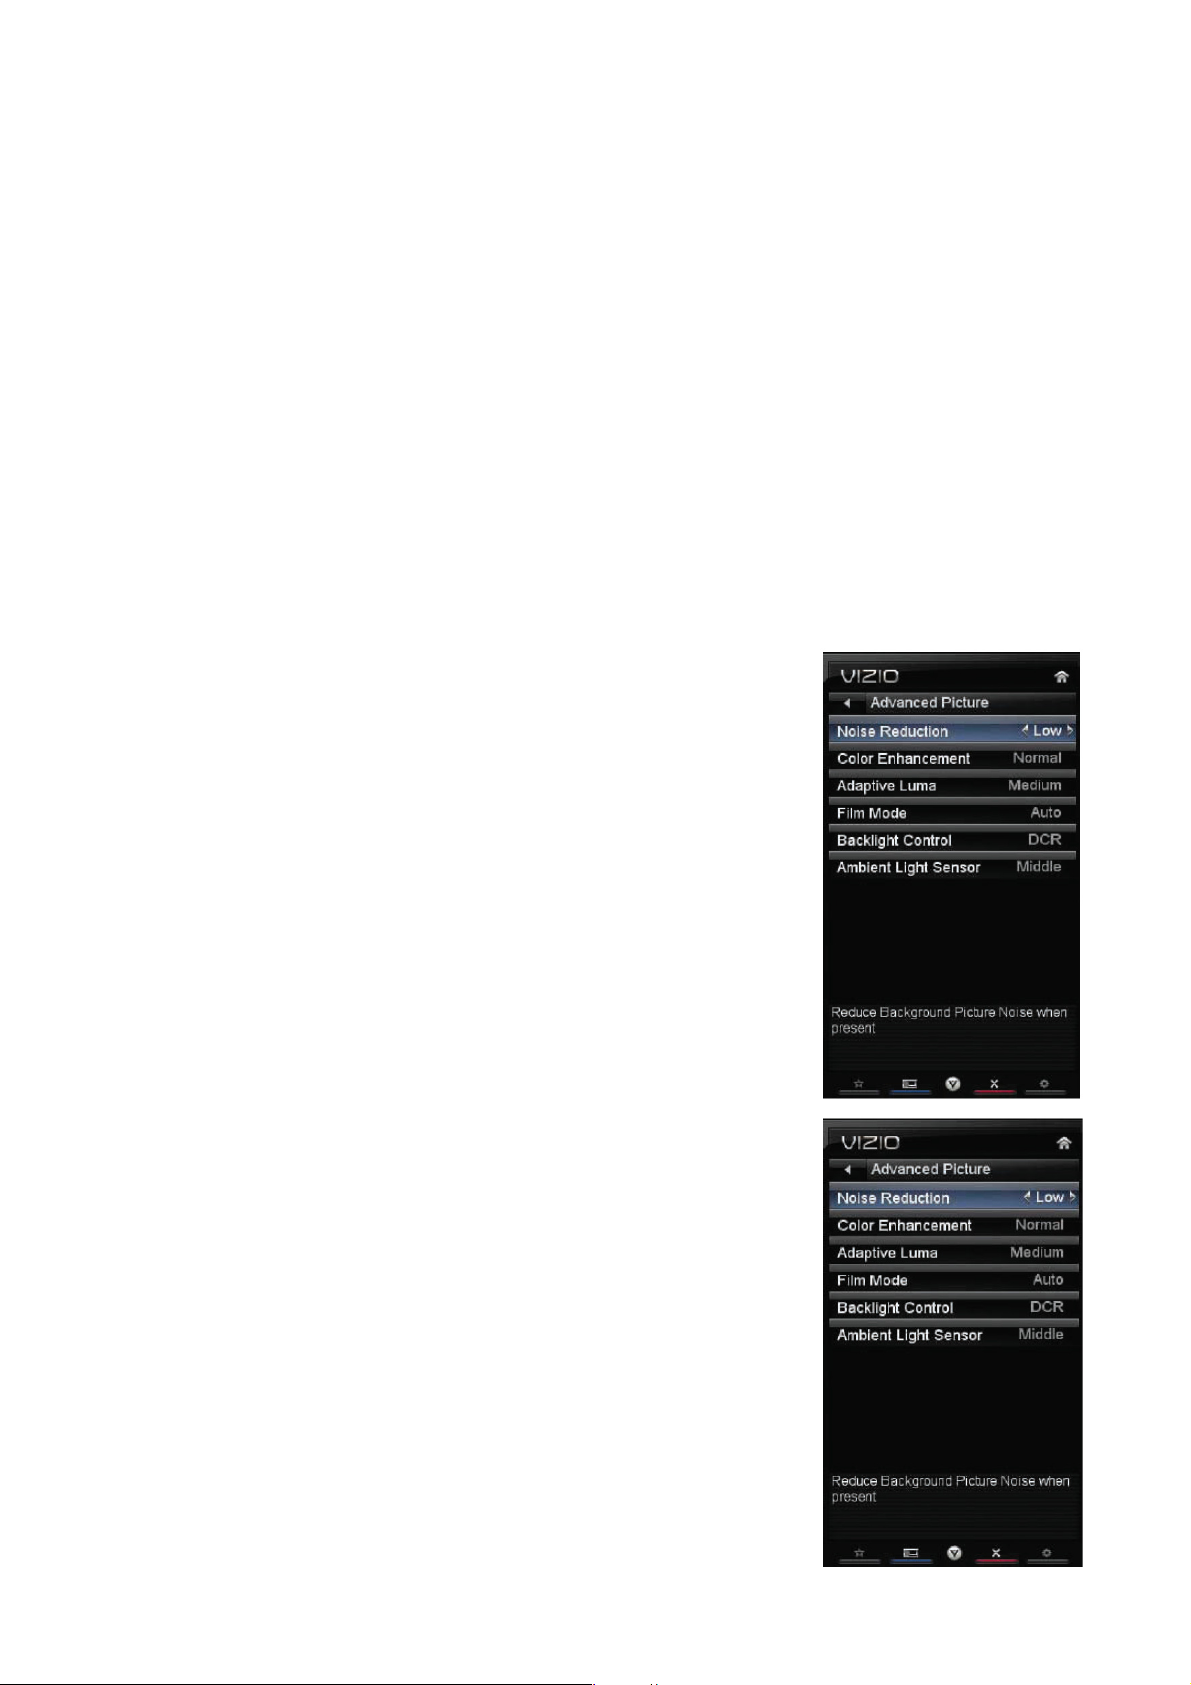
level of color first.
Sharpness
The sharpness adjustment adjusts the sharpness of the edges of elements in the picture. It does not produce detail
that otherwise does not exist. This adjustment is helpful when viewing (Standard Definition) sources.
Size & Position
• Horizontal Position: Adjust the horizontal position of the picture.
• Vertical Position: Adjust the vertical position of the picture.
• Horizontal Size: Adjust the horizontal size of the picture.
• Vertical Size: Adjust the vertical size of the picture.
Color Temperature
Color Temperature is the “warmness” or “coolness” of the white areas of the picture.
• Color Temperature Choose from Cool, Computer, Normal, or Custom. Cool produces a blue-hued image.
Computer sets the white point at the established setting for a PC display (9300K). Normal is the setting for
television broadcasting. Custom allows you to set a preset calibrated for a white point to suit individual preferences:
• Red Gain
• Green Gain
• Blue Gain
• Red Offset
• Green Offset
• Blue Offset
• Reset Color Temperature: Select to reset color temperature settings to factory
default.
Advanced Picture
To select the options in the Advanced Picture sub-menu, press
OK. A new menu will be displayed showing the advanced functions available for
fine tuning of the picture.
• Noise Reduction
This feature diminishes picture artifacts caused by the digitizing of image motion
content that may be present in the picture. Choose from Off, Low, Medium, or
High.
• Color Enhancement
This feature increases the picture reproduction performance of the picture by
reducing oversaturation of certain colors and improving flesh tones. Choose from
Off, Normal, Rich Color, Green/Flesh, and Green/Blue.• Adaptive Luma
Large areas of brightness in the picture will result in a higher Average Picture
Level (APL) and the overall picture will look too light. This feature will lower the
APL to counteract this effect. Choose from Off,
Low, Medium, Strong, or
• Film Mode
Choose from Off or Auto. When set to Off it will stay at 60 fps. When set to Auto,
the TV will detect the cadence (for example at 24 frames/second for film, or
normal video at 60 fps).
• Backlight Control
Extend.
12
Page 13
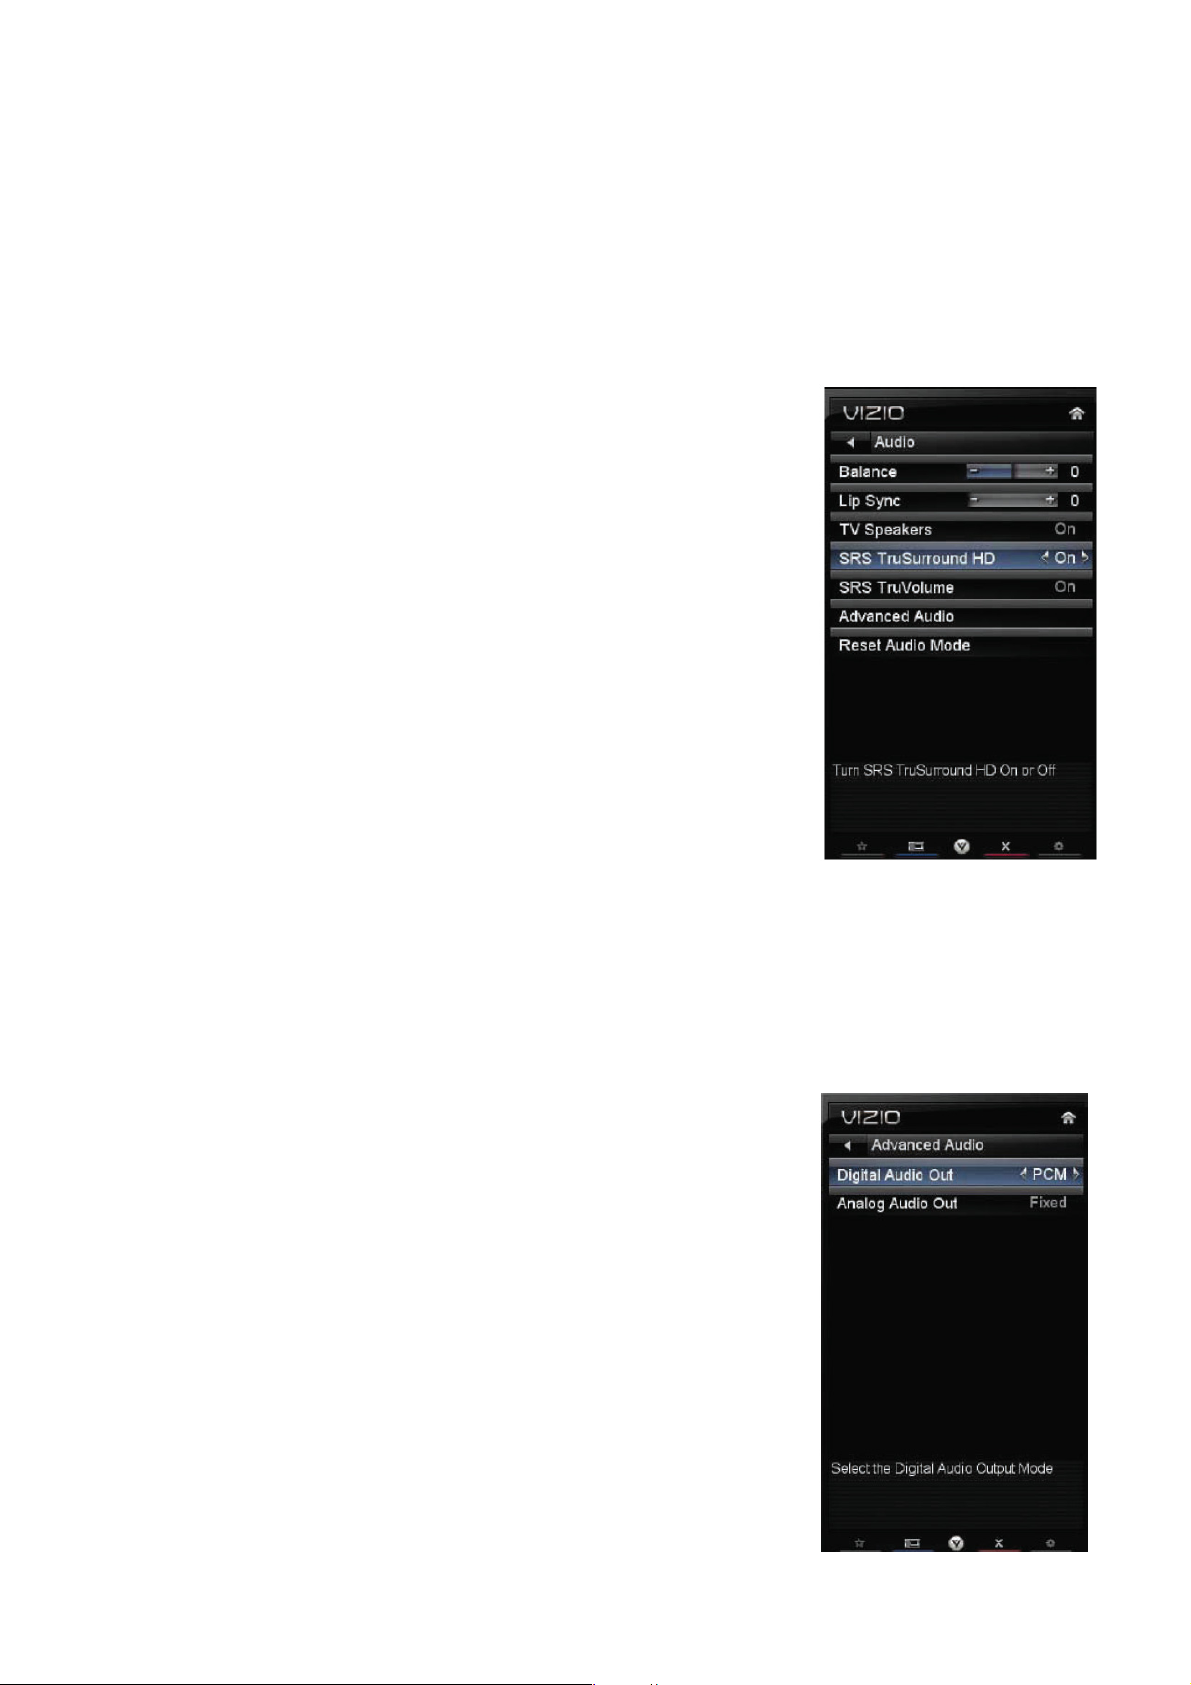
Select from Off or DCR to improve the contrast ratio through intelligent control of the CCFL backlight.
• Ambient Light Sensor
Choose Off, Low, Medium, or High. When set to Low, Medium, or High your HDTV will automatically adjust to
light changes in the room.
Reset Picture Mode
Return all Picture settings to factory default. A screen will come up to confirm your selection or to cancel it. Press ◄
or ► to make the selection, and then press OK to accept it.
Note: Only settings under the Picture will be reset.
6. Audio Menu
Adjust audio options including balance, equalizer, and advanced audio settings.
Audio Mode
Choose from Flat, Rock, Pop, Classical or Jazz.
Note: When SRS TruSurround HD is On, Audio Mode selections are not
available.
Balance
Adjust the sound to the left or the right.
Lip Sync
Lip Sync is designed to adjust the audio of the program being viewed so that it
matches the movement of the lips of someone talking on the screen.
TV Speakers
Turn the internal speakers On or Off. You may want to turn the internal speakers
off when listening to the audio through your Home Theater System.
SRS TruSurround HD
This technology creates an immersive, feature-rich surround sound experience from two speakers, complete with
rich bass, high frequency detail and clear dialog. Choose from On or Off.
Note: When SRS TruSurround HD is On, Equalizer adjustments are not available.
SRS TruVolume
When the programming switches to a commercial or when changing from channel to channel, volume fluctuations
occur. The technology provides the listener with a comfortable and consistent
volume level, preventing the sudden fluctuations of the sound level.
Advanced Audio
To select the options in the Advanced Audio sub-menu, press ►. A new menu
will be displayed showing the advanced functions available for fine tuning of the
audio.
Digital Audio Out
This option allows selection of the type of processing for the SPDIF (Optical
connector) when used with a home theater system. Select to choose from Dolby
Digital, PCM, or Off.
Analog Audio Out
This option sets the volume control properties when using the RCA (white and
red) connectors as audio line out to connect a home theater system. Choose
from Fixed or Variable. When set to Variable, volume from the external
speakers will change when you change the volume setting on the TV. When set to Fixed, the volume can only be
13
Page 14
changed by the settings on the external stereo system.
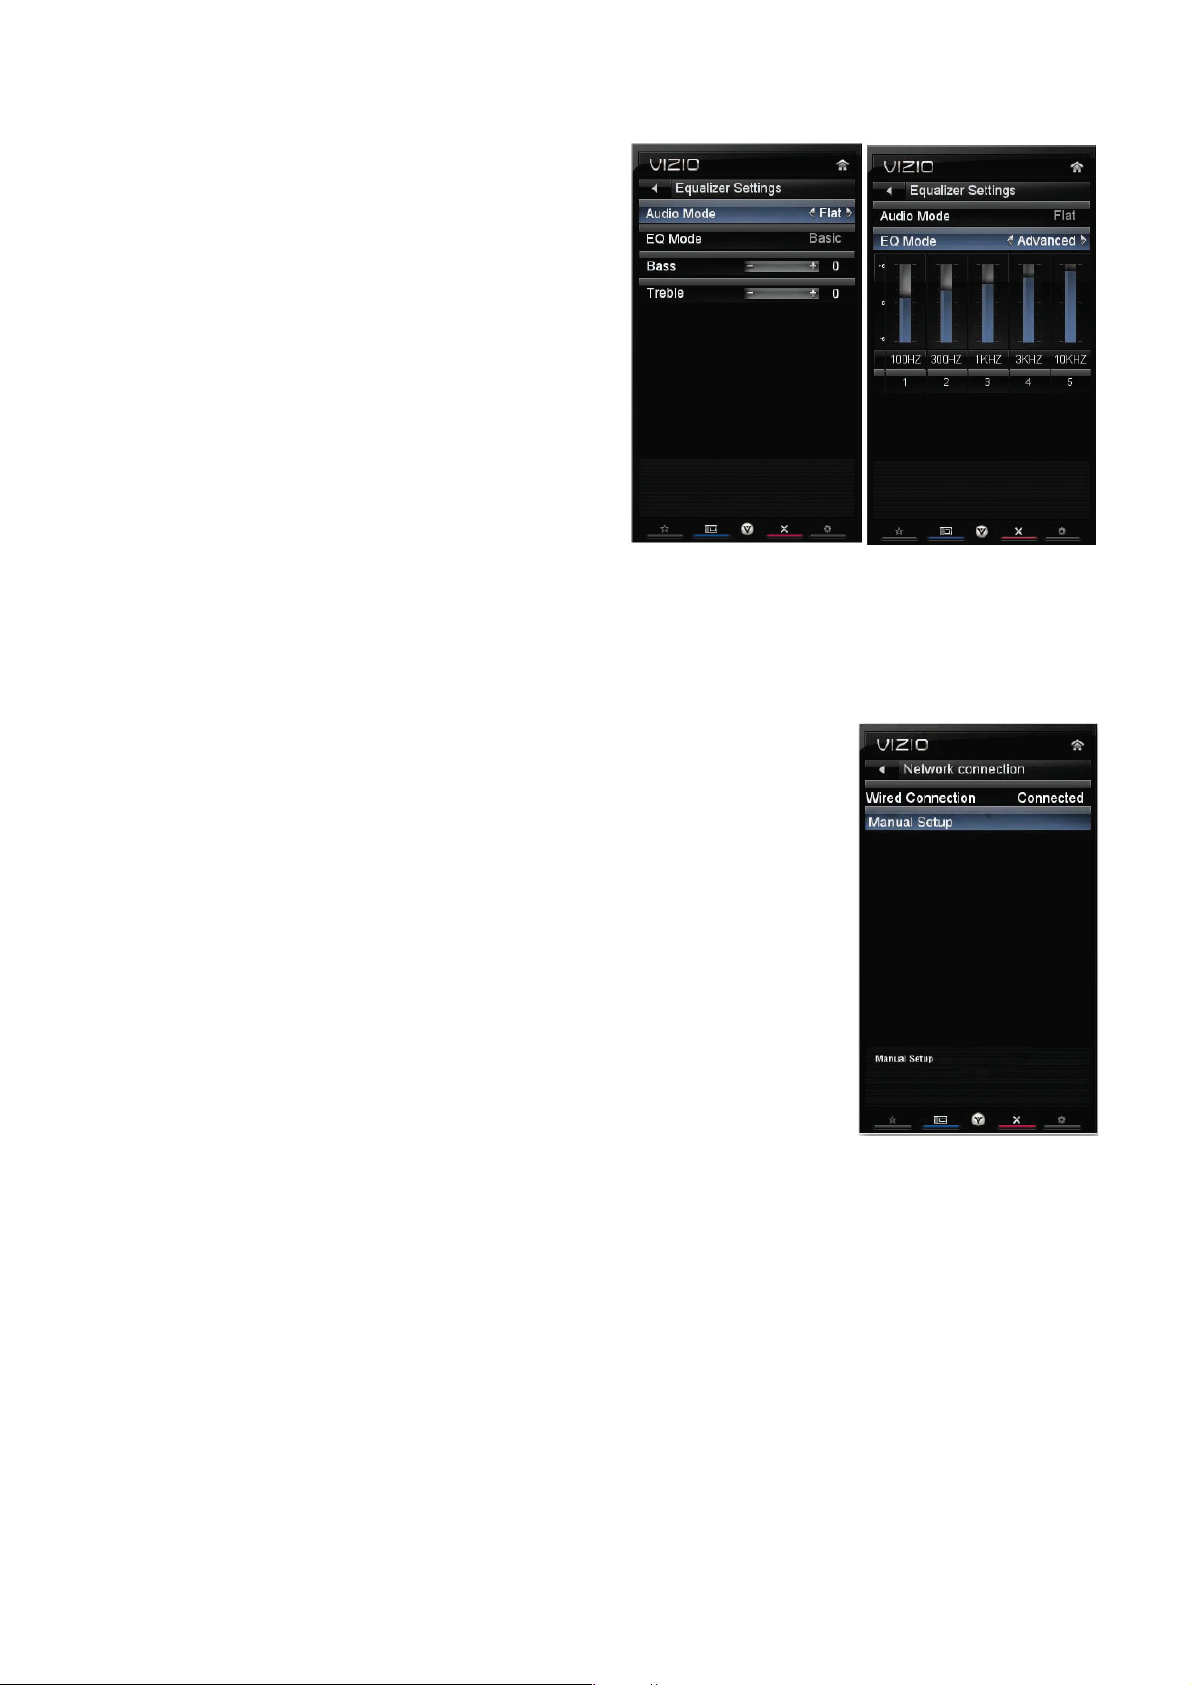
Equalizer Settings
To select the options in the Equalizer Settings sub-menu,
press OK. A new menu will be displayed showing the
available equalizer functions. Press ◄ or ► to select Basic
or Advanced.
• EQ Mode (Basic)
Adjust Bass and Treble.
• EQ Mode (Advanced)
Adjust boost or attenuation of different frequencies. Starting
from lowest to the highest, they are 100 Hz, 300Hz, 1 kHz,
3 kHz and 10 kHz.
1. Press ▼ then◄ or ► to select the frequency to be
adjusted. Press OK.
2. Press ▲ or ▼ to adjust the selected frequency to your preference. Values above 0 will boost the frequency and
values below 0 will attenuate the frequency.
Note: The Equalizer adjustment will only be available when SRS TSHD is set to Off.
7. Network Menu
When you first turned on your HDTV you set up your network connection using the
Setup App. If you did not do this or if your setup has changed, you can do this from
the Network menu. The Ethernet function on your HDTV is used to access the
Internet. Your HDTV also has 802.11n wireless, so you can connect your TV to the
Internet through your wireless home network. A wired connection may deliver a more
consistent connection depending on the conditions in your home environment. When
you enter the Network Menu you will see your current connection method.
Wired Connection
View that your wired connection is set to Connected. This is not an option that you
can adjust. It is for information only.
Manual Setup
Select to view and/or manually change your network settings.
Change Settings
Select to manually change your network settings such as the IP Address, the Subnet Mask, the Default Gateway,
the Preferred DNS Server, and the Alternate DNS Server.
Warning: unless you are an advanced user and are comfortable with wired and wireless networks, do not adjust
these settings.
Test Connection
Select this option to test your network connection.
Wireless Connection
Wireless Access Points
If there is no wired connection, the wireless menu will be displayed and you will see a list of available wireless
networks. You will also see that your Wired Connection is set to Disconnected.
14
Page 15
1. Press ▼ to select your wireless network, and then press
OK. If you do not see your wireless network in the list,
select More Access Points and then press OK.
2. If the network is password protected, enter the secure
access code you created when setting up your wireless
router. Slide the remote control open and begin typing in
the code. You can also select Show Keyboard and use
the on-screen keyboard instead of the remote control.
When you are finished entering the code, select Connect.
Note: If you have forgotten your secure access code,
please refer to the user manual for your wireless router or
contact the manufacturer or either your router or your
Internet Service Provider if they provided the router for you.
More Access Points
Select this option to show more wireless networks in the list. Select this option to refresh the list of available wireless
networks.
Manual Setup
Warning: unless you are an advanced user and are comfortable with wired and wireless networks, do not adjust
these settings.
• Change Settings: Use this option to manually enter the advanced settings of your network, such as the IP
Address, the Subnet Mask, the Default Gateway, the Preferred DNS Server, and the Alternate DNS Server.
• Test Connection: Select this option to test your network connection.
Enter Access Point Name
Select this option to connect to hidden networks. Slide the remote control open and begin typing in the name of the
network (SSID).
Note: If you are not sure of the name of your hidden wireless network, or need additional help setting up your
wireless network, please refer to the user manual for your wireless router or contact the manufacturer or either your
router or your Internet Service Provider if they provided the router for you.
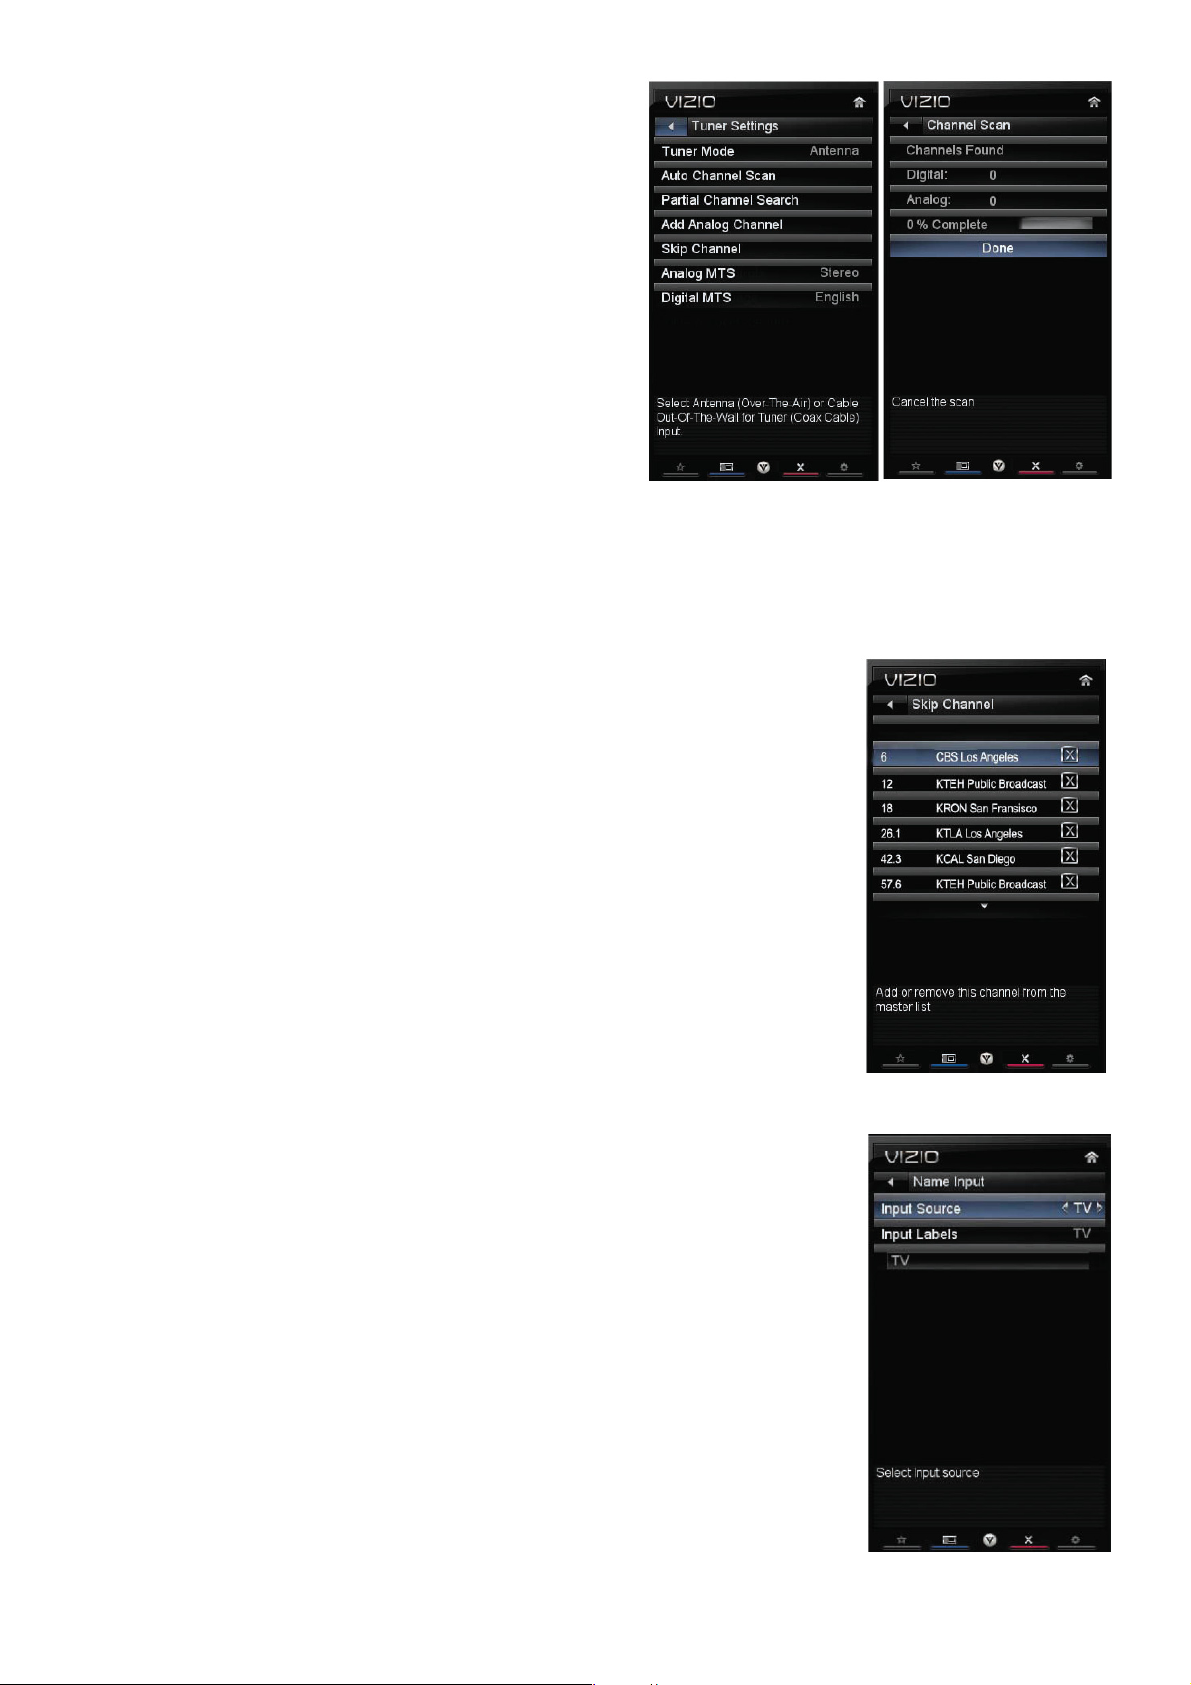
8. Settings Menu
Input Source
Select the Input Source for your HDTV. Choose from TV, AV (Composite), Comp
(Component), HDMI-1, HDMI-2, HDMI-3, HDMI-4, and RGB (VGA).
Settings Menu
When you first turned on your HDTV you scanned for channels using the Setup App.
If you did not do this or if your setup has changed, you can do this from the Tuner
menu.
Note: The tuner option can only be selected when your HDTV is in TV input mode.
Tuner Mode
Select Cable or Antenna depending upon which source you have attached to the
DTV / TV Input.
Auto Channel Search
Automatically search for TV channels that are available in your area. Be sure to first
15
Page 16
select the correct tuner mode above. The TV will search for
analog and digital channels. When the search is done, press
EXIT to begin watching your programs.
Partial Channel Search
If you believe channels are missing from the auto search, you
can do a partial channel search to look for channels in a
certain channel range again. Select to scan for Analog,
Digital, or both Analog/Digital channels, and then select
From Channel, To Channel and then select Start. For a
listing of digital TV stations in your area, visit
www.antennaweb.org.
Add Analog Channel
Manually add missing channels. Enter the channel number, and then select Add Channel to add that channel to
your list of available channels.
Skip Channel
After the TV has stored all of the available digital channels in memory you will find that some channels are too weak
to watch comfortably or they may be channels you do not want to see. Press OK to
select the channel to be skipped when using ▲ or ▼. An X will appear in channels
you have selected to skip. You will still be able to select this channel using the number
buttons on the remote control. Remember to use the DASH (−), to select digital
channels.
Analog MTS
This feature allows you to select the different languages the broadcaster is
transmitting the audio with the program you are watching. This signal is usually
Spanish. Choose from Mono, Stereo, or SAP.
Digital MTS
This feature allows you to select the different languages the broadcaster is
transmitting the audio with the program you are watching. This signal is usually
Spanish. Choose from English, French, or Spanish.
Name Input
This feature makes it easier for you to recognize the devices you have connected to
your HDTV when you press INPUT. For example, if you have a Blu-Ray DVD player
connected to the HDMI-1 input, you can have the input label read HDMI-1 BluRay
instead of just HDMI-1. You can select from twelve preset labels.
To use one of the twelve preset labels:
1. Select Input Source, and then press OK to show the list of inputs.
2. Press ▼ to select the input label you want to change, and then press OK.
3. Press ▼ to select Input Labels, and then press OK to show the list of twelve preset
labels.
4. Press ▼ to select the new input label name, and then press OK.
5. If you wish to create a custom name, press ▼ to select Show Keyboard, and then
press OK. A keyboard will open, allowing you to enter a custom name, up to 10 characters.
16
Page 17
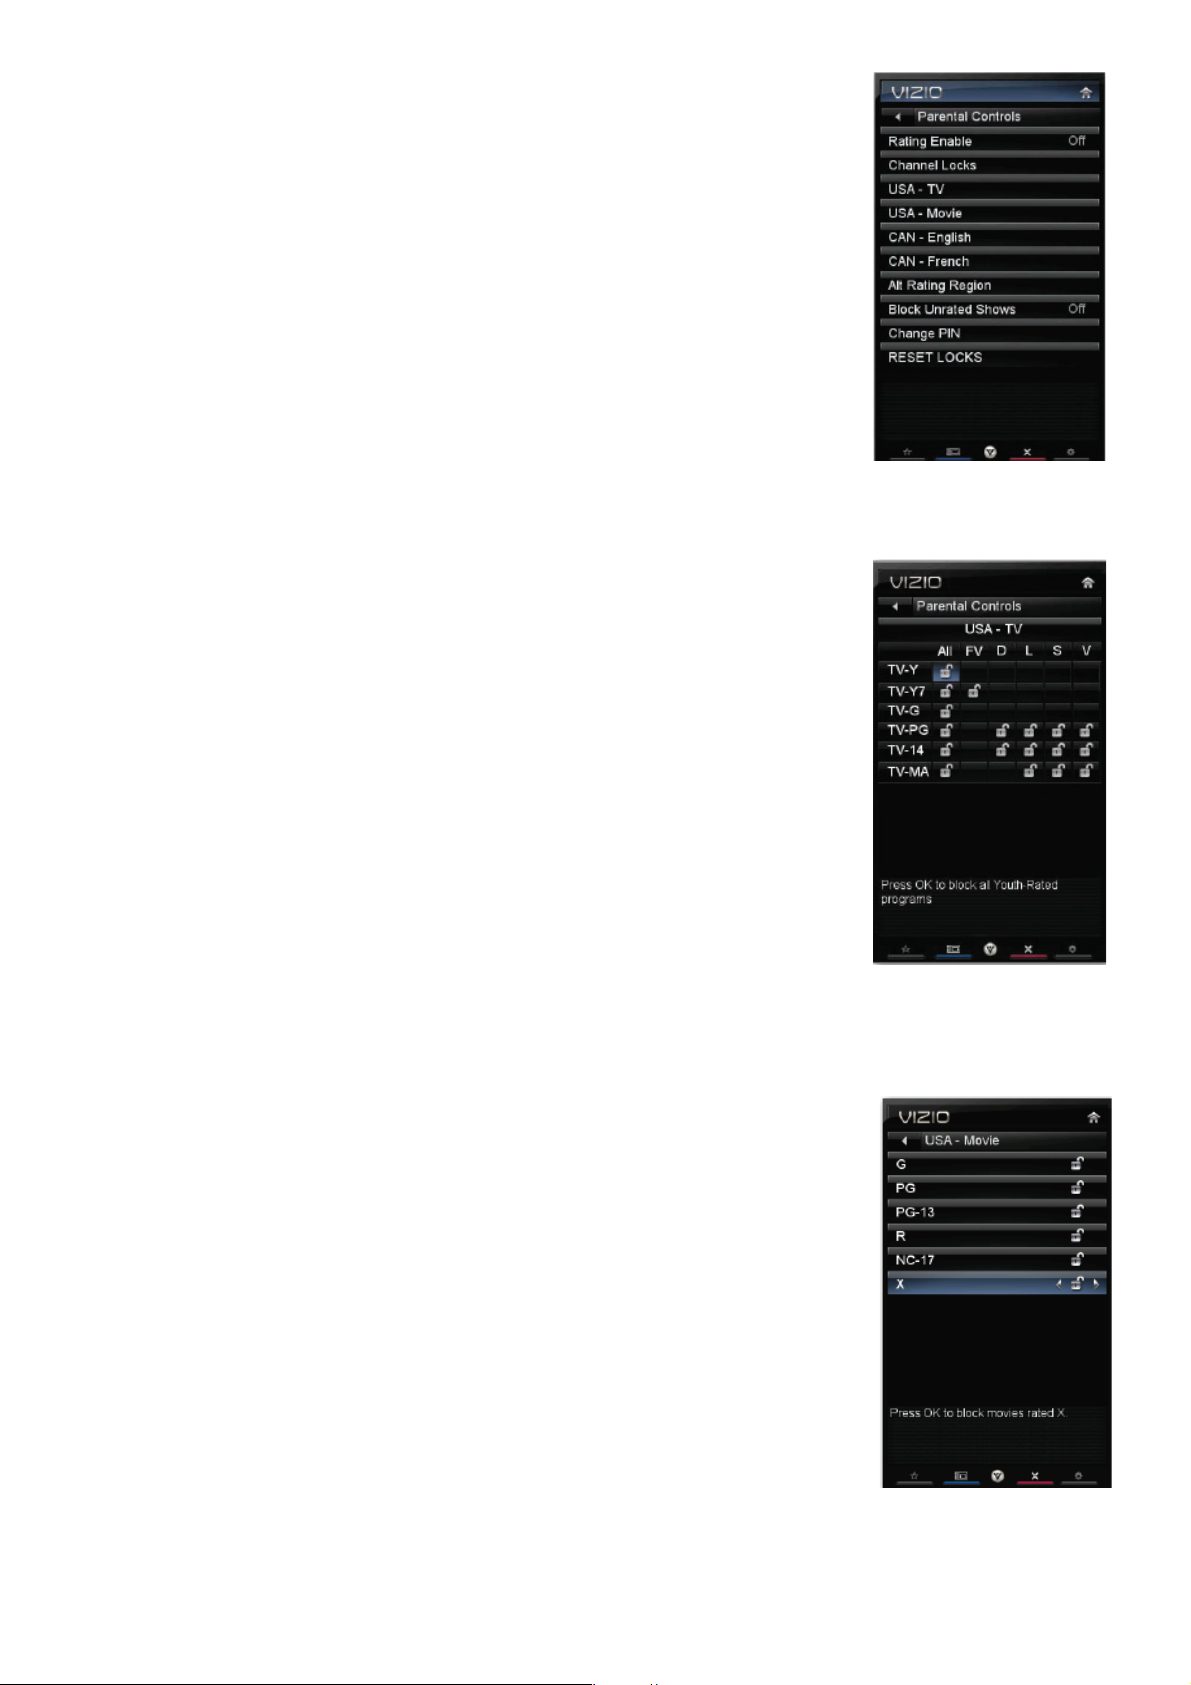
Parental Controls
If you want to restrict certain channel and program viewing, you can do this by turning
on the Parental Controls. Selected programs, movies and channels can then be made
available only after an authorized password has been entered and accepted by the TV.
To select the options in the Parental sub-menu, press OK and then create and/or enter
a password. A new menu will be displayed showing the following Parental settings. The
default password is “0000.”
Note: The Parental menu does not appear when the input mode is set to HDMI or RGB.
Rating Enable
Block or allow access to programs from channels that have been blocked or devices
selected as PIP inputs. Turn On to block or Off to allow rated content.
Channel Locks
Block individual channels from being displayed. Press ▲ or ▼ to select a channel to block and then press OK.
USA-TV
Note: When Rating Enable is OFF, the USA-TV Rating adjustments are not enabled.
Press OK to block (locked) or allow (unlocked) channels by the following US TV ratings:
TV-Y – All children
TV-Y7 – Older children
TV-G – General audience
TV-PG – Guidance suggested
TV-14 – Strongly cautioned
TV-MA – Mature audience
You can also customize the TV ratings for the following content:
A – All sub-ratings
FV – Fantasy violence
D – Sexual dialog
L – Adult language
S – Sexual situations
V – Violence
USA-Movie
Note: When Rating Enable is OFF, USA-Movie Rating adjustments are not enabled.
Press OK to block (locked) or allow (unlocked) channels by the following US Movie
ratings:
G – General audience
PG – Parental guidance suggested
PG-13 – Recommended for children 13 years of age or older
R – Mature audience
NC-17 – No one under 17 years of age
X – No one under 17 years of age
CAN-English
Note: When Rating Enable is OFF, Canadian English Rating adjustments are not
enabled. Press OK to block (locked) or allow (unlocked) channels by the following Canadian English ratings:
C – Children
C8+ – Children 8 years or older
17
Page 18
G – General Programming, suitable for all audiences
PG – Parental guidance
14+ – Viewers 14 years or older
18+ – Adult programming
CAN-French
Note: When Rating Enable is OFF, Canadian French Rating adjustments are not enabled. Press OK to block
(locked) or allow (unlocked) channels by the following Canadian French ratings:
G – General audience
8 ans+ – General – not recommended for young children
13 ans+ – Not suitable for children under 13 years of age
16 ans+ – Not suitable for fewer than 16 years of age
18 ans+ – Adults only
Block Unrated Shows
Block programming that does not have a rating.
Change PIN (Password)
Enter a new, 4-digit password using the number buttons on the remote control. Enter it
a second time to confirm you entered it correctly.
Note: Make sure you write down and store the new password in a secure place. The
Reset Locks feature does NOT reset the password.
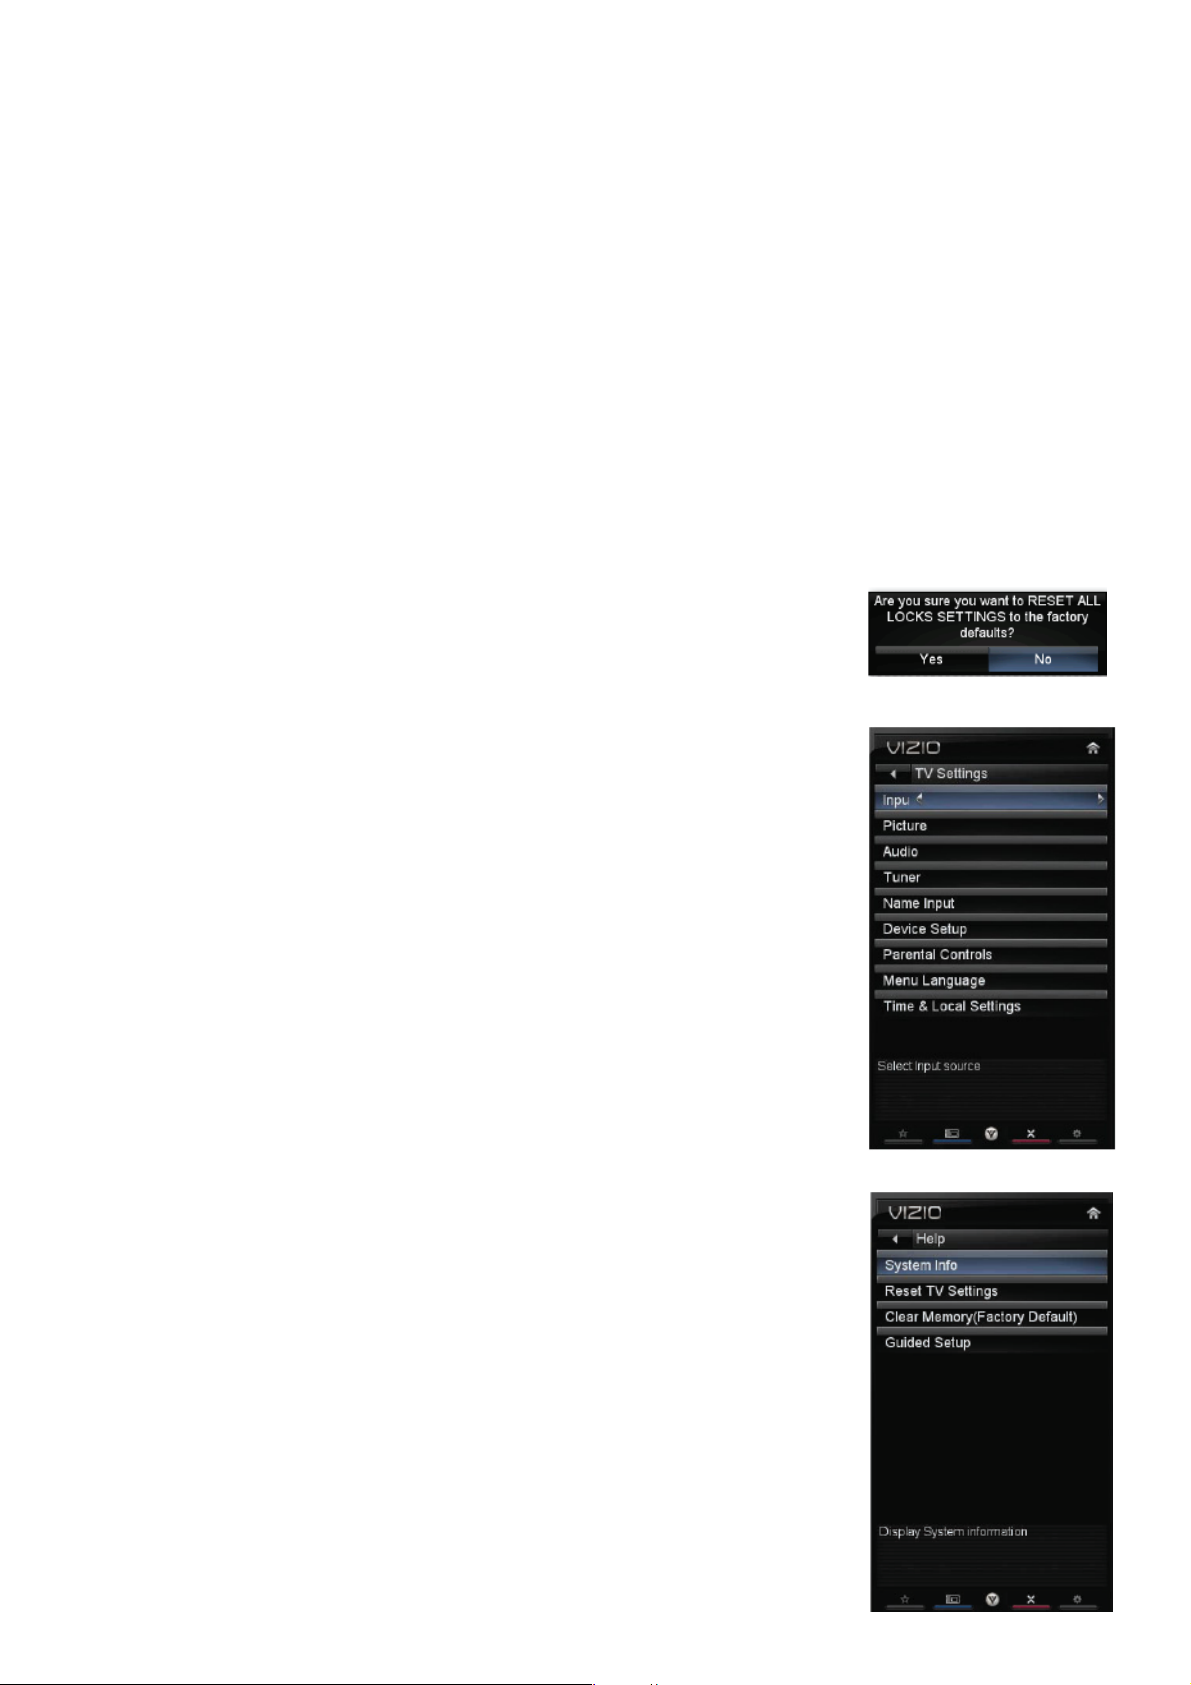
Reset Locks
Return all Parental Control lock settings to factory default. A screen will come up to
confirm your selection or to cancel it. Press ◄ or ► to make the selection, and then
press OK to accept it.
Menu Language
Select to change the language of the menu. The default is English. You can also
select French or Spanish.
Time & Local Settings
Time Zone
Setting the correct Time Zone for your area will ensure that the correct program times
are shown after pressing GUIDE.
Daylight Saving
Setting the daylight saving time for your area will ensure that the correct program times are shown after pressing
GUIDE.
Postal Code
Enter your 5-digit postal (ZIP) code to receive content personalized for your location.
9. Help Menu
System Info
Display the technical information including model name, version and revision of
firmware, source type, and resolution.
Reset TV Settings
Return all Picture and Audio settings to factory default. A screen will come up to
confirm your selection or to cancel it. Press Left or Right Navigation buttons to make
18
Page 19

the selection, and then press OK to accept it.
Note: This does NOT reset the Parental Control Password.
Clear Memory (Factory Default)
Use this function to reset the TV to the default factory settings. The screen will display a message to confirm that you
want to reset the values to factory settings. Press ◄ or ► to make the selection, and then press OK to accept it.
Note: This does NOT reset the Parental Control Password.
Guided Setup
Use this function to return to the Initial Setup menu. Use this function if you want to have a guided setup when you
move your TV. Refer to Chapter 3 for more information.
Note: Previously scanned channels will be removed.
19
Page 20
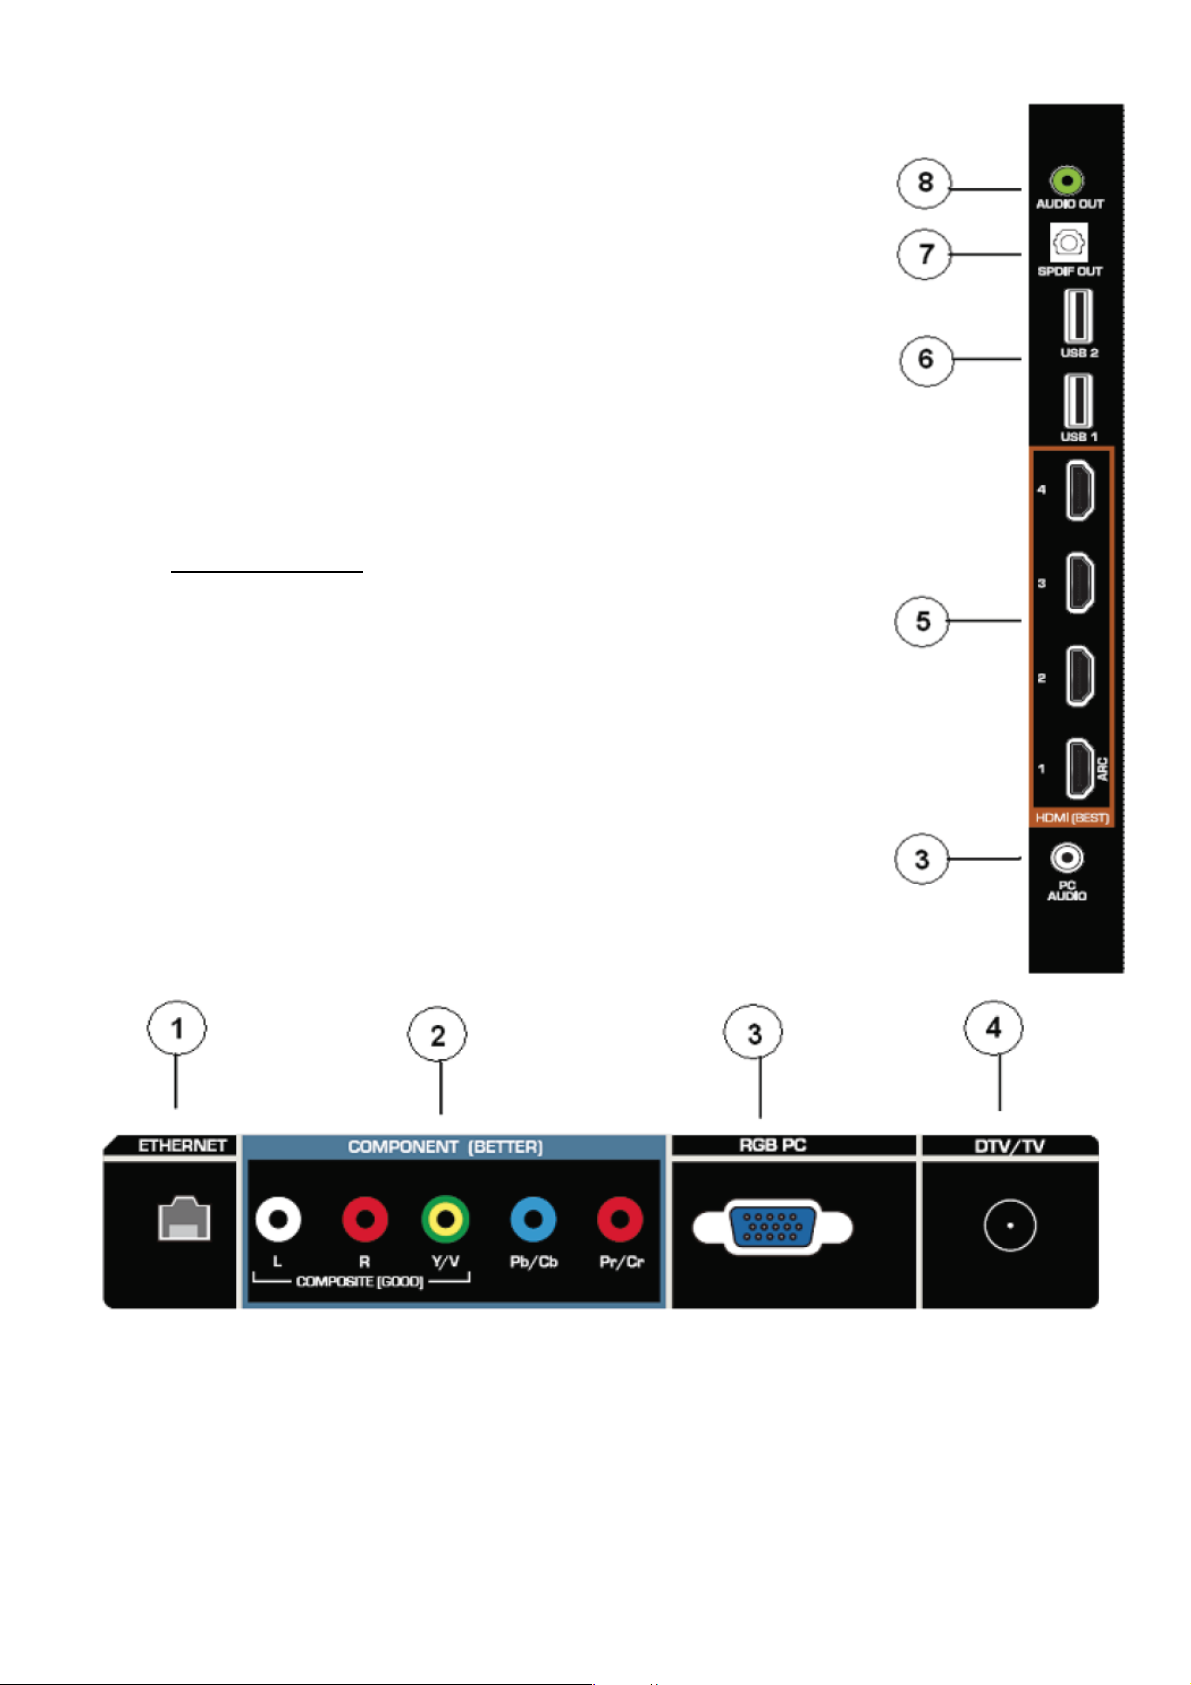
2.3 How to Connect
Rear and Side Panel Connections
1. ETHERNET—Connect an Ethernet cable to access the Internet. Set up the Internet
connection using the initial Setup App or the Network Menu in the HDTV Settings App.
Your HDTV also has 802.11n wireless, so you can connect your TV to the Internet
through your wireless home network.
2. COMPONENT (Y/V Pb/Cb Pr/Cr with L/R Audio)—Connect Component video
devices such as a DVD Player or Set Top Box here. Composite (AV) content or signal
can be watched using this input.
3. RGB PC VIDEO—Connect the video from a computer here. And add connect a 1/8”
mini plug stereo connector from the computer to the PC AUDIO input on the TV if you
want the sound to come from the HDTV speakers.
4. DTV/TV—Connect to an antenna or digital cable source. For digital TV stations in your
area visit www.antennaweb.org
that you use a HDMI or Component cable connection for high definition image quality.
5. HDMI 1, 2, 3 and 4—Connect digital video devices such as a DVD player or Set-Top
Box through this all digital connector.
6. USB PORTS— these two ports are reserved for future functions. Currently, they are
being used as service ports by authorized professional service technicians.
7. OPTICAL (SPDIF) Audio Out—Connect the audio from the HDTV to an external
device equipped with an Optical input, such as a Vizio Sound Bar, Home Theater System,
external amplifier, or stereo system.
8. ANALOG Audio out—Connect the audio from the HDTV to an external device, such
as a Home Theater System, external amplifier, or stereo system by using a stereo
Y-adapter from 1/8” stereo plug to L/R RCA jacks. Speakers cannot be connected directly
here.
. For Cable and Satellite Set-Top Boxes, we recommend
20
Page 21
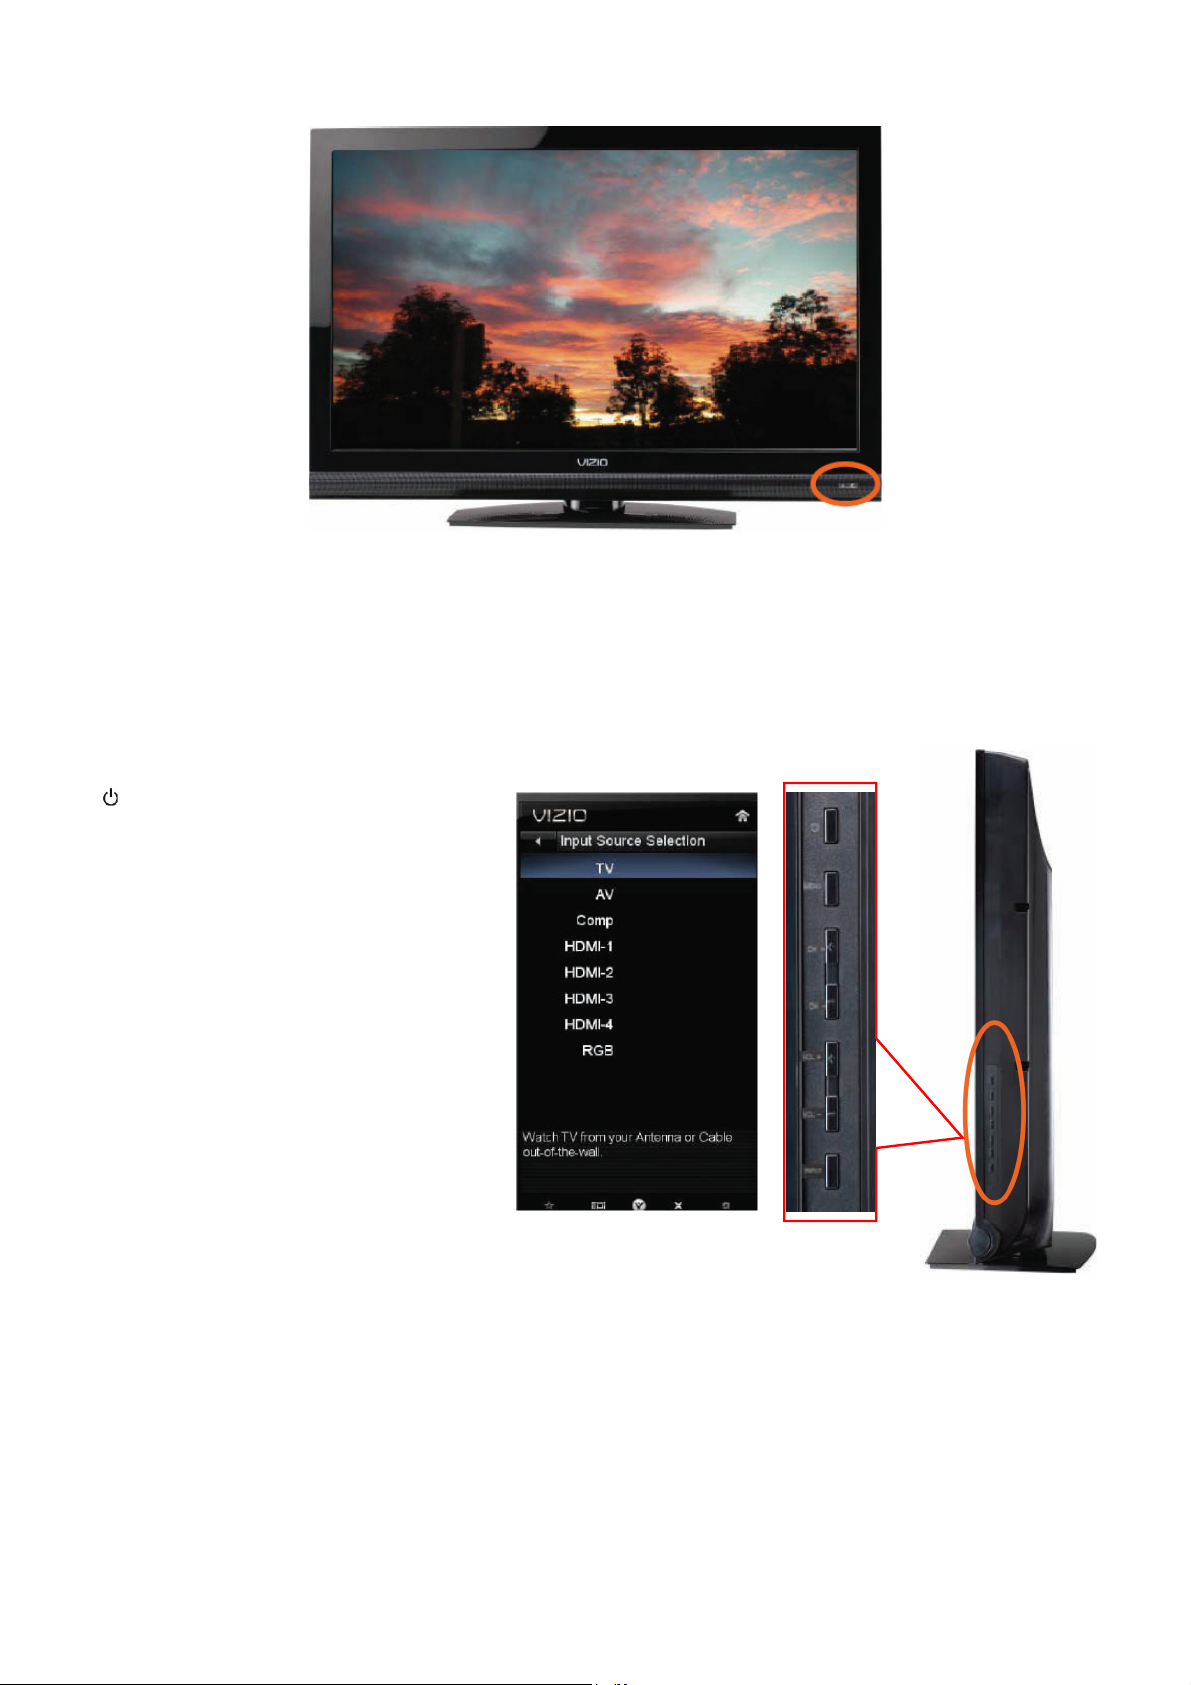
2.4 Front Panel Control Knobs
1. POWER LIGHT– The power indicator lights white when powered on and it will get dimmer after few seconds of
being powered on.
2. REMOTE CONTROL SENSOR – This is the window through which all of the remote control signals pass to the
sensor. Point the remote control directly at this window for the best response to the remote signal.
Side Control Panel
( ) – Press this button once to power your
TV on. Press the button again to power the TV
off.
MENU – This button activates the On Screen
Display (OSD).
CH ▲▼ – Use these buttons to step up or
down the TV channels. While the OSD is
active, these buttons function as up and down
controls in the OSD menus.
VOL◄► – Use these buttons to increase or
decrease to the speaker volume. While the
OSD is active, these buttons function as left
and right controls in the OSD menus.
INPUT (ENTER) – Repeated pressing of this button steps through the input sources in the
following sequence: TV, AV, COMPONENT, HDMI1, HDMI2, HDMI3, HDMI4, and RGB.
Once you have stepped through the entire sequence, you will return to the beginning of the sequence. Additionally,
when the OSD is active, press this button to select the highlighted option from the OSD menu. When the OSD is not
active, this button will show the current input selections.
Note: When using the AV input (usually, a composite signal) the video signal (yellow color coded cable) needs to be
connected to the green jack connector; if a black/white image is displayed, Component input has been selected by
mistake
21
Page 22
3. Input/Output Specification
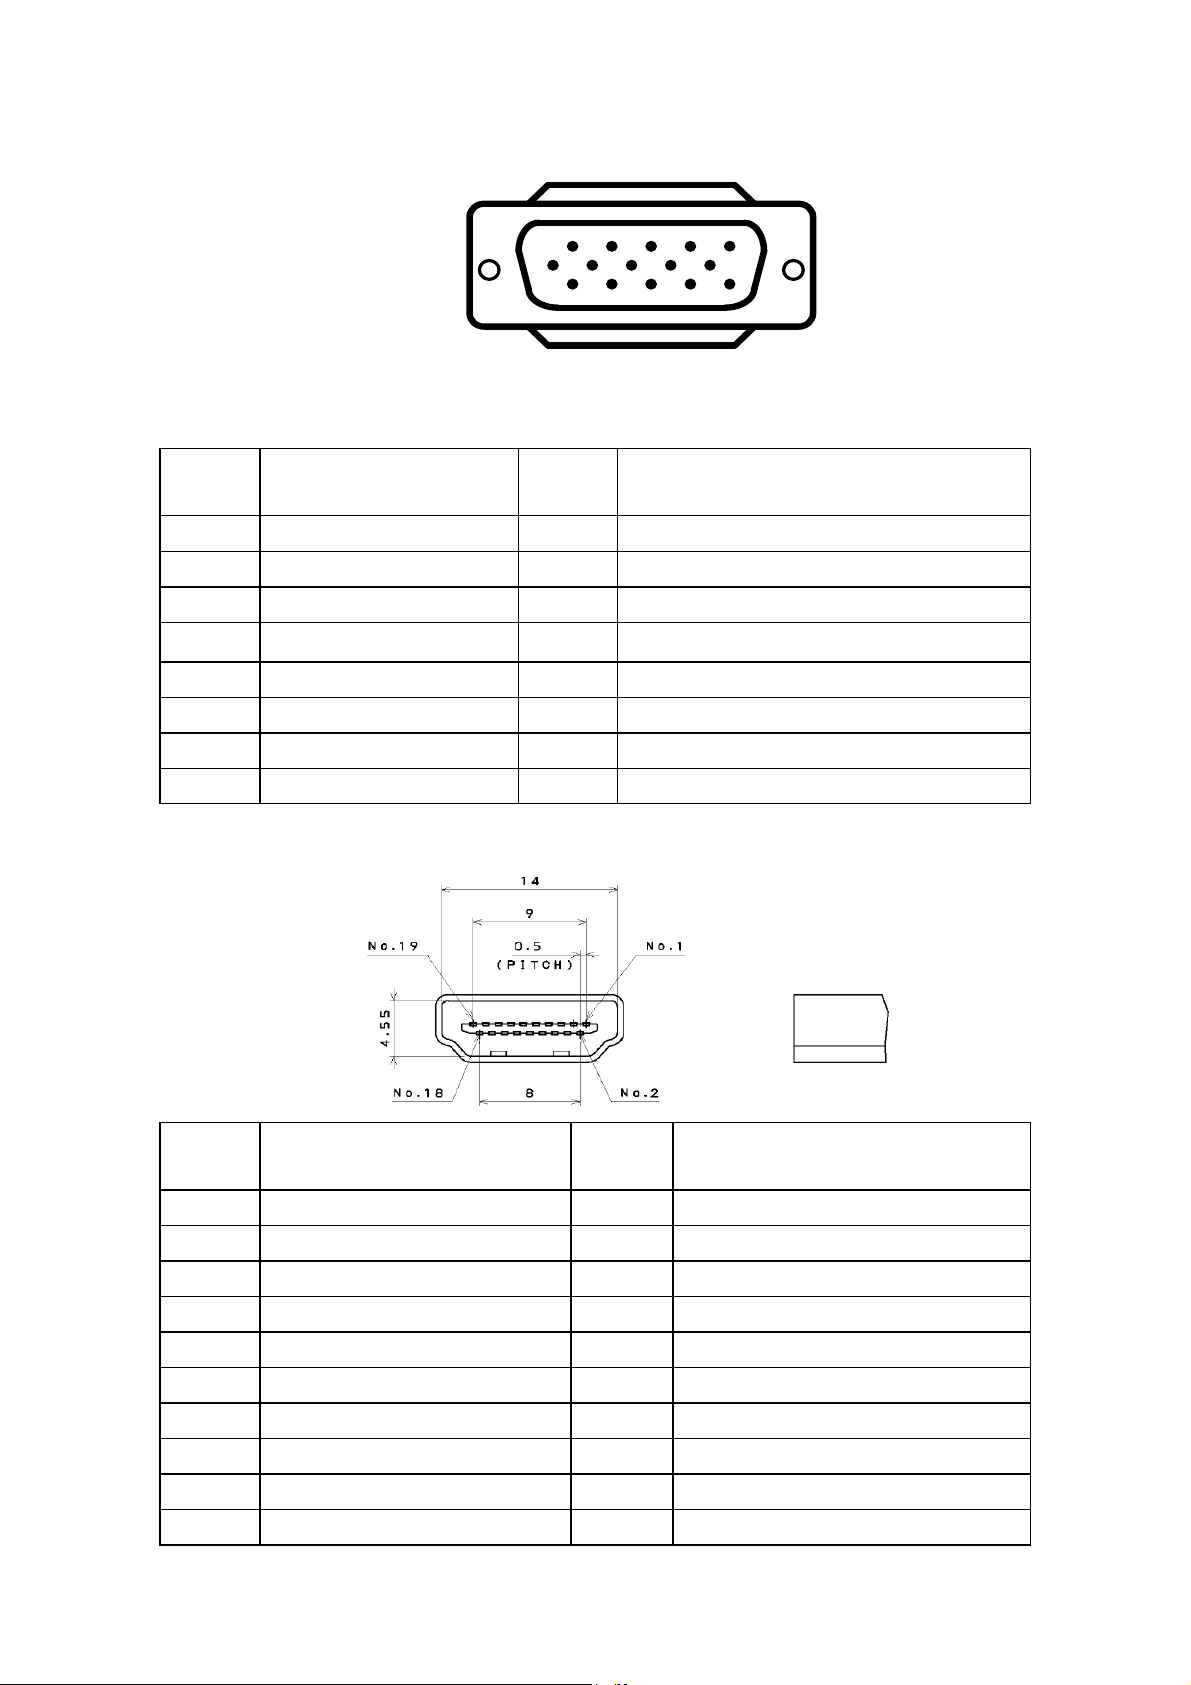
3.1 RGB Signal input
15 - Pin Color Display Signal Cable
Pin No. Description Pin No. Description
1
6
11 15
5
10
1
2
3
4
5
6
7
8
Red 9 +5V (supply from PC)
Green 10 Sync GND
Blue 11 D/RXDC
D/TXDC
12 VGA_DDC_SDA
GND 13 H-sync
Red GND 14 V-sync (vclk)
Green GND 15 VGA_DDC_SCL
Blue GND
3.2 HDMI Digital connector pin assignments
Pin No. Description Pin No. Description
1 TMDS Data2+ 2 TMDS Data2 Shield
3 TMDS Data2- 4 TMDS Data1+
5 TMDS Data1 Shield 6 TMDS Data1-
7 TMDS Data0+ 8 TMDS Data0 Shield
9 TMDS Data0- 10 TMDS Clock+
11 TMDS Clock Shield 12 TMDS Clock13 CEC 14 Reserved (N.C. on device)
15 SCL 16 SDA
17 DDC/CEC Ground 18 +5V Power
19 Hot Plug Detect
22
Page 23

3.3 Compatible Mode Table
If connecting to a PC through the RGB PC input, set the TV timing mode to VESA 1360x768 at 60Hz for better
picture quality (refer to the graphic card’s user guide for questions on how to set this timing mode). See the table
below for the factory preset resolutions.
Resolution Refresh(Hz) H.Freq(kHz) V.Freq(Hz) H.Sync V.Sync Pixel Freq(MHz)
640 x 480 60 31.469 59.941 N N 25.175
640 x 480 75 37.500 75.000 N N 31.500
800 x 600 60 37.879 60.317 P P 40.000
800 x 600 75 46.875 75.000 P P 49.500
1024 x 768 60 48.363 60.004 N N 65.000
1024 x 768 70 56.476 70.069 N N 75.000
1024 x 768 75 60.023 75.029 P P 78.750
720 x 400 70 31.469 70.087 N P 28.322
1920 x 1080 60 66.587 59.934 P N 138.50
23
Page 24
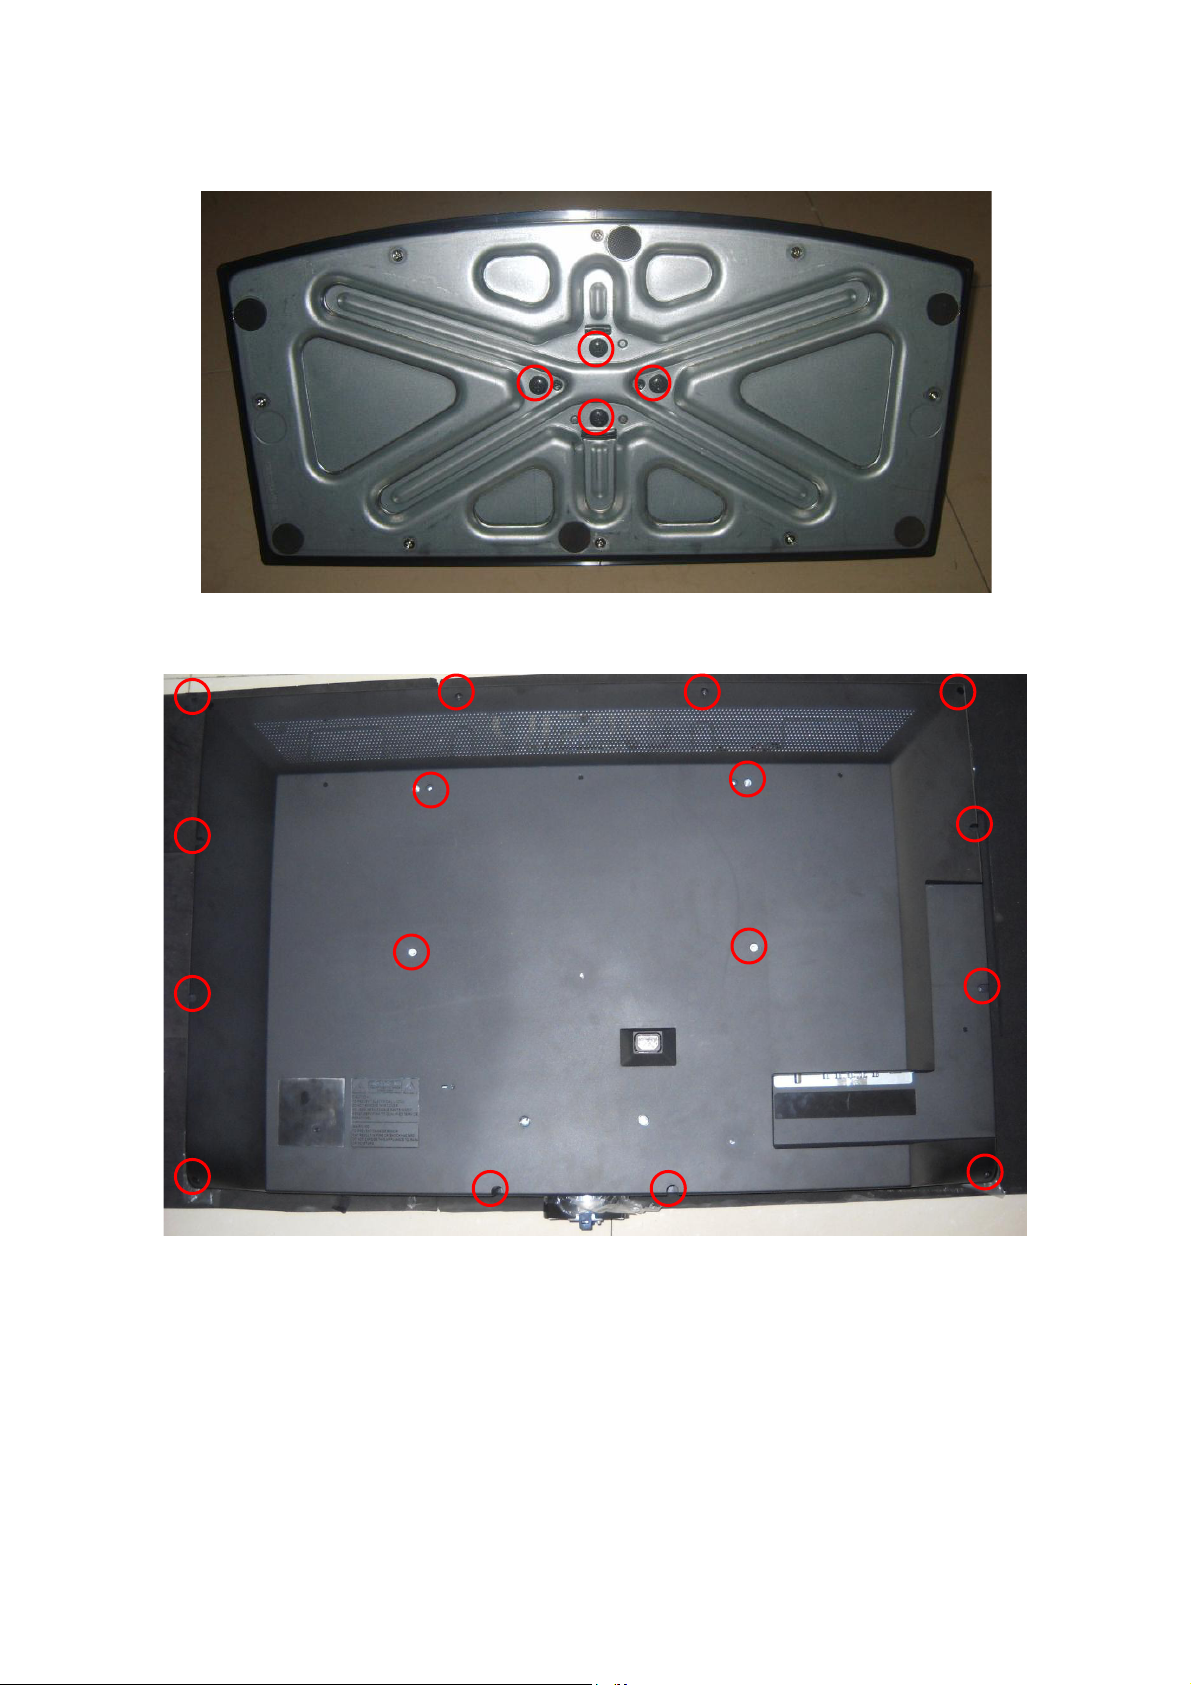
4. Mechanical Instructions
1. Remove the screws in red to remove the base.
2. Remove the screws to remove the rear cover.
24
Page 25
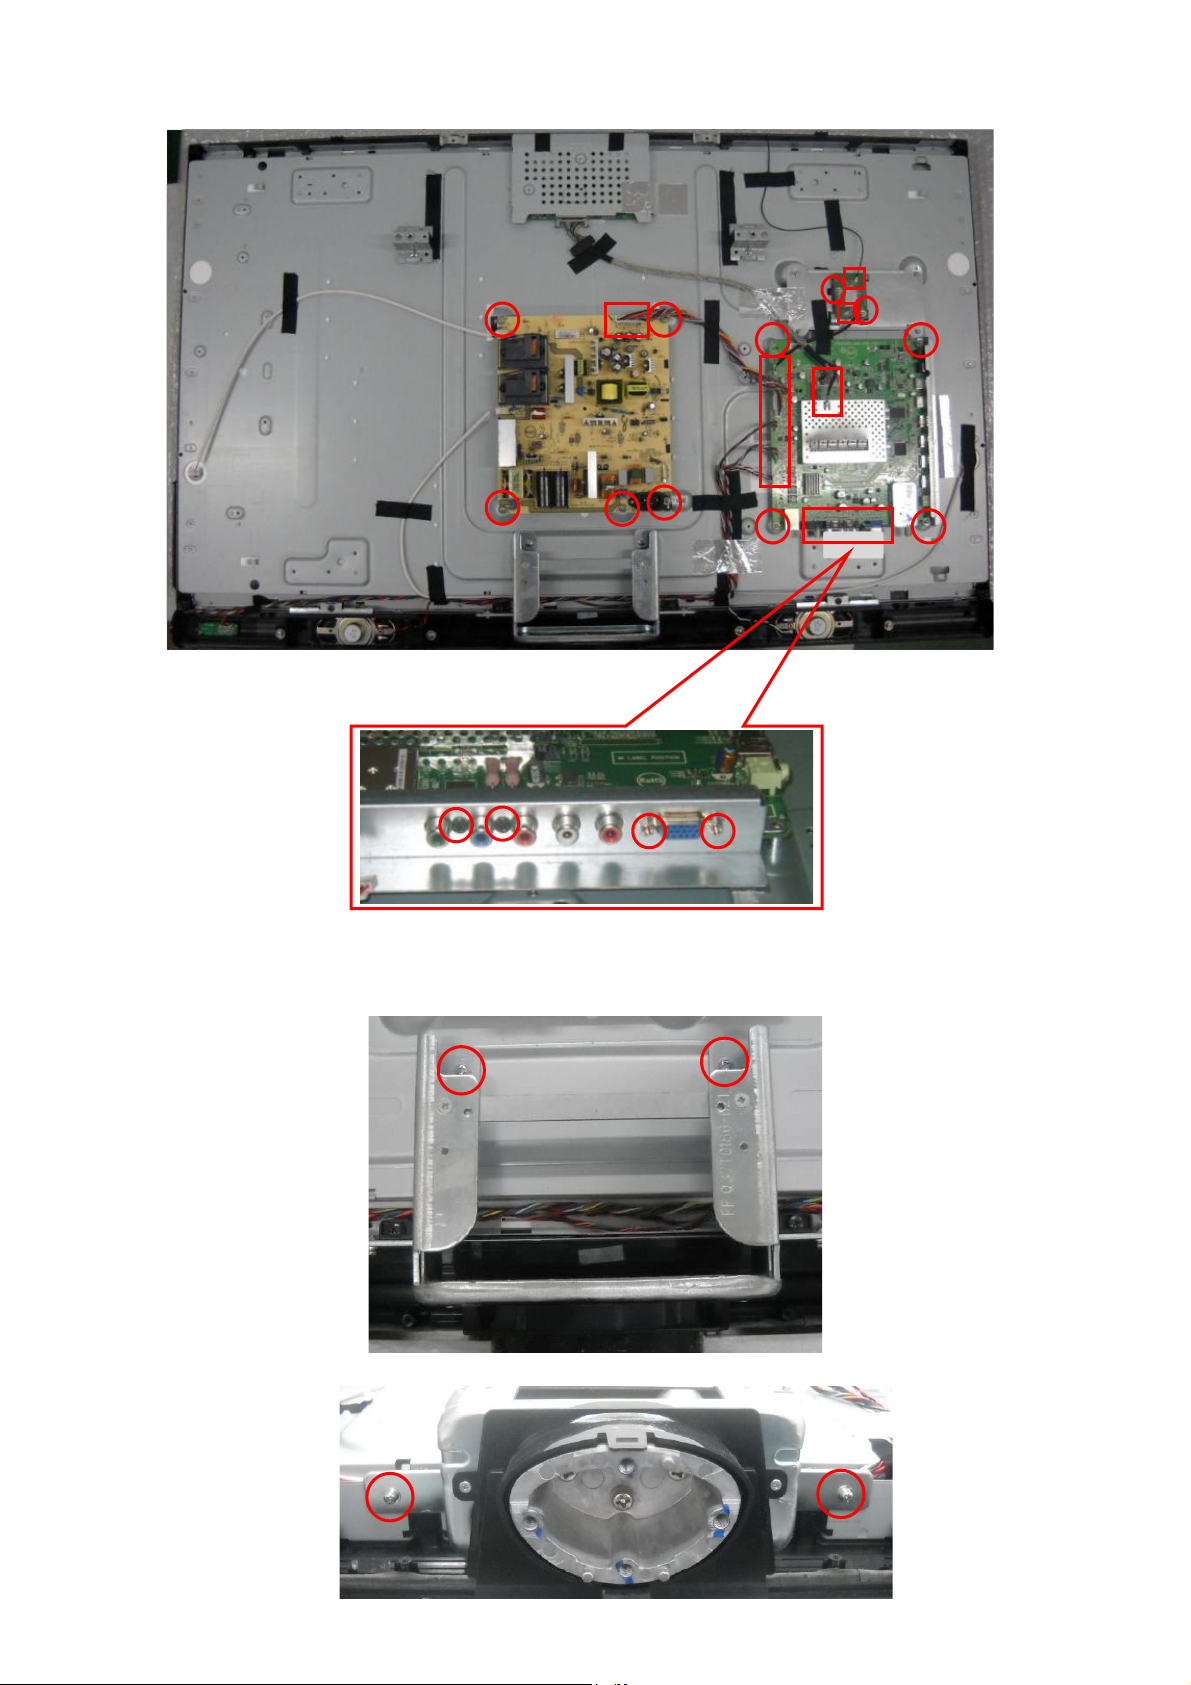
3. Remove the connectors and remove the screws remarked in red to remove the main board and power board.
4. Remove the screws remarked in red to remove the hinge.
25
Page 26
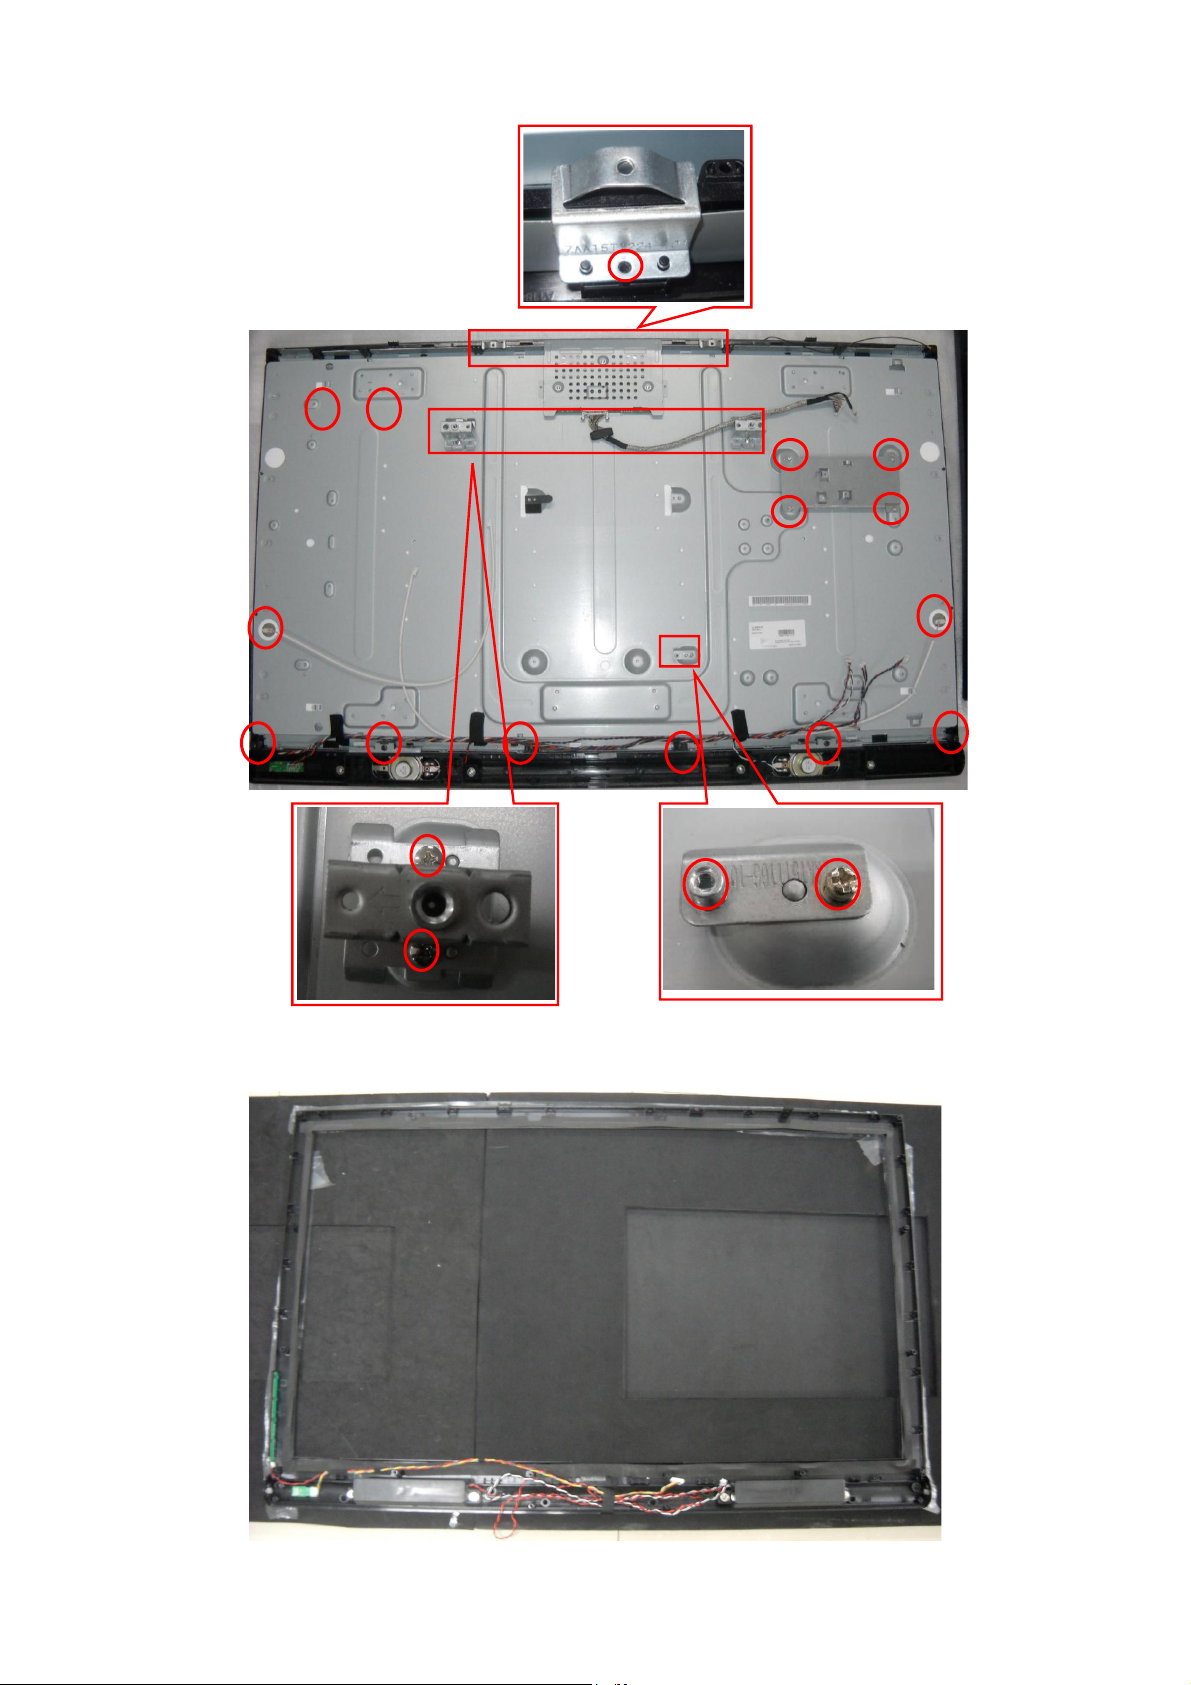
6. Remove the screws remarked in red to remove the bracket and the bezel.
7. The Bezel
26
Page 27

p
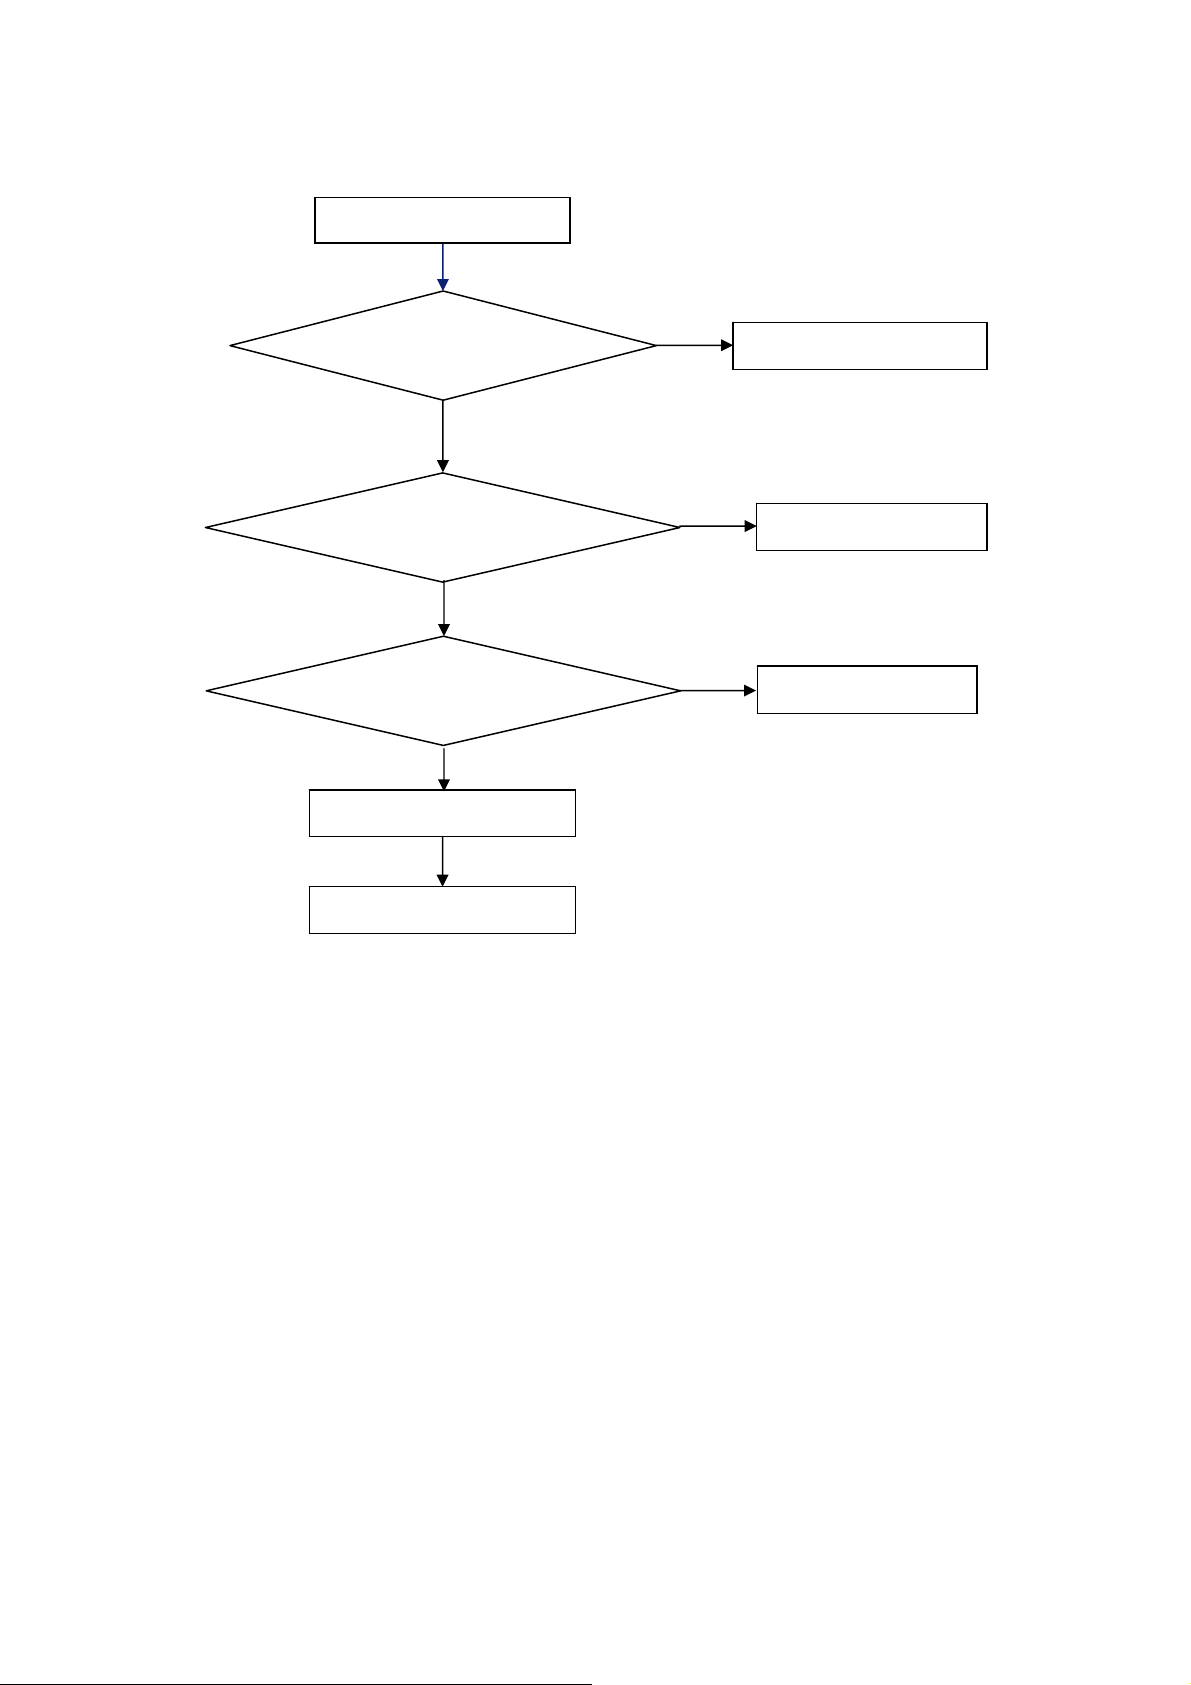
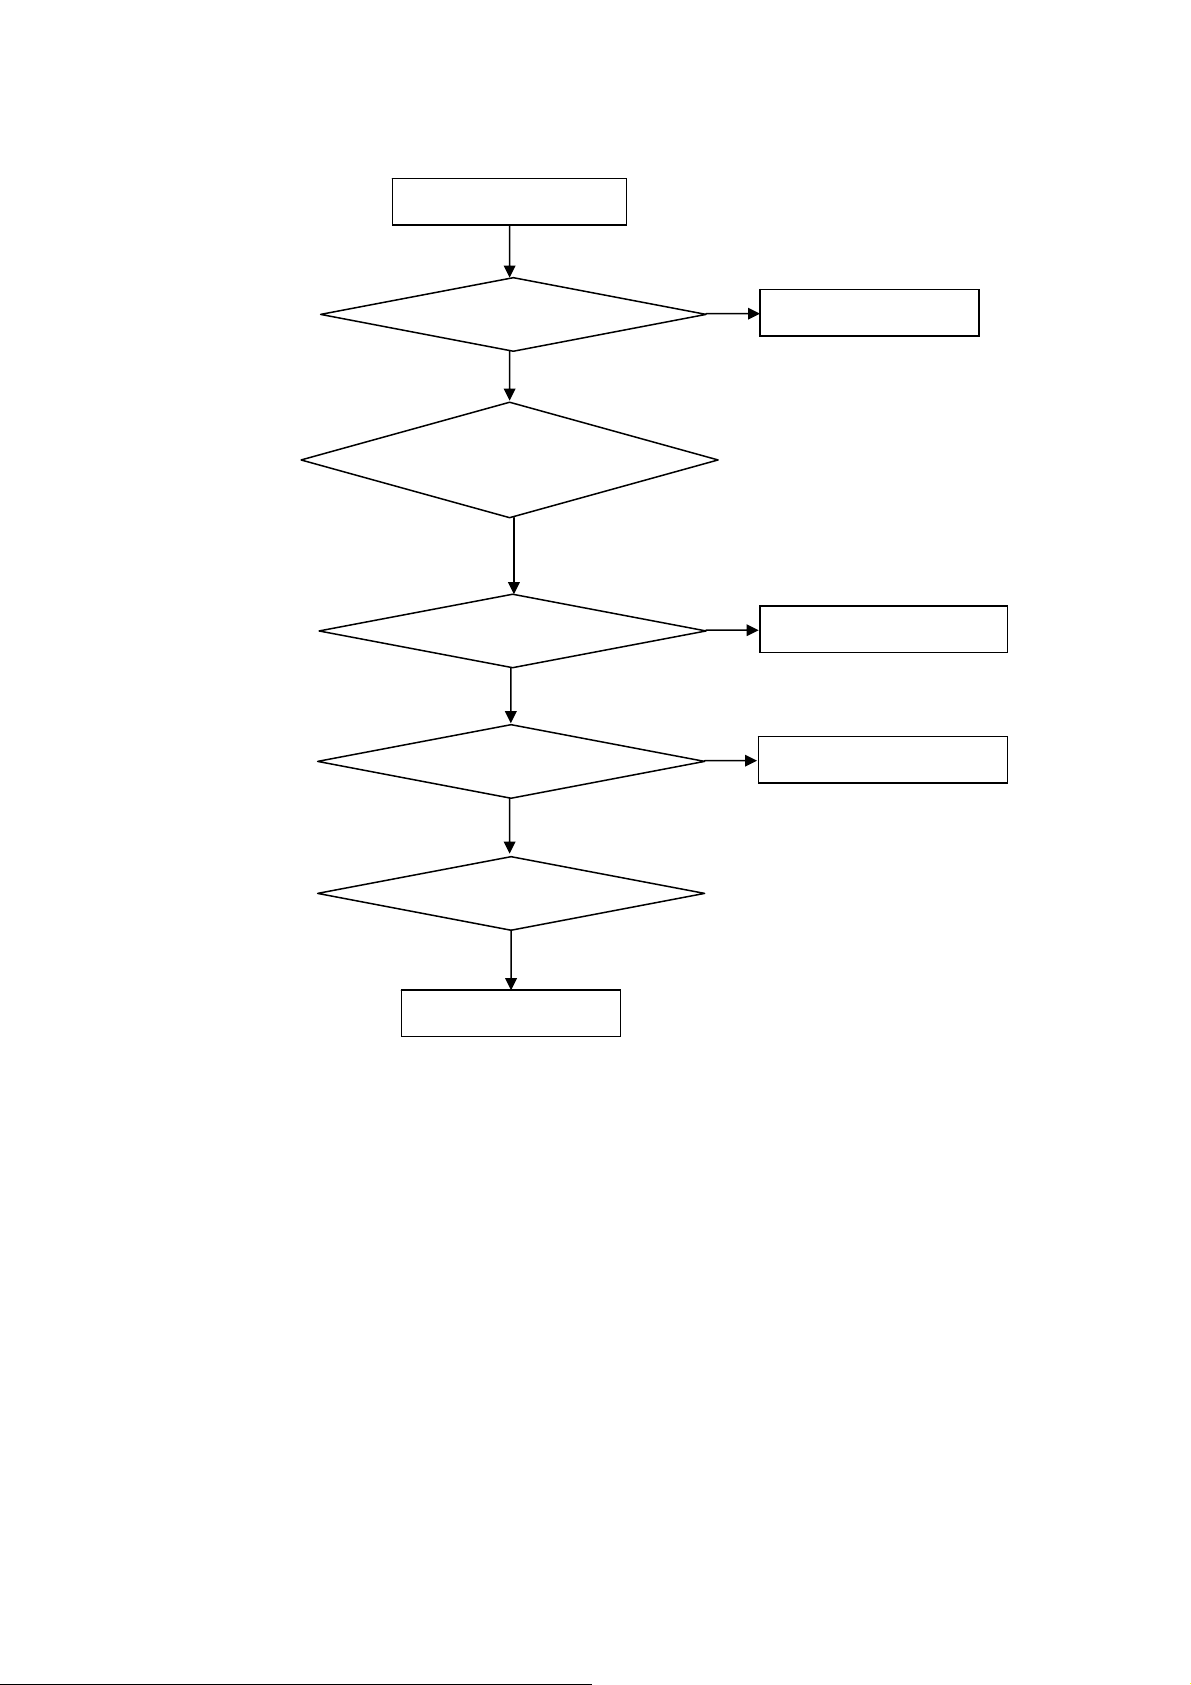
5. Repair Flow Chart
1. No power
No power (LED “Off”)
Check the AC input and
the
ower is “ON”?
Yes
Power board output=5V?
Yes
Check the IR board and LED
Replace the IR board
No
Replace the main board
No
Power “On”
No
Replace the power board
27
Page 28
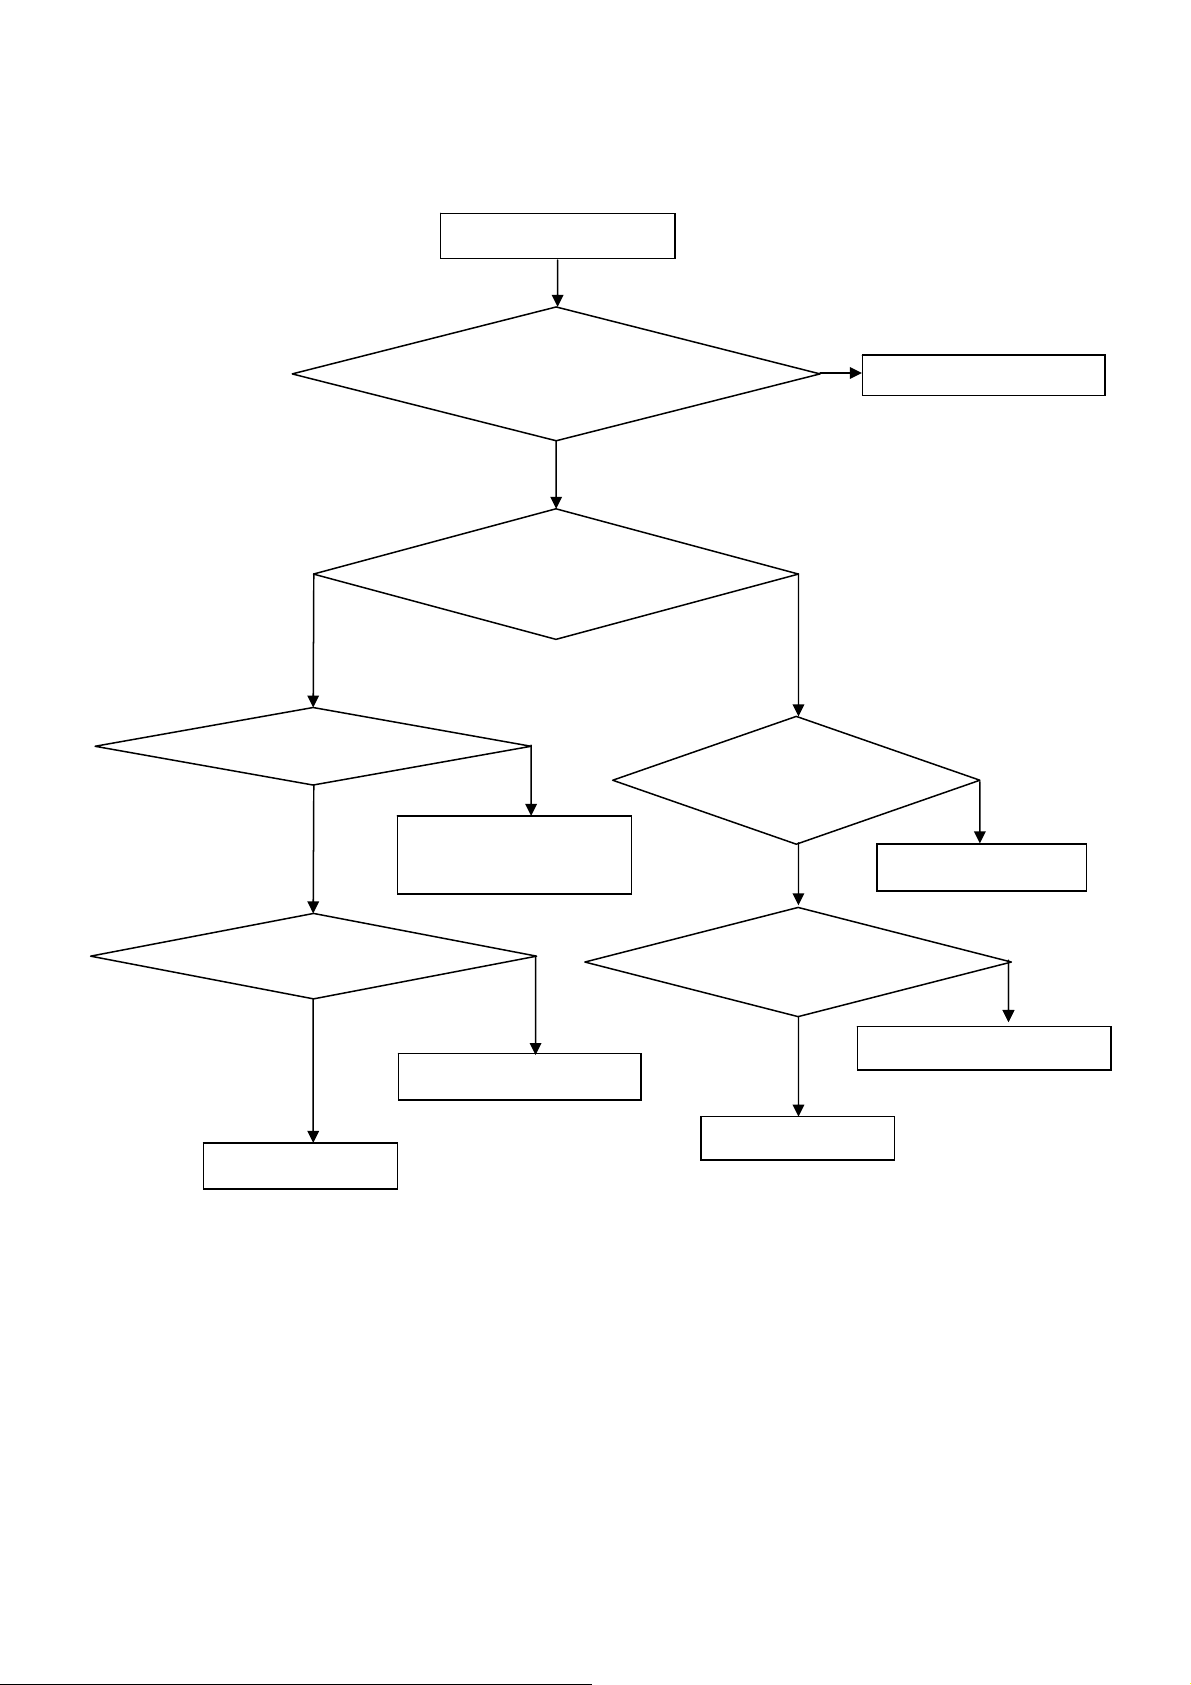
2. Can’t start
Power board output=24V?
Check the power key is under control?
Check the IR receiver is normal?
Replace the main board
Replace the Power board
Can’t start
No
Replace the power board
Yes
Yes
Replace the key board
No
Yes
Replace the IR board
No
No
28
Page 29
3. Abnormal Display
Abnormal Display
Check the source
Yes
Enter factory mode to do
“EEPROM initial”&“Reset”
No
No
Reset the source
Check the main board
Yes
Check the LVDS cable
Yes
Check the panel
No
Replace the panel
No
Replace the main board
No
Replace the LVDS cable
29
Page 30
4. No display
Check TV is under control and power
on/off by remote control and power key?
Yes
Check the LVDS cable
Yes
Panel Vcc = 12 V?
Yes
Replace the Panel
No display (LED white)
Yes
Check the backlight is
“On”?
No
Reinsert or replace the
LVDS cable
No
Replace the main board
No
Replace the main board
No
Check the B/L
signal is available?
Yes
Power board output =24 V?
Yes
Replace the Panel
Replace main board
Replace the power board
No
No
30
Page 31

5. Sound problem
Check the speaker resistance value is in spec
(Remark: The value is marked on the speaker)?
No sound or sound abnormal
Check the audio source connection
and the TV system are correct?
Yes
Check the TV is muted, adjust the
volume or enter the menu to reset?
No
Enter factory mode to do “Reset”
No
Check the cable between the
speakers and main board is
Yes
No
Reinsert the audio cable or
change the TV system
No
Replace the cable
No
Yes
Replace the speaker
Replace the main board
31
Page 32

6. Remote Control malfunction
Remote Control malfunction
Check the remote control battery is
not properly placed or no power?
Use the other remote controls
Whether the IR board is
abnormal?
Yes
Replace the battery
No
Yes
Replace the remote control
No
Yes
Replace the IR board
No
Replace the main board
32
Page 33

7. OSD is unstable or can’t work normally
OSD is unstable or can’t work normally
Key board connected properly?
Yes
No
Reconnect the key board
Buttons are OK?
Yes
Key board is OK?
Yes
Enter factory mode to do “Reset”
No
Replace the main board
No
No
Replace the button function
Replace the key board
33
Page 34

6. PCB Layout
6.1 Main Board
715G4365M0G000005K
34
Page 35

35
Page 36

36
Page 37

37
Page 38

6.2 Power Board
715G3829P02W30003S
38
Page 39

39 40
Page 40

Page 41

715G3885P03W30003M
41
Page 42

42 43
Page 43

Page 44

6.3 Key Board
715G4388K0E000004S
6.4 IR Board
715G4400R0C000004M
44
Page 45

7. Adjustment
7.1 White Balance Adjustment
Content of ADC Adjustment
1. Enter Factory Mode Method: Press RC key ‘menu’+’1’+’9’+’9’+’9’ plus last key(hold)
2. ADC Adjustment Method
First of all: Enter factory mode (same as the above-mentioned).
Second: Select the Item of “Current Source”.
Third: Set Timing and Pattern of Source.
Finally: Press the item of “Auto Color”.
3. Set Timing and Pattern of Sources
1. They both need ADC adjust with two sources (YPbPr, VGA).
2. Timing and Pattern Setting: YPbPr: Timing 331 pattern 886
VGA: Timing 137 pattern 886
Content of WB Adjustment
1. Enter into the factory mode :( same as the above-mentioned).
2. Take an example of adjusts HDMI_Normal:
a. Select item “Source”: HDMI and item “Color Temp”: Normal.
b. Adjust gain of RGB to meet spec in the below setting of time\pat.
(HDMI mode: TIM = 349; PAT = 141(80IRE))
x (center)
y (center)
Lv(center) >400cd >400cd >400cd
PC/ (7500K) Normal/ (6500K) Cool / (9300K)
0.285 0.015 0.314
0.293 0.015 0.324
0.015 0.276 0.015
0.015 0.282 0.015
Please note:
When technician access factory, please do factory reset when leaving the mode.
If technician does not do factory reset, TV will remain factory mode it causes TV cannot power off when press TV
side power button or remote control.
TV still remain the factory, it will cause TV cannot power off.
45
Page 46

7.2 Firmware Instruction
There are two methods to upgrade FW.
Method 1:
Upgrade online.
This way is easy and invisible. TV can detect new software and load it from website to upgrade automatically when
TV is connected to internet and standby (TV AC on and DC off).
Method 2:
Step 1: Ready for F/W Upgrade
1.1 Prepare a USB memory (The file system of USB memory must be FAT16 or FAT 32).
1.2 Copy the F/W files including 2 software files such as
computer to the U-disk root content, and remove it from computer’s USB port!
Note: Note the software version 2.1.9 as
Step 2: F/W Upgrade
2.1 AC on and turn on the TV. After the logo appears in the screen as figure 2.1, insert U-disk to the USB port as
figure2.2.
and from your
Figure 2.1 Figure 2.2
2.2 When the TV detects the U-disk, TV will appear a message as figure2.3. Please notice the content in the red
frame.
Figure2.3
46
Page 47

2.3 After about 3 minutes, another interface will show as figure2.4.
Figure2.5
2.4 Wait for about 7 minutes, TV will restart.
Step 3: Check the F/W version.
3.1 When TV restarts, press “MENU”+”1”+”9” +”9” +”9” key to enter the factory mode Figure3.1
Press these keys quickly.
1. Press “MENU”
2. Press “1”+”9”+”9”+”9”.
Figure 3.1
47
Page 48

3.2 Check the F/W version on the second row of the factory mode info as figure3.2. If F/W version is incorrect,
please redo upgrade else let’s go to Step 3.3.
figure3.2
3.3 If F/W version is correct, press ‘down’ Key to choose “Reset” option (The option will be orange as figure 3.3).
Then press ‘OK’ Key to reset as figure 3.4.
Figure3.3 figure3.4
3.5 After reset there will be an interface as figure3.5. Turn off the TV by remote control and wait for LED becoming
from light to dark. That is all of complete upgrade by U-disk.
Figure3.5
48
Page 49

7.3 DDC Instruction
Note: Take other model for example
Step1. Ready for writing EDID
Tool: 715G2005-C2
Cable: a LPT cable, a VGA cable, a DVI to HDMI cable and a 12V DC adapter.
715G2005-C2 male to male LPT cable
Step2. Connection for writing VGA EDID.
Connect to PC LPT port.
VGA cable
12v DC input
Connect to TV VGA port.
49
Page 50

Step3. Install TPV EDID tool.
This red frame contents detail information in VGA EDID file.
1. Double click this icon to install. 2. Double click this icon to run.
1. Click here to open this interface.
4. Click here to Read the file.
3. Click anyone file to
add VGA EDID file.
2. Choose the VGA EDID file.
50
Page 51

Step4. Click “FPD” to open another interface as follows.
1. Tick LPT1
2. Click here to read file as figure 4.2
2. Click “open” to read the “.dat” file.
Figure 4.2
51
Page 52

Step5. Click “write EDID” to write EDID. If display “NG” in the yellow blank, which represent writing failly. Please
check the whether the connection of tool and cables is nomal and retry. Another way is to change a new ISP board
and retry.
2.”OK” represents writing successfully.
3. Click “Read EDID”
can read out the EDID
info checked in “Edid
Conten” interface.
1. Click here to write EDID.
Write fail.
52
Page 53

8. Block Diagram
53
Page 54

9. Schematic Diagram
9.1 Main Board
715G4365M0G000005K
TU102
NC/TUNER
RF AGC
NC
NC
376891011
1
TUNER_RF_AGC
TP115
WHITE
TUNER_RF_AGC
4
Vt
TP101
AS
5122
TUNER_SCL
VCC_TUNER
TU101
DTVA50CVH1019A(B)
VCC_TUNER
3,4,6,7,8,9,10,13 NC
RF AGC
GND
112112141615
5
TUNER_SCL
TUNER_RF_AGC
TUNER_SDA
TUNER_SCL
R112
TUNER_AGCT_FILTERED
NC/0R05 1/ 16W
16
TH4
15
TH3
14
TH2
13
TH1
SDA
SCL
VCC
IF AGC
D-IF Out+
D-IF Out-
IF Out
TUNER_IF_N
R142
NC/0R05 1/ 16W
TUNER_IF_P
R143
VCC_TUNER
TUNER_SDA
NC/PMBT3904
GP26_RF_AGC_LEVEL7
NC/0R05 1/ 16W
VCC_TUNER
C101
R101
NC/1UF 16V
NC/47K 1/16W
Q101
Q102
R107
NC/1.1K 1/10W
NC/MMBT3906 PNP
Q103
NC/PMBT3904
R110
NC/10K 1/1 6W 5%
C114
NC/0.1uF 16V
NC/10N 25V
C116
SDA
SCLB+IF AGC
TUNER_SDA
22pF 50V
D-IF1
C111
C113
22pF 50V
D-IF2
20
TH4
19
TH3
18
TH2
17
TH1
TUNER_IF_AGC
R140
0R05 1/10W
R141
0R05 1/10W
+3.3VOnOf f
R106
100R 1/16W 5%
R108
100R 1/16W 5%
TUNER_IFA
R104
NC/2.7K 1/ 16W
C146
33P 50V
L105
0.47uH
R105
NC/2.7K 1/ 16W
TUNER_ IFA
TUNER_IF_N
TUNER_IF_P
TUNER_IF_AGC
BSC_M0_SDA 10
BSC_M0_SCL 10
SF101 NC/EMI FILTER
1
C102
IN
NC/0.1uF 16V
C115
NC/10N 25V
SAW FILTER
GND GND
2 3
OUT1
OUT2
R111
0R05 1/16W
4
5
R103
NC/4.7K 1 /16W
R102
NC/2K 1/16 W
CONTROLS
5
DEFAULT_B
8
TP102
VGA_REFSEL1
9
VGA_REFSEL0
TP103
13
TP104
VGA_VCMSEL0
14
TP105
VGA_VCMSEL1
16
TP106
VGA_BIASCNTL0
17
TP107
VGA_BIASCNTL1
18
TP108
VGA_BIASCNTL2
22
TP109
PGA_VCMSEL0
23
PGA_VCMSEL1
TP110
26
TP112
PGA_PWRSAVE0
27
PGA_PWRSAVE1
TP111
IF_AGC
GND
C112
NC/0.1uF 10V
U101
NC/BCM3411B1
20
19
25
24
<Package>
PGA_VDD
1
PGA_VDD1
VGA_INP
VGA_INN
PGA_OUTP
PGA_OUTN
PGA
VGA0 VGA1
PGA_GAIN
PGA_INN
PGA_INP
VGA_OUTN
VAGC
28
4
3
12
112915
TP114
TP113
BCM3411_IF_AG C
R109
NC/0R05OH M1/16W
BG_VDD
VGA1_VDD
VGA0_VDD
VGA_OUTP
BCM3411_IF_P
BCM3411_IF_N
TUNER_AGCI_FILTERED
C103
C104
NC/1000pF 50V
BG_VDD
C105
NC/1000pF 50V
VGA1_VDD
C107
NC/1000pF 50V
VGA0_VDD
C109
NC/1000pF 50V
NC/0.1uF 16V
C106
NC/0.1uF 16V
C108
NC/1uF 10V
C110
NC/1uF 10V
7
10
21
FB101
1 2
NC/600R/200mA
FB102
1 2
NC/600R/200mA
FB103
1 2
NC/600R/200mA
FB104
1 2
NC/600R/200mA
A3.3V_3411
BCM3411_IF_P
BCM3411_IF_N
TUNER_IF_P
TUNER_IF_N
R113
NC/0R05 1 /10W
R118
0R05 1/10W
R122
NC/0R05 1 /10W
R123
0R05 1/10W
3411_TUNER_IF _P
3411_TUNER_IF _N
GP52_BRD_POWER_ON7,8,18
+5VOnOf f
C133
+
47U 25V
Vout = 1.2 (1+R1/R2 )
GP52_BRD_POWER_ON7,8,18
R139
0R05 1/10W
C145
NC/150pF 5 0V
R136
NC/0R05 1/ 10W
C117
0.1uF 16V
C125
0.1uF 16V
U102
1
2
3
4 5
G965-25ADJPIUF
C142
NC/150pF 50V
VEN
VIN
VO
ADJGND
TUNE R_P
TUNE R_N
GND
GND
GND
+5VOnOf f
8
7
6
C143
NC/1UF 16V
L102
0.068uH
R132
75K 1/10W 1%
R135
12K 1/10W 1%
U104
1
IN
2
GND
3 4
SHDN
NC/G9141T11U
C121
180P 50V
C118
27P 50V
C126
27P 50V
R133
75K 1/10W 1%
OUT
SET
FB107 0.22uH 5%
1 2
1 2
FB108 0.22uH 5%
C134
+
47U 25V
5
27P 50V
C120
120pF 50V
C127
27P 50V
C128
120pF 50V
A5.0V
C135
100N 50V
R137
NC/232R +-1% 1/10W
R138
NC/100 OHM 1% 1/10W
FB106
1 2
30R/1800mA
FB105
1 2
NC/300R/700mA
C144
NC/4.7U F 10V
VCC_TUNER
R115
EDSAFE_IF_PC119
C122
27P 50V
C140
NC/470pF 50V
TP117
RED
+
470UF 16V
A3.3V_3411
C136
EDSAFE_IF_N
C141
NC/0.1uF 16V
L103
0.47uH
C137
4.7UF 10V
VCC_TUNER
C138
0.1uF 16V
EDSAFE_IF_P
EDSAFE_IF_N
BYP_DS_CLK
Tuner IF Inputs
and Control
DS_AGCT_CTL
DS_AGCI_CTL
AA26
P22
C139
10N 50V
U401D
BCM3549VMKFB5G
AA25
W25
W26
DS_AGCT_CTL
DS_AGCI_CTL
NC/510R 1/ 16W 5%
R121
R120
NC/2K 1/16W
NC/200OHM1/ 16W
C123
NC/0.1uF 16V
AGC_VDDO
C130
NC/0.1uF 10V
R126
R125
2K 1/16W
200OHM1/16W
C131
0.1uF 16V
T P V ( Top Victory Electron ics Co . , Ltd. )
G4365-M0C-000-0050-1-20100721
絬隔瓜絪腹
Key Component
01_ATSC Tuner
Date
C124
NC/10N 50V
R124
NC/3.9K 1/ 16W
C132
R128
NC/3.9K 1/ 16W
10N 50V
OEM MODE L Size
TPV MODEL
PCB NAME
Sheet
R119
NC/0R05 1/ 16W
R127
0R05 1/16W
715G4365-M0C-000-0050
117Sunday, Sept ember 26, 2010
of
TUNER_AGCT_FILTERED
TUNER_AGCI_FILTERED
Rev
称爹
D
1.0
54
Page 55

Side-VGA_AUD_IN
CN102
3
2
1
PHONEJAC K
Side-CVBS/LR
CN116
2
A
1
4
B
3
JACK
C661
470pF 50V
C670
220pF 50V
FB611300 OHM
FB612300 OHM
C662
470pF 50V
FB613300 OHM
FB614300 OHM
C671
220pF 50V
R667
1K 1/16W
R672
1K 1/16W
ZD605
ZD606
1 2
1 2
VPORT0603100KV05
VPORT0603100KV05
C663 470pF 50V
R681
1K 1/16W
R683
1K 1/16W
1 2
1 2
ZD607
ZD602
VPORT0603100KV05
VPORT0603100KV05
C678 470 pF 50V
R668
0R05 1/16W
R673
0R05 1/16W
NC
NC
R675
100K 1/16W
R682
0R05 1/16W
R684
0R05 1/16W
100K 1/16W
R686
R676
NC
NC
R687
C680
C664 470pF 50V
R674
100K 1/16W
100K 1/16W
R685
C679 470 pF 50V
NC
NC
C665
C666
R677
YPbPr_L_I N
YPbPr_R_IN
NC
NC
C681
R688
VGA_AUD_L_I N
VGA_AUD_R _IN
24K 1%
24K 1%
24K 1%
24K 1%
R669
R671
R689
12KOHM 1/10W
R678
R680
R690
12KOHM 1/10W
1uF 25V
C658
C660
1uF 25V
R692
12KOHM 1/10W
1uF 25V
C667
C669
1uF 25V
R691
12KOHM 1/10W
AUDMX_LEFT1
5%
AUDMX_RIGHT1
5%
AUDMX_LEFT5
5%
AUDMX_RIGHT5
5%
C675
C674
47P 50V
47P 50V
C676
47P 50V
C677
47P 50V
U401T
BCM3549VMKFB5G
AC8
AB9
AF6
AE7
AE8
AD9
AF7
AE9
AB10
AD10
AF9
AF10
AUDMX_LEFT1
AUDMX_RIGHT1
AUDMX_LEFT2
AUDMX_RIGHT2
AUDMX_LEFT3
AUDMX_RIGHT3
AUDMX_LEFT4
AUDMX_RIGHT4
AUDMX_LEFT5
AUDMX_RIGHT5
AUDMX_LEFT6
AUDMX_RIGHT6
Analog Audio Input Mux
AUDMX_INCM1
AUDMX_INCM2
AUDMX_INCM3
AUDMX_INCM4
AUDMX_INCM5
AUDMX_INCM6
AD8
AE6
AC9
AF8
AC10
AE10
AUDMX_INCM1
AUDMX_INCM5
C672
470N 16V
C673
470N 16V
C659
150N 50V
C668
150N 50V
CN117_AU DMX_INCM1_SHIE LD
CN116_AU DMX_INCM5_SHIE LD
TP602
TP601
R670
5.1 +-1% 1/10W
R679
5.1 +-1% 1/10W
55
T P V ( Top Victory Electronics Co . , Ltd. )
G4365-M0C-000-0050-1-20 100721
絬隔瓜絪腹
Key Component
2_Audio In
Date
OEM MODEL Size
TPV MOD EL
PCB NAME
715G4365-M0C-000-0050
217Sunday , September 26, 2010
Sheet
of
Custom
1.0
Rev
称爹
Page 56

10
10
A5.0V
R1221
10K 1/16W 5%
UART_TXD2
10
UART_RXD2
10
PC_SDA
PC_SDA
PC_SCL
PC_SCL
Side-YPbPr1
VGA_VSYNC
VGA_HSYNC
CONN_TXD2
10
R1215 100R 1/16W 5%
VGA_HSYNC
VGA_VSYNC
R1217 100R 1/16W 5%
R4759
2.2K 1/16W
U1202
1
B
2
A
3 4
GND Y
74LVC1G08GW
U1203
3 4
GND Y
2
A
1
B
74LVC1G08GW
CONN_TXD2
A5.0V
5
VCC
VSYNC_I N
HSYNC_IN
A5.0V
5
VCC
DPMS_HSYNC7
DPMS_VSYNC7
NC/0. 1uF 10V
R4326 NC
FB1203 60 OH M
1 2
FB1205 60 OH M
1 2
VGA_DDC_SCL
R4758
2.2K 1/16W
CVBS_IN
C1238 12P 50V
VGA_R_IN
1 2
ZD1203
C1208
C1207
NC/0.1uF 10V
ZD1201
1 2
VPORT0603100 KV05
UART_TXD2
H
V
C1215
C1214
10P 50V
10P 50V
FB1209 120R/500mA
1 2
VPORT0603100KV05
11
12
13
14
15
CN101
VGA_G_IN
1 2
R1206
0R05 1/10W
R1208
0R05 1/10W
1716
VGA_B_IN
1 2
ZD1204
VPORT0603100KV05
VGA_HSYNC
VGA_VSYNC
1
6
2
7
3
8
UART_RXD2
4
9
5
10
DB15
ZD1213
1 2
VPORT0603100KV05
TP1201
VGA_CN105_R _CM_SHIE LD
TP1203
VGA_CN105_G _CM_SHIELD
VGA_HSY NC
VGA_VSYNC
1 2
1 2
ZD1205
VPORT0603100KV05
ZD1207
ZD1206
VPORT0603100KV05
VPORT0603100KV05
VGA_DDC_SCL
1 2
ZD1208
VPORT0603100KV05
VGA_DDC_SDA
1 2
ZD1209
VPORT0603100KV05
MOS
R1209
R1211
100R 1/16W 5%
4.7K 1/16W
Q1201
PMBT3904
G32_VGA_EDID_WP7
R1207
10K 1/16W 5%
R1232
NC/10K1/16W
R1201
36OHM +-5% 1/10W
R1203
36OHM +-5% 1/10W
VGAROMWP
R1210
4.7K 1/16W
R1212
4.7K 1/16W
PC_SCL
PC_SDA
Reserved -Peter 8/6
VGA5V
VGA5V
R
G
B
R4325 NC
C1211
5PF 50V
1 2
VPORT0603100KV05
ZD1202
CVBS_IN1
C1212
5PF 50V
FB1201 30OH M
1 2
FB1202 30OH M
1 2
FB1204 30OH M
1 2
CONN_RXD2
C1213
5PF 50V
R1233
0R05 1/16W
C1239
NC/220pF 50V
LPF 7.5 MHz
CONN_RXD2
C1240
NC/220pF 50V
VGA_R_IN
VGA_G_INVGA_DDC_SDA
VGA_B_IN
10
R1234
14.7R 1%
C1201
100N 16V
C1203
100N 16V
5.0V_STBY
R1213
0R05 1/16W
R1216
0R05 1/16W
R1219
0R05 1/16W
VGA5V
1
3
C1209 100N 16V
R1214
75OHM 1/16W
C1210 100N 16V
R1218
75OHM 1/16W
C1216 100N 16V
R1220
75OHM 1/16W
C1237100N 16V
R1235
60R4 +-1% 1/16W
2
D1201
BAT54C
VGA_PLUGPW R
8
7
6
U1201
A0
VCC
A1
WP
A2
SCL
VSSSDA
M24C 02-W MN6 TP
TP1202
VGA_CN105_B_CM_SHIELD
TP1204
Y_PR_PB_CN 111_CM_SHIELD
C1206
100N 16V
1
2
3
45
U401P
BCM3549VMKFB5G
HSYNC_IN
VSYNC_I N
AC11
SD_G
AF11
SD_B
AB12
SD_R
AB6
AC6
AE17
AD17
AC17
AE18
AD18
AF19
AE16
AC16
AD16
AF12
AE12
AC13
AD13
AF15
AC14
AB11
AE13
AE14
AD15
AD19
RGB_HSYNC
RGB_VSYNC
SD_Y1
SD_PB1
SD_PR1
SD_Y2
SD_PB2
SD_PR2
SD_Y3
SD_PB3
SD_PR3
SD_L1
SD_C1
SD_L2
SD_C2
SD_L3
SD_C3
SD_CVBS1
SD_CVBS2
SD_CVBS3
SD_CVBS4
SD_SIF1
Analog Video
Inputs
SD_INCM_G
SD_INCM_B
SD_INCM_R
SD_I N CM_C OMP 1
SD_I N CM_C OMP 2
SD_I N CM_C OMP 3
SD_INCM_LC1
SD_INCM_LC2
SD_INCM_LC3
SD_INCM_CVBS1
SD_INCM_CVBS2
SD_INCM_CVBS3
SD_INCM_CVBS4
SD_INCM_SIF1
AD11
AE11
AA12
AF17
AF18
AF16
AC12
AF13
AD14
AA11
AD12
AF14
AE15
AE19
C1202
100N 16V
R1202
36OHM +-5% 1/10W
C1204
100N 16V
R1204
36OHM +-5% 1/10W
SD_INCM_R
SD_INCM_B
SD_INC M_G
SD_INC M_COMP 1
VDAC_AVDD3P3 15
C1235
C1234
10N 50V
100N 16V
VDAC_VREG
VDAC_RBIAS
R1230
562R 1%
U401O
BCM3549VMKFB5G
AF23
AF24
VDAC_VREG
VDAC_RBIAS
Analog Video
Outputs
VDAC_2
VDAC_1
AE21
AF22
75OHM 1/16W
R1231
CN111
JACK
FB1206 120R /500mA
Y_CVBS_IN
R1351
NC/0R05OHM1/16W
+3.3VOnOf f
Y_CVBS_SW7
Y_CVBS_IN
C1236
0.1uF 16V
2
A
1
4
B
3
6
C
5
Y_IN
1 2
C1218 12P 50V
FB1207 120R /500mA
1 2
C1223 12P 50V
FB1208 120R /500mA
1 2
C1228 12P 50V
U1204
6 1
SB1
2
5
GNDAVCC
4
3
B0
74LVC1G3157GW
Y_IN
CVBS_IN
ZD1210
1 2
VPORT0603100KV05
ZD1211
1 2
VPORT0603100KV05
ZD1212
1 2
VPORT0603100KV05
YPbPr_Y_IN1
YPbPr_Pb_IN1
YPbPr_Pr_IN1
L1201 0.15uH
C1219 15P 50V
C1221
15P 50V
LPF 60 MHz
L1202 0.15uH
C1225 15P 50V
C1226
15P 50V
LPF 60 MHz
L1203 0.15uH
C1231 15P 50V
C1232
15P 50V
LPF 60 MHz
C1222
15P 50V
C1227
15P 50V
C1233
15P 50V
R1222
0R05 1/16W
R1225
0R05 1/16W
R1227
0R05 1/16W
C1217 100N 16V
R1223
75OHM 1/16W
C1224 100N 16V
R1226
75OHM 1/16W
C1230 100N 16V
R1229
75OHM 1/16W
TP1205
SD_CVBS1_CM_SHIELD
C1241 100N 16V
R1236
36OHM +-5% 1/10W
SD_INCM _CVBS1
T P V ( Top Victory Electronics Co . , Ltd. )
G4365-M0C-000-0050-1-20100721
絬隔瓜絪腹
Key Component
03_Video In Analog
Date
OEM MODEL Size
TPV MODE L
PCB NAME
715G4365-M0C-000-005 0
of
317Wednesday, October 13, 2010
Sheet
Custom
1.0
Rev
称爹
56
Page 57

AC20
AA19
AB20
+12V
+24V
+3.3VOn Off
AE5
AF4
FB607
FB608
U401A
BCM3549VMKFB5G
SPDIF_I N_P
SPDIF_I N_N
I2S_CLK_IN
I2S_DATA_IN
I2S_LR_IN
NC/120R /6000mA
120R/6000mA
FB610
1 2
120R/3000mA
I2S_MUTEB#7
12
12
AMP24V
AMP3V3
Audio In/Out
C646
10uF 10V
3KOHM 5% 1/10W
R694
1K 1/16W
C647
0.1UF50V
C624
1uF 50V
AUD_LEFT0_P
AUD_LEFT0_N
AUD_RI GHT0_P
AUD_RIGH T0_N
AUD_LEFT1_P
AUD_LEFT1_N
AUD_RI GHT1_P
AUD_RIGH T1_N
AUD_LEFT2_P
AUD_LEFT2_N
AUD_RI GHT2_P
AUD_RIGH T2_N
AUD_SPDI F
I2S_CLK_OUT
I2S_DATA_OUT
I2S_LR_OUT
+3.3VOn Off
R641
C625
1uF 50V
Q608
PMBT3904
C626
0.1UF50V
AC25
AC26
AD26
AD25
AE25
AF25
AF26
AE26
AC23
AD23
AE24
AD24
AF5
AD20
AF21
AE20
TP608
TP604
TP609
TP614
LINE_L+
LINE_L-
LINE_R+
LINE_R-
TP612
TP603
TP607
TP613
I2S_OUT_CLK
I2S_OUT_DATA
I2S_OUT_LR
Amp_MuteA#
R693
100K 1/10W 5%
C627
0.1UF50V
AUD_SPDIF_OUT
R652
NC/0R05 1/ 10W
D604
BAS32L
R696
0R05 1/16W
GP22_AUD_FS1_CL K7
C629 1N 50V
HIZ
R618
NC/0R05OH M1/16W
C604 1N 50V
R699 0R05 1/10W
I2S_OUT_LR
I2S_OUT_CLK
I2S_ OUT_ DA TA
BSC_M1_SDA10
BSC_M1_SCL10
SPDIF_OU T
HDMI_SPDIF_IN 8
0R05 1/10W
R624 0R05 1/10W
R632
10K 1/10W
AMP_RESETN7
+3.3VOn Off
FB603
120R/500mA
1 2
123
Vin
Vcc
GND
CN602
CONNNECTOR
Shield
Shield
4
5
C615 10uF 6.3V
R698
C606 0.1uF 16V
modify to X7R
-Peter 07/02/2010
R634
C688 4. 7UF 6.3V
C605 0. 1uF 16V
R623 0R05 1/10W
R625 0R05 1/10W
R620 0R05 1/10W
R635 22 OH M 1/10W
C614
10pF 50V
R636 22 OH M 1/10W
C613
10pF 50V
R697 0R05 1/10W
C602
1UF 6.3V
AMP3V3
TP615
18.2K OHM 1/10W 1%
AMP3V3
R633
10K 1/10W
ALL_MUTE7
AMP24V
R608
+12V
1K 1/10W
R614
5.0V_STBY
10K 1/10W
R642
C692
R643
470OHM1/10W
47N 50V
470OHM1/10W
C691
47N 50V
C693
4N7 50V
U601
12
13
VR_ANA
AVDD
PLL_FLTP
14
15
16
17
18
19
20
21
22
23
24
TAS5708 20W
PLL_FLTM
SDOUT
MCLK
OSC_RES
DVSS
VR_DIG
PDN
LRCLK
SCLK
SDIN
SDA
SCL
RESET
STEST
DVDD
2526272829303132333435
AMP3V3
C616
C611
10uF 6.3V
0.1UF50V
R604 NC/1K 1/16W
Q604
PMBT3904
R617
NC
R626
NC
AMP24V
C610
0.1UF50V
C694
4N7 50V
AVSS
PVCC_A
PVCC_A
PGND_A
DVSS
PVCC_D
PVCC_D
PGND_D
AMP24V
C612
0.1UF50V
R605
NC/47K 1/ 16W
R612
NC
OUT_A
PGND_A
PGND_D
OUT_D
5.0V_STBY
R602
NC/1K 1/ 16W
Q607
NC/PMBT3904
R606 0R05 1/10W
R609
5.6K
R613
R615
33KOHM 1/10W
5.1KOHM +-5% 1/10W
Q605
PMBT3904
Q606
MMBT3906 PNP
R621
1K 1/10W
1234567891011
HS
OUT_B
PGND_B
PGND_B
PVCC_B
BST_B
VCLAMP_AB
BST_A
HIZ
AVCC
AGND
BYPASS
BST_D
VCLAMP_CD
BST_C
PVCC_C
PGND_C
PGND_C
OUT_C
36
R603
NC/0R 05 1/16W
1.2K 1/10W
R619
0R05 1/10W
330UF 35V
D603
BAS32L
AMP24V
C609
0.1UF50V
49
48
C683 22 0N 25V
47
C633 1uF 25V
46
45
C682 22 0N 25V
44
R627 0R05 1/10W
43
42
C636 1uF 25V
41
C684 22 0N 25V
40
C637 1uF 25V
39
38
C654 22 0N 25V
37
AMP24V
D601 BAS32L
R610
R616
3KOHM 5% 1/10W
C603
+
R622
100K 1/10W
E-Pad GND
C608
0.1UF50V
Q601
PMBT3904
D602
BAS32L
HIZ
C607
0.1UF50V
AMP3V3
R644
47K
AMP24V
+3.3VOn Off
+
C685
NC/22U F 35V
AMP MUTE
+3.3VOn Off
Line Mute
R611
1K 1/16W
FB623
1 2
120R/3000mA
R607
47K
D605
BAS32L
Q603
LINE3V3
C696
10uF 10V
L603 22uH
R650
NC
C635
NC
L604 22uH
L605 22uH
R662
NC
C655
NC
L606 22uH
Amp_MuteA#
PMBT3904
C623
0.1UF50V
C641
0.1UF50V
C643
0.1UF50V
C656
0.1UF50V
LINE_L-
LINE_L+
LINE_R+
LINE_R-
C695
0.1UF50V
R649
6.2 OHM 5% 1/4W
C630 0.1UF50V
C634 0.1UF50V
R653
6.2 OHM 5% 1/4W
R659 6.2 OHM 5% 1/4W
C601 0.1UF50V
C651 0.1UF50V
R665
6.2 OHM 5% 1/4W
Line out_L
Line out_R
1uF 50V
1uF 50V
C638
C640
C648
C639
1uF 50V
1uF 50V
C631
0.1uF 50V
C649
0.1uF 50V
R639
27K 1/10W 1%
R640
27K 1/10W 1%
R637
27K 1/10W 1%
R638
27K 1/10W 1%
R648
68K
1 2
C632
1N 50V
C650
1N 50V
R645
VPORT0603100KV05
C620
15P 50V
DRV602PWR
C622
15P 50V
68K
FB621 300 OHM
FB622
ZD603
1 2
VPORT0603100KV05
FB617
FB616
FB619
FB618
C619
15P 50V
U602
C621
15P 50V
300 OHM
1 2
80OHM 4A
1 2
80OHM 4A
1 2
80OHM 4A
1 2
80OHM 4A
121196
10
13
NC
-INL
+INL
OUTL
+INR
-INR
SGND
OUTR
1
2
543147 8
470PF 50V
C689
R631
100K 1/10W
C617
150pF 50V
R629
100K 1/10W
R646
68K
R647
68K
R628
100K 1/10W
C618
150pF 50V
R630
100K 1/10W
2N2 50V
2N2 50V
C686
C687
ZD604
C628
1N 50V
C642
1N 50V
C645
1N 50V
C657
1N 50V
Line out_L
LINE3V3
C653
1uF 50V
PVDDPVSS
PGND
C644
1uF 50V
EN
CN CP
C652
1uF 50V
Line Mute
Line out_R
CN603
1
7
6
2
3
4
5
12
PHONEJAC K
470PF 50V
FB620
C690
30 OHM
CN601
L
4
L+
3
L-
2
R+
1
R-
R
CONN
57
T P V ( Top Victory Electronics Co . , Ltd. )
G4365-M0C-000-0050-1-20100721
絬隔瓜絪腹
Key Component
04_AMP & HP & SPDIF Out
Date
OEM MODEL Size
TPV MODEL
PCB NAME
715G4365-M0C-000-0050
of
417Sunday, September 26, 2010
Sheet
Custom
1.0
Rev
称爹
Page 58

GPIO
U401C
BCM3549VMKFB5G
<Package>
GPIO_00/Ex t_IRQb_0/ MII_RX_CLK/VI_656_ 1
GPIO_01/Ext _IRQb_1/MII _RX_EN
GPIO_02/Ext _IRQb_2/MII _RXD_00/VI_656_0
GPIO_03/PKT1_DATA/MII _RXD_01
GPIO_04/PKT1_SY NC/MII _RXD_02
GPIO_05/PKT1_CLK/ MII_RXD_03
GPIO_06/PKT2_DATA/MII _RX_ER
GPIO_07/PKT2_SY NC/MII _TX_CLK
GPIO_08/PKT2_CLK/ MII_TXD_00
GPIO_09/RMX1_DATA/PWM_1/ANT_RX_DATA
GPIO_10/RMX1_SYN C/Ext_I RQb_4/ANT_TX_DATA
GPIO_11/RMX1_CLK/Ex t_IRQb_5/ ANT_DET
GPIO_12/PKT3_DATA/VO_656 _CLK
GPIO_13/PKT3_SY NC/VO_656_0/ MII_COL
GPIO_14/PKT3_CLK/ VO_656_1/MII_MDC
GPIO_15/UA RT_RXD_0/MII_CR S
GPIO_16/UART_TXD_0/MII_MDIO
GPIO_17/VCXO27_A/F P_4SEC_RESET/MII _TX_EN
GPIO_18/VCXO27_B/VO_656 _2/MII_TXD_01
GPIO_19/I2S _PM_CLK_OUT/VO_656_3/MII _TXD_02
GPIO_20/I2S _PM_LR_OUT/VO_656_4/MII _TXD_03
GPIO_21/I2S_ PM_DATA_OUT/VO_656_5/MII_TX_ER
GPIO_22/AUD _FS_CLK1/VO_ 656_6
GPIO_23/IR _INT/VO_656_7/ AUD_FS_C LK2
GPIO_24/PWM_0/ SC_IO_0
GPIO_25/IR 1_IN/SC _CLK_0
GPIO_26/IR_OUT/SC_RST_0
GPIO_27/EPHY _ACTIVITY /SC_PRE S_0
GPIO_28/EPHY _LINK/ SC_VCC_0
GPIO_29/EXT_SC_CLK/I R2_IN
GPIO_30/UART_TXD_1/Ext_IRQb_6
GPIO_31/UA RT_RXD_1/LVDS_MODE_VSY NC
GPIO_40/VSY NC/LED _LD_1/DS_C LK_F1B_ADC
GPIO_41/HS YNC/ LED_LD_2/D S0_AFT_CTL
GPIO_42/UAR T_RXD_2/LED_LD_3/ DS_CLK_ADC
GPIO_43/UART_TXD_2/LED_LD_4/RMX0_PAUSE
GPIO_44/PKT0_VALID /LED_LD_5/ VO_656_CLK/VI _656_CLK
GPIO_45/PKT0_ERR OR/LED_LD _6/VO_656_0/VI_656_ 2
GPIO_46/PKT1_VALID /LED_LD_7/ VO_656_1/VI_656_3
GPIO_47/PKT1_ERR OR/LED_LS_0/ VO_656_2/VI_656_4
GPIO_48/PKT2_VALID /LED_LS_1/VO_ 656_3/VI_656_5
GPIO_49/PKT2_ERR OR/LED_LS_2/ VO_656_4/VI_656_6
GPIO_50/PKT3_VALID /LED_LS_3/VO_ 656_5/VI_656_7
GPIO_51/PKT3_ERR OR/LED_LS_4/ VO_656_6/VI_656_8
GPIO_52/POD_PK T5P_ERROR/VO_656_7/ VI_656_9
GPIO_32/SPI_M_SC K
GPIO_33/SPI_M_MISO
GPIO_34/SPI_M_MOSI
GPIO_35/SPI_M_SS0b
GPIO_36/SPI_M_SS1b
GPIO_37/RMX0_VALID
GPIO_38/SPI_S _SS0b
GPIO_39/Ext _IRQb_3/LE D_LD_0
GPIO_53/LED _KD_0/RMX1_PAUSE
GPIO_54/LED _KD_1/RMX1_SYNC
GPIO_55/LED_KD _2/RMX1_DATA
GPIO_56/LED _KD_3/RMX1_CLK
GPIO_57/RMX1_VALID
G24
E24
G22
E23
D26
D25
D23
D24
C26
R25
R26
R24
L1
L3
L2
P23
P24
F25
R23
H23
G26
G25
AF20
J21
E22
AB21
AC21
M4
M5
E21
P26
P25
G2
G3
G5
G6
G4
F21
H21
L5
K4
K1
E25
F24
G21
H25
H24
K22
K21
J23
K6
K5
J22
M3
M2
M1
L4
L6
GP15_UART_RXD_0
GP16 _UA RT_TXD _0
Light_senso r_detect
R4523 NC
R4526 NC
R4530 NC
R492
0R05 1/16W
R4528 NC
R4527 NC
R482
33 OHM 1/16W
R4529 NC
R4531 NC
R4525 NC
ALL_MUTE 6
KD_LS0 10
KD_LS1 10
KD_LS2 10
DPM-Tocn 64 19
421_RESETN 19
KD_KD0 10
KD_KD1 10
KD_KD2 10
KD_KD3 10
TP448
GPIO2_IRQb_2 12
I2S_MUTEB# 6
DISM 19
Red_Orange 10
GP26_RF_AGC_LE VEL 3
VCOM_OSD_ON_OFF 19
TP450
DPMS_VSYNC 5
OPC_En To Panel 19
G32_VGA_EDI D_WP 5
VCOM_OSD_ON_OFF 19
PWR_OK 18
GP15_UART_RXD_0 10
GP16_UART_TXD_0 10
TP449
PS_ON 18
421 DDR Pwr_On 19
421 3V3 Pwr_On 19
BT_Wake up 12
GP22_AUD_FS1_C LK 6
TP452
GP25_IR1_IN 10
TP451
GP27_EPHY_ACTIVITY 11
GP28_EPHY_LI NK 11
Flash_WP 9
DPMS_HSYNC 5
TCON_PWR_ON 18
GP42_UART_RXD_2 10
GP43 _UA RT_TXD _2 1 0
X421_GPIO5 10
GP52_BRD_POWER _ON 3,8,18
Y_CVBS_SW 5
HDMI_INT
BT_RESET 9,10,12
USB_RESETn 12
AMP_RESETN 6
GP30 _UA RT_ TXD_1 1 0
GP31_UART_RXD_1 10
Rervsed Backlight ON/OFF19
GP41_LCD_BLON
R462
0R05 1/16W
+5VOnOf f
R481
NC/2K 1%
R4587
NC/4. 7K 1/16W
R489
4.7K 1/16W
R484
NC/10K 1/16W 5%
Tcon-151 pin 19
+5VOnOf f
R490
4.7K 1/16W
Q405
NC/PMBT3904
R487
10K 1/16W 5%
Q407
PMBT3904
R485
NC/4. 7K 1/16W
R488
10K 1/16W 5%
R491
NC/0R 05 1/16W
R483
NC/10K 1/16W 5%
+5VOnOf f
R486
1K 1/16W
Q406
PMBT3904
C458
NC/10uF 10V
C459
100N 16V
BL_DIM 18
C401
NC/100N 16V
BL_ON 18LED_CTL1 10
3.3V_STBY
R493
NC
R496
NC
Light_sens or_detect
58
T P V ( Top Victory Electronics Co . , Ltd. )
G4365-M0C-000-0050-1-20100721
絬隔瓜絪腹
Key Component
05_GPIOs
Date
OEM MODEL Size
TPV MOD EL
PCB NAME
715G4365-M0C-000-0050
Sheet
of
17Sunday, September 26, 2010
5
Custom
1.0
Rev
称爹
Page 59

CN506
20
22
23
21
HDMI
20
22
23
21
20
22
23
21
20
22
23
21
SHELL1
D2 Shield
SHELL3
D1 Shield
D0 Shield
CK Shield
CE Remote
DDC CLK
DDC DATA
SHELL4
SHELL2
Side
HDMI1
CN507
SHELL1
SHELL3
CE Remote
SHELL4
SHELL2
HDMI
Side
HDMI2
CN508
SHELL1
SHELL3
CE Remote
SHELL4
SHELL2
HDMI
Side
HDMI3
CN509
SHELL1
SHELL3
CE Remote
SHELL4
SHELL2
HDMI
Side
HDMI4
GND
HP DET
D2 Shield
D1 Shield
D0 Shield
CK Shield
DDC CLK
DDC DATA
HP DET
D2 Shield
D1 Shield
D0 Shield
CK Shield
DDC CLK
DDC DATA
HP DET
D2 Shield
D1 Shield
D0 Shield
CK Shield
DDC CLK
DDC DATA
HP DET
3.3V_STBY
12
D502
L501 NC/ 90 ohm124
1
D2+
2
3
3
D2-
L502 NC/ 90 ohm124
4
D1+
5
3
6
D1-
7
L503 NC/ 90 ohm124
D0+
8
9
D0-
CK+
CK-
NC
+5V
D2+
D1+
D0+
CK+
GND
D2+
D1+
D0+
CK+
GND
D2+
D1+
D0+
CK+
GND
3
L504 NC/ 90 ohm124
10
11
3
12
13
14
HEC+
15
16
17
FB507 30R /600mA12
18
HEC-
19
L505 NC/ 90 ohm124
1
2
3
3
D2-
4
L506 NC/ 90 ohm124
5
6
D1-
D0-
CK-
NC
+5V
D2-
D1-
D0-
CK-
NC
+5V
D2-
D1-
D0-
CK-
NC
+5V
3
7
L507 NC/ 90 ohm124
8
9
3
L508 NC/ 90 ohm124
10
11
3
12
13
14
15
16
17
FB504 30R /600mA12
18
19
L509 NC/ 90 ohm124
1
2
3
3
4
L510 NC/ 90 ohm124
5
6
3
L511 NC/ 90 ohm124
7
8
3
9
10
L512 NC/ 90 ohm124
11
12
3
13
14
15
16
17
FB505 30R /600mA12
18
19
1
L513 NC/ 90 ohm124
2
3
3
4
L514 NC/ 90 ohm124
5
6
3
7
L515 NC/ 90 ohm124
8
9
3
10
L516 NC/ 90 ohm124
11
12
3
13
14
15
16
17
FB506 30R /600mA12
18
19
HDMI1+5V
ZD514
HDMI2+5V
HDMI3+5V
HDMI4+5V
HDMI1_D2P
HDMI1_D2N
HDMI1_D1P
HDMI1_D1N
HDMI1_D0P
L517
ARC_BIAS
1uH
HDMI1_D0N
HDMI1_CLKP
HDMI1_CLKN
CEC
DDC1_SCL
R526 47K 1/16W
DDC1_SDA
R528 47K 1/16W
HDMI_HPD1
ZD502
ZD503
ZD504
VPORT0603100KV05
VPORT0603100KV05
VPORT0603100KV05
VPORT0603100KV05
HDMI2_D2P
HDMI2_D2N
HDMI2_D1P
HDMI2_D1N
HDMI2_D0P
HDMI2_D0N
HDMI2_CLKP
HDMI2_CLKN
CEC
DDC2_SCL
R538 47K 1/16W
DDC2_SDA
R539 47K 1/16W
HDMI_HPD2
ZD507
ZD506
ZD505
VPORT0603100KV05
VPORT0603100KV05
VPORT0603100KV05
HDMI3_D2P
HDMI3_D2N
HDMI3_D1P
HDMI3_D1N
HDMI3_D0P
HDMI3_D0N
HDMI3_CLKP
HDMI3_CLKN
CEC
DDC3_SCL
R550 47K 1/16W
DDC3_SDA
R552 47K 1/16W
HDMI_HPD3
ZD510
ZD509
ZD508
VPORT0603100KV05
VPORT0603100KV05
VPORT0603100KV05
HDMI4_D2P
HDMI4_D2N
HDMI4_D1P
HDMI4_D1N
HDMI4_D0P
HDMI4_D0N
HDMI4_CLKP
HDMI4_CLKN
CEC
DDC4_SCL
R567 47K 1/16W
DDC4_SDA
R568 47K 1/16W
HDMI_HPD4
ZD512
ZD511
ZD513
VPORT0603100KV05
VPORT0603100KV05
VPORT0603100KV05
HDMI1+5V
HDMI2+5V
HDMI3+5V
HDMI4+5V
TPWR_ CI 2CA
R531
10K 1/16W 5%
RB520S30
R529
27K 1/16W 5%
CEC
5.0V_STBY
R598
0R05 1/16W
R532
10K 1/16W 5%
R533
47K 1/16W
Q503
PMBT3904
R585 NC/0R05 1/16W
HDMII_1_CEC
HDMII_1_CEC
1 2
Q502
AO3401
U401G
BHDMI_D2P
BHDMI_D2N
BHDMI_D1P
BHDMI_D1N
BHDMI_D0P
BHDMI_D0N
BHDMI_CLKP
BHDMI_CLKN
R577 10K 1/16W 5%
R576 10K 1/16W 5%
3.3V_STBY
R594 NC
HDMI_+5V
R582 10K 1/16W 5%
AVDD12
+5VOnOf f
TPWR
HDMI1_CLKN
HDMI1_CLKP
HDMI1_D0N
HDMI1_D0P
HDMI1_D1N
HDMI1_D1P
HDMI1_D2N
HDMI1_D2P
HDMI2_CLKN
HDMI2_CLKP
HDMI2_D0N
HDMI2_D0P
HDMI2_D1N
HDMI2_D1P
HDMI2_D2N
HDMI2_D2P
HDMI3_CLKN
HDMI3_CLKP
HDMI3_D0N
HDMI3_D0P
HDMI3_D1N
HDMI3_D1P
HDMI3_D2N
HDMI3_D2P
HDMI4_CLKN
HDMI4_CLKP
HDMI4_D0N
HDMI4_D0P
HDMI4_D1N
HDMI4_D1P
HDMI4_D2N
HDMI4_D2P
HEC+
HEC-
3.3V_STBY
+5VOnOf f
C530 1uF 16V
C533 NC/1U F16V
R581 10K 1/16W 5%
R574 10K 1/16W 5%
R575 10K 1/16W 5%
U501
10
11
12
13
14
15
16
17
18
19
20
21
22
23
24
25
R595
NC
ZD501
VPORT0603100KV05
BCM3549VMKFB5G
AF2
HDMI_RX_0_DATA2_P
AF1
HDMI_RX_0_DATA2_N
AE2
HDMI_RX_0_DATA1_P
AE1
HDMI_RX_0_DATA1_N
AD2
HDMI_RX_0_DATA0_P
AD1
HDMI_RX_0_DATA0_N
AC2
HDMI_RX_0_CLK_P
AC1
HDMI_RX_0_CLK_N
AE3
HDMI_RX_0_CEC_DAT
AB3
HDMI_RX_0_DDC_SCL/BSC _M0_SCL
Y6
HDMI_RX_0_DDC_SDA/BSC _M0_SDA
TPWR
AA6
HDMI_RX_0_HTPLG_IN
AA5
HDMI_RX_0_HTPLG_OUT
AB1
HDMI_RX_1_DATA2_P
AB2
HDMI_RX_1_DATA2_N
AA1
HDMI_RX_1_DATA1_P
AA2
HDMI_RX_1_DATA1_N
Y2
HDMI_RX_1_DATA0_P
Y1
HDMI_RX_1_DATA0_N
W3
HDMI_RX_1_CLK_P
W2
HDMI_RX_1_CLK_N
AA3
HDMI_RX_1_CEC_DAT
V5
HDMI_RX_1_DDC_SCL/BSC _M0_SCL
V3
HDMI_RX_1_DDC_SDA/BSC _M0_SDA
V4
HDMI_RX_1_HTPLG_IN
U6
HDMI_RX_1_HTPLG_OUT
AVDD12
100999897969594939291908988878685848382818079787776
101
ePAD
R1XCP
R1XCN
AVDD12
1
R1X0N
2
R1X0P
3
R1X1N
4
R1X1P
5
R1X2N
6
R1X2P
7
VDD33
8
R2XCN
9
R2XCP
R2X0N
R2X0P
R2X1N
R2X1P
R2X2N
R2X2P
VDD33
R3XCN
R3XCP
R3X0N
R3X0P
R3X1N
R3X1P
R3X2N
R3X2P
AVDD12
R4XCN
R4X0N
R4XCP
2950313230
28
27
HECP
HECN
R0X2P
R4X0P
R0X1P
R0X2N
R0X1N
R4X1P
R4X2N
R4X1N
VDD33
VDD12
R0X0P
R0X0N
VDD33
VDD12
R0XCP
R0XCN
Sil9385CTU
VDD12
SPDIF_IN
R4X2P
VDD33
ETH_RX1P
ETH_RX1N
34
37454643442638
1uF 16V
C531
VDD12
HDMI_SPD IF_IN
HDMI
HDMI_RX_0_RESREF
HDMI_RX_1_RESREF
TX0P
TX0N
TXCP
TXCN
ETH_TX1P
ETH_TX1N
HECP
HECN
4051353633
HECP
HECN
R593
EPWR33
75R
AC4
W4
R584 0R05 1/16W
TVDD12
R579 0R05 1/16W
TPWR_ CI 2CA
GND
TX1P
TX2P
TX1N
TX2N
RSVDL
TVDD12
TPWR_CI2CA
R3PWR5V
CBUS_HPD3
DSCL3
DSDA3
CSCL
CSDA
GPIO1
GPIO0
INT
CEC_A
R5PWR5V(VGA)
SBVC55
HDMI_RSVD
DSCL5(VGA)
DSDA5(VGA)
R4PWR5V
CBUS_HPD4
DSCL4
DSDA4
R2PWR5V
CBUS_HPD2
DSCL2
DSDA2
MICO M_VC C3 3
R1PWR5V
CBUS_HPD1
R0PWR5V
DSDAL
DSCL0
CBUS_HPD0
EPWR33
DSDA0
DSCL1
4748414239
49
DDC2_SDA
DDC1_SDA
DDC2_SCL
HDMI_HPD1
DDC1_SCL
HDMI_HPD2
H1+5V
R527
499R 1%
HDMI_0_REF
R530
NC/499 OHM 1% 1/16W
Why DNI
Tommy
HDMI_1_REF
BHDMI_CLKN
BHDMI_CLKP
BHDMI_D0N
BHDMI_D0P
BHDMI_D1N
BHDMI_D1P
BHDMI_D2N
BHDMI_D2P
R542 NC/4. 7K 1/16W
R543 1K 1/16W
75
74
73
72
71
70
R535 10K 1/16W 5%
69
68
R534 10K 1/16W 5%
67
R536 10K 1/16W 5%
66
65
64
63
R592 10K 1/16W 5%
62
R586 10K 1/16W 5%
61
60
R587 100K 1/16W 5%
59
58
R590 10K 1/16W 5%
R591 10K 1/16W 5%
57
56
55
54
53
52
HDMI1+5V
HDMI2+5V
HDMI3+5V
HDMI4+5V
HDMI_0_RXVDD2P5 15
HDMI_1_RXVDD2P5 15
HDMI_HPD4
DDC4_SCL
DDC4_SDA
R549 0R05 1/16W
R551 0R05 1/16W
R589 10K 1/16W 5%
ARC_BIAS
HDMI_HPD3
DDC3_SCL
DDC3_SDA
D503
BAT54C
1
2
D501 BAT54C
1
2
H4+5V
R597 10K 1/16W 5%
VDD33
SBVCC5
Follow IC vendor
suggestion -Peter
20100716
H3+5V
MICOM_VC C33
H2+5V
3
3
MICO M_VC C3 3
BSC_M3_SCL 10
BSC_M3_SDA 10
C514 10UF
C532 0.1uF 16V
HDMI_+5V
HDMI_INT 7
R588
10K 1/16W 5%
MICOM_VCC33
+5VOnOf f
R596
10K 1/16W 5%
1.2V_STBY
100N 16V
AVDD12
+3.3VOnOf f
1 2
120OHM
Q501
AO3414
R580
200K 1/10W 5%
FB508
1 2
120OHM
FB510
1 2
120OHM
C534
C525
10uF 16V
C526
10uF 16V
C527
10uF 16V
100N 16V
100N 16V
100N 16V
C520
C515
C519
C516
100N 16V
100N 16V
100N 16V
VDD12
C521
C522
100N 16V
TVDD1 2
C523
C529
1N 50V
FB503
1 2
120OHM
FB509
1 2
120OHM
10uF 16V
10uF 16V
C506
C505
C504
10uF 16V
10uF 16V
EPWR33
C524
C518
100N 16V
100N 16V
VDD33
C508
100N 16V
100N 16V
C509
C501
100N 16V
C507
+5VOnOff
5.0V_STBY
FB511
NC/0R05 1/ 10W
1 2
120OHM
R578 0R05 1/10W
R583
10uF 16V
6
SBVCC5
C528
C517
100N 16V
T P V ( Top Victory Electronics Co . , Lt d. )
G4365-M0C-000-0050-1-20100721
絬隔瓜絪腹
Key Component
06_HDMI SWITCH
Date
HDMI2+5VFB512
HDMI1+5V
R563
R569
HDMI3+5V
10R
10R
H1+5V
C510
10K 1/16W 5%
10R
H2+5V
R564
R565
1uF 16V
1uF 16V
C511
R571
10K 1/16W 5%
R570
10K 1/16W 5%
OEM MODEL Size
TPV MODEL
PCB NAME
715G4365-M0C-000-0050
617Sunday, Septem ber 26, 2010
of
Sheet
HDMI4+5V
10R
H3+5V
H4+5V
R566
1uF 16V
1uF 16V
C513
C512
R572
10K 1/16W 5%
Custom
1.0
Rev
称爹
59
Page 60

U401H
BCM3549VMKFB5G
NAND FLASH
SERIAL FLASH
C4001
100N 16V
3.3V_STBY
5.0V_STBY
NAND_DATA0
NAND_DATA1
NAND_DATA2
NAND_DATA3
NAND_DATA4
NAND_DATA5
NAND_DATA6
NAND_DATA7
NAND_ALE
NAND_CS0b
NAND_CLE
NAND_WEb
NAND_REb
NAND_RBb
SF_MISO
SF_MOSI
SF_SCK
SF_CSb
3.3V_STBY
R4593
NC
R4595
1KOHM +-1% 1/10W
R4594
1.8KOHM +-1% 1/10W
C457
NC
H26
J24
J25
J26
K24
K25
L24
L25
L21
L23
L22
K23
M21
M22
N22
M24
M25
M26
3
U413
Vcc
GND
RESET
TLV809L30DBVR
1
2
NAND_DATA0
NAND_DATA1
NAND_DATA2
NAND_DATA3
NAND_DATA4
NAND_DATA5
NAND_DATA6
NAND_DATA7
NAND_ALE
NAND_CS0b
NAND_CLE
NAND_WEb
NAND_REb
NAND_RBb
SW401
SW
3.3V_STBY
R458
NC/4. 7K 1/16W
R4756
0R05 OHM
U409
41
VCCGND
3 2
MR RESET
RESETb
NC/CAT811RTBI-GT3
RESETb
EJTAG _RS Tb10
R459
NC
R461
1K 1/16W
3.3V_STBY
R457
2.7K 1/10W
NAND_DATA0
NAND_DATA1
NAND_DATA2
NAND_DATA3
NAND_DATA4
NAND_DATA5
NAND_DATA6
NAND_DATA7
NAND_RBb
3.3V_STBY
R460
4.7K 1/ 16W
G23
3.3V_STBY
C455
100N 16V
29
I/O0
30
I/O1
31
I/O2
32
I/O3
41
I/O4
42
I/O5
43
I/O6
44
I/O7
R/B
U401I
BCM3549VMKFB5G
NMIb
F6
RESETb
U405
H27UAG8T2MTR-BC
3736
<Package>
VDDVSS
RE
CE
CLE
ALE
WE
WP
VSS VDD
13 12
RESETb 7,10,12
RESE T_OU Tb
8
9
16
17
18
197
C456
100N 16V
H22
NAND_REb
NAND_CS0b
NAND_C LE
NAND_ALE
NAND_WEb
R497 NC
R456
3.3K 1/16W
NAND_RESETb
RESET_OUTb
Flash_WP 7
U410
1
B
2
A
3 4
GND Y
NC/74LVC1G08GW
R4521 0R05 1/ 16W
3.3V_STBY
5
VCC
R463
R464
NC
NC
R472
R473
NC
NC
R465
2.7K 1%
R474
NC
R466
NC
R475
NC
R468
R467
NC
R476
NC
2.7K 1%
NC
R469
NC
R477
R478
NC
R471
R470
2.7K 1%
NC
R479
R480
NC
NC
NAND_DATA0
NAND_DATA1
NAND_DATA2
NAND_DATA3
NAND_DATA4
NAND_DATA5
NAND_DATA6
NAND_DATA7
NAND_ALE
T P V ( Top Victory Electronics Co . , Ltd. )
G4365-M0C-000-0050-1-20100721
絬隔瓜絪腹
Key Component
07_Reset; F lash; SC; Bootst rap
Date
OEM MODEL Size
TPV MODEL
PCB NAME
715G4365-M0C-000-0050
717Wednesday , October 13, 2010
Sheet
of
C
1.0
Rev
称爹
60
Page 61

KD_KD07
KD_KD17
KD_KD27
KD_KD37
KD_LS07
KD_LS17
KD_LS27
GP15_UART_RXD_07
GP16_UART_TXD_07
U401N
BCM3549VMKFB5G
I2C I/F
SGPIO_00/BSC_M0_SCL
SGPIO_01/BSC_M0_SDA
SGPIO_02/BSC_M1_SCL/THD_DIV_C LK
SGPIO_03/BSC_M1_SDA
SGPIO_04/BSC_M2_SCL
SGPIO_05/BSC_M2_SDA
SGPIO_06/BSC_M3_SCL
SGPIO_07/BSC_M3_SDA
TP439
TP441
TP442
R439
0R05 1/16W
R4520 33R 1/10W 5%
R4519 33R 1/10W 5%
R4501 33R 1/10W 5%
R4502 33R 1/10W 5%
R4582 33R 1/10W 5%
R4580 33R 1/10W 5%
R4581 33R 1/10W 5%
GP15_UART_RXD_0
GP16_UART_TXD_0
PLL_RAP_AVD_TESTOUT
VCXO_PLL_AUDIO_ TESTOUT
TP445
R413
10K 1/16W 5%
R415
NC/10KOHM 1/16W
N25
BSC_M0_SCL_O
N26
BSC_M0_SDA_IO
N24
BSC_M1_SCL_O
N23
BSC_M1_SDA_IO
J2
BSC_M2_SCL_O
BSC_M2_SDA_IO
J1
K3
BSC_M3_SCL_O
K2
BSC_M3_SDA_IO
CLK54_XTAL_P
CLK54_XTAL_N
PLL_VAFE_TESTOUT
DDR1_EXT_CLK
DDR1_PLL_TEST
R443
PM_OVERRIDE
0R05 1/16W
FB410 120R/500mA1 2
FB408 120R/500mA1 2
FB403 120R/500mA1 2
FB404 120R/500mA1 2
FB407
FB406
FB405 120R/500mA1 2
3.3V_STBY
3.3V_STBY
+3.3VOnOf f
U26
U25
M6
W23
Y15
C23
F20
P21
332 OHM 1/10W
R450
22 OHM 1/16W
C453
12P 50V
120R/500mA
1 2
1 2
120R/500mA
R414
NC/10KOHM 1/16W
Q402
2N7002
R416 10K 1/ 16W 5%
Q401
2N7002
R4221K 1/16W
R4211K 1/16W
R4241K 1/16W
R4261K 1/16W
R4231K 1/16W
R4251K 1/16W
CLK54_XTAL_P
CLK54_XTAL_N
PLL_RAP_AVD_TESTOUT
VCXO_PLL_AUDIO_TESTOUT
PLL_VAFE_TESTOUT
DDR_EXT_CLK
DDR_PLL_TEST
PM_OVERRIDE
R401
L401 0.33uH 10%
C451 22pF 50V
X401
1 2
54MHz
ESR < 40 ohm MAX
1 2
1 2
BZT52-C5V6S
BZT52-C5V6S
ZD411
ZD412
CONN_TXD0
CONN_RXD0
R4271K 1/16W
R4281K 1/16W
R429 22R 1/16W 5%
R430 22R 1/16W 5%
R431 22R 1/16W 5%
R432 22R 1/16W 5%
R433 22R 1/16W 5%
R434 22R 1/16W 5%
R435 22R 1/16W 5%
R436 22R 1/16W 5%
1 2
BZT52-C5V6S
BZT52-C5V6S
ZD410
C443 NC/22pF 16V
CLOCKS
R451
22 OHM 1/16W
C454
12P 50V
1 2
BZT52-C5V6S
ZD407
C444 NC/22pF 16V
1 2
1 2
1 2
BZT52-C5V6S
BZT52-C5V6S
C461 10N 50V
ZD409
ZD408
ZD416
GP31_UART_RXD_17
GP30_UART_TXD_17
GP42_UART_RXD_27
GP43_UART_TXD_27
C445 NC/22pF 16V
C446 NC/22pF 16V
C448 22pF 50V
C447 22pF 50V
U401B
BCM3549VMKFB5G
BYP_SYS216_CLK
BYP_SYS175_CLK
PLL_MAIN_MIPS_EREF_TESTOUT
PLL_DS_TESTOUT
C462 10N 50V
C463 10N 50V
C496 10N 50V
GP31_UART_RXD_1
GP30_UART_TXD_1
GP42_UART_RXD_2
GP43_UART_TXD_2
C450 NC/22pF 16V
C449 NC/22pF 16V
BYP_CPU_CLK
CLK54_MONITOR
C497 10N 50V
C498 10N 50V
C499 10N 50V
BSC_M0_SCL 3
BSC_M0_SDA 3
BSC_M1_SCL 6
BSC_M1_SDA 6
BSC_M2_SCL 12,19
BSC_M2_SDA 12,19
BSC_M3_SCL 8
BSC_M3_SDA 8
V25
V26
R22
T21
T24
R21
U401F
BCM3549VMKFB5G
3.3V_STBY
+3.3VOn Of f
R417
10K 1/16W 5%
+3.3VOn Of f
R419
NC/10KOHM 1/16W
+3.3VOn Of f
R4584
10K 1/16W 5%
+3.3VOn Of f
R4585
NC/10KOH M 1/16W
BYP_SY S216_CLK
BYP_SY S175_CLK
TP401
BYP_CPU_CLK
CLK54_MONITOR
PLL_MAIN_MIPS_EREF_TESTOUT
TP444
PLL_DS_TESTOUT
SPI_S_MISO
1112
CN406
1
2
3
4
5
6
7
8
9
10
CONN
R418 NC/10KOHM 1/16W
Q4032N7002
R420 10K 1/16W 5%
Q404
2N7002
R4586 NC/10KOH M 1/16W
Q415
2N7002
R4583 10K 1/16W 5%
Q414
CONN_RXD2
2N7002
R437
2.7K 1/10W
TP443
R444
NC/0R 05 1/16W
M23
CONN_TXD1
CONN_RXD1
VGA_TX
CONN_TXD2
VGA_RX
CN401
NC
R438
2.7K 1/10W
5.0V_STBY
R498
D401
NC/BAS32L
NC/4. 7K 1/16W
C460
+
NC/220UF 16V
R4504
R4503
1K 1/16W
33K 1/16W 5%
CONN_RXD25
R4510 47K 1/16W
GP25_IR1_IN
+3.3VOnOf f
BCM3549VMKFB5G
Test
5.0V_STBY
U401K
EJTAG_TR STBTMODE_0
EJTAG_TD O
EJTAG _TMS
EJTAG _TC K
EJTAG_CE0
EJTAG_CE1
4.7K 1/16W
R4514
PMBT3904
CONN_RXD2
EJTAG_TD I
Q411
PMBT3904
R4511
+
C465 220U F 16V
27K 1/16W 5%
Q413
BZT52-C5V6S
1 2
ZD417
1 2
NC/VPORT0603100KV05
G1J5
H3
H2
H1
H4
H6
H5
C4521 10N 50V
NC/VPORT0603100KV05
ZD413
D402
BAS32L
R4515
1K 1/16W
BSC_M2_SCL
BSC_M2_SDA
BSC_M1_SCL
BSC_M1_SDA
1 2
NC/VPORT0603100KV05
ZD403
3.3V_STBY
EJTAG_TR STb
EJTAG_TD I
EJTAG_TD O
EJTAG_TMS
EJTAG_TC K
EJTAG_CE0
EJTAG_CE1
R4512
470K 1/16W 5%
CONN_RXD0
CONN_RXD1
1 2
ZD404
R440
NC
R445
4.7K 1/16W
R453
1K5 1/10W 1%
ZD405 NC
1 2
R4507 NC/10KOHM 1/16W
R454
1K5 1/10W 1%
BSC_S_SCL
BSC_S_SDA
ZD406 NC
1 2
NC/3KOHM 1% 1/16W
NC3KOHM 1% 1/16W
R4517
10K 1/16W 5%
GP25_IR1_IN7
J4
J6
J3
F23
F22
R4509
R4513
TMODE_1
TMODE_2
TMODE_3
BSC_S_SCL/SPI_S_SCK
BSC_S_SDA/SPI_S_MOSI
Red_Orange7
LED_CTL17
TP438
TP440
3.3V_STBY
C452
NC
1
2
3
4
200K
R499
Q410
MMBT3906 PNP
R4516
22R 1/16W 5%
Q412
MMBT3906 PNP
5.0V_STBY
R4341 0R05 1/16W
R4342 0R05 1/16W
R4343 NC /0R05 1/ 16W
R4344 NC /0R05 1/ 16W
CN402
7
5
3
1
C442
NC
NC
3.3V_STBY
R441
NC
R446
4.7K 1/16W
EJTAG_RSTb9
MP : N C
LED401
NC/LED
R4508
1.8KOHM 5% 1/16W
R4518 0R05 1/10W
3.3V_STBY
8
CONN_TXD0
CONN_TXD1
6
4
2
R447
1K 1/16W
R455
1K 1/16W
3
1
VPORT0603100KV 05
3.3V_STBY
R448
1K 1/16W
FB401 120R/500mA
1 2
4
2
LED_5V
LED_R
LED_G
R495 NC
LED_G
LED_R
1 2
1 2
VPORT0603100KV 05
ZD418
ZD419
CONN_TXD2
1 2
1 2
NC/VPORT0603100KV05
NC/VPORT0603100KV05
NC/VPORT0603100KV05
ZD402
ZD401
R449
1K 1/16W
1
3
5
7
9
11
13
1
2
3
CN407
1
2
3
4
5
6
7
8
CONN
1 2
ZD414
NC/0R 05 1/16W
R442
EJTAG
CN404
NC/CONN
5.0V_STBY
CN408
NC/CONN
910
CONN_TXD2 5
RESETb 7,9,12
3.3V_STBY
2
4
6
R452
8
1K 1/16W
10
12
14
UART_TXD2
UART_TXD2
5
R4335
NC/0R 05 1/16W
C4320
100N 16V
UART_RXD2
UART_RXD2
5
R4336
NC/0R05 1/16W
C4322
100N 16V
T P V ( Top Victory Electronics Co . , Ltd. )
絬隔瓜絪腹
Key Component
Date
5.0V_STBY
ZD420
RLZ9.1B
1 2
R4333
1K 1/16W
R4334
4.7K 1/16W
G4365-M0C-000-0050-1- 20100721
08_IRQ; BSC; CLK; EJTAG; UART;
R4332
4.7K 1/16W
Q417
PMBT3904
5.0V_STBY
R4328
1K 1/16W
PC_SCL
PC_SDA
FB411 120R/ 500mA
5.0V_STBY
715G4365-M0C-000-0050
of
817Sunday, September 26, 2010
R4327
4.7K 1/16W
Q416
PMBT3904
R4330 0R05 OHM
R4331 0R05 OHM
1 2
C4324
100N 16V
C4321
22pF 50V
ZD421
RLZ9.1B
1 2
R4329
4.7K 1/16W
PC_SCL
5
PC_SDA
5
C4323
22pF 50V
OEM MODEL S ize
TPV MODEL
PCB NAME
Sheet
U415
6
/E
9
S1
10
S0
3
2Z
13
1Z
8
GND
7
VEE
16
VCC
D
1.0
Rev
称爹
74HC4052D
BSC_S_SCL
4
2Y3
BSC_S_SDA
11
1Y3
CONN_TXD2
2
2Y2
CONN_RXD2
15
1Y2
BSC_M2_SCL
5
2Y1
BSC_M2_SDA
14
1Y1
CONN_TXD0
1
2Y0
CONN_RXD0
12
1Y0
61
Page 62

GP27_EPHY_ACTI VITY7
R1333
10K 1/16W 5%
Q1301
MMBT3906 PNP
R1336
0R05 1/16W
TP1301
R1332 N C
R1331 N C
C1301
100P 50V
R1301
1.24K 1%
EPHY_RD AC
TP1302
USB_RREF
R1324
4K02 1/10W 1%
EPHY_VREF
USB_MONPLL
USB_MONCDR
ETHERN ET
P5
EPHY_R DAC
P6
EPHY_VR EF
U4
USB_RREF
R5
USB_MONPLL
T5
USB_MONCDR
R4757 0 OH M 1/4W
USB
EPHY_RDP
EPHY_RD N
EPHY_TDP
EPHY_TDN
USB_DP1
USB_DM1
USB_PWRON_1
USB_PWRF LT_1
USB_DP2
USB_DM2
USB_PWRON_2
USB_PWRF LT_2
P2
P3
N2
N3
V2
V1
T2
R1
U2
U1
T1
R2
U401Q
BCM3549VMKFB5G
<Package>
B_USB_DP1
B_USB_DM1
USB_PWRON _1
OVERCUR _FLAG
B_USB_DP2
B_USB_DM2
USB_OVER2
B_USB_DP1 12
B_USB_DM1 12
USB_PWRON_ 1 12
B_USB_DP2 12
B_USB_DM2 12
USB_OVER2 12
PRTPWR212
PRTPWR312
TP1303
GP28_EPHY_LI NK7
PRTPWR2
R1352 1K 1/16W
PRTPWR3
R1353 1K 1/16W
OVERCUR _FLAG
R1334
10K 1/16W 5%
USB_EN
5.0V_STBY
C1324
10uF 16V
USB_EN
R1327
0R05 1/10W
R1328
NC/0R 05 1/10W
U414
4
IN
1 3
EN OC
GND
2
U1301
1
GND
/OC1
2
IN
OUT1
3
EN1
OUT2
4 5
EN2 /OC2
BD8022FJ
OC_FLGA
OC_FLGB
62
Q1302
MMBT3906 PNP
R1335
0R05 1/16W
5
OUT
NC/G5250K1T1U
C1325
100N 16V
8
SVBUS_P2
7
6
+3.3VOnOf f
R1325
2.7K 1/10W
SVBUS_P2
OC_FLGA
+3.3VOn Of f
OC_FLGA
R1326
NC/2. 7K 1/10W
OC_FLGB
C1327
22uF 10V
C1329
22uF 10V
ETH_2.5V
EPHY_R DP
EPHY_R DN
EPHY_TDP
EPHY_TDN
+
+
C1326
100UF 16V
C1328
100UF 16V
FB1304
1 2
300OHM 4A
FB1301
1 2
100ohm
FB1305
1 2
100ohm
FB1306
1 2
100ohm
1 2
FB1307
100ohm
A2.5V_EPHY _TERM
C1321
100N 25V
USBDN_DP212
USBDN_DM212
USBDN_D P312
USBDN_D M312
R1320
0R05 1/10W
C1322
1N 50V
+3.3VO nOf f
C1320
22uF 10V
USB0_VBUS
USB0_GND
USB1_VBUS
USB1_GND
T P V ( Top Victory Electronics Co . , Lt d. )
G4365-M0C-000-0050-1-20100721
絬隔瓜絪腹
Key Component
09_USB & ETHERNET
Date
R1321
0R05 1/10W
C1323
1N 50V
R1322
62R 1/16W 5%
R1323
62R 1/16W 5%
L1302
124
90 ohm
L1301
124
90 ohm
OEM MODEL Size
TPV MODEL
PCB NAME
3
3
Sheet
CN105
couplier assem bly
1
RX_P R1
3
RX_CT R3
2
RX_N R2
7
TX_P R7
6
TX_CT R 6
8
TX_N R8
12
YLW_C L3
11
YLW_A L4
10
GRN_C L1
9
GRN_A L2
13
SHLD
14
SHLD
4
GND_R4
5
GND_R5
12
12
ZD1305 NC/PESD0603-240
ZD1304 NC/PESD0603-240
12
12
ZD1306 NC/PESD0603-240
ZD1307 NC/PESD0603-240
715G4365-M0C-000-0050
917Sunday, September 26, 2010
of
USB0_GND
USB0_VBUS
USB1_GND
USB1_VBUS
65
CN103
4
3
2
CONN
1234
1
NC
NC
C1332
C1333
65
CN104
4
3
2
CONN
1234
1
NC
NC
C1331
C1330
C
Rev
1.0
称爹
Page 63

+3.3VO nOf f
R4302
U4302 US B2514B-AEZG
10K 1/16W 5%
OC_FLGA10,19
OC_FLGB10,19
100K 1/16W
+3.3VO nOf f
R4313
R4316
NC/100K1/ 16W
R4319
1M 1/16W
R4303
NC/10K1/ 16W
USB_PWRON_111
USB_RESETn7
R4320
0R05 1/16W
+3.3VO nOf f
C4309
22pF 50V
C4315
18pF 50V
Internal PU
Internal PU
R4323
NC
Internal PU
R4324
NC
R4308
100K 1/16W
C4303
1uF 16V
X4301
NXS24.000AC12F-BK3
1 2
27
13
17
19
21
26
28
11
33
32
37
Ups tr ea m
Dow ns tr eam 1
USBUP_DM
USBUP_DP
USBDN1_DM
USBDN1_D P
PRTPWR1
VBUS_DET
OCS1
Dow ns tr eam 2
OCS2
USBDN2_DM
USBDN2_D P
PRTPWR2
Dow ns tr eam 3
OCS3
USBDN3_DM
USBDN3_D P
PRTPWR3
Dow ns tr eam 4
OCS4
USBDN4_DM
USBDN4_D P
PRTPWR4
EEPROM/ Co nf ig
SDA/SMBDATA/ NON_REM1
SCL/SMBCLK/CFG_SEL0
HS_IND/CFG_SEL1
Commo n
RESET
LOCAL_PWR/ NON_REM0/SUSP_I ND
TEST
XTAL1/CLKIN
XTAL2/CLKIN_EN
VSS(FLAG)
VDD33
VDD33CR
VDDA33
VDDA33
VDDA33
VDDA33/VD D33PLL
VDD18
VDDA18PLL
RBIAS
B_USB_DM1
30
B_USB_DP1
31
1
FOR BLUE TOOTH
2
12
USBDN_DM2
3
USBDN_DP2
4
PRTPWR2
16
USBDN_DM3
6
USBDN_DP3
7
PRTPWR3
18
8
R4322 10K 1/16W 5%
9
R4321 10K 1/16W 5%
20
22
24
25
HUB_RBIAS
35
R4314 12K 1% 1/16W
23
15
5
10
29
36
14
C4316
1uF 16V
34
C4318
1uF 16V
B_USB_DM1 11
B_USB_DP1 11
USBDN_DM2 11
USBDN_DP2 11
PRTPWR2 11
USBDN_DM3 11
USBDN_DP3 11
PRTPWR3 11
C4306
100N 16V
C4310
100N 16V
C4317
100N 16V
C4319
100N 16V
USBDN_DM1
USBDN_DP1
+3.3VO nOf f
C4311
100N 16V
C4307
4.7UF 10V
C4312
100N 16V
+3.3VOn Of f
C4308
100N 16V
C4313
100N 16V
R4305
NC
R4306
NC
+3.3VO nOf f
C4314
1uF 16V
BSC_M2_SDA 10, 19
BSC_M2_SCL 10,19
R4315
NC/100K1/ 16W
R4318
100K 1/16W
+3.3VOn Of f
GPIO2_IRQb_27
R4312
NC/100K1/ 16W
R4317
100K 1/16W
R4307
NC/100K1/ 16W
R4310
100K 1/16W
NC
R4304
3.3V_STBY
B_USB_DM211
TH4301
1 2
PTCR
+5VOnOf f
B_USB_DP211
t
BT_Wake up7
TH4302
1 2
PTCR
C4302
100N 16V
USBDN_DM1
USBDN_DP1
t
C4305
100N 16V
BT_RESET7,9,10
B_USB_DM2
B_USB_DP2
RESETb7,9, 10
+
BT module
C4304
220UF 16V
CN4306
1
2
3
4
5
6
7
8
9
CONN
FB4302
1 2
100ohm
FB4303
1 2
100ohm
1011
R4309
5.23K 1% 1/8W
WVBUS
1 2
ZD4301
R4311
10K 1/10W
VPORT0603100KV05
USB_OVER2 11
1 2
VPORT0603100KV05
ZD4302
4
CN4307
3
2
CONN
1
5 6
1 2
VPORT0603100KV05
ZD4303
63
T P V ( Top Victory Electronics Co . , Ltd. )
G4365-M0C-000-0050-1-20100721
絬隔瓜絪腹
Key Component
12_USB HUB
Date
E422VA C
OEM MOD EL Size
TPV MOD EL
E42AG5NKWKVCN 1.0
PCB NAME
715G4365-M0C-000-0050
12 19Wednesday , October 13, 2010
Sheet
of
Rev
称爹
称爹
<>
Page 64

DDR0_VREF0
C415
100N 16V
DDR0_DQ[15: 0]
DDR0_DQS0 14
DDR0_DQS0b 14
DDR0_DM0 14
DDR01_ODT 14
DDR1_VREF0
C416
470pF 50V
C435
100N 16V
DDR1_DQ[15:0]
DDR1_DQS0 14
DDR1_DQS0b 14
DDR1_DM0 14
DDR0_DQ[15:0] 14
C436
470pF 50V
DDR1_DQ[15: 0] 14
DDR01_CKE14
DDR01_RASb14
DDR01_CASb14
DDR01_WEb14
+
C467
100UF 16V
C470
10uF 16V
C473
10N 50V
C474 47N 16V
C471
470pF 50V
H8
H3
H7
J2
J8
J3
J7
K2
K8
K3
H2
K7
L2
L8
G2
G3
G1
E8
F8
F2
G8
F7
G7
F3
+
C484 100N 16V
C486 47N 16V
DDR01_A0
DDR01_A1
DDR01_A2
DDR01_A3
DDR1_A4
DDR1_A5
DDR1_A6
DDR01_A7
DDR01_A8
DDR01_A9
DDR01_A10
DDR01_A11 DDR1_DQ[15:0]
DDR01_A12
DDR01_A13
DDR01_BA0
DDR01_BA1
DDR01_BA2
DDR1_CLK
DDR1_CLKb
DDR01_CKE
DDR1_CSb_H_t est
DDR01_RASb
DDR01_CASb
DDR01_WEb
R4588
0R05 1/16W
DDR01_A0
DDR01_A1
DDR01_A2
DDR0_A4
DDR0_A5
DDR0_A6
DDR01_A7
DDR01_A8
DDR01_A9
DDR01_A10
DDR01_A11
DDR01_A12
DDR01_A13
DDR01_BA0
DDR01_BA1
DDR01_BA2
DDR0_CLK
DDR0_CLKb
DDR01_CKE
DDR0_CSb_H_t est
DDR01_RASb
DDR01_CASb
DDR01_WEb
R4589
0R05 1/16W
C469 100N 16V
C472 47N 16V
A1E9H9L1A9C1C3C7C9
VDD
VDD
VDD
VDD
A0
A1
A2
A3
A4
A5
A6
DDR2 SDRAM
A7
A8
128Mx8
A9
A10/AP
A11
A12
A13
BA0
BA1
BA2
CK
CK
CKE
CS
RAS
CAS
WE
VSS
VSS
VSS
VSS
A3E3J1K9A7B2B8D2D8
C479
100UF 16V
C481 100N 16V
C482
10uF 16V
C485 47N 16V
C489
470pF 50V
A1E9H9L1A9C1C3C7C9
VDD
VDD
VDD
H8
A0
H3
A1
H7
A2
J2
A3
J8
A4
J3
A5
J7
A6
K2
A7
K8
A8
K3
A9
H2
A10/AP
K7
A11
L2
A12
L8
A13
G2
BA0
G3
BA1
G1
BA2
E8
CK
F8
CK
F2
CKE
G8
CS
F7
RAS
G7
CAS
F3
WE
VSS
VSS
VSS
A3E3J1K9A7B2B8D2D8
C468
10uF 16V
C475
470pF 50V
D1.8V_BCM3549
VDDQ
VDDQ
VDDQ
VDDQ
VDDQ
1Gb
NC = L3,L7
NC/RDQS/NU
VSSQ
VSSQ
VSSQ
VSSQ
VSSQ
C480
10uF 10V
C487
470pF 50V
VDD
VDDQ
VDDQ
VDDQ
1Gb
DDR2 SDRAM
128Mx8
NC = L3,L7
VSS
VSSQ
VSSQ
VSSQ
E1
VREF
NF/DQ4
NF/DQ5
NF/DQ6
NF/DQ7
DQS/NU
DM/RDQS
E7
D1.8V_BCM3549
VDDQ
VDDQ
NC/RDQS/NU
VSSQ
VSSQ
VDDL
DQ0
DQ1
DQ2
DQ3
DQS
ODT
VSSDL
U411
H5PS1G83EFR-G7C-C
<Package>
E2
DDR0_VREF0
C8
DDR0_DQ9DDR01_A3
C2
DDR0_DQ8
D7
DDR0_DQ12
D3
DDR0_DQ13
D1
DDR0_DQ15
DDR0_DQ11
D9
B1
DDR0_DQ10
B9
DDR0_DQ14
B7
DDR0_DQS1
A8
DDR0_DQS1b
B3
DDR0_DM1
A2
F9
DDR01_ODT
U412
H5PS1G83EFR-G7C-C
E1
<Package>
VDDL
E2
VREF
C8
DQ0
C2
DQ1
D7
DQ2
D3
DQ3
D1
NF/DQ4
D9
NF/DQ5
B1
NF/DQ6
B9
NF/DQ7
B7
DQS
A8
DQS/NU
B3
DM/RDQS
A2
F9
ODT
VSSDL
E7
DDR0_VREF0
DDR1_VREF0DDR0_A5
DDR1_DQ9DDR0_A4
DDR1_DQ8
DDR1_DQ12
DDR1_DQ13
DDR1_DQ15
DDR1_DQ14
DDR1_DQ10
DDR1_DQ11
DDR1_DQS1
DDR1_DQS1b
DDR1_DM1
DDR01_ODT
DDR0_DQ[15: 0]
DDR0_DQS1b 14
DDR0_DM1 14
DDR1_VREF0
C477
100N 16V
DDR0_DQS1 14
C490
100N 16V
DDR1_DQS1 14
DDR1_DQS1b 14
DDR1_DM1 14
+
DDR01_A0
DDR01_A1
DDR01_A2
DDR01_A3
DDR0_A4
DDR0_A5
DDR0_A6
DDR01_A7
DDR01_A8
DDR01_A9
DDR01_A10
DDR01_A11
DDR01_A12
DDR01_A13
DDR01_BA0
DDR01_BA1
DDR01_BA2
DDR0_CLK
DDR0_CLKb
DDR01_CKE
DDR0_CSb_L_test
DDR01_RASb
DDR01_CASb
DDR01_WEb
R406
0R05 1/16W
C402 100U F 16V
C405
10uF 16V
C407 10N 50V
C411 47N 16V
C409
470pF 50V
H8
H3
H7
J2
J8
J3
J7
K2
K8
K3
H2
K7
L2
L8
G2
G3
G1
E8
F8
F2
G8
F7
G7
F3
C419 100UF 16 V
C425 100N 16V
C430 47N 16V
DDR01_A0
DDR01_A1
DDR01_A2
DDR01_A3
DDR1_A4
DDR1_A5
DDR1_A6
DDR01_A7
DDR01_A8
DDR01_A9
DDR01_A10
DDR01_A11
DDR01_A12
DDR01_A13
DDR01_BA0
DDR01_BA1
DDR01_BA2
DDR1_CLK
DDR1_CLKb
DDR01_CKE
DDR1_CSb_L_test
DDR01_RASb
DDR01_CASb
DDR01_WEb
C404 100N 16V
C408 47N 16V
A1E9H9L1A9C1C3C7C9
VDD
VDD
VDD
VDD
A0
A1
A2
A3
A4
A5
A6
DDR2 SDRAM
A7
A8
128Mx8
A9
A10/AP
A11
A12
A13
BA0
BA1
BA2
CK
CK
CKE
CS
RAS
CAS
WE
VSS
VSS
VSS
VSS
A3E3J1K9A7B2B8D2D8
+
C423
10uF 10V
C434
470pF 50V
A1E9H9L1A9C1C3C7C9
VDD
H8
A0
H3
A1
H7
A2
J2
A3
J8
A4
J3
A5
J7
A6
K2
A7
K8
A8
K3
A9
H2
A10/AP
K7
A11
L2
A12
L8
A13
G2
BA0
G3
BA1
G1
BA2
E8
CK
F8
CK
F2
CKE
G8
CS
F7
RAS
G7
CAS
F3
WE
VSS
A3E3J1K9A7B2B8D2D8
C403
10uF 10V
C412
470pF 50V
VDDQ
VDDQ
VDDQ
VDDQ
VDDQ
1Gb
NC = L3,L7
VSSQ
VSSQ
VSSQ
VSSQ
VSSQ
C421
10uF 16V
C422 100N 16V
C427 47N 16V
C431
470pF 50V
VDD
VDD
VDD
1Gb
DDR2 SDRAM
128Mx8
NC = L3,L7
VSS
VSS
VSS
D1.8V_BCM3549
E1
VREF
NF/DQ4
NF/DQ5
NF/DQ6
NF/DQ7
DQS/NU
DM/RDQS
NC/RDQS/NU
E7
VDDQ
VDDQ
VDDQ
VDDQ
VSSQ
VSSQ
VSSQ
VSSQ
U402
H5PS1G83EFR-G 7C-C
<Package>
VDDL
E2
DDR0_VREF0
C8
DDR0_DQ0
DQ0
C2
DDR0_DQ1
DQ1
D7
DDR0_DQ2
DQ2
DDR0_DQ3
D3
DQ3
D1
DDR0_DQ4
D9
DDR0_DQ5
B1
DDR0_DQ6
B9
DDR0_DQ7
B7
DDR0_DQS0
DQS
A8
DDR0_DQS0b
DDR0_DM0
B3
A2
F9
DDR01_ODT
ODT
VSSDL
D1.8V_BCM3549
U403
H5PS1G83EFR-G7C-C
E1
<Package>
VDDL
VDDQ
VREF
DQ0
DQ1
DQ2
DQ3
NF/DQ4
NF/DQ5
NF/DQ6
NF/DQ7
DQS
DQS/NU
DM/RDQS
NC/RDQS/NU
ODT
VSSQ
VSSDL
E7
E2
C8
C2
D7
D3
D1
D9
B1
B9
B7
A8
B3
A2
F9
DDR1_VREF0
DDR1_DQ0
DDR1_DQ1
DDR1_DQ5
DDR1_DQ3
DDR1_DQ4
DDR1_DQ2
DDR1_DQ6
DDR1_DQ7
DDR1_DQS0
DDR1_DQS0b
DDR1_DM0
DDR01_ODT
DDR0_CLK14
DDR0_CLKb14
DDR1_CLK14
DDR1_CLKb14
DDR01_RASb14
DDR01_A214
DDR01_A014
DDR1_A614
DDR01_CASb14
DDR01_CASb14
DDR01_A1214
DDR01_A914
DDR01_A714
DDR1_A514
DDR1_A414
DDR01_A1114
DDR01_A814
DDR01_A1314
DDR01_A314
DDR01_A114
DDR01_A1014
DDR01_BA114 DDR01_ODT 14
DDR01_BA014
DDR01_BA214
DDR01_WEb14
DDR01_ODT14
DDR01_RASb14
DDR01_A214
DDR01_A014
DDR0_A614
DDR01_A314
DDR01_A114
DDR01_A1014
DDR01_BA114
DDR01_A1214
DDR01_A914
DDR01_A714
DDR0_A514
DDR0_A414
DDR01_A1114
DDR01_A814
DDR01_A1314
DDR01_BA014
DDR01_BA214
DDR01_WEb14
DDR01_ODT14
DDR01_RASb
DDR01_A2
DDR01_A0
DDR1_A6
DDR01_CASb
DDR01_CASb
DDR01_A12
DDR01_A9
DDR01_A7
DDR1_A5
DDR1_A4
DDR01_A11
DDR01_A8
DDR01_A13
DDR01_A3
DDR01_A1
DDR01_A10
DDR01_BA1
DDR01_BA0
DDR01_BA2
DDR01_WEb
DDR01_ODT
DDR01_RASb
DDR01_A2
DDR01_A0
DDR0_A6
DDR01_A3
DDR01_A1
DDR01_A10
DDR01_BA1
DDR01_A12
DDR01_A9
DDR01_A7
DDR01_A11
DDR01_A8
DDR01_A13
DDR01_BA0
DDR01_BA2
DDR01_WEb
DDR01_ODT
R402
100R 1/16W 1%
R403
100R 1/16W 1%
DDR_VTT
RP405 60.4R 1%1
8
2
7
3
6
4
5
R4592 60.4R 1/16W 1%
R4591 60.4R 1/16W 1%
RP404 60.4R 1%1
8
2
7
3
6
4
5
RP403 60.4R 1%1
8
2
7
3
6
4
5
RP402 60.4R 1%1
8
2
7
3
6
4
5
RP401 60.4R 1%1
8
2
7
3
6
4
5
R405 60.4R 1/16W 1%
DDR_VTT
RP406 60.4R 1%1
8
2
7
3
6
4
5
RP407 60.4R 1%1
8
2
7
3
6
4
5
RP408 60.4R 1%1
8
2
7
3
6
4
5
RP409 60.4R 1%1
8
2
7
3
6
4
5
RP410 60.4R 1%1
8
2
7
3
6
4
5
R4590 60.4R 1/16W 1%
C4908
100N 16V
C417 10N 50V
C418 10N 50V
C420 10N 50V
C426 10N 50V
C433 10N 50V
C437 10N 50V
C483 10N 50V
C488 10N 50V
C492 10N 50V
C493 10N 50V
C494 10N 50V
C495 10N 50V
D1.8V_BCM3549
C4907
100N 16V
C4906
100N 16V
DDR01_CKE14
DDR01_RASb14
DDR01_CASb14
DDR01_WEb14
R404
0R05 1/16W
C478
470pF 50V
DDR0_DQ[15:0] 14
C491
470pF 50V
DDR1_D Q[15:0] 14
64
T P V ( Top Victory Electronics Co . , Ltd. )
G4365-M0C-000-0050-1-20100721
絬隔瓜絪腹
Key Component
11.32-bit DDR SDR AM
Date
OEM MOD EL Si ze
TPV MODE L
PCB NAME
715G4365-M0C-000-0050
11 17Sunday, September 26, 2010
Sheet
of
Custom
1.0
Rev
称爹
Page 65

R409
DDR1_COMP
240 OHM +-1% 1/16W
C22
32Bit
DDR
SDRAM
DDR_COMP
U401R
BCM3549VMKFB5G
DDR01_A00
DDR01_A01
DDR01_A02
DDR01_A03
DDR0_A04
DDR0_A05
DDR0_A06
DDR1_A04
DDR1_A05
DDR1_A06
DDR01_A07
DDR01_A08
DDR01_A09
DDR01_A10
DDR01_A11
DDR01_A12
DDR01_A13
DDR01_BA0
DDR01_BA1
DDR01_BA2
DDR0_DQ00
DDR0_DQ01
DDR0_DQ02
DDR0_DQ03
DDR0_DQ04
DDR0_DQ05
DDR0_DQ06
DDR0_DQ07
DDR0_DQ08
DDR0_DQ09
DDR0_DQ10
DDR0_DQ11
DDR0_DQ12
DDR0_DQ13
DDR0_DQ14
DDR0_DQ15
DDR1_DQ00
DDR1_DQ01
DDR1_DQ02
DDR1_DQ03
DDR1_DQ04
DDR1_DQ05
DDR1_DQ06
DDR1_DQ07
DDR1_DQ08
DDR1_DQ09
DDR1_DQ10
DDR1_DQ11
DDR1_DQ12
DDR1_DQ13
DDR1_DQ14
DDR1_DQ15
DDR0_DQS0
DDR0_DQS0b
DDR0_DQS1
DDR0_DQS1b
DDR1_DQS0
DDR1_DQS0b
DDR1_DQS1
DDR1_DQS1b
DDR0_DM0
DDR0_DM1
DDR1_DM0
DDR1_DM1
DDR01_RASb
DDR01_CASb
DDR01_WEb
DDR0_C LK
DDR0_C LKb
DDR1_C LK
DDR1_C LKb
DDR01_CKE
DDR01_ODT
DDR_VREF0
DDR_VREF1
DDR01_A0
B15
DDR01_A1
E14
A15
DDR01_A2
D15
DDR01_A3
DDR0_A4
E13
E12
DDR0_A5
F13
DDR0_A6
DDR1_A4
F15
DDR1_A5
C15
DDR1_A6
D16
DDR01_A7
C14
DDR01_A8
F14
B14
DDR01_A9
DDR01_A10
D14
C13
DDR01_A11
DDR01_A12
D13
B13
DDR01_A13
F16
DDR01_BA0
DDR01_BA1
B16
E15
DDR01_BA2
A8
DDR0_D Q0
B11
DDR0_D Q1
B8
DDR0_D Q2
DDR0_D Q3
D11
E11
DDR0_D Q4
DDR0_D Q5
C8
DDR0_D Q6
C11
C9
DDR0_D Q7
D8
DDR0_D Q8
E10
DDR0_D Q9
E9
DDR0_D Q10
DDR0_D Q11
F11
F12
DDR0_D Q12
DDR0_D Q13
E8
DDR0_D Q14
D10
F8
DDR0_D Q15
C18
DDR1_D Q0
DDR1_D Q1
C20
DDR1_D Q2
A18
DDR1_D Q3
B21
DDR1_D Q4
C21
DDR1_D Q5
B18
DDR1_D Q6
B20
DDR1_D Q7
D18
DDR1_D Q8
E18
DDR1_D Q9
D21
F18
DDR1_D Q10
E20
DDR1_D Q11
DDR1_D Q12
A22
DDR1_D Q13
F17
B22
DDR1_D Q14
DDR1_D Q15
E17
DDR0_D QS0
B10
B9
DDR0_D QS0B
F10
DDR0_D QS1
DDR0_D QS1B
F9
DDR1_D QS0
B19
C19
DDR1_D QS0B
DDR1_D QS1
E19
D19
DDR1_D QS1B
DDR0_D M0
A10
C10
DDR0_D M1
DDR1_D M0
A20
F19
DDR1_D M1
C16
DDR01_RASB
DDR01_CASB
A17
C17
DDR01_WEB
close to U401
B12
R4337 22 OH M +-1% 1/16W
R4338 22 OH M +-1% 1/16W
C12
A13
R4339 22 OH M +-1% 1/16W
R4340 22 OH M +-1% 1/16W
A12
B17
DDR01_CKE_C HIP
DDR01_ODT
E16
A7
DDR0_VREF0
DDR1_VREF0
A23
DDR01_A0 13
DDR01_A1 13
DDR01_A2 13
DDR01_A3 13
DDR0_A4 13
DDR0_A5 13
DDR0_A6 13
DDR1_A4 13
DDR1_A5 13
DDR1_A6 13
DDR01_A7 13
DDR01_A8 13
DDR01_A9 13
DDR01_A10 13
DDR01_A11 13
DDR01_A12 13
DDR01_A13 13
DDR01_BA0 13
DDR01_BA1 13
DDR01_BA2 13
DDR0_DQS0 13
DDR0_DQS0B 13
DDR0_DQS1 13
DDR0_DQS1B 13
DDR1_DQS0 13
DDR1_DQS0B 13
DDR1_DQS1 13
DDR1_DQS1B 13
DDR0_DM0 13
DDR0_DM1 13
DDR1_DM0 13
DDR1_DM1 13
DDR01_RASB 13
DDR01_CASB 13
DDR01_WEB 13
DDR0_CLK
DDR0_CLKB
DDR1_CLK
DDR1_CLKB
R408
22 OHM 1/16W
DDR01_ODT 13
DDR0_CLK 13
DDR0_CLKB 13
DDR1_CLK 13
DDR1_CLKB 13
DDR01_CKE 13
DDR0_D Q[15:0] 13
DDR1_D Q[15:0] 13
D1.8V_BCM3549
R407
NC/4.99K 1/ 16W 1%
R410
NC/4.99K 1/ 16W 1%
DDR0_VREF0
C438
1uF 16V
C439
470pF 50V
D1.8V_BCM3549
R411
NC/4. 99K 1/16W 1%
R412
NC/4.99K 1/ 16W 1%
DDR1_VREF0
C440
1uF 16V
C441
470pF 50V
TP414
TP416
TP420
TP422
TP426
TP428
TP430
TP431
TP432
TP434
DDR0_D QS0
DDR0_D QS0b
DDR0_D QS1
DDR0_D QS1b
DDR0_D Q0
DDR0_D Q7
DDR0_D Q11
DDR0_D Q12
DDR1_D QS0
DDR1_D QS0b
DDR1_D QS1
DDR1_D QS1b
DDR1_D Q1
DDR1_D Q6
DDR1_D Q9
DDR1_D Q14
DDR01_ODT
DDR01_A1
TP402
TP404
TP406
TP408
TP410
TP412
TP413
TP415
TP417
TP418
TP419
TP421
TP423
TP424
TP425
TP427
TP429
TP433
TP435
TP436
TP437
TP403
TP405
TP407
TP409
TP411
65
T P V ( Top Victory Electronics Co . , Ltd. )
G4365-M0C-000-0050-1-20100721
絬隔瓜絪腹
Key Component
12_32-bit DDR Term/ Conn
Date
OEM MODEL Size
TPV MOD EL
PCB NAME
715G4365-M0C-000-0050
Sheet
of
12 17Sunday, Sept ember 26, 2010
C
1.0
Rev
称爹
Page 66

1.2V_STBY
2.5V_STBY
3.3V_STBY
FB4711 30OHM1 2
FB4720 30OHM1 2
FB4722 30OHM1 2
FB4707
1 2
48 OHM
A1.2V_BCM3549
FB4716 80OHM 4A1 2
D1.2V_BCM3549
TP4704
RED
+
C4837
33UF 10V
A2.5V_BCM3549
D3.3V_BCM3549
A3.3V_BCM3549
A3.3V_BCM3549
A2.5V_BCM3549
A1.2V_BCM3549
R4731 0R05 1/10W
R4732 0R05 1/10W
R4733 0R05 1/10W
R4734 0R05 1/10W
R4735 0R05 1/10W
R4736 0R05 1/10W
R4737 0R05 1/10W
R4738 0R05 1/10W
TP4703
RED
+
C4836
+
C4835
330UF 6.3V
330UF 6.3V
TP4701
RED
+
C4850
33UF 10V
TP4705
RED
+
C4851
33UF 10V
TP4706
RED
+
C4864
33UF 10V
R4740 0R05 1/10W
R4741 0R05 1/10W
R4742 0R05 1/10W
FB4708 1KOHM1 2
R4743 0R05 1/10W
FB4709 600 OHM1 2
FB4710 1KOHM1 2
R4744 0R05 1/10W
R4745 0R05 1/10W
FB4712 1KOHM1 2
FB4713 1KOHM1 2
R4746 0R05 1/10W
R4747 0R05 1/10W
FB4714 1KOHM1 2
R4748 0R05 1/10W
FB4715 1KOHM1 2
R4749 0R05 1/10W
FB4717 600 OHM1 2
FB4718 1KOHM1 2
FB4719 1KOHM1 2
R4750 0R 05 1/10W
FB4721 1KOHM1 2
R4751 0R 05 1/10W
R4752 0R 05 1/10W
FB4723 600 OHM1 2
FB4724 1KOHM1 2
R4753 0R05 1/10W
R4754 0R05 1/10W
R4755 0R05 1/10W
FB4725 1KOHM1 2
FB4726 1KOHM1 2
FB4701 1KOHM1 2
FB4727
1 2
600R/300mA
R4730
NC/20R 1/10W 5%
C4809
10uF 16V
C4810 100N 16V
HDMI_1_RXVDD2P58
HDMI_0_RXVDD2P58
AGC_VDDO
C4811
10uF 10V
C4812 100N 16V
C4814
C4817
10uF 10V
10uF 16V
C4815 100N 16V
C4816 10N 50V
C4818 100N 16V
C4813 10N 50V
C4819 10N 50V
+
C4822 100N 16V
C4823 100N 16V
C4820 N C
C4808 330UF 6. 3V
C4821 N C
C4824 100N 16V
C4832
C4829
C4826
4.7UF 10V
C4825 100N 16V
C4827 NC
4.7UF 10V
4.7UF 10V
C4830 NC
C4831 100N 16V
C4828 100N 16V
C4833 100N 16V
1.2v@70mA; 2.5V@30mA; 3.3V@26mA
C4838
10uF 10V
C4839 10N 50V
C4852
10uF 16V
C4853 100N 16V
C4867
4.7UF 10V
C4865 NC
C4866 100N 16V
C4868 100N 16V
C4873
4.7UF 10V
C4872 100N 16V
C4875 N C
C4874 N C
C4876 N C
C4883
4.7UF 6.3V
C4843
C4844
4.7UF 10V
C4840 1N 50V
C4841 100N 16V
C4855
4.7UF 10V
C4854 100N 16V
C4870 100N 16V
C4869 100N 16V
C4884 100N 16V
10uF 16V
C4845 10N 50V
C4842 100N 16V
C4856 N C
C4857 N C
VDAC_AVD D3P35
C4871
4.7UF 10V
C4846 1N 50V
C4858 100N 16V
C4877
4.7UF 10V
C4878 100N 16V
C4847 100N 16V
C4859
4.7UF 10V
100N 16V
C4849
4.7UF 10V
C4848 100N 16V
C4861 10N 50V
C4863 10N 50V
C4862 1N 50V
C4860 1N 50V
C4882
C4880
4.7UF 10V
4.7UF 10V
C4879
C4881 100N 16V
T P V ( Top Victory Elec tronics Co . , Ltd. )
絬隔瓜絪腹
Key Component
Date
AGC_VDD O
AUDMX_AVDD2P5
AUDMX_LDO_CAP
AUD_VDDO2P5_0
AUD_AVD D2P5_1
AUD_AVD D2P5_2
CLK54_AVDD1P2
CLK54_AVDD2P5
DDR_BVDDO
DDR_BVDD1
LVDS_AVDDC1P2
LVDS_TX_AVDD2P5_1
LVDS_TX_AVDD2P5_2
LVDS_PLL_VREG
PLL_DS_AVDD1P2
EDSAFE_D VDD1P2
EDSAFE_AVD D2P5
C4834
4.7UF 10V
HDMI_0_PLL_VDD1P2
HDMI_0_RXVDD1P2
HDMI_0_RXVDD2P5
HDMI_0_RXVDD3P3
HDMI_1_PLL_VDD1P2
HDMI_1_RXVDD1P2
HDMI_1_RXVDD2P5
HDMI_1_RXVDD3P3
POR_OTP_VDD2P5
PLL_MAIN_AVDD1P2
SD_V_AVDD1P2
125mA
SD_V1_AVDD2P5
SD_V2_V3_V4_V5_AVDD2P5
3 x 125mA eac h = 375mA
PLL_VAFE_AVDD1P2
SPDIF_AVDD2P5
VCXO_AVDD1P2
VDAC_AVDD1P2
VDAC_AVDD2P5
VDAC_AVDD3P3
G4365-M0C-000-0050-1-20100721
13_Analog Power Decoupling
R4739
NC/0R05 1/ 10W
V24
AGC_VDDO
AC7
AUDMX_AVDD2P5
AA10
AUDMX_LDO_CAP
AB25
AUD_AVDD2P5_0
AB24 AA22
AUD_AVDD2P5_1 AUD _AVSS_1
AC24
AUD_AVDD2P5_2
U22
CLK54_AVDD 1P2
U23
CLK54_AVDD 2P5
A6 B7
DDR_BVDD0 DDR_BVSS0
A24
DDR_BVDD1
B23
DDR_PLL_LDO
5mA
USB_AVDD1P2PLL
USB_AVDD12
USB_AVDD2P5
USB_AVDD2P5REF
USB_AVDD33
EPHY_PLL_VDD1P2
EPHY_AVDD1P2
EPHY_AVDD2P5
PLL_RAP_AVD_AVDD1P2
DDR_PLL_LDO
100mA
F2
LVDS_TX_AVDD2P5_1
100mA
F4
LVDS_TX_AVDD2P5_2
F5
LVDS_PLL_VREG
C4905
10UF 6.3V
Y21
PLL_DS_AVDD1P2
0.07mA
AB26
EDSAFE_DVDD1P2
91mA
Y24 V20
EDSAFE_AVDD2P5 ED SAFE_AVSS
AE4
HDMI_RX_0_PLL_DVDD1P2
AD4
HDMI_RX_0_VDD1P2
AC3
HDMI_RX_0_VDD2P5
AD3
HDMI_RX_0_VDD3P3
AA4
HDMI_RX_1_PLL_DVDD1P2
Y4
HDMI_RX_1_VDD1P2
W5
HDMI_RX_1_VDD2P5
Y3
HDMI_RX_1_VDD3P3
AB7
POR_OTP_VDD2P5
T22
PLL_MAIN_AVDD1P2
AA16
SD_V1_AVDD1P2
AB15
SD_V2_AVDD1P2
AA14
SD_V3_AVDD1P2
AA13
SD_V4_AVDD1P2
AB19
SD_V5_AVDD1P2
AB13
SD_V1_AVDD2P5
AB14
SD_V2_AVDD2P5
AC15
SD_V3_AVDD2P5
Y11
SD_V4_AVDD2P5
AC19
SD_V5_AVDD2P5
AB16 Y16
PLL_VAFE_AVDD1P2 PLL_VAFE_AVSS
2mA
AD5 AD6
SPDIF_AVDD2P5 SPDIF_AVSS
1mA
AD22
VDAC_AVDD1P2
1mA
AE23
VDAC_AVDD3P3
AE22
120mA
VDAC_AVDD3P3
U3
USB_AVDD1P2PLL
R3
USB_AVDD1P2
T4
USB_AVDD2P5
T3
USB_AVDD2P5REF
R4
USB_AVDD3P3
N4
EPHY_PLL_VDD1P2
P1
EPHY_AVDD1P2
P4
EPHY_AVDD2P5
N6 N7
PLL_RAP_AVD_AVDD1P2 PLL_RAP_AVD_AGND
>100mA
OEM MODEL Size
TPV MODE L
PCB NAME
715G4365-M0C-000-0050
Sheet
13 17Sunday, September 26, 2010
of
Special
Power/Ground
HDMI_RX_0_PLL_AVSS
HDMI_RX_0_PLL_DVSS
HDMI_RX_1_PLL_AVSS
HDMI_RX_1_PLL_DVSS
AUDMX_AVSS
AUDMX_AVSS
AUD_AVSS_0
AUD_AVSS_0
AUD_AVSS_0
AUD_AVSS_0
AUD_AVSS_1
AUD_AVSS_2
AUD_AVSS_2
AUD_AVSS_2
AUD_AVSS_2
CLK54_AVSS
CLK54_AVSS
CLK54_AVSS
DDR_BVSS1
LVDS_TX_AVSS
LVDS_TX_AVSS
LVDS_TX_AVSS
LVDS_TX_AVSSLVDS_TX_AVDDC1P2
LVDS_TX_AVSS
LVDS_TX_AVSS
LVDS_TX_AVSS
LVDS_TX_AVSS
LVDS_TX_AVSS
LVDS_TX_AVSS
LVDS_TX_AVSS
LVDS_TX_AVSS
LVDS_TX_AVSS
PLL_DS_AGND
PLL_DS_AGND
EDSAFE_AVS S
EDSAFE_AVS S
EDSAFE_AVS S
EDSAFE_AVS S
EDSAFE_AVS S
HDMI_RX_0_AVSS
HDMI_RX_0_AVSS
HDMI_RX_0_AVSS
HDMI_RX_0_AVSS
HDMI_RX_0_AVSS
HDMI_RX_1_AVSS
HDMI_RX_1_AVSS
HDMI_RX_1_AVSS
HDMI_RX_1_AVSS
HDMI_RX_1_AVSS
HDMI_RX_1_AVSS
HDMI_RX_1_AVSS
PLL_MAIN_AGND
SD_V1_AVSS
SD_V1_AVSS
SD_V2_AVSS
SD_V3_AVSS
SD_V3_AVSS
SD_V4_AVSS
SD_V5_AVSS
SPDIF_AVSS
SPDIF_AVSS
VCXO_AGNDVCXO_AVDD1P2
VDAC_AVSS
VDAC_AVSS
VDAC_AVSSVDAC_AVDD2P5
VDAC_AVSS
VDAC_AVSS
USB_AVSS
USB_AVSS
EPHY_AG ND
EPHY_AG ND
EPHY_AG ND
U401J
BCM3549VMKFB5G
<Package>
Rev
称爹
AD7
Y10
AA23
Y22
W20
W19
AB23
Y20
AA21
AB22
AC22
T20
T23
U24
B24
G10
H7
E7
C1F1
F3
C4
A5
E5
E6
D7
F7
G7
G8
V22
V23
W22
W21
Y23
AA24
Y26
W8
V8
AB5
AF3
AC5
W6
W7
U7
V6
U5
W1
U8
AB4
Y5
V7
Y7
T25
AA15
W14
Y14
W13
Y13
Y12
AA18
AB8
AA9
U21Y25
W16
Y18
Y17AA20
Y19
AD21
R6
R7
N1
N5
P7
Custom
1.0
66
Page 67

AA17
AB17
AB18
AC18
P20
R20
U20
G18
D20
G20
H20
J20
K20
L20
M20
N20
N15
P15
R15
T15
U15
W15
A16
G16
K16
L16
M16
N16
P16
R16
T16
U16
D17
K17
L17
M17
N17
P17
R17
T17
U17
N12
P12
R12
T12
U12
K13
L13
M13
N13
P13
R13
T13
U13
G14
K14
L14
M14
N14
P14
R14
T14
U14
K15
L15
M15
W9
Y9
K10
L10
M10
N10
P10
R10
T10
U10
W10
A11
K11
L11
M11
N11
P11
R11
T11
U11
D12
G12
K12
L12
M12
T6
J7
K7
L7
M7
T7
AA7
T8
AA8
D9
A21
N21
K26
F26
W24
V21
U401M
BCM3549VMKFB5G
DVSS
DVSS
DVSS
DVSS
DVSS
DVSS
DVSS
DVSS
DVSS
DVSS
DVSS
Modify to X7R for thermal
DVSS
rating -Peter 2010/07/02
DVSS
DVSS
DVSS
DVSS
DVSS
DVSS
DVSS
DVSS
DVSS
DVSS
DVSS
DVSS
DVSS
DVSS
DVSS
Modify to X7R for thermal
DVSS
rating -Peter 2010/07/02
DVSS
DVSS
DVSS
DVSS
DVSS
DVSS
DVSS
DVSS
DVSS
DVSS
DVSS
DVSS
DVSS
DVSS
DVSS
DVSS
DVSS
General
DVSS
DVSS
Ground
DVSS
DVSS
DVSS
DVSS
DVSS
DVSS
DVSS
DVSS
DVSS
DVSS
DVSS
DVSS
DVSS
DVSS
DVSS
DVSS
DVSS
DVSS
DVSS
DVSS
DVSS
DVSS
DVSS
DVSS
DVSS
DVSS
DVSS
DVSS
DVSS
DVSS
DVSS
DVSS
DVSS
DVSS
DVSS
DVSS
DVSS
DVSS
DVSS
DVSS
DVSS
DVSS
DVSS
DVSS
DVSS
DVSS
DVSS
DVSS
DVSS
DVSS
DVSS
DVSS
DVSS
DVSS
DVSS
DVSS
DVSS
DVSS
DVSS
DVSS
C4702 33UF 10V
C4704 33UF 10V
C4706 10UF 6.3V
C4708 10UF 6.3V
C4710 100N 16V
C4712 10N 50V
C4714 1N 50V
C4716 4.7UF 6.3V
C4718 100N 16V
C4720 10N 50V
C4722 1N 50V
C4724 4.7UF 6.3V
C4726 100N 16V
C4728 10N 50V
C4730 1N 50V
C4732 4.7UF 6.3V
C4734 100N 16V
C4735 10N 50V
C4736 1N 50V
U401L
BCM3549VMKFB5G
C25
PKT0_CLK
C24
PKT0_DATA
B26
PKT0_SYNC
+
+
Transport In/Out
D1.2V_BCM3549
RMX0_CLK
RMX0_DATA
RMX0_SYNC
H8
J8
K8
L8
M8
N8
P8
R8
H9
H10
H11
H12
H13
H14
H15
H16
H17
H18
H19
J19
K19
L19
M19
N19
P19
R19
T19
U19
V19
Y8
A25
A26
B25
U401S
BCM3549VMKFB5G
VDDC
VDDC
VDDC
VDDC
VDDC
VDDC
VDDC
VDDC
VDDC
VDDC
VDDC
VDDC
VDDC
VDDC
VDDC
VDDC
VDDC
VDDC
VDDC
VDDC
VDDC
VDDC
VDDC
VDDC
VDDC
VDDC
VDDC
VDDC
VDDC
POR_VDD1P2
Digital
Power
VDDO
VDDO
VDDO
VDDO
VDDO
VDDO
VDDO
DDRV
DDRV
DDRV
DDRV
DDRV
DDRV
DDRV
DDRV
DDRV
DDR_VDDP1P8
DDR_VDDP1P8
W11
W12
W17
W18
E26
L26
T26
A9
G9
G11
G13
A14
G15
G17
A19
G19
C7
D22
D1.8V_BCM3549
C4737 33UF 10 V
C4741 4.7UF 6.3V
C4745 4.7UF 6.3V
C4749 4.7UF 6.3V
D3.3V_BCM3549
+
C470310uF 16V
C4705100N 16V
C470710N 50V
C47091N 50V
C47114.7UF 6.3V
C4713100N 16V
C471510N 50V
C47171N 50V
C47194.7UF 6.3V
C4721100N 16V
C472310N 50V
C47251N 50V
C47274.7UF 6.3V
C4729100N 16V
C473110N 50V
C47331N 50V
C4738 100N 16V
C4742 100N 16V
C4750 100N 16V
C4739 10N 50V
C4743 10N 50V
C4747 10N 50V
C4751 10N 50V
C4740 1N 50V
C4744 1N 50V
C4748 1N 50V
C4752 1N 50V
67
T P V ( Top Victory Electronics Co . , Ltd. )
G4365-M0C-000-0050-1-20100721
絬隔瓜絪腹
Key Component
14_Digital Power Dec oupling
Date
OEM MOD EL Size
TPV MOD EL
PCB NAME
715G4365-M0C-000-0050
of
14 17Sunday , Septem ber 26, 2010
Sheet
C
1.0
Rev
称爹
Page 68

C7888
1uF 16V
R757
10OHM 1% 1/4W
C7891
470pF 50V
R762
10K 1%
1
Vcc
2
REF
3
GND
4
FB
G5693F11U
U708
Thermal Pad
PGND
R763
2.55K 1%
9
8
Vin
7
LX
6
5
EN
C7897
0.1UF50V
C7902 2N 2 50V
C7886
0.1UF50V
R764
10K 1%
5.0V_STBY
C7887
22uF 10V
L705
2.2uH 30%
R759
NC/2 OH M +-1% 1/4W
C7898
NC/1nF 50V
1.8V_STBY
C7892
0.1UF50V
C7893
22uF 10V
FB728
1 2
30OHM
FB729
1 2
42OHM
+
C7889
100UF 16V
+
C7903
220UF 16V
C7894
10uF 16V
C7904
1N 50V
DDR0_VREF0
R756
0R05 1/16W
C7885
100N 16V
U701
D1.8V_VTT
D1.8V_BCM3549
C7895
1uF 16V
C7896
470pF 50V
C7899
100N 16V
G2996F1Uf
5
VDDQ
7
PVin
2
SD
6
AVin
4
VREF
3
DDR_VTT_OUT
VSense
8
VTT
1
GND
HS
9
R760
NC/390K 1/ 10W
R758
0R05 1/16W
R761
0R05 1/16W
+
C7890
100N 16V
C7901
220UF 16V
DDR1_VREF0
DDR_VTT
68
T P V ( Top Victory Electronics Co . , Ltd. )
G4365-M0C-000-0050-1-20100721
絬隔瓜絪腹
Key Component
17_Power Regulation DDR
Date
OEM MOD EL Size
TPV MODEL
PCB NAME
715G4365-M0C-000-0050
of
15 17Sunday, September 26, 2010
Sheet
Custom
1.0
Rev
称爹
Page 69

U401E
BCM3549VMKFB5G
LVDS
LVDS_TX_0_CLK_N
LVDS_TX_0_CLK_P
LVDS_TX_0_DATA0_N
LVDS_TX_0_DATA0_P
LVDS_TX_0_DATA1_N
LVDS_TX_0_DATA1_P
LVDS_TX_0_DATA2_N
LVDS_TX_0_DATA2_P
LVDS_TX_0_DATA3_N
LVDS_TX_0_DATA3_P
LVDS_TX_0_DATA4_N
LVDS_TX_0_DATA4_P
LVDS_TX_1_DATA0_N
LVDS_TX_1_DATA0_P
LVDS_TX_1_DATA1_N
LVDS_TX_1_DATA1_P
LVDS_TX_1_DATA2_N
LVDS_TX_1_DATA2_P
LVDS_TX_1_DATA3_N
LVDS_TX_1_DATA3_P
LVDS_TX_1_DATA4_N
LVDS_TX_1_DATA4_P
LVDS_TX_1_CLK_N
LVDS_TX_1_CLK_P
B5
C5
LVDS_TX_0_DATA0_N
A4
LVDS_TX_0_DATA0_P
B4
LVDS_TX_0_DATA1_N
B6
LVDS_TX_0_DATA1_P
C6
LVDS_TX_0_DATA2_N
A3
LVDS_TX_0_DATA2_P
B3
LVDS_TX_0_DATA3_N
A2
LVDS_TX_0_DATA3_P
A1
LVDS_TX_0_DATA4_N
D6
LVDS_TX_0_DATA4_P
D5
LVDS_TX_1_DATA0_N
B2
B1
LVDS_TX_1_DATA0_P
C3
LVDS_TX_1_DATA1_N
LVDS_TX_1_DATA1_P
C2
D2
LVDS_TX_1_DATA2_N
D1
LVDS_TX_1_DATA2_P
E2
LVDS_TX_1_DATA3_N
E1
LVDS_TX_1_DATA3_P
E4
LVDS_TX_1_DATA4_N
E3
LVDS_TX_1_DATA4_P
D4
D3
OCLK_N
OCLK_P
LVDS_TX_1_DATA0_N
LVDS_TX_1_DATA0_P
LVDS_TX_1_DATA1_N
LVDS_TX_1_DATA1_P
ECLK_P
ECLK_N
LVDS_TX_1_DATA2_P
LVDS_TX_1_DATA2_N
LVDS_TX_1_DATA3_N
LVDS_TX_1_DATA3_P
LVDS_TX_1_DATA4_P
For TCON DPM
ECLK_N R1343 0R05 1/ 16W
ECLK_P
PANEL_VCC
DPM-Tocn 647
BSC_M2_SCL10, 12
BSC_M2_SDA10,12
421_RESETN7
FB1308 BEAD1 2
12V
PANEL_VCC
CN702
6
5
4
3
2
1
NC/CONN
+5VOnOf f
LVDS_TX_1_DATA4_N
R1337 0R05 1/ 16W
R1339 0R05 1/ 16W
R1341 0R05 1/ 16W
C1336
10N 50V
C1335
+
100UF 25V
CN3001
43
1
3
5
7
9
11
13
15
17
19
21
23
25
27
29
31
33
35
37
39
41
CONN
2
4
6
8
10
12
14
16
18
20
22
24
26
28
BIT SEL
30
32
34
36
38
40
42
44
CN7010
56
LVDS_TX_0_DATA3_P
LVDS_TX_0_DATA3_N
LVDS_TX_0_DATA4_P
LVDS_TX_0_DATA4_N
LVDS_TX_0_DATA2_N
LVDS_TX_0_DATA2_P
LVDS_TX_0_DATA0_P
LVDS_TX_0_DATA0_N
LVDS_TX_0_DATA1_P
LVDS_TX_0_DATA1_N
R1338 0R05 1/ 16W
R1342 0R05 1/ 16W
R1344 0R05 1/ 16W
R1340 0R05 1/ 16W
+5VOnOf f
C1334
10N 50V
R1347 NC /0R05 1/ 16W
1
2
R1348 NC /0R05 1/ 16W
R1349 NC /0R05 1/ 16W
3
R1350 NC /0R05 1/ 16W
4
OCLK_P
OCLK_N
BIT SEL
Tcon-151 pin 7
VCOM_OSD_ON_OFF 7
OPC_En To Panel 7
X421_GPIO5 7
421 DDR Pwr_On 7
421 3V3 Pwr_On 7
Rervsed Backlight ON/OFF 7
DISM 7
+3.3V OnOf f
R1345
NC/ 1KOHM +-5% 1/16W
BIT SEL
R1346
NC/ 1KOHM +-5% 1/16W
69
NC
T P V ( Top Victory Electronics Co . , Ltd. )
絬隔瓜絪腹
Key Component
G4365-M0C-000-0050-1-20100721
17.BCM3541 LVDS I nput
Date
OEM MODEL Size
TPV MODEL
PCB NAME
Sheet
715G4365-M0C-000-0050
of
17 17Sunday , Septem ber 26, 2010
Rev
称爹
B
1.0
Page 70

9.2. Power Board
715G3829P02W30003S
L_1
BD901
TS10P0 6G
3
C902 680pF
R901
300K 1/4W
HS1
HEAT SINK
1
2 R975
HS21
HEAT SINK
1
2
HS6
HEAT SINK
1
2
FB908
1 2
1
BEAD
+
2
-
FB901
1 2
4
BEAD
2
3
L903
20.0mH
!
1
4
!
C904 CAP X2 470NF 10% 275VAC MPX
C903 680pF
!
L901
124
3
!
13mH
C901 CAP X2 470NF 10% 275VAC MPX
!
R903
300K 1/4W
R902
300K 1/4W
CN901
12
!
3
HS5
HEAT SINK
1
2
HS20
HEAT SINK
1
2
HS8
HEAT SINK
1
2
1
2
CN903
L
N
CONN
!
HS9
HEAT SINK
1
2
NR901
NTCR
F901
FUSE
D904
1N5408-P
11128
7
L904
170uH
1
FB902
BEAD
5.6B
C913
0.1uF 50V
ZD902
MTZJ T- 72
C916
NC
2
R911
20K 1/8W
0.001uF/250V
12
!
678
OUT
VCC
GND
INV
COMP
MOT
123
C928
!
Vcc_1
R9905
10KOHM +-1% 1/8W
R9906
51K 1/8W
C910
1UF450V
ZCD
R910
300K 1/8W
Vcc_1
+
C914
47uF/50V
R917
56K 1/8W
D901
PR1007
1 2
!
B+_390V
R924
R925
R926
R928
91KOHM +-1% 1/8W
C922
0.1uF 50V
R932
75 OHM 1/8W
47OHM +-5% 1/8W
C912
CAP CHI P 0805 56PF J 50V NPO
IC901
FAN7529MX
CS ZCD
4 5
R918
10KOHM +-1% 1/8W
C917
47nF 50V
R904
R941
NC
R940
1K 1/8W 1%
C923
L_2
220PF 1KV
D902
FMN-1106S
D905
12
R913
B0520LW
2
1
3
R914
10KOHM +-1% 1/8W
R915
470 OHM 1/8W
C915
220pF 50V
C919
C918
NC
CAP CHI P 0805 0.47UF K 50V X7R
R905
Vcc_2
Q905
KTA1273-Y- AT/ P
R9907
R938
10KOHM +-1% 1/8W
R9908
NC
R9909
NC
Q911
NC
Q910
PMBS3904
NC
R916
0.2OHM2W
Vcc_1
1 2
C926
10nF
Q901
STW26NM60
!
12
FB907
BEAD
R919
NC
R912
0.2OHM2W
R909
+5VS
43
IC954
NC
R920
R921
R922
R923
13KOHM +-1% 1/8W
R988
NC
R989
NC
ACD
FB909
!
1 2
BEAD
RV904
NC
3.9K 1/8W
B+_390V
+
+
C924
C925
100uF M 450V
100uF M 450V
FB_1
4.7 MOHM +-5% 1/4W
C909
C907
1N 50V
100N 50V
R908
2.4 OHM 1/4W
Vcc_1
R947
R949
5.1K 1/4W
5.1K 1/4W
R906
510K 1/8W
100N 50V
FB
R929
R075
10K OHM
IC903
1
BNO
2
COMP
3
NC
4 5
CS GND
4.7 OHM 1/4W
R930
C943
0.1uF 50V
10nF 50V
R942
51K 1/8W
C944
220pF 50V
LD7523GS
+
OVP
VCC
OUT
R937
C937
10uF/50V
8
7
6
B+
R948
0.1 ohm
C911
CAP CER 10NF K 1KV
A6069H
4 5
FB/OLP VCC
3
GND
2
BR
D/ST
1
S/OCP
D/ST
IC902
R907
2.4 OHM 1/4W
Q921
KTD1691/P
!
ZD901
MTZJ T-72 16B
1 2
B+
Vcc_2
C941
10uF/50V
+
C942
0.1uF 50V
R945
470 OHM 1/8W
C929
0.001uF/1KV
100KOHM +-1% 1/4W
D930
PR1007
7
8
C933
22uF/50V
Vcc
R939
10KOHM +-1% 1/8W
43
100KOHM +-1% 1/4W
100KOHM +-1% 1/4W
R933
10 OHM 1/8W
R934
1K 1/8W 1%
R9401
100KOHM +-1% 1/4W
R9402
D903
1N4148
+
C908
0.1uF 50V
+5VS
R960
1K 1/8W 1%
12
IC951
PC123X8YFZOF
Q950
PMBS3904
R9211
C939
0.001uF/1KV
R9212
D940
PR1007
D906
B0520LW
R943
22 OHM 1/8W
R9403
100KOHM +-1% 1/4W
R9404
100KOHM +-1% 1/4W
R931
2.4 OHM 1/4W
Vcc
D935
PR1007
+
C931
100uF 50V
R961
1K 1/8W 1%
C956
0.1uF 50V
R9213
100KOHM +-1% 1/4W
R9214
100KOHM +-1% 1/4W
12
R944
10KOHM +-1% 1/8W
R963
10KOHM +-1% 1/8W
T902
POWER X'FMR
5
4
3
!
470pF/250V
Q903
2SK4101LS
R946
0R33 5% 2W
1
2
3
4
5
C927
T901
POWER X'FMR
!
PS_ON
7
10
8
9
11
12
!
FB903
1 2
BEAD
R950
R951
6
3
D950
7
SBT15006JST
2
9
10
1
FB_1
R954
100 OHM +-1% 1/8W
12
43
IC950
!
PC123X8YFZOF
C955
0.22uF 50V
IC952
AS431AZTR-E1
R970
R971C921
C970
D951
FMEN210A
3
D952
FMEN-220A
2
1
C960
R974
1K 1/4W
12
IC970
PC123X8YFZOF
IC971
AS431AZTR-E1
C971
C961
R976
10KOHM +-1% 1/8W
3
2
1
R953
R952
FB
43
!
+
C953
330uF 16V
R956
1K 1/8W 1%
3.9K 1/8W
C950
C951
R955
1K 1/8W 1%
+
C972
470uF 35V
+
C976
0.33uF 50V
C957
1000uF 25V
+5VS
L950
3.5uH
+5V
A5V
R959
150KOHM +-1% 1/8W
L980
3.5uH
+
C973
470uF 35V
L951
3.5uH
+12V
R978
24KOHM +-1% 1/8W
R980
2KOHM +-1% 1/8W
R957
10KOHM +-1% 1/8W
R958
10KOHM +-1% 1/8W
+
+
+24V
+
C954
470uF 16V
C975
470uF 35V
C959
470uF 25V
R987
27K +-1% 1/8W
R979
NC
ON/OF F
R968
2.2K 1/4W
R972
2.2K 1/4W
A5V
C974
0.1uF 50V
PDIM
+24V
PS_ON
+5V
ACD
Q970
PMBS3904
+12V
R969
2.2K 1/4W
R973
2.2K 1/4W
+5V
2.5A
R965
+12V
2A
ZD951
MTZJ T- 72 16B
D954
1N4148
R983
1K 1/8W 1%
C978
0.1uF 50V
C977
0.1uF 50V
CN902
1
2
3
4
5
6
7
8
9
10
11
12
13
CONN
R966
+12V
1 2
R981
1K 1/8W 1%
R982
10KOHM +-1% 1/8W
+24V
1 2
+24V
1.5A
ZD952
MTZJ T- 72 30B
D955
1N4148
C979
0.1uF 50V
70
Page 71

B+_390V
PDIM
R812
NC
IS1
R826
510 OHM +-1% 1/8W
DR1
DIOD E SS0520 SOD-123
R808
1 MOHM +-1% 1/8W
R807
10KOHM +-1% 1/8W
C808
1N 50V
D806
1N4148
R801
0.1 ohm
POWER X'FMR
C802
2.2U25V
DR2
D802
1 2
1 2
VREF
R805
82K 1/8W
C807
MLCC 0805 330pF 50V N PO +/-5% SAMSUNG
R813
680K +-5% 1/8W
R828
68K 1/8W
C817
47nF 50V
4
1
D804
DIOD E SS0520 SOD-123
R806
3.3 MOHM +-5%
C810
1N 50V
VREF
R820
100KOHM +-1% 1/8W
Q804
PMBS3904
R829
1 MOHM +-1% 1/8W
T801
R809
51K 1/8W
VS1
VS2
CN904
T804
2 7
D801
DIOD E SS0520 SOD-123
12
5
R802
6
7
9
10
100 OHM +-1% 1/8W
D803 DIOD E SS0520 SOD-123
R803
100 OHM +-1% 1/8W
12
!
+12V
DR1
ZCS
D810
BAV70
Q803
2N7002
R817 1K 1/ 8W 1%
3
1
2
ISEN
Q801
AOTF12N50
R832
10KOHM +-1% 1/4W
Q802
AOTF12N50
R833
10KOHM +-1% 1/4W
IC801
1
DRV1
DRV2
2
GND
3
ZCS
VREF
4
RT1
ENA
5
CT
ADIM
6
LCT
TIME R
7
PDIM
SSTCMP
8 9
VSEN ISEN
OZ9976GN-C -0-TR
R819
C815
100KOHM +-1% 1/8W
1.5nF 50V
C816
820P 50V
C805
+
100uF 50V
16
15
VIN
14
ENA
13
12
11
10
R844
1 MOHM +-1% 1/8W
ISEN
D808
D809
1 2
FB904 BEAD
C806
0.1uF 50V
DR2
C812
22nF 50V
R818
750 OHM 1/8W
R821
10KOHM +-1% 1/8W
C803
0.001uF/ 1KV
C906
0.001uF/ 250V
VREF
C809
2U2 16V
C823
CAP CER 10NF K 1KV
C822
0.001uF/ 1KV
1 2
FB905
BEAD
!
R811
1M5 1/4W 1%
1U25V
C811
D805
3
BAV70
C819
NC
R834
NC
PDIM
2
1
C801
1UF450V
C804
1UF450V
ON/OFF
R810
100KOHM +-1% 1/8W
R815
51K 1/8W
R814
51K 1/8W
IS1
IS2
R804
10KOHM +-1% 1/8W
C813
4N7 50V
4 6
POWER X'FMR
!
!
T803
2 7
4 6
POWER X'FMR
100 OHM 1/4W
VREF
C814
2.2U25V
IS2
R816
R843
51K 1/8W
IS1
R822
ZCS
R823
51 OHM 1/4W
R824
51 OHM 1/4W
R836
R835
51 OHM 1/4W
51 OHM 1/4W
C825
12PF6KV
C826
1500PF 50V
C827
12PF6KV
R825
51 OHM 1/4W
C828
1500PF50V
R837
R838
51 OHM 1/4W
2
1
CN801
R839
100KOHM +-1% 1/8W
VS1
R840
51K 1/8W
CN802
2
1
CONN
R841
100KOHM +-1% 1/8W
R842
51K 1/8W
VS2
IS2
R827
510 OHM +-1% 1/8W
D807
1N4148
R830
68K 1/8W
C818
47nF 50V
Q805
PMBS3904
R831
1 MOHM +-1% 1/8W
71
Page 72

715G3885P03W30003M
!
1
BD901
GBJ1008
+
93G 50460 35
680pF 250V
!
R901
330K 1/4W
2
!
C901
CN901
SOCKET
HEAT SINK (D911)
HEAT SINK (Q902,Q903)
-
4
2
1
!
C904
0.047UF 275V
2
1
2
1
0.047UF 275V
!
R902
330K 1/4W
RV901
!
NC
!
HS2
1
2
HS5
1
2
3
3
!
L903
20.0MH
4
3
!
L902
2.0MH
73L 174 52 LG
4
!
C906
680pF 250V
!
3
L901
20.0MH
73L 174 49 LG
4
!
C903
R903
330K 1/4W
G
LN
033G8105 3A X *2
!
BO
12
C931
1uF/520V
CN902
CONN
2
N
1
L
R941
220R 1/4W
R943
5K1 1/8W
!
NR901
NTCR
t
!
F901
FUSE
HS3
HEAT SINK (IC901)
1
2
HS6
HEAT SINK (D903,D 906,D907)
1
2
R932
0.1R 3W
R934
0.1R 3W
B+
!
!
C936
47uF 25V
R940
20K 1/8W
C942
C940
4N7
10N
R904
0.1 ohm
VCC1
C908
10uF
HS4
HEAT SINK (Q901)
1
2
HEAT SINK (BD901,D 901)
FB903
BEAD
1 2
C902
470pF/250V
1 2
FB904
BEAD
5
VCC1
+
1
2
3
C941
1N
R905
2M 1% 1/4W
+
C909
0.1uF
HS1
1
2
126
L906
600uH 10%
73G 174148 S
GND
GATE
ICOMP
ISENSE
VSENSE
VINS4VCOMP
IC906
ICE2PCS02G
56G 379104
R906
2M 1% 1/4W
1N5408-E
C937
100N
VCC
R908
2K 1/4W
D909
8
7
6
5
R907
2M 1% 1/4W
R909
30K 1% 1/8W
C914
470N
51R 1/8W
R942
51K 1/8W
C938
470N
C907
1N 50V
C916
1N
FB905
BEAD
1 2
1 2
FB901
BEAD
FB902
1 2
C932
NC
!
Q901
STW20NM60
57G 667 25
ZD902
MTZJ T-72 15B
C919
22pF/3KV
R921
1K 1% 1/8W
!
C964
470pF/250V
Q904
KTD1691/P
57G 761 7
1 2
C918
1uF 25V
R916
47R 1/8W
22pF/3KV
BEAD
R935
1M 1% 1/4W
R939
1M 1% 1/4W
R944
1M 1% 1/4W
R945
22K 1% 1/8W
D902
IN4148
R910
47R 1/8W
12
ZD901
MTZJ T-72 15B
D904
IN4148
C920
R922
150R 1/8W
C905
10NF1KV
0R05 1/8W
STP10NK60ZFP
R976
0R05 1/8W
R931
1K2 /8W 1%
43
!
IC905
EL817M
56G 139 9
STP10NK60ZFP
57G 667 50
R975
!
Q902
57G 667 50
R917
10K 1/8W
100PF/2KV
R925
24K 1% 1/8W
C928
4.7uF
+
C933
82uF 450V
67G 42Z82015K
067G 42Z10115K *2
BO
Vcc
R946
1K 1/8W
!
Q903
R911
10K 1/8W
C924
D901
FMXA-1106S
D910
R933
R936
33R 1/8W
C939
1uF 25V
!
!
IN4148
1
2
3
4
5
6
7
8
C917
1uF 25V
C944
470pF/250V
C929
470pF/250V
Vsen
Vcc
FB
GND
Css
OC
RC
Reg
RV9COM
IC904
SSC9502S
56G 379112
D905
EG01A
1
R938
10K 1/8W
NC
NC
VGH
VS
VB
NC
NC
VGL
2
3
C943
1N
VCC1
18
17
16
15
14
13
12
11
10
R919
7.5R 1/4W
C926
1N
!
R947
220R 1/8W
12
Q905
2N3904S-RTK/PS
+
+
!
C934
82uF 450V
67G 42Z82015K
R958
1M5 1/4W 1%
1M5 1/4W 1%
1M5 1/4W 1%
620K 1/8W 1%
3
4
6
7
C915
0.033uF 1KV
C927
100N
56G 139 9
1 2
FB906
BEAD
067G 42Z10115K *2
R961
R964
R967
C960
220N
1.2R 2W
5V
R949
2K 1/8W
!
T902
POWER X'FMR
80TL42T 14 YS
12
9
8
14
11
10
13
R923
0R05 1/8W
43
!
IC902
EL817M
IC903
KIA431A-AT/P
56G 158 12
R968
R963
4.7M 1/4W
R950
4.7R 1W
C945
100N
3
1
D906
SBT15006JST
93G 60298
R924
4.7K 1% 1/8W
12
1
2
3
R948
2K7 1/8W
2
C948
NC
IC901
S/OCP
BR
GND
FB/OLP4VCC
A6069H
56T 379121
R926
3K 1% 1/8W
C930
100N 50V
100K 1/4W
100K 1/4W
D/ST
D/ST
PS_ON
3
1
3
1
V40100C
93G 60315
+
C921
1000uF25V
5.1K 1% 1/8W
R952
100K 1/4W
R954
100K 1/4W
D913
3.3R 1/4W
D914
PR1007
93G110050152T
D916
IN4148
+
C958
10uF
+
C911
1000UF 35V
+
C922
470UF 25V
C946
0.1NF 2KV
C947
0.1NF 2KV
R955
ZD906
MTZJ12B
1 2
R927
20K5 1/8W 1%
R930
2K 1% 1/8W
2
3
4
5
+
C956
100uF
!
L904
3.0uH +-10%
C912
470UF 35V
Vcc
EL817M
56G 139 9
C923
100N
T901
POWER X'FMR
80GL52T 5 L2
C954
NC
43
IC907
+
6
7
9
10
R962
220R 1/8W
12
2K 1/8W
IC908
KIA431A-AT/P
56G 158 12
R912
5.1K 1/4W
R928
56K 1% 1/8W
D911
3
SBT15006JST
93G 60298
2
1
R956
47R 1/4W
C949
R957
2N2 500V
47R 1/4W
R965
2.4K 1% 1/8W
R966
1K 1/8W
R970
C961
220N
R971
2.2K 1% 1/8W
R914
R913
5.1K 1/4W
5.1K 1/4W
12V
L907
3.5uH
+
+
C950
C951
330uF 16V
1000uF 16V
ZD903
MTZJ T-72 30B
1 2
D917
IN4148
R969
100R 1/8W
Q906
PMBS3904
C963
100N
24V
10
11
12
10
11
12
CN905
CONN
1
2
3
4
5
6
7
8
9
13
CN904
C913
R915
1uF
5.1K 1/4W
12V
PS_ON
5V
R972
1K 1/8W
1
2
3
4
5
6
7
8
9
CONN
24V
C952
0.1uF
12V
ZD904
MTZJ T-72 16B
1 2
D918
IN4148
1
2
3
4
5
6
7
8
9
10
11
12
13
CN903
CONN
5V
R951
R953
SARS01-V1
8
7
5
C955
0.1uF
C959
4N7
D903
2
V40100C
93G 60315
2
+
C910
1000UF 35V
D907
L905
3.5uH
R929
1
!
72
T P V ( Top Victory Electronics C o . , Ltd. )
絬隔瓜絪腹
B
Key Component
01.Adapter
Date
OEM MO DEL
TPV MODEL
PCB NAME
Sheet
715G3885-1
of
11Tuesday, March 09, 2010
Size
C
Rev
称爹
称爹
<>
Page 73

9.3 Key Board
715G4388K0E000004S
1112
CN001
1
2
3
4
5
6
7
8
9
10
CONN
GP53_KD0
GP54_KD1
GP55_KD2
GP56_KD3
GP47_LS0
GP48_LS1
GP49_LS2
+3V3VSB
GP49_LS2
GP55_KD2
GP54_KD1
GP48_LS1
GP47_LS0
GP53_KD0
GP56_KD3
pLS2
pLS1
pLS0
D003
1N4148W
D002
1N4148W
D001
1N4148W
C001
1NF 50V
C002
1NF 50V
R001
33R
R002
33R
R003
33R
C003
1NF 50V
6
2 1
5
34
SW001
SW
6
2 1
5
34
UP
SW004
SW
6
2 1
5
34
VOL+POWER
SW006
SW
SW002
6
SW
34
ZD006 VPORT 0603100KV05
ZD001 VPORT 0603100KV05
ZD003 VPORT 0603100KV05
ZD004 VPORT 0603100KV05
ZD002 VPORT 0603100KV05
ZD007 VPORT 0603100KV05
ZD005 VPORT 0603100KV05
+3V3VSB
2 1
5
6
MENU
SW003
SW
34
SOURCE
2 1
5
G4388-K0C-000-0040-1_20100702
01_Key pad
OEM MODEL Size
TPV MO DE L
PCB NAME
Sheet
pKD0
pKD2
R008 100R
R009 100RpKD1
R010 100R
R011 100RpKD3
3.3K OHM
R004
R005
3.3K OHM
R006
3.3K OHM
R007
3.3K OHM
T P V ( Top Victory Electronics Co . , Ltd. )
絬隔瓜絪腹
Key Component
Date
SW005
6
SW
34
DOWN
2 1
5
715G4388-K0C-000-0040
11Wednesday , July 21, 2010
of
Ke y pa d
6
2 1
5
SW007
SW
34
VOL-
Rev
称爹
B
1.0
73
Page 74

9.4 IR Board
715G4400R0C000004M
light sensor
560K 1/10W
CN201
8 9
R203
CONN
7
6
5
4
3
2
1
C202
1uF 25V
1uF 25V
ZD201
VPORT0603100KV05
C203
12
+5V_STB
R204
2K2 1/10W 1%
R205
4K7 1/10W 1%
1
2
ALS-PDIC144-6C/L378
ZD202
1 2
VPORT0603100KV05
ZD205
1 2
VPORT0603100KV05
I2C_SDA
I2C_SCL
+3.3V_STB
LED
+5V_STB
IRRXDA
12
ZD203
+5V_STB
VPORT0603100KV05
U201
VCC
VOUT
D201
2
3
BAV99
R206 4.7K 1/16W
+3.3V_STB
+3.3V_STB
1
R208 4.7K 1/16W
I2C_SCL
+3.3V_STB
C204
10uF 16V
23-21C/T1D-APQHY /2T
LED
+5V_STB
I2C_SDA
R209 33R 1/16W 5%
C205
100N 16V
LED201
VPORT0603100KV05
12
12
ZD204
IRRXDA
U203
1
SCL
2
VSS
3
VD33
4
VDD
6720-SG080WT
220R 1/10W 1%
R202
4K7 1/10W 1%
C201
100pF 50V
GPIOA4/ADC0
GPIOA3/IRQ1
GPIOA2/LED
R201
R207 33R 1/16W 5%
8
SDA
7
6
5
1
2
3
light sensor
U202
VOUT
GND
VCC
KSM-603TM2M
T P V ( Top Victory Electronics Co . , Ltd. )
絬隔瓜絪腹
Key Component
Date
G4400-R0B-000-0040-1_20100505
74
OEM MODEL Size
TPV MO D EL
PCB NAME
Sheet
715G4400-R0B-000-004001.IR and LIGH T SENSOR BOAR D
11Tuesday , Sept ember 07, 2010
of
Rev
称爹
A
1.0
Page 75

10. Exploded View
75
Page 76

Explode Parts List
No.
Description
No.
Description
1
2
3
4
5
6
7
8
9
10
11
12
13
LOGO
BEZEL_60HZ
IR BOARD
BACK LIGHT
SPEAKER
BRACKET_HOLDER_UDM_PANEL_NONE
PANEL
KEY COVER
KEY PAD
KEY BOARD
42-BKT-VESA
P/B STAND OFF SUPPORT BKT
WIFI USB IEEE
14
15
16A
16B
17
18
19
20
21
22
23
24
BRACKET WIRELESS BKT
BRACKET IO SIDE
MAIN BOARD
POWER BOARD
BRACKET IO BOTTOM
REAR COVER
HINGE
STAND BKT COVER
NECK COVER
NECK-DIE-CASTING
BASE COVER_VIZ2
BASE BKT
Screw List
No.
Part No. Description Q'ty
S1 0Q1G 940 16 47 CR3 SCREW(PANEL/BEZEL) 6
S2 0M1G1730 8120 SCREW(P/B STAND OFF SUPPORT BKT/PANEL) 1
S3 0M1G1730 6120 SCREW(WIRELESSW BRACKET/PANEL) 6
S4 0M1G1730 6120 SCREW(WIRELESSW BRACKET/WIFI USB IEEE) 2
S5 0M1G 940 6125 SCREW(BKT-VESA/ BKT-VESA SUPPORT) 4
S6 0M1G1830 8120 SCREW(PANEL/POWER BOARD) 5
S7 0M1G1730 6120 SCREW(PANEL/MAIN BOARD) 4
S8 0M1G 940 8 47 CR3 SCREW(MAIN BOARD/BRACKET IO BOTTOM) 2
S9 0M1G 940 8 47 CR3 SCREW(BKT-HOLDER-UDM/REAR COVER) 2
S10 0Q1G 940 16 47 CR3 SCREW(BEZEL/REAR COVER) 2
S11 0M1G 940 8 47 CR3 SCREW(BKT VESA/REAR COVER) 2
S12 0Q1G 940 30 47 CR3 SCREW(BEZEL/REAR COVER) 4
S13 0Q1G 940 16 47 CR3 SCREW(BEZEL/REAR COVER) 4
S14 0M1G1740 8120 SCREW(BRACKET PANEL BOTTOM/REAR COVER) 2
S15 0M1G1740 8120 SCREW(PANEL/ BRACKET PANEL BOTTOM UDM) 4
S16 0Q1G 130 8 47 CR3 SCREW(HINGE/STAND BKT) 2
S17 0M1G1730 8120 SCREW(NECK COVER/DC) 2
S18 0M1G1740 8120 SCREW(BKT-HINGE/NECK-DIE-CASTING) 3
S19 0Q1G 130 8 47 CR3 SCREW(BRACKET BASE/BASE COVER) 6
S20 0M1G6022500 SCREW(BRACKET BASE/HINGE) 4
S21 001G6021 1 SCREW(SPEAKER/BEZEL) 4
S22 0M1G 940 8 47 CR3 SCREW(BRACKET_HOLDER_UDM_PANEL_NONE/BEZEL) 2
76
Page 77

11. BOM List
Note: The parts information listed below are for reference only, and are subject to change without notice. Please go
to http://cs.tpv.com.cn/hello1.asp
E42AG5NKWKVCXNX
Location Part No. Description Remark
036T 600 18102 NONWOVEN FABRTC
036T 600 18103 NONWOVEN FABRTC
052G 1185 1 BIG TAPE(Y1200141)
052G 1186 SMALL TAPE
052G 1209 A TASMA ALUMINIOWA
052G 1211 B TASMA ALUMINIOWA
052G 2191 A PAPER TAPE
089G702A18NBL9 AC POWER CORD 1800MM
E09201 092TB1JX1A2WGM BATTERY LR6 FOR ALL EXPORT MODE
ECN701 095G801313D929 HARNESS 13P-13P 260MM FQE101255I
ECN4307 095G8014 4D979 HARNESS 4P-4P 140MM FQE101253I
ECN3001 095G801851D953 HARNESS 51P-42P 400MM FQE101252I
ECN801 095G8019 3D920 HARNESS 3P-2P 1000MM FQE92030I
ECN802 095G8019 3D921 HARNESS 3P-2P 500MM FQE92028I
for the latest information.
098GRABDANEVZR REMOTE CONTROL VIZIO RC2744201/01
0M1G 940 6125 SCREW 4.0X6.0
0M1G 940 8 47 CR3 SCREW
0M1G 940 8 47 CR3 SCREW
0M1G 940 8 47 CR3 SCREW
0M1G1730 6120 SCREW,42-D020523
0M1G1730 6120 SCREW,42-D020523
0M1G1730 8120 SCREW
0M1G1740 8120 SCREW FOR STD/MF 42-D020715/42-D000649()
0M1G1740 8120 SCREW FOR STD/MF 42-D020715/42-D000649()
0M1G1830 8120 SCREW
0Q1G 330 8 47 CR3 SCREW
0Q1G 330 8 47 CR3 SCREW
0Q1G 940 16 47 CR3 SCREW
0Q1G 940 16 47 CR3 SCREW
0Q1G 940 30 47 CR3 SCREW
305GLUSBDA51AC WIFI USB IEEE 802.11 N WN7511E 3-LF-PV
750TVG420CAE11N000 PANEL LC420WUE-SCA1 KR LGD
A15T0944101 42-BKT-VESA
A15T1055201 BRACKET IO BOTTOM
A15T1058201 BRACKET BRACKET IO SIDE
A15T1166101 P/B STAND OFF SUPPORT BKT
A15T1224101 BRACKET_HOLDER_UDM_PANEL_NONE
77
Page 78

PWTV9QG2LAAW POWER BOARD G3829-1-X-X-1-100518
Q02G7021 2 BOLT
Q02G7022 3 SCREW-STOPPER
Q12G6300 26 8 WASHER
Q12G6300 26 8 WASHER
Q15T0684201 BRACKET_HOLDER BRACKET_HOLDER -- --
Q33G 465 2 BK CLIP JIONTER
Q44GN044101 VIZIO FOR VA EPS
Q44GN044202 VIZIO FOR VA EPS
Q44GN044301 VIZIO FOR VA EPS
Q44GN044402 VIZIO FOR VA EPS
Q44GN044501 VIZIO FOR VA EPS
Q44GN044601 VIZIO FOR VA EPS
Q44T3121510549 GP PU FOAM
Q44T3231 21 18 EVA WASHER
Q44T3231 21 36 EVA WASHER
Q45G 77 5 PE PACKING (Y1900241)
Q45G 99626 36 PE BAG
Q45T 99609 71 EPE COVER FOR MONITOR
Q50G 4 10 TIE (Y1900221)
Q52G 1150523 TAPE_INSULATING
Q52G1001 TV001 AL TAPE
Q52G1801 TV006 INSULATING SHEET --
Q85G 583598 FOAM_ELECTRIC
X15T8022102 BRACKET WIRELESS BKT
X40G2010 42X03 LABEL IO
X40G2010 42X05 LABEL SIDE
X44GN043 FB 42" TV CARTON BOTTOM
X44GN043997 6B T 42¡° TV CARTON TOP
052G 1186 SMALL TAPE
0M1G6022500 SCREW
P36T0008 1 CLOTH
Q45G 76 28NV2 R PE BAG FOR BASE SCREW SZ02742
X41G42MV997 4B MANUAL
X41G78DV997 1A REGISTRATION CARD
X41G78DV997 4A ENVELOPE
X41G78SV99715B QSG
040G 58162435A P/N LABEL FOR MANUAL PE BAG
X40G 420997 8A RATING LABEL
X40G0001624 2A LABEL FOR SCREW PE BAG
X40G0001997 2A CARTON LABEL
SP01 078G120A 30 Y SPEAKER 16 OHM 12W 166X40 600/260
ECN407 095G8014 8D923 HARNESS 8P-8P 900MM FQE101254I
78
Page 79

ECN406 095G801410D940 HARNESS 10P-10P 920MM FQE101256I
705TQ949001 COMSUPTIVE ASS'Y-A4
IRPFAQH5 IR BOARD
KEPFQAA8 KEY BOARD
756TXACB 5K052 02 MAIN BOARD-CBPFA5AKQ7
U1201 056G1133 34 M24C02-WMN6TP
U405 056G2233 25 FLASH H27UAG8T2MTR-BC 16GB TSOP1-48
SMTF-U405 100TM5GM011K21 MCU ASS'Y-056G2233 25
SMTF-U1201 100TM5GMV01K1E MCU ASS'Y-056G1133 34
705TXA33N01 PLASTIC ASS'Y
A33T0808AFL 1L0100 KEY PAD
Q12T7037 1 GP RUBBER FOOT
Q33T0444ADTA1L0100 KEY COVER
705TXA34N32 BEZEL ASS'Y
001G6021 1 SCREW
036T 600 18100 NONWOVEN FABRTC
A33T0809XAA 1C0100 IR LENS
A34T1853AFLA1L0101 BEZEL_60HZ
Q16G0001 10 4 EVA WASHER
Q16G0001 10 7 EVA
Q36T 600 18134 NONWOVEN FABRIC
Q36T 600 35 4 GP NONWOVEN FABRIC
Q36T 600 35 4 GP NONWOVEN FABRIC
Q36T 600 36 4 GP NONWOVEN FABRIC
705TXA34N33 REAR COVER ASS'Y
036T 600 18117 HEMIRON
036T 600 18124 NONWOVEN FABRTC
A15T0282201 BKT-VESA-BTM
A34T1708ADT 1A0101 REAR COVER_42"
Q36T 600 35 3 GP NONWOVEN FABRIC
Q36T 600 37 24 GP NONWOVEN FABRIC
Q44T3231 21 35 EVA WASHER
X40G2010 42X04 LABEL IO
705TXA34N03 BASE ASS'Y
0Q1G 130 8 47 CR3 SCREW
A15T1037201 BASE BKT
A34T1710AFL 1L0100 STAND BKT COVER
A34T1711AFL 1L0100 NECK COVER
A34T1712AFL 1L0100 BASE COVER_VIZ2
Q12G6300 25 1 RUBBER FOOT
Q37T0186021 HINGE 40 --
040G 45762412B CBPC LABEL
CN701 033G327813D CONNECTOR
79
Page 80

CN601 033G3802 4B YH CONNECTOR 4PIN 2.0PITCH
CN116 088G 78 13 74 YG RCA JACK 1*2 W/R 2nd source
CN111 088G 78 13 75 YG RCA JACK 1*3 G/B/R 2nd source
CN116 088G 78 1374C RCA JACK 1*2 W/R
CN111 088G 78 1375C RCA JACK 1*3 G/B/R
CN102 088G 302 65 YG PHONE JACK 3P GREEN 2nd source
CN603 088G 30211K PHONE JACK 7PIN
CN102 088G 30265C PHONE JACK 3P GREEN
CN603 088G 302A11 YG PHONE JACK 3.5¦µ 7PIN BLACK CKX3.507B-01 2nd source
CN105 088G 342A00 AT RJ45 CONN + LED R/A 12P BLACK H=13.5
CN105 088G 342A00 CL RJ45 CONNECTOR (WITH LED) 2nd source
CN104 088G 352 21CL USB CONN TYPE A
CN103 088G 352 21CL USB CONN TYPE A
CN103 088G 352 2L YG USB CONNECTOR USB4-03 AU=1U'' 2nd source
CN104 088G 352 2L YG USB CONNECTOR USB4-03 AU=1U'' 2nd source
CN101 088G 35315FHSD D-SUB CONN WITH SCREW 17P BLUE
CN602 088G 359 6 JT FIBER-OPTIC 3PIN JST1226
X4301 093G 2245B J1 XTL NXS24.000AC12F-KAB7 12PF 30PPM
X401 093G 22930 J CRYSTAL NXS54.000AF10OKAB8 54M 15 10
TU101 094GNTAT MN1S TUNER USA A50CVH1019A(B)
Q85G 583598 FOAM_ELECTRIC
U601 Q90T6119 8 HEAT SINK
CN4307 033G8032 4F S HR CONNECTOR
CN407 033G8032 8F S HR WAFER 1.25MM 8P
CN406 033G803210F S HR CONNECTOR
U701 056G 379 82 IC G2996F1UF SOP-8
U703 056G 379150 IC G5692P11U SOP-8
U401 056G 562364 SCALER BCM3549VMKFSB5G BGA-640
U709 056G 563154 IC G5622ADJT11U SOT23-5
U707 056G 563156 IC G9141T11U SOT23-5
U705 056G 563159 IC G9091-330T11U 0.3A/3.3V SOT23-5
U706 056G 563167 IC G5657F12U SOP-8
U704 056G 563186 DC/DC CONVERTER IC G5684F11U SOP8
U708 056G 563187 IC G5693F11U SOP8
U102 056G 563519 IC G965-25ADJPIUF 1.8A SOP-8
U415 056G 614 1 74HC4052D S016 PHLIPS
U411 056G 615115 DRAM H5PS1G83EFR-G7C 1GB BGA-60
U412 056G 615115 DRAM H5PS1G83EFR-G7C 1GB BGA-60
U402 056G 615115 DRAM H5PS1G83EFR-G7C 1GB BGA-60
U403 056G 615115 DRAM H5PS1G83EFR-G7C 1GB BGA-60
U602 056G 616 55 AUDIO DRV602PW 870MW TSSOP-14
U501 056G 623 40 VIDEO SWITCH IC SII9385CTU TQFP-100
U413 056G 643 52 RESET TLV809L30DBVR 2.64V SOT-23
80
Page 81

U4302 056G 659 30 USB USB2514B-AEZG QFN-36
U1301 056G 667 2 POWER SWITCH BD8022FJ-E2 -
U1201 056G1133 34 M24C02-WMN6TP
U405 056G2233 25 FLASH H27UAG8T2MTR-BC 16GB TSOP1-48
U1204 056G4LVC 1G PH IC 74LVC1G3157GW SC-88
U1202 056G4LVCG08 PP IC 74LVC1G08GW TSSOP-5
U1203 056G4LVCG08 PP IC 74LVC1G08GW TSSOP-5
U1202 056G4LVCG08 TI IC SN74LVC1G08DCKR SC70-5
U1203 056G4LVCG08 TI IC SN74LVC1G08DCKR SC70-5
U601 056T 616 49 AUDIO TAS5708PHPR 20W HTQFP-48
Q704 057G 417 18 T PMBT3904 SOT-23
Q702 057G 417 18 T PMBT3904 SOT-23
Q608 057G 417 18 T PMBT3904 SOT-23
Q605 057G 417 18 T PMBT3904 SOT-23
Q604 057G 417 18 T PMBT3904 SOT-23
Q603 057G 417 18 T PMBT3904 SOT-23
Q601 057G 417 18 T PMBT3904 SOT-23
Q503 057G 417 18 T PMBT3904 SOT-23
Q417 057G 417 18 T PMBT3904 SOT-23
Q1201 057G 417 18 T PMBT3904 SOT-23
Q406 057G 417 18 T PMBT3904 SOT-23
Q407 057G 417 18 T PMBT3904 SOT-23
Q411 057G 417 18 T PMBT3904 SOT-23
Q413 057G 417 18 T PMBT3904 SOT-23
Q416 057G 417 18 T PMBT3904 SOT-23
Q606 057G 417907 T TRA PMBT3906 PNP -200MA/-40V SOT-23
Q412 057G 417907 T TRA PMBT3906 PNP -200MA/-40V SOT-23
Q1301 057G 417907 T TRA PMBT3906 PNP -200MA/-40V SOT-23
Q1302 057G 417907 T TRA PMBT3906 PNP -200MA/-40V SOT-23
Q410 057G 417907 T TRA PMBT3906 PNP -200MA/-40V SOT-23
Q403 057G 759 2A HF TANSISTOR 2N7002H SOT-23
Q415 057G 759 2A HF TANSISTOR 2N7002H SOT-23
Q414 057G 759 2A HF TANSISTOR 2N7002H SOT-23
Q404 057G 759 2A HF TANSISTOR 2N7002H SOT-23
Q402 057G 759 2A HF TANSISTOR 2N7002H SOT-23
Q401 057G 759 2A HF TANSISTOR 2N7002H SOT-23
Q502 057G 763 1 AO3401 SOT23 BY AOS
Q703 057G 763 79 FET AO4449 -7A/-30V SOIC-8
Q701 057G 763 79 FET AO4449 -7A/-30V SOIC-8
Q501 057G 763 84 FET AO3414 4.2A/20V SOT-23
Q501 057G 763984 MOSFET P5002CMG 3A 20V SOT-23
RP408 061G 1266048FF RST NET 60.4R 1% 1/16W FENGHUA
RP409 061G 1266048FF RST NET 60.4R 1% 1/16W FENGHUA
81
Page 82

RP410 061G 1266048FF RST NET 60.4R 1% 1/16W FENGHUA
RP407 061G 1266048FF RST NET 60.4R 1% 1/16W FENGHUA
RP406 061G 1266048FF RST NET 60.4R 1% 1/16W FENGHUA
RP405 061G 1266048FF RST NET 60.4R 1% 1/16W FENGHUA
RP404 061G 1266048FF RST NET 60.4R 1% 1/16W FENGHUA
RP403 061G 1266048FF RST NET 60.4R 1% 1/16W FENGHUA
RP402 061G 1266048FF RST NET 60.4R 1% 1/16W FENGHUA
RP401 061G 1266048FF RST NET 60.4R 1% 1/16W FENGHUA
RP410 061G 1266048FT RST NET 60.4R 1% 1/16W 8P4R
RP409 061G 1266048FT RST NET 60.4R 1% 1/16W 8P4R
RP408 061G 1266048FT RST NET 60.4R 1% 1/16W 8P4R
RP407 061G 1266048FT RST NET 60.4R 1% 1/16W 8P4R
RP406 061G 1266048FT RST NET 60.4R 1% 1/16W 8P4R
RP405 061G 1266048FT RST NET 60.4R 1% 1/16W 8P4R
RP404 061G 1266048FT RST NET 60.4R 1% 1/16W 8P4R
RP403 061G 1266048FT RST NET 60.4R 1% 1/16W 8P4R
RP402 061G 1266048FT RST NET 60.4R 1% 1/16W 8P4R
RP401 061G 1266048FT RST NET 60.4R 1% 1/16W 8P4R
TH4301 061G 56A150 LT PTCR SMD 0.08R , 1.5A - -
TH4302 061G 56A150 LT PTCR SMD 0.08R , 1.5A - -
TH4301 061G 56A150 WT PTCR SMD 0.04R - -
TH4302 061G 56A150 WT PTCR SMD 0.04R - -
R4331 061G0402000 JF RST CHIPR MAX0R05 1/16W FENGHUA
R4330 061G0402000 JF RST CHIPR MAX0R05 1/16W FENGHUA
R495 061G0402000 JF RST CHIPR MAX0R05 1/16W FENGHUA
R4756 061G0402000 JF RST CHIPR MAX0R05 1/16W FENGHUA
R443 061G0402000 JI RST 0402 0.05R MAX 1/16W
R439 061G0402000 JI RST 0402 0.05R MAX 1/16W
R4320 061G0402000 JI RST 0402 0.05R MAX 1/16W
R4521 061G0402000 JI RST 0402 0.05R MAX 1/16W
R4588 061G0402000 JI RST 0402 0.05R MAX 1/16W
R4589 061G0402000 JI RST 0402 0.05R MAX 1/16W
R462 061G0402000 JI RST 0402 0.05R MAX 1/16W
R492 061G0402000 JI RST 0402 0.05R MAX 1/16W
R549 061G0402000 JI RST 0402 0.05R MAX 1/16W
R551 061G0402000 JI RST 0402 0.05R MAX 1/16W
R579 061G0402000 JI RST 0402 0.05R MAX 1/16W
R584 061G0402000 JI RST 0402 0.05R MAX 1/16W
R598 061G0402000 JI RST 0402 0.05R MAX 1/16W
R668 061G0402000 JI RST 0402 0.05R MAX 1/16W
R673 061G0402000 JI RST 0402 0.05R MAX 1/16W
R682 061G0402000 JI RST 0402 0.05R MAX 1/16W
R684 061G0402000 JI RST 0402 0.05R MAX 1/16W
82
Page 83

R696 061G0402000 JI RST 0402 0.05R MAX 1/16W
R707 061G0402000 JI RST 0402 0.05R MAX 1/16W
R761 061G0402000 JI RST 0402 0.05R MAX 1/16W
R758 061G0402000 JI RST 0402 0.05R MAX 1/16W
R756 061G0402000 JI RST 0402 0.05R MAX 1/16W
R406 061G0402000 JI RST 0402 0.05R MAX 1/16W
R111 061G0402000 JI RST 0402 0.05R MAX 1/16W
R1213 061G0402000 JI RST 0402 0.05R MAX 1/16W
R1216 061G0402000 JI RST 0402 0.05R MAX 1/16W
R1219 061G0402000 JI RST 0402 0.05R MAX 1/16W
R1222 061G0402000 JI RST 0402 0.05R MAX 1/16W
R1225 061G0402000 JI RST 0402 0.05R MAX 1/16W
R1227 061G0402000 JI RST 0402 0.05R MAX 1/16W
R1233 061G0402000 JI RST 0402 0.05R MAX 1/16W
R127 061G0402000 JI RST 0402 0.05R MAX 1/16W
R1335 061G0402000 JI RST 0402 0.05R MAX 1/16W
R404 061G0402000 JI RST 0402 0.05R MAX 1/16W
R1344 061G0402000 JI RST 0402 0.05R MAX 1/16W
R1343 061G0402000 JI RST 0402 0.05R MAX 1/16W
R1342 061G0402000 JI RST 0402 0.05R MAX 1/16W
R1341 061G0402000 JI RST 0402 0.05R MAX 1/16W
R1340 061G0402000 JI RST 0402 0.05R MAX 1/16W
R1339 061G0402000 JI RST 0402 0.05R MAX 1/16W
R1337 061G0402000 JI RST 0402 0.05R MAX 1/16W
R1336 061G0402000 JI RST 0402 0.05R MAX 1/16W
R584 061G0402000 JT RST CHIPR MAX0R05 1/16W TZAI YUAN
R579 061G0402000 JT RST CHIPR MAX0R05 1/16W TZAI YUAN
R551 061G0402000 JT RST CHIPR MAX0R05 1/16W TZAI YUAN
R549 061G0402000 JT RST CHIPR MAX0R05 1/16W TZAI YUAN
R492 061G0402000 JT RST CHIPR MAX0R05 1/16W TZAI YUAN
R462 061G0402000 JT RST CHIPR MAX0R05 1/16W TZAI YUAN
R4589 061G0402000 JT RST CHIPR MAX0R05 1/16W TZAI YUAN
R4588 061G0402000 JT RST CHIPR MAX0R05 1/16W TZAI YUAN
R4521 061G0402000 JT RST CHIPR MAX0R05 1/16W TZAI YUAN
R443 061G0402000 JT RST CHIPR MAX0R05 1/16W TZAI YUAN
R439 061G0402000 JT RST CHIPR MAX0R05 1/16W TZAI YUAN
R598 061G0402000 JT RST CHIPR MAX0R05 1/16W TZAI YUAN
R668 061G0402000 JT RST CHIPR MAX0R05 1/16W TZAI YUAN
R673 061G0402000 JT RST CHIPR MAX0R05 1/16W TZAI YUAN
R682 061G0402000 JT RST CHIPR MAX0R05 1/16W TZAI YUAN
R684 061G0402000 JT RST CHIPR MAX0R05 1/16W TZAI YUAN
R696 061G0402000 JT RST CHIPR MAX0R05 1/16W TZAI YUAN
R707 061G0402000 JT RST CHIPR MAX0R05 1/16W TZAI YUAN
83
Page 84

R756 061G0402000 JT RST CHIPR MAX0R05 1/16W TZAI YUAN
R758 061G0402000 JT RST CHIPR MAX0R05 1/16W TZAI YUAN
R4342 061G0402000 JT RST CHIPR MAX0R05 1/16W TZAI YUAN
R4341 061G0402000 JT RST CHIPR MAX0R05 1/16W TZAI YUAN
R761 061G0402000 JT RST CHIPR MAX0R05 1/16W TZAI YUAN
R4320 061G0402000 JT RST CHIPR MAX0R05 1/16W TZAI YUAN
R111 061G0402000 JT RST CHIPR MAX0R05 1/16W TZAI YUAN
R1213 061G0402000 JT RST CHIPR MAX0R05 1/16W TZAI YUAN
R1216 061G0402000 JT RST CHIPR MAX0R05 1/16W TZAI YUAN
R1219 061G0402000 JT RST CHIPR MAX0R05 1/16W TZAI YUAN
R1222 061G0402000 JT RST CHIPR MAX0R05 1/16W TZAI YUAN
R1225 061G0402000 JT RST CHIPR MAX0R05 1/16W TZAI YUAN
R1227 061G0402000 JT RST CHIPR MAX0R05 1/16W TZAI YUAN
R1233 061G0402000 JT RST CHIPR MAX0R05 1/16W TZAI YUAN
R127 061G0402000 JT RST CHIPR MAX0R05 1/16W TZAI YUAN
R1335 061G0402000 JT RST CHIPR MAX0R05 1/16W TZAI YUAN
R406 061G0402000 JT RST CHIPR MAX0R05 1/16W TZAI YUAN
R404 061G0402000 JT RST CHIPR MAX0R05 1/16W TZAI YUAN
R1344 061G0402000 JT RST CHIPR MAX0R05 1/16W TZAI YUAN
R1343 061G0402000 JT RST CHIPR MAX0R05 1/16W TZAI YUAN
R1342 061G0402000 JT RST CHIPR MAX0R05 1/16W TZAI YUAN
R1341 061G0402000 JT RST CHIPR MAX0R05 1/16W TZAI YUAN
R1340 061G0402000 JT RST CHIPR MAX0R05 1/16W TZAI YUAN
R1339 061G0402000 JT RST CHIPR MAX0R05 1/16W TZAI YUAN
R1337 061G0402000 JT RST CHIPR MAX0R05 1/16W TZAI YUAN
R1336 061G0402000 JT RST CHIPR MAX0R05 1/16W TZAI YUAN
R566 061G0402100 JI TEST ONLY RST 0402 10R 5% 1/16W TA-I
R565 061G0402100 JI TEST ONLY RST 0402 10R 5% 1/16W TA-I
R564 061G0402100 JI TEST ONLY RST 0402 10R 5% 1/16W TA-I
R563 061G0402100 JI TEST ONLY RST 0402 10R 5% 1/16W TA-I
R563 061G0402100 JT RST CHIP 10R 1/16W 5% TZAI YUAN
R564 061G0402100 JT RST CHIP 10R 1/16W 5% TZAI YUAN
R565 061G0402100 JT RST CHIP 10R 1/16W 5% TZAI YUAN
R566 061G0402100 JT RST CHIP 10R 1/16W 5% TZAI YUAN
R402 061G04021000FI RST 0402 100R 1% 1/16W TA-I
R403 061G04021000FI RST 0402 100R 1% 1/16W TA-I
R402 061G04021000FT RST CHIP 100R 1/16W 1%
R403 061G04021000FT RST CHIP 100R 1/16W 1%
R1217 061G0402101 JF RST CHIPR 100 OHM +-5% 1/16W FENGHUA
R1215 061G0402101 JF RST CHIPR 100 OHM +-5% 1/16W FENGHUA
R1211 061G0402101 JF RST CHIPR 100 OHM +-5% 1/16W FENGHUA
R108 061G0402101 JF RST CHIPR 100 OHM +-5% 1/16W FENGHUA
R106 061G0402101 JF RST CHIPR 100 OHM +-5% 1/16W FENGHUA
84
Page 85

R106 061G0402101 JI BEST ONLY RST 0402 100R 5% 1/16W TA-I
R108 061G0402101 JI BEST ONLY RST 0402 100R 5% 1/16W TA-I
R1211 061G0402101 JI BEST ONLY RST 0402 100R 5% 1/16W TA-I
R1215 061G0402101 JI BEST ONLY RST 0402 100R 5% 1/16W TA-I
R1217 061G0402101 JI BEST ONLY RST 0402 100R 5% 1/16W TA-I
R1211 061G0402101 JT RST CHIP 100R 1/16W 5% TZAI YUAN
R1215 061G0402101 JT RST CHIP 100R 1/16W 5% TZAI YUAN
R1217 061G0402101 JT RST CHIP 100R 1/16W 5% TZAI YUAN
R108 061G0402101 JT RST CHIP 100R 1/16W 5% TZAI YUAN
R106 061G0402101 JT RST CHIP 100R 1/16W 5% TZAI YUAN
R448 061G0402102 JF RST CHIPR 1KOHM +-5% 1/16W FENGHUA
R449 061G0402102 JF RST CHIPR 1KOHM +-5% 1/16W FENGHUA
R4504 061G0402102 JF RST CHIPR 1KOHM +-5% 1/16W FENGHUA
R4515 061G0402102 JF RST CHIPR 1KOHM +-5% 1/16W FENGHUA
R452 061G0402102 JF RST CHIPR 1KOHM +-5% 1/16W FENGHUA
R455 061G0402102 JF RST CHIPR 1KOHM +-5% 1/16W FENGHUA
R461 061G0402102 JF RST CHIPR 1KOHM +-5% 1/16W FENGHUA
R486 061G0402102 JF RST CHIPR 1KOHM +-5% 1/16W FENGHUA
R543 061G0402102 JF RST CHIPR 1KOHM +-5% 1/16W FENGHUA
R611 061G0402102 JF RST CHIPR 1KOHM +-5% 1/16W FENGHUA
R667 061G0402102 JF RST CHIPR 1KOHM +-5% 1/16W FENGHUA
R672 061G0402102 JF RST CHIPR 1KOHM +-5% 1/16W FENGHUA
R681 061G0402102 JF RST CHIPR 1KOHM +-5% 1/16W FENGHUA
R719 061G0402102 JF RST CHIPR 1KOHM +-5% 1/16W FENGHUA
R694 061G0402102 JF RST CHIPR 1KOHM +-5% 1/16W FENGHUA
R683 061G0402102 JF RST CHIPR 1KOHM +-5% 1/16W FENGHUA
R1352 061G0402102 JF RST CHIPR 1KOHM +-5% 1/16W FENGHUA
R1353 061G0402102 JF RST CHIPR 1KOHM +-5% 1/16W FENGHUA
R421 061G0402102 JF RST CHIPR 1KOHM +-5% 1/16W FENGHUA
R422 061G0402102 JF RST CHIPR 1KOHM +-5% 1/16W FENGHUA
R423 061G0402102 JF RST CHIPR 1KOHM +-5% 1/16W FENGHUA
R424 061G0402102 JF RST CHIPR 1KOHM +-5% 1/16W FENGHUA
R425 061G0402102 JF RST CHIPR 1KOHM +-5% 1/16W FENGHUA
R426 061G0402102 JF RST CHIPR 1KOHM +-5% 1/16W FENGHUA
R427 061G0402102 JF RST CHIPR 1KOHM +-5% 1/16W FENGHUA
R428 061G0402102 JF RST CHIPR 1KOHM +-5% 1/16W FENGHUA
R4328 061G0402102 JF RST CHIPR 1KOHM +-5% 1/16W FENGHUA
R4333 061G0402102 JF RST CHIPR 1KOHM +-5% 1/16W FENGHUA
R447 061G0402102 JF RST CHIPR 1KOHM +-5% 1/16W FENGHUA
R486 061G0402102 JI TEST ONLY RST 0402 1K 5% 1/16W TA-I
R461 061G0402102 JI TEST ONLY RST 0402 1K 5% 1/16W TA-I
R455 061G0402102 JI TEST ONLY RST 0402 1K 5% 1/16W TA-I
R452 061G0402102 JI TEST ONLY RST 0402 1K 5% 1/16W TA-I
85
Page 86

R4515 061G0402102 JI TEST ONLY RST 0402 1K 5% 1/16W TA-I
R4504 061G0402102 JI TEST ONLY RST 0402 1K 5% 1/16W TA-I
R449 061G0402102 JI TEST ONLY RST 0402 1K 5% 1/16W TA-I
R448 061G0402102 JI TEST ONLY RST 0402 1K 5% 1/16W TA-I
R543 061G0402102 JI TEST ONLY RST 0402 1K 5% 1/16W TA-I
R611 061G0402102 JI TEST ONLY RST 0402 1K 5% 1/16W TA-I
R667 061G0402102 JI TEST ONLY RST 0402 1K 5% 1/16W TA-I
R672 061G0402102 JI TEST ONLY RST 0402 1K 5% 1/16W TA-I
R681 061G0402102 JI TEST ONLY RST 0402 1K 5% 1/16W TA-I
R683 061G0402102 JI TEST ONLY RST 0402 1K 5% 1/16W TA-I
R694 061G0402102 JI TEST ONLY RST 0402 1K 5% 1/16W TA-I
R719 061G0402102 JI TEST ONLY RST 0402 1K 5% 1/16W TA-I
R1352 061G0402102 JI TEST ONLY RST 0402 1K 5% 1/16W TA-I
R1353 061G0402102 JI TEST ONLY RST 0402 1K 5% 1/16W TA-I
R421 061G0402102 JI TEST ONLY RST 0402 1K 5% 1/16W TA-I
R422 061G0402102 JI TEST ONLY RST 0402 1K 5% 1/16W TA-I
R423 061G0402102 JI TEST ONLY RST 0402 1K 5% 1/16W TA-I
R424 061G0402102 JI TEST ONLY RST 0402 1K 5% 1/16W TA-I
R425 061G0402102 JI TEST ONLY RST 0402 1K 5% 1/16W TA-I
R426 061G0402102 JI TEST ONLY RST 0402 1K 5% 1/16W TA-I
R427 061G0402102 JI TEST ONLY RST 0402 1K 5% 1/16W TA-I
R428 061G0402102 JI TEST ONLY RST 0402 1K 5% 1/16W TA-I
R4328 061G0402102 JI TEST ONLY RST 0402 1K 5% 1/16W TA-I
R4333 061G0402102 JI TEST ONLY RST 0402 1K 5% 1/16W TA-I
R447 061G0402102 JI TEST ONLY RST 0402 1K 5% 1/16W TA-I
R582 061G0402103 JF RST CHIPR 10KOHM +-5% 1/16W FENGHUA
R581 061G0402103 JF RST CHIPR 10KOHM +-5% 1/16W FENGHUA
R577 061G0402103 JF RST CHIPR 10KOHM +-5% 1/16W FENGHUA
R576 061G0402103 JF RST CHIPR 10KOHM +-5% 1/16W FENGHUA
R575 061G0402103 JF RST CHIPR 10KOHM +-5% 1/16W FENGHUA
R574 061G0402103 JF RST CHIPR 10KOHM +-5% 1/16W FENGHUA
R572 061G0402103 JF RST CHIPR 10KOHM +-5% 1/16W FENGHUA
R571 061G0402103 JF RST CHIPR 10KOHM +-5% 1/16W FENGHUA
R570 061G0402103 JF RST CHIPR 10KOHM +-5% 1/16W FENGHUA
R569 061G0402103 JF RST CHIPR 10KOHM +-5% 1/16W FENGHUA
R536 061G0402103 JF RST CHIPR 10KOHM +-5% 1/16W FENGHUA
R586 061G0402103 JF RST CHIPR 10KOHM +-5% 1/16W FENGHUA
R588 061G0402103 JF RST CHIPR 10KOHM +-5% 1/16W FENGHUA
R589 061G0402103 JF RST CHIPR 10KOHM +-5% 1/16W FENGHUA
R590 061G0402103 JF RST CHIPR 10KOHM +-5% 1/16W FENGHUA
R591 061G0402103 JF RST CHIPR 10KOHM +-5% 1/16W FENGHUA
R592 061G0402103 JF RST CHIPR 10KOHM +-5% 1/16W FENGHUA
R596 061G0402103 JF RST CHIPR 10KOHM +-5% 1/16W FENGHUA
86
Page 87

R597 061G0402103 JF RST CHIPR 10KOHM +-5% 1/16W FENGHUA
R721 061G0402103 JF RST CHIPR 10KOHM +-5% 1/16W FENGHUA
R767 061G0402103 JF RST CHIPR 10KOHM +-5% 1/16W FENGHUA
R768 061G0402103 JF RST CHIPR 10KOHM +-5% 1/16W FENGHUA
R769 061G0402103 JF RST CHIPR 10KOHM +-5% 1/16W FENGHUA
R1207 061G0402103 JF RST CHIPR 10KOHM +-5% 1/16W FENGHUA
R1221 061G0402103 JF RST CHIPR 10KOHM +-5% 1/16W FENGHUA
R1333 061G0402103 JF RST CHIPR 10KOHM +-5% 1/16W FENGHUA
R1334 061G0402103 JF RST CHIPR 10KOHM +-5% 1/16W FENGHUA
R413 061G0402103 JF RST CHIPR 10KOHM +-5% 1/16W FENGHUA
R416 061G0402103 JF RST CHIPR 10KOHM +-5% 1/16W FENGHUA
R417 061G0402103 JF RST CHIPR 10KOHM +-5% 1/16W FENGHUA
R420 061G0402103 JF RST CHIPR 10KOHM +-5% 1/16W FENGHUA
R4302 061G0402103 JF RST CHIPR 10KOHM +-5% 1/16W FENGHUA
R4321 061G0402103 JF RST CHIPR 10KOHM +-5% 1/16W FENGHUA
R535 061G0402103 JF RST CHIPR 10KOHM +-5% 1/16W FENGHUA
R534 061G0402103 JF RST CHIPR 10KOHM +-5% 1/16W FENGHUA
R532 061G0402103 JF RST CHIPR 10KOHM +-5% 1/16W FENGHUA
R531 061G0402103 JF RST CHIPR 10KOHM +-5% 1/16W FENGHUA
R488 061G0402103 JF RST CHIPR 10KOHM +-5% 1/16W FENGHUA
R487 061G0402103 JF RST CHIPR 10KOHM +-5% 1/16W FENGHUA
R4584 061G0402103 JF RST CHIPR 10KOHM +-5% 1/16W FENGHUA
R4583 061G0402103 JF RST CHIPR 10KOHM +-5% 1/16W FENGHUA
R4517 061G0402103 JF RST CHIPR 10KOHM +-5% 1/16W FENGHUA
R4322 061G0402103 JF RST CHIPR 10KOHM +-5% 1/16W FENGHUA
R582 061G0402103 JI TEST ONLY RST 0402 10K 5% 1/16W TA-I
R581 061G0402103 JI TEST ONLY RST 0402 10K 5% 1/16W TA-I
R577 061G0402103 JI TEST ONLY RST 0402 10K 5% 1/16W TA-I
R576 061G0402103 JI TEST ONLY RST 0402 10K 5% 1/16W TA-I
R575 061G0402103 JI TEST ONLY RST 0402 10K 5% 1/16W TA-I
R574 061G0402103 JI TEST ONLY RST 0402 10K 5% 1/16W TA-I
R572 061G0402103 JI TEST ONLY RST 0402 10K 5% 1/16W TA-I
R571 061G0402103 JI TEST ONLY RST 0402 10K 5% 1/16W TA-I
R570 061G0402103 JI TEST ONLY RST 0402 10K 5% 1/16W TA-I
R569 061G0402103 JI TEST ONLY RST 0402 10K 5% 1/16W TA-I
R536 061G0402103 JI TEST ONLY RST 0402 10K 5% 1/16W TA-I
R586 061G0402103 JI TEST ONLY RST 0402 10K 5% 1/16W TA-I
R588 061G0402103 JI TEST ONLY RST 0402 10K 5% 1/16W TA-I
R589 061G0402103 JI TEST ONLY RST 0402 10K 5% 1/16W TA-I
R590 061G0402103 JI TEST ONLY RST 0402 10K 5% 1/16W TA-I
R591 061G0402103 JI TEST ONLY RST 0402 10K 5% 1/16W TA-I
R592 061G0402103 JI TEST ONLY RST 0402 10K 5% 1/16W TA-I
R596 061G0402103 JI TEST ONLY RST 0402 10K 5% 1/16W TA-I
87
Page 88

R597 061G0402103 JI TEST ONLY RST 0402 10K 5% 1/16W TA-I
R721 061G0402103 JI TEST ONLY RST 0402 10K 5% 1/16W TA-I
R767 061G0402103 JI TEST ONLY RST 0402 10K 5% 1/16W TA-I
R768 061G0402103 JI TEST ONLY RST 0402 10K 5% 1/16W TA-I
R769 061G0402103 JI TEST ONLY RST 0402 10K 5% 1/16W TA-I
R1207 061G0402103 JI TEST ONLY RST 0402 10K 5% 1/16W TA-I
R1221 061G0402103 JI TEST ONLY RST 0402 10K 5% 1/16W TA-I
R1333 061G0402103 JI TEST ONLY RST 0402 10K 5% 1/16W TA-I
R1334 061G0402103 JI TEST ONLY RST 0402 10K 5% 1/16W TA-I
R413 061G0402103 JI TEST ONLY RST 0402 10K 5% 1/16W TA-I
R416 061G0402103 JI TEST ONLY RST 0402 10K 5% 1/16W TA-I
R417 061G0402103 JI TEST ONLY RST 0402 10K 5% 1/16W TA-I
R420 061G0402103 JI TEST ONLY RST 0402 10K 5% 1/16W TA-I
R4302 061G0402103 JI TEST ONLY RST 0402 10K 5% 1/16W TA-I
R4321 061G0402103 JI TEST ONLY RST 0402 10K 5% 1/16W TA-I
R535 061G0402103 JI TEST ONLY RST 0402 10K 5% 1/16W TA-I
R534 061G0402103 JI TEST ONLY RST 0402 10K 5% 1/16W TA-I
R532 061G0402103 JI TEST ONLY RST 0402 10K 5% 1/16W TA-I
R531 061G0402103 JI TEST ONLY RST 0402 10K 5% 1/16W TA-I
R488 061G0402103 JI TEST ONLY RST 0402 10K 5% 1/16W TA-I
R487 061G0402103 JI TEST ONLY RST 0402 10K 5% 1/16W TA-I
R4584 061G0402103 JI TEST ONLY RST 0402 10K 5% 1/16W TA-I
R4583 061G0402103 JI TEST ONLY RST 0402 10K 5% 1/16W TA-I
R4517 061G0402103 JI TEST ONLY RST 0402 10K 5% 1/16W TA-I
R4322 061G0402103 JI TEST ONLY RST 0402 10K 5% 1/16W TA-I
R582 061G0402103 JT RST CHIP 10K 1/16W 5% TZAI YUAN
R581 061G0402103 JT RST CHIP 10K 1/16W 5% TZAI YUAN
R577 061G0402103 JT RST CHIP 10K 1/16W 5% TZAI YUAN
R576 061G0402103 JT RST CHIP 10K 1/16W 5% TZAI YUAN
R575 061G0402103 JT RST CHIP 10K 1/16W 5% TZAI YUAN
R574 061G0402103 JT RST CHIP 10K 1/16W 5% TZAI YUAN
R572 061G0402103 JT RST CHIP 10K 1/16W 5% TZAI YUAN
R571 061G0402103 JT RST CHIP 10K 1/16W 5% TZAI YUAN
R570 061G0402103 JT RST CHIP 10K 1/16W 5% TZAI YUAN
R569 061G0402103 JT RST CHIP 10K 1/16W 5% TZAI YUAN
R536 061G0402103 JT RST CHIP 10K 1/16W 5% TZAI YUAN
R586 061G0402103 JT RST CHIP 10K 1/16W 5% TZAI YUAN
R588 061G0402103 JT RST CHIP 10K 1/16W 5% TZAI YUAN
R589 061G0402103 JT RST CHIP 10K 1/16W 5% TZAI YUAN
R590 061G0402103 JT RST CHIP 10K 1/16W 5% TZAI YUAN
R591 061G0402103 JT RST CHIP 10K 1/16W 5% TZAI YUAN
R592 061G0402103 JT RST CHIP 10K 1/16W 5% TZAI YUAN
R596 061G0402103 JT RST CHIP 10K 1/16W 5% TZAI YUAN
88
Page 89

R597 061G0402103 JT RST CHIP 10K 1/16W 5% TZAI YUAN
R721 061G0402103 JT RST CHIP 10K 1/16W 5% TZAI YUAN
R767 061G0402103 JT RST CHIP 10K 1/16W 5% TZAI YUAN
R768 061G0402103 JT RST CHIP 10K 1/16W 5% TZAI YUAN
R769 061G0402103 JT RST CHIP 10K 1/16W 5% TZAI YUAN
R1207 061G0402103 JT RST CHIP 10K 1/16W 5% TZAI YUAN
R1221 061G0402103 JT RST CHIP 10K 1/16W 5% TZAI YUAN
R1333 061G0402103 JT RST CHIP 10K 1/16W 5% TZAI YUAN
R1334 061G0402103 JT RST CHIP 10K 1/16W 5% TZAI YUAN
R413 061G0402103 JT RST CHIP 10K 1/16W 5% TZAI YUAN
R416 061G0402103 JT RST CHIP 10K 1/16W 5% TZAI YUAN
R417 061G0402103 JT RST CHIP 10K 1/16W 5% TZAI YUAN
R420 061G0402103 JT RST CHIP 10K 1/16W 5% TZAI YUAN
R4302 061G0402103 JT RST CHIP 10K 1/16W 5% TZAI YUAN
R4321 061G0402103 JT RST CHIP 10K 1/16W 5% TZAI YUAN
R535 061G0402103 JT RST CHIP 10K 1/16W 5% TZAI YUAN
R534 061G0402103 JT RST CHIP 10K 1/16W 5% TZAI YUAN
R532 061G0402103 JT RST CHIP 10K 1/16W 5% TZAI YUAN
R531 061G0402103 JT RST CHIP 10K 1/16W 5% TZAI YUAN
R488 061G0402103 JT RST CHIP 10K 1/16W 5% TZAI YUAN
R487 061G0402103 JT RST CHIP 10K 1/16W 5% TZAI YUAN
R4584 061G0402103 JT RST CHIP 10K 1/16W 5% TZAI YUAN
R4583 061G0402103 JT RST CHIP 10K 1/16W 5% TZAI YUAN
R4517 061G0402103 JT RST CHIP 10K 1/16W 5% TZAI YUAN
R4322 061G0402103 JT RST CHIP 10K 1/16W 5% TZAI YUAN
R686 061G0402104 JF RST CHIPR 100KOHM +-5% 1/16W FENGHUA
R685 061G0402104 JF RST CHIPR 100KOHM +-5% 1/16W FENGHUA
R675 061G0402104 JF RST CHIPR 100KOHM +-5% 1/16W FENGHUA
R674 061G0402104 JF RST CHIPR 100KOHM +-5% 1/16W FENGHUA
R4318 061G0402104 JF RST CHIPR 100KOHM +-5% 1/16W FENGHUA
R4317 061G0402104 JF RST CHIPR 100KOHM +-5% 1/16W FENGHUA
R4313 061G0402104 JF RST CHIPR 100KOHM +-5% 1/16W FENGHUA
R4310 061G0402104 JF RST CHIPR 100KOHM +-5% 1/16W FENGHUA
R4308 061G0402104 JF RST CHIPR 100KOHM +-5% 1/16W FENGHUA
R686 061G0402104 JI TEST ONLY RST 0402 100K 5% 1/16W TA-I
R685 061G0402104 JI TEST ONLY RST 0402 100K 5% 1/16W TA-I
R675 061G0402104 JI TEST ONLY RST 0402 100K 5% 1/16W TA-I
R674 061G0402104 JI TEST ONLY RST 0402 100K 5% 1/16W TA-I
R4318 061G0402104 JI TEST ONLY RST 0402 100K 5% 1/16W TA-I
R4317 061G0402104 JI TEST ONLY RST 0402 100K 5% 1/16W TA-I
R4313 061G0402104 JI TEST ONLY RST 0402 100K 5% 1/16W TA-I
R4310 061G0402104 JI TEST ONLY RST 0402 100K 5% 1/16W TA-I
R4308 061G0402104 JI TEST ONLY RST 0402 100K 5% 1/16W TA-I
89
Page 90

R587 061G0402104 JT RST CHIP 100K 1/16W 5% TZAI YUAN
R4319 061G0402105 JF RST CHIPR 1MOHM 5% 1/16W FENGHUA
R4319 061G0402105 JI EST ONLY RST 0402 1M 5% 1/16W TA-I
R4314 061G04021202FI RST 0402 12K 1% 1/16W TA-I
R4314 061G04021202FT RST CHIP 12K 1% 1/16W TZAI YUAN
R1234 061G04021479FI RST 0402 14.7R 1% 1/16W
R1234 061G04021479FY RST CHIPR 14R7 +-1% 1/16W YAGEO
R4508 061G0402182 JF RST CHIPR 1.8KOHM 5% 1/16W FENGHUA
R4508 061G0402182 JT RST CHIPR 1.8KOHM 5% 1/16W TZAIYUAN
R711 061G04022002FI RST CHIP 20K 1/16W 1% TA-I
R711 061G04022002FT RST CHIP 20K 1/16W 1% TZAI YUAN
R125 061G0402201 JF RST CHIPR 200 OHM +-5% 1/16W FENGHUA
R125 061G0402201 JI RST 0402 200R 5% 1/16W
R126 061G0402202 JF RST CHIPR 2KOHM +-5% 1/16W FENGHUA
R126 061G0402202 JI RST 0402 2K 5% 1/16W
R499 061G0402204 JI RST 0402 200K 5% 1/16W TA-I
R499 061G0402204 JT RST 0402 200K 5% 1/16W TZAI YUAN
R408 061G0402220 JF RST CHIPR 22 OHM +-5% 1/16W FENGHUA
R450 061G0402220 JF RST CHIPR 22 OHM +-5% 1/16W FENGHUA
R451 061G0402220 JF RST CHIPR 22 OHM +-5% 1/16W FENGHUA
R408 061G0402220 JI RST 0402 22R 5% 1/16W TA-I
R450 061G0402220 JI RST 0402 22R 5% 1/16W TA-I
R451 061G0402220 JI RST 0402 22R 5% 1/16W TA-I
R4516 061G0402220 JT RST CHIP 22R 1/16W 5% TZAI YUAN
R436 061G0402220 JT RST CHIP 22R 1/16W 5% TZAI YUAN
R435 061G0402220 JT RST CHIP 22R 1/16W 5% TZAI YUAN
R434 061G0402220 JT RST CHIP 22R 1/16W 5% TZAI YUAN
R433 061G0402220 JT RST CHIP 22R 1/16W 5% TZAI YUAN
R432 061G0402220 JT RST CHIP 22R 1/16W 5% TZAI YUAN
R431 061G0402220 JT RST CHIP 22R 1/16W 5% TZAI YUAN
R430 061G0402220 JT RST CHIP 22R 1/16W 5% TZAI YUAN
R429 061G0402220 JT RST CHIP 22R 1/16W 5% TZAI YUAN
R702 061G04022200FI RST 0402 220R 1% 1/16W TA-I
R702 061G04022200FT RST CHIP R 220OHM 1/16W +/-1%
R4340 061G04022209FY RST CHIPR 0402 22 OHM +-1% 1/16W
R4339 061G04022209FY RST CHIPR 0402 22 OHM +-1% 1/16W
R4338 061G04022209FY RST CHIPR 0402 22 OHM +-1% 1/16W
R4337 061G04022209FY RST CHIPR 0402 22 OHM +-1% 1/16W
R4758 061G0402222 JF RST CHIPR 2.2KOHM +-5% 1/16W FENGHUA
R4759 061G0402222 JF RST CHIPR 2.2KOHM +-5% 1/16W FENGHUA
R409 061G04022400FF RST CHIPR 240 OHM +-1% 1/16W FENGHUA
R409 061G04022400FT RST CHIPR 240 OHM +-1% 1/16W TZAI YUAN
R465 061G04022701FF RST CHIP 2.7K 1/16W 1% FENGHUA
90
Page 91

R468 061G04022701FF RST CHIP 2.7K 1/16W 1% FENGHUA
R471 061G04022701FF RST CHIP 2.7K 1/16W 1% FENGHUA
R471 061G04022701FI TEST ONLY RST CHIP 2.7K 1/16W 1% TA-I
R468 061G04022701FI TEST ONLY RST CHIP 2.7K 1/16W 1% TA-I
R465 061G04022701FI TEST ONLY RST CHIP 2.7K 1/16W 1% TA-I
R529 061G0402273 JF RST CHIP 27K 1/16W 5% FENGHUA
R4514 061G0402273 JI RST 0402 27K 5% 1/16W
R4514 061G0402273 JT RST CHIP 27K 1/16W 5% TZAI YUAN
R529 061G0402273 JT RST CHIP 27K 1/16W 5% TZAI YUAN
R482 061G0402330 JF RST CHIPR 33 OHM +-5% 1/16W FENGHUA
R482 061G0402330 JI RST 0402 33R 5% 1/16W TA-I
R456 061G0402332 JF RST CHIPR 3.3KOHM 5% 1/16W FENGHUA
R456 061G0402332 JI RST 0402 3.3K 5% 1/16W TA-I
R4503 061G0402333 JF RST CHIP 33K 1/16W 5% FENGHUA
R4503 061G0402333 JT RST CHIP 33K 1/16W 5% TZAI YUAN
R460 061G0402472 JF RST CHIPR 4.7KOHM +-5% 1/16W FENGHUA
R489 061G0402472 JF RST CHIPR 4.7KOHM +-5% 1/16W FENGHUA
R490 061G0402472 JF RST CHIPR 4.7KOHM +-5% 1/16W FENGHUA
R4511 061G0402472 JF RST CHIPR 4.7KOHM +-5% 1/16W FENGHUA
R446 061G0402472 JF RST CHIPR 4.7KOHM +-5% 1/16W FENGHUA
R445 061G0402472 JF RST CHIPR 4.7KOHM +-5% 1/16W FENGHUA
R4334 061G0402472 JF RST CHIPR 4.7KOHM +-5% 1/16W FENGHUA
R4332 061G0402472 JF RST CHIPR 4.7KOHM +-5% 1/16W FENGHUA
R4329 061G0402472 JF RST CHIPR 4.7KOHM +-5% 1/16W FENGHUA
R4327 061G0402472 JF RST CHIPR 4.7KOHM +-5% 1/16W FENGHUA
R1212 061G0402472 JF RST CHIPR 4.7KOHM +-5% 1/16W FENGHUA
R1210 061G0402472 JF RST CHIPR 4.7KOHM +-5% 1/16W FENGHUA
R1209 061G0402472 JF RST CHIPR 4.7KOHM +-5% 1/16W FENGHUA
R4332 061G0402472 JI TEST ONLY RST CHIP 4.7K 5% 1/16W TA-I
R4334 061G0402472 JI TEST ONLY RST CHIP 4.7K 5% 1/16W TA-I
R445 061G0402472 JI TEST ONLY RST CHIP 4.7K 5% 1/16W TA-I
R446 061G0402472 JI TEST ONLY RST CHIP 4.7K 5% 1/16W TA-I
R4511 061G0402472 JI TEST ONLY RST CHIP 4.7K 5% 1/16W TA-I
R460 061G0402472 JI TEST ONLY RST CHIP 4.7K 5% 1/16W TA-I
R489 061G0402472 JI TEST ONLY RST CHIP 4.7K 5% 1/16W TA-I
R490 061G0402472 JI TEST ONLY RST CHIP 4.7K 5% 1/16W TA-I
R4329 061G0402472 JI TEST ONLY RST CHIP 4.7K 5% 1/16W TA-I
R4327 061G0402472 JI TEST ONLY RST CHIP 4.7K 5% 1/16W TA-I
R1212 061G0402472 JI TEST ONLY RST CHIP 4.7K 5% 1/16W TA-I
R1210 061G0402472 JI TEST ONLY RST CHIP 4.7K 5% 1/16W TA-I
R1209 061G0402472 JI TEST ONLY RST CHIP 4.7K 5% 1/16W TA-I
R4332 061G0402472 JT RST CHIP 4K7 1/16W 5% TZAI YUAN
R4334 061G0402472 JT RST CHIP 4K7 1/16W 5% TZAI YUAN
91
Page 92

R445 061G0402472 JT RST CHIP 4K7 1/16W 5% TZAI YUAN
R446 061G0402472 JT RST CHIP 4K7 1/16W 5% TZAI YUAN
R4511 061G0402472 JT RST CHIP 4K7 1/16W 5% TZAI YUAN
R460 061G0402472 JT RST CHIP 4K7 1/16W 5% TZAI YUAN
R489 061G0402472 JT RST CHIP 4K7 1/16W 5% TZAI YUAN
R490 061G0402472 JT RST CHIP 4K7 1/16W 5% TZAI YUAN
R4329 061G0402472 JT RST CHIP 4K7 1/16W 5% TZAI YUAN
R4327 061G0402472 JT RST CHIP 4K7 1/16W 5% TZAI YUAN
R1212 061G0402472 JT RST CHIP 4K7 1/16W 5% TZAI YUAN
R1210 061G0402472 JT RST CHIP 4K7 1/16W 5% TZAI YUAN
R1209 061G0402472 JT RST CHIP 4K7 1/16W 5% TZAI YUAN
R568 061G0402473 JF RST CHIPR 47KOHM +-5% 1/16W FENGHUA
R567 061G0402473 JF RST CHIPR 47KOHM +-5% 1/16W FENGHUA
R552 061G0402473 JF RST CHIPR 47KOHM +-5% 1/16W FENGHUA
R550 061G0402473 JF RST CHIPR 47KOHM +-5% 1/16W FENGHUA
R539 061G0402473 JF RST CHIPR 47KOHM +-5% 1/16W FENGHUA
R538 061G0402473 JF RST CHIPR 47KOHM +-5% 1/16W FENGHUA
R533 061G0402473 JF RST CHIPR 47KOHM +-5% 1/16W FENGHUA
R528 061G0402473 JF RST CHIPR 47KOHM +-5% 1/16W FENGHUA
R526 061G0402473 JF RST CHIPR 47KOHM +-5% 1/16W FENGHUA
R4510 061G0402473 JF RST CHIPR 47KOHM +-5% 1/16W FENGHUA
R568 061G0402473 JI TEST ONLY RST 0402 47K 5% 1/16W TA-I
R567 061G0402473 JI TEST ONLY RST 0402 47K 5% 1/16W TA-I
R552 061G0402473 JI TEST ONLY RST 0402 47K 5% 1/16W TA-I
R550 061G0402473 JI TEST ONLY RST 0402 47K 5% 1/16W TA-I
R539 061G0402473 JI TEST ONLY RST 0402 47K 5% 1/16W TA-I
R538 061G0402473 JI TEST ONLY RST 0402 47K 5% 1/16W TA-I
R533 061G0402473 JI TEST ONLY RST 0402 47K 5% 1/16W TA-I
R528 061G0402473 JI TEST ONLY RST 0402 47K 5% 1/16W TA-I
R526 061G0402473 JI TEST ONLY RST 0402 47K 5% 1/16W TA-I
R4510 061G0402473 JI TEST ONLY RST 0402 47K 5% 1/16W TA-I
R552 061G0402473 JT RST CHIP 47K 1/16W 5% TZAI YUAN
R567 061G0402473 JT RST CHIP 47K 1/16W 5% TZAI YUAN
R568 061G0402473 JT RST CHIP 47K 1/16W 5% TZAI YUAN
R550 061G0402473 JT RST CHIP 47K 1/16W 5% TZAI YUAN
R539 061G0402473 JT RST CHIP 47K 1/16W 5% TZAI YUAN
R538 061G0402473 JT RST CHIP 47K 1/16W 5% TZAI YUAN
R533 061G0402473 JT RST CHIP 47K 1/16W 5% TZAI YUAN
R528 061G0402473 JT RST CHIP 47K 1/16W 5% TZAI YUAN
R526 061G0402473 JT RST CHIP 47K 1/16W 5% TZAI YUAN
R4510 061G0402473 JT RST CHIP 47K 1/16W 5% TZAI YUAN
R4512 061G0402474 JI RST 0402 470K 5% 1/16W TA-I
R4512 061G0402474 JT RST CHIP 470K 1/16W 5% TZAI YUAN
92
Page 93

R527 061G04024990FI RST 0402 499R 1% 1/16W FENGHUA
R527 061G04024990FT RST CHIPR 499R +-1% 1/16W TZAI YUAN
R1230 061G04025620FF RST 0402 562R 1% 1/16W FENGHUA
R1230 061G04025620FT RST 0402 562R 1% 1/16W TZAI YUAN
R1235 061G04026049FF RST CHIP 60.4R 1/16W 1% FENGHUA
R4592 061G04026049FI RST CHIP 60.4R 1/16W 1% TA-I
R4591 061G04026049FI RST CHIP 60.4R 1/16W 1% TA-I
R4590 061G04026049FI RST CHIP 60.4R 1/16W 1% TA-I
R405 061G04026049FI RST CHIP 60.4R 1/16W 1% TA-I
R1235 061G04026049FI RST CHIP 60.4R 1/16W 1% TA-I
R1235 061G04026049FT RST CHIPR 60R4 +-1% 1/16W TZAI YUAN
R1322 061G0402620 JF RST CHIP 62R 1/16W 5% FENGHUA
R1323 061G0402620 JF RST CHIP 62R 1/16W 5% FENGHUA
R1322 061G0402620 JT RST CHIP 62R 1/16W 5% TZAI YUAN
R1323 061G0402620 JT RST CHIP 62R 1/16W 5% TZAI YUAN
R1231 061G0402750 JF RST CHIPR 75 OHM +-5% 1/16W FENGHUA
R1229 061G0402750 JF RST CHIPR 75 OHM +-5% 1/16W FENGHUA
R1226 061G0402750 JF RST CHIPR 75 OHM +-5% 1/16W FENGHUA
R1223 061G0402750 JF RST CHIPR 75 OHM +-5% 1/16W FENGHUA
R1220 061G0402750 JF RST CHIPR 75 OHM +-5% 1/16W FENGHUA
R1218 061G0402750 JF RST CHIPR 75 OHM +-5% 1/16W FENGHUA
R1214 061G0402750 JF RST CHIPR 75 OHM +-5% 1/16W FENGHUA
R593 061G0402750 JI TEST ONLY RST 0402 75R 5% 1/16W TA-I
R1231 061G0402750 JI TEST ONLY RST 0402 75R 5% 1/16W TA-I
R1229 061G0402750 JI TEST ONLY RST 0402 75R 5% 1/16W TA-I
R1226 061G0402750 JI TEST ONLY RST 0402 75R 5% 1/16W TA-I
R1223 061G0402750 JI TEST ONLY RST 0402 75R 5% 1/16W TA-I
R1220 061G0402750 JI TEST ONLY RST 0402 75R 5% 1/16W TA-I
R1218 061G0402750 JI TEST ONLY RST 0402 75R 5% 1/16W TA-I
R1214 061G0402750 JI TEST ONLY RST 0402 75R 5% 1/16W TA-I
R4754 061G0603000 JF RST CHIPR MAX 0R05 1/10W FENGHUA
R4753 061G0603000 JF RST CHIPR MAX 0R05 1/10W FENGHUA
R4752 061G0603000 JF RST CHIPR MAX 0R05 1/10W FENGHUA
R4751 061G0603000 JF RST CHIPR MAX 0R05 1/10W FENGHUA
R4750 061G0603000 JF RST CHIPR MAX 0R05 1/10W FENGHUA
R4749 061G0603000 JF RST CHIPR MAX 0R05 1/10W FENGHUA
R4748 061G0603000 JF RST CHIPR MAX 0R05 1/10W FENGHUA
R4747 061G0603000 JF RST CHIPR MAX 0R05 1/10W FENGHUA
R4746 061G0603000 JF RST CHIPR MAX 0R05 1/10W FENGHUA
R4743 061G0603000 JF RST CHIPR MAX 0R05 1/10W FENGHUA
R4744 061G0603000 JF RST CHIPR MAX 0R05 1/10W FENGHUA
R4745 061G0603000 JF RST CHIPR MAX 0R05 1/10W FENGHUA
R4755 061G0603000 JF RST CHIPR MAX 0R05 1/10W FENGHUA
93
Page 94

R728 061G0603000 JF RST CHIPR MAX 0R05 1/10W FENGHUA
R715 061G0603000 JF RST CHIPR MAX 0R05 1/10W FENGHUA
R699 061G0603000 JF RST CHIPR MAX 0R05 1/10W FENGHUA
R698 061G0603000 JF RST CHIPR MAX 0R05 1/10W FENGHUA
R697 061G0603000 JF RST CHIPR MAX 0R05 1/10W FENGHUA
R627 061G0603000 JF RST CHIPR MAX 0R05 1/10W FENGHUA
R625 061G0603000 JF RST CHIPR MAX 0R05 1/10W FENGHUA
R624 061G0603000 JF RST CHIPR MAX 0R05 1/10W FENGHUA
R623 061G0603000 JF RST CHIPR MAX 0R05 1/10W FENGHUA
R620 061G0603000 JF RST CHIPR MAX 0R05 1/10W FENGHUA
R619 061G0603000 JF RST CHIPR MAX 0R05 1/10W FENGHUA
R578 061G0603000 JF RST CHIPR MAX 0R05 1/10W FENGHUA
R118 061G0603000 JF RST CHIPR MAX 0R05 1/10W FENGHUA
R1206 061G0603000 JF RST CHIPR MAX 0R05 1/10W FENGHUA
R1208 061G0603000 JF RST CHIPR MAX 0R05 1/10W FENGHUA
R123 061G0603000 JF RST CHIPR MAX 0R05 1/10W FENGHUA
R1320 061G0603000 JF RST CHIPR MAX 0R05 1/10W FENGHUA
R1321 061G0603000 JF RST CHIPR MAX 0R05 1/10W FENGHUA
R1327 061G0603000 JF RST CHIPR MAX 0R05 1/10W FENGHUA
R139 061G0603000 JF RST CHIPR MAX 0R05 1/10W FENGHUA
R140 061G0603000 JF RST CHIPR MAX 0R05 1/10W FENGHUA
R141 061G0603000 JF RST CHIPR MAX 0R05 1/10W FENGHUA
R4518 061G0603000 JF RST CHIPR MAX 0R05 1/10W FENGHUA
R4742 061G0603000 JF RST CHIPR MAX 0R05 1/10W FENGHUA
R4741 061G0603000 JF RST CHIPR MAX 0R05 1/10W FENGHUA
R4740 061G0603000 JF RST CHIPR MAX 0R05 1/10W FENGHUA
R4738 061G0603000 JF RST CHIPR MAX 0R05 1/10W FENGHUA
R4737 061G0603000 JF RST CHIPR MAX 0R05 1/10W FENGHUA
R4736 061G0603000 JF RST CHIPR MAX 0R05 1/10W FENGHUA
R4735 061G0603000 JF RST CHIPR MAX 0R05 1/10W FENGHUA
R4734 061G0603000 JF RST CHIPR MAX 0R05 1/10W FENGHUA
R4733 061G0603000 JF RST CHIPR MAX 0R05 1/10W FENGHUA
R4732 061G0603000 JF RST CHIPR MAX 0R05 1/10W FENGHUA
R4731 061G0603000 JF RST CHIPR MAX 0R05 1/10W FENGHUA
R4754 061G0603000 JI TEST ONLY RST 0603 0.05R MAX 1/16W TA-I
R4753 061G0603000 JI TEST ONLY RST 0603 0.05R MAX 1/16W TA-I
R4752 061G0603000 JI TEST ONLY RST 0603 0.05R MAX 1/16W TA-I
R4751 061G0603000 JI TEST ONLY RST 0603 0.05R MAX 1/16W TA-I
R4750 061G0603000 JI TEST ONLY RST 0603 0.05R MAX 1/16W TA-I
R4749 061G0603000 JI TEST ONLY RST 0603 0.05R MAX 1/16W TA-I
R4748 061G0603000 JI TEST ONLY RST 0603 0.05R MAX 1/16W TA-I
R4747 061G0603000 JI TEST ONLY RST 0603 0.05R MAX 1/16W TA-I
R4746 061G0603000 JI TEST ONLY RST 0603 0.05R MAX 1/16W TA-I
94
Page 95

R4745 061G0603000 JI TEST ONLY RST 0603 0.05R MAX 1/16W TA-I
R4744 061G0603000 JI TEST ONLY RST 0603 0.05R MAX 1/16W TA-I
R4743 061G0603000 JI TEST ONLY RST 0603 0.05R MAX 1/16W TA-I
R4755 061G0603000 JI TEST ONLY RST 0603 0.05R MAX 1/16W TA-I
R699 061G0603000 JI TEST ONLY RST 0603 0.05R MAX 1/16W TA-I
R715 061G0603000 JI TEST ONLY RST 0603 0.05R MAX 1/16W TA-I
R728 061G0603000 JI TEST ONLY RST 0603 0.05R MAX 1/16W TA-I
R698 061G0603000 JI TEST ONLY RST 0603 0.05R MAX 1/16W TA-I
R697 061G0603000 JI TEST ONLY RST 0603 0.05R MAX 1/16W TA-I
R627 061G0603000 JI TEST ONLY RST 0603 0.05R MAX 1/16W TA-I
R625 061G0603000 JI TEST ONLY RST 0603 0.05R MAX 1/16W TA-I
R624 061G0603000 JI TEST ONLY RST 0603 0.05R MAX 1/16W TA-I
R623 061G0603000 JI TEST ONLY RST 0603 0.05R MAX 1/16W TA-I
R620 061G0603000 JI TEST ONLY RST 0603 0.05R MAX 1/16W TA-I
R619 061G0603000 JI TEST ONLY RST 0603 0.05R MAX 1/16W TA-I
R578 061G0603000 JI TEST ONLY RST 0603 0.05R MAX 1/16W TA-I
R118 061G0603000 JI TEST ONLY RST 0603 0.05R MAX 1/16W TA-I
R1206 061G0603000 JI TEST ONLY RST 0603 0.05R MAX 1/16W TA-I
R1208 061G0603000 JI TEST ONLY RST 0603 0.05R MAX 1/16W TA-I
R123 061G0603000 JI TEST ONLY RST 0603 0.05R MAX 1/16W TA-I
R1320 061G0603000 JI TEST ONLY RST 0603 0.05R MAX 1/16W TA-I
R1321 061G0603000 JI TEST ONLY RST 0603 0.05R MAX 1/16W TA-I
R1327 061G0603000 JI TEST ONLY RST 0603 0.05R MAX 1/16W TA-I
R139 061G0603000 JI TEST ONLY RST 0603 0.05R MAX 1/16W TA-I
R140 061G0603000 JI TEST ONLY RST 0603 0.05R MAX 1/16W TA-I
R141 061G0603000 JI TEST ONLY RST 0603 0.05R MAX 1/16W TA-I
R4518 061G0603000 JI TEST ONLY RST 0603 0.05R MAX 1/16W TA-I
R4742 061G0603000 JI TEST ONLY RST 0603 0.05R MAX 1/16W TA-I
R4741 061G0603000 JI TEST ONLY RST 0603 0.05R MAX 1/16W TA-I
R4740 061G0603000 JI TEST ONLY RST 0603 0.05R MAX 1/16W TA-I
R4738 061G0603000 JI TEST ONLY RST 0603 0.05R MAX 1/16W TA-I
R4737 061G0603000 JI TEST ONLY RST 0603 0.05R MAX 1/16W TA-I
R4736 061G0603000 JI TEST ONLY RST 0603 0.05R MAX 1/16W TA-I
R4735 061G0603000 JI TEST ONLY RST 0603 0.05R MAX 1/16W TA-I
R4734 061G0603000 JI TEST ONLY RST 0603 0.05R MAX 1/16W TA-I
R4733 061G0603000 JI TEST ONLY RST 0603 0.05R MAX 1/16W TA-I
R4732 061G0603000 JI TEST ONLY RST 0603 0.05R MAX 1/16W TA-I
R4731 061G0603000 JI TEST ONLY RST 0603 0.05R MAX 1/16W TA-I
R606 061G0603000 JT RST CHIP MAX 0R05 1/10W TZAI YUAN
R729 061G06031000FI RST 0603 100R 1% 1/10W
R729 061G06031000FT RST CHIP 100R 1/10W 1%
R4595 061G06031001FI TEST ONLY RST 0603 1K 1% 1/10W TA-I
R4595 061G06031001FT RST CHIP 1K 1/10W 1%
95
Page 96

R764 061G06031002FI RST 0603 10K 1% 1/10W TA-I
R762 061G06031002FI RST 0603 10K 1% 1/10W TA-I
R712 061G06031002FI RST 0603 10K 1% 1/10W TA-I
R709 061G06031002FI RST 0603 10K 1% 1/10W TA-I
R708 061G06031002FI RST 0603 10K 1% 1/10W TA-I
R764 061G06031002FT RST CHIP 10K 1/10W 1%
R762 061G06031002FT RST CHIP 10K 1/10W 1%
R712 061G06031002FT RST CHIP 10K 1/10W 1%
R709 061G06031002FT RST CHIP 10K 1/10W 1%
R708 061G06031002FT RST CHIP 10K 1/10W 1%
R725 061G0603101 JF RST CHIPR 100 OHM +-5% 1/10W FENGHUA
R608 061G0603102 JF RST CHIPR 1K OHM +-5% 1/10W FENGHUA
R621 061G0603102 JF RST CHIPR 1K OHM +-5% 1/10W FENGHUA
R608 061G0603102 JI TEST ONLY RST 0603 1K 5% 1/16W TA-I
R621 061G0603102 JI TEST ONLY RST 0603 1K 5% 1/16W TA-I
R4311 061G0603103 JF RST CHIPR 10K OHM +-5% 1/10W FENGHUA
R614 061G0603103 JF RST CHIPR 10K OHM +-5% 1/10W FENGHUA
R632 061G0603103 JF RST CHIPR 10K OHM +-5% 1/10W FENGHUA
R633 061G0603103 JF RST CHIPR 10K OHM +-5% 1/10W FENGHUA
R4304 061G0603103 JF RST CHIPR 10K OHM +-5% 1/10W FENGHUA
R4304 061G0603103 JI RST 0603 10K 5% 1/10W TA-I
R4311 061G0603103 JI RST 0603 10K 5% 1/10W TA-I
R614 061G0603103 JI RST 0603 10K 5% 1/10W TA-I
R632 061G0603103 JI RST 0603 10K 5% 1/10W TA-I
R633 061G0603103 JI RST 0603 10K 5% 1/10W TA-I
R631 061G0603104 JF RST CHIPR 100KOHM 5% 1/10W FENGHUA
R630 061G0603104 JF RST CHIPR 100KOHM 5% 1/10W FENGHUA
R629 061G0603104 JF RST CHIPR 100KOHM 5% 1/10W FENGHUA
R628 061G0603104 JF RST CHIPR 100KOHM 5% 1/10W FENGHUA
R622 061G0603104 JF RST CHIPR 100KOHM 5% 1/10W FENGHUA
R631 061G0603104 JI TEST ONLY RST 0603 100K 5% 1/16W TA-I
R630 061G0603104 JI TEST ONLY RST 0603 100K 5% 1/16W TA-I
R629 061G0603104 JI TEST ONLY RST 0603 100K 5% 1/16W TA-I
R628 061G0603104 JI TEST ONLY RST 0603 100K 5% 1/16W TA-I
R622 061G0603104 JI TEST ONLY RST 0603 100K 5% 1/16W TA-I
R693 061G0603104 JT RST CHIP 100K 1/10W 5% TZAI YUAN
R622 061G0603104 JT RST CHIP 100K 1/10W 5% TZAI YUAN
R628 061G0603104 JT RST CHIP 100K 1/10W 5% TZAI YUAN
R629 061G0603104 JT RST CHIP 100K 1/10W 5% TZAI YUAN
R630 061G0603104 JT RST CHIP 100K 1/10W 5% TZAI YUAN
R631 061G0603104 JT RST CHIP 100K 1/10W 5% TZAI YUAN
R710 061G06031201FF RST CHIPR 1.2KOHM +-1% 1/10W
R710 061G06031201FT RST CHIP 1K2 1/10W 1%
96
Page 97

R135 061G06031202FF RST 0603 12K 1% 1/10W
R135 061G06031202FT RST CHIP 12K 1/10W 1%
R724 061G06031203FI RST 0603 120K 1/10W 1% TA-I
R724 061G06031203FT RST CHIP 120K 1/10W 1%
R610 061G0603122 JF RST CHIPR 1.2KOHM 5% 1/10W FENGHUA
R610 061G0603122 JT RST CHIP 1K2 1/10W 5% TZAI YUAN
R689 061G0603123 JI RST 0603 12K 5% 1/10W
R690 061G0603123 JI RST 0603 12K 5% 1/10W
R691 061G0603123 JI RST 0603 12K 5% 1/10W
R692 061G0603123 JI RST 0603 12K 5% 1/10W
R690 061G0603123 JT RST CHIPR 12KOHM 1/10W TZAI YUAN
R691 061G0603123 JT RST CHIPR 12KOHM 1/10W TZAI YUAN
R692 061G0603123 JT RST CHIPR 12KOHM 1/10W TZAI YUAN
R689 061G0603123 JT RST CHIPR 12KOHM 1/10W TZAI YUAN
R1301 061G06031241FF RST 0603 1.24K 1% 1/10W FENGHUA
R1301 061G06031241FT RST 0603 1.24K 1% 1/10W TZAI YUAN
R701 061G06031500FI RST 0603 150R 1% 1/10W
R701 061G06031500FT RST CHIP 150R 1/10W 1%
R454 061G06031501FI RST 0603 1.5K 1% 1/10W TA-I
R453 061G06031501FI RST 0603 1.5K 1% 1/10W TA-I
R453 061G06031501FT RST CHIP 1K5 1/10W 1%
R454 061G06031501FT RST CHIP 1K5 1/10W 1%
R4594 061G06031801FI RST 0603 1.8K 1% 1/10W
R4594 061G06031801FT RST CHIP 1K8 1/10W 1%
R634 061G06031822FF RST CHIP 18.2K 1/10W 1% FENGHUA
R705 061G06032001FI TEST ONLY RST 0603 2K 1% 1/10W TA-I
R705 061G06032001FT RST CHIP R 2KOHM 1/10W +/-1%
R722 061G0603203 JF RST CHIPR 20K OHM +-5% 1/10W FENGHUA
R722 061G0603203 JI RST 0603 20K 5% 1/10W
R580 061G0603204 JI RST 0603 200K 5% 1/10W
R580 061G0603204 JT RST CHIP 200K 1/10W 5% TZAI YUAN
R635 061G0603220 JF ST CHIPR 22 OHM +-5% 1/10W FENGHUA
R636 061G0603220 JF ST CHIPR 22 OHM +-5% 1/10W FENGHUA
R717 061G0603223 JI RST 0603 22K 5% 1/10W TA-I
R766 061G0603223 JI RST 0603 22K 5% 1/10W TA-I
R680 061G06032402FI RST 0603 24K 1% 1/10W
R678 061G06032402FI RST 0603 24K 1% 1/10W
R671 061G06032402FI RST 0603 24K 1% 1/10W
R669 061G06032402FI RST 0603 24K 1% 1/10W
R763 061G06032551FF RST 0603 2.55K 1% 1/10W FENGHUA
R763 061G06032551FT RST 0603 2.55K 1% 1/10W TZAI YUAN
R637 061G06032702FI RST CHIP 27K 1/10W 1% TA-I
R638 061G06032702FI RST CHIP 27K 1/10W 1% TA-I
97
Page 98

R639 061G06032702FI RST CHIP 27K 1/10W 1% TA-I
R640 061G06032702FI RST CHIP 27K 1/10W 1% TA-I
R727 061G06032702FI RST CHIP 27K 1/10W 1% TA-I
R639 061G06032702FT RST CHIP 27K 1/10W 1%
R640 061G06032702FT RST CHIP 27K 1/10W 1%
R727 061G06032702FT RST CHIP 27K 1/10W 1%
R638 061G06032702FT RST CHIP 27K 1/10W 1%
R637 061G06032702FT RST CHIP 27K 1/10W 1%
R1325 061G0603272 JF RST CHIPR 2.7KOHM 5% 1/10W FENGHUA
R437 061G0603272 JF RST CHIPR 2.7KOHM 5% 1/10W FENGHUA
R438 061G0603272 JF RST CHIPR 2.7KOHM 5% 1/10W FENGHUA
R457 061G0603272 JF RST CHIPR 2.7KOHM 5% 1/10W FENGHUA
R457 061G0603272 JT RST CHIP 2K7 1/10W 5% TZAI YUAN
R1325 061G0603272 JT RST CHIP 2K7 1/10W 5% TZAI YUAN
R437 061G0603272 JT RST CHIP 2K7 1/10W 5% TZAI YUAN
R438 061G0603272 JT RST CHIP 2K7 1/10W 5% TZAI YUAN
R713 061G06033000FI RST 0603 300R 1% 1/10W
R713 061G06033000FT RST CHIP 300R 1/10W 1%
R616 061G0603302 JF RST CHIP 3KOHM 5% 1/10W FENGHUA
R641 061G0603302 JF RST CHIP 3KOHM 5% 1/10W FENGHUA
R616 061G0603302 JI RST 0603 3K 5% 1/16W TA-I
R641 061G0603302 JI RST 0603 3K 5% 1/16W TA-I
R4581 061G0603330 JF RST CHIP 33R 1/10W 5% FENGHUA
R4582 061G0603330 JF RST CHIP 33R 1/10W 5% FENGHUA
R4580 061G0603330 JF RST CHIP 33R 1/10W 5% FENGHUA
R4520 061G0603330 JF RST CHIP 33R 1/10W 5% FENGHUA
R4519 061G0603330 JF RST CHIP 33R 1/10W 5% FENGHUA
R4502 061G0603330 JF RST CHIP 33R 1/10W 5% FENGHUA
R4501 061G0603330 JF RST CHIP 33R 1/10W 5% FENGHUA
R4580 061G0603330 JT RST CHIP 33R 1/10W 5% TZAI YUAN
R4582 061G0603330 JT RST CHIP 33R 1/10W 5% TZAI YUAN
R4581 061G0603330 JT RST CHIP 33R 1/10W 5% TZAI YUAN
R4520 061G0603330 JT RST CHIP 33R 1/10W 5% TZAI YUAN
R4519 061G0603330 JT RST CHIP 33R 1/10W 5% TZAI YUAN
R4502 061G0603330 JT RST CHIP 33R 1/10W 5% TZAI YUAN
R4501 061G0603330 JT RST CHIP 33R 1/10W 5% TZAI YUAN
R401 061G06033320FF RST 0603 332R 1% 1/10W
R613 061G0603333 JF RST CHIPR 33KOHM 1/10W FENGHUA
R613 061G0603333 JI RST 0603 33K 5% 1/10W
R1236 061G0603360 JF RST CHIPR 36OHM +-5% 1/10W FENGHUA
R1204 061G0603360 JF RST CHIPR 36OHM +-5% 1/10W FENGHUA
R1203 061G0603360 JF RST CHIPR 36OHM +-5% 1/10W FENGHUA
R1202 061G0603360 JF RST CHIPR 36OHM +-5% 1/10W FENGHUA
98
Page 99

R1201 061G0603360 JF RST CHIPR 36OHM +-5% 1/10W FENGHUA
R1236 061G0603360 JT RST CHIP 36R 1/10W 5% TZAI YUAN
R1204 061G0603360 JT RST CHIP 36R 1/10W 5% TZAI YUAN
R1203 061G0603360 JT RST CHIP 36R 1/10W 5% TZAI YUAN
R1202 061G0603360 JT RST CHIP 36R 1/10W 5% TZAI YUAN
R1201 061G0603360 JT RST CHIP 36R 1/10W 5% TZAI YUAN
R1324 061G06034021FF RST CHIP 4.02 KOHM 1/10W 1% FENGHUA
R1324 061G06034021FT RST CHIP 4K02 1/10W 1%
R704 061G06034302FI RST CHIP 43K 1/10W 1% TA-I
R704 061G06034302FT RST CHIPR 43KOHM 1% 1/10W TZAI YUAN
R642 061G0603471 JF RST CHIPR 470OHM +-5% 1/10W FENGHUA
R643 061G0603471 JF RST CHIPR 470OHM +-5% 1/10W FENGHUA
R643 061G0603471 JI TEST ONLY RST 0603 470R 5% 1/16W TA-I
R642 061G0603471 JI TEST ONLY RST 0603 470R 5% 1/16W TA-I
R644 061G0603473 JI TEST ONLY RST 0603 47K 5% 1/16W TA-I
R607 061G0603473 JI TEST ONLY RST 0603 47K 5% 1/16W TA-I
R607 061G0603473 JT RST CHIP 47K 1/10W 5% TZAI YUAN
R644 061G0603473 JT RST CHIP 47K 1/10W 5% TZAI YUAN
R714 061G06035101FT RST CHIP 5K1 1/10W 1%
R679 061G06035108FF RST CHIPR 5.1OHM +-1% 1/10W FENGHUA
R670 061G06035108FF RST CHIPR 5.1OHM +-1% 1/10W FENGHUA
R615 061G0603512 JI RST 0603 5.1K 5% 1/16W TA-I
R615 061G0603512 JT RST CHIPR 5.1KOHM +-5% 1/10W TZAI YUAN
R645 061G0603683 JI TEST ONLY RST 0603 68K 5% 1/16W TA-I
R646 061G0603683 JI TEST ONLY RST 0603 68K 5% 1/16W TA-I
R647 061G0603683 JI TEST ONLY RST 0603 68K 5% 1/16W TA-I
R648 061G0603683 JI TEST ONLY RST 0603 68K 5% 1/16W TA-I
R646 061G0603683 JT RST CHIP 68K 1/10W 5% TZAI YUAN
R647 061G0603683 JT RST CHIP 68K 1/10W 5% TZAI YUAN
R648 061G0603683 JT RST CHIP 68K 1/10W 5% TZAI YUAN
R645 061G0603683 JT RST CHIP 68K 1/10W 5% TZAI YUAN
R132 061G06037502FI RST 0603 75K 1% 1/10W TA-I
R133 061G06037502FI RST 0603 75K 1% 1/10W TA-I
R133 061G06037502FT RST CHIP 75K 1/10W 1%
R132 061G06037502FT RST CHIP 75K 1/10W 1%
R4309 061G08055231FF RST CHIPR 5.23KOHM +-1% 1/8W FENGHUA
R4757 061G1206000 JI RST 0 OHM 5% 1/4W TA-I
R703 061G12061009FF RST CHIP 10 OHM 1% 1/4W FENGHUA
R757 061G12061009FF RST CHIP 10 OHM 1% 1/4W FENGHUA
R703 061G12061009FT RST CHIP R 10OHM 1/4W +/-1%
R757 061G12061009FT RST CHIP R 10OHM 1/4W +/-1%
R703 061G12061009FY RST CHIPR 10OHM 1% 1/4W YAGEO
R757 061G12061009FY RST CHIPR 10OHM 1% 1/4W YAGEO
99
Page 100

R609 061G1206562 JT RST 1206 5.6K 5% 1/4W TZAI YUAN
R665 061G1206629 JF RST CHIPR 6.2 OHM +-5% 1/4W FENGHUA
R659 061G1206629 JF RST CHIPR 6.2 OHM +-5% 1/4W FENGHUA
R653 061G1206629 JF RST CHIPR 6.2 OHM +-5% 1/4W FENGHUA
R649 061G1206629 JF RST CHIPR 6.2 OHM +-5% 1/4W FENGHUA
R665 061G1206629 JT RST CHIPR 6.2 OHM +-5% 1/4W TZAI YUAN
R649 061G1206629 JT RST CHIPR 6.2 OHM +-5% 1/4W TZAI YUAN
R653 061G1206629 JT RST CHIPR 6.2 OHM +-5% 1/4W TZAI YUAN
R659 061G1206629 JT RST CHIPR 6.2 OHM +-5% 1/4W TZAI YUAN
C1215 065G040210031D 3 CAP CHIP 0402 10P 50V NPO +/-5%
C1214 065G040210031D 3 CAP CHIP 0402 10P 50V NPO +/-5%
C4862 065G040210232K A CAP 0402 1NF K 50V X7R
C529 065G040210232K A CAP 0402 1NF K 50V X7R
C7904 065G040210232K A CAP 0402 1NF K 50V X7R
C4860 065G040210232K A CAP 0402 1NF K 50V X7R
C4846 065G040210232K A CAP 0402 1NF K 50V X7R
C4840 065G040210232K A CAP 0402 1NF K 50V X7R
C4752 065G040210232K A CAP 0402 1NF K 50V X7R
C4748 065G040210232K A CAP 0402 1NF K 50V X7R
C4744 065G040210232K A CAP 0402 1NF K 50V X7R
C4740 065G040210232K A CAP 0402 1NF K 50V X7R
C4736 065G040210232K A CAP 0402 1NF K 50V X7R
C4733 065G040210232K A CAP 0402 1NF K 50V X7R
C1322 065G040210232K A CAP 0402 1NF K 50V X7R
C1323 065G040210232K A CAP 0402 1NF K 50V X7R
C4709 065G040210232K A CAP 0402 1NF K 50V X7R
C4714 065G040210232K A CAP 0402 1NF K 50V X7R
C4730 065G040210232K A CAP 0402 1NF K 50V X7R
C4725 065G040210232K A CAP 0402 1NF K 50V X7R
C4717 065G040210232K A CAP 0402 1NF K 50V X7R
C4722 065G040210232K A CAP 0402 1NF K 50V X7R
C4748 065G040210232K Y CAP CHIP 0402 1N 50V X7R +/-10%
C4752 065G040210232K Y CAP CHIP 0402 1N 50V X7R +/-10%
C4744 065G040210232K Y CAP CHIP 0402 1N 50V X7R +/-10%
C4740 065G040210232K Y CAP CHIP 0402 1N 50V X7R +/-10%
C4736 065G040210232K Y CAP CHIP 0402 1N 50V X7R +/-10%
C4840 065G040210232K Y CAP CHIP 0402 1N 50V X7R +/-10%
C4846 065G040210232K Y CAP CHIP 0402 1N 50V X7R +/-10%
C4860 065G040210232K Y CAP CHIP 0402 1N 50V X7R +/-10%
C7904 065G040210232K Y CAP CHIP 0402 1N 50V X7R +/-10%
C529 065G040210232K Y CAP CHIP 0402 1N 50V X7R +/-10%
C4862 065G040210232K Y CAP CHIP 0402 1N 50V X7R +/-10%
C4733 065G040210232K Y CAP CHIP 0402 1N 50V X7R +/-10%
100
 Loading...