


Instruction Manual for the STARBOOK-S Set
PREFACE
Thank you for your purchase of a Vixen STARBOOK-S Go-To controller and Motors Set. The STAR BOOK-S features intuitive Go To operation with its LCD display for the Vixen GP series equatorial mounts. We hope it will help increase your enjoyment of your observing session. You should refer to the instruction manuals for your telescope together with this manual.
Read this instruction manual completely before use
- Always keep this instruction manual near your telescope to ensure quick answers to any questions.
- This instruction manual describes necessary precautions for the safe use of the product by |
|
|
. |
preventing possible injuries to yourself and others, as well as damage to the equipment |
|
WARNING! |
Inc |
|
|
Never look directly at the sun with your naked eyes or though this produ t Permanent and irreversible eye damage may result.
- Never connect the cable of the STARBOOK-S with other equipme t such as a PC. It may cause a failure, heating or electrical shock.
CAUTION
- This MrStarGuy,equipment has been tested and found to comply with the limits for a Class B digital device, pursuant of Part 15 of the FCC rules.
- Do not use the product while traveling or walking, as inj ries may arise from stumbling, falling or collision with objects.
- Keep plastic and vinyl packing materials away from children, these may cause danger from swallowing or suffocation.
- Do not use the product in wet envi onment.
1
|
|
|
|
|
|
|
PREFACE |
|
AUTOMATIC SLEWING |
|
19 |
||
|
|
|
Flow of Automatic Slewing |
|
19 |
|
WARNING CAUTION |
|
Home Position |
|
|
19 |
|
|
|
|
Align the Telescope |
|
20 |
|
CONTENTS |
3 |
Starting Automatic Slewing |
|
26 |
||
|
|
|
Choosing a Target from the |
|
28 |
|
BEFORE USE |
4 |
Object Menu |
|
|
|
|
Checking Contents |
4 |
Completing Observing |
|
30 |
||
Parts Descriptions |
4 |
|
|
|
|
|
Legend on the Screen |
6 |
APPLICATION |
|
|
32 |
|
Flow of Operation |
7 |
Chart Setting |
|
|
32 |
|
|
|
|
LCD Adjustment |
|
35 |
|
PREPARATION |
8 |
Backlighting Duration |
|
36 |
||
About Batteries |
8 |
Adjustment |
|
. |
||
|
|
|
Backlash Compe sation |
|
37 |
|
SETTING UP |
9 |
PEC |
|
|
39 |
|
Installing the RA Motor |
9 |
Connecting to LAN |
|
43 |
||
Installing the DEC Motor |
11 |
Automatic Slewing to a Comet |
44 |
|||
Connecting the Cables |
12 |
Setting Autoguider |
|
51 |
||
Supplying the Power |
12 |
|
Inc |
53 |
||
Upgrading our STARBOOK-S |
||||||
INITIAL SETTING |
13 |
|
|
|
|
|
Turning the Power On and Off |
13 |
|
|
|
|
|
Setting Language |
14 |
|
|
|
|
|
Setting Local Time |
15 |
|
|
|
|
|
Setting Location |
16 |
|
|
|
|
|
Saving the Settings |
17 |
|
|
|
|
|
BASIC OPERATION |
18 |
|
|
|
|
|
Moving the Telescope |
18 |
|
|
|
|
|
MrStarGuy, |
|
|
|
|||
2
BEFORE USE
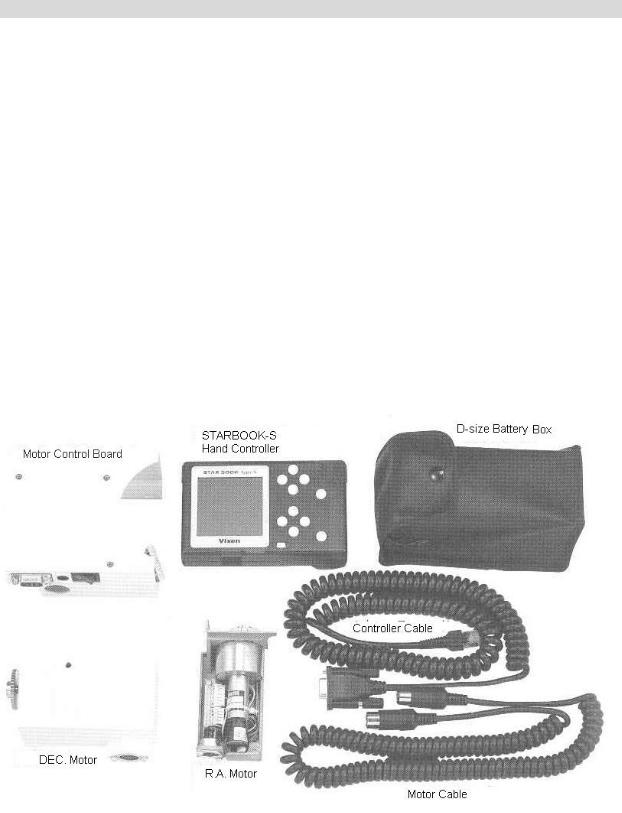
Checking Contents
This STARBOOK-S Set contains the parts listed below. Make sure that your box contains all these parts. Your contents may differ from this list if you purchased a telescope package complete with the STARBOOK-S.
Description |
Q’ty |
|
STARBOOK –S Hand Controller |
1 |
|
R.A. Motor |
1 |
|
Motor Control Board Combined with Motor |
1 |
|
Cover |
|
|
DEC. Motor |
1 |
|
DEC. Motor Gear Cover |
1 |
|
Vanity Cap for DEC shaft |
1 |
|
Space Filler for R.A. Motor Cover |
2 |
|
Spur Gears |
2 |
|
Motor Cable |
1 |
|
Controller Cable |
1 |
|
8x D-Size Battery Box |
1 |
|
5mm Allen wrench |
1 |
|
1.5mm Allen wrench |
1 |
|
Instruction Manual This booklet |
1 |
|
MrStarGuy, |
|
|
. Inc
3

STARBOOK-S Hand Controller
01. TN 2.6-inch monochrome LCD screen
02. Power switch
The upper buttons(Right side on-screen soft-key legend): Enter, Cursor movement, Scroll
03. |
LEFT |
(Moves the cursor left -The screen scrolls toward right.) |
04. |
UP |
(Moves the cursor up.-The screen scrolls down.) |
05. |
RIGHT |
(Moves the cursor right.-The screen scrolls toward left.) |
06. |
DOWN |
(Moves the cursor down.-The screen scrolls up.) |
07. |
ENTER |
(Changing Chart / Scope modes) |
The lower buttons(Left side on-screen soft-key legend): Alignment, Zoom |
. |
||||
|
|||||
08. |
MENU |
(Accesses various settings on the system menu.) |
Inc |
||
09. |
ZOOM+ |
(Zooms in the screen in 8 steps.) |
|||
|
|
||||
10. ALIGN |
(Aligns computer with telescope position.) |
|
|
||
11. ZOOM- |
(Zooms out the screen in 8 steps.) |
|
|
||
12. |
DISP |
(On screen information changes each time pressed.) |
|
||
13. |
LAN |
LAN connection terminal (10BASE-T) for commu ication with a PC |
|||
14. A.G. |
Autoguider port |
|
|
||
15. |
MrStarGuy, |
|
|
||
MOUNT |
Controller cable connection terminal |
|
|
||
4

Parts descriptions: GPD2 Mount with STARBOOK-S shown here
|
. |
MrStarGuy, |
Inc |
|
5

Legend on the Screen
|
|
. |
|
|
Inc |
MrStarGuy, |
||
01. Mode Display: SCOPE Mode and CHART Mode |
|
|
02. Date |
|
|
03. Time
04. Battery Level: Varies according to a level of discharge.
The battery levels are displayed individually for both the STAR BOOK-S and the Mount.
Note: battery level indic tor m show “Empty” when the controller cable is not connected securely.
05. Up Arrow / Down Arrow
Up arrow: A group of on-screen soft-keys corresponding to the upper buttons. Down arrow: A group of on-screen soft-keys corresponding to the lower buttons.
06 |
: Di ectional keys and cursor movement |
07. |
Select, Automatic lewing and changing Chart / Scope Modes. |
08. |
Zoom+: Zoom in the screen |
09. |
Zoom-: Zoom out the screen. |
10. |
T: Speed of scrolling the screen / zooming visually. |
11. enu: Open the System Menu dialog box to change various settings. 12. Align: Set up directions (alignment) for automatic slewing.
13. Disp: On screen information changes each time pressed.
6

Specifications
|
Display |
TN 2.6-inch monochrome LCD screen (160x160 = 25600 |
||
|
|
pixels) with backlighting |
|
|
|
Coordinates of object |
Shown on the STARBOOK-S in 0.1’ increment |
||
|
Slewing speed |
Max. 1200x (sidereal rate) |
|
|
|
Controller cable connection |
8-pole 8-wired modular jack |
|
|
|
terminal |
|
|
|
|
Autoguider port |
6-pole 6-wired modular jack |
|
|
|
LAN connection terminal |
10BASE-T |
|
|
|
Auxiliary terminal |
D-sub 9 PIN (unavailable) |
|
|
|
External power supply |
DC12V EIAJ RC5320A Class 4 |
|
|
|
Batteries |
Controller: 4 x AA-size alkaline batteries |
|
|
|
|
Motors: 8x D-size alkaline batteries |
|
|
|
Working duration with alkaline |
Controller: About 8 hours at 20 degrees C (68F) ambient |
||
|
batteries |
temperature |
|
. |
|
|
Motor: About 6 hours at 20 degrees C.(68F) ambient |
||
|
|
temperature |
|
|
|
Operating temperature |
0 degree C. to 40 degrees C. |
|
|
|
Maximum Loading weight |
7 kg for GP2, 10kg for GPD2 |
|
|
|
Celestial Data Base |
Total 22,735 objects consisting of: |
th |
|
|
|
|
|
|
|
|
17,635 Fixed stars brighter thanInc7 magnitude |
||
|
|
110 Messier objects |
|
|
|
|
4,980 NGC/IC objects brighter than 14th magnitude |
||
|
|
8 Planets, the Moon and Sun |
|
|
|
Controller Size |
85mm(w) x 134mm(l) x 38mm(h) |
|
|
|
Controller Weight |
165g (without batteries and without cables) |
||
|
MrStarGuy, |
|
|
|
|
|
|
||
7

Flow of Operation
Take the following steps to set up and use the STARBOOK-S.
1 PREPARATION page 8 Installing the supplied RA and DEC motors on a GP series equatorial mount of your telescope.
2 INITIAL SETTING |
page 13 |
Setting Language (The first time only) |
|
Turn the power switches of both the RA motor and controller to ON, then turn on the |
|
Starbook-S,and then choose your language in the STARBOOK-S. |
|
|
Setting Date & Time (The first time only) |
. |
|
|
|
|
|
|
Enter date and your local time. |
Inc |
|
|
Setting Longitude & Latitude (The first time only) |
|
|
|
|
|
|
|
Enter longitude and latitude of your observation site. |
|
|
3 |
AUTOMATIC SLEWING |
|
page 19 |
|
Home Position |
|
|
|
MrStarGuy, |
|
|
|
Slew the telescope to the home position. |
|
|
|
Alignment |
|
|
|
Choose two out of 39 registered reference stars in the STARBOOK-S’ database. |
||
|
Automatic Slewing |
|
|
|
Upon completion of alignment, automatic Go-To slewing and tracking are ready. |
||
4 |
FINISH OPERATION |
|
page 30 |
8

PREPARATION
About Batteries
The STARBOOK-S controller runs on four AA-size alkaline batteries (not supplied.) The batteries last about eight hours at a temperature of 20 degrees centigrade.
The RA and DEC motors run on eight D-size alkaline batteries (not included) or.an external power Inc
supply sold separately. The batteries last about eight hours at a temperature of 20 degrees centigrade.
Inserting the batteries into the STARBOOK-S
Push the latch of the rear cover down and open the cover toward you as shown in the figure.
Replace the cover.
Inserting the batte ies into the Battery Box
Insert 8 new and unused D-size alkaline batteries. Take care not to mix up the polarity of each battery.
InsertMrStarGuy,4 new and unused AA-size lk line batteries. Take care not to mix up the polarity of each battery.
Do not mix up the polarity as this may cause a failure.
SETTING UP
9

Installing the RA Motor
(1) Take off the vanity cap on the RA body of your mount as shown in the figure.
(2) |
Remove the screw to fix the plastic RA motor cover by using the Phillips-head screwdriver. |
|
(3) |
Remove the plastic RA motor cover. |
. |
|
||
|
MrStarGuy, |
Inc |
(4)Turn the altitude adjustment screw so that the altitude of the mount goes down to |
||
approximately 10 degrees as shown in the figure. You may need to hold down the mount to do |
||
this if it does not descend as you turn the altitude adjustment screw. |
||
(5) |
Attach the spur gear o he RA sh ft facing the flat side of the spur gear outward. Orient the |
|
spur gear so that the se screw is over the flat portion of the RA shaft as shown in figure 5-1. Put the spur gear into the dead end of the shaft (5-2) and tighten the setscrew by using the supplied 1.5mm Allen wrench (5-3).
The RA shaft is projected on both sides of the RA worm bracket. Attach the super gear to the shorter projected side with a nut.
(6) Attach the RA motor so that its dovetail attachment base fits the counterpart on the RA body as shown in the figure. Engage the gears so that the two are flush. At the same time, fix the RA
10
motor with the supplied bolt (long) through the hole just above the altitude adjustment screw by using the supplied 5mm Allen wrench.
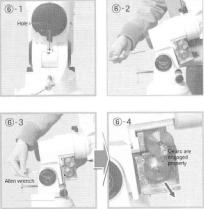 . * Make sure that the gears are engaged properly after you install theIncRA motor
(7) Turn the altitude adjustment screw until the altitude of the mou t goes up to the latitude of your observation site.
(8) ConnectMrStarGuy,the motor control board (combined with motor cover) and the RA motor with the electric wires. Hold the connector of the electric wires with your fingers so that the blue electric
wire is on the left side as shown in the figu e. Plug the connector into the socket on the RA motor securely.
*Take care not to tear apart the electric wires.
(9) Attach the motor control board (combined with motor cover) on the RA body by sliding it onto the guide rail as shown in the figure. Put the space filler onto it at the point where the motor gears are hidden behind the motor cover, then slide up the motor cover to the end and securely fix the motor cover in place with the screw.
11

Installing the DEC Motor
(1) Attach the spur gear to the DEC shaft facing the flat side of the spur gear outward. Orient the spur gear so that the setscrew is over the flat portion of the DEC shaft as shown in the figure. Put the spur gear into the dead end of the shaft and tighten the setscrew by using the supplied 1.5mm Allen wrench.
. Inc
(2) Attach the DEC motor so that its dovetail attachment base fits the counterpart bracket on the DEC bodyMrStarGuy,as shown in the figure. Engage the gears so that the two are flush. At the same time,
connect the DEC motor with the supplied bolt (short) through the hole of the bracket by using the supplied 5mm Allen wrench.
* Make sure that the gears are engaged p operly after you install the DEC motor.
(3) Push and fit the DEC mo or ge cover over the DEC motor as shown in the figure.
*Take care not to break the claws on the cover.
(4) Attach the vanity cap to cover the DEC shaft on the opposite side.
12

Connecting the Controller and Motor Cables
(1) Connect the RA motor and DEC motor with the motor cable as shown in the figure. Orient the motor cable plug so that it fits in the socket on the motor properly.
(2) Connect the STARBOOK-S controller cable to the motor control board. Orient the controller cable plug so that it fits in the socket on the motor control board properly Tighten the lock screws on the controller cable plug securely.
. Inc
Warning!
(3) ConnectMrStthe controllerarGuy,cable to the STARBOOK-S. Orient the controller cable plug so that it fits in the socket on the STARBOOK-S properly until it clicks.
Never connect the con roller c ble to other instruments such as a PC. It may cause a power failure, overheating, or elec ric shock. Please do not attach the controller cable to the LAN connection terminal. The connec ion size is similar.
Use the supplied batte box by connecting the cable from the battery box to the motor control board.
* An optional Vixen AC Adapter 12V 3A is available for the drives of the motors.
When using an external DC 12V power supply or an optional AC adapter 12V 3A, be sure to connect the power cable to the mount before turning on the power switch.
External power terminal |
DC 12V EIAJ RC5320A Class 4 |
INITIAL SETTING |
|
13
Turning the Power On and Off
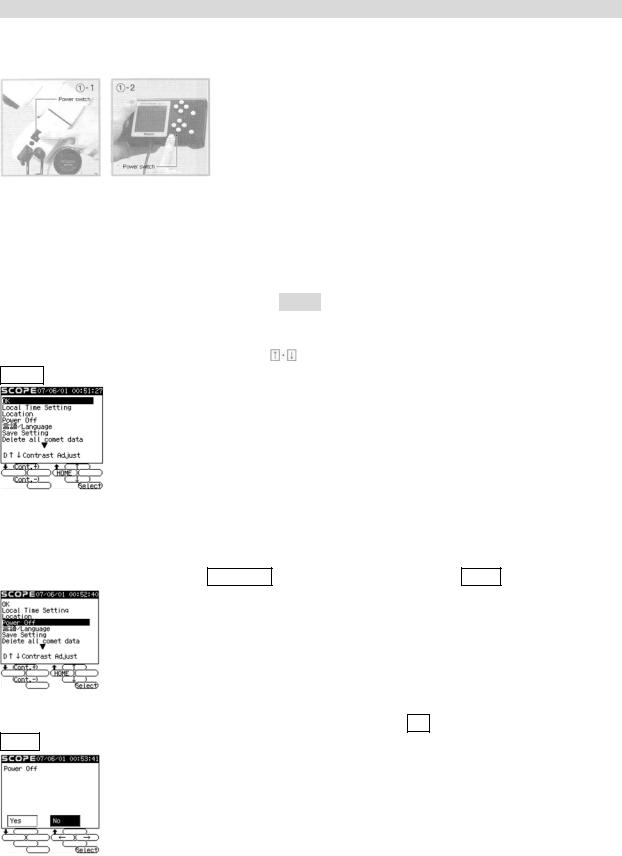
(1) There are two power switches; one on the RA motor and another on the STARBOOK-S hand controller. The power is supplied to both components independently so be sure to turn on both power switches.
|
|
. |
Caution |
Always turn on the power switch on the RA motor first, and then turn on the |
|
STARBOOK-S in succession. |
Inc |
|
(2) Confirm that the Vixen logo is displayed on the screen for a few seconds when you turn on the STARBOOK-S.
If the screen is hard to read, please refer to Hint 1(P. 14)
The pictureMrStarGuy,below will appear on screen after the Vixen logo when the STARBOOK-S power is switched on. Move the cursor with the keys onto the item you want to choose and press
Select .
Turn off the STARBOOKin the initi l setting screen (Refer to page 30 when you end operations for observing.)
(1) To turn off the power, choose Power Off with the  keys and press Select.
(2) The confirmation screen is displayed. Move the cursor to OK with the  keys and press Select.
(3) Then turn off the power switch on the RA motor.
14

Caution Remember to turn off the power switch on the RA motor as well as on the STARBOOK-S, otherwise, the batteries will be depleted. Turning one component off will not turn off the other.
Setting Language
The STARBOOK-S can be operated with your choice of language with English, German, French, Italy, Spanish and Japanese to choose from. Japanese is set at the default language initially.
Hint 1 Adjusting the LCD screen
(1)In the initial setting screen, choose |
/Language |
with the keys and press |
Select. |
|
|||||||
|
|
|
|
|
|
|
|
. |
|
|
|
(2) |
Choose your language with the |
|
|
|
|
|
Inc |
|
|
||
|
keys and press |
|
|
||||||||
|
Select. |
|
|
|
|
|
|||||
(3) |
The screen returns o he ini i |
l setting screen of your selected language. |
|||||||||
|
|
MrStarGuy, |
|
|
|
|
|||||
|
|
|
|
|
|
||||||
|
|
|
|
|
|
||||||
|
|
|
|
|
|
||||||
In the initial setting screen, contrast of the LCD screen can be adjusted with the keys Cont.+ or Cont.- shown at the lower left of the screen. Adjust it with the corresponding keys according to conditions of use.
Be sure to save the contrast setting for use under the same conditions next time.
The contrast of the screen may change with ambient temperature.
15

Setting Local Time
Enter the date and local time of your observing site by using the upper five buttons on the STARBOOK-S.
This task is required only once the first time you use the STARBOOK-S. However, you will need to reset the date and time if you travel from your regular observing site to a different time zone, or if you reset your clocks for Daylight Saving time. The STARBOOK-S keeps the stored memory
while you replace the batteries. It is not necessary to enter the date and time again if you put in fresh batteries within an hour. A deviation may arise between the initial clock of the STARBOOK-S and your time, but a few minute’s difference does not affect the slewing performance of the unit.
|
|
|
|
|
. |
(1) Choose |
Local Setting Time |
with the |
keys and press |
Select. |
Inc |
|
|
|
|
|
(2) To change the date and time, move the cursor with the  keys to the item where corrections
Setting Location
are needed. Then change the number with the |
keys. |
||||
(3) To finish the setting, move he cursor with the |
keys to |
|
and press |
|
to enter. |
OK |
Select |
||||
MrStarGuy, |
|
|
|
|
|
|
|
|
|
||
|
|
|
|
|
|
Enter the longitude, latitude and time zone of your observing site. Once the settings for your location are entered and saved, you don’t need to change them unless you travel more than 15 miles to a different observing location. The longitude and latitude of your observing site can be checked on a map or with a GPS device. The initial location is set at Tokyo.
16

(1) Choose Location with the  keys and press Select.
(2) To change the longitude and latitude settings for your observing site, move the cursor with
the keys to the item where corrections are needed. |
Then change the numbers with the |
||||
keys. |
. |
||||
|
|
|
|||
|
|
|
Inc |
|
|
(3) To finish the setting, move the cursor to |
OK |
with the |
keys and press |
Select. |
The screen |
(4) The STARBOOK-S will sk to eboot. Press Select to choose OK. To continue operation, turn on the power swi ch g in.
will goMrStarGuy,to the reboot screen. If the location settings remain the same as last time, it will go back to the initial setting screen.
About Time Zone
The time zones e based on longitude bands 15 degrees wide, starting at Greenwich, England. Set the time diffe ence in hours between your local time and Greenwich Mean Time (GMT). Its sign is plus if local time is ahead of GMT (east of Greenwich) and minus if local time is behind G T (west of Greenwich). For example, the time zone for Los Angeles (on Pacific Standard Time) is -8 hours.
Please note that the entered time zone setting is not converted to Daylight Saving time automatically. When you reset your clocks for Daylight time, add one hour to the value in the Time Zone setting, as in Los Angeles, change the setting from -8 to -7.
17
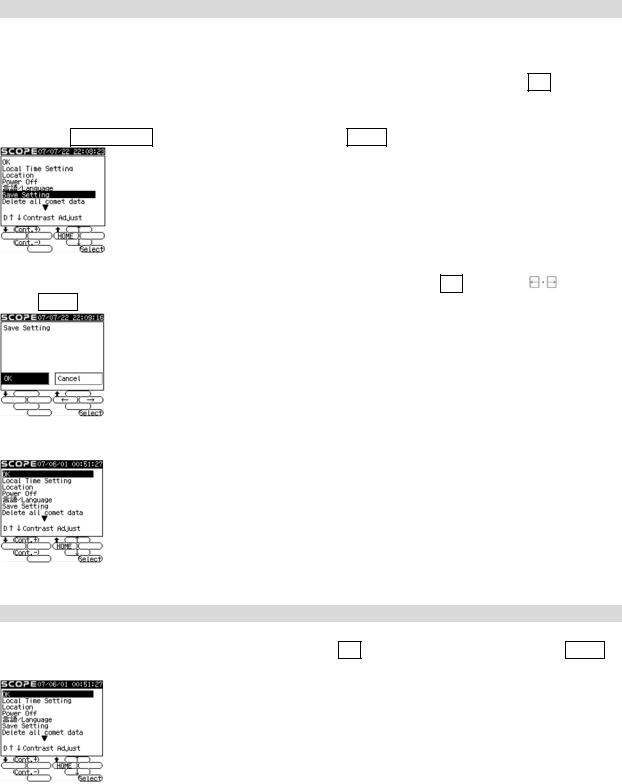
Saving the Settings
Save your time, language and contrast settings for the next use. Failure to do so will result in having to re-enter these settings every time you turn on the power. Once you save the settings, they will be stored in the memory of the STARBOOK-S and you can simply choose OK to advance the screen the next time you use it.
(1) Choose Save Setting with the  keys and press Select.
|
. |
|
Inc |
(2) Next the confirmation screen is displayed. Move the cursor to OK with the keys and |
|
press Select to enter. |
|
MrStarGuy, |
|
(3) Now all the entered data is saved and the screen goes back to the initial setting screen.
Moving the Telescope
(1)In the initial setting screen, move the cursor to OK with the  keys and press Select to enter.
(2)The screen displays a warning on solar observation.
18

(3)After reading the text, choose Confirm with the  keys and press Select to enter.
|
|
|
. |
|
|
|
|
|
|
|
|
|
|
Inc |
|
The warning continues on the screen when Not Confirm is chosen. |
|
||
(4)The screen advances to the home position setting as soon as you choose the Confirm key. However, please disregard it here and press OK with the Select key to co ti ue operation in the daytime.
MrStarGuy, |
|
(5)Press the |
keys to see in what direction the telescope tube moves. |
The  keys move the elescope left and right, and the
  keys move it up and down. (The telescope may not move below the horizon.)
Note: The mount sta ts driving at sidereal rate (the speed of Earth’s rotation) as soon as the OK key is pressed in the home position setting screen.
AUTO ATIC SLEWING
Automatic Slewing
Start automatic slewing after you generally understand the basic operation of the telescope. Automatic slewing allows your telescope to search for celestial objects based on the position of each object stored in the memory of the STARBOOK-S.
19
 Loading...