

Page 1
Polarie
Star Tracker
User's Guide
Page 2

PREFACE
Th is m an ua l de sc ri be s th e fu nc ti on s of t he P ol ar ie s ta r tr ac ke r.
Yo u ma y oc ca si on al ly f in d de sc ri pt io ns i n th e te xt n ot r el ev an t to y ou r pa rt ic ul ar m od el ; th is d ep en ds o n th e mo de l yo u pu rc ha se d.
Yo u sh ou ld refer to the instruction manuals for y ou r ca me ra , ba ll h ea d ad ap te r, c am er a tr ip od and shutter release control together w it h th is
ma nu al a s oc ca si on d em an ds .
Thank you very much for your purchase of a Vixen Polarie star tracker.
WARNING!
Never look directly at the sun with your naked eyes or through this product or its polar axis scope
sold separately. Permanent and irreversible eye damage may result.
Al wa ys k ee p th e in st ru ct io n ma nu al n ea r yo ur P ol ar ie t o en su re q ui ck a ns we rs t o an y qu es ti on s.
Th is in st ru ct io n m an ua l d es cr ib es ne ce ss ar y precautions for the safe use of th e p ro du ct to pr ev en t p os si bl e injuries to yourself and
ot he rs , as w el l as d am ag e to t he e qu ip me nt .
Read through this manual before use.
CAUTION
Do not use the product while traveling or walking, as injuries may
arise from stumbling, falling or collision with objects.
Do not try to restrain the movement of the mount when in operation,
which may lead to injuries to you or damage to your equipment.
Do not use the product in a wet environment
Do not turn on the power switch of the product under circumstances
when internal condensation is suspected on the equipment. It may
cause a failure by a short circuit.
Do not attempt to disassemble or alter any part of the equipment that
is not expressly described in this manual.
Use only recommended power sources. Using other power sources
could result in damage to the unit.
Insert the batteries in the correct direction.
Be careful not to drop the unit when handling. This may cause
damage or lead to injury.
HANDLING AND STRAGE
Do not leave the product inside a car in bright sunshine, or in hot
place. Keep any strong heat radiation sources away from the product.
Do not expose the product to rain, water drops, dirt or sand.
When cleaning, do not use solvent such as paint thinners.
For storage, keep the product in dry places, and do not expose to
direct sunlight.
Remove the batteries from the battery compartment if the product is
not used for a long time.
2
Page 3

CONTENTS
PREFACE
Warning!
Caution
Handling and Storage
・・・・・・・・・・・・・・・・・・・・・・・・・・・・・・・・・・・・・・・・・・・・・P2
・・・・・・・・・・・・・・・・・・・・・・・・・・・・・・・・・・・・・・・・・・・・・・P2
・・・・・・・・・・・・・・・・・・・・・・・・・・・・・・・
P2
CONTENTS
・・・・・・・・・・・・・・・・・・・・・・・・・・・・・・・・・・・・・・・・・・・・・・・・・ P 2
USING THE POLARIE
・・・・・・・・・・・・・・・・・・・・・・・・・・・・・・・・・・・P13
・・・・・・・・・・・・・・・・・・・・・・・・・・・・P13
・・・・・・
P14
・・・・・・
P14
・・・・・・P15
・・・・・・P
16
・・・・・・・・・・・・・・・・P17
・・・・・・・・・・・・・・・・P17
・・・・・・・・・・・・・・P17
・・・・・・・・P
17
・・・・・・・・・・・・・・・・・・・・・・・・・・・・・・P
18
・・・・・・・・・・・・・・・・・・・・・・・・・・・・P
18
・・・・・・・・・・・・・・・・・・・・・・P
19
・・・・・・・・・・・・・・・・・P
20
・・・・・・・・・P
20
・・・・・・・・・・・・・・・・・・・・・・・・・・・・・・・・・・・・ P13
SPECIFICATIONS
・・・・・・・・・・・・・・・・・・・・・・・・・・・・・・・・・・・・・・・・・ P21
APPENDIX
・・・・・・・・・・・・・・・・・・・・・・・・・・・・・・・・・・・・・・・・・・・・・・・ P23
BEFORE USE
・・・・・・・・・・・・・・・・・・・・・・・・・・・・・・・・・・P4
・・・・・・・・・・・・・・・・・・・・・・・・・・・・・・・・P4
・・・・・・・・・・・・・・・・・・・・・・・・・・・・・・・・・・・P
5
・・・・・・・・・・・・・・・・・・・・・・・・・・・
P6
・・・・・・・・・・・・・・・・・・・・・・・・・・・・・・・・・・・・・・・・・・・
P7
・・・・・・・・・・・・・・・・・・・・・
P8
・・・・・・・・・・・・・・・・・・・・・・・・・・・・・・・・・・・・・・・・・・・・・ P 4
・・・・・・・・・・・・・・・・・・・・・・・・・・・・・・・・・・・・・・・・・・・・・・・ P 3
Checking Contents
Basics of the Polarie
Parts Descriptions
M-178V Tr
ipod for Polarie
Mode Dial
Requirements and Useful Items
PREPARATION
・・・・・・・・・・・・・・・・・・・・・・・・・・・・P10
・・・・・・・・・・・・・・・・・・・・・・・・・・・・・・・P10
・・・・・・・・・・・・・・・・・・
P10
・・・・・・・・・・・・・・・・・・・・・・・・・・・・・・・・・・・・・・・・・・ P 10
Batteries for the Polarie
Inserting the Batteries
Utilizing an External Power Supply
SETTING UP
・・・・・・・・・・・・・・・・・・・・・・・・・・・・・・・P11
・・・・・・・・・・・・・・・・・・・・・・・・・・・・・・・・・・・・・・・・・・・・・ P11
Setting up the Polarie
Flow of Operation
What is Polar A
lignment?
Using the Polarie in the Northern Hemisphere
1. Find Polaris using a compass and the latitude of
your location
2. Find Polaris from Cassiopeia and the Big Dipper
Using the Polarie in the Southern Hemisphere
1. Find Octans using Small Magellanic Cloud and
the Southern Cross (Crux) as pointers
2. Find Octans using the arrangement of stars in
the Southern Cross (Crux) as pointers
3. Find Octans using Small Magellanic Cloud, Beta
Hydrus and Gamma Octantis as pointers
Point the Polarie to the South Celestial Pole
Basic Camera Settings
Switching ON the Polarie
Star-Scape Photography Mode
Wi
de-Field Astrophotography Mode
Solar Tr
acking Mode, Lunar Tracking Mode
・・・・・・・・P23
Using an optional Polarie Polar Axis Scope
3
Page 4

Zenith
North Celestial Pole
North Celestial Pole
Earth's Axis
Polar Axis
Horizon
Equator
North Pole
South Pole
BEFORE USE
The Polarie box contains the parts list ed below. Make s ure that your box contains a ll these parts.
Stars s eem to rotate around the celestial poles of the eart h. This is
called the d iur nal m oti on of stars. Th is is because Earth makes o ne
rotation on its a xis e ach d ay. Polarie tracks wit h the d iur nal motion
of the stars to eliminate "star trailing" on photographic images.
The motor-driven Pol ari e is set so that its r ota tio nal axis is parallel to
the axi s of the diurnal moti on of stars. It allows you to track the
camera, mounted on the Po lar ie, in the same direction as the stars
you want to photograph.
The Polarie is a totally new photographic accessory which easily
allows you to take pinp oin t phot os of stars and constellations. It is
designed to foll ow th e app are nt motion of th e sta rs ca use d by th e
earth's rotation, eliminating star trails.
With u se of the Polarie, taking wid e filed photographic images of
constellations, the Mil ky W ay, sho oti ng stars and bright comets is
surprisingly simple and easy.
Polarie also enables you to photograph starry nightscapes by adding
a night landscap e o r s ilh oue tte d f igu re in the foreground of your
frame. We name it “Star-Scape” photography.
Checking Contents
Polarie
Polarie User's Guide (This manual)
If purchased the Polarie as a package with the tripod
M-178V Tr
ipod with QHD-43 Ball head
QHD-33 Ball head
BASICS OF THE POLARIE
4
Page 5
Com pass(In side )
□□
□□
□□
□□
□□
□□
□□
□
□□□□□□□□
BEFORE USE
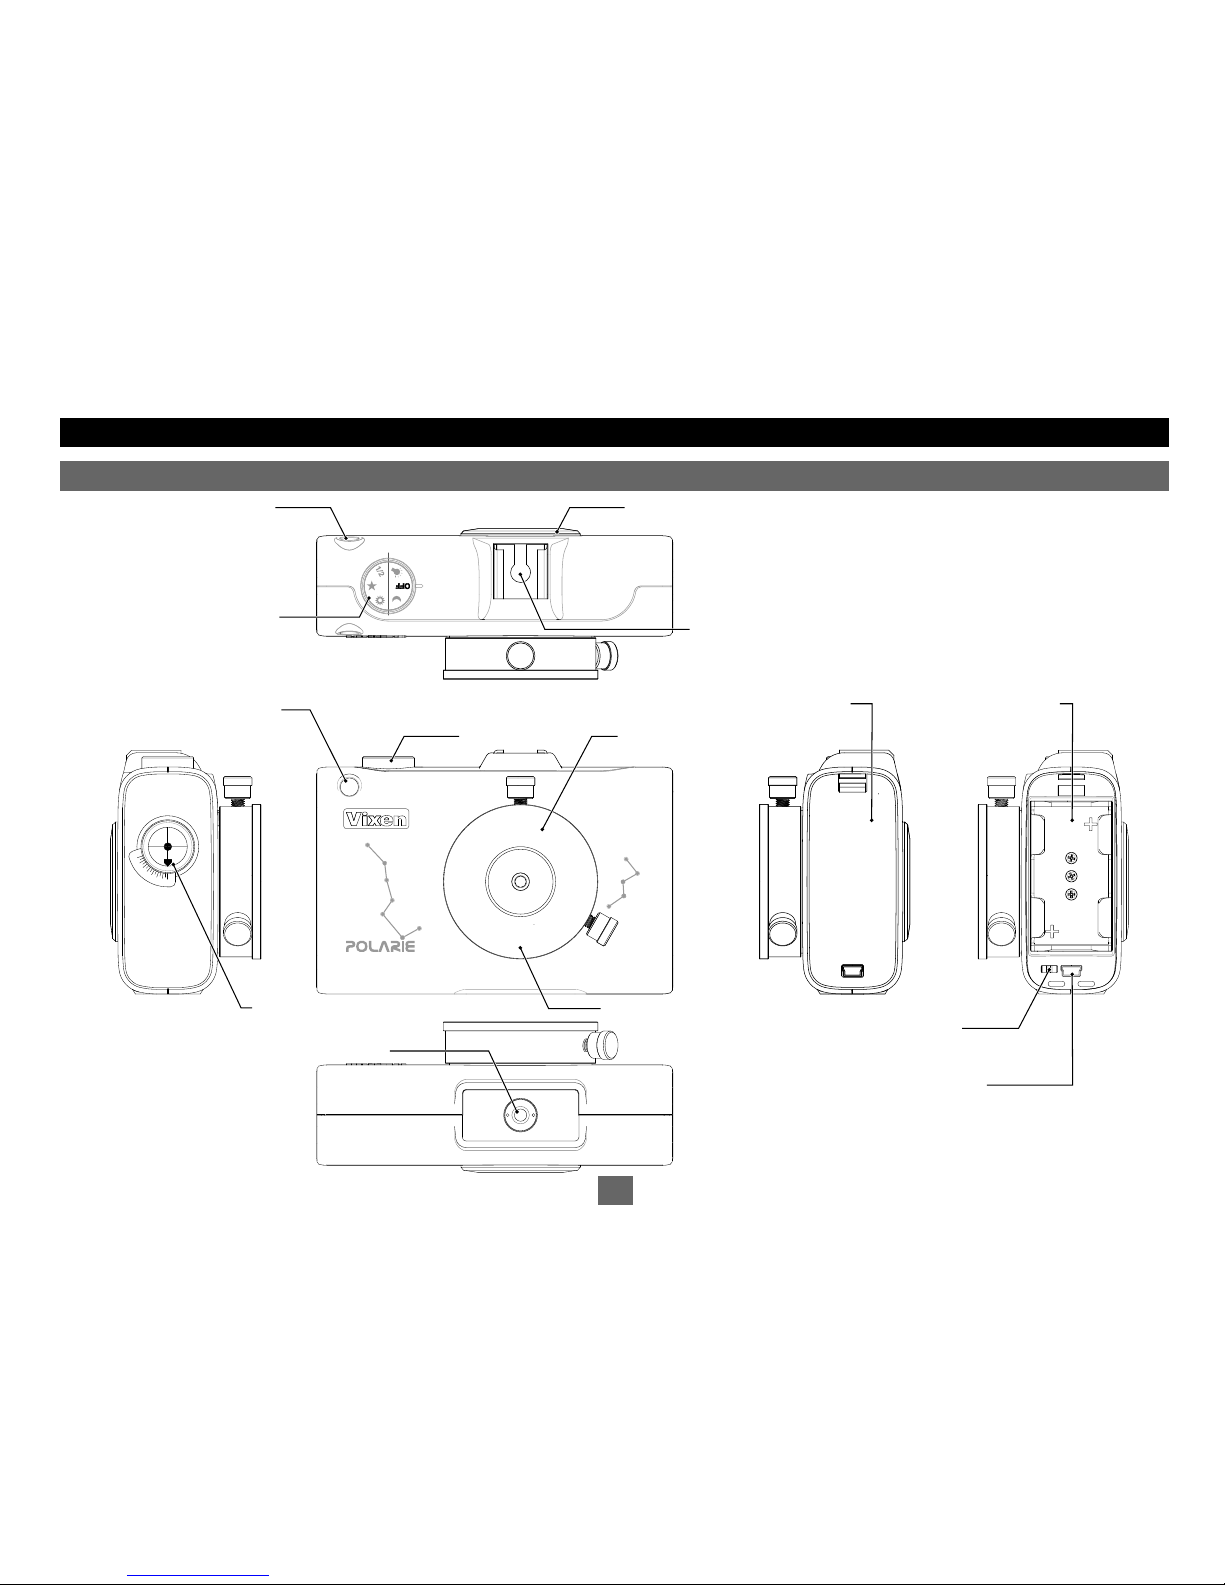
Parts Descriptions
N-S Change Swi tch
USB -minib Plug Soc ket for
Ext ernal P ower Sup ply
Bat tery Co mpar tmen t Cover Bat tery Co mpar tmen t
Pol ar Sigh t Ho le
Pol ar Sigh t Ho le
(Fi eld of View : 8. 9 degre es a ppro x.)
Acc essory Shoe
Mod e Dial Pol ar Axis Sco pe S etting Hole
(In side)
Til t Meter
Mod e Dial
Cam era Mou ntin g Bl ock
Soc ket for 1/4 " Th read Sc rew
[Of f the c over ]
5
Page 6
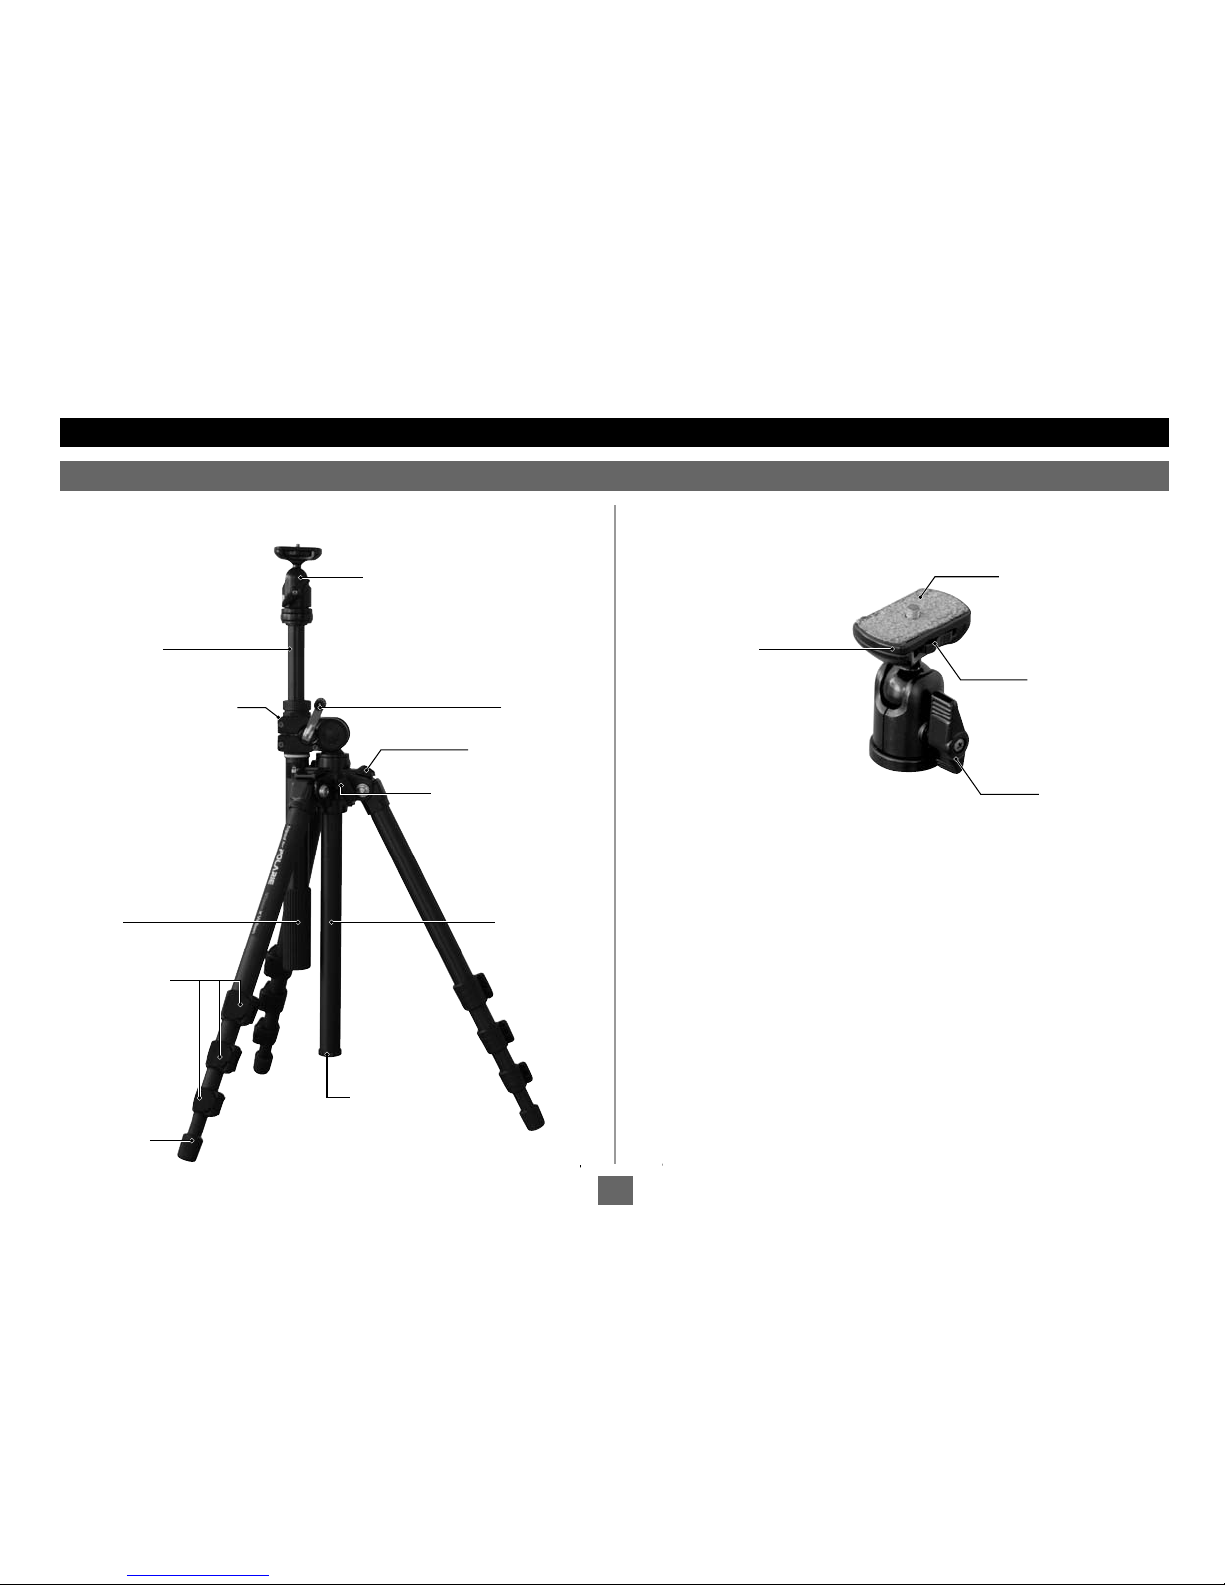
Ball head adapter (Velbon QHD-43)
is pre-installed on the tripod.
Crank handle
Leg angle adjuster
Center column lock lever
Center column
Standard UNC 1/4” thread
Camera mounting dial
Ball head lock lever
Geared elevator
Elevator lock lever (Far side)
Hand grip
Extension clamps
Rubber leg tip
Ball head adapter
(Ve
lbon QHD-33)
Ball head adapter 1: QHD-43 Ball head adapter 2: QHD-33
M-178V Tripod
Elevator bottom
BEFORE USE
M-178V Tripod for Polarie (If purchased as a package)
6
Page 7
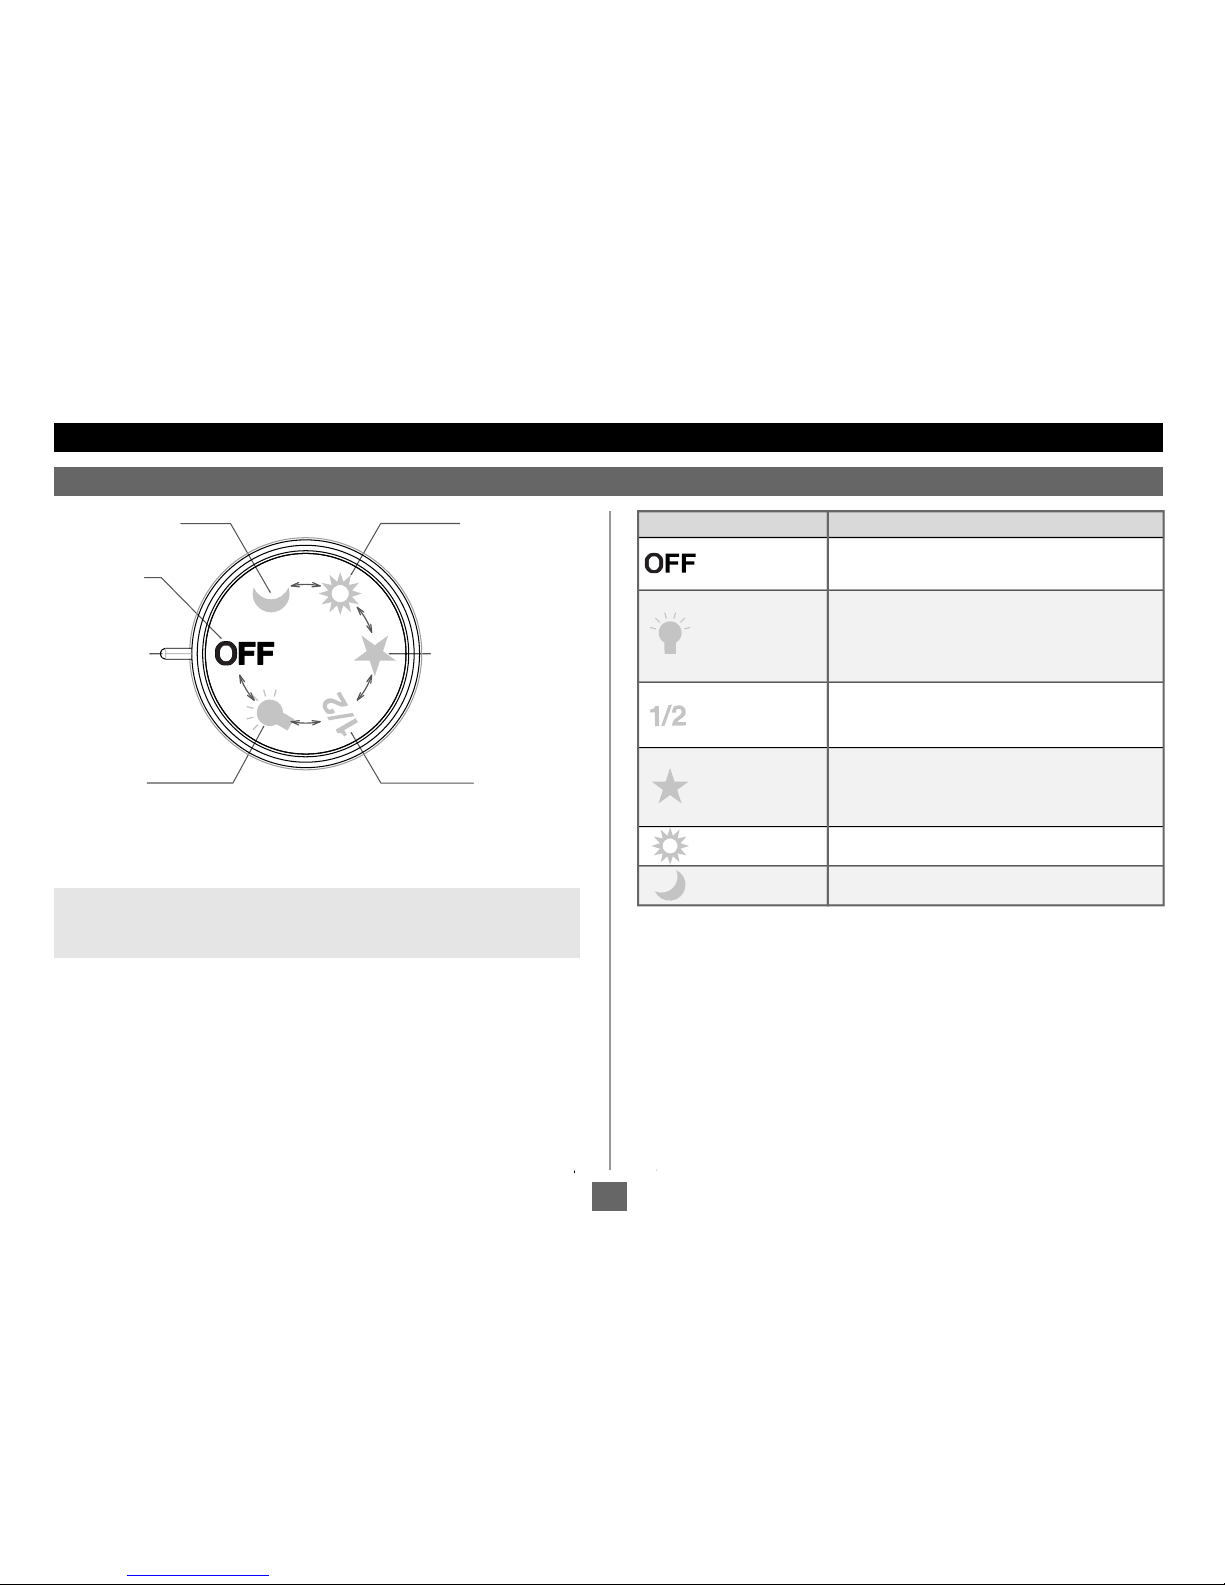
: Power OFF
: Preparati on
: Star-Scap e
Photograp hy
: Wide-Field
Astr oPhoto graphy
:
Solar track ing
:
Lunar tracking
Legend : Mode Description
Shuts off the power of Polarie.
Us ed fo r p ol ar al ig nm en t( Se t t o b e
parallel to the axi s of the diurnal mo tio n.) .
The built-in til t met er is backlighted in red
when the mode dial is set at this position.
A ha lf spee d of the celestial tracking rate
is selected for star-scape photography.
Ce le stial tr ac king rate is selected f or
wi de -f ield as tr op hotography with no
trailed stars.
Drives Polarie at the mean solar time.
Drives Polarie at the mean lunar time.
Lunar Tracking
Power OFF
Mode
Dial Pointer
Preparation
Solar Tracking
Wide-Field
Astrophotography
Star-Scape
Photography
Wi de -f ie ld ast ro ph ot og ra ph y : Ph ot og ra ph s of wid e- fi el d vi ew s of
constell ati ons and the Mi lky Way are ca lle d wide field p hot ography.
Usually night sca pes are no t inc lud ed in the frames of pho tographs
but they wi ll be in the b ack ground part of yo ur image.
Sta r-S cap e ph o to g ra p hy : P hot ogr aph s of w i de - fi e ld v iew s of
constell ati ons and the M ilk y Way plus ni ght landsc ape s under starry
skies th at are included i n t he frames of p hot ographs.
Color of the backlit legends on the mo de dial is chang ed if
the
rotating di rection of the tr acking motor i s s witched.
Track ing in northe rn hemisphere : Illuminated in red
Tracking in southern hemi sphere : Illum inated in green
BEFORE USE
Mode Dial
Wide-Fie ld astrophotograp hy vs. Star-Scape ph otography
The Polarie al low s yo u to not only take pi npo int photos of star s and
const ellat ions bu t also to crea te “star -scap e” photo s i n ni ght-sky
scenes by a ddi ng a mot ion l
ess night l and sca pe or si lho uet ted fig ure
in the foreground of your frame.
Star-Sca pe Photography
7
Page 8

A ta bl e be lo w sh ow s ne ce ss ar y eq ui pm en t an d it em s th at a re u se fu l fo r as tr o- ph ot og ra ph y wi th t he P ol ar ie .
Es se nt ia l : N ee de d su bj ec t to c on di ti on s : Us ef ul :
Description
Po la ri e
2 x AA -s iz e
Ba tt er ie s
(So ld comm erci ally )
Ex te rn al P ow er
Su pp ly
(So ld comm erci ally )
Ca me ra T ri po d
(So ld comm erci ally )
Ba ll H ea d
Ad ap te r
(So ld comm erci ally )
Polar Axis Scope
(Optional)
DS LR C am er a
wi th L en s( 1)
(So ld comm erci ally )
Le ns S ha de
(So ld comm erci ally )
Need
Item
Need
Ultra- sma ll and handy sta r tracker.
Alkaline batteries or rechargeable Ni-MH or
rechargeable Ni-Cd batteries are recommended.
Battery performance decreases in cold weather.
Be sure to prepare spare ones.
Power supply with USB-output (USB-mini Type
: DC4.4~5.25V) can be used . It is convenient
for long exposure wide-field astrophotography.
The tripod pan head with UNC1/4” thread is
required. It is recommended to use a sturdy
tripod. Included if purchased as a package.
Used to mou nt your cam era on the Pola rie.
So li d ba ll h ea d ty pe is reco mm ended.
Includ ed if purchased as a package.
It allows for a more accurate polar alignment.
A digi tal SLR camera w ith wide-ang le le ns is
the most pref erable. Rem emb er to bring the
battery for the camera and storage media
(CF, SD a nd etc.)with you , a lso.
It is usef ul to avoid unwant ed stray light and
le ss en dew cond en sa tions on t he l en s
surfac e o f your camera .
Description
Sh ut te r Re le as e
Ca bl e( 2)
(So ld comm erci ally )
Timer or Stopwatch
We ak A dh es iv e
Ta pe
(So ld comm erci ally )
De w He at er
(So ld comm erci ally )
Pl an is ph er e,
St ar C ha rt
Re d Fl as hl ig ht
Ou tf it f or c ol d
weather,Repellant
Shroud, Plastic bags
Item
It is used to avoid moving the camera and also
to c ontrol shutter exposure times. Genuine
parts are recommended.
It is used to measure the shutter exposure times.
It is used to hold the position of the focusing
ring after you focu s the lens to the object.
Autofocus lenses with inner focusing systems
may not hold the focus.
It is used to prevent the lens surface from dew
condensing during the photography session.
It is u sef ul to c onf ir m the d ir e ct ion s of
constellations and the position of stars.
It is used to read star charts, setting up and
dismantling equipment.
Take pr ecautions agai nst t he cold. Use an
insect repellent if necessary.
It is useful to protect equipment from a sudden
rain.
BEFORE USE
Requirements and Useful Items
8
Page 9

(1 )I t is s tr on gl y re co mm en de d that y ou r ca me ra have f un ct io ns
th at s at is fy t he f ol lo wi ng s pe ci fi ca ti on s.
A b ul b sh ut te r me ch an is m is needed for long ex po su re s. If i t is
no t available o n your ca me ra , both an ISO sp ee d setting f as te r
th an 320 0 an d a sh ut te r ex po su re time setting longer th an 30
se co nd s ar e re qu ir ed .
Sh ut te r re le as e ca bl es .
Wi de -a ng le d ph ot og ra ph ic l en se s ar e re co mm en de d.
Ma nu al Foc us is av ail abl e. Au to Fo cus re re ly wor ks in ni ght -
sk y sc en es .
DS LR cameras wi th an optical vie wf in de r or “L iv e Fo cu s” are
pr ef er ab le .
(2 )I t is best t o us e a remote re le as e ca bl e with functions to p re se t
th e shutter exposure times. In fr ar ed wir el es s re le as e models
ar e no t re co mm en de d.
BEFORE USE
Requirements and Useful Items
9
Page 10

PREPARATION
Polarie works w ith 2 AA al kal ine batteries which are sold separately. An external pow er supply is a vai lab le for the Pol ari e usi ng the USB-minib
plug (DC4.4V to 5.25V)*.
*Sanyo Lithiu m Ion b atterie s with USB out put (Enelo op KBC- L2B) is approv ed for use wit h P olarie as of N ov. 201 1.
I nserting th e Ba tteries
Open the battery co mpa rtm ent
cover by pus hin g down on the
tab of the cover as shown.
Batteries for the Polarie
Pus h d own on the tabPus h d own on the tab
Pul l t he c ove r to op enPul l t he c ove r to op en
N-S change
swi tch
N-S change
swi tch
1
Insert two AA alkaline batteries
in the correct direction.
2
U tilizing an E xt ernal Pow er S up ply
Use an external power sup ply
with USB-minib plug (D C4. 4V
to 5.25V) for this purpose.
If you co nn ect the externa l po we r su pply wi th the ba tt eries
inserted, t he ex ternal power supply ta kes precedence over th e
batteries.
Co nn ecting the e xt er nal p ow er su pp ly pr ev en ts th e ba tt er y
compartment cover from opening. Finish setting t he S- N swi tch i n
the battery compartment bef ore you con nec t the external power
supply.
Connect to the USB-minib pl ug
socket as shown in the photo.
1 2
Confirm the N-S change sw itc h
inside t he battery com par tme nt
is set t o wo rk corr ect ly in yo ur
lo cation. Swit ch to N i n the
northern hem isp her e or switch
to S in the southern hemisphere.
3
Replace the battery compartment
cov er so that the tab on the
cover fits in place.
4
Note:
USB -mi nib plu g so cke t USB -mi nib cab leUSB -mi nib plu g so cke t USB -mi nib cab le
10
Page 11

SETTING UP
Ex tensi on
cl amps
Ex tensi on
cl amps
To be even
Pul l apart ful lyPul l apart ful ly
To be even
Setting up the Polarie
This manual d esc rib es Polarie which comes w ith the M178-V tripod as a package. You ma y occ asi ona lly find descriptions in th e text not re lev ant
to your model. You should refer to the instruction manuals for your camera and tripod with this manual.
Place the tri pod o n even and solid
ground so that you have a stab le
ba se fo r you r pho togra ph y.
Lo osen the e xtens io n c lamp on
th e t ri pod l eg and d raw o ut th e
tripod leg un til it is at the desired
height.
Pull the tr ipo d le gs apart fully to
le t th e t ri po d s ta nd by itself.
Wh en nec es sa ry , ch an ge th e
height o f t he tripod by ad jus ting
th e t ripod le gs t o b e t he same
length
1/4 ” threa d so cket
(bo ttom)
1/4 ” threa d so cket
(bo ttom)
Cam era mou ntin dia lCam era mou ntin dia l
Bal l headBal l head
Cam era mou ntin g bl ock
Thu mb scre w
Cam era mou ntin g bl ock
Thu mb scre w
Thu mb scre wThu mb scre w
Mount the P ola rie on the ball h ead
ad ap te r of th e M 17 8-V tripod .
Attach the Polarie on the ball head
ada pt er s ecu re ly w ith the 1/4 ”
thr ea d s cr ew and t igh te n t he
camera mounting dial securely as
shown in the figure.
Loosen the two thum b screws and remove the camera mo unt ing
block from the Polarie as shown in the figure.
3
21
1/4 ” threa d
scr ew
1/4 ” threa d
scr ew
11
Page 12

SETTING UP
Bal l head
Cam era
mou nting
blo ck
Tur n the c amer a mo unting bloc k
whi le push ing the 1/4” th read scr ew
Bal l head
Cam era
mou nting
blo ck
Tur n the c amer a mo unting bloc k
whi le push ing the 1/4” th read scr ew
Attach another ball head adapter to the camera mounting block.
Push the 1 /4” th read screw protru ding from the center on t he
underside of the camera mounting block so that the 1/4” thread screw
is pushed out on front side. Attach the ball head adapter on the
camera mounting block with the protruded 1/4” thread screw and fix it
securely by turning the camera mounting block as shown in the figure.
Attach the camera onto the ball head-mounted Polarie. Make sure
that the camera is installed securely on the ball head adapter with the
camera mounting dial fully tightened.
Hol d w ith the han d s ecre ly
Cam era
mou nti ng d ial
Bal l h ead
Finis h
Cam era
mou nti ng d ial
Cam era mou ntin g bl ock
1/4 ” threa d
scr ew
Push
Mak e sure that all the lo cks are
fas tened f ully
Hol d w ith the han d s ecre ly
Cam era
mou nti ng d ial
Bal l h ead
Loc k l everLoc k l ever
Cam era
mou nti ng d ial
Mak e sure that all the lo cks are
fas tened f ully
Pu t t he camera mounting b lo ck
back on the Polarie and fix it securely
with the two thumb screws.
Note: Be sure to securely hold the
camera wi th your h and while
attaching it to a void dropping the
camera from the ball head adapter.
Also, make sure that all the screws
and lock levers are fastened fully.
Los ing balance due t o unlocked
levers could damage the camera or
lead to injury.
4 6
5
Cam era mou ntin g bl ock
1/4 ” threa d
scr ew
Push
Thu mb scre w
Thu mb scre w
Thu mb scre w
Thu mb scre wThu mb scre w
Thu mb scre w
12
Page 13

USING THE POLARIE
Flow of Operation What is Polar Alignment?
Polar align the Polarie
Setting various functions
on the camera
Determining a frame
Turning ON the Polarie
Taking photographs
North or south celestial pole
Diu rnal mo tion
of stars
Rotation axis
of Polarie
The Polarie works as a star trac ker when
set up to follow diurnal motion of stars.
It is es sen tia l that the rota tio n axis of the
Polarie is set to be para lle l to th at of the
diurnal motion of th e sta rs. This is cal led
polar alignment.
Using the Polarie in the
Northern Hemisphere
To set u p t he Pol ar ie , y ou n eed t o
lo ca te th e polar sta r f or both wide-
field a str op hot og rap hy and S tar -
Sca pe p hot og rap hy . T he p ola r
star is a 2 nd ma gni tu de sta r
ca ll ed Polaris. Y ou c an find
Po la ri s e as il y using either
of t he f ol lo wi ng m et ho ds .
Pl ace the P ol ar ie so that i ts
ro tation axis is paral le l t o t he
ea rth's axi s.
Se t a sh ut te r exp os ure time,
IS O speed and len s ap er ture
of your cam er a.
De termine a fr am e fo r a sho t
an d focus o n th e stars.
Po wer the Polarie a nd s el ec t
a tracking ra te .
Sh oot for t he s ta rs.
13
Page 14

USING THE POLARIE
Ori ent nor th
Bac klit in red
Lat itude
Nor th
Ori ent nor th
Nor th
Or ient no rth u sing Po larie 's
compass and face the front side of
the Polarie to the north. The
compass is stored inside the cap on
the back of the Polarie. Remove
the cap by turn ing c ounter-
clockwise to use the compass.
Polaris appears to remain at the same
lat itude during your photography
ses sion. It is rough ly the same
latitude as your location.
Unl ock the ball head an d tilt the
Polarie so that the built-in tilt meter
points your latitude.
Note:
Setting the mode dial to position
backlights the tilt meter in red.
The tilt meter is designed only for a
rough setting of the latitude.
Look through the polar sight hole
and confirm that Polaris can be seen
somewhere in the field of view.
In the event that Polaris is not there,
uncover the cap on the back side of
the Polarie and remov e the f ront
camera mounting block to make a
wide viewing hole.
Readju st the orientation of the
Polarie by slowly loosing the pan
head grip of your tripod so that Polaris comes into the field of view of
the polar sight hole.
Next, bring Polaris to the center of the polar sight's field of view and
firmly lock the pan head again.
Note: If your view through the polar
sight hole is blocked by the camera
mounted on the Polarie, turn the
camera to secure its field of view or
remove the camera while aligning
with Polaris.
1
2
3
1. Find Polaris using a compass and the latitude of your location
In the dir ecti on
of Polari s
Pan head grip
Loo k throu gh t he
pol ar sigh t ho le
In the dir ecti on
of Polari s
Pan head grip
Loo k throu gh t he
pol ar sigh t ho le
14
Page 15

Cassiopeoa
Extends 5 times
Extends 5 times
Big Dipper
Polaris
USING THE POLARIE
The constellations C ass iop eia and the Bi g D ipp er (part of Ur sa Major) are near P ola ris . You w ill be able to fi nd Polaris if you kn ow the position o f
these gr oup s of stars. Cassiopeia a nd the Big Dipper are aut umn and spr ing constellations respectively. Either co nst ell ati on is al way s above the
eastern or western horizon most of the year.
Directions 1:
Locate the two st ars th at form the outer edge of the Big Dipper as
shown in the above map. Draw an imaginary line st rai ght th rou gh the
tw o star s of t he dipper e dge. Yo u will s ee Pola ris eq ui dista nt
between the constellations.
Directions 2:
Cassiopeia looks like the letter “W” or the letter “M” depending on when
you observe it. Draw imaginary lines from the stars that form the outer
edges of the lette r “W” so tha t the t wo lines inters ect . Draw a n
imaginary line from the center of the “W” through the cross point of your
fir st line. Exten d it straight t hrough by about 5 times to get to Polaris.
Find Polarisu sin g th e guide m apb elo w. Yo u wi ll findi t easie r with
theh elp of acompass sin ce Polarisis loc ate dintheno rth .
Tu rn th e P ola rie to war d P ola ris a nd lo ok through the po lar si ght
ho le a nd co nfir m th at Po lari s is se en som ew here in the fi eld of
vi ew.
1 2
2. Find Polaris from Cassiopeia and the Big Dipper
15
Page 16

Small Magellanic
Cloud
Large Magellanic Cloud
HYDRUS
OCTANS
MENSA
VOLANS
CARINA
CENTAURUS
CRUX
CHAMAELEON
MUSCA
DORADO
α
γ
β
δ
β
γ
1
γ
2
γ
3
υ
τ
σ
χ
80°
70°
Small Magellanic
Cloud
Large Magellanic Cloud
80°
70°
1
1
2
3
I南半球での極軸合わせについて事前に八分儀座を調べることを推奨します。
USING THE POLARIE
Octans is a constellation loc ate d nea r the s out h celestial pole and it can be used to a lig n the P ola rie i n the southern hemisphere. Unlike Polaris
which is a bright 2nd magnitude star adjacent to the north celestial pole, Octans is made up of dark stars about 5th magnitude on average.
The nearest st ar to th e south celestial po le is Sigma Oc tan tis , which is one of f our stars forming a trapezoid in O cta ns, visible at 5. 5th magnitude.
There are a few methods to locate the inconspicuous Octans using the surrounding stars.
No te : D ep en di ng on
th e seas on of y ea r,
the o rient ation of th e
Octans changes.
Using the Polarie in the Southern Hemisphere
16
Page 17

USING THE POLARIE
1. Find Octans using Small Magellanic Cloud and the Southern Cross (Crux) as pointers
Draw an imaginary line between th e cen ter o f Sma ll Ma gel lan ic Cloud and Beta Crux and divide it at a r ati o of on e to two. You will find the four
stars of Octans at that location.
2. Find Octans using the arrangement of stars in the Southern Cross (Crux) as pointers
Draw an ima gin ary li ne straight through the tw o s tar s (Alpha and Beta Cr ux) of the Southern Cross mak ing th e vertical line of t he cro ss toward the
Small Magellanic Cloud. You will find the four stars of Octans at a place about 4.5 times extended from the span of the two stars.
3. Find Octans using Small Magellanic Cloud, Beta Hydrus and Gamma Octantis as pointers
If you lo ok toward Cru x from the Sm all Magellani c C loud, you wil l see Bata Hydru s. Going sout hward from Ba ta Hydrus will f ind you Gamma Oc tans
which consists of a row of three stars. C ont inue looki ng the same d istance towar d the Souther n Cross and y ou will fi nd the four s tars of Octan s.
Point the Polarie to the South Celestial Pole
Uncover the cap on th e back side of the Polarie a nd remo ve the front c ame ra mounting blo ck to make a wi de look-through ho le so that you can
secure about 14 degrees of field of view.
There is a group of four sta rs which form s a tra pez oid in Octans. The st ars are Sig ma( ) ,Ta u( ), Chi( ) and Upsilon( ) Octantis. L ook
through the hole and confirm if the four stars of Octans can be seen in the center of the hole. You should use a binocular with 6 to8 magnifying
power to locate the four stars if the sky is not dark enough.
While looking thr oug h the polar sight ho le, readjust the Polarie i n the direction of t he south celestial p ole so that Sigma Oc tan tis co mes nearest to
the center of its field of view.
Note: It is recommended to use an optional Polar axis finder for Polarie for better pointing accuracy.
17
Page 18

Mo de d ia l
N-S ch ange sw itchN-S ch ange sw itch
USING THE POLARIE
Basic Camera Settings
Set camera's various modes, shut ter exposur e times and lens aperture
val ues. For d etails refe r to instru ction manua ls of your camera.
Switching ON the Polarie
Tur ning the mode dia l to powe r up the Polarie and selecting a mode
for your plann ed imaging.
Shutter Speed:
Set to bulb (B).
Lens Aperture (F-Stop):
Fully open or stop the lens down by one or two steps.
ISO Speed (Light Sensitivity):
Doubling the ISO setting increases se nsi tiv ity b ut it w ill d ete rio rat e
image quality if boosted too much.
Exposure Time:
Longer exp osu res can gath er more ligh t to disp lay faint im age s,
but some star trailing may occur.
Sharp Focus:
Focus the l ens man ual ly to in fin ity or unti l the stars look as sharp
as possible if the camera has "Live Focus" mode.
Note:
Switch the lens from Auto to Manual Focus.
Attach th e zoom fo cus ring with tape when you put a dew heater
around the lens.
Determine Frame:
The s tar s are hard to v iew through the camera's fi nde r frame or on
its LCD screen unless you are viewing a ve ry br igh t sta r or pl ane t.
In stant resu lt s o f d ig ital ca meras make it easy to chec k t he
captured images on the spot. It is reco mme nde d to take a test
photo using th e fas tes t ISO sp eed to pick up mor e sta rs for this
purpose. Remember to change the ISO setting back.
Setting the Parameters:
The legend on the mode dial is
backlit in red when the rotation is set
for the northern hemisphere. Th e
legend is backlit in green if the N-S
switch i s set for the southe rn
hemisphere. Th e b ack lig ht w ill
flicker if the batteries run low.
The N-S change switch is next to the
USB-minib plug socket in the battery
compartment.
18
◎
◎
◎
◎
◎
◎
Page 19

USING THE POLARIE
: Star-Scape Photography Mode
If this mode is se lec ted , the Polarie tracks sta rs at half the spe ed of the diurnal motion of the stars. The ter res tri al objects are trailed less as
compared wi th images t ake n by wid e-f ield photography at a given ex pos ure time. Short ex pos ure times w ill allow you to take images with n o star
trails. P hot ogr aphy at half th e s pee d o f t he star's diurnal motio n l imi ts the movement se en in terrestrial objects . Ad ding landscape o r
architectural objects in the foreground will make your photos more impressive.
The tab le below sh ows recommended maxi mum shutter exposure t ime s to hold pin poi nt
star images at Star-Scape mode.
f=100mm
2sec.
2sec.
2sec.
3sec.
3sec.
4sec.
5sec.
8sec.
15sec.
f=85mm
3sec.
3sec.
3sec.
3sec.
4sec.
5sec.
6sec.
9sec.
18sec.
f=50mm
5sec.
5sec.
5sec.
6sec.
7sec.
8sec.
10sec.
16sec.
31sec.
f=35mm
7sec.
7sec.
8sec.
9sec.
10sec.
12sec.
15sec.
22sec.
45sec.
f=28mm
9sec.
9sec.
10sec.
11sec.
12sec.
15sec.
19sec.
28sec.
56sec.
f=24mm
11sec.
11sec.
12sec.
13sec.
14sec.
17sec.
22sec.
33sec.
65sec.
f=20mm
13sec.
13sec.
14sec.
15sec.
17sec.
21sec.
27sec.
40sec.
78sec.
f=15mm
18sec.
18sec.
19sec.
21sec.
23sec.
28sec.
36sec.
53sec.
105sec
0°
(Celestialequator)
±10°
±20°
±30°
±40°
±50°
±60°
±70°
±80°
Focal length of
photographic
lens(mm)
*1
Separation from
the celestial equator
Not e
*1: The above focal lengths show actual focal lengths of your camera. It is not necessary to convert them to focal lengths in 35mm film format if APS-C, 3/4 or other format is utilized for your camera.
*2: Th e ab ove exp osu re t imes ar e calcu lated o n the a ssum pti on t hat the pi xel size of an ima ging de vice is 0.0 01m m. All owab le maxi mum exp osure t imes wi ll c han ge a cco rdin g t o th e
s pecific ati ons of your ca mer a an d l ens. I t i s re com mended you tes t y our sys tem to det ermine the bes t e xpos ure time.
*3:The ab ove exp osure t imes wi ll be e xte nded by th ree tim es and mor e if yo u use a 35 mm f ilm format ca mera .
★
North
East
West
Large
Small
[Diurnal Motion of Stars]
Polaris
Sho rt expo sure tim e
pre vents s tar trai ling
19
Page 20

f=100mm
1min.
01sec.
1min.
02sec.
1min.
05sec.
1min.
11sec.
1min.
20sec.
1min.
36sec.
2min.
03sec.
3min.
00sec.
5min.
56sec.
f=85mm
1min.
12sec.
1min.
13sec.
1min.
17sec.
1min.
24sec.
1min.
35sec.
1min.
53sec.
2min.
25sec.
3min.
32sec.
6min.
59sec.
f=50mm
2min.
03sec.
2min.
05sec.
2min.
11sec.
2min.
22sec.
2min.
41sec.
3min.
12sec.
4min.
07sec.
6min.
01sec.
11min.
52sec.
f=35mm
2min.
56sec.
2min.
59sec.
3min.
08sec.
3min.
24sec.
3min.
50sec.
4min.
35sec.
5min.
53sec.
8min.
36sec.
16min.
58sec.
f=28mm
3min.
41sec.
3min.
55sec.
3min.
55sec.
4min.
15sec.
4min.
48sec.
5min.
43sec.
7min.
22sec.
10min.
46sec.
21min.
12sec.
f=24mm
4min.
17sec.
4min.
21sec.
4min.
34sec.
4min.
57sec.
5min.
36sec.
6min.
41sec.
8min.
35sec.
12min.
33sec.
24min.
44sec.
f=20mm
5min.
09sec.
5min.
14sec.
5min.
29sec.
5min.
57sec.
6min.
43sec.
8min.
01sec.
10min.
18sec.
15min.
04sec.
29min.
41sec.
f=15mm
6min.
52sec.
6min.
58sec.
7min.
19sec.
7min.
56sec.
8min.
58sec.
10min.
41sec.
13min.
45sec.
20min.
06sec.
39min.
17sec.
USING THE POLARIE
:Wide-Field Astrophotography Mode
If this mode is s ele cte d, th e Pol ari e fol low s sta rs at the same speed as the diurnal motion of th e sta rs. It is suitable for capturing dark stars and
faint celestial objects. It is possible to avoid star trails but the terrestrial objects are trailed in long exposure.
The table b elo w shows allowable maximum shu tte r ex pos ure times to hold pinp oin t star
images subject to a polar alignment at an error of 2 degrees.
: Solar Tracking Mode Lunar Tracking Mode
Since the Sun and Moon appear to move ac ros s t he sky at a di ffe ren t s pee d than the stars, Po lar ie inc lud es a Solar and Lu nar ra te option. These
rates are useful especially during an eclipse, allowing the user to maintain constant tracking on the object for up to 4 hours."
CAUTION: Never loo k directly at the sun with your nak ed eyes or through this pr odu ct or a camera mounted on the Polarie. Perm ane nt and
irreversible eye damage may result.
Focal length of
photographic
lens(mm)
*1
Separation from
the celestial equator
0°
(Celestialequator)
±10°
±20°
±30°
±40°
±50°
±60°
±70°
±80°
No star trails
Blurred terrestrial objects
Note
*1:The ab ove focal lengths show actual foc al len gth s
of yo ur camera. I t i s not n ecessary to co nvert
them to focal lengths i n 3 5mm fi lm format if APS-C,
3/4 or other format is utilized for your camera.
*2:The above exposure times a re calculated on the
assumption tha t the pixel si ze of an imaging device
is 0.001mm. Allowable maximum exposure times
will chan ge according to the specifications of your
camera and le ns. It is recommended you t est y our
system to determine the best exposure time.
*3: The above exposure times will be extended by three
times and more if you use a 35mm film format camera.
20
Page 21

SPECIFICATIONS
Type
Tracking Mode
Wheel gear
Wo
rm gear
Bearings
Drive
Maximum Loading weight
Polar sight hole
Ti
lt meter
Standard accessory
Wo
rking voltage
Operating temperature
Electricity consumption
Duration of operation
Dimensions
We
ight
Optional accessory
Ultra compact (equatorial) tracking platform
Celestial tracking rate. 1/2 of celestial tracking rate. Solar tracking rate (Mean solar time).
Lunar tracking rate (Mean lunar time) : Usable in both northern and southern hemispheres
57.6mm dia. aluminum alloy axis with full-circle 144-tooth
9mm dia. high tension brass
2 pieces
Pulse Motor (Stepper Motor)
2.0kg (4.4 lbs)
About 8.9° field of view
Angles between 0° and 70° (5° increments)
Compass
2 x A
A-size battery : DC2.4~3.0V
External power supply : DC4.4~5.25V
0 degree to 40 degrees C (104 F)
DC3V.
0.4A at a loading weight of 2.0kg (4.4 lbs)
About 2 hours: At 20 C (68 F) degrees temperature, a 2.0kg (4.4 lbs) loading weight with use of Alkaline batteries
95x137x58mm (3.7x5.9x2.3 inches)
740g (26.1 oz) without batteries
A
dedicated polar axis scope for Polarie
Polarie Star Tracker
21
Page 22

SPECIFICATIONS
Model
Tripod legs
Minimum tripod length
Wo
rking height
Elevator pole extension
Camera thread size
Maximum loading weight
We
ight
Standard accessory
M-178V
4-section legs
555mm (22”)
Adjustable from 540mm to 1,780mm (21.2 to 70 inches)
Geared part : 200mm (7.9”), Friction up and down part (Center column) : 290mm (11
4”)
UNC1/4 inch
About 3.0kg (6.6 lbs)
Tr
ipod : 1.98kg (4.3 lbs) without pan head
QHD-33 Ball head adapter : 130g (4.58 oz)
QHD-43 Ball head adapter : 158g (5.57 oz)
QHD-43 (Pre-installed on the tripod head) and QHD-33 Ball head adapters
Tripod for Polarie (If purchased as a package)
22
Page 23

APPENDIX
Using an optional Polarie Polar Axis Scope
Your polar alignment on the Polarie can be improved with use of the dedicated polar axis scope sold separately.
Parts Descriptions
Water level
Line marks
Eyepiece of the polar axis scope
(6x20 scope with 8-degree
field of view)
Time g rad uation circle
(10-mi nut e increments)
Date graduation circle
(2-day increments)
Meridi an offset scale
(Adjus tab le between
E20 an d W 20 at
5-degr ee increments)
Eyepiece diopter
adjustment ring
Tim e merid ian indi cator
Eye piece b arre l
23
Page 24

APPENDIX
Using the Polarie Polar Axis Scope in the Northern Hemisphere
Example: If your location is Tokyo, which has a longitude of 139° E,
you need to offset the standard time meridian indicator by 4° in the
direction of E after you set to 0 degree on the meridian offset scale.
Point th e Polarie in the direction
of nort h us ing its p ol ar si gh t
hole.
Lo ok t hr ou gh t he p ol ar a xi s
sc op e and t urn the e yepiece
diopter adjustment rin g so th at
the reticle can be seen clearly.
Ch eck the differe nce betw ee n
th e stan da rd time m eridian o f
your region and yo ur ob ser vin g
si te b ef or e you set up t he
Polarie.
If th e observing site is east of
standard time meridian, rotate the
time merid ian indicator in the
directi on a s indicated E on the
meridian offset scale.
If the observing site is west of standard time meridian, rot ate the
ti me meridia n i ndicato r i n th e di recti on as in dicated W on t he
meridian offset scale.
1
2
3 4
Match the date graduation circle
with your observing t ime b y
tur ning the eyepiece. You can
move the time meridian indicator
by rotating the eyepiece while you
hold the date graduation circle.
*Th e time and date graduat ion
circl es read 2 1h 40m on
December 20th in the figure.
Rot ate the dio pter
adj ustment rin g of
the eyepie ce
Rim of pol ar a xis
sco pe
Hold the non knurled part of the ey epiece
Rim of pol ar a xis
sco pe
Hold the non knurled part of the ey epiece
Hold the non knurled
part of the eyepiece
Loo k throu gh
Rot ate the dio pter
adj ustment rin g of
the eyepie ce
Loo k throu gh
Rotat e the date
gradu ation circle
Hol d the n on k nurl ed part wit h fi ngers
Hold the non knurled
part of the eyepiece
Hol d the n on k nurl ed part wit h fi ngers
Rotat e the date
gradu ation circle
No difference in longitude from
the standard time meridian
Difference by 4 degrees from
the standard time meridian
December
20th
21h40m
24
Page 25

Bubble
Line marks
APPENDIX
Un cover t he ca p on the ba ck
side of th e Polarie and remove
the front camera mounting block.
Insert the polar axis scope into
the center op eni ng hole of the
Polarie until snug.
Turn th e time graduation circle
by holding the sides of the water
le ve l s o that you bring the
bubble to the middle of the level.
Look th rou gh the pola r axis sc ope and confirm that Polaris ca n be
seen somewhere in the fiel d of view. Readjust the orie nta tio n of
the Polarie by slowly loosening t he pa n hea d gri p of your tripod so
th at i s set a t a de si gn at ed
position on th e reticle in the fie ld
of view. If the field of v iew is
too dim to see the reticle, point
a dim red fl ash lig ht to the fr ont
of the p ol ar axis s co pe to
slightly illuminate the reticle.
Caution:
Lo ck the p an he ad se curel y wh en you h ave c omple ted p olar
alignment. Be careful not to change the alignment.
Uncover the cap
Water l evel
Uncover the cap
Remove the camera
mounting block
and camera
Insert the polar
axis scope
Remove the camera
mounting block
and camera
Insert the polar
axis scope
Water l evel
Pol ari sPol ari s
5
8
6
7
25
Page 26

Octantis
σ
(Sigma)
χ(Chi)
τ(Tau)
υ(Upsilon)
Magnitude
5.5
5.2
5.6
5.7
γ
2
β
υ
τ
σ
χ
γ
3
Field of view of
the po lar axi s scope
Octant is four stars
Precession
Position of
Polaris in 2011
Polar axi s scope's Fie ld of view
Th e ori entat ion o f the reti cle
pa tt er n ch an ges acc or di ng t o
th e se as on s and hou rs .
The o rie n tat i o n o f t h e
ret icl e p att e rn c han ges
ac co rd in g to th e se as on s
an d ho ur s
APPENDIX
Slowly remo ve the pola r axis scop e from the Polarie and replace
the cap and camera mounting block.
The position of the north ce les tia l pol e mov es gradually each year
due to precession. According to this , the po sit ion of Pol ari s shifts
every year as s how n in th e figure. Place Polaris at a pos iti on on the
alignment scale in the re tic le to matc h the year of yo ur observation,
between 2005 and 2025.
9
1
2
3
Usi ngthePola rie PolarAxis Scop einthe
Sou thernHemis pher e
Se t up th e P ol ar ie mounted on t he t ri po d on a level ground
wh er e you can see Oc ta ns in the sky. Po in t th e Polarie in the
di re ct io n of s ou th b y us in g th e co mp as s.
Re fe r to se t up procedures 2 , 5 a nd 6 that a re d es cr ib ed for th e
us e in t he n or th er n he mi sp he re .
Yo u se e Octans in t he field of vi ew of the po la r a xi s scope.
Loo se n the p an h ead s lo wly a nd pl ace O ct ans a t the s et
po si ti on i n th e reticle as s ho wn in t he figure b y rotating t he
ey ep ie ce o f th e po la r ax is s co pe .
26
Page 27

γ
2
β
υ
τ
σ
χ
γ
3
Fi eld o f vie w
of the polar
ax is sc ope
Lo osen the pan hea d g rip fo r a dju stm ent
Ma tch w ith t he or ienta tion of th e fou r sta rs
The or ien tation of the re ticle pattern
ch an ge s ac co rd in g to t he s ea so ns
and hours.
υ
τ
σ
χ
Fi eld o f vie w
of the polar
ax is sc ope
Mach with each other
APPENDIX
Ma tc h the fo rm of th e Octantis four stars o n the re ti cl e wit h the
fo ur s ta rs o f Oc ta ns w hi le l oo ki ng t hr ou gh t he p ol ar a xi s sc op e.
Lo ck th e pa n he ad firmly
af te r co mp le ti ng the po la r
al ig nm en t.
No te :
Ta ke much c ar e no t to lo se t he balance of t he Polarie wh en you
lo os en t he l oc k of t he p an h ea d gr ip .
Slo wl y rem ove t he po lar a xis s cop e f ro m t he Po lar ie an d
re pl ac e th e ca p an d ca me ra m ou nt in g bl oc k.
6
54
Oct ant is
fou r s tars
Oct ant is
fou r s tars
27
Page 28

59ki-11-(80000094)-2S-84-(miz)(M)(k)
 Loading...