

Page 1

VIVOTEK Fixed Dome & PTZ Series
Mounting Cap
Installation Guide
Using AM-520 mounting cap
and compatible accessories
Rev. 1.2
IP Surveillance
Page 2
Revision History:
* Rev. 1.0: Initial Release
* Rev. 1.1: Added supported models
* Rev. 1.2: Threads have been added to the exterior for mount poles. Added FE8181 series
to the list of supported models.
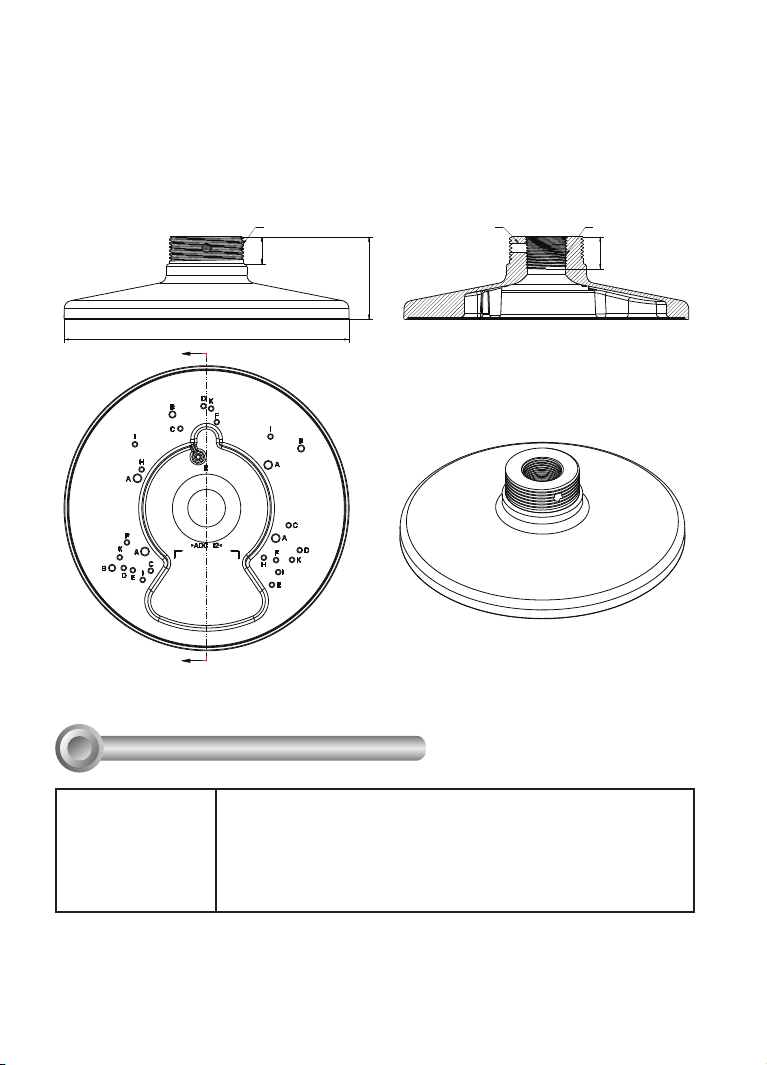
AM-520 Mounting Cap Mechanical Drawings
1-1/2"
17
180
C
C
Compatible VIVOTEK Cameras
I
52.2
M6
3/4" NPT
20
SECTION C-C
Fixed Dome series FD8361 / FD8361L / FD8362 /FD8362E / FD8363 / FD8335H/
FD8372 / FD8162 / FD8135H / FD8163 / FD8131V / FD8133V/
FD8134V / FE8172V / FE8171V / FE8174/ FE8174V / FE8181
/ FE8181V / MD7530 / MD7560 / MD8562 / FD8164 / FD8137H
/ FD8131 / FD8133 / FD8134 / FE8172 / F8173 / FD8164V /
FD8137HV
You may also refer to VIVOTEK's website for the list of supported models. Support for other models can
be available through time.
2
Page 3
Installation
II
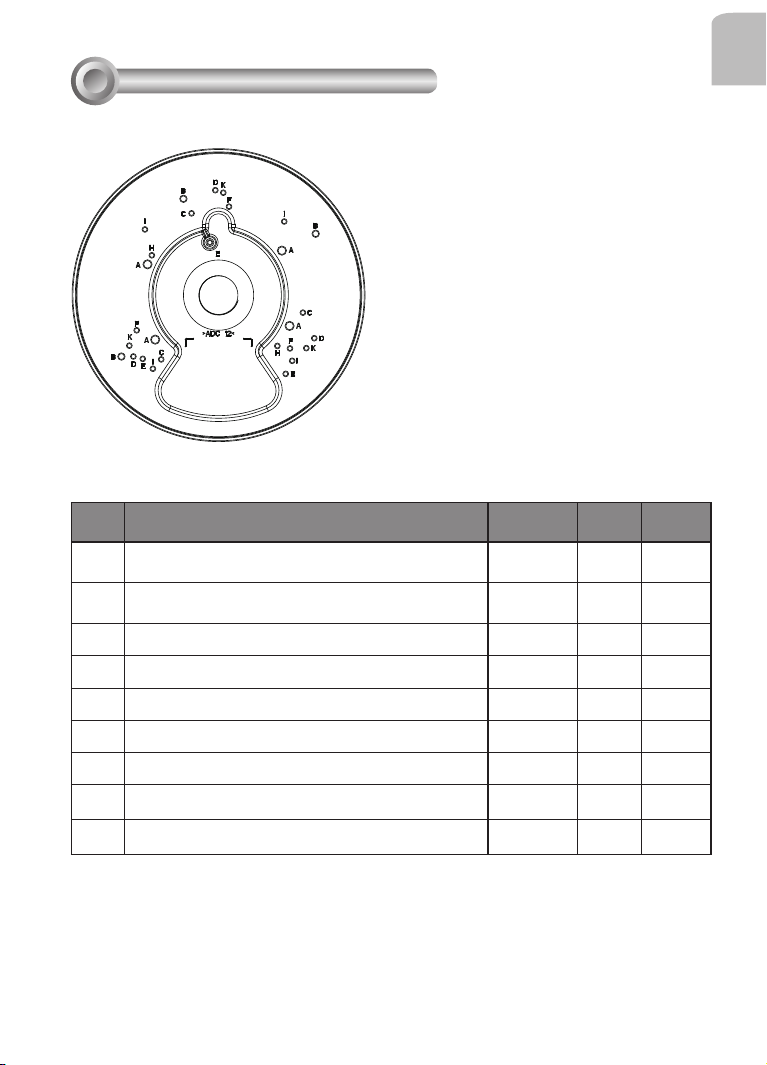
Mounting Hole Denitions
Above are the locations of different groups of mounting holes for matching different
cameras:
Hole
Applicable Cameras Screw No. of
Type
FD8361 / FD8361L / FD8362 /FD8362E / FD8363
A
/ FD8335H/ FD8372
FD8162 / FD8135H / FD8163 / FE8181 /
B
FE8181V
FD8131V / FD8133V/ FD8134V
C
FE8171V / FE8172V / FE8174V
D
MD7530 / MD7560 / MD8562
E
FD8164 / FD8137H
F
FD8131 / FD8133 / FD8134
H
FE8172 / FE8173 / FE8174
I
K FD8164V / FD8137HV
M5X10 round
head
M4X12 round
head
M3X6 round
head
M3X8 binding
head
M3X6 round
head
M3X6 round
head
M3X6 round
head
M3X8 binding
head
M3X6 round
head
screws
Screw
pack
4
3
3
3
3
3
2
4
C/E/F/K
3
English
A
B
C/E/F/K
D
C/E/F/K
C/E/F/K
H
I
3
Page 4
For cabling and conguration details with each network camera, please refer to their
documentation.
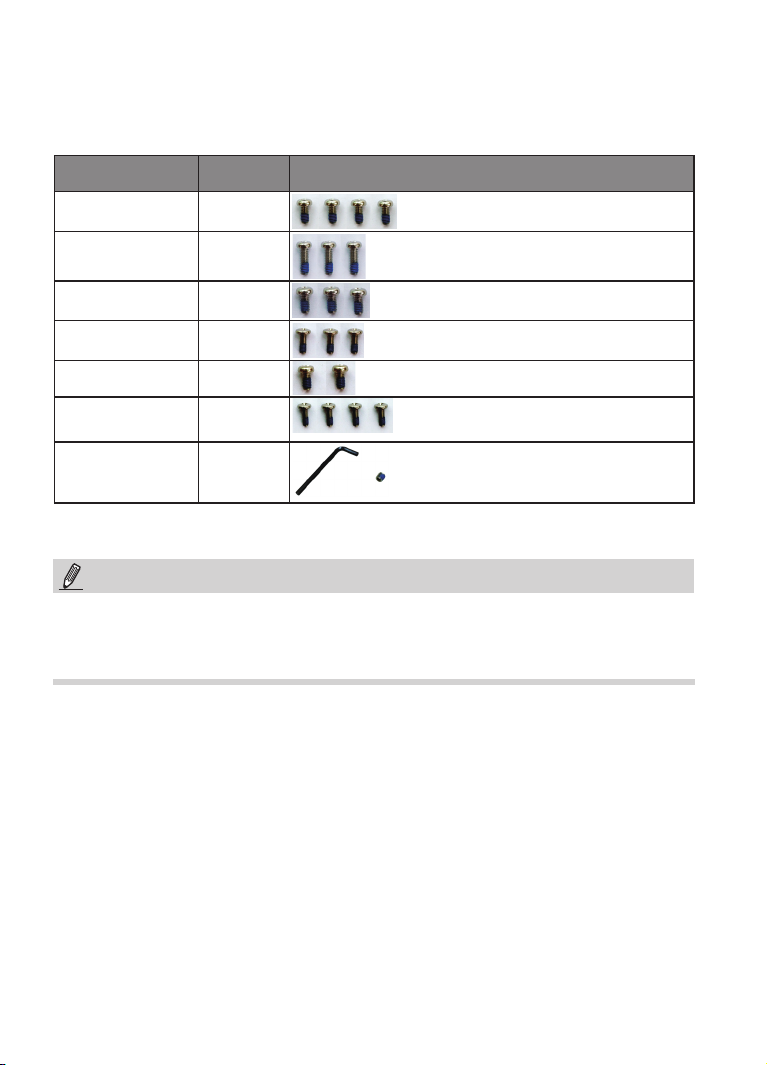
Refer to the table below for the description of the included screws:
Screw Description No. of
screws
M5X10 (A) 4
M4X12 (B) 3
M3X6 (C/E/F/K) 3
M3X8 (D) 3
M3X6 (H) 2
M3X8 (I) 4
Material char.
Hex wrench and hex
socket screw
1
NOTE:
1. Route cables before you secure the accessories to a wall.
2. For details on the cable connections with each camera, please refer to their Quick
Installation Guide.
4
Page 5
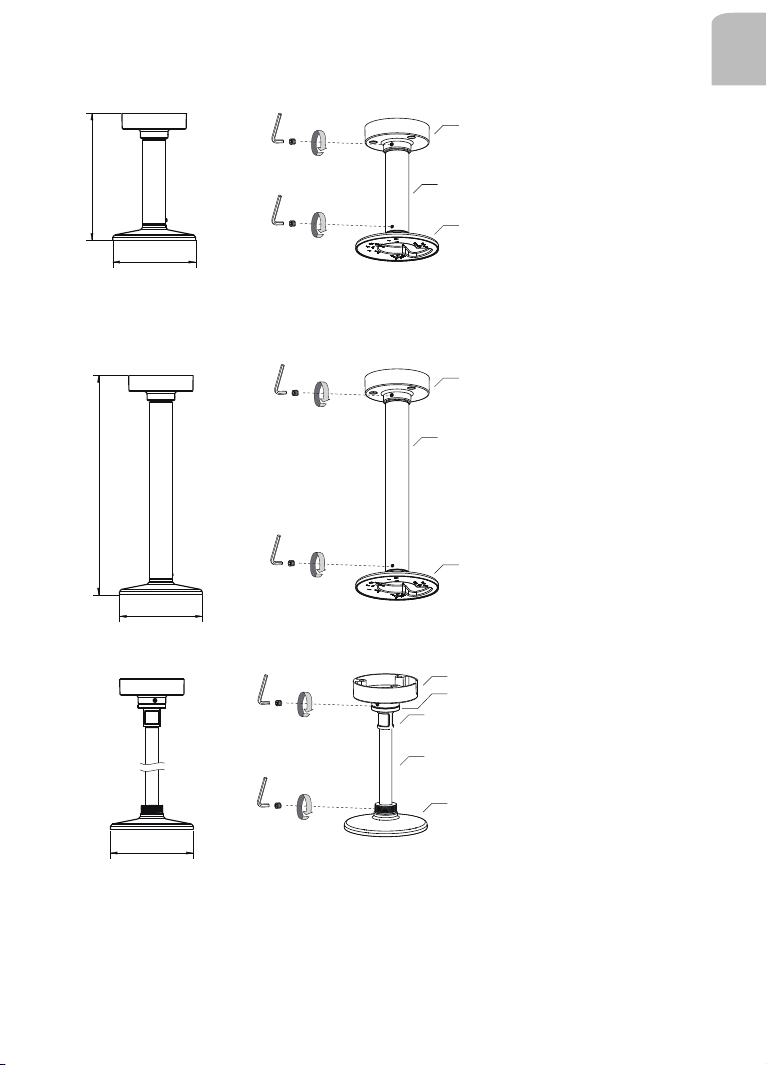
Conguration - Pendant Pipe
English
AM-118
276 mm
476 mm
AM-116
AM-520
180 mm
AM-118
AM-117
AM-520
180 mm
AM-118
AM-522
3/4" Female adapter
3/4" pendent pipe
180 mm
Note: The 3/4" female adapter is separately purchased.
5
AM-520
Page 6
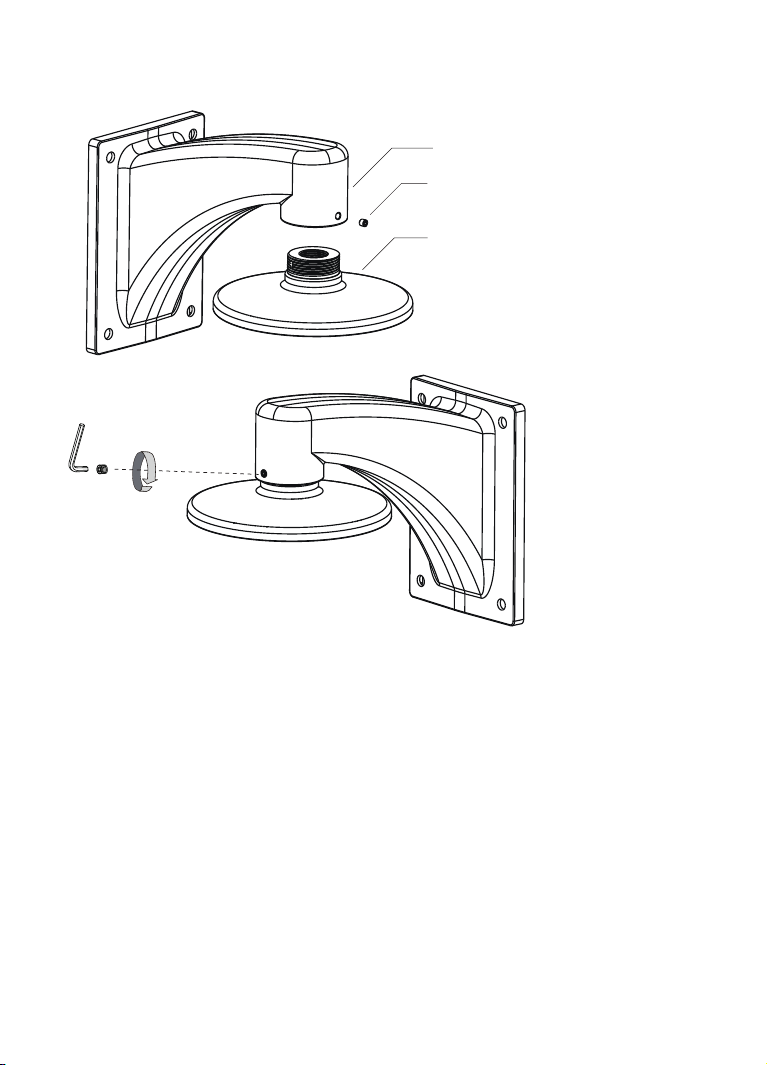
Conguration - Wall Mount
AM-212
HEX SOCKET SCREW
AM-520
6
Page 7

Conguration - Gooseneck
English
AM-221
HEX SOCKET SCREW
AM-520
NOTE:
When installing the mounting cap, take note that the orientation of the mounting cap can
affect the camera's shooting direction. You may need to remove the mounting cap, rotate,
and re-install it for the best orientation. Use the hex wrench to tighten its retention hex
socket screw when done.
7
Page 8

Installing Camera to Mounting Cap
Refer to the matching table on page 4 for the mounting hole information for your camera.
1. You should route cables through other accessories before you install cameras to the
mounting cap.
2. Route power lines and other cables through the mounting cap.
3. Orient and install the camera to the mounting cap.
4. Connect cables to the camera.
5. Install the mounting cap to other accessories, e.g., wall-mount bracket.
6. Proceed with initial setup such as enabling network access, focus tuning, or zooming.
When done, secure the outer dome cover.
Some installation samples are shown below:
FD8134
M3X6 Screws
RJ-45
coupler
H holes
8
Page 9

Note that for cameras that come with cable glands, e.g., FD8134 and FD8134V, it can be
tricky passing them through a 3/4" pendant pipe.
From local network
2
1. You can pass the cable gland and other wires
into or through the pendant pipe, while leaving
the RJ-45 connector behind.
2. Route another Ethernet cable from the local
network through the other end of the pendant
pipe.
English
1
3. You can then install the pendant pipe.
9
Page 10

You can then connect the RJ-45 from the camera with that from the local network using an
RJ-45 coupler. When done, press the coupler and the cables into the recess of the bracket.
RJ-45 coupler
Align and install the camera to the bracket.
10
Page 11

FD8134V
FD8135H
M4X12 Screws
English
M3X6 Screws
C holes
B holes
11
Page 12

FD8362E
A HOLES
12
Page 13

MD8562
E holes
English
M3X6 Screws
Press and route cables through here
13
Page 14

FE8172V / FE8174V
For details routing and preparing for waterproof cabling, please refer to the camera's Quick
Installation Guide.
M3X8 Screws
D holes
FD8164 / FD8137H
F holes
14
Page 15

FD8361L
English
M5X10
A holes
Route cables through
here
15
Page 16

FD8361
1
1. Secure 2 of the mounting screws
(those that are away from the routing
hole). Do not completely tighten the
screws yet. Refer to the previous
page for mounting hole positions.
2. Pass cable assembly through the
adapter and the 3/4" pipe.
M5X10
5 ~ 10 cm
2
3. Install another 2 screws to the positions
close to the routing hole.
3
16
Page 17

FE8172 / FE8173 / FE8174
FD8164V / FD8137HV
English
I holes
K holes
17
Page 18

FE8181 / FE8181V
B holes
B holes
18
 Loading...