

Page 1
Page 2
Preface
Copyright
©2016 Vivitek. is a trademark of Delta Electronics, Inc. Other trademarks
are the properties of their respective owners. Values, weights and dimensions are
approximate. Specications are subject to change without prior notice.
Disclaimer
The information in this document is subject to change without notice. The manufacturer
makes no representations or warranties with respect to the contents hereof and
specically disclaims any implied warranties of merchantability or tness for any particular
purpose. The manufacturer reserves the right to revise this publication and to make
changes from time to time in the content hereof without obligation of the manufacturer to
notify any person of such revision or changes.
Trademark Recognition
HDMI, the HDMI Logo, and High-Denition Multimedia Interface are
trademarks or registered trademarks of HDMI Licensing LLC in the
United States and other countries.
MHL, the MHL logo, and Mobile High-Denition Link are trademarks
or registered trademarks of MHL licensing, LLC.
All other product names used in this manual are the properties of their respective owners
and are acknowledged.
ii
Page 3
Important Safety Information
Important:
It is strongly recommended that you read this section carefully before using Qumi. These
safety and usage instructions that will make sure you enjoy many years of safe use of
Qumi. Keep this manual for future reference.
Symbols Used
Warning symbols are used on the unit and in this manual to alert you of hazardous
situations.
The following styles are used in this manual to alert you to important information.
Note:
Provides additional information on the topic at hand.
Important:
Provides additional information that should not be overlooked.
Caution:
Alerts you to situations that may damage the unit.
Warning:
Alerts you to situations that may damage the unit, create a hazardous environment, or
cause personal injury.
Throughout this manual, component parts and items in the OSD (On-Screen Display)
menus are denoted in bold font as in this example:
“Press the Menu button on the remote control to open the Setting menu.”
General Safety Information
• Do not open the unit case. There are no user-serviceable parts in the unit. For
servicing, contact qualied service personnel.
• Follow all warnings and cautions in this manual and on the unit case.
• The projection light source is extremely bright by design. To avoid damage to eyes,
do not look into the lens when the LED illumination is on.
• Do not place the unit on an unstable surface or stand.
• Avoid using the system near water, in direct sunlight, or near a heating device.
• Do not place heavy objects such as books or bags on the unit.
Note:
RG1 IEC 62471-5:2015.
iii
Page 4
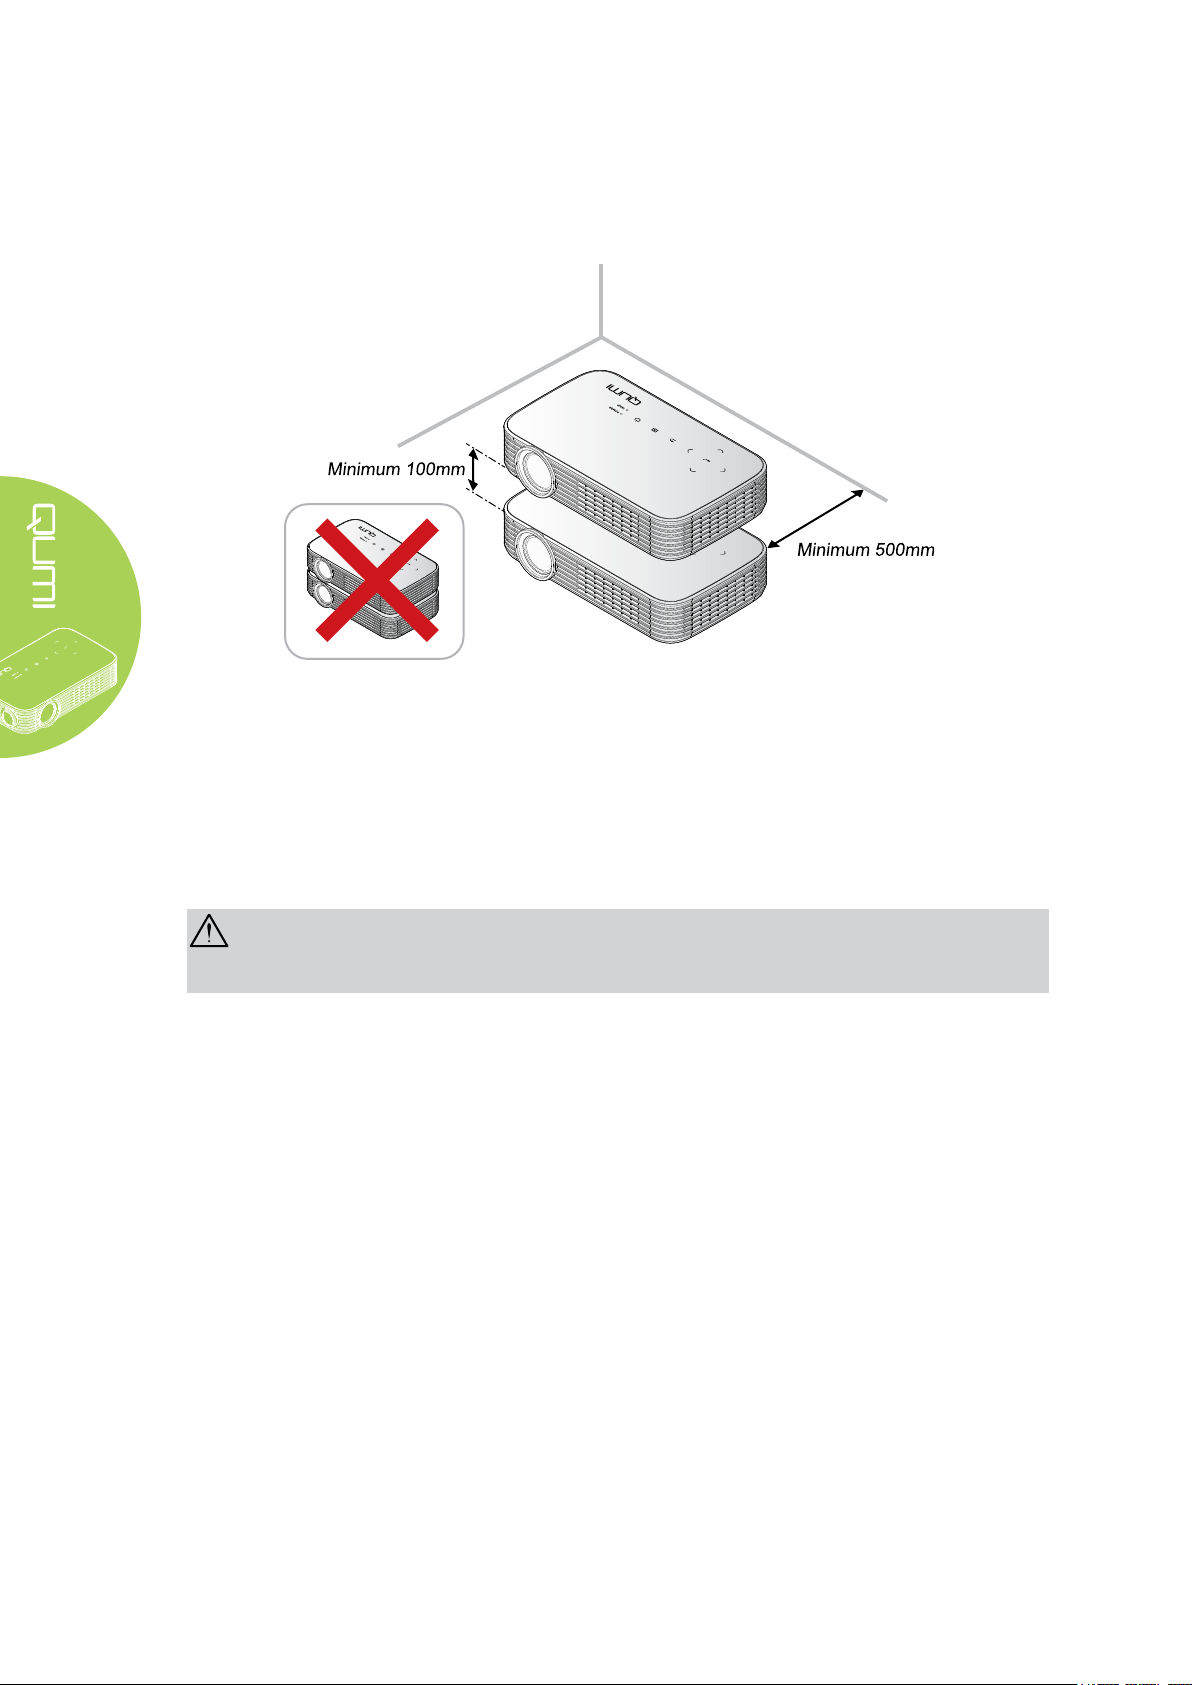
Qumi Installation Notice
• Allow at least a 500mm clearance around the exhaust vent.
• Make sure that the intake vents do not recycle hot air from the exhaust vent.
• When operating Qumi in an enclosed space, make sure that the surrounding air
temperature within the enclosure does not exceed operating temperature while Qumi
is running, and the air intake and exhaust vents are unobstructed.
• All enclosures should pass a certied thermal evaluation to make sure that Qumi
does not recycle exhaust air, as this may cause the device to shutdown even if the
enclosure temperature is with the acceptable operating temperature range.
Caution:
1. Alerts you to situations that may damage the unit.
2. Avoid using Qumi in dusty environments.
iv
Page 5

Power Safety
• Only use the supplied adapter.
• Do not place anything on the cord. Place the cord where it will not be in the way of
foot trafc.
• Remove the battery from the remote control when storing or not in use for a
prolonged period.
Cleaning Qumi
• Unplug the cord before cleaning. See Cleaning Qumi on page 47.
Note:
Qumi will be warm after usage. Allow Qumi to cool down before storing in a compartment.
Regulatory Warnings
Before installing and using Qumi, read the regulatory notices in the Regulatory
Compliance on page 56.
Symbol Explanations
DISPOSAL: Do not use household or municipal waste collection services for
disposal of electrical and electronic equipment. EU countries require the use
of separate recycling collection services.
Main Features
• Native 1080p resolution with a 16:9 aspect ratio.
• Up to 1,000 LED color brightness and 30,000:1 contrast for brilliant and sharp
images.
• Project a large 120” (diagonal) high denition image from only 4 meters from the
projection surface.
• Long life energy efcient LED light source with an estimated 30,000 hours of
operation.
• Wirelessly stream and project documents, photos, movies and other content with the
integrated wireless system.
• Built-in 2 watt audio speaker with audio-out port for attachment of external speakers.
About this manual
This manual is intended for end users and describes how to install and operate Qumi.
Wherever possible, relevant information—such as an illustration and its description—has
been kept on one page. This printer-friendly format is both for your convenience and to
help save paper, thereby protecting the environment. It is suggested that you only print
sections that are relevant to your needs.
v
Page 6

Table of Contents
Preface .................................................................................................................. ii
Chapter 1 At a Glance ................................................................ 1
Overview ................................................................................................................ 1
Standard Accessories ............................................................................................ 3
Remote Control For HDMI ..................................................................................... 4
Remote Control For Media / MHL .......................................................................... 6
Qumi and Remote Control Buttons ........................................................................ 8
Chapter 2 Getting Started .......................................................... 9
What You Need ...................................................................................................... 9
Setting Up Qumi .................................................................................................. 10
Setting Up the Remote ........................................................................................ 14
Chapter 3 Qumi User Interface ................................................ 15
Overview .............................................................................................................. 15
Media ................................................................................................................... 16
QumiCast ............................................................................................................. 26
USB Connection .................................................................................................. 34
HDMI / MHL .........................................................................................................35
Mirror ...................................................................................................................36
Chapter 4 On-Screen Display (OSD) Settings........................ 37
OSD Menu Controls ............................................................................................. 37
Setting the OSD Language .................................................................................. 38
OSD Menu Overview ........................................................................................... 39
OSD Menu Overview ........................................................................................... 40
Color Menu .......................................................................................................... 41
Display Menu ....................................................................................................... 42
Information Menu ................................................................................................. 44
Audio Menu .......................................................................................................... 45
Management ........................................................................................................ 46
Chapter 5 Taking Care of Your Qumi ...................................... 47
Cleaning Qumi ..................................................................................................... 47
Cleaning the Lens ................................................................................................ 47
Troubleshooting ...................................................................................................48
Vivitek Support Site ..............................................................................................51
Specications ....................................................................................................... 52
Projection Distance vs. Projection Size ............................................................... 53
Projection Distance and Size Table ..................................................................... 53
Timing Mode Table ............................................................................................... 54
Qumi Dimensions ................................................................................................ 55
Regulatory Compliance ....................................................................................... 56
Safety Certications ............................................................................................. 56
Disposal and Recycling ....................................................................................... 56
vi
Page 7
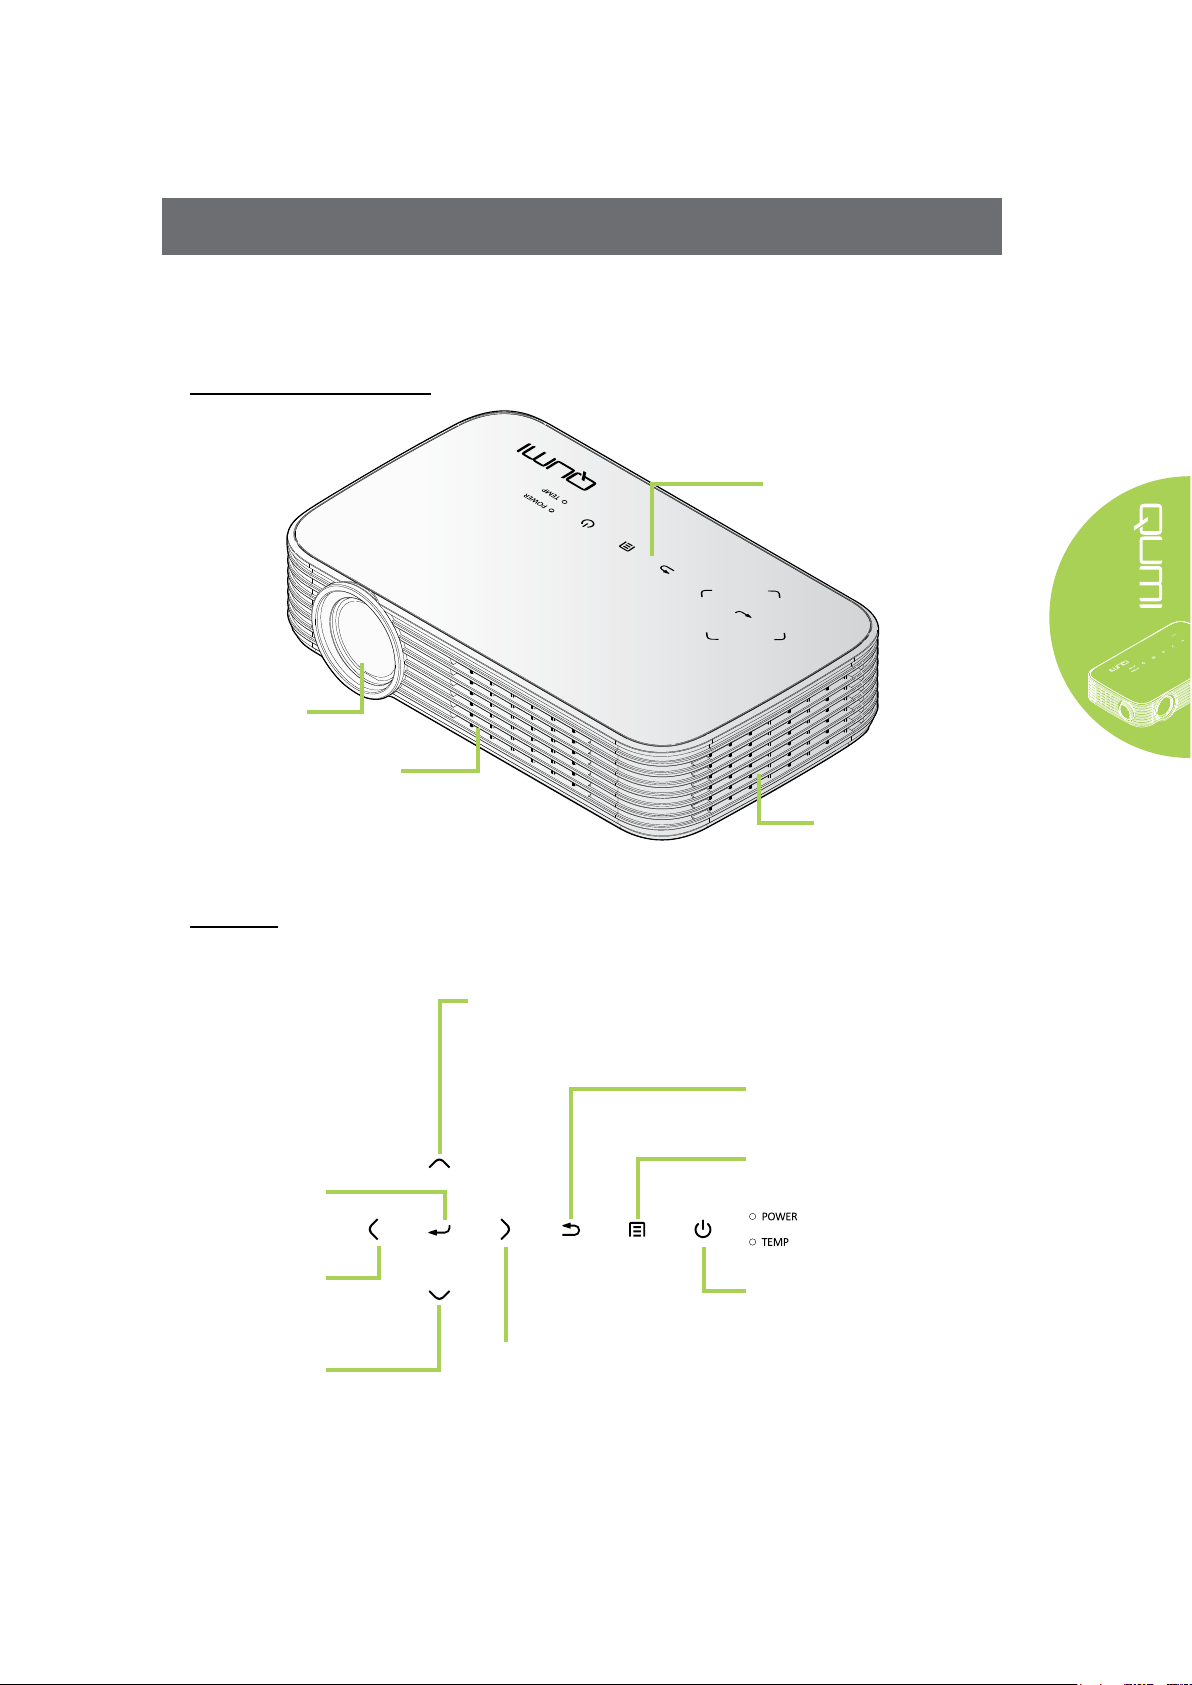
Chapter 1 At a Glance
Overview
Front/Top/Right View
Lens
Projection Lens
Cooling Vent
Do not cover
Keypad
See Keypad - On-Screen
Display (OSD) buttons
Cooling Vent
Do not cover
Keypad
Enter Cursor
Change settings in the OSD
Left Cursor
Navigate and change settings
in the OSD
Down Cursor
Navigate and change settings
in the OSD
Up Cursor
Navigate and change settings
in the OSD
Return
Return the previous OSD menu
Menu
Open and exit the OSD
Power Switch
Turn on/off Qumi
Right Cursor
Navigate and change settings
in the OSD
1
Page 8
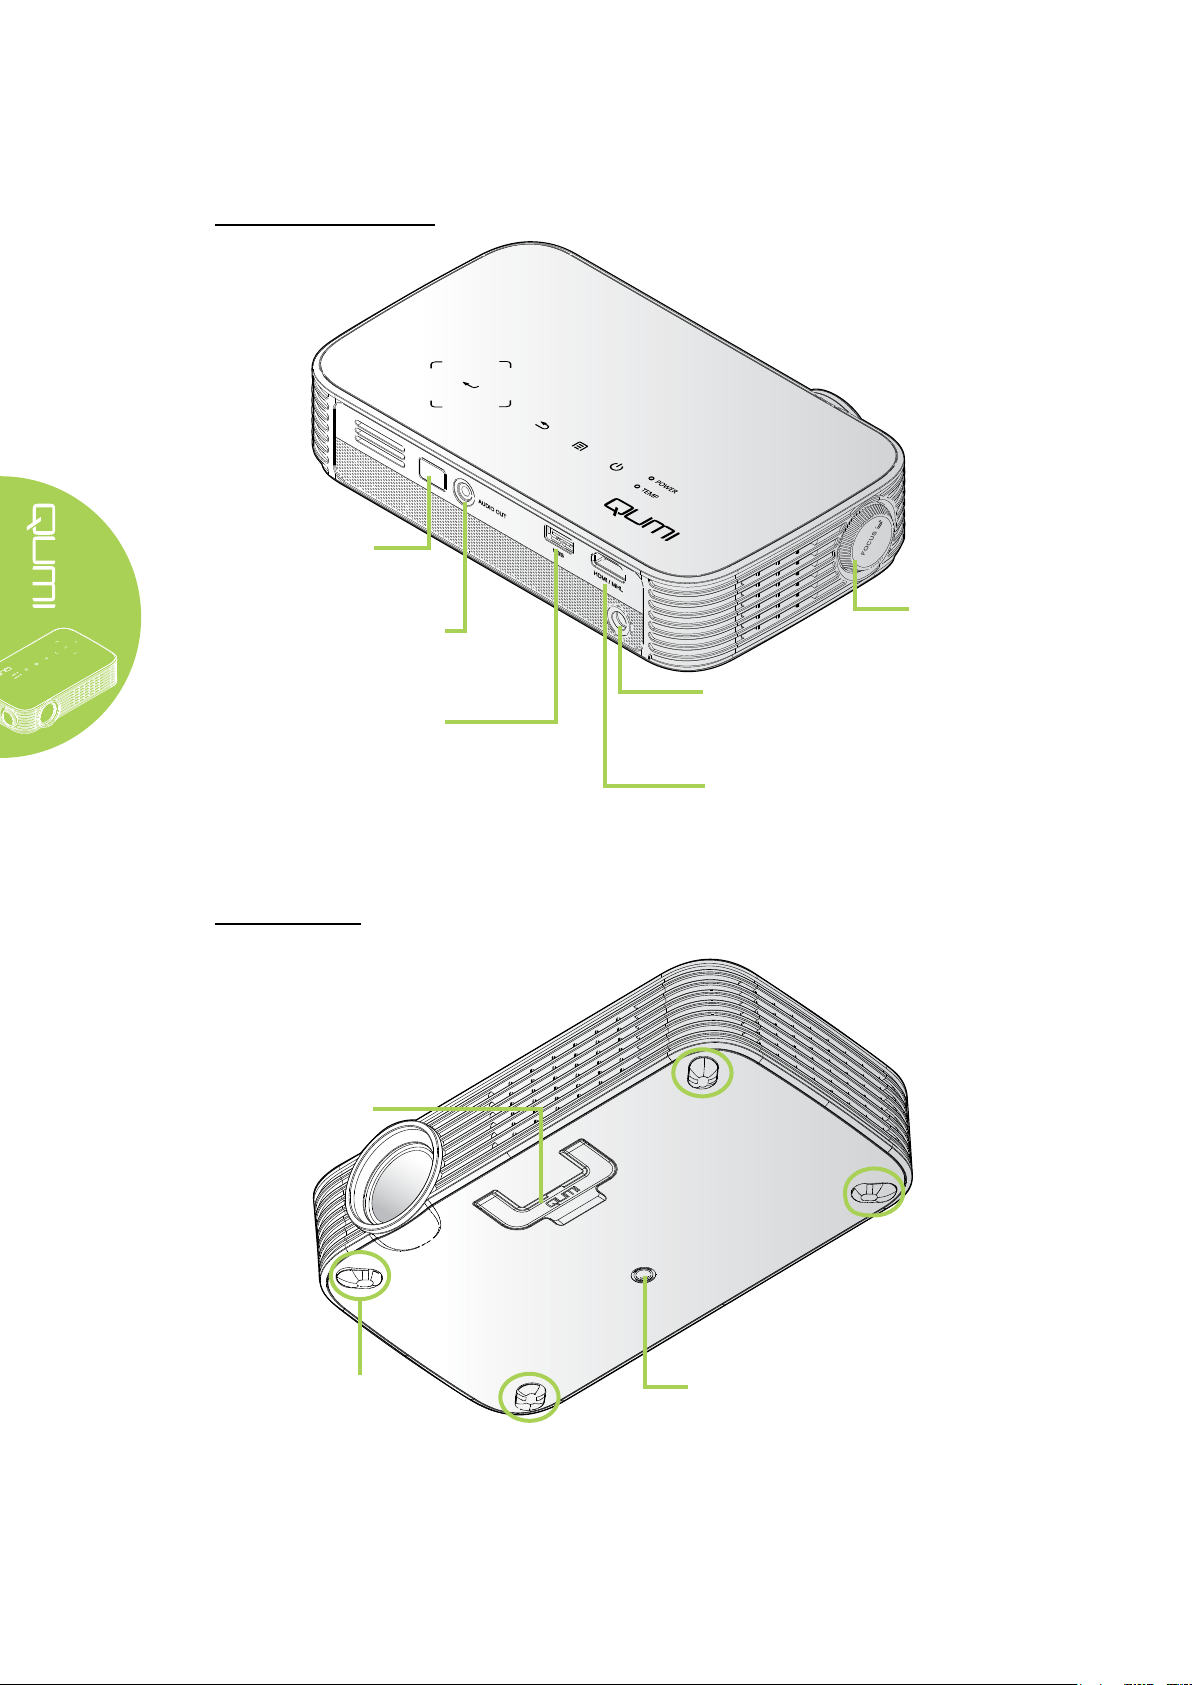
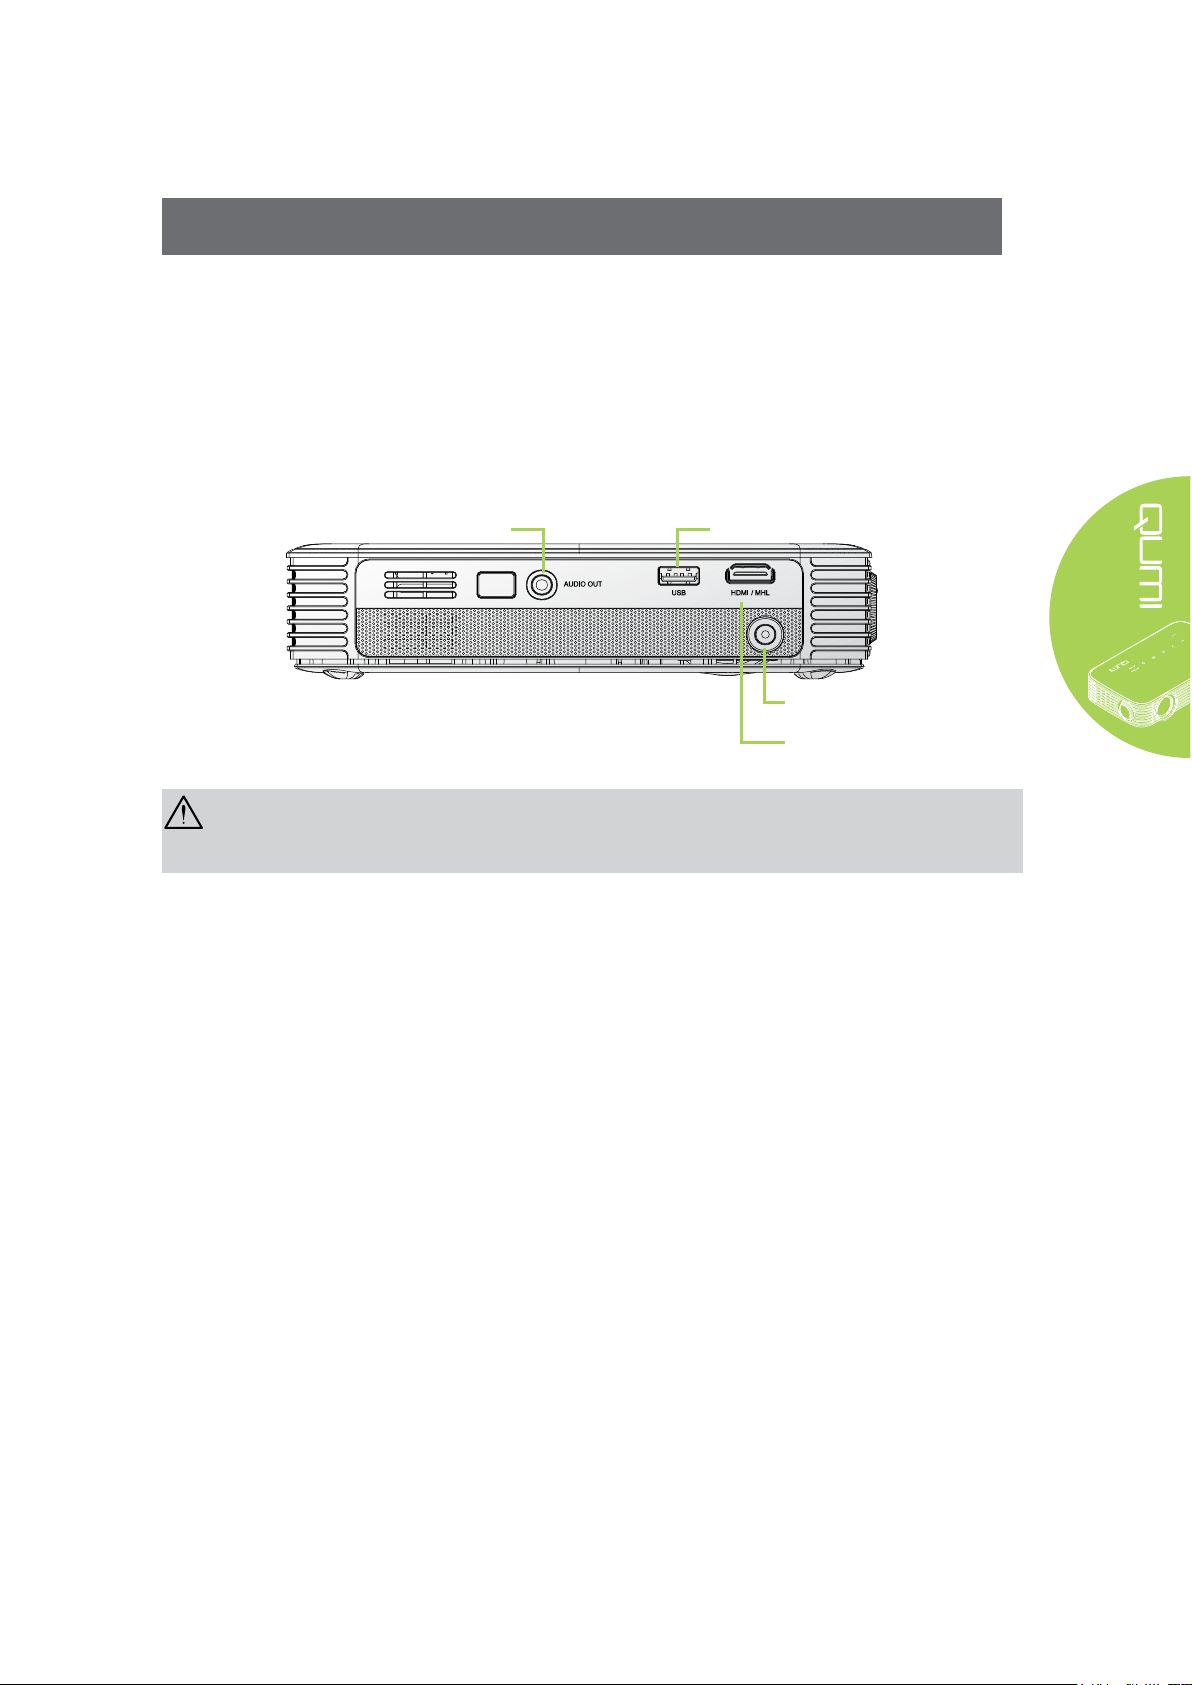
Rear/Top/Left View
IR Receiver
Receive IR signal from
the remote control
Audio Out
Connect an audio cable to
speakers or headphones
Connect an USB drive
USB
Focus Ring
Focus the projected image
DC In
Connect the supplied
power adapter
HDMI/MHL
Connect a HDMI/MHL cable
from a HDMI/MHL device
Bottom View
Kickstand
Rubber Foot Pad
Stability and maintain cooling
ventilation
Tripod Connecting Slot
Tripod not included
2
Page 9
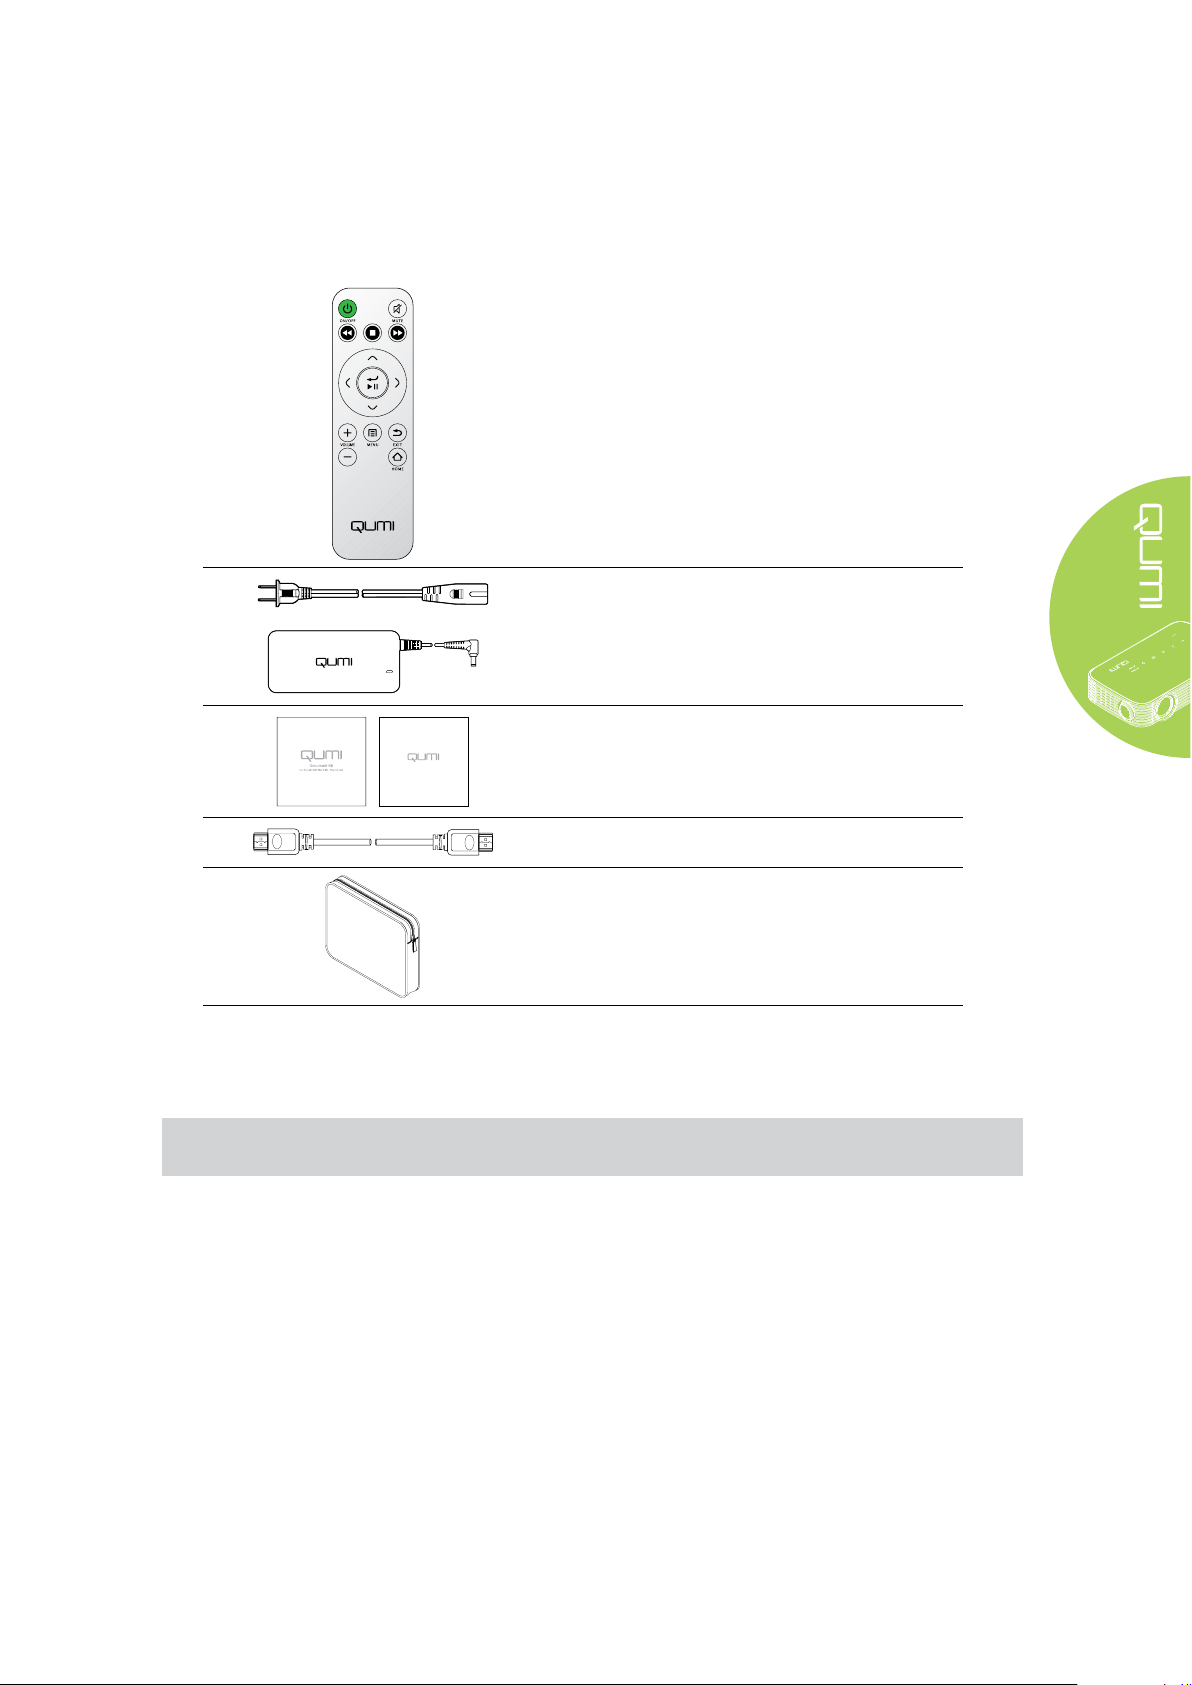
Standard Accessories
Along with Qumi, the following accessories are included:
Remote Control
(With one 3V CR2025 battery)
Regional Power Cord and Power Adapter
WARRANTY
Documentation Kit
(Quick Start Guide, Warranty Card)
HDMI cable
Carrying Case
Contact your dealer immediately if any items are missing, appear damaged, or if the unit
does not work. It is recommended that you keep the original packing material in case you
ever need to return the equipment for warranty service.
Note:
Accessories will vary from model to model.
3
Page 10
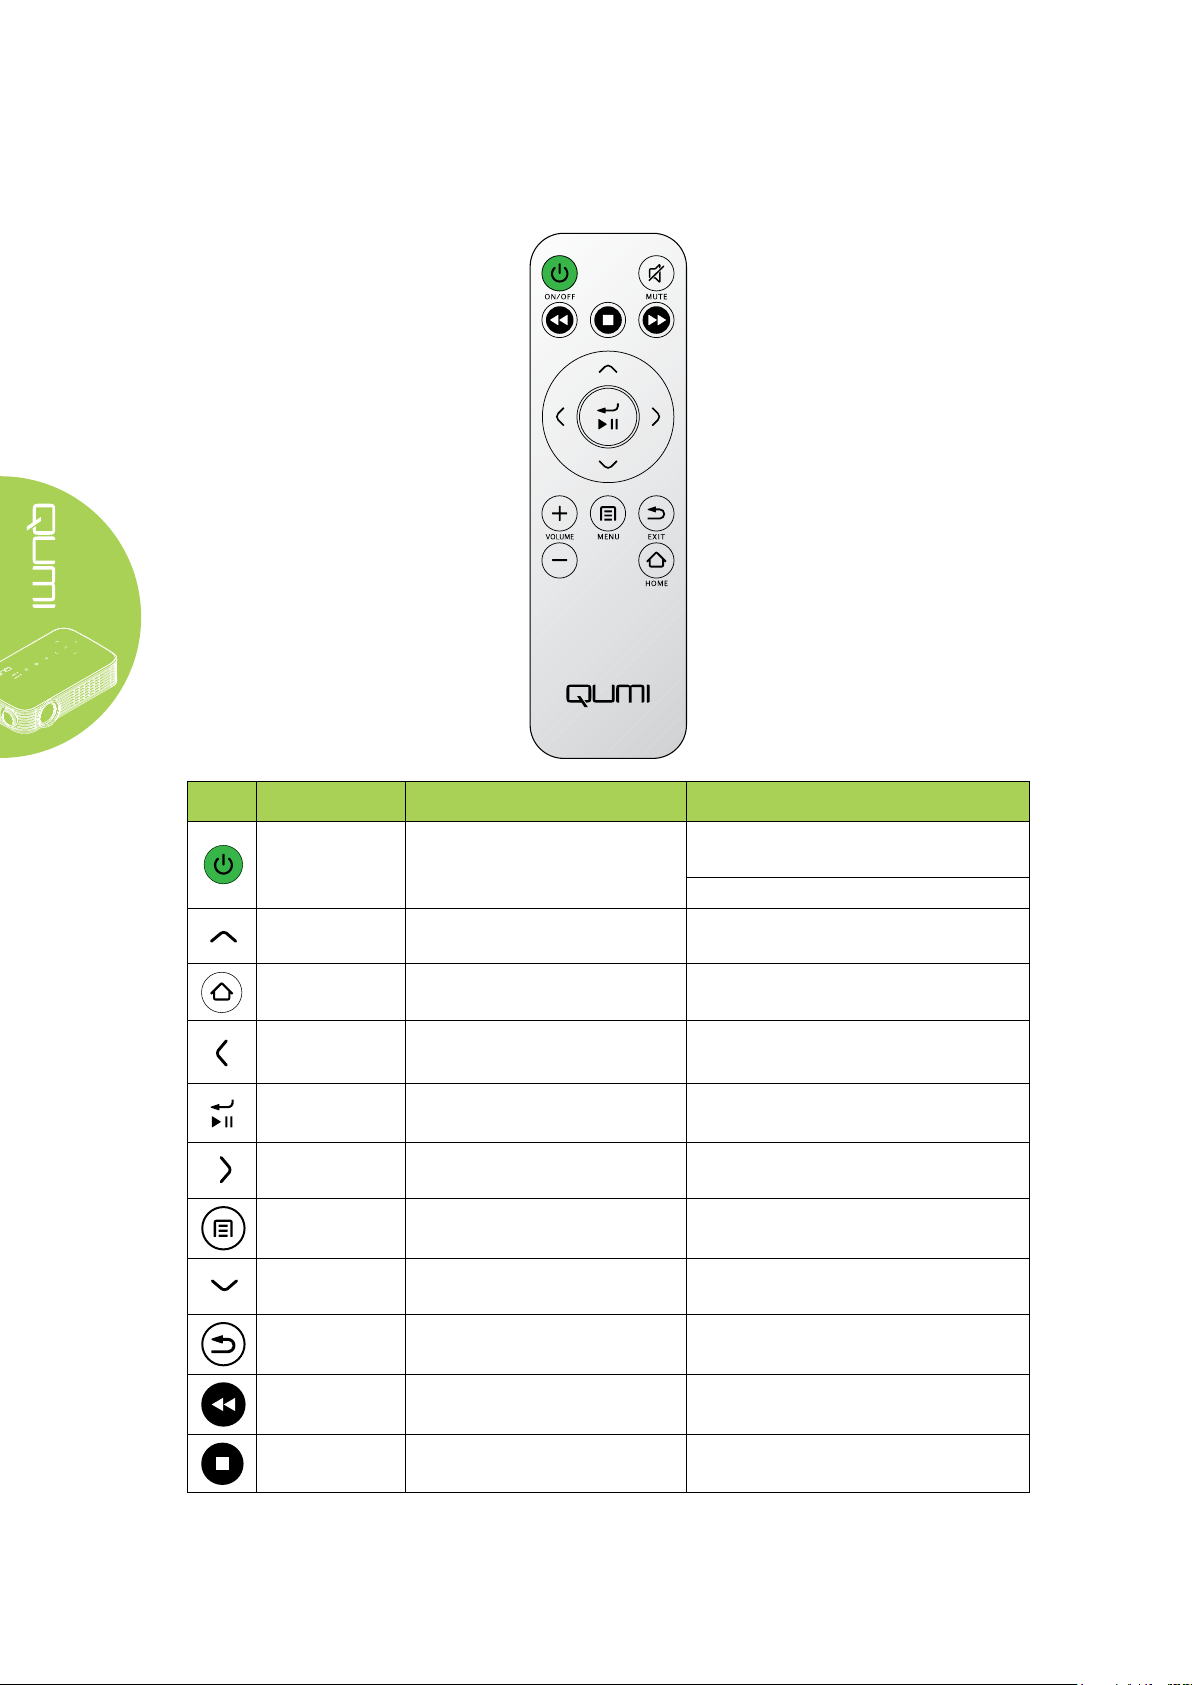
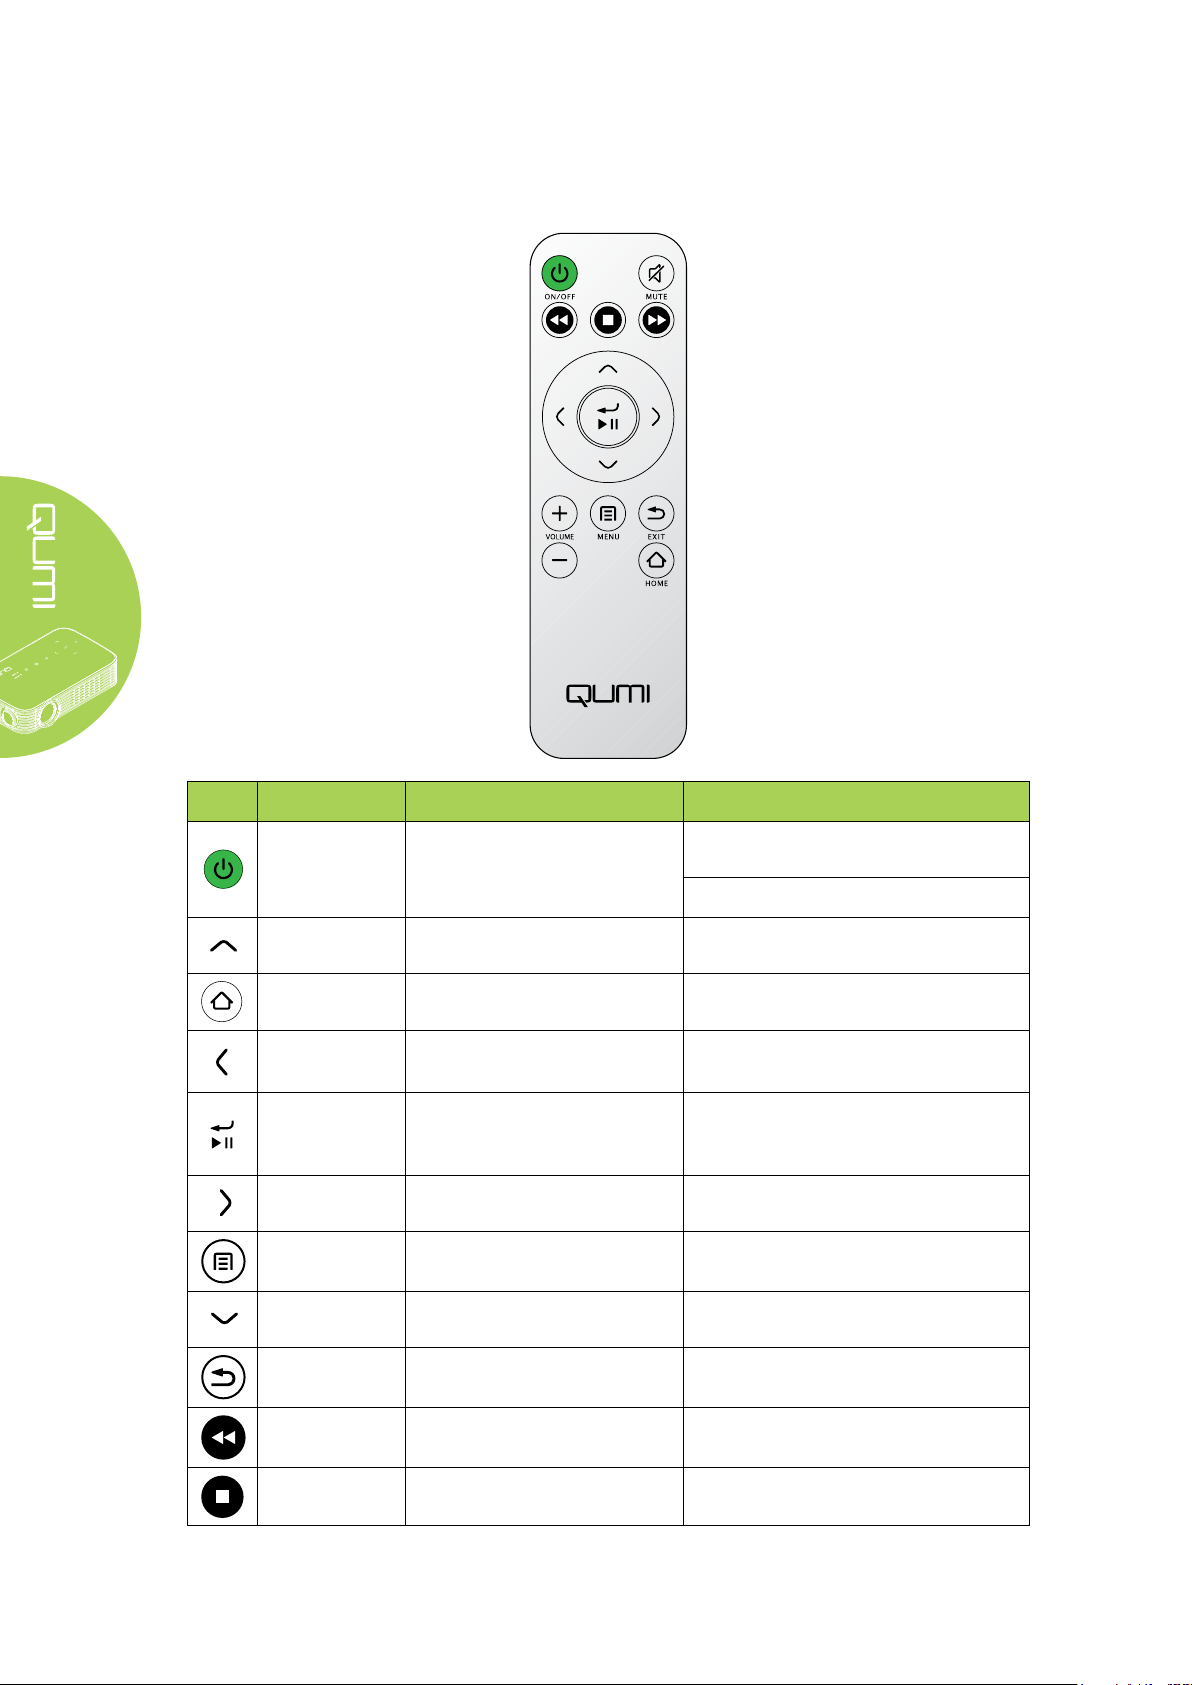
Remote Control For HDMI
Key Dene OSD Off OSD On
Press once -> “Power Off” warning
Power On/Off Power On/Off the projector.
Up N/A Moves OSD menu highlight
Home Returns to Home Page Returns to Home page
Left N/A Performs action indicated by menu
Enter / Play /
Pause
Right N/A Performs action indicated by menu
Menu Opens OSD menu Closes OSD
Down N/A move the highlight of OSD menu
Exit N/A Close OSD
N/A Performs action indicated by menu
message pop-up
Press twice -> projector “Power Off”
Rewind N/A N/A
Stop N/A N/A
4
Page 11
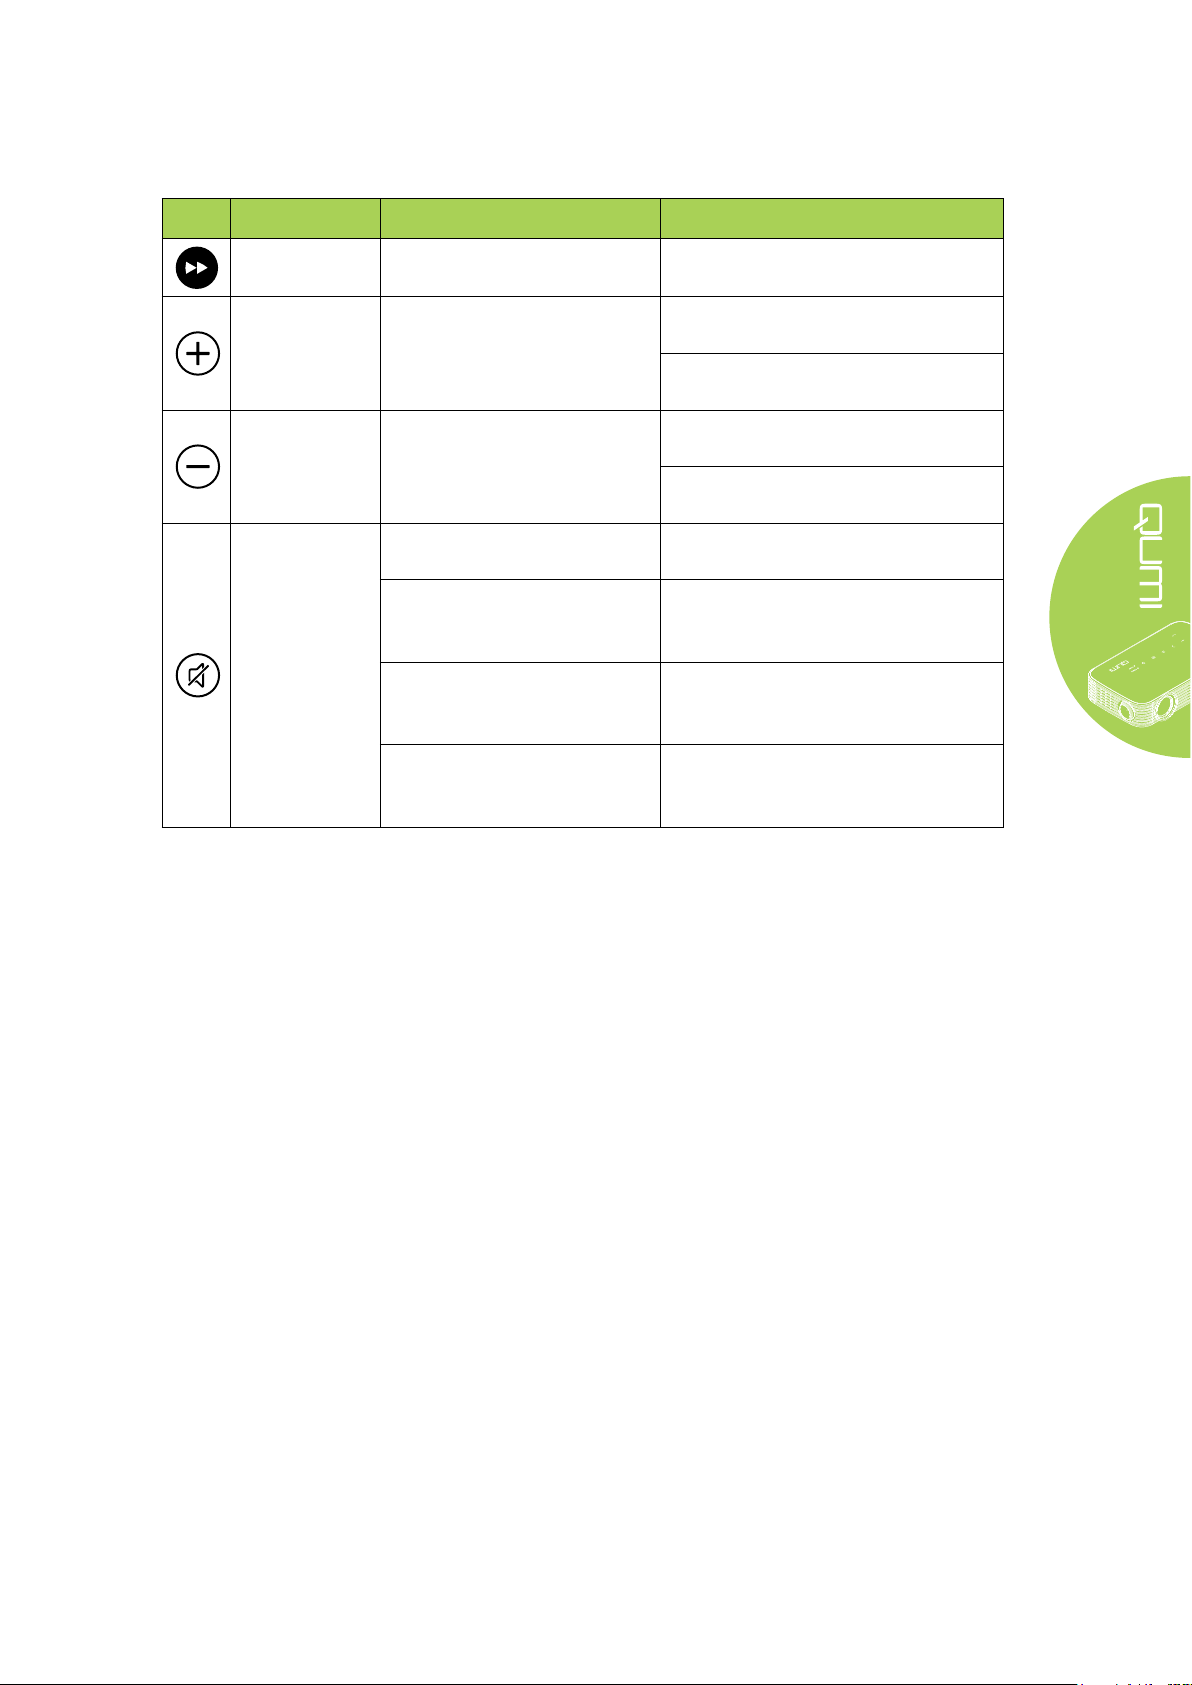
Key Dene OSD Off OSD On
Previous N/A N/A
If Volume menu is displayed:
Volume Up Opens Volume menu
Volume Down Opens Volume menu
If audio is not muted: mutes
audio and opens Mute menu
If audio is muted: unmutes
audio and opens UnMute
menu
Mute
Volume level is raised.
If other menu is displayed: closes
menu and opens Volume menu
If Volume menu is displayed:
Volume level is lowered.
If other menu is displayed: closes
menu and opens Volume menu.
If Mute menu is displayed, unmutes
audio and displays UnMute menu.
If UnMute menu is displayed, mutes
audio and displays Mute menu.
If other menu is displayed, closes
menu. If audio is not muted, mutes
audio and opens Mute menu.
If other menu is displayed, closes
menu. If audio is muted, unmutes
audio and opens UnMute menu.
5
Page 12
Remote Control For Media / MHL
Key Dene OSD Off OSD On
Press once -> “Power Off” warning
Power On/Off Power On/Off the projector.
Up Moves menu selection up Moves OSD menu highlight
Home Returns to Home Page Returns to Home page
Left Moves menu selection left Performs action indicated by menu
Enter / Play /
Pause
Right Moves menu selection right Performs action indicated by menu
Menu Opens OSD menu Closes OSD
Down Moves down in entry list Moves OSD menu highlight
Exit Exits current menu Closes OSD
Enters media sub menu,
Plays / Pauses media
selection
message pop-up
Press twice -> projector “Power Off”
Performs action indicated by menu
Rewind Rewinds media play Rewinds media play
Stop Stops media play Stops media play
6
Page 13
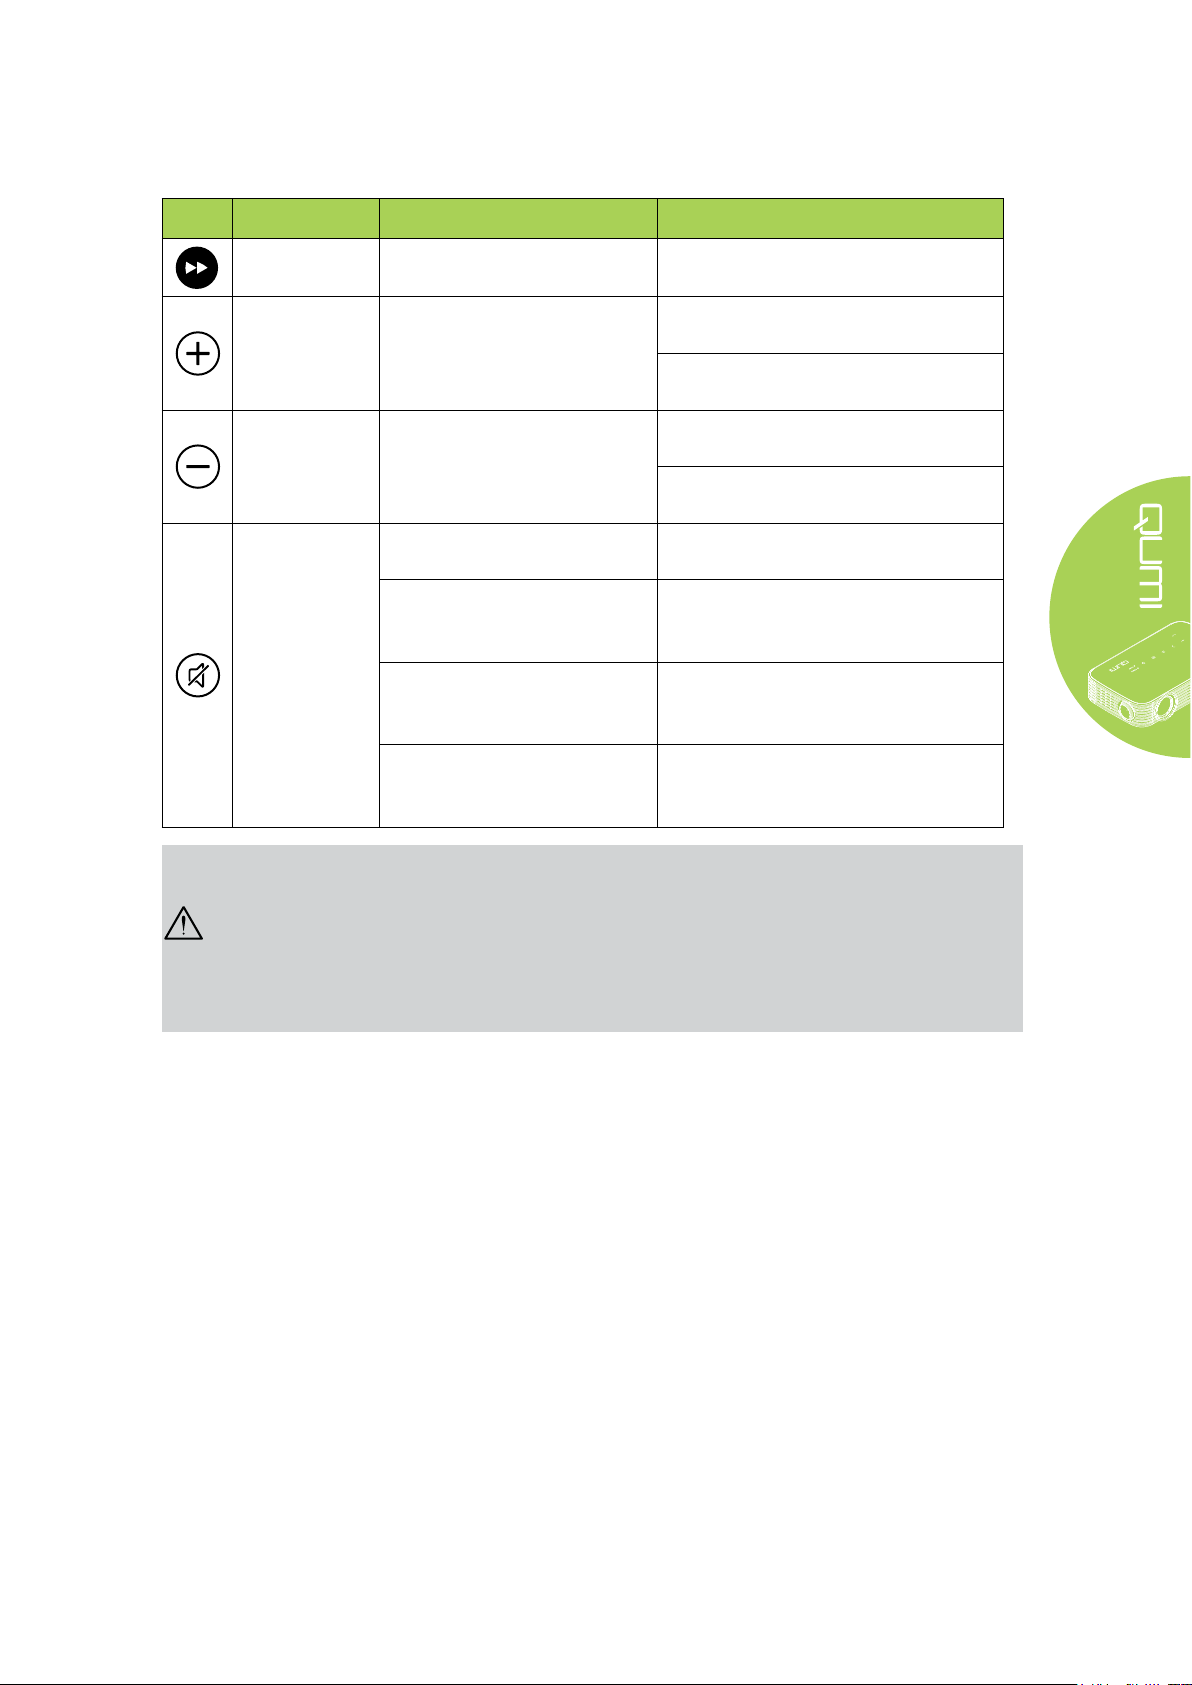
Key Dene OSD Off OSD On
Previous Skips to previous entry in list Skips to previous entry in list
If Volume menu is displayed:
Volume Up Opens Volume menu
Volume Down Opens Volume menu
If audio is not muted: mutes
audio and opens Mute menu
If audio is muted: unmutes
audio and opens UnMute
menu
Mute
Volume level is raised.
If other menu is displayed: closes
menu and opens Volume menu
If Volume menu is displayed:
Volume level is lowered.
If other menu is displayed: closes
menu and opens Volume menu.
If Mute menu is displayed, unmutes
audio and displays UnMute menu.
If UnMute menu is displayed, mutes
audio and displays Mute menu.
If other menu is displayed, closes
menu. If audio is not muted, mutes
audio and opens Mute menu.
If other menu is displayed, closes
menu. If audio is muted, unmutes
audio and opens UnMute menu.
Important:
1. Be sure nothing obstructs the path between the remote control and Qumi. If the path
between the remote control and Qumi is obstructed, the signal can bounce off certain
reective surfaces.
2. The buttons and keys on Qumi have the same layout and similar functions as the
corresponding buttons on the remote control. This user’s manual describes the functions
based on the remote control.
7
Page 14

Qumi and Remote Control Buttons
Qumi can be operated using the remote control or the keypad on the top of Qumi. All
operations can be carried out with the remote control.
The remote control is not only used to navigate the cursor in the menus, but can also be
used to control the media functions (music and video playback). For more details about
how to control the media functions with the remote control, please refer to 15.
Note:
MHL function:
For app settings, ▲ Up, ▼ Down, ◄ Left and ► Right are used as directional arrows;
ENTER and EXIT are also included.
Controlling your smart device with the remote control:
When the projector displays the contents of your MHL compatible smart device, you can
use the remote control to control your smart device.
To enter MHL mode, the following buttons are available to control your smart device; arrow
keys (▲ Up, ▼ Down, ◄ Left, ► Right), EXIT control buttons.
8
Page 15
Chapter 2 Getting Started
What You Need
Many types of external devices and peripherals can be connected to Qumi. DVD players
can be connected to play movies. Camcorders and digital cameras can also be used to
play videos and display photos.
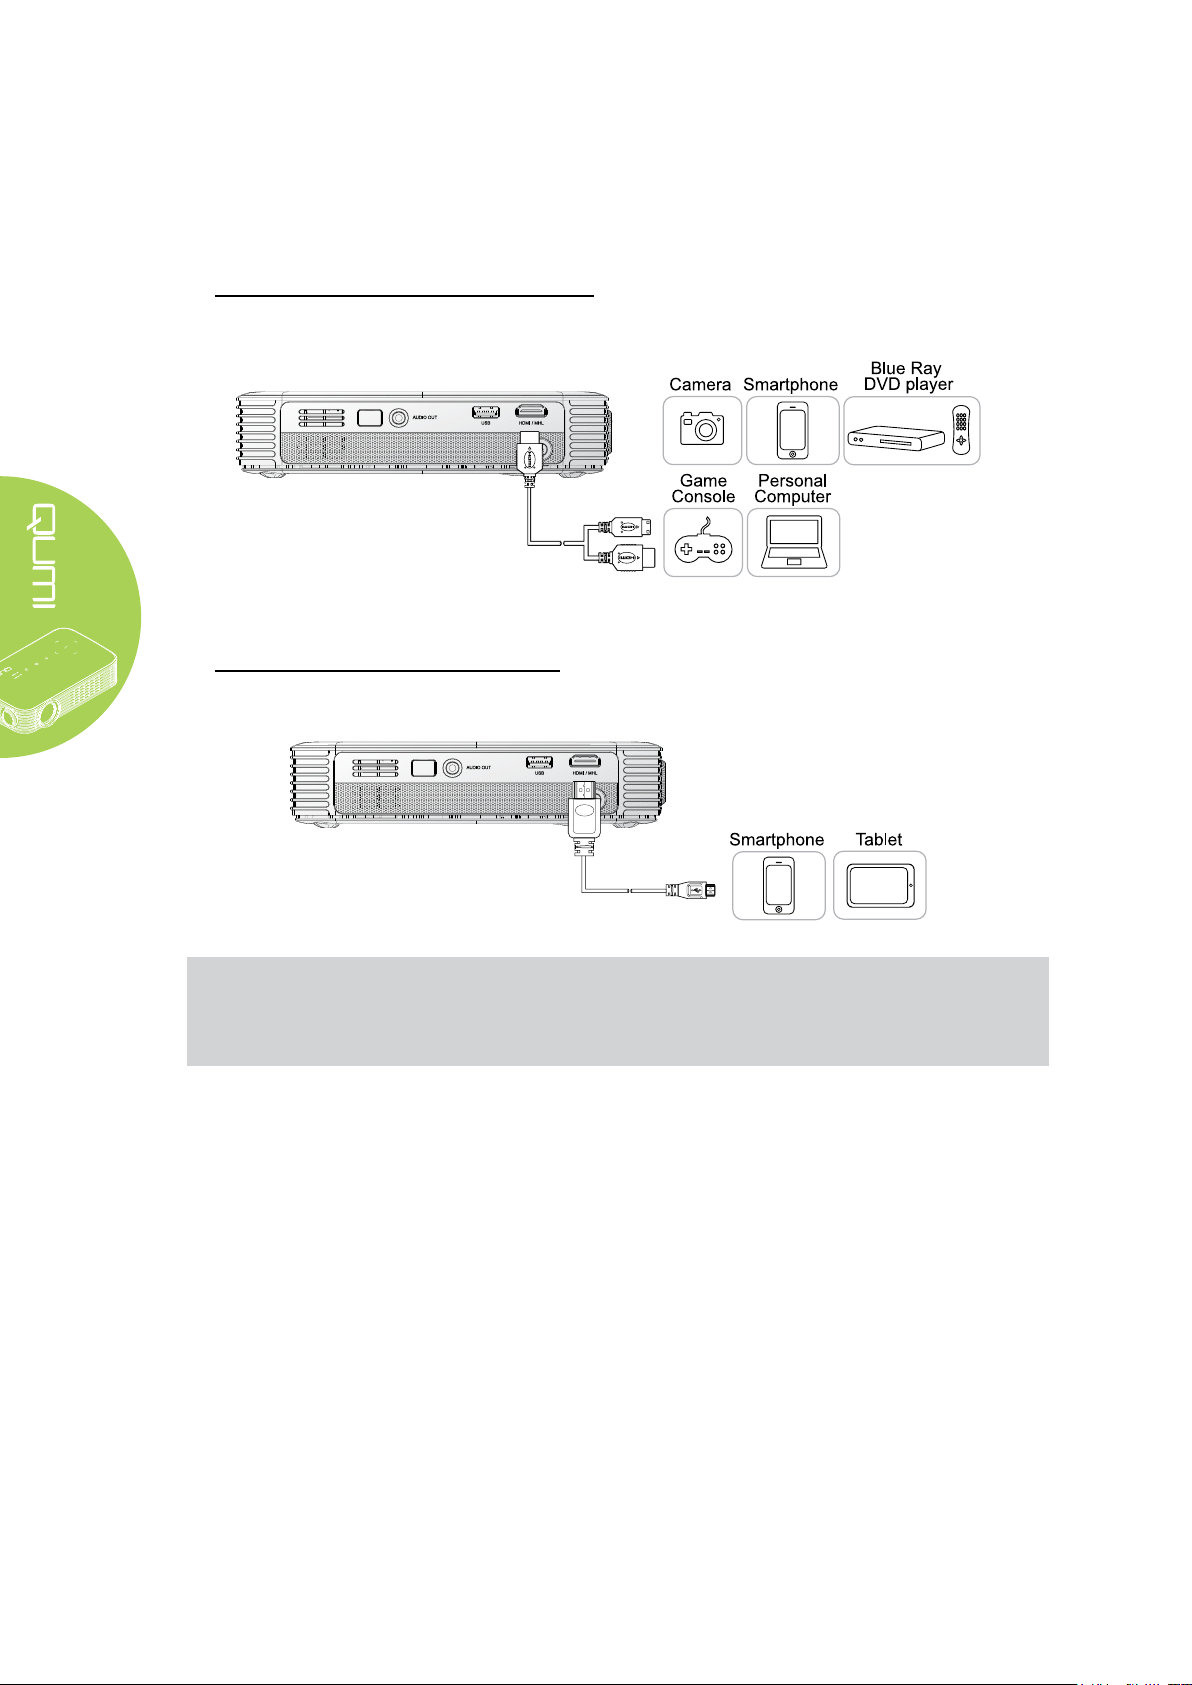
These devices can be connected to Qumi using an appropriate cable. Make sure that the
connecting device has an appropriate output connector.
Connect audio Insert USB device
Connect AC power adapter
Connect HDMI/MHL peripherals
Warning:
As a safety precaution, disconnect all power to Qumi and connecting devices before
making connections.
9
Page 16
Setting Up Qumi
Connecting Peripherals by HDMI
Connect HDMI-compatible peripherals to Qumi using an HDMI cable (optional).
Connecting to an MHL Device
Connect your Qumi to a MHL-compatible device by using an HDMI/MHL cable (optional).
Note:
For some MHL compatible devices, whose output is not via micro-USB, an extra cable
adaptor may be required.
Adapters for Samsung devices are sold separately.
10
Page 17
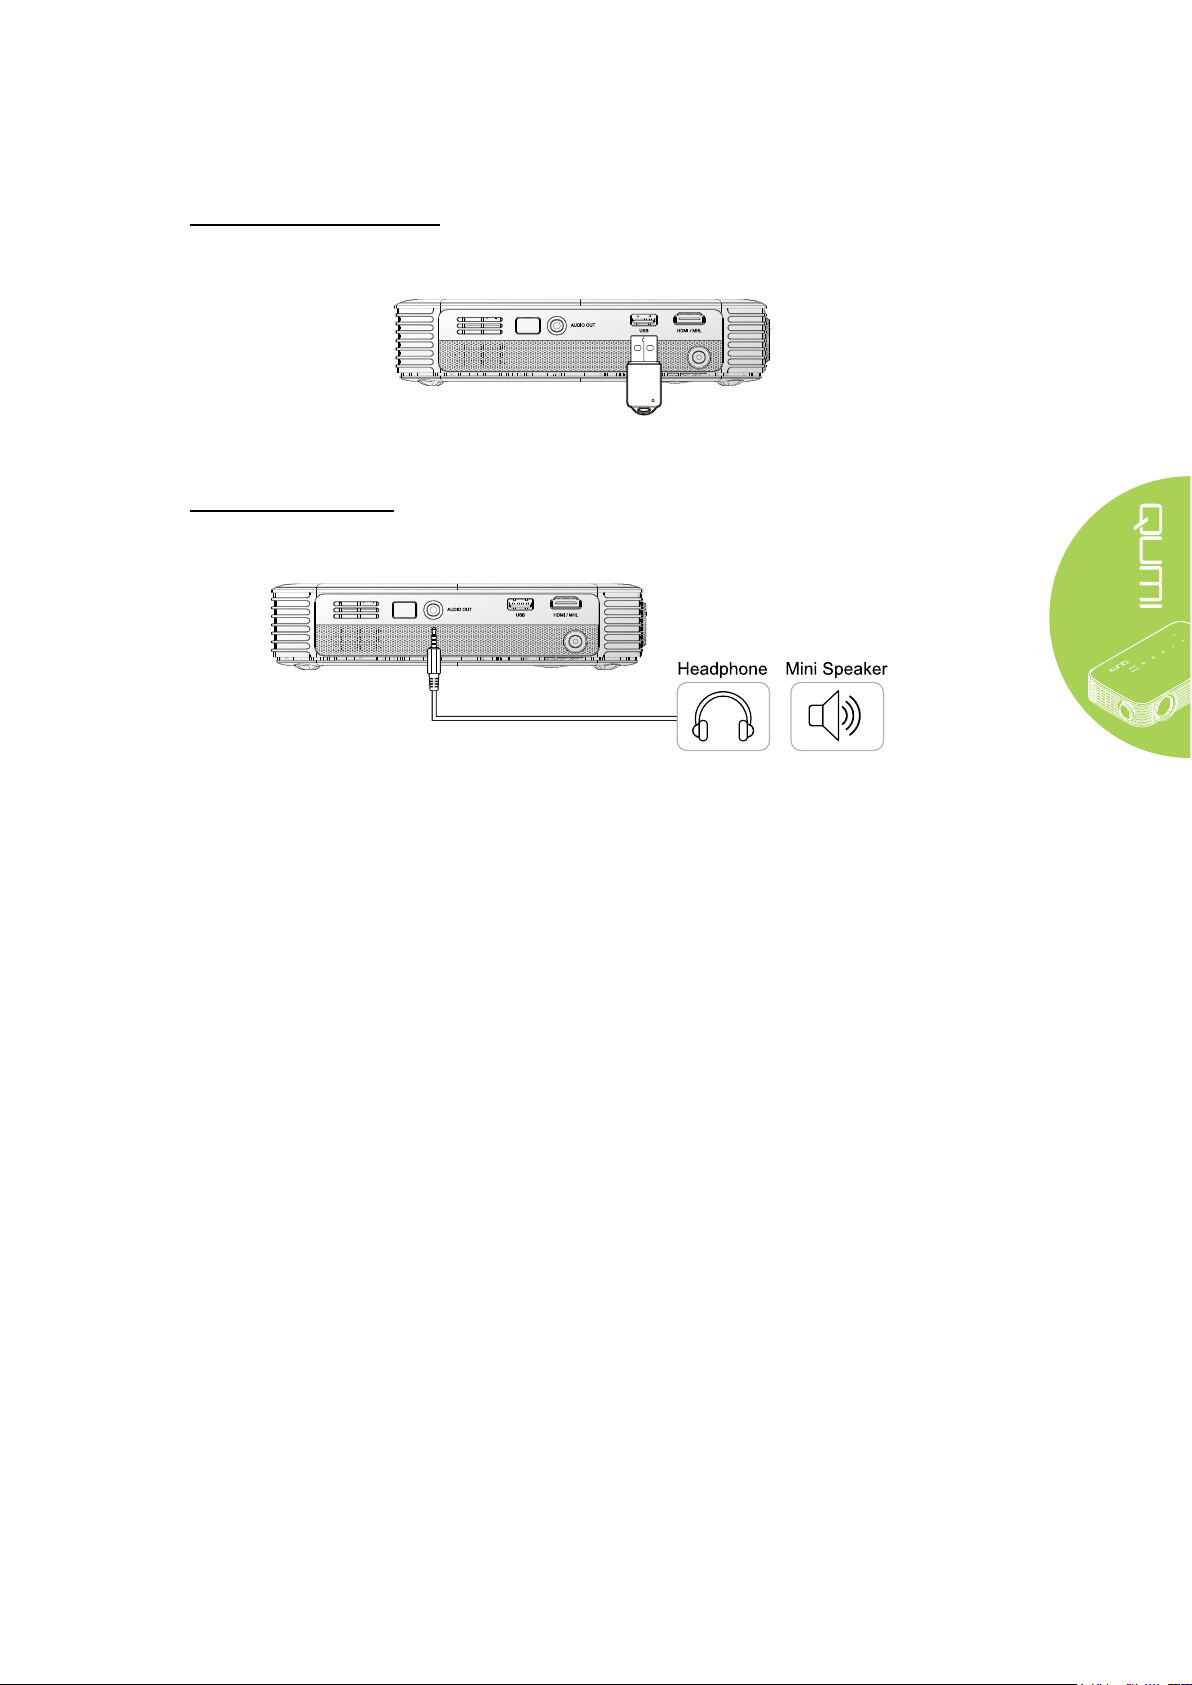
Inserting a USB Drive
Connect a USB drive to Qumi by inserting the storage device(s) into the appropriate port.
Connecting Audio
Connect earphones or mini speakers to Qumi by inserting into the Audio Out port.
11
Page 18
Starting and Shutting down Qumi
1.
2.
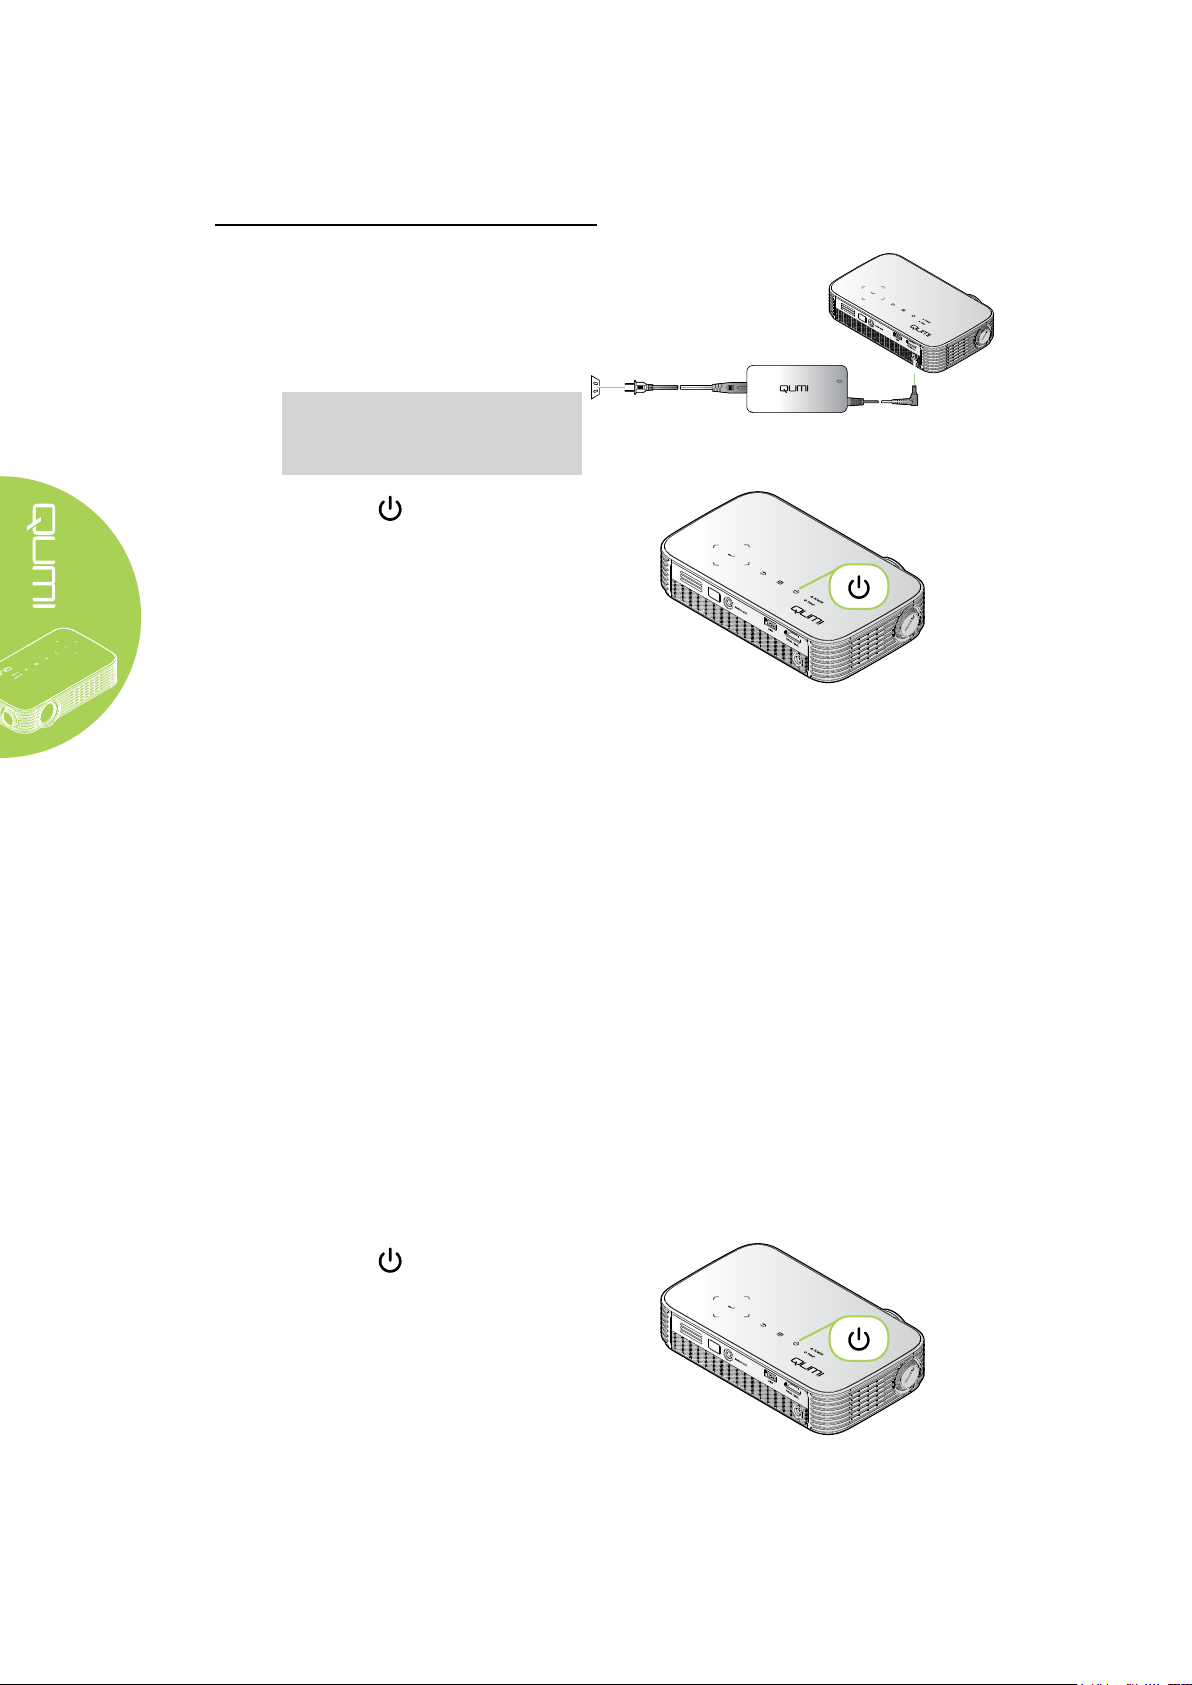
Connect the AC power adapter
to Qumi. Connect the other end
of the AC power adapter to a
wall outlet.
Note:
Adapter models may vary
between countries.
Press the POWER button to
turn on Qumi.
Qumi splash screen displays
and connected devices are
detected.
3.
4.
Press the ◄ or ► button on
the remote control to select the
function that you desire to play.
• Media
• QumiCast
• USB Connection
• HDMI / MHL
• Mirror
Press the POWER button to
turn off Qumi.
12
Page 19
5.
When the “Power Off? /Press
Power again” message appears,
press the POWER button.
The projector turns off.
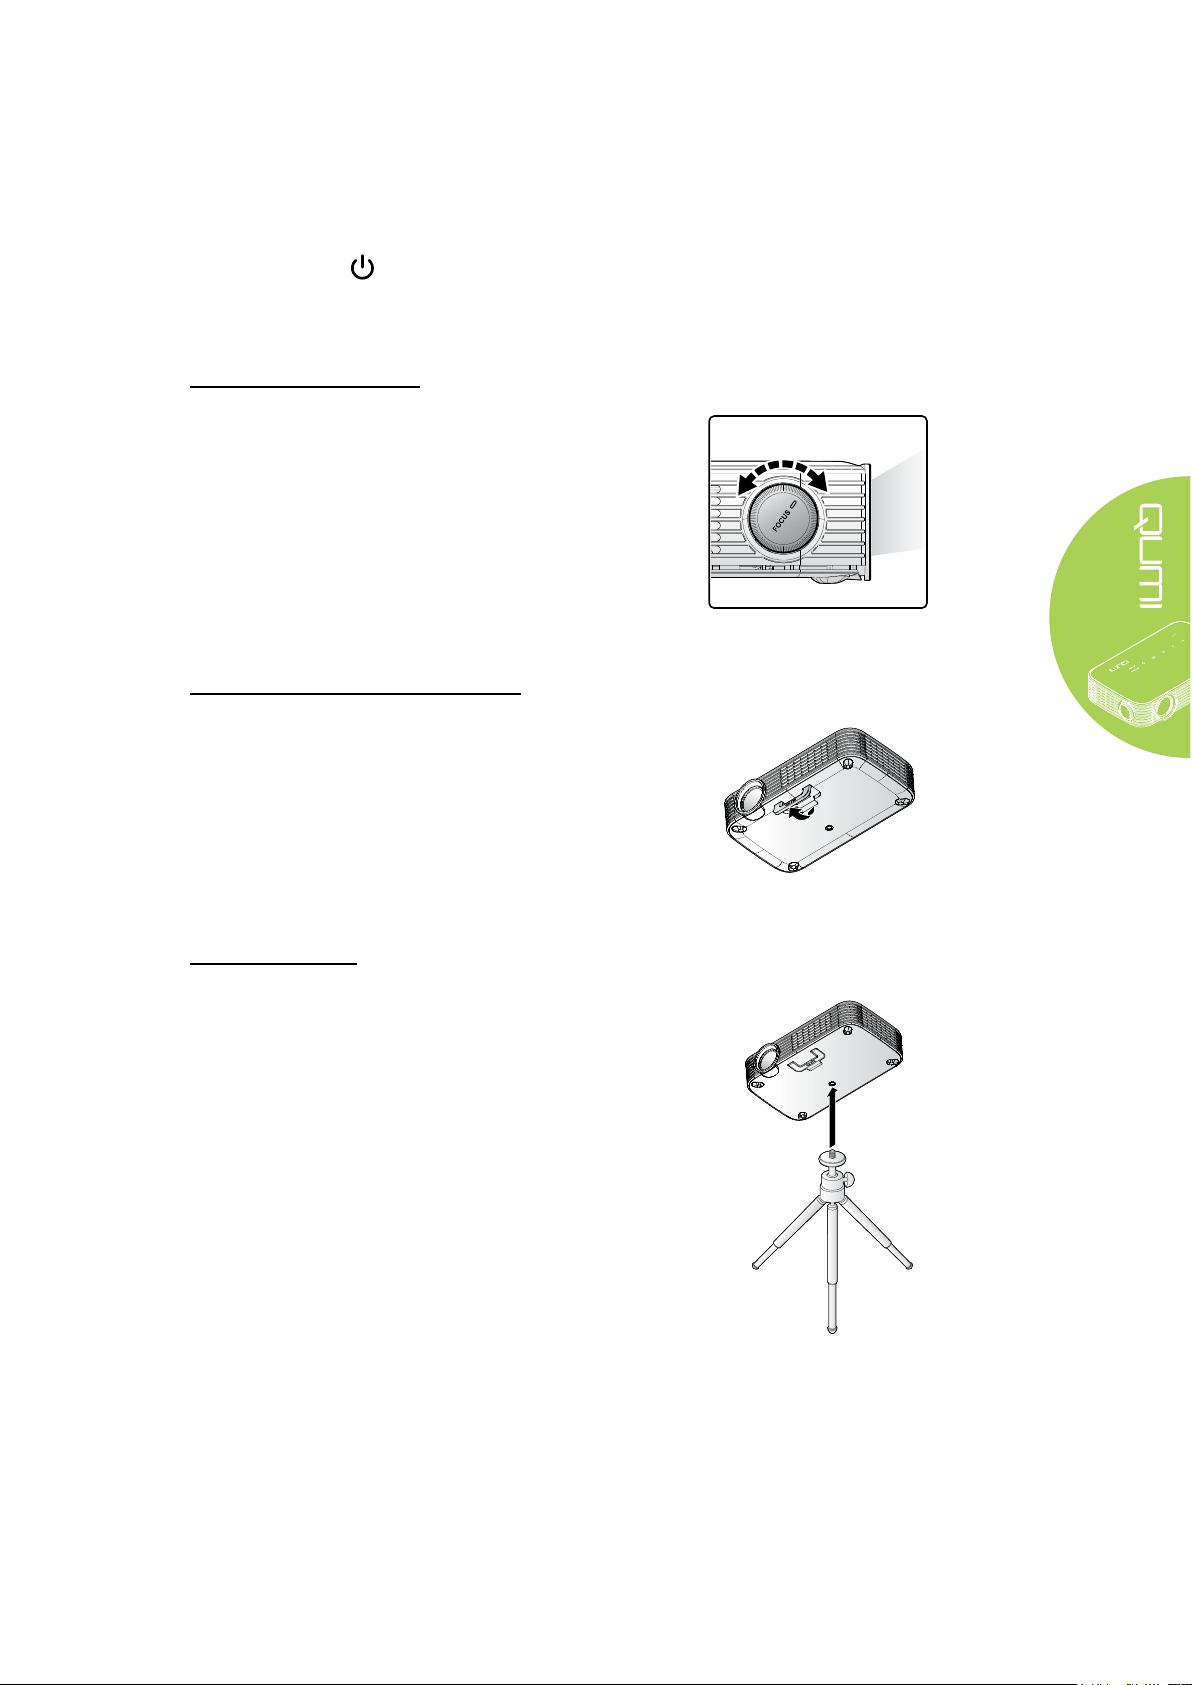
Adjusting the Image
If the projected image is not clear, the image can
be adjusted by moving the focus ring left or right
until the image is clear.
Adjusting the Projector Level
Flip down the kickstand to adjust the projector
level.
Using a Tripod
Qumi can be used with a tripod by connecting the
tripod to the bottom of Qumi. Many typical tripods
can be connected.
Supported Tripod Specications:
• Type: Tripod
• Slot size: 1/4-20 L6.3 mm
13
Page 20

Setting Up the Remote
The remote control comes with one (1) 3V lithium
battery (CR2025). The battery is pre-installed in
the remote control.
To begin using the remote control, remove the
plastic tab (A) from the battery compartment.
Replacing the Remote Control Batteries
1.
Remove the battery
compartment cover
by turning the cover
towards the arrow
(A). Then lift the
cover out towards
the arrow (B).
Caution:
1. Use only a 3V lithium battery (CR2025).
2. Dispose of used batteries according to local ordinance regulations.
3. Remove the battery when not using Qumi for prolonged periods.
2.
Remove the old
battery and insert
the new battery
with the positive
side facing up.
3.
Install the cover
as shown in the
illustration.
Operating Range
The remote control uses infrared (IR) transmission to control Qumi. It is not necessary to
point the remote directly at Qumi.
The remote control functions properly within a radius of approximately 7 meters (23 feet)
and 15 degrees above or below Qumi level (if the remote is not held perpendicular to the
sides or rear of Qumi).
If Qumi is unresponsive to the remote control, move closer towards Qumi.
14
Page 21

Chapter 3 Qumi User Interface
Overview
Qumi User Interface (UI) is designed to provide conguration and operational ease of use.
The UI also allows you to access media les from your smart devices (phones or tablets)
or USB drives for a complete media experience.
The UI contains ve main functions:
• Media - Allows the use of media stored in the internal memory or a connected USB
drive to display photos, music, audio and documents.
• QumiCast - Allows the streaming of media from smart devices or mirroring of
connected Android/iOS/Mac/Windows devices.
• USB Connection - Allows the use of a connected PC as a storage device.
• HDMI / MHL - Projection by using a connected HDMI or MHL device.
• Mirror - Projection by mirroring the Android device.
15
Page 22

Media
The Media center features Internal Memory, USB and Settings tools for the display of
media les through Qumi.
In the main menu, press the ◄ or ► button on the remote to select Media and press .
Supported Formats
The following le formats are supported:
• Image: JPEG, BMP
• Audio: MP1/MP2/MP3, WMA, OGG, ADPCM-WAV, PCM-WAV, AAC
• Voice record: MP3, WAV
• Video: AVI, divx, MKV, TS, DAT, VOB, MPG, MPEG, MOV, MP4, WMV
• Adobe® PDF (.pdf) (PDF 1.0, 1.1, 1.2, 1.3 and 1.4)
• Microsoft® Word (.doc/.docx)
• Microsoft® PowerPoint (.ppt/.pptx/.ppx/.ppsx) (does not support animation and slide
transitions)
• Microsoft® Excel (97-2010, .xls/.xlsx)
16
Page 23

Internal Memory
The Internal Memory tool provides functionality for saving external media les in Qumi.
1. In Media, press the ◄ or ► button on the remote to select Internal Memory and
press .
2. Press the ◄ or ► button on the remote to select Photo, Video, Music or
Document.
Function Description
Photo
Video Allows you to play movie les. See Video on page 20.
Music Allows you to play audio les. See Music on page 21.
Document
Allows you to display photos and provides slide show functionality.
See Photo on page 19.
Allows you to display documents les. See Document on page 22.
Note:
Bold text in Simplied Chinese format, and password protected les,
are not supported.
17
Page 24

USB
The USB tool provides functionality to display media les from a connected USB drive.
1. In Media, press the ◄ or ► button on the remote to select USB and press .
2. Press the ◄ or ► button on the remote to select Photo, Video, Music or
Document.
Function Description
Photo
Video Allows you to play movie les. See Video on page 20.
Music Allows you to play audio les. See Music on page 21.
Document
Allows you to display photos and provides slide show functionality.
See Photo on page 19.
Allows you to display documents les. See Document on page 22.
Note:
Bold text in Simplied Chinese format, and password protected les,
are not supported.
18
Page 25

Photo
The available images in the connected USB drive or Internal Memory are listed in the
Photo menu.
Press the ▲, ▼, ◄ or ► button on the remote to select the image and press to
display. The Control Panel displays in the middle-bottom of the image. The following
functions are available through the Control Panel.
Icon Description
Select to scroll to the previous image.
Select to scroll to the next image.
Rotate the image counter clockwise 90°.
Rotate the image clockwise 90°.
Reset rotation of image.
Select to start a slideshow of all the images in the internal memory or the USB
device.
Select to display the photo information.
19
Page 26
Video
Available videos in the connected USB drive or Internal Memory are listed in the Video
menu.
Press the ▲ or ▼ button on the remote to select the video and press to display. A
Control Panel also displays with the image. The following table displays the available
functions.
Icon Description
Select to move the play selection to the previous le.
Select to reverse the current play marker.
/
Select to play the selected le. Press again to pause or play the selection.
Select to stop the currently playing le.
Select to move the current play marker forward.
Select to move the play selection to the next le.
Information for repeat mode.
20
Page 27
Music
Available music in the connected USB drive or Internal Memory are listed in the Music
menu.
Press the ▲ or ▼ button on the remote to select the music and press to display. A
Control Panel also displays with the music. The following table displays the available
functions.
Icon Description
Select to move the play selection to the previous le.
Select to reverse the current play marker.
/
Select to play the selected le. Press again to pause or play the selection.
Select to stop the selected le.
Select to move the current play marker forward.
Select to move the play selection to the next le.
Information for repeat mode.
21
Page 28

Document
Available documents in the connected USB drive or Internal Memory are listed in the
Document menu.
Press the ▲ or ▼ button on the remote to select the document and press to display. A
Control Panel also displays with the document. The following table displays the available
functions.
Icon Description
If document is scaled outside screen border, press to scroll document up.
If document is scaled outside screen border, press to scroll document down.
If document is scaled outside screen border, press to scroll document left.
If document is scaled outside screen border, press to scroll document right.
Select to zoom in on the document.
Select to zoom out on the document.
Note:
In Display mode, press the ▲, ▼, ◄ or ► button on the remote to move and position the
image.
22
Page 29

Settings
The Settings menu allows access to settings for the Photo, Video, and Music functions.
1. In Media, press the ◄ or ► button on the remote to select Settings and press .
2. Press the ▲ or ▼ button on the remote to select Photo, Video or Music and press
◄ or ► to adjust the settings.
23
Page 30

Photo
Press the ▲ or ▼ button on the remote to select the item and press the ◄ or ► button on
the remote to change the setting.
Item Description
Display Ratio Select a display ratio (Original or Full Screen).
Interval Time Select a duration time for the set pattern (10 sec, 30 sec or 1 min).
Video
Press the ◄ or ► button on the remote to change the setting.
Item Description
Repeat Mode Select a repeat mode (Sequence, Single or Once).
24
Page 31

Music
Press the ◄ or ► button on the remote to change the setting.
Item Description
Repeat Mode Select a repeat mode (Sequence, Single or Once).
25
Page 32

QumiCast
System Requirements
The QumiCast software is available for the Mac, iOS, Android and Windows operating
systems. The following is a list of the software requirements:
•
Mac OS 10.9 and above
• iOS8 and above
Android 4.2 and above
•
• Windows 7, 8, 8.1 and above
Setup QumiCast
Download and install the QumiCast App:
• Smart device: iOS APP Store or Google Play
Or
Use the QR scanner app to scan the QR code on QumiCast LAN’s
main page.
• PC: http://www.vivitekcorp.com/qumicast/
Note:
1. Visit “http://www.vivitekcorp.com/qumicast/” for more detail and the latest QumiCast
APP download.
2. Your PC must be connected to the same network as your Qumi device.
26
Page 33

AP Setup Mode
By setting up Qumi as your network Access Point (AP), you can access Qumi menus
through the QumiCast software. Additionally, your device is able to access the internet if
Qumi has an established WiFi connection.
1. From the main menu, press the ◄ or ► button on the remote to select QumiCast.
Press to continue.
To access the QumiCast software on your smart device, you must rst download the
APP to your smart device.
2. You can scan the QR code found on the screen or download from the App Store or
Google Play. Search for QumiCast.
3. Turn on the WiFi function on your device.
4. In the network settings, select the SSID (QumiCast_XXXXXXXX) as displayed in the
menu screen.
5. When prompted for a password, enter the listed password as displayed on the
screen (XXXXXXXX in menu screen).
27
Page 34

6. The network connection between Qumi and smart device is established. The network
status is updated; see the following image.
7. On the device, tap the QumiCast application to open.
Note:
The device must be networked to Qumi prior to opening the QumiCast application.
8. Tap QumiCast to display the QumiCast menu. If no other menu displays, your smart
device has not detected Qumi on the network.
9. In QumiCast menu, tap Setting.
10. In the Setting menu, use your smart device or the remote to select Internet.
11. Tap or press on the remote to continue.
28
Page 35

12. Press the ▲ or ▼ on the remote or smart device to select a listed SSID and press
.
13. Once the SSID is selected, a password prompt displays. Enter the correlating
password if required. Tap or click OK to enter. Tap or click Cancel to stop the
process. Click Forget to remove the selected WiFi prole.
Note:
After setting up the wireless connection, you may need to reconnect Qumi and your
device.
29
Page 36

Router Setup Mode
In this conguration, both Qumi and device are connected to a local router. In this way, the
QumiCast software is able to remotely access Qumi through the network setting.
1. From the main menu, use the ◄ or ► on the remote to select QumiCast. Press
to continue.
To access the QumiCast software on your smart device, you need to rst download
the APP to your smart device.
2. You can scan the QR code found on the screen or download from the App Store or
Google Play. Search for QumiCast.
3. Turn on the WiFi function on your device.
4. In the network settings, select the SSID for your WiFi setup.
5. When prompted, enter the password to the selected SSID.
6. Both Qumi and your smart device are now connected to the same network router,
see the following image.
7. On the device, tap the QumiCast application to open.
Note:
The device must be networked to Qumi prior to opening the QumiCast application.
8. Tap QumiCast to display the QumiCast menu. If the no other menu displays, your
smart device does not detect Qumi on the network.
9. In QumiCast menu, tap Setting.
10. In the Setting menu, use your smart device or the remote to select Internet.
11. Tap or press on the remote to continue.
12. Press the ▲ or ▼ button on the remote to select a listed SSID and press .
13. Once the SSID is selected, a password prompt displays. Enter the correlating
password if required. Tap or click OK to enter. Tap or click Cancel to stop the
process. Click Forget to remove the selected WiFi prole.
Note:
1. Both Qumi and the device must be set up to use the same network subnet. Failure to
set up the network correctly prevents access to Qumi.
2. After setting up the wireless connection, the connection between your smart device and
Qumi may be dropped. Connect to Qumi again to continue using the QumiCast app.
30
Page 37

QumiCast Overview
The QumiCast application provides remote function control for Qumi.
Note:
The screen shot is only for reference.
Listed function names are for reference only and may differ from actual sample use.
iOS Android
Icon Function Description
Tap to stop Mirror mode.
Mirror Off
Photo
Camera Select to display the device’s camera image.
Music Select to play the device’s audio les.
Note:
Mirror Off is only available for Android devices.
Select to display available image les (camera roll or
connected device).
Use to edit a selected photo then save the images with
the modications.
31
Page 38

Icon Function Description
Select to display video les from the camera roll or a
connected device.
Once selected, you are prompted to enter a name for the
Video
Document
Web Select to display the built-in browser application.
CloudS
Cloud Storage
CloudV
Cloud Video
Split Screen
le before saving on Qumi’s internal memory.
Note:
Video format: MPEG1/2/4/H.
Subtitle format: srt, smi, ssa and cdg formats with UTF-8
coding.
Select to display specic documents. Easy commenting is
available. Modied documents are stored in the camera roll
as images.
Support Microsoft® Ofce, PDF and Apple’s iWorks. Sync
the documents les to your device before using.
Select to open a cloud provider in order to select and
download an available le.
Note:
Cloud provider application must be installed and appropriate
account information must be available to allow CloudS
access to the application.
Select to open a cloud provider in order to select and
download an available le.
Note:
Cloud provider application must be installed and appropriate
account information must be available to allow CloudV
access to the application.
Select to view the split screen option. Split Screen allows
you to select a single, double or quadruple screen view.
Multiple users can select the screen location to be displayed
through Qumi.
Note:
Limit on the use of streaming features, including video
streaming, music streaming, online video streaming, etc.
Tap to switch to Mirror mode. Once enabled, this mode
displays the contents of your smart device directly onto the
projected screen.
Mirror
Once you turn it on, there is a 60 second countdown to
allow your mobile phone to connect with Qumi. Select your
Miracast function in your device setting page.
Note:
Mirror is only available for Android devices.
32
Page 39

Icon Function Description
Settings menu provides conguration access for the
Setting
Preference
following: output resolution, SSID and password change,
router connection setup, boot up mode priority and rmware
updating.
Modify preference setting for the QumiCast application:
Select Preferred Device, Host Control preferences, and
displays versioning information.
33
Page 40

USB Connection
The USB Connection function allows a connected PC to function as an external storage
device. Once connected, Qumi can function as an external storage device, which allows
you to transfer les directly to Qumi’s internal memory.
See the following information.
1. Once both the PC and Qumi are powered on, connect one end of a type-A USB
cable to the USB socket on the PC, and the other end to the USB socket on Qumi.
2. Use the remote control to select USB Connection and press to initiate the USB
connection to the PC.
3. If the PC detects Qumi, check the disk of “My Computer” from the PC.
The new folder is Qumi internal memory for use as an external drive. You can drag
and drop les into the internal memory folder as you would any other storage drive.
Note:
1. Built-in memory for Qumi is 4GB.(2.5GB is user accessible)
2. The following screens are for reference only. The letter (F:) is automatically designated
by the PC. The designations may differ on your PC.
34
Page 41

HDMI / MHL
The HDMI / MHL function allows a connected devices via HDMI or HDMI/MHL cable.
To use Qumi projection function through the HDMI / MHL function, see the following
information.
1. Once both the device and Qumi are powered on, connect one end of HDMI/MHL
cable to the HDMI or MHL socket on the device, and the other end to the HDMI
socket on Qumi.
2. Use the remote control to select HDMI / MHL and press .
Once the device is connected, the projector displays the screen on the device.
35
Page 42

Mirror
Displays the contents of your smart device directly onto the projected screen.
Note:
Mirror is only available for Android devices.
Follow these instructions to use Qumi projection function through Mirror.
1. Power on your device before starting the process.
2. Use the remote control to select Mirror and press .
3. Turn on the WiFi function on your device.
4. In the network settings, select the SSID (QumiCast_XXXXXXXX) as displayed in the
menu screen.
5. When prompted for a password, enter the listed password as displayed on the
screen (XXXXXXXX in menu screen).
Once the device is connected, the projector displays the screen on the device.
36
Page 43
Chapter 4 On-Screen Display (OSD) Settings
OSD Menu Controls
Qumi has an On-Screen Display (OSD) settings menu that allows you to make
adjustments and changes to settings, such as Color, Display, Information, Audio, and
Management settings. There are 5 menus within the OSD menu:
• Color – Various aspects of the image quality can be adjusted in this menu.
• Display – Projector mode and other setting can be adjusted in this menu.
• Information – Device information can be found in this menu.
• Audio – Many settings for audio can be adjusted in this menu.
• Management – Default language and other settings can be adjusted in this menu.
The OSD menu can be accessed by pressing MENU button on the remote control or
pressing MENU on the keypad.
Navigating the OSD
The remote control cursor buttons or the buttons on the top of Qumi can be used to
navigate and make changes to the OSD settings.
1. Enter the OSD menu.
2. Press the ◄ or
► button to move
through the 5 menus
and press .
3. Press the ▲ or ▼
button to move the
cursor up and down
within in a menu.
4. Press the ◄ or ►
button to change the
values for specic
settings.
5. Press MENU
button on the remote
control to close the
OSD.
Press EXIT button
to close a submenu.
37
Page 44

Setting the OSD Language
The language that is displayed in the OSD can be changed. To change the language in
the OSD, perform the following steps:
1. Enter the OSD menu. Press the ◄ or ► button to select the Management and press
.
2. Press the ◄ or ► button until the language you want is shown in the cursor.
3. Press EXIT button to close submenu or MENU button to close the OSD.
38
Page 45

OSD Menu Overview
Use the following illustration to quickly nd a setting or determine the range for a setting.
Main Menu Sub Menu Settings
Color Display Mode Presentation, Bright, Game,
Movie, TV
Brightness 0~100
Contrast 0~100
Sharpness 0~3
Color Temperature Warm, Normal, Cold
Gamma 1.0, 1.2, 1.4, 1.6, 1.8, 2.0,
2.2, 2.4
Saturation 0~100
Hue -180~180
Wall Color White, Yellow, Blue, Pink,
Green
Display Projector Mode Front, Rear, Rear Ceiling,
Front Ceiling
Aspect Ratio Auto, Full, 4:3, 16:9, L.Box
V. Keystone -40~40
H. Keystone -25~25
4 Corner Correction
Auto V. Keystone Off, On
HDMI Color Range Auto, Limited Range, Full
Range
HDMI Scan Info Auto, Underscan, Overscan
3D 3D Mode Auto, Frame Packing, Side By
Side, Top And Bottom, Frame
Sequential, Off
3D L/R Invert
Digital Zoom 1.0x, 1.1x, 1.2x, 1.3x, 1.4x,
1.5x
39
Page 46

OSD Menu Overview
ةيبرعلا
Main Menu Sub Menu Settings
Information WiFi IP
Resolution
3D Format
LED Hours
FW Version
Audio Volume 0~10
Mute Off, On
Management Language English, Čeština, Dansk,
Deutsch, Español, Français,
Italiano, Magyar, Nederlands,
Polski, Português, Suomi,
Svenska, Türkçe, Русский,
ไทย, 繁體中文, 簡体中文,
日本語, 한국어, Việt Nam,
Auto Shutdown Off, 15 mins, 30 mins, 1 hour,
2 hour
AC Power On Off, On
LED Mode Eco., Normal
Fan Speed Normal, High
WiFi Off, On
FW Upgrade
Reset All
40
Page 47

Color Menu
To access the Color menu and adjust the settings, perform the following steps:
1. Enter the OSD menu.
2. Press the ◄ or ► button to select the Color menu and press .
3. Press the ▲ or ▼ button to move the cursor up or down in the Color menu.
4. Press the ◄ or ► button to change values for each applicable setting.
Item Description
Display Mode Press the ◄ or ► button to set the display mode.
Brightness Press the ◄ or ► button to adjust the display brightness.
Contrast Press the ◄ or ► button to adjust the display contrast.
Sharpness Press the ◄ or ► button to adjust the display sharpness level.
Color Temperature Press the ◄ or ► button to adjust the color temperature.
Gamma
Saturation Press the ◄ or ► button to adjust the display saturation.
Hue Press the ◄ or ► button to adjust the display hue.
Wall Color
Press the ◄ or ► button to adjust the gamma correction of the
display.
Press the ◄ or ► button to select the proper color according to
the wall.
41
Page 48

Display Menu
To access the Display menu and adjust the settings, perform the following steps:
1. Enter the OSD menu.
2. Press the ◄ or ► button to select the Display menu and press .
3. Press the ▲ or ▼ button to move the cursor up and down in the Display menu.
4. Press the ◄ or ► button to change values for each applicable setting.
Item Description
Projection Mode
Aspect Ratio Press the ◄ or ► button to adjust the video aspect ratio.
V. Keystone Press the ◄ or ► button to adjust the vertical display keystone.
H. Keystone Press the ◄ or ► button to adjust the horizontal display keystone.
4 Corner Correction
Auto V. Keystone
HDMI Color Range
HDMI Scan Info
3D
Digital Zoom Press the ◄ or ► button to adjust the digital zoom in or zoom out.
Press the ◄ or ► button to choose from four projection methods:
Front, Rear, Rear Ceiling, Front Ceiling.
Press and press the ▲,▼, ◄ or ► button to adjust four
corners of the image.
Press the ◄ or ► button to enable or disable automatic vertical
keystone.
Press the ◄ or ► button to select a suitable HDMI color range
according to the output device connected.
Press the ◄ or ► button to adjust the overscan ratio according to
the output device connected.
Press to enter the 3D menu. See 3D on page 43.
42
Page 49
3D
To adjust the 3D settings, press to enter the 3D sub menu.
Item Description
3D Mode
3D L/R Invert
Note:
To use the 3D function, the Play Movie in 3D setting found in your player under the 3D Disc
Menu must be enabled.
1. The 3D OSD menu item is gray if there is no appropriate 3D source. This is the default setting.
2. When the projector is connected to an appropriate 3D source, the 3D OSD menu item is
enabled for selection.
3. Use 3D glasses to view a 3D image.
4. You need 3D content from a 3D DVD or 3D media le.
5. You need to enable the 3D source (some 3D DVD content may have a 3D on-off selection
feature).
6. You need DLP link 3D shutter glasses.
7. Power on the glasses. Glasses normally have a power on-off switch. Each type of glasses has
its own conguration instructions. Please follow the conguration instructions that come with your
glasses to nish the setup process.
Press to select 3D mode.
Press to enable or disable 3D L/R Invert.
43
Page 50
Information Menu
To see the information of Qumi, perform the following steps:
1. Enter the OSD menu.
2. Press the ◄ or ► button to select the Information menu and press .
Item Description
WiFi IP Display the device WiFi IP address.
Resolution Display resolution information.
3D Format Display the 3D format.
LED Hours Display the LED use information (in hours).
FW Version Display the rmware version.
44
Page 51

Audio Menu
To access the Audio menu and adjust the settings, perform the following steps:
1. Enter the OSD menu.
2. Press the ◄ or ► button to select the Audio menu and press .
3. Press the ▲ or ▼ button to move the cursor up and down in the Audio menu.
4. Press the ◄ or ► button to change values for each applicable setting.
Item Description
Volume Press the ◄ or ► button to adjust the audio volume.
Mute Press the ◄ or ► button to turn on or off the speaker.
45
Page 52

Management
To access the Management menu and adjust the settings, perform the following steps:
1. Enter the OSD menu.
2. Press the ◄ or ► button to select the Management menu and press .
3. Press the ▲ or ▼ button to move the cursor up and down in the Management
menu.
4. Press the ◄ or ► button to change values for each applicable setting.
Item Description
Language Press the ◄ or ► button to select a different localization menu.
Auto Shutdown Press the ◄ or ► button to enable or disable automatic power off.
Auto Power On Press the ◄ or ► button to enable or disable automatic power on.
LED Mode
Fan Speed
WiFi Press the ◄ or ► button to enable or disable WiFi function.
FW Upgrade
Reset All
Press the ◄ or ► button to select the LED mode for higher
brightness, or lower brightness to save LED life.
Press the ◄ or ► button to enter and toggle between Normal and
High fan speeds.
Note:
We recommend selecting high speed in high temperature, high
humidity, or high altitude (higher than 1500m/4921ft) areas.
Press to upgrade the rmware upgrade.
Press to reset all items to factory preset values.
46
Page 53

Chapter 5 Taking Care of Your Qumi
Cleaning Qumi
Cleaning Qumi to remove dust and grime will help provide trouble-free operation.
Warning:
1. Qumi should be turned off and unplugged before cleaning. Failure to do so may result in
injury or damage to the system.
2. Use only a dampened cloth when cleaning. Do not allow water to enter the ventilation
openings on Qumi.
3. If a small amount of water gets into the interior of Qumi while cleaning, unplug Qumi and
set in a well ventilated area for several hours before using.
4. If a large amount of water gets into the interior of Qumi when cleaning, unplug Qumi and
have it serviced.
Cleaning the Lens
Optical lens cleaning solutions can be purchased from most camera and other retail
stores. To clean Qumi lens, perform the following steps:
1. Apply a small amount of the optic lens cleaning solution to a clean and soft cloth. (Do
not apply the cleaning solution directly to the lens.)
2. Gently wipe the lens in a circular motion.
Caution:
1. Do not use abrasive cleaners or solvents.
2. To prevent discoloration or fading, do not allow the cleaning solution to contact Qumi
case.
47
Page 54

Troubleshooting
Common Problems and Solutions
These guidelines provide tips to deal with problems you may encounter while using Qumi.
If the problem remains unresolved, contact your dealer for assistance.
The problem sometimes can be as simple as a wire that is not completely connected.
Review the following possible issues before proceeding to the problem-specic solutions.
• Use another electrical device to conrm that the electrical outlet is properly working.
• Make sure that Qumi is turned on.
• Make sure all connections are securely connected.
• Make sure that the connected device is turned on.
Tips for Troubleshooting
In each problem-specic section, perform the steps in the order suggested. Doing so may
help solve the problem more quickly.
In order to avoid replacing non-defective parts, try to nd and isolate the problem.
For example, if you replace batteries and the problem remains, put the original batteries
back and move to the next step.
Keep a record of the steps you take when troubleshooting. The information may be useful
for reference when calling technical support or for bringing Qumi to service personnel.
LED Error Messages
Error Code Messages
LED light source ready ON —
Over temperature error T1 ON ON
T1 I2C fail 4 1
ADC I2C fail 4 2
LED over temperature (Red) ON 1
LED over temperature (Green) ON 2
LED over temperature (Blue) ON 3
Fan 1 (Blower) error 6 1
Fan 2 (System) error 6 2
Red LED Thermistor error 8 1
Green LED Thermistor error 8 2
Blue LED Thermistor error 8 3
POWER
Green Blink
TEMP
Amber Blink
In the event of an LED error, disconnect the AC power cord and wait for one (1) minute
before restarting Qumi.
If any other situation occurs which is not listed in the chart above, please contact your
service center.
48
Page 55

Image Problems
Problem: No image appears on the screen
Turn off all of the equipment and power up the equipment again in the correct order.
Problem: The image is blurred
1. Adjust the focus on Qumi.
2. Make sure Qumi-to-screen distance is within the specied range.
3. Clean Qumi lens with optical lens cleaning cloth if it is dirty.
Problem: The image is wider at the top or bottom (trapezoid effect)
1. Position Qumi so that it is as perpendicular to the screen as possible.
2. Adjust the Keystone settings in the OSD to correct the problem or set Auto Keystone
to On.
Problem: The image is reversed
Check the orientation of the Projector Mode setting in the Display menu in the OSD.
Problem: The image is at with no contrast
Adjust the Contrast setting in the Color menu in the OSD.
Problem: The color of the projected image does not match the source image
Adjust the Color Temperature and Gamma settings in the Color menu in the OSD.
Remote Control Problems
Problem: Qumi does not respond to the remote control
1. Aim the remote control towards the remote sensor on Qumi.
2. Make sure the path between remote and sensor is not obstructed.
3. Turn off any uorescent lights in the room.
4. Check to see if the battery polarity is correct.
5. Replace the battery.
6. Turn off other infrared-enabled devices in the vicinity.
7. Have the remote control serviced.
49
Page 56

Audio Problems
Problem: There is no sound
1. Adjust the volume of the audio source.
2. Check the audio cable connection.
3. Test the output of the audio source with other speakers.
4. Have Qumi serviced.
Problem: The sound is distorted
1. Check the audio cable connection.
2. Test the output of the audio source with other speakers.
3. Have Qumi serviced.
FAQs
1. Is it possible to connect Qumi to a game console, such as a Microsoft® Xbox or
Sony® PS3?
Yes, Qumi can be used to display content from an Xbox or PS3 console. This can be
done by connecting the HDMI cable from the game console to Qumi.
2. Can Qumi project content from a television?
Watching television content can be done by connecting a cable box, digital set-topbox or satellite receiver because televisions are only able to produce images on its
own screen. For example, if a cable box is used, it can be connected by an HDMI
cable to Qumi.
3. How can MHL connect to Qumi?
Use support MHL cable to connect MHL device.
Please visit www.mhlconsortium.org/ for more information.
50
Page 57

4. How are images from a digital camera or a USB storage device displayed?
Images and other content can be displayed by connecting the following devices to
Qumi:
• USB ash drive, hard drive, card reader
• Digital camera
• Smart phone
• Multimedia storage viewer
Once the devices are connected, images can be displayed by using Qumi Media
Suite.
5. Which cable is required for video devices to be connected with Qumi?
Video devices can be connected to Qumi by using HDMI or MHL cable if the devices
contain the appropriate ports. .
6. What type of video formats does Qumi support?
AVI, divx, MKV, TS, DAT, VOB, MPG, MPEG, MOV, MP4, WMV.
7. What type of audio formats does Qumi support?
MP1/MP2/MP3, WMA, OGG, ADPCM-WAV, PCM-WAV, AAC.
8. What type of document formats does QUMI support?
Microsoft® Ofce 97-2010 (Word, Excel®, PowerPoint®), Adobe® PDF (1.0, 1.1, 1.2,
1.3 and 1.4).
9. What type of photo formats does QUMI support?
JPEG and BMP.
10. How long will the LED light source in Qumi last and can it be replaced?
Qumi does not use a typical light source. It uses a set of Light Emitting Diodes (LED)
to illuminate and project images. LED’s have a greater lifespan than conventional
lamps. Qumi LED’s are estimated to last for approximately 30,000 hours. The
lifespan of the LED depends on factors such as brightness, usage, environmental
conditions. LED brightness can decrease over time. The LED module is not
replaceable.
11. Why do I need to re-adjust the focus on my Qumi after it’s powered up?
For the best picture quality, adjustment of the focus ring may be necessary once the
operational temperature has been met.
Vivitek Support Site
Please visit www.vivitekcorp.com for more information, support and product registration.
51
Page 58

Specications
Model
Native Resolution
Projection Distance
Projection Screen Size
(Diagonal)
Projection Lens
Throw Ratio
Vertical Keystone Correction
Horizontal Keystone
Correction
Projection Methods
Data Compatibility
Video Compatibility
Safety Certication
Operation Temperature
Environmental Storage
Condition
Qumi Q8 Series
1920x1080 (1080p)
1.33m ~ 4m (52” ~ 157”)
1.0m ~ 3.0m (40” ~ 120”)
Manual focus
1.5x
+/- 40 steps
+/- 25 steps
Front, Rear, Front-Ceiling, Rear-Ceiling
VGA, SVGA, XGA, SXGA, SXGA+, UXGA, Mac
480i, 480p, 720p, 1080i, 1080p
FCC-B, UL, CCC, CE, PSE, KC, CB, CU, RoHS,
ICES-003 (Canada)
5°C ~ 35°C
-10°C ~ 60°C, 5~95% (N/A condensation)
Dimensions (WxDxH)
AC Input
Power Consumption
Audio Speaker
189.5mm (7.46”) x 113.8mm (4.48”) x 44.3mm (1.74”)
AC Universal 100 - 240, Typical @ 110VAC (100-
240)/+-10%
54W
2W mono speaker
HDMI/MHL x 1
Input Terminals
USB Type A x 1
Output Terminals
Note:
For questions regarding product specications, please contact your local distributor.
3.5mm earphone jack (volume control) x 1
52
Page 59

Projection Distance vs. Projection Size
Projection Distance and Size Table
Image
Diagonal
(inches/cm)
40/101.6 34.9/88.6 19.6/49.8 52.3/132.8 1.0/2.5
45/114.3 39.2/99.6 22.1/56.1 58.8/149.4 1.1/2.8
50/127.0 43.6/110.7 24.5/62.2 65.4/166.1 1.2/3.0
60/152.4 52.3/132.8 29.4/74.7 78.4/199.1 1.5/3.8
70/177.8 61.0/154.9 34.3/87.1 91.5/232.4 1.7/4.3
80/203.2 69.7/177.0 39.2/99.6 104.6/265.7 2.0/5.1
90/228.6 78.4/199.1 44.1/112.0 117.6/298.7 2.2/5.6
100/254.0 87.2/221.5 49.0/124.5 130.7/332.0 2.5/6.4
110/279.4 95.9/243.6 53.9/136.9 143.8/365.3 2.7/6.9
120/304.8 104.6/265.7 58.8/149.4 156.9/398.5 2.9/7.4
Note:
The offset table has a 10% tolerance due to optical component variations.
Image Width
(inches/cm)
Image High
(inches/cm)
Projection
Distance
(inches/cm)
Offset-A
(inches/cm)
53
Page 60

Timing Mode Table
3D
Timing
VESA640x480_60 31.47 59.94 O O O O
VESA640x480_72 37.86 72.81 O O
VESA640x480_75 37.5 75 O O
VESA640x480_85 43.27 85.01 O O
VESA800x600_60 37.88 60.32 O O O O
VESA800x600_72 48.08 72.19 O O
VESA800x600_75 46.88 75 O O
VESA800x600_85 53.67 85.06 O O
VESA800x600_120-RB 76.3 119.97 O O
VESA1024x768_60 48.36 60 O O O O
VESA1024x768_70 56.48 70.07 O O
VESA1024x768_75 60.02 75.03 O O
VESA1024x768_85 68.68 85 O O
VESA1024x768_120-RB 97.55 119.99 O O
VESA1280x768_60-RB 47.4 59.99 O O O O
VESA1280x768_60 47.78 59.87 O O O O
VESA1280x800_60 49.7 59.81 O O O O
VESA1280x800_75 62.79 74.93 O O
VESA1280x800_85 71.55 84.88 O O
VESA1280x800_120-RB 101.56 119.91 O O
VESA1280x1024_60 63.98 60.02 O O O
VESA1280x1024_75 79.98 75.02
VESA1280x1024_85 91.15 85.02
VESA1280x960_60 60 60 O O O
VESA1280x960_85 85.94 85
VESA1400x1050_60 65.32 59.98 O O O
VESA1440x900_60 55.93 59.89 O O O
VESA1600x1200_60 75 60 O O O
VESA1680x1050_60-RB 64.67 59.88 O O O
VESA1680x1050_60 65.29 59.95 O O O
VESA1920x1080_60 67.5 60 O O O
VESA1920x1200_60-RB 74.04 59.95
IBM-720x400-70 31.467 70.08 O O
MAC-640x480-66 35 66.67 O O
MAC-832x624-75 49.722 74.55 O O
MAC-1024x768-60 48.773 59.99 O O O O
MAC-1152x870-75 68.681 75.06 O O
SDTV-480i60 15.734 59.94 O O O O
SDTV-480P59 31.469 59.394 O O O O
SDTV-576i50 15.625 50 O O O O
SDTV-576P50 31.25 50 O O O O
HDTV-720P50 37.5 50 O O O O
HDTV-720P60 45 60 O O O O
HDTV-1080i50 28.125 50 O O O
HDTV-1080i60 33.75 60 O O O
HDTV-1080p24 27 24 O O O
HDTV-1080p25 28.13 25 O O O
HDTV-1080P30 33.75 30 O O O
HDTV-1080P50 56.25 50 O O O
HDTV-1080P60 67.5 60 O O O
H-Sync
[KHz]
V-Sync
[Hz]
Auto
Frame
Packing
Side
by
Side
Top
and
Bottom
Frame
Sequential
Off
54
Page 61

Qumi Dimensions
55
Page 62

Regulatory Compliance
FCC Warning
This equipment has been tested and found to comply with the limits for a Class B digital
device pursuant to Part 15 of the FCC Rules. These limits are designed to provide
reasonable protection against harmful interference when the equipment is operated in a
commercial environment.
This equipment generates, uses, and can radiate radio frequency energy and, if not
installed and used in accordance with the instruction manual, may cause harmful
interference to radio communications. Operation of this equipment in a residential area is
likely to cause harmful interference in which case the user will be required to correct the
interference at his/her own expense.
Changes or modications not expressly approved by the parties responsible for
compliance could void the user’s authority to operate the equipment.
Canada
This class B digital apparatus complies with Canadian ICES-003.
Safety Certications
FCC-B, UL, CCC, CE, PSE, KC, CB, CU, RoHS, ICES-003 (Canada)
Disposal and Recycling
This product may contain other electronic waste that can be hazardous if not disposed of
properly. Recycle or dispose in accordance with local, state, or federal Laws. For more
information, contact the Electronic Industries Alliance at www.eiae.org.
56
 Loading...