

Vivitek DU6771-WH User Manual
User's Manual

DU6771 DLP Projector User Manual
Table of Contents
Copyright ........................................................................................................................................................................... 2
Copyright .................................................................................................................................................................... 2
Disclaimer .................................................................................................................................................................. 2
About the Manual ....................................................................................................................................................... 2
Important Safety Guidelines .............................................................................................................................................. 3
Safety Notification ...................................................................................................................................................... 3
Installation and Use Notices ...................................................................................................................................... 4
Disposal of Old Electric and Electronic Equipment ................................................................................................... 4
Important Recycling Instructions ................................................................................................................................ 4
Introduction ........................................................................................................................................................................ 5
Packing Checklist ....................................................................................................................................................... 5
Projector Overview ..................................................................................................................................................... 6
IO Panel ..................................................................................................................................................................... 8
Control Panel ............................................................................................................................................................. 9
Remote Control ........................................................................................................................................................ 10
Installation and Setting up the Projector ......................................................................................................................... 12
Inserting or Replacing the Remote Control Batteries .............................................................................................. 12
Installing the Projector ............................................................................................................................................. 13
Installing or Removing the Optional Lens ................................................................................................................ 15
Turning on the Projector .......................................................................................................................................... 17
Turning off the Projector ........................................................................................................................................... 18
Setting up the Cooling Con dit ion ............................................................................................................................. 19
Setting up the Projecti on M ode ................................................................................................................................ 19
Adjusting Projected Image Posit ion ......................................................................................................................... 20
Adjusting the Focus and Zoom ................................................................................................................................ 20
Correcting Keystone Distortion ................................................................................................................................ 21
Correcting Distortion at the Corner .......................................................................................................................... 22
Using Control ID for Multi-projector Application ....................................................................................................... 23
Preventing the Unauthorized Use of the Projector .................................................................................................. 25
Using the Control Panel Lock ........................................................................................................................... 25
Using Security Lock .......................................................................................................................................... 25
Using the Screw to Lock the Projection Lens ................................................................................................... 26
Making Connections ........................................................................................................................................................ 27
Connecting to Personal Computer ........................................................................................................................... 27
Connecting to the Video Device............................................................................................................................... 27
Connecting to the Control Equipm ent ...................................................................................................................... 28
Connecting to the Screen Trigger ............................................................................................................................ 29
Connecting to External HDBas eT Transmitter ......................................................................................................... 30
Using the projector .......................................................................................................................................................... 31
Using On-Screen Display......................................................................................................................................... 31
Menu Tree ................................................................................................................................................................ 32
OSD Operation - PICTURE .............................................................................................................................. 36
OSD Operation - SIGNAL ................................................................................................................................. 38
OSD Operation - SETUP .................................................................................................................................. 39
OSD Operation - INSTALLATION ..................................................................................................................... 43
OSD Operation - SERVICE .............................................................................................................................. 49
Product Specification ...................................................................................................................................................... 50
Supported Signal Input Timing ........................................................................................................................................ 51
Configurations of T erminals ............................................................................................................................................. 53
DU6771 Lens Series ....................................................................................................................................................... 54
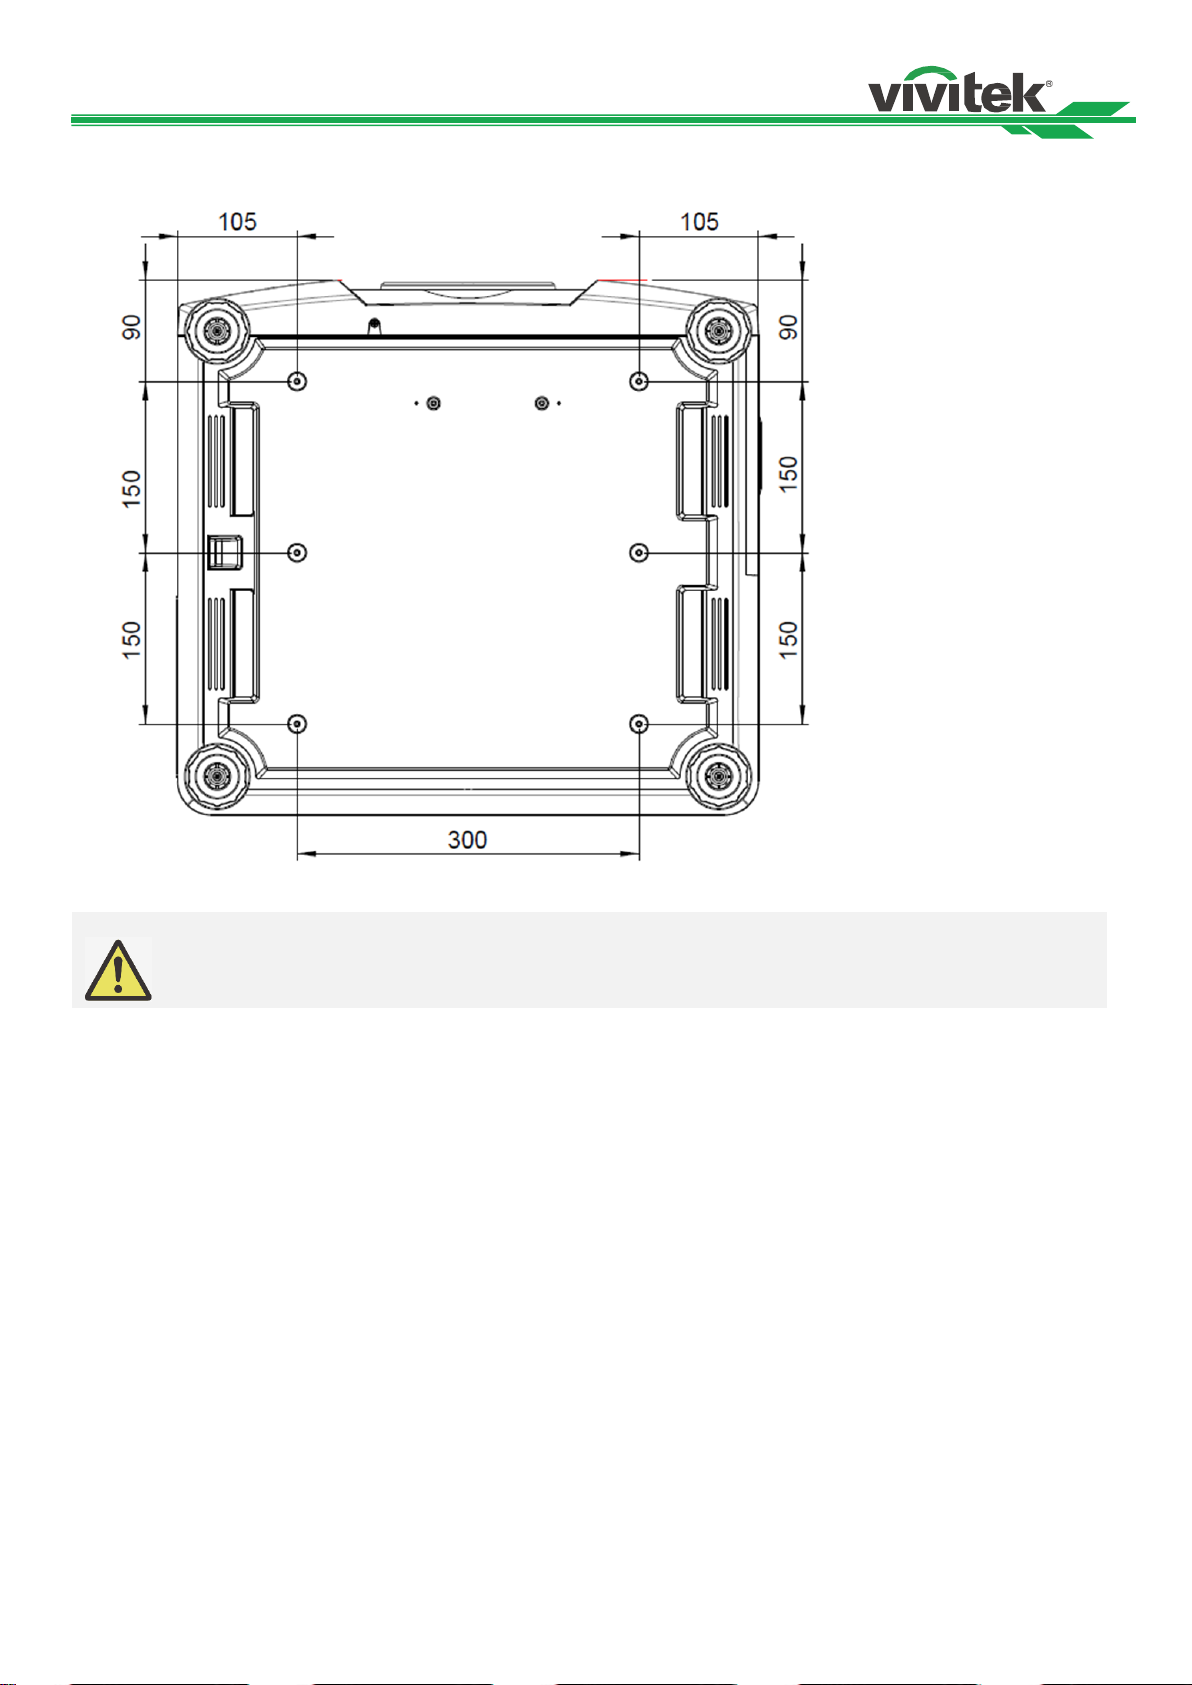
Product Dimensions ........................................................................................................................................................ 55
Replacing the Projection Lamps ..................................................................................................................................... 56
Replacing the Filter ......................................................................................................................................................... 58
Cleaning the Projector ..................................................................................................................................................... 59
Troubleshooting ............................................................................................................................................................... 60
LED Indication .......................................................................................................................................................... 60
Tips for Troubleshooting .......................................................................................................................................... 61
About the Vivitek Support ................................................................................................................................................ 63
UN67711216EN00
1

DU6771 DLP Projector User Manual
Copyright
Copyright
The User's Manual (including all pictures, illustrations and software) is protected by the international copyright right law.
All rights are reserved. No duplication of the manual or any content included in the manual is allowed without the written
consent of the manufacturer.
Vivitek is the trademark of Vivitek Corporation. ©All rights reserved. 2016
Disclaimer
The information in the manual is subject to change without notice. The manufacturer does not provide any statement or
warranty of the contents in the manual and clearly give up the implied warranties of merchantability and of fitness for a
particular purpose. The manufacturer reserves the rights to modify the publication and change the contents of the
materials at any time without notice to any person.
About the Manual
The manual describes how to install and use the projector and is applicable to the end-user. Relevant information (such
as illustrations and descriptions) is put on the same page as possible as we can. The format, easy for printing, is
convenient for reading and paper-saving which is beneficial to environmental protection. It is suggested printing the
page you need.
UN67711216EN00
2
DU6771 DLP Projector User Manual
To turn off main power, ensure to unplug from power outlet.
To prevent the projector from electrical discharge or electric shock, do not expose the projector to
To prevent electric shock, do not open the cabinet. There are high-voltage components inside.
This symbol alerts the user that important information which should be read carefully to avoid
As witch any bright light source, do not stare into the beam, RG2 IEC 62471-5:2015
Important Safet y Guideline s
Thank you for purchasing the high quality product!
Read the Manual carefully to obtain the best performance. The Manual provides instructions to use the menu and
implement operation.
Safety Notification
rain or moist environment. Do not use the plug with an extension cord or an outlet unless all the
prongs can be fully inserted.
Refer service to qualified service personnel.
problems concerning the operation and maintenance.
WARNING TO CALIFORNIA RESIDENTS:
Handling the cables supplied with this equipment might expose user to a little lead, a chemical known to the Stage of
California, resulting in risks of barrenness. Please remember to wash hands after handling.
NOTIFICATION (CANADA)
This class B digital equipment complies with Canadian ICE S-003.
CE NOTIFICATION
This is a class B product, which complies with rules for CE marking. This product may cause radio interference that the
user may be supposed to take adequate measures.
FCC NOTIFICATION
This device complies with the limits for a Class B digital device, pursuant to Part 15 of the FCC Rules. These limits are
designed to provide reasonable protection against harmful interference in a residential installation. This device
generates, uses and can radiate radio frequency energy, it may cause harmful interference to radio communications if
not installed and used in accordance with the installation instructions,
FCC CAUTION: To assure product compliance as testing, follow the installation instructions and use only shielded
cables when connecting to the peripheral devices. Any changes or modifications not expressly recognized by Vivitek
could void the user's author it y to operate this dev ic e.
Notification to Korea
This equipment is home use (Class B) electromagnetic wave suitability equipment and to be used mainly at home and
it can be used in all areas.
B 급 기기 (가정용 방송통신기자재)
이 기기는 가정용(B 급) 전자파적합기기로서 주 로 가정에서 사용하는 것을 목적으로 하며, 모 든 지역에서
사용할 수 있습니다.
3
UN67711216EN00

DU6771 DLP Projector User Manual
The symbol on your product or the package represents that the product should not be treated as the
The product may contain other electronic wastes and may pose risk if not discarded properly. Abide by
Notification to Norwegian and Sw edi sh
Equipment connected to the protective earthling of the building installation through the mains connection or through
other equipment with a connection to protective earthling - and to a cable distribution system using coaxial cable, may
in some circumstances create a fire hazard. Connection to a cable distribution system has therefore to be provided
through a device pr o v id in g elec tr ic al isolation below a certain frequency range (galvanic isolator, see EN 60728-11).
Installation and Use N o ti ces
1. Read and keep this manual properly.
2. Pay attention to all the noted warnings, and follow all the guidelines and descriptions in this manual.
3. Do not use the projector near water.
4. Do not install the equipment near the thermal sources, such as heaters, radiators, furnace, amplifiers, and any
other equipment that may generate heat.
5. Be careful while holding the equipment or moving the trolley with projector to prevent the equipment from turning
over.
6. Notice whether there is any parts with flaws after receiving the projector.
7. Please notice that the projector will not power on until the lens is fitted. The protection covering the lens should be
taken to install the lens.
8. Do not let any vent be obstructed.
9. Do not destroy the safety protection function of polarized or grounding plug of power cord. A polarized plug has
one wide and one narrow blade. The plug has two blades and one grounding blade. The wide blade or grounding
blade is provided for the safety concerns. If the plug provided does not match the outlet, please contact the
electrician to change outlet.
10. The +12V trigger only outputs 12V DC trigger signal. Do not connect other power input or output. Otherwise, the
equipment may malfunction.
11. Adjust the slide switch with suitable volt input, and then plug in the projector; the red LED indicator would flash and
then stabilize, getting into standby mode. User should only use the connectors or accessories provided by the
manufacturer.
12. When user turns on the projector, the red LED indicator would flash until stabilize. Do not look at the lens directly
while the projector is running.
13. Unplug the power cord of the equipment if there is a thunderstorm or the equipment is not going to be used for a
long time.
14. The packaging materials can be kept properly for transportation use afterwards.
15. If any breakdown occurs, please contact dealer or manufacture for qualified repair service.
Disposal of Old Electric and Electronic Equipment
normal household waste when disc ar de d but should b e carried to the recycling location of the waste
electric and electronic equipment. The consequence on the environment and human health due to the
incorrect disposal of the product can be prevented if it can be ensured that the product is properly
discarded. Material recycling is helpful to the protection of natural resources. The symbol is only valid in
European Union. If you want to discard electrical and electronic equipment, contact the governmental
authorities or your dealer for the correct method of disposal.
Important Recycling Instructions
the local, state/provincial or federal laws of recycling or discarding. For more information, please visit
the website and contact Electronic Industries Alliance (EIA) on WWW.EIAE.ORG.
4
UN67711216EN00

DU6771 DLP Projector User Manual
AC Power Cord
Power Cord
VGA Signal Cable
IR Remote Control
Wired Remote Cable
Anti-thief Screw (M4)
(for Lens Installation)
User’s Manual Disc
RoHS Card (China)
Certificate (China)
Introduction
The User's Manual describes the installation, setup and operation of the projector and provides assistance to the
installation personnel and the end-user to full y de velo p th e per f ormance of the proj ec tor. Vivitek has made every effort
to ensure that the inform ation in the M anual is correc t at the tim e of printing. T he contents m ay be frequent ly updat ed
due to the continuously product improvement and customer feedback. You can find the latest version of the Manual and
the manual of other Vivitek products on www.vivitekcorp.com.
Packing Checklist
The following items are included in the packaging box of the projector. If any loss or damage to any item, contact your
dealer or Vivitek customer service department.
5
UN67711216EN00

DU6771 DLP Projector User Manual
1. Front IR Receiver
The Receiver for IR signals from remote control.
10. Vent
lens settings, see OSD controls.
Warning:
Note for color wheel door
Projector Overview
Front-right View
The Receiver for IR signals from remote control.
2. LED Indicator
Display current projector status such as power, light
source status and warning.
3. Air Intake
The fan pulls the cool air to the projector for system
cooling.
4. Lens Release Button
Press the Lens Release button before removing the lens.
5. Lens hood
Remove the cover before installing the lens.
6. Height Adjuster
Adjust level of projector by four adjusters.
7. Intake Vent
The fans inside the projector suck the fresh air to cool the
projector.
8. Color Wheel Cover
Remove the cover for replacing the color wheel module.
9. Rear IR Receiver
The air passes through grill openings on the projector is for good air circulation. Do not obstruct any
Heat is discharged from the projector v ia the vent. Make
sure that the vent is not blocked by the object.
11. I/O Panel
Connect to various input, control or output terminals to the
projector.
12. Security Chain Slot
Insert the security cable or wire commercially available
into the security chain slot for preventing unauthorized
removal of the projector.
13. Kensington Lock
Attach the projector to a permanent object with the
Kensington slot.
14. AC Inlet
Connect the supplied power cable to this inlet.
15. AC Power Switch
Turn on/off the AC power of the projector.
16. Control Panel
Press the button to operate the OSD menu or adjust the
of the grill openings and keep the required distance from any object
The product is with changeable color wheel feature; it can detect which kind of the color wheel is
installed in the projector then switch to corresponding firmware for operation automatically. Please
UN67711216EN00
contact with your local dealer for ordering optional color wheel.
The product is with sealed optical engine for
6

DU6771 DLP Projector User Manual
17. Anti-thief Screw hole
Note:
14 mm
The screws are for Lens support kits only; overloading may damage the projector or cause injury.
When installing, ensure that you use only UL Listed ceiling mounts, Contact your dealer for
information on mounting the projector on a ceiling.
With ceiling installation, use approved mounting hardware & M4 screws; maximum depth of screw
The anti-thief screw can be fastened to prevent Lens
removing by unauthor i zed pers on.
18. Mounting Holes of Support Kit
These two screws holes can be used to fix support kits of
ultra-short throw lens.
19. Recess for projector handling.
These four recesses can be used for handling the
projector.
20. Ceiling Mounting Hole
These six screw holes are for ceiling mounting kits,
(M4 screw, maximum depth 14mm)
7
UN67711216EN00

DU6771 DLP Projector User Manual
HDBaseT/LAN
be used by the authorized maintenance person nel .
MONITOR OUT
Note for Trigger
Note for Wired Remote Controller
Do not use this jack for anything other than intended use
IO Panel
Connect an Ethernet cable (Cat5/Cat6, not supplied)
from a computer, network device, or HDBaseT
transmitter.
HDMI II
Connect the HDMI cable from a computer or video
device
DVI-D
Connect to DVI-D cable from a DVI-D output of the
device.
HDMI I
Connect the HDMI cable from a computer or video
device.
RS-232
The 9-pin D-sub interface is used to connect to the PC
control system and projector maintenance.
Service USB
It is a port exclusively used for maintenance and only can
Connect to a monitor to display the projected content.
VGA
Provide the standard 15-pin VGA connection and can
connect to RGB, HD Component or personal computer.
TRIGGER(12V +/-1.5V)
When connected to the screen through a 3.5mm cable,
the screen deploys automatically on start-up of the
projector. The screen reacts when the projector is
powered off.
3D SYNC IN / Out
Connect to the 3D IR synchronization signal transmitter.
WIRED REMOTE
Connect the supplied remote controller to the projector
Component (V, H, B/Pb, G/Y, R/Pr)
Connect RGBHV or Component signal from computer or
component video enabled dev ice
When the projector is turned on, a control signal (DC 12V) outputs from this terminal.
Do not use this jack for anything other than intended use.
Pl ease make sure whether the port for insertion is correct before the terminal of the wired remote
control is inserted. The remote control may be damaged if inserted to the wrong port such as trigger.
UN67711216EN00
8

DU6771 DLP Projector User Manual
POWER
Remote Control
CENTER LENS
Control Panel
User the button to turn on/off the projector.
INPUT
Push the button to select the input signal. HDMI, DVI,
VGA, Component…etc.
AUTO SYNC
Implement automatic signal synchronization.
ASPECT
Change the aspect ratio of the current image and push
the button to change to the next aspect ratio settings.
MENU
Push the button to display or hide the OSD menu.
UP/Down/Left/Right
Use the button to select the OSD option.
ENTER
Use the button to select settings or confirm the changed
settings.
EXIT
Push the button to return to the menu on the previous
level or exit the OSD menu.
Push the button to center the lens and calibrate the
parameter of lens shift, focusing and zooming.
Note: The lens memory function requires the accurate
lens adjustment parameter. Please center the lens every
time after the lens is mounted.
SHUTTER
Use the button to enable the light shutter for stopping the
projection temporarily
LENS SHIFT
Use these four buttons to move the projected image to
desired position.
FOCUS
Use the button to adjust the focus of projected image.
ZOOM
Use the button to zoom in/out the projected image.
UN67711216EN00
9

On
DU6771 DLP Projector User Manual
Remote Control
UN67711216EN00
Use the button to turn on the projector.
OFF
Use the button to turn off the projector.
FOCUS
Adjust the focus of the projected image.
ZOOM
Zoom in/out the projected image.
TEST PATTERN
Use the button to show the test pattern. Press this button again
to switch to the next pattern. Press the EXIT button to return to
the projected image.
LENS SHIFT
Use the button to move the lens right or left.
ENTER
Use the button to select settings or confirm the changed
settings.
MENU
Press the button to display or hide the OSD Menu.
EXIT
Press the button to return to the previous Menu or exit the OSD
Menu.
AUTO PC
You can use this function to synchronize the VGA input signal
automatically.
BLANK
Press the button to enable the shutter to temporarily interrupt
the projection.
STATUS
Show OSD MENU – SERVICE.
VGA
Select VGA input source.
COMPONENT
Select Component input source.
ASPECT
Press the button to switch the aspect ratio.
HDMI1
Select HDMI1 input source.
HDMI2
Select HDMI2 input source.
DVI
Select DVI input source.
3G-SDI (Not Applicable).
DisplayPort (Not Applicable)
HDBaseT
Select HDBaseT input source.
CLEAR
Erase ID number stored in the remote control.
FREEZE
Freeze the projected image or resume the projection.
ID SET
Set ID number of the remote control.
Wired Remote Jack
Connect to WIRED REMOTE terminal on the projector
10
DU6771 DLP Projector User Manual
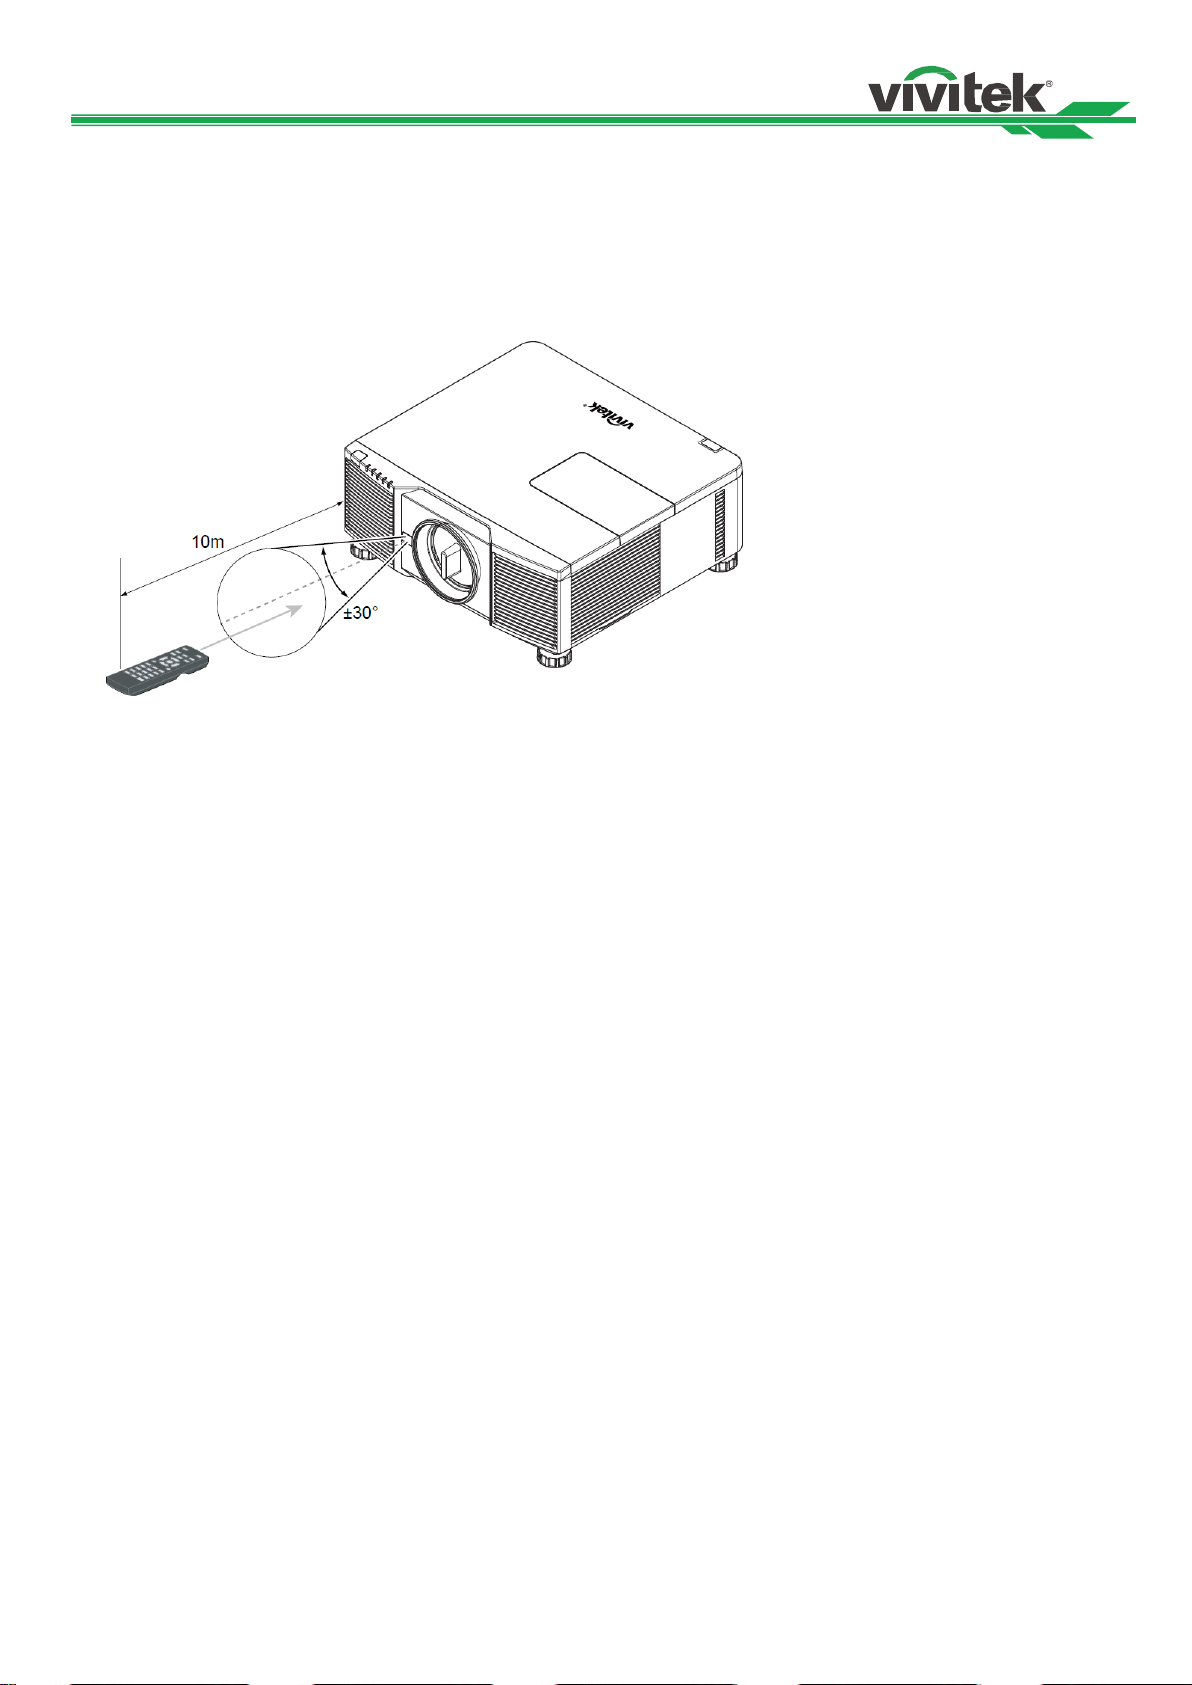
Remote Control Operating Range
The remote control uses infrared transmission to control the projector. It is not necessary to point the remote directly at
the projector. Provided you are not holding the remote perpendicular to the sides or the rear of the projector, the remote
will function well within a radius of about 10 meters (25 feet) and 15 degrees above or below the projector level. If the
projector does not respond to the remote control, move a little closer.
UN67711216EN00
11

DU6771 DLP Projector User Manual
Note:
not work functionally
Battery installation instructions
caused by leaks
Installation and Setti ng up t he Projector
Inserting or Replacing the Remote Control Batteries
1. Remove the battery compartment cover by sliding the cover in the direction of the arrow.
2. Place two AA batteries with the correct polarity.
3. Slide on the cover as the arrow in the illustration.
Avoid using the projector with bright fluorescent lighting turned on. Certain high-frequency
fluorescent lights can disrupt remote control operation.
Be sure nothing obstructs the path between the remote control and the projector.
Do not expose the remote control to high temperature or humidity; otherwise, the remote control will
Make sure the battery is installed with the correct polarity
Do not use the old and new batteries or the batteries of different types together
Remove the battery if the remote control may not be used for a long time to prevent the damage
UN67711216EN00
12
DU6771 DLP Projector User Manual
Projector installation must be done by a qualified professional. Contact your dealer for more
dropped
Ensure that the hot air from the exhaust vent is not sucked into the projector.
is with the acceptable operation temperature range.
Installing the Projector
The high qualit y display effec t can be guaranteed only when the projector is correctly insta lled. Generally, the light
source facing the screen should be reduced or eliminated as much as possible. The contrast of the image will be
obviously reduced if t he lig ht dir ectl y shines on the scr een, s uch as the be am from windows or the sear chlig ht cas t on
the image. The image may become faded an d not bright. Befor e installation, recommend to elim inate the effect of
ambient light. Beside the projection performance, please read below precaution for installation carefully.
Precautions for Installation
information. It is not recommended you install the projector yourself.
With ceiling installation, use approved mounting hardware & M4 screws; maximum depth of screw: 14
mm. Contact your dealer for information about mounting the projector on a ceiling.
Only use the projector on a solid, level surface, serious injury and damage can occur if the projector is
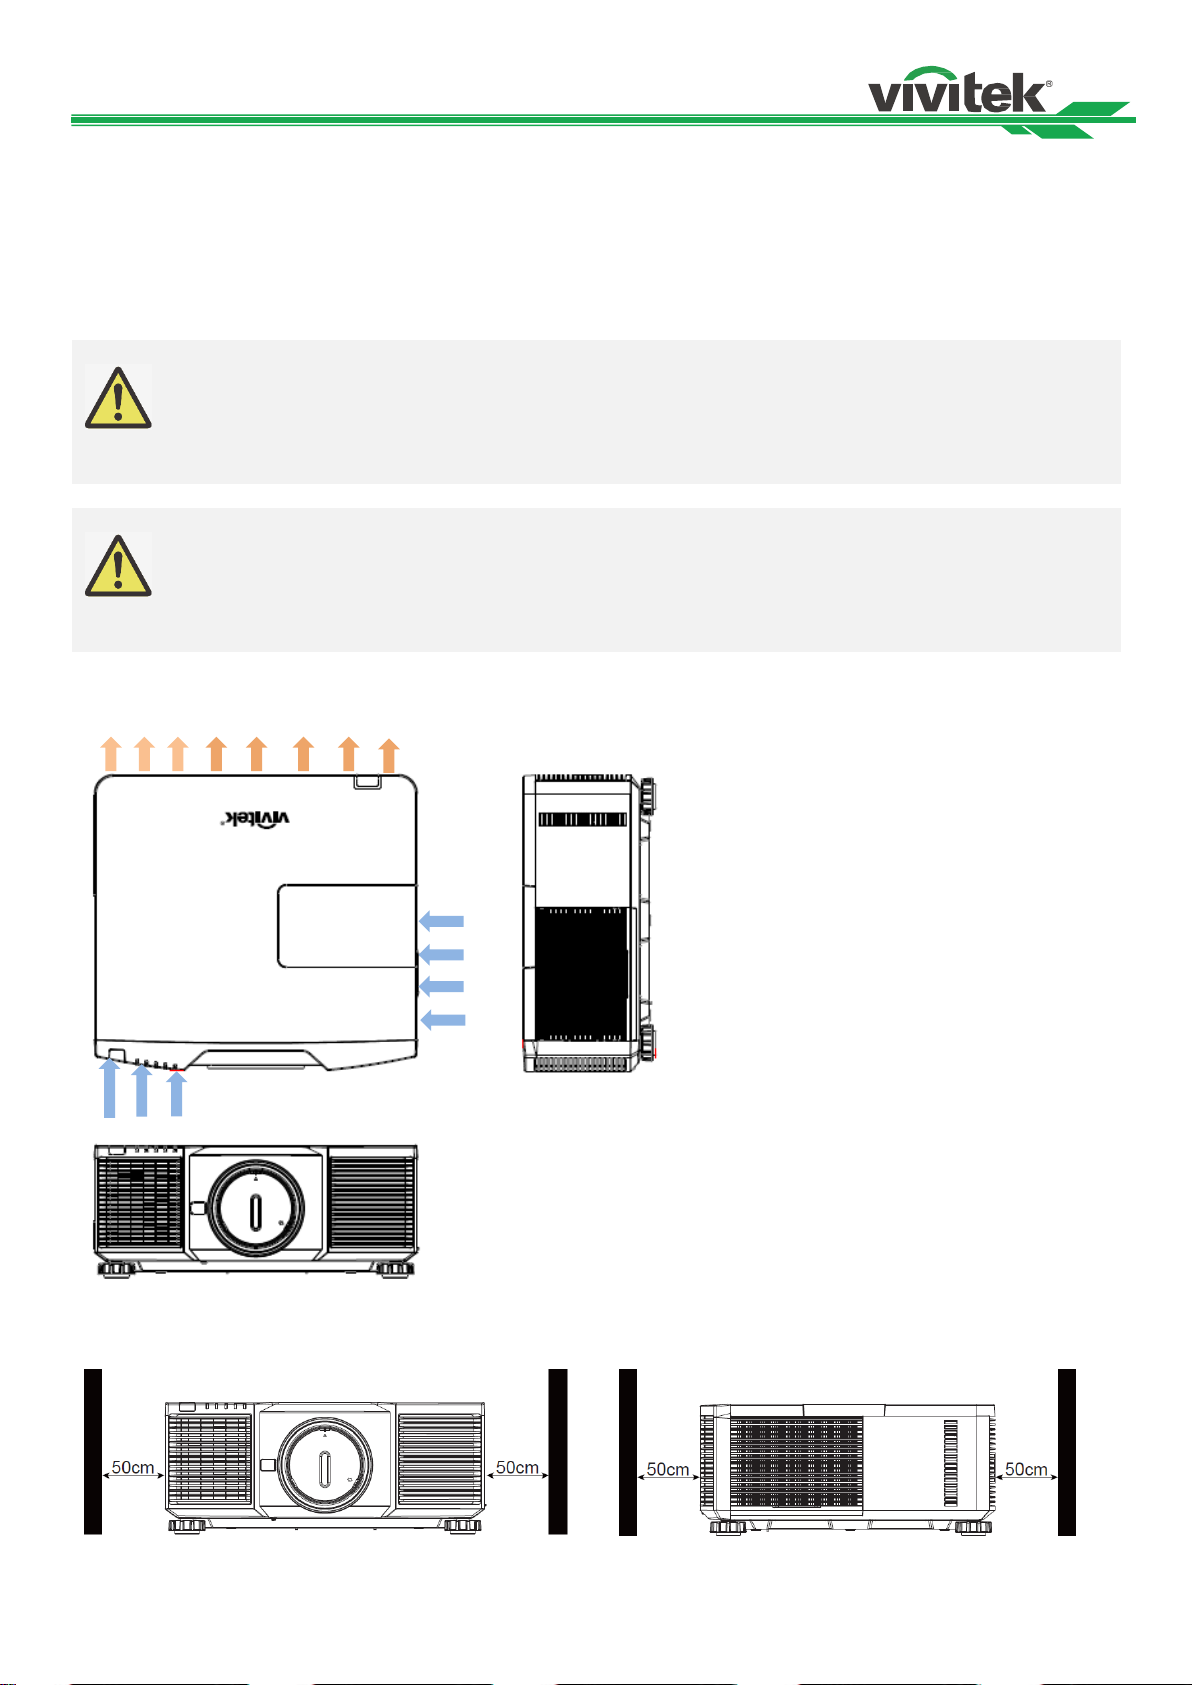
Ensure the air intake and exhaust vents are unobstructed and keep the required distance from any
object. Below is required minimum distance between the vent and any object.
All added enclosures should pass a certified thermal evaluation to ensure that the projector does not
recycle exhaust air, as this may cause the projector to stop projection even if the enclosure temperature
Airflow and Heat Emission
Minimum Distance to Vent
13
UN67711216EN00
DU6771 DLP Projector User Manual
Only use the projector on a solid, level surface, serious injury and damage can occur if the projector is
occur if the projector is dropped
Mounting the Projector
For mounting the projector, please use UL Listed ceiling mounts and M4 screws, maximum depth of screw: 14 mm.
dropped.
Pl ease do not stack the projector on the surface of another projector, serious injury and damage may
UN67711216EN00
14

DU6771 DLP Projector User Manual
Do not shake or place excessive pressure on the projector or the lens components as the projector
projector and lens.
I nstalling or Removing the Optional Lens
Before removing or installing the lens, be sure to turn off the projector and wait till the cooling fans
stop, and turn off the main power switch.
and lens components contain precision parts.
Be sure to remove the optional lens before shipping the projector. The lens and the lens shift
mechanism may encounter damage caused by improper handling during transportation.
Do not touch the lens surface when removing or installing the lens.
Keep fingerprints, dust or oil off the lens surface. Do not scratch the lens surface.
Work on a level surface with a soft cloth under it to avoid scratching.
If you remove and store the lens, attach the lens cap to the projector to keep off dust and dirt.
When installing the lens into the projector, be sure to remove the lens cap from the back of the
optional lens, the cap would block the light and be melted. Failure to do so will cause damage to the
Install New Lens
1. If the Lens cover is installed, pull the edge of the lens cover with one hand ( ① ), so that the lens cover can be
removed easily with the other hand ( ② )
2. Align the " " symbol on the lens label with the "* " symbol on the top of the body (align to the center of the lens
hole) and pull in the lens.
3. Make sure the lens is pushed into the holder and turn it clockwise to the "Lock" position. When turning the lens,
the "Click" sounds twice to indicate that the lens is completely fixed.
UN67711216EN00
15

DU6771 DLP Projector User Manual
Pl ease check if Release button is locked by the screw if the button can’t work.
4. Check if the lens is fixed successfully by pulling the lens out of the holder gently.
Removing the Existing Lens
1. Push the LENS RELEASE button all the way in and rotate the lens counterclockwise. The existing lens will be
disengaged
2. Pull out the existing lens slowly.
UN67711216EN00
16
DU6771 DLP Projector User Manual
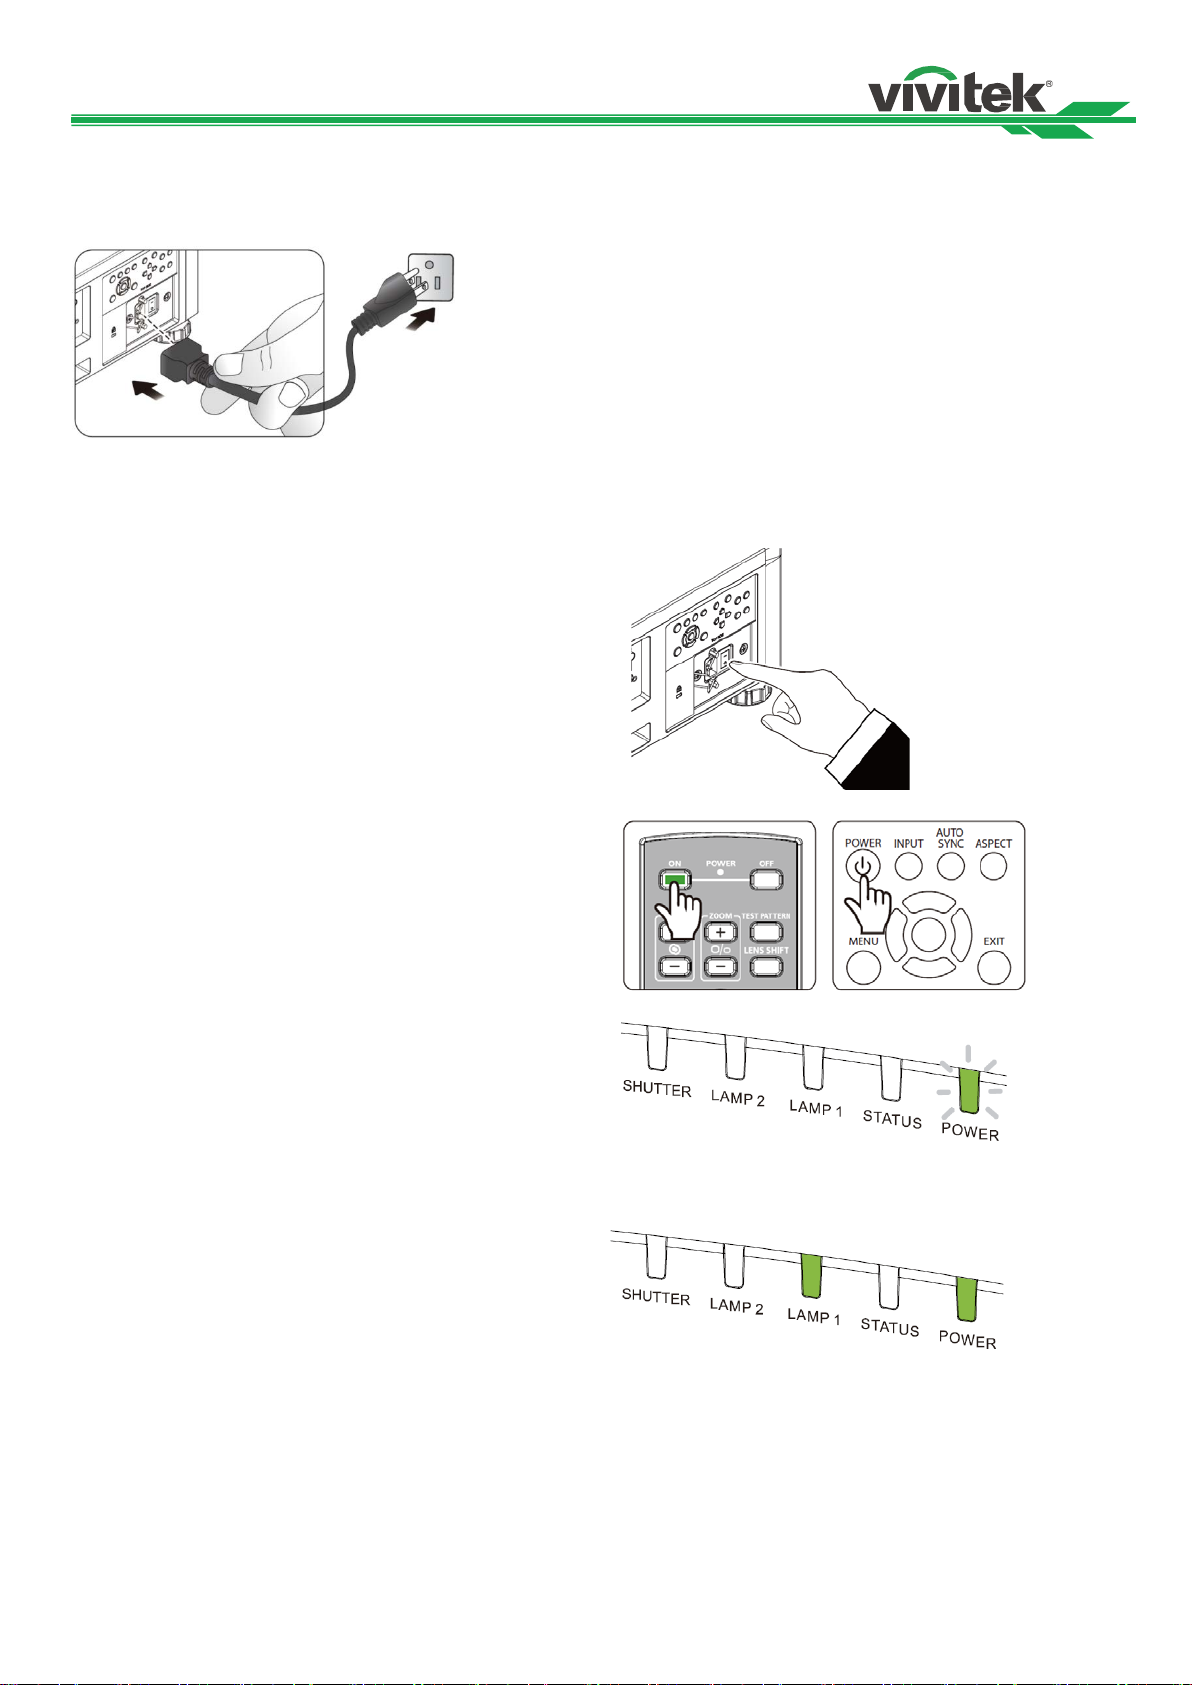
1. Press the main power switch to the on ( I ) position as
2. Press the POWER button on the control panel or ON
3. The Power LED and LIGHT LED flashes green till
4. After few seconds, both LEDs keep green, the projector
Turning on the Projector
The AC power cord is included in the box; plug the power cord to the AC socket on the IO panel.
Once the projector is c orre ctl y located and the p ower cable a nd other con nection s ar e in p lace, it is im porta nt that the
projector is powered on c orrectly in order to avoi d damage to com ponents and un-nec essary wear and te ar. Refer to
the following guide to power on the projector.
shown. POWER LEDs flashes then lights red.
button on the remote control.
power on process is finished.
is ready for use.
UN67711216EN00
17

DU6771 DLP Projector User Manual
Do not unplug the po wer cable from the wall outlet or projector when the projector is p owered on.
Do not turn off the AC power supply within 10 seconds after making adjustment or changing the setting.
1. Press the POWER button on the control panel or OFF
2. Press the POWER button again on the OSD control panel
3. The projector enters Standby mode when the power LED
4. Press the Main Power switch to the off position (O) to turn
Turning off the Projector
Once the projector is no longer required, it is important to shut it down correctly to avoid damage or unnecessary wear
and tear to the projector.
Doing so can caus e damage to the AC IN co nnector of the project or the prong p lug of the power
cable. To turn off the AC po wer supply when th e projector is powered on, us e a power str ip equipped
with a switch and a breaker.
Doing so is possible to cause loss of adjustments and settings and return to default.
Refer to the following guide to turn off the projector.
button on the remote control once, the Power Off window
displays.
or remote control to verify power off, the power LED
flashes orange after Power Off is confirmed.
lights red.
off the projector.
UN67711216EN00
18
DU6771 DLP Projector User Manual
60∘
60∘
60∘
60∘
Table
Ceiling
Upward
Downward
Setting up the Cooling Condition
The high qualit y display effec t can be guaranteed only when the projector is correctly installed. Generally, the light
source facing the screen should be reduced or eliminated as much as possible. The contrast of the image will be
obviously reduced if t he lig ht dir ectl y s hines on the sc reen, such as the beam fr om windows or the se archl ight cas t on
the image. The image may become faded and not bright.
Beside projection performance, the installation orientation would affect heat dissipation for the projector. Improper
cooling conditions may shorten the life of light source or damage the components inside the projector. Please set the
correct Cooling Condition on OSD menu according to the installation orientation.
The available installation options as below.
Table: Install the projector on the table and project the image within 60 degree as below illustration
Ceiling: Mount the projection on the ceiling and project the image within 60 degree as below illustration
Upward: Project the image upward or the installation angle the angle is over 60 degree as below illustration.
Downward: Project the image downward or the instal lation angle the angle is over 60 degree as below illustration.
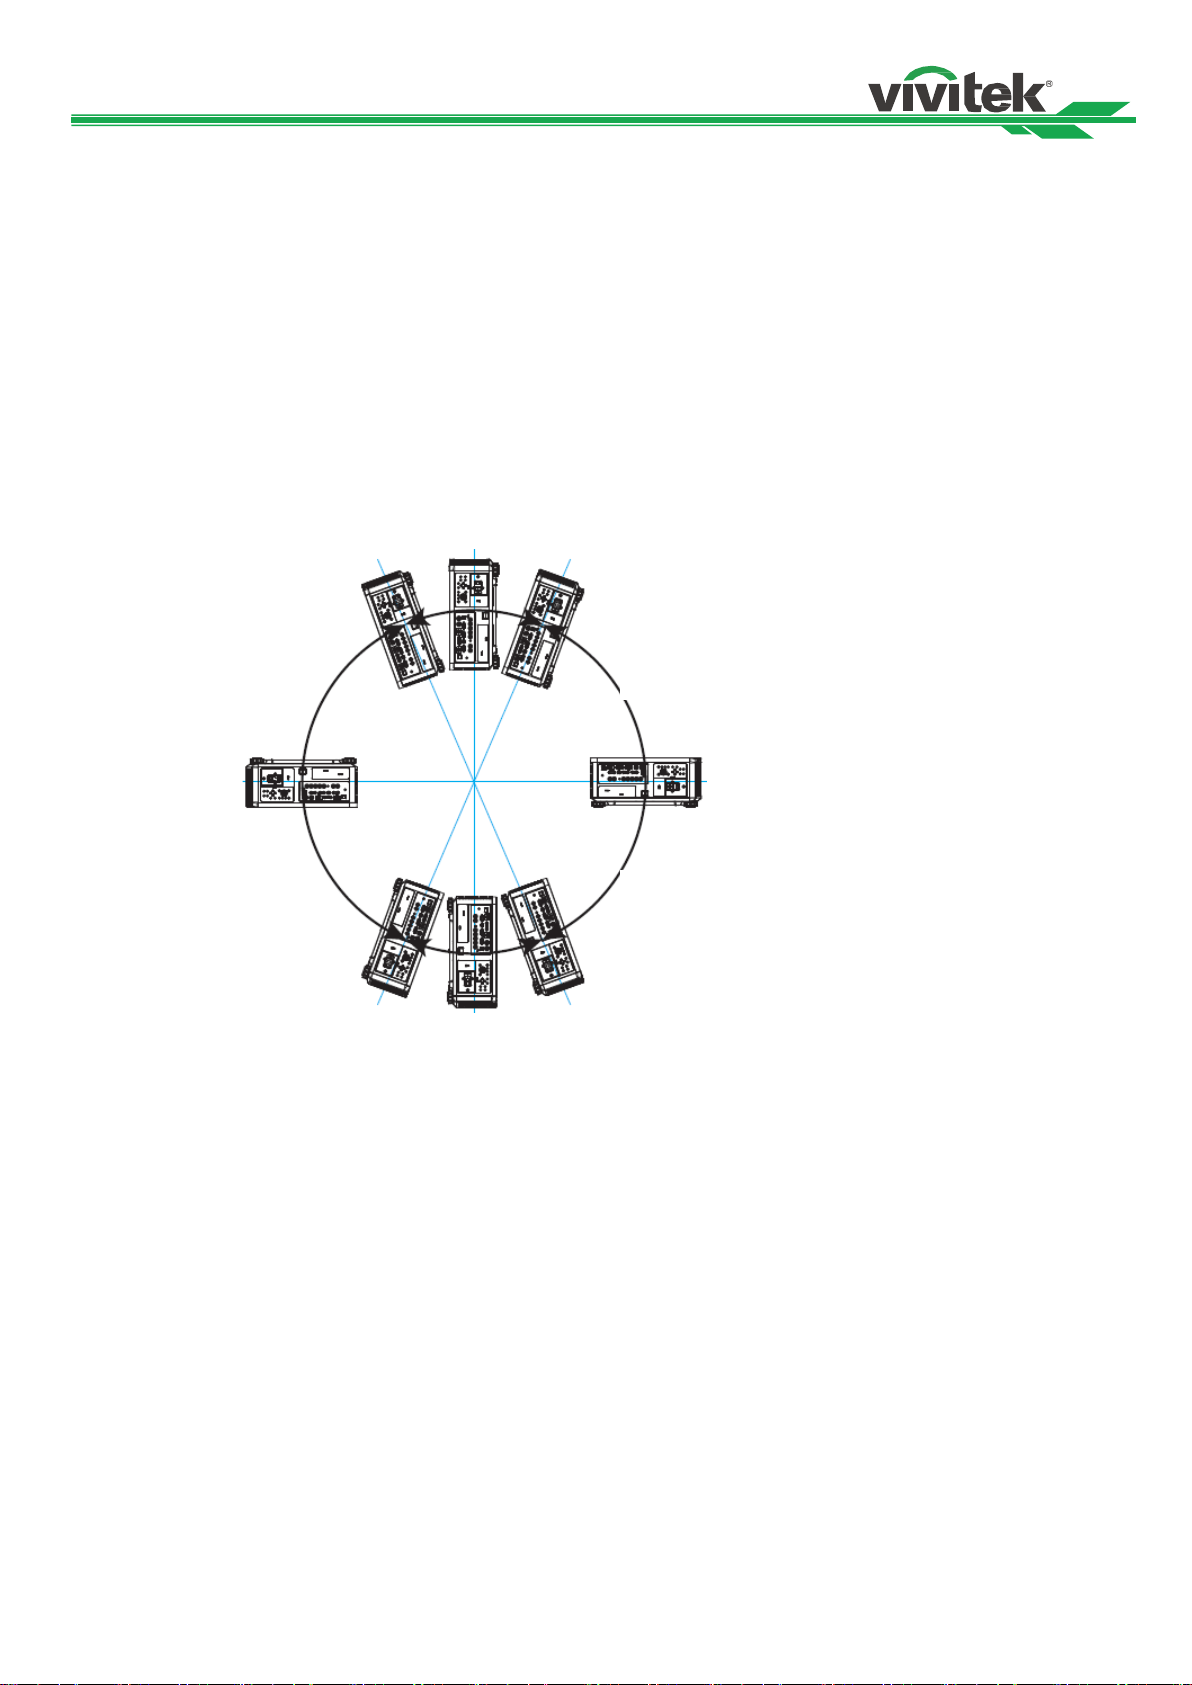
Setting up the Projection Mode
The projection mode option can be used to change the orientation of the projected image or flip the projected image.
Desktop Front: Install the projector on the table and project the image on the screen forward.
Ceiling Front: Mount the projector on the ceiling and project the image on the screen forward, the image is
overturned.
Rear Desktop: Install the projector on the table and project the image from the rear of the screen.
Rear Ceiling: Mount the projector on the ceiling and project the image from the rear of the screen, the image is
overturned.
19
UN67711216EN00
 Loading...