

Page 1
Touring the camera
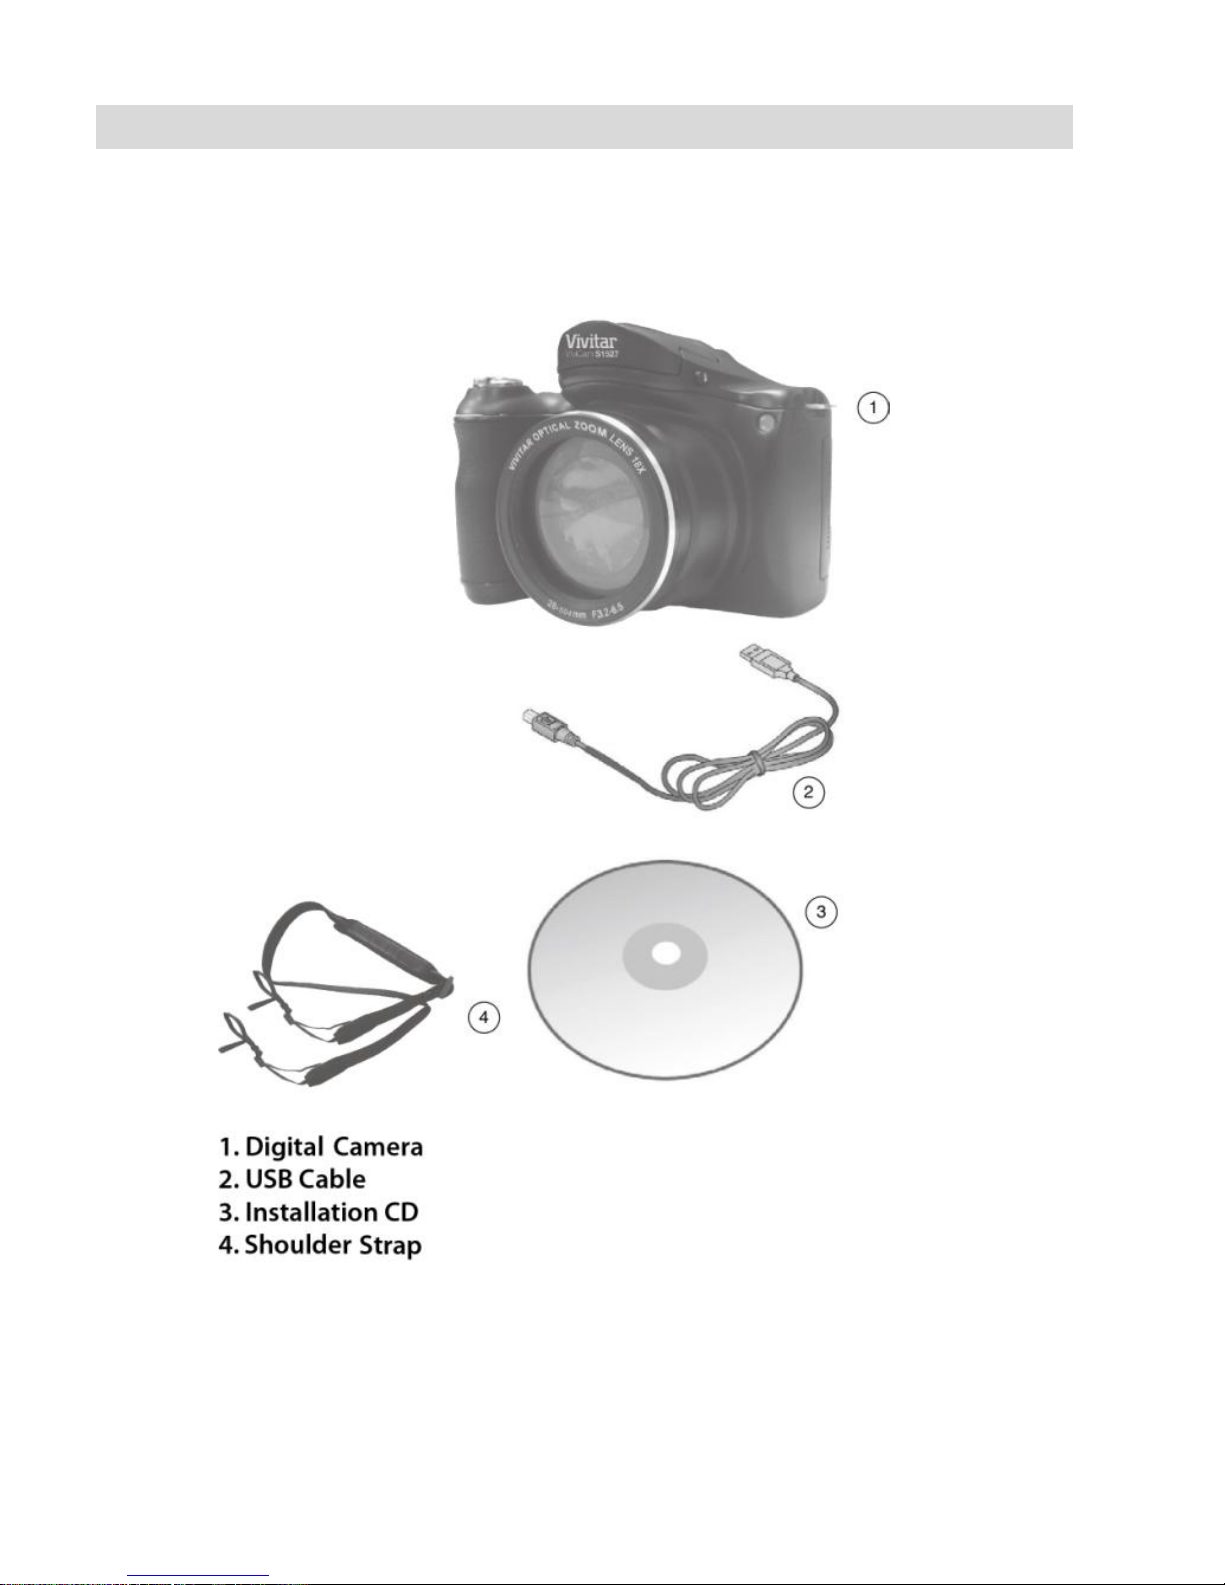
What your camera package includes
Carefully unpack your kit box and ensure that you have the following
items.
Page 2

Touring the camera
Computer System Requirements for Windows 2000 XP
To be able to download photos to your PC, you will need the
following minimum configuration:
Pentium III processor or above with Windows 2000 XP
128 MB RAM, with 150MB of free disk space
Available USB interface
CD-ROM Drive
1024 x 768 Recommended screen resolution
16-bit color or higher display adaptor
Computer System Requirements for Windows Vista/7
To be able to download photos to your PC your will need the
following minimum configuration: Windows Vista or 7
800MHz processor and 512 MB of system memory
20GB hard driver with at least 15GB of available space
Support for Super VGA graphics
Available USB Interface
CD-ROM drive
Computer System Requirements for Macintosh
Power Macintosh G3 500 MHz or higher
Mac OS X version 10.5.x or later
128 MB or more available system RAM (256 MB recommended),
150 MB free disk space
800x600 or higher-resolution monitor displaying millions of
colors
Page 3
Touring the camera
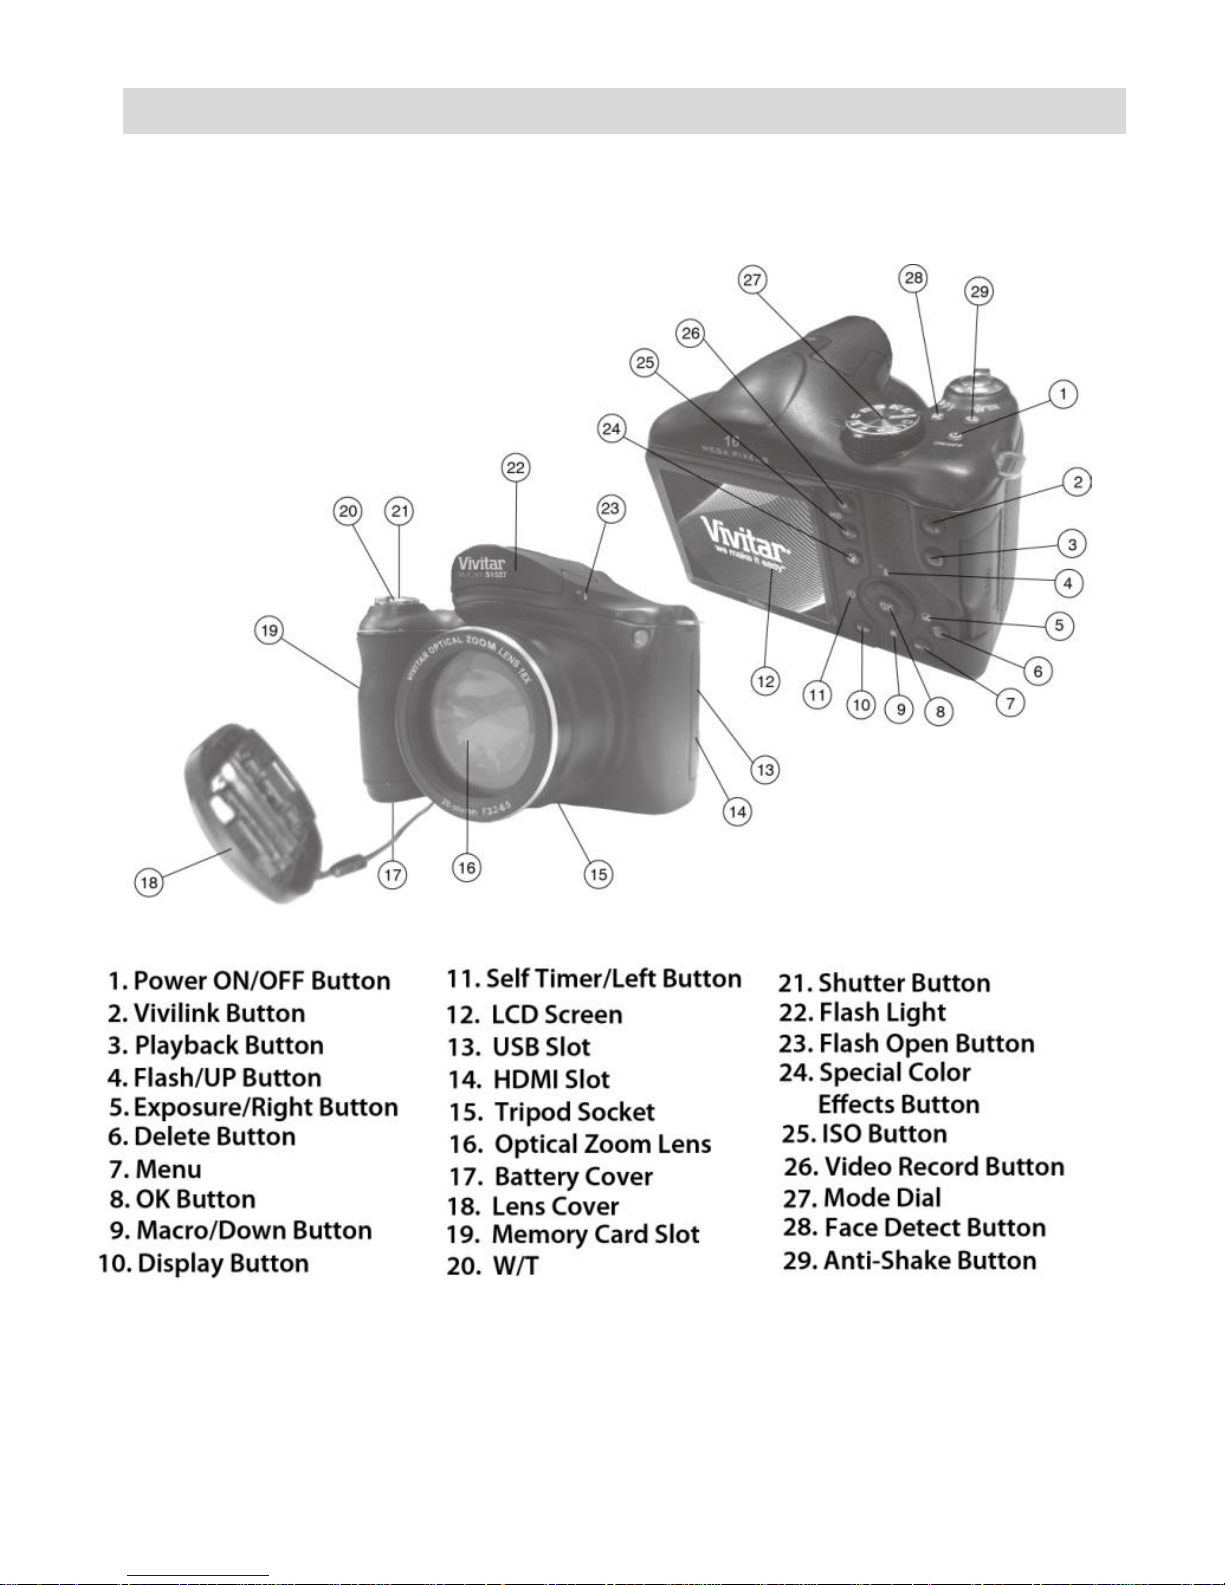
A quick look at your camera
Page 4

Touring the camera
Multifunctional buttons
You can choose camera settings by pressing the 4-way control or
OK.
1. Left/Self -timer:
• Scrolls left in menus.
• Toggles through the 4 self-timer options.
2. Up/Flash:
• Scrolls up in menus.
• Toggle through the flash options..
3. Right/Exposure:
• Scrolls right in menus.
• Selects an EV value.
4. Down/Focus:
• Scrolls down in menus
• Toggles between different focus modes.
5.
OK
: Confirms a chosen setting.
Page 5

Touring the camera
Englis
Preparing your camera for use
This section will guide you on how to prepare the camera before its initial
use.
Attaching the strap
To attach the lens and neck straps to your camera, do the following:
1. Insert one end of the neck strap through the strap eyelet.
2. Route it through the buckle as the inner loop.
3. Route the other end of the neck strap to the other
strap buckle to secure it.
Follow the above steps to attach the other side of
the neck strap.
4. Insert one end of the lens strap through the strap eyelet.
Make a loop to secure it.
5. Attach the other end of the lens strap on the lens cover.
Page 6

Touring the camera
6. Once complete, make sure the straps are tight.
Installing the batteries
Use only the specified batteries for the camera, and always turn off the
camera before removing the batteries.
To install the batteries:
1. Push the clip as the arrow showed and then
slide the battery cover to the right to release
and open it.
2. Insert the batteries in the correct direction by
matching the + - label on the battery slot.
3. Close the battery cover and then slide it to
the left to lock it in place.
Page 7
Operating the camera
Englis
h
Englis
To remove the batteries
1.Push the clip then slide the battery cover to the right to
release and open it.
2.Remove the battery .
3.Close the battery cover and then slide it to the left to
lock it in place.
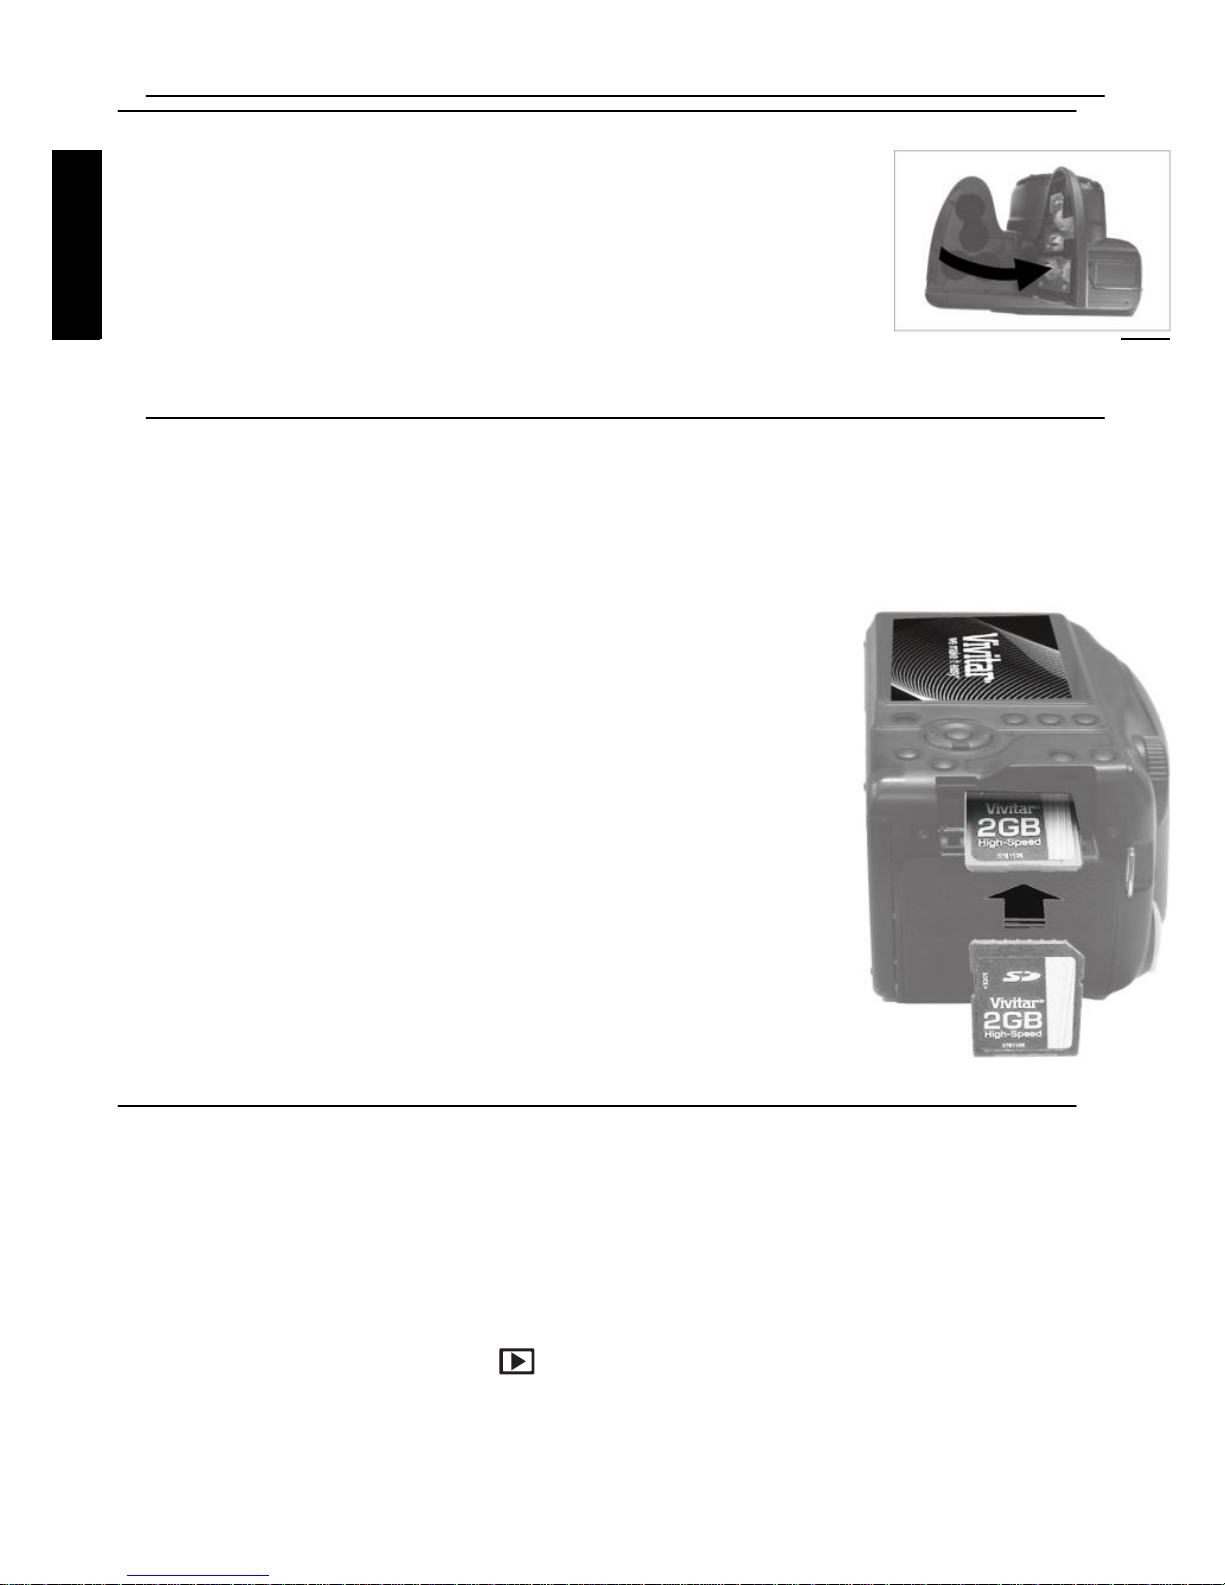
Installing an SD card
The camera comes with internal memory for storing captured images,
video clips, or audio files. You can also add an SD card to store more
files.
To install an SD card:
1. Locate the Memory Card slot at the side of the
camera.
2. Insert the Memory card into the slot in the
correct direction.
3. Push the card in until you feel it “click” into
position then closed the card cover
To remove an SD card:
1. Open the card cover on the side of the camera.
2. Lightly press the edge of the memory card to eject.
3. Close the card cover.
Turning the Power On and Off
There are two ways to turn on the camera:
• Press the Power button.
The camera is turned on in Camera mode.
• Press the playback button
The camera is turned on in Camera mode
Opening the Flash
Page 8
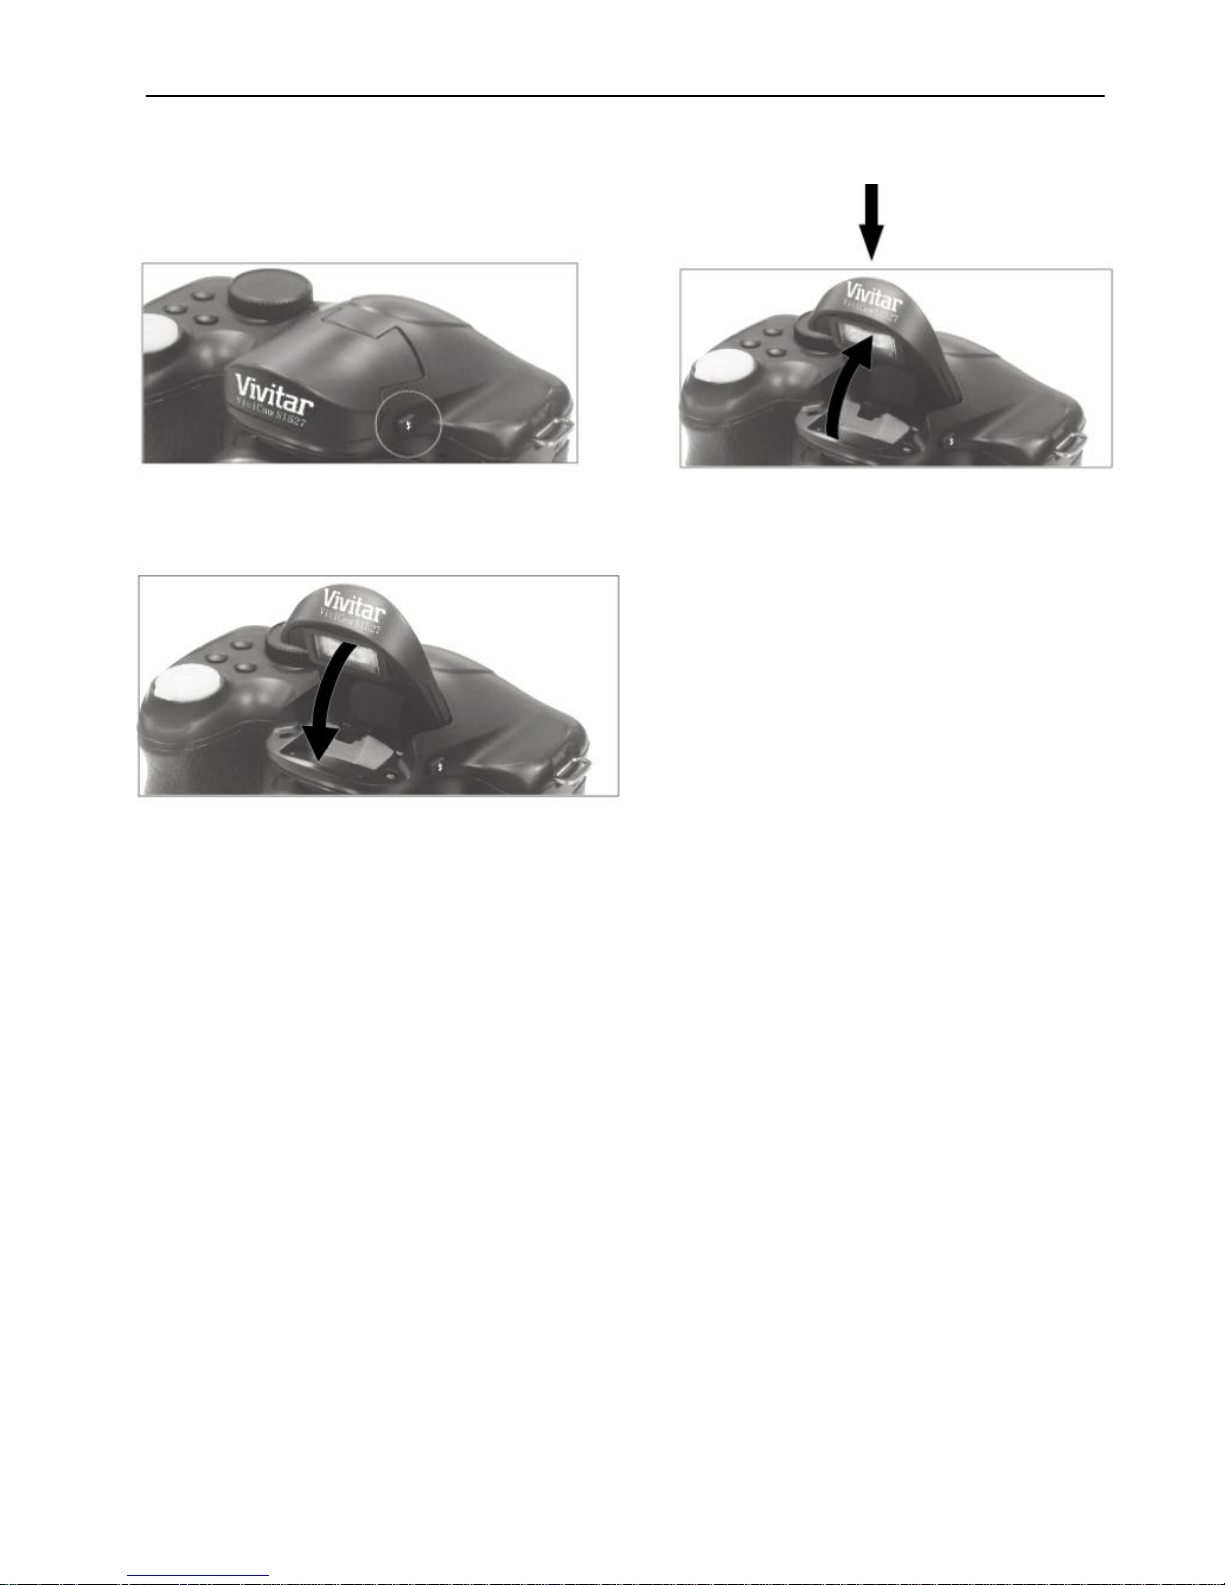
Operating the camera
You need to manually open the flash before switching the flash mode.
To open the flash:
Use hands to lift the flash to open it.
To close the flash:
Push down the flash to close it.
When the flash is closed, flash mode is automatically set to flash off.
Page 9

Operating the camera
Englis
Englis
h
Operating the camera
The procedure below is a general guideline for basic operation. It is
particularly useful if you are new to the camera.
1. Press the Power button to turn the power on.
Be sure that you have removed the lens cover before turning on the
camera.
2. Set the mode dial to the desired shooting mode.
3. If you need to use the flash for shooting, open the
flash
.
4. Use the Zoom lever to zoom-in/zoom-out on the
subject.
5. Press the Shutter button halfway to set automatic
f
ocus.
• Once the focus is set, the focus frame color will turn from red
(unfocused) to green (focused). If the focus frame color is red and you
press the Shutter button down, it might result in a blurred photo.
6. Press the Shutter button down fully to capture the
image
.
7. To switch to Video mode, press. Record Button or roll the mode dial
to video .Press the shutter button to start
• While recording, use the Zoom lever to zoom-in/zoom-out on the
subject. Press the right/exposure button to pause/resume the video
recording
8. To switch to Playback mode, press . In Playback mode, you can
view captured images or recorded videos.
• You can press left or right button to view other images/videos, slide the
Zoom lever to zoom in/out an image.
Page 10
Operating the camera
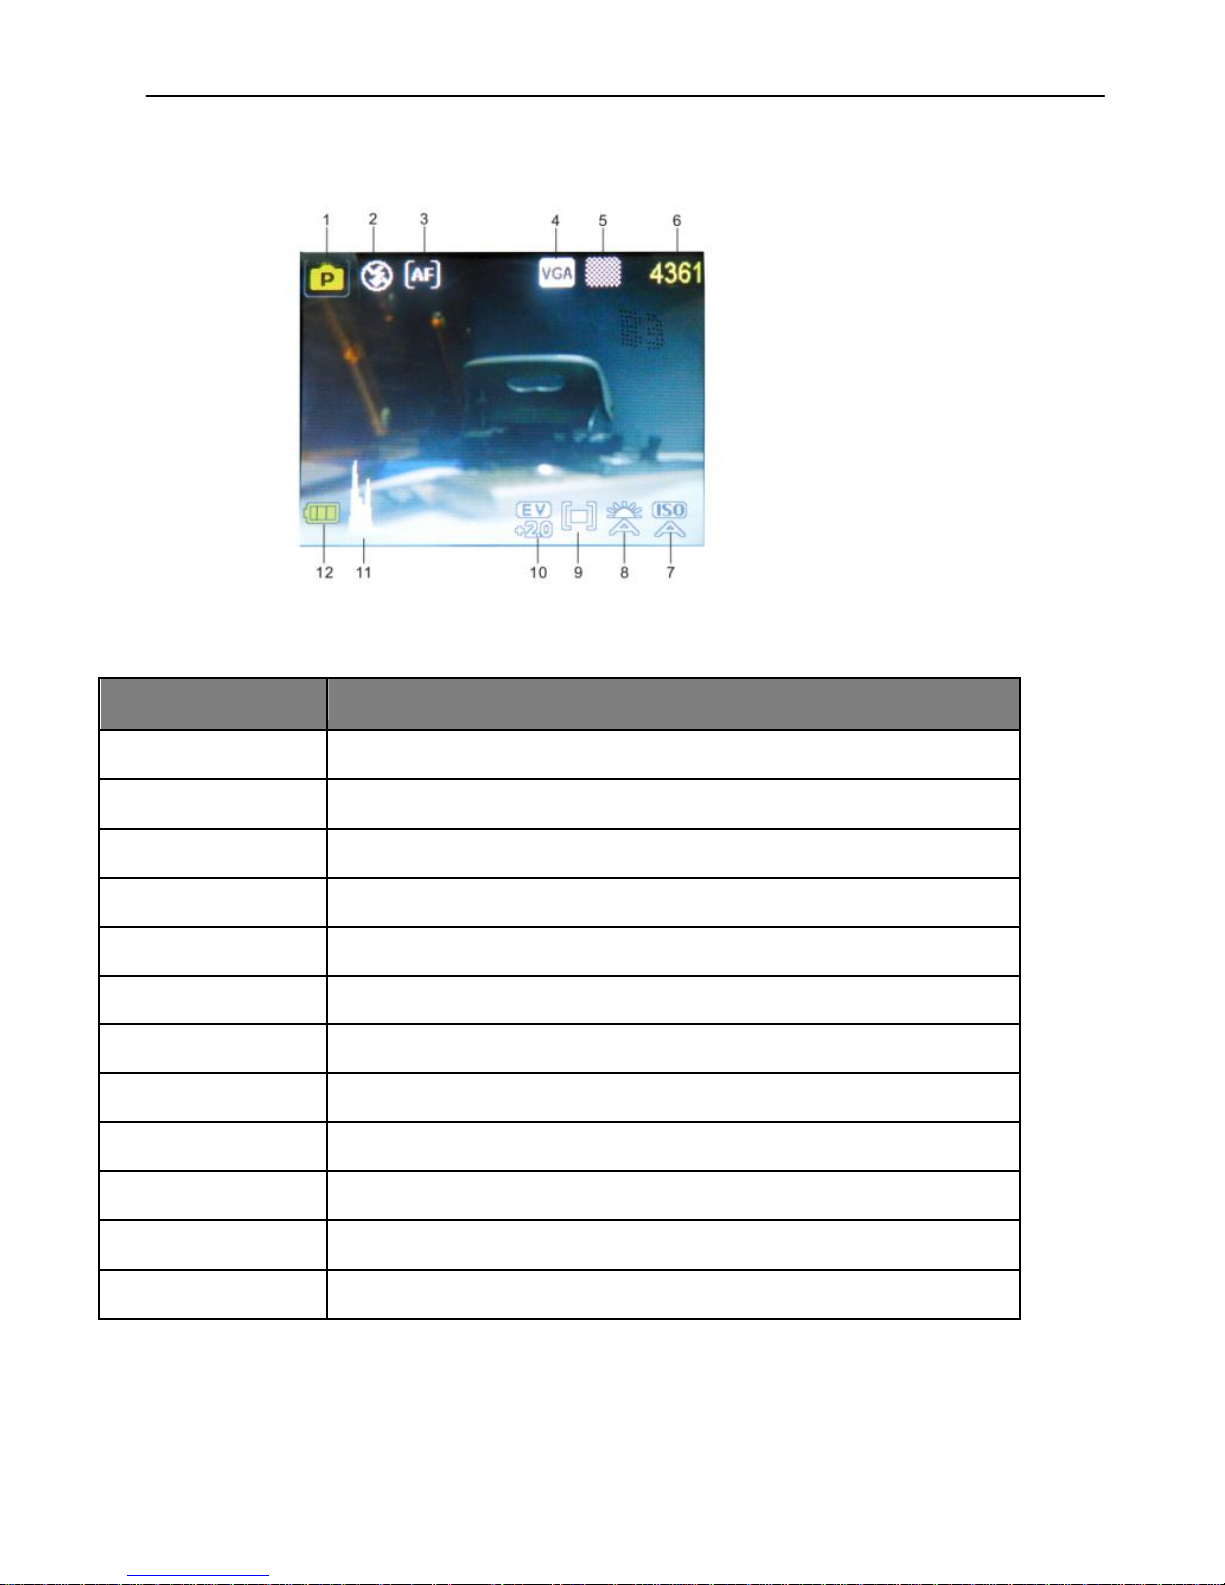
Capture mode
A
Item
Description
1
Shooting mode
2
Flash mode
3
Focus mode
4
Image size
5
Image quality
6
Numbers of shots available
7
ISO
8
Face Tracking
9
White balance
10
Exposure value (EV)
11
Histogram
12
Battery level
Page 11
Operating the camera
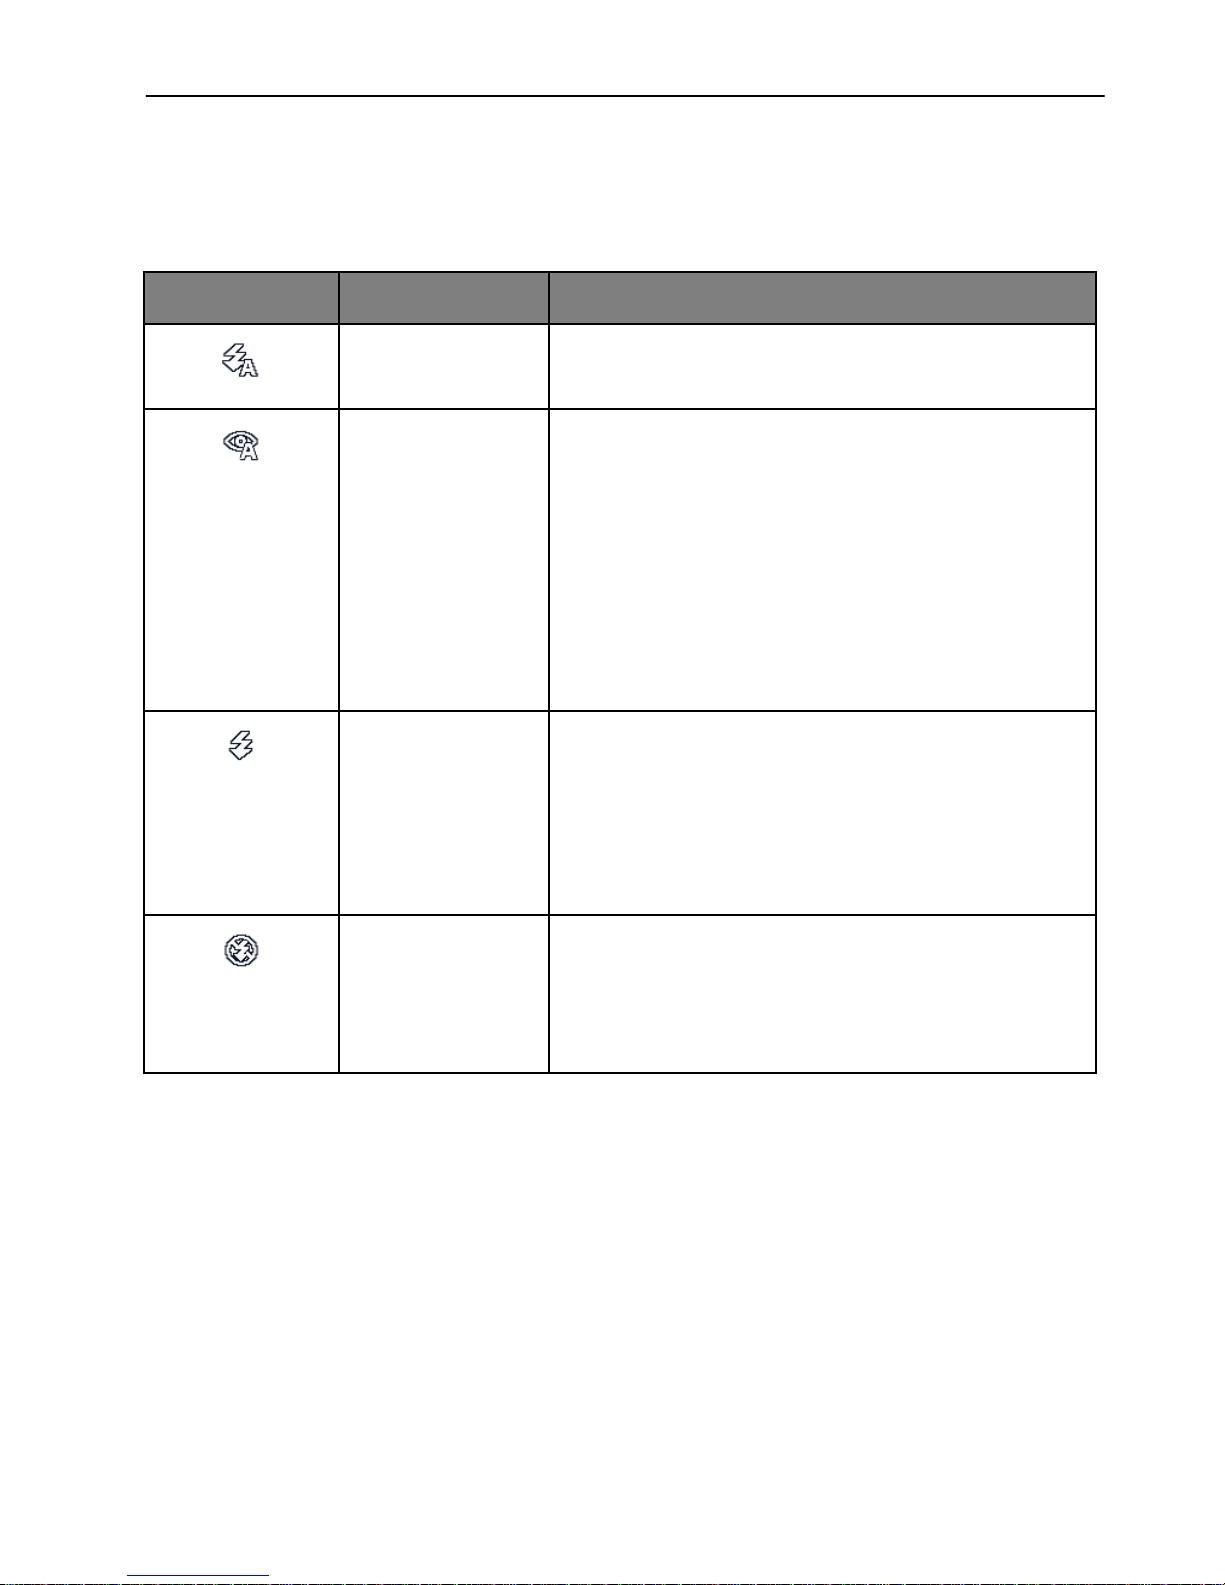
Flash mode
The flash offers additional light source (usually used in a low-light
environment). You can capture an image using one of the following flash
modes.
Icon
Mode
Description
Auto Flash
The flash fires automatically based on
the photographic conditions.
Auto Anti Redeye
Reduces the red-eye phenomenon when
capturing natural-looking images of
people and animals in low-light
conditions. Be sure to ask the subject to
look at the camera lens or get as close to
the camera as possible. The flash fires
automatically based on the photographic
conditions.
Force On
The flash always fires regardless of the
surrounding lighting conditions. Select
this mode when capturing images with
high contrast (backlighting) and deep
shadows.
Force Off
The flash does not fire. Select this mode
when flash photography is prohibited, or
when the distance to the subject is
beyond the effective range of the flash.
Page 12
Operating the camera
Englis
Englis
h
To select a flash mode:
1. Set the mode dial to the desired shooting mode.
2. Open the flash..
3. Press repeatedly until your desired flash mode is displayed on the
LCD
monitor.
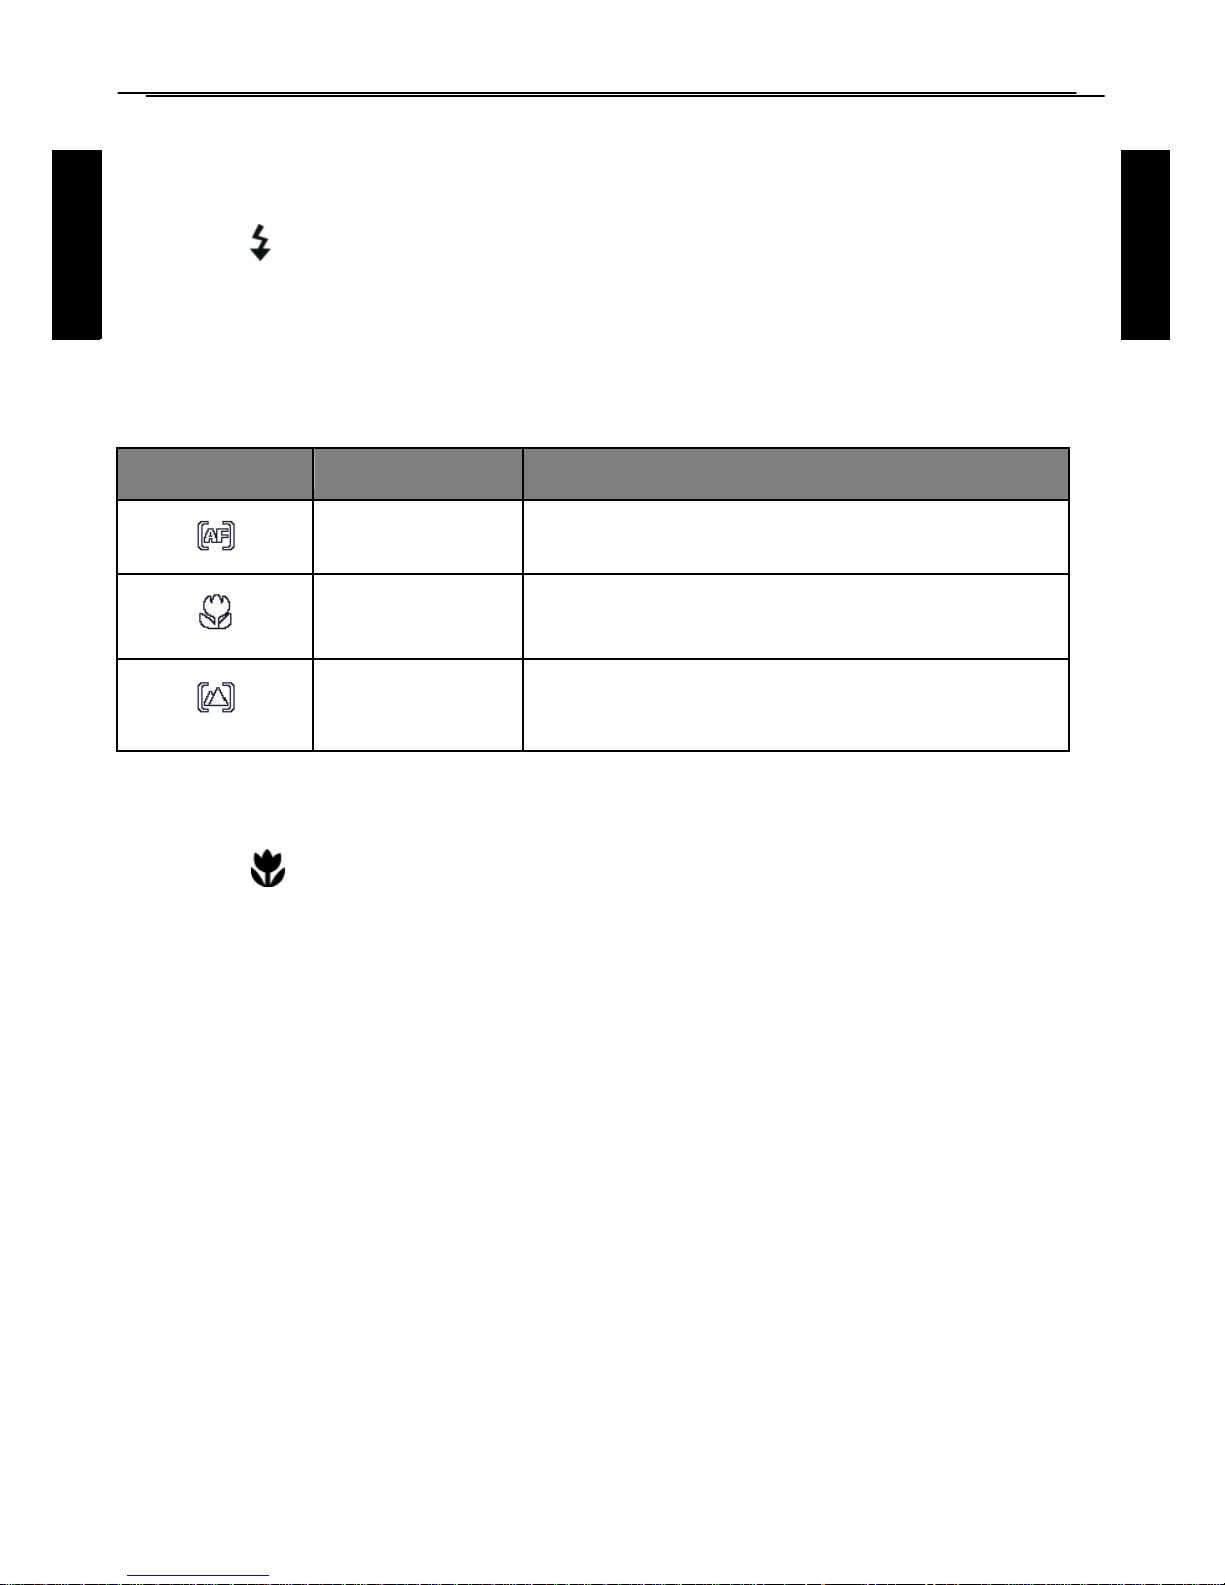
Focus mode
Icon
Mode
Description
Auto focus
Adjusts focus automatically.
Macro
Used when capturing images at a
close distance.
Infinity
Used when capturing images at
long distance.
To select the focus mode:
1. Set the mode dial to the desired shooting mode.
2. Press repeatedly to toggle between Auto focus and focus modes.
Page 13

Operating the camera
Englis
Selecting the Shooting Mode
Rotate the mode dial to select one of the eight shooting modes:
No.
Mode
Description
1.
Auto
The camera detects the shooting condition and
automatically switches to the appropriate scene
mode.
2
Program
The camera automatically configures the
appropriate settings, so you can capture images
with ease.
3.
Shutter
Priority
You can choose a shutter speed, while the aperture
value is automatically determined by the lighting
condition of the subject.
4.
Aperture
Priority
You can choose an aperture value, while the shutter
speed is automatically determined by the lighting
condition of the subject.
5.
Manual
Lets you set both aperture and shutter speed
manually.
6.
Continuous
Shooting
Lets you capture a series of shots with a single press of
the Shutter button.
7.
Video
Use this mode to record videos with your camera.
8.
Scene
Mode
Lets you select the desired scene mode that suits your
shooting environment.
Page 14

Operating the camera
Englis
h
Using Aperture Priority mode
Aperture priority is often used when shooting static subjects or
emphasizing the depth of field. In general, use a smaller aperture if a
greater depth of field is needed.
To adjust aperture value:
1. Set the mode dial to A
2. Press
OK.
3. Press Up/Down button to adjust the aperture value.
4. Press
OK
to confirm setting.
Using Shutter Priority mode
Shutter priority is often used when shooting moving subjects. In general,
use a shorter shutter speed to catch a fast-moving object.
To adjust shutter speed in Shutter Priority:
1. Set the mode dial to S.
2. Press
OK.
3. Press Left/Right button to adjust the shutter speed.
4. Press
OK
to confirm setting.
Using Manual mode
You can choose the aperture value and shutter speed in Manual mode.
To adjust values in Manual mode:
1. Set the mode dial to .
2. Press
OK.
3. Adjust the settings.
• Press Up/Down button to adjust the aperture value.
• Press Left/Right button to adjust the shutter speed.
4. Press
OK
to confirm setting.
Page 15

Operating the camera
Englis
Englis
h
Using Continuous Shooting mode
In this mode, you can take consecutive shots.
Icon
Mode
Descriptio
Burst
Continuously takes pictures as long as
you keep pressing the Shutter button.
The flash is always off in this mode.
Speedy Burst
Press and release the Shutter button.
When the photo size you select is VGA,
Speedy Burst will shoot continuously at
the speed of
30 shots per second. This will stop after
1second or when the memory card is
full.
AEB (Auto
Exposure
Bracketing)
Automatically takes 3 pictures with
slightly different settings in the shutter
speed or the aperture value.
To select a continuous mode:
1. Set the mode dial to
2. Press Up button to enter the select mode.
3. Press Up/Down button to select a desired
option.
4. Press
OK
to confirm.
Page 16

Operating the camera
Setting the Scene mode
Select one of the following scene modes to fit your shooting
condition.
Mode
Description
Backlight
Increases the exposure (by turning on the flash) when light
illuminates from the subject from the behind
Scenery
Catch the scenery with ease.
Smile
Capture
Automatically takes a shot when a smile is detected.
Blink Detect
Warns of eyes blinks if detected and lets you decided
whether to save the image file.
HDR
Increase the dynamic range and enhances the details of dark
area.
Sunset
Captures the warmth and atmosphere
(represented by hue) of sunrise or sunset.
Fireworks
Adds exposure time to shoot firework trails. Please keep the
camera steady or use a tripod while using this mode.
Snow
Used under a very bright light environment such as snow
scenes
Page 17

Operating the camera
Mode
Description
Text
Improves clarity & contrast when taking a close-up picture
of documents.
Food
Captures food by enhancing color brightness and giving
more vivid colors.
Night
Portrait
.Capture portrait in low light conditions
Kids
Increases sensitivity and emphasizes children's skin tones.
Building
Enhances lines & contracts to highlight the sense of the
three dimensions (3D) for a building.
Night
scenery
Captures photos in a low-light environment, such as in the
evening or at night.
To select a scene mode:
1. Set the mode dial to .
2. Press Up/Down button to select the
desired scene mode.
3. Press OK
to confirm setting.
Using the Menu Button
Press the Menu button to access more capture options. Depending on
your settings, the displayed option icons in the Function menu may vary.
Page 18

Operating the camera
To use the Menu Button:
1. Press the Menu button,
2. Press Up/Down button to select a menu item.
3. Press OK/Right button to enter the submenu.
4. Press Up/Down button to select an option.
5. Press
OK
to confirm the setting
Image size
Description
Description
16mega pixels (4608 x 3456)
6mega pixels (2560 x 1920)
14mega pixels(4300 x3255)
3 mega pixels (2048 x 1536)
12mega pixels (4000 x 3000)
2 mega pixels (1920 x 1080)
10mega pixels (3648 x 2736)
VGA (640 x 480)
8mega pixels (3264 x 2448)
To select an image size:
1. Press Menu button.
2. Press Up/Down button to select image size.
3. Press
OK
button to enter the submenu.
4. Press Up/Down button to select an option.
5. Press OK button to confirm the setting..
To select an image quality level:
1. Press Menu button.
2. Press Up/Down button to select image quality.
3. Press
OK
button to enter the submenu.
4. Press Up/Down button to select an option.
5. Press OK button to confirm the setting..
Page 19

Operating the camera
Englis
h
Movie size
Description
HD 720p (16:9; 1280 x
720)
To select a movie size:
1. Press Menu button.
2. Press Up/Down button to select image size in video mode.
3. Press
OK
button to enter the submenu.
5. Press OK button to confirm the setting..
Metering
Icon
Mode
Description
Multi
Detects the exposure based on
multiple points in the subject area.
Center
Detects the exposure of the entire
shooting screen, but gives more
importance to the values near the center.
Spot
Detects the exposure based on the
center spot in the subject area.
To select a metering option:
1. Press Menu button.
2. Press Up/Down button to select metering.
3. Press
OK
button to enter the submenu.
4. Press Up/Down button to select an option.
5. Press
OK
to confirm setting.
White Balance
Compensates for color temperatures in different lighting conditions, so
white and other colors can display properly when you capture images.
Page 20

Operating the camera
Icon
Mode
Description
Tungsten
Used when subjects lit by tungsten
(incandescent) lighting.
Fluorescent H
Fluorescent L
Adjusts for fluorescent lighting. Corrects
the green hue of fluorescent lighting.
Custom
Used when you want to manually adjust
white balance in a particular lighting
Auto
Adjusts white balance automatically.
Daylight
Used in bright daylight conditions.
Cloudy
Used in twilight or shady conditions.
To select White Balance:
1. Press Menu button.
2. Press Up/Down button to select white balance.
3. Press
OK
button to enter the submenu.
4. Press Up/Down button to select an option.
5. Press
OK
to confirm setting.
Page 21

Operating the camera
Englis
ISO
ISO configures the camera’s sensitivity to light. The higher the ISO value,
the brighter picture you can take in a low-light environment. Yet, you may
see more noise in the picture as you increase the ISO value.
Icon
Description
Automatically sets the ISO value.
Equivalent to color ISO 50/100/200 film. Used for
outdoor photography in bright sunlight.
Equivalent to color ISO 400/800/1600 film. Used it in a
low-light environment or where the flash light is not
allowed.
To select an ISO value:
1. Press Menu button.
2. Press Up/Down button to select ISO value.
3. Press
OK
button to enter the submenu.
4. Press Up/Down button to select an option.
5. Press
OK
to confirm setting.
Page 22

Operating the camera
Englis
h
Setting EV
EV (Exposure Value) lightens or darkens
the entire image. Adjust EV when the
brightness between the subject and the
background is not balanced, or when the
subject occupies only a small part of the
picture.
To select an EV:
1. Press Menu button.
2. Press Up/Down button to select EV.
3. Press
OK
button to enter the submenu.
4. Press Up/Down button to select an option .
5. Press
OK
to confirm setting.
Image Sharpness
This setting allows you to adjust the sharpness of images ,making edges
more or less distinct.
To select image sharpness:
1. Press Menu button.
2. Press Up/Down button to select Image sharpness.
3. Press
OK
button to enter the submenu.
4. Press Up/Down button to select from sharp/normal/soft.
5. Press
OK
to confirm setting.
Color Effect
Adds color filter effects to the image or video you want to capture.
Mode
Description
Normal
No effects are added.
Monochrome
Adds an effect with monochromatic color tones.
Page 23

Operating the camera
Sepia
Adds an effect with dark reddish brown color tones, so the
image or video looks as if it is old.
Red
The image becomes reddish.
Green
The image becomes greenish.
Blue
The image becomes bluish.
To select an effect:
1. Press Menu button.
2. Press Up/Down button to select Color Effect.
3. Press
OK
button to enter the submenu.
4. Press Up/Down button to select an option .
5. Press
OK
to confirm setting.
Page 24

Operating the camera
Englis
h
Englis
Date stamp
This setting allows you to adjust the system time which can be display on
the photos:
1. Press Menu button.
2. Press Up/Down button to select Date stamp.
3. Press
OK
button to enter the submenu.
4. Press Up/Down button to select from Off/Date/Date &Time
On selecting off no date will appear on the photo
On selecting date ,there is only date appear on the photo
On selecting date &time ,the date and time will both appear .
5. Press
OK
to confirm setting.
Face Detect
1. Press Menu button.
2. Press Up/Down button to select Face detect.
3. Press
OK
button to enter the submenu.
4. Press Up/Down button to select from Off/Face detect/Smile Detect/
Blinking Detect/Object Detect.
5. Press OK to confirm setting.
Recording Videos
You can record video with this camera. Set the movie size before you
start recording a video.
To record the video clip:
1. Press shutter button to start recording.
2. Use the Zoom lever to zoom in/out on the subject.
3. Press the right/exposure button to pause /resume the video recording
4. Press the shutter button again to stop the recording.
Setting the Drive Mode
You can included yourself in a photo by using this feature to delay the time
between pressing the shutter button and the photo is actually taken.
1. Press Left/Selftimer button
Page 25

Operating the camera
2. Press Up/Down button to select from
off/2 seconds/5seconds/10seconds
3. Press
OK
button confirm setting.
Battery status
Icon
Description
Battery power is full.
Battery power remains adequate.
Battery power is low.
Battery power is very low. You should replace the battery
ASAP.
Page 26

Operating the camera
Englis
h
Other settings
Press menu button and then press right button to enter the setup menu
Icon
Mode
Description
Silent Mode
Shutter
Sets the shutter sound on and off.
Start-up
Set the type of the startup sound
Beep
Sets the button (excluding shutter)
sound on and off.
Volume
Adjusts the volume of the shutter
sound, startup sound, operation
sound and playback sound.
Auto power off
[1 min.]
For power conservation, the camera
automatically enters the standby
mode after it has been idle for a
period of time. (Press any key to
resume.)
[3 min.]
[5 min.]
[Off]
The camera remains on when idle.
Date & Time
Sets the date and time.
Language
Select a language for display menus and other
information.
File Numbering
[Series]
Stores the most recently used file
number regardless of deleted files
or a change of memory card. This is
useful for avoiding the file name
duplication when images are
downloaded to a computer.
[Reset]
Resets file numbering each time
the memory card is changed.
Page 27

Operating the camera
Englis
Icon
Mode
Description
TV Out
You can review images on a television with an AV
[NTSC]
America, Japan, Taiwan and others
[PAL]
China, Europe, Oceania, and others
Frequency
50Hz
50HZ for Europe and Japan.
60Hz
60HZ is for the U.S.
Auto
It can adjust the frequency to the
site.
Battery Type
To ensure the camera displays battery level correctly,
set the type to match the batteries used.
Carbon-Zinc batteries are not recommended.
[Alkaline]
When using Alkaline batteries.
[NiMH]
When using NiMH batteries.
[Lithium]
When using Lithium batteries.
[Oxyride]
When using Oxyride batteries.
Format Memory
card
[Format]
Formats the internal memory or the memory card.
Default Setting
Resets the entire menu and button operation
settings to initial default.
Page 28

Operating the camera
Playback mode
Press to switch to Playback mode.
2.0
400
Item
Description
1
Indicates that the camera is in Playback mode.
2
Date and time when the file was created.
3
File number.
4
Histogram
5
File name, file size, shutter speed, and aperture value
6
White balance
7
Flash off
8
Image size
9
Display the shooting mode
Page 29

Operating the camera
Englis
Options for playback and editing
When the camera is in Playback mode, press left/right button to preview
the next/
previous recorded files. You can also select any of the following
options.
Enlarging an image
Magnifies an image, so more details can be seen.
To enlarge an image:
1. Press playback button to switch to Playback mode.
2. Press Left/ Right button to select the image you want to enlarge.
3. Use the Zoom lever to zoom-in/out on the image.
4. Press the 4 way button to move the area you want to see.
5. Use the zoom lever to zoom back the image.
Viewing multiple files at a time
Shows up to 9 files at a time on the screen.
To view multiple files:
1. Press playback button to switch to Playback mode.
2. Slide the Zoom lever to W In this mode, maximum 9 files (shown in
thumbnails) are displayed on the screen. Press up/down/left/right
select a file, and then press
OK
to view it in its normal viewing
size.
Page 30

Operating the camera
Englis
h
Playing back video clips
View recorded video clips in the playback mode.
To view a video clip:
1. Press playback button to switch to Playback mode.
2. Press left/right button to select the video clip you want to view
3. Press
UP button to start playing the video, press menu button to stop
playing and press left/right button to fast forward/rewind it
Page 31

Operating the camera
Englis
Slideshow
Sets the time interval for presenting a series of captured image and video
files
(first frame only).
To play a slideshow:
1. Press playback button to switch to Playback mode.
2. Press menu button and then press up/down button to select slide show.
3. Change the slideshow settings.
• Use the four-way control to set one of the following slideshow effects:
• Applies a transition effect from left to right.
• Applies a transition effect from upper-left side to lower-right side.
• Applies a horizontal transition effect.
• Applies a vertical transition effect.
• Applies a horizontal transition effect by intersecting an image.
• You can set the interval between 1/3/5/10 seconds.
4. Select whether you want to repeat the slideshow.
5. Select Start and press
OK
to play the slideshow.
Deleting files
Removes selected or all files.
To delete files:
1. Press playback button to switch to Playback mode.
2. Press menu button and then press upldown button to select delete.
3. Select whether to delete single/all
and then press
OK.
Page 32

Operating the camera
Englis
h
Protecting files
Prevents selected files from accidental removal.
To protect files:
1. Press playback button to switch to Playback mode.
2.
Press menu button and then press upldown button to select protect
3. Select whether to protect single/lock all images/unlock all images
then press
OK
.
Voice memo
Inserts a voice annotation to an image file.
To record a voice memo:
1. Press playback button to switch to Playback mode.
2. Press left/right button to select the image you want to add a voice
memo.
3. Press up/down button to select voice memo.
4. Select add to start your voice recording.
5. Press
OK
to stop recording.
To play back a voice memo:
1. Press
UP button
to play the voice memo.
Page 33

Operating the camera
Englis
4. Press menu button to exit playback.
Color Effect
You can add special effects to your images.
Mode
Description
Normal
No effect is added to the image.
Red Eye Removal
Reduce red eye in captured images
Sepia
Recorded image will be stored in a sepia tone.
B/W
Convert image to black & white.
Negative
Colors become the opposite of what they were in the
original image.
Mosaic
Applies a mosaic tile effect to the image.
Vivid Red
The image becomes reddish.
Vivid Green
The image becomes greenish.
Vivid Blue
The image becomes bluish.
To add a special effect to an image:
1. Press playback button to enter Playback mode.
2. Press left/right button to select the image you want to add an effect to.
3. Press menu button and then select
4. Press up or down to select the effect.
Page 34

Operating the camera
Englis
h
5. Press
OK
to confirm the change and save the image file.
Resizing
Changes an image file to a smaller size, and overwrites the image file or
saves it as another new file.
To resize an image:
1. Press playback button to switch to Playback mode.
2. Press left/right button to select the image you want to resize.
4. Press up/down to select the target image size to which you want to
reduce.
5. Press
OK
to confirm
Page 35

Working with computer and AV system
Englis
Englis
h
.
Startup image
Sets the welcome screen when the camera is powering on.
To select a startup image:
1. Press playback button to switch to Playback mode.
2. Press menu button and then press up/down select startup image
3. Press ok button to set this photo yes/no
4. Press
OK.
DPOF
The Digital Print Order Format (DPOF) setting allows you to select images
on the memory card for printing and specify the number of print copies in
advance using the camera. This is extremely convenient for sending the
images to a photo developing service or for printing on a direct print
function compatible printer.
To set up DPOF:
1. Press playback button to switch to Playback mode.
2.
Press menu button and then press up/down select DPOF
.
3. Press ok button and press up/down button to select single/all/reset
4. Press
OK.
Working with computer and AV
system
Bundled software
The camera offers the following programs on a CD.
To install these programs, see the information supplied with the CD.
Connecting the camera to a computer
You can connect the camera to a PC or notebook to transfer, view, print, or
Page 36

Working with computer and AV system
edit files.
To connect the camera to a computer:
1. Open the USB/AV port cover.
2. Connect the end of the smaller plug of the USB cable to the camera
3. Turn on the camera.
Page 37

Working with computer and AV system
4. Connect the other end of the USB cable to an available USB port on
your computer.
5. Select Computer and wait for the connection.
6. A Removable Disk icon appears in My Computer. Click this icon to
access the files in your camera.
Connecting the camera to an AV system
You can play files in your camera from an AV system such as TV or
projector.
To connect the camera to an AV system:
1. Open the USB/AV port cover.
2. Connect the end of the smaller plug of an AV cable to the camera.
3. Connect the yellow video plug and the white audio plug of the AV cable
to a video-input jack and an audio-input jack (left channel) on your AV
system.
4. Turn on the AV system, and then switch to the AV source connecting to
the camera.
5. Turn on the camera.
6. Follow the on-screen instructions to operate the camera via the
TV or projector screen.
Printing images
In addition to printing images by connecting the camera to a printer
via a computer or bringing the memory card (if available) to a
photo-processing center, you can choose to print using PictBridge.
Printing with PictBridge
You can directly print images by connecting your camera to a
PictBridge- compatible printer without using a computer.
To print images from a PictBridge-compatible printer:
1. Open the USB/AV port cover.
2. Connect the end of the smaller plug of the USB cable to the camera.
3. Connect the other end of the USB cable to an available USB port on
your printer.
Page 38

Working with computer and AV system
Englis
h
4. Turn on the printer. Wait for a while until it finishes starting up and is
ready to print.
5. Turn on the camera.
6. Select Printer and wait for the connection.
7. Select one of the following options:
• To print one image at a time, select Print Select, and press left or
right button to select an image.
• To print all images at a time, select Print All.
• To print all images (shown by thumbnails) at a time, select Print Index.
8. Press
OK.
Page 39

Working with computer and AV system
Englis
Troubleshooting and service information
If your camera cannot operate normally, see the frequently
encountered problems and solutions listed below. If the problem
persists, contact your nearest service center or technical support.
Problem
Cause
Solution
The camera
cannot
power up.
There is no battery or
the batteries are not
inserted correctly.
Insert the batteries correctly.
The batteries have
no power.
Replace the batteries.
The battery
power is
draining
quickly.
The external
temperature
is extremely low.
--
Many shots are being
captured in dark
places, requiring a
--
The
batteries
or
camera is
warm.
The camera or flash
was used continuously
over a long period of
-The LCD
screen is black.
The lens cover is on.
Remove the lens cover.
No image is
displayed on
the screen and
the camera
beeped three
The lens cover is on.
Remove the lens cover.
I cannot adjust
the flash
The flash is closed.
Open the flash.
The flash
does not fire.
The camera flash is
turned off.
Set the flash to Auto Flash.
The light source
is sufficient.
--
Page 40

Problem
Cause
Solution
Even though
the flash fired,
the image is
The distance to the
subject is greater than
the flash's effective
Get closer to the subject
and shoot.
The image
is too bright
or too dark.
The exposure is
excessive or
inadequate.
Reset exposure
compensation.
I cannot format
a memory
card.
The memory card is
write- protected.
Remove the write protection.
End of the memory
card life.
Insert a new memory card.
I cannot
download
images from
the camera to
my computer.
The free space on the
hard disk of your
computer is insufficient.
Ensure that the hard disk has
enough space for running
Windows and that the drive
for loading image files has
fr
ee
spac
e equal to or greater
than
There is no power
being supplied to the
Replace the batteries.
The camera
does not shoot
even when
pressing the
Shutter
button.
The batteries are
running low.
Replace the batteries.
The camera is not in
Capture mode.
Switch to Capture mode.
The Shutter button was
not pressed all the way
Press the Shutter button all
the way down.
The internal memory or
memory card does not
have any free space.
Load a new card or
delete unwanted files.
The flash is recharging.
Wait until the flash mode
icon, indicated on the
screen, stops flashing.
The camera does not
recognize the memory
card.
Format the memory card
before the initial use or
before using with another
Page 41

Englis
Englis
h
Specifications
Sensor
CMOS Sensor
Scene
Backlight, Scenery, Smile Capture, Blink Detect, HDR,
Sunset, Firework, Snow, Text, Food, Night Portrait, Kids
Building, Night Scenery,
Image Resolution
16M(4608X3456)、 14M(4300x3255)、 12M(4000×3000
)、 10M (3648×2736)、8M(3264X2448), 6M
3:2(2560X1920)、3M (2048x1536)、 2M (1920X1080))
Video Resolution
1280 X720 (30fps)
LCD
TXD 3.0“TFT
Image Quality
Normal/Fine/Super Fine
Anti-shake
Yes
White Balance
Auto / Daylight / Cloudy / Tungsten / Fluorescent H /
Fluorescent L / Manual
Exposure
-2.0 ~ +2.0 EV (0.3EV / step)
ISO
Auto/ISO50/100/200/400/800/1600
Flash
Auto Flash / Red Eye reduce /Off
Drive mode
Off / 10 sec. / 5sec. / 2sec
Power Source
CIPA approximately 330 (based on bundled AA Alkaline
batteries); 500 based on NiMH batteries; 850 based on
Lithium batteries)
Storage Type
Built-in approx. 108MB (+-5%)
SD (up to 4GB) / SDHC (up to 32GB) / SDXC (> 32GB)
File Format
Still Image: JPEG (EXIF 2.3 compatible); DCF compatible;
Support DPOF
Video: MJPEG
Audio:
AVI/MOV
Page 42

Englis
Interface
Digital output: USB 2.0 compatible
Audio / Video output (NTSC/PAL)
PictBridge compatible
 Loading...