

Page 1
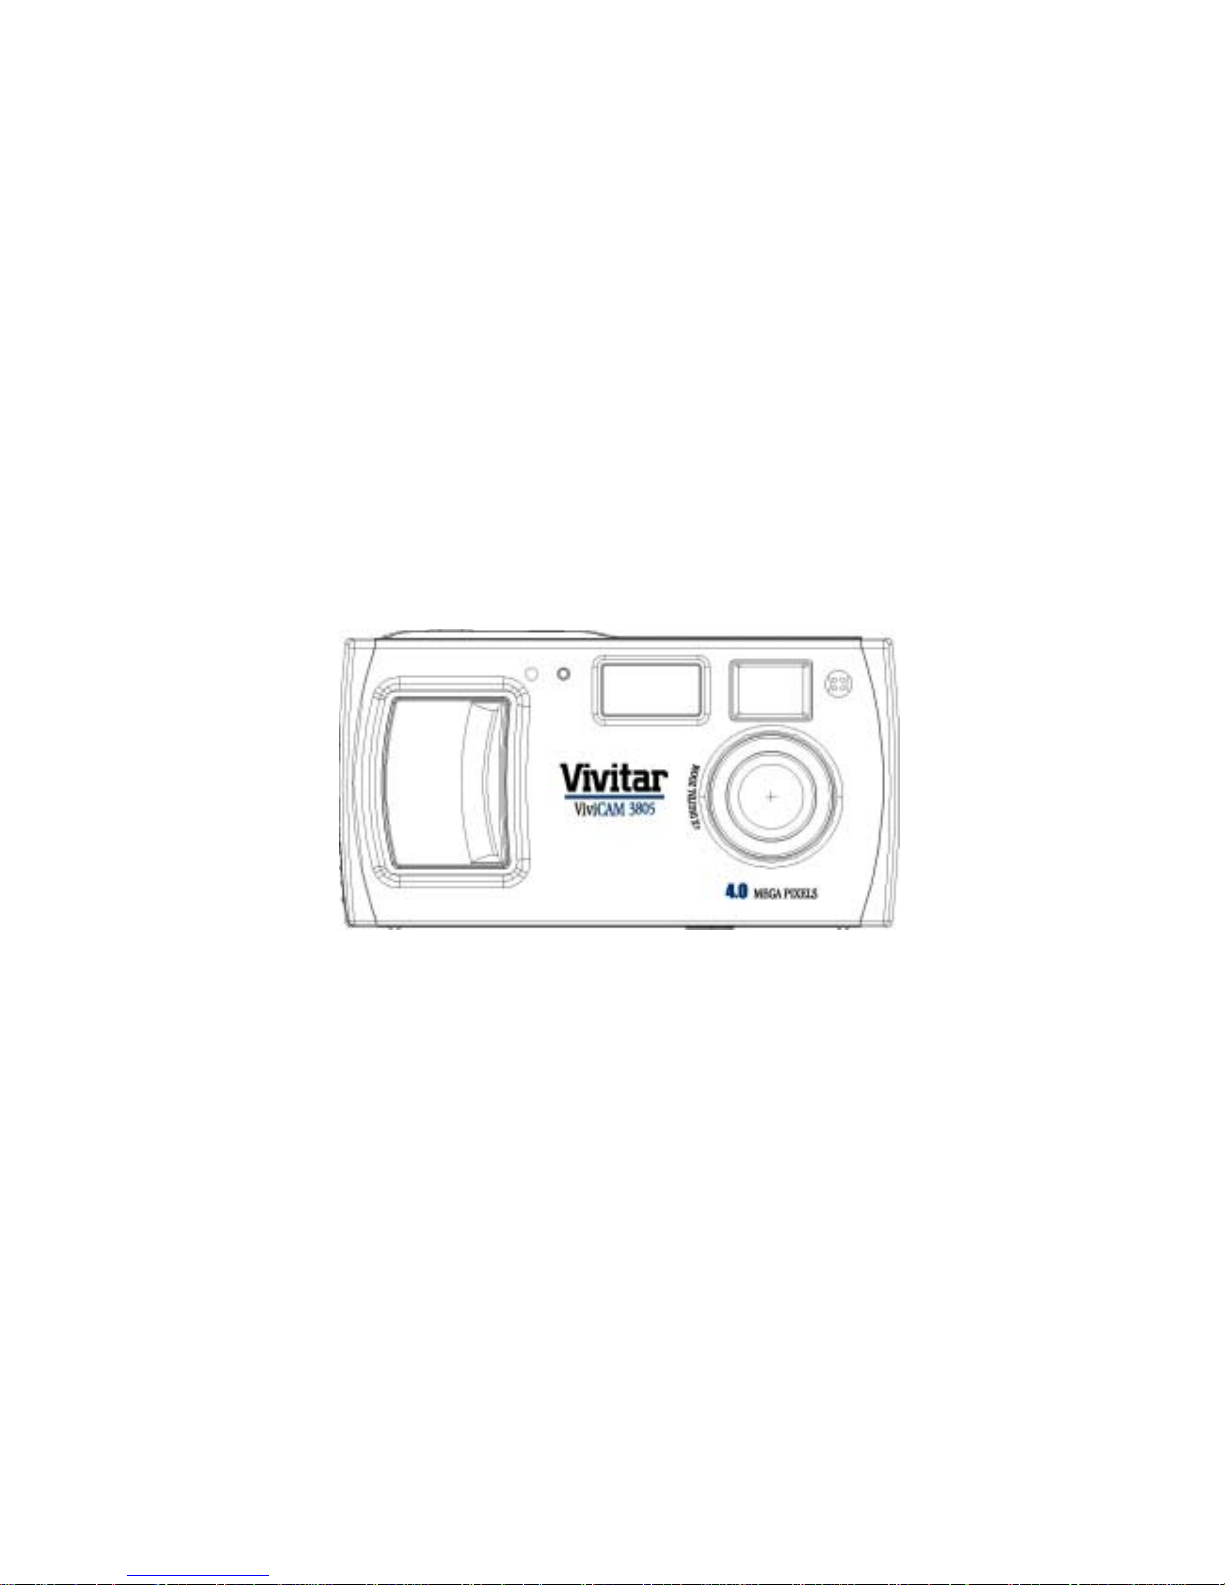
4.0 Megapixel
Digital Camera
User manual
Page 2

Preface
About this manual
This user manual has been designed to assist you to use the digital camera and take full advantage
of its features. Information in this document has been carefully checked for accuracy; however, no
guarantee is given to the correctness of the contents. The information in this document is subject
to change without notice.
Copyright
© Copyright 2004
This document contains proprietary information protected by copyright. All rights are reserved.
Trademarks
All trademarks and registered trademarks are the property of their respective owners.
Safety Information
• Do not disassemble the camera. Touching the product's internal parts could result in
injury. In the event of a malfunction or if the camera is accidentally broken open, forward
the product to an authorized service center for inspection.
• Avoid contact with liquid crystal. Should the LCD Screen break, care should be taken to
avoid injury due to broken glass and to prevent the liquid crystal from touching the skin or
entering the eyes or mouth.
• Do not use in the presence of flammable gas. Using electronic equipment near flammable
gas could result in explosion or fire.
• Observe proper precautions when handling batteries. The camera uses only AA alkaline or
NiMH rechargeable batteries. Batteries may leak or explode if handled improperly. Remove
the batteries (and the memory card) from the camera if you are going to store the camera
for extended periods. Ensure the camera is turned off before inserting or removing
batteries. Insert batteries correctly. Do not expose batteries to flame or excessive heat. Do
not immerse batteries in or expose to water. Discontinue use immediately if you notice any
changes in the battery such as discoloration, deformation, or leakage.
• Observe caution when operating the flash. Do not use the flash close to anyone's eyes.
This can cause temporary damage to eyesight. Particular care should be observed when
photographing infants - keep the flash at a distance of at least 1 meter from infants' eyes.
• WARNING: Handling the USB and AV cables on this product may exposure you to lead, a
chemical known to the State of California to cause birth defects or other reproductive harm.
Wash hands after handling.
Page 3

Table of Contents
Chapter 1 – Introduction _____________________________________________ 3
Package contents .............................................................................................4
Camera overview..............................................................................................5
Front view ............................................................................................. 5
Back view .............................................................................................6
Right view ............................................................................................. 7
Left View............................................................................................... 8
Using the LCD display .........................................................................................8
Switching the LCD on / off ........................................................................ 8
LCD icons.............................................................................................. 8
Chapter 2 – Getting started __________________________________________ 11
Attaching the hand strap ...................................................................................11
Inserting batteries .............................................................................................11
Inserting an SD/MMC card..................................................................................12
Turning the camera on / off ................................................................................13
Setting the date and time...................................................................................14
Setting the language.........................................................................................14
Installing the software ........................................................................................14
Chapter 3 – Taking still images or movie clips ___________________________ 16
Selecting the camera mode...............................................................................16
Taking photographs ..........................................................................................16
Adjusting camera settings using the camera keys....................................................16
Using the digital zoom.............................................................................17
Using the flash.......................................................................................17
Setting the resolution ..............................................................................17
Using the self-timer .................................................................................18
Using preset scene modes .......................................................................18
Adjusting camera settings using the menu .............................................................18
White balance ......................................................................................18
EV compensation ..................................................................................19
Special effect .......................................................................................20
Recording movie clips .......................................................................................20
Chapter 4 – Reviewing photos or movie clips ___________________________ 21
Reviewing photos / movie clips............................................................................21
Full screen review...................................................................................21
Magnifying still images............................................................................21
Adding / deleting a voice memo ..............................................................21
Thumbnail review...................................................................................22
Playing back movie clips.........................................................................22
Deleting photos or movie clips.............................................................................23
Locking photos or movie clips..............................................................................23
Viewing a slide show .........................................................................................24
Transferring photos or movie clips to an SD/MMC card..............................................24
Chapter 5 – Connecting to a PC or TV _________________________________ 25
Transferring files to a computer ............................................................................25
Viewing photos or movie clips on a TV...................................................................26
Selecting the TV setting...........................................................................26
Appendix A – Error messages ________________________________________ 27
Appendix B – Troubleshooting________________________________________ 28
1
Page 4

Appendix C – Hardware specifications ________________________________ 29
Appendix D – FCC Statement ________________________________________ 30
2
Page 5

Chapter 1 – Introduction
Congratulations on purchasing your 4 megapixel digital camera. Its sleek and trendy
design along with various useful features and ease of use make the camera a very
convenient tool in point-and-shoot photography. The camera provides high resolution and
excellent quality along with a 4X digital zoom feature. You can capture still images as
well as movie clips and also record voice memos for your digital photos. The LCD display
provides an easy way to preview as well as review your images or movie clips. The camera
supports flash control, preset scene modes, and self-timer mode to enable you to click
pictures in all types of environments.
This chapter describes the features and components of the camera, and provides
instructions on getting started to capture pictures or movie clips.
Features
• Powerful digital zoom (4x)
• 4.1 megapixel high resolution CCD
• Up to 2272 x 1704 image resolution
• Video (MPEG movie) capture resolution of 320x240, 15 fps
• Optical fixed focus lens
• Flash modes:
Auto / On / Off / Red-eye reduction
• Preset scene modes:
Auto / Night-shoot / Sport / Backlit
• Self-timer mode
• Full screen or thumbnail review modes
• 1.5-inch LCD color display
• USB 2.0 interface
• Built-in 16 MB flash memory
• Extra memory provided by SD/MMC card slot
• Built-in microphone and speaker
• Dedicated video button to record movie clips
• Stylish design with internal power control using sliding door switch
• Power-on music
3
Page 6
Digital Camera User Manual
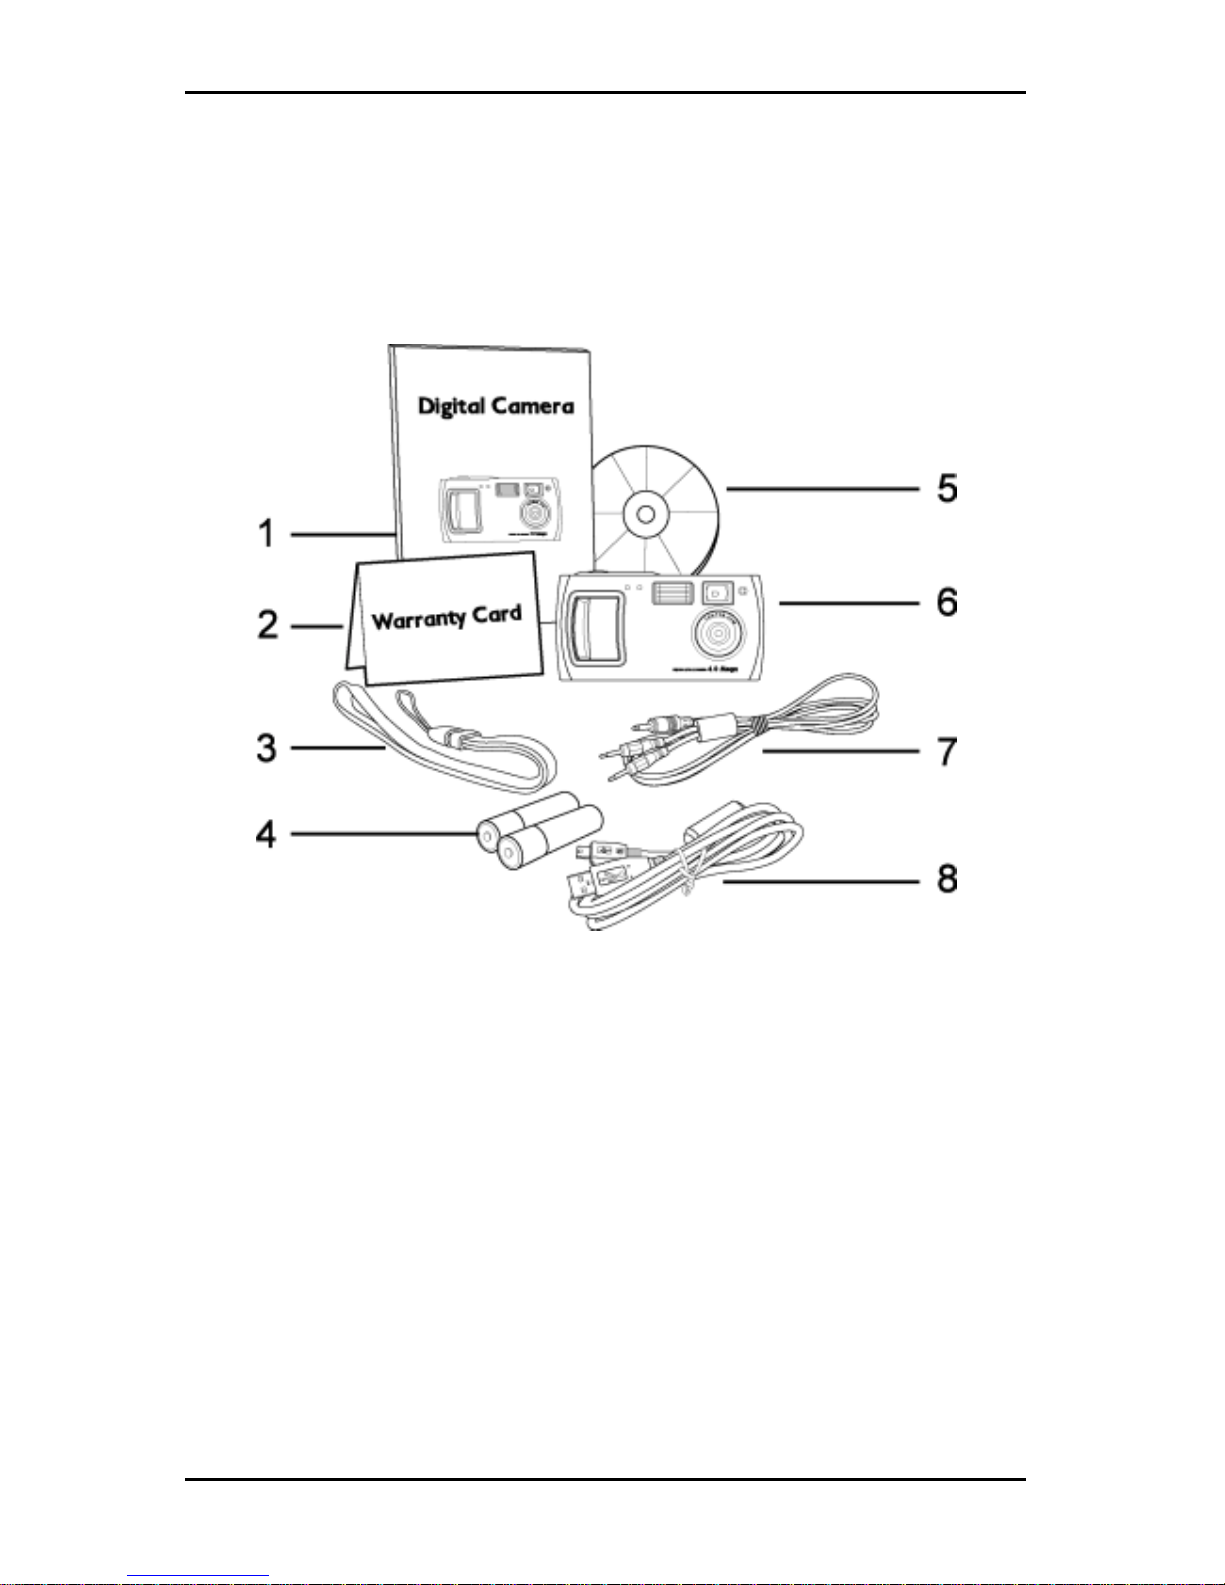
Package contents
Your digital camera package contains the following components. Check to make sure all
items are included. If any of the items is missing or appears damaged, contact an
authorized service center for assistance.
1. Quick start guide
2. Warranty card
3. Hand strap
4. Two (2) AA alkaline batteries
(Included for testing only, NiMH
rechargeable batteries are
recommended for normal use)
5. Installation CD-ROM
6. Digital camera
7. Audio / Video (AV) cable
8. USB cable
4
Page 7

Camera overview
Camera overview
The various views of the digital camera are shown on the following pages. Take a moment
to review these illustrations and become familiar with the terms used in this manual.
Front view
1. Shutter button: Press this button to capture still images.
2. Photo sensor: The light sensor detects the amount of surrounding light and adjusts
the automatic flash setting accordingly.
3. Self-timer LED (red): This LED indicates self-timer mode and blinks when you take
pictures using the self-timer.
4. Video button: Press this button to record movie clips.
5. Built-in flash: Use the flash to take pictures in low light conditions and to remove
unwanted shadows in bright conditions.
6. Viewfinder: Use the viewfinder to frame your shot instead of the LCD screen and
conserve power.
7. Microphone: Use the built-in microphone to record sound for movie clips and voice
memos.
8. Speaker: The built-in speaker enables you to listen to audio while playing back
voice memos or movie clips.
9. AV OUT and USB port cover: The cover houses the AV OUT and USB ports.
10. Lens and internal lens cover: The lens focuses the light onto the digital image
capturing circuitry. For the best picture quality, care should be taken to ensure it
remains free of dust, fingerprints, and scratches. The internal lens cover protects
the lens from dust or damage, and can be closed by the sliding door power switch.
11. Tripod connector: Use the tripod connector to fix the camera to a tripod. This
optional accessory is used to hold the camera still. It is especially useful for taking
low light night images.
5
Page 8
Digital Camera User Manual
12. Sliding door power switch: Slide this switch to turn the digital camera on or off.
This switch also controls the internal lens cover.
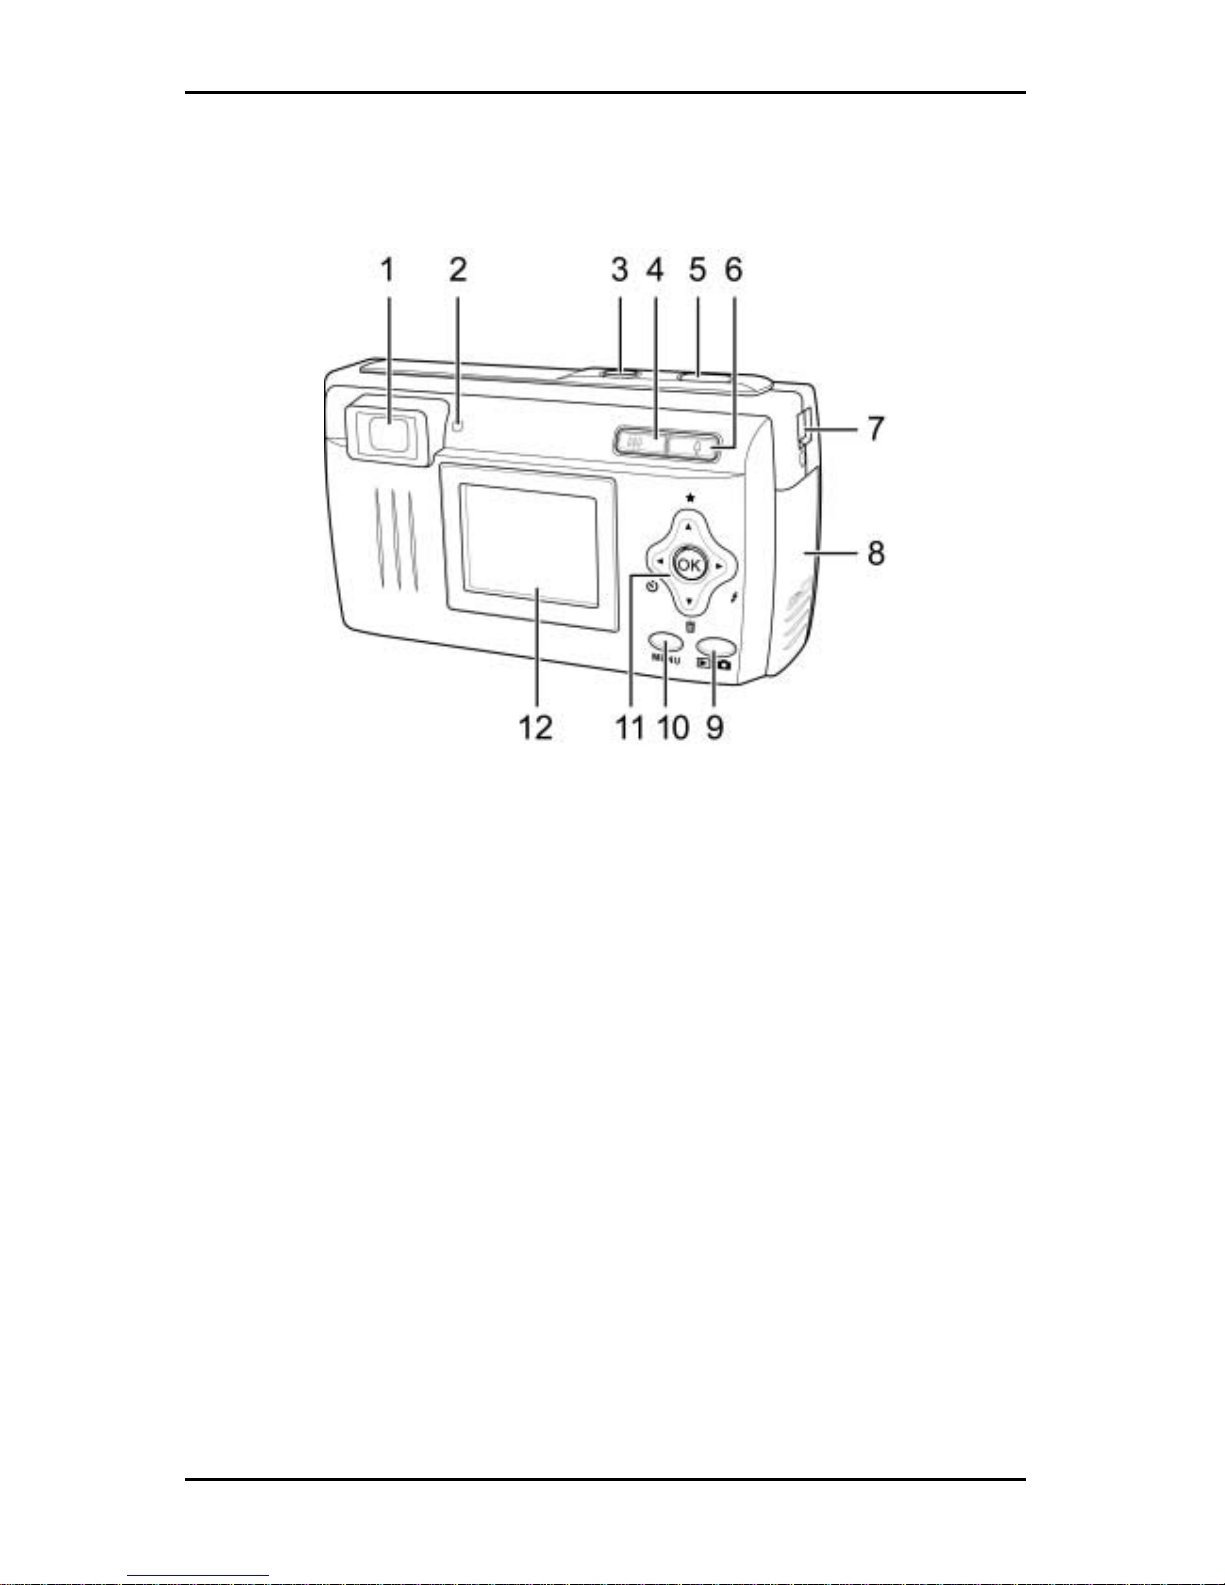
Back view
1. Viewfinder: Use the viewfinder to frame your shot instead of the LCD screen and
conserve power.
2. Power LED (green): Indicates the power status of the camera. This LED blinks
when the camera performs a self-check at startup, or while saving images / movie
clips on the internal memory or SD/MMC card. Once the camera is on, the power
LED is always on.
3. Video button: Press this button to record movie clips.
4. Zoom out / thumbnail button: Use the zoom out button to zoom out on your
subject while in capture mode. In playback mode, use this button to zoom out and
switch between thumbnail review and full-screen modes.
5. Shutter button: Press this button to capture still images.
6. Zoom in button: Use the zoom in button to zoom in on your subject while in
capture mode. In playback mode, use this button to zoom in on a photo and
magnify its details.
7. Hand strap eyelet: Holds the hand strap of the camera for easy carrying.
8. Battery / Memory card compartment: The cover opens to allow access to the
battery chamber as well as the memory card slot. The battery chamber
accommodates two AA NiMH rechargeable or alkaline batteries. The memory card
slot holds a SD or MMC Card to store images.
9. Mode button: Use the mode button to switch between capture and playback
modes.
10. MENU button: Use the MENU button to enter the setup menu.
6
Page 9
Camera overview
11. Five-way button: The five-way button functions as a navigation tool to move
through images, movie clips, or menu items. The button also provides additional
functionality of starting playback, setting the flash, self-timer, image resolution,
and deleting files as shown in the table below:
Button Function
▲ /
Moves to higher level item or sets image resolution.
◄ /
Moves to previous item or enables the self-timer.
► /
Moves to next item or sets the flash.
▼ /
Moves to lower level item or deletes the current file after image
capture. Sets the scene mode while capturing still images.
OK
Turns LCD on or off in capture mode. Press this button to
confirm selection of an item in the menu and to start playback
of a voice memo or movie clip in playback mode.
12. LCD screen: Use the LCD screen to preview or play back photos and movie clips.
While in the setup menu, use the LCD screen to view configuration details and
adjust the camera settings.
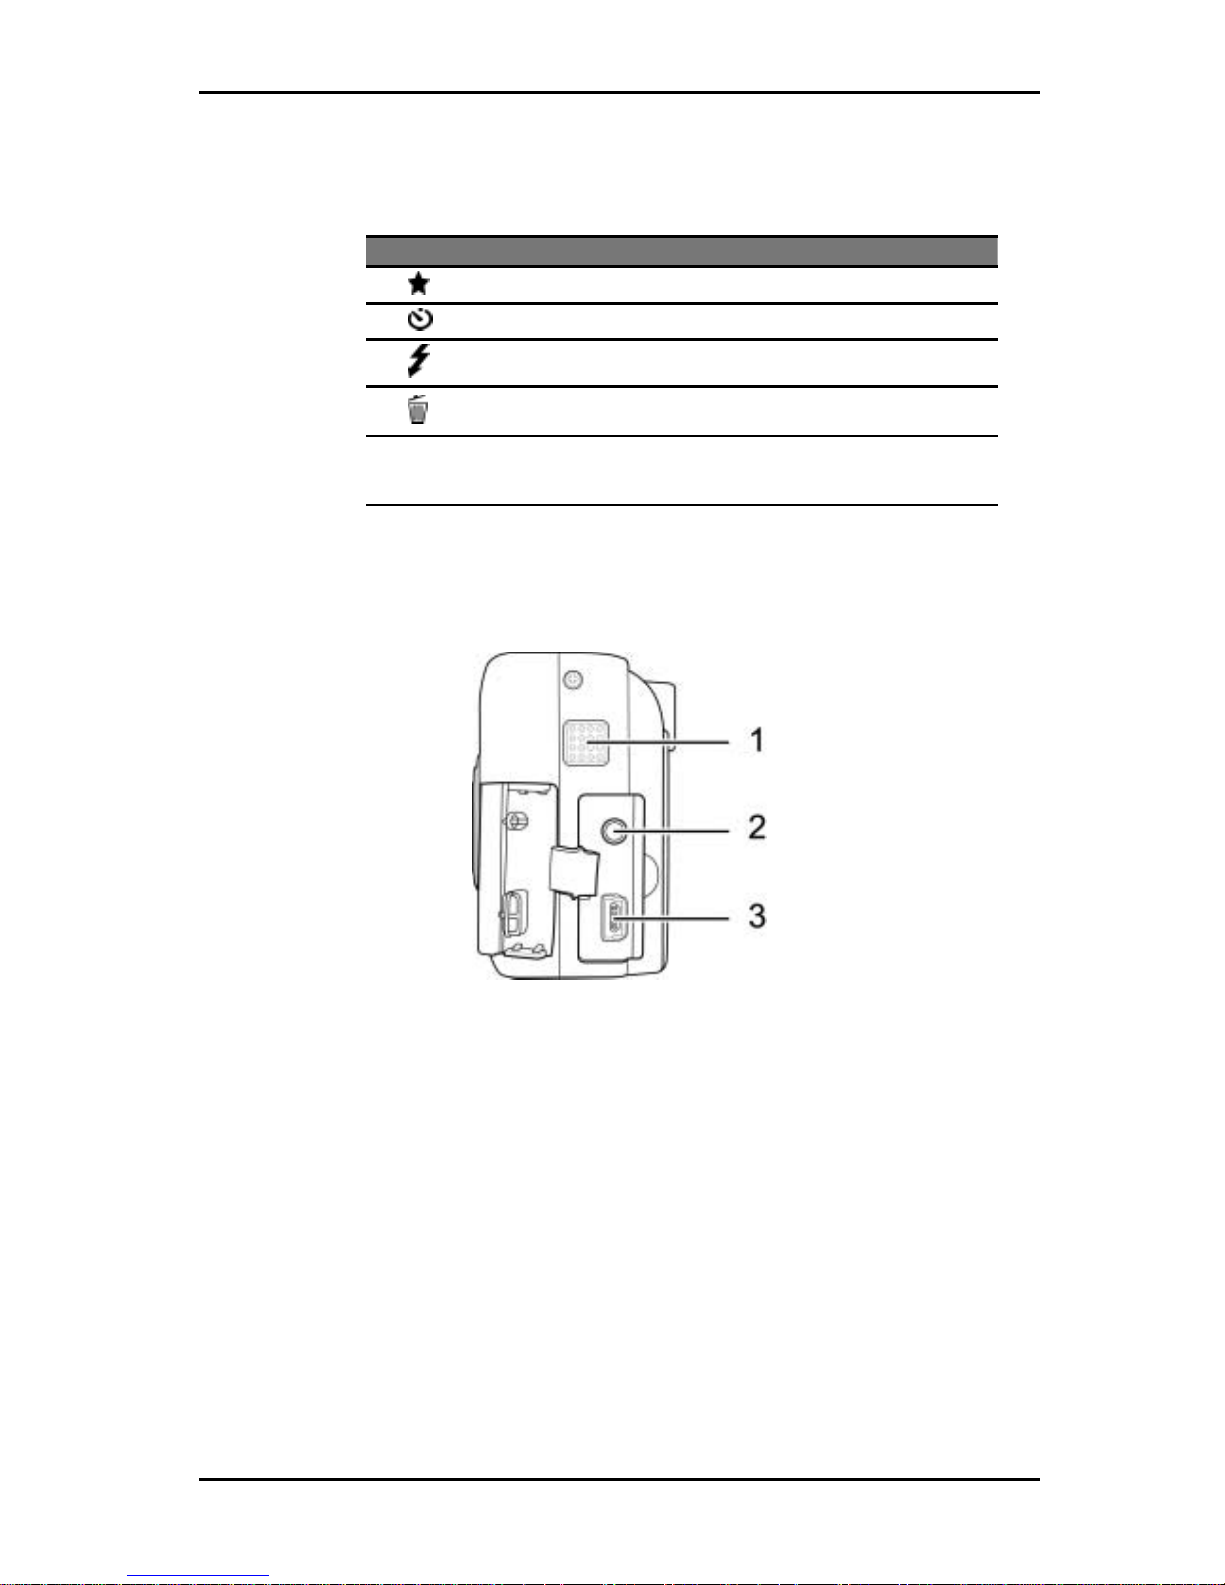
Right view
1. Speaker: The built-in speaker enables you to listen to audio while playing back
voice memos or movie clips.
2. AV OUT port: Connect AV cable here to use the television to preview your
pictures.
3. USB Port: Use the USB port to connect the camera to a PC and view or transfer
photos or movie clips.
7
Page 10
Digital Camera User Manual
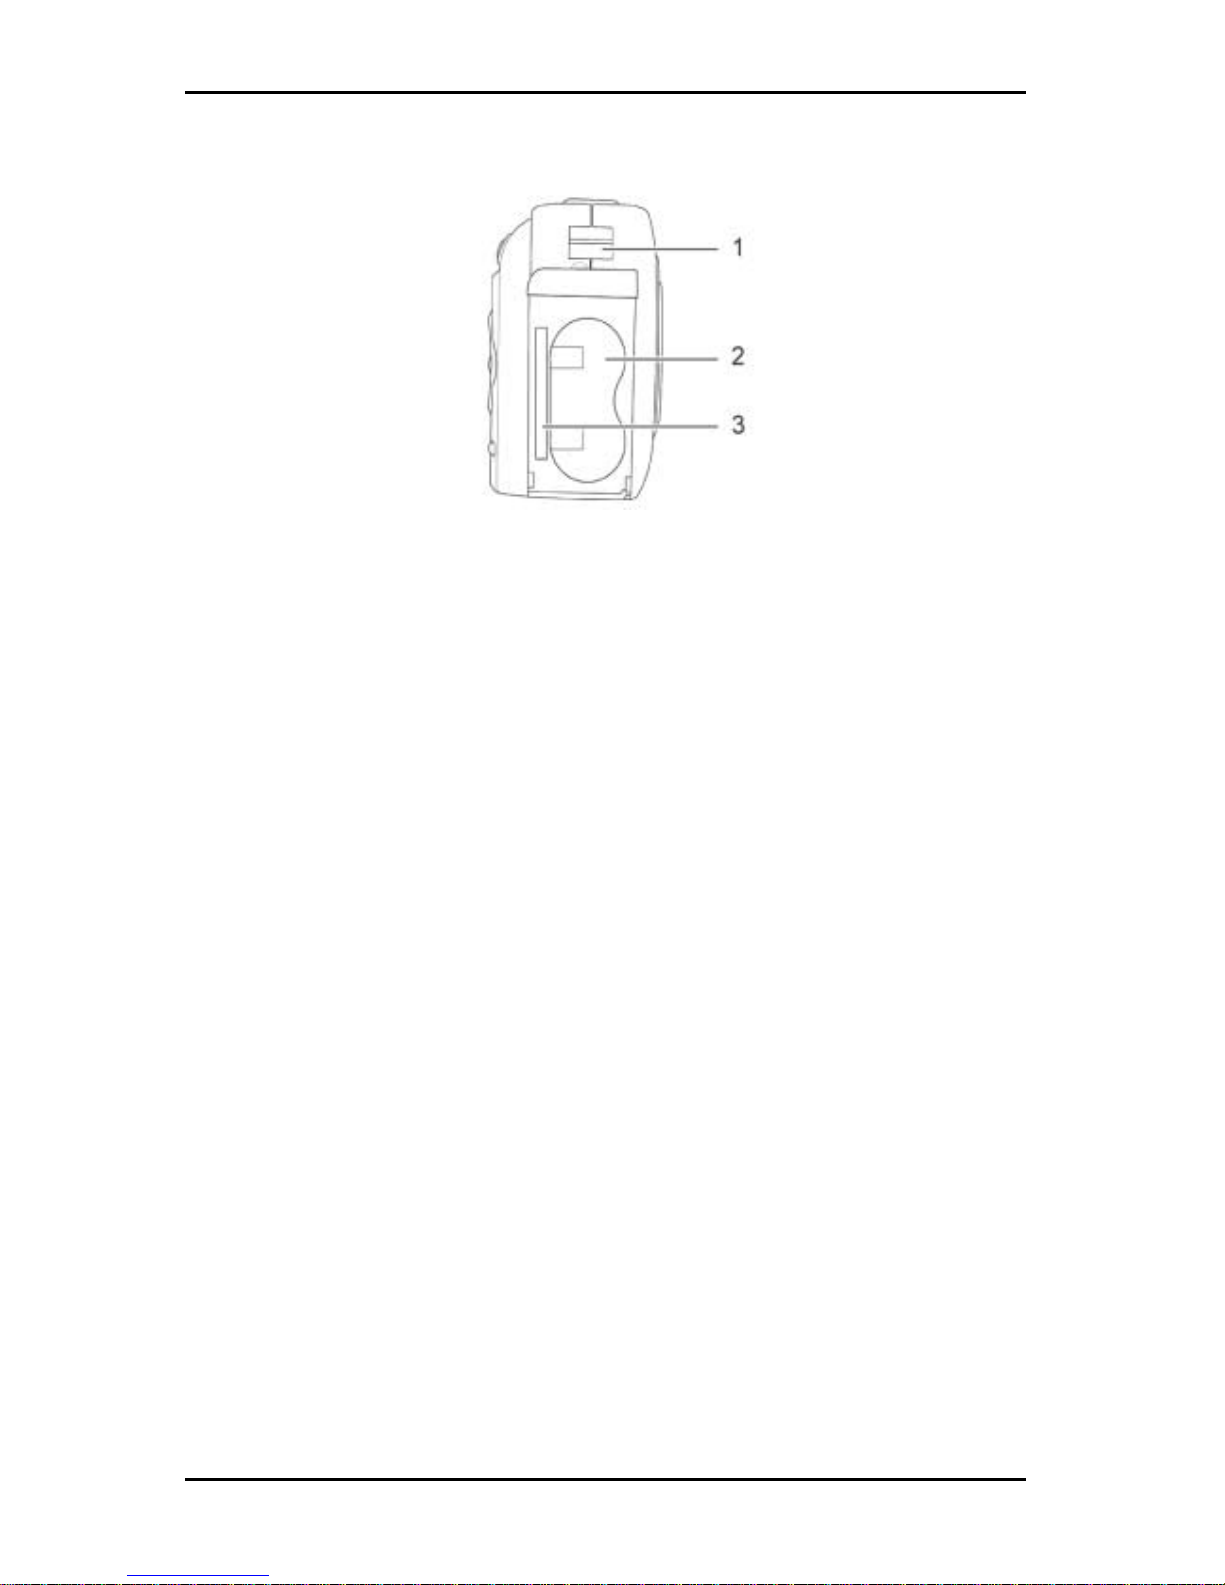
Left View
1. Hand strap eyelet: Holds the hand strap of the camera for easy carrying.
2. Battery compartment: Accommodates two AA NiMH rechargeable or alkaline
batteries.
3. Memory card slot: Holds a SD or MMC Card to store images.
Using the LCD display
The LCD screen on the back of your digital camera functions as a viewfinder, enabling you
to preview images or movie clips before capture. It displays various icons indicating the
camera settings. In addition, it also enables you to adjust the camera settings through the
on-screen menu. The LCD screen icons vary according to the mode of operation.
Switching the LCD on / off
Turn on the camera first (See page 13). To switch off the LCD, press the OK button. The
display is turned off. Press the OK key to turn the LCD on again.
LCD icons
The LCD screen shows a number of icons for capture and playback modes as described in
the following sections, with a description of the icons.
8
Page 11

Using the LCD display
LCD in capture mode
Description
1
SD/MMC card loaded in the camera
2
Preset scene mode – Night shot, Sports, Backlit
3
Self-timer active
4 Image resolution – 2272 x 1704, 2272 x 1704, 1600 x 1200, 640 x
480
5
Zoom slider – indicates level of zoom
6 Battery status – full, 10-30% capacity, less than 10%, empty. If this
indicator is blinking, the camera will turn off in 3 seconds.
7 EV (exposure value) compensation value – 2EV, 1.5EV, 1EV, 0.5EV,
0, -0.5EV, -1.0EV, -1.5EV, -2EV
8
White balance (WB) setting – Auto, Sunny, Cloudy, Fluorescent, Bulb
9
Flash status – On, Off, Red-eye reduction, Auto
10
Number of images remaining can be saved at this resolution
9
Page 12

Digital Camera User Manual
LCD in playback mode
Description
1
SD/MMC card loaded in the camera and playing files from the card
2
File locked
3
Still image with voice memo
4
Movie clip
5
Current file number / total number of files
6
Previous image or movie clip
7 Battery status – full, 10-30% capacity, less than 10%, empty. If this
indicator is blinking, it means that the camera will turn off in
three seconds.
8
Image resolution or total length of movie clip
9
Next image or movie clip
10
Page 13

Chapter 2 – Getting started
This chapter describes how to set up and prepare your camera before you start using it to
capture pictures or movie clips. Attach the hand strap, insert batteries and the SD/MMC
card to prepare your camera and adjust its settings as described below.
Attaching the hand strap
To insert the hand strap into the loop on the s
1. Thread the short loop of the ha
ide of the camera, do the following:
nd strap
2. through
3. Pull the long end of the strap tight to
onomy use Ni-MH rechargeable batteries with your new camera.
1. Slide the battery / memory card compartment cover on the side of the camera
through the hand strap eyelet.
Thread the long end of the strap
the short loop.
complete the attachment.
Inserting batteries
For performance and ec
To install or replace the batteries, do the following:
downward in the direction of the arrow.
2. Open the cover.
3. Insert the batteries into the chamber making sure that the positive and negative
ends are properly oriented, as indicated by the battery polarity labels in the
battery chamber.
11
Page 14

Digital Camera User Manual
4. Close the cover.
5. Snap the battery cover into place by sliding it upward in the direction of the arrow
shown.
Inserting an SD/MMC card
The camera offers two options for storing images / movie clips.
• Internal memory: 16 MB NAND flash memory (including program space area)
• External SD/MMC card (optional): You can store as many images / movie clips as you
like depending on the capacity of the memory card and image resolution.
NOTE: The SD/MMC card is an optional accessory. When the card is inserted, only
the SD/MMC card is used to store your pictures or movie clips. For more
information about how to transfer images or movies from the internal memory to
the SD card, refer to page 24.
To install a memory card, do the following:
1. Turn the camera off and slide the battery / memory card compartment cover on
the side of the camera downward in the direction of the arrow shown.
2. Open the cover.
12
Page 15

Turning the camera on / off
3. Insert the SD/MMC card with its notched corner towards the upper edge of the
camera (gold circuitry on the card facing the back of the camera). Press down on
the card to the level of the slot and it will be held in place.
4. Close the cover.
5. Snap the battery cover into place by sliding it upward in the direction of the arrow
shown.
To remove the memory card, press the SD/MMC card gently into the slot and release the
card. The card pops upward and can be easily removed.
Turning the camera on / off
The camera's stylish design offers a unique way of turning your camera on / off. Your
camera has a sliding door switch, which not only controls power but also operate the
internal lens cover.
• To turn the camera on, slide the door on the
front of the camera in the direction shown.
The lens cover is opened and the power LED
on the back of the camera blinks while the
camera performs a self-check. The startup
screen is displayed on the LCD screen. Once
the camera is ready, the power LED remains
lit and you can capture images or movie
clips.
• To turn off the camera, slide the door s
is closed and the camera is switched off after any operations in process are
completed.
witch in the opposite direction. The lens cover
Lens cover
13
Page 16

Digital Camera User Manual
NOTE: Your digital camera has a power saving feature that turns off the camera in
order to conserve power. In the capture mode, the LCD is turned off if there is no
action for 1 minute. Press the OK button to turn the LCD on. If there is no action
for 1.5 minutes, the camera is completely turned off. Slide the power switch to
close the lens cover.
Setting the date and time
To set the camera's date and time before using it, do the following:
1. Turn the camera on and ensure that it is in capture mode.
2. Press the MENU button to display the menu.
3. Use the ▲ or ▼ buttons to select DATE/TIME.
4. Use the ► or ◄ buttons to move between the year,
month, date, hour and minute fields. Use the ▲ or ▼
buttons to increase or decrease the values for each o
these fields.
f
5. After the date and time are set as desired, press the
OK button to save your settings.
6. Press the MENU button to exit.
Setting the language
Your digital camera can display text in English, Spanish, French, German, Italian,
Portuguese, Simplified Chinese, and
Japanese. To set the display language, do the
following:
1. Turn the camera on.
2. Press the MENU button to display the menu.
3. Use the ▲ or ▼ buttons to select LANGUAGE.
4. Use the ► or ◄ buttons to select the desired
language.
5. Press the OK button to set the language.
6. Press the MENU button to exit.
Installing the software
The software CD provided in your camera package contains the following items:
• ULEAD PhotoExplorer 8.0 SE: Photo imaging software. This is the all-in-one tool
for owners of digital cameras, WebCams, DV camcorders, scanners or anyone who
strives to effectively handle digital media.
• ULEAD Cool 360: Movie clip editing and viewing software. It lets you transform a
series of photos quickly and easily into 360° panoramic scenes or images for
delivery via e-mail, the Web or in MS Office documents.
• Adobe Acrobat Reader: PDF reader
• User manual (PDF format): Information about your digital camera and its
operation.
• Driver for Windows 98SE: Be sure to install this BEFORE using the USB cable to
connect your camera for the first time to your PC running Windows 98SE.
14
Page 17

Installing the software
Insert the CD into the CD-ROM drive of your PC and the auto
run feature displays the camera software installation menu.
Click the desired item and installation starts. Follow the
instructions on the screen to complete the installation.
If the CD does not auto run on your system you may access the
CD by double clicking the drive MY COMPUTER menu on your
computer’s desktop screen.
To view the user manual, navigate to the CD drive on your PC using Windows Explorer or a
similar file manager program. Double click the PDF file to view the manual in the
language of your choice. Install Adobe Acrobat Reader if you do not have it on your
system in order to view the manual.
15
Page 18

Chapter 3 – Taking still images or movie clips
This chapter shows you how to take pictures or record movie clips with your digital
camera. You can customize the camera settings using the camera buttons as well as the
system menu as described in this chapter.
Selecting the camera mode
Your digital camera has two modes.
• Capture mode: Use this mode to capture still images or record movie clips.
• Playback mode: Use this mode to review and play back your files, view a slide show,
and to record a voice memo.
Use the MODE button to switch between the capture and playback modes.
Taking photographs
Use this procedure to quickly capture a still image.
1. Turn on the camera and ensure that it is in capture
mode.
2. Use the LCD screen to frame your shot while
pointing the lens at the subject.
3. Press the shutter button all the way down to
capture your image.
4. The camera returns to the capture mode and the LCD displays the preview screen
again.
NOTE: You can delete unwanted files later by using the Delete function in the
setup menu. See page 23 for more details.
Adjusting camera settings using the camera keys
You can use the various features of your digital camera to enhance the quality of the
images as described in the following sections.
16
Page 19

Adjusting camera settings using the camera keys
Using the digital zoom
Your digital camera is equipped with a 4x digital zoom. The zoom level can be varied from
1x to 4x by using the zoom in and zoom out buttons as follows:
1. Turn on the camera.
2. Use the LCD screen to frame your shot while pointing
the lens at the subject.
3. Press the zoom in button to take a close-up of the
subject for more details and a narrow field of view.
Alternatively, press the zoom out button to take a
wider shot with fewer details.
4. Proceed to capture the image as described in Taking photographs on page 16.
NOTE: The zoom setting is preserved even after the image is captured. Use the
zoom out button to zoom out completely before using the flash, self-timer, or
preset scene modes.
Using the flash
The built-in flash of your digital camera can be adjusted for various light conditions. Press
the ► button repeatedly to select the desired flash setting as shown below:
Icon Description
Forced off – In this mode, the flash is disabled.
Auto – The camera senses whether the flash is needed by
detecting the amount of ambient light.
Forced on – The flash is enabled, regardless of the ambient
light.
Red-eye reduction – The flash fires twice to reduce the red-
eye effect.
NOTE: The image may be overexposed when you shoot bright scenes by using
forced flash.
Setting the resolution
The resolution setting changes the resolution and quality of the still images captured by
the camera. Press the ▲ button repeatedly to select the desired resolution:
Icon Description
4 star – 2272 x 1704
3 star – 2272 x 1704
2 star – 1600 x 1200
1 star – 640 x 480
The higher the quality, the clearer your picture will be. However, at the same time the
image file size will be larger, taking more time to send via email, and fewer pictures can
be stored in memory. Choose the setting that best matches the intended use for your life.
17
Page 20

Digital Camera User Manual
Using the self-timer
The self-timer option gives you the ability to take hands-free photos, such as selfportraits or group photos as well as movie clips as follows:
1. Position the camera on a stable surface (such as a tripod) and frame the shot.
2. Press the ◄ button to enable the self-timer. The self-timer icon appears on the
LCD screen.
3. Press the shutter button to capture an image or the
video button to record a movie clip. A 10-second delay
begins immediately. During this period, the self-timer
LED blinks slowly for the first 7 seconds and then
quickly for the last 3 seconds. The LCD screen displays
the countdown. When the delay ends, the camera
takes the picture.
NOTE: To cancel the self-timer, press the ◄ button again. To cancel the self-
timer after the shutter button has been pressed, press any of camera’s keys.
Using preset scene modes
The camera offers three preset modes to enable you to take pictures with a fixed focus.
Press the ▼ key to select the correct mode according to the ambient light and subject.
Icon Description
None Normal – This is the normal mode of operation.
Night shoot – Choose this mode when taking pictures at
night or under very poor light conditions. Put the camera
on a stable surface or use a tripod to hold the camera
steady and take a clear picture.
Sport – Use this mode when taking consecutive shots of
moving objects such as an athlete running.
Backlit – Use this mode when background lighting is
stronger than your subject.
Adjusting camera settings using the menu
You can also adjust more settings of your camera using the setup menu. Refer to the
following sections to learn how to adjust the white balance, EV compensation, quick
review, and special effect settings.
White balance
Change the preset white balance setting to suit the lighting conditions in which the
picture is taken.
Icon Description
AUTO
AUTO – This is the normal mode of operation where the
white balance is adjusted automatically. You can use the
AUTO setting to obtain the optimum image brightness
(exposure) when the subject is much brighter or darker
than the background.
Sunny – Choose this mode when taking pictures when
shooting outdoors or brightly lit surroundings.
Cloudy – Use this mode when shooting in poorly lit or
cloudy surroundings.
18
Page 21

Adjusting camera settings using the menu
Icon Description
Fluorescent – Use this mode for shooting under
fluorescent lamps.
Bulb – Use this mode for shooting under normal room
lights.
1. Turn the camera on and make sure that it is in
capture mode.
2. Press the MENU button to display the menu.
3. Use the ▲ or ▼ buttons to select WHITE BALANCE.
4. Use the ► or ◄ buttons to select the desired White
Balance setting.
5. Press the OK button to confirm your selection.
6. Press the MENU button to exit the menu.
EV compensation
The exposure value (EV) refers to the amount of light that is allowed to enter the camera.
The EV compensation is expressed as a single number that is used by the digital camera to
calculate the correct combination of aperture and shutter speed for producing optimum
quality pictures. Setting a higher EV compensation value will over-expose a shot while
setting a lower value will under-expose a shot. Exposure can be adjusted from –2.0 to +2.0.
The value is shown on the LCD display. To change the EV compensation value, do the
following:
1. Turn the camera on and make sure that it is in capture mode.
2. Press the MENU button to display the menu.
SATION.
Use the
5. Press the OK button to confirm your selection.
Press the MENU button to exit the menu.
3. Use the ▲ or ▼ buttons to select EV COMPEN
4. ► or ◄ buttons to increase or decrease the
EV value.
6.
19
Page 22

Digital Camera User Manual
Special effect
Your digital camera also provides three special effects that enable you to capture still
images in normal, sepia, or black and white modes. The following special effects are
available:
Icon Description
NORMAL
This is the normal mode of operation.
B&W
Select this effect to capture black and white images.
SEPIA
Select this effect to capture images in sepia tones.
To select a special effect, do the following:
1. Turn the camera on and make sure that it is in
capture mode.
2. Press the MENU button to display the menu.
3. Use the ▲ or ▼ buttons to select SPECIAL EFFECT.
4. Use the ► or ◄ buttons to select the desired effect.
5. Press the OK button to confirm your selection.
6. Press the MENU button to exit the menu.
Recording movie clips
The movie mode allows you record MPEG movie clips on your camera's internal memory or
SD/MMC memory card.
Record icon
To record a movie clip, do the following:
1. Turn on the camera.
2. Use the viewfinder or the LCD screen to frame
your shot while pointing the lens at the subject.
3. Press the Video button to begin recording.
4. During recording, the record icon appears on the
LCD screen along with the time remaining for r
To stop reco
ecording.
5. rding, press the Video button again.
The camera returns to the capture mode and the LCD displays the preview screen 6.
again.
NOTES:
! The zoom, flash, self-timer, and the preset scene buttons are
disabled while recording movie clips.
full.
! Recording is stopped automatically when the memory card is
20
Page 23

Chapter 4 – Reviewing photos or movie clips
One benefit of digital cameras is that you can immediately review the pictures or movie
clips you just took. This chapter describes how to review your digital images or movie
clips.
Reviewing photos / movie clips
To view the pictures that you have stored in internal memory or on the SD/MMC Card,
turn on the camera and slide the mode switch to playback mode.
NOTES:
! In playback mode, the first frame of movie clips is displayed in
full screen or thumbnail mode.
! When a SD/MMC card is inserted, the LCD screen displays only
the files stored on the card. If a SD/MMC card is not present, the
LCD screen displays the files stored in the internal memory.
Full screen review
Voice memo icon
The default playback method is to show each
individual picture one at a time at full screen
size. Press the ◄ and ► buttons to browse
through the still images or movie clips you've
taken. If a still image has a voice memo as
indicated by the voice memo icon, press the OK
button to play the voice memo. Press the OK
button to stop playing the voice memo.
Magnifying still images
You can also use the zoom in button to view a picture in more d
setting is 1.0X. Press the zoom in button to increase the zoo
ratio to 2.0X or 4.0X. Press the zoom out button to decrease
the zoom ratio.
etail. The default zoom
m
The magnified image is initially centered on the LCD. To pan
the view and see different parts of the magnified image, press
the
◄, ►, ▲, and ▼ keys. The image is moved in 1/8 step.
The left upper corner shows the thumbnail image along with
the zoom area highlighted.
Adding / deleting a voice memo
To add a voice memo to a still image, do the following:
1. Select the desired image in full screen review mode.
2. Press the MENU button to display the menu.
3. Use the ▲ or ▼ buttons to select VOICE MEMO.
4. If the DELETE option is grayed out, press OK to start
recording voice memo and press OK again to stop
recording. If the ADD option is grayed out, press OK
21
Page 24

Digital Camera User Manual
to delete existing voice memo.
5. The voice memo icon in playback mode indicates an image with a voice memo.
NOTES:
! The VOICE MEMO option is grayed out (unavailable) for movie
clips, if the file is locked, or if there are no files in memory.
! The ADD option is grayed out (unavailable) if a still image
already has a voice memo. Use the DELETE option to delete the
voice memo before recording a new one.
! The DELETE option is grayed out if the still image has no voice
memo attached to it.
Thumbnail review
If you press the zoom out button when the zoom ratio is at 1x (default), the camera
switches to thumbnail review mode. In thumbnail review mode, up to nine pictures are
shown on the LCD simultaneously. Use the ▲, ▼, ◄, and ► buttons to cycle through the
thumbnails.
To return to full screen review, select the photo you want to view and press the OK
button. The selected picture will expand to fill the entire LCD Screen.
NOTE: If an SD/MMC card is inserted, the thumbnail mode displays only
the files on the card and not on the internal memory. If a SD/MMC card
is not present, the LCD screen displays the files stored in the internal
memory.
Playing back movie clips
Movie clip icon
To view movie clips, do the following:
1. Use the ◄ or ► keys in playback mode to
locate a video file in full screen or
thumbnail review modes.
2. Press the OK button to start playing back
the video file.
3. The LCD screen displays the playback
status as well as elapsed playing time.
4. Press the OK button again to stop playback.
22
Page 25

Deleting photos or movie clips
Deleting photos or movie clips
You can delete a single image or movie clip, all files, or format the memory card using
the DELETE function in the playback menu. This allows you to delete unwanted files
immediately without transferring them to the computer. The following options are
available in the DELETE menu:
Icon Description
THIS Select this option to delete the selected image or movie
clip.
ALL Select this option to delete all images or movie clips
except the locked files.
FORMAT Use this option to format the SD/MMC or internal
memory card and remove all files including locked files.
To delete unwanted photos or movie clips, do the following:
1. Select the desired file in full screen review mode.
2. Press the MENU button to display the menu.
3. Use the ▲ or ▼ buttons to select DELETE.
4. Use the ► or ◄ buttons to select the desired option
as listed in the table above.
5. Press the OK button to confirm your selection. A
confirmation message is displayed. Select YES to confirm your selection.
6. Press the OK button again to continue the delete/format operation. The selected
files get deleted.
Locking photos or movie clips
To lock images or movie clips in order to prevent them from being deleted, do the
following:
1. Select the desired file in full screen review mode.
2. Press the MENU button to display the menu.
3. Use the ▲ or ▼ buttons to select PROTECT.
4. If the REMOVE option is grayed out, press the OK
button to lock the current file. If the THIS option is
grayed out, press the OK button to unlock the current
file.
5. The selected file gets locked or unlocked.
NOTES:
! The THIS option is grayed out (unavailable) if the file is already
locked. Use the REMOVE option to remove the lock if necessary.
! The REMOVE option is grayed out (unavailable) if the file is not
presently locked.
23
Page 26

Digital Camera User Manual
Viewing a slide show
You can view a slide show of all your images and movie clips as follows:
1. In playback mode, press the MENU button to display
the menu.
2. Use the ▲ or ▼ buttons to select SLIDE SHOW.
3. Use the ► or ◄ buttons to select START to start the
slide show and press the OK button to confirm your
selection. The slide show starts and all images and
videos are displayed at 5-second intervals in the
sequence they were taken.
4. Press the OK button to stop the slide show.
Transferring photos or movie clips to an SD/MMC card
To transfer your images and movie clips from the camera's internal memory to the
external SD/MMC card, do the following:
1. In playback mode, press the MENU button to display the menu.
2. Use the ▲ or ▼ buttons to select MOVE TO CARD.
3. Use the ► or ◄ buttons to YES to transfer all files to
the SD/MMC card or NO to cancel the operation.
4. Press the OK button to confirm your selection. All the
files get transferred to the SD/MMC card.
24
Page 27

Chapter 5 – Connecting to a PC or TV
The digital camera stores your still images and movie clips on the internal memory or the
external SD/MMC card. You can transfer your files to a computer using the USB cable and
view, edit, or delete them as desired. You can also connect your camera to a TV using the
AV cable and view all the images on the TV. This chapter explains how to connect your
digital camera to a computer or a TV set.
CAUTION: Please make sure you install the software from the CD-ROM before
connecting the camera to your computer if you are running Windows 98SE.
Transferring files to a computer
To transfer image and video files
to your computer, do the
following:
1. Turn on the camera and
set to the PLAYBACK
mode.
2. Connect the camera to
the computer with the
USB cable. The LCD
screen turns on and
displays Connecting. The
LCD screen turns off after
5 seconds and all camera
buttons are disabled.
3. Start Windows Explorer o
any other file manager
program. An extra disk
drive representing the
camera's memory called
Removable Disk is shown
under the My Computer
folder.
r
4. Select the highest removable disk drive. The drive contains a DCIM folder that
holds all other images and video files. The first 1000 files are saved in the
100DSC4M folder. If more then 1000 files are present on the camera, they are
saved in the 101DSC4M folder. Select the photos or videos, and drag and drop
them to any location on your computer's desktop or hard disk.
CAUTION: To disconnect the camera from the PC, use the Unplug or Eject
Hardware utility (green arrow in the systray at the bottom of your monitor screen)
to stop the device before unplugging it.
25
Page 28

Digital Camera User Manual
Viewing photos or movie clips on a TV
To view photos and videos on your TV, do the following:
1. Connect the AV Out port on your digital camera to the audio / video input ports on
your TV using the AV cable provided.
2. Turn on the camera. The LCD screen turns off while the camera enters playback
mode automatically.
3. Use the procedures described in Chapter 4 – Reviewing photos or movie clips to
play back the files on your camera.
Selecting the TV setting
When you connect the camera to the TV with the included AV cable, you have the option
to choose a transmission format compatible with that of your TV. This allows you to
record video images sent to the TV with a VCR.
1. Press the MENU button to display the menu.
2. Use the ▲ or ▼ buttons to select TV Setting.
3. Use the ► or ◄ buttons to select NTSC (US standard)
or PAL according to your country’s broadcast type.
Press the OK button to confirm your selection. The
selected TV format is set.
4. Press the MENU button to exit.
26
Page 29

Appendix A – Error messages
Error message Description Solution Time out
MEMORY FULL Internal memory or memory
card is full and camera is not
able to take a picture or
video at the current
resolution.
• Delete unwanted files.
• Turn off the camera
and insert a new
SD/MMC card.
5 seconds.
CARD ERROR SD/MMC card is not of the
correct format.
• Turn off the camera
and replace the card.
• Format the SD card.
5 seconds.
NO FILE No file on the internal
memory or SD/MMC card for
playback.
Change the mode to capture or
menu mode.
—
BATTERY EMPTY Battery is completely
discharged.
Replace the batteries.
3 seconds after
which the
camera is
switched off.
LOW BATTERY!
FLASH FORCED
OFF.
Flash setting is changed and
battery charge is too low to
fire the flash.
• Capture images or video
without using flash.
• Or, replace the batteries
before using the flash again.
1 second.
PROCESSING... Insufficient space in the
RAM to hold a new picture
while the current one is still
being processed. This
message is displayed if you
repeatedly and quickly press
the Shutter or Video button
to capture an image or video
file.
The message is cleared after
processing is complete.
—
PROCESSING Digital zoom in button
pressed to magnify an
image in playback mode.
The message is cleared after
processing is complete in
approximately 2-3 seconds and
the magnified image is
displayed.
—
CHARGING... The flash is not charged and
cannot fire.
The message disappears after
charging of the flash is
complete.
—
MOVING MOVE TO CARD option
selected from the menu in
playback mode
The message disappears after
the file transfer is complete.
—
27
Page 30

Appendix B – Troubleshooting
Problem
Possible
cause
Solution
The camera is
turned off.
Slide the power switch to turn the camera ON and
open the cover (See page 13).
The batteries
are discharged.
Replace the batteries with fresh ones. Refer to page
11.
The camera has no power.
The batteries
are inserted
incorrectly.
Check the battery orientation. Refer to page 11.
Internal memory
or memory card
full.
Backup your images and delete unwanted images, or
format the internal memory / memory card.
The camera won’t take a
picture.
Is the camera
connected to a
computer?
The camera’s buttons are not functional when
connected to a PC. Disconnect the camera to take
more pictures.
Is the flash on? Ensure the flash is set to AUTO or ON. Refer to page
17.
The flash doesn’t work.
The batteries
may be weak.
If the batteries are too weak, the flash will be unable to
recharge. Turn the camera off and wait a few seconds
before turning it back on. If this doesn’t work, replace
the batteries.
The images are blurry. The camera or
subject was
moving when
the shot was
taken.
Hold the camera steady or put it on a tripod to take
pictures.
The computer does not
recognize the camera.
The camera was
connected to a
personal
computer
running
Windows 98SE
before installing
the software.
Connect the camera to the computer with the USB
cable. Select [My computer] > [Control panel] >
[System] > [Device manager]. From [other devices]
delete [Composite USB device] or [unknown device].
Disconnect the camera from the computer, restart the
system, reinstall the software, and then reconnect the
camera.
Windows ME and Windows
2000: when the USB cable
is unplugged from the PC,
an "Unsafe Removal Device
Detected" error message
appears.
When removing
USB devices, it
is recommended
that users follow
the "Safe
Removal of USB
Device"
procedure.
Procedure:
A. Right-click the Unplug or Eject hardware icon at the
bottom-right of your computer screen.
B. Left-click the Unplug or Eject hardware text box to
open the 'Unplug or Eject Hardware' screen.
C. From the 'Unplug or Eject Hardware' screen, select
the device to be disconnected and then click the
Stop button to bring up the 'Stop a Hardware
device' confirmation screen.
D. From the 'Stop a Hardware device' confirmation
screen, select the device to be stopped and click
OK to bring up the 'Safe To Remove Hardware'
confirmation.
E. Disconnect the Digital Camera from your PC.
28
Page 31

Appendix C – Hardware specifications
Image Sensor 4.1M pixels CCD sensor
Digital Zoom 4x for still image capture
Still image capture
quality
4 star: 2272 x 1704
3 star: 2272 x 1704
2 star: 1600 x 1200
1 star: 640 x 480
Number of still images
(16 MB memory)
4 star: 10 images
3 star: 16 images
2 star: 32 images
1 star: 92 images
(Approximate)
Movie mode 320x240, 15 fps
File formats Still image: JPEG (EXIF 2.2)
Movie: MPEG1 (MPEG4 optional)
LCD monitor 1.5-inch color LCD
Storage media Built-in 16 MB Flash memory
Supports SD/MMC card
Lens Optical fixed focus lens
Lens cover Internal sliding door
Aperture F4.0 / F8.0
Focal distance 0.8m ~ infinity
Shutter speed 1/1000 sec (fastest)
Preset scene modes Sport, Night shoot, Backlit
Interface USB 2.0
A/V out
Video Output NTSC & PAL
Power source 2 x AA NiMH rechargeable batteries
Dimensions 105 x 54 x 32 mm
29
Page 32

Digital Camera User Manual
Appendix D – FCC Statement
This device complies with Part 15 of the FCC Rules. Operation is subject to the following two
conditions:
(1) This device may not cause harmful interference.
(2) This device must accept any interference received, including interference that may cause
undesired operation.
This equipment has been tested and found to comply with the limits for a Class B digital device,
pursuant to Part 15 of the FCC Rules. These limits are designed to provide reasonable protection
against harmful interference in a residential installation. This equipment generates, uses and can
radiate radio frequency energy and, if not installed and used in accordance with the instructions,
may cause harmful interference to radio communications. However, there is no guarantee that
interference will not occur in a particular installation. If this equipment does cause harmful
interference to radio or television reception, which can be determined by turning the equipment off
and on, the user is encouraged to try to correct the interference by one or more of the following
measures:
-- Reorient or relocate the receiving antenna.
-- Increase the separation between the equipment and receiver.
-- Connect the equipment into an outlet on a circuit different from that to which the receiver is
connected.
-- Consult the dealer or an experienced radio/TV technician for help.
30
 Loading...