

Page 1
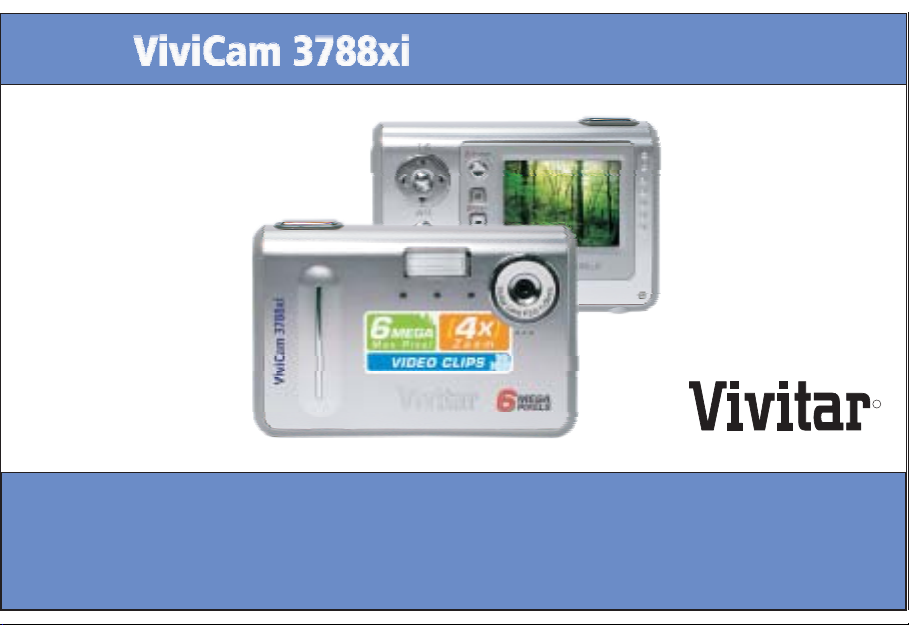
Digital cameraDigital camera
Operation manualOperation manual
Operation manualOperation manual
R
-English
Page 2

FCC STATEMENT
This device complies with Part 15 of the FCC Rules. Operation is subject to the following
two conditions:
(1) this device may not cause harmful interference, and
(2) this device must accept any interference received, including interference that may
cause undesired operation
This equipment has been tested and found to comply with the limits for Class B
Note:
digital devices, pursuant to Part 15 of the FCC rules. These limits are designed to
provide reasonable protection against harmful interference in a residential installation,
This equipment generates, uses and can radiate radio frequency energy and, if not
installed and used in accordance with the instructions, may cause harmful interference
to radio communications. However, there is no guarantee that interference will not
occur in a particular installation. If this equipment does cause harmful interference to
radio or television reception, which can be determined by turning the equipment off
and on, the user is encouraged to try to correct the interference by one or more of the
following measures :
Reorient or relocate the receiving antenna.
Increase the separation between the equipment and receiver.
Connect the equipment into an outlet on a circuit different from that to which the
receiver is connected.
Consult the dealer or an experienced radio/ TV technician for help.
A
Page 3

Use of shielded cable is required to comply with Class B limits in Subpart B or Part
15 of the FCC rules.
Do not make any changes or modifications to the equipment unless otherwise
specified in the manual. If such changes or modifications should be made, you could
be required to stop operation of the equipment .
TRADEMARK INFORMATION
Microsoft and Windows are U.S. registered trademarks of Microsoft Corporation.
Pentium is registered trademark of Intel Corporation.
Macintosh is a trademark of Apple Computer, Inc.
SD is a trademark.
R
R
TM
R
PhotoSuite , PhotoVista and the MGI logo are trademarks or registered trademarks
of MGI Software Corp.
Adobe, the Adobe logo, and Acrobat are trademarks of Adobe Systems Incorporated.
Other names and products may be trademarks or registered trademarks of their
respective owners.
READ THIS FIRST
Please start by reading the important messages below first.
1. The bundled driver, software ,design , specifications and user's manual that were
packaged with the camera are subject to change without notice.
2. The accessories that come with the camera may vary between regions.
3. For diver updates ,you can contact the dealer where you purchased the camera for
help.
4. We are not liable whatsoever for any compensation arising from errors in
descriptions in this user's manual.
B
Page 4

WARNINGS
Do not the camera if it is emitting smoke ,become unusually hot to be touched ,emitting
any unusual odor or noise, or if it is in any other abnormal state. Operating the camera
in any of these situations may cause a fire or an electrical shock. Stop using the
camera immediately , turn the camera off , and then disconnect the power source
( batteries or AC power adapter). (If you are using the AC power adapter , unplug the
adapter from the AC power outlet after you have disconnected the camera).
After checking that smoke is no longer being emitted , contact your dealer or a local
authorized service facility and request repairs . Never attempt to repair the camera
yourself as this is dangerous.
Do not use the camera if any foreign object have entered the camera . Turn the camera
off ,and then disconnect the power source (batteries or AC power adapter ).(If you are
using the AC power adapter, unplug the adapter from the AC power outlet after you
have disconnected camera.) Then contact your dealer or a local authorized service
facility. Do not continue to use the camera as this may cause a fire or an electrical shock.
If the camera has been dropped or if the camera cause has been damaged ,turn the
camera off ,and then disconnect the power source (batteries or AC power adapter ).
(If you are using the AC power adapter ,unplug the adapter from the AC power outlet
after you have disconnected the camera.) Then contact your dealer or a local
authorized service facility .Do not continue to use the camera as this may cause a fire
or an electrical shock.
C
Page 5

Do not place the camera in any unstable location such as on a wobbly table or sloping
surface where the camera may fall or tip over and cause injury.
Do not expose the camera to moisture and make sure that there is no water getting
into the camera .Take particular care when using the camera under extreme weather
conditions such as rain or snow ,or when operating the camera at the beach on near
water .Water in the camera may cause a fire or an electrical shock.
Do not attempt to modify the camera .This may cause a fire or an electrical shock.
Do not remove the camera casing . This may cause an electrical shock. Internal
inspection ,maintenance and repairs should only be carried out your dealer or a local
authorized service facility.
Do not touch the power plug during a thunderstorm if you are using the AC power
adapter .This may cause an electrical shock.
CAUTIONS
Do not place the camera in damp or dusty locations .This may cause a fire or an
electrical shock.
Do not place the camera in a location affected by oil fumes or steam ,such as near a
cooking stove or humidifier .This may cause or an electrical shock.
Exposure to high temperatures may adversely may adversely affect the camera case
and internal components and may cause a fire.
Do not cover or wrap camera or the AC power adapter with a cloth or quit .This may
cause heat to build up and distort the case and cause a fire .Always use the camera
and its accessories in well-ventilated locations.
D
Page 6

Handle the camera carefully and do not bump the camera into any bard object.
Handing the camera roughly may cause a malfunction.
Do not move camera while it is switched on .(If you are using the AC power adapter ,
unplug the adapter from the AC power outlet after you have switched off the camera.)
Ensure that any connector cords or cables to other devices are disconnected before
moving the camera .Failure to do so may damage the cords and cause a fire or an
electrical shock.
When leaving the camera unused for long periods ,such as during a vacation ,always
unplug the camera from the power source (batteries or AC power adapter ) for safety.
(If are using the AC power adapter ,unplug the adapter from the AC power outer you
have disconnected the camera .)Failure to do so could result in a fire.
Do not use batteries other than those specified for use with the camera .The use of
unsuitable batteries may in the batteries splitting or leaking and cause a fire ,injury ,
or soiling of the battery compartment .
When fitting batteries into the camera ,check the polarity markings on the battery
(-and+)to ensure that you insert the battery correctly .Incorrect battery polarity may
result in the batteries splitting or leaking and causing a fire ,injury ,or soiling of the
battery compartment .
Remove the batteries if the camera will not be used for an extended period of time.
The batteries may leak and cause a fire ,injury or soiling of the battery compartment .
If he batteries leak ,clean and wipe the battery compartment carefully and install new
batteries .Wash your hands carefully if you touch the battery fluid.
E
Page 7

OPERATIONS MANUAL
Content
1. Index
1.1 Thanks
1.2 Accessories
2. System Requirement
3. Camera Specification
3.1 Technical Specification
3.2 Camera layout
4. Installation and Prepare for using your camera
4.1 Connecting camera strap
4.2 Loading Re-chargeable Battery pack
4.3 Charging the battery by camera
4.4 Charging the battery by battery charger
4.5 Loading the Memory card (SD Card)
5. LCD icon Display
6. Using the camera
6.1 Turn on the camera
6.2 How to change the Mode setting
6.3 How to take the best image by adjusting Focusing slider
6.4 How to use the flash mode
7. Taking pictures / movie
7.1 Taking color Still Pictures
7.2 Taking Movie (Moving motion)
7.3 Taking Self-timer color still pictures
7.4 Taking Black and White still pictures
3
3
3
4
5
5
7
9
9
10
11
12
13
15
16
16
17
17
18
19
19
19
20
21
1
Page 8

8. Preview or Replay Pictures / movie
9. How to delete Pictures/ Movie
10.HowtousethecameraasaPCcamera
11.Adjusting the setting of the camera by using 'Menu' function
11.1 Self-timer
11.2 Flash
11.3 White Balance
11.4 Size of pictures
11.5 Quality of pictures
11.6 Set up date and time
11.7 Format memory card
12.Others Set Up
12.1 Install USB
12.2 How to change the USB model
12.3 How to change to TV model
12.4 How to set up the Auto Power off
13.Install software and download pictures
13.1 Installation of Applications
13.2 Download Picture
13.3 Install camera and software under Windows 98 System
13.4 How to install driver under Windows 98 system
13.5 Install camera under Windows ME/2000/XP
13.6 Download the photo
13.7 Cut the connection of computer and camera
13.8 Other ways of downloading the camera's images
14.Maintenance of Camera
21
24
25
26
27
27
29
30
31
32
33
33
33
34
34
35
35
35
42
42
43
43
44
45
46
46
2
Page 9
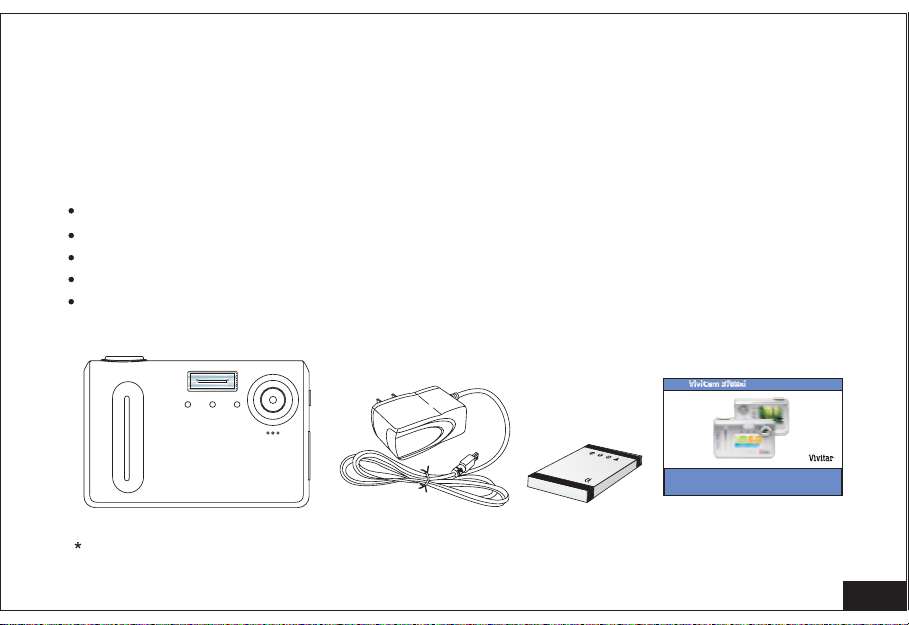
1.Index
Thanks for purchasing our digital camera. Before start using the camera, please
read the manual with care in order to get full use of the various functions and
extend
the life of the camera. Please keep the manual for future reference.
1.1 Thanks
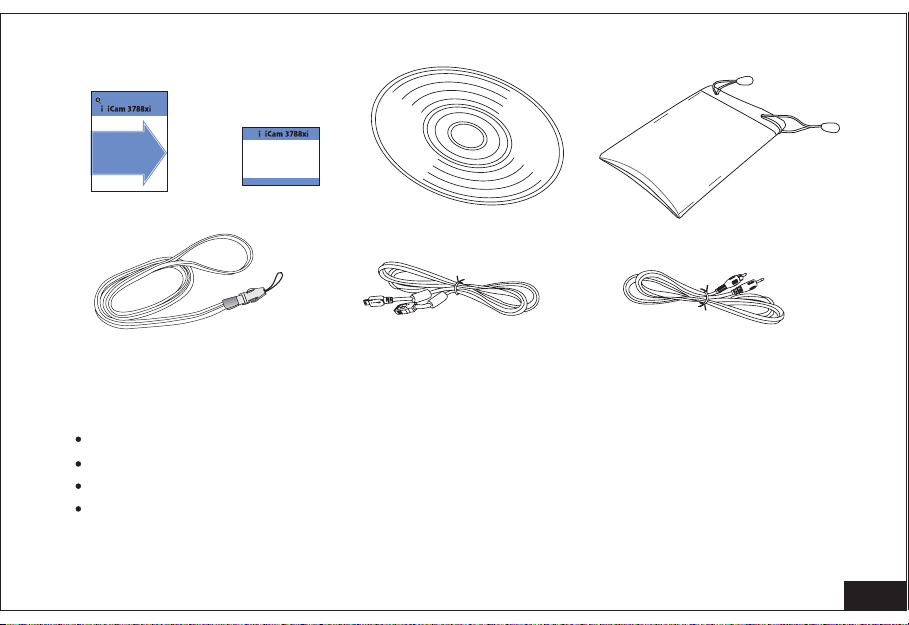
1.2 Accessories included:
USB cable / AV cable
Software and Driver CD
User Manual /
Quick Start Guide / Warranty
Protective leather Case / Strap
650mAh Rechargeable Battery Pack 1pc
Digital cameraDigital camera
SD/ Pouch card will be optional.Extra rechargeable Battery
Li-polymer
R
3
.7V
Operation manual
Operation manual
-English
3
Page 10
uick StartGuide
uick StartGuide
V v
START HERE
START HERE
Itis stronglyrecommended that you
followthese step-bystepnumbered
instructionsto setup and quickly
beginusing
V v
WARRANTY
WARRANTY
USB
2. System Requirement
Win 98 SE/ Windows 2000/ Windows XP/ mac 10.0
Me/
Pentium CPU 266MHz and upper
Memory 64MB and upper
Disk at least 100M space
4
Page 11

3. Camera Specification
3. 1 Technical Specification
Sensor
Pixel
Effective Pixel
Resolution
File Storage
Number of Photos
in 16MB Memory
File Format
Shooting Mode
Camera Lens 1/3 inch adjustable lens Marco, portrait, Normal
Focus
Aperture F=3
Depth of Field Marco 20cm, portrait 100-250cm, Normal 150cm ~ &
Shutter Speed Electronic shutter, 1/2-1/1000 Second
3.3Mega pixels CMOS sensor
6 Mega Pixels(with )interpolation
3.17Mega pixel
2816x2112,2048x1536, 1600x1200, 1280x960,
*Internal* 16M Flash , SD Card (8MB-512MB)
40(2048*1536), 60(1600*1200pixels), 400(1280*960),
25(2816*2112). Piece of pictures is related to image
JPEG
Single shot
Self-timer shot
Movie: AVI format, 7-15 frame/sec
On 320*240 mode, length of time relies on capacity of
memory medium Black & White shot
f=9mm
5
Page 12

Digital Zoom 4 times
White Balance
Exposure Control Automatic,
Flash Mode No Flash ( / Forced / AutomaticDefault)
PC-Camera Mode
Communication
Interface
TV Output
LCD
Power Supply 650mAh, Li-polymer Rechargeable battery
OSD Menu
Languages
OS Compatibility WIN98SE/2000/ME/XP; Mac Os10.0 or above
PC Application
Software
Operational Temperature 0 30
Storage Temperature -10 45
Dimension
Weight(battery not included ) 90 grams
Internal flash memory is subjected to be changed without further notice.
Automatic, sunshine, fluorescence light,
incandescence light
640*480: 7frame/sec, 352*288: 20frame/sec, 320*240:
20frame/sec
USB1.1
NTSC/PAL
1.8' TFT color LCD
Chinese English Japanese German
Photo Explorer 8.0 BASIC
93(W) x60(H) x18.59(D) mm
6
Page 13
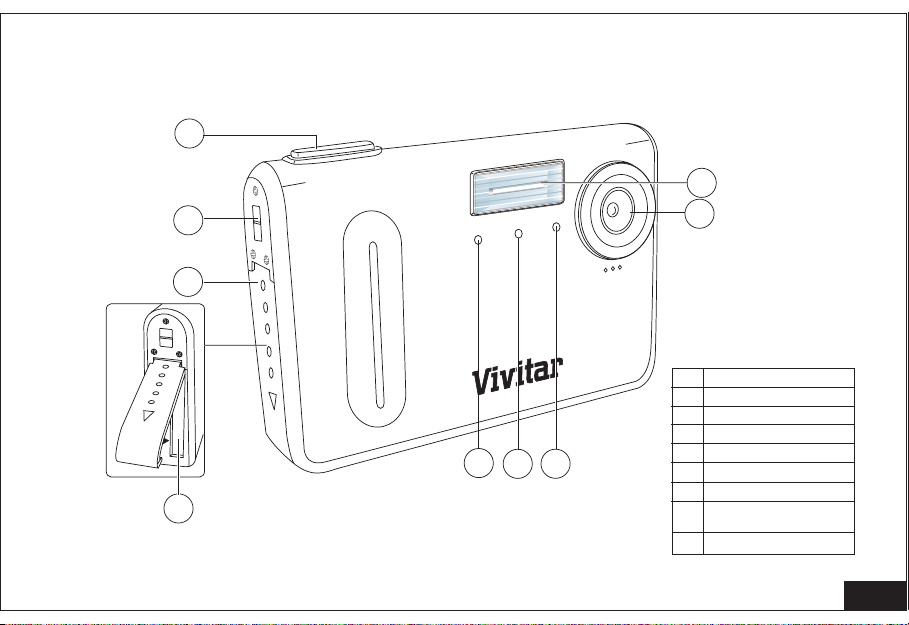
3.2 Camera layout
3
4
5
Battery
6
Battery
2
1
Lens (F3.f=9mm)
1
Flashlight
2
Shutter button
3
Strap slot
4
Battery cover
7
8
9
5
Battery apartment
6
Power onLed / ST Led
7
Battery chargingLED/
8
ST Led
Self timerlamp
9
7
Page 14
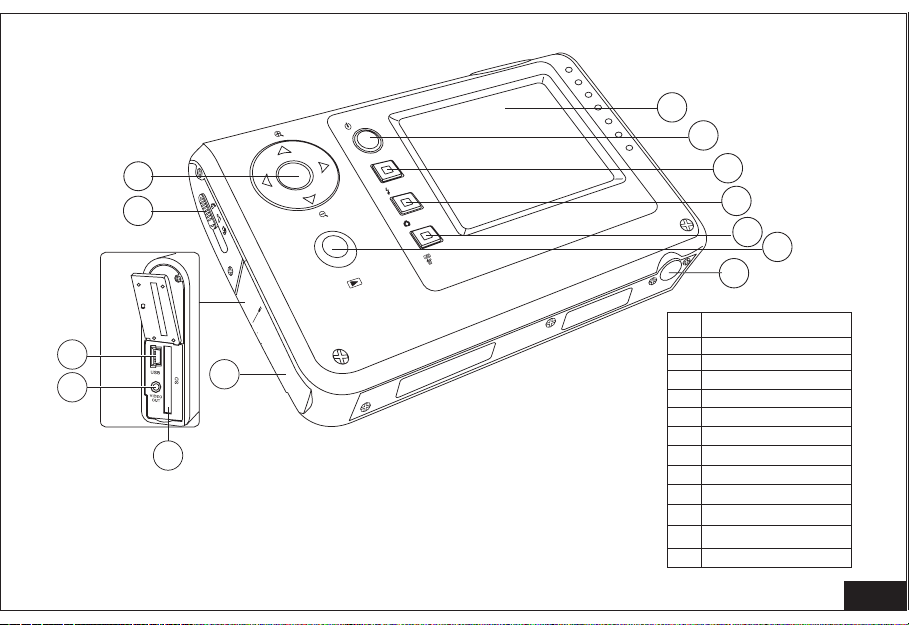
10
11
T
Power
16
17
18
Flash
W
review
/P
OK
Mode
Menu /
Delete
6.0 MEGA PIXELS
19
22
20
21
12
13
14
15
USB
VIDEO
ard
OUT
c
SD
Up Down
10
Left Right Button
3 StepsFocus slider
11
USB Socket
12
VIDEO OUT jack
13
Memory CardSlot
14
Side Cover
15
TFT LCD Display
16
Power button
17
Flash button
18
Mode button
19
Menu /Delete button
20
OK /Preview Button
21
Tripod Socket
22
8
Page 15
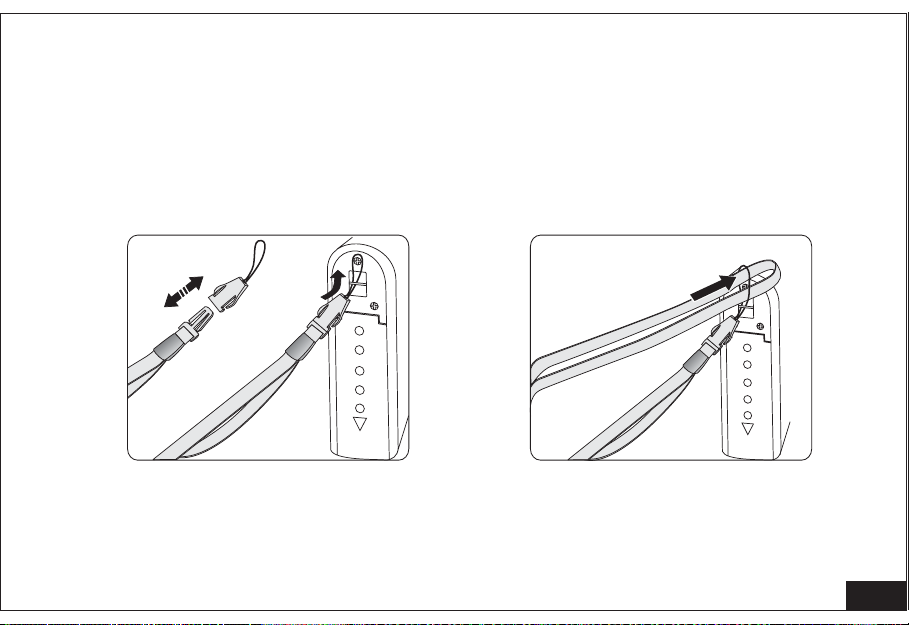
4. Installation and prepare for using your camera
4. 1 Connecting the Camera Strap
Take the strap out from the package; connect the strap to the camera per
instruction.
Battery
Battery
9
Page 16
4.2 Loading Rechargeable Battery Pack
Take the Rechargeable Battery Pack out from the packaging box
Open the Battery Compartment by sliding the battery door
Insert the battery per the indication of the +/- direction
Close the battery door
Li-polymer
3.7V
10
Page 17

4.3 Charging the battery by camera
Ensuring camera is power OFF , Connect the camera with provided USB cable
to the computer, turn on the computer and the camera will show a bit sound
and the middle LED at the front view will be on. The camera is in charging
condition.
Middle LED be auto off when battery is fully charged
11
Page 18

4.4 Charging the battery by the adapter (if applicable)
* Plug in the provided charger into power socket
* Ensure camera is power OFF and rechargable battery is properly inserted into
camera.
* Connect USB plug to camera USB socket
* Camera will show a bit sound and middle LED at front view will be on. The
camera is in charging condition.
* Middle LED will be auto OFF when battery is fully charged.
12
Page 19

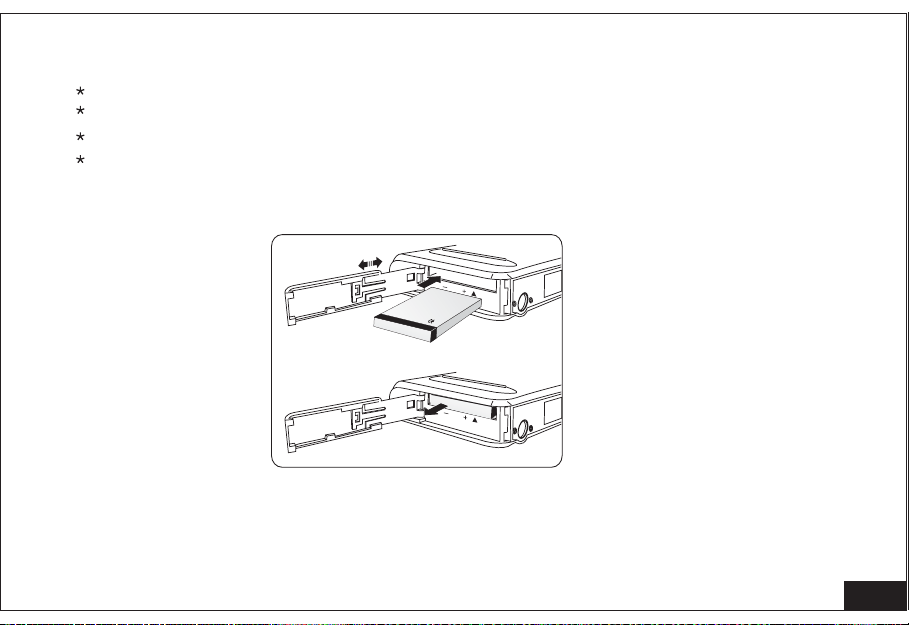
4.5 Loading the Memory Card (SD card)
This camera are using SD card as the memory card. Images will be stored
the memory card when SD card is present. It should be noted that internal
memory will be used if SD card is not used. User is required to download
pictures in SD card and in camera separately.
Standard SD card requirement - (8MB to 512MB) / 3.0V (3.3V)
Open the Side Cover of the camera, and you can find the SD card slot.
Insert the SD card into the card slot per the indication in the camera; the card
should be flat to the slot opening if it is inserted correctly.
To take out the inserted card, just slightly push the card, and it will spring out
for taking out.
Close the Side cover
into
13
Page 20

Attention:
Don't use SD CARD less than 8MB or more than 512MB
Don't use 5V SD CARD sold in the market.
The camera maybe not capable to recognize non-standard SD CARD, such as
3V (3.3V), or formatted SD CARD in another equipment (PC, etc). Please be
sure to
When keeping or taking the SD CARD, please put it into static-proof case.
Please don't bend, drop or bump the SD CARD.
Please touch the touching area of SD CARD.
Please re-use the write-protect switch.
Please read carefully the user's manual of SD CARD attached
Note:
If you can't install the SD CARD, it's probably you didn't insert the SD CARD
properly, please take out the SD CARD and insert again.
Don'tpresstheSDCARD,takeouttheSDCARDorbatterywhenthepower
supply is on, otherwise all the document in the SD CARD will be destroyed and
can't be recovered.
format the SD CARD in the exact camera before using.
14
Page 21

5. LCD Icon Display
White balance
Photo size
Photo quality
Battery status
Capture mode
A
Flash mode
2048
A
Digital zoom
Photo taken/Memory remain
15
Page 22

6. Using the Camera
T
W
OK /Preview
6.1 Turn on and off the camera
Power
Flash
Mode
Menu /
Delete
Power
6.0 MEGAPIXELS
* Turn on the camera by pressing the Power button, a beeping sound will come
and the left LED at the front cover will turn on. The TFT LCD display will
out
turn on
and camera are in ready condition
* Turn off the camera by pressing the Power button, a beeping sound will come
and the TFT LCD display and power LED will be off.
out
Attention:
In order to save power, the camera will be auto-shut off in 5 min.
(it can be adjusted in the camera set up mode, but we recommended to set at
shorttimeisbetter)
16
Page 23

6.2 How to change the mode setting
Mode
* While you turn on the camera or at the Still Camera mode, you can press the
Mode' button (quick function key) to change the Still camera function mode to
'
Movie function mode.
* You can select the 4 different function by pressing the mode button, it will
change
& White
between Still Camera mode > Movie Mode > Self-timer mode > Black
Still Camera mode.
Color Still PictureColor Still Picture
Movie VideoMovie Video
Self-timer Still pictureSelf-timer Still picture
Black and White Still PictureBlack and White Still Picture
6.3 How to Focus the best image by using the Focusing slider
* The camera can select the focus setting between-Normal and Marco.
portrait
* For portrait picture (between 0.8m to 2m), should set the camera at the middle
portrait
* If there is required to take far object (1.5m to infinity). -
.
Normal
* If you want to take picture object like flower, (at 0.2m) you should choose
Marco setting.
the
* The image will show direct in the LCD display. If the focus setting is incorrect,
you can see the image in the LCD is out of focus.
Depth of field
1.5M-&
1-2.5M
0.2M
Normal
Portrait
Marco
Focus
3M
1.4M
0.2M
17
Page 24

6.4 How to use the flash mode
Flash
* Camera have three flash mode No Flash / Auto Flash / Force Flash
* Camera was set at the No Flash mode in order to save power
* If you want to take a picture without flash, you can stay with No Flash mode
''
''
and the flashlight will stay off.
* If you not sure if the picture condition need flash or not, you can press the
'Flash' ' '
mode button to set the flash at Auto Flash model.
* Once you select this mode, the flash green LED on the button will blink until it
was full charged. The flash will automatically charge again when the flash was
used.
* Camera will stay at Auto Flash mode once selected, and it will return to No
mode by changing the flash mode again or it will reset to No flash mode
flash
while the
If you want to use Force flash, press the flash button to Force flash mode.
*
The
camera was switch off and restart again.
''
flash mode will be reset at No flash mode once the picture be taken once.
* Flash Mode icon will show on the top right hand side of the LCD display to
reflect
the flash status.
Auto
Force
Off
Depend on the environment
The flash is turn on no matter the light is strong or weak. The
environment will adjust the sharpness of the flashlight.
The flash is turn off no matter the light is strong or weak. The
mark fit to the environment that the flash is forbidden to use.
Note : Don't use any flash in Marco mode.
18
Page 25

7. Taking Pictures / Movie
7.1 Taking Color Still Picture
* Turn on the camera, the camera will be automatic set as the Still Picture mode
and the Still Picture icon will show at the top left hand corner in the LCD display
* Set the focus by sliding the Focus slider in the side of the camera.
* Aim the object by observing the LCD display to show the object is in position,
in focus and without covering by your finger.
* Press down the Shutter Button steadily , the still picture will be taken with a
beep sound to confirm. The no of picture taken will show in the bottom right
hand corner of the LCD display.
* To continuous to take still picture, just repeat the above steps
7.2 Taking Movie (Moving Video)
* Turn on the camera and set the camera at the Movie Mode
* Aim the object by observing the LCD display to show the object is in position,
focus and without covering by your finger.
in
* Press down the Shutter Button, the movie will start recording and recording
stop when you press the Shutter button one more time.
will
* If you want to use the digital zoom when taking the movie, you can zoom in
image by pressing the Up button and zoom out image by pressing the
the
Down
button.
* The record time will show on the bottom left hand corner of the LCD display.
19
Page 26

7.3 Taking Self-timer Still picture
* Set the camera at the Self-timer mode
* Set the camera with a tripod or a flat surface with same level of the object you
want to take picture with.
* Aim the objects and prepare a space for you by observing the LCD display to
show the object are in position and in focus.
* Press the Shutter Button and rush yourself to the position that you plan to be.
* Camera will start beeping together with the first left LED blinking for the first
3 seconds, then the first LED will stay ON and middle LED will blink for the
next 4 seconds. The first 2 LEDs will stay ON and the third LED will blink for
the next 2 seconds, and then picture will be taken at the 10 seconds with a
th
beeping sound.
* Camera will switch back to normal picture mode after self-timer picture is taken.
1-3sec 4-7sec 8-9sec
20
Page 27

7.4 Taking Black and White Still Picture
* To take picture in Black and White picture, select the Mode to B/W still picture
mode by presses the Mode button. The B/W icon will show on the top left hand
corner of the LCD display.
* Repeat the step on 6.3 for picture taking.
* The display will show also the Black and White color only at this mode.
8. Preview or Replay Pictures / Movie
8.1 How to view the still picture that you took
Turn on the camera
* Simply press the 'OK/Preview' button, and the camera will go to Preview mode,
and you can select the image by pushing the Left < button and Right > button.
* If you want to view the image by digital zoom by pressing the Up button to
zoom in and down button to zoom out.
* After you finish the preview, press the 'OK/Preview' button again, it will return
to picture mode.
OK/Preview
8.2 How to view the movie in the camera
OK/Preview
Turn on the camera
* Simply press the 'OK/Preview' button, and the camera will go to Preview mode,
and you can select the find the movie you want to see by pushing the Left
and Right > button.< button
21
Page 28

* Once select the movie, press the shutter button to play the movie, press one
more time, it can pause the movie. Once it finished, it will stop by itself.
* After you finish the preview, press the 'OK/Preview' button again, it will return to
movie mode.
8.3 How to replay the movie in TV
TV
TV
* You can replay the movie in your home TV
* Turn on the camera by pressing the Power button
* Connect the camera with the provided cable to the out of the
camera and Video
the inontheTV.
Video Video
* Turn on the power of the TV and select to AV mode of the TV
* Select the camera at the Preview mode of the movie camera as the step as
Select the movie you want to play and press the Shutter button to start and pause.
in 8.2
22
Page 29

Attention:
* When the camera was connect to the Video cable, the LCD display in the
camera will be automatically switch OFF
* When connect the camera to TV, the camera will consume power
* Do not connect the camera with the USB for charging in the same time as
using the Video connection
* The system of the TV will affect the quality of image, please adjust the camera
output system to the same as the TV (NTSC/PAL). You can find this setting at
the Setting of Camera instruction.
8.4 How to zoom in the picture
When viewing the pictures, you can zoom in them.
How to zoom in:
1. Turn on the camera.
2. Press OK button, enter Preview mode.
3. Press direction button (right/left) to the pictures you want to zoom in.
4. Press up-direction button to zoom in.
5. Press left/right/up/down-direction button to move left/ right/ up/down side.
6. This function can change picture quality. The larger the amplification is the
worse the picture quality becomes. The largest zoom-out is 4 times Use
to review the imageLCD
23
Page 30

Attention:
The color of the upright bar on the right of LCD will be changing consecutively
according to the digital zoom change. The top indicates the biggest
amplification
time. It's possible to have some graininess on the photo under
digital zoom function.
9. How to delete the still picture or movie
Delete
a. While you are at picture or movie preview mode, go to the picture or movie
you want to delete, you can delete the picture you do not like.
b. Go to the picture or movie you want to delete, press the 'Menu/Delete' button,
it will show a Menu page for ' Del Image' and ' del 1 ';
24
Page 31

c. Then press the 'OK/Preview' button to confirm. the screen will shows 'Del 1'
Yes
(OK) No(Menu).
d. If you decided to delete this picture or movie, just press 'OK/Preview button)
or if
you do not want to delete, press the 'Menu' button to cancel the delete
request.
e.
If you want to delete all images, you can go to Preview mode by pressing
the 'OK/Preview' button, and press the 'Menu' button. It will show the
Menu page for 'Del Image' and 'del 1' screen, you can press
the Right >
button to change the ' del 1' to ' del all' Then, press the 'OK/Preview' to
confirm, the screen will show ' del all' Yes No(Menu).
f. to delete all file, press 'OK/Preview' or if you do not want to
If you decided
(OK)
delete all file, press the 'Menu' button to cancel the delete all request.
Attention:
Once you select Delete All, the entire file inside the camera included
still picture and movie will all be deleted and cannot be recovered. So, we are not
recommended to use this function unless you was completed the download of
files to your computer, and decided to clean all memory in the camera.
10. How to use the camera as a PC camera
a. The camera can be used as PC camera. You can connect your communication
with your friends, customer via the Internet with Video frequency.
b. Turn on the camera and go to Menu and change the camera setting
c. Press the 'Menu' button, enter to USB mode, and use the left button to change
the setting to PC camera mode.
25
Page 32

d. Press the 'OK/Preview' button to confirm
e. Press the Menu button to preview status
f. Connect the USB port of the camera to the Computer.
g. Operating the ' AMCAP.EXE.'
h. Then it will appear window show in the computer screen of a dynamic images
shot by the camera.
i. You can cut off the PC camera connection by closing the software, and
computer
can operate the other system.
j. Disconnect the cable and removed the camera from the connection.
11. Adjust the setting of camera by 'Menu' function
Menu
Besides the Built-in Quick function key of the camera, you can adjust the
setting
we
the best
of the camera by using the 'Menu' button of the camera. In this chapter
indicate how to use your camera to take high-quality pictures and acquire
image output camera mode will be preset as color still picture.
26
Page 33

11.1 Self-Timer
When using Self-Timer, you can take your own pictures as well as take for a
group, which has sculpted already. Turn on the Self-Timer and press the
shutter; the camera can work after 10 seconds.
*
Normal set-up
1. Turn on the camera.
2. Press the menu button , enter the camera original set-up menu.
Menu
3. Press the up or down button to select the capture mode .
4. Press the left or right button to select Self .
5. Press OK to confirm
6. Press menu return to review option.
Attention:
select common mode under
capture option.
7. Press the shutter button
8. The red led will flash; the photo will be taken
in10 secretary.
11.2 Flash
You can adjust the flash function by the Menu
repeat the operation to cancel fix time,
MENU
Capture modeCapture mode
Photo size 1280x960Photo size 1280x960
Quality EconomicQuality Economic
White bal. AutoWhite bal. Auto
camera will preset at No flash.mode
1/3 EXIT OKMENU OK1/3 EXIT OKMENU OK
SelfSelf
27
Page 34

*Normal set-up
1. Turn on the camera.
2. Press the menu button; enter the camera
original set-up menu.
3. Press the up or down button to select the
flash mode .
4. Press the left or right button to select the
status of the flashlight.
5. Press OK to confirm
6. Press menu button return to review option.
7. The indicate light of the flash stopped means
the charge is OK
Attention:
Charge the flashlight during the interval of taking photos. The green light
to LCD can indicate.
The photo could be taken when the green light stops flash blinking .
If the distance is too short or the light is not strong enough, the exposure will
be failed and some light spots will appear.
Theworkingdistancefortheflashis1mto2.5m.
MENU
Flash modeFlash mode
USB mode CameraUSB mode Camera
TV mode PAL
TV mode PAL
Auto Off 5 minAuto Off 5 min
2/3 EXIT OKMENU OK2/3 EXIT OKMENU OK
Off
close
28
Page 35

11.3 Adjusting white balance
Adjust white balance to get the excellent photo.
Mode
Auto
Daylight
Fluorescent lamp
Incandescence lamp
Normal Set Up
1. Turn on the camera.
2. Press the menu button; enter the camera
original
3. Press the up or down button to select white bal .
4. Press the left or right button to select white
balance
5. Press OK to confirm
6. Press menu return to review option.
set-up menu.
needed.
Common spot
Taken outdoor
Taken under fluorescent lamp
Taken under incandescence lamp
Spot
MENU
Capture mode NormalCapture mode Normal
Photo size 1280x960Photo size 1280x960
Quality EconomicQuality Economic
White bal. AutoWhite bal. Auto
1/3 EXIT OKMENU OK1/3 EXIT OKMENU OK
29
Page 36

Result
1280 1280 x 960 1228800 1.2M
1600 1600 x 1200 1920000 2.0M
2048 2048 x 1536 3145728 3.1M
2816 2816 x 2112 5947392 6.0M
11.4 Adjusting the size of picture
There are 4 sizes for the picture: 1280-,1600-,2048-,2816-. The size of the photo will
adjusted by set up, which decides the picture quantity saved in SD card.
be
the larger
Attention: all photos with different sizes can be saved in the same SD card. But the
camera keeps the present size set until you change this set. The picture quantity will
be changed according to the photo size.
Default setting is 2048,3.0M
Normal set up
1. Turn on the camera.
2. Press the menu button; enter the camera original
set-up menu.
3. Press the up or down button to select the photo size .
4. Press the left or right button to select the size of
photo..
5. Press OK to confirm
6. Press menu return to review option
the size is, the less the quantity is in the SD card.
MENU
''
''
Capture mode NormalCapture mode Normal
Photo size 1280x960Photo size 1280x960
Quality EconomicQuality Economic
White bal. AutoWhite bal. Auto
1/3 EXIT OKMENU OK1/3 EXIT OKMENU OK
30
Page 37

11.5 Adjusting quality of photo
There are 3 set-up options for the camera display on the screen: normal
/best /basic
The photo quality is based on the option you select, which also decides the
quantity saved in SD card. The higher the quality is, the clearer the picture
is and the bigger the space in SD will be taken.
Attention:
Different quality photos can be saved in 1 memory card. The last
size of the photo will be remaining. Size of the photo will be changed based
on selected quality.
The quality of the photo subject to the quality you choose.
Normal Set Up
1. Turn on the camera.
2. Press the menu button; enter the camera
original set-up menu.
3. Press the up or down button to select the
Quality .
''
4. Press the left or right button to select the
quality of photo.
5. Press OK to confirm
6. Press menu return to review option.
''
''
MENU
Capture mode NormalCapture mode Normal
Photo size 1280x960Photo size 1280x960
Quality FineQuality Fine
White bal. AutoWhite bal. Auto
1/3 EXIT OKMENU OK1/3 EXIT OKMENU OK
31
Page 38

11.6 Set-up date and time, camera will preset as Off .
Adjusting the data and time:
1. Turn on the camera.
2. Press the
3. Press the up or down button to select set time .
4. Press 'OK' to confirm.
5. Press the left and right button to select set up time.
6. Re-press the up or down button to select the time and date needed.
7. Re- presses the up or down button to adjust the data.
8. Press the left and right button select,
9. Press ' OK' to confirm,
10. Press, ' cance l' to return.
'menu' button; enter the camera original set-up menu.
''
MENU
Language EnglishLanguage English
Format FormatFFormat FormatF
Set time DffSet time Dff
2003 08 29 01 322003 08 29 01 32
Default setDefault set
3/3 EXIT OKMENU OK3/3 EXIT OKMENU OK
OK CancelOK Cancel
32
Page 39

11.7 Format the memory card, camera preset as Format F .
Attention: The photos & information will be cancelled after formatting the card.
Please check your card before format.
1. Press the card to unlock.
2. Put the card into the camera
3. Push the dial to turn on the camera.
4. Select the manual to set-up
5. Press the up & down button to select format
6. Press the left & right button to select format
and
push OK to confirm.
7. The format finished in short time.
8. Press set-up to return.
''
MENU
Language EnglishLanguage English
Format FormatFFormat FormatF
Set time OffSet time Off
Default setDefault set
3/3 EXIT OKMENU OK3/3 EXIT OKMENU OK
Attention:
12. Other setup
12.1 Install USB
When the digital camera connects with the PC, we can design different
working models, camera preset as camera .
1. PC--Camera model: the digital camera can be used as a PC camera. Under
this
and transfer
2. Camera model: Under this model, you can download, delete and transfer
documents. And also can be used as a removable disk.
Please do not open the cover or take the battery out.
model, camera can communicate with the long-distance computer
the pictures.
33
Page 40

12.2 How to change the USB model, camera preset as card camera .
1.Turn on the camera.
2.Press the menu button; enter the camera
original set-up menu.
3.Use the up or down key of 4-direction control
button, enter the USB mode .
4.Press the OK button to confirm.
5.Use the up or down key of 4-direction control
button, select the USB model you hoped.
6.Press the OK button to confirm.
7.Press the MENU button to return the preview
state.
12.3 How to change the TV model, camera preset as PAL :
1.Turn on the camera.
2.Press the menu button; enter the camera
original set-up menu.
3.Use the up or down key of 4-direction control
button, enter the TV model menu bar.
4.Use the left or right key of 4-direction control
button, select the TV model you hoped.
5.Press the OK button to confirm
6.Press the MENU button to return the preview
state.
''
''
''
''
''
''
''
''
''
''
MENU
Flash mode OffFlash mode Off
USB mode CameraUSB mode Camera
TV made PALTV made PAL
Auto off 5 minAuto off 5 min
2/3 EXIT OKMENU OK2/3 EXIT OKMENU OK
MENU
Flash mode OffFlash mode Off
USB mode CameraUSB mode Camera
TV made PALTV made PAL
Auto off 5 minAuto off 5 min
2/3 EXIT OKMENU OK2/3 EXIT OKMENU OK
34
Page 41

12.4 How to set up the auto power off time, camera preset at 5 min.
1. Turn on the camera.
2. Press the menu button; enter the camera
original set-up menu.
3. Use the up or down key of 4 direction control
button, enter the Auto off menu bar.
4. Use the left or right key of 4 direction control
button, select the Auto power off time you hoped.
5. Press the OK button to confirm.
6. Press the MENU button to return the
preview
13. Install software and download picture
13.1 Installation of the Application
Insert the accompanying CD into the CD-ROM
drive and the application starts to install
automatically.
Language select dialogue box will appear
''
then click English , then click <OK>
and ' '
''
''
''
''
state.
MENU
Flash mode OffFlash mode Off
USB mode CameraUSB mode Camera
TV made PALTV made PAL
Auto off DisableAuto off Disable
2/3 EXIT OKMENU OK2/3 EXIT OKMENU OK
35
Page 42

Step1: Put provide disc into CD room, Application will run automatically (or you
may click on CD Room icon then double click on autorun . Exe File to run
setup program)
Step2: Click Ulead Photo Explorer 8 SE Basic then display below diagram.
36
Page 43

Step3: Select language , click next
Step4: Confirm installation, click next
37
Page 44

Step5: Type in serial number (provide in package), click next
Step6: Select installation path, click next
38
Page 45

Step7: Select installation item, click next
Step8: Confirm installation path, click next
39
Page 46

Step9: Select country, click next
Step10: Click next
40
Page 47

Step11: Select installation items, click next
Step12: Installation complete, select reboot PC or not, program can be used
after PC is rebooted.
41
Page 48

program can be used after PC is rebooted.
13.2 Download picture
Power ON your camera. Connect the camera with the computer, you can
downloa
need to the SD
d the photos to the computer, or you can copy the documents you
card of camera, so you can communicate with other users,
letthecameraasaUdisk.
Some OS first connect with the camera, maybe need special set-up.
Note : If camera is not ON, your PC will not recognize the camera asaUdisk.
13.3 Install camera and software under Windows 98 system
Because Windows 98 don't sustain the Mass Storage of Microsoft, so if you
the OS of Windows 98, you need install relevant driver system and then
use
you can
download the photos correctly, and use the camera as the U disk.
Confirm:
The computer turn on and start-up the Windows 98 SE;
If you are operating application, please exit all of them;
Insure the usage of battery is enough.
Note:
Before insert to the camera, please confirm that the camera has turned on;
Before pull out the camera, please confirm that the camera has turned off;
The user
connect the
of operating Windows 98 SE need install the USB driver when you
camera with the computer first time.
42
Page 49

13.4 How to install driver under Windows 98:
1. Insert he attached software disk into CD-ROM driver;
2. Insert the USB cable into the USB port of computer;
3. After confirming the camera has turned on, insert the USB cable into the USB
port of camera;
4. The system of computer management will identify the camera, according to
every indicator, you can complete the installation. Driver on X:\DRIVER\ V1.0 ;
( X: as the driver of computer CD);
5. The computer identify the camera as one new equipment
When you first connect the camera with the computer, computer identifies the
camera automatically. When appears the news of installation finished , click
confirm button. Computer will identify the camera as U disk.
When the camera connects with the computer, the button on the camera
work.cannot
13.5 Install camera under Windows ME/2000/XP
This camera use Mass Storage of Microsoft, when you first insert the camera
into
the PC, the system will show find new equipment , then it can install
the driver of
Remarks: After the first time, your computer need not install driver system.
camera automatically, don't need person to operate.
''
43
Page 50

Note:
has turned on; before pull out the camera, and please confirm that the camera has
turned off.
When you first connect the camera with the computer, computer identifies the
camera automatically. When appears the news of installation finished , click
* For Mac 10.0, computer identify the camera as (unlabeled) hard disk
13.6 Download the photos
After installing the driver system, the camera becomesaUdisk.
* For Mac 10.0, Double click the icon of New harddisk. Repeat step 3&4 to retrieve
Note: Don't open the camera's insert-card cover, install or take out the battery, or
the image files will be broken.
Before connect the camera with the computer, please confirm the camera
1. Insert the USB cable into the USB port of computer;
2. After confirming the camera has turned on, insert the USB cable into the USB
of camera;
port
3. The system of computer management will identify the camera automatically.
4. The computer identify the camera as one new equipment
confirm button. Computer will identify the camera as U disk.
1. Double click the icon of my computer on the desktop;
2. Double click the icon of U Disk ;
3. Double click DCIM file ;
4. Save the documents that all final words are JPG to the file of computer's
disk you appointed.
hard
photos.
''
''
''
''
44
Page 51

13.7 Cut the connection of computer and camera
Windows 98
1. Double click the icon of my computer and right click removable disk
show the
2. Click the flip out ;
3. Confirm the operation system finished;
4. Pull out the USB cable from the camera;
5. Pull out the USB cable from the computer.
Windows Me/2000/XP
1. Click the icon of pull out or insert hard ware , appear the messenger of
equipment has been stopped;
2. Click the messenger, appear the window of pull out or flip out hard ware ;
3. When appear the messenger of now the USB disk can be deleted from the
system safely , click Enter button;
4. Pull out the USB cable from the camera;
5. Pull out the USB cable from the computer.
Note:
When you click pull out or insert hard ware , then recover the move window,
please confirm that you have not downloaded image files from the camera first,
and then pull out the USB cable.
If you pull out the USB cable of the camera directly, it will be broken the camera'
s storage card or the computer's USB port.
Mac 10.0,Please disconnect hard disk before unplug camera.
choice;
''
''
'''
''
'' ' '
''
'
45
Page 52

13.8 Other ways of downloading the camera's images
If you don't want download the image files through the camera's USB port, you
can download through card reader, and detailed ways please refer to the
specification of card reader.
Note:
Please confirm your camera has been turned off when you pull out the card.
14. Maintenance of Camera
a. In order to get full use of the camera and keep the life of the camera,
we need
to take care of the camera and all the accessories in good condition.
b. Read the manual and understand the full functions of the camera
c. Do not open or trying to repair the camera, if there is any problem or
damaged,
go to the specify maintenance center
d. Put the camera in the protect pouch to protect the LCD display and the
camera
body
e.Donotletwatergointhecamera
f . Do not use un-approved battery pack or charger
46
 Loading...