

Page 1
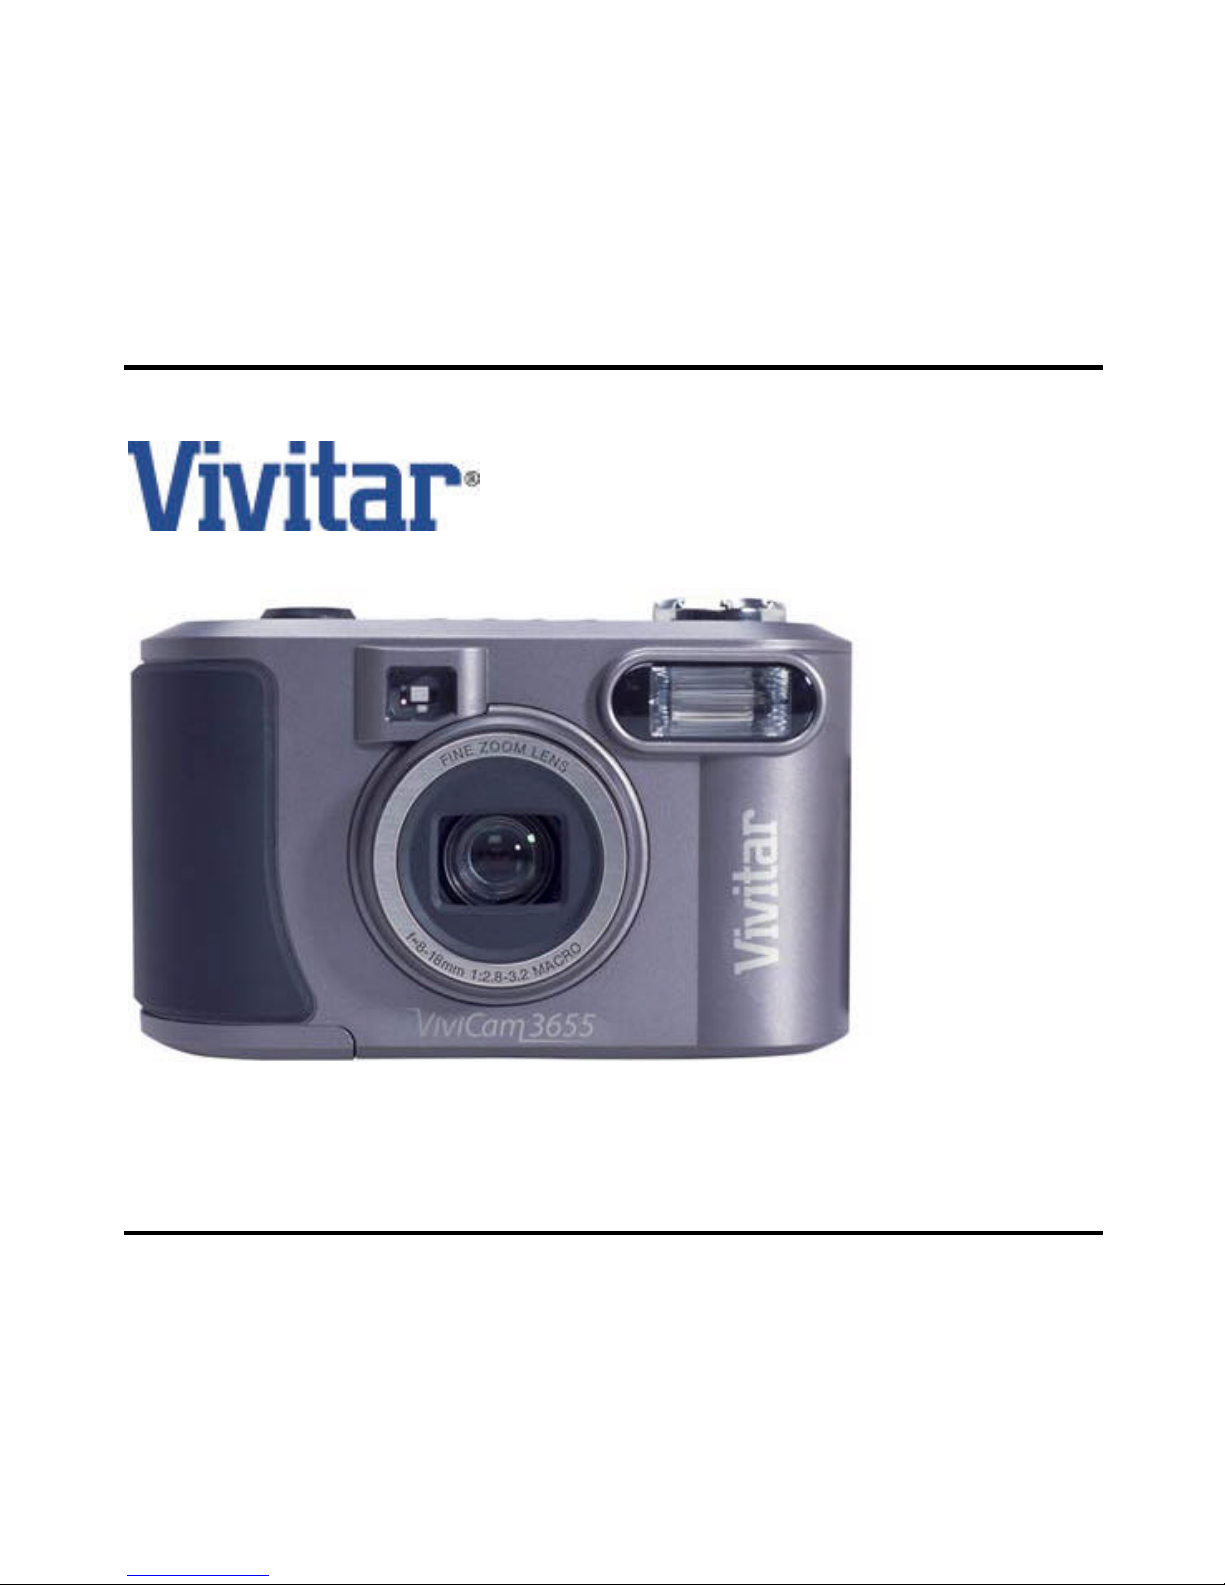
Vivicam 3655 User Manual
English 021009
Page 2

1
Warranty Policy
This camera is under warranty for one full year from the date of purchase by the orignal purchaser. In case of defects in
materials or workmanship, we will replace or repair the camera free of charge. This warranty applies to the camera only. This
warranty does not include batteries, or other accessories which have not been manufactured by our company. This warranty
will not be honored if the camera has been mishandled or tampered with, or altered by anyone other than the manufacturer.
Other than for the warranty herein, we are not responsible for loss, damage, or inconvenience of any kind.
A defective camera being returned under warranty must be accompanied by a brief description of the difficulties encountered and also by a proof of purchase with the date of purchase clearly indicated. All related transportation costs and insurances are at the ower’ s expense. Any alteration of this warranty cannot be made without the written approval fr om our company.
FCC Notice
This equipment has been tested and found to comply with the limits for a Class B digital device, pursuant to part 15 of the
FCC Rules. These limits are designed to provide reasonable protection against harmful interference in commerical installation.
This equipment generates, uses and can radiate radio frequency energy and if not installed and used in accordance with the
instructions, may cause harmful interference to radio communications. However, there is no guarentee that interference will
not occur in a particular installation. If this equipment does cause harmful interferece to radio or television reception, detectable by turning the equipment in question off and on, the user is encouraged to try to correct the intereference by one or more
of the following measures: Reorient or relocate the receiving antenna; Increase the distance between the equipment and the
receiver; Connect the equipment to an outlet on a different circuit than that which the receiver is connected to; Or consult the
dealer or an experienced radio/TV technician for help.
NOTE
A shielded-type DC power cable incorporated with a ferrite core is required in order to meet the FCC emission limits and also
to prevent interference to the nearby radio and television reception.
Use only shielded I/O cable incorporated with a ferrite core to connect this equipment to host computer and TV set. Shielded
A.C. power cable and shielded I/O cables are required in order to meet the FCC emision limits. It is essential that only the
supplied power cord and I/O cable(s) be used.
Page 3

2
CAUTION
Do not place this camera in damp or dusty location.
This may cause a fire or electric shock.
Do not place this camera in a location affected by oil fumes or
steam, such as near a cooking stove or humidifier. This may cause
a fire or electric shock.
Do not leave this camera in places subject to extremely high
temperatures, such as in a sealed vehicle or in direct sunlight.
Exposure to high temperatures may adversely affect the camera
case and internal components and cause a fire.
Do not cover or wrap the camera or the AC power adapter with a
cloth or quilt. This may cause heat to build up and distort the
case or cause a fire. Always use the camera and its accessories
in well-ventilated locations.
Do not move the camera while it is switched on. (if you are using
the AC power adapter, unplug the adapter from the AC power
outlet after you have switched off the camera.) Then ensure that
any connector cords or cables to other devices are disconnected
before moving the camera, Failure to do so may damage the cords
or cables and cause a fire or electric shock.
Take care that the camera is not bumped when it is being moved.
This may cause the camera to malfunction.
When handling the camera, always unplug it from the power
source (batteries or AC power adapter) for safety. (if you are using
the AC power adapter, unplug the adapter from the AC power
outlet after you have disconnected
the camera.) Failure to do so
could result in an electric shock.
Page 4
3
CAUTION
When leaving the camera unused for long periods, such as during
a vacation, always unplug the camera from the power source
(batteries or AC power adapter ) for safety.
(if you are using the AC power adapter, unplug the adapter from
the AC power outlet after you have disconnected the camera.)
Failure to do so could result in a fire.
Do not use batteries other than those specified for use with
your camera.
The use of unsuitable batteries may result in the batteries
splitting or leaking and causing a fire, injury, or soiling of the
battery compartment.
When fitting a battery into the camera, check the polarity
markings on the battery ( and )to ensure that you insert the
battery correctly.
Incorrect battery polarity may result in the batteries splitting or
leaking and causing a fire, injury, or soiling of the battery
compartment.
Remove the batteries if the camera will not be used for an
extended period of time. The batteries may leak and cause a fire,
injury or soiling of the battery compartment. If the batteries leak,
clean and wipe the battery compartment carefully and install new
batteries. Wash your hands carefully if you touch the battery fluid.
Page 5

4
Do not use the camera if any water has entered the camera.
Switch the camera off, and then disconnect the power source
(batteries or AC power adapter). (if you are using the AC power
adapter, unplug the adapter from the AC power outlet after you
have disconnected the camera.) Then contact your dealer or your
local authorized service facility. Do not continue to use the
camera as this may cause a fire or electric shock.
Do not use the camera if any foreign objects have entered the
camera. Turn the camera off, and then disconnect the power
source (batteries or AC power adapter). (if you are using the AC
power adapter, unplug the adapter from the AC power outlet
after you have disconnected the camera.) Then contact your
dealer or your local authorized service facility. Do not continue
to use the camera as this may cause a fire or electric shock.
If the camera has been dropped or the camera case has been
damaged, switch the camera off, and then disconnect the power
source (batteries or AC power adapter). (if you are using the AC
power adapter, unplug the adapter from the AC power outlet
after you have disconnected the camera.) Then contact your
dealer or your local authorized service facility. Do not continue
to use the camera as this may cause a fire or electric shock.
Do not use this camera when it is emitting smoke, is unusually
hot to the touch, is emitting any unusual odor or noise, or is in
any other abnormal state. Use of the camera in any of these
situations may cause a fire or electric shock. Stop using the
camera immediately, turn the camera off, and then disconnect
the power source (batteries or AC power adapter). (If you are
using the AC power adapter, unplug the adapter from the AC
power outlet after you have disconnected the camera.) After
checking that smoke is no longer being emitted, contact your
dealer or your local authorized service facility and request repairs.
never attempt to repair this camera yourself as this is dangerous.
WARNING
Unplug from
power socket.
Page 6
5
Do not place the camera in unstable locations such as on a wobbly
table or sloping surface where the camera may fall or tip over
and cause injury.
Take care that the camera is not exposed to moisture and that
water does not get into the camera. Take particular care when it
is raining or snowing or when you are using the camera at the
beach or near water.
Water in the camera may cause a fire or electric shock.
Do not insert or drop metallic or inflammable foreign objects
into the camera through access points such as the Compact Flash
card slot.
This may cause a fire or electric shock.
Do not attempt to modify this camera. This may cause a fire or
electric shock.
Do not remove the camera casing. This may cause an electric
shock. Internal inspection, maintenance and repairs should be
carried out by your dealer or local authorized service facility.
Do not use this camera in the bathroom. This may cause a fire or
electric shock.
Do not touch the power plug during a thunderstorm if you are
using the AC power adapter.
This may cause an electric shock.
WARNING
Do not disassemble
Do not use in wet areas.
Do not touch
Page 7
6
Do not attempt to charge the alkaline battery.
This may cause the battery to split or leak, causing fire or injury.
Never use this camera, look through the viewfinder, or watch
the LCD (liquid crystal display)while you are operating a moving
car, motorcycle or bicycle.
This may cause a traffic accident.
Do not carry or store a battery with objects such as metal pens,
necklaces, coins or hairpins. This could short circuit the positive
and negative poles of the battery.
This may cause the battery to split or leak, resulting in fire or
injury.
Do not heat or attempt to disassemble a battery, and do not
place a battery in water or in a fire.
Any of these may cause the battery to split or leak, cause fire or
injury.
Do not subject a battery to strong impacts, such as hitting it
with a hammer, stepping on it or dropping it. Any of these may
cause the battery to split or leak, cause fire or injury.
Use only the specified batteries or AC power adapter specified
for use with this camera.
The use of other power sources may cause a fire.
WARNING
Page 8

7
CONTENTS
Introduction-----------------------------------------9
What’s Inside----------------------------------------------------------------9
Optional Items--------------------------------------------------------------9
CD-ROM Contents---------------------------------------------------------10
System Requirements (Windows)--------------------------------------10
Getting to Know the Camera------------------11
Front View Diagram------------------------------------------------------- 11
Top View Diagram----------------------------------------------------------11
Bottom View Diagram-----------------------------------------------------12
Back View Diagram--------------------------------------------------------12
Getting Started------------------------------------14
Attaching the Strap--------------------------------------------------------14
Power Supply---------------------------------------------------------------14
Memory-----------------------------------------------------------------------15
Turning the camera on and off--------------------------------------------16
Taking Pictures---------------------------------------17
Taking Pictures--------------------------------------------------------------17
Zoom Control----------------------------------------------------------------18
Setting the Picture Resolution and Quality---------------------------18
Setting the Macro Mode--------------------------------------------------19
Setting the Self-Timer-----------------------------------------------------19
Setting the Flash Mode---------------------------------------------------20
Images Remaining----------------------------------------------------------20
Camera Operating Modes------------------------20
Page 9

8
RECORD Mode--------------------------------------------------------------21
PLAY Mode-------------------------------------------------------------------24
SETUP Mode-----------------------------------------------------------------26
ERASE Mode-------------------------------------------------------------------29
PC Mode----------------------------------------------------------------------30
Viewing Pictures---------------------------------------30
Viewing on a TV-------------------------------------------------------------30
Viewing on the Display LCD----------------------------------------------31
Downloading pictures into your PC-----------32
Connecting the camera to your PC--------------------------------------32
Camera driver and software installation-------------------------------32
Downloading and saving images to your hard drive-----------------33
Appendix 1 : Status LCD Icons----------------------34
Appendix 2 : Default Settings-----------------------34
Appendix 3 : Digital Camera Specifications---35
Page 10

9
Introduction
Congratulations on purchasing your new digital camera. Capturing high quality digital images is easy with this state-of-the-art
smart camera. Equipped with a 2.3 mega pixel CCD, this camera is capable of capturing images with a resolution of up to
1792X1200 pixels. With Macro Mode for taking pictures of objects very close to the camera and a 4.6X Zoom (2.3X optical
and 2X digital), the range of pictures that you can take with this digital camera is almost unlimited. In addition, built-in sensor
automatically analyze the lighting environment and customize camera settings such as White Balance, EV Compensation and
flash function to ensure optimum picture quality. The 1.8" full-color liquid crystal display (LCD) on the back of the camera
makes it easy to frame images when taking pictures, and displays a preview of an image after it has been captured. USB and
RS232 output capabilities make it easy to connect the camera to your computer, and with the included software, downloading
and editing your images is a breeze. It can also be connected directly to a television, allowing the user to display images
stored on the camera on the television screen. The easy-to-use Compact Flash Memory Cards provides reliable, flexible
image storage capacity for your images.
In total, this state-of-the-art camera affords the convenience and flexibility of a digital image capture device while retaining
the ease of use of traditional cameras.
What’s Inside
Digital Camera
Quick Start Guide
Owner’s Manual
Serial Cable (PC)
USB Cable
Video Cable
CD-ROM (Twain driver and Bundled software)
4 x AA alkaline batteries
AC Power Adapter
Pouch and Strap
Compact Flash Memory Card
Optional Items
Compact Flash Memory Card--4MB, 8MB,16MB, 32MB, 48MB, 64MB, 96MB and 128MB
Page 11

10
CD-ROM Contents
TWAIN Acquire Module - Lets you download pictures from all TWAIN-compliant devices to your computer.
Image Application Software- Allows you to quickly and easily touch up any photo captured with your camera.
System Requirements (Windows)
Personal Computer with minimum Pentium 166 MHz with graphic card
Microsoft Windows 98,ME,2000(both RS232 and USB connection)
Microsoft Windows 95,NT(RS232 connection only)
32MB or more of RAM
80MB of hard disk space
Available serial port or USB port
CD-ROM drive
Color display (800x600 24-bit or higher recommended)
Page 12
11
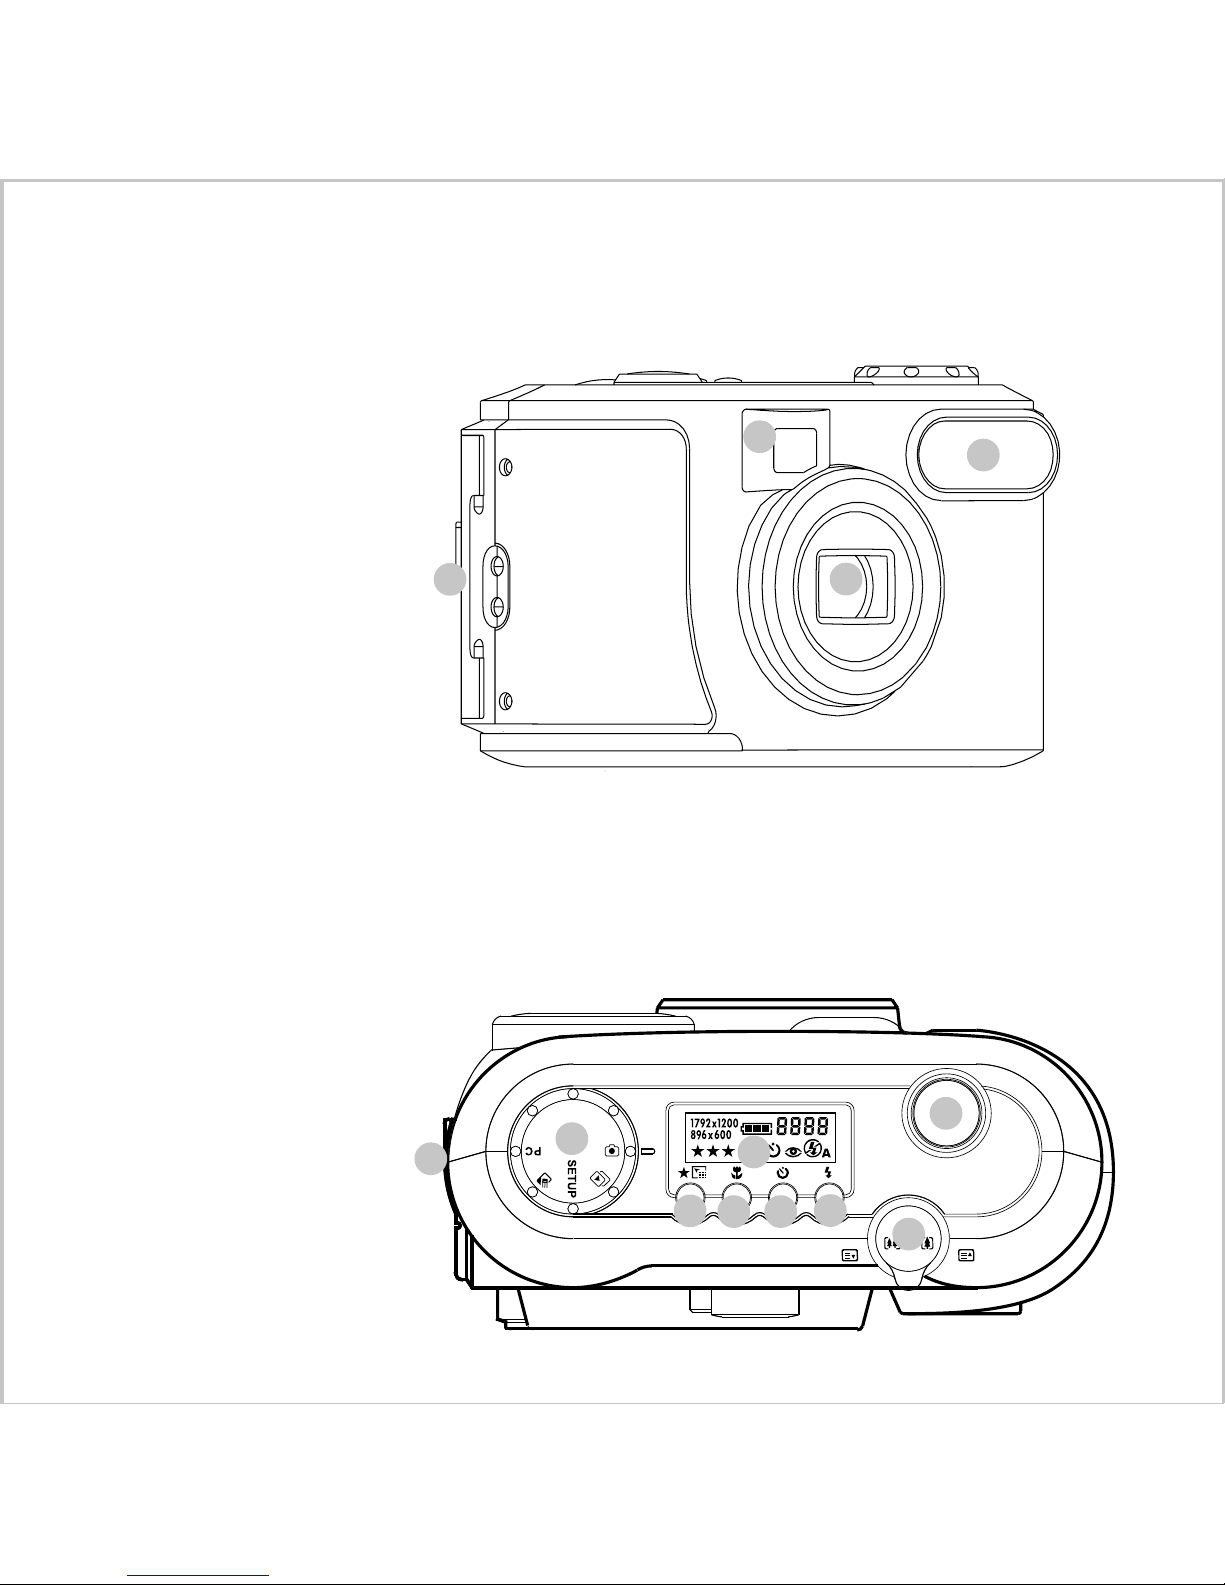
Getting To Know The Camera
Front View Diagram
1. Lens
2. Flash
3. Viewfinder Window
4. CF Card Slot Door
Top View Diagram
1. Mode Knob
2. Status LCD
3. Shutter Button
4. Resolution and Quality Button
5. Macro Mode Button
6. Self-Timer Button
7. Flash Button
8. Zoom Control
9. Connector Door
1
2
3
4
1
9
4
2
5 6
7
8
3
Page 13

12
Bottom View Diagram
1. Battery door
2. Tripod Socket
Back View Diagram
1. Power ON/OFF Switch
2. LCD ON/OFF Button
3. Menu Button
4. OK Button
5. Processing LED
6. Optical Viewfinder
7. Display LCD
2
3
4
7
1 5
6
1
2
Page 14

13
Mode Knob
The mode knob allows you to choose from five camera modes:
Record Mode Record Mode
Record Mode Record Mode
Record Mode - to capture and store images
Play ModePlay Mode
Play ModePlay Mode
Play Mode - to view stored images
Setup ModeSetup Mode
Setup ModeSetup Mode
Setup Mode - to set various camera options
Erase ModeErase Mode
Erase ModeErase Mode
Erase Mode - to erase stored images
PC ModePC Mode
PC ModePC Mode
PC Mode - to transfer stored images to a PC
Status LCD
Resolution/ QualityResolution/ Quality
Resolution/ QualityResolution/ Quality
Resolution/ Quality - to define the image resolution and quality
Macro ModeMacro Mode
Macro ModeMacro Mode
Macro Mode - to take close-up shot
Self-TimerSelf-Timer
Self-TimerSelf-Timer
Self-Timer - to set the 10-sec delay
FlashFlash
FlashFlash
Flash - to set the flash mode
Color Display LCD
LCDLCD
LCDLCD
LCD - to toggle the Color Display LCD between On and Off.
MenuMenu
MenuMenu
Menu - to toggle between entering and exiting the camera mode menu
OKOK
OKOK
OK - press to confirm the highlighted field
Zoom Control
In Record ModeIn Record Mode
In Record ModeIn Record Mode
In Record Mode - Zoom control is used to zoom in and out the subject
In Play, Setup, Erase ModesIn Play, Setup, Erase Modes
In Play, Setup, Erase ModesIn Play, Setup, Erase Modes
In Play, Setup, Erase Modes - Zoom control is acted as menu select button to scroll up and down through the
menus or to increase or decrease the value for some specific numeric high
lighted field.
Page 15

14
Getting Started
Attaching the Strap
It is best to use the included carrying-strap whenever carrying the camera, and especially when taking pictures outdoors.
This will help to prevent the camera from being dropped or otherwise too roughly handled. Dropping the camera may cause
external or internal damage.
To attach the strap to the camera
1. Insert the small loop at the end of the strap
into one side of the camera’s strap holder.
2. Push inward until the loop comes out of the
other side of the strap holder.
3. Insert the other end of the strap through the
loop and pull it until the strap is securely
attached to the camera.
Power Supply
This camera features a two-way power supply that lets you use either batteries (AA-size Alkaline) or a household AC current.
Loading the Batteries
1. Slide the battery door in the direction indicated by the arrow.
2. The door should spring partially open. Gently
open it the rest of the way with your finger.
3. Insert the batteries and follow the polarity
directions indicated on the inner side of the
battery door.
4. Close the battery door.
If you are not going to be using the camera for an extended period of time, you should remove the batteries to
prevent leaks or corrosion.
Never use manganese batteries.
Never mix old and new batteries.
Low temperatures (under 0 C) may reduce the output efficiency of batteries, thereby shortening the operation
time of camera.
The recommended battery is AA-size alkaline battery.
NOTE
Page 16

15
Using the Power Adapter
If you prefer to operate the camera on AC power, use the 7V/1A adapter that comes with the camera. Simply connect the
power adapter into the DC IN port on the camera, and then plug the power adapter to a wall socket.
Always be sure to use the AC adapter which comes with the camera, or optional from the manufacturer. Any other adapter
may cause damage to the camera, which is not covered under the warranty.
Grasp the adapter, not the cord, when unplugging the adapter from a wall socket.
If the power cord becomes damaged (exposed or severed wires, etc.), please purchase a new AC adapter. Use of a
damaged cord may cause fire or electrical shock.
Switch off and disconnect the camera from the AC adapter before unplugging it from the wall socket.
Battery Life Indicator
Located on the Status LCD, the Battery Status Indicator is active at all times while the camera is on. When battery power is
close to full, all three bars of the indicator will be shaded. When battery power is down to roughly half, the left-most bar in the
indicator will be off, and the other two will remain shaded. When battery power is low, only the right-most bar in the indicator
will be on. This indicates that the batteries are weak and need to be replaced. It is recommended that you do not use the
Flash or Auto-Flash features while battery power is low. When the batteries are completely dead, the camera will not turn on.
Full Battery Power
Medium Battery Power
Low Battery Power
No Battery Power
NOTE
Page 17

16
Memory
Compact Flash Card
This camera features a removable ATA-compatible memory device, called a Compact Flash Memory Card, for storing image
information. This means that any pictures you take will not be lost when the camera is turned off or low on power. If the
batteries go dead, simply insert a new set or connect the AC power supply and you will be able to retrieve and view any
previously captured photos.
You can increase the storage capacity of the camera by using a Compact Flash Memory Card with a higher capacity. Compact Flash Memory Cards are available with capacities of 4MB, 8MB, 16MB, 32MB,48MB, 64MB, 96MB and 128MB.
To install the Compact Flash Memory Card
1. Open the card slot located on the side of the camera.
2. Make sure the front of the CF card toward the front of
the camera and the end with pin-connector toward the
card slot.
3. Push the memory card all the way into the card slot until
you hear a clicking sound.
4. Close the card slot cover.
5. To remove the card, push the Eject button.
Card Full
When your camera’s memory is full, the Display LCD will show a “Card Full” message.
Once your camera’s memory is full, you must remove pictures from memory or remove the current Compact Flash Memory
Card and insert a new one before capturing new images. To save pictures, transfer them from the camera to your computer.
(For more detailed instructions on how to transfer captured images to your computer, see the section entitled Downloading
Pictures into your PC later in this manual.)
Turning the camera on and off
1.Insert a Compact Flash Memory Card
2.Set the camera to Record Mode.
3.Turn the camera on by sliding the power switch in the direction indicated by the arrow, and then releasing it.
--The lens will extend.
--The red Processing LED on the back of the camera lights on until the camera is ready to take pictures.
4.To turn off the camera, sliding the power switch again and releasing it.
--When the camera is turned off, the lens will automatically be retracted.
1
5
3
Page 18

17
Y ou cannot take pictur es without a memory card in the camera. Without a memory card in the camera, the camera cannot be
turned on.
Taking Pictures
The camera allows you to easily take digital photo shots. This section shows you the basic camera operation and get to know
the functions of Status LCD. The Status LCD is located on the top of the camera. It displays the current camera settings, such
as flash mode, image remaining numbers, battery indicator, self-timer, macro mode, resolution / quality.
Taking Pictures
1. Ensure the camera is
ONON
ONON
ON.
2. Set the camera to
RecordRecord
RecordRecord
Record Mode.
3. Using the Optical Viewfinder or the Display LCD to select your image.
4. Press
Shutter buttonShutter button
Shutter buttonShutter button
Shutter button halfway down to focus on the object.
--The Processing LED will come on green and indicate locking in the auto focus and exposure.
5. Press
Shutter buttonShutter button
Shutter buttonShutter button
Shutter button all the way down captures the image.
--The Processing LED will come on red and remain on until the camera has completed processing and storing the image.
--Releasing the
Shutter buttonShutter button
Shutter buttonShutter button
Shutter button will clear focus so that another image may be captured.
Quick View
If the Display LCD is on and Quick View mode is enabled, a preview of the captured image is shown on the Display LCD as
soon as the image acquired. When the two seconds are over, the Display LCD will return to viewfinder mode.
If the Display LCD is off but QuickView mode is enabled, a preview of the captured image is temporarily shown on the Display
LCD for two seconds as soon as the image acquired. After the two seconds is over, the Display LCD will be automatically
turned off.
During this two seconds of preview in either case, the user will have the option, by means of an on-screen prompt, of deleting
the image just captured by pressing the OK button once processing is completed.
(For more information about QuickView, see page22.)
NOTE
ATTENTION
Using the Display LCD while taking pictures shortens the life span of your batteries. To
save battery power you can take pictures without the Display LCD. Simply turn off the
LCD Display and use the Optical Viewfinder to frame the image as you would with a
traditional camera.
Delete
Page 19

18
Zoom Control
This camera features two types of zooming, optical zooming (2.3X) and digital zooming (2X). Use the zoom control to adjust
the optical zoom lens from Wide Angle (38 mm) to TelePhoto (90 mm). Use the digital zooming to zoom in on an object beyond
the range provided by the optical zoom lens. To access digital zoom, LCD display is required.
Optical Zoom
1. Set the camera to RECORD MODE.
2. Pushing the
Zoom ControlZoom Control
Zoom ControlZoom Control
Zoom Control to the right will move the lens towards the Telephoto position, meaning zoom in on your
subject.
3. Pushing the
Zoom ControlZoom Control
Zoom ControlZoom Control
Zoom Control to the left will move the lens towards the Wide-angle position, meaning zoom away from your
subject.
Digital Zoom
1. Press
LCDLCD
LCDLCD
LCD button to turn on the LCD display.
2. Press
OKOK
OKOK
OK button to active 2X digital zoom
3. Adjust the
zoom controlzoom control
zoom controlzoom control
zoom control for fine-tuning the framing image.
Digital zoom is disabled when the LCD Display is off.
Setting the Picture Resolution and Quality
Two different elements combine to determine the overall quality of the pictures that you take.
The first is resolution. This digital camera can take pictures at two different resolutions: 1792x1200 pixels and 896x600 pixels.
The second element is the amount of compression applied to captured images. This camera can capture at three types of
compression settings: high compression, medium compression and low compression.
The higher the resolution, the higher the image quality will be. The lower the compression, the higher the image quality will be.
Higher quality images, however, have larger image file sizes, and therefore, fewer of them can be stored on the camera at one
time.
Picture resolution and quality is set using the Resolution/Quality Button. This button is active only in RECORD mode. The
current resolution and quality settings are displayed in the Status LCD. Each time the Resolution/Quality button is pressed,
the next lower resolution/quality setting is selected, in a fixed sequence. There are six combination of resolution and quality
settings which are given in the following table:
NOTE
1
2
Page 20

19
Setting the Macro Mode
Pressing the Macro Mode button toggles between Normal and Macro Mode. Use the Macro mode setting to gain sharpness
and detail in pictures at close range between the objects 8cm to 40cm from the camera.
How to take Close-up shots
1. Set the camera to
RECORDRECORD
RECORDRECORD
RECORD MODE.
2. Press the
Macro buttonMacro button
Macro buttonMacro button
Macro button once to active macro mode.
3. Press the
Shutter buttonShutter button
Shutter buttonShutter button
Shutter button half way to lock the focus and exposure.
4. Press the
Shutter buttonShutter button
Shutter buttonShutter button
Shutter button all the way down to take the picture.
Enabled Macro Mode will cause the flash mode forced to OFF or ON. The Macro Mode button is active only in RECORD
Mode.
Setting the Self-Timer
Press the Self-Timer button once to active the self-timer. The Self-Timer creates a 10-second delay between the time you
press the Shutter button and the time the picture is taken. The 10-second delay is marked by the Self-Timer LED flashing, and
if “Beep On” is enabled (see Sound option under SETUP Mode), by beeping for the final three seconds.
The Self-Timer is automatically turned off after the picture is taken or if the camera is powered off.
The Self-Timer button is active only in RECORD Mode.
NOTE
NOTE
Overall Picture Quality
Best
Better
Good
Fine
Normal
Economy
Quality
Resolution
1792x1200
1792x1200
1792x1200
896x600
896x600
896x600
Page 21

20
Setting the Flash Mode
Toggle the flash button to select auto, red-eye reduction, fill-in and off. The flash has an effective range of approximately 1m
- 3m. There are four flash modes as follows:
Auto The camera automatically fires the flash when the brightness of the subject or scene is too low
Red-Eye Auto Mode with Pre-Flash to reduce Red-Eye
Fill-In Flash is always enabled
Off Flash is disabled
Flash Mode is forced to Off when one of the manual White Balance settings is selected in SETUP mode.
The Flash Mode Button is active only in RECORD mode.
Images Remaining
The approximate number of additional images that can be stored at the current Resolution and Quality settings is displayed
in the Status LCD when the camera is in RECORD Mode. As Resolution and Quality settings are decreased, the number of
additional pictures storable will increase, and vice versa. This number will automatically be updated after each new image is
captured and stored.
The total number of stored images may be varied with the free space of the card, the mixture of the image quality mode, and
also the complexity of the subject.
Camera Operating Modes
The camera provides five camera operating modes-RECORD, PLAY, SETUP, ERASE, PC. The operating mode is selected
using the Mode Knob on the top panel of the camera. You can access the advanced camera setting to customize your
camera according to your personal preferences. To access the advanced camera setting with different camera modes, the
built-in Display LCD is required. The built-in Display LCD acts as the primary user-interface for many camera functions. This
section describes each camera operating mode and how to change the settings in details.
NOTE
NOTE
Page 22

21
To access the menu of each camera operating mode
1. Switch on the camera by
Power ON/OFFPower ON/OFF
Power ON/OFFPower ON/OFF
Power ON/OFF.
2. Rotate the
Mode KnobMode Knob
Mode KnobMode Knob
Mode Knob to the desired operating mode.
3. Press the
MenuMenu
MenuMenu
Menu button .
Once a menu is invoked, the Zoom Control is used to move the highlight through the menu items. For the top-level menus
(RECORD, PLAY, ERASE, SETUP), pressing the OK button will cause the corresponding submenu to be displayed. When
submenus with multi-field data items (e.g., Date/Time) are invoked, the Zoom Control is used to increase or decrease the
currently highlighted numeric field. For all menus and submenus, the OK button is used to select the highlighted menu item,
or, in the case of multi-field data items to move the highlight to the next field. If there are no submenus for the highlighted
menu item, or the highlight is on the final field of a multi-field data item, pressing the OK button will cause the previous, higherlevel menu to be redisplayed.
RECORD Mode
The camera is able to capture images only when in RECORD Mode. In this mode, a numeric display on the Status LCD
indicates the approximate number of additional pictures that can be stored at the current Resolution and Quality settings. In
RECORD Mode, the user can frame subjects either through the optical viewfinder or by using the Display LCD. Framed
images can be captured by fully depressing the Shutter button. (For more detailed instructions on taking pictures, see the
Taking Pictures section on page17.)
LCD Brightness - allows the brightness of the Display LCD to be changed, with a range of -5 to +5.
QuickView - allows QuickView Mode to be enabled or disabled.
White Balance - allows one of several manual white balance settings to be enabled,to remove the color cast at a variety of
lighting condition that add.
EV Compensate - allows manually adjust the overall brightness with a range of -1.5 to +1.5
To access Record Menu:
1. Set the camera to
RECORDRECORD
RECORDRECORD
RECORD mode.
2. Press the
Menu buttonMenu button
Menu buttonMenu button
Menu button.
3. Use the
Zoom ControlZoom Control
Zoom ControlZoom Control
Zoom Control to scroll through the items.
4. Press
OKOK
OKOK
OK button to enter the sub-menu.
RECORD MENU
LCD Brightness
Quick Vie w
White Balance
EV Compensate
Page 23

22
LCD Brightness
The LCD Brightness submenu allows the brightness of the Display LCD to be adjusted. Brightness can be adjusted over a
range of -5.0 to +5.0.
1. Pushing the Zoom Control to the left will decrease the brightness of the Display LCD by one step (-1.0).
2. Pushing the Zoom Control to the right will increase the brightness of the Display LCD by one step (+1.0).
3. Pressing OK saves the new brightness setting, and returns to the RECORD menu.
This option is also available under the PLAY menu.
QuickView
The QuickView submenu allows the QuickView feature to be toggled on and off.
Enabling QuickView is useful when operating the camera with the LCD turned off, because it causes newly acquired pictures
to be displayed on the LCD for two seconds after being captured. During the two-second intervals, the picture just captured
may be deleted by pressing the OK button. The word “DELETE” will appear in the lower left corner of the LCD while the delete
option is available. After two seconds, the LCD will turn off again and the image is stored in memory. The image may still be
deleted later in ERASE mode.
1. Pushing the Zoom Control to move the highlight between On and Off.
2. Pressing OK saves the new setting, and returns to the RECORD menu.
White Balance
White Balance allows you to obtain the highest color fidelity possible by taking into account the lighting conditions in which
the camera is operating. Set the appropriate white balance setting to remove the color cast that the current lighting conditions
add. The default Auto White Balance mode should work well under most normal lighting conditions. For those circumstances
where the Auto mode does not produce the desired result, one of several manual White Balance settings can be used,
depending on the ambient lighting conditions. The available settings correspond approximately to the following lighting
conditions:
NOTE
LCD BRIGHTNESS
+0.0
QUICK VIEW
On
Off
Page 24

23
MODE LIGHTING CONDITIONS
Auto Automatically chooses the best White Balance for given lighting conditions
Daylight Outdoor daylight
Incandescent Incandescent light
Fluorescent 1 Cool Fluorescent lighting (5800K)
Fluorescent 2 Warm Fluorescent lighting (3950K)
1. Pushing the Zoom Control to make a selection.
2. Pressing OK saves the new setting, and returns to the RECORD menu.
Selecting any of the manual White Balance modes will disable flash operation.
EV Compensation
The Exposure Value (EV) Compensate is a method of adjusting the exposure for pictures that are too light or too dark. The
EV Compensate can be manually adjusted using this submenu over a range of -1.5 to +1.5 EV in steps of 0.3 EV.
Pushing the Zoom Control to the left will decrease the EV Compensate setting by one step (-0.3). Pushing the Zoom Control
to the right will increase the EV Compensate setting by one step (+0.3). Pressing OK saves the new setting and returns to
the RECORD menu.
1. Pushing the Zoom Control to change the value.
--If the ambient light is normal, maintain +0.0 will automatically choose the correct exposure for the image.
--If the ambient light is too dark, increase (+) the exposure compensation setting to achieve a better result.
--If the ambient light is too light, decrease (-) the exposure compensation setting to achieve a better result.
2. Pressing OK saves the new setting, and returns to the RECORD menu.
WHITE BALANCE
AUTO
Daylight
Incandescent
Fluorescent 1
Fluorescent 2
EV COMPENSATE
+0.0
NOTE
Page 25

24
PLAY Mode
In PLAY Mode, the user can view pr eviously captur ed images either on the Display LCD, or a TV. On first entering PLAY Mode,
the last image captured will be displayed. When an image is displayed in PLAY Mode, the Zoom Control can be used to scroll
backwards or forwards through stored images.
L LCD Brightness - allows the brightness of the Display LCD to be changed, with a range of -5 to +5.
Video Mode - is used to select whether NTSC or PAL as the video output format.
SlideShow menu - plays back stored images as a slideshow.
Protect Files - protects stored images in CF card from being erased accidentally.
To access Play Menu
1. Set the camera to
PLAYPLAY
PLAYPLAY
PLAY mode.
2. Press the
MenuMenu
MenuMenu
Menu button .
3. Use the
Zoom ControlZoom Control
Zoom ControlZoom Control
Zoom Control to scroll through the items
4. Press
OKOK
OKOK
OK button to enter the sub-menu
LCD Brightness
The LCD Brightness submenu allows the brightness of the Display LCD to be adjusted. Brightness can be adjusted over a
range of -5.0 to +5.0.
1. Pushing the Zoom Control to the left will decrease the brightness of the Display LCD by one step (-1.0).
2. Pushing the Zoom Control to the right will increase the brightness of the Display LCD by one step (+1.0).
3. Pressing OK saves the new brightness setting, and returns to the RECORD menu.
This option is also available under the RECORD menu.
NOTE
LCD BRIGHTNESS
+0.0
PLAY MENU
LCD Brightness
Video Mode
Slide Show
Protect Files
Page 26

25
Video Mode
The Video Mode submenu allows the selection of either NTSC or PAL as the video output format.
On first entering this submenu, the current Video Mode will be highlighted.
1. Pushing the Zoom Control to select the NTSC or PAL.
2. Pressing OK saves the new setting, and returns to the PLAY menu.
SlideShow
The SlideShow submenu allows stored images to be displayed as a slideshow. The user must specify the delay (in seconds)
between images, from 1 to 10 seconds.
While the slide show is running, pressing the LCD, Menu, OK or Zoom Control buttons will interrupt the slideshow display and
cause an immediate return to the currently active play mode.
1. Pushing the Zoom Control to increase or decrease the delay between images from 1 to 10 seconds.
2. Pressing OK saves the new setting, and returns to the PLAY menu.
Protecting Files
You can protect your pictures from being erased accidentally from the camera memory card. It is recommended to use this
feature if the camera and the memory card are used by more than one person.
SLIDESHOW MODE
Delay,sec.
10
VIDEO MODE
NTSC
PAL
PROTECT FILES
Protect Current
Protect ALL
Unprotect All
Cancel
Page 27

26
To protect files
1. Push the Zoom Control to highlight Protect Current to lock current picture or Protect ALL to lock all the pictures in the
memory card.
2. Press OK and returns to the PLAY menu.
Unprotect Files
If there is files been locked, the items of PROTECT FILES submenu appear as Unprotect Current and Unprotect All.
To unprotect files
1. Push the Zoom Control to highlight Unprotect Current to unlock current picture or Unprotect ALL to unlock all the pictures
in the memory card.
2. Press OK and returns to the PLAY menu.
If you are attempting to erase protect files, will cause a series of beeps and leave the protected files without erased.
SETUP Mode
SETUP mode allows various camera settings to be altered. Selecting SETUP Mode with the Mode Knob will automatically
display the Setup Menu.
To check the Camera Firmware version
1. Set the camera to SETUP Mode
2. Turn on the camera by sliding the Power ON/OFF switch
3. The firmware version is shown on the first splash screen at camera starting.
NOTE
SETUP MENU
Date/Time
Language
Sound
Format Media
Auto Power Off
PROTECT FILES
Unprotect Current
Protect All
Unprotect All
Cancel
Page 28

27
Date/TimeDate/Time
Date/TimeDate/Time
Date/Time - to set the current date and time.
LanguageLanguage
LanguageLanguage
Language - to select the language for all menus.
SoundSound
SoundSound
Sound - to turn on or off the sound
Format MediaFormat Media
Format MediaFormat Media
Format Media - allows the Compact Flash Memory Card currently installed in the camera to be reformatted.
Auto Power OffAuto Power Off
Auto Power OffAuto Power Off
Auto Power Off - to set the auto power off at delay of 1,2 or 3 minutes.
To access Setup Menu
1. Set the camera to mode, the menu is displayed as soon as SETUP Mode is entered
2. Use the Zoom Control to scroll through the items
3. Press OK button to enter the sub-menu
Date/Time
The Date/Time is used to set the current date and time. The date format is MM/DD/YY. The time for mat is 24-hour.
If the battery is removed from the camera, you may need to reset the correct Date and Time.
To set the Date/Time
1. Set the camera to SETUP Mode
2. Select the Date/Time from the SETUP MENU
3. Press OK to enter DATE/TIME submenu.
4. Use the Zoom Control to adjust the value for the highlighted field over the full legal range for that field.
5. Press OK to move the highlights to the next field.
6. Press OK on the minutes field will save the new setting and return to the SETUP Menu.
Language
The Language dialog box is used to select the language used for all menus and prompts.
On first entering this submenu, the current language setting will be highlighted.
1. Use the Zoom to move the highlight up or down the list of items to select the language.
2. Pressing OK saves the new setting, and returns to the SETUP menu.
DATE/TIME
MM/DD/YY
HH:MM
Page 29

28
Sound
The Sound submenu allows the user to choose whether or not confirmation “beeps” are produced when buttons are pressed
or when the camera prompts or alerts the user.
When set to Beep On, short beeps are produced when an image is captured in RECORD mode, during the last 3 seconds of
Self-Timer mode, and when any button is pressed.
1. Pushing the Zoom Control to select the Beep On or Beep Off.
2. Pressing OK saves the new setting, and returns to the SETUP menu.
Format Media
1. Set the camera to SETUP Mode.
2. Use the zoom control to select Format Media.
3. Press OK button to enter Format Media submenu.
4. Use the Zoom Control to select Yes and press OK
button to format the Compact Flash Memory Card .
-- Selecting No and pressing OK will return to the SETUP Menu without formatting the Compact Flash Memory Card.
Upon completion of formatting, the following submenu will appear:
5.Use the Zoom Control to select No and Press OK to return to the SETUP Menu without resetting image numbers.
Selecting Yes and pressing OK resets the image number to 001, and then returns to the
SETUP menu.
SOUND
Beep On
Beep Off
FORMAT MEDIA
Are Y ou Sure?
Yes
No
FORMAT MEDIA
Reset Image No.?
Yes
No
FORMAT MEDIA
Reset Image No.?
Yes
No
Page 30

29
Formatting a Compact Flash Memory Card will cause all images currently stored on that card to be erased.
Auto Power Off
This camera is equipped with an automatic power off function to help conserve battery power. If no operations are performed
for a period of 1, 2 or 3 minutes, the camera will automatically power off. The camera lens will be retracted and covered. After
the lens has retracted, the power switch must be used to power the camera back on.
1.Pushing the Zoom Control to increase or decrease the delay from 1 to 3 minutes.
2.Pressing OK saves the new settings, and returns to the SETUP menu.
ERASE Mode
In ERASE mode, the user can view previously captured images either on the Display LCD, or a TV. When an image is
displayed in ERASE Mode, the Zoom Control can be used to scroll backwards or forwards through stored images. Pressing
the Menu button in ERASE Mode entering the ERASE Menu.
To access Erase Menu
1.Set the camera to Erase mode.
2.Use the zoom control to scroll through the images.
3.Press menu button to enter Erase menu.
Erase Current
1. Set the camera to Erase Mode, the most recent captured image will be shown on the LCD Display.
2. Use the zoom control to select the image to be erased
3. Press Menu button to enter Erase Menu
4. Use the zoom control to select Erase Current
5. Press OK button to enter the ERASE CURRENT sub-menu.
6. Use the zoom control to select YES. Press OK button to
erase the current image, and returns to ERASE mode,
displaying the next available image.
--Select NO and press OK button to immediately returns to ERASE mode, leaving the current image without erasing.
ERASE MENU
Erase Current
Erase All
ERASE CURRENT
Erase Image
Number 0001?
Yes
No
NOTE
AUTO POWER OFF
Delay, min
3
Page 31

30
Erase All
1. Set the camera to Erase Mode, the most recent captured image will be shown on the LCD Display.
2. Press Menu button to enter the Erase Menu
3. Use the zoom control to select Erase All
4. Press OK button to enter the ERASE ALL sub-menu.
5. Use the zoom control to select YES. Press OK button
to erase all the images stored, and returns to ERASE mode.
--Select NO and press OK button immediately returns to
ERASE mode,leaving the images without erased.
PC Mode
You must set the camera to PC Mode to connect your camera to your computer. In PC Mode, images may be transferred to a
PC via either RS-232 or USB. There are no menus associated with this mode, and no buttons are active in this mode.
VIEWING PICTURES
Viewing on a TV
Before you can view pictures on your TV, you need to identify first what TV standard your television uses. If you have a NTSC
standard TV, set the camera to NTSC. If you have a PAL standard TV, set the camera to PAL. (For more information on how to
set the TV output for your camera, see page30 .)
1. Attach one end of a video line to the Video Output port of the digital camera
2. Attach the other end to the video-in port on the television.
3. Turn on the camera and television.
4. Set the camera to Play mode
5. Scroll backwards and forwards through your pictures using zoom control
Erase ALL
Erase All?
Yes
No
Page 32

31
Viewing on the Display LCD
The Images already stored in the camera’s memory can be viewed in PLAY Mode. Entering play mode will cause the most
recently acquired image to be displayed on the Display LCD.
1. Set the camera to PLAY Mode
2. Scroll backwards and forwards through your pictures using zoom control
View Image information and thumbnails
General image information can be viewed. This information includes, Image number, Resolution, and the Date and Time at
which the picture was taken.
1. Set the camera to PLAY Mode
2. Pressing the LCD button once when an image is displayed
will cause the image information to be displayed over the
image.
3. Pressing the LCD button again while this image information
is displayed will cause the images to be displayed as
thumbnails,with nine images appearing on the screen at
the same time.
4.The Zoom Control can then be used to move the highlight
through the displayed images.
--Pressing the LCD button again while in thumbnail mode will
cause the currently highlighted thumbnail to be displayed full
screen on the Display LCD. The user can then continue to scroll
through the images as usual, using the Zoom Control.
Viewing as a Slide Show
The camera can setup a slideshow and playback the stored images for a specified interval.
1. Set the camera to PLAY Mode
2. Press Menu button to invoke the PLAY MENU
3. Use the zoom control to highlight selecting Slideshow
4. Press OK button to enter SLIDESHOW submenu
5. Use the zoom control to set the delay intervals between each displayed images
6. Press OK button to start playing the slideshow
1792
1200
0002
10.19.00
15:58
Page 33

32
Downloading pictures into your PC
Connecting the camera to your PC
Use the supplied cable to connect the camera to your computer, properly attach one end of the cable to digital port of the
digital camera, and the other end of the cable to the back of your computer.
For RS232 interface:
1 Plug one end of the serial cable into your computer COM port.
2 Connect the other end of the serial cable to the digital port of the camera.
3 Set the camera to Mode
4 Turn on your camera.
For USB interface:
1 Plug one end of the USB cable into your computer USB port.
2 Connect the other end of the USB cable to the digital port of the camera.
3 Set the camera to Mode
4 Turn on your camera.
Camera driver and software installation
The appropriate TWAIN driver and software are r equir ed in order to download images fr om the digital camera to your computer.
Y ou need to install the TWAIN driver and software which comes with the included CD-ROM . It is implemented with auto-setup
program. Once you insert CD-ROM disk into the CD-ROM drive, the installation menu will pop-up. Otherwise, you still can run
“setup.exe” file in the root directory of CD-ROM drive.
To install camera driver and application software:
1 Insert the software CD-ROM disc into your CD-ROM drive.
2 The setup program will begin - simply follow the on-screen instructions to complete both the TWAIN driver and the image
application software installation.
3 Restart the computer.
The TWAIN drivers will only become effective after the system is rebooted.
NOTE
Page 34

33
Downloading and saving images to your hard drive
Once you have the TWAIN driver and image application software installed on your PC, use the following procedures to
transfer pictures from the camera to your computer’s hard drive and save them.
1.Launch the image application
2.Select
Digital Camera 1792 X1200 pixelsDigital Camera 1792 X1200 pixels
Digital Camera 1792 X1200 pixelsDigital Camera 1792 X1200 pixels
Digital Camera 1792 X1200 pixels for the TWAIN device.
3.Invoke the TWAIN interface.
4.Start downloading pictures from your camera to your hard disk.
5.Select the pictures you wish to save by clicking on them (hold Ctrl key for multiple selections). Selected pictures will be
surrounded by a red border.
You now have two options as to what to do with the downloaded images:
Save selected pictures directly to your hard drive.
1. Click the Save Photos to Disk Directory to bring up the Save Files to Directory window.
2. Under Save In, select the directory in which you wish to save the pictures.
3. T ype in a three-letter prefix followed by a number. This will be the filename for the first image. Filenames for all subsequent
images in this batch will be consecutive. For example, if you choose “pic001” as the filename for the first image, the
second image will be named “pic002”, the third “pic003” etc.
Open the pictures in image application software.
1. Click the Transfer Pictures to Application to open the selected pictures in image application software. These
images can now be manipulated or enhanced before saving.
2. When you are ready to save an image, select Save As from the File menu.
3. Select which directory in which you wish to store the pictures.
4. Type in the name for the picture to be saved.
5. Select the JPEG option under Save as Type.
6. Click Save.
NOTE
The way to select the TWAIN device and invoke the TWAIN driver
interface may differ from each other , please r efer to its respective
software on-line help for more information.
Page 35

34
Appendix 1 : Status LCD Icons
Appendix 2 : Default Settings
Resolution
Quality
Flash Mode
Macro Mode Off
Quick View Off
White Balance Auto
EV Compensate +0.0
Slideshow 3 Sec
Sound Beep Off
Auto Power OFF 1min
Resolution
1792X1200 pixels
896X600 pixels
Quality
high compression
medium compression
low compression
Flash Mode
Auto Flash
Red-Eye Reduction
Fill-in (flash is always on)
Off (Flash is disabled)
Number of Pictures Remaining
Digits of remaining pictures at current
Resolution/Quality setting
Battery Life Indicator
Full Battery Power
Medium Battery Power
Low Battery Power
Empty Battery Power
Macro Mode
Self-Timer
Page 36

35
Appendix 3 : Digital Camera Specifications
Image Sensor
Image Resolution
Color
File Format
Playback Mode
External Memory
Storage
Working Range
Zoom
LCD Display
LCD Indicator
Built-in Flash
Self-timer
Focal Length
Aperture Ratio
Shutter Speed
Exposure
White Balance
Language
1/1.75" CCD with 2.3 mega pixels
1792 x 1200 ; 896 x 600
24 bit (RGB)
JPEG
Single image, 9 thumbnail images
Compact Flash Card Type 1 Slot
High Resolution : 7/14/29 images at low / medium / high compression setting per 8 MB
Standard Resolution : 29/58/116 images at low / medium / high compression setting per 8 MB
Normal: 40cm ~ Infinity; Macro: 8 ~ 40 cm
4.6X Zoom(2.3X Optical and 2X Digital)
1.8" color LCD for real time display with 280x220 image
Flash/Resolution/Battery Status/Number of Image
Auto/Fill/Off/Red-eye reduction
10 sec delay
8mm-18mm (equivalent to 38mm-90mm in 35mm camera)
f/(2.8/4.2/7/13)
1/4 ~ 1/500 sec
Auto; Manual: 0.3 EV step, -1.5 ~ +1.5 EV
Auto, Daylight, Incandescent, Fluorescent 1, Fluorescent 2
English, German, French, Spanish, Japanese, Portuguese
Page 37

36
 Loading...