

Page 1
Page 2

Vivicam 3630 Digital Camera User's Manual
Electromagnetic Compatibility Notice........................................................................1
FCC Notice................................................................................................................1
Welcome....................................................................................................................2
About Batteries..........................................................................................................2
Camera Features......................................................................................................3
Computer System Requirements.............................................................................3
Package Contents....................................................................................................4
Nomenclature...........................................................................................................4
Installing Batteries....................................................................................................6
Preparing to Take Images........................................................................................7
Inserting a Compact Flash (CF) Memory Card (optional)........................................7
Removing a Compact Flash (CF) Memory Card.....................................................9
Turning the Camera On and Off..............................................................................10
Turning the LCD Image Display On and Off............................................................11
Setting up your Camera..........................................................................................11
Selecting Image Resolution and Quality..................................................................12
Selecting the Flash mode........................................................................................13
Using the Self-timer.................................................................................................13
Taking an Image.....................................................................................................14
Recording a Movie (Silent Video)............................................................................14
Reviewing Images and Movies on LCD Image Display.........................................15
• Zooming Still Images at Playback................................................................15
• Viewing Multiple Images.............................................................................15
• Displaying a Slide Show.............................................................................15
Erasing Images and Movies........................................................................................16
Formatting Media...................................................................................................16
Connecting Your Camera to a Television................................................................16
Using the Camera with Your PC...........................................................................17
Installing Camera drivers for Windows 98SE/Me/2000/XP (Required).............17
Installing Arcsoft Software Application Programs.............................................19
Downloading Images and Movies to Your PC.........................................................19
Playing back Movies on your PC..................................................................19
Downloading Images using PhotoStudio................................................................20
Using PhotoPrinter................................................................................................20
Using Funhouse................................................................................................21
Product Specifications................................................................................................22
1
Page 3

Electromagnetic Compatibility Notice
This device complies with Part 15 of the FCC rules. Operation is subject to the
following two conditions:
(1) This device may not cause harmful interference, and
(2) This device must accept any interference received, including interference that
may cause undesired operation.
Warning: Changes or modifications to this unit not expressly approved by the party
responsible for compliance could void the user's authority to operate the equipment.
This equipment has been tested and found to comply with the limits for a Class B
digital device, pursuant to Part 15 of the FCC rules. These limits are designed to
provide reasonable protection against harmful interference in a residential installation.
This equipment generates, uses, and can radiate radio frequency energy, and if
not installed and used in accordance with the instructions, may cause harmful
interference to radio communications. However, there is no guarantee that interference
will not occur in a particular installation.
If the unit does cause harmful interference to radio or television reception, which
can be determined by turning the equipment off and on, the user is encouraged to
try correcting the interference by one or more of the following measures:
• Re-orient or relocate the receiving antenna.
• Increase the separation between the equipment and receiver.
• Connect the equipment into an outlet on a circuit different from that to which
the receiver is connected.
• Consult the dealer or any experienced TV/radio technician for help.
NOTE:
• Shielded cables are used with this unit to ensure compliance with the Class B
FCC limits.
• A high electrostatic discharge environment may cause the camera to malfunction.
Reset the camera by taking out the batteries and re-inserting them.
FCC Notice
In order to maintain compliance with FCC regulations, shielded cables must be
used with this equipment. Operation with non-approved equipment or unshielded
cables is likely to result in interference to radio and TV reception. To comply with
1
Page 4

the limits for a class B digital device, pursuant to part 15 of the FCC rules, this
device must only be installed on computer equipment certified to comply with the
Class B limits.
Use only the supplied USB cable should be used with the product. Operation with
non-certified computers, use of a cable other than that supplied, or modification of
the device may result in interference to radio or television reception and could void
the user’s authority to operate this device.
Welcome
Thank you for choosing the Vivicam 3630 Digital Camera. Please read the following
precautions carefully before using the product.
• This camera is not water-resistant and should not be used outdoors in snow
or rain. If accidentally dropped in water, please quickly pour out the water and
dry the camera in sunlight or using an air-blower.
• Protect the camera from excessive humidity. It will fog the lens and images will
be blurred.
• Do not expose the camera to sand or dust.
• Do not attempt to disassemble the camera yourself. Always send it to an
authorized service facility for repair.
• To store the camera, wrap it in a clean, soft cloth and place it in a cool, dry,
dust-free place. Do not place the camera directly under the sun or in extreme
heat.
• Take care of the lens. Use a soft, damp cloth to clean it.
• Do not scratch the Lens, Status LCD Panel, LCD Image display or Viewfinder.
• If the Status LCD Panel or LCD Image display is damaged, do not touch it.
• Condensation is a problem when bringing cold equipment into a warm room.
Place the camera in a plastic bag so condensation forms on the outside of the
bag.
About Batteries
• Battery life is shorter for poor quality alkaline batteries. If you frequently use
the LCD image display and flash, you should use good quality batteries such
as camera-rated alkaline batteries. Alkaline or NiMH atteries can be used with
this camera. The camera may not function properly if you use poor quality
batteries. High power NiMH rechargeable batteries (1300mAH or higher) are
highly recommended.
2
Page 5

• Make sure all batteries are fresh, or fully charged.
• If the camera fails to start after inserting new batteries (nothing appears on the
Status LCD panel), the batteries may be inserted in wrong orientation.
• The batteries may explode or cause burns if disassembled, recharged,
shorted, exposed to high temperature, or disposed of in a fire.
• Ensure that the battery orientation is correct when placing them in the camera
• Batteries may feel warm after being used for some time.
• Remove the batteries if you will not use the camera for one month or longer.
Camera Features
1. Two-mega-pixel CCD image sensor
2. Maximum image resolution of 1600 x 1200 pixels
3. Two image resolution (Full and Half) and three image quality settings (High,
Normal and Economy)
4. Still images in common in JPEG file format
5. 1.5-inch color TFT LCD image display (312 x 230 pixels)
6. USB port for connection to a PC
7. Built-in four-mode flash (Automatic, On, Off, Red-Eye Reduction modes)
8. Compatible with Compact Flash Type 1memory cards (4MB to 256MB)
9. Tripod mounting socket (1/4” – 20)
10. Uses 4 x AA alkaline or Ni-MH batteries
11. Automatic Exposure Compensation and White Balance
12. 2X Digital Zoom
13. TV output port for connection to a TV
14. Slide show playback capability
15. Date/Time setting
16. Automatic power off to save battery power
17. Self-Timer with 10-second delay
18. Silent Movie capture mode (no audio or sound)
Computer System Requirements
• PC with a 300MHz Pentium-class microprocessor and a CD-ROM drive
• Windows 98SE / Me / 2000 / XP
• 64MB RAM
• 500MB of available hard disk space (for applications and images)
• Color display monitor display supporting 16-bit color or better
• Available USB port
3
Page 6
Package Contents
• Vivicam 3630 Digital Camera
• Program CD (Application Software, User’s Manual, camera drivers)
• USB cable
• TV cable
• Quick Start Guide
• User’s Manual
• Hand Strap
• 4 x AA batteries
Note: The contents of your camera kit may be slightly different depending upon the options
and accessories specified by your retailer or dealer. See retail package for precise contents
and inclusions.
Nomenclature
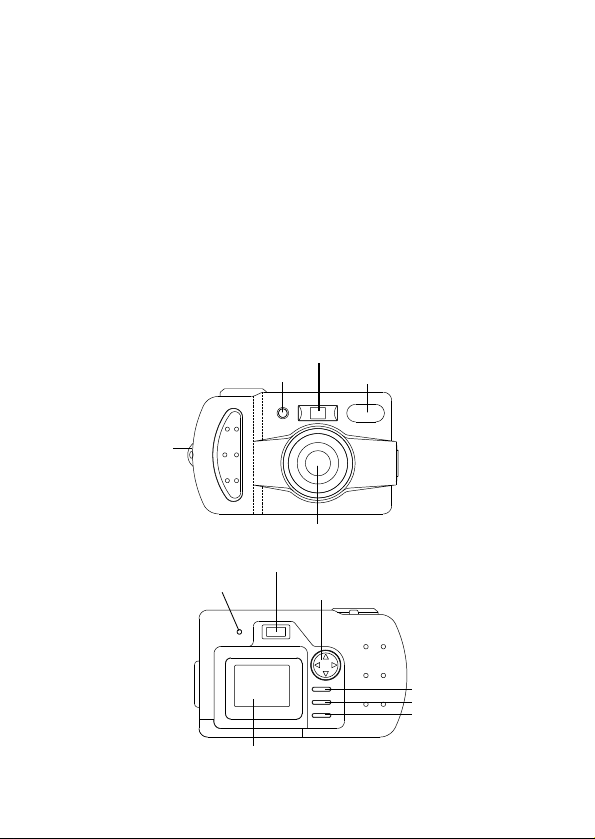
Front panel
Hand strap
mount
Back panel
Operation status
indicator
Viewfinder window
LED
Viewfinder
LCD monitor
Lens
4-way button
4
Flash
Menu button
Movie/Delete button
Display button
Page 7
Menu button: The button will invoke or hide the option and setting menus on
the LCD image display. The menu button can also cancel actions
Movie/Delete button: Sets camera to Movie mode or Delete mode
Display button:
• In Record mode: Turns LCD image display on or off
• In Playback mode: Toggles from full screen to 3 x 3 thumbnails display
to slide show mode.
4-way button: makes selections:
• UP
• DOWN
• RIGHT
• LEFT
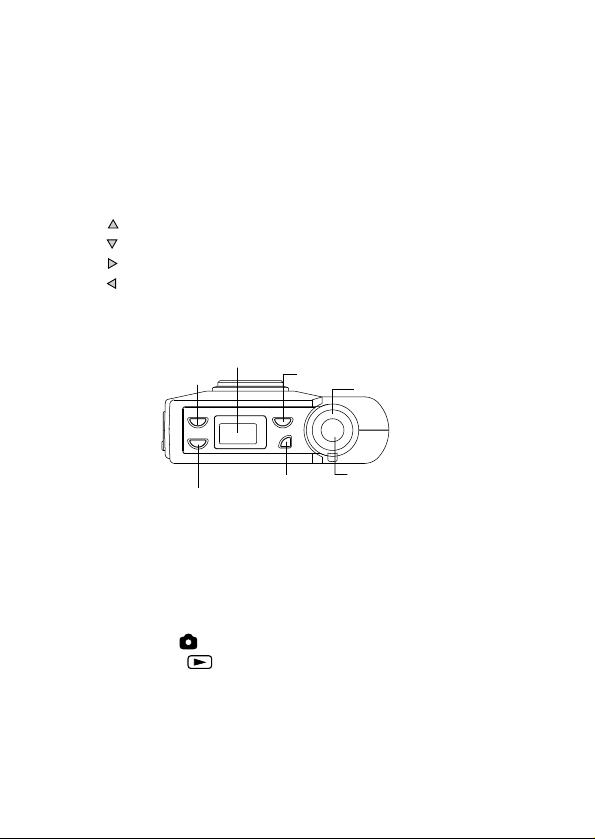
Top panel
Flash button
Status LCD
Self-timer button
Mode dial
Resolution button
Power button: Turns the camera on or off
Resolution button: Changes image resolution and quality settings
Self-timer button: Turns the self-timer on or off
Flash button: Toggles the built-in flash through Automatic, Red-Eye
Reduction, On, and Off modes
Mode dial:
Power button
Shutter
• Record mode : For capturing images or movies (without audio)
• Playback mode : For reviewing images or movies
Shutter: Used to capture images & movies; confirms actions
5
Page 8
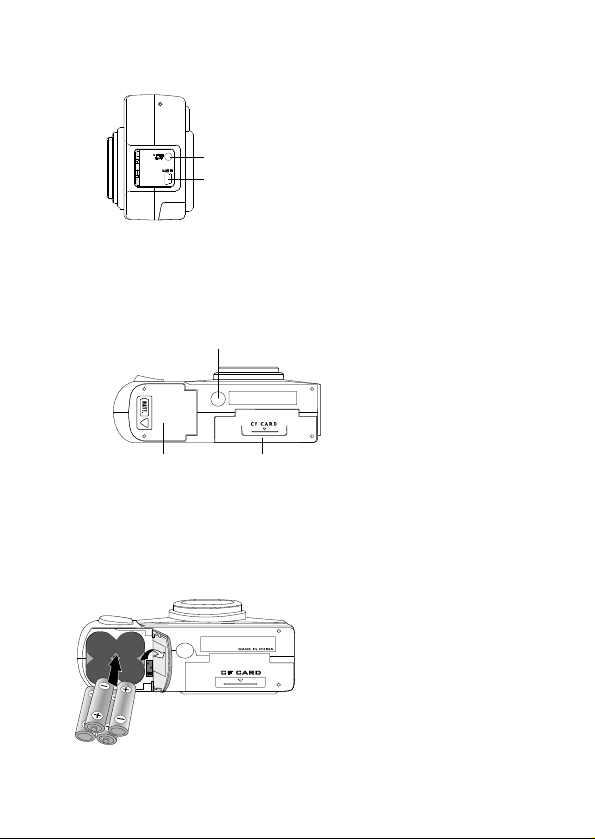
Side panel
Video Port
USB Port
USB Port: For connecting to a PC
Video Port: For connecting to television with Video input
Bottom panel
Tripod mount
Battery
compartment
CF card compartment
Installing Batteries
1. Slide and lift open battery compartment cover
2. Insert 4 AA batteries into the battery compartment, making sure the polarities
are oriented exactly as shown:
6
Page 9

3. Close battery compartment cover
Battery Power Indicators
The following icons will display on the Status (information) LCD and LCD image
display, respectively, indicating the battery status:
and indicate full battery power
and indicate low battery power
and indicate virtually no useable battery power
NOTE:
• If the batteries are removed, some camera settings will be reset to their default
values. For example, date & time will be reset to 01/01/02, 00:00.
• The battery icon will blink when battery power is low. Replace old batteries with
new batteries immediately.
CAUTION – To avoid battery leakage
• Non-rechargeable batteries are not to be recharged
• Be sure to insert batteries in correct orientation
• Remove batteries from the camera before extended storage
• Always remove old or dead batteries from the camera
• Do not short-circuit the battery terminals
• Check that the contact surfaces are clean and bright before installing batteries
Preparing to Take Images
Inserting a Compact Flash (CF) Memory Card (optional)
NOTE: There is 8MB of memory built-in to the camera. You may use an optional CF card
(not supplied in the camera kit) to store additional images or movies. Note that the camera
is “card-priority”. Internal memory is not accessible when a CF card is present in the camera.
The internal (built-in) memory can only be used when a CF card is NOT inserted.
1. Make sure camera is turned off
2. Open the CF card compartment cover
7
Page 10

CF CARD
BATT.
BATT.
3. Orient the CF card as shown and insert it fully into compartment.
Note: If the CF card does not insert easily, please try the other side. DO NOT
force the CF card into the card slot as this may break the memory card or your
camera.
Notice that there is a yellow memory card ejection lever that will rise up as the
CF card is inserted.
4. Fold down the CF card ejector mechanism and close CF card compartment
cover. The CF door will not close if the lever is up.
CF CARD
BATT.
BATT.
8
Page 11

Removing a Compact Flash (CF) Memory Card
1. Make sure camera power is turned off.
NOTE: Removing a CF card with camera powered on may result in data loss.
2. Open the CF card compartment cover
CF CARD
BATT.
BATT.
3. Lift the CF-card ejection arm (from horizontal to vertical position) and
then push the ejector mechanism in (down) to eject the CF card
4. Remove the CF card by catching the edge of the card
5. Close the CF card compartment cover
CF CARD
BATT.
9
Page 12

CF Memory Card Capacity:
The number of images that may be stored on a CF memory card (or internal memory)
depends upon the image resolution and quality settings. The following table estimates
the number of images that may be stored in 8MB of memory:
Resolution / Quality
Display On Display On Approximate
Status LCD LCD Image display Number of Images
FULL*** 16
FULL** 27
FULL* 43
HALF*** 72
HALF** 108
HALF* 121
N
F
L
L
N
L
Where:
FULL or = High Resolution (1600 x 1200 pixels)
HALF or = Low Resolution (800 x 600 pixels)
*** or = Fine quality
** or = Good quality
* or = Normal quality
L
F
G
N
NOTE:
• The above figures are estimates. The actual number of images will vary depending
on scene (image) complexity.
• Only CF Type 1 memory cards can be used in the 3630 camera.
• The use of CFA-approved CF memory cards is recommended.
• Compatibility with all CF memory cards is NOT guaranteed.
• If a CF card is inserted while the camera is powered on, you must power the
camera off and then on again to reset the frame counter (that is shown on the
Status LCD) according to the CF memory card size.
Turning the Camera On and Off
To power on the camera, press the Power button and hold momentarily until the
camera beeps and icons appear on the Status LCD.
To turn off camera, press the Power button and hold momentarily until the icons
disappear from the Status LCD.
10
Page 13

NOTE: The camera is set to automatically turn off when there is no activity for a period
of time. The automatic power-off time interval is set to one minute, by default. To change
the power-off time interval, refer to the section “Setting up your Camera.”
Turning the LCD Image Display On and Off
When camera is in Playback mode, the LCD image display will always be on.
When the camera is in Record mode, the LCD image display will turn on automatically,
as well. However you may wish to conserve battery power by turning the image
LCD off. Pressing the DISPLAY button will toggle the LCD image display to:
Turn on without icon display Turn off Turn on with icon display
NOTE: When LCD image display is turned off, pressing the 4-way button will have
no effect.
Setting up your Camera
To navigate the Setup menu on the LCD image display:
• Press UP or DOWN on the 4-way button to select a menu item
• Press RIGHT or LEFT on the 4-way button to select a value for a menu item
• Press Shutter button to confirm settings and exit Setup menu
• Press Menu button to cancel and exit Setup menu
Confirming a Selection:
• Press the Shutter button once to confirm a setting for a menu item.
To display the Record-Mode Setup menu:
1. Power on the camera in Record mode
2. Press MENU button
Record Setup Menu Options:
Format Media: Quick or Full
Auto (Power) Off: 1 min, 2 min, 3 min or Off
Date: Month – Day - Year format
To display the Playback-Mode Setup menu:
11
Page 14

1. Power on the camera in Playback mode
2. Press MENU button
Playback Setup Menu Option:
Format Media: Quick or Full
Detail and Explanation:
Format Media
Formatting will delete all images and data on a CF memory card.
• Full Formatting will perform checks for bad sectors
• Quick Formatting will not check for bad sectors
Note that deleted files cannot be recovered!
Auto (Power) Off
When the camera is on and there is no activity for a period of time, the camera
will automatically turn itself off.
• You may set the power-off time interval to one, two, or three minutes.
• Select “Off” if you wish to disable this function altogether.
• The Automatic Power Off time interval is set to 1 minute by default.
Date
Enter the current date and time so that image files are recorded (time-stamped)
with date and time of capture.
NOTE:
• White Balance and Exposure Compensation will be adjusted automatically
according to lighting conditions.
• Whenever the batteries are replaced, all settings will return to their default
values.
Selecting Image Resolution and Quality
1. Make sure camera is in the Record mode
2. Press the Resolution button and the icon display changes as follows:
On the Status LCD
FULL** FULL*** HALF* HALF** HALF*** FULL*
On the LCD Image display
N
F
H
G
L
L
L
N
F
H
12
Page 15

Where:
FULL or = High Resolution (1600 x 1200 pixels)
HALF or = Low Resolution (800 x 600 pixels)
*** or = Fine quality
** or = Good quality
* or = Normal quality
Selecting the Flash mode
1. Make sure the camera is in Record mode
2. Press the Flash button repeatedly and the icon display changes:
On the Status LCD
(Flash Off) No icon (Automatic Flash) (Red-Eye Reduction)
(Flash On)
On the LCD Image display
(Flash Off) A (Automatic Flash) (Red-Eye Reduction)
(Flash On)
Remarks:
The camera defaults to the Flash Off mode.
Automatic Flash: The flash fires according to lighting conditions (automatically)
Flash on: The flash is forced to fire. You can use this mode if your intended subject
is subject to backlighting. This is also known as fill-flash.
Flash off: The flash is suppressed. You can use this mode when your subject is
too far for flash to have any effect. Turning the Flash to OFF will save battery power
and reduce the shot-to-shot time interval.
Red-Eye Reduction: This reduces the red-eye effect in your subject’s eyes when
taking images in low-light conditions, where the flash is used. The camera will fire
a pre-flash sequence and then fire a normal flash to take the picture.
Using the Self-timer
1. Make sure the camera is in the Record mode
2. Press Self-timer button to activate the Self-timer.
LCD and the LCD image display
3. Press Self-timer button again to turn off the Self-timer.
the Status LCD and the LCD image display
Note: When Self-timer is activated, an image will be taken 10 seconds after the
Shutter button is pressed. During the 10-second period, the LED on the front of
the camera will blink and a beep-tone will sound until the image is taken. In the
final two seconds, the beep will sound faster.
will display on the Status
will disappear from
13L14
Page 16

Taking an Image
1. Look through Viewfinder or use the LCD image display to frame your shot.
2X Digital Zoom: To invoke 2X Digital Zoom, turn on LCD image display (by
pressing DISPLAY button) and press UP on the 4-way button.
The .
icon will appear in the upper left corner of the LCD image display.
The image on LCD image display will be enlarged by a factor of two.
To return to an un-zoomed view, press DOWN on the 4-way button and the .
icon will disappear from the LCD image display.
2. Press the Shutter button half way to initiate the automatic-exposure calculation
and the flash charging process.
NOTE: Wait until the Operation Status Indicator (LED) stops blinking before
pressing the Shutter button fully down.
3. Press Shutter button fully down to capture the image.
NOTE:
• When the camera is set to the Camera mode,
display
• While an image is being saved into memory, the Operation Status Indicator
(LED) on the back of the camera will flash.
Recording a Movie (Silent Video)
1. Make sure the camera is in Record mode
2. Press the Movie/Delete button. The
LCD and LCD Image display, respectively.
3. Press and release the Shutter button (press briefly) to begin recording. DO
NOT hold the shutter button down while recording. The
on LCD image display and the Operation Status Indicator (LED) will blink.
4. To stop recording, press the Shutter button again
NOTE:
• No sound can be recorded with the Vivicam 3630 camera.
• The movies recorded are saved in QuickTime format (.MOV)
• The maximum length of a single movie clip is 30 seconds.
• The numeric value displayed on the Status LCD is the estimated time (in seconds)
available for movie recording based upon available memory space.
will appear on the LCD image
and icons appear on Status
icon will appear
Page 17

Reviewing Images and Movies on LCD Image Display
• Turn the Mode dial to the Playback mode. The last image (or a snapshot of
the last movie taken) will appear on LCD image display in full screen.
NOTE: When an image is being reviewed, the icon will appear on the LCD
image display. When a movie is displayed, and will appear.
• Press RIGHT or LEFT on the 4-way button to review other images and movies.
To review a movie, locate the desired movie clip and press the Shutter button
to start movie playback. To stop a movie playback, press any of the following
buttons: Menu, Movie/Delete or Display
• Zooming Still Images at Playback
To zoom in on the image being reviewed, press UP on the 4-way button
repeatedly. To zoom back out, press DOWN on the 4-way button repeatedly.
Note: Movies cannot be zoomed.
• Viewing Multiple Images
To display images in a 3 x 3 thumbnail array, press the DISPLAY button
once. The
To navigate through the thumbnails, use the 4-way button. To return to full
screen, select a thumbnail and press Shutter button.
• Displaying a Slide Show
To view your images as a slide show, press DISPLAY button twice. The
icon will appear on LCD image display. To stop the slide show, press
the Menu, Movie/Delete or Display button
NOTE: Pressing DISPLAY button in a slide show will toggle to 3x3 thumbnail
array. To go back to full screen mode from a slide show, press DISPLAY button
once to go to 3x3 thumbnail array first, then press Shutter to enter the full screen
mode.
icon will appear on LCD image display.
Tip: You may set the beginning picture for the slide show by selecting the picture
in the thumbnail view and pressing the DISPLAY button once.
15
Page 18

Erasing Images and Movies
1. Turn the Mode dial to the Playback mode
2. Press RIGHT or LEFT on the 4-way button to locate the image or movie you
wish to erase
3. Press the Movie/Delete button to initiate the deletion function
4. Press the Shutter button to confirm deletion, OR, press the Menu button to
cancel
Formatting Media
Alternatively, you can erase all images and movies on a CF card by formatting it.
1. Turn the Mode dial to the Record mode
2. Press the Menu button
3. Press UP or DOWN on the 4-way button to select Format Media
4. Press RIGHT or LEFT on the 4-way button to select Full or Quick formatting
5. Press the Shutter button to initiate formatting
6. Press the Shutter button to confirm formatting, OR, Menu button to cancel
NOTE: Formatting will delete all images and data from a CF card. Full Formatting
will check for bad sectors; whereas Quick Formatting will simply erase all data.
Note that deleted files cannot be recovered!
Connecting Your Camera to a Television
If you wish to view your images on a TV, you will need a TV with a video input jack.
The color system of the TV must be NTSC.
1. Using the video cable connect the Video port of the camera to the Video Input
jack of your TV
2. Turn on the TV and select the appropriate Video Input source to which camera
is connected
3. Power on camera
NOTE: You may review your images and recorded movies, or you may see a
live image on the TV as you would on the camera's LCD image display, depending
upon the mode to which the camera is set.
16
Page 19

Using the Camera with Your PC
Power on your computer and insert the installation CD into the CD-ROM drive, it
will Auto run* and present a menu screen. First, install the camera drivers. After
installing the drivers you may install the Arcsoft applications programs. The Arcsoft
applications are not required for camera operation and may be installed at any time.
Notes: Install the camera drivers before connecting your camera to your PC.
Note: Auto run may not occur if autorun has been disabled on your computer.
Installing Camera drivers for Windows 98SE/Me/2000/XP (Required)
1. From the Autorun installation screen, select "Install Camera Drivers".
2. Click Next button to proceed with driver installation.
3. Follow the screen instructions.
4. After clicking the Finish button, connect the camera to your PC using the USB
cable
5. Power on the camera
6. Several windows will appear on your computer screen momentarily while the
system is being updated.
NOTE: When installing drivers in Win XP, the following screens will appear. Click
on Next to proceed:
17
Page 20

Windows XP users may receive a standard message about XP compatibility. Click on
“Continue Anyway”.
Windows will discover the Camera as a USB Mass Storage Device:
Click on “Finish.”
5. After the system update is finished, go to the Windows desktop and double click
on My Computer. Locate the camera as a new disk drive icon typically called,
“Removable Disk”
6. The Vivicam 3630 camera appears to your computer as a Mass Storage Device,
Vivitar (X:), where X is the next available drive letter on your computer – typically
(but not always) drive letter e:, f: , or g:
Note: In some cases, the content
of the camera may pop up
automatically.
Note: The camera must be
disconnected from the computer
before it can be powered off.
18
Page 21

As a mass storage device your camera is accessible as if it were a CD ROM or
floppy storage disk. Hence the name “Removable Disk.”
To stop using your camera click on the “Safely Remove Hardware” icon in the lower
right hand corner of the windows desktop – in the area known as the “Systray.”
Then click on the line item representing your camera.
Installing Arcsoft Software Application Programs
1. From the Autorun installation screen, select “Install Arcsoft Programs.”
2. Select your desired language
3. Select components to install
4. Follow screen instructions to complete the installation
Note: The Arcsoft programs are included for use with your new camera images. Installation
of the Arcsoft programs is optional. You may prefer to use imaging software already
installed on your computer.
Downloading Images and Movies to Your PC
1. Take some images and movies with your camera
2. Connect camera to PC with the USB cable
3. Power on the camera
4. From the windows desktop double click on My Computer. Double-click on
“Removable Disk”, a newly created Drive X (where X is the next available drive
specification on your computer such as Drive D or Drive E)
5. Open folder Dcim\100imdir and you will see your image and movie files
6. Copy and paste your images and movie files to your hard disk so that you can
access them when the digital camera is not connected to the PC
Playing back Movies on your PC
1. Locate the movie file you want to playback
2. Double-click the file to open it with its associated application
Note: The software programs for playing QuickTime movies are NOT included in the
camera package. You have to install those programs (such as QuickTime 5.0) on your
computer before you can playback your downloaded movies. QuickTime is available at
no charge from Apple Computer at
19
Page 22

Downloading Images using PhotoStudio
Note: The graphics shown are based on the user interface in Windows 98SE
1. Take some images with your camera
2. Connect the camera to the computer with the USB cable
3. Search through Start > Programs > Vivicam 3630 Digital Camera Suite and
click PhotoStudio 2000 icon
4. Select File and click Open from the pull-down menu. The Open dialog box will
appear.
5. Open folder 100imdir through the path X:\Dcim, where X is the drive specification
for the Mass Storage Device.
6. Select the desired image file and click Open button
7. You may edit the image with the
available tools.
8. To save the image file on your
hard disk, select File and click
Save As from the pull-down
menu.
9. Create a folder if necessary and
enter a filename for the file. Then
click Save button from the
opened Save As dialog box
Note: If you want to know more about PhotoStudio, please consult its on-line help by
clicking the “?” icon on the windows’ upper right corner or the “Help” button on the pulldown menu.
Using PhotoPrinter
Note: The graphics shown are based on the user interface in Windows 98SE.
1. Search through Start > Programs > Vivicam 3630 Digital Camera Suite and
click PhotoPrinter 2000 Pro icon
2. To print an image downloaded on your hard disk, click get image icon on the
layout window and click add image icon on the get image window.
20
Page 23

3. Open the desired image through
the Add Thumbnails dialog
box. When an image thumbnail
has been added to the get
image window, double-click the
thumbnail. Set print options
available and print the image.
Note: If you want to know more
about PhotoPrinter, please consult
its on-line help by clicking the “?”
icon on the windows’ upper right
corner.
Using Funhouse
Note: The graphics shown are based on the user interface in Windows 98SE.
1. Search through Start >Programs
> Vivicam 3630 Digital Camera
Suite and click Funhouse icon
2. Click the 1 Get Template icon
on the main screen to select a
template for your image to put
on.
3. Click 2 Get image icon on the
main screen to select a image.
4. To select a image from your digital camera, click Acquire icon on the get image
window.
5. If you want to select a image already on your hard disk or other storage medium,
click Open icon on get image window.
6. You may modify the image with the available functions
• Click 3 Fine-Tune icon to make
changes to the inserted Images
• Click 4 Add Text icon to add text
to your project
• Click 5 Print Preview icon to
view/change the print settings for
optimal printing
• Click Start over icon to clear your
current template and any selected
Images
• Click Save as icon to save your
finished image
• Click Send icon to send your
finished image as an email
attachment
21
Page 24

Note: If you want to know more about Funhouse, please consult its on-line help by clicking
the “?” icon on the windows’ upper right corner.
Product Specifications
Image Sensor CCD sensor with 2 Mega pixels
Max. Image Resolution Full: 1600 x 1200 pixels
Half: 800 x 600 pixels
Image Format / Quality JPEG / High, Normal, Economy
Movie Format / Resolution QuickTime movie (.MOV) / 320 x 240 pixels
Movie clip length Max. 30 seconds
LCD Image display 1.5-inch color TFT display, 312 x 230 pixels
Status LCD With icons showing Flash / Resolution / JPEG
quality / Battery Status / Number of Images
Lens / Focus Range Fixed focus / 1m to infinity
Storage Media/Memory Card Compact Flash card Type 1
Flash Four modes: Automatic, On, Red-eye reduction,
Off
Power Source 4 x AA alkaline batteries
Digital Zoom 2X digital zoom
EV Compensation Automatic
White Balance Automatic
Self-Timer 10-second delay
Video Output NTSC Video Out, Slide Show (Playback) and
Live Video (Record)
PC Interface USB port
Dimensions 121 x 71.5 x 43 mm (WHD)
22
 Loading...