

Page 1
Vivitar MagnaCam 1025X2 2 MP Digital Camera/Binocular
1
MagnaCam 1025X2 DIGITAL CAMERA/BINOCULAR
2 Megapixel
INSTRUCTION MANUAL
Page 2

Vivitar MagnaCam 1025X2 2 MP Digital Camera/Binocular
2
Contents
1. Introduction 3
2. Specifications 5
3. Operation 9
4. Software Installation 16
5. Maintenance 18
Note:
In order to match the digital camera to the binocular optics the
MagnaCam 1025x2 uses a lens with a focal length of 103 mm.
This is equivalent to a 530 mm lens on a traditional 35mm camera.
Any camera with such a long focal length is susceptible to image
jitter which may cause images to appear blurred. To capture a
quality image, it is essential to keep the camera very stabile when
capturing an image.
Rev – 9 Aug 2004
Page 3

Vivitar MagnaCam 1025X2 2 MP Digital Camera/Binocular
3
1. Introduction
MagnaCam is a unique combination of a binocular and
digital camera. It is designed for simple operational
utility with these features:
o Fully functional binocular
o Integral Digital Camera offering:
Digital-still image capture of the scene
Continuous shooting (movie) mode – up to 60 seconds
USB Connectivity to your computer
PC/Web cam mode (for PC users)
Self-Timer with 10 second delay
Automatic exposure and white balance control
Automatic Power-off/Power Management
SD memory card slot (Max.128 MB, card not included)
Note: As a digital camera, the MagnaCam connects to your computer as a
USB mass-storage device. The memory of the MagnaCam appears as a
removable disk to your computers operating system.
Page 4

Vivitar MagnaCam 1025X2 2 MP Digital Camera/Binocular
4
1.1 Package Contents
MagnaCam Digital Binocular kit typically includes the
following items:
1. Digital camera/binocular
2. Binocular carrying pouch
3. Binocular neck strap
4. Two AAA
batteries
5. Cleaning cloth
6. CD ROM(s) with application software
7. USB cable
8. Instruction Manual
9. Warranty card
Please note that inclusions and accessories will vary depending upon
your ret ailer. Updates to this User Manual may be found on the Vivitar
website at
www.vivitar.com .
Page 5

Vivitar MagnaCam 1025X2 2 MP Digital Camera/Binocular
5
2. Specifications
Digital Camera
Image Resolution (still images)
High = 1600x1200 (Hr), Low = 1280×1024 (Lr)
Image Storage
25 images (High res.); 60 images (Low res.)
Internal Memory
16MB
(9MB for image storage, 7MB for buffer and AV)
Lens Aperture
F7
Focal Length
103 mm (35 mm equivalence of 531 mm)
Angle of View (degrees)
Horiz: +/- 3.7, Vert: +/-3.0, (Diag +/- 4.7)
Range of Focus
24 feet (8 M) to infinity
Exposure & White Balance
Automatic
Removable Memory
Secure Digital (SD) cards up 128 MB
Power
2 x AAA batteries
Binoculars
Magnification
10X
Angle of View (degrees)
±3.15
Objective Lens Diameter
25 mm
Nearest Observing Distance
6 meters (20 feet)
Exit Pupil Distance & Diameter
10 mm, 2.5 mm
Product Dimension Size
135 x 130 x 50 mm (5.3 x 5 x 2 inches)
Weight (without batteries)
340 grams (12 ounces)
Page 6
Vivitar MagnaCam 1025X2 2 MP Digital Camera/Binocular
6
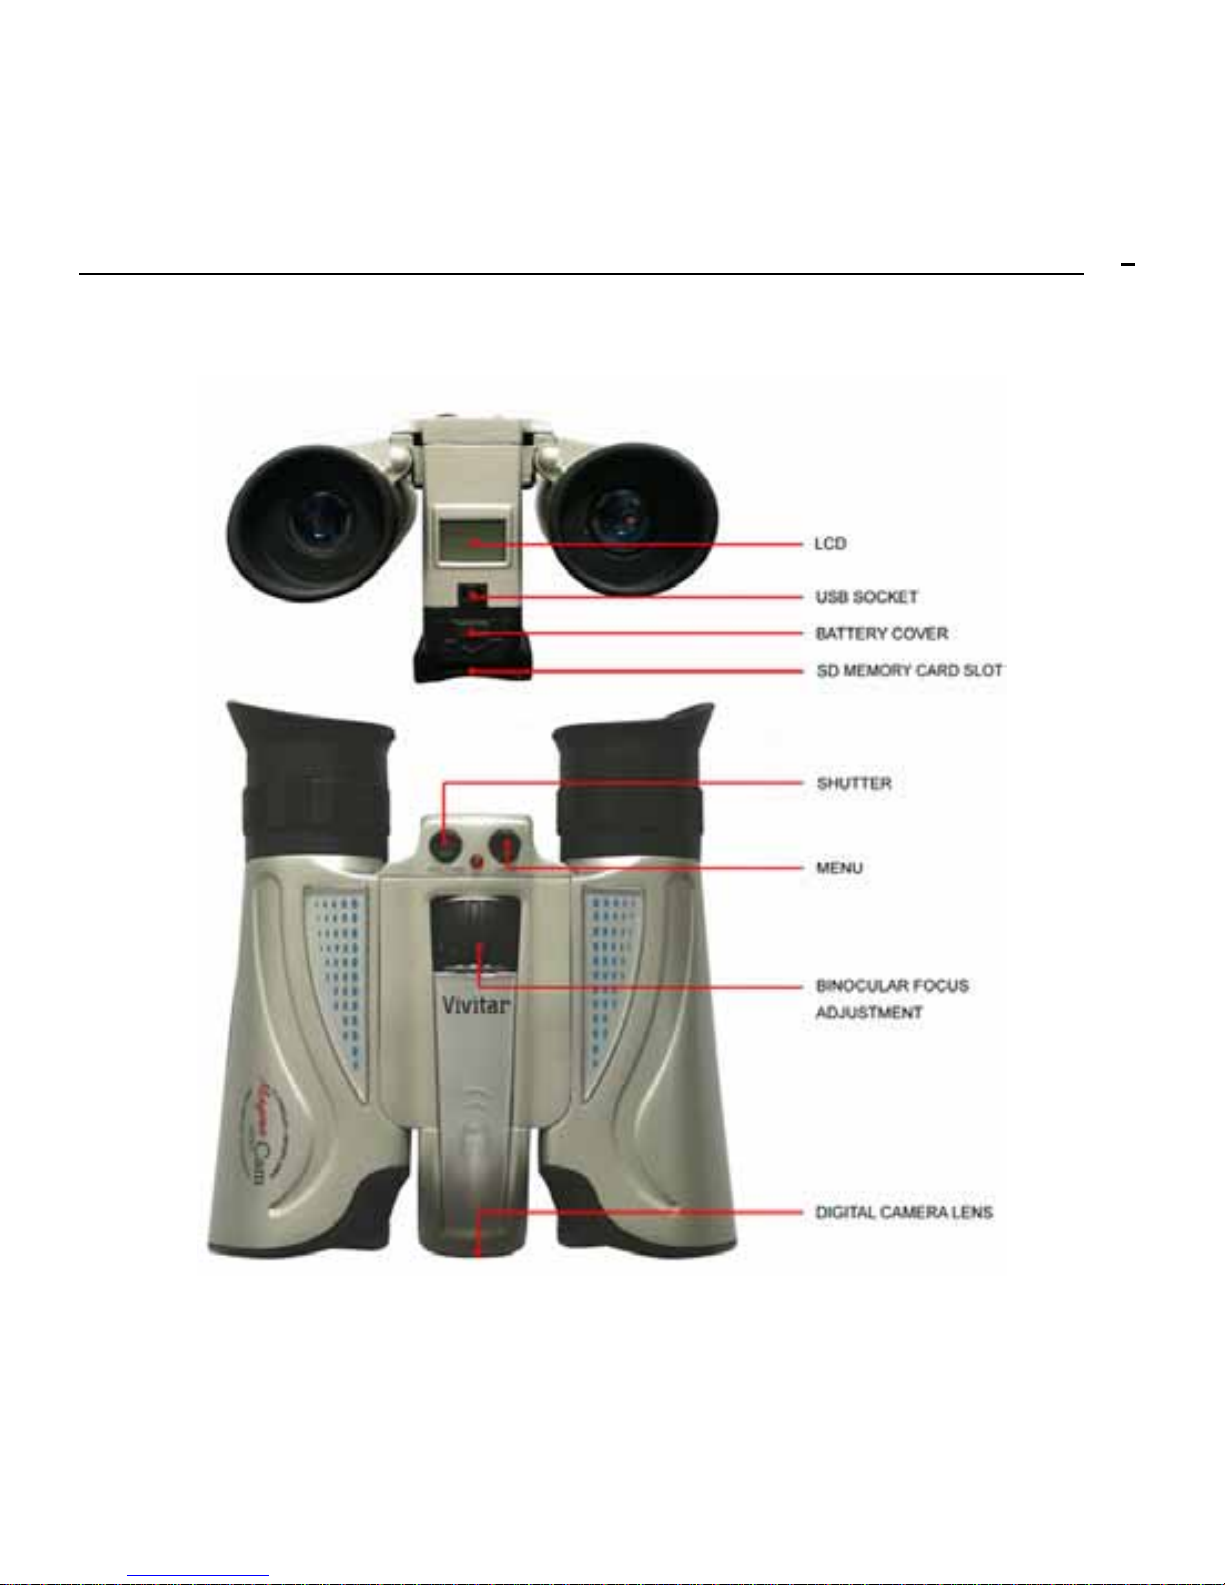
2.1 Product Features:
Page 7

Vivitar MagnaCam 1025X2 2 MP Digital Camera/Binocular
7
2.1.1 Battery Orientation
The MagnaCam 1025x2 uses two
AAA batteries. To insert the
batteries open the battery cover.
Place the batteries with the polarity
(orientation), as shown. Note the
small “+” and “-“ markings on the
battery compartment and orientation
decal inside the battery cavity.
Close the battery door.
Important note about batteries.
The internal memory of the camera
requires batteries to be present at
all times in order to retain images in
internal memory. This will cause a slight drain on the batteries. If the
camera will not be used for a period of several days, or more, download your
images and remove the batteries during storage periods to maximize battery
life. You may use alkaline or rechargeable NiMH batteries (highly
recommended.) Images stored on a memory card are not af fected by
battery status, however.
Page 8

Vivitar MagnaCam 1025X2 2 MP Digital Camera/Binocular
8
2.2 LCD Display
Digital camera modes and functions are presented on the information LCD
display on the back of the camera frame. Press and hold the Menu button
for three to four seconds to power-on the camera. The camera will beep
as it powers-up. The camera will display the current resolution setting
(example: Hi), and the current number of images that you had taken. Press
the Menu button (repeatedly) to scroll through the digital camera options.
The meaning of each symbol is as follows:
Display Meaning Operation
Number of images
taken
Press Shutter to capture an image, the counter will
increase by one
Self-timer
Press Shutter to invoke 10-second self-timer. The
camera beeps and LED blinks.
Movie Capture
Press Shutter to begin Movie capture, LED
flashes. Press Shutter again to stop Movie capture
Clear All Images
To delete all images in memory, Press Shutter once
to start deletion, the LCD will blink. Press Shutter
again to confirm your decision – LED blinks once
and the camera beeps once to confirm.
Page 9

Vivitar MagnaCam 1025X2 2 MP Digital Camera/Binocular
9
Clear (delete) Last
image
Press Shutter to delete the last image. The counter
will decrease by one.
Resolution setting
Press Shutter to toggle between High Res (1600 x
1200) and Low Res (1280 x 1024)
PCC
PC Camera mode
Press Shutter to toggle between PC camera (PCC)
and mass storage mode (USB)
SD card Indicates that an SD card is present
Note: The sequence of the digital camera menu presentation i s the same as
this table. When the batteries are low, the LCD display will blink and
the camera will automatically turn off.
The MagnaCam 1025x2 digital camera
captures a rectangular image within the
circular field-of-view of the binocular
approximately as shown:
Page 10

Vivitar MagnaCam 1025X2 2 MP Digital Camera/Binocular
10
3. Binocular Operation
Adjusting the Pupil Distance
Hold the two barrels of the binocular in each hand. Pull the barrels
together or apart until you see a single circular field with both eyes. This is
the best inter-pupillary distance for observation.
Focusing the Binocular
1. Close your right eye and look through the binocular at an object.
Rotate the Center Focus Knob until the object is sharp and clear to
your left eye. At this point the object is in focus for your left eye.
2. Close your left eye and look through the binocular at the same object
with your right eye. Rotate the Diopter ring until the object is sharp
and clear. At this point the object is in focus for both eyes.
After the diopter setting is made, you may focus upon any object using
the Center Focus Knob.
Rubber Eyecups
Without eyeglasses, place your eyes against the rubber eyecups while
observing through the binocular. For best results with eyeglasses, fold
down the rubber eyecups and place your glasses directly against the
rubber eyepieces while observing through the binocular.
Caution: Never observe or shoot into the Sun.
Page 11

Vivitar MagnaCam 1025X2 2 MP Digital Camera/Binocular
11
3.1 Digital Camera Operation
The digital camera has an automatic power-off feature. It is suggested
that you select an object through the binocular before you turn on the
camera. The MagnaCam digital camera has two imaging modes: still
image mode, and movie mode.
3.1.1 Still Image Mode (for shooting individual frames) -
Make camera adjustments as described in
Binoculars Operation.
Look through the binocular and locate an object to shoot. Rotate the
Center Focus Knob until the object is sharp and clear.
Press Menu button to turn on the camera and observe the LCD
display. If no symbol show on the LCD, then replace the battery.
Press the Shutter button to capture an image.
Confirm that your image was stored. The image counter in the LCD
display will decrement by one after an image is captured.
You can delete one or all the previous images at any time.
Still Images are stored in JPG file format, in camera memory.
Note: The camera performs best with good lighting conditions.
Page 12

Vivitar MagnaCam 1025X2 2 MP Digital Camera/Binocular
12
3.1.2 Self-Timer Shooting
Press Menu until
appears in the LCD display.
Press the Shutter button. The LCD will countdown, the LED will
flash, and the camera will beep for 10 seconds.
3.1.3 Movie Shooting -
Press Menu until
appears in the LCD display.
View the object through the binocular.
Press the Shutter button to begin movie capture. Press the Shutter
button to stop movie capture again.
Note: Hold the camera steady in movie mode.
The maximum length of a movie is 60 seconds.
Movies are stored in AVI file format, in camera memory.
To view your images use Windows Media Player or Apple
QuickTime.
Movies do not include sound. (Silent video)
Note: The minimum focus distance for the camera is 24 feet (8 Meters).
Objects closer than 24 feet will appear to be out of focus.
Page 13

Vivitar MagnaCam 1025X2 2 MP Digital Camera/Binocular
13
3.1.4 Downloading Images -
o If your PC uses Windows 98, you must install the USB driver before
downloading images. To install the USB driver, insert the Driver CD, and
click on “MagnaCam setup” to start auto-run installation. Windows XP
users will not require a driver for image downloading.
o Your still Images and movie clips can be transferred to your computer using
the USB cable.
o Your computer will automatically recognize the camera as a USB
mass-storage device. The memory of the MagnaCam appears as a
removable disk to your computers operating system.
o The camera’s memory will appear as an icon similar to a hard disk on your
desktop (Mac OS), or under My Computer (Windows). Windows 98 users
will need a driver.
o Double click the camera drive icon and locate the folder “DCIM”.
o Double click to open the DCIM folder to find another folder, “100media”.
o Open the 100media folder to find your still images (JPG files) and movies
(AVI files).
o Copy (or move) your images to a folder on your computer hard drive.
o After successfully transferring images to your computer, delete (clear) the
images from camera memory so that you may capture more images.
Note: After transferring images to your computer, delete the images
from camera memory so that you may capture more images.
Page 14

Vivitar MagnaCam 1025X2 2 MP Digital Camera/Binocular
14
3.1.5 PC/ Bino web Cam Mode -
o PC users may use their MagnaCam as a PC/Web camera.
o To use your MagnaCam as a PC/web cam you must first
click on
“MagnaCam setup” to start auto-run installation
from the CD ROM.
(Applies to all version of Windows).
o Turn on the camera and press the Menu button until “PCC” appears
in the LCD display. Using the USB cable, connect your MagnaCam
to your PC.
o Note: If you have not alrea dy loaded the video drivers your computer
will prompt you to do so at this time. Follow the on-screen
instructions.
o Once the drivers are loaded and the MagnaCam is connected to
your PC (in PC mode), you may view live video from your binocular.
o From the Windows desktop, click on Start, Programs,
MagnaCam,
PCCam, PCCam is a small
utility that will allow you to see
live video from the MagnaCam.
Page 15

Vivitar MagnaCam 1025X2 2 MP Digital Camera/Binocular
15
o Live Video will appear in the PCCam window:
Computer System Requirements:
Your digital camera images can be transferred to you computer for
viewing and processing. As a minimum your computer should have:
Windows 98/Me/2000/XP
400 MHz processor
128 MB RAM
CD-ROM drive
Available USB port
60MB available hard disk space
Page 16

Vivitar MagnaCam 1025X2 2 MP Digital Camera/Binocular
16
Precautions and Warnings:
o WARNING: Handling the USB cable on this product may expose
you to lead, a chemical known to the State of California to cause birth
defects or other reproductive harm. Wash hands after handling.
o Never operate this camera/binocular while driving a vehicle. This
may cause a traffic accident.
o Remove the batteries if the camera will not be used for an extended
period of time. The batteries may leak and cause a fire, injury or
soiling of the battery compartment. If the batteries leak, clean and
wipe the battery compartment carefully and install new batteries.
Wash your hands carefully if you touch the battery fluid.
o Always make sure the camera is OFF before in serting or removin g an
SD memory card.
Page 17

Vivitar MagnaCam 1025X2 2 MP Digital Camera/Binocular
17
4. Software Installation
Software and drivers should be installed before connecting the
MagnaCam -setup to your PC for the first time.
Windows users should insert the enclosed CD into your computers
CD-ROM drive.
The CD should run automatically. If not, go to My Computer and
click on the CD-ROM icon. Then, double click on the file
“MagnaCam
setup.exe” to start the installation program.
Follow the screen instructions:
Page 18

Vivitar MagnaCam 1025X2 2 MP Digital Camera/Binocular
18
The welcome Screen appears. Click “Next” to continue.
The installer will copy the necessary files.
Click “Finish” to complete the installation and restart your PC.
Page 19

Vivitar MagnaCam 1025X2 2 MP Digital Camera/Binocular
19
5.Maintenance
Basic Maintenance
Operation environments: 0 - 100 Deg F, 20 85% relative humidity.
Do not submerge this product in liquid or expose to direct steam.
Do not place the product in the places of high temperature, direct
sunlight, or dust.
Do not modify the product or attempt repair, as this will lead to
product malfunction.
Remove the battery if it will not be used for Long time. Download
your images before removing the batteries. (See note below.)
To clean your digital binocular, use a mild soap and soft damp cloth.
Important Notes Regarding Image Storage
The MagnaCam camera features “built-in” internal memory. Batteries must be
present in the camera at all times in order to retain those image stored internally.
If battery power is removed your images will be lost from internal memory.
Therefore, always download your images to your computer before taking out, or
replacing, the battery. Never remove the batteries while the camera is ON or
images will be lost immediately.
Images stored on an SD memory card, however, are not subject to this restriction
and are retained indefinitely. An SD memory card is highly recommended.
Page 20

Vivitar MagnaCam 1025X2 2 MP Digital Camera/Binocular
20
The MagnaCam 1025x2 assigns preference to SD card memory. Whenever an
SD memory card is inserted the 1025X2 will automatically begin to use the SD card
instead of internal memory. An SD memory card is not only assigned “first
priority” but also exclusivity. Access to internal memory is not available when an
SD card is used. If it appears that you cannot find your images (because they are
stored internally), try removing the SD card to again be able to “see” the internal
memory. Only when the SD memory card is removed will internal memory be
accessible.
 Loading...