

Page 1

IPC 117
360 View Wi-Fi Cam
Smart Security Wi-Fi Cam
User Manual
© 2009-2018 Sakar International, Inc. All rights reserved.
Windows and the Windows logo are registered trademarks of Microsoft Corporation.
All other trademarks are the property of their respective companies.
Page 2

1
TABLE OF CONTENTS
Introduction .................................................................................................................................. 2
Features ....................................................................................................................................... 2
What’s Included ............................................................................................................................ 3
Parts of the Camera ..................................................................................................................... 4
Initial Camera Setup ..................................................................................................................... 5
INSTALLING THE MEMORY CARD .......................................................................................................................................................... 5
TURNING ON THE SMART SECURITY CAM................................................................................................................................................ 6
CAMERA RESET ................................................................................................................................................................................. 7
INDI CATO R LIGHT .............................................................................................................................................................................. 8
MOUNTING THE CAMERA ................................................................................................................................................................... 9
Initial Mobile Device Setup .......................................................................................................... 11
MOBILE DEVICE – ANDROID AND IOS SYSTEM REQUIREMENTS ................................................................................................................ 11
VIVITAR SMART HOME SECURITY – INSTALL AND LAUNCH ....................................................................................................................... 11
Connecting Your IP Camera with the Vivitar Smart Home Security Mobile Application .............. 12
INTRODUCTION ............................................................................................................................................................................... 12
QUICK OVERVIEW ........................................................................................................................................................................... 13
INITIAL SETUP: CONNECTING YOUR CAMERA TO THE APP ........................................................................................................................ 14
Using Vivitar Smart Home Security ............................................................................................ 20
LIVE IP CAMERA VIEW ..................................................................................................................................................................... 20
MAIN MENU .................................................................................................................................................................................. 24
NAVIGATION BAR ............................................................................................................................................................................ 46
IP CAMERAS SCREEN ....................................................................................................................................................................... 47
DEVICES ........................................................................................................................................................................................ 49
SHARING IP CAMERAS...................................................................................................................................................................... 50
RECONNECTING DEVICES .................................................................................................................................................................. 54
HOME AND AWAY MODES ................................................................................................................................................................ 57
FULL SCREEN LIVE STREAMING VIDEO MODE........................................................................................................................................ 59
Using your IPC with Amazon Alexa and Google Home .............................................................. 61
AMAZON ALEXA SKILLS..................................................................................................................................................................... 61
GOOGLE ACTION ............................................................................................................................................................................. 63
Camera Technical Specifications ................................................................................................ 66
Technical Support ....................................................................................................................... 66
Sakar Warranty Card .................................................................................................................. 67
Page 3

2
Introduction
Thank you for purchasing your Vivitar IPC 117 Smart Security 360 View Wi-Fi Cam.
Everything you need to stream live video, record in HD and capture still images and videos
remotely is included with your camera and the accompanying online Vivitar ‘Smart Home
Security’ application.
You can use the app to monitor what is going on inside and outside your home via any mobile
device from anywhere. There is automatic activation of all IP cameras based on motion and
sound detection. In addition, you can use the ‘Smart Home Security’ app to control your lighting,
doorbell, electrical outlets and more.
Please read this manual carefully first in order to get the most out of your Vivitar Smart Security
Cam.
NOTE:
Your Smart Security Cam requires a Class 4 or higher Micro SDHC memory card up to 32 GB.
Micro SD Memory cards are not included and need to be purchased separately.
Features
• Full 360-degree view
• Records video in Full HD 1080p resolution
• Rotation swivel head allows for precise positioning
• Motion detection and event notification
• Two-way audio “intercom”, hear and talk with anyone in the room
• Night view using the infrared video mode
• Easily connects to your smart phone or tablet
• Wireless Wi-Fi Connectivity
• Built-in Speaker/Microphone
• Stream Live Video
• Still Image Capture
• Vivitar Smart Home Security app: Free Mobile App for iOS and Android smartphones or
tablets
Page 4
3
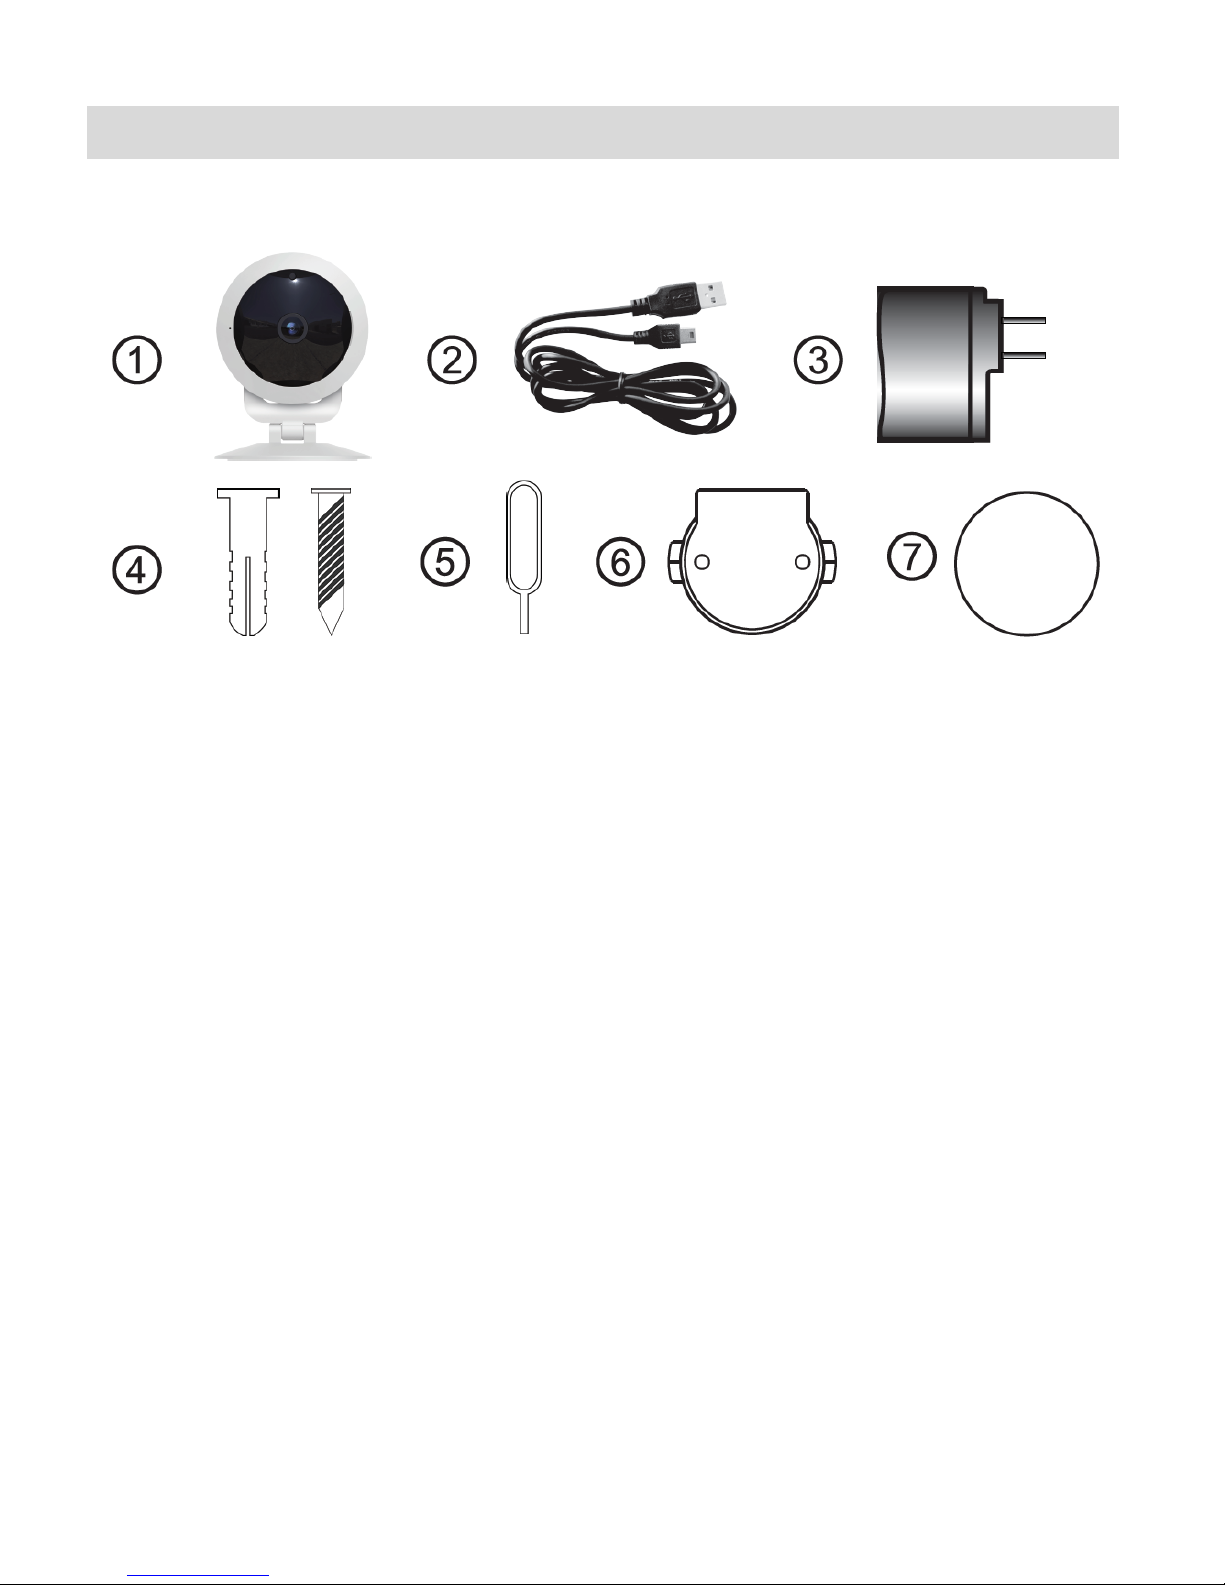
What’s Included
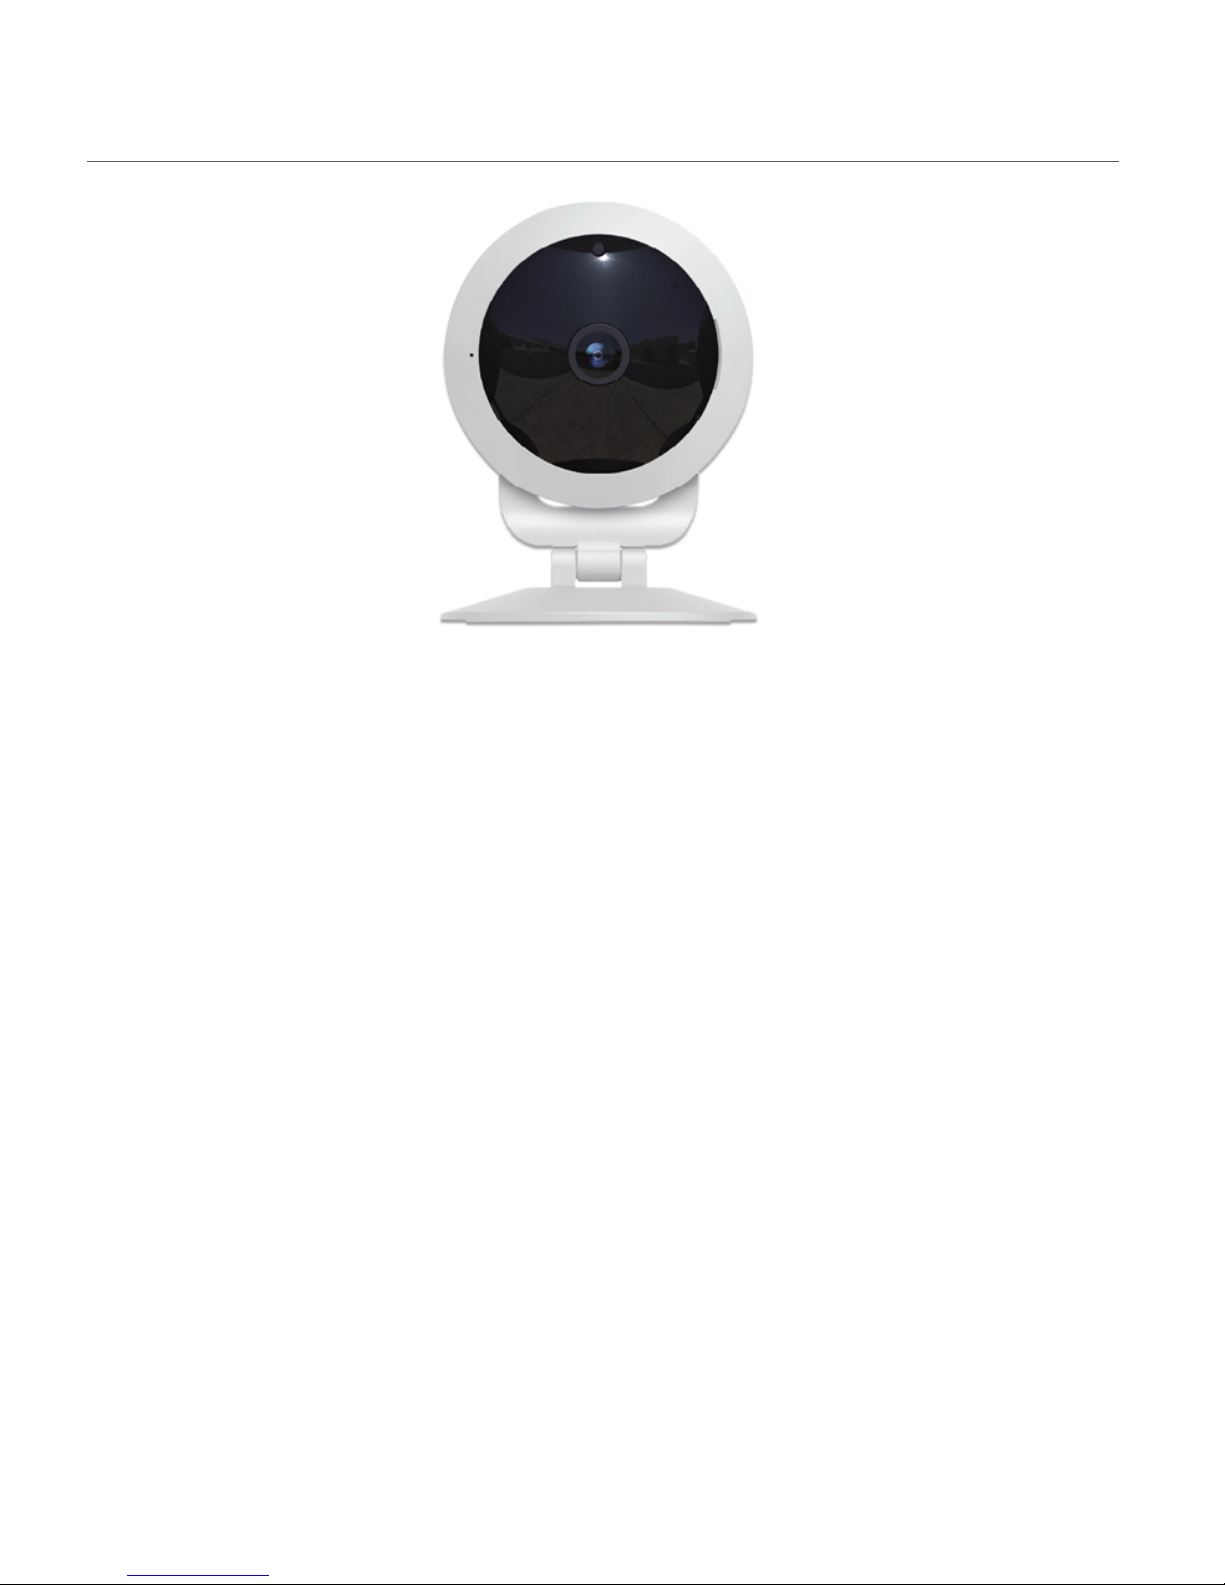
1. IP Camera
2. Micro USB cable
3. AC Charger
4. Screws
5. Setup Tool
6. Wall Mount
7. 2-Sided Foam Pad
NOTE: Micro SD Memory Card not included.
Page 5
4
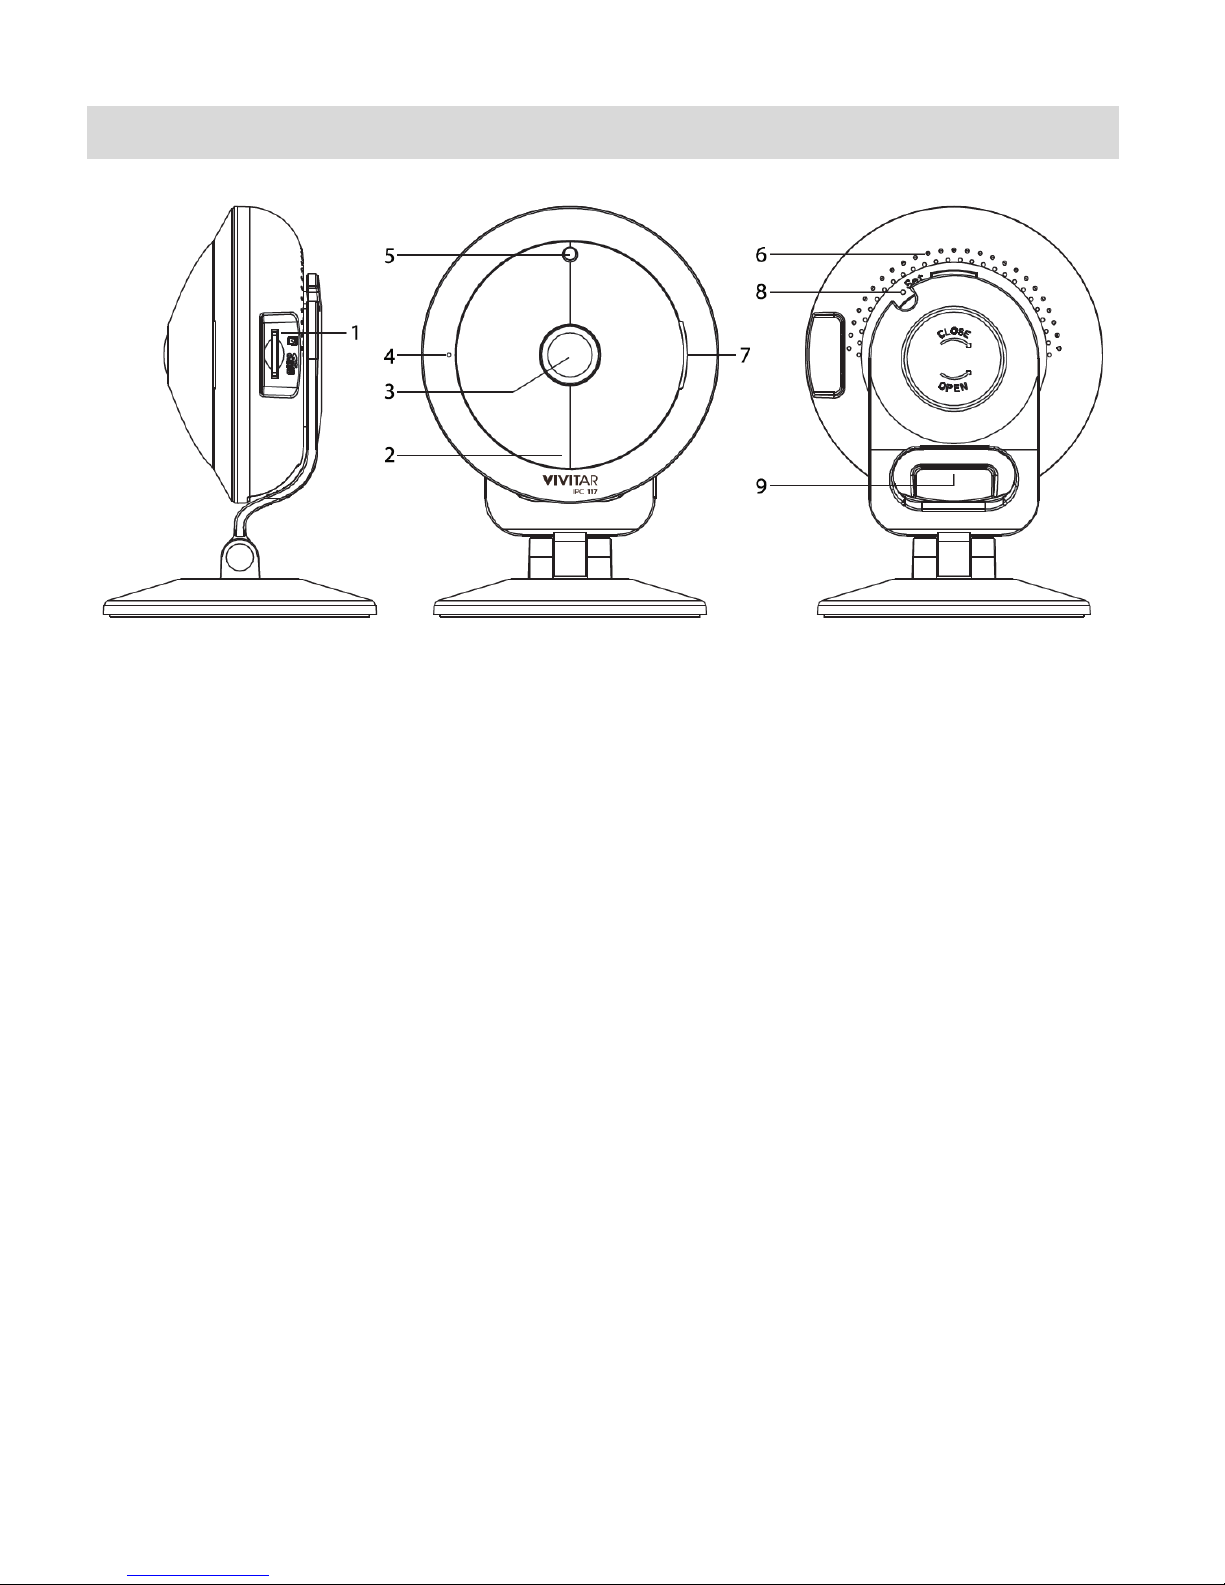
Parts of the Camera
1. Micro SD Memory Card Slot 6. Ventilation Holes
2. LED Status Light Indicator (Red/Blue) 7. Speaker
3. Lens 8. RESET
4. Microphone 9. Micro USB Port
5. Light Sensor
Page 6
5
Initial Camera Setup
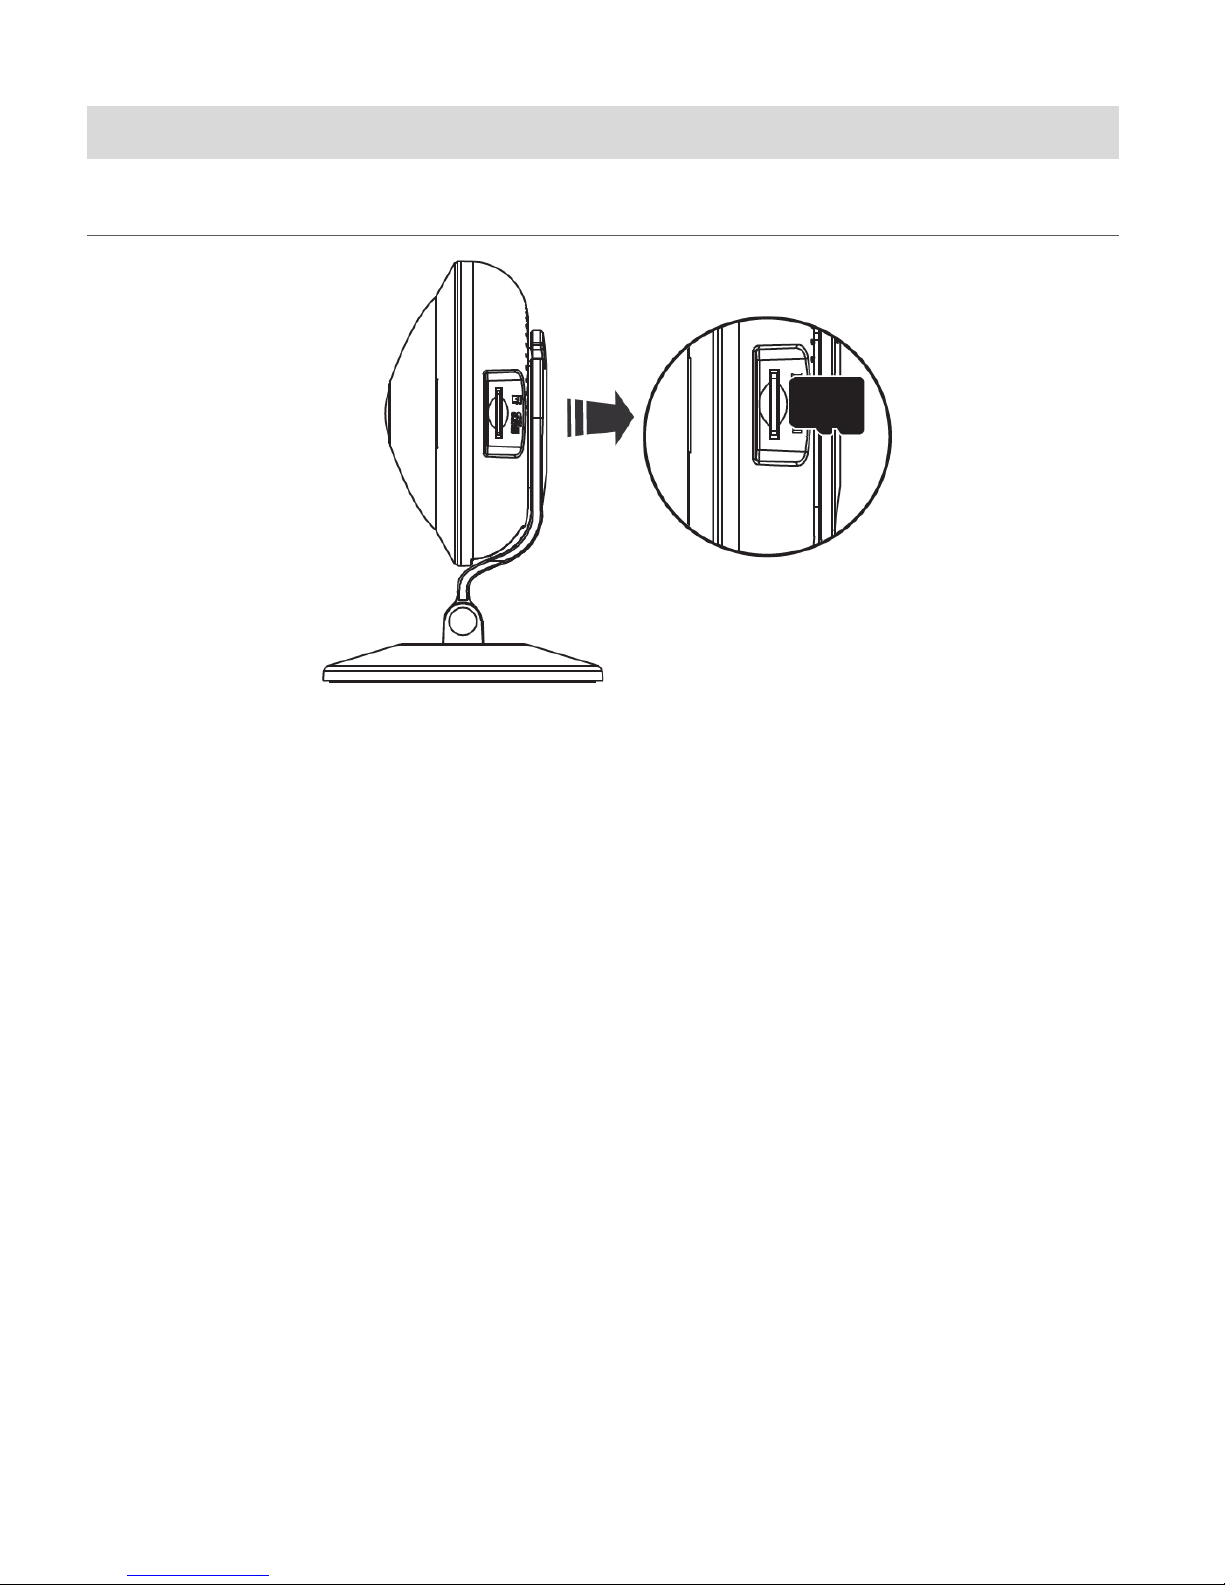
INSTALLING THE MEMORY CARD
Make sure a Micro SD Memory card (Class 4 or higher, up to 32 GB) has been properly inserted
into your Smart Security Cam. Micro SD Memory card not included and must be purchased
separately. To properly insert the Micro SD Memory Card:
1. Insert the Micro SD memory card into the Micro SD Card slot as shown in the illustration
above.
2. Gently press the Micro SD Card until you hear a slight clicking sound.
This indicates the memory card has been inserted correctly.
NOTE: Make sure to insert the Micro SD Memory card before plugging in your device.
Page 7
6
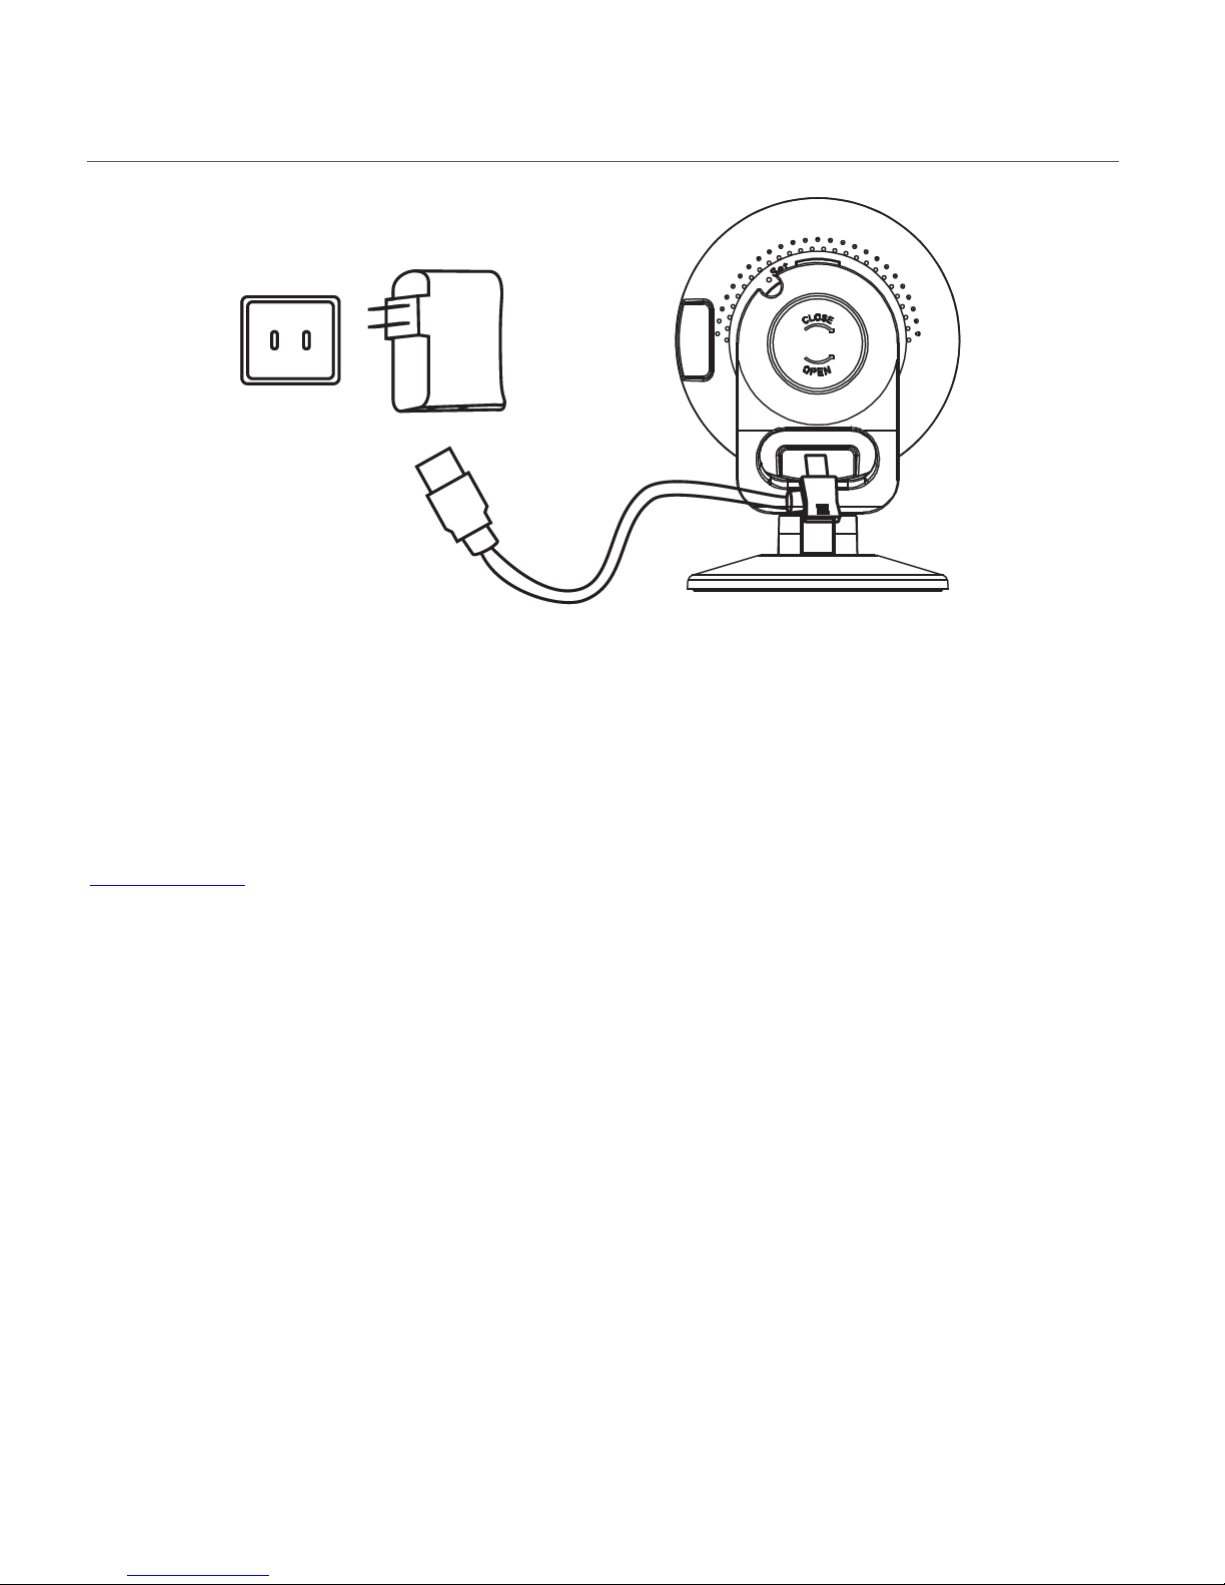
TURNING ON THE SMART SECURITY CAM
Connect one end of the Micro USB cable to your IP camera and the other end to the AC charger
and then plug the AC charger into a power socket. The RED indicator light turns on.
NOTE:
If the camera indicator is blinking blue, the camera needs to be reset. See the section below,
Camera Reset, for further information.
The LED power light indicator blinks blue after about one minute, indicating that the camera is
powered on. To power off the camera, disconnect the USB cable from the power source.
Page 8
7
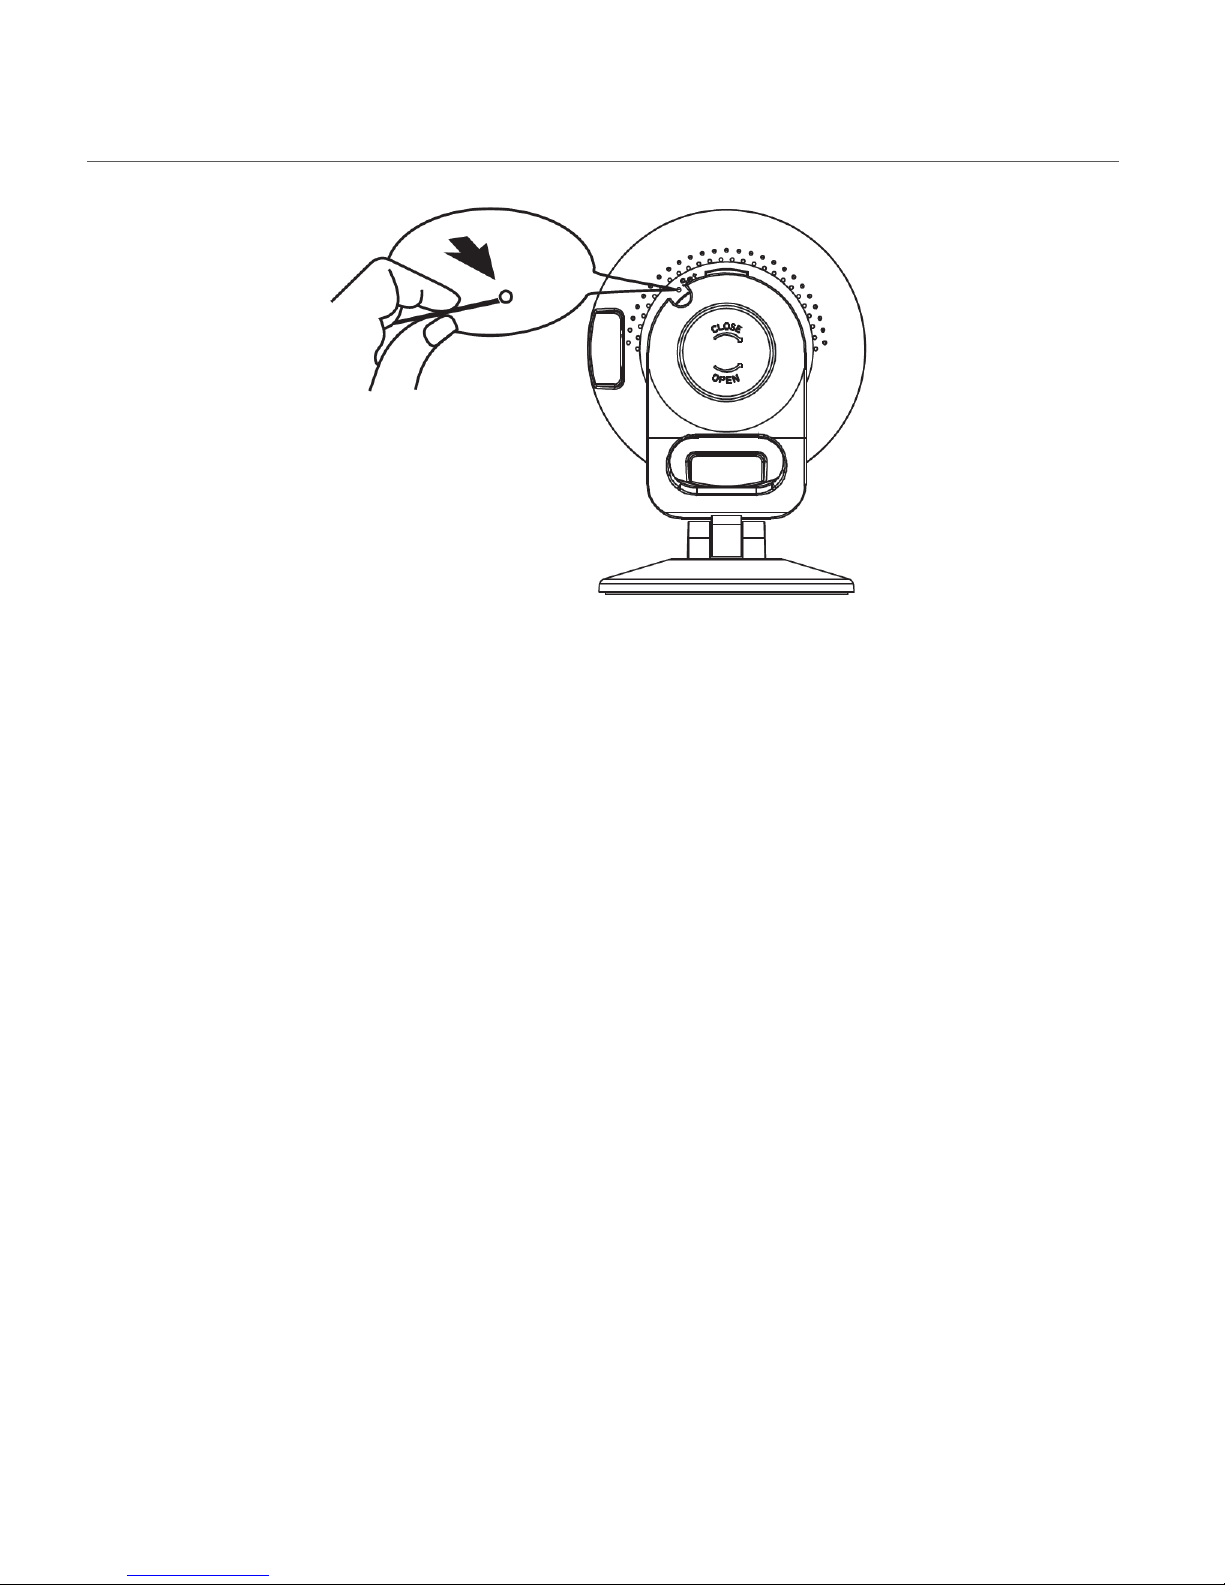
CAMERA RESET
If the camera indicator is blinking blue upon startup, the camera needs to be reset.
To reset the IP Camera:
1. Use the Setup Tool (supplied) or a small pin to press the RESET button (hole) on the back of
the camera.
2. Press and hold until the LED light indicator turns red. Release the RESET button and wait for
the system to reboot. This will take about 15 seconds. You will hear the camera emit ‘Reset
Success’.
Page 9
8
INDICATOR LIGHT
Red Flashing Indicator Light:
When the red indicator light is flashing, this indicates that the camera is in setting mode and it is
ready for Wi-Fi setup via your mobile device.
Blue Steady Indicator Light:
When the blue indicator light is steady, this indicates that the camera is connected to Wi-Fi.
Blue Flashing Indicator Light:
When the blue indicator light is flashing, this indicates that the camera may need to be reset if it
does not connect to your device while adding a new device or reconnecting a device.
Page 10
9
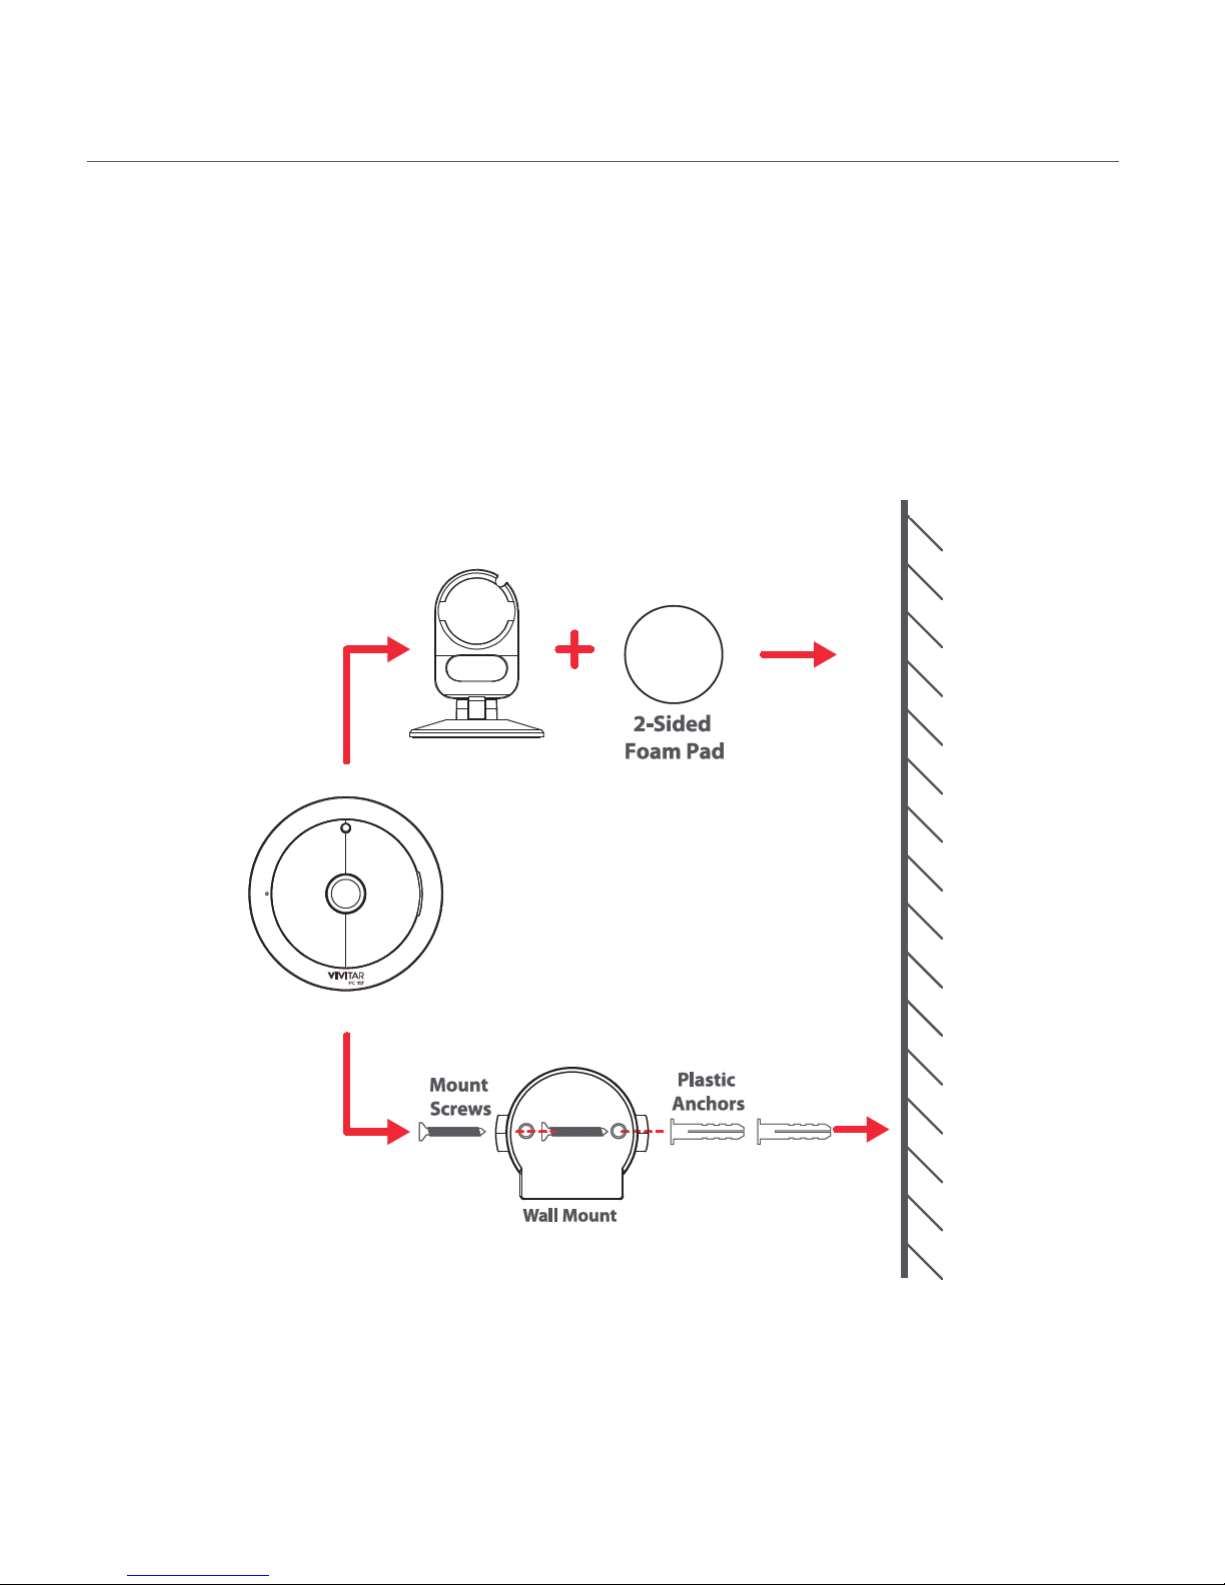
MOUNTING THE CAMERA
The IP Camera can be mounted in the following ways:
• The 2-sided foam pad can be placed on the bottom of the base and then stuck to a
surface.
• The wall mount can be installed to a non-magnetic surface, allowing the camera to
mount on it.
Page 11
10
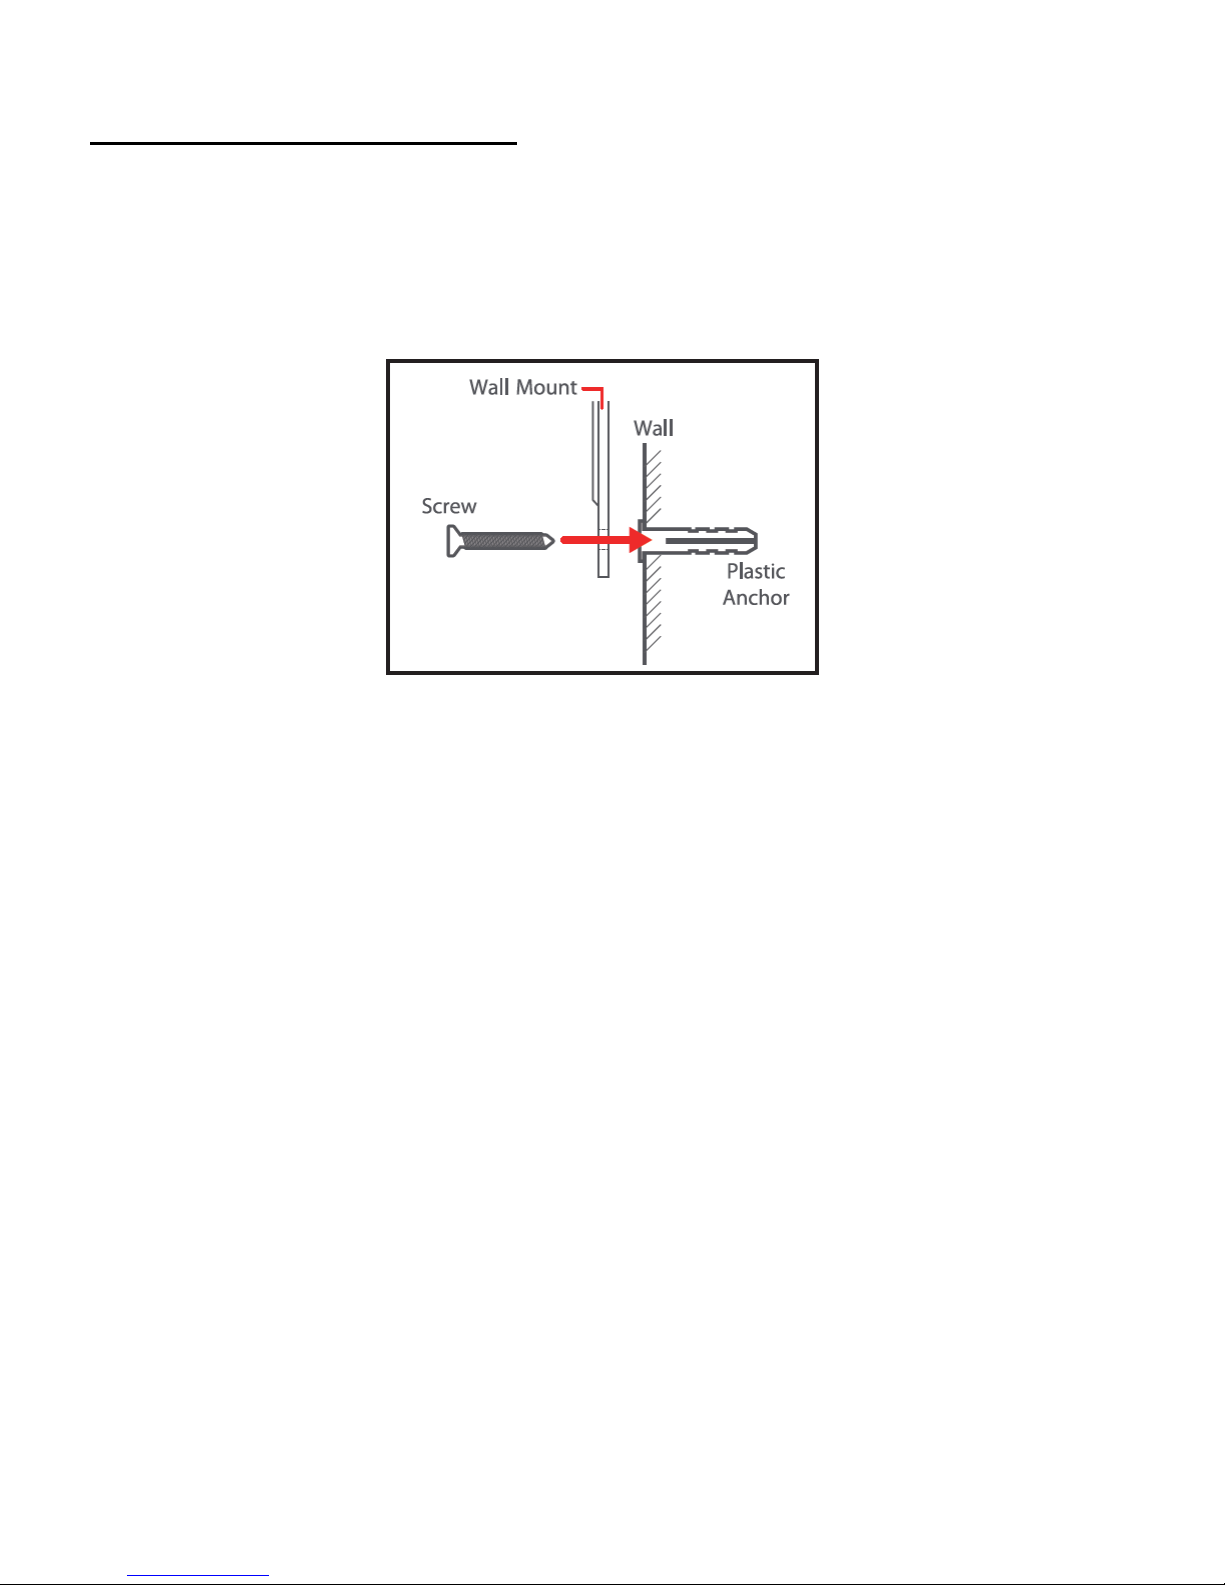
INSTALLING THE WALL MOUNT
1. Find the location (wall surface) where you would like to mount the camera.
2. Using a pencil, place the wall mount against the surface (wall) and mark on the surface
where the two screw holes on the wall mount are. These will mark the location where you will
drill to place the plastic anchors.
3. Drill two holes at the spots you marked and push the plastic anchors into the holes in the
surface/wall.
4. Place the wall mount and align the holes with the anchors and drive or drill the mount screws
in.
Page 12
11
Initial Mobile Device Setup
MOBILE DEVICE – ANDROID AND IOS SYSTEM REQUIREMENTS
• Android cellphone/tablet with OS 4.4 or higher
• iPhone/iPad with iOS 9.0 or higher
VIVITAR SMART HOME SECURITY – INSTALL AND LAUNCH
1. Make sure your mobile device is connected to a Wi-Fi Network via the Settings of your
mobile phone or tablet.
2. Use your mobile phone or tablet to search for Vivitar Smart Home Security in the Google
Play Store (for Android OS) or the Apple App Store (for iOS).
Alternatively, scan the QR codes below to find the application.
Android OS iOS
3. Install the application according to the instructions as seen on your mobile device.
4. After successfully installing Vivitar Smart Home Security, tap the icon to launch the
application.
5. The Vivitar Smart Home Security Home ‘Devices’ home screen appears.
Page 13

12
Connecting Your IP Camera with the Vivitar Smart
Home Security Mobile Application
INTRODUCTION
The Vivitar Smart Home Security application allows you to easily connect and control your
lighting, indoor and outdoor IP Cameras, electric outlets and more via any mobile device from
anywhere.
With Vivitar Smart Home Security, you can see what is going on in and outside your home 24
hours a day, 7 days a week. Receive automatic alerts from your IP Cameras upon detection of
motion and sound. Set on/off schedules for each smart light bulb or outlet and more with
automatic adjustments for sunrise/sunset.
• Motion Detection/Event Notification
• 2-Way Intercom (speaker/listen)
• Free Cloud Storage
• Night View, using the Infrared Video Mode
• Easily connects to your smart phone or tablet
• Home, Baby and Pets Monitoring
• Connect multiple IP Cameras
IP Camera: Home Mode
• Monitor your home via any mobile device from anywhere.
• IP Cameras have full duplex intercom capabilities.
IP Camera: Away Mode
• Receive automatic alerts from your IP Camera based on motion and sound detection.
• Telepresence notification to any mobile device.
• Alerts to police, emergency services, and your selected list of contacts when motion or sound
is detected.
Page 14
13
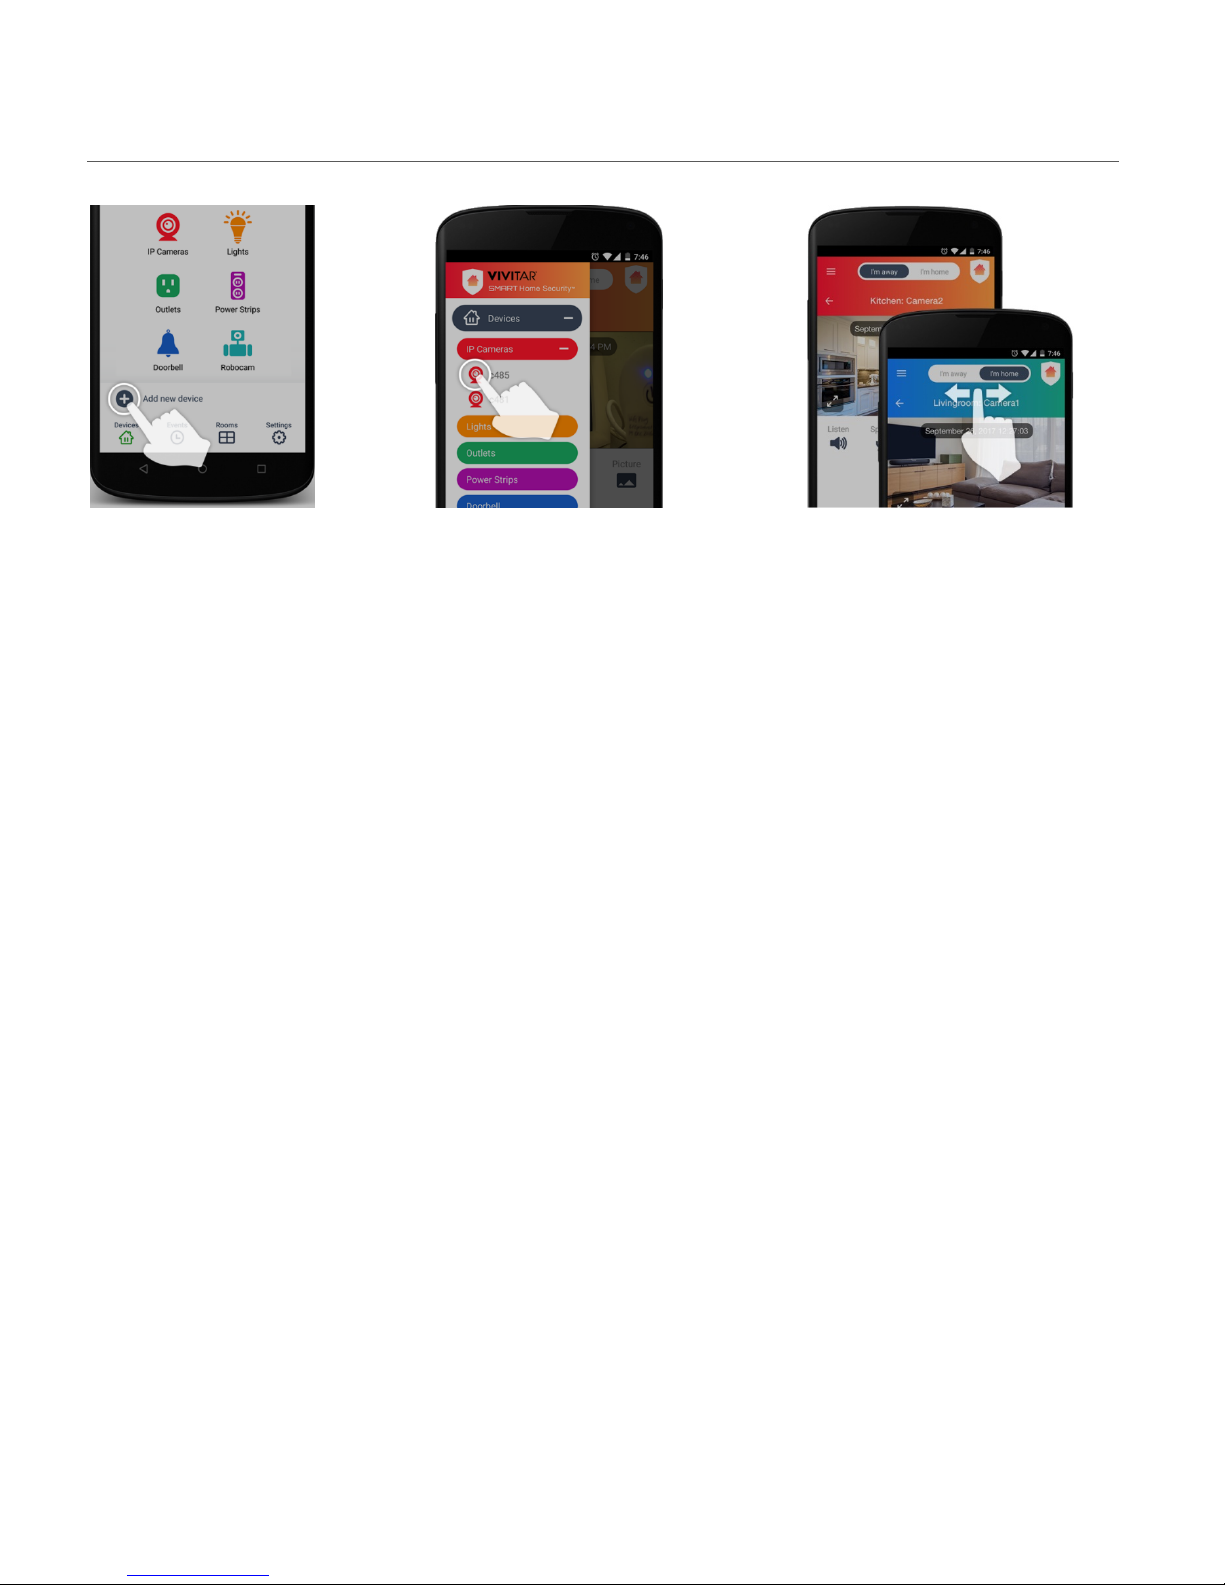
QUICK OVERVIEW
ADD NEW VIVITAR
SMART HOME DEVICES
Tap the ‘Add new device’
button on the Home screen
and follow the instructions
to add your new device.
CONTROLS ALL VIVITAR SMART
HOME DEVICES
Tap the ‘Main Menu’ button to easily
navigate to all the main functions of the
app. Tap ‘Devices’ to control your smart
lights, indoor and outdoor IP cameras,
electric outlets and more.
HOME & AWAY MODES
Switch the Home & Away modes when
you leave your home and when you
come back to automatically adjust all the
devices’ security settings in your home.
Page 15

14
INITIAL SETUP: CONNECTING YOUR CAMERA TO THE APP
NOTE:
• Your IP Camera is supported only on a 2.4GHz Wi-Fi Network. Before setup, please make
sure your mobile device is connected to a 2.4GHz Wi-Fi Network.
• Please follow the steps below to create your User Account. You must be logged into your
User Account to register and use your IP Camera.
INITIAL CAMERA AND DEVICE SETUP:
1. ENABLE MOBILE DEVICE WI-FI
Make sure to enable Wi-Fi on your smartphone or tablet via the settings of your mobile
device.
2. LAUNCH MOBILE APP
If you have not already launched the app, tap the Vivitar Smart Home Security
application icon on your smartphone or tablet to launch the installed app.
3. TUTORIAL
A quick overview through the app appears.
Scroll through the pages to view the tutorial or tap Skip to continue the initial setup.
NOTE: A window appears during the quick overview regarding the permission of receiving
Notifications, such as sounds, icon badges, alerts. Tap Allow to allow the “Smart Home
Security” app to send you notifications. This can be configured later via your phone
settings.
4. END USER LICENSE AGREEMENT
The End User License Agreement screen appears. Tap Agree & Continue to enter the
‘Devices’ Home screen and continue to the initial registration and adding your device.
5. INITIAL REGISTERATION – IP CAMERAS ACCOUNT
You must create a new IP Cameras Account or sign in to your existing account to use your
Page 16

15
device. To register and add a new IP Camera:
1) From the ‘Devices’ Home screen, tap Add New Device to enter the ‘Add new
device’ screen.
The list of Vivitar Smart Home Security devices appears.
2) Ta p IP Cameras to enter the list of Vivitar IP Cameras.
3) Ta p IPC-117 360 View Wi-Fi Cam to select and register your IPC -117 camera.
NOTE: Alternatively, you can select your IP Camera and continue to the registration by
scanning in the barcode on the back your camera. Tap Scan Barcode located on the
bottom of the first ‘Add new device’ screen that lists the Smart Home devices.
4) The ‘Register a new device’ screen appears.
You can create a new account or if you have already created an account, you can sign
in to your existing account.
NOTE: If you select ‘Cancel’ without signing in or creating a new account, you will not
be able to access your IP Camera via the app.
a) Create a New Account:
Tap Register to create a new Smart Home Security account.
You will be prompted to enter your email and a password for this account.
A registration verification code is sent to your email. You will then be prompted to enter
this verification code in the app. Enter the code then tap Verify to complete your new
account registration.
NOTE: You may be prompted to sign into your account to begin using your camera
after camera connection.
b) Sign in to Existing Account:
To sign in to your existing Smart Home Security account, tap Sign In from the ‘Register
a new device’ screen.
Enter your email, your account password and then tap Sign In.
Page 17

16
6. ADD NEW DEVICE
The ‘Add Device’ instruction screen then appears.
1) MAKE SURE YOUR CAMERA’S LED LIGHT IS BLINKING RED
Plug in your camera and wait a moment.
When the red LED light is blinking, tap Continue.
NOTE: The camera’s Wi-Fi can only be found when the camera’s LED indicator light is
red and is flashing. If you do not see this, then the camera will need to be reset. Please
follow these steps:
TO RESET YOUR CAMERA:
- Use the Setup tool (supplied) or a small pin to push and hold the ‘Reset/Set’ button
(hole) found on the back of the camera.
- Release the pin once you hear the camera emit ‘Reset Success’.
- Wait a few moments until the red LED light starts blinking, then tap Continue.
2) CONFIGURE NETWORK
The ‘Configure Network’ screen appears.
The name of the Wi-Fi network that your phone is connected to automatically appears.
Enter the Wi-Fi password and then tap Continue.
3) CONNECTING
The ‘Connecting’ screen appears displaying the connection progress. Please wait for the
indication that the camera has successfully been found and connected.
NOTE: The camera will emit the following once connected: ‘Wi-Fi Connect Success.
Internet Connected. Welcome using Cloud Camera’.
4) ADD CAMERA NAME AND LOCATION
The ‘Add to Account’ screen then appears displaying the camera image along with the
model name and UID number.
Enter the following details for your IP Camera:
Set Name: Enter a name for your camera.
Set Room: Tap to view the list of room names and select the appropriate room.
After setting your camera name and room, tap Done.
Page 18

17
7. CLOUD SUBSCRIPTION:
A message then appears notifying you that your device has been added successfully. Tap
Cloud Subscription to view your Cloud storage options or tap Next to proceed.
a) Tap Cloud Subscription: The Service Packages screen appears.
The Cloud Video Recording Subscription allows you to:
Automatically Store Video: Automatically save your recording of the last 14 days.
Video Alarm Notifications: Receive alarm notifications (sound detection, motion detection)
Secure Data: Save and secure your data on the cloud storage.
View and playback your saved events.
- Tap Subscribe to view the payment options for the Cloud Video Recording.
Follow the steps for payment completion.
NOTE: After your Cloud Subscription is confirmed you will have a 24/14 Cloud Recording
Subscription. It may take up to 15 minutes for the Cloud Subscription to take effect. You will
be charged monthly on the 28th of each month.
- After the Cloud Subscription has been confirmed, tap the Back button.
b) Tap Next to proceed to the Devices screen/Live IP Camera Mode screen without
subscribing to the Cloud Storage.
NOTE: If you choose to skip the Cloud Subscription, you can access the Cloud Subscription
at any time from the selected camera’s settings.
Page 19
18
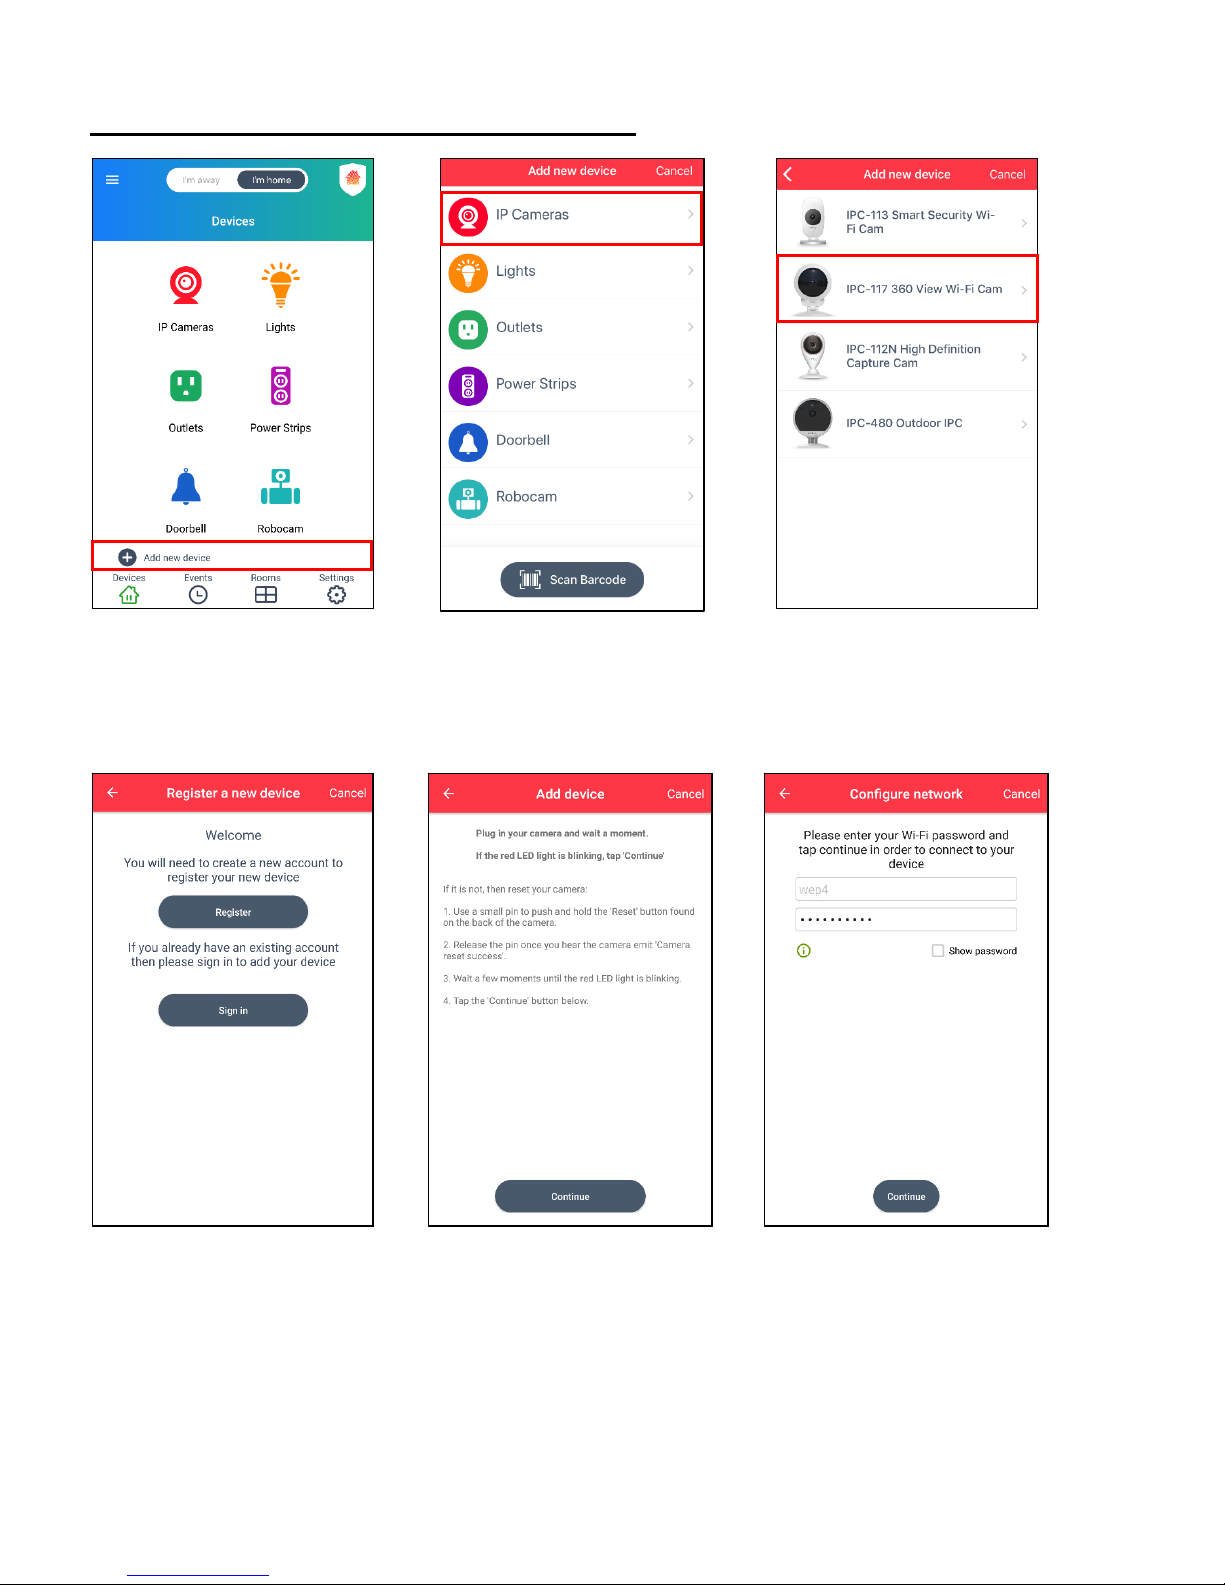
INITIAL REGISTRATION AND ADDING A DEVICE
4. Tap Register or Sign In 5. Follow the Add Device 6. Enter Wi-Fi password then
and follow the instructions instructions then tap Continue tap Continue
1. Devices: Tap Add device 2. Tap IP Cameras 3. Tap your IP Camera
Page 20
19
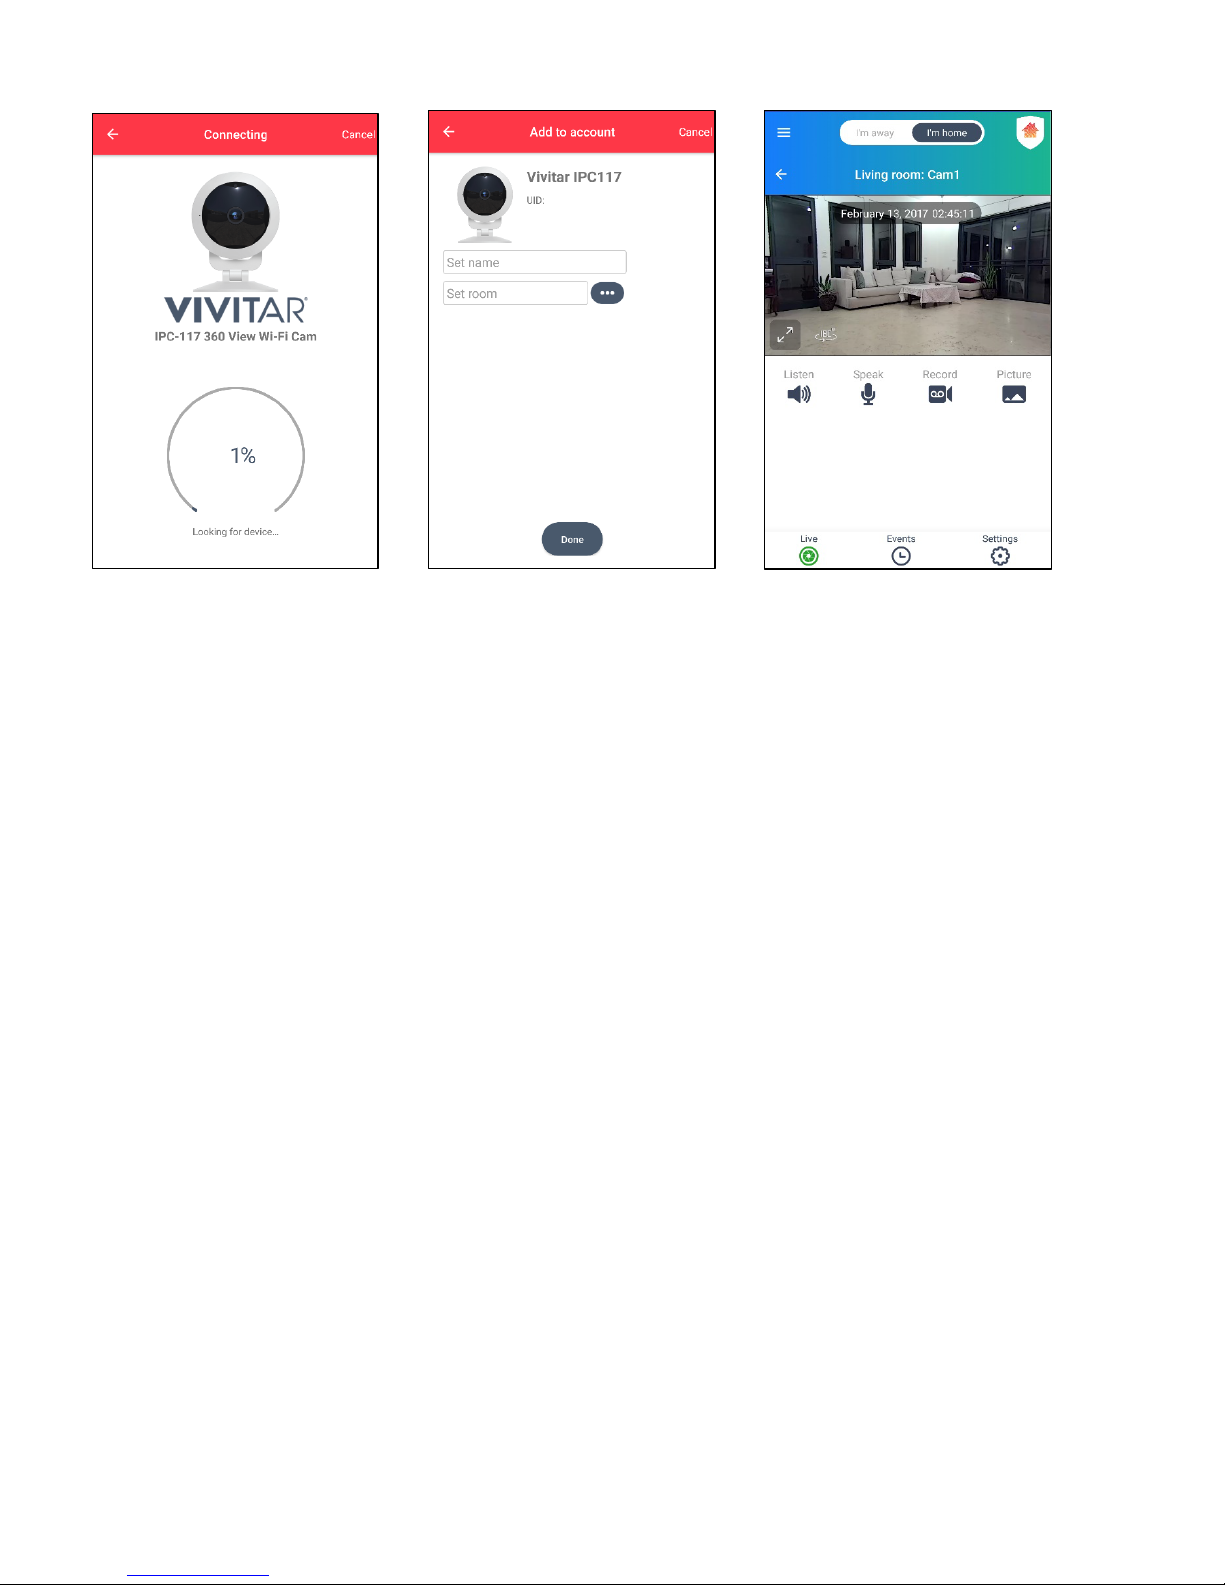
6. Connecting screen 7. Enter camera name and 8. Enter Live IP Camera View
tap Set Room to select
location, then tap Done.
NOTE: The Cloud Subscription
window then appears.
Follow the prompts to subscribe.
NOTE:
• After initial setup and after connecting additional IP Cameras, the ‘Devices’ home screen
appears. Tap IP Cameras to view the list of your connected IP Cameras. Then tap on a
video thumbnail view to open the selected camera in the ‘Live IP Camera’ view.
• When re-launching the app, the ‘Devices’ home screen appears by default.
Page 21
20
Using Vivitar Smart Home Security
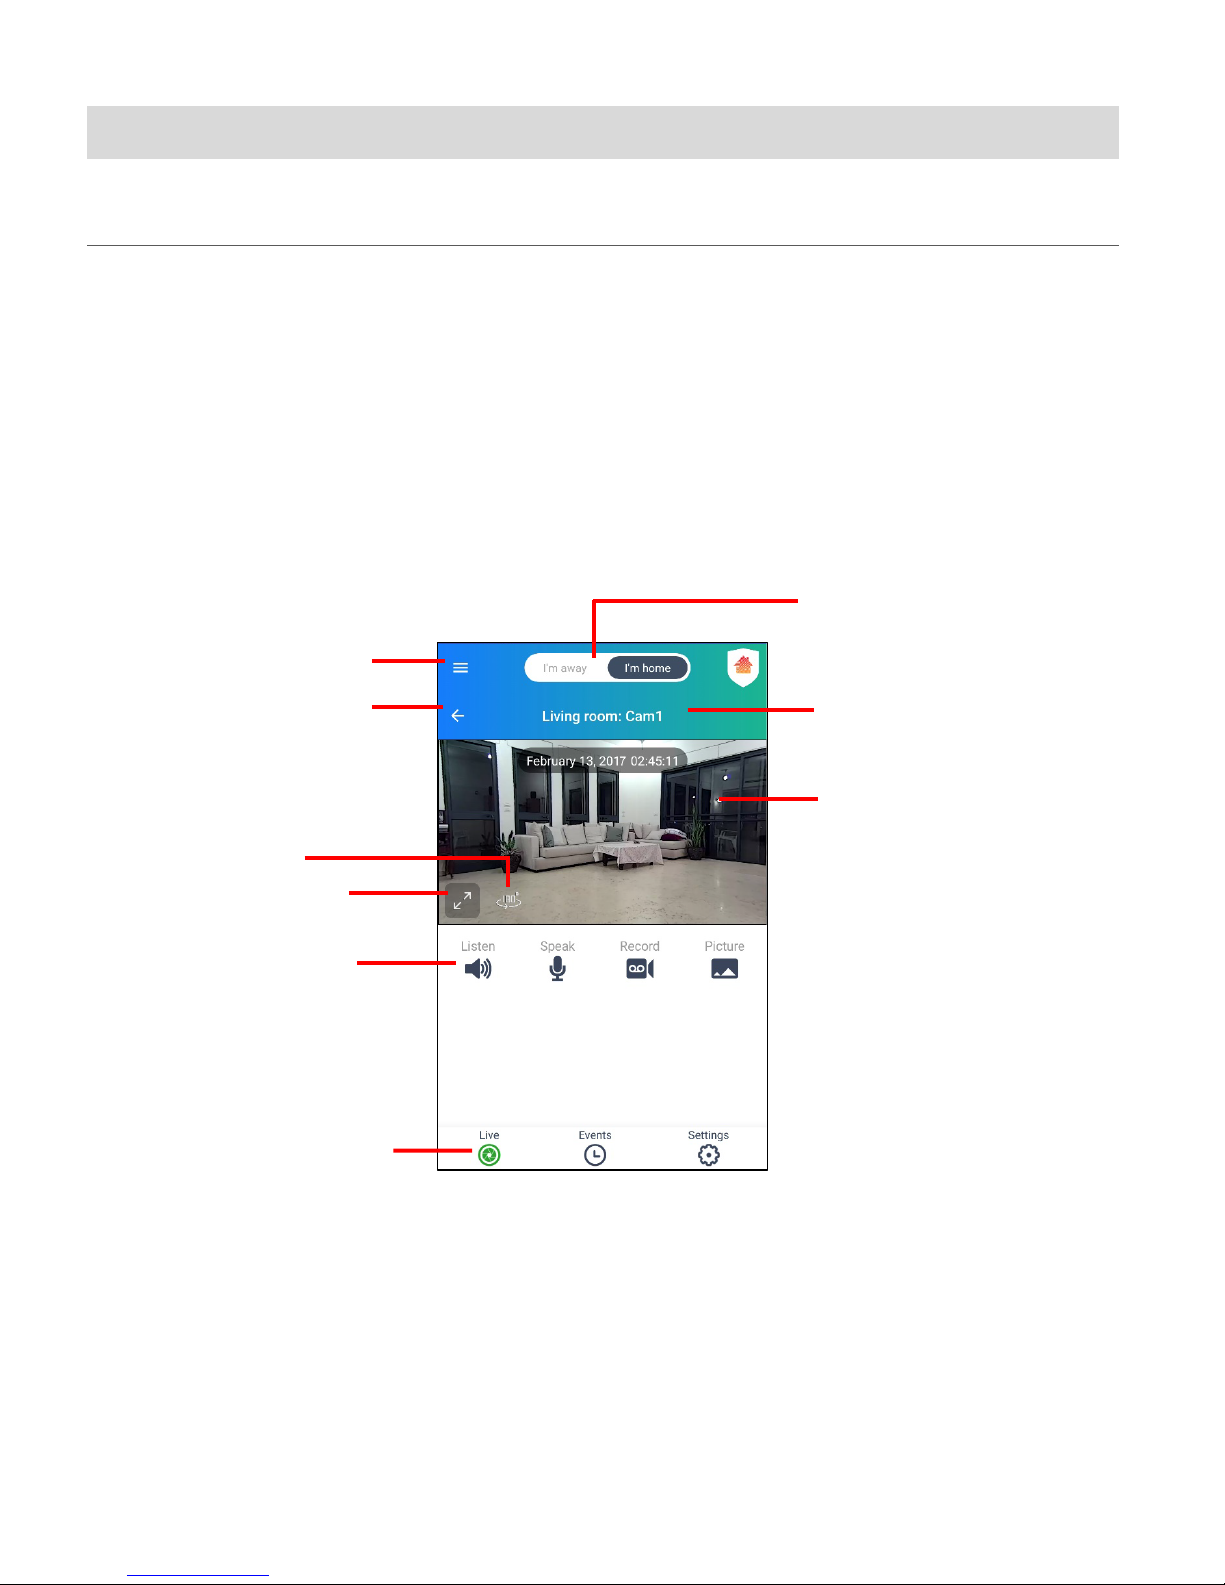
9. Streaming Live Video
5. Camera
6. Views/Settings
1. Main Menu
8. Camera Location:
Camera Name
7. Home / Away Mode
2. Back Button
4. Full Screen
View
3. Panoramic
View
LIVE IP CAMERA VIEW
The Live IP Camera view displays the live streaming video of your selected registered IP
Camera and camera options. You must be signed in and connected
NOTE:
• You must be logged in to your account in order to view your camera’s streaming video.
• To view your camera’s Events, please sign into or sign up for a Cloud Subscription.
(with date and time
displayed)
Controls
Page 22

21
The connected camera displays the following:
ITEM NAME FUNCTION
1 Main Menu Displays the Main Menu options:
Devices, Events, Rooms, Settings, Accounts, Help
2 Back Button Tap to go back to the previously viewed screen.
3 Panoramic View Tap to change to the Panoramic view.
4 Full Screen View Tap the arrows to switch between streaming video
display in portrait view and Full Screen Landscape vie w.
5 Camera Controls
(Manual)
Tap to activate the selected option(s):
Listen, Speak, Record, Picture
NOTE: These options can be used simultaneously.
6 View / Settings Tap to change between Live View, Events View or
Camera Settings.
7 Away / Home Mode Tap to toggle between the Away and Home Modes
8 Camera Location:
Camera Name
Displays the camera name and room name you entered
during the setup.
NOTE: You can change the names at any time via the
Camera ‘Settings’.
9 Live Camera View Streaming Video of your selected camera is shown,
with the date and time.
Page 23

22
LIVE IP CAMERA VIEW: OPTIONS
• Main Menu:
Tap the Main Menu button to open the list of menu options:
Devices, Events, Rooms, Settings, Accounts, Help
Please see the Main Menu section for more information.
• Home and Away:
Tap I’m away or I’m home at the top of the screen to switch between Home Mode and Away
Mode. Remember to adjust when you leave your home and when you come back to
automatically adjusts all your devices security settings in your home.
Please see the Home and Away Modes section for more information.
• Back:
Tap the Back button to go back to the previous screen.
• Full Screen:
Tap the Full Screen button to view the Live Streaming Video in full screen (landscape view).
Please see Full Screen Live Streaming Video Mode for more details.
• Panoramic View:
Tap the Panoramic button to view and capture the scene in Panoramic view.
• Listen:
Tap the Listen button to enable or disable listening to the incoming sound from your IP
Camera. The ‘Listen’ button turns green when enabled and the sound from the streaming
video can be heard.
NOTE: The app needs access to your microphone in order to use the ‘Listen’ function.
Please make sure to tap OK when the message appears to allow access to your device’s
microphone.
• Speak:
Tap the Speak button to enable or to disable speaking via the Vivitar Smart Home Security
app on your mobile device and having that sound emit through your IP Camera. The ‘Speak’
button turns green when enabled.
Page 24

23
NOTE: The app needs access to your microphone in order to use the ‘Speak’ function.
Please make sure to tap OK when the message appears to allow access to your device’s
microphone.
• Record:
Tap the Record button to start recording a video from the live stream. Tap again to stop
recording. The video is saved to your mobile device’s Photos app. The ‘Record’ button turns
green when enabled and a blinking, red record icon appears on streaming live video. The
elapsed recording time is also displayed.
NOTE: The app needs access to your photo library in order to save recorded videos. Please
make sure to tap OK when the message appears to allow access to your mobile device’s
photos.
• Picture:
Tap the Picture button to take a picture from the live stream. The picture is saved to your
mobile device’s Photos app. The ‘Picture’ button turns green when in use.
NOTE: The app needs access to your photo library in order to save captured photos. Please
make sure to tap OK when the message appears to allow access to your mobile device’s
photos.
• Bottom Navigation Bar Buttons:
Live: Tap Live to return to the selected Live IP Camera Mode.
Events: Tap Events to view the ‘Events’ screen for the selected device.
Settings: Tap Settings to view the ‘Settings’ screen for the selected device.
NOTE: The navigation bar button appears green when in the selected view.
The following features can work simultaneously: Listen, Speak, Record, Picture.
Page 25

24
MAIN MENU
Tap the Main Menu button to view the following menu options:
Devices +, Events, Rooms, Settings, Accounts +, Help
Tap on one of the menu items to view the selected menu’s options.
Page 26

25
DEVICES +
Tap the Main Menu
ONE DEVICE:
MULTIPLE DEVICES:
Tap the Main Menu button. Then tap Devices to go to the ‘Devices’ Home screen.
From the ‘Devices’ Home screen, tap IP Cameras to:
• Enter the Live IP Camera view (if you have only one registered IP Camera).
• Enter the ‘IP Cameras’ screen displaying the list of registered IP Cameras (if you have more
than one registered IP Camera). Select one of the video thumbnails to choose a camera to
view in Live IP Camera view.
button, Devices, then
tap IP Cameras.
If one IP Camera
is connected >
enter the Live IP
Camera view.
If Multiple IP Cameras
are connected > enter
the ‘IP Cameras’
Screen and tap a
thumbnail image to
select your camera.
The Live IP Camera
view then opens.
Page 27

26
Alternatively:
1. Tap the Main Menu button.
2. Then tap the + (plus symbol) by the Devices option to expand the list of devices within the
Main menu.
3. Tap the IP Cameras option or the + (plus symbol) by the IP Cameras option if you have
more than one device connected to expand the list of registered cameras.
NOTE: If there is only one device connected, the plus symbol does not appear.
4. If you have only one device connected, after tapping on IP Cameras from the Menu list, the
Live IP Camera view appears.
If you have more than one camera connected, after tapping on IP Cameras from the Menu
List, the IP Cameras screen appears. Tap the camera name/thumbnail you would like to
select and see that camera in Live Camera view.
NOTE:
- Tap Devices > IP Cameras - (the minus symbol) to close the expanded list of IP Cameras.
- When in other screens, tap the Devices navigation button to open the ‘Devices’ home
screen.
Page 28

27
The ‘Devices’ list includes:
IP Cameras, Lights, Outlets, Power Strips, Doorbell, Robocam
NOTE: List of devices subject to change as per update of new devices.
1) IP Cameras
Tap IP Cameras to go to the ‘IP Cameras’ screen or directly to the Live Camera view.
NOTE:
• If you have only one registered IP Camera, the IP Live Camera view opens. If you
have more than one registered IP Camera, the list of registered IP Cameras
appears in the ‘IP Cameras’ screen. Select one of the video thumbnails to select a
camera to view in Live IP Camera view.
• The plus symbol + appears by the IP Cameras menu item once you have added a
camera. Every new camera is added to the IP Cameras menu as a separate item.
You can also tap the + (plus) on the IP Cameras menu option to expand the IP
Camera list and view your list of registered IP Cameras. Ta p on a camera from the
list to select it and open the Live Camera view of the selected camera.
Page 29

28
2) Lights
Tap Lights to access and control your registered light bulb(s).
NOTE: Please sign in to or create an account for your light bulb(s).
3) Outlets
Tap Outlets to access and control your registered outlets(s).
NOTE: Please sign in to or create an account for your outlet(s).
4) Power Strips
Tap Power Strips to access and control your registered power strip(s).
NOTE: Please sign in to or create an account for your power strip(s).
5) Doorbell
Tap Doorbell to access and control your registered doorbell(s).
NOTE: Please sign in to or create an account for your doorbell(s). If you have
registered your IP Camera, this account is also active for your Doorbell.
6) Robocam
Tap Robocam to access and control your registered Robocam(s).
NOTE: Please sign in to or create an account for your Robocam(s).
Page 30

29
EVENTS
Events are video recordings captured based on the sound/motion detection recorded by your IP
Camera. The video recordings are based off on your Home & Away motion detection and sound
detection settings.
Your events can be saved to your SD Card and to your Cloud.
1. Tap Events from the Main Menu to open the ‘Events’ screen.
NOTE: Alternatively, if you are viewing the Live IP Camera Mode of a selected camera, you
can tap on the Events button on the bottom bar to open the ‘Events’ screen for that
specific camera.
2. The list of registered cameras appears. Each camera appears listed as per
Room Location Name: Camera Name.
3. Tap on the camera for which you would like to see the list of captured Events.
4. The ‘Events’ screen opens, displaying the list of recorded events as per SD Card or Cloud.
The Events button on the bottom navigation bar button is selected, indicating that the
Events view is active.
5. There are two options for Events: SD Card, Cloud
- Tap Cloud to view all the list of all the camera’s events. You are required to have a Cloud
Subscription to view these events.
- If you have inserted an SD Card, then you can also tap SD Card to view the events.
NOTE: The events are automatically saved to the Cloud. If you have inserted an SD
Memory Card, then the events are also saved to the SD Card.
6. Scroll down to see all the events listed by order of the date the video was captured.
Each Cloud event thumbnail shows the following regarding the captured event:
Date, Time, Type of Detection – sound or motion.
7. Tap on an event thumbnail in the list to view it in the ‘Events Playback’ screen.
Page 31

30
Events Playback Screen
The Events Playback screen plays back the selected captured sound or motion event.
The Events Playback Screen displays the following information:
• Camera Location: Name
• Type of detection: Sound detection or Motion detection
• Date and Time. The time progression is shown as the video is played.
• Playback screen: Displays the recording of the video/sound event.
- Event Type: An icon is displayed on the video indicating whether it is a Cloud or
SD Card event.
- Full Screen Playback: Tap the arrows to display the playback in full screen
landscape view. The date and elapsed time appears. Tap the capture button to take a
picture or record a video of the displayed event.
• Video Controls: Play / Pause
Tap the controls to Play or Pause the event.
• Time duration of the captured video – with a slide control to view a specific time within the
recorded time.
• Picture: Tap on the Picture button to take a picture from the recorded event as you
play the event. The photo is saved to your phone’s Photos app.
• Video: Tap on the Record button to save a video of an event or a selection of the
event that is currently playing.
- Tap the Record button to start saving the video. The Record button turns green. A red
record indicator blinks with the elapsed recording time next to it, indicating that the
recording is in progress.
- Tap the Record button again to stop recording the video. The Record button turns gray.
The video is saved to your phone’s Photo app.
NOTE: Newly recorded cloud events may take a few minutes to become available for playback.
If the new recording does not immediately playback, please wait a few moments and then
playback the event.
Page 32

31
Cloud Events: Cloud Video Recording Subscription Events
A Cloud subscription is required to save and play the Cloud Events.
The Cloud Video Recording Subscription provides the following features:
• Automatically saves and stores the recordings of the last 14 days.
• Sends alarm notifications for sound detection and/or motion detection (as per your settings).
• Secures your data in the cloud storage.
NOTE: To subscribe and view your Cloud Events, tap on Settings > Cloud Subscription.
Follow the instructions to purchase and activate your Cloud Subscription.
SD Card Events
Motion and sound detection events are automatically saved to the SD card and are both shown
as ‘Alert’ events.
Coming Soon: Scheduled SD card recording time via the selected camera’s settings.
Cloud Events Screen SD Card Events Screen
Page 33

32
ROOMS
Each camera includes the room name as per the room name added during initial setup or via the
camera’s settings. The room name options include:
Kitchen, Office, Living Room, Dining Room, Bathroom, Bedroom, Hallway, Cellar, and New
Room (enter custom room name)
1. Tap Rooms from the Main Menu to open the ‘Rooms’ screen.
2. The list of rooms (room name and icon) per your registered camera(s) appears.
3. Tap on a room to open the list of camera’s associated with the selected room.
Each camera appears as a video thumbnail in the selected room screen.
Each thumbnail displays the following:
- Room Name: Camera Name
- Camera Status: ON (camera is streaming live video) or OFF (camera is offline)
- Menu Options: Tap on the Menu icon to open the window with the following options –
• Remove Device – Tap to remove the selected IP camera from the app.
• Live – Tap to open the ‘Live IP Camera’ screen.
• Events – Tap to open ‘Events’ screen for the selected IP Camera.
• Settings – Tap to open the ‘Settings’ screen for the selected IP Camera.
• Share Device – Tap to open the ‘Share’ screen for the selected IP Camera.
4. Tap on a video thumbnail to go to the camera’s ‘Live IP Camera’ screen.
NOTE: To change the camera’s room name, tap on Settings > Room. Tap to select the room
name from the list or tap on New Room to enter a custom name for the camera’s room name.
Page 34

33
List of room(s) of your registered camera(s) Display of your registered camera(s) for the
selected room
Page 35

34
SETTINGS
Settings displays the camera information and settings for the selected camera.
1. Tap Settings from the Main Menu to open the ‘Settings’ screen.
NOTE: Alternatively, tap the Settings button on the bottom navigation bar to open the
‘Settings’ screen or to go directly to the settings of your selected IP Camera while in Live or
Events mode.
2. The list of registered cameras appears on the ‘Settings’ screen.
3. Tap on your IP Camera to open the ‘Settings’ screen specific for your selected IP Camera.
The Settings button on the bottom navigation bar is selected and changes to green.
4. The following information appears in the camera’s Settings screen:
• Camera Room: Camera Name
The room and camera name are displayed on the top of the screen.
• UID:
The IP Camera’s UID is shown.
• Name:
The IP Camera’s name is shown. To view and edit the name, tap on ‘Name’ to open the
‘Name’ screen. To edit the name, tap on the name field, type in the desired camera
name and then tap Rename (Android) or Done (iOS) to save.
• Room:
The IP Camera’s room name is shown. Tap to open the screen displaying the room
options. The currently selected room appears with a check mark. To change the room,
tap on the desired room or enter a custom room name (New Room), then tap the back
button to save and return to the previous screen.
Page 36

35
• Owner:
The account name (email) appears. Tap to open the ‘IP Cameras & Doorbell’ Accounts
screen. Please see Accounts + for more details.
NOTE: This is not available for shared devices.
• Model:
The Vivitar IP Camera model name appears.
• Could Subscription:
Tap to open the ‘Service Packages’ screen for your Cloud Subscription.
A Cloud subscription is required to save and play the Cloud Events.
The Cloud Video Recording Subscription provides the following features:
- Automatically saves and stores the recordings of the last 14 days.
- Sends alarm notifications for sound detection and/or motion detection (as per your
settings).
- Secures your data in the cloud storage.
NOTE: A shared camera does not allow access to Cloud Subscription.
• Emergency Contacts:
Tap to view your list of contact numbers for the Police, Fire Department, Emergency, and
any added custom contacts.
These will act as speed dial numbers and will appear in the Alerts you’ll receive from the
application.
NOTE: Please select OK/Allow to allow the app access to your phone’s contact when
prompted.
Page 37

36
• Advanced Settings:
Tap to view your – Device Settings, Security Settings, set Date/Time, and SD Card
settings.
DEVICE SETTINGS
1) Frequency: Tap Frequency from the Advanced Settings list to view this setting. To
change the setting, tap on the desired option, then tap the back button to save and
return to the previous screen. The Frequency options include:
50 Hz; 60 Hz
2) Flip & Mirror: Tap Flip & Mirror from the Advanced Settings list to view this setting.
To change the setting, tap on the desired option, then tap the back button to save
and return to the previous screen. The Flip & Mirror options include:
- Normal: The live video streaming is shown identical to what is seen.
- Mirror: The live video streaming is shown reversed, as in a mirror (flipped
horizontally).
- Flip: The live video streaming is shown flipped 180 degrees (appears upside
down).
- Flip & Mirror: The live video streaming is shown flipped 180 degrees (appears
upside down) and mirrored.
3) Video Quality: Tap Video Quality from the Advanced Settings list to view this
setting. To change the setting, tap on the desired option, then tap the back button
to save and return to the previous screen. The Video Quality options include:
Low, Medium, High, Max (1080p)
SECURITY
‘Security’ displays the current setting (On or Off) for:
Motion Detection and Sound Detection.
The security settings cannot be set in this screen, they are displayed for your reference.
The Security options can be viewed and changed in the Home & Away settings. Please
return to the main Settings screen and then tap on Home & Away to set the Security
options.
Page 38

37
DATE & TIME
Tap Sync time with my phone to sync your camera time with your phone. A message
appears in the app once successfully synced.
SD CARD
1) Schedule SD card recording: Coming Soon (currently not available).
2) Storage: ‘Storage’ displays the amount of available and total amount of space on
your installed Micro SD Memory card.
3) Format SD Card: Tap ‘Format SD Card’ to erase and format the installed Micro SD
Memory card. A message appears to confirm with the following options:
- Cancel: Tap Cancel to return to the settings without formatting the SD card.
- Format: Tap Format to format the SD Card. A message appears that the SD card
has been formatted successfully. Please use with caution – this feature
permanently deletes all the captured SD Card Events.
• Home & Away:
Tap to open the Home & Away options.
Select your settings for capturing events while you are home and while you are away.
Tap Home / Away to open the options for each setting. The Home & Away detection
options include:
- Motion Detection:
Home: Off, Low, Medium, High
Away: Off, Low, Medium, High
- Sound Detection:
Home: Off, Low, Medium, High
Away: Off, Low, Medium, High
NOTE:
- In the Advanced settings screen under ‘Security’, the settings selected in the Home &
Away settings are displayed, but cannot be changed. Please select Home & Away to
change the motion/sound settings for capturing events while you are at home or away
from home.
Page 39

38
- To apply your Home & Away settings, please toggle the I’m away / I’m home switch at
the top of your screen.
• Firmware:
The IP Camera’s firmware version number is displayed.
• Restart:
Tap Restart to restart your IP Camera.
A message appears to reconfirm. Tap Cancel to return to the settings without restarting
or tap Restart to restart your IP Camera.
• Restore factory settings:
Tap to restore your IP Camera to the factory’s original settings.
A message appears to reconfirm. Tap Cancel to return to the settings without restoring
the factory settings or tap Reset.to restore the settings to the default factory settings.
• Remove device:
Tap Remove device to remove the IP Camera from your account.
A message appears to reconfirm. Tap Cancel to return to the settings without removing
the camera or tap Remove.to remove the IP Camera from your account. If you have
selected to remove the camera, a message appears once the device is successfully
removed.
Page 40

39
ACCOUNTS +
You must have an account to use your IP Camera.
After creating your account, your IP Camera is connected to this specific user account and you
must be signed into this account when using the app with this camera. Your user account allows
you access to the Cloud Subscription from Settings.
1. Tap the Main Menu button to view the menu options.
2. Tap the Accounts option, to expand the Accounts list and tap IP Cameras & Doorbell.
NOTE: If you would like to add your Vivitar Lights & Outlets to the app, please register a
separate account for those devices.
3. NEW USER/SIGN IN:
If you are not signed in to your account or do not have an account, the ‘Sign In’ screen
appears. The options include: Sign in, Create account.
- SIGN IN: If you already have a registered device, please enter your email and account
password, then tap Sign in. If you have forgotten your accounts password, then please tap
Forgot password to assist with signing in.
- CREATE ACCOUNT: If you do not have an account, tap Create account and follow the
prompts to register your device.
4. SIGNED IN REGISTERED USER:
If you have signed in to your account, the ‘Accounts’ screen opens.
The IP Camera account is listed.
Tap the account to open the ‘IP Cameras’ screen.
The following information appears: Account name, Account QR code, Emergency Contacts,
Messages, Share devices, Sign Out
Page 41

40
• Account Name
Your account name (your email) is displayed.
• QR Code
The QR Code contains your account name information so that another user can scan
this code from their mobile device in order to share cameras.
• Emergency Contacts
Tap to open the ‘Emergency Contacts’ screen.
Please set the Emergency contact numbers in the fields. These will act as speed dial
numbers and will appear in the Alert notifications window you will receive from the Smart
Home Security application.
The Emergency contact information includes:
- Police: Tap to enter the phone number for the police.
- Fire Department: Tap to enter the phone number for the fire department.
- Emergency: Tap to enter the phone number of the person you would like to contact in
case of emergency or tap to select the emergency contact number from your phone’s
contact list.
- Add Custom Contact: Ta p t o select a contact to add.
NOTE: The name and number for each contact can be edited or removed by tapping on
the contact or the edit button by the contact.
Page 42

41
ALERT NOTIFICATIONS – CALL EMERGENCY CONTACT:
When you are signed into your account and have your camera connected, your mobile
device will detect motion and sound according to the level of detection selected in the
camera’s Home & Away settings. Once motion/sound is detected, your mobile device will
receive an alert notification.
1) Tap on the notification to open the Vivitar Smart Home Security app with the Alert
notification message displayed.
2) The options in the Alert notification message include:
a) Emergency call: Tap on Emergency call to open the list of emergency numbers.
NOTE: For this list to appear, please make sure to enter the phone numbers in the
‘Emergency Contacts’ screen from the Accounts > IP Cameras option.
Tap on an emergency contact from the list (Police, Fire Department, Emergency
Contact, or added custom contact) to immediately call that contact or tap Cancel
to exit the list.
b) Close Window (X): Tap on the X to close the alert message window.
IMPORTANT: When using the app with Apple iPads or Android tablets, the motion or
sound detection alert message window does not include the option to make emergency
phone calls from within the app. The ‘Emergency call’ option to select and immediately
call the emergency contact (Police, Fire Department, or Emergency contact) is not
available as these mobile devices are unable to make phone calls.
Page 43

42
• Messages:
Tap to open the ‘Messages’ window. This displays all messages related to sharing
your IP Camera or Doorbell device and messages related to your Cloud
Subscription.
- Shared Device Message: The message type (Device Share) and date/time are
shown at the top of the message. The account name/camera name that is shared
with you is displayed, along with the shared status - either Accepted or Declined.
- Cloud Subscription Message: The message type (Cloud Subscription) and
date/time are shown at the top of the message. Once you have added your Cloud
Subscription, the message appears showing the subscription is confirmed with a
summary of the subscription.
- To Delete Messages: If you would like to delete all the messages, tap Clear All.
- Message Notification: When a message is received, a red circle with the number of
messages received appears on the Main Menu. Tap the Main Menu to expand the
menu options. The red circle with the number of messages received is also shown
on the Accounts > IP Cameras menu item. Tap IP Cameras to enter the ‘IP
Cameras’ screen. The ‘Messages’ option also appears with a red circle and the
number of messages received. Tap on Messages to view the messages(s). The
latest unread message(s) appears with a red circle by the message name. The
messages already seen appear with a black circle by the message name.
Page 44

43
• Share devices:
The ‘Share devices’ option allows you to share your IP Camera with another user.
1) Ta p Share devices to open the list of devices registered to your account that are
available to share.
2) Tap on your IP Camera.
3) The ‘Share’ window appears with the following information needed:
RECIPIENT ACCOUNT:
Enter your recipient’s account (email) or scan in the recipient’s QR Code (as seen
in their app’s Accounts > ‘IP Cameras’ screen.
4) SHARE:
Once you have entered the recipient’s account name, tap Share.
RECIPIENT SHARE NOTFICATION: The recipient receives a ‘Device Sharing’
notification. They need to tap the notification to open the message or access the
message from the Accounts > ‘Messages’ screen. In this ‘Device sharing’
message, the recipient has the following options:
- Decline: The recipient can tap Decline to reject the sharing of your camera.
- Accept: The recipient can tap Accept to accept and begin sharing your device.
5) ‘SHARE TO’ L IST:
After tapping Share, the ‘Share’ screen in your app now displays the list of ‘Shared
to” devices which shows the recipient’s account name.
DELETE: If you would like to remove the shared account, tap on the Delete
button by the Shared account name, then tap Remove to delete the account.
6) MESSAGES:
- A message is received once the recipient has agreed or declined the share
request.
- The recipient also receives a message displaying the Device sharing status to be
either Accepted or Declined – as per the recipient’s selection.
7) Once your IP Camera is shared with the recipient, the recipient now is able to
select your camera from the ‘Devices > IP Cameras’ screen. They can view the live
streaming video from your camera, record video and take pictures.
Page 45

44
• Sign out
NOTE: The recipient cannot change any of your camera settings. The recipient
cannot view your captured Cloud Events nor SD Card Events.
See Sharing IP Cameras for more information.
Tap Sign out to sign out of your IP Camera account.
A message to reconfirm appears. Tap Cancel to remain signed in or tap Sign out to sign
out.
Page 46

45
HELP
The Help opens the Help menu.
Tap Help from the Main Menu to open the ‘Help’ window. The following list of options appears:
1. About:
Tap About to open the window displaying the Smart Home Security copyright and version
number.
Tap Cancel to exit the ‘About’ window.
2. Help:
Tap Help to open the online Help.
3. User Manual:
Tap User Manual to open the online User Manual.
4. License:
Tap License to view the License Agreement.
5. Cancel:
Tap Cancel to exit the ‘Help’ window.
Page 47

46
NAVIGATION B AR
The bottom navigation bar allows you to quickly and easily access the controls for your Smart
Home Security. When selected, the navigation button appears in green.
Devices:
Tap Devices to open the Devices screen. The Devices screen displays the list of Vivitar Smart
Home Security devices: IP Cameras, Lights, Outlets, Power Strips, Doorbell, Robobcam.
See Devices for more information.
Events:
Tap Events to open the Events screen. If you have more than one registered camera, the list of
cameras appears. Tap on one of the cameras from the list to open the ‘Events’ screen for the
selected camera. If you have only one registered camera, that camera’s ‘Events’ screen
automatically opens.
The ‘Events’ screen displays the video recordings captured as per the sound/motion detection
recorded by your IP Camera. The video recordings are based on your Home & Away motion
detection and sound detection settings. Your Events can be saved to your SD Card and to your
Cloud. See Events for more details.
Rooms
Tap Rooms to open the Rooms screen. The Rooms screen displays the room that your camera
is connected to. If you have multiple cameras registered and connected or shared to the app,
then the room name and icon for each camera is shown.
NOTE: Each camera includes a room name as per the room name added during initial setup or
via the camera’s settings. The room name options include: Kitchen, Office, Living Room, Dining
Room, Bathroom, Bedroom, Hallway, Cellar and New Room (custom added room name)
See Rooms for more information.
Settings
Tap Settings to open the settings screen for your connected camera. See Settings for more
information.
Page 48

47
IP CAMERAS SCREEN
1. Tap the Devices button on the bottom navigation bar, then tap IP Cameras.
2. One of the following screens will appear:
- Live IP Camera screen: If you have only one camera connected, the Live IP Camera
screen opens.
- ‘IP Cameras’ list screen: If your camera is offline, or if you have more than one camera
connected, then the IP Cameras Screen opens.
3. The ‘IP Cameras’ screen displays a Thumbnail image for each connected camera.
4. Each camera Thumbnail displays the following:
• Camera Room : Camera Name
Your registered camera room and camera name appear below the thumbnail.
• On / Off
If your camera is online, the ON indicator appears on the thumbnail.
If your camera is offline, the OFF indicator appears on the thumbnail.
• Shared
If you have added a shared camera, the shared icon indicator appears on the
thumbnail of the shared camera.
• Menu
The menu button appears below the thumbnail image by the camera name.
The menu options include:
- REMOVE DEVICE: Tap to remove the device from the app. You will be asked to
reconfirm. Tap Remove to remove the device or Cancel to exit without removing the
camera.
- RECONNECT: Tap to reconnect your camera if Wi-Fi has been disconnected. Make
sure your mobile device is connected to Wi-Fi.
- LIVE: Tap to enter Live IP Camera mode.
- EVENTS: Tap to enter the Events mode. Note that this option is not available for a
camera that is being shared.
Page 49

48
- SETTINGS: Tap to enter the selected camera’s settings.
- SHARE DEVICE: Tap to enter the Share screen and follow the prompts to share your
camera with another person. Note that this option is not available for a camera that is
being shared.
- CANCEL: Tap to exit the menu options.
5. ‘IP Cameras’ screen - Navigation Options:
• Back: Tap the Back button to return to the Devices. Screen.
• Add Device: Tap Add Device to open the ‘Add new device’ screen and add a new
IP Camera from the list that appears.
• Navigation Bar: Tap one of the following options on the Navigation bar to enter the
selected screen: Devices, Events, Rooms, Settings.
• Main Menu: Tap the Main Menu button to open the main menu options.
6. Tap a Thumbnail to enter the Live IP Camera view for the selected camera.
NOTE: Please make sure the camera is connected. The ON symbol appears on the
Thumbnail when it is connected.
Page 50

49
DEVICES
The ‘Devices’ home screen displays the list of device types that you can control and use via the
Vivitar Smart Home Security app.
These devices include: IP Cameras, Lights, Outlets, Power Strips, Doorbell, and Robocam
IP CAMERAS
Each connected IP Camera includes the following features:
• Live View:
Tap to view the selected camera in Live IP Camera view. This option is available once
you have connected your camera and have entered the Live IP Camera view.
See Live IP Camera view for more information.
• Events View:
Tap to view the selected camera’s list of SD and Cloud Events.
See Events for more information.
• Rooms View:
Tap to view the screen with connected device list shown by the room name.
See Rooms for more information.
• Settings View:
Tap Settings to view the ‘Settings’ screen for the selected device.
See Settings for more information.
• Home and Away Modes:
Switch the Home & Away modes when you leave your home and when you come back to
automatically adjusts all your devices security settings in your home.
See Home & Away Modes for more information.
• Share Device:
Share your IP Camera with another user.
See Sharing IP Cameras for more information.
Page 51

50
SHARING IP CAMERAS
You can share your IP Camera with another user. Your shared device can be used for viewing
your IP camera’s live stream.
SHARE YOUR DEVICE
1. To share your IP Camera with someone, please follow the steps below:
tap the following: Menu > Accounts > IP Cameras > Share devices
2. The ‘Share devices’ screen appears.
Tap on a device name to select it and to set up the sharing with another user.
NOTE:
Connected IP Cameras appear in the camera list with a red IP Camera icon.
Those IP cameras that are not connected appear with a black IP Camera icon.
3. After the IP Camera is selected, the ‘Share’ window opens.
Enter the other user’s account name (registered email) and tap Share.
Alternatively: Go to the other user’s app, tap Menu > Accounts> IP Cameras and scan their
bar code. This automatically identifies the user’s name (email). Then tap Share.
4. The other user will get a Device sharing message in Menu > Accounts > IP Cameras >
Messages.
- The other user will need to view this message in order to accept or decline the device
sharing. The other user must tap Accept to see your shared IP Camera in
the Devices screen and in the Live IP Camera view.
- After accepting the device sharing, a new message is displayed in the user’s messages that
shows you have shared a device with him/her and that the status is ‘Accepted’.
You also receive a message that your device is being shared.
- The new shared device will appear on the user’s ‘Devices’ screen.
5. In your ‘Share’ screen, the other user’s name (email) appears in the ‘SHARED TO’ list.
6. In the ‘IP Cameras’ screen the shared camera’s video thumbnail is shown with the SHARED
icon indicator .
Page 52

51
REMOVE SHARED DEVICES
To remove sharing your device with another user:
1. Tap Menu > Accounts > IP Cameras > Share devices.
2. The ‘Share devices’ screen opens.
Tap on the device name that is being shared.
3. The ‘Share’ screen opens.
Select the device name from the SHARED TO list and tap the X (Android) or (iOS)
remove button.
4. The other user will get a Device sharing message informing him that the shared device was
removed. This message can be found in Menu > Accounts > IP Cameras > Messages.
Page 53

52
TO SHARE YOUR DEVICE:
Share devices
1. Tap Menu. 2. Tap Accounts.
3. Tap IP Cameras.
4. Tap
.
5. Tap the IP Camera you
would like to share.
6. Enter the recipient’s
account (email).
Alternatively, tap on the
Bar Cod icon to scan in the
recipient’s Account Bar
Code as seen in his/hers
Menu > Accounts >
IP Cameras screen.
Page 54

53
7. The SHARED TO list
appears with the recipient’s
account (email).
NOTE: To stop sharing
your camera with the
recipient, tap
the X (Android) or
(iOS) button then tap
Remove.
8. The recipient receives a
message. The recipient
must tap Accept to be
able to view your camera
in Live IP view.
9. Once the recipient accepts the
device sharing, he/she receives
an updated message showing
that the device sharing status is
‘Accepted’.
You also receive a message that
your device is being shared.
10. The recipient’s ‘IP Cameras’
screen shows your shared IP
camera in the thumbnail list of
devices.
The shared camera thumbnail
displays the current camera
status (OFF or ON) and the
Shared Device icon:
Page 55

54
RECONNECTING DEVICES
RECONNECTING: WHEN USING THE SAME WI-FI
To reconnect your IP Camera to the Vivitar Smart Home Security app, please check that you are
using the same Wi-Fi configuration as was used to set up your IP Camera.
1. Make sure your IP Camera is plugged in and powered on.
2. Launch the Vivitar Smart Home Security app.
3. Tap IP Cameras from the ‘Devices’ home screen.
4. To select your IP Camera, tap your IP Camera’s video thumbnail as shown in the ‘IP
Cameras’ screen.
5. The connection should automatically refresh, and the Live IP Camera view screen opens.
RECONNECTING: WHEN CHANGING TO A DIFFERENT WI-FI
To reconnect your IP Camera to the Vivitar Smart Home Security app when you change to a
different Wi-Fi, please LONG RESET the camera using the reset tool so that the Wi-Fi
configuration to connect the devices can be reset.
This means that when you place your already added IP Camera in a location with a different Wi-
Fi than the one used when the device was added, please follow the steps below to long reset
your IP Camera:
LONG RESET
1. Plug in your IP Camera and make sure it is powered on.
Please remember that this Long Reset is needed only when resetting the camera’s Wi-Fi to a
new Wi-Fi. It is used when the current location has a Wi-Fi that is different than the one used
to add the camera initially.
2. About 5 seconds after your IP Camera has been plugged in, the camera emits ‘Please wait
for Wi-Fi Connecting’ and the blue LED light blinks.
3. Use the Setup Tool (supplied) or a small pin to press the RESET button (hole) on the back of
the camera. Press and hold the reset button for approximately 30 seconds.
Page 56

55
- After about 5 seconds the camera emits ‘Reset Success’.
- Very important: Please make sure to continue holding and pressing the button to
progress with the Long Reset that allows you to reset the Wi-Fi.
- After about 30 seconds, the camera emits ‘Please use mobile phone for Wi-Fi
configuration. Reset success.’
- Please release the Reset tool.
4. The LED light begins blinking red which indicates the reset is complete and the camera is in
standby mode, ready to be connected. The camera emits again ‘Please use mobile phone for
wi-fi configuration.’
5. Please launch the app and select your previously added camera from the IP Cameras
screen.
6. If the app shows that your IP Camera is still offline, please remove your IP Camera and add it
again. Please see the Troubleshooting section below with details on how to remove the
camera and add it again with the new Wi-Fi.
RECONNECTING: TROUBLESHOOTING
Q: I cannot reconnect to my IP Camera after trying to reconnect as outlined above or
after a factory reset.
A: If you tap on your camera’s video thumbnail from the IP Camera screen to reconnect as
described above or if you do a factory reset via the application and there is no connection
with your previously added camera, a window will appear in the app that shows your
‘Device is offline’. The following options appear in the window: OK/Cancel and Remove. If
you have checked that your camera is plugged in and powered on, then please proceed
with the steps below to remove your camera and add it again.
REMOVE CAMERA FROM APP
1. Ta p Remove from the window option that appears after tapping on the video
thumbnail.
NOTE: You can also remove your IP Camera via the menu that appears below your IP
Camera in the ‘IP Cameras’ screen. Select ‘Remove Device’ from this menu or tap the
Page 57

56
‘Settings’ option from the menu and then select ‘Remove Device’.
2. If the camera light is not blinking red, then please proceed to reset your IP Camera.
Please see Long Reset for more information on how to reset your IP Camera and the
Wi-Fi connection.
3. Then from the ‘IP Cameras’ or ‘Devices’ screen, tap Add new device to add your
device again.
Please see ADD NEW DEVICE for instructions on how to add your device again.
Q: I cannot reconnect to my IP Camera after completing a factory reset via the
application.
A: Your IP Camera needs to be reset, and you will need to add your device.
1. Please see Camera Reset for more information on how to reset your IP Camera.
2. Please see ADD NEW DEVICE for instructions on how to add a new device.
Q: I cannot reconnect to my IP Camera after changing to a different Wi-Fi network and
resetting the camera. While adding the camera again, the IP Camera emits ‘Password
error. Please configure again’.
A: Please make sure you have entered the correct Wi-Fi password in the ‘Configure Network’
screen. Go back to this screen or add the device again to enter the correct Wi-Fi password.
The connection will not succeed if the password is incorrect, so please make sure it is the
right one. Tap Show password to assist you with viewing the password as you enter it.
Page 58

57
HOME AND AWAY MODES
Set your IP Camera security settings to detect motion and sound while you are home or away
from home.
When motion or sound is detected, a video is automatically recorded.
These recorded videos can be seen in the ‘Events’ screen according to date and time taken. A
notification is sent to your phone when motion or sound is detected.
To s et your IP Camera security settings for the Home and Away modes please follow the
instructions below:
1. Tap Devices > IP Cameras > Live IP Camera (tap Video Thumbnail) > Settings.
Alternatively: Tap Settings from the bottom navigation bar and then select your
connected IP Camera name.
2. Tap Home & Away to open the Home & Away settings.
This includes the settings for Motion Detection and Sound Detection.
A) MOTION DETECTION
• Motion detection - HOME:
Select one of the options to set up the Motion detection level in the Home mode:
Tap > OFF, Low, Medium or High.
NOTE: The app default is set to OFF while you are at home.
• Motion detection - AWAY :
Select one of the options to set up the Motion detection level in the Away mode:
Tap > OFF, Low, Medium or High
NOTE: The app default is set to Medium while you are away from home.
B) SOUND DETECTION
• Sound detection - HOME:
Select one of the options to set up the Sound detection level in the Home mode:
Page 59

58
Tap > OFF, Low, Medium or High.
HOME & AWAY MODES
color is blue.
NOTE: The app default is set to OFF while you are at home.
• Sound detection - AWAY :
Select one of the options to set up the Sound detection level in the Away mode:
Tap > OFF, Low, Medium or High
NOTE: The app default is set to Medium while you are away from home.
Switch the Home & Away modes when you leave your home and when you come back to
automatically adjust all the devices’ security settings in your home.
Slide your finger on the Home/Away mode button to select the mode ‘I’m away’ or ‘I’m home’.
NOTE: The top background color for Away Mode is red and for Home Mode the background
Page 60

59
FULL SCREEN LIVE STREAMING VIDEO MODE
1. From the IP Live Camera Mode screen tap, the Full Screen button to view the Live IP
Camera video stream in full screen (landscape view).
2. The following appears on the Full Screen Mode screen:
• The date and time appear on top.
• Tap the options expand button to open and view the options below. Tap again to
close the options.
Listen:
Tap to enable or disable listening to the incoming sound from your IP Camera. The
‘Listen’ button turns green when enabled and the sound from the streaming video can
be heard.
Speak:
Tap to enable or to disable speaking via the Vivitar Smart Home Security app on your
mobile device and having that sound emit through your IP Camera. The ‘Speak’ button
turns green when enabled.
Record:
Tap to start recording a video from the live stream. Tap again to stop recording. The
video is saved to your mobile device’s Photos app. The ‘Record’ button turns green
when enabled.
Picture:
Tap to take a picture from the live stream. The picture is saved to your mobile device’s
Photos app. The ‘Picture’ button turns green when in use.
Tap the Live camera video stream to return to Live IP Camera screen.
• Tap the Exit full screen button to return to the Live IP Camera screen.
Page 61

60
Live IP Camera View: Portrait View
Tap on the Full Screen button to
open the Live IP Camera View in Full
Scree, Landscape View.
Live IP Camera View: Full Screen
View, Landscape
Tap the Options expand
button to open and view the options
as shown below.
Live IP Camera View: Full Screen
View, Landscape
Expanded Options view.
Tap the Exit full screen button to
return to the Live IP Camera screen.
Page 62

61
Using your IPC with Amazon Alexa and Google Home
Group 1 : IP Cameras
AMAZON ALEXA SKILLS
For Group 1: IP CAMERAS
With the Vivitar Home Cameras Alexa skill you can easily control your Vivitar IP Cameras using
Alexa voice commands.
Ask Alexa to modify your camera’s motion detection and sound detection settings and sensitivity.
These modifications will also be reflected in the Vivitar Smart Home Security app.
GETTING STARTED
1. Open the Vivitar Smart Home Security app for Android or iOS.
2. Make sure that you have created a Group 1 account and have completed the setup for
your Vivitar Smart IP Camera, using the Vivitar Smart Home Security app.
3. Connect your Vivitar Smart IP Camera to the same Wi-Fi network as your Alexa device.
4. Download the Amazon Alexa app on your mobile device.
DISCOVERING THE VIVITAR SMART IP CAMERA WITH A SKILL
1. You can connect the Vivitar Smart Home device using the Alexa app.
2. Go to the Menu, and then select Skills.
3. Search and find the Vivitar Home Cameras Skill for your device, then select Enable.
4. Follow the on-screen instructions to complete the linking process.
Page 63

62
5. Ask Alexa to discover your device. Say, “Alexa, discover my devices,” or select Add Device
in the Smart Home section of the Alexa app.
6. Your discovered Vivitar IP Camera is listed under the Smart Home section of the Alexa app.
7. You can now use an Alexa-enabled device to control your connected Vivitar Smart IP Cam.
SUPPORTED VOICE COMMANDS
GIVE VOICE COMMANDS TO ALEXA:
1. Use an Alexa-enabled device to control your connected Vivitar Smart IP Camera.
2. To start using the skill, simply use one of the listed voice commands.
USE THESE COMMANDS TO CONTROL YOUR VIVITAR SMART IP CAMERAS VIA ALEXA:
• “Alexa, ask Home Camera to open camera detection.”
• “Alexa, ask Home Camera to close camera detection.”
• “Alexa, ask Home Camera to open camera motion detection.”
• “Alexa, ask Home Camera to close the camera motion detection.”
• “Alexa, ask Home Camera to open the camera sound detection.”
• “Alexa, ask Home Camera to close the camera sound detection.”
• “Alexa, ask Home Camera to set camera detection sensitivity to low.”
• “Alexa, ask Home Camera to set camera detection sensitivity to medium.”
• “Alexa, ask Home Camera to set camera detection sensitivity to high.”
Page 64

63
GOOGLE ACTION
For Group 1: IP CAMERAS
The Vivitar Smart Cameras Google Action allows you to control your Vivitar IP Cameras.
Ask the Google Home Assistant to modify your camera’s motion detection and sound detection
settings and sensitivity. These modifications will also be reflected in the Vivitar Smart Home
Security app.
Get started by setting up your Vivitar IP Cameras and then control motion and sound detection
using Google Assistant commands (invocations).
WHAT YOU’LL NEED
• A Mobile Device.
• Vivitar IP Camera(s): Signed in and connected to the Vivitar Smart Home Security App.
• “OK Google” turned on.
• Internet Connection.
GETTING STARTED
1. Use one of these supported mobile devices.
• Android phones or tablets with OS 6.0 or higher
For more information go to Google Assistant Support (Android)
• iPhones and iPads with IOS 9.0 or higher with installed Google Assistant app
For more information go to Google Assistant Support (iOS)
• Google Home speakers and Google Home Mini speakers
• Android TVs with OS 6.0 or higher
• Google Chromebooks
2. “OK Google” turned on.
3. Internet connection.
4. Vivitar Smart Home IP Camera(s).
Page 65

64
SETTING UP YOUR VIVITAR SMART IP CAMERA:
If you haven’t already done so, please set up your Vivitar Smart IP Camera(s) by following the
steps below.
1. Open the Vivitar Smart Home Security app for Android or iOS.
2. Make sure that you have created a Group 1 Account and have completed the setup for
your Vivitar Smart Home IP Camera using the Vivitar Smart Home Security app.
3. Connect the Vivitar Smart Home IP Camera to the same Wi-Fi network as your Google
device.
NOTE: Please see Vivitar IP Camera Setup for further information.
GOOGLE ASSISTANT SETUP:
Make sure to activate your Google assistant ("OK Google") on your phone.
For further instructions – see here: Google Assistant Help - Settings
CONNECTING YOUR VIVITAR SMART HOME DEVICE TO GOOGLE:
1. To activate your Google Assistant and start a conversation say:
“OK Google, talk to Vivitar Smart Cameras”.
2. You will be prompted with the Vivitar Google Action – which will notify you that the account is
not linked yet.
Tap “Link Vivitar Smart Cameras to Google”.
3. In the Login page, enter your Vivitar Smart Home Security app credentials – your
Group 1 Account email and password – and then tap Sign in.
NOTE: This is the same account information you used to set up your Vivitar Smart Home
IP Camera in your Vivitar Smart Home Security app.
4. Grant permission to Google Assistant by typing Yes or OK.
5. You are now ready to start controlling your Vivitar Smart Home IP Camera using Google
Assistant commands.
6. To end the conversation, say “Exit”.
Page 66

65
GIVING VOICE COMMANDS TO GOOGLE ASSISTANT
1. Use one of the supported mobile devices.
2. To start a conversation, say “OK Google, talk to Vivitar Smart Cameras”.
NOTE: For the Google Home speaker, you can use “Ok Google” and “Hey Google”
interchangeably.
3. Say “Ok Google, show device” or “Scan for devices” to get a list of your devices.
4. Say your voice commands to the Google Assistant.
5. To end the conversation, say “Exit”.
Here are some sample phrases for the Vivitar Smart IP Cameras:
• “Turn on/off ‘camera name’ detection”
• “Turn on/off ‘room name’ detection”
• “Turn on/off ‘camera name’ sound detection”
• “Turn on/off ‘camera name’ motion detection”
• “Turn on/off camera motion detection”
• “Turn on/off camera sound detection”
• “Set ‘camera name’ detection sensitivity to low/medium/high”
• “Set camera sound detection sensitivity to low/medium/high”
• “Set camera motion detection sensitivity to low/medium/high”
NOTE:
• After allowing permissions, you'll be able to control camera settings (Motion/sound
detection) via Google Assistant.
• You must start every session by saying “Talk to Vivitar Smart Cameras” to activate the
Vivitar Google Action. Please see the online Google Assistant for Vivitar Smart Cameras:
Google Assistant: Vivitar Smart Cameras
Page 67

66
Camera Technical Specifications
Image Sensor
Video Resolution
Photo Resolution
External Memory
Lens
USB Interface
2MP
1080P (Format H.264)
2MP (Format JPEG)
Micro SD Card (up to 32GB) – Class 4 or higher
Fixed Focus ; f=1.45mm
Micro USB
Technical Support
For technical support issues please visit our website at www.vivitar.com . You can find
manuals, software and FAQ’s at the website. Can’t find what you are looking for? E-mail us at
support@vivitar.com and one of our technical support team members will answer your
questions. For phone support in the US please call 1-800-592-9541, in the UK call 0800 917
4831, in Australia call 1800-006-614. If you would like to call from anywhere else, please visit
www.vivitar.com for your local toll-free number.
Page 68

67
Sakar Warranty Card
Sakar US
Sakar UK/Europe
Coventry, CV3 4SU
Sakar Australia
This warranty covers for the original consumer purchaser only and is not transferable. Products
that fail to function properly UNDER NORMAL USAGE, due to defects in material or
workmanship will be repaired at no charge for parts or labor for a period of one year from the
time of purchase.
What Is Not Covered By Warranty:
Damages or malfunctions not resulting from defects in material or workmanship and damages or
malfunctions from other than normal use, including but limited to, repair by unauthorized parties,
tampering, modification or accident.
What To Do When Service Is Required:
When returning your defective product (postage pre-paid) for service, your package should
include:
1. Copy of original bill of sale.
2. A detailed written description of the problem.
3. Your return address and telephone number (Daytime).
MAIL TO ADDRESS BELOW:
Sakar International
Attention: Service Department
195 Carter Drive
Edison, NJ
08817
Attention: Service
Department
2D, Siskin Parkway East
4020 Middlemarch Business
Park
Return faulty camera to
the Refund Counter at
the store where
purchased
Remark:
Product and software are updated periodically. The application interface in this manual are only
for example. No extra notification on further changes.
 Loading...