

Vivax WFL-601, WFL-1001, WFL-801 Service Manual
'UXP:DVKLQJ0DFKLQH
Service Manual
9,9$;
:)/:)/:)/

1 ….........................................………………… ............
2 INTRODUCTION ………………....................…...........…..
2.1 C …………………….…………………………………….....
2.2 ………………….…………………………………………………...
2.3 ……………………………………………………............
2.4 …………………………………………………............
2.5 Introduction ……………….…………………………………………..
2.6 …………………………………………………………………………...
2.7F of s ……………………..........................................................
2.7.1 of a ……………………………………………………….
2.7.2 F of a ……………………………………..…..
2.7.3 F of b ……………………………………………………....
2.7.4 F of …………………………………………………….…....
2.7.5 F of c ……………………………………………………………..
2.7.6 m …………………………………………………………………..
2.7.7 F of less iron…………………………………………………..……….......
2.7.8 F of m ………………………………………..…….....
3 ………………………………………………………………………........
3.1 ……………………………………………………….....…………..
3.2 ……………………………………………………..……..…...
3.3 ……………………………………………………………...………………..
3.4 …………………………………………………………...………….
3.5 …………………………………………………………...……….…..
3.6 …………………………………………………………..……….
3.7 ……………………………………………………….....
4. …………………………………………………..
4.1 …………………………………………………………………………….
4.2 ………………………………………………………………………...
4.3 ………………………………………………………………………..
4.4 ……………………………………………………………………………….
4.5 ……………………………………………………………………………..
4.6 ……………………………………………………………………………...
4.7 ……………………………………………………………………………….
4.8 ………………………………………………………………………...….
4.9 ……………………………………………………………..……..……..…….
4.10 ………………………………………………………………..…..
4.10.1 …………………………………………………………………..…....
4.10.2 .....................................................................................................
4.11 ............................................................................................
4.12 ......................................................................................................
SAFETY PRECAUTION
OF WASHING MACHINE
haracteristics of product
Working principle
Summary model of product
Exploded view & List of parts
of control panel
Basic function
unction afety guard
Function void overflow
unction void heating without water
unction ubble checking
unction auto-balance
unction hild lock
Program emory
unction
unction otor self-protection
INSTALLATION
Select the location
Remove transport bolts
Adjust leg
Connect inlet pipe
Place outlet hose
Electrical connection
Installing and checking items
OVERVIEW OF MAIN COMPONENTS
Top cover kit
Drawer panel kit
Control panel kit
Front plate
Lower panel
Filter cover
Cabinet kit
Panel support
Absorber
Drum tub assembly
Rear tub kit
Drum kit
Detergent box hose
Inlet system
. ........
5
6
6
6
7
8
13
14
15
15
15
15
16
16
16
16
16
17
17
17
17
18
18
18
19
20
20
20
21
21
21
22
22
22
23
23
23
24
24
25
P.02
TABLE OF CONTENTS

26
27
27
27
28
28
29
29
29
29
30
30
31
33
34
35
35
36
36
36
36
37
37
37
38
38
39
39
40
40
40
41
41
41
42
42
42
43
43
25
4.12.2 ..................................................................................................
4.12.3 ........................................................................................
4.13 ....................................................................................................
4.13.1 .........................................................................................
4.13.2 .................................................................................................
4. 14 ...........................………………..............………………………….…….
4.15 ...........................………………..............…………………………………..
4.16 ...........................………………..............………………………….……
4.17 ...........................………………................................….
4.18 ...........................………………..............…………………………………...
4.19 ...........................………………..............…………………………………….
4.20 ...........................………………..............……………………………....
4.21 ...........................………………..............……………………………….…..
4.22 ...........................………………..............……………………………....
4.23 ...........................………………..............……………………....
4.24 Sub- ...........................………………..............………………………..
4.25 ...........................………………..............………………..
5 ...........................………………..............…….
5.1 ...........................………………..............……………………..
5.2 ...........................………………..............……………………….
5.3 ...........................………………..............…………………..
5.4 ...........................………………..............…………………….
5.5 ...........................………………..............………………………
5.6 ...........................………………..............………………….….
5.7 ...........................………………..............………………………….
5.8 ...........................………………..............………………….….
5.9 ...........................………………..............………………….
5.10 ...........................………………..............……………………
5.11 ...........................………………..............……...……….
5.12 ...........................………………..............……………………..….
5.13 ...........................……………….......……………...
5.14 ...........................………………..............…………..……...
5.15 ...........................………………..............…………………………..
5.16 ...........................………………..............…………….……..
5.17 ...........................………………..............…………………….…..
5.18 ...........................……………..………………...
5.19 ...........................………………..............……………..……..
5.20 ...........................………………..............………………...
5.21 ...........................………………..............…………...
4.12.1 ..............................................................................................Pressure switch
Inlet valve
Detergent box kit
Drain system
Drainage system
Drain pump
Door kit
Gasket
Door lock
NTC temperature sensor
Heater
Filter
Condenser
Motor
PCB panel
Main harness assy
harness assy
Bill of damageable parts
UNPACKING WAYS OF MAIN PARTS
Undo the back cover
Undo the top cover
Undo the control panel
Undo the lower panel
Undo the door lock
Undo the front panel
Undo the gasket
Undo the PCB panel
Undo the detergent box
Undo the inlet valve
Undo the pressure switch
Undo the pulley
Undo the upper counterweight
Undo the absorber pin
Undo the filter
Undo the drain pump
Undo the heater
Undo the NTC temperature sensor
Undo the door glass
Undo the panel support
Undo the drum tub assembly
P.03
TABLE OF CONTENTS

5.22 ...........................………………..............……………………...
5.23 ...........................……….…………………………..
5.24 ...........................………………..............…………………………
6 ……...........................………………..............……………......
6.1 ...........................….....………………
6.2 ...........................………………..............……………………....
6.3 ...........................…….....…....…....…......
6.4 ...........................………..……………
6.5 ...........................………………..............…………………………........
6.6 ...........................………………......………….
6.7 ...........................………………..............…………………………..........
6.8 ...........................………………..............…………………………….
7 T ...........................……………….....………………......
7.1 .......................……………………….…..
7.2 ...........................………………..............……………..
Undo the absorber
Undo the lower counterweight
Undo the motor
TROUBLESHOOTING
Circuit program & wiring connection figure
PCB wiring figure
Schedule of failure alarm & its disposal
Electrical parts working & testing principle
Self-check
Marketing-show (no-water testing)
Fault tree
Service tools
ECHNICAL SPECIFICATION
Product technical specification parameter
Table of washing procedure
TABLE OF CONTENTS
44
44
44
45
45
46
47
50
55
55
56
64
65
65
66
P.04

1.SAFETY PRECAUTION
P.05
1.Do not try to repair the machine by yourself. The machine may be damaged and its life
be shortened. What is worse, it will injure yourself.
2.Pull out its plug from the power socket before maintenance. Electricity!
3.Do not use several power plug with one socket.
To avoid fire, don’t use any socket with its actual current more than rated current.
4.Please check the power plug and socket whether damaged or not.
To avoid an electrical shock and fire, the power plug and socket should be replaced if
they are damaged.
.Don’t try to clean up the washing machine with water, or else, it’s possible to cause an
electrical shock or fire and shorten its life.
6.Forbid the harness contact with water for avoiding wet and don’t extend it during
maintenance. Don’t twist the harness to avoid it distorted.
7.Please clean up the dirt and dust on the surface of the cabinet, harness and connection
parts during maintenance.
Please avoid fire because of the electric leakage of harness.
8.Check electrical parts, harness whether they have become moist and replace them if
they are wet.
9.Check all parts of the machine and make sure to keep them in good condition after
maintenance.
10.Fasten upon the power plug and pull it out .
Be careful of a fire and electric shock when power cord is damaged.
11.Pull out its power plug when this machine doesn’t work.
Be careful of an electric shock and fire because of levin.
12.Don’t put tinder or sprayer beside the washing machine.
Be careful of a fire and explosion because of electric spark.
13.Don’t put a basin of water or wet clothes on the washing machine.
It is possible to cause an electric shock or fire if water from wet clothes leaks in to
the washing machine.
14.Do not place the washing machine in the place where it can be exposed to rain and
snow. Or else, it may cause an electric shock or fire, and therefore shorten its life.
15.Don’t press the button with sharp items such as nail, screw etc. Or else, it may cause
an electric shock or other damages.
16.This machine should be placed on the horizontal ground and installed correctly.
The machine is liable to shift on the gradient ground.
17.If the harness is damaged, it should be replaced completely.
18.It is necessary to put a mat on the floor and recline down the washing machine along
its side when repair it.
It is possible to damage the electrical components if the front of the washing machine
is placed at the ground.
19.During changing the heater of this machine, please check whether it is fixed on the
blanket correctly and whether the screw is fastened tight or not.
5

2.INTRODUCTION OF PRODUCTS
P.06
2.1 haracteristics of product
It is the latest designed machine, which have many advantages such as fashion, large
rated washing capacity and large washing range. Specifically, its feature is as following:
1.Large washing range from cotton to wool and silk.
2.Gentle washing: no twist and little abrasion.
3.Electron auto-balance system, that is, the PCB panel controls the speed of spin and
ensures uniform distribution of clothes to reduce the wear of textile caused by its
vibration.
4.The drum of this machine is made of stainless steel of high quality and the cabinet is
durable.
5.The maximum temperature of washing water could be controlled independently and it
is up to 90℃.
6.Unique washing methods: rain, soak, throwing-knocking knead and so on, which can
wash clothes uniformly and improve washing performance.
7.Safety guard: water level control, door lock, child lock etc.
8.Anti-crease function: there is an automatic anti-crease and soak function in the
synthetic program, that’s, it doesn't drain at the end of washing and leave the clean
textile in the water of the drum to achieve the function of less crease, especially silk.
9.Function of adjusting spin speed : select different spin speed according to textile.
10.Electronic water distribution system: The machine uses PCB to control the inlet valve
and distribute water properly at the different stages and dissolve detergent and softener
absolutely to improve washing performance.
2.2.Working principle
Drum washing machine wash clothes mainly in virtue of mechanical friction, chemical
force and temperature force. When the machine works, the motor runs clockwise several
seconds and runs anti-clockwise several seconds to drive the drum whose three lifters
hold up the clothes pressing against the inside of the drum. When clothes rise close to the
top, because the speed of motor is low and the centrifugal force is not enough to overcome
the gravity, clothes fall and impinge with washing liquid (like manual throwing-knocking
washing). The second force is the extrusion force of clothes (like manual extrusion). The
last force is the friction between clothes, clothes and lifters(like manual knead). To
improve washing performance, automatic drum washing machine could automatically
heat the washing liquid, whose temperature can be adjusted from 30℃ to 90℃. The high
temperature quickens the movement of the numerator of the washing liquid and speedups
C
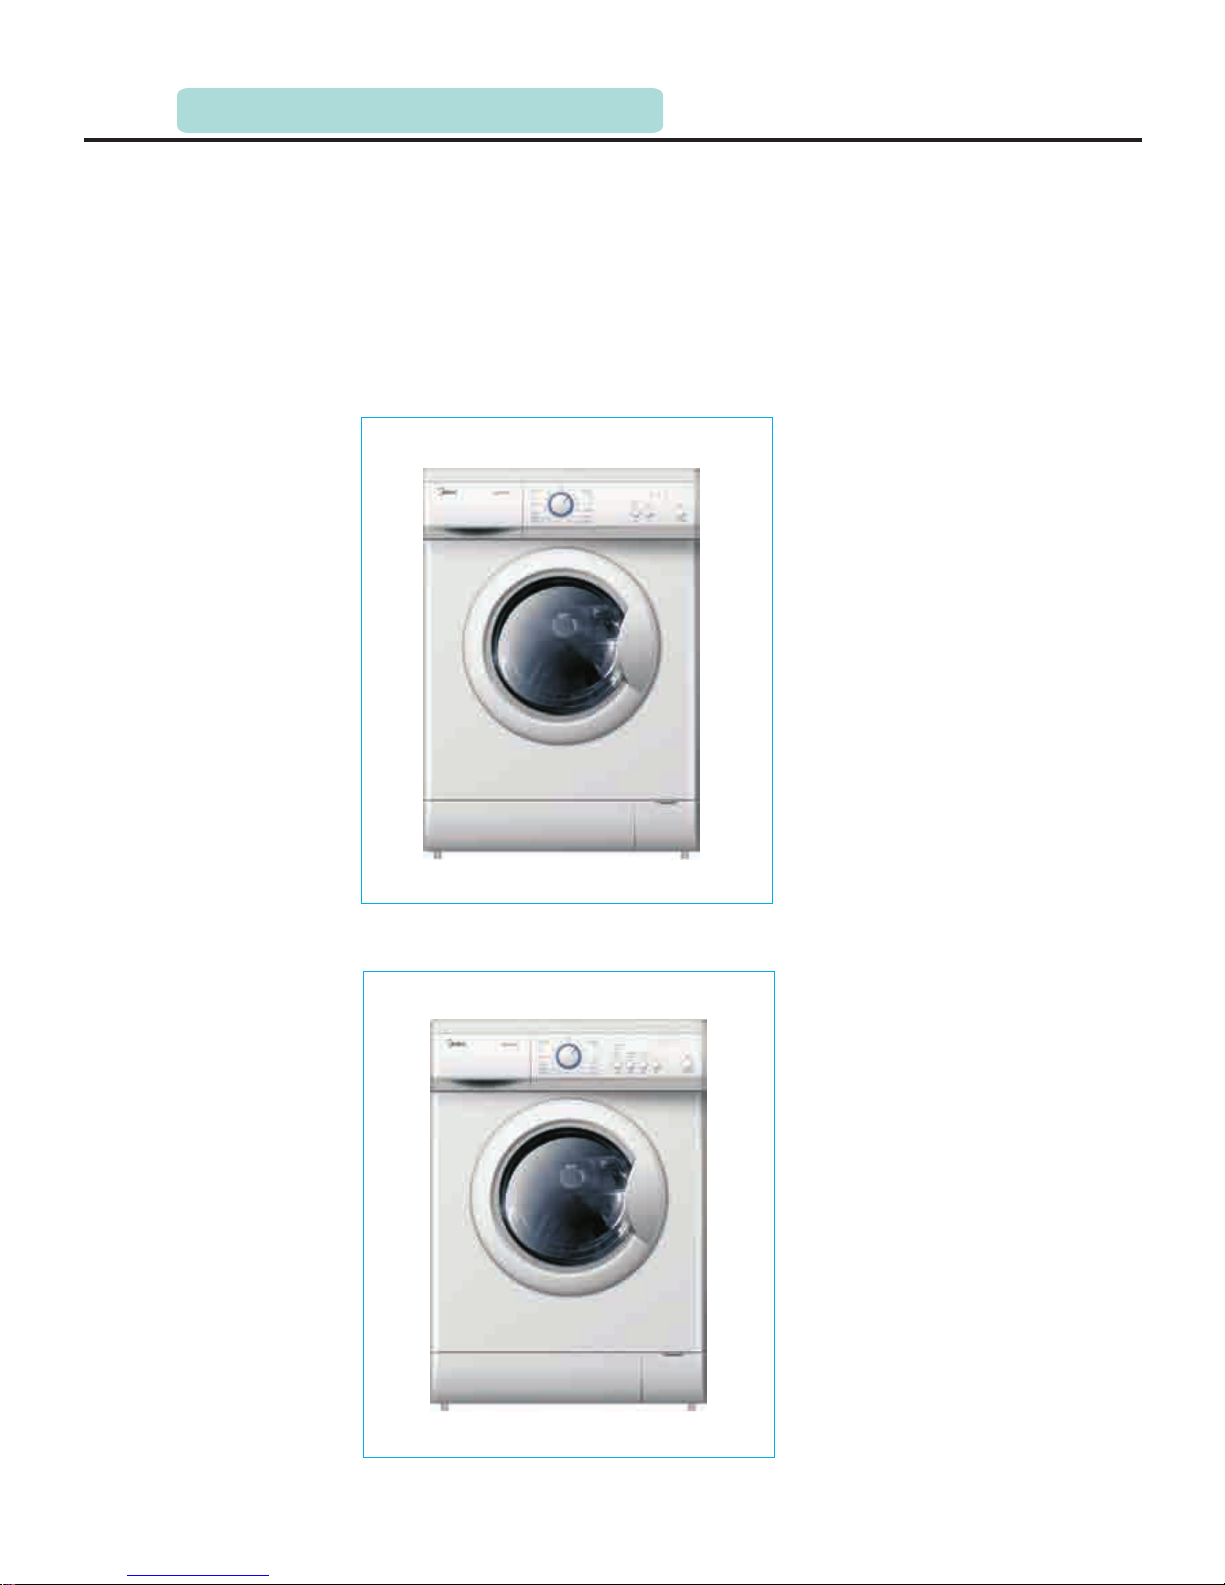
2.3 Summary model of product
P.07
MG52-6001
MG52-6510/8002
2.Overview of products2.INTRODUCTION OF PRODUCTS
the Chemical reaction. In a word, drum washing machine destroys bonding force between
dirt and clothes in virtue of intergraded force of water, detergent and mechanical force, to
clean away the dust.
01
02
03
04
05
06
07
08
09
10
12
11
13
14
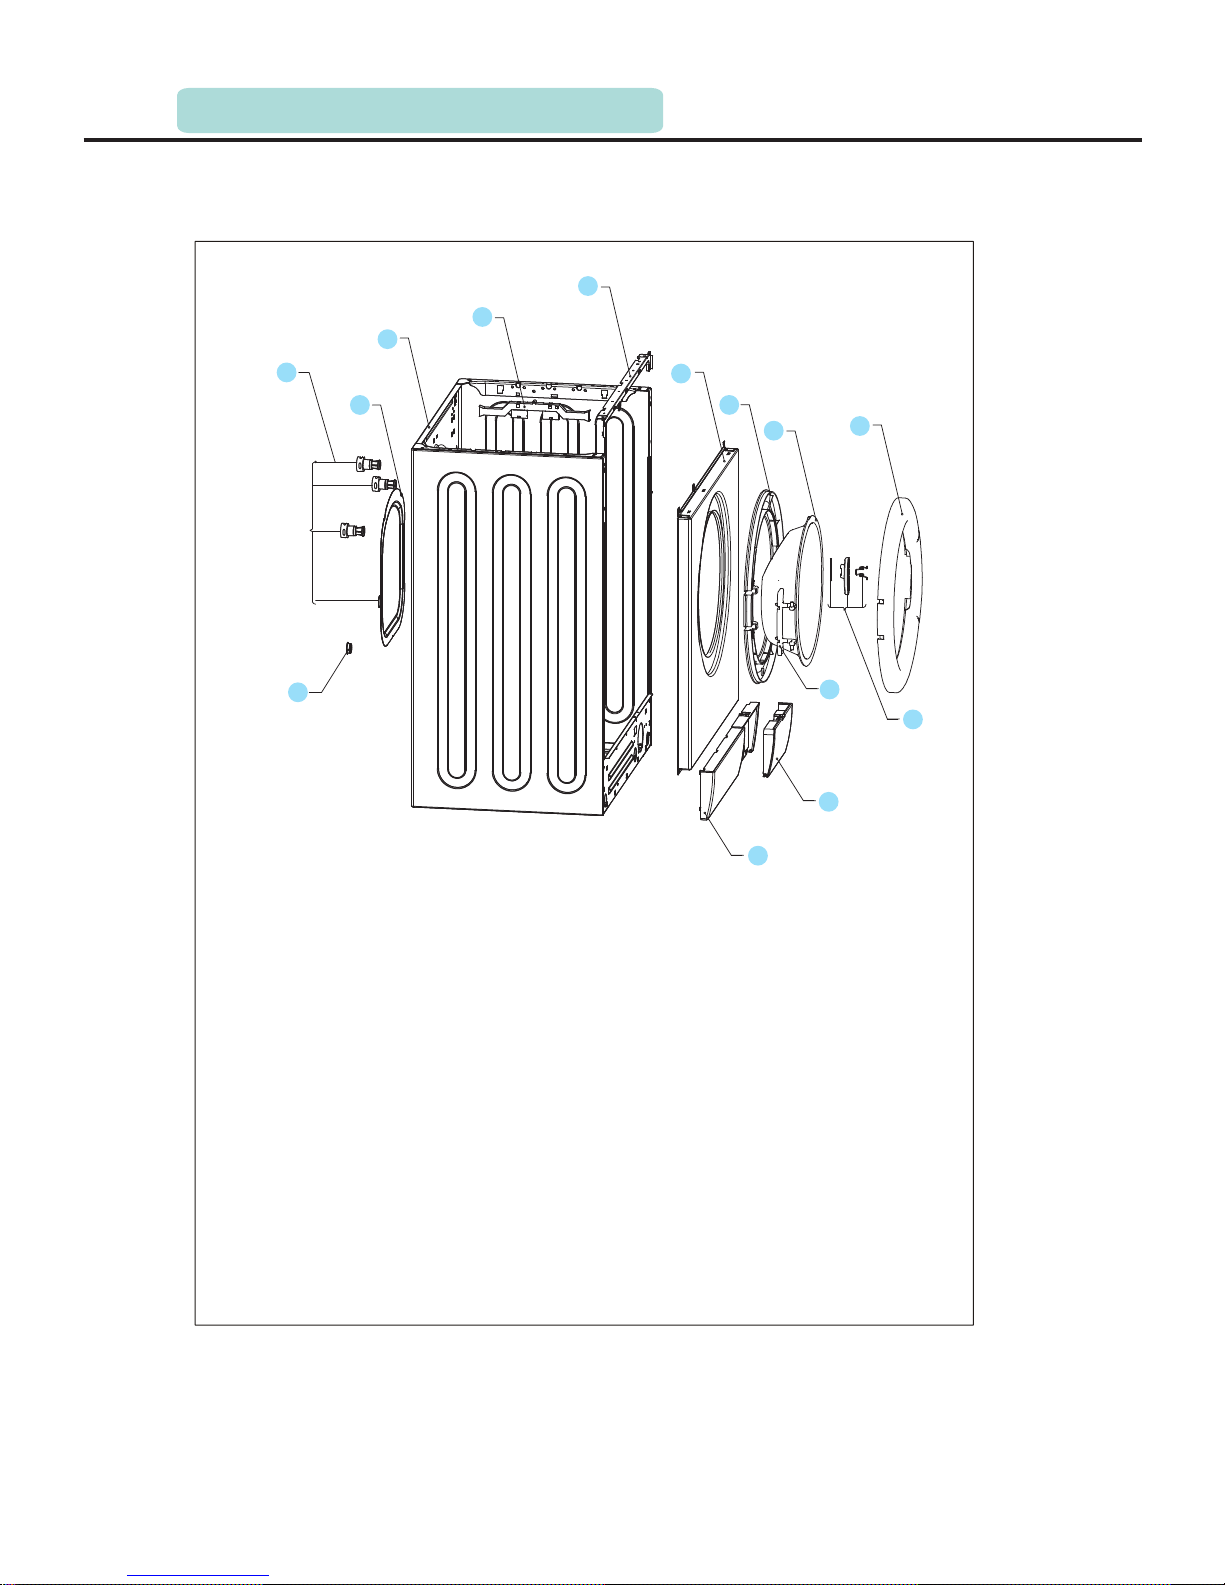
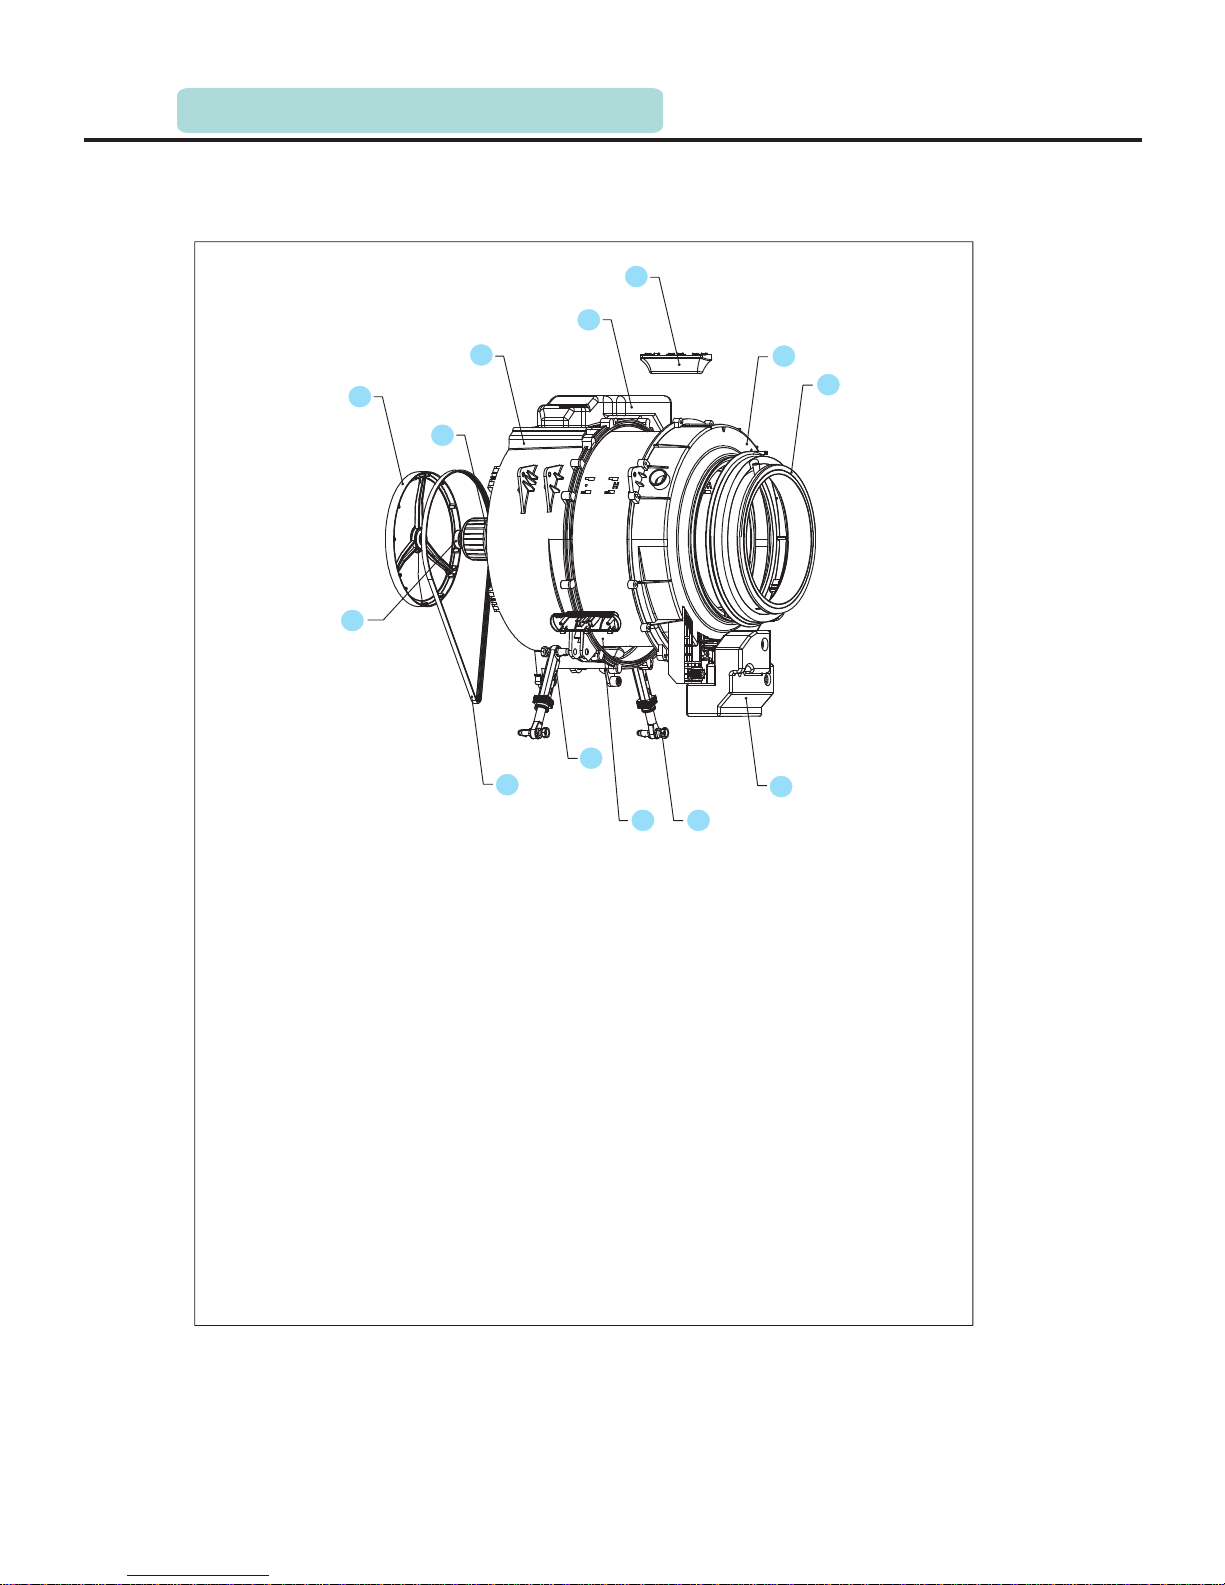
2.4 Explored & list of partsview
P.08
Mode l MG52-600 1/ /MG52-8002MG52 -6510
01 Transport bolt kit
02 Hole plug 09 Door glass
03 Back cover 10 Outer door
04 Cabinet kit 11 Door handle
05 Cable channel 12 Hinge
06 Panel support 13 Filter cover
07 Front plate 14 Lower panel
08 Inner door
2.INTRODUCTION OF PRODUCTS
15
16
17
18
19
20
P.09
Mode l MG52-600 1/ /MG52-8002MG52 -6510
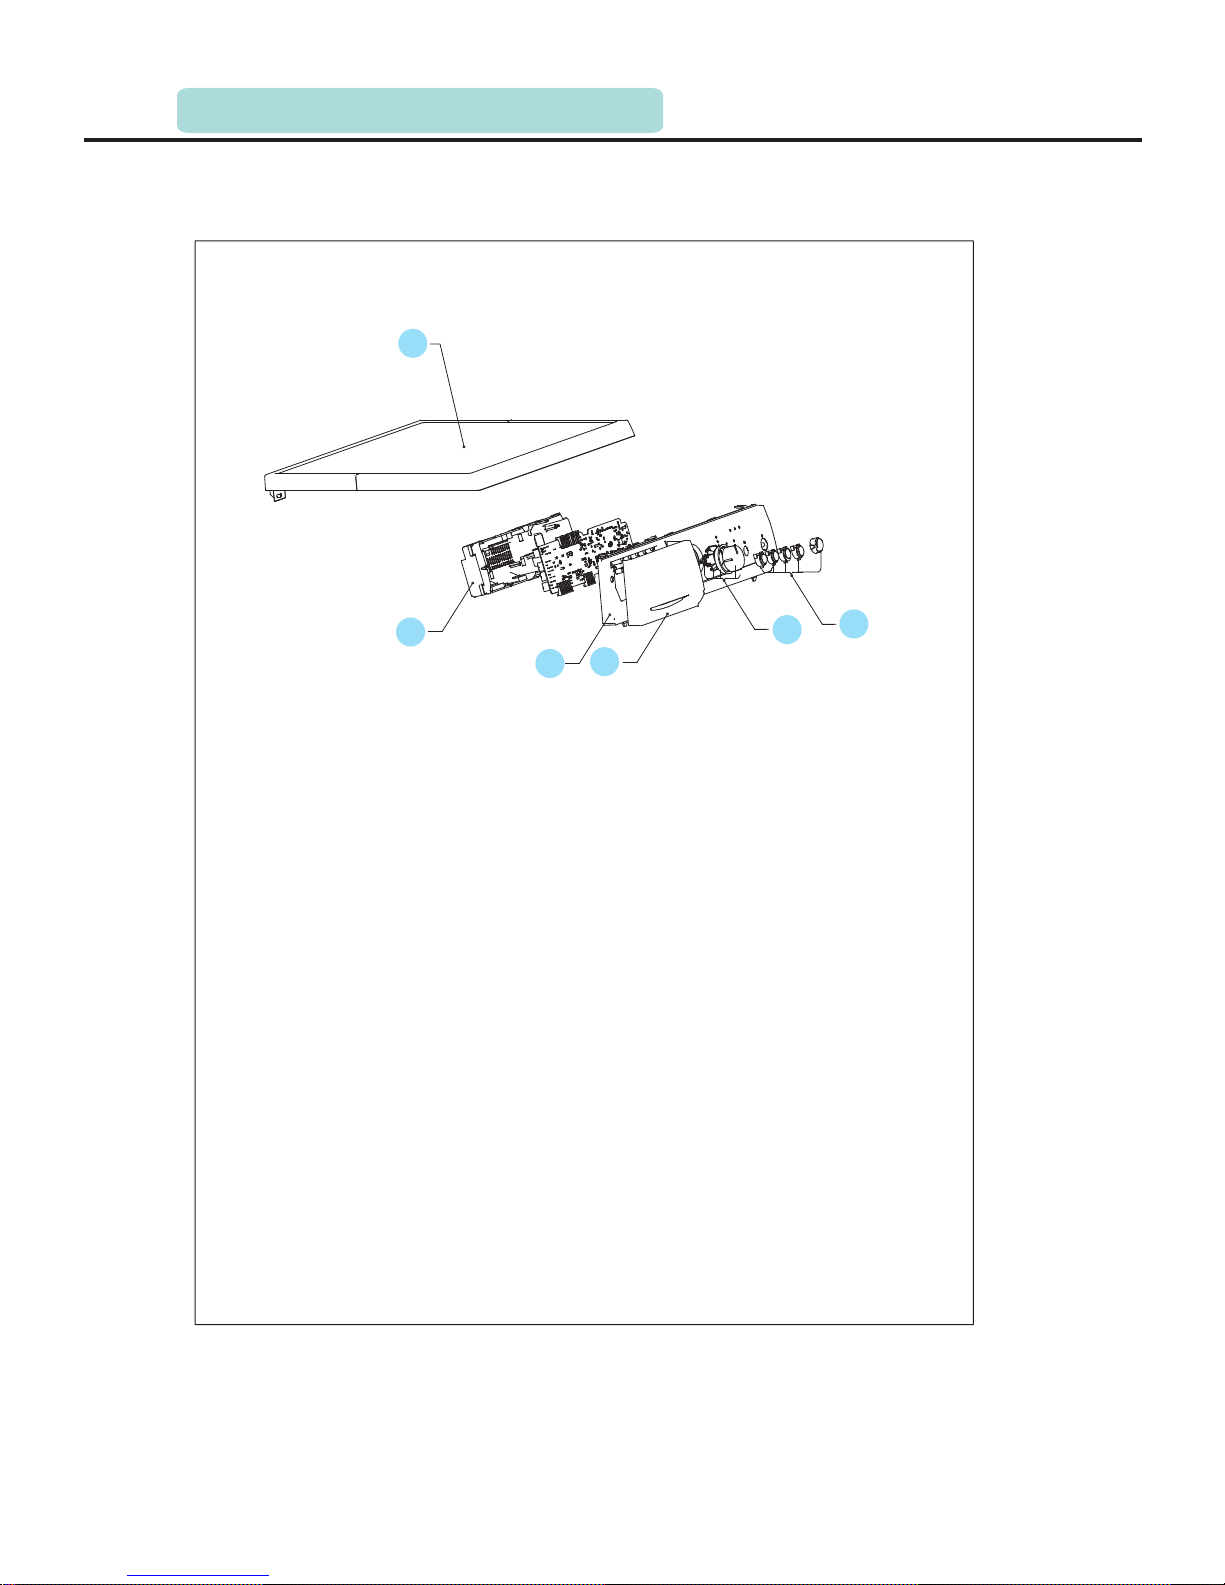
2.4 Explored & list of partsview
15 Top cover kit
16 E-housing
17 Control panel
18 Drawer panel
19 Knob
20 Push button
2.INTRODUCTION OF PRODUCTS
21
22
23
24
25
26
27
29
28
30
31
32
33
P.10
Mode l MG52-600 1/ /MG52-8002MG52 -6510
2.Overview of products
2.4 Explored & list of partsview
21 Pulley
22 Bearing hosing
23 Rear tub
24 Upper counterweight
25 Lifter
26 Front tub
27 Gasket
28 Lower counterweight
29 Absorber pin
30 Inner drum assy
31 Absorber
32 Belt
33 Ball bearing 62032
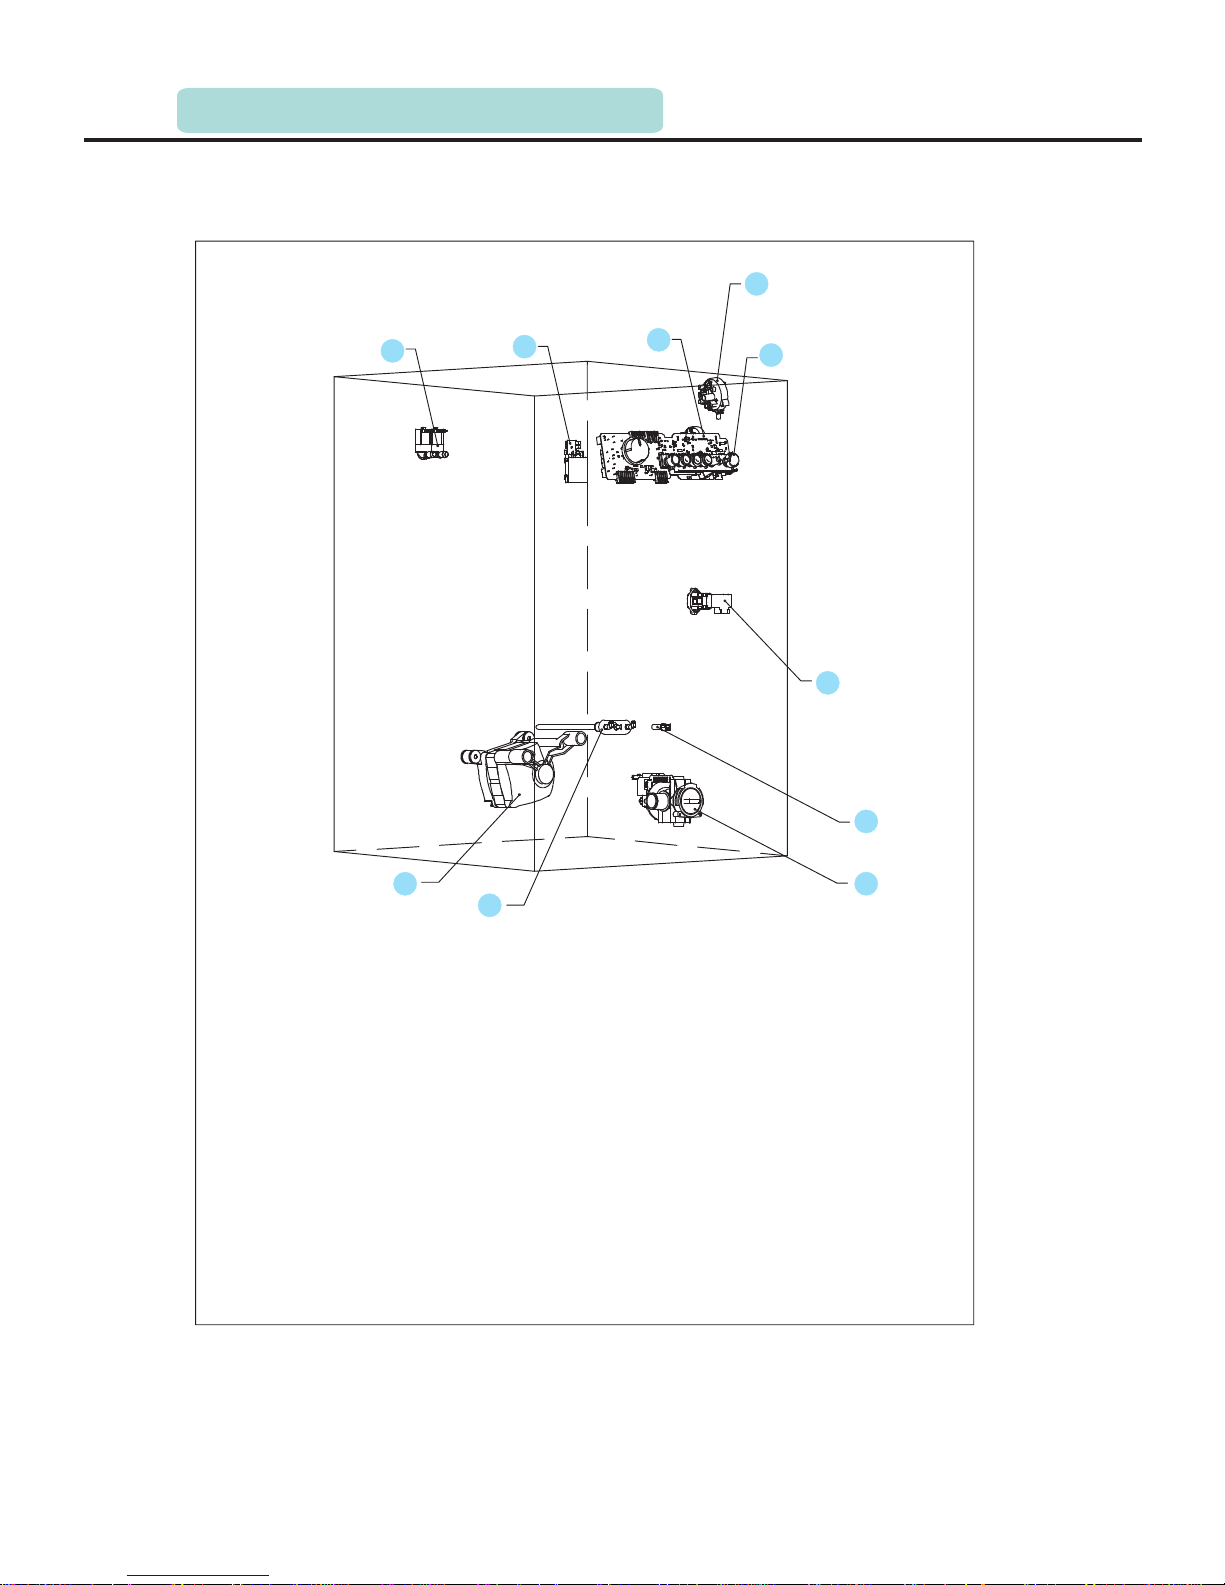
2.INTRODUCTION OF PRODUCTS
34
35
36
37
38
39
40
41
42
43
P.11
Mode l MG52-600 1/ /MG52-8002MG52 -6510
2.4 Explored & list of partsview
34 Inlet valve
35 Filter
36 PCB
37 Pressure switch
38 Silicon
39 Door lock
40 NTC
41 Drain pump
42 Heater
43 Motor
2.INTRODUCTION OF PRODUCTS
45
44
46
47
48
49
50
51
52
53
54
55
56
57
58
P.12
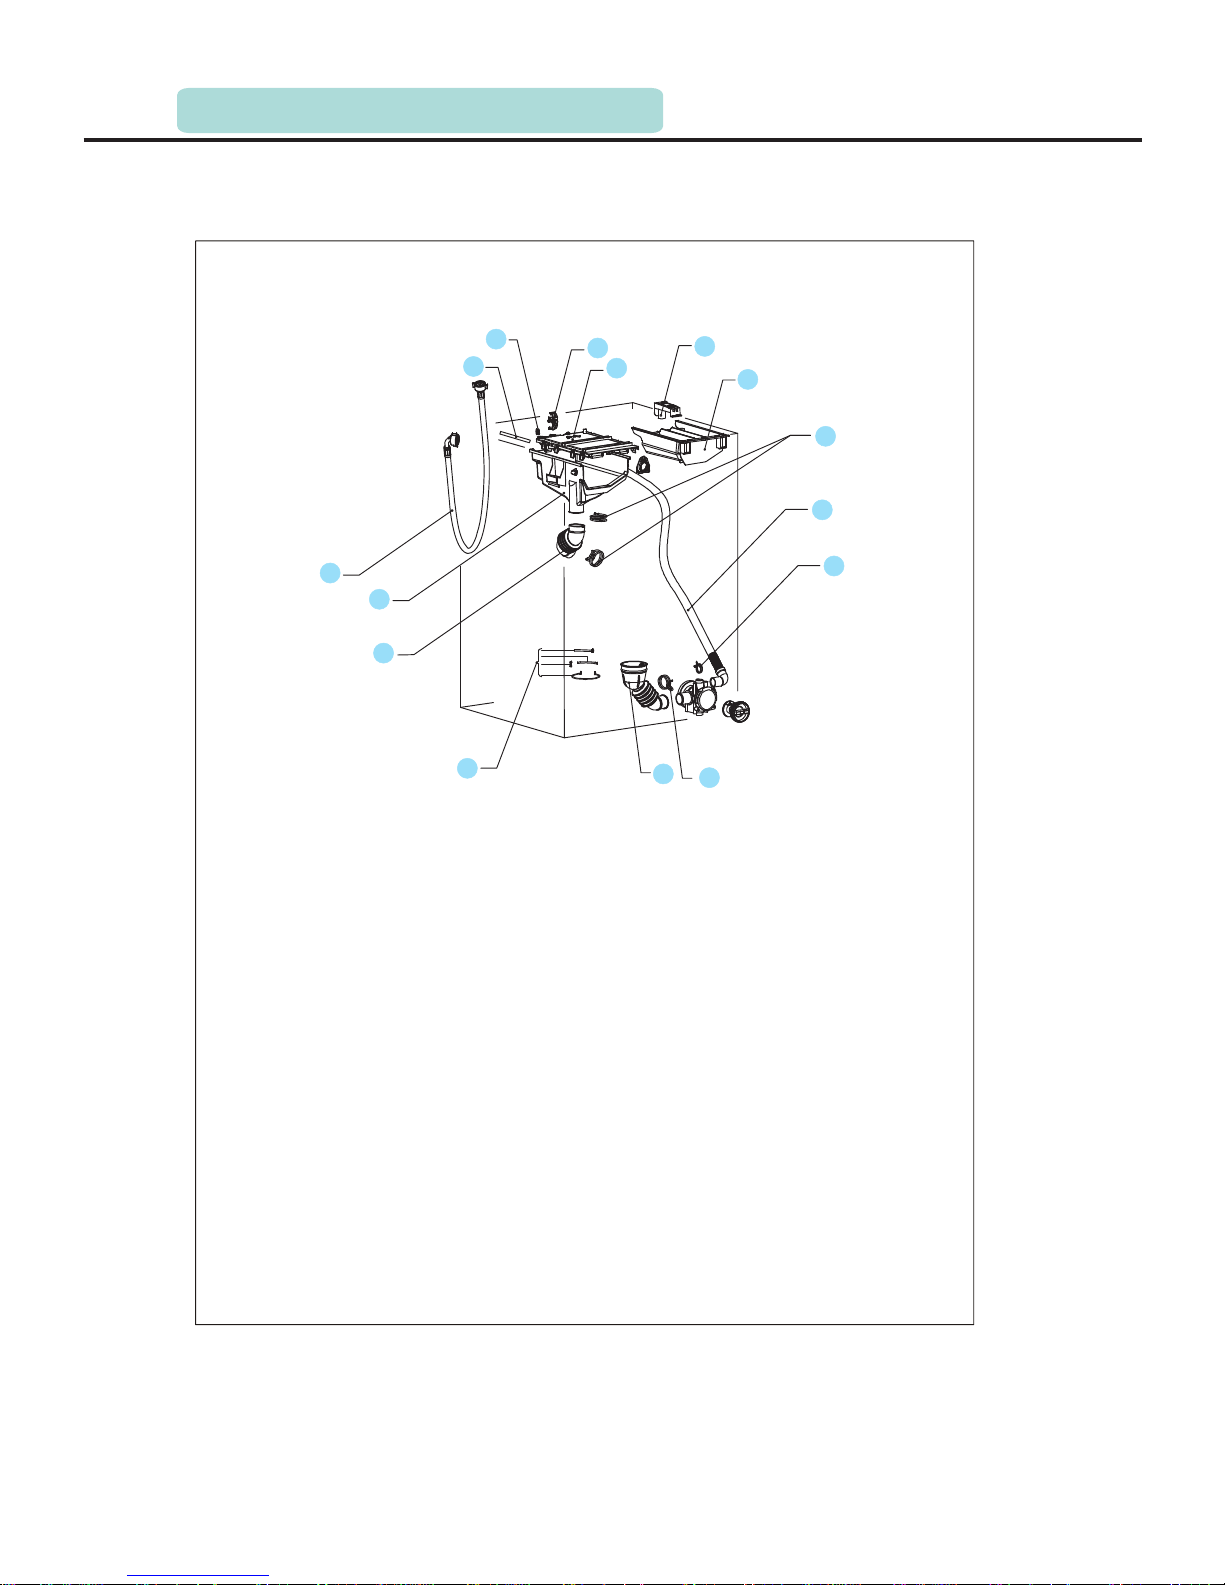
Mode l MG52-600 1/ /MG52-8002MG52 -6510
2.Overview of products
2.4 Explored & list of partsview
44 Inlet hose
45 Inlet hose clamp
46 Outlet hose support
47 Detergent box-upper
48 Softener cap
49 Drawer
50 detergent hose clamp
51 Outlet hose
52 Hose clamp
53 Hose clamp
54 Drain hose
55 Hose clamp
56 Detergent box hose
57 detergent box
58 Inlet hose assy
2.INTRODUCTION OF PRODUCTS
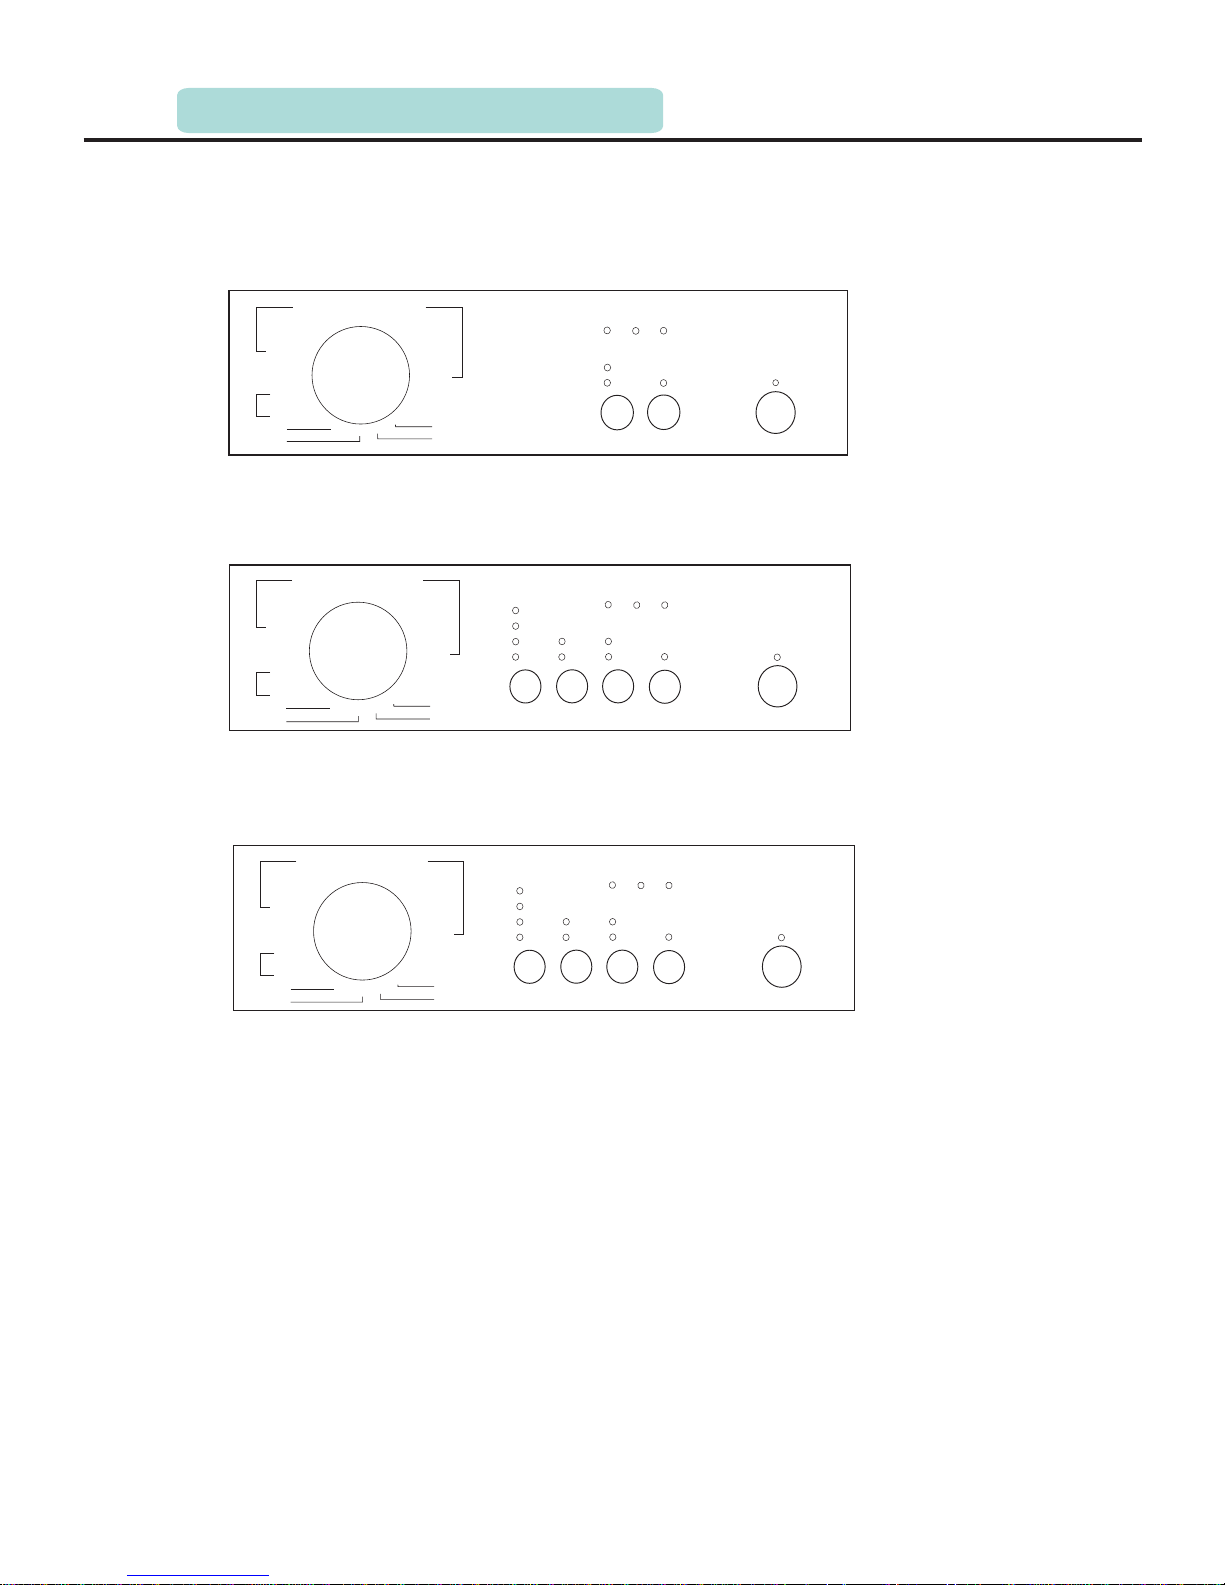
2.5 Introduction of control panel
MG52-8002
MG52-6510
P.13
MG52-6001
1.Drawer Panel: put detergent into detergent box by pulling out Drawer.
2.Control Panel: manipulate washing machine with the panel.
3.Knob: revolve this knob and select washing program accordingly ( cotton, synthetic,
wool, delicate, quick) can be selected circularly.
4.Function Button: achieve functions of speed selection, temperature selection, number
of rinse etc.
5.Start/Pause Button: press this button to restart or pause will be done.
6. Display screen: show washing process and relative error information.
START/PAUSE
FUNC TION2FUNC TION
1
INTE NSIVE
WASH SPINRINS E
PRE
WASH
ECO WAS H
60
30
40
40
40
60
90
30
SILK
WOOL
WASH
RINS E
SPIN
DRAI N
STOP
COLDCOLD
COLD
COTT ON
QUIC K
SYNT HETIC
MG5 2-60 01
WASH
RINSE
SPIN
60
30
40
40
40
60
90
30
SILK
WOOL
WASH
RINSE
SPIN
DRAI N
STOP
COLDCOLD
COLD
COTTON
QUICK
SYNT HETIC
INTE NSIVE
ECO WAS H
BABY CARE
LESS
IRON
400
600
800
NOSP IN
SPEE D
PRE
WASH
FUNC TION
1
FUNC TION
2
MG52 -8002
START/PAUSE
WASH
RINSE
SPIN
60
30
40
40
40
60
90
30
SILK
WOOL
WASH
RINSE
SPIN
DRAI N
STOP
COLDCOLD
COLD
COTTON
QUICK
SYNT HETIC
INTE NSIVE
ECO WAS H
BABY CARE
LESS
IRON
400
500
600
NOSP IN
SPEE D
PRE
WASH
FUNC TION
1
FUNC TION
2
MG52 -6510
START/PAUSE
2.INTRODUCTION OF PRODUCTS

P00 P08
P01 P09
P02 P10
P03 P11
P04 P12 Silk
P05 P13
P06 P14
P07 P15
Stop Rinse
Cotton cold Wash
Cotton 40℃ Wool cold
Cotton 60℃ Wool 40℃
Cotton 90℃ 30℃
Quick 30℃ Synthetic 60℃
Drain Synthetic 40℃
Spin Synthetic cold
Programs corresponding with the encoder knob of MG52-6001/6510/8002
P.14
2.6 of basic
1.Cotton
You can select this program to wash the daily washable clothes. The washing period is
quite long with quite strong washing intensity. It is recommended to wash the daily
cotton articles, such as: bed sheets, quilt covers, pillowcases, gowns, underwear etc.
2.Synthetic
You can select this program to wash the quite delicate clothes. The procedure is shorter
compared with that for cottons and the washing intension is quite gentle. It is
recommend to wash synthetic articles, such as: shirt, coats, blending. As for curtains
and laced textiles, the program “Synthetic 40℃”should be selected. While washing the
knitting textiles, less detergent due to its loose string construction and easily forming
bubbles.
3.Wool
You can select this program to wash the wool textiles labeled “machine wash”. Please
select the proper washing temperature according to the label on the articles to be
washed, and furthermore, the proper detergent shall be selected for wool textiles.
4.Silk
You can select this program to wash your silk clothes. It is gentler than synthetic
program due to less speed. It’s recommend to the textiles to be washed softly.
5.Quick
This program is suitable to wash few and not very dirty clothes quickly.
6.Intensive
To improve the washing performance, main wash time is increased. Except single
quick, wash, drain and spin programs, the other procedure can select intensive function.
It is recommend to wash clothes for babies or persons with allergic skin.
7.Eco-wash
As for few clothes, heating temperature and water quantity are reduced during wash/pre
wash program and water quantity is reduced during rinse procedure so as to achieve the
Function
2.INTRODUCTION OF PRODUCTS

P.15
energy to save. It should be set effectively before work, and once the cotton synthetic
and silk program, which have this function runs, it can’t be paused and reset.
Only cotton, synthetic and silk programs have this function.
8.Pre-wash
One washing program is added before main wash to improve the washing performance.
Only cotton program has pre-wash function.
9.Baby care
This is to increase the level of rinse water.
Baby care function can make the rinse performance better to protect the baby skin.
Except single wash, rinse, drain and spin program, the other programs can select baby
care function.
10.Spin/no spin function
The last spin speed can be selected and set.
As for model MG52-6001, the defaulted speed is 600rpm.
As for model MG52-8002, the rotating speed’s range selected through spin button can
be no spin-400-600-800rpm.
No spin means the drum rotating speed is zero after the last spin program complete its
drain stage.
During rinse, its spin speed is unchanged.
11.Wash
Single wash program.
12.Rinse
Single rinse program.
13.Spin
Single spin program. Soap liquid or rinse water shall be drained before spin.
14.Drain
During draining procedure, the clothes will only be drained but no spin to protect the
delicate and soft textiles.
2.7 Function of safety guard
2.7.1 Function of avoid overflow
When the water level is up to the abnormal height in the drum(the set warning level),
washing machines will automatically switch on drainage pump to drain by pressure
switch, even if the inlet valve failure which can not stop the inflowing water, the
washing machine will not be in the overflow. At the same time, the pressure switch will
feed back to control panel a signal of fault and the washing machine will alarm.
2.7.2 Function of avoid heating without water
When there is no water or not enough to submerge the heater, and at the same this
machine is in fault, the fuse in the heater will melt to cut off the heater and avoid danger.
2.7.3 Function of bubble checking
About wiping off bubble: When the water level is lower than level I during draining, the
2.INTRODUCTION OF PRODUCTS

P.16
spin function will start. If there is over much bubble in the drum, it will increase the
pressure in the drum and switch on the pressure switch , at the same time the PCB panel
begin the bubble checking function and clean it away.
2.7.4 Function of auto-balance
1. This function will start before spin and after drainage.
2. Drum reverses the speed of 50 rounds per minute in the first six seconds.
3. In the next 10 seconds, the rotational speed from 50r/m to 100r/m slowly.
4. In the following 18 seconds, the washing machine rotates in the speed of 100r/m and
estimates the degree of imbalance according to the signal of the motor.
5. If the degree of imbalance is more than the setting value, the auto-balance system will
feed back imbalance information of 12 cycles.
2.7.5 Function of child lock
To avoid the fault operation by children and then making this wash procedure work
abnormally, you can select this function in which other buttons can't be work except knob.
As for MG52-6001, press the second button and the first button at the same time for 2.5
seconds from left , the buzzer rings and the pre-wash button, auxiliary function button,
start/stop and knob are locked. And then, press them at the same time for another 2.5
seconds, the buzzer rings again and the locked buttons are unlocked. Child lock function
is cancled after the whole program is completed when child lock is effective, press the
non-child lock button and then buzzer rings to remind that operation is invalid. As for
MG52-6510/8002, press the second button from left and the pre-wash button at the same
time for 2.5 seconds, the buzzer rings and locks the pre-wash button. Other steps is same
as MG52-6001.
2.7.6 Program memory
If the running washing machine is powered off, its washing procedure will be stored in
chips. When the power is on, washing machine will run from the memorying procedure.
If washing machine is powered off during spin, the machine will spin from the start of the
procedure again.
2.7.7 Function of less iron
Less iron(anti-crease) means washing machine neither drains nor spins, and what is
more, it will run every several seconds to spread out textiles. Less iron can be used in all
procedures but wash, rinse, drain and spin.
NOTE: To achieve anti-crease completely, you have to iron them.
2.7.8 Function of motor self-protection
When the washing machine works in the poor conditions, the enormous load on the motor
will make its temperature increase and its performance decrease even burned motor.
When its temperature increases to a set value, the thermal protector of motor will
automatically cut off the power supply to achieve self-protection and alarm.
2.INTRODUCTION OF PRODUCTS
P.17
3.1 Select the location
1. Washing machine must be placed in the formation, firm, dry and well-ventilated places.
2. Washing machine need a certain space and the shortest distance from the wall is not
less than 12cm generally.
3. Don't place the washing machine in the condition of freeze-easy.
4. Washing machine should be placed away from heat, sunlight to prevent pieces of
plastic and rubber become aging.
5. Do not put the washing machine in the place where it can be exposed to rain and snow.
6. It is not suitable to use the washing machine on vessels, aeroplanes and vehicles.
7. To avoid walling up the vent, please don't put washing machine on the carpet.
NOTE: Washing machine should be put in the room which have enough space, such as its
door can be fully opened.
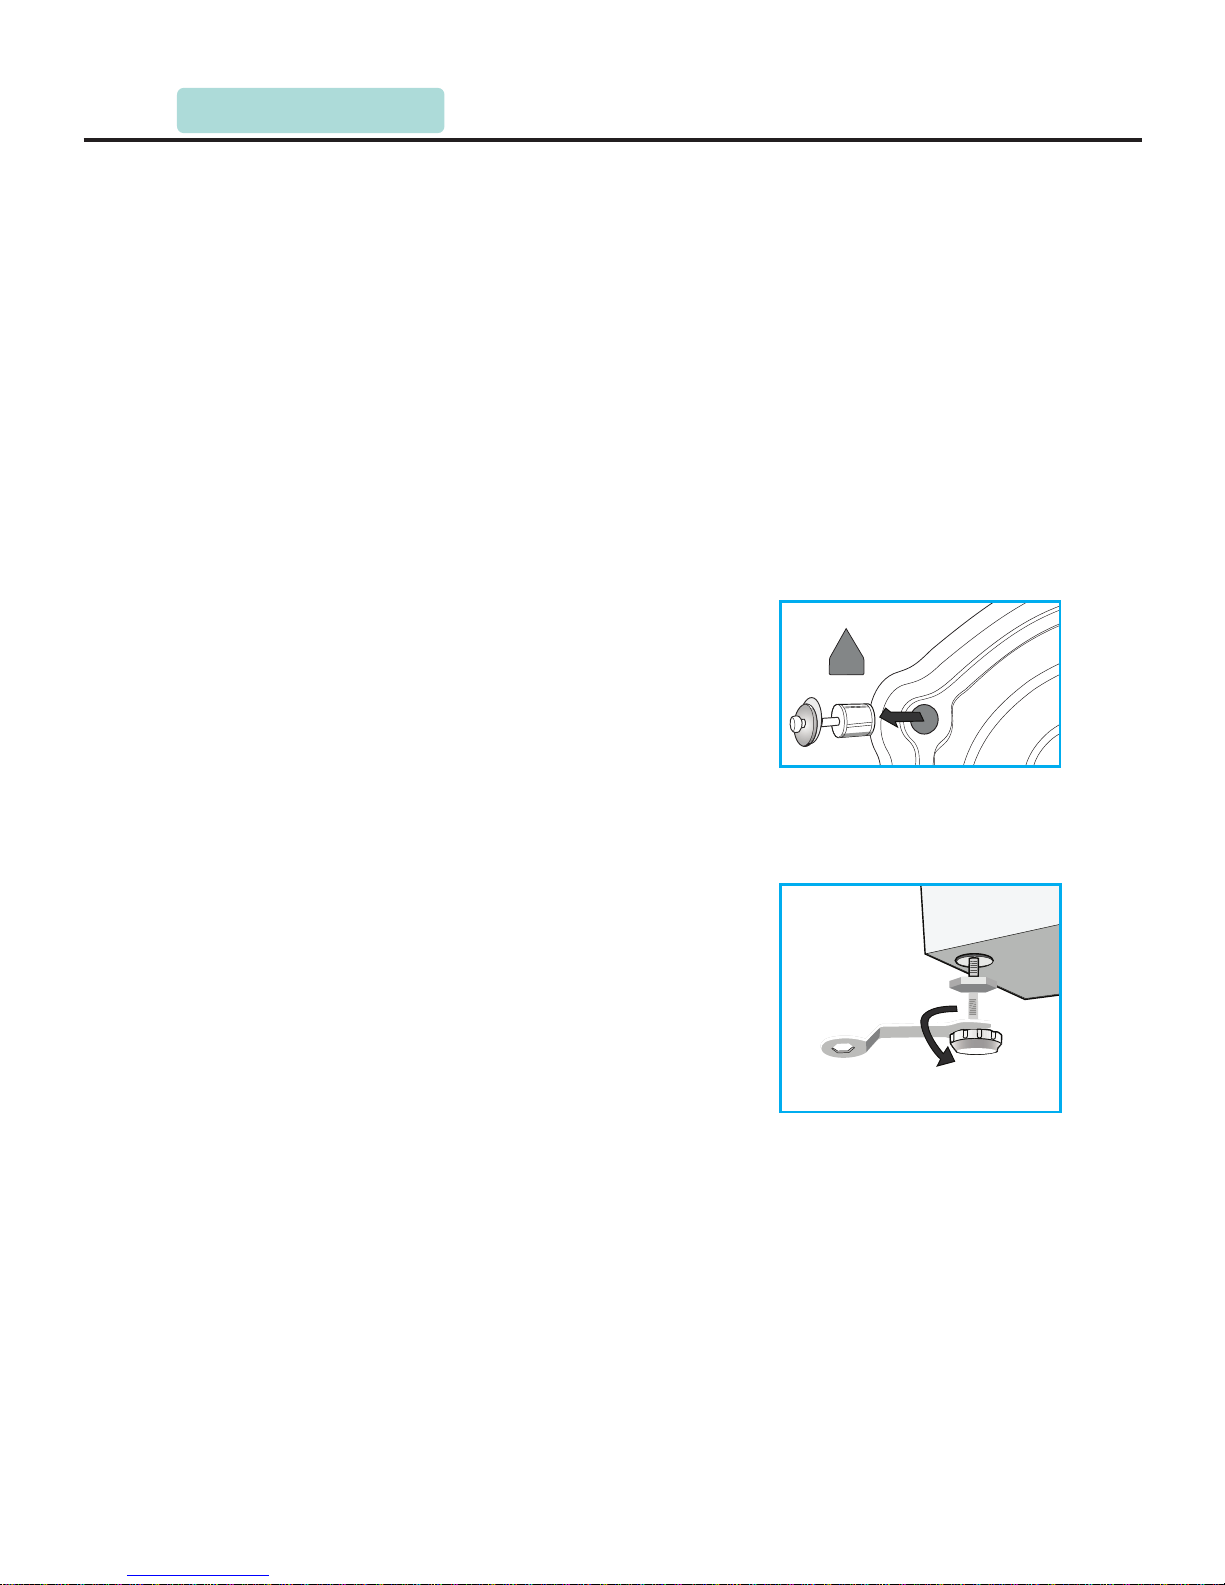
3.2 Remove transport bolts
Before using this washing machine, transport
bolts must be removed from the backside of
this machine.
Please take the following steps to remove the bolts:
1. Loosen all bolts with spanner and then
remove bolts.
2. Stop the holes with transport holes plugs.
3. Keep the transports bolts properly for future
use.
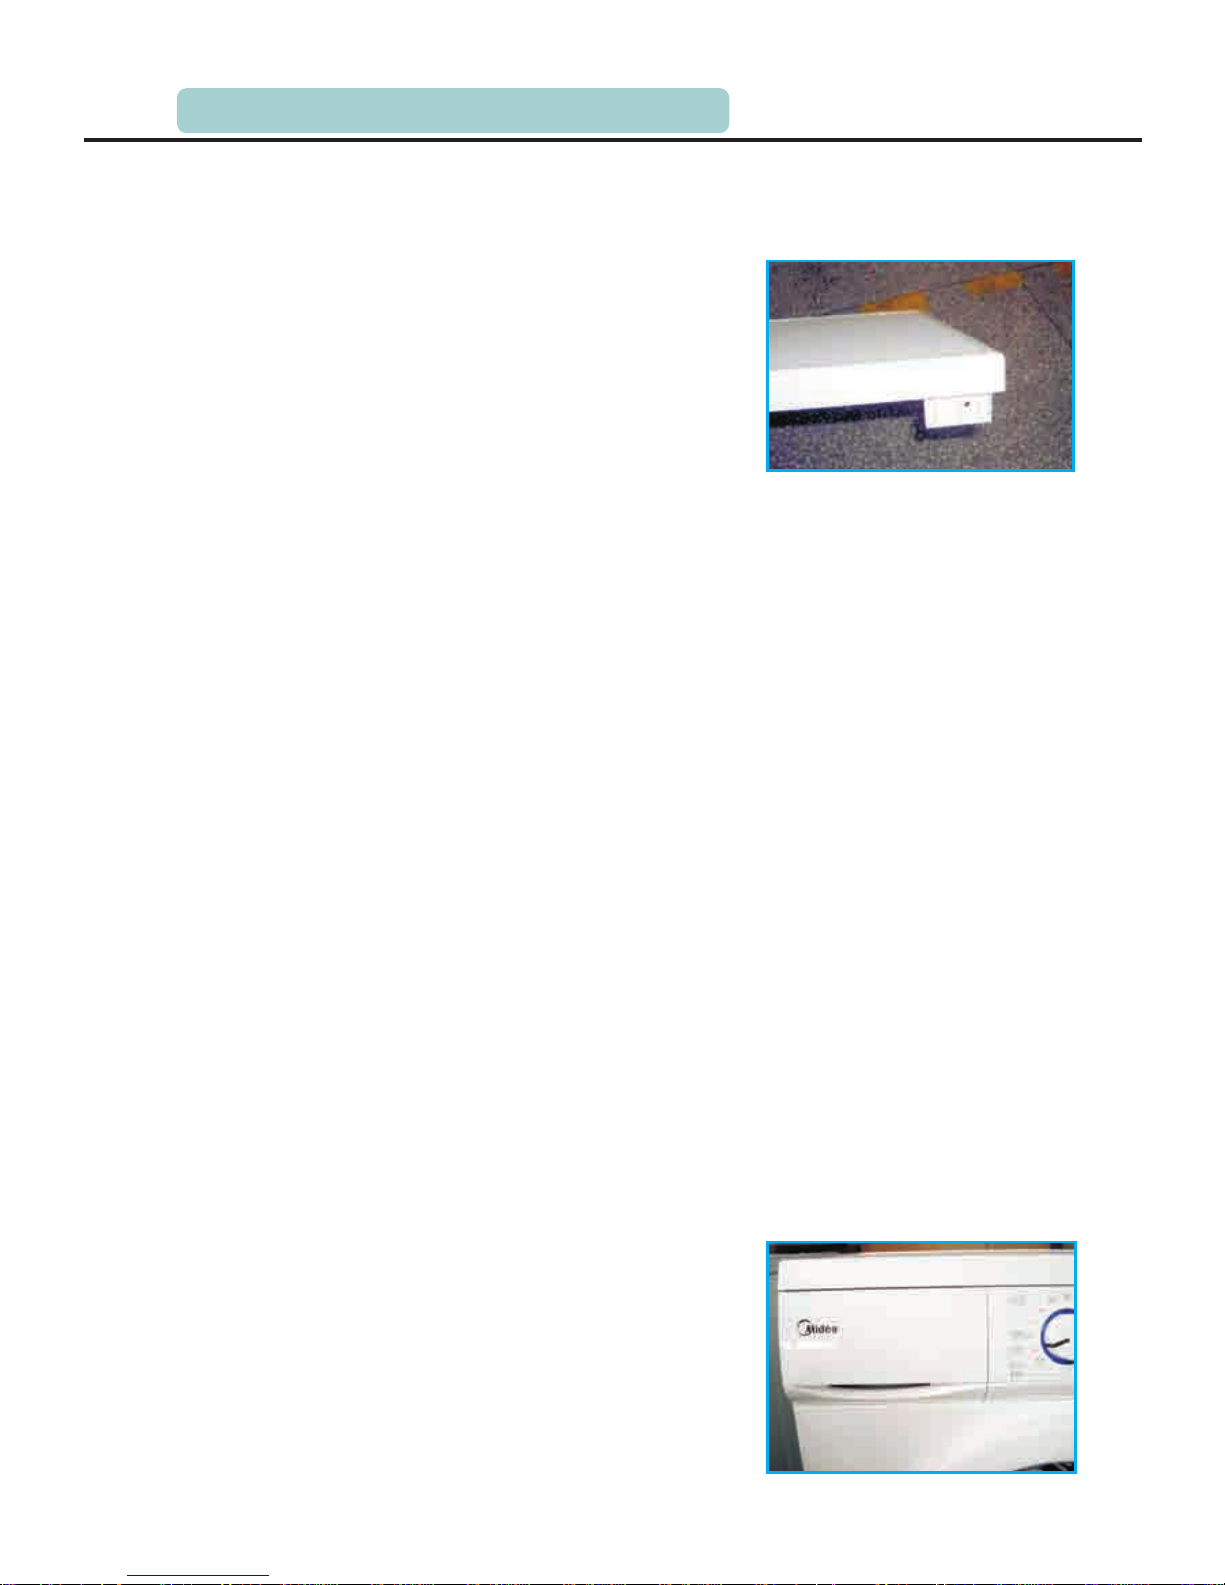
3.3 Adjust leg
1. When positioning the washing machine,
please first check whether the leg are closely
attached to the cabinet. If not, please turn them
to the original position with hand or spanner
and tighten them with spanner.
2. After position washing machine, press four
corners on top cover of this machine in
sequence. If the machine is not stable, this
leg should be adjusted.
3. To ensure the positioning status of washing machine, loosen the lock nut with spanner
and turn the leg with hand until it closely attaches to floor. Press the leg with one hand
and fasten the nut closely to the cabinet with the other hand.
4. After being locked properly, press four corners again to make sure that they have been
adjusted properly. If it is still unstable, above-mentioned steps shall be repeated by 2
to 3.
NOTE: In principle, there is only one loosen leg at most. If this leg is located at back of
this machine and it is inconvenient for adjustment, then another leg at its diagonal position
can be adjusted to achieve the same effect.
3.INSTALLATION
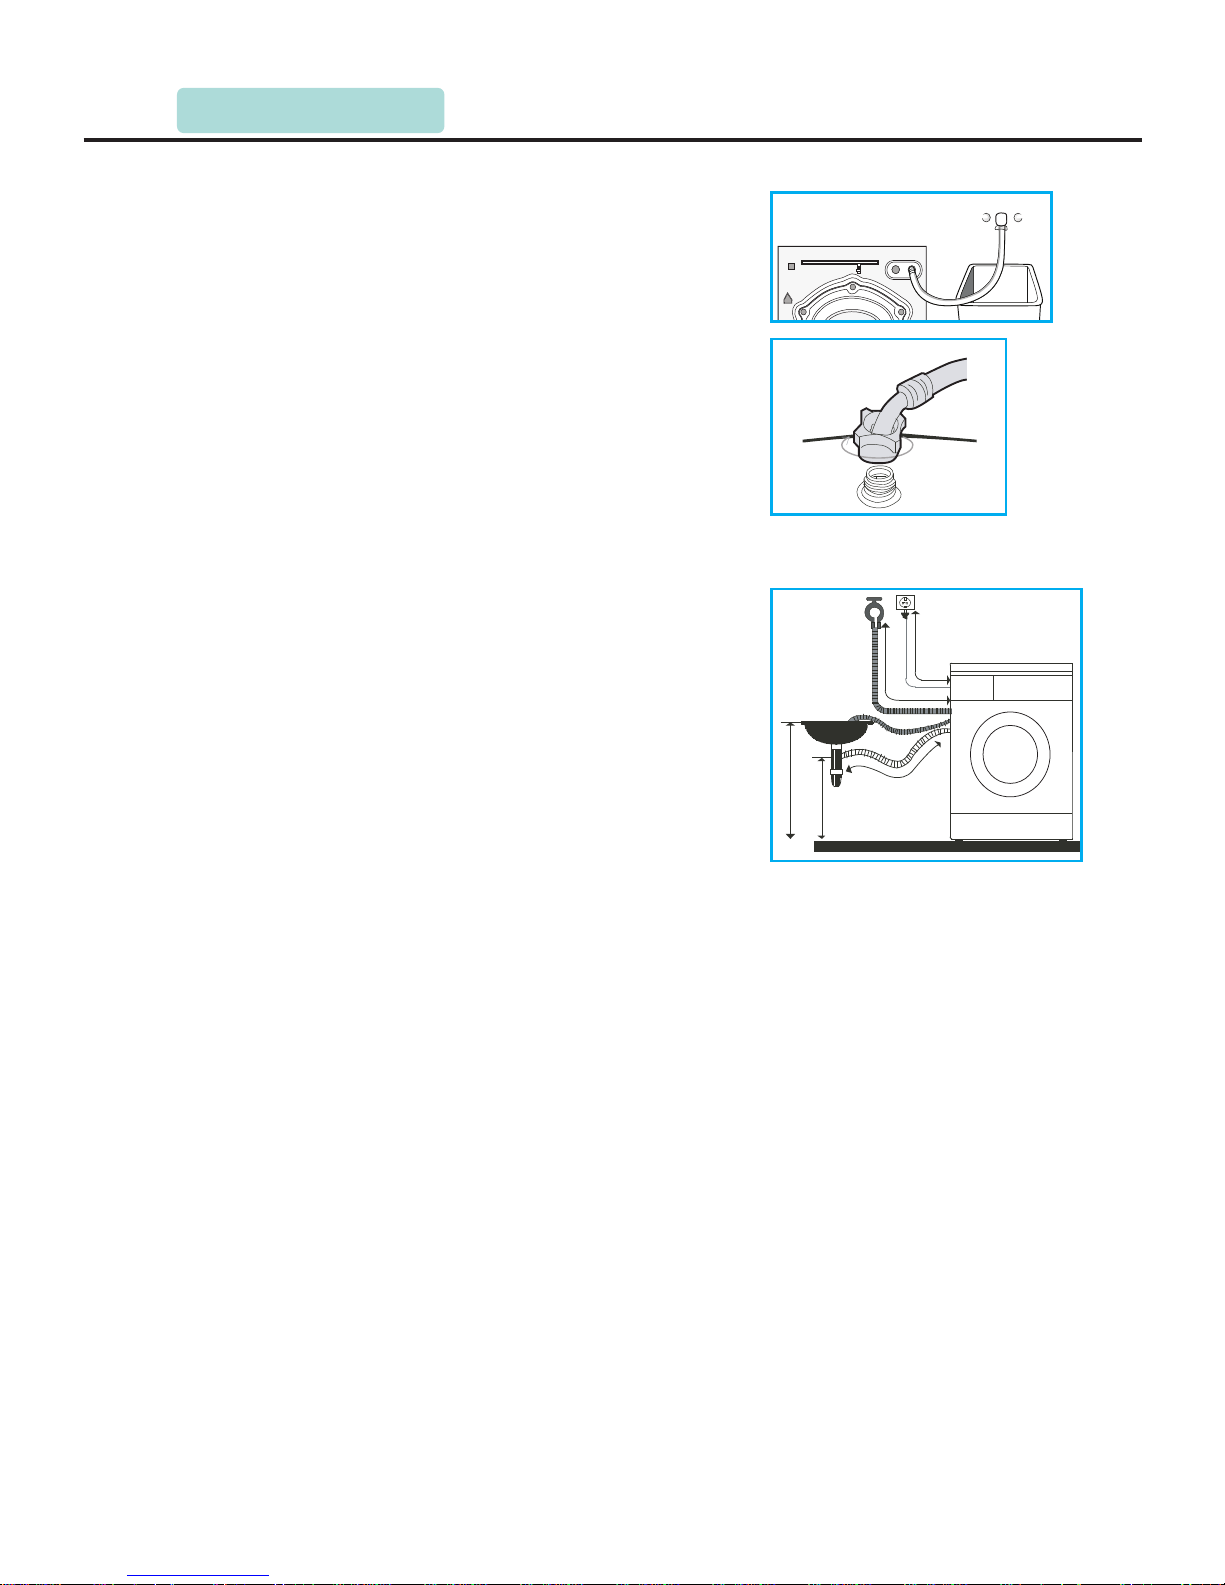
100cm
140cm
Min60cm
Max100cm
110c m
P.18
1.Connect the elbow to tap and fasten it clockwise.
2.Connect the other end of inlet pipe to the inlet
valve at the backside of washing machine and
fasten the pipe tightly clockwise.
NOTE: after connection, if there is any leakage with
hose, then repeat the steps to connect inlet pipe. The
most common type of tap shall be used to supply
water. If tap is square or too big, then standard tap
shall be changed.
3.4 Connect inlet pipe
Connect the inlet pipe as indicated in the figure.
3.5 Place outlet hose
There are two ways to place the end of outlet hose:
1. Put it beside the water trough.
1) Washing machine shall be located nearby the
slipway’s inlet so that it is convenient for this
machine to drain.
2) Take out splint from PE bag and fasten it on the
end of the drain hose, and then put it beside the
water through or the slipway’s inlet.
NOTE: clean up the filter of outlet valve, don’t fold it,
don’t clog the inlet/outlet hose to make sure them
expedite to inlet or drain.
2. Connect it to the branch drain pipe of the though.
3.6 Electrical connection
1. The maximum current through the unit is 10A when this machine heats the washing
liquid, and please make sure that your household power supply system (current, power
voltage and wire) can meet the normal loading requirements of the electrical appliances.
2. Please connect the power to a socket which is correctly installed and properly earthed.
3. Please make sure your household power voltage is same as that of the machine’s rating
label.
4. Power plug must match the socket and cabinet must be properly and effectively earthed.
5. Do not use multi-purpose plug or socket as extension cord.
6. Do not connect and pull out plug with wet hand.
7. When connect and pull out plug, hold the plug tightly and then pull it out. Do not pull
power cord forcibly.
8. If power cord is damaged or has any sign of being broken, special power cord must be
gotten from its manufacturer or service center for replacement.
9. Has been positioned, the plug of Washing machine should get to socket properly and
effectively.
3.INSTALLATION

P.1 9
3.7 Installing and checking items
1. Check whether remove transport bolts or not.
2. Check whether the socket is installed and properly earthed.
3. Check whether this machine is level or not.
4. Check whether inlet pipe/outlet pipe is wringed or not .
5. Guide user to operate the washing machine and make sure no leakage and no abnormal
sound.
NOTE: please read instruction manual carefully to ensure the proper operation of this
washing machine.
3.INSTALLATION
4.OVERVIEW OF MAIN COMPONENTS
P.20
4.1 Top cover kit
1. Parts component
Top cover is made up of hyperbaric plate, top
cover-f and top cover-b. Both top cover-f and
top cover-b are ABS materials. Front of top
cover lock to the panel support of this machine's
cabinet, and back of top cover fastnesses to the
U-type backside of cabinet with screw.
Two-piece of hyperbaric plate is covered by
melamine which is waterproof and fireproofing,
and furthermore, the dirt and smudge on its
surface could be erasured easily.
2. Summery about function
The two screws fixing the top cover screw into the
cabinet to avoid loosening.
Chang and maintain PCB kit, pressure sensor,
filter, inlet valve after unpack top cover kit.
4.2 Drawer panel kit
1. Drawer, Drawer panel and Softener cap
Drawer panel kit is consist of drawer, drawer panel and softener cap. Drawer panel is
clipped on the face of draw without screw and softener cap in the center of drawer.
According to the need of costumers, different detergent could be placed in three boxes
of drawer respectively, and concretely the right one is pre-wash box, the left one is main
wash box and the center one is softener box. Certainly user can put decolourant, spicery
and softener in the center one to improve washing performance.
After water fill in the drum through drawer, siphon structure of inlet system ensure that
drawer have no remanent water or wash liquid.
Drawer can be taken out and cleaned up: Unfold the drawer up to 10cm, and then take
out the drawer at the same time press the elastic plate to avoid injuring the softener box.
What is noticeable: during cut the softener cap in the detergent box, you have to press
the protuberant support of its end.
During the washing machine’s in work, it should remind user of closing the drawer, or
else, the detergent can’t be flowed into the drum completely, and what is worse water
may flow out from the outside of the cabinet.
2. Draw panel deck
The material of drawer panel kit is PMMA.
 Loading...