

Vivax OBI-60 A IX, OBI-61 A User Manual
User
manual
Built-in
electric
oven
ENG
RoHS
2002 / 95 / EC
OBI-60 A IX
OBI-61 A IX

OBI-60 A IX OBI-61 A IX
Dear User ;
We aim to provide you with a high quality product manufactured in our modern factory with great care and in compliance with
total quality control principles.
Therefore, we suggest you read the user manual carefully before using the product and, keep it safe for future reference.
Note: This user manual covers more than one model. Some of the features specified in the Manual may not be available in your
appliance.
Pieces of packaging (plastic bags, polystyrene etc.) must not be left within reach of children, as they are potentially
dangerous. Please dispose of packaging thoughtfully by the appropriate means.
THIS APPLIANCE SHALL BE INSTALLED IN ACCORDANCE WITH THE REGULATIONS IN FORCE AND ONLY USED IN A WELL
VENTILATED SPACE. READ THE INSTRUCTIONS BEFORE INSTALLING OR USING THIS APPLIANCE'
CONTENTS
1.
INSTALLATION OF YOUR OVEN
7.
USING HEAT SHIELD
2.
TECHNICAL FEATURES OF YOUR
OVEN
8.
MAINTENANCE and CLEANING
3.
IMPORTANT WARNINGS
9.
GENERAL OVERWIEF OF DIGITAL TIMER
4.
IF YOUR OVEN DOES NOT OPERATE
5.
DESCRIPTION OF OVEN & CONTROL
PANELS
6.
USING OVEN SECTION
1 - INSTALLATION OF YOUR OVEN
ELECTRICAL CONNECTION and SECURITY
1. THIS APPLIANCE MUST BE EARTHED
2.
Your oven is adjusted in compliance with 230 Volt AC, 50 Hz electrical supply, and requires a 16 Amp fuse. If the mains are different from this
specified value, contact an electrician or your authorised service.
3. Isolation switches for the oven must be accessible to the end user with the oven in place.
4.
Should you need to replace the 16 Amp plug top, please ensure you rewire the plug as follows;
Brown wire to the Live terminal
Blue wire to the Neutral terminal
Yellow & Green wire to Earth
5.
Electrical connection of the oven should only be made using sockets with Earth system installed, and in compliance with Regulations. If there is no
proper socket with Earth in place, immediately contact a qualified electrician. The Manufacturer will not be responsible for damage or injuries that can
arise because of inappropriate supply outlets with no earth system.
6. If your electric supply cable becomes damaged, it should be replaced by an authorised service engineer or qualified electrician.
7. The electrical supply cable should not touch the hot parts of the appliance.
8.
The oven should be installed into an oven housing that provides good higher ventilation.
9.
This oven must be correctly installed and secured in place, in accordance with manufacturer’s instructions and by a qualified person.
10.
Never work on the oven while it is switched on. Maintenance and service must be carried out after the power supply has been disconnected.
OBI-60 A IX OBI-61 A IX
1- INSTALLATION OF YOUR OVEN
4X
5
65
m
m
5
95
m
m
5
6
0
m
m
590 mm
5
9
5
m
m
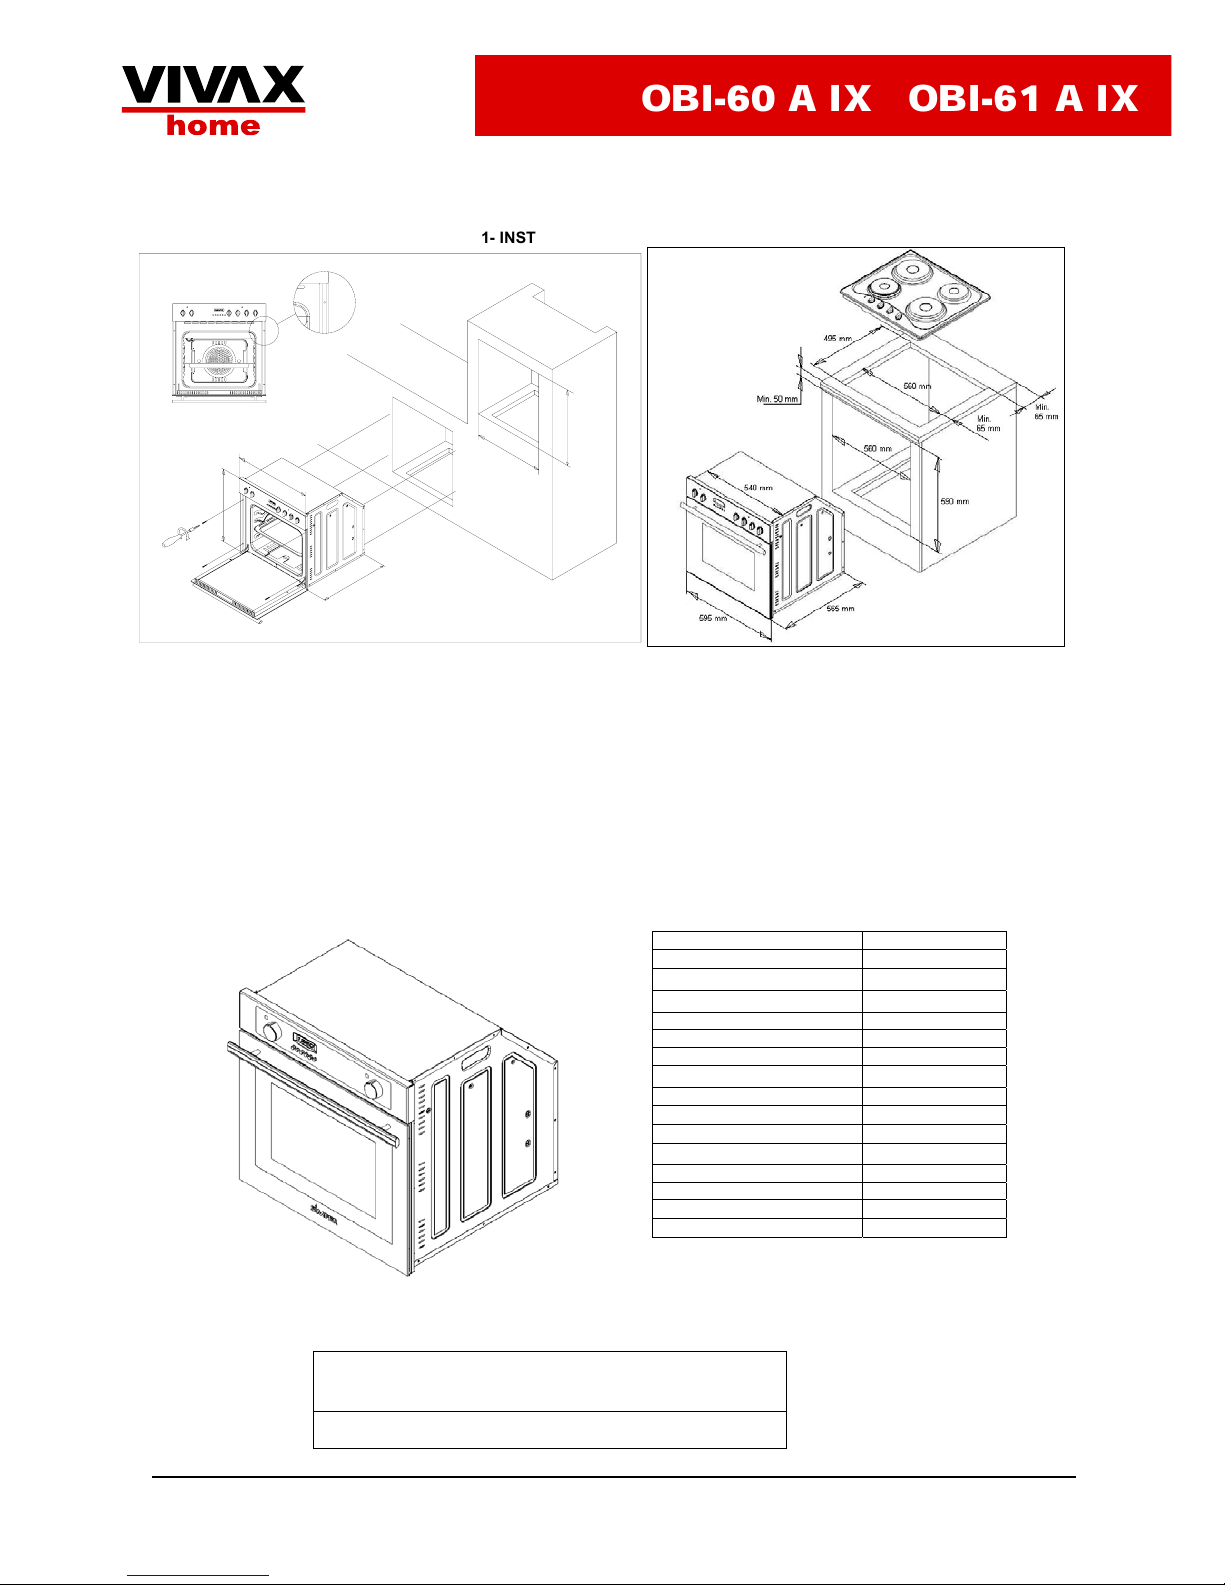
Figure-1
Important notices for the installation;
1-This appliance must be installed by a competent person and with particular attention to ventilation
2-The housing must be heat resistant to a temperature of 120 °C as per EEC directives.
3-The oven can be installed into a Standard 600 mm housing unit as shown in Figure-1, or in a tall housing unit when built-in a column.
4-In both cases ventilation provisions must be made. Keep a gap at the back of the housing unit of 85 - 90 mm depth.
5-Do not step-on, lean-on or rest heavy items on the open door, or maneuver the oven by the door.
2 - TECHNICAL FEATURES OF YOUR OVEN
SPECIFICATIONS
OUTER WIDTH
595 mm
OUTER DEPTH
605 mm
OUTER HEIGHT
595 mm
INNER WIDTH
460 mm
INNER DEPTH
400 mm
INNER HEIGHT
350 mm
OVEN VOLUME
64 lt
LAMP POWER
15 W
THERMOSTAT
50 - 280
0
C
BOTTOM HEATING ELEMENT
1200 W
TOP HEATING ELEMENT
1000 W
TURBO HEATING ELEMENT
2200 W
GRILL HEATING ELEMENT
2000 W
FAN MOTOR & COOLING FAN
40 W & 22 W
SUPPLY VOLTAGE
230 V , 50 Hz
Before starting to use the appliance, read the user manual
carefully. In this user Manual, there is important information
regarding your safety, oven usage and maintenance.
Keep this user manual somewhere safe, and make it available to
anyone who uses the oven.

OBI-60 A IX OBI-61 A IX
3 – IMPORTANT WARNINGS
NOTE: THIS APPLIANCE MUST BE EARTHED
1.
Pay attention to health and safety requirements – do not leave children un-supervised when cooking.
2.
Power supply voltage of your oven is 230 Volt 50 Hz.
3.
If the current rate of the fuse in your installation is less than 16 Amp, have a qualified electrician fit a16 Amp fuse.
4.
The plug on your oven must be earthed, ensure the supply socket is earthed. If the oven is used without an appropriate earth
connection, the manufacturer will not accept any liability for any loss or injury, which may arise.
The plug has to be located as
reachable after installing
5.
Keep the electrical cable of your oven away from the hot areas; do not let them touch the appliance. Keep them away from sharp
sides and heated surfaces.
6.
If the supply cord is damaged, it must be replaced by the manufacturer, its services agent or similar qualified persons in order
to avoid hazard.
7.
Ensure that the appliance is switched off before replacing the lamp to avoid the possibility of electric shock.
8.
In case of power failure, you will need to reset the clock. Otherwise, the oven will not operate (Digital Timer).
12.
Usage of your appliance creates moisture and heat in the room; make sure that your kitchen is well ventilated.
13.
When the oven is being used, some parts may become hot; children should be kept away and supervised at all times.
14.
When the oven is hot never touch the oven glass by hand.
15.
Before starting to use your appliance, keep curtains, paper or inflammable things away from your appliance. Do not keep
combustible or inflammable things in or near the appliance.
16.
This oven is produced for domestic cooking purposes only. Please do not use for any other purpose.
17.
When connecting to a cooker panel, the supply switch must have a double pole switch with contact separation of 3mm min
18. Use glove when using cooker. Do not touch on hot surfaces.
19. Do not splash water onto the cooker.
20. Do not use cooker in potentially explosive atmospheres.
21. Do not carry cooker to hold with handle
22. Some models are supplied without a plug-an-lead set. In this case please use a flexible cable to suitable for connection to mono phase: H05 VV-F 3
G 4 mm2 or for 3 phase: H05 VV-F 5 G 1.5 mm2
4- IF THE OVEN DOES NOT OPERATE
1. Please check that the electrical supply is connected and turned-on to the oven
2. Please check that there is electricity supply to the property.
3. Please check the fuse.
4. Please check the clock / auto programmer is set to the manual mode.
5. If you cannot solve the problem, contact the manufacturer-supplier, services agent or similar qualified persons.
OBI-60 A IX OBI-61 A IX
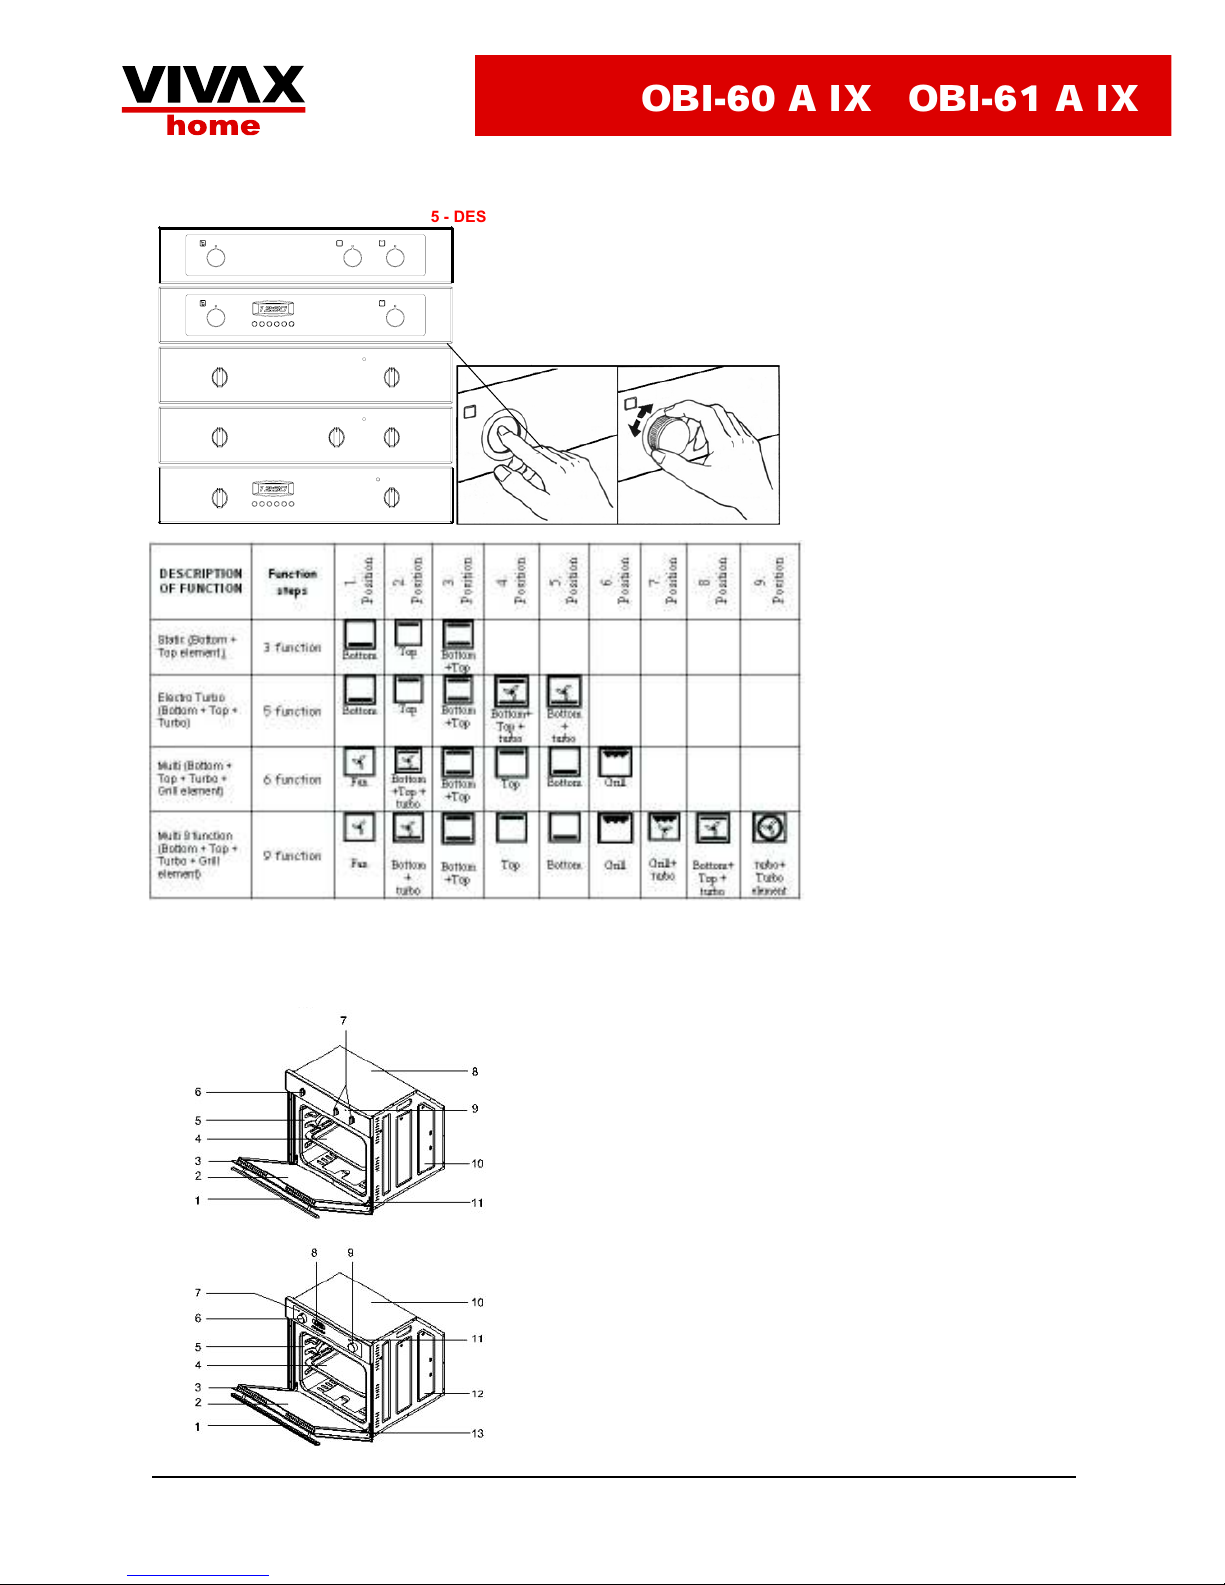
5 - DESCRIPTION OF OVEN and CONTROL PANELS
MEANINGS OF THE SYMBOLS THAT MIGHT BE ON YOUR CONTROL PANEL, ARE AS FOLLOWS
7
THERMOSTAT KNOB; In order to operate the
oven, the thermostat must be adjusted to desired
temperature. Your thermostat can be regulated
between 50º – 280º degrees Celsius.
MECHANIC TIMER KNOB (Optional); In order
to operate the oven, the timer switch should be
adjusted to the desired time.
5 - DESCRIPTION OF THE OVEN and CONTROL PANELS
1- Handle 9- Indicator of oven
2- Inner glass door 10- Side panel of oven
3- Glass door 11- Hinges of oven door
4- Oven tray
5- Cavity
6- Thermostat control knob
7- Oven control knob
8- Oven body
1- Handle 9- Oven control knob (pop-up type)
2- Inner glass of oven door 10- Oven body
3- Glass door 11- Indicator of oven
4- Oven tray 12- Side panel
5- Cavity 13- Hinges of oven door
6- Thermostat control knob ( pop-up type)
7- Thermostat lamp
8- Digital timer
OBI-60 A IX OBI-61 A IX
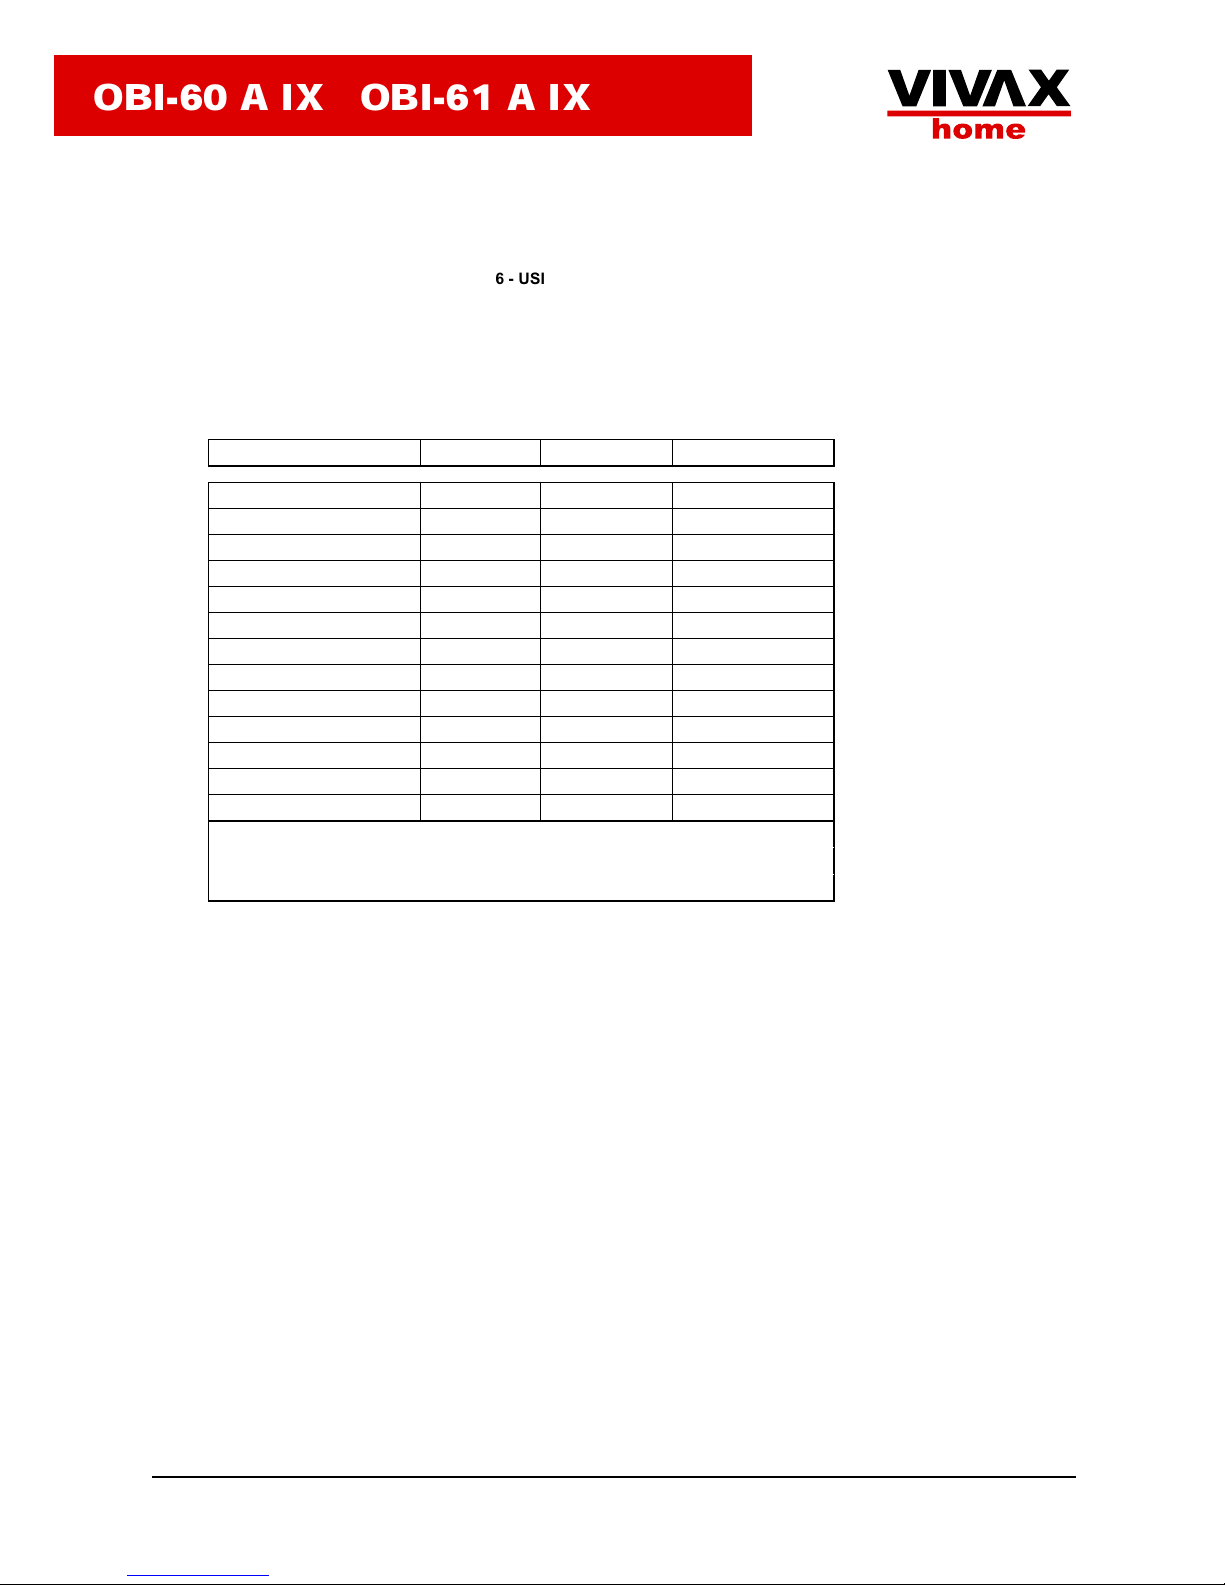
6 - USING THE OVEN SECTION
When your oven is operated for the first time, an odour will be given off from using the heating elements. In order to get rid of this, operate the oven at
250 °C for 45 minutes while it is empty.
In order to use your oven; the switch must be rotated to the desired temperature, otherwise the oven will not operate.
A suggestion of cooking times and thermostat positions are given in cooking table below – these are only a guide and will vary subject to weight and
quantity of food being cooked.
You may experiment and find different flavours suitable for your taste depending on your cooking and using habits.
When the oven is being used, the lid of the oven should be opened, otherwise circulation of the heat may be imbalanced and the results may change.
COOKING TABLE
MEALS TEMPERATURE RACK POSITION COOKING TIME (min.)
CREAMED CAKE 150 - 170 2 30 - 35
PASTRY 200 - 220 2 35 - 45
BISCUITS 160 - 170 3 20 - 25
COOKIES 160 - 170 3 20 - 35
CAKE 160 - 180 2 25 - 35
BRAIDED COOKIES 200 - 220 2 30 - 40
FILO PASTRY 180 - 200 2 35 - 45
SAVORY PASTRY 160 - 180 2 20 - 30
LAMB 200 - 230 3 20 - 25
VEAL 200 - 230 3 30 - 40
BEEF 230 - 250 3 30 - 40
CHICKEN (IN PIECES) 230 - 240 3 30 - 40
FISH 200 - 220 3 20 - 30
Note: The values in the Table are the results obtained in our laboratories. You can find
flavours different and suitable to your taste by experience. 5 - 10 min. preliminary
heating should be done prior to cooking.

OBI-60 A IX OBI-61 A IX
7 – USING THE HEAT SHIELD
A heat shield (figure 1) is designed to protect the control panel and knobs when the oven is in Grill mode.
Please use the heat shield in order to avoid heat damage to the control panel and the control knobs when the oven is in Grill mode.
Place the heat shield under the control panel by opening the oven front door (Figure 2)
Locate the two mounting tabs on the heat shield into the two slots under the control panel, then secure in place between oven and inner door by gently
closing the door (figure 3).
It is important to keep the door open the specified distance when Grilling.
The heat shield will provide an ideal cooking performance while protecting the control panel and knobs.
WARNING:
THE HEAT SHIELD BECOMES HOT IN USE ~ NEVER ATTEMPT TO REMOVE IT WITH BARE HANDS IMMEDIATLY AFTER USE
Figure-1 Figure-2 Figure-3
8-MAINTENANCE and CLEANING
1.
Disconnect the plug supplying the electricity to the oven or switch off at the supply panel.
2.
While the oven is operating or shortly after it starts operating, it becomes very hot. You must take care to avoid touching the heating
elements.
3.
Never clean the interior parts, panels, trays and all other enamel parts of the oven using tools like hard wire brush, scouring mesh or knife.
Do not use abrasive, scratching agents and detergents.
4.
After cleaning the interior parts of the oven with a soapy cloth, rinse it and then dry thoroughly with a soft cloth.
5.
Clean the glass surfaces with special glass cleaning agents.
6.
Do not clean your oven with steam cleaners.
7.
Never use inflammable agents like thinners, petrol and acid, when cleaning your oven.
8.
Do not wash any part of your oven in a dishwasher.
In order to clean the glass door of the oven; remove the inner glass cover profile (across the top and has many holes). Slide the glass out
carefully, then clean and rinse glass thoroughly. After drying, re-install the glass in the door and refit top glass cover profile.
9.
10.
Clean the oven regularly to prevent heavy build-up of cooking spoil that can result in burning smells.
Baked-on cooking spoil can give an appearance of ‘blisters’ in the enamel on the floor of the oven, ‘blistering’ is not possible and bakedon grease is not a manufacturing defect.
11.

Upute za
uporabu
Ugradbena
električna
pećnica
HR
BiH
CG
RoHS
2002 / 95 / EC
OBI-60 A IX
OBI-61 A IX
OBI-60 A IX OBI-61 A IX
Dragi korisniþe;
Naš cilj je da Vam ovaj ure
ÿ
aj, proizveden u našim modernim pogonima u pažljivoj radnoj okolini, pruži najbolja radna
svojstva u skladu sa idejom potpune kvalitete.
Stoga predlažemo da prije uporabe proizvoda pažljivo pro
þ
itate korisniþka uputstva te ih saþuvate.
Napomena: Ova korisni
þ
ka uputstva su namijenjena za više od jednog modela. Neke od funkcija prikazanih u uputstvima možda nisu
raspoložive kod Vašeg ure
ÿ
aja.
Dijelovi ambalaže (plastiþne vreüice, stiropor, itd.) se ne smiju ostavljati na dohvat djeci, jer su potencijalno opasni. Molimo
pažljivo uklonite ambalažu na ispravan na
þ
in.
OVAJ UREĈAJ SE MORA INSTALIRATI SUKLADNO VAŽEûIM PROPISIMA I KORISTITI ISKLJUýIVO U DOBRO PROZRAýENOJ
PROSTORIJI. PRIJE INSTALACIJE ILI UPORABE OVOG UREĈAJA PROýITAJTE UPUTSTVA.
SADRŽAJ
1.
INSTALACIJA VAŠE PEûNICE
7.
UPORABA TOPLINSKOG DEFLEKTORA
2.
TEHNIýKE ZNAýAJKE VAŠE
PEûNICE
8.
ODRŽAVANJE i ýIŠûENJE
3.
VAŽNA UPOZORENJA
9.
OPûENITI PREGLED DIGITALNOG TIMERA
4.
UKOLIKO VAŠA PEûNICA NE RADI
5.
OPIS PEûNICE I KONTROLNIH
PLOýA
6.
UPORABA PEûNICE
1 – INSTALACIJA VAŠE PEûNICE
ELEKTRIýNO POVEZIVANJE i SIGURNOST
1. OVAJ UREĈAJ MORA BITI UZEMLJEN
2.
Vaša je peünica podešena u skladu sa elektriþnim naponom od 230 V AC 50 Hz i zahtijeva osiguraþ od 16 A. Ukoliko se napon gradske razlikuje od
ove navedene vrijednosti, molimo kontaktirajte ovlašteni servis.
3.
Izolacijski prekidaþi za peünicu moraju biti dostupni korisniku nakon instalacije peünice.
4.
Ukoliko zatrebate zamijeniti vrh 16A utikaþa, povežite novi utikaþ na sljedeüi naþin;
Smeÿa
žica na prikljuþak
pod naponom
Plava
žica na
neutralni
prikljuþak
Žuto-zelena
žica na
uzemljenje
5.
Elektriþno povezivanje peünice bi trebalo izvršiti putem utiþnica uzemljenih u skladu s važeüim propisima. Ukoliko na mjestu instalacije peünice ne
postoji uti
þ
nica s odgovarajuüim uzemljenjem odmah kontaktirajte kvalificiranog elektriþara. Proizvoÿaþ nikada neüe biti odgovoran za ošteüenja
nastala jer uti
þ
nica u koju je ukljuþen ureÿaj nije ispravno uzemljena.
6.
Ukoliko se kabel napajanja ošteti, trebao bi ga zamijeniti ovlašteni servis ili kvalificirani elektriþar.
7.
Kabel napajanja ne bi smio dodirivati vruüe dijelove ureÿaja.
8.
Pe
ü
nica bi trebala biti postavljena u element koji omoguüuje dobu ventilaciju.
9.
Ova pe
ü
nica m
ora biti ispravno instalirana i u
þ
vršüena sukladno uputstvima proizvoÿaþa i od strane kvalificirane osobe.
10.
Nikada ne radite na pe
ü
nici kada je ukljuþena. Održavanje i servisiranje treba vršiti nakon iskljuþivanja peünice iz struje.
OBI-60 A IX OBI-61 A IX
1- INSTALACIJA VAŠE PEûNICE
4X
5
65
m
m
5
95
m
m
5
6
0
m
m
590 mm
5
9
5
m
m
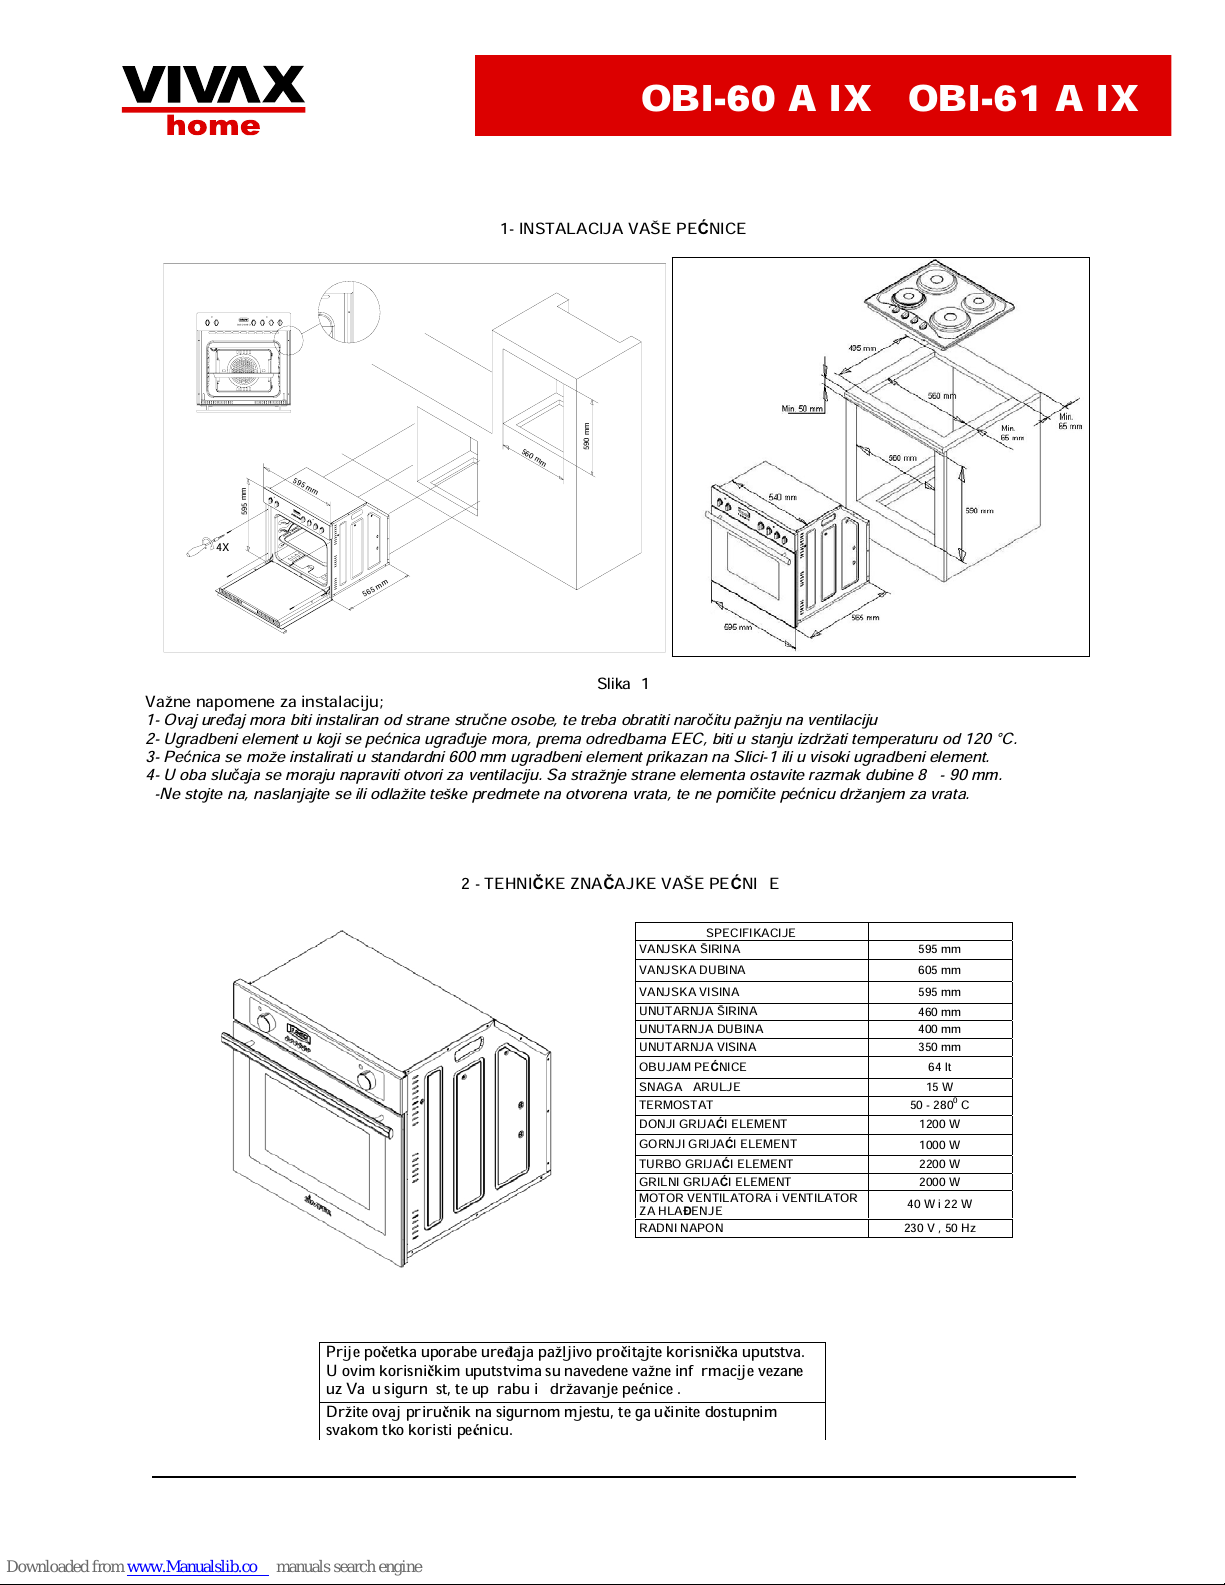
Slika -1
Važne napomene za instalaciju;
1- Ovaj ureÿaj mora biti instaliran od strane struþne osobe, te treba obratiti naroþitu pažnju na ventilaciju
2- Ugradbeni element u koji se pe
ü
nica ugraÿuje mora, prema odredbama EEC, biti u stanju izdržati temperaturu od 120 °C.
3- Pe
ü
nica se može instalirati u standardni 600 mm ugradbeni element prikazan na Slici-1 ili u visoki ugradbeni element.
4- U oba slu
þ
aja se moraju napraviti otvori za ventilaciju. Sa stražnje strane elementa ostavite razmak dubine 85 - 90 mm.
5-Ne stojte na, naslanjajte se ili odlažite teške predmete na otvorena vrata, te ne pomi
þ
ite peünicu držanjem za vrata.
2 - TEHNIýKE ZNAýAJKE VAŠE PEûNI
CE
SPECIFIKACIJE
VANJSKA ŠIRINA
595 mm
VANJSKA DUBINA
605 mm
VANJSKA VISINA
595 mm
UNUTARNJA ŠIRINA
460 mm
UNUTARNJA DUBINA
400 mm
UNUTARNJA VISINA
350 mm
OBUJAM PEûNICE
64 lt
SNAGA ŽARULJE
15 W
TERMOSTAT
50 - 280
0
C
DONJI GRIJAûI ELEMENT
1200 W
GORNJI GRIJAûI ELEMENT
1000 W
TURBO GRIJAûI ELEMENT
2200 W
GRILNI GRIJAûI ELEMENT
2000 W
MOTOR VENTILATORA i VENTILATOR
ZA HLAĈENJE
40 W i 22 W
RADNI NAPON
230 V , 50 Hz
Prije poþetka uporabe ureÿaja pažljivo proþitajte korisniþka uputstva.
U ovim korisniþkim uputstvima su navedene važne informacije vezane
uz Vašu sigurnost, te uporabu i održavanje peünice .
Držite ovaj priruþnik na sigurnom mjestu, te ga uþinite dostupnim
svakom tko koristi peünicu.
OBI-60 A IX OBI-61 A IX
3 – VAŽNA UPOZORENJA
NAPOMENA: OVAJ UREĈAJ MORA BITI UZEMLJEN
1.
Obratite pozornost na zdravstvene i sigurnosne zahtjeve – ne ostavljajte djecu bez nadzora tijekom kuhanja.
2.
Radni napon Vaše peünice iznosi 230 V 50 Hz.
3.
Ukoliko je snaga strujnog osiguraþa u Vašem domu manja od 16 A, kontaktirajte kvalificiranog elektriþara radi ugradnje 16 A osiguraþa.
4.
Utikaþ Vaše peünice mora biti uzemljen, stoga osigurajte da je i strujna utiþnica uzemljena. Ukoliko se peünica koristi bez odgovarajuüeg
uzemljenja proizvo
ÿaþ
ne prihvaüa ikakvu odgovornost za bilo kakav posljediþan gubitak ili ozljedu. Nakon instalacije utikaþ mora biti na
dohvat ruke.
5.
Držite kabel napajanja Vaše peünice podalje vruüih podruþja; ne dopuštajte da kabel napajanja dodiruje ureÿaj. Držite kabel napajanja
podalje oštrih rubova i zagrijanih površina.
6.
Ukoliko je kabel napajanja ošteüen, mora ga zamijeniti proizvoÿaþ, ovlašteni serviser ili sliþno ovlašteno osoblje kako bi se izbjegle
mogu
ü
e opasnosti.
7.
Prije zamjene žarulje obavezno iskljuþite ureÿaj iz struje kako biste izbjegli opasnost od strujnog udara.
8.
U sluþaju nestanka struje obavezno ponovno podesite sat. U suprotnom peünica neüe raditi (digitalni timer).
12.
Uporaba Vašeg ureÿaja stvara vlagu i toplinu u prostoriji u kojoj se ureÿaj nalazi, te stoga osigurajte dobru ventilaciju kuhinje.
13.
Prilikom uporabe peünice, izloženi dijelovi bi mogli biti vruüi; djecu bi uvijek trebalo držati podalje peünice.
14.
Kada je peünica vruüa nikada ne dodirujte staklo peünice rukama.
15.
Prije poþetka uporabe peünice, odmaknite zavjese, papir ili zapaljive stvari od peünice. Ne držite zapaljive ili eksplozivne stvari unutar ili
blizu pe
ü
nice.
16.
Peünica je namijenjena iskljuþivo za kuhanje u domaüinstvu. Molimo ne koristite je u druge svrhe.
17.
Prilikom povezivanja sa ploþom za kuhanje, prekidaþ napajanja mora posjedovati dvopolni prekidaþ sa kontaktnim razmakom od min.
3mm.
18. Koristite rukavicu prilikom uporabe pe
ü
nice. Ne dodirujte vruüe površine.
19. Ne polijevajte pe
ü
nicu vodom.
20. Ne koristite pe
ü
nicu u potencijalno eksplozivnom okružju.
21. Ne nosite pe
ü
nicu držeüi je za vratnu dršku.
22. Neki modeli se isporu
þ
uju bez kabela napajanja i utikaþa. U tom sluþaju koristite fleksibilan kabel podoban za spajanje na jednu fazu: H05 VV-F 3 G
4 mm
2
ili za 3 faze: H05 VV-F 5 G 1.5 mm2.
4- UKOLIKO PEûNICA NE RADI
1. Molimo provjerite je li utikaþ kabela napajanja þvrsto ukljuþen u strujnu utiþnicu
2. Molimo provjerite ima li struje u strujnoj uti
þ
nici.
3. Molimo provjerite strujni osigura
þ
.
4. Molimo provjerite je li sat/automatski programator postavljane na ru
þ
ni naþin rada.
5. Ukoliko niste u stanju otkloniti problem, kontaktirajte ovlaštenog servisera ili sli
þ
no kvalificiranu osobu.
OBI-60 A IX OBI-61 A IX
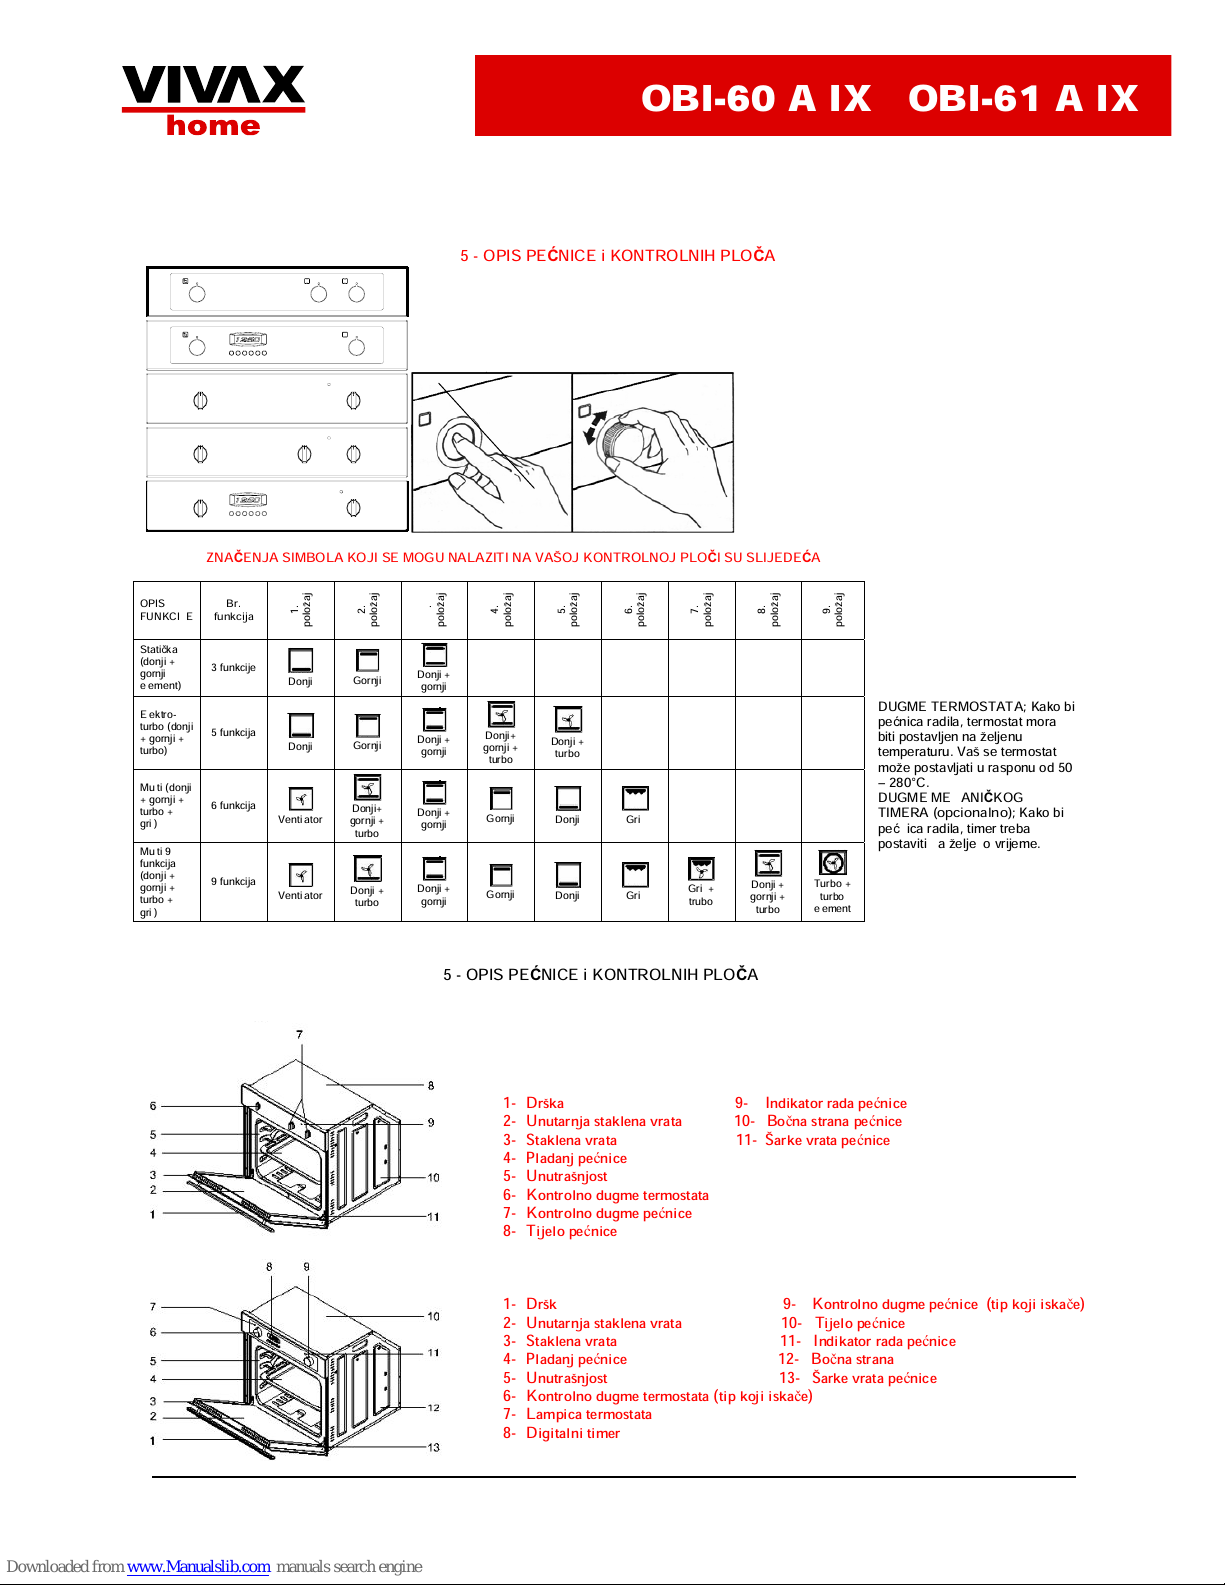
5 - OPIS PEûNICE i KONTROLNIH PLOýA
ZNAýENJA SIMBOLA KOJI SE MOGU NALAZITI NA VAŠOJ KONTROLNOJ PLOýI SU SLIJEDEûA
OPIS
FUNKCIJE
Br.
funkcija
1.
položaj
2.
položaj
3.
položaj
4.
položaj
5.
položaj
6.
položaj
7.
položaj
8.
položaj
9.
položaj
Statiþka
(donji +
gornji
element)
3 funkcije
Donji
Gornji
Donji +
gornji
Elektro-
turbo (donji
+ gornji +
turbo)
5 funkcija
Donji
Gornji
Donji +
gornji
Donji+
gornji +
turbo
Donji +
turbo
Multi (donji
+ gornji +
turbo +
gril)
6 funkcija
Ventilator
Donji+
gornji +
turbo
Donji +
gornji
Gornji
Donji Gril
Multi 9
funkcija
(donji +
gornji +
turbo +
gril)
9 funkcija
Ventilator
Donji +
turbo
Donji +
gornji
Gornji
Donji Gril
Gril +
trubo
Donji +
gornji +
turbo
Turbo +
turbo
element
DUGME TERMOSTATA
; Kako bi
peünica radila, termostat mora
biti postavljen na željenu
temperaturu. Vaš se termostat
može postavljati u rasponu od 50
– 280°C.
DUGME MEHANIýKOG
TIMERA (opcionalno)
; Kako bi
peünica radila, timer treba
postaviti na željeno vrijeme.
5 - OPIS PEûNICE i KONTROLNIH PLOýA
1- Drška 9- Indikator rada peünice
2- Unutarnja staklena vrata 10- Boþna strana peünice
3- Staklena vrata 11- Šarke vrata peünice
4- Pladanj peünice
5- Unutrašnjost
6- Kontrolno dugme termostata
7- Kontrolno dugme peünice
8- Tijelo peünice
1- Drška 9- Kontrolno dugme peünice (tip koji iskaþe)
2- Unutarnja staklena vrata 10- Tijelo peünice
3- Staklena vrata 11- Indikator rada peünice
4- Pladanj peünice 12- Boþna strana
5- Unutrašnjost 13- Šarke vrata peünice
6- Kontrolno dugme termostata (tip koji iskaþe)
7- Lampica termostata
8- Digitalni timer
OBI-60 A IX OBI-61 A IX
6 - UPORABA PEûNICE
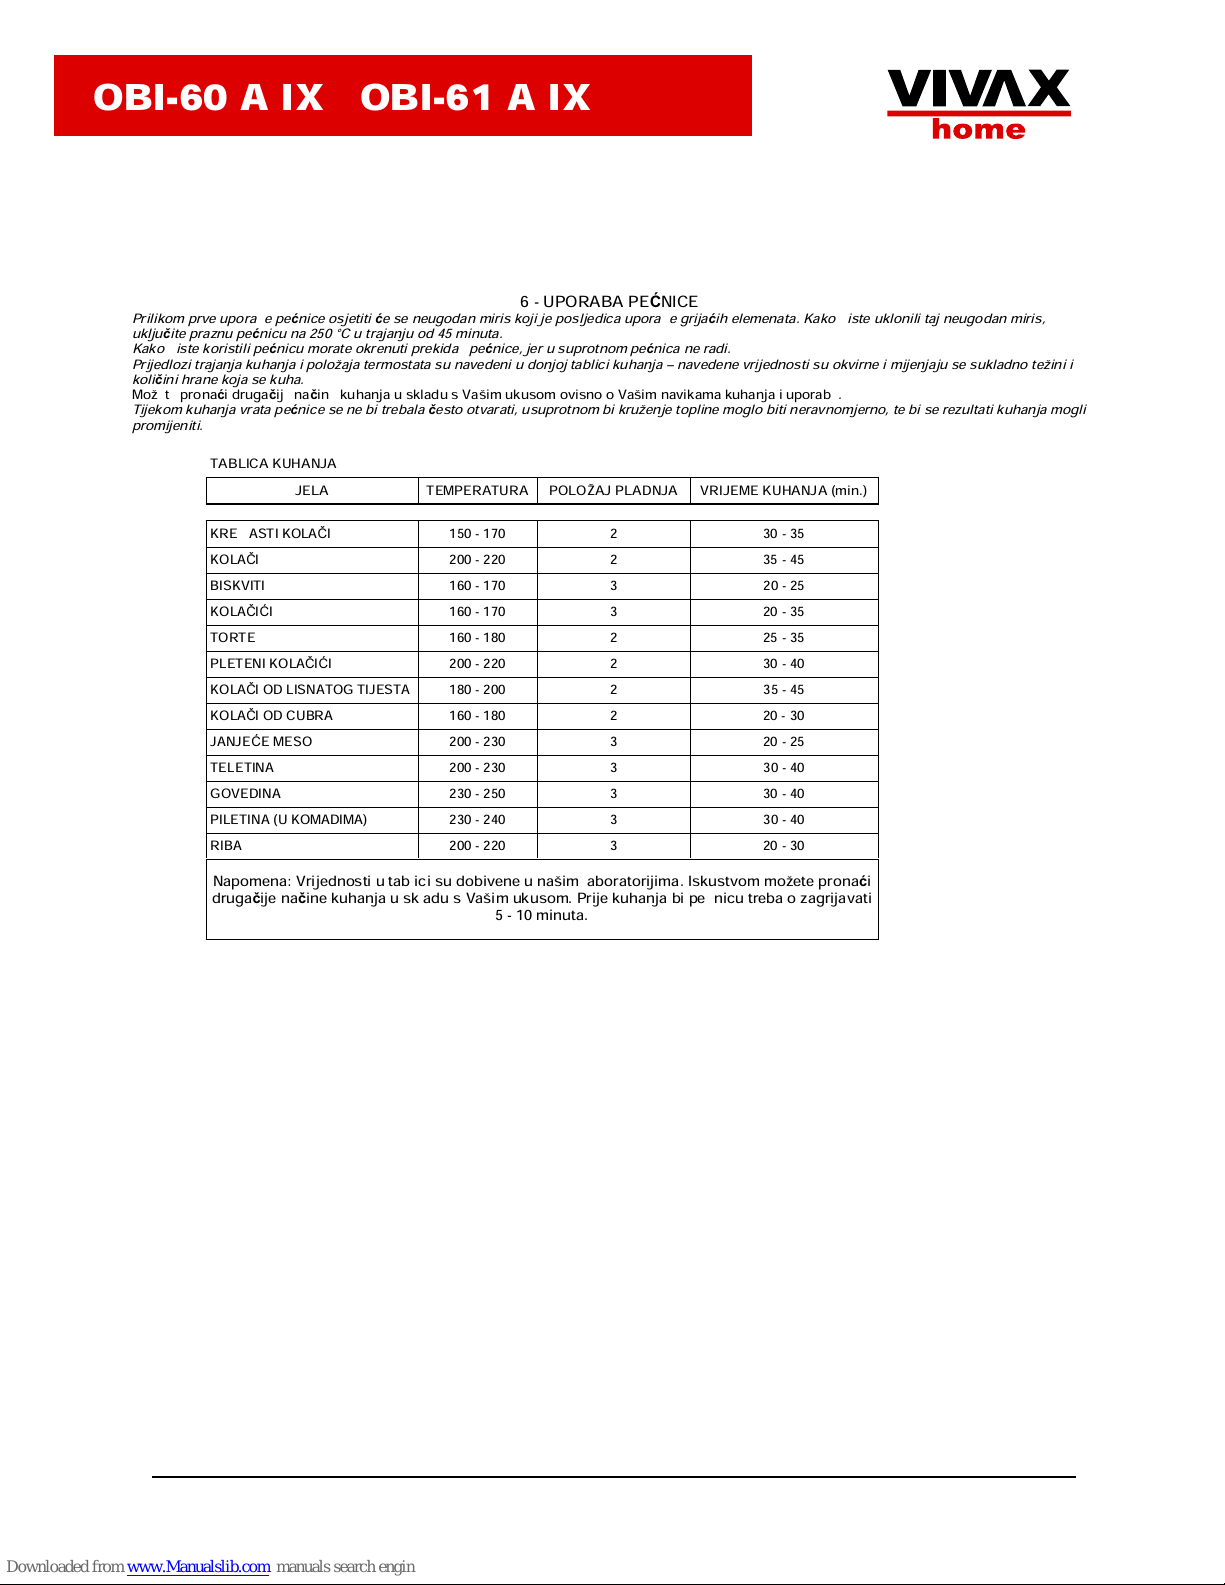
Prilikom prve uporabe peünice osjetiti üe se neugodan miris koji je posljedica uporabe grijaüih elemenata. Kako biste uklonili taj neugodan miris,
uklju
þ
ite praznu peünicu na 250 °C u trajanju od 45 minuta.
Kako biste koristili pe
ü
nicu morate okrenuti prekidaþ peünice, jer u suprotnom peünica ne radi.
Prijedlozi trajanja kuhanja i položaja termostata su navedeni u donjoj tablici kuhanja – navedene vrijednosti su okvirne i mijenjaju se sukladno težini i
koli
þ
ini hrane koja se kuha.
Možete pronaüi drugaþije naþine kuhanja u skladu s Vašim ukusom ovisno o Vašim navikama kuhanja i uporabe
.
Tijekom kuhanja vrata pe
ü
nice se ne bi trebala þesto otvarati, usuprotnom bi kruženje topline moglo biti neravnomjerno, te bi se rezultati kuhanja mogli
promijeniti.
TABLICA KUHANJA
JELA TEMPERATURA POLOŽAJ PLADNJA VRIJEME KUHANJA (min.)
KREMASTI KOLAýI 150 - 170 2 30 - 35
KOLAýI 200 - 220 2 35 - 45
BISKVITI 160 - 170 3 20 - 25
KOLAýIûI 160 - 170 3 20 - 35
TORTE 160 - 180 2 25 - 35
PLETENI KOLAýIûI 200 - 220 2 30 - 40
KOLAýI OD LISNATOG TIJESTA 180 - 200 2 35 - 45
KOLAýI OD CUBRA 160 - 180 2 20 - 30
JANJEûE MESO 200 - 230 3 20 - 25
TELETINA 200 - 230 3 30 - 40
GOVEDINA 230 - 250 3 30 - 40
PILETINA (U KOMADIMA) 230 - 240 3 30 - 40
RIBA 200 - 220 3 20 - 30
Napomena: Vrijednosti u tablici su dobivene u našim laboratorijima. Iskustvom možete pronaüi
drugaþije naþine kuhanja u skladu s Vašim ukusom. Prije kuhanja bi peünicu trebalo zagrijavati
5 - 10 minuta.
OBI-60 A IX OBI-61 A IX
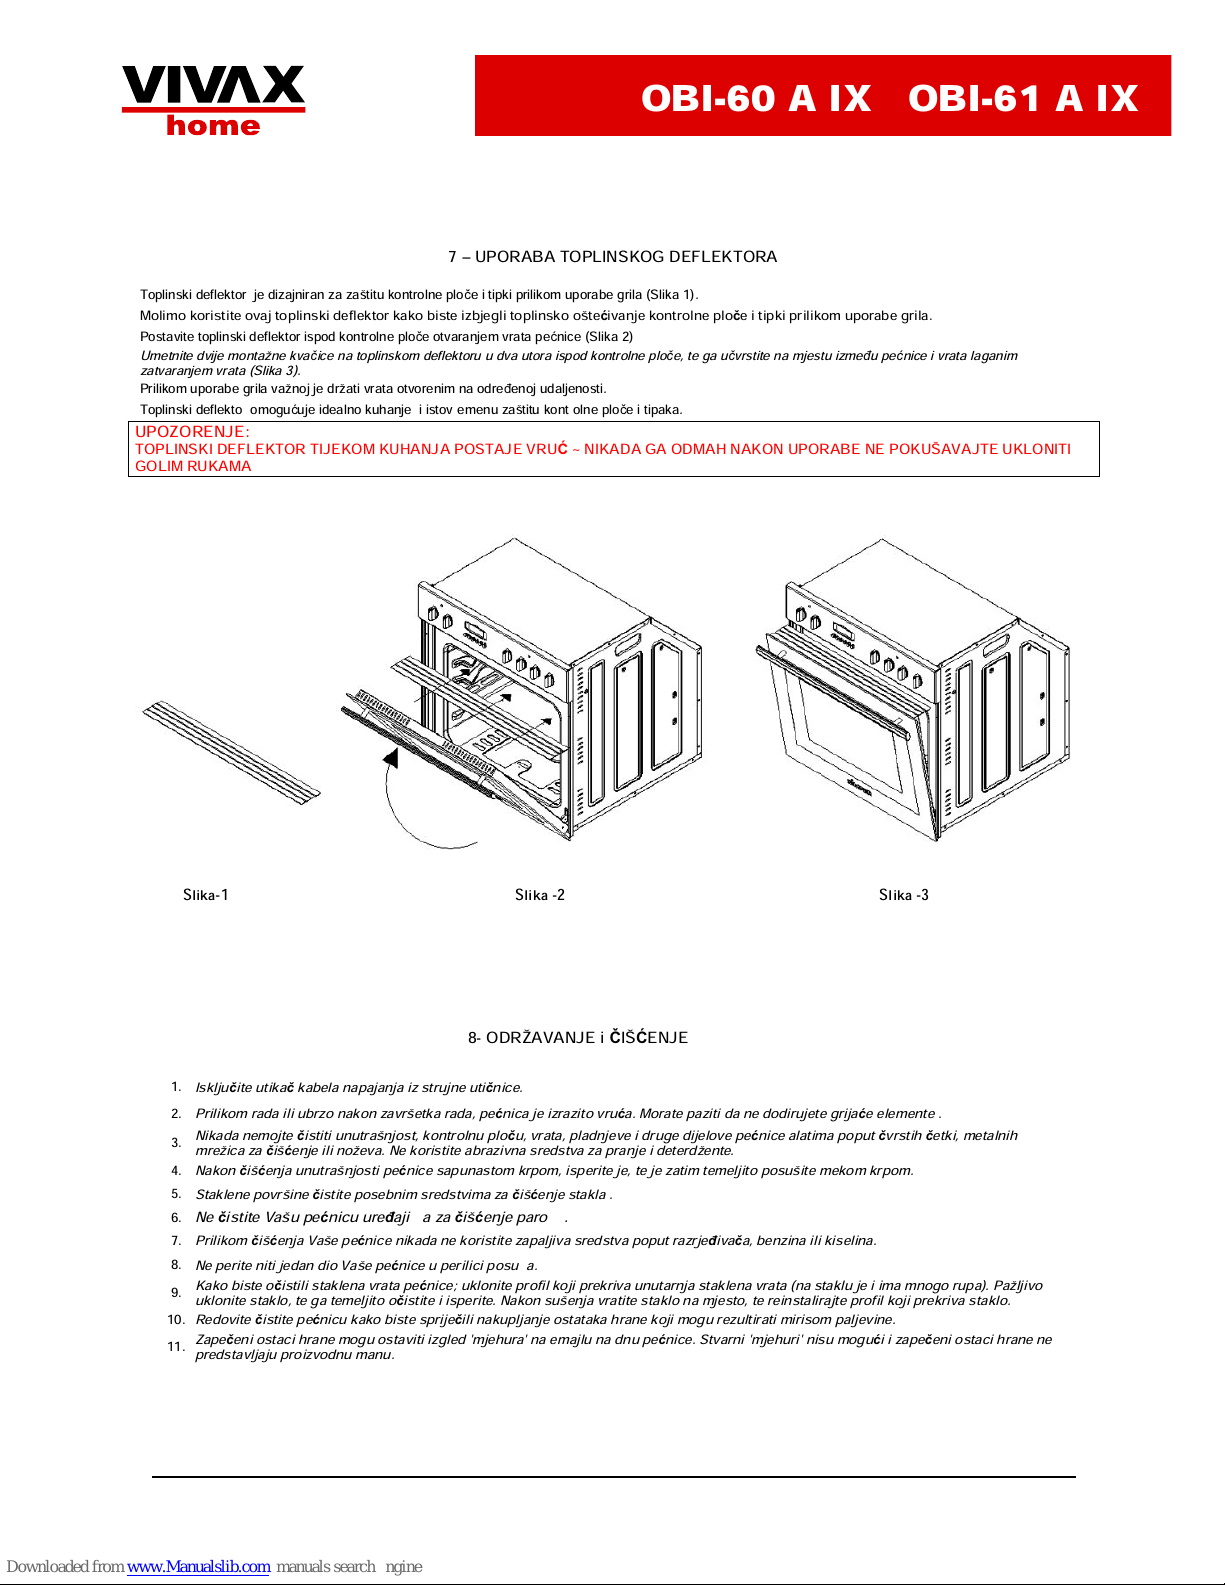
7 – UPORABA TOPLINSKOG DEFLEKTORA
Toplinski deflektor je dizajniran za zaštitu kontrolne ploþe i tipki prilikom uporabe grila (Slika 1)
.
Molimo koristite ovaj toplinski deflektor kako biste izbjegli toplinsko ošteüivanje kontrolne ploþe i tipki prilikom uporabe grila.
Postavite toplinski deflektor ispod kontrolne ploþe otvaranjem vrata peünice (Slika 2)
Umetnite dvije montažne kvaþice na toplinskom deflektoru u dva utora ispod kontrolne ploþe, te ga uþvrstite na mjestu izmeÿu peünice i vrata laganim
zatvaranjem vrata (Slika 3).
Prilikom uporabe grila važnoj je držati vrata otvorenim na odreÿenoj udaljenosti
.
Toplinski deflektor omoguüuje idealno kuhanje i istovremenu zaštitu kontrolne ploþe i tipaka
.
UPOZORENJE:
TOPLINSKI DEFLEKTOR TIJEKOM KUHANJA POSTAJE VRUû ~ NIKADA GA ODMAH NAKON UPORABE NE POKUŠAVAJTE UKLONITI
GOLIM RUKAMA
Slika-1 Slika -2 Slika -3
8- ODRŽAVANJE i ýIŠûENJE
1.
Iskljuþite utikaþ kabela napajanja iz strujne utiþnice.
2.
Prilikom rada ili ubrzo nakon završetka rada, peünica je izrazito vruüa. Morate paziti da ne dodirujete grijaüe elemente .
3.
Nikada nemojte þistiti unutrašnjost, kontrolnu ploþu, vrata, pladnjeve i druge dijelove peünice alatima poput þvrstih þetki, metalnih
mrežica za
þišü
enje ili noževa. Ne koristite abrazivna sredstva za pranje i deterdžente.
4.
Nakon þišüenja unutrašnjosti peünice sapunastom krpom, isperite je, te je zatim temeljito posušite mekom krpom.
5.
Staklene površine þistite posebnim sredstvima za þišüenje stakla .
6.
Neþistite Vašu peünicu ureÿajima za þišüenje parom .
7.
Prilikomþišüenja Vaše peünice nikada ne koristite zapaljiva sredstva poput razrjeÿivaþa, benzina ili kiselina.
8.
Ne perite niti jedan dio Vaše peünice u perilici posuÿa.
Kako biste o
þ
istili staklena vrata peünice; uklonite profil koji prekriva unutarnja staklena vrata (na staklu je i ima mnogo rupa). Pažljivo
uklonite staklo, te ga temeljito o
þ
istite i isperite. Nakon sušenja vratite staklo na mjesto, te reinstalirajte profil koji prekriva staklo.
9.
10.
Redovite þistite peünicu kako biste sprijeþili nakupljanje ostataka hrane koji mogu rezultirati mirisom paljevine.
Zapeþeni ostaci hrane mogu ostaviti izgled 'mjehura' na emajlu na dnu peünice. Stvarni 'mjehuri' nisu moguüi i zapeþeni ostaci hrane ne
predstavljaju proizvodnu manu.
11.

Korisničko
uputstvo
Ugradna
električna
rerna
SR
RoHS
2002 / 95 / EC
OBI-60 A IX
OBI-61 A IX
OBI-60 A IX OBI-61 A IX
Dragi korisniþe;
Naš cilj je da Vam ovaj ure
ÿ
aj, proizveden u našim modernim pogonima u pažljivoj radnoj okolini, pruži najbolja radna
svojstva u skladu sa idejom potpunod kvaliteta.
Stoga predlažemo da pre upotrebe proizvoda pažljivo pro
þ
itate korisniþka uputstva i saþuvate ih .
Napomena: Ova korisni
þ
ka uputstva su namenjena za više od jednog modela. Neke od funkcija prikazanih u uputstvima možda nisu
raspoložive kod Vašeg ure
ÿ
aja.
Delovi ambalaže (plastiþne vreüice, stiropor, itd.) se ne smejuu ostavljati na dohvat deci, jer su potencijalno opasni. Molimo
pažljivo uklonite ambalažu na pravilan na
þ
in.
OVAJ UREĈAJ SE MORA INSTALIRATI U SKLADU SA VAŽEûIM PROPISIMA I KORISTITI ISKLJUýIVO U DOBRO PROVRETRENOJ
PROSTORIJI. PRE INSTALACIJE ILI PRE UPOTREBE OVOG UREĈAJA PROýITAJTE UPUTSTVA.
SADRŽAJ
1.
INSTALACIJA VAŠE RERNE
7.
UPOTREBA TOPLINSKOG DEFLEKTORA
2.
TEHNIýKE KARAKTERISTIKE VAŠE
RERNE
8.
ODRŽAVANJE i ýIŠûENJE
3.
VAŽNA UPOZORENJA
9.
OPŠTI PREGLED DIGITALNOG TIMERA
4.
UKOLIKO VAŠA RERNA NE RADI
5.
OPIS RERNEI KONTROLNIH PLOýA
6.
UPOTREBA RERNE
1 – INSTALACIJA VAŠE RERNE
ELEKTRIýNO POVEZIVANJE i SIGURNOST
1. OVAJ UREĈAJ MORA BITI UZEMLJEN
2.
Vaša je RERNA podešena u skladu sa elektriþnim naponom od 230 V AC 50 Hz i zahteva osiguraþ od 16 A. Ukoliko se napon gradske razlikuje od
ove navedene vrednosti, molimo kontaktirajte ovlaš
ü
eni servis.
3.
Izolacijski prekidaþi za rernu moraju biti dostupni korisniku nakon instalacije rerne.
4.
Ukoliko vam zatreba zamena vrh 16A utikaþa, povežite novi utikaþ na sledeüi naþin;
Smeÿa
žica na prikljuþak
pod naponom
Plava
žica na
neutralni
prikljuþak
Žuto-zelena
žica na
uzemljenje
5.
Elektriþno povezivanje rerne bi trebalo izvršiti putem utiþnica uzemljenih u skladu s važeüim propisima. Ukoliko na mestu instalacije rerne ne postoji
uti
þ
nica s odgovarajuüim uzemljenjem odmah kontaktirajte kvalifikovanog elektriþara. Proizvoÿaþ nikada neüe biti odgovoran za ošteüenja nastala
jer uti
þ
nica u koju je ukljuþen ureÿaj nije pravilno uzemljena.
6.
Ukoliko se kabl napajanja ošteti, trebao bi ga zajeniti ovlašüeni servis ili kvalifikovani elektriþar.
7.
Kabl napajanja ne bi smeo dodirivati vruüe delove ureÿaja.
8.
RERNA bi trebala biti postavljena u element koji omogu
ü
uje dobu ventilaciju.
9.
Ova RERNA mora biti ispravno instalirana i u
þ
vršüena u skaldu sa uputstvima proizvoÿaþa i od strane kvalifikoane osobe.
10.
Nikada ne radite na rerni kada je uklju
þ
ena. Održavanje i servisiranje treba vršiti nakon iskljuþivanja rerne iz struje.
 Loading...