

Page 1

www.vitesse.ru
DEAR CUSTOMER!
You have made an excellent decision. Vitesse home range offers you an
exclusive, high quality range of appliances for your ultimate home luxury and
healthy living.
IMPORTANT SAFEGUARDS
Make sure to read all the safety precautions below and look at the illustrations
before you start using the appliance.
1. Read all instructions carefully before using.
2. Use the appliance for its intended use only.
3. The appliance is intended for household use only.
4. To protect against the risk of electric shock, do not immerse the appliance into
water or any other liquids.
5. The appliance should always be turned to OFF before plugging or unplugging
from outlet. Never yank cord to disconnect from outlet; instead, grasp plug and
pull to disconnect.
6. Do not allow power cord to touch hot surface.
7. Always disconnect the plug of the appliance from electrical outlet when filling
with water or emptying and when not in use.
8. Do not operate the appliance with a damaged cord or if the appliance has
been dropped or damaged. To avoid a hazard such as the risk of electric
shock, do not disassemble the appliance, it must be taken to a qualified
serviceman or manufacturer or its service agent for examination and repair.
Incorrect re-assembly can cause a risk of electric shock when the iron is used.
9. Place the iron out of the reach of children, close supervision is necessary for
any appliance being used by or near children.
10. Always rest and use the appliance on a stable, level and horizontal surface or
ironing board.
11. Burns can occur from touching hot metal parts, hot water or steam. Use
caution when using the appliance. Do not touch the sole-plate until they have
cooled down completely.
12. Never use the iron facing towards people because the steam can cause
burns.
13. The iron must not left unattended while it is connected to the supply mains.
14. The iron is not to be used if it has been dropped, if there are visible signs of
damage or if it is leaking.
15. The appliance is not intended for use by children or other persons without
assistance or supervision if their physical, sensory or mental capabilities
prevent them from using it safety. Children should be supervised to ensure
that they do not play with the appliance.
16. When placing the iron on its stand, ensure the surface on which the stand is
placed is stable.
SPECIAL INSTRUCTIONS
1. To avoid a circuit overload, do not operate another high wattage
appliance in the same circuit.
2. If an extension cord is absolutely necessary, a 10-ampere cord should
be used. Cords rated for a lower amperage may overheat, care should
be taken to ensure that the cord cannot be accidentally pulled or
tripped over.
3. Never yank cord to disconnect from outlet; instead, grasp plug and
pull to disconnect.
PARTS AND FEATURE
1. Heating Indicator Light
2. Temperature control dial
3. Self-cleaning button
4. Reservoir
11
5. Soleplate
6. Nozzle
7. Inlet Cover
8. Steam control knob
9. Spray water button
10
9
8
1
10. Turbo steam button
11. Cord guard
12. Anti-calc box
6
12
7
2
3
4
5
P/1 P/2
Page 2
www.vitesse.ru
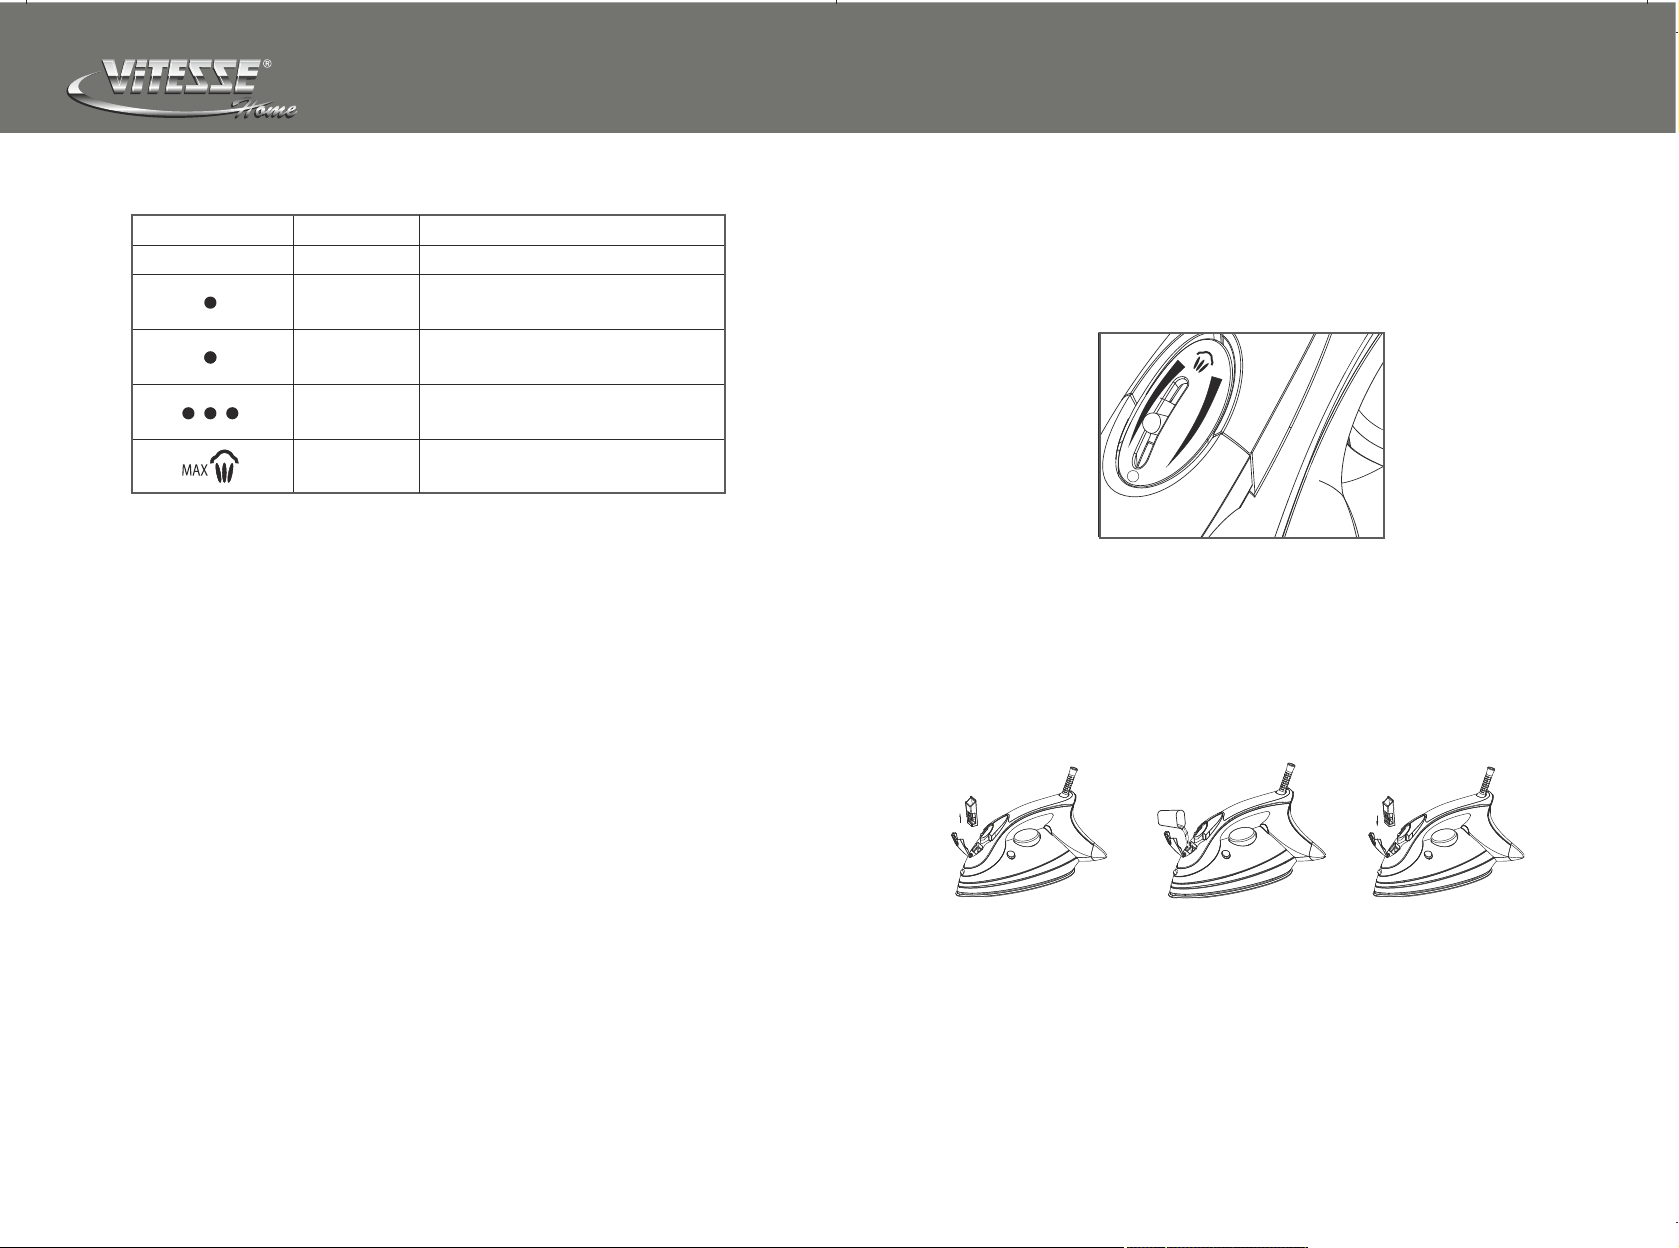
FABRIC SETTING CHART
Temperature Setting
Min
Fabric Setting
Off
Synthetic
Silk/Wool
Cotton
Max
Ironing Instruction
Dry iron for lower ironing temperature,
such as Nylon, Acrylic, Polyester
Dry iron for mid ironing
temperature, such as Silk Wool
Dry iron for higher temperature,
such as Cotton/Linen
Steam iron for all fabrics
IRONING TEMPERATURE SETTING GUIDE
1. Follow up the ironing instructions on the garment label. If there is not any
instruction label, but you know what kind of the fabric is, please refer to the
FABRIC SETTING CHART described in this instruction manual.
2. The fabric setting chart is only valid for plain fabrics and not for materials to
which finishes, glosses etc., have been applied. Textile to which some kind of
finish has been applied (gloss, crinkle, relief etc.) is best ironed at lower
temperature.
3. First sort laundry according to ironing FABRIC SETTING CHART: wool with
wool, cotton with cotton, etc.
4. The iron heats up more quickly than it cools down. Therefore, start ironing
articles that need to be ironed at the lowest temperature, such as those made
of synthetic fibres.
5. If the fabric consists of various kinds of fibres, always select the temperature
required by the most delicate fibres, i.e. the lowest temperature. If, for
example, an article consists of 60% polyester and 40% cotton, according to
the fabric setting chart it should be ironed for polyester and without steam.
6. If you do not know what kind of fabric the article is made of, iron a piece of the
material which is not visible when you wear to find out the appropriate
temperature for your articles.
7. Pure woolen fabrics (100% wool) should be ironed with the iron setting to
steam ironing position. It is advisable to set the temperature control dial to
“Max” position and use a dry pressing cloth.
8. When steam ironing woolen fabrics, shiny patches may occur. You may
prevent this by turning the article inside out and ironing the reverse side.
9. After using of steam ironing for cotton fabrics, do not iron articles required by
lower temperature (such as nylon etc.) immediately. It is advisable to adjust
the temperature dial to the lower setting, waiting for about 2-4 minutes till the
power indicator light turn off, and then you can start ironing.
HOW TO FILL RESERVOIR
Make sure that the iron is unplugged from main socket or steam control knob is set
at “O” position before filling water into the reservoir.
1. Set the steam control knob to”0”position as shown in figure 2.
Fig.2
2. Open inlet cover and take Anti-calc box upwards out of the filling hole (Fig.3).
3. Using a cup, slowly pour tap water or distilled water into the reservoir as show
in figure 4. Never to fill beyond the Max filling line.
4. Replace the Anti-calc box back into the filling hole as show in figure 5.
5. Hold the iron in horizontal direction, and then move the iron front and back for
about 30 seconds so that limescales in water can be purified by the ion
exchange resin in the Anti-calc box.
Fig.3 Fig.4 Fig.5
Note:
When using distilled water, you can mix it with tap water in a proportion of 50%.
P/3 P/4
Page 3

www.vitesse.ru
STEAM IRONING
1. Place the iron on a level, horizontal ironing board.
2. Set the steam control knob to “0” position, and then fill the reservoir with clean
tap water refer to above filling instruction.
3. Connect the appliance to a suitable power socket, set the temperature control
dial to ”MAX” position. The heating indicator light will light up, which indicate
that the unit is being heated up. When the required temperature is reached,
the heating indicator light will turn off.
4. For every first use, press down the Turbo Steam Button several times
continuously, and then press down the self-clean button for about 10 seconds
to clean the steam chamber.
5. Set temperature control dial to desired position according to different fabrics,
put the steam control knob to ” “ position, and then steam will come out from
steam vents of soleplate. During steam ironing, it is normal that the heating
indicator light cycle from ON to OFF and the OFF to ON. It is because the
appliance is automatically heat preservation.
6. When setting the temperature control dial on ” ” or “ ” position, there are
no steam go out of the soleplate since the temperature of soleplate is so low
that it can not produce steam.
7. After use, turn steam control knob to “0” position, disconnect the appliance
from power socket.
8. Before storing, please allow the unit completely cool down.
Note:
1. It is normal that a “pong” sound produced, it because that the anti-drip function
is automatically activated.
2. Every first time use, the iron should be pre-heated for about 2 minutes. During
steam ironing stage, steam may be stopped escaping from the outlet resulting
from the anti-drip function being activated. Just to turn the steam control knob
to smaller steam position or temperature control dial to larger position, it will be
resumed again.
DRY IRONING
1. Place the iron on a level, horizontal ironing board.
2. Set the steam control knob to “0” position.
3. Fill reservoir with water as indicated in above filling instruction.
4. Connect the appliance to suitable power socket, and then set temperature
control dial to the desired position according to different fabrics. The heating
indicator light will light up, which indicate that the unit being heated up, When
the heating indicator light turn off, the required temperature is reached. It is
ready for dry ironing. 5. If water spray is necessary, press down the spray
button two or three times in quick succession, water can be sprayed evenly in
the fabric.
6. After use, turn temperature control dial to “Min” position, and disconnect the
appliance from main socket.
Note:
When changing your temperature control dial from higher settings to lower, it is
proposed that not to start ironing immediately since there may be any burns
caused on your fabrics by high temperature. Please wait for the indicator light
illuminate again and then start ironing.
TURBO STEAM IRONING
The Turbo of Steam feature provides additional steam for removing stubborn
creases
1. Set the ”steam control knob” to “0” position, and then fill the reservoir with
clean tap water refer to above filling instruction.
2. Connect the appliance to a suitable socket outlet, set the temperature control
dial to ” MAX” position. The heating indicator light will light up, which indicate
that the unit being heated up, When the heating indicator light turn off, the
required temperature is reached.
3. Press the turbo steam button two or three times in quick succession to obtain
more powerful turbo steam.
4. It is normal that a small amount of water may be ejected from the sole-plate
when pressing burst steam button so frequently that temperature of sole-plate
will be down accordingly. It is supposed to stop pressing turbo steam button,
and allow it to heat up again.
5. After use, turn steam control knob to “0” position, disconnect the appliance
from power socket.
6. Before storing, please allow the unit completely cool down.
Caution:
when using turbo steam ironing, should turn steam control knob to “0” position.
P/5 P/6
Page 4

www.vitesse.ru
VERTICAL STEAM IRONING
Vertical steam ironing is especially used for removing creases from hanging
clothes and curtains
1. Set the steam control knob to “0” position, fill water into water tank as
described in water filling instruction.
2. Connect the appliance to suitable power socket, and then set temperature
control dial to the max temperature setting. The heating indicator light will light
up, which indicate that the unit being heated up, When the heating indicator
light turn off, the required temperature is reached. It is ready for vertical steam
ironing
3. Hold the iron in vertical position as shown in figure 6,
and then press down the steam button, vertical steam
will go out from the steam outlet of the sole-plate.
4. After use, turn adjustable steam control knob to “0”
position, disconnect the appliance from power socket
5. Before storing, please allow the unit completely cool
down Caution: Never perform steam ironing directly
on person.
Fig.6
ANTI-DRIP SYSTEM
This appliance has a safety mechanical protection that can protect water drip from
the sole-plate when the temperature of steam chamber is so low that it cannot
provide steam.
ANTI-CALC SYSTEM
The anti-calc box is designed to purify hard water and reduce the buildup of
limescale which occurs during steam ironing, this will prolong the working life of
your iron. Note : The anti-calc box should be replaced with a new one after two
months, in case of using one time each day, and you can contact with
manufacturer or agency for purchasing a new one.
MAINTENANCE
After several use of your iron, a little amount of limescale will be built up in the
steam chamber and steam outlet, following up below self-cleaning process, it will
be well removed.
1. Set the adjustable steam control knob to”0” position.
2. Fill reservoir with water to max filling line.
3. Place the iron on the ironing rest, and place a sink
under the ironing rest to prepare for pouring water
and ejecting steam.
4. Set temperature control dial to “ ”position.
5. Plug the unit into the main socket.
6. Allow the iron to heat up for 2 minutes.
7. Disconnect the iron from main socket.
8. Hold the iron horizontally over the sink.
Fig.8
9. Push the self-cleaning button.
10. Boiling water and steam will emit from the outlet in soleplate and wash away
the impurities and scale.
11. Move the iron backwards and forwards while this happens. Go on letting
steam and water escape until the water tank is virtually empty.
12. Insert the iron into main socket again.
13. Set the temperature control dial to “ ” position, Let the iron heat up again.
The remainder of the water inside the steam chamber will now vaporize.
14. Unplug from power supply and allow soleplate to cool down and wipe it clean
with a soft damp cloth.
Note:
Never use scouring pads, abrasive or harsh cleaners as this may scratch the
surface.
Fig.7
P/7 P/8
Page 5

www.vitesse.ru
УВАЖАЕМЫЕ ПОКУПАТЕЛИ! ВЫ ПРИНЯЛИ БЛЕСТЯЩЕЕ РЕШЕНИЕ!
Фирма Vitesse предлагает Вам гамму эксклюзивных высококачественных
приборов для несомненно роскошного и здорового образа жизни.
ТЕХНИКА БЕЗОПАСНОСТИ
Перед первым использованием прибора внимательно прочитайте правила
техники безопасности и просмотрите рисунки.
1. Прочитайте все инструкции по эксплуатации.
2. Применяйте прибор только по назначению.
3. Утюг предназначен для домашнего использования.
4. Чтобы предотвратить риск поражения электрическим током, не
погружайте утюг в воду или другую жидкость.
5. Перед тем как подключить или отключить прибор от электросети,
убедитесь, что переключатель настроен на OFF. Чтобы извлечь вилку из
розетки, не тяните за шнур питания. Держитесь за штепсельную вилку.
6. Во время работы следите за тем, чтобы шнур питания не касался
горячей подошвы.
7. Отключайте прибор от электросети, после применения, а также перед
тем, как наполнить или опорожнить резервуар для воды.
8. Не используйте утюг, когда поврежден шнур питания, после падения, а
также других поломок. Во избежание риска поражения электрическим
током не пытайтесь ремонтировать прибор самостоятельно. Обратитесь
в гарантийную мастерскую.
9. Храните электроприбор в недоступном для детей месте. Будьте
особенно внимательны, если во время глаженья поблизости находятся
дети или утюг используется детьми.
10. Применяйте прибор на устойчивой горизонтальной поверхности или
гладильной доске.
11. Когда утюг включен, не дотрагивайтесь до металлических поверхностей,
избегайте контакта с водой и паром, так как это может вызвать ожоги.
Будьте осторожны при эксплуатации прибора. Не касайтесь подошвы
утюга, пока он полностью не остынет.
12. Во время глажки не направляйте утюг на людей, поскольку струя пара
может привести к ожогам.
13. Не оставляйте включенный электроприбор без присмотра.
14. Не следует использовать утюг, если он падал, при протекании, а также в
том случае, если были замечены другие видимые повреждения.
15. Не позволяйте пользоваться самостоятельно прибором, без помощи или
наблюдения, детям и особам с физическими, чувствительными или
ментальными недостатками, которые не позволяют им использовать
утюг безопасно. Убедитесь, что дети не играют с устройством.
16. Когда ставите утюг на подставку, проверьте, чтобы поверхность, на,
которой установлена подставка была устойчивой.
ТЕХНИКА ЭЛЕКТРОБЕЗОПАСНОСТИ
1. Во избежание короткого замыкания, не включайте другой мощный
электроприбор в ту розетку, куда включен утюг.
2. Используйте только исправные удлинители соответствующего типа
(10А). Шнуры с меньшей силой тока могут перегреться. Располагайте
удлинитель таким образом, чтобы об него не споткнутся.
3. Чтобы отключить прибор от электросети, не тяните за шнур питания.
Держитесь за штепсельную вилку.
ОПИСАНИЕ
1. Индикатор
2. Терморегулятор
3. Кнопка самоочистки
4. Резервуар для воды
5. Подошва
6. Распылитель
8. Регулятор подачи пара
9. Кнопка распылителя
10. Кнопка подачи пара
11. Кембрик
12. Насадка для фильтрации
воды
7. Крышка отверстия для
заливания воды
10
9
8
7
6
12
5
11
1
2
3
4
P/9 P/10
Page 6

www.vitesse.ru
ТАБЛИЦА ТЕМПЕРАТУРНЫХ РЕЖИМОВ
Температурный режим
Min
Тип ткани
Выкл
Синтетика
Шелк/Шерсть
Хлопок
Макс
Инструкция глажки
Сухая глажка при низком температурном режиме
для таких видов волокна: нейлон, акрил, полиэстер
Сухая глажка при среднем температурном
режиме для таких видов волокна: шелк, шерсть
Сухая глажка при высоком температурном
режиме для таких видов волокна: хлопок, лен
Глаженье с паром для всех типов тканей
УСТАНОВКА ТЕМПЕРАТУРНОГО РЕЖИМА
1. Перед тем, как установить температурный режим, определите тип ткани,
руководствуясь обозначением на ярлыке изделия. Если указания по
глажке изделия отсутствуют, но тип ткани вам известен, воспользуйтесь
приведенной в данной инструкции ТАБЛИЦЕЙ ТЕМПЕРАТУРНЫХ
РЕЖИМОВ.
2. Таблицу следует использовать только для простых тканей. Текстиль, к
которому применялись некоторые виды обработки (лакирование,
гофрирование), утюжьте при наиболее низком температурном режиме.
3. Рассортируйте белье для стирки, по типам ткани ссылаясь на ТАБЛИЦУ
ТЕМПЕРАТУРНЫХ РЕЖИМОВ.
4. Поскольку утюг нагревается быстрее, чем остывает, начинайте глаженье
с тканей требующих низкой температуры, например, синтетических
изделий.
5. Если ткань состоит из комбинированных волокон, устанавливайте
температуру, которая необходима для утюжки более тонкой ткани, т.е.
низкую температуру. Например, если изделие состоит из 60%
полиэстера и 40% хлопка, следуя таблице, необходимо выбрать
температурный режим для полиэстера без пара.
6. Если Вы не знаете, из какой типа ткани сделано изделие, для того, чтобы
найты соответствующий температурный режим, попробуйте проутюжить
выворотный кусочек ткани.
7. Изделия из натуральной шерсти (100% шерсть) следует утюжить в
режиме пара. Рекомендуется настроить дисковый терморегулятор на
«Макс.» режим и использовать сухую утюжку.
8. Если шерстяные изделия гладить с паром, то могут оставаться
блестящие пятна. Чтобы избежать таких пятен, утюжьте выворотную
сторону.
9. После использования режима паровой утюжки, не следует сразу гладить
изделия, требующие более низкой температуры (например, нейлон).
Настройте дисковый терморегулятор на меньшую температуру и
подождите 2-4 минуты, пока световой индикатор погаснет.
НАПОЛНЕНИЕ РЕЗЕРВУАРА
Перед наполнением резервуара водой, убедитесь, что утюг отключен от
электросети, а регулятор подачи пара в положении «0».
1. Установите регулятор подачи пара в положение «0» как показано на
рисунке 2.
Рис.2
1. Откройте крышку отверстия для заливания воды и снимите насадку для
фильтрации (Рис.3).
2. С помощью чашки, аккуратно залейте водопроводную или
дистиллированную воду в резервуар до отметки максимального уровня
“MAX”, как показано на Рис.4.
3. Установите снова насадку для фильтрации воды в отверстие для
заливания воды. Смотрите Рис.4
4. Держа утюг в горизонтальной плоскости, встряхивайте на протяжении 30
секунд, для того чтобы осадок в воде мог раствориться под
воздействием ионнобменной смолы в насадке для фильтрации.
Рис..3
Рис.4 Рис.5
Внимание: Если используете дистиллированную воду, можете разбавлять
ее наполовину с водопроводной водой.
P/11 P/12
Page 7

www.vitesse.ru
ГЛАЖЕНЬЕ С ПАРОМ
1. Поставьте утюг на устойчивую горизонтальную гладильную доску.
2. Установите регулятор подачи пара в положение «0», и наполните
резервуар чистой водопроводной водой, смотрите инструкции по
наполнению резервуара.
3. Подключите прибор к соответствующей электрической розетке,
настройте дисковый терморегулятор в положение “MAX”. Загорится
световой индикатор, это указывает, что утюг нагревается. Когда будет
достигнута необходимая температура, индикатор погаснет.
4. При каждом первом использовании, нажмите кнопку подачи пара
несколько раз, затем нажмите кнопку самочистки и держите на
протяжении 10 секунд, чтобы очистить паровую камеру.
5. Настройте дисковый терморегулятор на режим, который необходим для
утюжки определенного типа ткани, регулятор подачи пара установите в
положение « ». Пар будет поступать через отверстия, расположенные
на подошве утюга. Во время глаженья с паром, нормальным является
периодическое включение и выключение индикатора. Так как прибор
оснащен системой автоматического выключения при перегреве.
6. При настройке терморегулятора на режим « » или « », пар не будет
поступать, так как температура подошвы утюга очень низкая.
7. После эксплуатации установите регулятор подачи пара в положение «0»
и отключите прибор от электросети.
8. Перед тем, как поставить утюг на хранение, подождите, пока он
полностью остынет.
Внимание:
1. Естественным есть то, что при автоматической активации функции
защиты от протекания, есть запах.
2. Перед каждым первым применением, утюг следует предварительно
нагревать в течение 2 минут. При работе функции глаженья с паром,
может остановиться выход пара в результате активации функции
защиты от протекания. Для того, чтобы возобновить выход пара, следует
установить регулятор подачи пара в меньшее положение или дисковый
терморегулятор на высший температурный режим.
СУХАЯ ГЛАЖКА
1. Поставьте утюг на устойчивую горизонтальную гладильную доску.
2. Установите регулятор подачи пара в положение «0».
3. Наполните резервуар водой, смотрите инструкции по наполнению
резервуара.
4. Подключите прибор к соответствующей электрической розетке,
настройте дисковый терморегулятор на режим, который необходим для
утюжки определенного типа ткани. Загорится световой индикатор, это
указывает, что утюг нагревается. Когда будет достигнута необходимая
температура, индикатор погаснет. Утюг готов к сухой глажки.
5. Если н е о бходимо раз б р ы зги в а н ие, н а ж м ите в бы с т рой
последовательности кнопку распылителя два или три раза, вода
равномерно будет разбрызгиваться на ткань.
6. После эксплуатации настройте дисковый терморегулятор на «Min»
режим и отключите прибор от сетевой розетки.
Внимание:
Когда поворачиваете дисковый терморегулятор, переустанавливая с
режима высшей температуры на низшую, рекомендуется не начинать
глажку сразу, так как нагретый утюг может оставить пятна на более тонкой
ткани. Подождите, пока световой индикатор снова загорится, тогда
начинайте глажку.
ПАРОВОЙ УДАР
Функция парового удара обеспечивает дополнительный пар для
разглаживания неподатливых складок.
1. Установите регулятор подачи пара в положение «0» и затем наполните
резервуар чистой водопроводной водой, смотрите инструкции по
наполнению резервуара.
2. Подключите прибор к соответствующей электрической розетке,
настройте дисковый терморегулятор на “MAX” режим. Загорится
световой индикатор, это указывает, что утюг нагревается. Когда будет
достигнута необходимая температура, индикатор погаснет.
3. Нажмите в быстрой последовательности кнопку подачи пара два или три
раза, чтобы получить мощный паровой удар.
4. При частом нажатии кнопки подачи пара, с подошвы утюга может
пролиться небольшое количество воды, что соответственно снизит
температура подошвы. Следует больше не нажимать кнопку подачи
пара и подождать, пока прибор снова нагреется.
5. После эксплуатации установите регулятор подачи пара в положение «0»
и отключите прибор от сетевой розетки.
6. Перед тем, как поставить утюг на хранение, прибор должен полностью
остыть.
Внимание:
Когда при глажке используете паровой удар, регулятор подачи пара следует
установить в положение «0».
P/13 P/14
Page 8

www.vitesse.ru
ВЕРТИКАЛЬНОЕ ОТПАРИВАНИЕ
Функция вертикального отпаривания предназначена для разглаживания
складок на висящей одежде или на шторах.
1. Установите регулятор подачи пара в положение «0», и наполните
резервуар водой, смотрите инструкции по наполнению резервуара.
2. Подключите прибор к соответствующей электрической розетке, затем
настройте дисковый терморегулятор на максимальный температурный
режим. Загорится световой индикатор, это указывает, что утюг
нагревается. Когда будет достигнута необходимая температура,
индикатор погаснет. Утюг готов к вертикальному отпариванию.
3. Держите утюг в вертикальном положении, как показано на Рис.6, затем
нажмите кнопку подачи пара, и вертикальный пар будет поступать через
отверстия, расположенные на подошве утюга.
4. После эксплуатации установите регулятор подачи
пара в положение «0» и отключите прибор от
сетевой розетки.
5. Перед тем, как поставить утюг на хранение,
подождите, пока он полностью остынет.
Внимание: Никогда не направляйте утюг на людей,
когда он находится в режиме паровой глажки.
СИСТЕМА ЗАЩИТЫ ОТ ПРОТЕКАНИЯ
Рис.6
Прибор оснащен системой механической защиты от протекания воды
сквозь отверстия на подошве прибора, когда температура паровой камеры
слишком низкая, чтобы производить пар.
СИСТЕМА ФИЛЬТРАЦИИ ВОДЫ
Насадка для фильтрации воды предназначена для очищения жесткой воды
и уменьшения образования накипи, которая накапливается в процессе
паровой глажки. Эта система продлит период эксплуатации прибора.
Внимание: Насадку следует менять через два месяца, если утюг
использовался раз в день. Купить новую насадку можно непосредственно у
производителя или поставщика.
months, in case of using one time each day, and you can contact with
manufacturer or agency for purchasing a new one.
УХОД И ЧИСТКА
После нескольких применений утюга, в паровой камере и в отверстиях
выхода пара образуется небольшое количество накипи. Чтобы легко
удалить накипь следуйте описанным ниже инструкциям.
1. Установите регулятор подачи пара в положение «0».
2. Наполните резервуар водой до отметки
максимального наполнения.
3. Поставьте прибор на подставку, а под подставку
емкость для вытекания воды и выхода пара.
4. Настройте дисковый терморегулятор на
« » режим.
5. Подключите прибор к стенной розетке.
6. Подождите 2 минуты, пока утюг нагреется.
7. Отсоедините прибор от электросети.
8. Держите утюг в горизонтальном положении над емкостью.
9. Нажмите кнопку самоочистки.
10. Кипяченая вода и пар выйду через отверстия на подошве утюга, смыв
грязь и накипь.
11. Подвигайте прибором, пока емкость не будет фактически пустой.
12. Подключите прибор снова к стенной розетке.
13. Настройте дисковый терморегулятор на « » режим. Подождите,
пока утюг нагреется. Остатки воды в паровой камере испарятся.
14. Отключите утюг от электросети. После полного остывания прибора,
очистите подошву с помощью мягкой влажной ткани.
Внимание:
Не используйте для очистки губки, абразивные или жесткие средства, так,
Рис.8
как это может поцарапать поверхность прибора.
ТЕХНИЧЕСКИЕ ХАРАКТЕРИСТИКИ
Мощность: 1800 Вт
Параметры питания: 220-240 В, 50/60 Гц
ВНИМАНИЕ! Все материалы данного руководства были тщательно проверены. При
обнаружении опечаток, опущений и несоответствий компания оставляет за собой
право окончательной трактовки. Дизайн и характеристики прибора могут быть
изменены без предварительного уведомления. Перед приобретением ознакомьтесь с
фактическими характеристиками изделия.
Мы проверяем каждый прибор на производстве, чтобы убедиться, что он работает
правильно. В результате тестирования в резервуаре для воды может остаться ее
небольшое количество.
Срок службы товара не менее 2-х лет при соблюдении условий эксплуатации.
Рис.7
По окончании срока эксплуатации электроприбора не выбрасывайте его
вместе с обычными бытовыми отходами, а передайте в официальный пункт
сбора на утилизацию. Таким образом Вы поможете сохранить окружающую
P/15 P/16
среду.
 Loading...